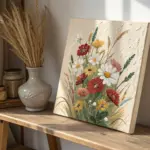
Texture art is one of my favorite ways to make a simple canvas feel alive, because you can literally build the surface with your hands and a few easy tools. If you’ve been craving that satisfying raised texture look (the kind that catches light and shadow), these ideas will keep you happily experimenting for days.
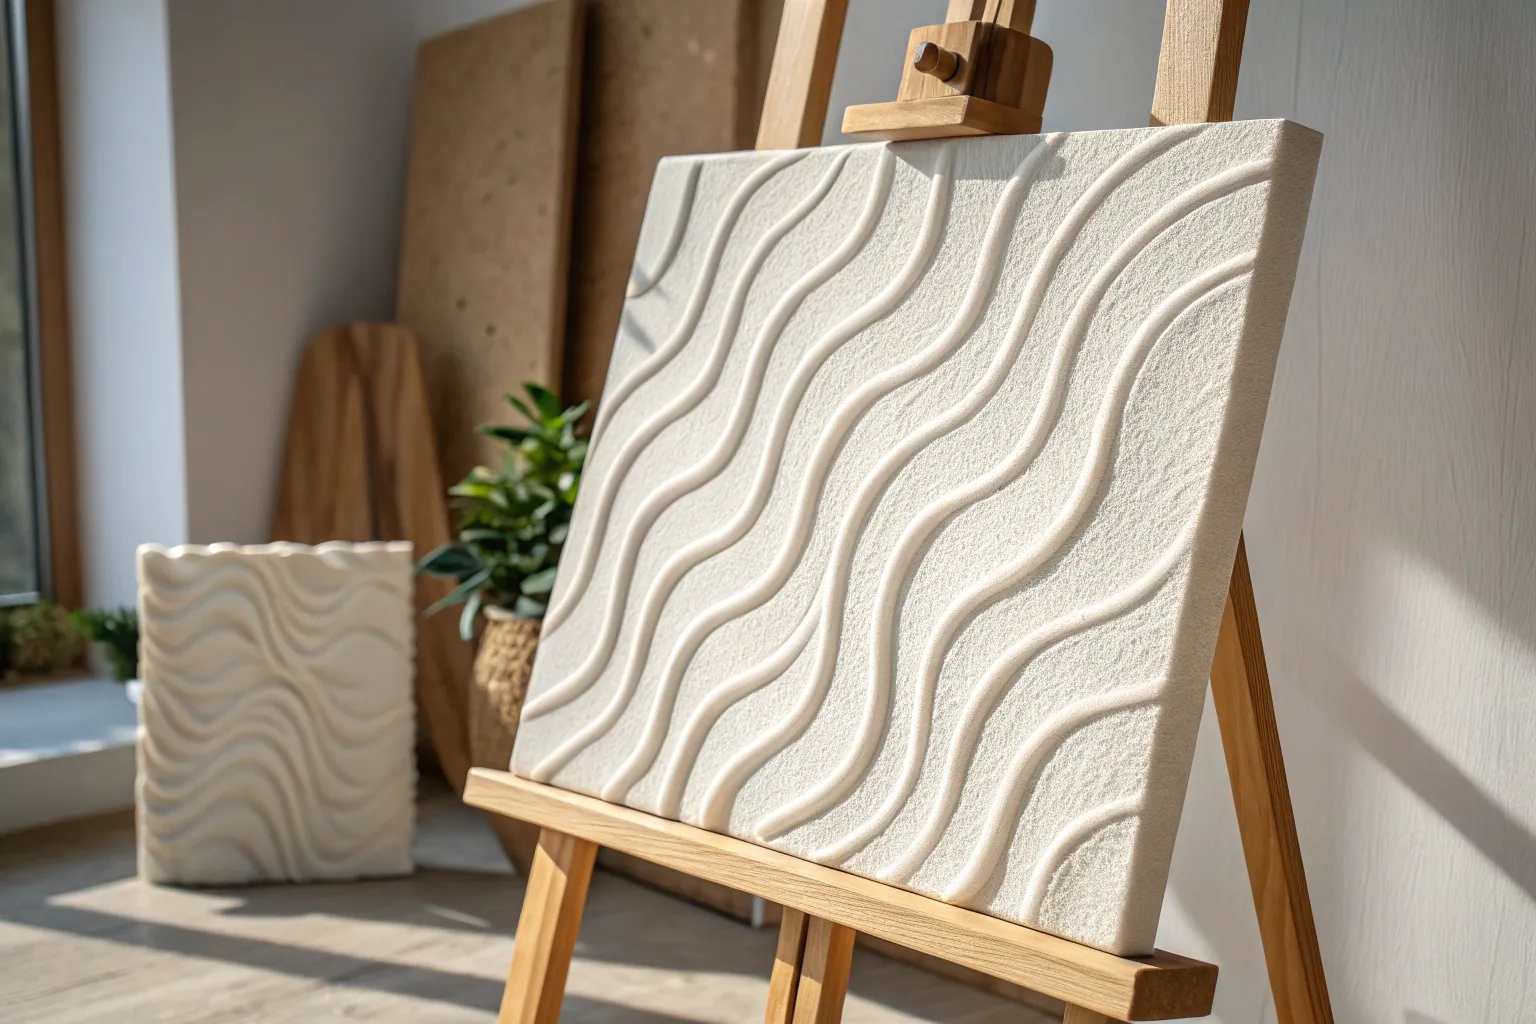
Classic Minimalist Raised Arches
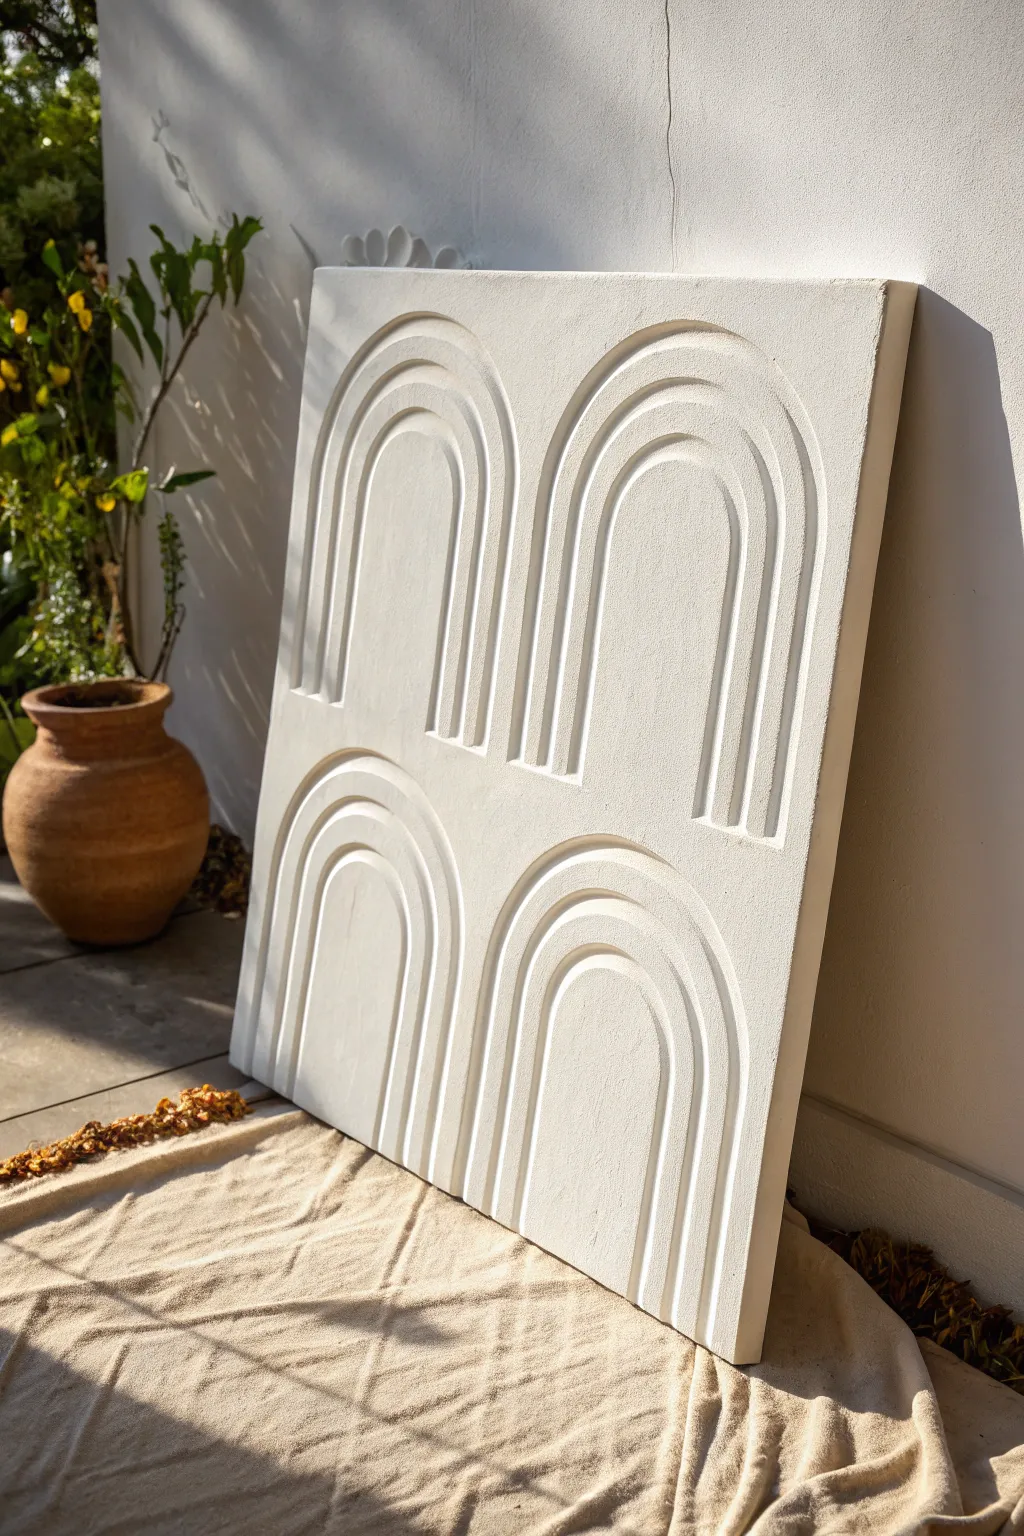
Capture the essence of modern minimalism with this striking relief artwork featuring four repeating arch motifs. By building up layers of joint compound or modeling paste, you will create a piece that plays beautifully with light and shadow for a high-end gallery look.
Detailed Instructions
Materials
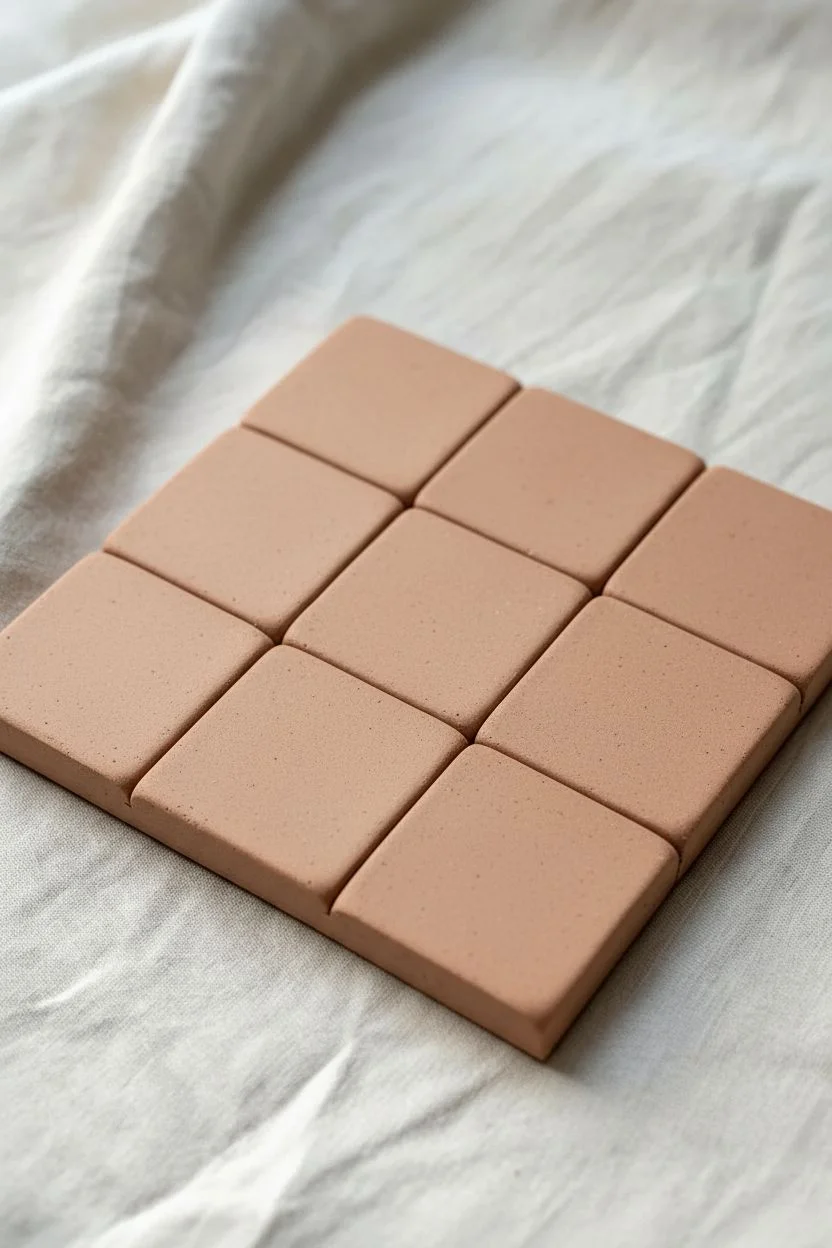
- Large sturdy canvas (gallery wrapped) or wooden cradled panel (approx. 24×30 inches)
- Modeling paste or lightweight joint compound (pre-mixed)
- Notched trowel or combing tool (U-notch or square notch)
- Flat putty knife or spatula (3-4 inches wide)
- Pencil
- Ruler or T-square
- Compass or round object for tracing curves
- Painter’s tape (blue or green)
- Fine-grit sandpaper (220 grit)
- White acrylic paint (matte finish)
- Wide flat paintbrush or foam roller
- Drop cloth or workspace protection
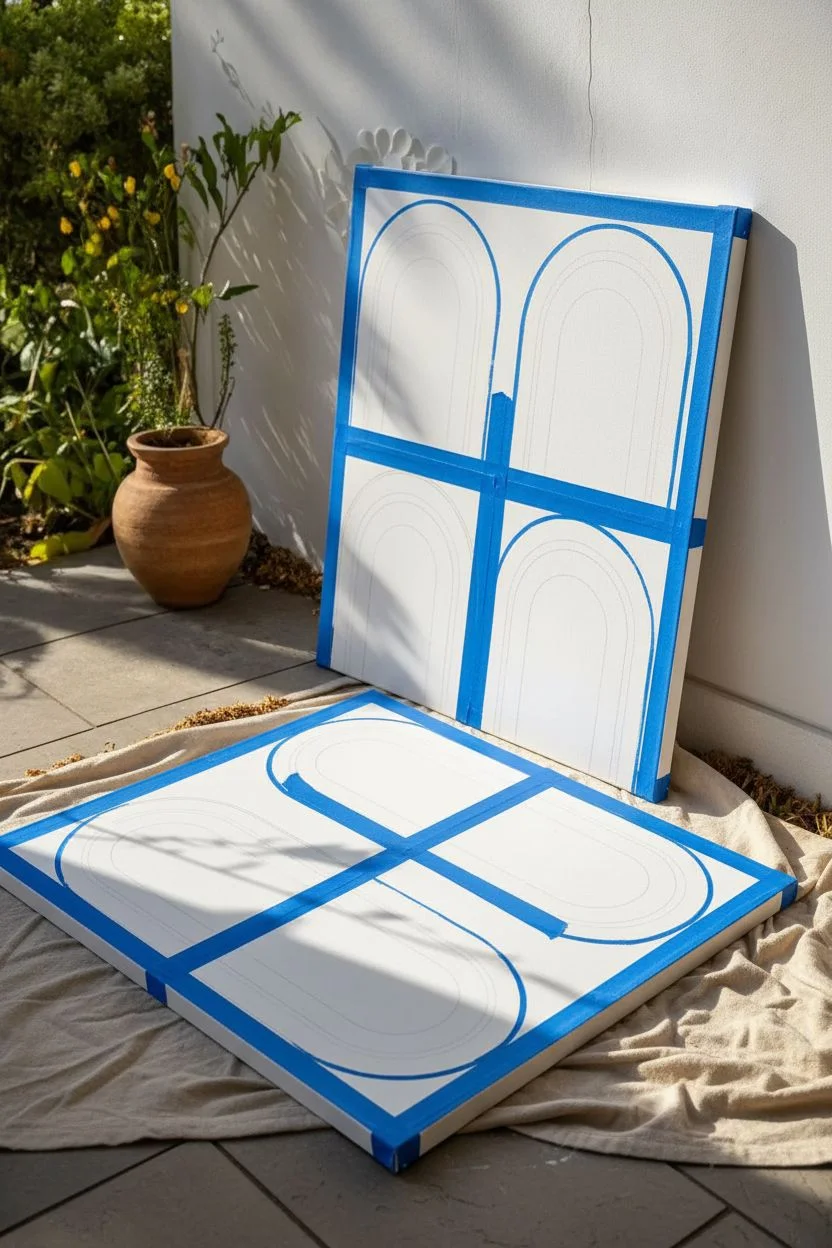
Step 1: Planning the Layout
-
Prepare the workspace:
Lay down your drop cloth on a flat, sturdy table. This project gets messy with paste, so horizontal working is best to prevent dripping. -
Measure the canvas:
Determine the midpoint of your canvas both vertically and horizontally. Draw a light cross to divide the surface into four equal quadrants. -
Draft the arch positions:
In each quadrant, lightly sketch the base of your arches. Ensure there is equal negative space between the arches and the edge of the canvas for a balanced composition. -
Sketch the curves:
Use a large compass or trace a circular object (like a dinner plate or paint lid) to create the rounded top of each arch. Connect these semi-circles to the straight vertical lines you drew previously. -
Define the boundaries:
Place painter’s tape along the outside edges of your sketched arches. This creates a stencil that will help keep your paste confined to the arch shapes initially.
Keep It Clean
Keep a bucket of warm water and a rag nearby. Joint compound dries quickly on tools, and wiping your trowel after every single pass is the secret to sharp, defined grooves.
Step 2: Applying the Base Texture
-
Mix the medium:
Open your joint compound or modeling paste. Give it a good stir to ensure it is smooth and free of air bubbles or dried clumps. -
Apply the first layer:
Using the flat putty knife, apply a generous layer of paste inside your taped arch areas. Aim for a thickness of about 1/4 inch to ensure the texture holds. -
Smooth the surface:
Gently glide the putty knife over the applied paste to level it out. It doesn’t need to be perfectly glass-smooth, but it should be relatively even in height. -
Remove the tape:
Carefully peel away the painter’s tape while the paste is still wet. Pull the tape away from the paste at a sharp angle to keep the edges crisp. -
Clean the edges:
If the removal of the tape created any jagged ridges, use a small palette knife or your finger (dampened with water) to gently tap them down.
Step 3: Creating the Grooves
-
Select your tool:
Clean off your notched trowel or combing tool completely. A clean tool is essential for crisp lines. -
Drag the straight lines:
Starting at the bottom of an arch, press the notched tool into the wet paste and drag it upwards in a straight line. Stop just before the curve begins. -
Execute the curve:
This is the trickiest part; carefully pivot the tool to follow the curve of the arch top. I find rotating the canvas itself, rather than my arm, helps maintain a steady hand here. -
Finish the stroke:
Continue dragging the tool down the other side of the arch until you reach the bottom edge. Lift the tool cleanly straight up. -
Repeat for all arches:
Wipe the tool clean after every single pass. Repeat the process for the remaining three arches, taking your time to match the depth of the grooves. -
Refine the details:
Use a toothpick or small sculpting tool to clean out any bits of paste that may have fallen into the grooves.
Play with Sand
Mix a small amount of fine sand into your white paint for the final coat. This adds a subtle, gritty stone-like finish that makes the plaster look like carved limestone.
Step 4: Finishing Touches
-
Allow to dry:
Let the artwork dry completely flat. Depending on humidity and thickness, this can take 24 to 48 hours. The paste will turn from greyish to bright white when dry. -
Sand imperfections:
Once fully cured, use fine-grit sandpaper to very lightly smooth the top surfaces of the ridges. Do not sand hard enough to destroy the texture, just enough to remove sharp burrs. -
Dust off:
Use a dry brush or a vacuum attachment to remove all sanding dust from the grooves. -
Prime the background:
If you want the background to have movement, apply a very thin, distinct layer of paste to the negative space, or simply prepare to paint it. -
Apply the final coat:
Paint the entire piece, including the textured arches and the flat background, with matte white acrylic paint. Dab the brush into the grooves to ensure full coverage.
Hang your new masterpiece in a spot with side-lighting to really let those beautiful shadows pop.


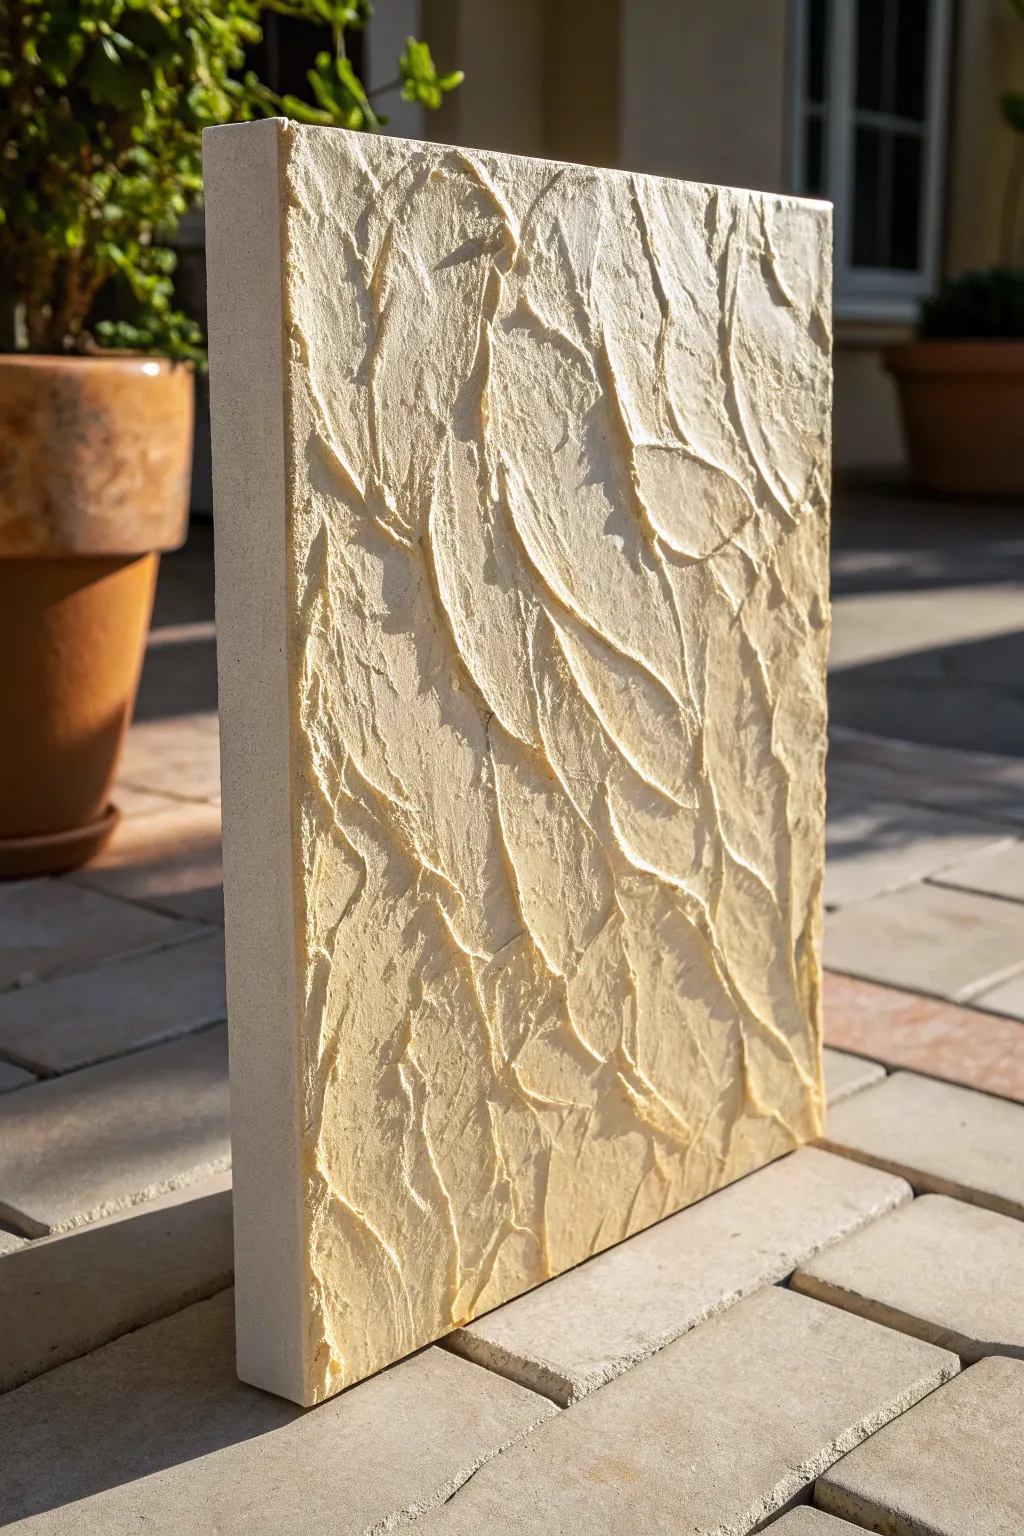
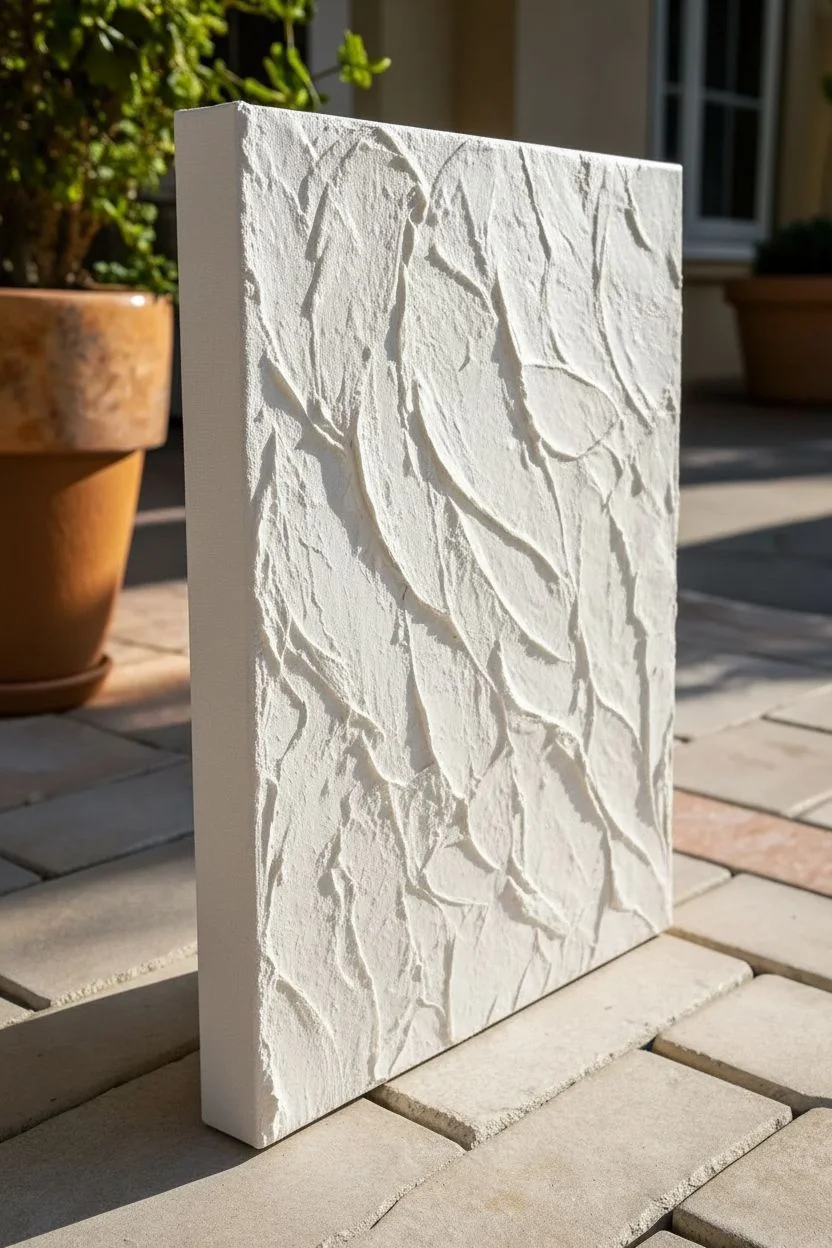
Clean Ridge Lines With a Notched Scraper
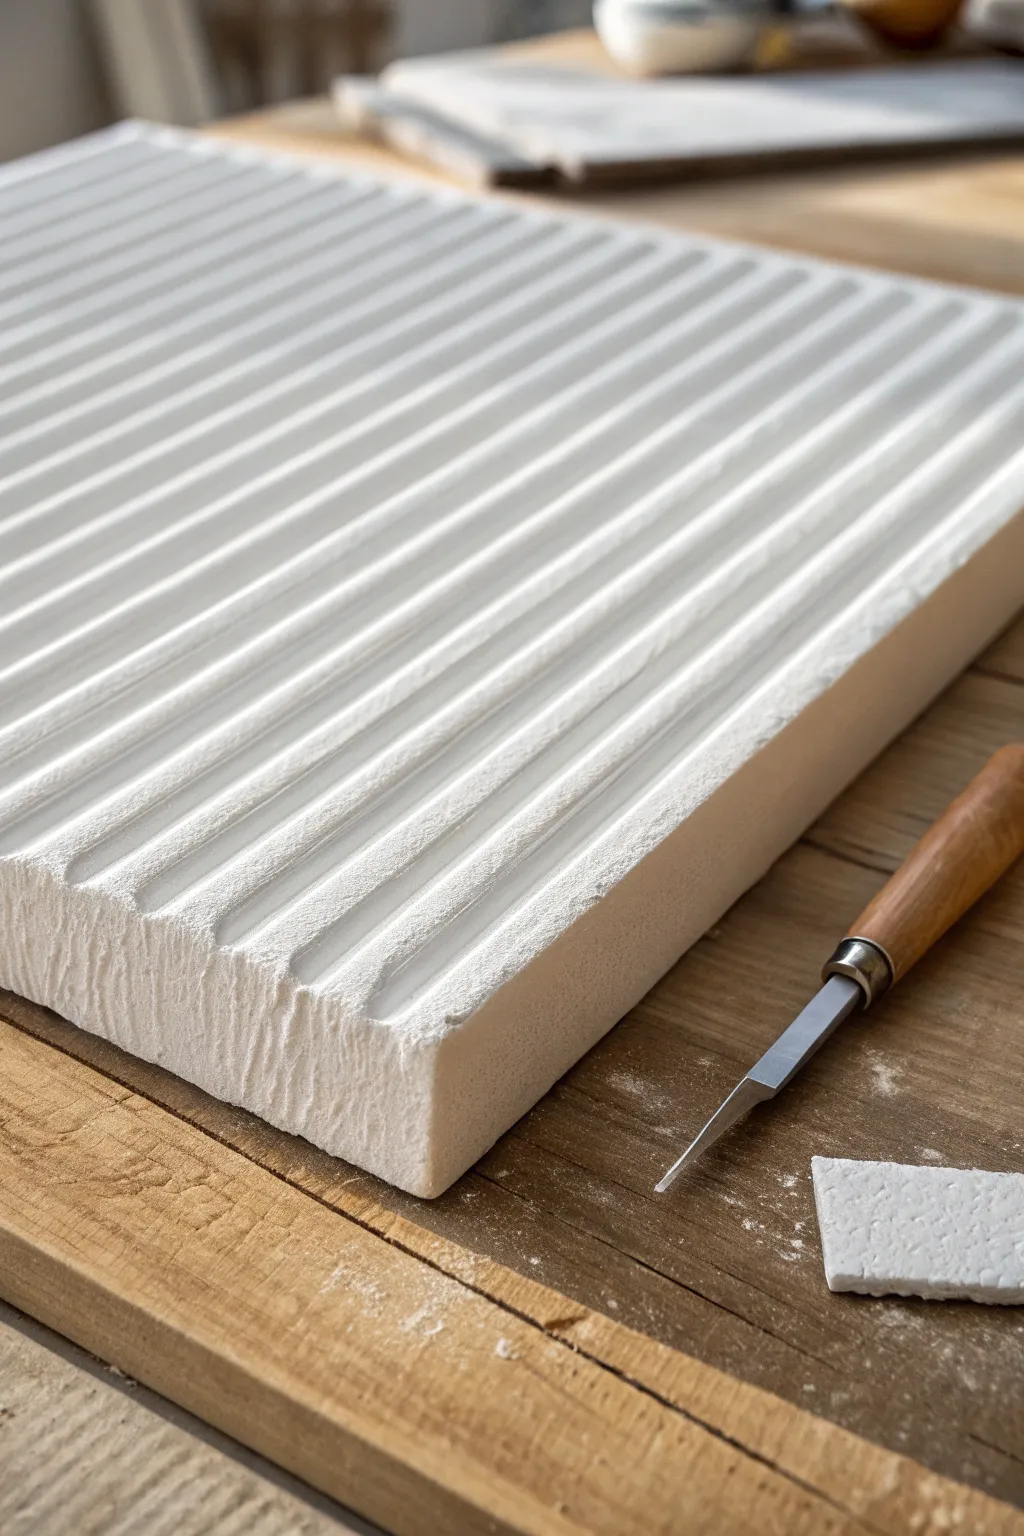
Embrace the beauty of simplicity with this textured relief art that features crisp, parallel ridges for a modern architectural look. The play of light and shadow across the deep grooves transforms plain white plaster into a sophisticated sculptural statement.
How-To Guide
Materials
- Sturdy wooden panel or cradled canvas (approx. 12×12 inches)
- Heavy body acrylic modeling paste or joint compound
- Wide notched scraper or tiling trowel (square notch recommended)
- Palette knife or large flat spatula
- Gesso (white)
- Fine-grit sandpaper (220 grit)
- Matte white acrylic paint or spray paint
- Painter’s tape
- Clean, damp cloth
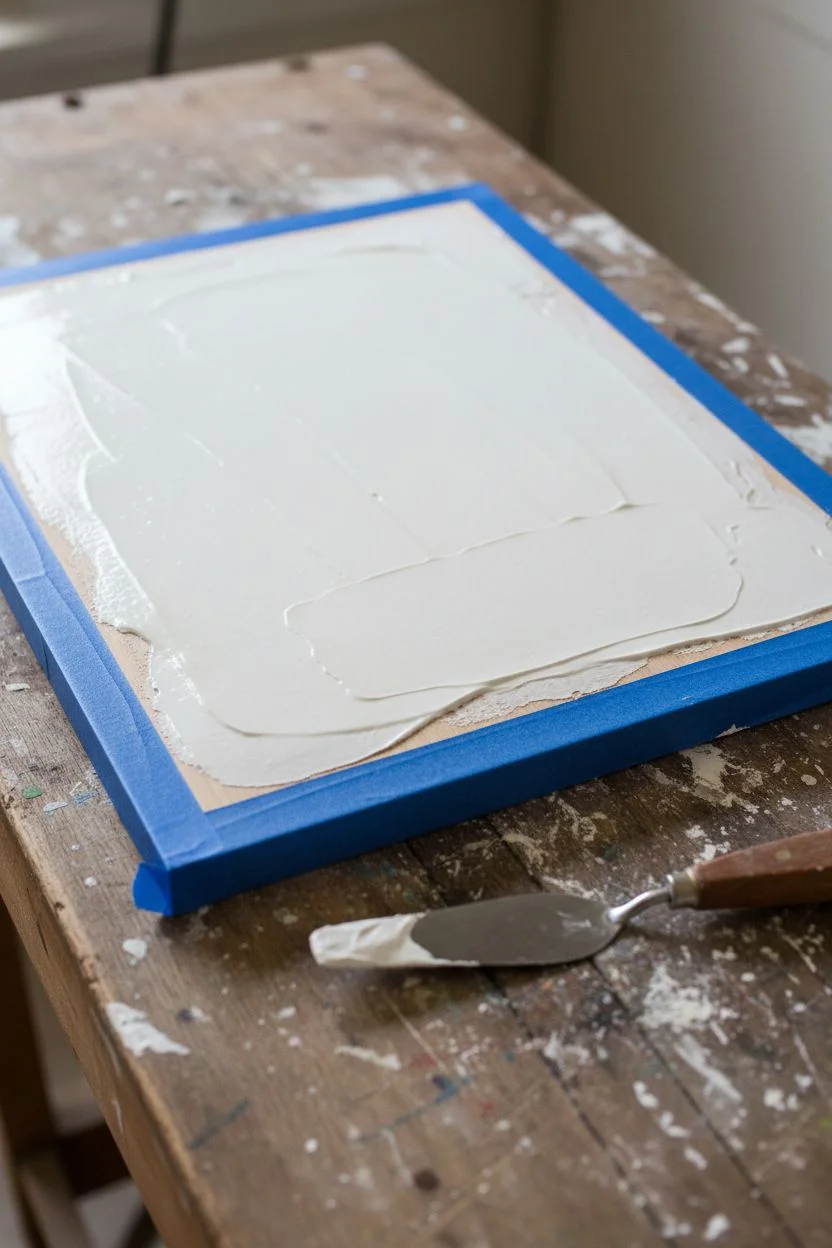
Step 1: Preparation and Base Layer
-
Prime the surface:
Begin by ensuring your wooden panel is free of dust. Apply a thin, even coat of white gesso to seal the wood and provide a grippy surface for the heavy paste. Let this dry completely according to the manufacturer’s instructions. -
Tape the edges:
To keep the sides of your panel clean, apply painter’s tape flush with the top surface around all four perimeter edges. This creates a crisp boundary for your textured work. -
Select your medium:
For this deep texture, you need a substantial medium. Heavy body modeling paste is ideal for durability, but standard joint compound works well for practice pieces. Ensure the mixture is smooth and lump-free.
Step 2: Creating the Ridge Texture
-
Apply a thick layer:
Using a large flat spatula or palette knife, spread a generous layer of your chosen paste onto the panel. Aim for a thickness of about 1/4 to 1/2 inch to ensure the grooves have enough depth without scraping bare wood. -
Level the surface:
Smooth out the paste as much as possible. It is crucial to have a relatively even thickness across the board so your ridge lines remain consistent in height. -
Prepare the notched tool:
Clean your notched scraper so there is no dried residue interfering with the teeth. I like to wipe it with a slightly damp cloth right before use to help it glide. -
Position the scraper:
Place the notched scraper at the top edge of the panel. Hold it at a consistent angle (around 45 degrees usually works best) to drag through the paste. -
Drag the texture:
In one confident, continuous motion, pull the scraper from the top to the bottom edge. maintain firm, even pressure to create straight, parallel lines. hésitation here creates wobbles, so commit to the movement. -
Assess the lines:
Check your ridges immediately. If you aren’t happy with the uniformity or depth, realize you can simply re-smooth the paste with your spatula and try dragging the texture again while it’s still wet. -
Clean the sides:
Once satisfied with the top texture, gently remove the painter’s tape while the paste is still wet. Use a palette knife to tidy up any paste that may have spilled over the edges, creating a sharp 90-degree corner.
Clean Start
Wipe your notched trowel with a damp rag after every single pass if you are doing multiple rows. dried bits on the tool are the #1 cause of messy groove lines.
Step 3: Finishing Touches
-
Allow to cure:
Let the piece dry undisturbed in a flat position. Because the paste is thick, this may take 24 to 48 hours. Do not rush this step, as the interior needs to harden fully. -
Inspect for imperfections:
Look closely at the dried ridges. Sometimes small burrs or rough spots appear where the paste lifted. Identify the areas that need refining. -
Sand lightly:
Take a small piece of 220-grit sandpaper and very gently smooth the tops of the ridges if they feel too sharp. Be careful not to flatten them; you just want a clean finish. -
Dust off debris:
Use a dry, soft brush or compressed air to remove all sanding dust from the deep grooves. Trapped dust will ruin the final painted finish. -
Apply final white coat:
To unify the surface and sheen, spray or brush a coat of matte white acrylic paint over the entire piece. Spray paint often works best to get inside the grooves without pooling. -
Second coat:
Apply a second light coat of paint if needed for full opacity, ensuring the white is brilliant and consistent from every angle.
Scale It Up
For a bold look, try using a tiling trowel with larger 1/2-inch notches. Deeper grooves create more dramatic shadows, perfect for hanging near a window.
Hang your new textured relief where natural light can rake across the surface to emphasize those satisfyingly clean lines


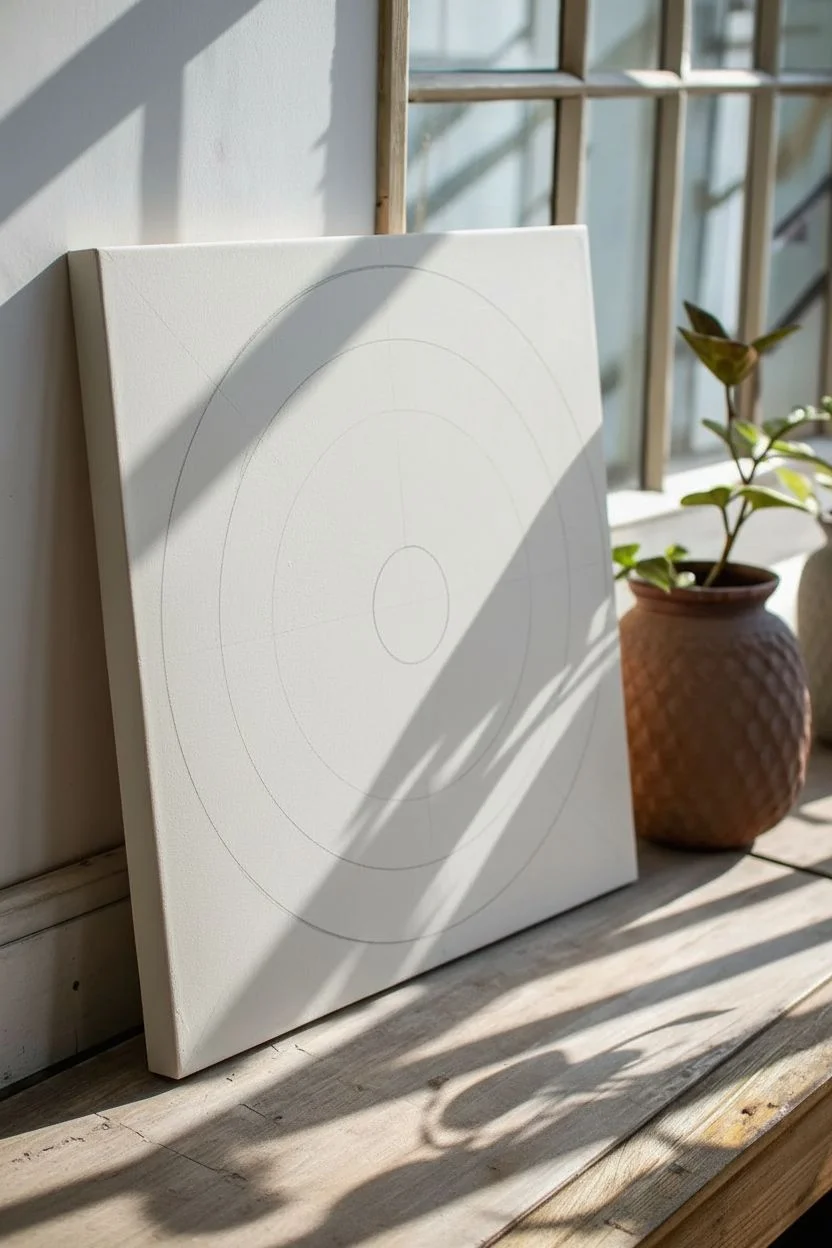
Concentric Circles That Catch the Light
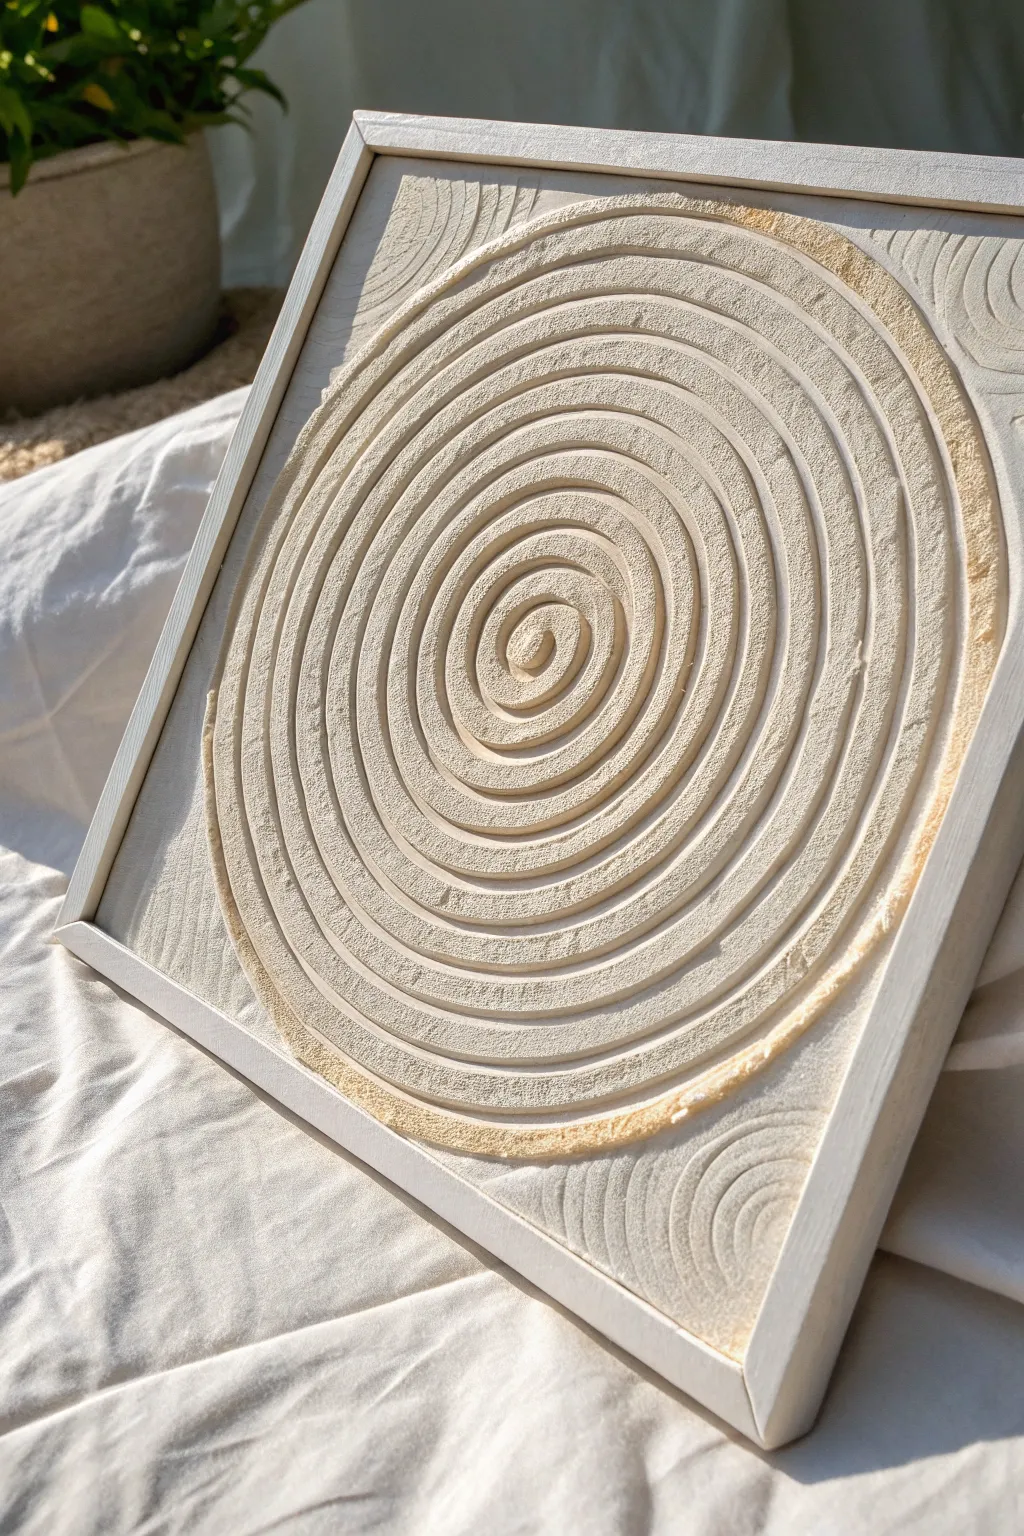

This minimalist yet striking piece uses granular texture paste to create a mesmerizing 3D spiral that plays with light and shadow. The organic, sandy finish brings a calm, earthy feel to any space, while the framed presentation elevates it to gallery-quality décor.
Step-by-Step
Materials
- Square wood panel or canvas (approx. 12×12 inches)
- Floating wood frame (raw or light wash)
- Texture paste or heavy modeling paste
- Fine sand or granular additive (if paste is smooth)
- Notched trowel or combing tool (fine teeth)
- Palette knife or wide scraper
- Compass or round object for tracing (optional)
- Pencil
- Acrylic paint (cream or off-white)
- Metallic gold wax or dry-brush paint
- Matte sealant spray
Step 1: Preparation & Base Layer
-
Prepare the surface:
Ensure your wood panel or canvas is clean and dust-free. If you are using a raw wood panel, a coat of gesso is a good idea to prime the surface and prevent the wood from absorbing too much moisture from the paste. -
Mix your medium:
If your texture paste is smooth, mix in fine sand or a granular medium now. You want a consistency that resembles wet beach sand—thick enough to hold a peak but spreadable. -
Apply the base coat:
Using a palette knife or wide scraper, apply a thick, even layer of the textured paste across the entire surface of the board. Aim for a thickness of about 1/8 to 1/4 inch. -
Smooth the surface:
Level out the paste as much as possible. It is helpful to work quickly here, as you don’t want the paste to begin hardening before you carve your design.
Cracks appearing?
Thick paste can crack if it dries too fast. If hairline cracks appear, mix a little paste with water and smooth it into the fissures with a small brush.
Step 2: Creating the Spiral
-
Mark the center:
Find the rough center of your square and gently press a small indentation there to guide your spiral starting point. -
Begin the spiral:
Using the corner of a palette knife, a stylus, or even a finger (if you don’t mind the mess), start at the center mark. Press firmly into the wet paste and begin dragging outward in a tight circular motion. -
Widen the path:
Continue the continuous line, gradually expanding the radius of your circle as you move outward. Maintain steady pressure to ensure the grooves are deep enough to catch shadows. -
Refine the ridges:
Go back over your spiral path if needed to deepen the grooves. The displaced paste will form raised ridges between your lines; try to keep these ridges relatively consistent in height. -
Detail the corners:
For the corners outside the main spiral, use a notched trowel or comb to create subtle arched patterns that echo the main shape, or leave them slightly roughly textured for contrast. -
Let it cure:
Allow the piece to dry completely. Because the paste is thick, I usually leave this for at least 24 hours in a dry, warm spot to ensure the center is fully hardened.
Add Dimension
Mix two slightly different shades of cream paint. Use the darker shade in the deep grooves and the lighter shade on the ridges to exaggerate the 3D depth.
Step 3: Finishing Touches
-
Sand rough spots:
Once bone dry, lightly brush your hand over the surface. If there are any extremely sharp peaks or unwanted crumbly bits, gently sand them down with fine-grit sandpaper. -
Apply base color:
Paint the entire textured surface with a cream or off-white acrylic paint. This unifies the color of the paste and the sand. Let this coat dry. -
Highlight with gold:
Pick up a tiny amount of metallic gold wax or paint on a dry brush or your fingertip. Very gently graze the tops of the highest spiral ridges, focusing on the outer rings. -
Seal the artwork:
Spray the entire piece with a matte sealant. This locks in the gritty texture and prevents the sand from dusting off over time. -
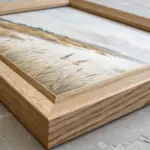
Frame it:
Place your finished board into the floating frame. Secure it from the back using offsets or glue, ensuring an even gap around all four sides for that suspended look.
Hang your textured masterpiece near a window where the changing daylight will constantly alter the shadows of the spiral


Palette Knife Petal Blooms in Relief
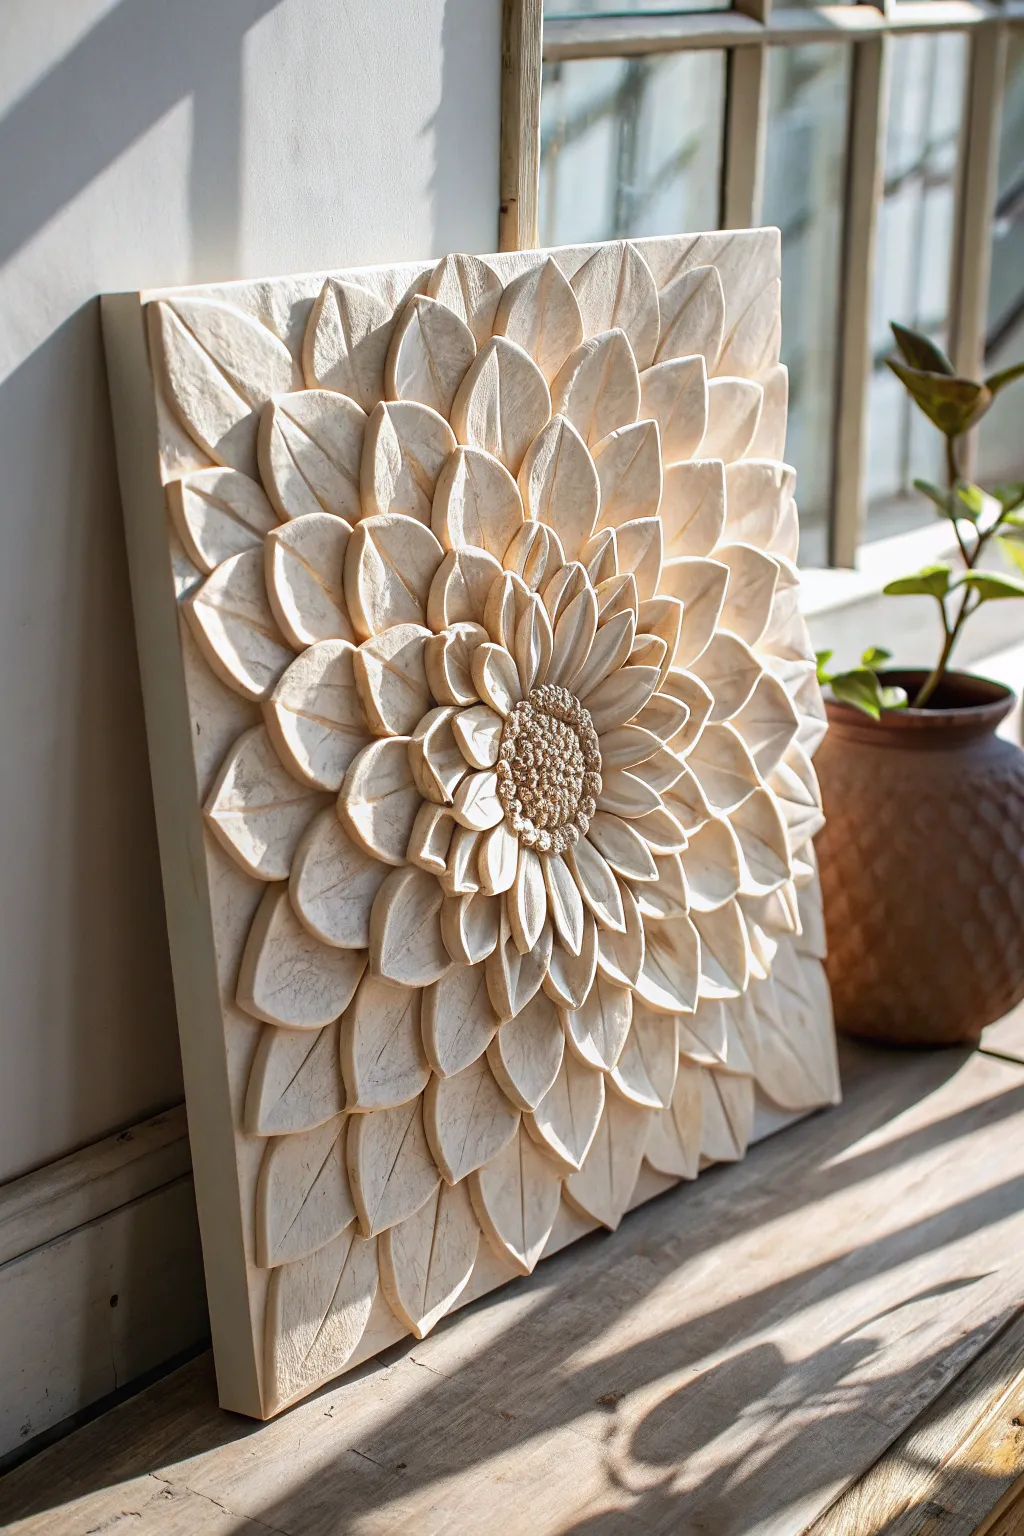
Transform a blank canvas into a stunning three-dimensional relief sculpture that captures the organic beauty of a blooming dahlia. Using thick modeling paste and palette knives, you will build up layers of petals to create dramatic shadows and light play.
Step-by-Step Tutorial
Materials
- Sturdy wooden panel or heavy-duty gallery wrap canvas (square)
- Heavy body modeling paste or texture medium
- Gesso (white)
- Various palette knives (particularly teardrop and pointed shapes)
- Pencil and compass
- Sandpaper (fine grit)
- Matte white acrylic paint or cream spray paint
- Small sculpting tools or toothpicks
- Varnish (optional)
Step 1: Preparation and Mapping
-
Prepare the surface:
Begin by priming your wooden panel or canvas with a coat of gesso to ensure a good grip for the heavy paste. Allow it to dry completely. -
Map the center:
Find the exact center of your square panel. Use a compass to draw a small circle (about 2 inches in diameter) in the middle to serve as the flower’s heart. -
Sketch the petal guides:
Lightly sketch concentric circles radiating outward from the center. These don’t need to be perfect, but they will help you keep your petal layers symmetrical as you work outward.
Keep Your Tools Clean
Heavy paste dries like cement! Keep a jar of water nearby and rinse your palette knives immediately after shaping each section to prevent buildup.
Step 2: Sculpting the Center
-
Apply the base paste:
Scoop a generous mound of modeling paste onto the center circle. You want this to be raised about a half-inch from the surface. -
Texture the seeds:
Using a stippling tool, the tip of a toothpick, or a small brush handle, repeatedly poke the center mound to create a densely pitted, seed-like texture. -
Refine the edge:
Clean up the perimeter of the center mound with a small palette knife so there is a clear distinction where the petals will begin.
Collapsing Petals?
If your high-relief petals are slumping, your paste layer is too thick or wet. Mix in a little marble dust or let the paste sit on the palette to stiffen before applying.
Step 3: Forming the Petals
-
Start the inner ring:
Load the back of a small, teardrop-shaped palette knife with a thick glob of paste. Press it gently against the canvas right next to the center seeds, pull outward slightly, and lift off to create a small, cupped petal shape. -
Define the petal vein:
While the paste is wet, use the edge of your knife or a sculpting tool to gently score a central line down the middle of the petal. -
Complete the first layer:
Continue creating these small petals around the entire circumference of the seeded center. Aim for them to stand upright slightly. -
Let it set slightly:
I like to wait about 15-20 minutes here before starting the next row. This prevents the inner petals from smushing when you work on the outer ones. -
Build the middle layers:
Move to the next sketched ring. Use a slightly larger knife or more paste to create bigger petals that overlap the gaps of the previous row. -
Shape the texture:
As you pull the knife away, encourage the tips of the petals to curl slightly or taper to a point. Use a secondary tool to carve subtle side veins if desired. -
Work toward the corners:
As you reach the outer edges, the petals should be larger and flatter against the canvas. Extend them all the way to the corners of the square to fill the negative space. -
Fill the gaps:
Look for empty spaces between the larger outer petals and insert smaller, partially hidden petals to create density and depth.
Step 4: Finishing Touches
-
Smooth the edges:
Once the sculpture is fully shaped but hasn’t fully hardened, use a damp brush to gently smooth any unwanted jagged peaks on the petal edges. -
Deep drying:
Allow the piece to dry for at least 24-48 hours. Heavy modeling paste takes a long time to cure all the way through. -
Sand and refining:
Inspect the dried piece. If there are sharp, unnatural spikes, gently sand them down with fine-grit sandpaper. -
Final coat:
Paint the entire relief with a matte white acrylic or cream spray paint. This unifies the texture and covers any pencil marks or transparency variations in the paste.
Hang your relief art near a window where the changing daylight will dance across the textures you created
BRUSH GUIDE
The Right Brush for Every Stroke
From clean lines to bold texture — master brush choice, stroke control, and essential techniques.
Explore the Full Guide
Abstract Swirls and Peaks You Can Feel
Transform a simple square canvas into a delicious-looking sculptural piece using the irresistible texture of thick modeling paste. This project mimics the luscious peaks and valleys of meringue frosting, creating a tactile artwork that looks good enough to eat but is designed to last forever on your wall.
Step-by-Step Guide
Materials
- Small square canvas or wooden art panel (approx. 8×8 or 10×10 inches)
- Heavy body acrylic paint (Titanium White)
- Heavy structure gel or modeling paste (high viscosity)
- Palette knife or offset spatula (rounded tip)
- Piping bag with a large star tip (e.g., 1M or 2D)
- Golden brown acrylic paint (Burnt Sienna or Raw Sienna)
- Small flat brush
- Matte or satin varnish spray
- Disposable mixing cups
Step 1: Base Preparation
-
Prime the surface:
Begin by painting your canvas or wooden panel with a solid coat of Titanium White acrylic paint to ensure a clean, bright background. -
Create the ‘crust’:
To mimic the golden cake base seen at the bottom edges, mix a small amount of Burnt Sienna with white to achieve a golden-brown pastry color. -
Apply the border:
Carefully paint the outer side edges and a very thin strip (about 1/8 inch) along the bottom perimeter of the face of the canvas. This creates the illusion of the cake layer peeking out from under the frosting.
Clean Swirls Pro-Tip
Wipe your palette knife clean with a damp cloth after every single drag or swirl. Heavy paste builds up quickly on the tool, and a dirty knife leads to messy, jagged ridges instead of smooth ones.
Step 2: Sculpting the Swirls
-
Prepare the medium:
In a mixing cup, mix your heavy modeling paste with a generous amount of Titanium White paint. You want a very thick, creamy consistency—likened to stiff-peak meringue. -
Base layer options:
Apply a base layer of this white mixture over the entire face of the canvas (masking off your brown ‘crust’ edge if you like) using a spatula. Aim for a thickness of about 1/4 inch. -
Spatula technique:
Using a rounded palette knife or an actual offset cake spatula, press gently into the wet paste at the top left corner. -
Create the wave:
Drag the tool downwards in a long, confident ‘S’ curve. The key is to vary the pressure: press harder at the start of the curve and lift slightly as you turn to create ridges. -
Repeat the pattern:
Continue making these large, sweeping curved motions across the surface. Let the ridges of the paste build up on the edges of your stroke to simulate fluffy frosting. -
Refine the texture:
If a swirl looks too flat, add a dollop more paste and re-swirl. I find that working quickly prevents the paste from forming a skin before you are happy with the shape. -
Clean up edges:
Use the clean edge of your knife to gently square off the sides of the white paste block, ensuring it looks like a slice of cake rather than just a messy spread.
Level Up: Berry Accents
Mix a tiny amount of red ink or fluid acrylic into clear gel medium. Carefully drip this ‘syrup’ onto the white peaks using a pipette for a hyper-realistic berry coulis effect.
Step 3: Piping the Peaks
-
Fill the piping bag:
Take the remaining white modeling paste mixture and fill a piping bag fitted with a large star tip. Ensure there are no air bubbles. -
Position the peaks:
Identify 5-7 spots on your textured surface where you want to add the decorative dollops. Place them randomly but balanced, avoiding perfect symmetry. -
Pipe the rosettes:
Hold the bag perpendicular to the surface. Squeeze effectively to build a base, then lift straight up while releasing pressure to create a sharp ripple and pointy peak. -
Sharpen the tips:
If the modeling paste doesn’t pull away cleanly to form a sharp point, use a toothpick to gently pull the paste upwards into a tine tip. -
Drying process:
Allow the piece to dry flat in a dust-free area. thick modeling paste takes a significant time to cure—usually 24 to 48 hours for full hardness. -
Seal the art:
Once fully cured and rock hard, spray the entire piece with a satin varnish. This gives it a slight sheen, mimicking the moisture of fresh whipped cream.
Now you have a stunning, high-texture piece that captures the sweetness of dessert in a permanent sculptural form
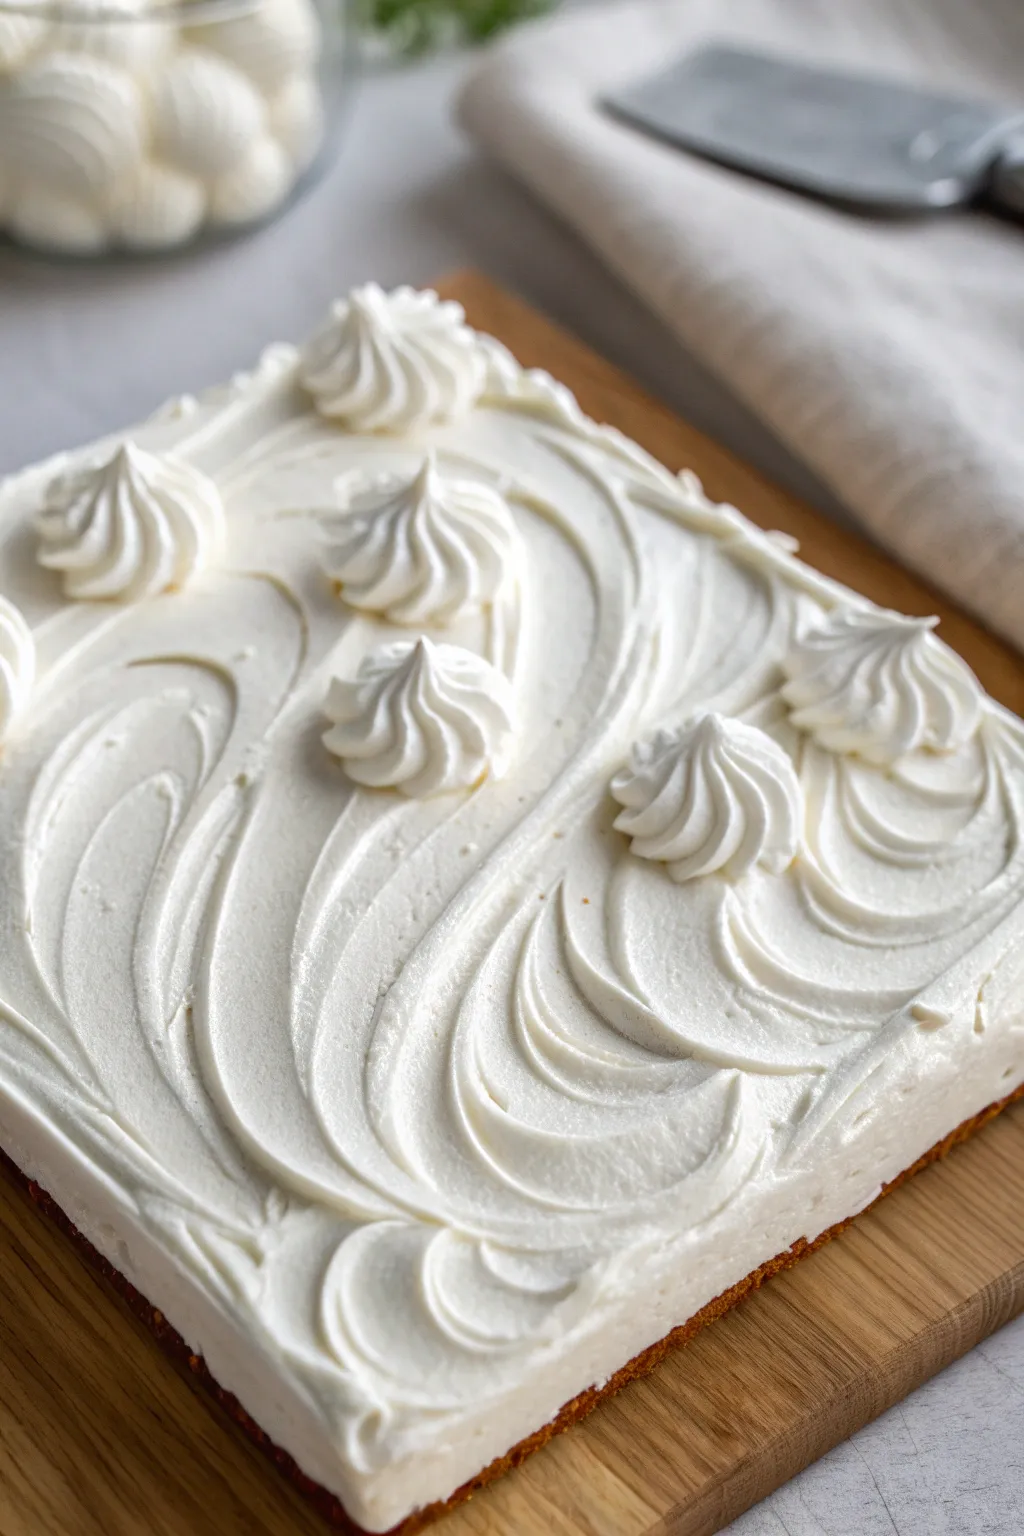
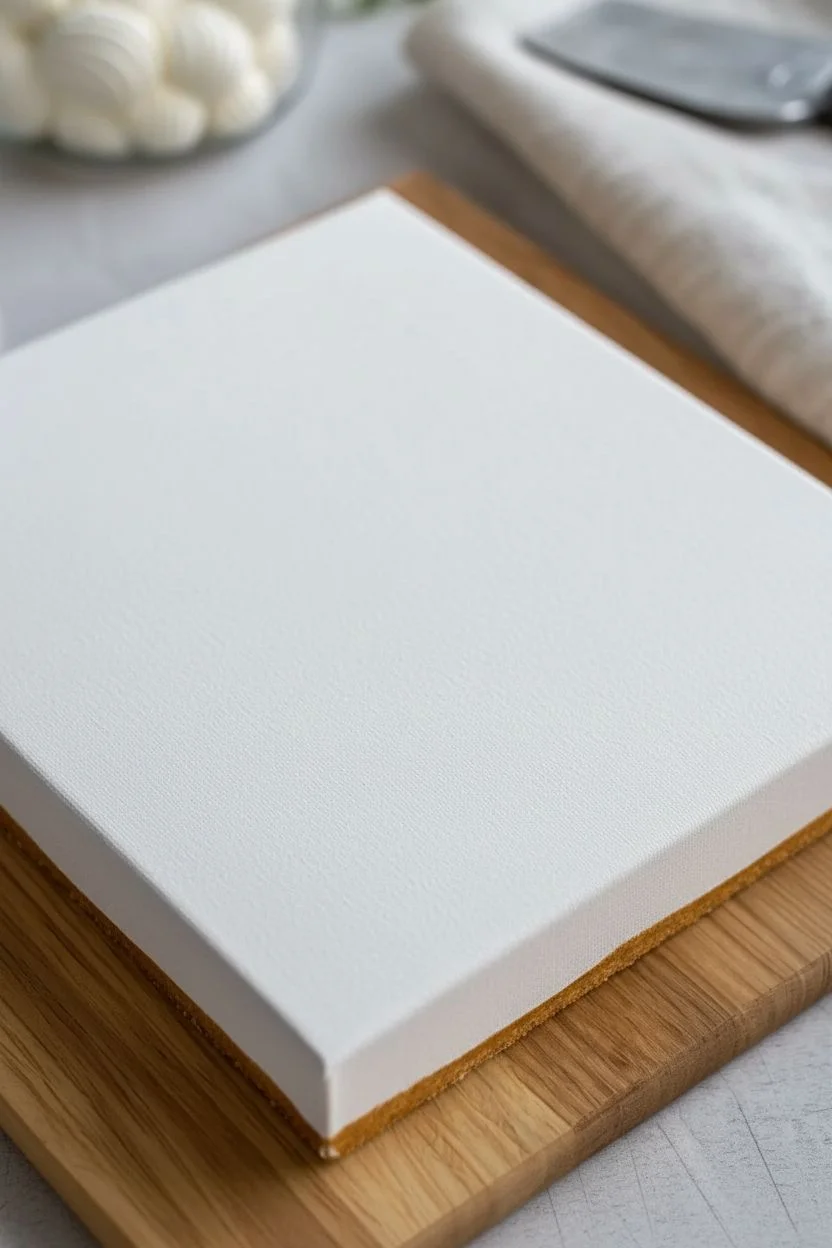
Soft Wave Foam Texture for Seascapes
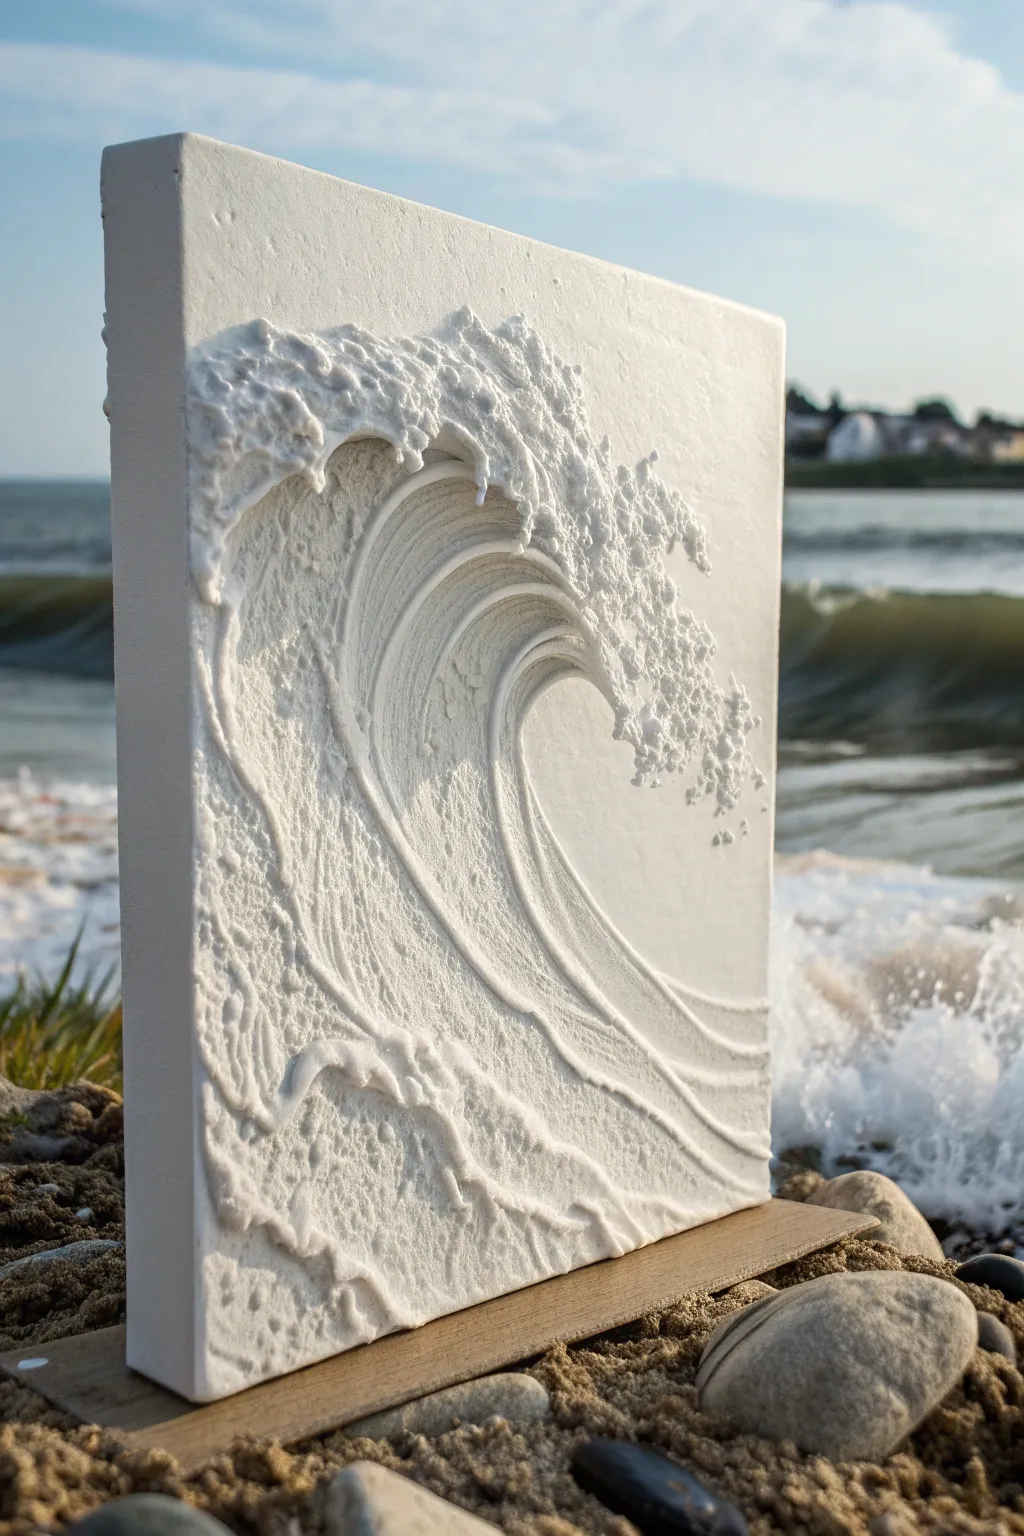
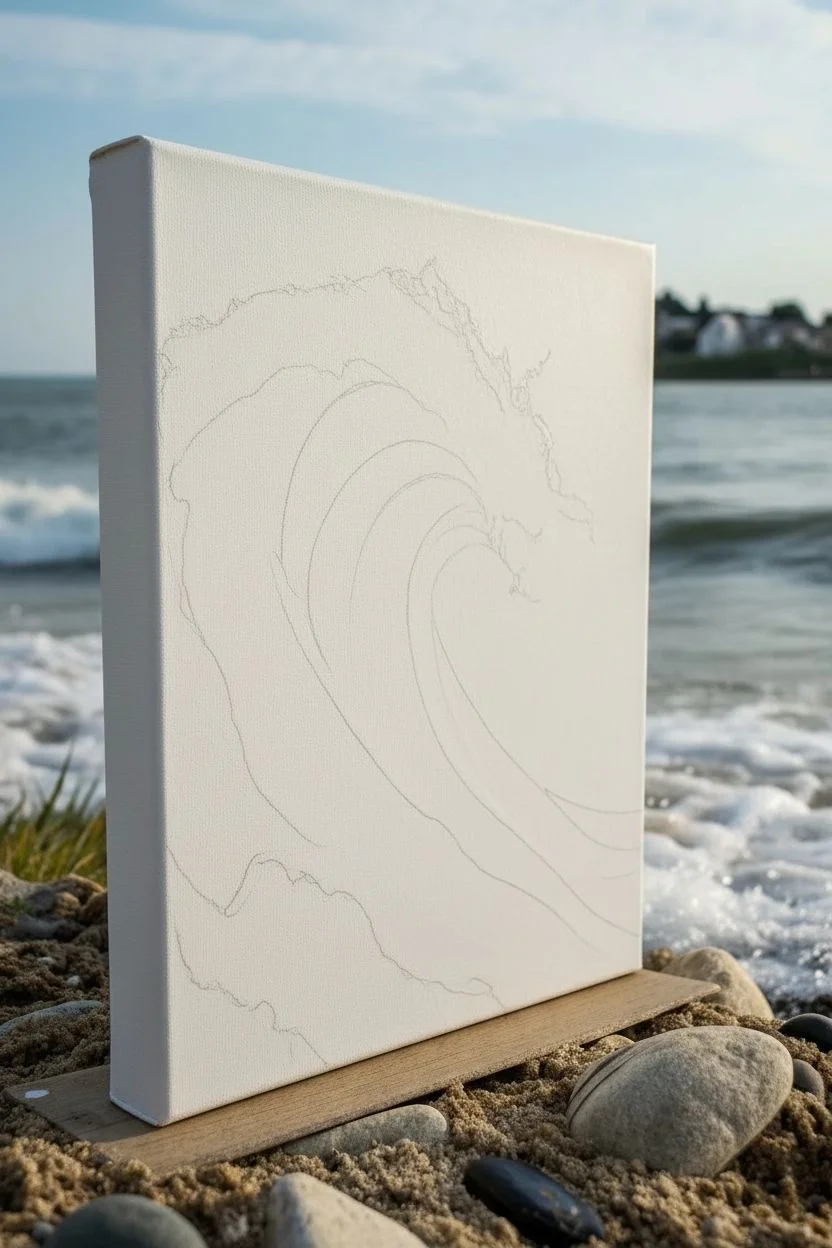
Capture the raw power and motion of the ocean using nothing but texture paste and modeling tools. This striking project relies on the contrast between smooth, sweeping ridges and rough, bubbly foam to create a dynamic 3D wave effect on a simple canvas.
Detailed Instructions
Materials
- Stretched canvas (square format, e.g., 12×12 inches)
- Heavy body texture paste or modeling paste
- Gesso (white)
- Palette knives (various shapes: trowel, rounded edge)
- Small sea sponge or stippling brush
- Coarse pumice gel or sand texture medium (optional for grit)
- Piping bag or plastic sandwich bag with corner cut
- Pencil (H or HB)
- Fan brush (stiff bristle)
- Matte white acrylic paint (optional for final coat)
- Spray varnish (matte)
Step 1: Preparation and Mapping
-
Prime the Surface:
Begin by applying a generous coat of white gesso to your canvas. This ensures a strong bond for the heavy texture paste later. Let it dry completely. -
Sketch the Wave Form:
Lightly sketch the outline of your wave using an H pencil. Focus on the main C-curve of the barrel and mark the areas where the foam will splash at the crest and the base. -
Prepare Your Pastes:
Scoop a large amount of modeling paste onto a mixing palette. If you want extra grit in the foam areas, mix a portion of the paste with coarse pumice gel or a sprinkle of sand in a separate pile.
Crack Control
Thick paste often cracks while drying. To prevent this, apply the wave’s thickest parts in two layers, letting the first dry partially before adding volume.
Step 2: Sculpting the Wave Barrel
-
Apply the Base Layer:
Using a wide palette knife, apply a thick, smooth layer of plain modeling paste inside the curve of the wave. Aim for a thickness of about 1/4 inch. -
Create the Swell Lines:
While the paste is wet, use the edge of a clean trowel-shaped palette knife or a stiff fan brush. Drag it through the paste following the curve of the wave to create deep, parallel grooves that mimic rushing water. -
Refine the Curve:
Smooth out the inner edge of the wave barrel. The water here should look slick and fast, so minimize roughness and focus on flow. -
Build the Tunnel:
Add extra paste to the lip of the wave (the top overhang). Use a rounded knife to pull the paste downwards slightly, emphasizing the feeling of the wave curling over itself.
Pro Tip: Lighting is Key
Since this is white-on-white, the drama comes from shadows. Display your finished piece near a window with side-lighting to make the textures pop.
Step 3: Creating the Crash and Foam
-
Rough Texture Application:
Switch to your gritty paste mixture (or plain paste). Dab it heavily along the crest of the wave and the bottom splash zone using a palette knife. Don’t smooth it out; you want chaos here. -
Stippling the Sea Spray:
Take a damp sea sponge or a stiff stippling brush. Press it into the wet paste at the top of the wave and pull straight up. This creates sharp little peaks that look like flying droplets. -
Piping Detailed Foam:
Fill a piping bag (or sandwich bag) with standard modeling paste. Determine where the prominent white cap of the wave is breaking. -
Adding Volume to the Crest:
Squeeze irregular blobs and lines of paste onto the very top edge of the wave. Use a toothpick or small tool to tear at these blobs, merging them with the sponged texture to look explosive. -
Texturing the Foreground:
Apply a thinner layer of paste at the very bottom of the canvas. Use the flat side of a knife to pat it down, creating a ‘choppy water’ texture that connects the wave to the bottom edge.
Step 4: Refining and Finishing
-
Connect the Textures:
Look for harsh lines between the smooth barrel and the rough foam. Use a damp brush to gently feather these areas together so the transition feels organic. -
Enhance the Splash:
For the finest spray details, flick a stiff toothbrush loaded with watered-down paste or heavy body white paint onto the area just behind the wave’s crest. -
The Long Dry:
Allow the artwork to dry flat. Because the texture is thick, this might take 24-48 hours. Don’t rush this step or the center may crack. -
Unified White Coat:
Once fully rigid, paint the entire sculpture with a layer of matte white acrylic. This unifies the color of the different pastes and hides any pencil marks. -
Seal the Work:
Finish with a matte spray varnish to protect the deep crevices from dust accumulation without adding an artificial sheen.
Hang your relief art in a spot with good natural light and enjoy the calming coastal energy it brings to your space

PENCIL GUIDE
Understanding Pencil Grades from H to B
From first sketch to finished drawing — learn pencil grades, line control, and shading techniques.
Explore the Full Guide
Lace and Fabric Stamps for Delicate Patterns
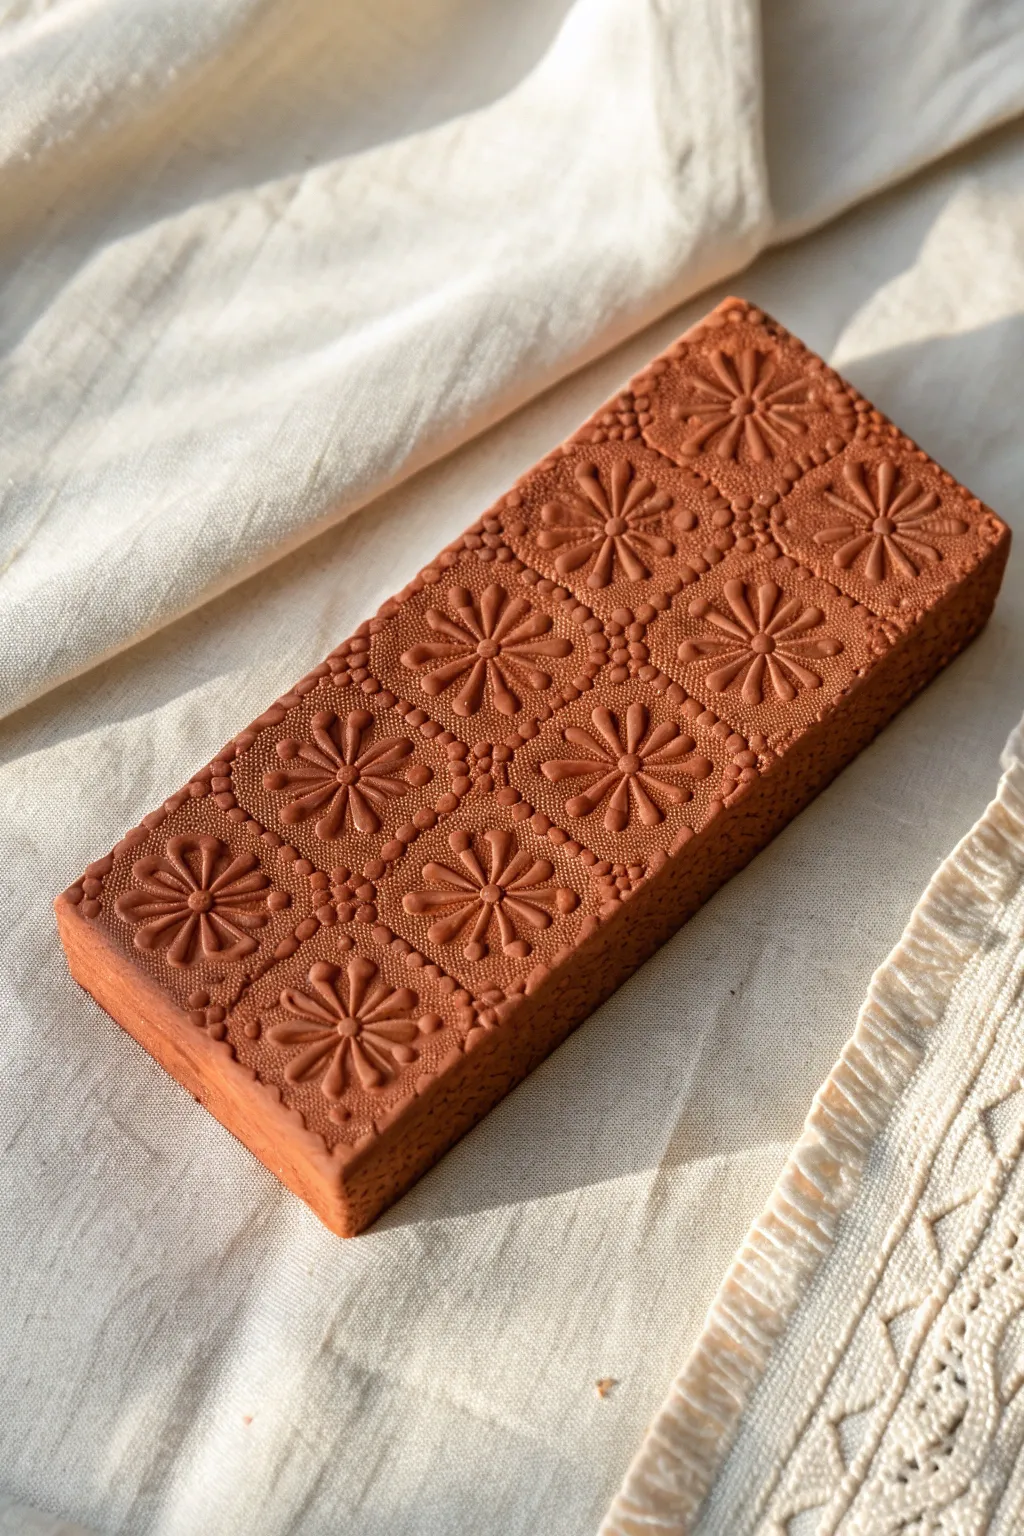
This project captures the delicate intricacy of vintage textiles in solid form, creating a stunning decorative object with a warm, earthy aesthetic. By pressing lace or a textured stamp into leather-hard terracotta clay, you’ll achieve a raised floral relief pattern that feels both ancient and modern.
Step-by-Step Guide
Materials
- Air-dry terracotta clay (or kiln-fire clay if preferred)
- Wooden rolling pin
- Two wooden guide strips (approx. 1 inch thick)
- Heavy-duty lace trim or a deep-texture floral rubber stamp
- Fettling knife or clay cutting wire
- Smoothing sponge
- Fine-grit sandpaper
- Cornstarch or baby powder (release agent)
- Canvas or heavy cloth workspace mat
- Matte spray sealant (optional)
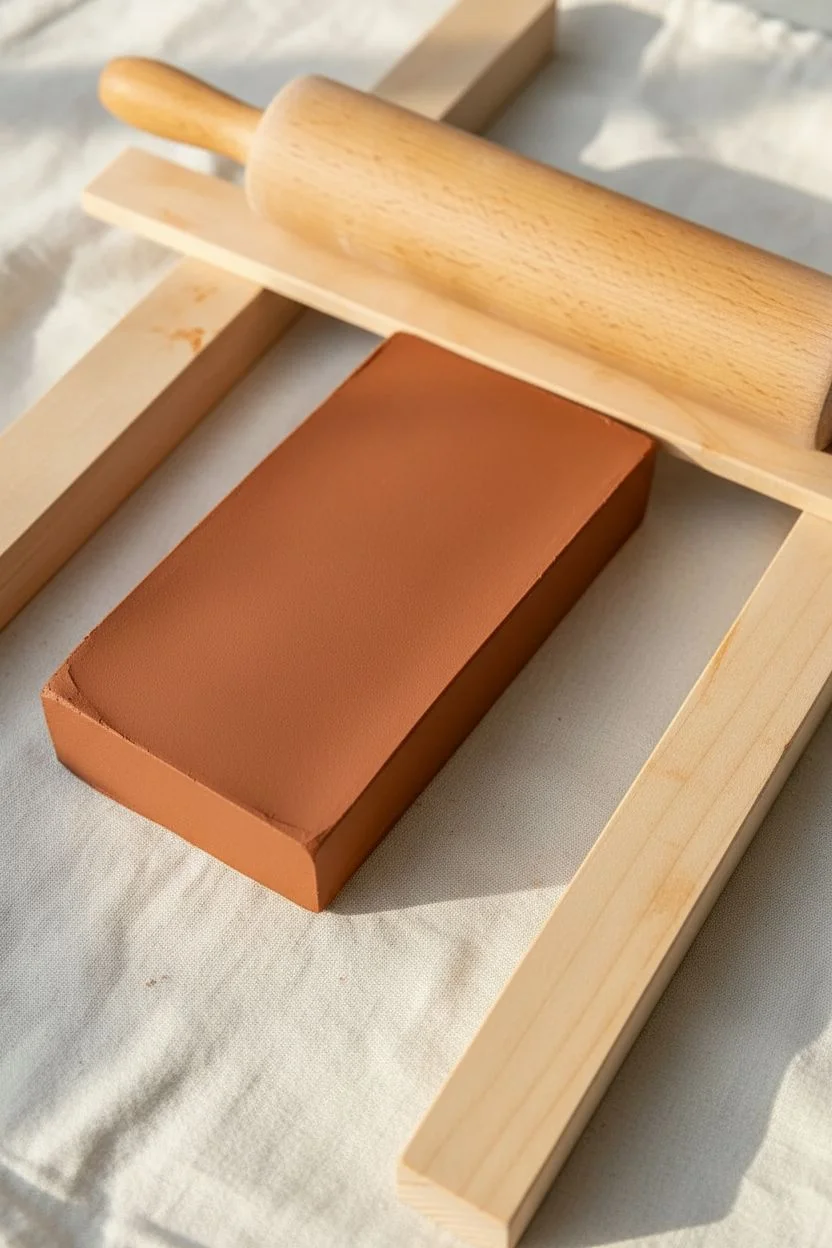
Step 1: Preparing the Base
-
Condition the Clay:
Begin by taking a substantial block of terracotta air-dry clay. Knead it firmly on your canvas mat to remove air bubbles and ensure a uniform consistency. -
Set Up Guides:
Place your two wooden guide strips on either side of the clay. These will ensure your slab is perfectly even and thick enough to hold the deep impression without warping. -
Roll the Slab:
Using the rolling pin, roll the clay out until the pin rests securely on the guide strips. You want a thick, substantial slab, roughly 1 inch deep. -
Cut the Rectangle:
Using a sharp fettling knife or ruler edge, cut a clean, precise rectangle from your slab. Aim for sharp, crisp corners rather than rounded ones to match the architectural look of the reference. -
Smooth the Surface:
Dip your sponge lightly in water and run it over the top surface and the cut sides. You want to erase any canvas marks or fingerprints to create a pristine canvas for your texture.
Sticky Clay Problems?
If the clay sticks to your stamp, let the slab sit for 15-20 minutes to become ‘leather hard’ before stamping again. The slightly drier surface holds detail better.
Step 2: Creating the Texture
-
Prep the Texture Tool:
Take your lace strip or texture stamp. Lightly dust the surface of the clay and the tool with cornstarch. I always do this to prevent the sticky clay from gripping the intricate details and ruining the pull. -
Position the Pattern:
Align your lace or stamp carefully at one corner of the block. If using a smaller stamp, plan your grid layout mentally before pressing. -
Pressing the Design:
Press the texture tool firmly into the clay. Consistency is key here; apply even pressure across the entire surface so the relief depth is uniform. -
Repeating the Pattern:
If using a smaller stamp, lift it straight up and align it directly next to the first impression. Continue until the entire top surface is covered in the grid of floral motifs. -
Connecting the Dots:
To mimic the specific look of the image, use a small, round stylus or the back of a paintbrush to gently press dots into the intersections between the square floral blocks. -
Refining the Edges:
The pressure of stamping may have bulged the sides slightly. Use a flat wooden rib or ruler to gently push the vertical sides back into square alignment without disturbing the top texture.
Step 3: Finishing Touches
-
Initial Drying:
Allow the block to dry slowly away from direct heat or sunlight. Flip it occasionally if possible, or place it on a wire rack to ensure even airflow. -
Dust Removal:
Once the surface is dry to the touch, use a soft, dry paintbrush to sweep away any remaining cornstarch or loose crumbs from the deep crevices of the pattern. -
Sanding:
After the block is fully cured (usually 24-48 hours depending on thickness), use fine-grit sandpaper to gently smooth the bottom and vertical sides. Avoid sanding the textured top. -
Sealing:
Finish by applying a light coat of matte spray sealant. This protects the clay from moisture and deepens the rich terracotta color slightly.
Add Antique Depth
Mix a tiny amount of black or dark brown acrylic paint with water (wash). Brush over the texture, then wipe the high points clean to make the pattern pop.
Enjoy the tactile satisfaction of your new, handmade architectural art piece
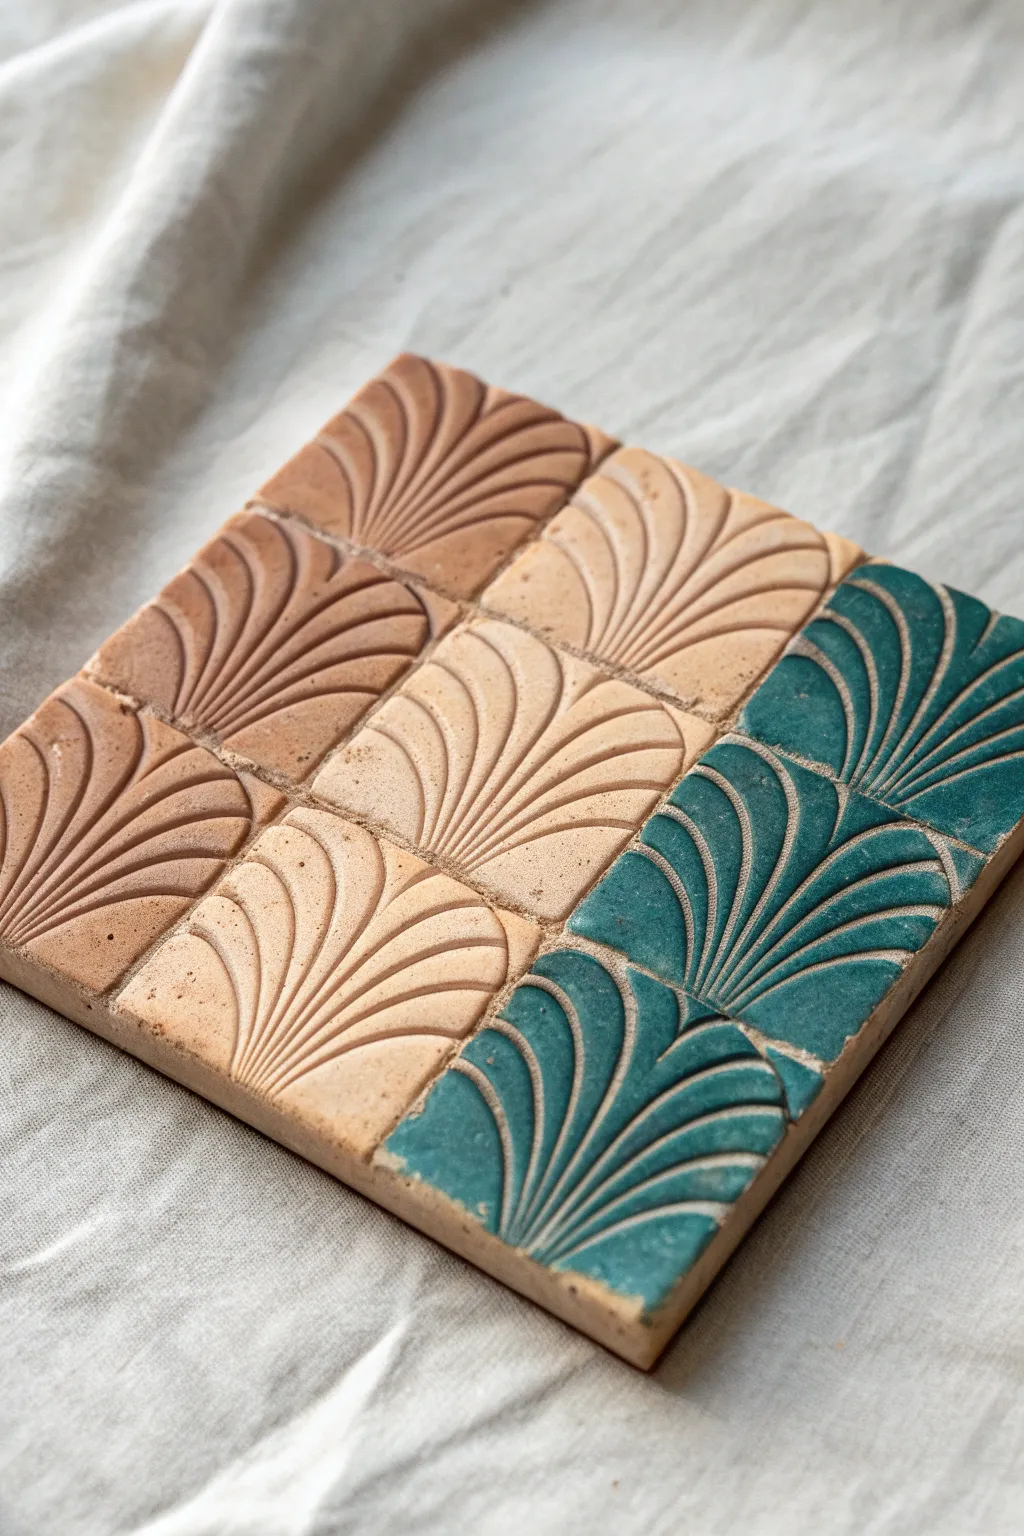
Grid Sampler: A Mini Texture Library on One Canvas
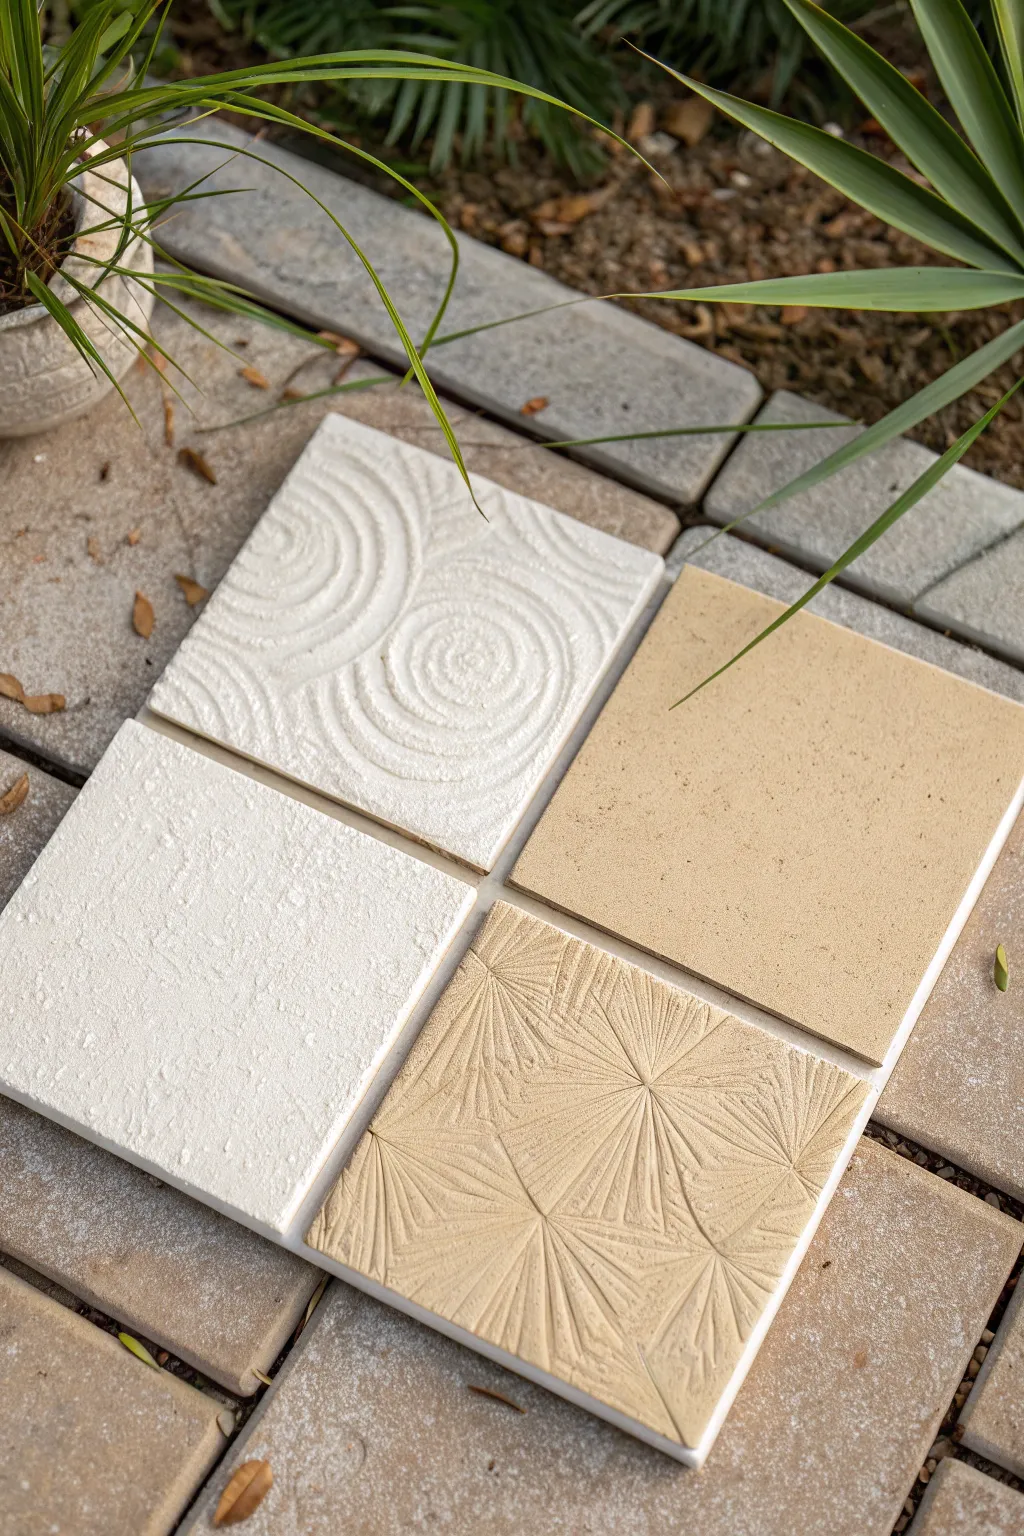
Create a sophisticated minimalist wall art piece by combining four distinct textural studies into a single unified composition. This project explores the tactile differences between smooth, rough, swirling, and geometric finishes using simple plaster techniques.
Detailed Instructions
Materials
- 4 small square wooden panels or heavy canvas boards (6×6 inch or 8×8 inch)
- Modeling paste or joint compound
- Palette knives (flat and trowel shapes)
- Notched trowel tool or comb (for swirls)
- Carving tool or toothpick
- Fine grit sandpaper
- Acrylic paint (warm white and sandy beige)
- Matte spray varnish
- Wood glue or heavy-duty construction adhesive
- Backing board (optional, if mounting together)
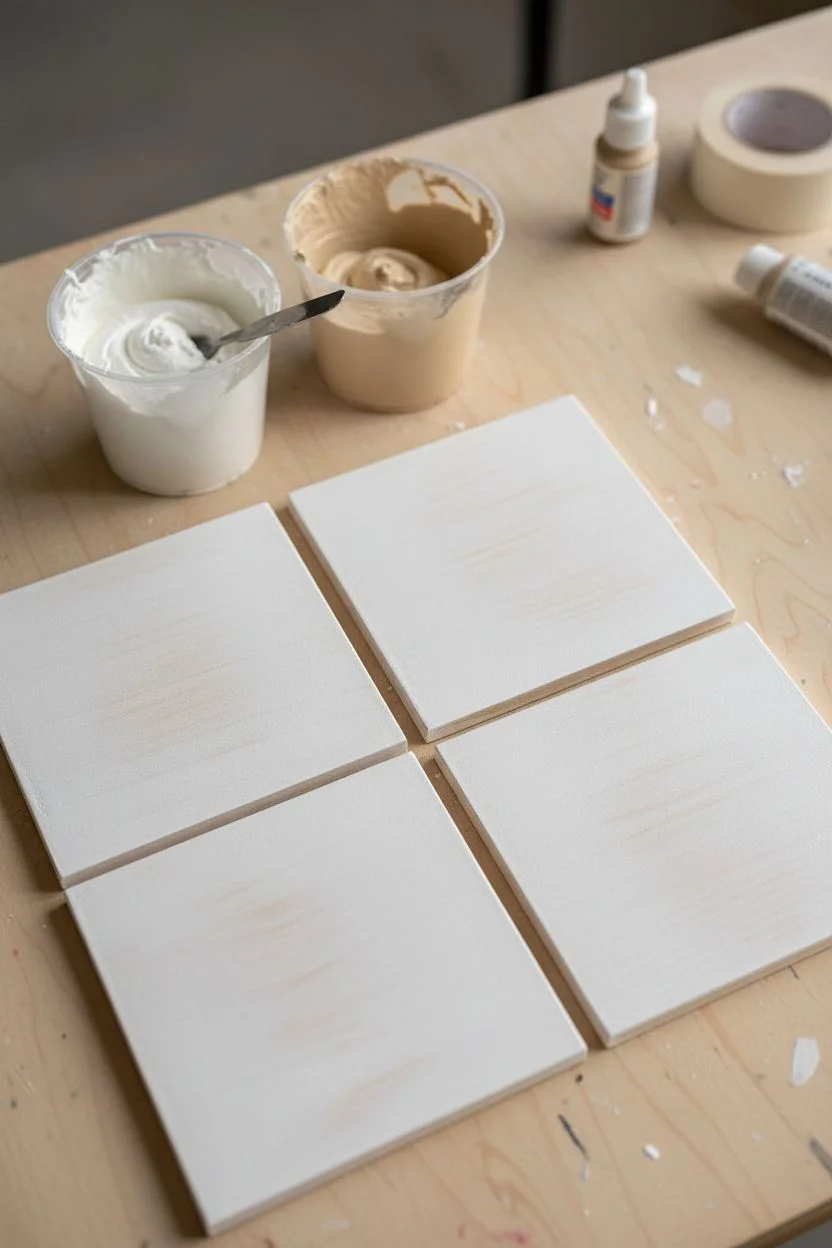
Step 1: Preparation & Base Coat
-
Prepare the Substrates:
Lay out your four square panels on a flat, protected work surface. Identify which two will be your ‘white’ tiles and which two will be your ‘tan’ tiles to ensure balanced composition later. -
Prime the Surface:
Apply a thin seal coat of gesso or white acrylic paint to all four boards. This prevents the wood from absorbing moisture too quickly from the texture medium, which can cause cracking. -
Mix the Texture Medium:
Scoop a generous amount of modeling paste into a mixing cup. If you want the tan tiles to be colored all the way through, mix a drop of beige acrylic paint directly into half of the paste now.
Cracks happen?
If the paste cracks while drying, mix a small slurry of paste and water. Paint it into the cracks with a small brush and smooth over for an invisible repair.
Step 2: Creating the Textures
-
Apply Paste for Swirls:
On the first white tile, use a palette knife to spread a thick, even layer of white paste, approximately 1/4 inch deep. Smooth it out reasonably well so the surface is level. -
Sculpt the Swirls:
While the paste is wet, take a notched tool or the rounded tip of a palette knife. Press gently into the center of a quadrant and rotate outward in a spiral motion to create the rippled water effect. -
Apply Paste for Stucco:
On the second white tile, apply a slightly thinner layer of white paste. You don’t need to be neat here; the goal is roughness. -
Stipple the Surface:
Using the flat side of a trowel or a stiff bristle brush, tap straight down into the wet paste and pull up sharply. Knock down any overly high peaks with a light sweeping motion to create a rough, stone-like pitted texture. -
Apply Paste for Sandstone:
On the first tan tile (top right in the reference), apply the beige-tinted paste. Use a wide putty knife to get this surface as smooth and flat as possible. -
Texturize the Sandstone:
Before it dries, sprinkle a tiny pinch of real sand or dry grout powder over the surface and press it in flat with your knife, creating a subtle, gritty realism. -
Apply Paste for Geometric Carving:
On the final tan tile, apply a thick, smooth layer of the beige paste, similar to the first step. Let this sit for about 10-15 minutes until it is leather-hard—firm but still impressionable. -
Carve the Starburst:
Using a carving tool or toothpick, draw lines radiating outward from central points to mimic a palm leaf or starburst pattern. Overlap the shapes slightly for a complex, organic look.
Step 3: Finishing Touches
-
Dry Completely:
Allow all four tiles to dry undisturbed for at least 24 hours. Thick paste holds moisture, and rushing this step can ruin the crisp details. -
Sand the Edges:
Once bone dry, take fine-grit sandpaper and gently clean up the sides of the panels to ensure they are square and sharp. Lightly sand the ‘smooth’ sandstone tile if any ridges appeared during drying. -
Enhance with Paint:
If you didn’t tint the paste earlier, or if lines need definition, paint the two geometric tiles with a matte sandy beige acrylic. Paint the textured white tiles with a creamy off-white to unify them. -
Seal the Work:
I like to finish with a quick mist of matte spray varnish over all four pieces. This seals the porous paste and makes dusting easier in the future. -
Assemble the Grid:
Arrangement is key. Place the tiles in a 2×2 grid, alternating the styles (Diagonal whites, diagonal tans). Glue them onto a larger backing board or hang them individually with narrow spacing.
Go monochromatic
Paint all four tiles the exact same shade (like charcoal or pure white). The shadows created by the different textures will become the main focus.
Step back and enjoy the subtle interplay of shadow and light on your new textured gallery wall


Piped Lines for Super-Precise Raised Designs
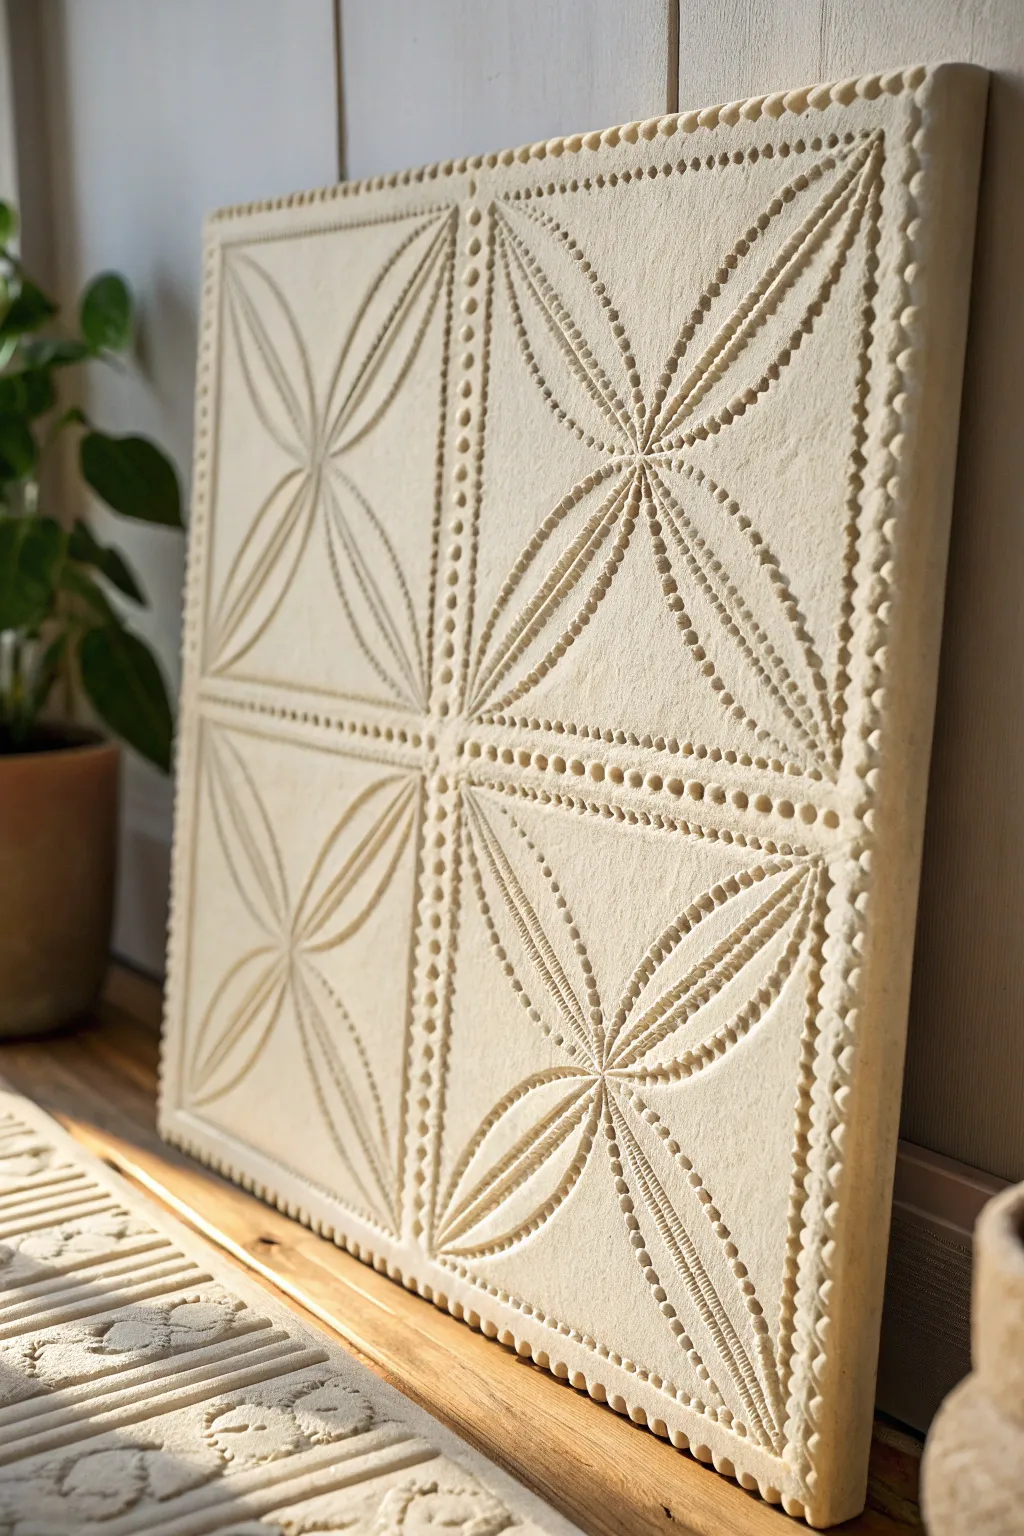
Achieve stunning architectural definition with this geometric texture art project that mimics the look of carved plaster or tile. By using high-density texture paste and piping tools, you’ll create crisp raised lines and intricate dots for a sophisticated, minimalist relief.
Step-by-Step Tutorial
Materials
- Deep edge canvas or wooden cradled panel (approx. 16×16 inches)
- Heavy body modeling paste or texture medium
- Gesso (white or cream)
- Piping bag or plastic squeeze bottle with fine precision tips
- Palette knife
- Ruler or straight edge
- Pencil
- Sandpaper (fine grit)
- Acrylic paint (warm cream or bone white)
- Matte spray varnish
Step 1: Base Preparation
-
Prime the Surface:
Begin by coating your canvas or wooden panel with a generous layer of gesso. This ensures a smooth, non-absorbent surface for the heavy paste to adhere to. -
Sand for Smoothness:
Once the gesso is completely dry, lightly sand the surface with fine-grit sandpaper to remove any brushstrokes or bumps. Wipe away the dust with a clean, barely damp cloth. -
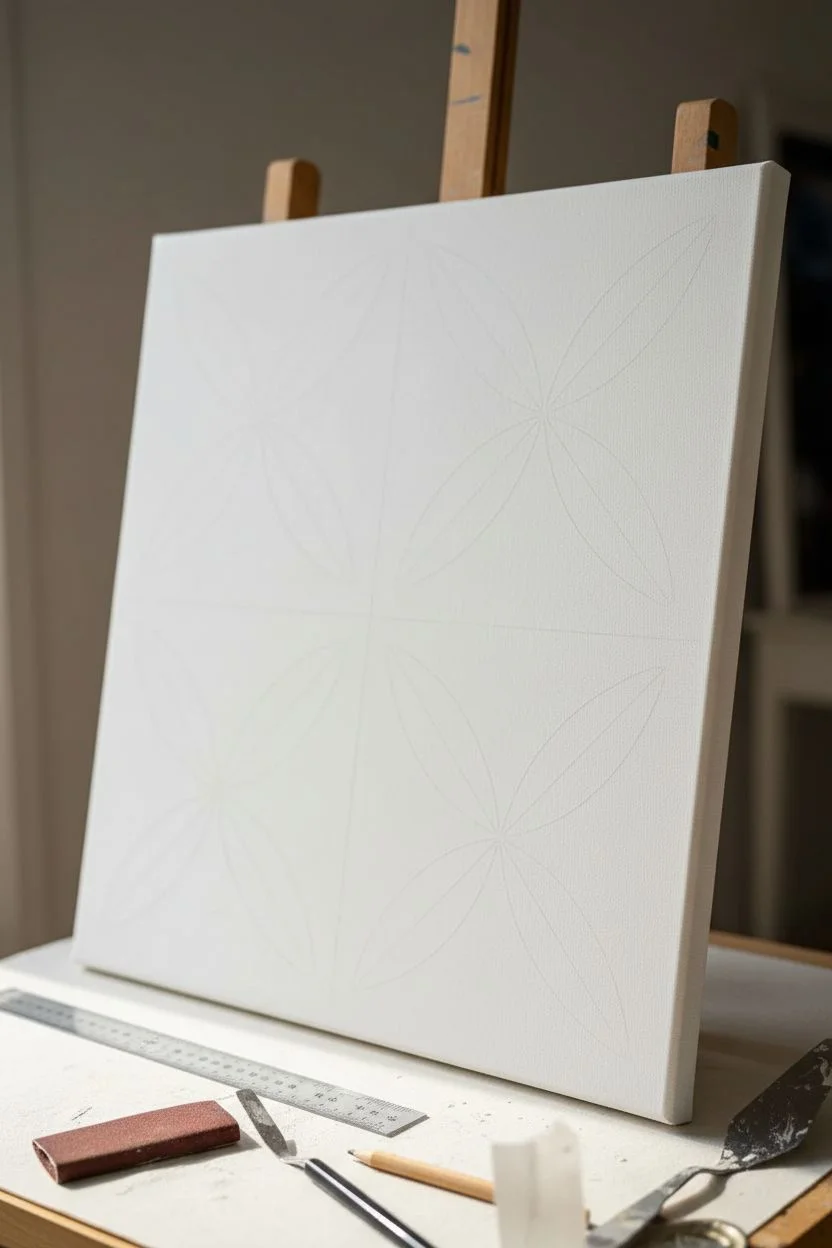
Mark the Grid:
Use your ruler and pencil to lightly draw a large ‘plus’ sign, dividing the square surface into four equal quadrants. Be precise, as this grid creates the foundation for the symmetry. -
Sketch the Petals:
In each quadrant, lightly sketch an ‘X’ shape from corner to corner. Then, draw curved lines connecting the center point to the corners to form the four-petal floral shape shown in the reference. Keep these lines faint.
Slumping Lines?
If your piped lines are flattening out, your paste is likely too thin. Mix in a small amount of marble dust or let the paste sit open for 15 mins to thicken.
Step 2: Piping the Structure
-
Prepare the Paste:
Fill your piping bag or squeeze bottle with the heavy body modeling paste. You want a consistency similar to stiff cake frosting—if it’s too runny, the lines will slump; too thick, and it will be hard to squeeze. -
Pipe the Dividers:
Start by piping a row of small, tight dots along the main vertical and horizontal grid lines you drew earlier. This creates the ‘grout line’ effect separating the four tiles. -
Outline the Borders:
Next, pipe a similar dotted border around the extreme outer edge of the canvas to frame the entire piece. -
Pipe Main Arcs:
Now move to the floral designs. Pipe solid, smooth lines along the curved petal outlines. Apply steady pressure to keep the line thickness consistent. -
Create Inner Details:
Inside each large petal shape, pipe a smaller, thinner line that echoes the outer shape. This double-line effect adds depth to the relief. -
Adding Texture Dots:
Along the spine (the straight line) of every petal, pipe a row of very small, precise dots. This mimics the beaded texture seen in the reference image. -
Fill the Petal Interiors:
Between the solid lines of the petals, add rows of tiny dots. These should follow the curve of the petal, filling the space with texture.
Stone Effect
Mix fine sand or baking soda into your final paint coat. This creates a gritty, sandstone-like surface texture that makes the relief look like carved rock.
Step 3: Refining and Finishing
-
Clean Up Edges:
If any dots have ‘tails’ or peaks from lifting the piping tip, dip your finger in a little water and gently tap them down to round them off while the paste is still wet. -
Let it Cure:
Allow the entire piece to dry completely. Because the paste is thick, this can take 24 to 48 hours. Do not rush this step, or the interior of the lines may crack. -
Base Coating:
Once hardened, paint the entire artwork with your warm cream or bone-white acrylic paint. Use a soft brush to get into all the nooks and crannies created by the piping. -
Apply Second Coat:
A single coat often leaves streaks on textured surfaces, so apply a second coat for a velvety, matte finish. I prefer to use a slightly lighter shade here to highlight the raised areas naturally. -
Seal the Work:
To protect that crisp white finish from dust, finish with a light mist of matte spray varnish.
Hang your piece near a window where natural light can cast shadows across the relief, highlighting your precise handiwork.
Raised Floral “Frosting” Shapes With Piping
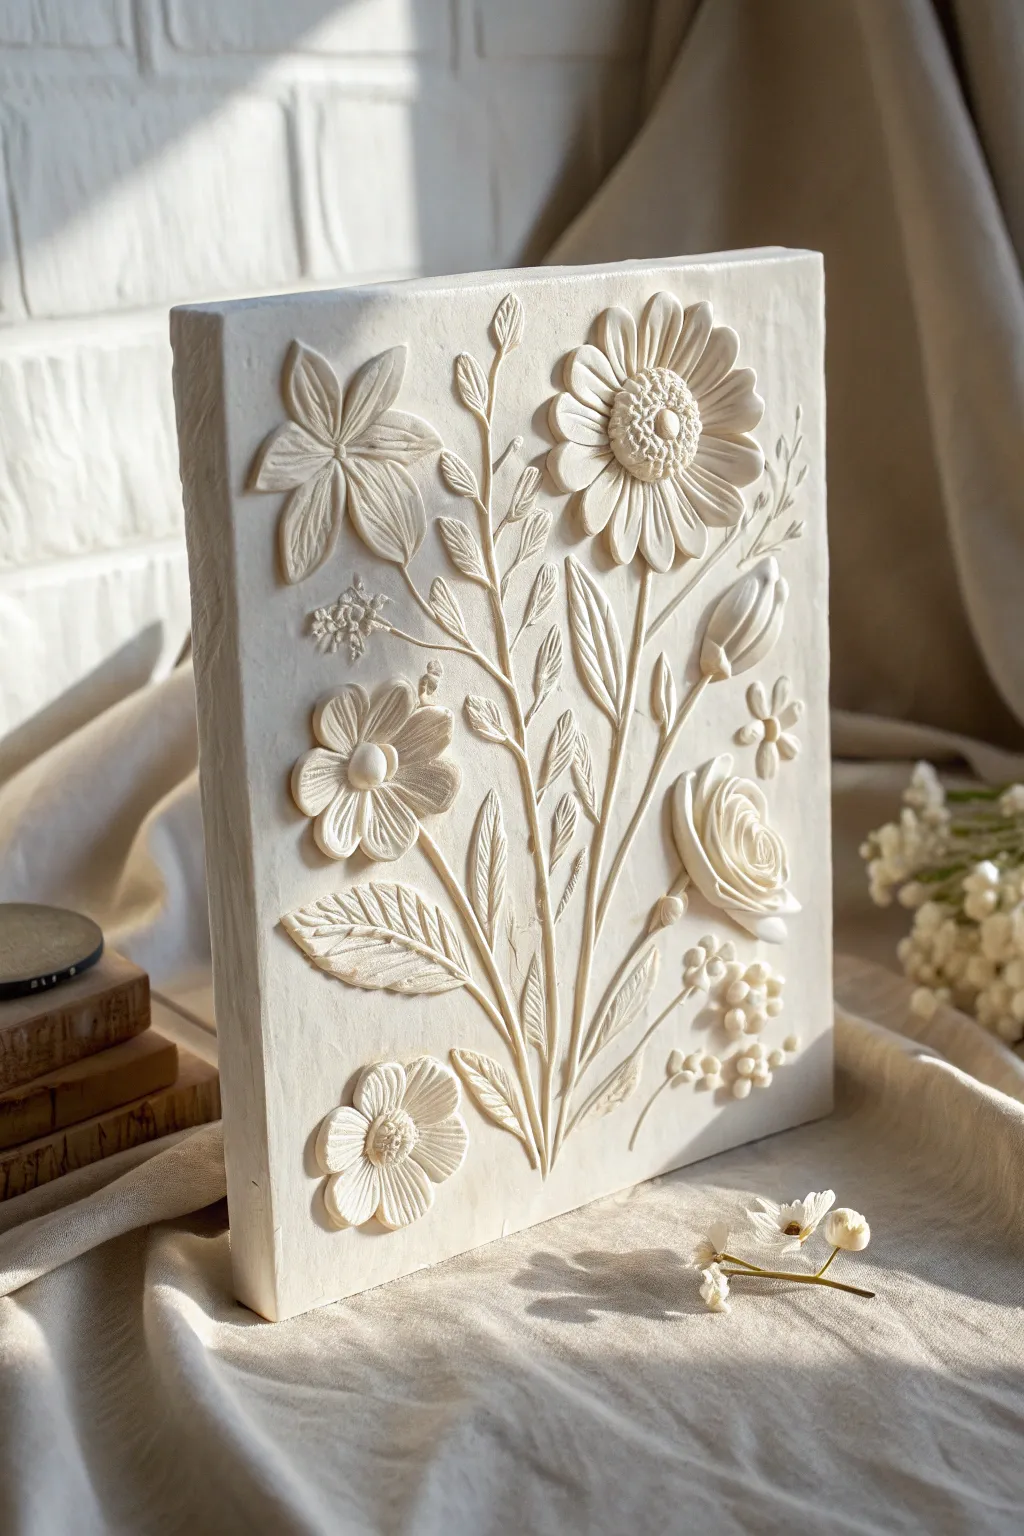
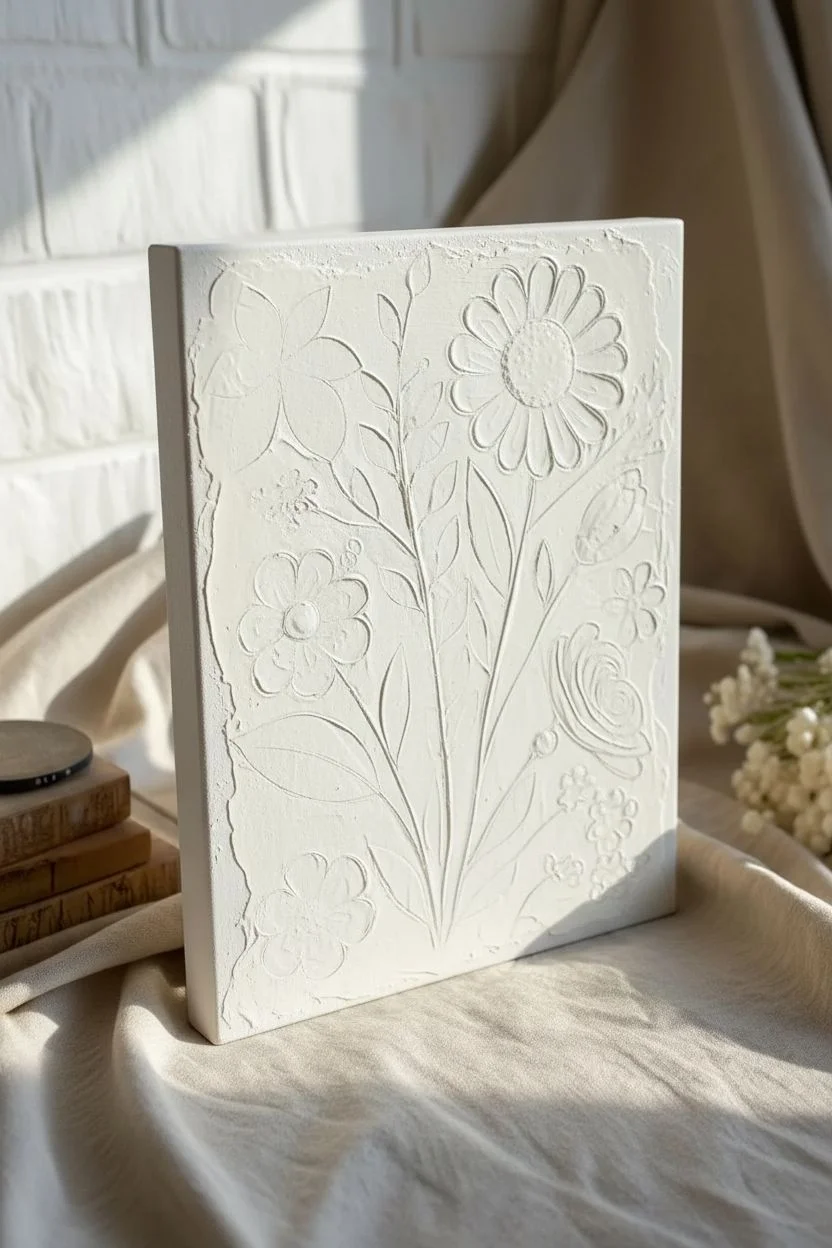
Capture the delicate beauty of a wildflower bouquet with this tactile texture art project that looks almost good enough to eat. By using a thickened modeling paste and piping techniques usually reserved for cake decorating, you’ll create a monochromatic masterpiece with stunning depth and shadow.
Detailed Instructions
Materials
- Rectangular wood panel or deep-edge canvas (approx. 8×10 or 9×12 inches)
- White modeling paste or heavy body texture gel
- Gesso (white)
- Palette knife
- Piping bags (disposable or reusable)
- Piping tips: Petal tip (e.g., Wilton #104), Round tip (small and medium like #2 and #5), Leaf tip (e.g., Wilton #352)
- Couplers for piping bags
- Acrylic paint (Titanium White and Unbleached Titanium/Cream)
- Fine grit sandpaper
- Matte spray varnish
Step 1: Base Preparation
-
Prime the Surface:
Begin by applying a smooth, even coat of white Gesso to your wood panel or canvas. This seals the surface and ensures your texture paste adheres properly. Let it dry completely. -
Create the Background Texture:
Mix a small amount of Unbleached Titanium paint into your modeling paste to create a warm, creamy off-white base tone. Using a palette knife, spread a thin layer across the entire surface. Don’t worry about being perfectly smooth; subtle ridges add character. -
Sketch the Layout:
Once the background layer is dry to the touch, lightly sketch the main stems and flower placements with a pencil. This guide will help you keep the composition balanced as you begin piping.
Step 2: Mixing and Piping Prep
-
Thicken the Mix:
Prepare your main batch of modeling paste. If your paste feels too loose, mix in a tiny bit of cornstarch or baby powder to stiffen it slightly; it needs to hold a peaks just like stiff frosting. -
Color Match:
Tint this batch with the same creamy white acrylic paint used for the background so the relief elements blend seamlessly with the base. -
Fill the Bags:
Fit your piping bags with couplers and the various tips. Fill the bags about halfway with the paste. Overfilling makes them hard to control, so I prefer working with smaller amounts.
Paste Too Soft?
If your petals are flopping over, your paste is too warm or thin. Refrigerate the piping bag for 10 minutes or mix in a teaspoon of plaster powder to stiffen the consistency instantly.
Step 3: Sculpting the Flora
-
Pipe the Main Stems:
Using a medium round tip, pipe long, confident lines for the main stems, starting from the bottom center and branching outward. Vary the pressure to create slightly thicker bases for the stems. -
Form the Leaves:
Switch to the leaf tip (the V-shaped one). Hold the bag so the ‘V’ opens sideways. Squeeze firmly at the base of the stem, pull away, and release pressure to create a sharp, tapered leaf point. -
Add Veining Detail:
While the leaf paste is still wet, use the tip of a palette knife or a toothpick to gently score a center vein into the larger leaves for added realism. -
Create the Large Daisy:
For the prominent top-right flower, use the petal tip. Position the wide end of the tip touching the canvas and the narrow end facing up. Pipe U-shaped loops in a circle to form the petals. -
Build the Daisy Center:
Switch to a small round tip and pipe tiny dots in the center of your daisy, building them up into a domed cluster. -
Pipe the Lilies:
For the lily-like flowers on the left, use the petal tip again. Pipe longer, sweeping strokes that curve outward. Layer three or four petals to create a trumpet shape. -
Sculpt the Rose:
Create the rose on the lower right by piping a tight spiral with the petal tip for the center, then piping overlapping C-shaped curved petals around it, angling the tip outward as you move to the outer layers. -
Fill in Small Blooms:
Use the small round tip to create the tiny five-petal filler flowers. Simply pipe five small dots in a circle and use a toothpick to drag the wet paste slightly toward the center. -
Add Buds and Details:
Pipe simple teardrop shapes at the ends of the thinner branches to represent closed flower buds.
Gilded Edges
Once fully dry, use a dry brush to lightly dust the tips of the petals and leaves with metallic gold wax or paint. This highlights the texture and adds a vintage elegance.
Step 4: Refining and Sealing
-
Clean Up Edges:
Check your work for any unwanted peaks or messy edges. Use a slightly damp brush to smooth out imperfections while the paste is still workable. -
Long Drying Time:
Allow the piece to dry flat in a safe, dust-free area. Because the paste is thick, this will take at least 24-48 hours. The surface may feel dry sooner, but the center needs to cure fully. -
Sanding (Optional):
If there are any incredibly sharp or jagged peaks once dry, very gently smooth them with fine-grit sandpaper, being careful not to break the delicate petals. -
Final Seal:
Finish the piece with a light coat of matte spray varnish to protect the surface from dust and yellowing over time.
Hang your finished relief art in a spot where natural side lighting will catch those beautiful ridges and cast soft shadows
Fork, Spoon, and Comb Marks for Easy Patterns
These textured clay tiles feature a rhythmic, fan-like pattern that evokes Art Deco design or natural sea shells. By using a simple household comb to impress the design into soft clay, you can create a sophisticated wall hanging or coaster set with minimal effort.
Step-by-Step Guide
Materials
- Air-dry clay (terra cotta and stone colors) or polymer clay
- Rolling pin
- Square cookie cutter (approx. 2-3 inches) or craft knife and ruler
- Wide-toothed plastic comb (or a specialized clay texture tool)
- Acrylic paints (Teal, Deep Green, Burnt Sienna, Cream)
- Matte sealant or varnish
- Sandpaper (fine grit)
- Piece of canvas or parchment paper (for rolling surface)
- Small flat paintbrush
- Palette or paper plate
Step 1: Preparation & Shaping
-
Prepare your workspace:
Lay down a piece of canvas or parchment paper to prevent your clay from sticking to the table. This also gives the back of the tiles a nice texture. -
Condition the clay:
Take a generous amount of air-dry clay and knead it in your hands until it becomes warm, pliable, and free of cracks. If you are using colored clays, you can marble them slightly or keep them solid. -
Roll out the slab:
Using your rolling pin, flatten the clay into an even slab. Aim for a thickness of about 1/4 inch to ensure durability without making the tiles too heavy. -
Cut the squares:
Use a square cookie cutter to stamp out nine identical squares. If you don’t have a cutter, use a ruler and a craft knife to measure and cut precise 2×2 or 3×3 inch squares. -
Smooth the edges:
Dip your finger in a little water and gently run it along the cut edges of each square to soften any sharp corners or clay burrs.
Step 2: Texturing the Design
-
Position the first tile:
Place one square tile in front of you. Orient it so one corner is pointing towards you (diamond orientation) if you want the fan to radiate from a corner, or square if you want it centered on a side. -
Begin the impression:
Take your wide-toothed comb. Press the tips of the comb teeth gently into the bottom center edge of the tile. -
Drag and pivot:
While maintaining pressure, drag the comb upwards and outwards in a curving motion towards the top right corner. The goal is to create sweeping lines. -
Repeat the curve:
Return the comb to the starting point at the bottom center. Create a new set of lines curving towards the top left corner. The two sets of curves should meet at the bottom to form a V shape. -
Fill the center:
Make a final impression straight up the middle to complete the fan shape. Vary the pressure: push deeper at the start and lift gently as you reach the edges to create a tapered look. -
Texture all tiles:
Repeat this combing process for all nine tiles. Don’t worry if they aren’t identical; slight variations add to the handmade charm. -
Let it dry:
Allow the tiles to dry completely according to the package instructions. This usually takes 24-48 hours. Turn them over halfway through to ensure even drying.
Clean Lines Trick
Before pressing, lightly dust your comb with cornstarch or baby powder. This acts as a release agent and prevents the clay from sticking to the teeth or dragging.
Step 3: Painting & Finishing
-
Sand imperfections:
Once fully dry, lightly sand the edges with fine-grit sandpaper to remove any roughness. -
Mix your colors:
Prepare your palette. Keep three tiles natural (or paint them a warm terracotta). Mix a light sand/cream color for the middle three, and a deep teal for the final three. -
Paint the first set:
Apply the teal paint to three of the tiles. Use a fairly dry brush technique so the paint doesn’t pool in the deep grooves of the comb marks. -
Paint the middle set:
Paint the next three tiles in the cream/sand shade. Only apply one thin coat if you want the natural clay texture to show through slightly. -
Enhance the texture:
For a weathered look, you can lightly sand the painted surface once dry. This reveals the clay color on the raised ridges while keeping the paint in the valleys. -
Seal the work:
Finish by applying a coat of matte spray varnish or sealant to protect the surface and enrich the colors without adding too much shine. -
Assemble:
Arrange your tiles in a 3×3 grid. You can glue them onto a backing board for a wall piece or add felt pads underneath to use them as individual coasters.
Grout Effect
Mount the tiles on a wooden board with small gaps between them. Fill the gaps with actual tile grout or textured paste for an authentic mosaic look.
Display your textured grid proudly and enjoy the shadow play across the ridges throughout the day
Crosshatch Textures That Feel Like Woven Fabric
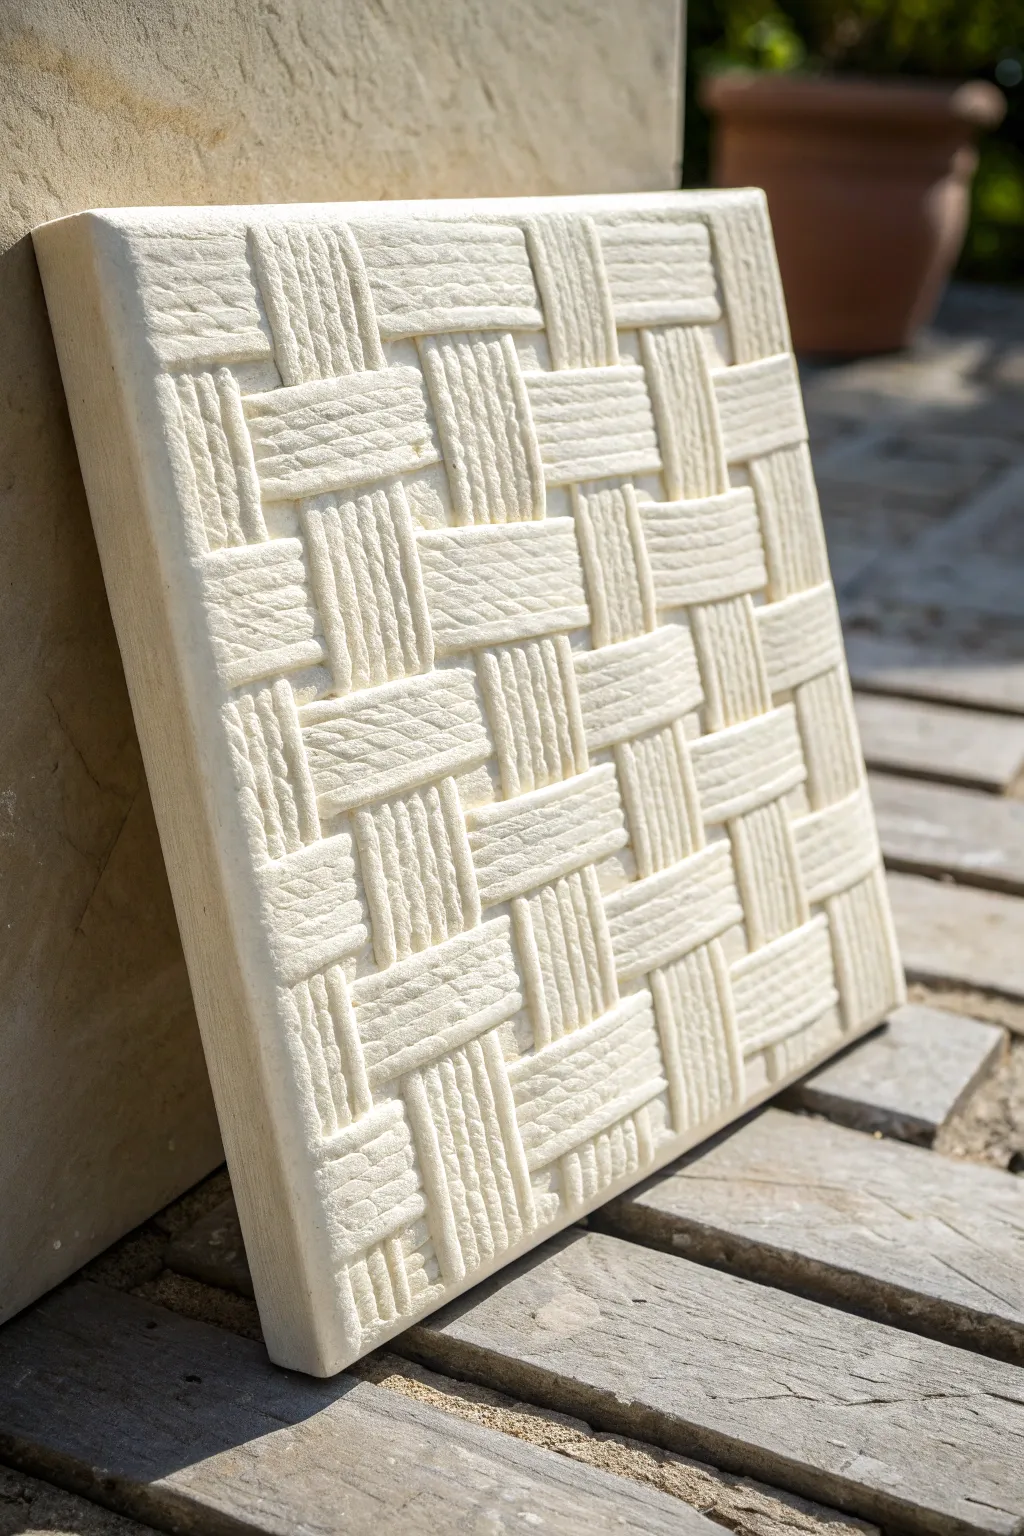
This project transforms a simple flat surface into a stunning, tactile piece of art that mimics the coarse weave of fabric frozen in stone. By carefully sculpting or molding plaster, you can achieve a sophisticated monochromatic relief that plays beautifully with light and shadow.
Step-by-Step
Materials
- Square wooden panel or canvas board (approx. 10×10 inches)
- Thick texture paste, modeling paste, or plaster of Paris
- Palette knife
- Comb texture tool or a piece of notched plastic
- Ruler
- Pencil
- Sandpaper (fine grit)
- Wide, flat paintbrush
- Off-white or cream acrylic paint (matte finish)
- Spray sealant (matte, optional)
Step 1: Preparation & Mapping
-
Prime your base:
Begin by ensuring your wooden panel or canvas board is clean and dry. If using wood, a quick coat of gesso helps seal it and provides a good grip for the heavy texture paste you’ll be applying next. -
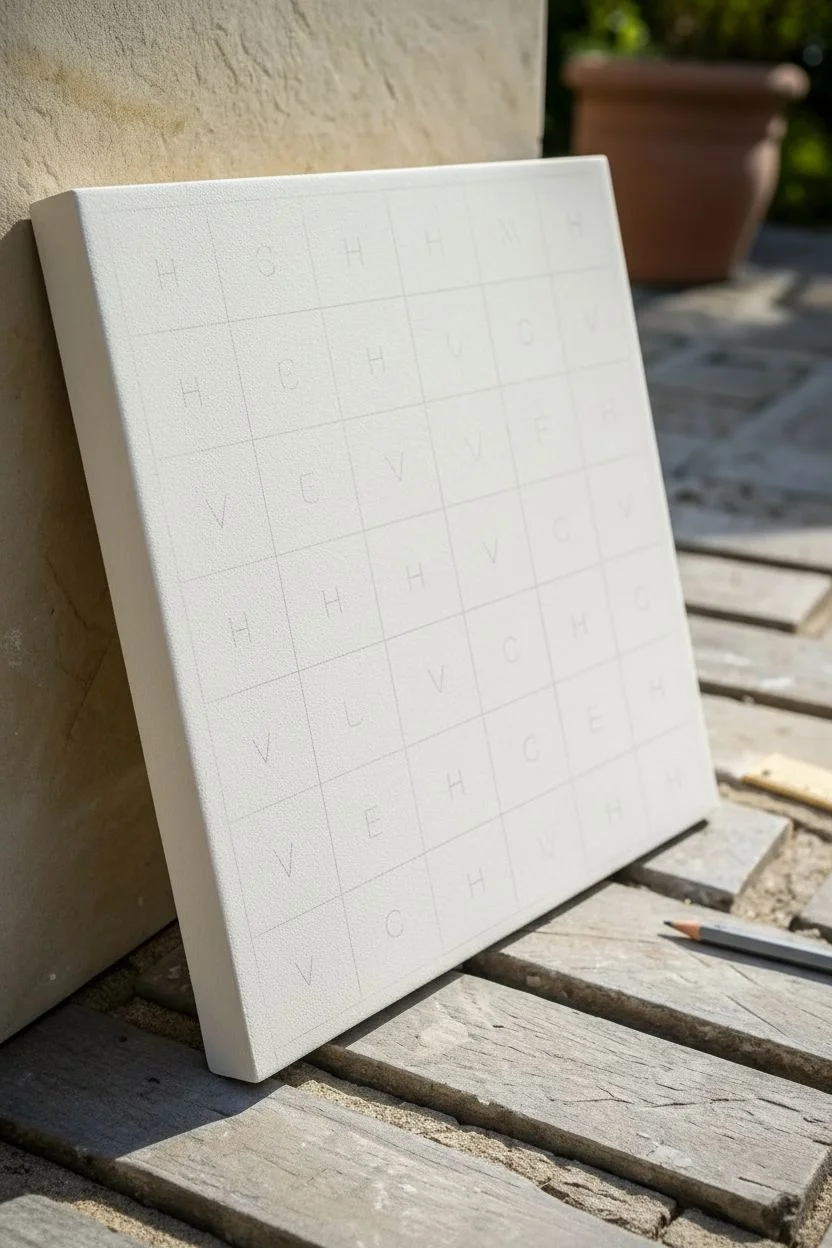
Grid layout:
Using a ruler and pencil, lightly draw a grid across the entire surface. The squares should correspond to the width of your desired ‘weave’ blocks. For the look in the photo, aim for squares that are about 1.5 to 2 inches wide. -
Mark the pattern:
Visualizing a basketweave pattern, mark alternating squares with ‘H’ for horizontal and ‘V’ for vertical. Double-check your logic: if one square is horizontal, its immediate neighbors (up, down, left, right) should be vertical.
Clean Comb Trick
Keep a damp rag or paper towel next to your workspace. Wipe your combing tool after *every single* drag. Dried bits of paste on the teeth will drag through fresh sections and ruin the clean lines.
Step 2: Sculpting the Weave
-
Apply base layer:
Apply a generous, even layer of texture paste or plaster to the first ‘vertical’ square. The layer needs to be roughly 1/4 inch thick to allow for deep texturing. -
Create combed texture:
Take your comb tool or notched spreader and drag it vertically through the wet paste. Press firmly enough to create deep grooves but not so hard that you scrape down to the raw wood. Wipe the tool clean. -
Horizontal blocks:
Move to an adjacent ‘horizontal’ square. Apply the thick paste block, then drag your comb tool horizontally from left to right. I find it helpful to slightly overlap the edge of the previous square to make the weave look tight. -
Work in sections:
Continue this process across the board, working in a checkerboard fashion. It is often easier to do all horizontal squares in one row, then switch to vertical, to minimize turning the board constantly. -
Refine edges:
As you work, use a small palette knife or a toothpick to neaten the edges where the blocks meet. The goal is to make it look like one strip of ‘fabric’ is tucking under another, so clean, sharp start-and-stop points are crucial. -
Create yarn detail:
Before the paste dries completely, you can add extra realism. Gently press the flat side of a palette knife slightly against the ridges to flatten them just a tiny bit, mimicking the way fabric threads flatten under tension. -
Side definition:
Don’t forget the sides of your panel. Extend the texture or simply smooth the paste over the edges to give the artwork a finished, slab-like appearance rather than just a topped canvas.
Step 3: Finishing Touches
-
Let it cure:
Allow the relief to dry completely. Depending on the thickness of your paste and humidity, this could take 24 to 48 hours. Don’t rush this; the center of the blocks needs to be hard. -
Soft sanding:
Once bone dry, take fine-grit sandpaper and very gently pass it over the top of the texture. You aren’t trying to remove material, just knock off any sharp peaks or jagged bits to soften the look. -
Dust removal:
Use a dry, soft brush or a vacuum attachment to thoroughly remove all sanding dust from the deep grooves. Trapped dust will ruin the paint finish. -
Base painting:
Paint the entire piece with an off-white or cream acrylic paint. Use a stiff brush to jam the paint into the deep crevices, ensuring no raw paste color shows through. -
Dry brushing:
To highlight the texture, load a brush with a slightly lighter shade of white, wipe most of it off, and lightly drag it across the very tops of the ridges. This emphasizes the ‘woven’ height. -
Seal (optional):
If you plan to display this in a humid area or outdoors (if using suitable plaster), finish with a spray of matte sealant to protect the surface from moisture and dust.
Cracking Paste?
If your thick paste cracks while drying, it likely dried too fast. Mix a tiny bit of acrylic medium into the paste next time for flexibility, or fill the cracks with a thin wash of paste and repaint.
Hang your textured masterpiece where the light can hit it from an angle to really show off the dimension
Pebble and Stone Imprints for Earthy Texture
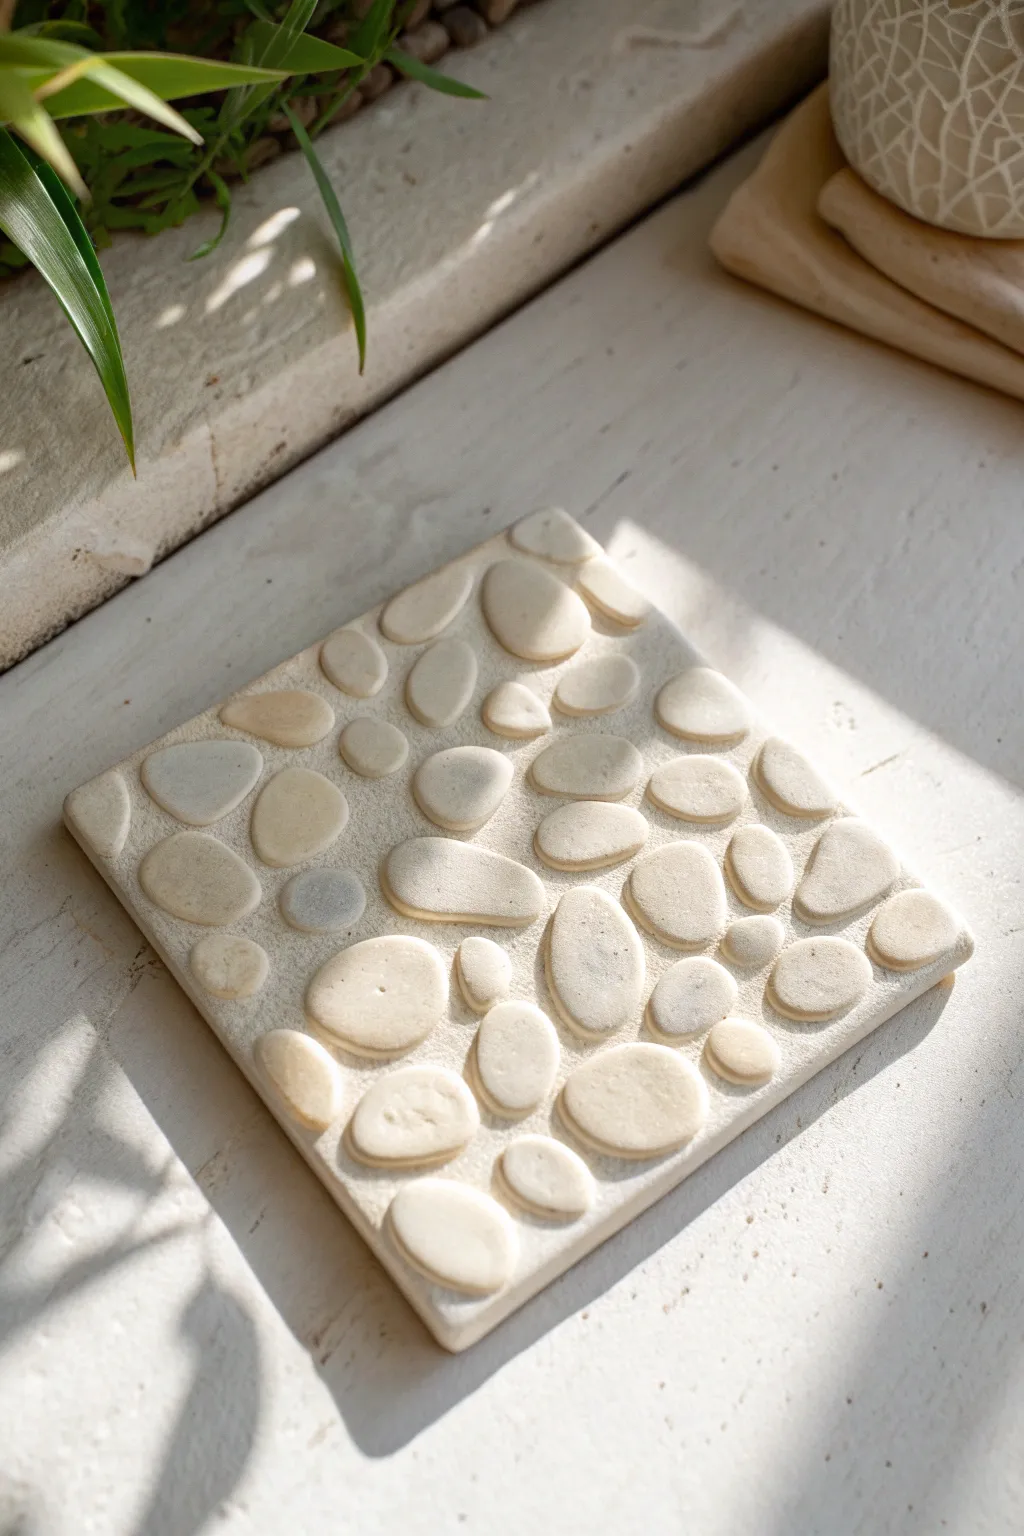
Bring the serene, tactile beauty of a riverbed into your home with this faux-stone relief project. By clever masking and texture building, you’ll create a stunningly realistic tile that looks like polished pebbles emerging from rough limestone.
Step-by-Step Guide
Materials
- Square wooden panel or ceramic tile (approx. 8×8 inches)
- White or light beige stone texture paste (or drywall compound mixed with sand)
- Smooth modeling paste (white)
- Cardstock or heavy watercolor paper
- Scissors and pencil
- Sandpaper (fine and medium grit)
- Palette knife and small spatula
- Matte acrylic varnish
- Sponge dabber or stippling brush
- Off-white acrylic paint (optional)
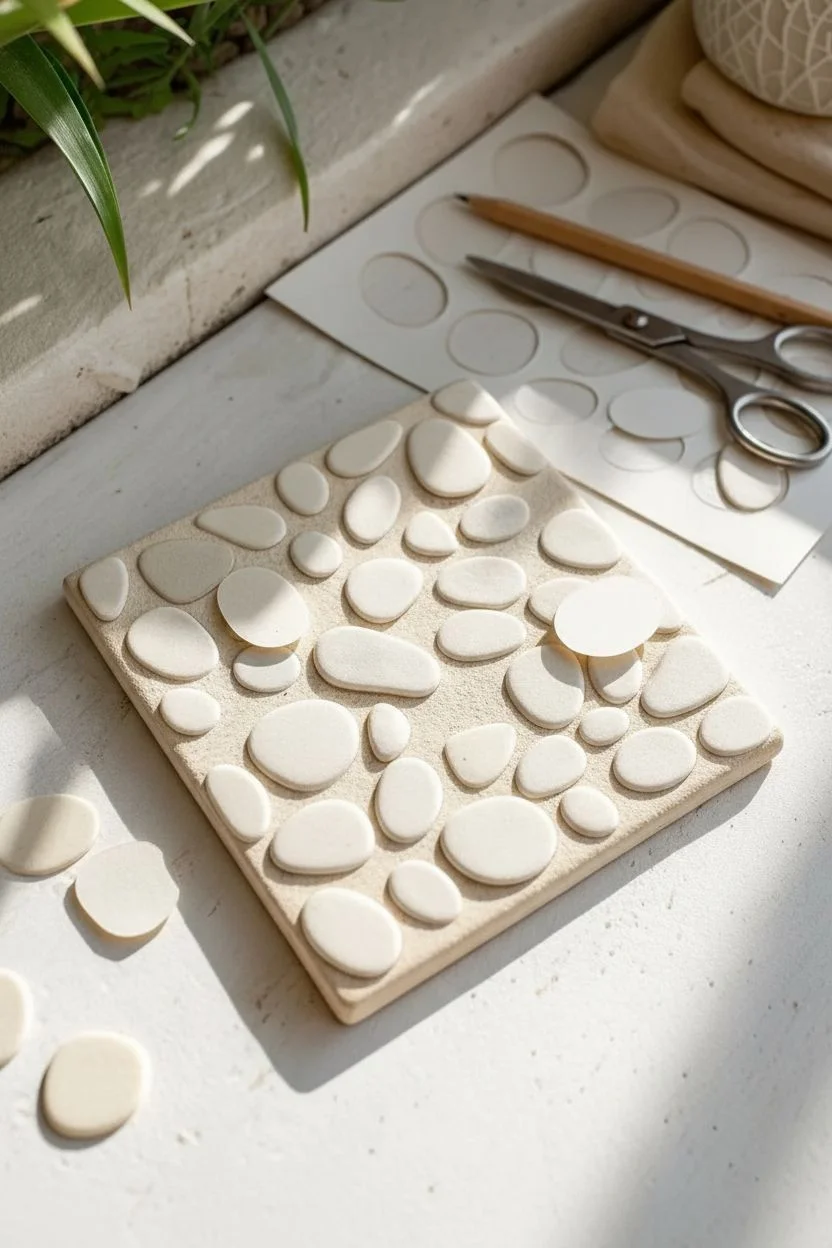
Step 1: Planning and Preparation
-
Prepare the base:
Begin with a clean, dry square base. If you are using wood, give it a quick coat of primer or gesso to ensure the pastes adhere properly and don’t soak into the grain. -
Draft your pebble shapes:
On a sheet of cardstock, sketch out various organic pebble shapes. Aim for variety—some oval, some round, and different sizes ranging from small marbles to large coins. -
Cut the stencils:
Cut out your pebble drawings carefully. You are creating a reverse stencil, so keep the paper ‘skeleton’ intact if you want a negative mold, but for this specific raised look, we actually need the cut-out paper pebble shapes themselves to act as masks. -
Arrange the composition:
Place your paper pebble cutouts onto the tile to test the layout. Leave uneven gaps between them to mimic natural stone scattering. Once satisfied, lightly trace their positions with a pencil or adhere them temporarily with a tiny dab of repositionable glue.
Step 2: Creating the Rough Texture
-
Apply the background texture:
Remove the paper pebbles for a moment. Spread a layer of your gritty stone texture paste over the entire surface of the tile, aiming for a thickness of about 3-4mm. -
Embed the masks:
While the texture paste is still wet, press your paper pebble cutouts back into their designated spots. Push them down slightly so they sit just below the surface level of the gritty paste. -
Distress the surface:
Use a sponge or a crumpled piece of plastic wrap to tap the wet texture paste around the paper masks. This creates that porous, limestone-like finish seen in the background. -
Let it cure:
Allow this base layer to dry completely. This creates the ‘grout’ or rough stone bed that the smooth pebbles will contrast against.
Clean Edges Trick
Use a slightly damp cotton swab to wipe the perimeter of each smooth pebble immediately after shaping. It acts like an eraser for any paste spillover.
Step 3: Sculpting the Pebbles
-
The pebble lift:
Find the paper cutouts embedded in the dry base. Locate these spots—they act as your guide. Now, apply a dollop of smooth modeling paste directly over where each paper mask is sitting. -
Shape the stones:
Using a small spatula or palette knife, carefully sculpt the smooth paste into domed shapes. The goal is to cover the paper cutout entirely but not let the smooth paste spill too far onto the rough background. -
Smoothing the domes:
Dip your finger in a little water and gently rub the tops of the wet modeling paste to create perfectly smooth, rounded pebble surfaces. I find this tactile step helps get the organic feel just right. -
Refine the edges:
Use a toothpick or a clay tool to clean up the edges where the smooth pebble meets the rough background, defining distinct separation. -
Dry thoroughly:
Let the raised pebbles dry completely. Thick modeling paste can take up to 24 hours to cure fully, so patience is key here.
Level Up: Fossil Inclusions
Press a small seashell or dried leaf into one of the smooth pebbles while wet, then lift it out to leave a subtle fossil impression.
Step 4: Finishing Touches
-
Sanding for contrast:
Once hard, use fine-grit sandpaper to gently polish the tops of the pebbles until they are silky smooth. -
Color unification (optional):
If your pastes were different shades of white, apply a very thin wash of off-white acrylic paint over the whole piece to unify the color while letting the texture remain key. -
Highlighting the texture:
Dry brush a tiny amount of lighter white paint over the rough background areas only. This catches the gritty peaks and enhances the contrast against the smooth stones. -
Seal the work:
Finish with a matte spray varnish to protect the surface without adding unnatural gloss, preserving the raw stone aesthetic.
Display your new textured artwork flat on a coffee table or mounted on a wall for a minimal, organic accent
Sculpted Mountain Ranges With Spackled Layers
Bring the grandeur of an alpine landscape into your home with this monochromatic texture art piece. By layering thick modeling paste or spackle, you’ll create physical depth and dramatic shadows that change with the day’s light, mimicking real mountain ridges.
Step-by-Step
Materials
- Large square wooden art panel or gallery-wrapped canvas
- Lightweight framing wood (oak or pine strips) for customs frame
- Joint compound, spackle, or heavy body modeling paste (approx. 1 gallon)
- Palette knives (assorted sizes, specifically pointed trowel shapes)
- Pencil
- Sandpaper (medium and fine grit)
- Matte white acrylic paint or gesso
- Wide flat paintbrush
- Drop cloth or plastic sheeting
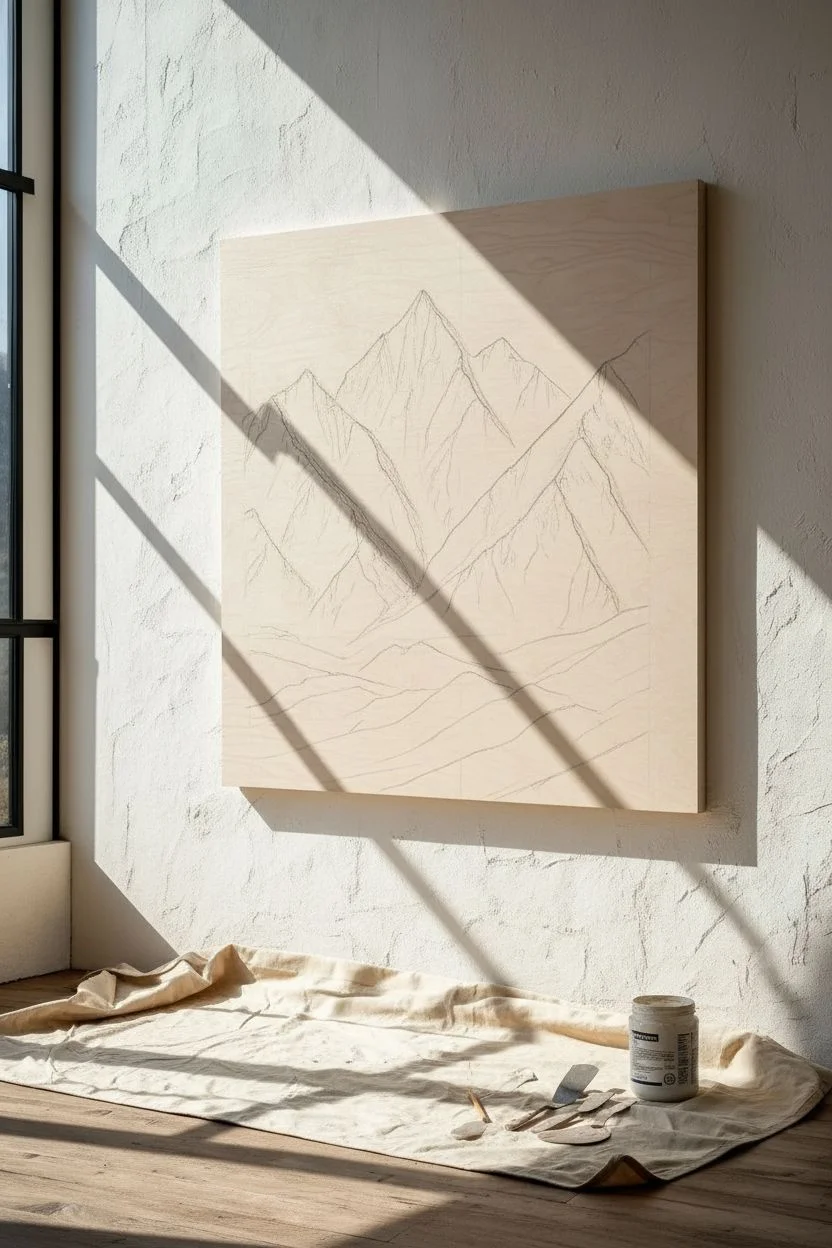
Step 1: Preparation and Mapping
-
Prepare your surface:
Lay down your drop cloth to protect your workspace from dust and paste splatter. If you are using a wooden panel, ensure it is clean and lightly sanded. If using canvas, make sure it is taut; you can slide a piece of cardboard behind the canvas fabric to provide support against the pressure of the palette knife. -
Draft the peaks:
Lightly sketch your mountain composition directly onto the surface using a pencil. You don’t need excessive detail, just the main triangular shapes for the peaks and a few flowing lines at the bottom for the foothills. Aim for an asymmetrical layout with one dominant peak slightly off-center for visual interest.
Step 2: Sculpting the Landscape
-
Apply the base layer:
Scoop out a generous amount of joint compound or modeling paste. Apply a thin, scratch-coat layer over the entire mountain shape area to give the subsequent thicker layers something to grip onto. -
Build the main ridge lines:
Using the edge of a medium-sized palette knife, apply thick lines of paste along the primary spines of your sketched mountains. I like to make these ridges about half an inch high initially, as they will serve as the backbone of the structure. -
Create the sunlit faces:
Load your palette knife and pull the paste downward from the ridge line to the right. Apply lighter pressure to leave the texture rough and jagged, simulating rocky cliffs. -
Form the shadowed valleys:
On the opposite side of your ridge lines (the left side), pull the paste down more steeply. Create deep crevasses by digging the tip of the knife in slightly. This contrast in texture creates the illusion of deep valleys. -
Add secondary peaks:
Switch to a smaller, pointed palette knife. Add smaller triangular peaks in the foreground using the same technique: build a ridge, then drag texture down both sides. Overlap these slightly over the base of the larger mountains behind them. -
Sculpt the foothills:
For the bottom third of the artwork, use broader, sweeping horizontal strokes. Instead of sharp peaks, create rolling, wave-like dunes that mimic undulating hills or scree slopes at the mountain base. -
Refine the texture:
Go back while the paste is still wet and tap the flat side of the knife against flat areas to create a ‘stucco’ texture, or use the knife edge to sharpen any ridge lines that have slumped. -
Check angles:
View your work from the side. Ensure the relief height varies—some peaks should project further out than others to create a convincing 3D effect.
Mix It Up
Mix a handful of fine sand into your joint compound before applying it. This adds an ultra-realistic gritty stone texture that catches the light beautifully.
Step 3: Finishing Touches
-
Allow to cure:
This is the most critical step. Let the artwork dry completely. Because the paste is thick, this can take 24 to 48 hours. If the paste feels cool to the touch, it is still releasing moisture and needs more time. -
Check for cracks:
Thick paste often cracks as it shrinks. Don’t worry if this happens; simply fill the cracks with a little fresh paste and smooth them over with your finger or a small tool, then let that patch dry. -
Sand for highlights:
Once fully bone-dry, take your fine-grit sandpaper and very gently sand just the very tops of the ridges and peaks. This enhances the sharpness and creates a cleaner profile against the light. -
Prime and paint:
To seal the artwork and unify the color, apply two coats of matte white acrylic paint or gesso. Use a brush rather than a roller to ensure the paint gets into all the deep crevices and textured pits. -
Frame the piece:
Measure the outer dimensions of your canvas or panel. Cut your wood strips to size with 45-degree mitered corners for a professional look, or simple butt joints for a rustic feel. -
Attach the frame:
Glue and nail the wood strips to the edges of your canvas support. The natural wood tone provides a beautiful, warm border that contrasts elegantly with the stark white texture.
Shadow Play
Install this artwork on a wall perpendicular to a window. The side-lighting is crucial for casting the deep shadows that make the relief pop.
Hang your masterpiece where the changing daylight can play across the ridges, revealing new details every hour
Metallic Dry Brush to Highlight Peaks and Valleys
Learn to create a stunning piece of dimensional wall art that mimics the organic look of natural stone or wind-swept sand. This tutorial focuses on building heavy relief texture and enhancing those peaks with a subtle, shimmering metallic finish.
Step-by-Step Guide
Materials
- Stretched canvas or wood art panel (heavy duty)
- Modeling paste or heavy structure gel
- Palette knife (large, trowel-shaped)
- Acrylic paint (cream or warm beige)
- Acrylic paint (metallic gold or champagne)
- Wide flat paintbrush (synthetic)
- Stiff bristle brush (for dry brushing)
- Drop cloth or workspace protection
Step 1: Building the Texture
-
Prepare your base:
Ensure your canvas or wood panel is clean and free of dust. If using raw wood, apply a coat of gesso first to seal it. -
Scoop the medium:
Using your large palette knife, scoop a generous amount of modeling paste. You want a thick pile on your knife, like frosting a cake. -
Apply the initial layer:
Spread the paste across the entire surface of the panel. Aim for a thickness of about 1/4 inch to ensure you have enough material to sculpt. -
Create directional flow:
Starting from the top corner, drag your palette knife downward in wavy, irregular motions. I like to twist my wrist slightly as I pull down to create distinct ridges. -
Add overlapping layers:
Don’t aim for perfection. Apply fresh dollops of paste over your first layer and drag them in slightly different directions to create intersections and valleys. -
Enhance the peaks:
Use the edge of the knife to lift the paste slightly in certain areas, creating sharper, higher ridges that will catch the light later. -
Check the edges:
Smooth the paste around the sides of the canvas or panel so the texture wraps around cleanly for a finished look. -
Allow for deep drying:
Because the paste is thick, let this dry for at least 24 hours. The center needs to be completely hard before painting.
Knife Angle Secrets
Hold the palette knife at a low, 30-degree angle for smooth sweeps. Increase the angle to nearly 90 degrees to scrape and create sharp jagged ridges.
Step 2: Painting and Highlighting
-
Apply the base coat:
Mix a warm beige or cream acrylic paint. Using a wide synthetic brush, paint the entire textured surface. -
Cover the crevices:
Be diligent about working the paint into every deep valley and crack. No white modeling paste should be visible. -
Let the base dry:
Allow the base coat to dry completely to the touch, usually about 1-2 hours depending on humidity. -
Prepare the metallic paint:
Squeeze a small amount of metallic gold or champagne paint onto a paper towel or plate. You need very little pigment for this step. -
Load the dry brush:
Dip just the tips of your stiff bristle brush into the metallic paint, then rub most of it off onto a paper towel until the brush is almost dry. -
Begin dry brushing:
Gently sweep the brush horizontally across the raised textures. The goal is to catch only the highest peaks, leaving the valleys the original base color. -
Build the shimmer gradually:
Apply the metallic highlight in several light passes rather than one heavy one. This creates a more sophisticated, natural depth. -
Highlight specific focal points:
Choose a few areas where the texture is most interesting and apply slightly more pressure to deposit extra metallic pigment there. -
Seal the artwork:
Once fully dry, apply a spray varnish (matte or satin) to protect the textured surface from dust accumulation.
Adding Grit
Mix a handful of fine play sand or coffee grounds into your modeling paste before applying it. This creates a micro-texture that grabs the metallic paint beautifully.
Hang your new textured masterpiece in a spot where natural light will dance across the metallic peaks throughout the day
Sgraffito Scratch-Back Patterns in Wet Paste

Create a sophisticated, fossil-like relief carving using the sgraffito method on wet plaster or texture paste. This project transforms a simple square base into an elegant botanical sculpture with deep, rhythmic grooves and a natural limestone finish.
Step-by-Step Tutorial
Materials
- Square wooden panel or ceramic tile (approx. 6×6 or 8×8 inches)
- Heavy body texture paste, drywall joint compound, or plaster of Paris
- Palette knife or flat trowel
- Sgraffito loop tool (small to medium size)
- Pointed stylus or toothpick
- Fine-grit sandpaper (220 grit)
- Cream or off-white matte acrylic paint
- Raw sienna or brown antiquing glaze (optional)
- Soft brush
- Spray sealant (matte finish)
Step 1: Preparation & Application
-
Prepare the substrate:
Begin with a clean, dry square base. If you are using a wooden panel, give it a quick coat of primer to prevent the wood from absorbing too much moisture from your paste layer. -
Apply the base layer:
Using a palette knife or flat trowel, spread your texture paste or joint compound across the entire surface.Aim for a consistent thickness of about 1/4 inch (6mm) to allow ample depth for carving. -
Smooth the surface:
Run the flat edge of your trowel gently over the wet paste to smooth out major ridges. It doesn’t need to be perfectly glass-smooth—a little natural texture adds to the stone effect. -
Let it firm up:
This is crucial: allow the paste to set slightly. It should be firm enough to hold a shape but soft enough to carve easily. I usually wait about 20-30 minutes depending on humidity; touch it lightly to ensure it’s not sticky but still impressionable.
Step 2: Carving the Sgraffito Design
-
Mark the center point:
Identify a focal point for your design. In the reference image, the leaves radiate from the lower right quadrant. Lightly prick this spot with a toothpick. -
Sketch the main veins:
Using a stylus or toothpick, lightly sketch the primary curved lines that will form the spines of your leaves. Draw them swirling outward from your focal point towards the corners. -
Carve the first spine:
Switch to your loop tool. Press adjacent to your sketched line and drag firmly to carve out a deep, clean channel. This darker channel acts as the negative space separating the leaves. -
Create the leaf ribs:
Starting from the central spine of a leaf, carve curved parallel lines outward to the leaf’s edge. Use steady pressure to remove strips of paste, revealing the ‘veins’ of the leaf. -
Maintain flow:
Ensure all your rib lines follow the same curve direction as the main leaf spine. This creates that cohesive, sweeping motion seen in the artwork. -
Add a spiral detail:
In the open space on the right (or your chosen focal area), carve a tight spiral or scroll shape. This decorative element breaks up the leaf pattern and adds a classical touch. -
Refine the edges:
Go back over any rough areas where the paste might have crumbled. Use a damp brush to gently smooth down jagged bits inside the carved grooves. -
Texture the flat areas:
If any large areas remain uncarved, lightly tap them with a stiff bristle brush or a piece of sponge to add a subtle pitted texture, mimicking natural stone.
Pro Tip: Moisture Control
If the paste starts drying too fast while you carve, lightly mist it with water from a spray bottle to keep it workable without making it runny.
Step 3: Finishing & Coloring
-
Full dry time:
Allow the piece to dry completely. For a thick layer like this, it is safest to leave it overnight or up to 24 hours to ensure the core is hard. -
Sanding:
Once bone dry, take your fine-grit sandpaper and very gently sand the top surface. This knocks down any sharp peaks and gives the raised areas a smooth, worn feel. -
Base coat:
Paint the entire tile with an off-white or cream matte acrylic paint. Make sure to get the paint into the deep crevices. -
Optional aging wash:
To enhance the depth, mix a tiny drop of raw sienna with water. Brush this wash over the tile and immediately wipe the surface with a cloth, leaving the darker color only in the carved grooves. -
Final seal:
Protect your relief work with a light coat of matte spray sealant. This preserves the plaster texture and prevents chipping over time.
Level Up: Metallic Touch
Once dry, dry-brush a tiny amount of gold or bronze wax onto just the highest raised ridges to catch the light and add luxury.
Display your finished relief on a small easel or mount it in a shadow box to show off the intricate play of light and shadow
Cracked Plaster Look for Vintage Drama
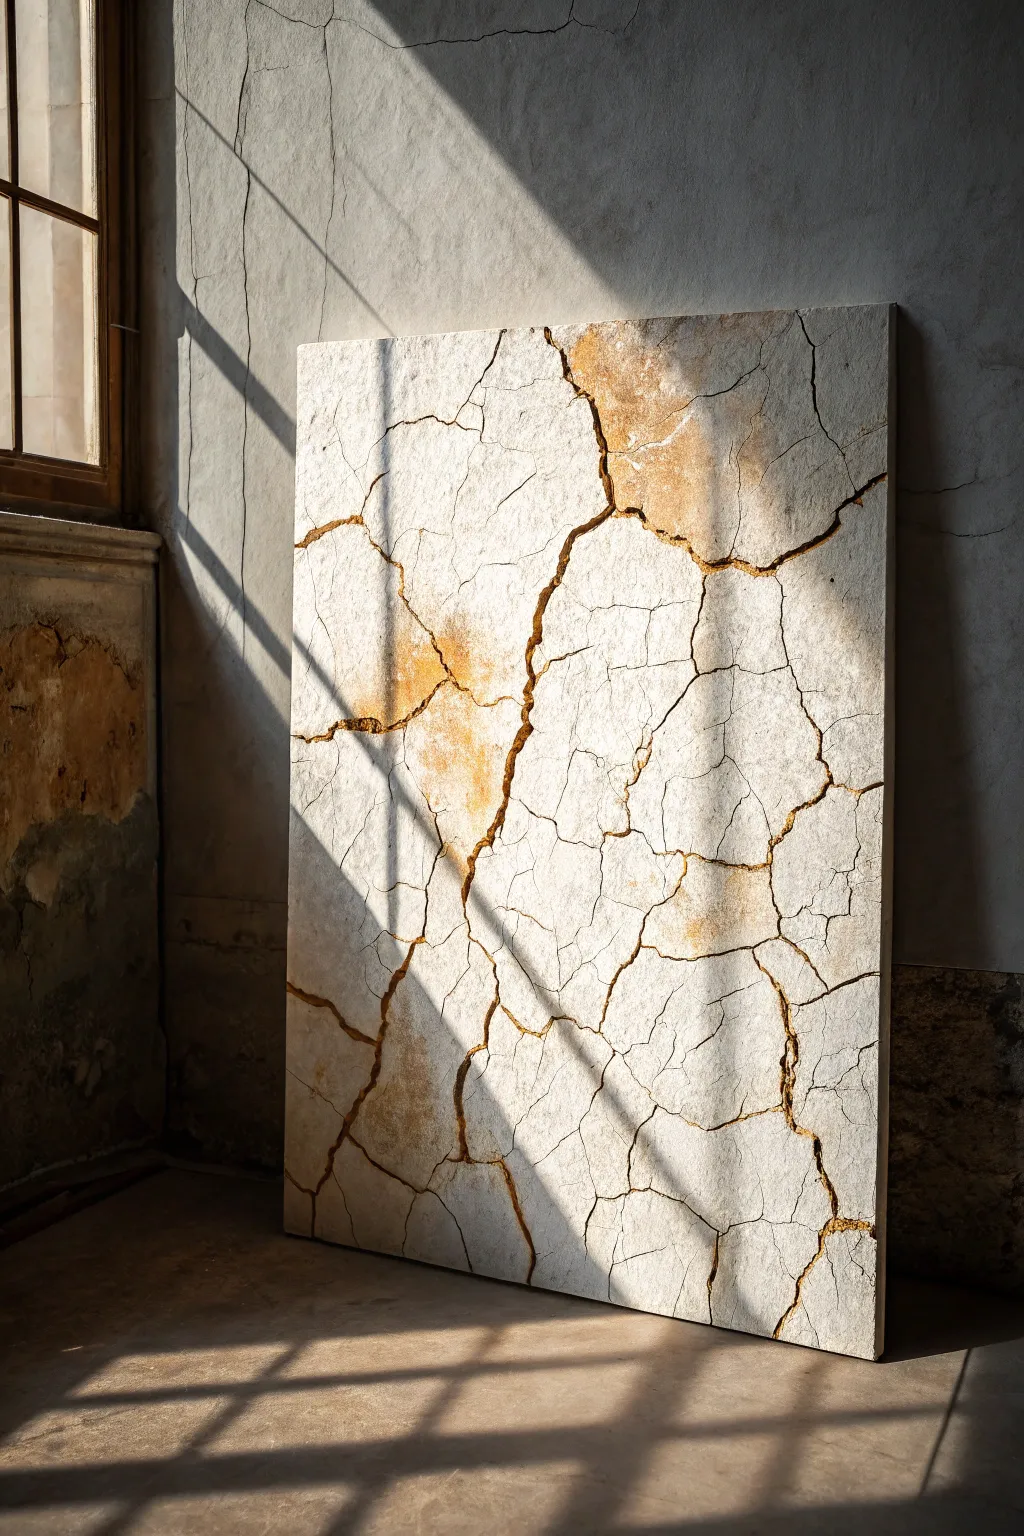
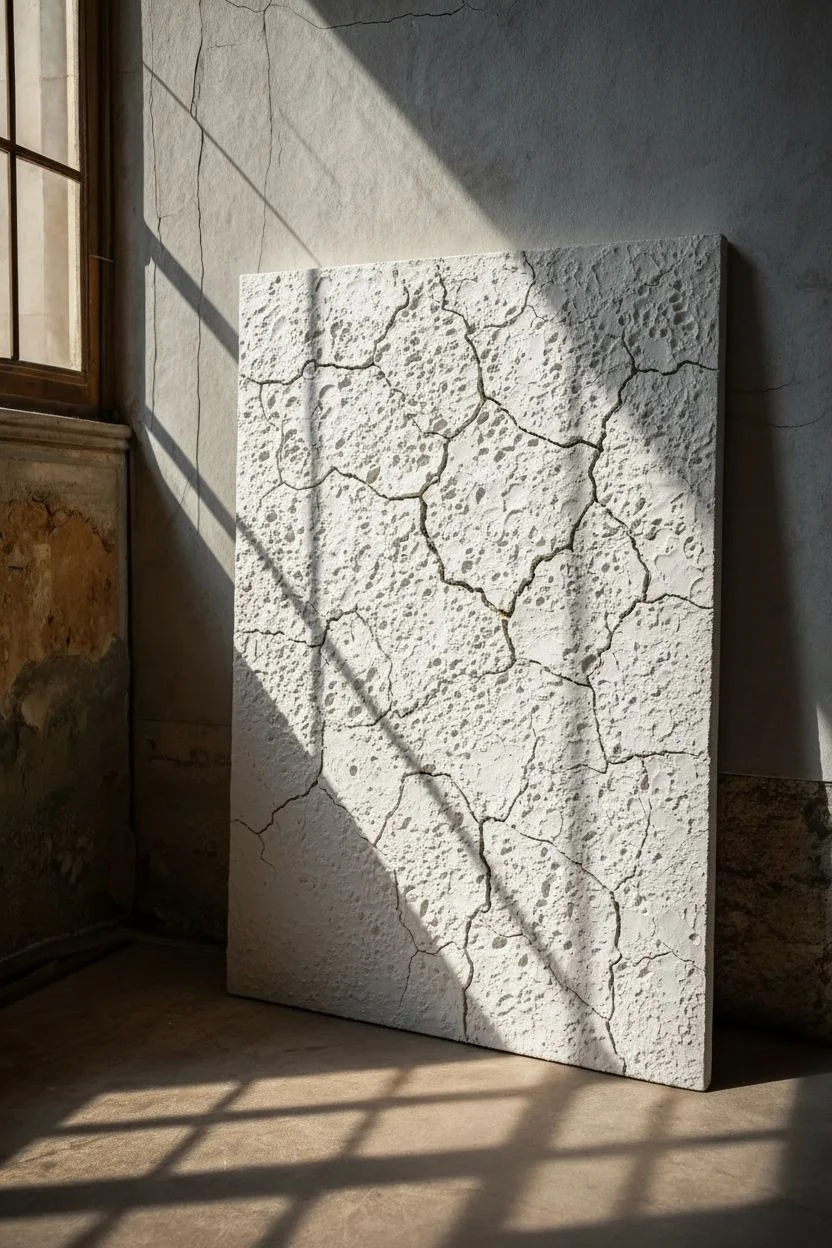
Capture the beauty of imperfection with this striking textured wall art that mimics the look of aged, cracked earth or stone. Using modeling paste and strategic layering, you will create a piece that feels ancient yet modern, featuring deep, golden-stained fissures that catch the light.
Detailed Instructions
Materials
- Large wooden panel or heavy-duty canvas (24″x36″ or larger)
- Modeling paste (heavy body) or joint compound
- Palette knives (varying sizes, especially trowel style)
- Acrylic paints (Titanium White, Unbleached Titanium, Raw Sienna, Burnt Umber)
- Gold metallic pigment powder or acrylic paint
- Matte medium or white craft glue
- Spray bottle with water
- Sea sponge or textured rag
- Small detail brushes
- Fine-grit sandpaper (optional)
- Matte varnish spray
Step 1: Building the Foundation
-
Prepare the Surface:
Ensure your wooden panel or canvas is clean and dry. If using raw wood, apply a coat of gesso to seal it and provide a good grip for the heavy texture medium. -
Apply the Base Layer:
Using a large trowel or palette knife, spread a thick, even layer of modeling paste or joint compound across the entire surface. Aim for a thickness of about 1/8 to 1/4 inch. -
Create Texture:
While the paste is still wet, gently dab the surface with a sea sponge or a crumpled rag. This eliminates smooth tool marks and gives the piece a natural, stone-like pitted texture. -
Carve Main Fissures:
Before the paste begins to set, use the edge of a palette knife to carve out your major crack lines. Make these lines jagged and irregular, varying the width as you go to simulate natural breaking points. -
add Micro-Cracks:
Using a finer tool, such as a toothpick or a small detail knife, scratch in smaller, spider-webbing cracks that branch off from the main fissures. This adds realism and scale to the piece. -
Let it Cure:
Allow the textured surface to dry completely. Since the layer is thick, I recommend leaving it for at least 24 hours to ensure the core is hard and won’t crack unintentionally.
Cracks not deep enough?
If your carved lines disappear as the paste settles, wait 20 minutes for it to firm up slightly, then re-carve the lines. The paste needs to be stiff enough to hold the shape.
Step 2: Adding Color and Depth
-
Base Color Wash:
Mix Titanium White with a touch of Unbleached Titanium and water to create a milky wash. Brush this over the entire dried surface to unify the texture and soften the stark white of the paste. -
Staining the Surface:
Dilute Raw Sienna with plenty of water. Using a sponge, dab this wash randomly around the canvas, focusing slightly more near the larger cracks. This creates the subtle, sun-baked discoloration seen in the reference image. -
Removing Excess Stain:
Immediately blot the stained areas with a clean, damp cloth. You want to lift the pigment from the high points of the texture, leaving the color settled in the varying pits and crevices. -
Darkening the Depths:
Mix a watery wash of Burnt Umber. Using a small detail brush, carefully run this dark liquid into the deepest parts of your carved cracks. Let capillary action pull the paint through the fissure lines.
Pro Tip: Warmer Tone
Mix a tiny pinch of fine sand or grout into your initial modeling paste layer. This adds physical grit and creates a more convincing calcified stone texture.
Step 3: The Golden Details
-
Prepare the Gold:
Mix your gold pigment powder with a little matte medium or varnish to create a rich, liquid gold. Alternatively, a high-quality fluid metallic acrylic works well here. -
Gilding the Cracks:
Using a fine liner brush, paint the interior edges and bottoms of the cracks with the gold mixture. Don’t worry about being perfectly neat; a little spillover onto the ‘plaster’ surface adds to the organic look. -
Highlighting Edges:
Take a fairly dry brush with a small amount of gold and lightly drag it over the rough edges immediately surrounding the major cracks. This catches the texture and mimics mineral deposits. -
Final White Dry Brush:
To bring the ‘stone’ surface forward, dip a large brush in Titanium White, wipe most of it off, and lightly dry brush over the flat areas, avoiding the cracks. This increases contrast. -
Sealing:
Once all paint is fully dry, spray the entire artwork with a matte varnish. This protects the plaster from chipping and seals the pigments without adding an artificial glossy sheen.
Hang your finished piece in a spot where the changing daylight can play across the texture, revealing different details throughout the day


Have a question or want to share your own experience? I'd love to hear from you in the comments below!