If you’re painting a toddler boy room, the sweet spot is playful enough for right now but calm and classic enough to grow with him. I like leaning on confident blue and green palettes plus a few clever paint tricks that keep the room feeling tidy even on chaotic days.
Classic Navy Blue Walls With Bright Trim
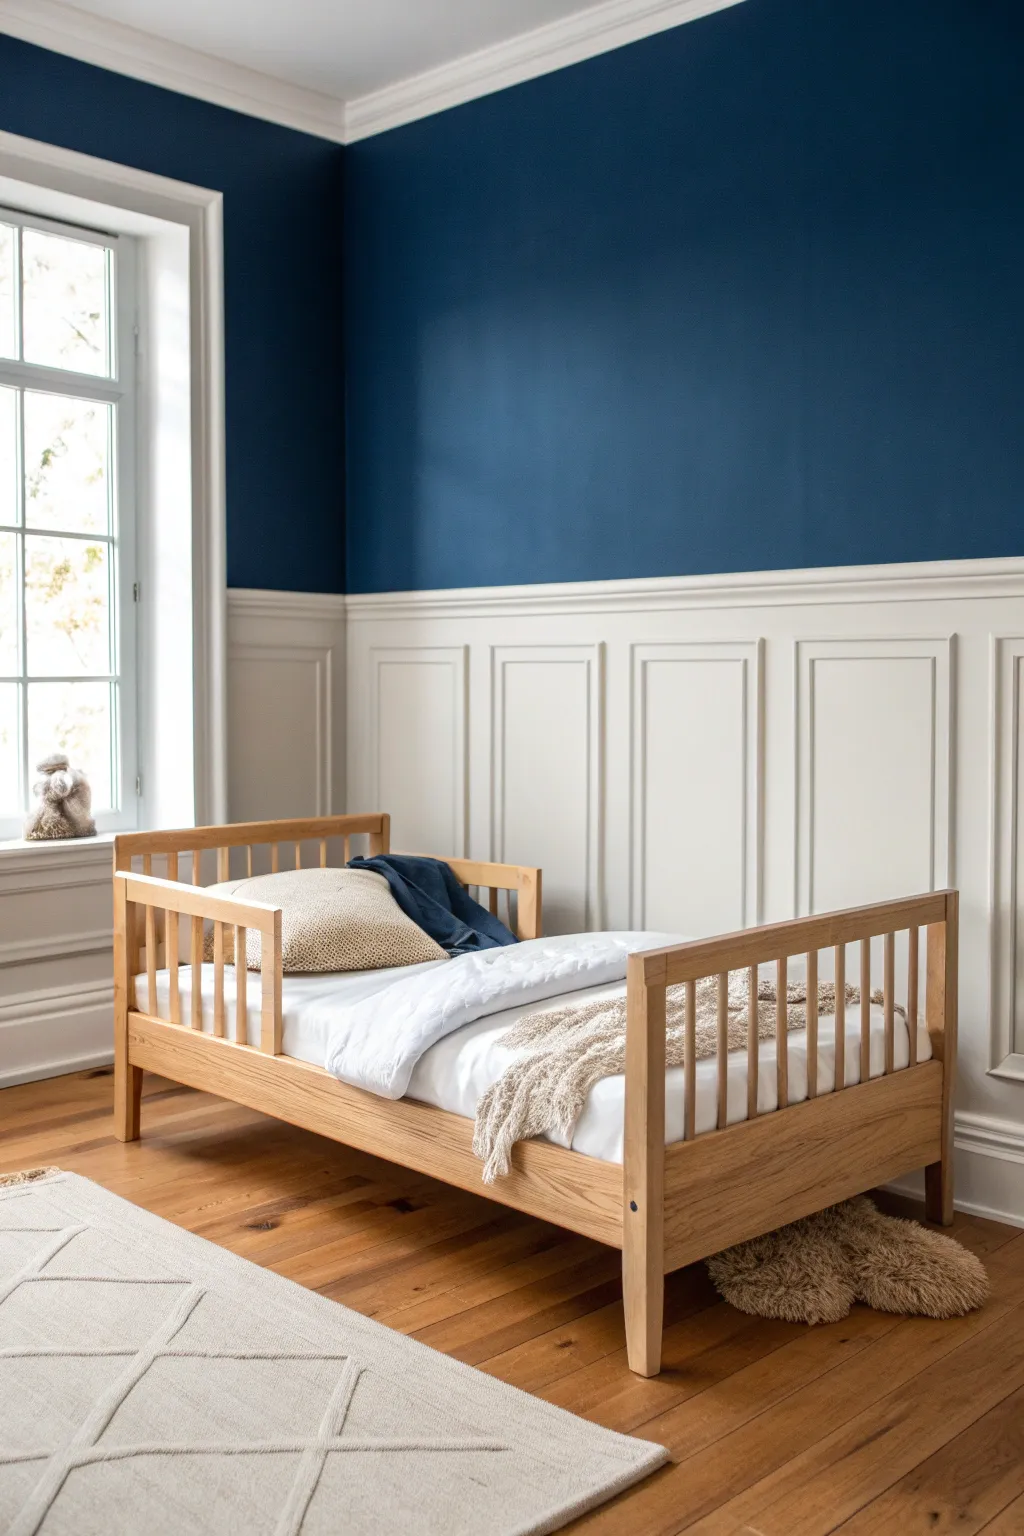
Transform a simple room into a sophisticated retreat with this classic combination of deep navy walls and crisp white wainscoting. This high-contrast look anchors the space while keeping it bright, creating a perfect backdrop that grows with your child from toddler years well into adolescence.
Step-by-Step Guide
Materials
- Interior latex paint (Deep Navy Blue, matte or eggshell finish)
- Interior trim paint (Bright White, semi-gloss or satin)
- Primer (tinted gray recommended for under navy)
- Pre-primed wainscoting panels or molding kits
- Construction adhesive (Liquid Nails)
- Brad nailer and 1-inch brad nails
- Wood filler and putty knife
- Caulk gun and paintable caulk
- Painter’s tape (high quality)
- Laser level or spirit level
- Angled sash brush (2.5 inch)
- Paint roller (3/8 inch nap)
- Drop cloths
- Fine-grit sandpaper (220 grit)
- Tape measure
- Pencil
Step 1: Preparation & Planning
-
Clear and Clean:
Remove all furniture, switch plates, and window treatments. Wipe down the walls with a damp cloth to remove dust and grime, ensuring a clean surface for adhesion. -
Determine Height:
Decide on the height of your wainscoting. A classic rule of thumb is one-third of the wall height, but for this dramatic look, bringing it up to chair-rail height (about 32-36 inches) works beautifully. -
Mark the Level Line:
Using your laser level or spirit level, draw a continuous, perfectly straight horizontal line around the entire room at your chosen height. This line will separate your navy paint from the white paneling.
Secret to Sharp Lines
When painting over tape, brush a tiny amount of the base color (white) over the tape edge first. This seals the tape so no navy bleeds underneath.
Step 2: Applying the Navy
-
Tape the Ceiling:
Apply painter’s tape carefully along the ceiling edge and around window frames that sit above your level line to protect them from the dark paint. -
Cut In Edges:
Using your angled sash brush, ‘cut in’ a 3-inch border of navy paint along the ceiling, corners, and just above your horizontal level line. I find a steady hand here saves headache later. -
Roll the Walls:
Load your roller with the navy paint. Apply in ‘W’ or ‘M’ patterns to distribute paint evenly on the upper wall section, overlapping your wet edges to avoid streaks. -
Second Coat:
Navy is a deep pigment and almost always requires two, sometimes three, coats for true richness. Allow 4 hours of drying time between coats. -
Remove Tape:
Pull the painter’s tape off while the final coat is still slightly tacky to ensure a crisp, clean line without peeling.
Elevate the Look
Paint the window trim and sills in the same semi-gloss white as the wainscoting to create a cohesive, custom millwork feel throughout the room.
Step 3: Installing Wainscoting
-
Prep Lower Walls:
While the top dries, scuff sand the lower portion of the wall lightly if it has a glossy finish to help the adhesive stick better. -
Install Baseboard:
If not already present, install your baseboard molding first. This acts as the foundation for your wainscoting panels. -
Layout Panels:
Measure the width of your walls and calculate the spacing for your vertical stiles and boxes. Uneven spacing is very noticeable, so map this out on the wall with a pencil first. -
Attach Top Rail:
Install the horizontal top rail (chair rail) right along the line where the navy paint ends. Use construction adhesive on the back and secure with brad nails into the studs. -
Install Vertical Stiles:
Cut your vertical molding pieces to fit snugly between the baseboard and the top rail. Adhere and nail them in place according to your spacing plan. -
Create Inner Boxes:
If you are using picture frame molding (as shown in the inspiration), cut 45-degree miters for the inner boxes. Glue and nail them centered within each panel section.
Step 4: finishing Touches
-
Fill Nail Holes:
Go over every piece of trim with wood filler. Press it into the nail holes, let it dry, and sand it completely flush. -
Caulk Seams:
Run a bead of paintable caulk along every seam where wood meets wall or wood meets wood. Smooth it with a wet finger for a seamless, built-in look. -
Prime the Trim:
Apply a coat of primer to all the new wood and the lower drywall sections. This is crucial for a uniform final finish. -
Paint the Wainscoting:
Using a semi-gloss or satin white paint, brush the molding profiles first, then roll the flat interior sections. Two coats will give you that durable, scrubbable finish perfect for a toddler’s room.
Step back and admire the sophisticated contrast you’ve created, ready for furniture arrangement and styling


Soft Sky Blue for a Sleepy, Calm Feel
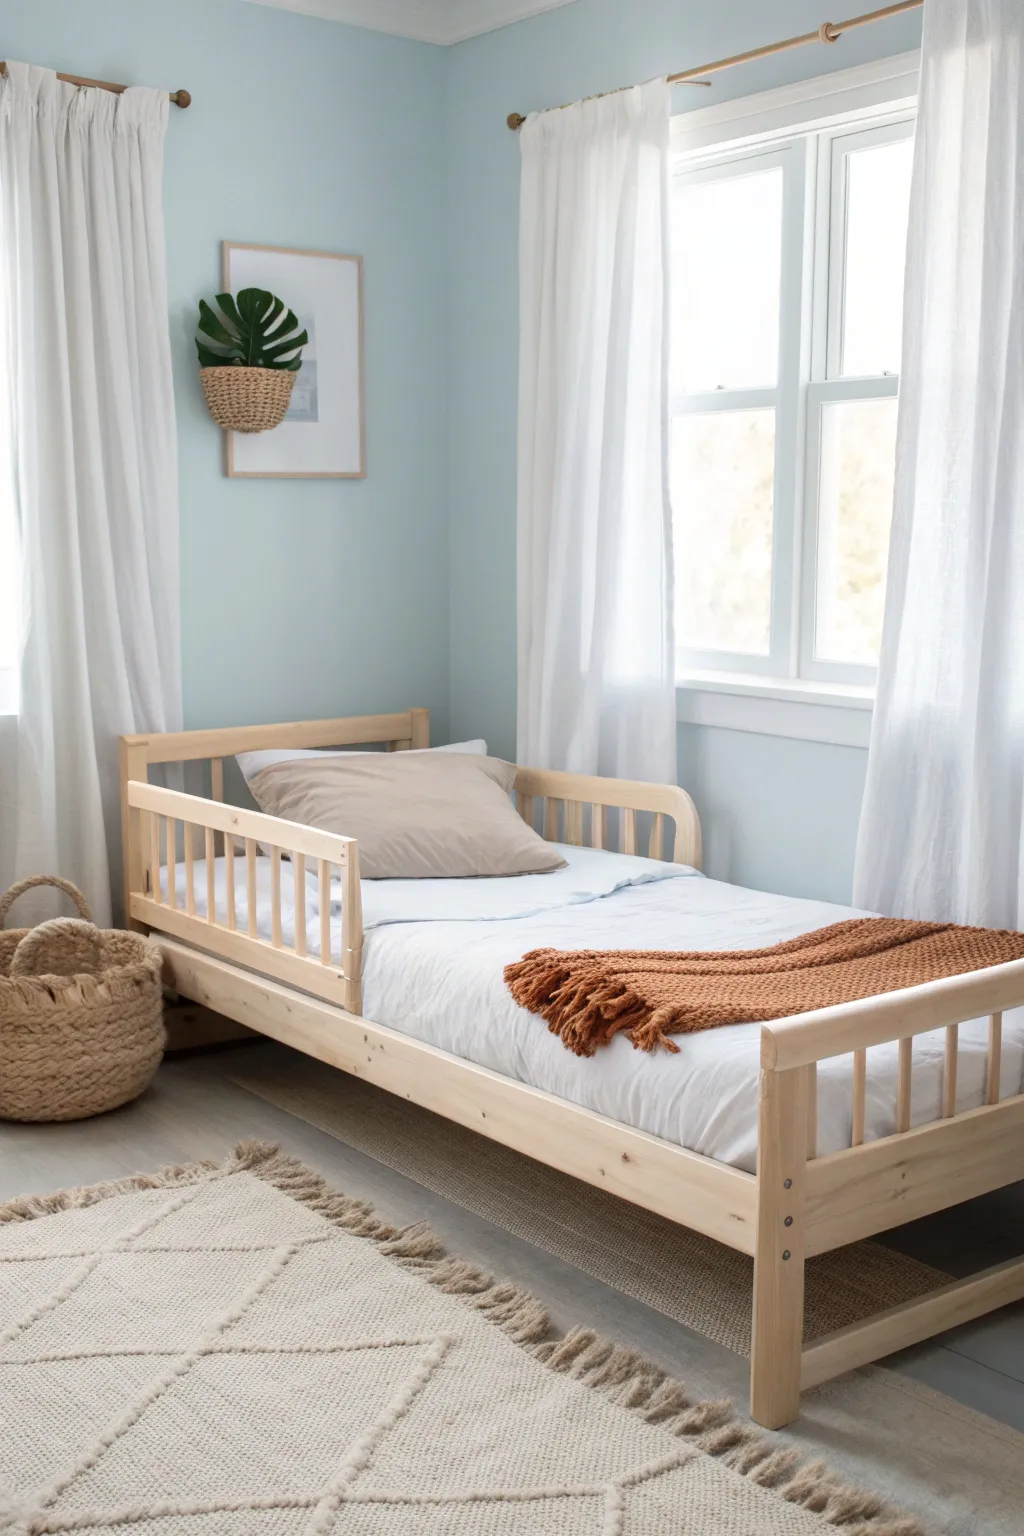
Transform a toddler’s room into a peaceful haven with this soft sky blue paint project that balances warmth and airiness. The combination of calming blue walls, natural light wood furniture, and textured neutrals creates a timeless, sleepy atmosphere perfectly suited for quiet time.
Step-by-Step Tutorial
Materials
- Interior latex wall paint (Satin or Eggshell finish, Soft Sky Blue color)
- Painter’s tape (multi-surface)
- Drop cloths or plastic sheeting
- Spackle and putty knife
- Sandpaper (fine grit, 220)
- Angled sash brush (2.5 inch)
- Paint roller frame and extension pole
- Microfiber roller covers (3/8 inch nap)
- Paint tray and liners
- Screwdriver (for removing outlet covers)
- Light wood toddler bed frame (pine or birch)
- Beige textured area rug (wool or cotton blend)
- White linen curtains
- Curtain rod hardware
- Woven wall basket or planter
- Framed artwork
Step 1: Preparation & Repairs
-
Clear and Clean:
Begin by removing all furniture and wall decor from the room to create an empty workspace. Vacuum the baseboards and wipe down the walls with a damp cloth to remove dust and grime, ensuring better paint adhesion later. -
Patch Imperfections:
Inspect the walls for any nail holes or dings. Apply a small amount of spackle with a putty knife, smoothing it over the hole. Let this dry completely before sanding it flush with the wall surface using 220-grit sandpaper. -
Protect Surfaces:
Remove all outlet covers and switch plates with a screwdriver. Apply painter’s tape carefully along the edges of the baseboards, window trim, and door frames to ensure crisp lines. Lay down drop cloths to protect your flooring.
Paint Sheen Tip
For a toddler’s room, choose an Eggshell or Satin finish. These sheens are durable and easier to wipe clean of fingerprints or crayon marks than flat paint.
Step 2: Painting the Walls
-
Cut In the Edges:
Open your can of Soft Sky Blue paint and stir thoroughly. Using the angled sash brush, ‘cut in’ a 2-3 inch border around the ceiling line, corners, baseboards, and window trim where the roller won’t reach. -
Roll the First Coat:
Pour paint into the tray and load your roller uniformly. Start painting large sections of the wall using a ‘W’ or ‘M’ motion to distribute the paint evenly, then fill in the gaps without reloading until the section is covered. -
Maintain a Wet Edge:
Work across the wall from one side to the other, maintaining a ‘wet edge’ to prevent lap marks. I find it helpful to roll vertically from top to bottom for the final pass on each section to smooth out texture. -
Apply Second Coat:
Allow the first coat to dry for at least 4 hours (or as directed by the manufacturer). Apply a second coat using the same technique to ensure full coverage and a rich, true sky blue color. -
Clean Up:
While the paint is still slightly tacky, carefully peel off the painter’s tape at a 45-degree angle to avoid pulling up any dried paint. Reattach outlet covers once the walls are fully dry.
Style Level Up
Add a dimmable warm-light floor lamp or a string of cotton ball fairy lights to create a cozy reading nook atmosphere in the evening.
Step 3: Furnishing & Styling
-
Lay the Foundation:
Once the room is dry and clean, roll out the beige textured area rug. Position it centrally or where the bed will sit to anchor the space and add warmth to the floor. -
Assemble the Bed:
Bring in the light wood toddler bed frame. Assemble it according to the manufacturer’s instructions, placing it against the main wall or in a corner to maximize play space. -
Install Window Treatments:
Mount the curtain rod hardware high above the window frame to make the ceilings appear taller. Hang the white linen curtains, ensuring they skim the floor for a polished look. -
Dress the Bed:
Make the bed with crisp white sheets and a neutral beige pillow. Add a rust or terracotta-colored throw blanket at the foot of the bed for a pop of contrasting warmth. -
Add Wall Decor:
Hang a simple wooden frame with soft artwork above the bed or on an adjacent wall. Near it, install a small woven wall planter with faux or pet-safe greenery to bring a touch of nature indoors. -
Final Touches:
Place a woven storage basket near the bed for toys or blankets. The texture of the basket should complement the rug and the wall planter, tying the natural theme together.
Step back and enjoy the tranquil atmosphere you have created for your little one’s new room


Warm Greige Base With Blue-Green Accents

Transform a plain bedroom wall into a stunning focal point by combining classic panel molding with a modern painted arch. This project creates depth and whimsy using a sophisticated palette of warm greige and muted turquoise without requiring major construction.
Detailed Instructions
Materials
- Warm greige wall paint (eggshell finish)
- Muted blue-green/turquoise paint (satin or semi-gloss finish)
- 1×3 inch wooden battens/trim boards
- Top rail molding strip
- Painter’s tape
- Laser level (highly recommended)
- Pencil and string (or a large compass)
- Small finishing nails or construction adhesive
- Wood filler
- Sandpaper (120-grit and 220-grit)
- Paint rollers (microfiber)
- Angled sash brush
- Caulk gun and paintable caulk
- Drop cloths
Step 1: Preparation & Base Coat
-
Clear and Clean:
Remove all furniture from the wall area. Clean the walls thoroughly with mild soap and water to remove any dust or grease then let them dry completely. -
Patch Imperfections:
Fill any existing nail holes or dents with spackle. Once dry, sand these spots smooth so your new paint job will look flawless. -
Apply the Base Color:
Roll two coats of the warm greige paint onto the entire wall, extending all the way from floor to ceiling. Allow full drying time between coats according to the can’s instructions.
Clean Arch Curves
If flexible tape isn’t available, cut standard blue tape into 2-inch strips. Overlap them slightly as you follow the pencil curve to keep the radius smooth.
Step 2: Creating the Arch Feature
-
Mark the Center:
Determine exactly where you want the toddler bed to sit. Mark the center point on the wall at the height where the curve of the arch should begin (usually about 4-5 feet up). -
Draw the Curve:
Use the tack-and-string method: pin a tack at your center mark, tie a string to it, and tie a pencil to the other end. Keep the string taut and draw a half-circle on the wall to create your perfect arch top. -
Extend the Sides:
Use a level (a laser level is fantastic here) to draw straight vertical lines down from the widest points of your arch to the floor. -
Outline with Tape:
Carefully apply painter’s tape along the *outside* of your pencil lines. For the curved top, use small, overlapping pieces of tape or flexible masking tape designed for curves to get a clean edge. -
Seal the Tape Edge:
I always brush a tiny amount of the base greige color over the tape edge first. This seals the tape and prevents the blue-green paint from bleeding under, ensuring a crisp line.
Step 3: Installing the Wainscoting
-
Plan the Layout:
Measure the remaining wall space on either side of the arch. Plan your vertical batten spacing so they look symmetrical. -
Cut the Wood:
Cut your 1×3 boards to length. You’ll need a long horizontal top rail that runs the wall width (interrupted by the arch) and vertical stiles. -
Attach Horizontal Rails:
Install the top horizontal markings first, aligning them with the height where your arch curve begins. Use construction adhesive and finishing nails to secure them to the studs. -
Install Vertical Battens:
Place your vertical boards perpendicular to the floorboards. Use your level constantly to ensure they are perfectly upright before nailing them into place. -
Fill and Sand:
Fill all nail holes and the seams where wood meets wood with wood filler. Once dry, sand everything smooth with 220-grit sandpaper. -
Caulk the Seams:
Run a thin bead of printable caulk along every edge where the wood meets the drywall. Smooth it with a wet finger. This step is crucial for making the woodwork look built-in rather than stuck-on.
Add a Picture Ledge
Make the space functional by mounting a shallow wooden picture ledge inside the arch or just above the wainscoting line to display books or artwork.
Step 4: Painting the Accent
-
Cut In the Edges:
Using your angled sash brush and the blue-green paint, carefully cut in around the intricate edges of the molding and the taped outline of the arch. -
Paint the Inset:
Paint the interior of the arch shape first. Since this is flat wall, a small roller works best here for a smooth texture. -
Paint the Woodwork:
Paint the wainscoting panels and trim boards with the blue-green color. A satin or semi-gloss finish is great here as it’s more durable against toddler scuffs. -
Second Coat:
Apply a second coat to all blue-green areas to ensure rich, opaque coverage. -
The Reveal:
While the paint is still slightly tacky (not fully dry), slowly peel off the painter’s tape pulled back at a 45-degree angle to reveal your crisp arch line.
Step back and admire how this architectural paint trick completely changes the character of the room


Two-Tone Color Blocking to Hide Scuffs
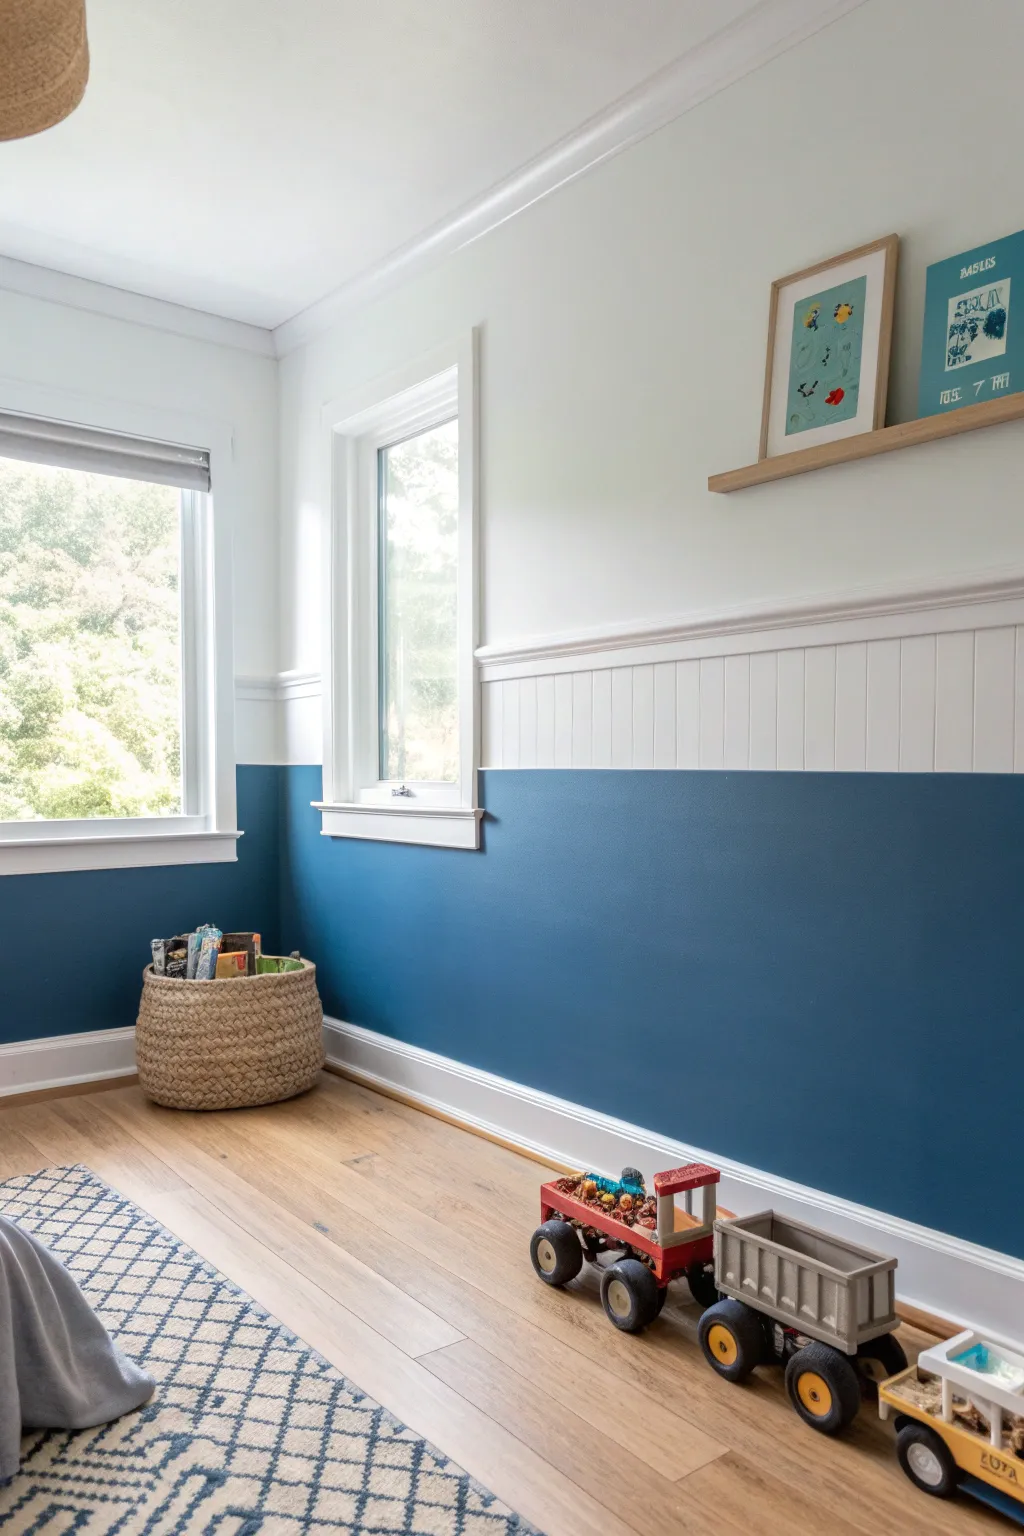
This project transforms a plain room into a durable, stylish space by combining a deep teal lower wall with crisp white wainscoting and molding. It’s the perfect way to hide those inevitable toddler scuffs while keeping the room bright and airy.
How-To Guide
Materials
- Interior paint: Deep teal/blue (semi-gloss or satin finish)
- Interior paint: Bright white (eggshell or satin finish)
- Beadboard paneling sheets or beadboard wallpaper
- Chair rail molding
- Baseboard molding (white)
- Painter’s tape (high quality)
- Spackle or wood filler
- Caulk and caulk gun
- Paint rollers (medium nap) and extension pole
- Angled sash brush (2-inch)
- Drop cloths
- Sandpaper (fine grit)
- Level and pencil
- Construction adhesive (if installing panels)
- Brad nailer and nails (optional, for molding)
Step 1: Preparation & Planning
-
Measure and mark:
Begin by determining the height for your color split. A standard chair rail height is usually between 32 and 36 inches from the floor, but you can go higher for a more dramatic look. Use a tape measure and mark this height at several points along the walls. -
Draw a level line:
Using a long level or a laser level, connect your marks to create a continuous, straight horizontal line around the entire room. This line will guide where your colors meet and where your molding will sit. -
Prep the surface:
Remove any outlet covers and existing baseboards if you plan to replace them. Patch any holes with spackle, sand them smooth once dry, and wipe down the walls with a damp cloth to remove dust.
Clean Lines Secret
To avoid paint bleeding, always remove the tape while the paint is still damp. Pulling it off dry can sometimes chip your fresh coat.
Step 2: Painting the Upper Wall
-
Cut in the edges:
Start with your bright white paint. Using your angled sash brush, carefully paint along the ceiling line, corners, and around window frames that sit in the upper section. -
Roll the top section:
Use a roller to paint the upper portion of the wall. Bring the white paint down slightly past your pencil line—no need to be perfect here, as the lower color and molding will cover the transition. -
Apply a second coat:
Allow the first coat to dry completely according to the can’s instructions, then apply a second coat for a crisp, opaque finish.
Uneven Floor Fix
If your floors aren’t level, baseboards might show gaps. Use a ‘shoe molding’ or quarter-round at the bottom of the baseboard to hide these discrepancies easily.
Step 3: Creating the Lower Section
-
Install beadboard (Optional):
If you are achieving the texture shown in the upper section of the wainscoting look, measure and cut your beadboard panels to fit between your pencil line and the floor. Adhere them to the wall using construction adhesive and secure with brad nails. I find this step really adds that classic cottage character. -
Tape the transition line:
Apply painter’s tape firmly along your level pencil line (or just above the beadboard if you installed it). Press the edge of the tape down firmly with a putty knife to prevent bleed-through. -
Seal the tape:
Paint a very thin layer of the *white* paint (the base color) over the edge of the tape. This trick seals the tape edge so any paint that bleeds under is the same color as the top wall, ensuring a razor-sharp line later. -
Cut in the dark color:
Once the seal is dry, dip your angled brush into the deep teal paint. Cut in along the tape line, corners, and around the baseboards or floor line. -
Roll the bold color:
Using a fresh roller cover, apply the deep teal paint to the lower section of the wall. Move in ‘W’ patterns to distribute paint evenly, then smooth it out with vertical strokes. -
Second coat and tape removal:
Apply a second coat of teal for rich, true color coverage. While the paint is still slightly tacky (not fully dried), carefully peel off the painter’s tape at a 45-degree angle to reveal your clean line.
Step 4: Finishing Touches
-
Install the chair rail:
Measure and cut your chair rail molding to fit the length of each wall. Install it directly over the color transition line using a brad nailer. This hides the paint seam and adds architectural interest. -
Paint the molding:
If your molding wasn’t pre-painted, paint it now. I usually paint the chair rail white to match the upper wall, which creates a cohesive frame for the wainscoting effect. -
Caulk gaps:
Run a thin bead of finish caulk along the top and bottom of the chair rail and baseboards to fill any gaps between the molding and the wall. smooth it with a wet finger. -
Touch up:
Do a final inspection. Use a small artist’s brush to touch up any spots on the molding or walls where the paint might have slipped.
Now you have a durable, scuff-resistant room that looks professionally designed and is ready for playtime.
BRUSH GUIDE
The Right Brush for Every Stroke
From clean lines to bold texture — master brush choice, stroke control, and essential techniques.
Explore the Full Guide
Simple Stripes in Classic Boy Colors
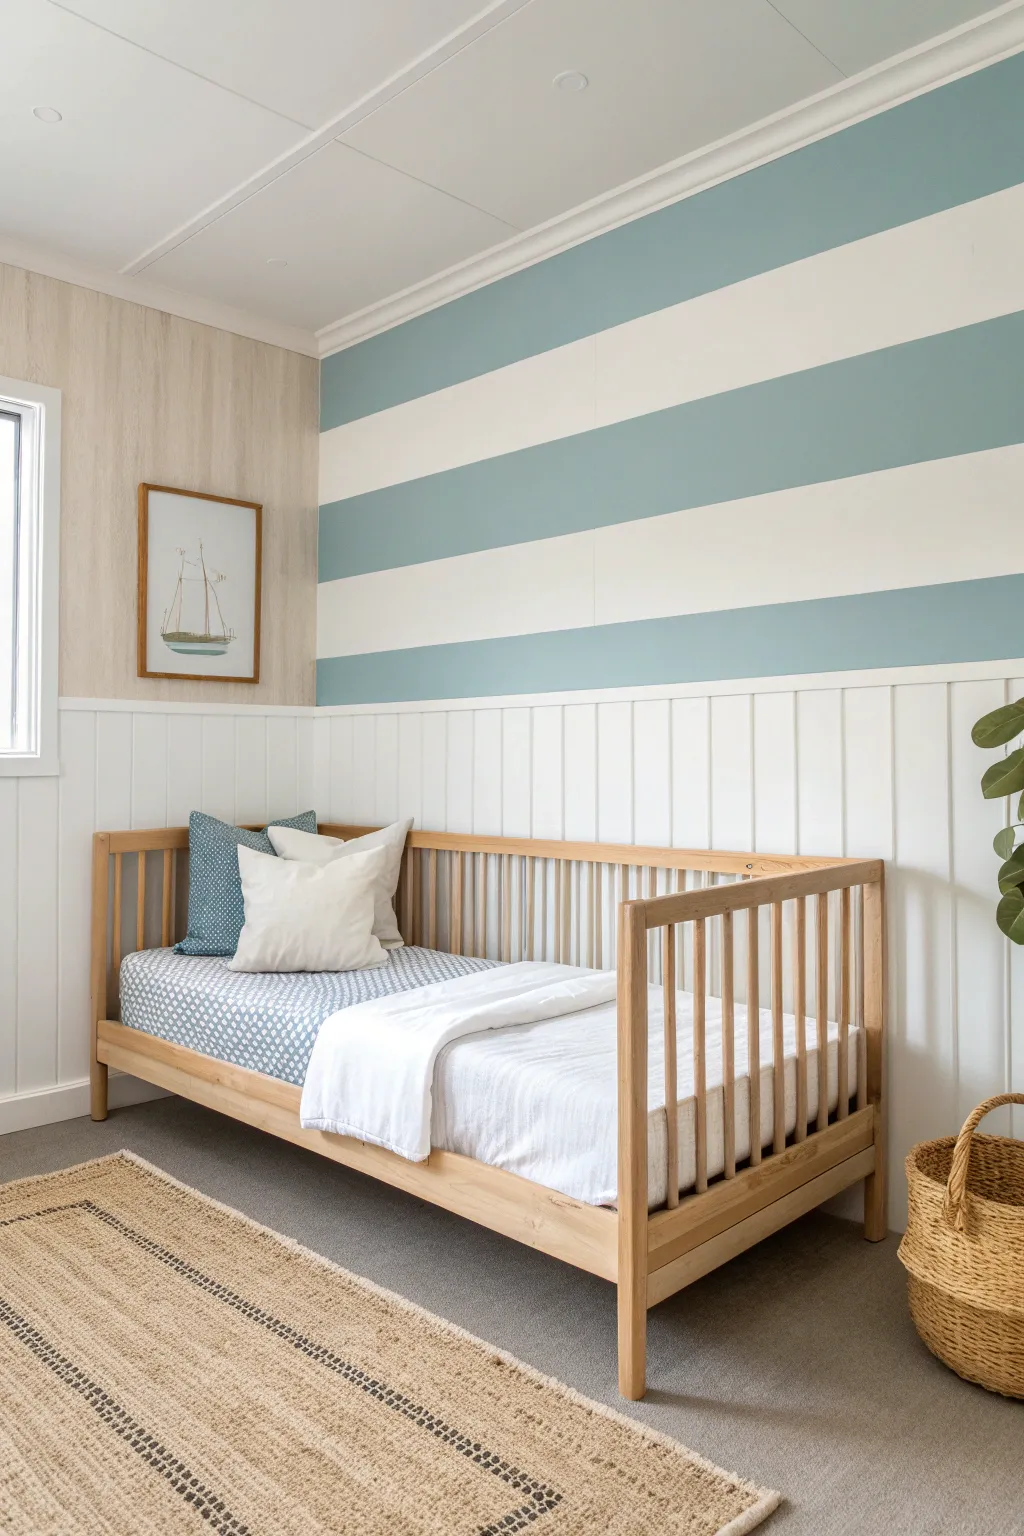
Transform a plain bedroom into a seaside retreat with this classic wide-stripe wall treatment. Combining crisp beadboard wainscoting with bold horizontal stripes creates a timeless, airy look perfect for a growing toddler’s space.
Step-by-Step
Materials
- Interior latex paint (Eggshell finish, White)
- Interior latex paint (Eggshell finish, Muted Teal/Blue-Grey)
- Beadboard paneling sheets or individual planks
- Chair rail molding
- Baseboard molding
- Construction adhesive
- Brad nailer and 1-1/2 inch nails
- Painter’s tape (high quality)
- Laser level or traditional level
- Pencil
- Measuring tape
- Paint roller (3/8 nap) and extension pole
- Angled sash brush (2 inch)
- Wood filler
- Caulk and caulk gun
- Fine-grit sandpaper
Step 1: Prepping and Wainscoting
-
Clear and clean:
Begin by removing all furniture from the wall area. Clean the walls thoroughly with mild soap and water to remove dust, and patch any existing holes with spackling compound, sanding smooth once dry. -
Measure wainscoting height:
Determine the desired height for your beadboard wainscoting. A standard height is often around 32-36 inches from the floor, roughly one-third of the wall height. Mark a level line across the wall at this height. -
Install beadboard panels:
Apply construction adhesive to the back of your beadboard sheets. Press them firmly onto the lower portion of the wall, aligning the top edge with your level line. Secure them in place using a brad nailer, focusing on studs where possible. -
Add baseboards:
Cut your baseboard molding to fit the length of the wall. Nail it along the bottom edge of the beadboard to create a finished look against the floor. -
Install chair rail:
Measure and cut the chair rail molding to rest on top of the beadboard. Secure it with brad nails, covering the raw top edge of the paneling. -
Fill and caulk:
Use wood filler to cover all nail holes in the beadboard and trim. Apply a bead of paintable caulk along the top of the chair rail (where it meets the drywall) and in corners for a seamless finish. Let everything dry completely.
Tape Like a Pro
For super sharp lines, run a credit card or putty knife firmly over the edge of the painter’s tape before you start painting to ensure a tight seal.
Step 2: Painting the Base and Stripes
-
Paint the wainscoting:
Apply two coats of white trim paint to the beadboard, baseboards, and chair rail. Allow sufficient drying time between coats as per the paint manufacturer’s instructions. -
Paint the upper wall base:
Roll two coats of your white base color onto the entire upper wall section above the chair rail. This will serve as the color for the lighter stripes. Let this cure for at least 24 hours to ensure the tape won’t peel it off later. -
Calculate stripe width:
Measure the remaining vertical space from the top of the chair rail to the ceiling. Divide this number by the desired number of stripes (usually 3 or 5 for best visual balance) to find the exact width of each stripe. -
Mark the lines:
Using a measuring tape and pencil, make small tick marks up the wall at your calculated intervals. I find using a laser level here saves a massive amount of time compared to a standard spirit level. -
Apply painter’s tape:
Apply painter’s tape horizontally across the wall, aligning the *outside* edge of the tape with your pencil lines. Remember to place the tape over the sections that will remain *white* so you are painting the alternating spaces. -
Seal the tape edges:
To prevent bleeding, lightly brush a small amount of the *base white paint* over the edges of the tape. This seals the gap; if any paint bleeds under, it will be white on white. -
Paint the colored stripes:
Once the seal is dry, use your roller to apply the muted teal color between the taped areas. Use a ‘W’ motion for even coverage. Avoid overloading the roller to prevent drips. -
Apply second coat:
Let the first coat set up (check can for recoat times) and apply a second coat of the teal color for a rich, solid finish. -
Remove tape:
Carefully peel off the painter’s tape while the final coat is still slightly tacky—pulling slowly at a 45-degree angle away from the painted edge usually gives the crispest line.
Uneven Ceiling Line?
Ceilings are rarely perfectly straight. If your top stripe looks crooked, paint the ceiling down 1/4 inch onto the wall, then tape slightly below the corner.
Step back and admire how these fresh, wide stripes instantly make the room feel larger and more tailored
Painter’s Tape Triangles for Playful Geometry
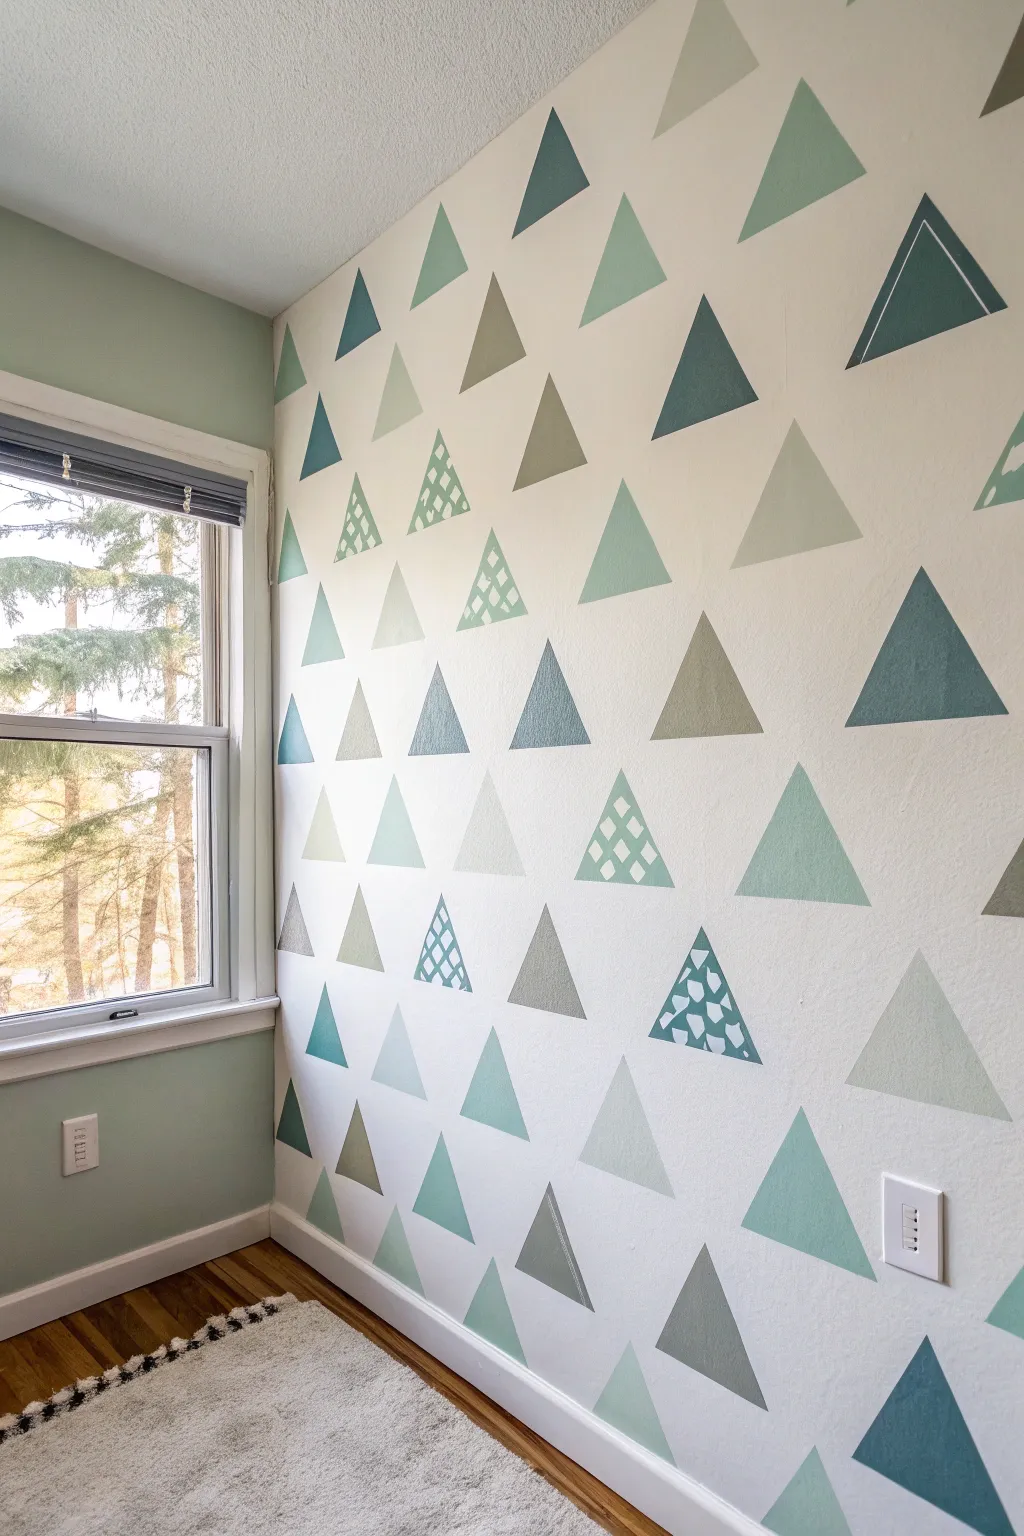
Transform a plain white wall into a modern, adventurous focal point using nothing but painter’s tape and a few sample pots of paint. This geometric design mixes solid shapes with subtle patterns to create depth and visual interest perfect for a growing toddler’s room.
Step-by-Step Tutorial
Materials
- Wide painter’s tape (1.5 or 2 inch)
- Small craft paintbrushes (angled and flat)
- Small foam roller
- Paint tray
- Pencil
- Ruler or straight edge
- Base wall paint (usually white or off-white)
- 3-5 shades of coordinating paint (sage green, teal, grey, navy)
- Drop cloth
- Damp rag for cleanup
Step 1: Planning and Preparation
-
Prepare the workspace:
Clear the area in front of the wall and lay down a drop cloth to protect your flooring from accidental drips. -
Clean the surface:
Wipe down the wall with a damp cloth to remove any dust or grime, ensuring the tape will adhere perfectly. -
Visualize the layout:
Before taping, step back and envision a random scatter of triangles. You want an organic flow rather than strict rows, with slightly more density near the middle and bottom.
Bleed-Proof Lines
Always paint a layer of the *background* wall color over the tape edges first. This seals the gap, ensuring your colored triangle lines remain razor-sharp.
Step 2: Taping the Shapes
-
Create the first triangle:
Tear off three strips of painter’s tape. Place them on the wall to form a triangle, crossing the ends over each other at the corners to ensure sharp points. -
Vary the sizes:
Continue creating triangles across the wall. I like to make most of them roughly the same size (about 6-8 inches tall) but include a few slightly larger or smaller ones for variety. -
Seal the edges:
Run your credit card or a firm finger over every edge of the tape. This is crucial to prevent paint from bleeding under the tape and ruining your crisp lines. -
Seal with base color:
Brush a light coat of your existing wall color (the white background color) over the edges of the tape. This creates a barrier so that if any paint bleeds, it matches the wall and remains invisible.
Glow-in-the-Dark
Mix a clear glow-in-the-dark glaze with one of your lighter paint colors. The triangles will look normal by day but create a magical starry effect at night.
Step 3: Painting the Solids
-
Assign your colors:
Mark each taped triangle with a small dot of the color you plan to paint it. This helps you balance the color distribution before you commit. -
Paint the first coat:
Using a small foam roller or brush, fill in the solid triangles. Work one color at a time to minimize washing brushes. -
Apply second coat:
Once the first coat is dry to the touch, apply a second coat for rich, opaque coverage, especially for darker teal or navy shades.
Step 4: Adding Patterns & Details
-
Create the ‘outline’ triangle:
For the hollow triangle style, paint the solid shape first. Once dry, place a smaller triangle of tape inside the painted one, then paint the center back to white. -
Paint the grid patterns:
For patterned triangles, paint the base color first (e.g., white or light grey). Once dry, apply thin strips of tape (or cut standard tape in half lengthwise) in a crisscross pattern and paint over them with a contrasting color. -
Add freehand textures:
For the terrazzo or dot-style triangles, paint the base triangle solid white or light grey first. Use a small detail brush to hand-paint irregular geometric chunks in a darker teal.
Step 5: The Reveal
-
Remove tape carefully:
While the final coat is still slightly tacky (not fully cured), slowly peel back the tape at a 45-degree angle. This prevents the dried paint from peeling off with the tape. -
Touch up edges:
Inspect your triangles for any bleed-through. Use a tiny artist’s brush and your background wall color to erase any imperfections.
Step back and enjoy the playful, custom look you’ve created for the room

PENCIL GUIDE
Understanding Pencil Grades from H to B
From first sketch to finished drawing — learn pencil grades, line control, and shading techniques.
Explore the Full Guide
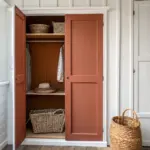
Color-Pop Painted Door or Closet Front
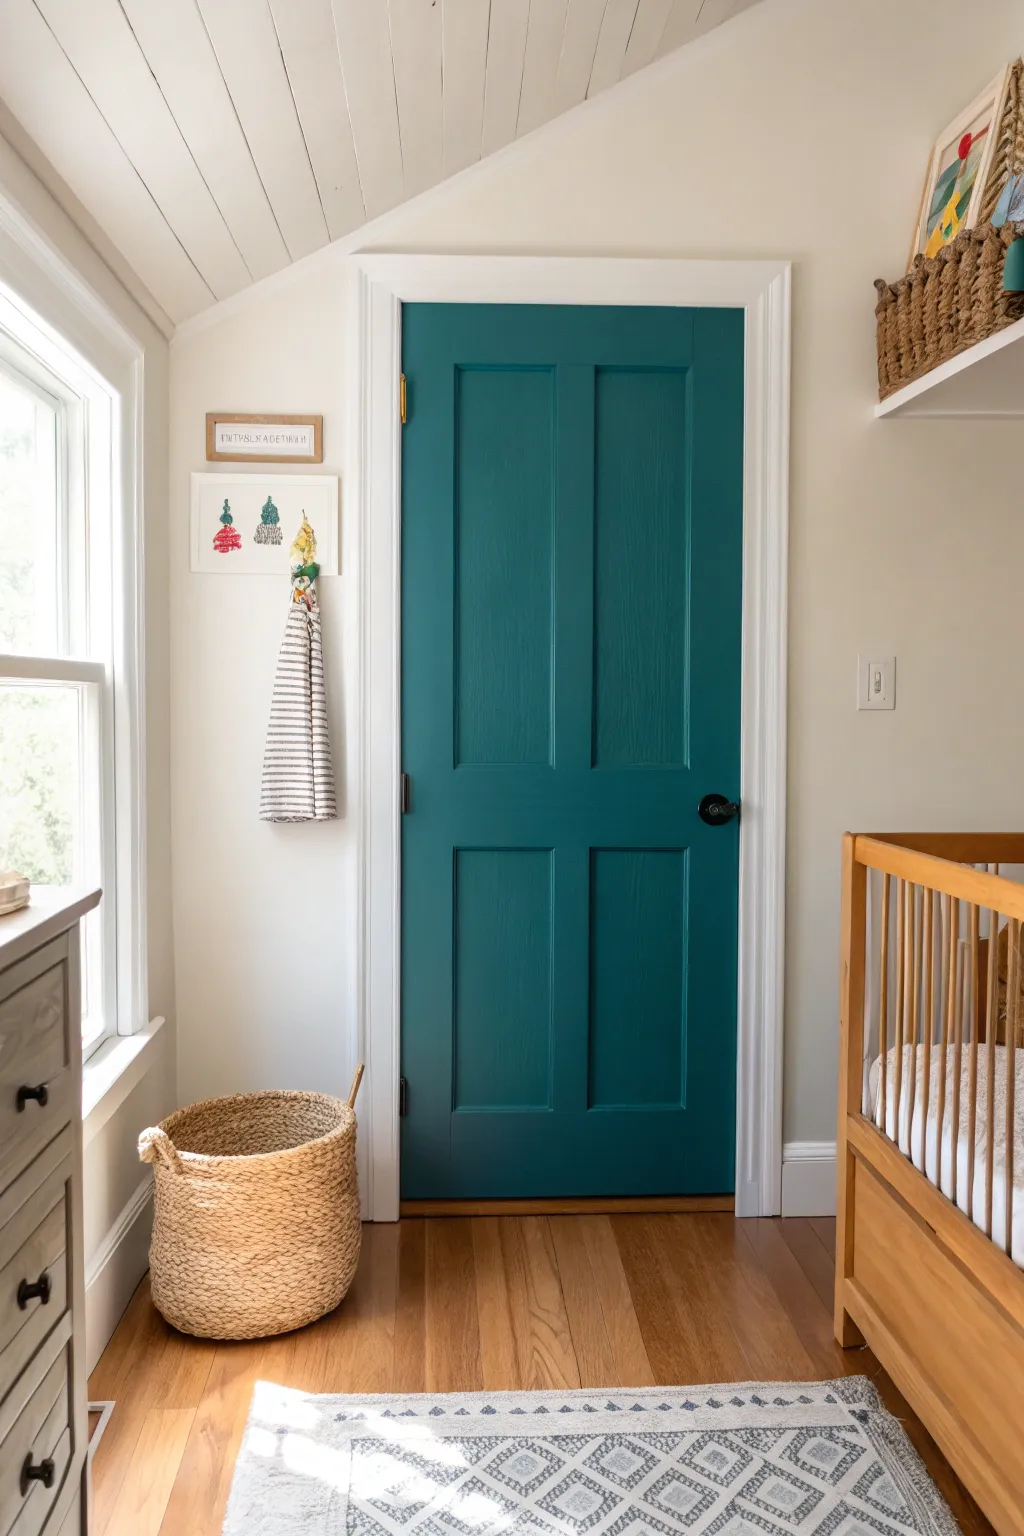
Transform a standard interior door into a vibrant focal point that instantly elevates a toddler’s room with a bold splash of color. This sophisticated teal shade adds depth and personality while maintaining a playful, modern aesthetic.
How-To Guide
Materials
- Interior semi-gloss or satin enamel paint (teal/peacock blue)
- High-quality primer (if painting over a dark color or bare wood)
- Liquid deglosser or fine-grit sandpaper (180-220 grit)
- Tack cloth
- Painter’s tape (multi-surface)
- 2-inch angled sash brush
- 4-inch foam or microfiber mini roller
- Paint tray and liners
- Screwdriver (for hardware removal)
- Drop cloth
- Mild soap and water
Step 1: Preparation
-
Clear the area:
Lay down a drop cloth underneath the door to protect your flooring. Ensure the room is well-ventilated by opening windows if possible. -
Remove hardware:
Using a screwdriver, carefully remove the doorknob and latch plate. Store these pieces and their screws in a small bag so nothing gets lost. -
Clean the surface:
Wipe the entire door down with mild soap and water to remove dust, fingerprints, and grime. Let it dry completely. -
Prep the shine:
If the door currently has a glossy finish, lightly scuff it with 180-220 grit sandpaper or wipe it down with a liquid deglosser. This helps the new paint adhere properly. -
Remove dust:
Run a tack cloth over every surface, paying special attention to corners and molding crevices, to pick up any residual sanding dust. -
Protect the perimeter:
Apply painter’s tape to the hinges (unless you removed the door entirely) and around the door frame if you aren’t painting the trim.
Pro Tip: Order Matters
Always paint in sections: panels first, then horizontal rails, and finish with vertical stiles. This mimics how wood doors are constructed and hides brush marks.
Step 2: Painting
-
Stir the paint:
Open your teal paint can and stir it thoroughly to ensure the pigments are evenly distributed. -
Start with panels:
Dip your 2-inch angled brush into the paint. Begin by painting the recessed moldings around the four interior panels first. -
Fill the panels:
Switch to your mini roller or use the flat side of your brush to fill in the flat center of each of the four panels. Smooth out any drips immediately. -
Paint the center stile:
Paint the vertical strip running down the center of the door, between the panels, using smooth vertical strokes. -
Paint the rails:
Move on to the horizontal rails (the top, middle, and bottom horizontal sections). Paint these with horizontal strokes, blending carefully where they meet the vertical stiles. -
Finish with outer stiles:
Finally, paint the two long vertical stiles on the far left and right sides of the door. Use long, continuous strokes from top to bottom for the smoothest finish. -
Check the edges:
Don’t forget to paint the inner edge of the door that is visible when it opens. -
Dry and assess:
Allow the first coat to dry according to the manufacturer’s instructions. Darker colors like this often look patchy after one coat, so don’t worry. -
Apply second coat:
Repeat the painting process in the exact same order (panels, center vertical, horizontals, outer verticals). I find this second coat is where the rich teal color really comes to life.
Step 3: Finishing Touches
-
Remove tape:
While the final coat is still slightly tacky (not fully cured), carefully peel away the painter’s tape at a 45-degree angle to ensure a crisp line. -
Cure time:
Let the door dry completely, ideally overnight, before reinstalling any hardware to prevent the fresh paint from sticking or peeling. -
Reinstall hardware:
Screw the doorknob and latch plate back into place. -
Final inspection:
Check for any small touch-ups needed around the hinges or edges and apply a tiny dab of paint if necessary.
Level Up: Hardware Swap
To really make the teal pop, swap out standard silver or brass knobs for matte black hardware. The modern contrast looks incredibly high-end.
Now you have a stunning, colorful entryway that sets a cheerful tone for the whole room
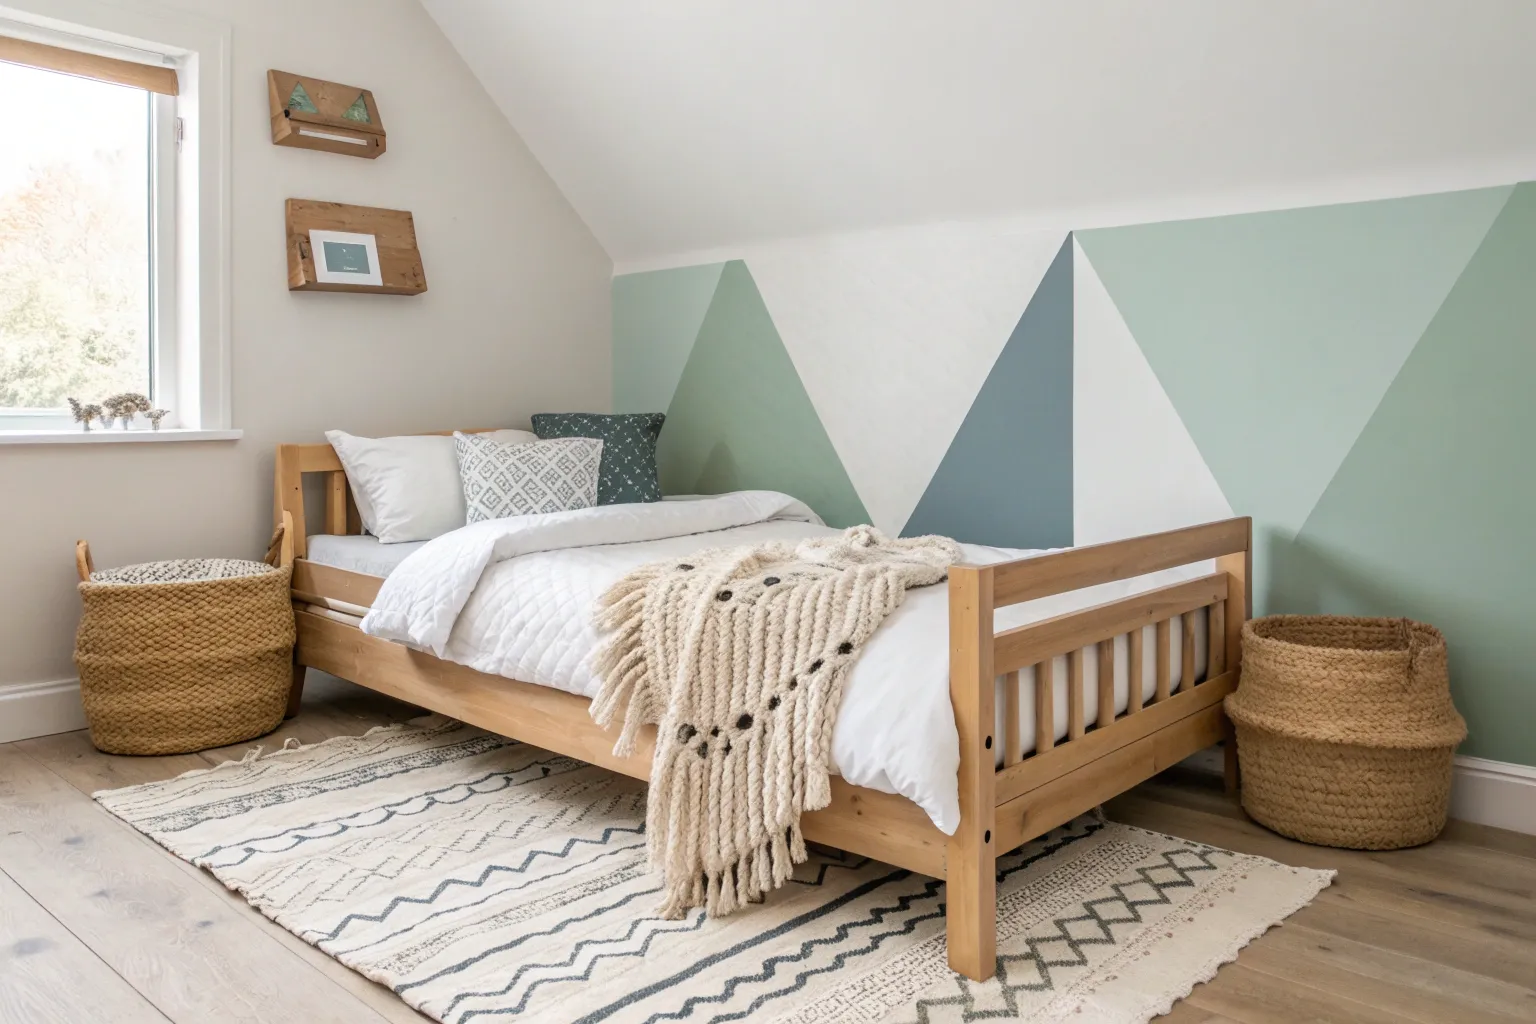
Mountain Range Accent Wall Behind the Bed
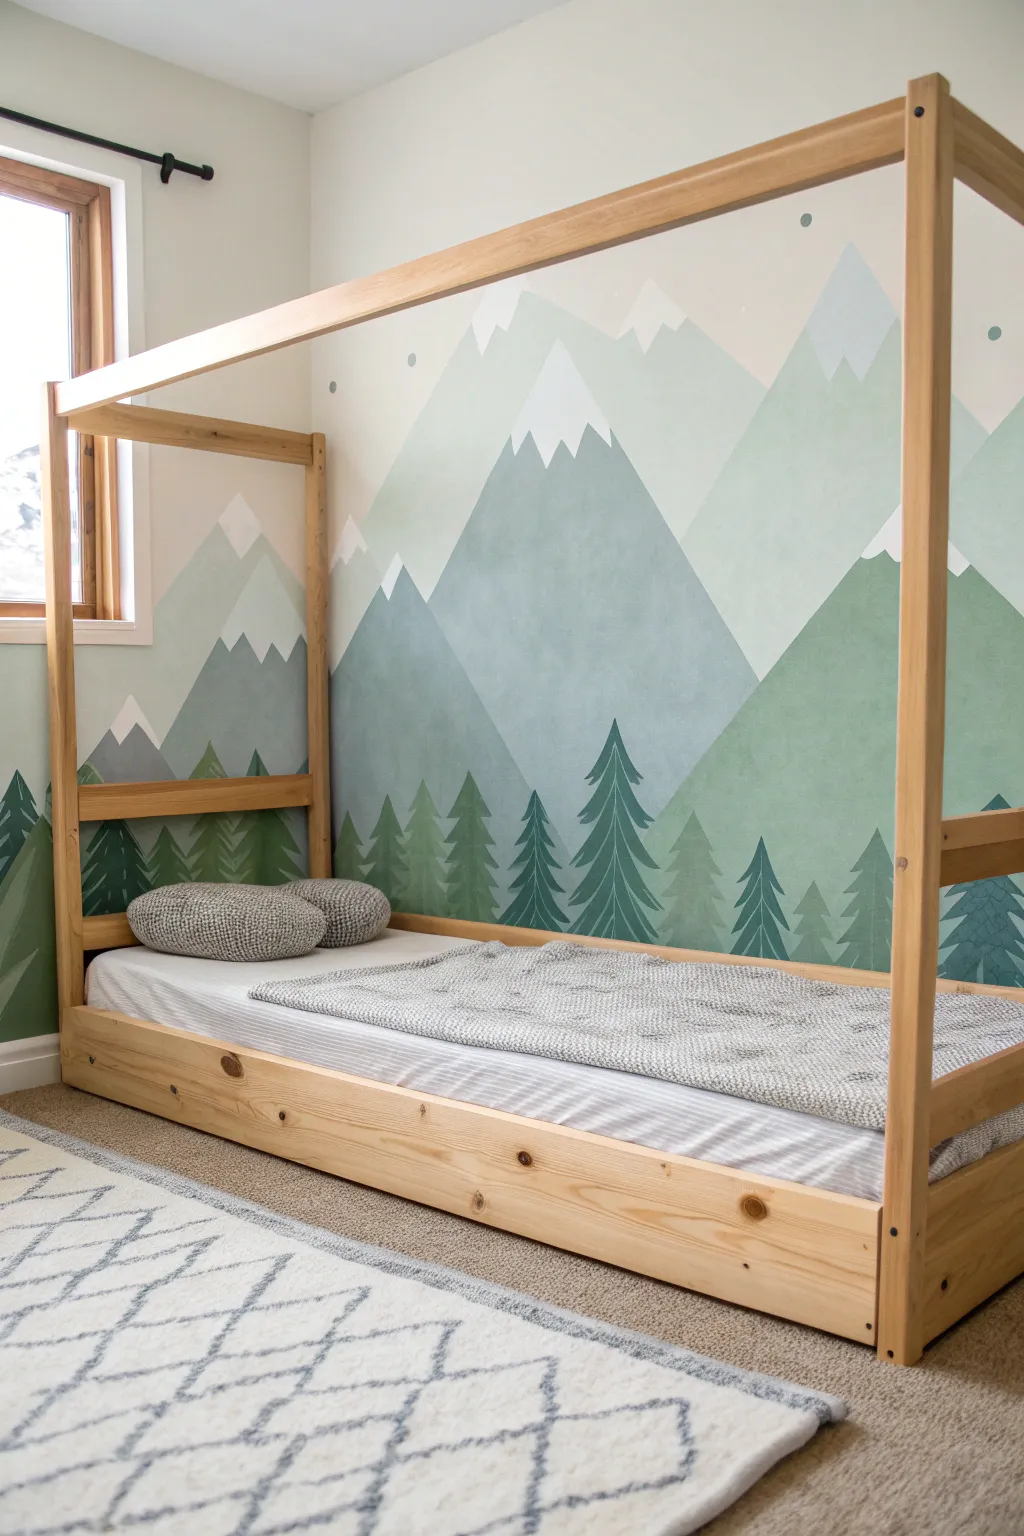
Transform a plain wall into an alpine adventure with this serene, layered mountain mural. Utilizing a gradient of greens and blue-greys, this project creates a sense of depth and wonder perfect for a growing toddler’s imagination.
Step-by-Step Tutorial
Materials
- Interior latex paint (White for peaks/sky)
- Interior latex paint (Light sage green)
- Interior latex paint (Medium olive green)
- Interior latex paint (Dark forest green)
- Interior latex paint (Cool blue-grey)
- Painter’s tape (various widths)
- Pencil
- Bubble level or laser level
- Paint rollers (4-inch trim rollers work best)
- Angled sash brush (2-inch)
- Small artist brushes (for fine tree details)
- Drop cloths
- Paint tray
Step 1: Planning and Preparation
-
Prepare the canvas:
Clear the room or move furniture to the center and cover with drop cloths. Ensure the wall is clean, dry, and free of dust. If you are changing the base wall color, paint the entire wall a soft off-white or very pale grey first and let it dry completely. -
Sketch the layout:
Stand back and visualize three distinct layers of mountains. Using a pencil, lightly sketch the jagged outlines of your mountain ranges directly onto the wall. The back layer should be the highest, the middle layer slightly lower, and the front layer the lowest. -
Mark the peaks:
Draw the snow caps on the highest peaks now so you don’t forget where they go. These zig-zag lines effectively separate the mountain color from the white snow tip.
Clean Lines Hack
To get razor-sharp lines on textured walls, seal the tape edge with a thin layer of the existing base wall color before applying your new mountain color.
Step 2: Painting the Mountains
-
Tape the first layer:
Use painter’s tape to outline the top edge of your furthest, highest mountain range. Press the tape edges down firmly to prevent bleed-through. -
Paint the background mountains:
Fill in the shape of the furthest mountains using a roller and your lightest blue-grey or sage color. Use a brush to cut in sharply against the tape line. -
Remove the tape:
Peel off the tape while the paint is still slightly tacky to ensure a crisp line. Allow this layer to dry for at least 4 hours before moving on. -
Tape the middle layer:
Apply tape for the outline of the second, middle layer of mountains. This layer will overlap the bottom of your first layer. -
Paint the mid-ground:
Paint this section using your medium olive green shade. This contrast creates the atmospheric perspective that makes the mountains look distant. -
Finish the foreground mountains:
Once the middle layer is dry, repeat the taping and painting process for the lowest, front-most mountain range using a slightly deeper green tone.
Step 3: Details and Foreground
-
Add the snow caps:
Using a small angled brush and white paint, carefully fill in the peak triangles you sketched earlier on the highest mountains. You can do this freehand for a softer look or tape it for sharp geometry. -
Draft the pine trees:
Lightly sketch vertical lines in the foreground where you want your pine trees to stand. Vary their heights to keep the scene natural. -
Paint tree trunks:
Using your darkest forest green paint and a small brush, paint thin vertical lines over your sketch marks to serve as the tree trunks. -
Create the branches:
Starting at the top of a trunk, use a small flat brush to dab downward-slanting strokes. Keep the strokes short at the top and gradually widen them as you move down the tree to create a triangular pine shape. -
Layer the trees:
I like to overlap some trees slightly. Paint the trees in the very front with the heaviest coat of dark green, and perhaps mix a little of the medium green into the trees that are supposed to look further back. -
Touch ups:
Inspect your edges. If any paint bled under the tape, use a small artist brush and the background color to clean up the lines. -
Add atmospheric elements:
Optional: lightly dilute a bit of white paint with water and glaze the bottom of the mountains to create a ‘misty’ effect where the mountains meet the floor. -
Final dry:
Remove all remaining tape and allow the full mural to cure for 24 hours before moving the bed frame back against the wall.
Level Up: Starry Night
Once the mural is dry, dip a toothbrush in white paint and flick the bristles to splatter tiny stars across the sky portion for a magical night scene.
Now you have a breathtaking vista ready for your little explorer to enjoy


Soft Cloud Band for a Storybook Sky
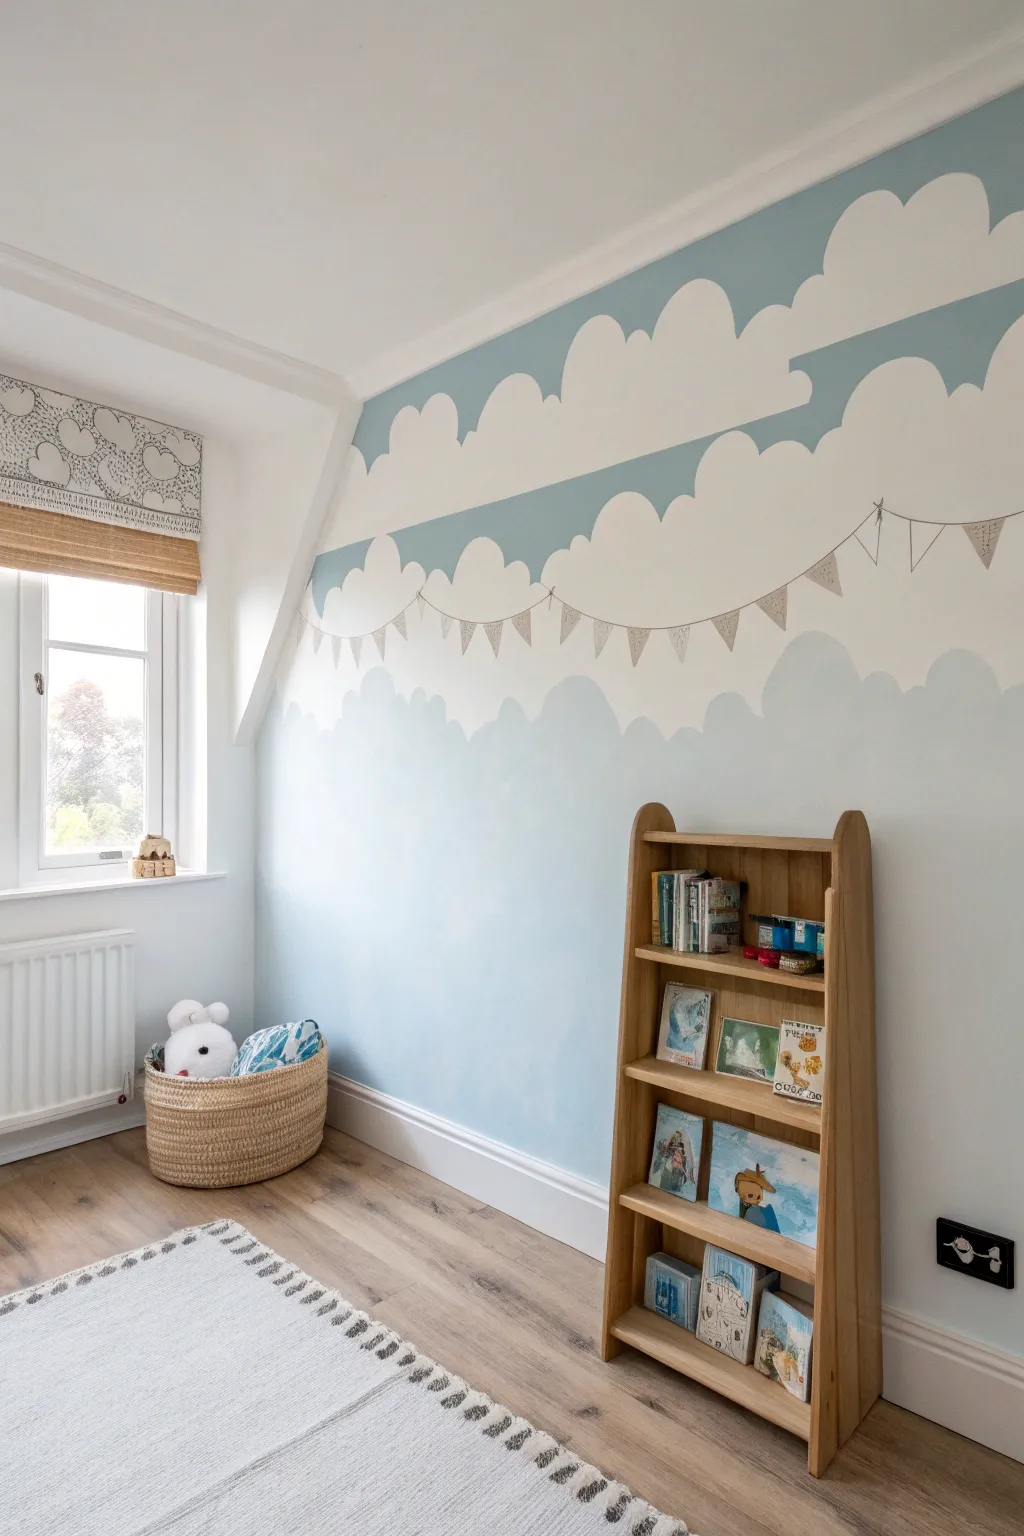
Transform a plain wall into a dreamy skyscape with this layered cloud mural technique. By using simple scalloped shapes and alternating bands of soft blue and white, you’ll create a storybook backdrop perfect for a toddler’s imagination.
Detailed Instructions
Materials
- Light blue latex wall paint (eggshell or satin finish)
- White latex wall paint (eggshell or satin finish)
- Pencil
- Cardboard or poster board (for templates)
- Scissors
- Painter’s tape
- Spirit level or laser level
- Small foam roller and tray
- Angled sash brush (2-inch)
- Artist’s liner brush or paint pen (dark grey or taupe)
- Drop cloth
- Ladder
Step 1: Preparation & Base Coat
-
Prepare the workspace:
Clear the area against the wall, remove any outlet covers, and lay down a drop cloth to protect your flooring from drips. -
Apply the base color:
Paint the entire wall with your chosen white paint. This acts as the lightest cloud layer and ensures a clean background. Let this dry completely, ideally overnight, so your tape won’t peel it up later. -
Create cloud templates:
While the base coat dries, cut several semi-circle and organic ‘cloud hump’ shapes out of cardboard. Vary the sizes—some wide and shallow, some taller and rounder—to keep the look natural rather than uniform.
Curve Control Pro-Tip
For stiffer cardboard templates that are easier to trace, cut up a cereal box. The flexibility allows you to bend it into corners if a cloud shape hits an adjacent wall.
Step 2: Drafting the Sky
-
Plan the horizon lines:
Decide on the height of your blue sky bands. Use a spirit level or laser level to lightly pencil horizontal lines across the wall where you want the bottom of each blue strip to begin. -
Trace the cloud layer:
Along the top edge of where your blue band will be, trace your cardboard templates. Overlap them slightly and mix up the sizes as you move across the wall to create a fluffy, undulating cloud top. -
Define the bottom edge:
For the bottom storage of the blue band, replicate the process or simply tape it off straight if you prefer a hard line, though the image shows cloud shapes on both top and bottom edges of the blue bands for a floating look. -
Repeat for upper bands:
Move up the wall and repeat the tracing process for the second blue strip near the ceiling. Ensure the spacing between the bands feels balanced.
Level Up: Pattern Play
Instead of leaving the bunting flags as simple outlines, use a tiny brush to add miniature polka dots or stripes inside the flags for a pop of color.
Step 3: Painting the Blue
-
Cut in the edges:
Using your angled sash brush or a smaller artist brush for tight curves, carefully paint along the pencil lines of your cloud shapes with the light blue paint. Steady your hand and go slow around the curves. -
Fill the bands:
Once the intricate edges are cut in, use a small foam roller to fill in the main body of the blue bands. The foam roller helps achieve a smooth finish without heavy brushstrokes. -
Second coat:
Allow the first coat of blue to dry to the touch (usually 1 hour). I find a second coat is almost always necessary to get that rich, solid color that pops against the white. -
Touch ups:
Inspect your edges. If any white shows through where it shouldn’t, or if the blue wobbled, use a small craft brush to refine the lines once the paint is fully dry.
Step 4: Adding the Bunting Detail
-
Sketch the swag:
Lightly draw a swooping line across the middle white cloud band to represent the string of the bunting. Make sure the dips in the line feel relaxed and natural. -
Draw triangles:
Sketch small triangles hanging from the line. Vary the angles slightly so they look like they are fluttering. -
Paint the string:
Using an artist’s liner brush and dark grey or taupe paint (or a steady paint pen), trace over your pencil line for the string. Keep the line thin and delicate. -
Outline the flags:
Trace the outlines of the triangles with the same tool. You can leave them as outlines for a sketchy, illustrative look like in the photo, or fill them in with faint patterns. -
Erase guidelines:
Once the bunting paint is completely cured (give it 24 hours to be safe), gently erase any visible pencil marks with a clean white eraser.
Step back and admire the peaceful, floating atmosphere you have built for your little one
Woodland Tree Silhouettes as a Border
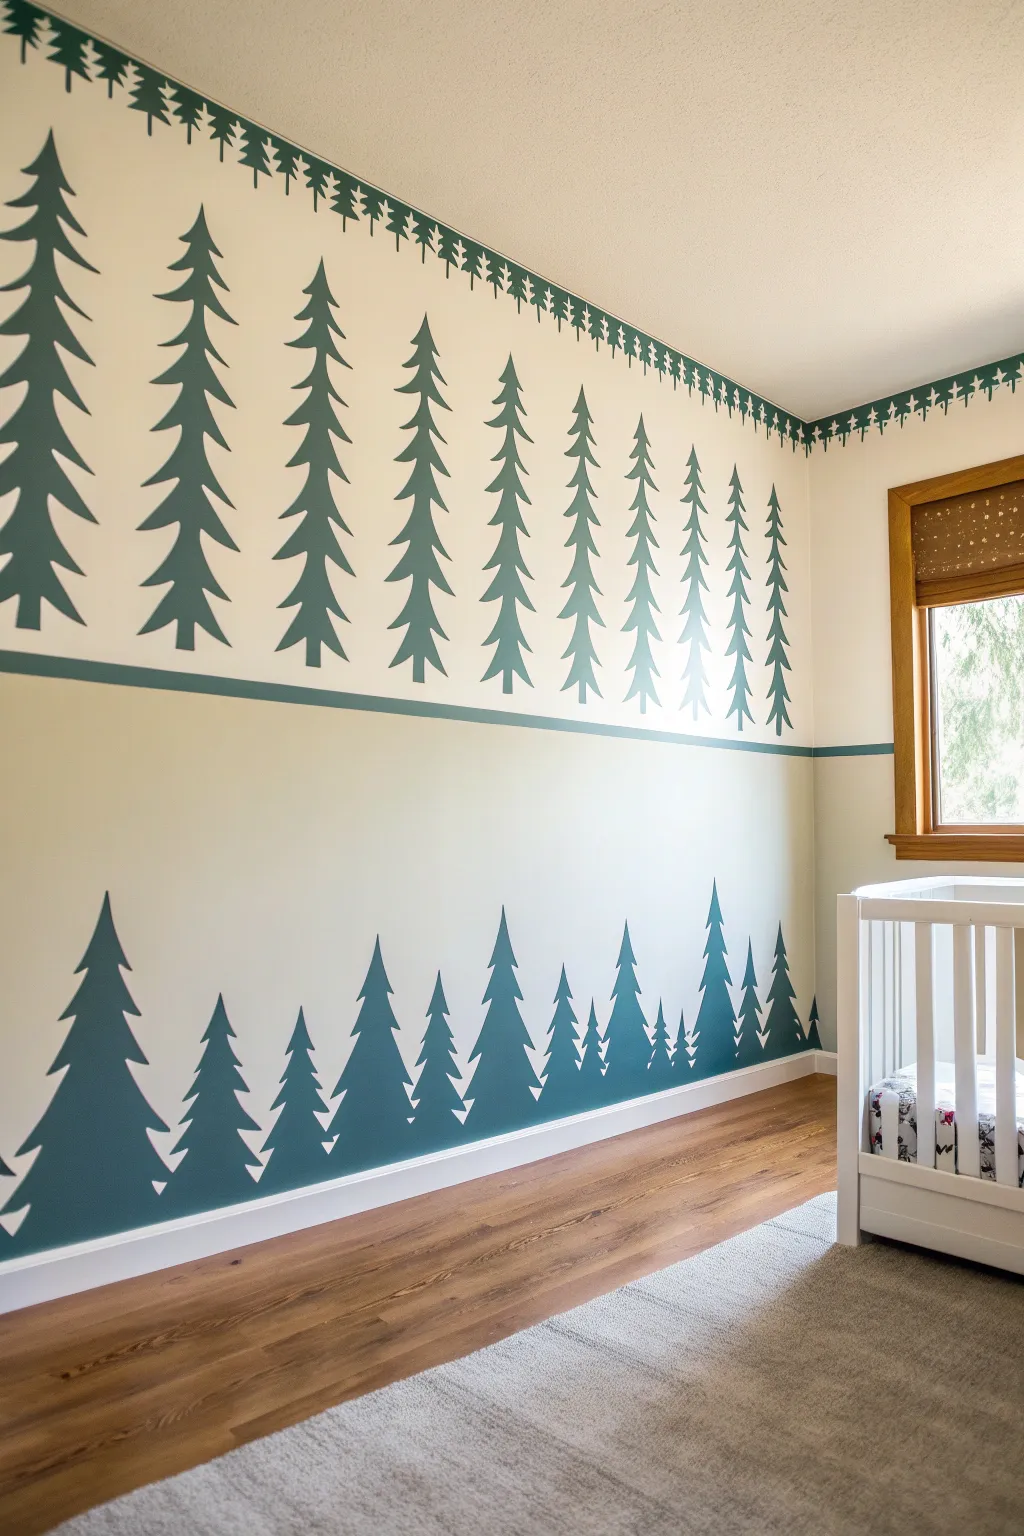
Bring the outdoors in with this sophisticated, three-tiered woodland mural featuring perfectly crisp pine tree silhouettes. The design creates depth by using distinct sizes of trees across three horizontal zones, anchored by a calming two-tone wall color scheme.
How-To Guide
Materials
- Latex wall paint (Cream/Off-white for base)
- Latex wall paint (Deep Forest Green for trees/lower wall)
- Painter’s tape (various widths)
- Laser level (highly recommended) or spirit level
- Pencil
- Large custom stencils (Tall slender pine tree)
- Small stencil strip (Mini border pines)
- Medium stencil strip (Lower jagged pines)
- Stencil brushes (dense foam or bristle)
- Small artist brush (for touch-ups)
- Paint roller and tray
- Measuring tape
- Paper towels
Step 1: Base Coat & Layout
-
Prepare the canvas:
Begin by painting the entire wall with your chosen cream or off-white base color. Allow this to cure for at least 24 hours so your tape won’t peel it off later. -
Establish the horizon line:
Decide where you want the color split to happen. In the image, this is slightly below the midpoint of the wall. Mark this height with a pencil. -
Tape the divider:
Using a laser level to guide you, run a strip of painter’s tape horizontally across the entire room at your marked height. This will serve as the sharp line separating the upper and lower sections. -
Paint the dividing stripe:
To create the distinct green stripe seen in the photo, place a second line of tape parallel to the first, about 1.5 to 2 inches above it. Paint the space between these tape lines with your deep forest green paint. Peel the tape while still slightly wet to ensure a crisp edge, then let dry completely.
Bleed Patrol
If paint bleeds under your stencil, wait for it to dry completely. Then, use a small flat-edged craft brush and your background wall color to carefully ‘erase’ the mistake.
Step 2: The Upper Forest
-
Mark vertical guides:
For the large upper trees, you need regular spacing. Measure the wall width and divide by the number of trees you want to determine spacing. Lightly mark vertical plumb lines with a pencil where the center of each trunk should go. -
Position the main stencil:
Secure your large, slender pine tree stencil to the first mark using painter’s tape. Ensure the bottom of the tree aligns perfectly with the top of your green horizontal stripe. -
Load the brush sparingly:
Dip your stencil brush into the green paint, then offload almost all the paint onto a paper towel. The brush should feel nearly dry. This is crucial to prevent paint bleeding under the stencil. -
Stipple the design:
Apply the paint using a straight up-and-down pouncing or swirling motion. Build up coverage gradually rather than trying to get opaque color in one pass. -
Repeat the pattern:
Carefully remove the stencil and reposition it at the next interval mark. I like to wipe the back of the stencil occasionally to keep paint buildup from smudging the wall. -
Create the ceiling border:
For the tiny trees at the very top, use a border stencil. Align it flush with the ceiling or crown molding. Use the same dry-brush technique, being extra gentle since detail is tinier here.
Step 3: The Lower Woodland
-
Paint the lower wall:
Below your horizontal stripe, paint the entire lower section of the wall in the deep forest green. This grounds the room. You might need two coats for full opacity. -
Stencil the negative space:
This section uses a ‘reverse’ or negative space technique. You will be stenciling cream trees *over* the dark green wall to make them look like they are standing in front. Alternatively, if you haven’t painted the lower wall green yet, you can stencil green trees onto the cream base—but the image shows a solid green bottom with tree shapes rising up. -
Alternative: The Overlay Method:
Actually, looking closely at the opacity, it’s easier to paint the tree shapes in green directly onto a cream wall. Let’s pivot: Ensure the bottom half of the wall remains your cream base color for now. -
Position the lower stencil:
Use a stencil that features a jagged, variable treeline. Position it so the bottom of the stencil aligns with your baseboard. -
Fill in the lower trees:
Using the deep green paint, fill in these lower tree shapes. These trees should be denser and vary in height more than the upper ones to create a ‘foreground’ look. -
Connect the forest floor:
Once the trees are stenciled, use a brush or small roller to fill in all the space *between* the trees and the baseboard with solid green paint, creating a continuous dark silhouette along the bottom. -
Final touches:
Inspect all your edges. Use a small artist brush and the base cream color to clean up any green bleeds, or the green paint to sharpen the tips of the pine needles.
Level Up: Texture
For a rustic look, use a sea sponge instead of a brush for the trees. This creates a mottled, organic texture that mimics real pine needles better than flat paint.
Step back and admire how your measured spacing creates a peaceful, rhythmic forest scene right in your room
Minimal City Skyline for Little Adventurers
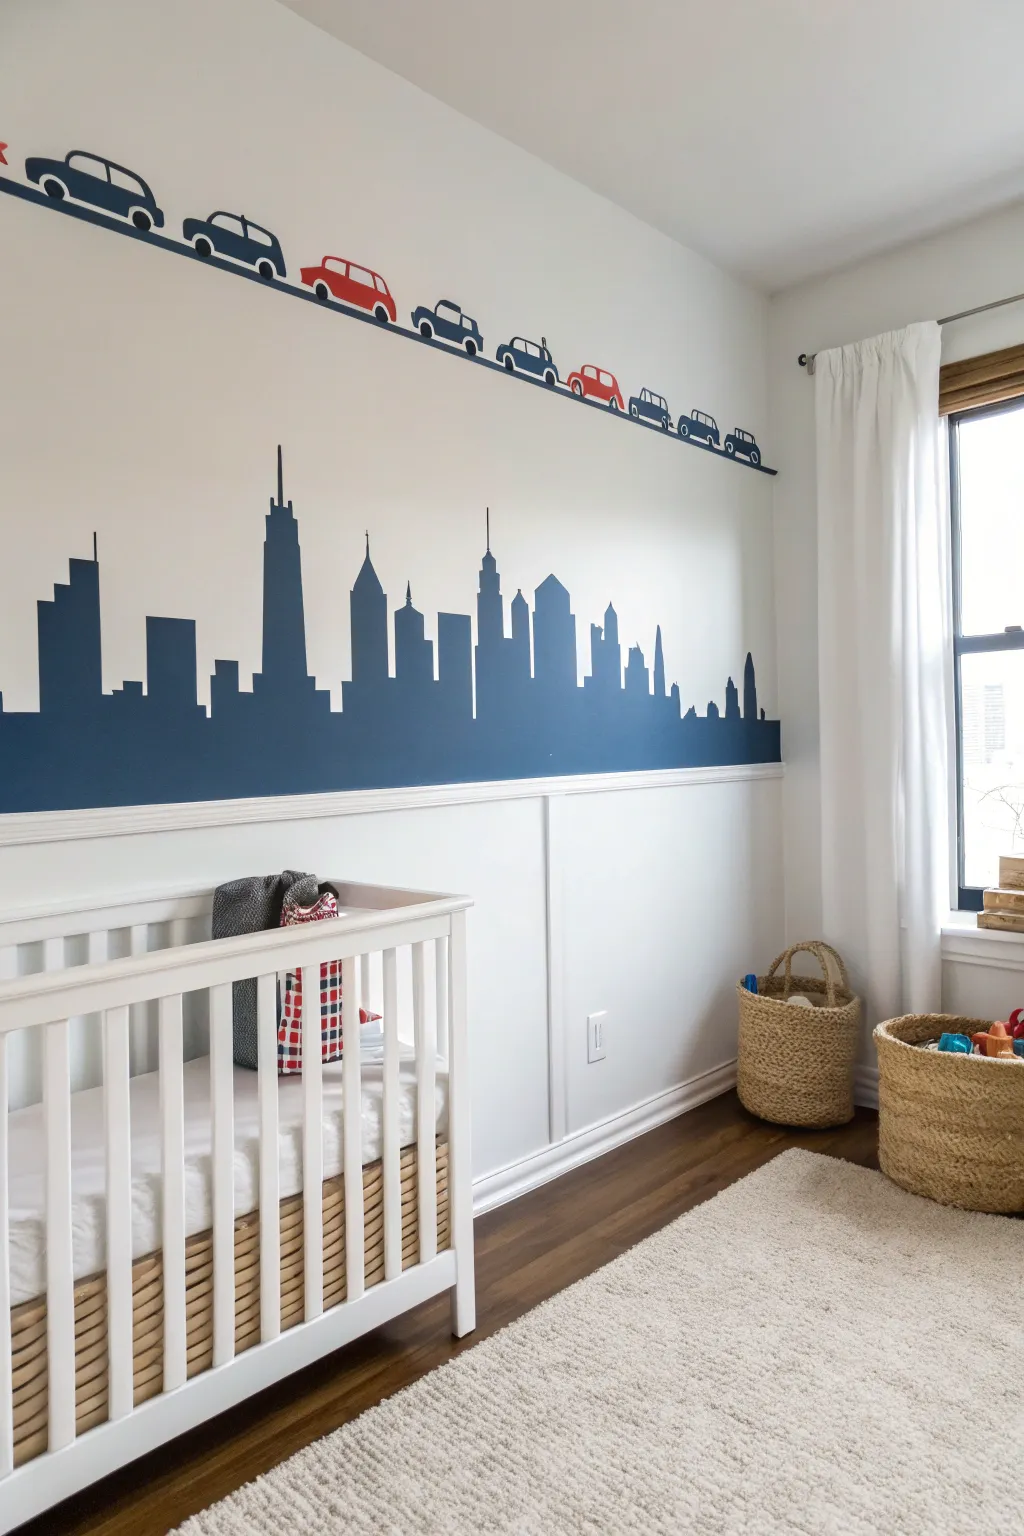
Bring the excitement of the big city into your little one’s room with this clean, modern skyline mural featuring a playful parade of cars overhead. This two-part design combines a bold navy cityscape silhouette with whimsical wall decals for a look that is both sophisticated and fun.
Step-by-Step Tutorial
Materials
- Navy blue interior semi-gloss or satin paint
- Painter’s tape (frog tape recommended for sharp lines)
- Small foam roller and tray
- Angled sash brush (1.5 or 2 inch)
- Pencil and eraser
- Bubble level or laser level
- Ruler or straight edge
- Car wall decals (navy and red)
- Washi tape or thin black tape (for the road line)
- Drop cloth
Step 1: Planning the Skyline
-
Prep the surface:
Begin by ensuring the wall surface above the wainscoting is clean and dry. If you don’t have existing wainscoting, simply measure about 30-36 inches up from the floor to establish your horizon line. -
Tape the horizon:
Apply a strip of painter’s tape along the top edge of your wainscoting or baseboard molding to protect it from the navy paint. -
Establish building heights:
Using a pencil and a ruler, lightly mark the tops of your tallest skyscrapers first. vary the heights to create visual interest, keeping the tallest ones slightly off-center. -
Sketch the outline:
Draw the outline of your city directly on the wall using a pencil and straight edge. Include a mix of flat-topped office buildings, pointed spires, and stepped skyscrapers. -
Add detail:
Incorporate recognizable shapes like antennas or water towers for character, but keep the overall forms simple and geometric.
Bleed-Proof Lines
Before painting navy, brush a thin layer of your existing white wall color over the tape edges. This seals the tape, so any bleed is invisible white-on-white.
Step 2: Painting the City
-
Tape the vertical lines:
For crisp building edges, apply painter’s tape along the vertical pencil lines of your skyscrapers. You can tape the horizontal roof lines now or freehand them later if you have a steady hand. -
Seal the tape:
Run a credit card or your fingernail firmly over the tape edges to ensure a tight seal against the wall texture. -
Cut in the edges:
Use your angled sash brush to carefully paint the borders of the buildings. Since I find tape can sometimes bleed, dab the paint gently away from the tape edge rather than brushing underneath it. -
Fill in the shapes:
Use a small foam roller to fill in the large bodies of the buildings with navy paint. This ensures a smooth, non-streaky finish compared to brushing the whole area. -
Apply a second coat:
Allow the first coat to dry according to the paint can’s instructions, then apply a second coat for rich, opaque coverage. -
Reveal the skyline:
Remove the painter’s tape while the paint is still slightly tacky to prevent peeling the dry film. Pull the tape away slowly at a 45-degree angle. -
Touch up:
Once fully dry, check for any uneven lines or pencil marks. Use a small artist’s brush and your background wall color to correct any mistakes.
Uneven Tape Lines?
If paint seeped under the tape, wait for it to dry completely. Then, use a small flat artist’s brush and the original wall color to carefully erase the mistake.
Step 3: Adding the Traffic
-
Mark the road:
Measure approximately 12-18 inches above the highest point of your skyline. Use a laser level to lightly mark a long, straight horizontal line across the entire wall width. -
Apply the road line:
Carefully apply a long strip of thin black tape or dark blue washi tape along your marked line to create the ‘road’ surface. -
Plan car placement:
Lay out your car decals on the floor first to plan the sequence. Alternating the orientation and colors (like red sedans and blue trucks) keeps the parade lively. -
Stick the decals:
Peel the backing off the car decals and place them directly onto the tape line, ensuring their wheels ‘sit’ perfectly on the road. -
Smooth it out:
Use a soft cloth to press the decals firmly onto the wall, smoothing from the center outward to remove any trapped air bubbles.
Step back and admire how this simple graphic transformation turns a blank wall into a bustling metropolis
Chalkboard Wall for Toddler Scribbles
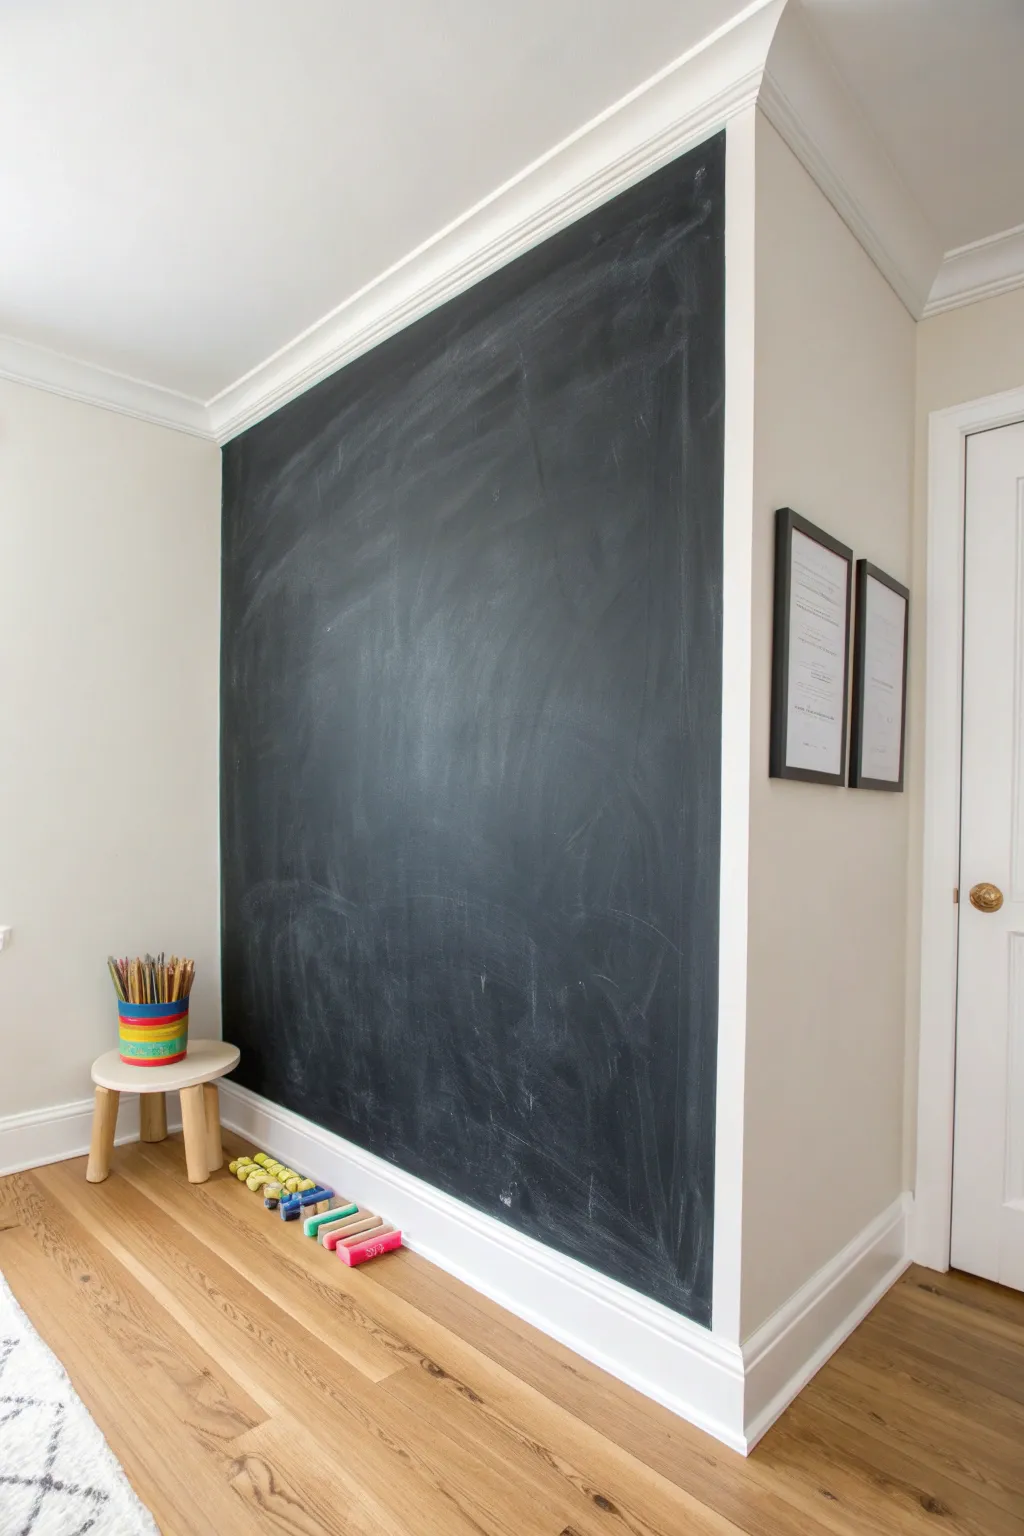
Transform a blank corner into an expansive creative zone with this sleek, floor-to-ceiling chalkboard wall. Perfect for scribbles, practicing ABCs, or displaying daily menus, this high-contrast feature wall is as functional as it is stylish.
Step-by-Step
Materials
- High-quality chalkboard paint (black or slate)
- Painter’s tape (frog tape recommended)
- Sanding block or sandpaper (120-150 grit)
- Fill spackle and putty knife
- Drop cloth
- Roller frame
- Foam roller covers (for smooth finish)
- Small angled paint brush
- Paint tray and liner
- Damp rag
- Stick of white chalk (for seasoning)
- Chalk eraser or soft cloth
Step 1: Prep Work
-
Clear and clean:
Remove any furniture, outlet covers, or artwork from the target wall area. Wash the wall thoroughly with mild soap and water or a TSP substitute to remove grease and dust, ensuring the paint will adhere properly. -
Patch imperfections:
Inspect the wall for any nail holes, dents, or deep scratches. Fill these spots with spackle using your putty knife. Let the spackle dry completely according to the package instructions. -
Sand for smoothness:
Sand the patched areas until they are flush with the wall. Then, lightly sand the entire wall area you plan to paint. A smoother starting surface is crucial for a chalkboard; you don’t want the chalk catching on bumps later. -
Wipe down:
Use a damp rag or tack cloth to remove every speck of sanding dust. Even a little dust can ruin the smoothness of your final finish. -
Protect the edges:
Apply painter’s tape carefully along the baseboards, crown molding, and adjoining walls. Press the edges of the tape down firmly with a credit card or your thumbnail to prevent paint bleed.
Step 2: Painting the Surface
-
Stir thoroughly:
Open your chalkboard paint and stir it extremely well. The chalkboardizing particles settle at the bottom, so take your time mixing to ensure an even consistency. -
Cut in the edges:
Using your small angled brush, paint a 2-3 inch border around the taped perimeter of the wall. Feather the wet edge toward the center so it blends seamlessly when you roll. -
Start rolling:
Pour some paint into your tray. Load your foam roller—I prefer foam over nap rollers because it leaves a much smoother texture ideal for writing. Apply the paint in ‘W’ shapes, working in manageable 3-foot sections. -
Finish the first coat:
Continue rolling until the entire taped-off area is covered. Don’t worry if it looks slightly patchy or streaky right now; chalkboard paint often needs multiple coats for full opacity. -
Let it cure:
Allow the first coat to dry for at least 4 hours, or whatever duration the manufacturer specifies. It is vital not to rush this step. -
Light sanding (optional):
If you notice small bumps after the first coat dries, very lightly scuff it with fine sandpaper and wipe away the dust. -
Apply the second coat:
Repeat the cutting-in and rolling process for a second coat. This layer provides the deep, rich black color and durability needed for repeated drawing sessions. -
Remove tape:
While the second coat is still slightly tacky (not soaking wet, but not fully dry), carefully peel away the painter’s tape at a 45-degree angle to ensure a crisp line. -
The long wait:
This is the hardest part: let the paint cure for a full 3 days before writing on it. The paint needs to harden completely to withstand chalk pressure.
Smooth Operator
Use a high-density foam roller instead of a traditional napped roller. Foam eliminates the ‘orange peel’ texture, creating a silky-smooth surface that’s much easier to draw on and erase cleanly.
Step 3: Seasoning the Wall
-
Why season?:
If you write on fresh chalkboard paint immediately, that first drawing might be permanently etched into the surface (called ‘ghosting’). Seasoning prevents this. -
Cover with chalk:
Take a piece of regular white chalk and lay it on its side. Rub the entire wall surface, side-to-side and top-to-bottom, until every inch is covered in chalk dust. -
Work it in:
Take a dry soft cloth or paper towel and rub the chalk dust into the paint in circular motions. -
Wipe clean:
Finally, use a slightly damp cloth or eraser to wipe the wall clean. Your giant canvas is now primed and ready for its first masterpiece.
Magnetic Magic
Before applying the chalkboard paint, apply 2-3 coats of magnetic primer underneath. This turns your drawing wall into a fully functional magnetic gallery for holding up paper artwork.
Now you have a durable, interactive space ready for endless imagination and easy cleanup
A Painted Art Strip for Rotating Mini Masterpieces
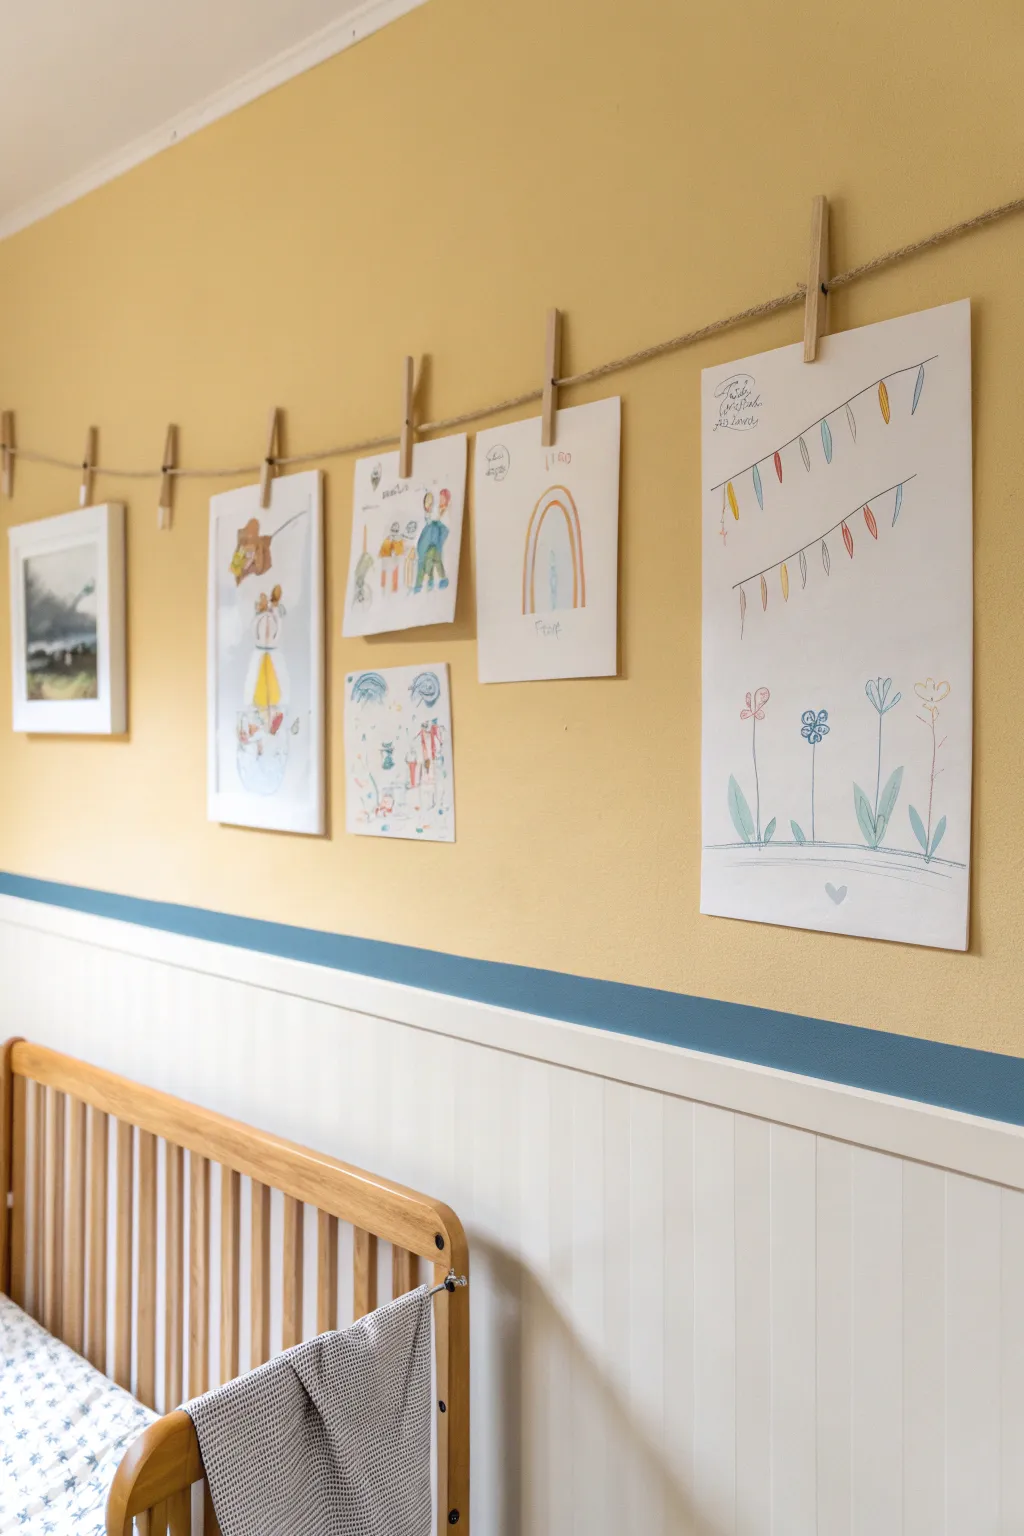
Transform a blank yellow wall into a dynamic gallery space with this charming clothesline display. By combining a classic painted wainscoting effect with a simple rustic twine hanger, you create the perfect backdrop for showcasing your little one’s ever-changing creativity.
How-To Guide
Materials
- Painter’s tape (high quality, 1-inch width)
- Blue latex paint (satin or eggshell finish)
- Small angled sash brush (1.5 to 2 inch)
- Paint roller and tray (small foam roller works well)
- Drop cloth
- Jute twine or rustic hemp rope
- Wooden clothespins (natural finish)
- Measuring tape
- Level
- Pencil
- Small finishing nails or screw hooks
Step 1: Painting the Accent Strip
-
Prepare the surface:
Ensure your wall is clean and the base wainscoting color (white) and upper wall color (yellow) are fully dry and cured before starting. Lay down a drop cloth to protect the floor or crib below -
Measure the stripe height:
Decide exactly where you want the blue separation stripe to sit. In this design, it rests directly on top of the white wainscoting paneling. Measure about 1.5 to 2 inches up from the top edge of the paneling. -
Mark the line:
Using a pencil and a level, lightly mark a horizontal line across the wall at your measured height to serve as the top guide for your blue stripe. -
Tape the top edge:
Apply a strip of painter’s tape along the top of your pencil line. Press the edge of the tape down firmly with your fingertip or a credit card to prevent paint bleed. -
Tape the bottom edge:
If your wainscoting has a ledge, tape directly on top of it. If it’s a painted faux-wainscoting line, apply tape just below where you want the blue stripe to start. -
Seal the tape:
A great trick I us is to lightly brush a tiny amount of the *background* yellow paint over the edge of the top tape line first. This seals any gaps so the blue paint creates a razor-sharp line. -
Apply the blue paint:
Once the seal is dry, dip your angled sash brush into the blue paint. Apply the paint between the tape lines, using smooth horizontal strokes. -
Add a second coat:
Allow the first coat to dry to the touch, then apply a second coat for rich, opaque coverage. -
Remove tape:
Retire the tape while the second coat of paint is still slightly tacky. Pull the tape slowly at a 45-degree angle away from the painted area.
Sagging String?
If the twine sags too much once you add heavy paper, simply unknot one end, pull it tighter to reduce the slack, and re-tie. Heavier paper needs a tighter line.
Step 2: Installing the Clothesline
-
Plan the anchor points:
Determine where the twine will hang. You want it high enough that the art doesn’t obscure the blue stripe, but low enough to be easily reached. About 6-8 inches below the ceiling molding is a good starting point. -
Mark anchor locations:
Measure equal distances from the corners of the room or center the line above the crib. Mark two points for your nails or hooks, ensuring they are level. -
Install the fasteners:
Hammer small finishing nails into your marked spots, leaving just enough head sticking out to wrap the twine. Alternatively, screw in small cup hooks for a slightly more industrial look. -
Cut the twine:
Cut a length of jute twine that is roughly 6 inches longer than the distance between your nails. -
Knot the first end:
Tie a secure loop knot at one end of the twine and hook it over the first nail. -
Set the tension:
Stretch the twine across to the second nail. Don’t pull it perfectly tight; allow for a gentle, natural swoop in the line, which adds to the casual look. -
Secure the twine:
Wrap the twine around the second nail several times and tie it off securely. Trim any excess string for a tidy finish. -
Hang the art:
Use natural wooden clothespins to clip artwork onto the line. Space them out evenly or overlap them slightly for a busy, creative feel.
Level Up: Color Pop
Dip the tips of the wooden clothespins in the same blue paint used for the wall stripe. This ties the hanging hardware visually to the décor below.
Now stepping back, you can admire a playful gallery that changes as fast as your toddler creates new masterpieces
Moody Painted Ceiling for a Cozy “Fort”
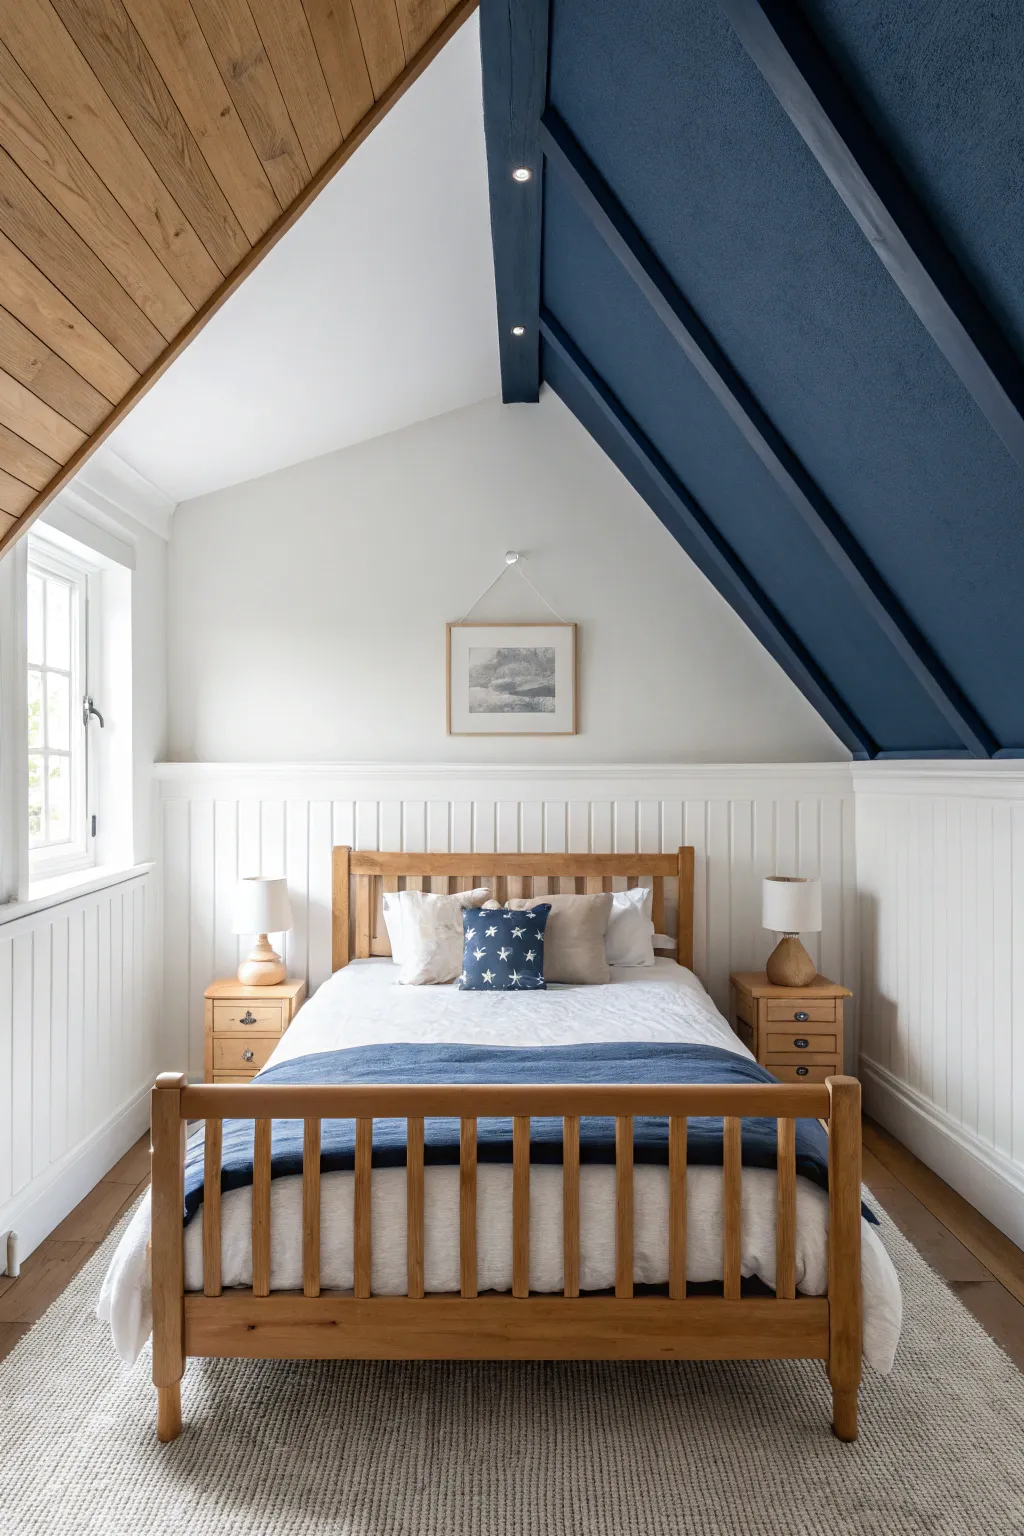
Transform a slanted ceiling nook into a cozy, starry-night retreat by painting exposed beams in a deep, moody blue. This high-contrast look creates a comforting ‘fort’ sensation perfect for a toddler’s room while maintaining a sophisticated edge.
Step-by-Step
Materials
- High-quality painter’s tape (multi-surface)
- Deep navy blue interior latex paint (matte or eggshell finish)
- White interior latex paint (satin or semi-gloss for trim)
- Angled sash brush (2.5 inch)
- Small artist’s brush (for touch-ups)
- Paint roller frame and extension pole
- Microfiber roller covers (3/8 inch nap)
- Drop cloths
- Sanding sponge (medium grit)
- Tack cloth
- Liquid deglosser (optional, for previously painted beams)
- Ladder
Step 1: Preparation & Taping
-
Assess the surface:
Begin by inspecting the beams and ceiling slope you plan to paint. If the wood is raw, give it a quick sanding. If it has a glossy finish, wipe it down with a liquid deglosser to help the new paint adhere. -
Clean thoroughly:
Dust is the enemy of a crisp line. Wipe down the entire ceiling area and beams with a tack cloth to remove any cobwebs or sanding residue. -
Protect the floor:
Lay down heavy-duty drop cloths over the entire floor area. Since you are painting overhead, splatter is inevitable, so be generous with your floor coverage. -
Tape the transitions:
Apply painter’s tape exactly where the ceiling slope meets the vertical wall. This line needs to be razor-sharp. Press the tape edge down firmly with your thumbnail or a putty knife to prevent bleed-through. -
Tape the center beam:
If your ceiling meets a natural wood section (like the left side in the photo), carefully tape along the center apex beam to separate the painted zone from the natural wood zone.
Step 2: Painting the Structure
-
Cut in the edges first:
Using your angled sash brush and the deep navy paint, carefully ‘cut in’ along the edges of the beams where they meet the ceiling panels, and along your taped wall lines. -
Paint the recesses:
Continue using the brush to get into the tight corners and grooves of the ceiling paneling that a roller won’t reach. I like to do this section by section so the paint stays wet while I roll. -
Roll the flat panels:
Dip your roller into the navy paint. Roll the flat sections of the ceiling between the beams. Use a ‘W’ motion to distribute paint evenly, then smooth it out with straight, parallel strokes. -
Paint the beam faces:
Once the recessed ceiling panels are coated, paint the sides and bottom faces of the structural beams. The roller can work for the bottom face, but use the brush for the sides to ensure full coverage. -
Let the first coat dry:
Allow the first coat to dry completely according to the manufacturer’s instructions, usually about 4 hours. Dark colors often look patchy after one coat, so don’t worry. -
Apply the second coat:
Repeat the cutting and rolling process for a second coat. This is crucial for deep blues to achieve that rich, velvety opacity.
Pro Tip: The Seal Trick
After taping, paint a thin line of the *existing* wall color (white) over the tape edge first. This seals the tape, so if any paint bleeds under, it’s white-on-white, leaving a perfect blue line later.
Step 3: Finishing Touches
-
Remove tape carefully:
While the paint is still slightly tacky (or immediately after the final coat dries), verify the edges and slowly peel back the painter’s tape at a 45-degree angle. -
Touch up imperfections:
Inspect your lines. If any blue bled onto the white wall or natural wood, use a damp cloth immediately or wait for it to dry and touch up with the appropriate background color using the small artist’s brush. -
Install lighting:
If you have recessed lights in the beams like the example, ensure the housing is clean. A quick wipe removes any accidental paint splatters from the metal rims. -
Style the bedding:
To echo the ceiling, add navy accents to the bed. A blue throw blanket or a pillow with a star motif ties the ‘fort’ theme together perfectly.
Level Up: Starry Night
For a magical touch, use a stencil to add faint, metallic gold or silver stars sporadically across the blue ceiling panels, turning the ‘fort’ into a true night sky experience.
Step back and admire how this bold ceiling creates an instant architectural feature and a snug hideaway for your little one
Gentle Ombre Fade From Deep to Light
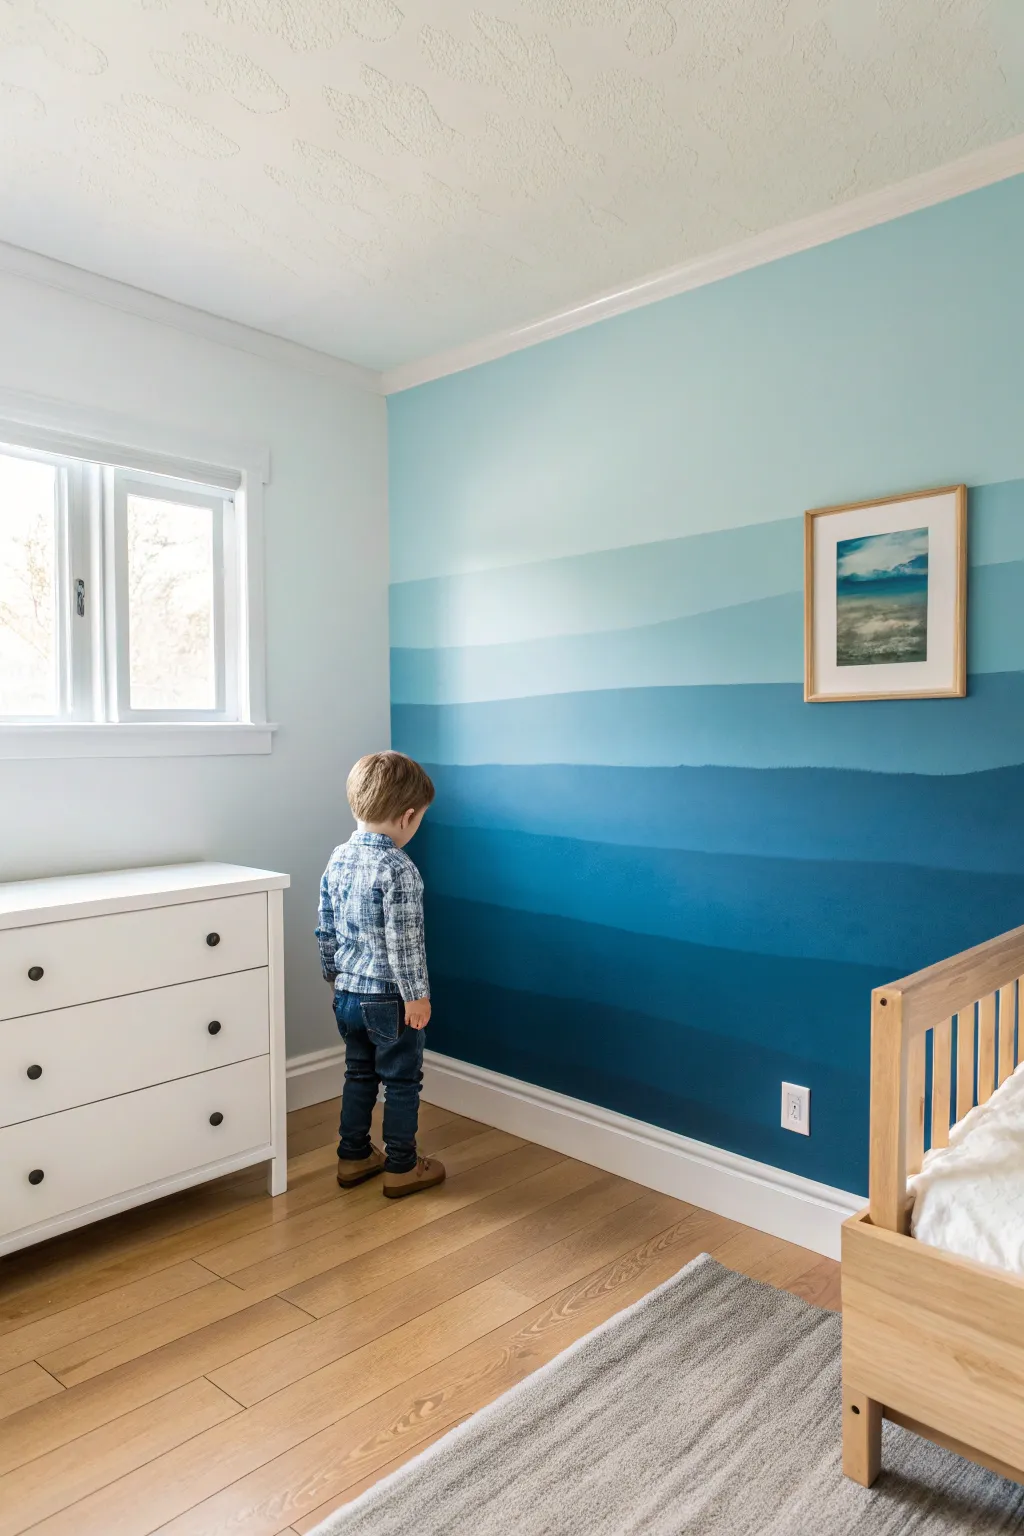
Transform a plain bedroom wall into a calming seascape with this distinct banded ombre effect. By layering hand-painted wavy lines over varied shades of blue, you create a soft, organic gradient that feels like looking out at the ocean horizon.
How-To Guide
Materials
- Interior latex wall paint (white base)
- Interior latex wall paint (deep teal or navy)
- 4-5 plastic mixing containers or small buckets
- Stir sticks
- 2-inch angled sash brush
- 4-inch mini roller and roller tray
- Painter’s tape
- Drop cloths
- Measuring tape
- Pencil
Step 1: Preparation and Mixing
-
Prep the room:
Clear the area against the wall you intend to paint. Lay down drop cloths to protect the flooring and apply painter’s tape to the baseboards, ceiling line, and adjoining walls to ensure crisp edges. -
Establish color grades:
You will need about 5-7 distinct shades depending on your wall height. Pour your darkest teal paint into the first bucket—this is your base color for the bottom stripe. -
Mix the gradients:
For the subsequent buckets, create progressively lighter shades. Start with the dark paint and gradually add white base paint. Aim for visible distinct steps in lightness rather than a subtle micro-gradient. -
Test the swatches:
Paint a small swatch of each mixed color on a piece of cardboard or scrap paper. Let them dry completely, as latex paint often dries darker or lighter than it appears wet. Adjust the mixes until you have a pleasing stair-step progression from deep navy to sky blue.
Uneven Coverage?
Dark colors like navy often require two coats. If the bottom stripes look patchy, let them dry fully and apply a second coat, carefully re-cutting the wave line with your brush.
Step 2: Mapping the Wall
-
Measure vertical sections:
Measure the total height of the wall and divide by the number of color bands you plan to use. Mark these rough intervals lightly with a pencil on the wall. -
Sketch the wave lines:
Don’t use a level for this step. Instead, hand-sketch faint, undulating lines across the wall at your pencil marks. The goal is an organic ‘landscape’ feel, so gentle dips and rises are perfect here.
Step 3: Painting the Bands
-
Start at the top:
Begin with your lightest shade (the sky color). Using the angled sash brush, cut in along the ceiling line and corners first. -
Fill the top section:
Use the roller to fill in the top section, bringing the paint down just past your first pencil wave line. Don’t worry about a perfect edge at the bottom yet. -
Create the first transition:
While the top paint is drying, switch to your second lightest color. Use your brush to carefully paint the top edge of this new band, following your pencil wave guide. Overlap the lighter paint slightly to cover the pencil marks. -
Refine the brushwork:
For that soft, hand-painted look seen in the photo, utilize the brush to feather the top edge slightly. I like to keep the brush fairly wet to ensure a solid line that doesn’t look dry or scratchy. -
Roll the second band:
Once the top edge is cut in with the brush, use a fresh roller cover (or a cleaned one) to fill the body of this second band. Roll down to just past the next pencil mark. -
Continue downwards:
Repeat this process for each subsequent color band. Cut the top wavy line with a brush, creating that organic horizon shapes, then fill the area below with the roller. -
Paint the darkest bottom:
Finally, apply the darkest color at the bottom. Cut in the top wave against the previous band, then paint all the way down to the taped baseboard.
Texture Twist
For a mountain range effect instead of ocean waves, make your pencil guide lines jagged and peaked rather than smooth and rolling.
Step 4: Finishing Touches
-
Remove tape:
While the paint is still slightly tacky (not fully cured), carefully peel away the painter’s tape at a 45-degree angle to prevent peeling any paint. -
Touch up:
Inspect your wavy lines. If any background color drifted too far or the transitions look messy, use a small artist’s brush to tidy up the edges. -
Final cure:
Allow the wall to dry undisturbed for at least 24 hours before moving furniture back against it, as heavy pigment loads can take a little longer to harden.
This serene backdrop sets a peaceful tone for the room that will age gracefully as your child grows
Playful Scallop Edge Divider in Blue and Sand
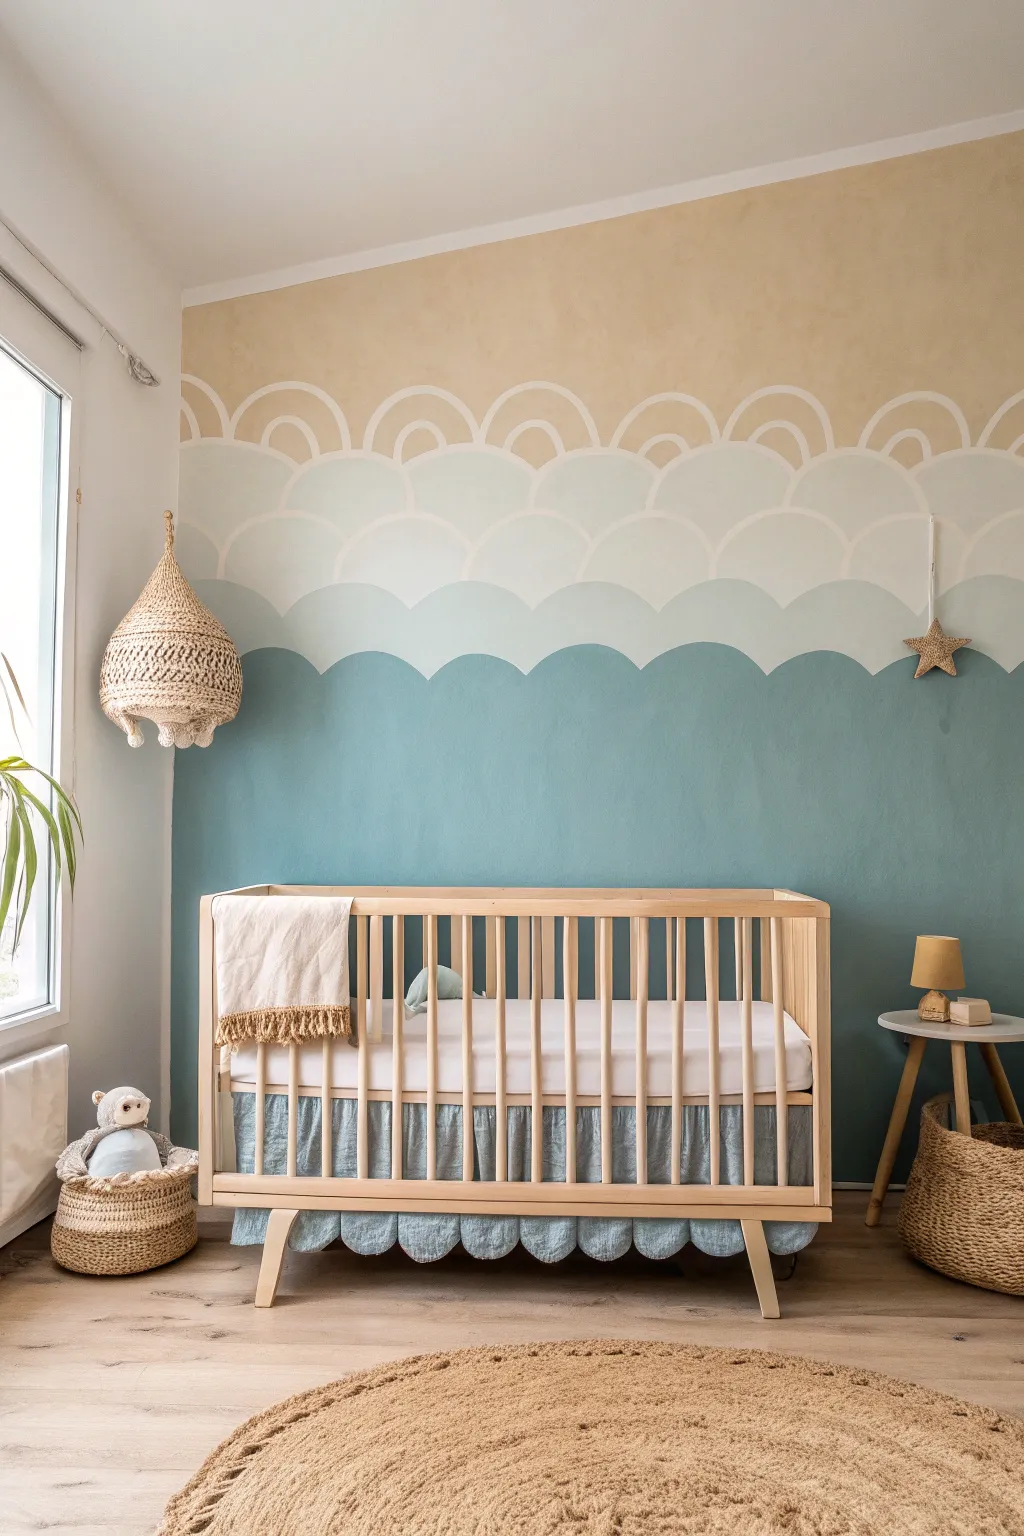
Transform a nursery wall into a calming seascape with this layered scallop design. Using soft shades of teal, sky blue, and warm sand, this hand-painted mural adds height and whimsy to the room without feeling cluttered.
Detailed Instructions
Materials
- Latex interior wall paint (Teal/Deep Aqua)
- Latex interior wall paint (Sky Blue)
- Latex interior wall paint (Cream/Off-White)
- Latex interior wall paint (Sand/Beige)
- Cardboard or sturdy cardstock (for stencils)
- Scissors and X-ACTO knife
- Pencil or white chalk
- Bubble level
- Painter’s tape
- Small roller (4-inch) and tray
- Angled sash brush (2-inch)
- Small artist brush or liner brush
- Drop cloths
Step 1: Preparation and Base
-
Prepare the space:
Clear the room of furniture or move pieces to the center. Lay down drop cloths to protect the flooring and tape off the baseboards and adjoining walls with painter’s tape. -
Paint the top section:
Start by painting the upper portion of the wall with your Sand/Beige color. Since the scallops will overlap this later, extend the paint down a bit lower than where you want the final beige section to end. Let this dry completely. -
Create the stencil:
Cut a piece of cardboard into a semi-circle to define your scallop size. A dinner plate makes a perfect template for tracing. I find a 10-12 inch width works well for this scale. Cut it out cleanly with scissors.
Clean Curves Secret
Don’t overload your brush when doing edges. Too much paint creates ridges. Use a ‘cutting in’ technique: press the bristles firmly so they fan out to create a sharp edge.
Step 2: Mapping the Design
-
Mark the horizon line:
Decide where the main teal section will stop—usually about midway up the wall or slightly lower (wainscot height). Use a level and a pencil to draw a faint straight horizontal line across the entire wall at this height. -
Trace the bottom scallops:
Place your cardboard stencil along the horizontal line you just drew. Trace the semi-circles with a pencil or chalk, moving the stencil across the wall side-by-side. Ensure the bottom points of the scallops touch your guide line. -
Paint the teal base:
Using the 4-inch roller, fill in the bottom section of the wall with the Teal paint up to about an inch below your scallop tracings. This covers the bulk of the area quickly. -
Cut in the teal scallops:
Switch to your angled sash brush to carefully paint inside the traced scallop lines. Use a steady hand to create the smooth curve. It helps to overload the brush slightly and drag it in one long motion rather than short strokes. -
Dry and repeat:
Allow the teal paint to dry completely. If the coverage looks patchy, apply a second coat to ensure a rich, solid color foundation.
Uneven Wall Widths?
If your wall width isn’t perfectly divisible by your stencil size, start stenciling from the CENTER of the wall and work out. The partial scallops will end up in the corners.
Step 3: Layering the Waves
-
Map the second layer:
Once the teal is dry, position your stencil so that the bottom points of the new row align with the peak of the teal row below (or offset them like bricks depending on your preference; here they are offset). Trace this second row lightly. -
Paint the sky blue layer:
Using the Sky Blue paint and a clean sash brush, carefully fill in this second row of scallops. Because this layer sits ‘behind’ the first, paint slightly down into the teal layer’s valleys to ensure no gaps show. -
Map the third layer:
Repeat the tracing process for the third layer, moving upwards. This row will be painted in Cream/Off-White. -
Paint the cream layer:
Fill in the third row with the Cream paint. This layer bridges the gap between the cool blues and the warm sand. You might need two coats here since light paint over a darker base (if you overlapped) can be translucent.
Step 4: The Detail Work
-
Outline the top row:
For the final row that transitions into the beige, you aren’t painting solid shapes. Instead, trace your stencil one last time above the cream layer. -
Paint the outlines:
Use a small artist brush and the Cream paint to hand-paint a thick outline along your pencil marks. This creates the airy, open-scallop look at the very top. -
Add inner details:
Using the Sand/Beige paint and a fine liner brush, paint a smaller semi-circle arch inside the cream outlines you just created. This mimics the look of a rainbow or rising sun. -
Touch ups:
Step back and inspect your curves. Use a small brush to sharpen any wobbly edges or fill in pinholes where the roller missed. Erase any visible pencil marks lightly.
Now step back and admire the gentle rhythm these painted waves bring to your little one’s sanctuary
Hidden Glow Star Details on a Night-Sky Wall
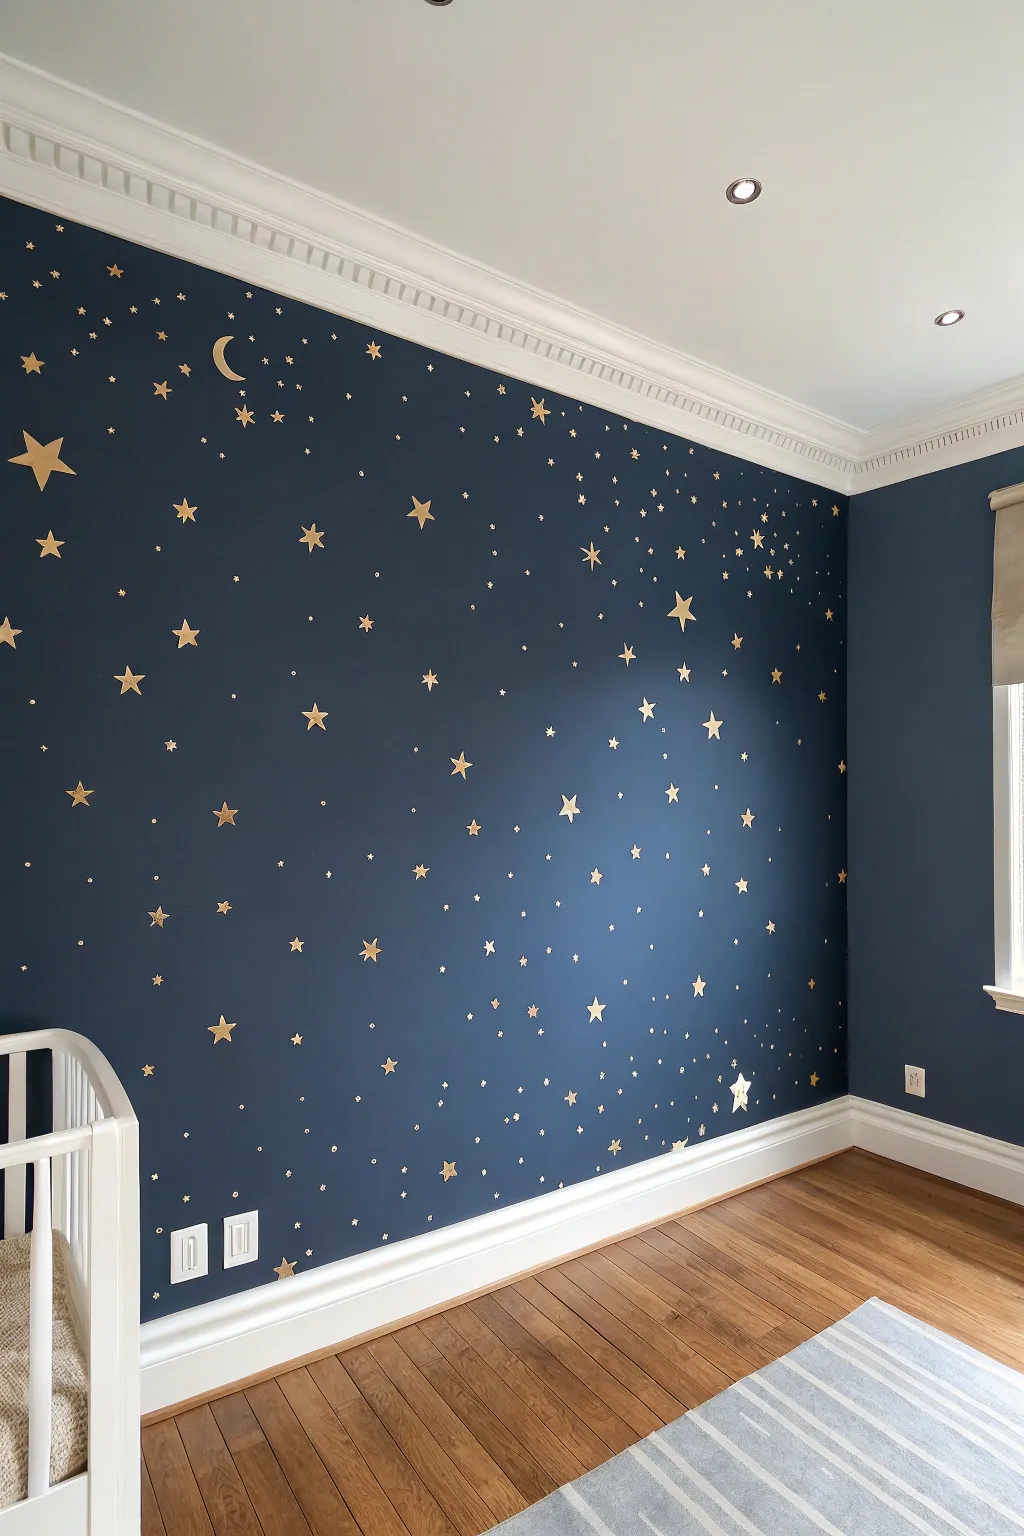
Transform a plain wall into a dreamy midnight sky that sparkles by day and glows by night. This project combines deep navy paint with metallic gold decals and hidden glow-in-the-dark paint for a magical bedtime surprise.
Step-by-Step Tutorial
Materials
- Deep navy blue interior latex paint (eggshell or satin finish)
- Painter’s tape
- Drop cloths
- Paint rollers and tray
- Angled sash brush for cutting in
- Gold star wall decals (assorted sizes)
- Metallic gold crescent moon decal
- Glow-in-the-dark acrylic craft paint
- Small fine-point paintbrush
- Ladder or step stool
- Clean, dry cloth
Step 1: Setting the Midnight Scene
-
Prep the room:
Clear furniture away from the accent wall and cover the floor with drop cloths. Apply painter’s tape along the baseboards, ceiling molding, and adjacent walls to ensure crisp, clean lines. -
Cut in the edges:
Using your angled sash brush, carefully paint a 2-3 inch border of the navy blue paint along all the taped edges and corners where the roller won’t reach. -
Roll the first coat:
Pour your navy paint into the tray. Load the roller and apply the first coat using W-shaped strokes to distribute the paint evenly across the wall. Don’t worry if it looks slightly patchy; dark colors often need two coats. -
Apply the second coat:
Allow the first coat to dry according to the manufacturer’s instructions (usually 2-4 hours). Apply a second coat to achieve that deep, rich midnight blue saturation. -
Clean up borders:
While the paint is still slightly tacky, carefully peel away the painter’s tape at a 45-degree angle to prevent peeling. Let the wall cure for at least 24-48 hours before applying any adhesive.
Decal Not Sticking?
If decals curl or won’t stick, the paint is likely too fresh. Wait another 24 hours. If walls are textured, use a warm hairdryer on the decal for 10 seconds, then press firmly with a cloth to mould it.
Step 2: Creating the Constellations
-
Plan the moon placement:
Identify a focal point for the crescent moon decal, typically in the upper third of the wall but away from corners. Stick the moon in place first. -
Map out large stars:
Take your largest gold star decals and scatter them across the wall. Aim for a random, organic distribution rather than perfect rows to mimic a real sky. -
Fill in with medium stars:
Place the medium-sized stars in the empty spaces between the large ones. Step back occasionally to check the balance and ensure no area looks too crowded or too empty. -
Add the stardust:
Use the smallest dot or tiny star decals to fill the remaining voids. Grouping a few tiny ones together can create nice mini-constellation effects. -
Secure the decals:
Once you are happy with the placement, gently rub a clean, dry cloth over each decal to ensure the adhesive bonds firmly to the painted wall.
Step 3: The Hidden Glow Effect
-
Prepare the glow paint:
Shake your bottle of glow-in-the-dark acrylic paint thoroughly. Squeeze a small amount onto a palette or paper plate. -
Paint over specific stars:
Dip the fine-point brush into the glow paint. Carefully paint a thin layer directly on top of the gold vinyl of the larger stars. The paint dries clear, so it won’t ruin the gold look. -
Create invisible stars:
For an extra layer of magic, use the tip of your brush to dot small ‘invisible’ stars directly onto the blue paint in the darker areas. These will only appear when the lights go out. -
Let it charge:
Allow the glow paint to dry completely. For the best effect, leave the room lights on for roughly 30 minutes before bedtime to charge the phosphorescent pigment.
Level Up: Real Constellations
Before placing decals, lightly sketch real constellations like the Big Dipper or Orion using white chalk. Place your gold stars along these lines for an educational and authentic night sky.
Now you have a sophisticated celestial wall that creates a comforting glow for your little one every night
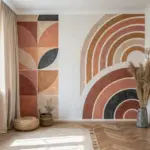
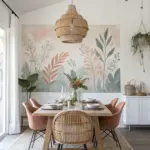

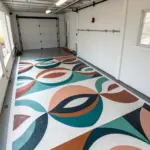
Have a question or want to share your own experience? I'd love to hear from you in the comments below!