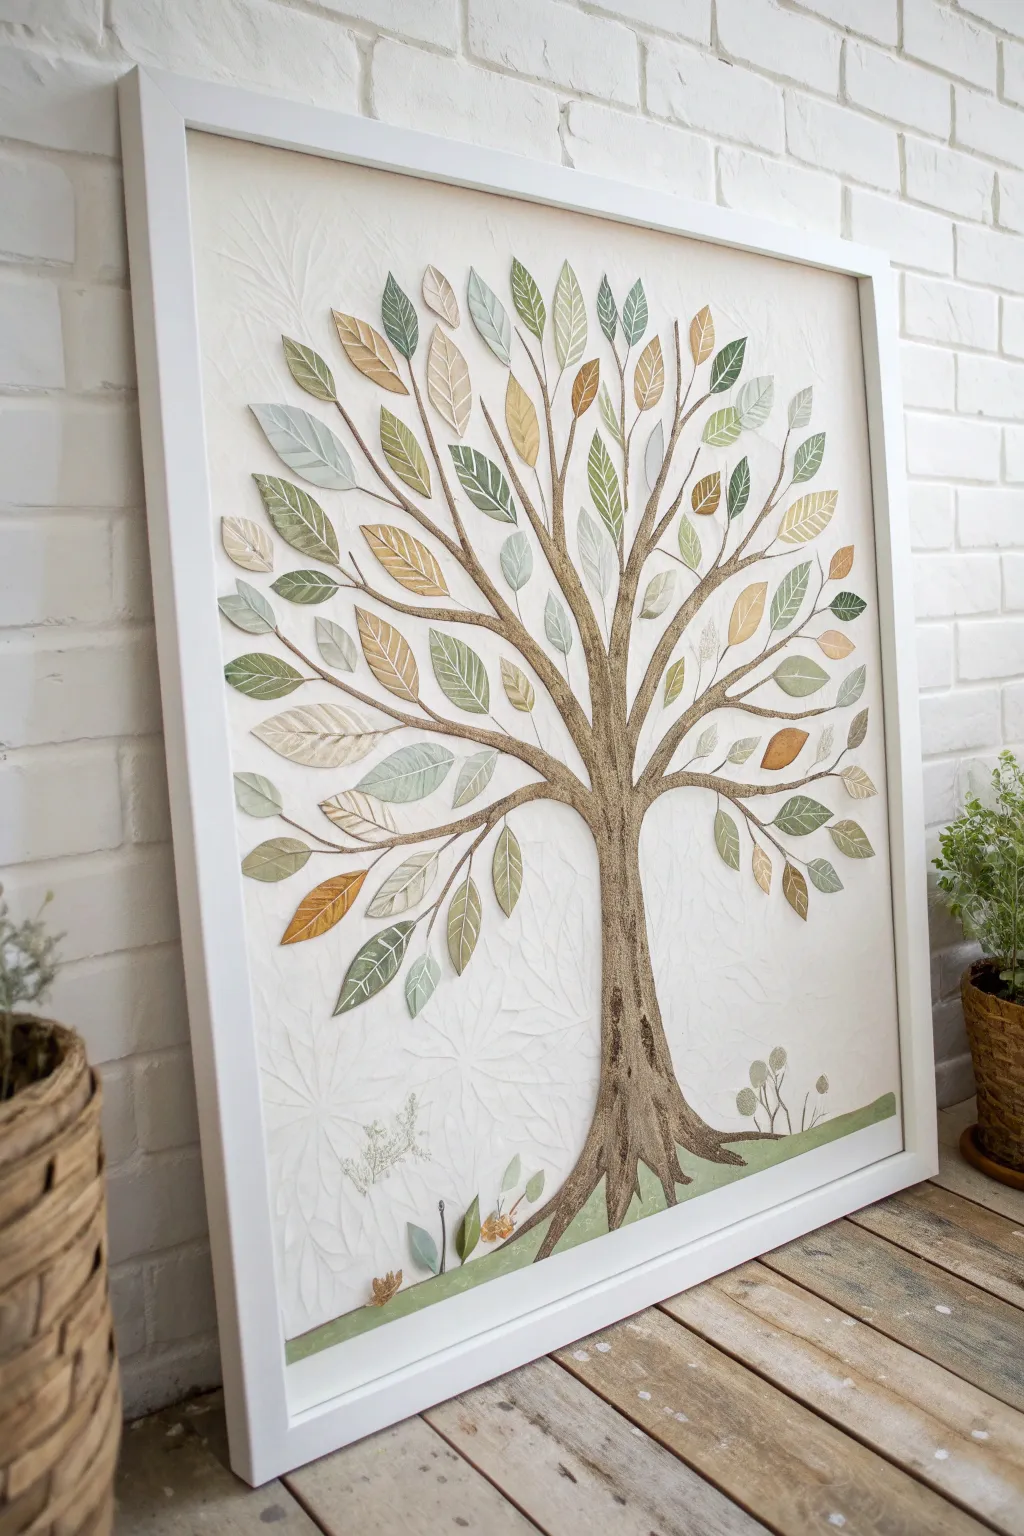
Whenever I paint a Tree of Life, it feels like I’m building a little universe on the page—roots in the earth, branches reaching into the unknown. Here are my favorite tree of life painting ideas to spark your next piece, from classic symbolism to playful, unexpected twists.
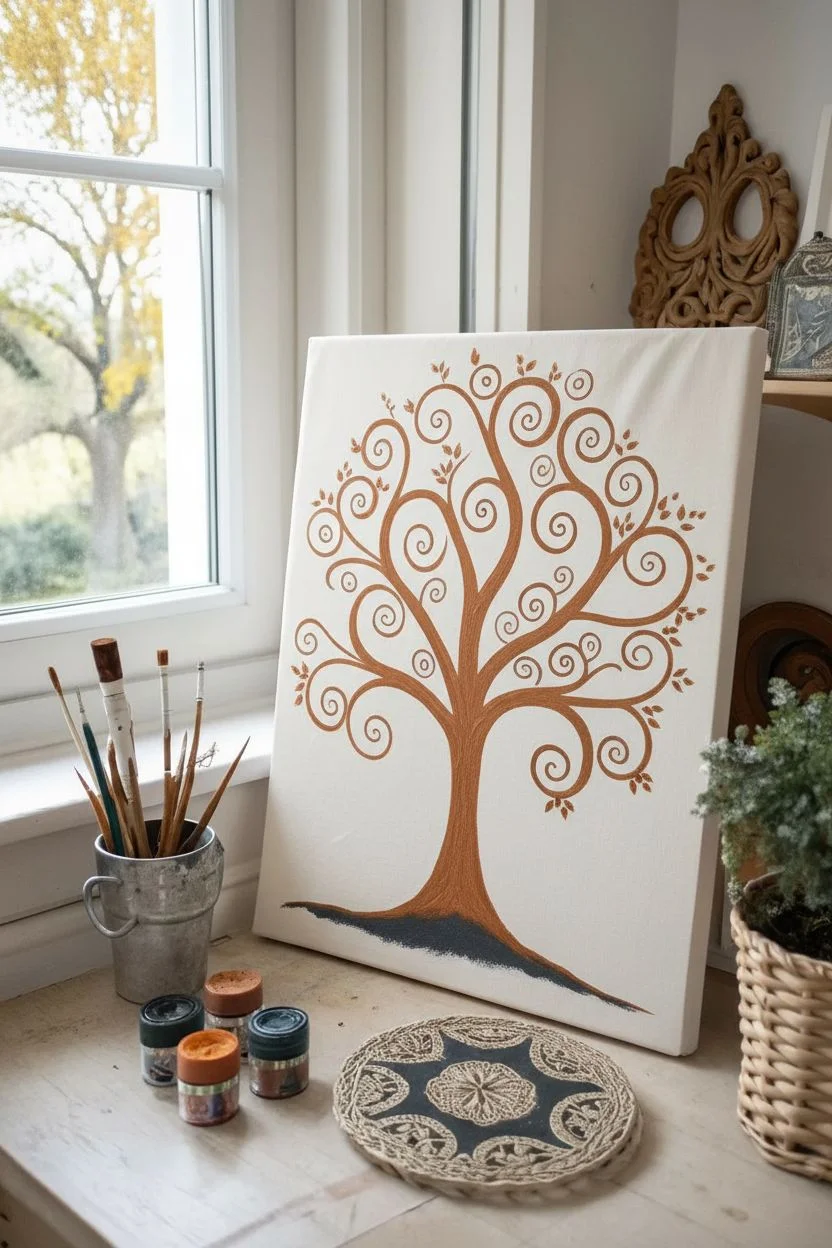
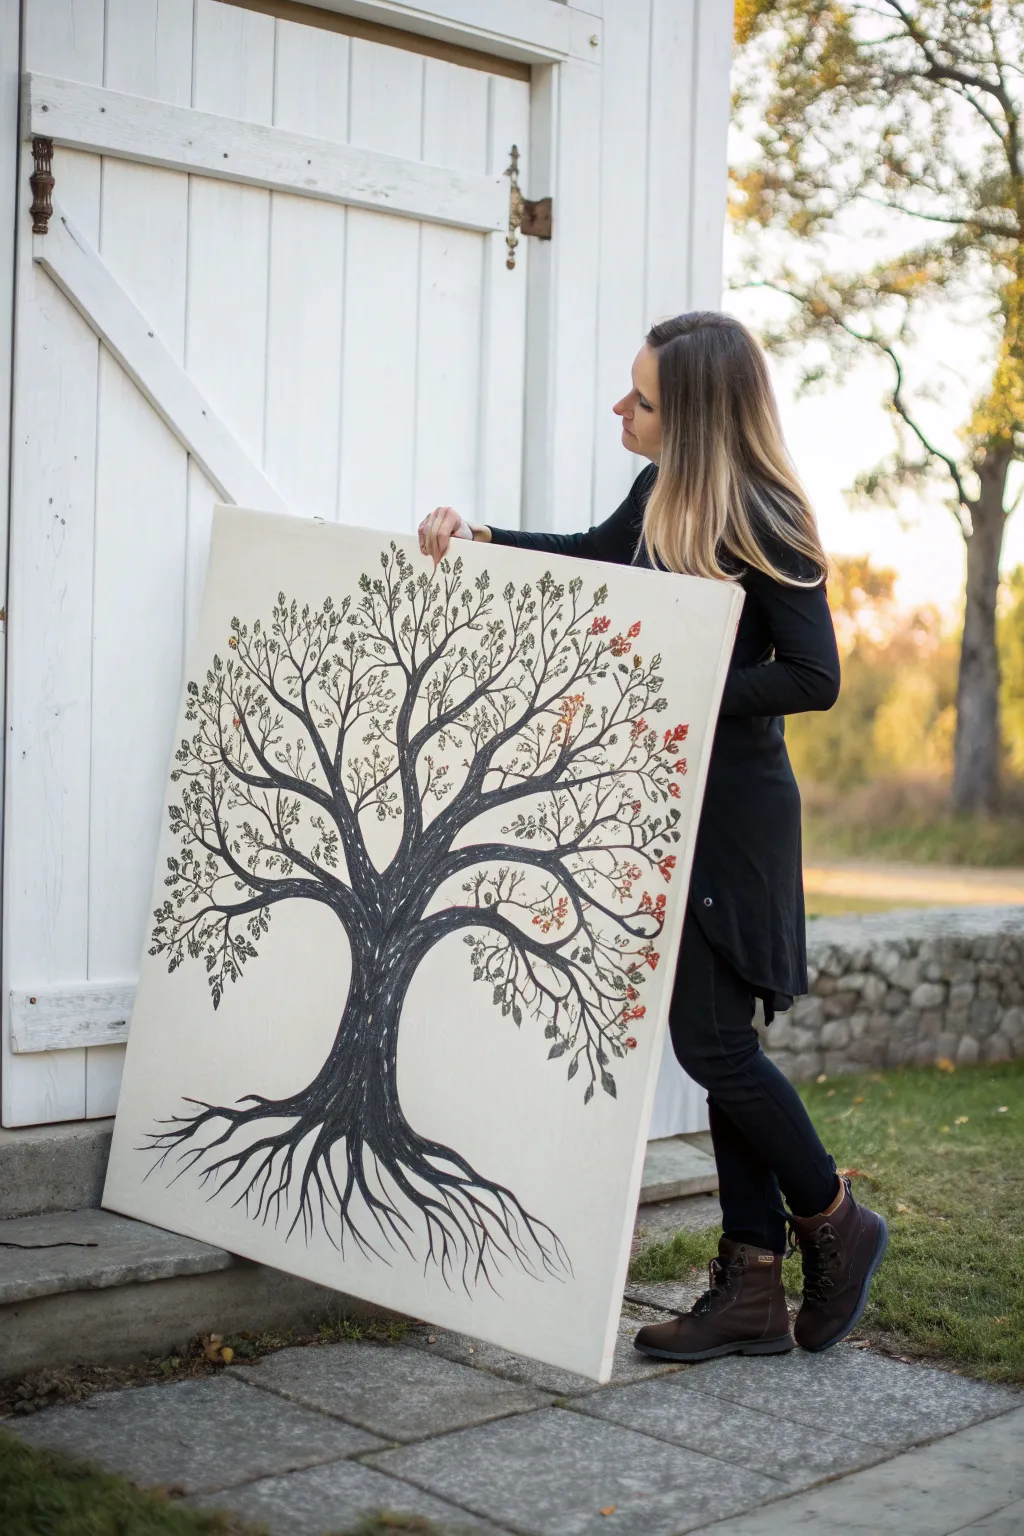
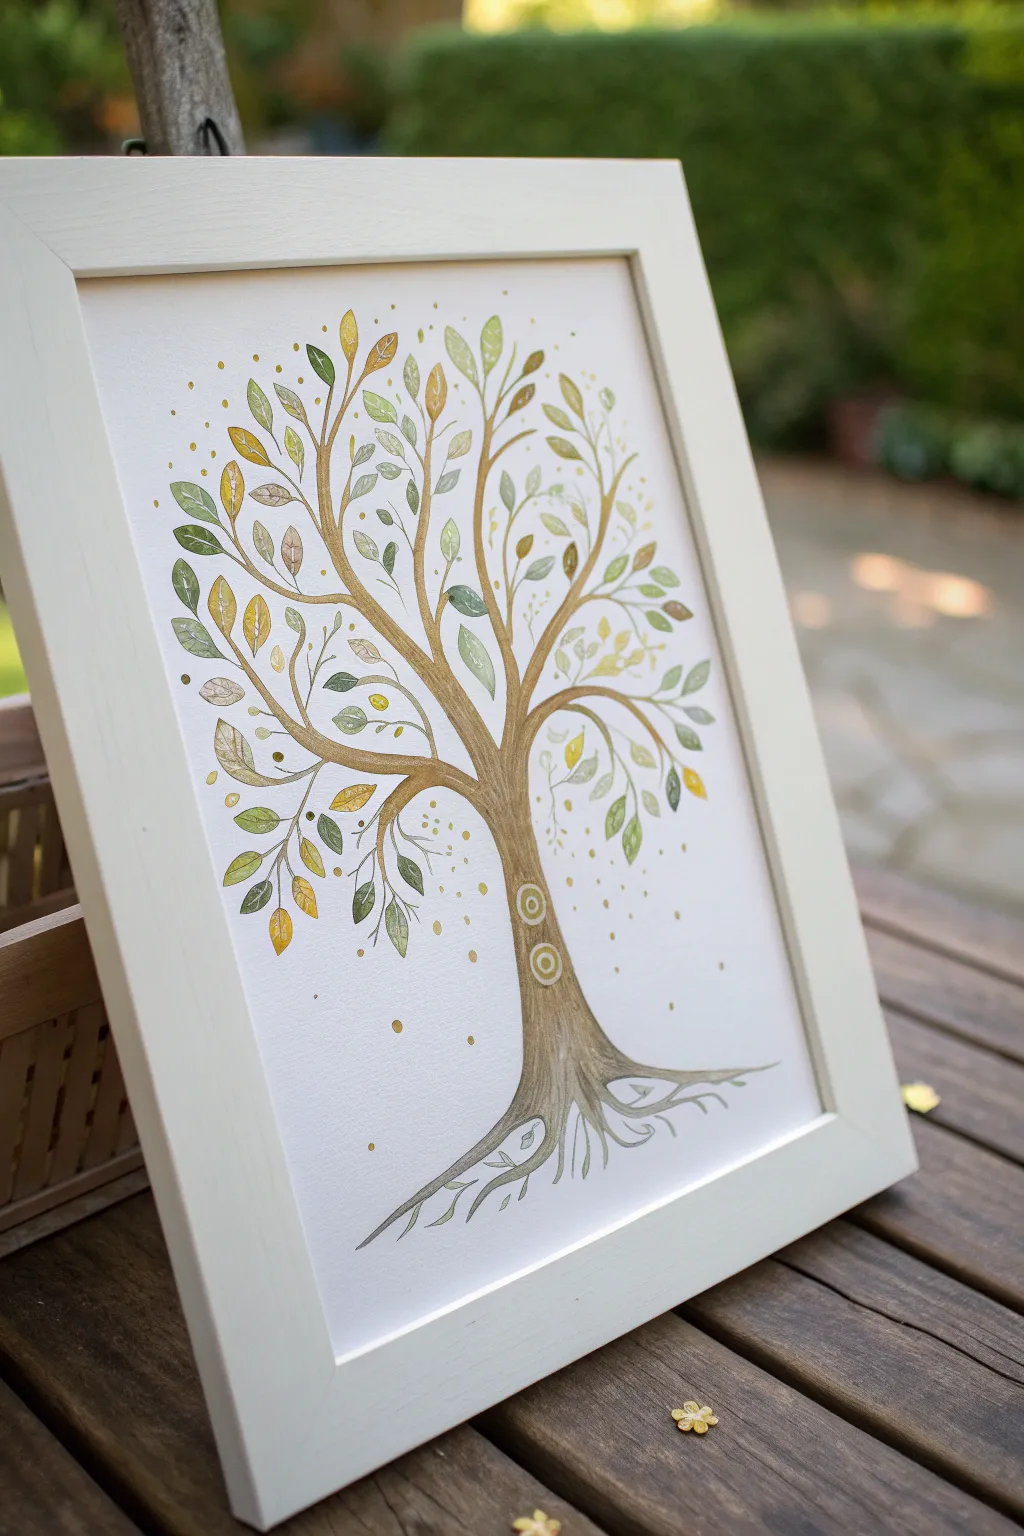
Rainbow Canopy Tree of Life
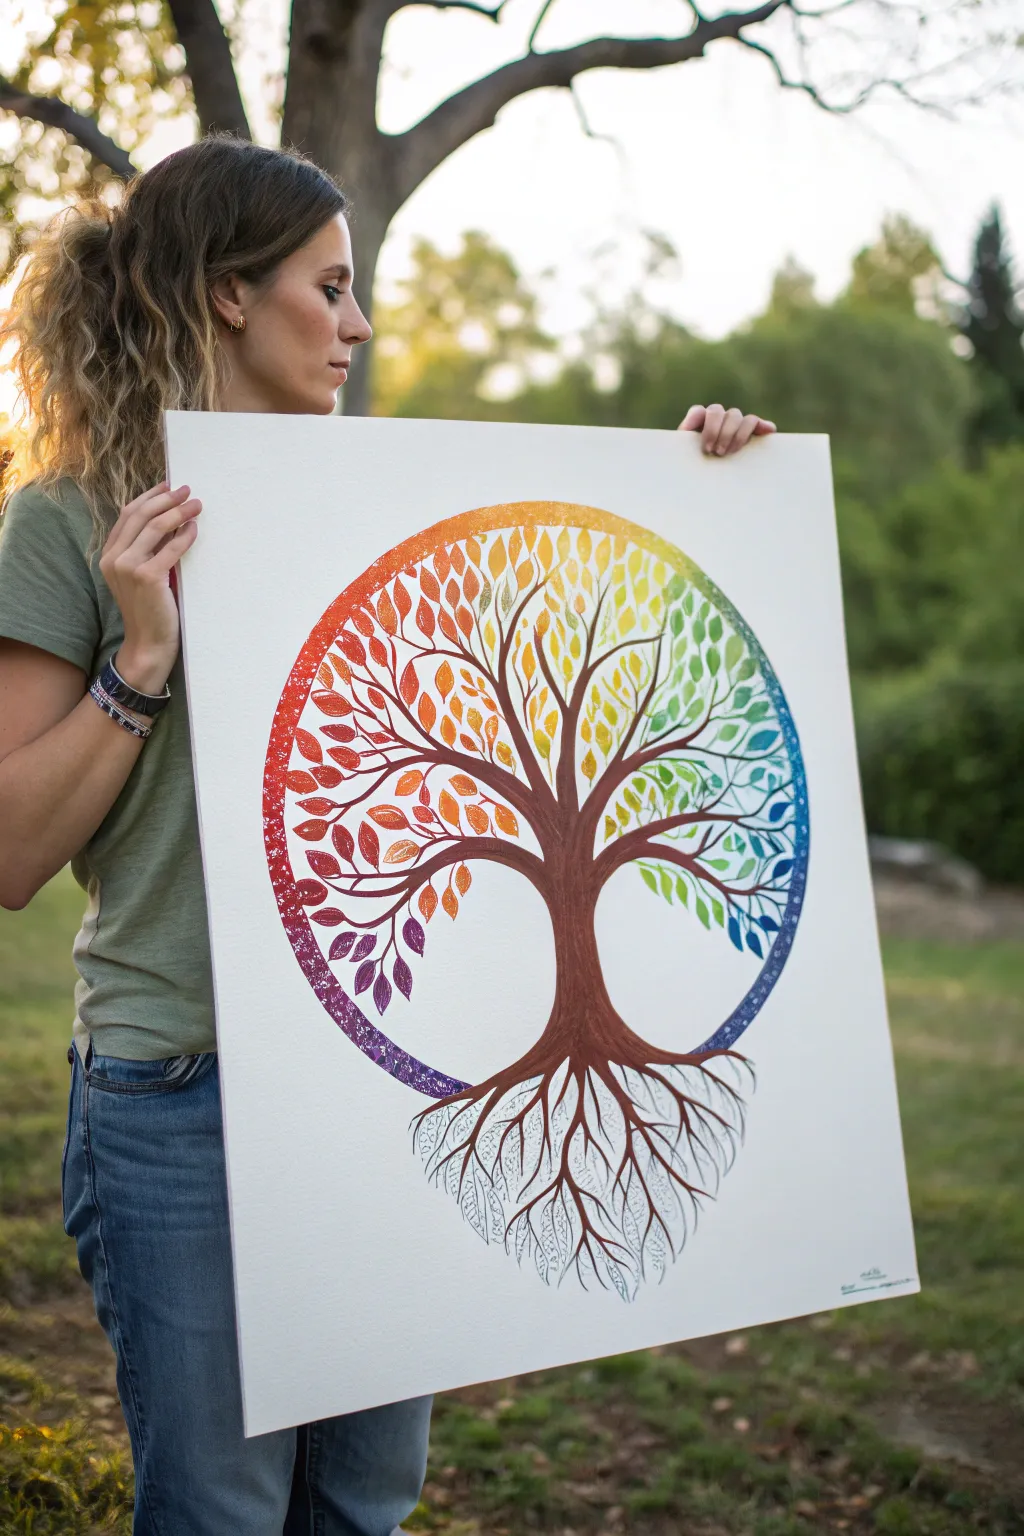
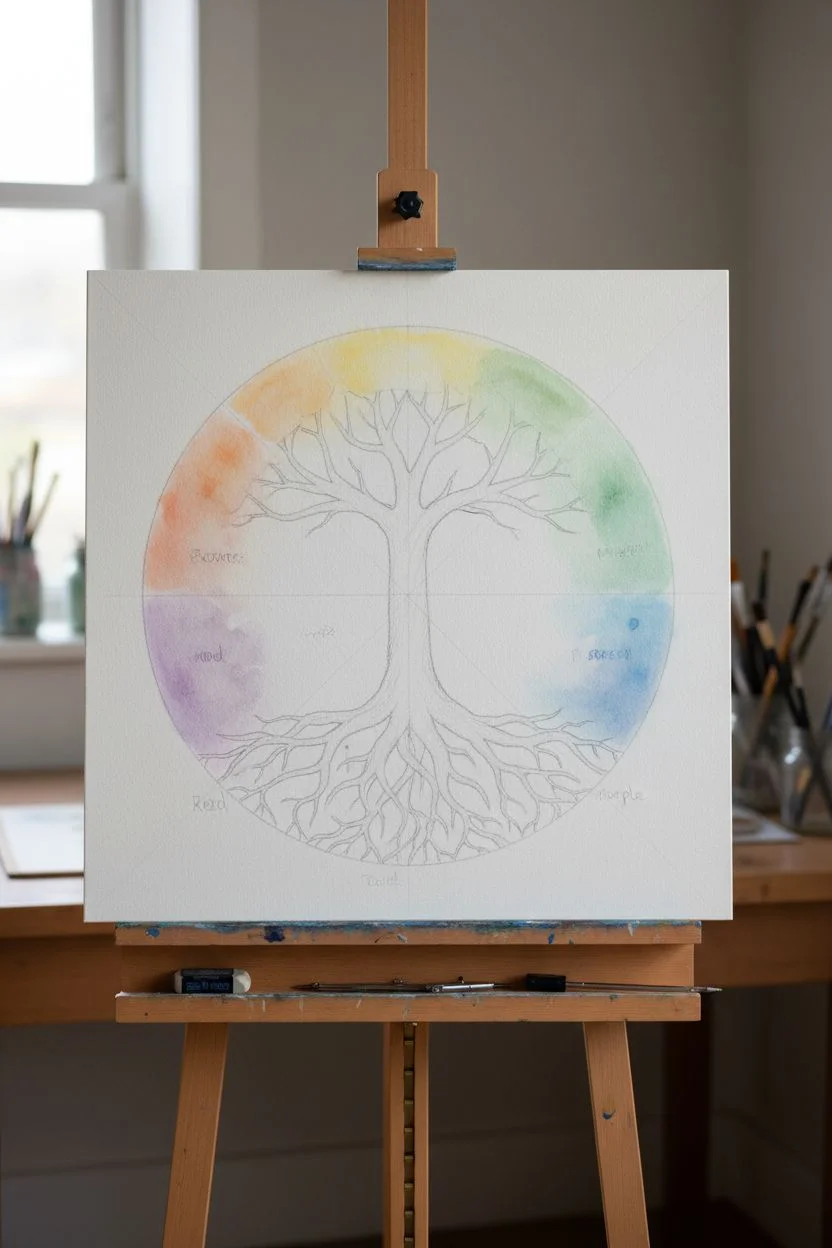
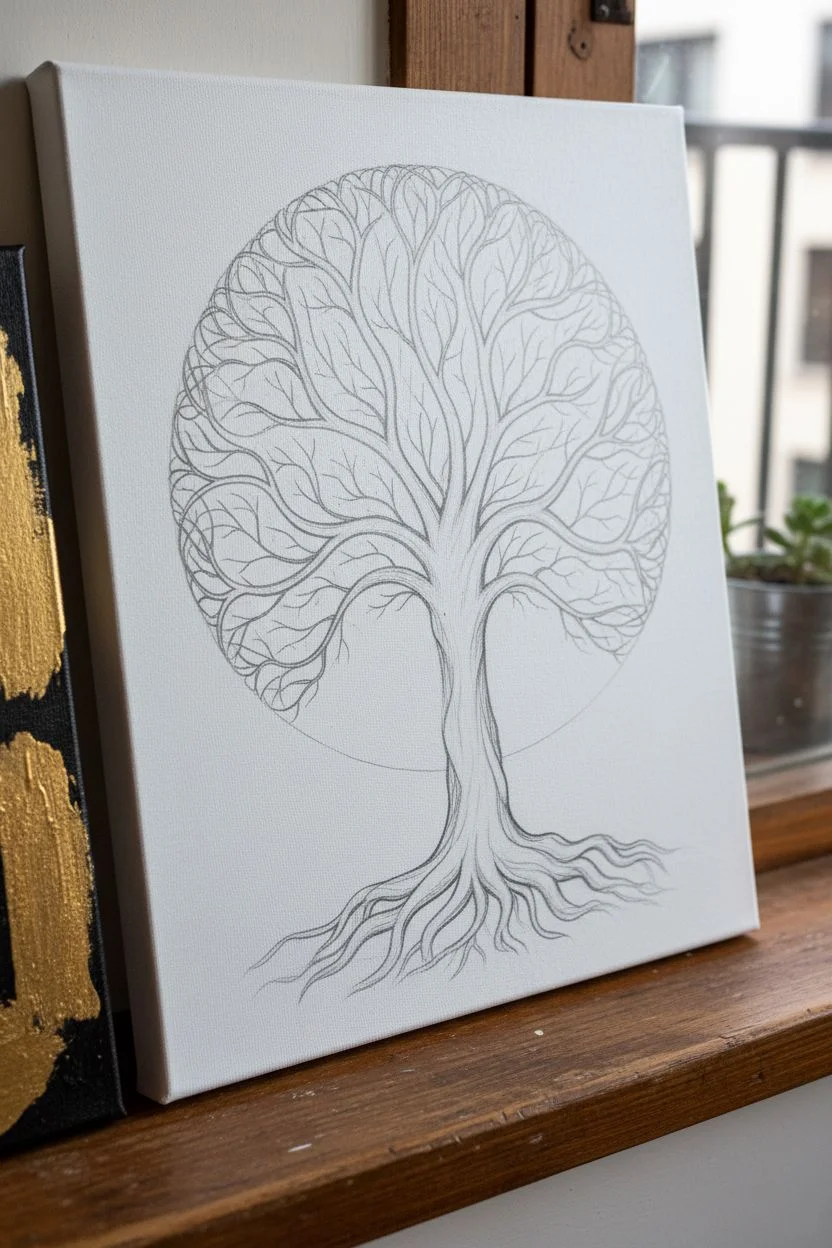
This striking piece features a silhouetted tree trunk that bridges the gap between vibrant color and detailed line work. The canopy bursts with a spectrum of rainbow leaves arranged in a perfect circle, while the exposed roots mirror the shape below in delicate black ink.
Step-by-Step
Materials
- Large square canvas or heavy watercolor paper (approx. 24×24 inches)
- Acrylic paints (Red, Orange, Yellow, Green, Blue, Indigo, Violet, Brown)
- Medium flat brush
- Small round detail brush (size 0 or 1)
- Fine-point black permanent marker or ink pen
- Large compass or a round object to trace (like a large serving platter)
- Pencil and eraser
- Palette for mixing
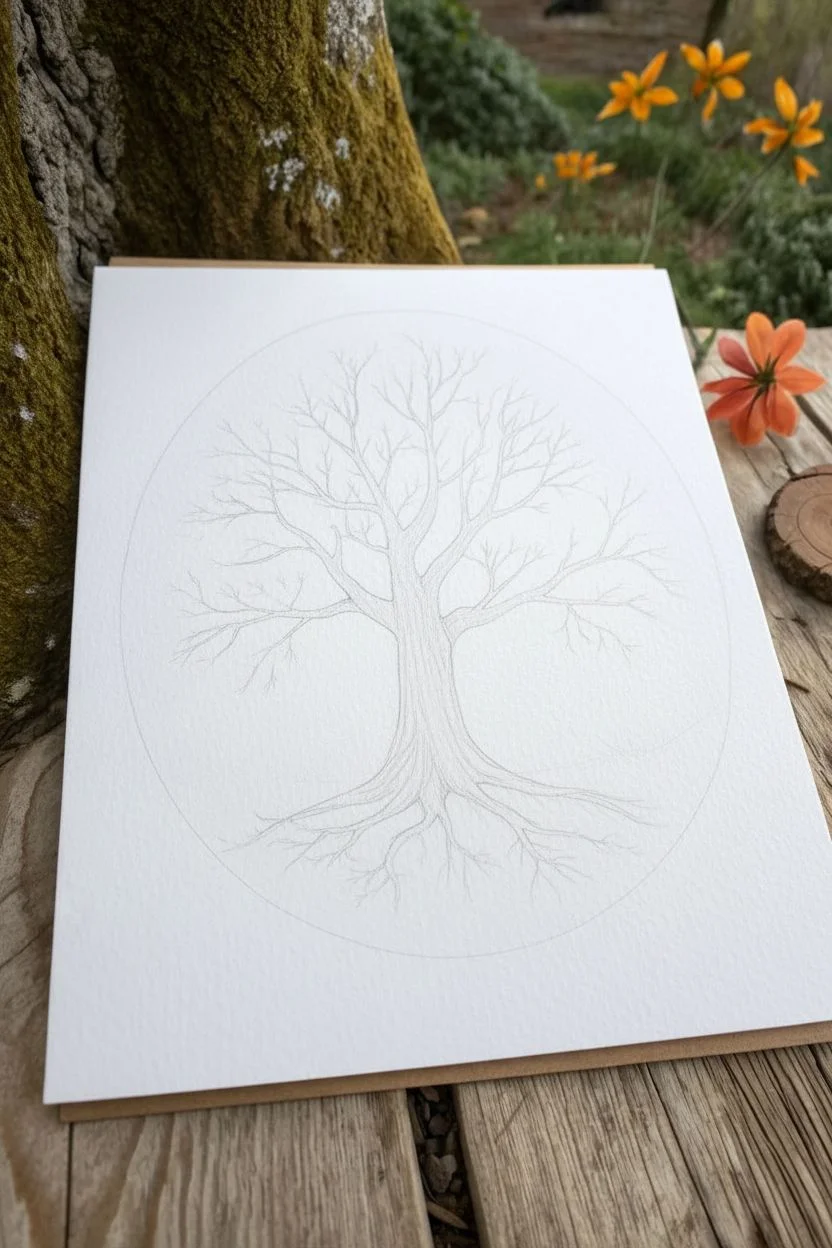
Step 1: Drafting the Structure
-
Establish the circle:
Begin by lightly tracing a large circle in the center of your canvas using a compass or a large round template. This will serve as the boundary for your rainbow canopy and the outer rim. -
Sketch the trunk:
Lightly sketch the tree trunk in the center. It should be thickest at the middle and taper upwards into branches and downwards into roots. Ensure the main branches and roots extend almost to the edge of your circle guide. -
Outline the branches:
Draw the main branches reaching upward, fanning out to fill the top half of the circle. Keep the lines flowing and organic. -
Draft the roots:
Mirror the upper branches by sketching the root system in the bottom half. These should look like an inverted reflection of the branches but can be slightly more gnarled or intricate. -
Map the color zones:
Very faintly mark where your color transitions will happen around the circle, moving clockwise from red on the left, through orange, yellow at the top, green, and blue/purple on the right.
Uneven Circle?
If your hand-painted circle looks wobbly, don’t worry. Use a slightly larger bowl or plate as a stencil to gently correct the outer edge with white paint.
Step 2: Painting the Tree
-
Paint the trunk:
Using a medium brown acrylic paint, fill in the central trunk and the main thick branches. I like to add a tiny touch of black to the brown to make the silhouette stand out more against the white background. -
Refine the branches:
Switch to a smaller round brush to extend the brown paint into the finer branch tips. Let them taper off naturally before they reach the edge of the circle. -
Start the rainbow rim:
Paint a simplified, segmented ring around the outer edge of your pencil circle. Start with red on the lower left and blend smoothly into orange as you move up. -
Complete the gradient:
Continue the rim gradient: yellow at the peak, transitioning to green, light blue, dark blue, and finally purple as you curve back down to the bottom right. Let this ring dry completely. -
Add texture to the rim:
Once dry, use a damp sponge or a dry brush to dab a little white texture over the rainbow rim to give it that slightly distressed, organic look seen in the photo.
Pro Tip: Color Flow
Pre-mix your transition colors (like yellow-orange and blue-green) on your palette before painting to ensure the rainbow gradient looks smooth and natural.
Step 3: Creating the Leaves
-
Paint red and orange leaves:
Using a small round brush, paint individual leaf shapes on the left side branches. Match the leaf color to the adjacent section of the rainbow rim (reds at the bottom left, oranges moving up). -
Yellow and green foliage:
Continue painting leaves across the top arch. Use bright yellow for the highest branches and transition into fresh greens as you move down the right side. -
Blue and purple finish:
Complete the canopy on the lower right with blue and violet leaves. Ensure the leaves are dense enough to define the shape but spaced enough to see the white background. -
Layering for depth:
Go back and add a few lighter or darker shades within each color zone (like a pale lime green next to a dark forest green) to add dimension to the foliage.
Step 4: The Root System
-
Outline the roots:
Switch to your fine-point black marker or ink pen. Carefully trace over your pencil sketches for the root system. -
Detailing the underground:
Instead of coloring the roots in, fill them with intricate linework. Use stippling (dots) or hatching lines to create shadow and texture within the root outlines. -
Connect the halves:
Ensure the painted brown trunk transitions seamlessly into the inked roots. You might need to bring the ink lines slightly up into the brown paint to blend the two styles. -
Final touches:
Erase any remaining pencil marks once the ink and paint are fully dry. Step back and check if the circular shape feels balanced.
Hang this vibrant piece in a sunny spot to let the rainbow colors truly shine


Glowing Halo Aura Behind the Tree of Life
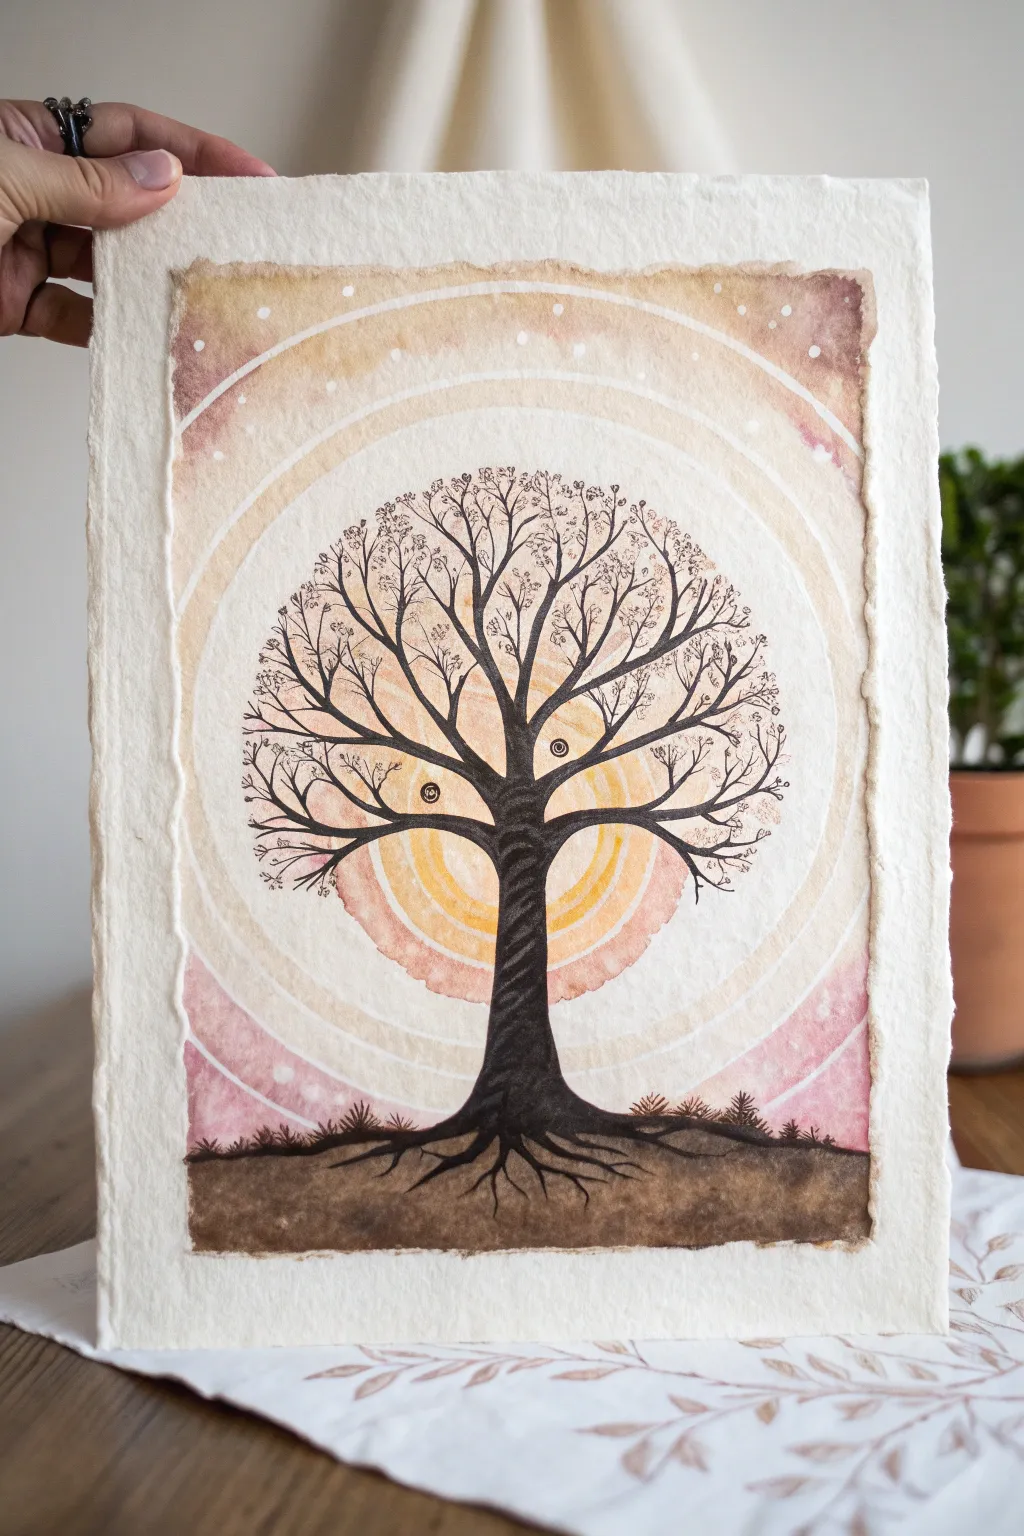
This project captures a mystical balance between grounding earth and ethereal light using concentric circles and fine ink details. You’ll create a glowing sunset aura on beautiful deckle-edge paper, centering a stark, silhouetted tree of life that bridges the two worlds.
Detailed Instructions
Materials
- Heavyweight handmade cotton rag paper (deckle edge)
- Watercolor paints (Yellow Ochre, Burnt Sienna, Alizarin Crimson, Sepia)
- Black waterproof fine liner pens (0.1, 0.3, and 0.5 sizes)
- Compass or circular objects for tracing
- Soft round watercolor brushes (Size 4 and 8)
- White gel pen or white gouache
- Masking fluid (optional)
- Pencil and eraser
- Painter’s tape and drawing board
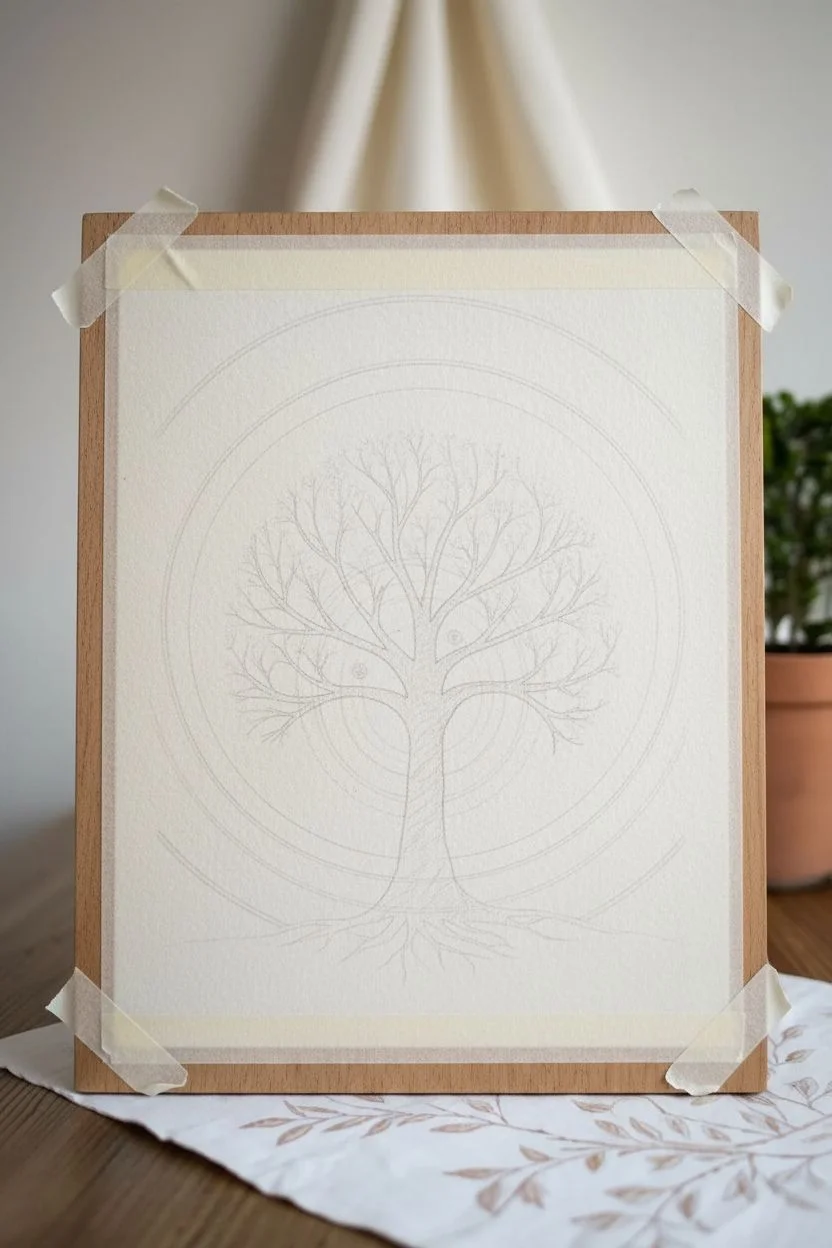
Step 1: Setting the Scene
-
Paper Preparation:
Secure your handmade paper to a board using painters tape. Since this paper is textured and delicate, tape only the very corners or use a low-tack tape to prevent tearing. -
Drafting the Geometry:
Using a compass very lightly, draw a small circle in the direct center of the page. This will be your ‘sun’ or light source. -
Expanding the Halo:
Draw three to four concentric rings extending outward from that center circle, spacing them evenly until you reach almost the edge of the paper. Keep these lines faint as they are just guides for your paint. -
Sketching the Tree:
Lightly sketch the silhouette of your tree. Place the trunk directly over the center rings, letting the branches fan out to fill the upper circle and the roots spread into the bottom third of the page.
Step 2: Painting the Aura
-
First Wash – The Center:
Wet the innermost circle with clean water. Drop in dilute Yellow Ochre, keeping it strongest at the edges and fading to almost white in the very middle. -
The Second Ring:
Move to the next ring outward. Wet the paper and apply a slightly darker mix of Yellow Ochre and a touch of Burnt Sienna. Leave a tiny sliver of dry white paper between this ring and the center one to create that distinct ‘halo’ separation. -
Expanding Warmth:
For the third ring, mix Burnt Sienna with a hint of Alizarin Crimson to get a soft peach tone. Paint this ring, again leaving a hairline gap of white paper between it and the previous ring. -
The Outer Glow:
Paint the outermost areas and corners with a mix of Alizarin Crimson and Sepia for a dusky, brownish-pink frame. Fade this wash gently toward the interior rings. -
Adding Stars:
While the outer layers are still damp, splatter clean water or drop in tiny dots of white gouache to create ‘stars’ or distinct atmospheric speckles in the upper corners. -
Grounding the Earth:
Paint the bottom section of the page with a rich Sepia or dark brown watercolor wash. Let the top edge of this ground layer be uneven to mimic terrain. Allow the entire painting to dry completely.
Halo Control
To keep the white gaps between rings crisp, you can apply thin lines of masking fluid with a ruling pen before painting. Rub it away gently once the paint is bone dry.
Step 3: Inking the Silhouette
-
Outline the Trunk:
Switch to your 0.5 waterproof pen. Carefully outline the twisted trunk of your tree, following your pencil sketch. Thick lines work best here to contrast against the soft background. -
Fill the Core:
Color in the trunk solid black. I like to use distinct, directional strokes that follow the twist of the wood rather than just scribbling it in, giving the silhouette texture. -
Root System:
Extend the black ink downwards into the brown earth section. Draw roots that wiggle and taper deep into the ground, grounding your composition. -
Primary Branches:
Draw the main thick branches extending upward. Ensure they curve gracefully to fit within the circular composition of your painted halos. -
Fine Branching:
Switch to a 0.3 pen. Add smaller branches splitting off from the main ones. Keep your hand loose to avoid stiff, unnatural lines. -
Delicate Twigs:
Using your finest 0.1 pen, add the tiniest twigs at the very ends of the branches. Crowd these slightly to create a dense canopy effect. -
Leaf details:
Stipple or draw tiny loops at the ends of the finest twigs to suggest leaves associated with the season. -
The Magical Eyes:
Referencing the image, draw two small spiral ‘eyes’ or knots on the trunk or lower branches using the fine pen. This gives the tree its mystical, sentient character. -
Final Grass Details:
Use the 0.1 pen to add tiny spikes of grass and small plants along the horizon line where the black trunk meets the brown earth paint.
Golden Hour Glow
Mix a tiny bit of metallic gold watercolor or iridescent medium into your yellow ochre wash. The center of your tree will shimmer subtly when hung in natural light.
Step back and admire how the dark silhouette makes the warm background colors sing


Mirrored Roots and Branches “As Above, So Below”
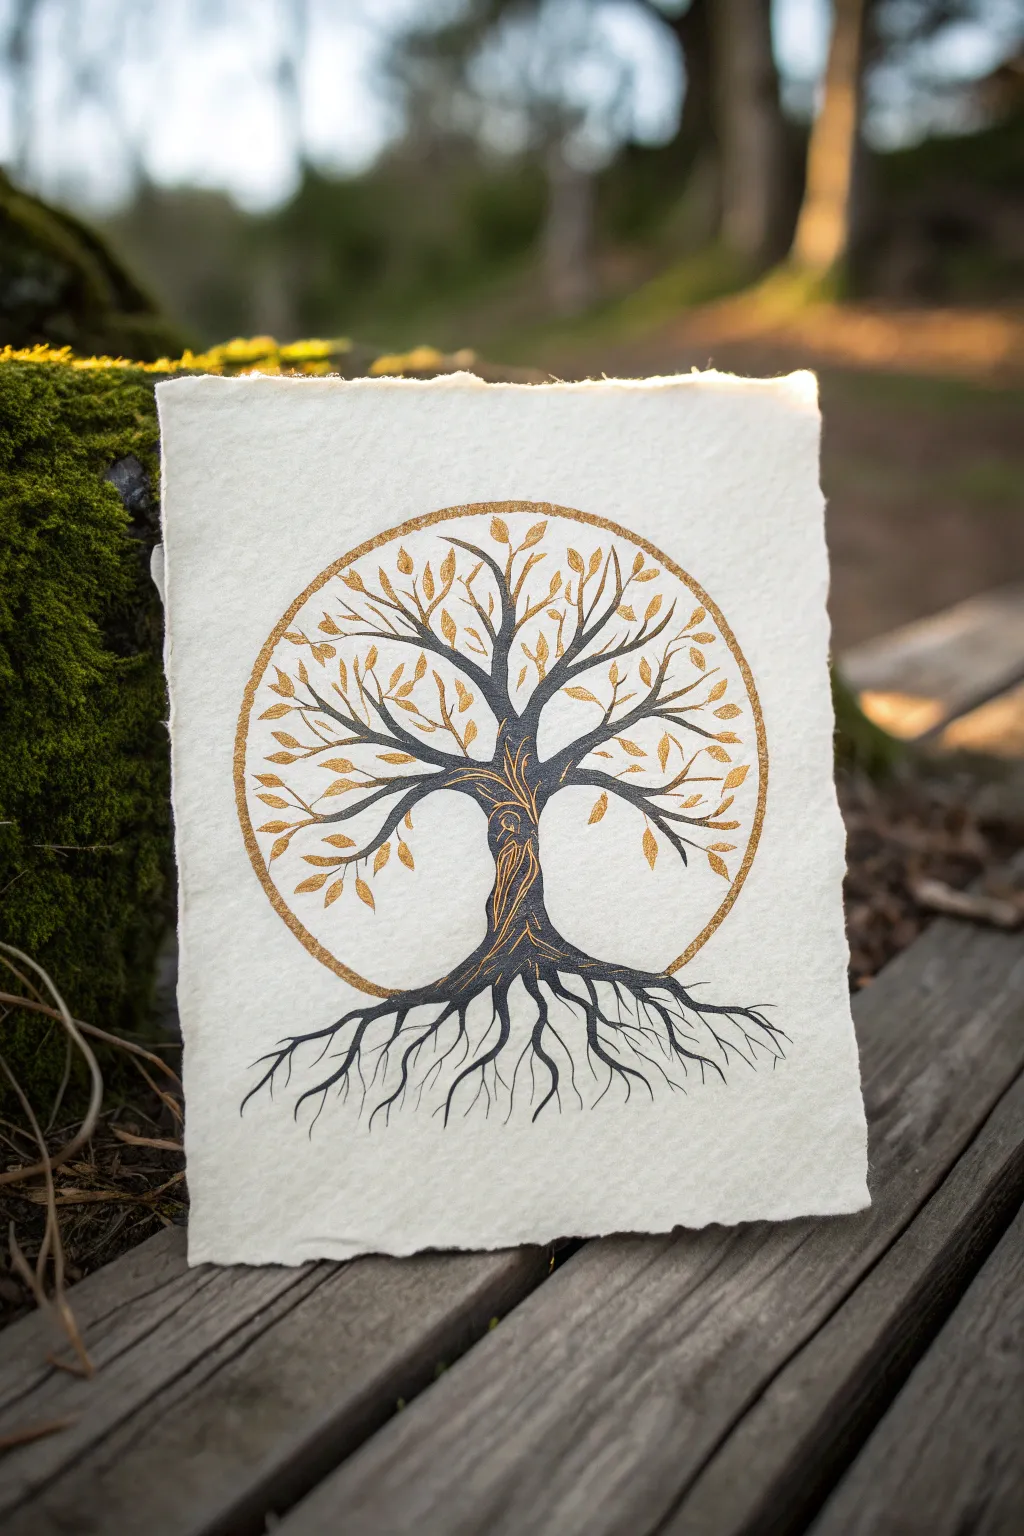
This project captures the essence of balance with a stylized Tree of Life design featuring intricate, spreading roots that mirror the canopy above. The stark contrast of black ink against metallic gold leaves on textured, deckled-edge paper creates a piece that feels both rustic and luxurious.
How-To Guide
Materials
- Heavyweight cold-press watercolor paper or handmade cotton rag paper (deckled edge)
- Black archival fine liner pens (sizes 005, 01, and 05)
- Black ink or gouache
- Fine round paintbrush (size 0 or 1)
- Metallic gold watercolor paint or gold gouache
- Pencil (HB)
- Kneaded eraser
- Compass or circular object (approx. 5-6 inches diameter)
- Ruler
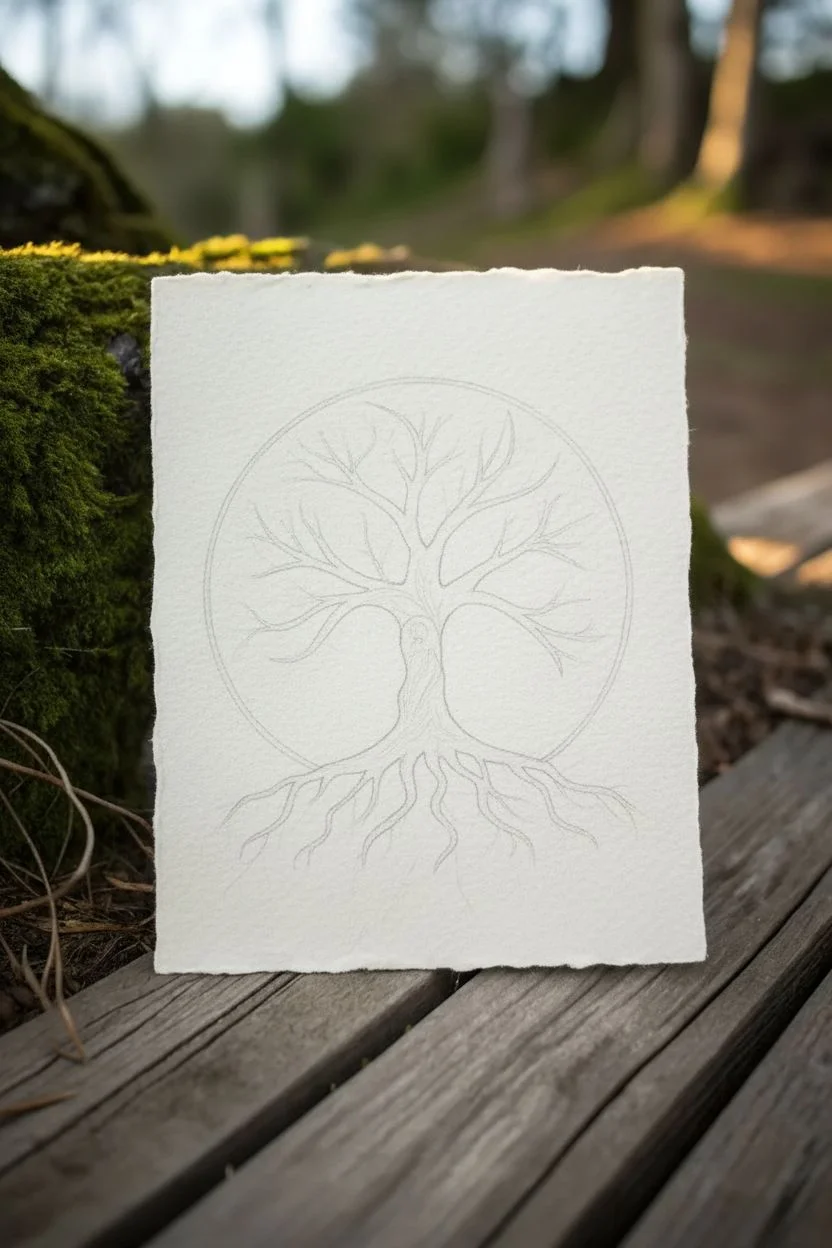
Step 1: Planning the Composition
-
Paper Preparation:
Start by selecting a piece of heavy, textured paper. If your paper doesn’t have a deckled edge, you can gently tear the edges against a ruler to create that soft, raw look. -
Drawing the Circle:
Use a compass or trace a circular object lightly in pencil slightly above the center of the page. This circle will contain the canopy, while the roots will flow out from beneath it. -
Sketching the Trunk:
Lightly sketch the main trunk in the center of the circle. Create a sturdy, twisting form that tapers slightly as gets closer to the middle point. -
Adding Branches:
Extend branches upward from the trunk, fanning them out to reach the edges of your pencil circle. Keep them organic and flowing. -
Sketching the Roots:
Draw the main root lines descending from the trunk’s base. Unlike the branches, these should break the boundary of where a circle would be, spreading wide and deep into the ‘ground’ area of the paper.
Choosing Your Paper
Cotton rag paper is ideal here. Its thirsty surface absorbs the ink beautifully, preventing bleeding, while the heavy texture adds an ancient feel.
Step 2: Inking the Structure
-
Outlining the Trunk:
Using your 01 size pen, carefully outline the main shape of the trunk. Don’t worry about perfectly straight lines; a slightly shaky hand adds to the bark texture. -
Filling the Silhouette:
Switch to a brush and black ink (or gouache) to fill in the trunk solid black. Leave small, thin slivers of white paper showing through in the middle of the trunk to suggest twisted wood texture. -
Refining the Branches:
Use the brush or a thicker 05 pen to taper the branches as they extend outward. They should be thickest near the trunk and hair-thin at the tips. -
Creating Root Details:
Ink the roots with long, sinuous strokes. I find that quick, confident movements help create smoother, more root-like curves than slow, hesitant ones. -
Adding Rootlets:
Switch to your finest 005 pen. Draw tiny, hair-like rootlets branching off the main roots, dragging the ink downward to fade it out. -
Bark Texture:
Add fine lines running vertically inside the trunk area using the finest pen (if you painted it solid, you might use white gel pen or metallic gold for this, or rely on the negative space left earlier).
Ink Bleeding issues?
If ink feathers on the textured paper, switch to a gouache paint with very little water, or spray the paper lightly with a matte fixative before inking.
Step 3: Gilding the Canopy
-
Mixing the Gold:
Prepare your metallic gold paint. It should be opaque enough to cover the paper but fluid enough to glide easily. Test the consistency on a scrap piece of paper first. -
Painting the Halo:
Using the fine brush, paint over your pencil circle line with gold. Make this line organic and slightly uneven to mimic a vine or branch enclosing the tree. -
Adding Leaves:
Begin painting small, leaf-shaped dabs of gold attached to the black branches. Cluster them slightly but ensure they remain distinct. -
Filling the Canopy:
Continue adding gold leaves until the circle feels balanced. Vary the size of the leaves slightly for naturalism. -
Highlighting the Trunk:
For a magical touch, paint very thin veins of gold swirling up the black trunk, connecting the roots to the golden canopy.
Step 4: Finishing Touches
-
Erase Guidelines:
Wait until the ink and paint are completely bone dry. Gently erase any visible pencil marks with the kneaded eraser. -
Final Inspection:
Check for any gaps in the black ink that need filling or leaves that need a second coat of gold for extra shine.
Now you have a stunning piece of symbolic art ready to frame or display on a rustic shelf


Day and Night Dual-World Tree of Life
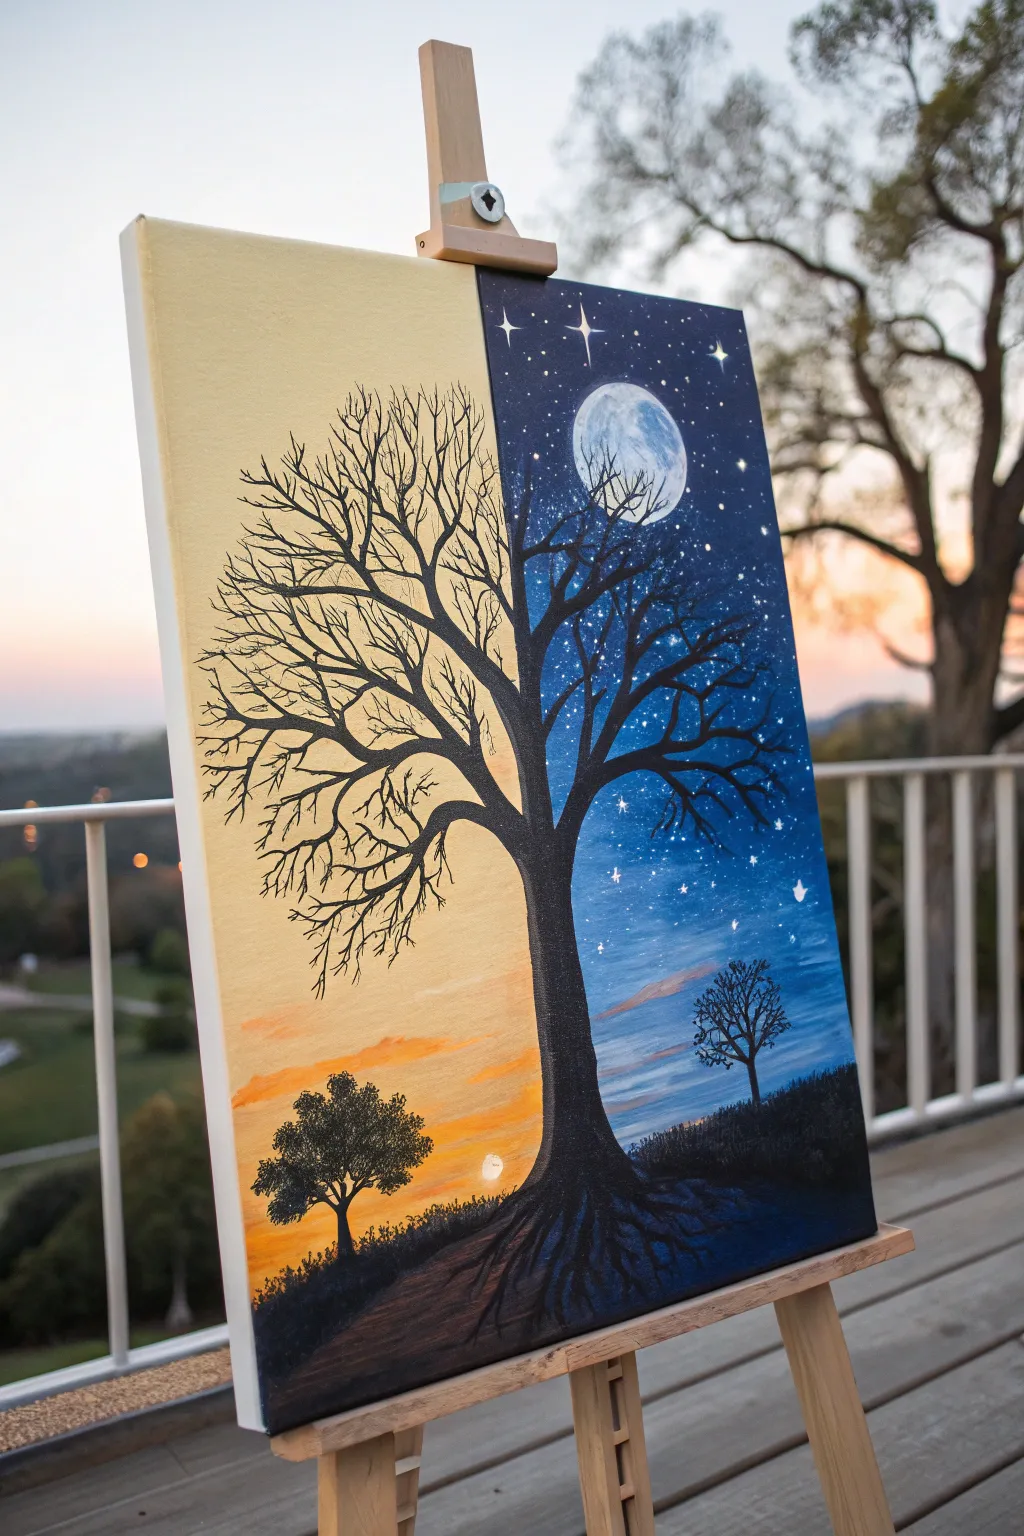
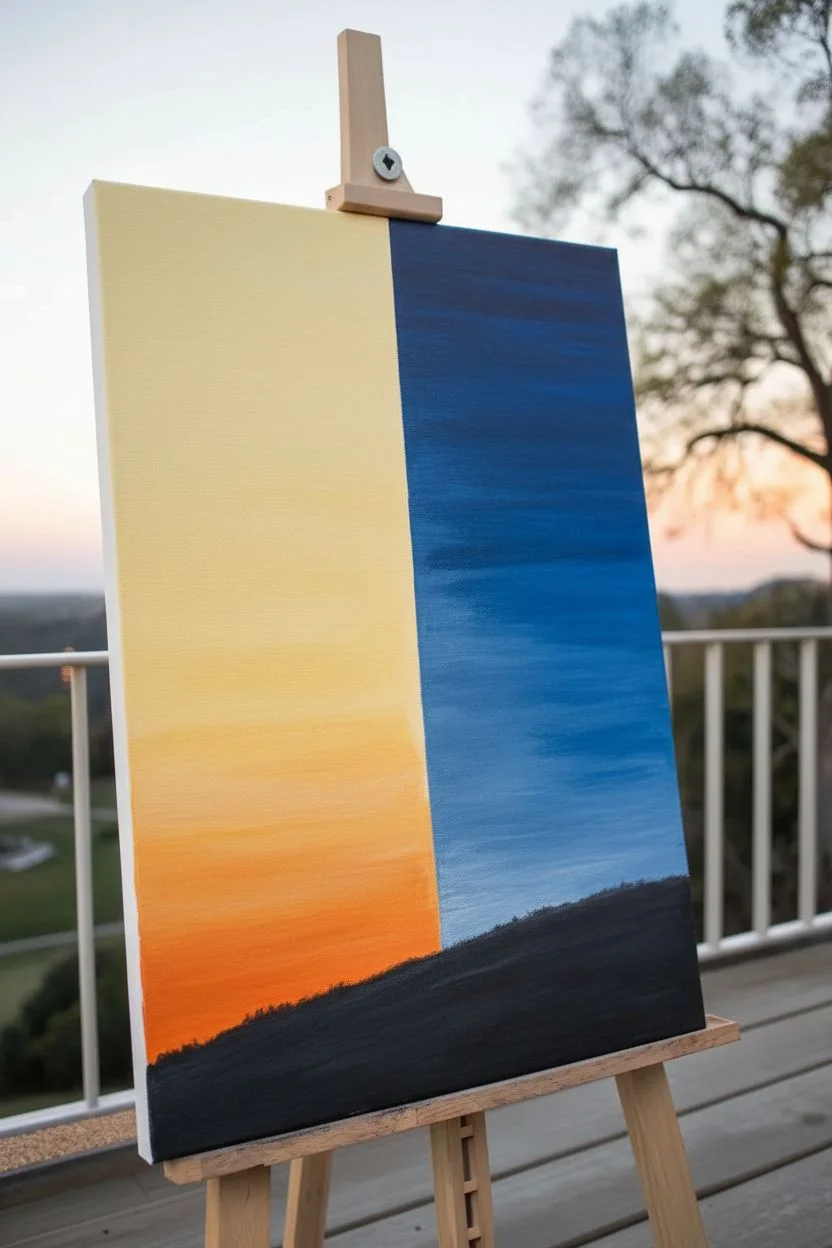
This striking acrylic painting explores contrast by splitting the canvas into two distinct worlds—a warm, golden day and a cool, starry night—united by a single, majestic silhouette tree. It’s a wonderful study in gradients and balance that makes a bold statement piece for any room.
Step-by-Step Tutorial
Materials
- Rectangular stretched canvas (e.g., 16×20 or 18×24 inches)
- Acrylic paints: Titanium White, Cadmium Yellow, Orange, Deep Blue (Ultramarine or Phthalo), Black
- Painter’s tape or masking tape
- Large flat brush (for blending backgrounds)
- Medium round brush (for the main tree trunk)
- Fine detail brush (liner brush for branches and stars)
- Palette for mixing
- Water cup and paper towels
- Compass or round object (to trace the moon)
Step 1: Setting the Scene: The Split Background
-
Tape the divider:
Begin by placing a strip of painter’s tape vertically down the exact center of your canvas. Press the edges down firmly to ensure sharp lines and prevent paint bleed. -
Paint the day sky:
On the left side, start at the top with a pale, creamy yellow (mix plenty of white with a drop of yellow). As you work your way down, gradually mix in more pure yellow, blending smoothly. -
Add the sunset horizon:
Near the bottom quarter of the left side, blend in orange to create a sunset glow. Keep your brush strokes horizontal to mimic the horizon atmosphere. -
Paint the night sky:
Move to the right side of the tape. Start at the top with your darkest blue mixed with a touch of black for deep space. Gradually lighten the blue as you move downward, adding a tiny bit of white near the horizon line to create atmospheric perspective. -
Reveal the split:
Once the base layers are tacky but not fully dry, carefully peel off the center tape. Let the entire background dry completely before proceeding.
Bleeding Lines?
If paint bleeds under the tape, don’t panic. Wait for it to dry, then gently scrape the excess with a craft knife or paint over it with the opposing color before starting the tree trunk.
Step 2: Adding the Elements: Moon, Stars & Ground
-
Create the moon:
On the upper right side, use a round object or compass to outline a circle. Paint it solid white first. Once dry, dab a little gray or pale blue with a dry brush to create textured craters. -
Paint the stars:
Using your smallest liner brush or a toothpick, dot the night sky with white stars. For the larger stars, paint a small cross with a bright center point. You can also flick a toothbrush dipped in watered-down white paint for a galaxy effect. -
Add the distant sun:
On the day side, near the horizon, paint a small, soft white circle for the setting sun to mirror the moon, though keep it smaller and subtler. -
Paint the ground layer:
Mix a dark grey-black shade. Paint a sloping hill at the very bottom that spans across both the day and night sides, connecting the two worlds.
Metallic Magic
Use metallic gold paint for the sun rays and metallic silver for the stars. The shimmer adds a magical quality that changes as you move around the room.
Step 3: The Central Silhouette
-
Outline the trunk:
Using black paint, sketch the main trunk right in the center where the tape line used to be. Make the base wide and roots spreading out, tapering as it goes up. -
Fill the trunk:
Fill in the trunk with solid black paint. Paint the roots extending down into the ground layer, giving the tree a grounded, ancient feel. -
Branching out:
Switch to a medium round brush. Paint thick primary branches extending left and right. Aim for asymmetry—nature isn’t perfectly mirrored. -
Adding fine twigs:
I prefer using a liner brush with slightly watered-down black paint for this step. Create intricate, spindly twigs reaching out to the edges of the canvas. -
Day vs. Night branches:
On the day side, keep the branches distinct and sharp. On the night side, let some branches cross over the moon face for a spooky, dramatic silhouette.
Step 4: Final Details
-
Paint the distant trees:
On the horizon line of the ‘Day’ side, paint a miniature silhouette tree in the distance. Do the same on the ‘Night’ side. These give the painting immense scale. -
Highlighting:
Add very subtle highlights to the main trunk. On the left edge of the trunk, brush a faint line of yellow-orange (sunlight). On the right edge, use a faint line of blue-white (moonlight). -
Refine the center line:
If any paint bled into the center earlier, use the black trunk to cover it up, or carefully touch up with the background colors. -
Varnish:
Once fully cured (usually 24 hours), apply a satin or gloss varnish to deepen the black tones and protect the colors.
Step back and admire how the contrast of light and dark creates a harmonious balance in your artwork
BRUSH GUIDE
The Right Brush for Every Stroke
From clean lines to bold texture — master brush choice, stroke control, and essential techniques.
Explore the Full Guide
Four Seasons Wheel Tree of Life
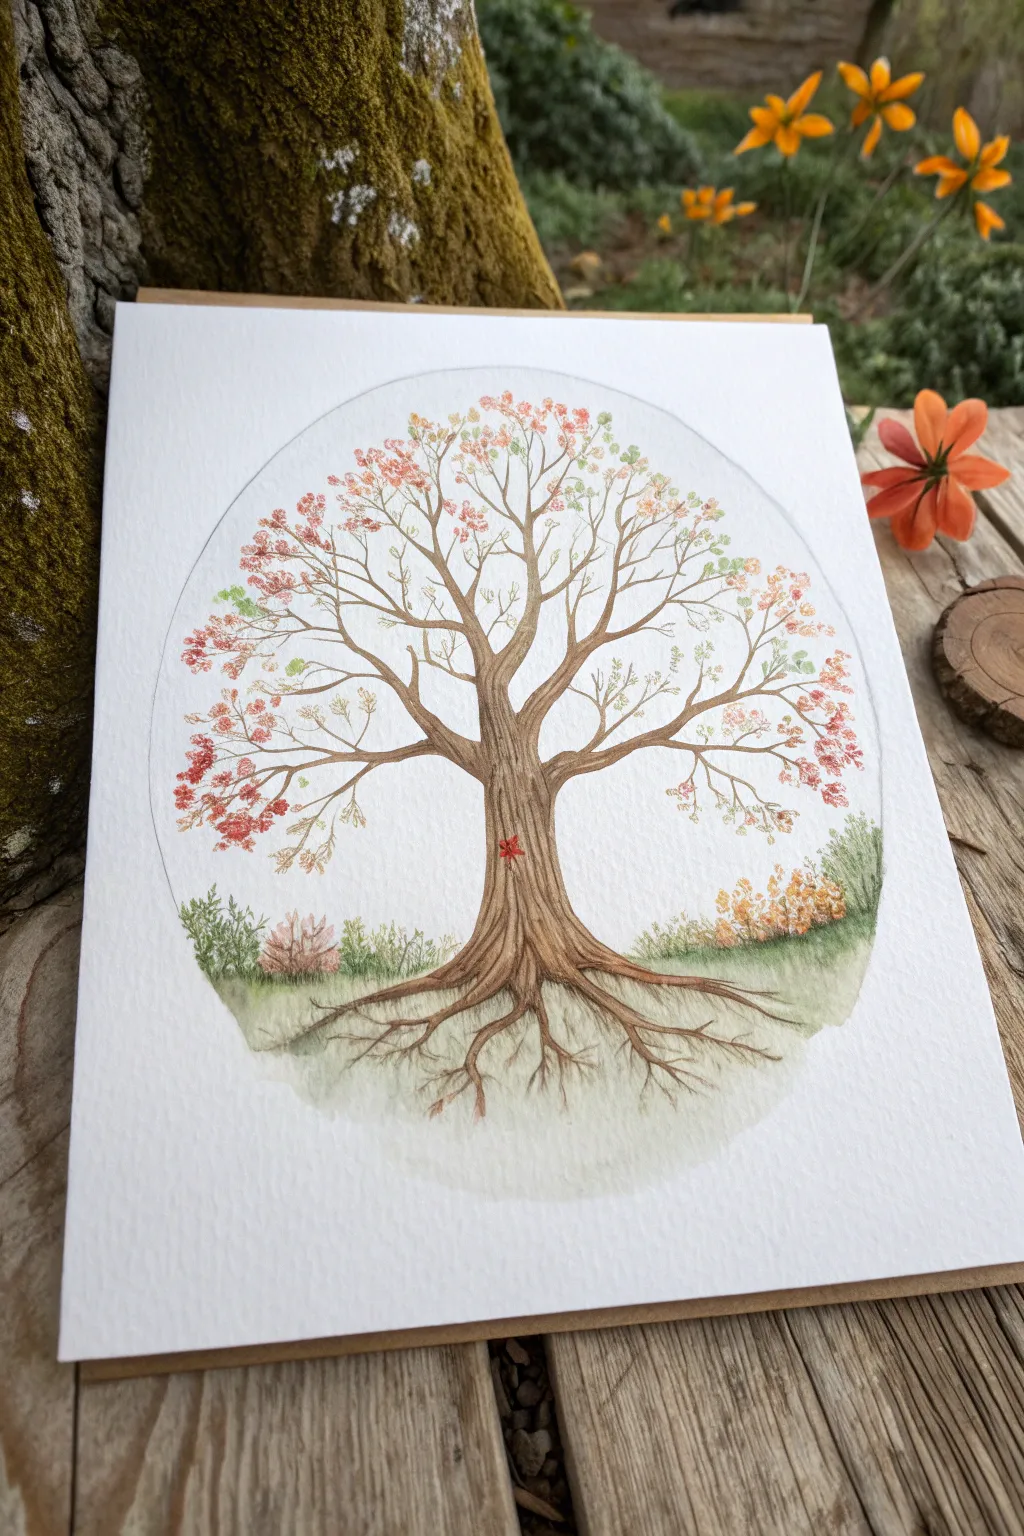
Capture the delicate balance of nature with this circular Tree of Life painting, where the foliage dances between spring greens and autumn reds. This project uses soft watercolor washes and fine ink details to create a serene, grounded centerpiece perfect for framing.
Step-by-Step
Materials
- Cold press watercolor paper (300 gsm)
- Pencil (HB or H) and eraser
- Compass or large circular object (bowl/plate)
- Watercolor paints (Burnt Umber, Sap Green, Alizarin Crimson, Yellow Ochre, Burnt Sienna)
- Fine liner brushes (size 0 and 2)
- Round brush (size 6)
- Dark brown fine liner pen (optional, waterproof)
- Jar of water and paper towels
Step 1: Sketching the Framework
-
Establish the Boundary:
Begin by lightly drawing a large circle or oval in the center of your paper using a compass or by tracing a bowl. This will act as the container for your entire scene. -
Draft the Trunk:
Sketch the main trunk in the center. Keep it relatively straight but give it organic bumps; widen it significantly at the base where the roots begin and at the top where major branches split. -
Root System:
Draw the roots extending downward, letting them fan out and taper into fine lines. Ensure the roots stay mostly within the bottom curve of your circle boundary. -
Branch Structure:
Create a network of branches reaching upward. Start with three or four main thick limbs, then split them into thinner and thinner twigs that reach toward the upper curve of the boundary line.
Step 2: Painting the Tree
-
Base Trunk Layer:
Mix a watery wash of Burnt Umber and Yellow Ochre. Paint the entire trunk and root system with this light brown shade to establish the local color. -
Adding Texture:
While the base is damp but not soaking, drop in darker Burnt Umber along the sides of the trunk to create a rounded, 3D effect. -
Bark Details:
Once the first layer is dry, use your smallest brush with concentrated dark brown paint to draw vertical, slightly wavy lines up the trunk. This mimics the striations of bark. -
Root Definition:
Darken the underside of the roots and the crevices where they join the trunk. This grounding shadow prevents the tree from looking like it’s floating. -
The Tiny Heart:
Locate a spot on the lower trunk and carefully paint a tiny red geometric shape, like a small star or heart, or perhaps a hanging leaf, using Alizarin Crimson.
Muddy colors?
If your foliage colors are turning brown where they meet, let the red side dry completely before stippling the green section nearby. Wet-on-wet mixing works best for same-family colors.
Step 3: Foliage and Ground
-
Canopy Strategy:
Instead of painting individual leaves, we will stipple clusters of color. Decide on your seasonal flow—perhaps left is autumn (reds) and right is spring (greens). -
Stippling Red Foliage:
Dip a size 2 brush into Alizarin Crimson and Burnt Sienna. Gently dab small dots and clusters at the ends of the left-side branches, leaving plenty of white space between them. -
Stippling Green Foliage:
Clean your brush and switch to Sap Green mixed with a touch of yellow. Apply these dots to the right side of the tree, occasionally letting the green and red clusters mingle in the center. -
Ground Wash:
Create a very dilute wash of Sap Green and apply it loosely along the bottom of the circle, painting over the roots slightly to settle them into the ‘grass.’ -
Undergrowth Texture:
While the ground wash is wet, drop in touches of darker green and brown near the horizon line to suggest distant bushes or weeds. -
Foreground Bushes:
Once the ground is dry, paint small, specific shrub shapes on the left and right using clearer, more saturated greens and reddish-browns to balance the composition. -
Final Ink Touches:
If you want sharper definition, use a waterproof fine liner pen to very lightly outline some of the outer branches and bark textures, but keep the lines broken and organic.
Golden Hour Glow
For a magical touch, paint a very faint, watery layer of yellow ochre over the entire circle once everything is 100% dry to give it an antique, sunlit feel.
Now you have a timeless piece of botanical art that celebrates the changing beauty of nature
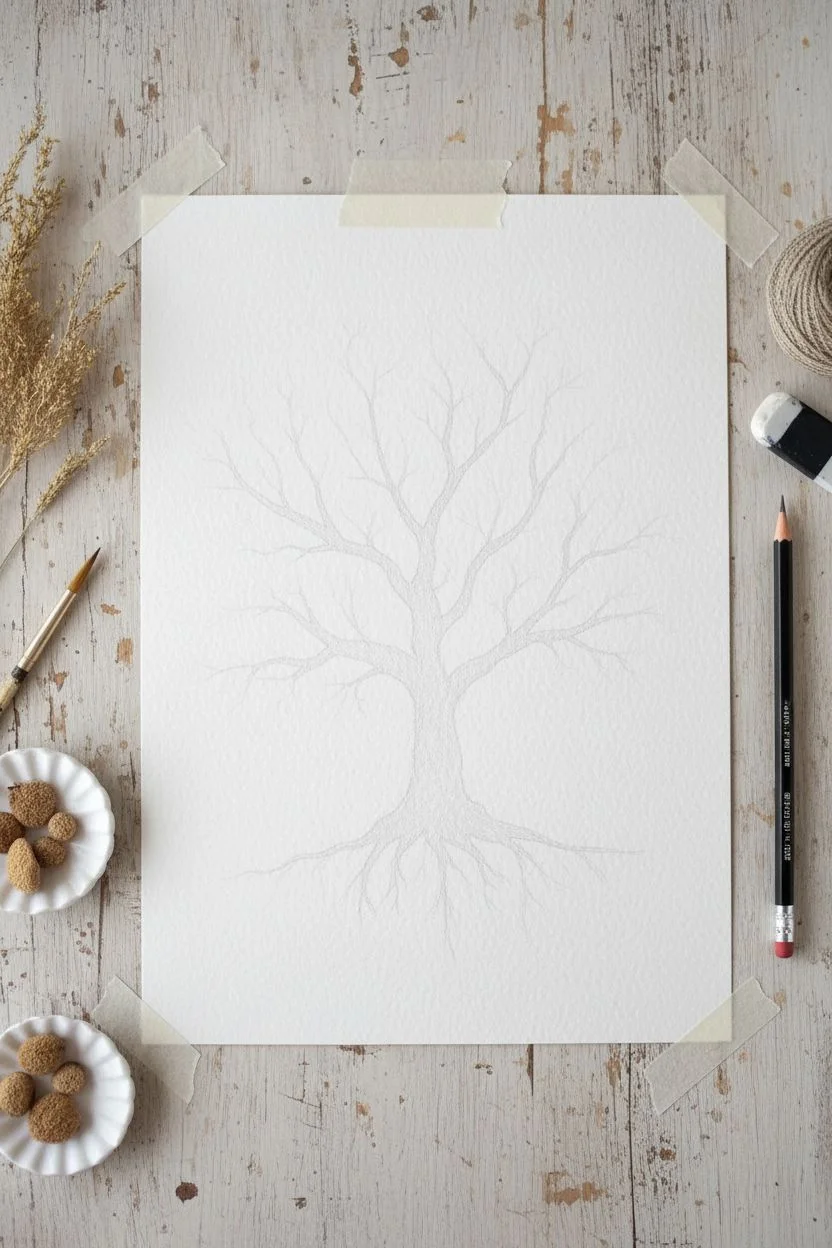
Minimalist Monochrome Tree of Life
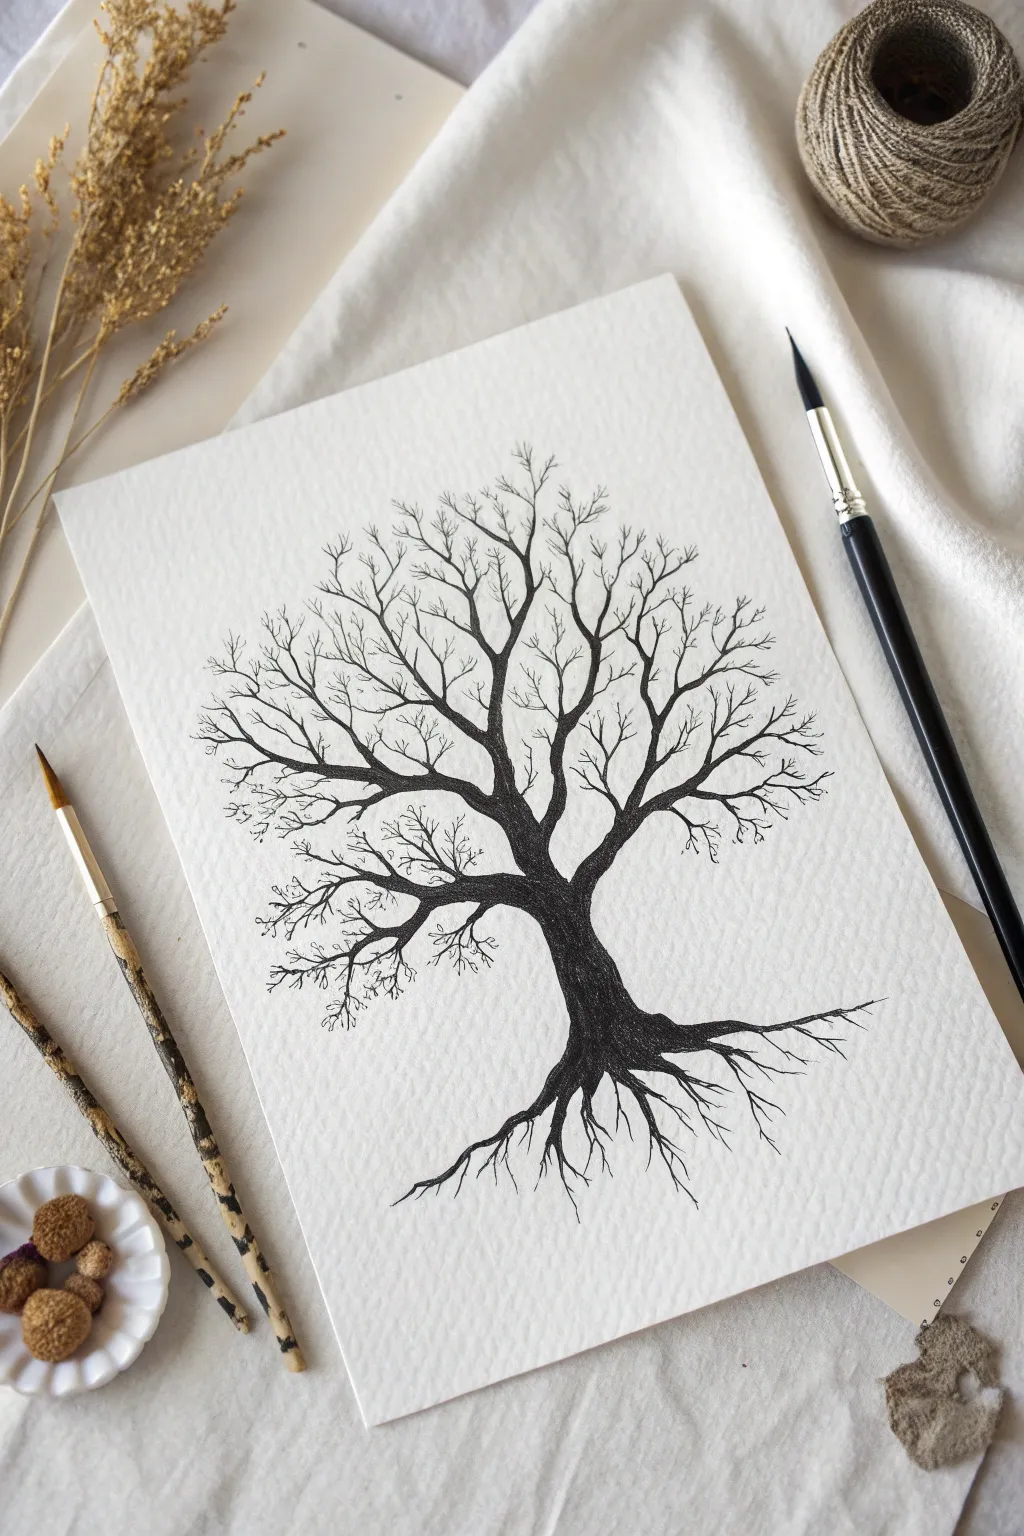
Embrace the beauty of simplicity with this striking monochrome ink drawing that focuses on the elegant structure of a winter tree. This project uses fine lines and deep contrasts to create a piece that feels both grounded and ethereal, perfect for a minimalist aesthetic.
Step-by-Step Guide
Materials
- Heavyweight watercolor paper or textured mixed-media paper (140lb/300gsm)
- Black India ink or high-quality black gouache
- Synthetic round brush (size 4 or 6 for the trunk)
- Fine liner brush or rigger brush (size 0 or 00 for branches)
- Pencil (HB) and kneadable eraser
- Jar of clean water
- Paper towels
- Masking tape (optional, to secure paper)
Step 1: Sketching the Skeleton
-
Prepare your surface:
Start by taping down your textured paper to a flat surface if you want crisp edges, though a loose sheet works fine for this organic study. Ensure your workspace is well-lit. -
Mark the horizon line:
Visualize where the tree will sit. Since we are including roots, the ‘ground’ line is imaginary, but you want the trunk to start roughly in the bottom third of the page to leave room for the root system. -
Lightly pencil the trunk:
Using your HB pencil, lightly sketch the central trunk. It should be thickest at the base and taper slightly as it moves upward, splitting into two or three main arterial branches. -
Map out the roots:
Sketch the primary roots mirroring the branches below the imaginary ground line. Keep these loose and organic; they don’t need to be perfectly symmetrical. -
Indicate branch direction:
Draw faint directional lines where the major boughs will reach. This ensures your canopy shape is balanced—aim for a rounded or slightly oval overall silhouette—before you commit with ink.
Ink Flow Control
If using a new brush, dip the bristles in water and blot them almost dry before grabbing ink. This ‘primes’ the bristles, helping the ink flow smoother for long delicate lines.
Step 2: Inking the Core Structure
-
Load the main brush:
Dip your size 4 or 6 round brush into the black ink. You want the brush fully loaded but not dripping. -
Paint the base trunk:
Starting just above the roots, pull the brush upward to create the main trunk. Apply more pressure at the bottom for thickness and lift gently as you move up. -
Fill the roots:
While the trunk is wet, extend the stroke downwards into the main roots. Let the ink flow naturally into the textured valleys of the paper, giving the roots a rugged, earthy feel. -
Create the main splits:
Paint the first major divisions of the tree. These should be substantial limbs, not flimsy twigs. Use the tip of your round brush to ensure the connection points look seamless and strong. -
Add texture to the bark:
I like to go back over the still-damp trunk with a slightly drier brush to add vertical striations, suggesting the roughness of bark without needing intense detail.
Add Metallic Accents
Once the black ink is dry, re-trace just the upper edges of the main branches with a fine gold or silver gel pen to mimic sunlight hitting the winter wood.
Step 3: Branching Out
-
Switch to the fine liner:
Swap your brush for the size 0 or rigger brush. This tool is essential for those whisper-thin upper branches. -
Extend secondary branches:
From your main limbs, paint secondary branches. Move your hand quickly; a slightly shaky or hesitant hand actually makes the branches look more organic and wood-like. -
The ‘Y’ technique:
As you move outward, constantly split your lines into ‘Y’ shapes. Every branch should eventually yield two smaller ones. -
Cross slightly:
Don’t be afraid to let a few branches cross over each other. This adds depth and prevents the tree from looking two-dimensional or overly manicured. -
Detail the roots:
Use the fine brush to add tiny, hair-like rootlets extending from the main roots, fading them out into the white space.
Step 4: Fine Details for the Canopy
-
Add the twig extremities:
At the very tips of your branches, use the very point of your brush to add tiny flicks and clusters of twigs. These populate the canopy and give the tree its fullness without leaves. -
Check density balance:
Step back and look at the overall shape. Fill in any ‘bald spots’ in the canopy with extra fine lines, keeping the distribution fairly even. -
Let dry completely:
Allow the ink to dry fully. Do not touch it, as India ink can smudge easily while wet. -
Erase pencil marks:
Once you are 100% sure the ink is bone dry, gently run your kneadable eraser over the drawing to lift the initial graphite sketch lines.
Step back and admire the stark elegance of your intricate organic composition

PENCIL GUIDE
Understanding Pencil Grades from H to B
From first sketch to finished drawing — learn pencil grades, line control, and shading techniques.
Explore the Full Guide
Metallic Highlights on a Simple Tree of Life
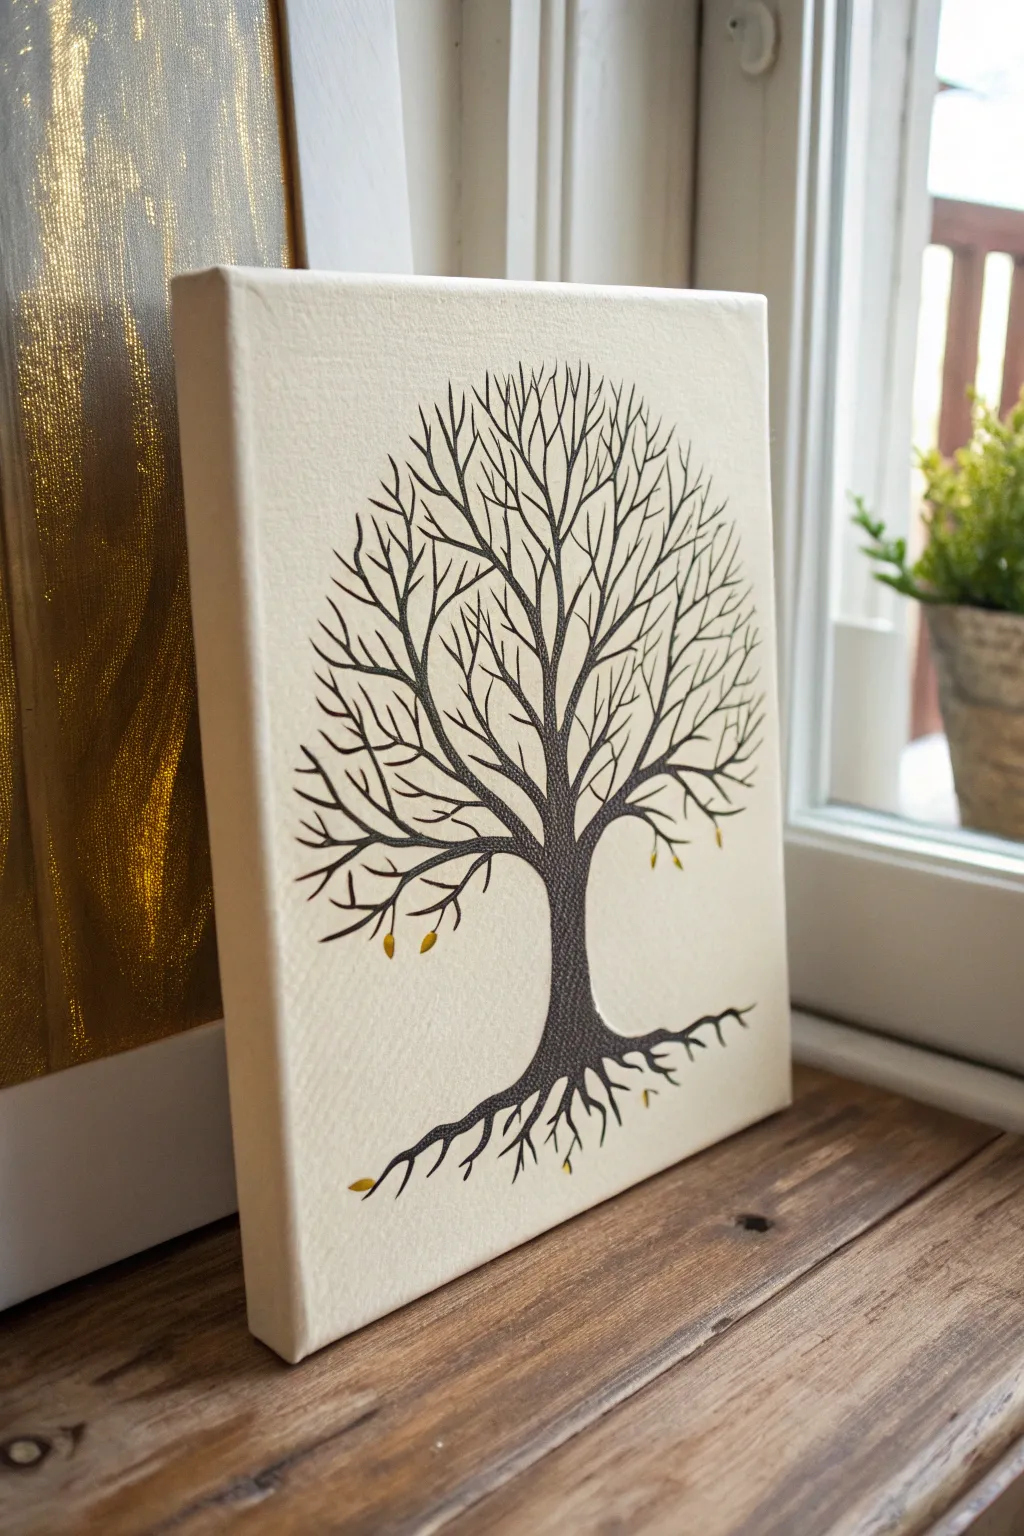
This elegant project combines the stark beauty of a black silhouette with delicate touches of metallic warmth. Using a stretched canvas and a few simple tools, you will create a modern Tree of Life that feels both grounded and ethereal.
Step-by-Step Tutorial
Materials
- Small stretched canvas (approx. 8×10 or 9×12 inches)
- Black acrylic paint (matte or satin finish)
- Fine liner brush (size 0 or 00)
- Small round brush (size 2)
- Pencil and eraser
- Gold leaf flakes or gold metallic paint pen
- tweezers (if using gold leaf)
- Gold size or craft glue (if using gold leaf)
- Varnish (optional)
Step 1: Sketching the Silhouette
-
Prepare the canvas:
Start with a clean, white stretched canvas. If your canvas feels too rough, you can apply a coat of gesso and sand it lightly once dry for a smoother painting surface, though the raw texture works well for this rustic look. -
Mark the trunk position:
Using a pencil, lightly mark the center vertical line of the canvas. Draw a gentle curve for the trunk, keeping it slightly wider at the bottom and tapering as it moves upward to the middle of the canvas. -
Draft the primary branches:
Sketch three or four main branches extending from the top of the trunk. Instead of straight lines, use wavy, organic strokes that curve outward to creating a rounded canopy shape. -
Add the root system:
At the base of the trunk, sketch roots that mirror the branches but on a smaller scale. Let them spread mostly sideways, anchoring the tree to the bottom edge of the canvas. -
Refine the canopy:
Fill in the gaps between the main branches with secondary and tertiary twigs. Aim for a dense, intricate network of lines that form a consistent oval or circular outline for the whole tree.
Flow State
If your black paint feels ‘draggy’ or dry while painting fine branches, mix in a drop or two of flow improver or water. Inky consistency creates smoother lines.
Step 2: Painting the Tree
-
Outline the trunk:
Dip your decorative round brush into black acrylic paint. Carefully trace the outline of the trunk you sketched, ensuring the edges are crisp and clean. -
Fill the core:
Fill in the trunk completely with solid black paint. I find that doing a second coat here ensures the black is opaque and deep, covering the canvas weave fully. -
Switch to a liner brush:
For the branches, switch to your finest liner brush. To make the paint flow better for thin lines, add a tiny drop of water to your black acrylics on the palette. -
Paint main branches:
Paint the thicker branches extending from the trunk first. Press harder at the base of the branch and lift pressure as you move outward to taper the line naturally. -
Detail the twigs:
Work your way to the outer edges of the canopy, painting the smallest twigs. Use very light pressure and a steady hand to keep these lines delicate and sharp. -
Paint the roots:
Repeat the process for the roots at the bottom. Make them look gnarled by twisting your brush slightly as you paint, letting them fade out into fine points. -
Let it cure:
Allow the black paint to dry completely. This is crucial before adding metallic elements to avoid smudging the crisp silhouette. -
Erase pencil marks:
Once the paint is bone dry, gently erase any visible pencil sketch lines that weren’t covered by the paint.
Step 3: Adding Metallic Accents
-
Plan the highlights:
Decide where you want your ‘leaves’ or metallic accents. In the reference image, they are sparse and falling, symbolizing autumn or change. Pick 5-7 spots near the lower branches and roots. -
Apply adhesive:
If using gold leaf, dab tiny dots of sizing or glue where you want the leaves. If using a paint pen, skip this step. Let the glue become tacky (usually takes 5-10 minutes). -
Place gold leaf:
Using tweezers, pick up small fragments of gold leaf and press them gently onto the tacky glue spots. Don’t worry about perfect shapes; the irregular edges add character. -
Brush off excess:
Once the gold leaf is adhered, use a dry, soft brush to gently sweep away the loose flakes, revealing the small golden accents. -
Alternative: Paint pen:
If you are using a gold paint pen instead, simply draw small, tear-drop shapes in the chosen spots. Shake the pen well beforehand to ensure the metallic pigment is rich. -
Seal the work:
To protect the gold leaf from tarnishing and the paint from dust, apply a light coat of spray varnish over the entire canvas once everything is dry.
Shaky Hands?
Stabilize your painting hand by resting your pinky finger on a dry part of the canvas while you work on the delicate outer twigs. It acts as an anchor.
Now you have a striking, modern piece of art that beautifully balances stark contrast with metallic warmth.
Soft Watercolor Bloom Tree of Life
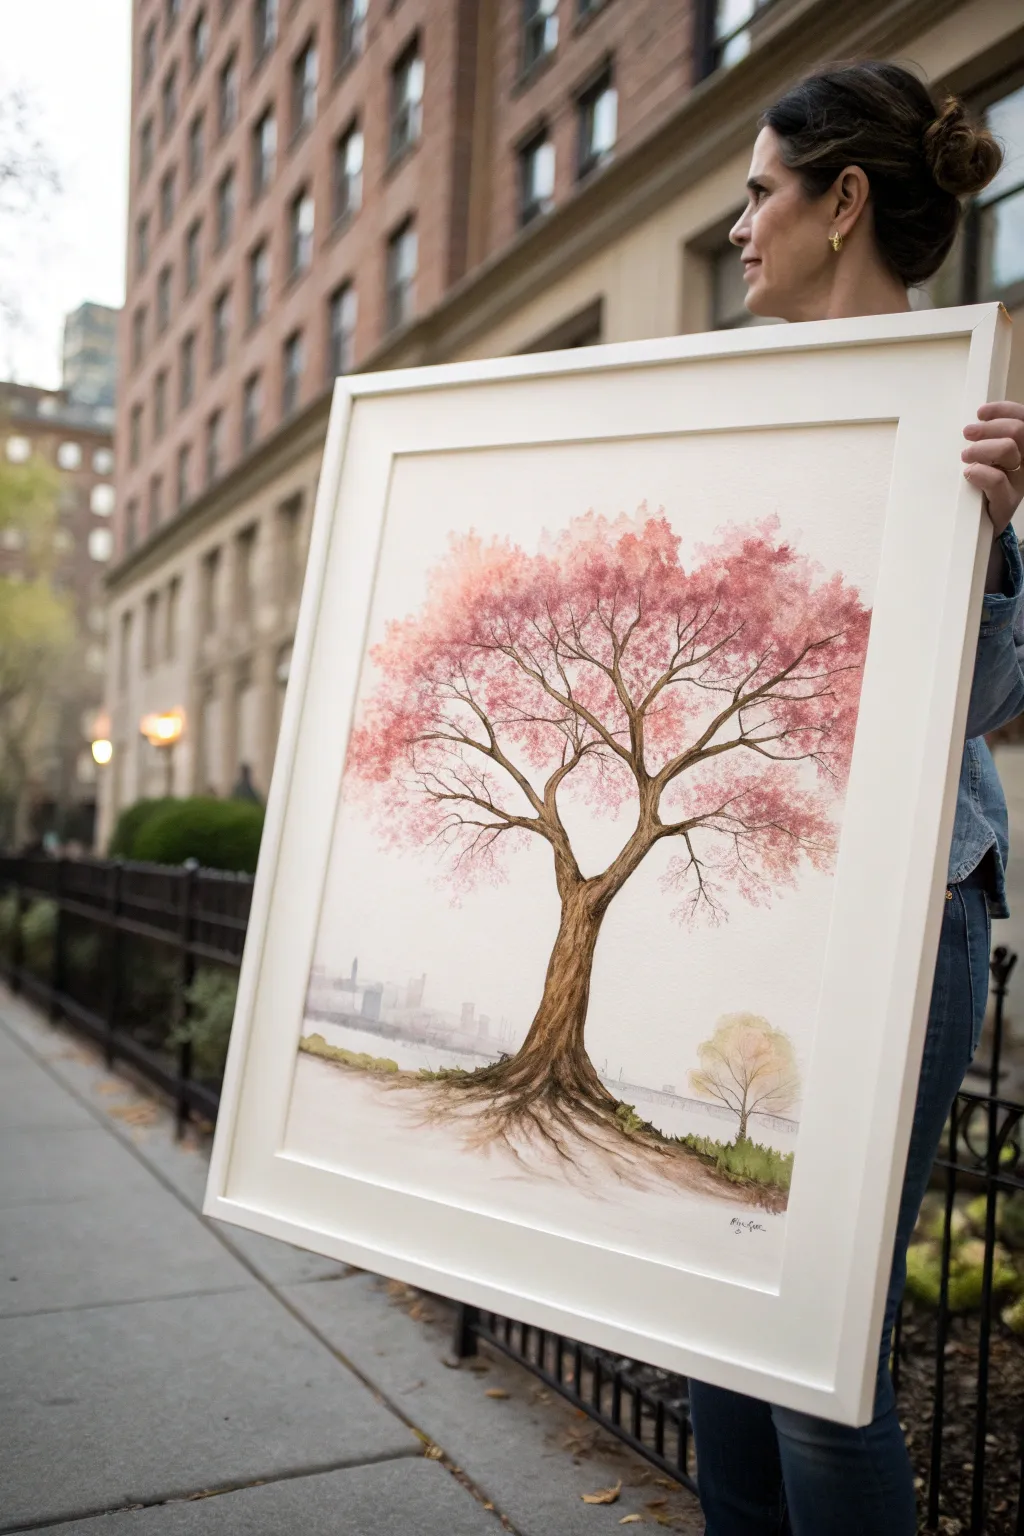
This large-scale watercolor captures the delicate softness of spring blossoms against a subtle, hazy urban skyline. The focal point is a majestic tree with a textured trunk and an airy canopy of pinks and corals, making it a perfect statement piece for any room.
Detailed Instructions
Materials
- Large sheet of cold-press watercolor paper (18×24 inches or larger)
- Watercolor paints (Sap Green, Burnt Umber, Alizarin Crimson, Rose Madder, Yellow Ochre, Ultramarine Blue)
- Large round brush (size 12 or 14)
- Small liner brush (size 2)
- Medium flat brush (size 1/2 inch)
- Masking tape
- Drawing board
- Pencil (HB)
- Paper towels
- Clean water jars
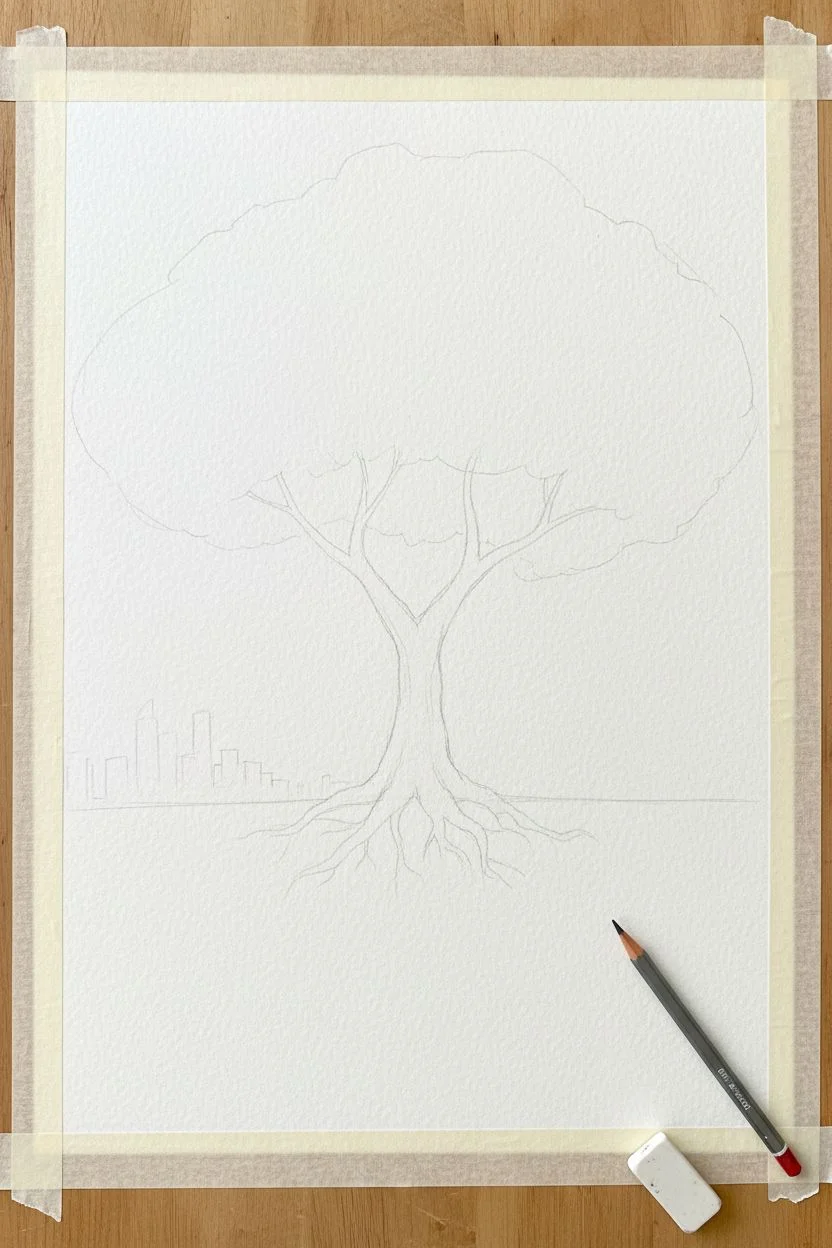
Step 1: Preparation and Sketching
-
Secure the paper:
Begin by taping your large watercolor paper securely to a drawing board on all four sides. This prevents the paper from buckling when we apply wet washes later. -
Draft the horizon line:
Lightly sketch a low horizon line about one-quarter of the way up the page. This will be the ground where your tree stands. -
Outline the trunk structure:
Draw the main trunk of the tree centered on the paper. Start wide at the roots, curve gently upwards, and let the main branches split into a ‘Y’ shape before fanning out. -
Sketch the canopy shape:
Don’t draw individual leaves. Instead, lightly sketch the overall oval or cloud-like shape where the pink foliage will go to guide your painting. -
Hint at the background:
Very faintly sketch a simple city skyline in the distance on the left side of the horizon. Keep the shapes geometric but simple.
Fixing “Cauliflowers”
If water blooms create unwanted hard edges in your soft pink leaves, soften them with a damp, clean brush while the paint is still slightly moist to blend.
Step 2: Painting the Tree Structure
-
Mix the trunk color:
Create a rich wood tone by mixing Burnt Umber with a touch of Ultramarine Blue to deepen it. You want a color that isn’t too warm. -
Paint the trunk base:
Using your large round brush, paint the trunk starting from the roots upward. Use uneven, slightly jerky strokes to mimic the texture of bark rather than a smooth line. -
Add texture while wet:
While the trunk paint is still damp, drop in concentrated dark brown (less water) along the shadowed side of the tree (usually the right side) to create volume. -
Extend the branches:
Switch to your smaller liner brush as you move up.Pull the paint out into finer and finer branches. Remember that branches should get thinner the further they grow from the trunk. -
Ground the tree:
Paint the exposed roots splaying out into the soil. Use diluted brown and a touch of Yellow Ochre to wash in the ground area immediately around the roots.
Add Metallic Shimmer
Mix a tiny amount of iridescent watercolor medium or gold watercolor paint into your brown trunk mixture to give the bark a magical, sun-kissed glow.
Step 3: Creating the Foliage
-
Prepare the pinks:
Mix three puddles of paint: a pale watery pink (Rose Madder), a medium coral (Alizarin Crimson + Yellow Ochre), and a deeper pink-red. -
Apply the first bloom layer:
Using the large round brush, dab the palest pink onto the paper in clusters at the ends of your branches. Use a ‘stippling’ motion—tapping the brush tip—to create the feeling of leaves. -
Building canopy density:
While the first layer is still wet, drop in your medium coral color near the bottom of each leaf cluster. This creates a shadow effect within the foliage. -
Adding depth to blooms:
I like to use the darkest pink sparingly in the center of the dense clusters to suggest thick branches hidden by flowers. Leave some white paper showing between clusters for ‘air’. -
Paint the secondary tree:
To the right of the main tree, paint a small shrub or sapling using Yellow Ochre and a touch of Sap Green. Keep it loose and watery so it doesn’t compete with the main subject.
Step 4: The Background and Details
-
Wash the skyline:
Mix a very watery, pale gray-blue. Paint the distant city buildings using vertical strokes with the flat brush. Soften the edges with clean water so they look foggy and distant. -
Add ground vegetation:
Mix Sap Green with a little brown. Dab this around the base of the tree and the smaller shrub to suggest grass or moss growing over the roots. -
Refine the branches:
Once the pink foliage is completely dry, use your liner brush and dark brown paint to reconnect any floating branches to the main trunk, weaving them visually through the pink clouds. -
Final assessment:
Step back and look at the composition. If the trunk looks too flat, add a glaze of dark brown on the shadowed side for extra contrast.
Frame your masterpiece in a wide white mat and lighter frame to let the delicate colors truly breathe.


Abstract Swirl Canopy Tree of Life
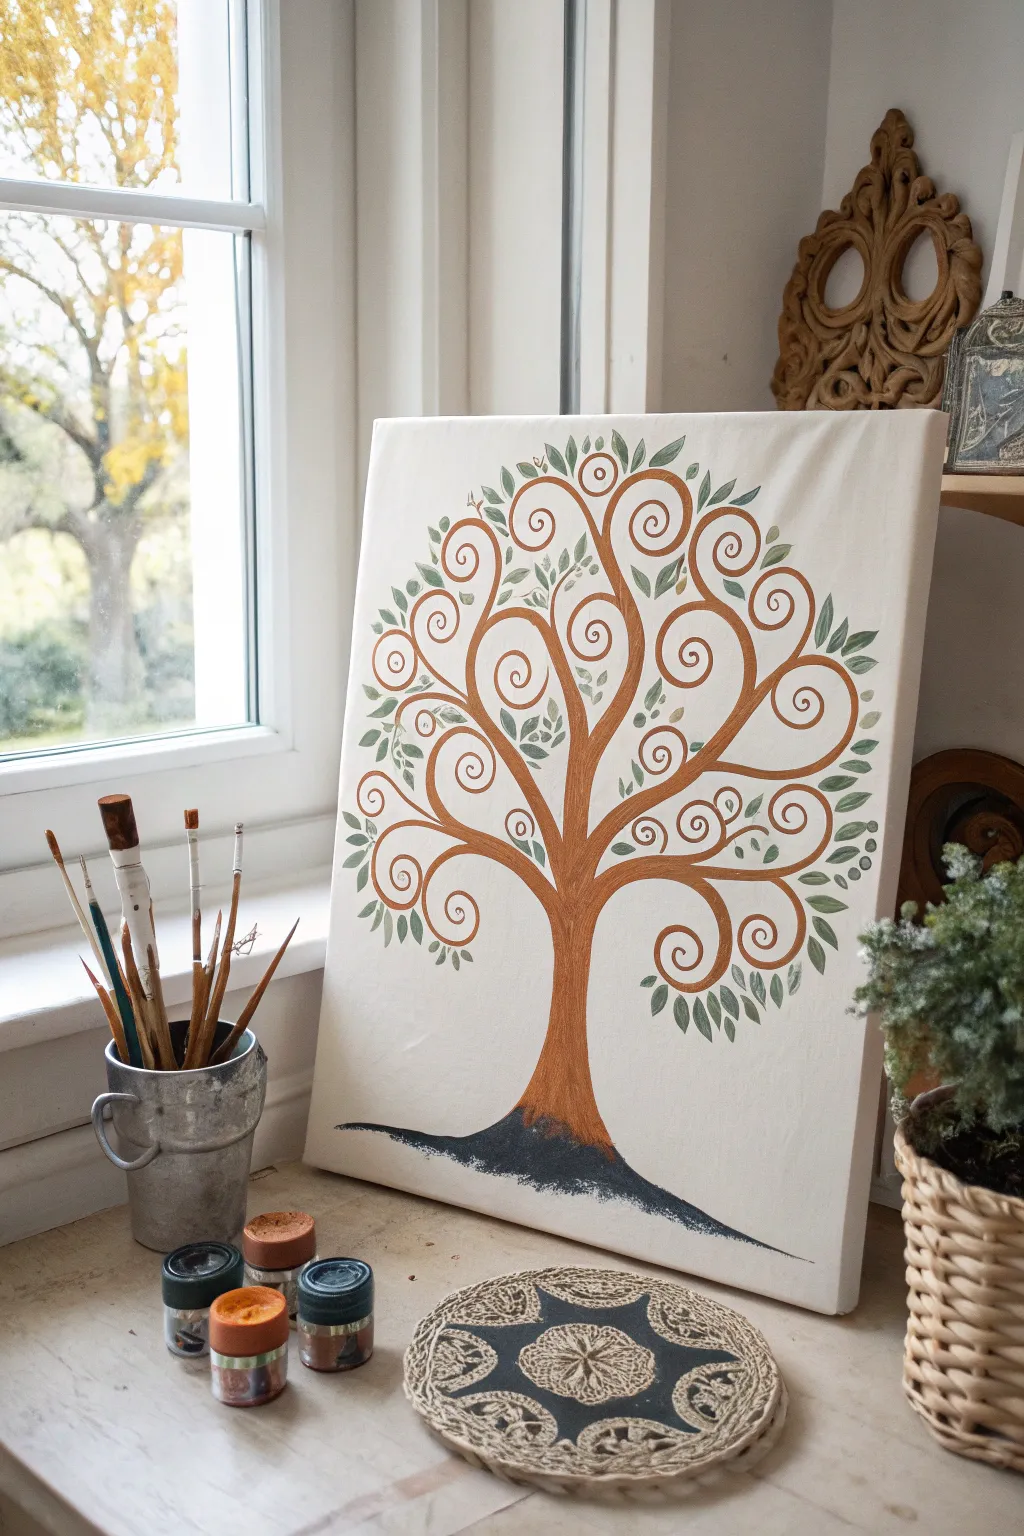
Capture the essence of growth and connection with this stylized tree design, characterized by its playful, curling branches and soft green foliage. The simple color palette of copper-brown and sage green creates a calming, organic piece perfect for bringing a touch of nature indoors.
Step-by-Step Tutorial
Materials
- Rectangular stretched canvas (approx. 16×20 inches)
- Acrylic paints: Copper or Burnt Sienna, Dark Grey or Soft Black, Sage Green, Titanium White
- Medium round brush (size 6 or 8)
- Small liner brush (size 1 or 2)
- Pencil and eraser
- Palette or paper plate
- Cup of water and paper towels
Step 1: Planning the Structure
-
Establish the ground line:
Begin by lightly sketching a gently curved mound at the very bottom center of your canvas. This will be the foundational earth for your tree, anchoring the composition. -
Sketch the trunk:
Draw the trunk rising from the center of the mound. It should be relatively thick at the base and taper gradually as it moves upward to about the center point of the canvas. -
Map out the main swirls:
Lightly sketch the primary branches. Instead of jagged realistic branches, visualize these as large spirals. Start with two main branches splitting from the trunk top, curling outward to the left and right. -
Fill the canopy:
Add secondary swirl branches filling the empty spaces. Create a balanced, circular overall shape for the canopy, ensuring the spirals curl in various directions but generally maintain a cohesive, rounded silhouette.
Step 2: Painting the Tree
-
Paint the trunk base:
Load your medium round brush with your copper or burnt sienna paint. Start at the bottom of the trunk, applying smooth strokes upward. I like to keep the paint slightly fluid here to help the brush glide. -
Extend the branches:
Continue painting up the trunk and into the main branches. As the branches narrow, switch to a smaller brush if needed to maintain control on the curves. -
Detail the spirals:
Carefully paint the spiral ends of the branches. Use the tip of your brush and a steady hand to create the tight curls at the end of each limb. It helps to rotate the canvas physically if you find the angle awkward. -
Add floating spirals:
Consult the reference image and notice independent spiral shapes floating near the branches. Paint these unattached swirls to fill gaps and add a sense of movement to the canopy. -
Second coat:
Let the brown paint dry completely. If the canvas texture is showing through too much, apply a second coat to the trunk and branches for solid, opaque coverage.
Fixing wobbly lines
If your spirals look shaky, thin your paint slightly with water to an ink-like consistency. This helps the brush create long, unbroken curves smoothly.
Step 3: Adding Foliage and Earth
-
Mix your leaf greens:
Prepare a sage green on your palette. For variety, create a second puddle of the same green mixed with a tiny bit of white to have two slightly different tonal values. -
Paint single leaves:
Using a small round brush, paint simple, almond-shaped leaves attached to the sides of the brown branches. A single press-and-lift motion works well for this leaf shape. -
Create leaf clusters:
Add clusters of three or four leaves at the ends of some swirls. Vary the direction of the leaves to make the tree look lush and natural. -
Incorporate variations:
Dip into your lighter green mix occasionally and add leaves randomly throughout the canopy. This subtle color shift adds depth without overcomplicating the simple style. -
Paint the ground:
Using the dark grey or soft black paint, fill in the mound shape at the bottom. Use horizontal, slightly textured strokes to simulate soil or shadow. -
Blend the transition:
While the grey paint is still wet, gently smudge the area where the copper trunk meets the grey earth to create a rooted look, rather than a harsh line. -
Final touches:
Step back and assess the balance. If any area looks too sparse, add a small floating spiral or a few extra green leaves to even out the composition.
Add metallic flair
Swap the standard brown paint for a metallic bronze or copper acrylic. It catches the light beautifuly and gives the artwork a rich, decorative finish.
Display your new artwork near a window where natural light can highlight the warm tones and clean lines you have created
Geometric Pattern Tree of Life
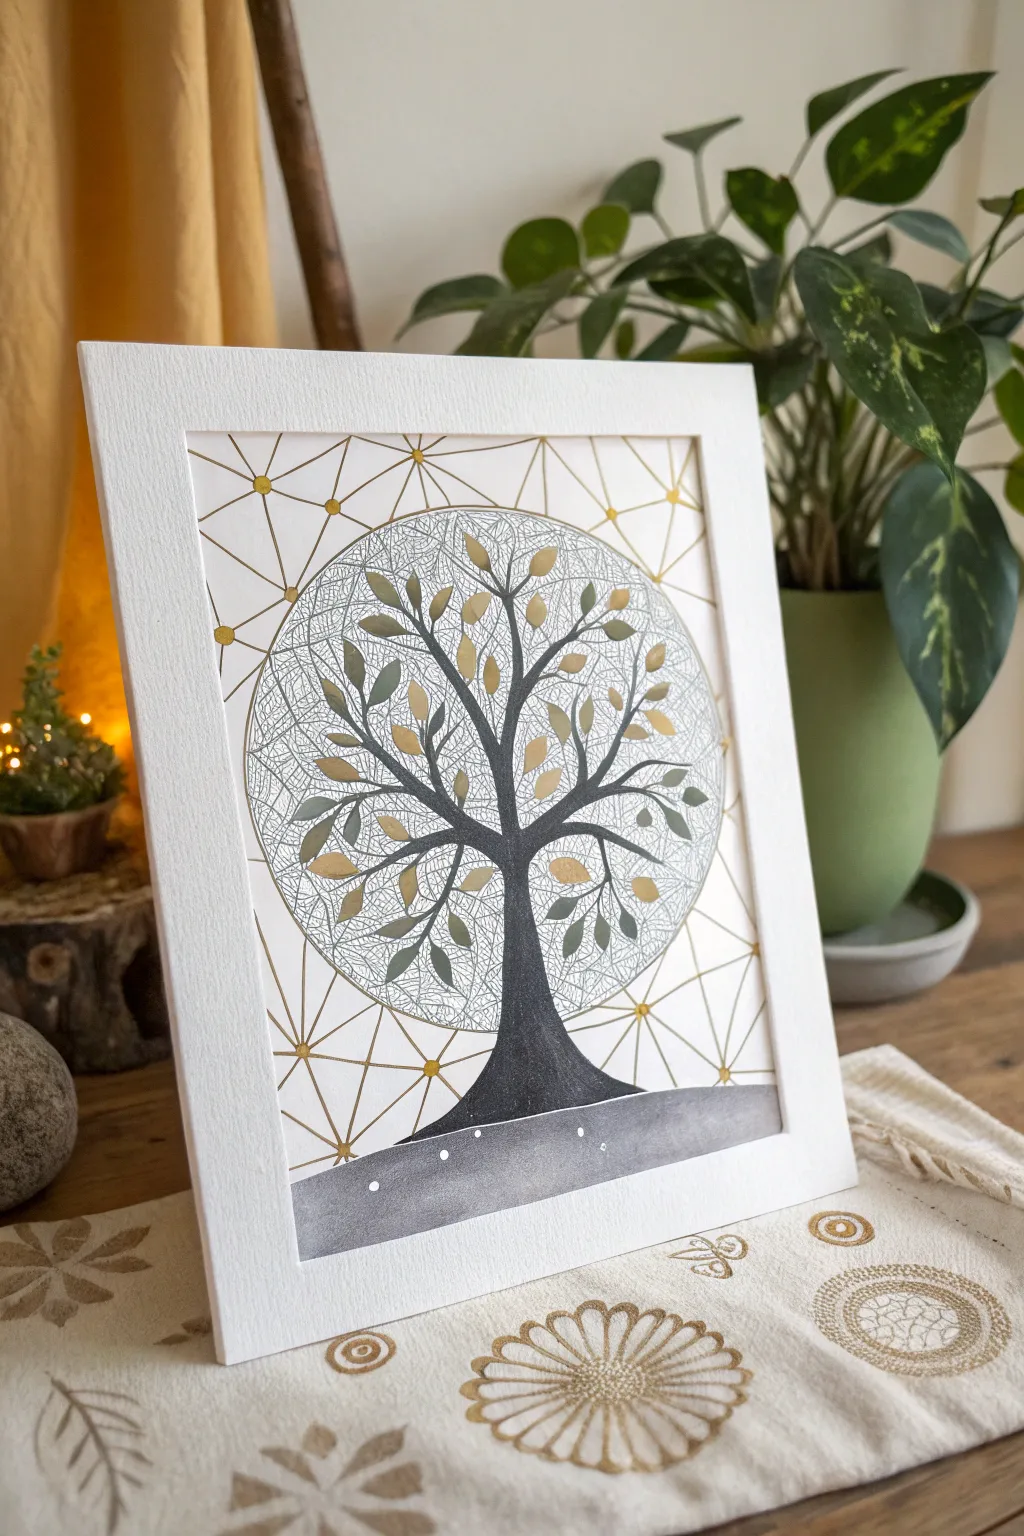

This striking mixed-media piece combines the organic flow of a black silhouette tree with structured geometric linework and distinct gold accents. By juxtaposing fine ink details against bold shapes, you’ll create a modern, elegant interpretation of the classic Tree of Life symbol.
Detailed Instructions
Materials
- High-quality watercolor paper or bristol board (heavyweight)
- Black ink fineliners (0.1mm, 0.3mm, and 0.5mm)
- Metallic gold paint marker or gold leaf paint
- Compass for drawing circles
- Ruler or straight edge
- Pencil and eraser
- Dark grey or black watercolor paint or gouache
- Fine detail paintbrush
Step 1: Planning the Geometric Framework
-
Establish the focal circle:
Begin by finding the center of your paper. Using your compass, draw a large distinct circle that will house the tree’s detailed crown. Press lightly with your pencil so guidelines can be erased later. -
Draft the grid markings:
Around the main circle, map out a series of evenly spaced dots. You want to create a constellation effect. Use your ruler to measure specific intervals or eye-ball it for a more organic feel, placing dots both inside and outside the central circle area. -
Connect the constellation:
Using a ruler, connect these dots with straight pencil lines to form triangles and intersecting angles. These lines should mimic a geodesic dome or a star chart, extending all the way to the paper’s edge. -
Ink the metallic nodes:
Before drawing the gold lines, take your gold paint marker or a small brush with gold paint and fill in the ‘nodes’—the intersections where your pencil lines meet. Create small, solid gold circles at these junctions. -
Connect with gold:
Once the nodes are dry, use a ruler and a gold pen (or very fine brush) to trace over your straight pencil lines, connecting the gold dots. This creates the shining geometric web background.
Step 2: Creating the Tree Silhouette
-
Sketch the trunk:
Lightly sketch the tree trunk starting from the bottom center. Widen the base into a sloping hill shape and taper the trunk as it moves upward into the circle. -
Branch out:
Sketch the main branches spreading out inside the circle. Aim for a balanced, symmetrical feel, but keep the curves natural. Ensure the branches reach out towards the edges of the circle. -
Fill the silhouette:
Using dark grey or black watercolor (or gouache for opacity), fill in the trunk and the hill base. I find that a slightly watered-down black watercolor adds a nice texture that isn’t too flat. -
Add base details:
While painting the base, you can leave tiny pin-prick spots unpainted or use white gel pen later to add small dots along the ground line for a magical dust effect. -
Paint the branches:
Switch to a finer brush to paint the branches extending from the trunk. Make sure they taper off into thin points.
Use a Bridge
Place a scrap piece of paper under your hand while drawing the fine ink lines. This prevents oils from your skin transferring to the paper and stops you from smudging the wet gold ink.
Step 3: Detailing and Refinement
-
Detailed ink webs:
This is the meditative part. Inside the large circle, but *behind* the tree branches, use your 0.1mm black fineliner to draw an intricate web of erratic, fine lines. These should look like cracked porcelain or fine capillaries. -
Avoid the branches:
Be careful not to draw these fine lines over your painted tree trunk or branches; the web texture is strictly background filler within the circle. -
Paint the leaves:
Using two different shades of olive green and a grey-green paint, add small, simple almond-shaped leaves to the branches. Keep them somewhat sparse to let the background show through. -
Add gold leaves:
Select a few specific spots on the branches to add special gold leaves among the green ones. This ties the tree visually to the geometric background. -
Outline the circle:
Use a 0.3mm or 0.5mm black pen to carefully trace the main circle perimeter again to give it a crisp, defined edge. -
Erase guidelines:
Once you are absolutely certain all ink and paint is completely dry, gently erase any remaining pencil marks from your initial grid.
Gold Ink Clogging?
Gold pens often dry out or clog mid-project. Keep a scrap paper nearby to scribble on to get the flow started again, or store the pen tip-down for 10 minutes before use.
Frame your piece without glass initially to let the metallic textures catch the light perfectly
Cosmic Root System Tree of Life
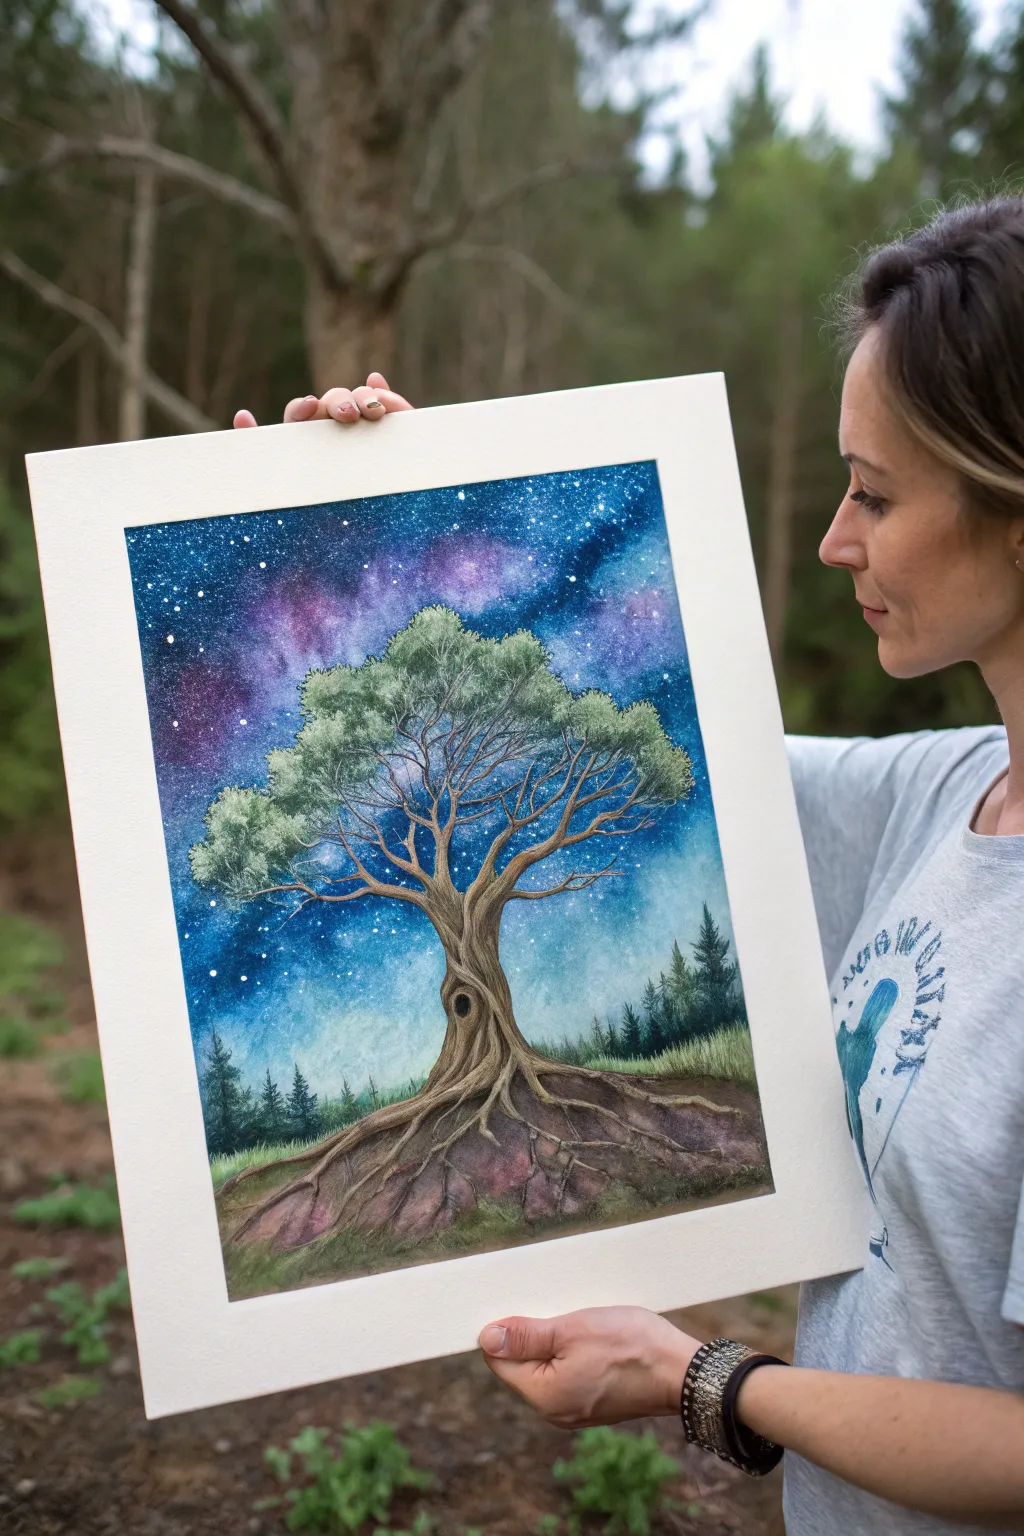
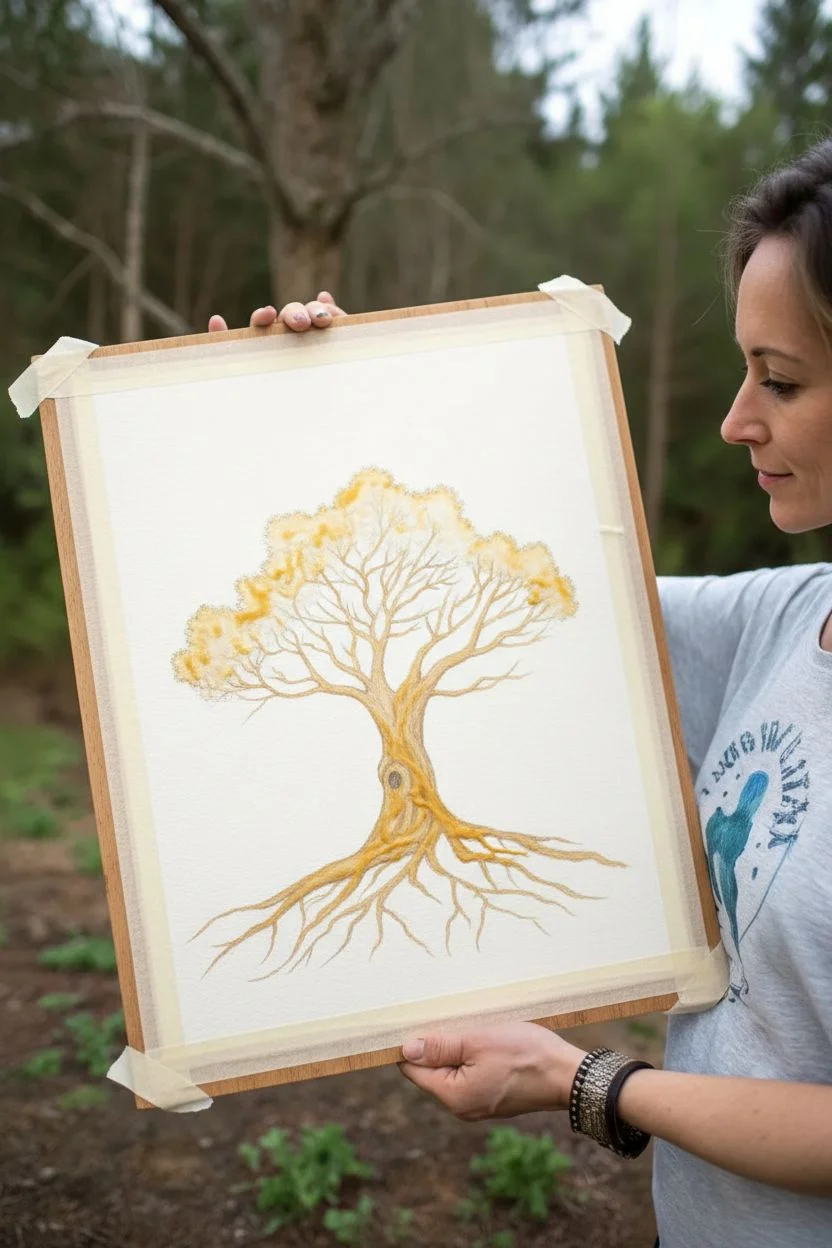
Blend the grounded strength of an ancient tree with the ethereal beauty of the cosmos in this striking mixed-media painting. The contrast between the gnarled, earthly roots and the vibrant, star-filled nebula creates a captivating piece that celebrates the connection between earth and sky.
Step-by-Step
Materials
- Heavyweight watercolor paper (300gsm cold press, at least 11×14 inches)
- Watercolor paints (Indigo, Prussian Blue, Violet, Magenta, Black)
- White gouache or acrylic ink
- Gouache paints (earth tones: Burnt Umber, Yellow Ochre, Sepia, Olive Green)
- Masking fluid
- Painter’s tape
- Variety of brushes: large mop brush, medium round brush, fine liner brush
- Old toothbrush (for splatter)
- Pencil and eraser
- Two jars of water
- Paper towels
Step 1: Preparation & Sketching
-
Secure the paper:
Tape your watercolor paper down to a rigid board on all four sides. This prevents buckling when we add heavy washes for the galaxy background. -
Sketch the silhouette:
Lightly sketch the outline of your tree. Focus on a wide, sturdy trunk that tapers upward into spreading branches. Don’t worry about leaf details yet, just get the skeleton right. -
Draft the root system:
Draw the roots extending outward, mirroring the canopy above. Make them gnarled and interwoven, creating mounds of earth between them to anchor the tree visually. -
Protect the tree:
Carefully apply masking fluid over your entire tree sketch—trunk, branches, and the main root mounds. This is crucial so we can paint the dark sky freely without ruining the lighter wood tones later.
Step 2: Painting the Galaxy Sky
-
Wet-on-wet base:
Once the masking fluid is bone dry, wet the entire sky area with clean water. You want a glisten, not a puddle. -
Lay down the nebula:
Drop in bright Magenta and Violet while the paper is wet. Let them bloom and spread softly to create the glowing center of your galaxy behind the tree branches. -
Deepen the cosmos:
While still damp, introduce Prussian Blue and Indigo around the pink/purple areas. Blend outwards towards the edges. -
Darken the corners:
Add Black or highly concentrated Indigo to the top corners and edges of the sky to create depth and frame the glowing center. -
Create the stars:
Let the sky dry completely. Dilute white gouache or acrylic ink with a little water. Dip an old toothbrush into it and flick the bristles to spray fine white specks across the dark sky. -
Highlight specific stars:
Use a fine liner brush and pure white gouache to manually dot in larger, brighter stars. I like to add a tiny cross-shape to one or two for a twinkling effect.
Nebula Glow Tip
Keep the center of your galaxy lighter than the edges. If your paint gets too dark near the tree branches, lift some pigment out with a thirsty, damp brush while it’s wet.
Step 3: The Tree & Foreground
-
Reveal the tree:
Gently rub off the masking fluid with your finger or a rubber cement pickup to reveal the pristine white paper underneath. -
Base coat the bark:
Using gouache (which is more opaque), paint the trunk and roots with a light wash of Yellow Ochre mixed with a touch of Burnt Umber. -
Add wood texture:
Use a darker Sepia or Burnt Umber on a fine brush to paint deeper grooves, knots, and twisting grain lines up the trunk. Remember to shade the underside of branches. -
Detail the hollow:
Paint the small hollow in the trunk using near-black brown. Soften the edges slightly so it looks recessed rather than just a black sticker. -
Paint the foliage:
Stipple Olive Green and a mix of green/yellow onto the branches. Don’t paint individual leaves; use a tapping motion to create clumps of canopy that let bits of the galaxy show through. -
Ground the roots:
Paint the earth between the roots with dark browns and violets. Add small vertical strokes of green and yellow along the horizon line to suggest distant grass or pine trees. -
Final touches:
Add highlights to the tops of the roots and branches using a mix of white and ochre to simulate starlight hitting the wood.
Masking Fluid Issues
If masking fluid rips your paper upon removal, it likely wasn’t 100% dry, or the paper is too soft. Always use heavyweight cotton paper and peel slowly at an angle.
Now step back and admire how your ancient tree connects the earth to the infinite stars above
Mandala Circle Tree of Life Centerpiece
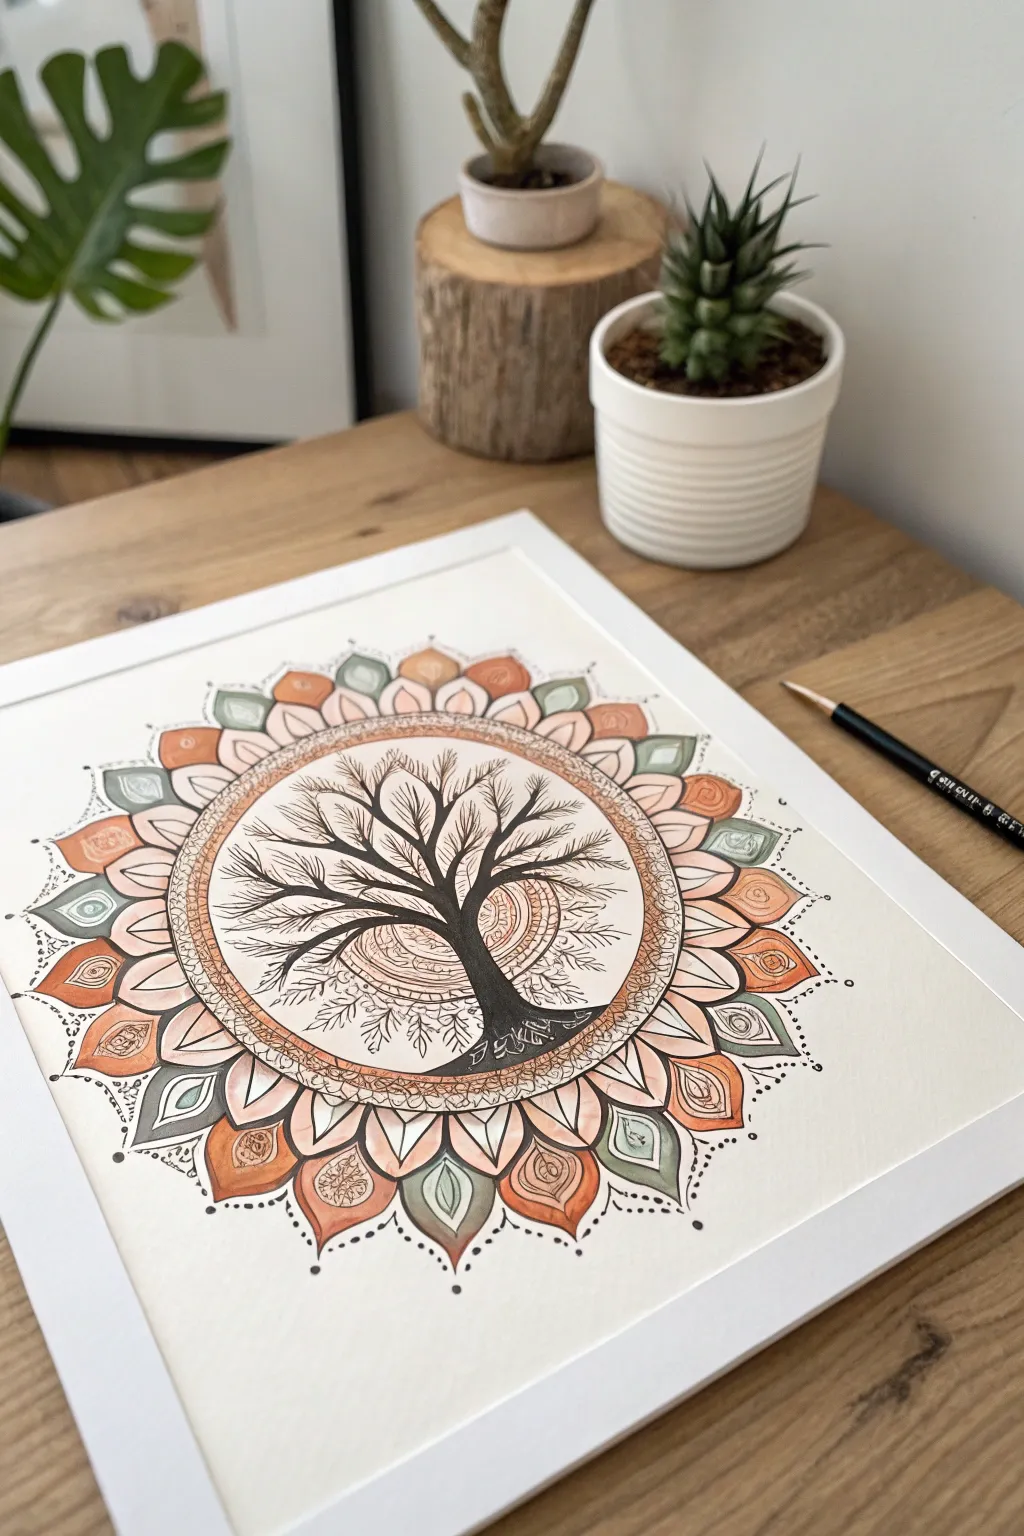
Merge the grounding symbolism of the Tree of Life with the meditative symmetry of a mandala in this delicate illustration. This project combines precise fineliner work with soft watercolor washes in earthy tones of burnt orange and sage green.
Detailed Instructions
Materials
- Hot press watercolor paper (smooth finish)
- Black waterproof fine liner pens (sizes 005, 01, and 05)
- Watercolor paint set (burnt sienna, sap green, indigo)
- Compass
- Protractor
- HB Pencil and quality eraser
- Round watercolor brush (size 4 or 6)
- Ruler
Step 1: Drafting the Structure
-
Find the center:
Begin by finding the exact center of your watercolor paper. Mark it lightly with your pencil. Use your compass to draw a central circle about 4 inches in diameter; this will be the boundary for the tree illustration. -
Create the outer rings:
Around the central circle, draw two more concentric circles spaced closely together (about 1/4 inch apart) to form a decorative band. Then, draw a larger outer circle where the tips of the mandala petals will reach. -
Divide the circle:
Use your protractor to divide the circle into 16 or 24 equal sections. Lightly draw straight lines through the center to the outer edge to act as guides for your petal symmetry. -
Sketch the tree:
Inside the innermost circle, sketch the silhouette of the tree. Start with a wide, rooted trunk at the bottom and branch out upwards. Ensure the branches reach right up to the edge of the circle but don’t cross it. -
Draft the petals:
Using your radial guidelines, sketch the petal shapes in the outer ring. Create two layers: a larger, pointed set of main petals and smaller, rounded petals tucked in the spaces between them to create depth.
Step 2: Inking the Outline
-
Outline the tree trunk:
Switch to your 05 waterproof pen for the tree trunk and main branches. Fill in the trunk solid black to create a strong silhouette, leaving a few tiny white gaps near the roots to suggest texture or light. -
Add delicate branches:
Use a finer 01 pen to trace the smaller branches. Let them taper off into fine points. Add tiny, leaf-like scribbles or veins inside the open areas of the tree crown for texture. -
Trace the geometric rings:
Carefully trace the circular borders. For the decorative band between the tree and the petals, fill it with a repetitive pattern, such as tiny circles or a chain link design, using the 005 pen. -
Define the mandala petals:
Ink the outlines of your petals with the 01 pen. I prefer to break the line slightly in places or vary the pressure to keep the look organic rather than mechanical. -
Erase pencil guides:
Wait at least 15 minutes to ensure the ink is completely dry. Gently erase all your pencil lines and guidelines to reveal the clean black and white structure.
Ink Smearing?
If your waterproof pen smears when painting, switch to adding ink AFTER the watercolor dries. Or, ensure you’re using pigment liners labeled ‘archival’ or ‘waterproof’ specifically.
Step 3: Adding Color
-
Mix your palette:
Prepare watery washes of Burnt Sienna (for the orange tones) and a mix of Sap Green with a touch of Indigo (for the sage/grey-green tones). Keep the pigment transparent. -
Paint the background wash:
Behind the black tree silhouette, wet the paper slightly and drop in a very faint wash of the orange tone near the horizon line to suggest a glowing sun or earth. -
Color primary petals:
Paint the large, pointed petals with the Burnt Sienna mix. To add dimension, drop concentrated pigment at the base of the petal and use a clean, damp brush to pull the color toward the tip, creating a gradient. -
Color secondary petals:
Use the sage green mix for the smaller, rounded petals between the orange ones. This contrasting color helps the orange pop. -
Add petal details:
Once the paint is fully dry, use the 005 pen to add intricate details inside the colored petals, such as teardrop shapes, veins, or stippling (dots) to enhance the decorative feel. -
Final decorative dots:
Finish by adding small black dots around the outermost edge of the mandala and at the tips of the petals. This creates a floating, airy effect for the border.
Pro Tip: Consistency
Turn your paper as you draw the petals. Keeping your hand in the same comfortable position and rotating the artwork ensures every petal curve looks consistent.
Frame your mandala in a simple white frame to let the earthy colors breathe and become a focal point in your room
Spiral Branches and Roots Tree of Life
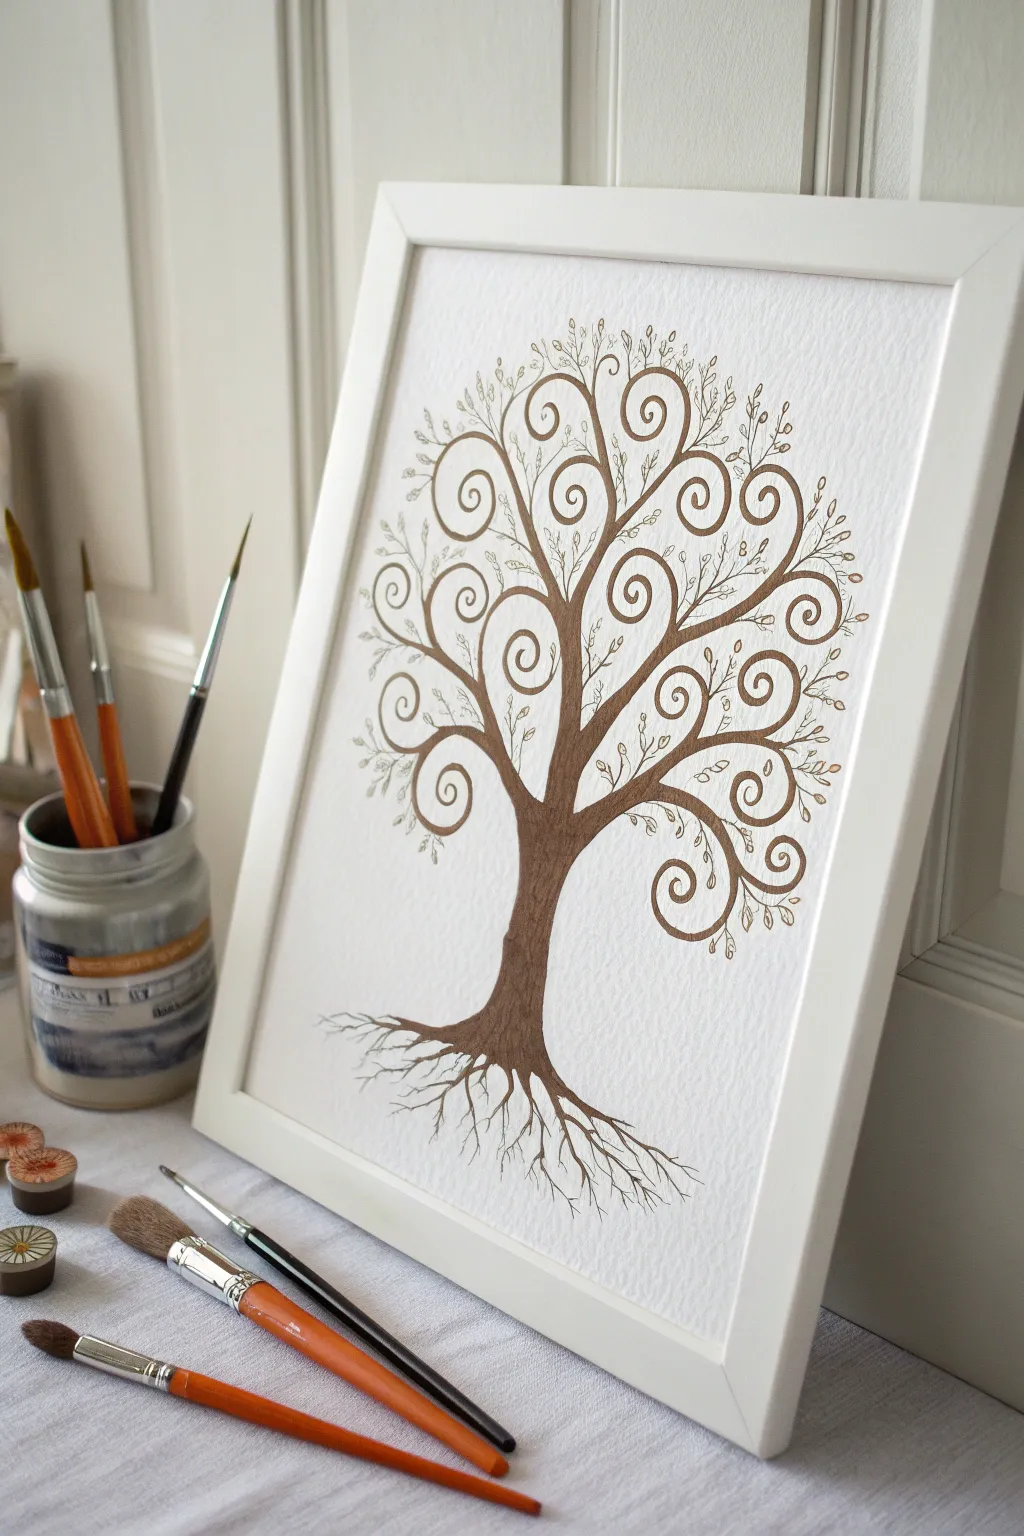
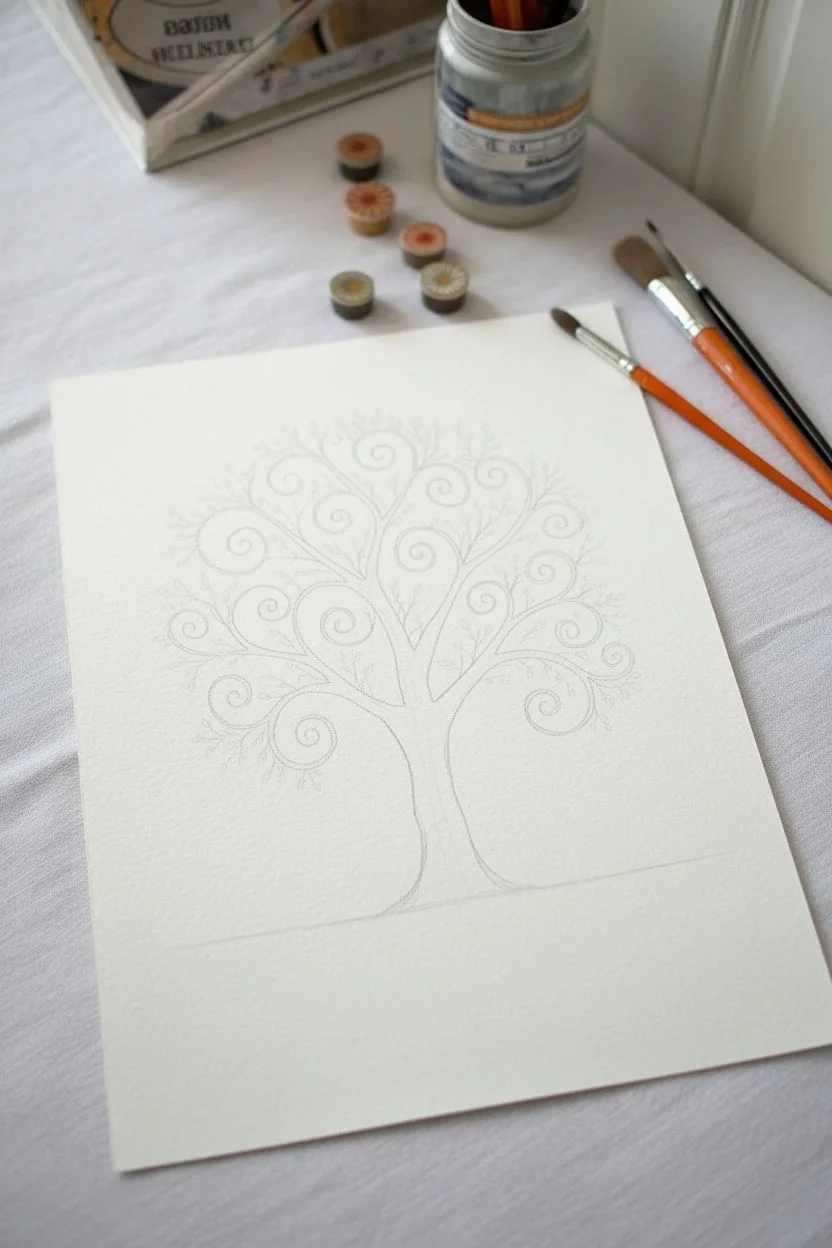
Capture the essence of growth and connection with this elegant, monochromatic Tree of Life painting. Featuring graceful spiral branches and delicate, sprawling roots, this project uses simple brushwork to create a sophisticated piece suitable for framing.
How-To Guide
Materials
- Cold-press watercolor paper (A4 or 8×10)
- Sepia or burnt umber watercolor paint
- Small round brush (size 2 or 3)
- Fine liner brush (size 0 or 00)
- Pencil (HB or H)
- Eraser
- Jar of water
- Paper towel
Step 1: Planning the Structure
-
Mark the horizon line:
Start by lightly sketching a faint horizon line about a quarter or third of the way up from the bottom of your paper. This will help ground your tree and separate the trunk from the root system, though the line itself will be erased later. -
Sketch the trunk:
Draw the main trunk centered on your paper. Keep the base slightly wider where it meets the ground, tapering gently as it moves upward before splitting into the main branches. -
Map out the spirals:
Lightly sketch the main spiral shapes of the branches. Don’t worry about perfect symmetry; focus on creating a balanced, rounded canopy shape. Each main branch should curl inward or outward in a deliberate scroll-like fashion.
Uneven Spirals?
If your spirals look shaky, try painting them in smooth, quick motions rather than slow strokes. Rest your pinky finger on a dry part of the paper to stabilize your hand.
Step 2: Painting the Main Form
-
Mix your base color:
Prepare a puddle of sepia or burnt umber watercolor. Aim for a medium consistency—dark enough to show up clearly but fluid enough to flow off your brush easily. -
Fill the trunk:
Using your size 2 or 3 round brush, carefully paint the trunk. Use downward strokes to mimic the grain of bark, keeping the edges crisp. -
Paint the primary spirals:
Extend the paint from the trunk into the thickest parts of your spiral branches. As you follow the curl of the spiral, gradually lift pressure on your brush to taper the line, making it thinner as it curls inward. -
Add secondary branches:
Switch to a smaller brush if needed. Paint smaller spiral offshoots branching from the main curls. I find it helpful to rotate the paper as I work to maintain a natural curve with my hand.
Step 3: Detailed Line Work
-
Switch to the liner brush:
Load your fine liner brush (size 0 or 00) with a slightly darker, more concentrated mix of the same brown paint. -
Create the root system:
At the base of the trunk, paint thin roots extending downwards. Unlike the smooth upper branches, let these lines be slightly jagged or wavy to represent them digging into the earth. -
Detail the root tips:
Feather the ends of the roots into very fine, hairline strokes that fade out, suggesting they go deep underground. -
Add tiny twigs:
Return to the canopy and add very fine, short lines branching off the spiral curves. These will serve as stems for your leaves. -
Paint delicate leaves:
Using the tip of your brush, press down gently and lift to create small, tear-drop shaped leaves on the fine twigs. Keep them sparse and airy to maintain the delicate look. -
Incorporate small dots:
Add tiny dot accents near the ends of some spirals or floating near the leaves for a bit of whimsical texture.
Pro Tip: Custom tint
Add a tiny drop of metallic gold paint to your brown mixture. It won’t be overly shiny, but it will give the branches a warm, subtle glow when the light hits the texture.
Step 4: Refining and Finishing
-
Deepen the shadows:
Once the first layer is dry, go back over the trunk and the underside of the main branches with a second coat of paint to add depth and dimension. -
Check for balance:
Step back and look at your composition. If one side looks too empty, add a few more small decorative spirals or floating leaves to balance the visual weight. -
Erase pencil marks:
Wait until the painting is completely bone-dry. Gently erase any visible pencil sketch lines, especially around the light spirals and the horizon line you drew earlier. -
Flatten the paper:
If your paper has buckled slightly from the water, place the dry artwork under a heavy book overnight to flatten it before framing.
Place your finished piece in a simple white frame to let the intricate details of your tree truly shine
Mother Nature Silhouette Trunk Tree of Life
Create a striking focal point for any room with this bold, illustrative Tree of Life painting. Featuring exaggerated, sprawling roots and a canopy of delicate, fingerprint-style leaves, this project combines graphic lines with organic textures for a timeless look on a large canvas.
Step-by-Step
Materials
- Large stretched canvas (approx. 30×40 inches or larger)
- Black acrylic paint (heavy body preferred)
- White or cream acrylic paint (for background)
- Olive green acrylic paint
- Burnt sienna or reddish-orange acrylic paint
- Large flat brush (2-3 inch) for background
- Round brushes (sizes 4, 6, and 8) for the trunk
- Fine liner brush (size 0 or 1) for details
- Graphite pencil and eraser
- Palette for mixing
- Water cup and paper towels
Step 1: Preparing the Foundation
-
Prime the Surface:
Even if your canvas is pre-primed, apply an even coat of white or cream acrylic paint using the large flat brush. This ensures a consistent, smooth texture and a warm base tone. -
Dry Completely:
Allow the background layer to dry fully before moving on. Touches of dampness can cause the pencil sketch to smudge later. -
Sketch the Trunk Shape:
Using a pencil, lightly outline the main trunk. Start wide at the bottom and taper gently as you move upward to the first major split. -
Map the Roots:
Draw the root system extending from the base. These should mirror the branches above but feel heavier and more grounded, spreading out horizontally across the bottom of the canvas. -
Draft Main Branches:
Sketch four to five primary branches radiating from the top of the trunk. Keep the lines flowing and organic rather than stiff and straight.
Uneven Coverage?
If the black paint looks streaky or greyish after drying, apply a second coat specifically to the trunk and thickest roots for a bold, solid silhouette.
Step 2: Painting the Structure
-
Outline in Black:
Load a size 6 or 8 round brush with black acrylic paint. Carefully trace over your pencil lines for the trunk and main roots to establish the silhouette. -
Fill the Core:
Fill in the central trunk area with solid black paint. Don’t worry about texture yet; just focus on getting opaque coverage. -
Taper the Roots:
Switch to a smaller brush to extend the root tips into sharp, fine points. Drag the brush lightly at the end of each stroke to get that tapering effect. -
Create Texture Lines:
While the black paint is wet, or using a slightly dry brush technique later, add streaks of very dark grey or diluted white vertically along the trunk to simulate bark texture. -
Extend Secondary Branches:
Using a size 4 brush, paint thinner branches splitting off from your main limbs. Let them curve and twist slightly to fill the negative space in the upper canvas. -
Add Fine Twigs:
Switch to your fine liner brush. Add delicate twigs growing from the secondary branches. These should be numerous and fill out the canopy shape.
Pro Tip: Airy Canopy
Don’t overfill the branches! Leave plenty of ‘sky’ visible between the leaves. This negative space keeps the painting feeling light and illustrative rather than heavy.
Step 3: Adding the Foliage
-
Mix Leaf Colors:
Prepare a palette with olive green and burnt sienna. You can also mix a touch of white into some green to create a lighter sage tone for variety. -
Stamp the Green Leaves:
Dip a small, stiff round brush or even your fingertip into the green paint. Press onto the ends of the twigs to create small, cluster-like leaf shapes. -
Add Autumn Accents:
intersperse the reddish-orange leaves among the green ones, focusing on the outer edges or one side of the tree to suggest a seasonal transition. -
Layering for Density:
Once the first layer of leaves is dry, add a few overlapping leaves in slightly different shades to create depth and volume in the canopy. -
Final Root Details:
Check the bottom of the canvas. Add a few very fine, hair-like rootlets coming off the main roots using the liner brush to ground the tree firmly. -
Review and Refine:
Step back to look at the overall balance. If any branch looks too bare, add a quick twig and a leaf or two to fill the gap.
Hang your finished canvas proudly to display the intricate balance of roots and branches you have created
Heart Leaves or Symbolic Fruit Tree of Life

Celebrate love and growth with this charming watercolor illustration featuring heart-shaped fruits and stylized swirling bark details. The textured paper and soft, distinct brushstrokes give this piece a beautiful, folk-art inspired aesthetic perfect for a family tree or nursery decor.
Step-by-Step Tutorial
Materials
- Cold press watercolor paper (300 gsm or heavier)
- Watercolor paints (Browns, Reds, Greens, Pinks)
- Round watercolor brushes (sizes 2, 4, and 6)
- Pencil (HB or lighter) and eraser
- Jar of clean water
- Paper towel or cloth
- Masking tape (optional for edges)
Step 1: Sketching the Skeleton
-
Establish the Trunk:
Begin lightly with your pencil. Draw a sturdy trunk in the center, tapering slightly as it goes up. Allow the base to flare out widely into winding root shapes that anchor the tree. -
Map the Branches:
Branch out from the top of the trunk. Sketch primary branches reaching outward in a radial, fan-like pattern to form a pleasing rounded crown shape. Add smaller twig offshoots to fill the gaps. -
Place the Hearts:
Instead of circles for fruit, sketch small heart shapes hanging from the tips of various twigs. Scatter them evenly throughout the canopy to create balance.
Wet-on-Dry Precision
For the crisp swirls on the bark, ensure the base layer is bone dry. If the paper is cool to the touch, it’s still damp. Patience prevents blurry lines.
Step 2: Painting the Tree Structure
-
Base Trunk Layer:
Mix a warm, medium-brown tone. Using a size 6 brush, fill in the trunk and main branches. Keep the wash fairly light and transparent for now so you can add details later. -
Extending the Roots:
Pull the brown paint down into the roots, letting the color fade slightly as the roots taper into the ground area. -
Adding Dimension:
While the paint is still damp but not soaking, drop slightly darker brown pigment along the edges of the trunk to create a subtle 3D roundness. -
Painting the Ground:
Mix a very dilute, dusty pink or mauve. Wash this color loosely around the roots to ground the tree, creating a soft textural base rather than a solid line of grass.
Make It a Family Tree
Use a fine-liner pen to write family names inside the hearts or along the branches. It turns the artwork into a meaningful heirloom gift.
Step 3: Adding Foliage and Fruit
-
Painting the Leaves:
Mix a muted olive green. Using your size 4 brush, paint simple almond-shaped leaves attached to the branches. Vary the green shades slightly—some lighter, some darker—to add visual interest. -
Filling the Hearts:
Switch to your reds and pinks. Paint the heart fruits carefully. I like to leave a tiny speck of white paper unpainted on one side of each heart to mimic a highlight. -
Adding Variation:
Don’t make every heart identical. Paint some a deep crimson, others a soft blush, and maybe a few in a burnt orange tone to suggest different stages of ripeness.
Step 4: Detailing and Refining
-
Decorative Swirls:
Once the trunk is completely dry, mix a concentrated dark brown. Use your finest brush (size 2) to paint spiral patterns and swirly wood grain textures up the trunk and onto the main roots. -
Leaf Veins:
Using a slightly darker green than your base leaf color, paint a single central vein line on larger leaves for definition. -
Stem Connections:
Use the fine brush to ensure every heart and leaf is connected to a branch with a thin brown stem line so nothing is floating. -
Final Contrast Check:
Step back and assess your painting. If the tree feels too flat, add small touches of dark brown shadow under the main branches where they join the trunk.
Now you have a heartwarming piece of art that symbolizes deep roots and flourishing love
Bird and Wildlife Silhouettes in the Tree of Life
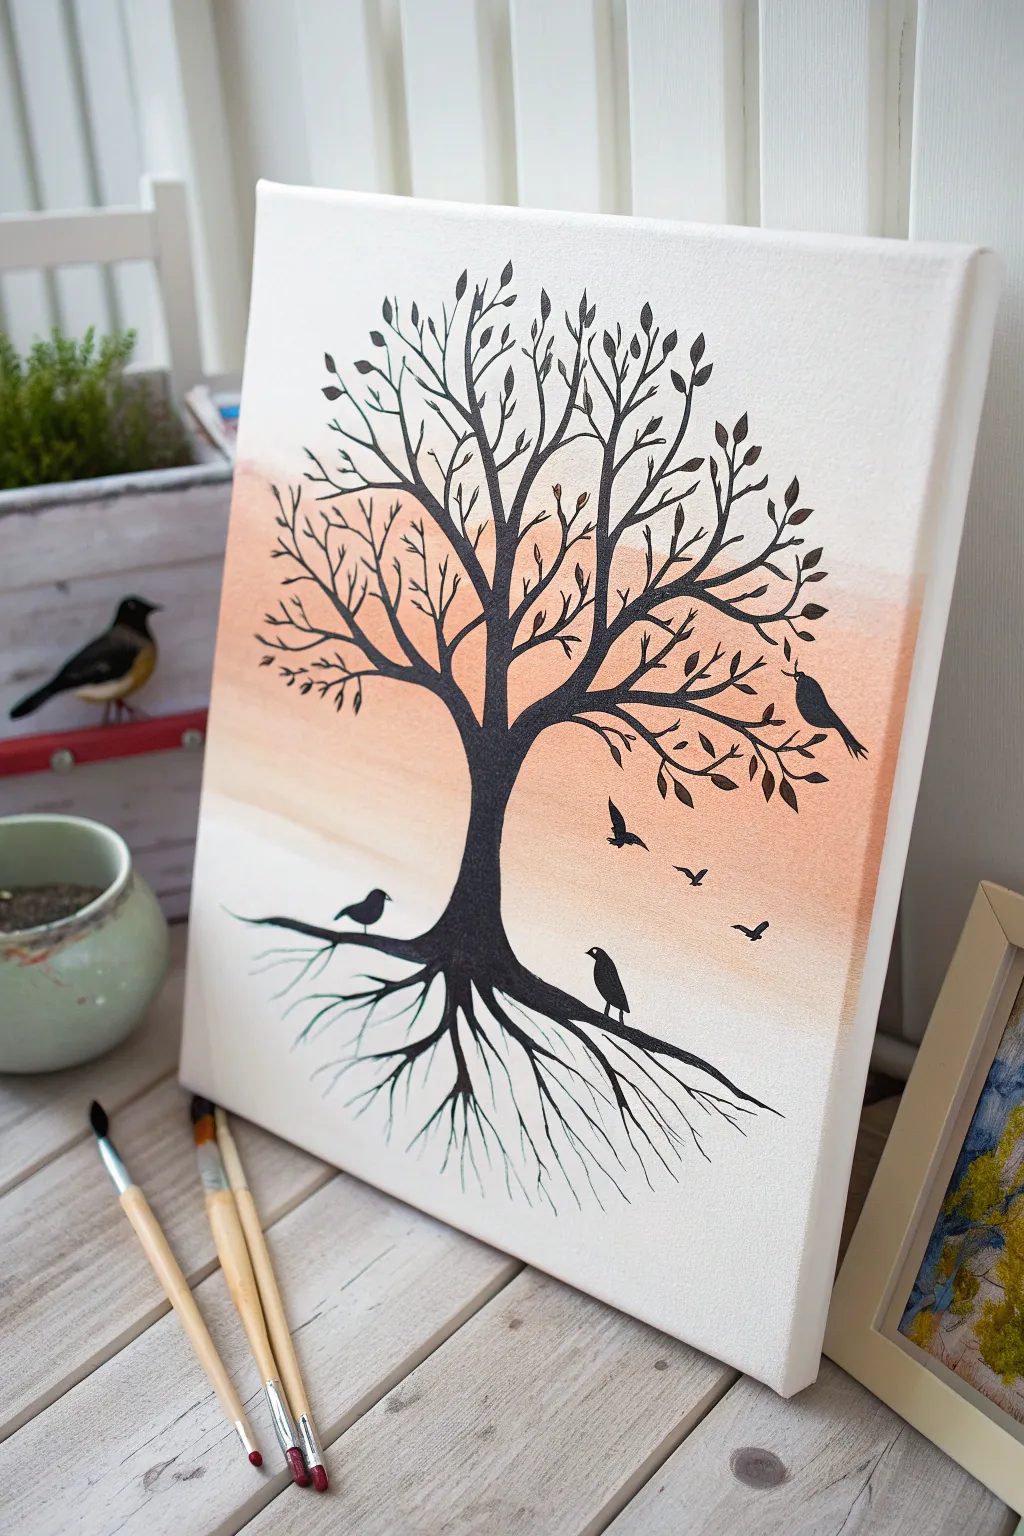
This elegant Tree of Life painting contrasts the stark beauty of a black silhouette against a soft, sun-washed horizon. With delicate roots mirroring the branches and playful bird figures, this piece captures the serene balance of nature.
Step-by-Step
Materials
- Rectangular stretched canvas (e.g., 11×14 or 16×20 inches)
- Acrylic paints: Titanium White, Peach or Light Coral, Mars Black
- Wide flat brush (1-2 inches) for background
- Medium round brush (size 4-6) for trunk
- Fine liner or detail brush (size 0-1) for twigs and roots
- Palette for mixing
- Pencil and eraser
- Water cup and paper towels
Step 1: Creating the Sky
-
Prepare the canvas:
Start with a clean, dry canvas. If your canvas isn’t pre-primed, apply a coat of gesso and let it dry completely to ensure a smooth painting surface. -
Mix the horizon color:
On your palette, mix a soft peach color. You can achieve this by combining your Peach/Coral paint with a significant amount of Titanium White to keep it pastel and airy. -
Apply the wash:
Using a slightly damp wide flat brush, paint a horizontal band of the peach color across the middle section of the canvas. You don’t want hard edges; use a dry-brush technique or a little water to feather the edges upwards and downwards into the white space. -
Blend the transition:
While the paint is still wet, clean your brush and use pure Titanium White to blend the top and bottom edges of the peach band, creating a seamless gradient that fades into the white canvas. Let this background dry completely.
Ink for crisp lines
For the finest root tips and smallest twigs, switch from paint to a black pigment liner or acrylic paint marker. This gives you ultimate control over hairline details.
Step 2: Drafting the Tree
-
Sketch the trunk:
Lightly sketch the tree structure with a pencil. Start with a central vertical trunk that widens slightly at the base before splitting into main branches. -
Add roots and branches:
Draw the root system extending downward, mirroring the spread of the branches above. Outline the main branches reaching outward in a radial pattern, ensuring they taper as they move away from the trunk. -
Position the wildlife:
Sketch small outlines for the birds. Place one perched on a right-side branch, one flying in the distance, and two standing on the ground line near the roots.
Shaky hands?
If you struggle painting straight thin lines for twigs, rest your pinky finger on a dry part of the canvas to stabilize your hand while using the liner brush.
Step 3: Painting the Silhouette
-
Fill the main trunk:
Load your medium round brush with Mars Black. Carefully fill in the trunk shape you sketched, keeping your strokes vertical to mimic the grain of wood. -
Extend the branches:
Switch to a smaller brush as you move outward. Paint the main branches, ensuring they flow naturally from the trunk. A slightly shaky hand here actually helps create organic-looking bark textures. -
Detail the roots:
Use the fine liner brush to paint the roots. These should be thinner than the trunk and wiggle downwards, tapering off into very fine lines at the bottom. -
Add fine twigs:
With the detail brush and thinned black paint (add a drop of water to improve flow), add many small, fine twigs branching off the main limbs. Fill the empty spaces in the canopy essentially.
Step 4: Adding Life and Details
-
Paint the leaves:
Using the tip of a small round brush, press down and lift up quickly to create teardrop-shaped leaves scattered across the branch tips. Vary the direction of the leaves to make the foliage look natural. -
Define the ground birds:
Paint the two birds near the roots first. Use opacity to your advantage; one solid coat of black should suffice. Give them simple, rounded bodies and tiny beaks. -
Paint the arboreal birds:
Carefully fill in the bird perched on the branch and the one flying mid-air. Ensure their wings or tails have sharp points to distinguish them clearly against the peach background. -
Add floating birds:
For depth, add two or three tiny ‘V’ shapes or seagull silhouettes in the distance on the right side of the canvas. -
Final check:
Step back and look at the balance of the composition. If the tree looks too sparse on one side, simply add a few more twigs and leaves to even it out.
Once the black paint has dried fully, your stylized tree of life is ready to bring a touch of nature’s calm to your wall
Floating Orbs and Seed-Glow Tree of Life
Capture the magic of nature with this elegant watercolor tree of life, featuring swirling roots and a canopy of autumnal leaves. The delicate gold accents add a whimsical, floating quality that brings a warm glow to any room.
Step-by-Step Tutorial
Materials
- Cold press watercolor paper (minimum 140lb/300gsm)
- Watercolor paints (Burnt Umber, Sepia, Sap Green, Olive Green, Yellow Ochre, Gold)
- Fine liner brushes (size 0 and 00)
- Round brush (size 4 or 6)
- Golden metallic watercolor paint or gold ink
- Pencil (HB or H for light sketching)
- Kneadable eraser
- Two jars of water
- Paper towels
- White or light wood frame (optional)
Step 1: Sketching the Skeleton
-
Plan the structure:
Begin by lightly sketching the trunk in the center of your paper. Make the base wider, tapering gently as it rises. Instead of straight lines, use slightly wavy, organic strokes to suggest the twisting nature of wood. -
Map the branches:
Extend 4-5 main branches from the top of the trunk. Let them curve outwards and upwards, splitting into smaller ‘Y’ shapes as they reach toward the edges of the paper. Keep your pencil pressure very light so the graphite doesn’t show through the paint later. -
Root foundation:
Draw the roots mirroring the branches but slightly more compact. They should flow downwards and outwards, creating a grounded feel. Add a few small, detached root tips floating near the main root ball for an artistic touch.
Muddy colors?
If your brown trunk is bleeding into your green leaves, ensure the trunk is 100% dry before painting leaves that touch it. Use a hair dryer on low heat to speed up the process.
Step 2: Painting the Trunk and Roots
-
Base wash:
Mix a watery wash of Yellow Ochre and a touch of Burnt Umber. Using your round brush, fill in the trunk and main branches. Don’t worry about texture yet; just get a nice, even pale brown layer down. -
Defining the grain:
Once the base is damp (not soaking), switch to a smaller brush with a darker mix of Burnt Umber and Sepia. Paint vertical, flowing lines up the trunk to mimic bark texture. -
Adding depth:
Darken the edges of the trunk and the undersides of the branches with your Sepia mix. This creates a cylindrical 3D effect. Leave the center of the trunk slightly lighter to show where the light hits. -
Root details:
Paint the roots using the same technique, letting the tips fade out into nothingness. Use fine, darker lines to show how the roots overlap and twist near the base of the tree. -
The spiral symbols:
Near the base of the trunk, carefully paint two small concentric circles using a clean brush and slightly lifted paint (or white gouache if you need to correct). Or, paint around two small circular areas to leave the white paper showing, then add a dot in the center.
Step 3: Foliage and Atmosphere
-
Leaf palette strategy:
Prepare three distinct puddles of color on your palette: a fresh Sap Green, a muted Olive Green, and a warm Golden Yellow/Ochre. You want variation to make the tree look alive. -
Painting first leaves:
Using the point of your round brush or a larger liner brush, press down and lift to create simple leaf shapes. Start with the green leaves scattered evenly around the outer branches. -
Layering colors:
While the first set is drying, add yellow and ochre leaves. Place some close to the greens and others on their own. I find that leaving a tiny gap between the leaf stem and the branch keeps the painting looking airy and delicate. -
Varied saturation:
Make some leaves translucent by using more water, and others more opaque with heavier pigment. This depth mimics how light filters through a real canopy. -
Connecting stems:
Once the leaves are dry, use your finest liner brush and a diluted brown to draw thin, delicate stems connecting floating leaves back to the main branches.
Level Up: Celtic Knots
Instead of simple wood grain, try weaving the roots into a basic Celtic knot pattern at the bottom to emphasize the ‘Tree of Life’ mythology and add complexity.
Step 4: The Golden Glow
-
Mixing metallics:
Activate your gold watercolor pan with a few drops of water, or shake your gold ink well. You want a consistency that flows off the brush but remains opaque. -
Placing the orbs:
Paint small, perfect circles of varying sizes scattered throughout the branches and the empty white space around the tree. Think of them as floating seeds or fireflies. -
Concentrating the magic:
Add a few more gold dots near the roots and clustered slightly denser in the upper corners of the composition to frame the tree. -
Final leaf accents:
Select a few random dried leaves and paint a thin gold vein down their center, or outline one side of a significant leaf with a trace of gold for extra sparkle. -
Framing:
Allow the piece to dry completely (at least an hour for the metallic paint). Erase any visible pencil lines gently, then place into a white frame to make the colors pop.
Hang your finished piece in a sunny spot where the natural light will catch those beautiful gold accents.
Negative Space Tree of Life With a Bold Background

This striking project reverses the typical painting process by placing a delicate white skeletal tree against a bold, saturated teal background. The result is a modern, meditative piece that celebrates the intricate network of branches and roots with stunning clarity.
How-To Guide
Materials
- Stretched canvas (rectangular, e.g., 16×20 inches)
- Acrylic paint: Deep Teal or Peacock Blue
- Wide flat brush or foam roller
- White gel pen (medium and bold nibs) or white acrylic paint marker
- Graphite transfer paper (optional)
- Pencil and eraser
- Ruler
- Reference photo of a winter tree or tree silhouette
Step 1: Setting the Stage
-
Prepare the canvas:
Wipe down your canvas with a clean, dry cloth to remove any dust that might interfere with paint adhesion. -
Apply the base coat:
Using a wide flat brush or a foam roller, apply a smooth, even coat of your Deep Teal acrylic paint. Ensure you paint the sides of the canvas as well for a polished, frameless look. -
Let it dry completely:
Allow the first coat to dry fully. If the canvas texture is still showing through too much or the color looks streaky, apply a second coat. A solid, opaque background is crucial for this high-contrast effect so take your time here. -
Determine placement:
Once the paint is bone dry, lightly decide where your horizon line will be. For this composition, keep the ground line quite low, perhaps only an inch or two from the bottom edge, to maximize space for the canopy.
Ink Not Flowing?
Acrylic paint can sometimes clog gel pens. If the ink stops, scribble quickly on a rubber sole of a shoe or a rough scrap of paper to get the ball rolling again.
Step 2: Drafting the Skeleton
-
Sketch the trunk:
Using a regular pencil, very lightly sketch the central trunk. Since you are drawing on dark paint, angle the canvas to catch the light so you can see the graphite sheen. Start with a solid base that tapers upwards. -
Establish main branches:
Draw four to five main arterial branches splitting off from the trunk. Aim for a symmetrical, rounded shape overall, but ensure the individual branches bend and twist organically to avoid it looking artificial. -
Add the ground and figures:
Sketch a simple curved line for the ground. If you want to include the tiny silhouette figures seen in the example (two small owl-like or human shapes), place them near the base of the trunk now. -
Review the structure:
Step back and look at your pencil guide. The canopy should feel full and fill the upper 80% of the canvas. Erase any lines that feel unbalanced; a clean eraser should lift the graphite without damaging the acrylic if you are gentle.
Step 3: Inking the Tree
-
Outline the trunk:
Switch to your bold-nib white gel pen or paint marker. Check the flow on a scrap piece of paper first, then carefully outline the trunk and the thickest parts of the main branches. -
Fill the core:
Color in the trunk and main branches solid white. I find that using short, vertical strokes mimics the texture of bark better than coloring in circular motions. -
Create secondary branches:
Extend lines from your main branches. These should be thinner than the trunk. Use a ‘Y’ shape strategy—every time a branch ends, split it into two smaller lines. -
Detail the roots:
Draw roots extending downward from the trunk into the ground area. Unlike the branches which reach up, these should weave downward and spread horizontally, fading out into thin lines. -
Refine the ground line:
Go over your horizon line with a single clean stroke. Add a few scratchy marks just under the line to suggest grass or uneven earth.
Pro Tip: Bark Texture
Don’t color the trunk perfectly solid white. Leave tiny, hair-thin vertical streaks of the blue background visible to mimic the natural cragginess of bark.
Step 4: The Fine Filigree
-
Switch to fine tips:
For the outer edges of the canopy, switch to a finer tip pen if you have one. This helps create the illusion of delicate twigs. -
Build the texture:
Work section by section, adding thousands of tiny, erratic lines branching off your secondary branches. Let your hand shake slightly; perfect straight lines rarely exist in nature. -
Cross and overlap:
Don’t be afraid to let lines cross over each other. This creates density and visual depth. -
Check the density:
Step back frequently. You want the ‘white’ to look densest near the center and lighter/airier at the edges. Add more tiny twig lines in the middle sections to build this volume. -
Highlight the figures:
Carefully fill in your tiny figures at the base in solid white so they pop against the dark background. -
Final touches:
Look for any gaps in the canopy that feel too empty and fill them with delicate webbing. Once fully dry, gently erase any visible pencil marks.
Hang your masterpiece in a well-lit spot to let that crisp white contrast truly shine.
Mixed-Media Collage Tree of Life With Natural Textures

This elegant mixed-media piece combines the warmth of wood textures with the delicacy of paper crafting to create a stylized Tree of Life. The background features a subtle, embossed-style leaf pattern that adds incredible depth behind the main focal point.
Step-by-Step
Materials
- Large wooden frame (white)
- Heavyweight textural paper or canvas panel (for the base)
- Wood veneer sheets or textured brown cardstock
- Assorted watercolor papers (textured)
- Watercolor paints or acrylic inks (earth tones)
- Modeling paste or heavy structure gel
- Leaf stencil (large scale)
- Palette knife
- Fine detail scissors or X-Acto knife
- Craft glue or matte medium
- Fine-point brown marker or pen
- Pencil
Step 1: Creating the Textured Backdrop
-
Prepare the base:
Start with a sturdy backing board or canvas panel sized to fit your frame. Wipe the surface clean to ensure adhesion. -
Apply the background texture:
Before building the tree, create the subtle background pattern. Place a large leaf stencil over the lower left and bottom areas of the board. -
Spread the medium:
Using a palette knife, gently spread white modeling paste or heavy structure gel through the stencil. You want a low-relief effect—visible but not overwhelming. Lift the stencil carefully and let this dry completely, usually for several hours. -
Seal the surface:
Once the textured paste is hard, apply a thin coat of white gesso or acrylic paint over the entire background to unify the color and texture.
Natural Texture Hack
No veneer? Use brown paper grocery bags. Crumple the paper tightly, flatten it, and brush with watered-down brown acrylics for a realistic bark look.
Step 2: Constructing the Tree Trunk
-
Sketch the silhouette:
Lightly draw the outline of your tree trunk and main branches on the background. Aim for a sturdy base that tapsers gracefully upward into thinner limbs. -
Cut the wood texture:
Take your wood veneer sheet or textured brown cardstock. Cut it into shapes that correspond to your trunk sketch. I find it easier to cut the trunk in a few vertical segments rather than one giant piece to mimic natural bark growth. -
Adhere the trunk:
Glue the veneer pieces onto your sketched outline. Use matte medium for a secure bond that won’t show if it seeps out. -
Add bark details:
Using a fine-point brown marker or dark brown paint, draw vertical striations and knots onto the veneer to enhance the woodgrain effect and define the edges of the branches.
Step 3: Crafting the Canopy
-
Paint the leaf paper:
Take several sheets of textured watercolor paper. Paint loose washes of sage green, olive, ochre, muted blue, and tan. Don’t worry about uniformity; the color variation adds realism. -
Trace and cut leaves:
Once the paint is dry, cut out dozens of leaf shapes. Vary the sizes slightly, keeping them generally uniform in shape (like simple ovals or pointed ellipses). -
Score the leaves:
To give the leaves dimension, gently score them down the center with a dull blade or bone folder, then fold them slightly along the vein line. -
Draw leaf veins:
Use a fine liner pen or a very thin brush with white or light gray paint to add delicate vein patterns to each leaf cutout.
Level Up: Metallic Touch
Brush a tiny amount of gold or copper leafing wax onto the edges of the trunk and a few select leaves to catch the light.
Step 4: Assembly and Finishing
-
Place the leaves:
Begin arranging the leaves at the tips of your painted branches. Dry fit them first to ensure a balanced, radial composition. -
Glue the foliage:
Glue the leaves in place, overlapping them slightly. adhere only the base of each leaf, allowing the tips to curl upward for a 3D effect. -
Create the ground:
Cut a gentle curving strip of green-painted paper or veneer for the grassy hill at the bottom. Glue this over the base of the trunk. -
Add small details:
If desired, create tiny seedling sprouts or small shrubs near the base using smaller scraps of your painted paper. -
Frame the work:
Once all glue is fully cured, place the artwork into a deep shadow box or standard frame without the glass touching the paper to preserve the 3D relief.
Hang your textured masterpiece in a well-lit area where the shadows can play across the relief surface


Have a question or want to share your own experience? I'd love to hear from you in the comments below!