Tree trunks are such underrated canvases—already full of texture, grooves, and natural personality. If you’ve been craving an outdoor project that feels bold, whimsical, or quietly magical, these tree trunk painting ideas will get your hands itching to create.
Bold Black-and-White Geometric Bands
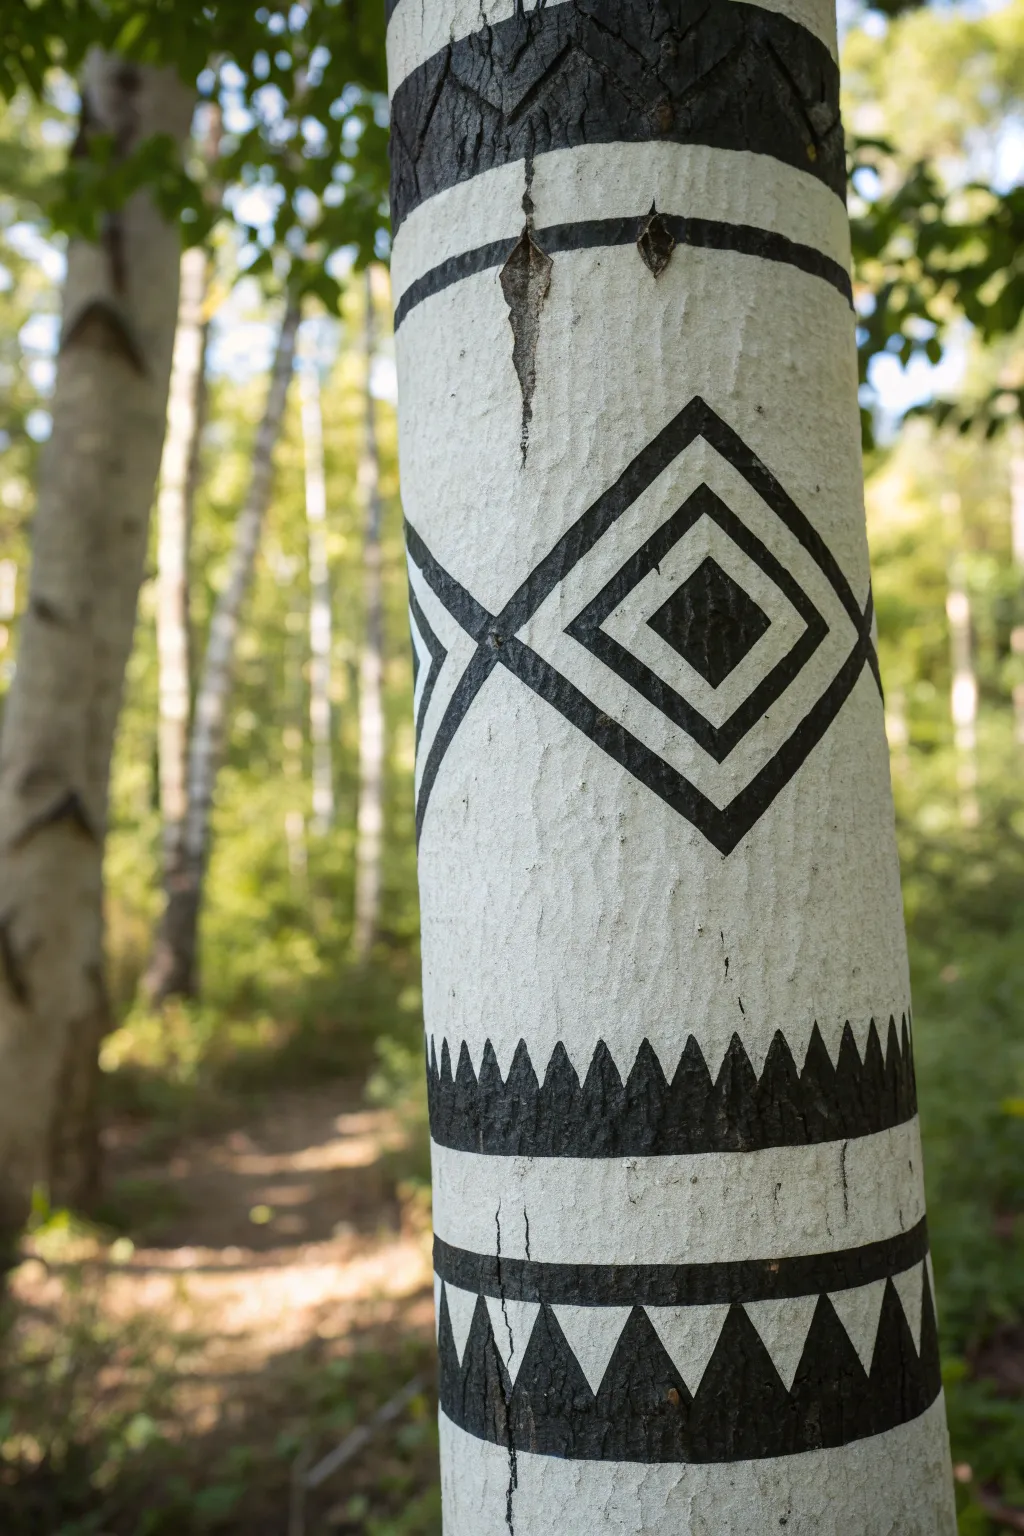
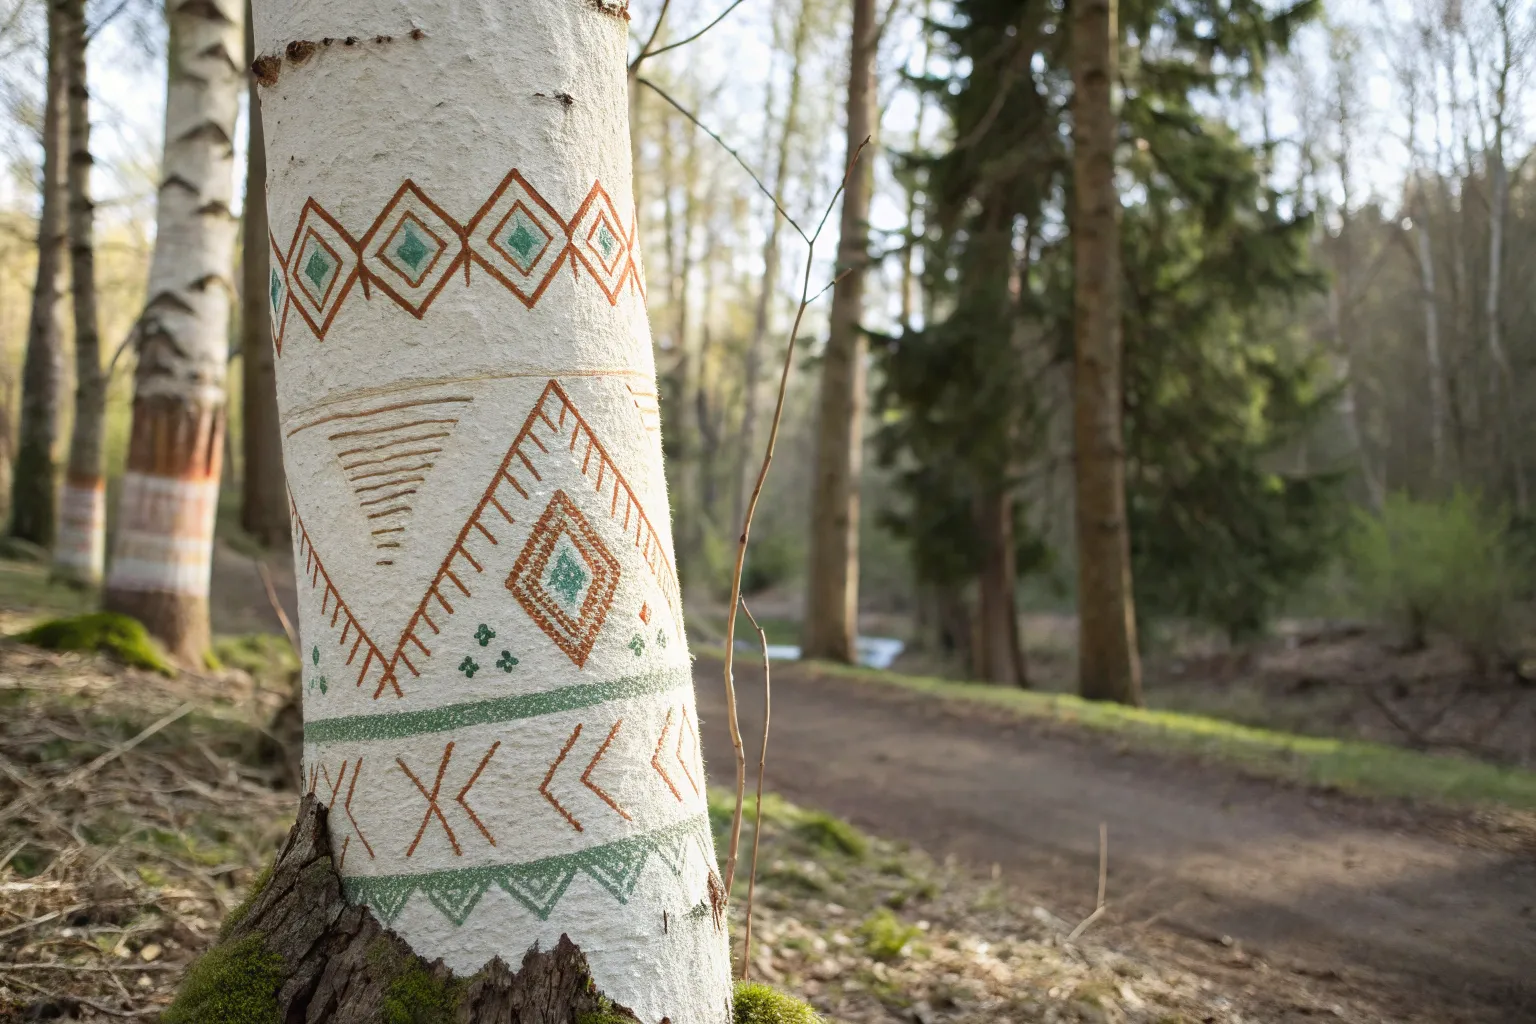
Transform a simple tree trunk into bold, eye-catching yard art with this high-contrast painting project. The striking black-and-white motif uses repeating diamonds and zigzags to create a rhythmic, almost tribal aesthetic that pops against the natural greenery.
Detailed Instructions
Materials
- Outdoor acrylic paint (bright white)
- Outdoor acrylic paint (matte black)
- Wide flat brush (2-inch)
- Medium flat brush (1-inch)
- Detail round brush (size 4 or 6)
- Painter’s tape (various widths)
- Chalk or pencil for sketching
- Measuring tape
- Wire brush (for cleaning bark)
- Rag and water
Step 1: Preparation & Base Coat
-
Clean the canvas:
Before laying down any paint, gently scrub the selected area of the tree trunk with a wire brush to remove moss, loose bark, and dirt. -
Wipe it down:
Use a damp rag to wipe away the dust created by scrubbing, ensuring a clean surface for adhesion. -
Define the work area:
Decide how high and low your design will go. Mark the top and bottom boundaries with small pieces of tape or chalk marks. -
Apply the white base:
Using the 2-inch flat brush, paint the entire selected section of the trunk with bright white outdoor acrylic paint. -
Build opacity:
Let the first coat dry completely (about 30 minutes in dry weather), then apply a second coat of white. The goal is a solid, opaque background where no bark color shows through.
Rough Bark Blues?
If the bark is very craggy, dab the paint into crevices rather than brushing across them. A stiff stencil brush can help push pigment into deep grooves.
Step 2: Mapping the Design
-
Determine the center:
Find the visual center of your painted area—this is where the large diamond pattern will sit. Mark this spot lightly with chalk. -
Mark horizontal bands:
Use your measuring tape to lightly chalk horizontal lines around the circumference of the tree. You’ll need lines near the bottom for the triangles and lines near the top for the upper borders. -
Sketch the diamonds:
Starting from your center point, sketch a large diamond shape. Inside it, sketch two progressively smaller diamonds to create the nested effect shown in the image. -
Sketch the zigzags:
Along the bottom horizontal band, draw a series of upside-down triangles (points facing down). Above that, draw a row of smaller, spikier triangles (points facing up) to create the ‘teeth’ pattern. -
Sketch the top details:
Near the top of your white section, draw a simple horizontal band, and above it, a repeating curved scallop or ‘U’ shape pattern.
Add a Pop of Color
Keep the geometric bands black, but paint the center of the nested diamond a bright turquoise or gold for a modern, unexpected accent.
Step 3: Painting the Black Motifs
-
Paint the central diamonds:
Load your medium flat brush with matte black paint. Carefully paint the solid center diamond first. -
Outline the diamond bands:
Using a steady hand or the edge of the flat brush, paint the thick black outline of the largest diamond. Leave the white space between this outline and the center diamond intact. -
Connect the pattern:
Extend the side points of your large diamond horizontally around the tree (or as far as visible) to create the feel of a continuous band. -
Fill the bottom triangles:
Switch to your medium brush to fill in the large, downward-pointing triangles at the base. Ensure the points are sharp. -
Create the saw-tooth band:
Paint the horizontal band just above the large triangles. From this band, carefully paint the small upward-pointing spikes using your detail round brush. -
Execute the top details:
Move to the upper section. Paint the thin horizontal straight line, and then fill in the scalloped area at the very top with solid black. -
Touch up edges:
Once the black paint is dry, I find it helpful to go back with a small brush and white paint to crisp up any lines that got a bit wobbly.
Step back and enjoy the striking contrast of your new forest art piece


Simple Heart Motif on Bark
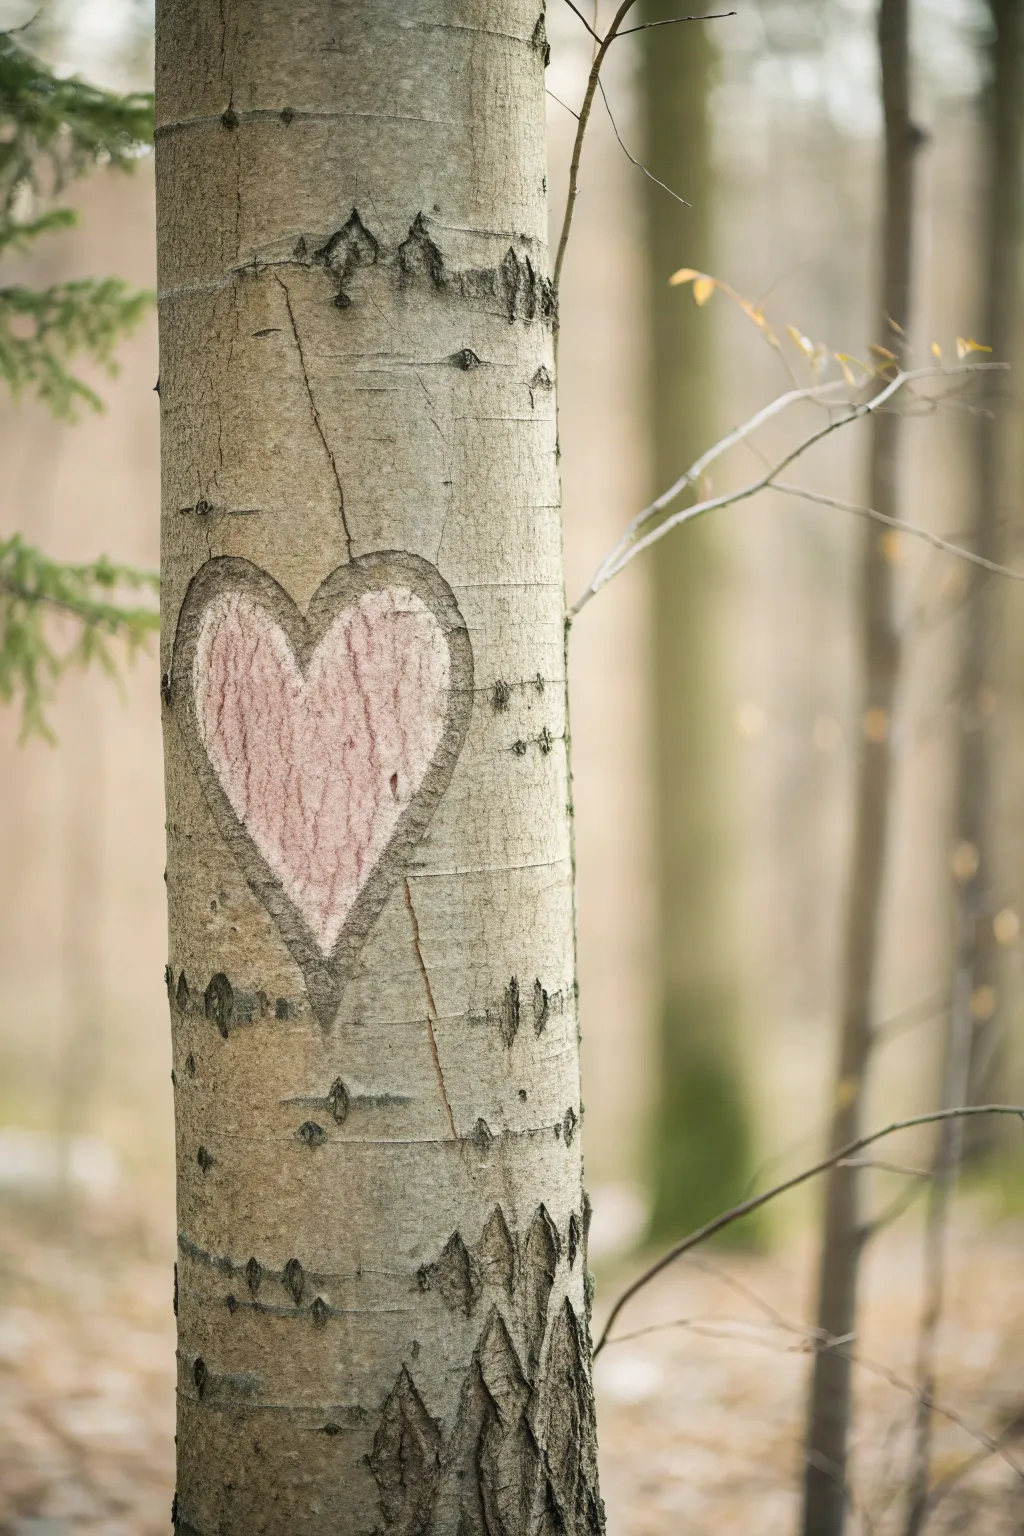
Capture the timeless romance of lovers’ initials without harming nature with this trompe-l’œil painting technique. This project teaches you how to paint a realistic heart directly onto a tree trunk, using shading and tinting to mimic the look of fresh wood revealed beneath the bark.
Step-by-Step
Materials
- Non-toxic acrylic outdoor paint (dark brown, cream, pink)
- Small flat brush (size 4 or 6)
- Fine liner brush (size 0 or 1)
- Chalk or soft pastel (for sketching)
- Paper towel or rag
- Water cup
- Smooth-barked tree (like beech or aspen) on your own property
Step 1: Preparation & Outline
-
Select the Canvas:
Choose a tree with relatively smooth, light-colored bark. Beech, aspen, or birch trees work best because their natural gray or white surface provides the necessary contrast for the ‘carved’ effect. -
Clean the Surface:
Gently brush away any loose moss, dirt, or spiderwebs from the area where you intend to paint. Use a dry rag rather than water to keep the bark ready for paint immediately. -
Sketch the Shape:
Using a piece of chalk or a soft pastel in a light color, lightly sketch a classic heart shape onto the trunk. Keep the lines simple and slightly organic; a perfectly symmetrical heart can look artificial in a forest setting. -
Check the Scale:
Step back about five feet to ensure the heart is visible and centered nicely between the natural markings of the tree. Wipe away and redraw if the proportions feel off.
Uneven Bark Texture?
If the bark is too rough, don’t force paint into deep crevices. Let the brush skip over the deepest grooves. This broken line effect actually enhances the realism of the ‘carving’.
Step 2: Creating the Carved Effect
-
Mix the Shadow Color:
Mix a dark brown acrylic paint with a tiny drop of black to create a deep, shadowy earth tone. This will represent the shadowed edge where the knife would have ostensibly cut into the bark. -
Paint the Outline:
Using your small flat brush turned on its edge, paint a deliberate, unbroken line over your chalk sketch. The line should be slightly thicker at the top curves and thinner toward the bottom point to suggest depth. -
Soften the Inner Edge:
While the brown outline is still wet, quickly rinse your brush and use it damp—but without paint—to gently drag the inner edge of the brown line inward. This creates a soft gradient rather than a harsh cartoon line. -
Define the Sharp Outer Edge:
Go back with the fine liner brush and the dark brown mix to sharpen the *outer* edge of the heart. This hard line is crucial for the illusion that the bark has been sliced.
Depth Illusion Tip
Make the dark outline slightly thicker at the top ‘V’ of the heart and thinner at the bottom point. This mimics how shadows naturally fall in a recessed carving.
Step 3: Filling and Texturing
-
Mix the ‘Fresh Wood’ Tone:
Combine cream paint with a touch of pink and a very small amount of brown. You are aiming for a fleshy, raw wood color that looks significantly lighter than the weathered gray bark. -
Fill the Heart:
Apply this lighter mixture inside the heart shape. Don’t paint it solidly opaque; use a ‘dry brush’ technique to let some of the tree’s natural vertical texture show through. -
Add Vertical Grain:
Dip your fine liner brush into a slightly watered-down pinkish-brown. Paint thin, vertical striations inside the heart to mimic the wood grain found beneath the bark. -
Tint the Center:
I like to add a subtle wash of pink to the center of the heart to make it pop. Dilute a tiny amount of pink paint with water and glaze the middle area, fading it out toward the brown edges. -
Highlight the Cut:
Mix a very light cream (almost white). Using the fine liner brush, add a thin highlight just inside the dark brown outline on the side where the light source is coming from (usually the top). -
Blend the Transitions:
Use a clean, dry brush to lightly feather the pinkish interior paint into the dark brown border. The goal is to make the ‘wood’ look slightly recessed.
Step 4: Final Touches
-
Enhance Natural Flaws:
If the tree has natural horizontal scars or ‘eyes’ near your heart, use your dark brown paint to slightly darken them. This integrates your painting into the surrounding bark environment. -
Step Back and Assess:
Walk away from the tree again to view the illusion. If the heart looks too bright or ‘stickered on,’ wash over the entire painted area with extremely diluted brown water to mute the colors. -
Clean Up:
Wipe away any remaining visible chalk marks with a damp cloth, being careful not to smudge your fresh acrylic work.
Enjoy the gentle surprise your artistic addition brings to the woodland landscape.


Rainbow Wrap Stripes Around the Trunk
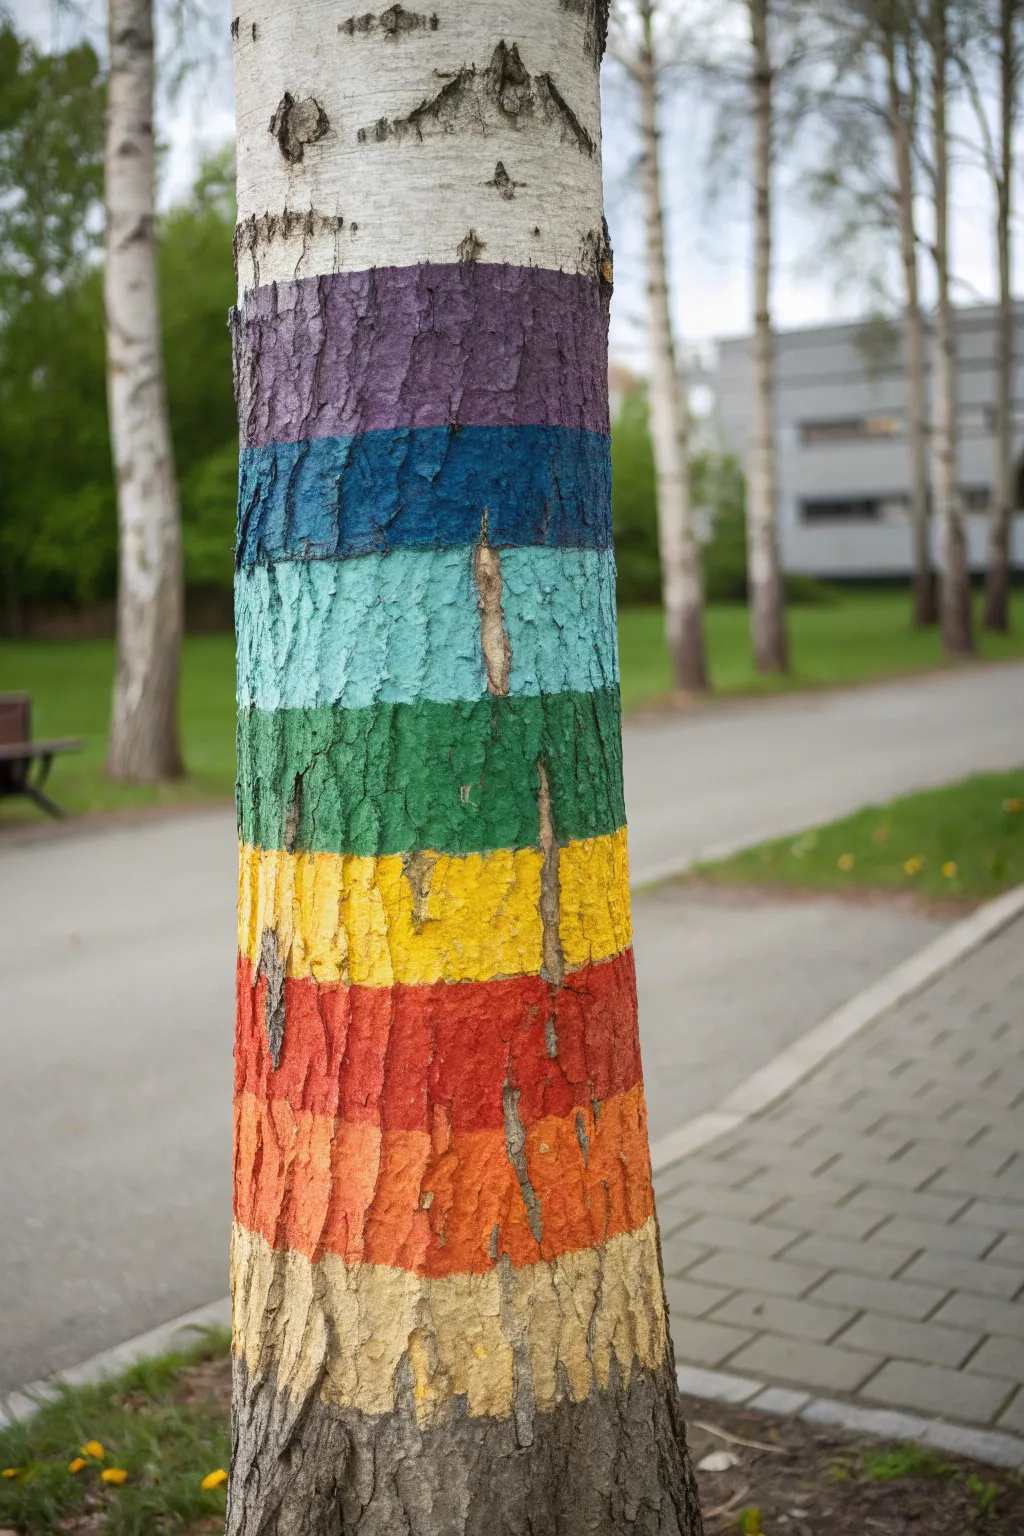
Transform a simple birch or aspen tree into a vibrant statement piece with this bold, color-blocked painting project. The rough texture of the bark adds depth to the horizontal rainbow stripes, creating a cheerful focal point for any garden path or park setting.
Step-by-Step Tutorial
Materials
- Non-toxic, eco-friendly exterior craft paint (purple, dark blue, light blue, green, yellow, warm red, orange, beige)
- Wide flat synthetic paintbrush (2-3 inches)
- Medium round bristle brush (for crevices)
- Painter’s tape or chalk (optional guide)
- Wire brush or stiff scrub brush
- Clean rags or shop towels
- Water container for rinsing
- Drop cloth or cardboard to protect the ground
Step 1: Preparation
-
Choose your canvas:
Select a tree with relatively light-colored bark, like the birch shown here, as this allows the colors to pop without multiple primer coats. Ensure the tree is healthy and fully grown. -
Clean the surface:
Gently scrub the section of the trunk you intend to paint using a dry stiff brush. Your goal is to remove loose moss, dirt, and flaking bark without damaging the living layers underneath. -
Protect the area:
Lay down a drop cloth or piece of cardboard around the base of the tree to catch any drips, as outdoor paint can be difficult to remove from pavers or grass. -
Establish the boundaries:
Decide on the height of your painted section. The example shows the stripes starting near the base and extending up about 4-5 feet. Mark the top and bottom limits lightly with chalk.
Bark Texture Pro-Tip
Don’t try to paint a perfectly straight line over rough bark. Let the brush follow the natural ridges and bumps; the slight waviness adds character.
Step 2: Measuring and Mapping
-
Determine stripe width:
Measure the total vertical distance between your top and bottom marks. Divide this number by 8 (for the eight distinct bands of color shown: purple, dark blue, light blue, green, yellow, red, orange, beige). -
Mark the segments:
Using a piece of chalk, create small tick marks on the bark to indicate where each color change will happen. I find it helpful to walk around the tree to ensure the marks are relatively level. -
Tape or trace:
If you want crisp lines, wrap painter’s tape around the circumference at your tick marks. However, for the organic look seen in the photo, you can simply freehand the lines based on your chalk guides.
Paint Absorption Help
If the bark is very porous and soaking up too much paint, dab a little water on the brush first or apply a second coat after the first is touch-dry.
Step 3: Painting the Spectrum
-
Start at the top:
Begin with your purple shade at the highest section. Starting at the top prevents wet paint from dripping down onto finished lower colors. -
Apply the purple:
Load your wide flat brush and apply the paint horizontally. Use a dabbing motion to push the pigment into the deep cracks and texture of the bark. -
Move to dark blue:
Clean your brush thoroughly and move to the second stripe: dark blue. Paint right up to the purple line, allowing them to touch but not necessarily blend. -
Ensure coverage:
Check the deep crevices of the bark. If the flat brush misses spots, use a smaller round bristle brush to work the paint into those textured gaps for solid coverage. -
Apply light blue and green:
Continue working downward, painting the light blue stripe followed by the green stripe. Step back occasionally to ensure your bands look parallel from a distance. -
Paint the warm tones:
Proceed with the yellow and warm red stripes. The yellow might require a slightly thicker coat to appear opaque against the greyish bark tones. -
Finish the bottom stripes:
Paint the orange stripe, and finally, the beige or cream-colored band at the very bottom. The beige stripe serves as a nice transition back to the natural tree roots. -
Refine the edges:
Walk around the entire tree to inspect where the color bands meet. If the lines are too jagged, carefully use a small brush to straighten the borders.
Step 4: Final Touches
-
Check for drips:
Inspect the lower sections for any accidental drips from the upper colors and dab them away or paint over them while they are still tacky. -
Let it cure:
Allow the paint to dry completely according to the manufacturer’s instructions before removing your drop cloth or touching the surface.
Now you have a stunning, colorful installation that brightens up the landscape all year round


Optical Illusion Wavy Lines
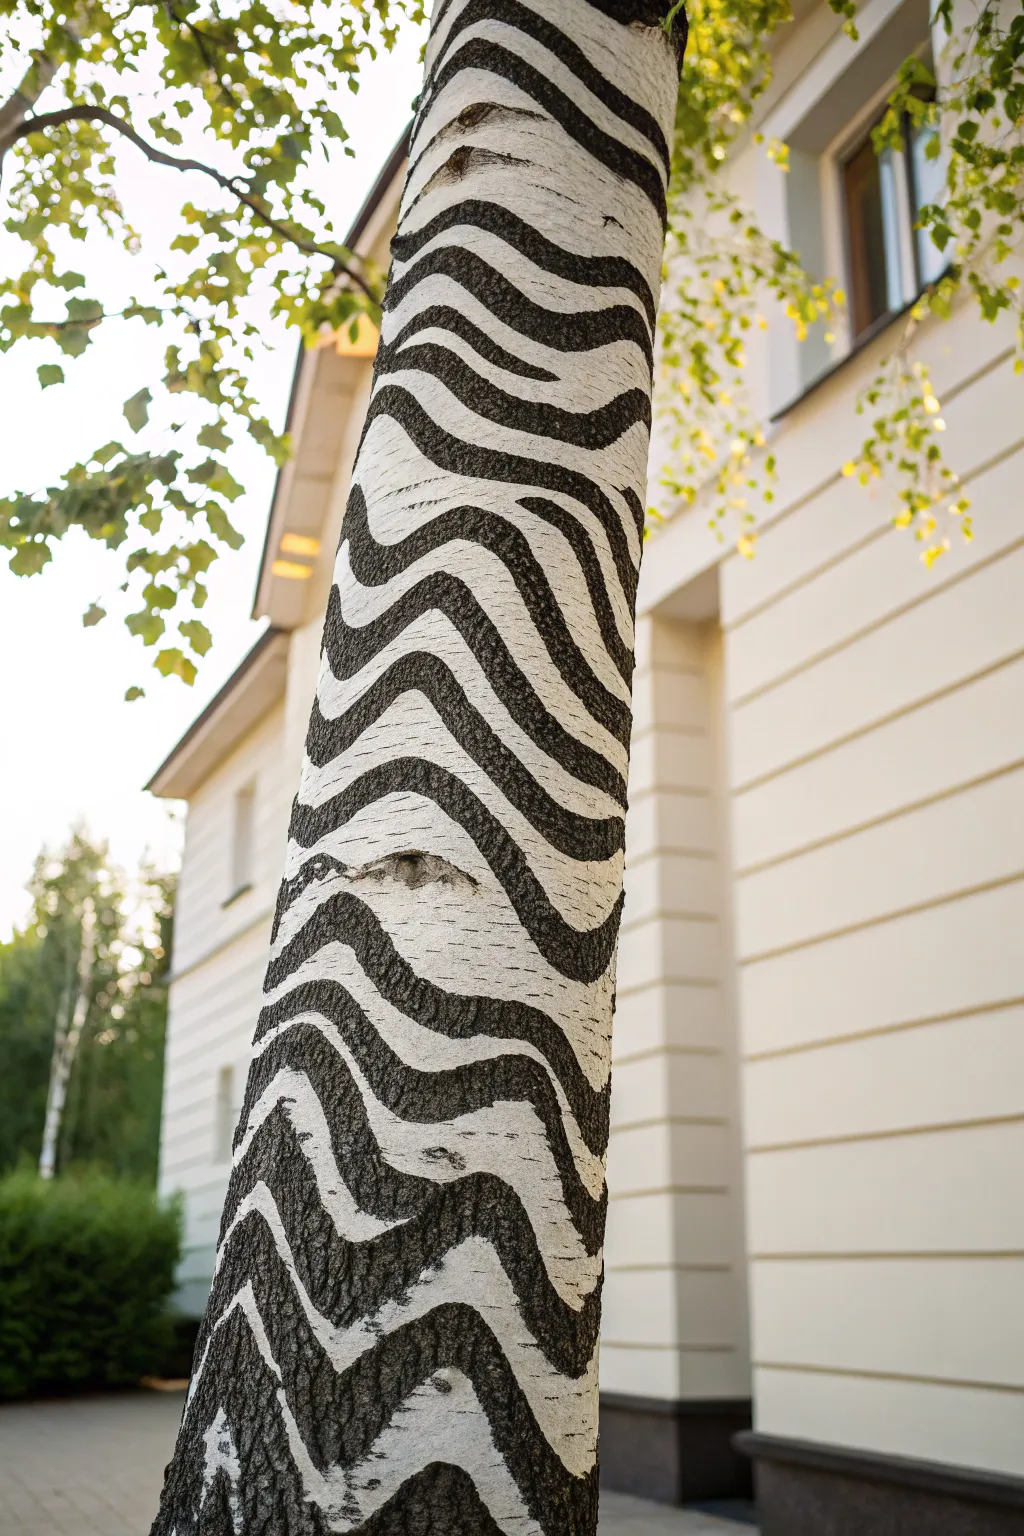
Transform a plain tree trunk into a striking piece of optical art using bold, undulating waveforms. This high-contrast black and white design creates a mesmerizing textural effect that makes the tree pop against any landscape background.
Step-by-Step Guide
Materials
- Outdoor acrylic paint (white)
- Outdoor acrylic paint (black)
- Wide flat brush (2-3 inch)
- Medium round brush
- Medium flat brush
- Chalk or charcoal stick
- Environmentally safe tree wrap (optional)
- Wire brush or stiff scrub brush
- Clean rags and water
Step 1: Preparation
-
Choose your canvas:
For this project, select a tree with a relatively straight and smooth trunk, like the birch shown here, as it makes the illusion much more effective than a heavily knotted or leaning tree. -
Clean surface debris:
Use a stiff scrub brush or wire brush to gently remove loose bark, moss, and dirt from the area you intend to paint. A smooth surface ensures cleaner lines later. -
Wipe it down:
Take a damp rag and wipe away the dust created by scrubbing. Let the bark dry completely before applying any paint, usually about an hour on a warm day. -
Consider protection:
If you are concerned about painting directly on living bark, wrap the trunk tightly with biodegradable paper tree wrap first. Otherwise, ensure you are using non-toxic, water-based latex or acrylics safe for plants.
Clean Edges Trick
For ultra-crisp lines on rough bark, dab the paint along the edge rather than dragging the brush. This pushes paint into the texture without bleeding.
Step 2: Painting the Base
-
Apply the white base:
Dip your wide flat brush into the white outdoor paint. Cover the entire circumference of the trunk section you are decorating. -
Work into crevices:
Press the bristles firmly to get the white paint into the deeper cracks of the bark. You want a solid, opaque background without the natural wood color showing through. -
Dry and recoat:
Allow the first coat to dry for 2-4 hours. Apply a second coat of white to ensure it is bright and fully opaque, providing the highest possible contrast for the black stripes.
Add UV Glow
Mix a clear UV-reactive additive into the white paint layer. During the day it looks normal, but at night it will glow under blacklight for a spooky effect.
Step 3: Create the Illusion
-
Draft the waves:
Using a piece of chalk or charcoal, lightly sketch your wavy pattern directly onto the dried white base. Aim for rhythmic, undulating lines that curve upward and downward in unison. -
Vary layer thickness:
As you sketch the bands, establish a pattern of alternating thick and thin stripes. The variation in width is crucial for the vibrating optical effect. -
Paint the black outlines:
Load a medium round brush with black paint. Carefully trace over your chalk lines to establish the boundaries of the dark waves. -
Fill the dark bands:
Switch to a medium flat brush to fill in the black sections. I find it helpful to start in the center of the band and push paint toward the edges for crisper lines. -
Smooth the curves:
Go back over the edges where the black meets the white. The transition should be sharp; if your hand shakes, simply let it become part of the organic texture or touch it up with white later. -
Connect the circumference:
Move around the tree to ensure the waves connect seamlessly on the other side. They don’t have to be mathematically perfect, but the flow should feel continuous. -
Add detail interruptions:
If there are knots or branches (like the small hole visible in the image), let the waves warp slightly around them rather than painting straight over, which enhances the 3D feel. -
Final touch-ups:
Inspect your work for any gray spots where the black paint is thin. Apply a second coat to the black bands if necessary to achieve a deep, matte finish. -
Clean up borders:
Take a small brush with white paint and tidy up any accidental black smudges on the white stripes to regain that sharp contrast.
Step back and watch your tree trunk seemingly vibrate with visual energy as you walk past it
BRUSH GUIDE
The Right Brush for Every Stroke
From clean lines to bold texture — master brush choice, stroke control, and essential techniques.
Explore the Full Guide
Concentric Circle Target Pattern
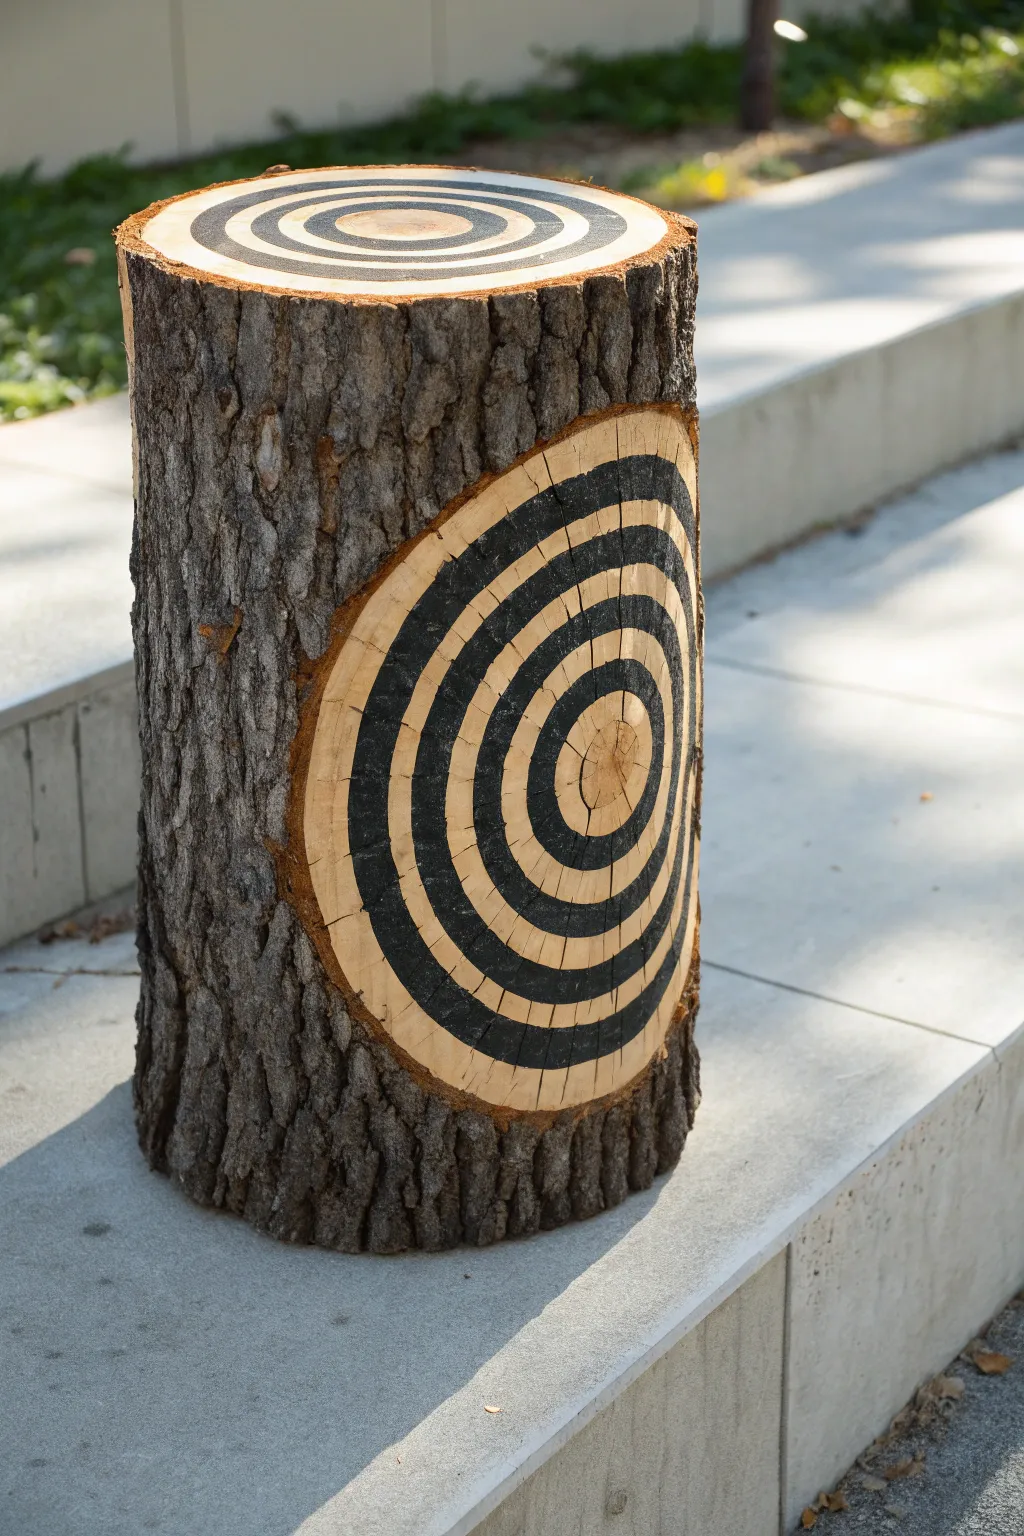
Transform a simple log into a striking piece of sculptural art by combining raw texture with clean geometric lines. This project features high-contrast bullseye patterns painted on both the top grain and a uniquely carved side panel, creating a bold decorative object for patios or garden seating.
How-To Guide
Materials
- Sturdy tree log or stump (dry and seasoned)
- Chainsaw (or large hand saw and chisel)
- Angle grinder with flap disc (40 and 120 grit)
- Orbit sander with 80, 120, and 220 grit pads
- Measuring tape and pencil
- Compass (large geometric or string improvisation)
- Ebony or charred black exterior wood stain (or acrylic paint)
- Clear outdoor spar urethane or polyurethane (matte finish)
- Assorted artist brushes (flat edge and fine liner)
- Work bench or clamps
Step 1: Shaping the Canvas
-
Prepare the log:
Begin with a dry log that has its bark intact. Ensure the bottom is cut flat and level so it stands upright without wobbling. If the top surface is rough, use your sander with 80-grit paper to smooth it down until the growth rings are clearly visible. -
Mark the side cut:
Decide where you want the side detail. You are looking to create a flat, oval-shaped plane on the curved vertical surface of the log. Mark an outline with chalk or pencil if helpful. -
Create the side face:
Using a chainsaw or a large handsaw, carefully slice off the marked section of bark and wood. You want to cut deep enough to reveal a smooth, wide area of heartwood, but not so deep that you compromise the log’s stability. -
Rough sanding:
The chainsaw cut will be rough. Switch to an angle grinder with a 40-grit flap disc to quickly level out the ridges and remove deep saw marks on both the top face and the new side cut. -
Refine the surface:
Move to an orbit sander. Cycle through 80, 120, and finally 220 grit on both the top circle and the side oval. The wood needs to be extremely smooth to prevent paint bleed later. -
Clean the grain:
Use a tack cloth or compressed air to remove every speck of sawdust from the cracks and bark crevices.
Clean Lines Pro Tip
Wood grain naturally wicks liquid. To stop paint bleeding, score your circular pencil lines with an X-Acto knife before painting. The cut fibers act as a physical barrier for the paint.
Step 2: Mapping the Geometry
-
Find the centers:
Locate the approximate center of the top growth rings. Do the same for the side oval. Mark these center points lightly with a pencil. -
Draw the top circles:
Using a compass, draw a series of concentric circles on the top face. Start with a small center bullseye, then create alternating bands. Based on the photo, aim for bands that are roughly 1 inch thick. -
Draw the side circles:
Repeat the process on the side oval. Because the surface is elongated, your compass will still draw perfect circles, but the outer rings will eventually run off the edge of the flat plane, creating that interesting cropped effect. -
Mark the paint zones:
Lightly mark an ‘X’ in every other band so you know which rings will be painted black and which will remain natural wood. This prevents confusion once the brush touches the wood.
Step 3: Painting and Sealing
-
Outline the edges:
Using a fine liner brush and your black stain or paint, carefully trace the pencil lines of your circles. Working slowly here is crucial for a crisp geometric look. -
Fill the bands:
Switch to a wider flat brush to fill in the bands marked with an ‘X’. I generally prefer using a dark wood stain rather than paint because it soaks into the grain, keeping the texture visible while providing deep color. -
Address cracks:
If your log has natural drying cracks (checks), decide if you want to paint inside them. Painting the interior walls of the crack black can make the design look more continuous. -
Let it cure:
Allow the black pigment to dry completely. If using stain, wait at least 24 hours to ensure it doesn’t smear during the sealing phase. -
Apply the first coat:
Brush or spray a coat of clear matte spar urethane over the painted areas and the bark. The matte finish preserves the natural look without making it look like plastic. -
Sand and recoat:
Once dry, lightly hand-sand the painted faces with 320-grit paper to knock down any raised grain. Wipe clean and apply a second, final coat of sealer for weather resistance.
Level Up: Gold Leaf
Instead of leaving the alternate rings as bare wood, apply gold leaf sizing and metallic leaf to them. The contrast between rustic bark, matte black, and shiny gold is stunning.
Place your geometric log art in a sunny spot and enjoy how the shadows play across the textured bark


Have a question or want to share your own experience? I'd love to hear from you in the comments below!