If you’re craving that everyday vacation feeling, a tropical wall mural can turn one plain wall into a whole mood. I’m sharing my favorite mural directions—from classic leafy backdrops to artsy, unexpected twists—so you can find a tropical scene that feels like you.
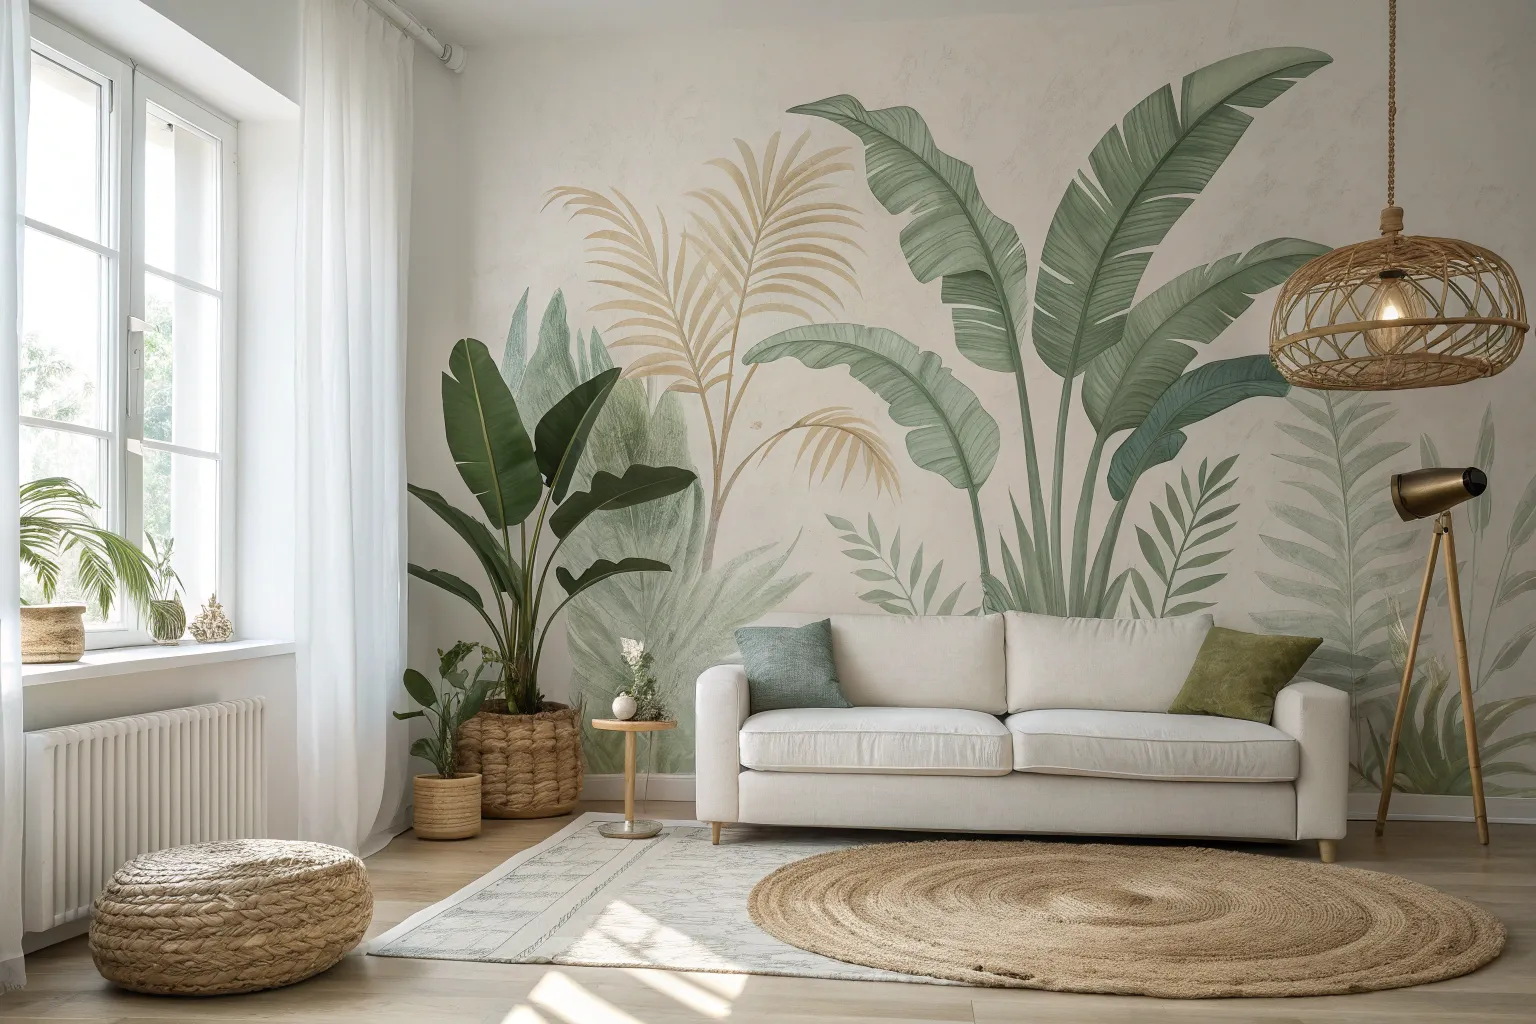
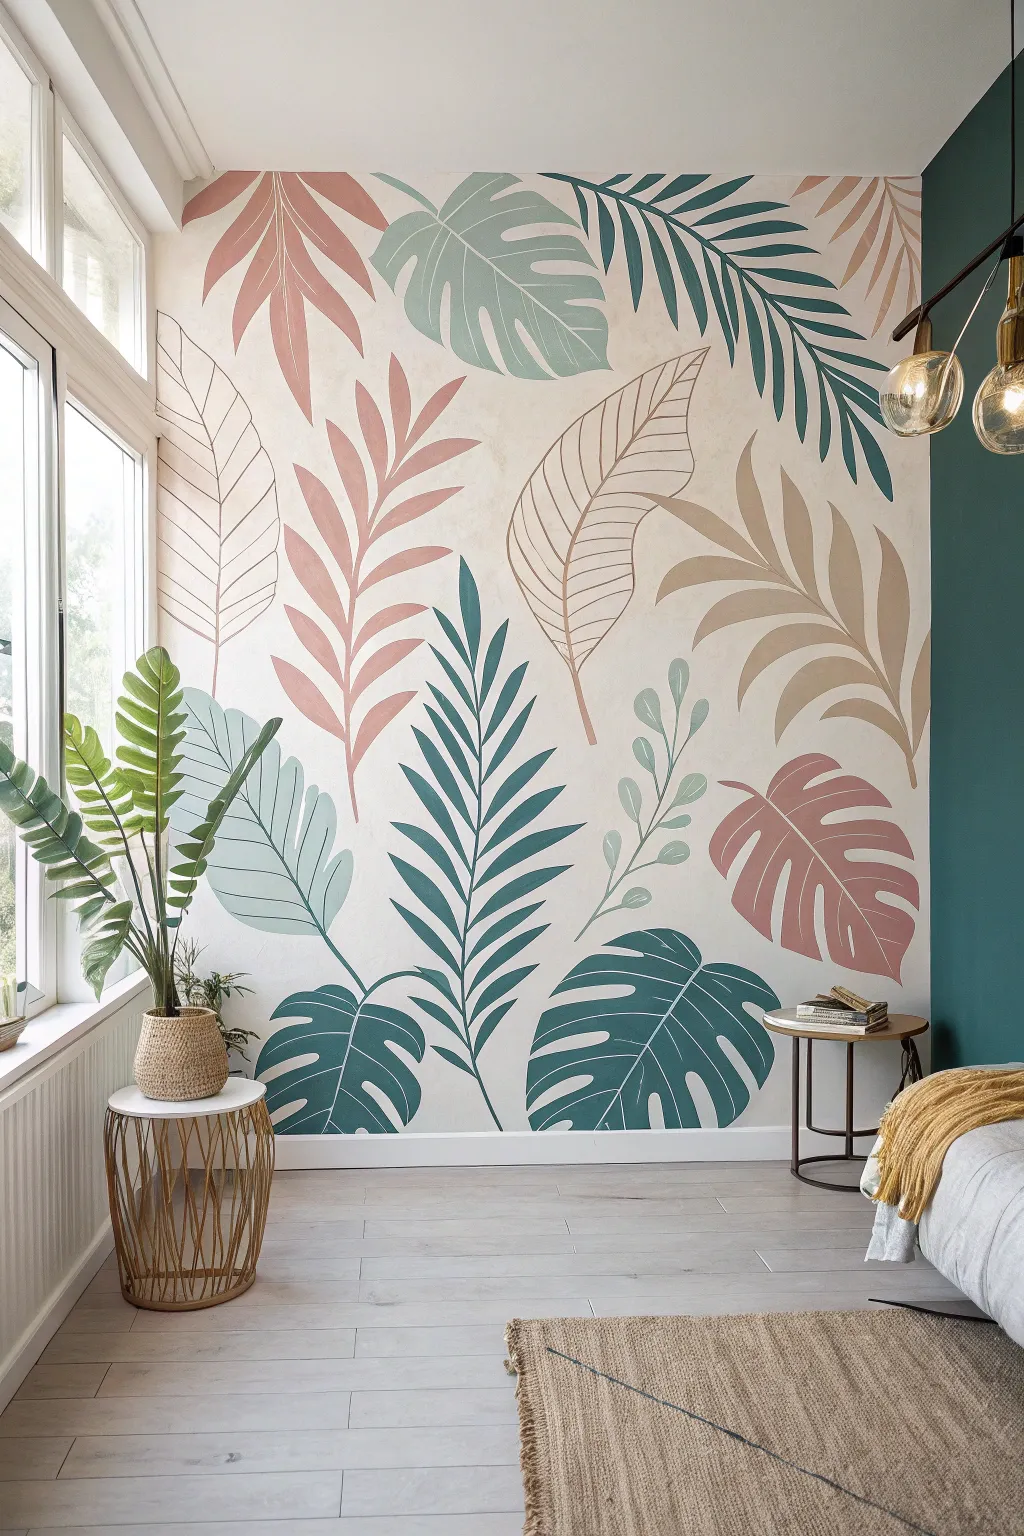
Oversized Monstera and Palm Statement Wall
Bring the calming vibes of a rainforest directly into your living room with this large-scale botanical mural. Featuring oversized Monstera leaves and sweeping palm fronds, the watercolor-style application creates a soft, airy atmosphere that instantly enlarges a space.
Detailed Instructions
Materials
- Interior acrylic latex paint (Cream/Beige base coat)
- Acrylic paints (Dark hunter green, kelly green, sap green, lime green, white, yellow ochre)
- Glazing medium (clear)
- Assorted paintbrushes (1-inch angled sash, round #8 and #12, liner brush)
- Chalk or watercolor pencils (light green or beige)
- Projector (optional but recommended)
- Drop cloths
- Painter’s tape
- Paper plates or palette
- Water cups and rags
Step 1: Preparation & Base
-
Prepare the workspace:
Clear the furniture away from the wall you intend to paint. Lay down drop cloths to protect your flooring and tape off the ceiling line, baseboards, and any adjoining walls with painter’s tape to ensure crisp edges. -
Apply the background:
Roll on two coats of your cream or soft beige interior wall paint. This warm, neutral background is crucial as it creates a vintage botanical print look and allows the green glazes to stand out warmly. -
Create the composition:
Once the base is fully dry, sketch your design. If you aren’t confident freehanding, use a projector to cast images of Monstera leaves and palm fronds onto the wall. Trace the outlines lightly using a light green watercolor pencil or chalk. -
Plan layering:
Notice how some leaves sit ‘behind’ others. Sketch the rearmost leaves first (the lighter, yellowish-green palms) and the foreground leaves (the dark green Monstera) last to keep your visual map clear.
Keep it fluid
Work with a ‘wet edge’ on individual leaves. If the paint dries mid-leaf, you’ll get hard lines. Finish one whole frond before taking a break.
Step 2: Painting the Foliage
-
Mix your glazes:
Mix your acrylic greens with glazing medium in a roughly 1:1 ratio. You want the paint to be translucent so brushstrokes show through, mimiciking watercolor. Prepare a ‘light mix’ (lime green + white + ochre) and a ‘dark mix’ (hunter green + sap green). -
Paint the background palms:
Start with the large, sweeping fan palms that sit in the background. Use the 1-inch angled brush and your ‘light mix.’ Start at the stem and pull the brush outward in long, confident strokes to create the tapered leaflets. -
Add ribbing detail:
While the light palms are still slightly tacky, take a smaller round brush with a slightly darker version of your light mix. Run a thin line down the center of each leaflet to suggest a central vein. -
Block in the darker fronds:
Moving to the mid-ground, paint the majestic feather palms (the long, curving ones). Use a medium green mix. Paint the central spine of the frond first, then flick your brush outwards from the spine to create the leaves. -
Paint the Monstera outlines:
For the star of the show—the large Monstera leaf—switch to your ‘dark mix’ and the angled sash brush. Carefully paint the outline of the leaf first, ensuring you capture the characteristic holes (fenestrations) accurately. -
Fill the Monstera:
Fill in the Monstera leaf using long, curved strokes that follow the direction of the veins. I like to keep the paint thinner in the center and more saturated directly next to the veins to create natural depth. -
Deepen the shadows:
Once the first layer of the Monstera is dry, go back with un-thinned hunter green.paint into the deepest areas, particularly where the leaf connects to the stem and along the primary veins, to add volume. -
Add delicate ferns:
Use your liner brush or a small round brush to add the smallest details, like the little fern fronds peeking out at the bottom. These should be looser and more gestural.
Step 3: Finishing Touches
-
Refine the edges:
Step back and look at the wall from a distance. If any leaf edges look too fuzzy, use a small brush with your original wall color to ‘cut in’ and sharpen the silhouette against the background. -
Add highlights:
Mix a tiny amount of white into your lime green. lightly dry-brush this onto the highest curves of the Monstera and the tips of the palm fronds to simulate sunlight catching the foliage. -
Clean up sketch lines:
If any chalk or watercolor pencil lines are still visible, use a damp cloth to gently wipe them away. This is why we used water-soluble sketching tools; they disappear without damaging the paint.
Make it 3D
Once dry, use a very diluted gray-brown glaze to paint a faint ‘drop shadow’ on the wall directly underneath and to one side of the largest leaves.
Enjoy the permanent vacation vibes your new botanical masterpiece brings to the room


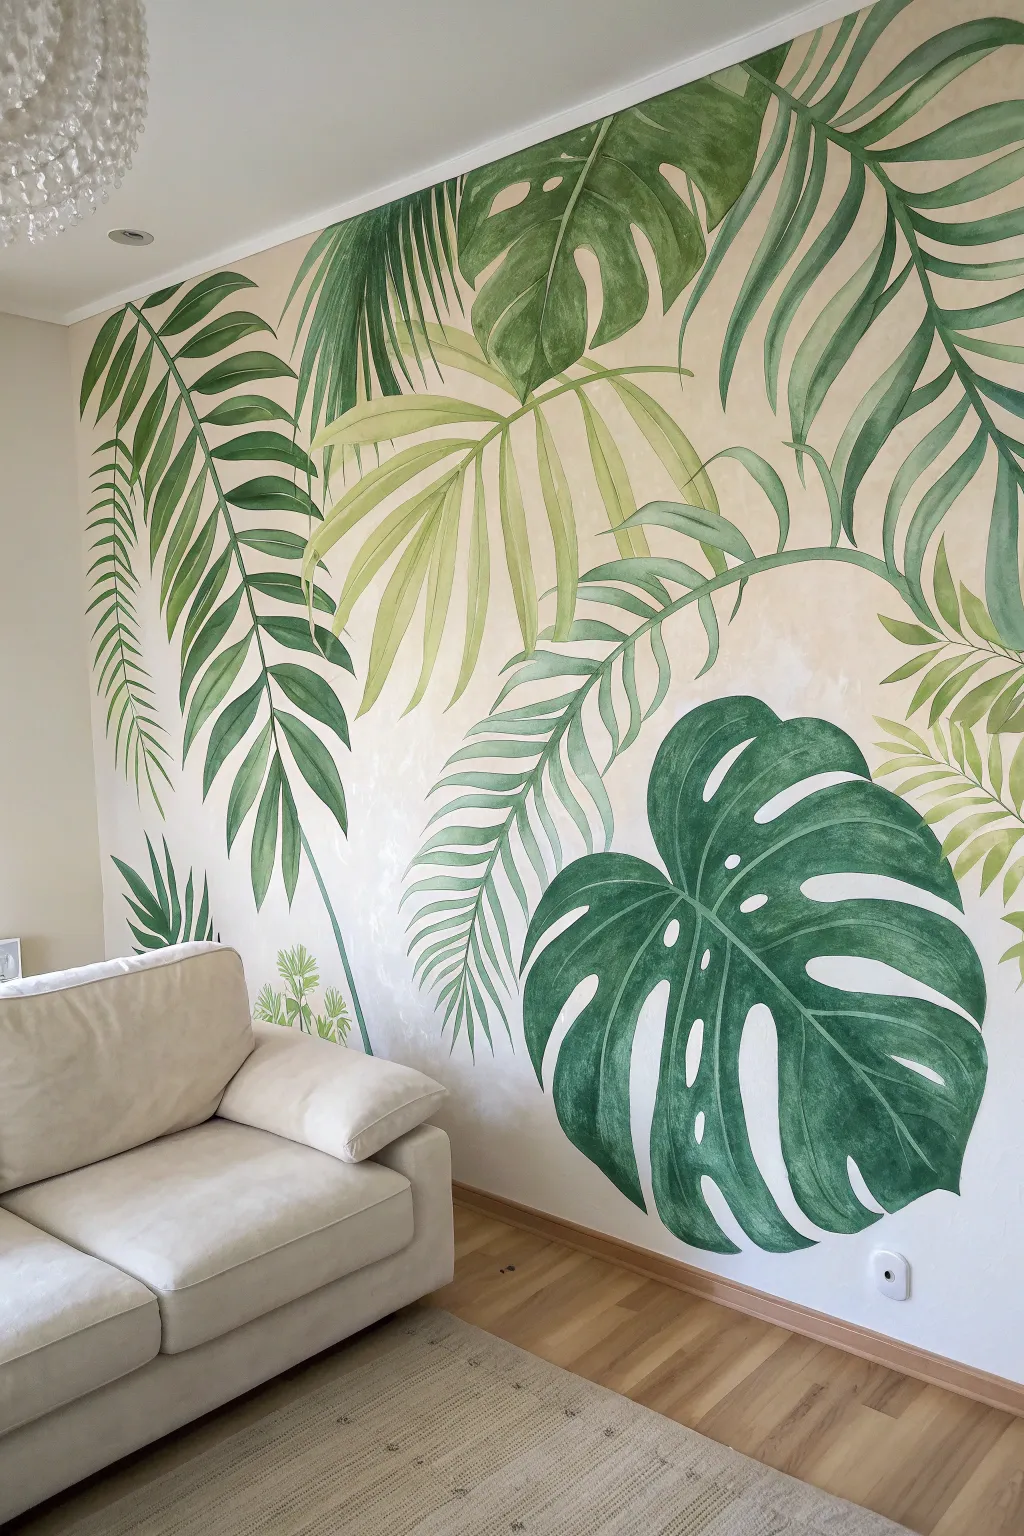
Watercolor Tropical Leaves Fade-Out
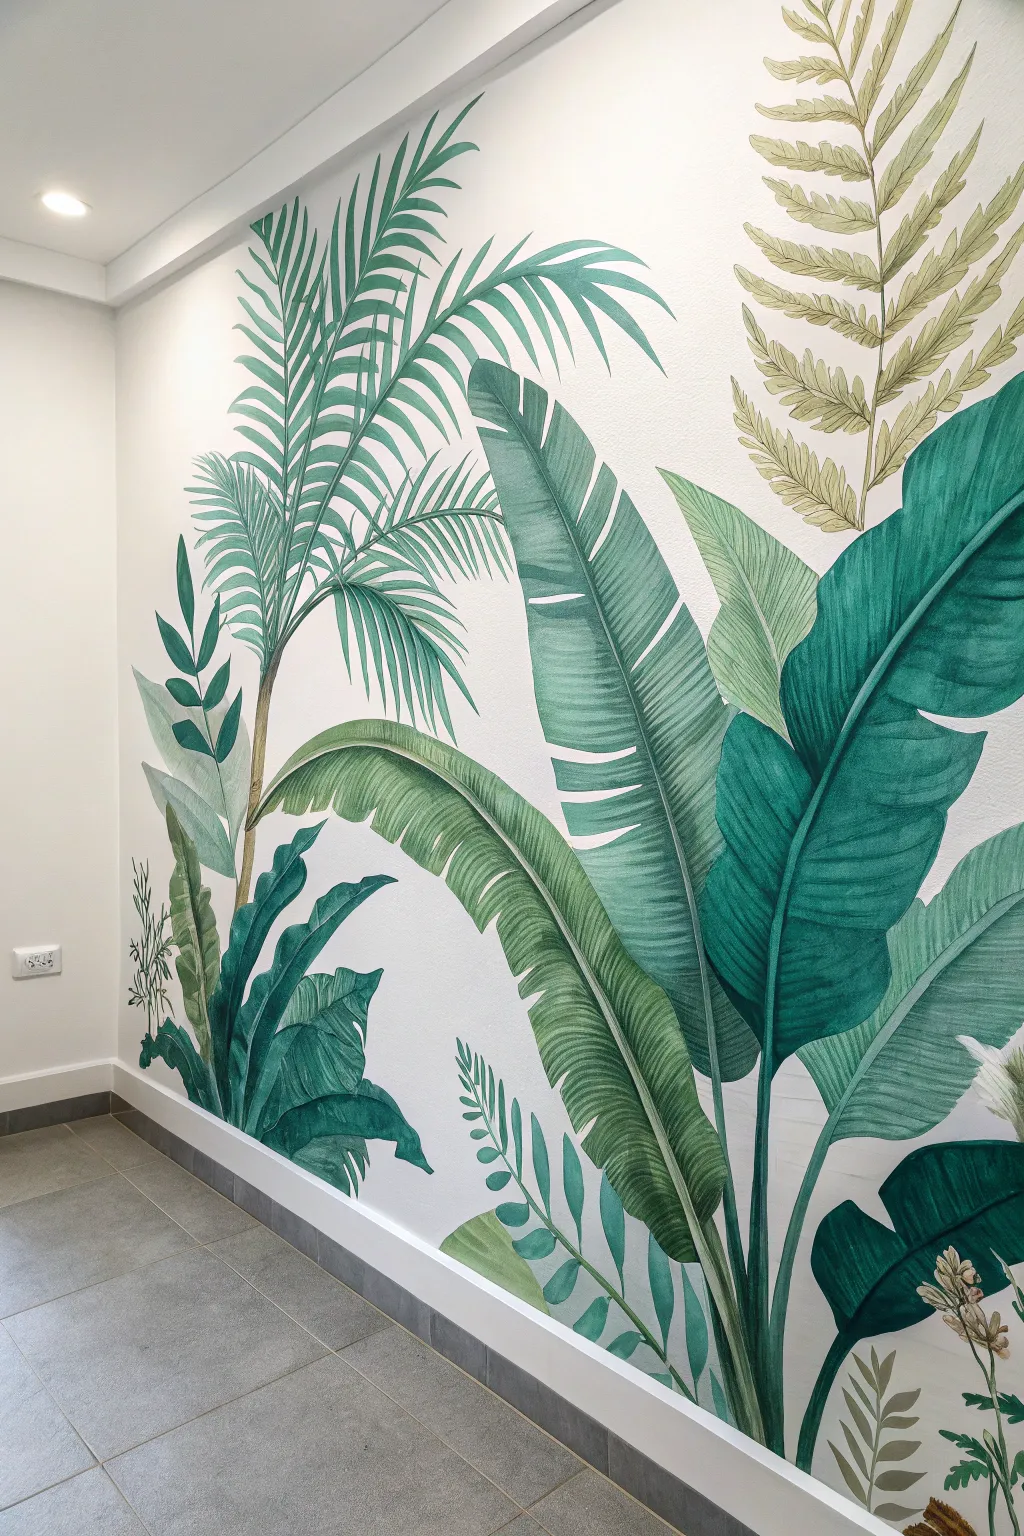
Transform a plain white wall into a vibrant conservatory with this large-scale botanical mural. Using acrylic paints thinned to mimic watercolor, you’ll layer translucent greens to create depth and that dreamy, fade-out aesthetic seen in high-end wallpapers.
How-To Guide
Materials
- Interior latex paint (white base)
- High-quality acrylic paints (Phthalo Green, Sap Green, Yellow Ochre, Burnt Umber, Hooker’s Green)
- Glazing medium or water (for thinning)
- Pencil and large eraser
- Projector (optional but recommended)
- Various paintbrushes (2-inch flat brush, 1-inch angled brush, #6 round brush for details)
- Painter’s tape
- Drop cloth
- Palette or large plastic plates
- Stepladder
Step 1: Preparation and Composition
-
Prep the Surface:
Start with a clean, dry wall. If your wall isn’t already white, apply a fresh coat of stark white interior latex paint. This bright background is crucial for the ‘watercolor’ transparency effect to work properly. -
Plan the Layout:
Sketch your design on paper first. Notice how the image features a large banana leaf grouping on the right, a tall palm on the left, and a fern floating near the top right. Balance is key. -
Transfer the Outline:
If you have a projector, projected your sketch onto the wall and lightly trace the major shapes with a pencil. If drawing freehand, start with the central stems to establish flow, then fill in the leaf outlines. Keep pencil lines very faint so they don’t show through the translucent paint.
Glazing Magic
Don’t use just water to thin your acrylics! Glazing liquid maintains the paint’s binding properties, preventing it from flaking off later while still giving you that beautiful transparency.
Step 2: Base Layers and Large Leaves
-
Mix Your ‘Watercolors’:
To get that watercolor look with acrylics, you need to dilute the paint. Mix your green acrylics with glazing medium (preferred for durability) or water until they have the consistency of heavy cream. You want the white wall to shine through slightly. -
Paint the Banana Leaves (Base):
Start with the large banana leaves on the right. Mix a mid-tone cool green (Phthalo Green + White). Use the 2-inch flat brush to block in the shape. Use long, sweeping strokes that follow the veins of the leaf, starting from the center rib and pulling outward. -
Add Variation While Wet:
While the base layer is still tacky, dip your brush into a slightly darker green and blend it into the shadowed areas where leaves overlap. This wet-on-wet technique creates soft, seamless gradients. -
Paint the Palm Fronds:
Move to the palm tree on the left. Using a Sap Green mix, paint the slender central stem first. Then, use the 1-inch angled brush to flick paint outward for the individual leaflets, tapering the ends to sharp points.
Step 3: Detailing and Depth
-
Layering the Fern:
For the fern in the top right, mix a warmer, yellowish-green (Yellow Ochre + Sap Green). This color shift adds variety. Paint the stem, then add the small delicate leaves. Keep the paint very thin here to make it look further away. -
Define the Veins:
Once the large leaves are dry, use a liner brush or the #6 round brush with a darker, opaque green mixture. Paint the central veins and the subtle ribbing lines on the banana leaves. Keep your hand loose; shaky lines look more organic. -
Deepen the Shadows:
Mix a dark jungle green (Hooker’s Green + a touch of Burnt Umber). Apply this strictly to the deepest crevices where the leaves bunch together at the bottom. This high contrast anchors the mural. -
Create the Grounding Foliage:
At the very bottom, paint the smaller, denser leaves using a mix of your dark green and the mid-tone. These ground the composition and hide the transition to the floorboards.
Metallic Accent Pop
After the green layers dry, trace a few select veins or leaf edges with a gold leaf pen or metallic gold paint. It adds a subtle shimmer that catches the sunlight beautifully.
Step 4: Finishing Touches
-
The Fade-Out Effect:
Examine the edges of your leaves. If any look too harsh, take a clean, damp brush and gently rub the edge to soften it into the white wall. I like to do this specifically on the tips of the tallest palms. -
Add Highlights:
Mix a very pale mint green or use slightly watered-down white. Add subtle highlights to the top ridges of the banana leaves where the ‘sun’ would hit. -
Erase and Clean:
Once the paint is fully cured (give it at least 24 hours), gently erase any visible pencil marks. Touch up the white background if any green paint splattered outside the lines. -
Seal (Optional):
If this is in a high-traffic area, apply a clear, matte water-based polycrylic sealer over the entire wall to protect your artwork without adding unwanted shine.
Step back and enjoy the calming, botanical atmosphere you’ve brought into your home


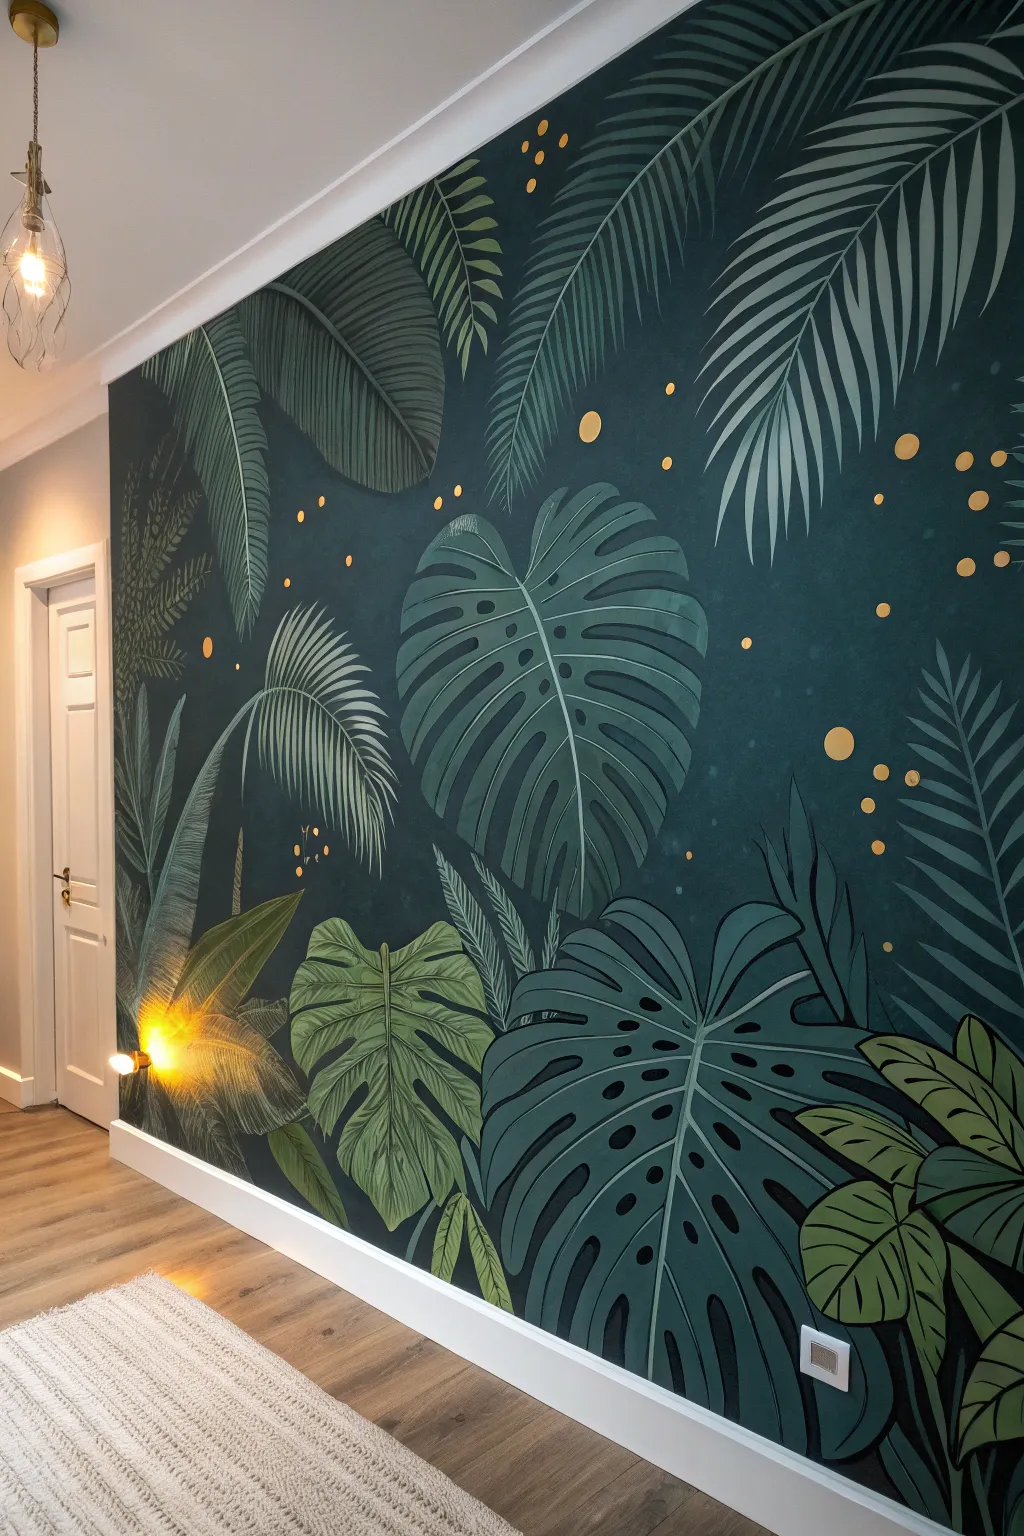
Dark and Moody Jungle Corner Wrap
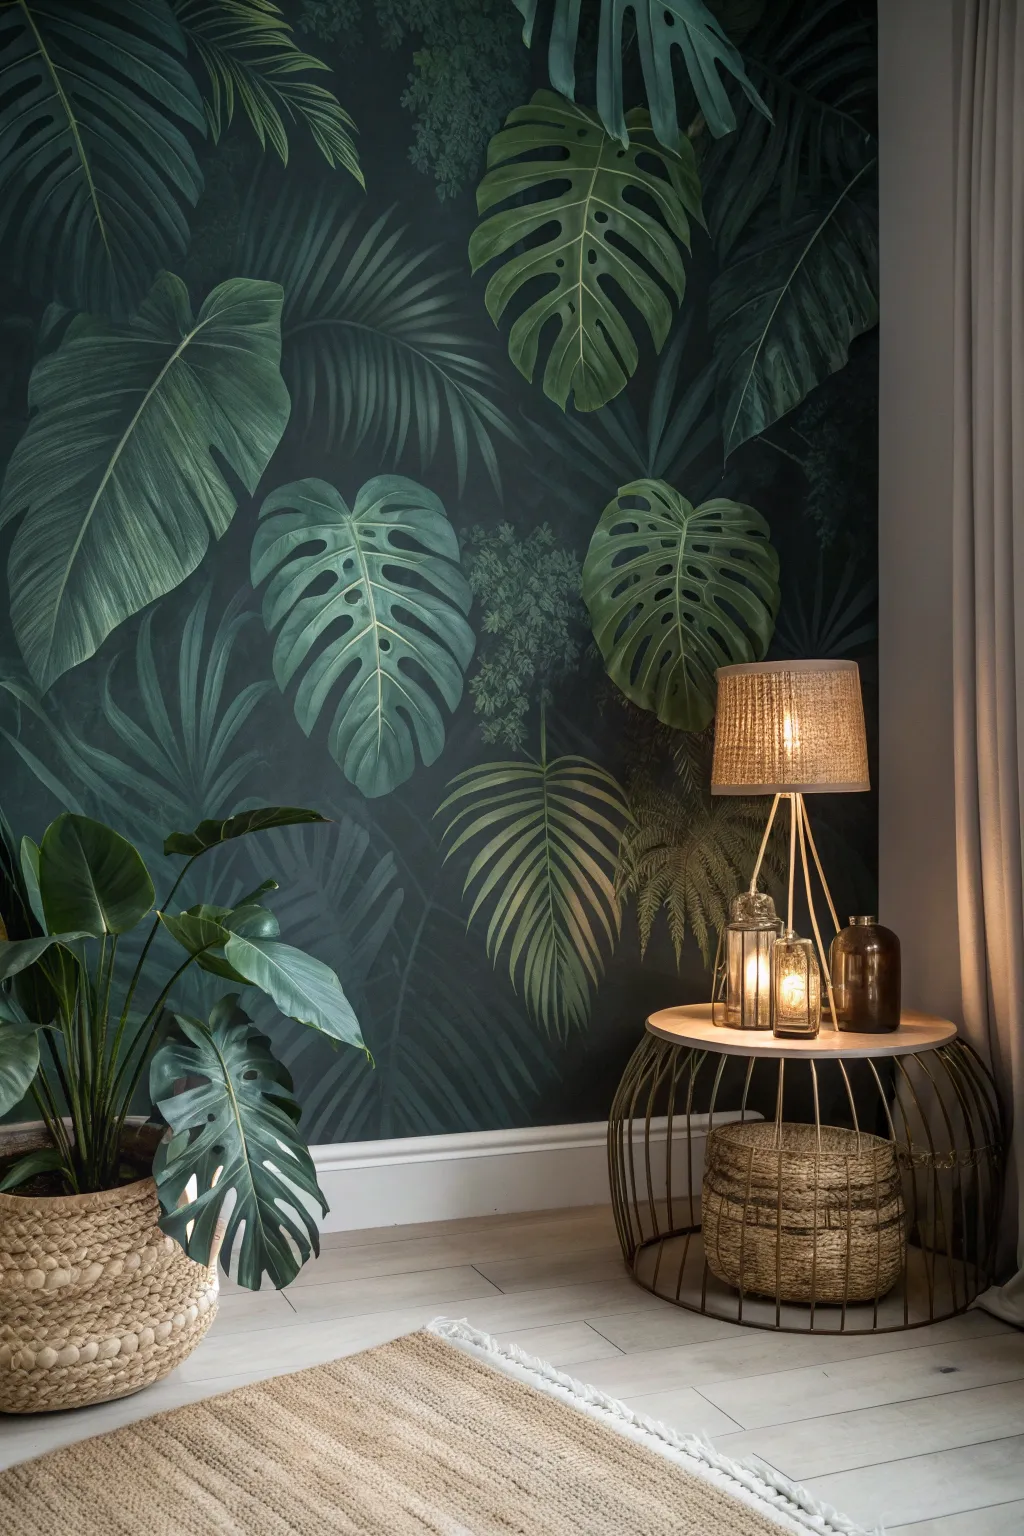
Transform a plain corner into a lush, nocturnal escape with this dramatic tropical wall mural. Featuring oversized Monstera leaves and palm fronds against a deep, mysterious background, this project brings the depth of the jungle right into your living space.
Step-by-Step Guide
Materials
- High-quality interior latex paint (Dark forest green/black for base)
- Acrylic paints (various shades of green: emerald, sap, olive, teal, lime, white for highlights)
- Wide paint roller and tray
- Painter’s tape
- Drop cloths
- Chalk or pastel pencil (light gray or white)
- Large flat brushes (2-3 inch)
- Medium round brushes (size 8-10)
- Small liner brush (size 2-4)
- Stepladder
- Mixing containers or palette
- Matte clear topcoat (optional)
Step 1: Preparation and Base Coat
-
Clear and Protect:
Remove all furniture, including the side table and plants, from the corner area. Lay down drop cloths to protect your flooring and apply painter’s tape to the baseboards, ceiling line, and adjacent walls if you aren’t wrapping the design further. -
Establish the Backdrop:
Mix your dark forest green latex paint with a touch of black to create a very deep, almost midnight-green base color. This creates the moody atmosphere essential for this look. -
Roll the Base:
Using the roller, apply the dark base coat evenly across both walls meeting in the corner. Ensure full coverage; a second coat is usually necessary for such a dark pigment to look rich and velvety. Let this dry completely, ideally overnight.
Uneven Coverage?
If the dark background looks patchy after drying, don’t panic. A third coat is often needed for deep greens. Use a high-quality short-nap roller to minimize texture.
Step 2: Sketching the Composition
-
Plan the Layout:
Stand back and visualize where your largest leaves will go. Aim for asymmetry—place a large Monstera leaf dominating one side and sweeping palm fronds on the other. -
Chalk Outline:
Lightly sketch the outlines of the major leaves using white chalk. Don’t worry about perfect details yet; just focus on the size, scale, and direction of the leaves. Draw large kidney shapes for Monstera and long, arching lines for palm fronds. -
Refining Shapes:
Go back over your rough shapes to add the characteristic details: cut out the deep notches in the Monstera leaves and define the individual leaflets on the palm fronds.
Step 3: Painting the Foliage
-
Block in Main Leaves:
Mix a medium-dark emerald green. Using a large flat brush, fill in the shapes of your main foreground leaves. Keep the paint slightly thin so the dark background influences the tone, adding natural shadow. -
Add Palm Texture:
For the palm fronds, use a swooping motion with a medium round brush. Start from the center vein (rachis) and flick outward to create tapering leaflets. Vary your green shades here—some darker, some lighter—to create depth. -
Layering Monsteras:
Create the ribbed texture on the Monstera leaves. Mix a lighter sage or olive green and paint subtle veins radiating from the center spine toward the edges. I find blending this while the base green is still slightly tacky helps create a softer, more realistic gradient. -
Creating Depth:
Mix a very dark green (nearly black) and paint ‘behind’ the main leaves where they overlap. This negative painting technique pushes the background further away and makes the foreground leaves pop. -
Background Elements:
Using a dry-brush technique with a muted, dark teal-green, lightly scrub in suggestion of ferns or distant foliage in the empty spaces. These should be soft and out of focus compared to the crisp foreground leaves.
Dimensional Pop
Enhance the 3D effect by mixing a tiny drop of metallic gold paint into your highlight color. It adds a subtle sheen that mimics the waxy texture of real tropical leaves.
Step 4: Detailing and Highlights
-
Defining Veins:
Switch to your small liner brush. Mix a pale lime or mint green with a bit of white. carefully paint the central veins of the Monstera leaves and the spines of the palms. -
Adding Highlights:
Imagine a light source coming from the top left. Add touches of your lightest green mix to the upper edges of the leaves and the tips of the palm fronds to simulate light catching the glossy surfaces. -
Shadow Play:
Deepen the shadows specifically where leaves overlap. Use a glaze (paint mixed with water or glazing medium) of dark black-green to shadow the leaf underneath, anchoring the composition. -
Cleanup:
Step back and check the overall balance. Wipe away any remaining visible chalk lines with a damp cloth. -
Final Protection:
For longevity, especially in high-traffic areas, apply a matte clear topcoat over the entire mural once the paint has cured for at least 48 hours.
Once the paint is dry, move your furniture back in and enjoy your personal jungle retreat


Vintage Botanical Study Wall
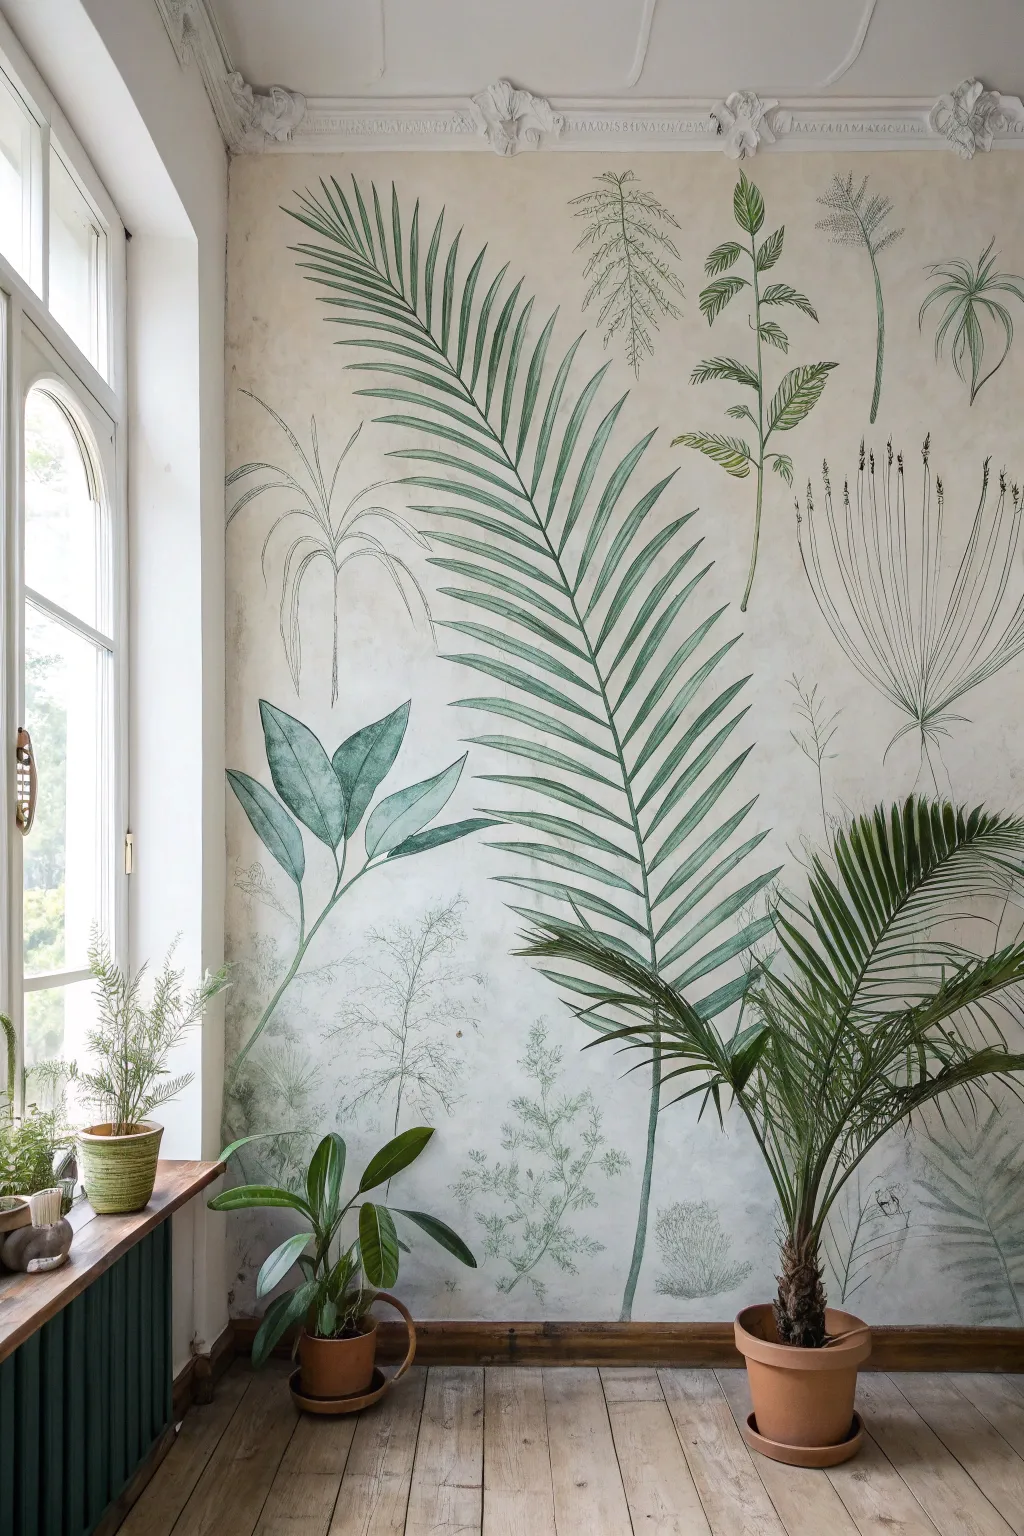
Transform a plain wall into an oversized page from a 19th-century naturalist’s sketchbook with this delicate, sophisticated mural. By layering soft washes and crisp line work, you’ll create a serene botanical feature that feels timeless rather than trendy.
Detailed Instructions
Materials
- Interior wall paint (matte latex/emulsion) in a warm off-white or parchment color
- Soft green latex paint (sage or moss)
- Dark green acrylic paint or latex paint (forest green)
- Clear acrylic glazing medium
- Pencil and large eraser
- Projector (optional but recommended)
- Painter’s tape and drop cloths
- Large synthetic brushes (2-3 inch) for washes
- Set of round artist brushes (sizes 4, 6, and 10) for details
- Fine liner brush (size 0 or 1) for delicate stems
- Sea sponge or clean cotton rags
- Water bucket and mixing trays
Step 1: Setting the Scene
-
Clear and prep:
Begin by removing all furniture, art, and switch plates from your chosen wall. Wipe the surface down with a damp cloth to remove dust, ensuring a clean canvas for your artwork. -
Lay the base coat:
Apply two coats of your warm parchment-colored wall paint. This off-white base mimics the look of aged paper which is crucial for the vintage effect. -
Create an aged patina:
Once the base is dry, mix a very small amount of lukewarm tea or a diluted beige glaze. Use a sponge or rag to lightly dab and rub random areas of the wall, focusing on corners and edges to create subtle discoloration akin to old paper.
Step 2: Planning the Composition
-
Source your imagery:
Find high-resolution images of vintage botanical prints. Look for variety: one large palm Frond as a focal point, a few medium-sized leafy plants, and delicate grassy fillers. -
Project and trace:
Set up your projector to cast the images onto the wall. I find it helpful to move the projector closer or further away to play with scale—oversized botanicals look more modern. -
Sketch the outlines:
Using a light pencil (HB is good), gently trace the projected outlines. Don’t worry about shadows yet; just capture the main stems, veins, and leaf shapes. -
Balance the layout:
Step back frequently. Ensure you have negative space between the plants so the ‘paper’ background shows through; a crowded composition loses the scientific study feel.
Water Control
Keep a damp rag or sponge in your non-painting hand. If a drip runs down the wall, wipe it downward immediately to create a faded ‘stem’ rather than a messy splash.
Step 3: Painting the Foliage
-
Mix your washes:
Mix your sage green paint with the clear glazing medium (about a 1:3 ratio). You want a translucent, watercolor-like consistency, not opaque coverage. -
Base fill the leaves:
Using a size 10 round brush, fill in the large leaf shapes with your glaze mixture. Work quickly and don’t worry about streaks—they actually add to the hand-painted watercolor look. -
Vary the saturation:
While the glaze is wet, dip your brush into a slightly unmixed bit of green and touch it to the base of the leaves. Let the darker color bleed naturally into the lighter wash. -
Create depth:
For the largest palm frond, paint only one half of each leaflet with a second coat of glaze once the first is dry. This indicates a light source and gives the frond dimension. -
Paint secondary plants:
Move to the medium-sized plants. Consider slightly altering your green mix by adding a tiny dot of yellow or brown to differentiate species, but keep the overall palette cohesive.
Add Scientific Notes
Use a fine liner brush or a dark charcoal pencil to write the Latin names of the plants in cursive near the roots for authentic scientific diagram flair.
Step 4: Refining Details
-
Mix the detail color:
Take your dark forest green paint and thin it with water until it flows like ink. It should be fluid enough to make long lines without breaking, but opaque enough to stand out. -
Line the stems:
Using your fine liner brush, trace the central stems of the plants. Use a ‘shakey’ hand intentionally here; organic lines look more realistic than ruler-straight ones. -
Add veining:
Paint the central vein of each leaf with the dark green mix. For the large palm, draw a sharp line right down the center of the spine. -
Sketch the wispy fillers:
For the delicate grassy plants in the background (like the seed heads on the right), skip the wash entirely. Use only the fine liner brush to sketch them directly onto the wall for a pencil-drawing effect. -
Define the edges:
Go back to your main focal leaves. Use the fine brush to vaguely outline parts of the leaves, but don’t close every shape. Broken outlines suggest an artist’s sketch. -
Erase pencil marks:
Once the paint is thoroughly dry (give it at least 24 hours to be safe), gently erase any visible pencil lines that weren’t covered by paint. -
Final assessment:
Step back across the room. If any area looks too flat, use a very dry brush with a tiny amount of dark paint to add subtle cross-hatching or stippling for texture.
Now you have a calm, intellectual corner that brings the quiet beauty of a conservatory indoors.
BRUSH GUIDE
The Right Brush for Every Stroke
From clean lines to bold texture — master brush choice, stroke control, and essential techniques.
Explore the Full Guide
Tropical Birds Hidden in the Greenery
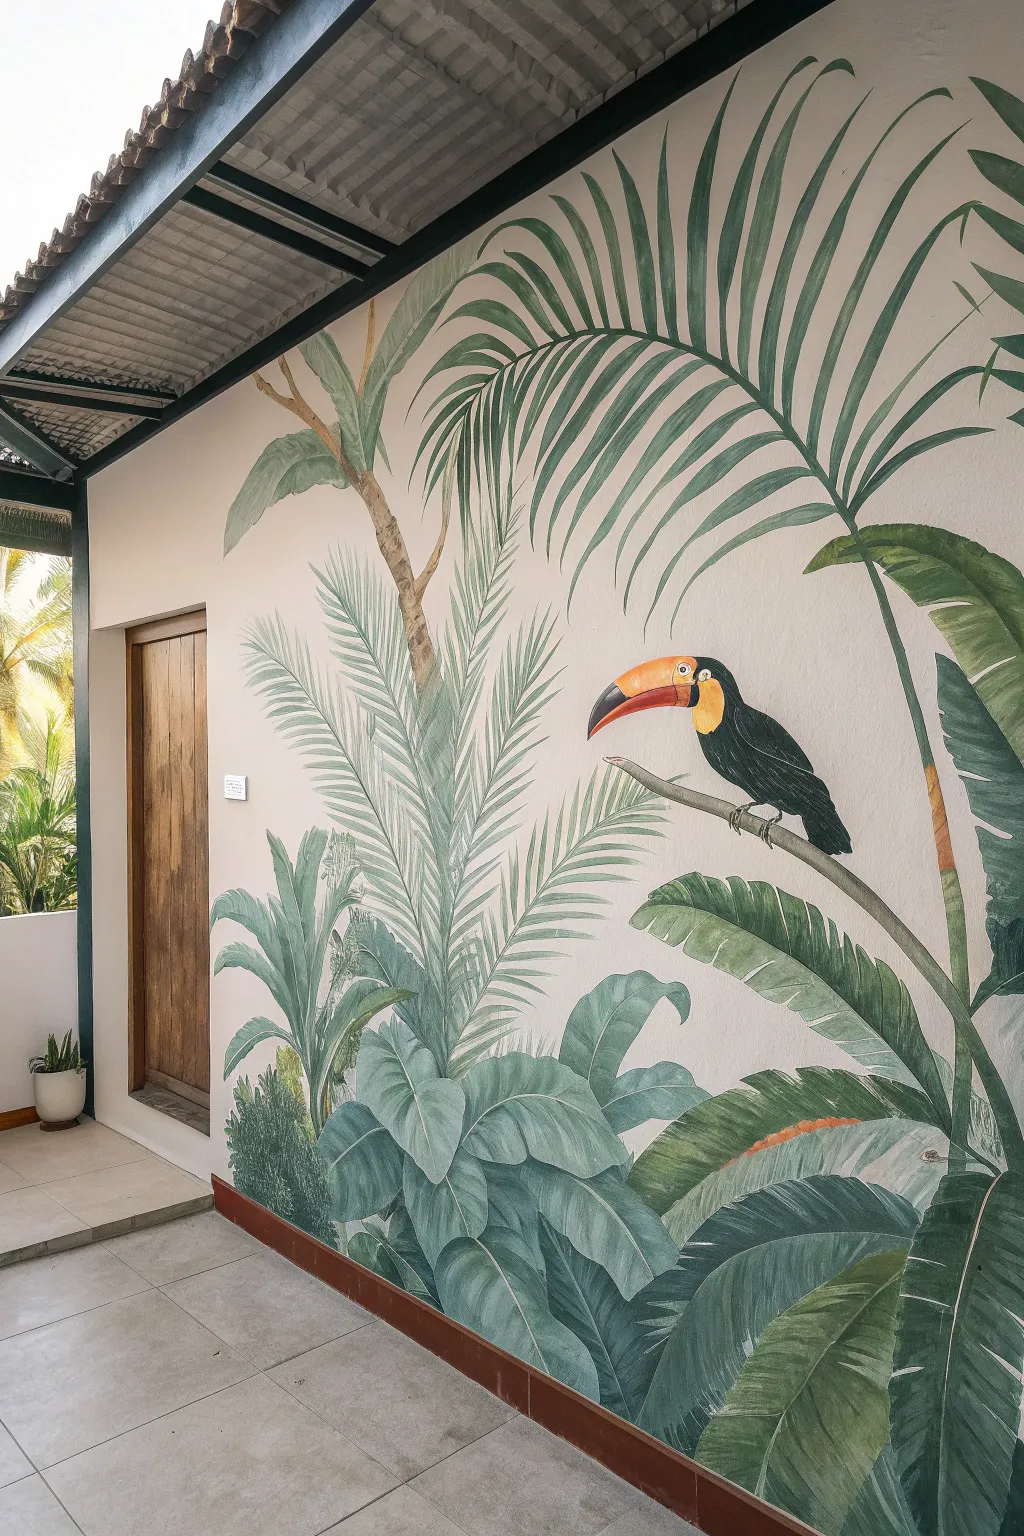
Transform a plain wall into a lush jungle scene with this soft, illustrative mural featuring trailing palms and a vibrant toucan perched amidst the greenery. The muted greens and focused pops of orange create a sophisticated tropical aesthetic that feels airy rather than overwhelming.
How-To Guide
Materials
- Interior latex paint (Eggshell finish: Cream/Off-white for base)
- Acrylic mural paints or high-quality latex samples (Deep Green, Sage Green, Olive, Brown, Black, White, Bright Orange, Yellow, Blue-Grey)
- Chalk or watercolor pencils (light brown or grey)
- Assorted synthetic brushes (2-inch flat brush, various angled sash brushes, fine liner brush)
- Painter’s tape and drop cloths
- Stepladder
- Mixing containers or paper plates
- Clean rags and water cup
Step 1: Preparation & Sketching
-
Prime and prep:
Ensure your wall surface is clean and smooth. If changing the base color, roll on two coats of your cream or off-white base color and allow it to dry completely—usually at least 4 hours—before starting your sketch. -
Map out the composition:
Using a light brown chalk or watercolor pencil, lightly sketch the main structural elements. Start with the large tree trunk/branch coming from the top left corner, then rough in the placement of the toucan to ensure it’s at eye level. -
Outline the foliage:
Sketch the large sweeping curves of the palm fronds arching from the top right. I find it helpful to draw just the center spine of the leaf first, then indicate the direction of the leaflets. Add the lower clusters of broad leaves at the bottom.
Transparency Trick
Mix a glazing medium or water into your background leaf colors. This makes the paint semi-transparent, creating a watercolor effect that looks softer on the wall.
Step 2: Painting the Greenery
-
Block in the trunk:
Mix a diluted brown wash using acrylics and water. Paint the main tree trunk, keeping the edges organic and slightly rough. Add darker brown on the underside for shadow. -
Base coat the large palm:
Using a medium-sized angle brush and sage green paint, create the long, thin leaflets of the upper palm branches. Use long, confident strokes that taper at the end, pulling the brush away from the center spine. -
Layer the lower foliage:
For the broad leaves at the bottom, mix a slightly blue-toned green. Fill in these large shapes, but don’t worry about perfect coverage yet; a little streakiness adds texture. -
Add depth with shadows:
While the green is still slightly tacky, blend in a deeper forest green near the base of the leaves and where leaves overlap. This creates immediate volume. -
Highlight the leaves:
Mix a little white and yellow into your sage green. Add highlights to the tops of the curved leaves and the tips of the palm fronds to simulate sunlight hitting the canopy. -
Create the dense shrubbery:
Use an old, scruffy brush to stipple (dab repeatedly) dark green and olive tones at the very bottom left corner. This creates the texture of dense, low-growing bushes.
Step 3: The Toucan & Details
-
Block in the bird’s body:
Paint the body of the toucan with solid black. Leave the chest area empty for now. Smooth out the contours to give the bird a sleek appearance. -
Establish the beak shape:
Paint the large beak shape with a base of white to ensure the bright colors pop later. Let this dry completely. -
Color the beak:
Apply bright orange to the top of the beak and a deep red or maroon at the very tip and base. Blend yellow into the upper ridge for a gradient effect. -
Paint the chest and eye:
Fill the chest area with a bright yellow, blending into white near the neck. Use a fine liner brush to paint the blue ring around the eye, followed by the black pupil with a tiny white reflection dot. -
Add beak details:
Use a thin liner brush with black paint to outline the beak segments and the opening line of the mouth. This crisp line work defines the character. -
Perch the bird:
Paint the specific branch the toucan is standing on. Use grey-brown tones, and make sure the bird’s feet (painted in grey) look like they are gripping the wood, not just floating on top. -
Refine the background leaves:
Go back to the large palm fronds with a very watered-down light green. Paint faint ‘ghost’ leaves in the background to create atmospheric depth. -
Final touches:
Step back and look for balance. Use a small brush to sharpen any leaf tips or add vein details to the large bottom leaves with a lighter green shade. Erase any visible chalk lines with a damp cloth.
Uneven Coverage?
If your large leaves look patchy, don’t overwork them while wet. Let the first coat dry fully, then apply a second thin layer or dry-brush a lighter color over the texture.
Now you have a serene slice of the tropics permanently captured in your home
Hibiscus and Bird of Paradise Color Bursts
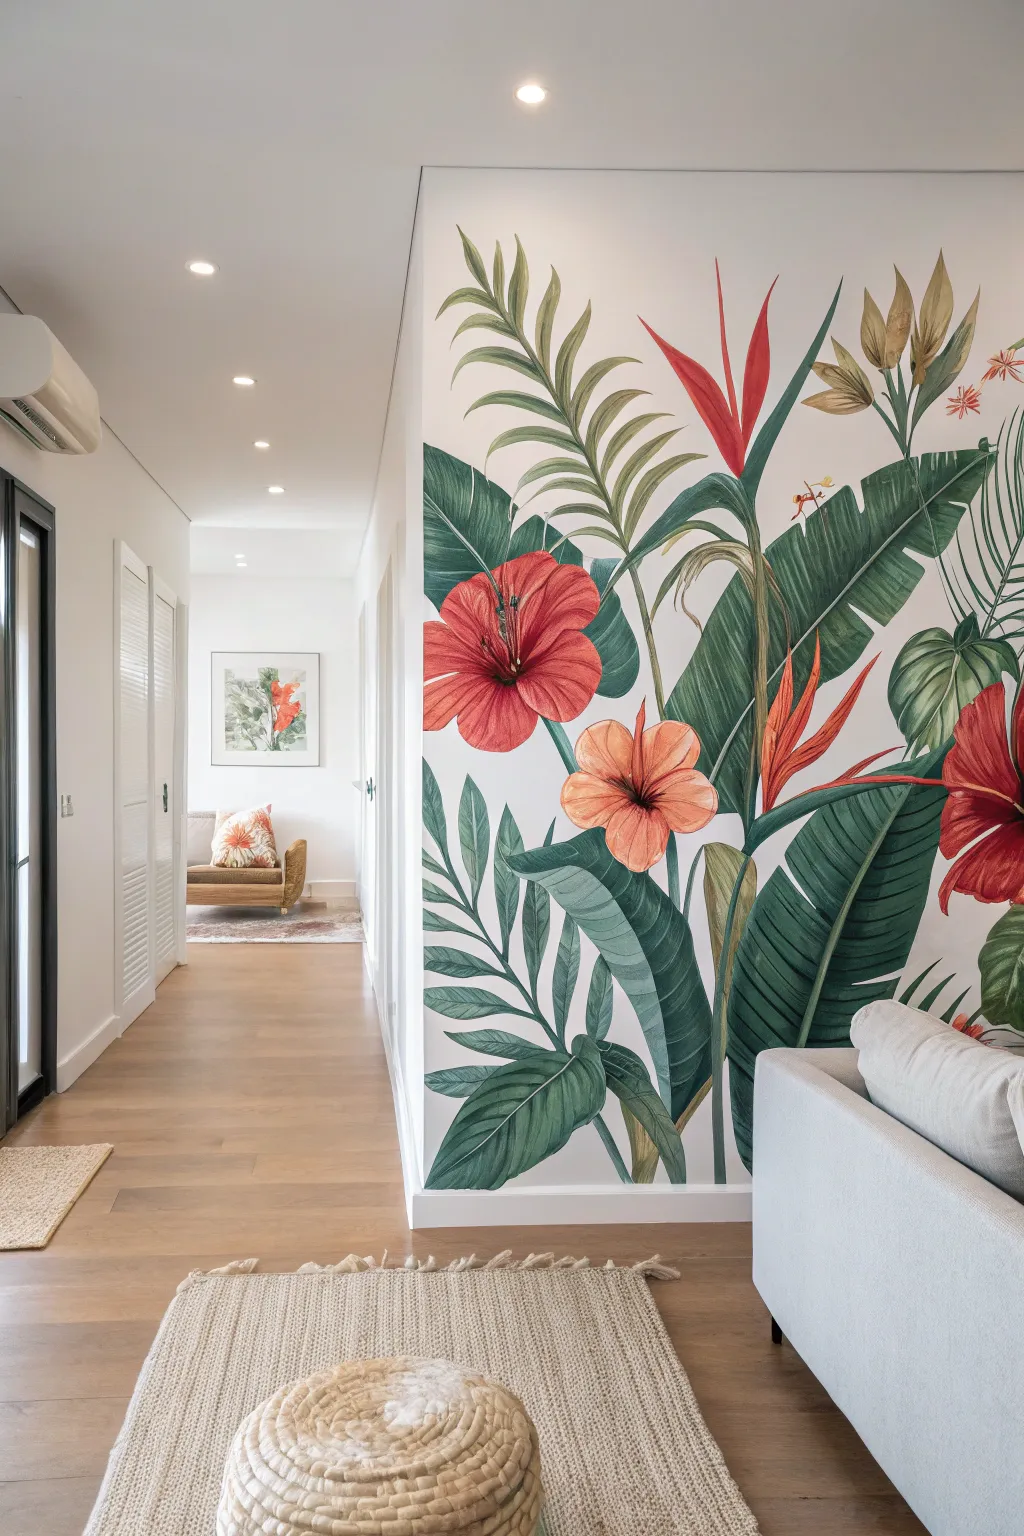
Transform a plain white wall into a lush conservatory with this vibrant, large-scale botanical mural featuring bold hibiscus blooms and striking bird of paradise flowers. The design uses clean lines and saturated colors against a stark white background to create a modern, illustrative feel that doesn’t overwhelm the space.
Step-by-Step
Materials
- High-quality interior latex paint (white base for wall)
- Acrylic paints (Cadmium Red, Orange vivid, Sap Green, Phthalo Green, Yellow Ochre, Burnt Umber, White)
- Pencil and large eraser
- Projector (optional but recommended for scale)
- Painter’s tape and drop cloths
- Assorted synthetic brushes (2-inch flat, 1-inch angle bright, #4 and #6 round for details)
- Mixing trays or disposable plates
- Clear matte varnish (water-based)
Step 1: Preparation and Layout
-
Prepare the Canvas:
Begin by cleaning the wall thoroughly with a mild detergent solution to remove any dust or grease. Once dry, examine the surface for imperfections; patch any holes and sand smooth. -
Base Coat:
Apply a fresh coat of bright, clean white interior latex paint using a roller. Two coats are usually best to ensure a crisp backdrop that makes colors pop. Let this cure for at least 24 hours. -
Sketch the Composition:
If you are confident in your drawing skills, lightly sketch the large banana leaves first as anchors, followed by the flowers. I find using a projector speeds this up significantly: project your reference image onto the wall and lightly trace the outlines with a pencil. -
Refine the Lines:
Step back and check your proportions. The hibiscus blooms should be large and dominant. Erase any heavy pencil marks, leaving only faint guidelines so the graphite doesn’t smudge into your paint later.
Stay Fluid
Mix a glazing medium or a little water into your acrylics. This prevents the paint from drying too fast on the wall and allows for smoother, longer brushstrokes on large leaves.
Step 2: Painting the Greenery
-
Mix Your Base Greens:
Create three shades of green: a deep shadow green (Phthalo Green + touch of Burnt Umber), a mid-tone grass green (Sap Green), and a light highlight green (Sap Green + White + Yellow Ochre). -
Block in Banana Leaves:
Using the 2-inch flat brush, fill in the large banana leaves with your mid-tone green. Don’t worry about perfect coverage yet; you want to establish the shape. -
Add Leaf Structure:
Switch to the 1-inch angle brush. While the base is tacky, paint the central veins of the leaves using the light highlight green for contrast. -
Create Depth:
Apply the deep shadow green to the areas where leaves overlap or curl under. Use long, sweeping strokes that mimic the natural direction of the leaf fibers. -
Paint the Palm Fronds:
For the feathery palm leaves, use a smaller round brush. Start from the central stem and pull outward with quick, flicking motions to create tapered tips. Vary your greens here to distinguish them from the banana leaves.
Step 3: Floral Elements and Details
-
Base the Hibiscus:
Mix a vibrant coral-red. Paint the petals of the hibiscus flowers using the 1-inch brush, following the curve of each petal towards the center. Leave the very center unpainted for now. -
Hibiscus Shading:
Mix a darker version of your red (add a dot of Burnt Umber or purple). Paint thin streaks radiating from the center of the flower outward to create the illusion of a cup shape. -
Bird of Paradise Spikes:
Paint the sharp, angular petals of the Bird of Paradise flowers using bright orange and yellow. Use a clean, sharp edge to distinguish these architectural flowers from the softer hibiscus. -
Adding Stems:
Connect your floating flowers to the foliage with long, elegant stems using a mixture of green and brown. A liner brush works perfectly for this to keep lines even. -
Stamen Details:
Use a #4 round brush to carefully paint the long stamen of the hibiscus. Add tiny dots of yellow paint at the end for the pollen. -
Final Highlights:
Mix a very pale green-white. Add subtle highlights to the top edges of the banana leaves and the tips of the Bird of Paradise to make them look sun-kissed. -
Clean Up:
Inspect the surrounding white wall for any accidental splatters. Use a small brush and your original wall paint to touch up these areas for a seamless look.
3D Effect
Once the mural is fully dry, stick faux silk flowers or real dried palm leaves onto specific spots of the mural using removable mounting putty for a mixed-media texture that pops.
Step back and admire how this botanical masterpiece brings a permanent vacation vibe to your hallway

PENCIL GUIDE
Understanding Pencil Grades from H to B
From first sketch to finished drawing — learn pencil grades, line control, and shading techniques.
Explore the Full Guide
Banana Leaf Fan Pattern for a Dining Nook
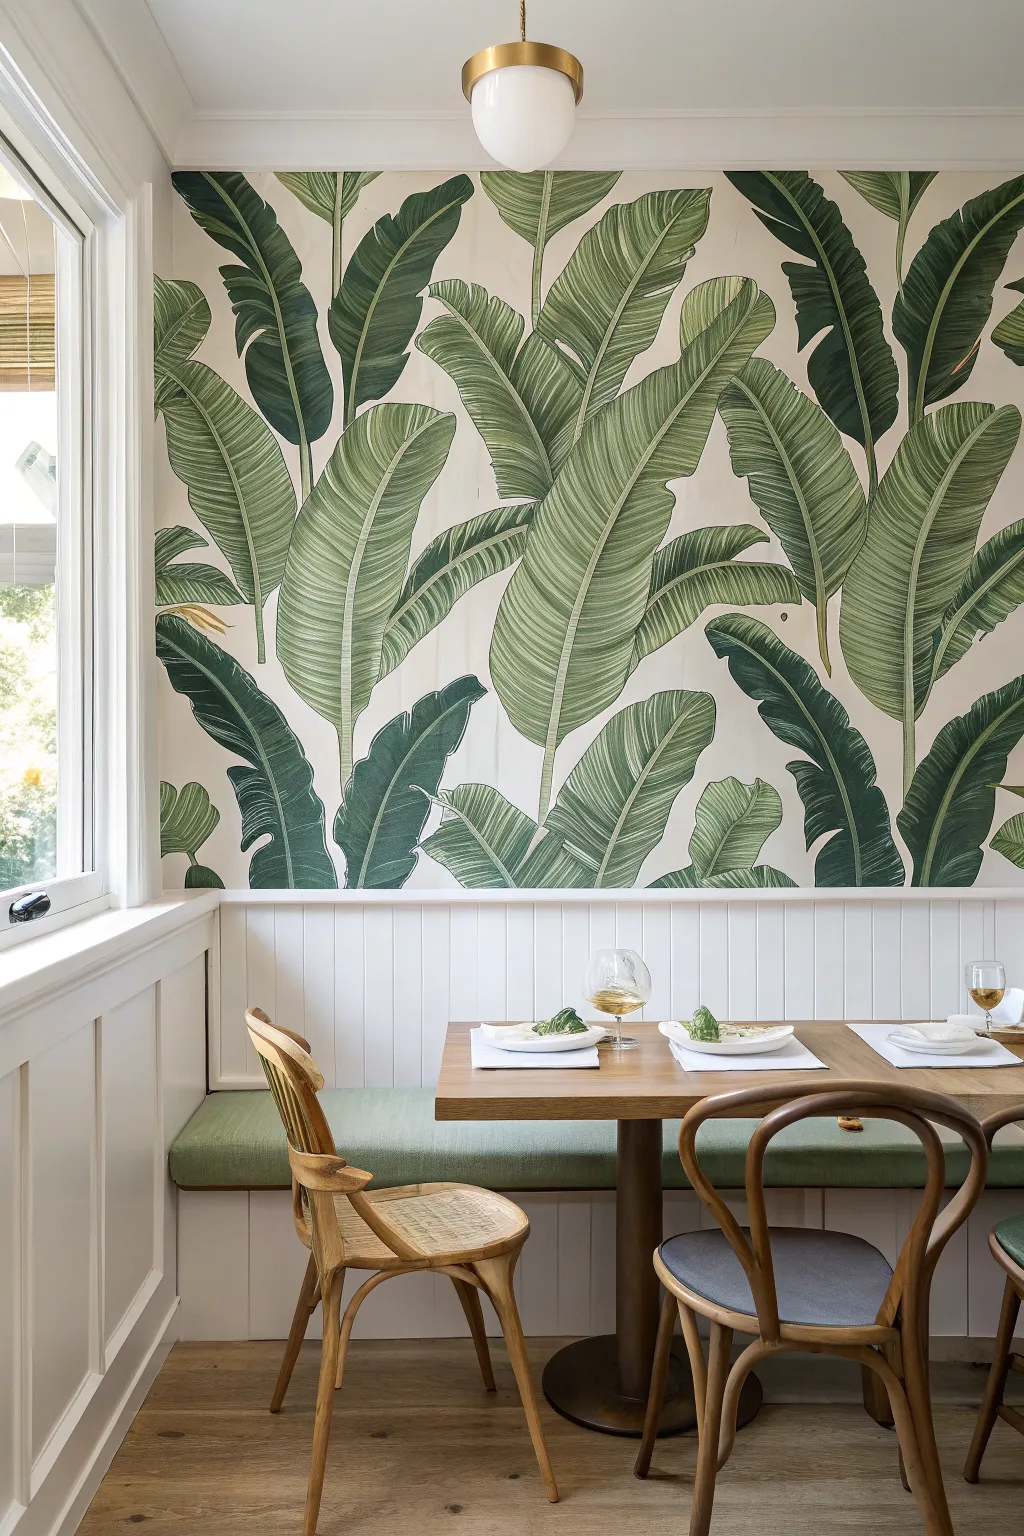
Transform a plain dining corner into a lush, vibrant escape with this statement banana leaf wall mural. Whether you choose hand-painting or applying a high-quality mural paper, the oversized botanical patterns bring an immediate sense of organic relaxation and timeless style to your eating space.
Detailed Instructions
Materials
- Banana leaf wallpaper mural (pre-pasted or peel-and-stick)
- Wallpaper paste (if using non-adhesive paper)
- Smoothing tool or plastic squeegee
- Sharp utility knife or X-Acto blade
- Measuring tape
- Level or plumb line
- Sponge and bucket of clean water
- Ladder or step stool
- Painters tape
- Drop cloth
- Seam roller (optional)
Step 1: Preparation
-
Clear and clean the workspace:
Remove all furniture, including tables and chairs, from the nook to give yourself ample movement room. Cover the floor and any wainscoting with a drop cloth to protect surfaces from paste or water drips. -
Prep the wall surface:
Inspect the wall above the wainscoting for any holes or rough patches. Fill them with spackle and sand smooth. Wipe the entire wall down with a damp sponge to remove dust, ensuring the adhesive bonds perfectly. -
Measure and mark guidelines:
Establish a vertical plumb line using your level. This is crucial because corners in homes are rarely perfectly straight. Measure out from the corner a distance slightly less than the width of your first wallpaper panel and draw a light pencil line vertically.
Bubbles Won’t Budge?
If a large air bubble is trapped and smoothing doesn’t work, don’t peel the whole sheet back. Use a syringe with a tiny bit of wallpaper glue, inject it into the bubble, and smooth flat.
Step 2: Applying the Mural
-
Prepare the first panel:
If using pre-pasted paper, activate the adhesive with water according to the manufacturer’s instructions. If using traditional paper, apply a generous, even coat of paste to the back. A technique called “booking”—folding the pasted sides against each other—helps the paper relax for a few minutes before hanging. -
Hang the first strip:
Align the edge of your first panel with your plumb pencil line, not the corner itself. Allow a couple of inches of excess paper to overlap onto the ceiling and the corner wall. Use your smoothing tool to gently press the paper against the wall, working from the center outward to push out air bubbles. -
Trim the excess:
Using the straight edge of your smoothing tool as a guide, carefully trim the excess paper at the ceiling line and along the top of the wainscoting with a sharp utility knife. Change your blade frequently to avoid snagging or tearing the wet paper. -
Match the pattern:
Prepare the second panel. I usually like to hold this panel up dry first to double-check exactly where the leaves align. Carefully position it next to the first panel, sliding it gently until the banana leaf veins match perfectly seamlessly. -
Smooth firmly:
Once aligned, smooth the second panel down just like the first. Ensure the seams are butted tightly against each other but not overlapping, which can create a ridge. -
Continue securely:
Repeat this process for the remaining panels across the wall. As you work, wipe away any excess paste that squeezes out of the seams immediately with a clean, damp sponge to prevent a shiny residue from drying on the matte leaf print.
Pro Tip: Pattern Placement
Before pasting anything, lay all panels on the floor to visualize the full image. Ensure the most detailed ‘hero’ leaves aren’t cut off by the wainscoting or hidden behind a pendant light.
Step 3: Finishing Touches
-
Manage the corners:
When you reach the adjacent wall corner, smooth the paper into the crevice. Make a small relief cut at the top and bottom if needed, then wrap the paper onto the next wall slightly if your mural continues, or trim neatly flush if stopping. -
Roll the seams:
Wait about 15-20 minutes for the adhesive to set slightly, then gently run a seam roller over the joins. This ensures the edges don’t curl up later and makes the mural look like one continuous painting. -
Final inspection:
Scan the wall for any stubborn air bubbles. If you find small ones, you can often gently prick them with a fine needle and smooth the air out towards the hole. -
Clean and reset:
Remove your drop cloths and wipe down the wainscoting ledge one last time. Once the wall is fully dry (usually 24 hours), move your bench seating and dining table back into position to complete the look.
Enjoy your meals surrounded by the calming, verdant energy of your new tropical dining nook
Abstract Tropics With Color-Block Leaves
Transform a plain white wall into an artful jungle with this oversized, abstract tropical mural. Using a palette of muted earth tones and fluid, organic shapes, you’ll create a serene botanical statement that feels both modern and hand-crafted.
How-To Guide
Materials
- Interior latex paint (matte or eggshell finish): Sage Green, Teal, Dusty Rose, Beige, Tan, Dark Green
- Paint rollers (mini foam rollers work best for smooth coverage)
- Painter’s tape
- Large roll of kraft paper or cardboard
- Pencil and eraser
- Projector (optional but highly recommended)
- Chalk or pastel pencil
- Assorted paintbrushes: 1-inch angled sash brush, fine liner brush, and medium round brush
- Drop cloths
- Ladder
Step 1: Preparation & Planning
-
Clean the canvas:
Before you even touch a paintbrush, ensure your wall is pristine. Wipe it down with a damp cloth to remove dust and grease, and patch any holes. A clean surface ensures crisp lines and good adhesion. -
Sketch your composition:
Don’t just wing it on the wall. Sketch your design on a piece of paper first to figure out the balance. Notice how the leaves in the photo overlap and fan out from different directions—some from the floor, others hanging from the ceiling. -
Project or grid:
If you have a projector, cast your sketch onto the wall to trace the outlines lightly with a pencil. I prefer using a light-colored chalk or pastel pencil here, as it’s easier to wipe away than graphite if you make a mistake. -
Freehand sketching:
If you are freehanding, start by drawing the main spines or stems of the largest leaves first to establish flow. Then, flesh out the leaf shapes around these central lines.
Step 2: Painting the Base Shapes
-
Start with the background leaves:
Identify which leaves appear “furthest back” in your design. In this mural, these are often the lighter beige or tan shapes. Paint these first so that darker, foreground leaves can overlap them cleanly later. -
Outline then fill:
Use a 1-inch angled sash brush to carefully cut in the outline of a leaf shape. Once the edge is defined, use a mini foam roller to fill in the center. This prevents brush strokes and gives that smooth, graphic look seen in the photo. -
Work color by color:
To save time on washing brushes, paint all the beige leaves first, then move to the dusty rose, then the sage green. Let each color dry to the touch before starting an adjacent shape to prevent bleeding. -
Add large focal leaves:
Paint the large, dark teal monstera leaves at the bottom and the prominent palm fronds. These act as anchors for the mural. Ensure the paint is opaque; you might need two coats for the darker greens.
Uneven Lines?
If your hand is shaky, use a mahl stick (or a yardstick) to rest your hand against the wall while painting. It stabilizes your wrist for smoother, longer strokes.
Step 3: Adding Details & Linework
-
Paint the stems:
Once your main leaf bodies are dry, use a medium round brush to paint the stems connecting the leaves. Keep your hand loose to maintain the organic, flowing feel of the plants. -
Create the ‘outline’ leaves:
Notice some leaves are just outlines (like the beige ones on the left). Create these using a fine liner brush and thinned paint. The line should be consistent in width but not machine-perfect; a little wavering adds charm. -
Add definition to solid leaves:
For certain leaves, like the large Monstera, use a fine brush and your wall’s base color (white or cream) to paint thin veins back onto the dry solid color. This negative space technique adds immense detail. -
Layering the overlaps:
Where leaves overlap, ensure the top leaf’s edge is crisp. If you need to sharpen an edge, wait for everything to dry completely and carefully re-cut the line with your liner brush.
Paint Consistency
Add a tiny splash of water or Floetrol to your latex paint for liner work. It helps the paint glide off the brush smoothly for long stems without skipping.
Step 4: Finishing Touches
-
Erase guidelines:
Once the paint has cured (give it at least 24 hours to be safe), gently wipe away any visible chalk or pencil marks with a damp cloth or a clean eraser. -
Touch-ups:
Stand back and look at the wall from a distance. Check for any patchy areas or wobbly lines. Small touch-ups with a small artist’s brush can make a huge difference in the professional finish.
Step back and admire your lush, maintenance-free indoor garden that will stay green all year round


Night Jungle With Subtle Glow Highlights
Transform a plain wall into a lush, nocturnal escape with this hand-painted mural technique. This project layers deep teal tones with stylized botanical forms and scattering of gold accents to create a moody, sophisticated jungle atmosphere.
How-To Guide
Materials
- Interior latex paint (Deep Midnight Teal for base)
- Acrylic paints (Forest Green, Sage Green, Emerald, Leaf Green, White, Black)
- Metallic Gold acrylic paint or gold leaf pen
- Assorted paintbrushes (2-inch angled sash brush, various round and filbert brushes)
- Painter’s tape
- Chalk or pastel pencil (light gray or white)
- Drop cloths
- Ladder or step stool
- Sea sponge (optional, for texture)
- Projector (optional, for transferring sketches)
Step 1: Base Preparation
-
Prep the surface:
Begin by clearing the wall area and laying down drop cloths. Mask off baseboards, ceiling edges, and adjacent walls with painter’s tape to ensure crisp lines. -
Apply the background color:
Roll on your base coat of Deep Midnight Teal. Use a W-pattern for even coverage. This dark background is crucial for the ‘night jungle’ effect, so you may need two coats for full opacity. Let this dry completely, ideally overnight.
Step 2: Sketching the Jungle
-
Plan your composition:
Before painting, visualize the layout. Aim for large Monstera leaves near the bottom and sweeping palm fronds reaching down from the top. Balance is key; avoid clustering everything in one spot. -
Transfer the design:
Using a light gray chalk or pastel pencil, sketch the outline of your leaves directly onto the dark wall. Chalk is forgiving because it wipes off easily with a damp cloth if you make a mistake. If you aren’t confident freehanding, project a jungle line drawing onto the wall and trace the outlines.
Chalk It Up
Can’t erase? If your chalk sketch won’t wipe off easily, don’t scrub hard. Just dab a tiny bit of your background wall paint over the stubborn line to cover it up seamlessly.
Step 3: Blocking and Layering
-
Mix your greens:
Prepare a palette of at least three green tones. Mix your acrylics to create a ‘Shadow Green’ (darker than the base), a ‘Mid-tone Forest’, and a brighter ‘Highlight Sage’. Mixing a tiny bit of the wall color into your greens helps harmonize the mural. -
Paint the background leaves:
Start with the leaves that appear furthest back in the composition. Use the darker, more muted green tones here. Fill in the shapes with a large brush, not worrying too much about perfect detail yet. -
Paint the foreground elements:
Move to the prominent foreground leaves, like the large Monstera and lower palm fronds. Use your brighter and more saturated greens for these to make them pop against the dark background. I find using a filbert brush helps create those smooth, rounded leaf edges.
3D Effect
For a true ‘pop’, cut shapes of a few leaves from thin MDF or sturdy cardstock, paint them to match, and mount them to the wall with spacers for real physical depth.
Step 4: Detailing and Depth
-
Add vein details:
Once the base layers are dry, mix a lighter green (add a touch of white or yellow to your mid-tone). Use a fine liner brush to paint the central veins and ribs of the leaves. Keep your hand steady but fluid; natural veins aren’t perfectly straight. -
Create shadows:
To give the leaves dimension, mix a watered-down glaze of black or very dark green acrylic. Apply this gently along one side of the veins and where leaves overlap to create depth and separation. -
Highlighting edges:
Using your lightest sage or a pale mint color, dry-brush the very edges and tips of the foreground leaves. This simulates moonlight or ambient light catching the foliage.
Step 5: The Galactic Finishes
-
Add the gold accents:
Dip the handle end of a paintbrush into metallic gold paint, or use a round sponge dabber. Create random dots of varying sizes throughout the open ‘sky’ areas of the mural. These represent fireflies or distant stars. -
Cluster the shimmer:
Group a few dots closer together in some areas to create visual interest, rather than spacing them all perfectly evenly. Let the metallic paint catch the light. -
Clean up:
Once all paint is dry, gently wipe away any visible chalk lines with a damp microfiber cloth. Carefully peel away the painter’s tape at a 45-degree angle.
Step back and admire your moody, hand-painted sanctuary, ready for a cozy evening in


Have a question or want to share your own experience? I'd love to hear from you in the comments below!