If you’ve ever tried sketching a truck and ended up with a wobbly box on wheels, you’re not alone—I’ve been there. These truck drawing ideas are meant to help you lock in solid shapes, fun details, and a little bit of that rugged truck attitude.
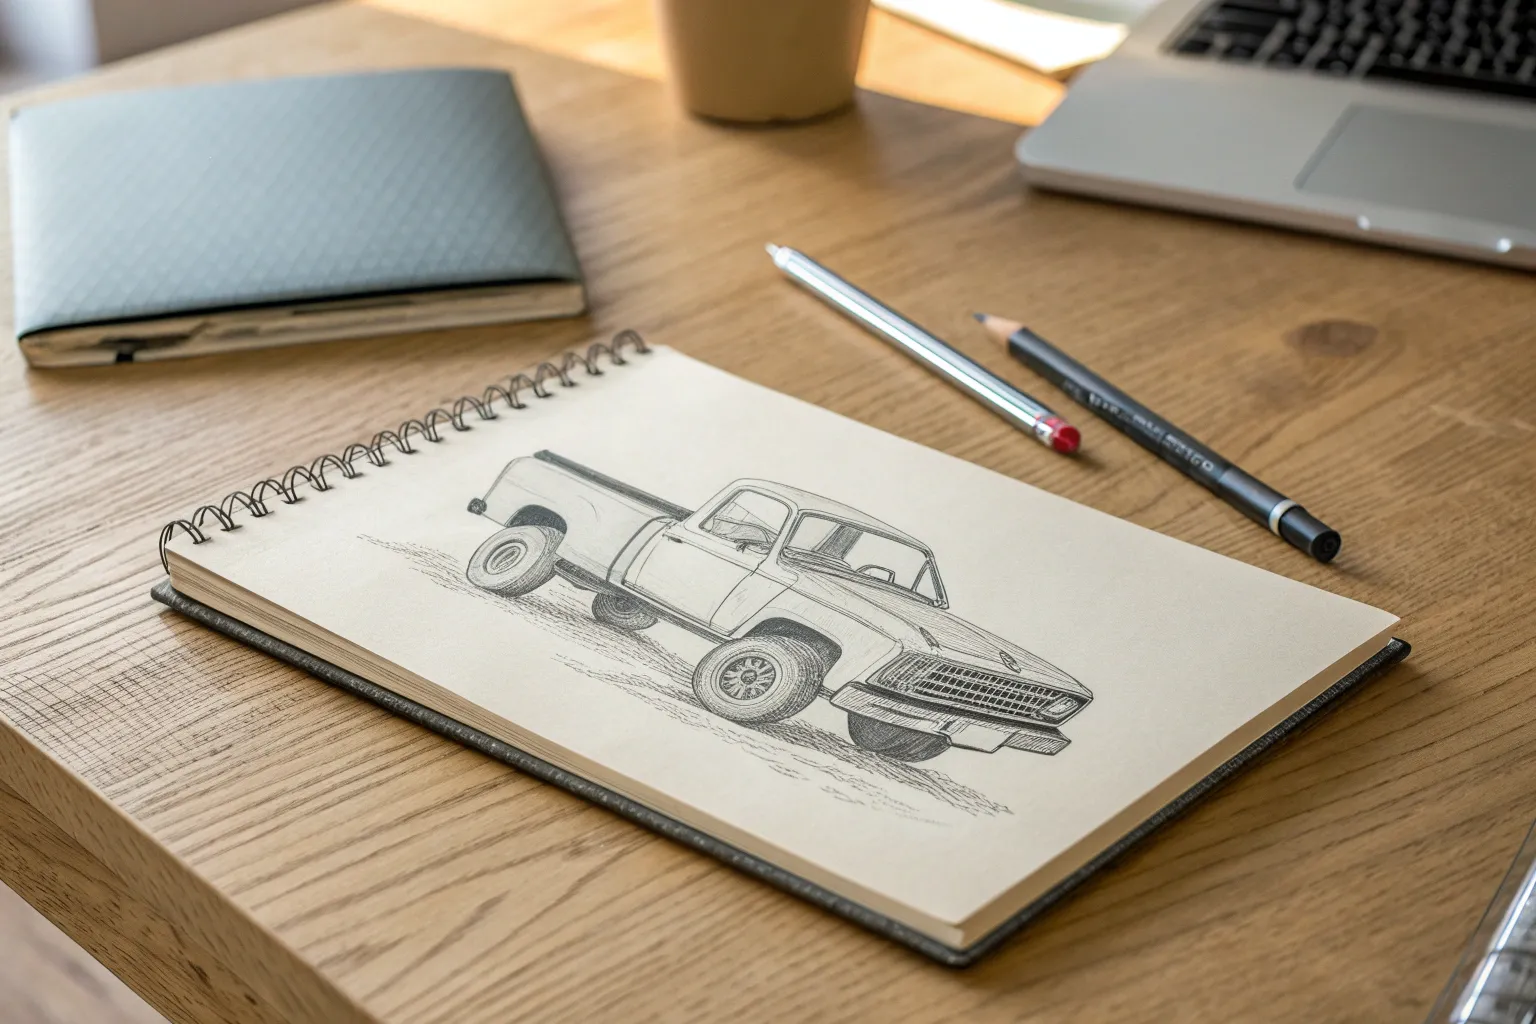
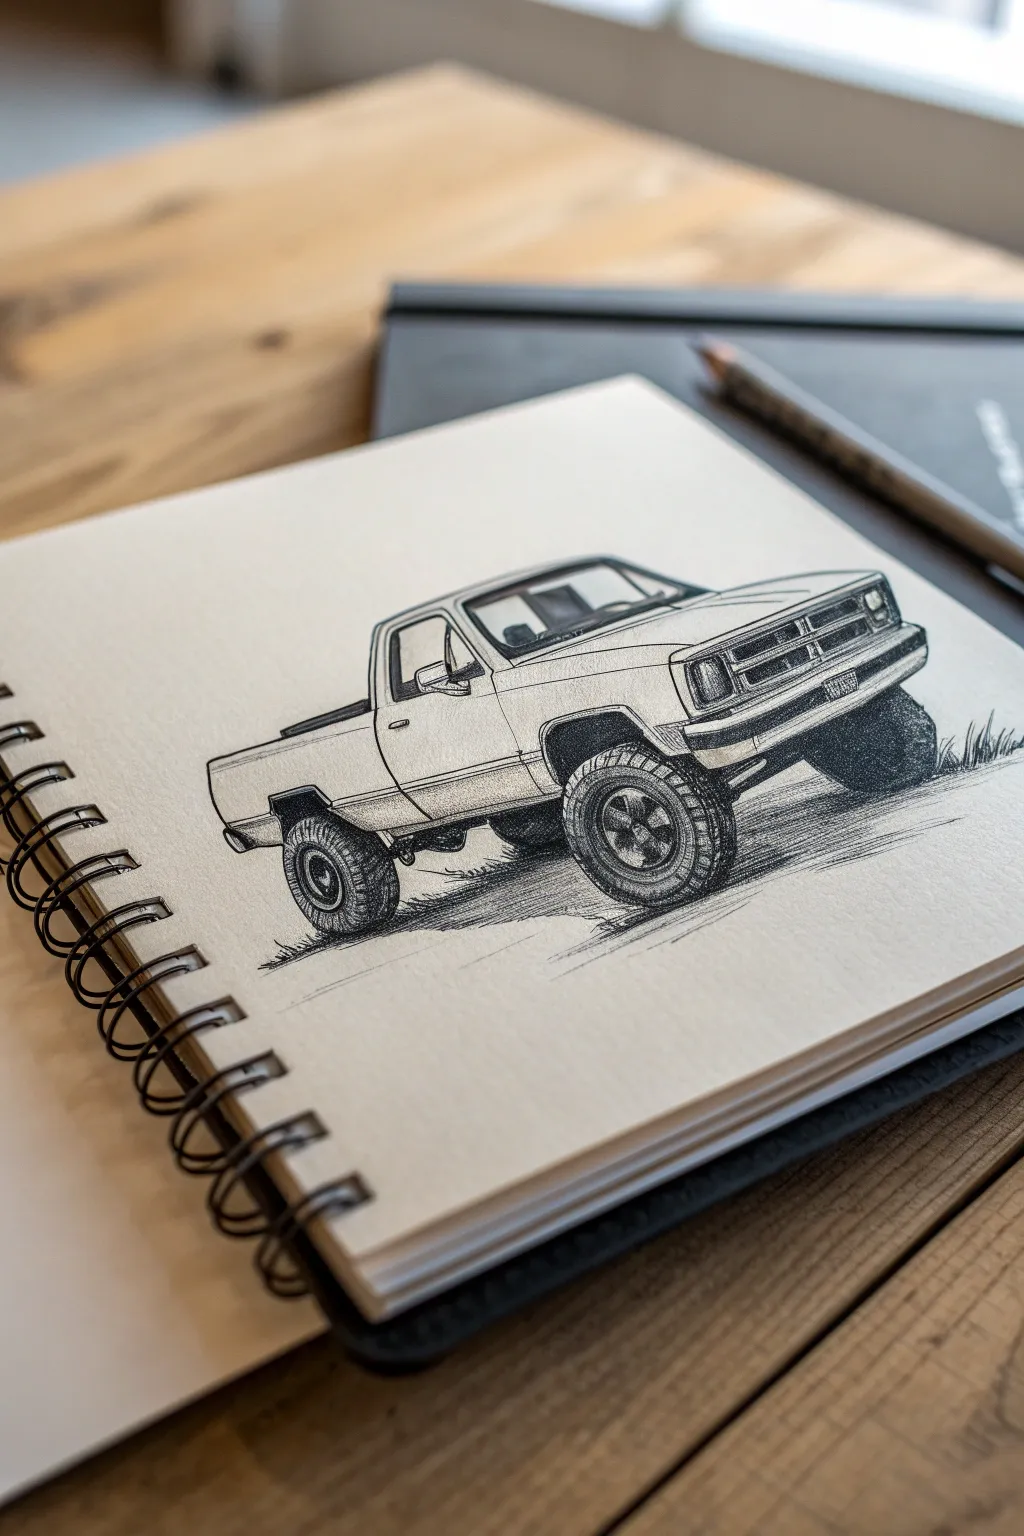
Simple Pickup Side Profile
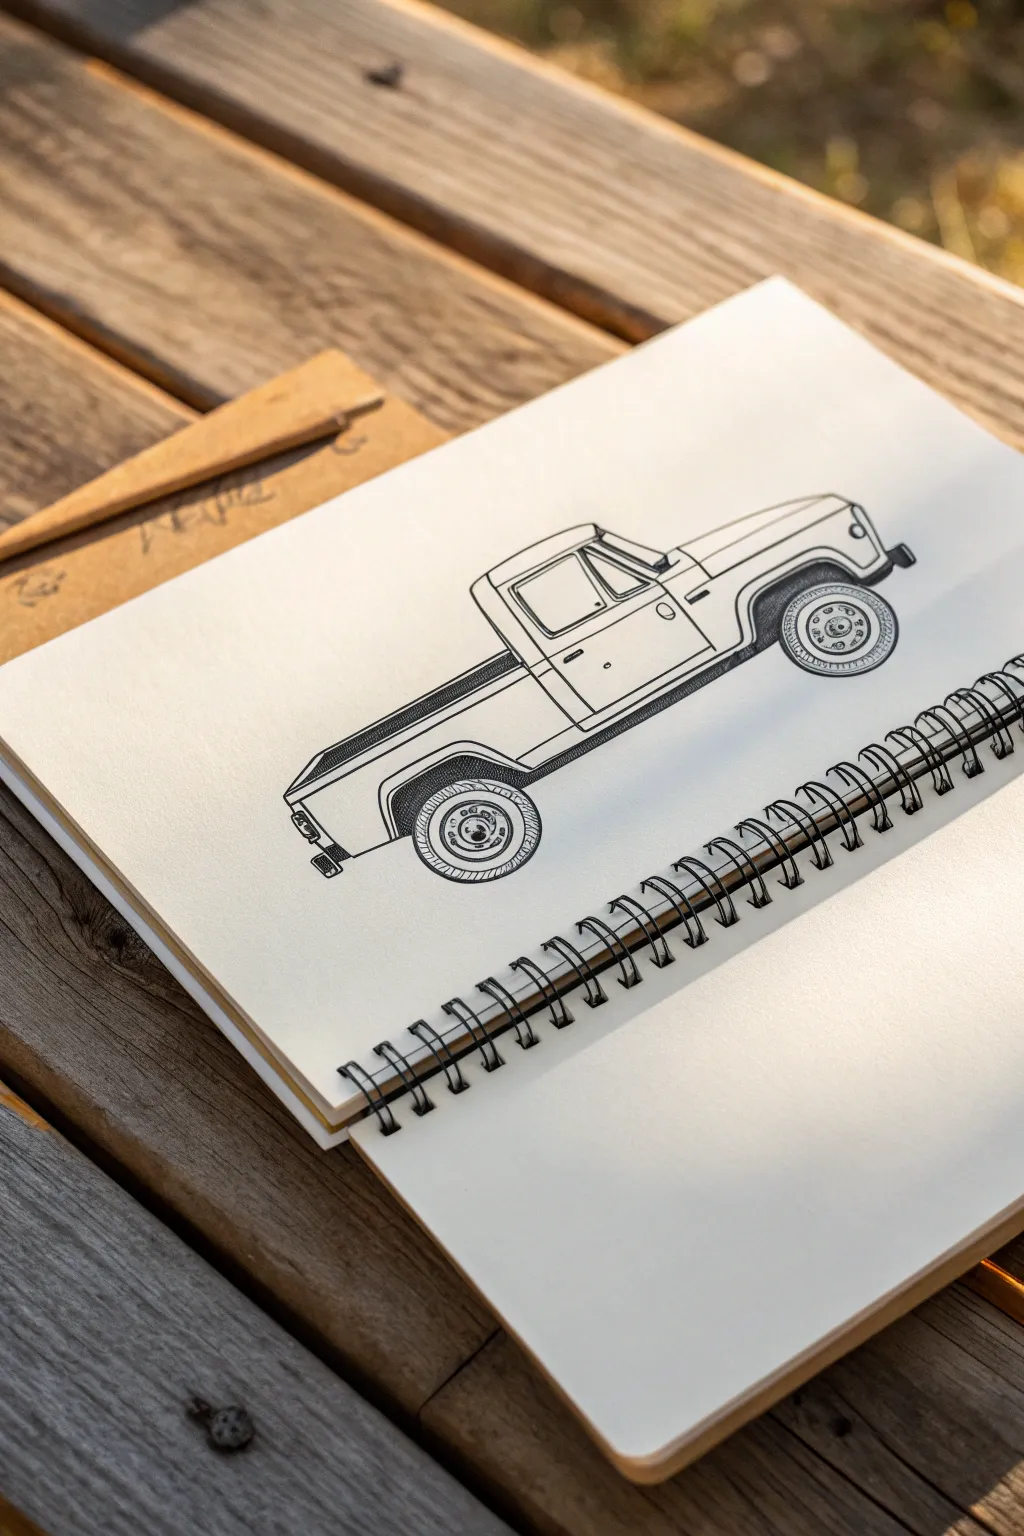
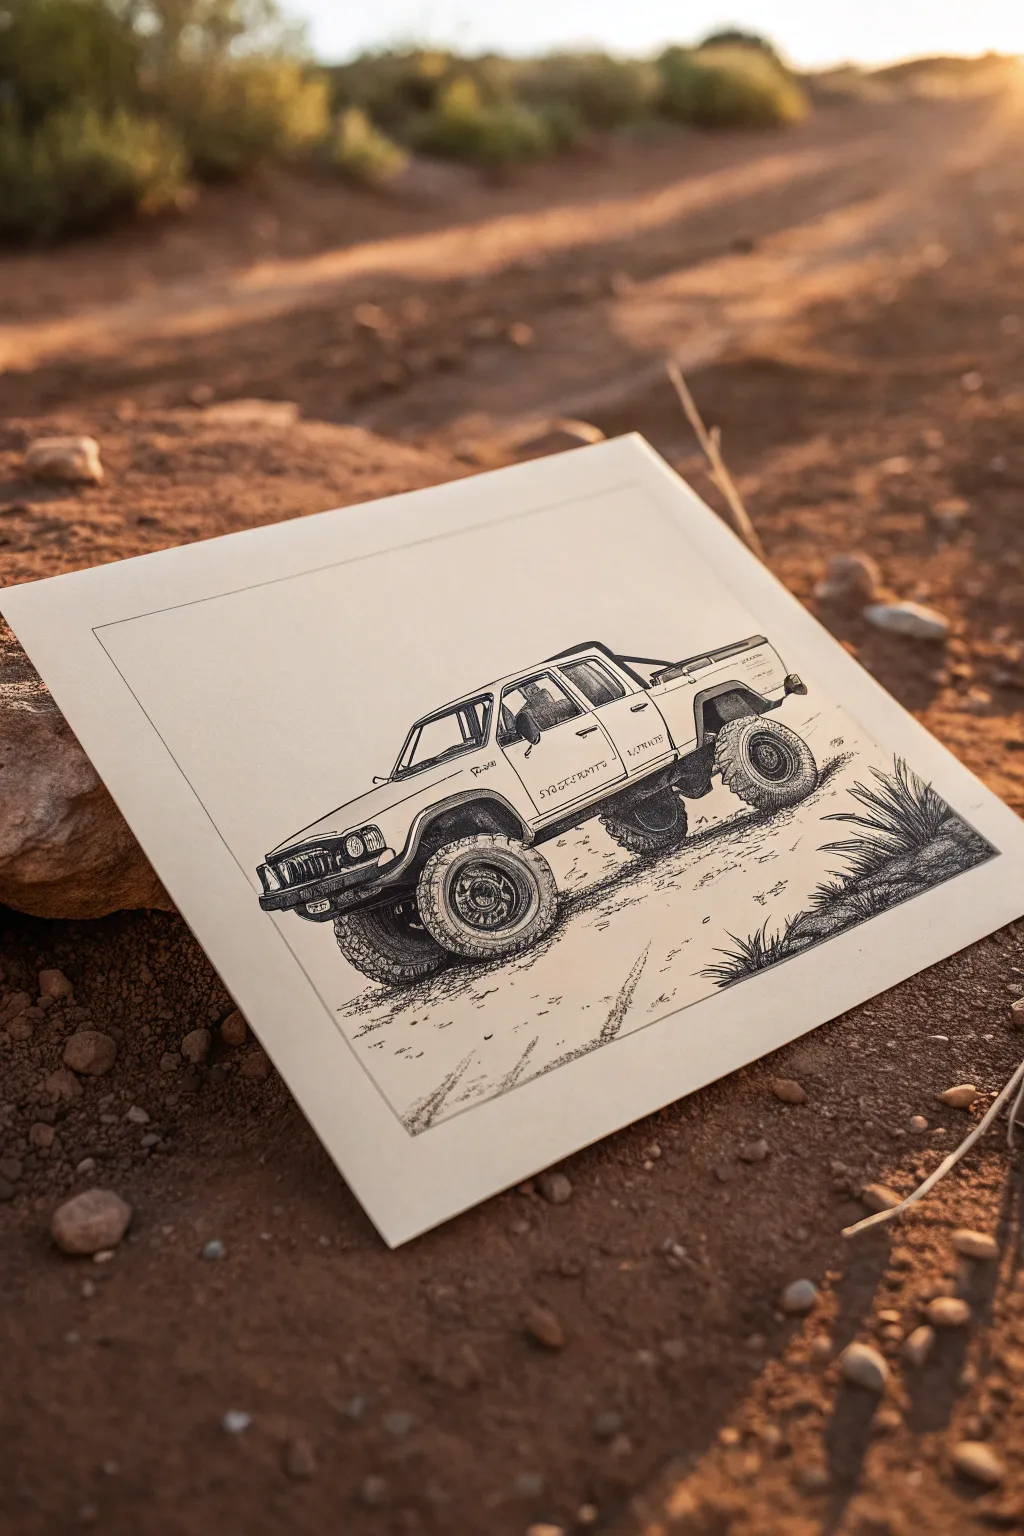
Capture the rugged charm of a classic utility vehicle with this clean line art tutorial. Using precise pen work and strategic hatching, you’ll build a defined side profile that looks great in any sketchbook.
How-To Guide
Materials
- Spiral-bound sketchbook (smooth paper recommended)
- HB or 2H graphite pencil for sketching
- Fine liner pens (sizes 0.1, 0.3, and 0.5mm)
- Ruler or straight edge
- Kneaded eraser
Step 1: Constructing the Framework
-
Establish the ground line:
Begin by lightly drawing a horizontal line to represent the ground. This ensures your wheels will sit evenly. Just above this, draw parallel lines for the chassis bottom and the wheelbase length. -
Block out main shapes:
Sketch a long rectangle for the truck bed and a taller, squarish shape for the cab. Keep the hood section distinct and prominent, extending forward from the cab. -
Define the wheel wells:
Draw two semi-circles cutting into the chassis line where the tires will go. These should be evenly spaced, with the rear wheel well slightly closer to the back bumper than the front is to the nose. -
Add wheel circles:
Inside those wells, sketch perfect circles for the tires. Draw a smaller concentric circle inside each for the rim, and a tiny one in the very center for the hub. -
Shape the cabin:
refine the cab shape. Slant the front windshield line slightly back and curve the roofline down just a touch as it meets the bed. Sketch the window opening, keeping the frame thick.
Wobbly Wheels?
Drawing perfect circles is hard! Use a circle template or find a small household object (like a coin or bottle cap) to trace for perfectly round tires.
Step 2: Refining the Details
-
Detail the bed and rails:
Draw the top rail of the truck bed. Add a slight overhang at the back for the tailgate profile and sketch the rear bumper sticking out below. -
Front end features:
At the front, define the grill area and add the side indicator light. Sketch the front bumper protruding similarly to the rear. -
Door and handle placement:
Draw the vertical line separating the cab from the bed, and another for the door seam. Place a small oval or rectangle for the door handle below the window line. -
Inner wheel details:
Flesh out the wheels. Add small circles around the main hub to represent lug nuts. I find sketching these lightly first helps keep the spacing even.
Step 3: Inking and In-filling
-
Outline the body:
Switch to a 0.5mm fine liner. Go over your main body lines—the roof, hood, bed, and bumpers—creating a confident, solid outline. -
Ink the structural lines:
Use a 0.3mm pen for interior lines like the door seams, window frame, and the bed rail details. This slight difference in line weight adds depth. -
Deepen the tires:
With the 0.5mm pen, ink the tires. Use closely spaced vertical or diagonal hatching lines to shade the rubber, leaving the rims white for contrast. -
Create undercarriage shadow:
Use your thickest pen or repeated heavy strokes to fill in the space inside the wheel wells (above the tires) and underneath the chassis with solid black. -
Add texture to the bed:
Along the top strip of the truck bed, use very fine cross-hatching or stippling with the 0.1mm pen to suggest a textured cover or darker rail material. -
Detail the hubcaps:
carefully ink the lug nuts and center hub. Keep these lines crisp and clean to make the metallic parts look manufactured. -
Final clean up:
Wait at least 10 minutes for the ink to fully cure, then gently erase all graphite guidelines with your kneaded eraser to reveal the sharp illustration.
Pro Tip: Line Weight
Make the bottom-most lines of the truck thicker than the top lines. This ‘grounding’ technique gives the vehicle a sense of weight and gravity.
Your classic truck is now ready to roll off the page, carrying a load of artistic accomplishment


Three-Quarter Pickup Stance
Capture the rugged appeal of a classic lifted pickup with this detailed ink sketch tutorial. This three-quarter view perfectly showcases both the front grille and the side profile, emphasizing the truck’s height and sturdy tires.
Step-by-Step Tutorial
Materials
- Spiral-bound sketchbook (heavyweight drawing paper)
- HB graphite pencil
- Kneaded eraser
- Fine liner pens (sizes 0.1, 0.3, and 0.5)
- Ruler (optional, for guidelines)
Step 1: Laying the Structural Foundation
-
Establish the box form:
Begin by sketching a large rectangular box in perspective toward the center of your page. The front face should be narrower than the side face, angled slightly to create that three-quarter view. -
Define the cabin and bed:
Divide your main box into two primary sections: the shorter engine bay at the front and a taller, larger section for the cabin and bed. Sketch a slanted line for the windshield to separate the hood from the roof. -
Place the wheels:
Lightly draw two large ovals for the tires. Because this is a lifted truck, place them well below the main body line, leaving plenty of space for the suspension. The front wheel should be slightly turned for a dynamic look. -
Refine the body shape:
Carve out the wheel wells from the main body block. Use squared-off angles rather than perfect circles to mimic the rugged fender design typical of older trucks.
Perspective Pro-Tip
Keep your horizontal lines parallel to each other as they recede. If the roof line angles down, the bottom door line should follow the same angle.
Step 2: Designing the Details
-
Sketch the grille and headlights:
On the front face, divide the rectangular space into the grille sections. Draw the rectangular headlights on either side, keeping them parallel to your perspective lines. -
Add windows and doors:
Outline the side window and the windshield. Draw the vertical line for the door jam and sketch a small rectangular shape for the side mirror attached to the door. -
Detail the bumper and trim:
Draw the heavy chrome bumper extending across the front. Add a thin parallel line running along the side of the truck body to represent the trim molding. -
Flesh out the tires:
Give the tires dimension by drawing the tread thickness. Inside the ovals, sketch the smaller circle for the rims and add the lug nut details. -
Add undercarriage hints:
Sketch rough shapes underneath the body between the wheels to suggest axles, driveshafts, and suspension components. This adds weight to the drawing.
Step 3: Inking and Definition
-
Outline the main body:
Switch to your 0.5 pen. Carefully go over the main outline of the truck body, using confident, straight strokes for the boxy edges. -
Define the grille:
Use the 0.3 pen to outline the individual slots of the grille and the headlight frames. Keep these lines crisp to show the plastic or metal material. -
Ink the tires and wheels:
Use the 0.5 pen for the outer tire shape. I like to use slightly broken or jittery lines here to suggest the rubber texture rather than a perfect smooth circle. -
Add tread texture:
With the 0.1 pen, draw short, diagonal hatch marks along the edge of the tires to simulate aggressive off-road tread patterns.
Wobbly Wheels?
If your tires look flat, check the axis. The ovals for the wheels should be perpendicular to the axle line, not just vertical on the page.
Step 4: Shading and Final Textures
-
Darken the wheel wells:
Fill in the deep shadow areas inside the wheel wells and under the truck frame using solid black ink or dense cross-hatching to create depth. -
Shade the tires:
Apply heavy hatching to the side walls of the tires. Leave the rims lighter to suggest a metallic reflection. -
Add body shadows:
Use a 0.1 pen to add subtle hatching underneath the side trim line and below the bumper giving the vehicle a grounded feel. -
Ground the vehicle:
Sketch quick, horizontal scribbles and grass tufts under the tires to show the truck is sitting on dirt rather than floating in space. -
Clean up:
Once the ink is completely dry, gently erase all your initial graphite guidelines to reveal the clean, sharp sketch.
Now you have a tough, detailed truck sketch ready to tear up the trails of your sketchbook


Front View With Symmetry Lines
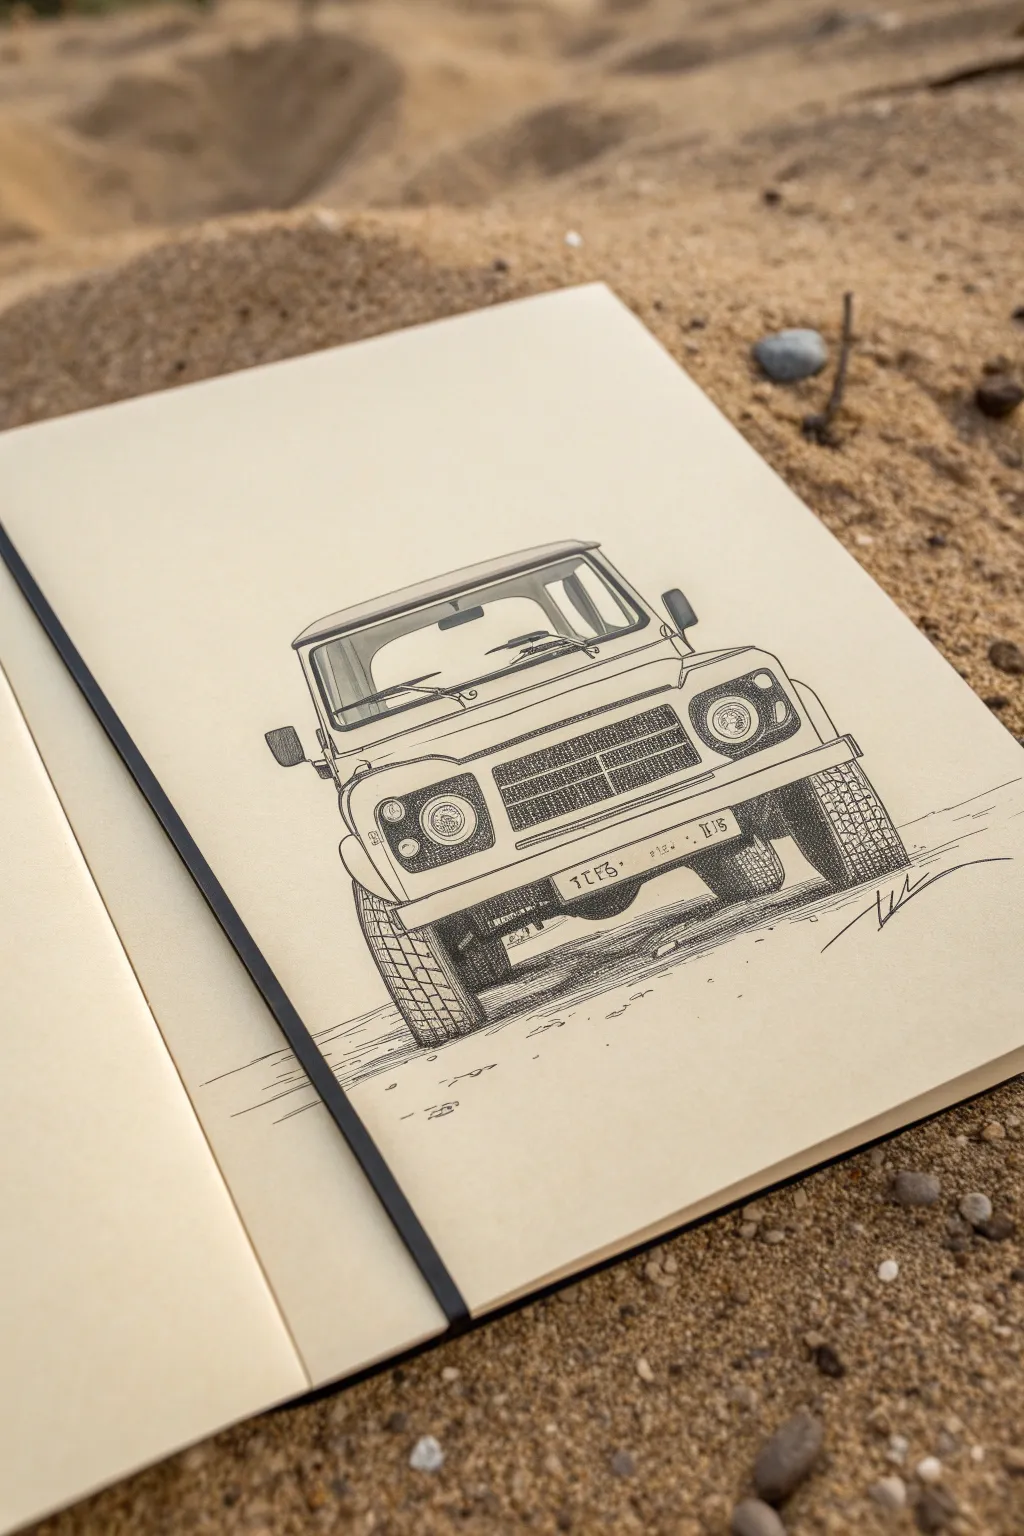
Capture the rugged spirit of adventure with this detailed ink drawing of a classic vintage utility vehicle. This front-view perspective exercise helps you master symmetry, tire tread textures, and clean linework, all set against a simple ground shadow.
Step-by-Step
Materials
- Sketchbook with cream or off-white paper (A5 or A4)
- HB Graphite pencil
- Kneaded eraser
- Fine liner pens (sizes 0.1, 0.3, and 0.5)
- Ruler (clear plastic is best)
Step 1: Constructing the Framework
-
Establish the horizon line:
Begin by lightly drawing a horizontal line across the lower third of your page. This will represent the ground plane where the tires will rest. -
Draw the center line:
Using your ruler, draw a vertical line straight down the middle of your page. This axis of symmetry is crucial for ensuring the truck looks balanced and not lopsided. -
Block in the main body box:
Sketch a large rectangle centered on your vertical line. The width should be roughly 1.5 times the height. This defines the main grill and hood area. -
Add the cabin box:
Draw a slightly narrower trapezoid sitting on top of your rectangle for the windshield and roof area. Taper the sides slightly inward as they go up to suggest perspective. -
Position the tires:
Sketch two vertical rectangles hanging off the bottom corners of the main body box. These should be equal distance from the center line and angled slightly outward at the bottom to show the suspension stance.
Keep it Loose
Don’t connect every single line perfectly. Leaving small gaps in the outline (broken lines) especially on the ground shadow makes the sketch feel more dynamic and less like a technical blueprint.
Step 2: Defining the Features
-
Refine the windshield:
Round off the corners of your upper trapezoid slightly. Draw a second line inside the frame to create the rubber seal thickness, and split the glass area if drawing a split-windshield model. -
Draft the grill and headlights:
On the main body rectangle, draw two large circles on either side for headlights. Connect them with a rectangular grill section in the center. Use your ruler to ensure the top and bottom of the grill are level. -
Add the bumper and license plate:
Draw a horizontal bar running across the bottom of the grill area for the bumper. In the center, sketch a small rectangle for the license plate, incorporating text like ‘JEEP’ or similar abstract shapes. -
Detail the wheel arches:
Draw curved lines above the tires to create the fenders or wheel arches. These should flare out slightly from the main body. -
Sketch the side mirrors:
Add small rectangular stalks sticking out from the base of the A-pillars (the sides of the windshield) to represent the side view mirrors.
Uneven Wheels?
If your tires look misaligned, check your initial horizon line. Place a ruler horizontally across the bottom of both tires; they should hit the ground at the exact same level.
Step 3: Inking and Texturing
-
Outline the main shapes:
Switch to your 0.5 fine liner. Carefully go over the main silhouette of the truck, the bumper, and the roofline. Keep your hand steady and confident. -
Detail the grill mesh:
Using a 0.1 or 0.3 pen, draw a crosshatch pattern inside the central grill rectangle to simulate the mesh texture. Keep the lines close together for a dense look. -
Fill in the headlights:
Draw concentric circles inside the headlights with the 0.1 pen. Leave small white shapes near the top to serve as reflections on the glass. -
Create tire tread:
I particularly enjoy this part; use short, angled strokes to create a blocky tread pattern on the tires. Cross-hatch the side of the tires to show shadow and roundness. -
Add undercarriage shadows:
Use dense hatching with the 0.5 pen underneath the bumper and between the tires to represent the differential and axles. This grounds the vehicle firmly. -
Draw the ground shadow:
Sketch loose, horizontal scribbles under the tires and fading out to the sides. This cast shadow integrates the truck into the environment. -
Erase pencil guides:
Wait at least 5-10 minutes for the ink to dry completely, then gently rub your kneaded eraser over the entire drawing to lift the graphite lines.
Now you have a rugged, road-ready truck sketch to anchor your travel journal

Lifted Off-Road Truck
Capture the rugged spirit of an off-road adventure with this detailed pen and ink truck illustration. This project focuses on heavy line weights and texturing techniques to give your vehicle a weighty, lifted stance that looks ready to tackle any terrain.
Step-by-Step Guide
Materials
- Smooth bristol board or heavyweight drawing paper (9×12 inches)
- HB graphite pencil
- Kneaded eraser
- Fine liner pens (sizes 0.1, 0.3, and 0.5)
- Ruler or straight edge
- Reference photo of a lifted truck
Step 1: Drafting the Construct
-
Establish the Wheelbase:
Begin by lightly sketching two large ovals for the wheels using your HB pencil. Because this is a lifted truck, keep substantial distance between the top of the tires and where the wheel wells will eventually be. -
Block in the Body:
Sketch a rectangular box shape hovering above your wheels. Angle the front hood slightly downward and keep the bed flat. Ensure the body sits high up to emphasize the suspension lift. -
Define the Cab:
Carve out the cab shape from your main block. Draw the A-pillar and roofline, making sure the windshield has a steep rake. Roughly mark where the windows will go. -
Add Mechanical Details:
Sketch the suspension components underneath. I like to draw simple cylinders and blocks to represent the axles and drivhafts connecting the wheels to the frame. -
Refine the Outline:
Go over your pencil lines, tightening up the shapes of the knobby tires, the grill, and the roll bar in the truck bed. Use your eraser to lift away messy construction lines until you have a clean guide.
Uneven Wheels?
If your wheels look wobbly, draw a centerline through both axles before sketching the ovals. This ensures your tires align correctly and the truck doesn’t look like it has a broken axle.
Step 2: Inking the Outlines
-
Main Body Contours:
Switch to a 0.5 fine liner. Trace the main outline of the truck body, using a confident, continuous stroke for the roof and hood. Leave gaps where the metal might gleam or reflect light. -
Tire Treads:
Use the 0.3 pen to outline the tires. Instead of a smooth circle, use jagged, chunky shapes to create the aggressive tread pattern characteristic of off-road tires. -
Understyle Components:
Ink the visible suspension parts, axles, and frame rails underneath. These areas are usually in shadow, so you can use slightly heavier lines here to imply weight. -
Window Frames:
carefully outline the window frames and the side mirror. Keep these lines crisp and geometric to contrast with the rougher textures of the tires and ground.
Step 3: Shading and Texture
-
Darkest Shadows:
Using the 0.5 pen, fill in the solid black areas: the interior of the wheel wells, the deeper parts of the undercarriage, and the heavy shadows beneath the vehicle. -
Tire Texture:
Switch to a 0.1 pen for detailing. Use short, curved hatching lines on the sidewalls of the tires to show their roundness. Leave the tops of the massive treads white to show where the light hits. -
Body Reflections:
Add minimal shading to the truck’s body using very fine hatching. Focus on the lower rocker panels and the curves of the fenders. Keep the upper surfaces mostly white to make the truck look clean and shiny. -
Interior Depth:
Cross-hatch the interior window space lightly. You want it to look dark but transparent enough to hint at a steering wheel or seat inside. -
Grill and Bumper:
Detail the front grill with vertical strokes. Depending on the model, add fog lights or a winch bumper using small circles and geometric blocks.
Pro Tip: Line Weight
Use line weight to create depth. Objects closer to the viewer (like the front tire) should have thicker outlines than objects further away (like the rear bumper).
Step 4: Grounding the Scene
-
Rough Ground:
Draw the ground beneath the tires. Use jagged, horizontal scribbles to suggest rocks and dirt rather than smooth pavement. -
Adding Vegetation:
Sketch a few clumps of desert grass or small bushes in the foreground and background using quick, upward strokes with the 0.1 pen. -
Cast Shadows:
Add stippling (dots) or loose hatching on the ground directly under the tires and chassis to firmly plant the vehicle in the environment. -
Final Cleanup:
Wait at least 15 minutes for the ink to fully set. Then, gently erase all remaining pencil marks with your kneaded eraser to reveal the crisp black and white contrast.
Step back and admire the rugged stance of your finished off-road machine

PENCIL GUIDE
Understanding Pencil Grades from H to B
From first sketch to finished drawing — learn pencil grades, line control, and shading techniques.
Explore the Full Guide
Vintage Rounded-Body Truck

Capture the nostalgic charm of a vintage rounded-body truck with this graphite pencil study. The tutorial focuses on building organic curves and using cross-hatching to suggest shiny metal and shadow.
Detailed Instructions
Materials
- Sketchbook with medium-tooth paper (A4 or similar)
- H pencil for initial layout
- HB or B pencil for detailing
- 2B or 4B pencil for deep shadows
- Fine liner pen (01 or 03 micron), optional for final lines
- Kneaded eraser
- Ruler (optional for wheel base alignment)
Step 1: Drafting the Basic Form
-
Establish the ground plane:
Visualize a perspective line running diagonally from the bottom left to the center right. Draw two faint ovals for wheels along this line to set your wheel base. -
Block in the main cabin:
Above the front wheel, sketch a rounded, domed cube shape for the driver’s cabin. Vintage trucks have tall, curved roofs, so keep the lines soft rather than geometric. -
Extend the hood and bed:
Draw a sweeping curve extending forward from the cabin for the hood and a rectangular shape stretching backward for the truck bed. Use very light pressure with your H pencil so adjustments are easy. -
Add the exaggerated fenders:
Sketch the large, bulbous fenders over the wheels. The front fender should connect seamlessly to the running board (the step below the door), sweeping back to meet the rear fender.
Step 2: Defining the Structure
-
Detail the grill and bumper:
At the very front, draw horizontal parallel lines to create the iconic broad grill. Below it, add a curved double-line shape to represent the heavy chrome bumper. -
Position the headlights:
Place circular headlights on the front fenders, slightly recessed. Imagine them as eyes sitting on the cheeks of the truck. -
Refine the windows:
Carve out the windshield and side window shapes within the cabin block. Note the split down the middle of the windshield, a common feature in vehicles of this era. -
Draw the wheels and tires:
Thicken the initial wheel ovals to create tires. Inside the ovals, draw smaller concentric circles for the rims and hubcaps. -
Clean up the outline:
Using your eraser, dab away the confusing construction lines, leaving only the definitive contours of the truck.
Wheel Alignment?
If your truck looks like it’s tilting, check the bottom of the tires. A ruler connecting the bottom of the front and rear tires should match the angle of the bumper and running board.
Step 3: Shading and Texture
-
Apply base shading:
Switch to an HB pencil. Start adding gentle hatching (diagonal parallel lines) to the side of the truck body to indicate its vertical plane. -
Darken the tires:
Fill in the tires with darker, denser strokes, leaving the rims lighter white paper. Add a shadow beneath the fender to ground the wheel. -
Enhance the chrome:
For the grill and bumper, use high-contrast shading. Leave distinct white stripes for reflections and press hard with a 2B pencil for the dark gaps between grill slats. -
Contour the fenders:
Use curved hatching lines that follow the round shape of the fenders. This helps communicate the volume and metal curvature. -
Cast the ground shadow:
Draw horizontal, slightly diagonal sketchy lines beneath the truck. These should be longest under the wheels and fade out quickly to anchor the vehicle to the page. -
Final contrast adjustments:
I like to take a step back here and squint at the drawing. Use a 4B pencil to punch up the darkest areas: inside the wheel wells, the window interiors, and the underside of the chassis.
Level Up: Rusty Patina
Instead of smooth shading, use stippling (lots of small dots) and erratic scribbles on the fenders and door panels to simulate rust and aged paint on an old work truck.
Step back and admire the classic lines of your finished vintage truck sketch
Modern Boxy Crew Cab
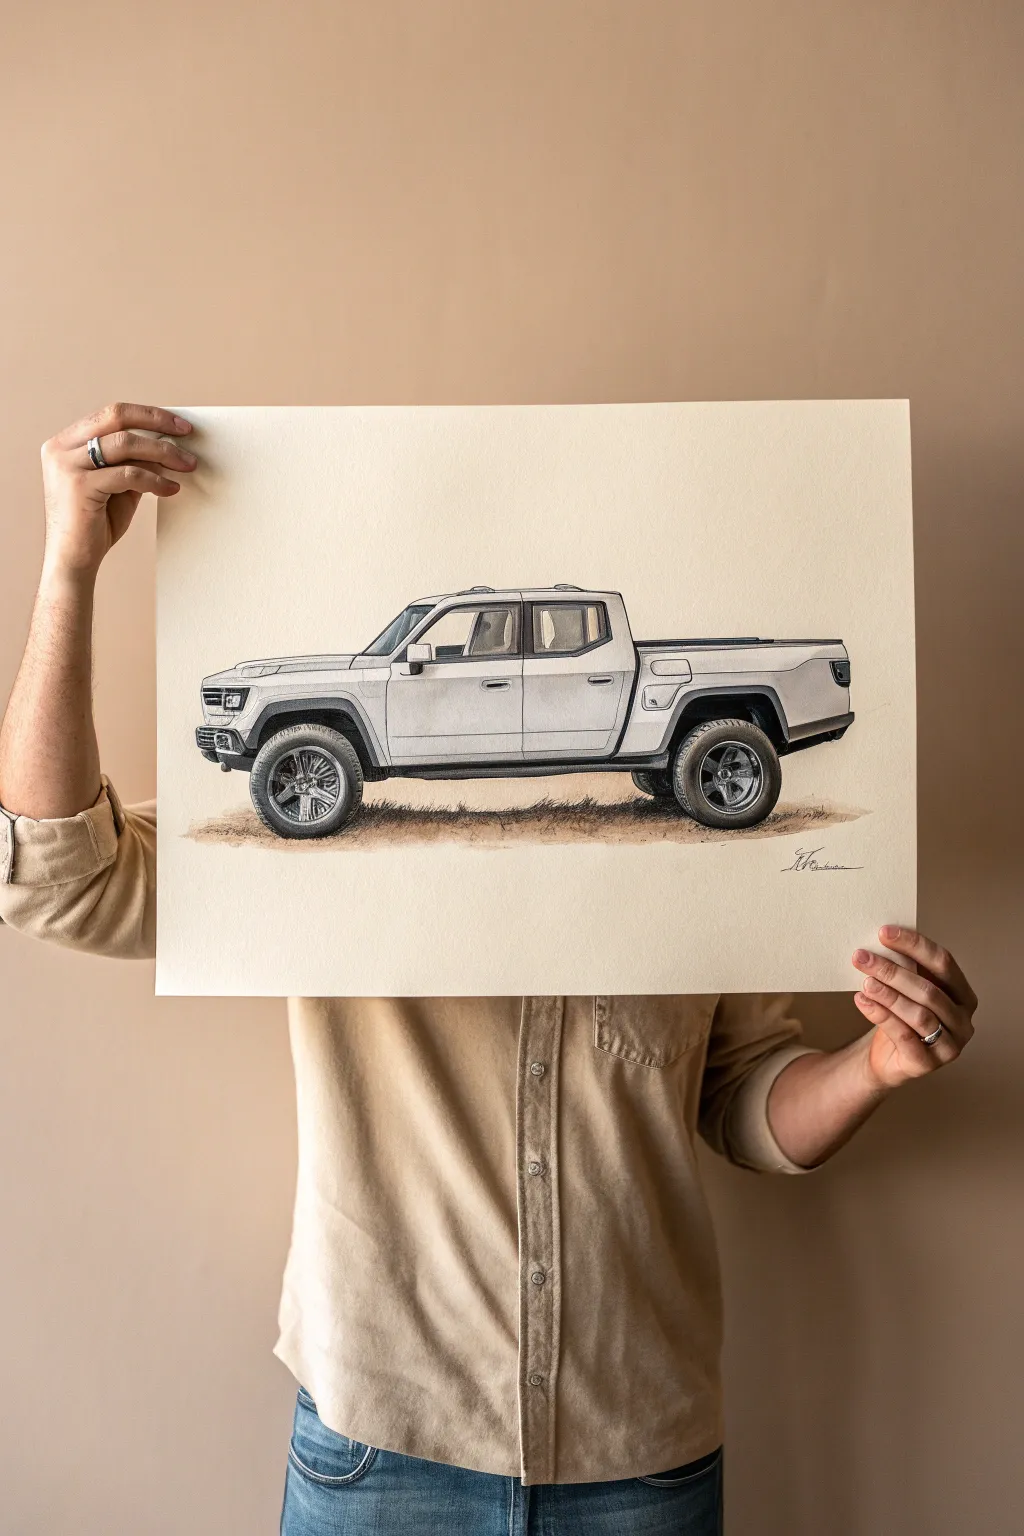
This project tackles the crisp lines and subtle shading of a modern electric pickup truck rendered in profile. By combining alcohol markers for smooth base tones with colored pencils for fine details, you’ll create a polished automotive illustration that pops off the page.
Step-by-Step Guide
Materials
- Large format marker paper (A3 or 11×17 inch, smooth)
- Set of Cool Grey alcohol markers (C1, C3, C5, C7)
- Set of Warm Grey alcohol markers (W1, W3, W5)
- Black fine liner pens (0.1mm, 0.3mm, 0.5mm)
- Colored pencils (White, Black, Dark Grey, Indigo Blue, light brown/tan for ground)
- White gel pen or gouache for highlights
- Ruler or French curves
- HB Graphite pencil
- Eraser
Step 1: Drafting the Structure
-
Establish the wheelbase:
Begin with a light HB pencil. Draw a horizontal ground line near the bottom third of your paper. Mark two points on this line for the center of your wheels; for a crew cab truck like this, the distance between wheels is roughly three times the wheel diameter. -
Block in the body shape:
Sketch light rectangular boxes to define the main masses: the front hood (shorter), the cab (tallest section), and the bed (rectangular rear). This truck features a strong horizontal beltline, so keep your top edges parallel to the ground. -
Refine the silhouette:
Using your ruler or French curves, tighten the lines. Connect the hood to the windshield at a distinct angle. Round off the corners of the wheel wells slightly—modern trucks often have squared-off arches rather than perfect circles. -
Add key details:
Sketch the geometric headlights, the side mirrors on the door, and the door handles. Draw the simple five-spoke layout for the rims inside the wheel circles.
Uneven marker streaks?
Work quickly while the ink is wet to blend seamlessly. If streaks dry, go over the entire section again with the same color to saturate the paper evenly.
Step 2: Marker Rendering
-
Lay down the base coat:
Since the truck is white, we rely on the paper color for the brightest parts. Use your lightest Cool Grey (C1) to shade the lower half of the doors and the bed side. This implies the surface is vertical and facing away from the overhead light. -
Define the windows:
Use a medium Cool Grey (C3 or C5) to fill in the window areas. Leave the interior shapes slightly lighter to suggest seats inside, but keeping it fairly abstract works well for this scale. -
Darken the cladding and tires:
Switch to your darkest Cool Greys (C7) or a Black marker. Fill in the tires, the wheel well liners, and the black trim running along the bottom rocker panels. Leave a tiny sliver of white at the top of the tires as a highlight. -
Ground shadow:
Take a Warm Grey marker (W5) and draw a distinct shadow underneath the truck. The shadow should be darkest directly under the tires and fade out slightly at the edges.
Level Up: Metallic Paint
To make the paint look metallic, create a high-contrast ‘horizon line’ reflection in the body side. Darken the ground reflection sharply halfway up the door.
Step 3: Pencil Detailing
-
Sharpen the panel gaps:
Use a sharp black or dark grey colored pencil to trace over your pencil lines for the door cuts, fuel door, and hood seam. Keep your hand steady and use a ruler if necessary for a crisp, manufactured look. -
Enhance the rims:
Use a medium grey pencil to shade the metal spokes of the wheels. Add deep black pencil into the crevices of the rim to create depth and dimension. -
Refine transitions:
With a white colored pencil, gently blend the edges where your C1 marker meets the white paper. I find this softens the transition and makes the metal look smooth and painted. -
Add the ground texture:
Using a light brown or tan colored pencil, sketch loose, horizontal strokes under the chassis shadow. This suggests dirt or dry grass without distracting from the vehicle.
Step 4: Final Highlights
-
Pop the highlights:
Use a white gel pen or a fine brush with white gouache. Add sharp, crisp lines to the top edges of the bed, the door handles, the top of the bumper, and the rim spokes. -
Headlight details:
Add small touches of white inside the headlight housing to mimic the LED elements reflecting light. -
Final clean up:
Erase any remaining stray graphite lines. Sign your work with a fine liner near the back tire for a professional studio touch.
Step back and admire the clean, industrial aesthetic of your finished truck drawing
BRUSH GUIDE
The Right Brush for Every Stroke
From clean lines to bold texture — master brush choice, stroke control, and essential techniques.
Explore the Full Guide
Dump Truck With Big Forms
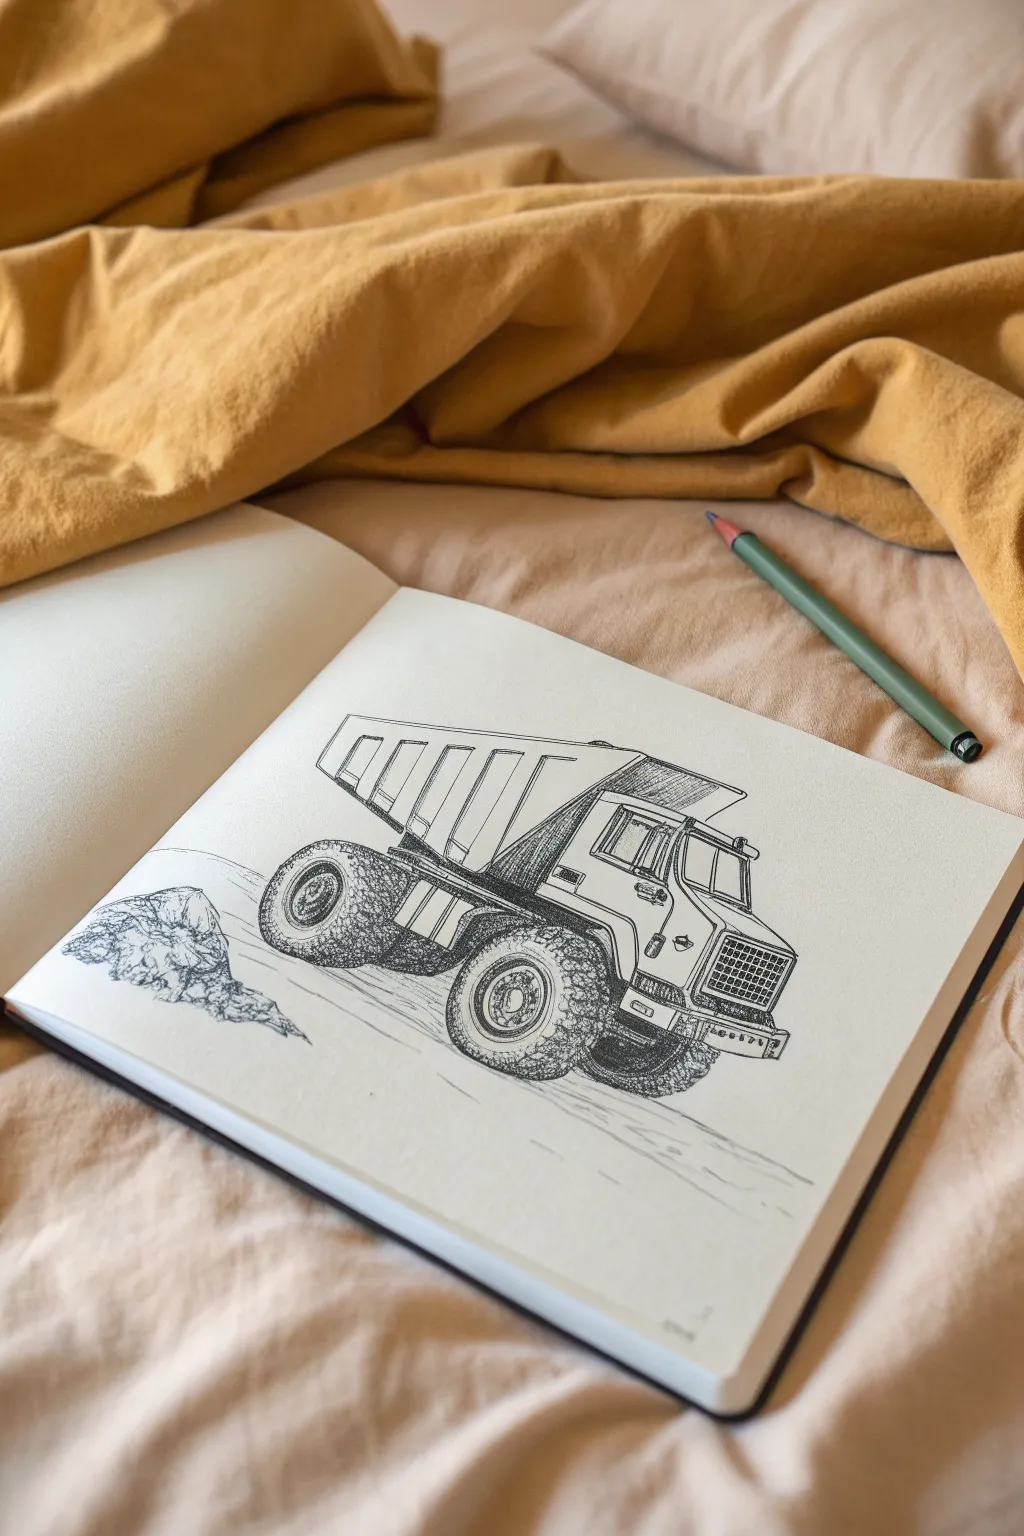
Capture the rugged feel of industrial machinery with this pen-and-ink study of a dump truck. Focusing on bold lines and grainy textures brings the vehicle’s massive tires and sturdy frame to life on the page.
Step-by-Step Tutorial
Materials
- Sketchbook (heavyweight paper recommended)
- Pencil (HB for initial sketching)
- Fine liner pens (0.1mm, 0.3mm, and 0.5mm)
- Eraser
Step 1: Constructing the Frame
-
Establish the Chassis:
Begin with a loose pencil sketch to map out the basic blocks. Draw a long, angled rectangular shape for the main chassis, keeping perspective in mind—the front should appear slightly larger than the back. -
Place the Cab:
Sit a boxy cabin shape on the front right side of your chassis line. Sketch the suggestion of a windshield and side window, keeping the lines geometric and angular. -
Block in the Dump Bed:
Add the large dumping container on the back. This is essentially a large, angled wedge shape that rises above the cab. Draw vertical guidelines along its side to mark where the reinforcement ribs will go. -
Position the Wheels:
Lightly sketch two large ovals for the visible wheels—one under the cab and one under the rear of the bed. Since they are chunky off-road tires, make these ovals wide and substantial.
Step 2: Inking the Outlines
-
Define the Cab Details:
Switch to your 0.3mm pen. Ink the outline of the cabin, adding the window frames, the front grille, and the side mirrors. Use a ruler if you want perfectly straight lines, or freehand it for a sketchier look. -
Structure the Dump Bed:
Ink the long lines of the dump bed. Along the side, draw the vertical ribs using the pencil guides you made earlier, giving them a slight thickness to show dimension. -
Draw the Grill Mesh:
For the front radiator grille, create a cross-hatch pattern. Draw closely spaced vertical lines intersected by horizontal ones to create a sense of mesh texture. -
Outline the Tires:
Go over the wheel ovals with a bumpy, uneven line to suggest heavy tread. Don’t make perfect circles; let the bottom flatten slightly where the heavy truck presses into the ground.
Ink Weight Trick
Use a thicker 0.5mm pen for the outermost silhouette lines and the ground shadow. This separates the truck from the background instantly.
Step 3: Adding Texture and Shading
-
Stipple the Tires:
This is the most crucial step for realism. Using your 0.5mm pen, fill the darker shadow areas of the tires with dense stippling (lots of little dots). This mimics the rough rubber texture better than solid black. -
Cross-Hatch the Treads:
On the lighter, top surfaces of the tires, use lighter cross-hatching to suggest the deep grooves of the treads. Leave some white space to show where light hits the rubber. -
Shade the Undercarriage:
Use dense vertical hatching lines under the dump bed and behind the cab to create deep shadows. This adds weight and grounds the different components. -
Detail the Dirt Pile:
Behind the rear wheel, sketch a small mound of dirt or rocks. Use jagged, angular lines for the rocks and loose, scribbly hatching for the dirt to contrast with the clean lines of the metal truck. -
Ground the Vehicle:
Add a few quick horizontal horizon lines extending from the tires to the background. This simple addition places the truck in an environment rather than having it float in white space. -
Final Clean Up:
Once the ink is completely dry, gently erase all the underlying pencil marks to reveal the crisp contrast of the black ink against the paper.
Wobbly Wheels?
If your tires look flat, ensure you draw the inner rim (the hubcap area) slightly off-center, pushed away from the viewer. This corrects the perspective.
You now have a heavy-duty industrial drawing that showcases both mechanical precision and organic texture
Tow Truck With Hook and Boom
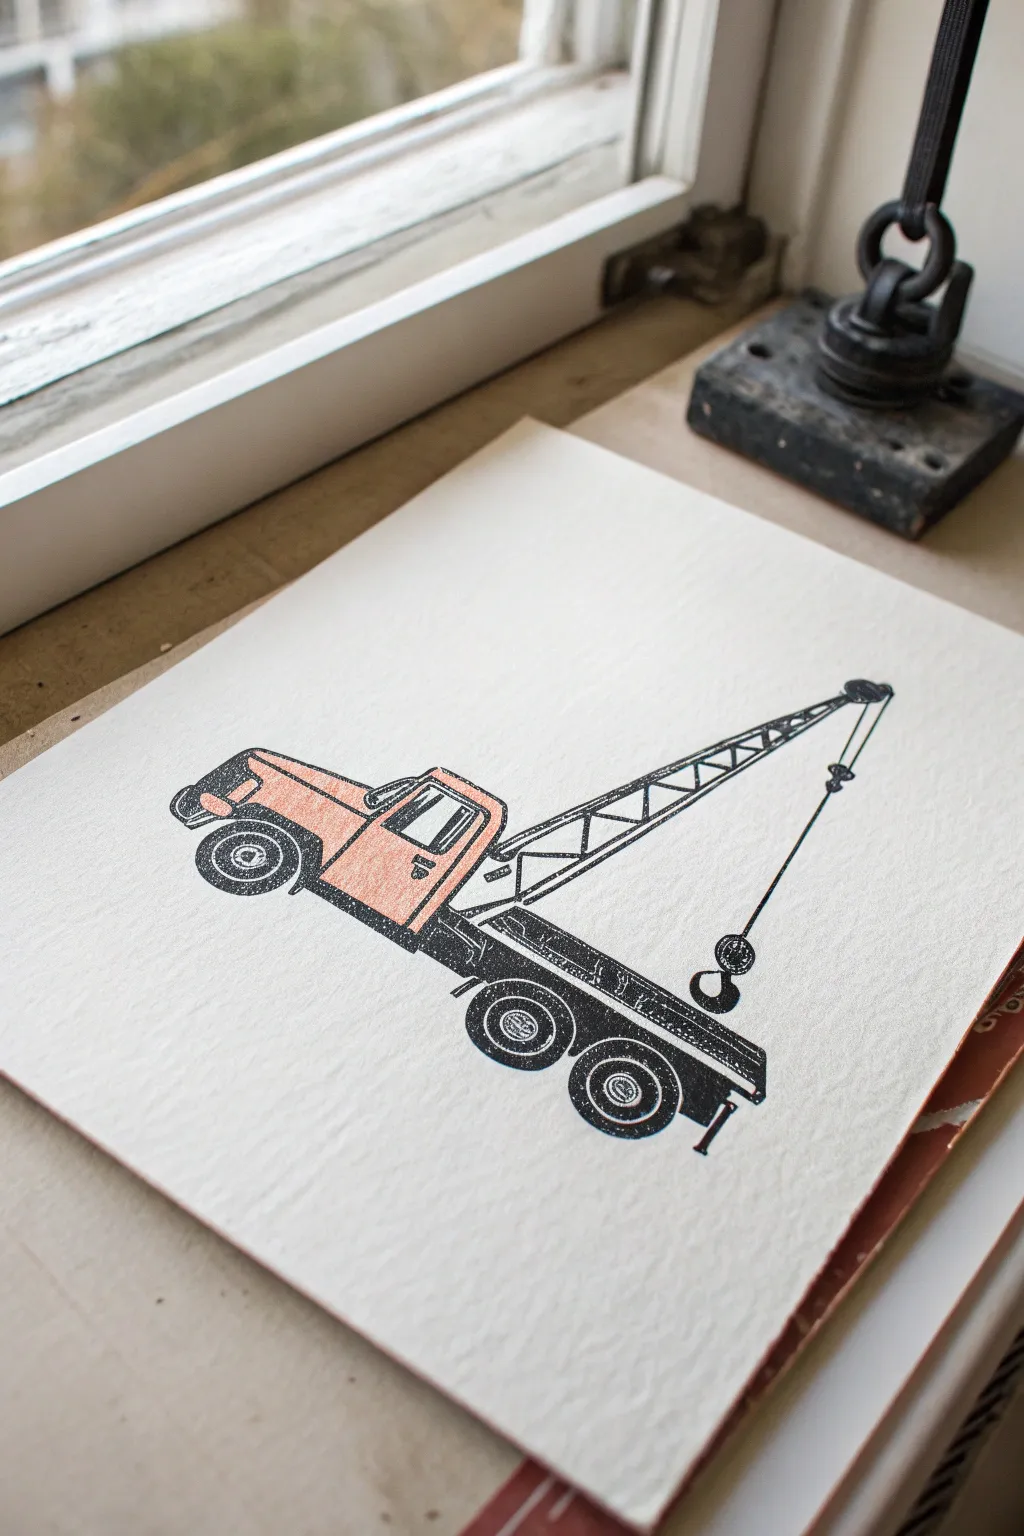
This project captures the nostalgic charm of a classic work vehicle using a two-color block printing technique. The final result features bold black lines and a warm peach accent that gives the truck a distinct, retro storybook feel.
Detailed Instructions
Materials
- Soft-cut lino block (at least 5×7 inches)
- Lino carving tools (V-gouge and U-gouge)
- Block printing ink (Black)
- Block printing ink (Peach or Salmon)
- Brayer (rubber roller)
- Pencil and tracing paper
- Barren or wooden spoon (for burnishing)
- Heavyweight printmaking paper (smooth or slightly textured)
- Craft knife
- Glass slab or acrylic sheet (for inking)
Step 1: Design and Initial Carve
-
Sketch your design:
Start by drawing the truck profile on paper. Focus on the key shapes: the cab, the long flatbed, and the triangular boom structure. Keep the details simple since you will be carving them out. -
Transfer to block:
Place your tracing paper with the drawing face down onto your carving block. Rub the back firmly to transfer the graphite image. Remember, the printed image will be a mirror reflection of your carving. -
Outline the main shapes:
Using a fine V-gouge tool, carve carefully along the outer lines of your drawing. This establishes the boundaries for your truck’s cab, wheels, and flatbed. -
Carve the details:
Switch to a U-gouge to clear away the large negative spaces around the truck. Leave the paper ‘white’ around the vehicle. For the boom crane, carve out the triangular spaces between the trusses carefully.
Patchy Ink Coverage?
If the print looks too salty or speckled, your paper might be too textured. Try slightly dampening the paper before printing to help it grab the ink better.
Step 2: Creating the Two-Tone Effect
-
Plan your color separation:
For this specific look, we represent the truck cab in color and the chassis in black. You can either use the ‘reduction method’ (print color, carve away color areas, print black) or the easier ‘jigsaw method.’ -
Separation cut (Jigsaw Method):
I find the jigsaw method safest for beginners. Using a craft knife, physically cut the soft lino block to separate the truck cab shape from the rest of the chassis and crane. Now you have two puzzle pieces. -
Ink the cab:
Squeeze out a small amount of peach or salmon ink onto your glass slab. Roll it out with the brayer until it sounds like sizzling bacon. Roll this color onto the isolated cab piece. -
Ink the chassis:
Clean your brayer or grab a second one. Roll out the black ink and apply it to the chassis, wheels, and crane boom section of the block.
Make It a Series
Carve diverse work vehicles like bulldozers or cement mixers. Print them in different bright colors (yellow, blue, green) to create a cohesive nursery wall art set.
Step 3: Printing the Image
-
Reassemble the block:
On a clean surface or registration board, fit the two inked pieces back together like a puzzle. They should lock tightly in place. -
Position the paper:
Carefully align your printmaking paper over the inked blocks. Once the paper touches the ink, do not shift it, or the image will smudge. -
Burnish the print:
Using a baren or the back of a wooden spoon, rub the back of the paper in small circular motions. Apply firm, even pressure across the entire image, paying special attention to the edges. -
Reveal the print:
Slowly peel back one corner of the paper to check ink transfer. If it looks spotty, lay it back down carefully and rub more. If it looks solid, peel the paper completely off to reveal your artwork. -
Dry the print:
Place your finished print in a safe, flat area to dry. Oil-based inks can take a few days, while water-soluble inks dry much faster.
Step 4: Adding Final Touches
-
Check the boom lines:
Sometimes the fine lines of the crane boom might not transfer perfectly. If needed, you can touch up small gaps with a fine black liner pen, though the textured look adds character. -
Clean your tools:
Wash your blocks and rollers immediately. If you used water-soluble ink, warm soapy water works perfectly; for oil-based, you might need vegetable oil or mineral spirits.
This charming industrial print looks wonderful framed in natural wood to highlight the warm tones of the truck cab


Box Truck With Clean Perspective

Capture the mechanical beauty of a classic box truck with this clean line art tutorial. Using fine pigment liners and careful perspective, you’ll build a realistic vehicle from simple geometric shapes to detailed textures.
Step-by-Step Guide
Materials
- Sketchbook or drawing paper (smooth surface)
- H or HB pencil for initial sketching
- Fine liner pens (0.1mm, 0.3mm, 0.5mm black)
- Ruler or straight edge
- Eraser (kneaded preferred)
Step 1: Constructing the Framework
-
Establish the horizon line:
Begin by lightly drawing a horizon line across the lower third of your page. This will help ground your vehicle in space. -
Block in the cargo box:
Draw a large rectangular prism for the main cargo area. Angle the top and bottom lines slightly so they would eventually converge at a vanishing point far off the left side of the paper. -
Add the cab shape:
Attach a smaller, slightly angled block to the front of your cargo box to represent the cab. Ensure the perspective lines match the angles you established for the box. -
Place the wheel positions:
Sketch light ovals where the wheels will go. You’ll need one for the front tire under the cab and two overlapping ovals for the rear tandem wheels under the back of the box.
Wobbly Wheels?
If freehand circles are tough, use a circle template or a coin to trace your wheels. Getting the ellipse shape right is key to the perspective look.
Step 2: Refining the Proportions
-
Define the windshield and windows:
Carve out the angled windshield on the front of the cab and the side window on the door. Keep your lines parallel to the vertical edges of the cab. -
Sketch the grill and bumper:
Draw the rectangular grill area on the nose of the truck and shape the bumper below it. Add the wheel well arches over the front tire. -
Detail the cargo box:
Divide the side of the large box into vertical panels using your ruler. Add the metal trim at the top and bottom edges. -
Refine the undercarriage:
Sketch the fuel tank and battery box cylinder between the front and rear wheels. This fills the empty negative space and adds weight to the drawing.
Step 3: Inking the Details
-
Outline the main shapes:
Switch to a 0.5mm pen to trace over the primary outline of the truck. Use steady, confident strokes, using a ruler for the long straight lines of the cargo box. -
Ink the structural details:
Use a finer 0.3mm pen for secondary details like the door seams, the window frames, and the grill grid pattern. -
Texture the tires:
Carefully ink the wheels. Use concentric circles for the rims and add tread thickness to the tires. Darken the inside of the wheel wells significantly. -
Create the grill mesh:
Draw a tiny cross-hatch pattern inside the front grill area to simulate the mesh texture.
Use Line Weight
Thicken the bottom outline of the entire truck with your boldest pen. This ‘grounding line’ adds immediate visual weight and realism.
Step 4: Shading and Shadow
-
Hatch the tires:
Use your 0.1mm pen to add dense hatching on the tires. Leave the top edges lighter to suggest light hitting the rubber, while making the bottom areas nearly black. -
Shade the window interiors:
Darken the interior of the cab visible through the windows using vertical hatching lines. This creates depth and makes the glass look reflective. -
Add undercarriage shadows:
Apply heavy, dark ink to the fuel tank, battery box, and the spaces between the rear wheels. I find that deepening these shadows really anchors the truck to the ground. -
Ground shadow:
Draw horizontal hatching lines on the ground beneath the truck. Extend them slightly to the right to match the light source in the scene. -
Clean up:
Wait several minutes for the ink to fully dry, then gently erase all your pencil guides to reveal the crisp line art.
This technical drawing exercise results in a satisfyingly structured piece representing the heavy lifting of road transport
Monster-Style Truck From Below
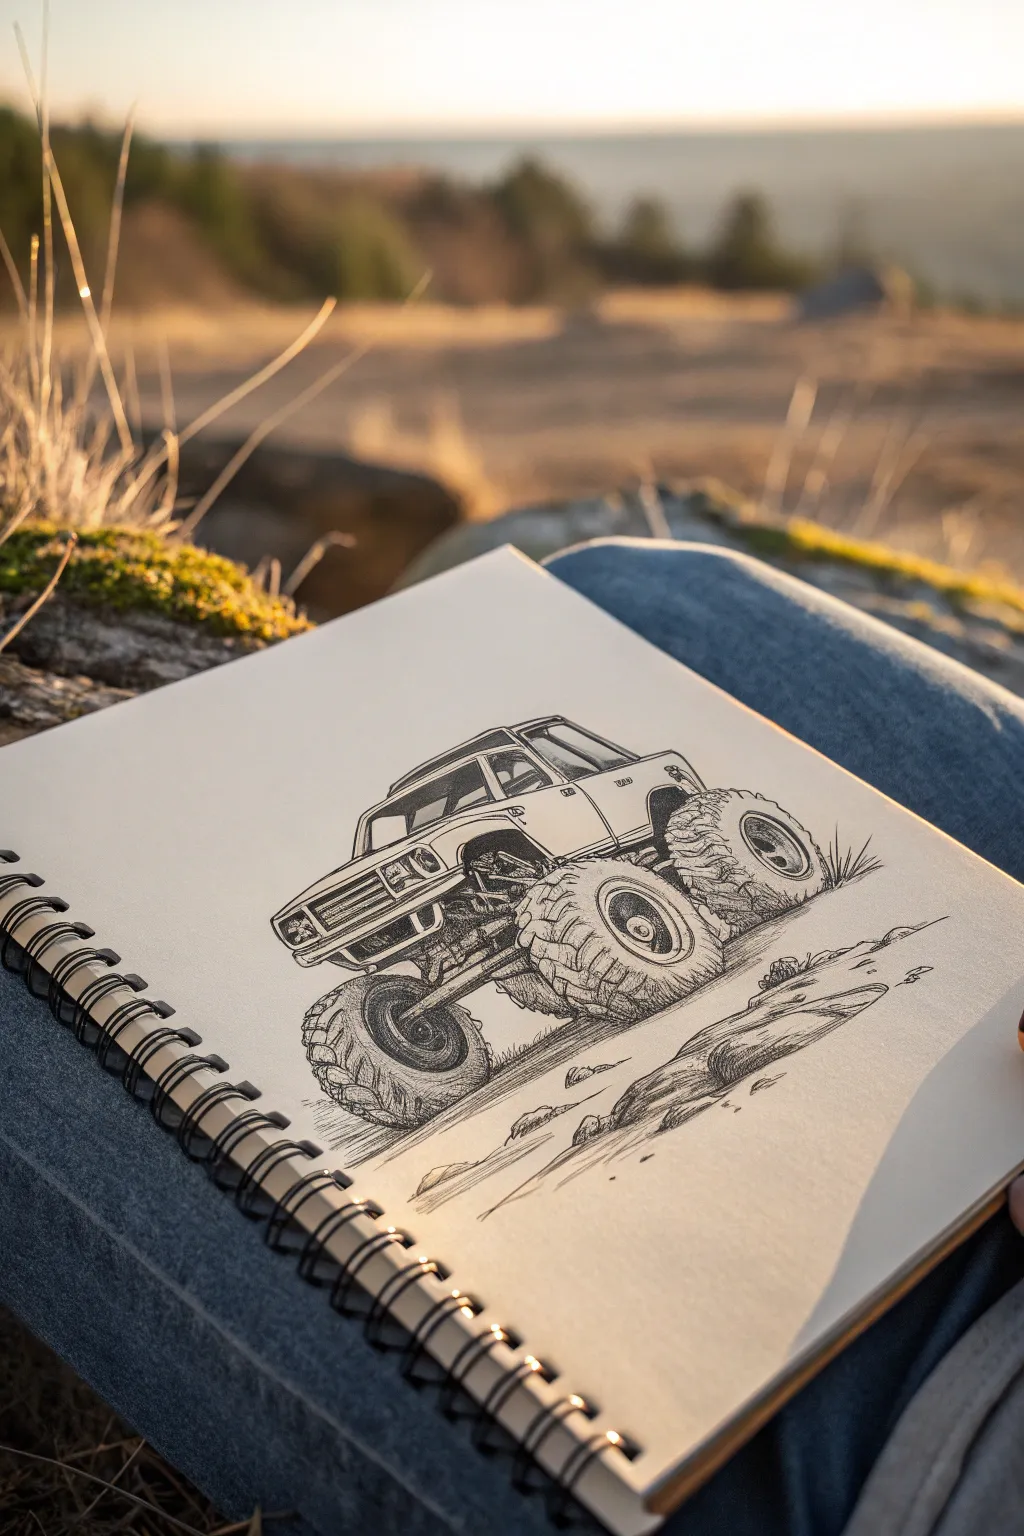
Capture the imposing power of an off-road beast by drawing it from a dramatic low angle. This pen and ink sketch emphasizes massive tires and suspension details using classic cross-hatching techniques.
Step-by-Step Guide
Materials
- Sketchbook (heavyweight paper preferred)
- HB or 2H graphite pencil for under-drawing
- Fine liner pens (0.1mm, 0.3mm, 0.5mm)
- Kneaded eraser
Step 1: Laying the Structure
-
Establish the horizon:
Start by lightly sketching a low horizon line near the bottom third of your page. This placement is crucial for achieving that towering ‘monster truck’ perspective. -
Block in the tires:
Draw three large ovals to represent the visible wheels. The front right tire should be the largest and most prominent closer to the viewer. Place the rear right tire slightly higher and smaller to show depth. -
Add the chassis box:
Above the wheels, sketch a rectangular box for the body of the truck. Tilt it slightly upwards to match the aggressive climb angle suggested by the terrain. -
Connect the suspension:
Draw simple lines connecting the center of your wheel ovals to the body box. These will serve as guides for the complex axles and shocks later. -
Define the cabin:
Refine the body shape into a pickup truck style, adding the cab roof and the bed. Keep the lines geometric and angular.
Wobbly Wheels?
If your tires look flat instead of round, check your tread lines. The tread pattern must curve with the surface of the tire, becoming narrower as it wraps around the edges to convey volume.
Step 2: Refining the Sketch
-
Detail the tire treads:
This is the most time-consuming part. Pencil in chunky, chevron-shaped tread patterns on the surfaces of the tires. Make them curve around the form to emphasize the roundness. -
Flesh out the undercarriage:
Thicken the suspension lines into tubes for the axles and coil springs. Add the differential casing (the pumpkin shape) on the axles. -
Add vehicle features:
Sketch the grill, headlights, door seams, and side mirrors. Don’t forget the roll bar in the back or the rock sliders along the bottom edge of the body. -
Outline the terrain:
Lightly sketch rocky shapes and uneven ground beneath the tires to give the truck a context for its climb.
Mud Spatter Effect
Use a stippling technique (lots of tiny dots) around the wheel wells and lower panels to mimic dried mud or dirt spray, making your off-roader look like it’s been hard at work.
Step 3: Inking and Texture
-
Outline the main shapes:
Switch to your 0.5mm pen. Go over the main outline of the truck body and the outer edges of the tires. Use a confident, steady hand, but don’t worry if lines overlap slightly; it adds character. -
Ink the treads:
Using a 0.3mm pen, carefully ink the tread blocks. I find it helps to add small cracks and wear marks here to make the rubber look used and rugged. -
Detail the mechanical parts:
Use the 0.1mm pen to draw the intricate details of the springs, shocks, and undercarriage. Keep these lines thinner to push them visually into the background. -
Shade with hatching:
Start adding shadows using parallel lines (hatching). Focus on the underside of the truck body, inside the wheel wells, and the shadow side of the tires. -
Deepen shadows with cross-hatching:
For the darkest areas, like the deep recesses of the suspension and the interior of the wheel rims, add a second layer of perpendicular lines (cross-hatching). -
Texture the ground:
Use quick, scribbly lines to indicate rocks and dirt. Add a cast shadow underneath the truck using horizontal hatching to ground the vehicle. -
Clean up:
Once the ink is completely dry, gently erase the visible pencil guidelines with your kneaded eraser to reveal the crisp ink work.
Now you have a rugged drawing that looks ready to tackle any trail


Have a question or want to share your own experience? I'd love to hear from you in the comments below!