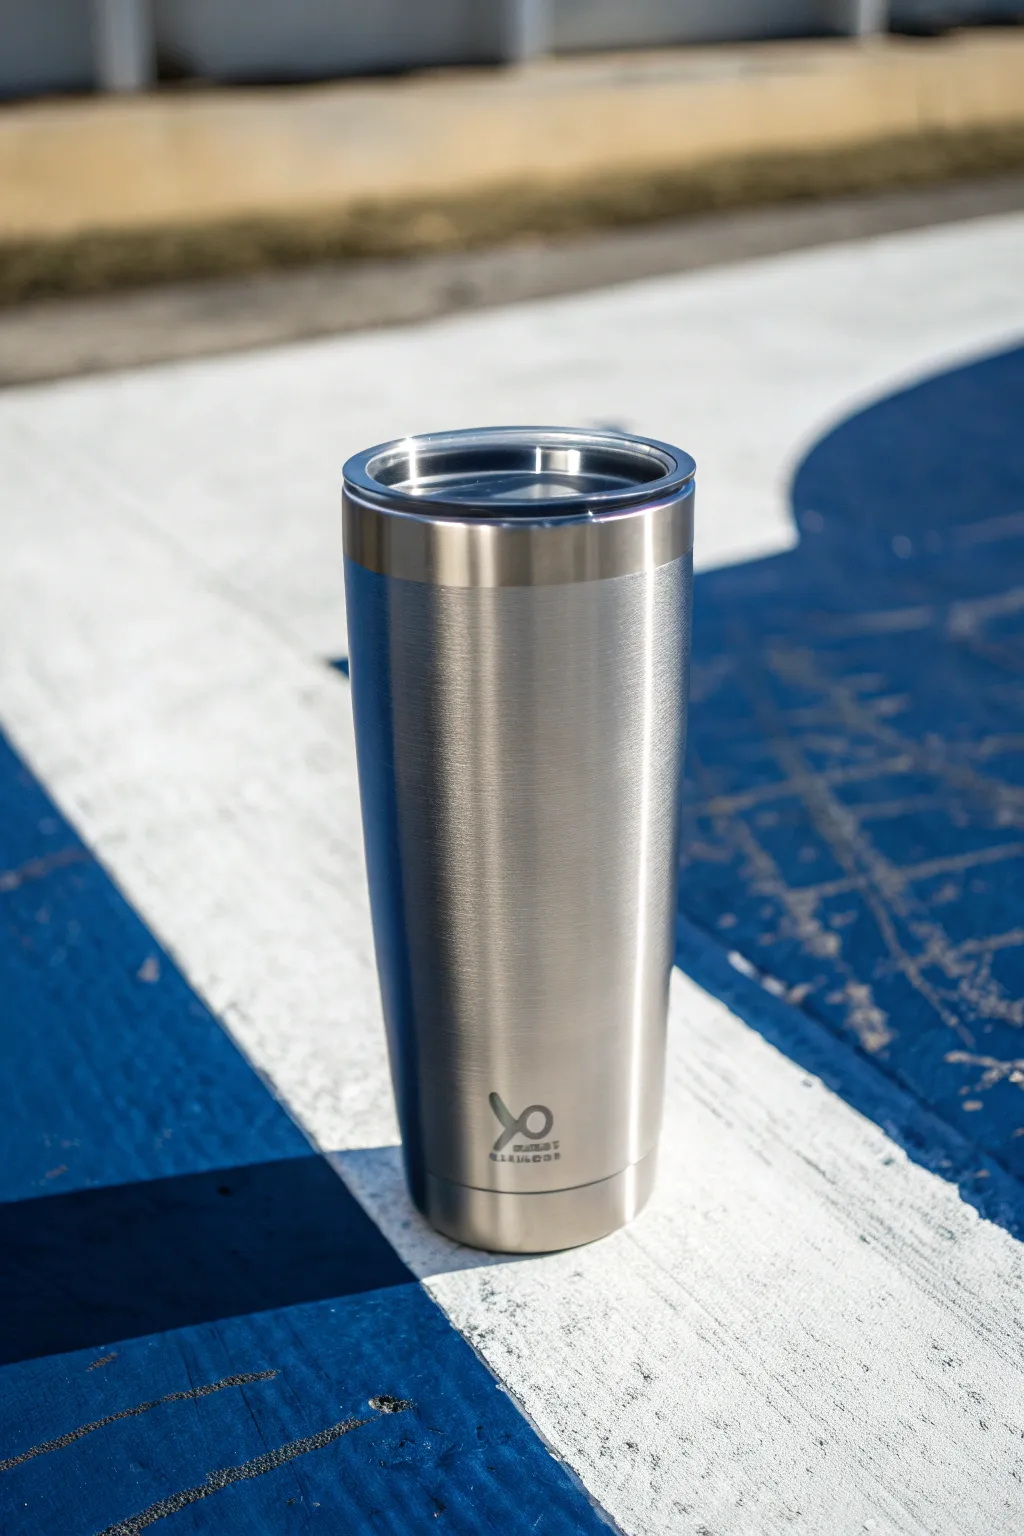
A plain cup turns into a tiny, handheld canvas the second you start playing with tumbler painting. Here are my favorite ideas that look amazing on curved stainless steel and feel totally doable, even if you’re new to painting on metal.
Classic Ombre Tumbler Fade
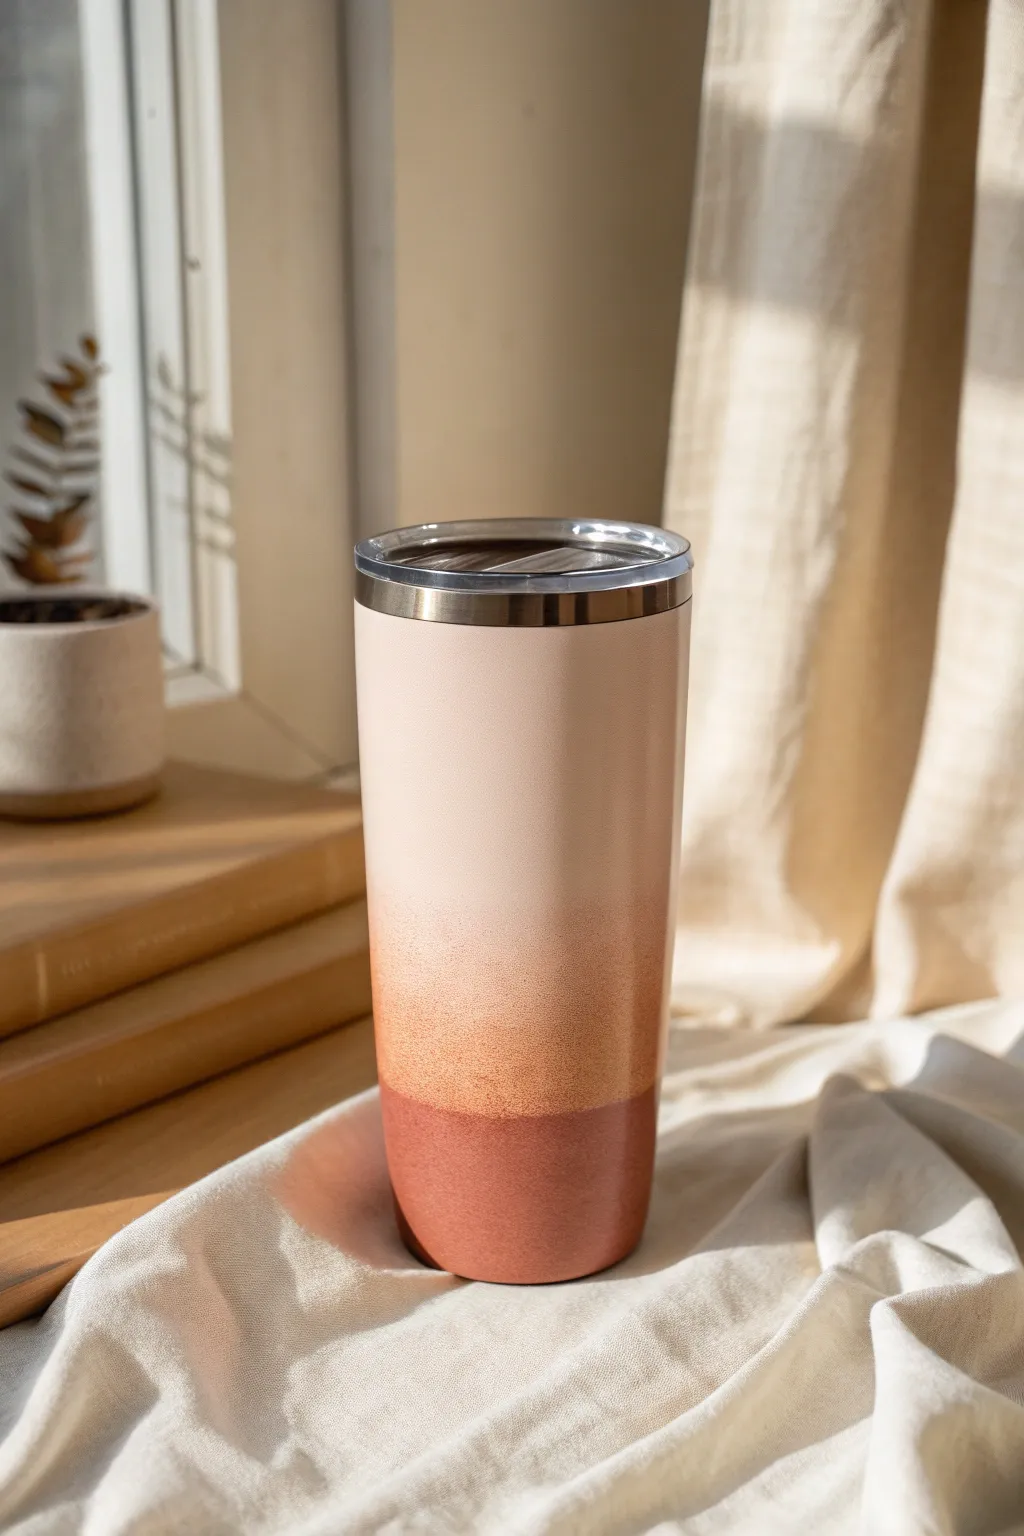
Capture the warmth of a desert sunset with this subtle, three-tone ombre tumbler. The gentle gradient moves from creamy beige to warm ochre and grounds itself in rustic terracotta, perfect for a cozy, earthy aesthetic.
How-To Guide
Materials
- Stainless steel tumbler (20 oz or 30 oz)
- Spray paint: Cream or Pale Beige (matte)
- Spray paint: Warm Tan or Ochre (matte)
- Spray paint: Terracotta or Rust (matte)
- Painter’s tape
- Sandpaper (400 grit)
- Rubbing alcohol and lint-free cloth
- Turntable or lazy susan (optional but helpful)
- Cardboard box or drop cloth
- Clear matte sealer spray
- Respirator mask (for safety)
Step 1: Preparation & Base Coat
-
Prep the surface:
Begin by lightly sanding the entire exterior of your stainless steel tumbler with 400-grit sandpaper. You just want to scuff the shiny surface to help the paint adhere better. -
Clean thoroughly:
Wipe down the sanded tumbler with rubbing alcohol on a lint-free cloth to remove all dust and oils. Avoid touching the surface with your bare hands after this step. -
Mask the rim:
Apply painter’s tape carefully around the top steel rim and cover the inside of the cup completely to prevent overspray getting inside. -
Base coat application:
Place the tumbler upside down on a stand in your ventilated spray area. Shake the Cream/Pale Beige can vigorously for a minute. -
Initial spray:
Apply a light, even coat of the Cream paint over the entire tumbler. Don’t try for full opacity immediately; multiple thin coats prevent drips. Let this dry for about 15-20 minutes.
Mist Control
For the softest blend, always start spraying significantly below the area you want to paint, then drift the mist upward. Gravity helps the droplets disperse naturally.
Step 2: Creating the Ombre Fade
-
Apply the middle tone:
Once the base is dry to the touch, grab your Warm Tan/Ochre spray paint. Hold the can about 10-12 inches away and aim at the middle section of the cup. -
Mist the transition:
Spray lightly in short bursts, focusing on the center but allowing the mist to drift slightly upward into the cream section. This creates that soft, seamless transition rather than a hard line. -
Bottom heavy:
Ensure the bottom two-thirds (middle and bottom sections) are covered in this tan shade, leaving the top third as the original cream color. Let this layer dry for 20 minutes. -
Introduce the terracotta:
Now, take the Terracotta/Rust color. Turn the cup so you can easily access the bottom third. I like to elevate the cup slightly here to get the very bottom edge. -
Create the bottom gradient:
Aim strictly at the bottom third of the tumbler. Apply the paint, moving the can horizontally while rotating the cup. -
Feathering upward:
Pull the spray can slightly further away as you approach the middle tan section to feather the edge. You want the rust color to fade gently into the tan, not stop abruptly. -
Check the opacity:
Inspect the color density. If the bottom looks too sheer, add another very light coat of terracotta, focusing only on the lowest inch for depth. -
Dry time:
Let the painted tumbler sit undisturbed for at least 2 hours. It needs to be fully dry to the touch before sealing.
Add Texture
Before sealing, lightly mist the wet paint with a stone-texture spray from 18 inches away. It adds a gritty, ceramic feel that matches the earthy colors perfectly.
Step 3: Finishing Touches
-
Remove tape:
Very carefully peel off the painter’s tape from the rim. Pulling slowly at a 45-degree angle usually gives the cleanest line. -
Sealing the design:
To protect that matte finish, apply 2-3 light coats of clear matte sealer spray. This prevents chipping and keeps the texture feeling velvety. -
Final cure:
Allow the tumbler to cure fully according to your sealer’s instructions (usually 24-48 hours) before washing or using.
Enjoy your beautifully blended tumbler knowing you mastered the art of the perfect fade


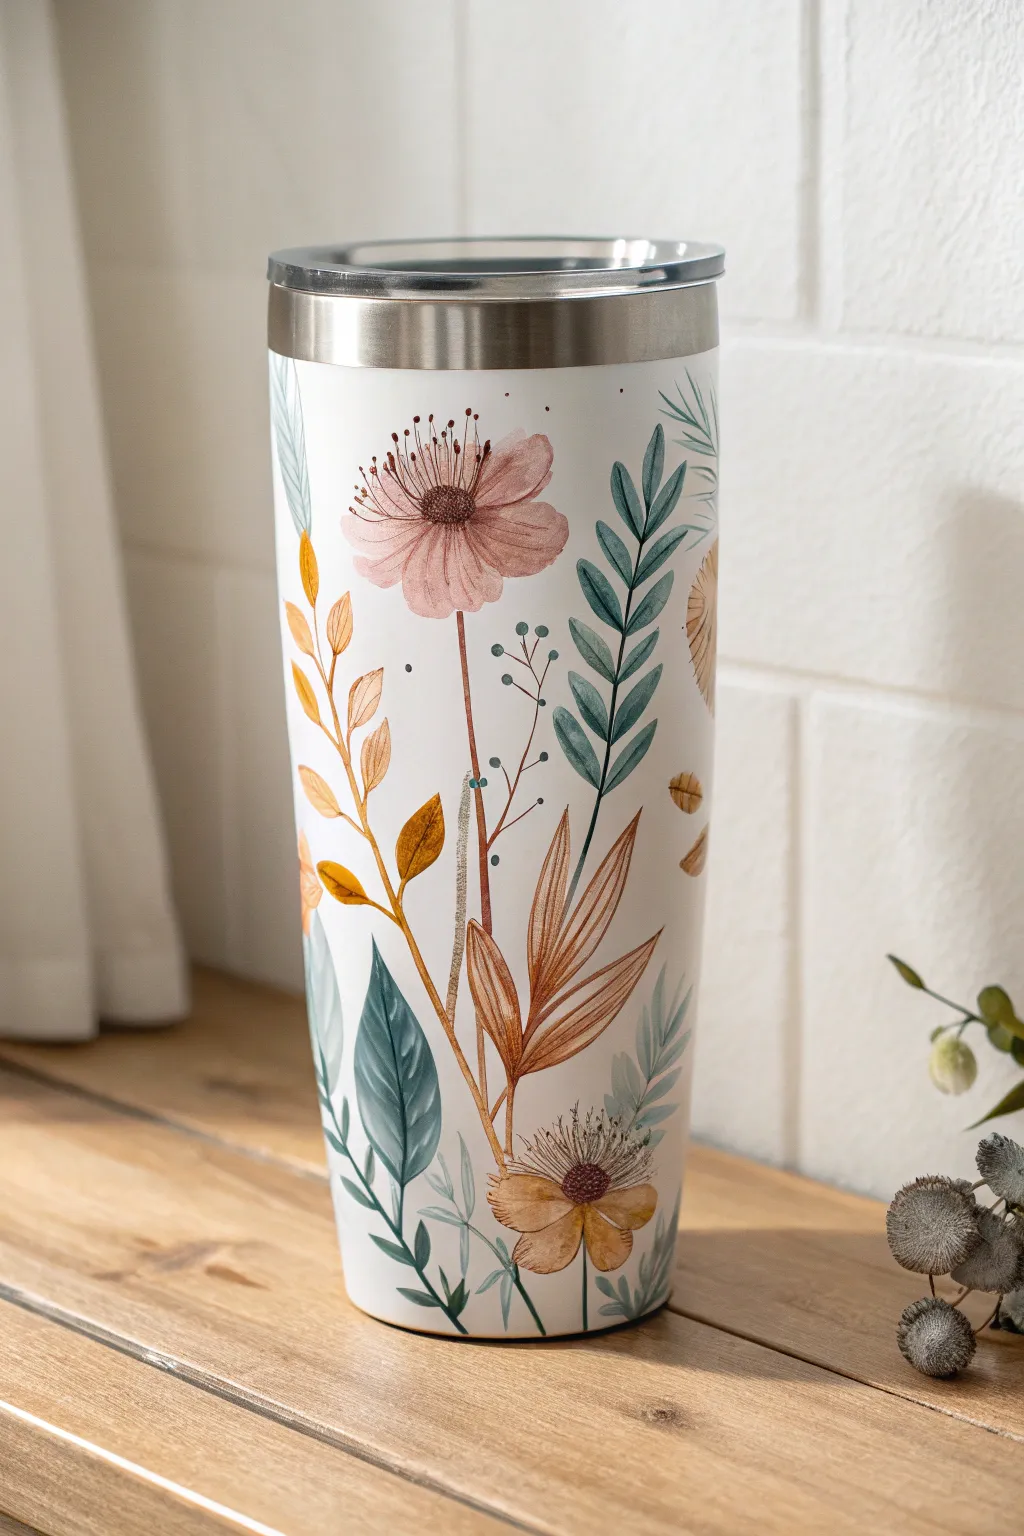
Wrap-Around Floral Tumbler Pattern
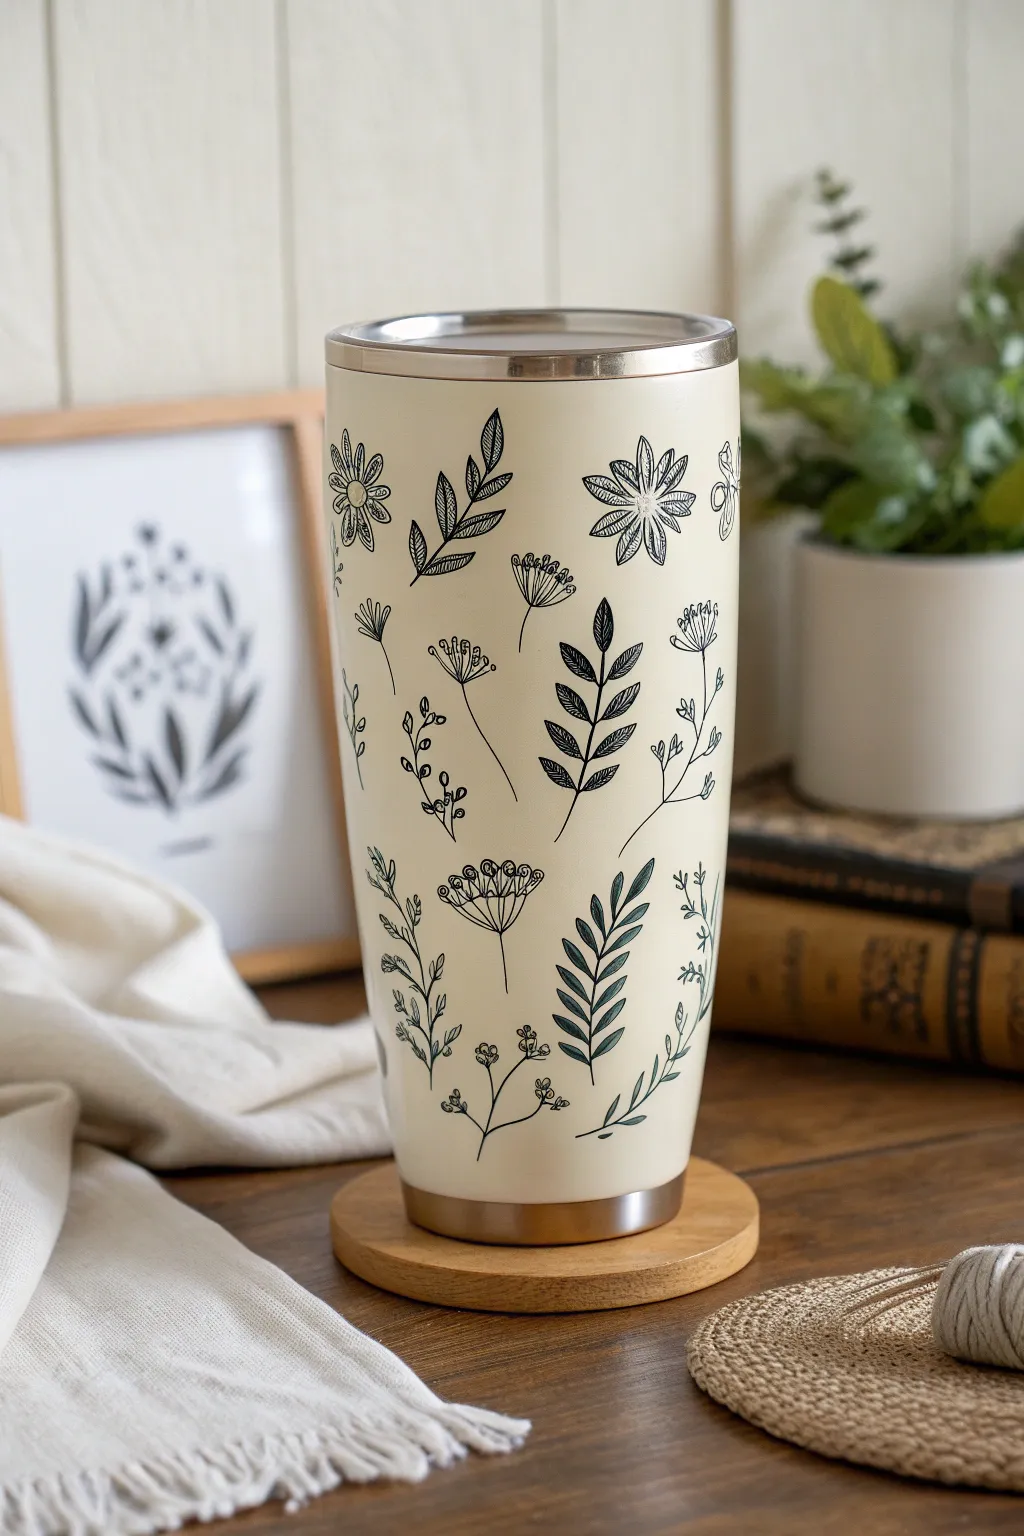
Transform a plain stainless steel tumbler into a delicate piece of drinkware art with this wrap-around floral design. The look mimics fine ink illustrations on a creamy background, using durable paint markers for a lasting finish.
Step-by-Step
Materials
- Stainless steel travel tumbler (20-30 oz)
- Sandpaper (fine grit, around 400)
- Rubbing alcohol and lint-free cloth
- Cream or off-white spray paint (matt or satin finish)
- Painter’s tape
- Black oil-based paint pen (extra fine tip, 0.7mm)
- Black oil-based paint pen (fine tip, 1-2mm)
- Spray sealer (glossy or matte, food-safe resin is optional for heavy use)
- Pencil and eraser (optional for sketching)
Step 1: Preparation & Base Coat
-
Prepare the surface:
Begin by lightly sanding the entire exterior of your stainless steel tumbler. This creates a slightly rough texture that helps the spray paint adhere better, preventing future chipping. -
Clean thoroughly:
Wipe down the sanded surface with rubbing alcohol on a lint-free cloth to remove all dust and oils from your hands. -
Mask the rim:
Use painter’s tape to carefully cover the silver rim at the top and the metal base at the bottom if you want to keep those exposed steel accents visible like the example. -
Apply base color:
In a well-ventilated area, apply the cream or off-white spray paint. Hold the can about 8-10 inches away and use steady, sweeping motions. -
Layering:
Apply 2-3 light coats rather than one heavy one to avoid drips. Allow the paint to dry completely between coats according to the manufacturer’s instructions. -
Final dry:
Let the final coat of cream paint cure for at least 24 hours. The surface must be perfectly hard before you start drawing.
Smudge Alert
Oil-based pens take longer to dry than water-based ones. As you rotate the cup, rest your hand on a clean scrap of paper to avoid smearing wet ink.
Step 2: Drawing the Pattern
-
Plan your placement:
Visualize where your larger floral elements will go. I find it helpful to lightly mark the positions of the biggest leaves with a pencil first to ensure even spacing around the curve. -
Start with large leaves:
Using the fine tip (1-2mm) black paint pen, draw the larger, solid leaf shapes first. Focus on the ferns and broad leaves. Outline the shape and color them in solid black for contrast. -
Add main stems:
Switch to the extra-fine tip pen (0.7mm). Draw long, thin stems curving upwards from the bottom and downwards from the top to create movement. -
Draw detailed flowers:
Sketch the outline of the daisy-like flowers and the rounded tufts. Avoid coloring these in solid; instead, use fine lines to detail the petals and centers. -
Incorporate delicate sprigs:
Fill the empty spaces between the larger elements with smaller sprigs. These should be very airy—think tiny buds on thin branches or dandelion-style fluff. -
Add texture lines:
Go back to your larger open leaves (like the ones with veins). Use the extra-fine pen to draw the central vein and side veins inside the leaf outlines. -
Balance the composition:
Rotate the tumbler slowly. Look for any large patches of cream space that feel empty and add a small floating leaf or petal to balance the visual weight. -
Clean up:
If you made any small pencil marks earlier, gently erase them once you are absolutely certain the marker ink is 100% dry.
Step 3: Sealing & Finishing
-
Remove tape:
Carefully peel away the painter’s tape from the top rim and bottom base. Pull the tape away at a 45-degree angle to ensure a crisp line. -
Seal the design:
To protect your artwork from washing off, apply a clear top coat. A spray sealer works well for light use, but for a daily-use tumbler, applying a layer of food-safe epoxy resin provides the best durability.
Pro Tip: Line Weight
Vary your pressure. Pressing harder creates thicker lines for stems, while a feather-light touch creates delicate veins and flower details.
Enjoy sipping from your elegant, hand-illustrated tumbler knowing the design is uniquely yours


Glitter-Dip Painted Tumbler Base
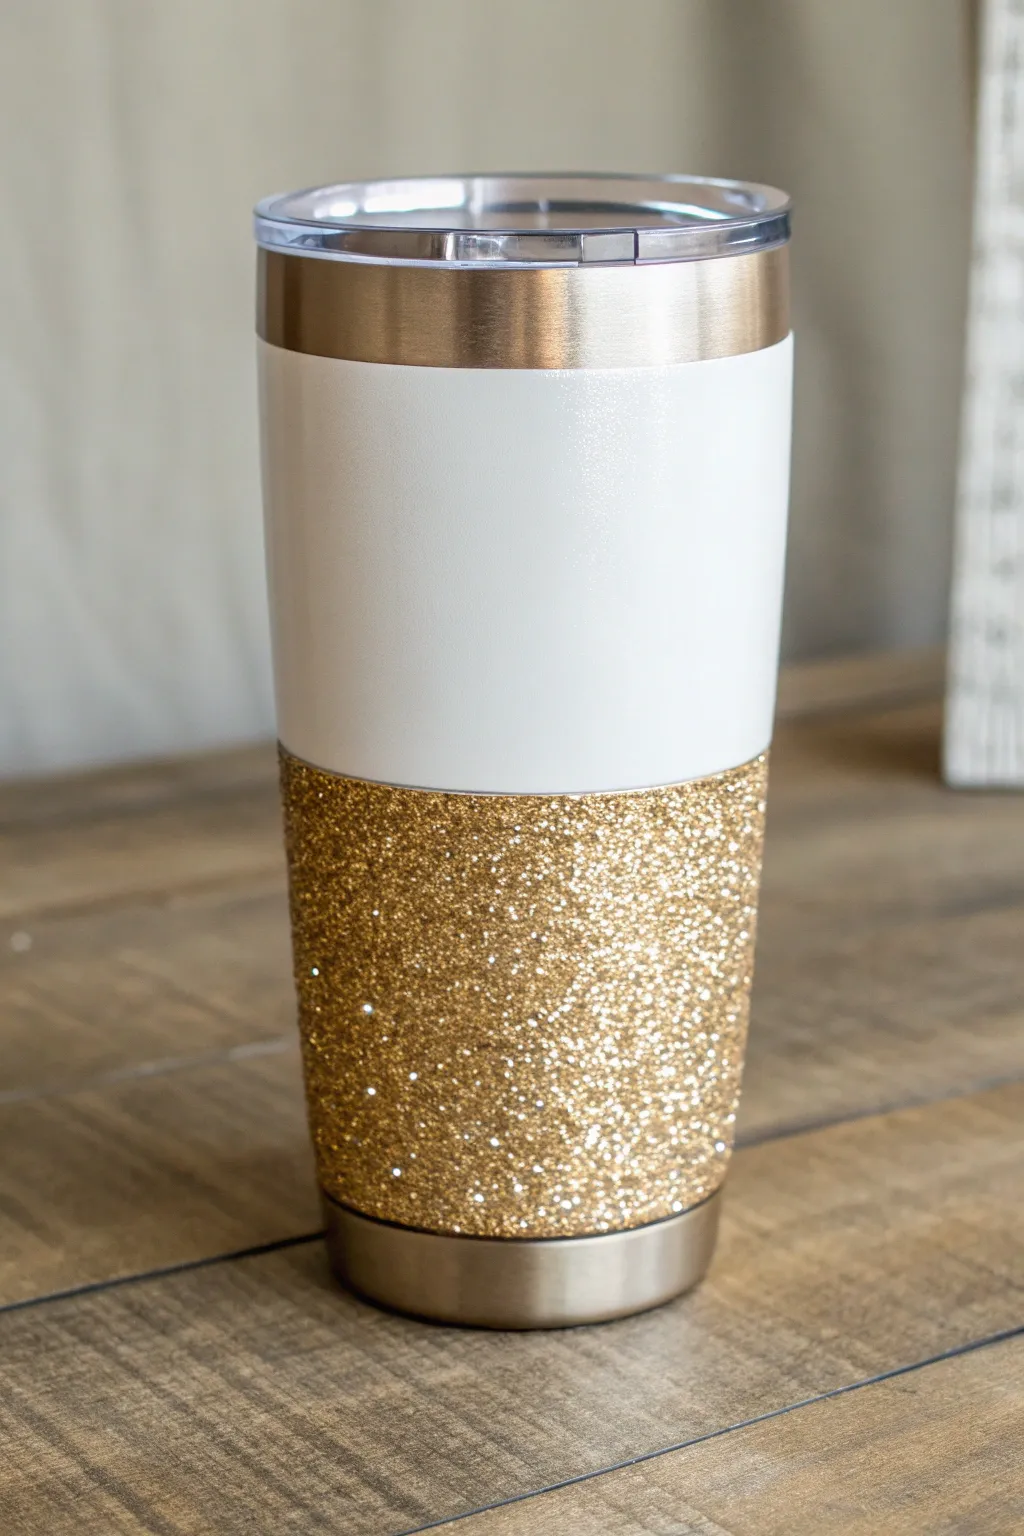
Transform a plain stainless steel tumbler into a chic accessory with this two-tone glitter dip design. The crisp white top contrasts beautifully with the sparkling gold base, making it perfect for gifts or personal use.
How-To Guide
Materials
- Stainless steel tumbler (20oz or 30oz)
- White spray paint (matte or satin finish)
- Painter’s tape
- Mod Podge (Hard Coat or Dishwasher Safe formula)
- Fine gold glitter
- Soft bristle brush
- Epoxy resin kit (part A and part B)
- Silicone gloved or brush for epoxy
- Cup turner (rotisserie)
- Sandpaper (fine grit, 400-600)
- Isopropyl alcohol and lint-free cloth
Step 1: Preparation and Base Coat
-
Prep the surface:
Begin by lightly sanding the entire outer surface of the tumbler with fine-grit sandpaper. This roughs up the smooth steel just enough to help the paint adhere properly. -
Clean thoroughly:
Wipe the tumbler down with isopropyl alcohol and a lint-free cloth to remove any sanding dust or oils from your hands. -
Tape the rim:
Apply a strip of painter’s tape around the top rim of the cup to keep the stainless steel lip clean and free of paint and epoxy. -
Apply the white base:
Take the tumbler to a well-ventilated area. Spray an even coat of white spray paint over the entire body of the cup. Let it dry, then apply a second coat for full opacity. -
Let it cure:
Allow the white paint to dry completely according to the can’s instructions, usually for at least 24 hours, to prevent cracking later.
Step 2: The Glitter Dip
-
Mark the glitter line:
Decide how high you want the gold section to go—typically about a third or half of the way up. Apply a piece of painter’s tape horizontally around the cup to create a crisp line. -
Apply adhesive:
Using a soft brush, apply a smooth, even layer of Mod Podge to the area below the tape line. Ensure you cover every spot so the glitter sticks uniformly. -
Pour the glitter:
Holding the tumbler over a sheet of paper (to catch excess), pour the fine gold glitter generously over the wet Mod Podge. Rotate the cup until the adhesive is fully concealed. -
Tap off excess:
Gently tap the bottom of the cup to knock off loose glitter. I usually let this dry for about 30 minutes before deciding if a second coat is needed for better coverage. -
Seal the glitter:
Once the glitter layer is dry, gently brush a second, thin layer of Mod Podge over the glitter to seal it in place. This prevents the particles from moving when you apply the resin. -
Remove the tape:
Carefully peel off the painter’s tape while the sealing coat is still slightly damp to ensure a sharp, clean line between the white paint and the gold glitter.
Uneven Glitter Edge?
If paint bled or the line is jagged, use a thin stripe of gold vinyl or pinstriping tape to cover the transition line before applying the final epoxy coat.
Step 3: Epoxy Finish
-
Set up the turner:
Place the tumbler on your cup turner. Ensure it is level so the epoxy doesn’t pool at one end. -
Mix the resin:
Mix your epoxy resin (Part A and Part B) in equal parts according to the manufacturer’s directions. Stir slowly to minimize air bubbles. -
Apply first coat:
With the turner rotating, use a gloved finger or silicone brush to spread the epoxy over the entire cup, from the taped rim down to the bottom. -
Check for bubbles:
Use a heat gun or torch lightly over the surface to pop any micro-bubbles that rise to the top. Keep the heat source moving to avoid scorching firmly. -
Cure and repeat:
Let the cup spin for 6–8 hours until dry to the touch. If the glitter area feels rough, lightly sand it smooth, wipe clean, and apply a second coat of epoxy for a glass-like finish. -
Final reveal:
Once the final coat is cured (usually 24 hours), remove the rim tape and wash the tumbler with heavy soap and water before using.
Add a Monogram
Before the final layer of epoxy, apply a vinyl decal, name, or monogram to the white section for a personalized custom touch.
Enjoy your sparkling new tumbler or wrap it up as a stunning handmade gift


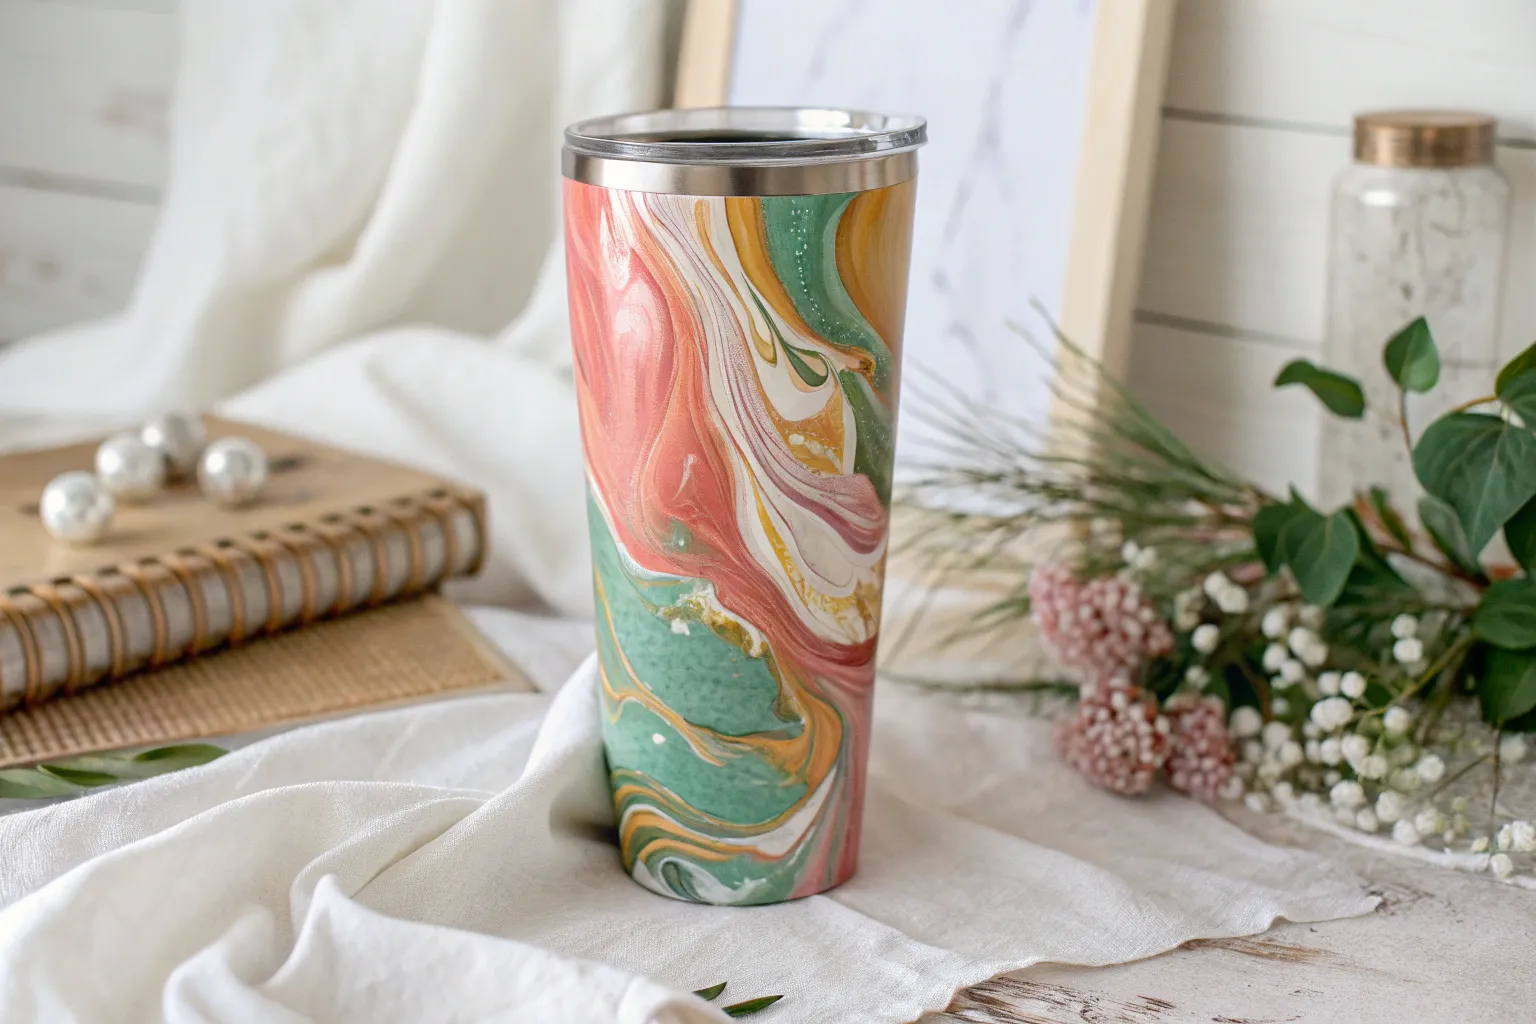
Marbled Pour-Paint Tumbler Swirls

Capture the fluid beauty of polished stone with this mesmerizing hydro-dip technique. The intricate swirls of teal, rust, and cream create an organic, high-end look on a simple stainless steel tumbler.
Step-by-Step
Materials
- Stainless steel tumbler (20-30 oz)
- Spray paint (matte white for base)
- A large, deep plastic tub or bucket (deep enough to submerge tumbler verticaly)
- Spray paints (Teal/Turquoise, Rust/Terracotta, Cream/Off-white, Dark Grey)
- Painter’s tape
- Sandpaper (fine grit, 220-400)
- Isopropyl alcohol and lint-free cloth
- Wooden dowel or PVC pipe (to hold the tumbler)
- Gloves and respirator mask
- Clear sealant spray (Glossy or Epoxy resin)
Step 1: Preparation
-
Clean the surface:
Start by washing your stainless steel tumbler with warm soapy water to remove any manufacturing oils. -
Scuff the surface:
Lightly sand the entire exterior of the tumbler with fine-grit sandpaper. This creates a ‘tooth’ for the paint to grab onto. -
Wipe down:
Clean the sanded surface thoroughly with isopropyl alcohol and a lint-free cloth to remove all dust and residue. -
Tape the rim:
Apply painter’s tape carefully around the top steel rim and the inside of the cup. You want to keep the area where your lips touch paint-free. -
Create a handle:
Insert a wooden dowel, a pool noodle, or PVC pipe securely inside the tumbler. This will act as your handle so you don’t have to touch the wet paint.
Paint Clumping?
If the paint clumps on the water surface, your water is likely too cold. Aim for room temperature or slightly lukewarm water for a smooth film.
Step 2: Base Coat
-
Prime the tumbler:
Spray a coat of matte white paint evenly over the tumbler. This white base makes the marble colors pop later. -
Let it dry:
Allow the base coat to dry completely according to the can instructions, usually about 30-60 minutes.
Add Subtle Sparkle
Mix a metallic gold or copper spray paint into your dipping rotation. The metallic flecks will separate and create shimmering veins throughout the marble.
Step 3: The Hydro Dip
-
Prepare the water bath:
Fill your plastic tub with lukewarm tap water. The temperature is key; cold water makes the paint skin over too fast. -
Spray the first color:
Shake your spray cans vigorously. Start by spraying your darkest color (Dark Grey) into the center of the water. -
Layer the colors:
Quickly spray your other colors (Teal, Rust, Cream) into the center of the previous ring of paint. Alternate colors to build a bullseye pattern on the water’s surface. -
Swirl the pattern:
Use a stir stick or toothpick to gently swirl the floating paint. Don’t overmix; simple, wide strokes create the best marble veins. -
Check the density:
Ensure there is enough paint coverage on the water to coat the entire cup before you dip. -
The dip:
Holding your makeshift handle, slowly lower the tumbler into the water at a 45-degree angle. Rotate the cup slightly as you submerge it to catch the swirling pattern on all sides. -
Clear the surface:
While the cup is fully submerged, blow on the water’s surface or use your hand (gloved!) to clear away the excess floating paint so it doesn’t double-coat the cup on the way out. -
Remove the cup:
Pull the tumbler straight up out of the water. Shake off excess water gently.
Step 4: Finishing Touches
-
Dry time:
Stand the cup up on its handle base and let it dry fully. I prefer to leave it overnight to ensure all moisture trapped under the paint evaporates. -
Remove tape:
Carefully peel away the painter’s tape from the rim. -
Clean up the rim:
If any paint seeped under the tape, carefully scrape it away with an X-Acto knife or wipe with a little acetone. -
Seal the deal:
Apply 2-3 coats of clear glossy spray sealant to protect the design. For a glass-like finish, you can coat it with epoxy resin instead.
Enjoy your sophisticated, custom marble tumbler knowing no two dips are ever exactly the same
BRUSH GUIDE
The Right Brush for Every Stroke
From clean lines to bold texture — master brush choice, stroke control, and essential techniques.
Explore the Full Guide
Galaxy Sky Tumbler Painting
Transform a plain stainless steel tumbler into a stunning piece of portable art featuring deep nebula clouds and sparkling stars. This project uses sponge painting techniques to create a seamless, dreamy blend of teals and violets against a dark void.
Detailed Instructions
Materials
- Stainless steel tumbler (20 oz or 30 oz)
- Spray paint primer (white or metallic)
- Acrylic paints (black, dark purple, teal/turquoise, violet, titanium white)
- Makeup sponges or small craft sponges
- Fine liner detail brush (size 00 or 000)
- Small mixing palette or paper plate
- Painter’s tape
- Sandpaper (220 grit)
- Cup turner (optional but recommended for drying)
- Epoxy resin or food-safe clear coat spray
Step 1: Preparation & Base Coat
-
Tape the Rims:
Begin by carefully applying painter’s tape to the top rim and the very bottom edge of your stainless steel tumbler. This ensures you keep the raw steel detail visible, just like in the reference photo, and prevents mouth contact with paint. -
Sand the Surface:
Lightly scuff the main body of the tumbler with 220-grit sandpaper. This gives the metal surface some ‘tooth’ for the primer to grab onto, ensuring your galaxy doesn’t peel later. -
Prime the Cup:
Wipe away any sanding dust with alcohol. Apply a thin, even coat of spray primer. A metallic or white primer works best to make the subsequent colors pop, but let it cure completely according to the can’s instructions. -
Apply the Black Base:
Once primed, use a sponge or flat brush to cover the entire working area with black acrylic paint. This creates the deep space background needed for the colors to stand out.
Muddy Colors?
If your teal and purple are turning grey where they meet, let the first color dry completely before sponging the second color over the edge.
Step 2: Creating the Nebula
-
Sponge the Teal:
Tear off a piece of makeup sponge for a rough texture. Dip it into your teal paint and dab off the excess on a paper plate. Lightly sponge irregular cloud shapes onto the black cup, starting in the middle and drifting diagonally. -
Add Purple Depths:
Using a fresh sponge piece, pick up the dark purple. Dab this color along the edges of your teal clouds, letting them overlap slightly to create a transitional hue. -
Layering Violet:
While the paint is just barely tachy but not wet, sponge bright violet into the centers of the dark purple areas. This creates a glowing effect and adds dimension to the gas clouds. -
Intensify the Black:
I like to go back in with a tiny bit of black on a clean sponge to ‘cut’ into the colors. Dab black over the edges of the teal and purple to create jagged, realistic nebula borders rather than soft blobs. -
Highlight the Clouds:
Mix a tiny drop of white into your teal paint to create a pale aqua. Very sparingly dab this into the brightest center points of the teal sections to make them look luminous. -
Final Blending:
Check your transitions. If any color edge looks too harsh, use a lightly dampened sponge (no paint) to soften the boundary between the nebula and the black space void.
Step 3: Stars & Finishing
-
Splatter Small Stars:
Thin down your white acrylic paint with a few drops of water until it’s inky. Dip a stiff toothbrush or fan brush into it and flick the bristles to spray tiny specks of stars across the galaxy. -
Paint Major Stars:
Using your finest liner brush, paint the ‘hero’ stars. Paint a small cross shape first, then extend the vertical and horizontal lines into long, thin tapering points. -
Add Star Centers:
Place a tiny dot of pure white paint in the absolute center of your largest painted stars to make them shine intensely. -
Scatter Medium Stars:
Use the tip of a toothpick or the handle end of a brush dipped in white paint to dot random medium-sized stars around the nebula clouds. -
Remove Tape:
Carefully peel off the painter’s tape while the paint is dry but before you apply any topcoat. This ensures a crisp, clean line against the steel. -
Seal the Design:
For a durable, glassy finish like the image, apply a coat of food-safe epoxy resin while spinning the cup on a turner. Alternatively, apply 2-3 coats of a high-gloss clear acrylic spray sealant.
Holographic Touches
Mix a tiny amount of ultra-fine holographic glitter into your final resin coat or clear glaze to make the entire galaxy shimmer in the sunlight.
Enjoy sipping from your personal slice of the universe
Geometric Color-Block Tumbler Design
Transform a plain stainless steel tumbler into a retro-modern statement piece with this geometric triangle design. The pattern features an interlocking mosaic of cream, forest green, deep teal, and terracotta triangles that looks professionally printed but is surprisingly achievable at home.
Step-by-Step
Materials
- Stainless steel tumbler (20 oz or 30 oz)
- Spray paint primer (white or light grey)
- Acrylic craft paints (Cream/Beige, Terracotta/Burnt Orange, Forest Green, Deep Teal, Navy Blue)
- Painter’s tape (various widths, preferably narrow like 1/4 inch or washi tape)
- X-Acto knife or craft blade
- Self-healing cutting mat
- Ruler or straight edge
- Clear sealant (Epoxy resin or dishwasher-safe Mod Podge)
- Fine grit sandpaper (400-600 grit)
- Rubbing alcohol
- Small flat paintbrushes
- Pencil
Step 1: Preparation & Base Coat
-
Clean surface:
Begin by thoroughly cleaning the exterior of your stainless steel tumbler with rubbing alcohol to remove any oils or fingerprints that could prevent paint adhesion. -
Sand lightly:
Scuff the surface gently with fine-grit sandpaper. This creates a slightly textured surface or ‘tooth’ for the primer to grip onto better. -
Tape off rim:
Apply painter’s tape around the top rim (where your lips will touch) and the very bottom edge if you want to keep the steel exposed there. Press the edges down firmly. -
Apply primer:
Spray the entire cup with an even coat of light-colored primer. I prefer doing two thin coats rather than one heavy one to avoid drips. Let this dry completely according to the can’s instructions.
Step 2: Creating the Geometric Grid
-
Prepare tape strips:
To make the triangle pattern, stick long strips of painter’s tape onto your cutting mat. If you are using standard width tape, use a ruler and X-Acto knife to slice them into thinner strips, about 1/8 to 1/4 inch wide. -
Establish diagonal lines:
Begin applying tape strips diagonally across the cup. Space them evenly apart—about 1.5 to 2 inches—creating a spiral effect from top to bottom. -
Create the cross-hatch:
Apply a second set of diagonal tape strips going the opposite direction. Steps like this are crucial; make sure these intersect the first lines to form diamond shapes first. -
Bisect diamonds:
To turn those diamonds into triangles, lay horizontal strips of tape through the center of each diamond row. Alternatively, you can use a pencil to lightly draw these lines if you prefer to freehand paint within the lines later. -
Seal the tape:
Run your finger or a credit card firmly over all tape edges to prevent paint bleed. For extra crisp lines, paint a very thin layer of your base primer color over the tape edges.
Pro Tip: Custom Stencils
Can’t get tape straight? Cut triangle shapes out of vinyl or contact paper using a craft cutting machine. Apply these as ‘negative space’ masks instead of using strip tape.
Step 3: Painting the Sections
-
Plan your palette:
Squeeze your acrylic colors (cream, terracotta, forest green, deep teal, navy) onto a palette. Decide on a rough color distribution so no two adjacent triangles share the same color. -
Start with lightest color:
Begin painting specific triangles with your Cream/Beige shade. Apply thin, even layers. You will likely need 2-3 coats for opaque coverage. -
Apply mid-tones:
Move on to the Terracotta and Forest Green sections. Use a small flat brush to get crisp edges near the tape without flooding the area. -
Finish with darks:
Fill the remaining triangles with Deep Teal and Navy Blue. Darker colors usually cover faster, but be careful not to smudge your lighter sections. -
Check coverage:
Hold the tumbler up to the light to check for streaks or thin spots. Touch up any areas where the primer is still showing through. -
Remove tape:
This is the satisfying part—carefully peel off the tape while the final coat of paint is still slightly tacky but not wet. Pull the tape away from the painted edge at a 45-degree angle.
Troubleshooting: Peeling Paint
If paint lifts when removing tape, you waited too long. Use an X-Acto knife to gently score the edge of the dried paint against the tape line before pulling to separate them cleanly.
Step 4: Sealing & Finishing
-
Clean lines:
If any paint bled under the tape, use a toothpick or a damp brush to gently scrape or wipe it away before the paint fully cures. -
Dry time:
Allow the acrylic paint to cure fully for at least 24 hours. Don’t rush this, or the sealer might react with the paint. -
Prepare resin:
Mix a small batch of food-safe epoxy resin according to the manufacturer’s ratios. Wear gloves and work in a ventilated area. -
Apply sealant:
Place the tumbler on a cup turner (or support rod). Pour the resin slowly and use a gloved finger to spread it evenly over the entire painted surface, right up to the steel rims. -
Pop bubbles:
Use a heat gun or torch lightly over the spinning cup to pop any air bubbles in the resin. -
Final cure:
Let the tumbler spin until dry to touch (usually 6-8 hours), then let it sit and cure fully for 72 hours before using.
Enjoy your durable, custom-designed tumbler that looks good enough to have been bought in a boutique shop

PENCIL GUIDE
Understanding Pencil Grades from H to B
From first sketch to finished drawing — learn pencil grades, line control, and shading techniques.
Explore the Full Guide
Stencil Monogram Tumbler Painting
Achieve a sleek, professional look with this faux-etched style that combines the durability of stainless steel with clean, personalized typography. This project uses a negative space technique to create a crisp white monogram that stands out beautifully against the brushed metal finish.
Step-by-Step Tutorial
Materials
- Stainless steel tumbler (20oz or 30oz)
- Rubbing alcohol
- Lint-free cloth
- White permanent adhesive vinyl (Oracal 651 recommended)
- Cricut or Silhouette cutting machine
- Weeding tools
- Transfer tape
- Scraper tool or credit card
- Painter’s tape based on preference
- Measuring tape
Step 1: Design & Preparation
-
Measure the surface:
Before you even open your design software, measure the printable area of your tumbler. You want the monogram to be prominent but not wrapped so far around the curve that it distorts visually. -
Create the monogram:
In your cutting machine software, select a circle monogram font. Type your initials (typically First, Last, Middle) and weld the letters together inside a designated circle frame if your font requires it. -
Scale the design:
Resize your monogram to fit the measurements you took earlier. For a standard 20oz tumbler, a 3-inch to 3.5-inch diameter usually looks proportional. -
Cut the vinyl:
Load your white permanent vinyl into the machine, shiny side up. Adjust your cut settings to ‘Vinyl’ and let the machine precision-cut the intricate lines of the letters. -
Clean the tumbler:
While the machine is cutting, thoroughly wipe down the stainless steel surface with rubbing alcohol and a lint-free cloth. This removes invisible finger oils that prevent vinyl from sticking long-term.
Sticky Situation?
If the vinyl refuses to stick to the metal while peeling the tape, your surface might be cold. Warm the metal slightly with a hair dryer to help adhesion.
Step 2: Weeding & Transfer
-
Weed the design:
Carefully remove the excess vinyl from your backing sheet. You want to leave only the white circle and the white letters; remove the negative spaces inside the B’s and around the S. -
Apply transfer tape:
Cut a piece of transfer tape slightly larger than your decal. Lay it sticky-side down over the vinyl design and burnish it firmly with a scraper tool to ensure the vinyl lifts off the backing. -
Peel the backing:
Flip the design over so the paper backing is facing you. Peel the paper away from the transfer tape at a sharp 45-degree angle. If the vinyl stays on the paper, push it back down and rub it again. -
Center the design:
To ensure straight placement, I like to put a tiny piece of parchment paper under the center of the decal first so it doesn’t stick immediately. Hover the design over the tumbler until it looks perfectly centered vertically and horizontally.
Step 3: Application & Finishing
-
Anchor the center:
Once positioned, press firmly down the center of the decal. Work your way outward from the middle to the edges to push out air bubbles as you go. -
Burnish onto the curve:
The curved surface can be tricky. Use your scraper tool to rub the vinyl firmly onto the steel, paying special attention to the thin lines of the letters. -
Remove transfer tape:
Slowly peel back the transfer tape, keeping it flat against the surface of the tumbler. Do not pull straight up, or you might lift the vinyl. -
Final smooth out:
Run your finger over the decal one last time to ensure all edges are sealed completely against the metal. -
Cure time:
Allow the vinyl to cure for at least 24 to 48 hours before using or washing the tumbler. This bond needs time to become truly permanent.
Level Up
Make it paint-dipped! Tape off the bottom half of the tumbler, spray paint it a matte color, and place the monogram over the painted section for contrast.
Now you have a sleek, personalized tumbler ready for your morning coffee or hydration goals
Negative Space Tumbler Silhouette
This project focuses on the clean, industrial beauty of raw stainless steel revealed through negative space. By using vinyl stencils on a bare tumbler, you create a sophisticated, minimalist design where the metal itself becomes the artwork.
Step-by-Step Guide
Materials
- Stainless steel tumbler (20oz or 30oz)
- Rubbing alcohol
- Lint-free cloth
- Adhesive vinyl (any color, for stenciling)
- Cricut or Silhouette cutting machine (optional)
- Hobby knife or scissors
- Transfer tape
- Painter’s tape
- Spray paint or Plasti Dip (optional, depending on desired finish)
- Clear sealant (optional)
Step 1: Preparation
-
Clean the Surface:
Before doing anything else, wipe down the entire exterior of your stainless steel tumbler with rubbing alcohol on a lint-free cloth. This removes manufacturing oils and fingerprints that could prevent adhesion. -
Design the Silhouette:
Decide on the logo, name, or shape you want to feature as negative space. Since the metal is the star here, simple bold shapes or logos work best. -
Cut the Stencil:
Using a vinyl cutter or a hobby knife, cut out your chosen design on adhesive vinyl. For this negative space technique, you are actually creating a reverse stencil—you want to protect the area that will remain silver.
Bleeding Lines?
If paint bleeds under the sticker, your vinyl wasn’t burnished enough. Next time, spray a quick layer of clear coat over the vinyl *before* the color to seal the edges.
Step 2: Applying the Mask
-
Weed the Vinyl:
Carefully remove the excess vinyl from your backing sheet. Make sure you keep the actual shape you want to see in metal (the positive space of the vinyl) ready to apply. -
Apply Transfer Tape:
Place a piece of transfer tape over your vinyl decal. Use a scraper tool or credit card to burnish it down firmly so the vinyl lifts easily from its backing. -
Position the Decal:
Align the decal on the tumbler where you want the logo to appear. I find looking at the tumbler from the top down helps center the design vertically. -
Adhere the Vinyl:
Press the vinyl onto the steel surface, starting from the center and smoothing outward to push out any air bubbles. -
Seal the Edges:
Run your fingernail or a burnishing tool firmly along the edges of the vinyl. This step is crucial to prevent any paint from bleeding under the sticker later. -
Mask the Rim:
If you want to keep the drinking rim perfectly silver like the example, run a strip of painter’s tape around the very top edge to protect it.
Step 3: Painting and Reveal
-
Prepare for Painting:
Take the tumbler outdoors or to a well-ventilated area. Place it upside down on a stand (a cardboard box with a dowel works great) to avoid touching wet paint. -
Apply Base Coat:
Spray a light, even coat of your chosen paint over the entire tumbler, covering the vinyl decal completely. Keep the can moving to avoid drips. -
Build Layers:
Allow the first coat to verify dry slightly (about 15 minutes), then apply a second and possibly third coat until you have solid, opaque coverage. -
Semi-Dry Stage:
Wait until the paint is tacky but not fully cured. If you wait until it’s rock hard, peeling the vinyl might chip the paint edges. -
Peel the Detail:
Using a weeding tool or pin, carefully lift the edge of your vinyl decal. Slowly pull it away at a sharp angle to reveal the shiny stainless steel underneath. -
Remove Rim Tape:
Gently peel away the painter’s tape from the rim, ensuring a crisp line where the paint meets the steel.
Pro Tip: Texture
For a rugged look, use ‘truck bed liner’ spray paint. It creates a grippy, durable texture that contrasts incredibly well with the smooth, exposed steel logo.
Step 4: Finishing Touches
-
Clean Up Edges:
If any tiny bits of paint bled under the vinyl, use a toothpick dipped in a tiny bit of acetone to gently scrape them away. -
Seal the Work:
To protect the paint from chipping during use, apply a clear coat spray over the entire exterior. I prefer a matte clear coat for a modern textual contrast. -
Final Cure:
Let the tumbler sit for at least 24-48 hours before washing or using it to ensure the paint and sealant have reached maximum hardness.
Enjoy your sleek, custom tumbler knowing it has a durable finish tailored exactly to your style


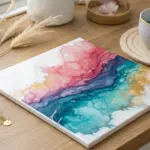
Watercolor-Style Ink Wash Tumbler
Capture the delicate beauty of a meadow on your morning brew cup using alcohol inks to mimic soft watercolor textures. This project combines airy botanical sketches with translucent washes of color for an elegant, nature-inspired finish.
Detailed Instructions
Materials
- Stainless steel tumbler (20oz skinny or similar)
- White spray paint (matte or satin)
- Alcohol inks (soft pink, peach/amber, sage green, teal, brown)
- 91% or 99% Isopropyl alcohol
- Fine detail paintbrushes (sizes 0 and 00)
- Blending solution (optional but helpful)
- Black or dark brown fine-point permanent marker or acrylic paint pen
- Clear epoxy resin or water-based sealer (like Crystalac)
- Small mixing cups for inks
- Paper towels
- Gloves
Step 1: Base Preparation
-
Sand the Tumbler:
Begin by lightly sanding the entire surface of your stainless steel tumbler with 220-grit sandpaper. This gives the paint something to grip onto, ensuring your artwork lasts longer. -
Clean Thoroughly:
Wipe away all the sanding dust using isopropyl alcohol and a lint-free cloth or paper towel. Oils from your fingers can prevent paint adhesion, so handle it by the rim or inside from this point on. -
Apply the Base Coat:
Spray the tumbler with white spray paint. Apply 2-3 light, even coats rather than one heavy one to avoid drips. Let it dry completely between coats and allow it to cure fully according to the can’s instructions—usually 24 hours is best for a rock-hard canvas.
Step 2: Creating the Floral Wash
-
Prepare Your Palette:
Squeeze a few drops of your alcohol ink colors into small mixing cups. Add a few drops of isopropyl alcohol to each color to dilute them; this is the secret to achieving that translucent, watercolor-wash look. -
Start the Main Flower:
Dip a brush into your diluted soft pink ink. Near the top third of the tumbler, paint loose, petal-like shapes radiating from a center point. Don’t worry about perfect edges; the bleed creates the charm. -
Deepen the Center:
While the pink layer is still slightly tacky, dab a tiny bit of undiluted brown or amber ink into the very center of your flower. Allow it to naturally bloom outward slightly into the pink petals. -
Add Secondary Blooms:
Near the bottom, paint a smaller flower shape using the peach or amber mixture. Keep the strokes fluid and light, almost as if you are sketching with the liquid. -
Paint the Large Leaves:
Using your teal-diluted ink, paint broad, elongated leaf shapes near the bottom, pointing upwards. I like to let the brush linger for a second at the tip of the leaf to deposit a touch more pigment. -
Add Contrasting Foliage:
Switch to your sage green mix. Paint a stem with smaller, fern-like leaves extending vertically alongside the flowers. Vary the pressure on your brush to create tapered leaf tips. -
Create Warm Accents:
Use a golden-yellow or light orange ink to add wispy, tall stems filler branches. These should look dried or autumnal, adding warmth to the cool green tones. -
Layering Colors:
Once the first layer of leaves is dry (alcohol ink dies very fast), go back over some sections with a second, slightly more saturated layer of ink to create depth and shadows where leaves might overlap. -
Splatter Texture:
Dip an old toothbrush or stiff brush into diluted brown ink and flick it very gently nearby (test on paper first!) to add tiny speckles around the flowers, mimicking pollen or natural imperfections.
Alcohol Ink Control
If a color spreads too much, use a clean brush dipped in plain alcohol to ‘push’ the edges back or lift pigment away.
Step 3: Detailing and Sealing
-
Outline the Main Bloom:
Using a very fine detail brush with dark brown ink (or a fine-point paint pen), loosely outline the pink petals. Don’t close every line; keeping breaks in the lines maintains that airy, illustrative style. -
Draw the Stamen:
In the center of the pink flower, draw fine lines radiating outward, topped with tiny dots for the stamen. This high-contrast detail immediately makes the flower pop. -
Define the Leaves:
Add central veins to your teal and sage leaves using thin, delicate strokes. You don’t need to outline the entire leaf—just a suggestion of the spine and a few edges works best. -
Connect the Elements:
Draw thin, dark stems connecting your floating flowers and leaves to the bottom ‘ground’ area of the design, grounding the composition. -
Allow to Dry:
Let the inks and paint pens dry for at least 6-12 hours. Alcohol ink can reactivate easily, so ensure it is bone dry before the sealing step. -
Seal the Design:
Seal the tumbler with a clear spray sealer first to lock in the inks. Do two light mists. -
Final Clear Coat:
Apply your final coat of epoxy resin or a water-based topcoat (like Crystalac) for a smooth, glass-like finish. Follow the manufacturer’s specific instructions for mixing and curing times.
Add Some Shimmer
Mix a tiny amount of metallic gold mica powder into your resin or topcoat for a subtle, sun-kissed sparkle over the florals.
Now you have a stunning, hand-painted piece of functional art to keep your drinks stylishly cool
Woodgrain Painted Tumbler Illusion
Transform a plain stainless steel tumbler into a rustic masterpiece with this stunning woodgrain illusion. By layering alcohol inks and strategic brushwork, you’ll create a rich, realistic timber texture that looks like it came straight from the woodshop.
How-To Guide
Materials
- Stainless steel tumbler (20oz or 30oz)
- White spray paint (matte or satin)
- Alcohol inks (Teakwood, Latte, Espresso, and Caramel colors)
- Stiff bristle brush (chip brush)
- Painter’s tape or electrical tape
- Epoxy resin or Crystalac
- Rubbing alcohol
- Gloves and respirator (for epoxy work)
- Detail brush
- Silver metallic paint or chrome vinyl tape (optional)
Step 1: Preparation and Base Coat
-
Surface Prep:
Begin by sanding the entire exterior of your stainless steel tumbler lightly with fine-grit sandpaper to give the paint something to grip. Clean it thoroughly with rubbing alcohol to remove any oils or dust. -
Base Painting:
Spray paint the entire tumbler with a matte white base coat. While you can use a light tan, white often makes the alcohol ink colors pop more vividly later on. Let this dry completely, usually for about 24 hours. -
Tape Off Accents:
To recreate the metal band look shown in the photo, tape off the top rim and the very bottom rim. For the decorative ring near the bottom, I like to use thin pinstripe tape to mask off that specific double-line area.
Step 2: Creating the Wood Grain
-
First Ink Layer:
Squeeze a generous line of your lightest brown alcohol ink (like Latte or Caramel) directly onto the stiff bristle brush. Quickly brush this vertically down the tumbler from top to bottom. -
Building Texture:
Continue painting in long, vertical strokes. The bristles of the chip brush will naturally separate the ink, leaving white streaks behind—this is perfect, as it mimics natural wood fibers. -
Adding Depth:
While the first layer is still slightly active, apply a darker brown ink (like Teakwood) to your brush. Apply this sporadically over the lighter base to create variation in tone. -
Creating Knots and Grain:
To make the distinctive dark grain lines seen in the image, take a smaller detail brush dipped in your darkest brown (Espresso). Wiggle the brush slightly as you pull it down vertically to create wavy, organic grain lines. -
Blending the Grain:
Immediately after drawing the dark lines, lightly sweep your dry chip brush over them vertically. This softens the harsh lines and blends them into the wood texture, making them look embedded rather than painted on top. -
Adding Knots (Optional):
If you want a knot effect, place a drop of dark ink and swirl it slightly with a toothpick or small brush, then drag the surrounding ‘grain’ lines around it so the flow looks natural. -
Final Ink Touch-ups:
Inspect the tumbler for any areas that look too white or flat. Add thin layers of a medium-tone ink to warm up those spots until you are happy with the richness of the wood color.
Too dark?
If your wood grain becomes too dark or muddy, dampen a brush with plain rubbing alcohol and lightly swipe it over the area to lift some of the pigment.
Step 3: Sealing and Finishing
-
Sealing the Ink:
Once the ink is completely dry, spray the tumbler with a clear acrylic sealer. This is crucial because wet epoxy or topcoats can sometimes reactivate the ink and smudge your beautiful grain lines. -
Removing Tape:
Carefully peel away the tape at the top, bottom, and the decorative ring section. You should now see crisp white or stainless steel lines where the tape was. -
Restore Metallic finish:
If your base cup wasn’t silver underneath, or if paint bled, use a metallic silver paint pen or apply thin chrome vinyl strips over the unpainted bands to achieve that polished metal look. -
First Epoxy Coat:
Mix a small batch of epoxy resin according to the manufacturer’s instructions. Apply a smooth, even coat over the entire tumbler while it spins on a cup turner. -
Pop Bubbles:
Briefly run a torch or heat gun over the spinning cup to pop any micro-bubbles in the resin. Be quick to avoid scorching the epoxy. -
Final Cure:
Allow the tumbler to spin until the epoxy is touch-dry (usually 6-8 hours), then let it cure fully for another 24-48 hours before using.
Add a brand
Before the final epoxy coat, apply a vinyl decal that looks like a burned-in brand or logo for an authentic custom farmhouse look.
Enjoy your durable, custom tumbler that brings a touch of nature to your daily hydration routine
Sunset Horizon Tumbler Gradient Scene
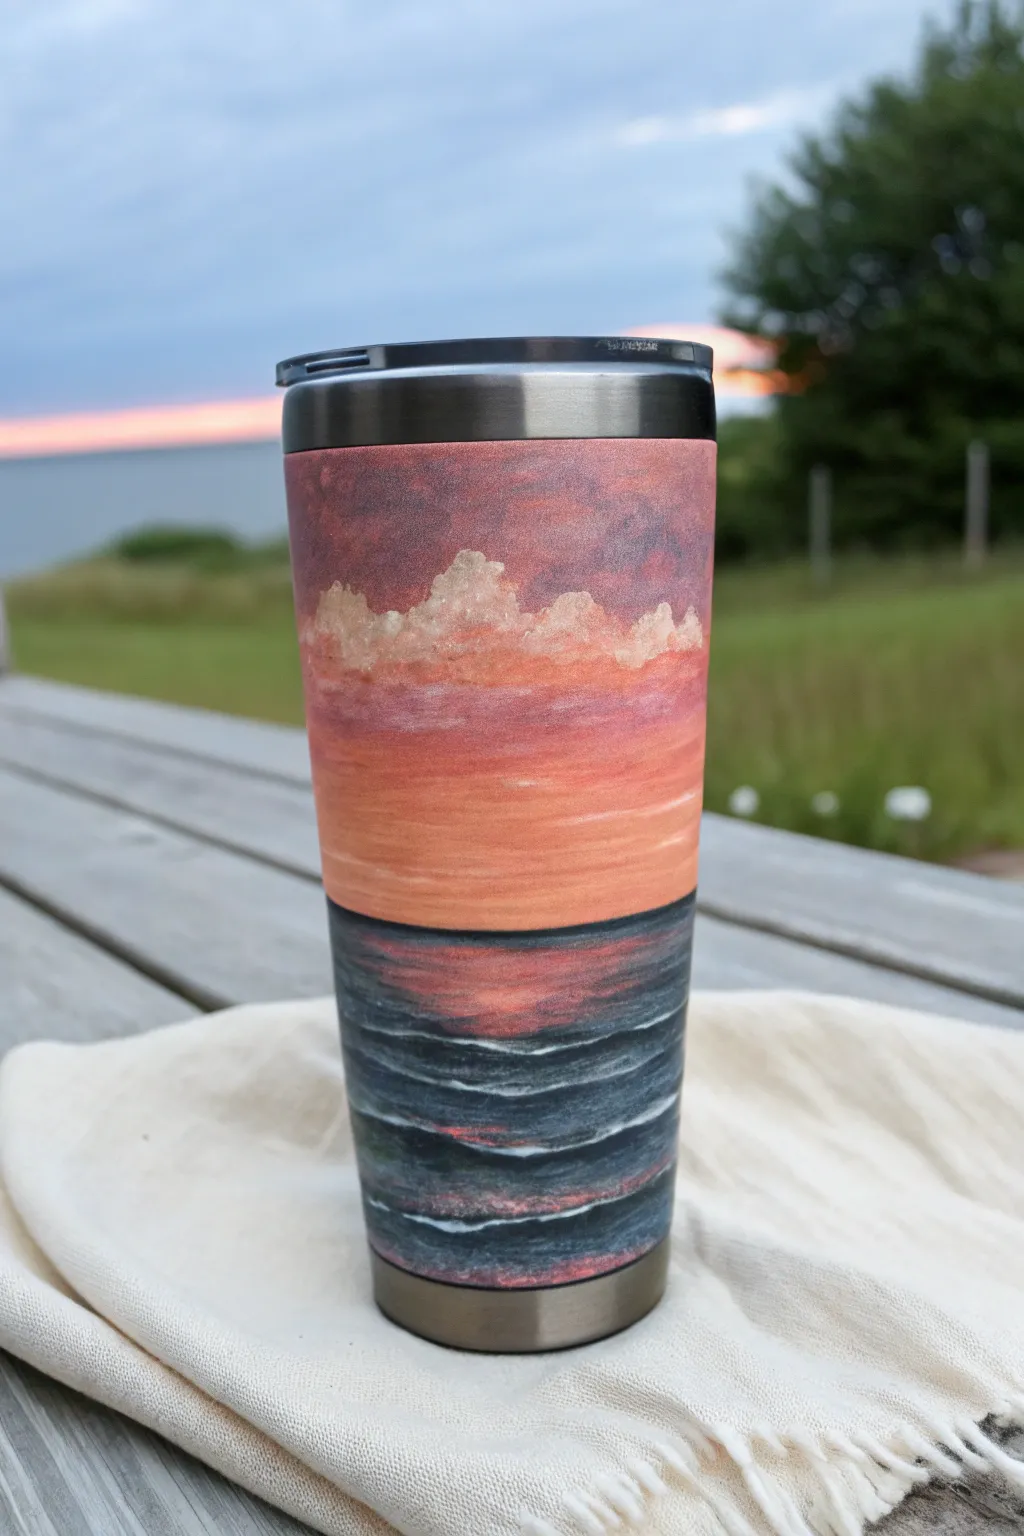
Capture the serene beauty of daybreak on your favorite drinkware with this stunning gradient landscape. This project transforms a plain stainless steel tumbler into a canvas featuring a warm, glowing sky reflected over deep, rippling waters.
Detailed Instructions
Materials
- Stainless steel tumbler (sanded and prepped)
- White spray paint primer
- Acrylic paints (Indigo, Black, Burnt Orange, Magenta, White, Pale Yellow)
- Makeup sponges or blending wedges
- Small flat brush
- Fine liner brush
- Epoxy resin or polyurethane sealer
- Painter’s tape
- Sandpaper (fine grit)
Step 1: Preparation & Sky Gradient
-
Prep the surface:
Begin by lightly sanding your stainless steel tumbler to help the paint adhere. Wipe it down with alcohol to remove any oils, then protect the top rim and bottom base with painter’s tape to keep the steel showing. -
Prime the canvas:
Apply a coat of white spray primer to the exposed area of the tumbler. This bright white base is crucial for making your sunset colors pop later on. Let it dry completely. -
Establish the horizon:
Visualize a line slightly below the middle of the tumbler. This will be your horizon line. Everything above is sky; everything below is water. -
Apply the upper sky:
Using a makeup sponge, dab a mix of magenta and a touch of indigo near the top edge of your taped section to create a dusky purple. Sponge it on lightly to build texture. -
Blend the sunset transition:
While the purple is still tacky, load a fresh sponge with magenta and burnt orange. Dab this just below the purple, overlapping slightly to blend the two colors into a soft, reddish-pink transition. -
Create the golden glow:
For the area just above the horizon line, sponge on a mix of pale yellow and burnt orange. This will represent the sun’s brightest point just before it dips below the water. -
Soften the gradient:
Go back with a clean sponge and gently tap over the seams between your color bands. The goal is a seamless, misty fade from the dark purple top to the bright orange bottom.
Step 2: Clouds & Water
-
Scumble the clouds:
Mix a small amount of white with a tiny drop of orange. Using a dry, small brush, use a ‘scumbling’ or circular scrubbing motion to create fluffy cloud shapes across the middle of the pink sky section. -
Highlight the cloud tops:
Dip just the tip of your brush in pure white and tap it along the top edges of your clouds. This catches the ‘light’ and gives them a three-dimensional fluffiness. -
Basecoat the water:
Switch to your dark colors. Paint the entire area below the horizon line with a deep mix of indigo and black. It should be very dark, almost solid black, to contrast with the bright sky. -
Add reflected color:
While the dark base is wet, take a small amount of your orange/red sunset mix on a flat brush. Horizontal strokes are key here. Gently drag the color across the center of the water area to mimic the sun’s reflection. -
Refine the ripples:
Using a fine liner brush and thinned-down white paint, add very thin, horizontal varying lines across the dark water. These represent the crests of small waves catching the light. -
Add deep shadows:
Go back in with pure black on your liner brush and accentuate the areas between the white ripples, adding depth to the waves. -
Final reflection details:
I like to add a few tiny dashes of the bright pink/orange mix directly into the white ripple lines near the center, tying the sky and water together perfectly.
Sponge Tactics
Don’t wipe the paint with the sponge; tap or ‘spounce’ it up and down. This creates an airbrushed look without leaving streaks.
Step 3: Sealing & Finish
-
Remove the tape:
Carefully peel away the painter’s tape from the top and bottom rims before the paint is fully cured to ensure a crisp, clean line. -
Dry time:
Allow the acrylic paint to dry completely, preferably overnight. Moisture trapped under the sealer can cause cloudiness later. -
Apply sealer:
Finish your tumbler with a food-safe epoxy resin or a heavy-duty polyurethane topcoat. This protects the artwork from chipping and gives it that glossy, professional shine.
Add Some Sparkle
Mix a pinch of ultrafine holographic glitter into your final epoxy layer to make the water look like it’s glistening in real sunlight.
Now you have a functional piece of art that brings a peaceful sunrise to your morning coffee routine
Mountain Silhouette Tumbler Wrap
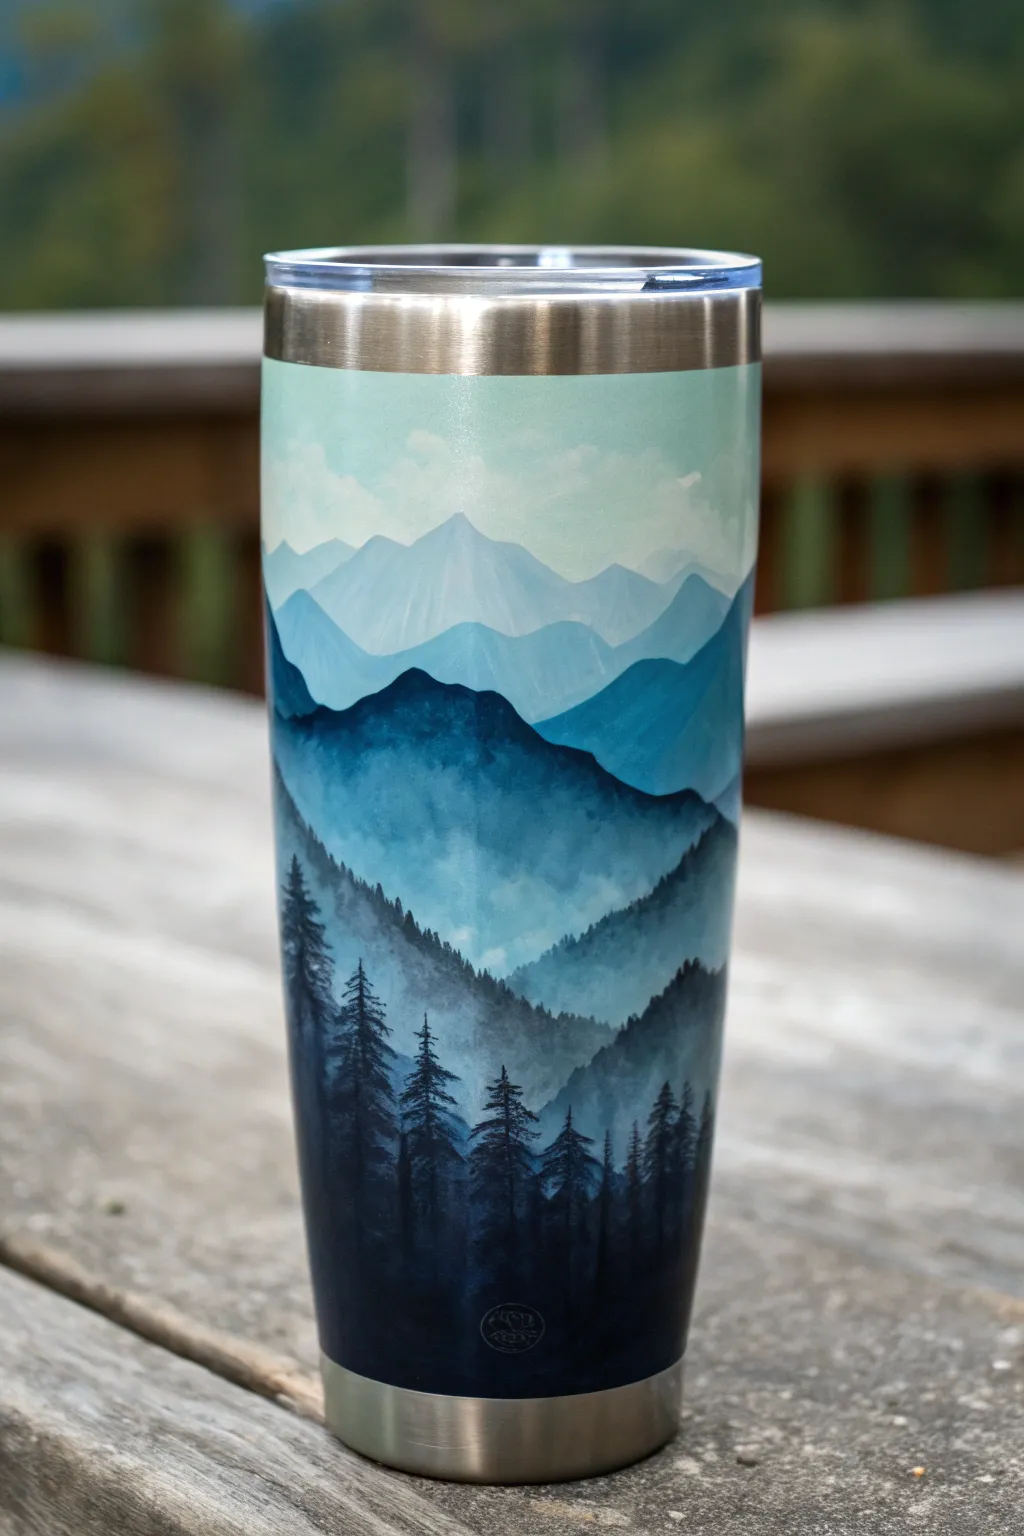
Capture the serene beauty of a mountain range fading into the distance with this atmospheric tumbler project. Using a smooth gradient technique and simple silhouettes, you’ll create a stunning piece of functional landscape art that looks like a watercolor painting.
How-To Guide
Materials
- Stainless steel tumbler (20oz or 30oz)
- Sandpaper (400 grit)
- Rubbing alcohol
- White spray paint primer (matte)
- Acrylic paints: Titanium White, Sky Blue, Phthalo Blue, Black
- Makeup sponges or painting sponges
- Small flat brush
- Fine liner brush (size 0 or 00)
- Clear coat sealant (epoxy resin or spray sealer)
- Paper towels
- Palette or paper plate
Step 1: Base Preparation
-
Sand the Surface:
Begin by lightly sanding the entire stainless steel surface of the tumbler with 400-grit sandpaper. This creates a ‘tooth’ for the paint to grip onto, ensuring longevity. -
Clean Thoroughly:
Wipe down the sanded tumbler with rubbing alcohol and a clean paper towel to remove any oils, dust, or metal shavings. Avoid touching the surface with bare hands after this step. -
Apply Primer:
Spray a thin, even coat of matte white primer over the tumbler. Rotate the cup as you spray to avoid drips. Let this dry completely according to the can’s instructions.
Atmospheric Depth
Add a tiny drop of white paint to your sponge and lightly tap it between the mountain layers while they dry. This creates a realistic ‘mist’ effect separation.
Step 2: Creating the Ombré Sky
-
Mix the Sky Color:
On your palette, mix a large amount of white with just a tiny drop of Sky Blue. You want a very pale, almost white, cool blue tone. -
Sponge the Top Third:
Dip a makeup sponge into your pale blue mix. Dab it onto the top third of the tumbler using an up-and-down motion to create a smooth texture without brushstrokes. -
Create a Mid-Tone:
Add a little more Sky Blue to your mixture. Sponge this color below our first layer, blending the meeting point while the paint is still wet to create a soft transition.
Step 3: Painting the Mountain Ranges
-
Draft the Furthest Range:
Mix a light blue-grey shade. Using a flat brush, paint a jagged mountain outline just below the sky section. Fill in the shape downwards slightly with a sponge to keep it hazy. -
Layer the Second Range:
Darken your blue mix slightly with a touch of Phthalo Blue. Paint a second mountain range below the first, overlapping it. Make the peaks distinct from the first layer. -
Blend the Fog:
While the bottom edge of this second mountain range is wet, use a clean, slightly damp sponge to dab at the bottom edge, fading it out into the white/primer background. This mimics mist. -
Paint the Mid-Ground Mountains:
Mix a medium blue hue (Phthalo Blue and white). Paint a third, more prominent mountain range. Increase the contrast here—the closer the mountains, the darker and sharper they should appear. -
Add Texture:
Using a slightly dry sponge with the medium blue, dab gently within the body of the mid-ground mountains to suggest rocky textures or forests in the distance. -
Create the Foreground Base:
Mix Phthalo Blue with a small amount of Black to get a deep navy. Paint the largest, closest mountain shape near the bottom of the cup, covering the remaining white space. -
Deepen the Bottom:
Sponge pure black (or extremely dark navy) at the very bottom edge of the tumbler, blending it up into the deep blue mountain base to ground the composition.
Fixing Mistakes
If a mountain layer gets too dark, wait for it to dry completely. You can paint a lighter layer right over it. Acrylics are opaque and very forgiving of errors.
Step 4: Silhouettes and Sealing
-
Start the Trees:
Switch to your fine liner brush. Using the deep navy/black mix, paint a vertical line for a tree trunk extending up from the dark foreground. -
Add Tree Foliage:
Using the tip of the liner brush, dab small horizontal strokes outward from the trunk, getting wider as you move down. Keep the strokes rough and organic to look like pine needles. -
Fill the Forest:
Continue adding trees of varying heights across the bottom foreground. I like to group them in clusters—some tall, some short—to make the forest look natural. -
Dry Time:
Allow the entire painting to dry for at least 24 hours. The acrylics must be fully cured before sealing. -
Seal the Design:
Apply your chosen sealant. If using epoxy resin, mix equal parts and apply a smooth coat while rotating. If using spray sealer, apply 2-3 thin coats for a glossy, durable finish.
Enjoy your beautiful new custom drinkware on your next outdoor adventure
Leopard Print Painted Tumbler
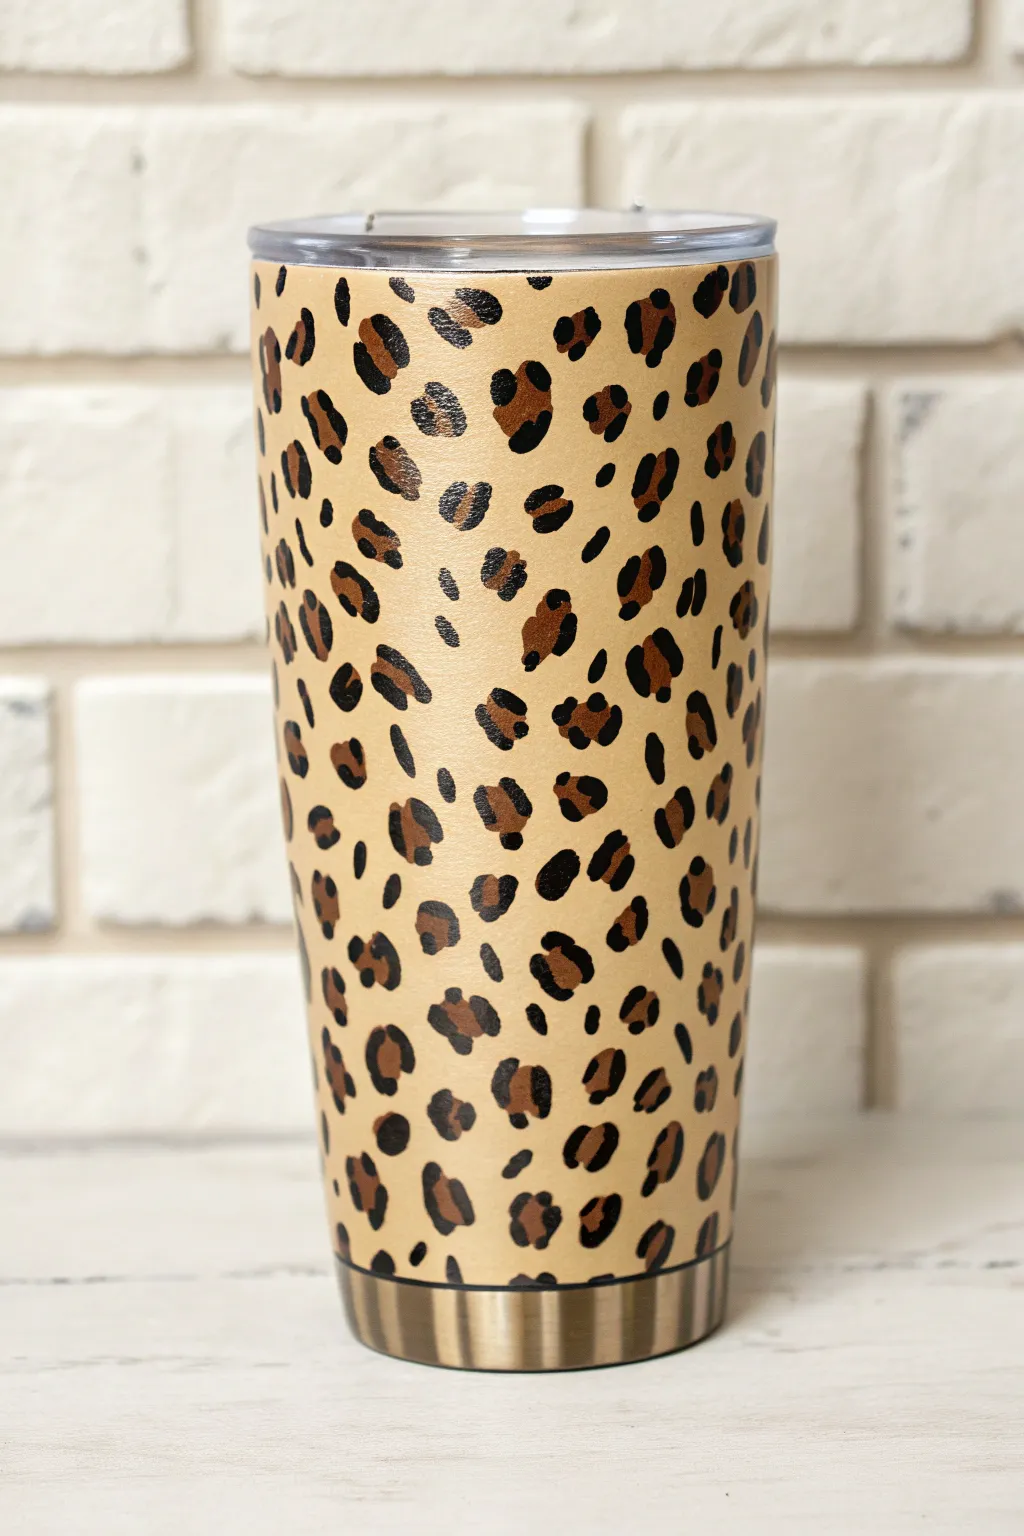
Achieve a chic and timeless look with this leopard print tumbler tutorial. This design features a warm beige base with metallic copper spots defined by crisp black detailing for a finish that looks store-bought but is entirely handmade.
Step-by-Step
Materials
- Stainless steel tumbler (20 oz or 30 oz)
- Sandpaper (400 grit)
- Rubbing alcohol
- Base spray paint (matte beige or light tan)
- Acrylic paint (metallic copper or bronze)
- Acrylic paint (black)
- Small round paintbrush (size 2 or 4)
- Detail liner brush (size 0 or 00)
- Epoxy resin (A and B parts) or clear Crystalac top coat
- Tumbler turner
- Silicone mixing cups and stir sticks
- Gloves and respirator (if using epoxy)
Step 1: Preparation & Base Coat
-
Prep the surface:
Begin by lightly sanding the entire stainless steel surface of your tumbler with 400-grit sandpaper. This creates a grip for the paint without leaving deep scratches. -
Clean thoroughly:
Wipe down the sanded tumbler with rubbing alcohol and a lint-free cloth to remove all dust, oils, and fingerprints. Let it air dry completely. -
Apply the base color:
Place the tumbler on a stand or dowel. Spray an even coat of matte beige or light tan spray paint. Hold the can about 8-10 inches away and use sweeping motions. -
Second coat:
Allow the first coat to dry for the time recommended on the can (usually 15-20 minutes). If you can still see the steel, apply a second thin coat for opaque coverage and let it cure fully.
Step 2: Painting the Leopard Spots
-
Start the center spots:
Pour a small amount of metallic copper acrylic paint onto a palette. Using your size 2 or 4 round brush, dab irregular oval-ish shapes onto the tumbler. -
Randomize placement:
Space these copper blobs randomly around the cup. Avoid making perfectly round circles; rough, organic shapes look far more realistic. -
Vary sizes:
Make some spots slightly larger and some smaller to create a natural pattern. Leave ample negative space (the beige background) between them. -
Let spots dry:
Wait for the copper paint to dry completely. Acrylics dry fast, so this should only take about 10-15 minutes.
Paint Peeling?
If your acrylic paint beads up or peels off the spray paint layer, light scuff the beige base with a grey scotch-brite pad before painting the spots to improve adhesion.
Step 3: Adding the Black Details
-
Prep the black paint:
Load your fine detail liner brush with black acrylic paint. You want the consistency to be smooth, so add a tiny drop of water if the paint feels too thick. -
Outline technique:
Paint around the copper spots, but do not enclose them completely. Paint two or three disjointed ‘brackets’ around each spot (like parentheses). -
Vary the outlines:
I like to mix it up by doing a ‘C’ shape on one side and a dot on the other, or two distinct thick lines. Imperfection is key here. -
Add filler spots:
Look at the empty beige spaces between your main leopard spots. Use the black paint to add small, random irregular dots or tiny dashes to fill the gaps. -
Check density:
Rotate the tumbler to ensure the pattern looks balanced from all angles. Add more tiny black filler spots if any area looks too empty. -
Full dry:
Allow all acrylic paint work to dry for at least 24 hours to ensure no moisture is trapped before sealing.
Add Some Glam
Mix a tiny pinch of fine gold glitter into your copper paint for the center spots. Under the epoxy layer, this will give the leopard print a subtle, high-end shimmer.
Step 4: Sealing & Finishing
-
Mix the epoxy:
In a ventilated area, mix equal parts A and B of your epoxy resin in a silicone cup. Stir slowly for 3-5 minutes to minimize bubbles. -
Apply the seal:
Mount the tumbler on your turner and turn it on. While wearing gloves, pour the resin onto the tumbler and use your finger to spread it evenly from top to bottom. -
Smooth the edges:
Pay close attention to the rim and the bottom edge. Ensure the resin coats the paint but doesn’t pool underneath the cup. -
Pop bubbles:
Quickly pass a heat gun or torch over the spinning tumbler to pop any micro-bubbles in the resin. -
Cure:
Let the tumbler spin for 6-8 hours, then turn off the spinner and let it cure on the drying rack for another 12-24 hours until hard.
Once fully cured, your wild new tumbler is ready to accompany you on your daily adventures
Drip Art Tumbler Melt Effect
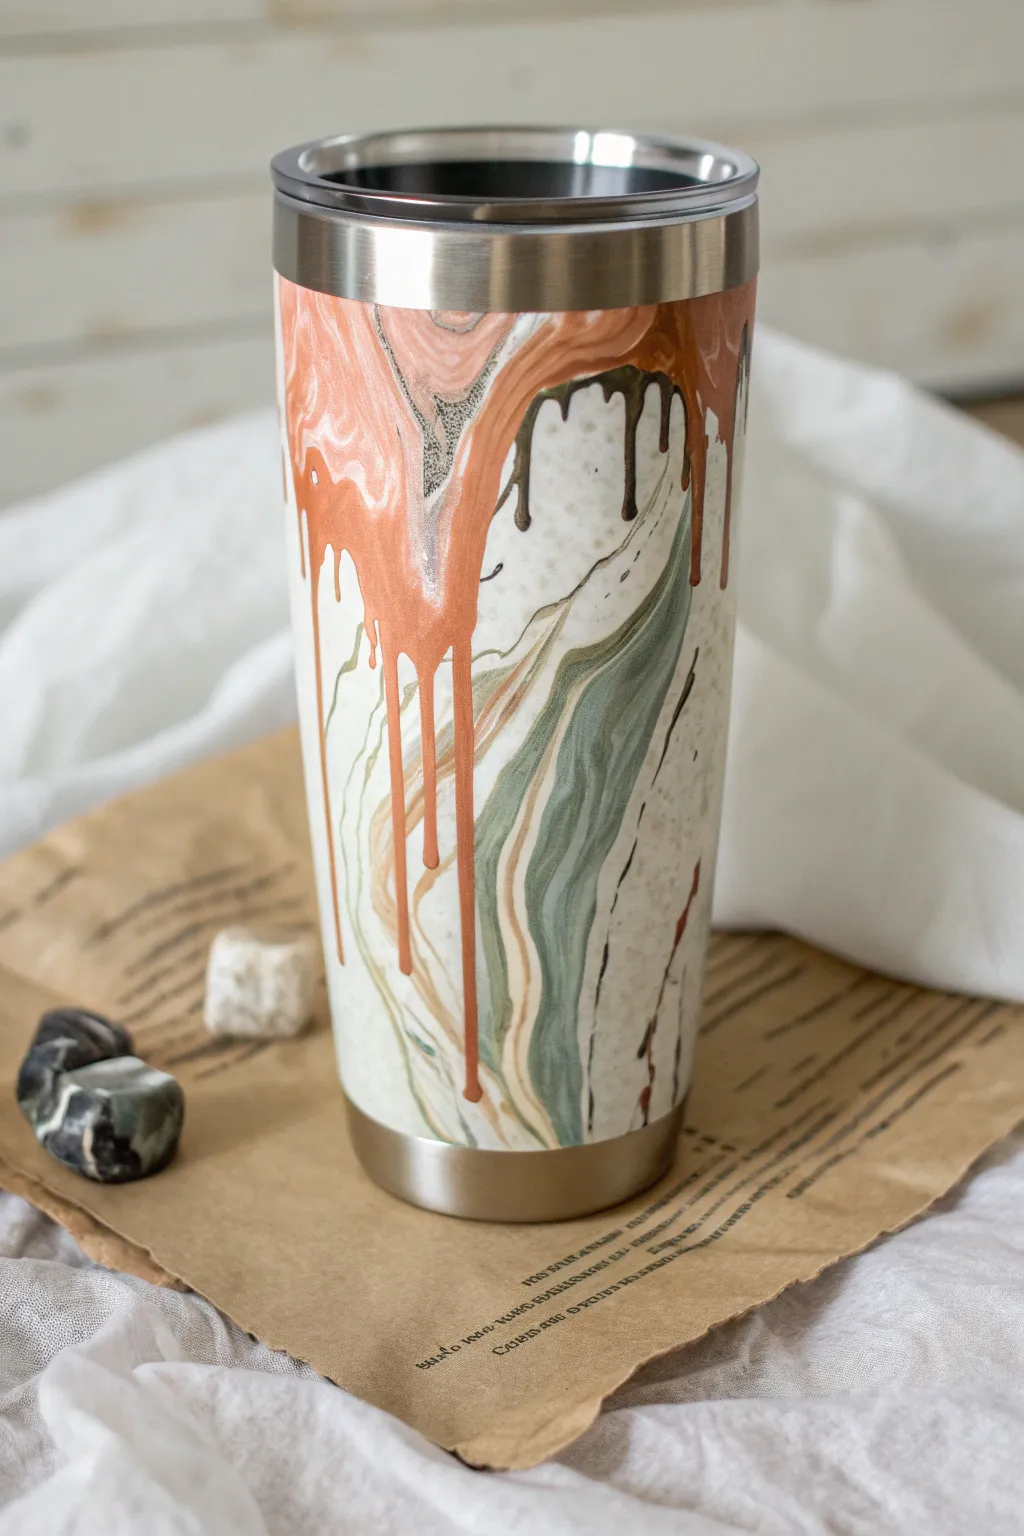
This stunning tumbler combines the sophisticated flow of hydro-dipped marbling with the playful, trendy look of a metallic melt. The result is an elegant, organic piece that juxtaposes soft sage and cream tones with striking copper drips.
Step-by-Step Guide
Materials
- Stainless steel tumbler (20 oz skinny or similar)
- White spray paint (as a base)
- Spray paints in cream/beige, sage green, and white
- Metallic copper acrylic paint (high viscosity/heavy body)
- Metallic bronze or dark gold acrylic paint
- Large bucket or container (deep enough to submerge standard tumbler)
- Painter’s tape and electrical tape
- Squeezable condiment bottles or piping bags
- Epoxy resin (two-part) and mixing cups
- Gloves and stir sticks
- Fine-grit sandpaper (400-600 grit)
- Rubbing alcohol
- Cup turner (highly recommended)
Step 1: Prepping and Base Coat
-
Sand the surface:
Begin by scuffing the entire surface of your stainless steel tumbler with fine-grit sandpaper. This creates a microscopic texture that helps the paint adhere permanently. -
Clean thoroughly:
Wipe the tumbler down with rubbing alcohol and a lint-free cloth to remove any sanding dust or oils from your hands. -
Mask off areas:
Tape off the top rim (inside) and the bottom steel rim (if you want that exposed look shown in the image) using electrical tape for sharp lines and painter’s tape for coverage. -
Apply the white base:
Spray paint the entire tumbler with a matte or satin white primer. Do light, even coats to avoid drips. Let this base coat dry completely (usually 2-4 hours).
Step 2: Hydro-Dipping the Marble Effect
-
Prepare the water bath:
Fill a bucket with tepid water. The temperature matters—if it’s too cold, the paint skins over too fast; too hot, and it disperses too thinly. -
Layer the colors:
Spray your chosen colors (cream, sage green, white) directly onto the center of the water’s surface. Alternate colors, spraying for just a second each time to create a bullseye pattern. -
Swirl the pattern:
Use a stir stick to gently break the concentric circles and swirl the paint floating on the surface. Don’t overmix, or the colors will turn muddy; aim for distinct ribbons of color. -
Dip the tumbler:
Wearing a glove, hold the tumbler by the handle (or use a PVC pipe insert) and slowly dip it into the water at a 45-degree angle, twisting slightly as you submerge it to catch the swirl pattern completely. -
Clear and remove:
While the tumbler is underwater, blow on the surface to disperse excess paint, then pull the tumbler out quickly. Set it aside to dry fully for at least 24 hours.
Drip Disaster?
If your drips are running too fast and reaching the bottom, flip the tumbler upside down immediately! Gravity will pull the paint back toward the rim, saving your design.
Step 3: Creating the Metallic Melt
-
Seal the marble:
Apply a thin layer of epoxy resin or a clear gloss spray sealant over the dried hydro-dip to protect the pattern. If using epoxy, let it cure until tack-free. -
The copper mix:
Mix your metallic copper acrylic paint with a tiny amount of water or pouring medium if it’s too thick. You want a consistency like warm honey—thick enough to ooze slowly, but not run off immediately. -
Start the rim drip:
Place the tumbler upright. Using a squeeze bottle or a spoon, carefully deposit the copper paint along the very top edge of the taped rim. -
Encourage the drips:
Gently tap the tumbler on the table or tilt it slightly to encourage the paint to run down in uneven, organic drips. I find using a toothpick helps guide specific drips exactly where you want them. -
Add accent drips:
Once the copper is settled but still wet, add a few smaller accent drips using the darker bronze metallic paint. Place these in the negative spaces between the large copper drips for depth. -
Let the drips set:
Allow the thick paint drips to dry completely. Because the paint is thick, this might take overnight. Ensure it is fully hardened before proceeding.
Add Subtle Shimmer
Mix a tiny pinch of fine copper glitter or mica powder into your final layer of clear epoxy. This adds a hidden sparkle that only catches the light at certain angles.
Step 4: Final Seal
-
Remove tape:
Carefully peel away your masking tape. If the paint bridged over the tape, score the edge lightly with an X-Acto knife first to prevent peeling. -
Mix final epoxy:
Mix a final batch of two-part epoxy resin. Stir slowly to minimize bubbles. -
Apply and turn:
With the cup on the turner, apply a smooth, even layer of epoxy over the entire exterior, sealing both the marble and the 3D texture of the drips. Use a heat gun quickly to pop bubbles. -
Cure:
Let the tumbler spin for 8-12 hours until the epoxy is hard, then let it sit for another 24 hours to fully cure.
Now you have a gorgeous, durable piece of functional art perfect for your morning coffee
Textured Tumbler Painting With Raised Details
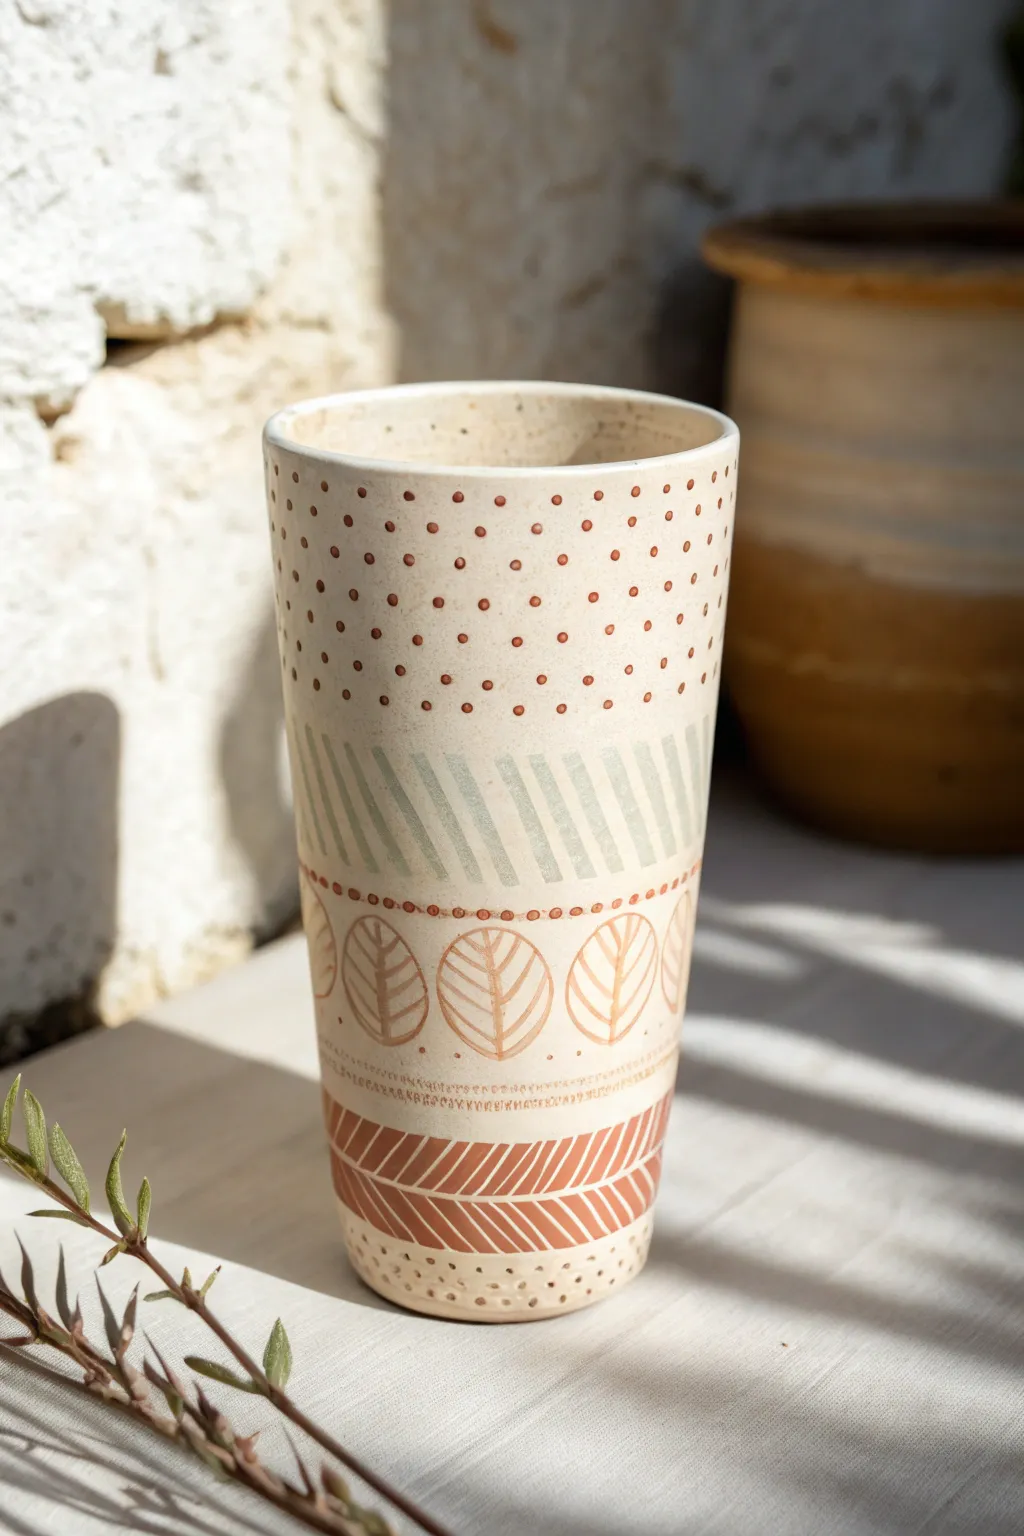
Recreate the artisan charm of handmade pottery with this textural painting project. By combining matte colors with raised elements, you can transform a plain ceramic bisque tumbler into a stunning piece of functional decor that feels as good as it looks.
How-To Guide
Materials
- Bisque fired ceramic tumbler (unglazed)
- Puffy paint or dimensional fabric paint (Terracotta, Cream, Sage Green)
- Acrylic paints (matte finish in Cream, Terracotta, Sage Green)
- Flat shader brushes (medium)
- Fine liner brush
- Pencil
- Ruler or measuring tape
- Painter’s tape (optional)
- Clear matte sealant spray
Step 1: Planning and Base Work
-
Clean and prep:
Begin by wiping down your bisque tumbler with a damp cloth to remove any kiln dust. Let it dry completely for about 10 minutes. -
Establish the cream base:
Apply a base coat of matte cream acrylic paint to the entire exterior. I like to do two thin coats rather than one thick one for the smoothest finish. -
Section off the design:
Using a pencil and a ruler, lightly mark horizontal rings around the tumbler to designate your different pattern zones. You’ll need five distinct sections for this specific design.
Clean Lines Pro-Tip
Rest your painting hand’s pinky finger on the table or a dry part of the cup for stability. This anchors your hand, making it much easier to pipe consistent dots and straight lines.
Step 2: Creating the Upper Patterns
-
Dot the top section:
In the top section, use terracotta dimensional paint (directly from the applicator tip) to create rows of small, evenly spaced dots. Stagger the rows slightly for a softer look. -
Paint the diagonal stripes:
Moving to the second section down, mix a watered-down sage green acrylic paint. Use a flat shader brush to paint diagonal, parallel stripes. The watered-down paint mimics a watercolor glaze effect. -
Add texture to stripes:
Once the green stripes are dry, go over every other stripe with a very thin line of clear or cream dimensional paint to add subtle tactile variation.
Step 3: Painting the Leaf Band
-
Outline the leaves:
In the middle band, use a fine liner brush and terracotta acrylic paint to sketch simple oval leaf shapes. They should be large and fill the height of the band. -
Fill in leaf veins:
Paint a center line down each leaf, then add curved veins extending outward toward the edges. Keep your hand loose; imperfections add to the handmade feel. -
Frame the band:
Use your dimensional paint to create a row of tiny dots along the top and bottom borders of this leaf section, framing your artwork. -
Add a dashed border:
Just below the bottom row of dots, paint a very fine, dashed line horizontally around the circumference using the terracotta color.
Level Up: Texture Play
Mix baking soda into your acrylic paint for the base coat before starting the pattern. This creates a gritty, sandy stone texture that makes the piece look like ancient pottery.
Step 4: Detailed Lower Sections
-
Create the chevron base:
For the fourth section, switch to a darker terracotta dimensional paint. Draw a bold herringbone or chevron pattern. The raised paint here is crucial for grip and aesthetics. -
Fill the chevrons:
If you want more contrast, use a small brush to fill in the spaces between your raised chevron lines with a slightly lighter terracotta acrylic wash. -
Finish the bottom edge:
For the final bottom section, return to the dotting technique. Create three rows of tiny dots. Make the top two rows terracotta and the very bottom row a darker brown or sage for contrast.
Step 5: Finishing Touches
-
Dry thoroughly:
Allow the tumbler to sit undisturbed for at least 24 hours. The dimensional paint takes the longest to cure fully. -
Seal the work:
Spray the entire exterior with a clear matte sealant. This protects the acrylic from moisture and ensures your raised details stay put.
Enjoy using your new custom tumbler for your morning tea or as a stylish holder for your paintbrushes
Glow-Effect Neon Tumbler Painting
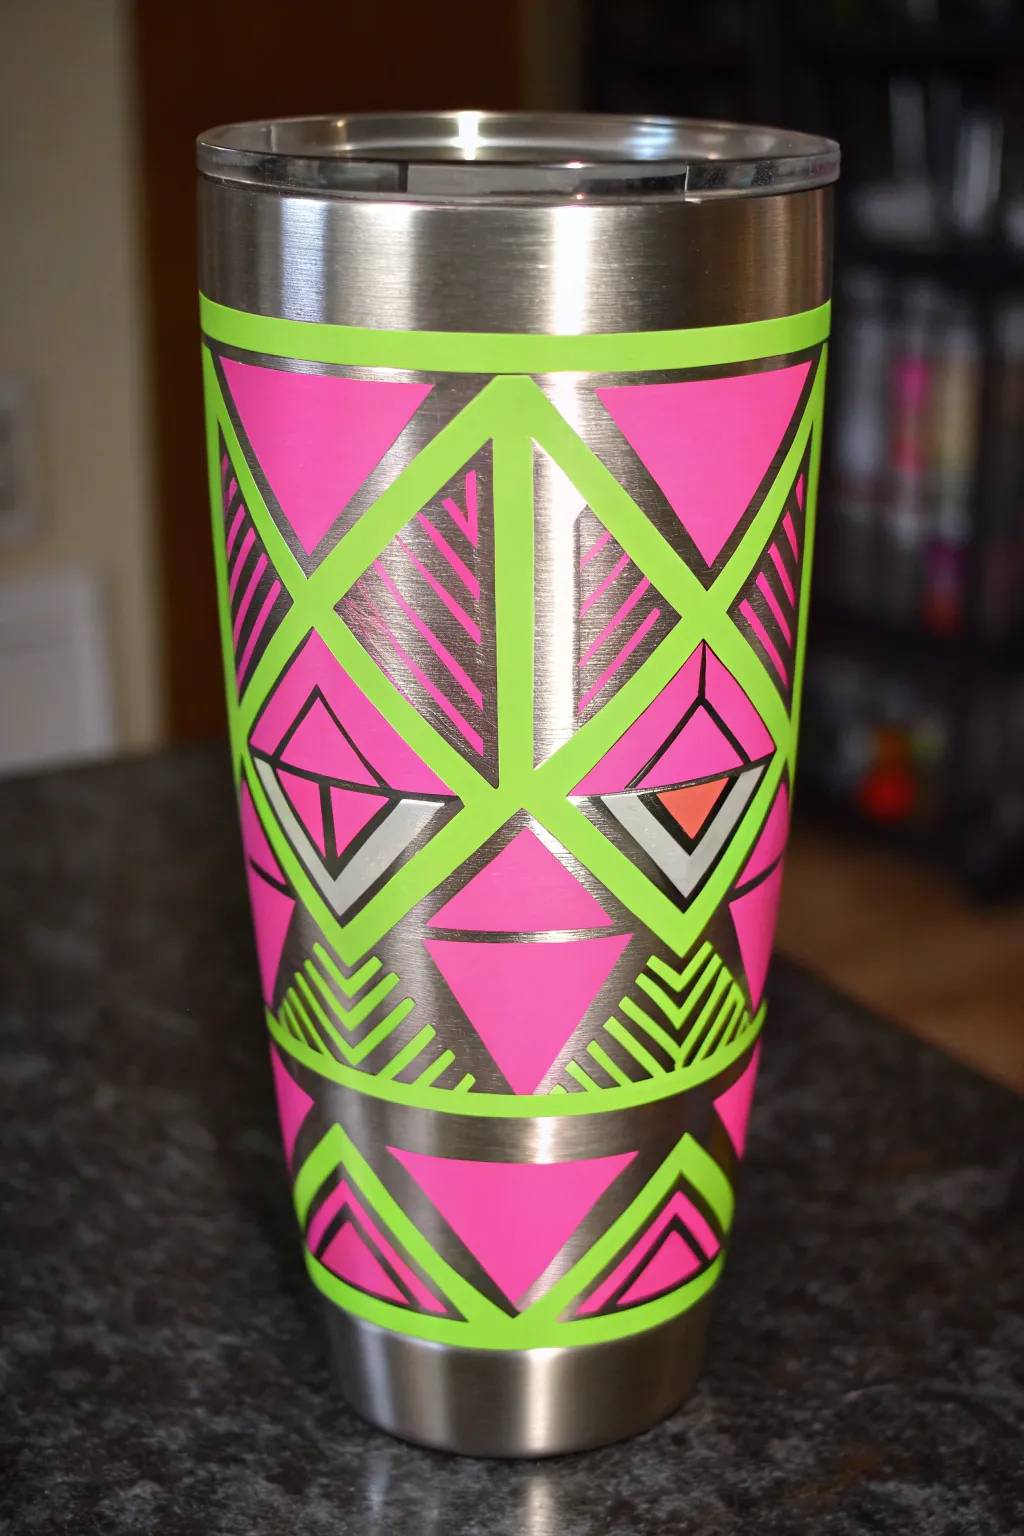
Transform a plain stainless steel tumbler into an 80s-inspired masterpiece with this striking geometric design. By utilizing the raw metal as a design element alongside neon lime and hot pink vinyl, you achieve a unique ‘negative space’ effect that really pops.
Step-by-Step Tutorial
Materials
- Stainless steel tumbler (20oz or 30oz, unpainted)
- Permanent adhesive vinyl (Hot Pink)
- Permanent adhesive vinyl (Neon Lime Green)
- Holographic or metallic grey vinyl (optional accent)
- Transfer tape
- Weeding tool
- Scraper tool
- Cutting machine (Cricut or Silhouette)
- Isopropyl alcohol and lint-free cloth
- Masking tape (for hinge method)
Step 1: Preparation & Design
-
Prepare the surface:
Start by cleaning your stainless steel tumbler thoroughly with isopropyl alcohol and a lint-free cloth to remove any oils or fingerprints. This ensures maximum adhesion for the vinyl. -
Select your pattern:
Choose a digital geometric vector file (SVG) that features triangles, diamonds, and chevron patterns. You want a design that has a thick framework (which will be green) and inset shapes (which will be pink). -
Separate the layers:
In your cutting machine software, separate the design into two main layers: the ‘skeleton’ or outline grid, and the inner geometric fill shapes. Size the entire design to wrap fully around your specific tumbler dimensions.
Bubbles Won’t Budge?
If a bubble is stubborn, heat the vinyl slightly with a hair dryer (low heat) for just 3-5 seconds. The warmth makes the vinyl pliable, letting you push the air out easily.
Step 2: Cutting & Weeding
-
Cut the outline layer:
Load the Neon Lime Green vinyl onto your cutting mat. Adjust your blade settings for standard glossy vinyl and cut the ‘skeleton’ outline layer. -
Cut the fill layer:
Load the Hot Pink vinyl next. Cut the solid geometric shapes (triangles and diamonds) that fit inside the green framework. If you want the metallic grey accents shown in the photo, cut those specific shapes from grey or holographic vinyl now. -
Weed the designs:
Use your weeding tool to carefully remove all the excess vinyl around your cut lines. Be gentle with the green outline, as thin geometric strips can sometimes distort if pulled too hard.
Pro Tip: The Gap Trick
Deliberately leave a 1mm gap between the green grid and the pink fill. The shiny steel peeking through creates a faux-metallic outline that looks incredibly professional.
Step 3: Application: The Outline
-
Apply transfer tape:
Cut a piece of transfer tape slightly larger than your green outline design and smooth it down firmly over the vinyl using a scraper tool. -
Align on the cup:
I prefer to lay the cup on a secure stand or cradle. Wrap the green design around the cup to check alignment without removing the backing paper yet. Use piece of masking tape to hold it in place once centered. -
Apply the green frame:
Using the hinge method, peel back one side of the backing paper, cut it off, and smooth the vinyl onto the steel. Then, work your way around the cup, smoothing from the center outward to prevent bubbles. -
Remove tape:
Slowly peel back the transfer tape at a sharp 45-degree angle. If the green vinyl lifts, lay the tape back down and burnish it again with your scraper.
Step 4: Application: The Fill
-
Transfer the pink shapes:
Apply transfer tape to your sheet of Hot Pink geometric shapes. You can move them all at once if the spacing matches the grid perfect, but I find it safer to cut the sheet into smaller sections for easier handling. -
Inset the pink vinyl:
Carefully place the pink triangles and diamonds into the empty spaces of the green grid. Aim for centered placement so a thin sliver of raw stainless steel shows between the pink fill and the green border. -
Add texture accents:
Notice the striped texture on the original cup? You can create this by applying vinyl that has fine lines cut out of it, allowing the metal to show through as stripes. Apply these textured pieces in alternating sections. -
Apply the eye detail:
Locate the ‘eye’ motif in the center of the design. Place the metallic grey triangle first, then layer the smaller orange or pink accent triangle on top of it for depth. -
Burnish down:
Once all pieces are placed, run your scraper tool (or a credit card wrapped in a cloth) over the entire design to ensure every edge is sealed tight against the metal.
Step 5: Finishing
-
Final check:
Inspect the cup for any air bubbles. If you find one, prick it with a fine pin and smooth the air out with your finger. -
Seal (Optional):
While permanent vinyl is durable, applying a thin layer of food-safe epoxy resin over the entire tumbler will lock the design in permanently and give it a glossy, glass-like finish. Follow the resin manufacturer’s instructions for mixing and curing.
Enjoy your brilliantly vivid neon tumbler on every hydration break

Have a question or want to share your own experience? I'd love to hear from you in the comments below!