
If you’re in the mood to paint something festive, a turkey is basically the perfect canvas for color, pattern, and personality. I pulled together my favorite turkey painting ideas—from super simple and classic to artsy, unexpected twists you can totally make your own.
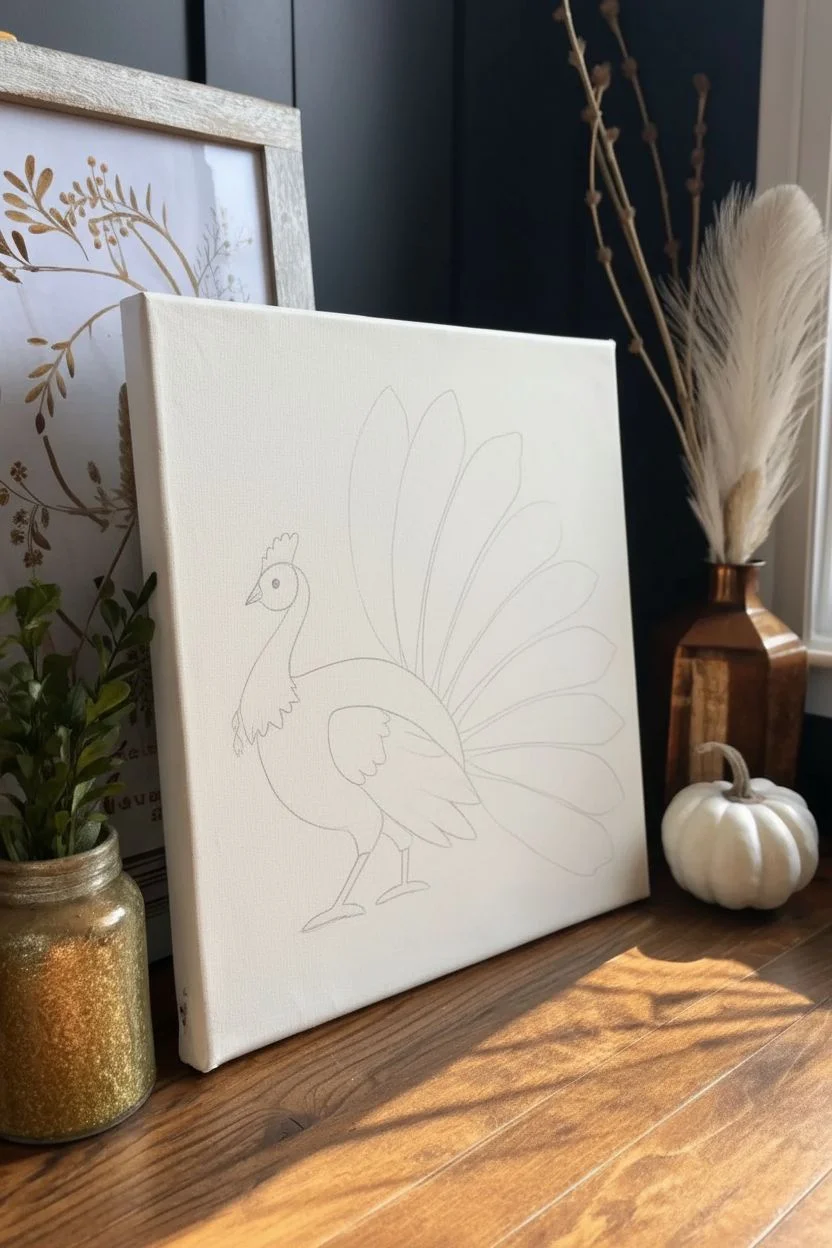
Cute Cartoon Turkey With Big Eyes
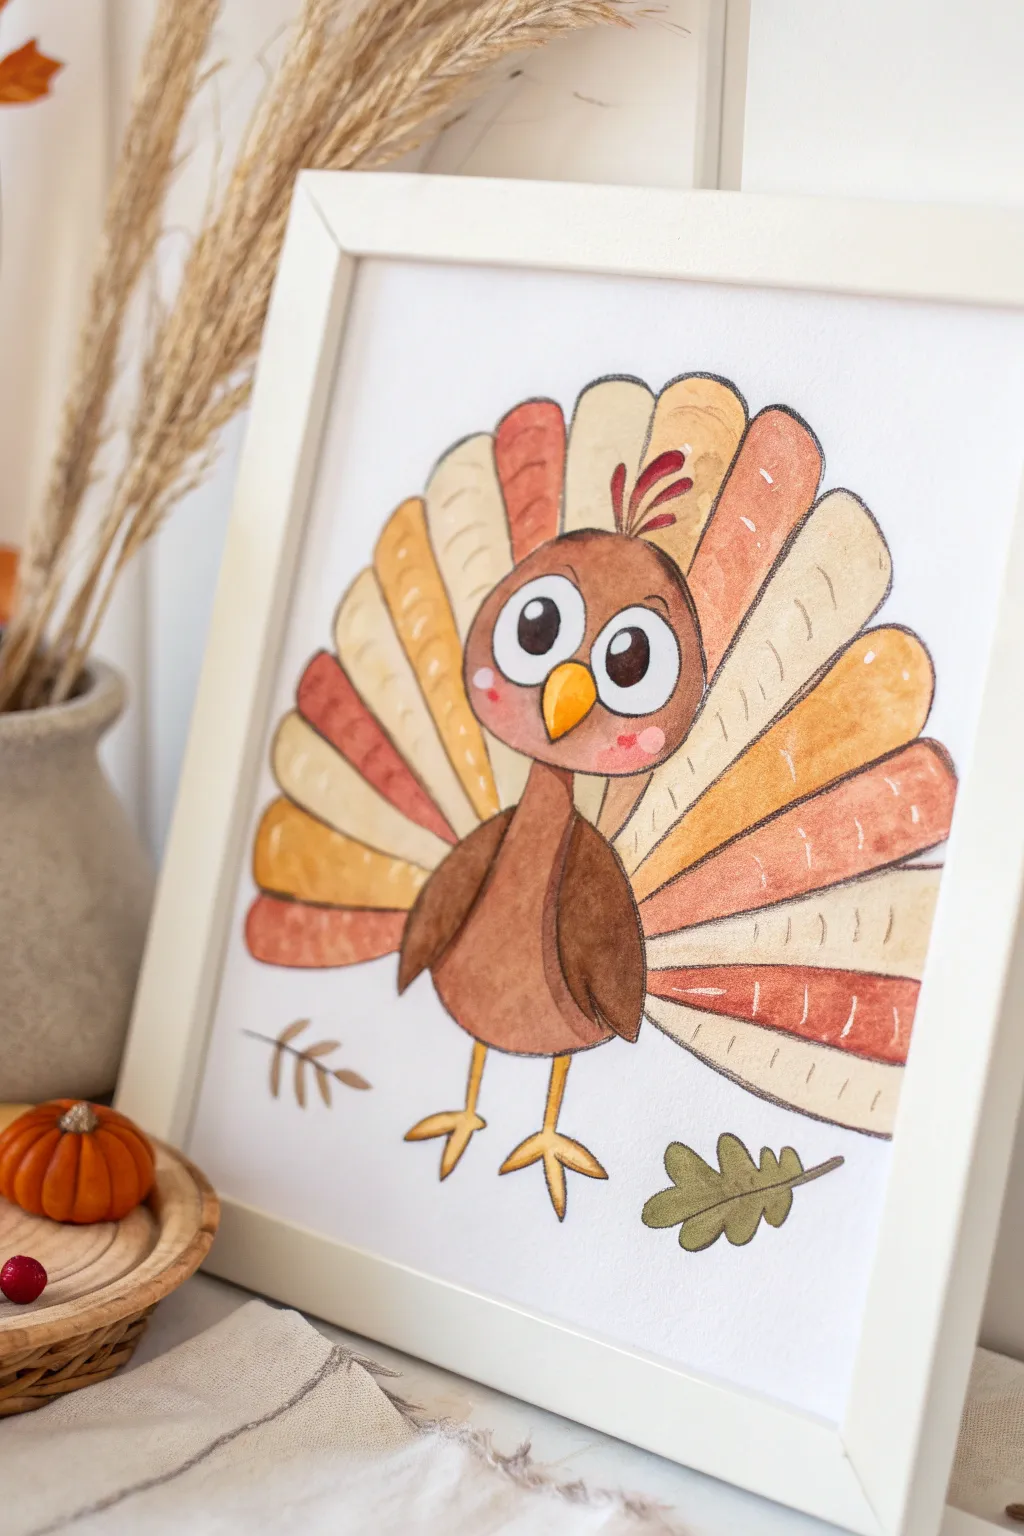
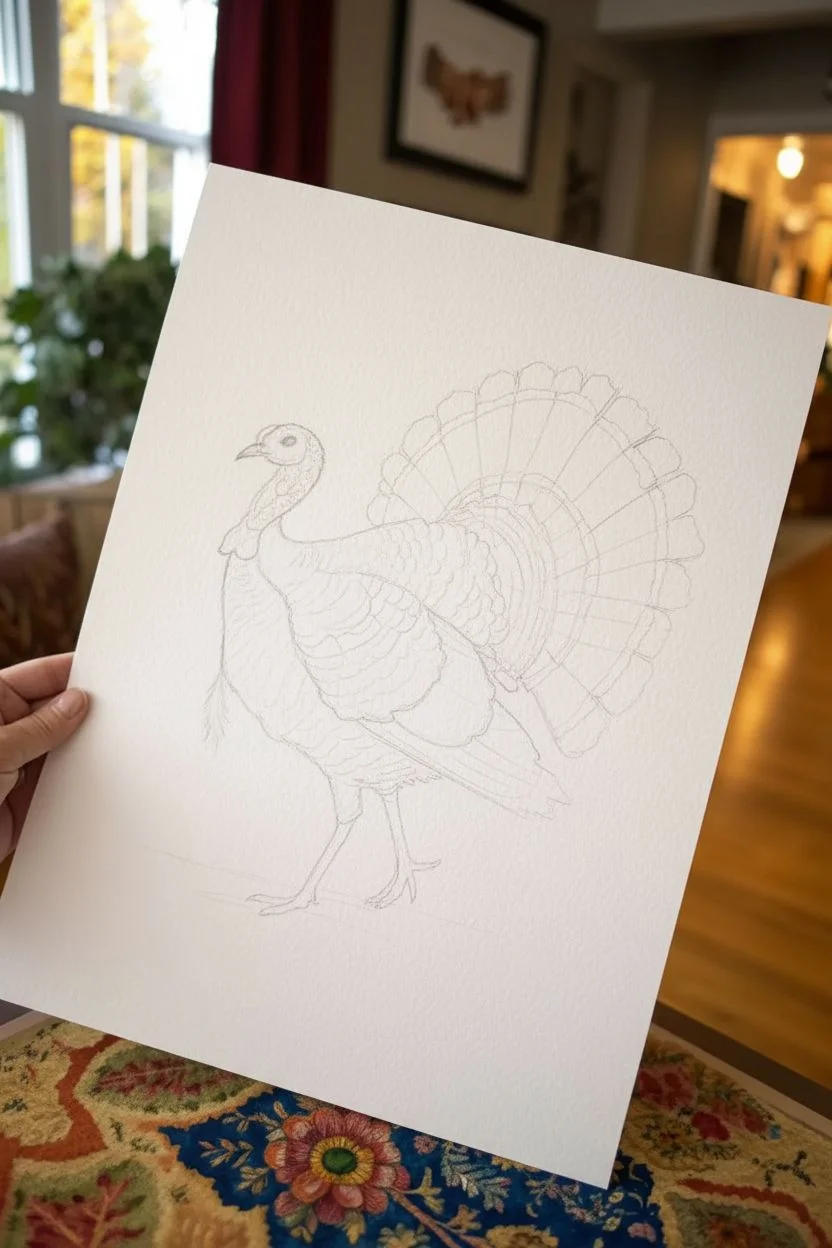
This charming turkey painting captures the fun of Thanksgiving with large, expressive eyes and a warm, autumnal color palette. The soft watercolor washes give it a cozy, handcrafted feel that looks wonderful framed on a mantle or holiday table.
How-To Guide
Materials
- Cold press watercolor paper (140lb/300gsm)
- Watercolor paint set (focus on ochre, burnt sienna, rust, and orange)
- Fine tip black waterproof pen (0.3mm or 0.5mm)
- Round brushes (size 4 and 6)
- Pencil and eraser
- Paper towels
- Jar of clean water
- White or light wood frame
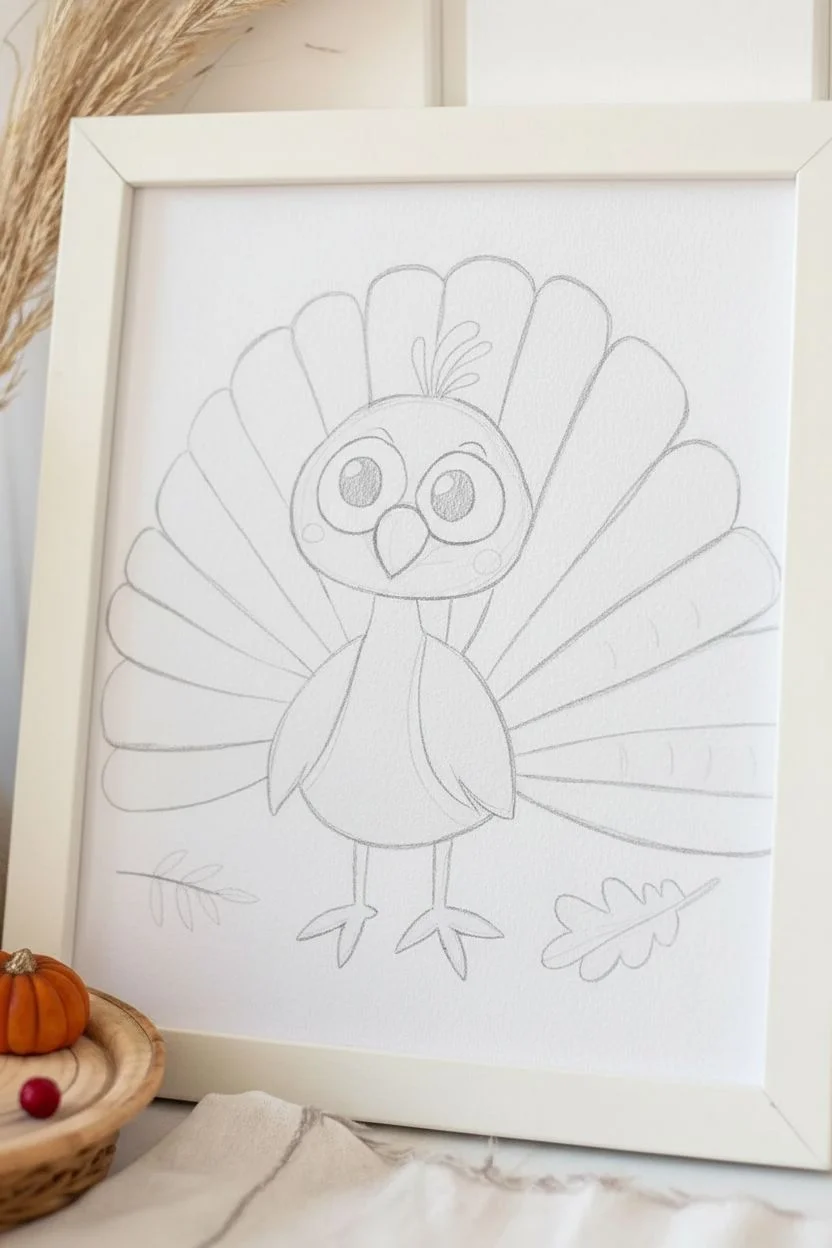
Step 1: Sketching the Turkey
-
Draft the head:
Start by lightly sketching a rounded oval shape for the turkey’s head in the center of your paper. Leave enough room above for the feathers and below for the legs. -
Add the big eyes:
Inside the head oval, draw two large circles that touch in the middle. These oversized eyes are the key to the “cute” factor. Inside each, draw a smaller circle for the pupil, leaving a tiny white dot for a highlight. -
Draw the beak and body:
Place a small, upside-down triangle right between the eyes for the beak. Below the head, sketch a pear-shaped body that is slightly smaller than the head spread. -
Add wings and feet:
Draw two simple oval wings on the sides of the body. At the bottom, sketch two thin legs ending in three-toed feet. -
Fan out the tail:
Draw the tail feathers fanning out behind the turkey. Start with a central feather directly behind the head, then add about 4-5 feathers on each side, curving them slightly downward as you move outward.
Step 2: Inking the Outline
-
Trace over pencil lines:
Using your waterproof black pen, carefully go over your pencil sketch. Use a confident, consistent pressure for clean lines. -
Fill the pupils:
Color in the pupils completely black with the pen, being very careful to preserve the small white highlight circles you sketched earlier. -
Add dashed details:
Draw small vertical dashed lines inside the tail feathers to suggest texture. Keep these lines loose and varied for an organic look. -
Sketch floating leaves:
Add a simple fern shape to the left and an oak leaf shape to the right of the turkey’s feet. Ink these as well. -
Erase guidelines:
Wait at least 5-10 minutes for the ink to dry completely, then gently erase all visible pencil marks.
Bleeding Lines?
If your black ink runs when you paint, stop immediately. Your pen isn’t waterproof or hasn’t dried long enough. Use a hairdryer to set the ink before continuing with paint.
Step 3: Painting the Turkey
-
Paint the beak:
Dip your size 4 brush into a bright yellow-orange and fill in the beak. This small area dries quickly. -
Wash the body and head:
Mix a diluted brown (burnt sienna) with plenty of water. Paint the head and body, working around the eyes and beak. I like to keep the center of the face slightly lighter to add dimension. -
Darken the wings:
Use a slightly more concentrated brown mix (less water) for the wings so they stand out against the body. -
Add rosy cheeks:
While the head is damp (or re-wet slightly), dab two small spots of watered-down red or pink just below the eyes for flushed cheeks. -
Color the legs:
Use a golden yellow ochre to paint the thin legs and feet.
Pro Tip: Eye Sparkle
If you accidentally paint over the white highlight in the eye, don’t worry. Just use a white gel pen or a dot of white acrylic paint to add the sparkle back in at the very end.
Step 4: Painting the Feathers
-
Select your palette:
Prepare three distinct fall colors on your palette: a pale cream/beige, a warm golden yellow, and a rusty orange-red. -
Paint the first feather set:
Start by painting every third feather with the cream color. Painting non-adjacent sections helps wet paint from bleeding into neighboring feathers. -
Apply the gold tones:
Once the cream sections are dry, paint the next set of alternating feathers with your golden yellow mix. -
Finish with rust red:
Fill in the remaining feathers with the rust orange color. This alternating pattern creates a beautiful striped fan effect. -
Paint the loose leaves:
Use a muted olive green for the oak leaf on the ground and a light brown for the fern sprig. -
Final touches:
Once fully dry, you can add a tiny bit of red to the top of the head for the wattle/comb if desired, or leave it simple. Frame your work once completely dry.
Now your adorable Thanksgiving turkey is ready to greet guests with its wobbling charm


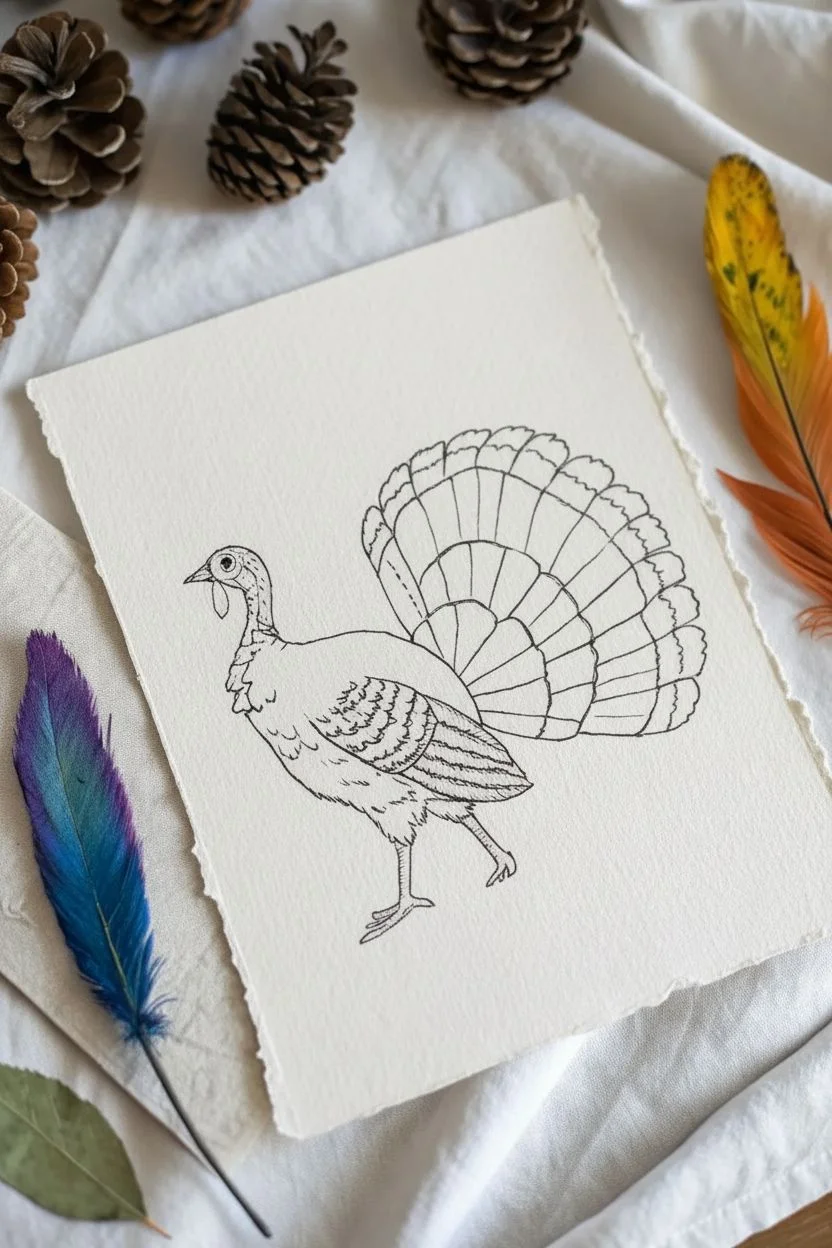
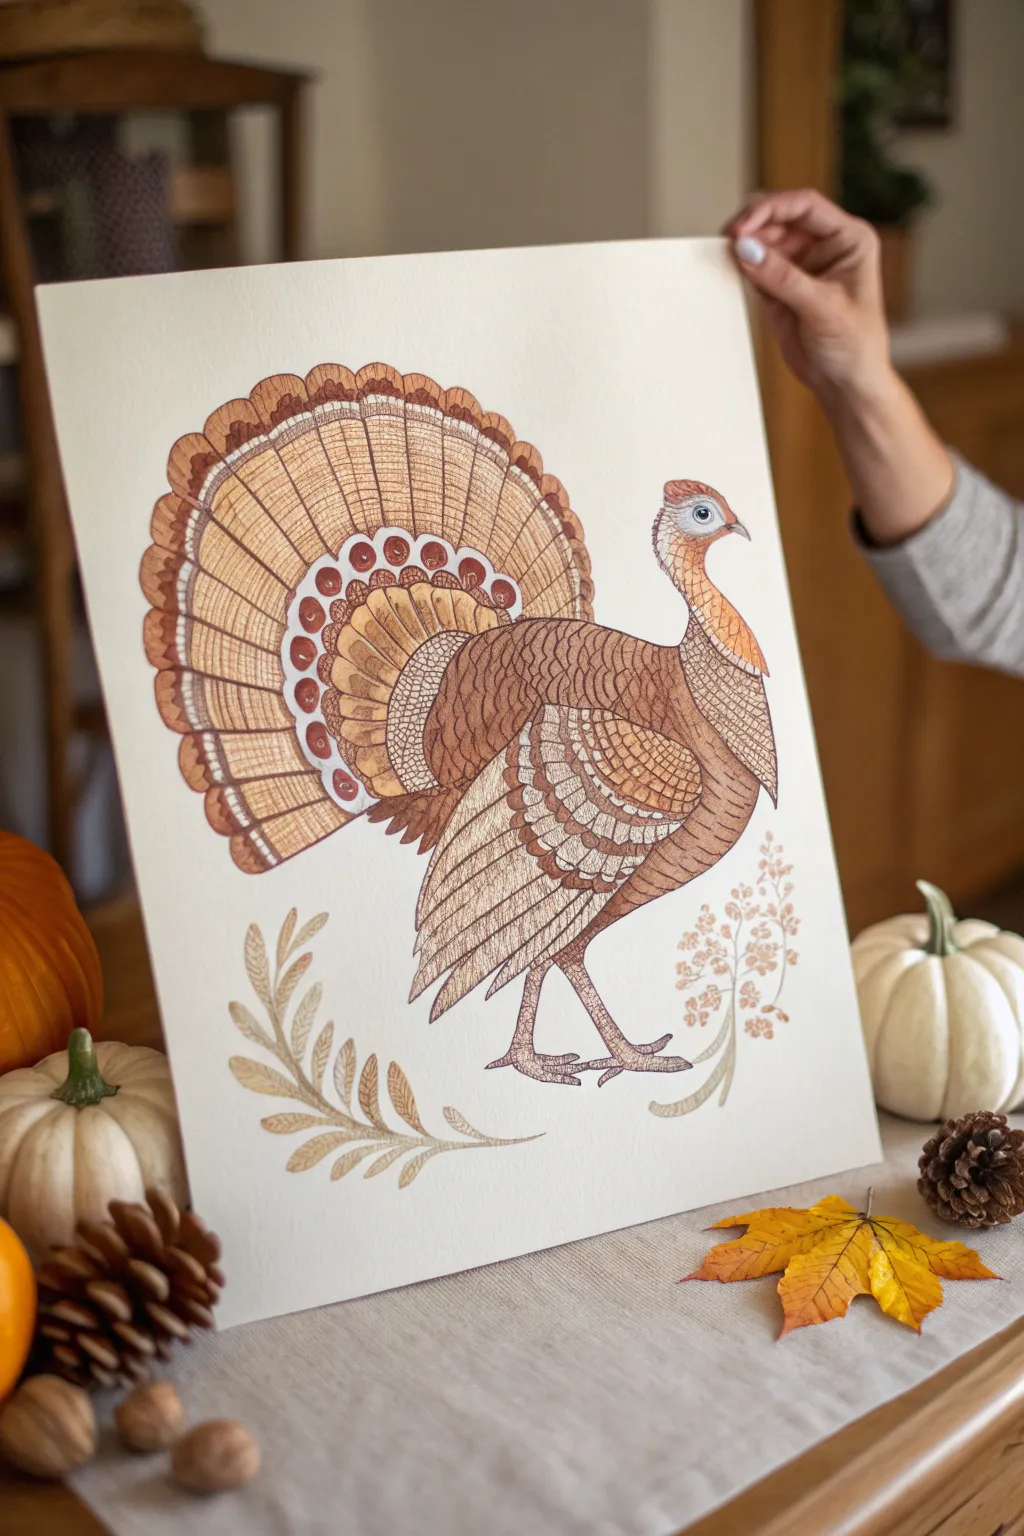
Classic Side-Profile Turkey in Autumn Colors
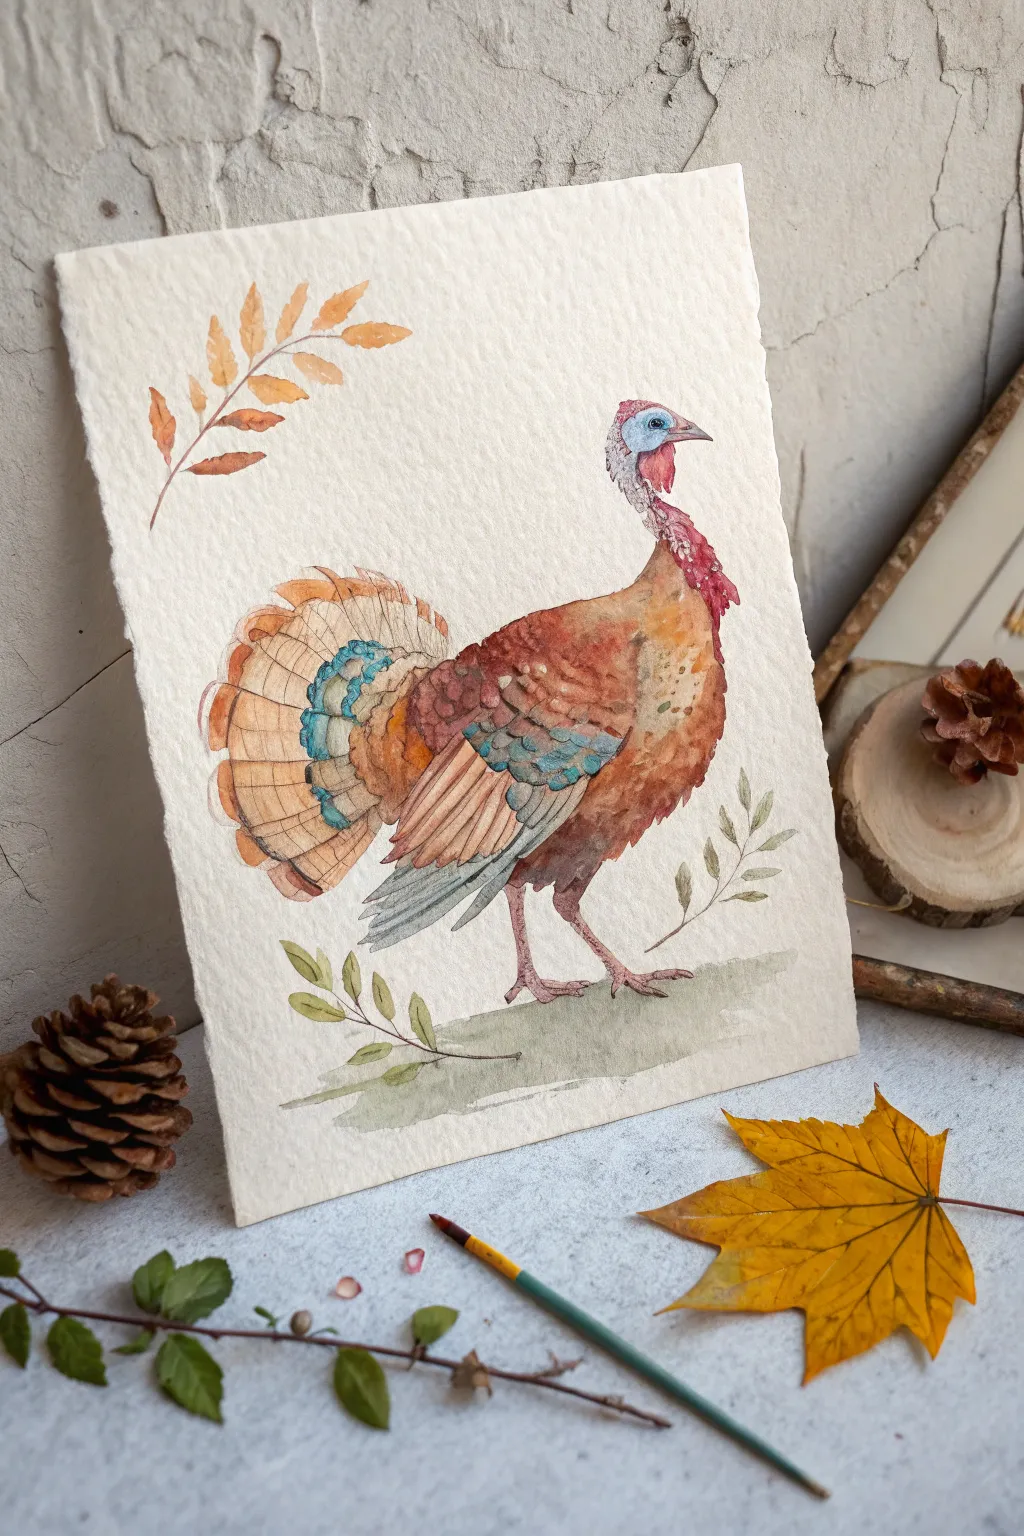
Capture the spirit of the season with this elegant, side-profile turkey painting, rendered in warm autumn hues of rust, ochre, and soft teal. This project emphasizes meticulous feather detailing and a classic illustrative style perfect for holiday decor.
Step-by-Step Guide
Materials
- Cold press watercolor paper (approx. 300gsm/140lb)
- Pencil (HB or H for light sketching)
- Kneaded eraser
- Watercolor paints (burnt sienna, yellow ochre, cadmium red, cerulean blue, payne’s gray, sap green)
- Fine detail brushes (sizes 0, 2, and 4)
- Clean water jar
- Paper towels
- Masking fluid (optional, for highlights)
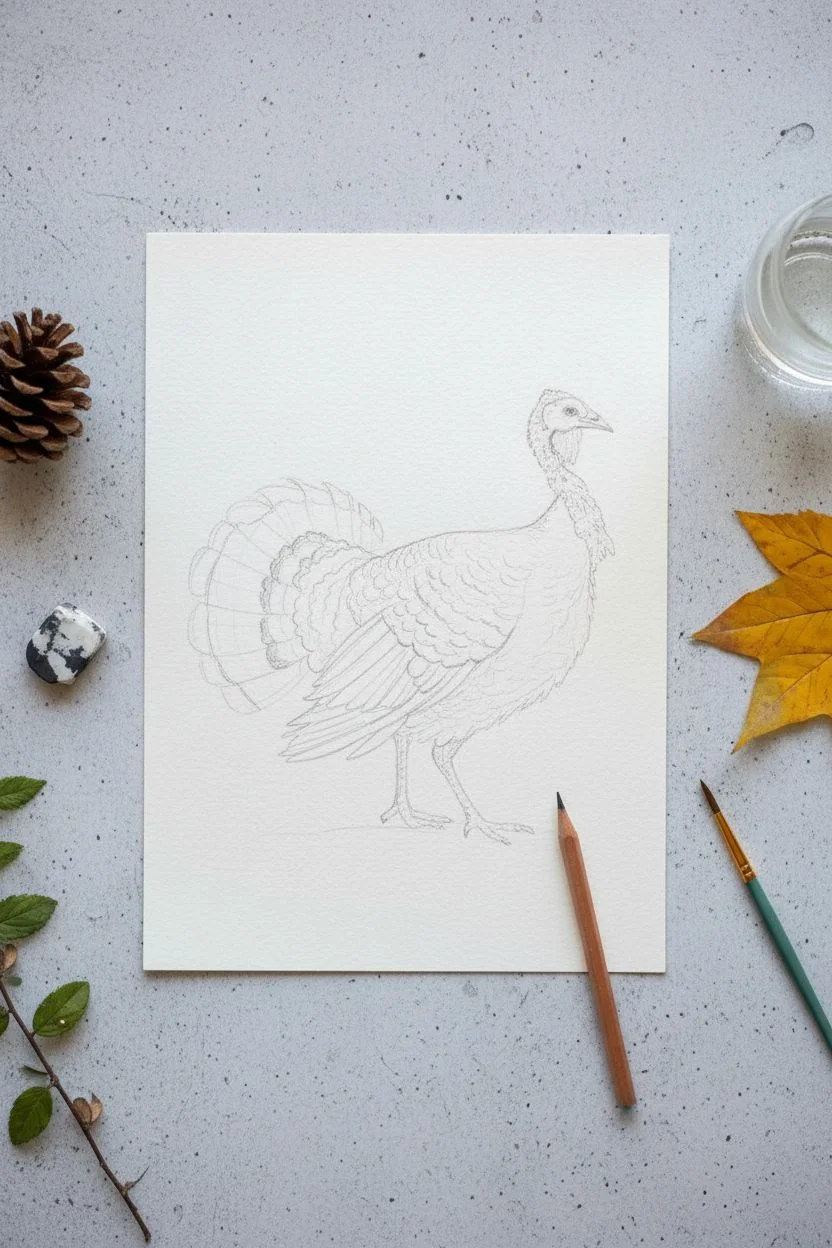
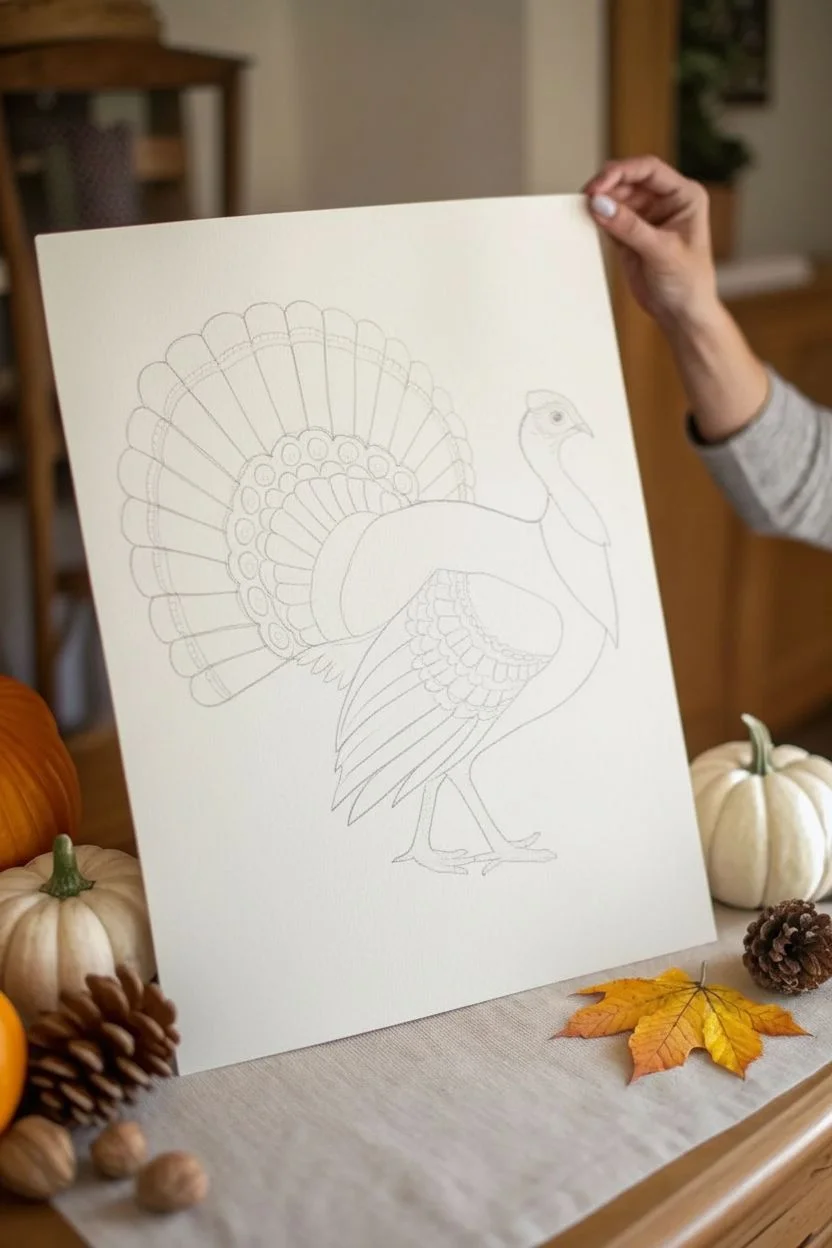
Step 1: Drafting the Form
-
Lightly sketch the outline:
Begin by lightly sketching the silhouette of the turkey. Focus on the distinct S-curve of the neck leading into the round body. Keep your pencil pressure very light so graphite doesn’t smudge into the paint later. -
Feature placement:
Map out the specific areas: the wattle and snood on the head, the layering of the wing feathers, and the broad fan of the tail. Mark the curved lines that will define the rows of feathers on the body. -
Refine the tail fan:
Draw the individual tail feathers, ensuring they radiate outward evenly. Add the scalloped edges where the colored bands will go, specifically marking the area for the teal secondary feathers.
Muddy Colors?
If your feathers lose definition and look muddy, let the paper bug-dry completely. Then, use a fine, semi-dry brush to re-establish the edges.
Step 2: Painting the Head and Neck
-
Base layer for the head:
Mix a very dilute wash of cerulean blue with a touch of gray. Apply this to the top of the head and the area around the eye, leaving the eye itself white for now. -
Adding the distinctive red:
While the blue is dry, mix a vibrant red using cadmium red and a touch of deeply concentrated pink or alizarin crimson. Paint the wattle (neck skin) with a bumpy, textured stroke to mimic the natural skin texture. -
Defining the eye and beak:
Use a size 0 brush with dark gray or black to carefully paint the pupil, leaving a tiny speck of white paper for the catchlight. Paint the beak with a light wash of gray-brown.
Level Up: Metallic Pop
Once your painting is fully dry, trace the teal feather edges with gold watercolor or a metallic pen for an iridescent effect.
Step 3: Building Body Texture
-
Underpainting the body:
Apply a wash of yellow ochre to the chest and upper back area. While this is still damp, drop in hints of burnt sienna to create a soft, blended transition between colors. -
Layering the breast feathers:
Once the underlayer is dry, use a size 2 brush to paint small, U-shaped feather scales. Use a mix of burnt sienna and rust red, keeping the edges slightly soft to suggest fluffiness. -
Darkening the lower body:
Move towards the underbelly using a darker mix of burnt sienna and a touch of brown. Paint larger, looser feather shapes here to suggest shadow and weight.
Step 4: The Wings and Tail
-
Painting the teal band:
Mix a specific teal color using sap green and cerulean blue. Carefully paint the decorative band of feathers on the wing and the tail fan. I like to let the paint pool slightly at the bottom of each feather scale for natural shading. -
Primary wing feathers:
For the long wing feathers pointing downward, use a mix of gray and light brown. Paint distinct, long stripes, leaving very thin gaps of white paper between them to separate the quills. -
Tail feather gradients:
Paint the main tail feathers with a wash of pale ochre. While wet, touch the outer edges with burnt orange to create a glowing rim effect. -
Detailing the tail:
Once dry, use a fine brush with dark brown to draw the separation lines between the tail feathers and add fine hatching marks for texture.
Step 5: Finishing Touches
-
Legs and feet:
Paint the legs using a pale pinkish-gray mix. When dry, use a very fine darker line to indicate the scales and sharp claws. -
Grounding shadow:
Mix a neutral greenish-gray wash. Apply a horizontal patch of color beneath the turkey’s feet to ground the figure, letting the edges fade out softly. -
Decorative foliage:
Surround the bird with simple botanical elements. Paint a sprig of leaves on the ground in olive green, and a floating branch above in autumn orange tones. -
Final assessment:
Step back and check your contrast. If the feathers look too flat, add small touches of concentrated dark brown to the deepest shadow areas under the wing and tail.
Allow your beautiful autumn bird to dry completely before framing or displaying on a mantel.


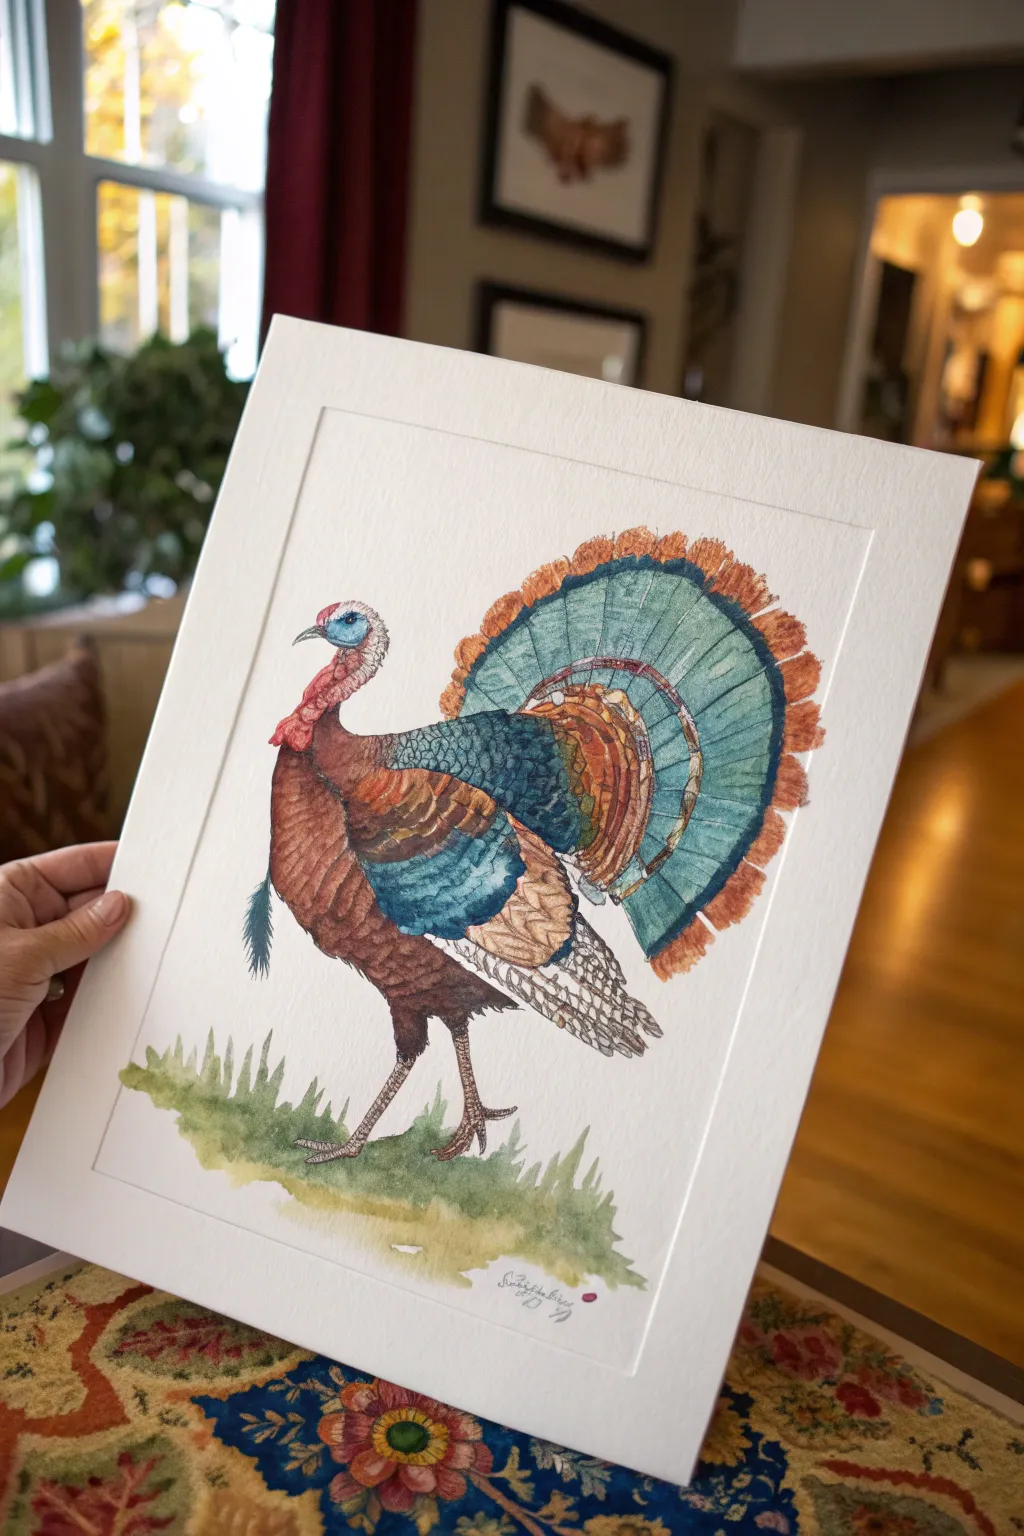
Rainbow Tail Feather Turkey for Maximum Color
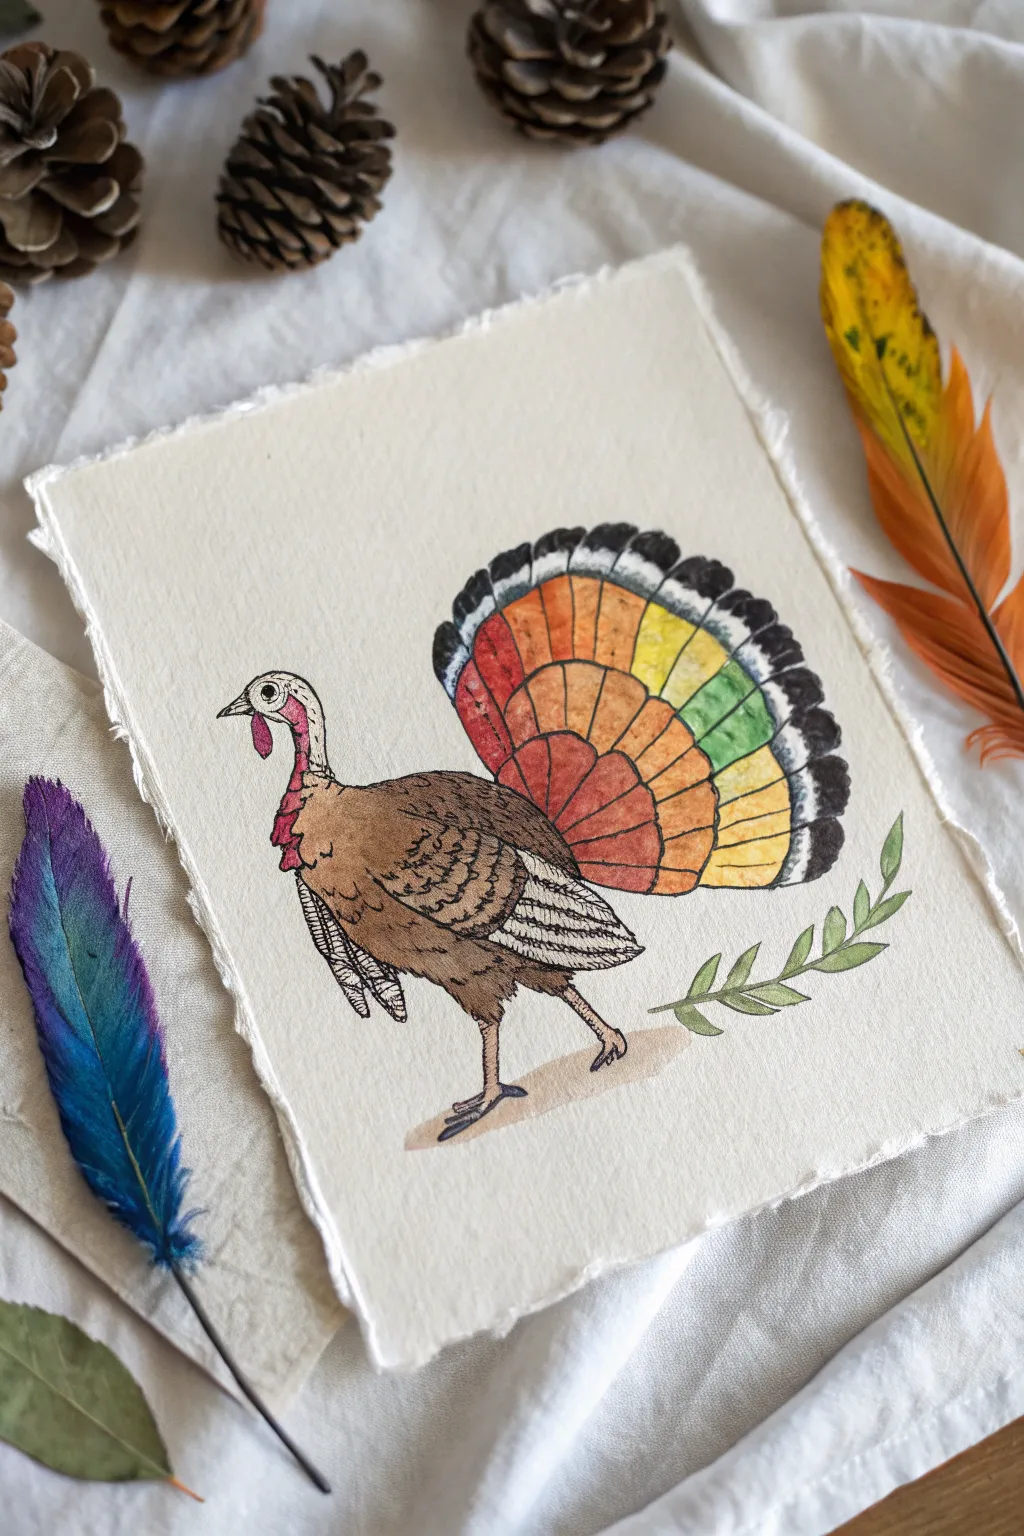
This charming project moves away from traditional fall earth tones to explore a vibrant spectrum on your turkey’s tail. Using a combination of ink outlines and watercolor washes, you’ll create a festive bird that feels both rustic and joyfully modern.
Detailed Instructions
Materials
- Cold press watercolor paper (deckle edge optional)
- Fine liner pen (waterproof, black, size 03 or 05)
- Watercolor paints (pan or tube)
- Small round brushes (size 2 and size 4)
- Pencil (HB) and eraser
- Clean water and paper towels
Step 1: Sketching the Outline
-
Body structure:
Begin by lightly sketching the turkey’s body shape in pencil. Think of a rounded, teardrop shape for the torso and a smaller oval for the head, connected by a slender neck. -
Adding feathers:
Sketch the fan of tail feathers behind the body. Draw a large semi-circle, then divide it into vertical segments like slices of a pie to represent individual broad feathers. -
Wing and leg details:
Add a wing on the side of the body, curving downward with layered feather shapes. Draw two sturdy legs walking forward, ensuring the feet feel grounded. -
Face details:
Refine the head shape, adding a small beak, a circular eye, and the wattle (the bumpy skin) draped over the beak and down the neck. -
Inking:
Trace over your pencil lines with a waterproof fine liner pen. Use a slightly jagged or broken line for the body feathers to suggest texture, while keeping the tail outlines smoother. -
Clean up:
Once the ink is completely dry, gently erase all underlying pencil marks to keep your watercolor paper pristine.
Step 2: Painting the Turkey
-
Body wash:
Mix a warm, light brown watercolor. Apply a wash over the main body, keeping the pigment lighter near the top of the back for a sense of volume. -
Wing texture:
While the body is still slightly damp, drop a darker brown into the wing area to separate it visually. I like to let this bleed slightly for a natural look. -
The wattle:
Paint the wattle and skin around the beak with a diluted crimson or pink, carefully avoiding the eye. -
Leg work:
Use a mix of brown and gray for the legs and feet. Add a tiny shadow on the ground beneath the feet using a very watery gray to ground the bird.
Muddy Colors?
If tail colors are turning brown, your brush isn’t clean enough between sections. Rinse thoroughly and change water often when switching from red/orange to green.
Step 3: The Rainbow Tail
-
Planning the gradient:
Decide on your color order. The example uses a warm-to-cool spectrum: red, orange, yellow, and green. -
Applying the first color:
Start on the left side of the tail fan with a vibrant red. Paint the first few segments, diluting the paint slightly as you move toward the next color section. -
Blending orange and yellow:
Paint the next segments orange, blending the wet edge slightly with the previous red. Continue into a sunny yellow for the center tail feathers. -
Finishing with green:
Complete the right side of the fan with a fresh leafy green. Keep the paint relatively transparent so the ink lines show through comfortably. -
Tail tips:
Paint the very tips of the tail feathers (the outer band) with black or dark gray, leaving small white gaps or ‘scallops’ to separate the dark tip from the rainbow section.
Stylistic Framing
Create the rustic look from the photo by carefully tearing the edges of your watercolor paper against a ruler instead of cutting it with scissors.
Step 4: Final Touches
-
Adding foliage:
Sketch a simple leafy branch near the turkey’s feet. Paint the leaves with the same green used in the tail to tie the color palette together. -
Deepening contrast:
Once the body is dry, go back with your fine liner to add small hatching lines on the wing and chest for shadow and feather texture. -
Checking values:
If the tail colors dried too light, add a second layer of glaze over each section to boost the vibrancy.
Display your colorful turkey on a mantle or use it as a unique place card for a bright autumn dinner setting


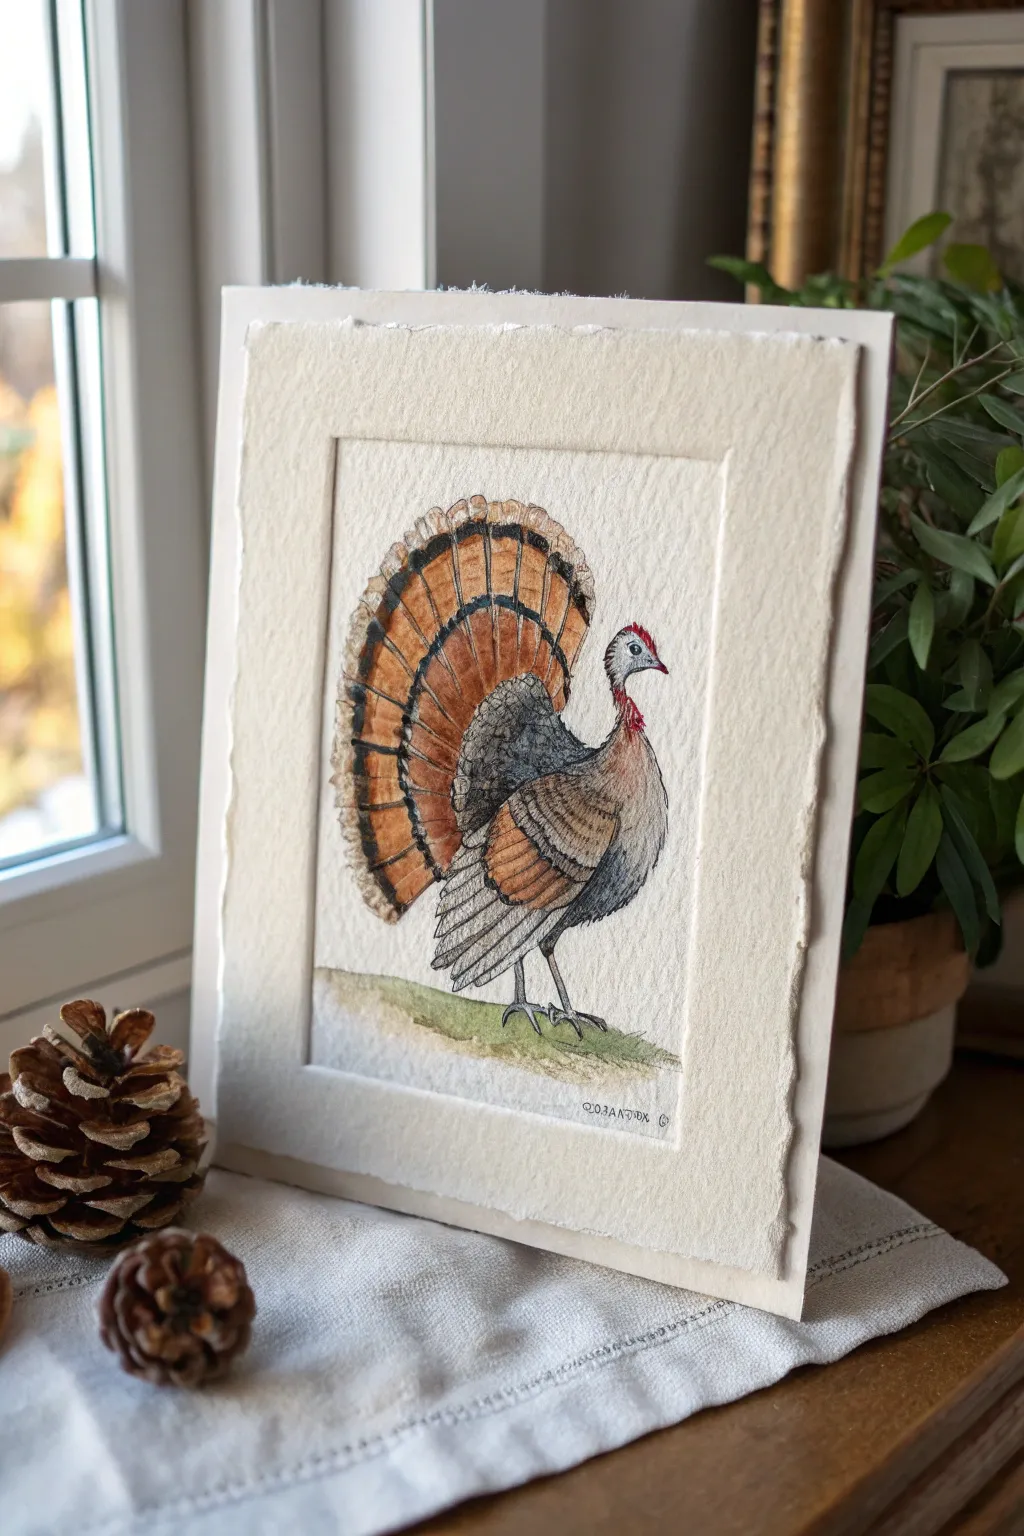
Pilgrim Hat Turkey for a Holiday Look

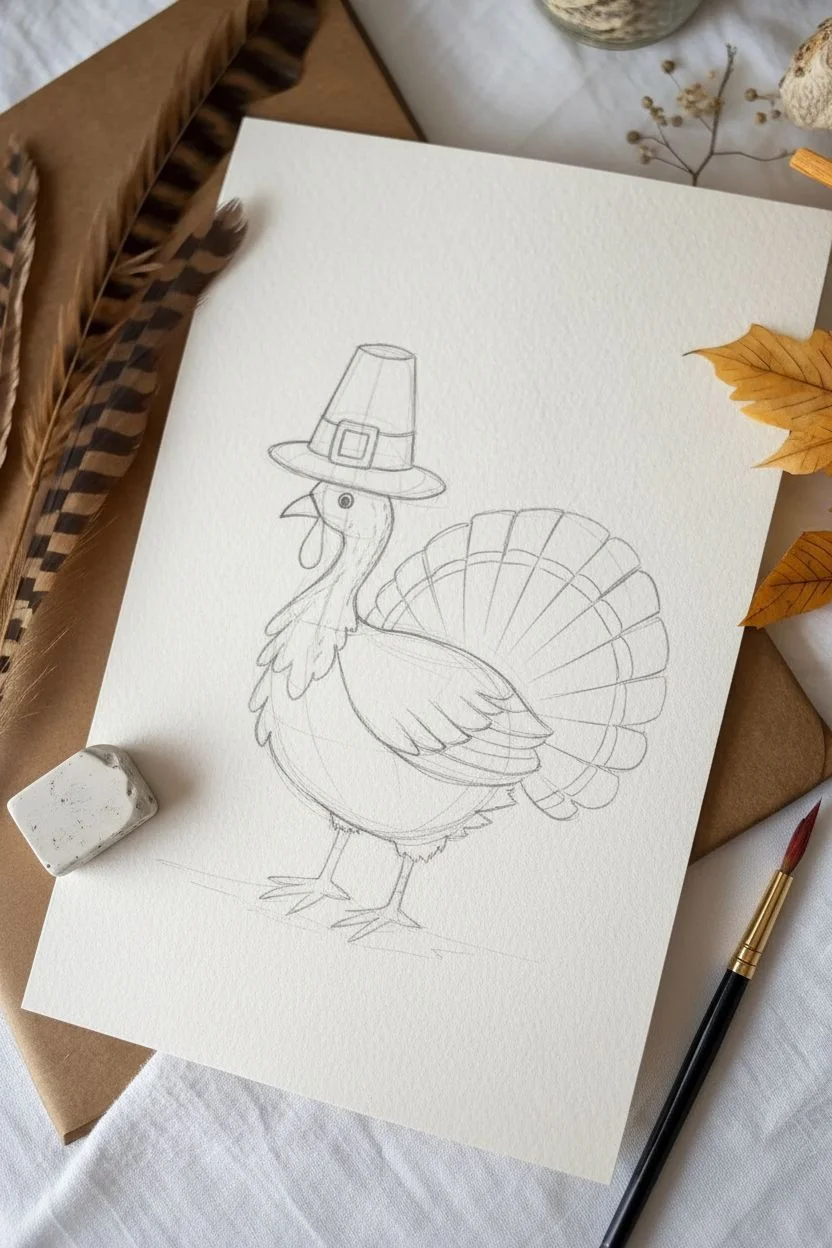
Celebrate the Thanksgiving season with this charming watercolor illustration features a classic turkey donning a dapper Pilgrim hat. The piece balances soft, warm washes with crisp ink details, making it a delightful project for beginner to intermediate artists looking to capture a festive spirit.
Step-by-Step Guide
Materials
- Cold press watercolor paper (approx. 140lb/300gsm)
- HB or 2B pencil for sketching
- Kneaded eraser
- Watercolors: Burnt Sienna, Yellow Ochre, Alizarin Crimson, Paynes Grey, Burnt Umber, and Emerald Green
- Synthetic round brushes (sizes 4 and 6)
- Fine detail brush (size 0 or 2)
- Black archival fine liner pen (optional, for the eye)
Step 1: Sketching the Character
-
Draw the basic shapes:
Start by lightly sketching a rounded pear shape for the turkey’s body, slightly tilted to the left. Add a smaller circle on top for the head, connecting them with a gently curved neck. -
Add the tail fan:
Behind the body, draw a large semi-circle fan shape. Divide this fan into individual feathers with radiating lines, curving the top edges to give them a rounded, scalloped appearance. -
Place the pilgrim hat:
Position the hat directly on the head. Sketch a wide, flat oval for the brim and a tall, tapered cylinder for the crown. Don’t forget the square buckle detail on the front band. -
Refine features:
Draw the beak as a small triangle and add the ‘snood’ (the fleshy red part) draped over the beak. Sketch the wattle texture on the neck with wavy lines and define the wing feathers on the side of the body.
Muddy Colors?
If your browns look dull or grey, let layers dry completely before adding new ones. Wet-on-wet with brown paints can quickly turn muddy if you overwork the paper.
Step 2: Painting the Body and Head
-
Wash the head:
Mix a watery wash of Burnt Sienna with a touch of Alizarin Crimson. Paint the head and neck area, dropping slightly more concentrated pigment into the wattle area while it’s still damp to create texture. -
Paint the body base:
For the main body, use a mix of Burnt Umber and Burnt Sienna. Apply an even wash, leaving the wing area slightly lighter to separate it visually from the chest. -
Detail the wings:
Switch to a smaller brush. Using a more saturated brown mix, paint the individual feathers on the wing, leaving thin slivers of white paper or lighter paint between them to define their shape. -
Add shadows:
Once the initial body layer is dry, glaze a thin layer of cooler brown (mix a little blue into your brown) under the wing and at the bottom of the belly to give the bird volume.
Step 3: Painting the Tail and Hat
-
Tail feather base:
Paint the tail feathers with a warm Yellow Ochre, transitioning into Burnt Sienna as you move outward. Keep the wash fairly wet so the colors bleed softly into one another. -
Add the decorative stripe:
Allow the tail to dry completely. Carefully paint a curved stripe across the fan using Emerald Green. This contrasting cool tone makes the warm browns pop. -
Paint the pilgrim hat:
Use Paynes Grey (or a diluted black) for the hat. Create a gradient effect by keeping the top of the hat lighter and darkening the brim and the band area. -
Gold buckle detail:
With a steady hand and a small brush, fill in the square buckle with a bright yellow or gold hue. Ensure the surrounding black paint is dry first to prevent muddying the color.
Texture Trick
While the paint on the turkey’s breast is still slightly damp, sprinkle a tiny pinch of salt. When it dries and you brush it off, it creates a speckled feather texture.
Step 4: Final Details
-
Face and legs:
Paint the legs and beak with a pale yellow-brown mix. Add the eye using a dark black dot, leaving a tiny speck of white for a highlight. -
Define the outlines:
Using a very fine brush with concentrated dark brown or black paint, gently outline the major forms—especially the tail feathers and wing—to give the illustration a crisp, finished look. -
Ground the subject:
Mix a watery, muddy yellow-brown and paint a loose, jagged shape under the turkey’s feet. This simple shadow grounds the figure so it doesn’t look like it’s floating individually in space.
Frame your feathered friend or scan it to create custom Thanksgiving place cards for your holiday table
BRUSH GUIDE
The Right Brush for Every Stroke
From clean lines to bold texture — master brush choice, stroke control, and essential techniques.
Explore the Full Guide
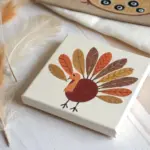
“Happy Thanksgiving” Turkey Sign Painting
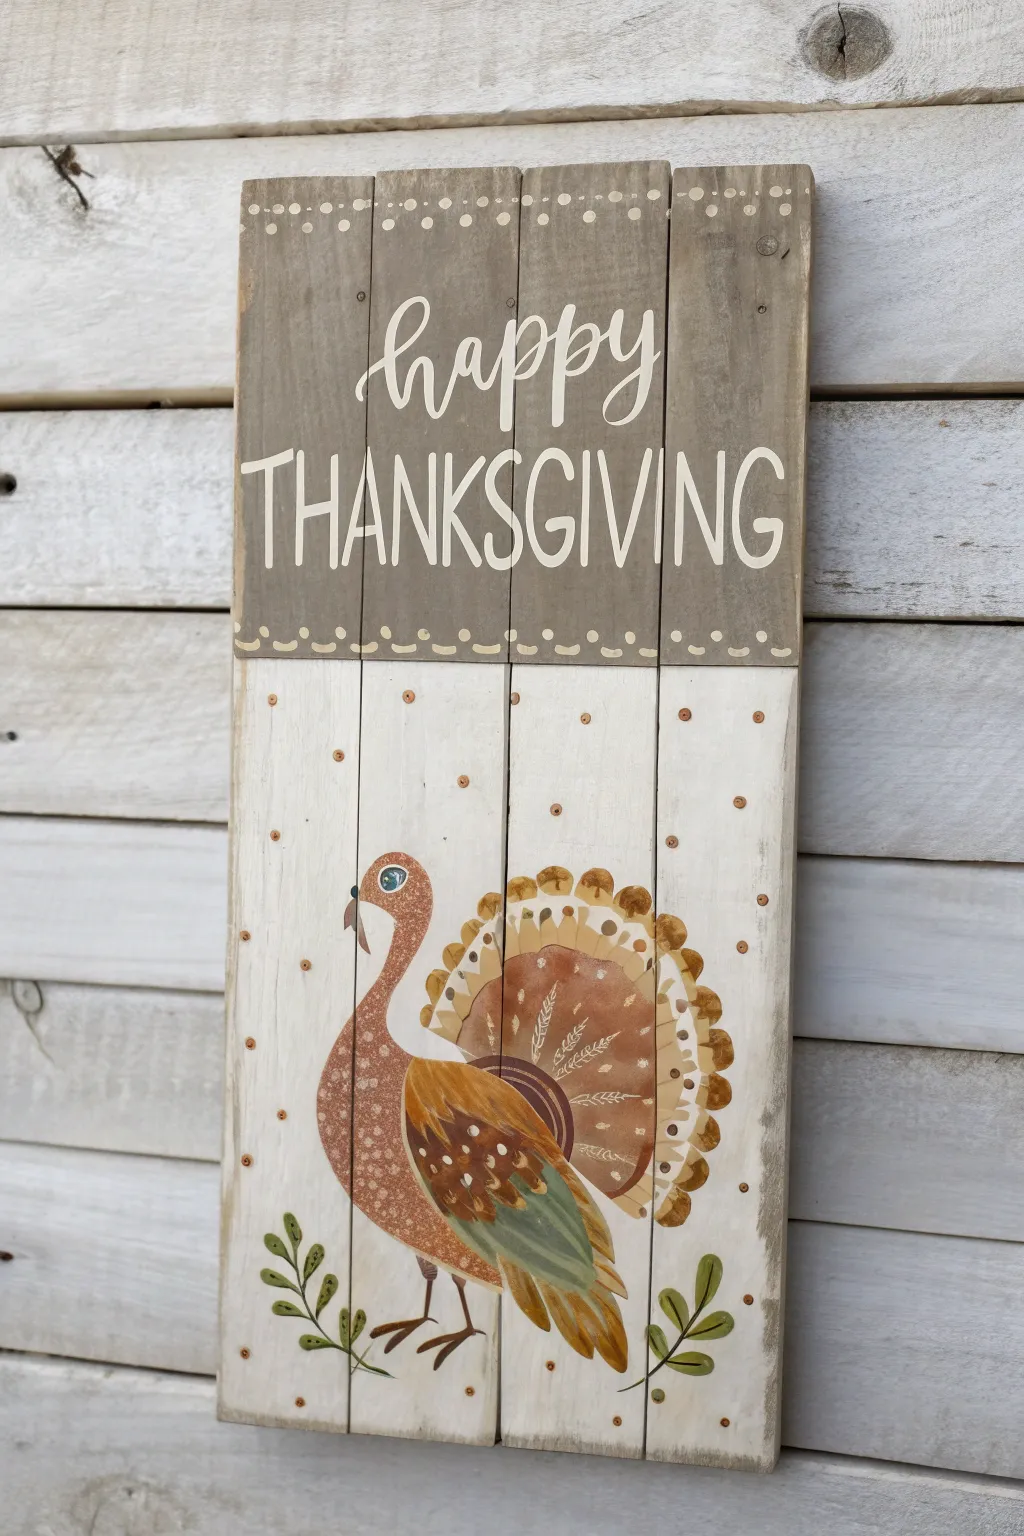
Celebrate the harvest season with this charming vertical pallet sign featuring a whimsically painted turkey. The design combines stained wood warmth with crisp white paint for a classic farmhouse look that says ‘Happy Thanksgiving’ in style.
Detailed Instructions
Materials
- Vertical wooden pallet board (approx. 10×24 inches)
- Acrylic paints (white, dark brown, tan, burnt orange, muted green, gold/yellow, black)
- Painters tape
- Medium wood stain (walnut or similar)
- Wide flat brush
- Detail liner brush
- Small round brush
- Dotting tool or end of a paintbrush handle
- Pencil for sketching
- Graphite paper (optional for tracing text)
- Fine-grit sandpaper
Step 1: Preparation & Background
-
Prep the surface:
Begin by ensuring your wooden board is clean and smooth. If the wood is rough, give it a quick pass with fine-grit sandpaper to remove any splinters that might snag your brush later. -
Tape off the sections:
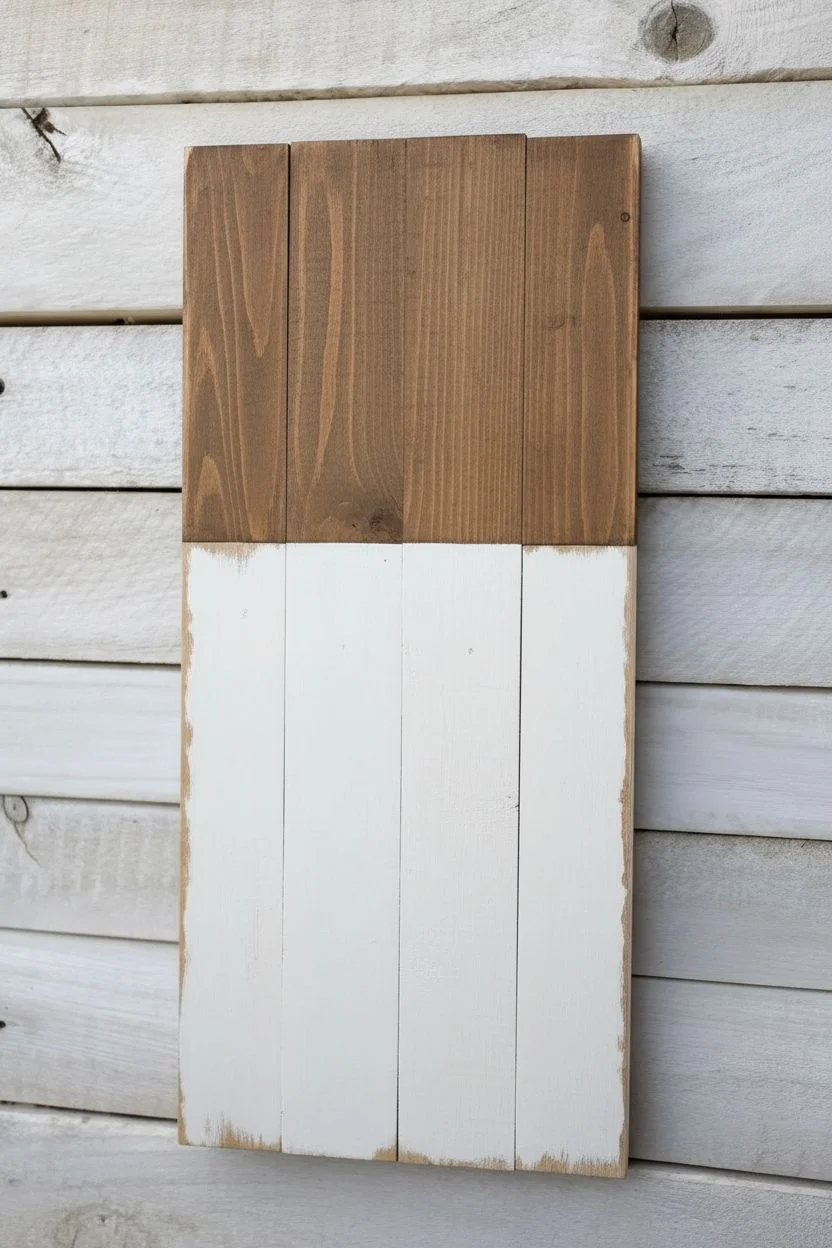
Measure about one-third down from the top of the board. Apply a strip of painter’s tape horizontally across the wood to create a crisp dividing line between the top and bottom sections. -
Stain the top:
Using a rag or sponge brush, apply your wood stain to the top section above the tape. Wipe away excess stain for an even finish and let this dry completely before moving on. -
Paint the bottom:
Once the stain is dry, remove the tape and re-apply it over the bottom edge of the stained section to protect it. Paint the lower two-thirds of the board with a solid coat of white acrylic paint. You may need two coats for full opacity. -
Distress the edges:
After the white paint is fully dry, lightly sand the edges and corners to reveal some of the wood underneath, giving the piece a weathered, rustic appearance.
Paint Bleeding?
If paint bleeds under your tape, wait for it to dry completely. Then, use a small flat brush with the background color to carefully touch up the line.
Step 2: Lettering & Details
-
Sketch the text:
In the stained top section, lightly sketch ‘happy’ in a fluid script font and ‘THANKSGIVING’ in a tall, narrow sans-serif font using a pencil or white chalk pencil. -
Paint the letters:
Using a liner brush and white paint, carefully fill in your lettering. I find that thinning the paint slightly with water helps the brush glide smoother over the wood grain. -
Add dots:
Dip the end of a paintbrush handle into tan or light grey paint. Dot a border along the very top edge of the board and along the transition line where the stain meets the white paint.
Step 3: Painting the Turkey
-
Outline the shape:
Lightly sketch the turkey’s body on the white section. Draw a teardrop shape for the body, a long curved neck, and a fan shape behind it for the tail feathers. -
Base coat the body:
Fill in the neck and head with a reddish-brown mix. For the main breast area, use a textured sponge or stippling technique with brown paint to create a feathery look. -
Paint the tail fan:
Paint the large fan shape behind the body in a warm, medium brown. While wet, blend in a slightly darker shade near the base where the feathers would meet the body. -
Add the wing:
Paint a defined wing shape over the lower body using a mix of ochre, burnt orange, and a touch of muted green for the feather tips. -
Detail the feathers:
Use a liner brush with cream or light tan wrap to paint fine lines and ‘wheat’ patterns on the tail fan to simulate individual feather details. -
Scallop the tail edges:
Paint a scalloped border around the top edge of the tail fan using cream and darker brown semi-circles to mimic the layered tips of turkey feathers. -
Add facial features:
Paint a small beak in yellow and a wattle in red. Add the eye with a circle of white, a smaller circle of blue, and a tiny black pupil. -
Paint the legs:
Using dark brown paint and your finest brush, paint thin, spindly legs and feet extending from the bottom of the body. -
Finishing touches:
Add small green leafy sprigs near the turkey’s feet on both sides. Finally, add tiny burnt orange dots randomly around the white background to tie the colors together.
Add Dimension
Mix a tiny amount of glazing medium or water with dark brown paint to add subtle shadows under the turkey’s wing and neck for a 3D effect.
Display your new sign on a porch or entryway to welcome guests for the holiday feast
Handprint Turkey Painting Keepsake
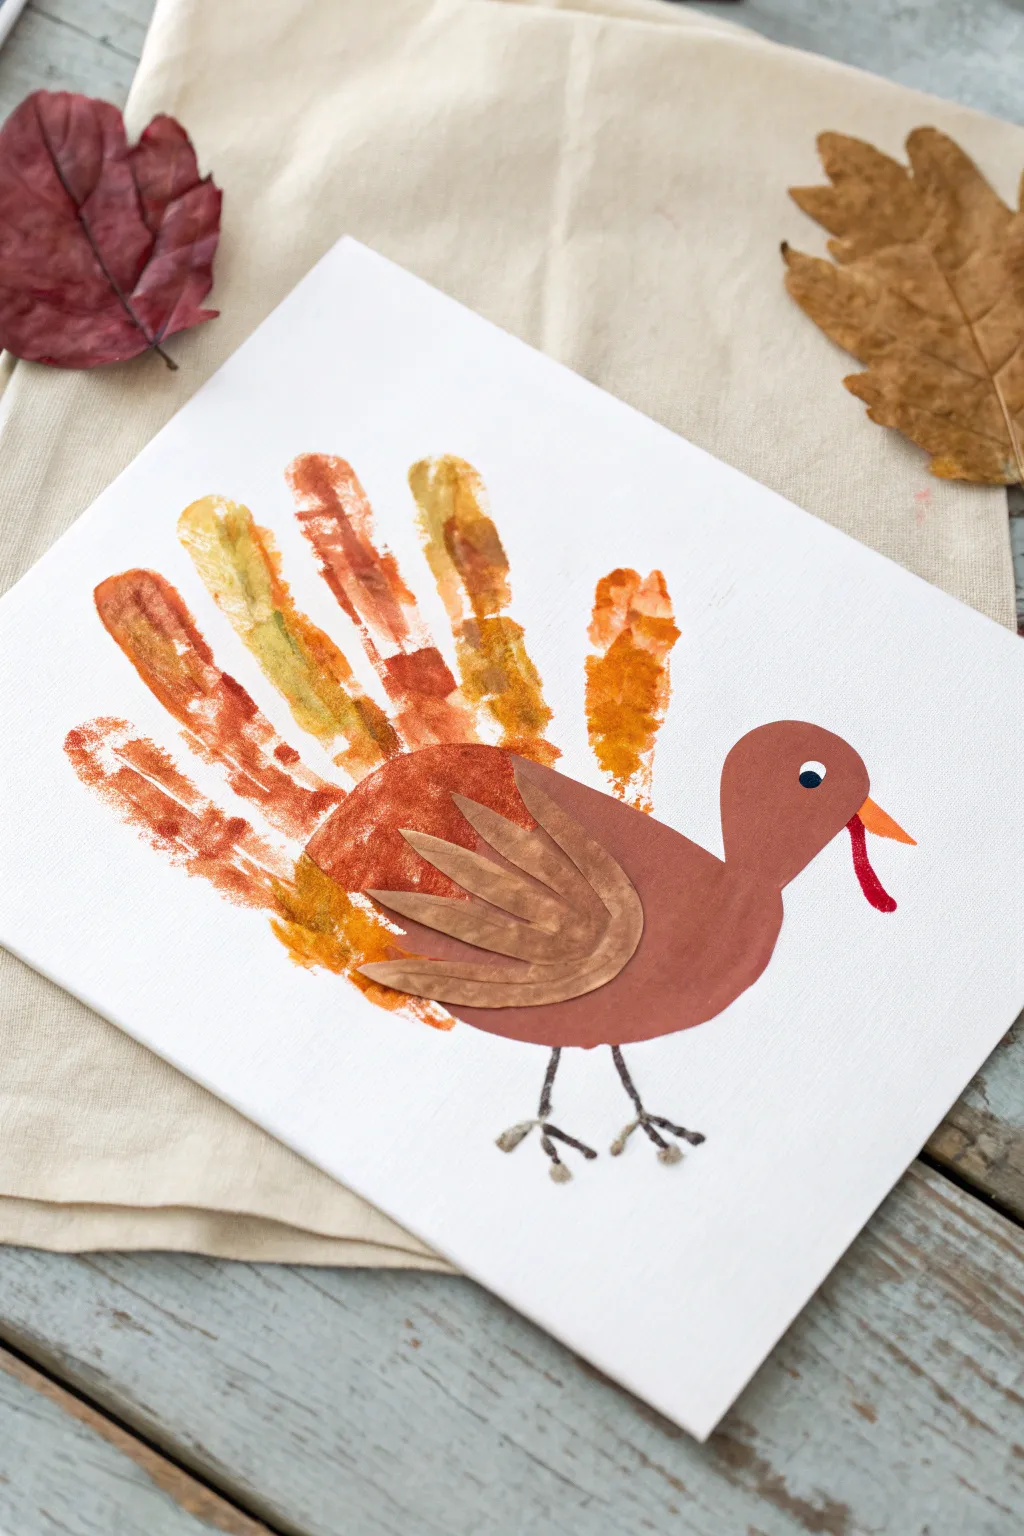

This adorable autumn craft turns a simple handprint into a vibrant turkey’s tail, creating a memory you can display year after year. The combination of colorful finger paints and collage-style paper elements adds lovely texture and depth to this festive artwork.
Step-by-Step Tutorial
Materials
- Small white canvas (8×10 or similar)
- Acrylic craft paints (orange, yellow, brown, red, white, black)
- Paintbrushes (flat brush for hand, fine liner brush for details)
- Brown construction paper or cardstock
- Orange construction paper
- Red pipe cleaner or red felt
- Googly eye (optional, but shown painted here)
- Scissors
- Craft glue
- Fine-grit sandpaper (optional, for distressing legs)
- Small twigs or brown yarn (for legs)
Step 1: Creating the Tail Feathers
-
Prepare the workspace:
Lay down newspaper or a mess mat, as handprint painting can get a little messy. Have your canvas ready and clean. -
Mix autumn colors:
Squeeze out generous dollops of orange, yellow, and red-brown paint onto a palette or paper plate. You want fall shades that mimic turning leaves. -
Paint the hand:
Using a flat brush, paint your child’s fingers with alternating stripes of the autumn colors. I usually paint the palm a solid reddish-brown to form the base of the tail. -
Blend slightly:
Don’t worry about keeping the colors perfectly separated on the fingers; slightly blending them where they meet creates a more natural feather look. -
Stamp the print:
Guide the painted hand firmly onto the left side of the canvas. Press down on the palm and each finger to ensure good paint transfer. -
Lift carefully:
Lift the hand straight up to avoid smearing the ‘feathers.’ If any spots are too light, you can gently dab a little extra paint in those areas. -
Dry completely:
Set the canvas aside to dry fully. Acrylics usually dry fast, but thick handprints might need an hour.
Clean Prints Pro Tip
Does the handprint look patchy? Use a slightly damp sponge to lightly moisten the hand before applying paint. This helps the paint transfer smoothly to the canvas weave.
Step 2: Building the Body
-
Shape the body:
While the paint dries, cut a rounded pear shape out of brown construction paper. This will be the turkey’s head and main body. -
Create the wing:
Cut a separate, smaller oval shape from the same brown paper for the wing. -
Add wing details:
Snip three or four leaf-shaped pieces of brown paper. Glue these onto your wing oval in a fanned-out pattern to look like layered feathers. -
Attach the body:
Once the handprint is dry, glue the main brown body shape onto the right side of the canvas, overlapping the heel of the handprint slightly. -
Attach the wing:
Glue your layered wing piece onto the center of the body.
Level Up: Texture
Instead of painted legs, use real dried twigs from the yard glued on with tacky glue. It adds an amazing 3D rustic element that pops off the canvas.
Step 3: Adding the Details
-
Make the beak:
Cut a small triangle from orange paper and glue it to the front of the face. -
Add the snood:
Paint a wiggly red line hanging over the beak using a fine brush, or glue on a small piece of red felt or pipe cleaner for texture. -
Create the eye:
Dip the handle end of a paintbrush into white paint and dot it onto the head for the eye. Once dry, add a tiny black dot in the center. -
Form the legs:
For a rustic touch, glue two small, thin twigs extending down from the body. Alternatively, paint them on with dark brown paint. -
Give the turkey feet:
Glue smaller twig bits at the bottom of the legs to create the three-toed feet, or paint them to match the legs. -
Add highlights:
Using a very dry brush with a tiny amount of lighter brown paint, gently scuff over the paper wing and body to add dimension and texture.
Once the glue sets, you will have a charming seasonal decoration that captures a moment in time

PENCIL GUIDE
Understanding Pencil Grades from H to B
From first sketch to finished drawing — learn pencil grades, line control, and shading techniques.
Explore the Full Guide
Simple Acrylic Turkey With Bold Contrast Background
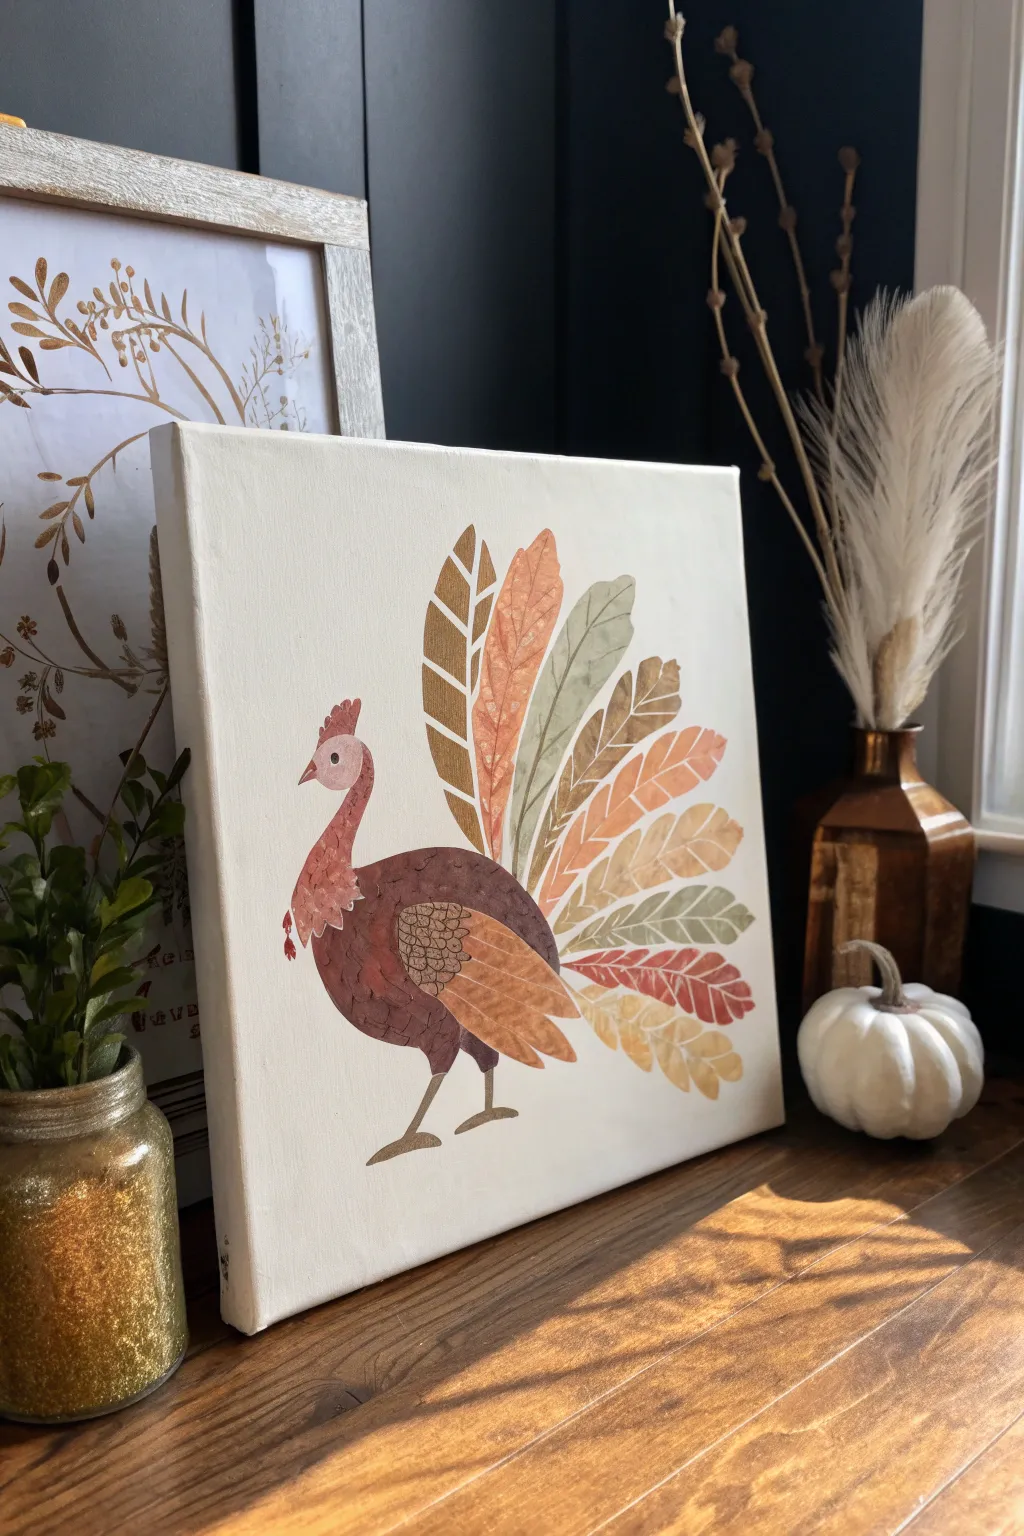
This charming project combines simple shapes with warm autumnal tones to create a stylized, folk-art-inspired turkey. The crisp white background makes the earthy colors pop, creating a modern yet cozy piece of Thanksgiving decor.
Step-by-Step Tutorial
Materials
- Square stretched canvas (10×10 or 12×12 inches)
- Acrylic paints (Burgundy, burnt sienna, mustard yellow, sage green, cream, metallic gold)
- Small flat brushes (size 4 or 6)
- Fine liner brush (size 0 or 1)
- Pencil and eraser
- Carbon paper (optional)
- Palette or paper plate
- Water cup and paper towels
Step 1: Planning and Sketching
-
Prepare the canvas:
Ensure your canvas is clean. If it’s not a bright white, apply a coat of white acrylic or gesso to create a crisp, clean background and let it dry completely. -
Outline the body:
Using a light pencil, sketch the main body shape of the turkey. Think of a rounded oval for the body and a slender, curved neck leading to a small round head. -
Sketch the tail feathers:
Draw large, elongated teardrop shapes radiating from the back of the turkey’s body. Arrange them in a fan shape, overlapping them slightly to create depth. Aim for about 7-9 large feathers. -
Add details:
Sketch a smaller wing shape on the body, the legs, and the beak. Don’t worry about perfect realism; the charm lies in the stylized, simple forms.
Uneven Coverage?
If your lighter colors like mustard or sage look streaky over the white canvas, don’t overload the brush. Apply two thin coats rather than one thick gloopy one.
Step 2: Painting the Body
-
Base coat the body:
Mix a deep burgundy with a touch of burnt sienna. Paint the main oval body shape with a flat brush, ensuring smooth coverage. -
Paint the neck and head:
Lighten your burgundy mix with a little cream or white to create a dusty rose color. Paint the neck and head area, blending gently where it meets the darker body. -
Detail the head:
Use a darker red for the wattle and crest on top of the head. Use the fine liner brush to add a small white circle for the eye with a tiny black dot in the center. -
Adding texture:
Once the body is dry, mix a slightly lighter shade of brown-red. Use a small brush to dab on small, scalloped shapes near the neck and chest to mimic feathers.
Step 3: Creating the Plumage
-
Select your palette:
Prepare your key feather colors: sage green, mustard yellow, terra cotta/orange, and a metallic gold or bronze. The variety is what makes the tail visually interesting. -
Block in the feathers:
Paint each tail feather a solid base color, alternating the shades so no two adjacent feathers are the same color. -
Adding the central vein:
Once the base colors are dry, use a liner brush with a slightly lighter or darker version of the base color to paint a thin line down the center of each feather. -
Create the feather pattern:
Paint angled lines or small leaf-like veins branching out from the center line on each feather. I find keeping these strokes loose adds to the folk-art feel. -
Paint the wing:
Fill in the wing shape on the body with a bright orange or mustard color. Add scale-like patterns in a darker brown at the top of the wing for texture.
Newspaper Collage Look
Instead of painting the feather patterns, cut the feather shapes out of patterned scrapbook paper or old book pages, glue them onto the canvas, and then paint a sheer wash of color over them.
Step 4: Final Touches
-
Paint the legs:
Using a gold or light brown paint and your fine liner brush, paint the thin legs and feet. Give them a simple, angular shape. -
Clean up edges:
If any paint went outside the lines, use white paint to carefully touch up the background around the turkey for a crisp edge. -
Add gold accents:
If you have metallic gold paint, add subtle highlights to a few feathers or the wing tips to catch the light.
Display your finished turkey on a mantel or shelf to bring a festive, handcrafted touch to your holiday season
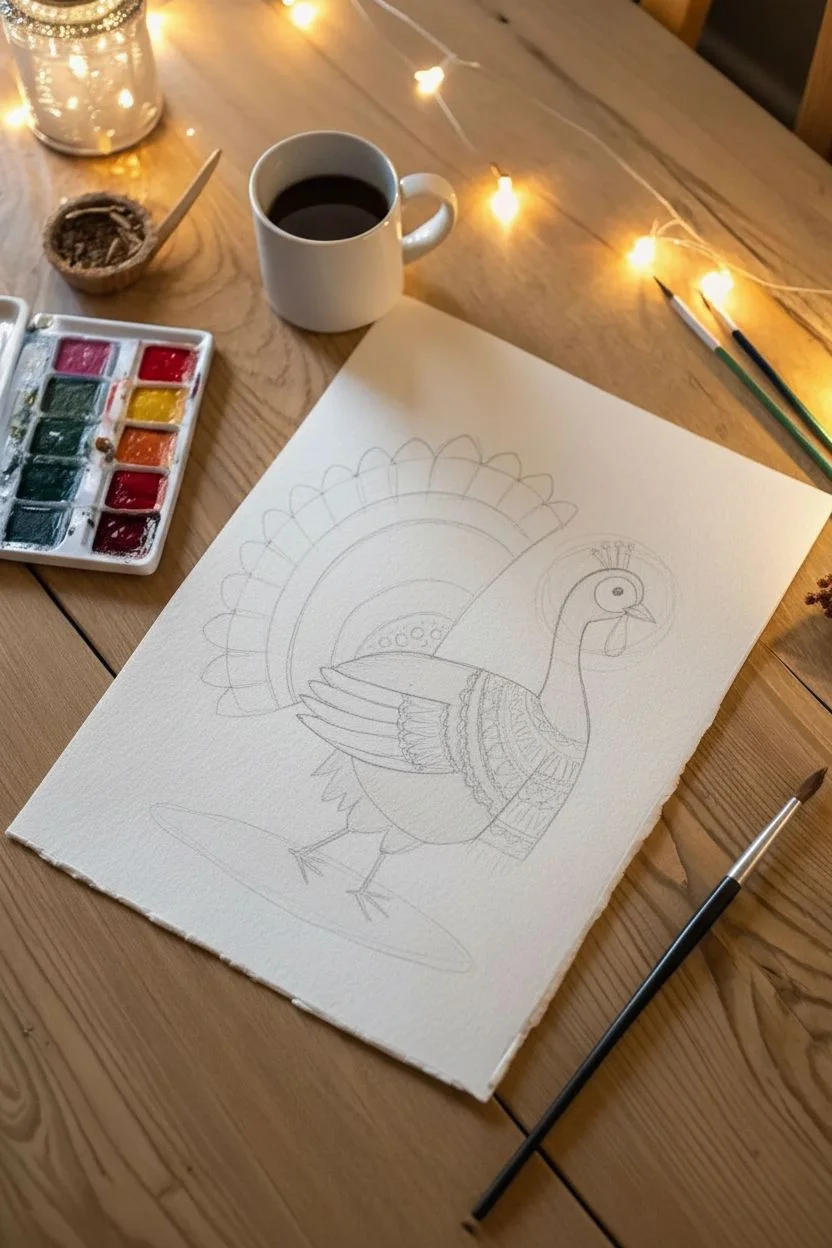
Patterned Feather Turkey (Doodles, Dashes, and Swirls)
This intricate turkey artwork combines delicate line work with warm, autumnal washes to create a sophisticated, folk-art inspired piece. By breaking the bird’s feathers into methodical sections of lines, dots, and scallops, you achieve a textured look that feels both organic and structured.
Detailed Instructions
Materials
- Hot press watercolor paper (smooth texture is crucial for pens)
- Pencil (HB or H) and elevated eraser
- Waterproof fine liner pens (brown, sepia, and black – sizes 01 and 03)
- Watercolor paints (Burnt Sienna, Yellow Ochre, Raw Umber, Burnt Umber)
- Small round watercolor brushes (sizes 2 and 4)
- White gel pen (optional for highlights)
- Ruler (optional for symmetry)
Step 1: Drafting the Shapes
-
Outline the body:
Start lightly with your pencil. Draw a rounded, pear-like shape for the main body of the turkey, tilting it slightly forward. Add a slender, curved neck leading up to a small, oval head. -
Sketch the tail fan:
Behind the body, lightly sketch a large semi-circle for the tail feathers. Divide this fan into concentric arches. You want a small inner arch near the body, a middle band where the rounded ‘eyes’ of the feathers will go, and a larger outer section for the long tail feathers. -
Define wing and legs:
Draw a large wing shape overlapping the body, mimicking the curve of the bird’s back. Sketch two thin legs with sturdy, three-toed feet grounded at the bottom. -
Add decorative elements:
Before inking, lightly sketch two curving branches at the bottom of the composition to frame the bird, adding simple leaf shapes along the stems.
Step 2: Inking the Patterns
-
Outline the main forms:
Using a brown or sepia 03 waterproof fineliner, go over your main pencil outlines. Keep your hand steady but allow for a slightly organic, uneven line quality to maintain the hand-drawn feel. -
Detail the head and neck:
Switch to a finer 01 pen. Draw tiny overlapping scales or ‘u’ shapes down the neck to simulate wattle texture. Draw the eye clearly with a small pupil. -
Texture the body feathers:
On the main body, draw rows of curved scallops. Inside each scallop, add tiny vertical hatching lines. This repetition creates the dense feather look. -
Pattern the wing:
Divide the wing into sections. On the upper wing contour (the coverts), draw a checkerboard-style cross-hatch pattern. For the lower flight feathers, draw long, straight diagonal lines. -
Detail the tail fan:
Working on the tail fan, draw long, radiating lines for the outer feathers. Draw horizontal ‘break’ lines across them intermittently to suggest the natural banding of turkey feathers. -
Create the tail spots:
In the middle band of the tail, draw distinct oval shapes. Leave the center of these ovals empty for now; we will paint them later. -
Ink the foliage:
Trace your bottom branches. Instead of filling them in solid, use hatching or stippling (dots) to shade one side of each leaf, giving them dimension. -
Erase pencil lines:
Wait until the ink is completely dry—smearing is the enemy here. Gently erase all underlying graphite marks.
Ink Smearing?
If your fineliner bleeds when you add watercolor, the ink likely wasn’t waterproof. Test your pen on a scrap piece of paper with water before starting the main project.
Step 3: Watercolor Wash
-
Base coat on the body:
Mix a watery wash of Burnt Sienna. Paint the main body, carefully painting around the patterned sections to let the white paper show through in highlights. -
Paint the tail feathers:
Use Yellow Ochre for the long outer tail feathers. Apply the paint in stripes, following the inked banding you drew earlier. I usually alternate between painted and unpainted bands for high contrast. -
Accentuate the spots:
Mix a stronger, more concentrated Burnt Umber or a reddish-brown. Carefully fill in the ovals on the tail fan. These should be the darkest points of color on the tail. -
Wing variations:
On the wing, alternate between a light Raw Umber wash and leaving sections white. This emphasizes the geometric patterns you drew. -
Head and neck details:
Add a touch of diluted orange or red-brown to the neck wattle area. Keep the face mostly pale to draw attention to the eye. -
Grounding the artwork:
Paint the decorative leaves at the bottom with a very pale, tea-stained brown or beige. They should look subtle and not distract from the turkey. -
Final touches:
Once everything is dry, you can use a white gel pen to add tiny dots or separating lines if any area feels too dark or muddy.
Pattern Zen
Don’t rush the repetitive lines! Treat the hatching and scales like a meditative zen-doodle. The tiny imperfections in spacing make it look authentically hand-crafted.
Display your detailed turkey illustration in a simple frame or on a mantel to add a touch of artistic warmth to your seasonal decor


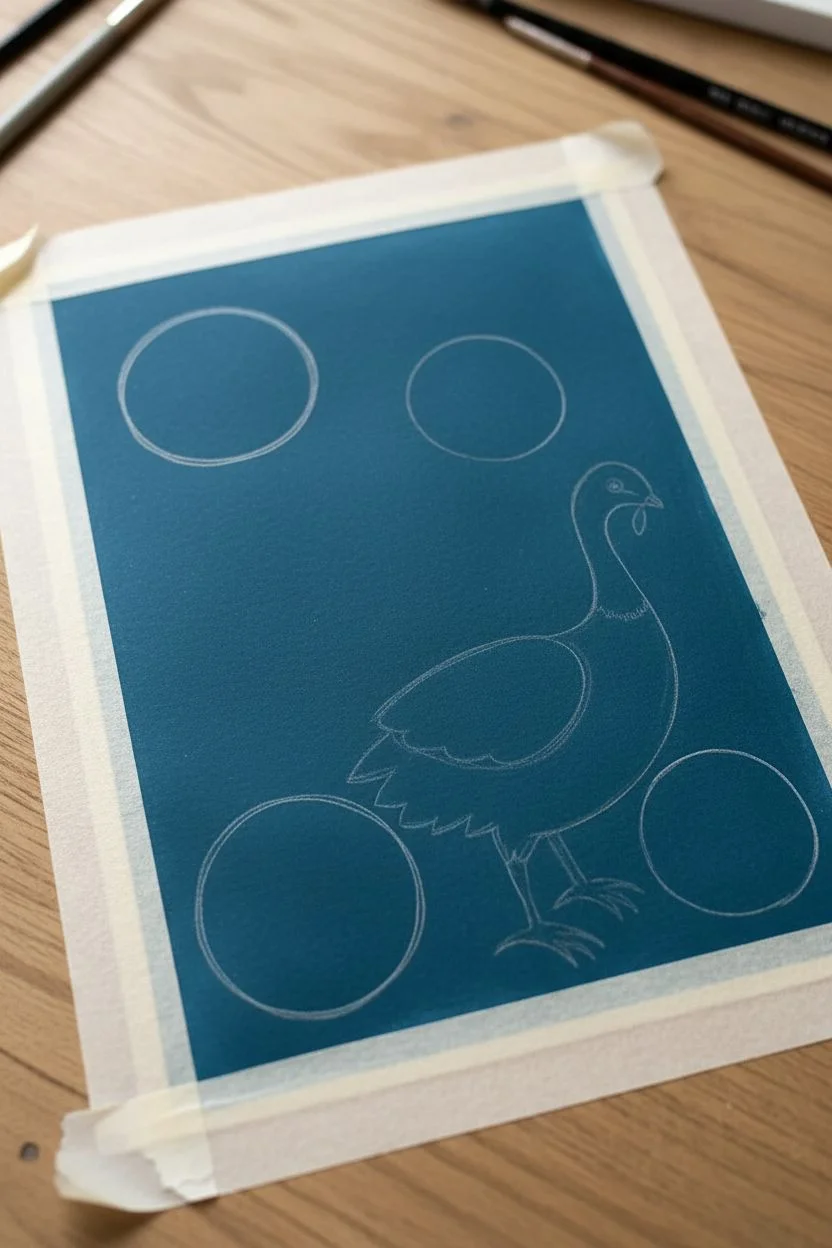
Polka Dot and Spiral Background Turkey
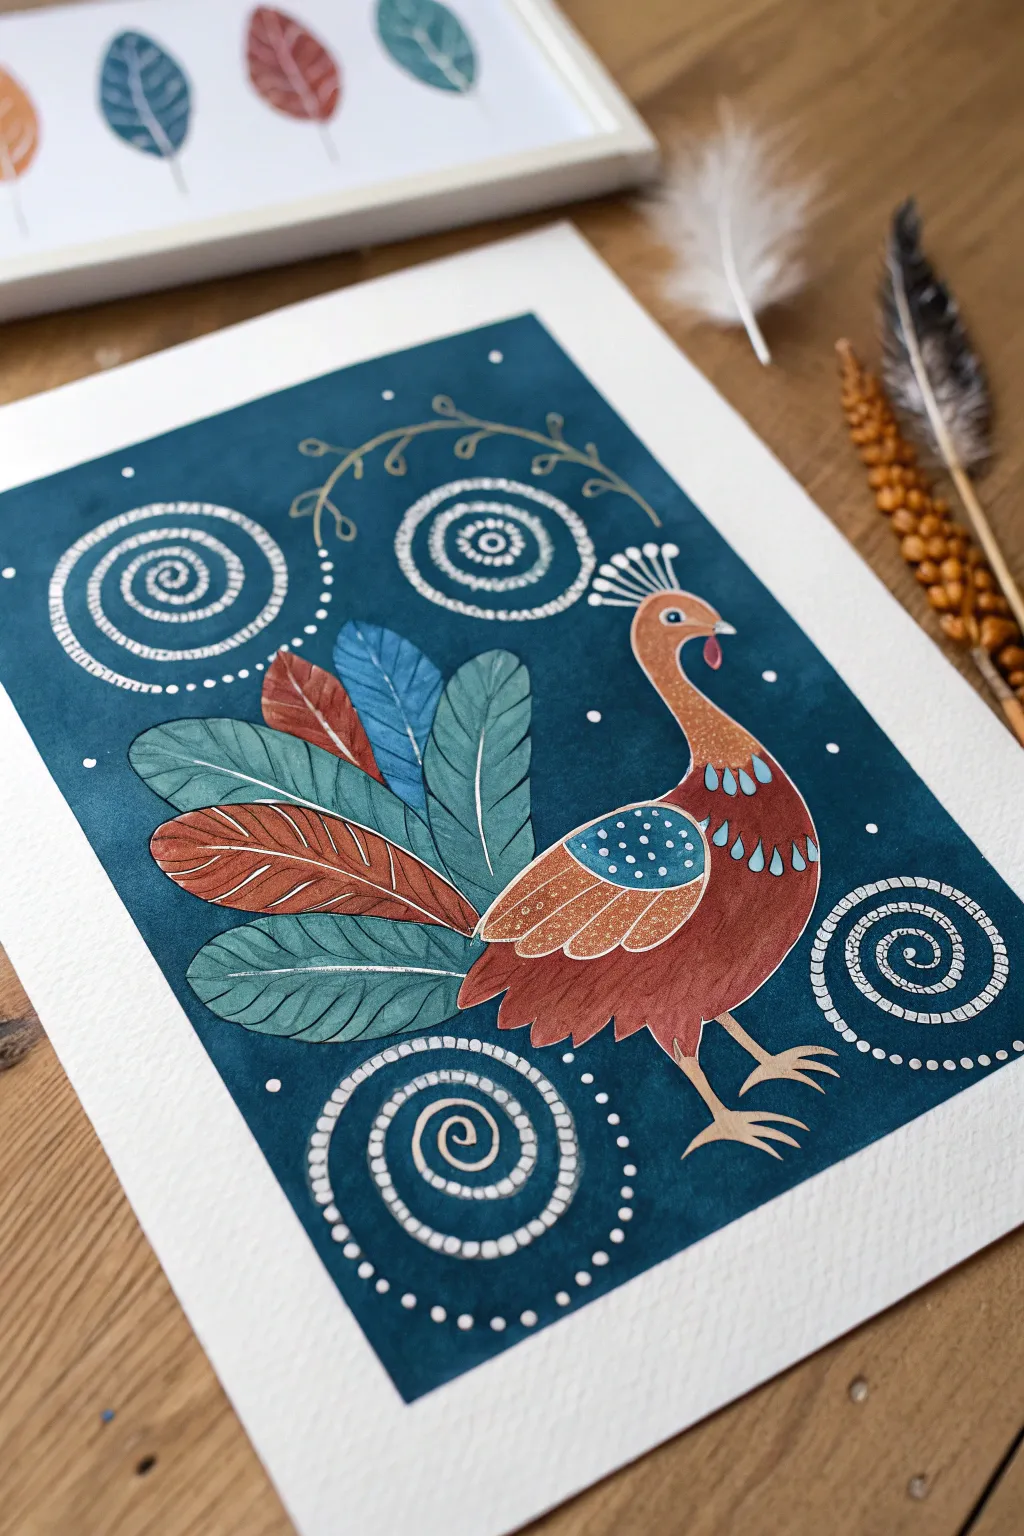
This charming project combines folk art motifs with deep jewel tones for a turkey illustration that feels both festive and sophisticated. You’ll layer gouache or acrylic paint to create a rich teal backdrop for the spiral patterns and the warmly colored bird.
Step-by-Step Tutorial
Materials
- Cold press watercolor paper (A4 or similar)
- Gouache or matte acrylic paints (Deep teal/Prussian blue, burnt sienna/rust, light blue, teal green, white)
- Metallic gold paint or pen (optional)
- Small round brushes (sizes 0, 2, and 4)
- White gel pen (size 08 or 10)
- Pencil and eraser for sketching
- Painter’s tape or masking tape
Step 1: Preparation and Base Layer
-
Tape edges:
Begin by taping down all four edges of your watercolor paper to a hard board or table. This creates that crisp white border seen in the final piece and keeps the paper flat while wet. -
Sketch the outline:
Lightly sketch the turkey’s shape in the center-right of the paper. Focus on a simple oval body, a curved neck leading to a round head, and a large fan of feathers spreading out behind. -
Plan background elements:
Draw four large circles where your white spirals will go—one in the top left, one top center, one bottom left, and one bottom right. -
Paint the background:
Mix a deep teal or Prussian blue color. Carefully paint around your sketched turkey and the four spiral circles, filling in the rest of the background with a solid, opaque layer. Let this dry completely.
Step 2: Painting the Turkey
-
Base coat the body:
Using a rust or burnt sienna shade, paint the turkey’s head, neck, and main body shape. Leave a small oval space on the wing area unpainted for a contrasting color later. -
Layer the feathers:
Start painting the tail feathers. Use a mix of teal green for the outer feathers and a lighter blue for the smaller, inner feathers near the body. -
Add wing detail:
Fill in that reserved wing oval with a bright teal or light blue paint. This creates a nice pop of cool color against the warm rust body. -
Paint secondary feathers:
Add a few rust-colored feathers into the tail mix to tie the design together. Ensure the feathers overlap slightly for a natural, fanned look. -
Refine the edges:
Once the first layers are dry, I like to go back with a smaller brush to tidy up any edges where the turkey meets the dark background.
Clean Lines Pro-Tip
If you struggle painting perfect spirals, use a white gel pen instead of a brush. It gives you much more control over the continuous curve and the tiny dots.
Step 3: Adding Details and Patterns
-
Face details:
Use a tiny brush to add a white eye with a blue pupil. Add the beak in a light tan and the wattle (the skin under the beak) in a reddish tone. -
Body markings:
Paint teardrop shapes on the turkey’s chest using light blue paint. On the wing, add small white polka dots. -
Feather spines:
Using a very fine brush or a white gel pen, draw the central spine (rachis) down the center of each tail feather. -
Gold accents:
If you have metallic gold paint, add thin outlines to the wing and body feathers to make them shimmer. If not, a light beige works well too. -
Head crest:
Paint small lines extending from the top of the head, topped with tiny white dots to create a regal crest. -
Legs and feet:
Paint the legs and feet using a beige or light tan color, positioning them so the bird looks stable and grounded.
Fixing Background Mistakes
If your teal background paint accidentally overlaps your spiral circles, simply paint over the mistake with white gouache once the teal is completely dry.
Step 4: Background Motifs
-
Paint the spirals:
Return to those four empty circles in the background. Using white paint, create a spiral starting from the center and working outward. -
Dot the spirals:
Between the lines of your white spirals, use your smallest brush or a dotting tool to add rows of tiny white dots following the curve. -
Decorative vines:
With a fine brush and gold or beige paint, draw a delicate, waving vine with simple leaves arching over the turkey’s head. -
Filling space:
Add scattered white dots of varying sizes throughout the dark teal background to mimic stars or snow. -
Remove tape:
Wait until the painting is 100% dry to the touch, then slowly peel away the masking tape at a 45-degree angle to reveal your clean border.
Frame your festive bird or scan it to create unique seasonal greeting cards for friends and family
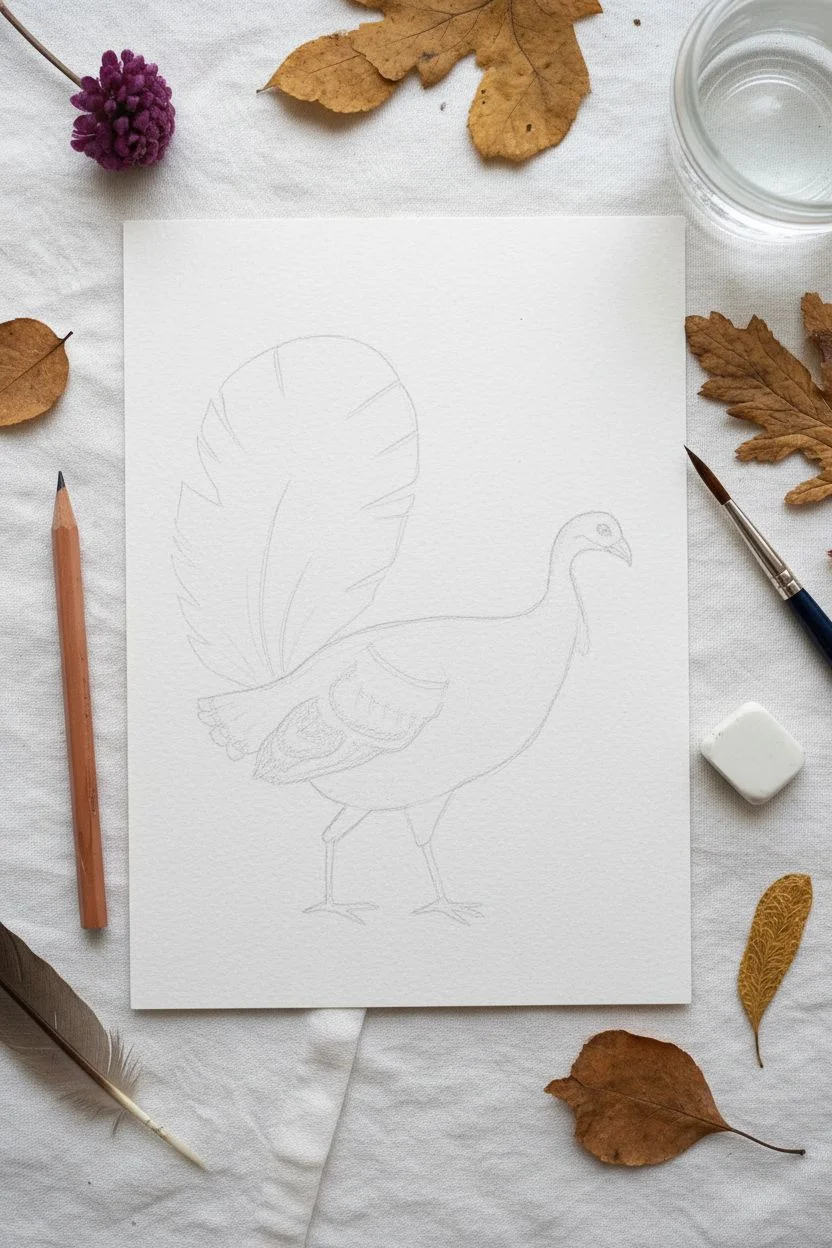
Bubble-Stamped Texture Feathers on a Turkey Tail
Capture the rustic charm of autumn with this detailed wild turkey illustration, featuring intricate ink work and warm watercolor washes. The finished piece is mounted with a torn-edge border, giving it the elegant feel of a keepsake ornithological study.
Step-by-Step
Materials
- Cold press watercolor paper (heavyweight, 300gsm)
- Pencil (HB or 2H)
- Fineliner pens (sizes 0.1, 0.3, and 0.5, black ink)
- Watercolor paints (Burnt Sienna, Yellow Ochre, Paynes Grey, Burnt Umber, Alizarin Crimson)
- Small round watercolor brushes (sizes 2 and 4)
- Additional sheet of textured handmade paper (deckle edge)
- Craft glue or double-sided tape
- Ruler
Step 1: Drafting the Turkey
-
Establish proportions:
Begin by lightly sketching the basic shapes of the turkey on your watercolor paper. Use an oval for the body and a smaller circle for the head, connecting them with a curved neck line. -
Outline the tail fan:
Draw a large semi-circle behind the body to represent the fanned tail feathers. This arc should extend well above the head and body. -
Refine the anatomy:
Sketch the legs, focusing on the spurred ankles and clawed feet. Add the wattle and snood details on the head and neck area. -
Detail the feathers:
Lightly draw the segmented lines of the tail feathers and the layered wing feathers. Don’t press too hard with the pencil, as these lines will be inked later.
Natural Paper Edge
To get a softer torn edge, moisten the paper along your tear line with a wet brush before tearing it against a ruler.
Step 2: Inking the Details
-
Outline the main form:
Using a 0.3 fineliner, carefully trace over your pencil lines for the body, head, and legs. Use short, broken strokes on the chest to suggest plumage texture. -
Detail the tail feathers:
Switch to a 0.1 fineliner for the delicate lines within the tail fan. Draw the individual vanes and the characteristic dark bands that curve across the fan. -
Add texture and shading:
Use stippling (small dots) on the head and neck for a bumpy texture. Use fine hatching lines on the wing feathers and under the belly to create shadow and volume. -
Erase pencil guides:
Once the ink is completely dry—wait at least 15 minutes to be safe—gently erase all underlying pencil marks.
Metallic Accent
Use gold metallic watercolor or a gold gel pen to outline just the tips of the tail feathers for a subtle, festive shimmer.
Step 3: Watercolor Application
-
Wash the tail fan:
Mix a warm, diluted Burnt Sienna and apply it to the tail feathers. Leave the very tips of the feathers unpainted or very pale. -
Add dark bands:
While the previous layer is dry, mix Burnt Umber with a touch of Paynes Grey. careful paint the dark horizontal bands across the tail fan. -
Paint the body plumage:
Use a mix of Paynes Grey and Burnt Umber for the main body feathers. Keep the wash loose, allowing the white of the paper to show through for highlights. -
Color the head and wattle:
Apply a very small amount of Alizarin Crimson to the wattle and neck area. I like to keep this subtle so it doesn’t overpower the earth tones. -
Detail the legs and ground:
Paint the legs with a light grey wash. Add a simple wash of Yellow Ochre and Green under the feet to ground the figure. -
Strengthen shadows:
Once everything is dry, add a second, darker layer of grey blend to the underside of the wing and the bottom of the belly to increase contrast.
Step 4: Finishing touches
-
Re-ink if necessary:
If the watercolor has dulled any crisp lines, go back over key areas like the eye and beak with your 0.1 pen. -
Create the torn border:
Place a ruler on your painting about a half-inch from the painted area. Tear the paper upwards against the ruler edge to create a soft, fibrous border. -
Mount the artwork:
Center your torn watercolor piece onto the larger sheet of handmade deckle-edge paper. Secure it with a small amount of glue or tape to complete that layered, gallery look.
Now you have a timeless piece of art perfect for seasonal display or gifting.
Shaving-Cream Marbled Feather Fan Turkey
Blend traditional watercolor techniques with a fun, textured twist in this detailed turkey portrait. The vibrant tail feathers feature a unique marbling effect that mimics the intricate patterns found in nature, all set against a soft, grassy wash.
Step-by-Step Guide
Materials
- Heavyweight cold-press watercolor paper (140lb or higher)
- Watercolor paints (tube or pan set)
- Shaving cream (foaming white type, not gel)
- Liquid watercolor or food coloring (for marbling)
- Shallow baking dish or tray
- Ruler or squeegee tool (old credit card works)
- Fine liner brushes (size 0 and 2)
- Medium round brush (size 6 or 8)
- Pencil for sketching
- Masking fluid (optional)
- Palette for mixing
Step 1: Sketching and Preparation
-
Outline the turkey:
Begin by lightly sketching the turkey’s profile in pencil. Focus on the main shapes: the rounded body, the long neck, the fan-shaped tail, and the legs. Keep your lines faint so they won’t show through the lighter washes later. -
Detail the feathers:
Refine your sketch by drawing individual feather groups. Pay special attention to the tail fan, dividing it into segments where you will apply the marbled texture. Sketch the wing layers clearly, separating the coverts from the flight feathers. -
Prepare the marbling station:
In a shallow dish, spray a layer of shaving cream about an inch thick. Smooth the top surface gently with a spatula or ruler to create a flat canvas for your colors.
Step 2: Marbling the Tail Feathers
-
Apply color drops:
Drop small amounts of liquid watercolor (teal, copper, and rust orange) onto the shaving cream. Use a toothpick or the end of a paintbrush to swirl the colors, creating a marbled pattern that resembles complex feather barbs. -
Print the texture:
This step requires precision. Briefly press a separate scrap piece of watercolor paper onto the shaving cream to capture the print, then scrape off the excess cream. Once you have a successful marbled sheet, let it dry completely. -
Cut and collage (Option A):
If you prefer a collage look, cut feather shapes from your dry marbled paper and adhere them to the turkey sketch. However, for the painted look in the image, use the marbled paper as a visual reference to paint similar patterns directly, or use masking fluid to block out shapes and dip the actual turkey painting (carefully!) if you are feeling adventurous. -
Direct painting alternative (Option B):
To match the image exactly without cutting, replicate the marbling look with wet-on-wet painting. Wet the tail fan area with clean water. Drop in teal and burnt orange paint, letting them bleed naturally into each other but not mixing fully into brown.
Muddy Colors?
If your teal and orange layers are turning brown, let the first color dry completely before adding the second. Use a light touch so you don’t reactivate the layer underneath.
Step 3: Painting the Body
-
Head and wattle:
Using a fine brush, paint the head with a pale blue wash. While still damp, touch in bright red and dots of pink along the neck to create the textured, bumpy look of the wattle. -
Chest and body base:
Mix a warm reddish-brown using burnt sienna and a touch of alizarin crimson. Apply this as a base wash over the chest and main body, leaving some lighter gaps between feather groups for highlights. -
Layering wing feathers:
For the wings, switch to a darker mix of ultramarine blue and burnt umber. Paint the layered feathers with distinct strokes, allowing each layer to dry slightly before adding the next to keep edges crisp. -
Adding texture:
Once the body wash is dry, use your smallest brush to paint fine lines and scallops in a darker brown over top. This mimics the individual barbs and edges of the body plumage.
Pro Tip: Scratch for Highlights
Use a clean, damp stiff brush or even a dull knife edge to gently lift or scratch out thin lines in the dark wing feathers while damp. This adds instant realistic texture.
Step 4: Finishing Details
-
Defining the tail fan:
Return to the tail. Using a dry-brush technique with teal and copper paint, add radiating lines over your initial wash to simulate the stiff structure of the tail feathers. -
Edge detailing:
Paint the outer tips of the tail feathers with a rust-orange hue. Use jagged, short strokes to create the fringed appearance characteristic of turkey feathers. -
Legs and feet:
Paint the legs with a mix of grey and purple. Use fine lines to indicate the scales and texture on the feet and adding the sharp spurs on the back of the legs. -
Grounding the subject:
Mix a sap green with a little yellow ochre. Paint loose, upward strokes at the turkey’s feet to create a grassy patch. Let the bottom fade out softly into the white of the paper. -
Final touches:
Check your contrast. I often go back in with a very dark mix (indigo and sepia) to deepen the shadows under the wing and between the tail feathers to make the colors pop.
Allow your painting to dry flat completely before framing it to display your colorful bird.
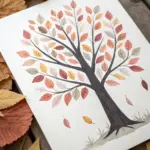
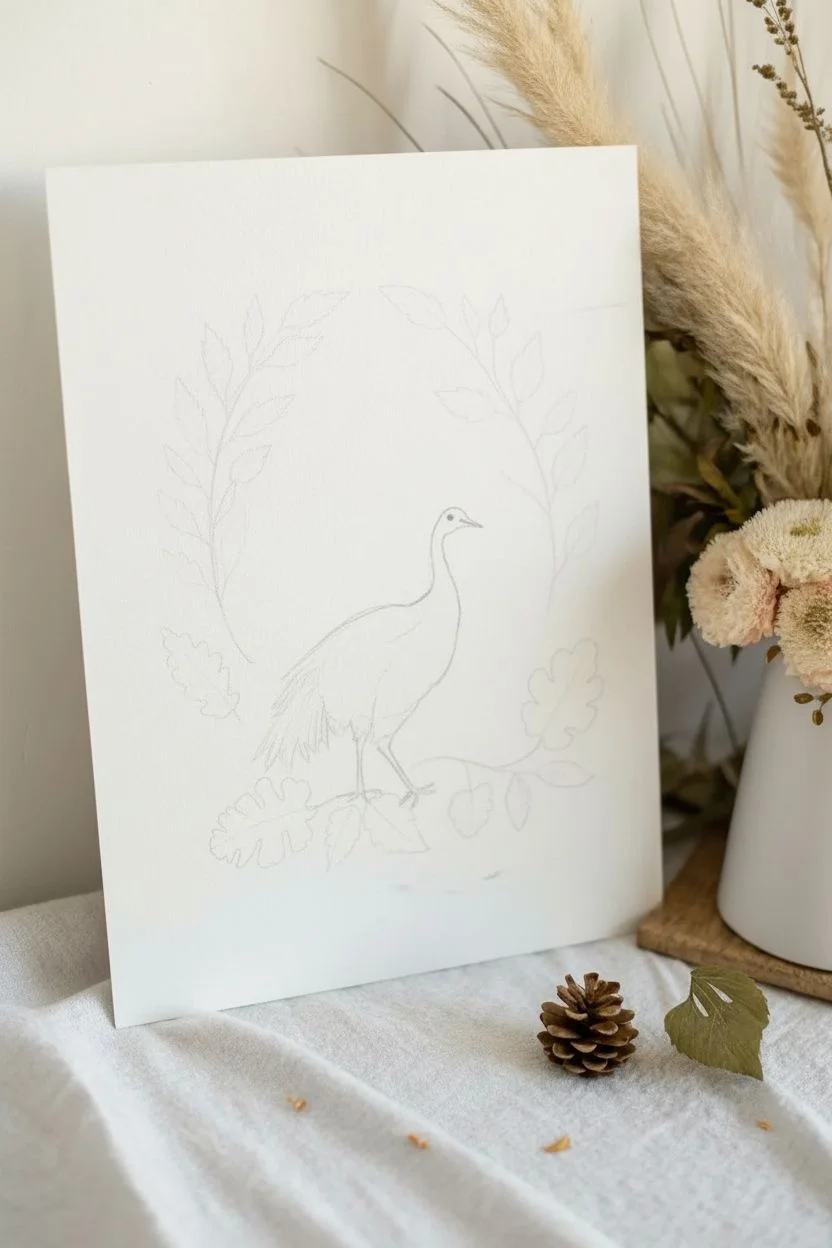
Leaf-Printed Feathers Turkey in a Nature Style
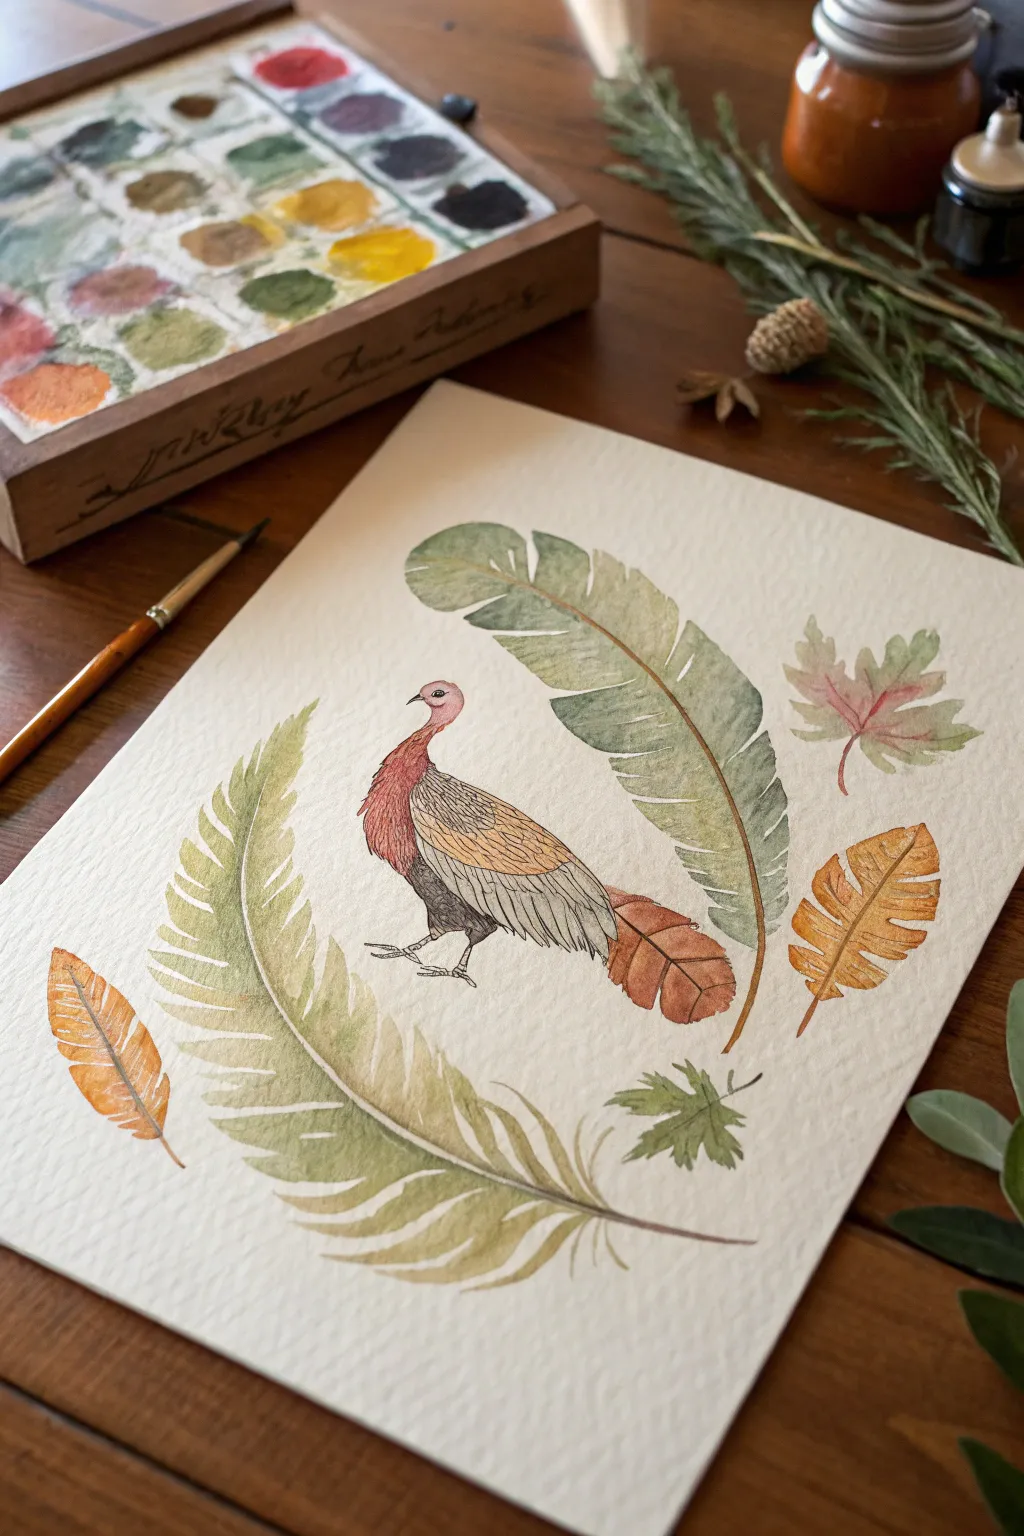
Capture the rustic charm of autumn with this delicate watercolor illustration featuring a wild turkey surrounded by a wreath of stylized feathers and leaves. The soft, earthy palette and intricate linework give this piece a timeless, nature-study aesthetic perfect for seasonal decor.
Step-by-Step
Materials
- Cold press watercolor paper (140lb/300gsm)
- Watercolor paint set (pans or tubes)
- Round watercolor brushes (sizes 2, 4, and 00 for details)
- HB pencil for sketching
- Waterproof fine liner pen (black or sepia, 0.1mm)
- Clean water jar
- Paper towels
- Palette for mixing
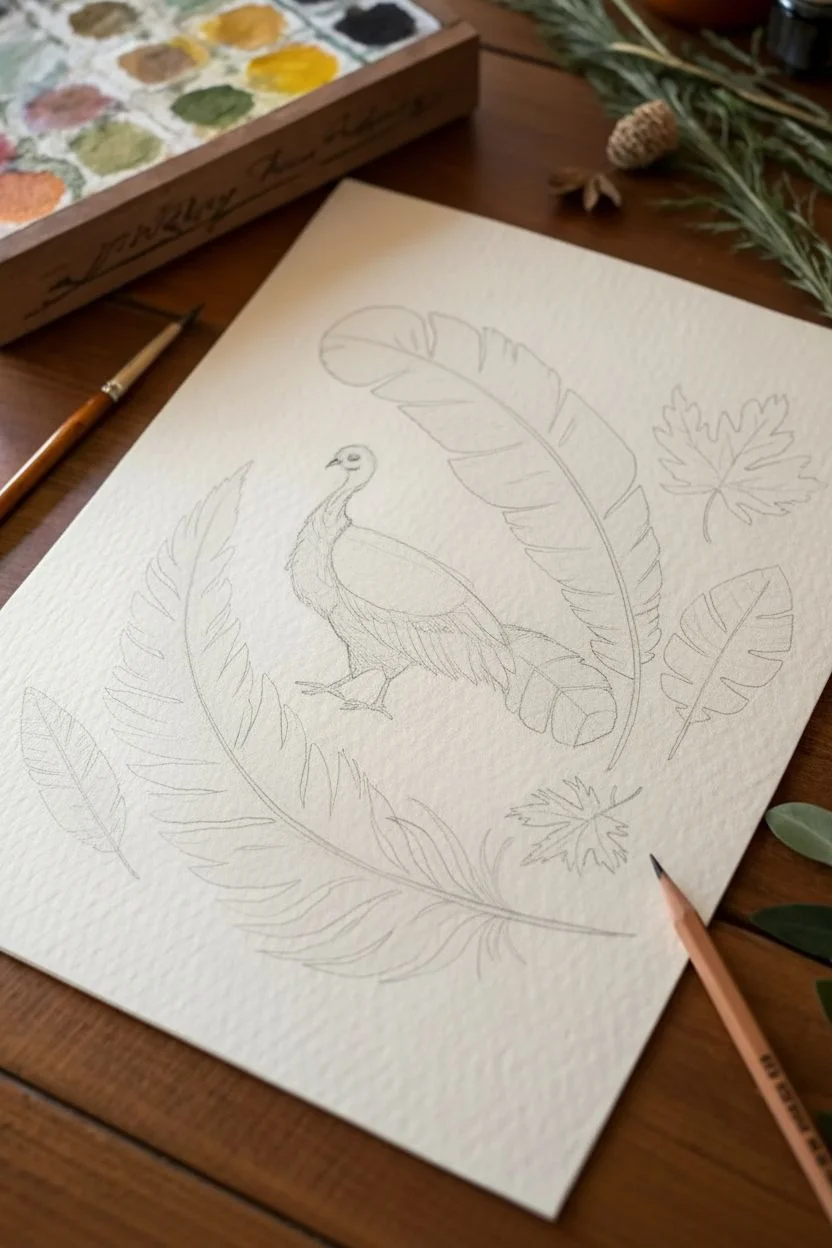
Step 1: Sketching the Composition
-
Outline the central figure:
Start by lightly sketching the silhouette of the turkey in the center of your paper. Draw a small oval for the head, a slender S-curved neck, and a plump, tear-drop shaped body. Angle the legs slightly as if the bird is striding forward. -
Map out the wreath:
Visualize an oval shape framing the turkey. Lightly pencil in two large, curving feathers on either side—one arching over the top and one swooping underneath. These act as the anchors for your composition. -
Add foliage elements:
Fill in the gaps of your wreath with smaller nature elements. Sketch a small feather on the bottom left, a medium striped feather on the right, and scatter a few maple-style leaves around the perimeter to balance the open space. -
Refine the turkey details:
Go back to your central bird and lightly indicate wing sections and the fan of the tail. Mark the separation between the neck feathers and the body plumage.
Step 2: Painting the Wreath
-
Mix your greens:
Prepare two shades of green on your palette: a muted olive green and a cooler, sage green. Keep the mixes watery and transparent. -
Paint the large feathers:
Using a size 4 brush, paint the large curved feathers. Start from the quill and pull outward. I like to drop in the olive green near the base and transition to sage at the tips, letting them bleed together on the wet paper. -
Create texture with negative space:
As you paint the feather vanes, leave tiny slivers of white paper between some strokes to simulate the separation of barbs. This adds instant texture without needing ink. -
Color the accent leaves:
Paint the maple leaves with a wash involving splashes of subdued red and green. Let the colors mix on the paper for a mottled, autumnal look. -
Detail the side feathers:
For the smaller side feathers, use warm ochre and burnt sienna tones. Paint broad stripes of color, allowing each section to dry slightly before painting the next to keep the edges somewhat distinct.
Natural Texture Trick
Mix a tiny amount of salt into your wet watercolor wash on the oversized feathers. As it dries, the salt pushes the pigment away, creating a speckled texture that mimics real plumage.
Step 3: Bringing the Turkey to Life
-
Paint the head and neck:
Mix a watery pinkish-red using alizarin crimson and a touch of white or water. Gently wash this over the head and neck area, keeping it very pale near the eye. -
Layer the body plumage:
For the upper wing area, use a golden yellow ochre. Transition into a grayish-brown for the main wing feathers, and finish with a reddish-brown for the tail feathers. -
Add definition to the body:
While the body paint is still slightly damp, drop in a darker brown (burnt umber) at the bottom of the chest and under the wing to create shadow and volume. -
Let it dry completely:
Wait for all paint layers to be bone dry. If the paper feels cool to the touch, it still holds moisture. Patience here prevents your ink lines from bleeding.
Level Up: Vintage Vibe
Tea stain your paper before starting! paint a wash of strong black tea over the whole sheet and let it dry. This gives an antique parchment look that suits the botanical style perfectly.
Step 4: Inking and Final Details
-
Outline the turkey:
Using your 0.1mm fine liner, carefully trace the turkey’s outline. Use short, broken strokes on the neck to suggest bumpy skin or small feathers, and longer smooth lines for the wing feathers. -
Detail the feathers:
Draw delicate lines inside the wing sections. Use scalloped lines for the upper wing coverts and long parallel lines for the flight feathers. -
Ink the wreath elements:
Go over your painted leaves and large feathers with the pen. Don’t outline every single painted edge; broken, sketchy lines look more organic and artistic. -
Add the central quills:
Draw a confident line down the center of each large feather to represent the quill (rachis). From this center line, draw faint, diagonal strokes outward to emphasize the feather structure. -
Final touches:
Add a tiny dot for the turkey’s eye and draw the legs with thin, darker lines. Erase any visible pencil marks that haven’t been covered by paint.
Now you have a charming piece of autumn art ready to be framed or gifted to a nature lover.
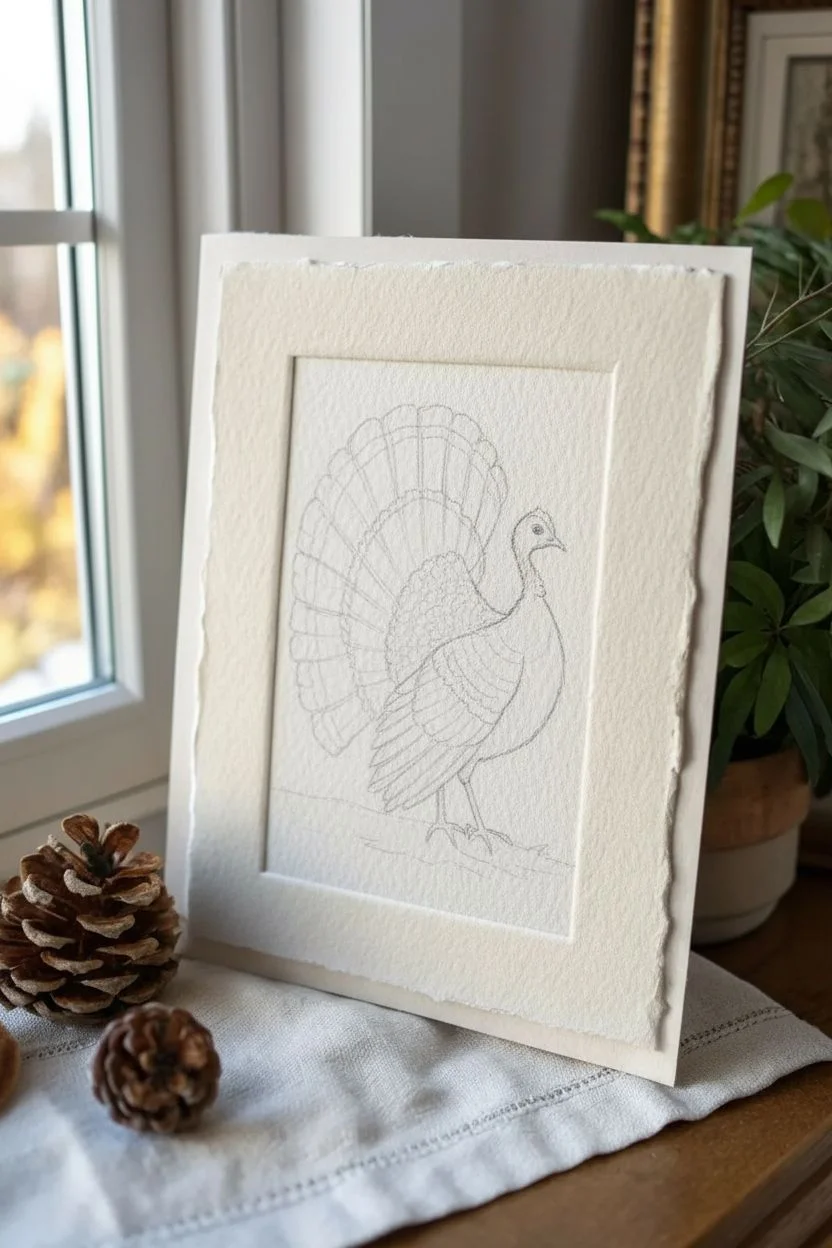
Negative Space Turkey Silhouette With a Color Wash
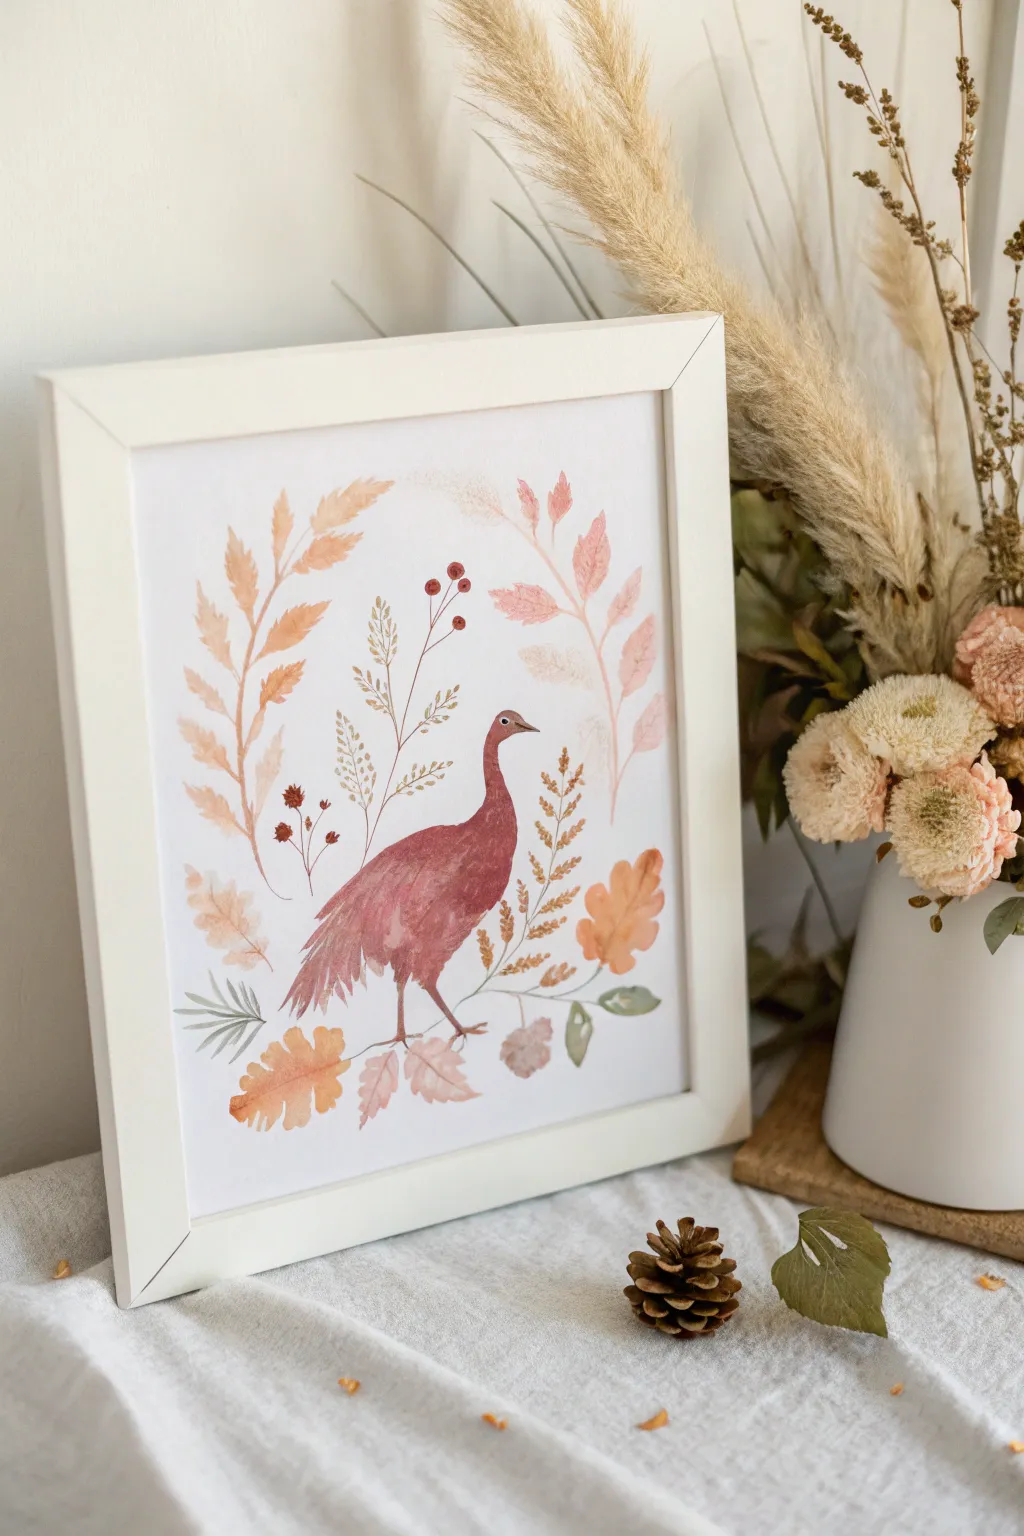
Capture the delicate beauty of autumn with this watercolor illustration, featuring a graceful turkey surrounded by swirling foliage. The soft, monochromatic wash of the bird contrasts beautifully with the mixed botanical elements, creating a piece that feels both rustic and refined.
Step-by-Step Tutorial
Materials
- Cold press watercolor paper (140lb/300gsm)
- Watercolor paints (burnt sienna, crimson red, yellow ochre, sap green, brown)
- Round watercolor brushes (sizes 2, 4, and 6)
- Pencil and kneaded eraser
- Palette for mixing
- Two jars of water
- Paper towels
- White or light wood frame (8×10 or similar)
Step 1: Sketching the Composition
-
Outline the turkey:
Begin by lightly sketching the outline of the turkey in the center of your paper. Focus on the elongated neck and the rounded, sloping body shape. Keep your pencil lines very faint so they won’t show through the translucent paint later. -
Map out the foliage:
Draw loose guides for the surrounding plants. These should curve upwards, framing the bird like a wreath. Include a mix of fern-like fronds, rounded oak leaves, and thin stems with berries. -
Refine the details:
Add the turkey’s legs and the small details of the beak and eye. Erase any heavy lines with a kneaded eraser until you have a ghostly guide.
Keep it Loose
Don’t overwork the leaves. A single brushstroke often looks more like a leaf than a carefully painted shape. Let the brush do the work.
Step 2: Painting the Turkey
-
Mix the body color:
Create a dusty rose or light maroon shade by mixing crimson red with a touch of brown or burnt sienna. Dilute it with water until it’s semi-transparent. -
Apply the base wash:
Using a size 6 brush, fill in the turkey’s body. I like to start at the neck and work downwards, lifting my brush as I reach the tail feathers to create a feathered texture. -
Add depth while wet:
While the paint is still damp, drop slightly more concentrated pigment into the lower belly and chest area to create volume and shadow. -
Paint the legs and eye:
Switch to a size 2 brush and a darker brown mix. Carefully paint the thin legs, feet, and the tiny eye. Leave a minuscule white dot in the eye for a highlight if you can manage it.
Metallic Magic
Once dry, add tiny accents of gold watercolor or metallic ink to the berry stems or leaf veins for a subtle shimmer that catches the light.
Step 3: Creating the Botanical Border
-
Mix autumn palettes:
Prepare three puddles of color on your palette: a pale orange-yellow, a muted sage green, and a deeper rust red. -
Paint the tall grasses:
Using the pale orange-yellow and a size 4 brush, paint the tall, sweeping fronds on the left and right. Use quick, gentle strokes that mimic the sway of dried grass. -
Add the oak leaves:
Dip into your rust and orange mixes to paint the broader leaves near the bottom. Allow the colors to bleed slightly into one another for a variegated autumn look. -
Insert green accents:
Use your sage green mix to add the smaller leaves near the bottom left and right corners. These cool tones balance the warmth of the bird. -
Detail the berries:
With a fine brush and concentrated red paint, dot in the clusters of berries on their thin stems. Connect them with hair-thin brown lines.
Step 4: Finishing and Framing
-
Review and refine:
Step back and look for empty spots. If the composition feels unbalanced, add small, faint leaves or stems in a very diluted wash to fill gaps without overpowering the main subject. -
Final drying:
Let the painting dry completely—ideally for several hours so the paper flattens out and the paint sets fully. -
Erase guidelines:
Once bone dry, gently erase any remaining pencil marks that haven’t been covered by paint. -
Mount and frame:
Place your artwork into a simple white or light wood frame to complement the airy, natural aesthetic of the painting.
Hang your finished piece in a cozy corner to bring a touch of woodland charm to your home
Cozy Sweater Turkey Character Painting

Embrace the autumn chill with this whimsical illustration of a turkey bundled up for the season. This watercolor project combines traditional fall motifs with a playful character design, featuring decorative line work and warm, earthy tones perfect for Thanksgiving cards or seasonal decor.
Step-by-Step Tutorial
Materials
- Cold press watercolor paper (A4 or similar)
- Watercolor paint set (Earth tones: Burnt Sienna, Yellow Ochre, Alizarin Crimson, Sepia, Black)
- Round watercolor brushes (Size 4 for fills, Size 0 or 1 for details)
- Fine liner pen (Black, waterproof, 0.3mm or 0.5mm)
- HB Pencil
- Kneadable eraser
- Jar of clean water
- Paper towels
Step 1: Sketching the Character
-
Body shapes:
Begin by lightly sketching a large oval for the turkey’s body, tilted slightly upward. Add a smaller circle for the head connected by a curved neck line. Leave space on the left side for the large tail fan. -
Adding features:
Sketch a small triangular beak and a wattle hanging below it. Draw a large, round eye. Add three whimsical feathers sticking straight up from the top of the head like a crown. -
The fan tail:
Draw a large semi-circle arching over the turkey’s back. Divide this into two main sections: an inner semi-circle attached to the body, and an outer ring that will become the tips of the feathers. -
Sweater details:
Map out the sweater on the turkey’s chest and neck. Draw curved bands following the contour of the body to represent the knitting pattern. Sketch the wing resting over the sweater area. -
Legs and ground:
Draw two thin legs ending in simple, three-toed feet. Lightly mark a small oval shadow on the ground beneath the turkey.
Clear Lines
Wait until your paper is cool to the touch before inking. If the paper feels cold, it’s still damp deep down, and your pen ink might bleed into the paper fibers.
Step 2: Applying Watercolor Base Layers
-
Body wash:
Mix a warm Burnt Sienna. Paint the lower body and the neck area above the sweater, leaving the sweater bands and wing unpainted for now. Keep the wash relatively flat but allow some pigment to pool at the bottom for shadow. -
Tail colors:
For the inner fan of the tail, use a diluted wash of orange or light rust. Let it fade out slightly as it reaches the outer ring. Paint the outer feather tips with alternating patches of Yellow Ochre and a deeper orange. -
The sweater pattern:
Carefully paint the bands of the sweater. Use Alizarin Crimson for the hearts and stripes, and leave some bands white or paint them with a very pale beige wash. I find using a size 0 brush here helps keep the patterns crisp. -
Wing and face:
Paint the wing feathers with a very light wash of brown or cream. Use a brighter red for the wattle and a yellow-orange for the beak. Paint the head a soft pinkish-brown. -
Ground shadow:
Mix a watery grey-green color and paint the oval shadow under the feet. Soften the edges with a clean, damp brush so it doesn’t look like a solid object.
Step 3: Detailing with Ink
-
Basic outlining:
Once the paint is completely bone-dry, use your fine liner pen to trace the main outlines of the turkey. Keep the lines somewhat loose and sketchy rather than perfectly rigid. -
Sweater texture:
Add the knit details. Draw small triangles, dashes, and zig-zags within the painted bands of the sweater. Add vertical fringe lines at the bottom hem of the sweater. -
Feather definition:
Draw the quills and barbs on the wing feathers. Use thin, flicking strokes to suggest texture. Outline the individual scallops on the outer ring of the tail fan. -
Decorative patterns:
Add small circles or dots inside the tail fan segments. Use stippling (small dots) on the neck and body to suggest a feathery texture without drawing individual feathers. -
Final touches:
Darken the pupil of the eye, leaving a tiny white highlight. Draw the legs and feet with firm strokes, adding small claws at the tips.
Festive Flair
Swap the sweater colors to match a specific holiday theme, or use metallic gold paint for the decorative dots on the tail fan to make the artwork sparkle.
Now you have a charming, cozy character ready to greet the season
Galaxy Feather Turkey With Starry Details
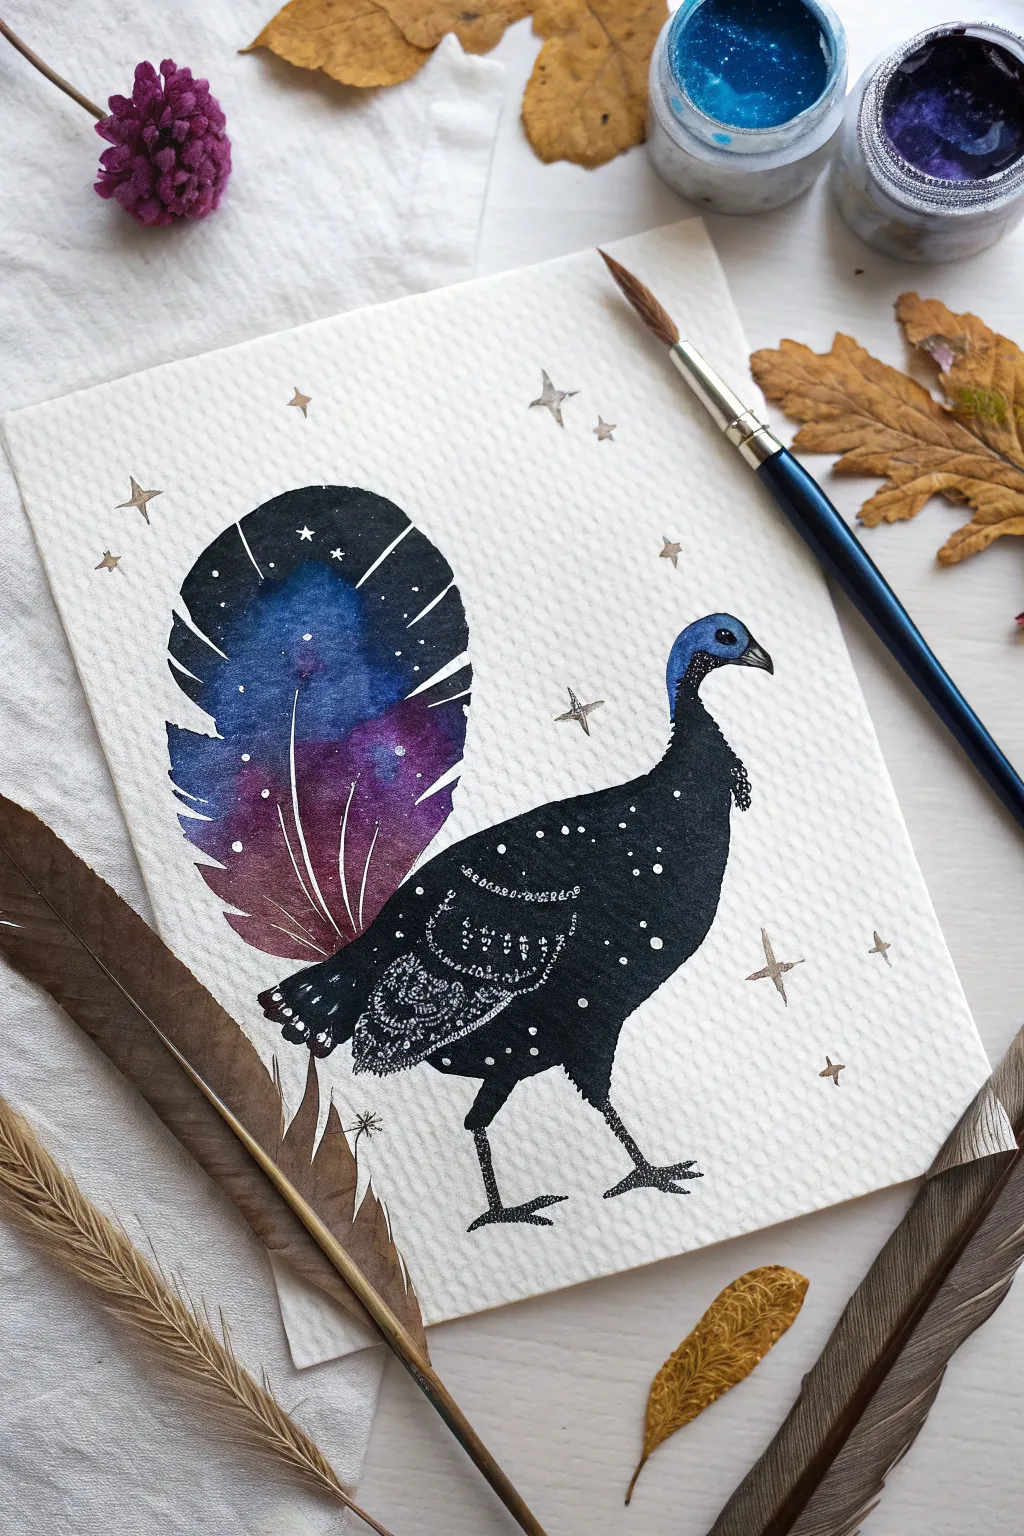
Transform a traditional Thanksgiving symbol into a celestial masterpiece with this watercolor and ink project. This turkey features a stunning galaxy-filled tail fan and intricate starry details that make it truly out of this world.
Step-by-Step
Materials
- Cold press watercolor paper (300 gsm)
- Pencil (HB or H)
- Kneaded eraser
- Watercolor paints (Indigo, ultramarine blue, purple, magenta)
- Black waterproof ink or black gouache
- Small round watercolor brush (size 2 or 4)
- Fine liner brush or size 0 detail brush
- White gel pen or white gouache for stars
- Gold or silver metallic watercolor/paint for stars
- Jar of clean water
- Paper towel
Step 1: Sketching and Masking
-
Outline the body:
Begin by lightly sketching the profile of the turkey in the center of your paper. Draw a simple, rounded body shape that tapers up into a slender neck and small head. -
Add the tail fan:
Behind the body, sketch a large, singular fan shape for the tail feathers. Instead of individual feathers, draw one broad petal-like shape that curves upward, giving you plenty of space for the galaxy effect. -
Refine the details:
add stick-like legs with three toes each and faint lines indicating where the wing would sit on the body. Keep your pencil lines very light so they don’t show through the watercolor later.
Step 2: Painting the Galaxy Tail
-
Wet the tail area:
Using clean water, carefully wet the inside of the tail fan shape. You want the paper to be glistening but not forming a puddle. -
Drop in bright colors:
While the paper is wet, touch your brush loaded with magenta and purple into the bottom and middle sections of the tail. Allow the colors to bloom and spread naturally. -
Add deep space tones:
Introduce ultramarine blue and indigo to the upper and outer edges of the tail fan. Let these darker colors bleed into the purples to create a seamless gradient. -
Lift and blend:
If the colors get too dark, use a clean, thirsty brush to lift a little pigment from the center, creating a glowing nebula effect. Let this section dry completely before moving on.
Star Sprinkle Tip
For a natural starry look on the tail, load a stiff brush with white gouache and tap it against another brush handle to splatter tiny flecks.
Step 3: The Celestial Body
-
Paint the head:
Mix a vibrant blue watercolor and carefully paint the turkey’s head and neck. Leave a tiny white circle unpainted for the eye to give it life. -
Fill the body silhouette:
Switch to your black ink or black gouache. Carefully fill in the entire body shape, wing, and legs, creating a stark, solid silhouette against the white paper. -
Connect the shapes:
Where the blue neck meets the black body, carefully blend the edge or simply overlap the black slightly for a clean transition. Ensure the black is fully opaque and solid. -
Define the tail structure:
It’s time to structure that colorful blob we painted earlier. Use white gouache or a gel pen to draw the feather spines radiating from the base of the tail upward, segmenting your galaxy.
Level Up Your Art
Use a metallic blue or purple paint for the galaxy section. It adds a beautiful shimmer that catches the light like real nebulae.
Step 4: Starry Embellishments
-
Add body constellations:
Once the black body paint is bone dry, use a white gel pen or fine brush with white gouache to add tiny dots and stars across the turkey’s back and wing. -
Detail the wing:
I like to concentrate a pattern of intricate white dots and curved lines on the wing area to suggest decorative embroidery or lace-like feather patterns. -
Create the galaxy stars:
Flick white paint or use your gel pen to add stars within the dark blue and purple sections of the tail fan. Add a few larger cross-shaped stars for variety. -
Paint the background stars:
Mix a metallic gold or silver paint. Draw scattered four-pointed stars and small diamonds floating in the white space around the turkey. -
Final touches:
Add a tiny black pupil to the center of the eye and ensure your leg lines are crisp. Erase any visible pencil marks around the edges once everything is 100% dry.
Now you have a magical, cosmic bird ready to adorn your holiday table or wall


Have a question or want to share your own experience? I'd love to hear from you in the comments below!