If you’ve ever looked at a deck and thought, “It needs a little more drama,” a two tone deck stain is the easiest way to get that pop without going overboard. I love how two colors can separate the deck’s shapes—floors, rails, stairs—so everything feels intentional and designed.
Dark Deck Floor With Light Railings
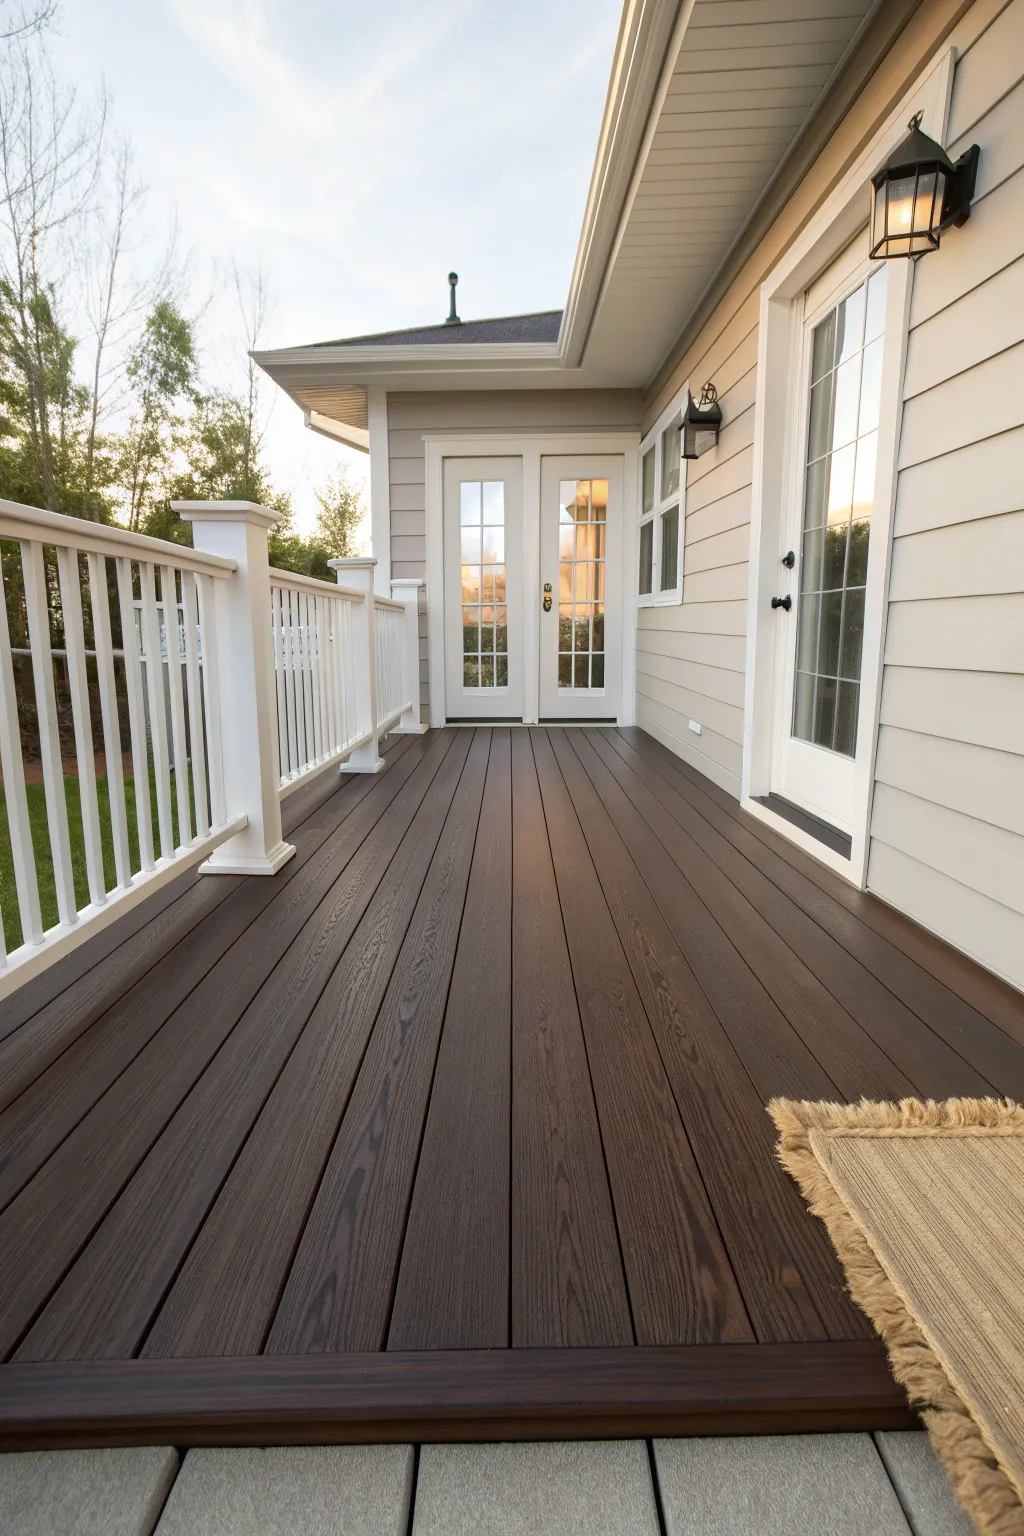
Achieve a sophisticated outdoor look by pairing rich, espresso-toned decking with crisp white architectural elements. This project transforms a standard porch into an elegant extension of your home using deep penetrating stains and bright, durable enamels.
Step-by-Step Tutorial
Materials
- Deck cleaner/stripper
- Pressure washer (optional but recommended)
- 80-grit sandpaper & pole sander
- Stiff bristle scrub brush
- Deep brown/Espresso semi-transparent or solid deck stain
- Exterior white paint (gloss or semi-gloss finish)
- Painter’s tape & drop cloths
- Purdy 3-inch synthetic bristle brush
- Lambswool applicator pad or stain pad
- Extension pole
- Mineral spirits (for clean up depending on stain type)
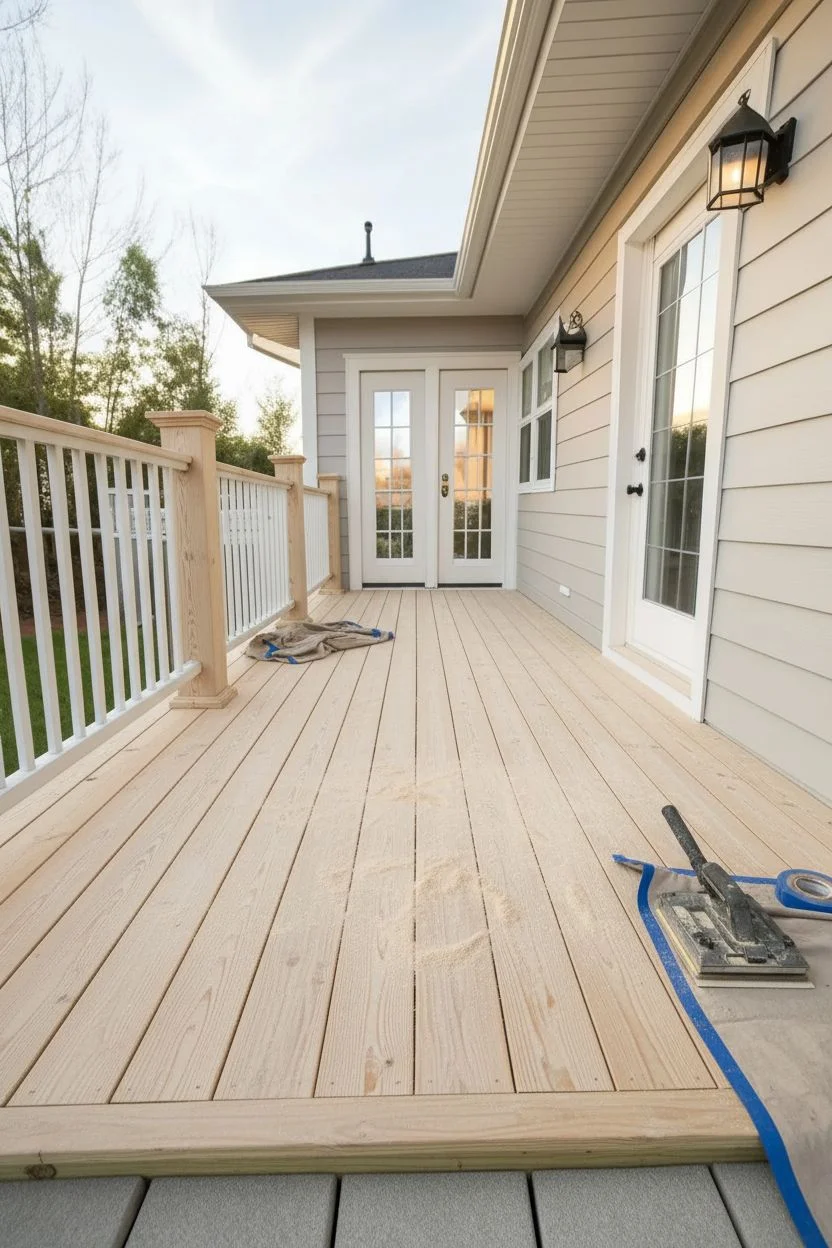
Step 1: Preparation & Cleaning
-
Assess the surface:
Begin by inspecting the entire deck surface for loose boards, protruding nail heads, or splinters. Secure any loose elements and replace rotten wood before starting the cosmetic work. -
Deep clean the wood:
Apply a quality deck cleaner or stripper according to the manufacturer’s instructions. Scrub vigorously with a stiff bristle brush to remove dirt, mildew, and gray wood fibers. -
Rinse thoroughly:
Rinse the deck completely. If using a pressure washer, keep the pressure low (under 1200 PSI) and use a wide fan tip to avoid gouging the wood grain. -
Allow extensive drying:
Patience is key here; let the wood dry for at least 48 hours. The moisture content needs to be low for the stain to penetrate properly. -
Sand for smoothness:
Once dry, run a pole sander with 80-grit sandpaper over the floorboards to open the pores and smooth out any fuzz raised by the washing process.
Step 2: Painting the Railings
-
Protect the deck floor:
Even though you are staining the floor later, drips of white paint can seal the wood pores. Lay down drop cloths generously under the railings. -
Prime bare wood:
If your railings are new raw wood or have peeled significantly, apply a high-quality exterior wood primer first. -
Paint the balusters first:
Using a 2-inch angled sash brush, paint the vertical balusters. I find it easiest to paint the hard-to-reach sides first before smoothing out the front faces. -
Finish the posts and rails:
Move onto the horizontal top and bottom rails and the larger posts. Apply two coats of exterior white semi-gloss paint, allowing proper drying time between coats. -
Tape off the base:
Once the white paint is fully cured (give it a day or two), apply blue painter’s tape to the bottom of the posts where they meet the floor to ensure a crisp line.
Sticky Situation?
If the stain remains tacky after 24 hours, you likely over-applied. Use mineral spirits (for oil-based) or water (for water-based) on a rag to gently wipe away the excess sitting on top.
Step 3: Staining the Deck Floor
-
Cut in the edges:
Start by using a 3-inch synthetic brush to apply the dark stain carefully along the edges of the house and around the base of the white railing posts. -
Work the gaps:
Use the brush to get stain in between the deck boards. This ensures that when the wood shrinks in colder weather, you won’t see raw wood stripes appearing. -
Apply to the main field:
Pour your dark espresso stain into a wide tray. Using a lambswool applicator or a specialized stain pad on an extension pole, begin applying stain to the main floor area. -
Follow the grain:
Work securely along the length of 2-3 boards at a time. Do not stop in the middle of a board to avoid lap marks; act quickly to keep a wet edge. -
Back-brushing technique:
Immediately after applying with the pad, I like to lightly run a brush over the wet stain if the wood has deep texture, helping to work the product into the grain. -
Wipe excess stain:
If using a semi-transparent stain, check the label; some require wiping off excess product after 15 minutes to prevent a tacky, shiny surface. -
Apply a second coat:
If the color isn’t deep enough after the first coat dries (usually 4-24 hours), apply a second thin coat using the same method.
Pro Tip: The Wet Edge
Never start a new row of boards until you finish the current ones end-to-end. Stopping mid-board creates visible ‘lap marks’ where layers overlap and dry unevenly.
Step 4: Final Touches
-
Remove tape carefully:
Score the edge of the painter’s tape with a sharp utility knife before peeling it off to prevent pulling up any dried stain. -
Cure time:
Keep foot traffic and furniture off the deck for at least 24 to 48 hours to allow the finish to harden completely. -
Style and enjoy:
Add a woven doormat and your patio furniture once the surface is solid and non-tacky.
Enjoy your beautifully contrasted deck as the perfect backdrop for morning coffees and evening gatherings.


Light Deck Floor With Dark Railings
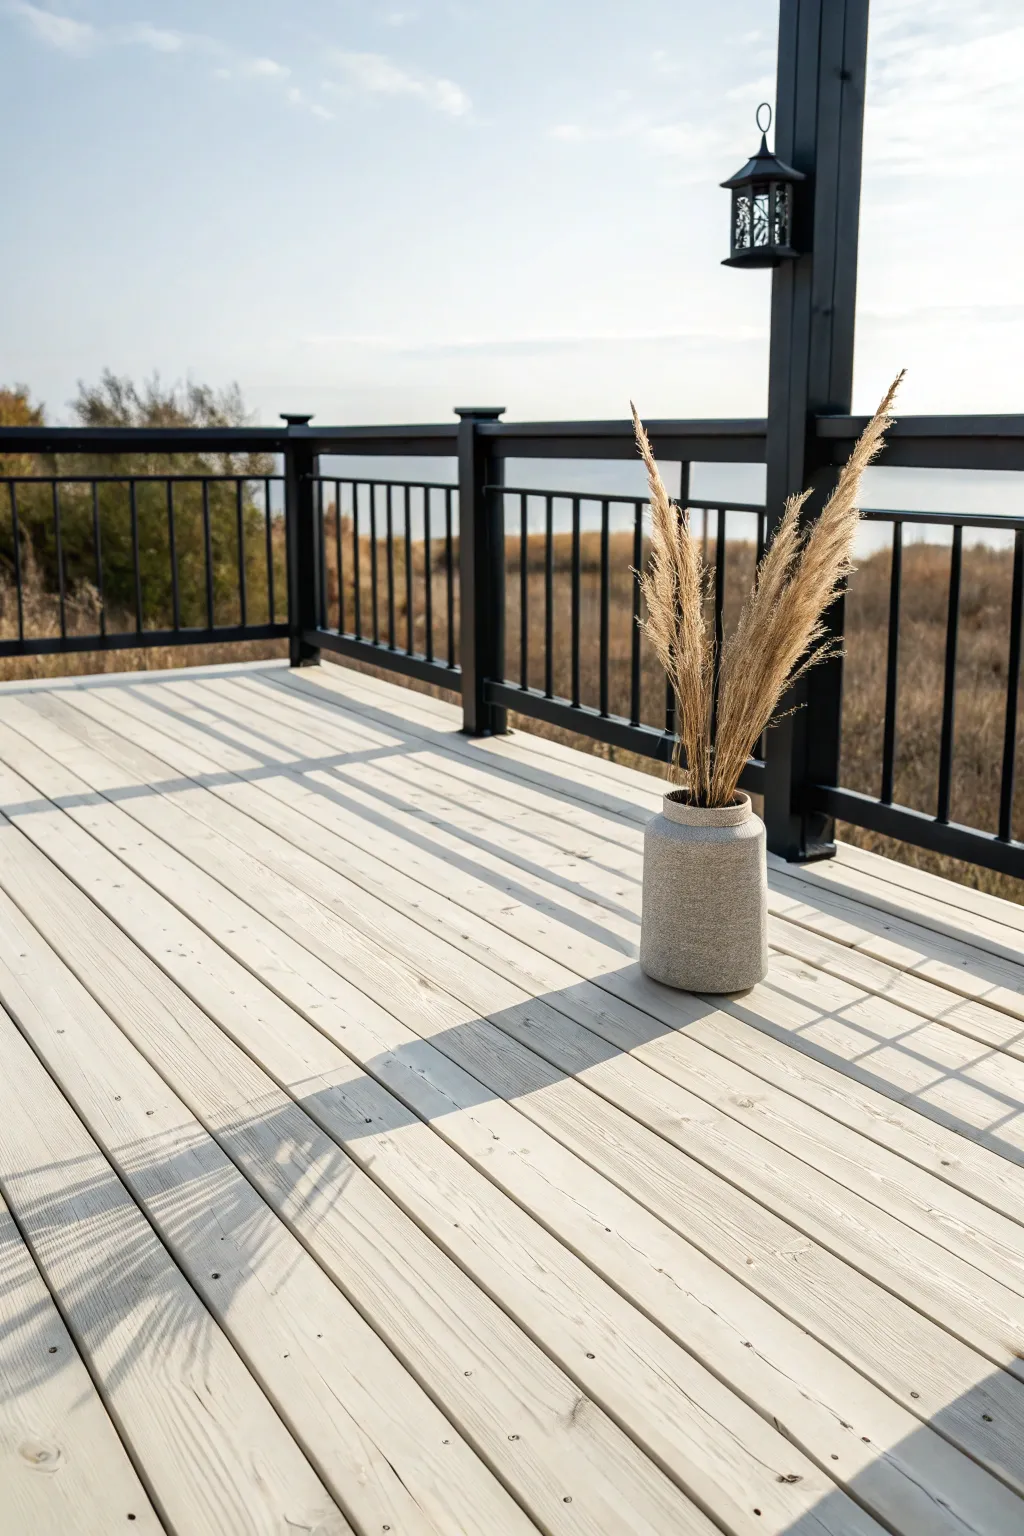
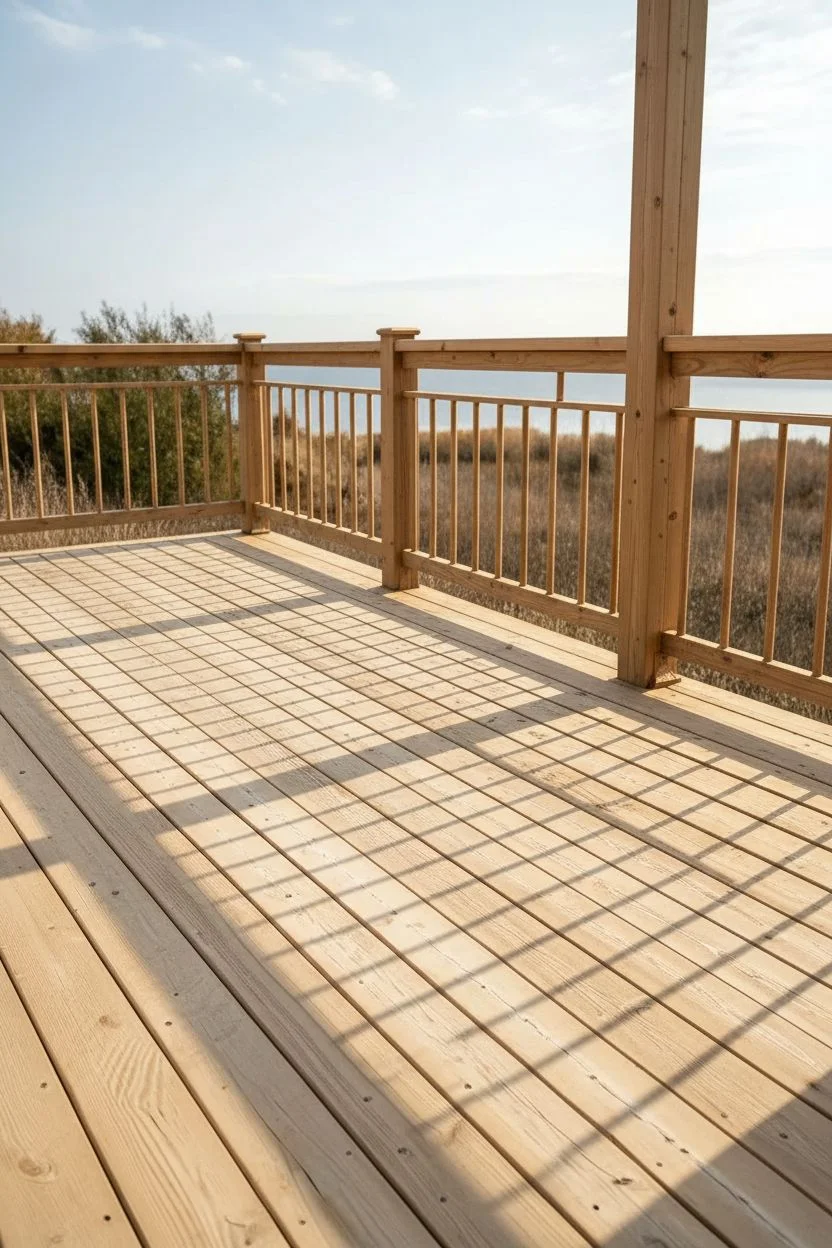
This striking two-tone design pairs a bright, airy whitewashed floor with sleek matte black railings for a modern coastal aesthetic. The high contrast emphasizes clean lines while keeping the space feeling open and expansive.
How-To Guide
Materials
- Deck cleaner and brightener
- Pressure washer (optional but recommended)
- Stiff bristle scrub brush
- Medium-grit sandpaper (80-100 grit)
- Orbital sander
- Painters tape (wide width)
- Drop cloths or plastic sheeting
- Solid body stain or exterior paint (Matte Black)
- Semi-transparent or semi-solid deck stain (Whitewash or Driftwood Gray)
- High-quality synthetic bristle brushes (2-inch and 4-inch)
- Paint roller with 3/8-inch nap and extension pole
- Clean rags
Step 1: Preparation
-
Clear and clean:
Remove all furniture, rugs, and planters from the deck. Apply a deck cleaner generously to the wood surfaces. -
Scrub the surface:
Using a stiff bristle brush, scrub the wood thoroughly to remove dirt, mildew, and old finishes. I find that scrubbing with the grain yields the best results. -
Rinse and dry:
Rinse the entire deck thoroughly with a garden hose or a pressure washer on a low setting (under 1200 PSI) to avoid damaging the wood fibers. Allow the wood to dry completely for at least 48 hours. -
Sand the surfaces:
Once dry, use an orbital sander with medium-grit sandpaper to smooth out rough spots and open up the wood pores for the stain. Focus on removing splinters and leveling any uneven board joints. -
Remove dust:
Sweep or vacuum up all sawdust. Wipe the railings and floorboards with a tack cloth or a damp rag to ensure a pristine surface for staining.
Uneven Blotches?
If the light stain looks blotchy, the wood might have had remaining sealer. Lightly sand the blotchy areas again and reapply the stain sparingly to blend it in.
Step 2: Painting the Railings
-
Protect the floor:
Before starting on the railings, lay down drop cloths and use painter’s tape to mask off the floorboards immediately adjacent to the posts and balusters. -
Cut in edges:
Use a 2-inch angled brush to carefully apply the black solid body stain or exterior paint to the corners, crevices, and hard-to-reach areas of the railings and posts. -
Apply the black finish:
Paint the flat surfaces of the sturdy posts and top rails using a 4-inch brush or a small foam roller for a smooth, matte finish. Apply thin, even coats to prevent drips. -
Finish the balusters:
Coat the individual balusters, working from top to bottom. Check for drips on the underside of bottom rails and smooth them out immediately. -
Second coat:
Allow the first coat to dry according to the manufacturer’s instructions. Apply a second coat to ensure full coverage and a deep, rich black color. -
Remove masking:
Carefully remove the painter’s tape while the paint is still slightly tacky to ensure a clean, crisp line.
Step 3: Staining the Floor
-
Mask the posts:
Once the railing paint is fully cured (usually 24 hours), apply fresh painter’s tape around the base of the black posts to protect them from the floor stain. -
Stir the stain:
Thoroughly mix your semi-transparent whitewash or light gray stain. Pigments settle at the bottom, so stir frequently throughout the application process. -
Cut in the perimeter:
Use a wide brush to apply stain to the edges of the deck and around the base of the posts, carefully blending outwards. -
Roll the main area:
Use a roller on an extension pole to apply the stain to the main floorboards. Work in long, continuous strokes along the length of the boards to avoid lap marks. -
Back-brushing:
Immediately after rolling a section, go over it with a dry brush (back-brushing) to push the stain into the wood grain and remove excess product. -
Complete the floor:
Continue working in small sections, roughly 2-3 boards wide, moving from one end of the deck to the other to maintain a wet edge. -
Final cure:
Allow the floor stain to dry completely before walking on it or replacing furniture. This usually takes 24-48 hours depending on humidity.
Pro Tip: Solar Defense
Since light stains offer less UV protection than dark ones, add a clear UV-protective topcoat over the whitewash to prevent premature graying and sun damage.
Enjoy the crisp, modern look of your beautifully contrasted outdoor living space


Picture Frame Border on the Deck Floor
Elevate your outdoor space with this sophisticated two-tone staining technique that mimics the look of a custom carpentry inlay. By using a lighter, natural tone for the border boards against a rich, warm mahogany or teak shade for the main deck, you create a defined visual boundary that feels both modern and luxurious.
How-To Guide
Materials
- Deck cleaner and brightener
- Pressure washer (optional but recommended)
- Medium-grit sandpaper (80-grit)
- Orbital sander or pole sander
- High-quality penetrating oil stain (Warm Mahogany/Teak tint)
- High-quality penetrating oil stain (Natural/Clear tint)
- Blue painter’s tape (2-inch width)
- Various paint brushes (3-4 inch for main areas, 2 inch for distinct edges)
- Paint pad applicator with extension pole
- Drop cloths or plastic sheeting
- Rags for cleanup
- Stir sticks
Step 1: Preparation & Surface Cleaning
-
Clear the deck:
Remove all furniture, planters, and debris from the deck surface to ensure you have complete, unobstructed access to every board. -
Inspect the wood:
Check for any loose screws or nails and secure them flush with the wood surface. Replace any rotting or severely damaged boards before proceeding. -
Apply deck cleaner:
Spray a quality deck cleaner across the entire surface. Let it sit for the manufacturer’s recommended time to break down dirt, mold, and old finish. -
Scrub and rinse:
Scrub the wood with a stiff-bristle brush, moving with the grain. Rinse thoroughly with a garden hose or pressure washer on a low setting (under 1200 PSI) to avoid damaging the wood fibers. -
Allow to dry:
Let the deck dry completely for at least 48 hours. The wood moisture content needs to be low for the stain to penetrate properly.
Bleeding Lines?
If stain bleeds under the tape, wait for it to fully dry. Then, use a small detail sander or scraper to gently remove the error, and carefully re-apply the correct color with a small artist’s brush.
Step 2: Sanding & Taping
-
Sand the surface:
Using an orbital sander or a pole sander with 80-grit paper, lightly sand the entire deck. This opens up the wood pores and ensures an even absorption of the stain. -
Clear the dust:
Sweep or use a leaf blower to remove all sanding dust. For the cleanest surface, I like to follow up with a quick wipe using a tack cloth or slightly damp rag. -
Protect the house:
Use plastic sheeting and painter’s tape to protect the siding of your house and the white railing posts where they meet the deck floor. -
Define the border:
This is the critical step for the picture frame look. Apply painter’s tape precisely along the inner edge where the lighter border boards meet the main decking boards. Press the tape edges down firmly to prevent bleed-through.
Triple Tone Geometry
Add a third dimension by using a very dark (almost charcoal) stain on the vertical riser boards below the deck edge. This makes the lighter picture frame border pop even more visually.
Step 3: Staining the Main Deck
-
Mix the darker stain:
Thoroughly stir your darker stain (Mahogany or Teak tone). Ensure all pigments settled at the bottom are fully incorporated. -
Cut in the edges:
Using a 3-inch brush, carefully apply the darker stain along the taped line and near the house siding. Work in small sections to maintain a wet edge. -
Apply to main boards:
Use a paint pad applicator on a pole to stain the large interior section of the deck. Apply the stain smoothly with the grain, covering full lengths of boards to avoid lap marks. -
Back-brushing:
Immediately after applying with the pad, run a brush over the wet stain to work it deep into the wood pores and even out any puddles. -
Wipe excess:
After about 15-20 minutes (check your product’s specific instructions), wipe off any unabsorbed stain with a clean rag. This prevents a tacky/shiny surface. -
Remove tape:
Carefully peel up the painter’s tape while the stain is still slightly damp. Pulling it away at a 45-degree angle helps keep the line crisp.
Step 4: Staining the Border
-
Allow cure time:
Let the main deck area dry completely according to the stain manufacturer’s waiting period, usually 24 hours. -
Tape the dark wood:
Now, apply fresh painter’s tape along the edge of the *dark* stained wood you just finished, protecting it from the lighter stain we are about to apply. -
Apply the natural stain:
Stir your ‘Natural’ or lighter-toned stain. Using a clean 2-inch or 3-inch brush, carefully apply this lighter shade to the perimeter border boards. -
Finish the perimeter:
Ensure you coat the ends of the boards and the gaps between the border pieces thoroughly. Wipe away excess oil after the appropriate penetration time. -
Final reveal:
Once the border is dry to the touch, remove the final tape strips to reveal your sharp, two-tone transition.
Enjoy the striking visual depth your new two-tone deck brings to your backyard gatherings


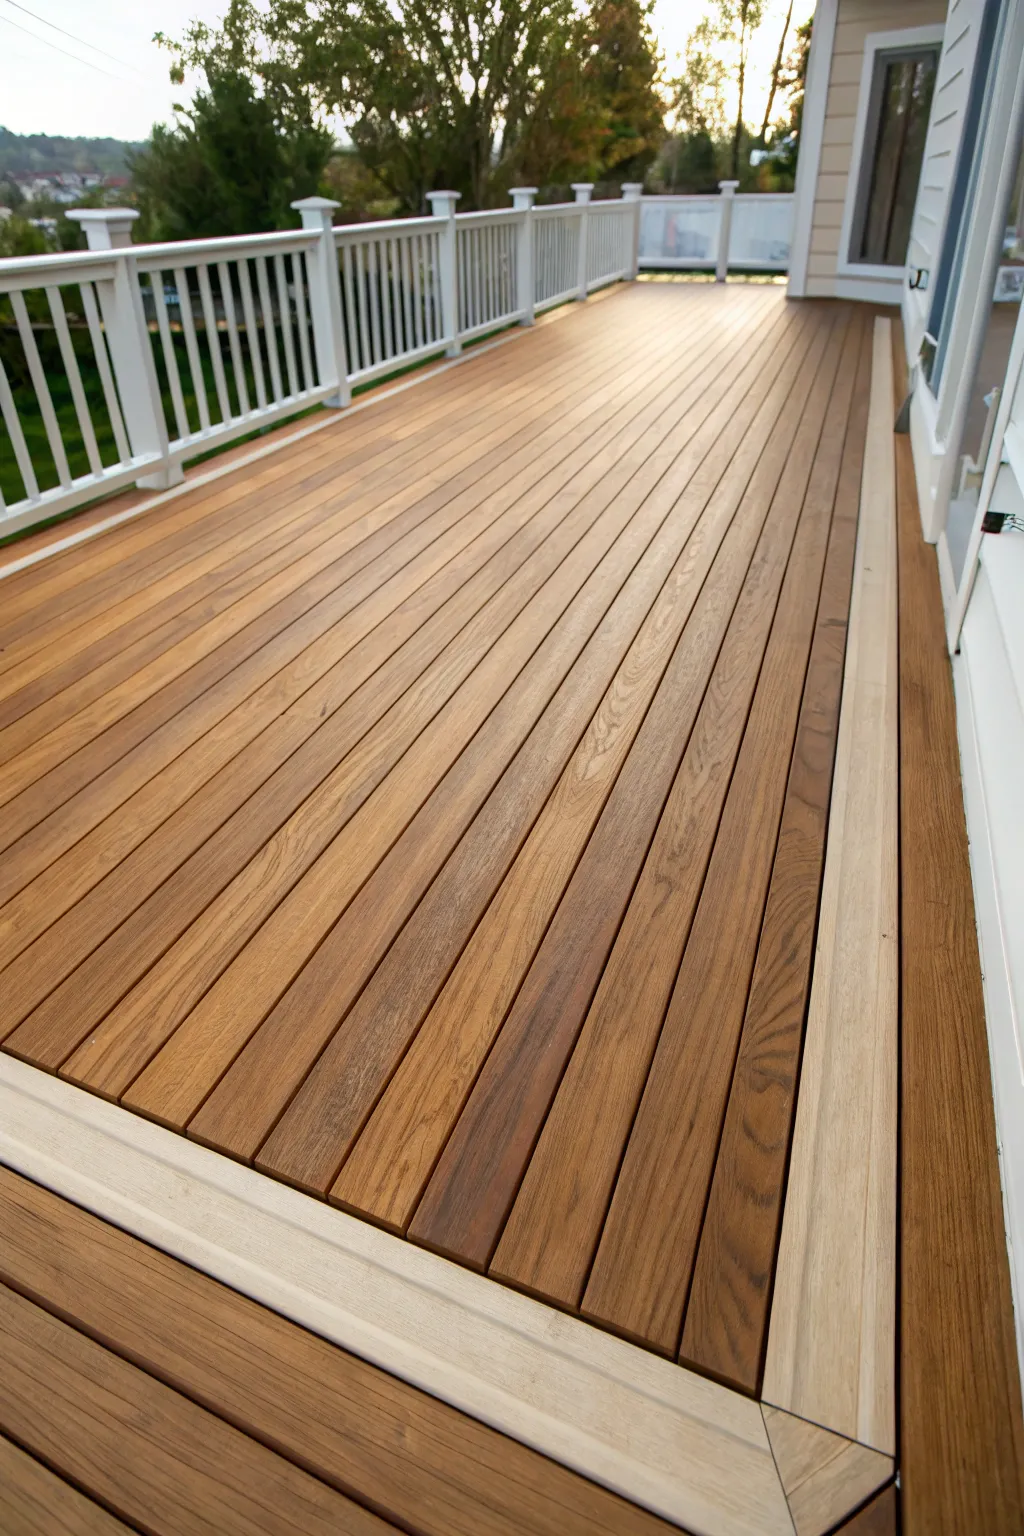
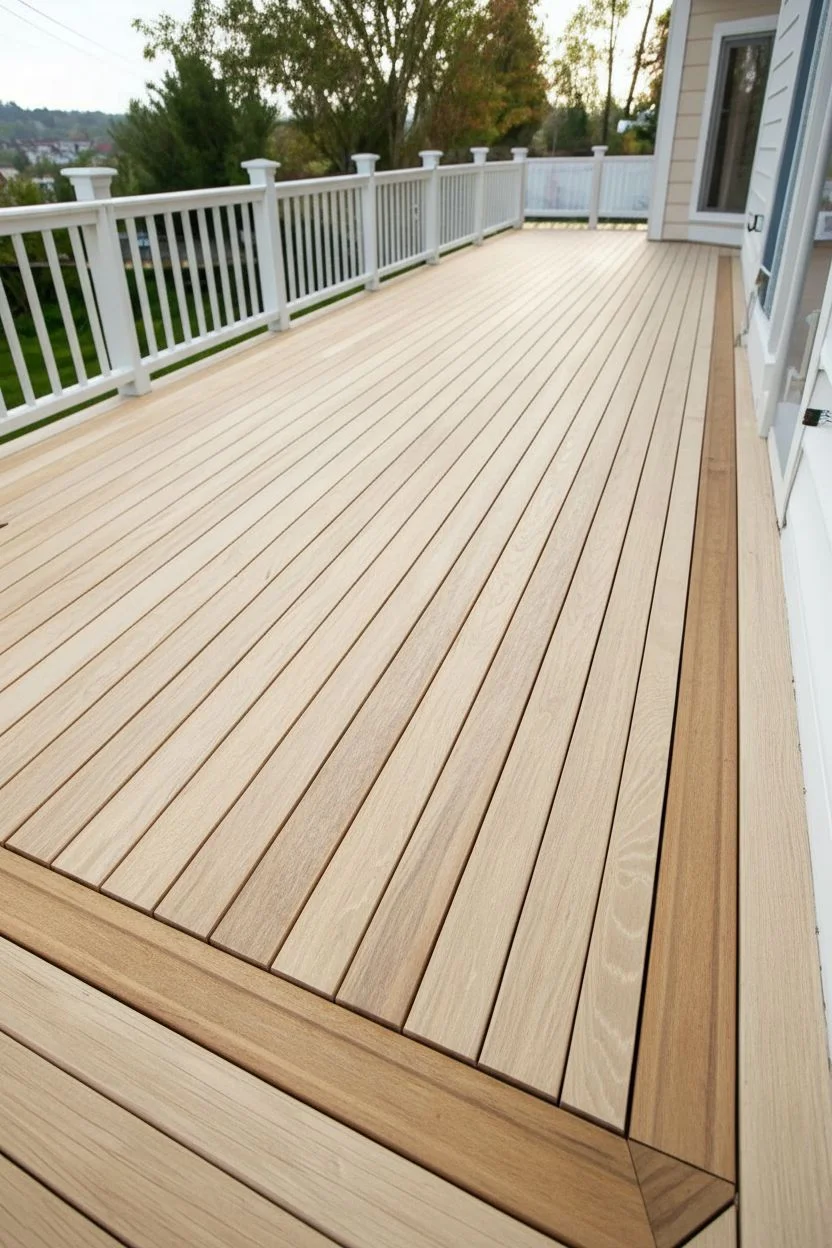
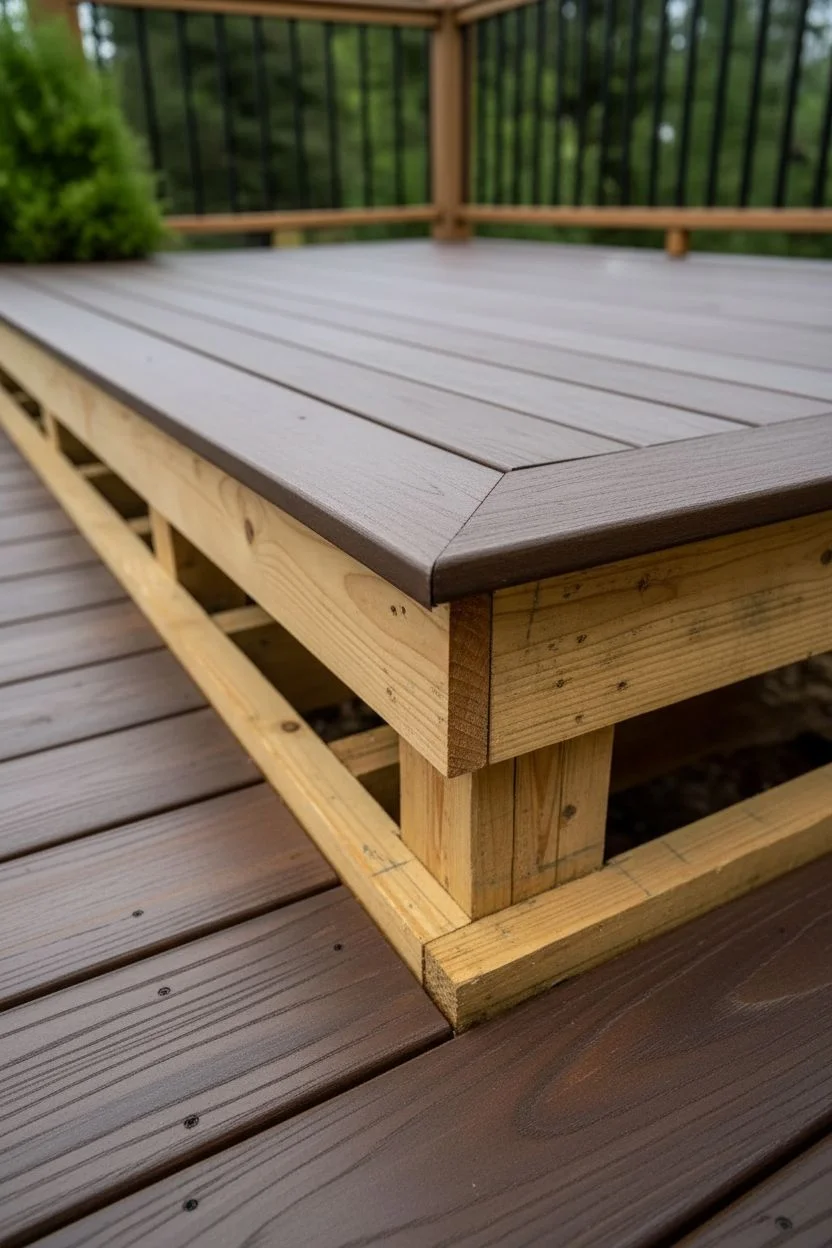
Perimeter Fascia Matched to the Darker Tone

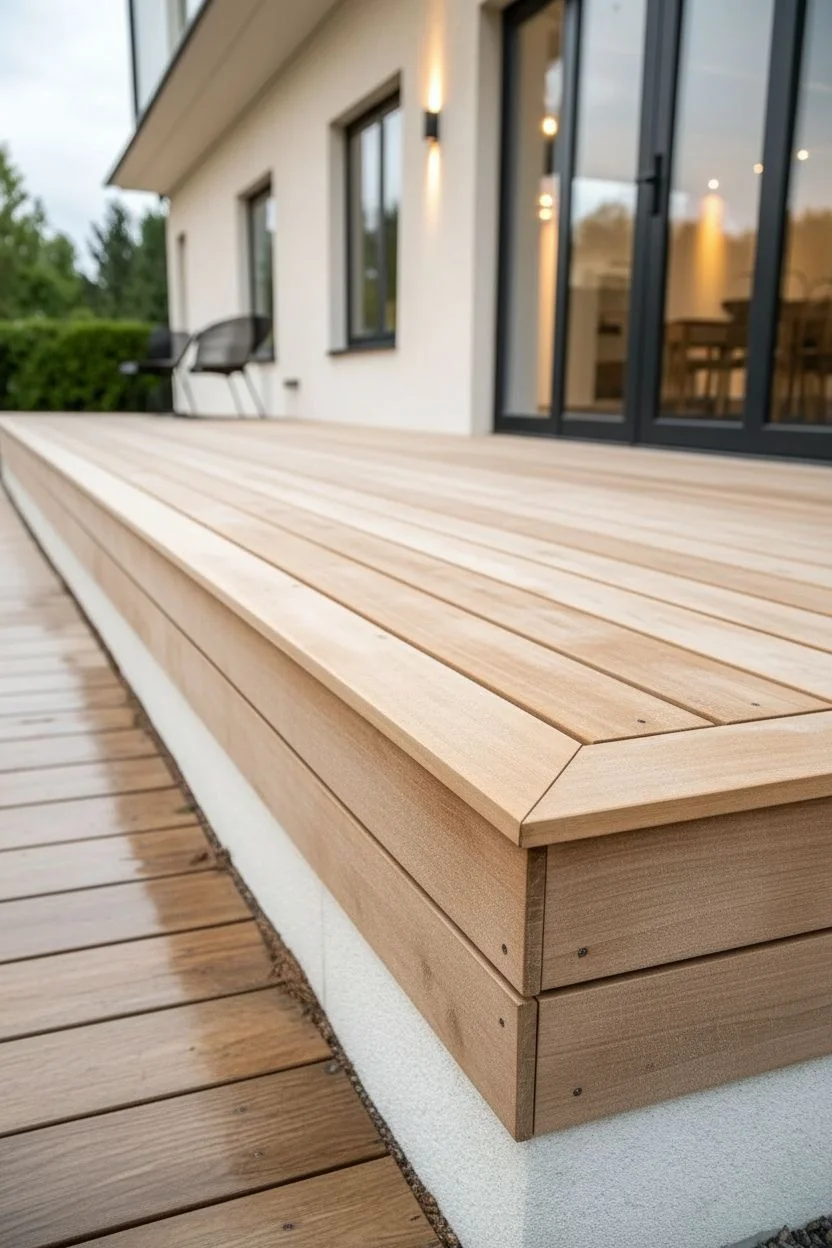
This project creates a striking visual frame for your outdoor space by staining or painting the perimeter nosing and fascia boards in a dark, matte tone that contrasts beautifully against lighter, natural decking. The result is a crisp, modern border that defines the deck’s edge with architectural precision.
How-To Guide
Materials
- Deck cleaner and brightener
- Pressure washer (optional but recommended)
- 80-grit and 120-grit sandpaper
- Orbital sander
- Exterior wood stain (Natural/Medium tone for main deck)
- Solid body stain or exterior paint (Black or Charcoal for perimeter)
- Painter’s tape (high quality)
- 3-inch synthetic bristle brush
- 4-inch foam roller or stain pad
- Drop cloths or plastic sheeting
- Stir sticks
Step 1: Preparation & Surface Cleaning
-
Clear everything:
Remove all furniture, plants, and decor from the deck surface to ensure you have unobstructed access to every board. -
Clean the wood:
Apply a quality deck cleaner according to the manufacturer’s instructions. Scrub firmly with a stiff bristle broom to remove dirt, mildew, and gray fibers. -
Rinse thoroughly:
Rinse the entire deck with a garden hose or a pressure washer on a low setting (be careful not to gouge the wood). Let the wood dry completely for at least 48 hours. -
Sand the perimeter:
Using 80-grit sandpaper on an orbital sander, go over the perimeter boards (the fascia and nosing) that will receive the dark color. This opens the wood grain for better absorption. -
Finish sanding:
Switch to 120-grit sandpaper for a final pass on the perimeter to ensure a smooth finish, then wipe away all dust with a tack cloth or damp rag.
Pro Tip: Sharp Lines
To prevent bleed-under, paint a thin layer of the clear or base color over the tape edge first. This seals the tape, so any bleed is invisible before you apply the black.
Step 2: Applying the Main Deck Stain
-
Protect the perimeter:
Before staining the main deck, apply painter’s tape carefully along the inner edge where the main decking meets the perimeter boards you intend to make dark. -
Stain the main area:
Apply your natural or medium-tone semi-transparent stain to the main field of the deck using a stain pad or brush. Work in the direction of the grain. -
Work in sections:
Complete 3-4 boards at a time to maintain a wet edge and avoid lap marks. I like to back-brush immediately to ensure the stain penetrates evenly. -
Allow to cure:
Let the main deck stain dry completely based on the can’s instructions—usually 24 to 48 hours—before walking on it or applying tape.
Troubleshooting: Lap Marks
If you see uneven streaks in the stain, you likely let a wet edge dry mid-board. Always stain full lengths of boards at once, never stopping in the middle.
Step 3: Creating the Dark Border
-
Reverse the tape:
Once the main deck is fully dry, apply a fresh line of painter’s tape along the edge of the stained wood to protect it from the dark stain. -
Press the edges:
Firmly press down the edge of the tape with a putty knife or your fingernail to prevent the dark stain from bleeding under. -
Cut in the edges:
Use a small 2-inch brush to carefully apply the black or charcoal solid stain/paint to the edges and corners of the perimeter boards. -
Fill the surface:
Using a 4-inch roller or brush, apply the darkness to the flat surfaces of the nosing and the vertical fascia boards. -
Check for coverage:
Solid stains often require two coats for true opacity. Allow the first coat to dry (usually 4-6 hours) before applying a second coat. -
Address the screw heads:
Dab a little extra stain into countersunk screw holes on the perimeter to ensure the hardware doesn’t shine through and disrupt the dark border. -
Remove tape:
Remove the painter’s tape slowly while the final coat is still slightly tacky to ensure a crisp, clean line without peeling. -
Final cure:
Allow the entire project to cure for 72 hours before placing distinct heavy furniture back onto the deck.
Enjoy the defined architectural look your new two-tone deck brings to the backyard
BRUSH GUIDE
The Right Brush for Every Stroke
From clean lines to bold texture — master brush choice, stroke control, and essential techniques.
Explore the Full Guide
Perimeter Fascia Matched to the Lighter Tone
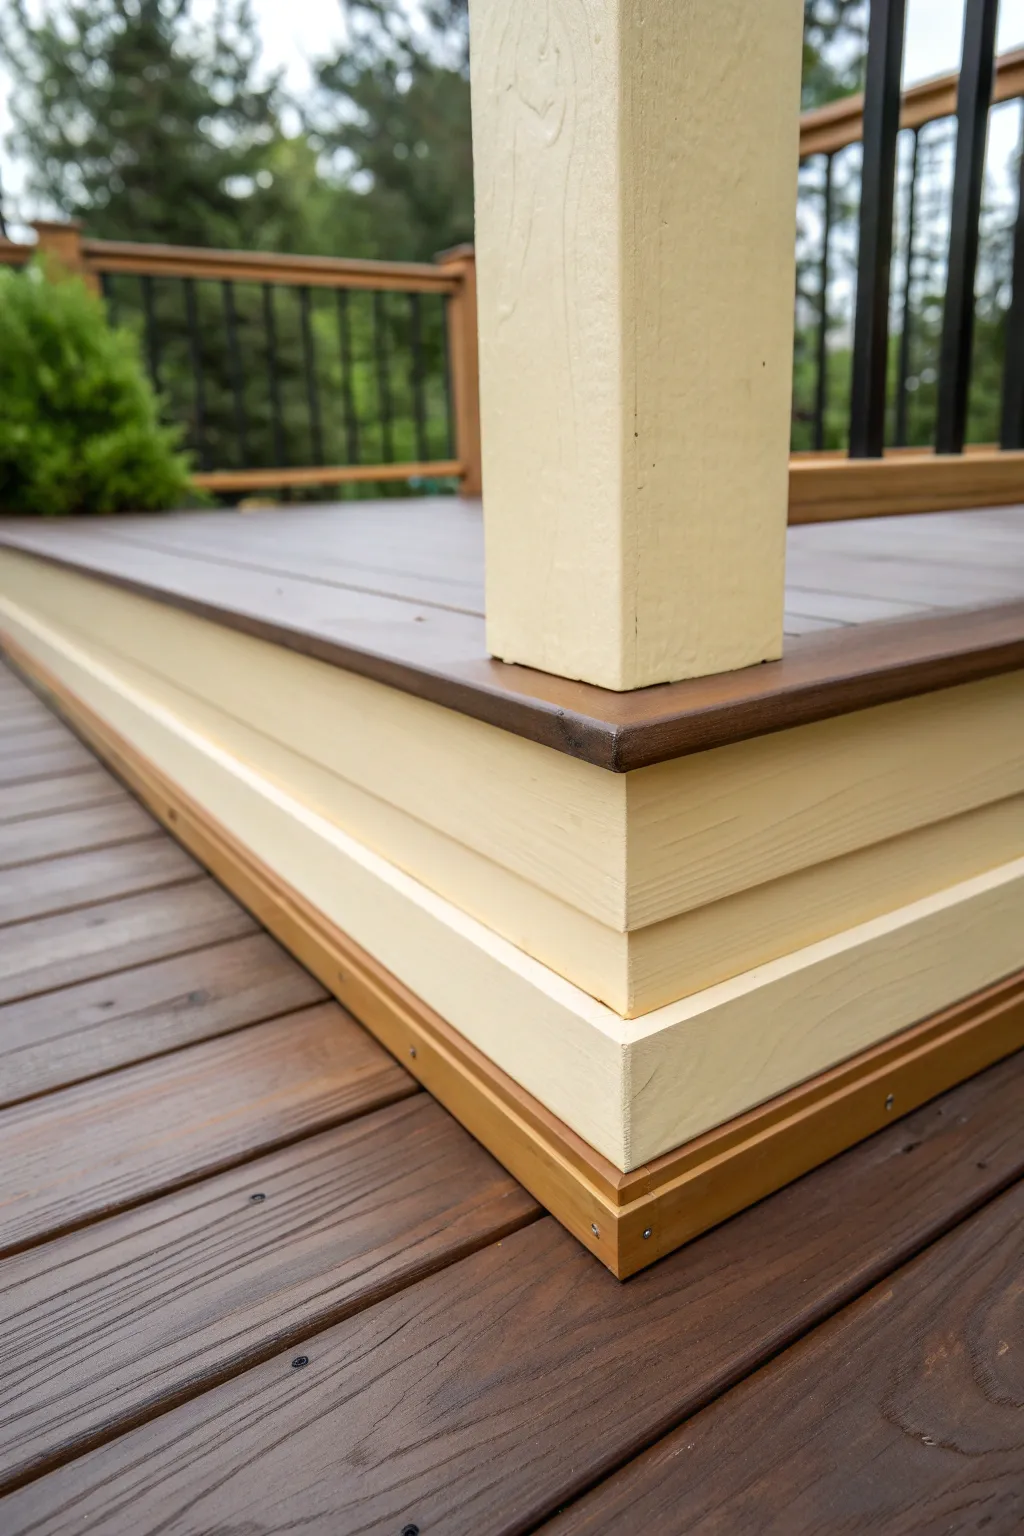
Enhance your deck’s architecture by pairing deep mocha decking with a soft, creamy fascia and post system. This specific two-tone approach draws the eye to the distinct layers of the build, creating a crisp, tailored look that feels both classic and modern.
Step-by-Step Tutorial
Materials
- Composite decking boards (Mocha/Dark Brown)
- Fascia boards (Cream/Ivory)
- 6×6 Post sleeve (Cream/Ivory)
- Base trim moulding (Light wood tone/Cedar)
- Color-matched composite deck screws
- Fascia screws or plugs (Cream color)
- Circular saw
- Miter saw (10-inch or larger)
- Drill/Driver set
- Measuring tape
- Speed square
- Jigsaw (for precise notches)
- Carpenter’s pencil
- Construction adhesive (optional)
Step 1: Preparation and Decking Installation
-
Measure the framework:
Begin by double-checking the squareness of your underlying frame. For a rim-finished look like this, your rim joists must be perfectly straight. -
Install the cleaner board:
Cut your dark brown picture frame board (the border board) to size. Miter the corner at a precise 45-degree angle to create a sharp corner joint. -
Establish the overhang:
Position this border board so it overhangs the rim joist by about 3/4 to 1 inch. This creates a shadow line and allows water to drip clear of the fascia. -
Fasten the decking:
Secure the dark decking boards using hidden fasteners or color-matched screws. I find that pre-drilling near the mitered corners prevents splitting and ensures that tight joint stays closed. -
Fill the field:
Run the remaining main decking boards parallel to your picture frame border, maintaining consistent spacing gaps for drainage.
Pro Tip: Expansion Gaps
Composite fascia expands more than wood. Oversize your screw holes slightly in the fascia board so it can move without buckling.
Step 2: Installing the Cream Fascia
-
Measure vertical drop:
Measure the height of your rim joist from the bottom of the decking board to the bottom edge of the frame. Subtract the width of your bottom trim if you plan to tuck it under, or measure full length if the trim sits on top. -
Cut fascia boards:
Cut the cream-colored fascia boards to length. For the outside corner seen in the image, cut a 45-degree bevel on the end of the board so the two fascia pieces meet in a sharp point. -
Test the corner fit:
Hold the two mitered fascia boards up to the corner to ensure the gap is tight. If the frame isn’t perfectly square, you may need to adjust your miter angle slightly. -
Fasten the upper fascia:
Attach the top fascia board just under the dark decking lip. Use screws specifically designed for fascia, which allow for expansion and contraction. Countersink slightly if you have matching plugs. -
Install the lower fascia tier:
If your design uses a stacked look like the image, install the second cream board directly below the first. Ensure the horizontal seam is tight and level.
Troubleshooting: Open Miters
If your fascia miters keep opening up, use a ‘glue and screw’ technique: glue the miter cut itself with CA glue before screwing boards to the rim.
Step 3: Adding the Post and Trim Details
-
Size the post sleeve:
Slide the matching cream post sleeve over your 4×4 or 6×6 structural post. It should sit flush against the decking surface. -
Secure the post base:
If your sleeve doesn’t snap into a mounted base, use a small bead of clear silicone or adhesive inside the bottom edge to keep it from rattling in the wind. -
Measure base trim:
Measure the bottom perimeter of your fascia for the final trim piece. This thin strip (often cedar or a lighter composite) acts as a visual foundation. -
Miter the trim corners:
Cut 45-degree miters on the base trim to match the fascia corner above it. This vertical alignment of corners is critical for a professional look. -
Attach the base moulding:
Fasten the base trim to the bottom of the rim joist. Use stainless steel trim screws with small heads to keeping fastenings unobtrusive. -
Final wipe down:
Clean off any sawdust or pencil marks from the cream surfaces immediately, as dark dust can stain lighter composite materials if left wet.
Step back and admire how the crisp cream fascia highlights the rich coffee tones of your new deck surface
Posts in One Tone, Rails and Spindles in the Other


This project creates a striking modern aesthetic by pairing warm, golden-brown wood tones with sleek matte black balusters. The result is a high-contrast, polished look that highlights the architectural verticality of your deck without overwhelming the space.
Detailed Instructions
Materials
- Deck cleaner and brightener
- Pressure washer (optional but recommended)
- Medium-grit sanding sponge (80-100 grit)
- Painter’s tape (blue or green)
- Drop cloths or plastic sheeting
- Semi-transparent stain (Cedar or Honey tone)
- High-quality 2-inch synthetic bristle brush
- Small foam brush or trim roller
- Matte black exterior metal paint (if refinishing existing metal)
- Wire brush (for metal prep)
- Stain rags
Step 1: Preparation and Cleaning
-
Clear the area:
Remove all furniture, planters, and debris from the deck surface to ensure you have unobstructed access to every post and rail section. -
Deep clean the wood:
Apply a quality deck cleaner to the wooden posts, top rails, and bottom plates. Scrub vigorously with a stiff-bristle brush to remove dirt, mildew, and gray weathered fibers. -
Rinse thoroughly:
Wash away all cleaner residue using a garden hose or a pressure washer on a low setting. Let the wood dry completely for at least 24 to 48 hours before proceeding. -
Sand for adhesion:
Once dry, lightly sand the wooden posts and rails with a medium-grit sanding sponge. This opens the wood pores and ensures the stain penetrates evenly. -
Clean the metal:
Wipe down the black metal balusters and horizontal bars with a damp cloth to remove dust. If you are repainting these, use a wire brush to scuff any shiny surfaces.
Uneven Color Absorption?
If some wood areas look darker than others, it’s often due to inconsistent sanding. Lightly re-sand the dark spots and blend the stain again for a uniform look.
Step 2: Protecting and Masking
-
Tape off the floor:
Apply painter’s tape to the deck floor right along the base of the wooden posts and bottom rails to prevent stain dripping onto your gray decking. -
Mask the metal connection points:
Carefully wrap painter’s tape around the ends of the black metal rails where they meet the wooden posts. Precision here is key for that crisp, professional line. -
Lay down drop cloths:
Spread your drop cloths under the entire length of the railing section you are working on to catch any accidental spills.
Use a Shield
Hold a thin piece of cardboard or a dedicated plastic paint shield between the metal balusters and the wood when staining to speed up work without taping everything.
Step 3: Applying the Finish
-
Stir the stain:
Mix your semi-transparent cedar-toned stain thoroughly to ensure the pigment is evenly distributed from the bottom of the can. -
Start with the posts:
Using a 2-inch synthetic brush, apply the stain to the vertical posts first. Brush in the direction of the wood grain, working from top to bottom. -
Stain the top rail:
Move to the horizontal top cap rail. Apply stain in smooth, long strokes to avoid lap marks, ensuring you coat the sides and underside lip. -
Detail the trim:
Use a small foam brush to carefully stain the molding at the base of the posts and the bottom wooden rail, getting close to—but not touching—the floor tape. -
Wipe excess stain:
I always keep a clean rag handy to wipe away any excess stain that hasn’t soaked in after a few minutes, which prevents sticky, shiny spots. -
Touch up metal (if needed):
If your black metal spindles need refreshing, carefully paint them now using a small artist’s brush and matte black metal paint, steadying your hand against the post. -
Check for consistency:
Step back and look for any missed spots or uneven coloring on the wood. Apply a second light coat if a richer color depth is desired. -
Remove tape:
Peel off the painter’s tape while the stain is still slightly tacky to ensure a clean edge without peeling away any dried finish.
Enjoy the sleek, architectural beauty your newly finished two-tone railing brings to your outdoor living space

PENCIL GUIDE
Understanding Pencil Grades from H to B
From first sketch to finished drawing — learn pencil grades, line control, and shading techniques.
Explore the Full Guide
Top Rail in Floor Color, Balusters in Contrast
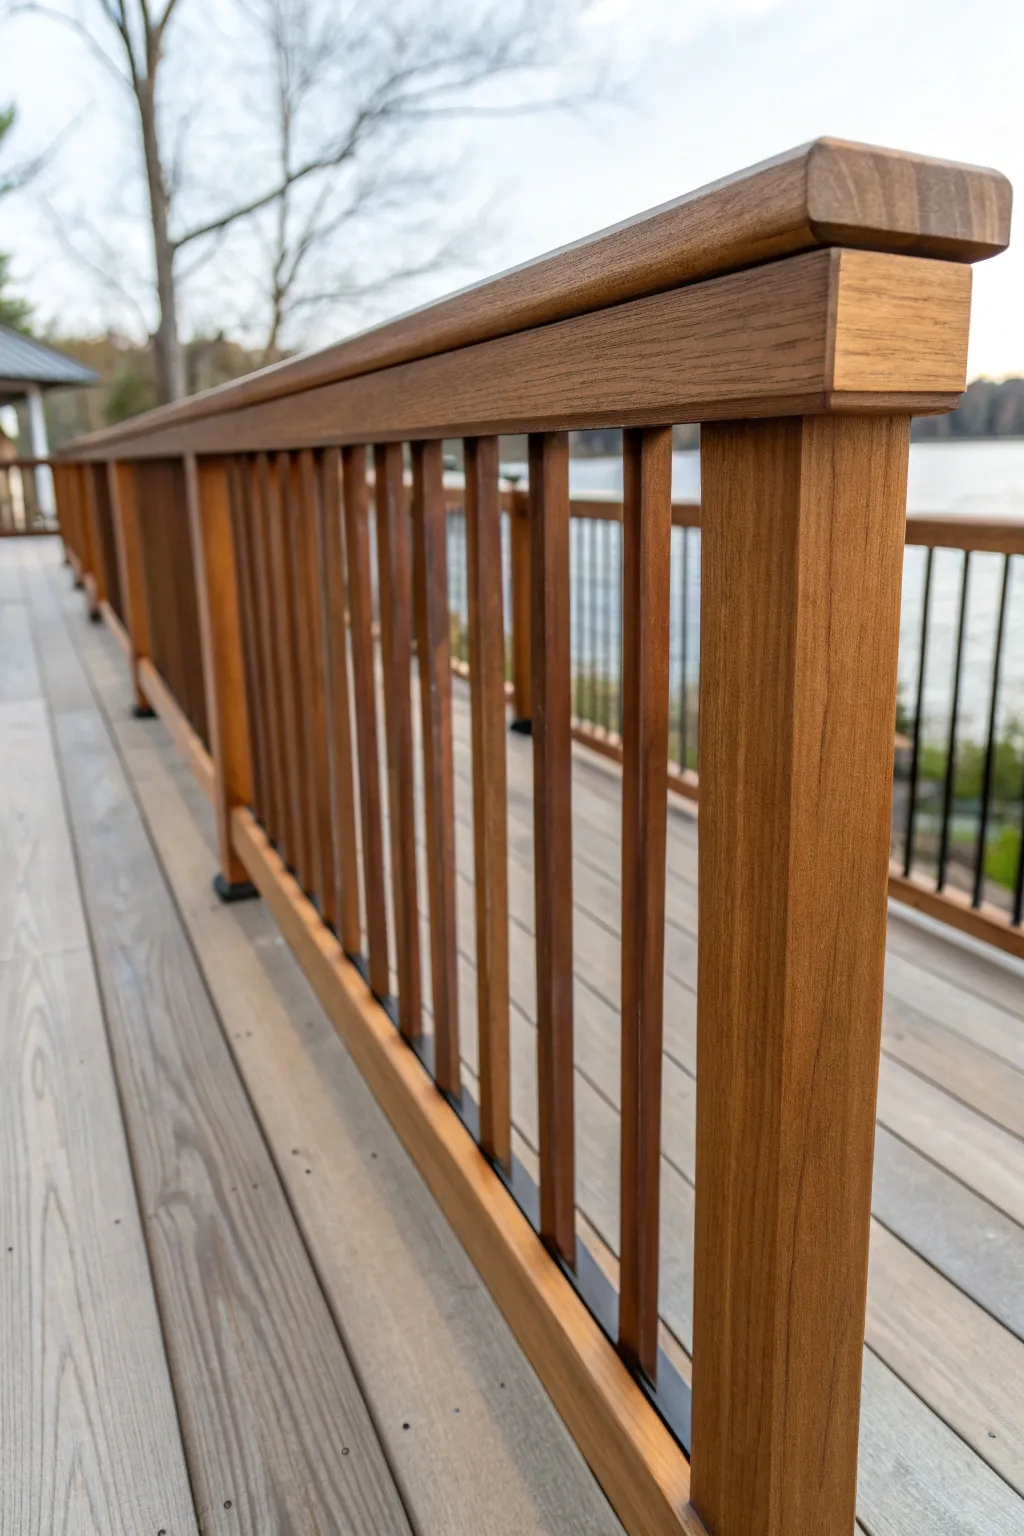
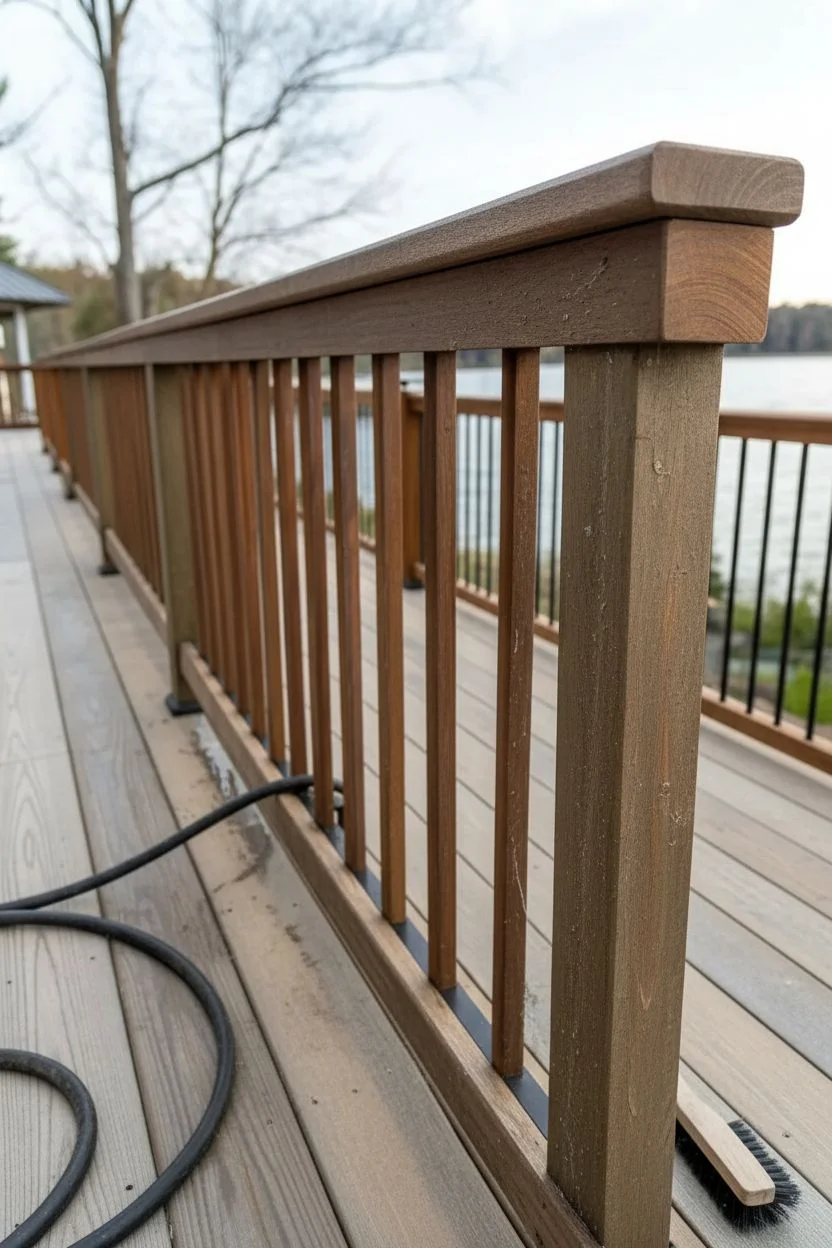
This elegant railing design creates a cohesive connection between your deck flooring and the handrail, while using contrasting balusters to add visual depth. The warm wood tones on the top rail perfectly mirror the floorboards, grounding the space with a sophisticated, custom-built look.
How-To Guide
Materials
- Semi-transparent exterior wood stain (floor color)
- Contrasting wood stain or solid color stain (baluster color, if different)
- Wood cleaner/brightener
- 80-grit and 100-grit sandpaper
- Orbital sander
- Stiff bristle scrub brush
- High-quality natural bristle stain brush (2-3 inch)
- Small angled sash brush for balusters
- Drop cloths or painter’s tape
- Rags for wiping excess stain
- Stir sticks
Step 1: Preparation & Cleaning
-
Inspect the wood surface:
Begin by checking your railing and deck boards for any protruding nails, screws, or rough splinters. Tap down any loose fasteners to ensure a smooth working surface. -
Apply wood cleaner:
Mix your wood cleaner or brightener according to the manufacturer’s instructions. Spray or brush it generously onto the railing and floor boards to lift dirt and old finish. -
Scrub thoroughly:
Using a stiff bristle brush, scrub the wood with the grain to remove graying fibers and debris. I find getting into the corners where balusters meet the rail is crucial here for a clean finish later. -
Rinse and dry:
Rinse the wood thoroughly with a garden hose, ensuring no cleaner residue remains. Allow the wood to dry completely, which usually takes 24 to 48 hours depending on the weather.
Step 2: Sanding for smoothness
-
Rough sanding:
Use an 80-grit sandpaper on your orbital sander to remove any remaining old stain or rough spots on the top rail and balusters. -
Smooth out the top rail:
Switch to 100-grit sandpaper specifically for the handrail surface. This is the part people will touch most often, so you want it buttery smooth and free of splinters. -
Hand sand the details:
Fold a piece of sandpaper to get into the crevices between balusters and the bottom rail where the power sander can’t reach. -
Remove sanding dust:
Vacuum or use a tack cloth to remove every speck of sawdust. Dust left behind will create a gritty texture in your final stain.
Uneven Color Fix
If the stain appears blotchy, the wood may have dried unevenly after cleaning. Lightly sand the dark spots to open the pores, then apply a tiny amount of stain to blend it back in.
Step 3: Applying the Stain
-
Protect surrounding areas:
Lay down drop cloths under result railing sections to catch drips. If you are staining the floor a different color or at a different time, tape off the base of the posts carefully. -
Stir the stain:
Stir your chosen stain thoroughly to redistribute pigments that settle at the bottom. Do not shake the can, as this introduces bubbles. -
Start with the balusters:
Using your small angled sash brush, apply stain to the balusters first. Work from top to bottom on one section at a time to maintain a wet edge. -
Wipe excess from balusters:
If using a penetrating stain, wait a few minutes and then wipe off any excess with a clean rag to prevent tacky spots and reveal the grain. -
Stain the top rail:
Apply the stain to the top handrail using the larger natura bristle brush. Ensure you use the exact same stain color here as you plan to use (or have used) on the deck flooring. -
Check for drips:
Scan the underside of the top rail and the sides of the balusters for any drips or runs and smooth them out immediately with your brush. -
Allow to dry:
Let the first coat dry completely according to the product’s instructions. This is usually 24 hours, but humidity can extend this time.
Wet Edge Master
Work in small sections of 3-4 balusters at a time. Completing a small group before moving on prevents lap marks where dry stain meets wet stain.
Step 4: Finishing touches
-
Assess the color depth:
Once dry, compare the top rail color to your deck floor. If the rail looks lighter, a second coat may be needed to achieve a closer match. -
Apply second coat (optional):
If deepening the color, apply a second thin coat of stain, following the same process of brushing on and wiping off excess. -
Final cure:
Avoid placing furniture or leaning on the rails for at least 48 hours to allow the stain to fully cure and harden against weather exposure.
Now you have a beautifully coordinated railing that naturally extends the look of your deck floor for a seamless outdoor living space
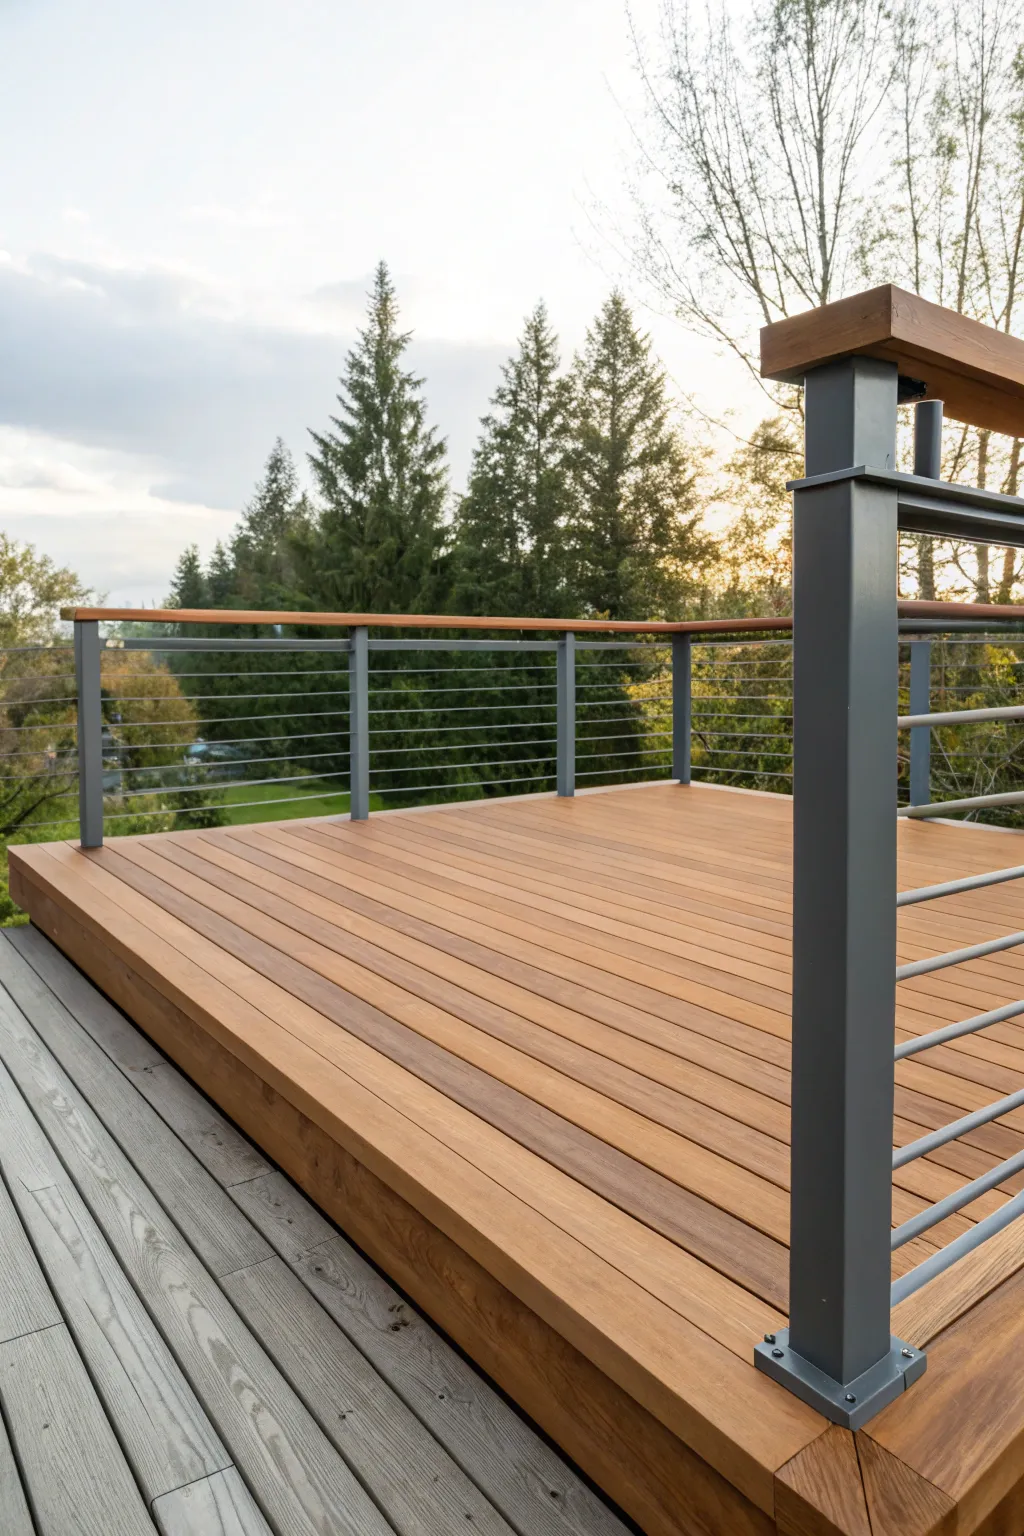
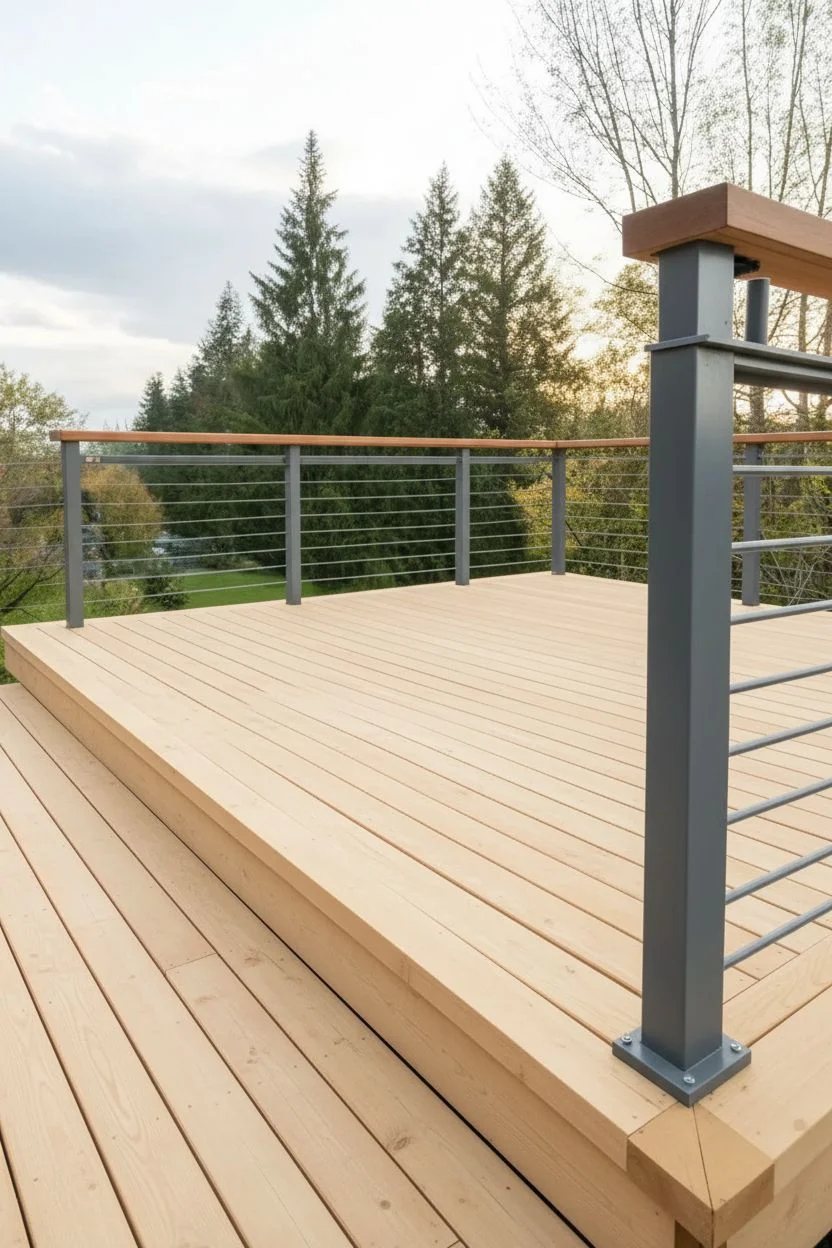
Horizontal Boards Semi-Transparent, Verticals Solid
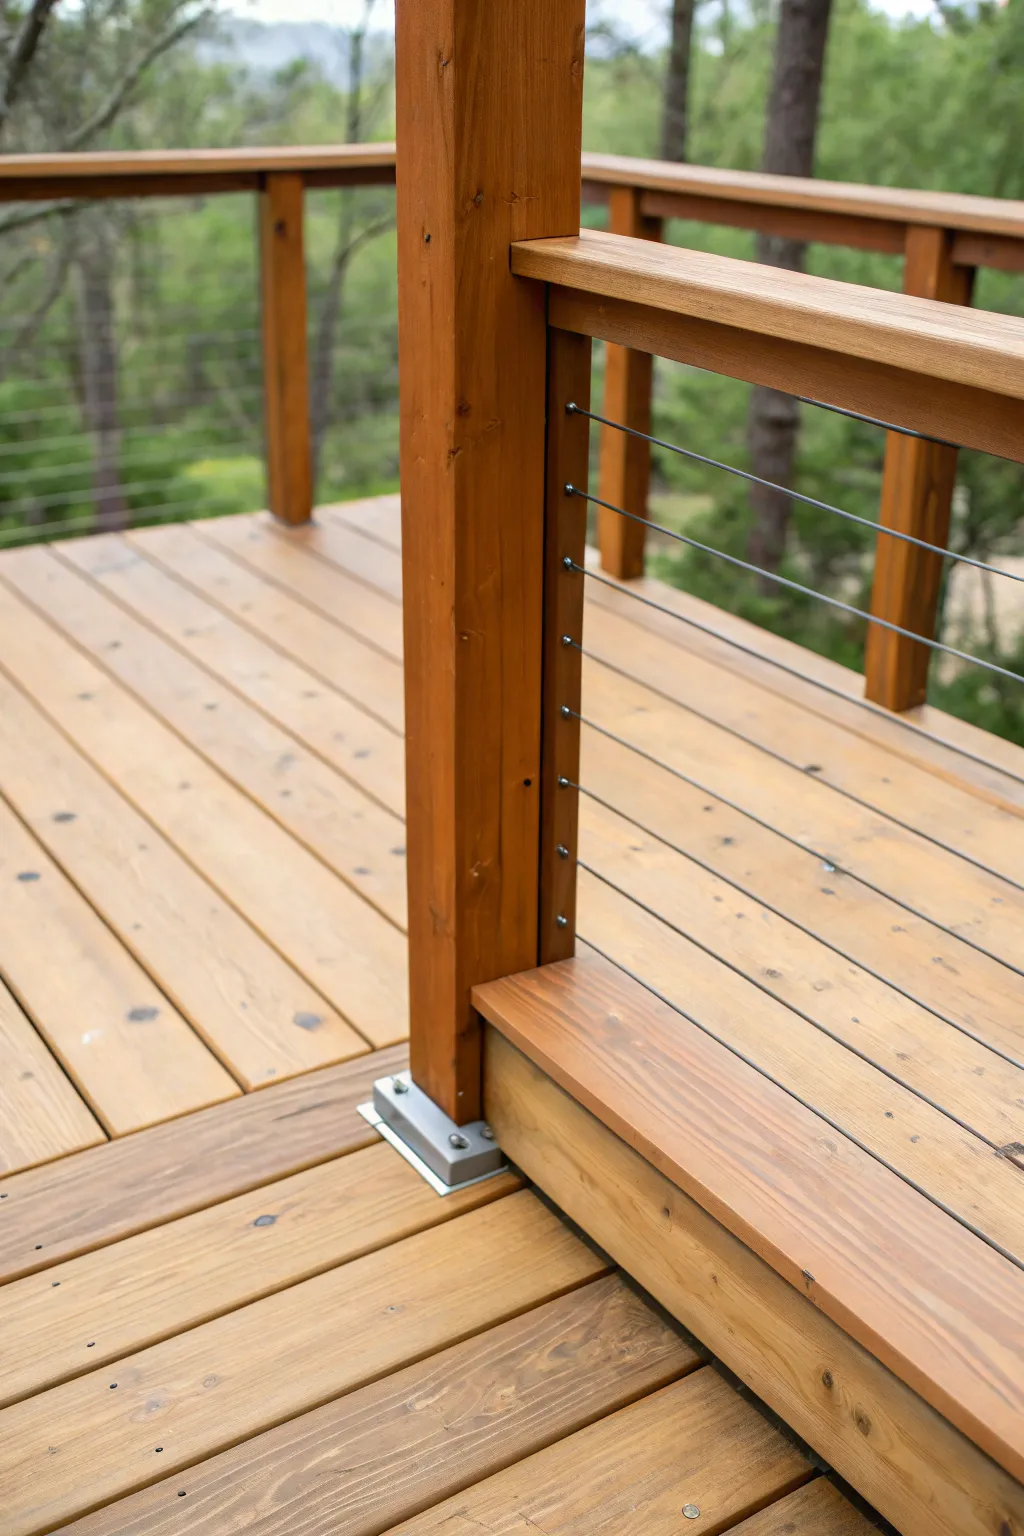
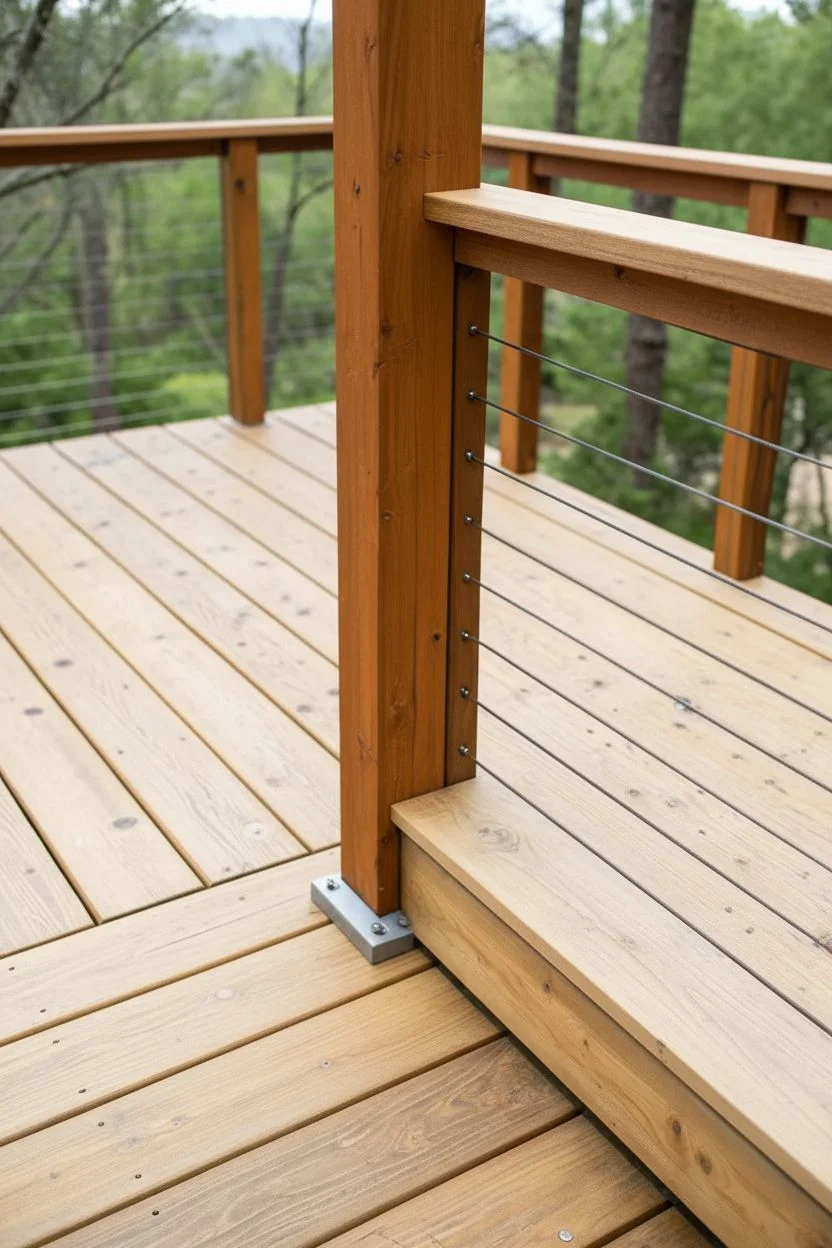
This project showcases a beautiful blend of natural wood warmth and modern industrial elements, perfect for updating an outdoor space. By combining rich cedar-toned stains with sleek stainless steel cable railing, you attain a look that feels both rustic and refined.
Step-by-Step
Materials
- Deck cleaner and brightener
- Pressure washer (optional but recommended)
- 80-grit and 100-grit sandpaper
- Orbital sander
- Stiff-bristle scrub brush
- High-quality semi-transparent deck stain (Cedar or Red hue)
- Wide lush stain brush (4-inch)
- Detail brush (2-inch)
- Paint tray and liner
- Painters tape
- Clean rags for wiping
- Stainless steel cable railing kit (if installing new railing)
- Cable cutters and crimping tool
- Drop cloths
Step 1: Preparation and Cleaning
-
Clear the deck:
Remove all furniture, planters, and debris from the deck surface to ensure you have a completely clear workspace for consistent application. -
Wash the wood:
Apply a deck cleaner generously to the wood surface. Use a stiff-bristle brush to scrub away dirt, mildew, and gray wood fibers. If the wood is older, a brightener step is crucial to restore the natural pH balance. -
Rinse thoroughly:
Rinse the entire deck with a garden hose or a pressure washer set to a low setting (under 1200 PSI) to avoid damaging the soft wood fibers. Allow the wood to dry completely, ideally for 48 hours.
Step 2: Sanding and Smoothing
-
Inspect for roughness:
Once dry, run your hand over the boards to check for splintering or raised grain. Pay special attention to high-traffic areas and the handrails. -
Sand the surface:
Use an orbital sander with 80-grit sandpaper to remove any remaining old finish or rough spots. Follow up with 100-grit paper to smooth the surface without closing the wood pores completely, which ensures the stain penetrates well. -
Dust removal:
Sweep or vacuum up all sawdust. I like to wipe everything down with a tack cloth or a slightly damp rag to ensure no dust particles get trapped in the stain.
Sticky Situation?
If your stain remains tacky after drying, you likely applied too much or didn’t wipe the excess. Wipe gently with mineral spirits to remove the surface film.
Step 3: Staining the Wood
-
Protect metal hardware:
Use painter’s tape to carefully mask off the metal post bases and any existing cable hardware if you aren’t removing them. This keeps your metal accents looking crisp and clean. -
Stain vertical posts first:
Dip your 2-inch brush into the semi-transparent stain and start with the vertical posts. Work from the top down, brushing with the grain to avoid drips running onto finished areas. -
Work in sections:
Move to the horizontal deck boards. Apply stain to 2-3 boards at a time, running the entire length of the board to prevent lap marks where wet stain meets dry stain. -
Back-brushing technique:
Apply the stain liberally, then use the brush to ‘back-brush’ or smooth out any puddles. This pushes the pigment deep into the wood grain for that rich, uniform color seen in the photo. -
Wipe excess stain:
If using an oil-based penetrating stain, check the manufacturer’s instructions. You may need to wipe off excess stain after 15-20 minutes to prevent a sticky surface. -
Detail the edges:
Don’t forget the ends of the boards and the sides of the railing caps. These areas soak up moisture quickly, so sealing them well is vital for longevity. -
Dry time:
Allow the first coat to dry according to the can’s directions. If you want a deeper color like the rich amber tone in the image, a second thin coat can be applied once the first is dry.
Pro Tip: Hidden Fasteners
For that smooth, nail-free look on the floorboards, use a hidden fastener system that screws into the side of the boards rather than the top face.
Step 4: Cable Railing Installation (If Applicable)
-
Pre-drill posts:
If installing new cables, mark your drill holes evenly on the posts. I prefer using a template to ensure every cable line is perfectly parallel. -
Thread the cables:
Feed the stainless steel cables through the pre-drilled holes in the intermediate posts. Be careful not to scratch your fresh stain job as you pull the wire through. -
Secure the ends:
Attach the tensioning hardware to the end posts. Crimp the cable securely inside the fitting using a hydraulic crimper or hand swager. -
Tension the lines:
Tighten the cables starting from the center strand and working your way out to the top and bottom. This distributes the tension evenly on the posts to prevent bowing. -
Trim excess wire:
Use high-quality cable cutters to trim any excess wire flush with the fitting cap for a clean, professional finish.
Step back and enjoy the modern, airy feel your renewed deck brings to your backyard


Warm Cedar-Like Tone Paired With a Cool Gray Tone
This sophisticated project pairs rich, warm timber tones with cool, weathered grays to create a modern outdoor living space with undeniable visual impact. The crisp contrast highlights architectural lines while maintaining a cohesive, natural aesthetic.
Step-by-Step Guide
Materials
- Semi-transparent stain (Warm Cedar/Teak tone)
- Semi-solid or solid stain (Cool Driftwood Gray tone)
- Deck cleaner and brightener
- Pressure washer
- Stiff bristle deck brush
- Synthetic bristle stain brush (4-inch)
- Detail brush (2-inch)
- Roller with 3/8-inch nap extension pole
- Paint tray and liners
- Painters tape (exterior grade)
- Sandpaper 80-grit
- Pole sander
- Drop cloths or plastic sheeting
Step 1: Preparation & Cleaning
-
Assess the Surface:
Before you begin, inspect the deck boards carefully. Ensure all fasteners are sunk below the surface and replace any severely warped or rotting boards to ensure a smooth finish. -
Apply Cleaner:
Spray the deck cleaner generously over the entire surface. Let it sit for the recommended time (usually 10-15 minutes) but do not let it dry out; mist with water if necessary. -
Scrub the Grain:
Using your stiff bristle brush, scrub the boards vigorously in the direction of the wood grain. This mechanical action is crucial for removing embedded dirt and gray wood fibers. -
Pressure Wash:
Rinse the cleaner off using a pressure washer set to a low-to-medium setting (under 1500 PSI). Keep the nozzle moving constantly to avoid gouging the softer wood. -
Allow to Dry:
Let the wood dry completely. This usually takes 48 hours of dry weather. Staining damp wood is the number one cause of premature peeling. -
Sanding:
Once dry, run a pole sander with 80-grit paper over the entire deck. This opens the wood pores for better stain absorption and smooths out any fuzz raised by washing.
Softer Texture Tip
For the smoothest feel underfoot, sand the cedar-toned boards with 100-grit paper after the washing step, then remove all dust with a tack cloth.
Step 2: Staining the Gray (The Base)
-
Define Boundaries:
Decide where the transition will happen. In this look, the lower, older-looking deck section is the cool gray element. Use painter’s tape to protect any vertical posts or the upper deck riser if they are connected. -
Cut In Edges:
Using a 2-inch brush, carefully apply the cool gray stain to the edges, corners, and between the gaps of the lower deck boards. -
Roll the Field:
Pour your gray stain into a tray. Use the roller to apply an even coat to the main surface of the lower deck boards, maintaining a wet edge to prevent lap marks. -
Back-Brushing:
Immediately after rolling a section, run a wide brush over the wet stain. This pushes the product into the grain and levels out any roller texture. -
Second Coat (Optional):
If the gray coverage looks uneven or too transparent, wait the recommended drying time (typically 4-6 hours) and apply a second thin coat.
Step 3: Staining the Cedar Tone (The Feature)
-
Protect the Gray:
Once the gray section is fully dry (I prefer to wait overnight just to be safe), lay down drop cloths or tape off the edge where the upper deck meets the lower deck to prevent drips. -
Stain Railings First:
Start with the top rail cap. Use a brush to apply the warm cedar stain, smoothing out runs immediately. Working top-down ensures drips don’t ruin finished lower areas. -
Detail Work:
Use your smaller brush to carefully cut in around the metal posts. Take your time here; crisp lines between wood and metal are essential for this high-end look. -
Apply Main Stain:
Working on 2-3 boards at a time, apply the cedar stain along the full length of the upper deck boards. Avoid stopping in the middle of a board. -
Smooth and Seal:
Use the brush to ensure the stain penetrates any knots or cracks. Back-brush the entire length one last time for a uniform, professional sheen. -
Final Cure:
Keep foot traffic and furniture off the finished deck for at least 24-48 hours to allow the stain to cure fully and harden against scuffs.
blotchy Stain?
If stain looks uneven or blotchy, you likely didn’t remove the old finish or mill glaze entirely. Resand the spot to bare wood and reapply stain carefully.
Now you have a stunning two-tone deck that perfectly balances warmth and modern cool
Two-Tone Diagonal Field With Straight Border
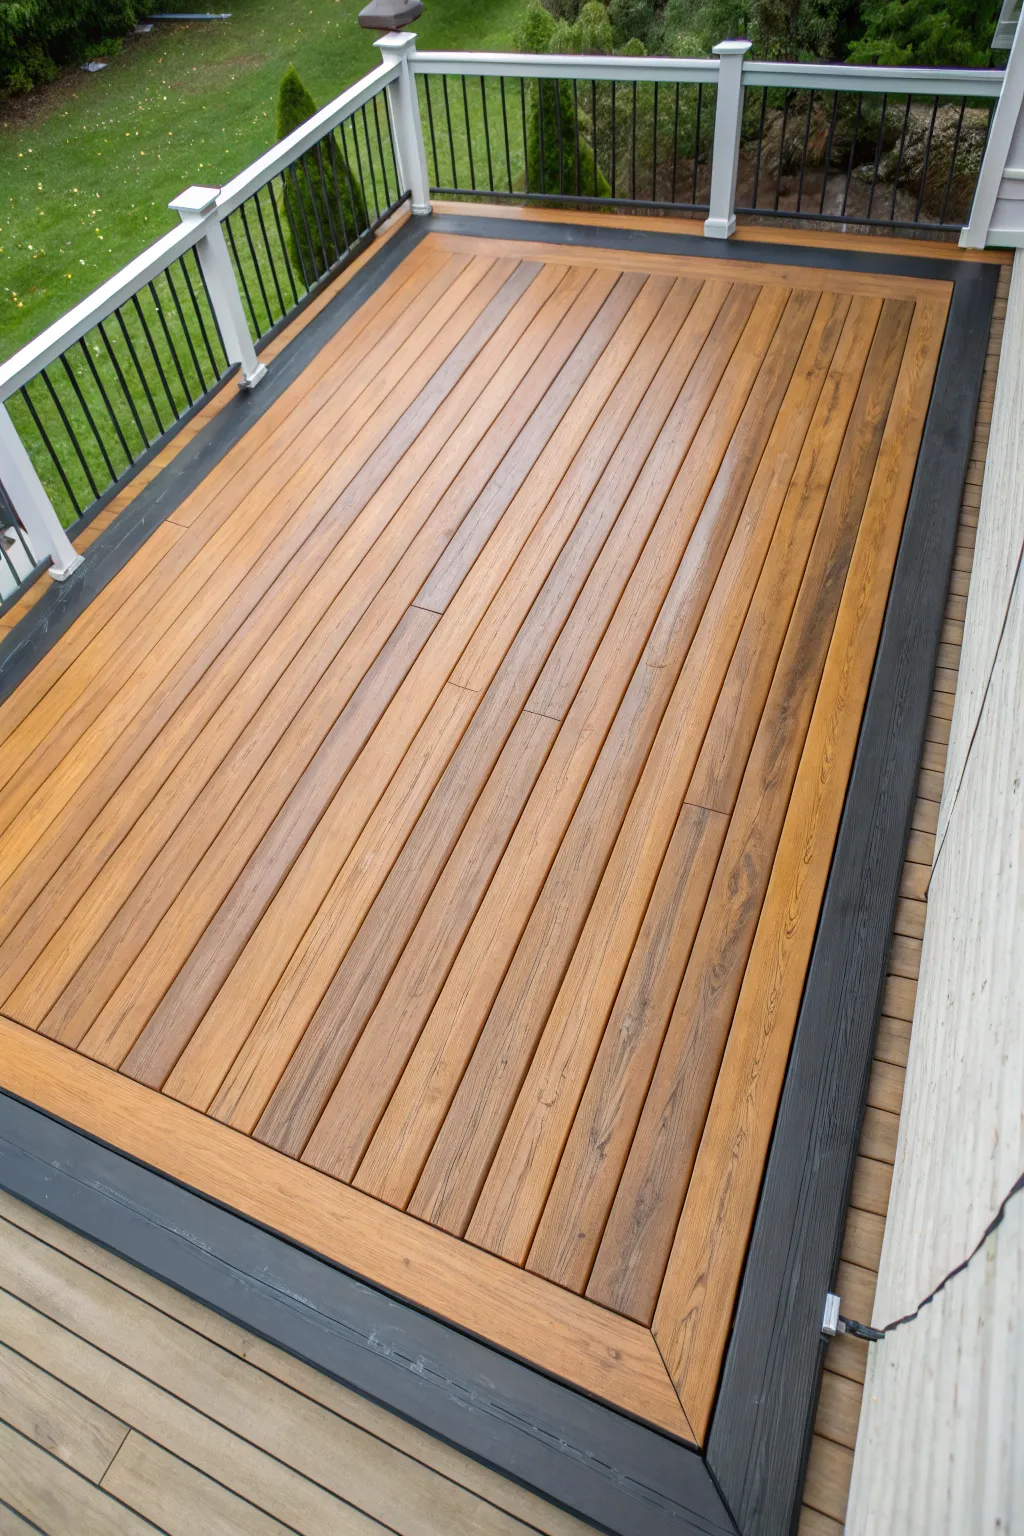
This stunning deck project combines rich, warm wood tones with a bold, dark charcoal perimeter to create a sophisticated outdoor living space. The picture-frame border defines the area sharply, while the varied grain of the interior boards adds natural warmth and character.
Step-by-Step Tutorial
Materials
- Composite or wood decking boards (main field color: Golden Teak)
- Composite or wood decking boards (border color: Charcoal/Black)
- Hidden fastener system
- Cortex plugs or matching screws
- Miter saw
- Table saw (for ripping boards)
- Drill/Driver
- Chalk line
- Spacer tools
- Joist tape
- Safety glasses and hearing protection
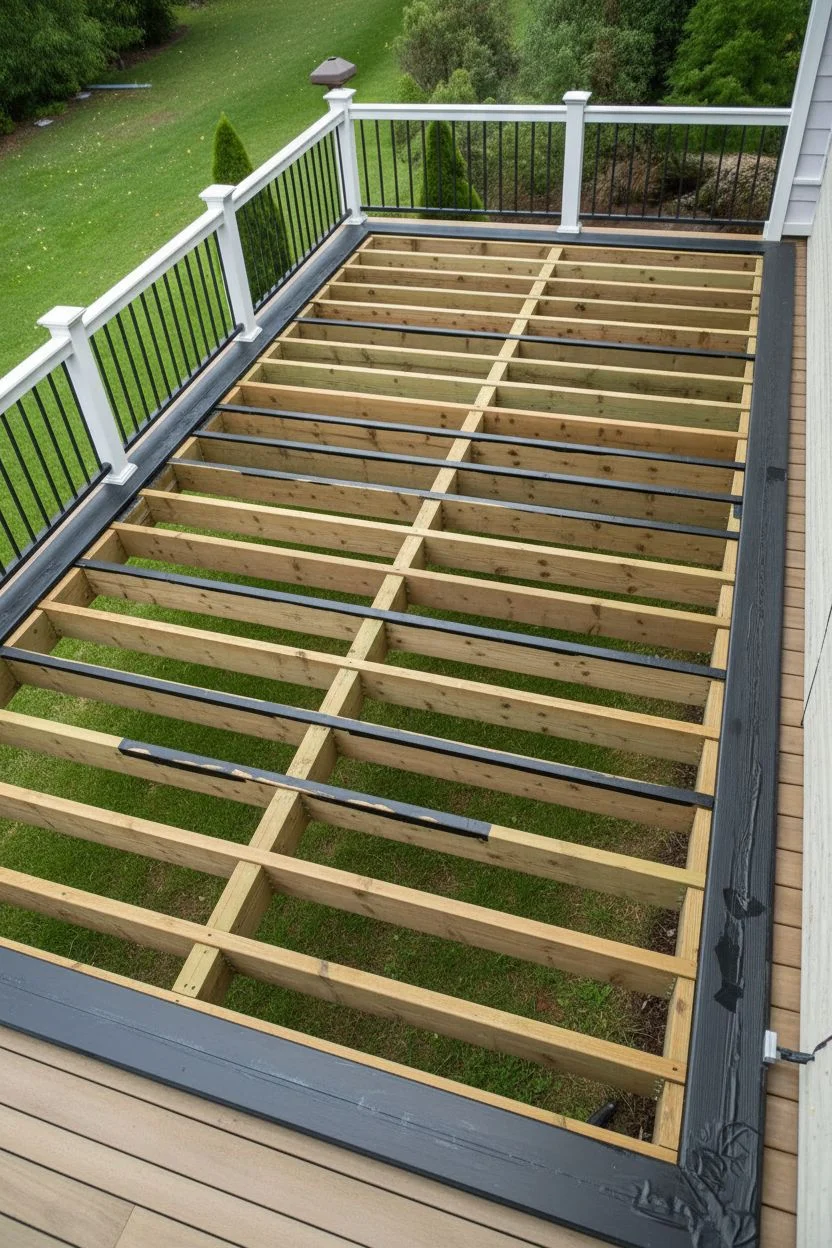
Step 1: Framing and Preparation
-
Verify Framing Structure:
Before laying any boards, ensure your joist substructure is perfectly flat and robust. For a picture-frame design like this, you need extra blocking installed around the perimeter to support the border boards and the ends of the field boards. -
Apply Joist Tape:
Protect your framing lumber by applying butyl joist tape to the tops of all joists and blocking. This simple step significantly extends the life of the substructure by preventing water infiltration.
Miter Gaps?
If miter joints open up, use the ‘biscuits’ method or pocket screws underneath to lock corners together tight before fastening them down.
Step 2: Installing the Dark Perimeter
-
Cut the Outer Border:
Start by cutting your dark charcoal border boards to length. For the corners, I like to use a precise 45-degree miter cut to create that sharp, professional corner join visible in the project image. -
Secure the First Board:
Place the first dark border board against the house or railing posts, leaving the appropriate drainage gap. Fasten it securely using surface screws that will later be hidden with matching plugs. -
Complete the Outer Ring:
Continue installing the dark border boards around the entire perimeter of the deck area. Ensure the mitered corners meet flush; shims can help adjust slight framing imperfections.
Create a ‘Breaker Board’
For very wide decks, run a dark perpendicular board in the middle to split the field. This avoids butt joints and adds a custom design element.
Step 3: Creating the Inner Picture Frame
-
Measure the Honey-Tone Border:
Inside the dark charcoal ring, measure and cut the lighter, golden-toned boards to create a secondary frame. Miter these corners at 45 degrees as well to mirror the outer dark frame. -
Fasten the Inner Frame:
Install this inner picture frame tight against the dark border (with proper spacing). This lighter band acts as a visual transition between the dark edge and the main deck field.
Step 4: Laying the Main Field
-
Mark the Starting Line:
Snap a chalk line down the center of the framed area or parallel to the house wall to guide your first field board. Keeping this first board perfectly straight is critical for the rest of the layout. -
Install the First Field Board:
Lay your first golden-toned field board along your guide line. Note that in the image, the field boards run parallel to the long edge, creating a linear flow. -
Use Hidden Fasteners:
For the clean, screw-free look shown in the photo, use hidden fasteners between each groove of the field boards. Slide the clip into the groove and drive the screw into the joist below. -
Continue the Field Installation:
Work your way outward from your starting board. Use spacers to maintain consistent gaps between boards, which aids in drainage and aesthetics. -
Mix the Grain Patterns:
As you lay the boards, pull from different packs of decking. This ensures a nice mix of wood grain patterns and slight color variations, preventing any unnatural-looking patches. -
Trim the Ends:
If your field boards run long, let them overhang slightly and trim them all at once with a track saw later, or measure each one precisely to fit snugly against the inner picture frame border.
Step 5: Finishing Touches
-
Install Fascia Board:
To cover the exposed rim joists on the exterior, install a fascia board that matches the dark perimeter color. This grounds the design and hides the treated lumber underneath. -
Plug Surface Screws:
Go back to the perimeter boards where you used surface screws. Tap in the color-matched plugs made for your specific decking material to make the fasteners virtually vanish. -
Final Clean Up:
Sweep the deck thoroughly to remove any composite shavings or sawdust. A quick rinse with a hose will help settle the dust and reveal the final contrast.
Now you have a professional-grade deck with a striking border that frames your outdoor view perfectly
Two-Tone “Runner” Path to the Stairs
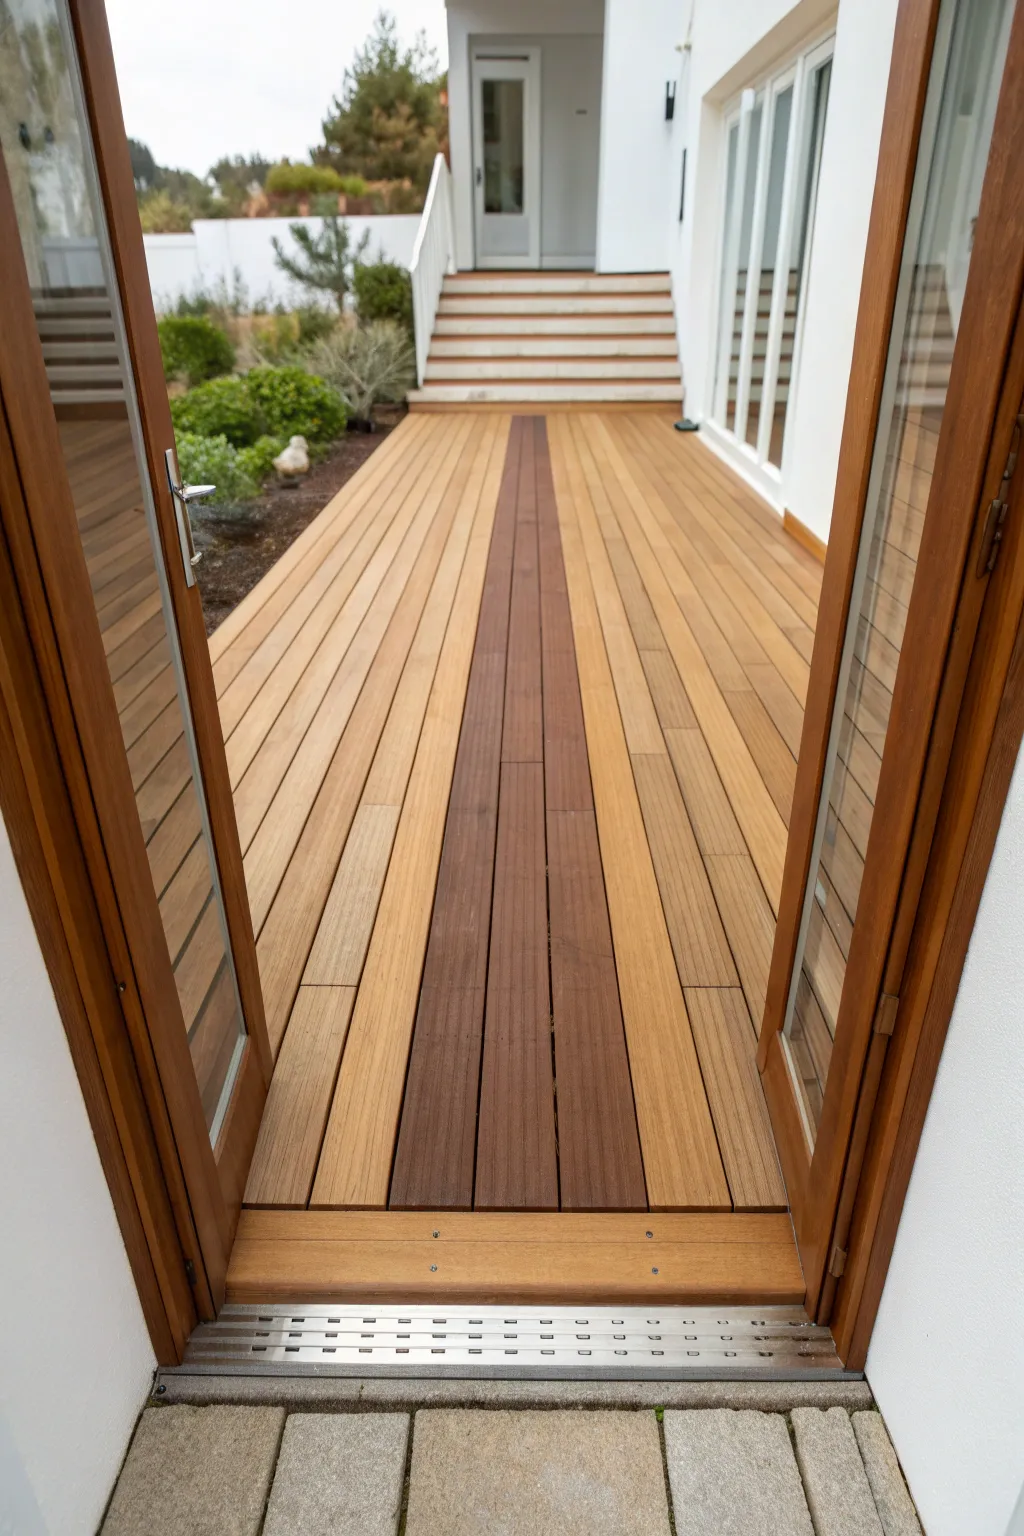
Transform a standard deck into a striking architectural feature by creating a two-tone “runner” effect that leads the eye straight to your garden stairs. This project uses contrasting stain colors to mimic the look of an elegant hallway rug, adding depth and direction to your outdoor living space.
Step-by-Step Guide
Materials
- Wood deck cleaner
- Pressure washer (optional but recommended)
- Stiff-bristle scrub brush
- 80-grit sandpaper (for orbital sander)
- Orbital sander
- Painter’s tape (high-quality exterior grade)
- Plastic sheeting or drop cloths
- Light-toned semi-transparent deck stain (e.g., Cedar or Natural)
- Dark-toned semi-transparent deck stain (e.g., Mahogany or Dark Walnut)
- Wide stain brush (4-inch)
- Sponge brushes or trim pads
- Rags for cleanup
- Stain applicator pad on a pole
Step 1: Preparation & Cleaning
-
Assess the surface:
Begin by inspecting your deck boards for any old finish, mold, or graying wood. If the wood is new, ensure it has weathered sufficiently to accept stain. -
Clean deeply:
Apply a quality wood deck cleaner according to the manufacturer’s instructions. Scrub vigorously with a stiff-bristle brush to remove dirt and mill glaze. -
Rinse thoroughly:
Wash away all cleaner residue using a garden hose or a pressure washer on a low setting. Let the wood dry completely for at least 48 hours before proceeding. -
Sand for smoothness:
Using an orbital sander with 80-grit paper, lightly sand the entire surface. This opens the wood pores for better stain absorption and removes any remaining fuzz. -
Remove dust:
Sweep or use a leaf blower to remove all sanding dust. Every speck of dust can affect the final finish, so be thorough here.
Clean Lines Secret
Before applying your dark stain, seal the tape edge with a tiny bit of clear sealer or the lighter stain first. This blocks voids so the dark color won’t bleed under.
Step 2: Mapping the Runner
-
Measure the center:
Find the exact center of your deck width, aligning it with the stairs or doorway as your focal point. Mark the center point lightly with a pencil. -
Define the width:
Decide on the width of your dark runner. Three to four standard deck boards wide usually creates a bold, balanced look. Mark the boundaries of these specific boards. -
Tape the boundaries:
Apply high-quality exterior painter’s tape deeply into the grooves between the chosen ‘runner’ boards and the ‘field’ boards. Press the tape down firmly to prevent stain bleed-under. -
Protect the field:
Lay plastic sheeting over the outer ‘field’ boards you intend to keep light. Tape the plastic down securely so no accidental drips land on the lighter wood.
Step 3: Staining the Dark Runner
-
Mix the dark stain:
Stir your dark stain thoroughly. Pigments often settle at the bottom, and you need a consistent color for that rich, mahogany look. -
Cut in the edges:
Use a sponge brush or small trim pad to carefully apply the dark stain along the taped edges and in between the board gaps within your runner zone. -
Apply the main coat:
Using a stain pad or brush, apply the dark stain to the full length of the runner boards. Work in long, continuous strokes from one end to the other to avoid lap marks. -
Wipe excess:
If the stain instructions suggest it, wipe up any unabsorbed stain with a rag after a few minutes. This prevents shiny spots and ensures a uniform matte finish. -
Let it cure:
Allow the dark runner to dry completely according to the can’s instructions. I prefer waiting a full 24 hours to ensure the tape pulls away cleanly without disturbing the finish.
Go Geometric
Don’t stop at a straight runner. Use tape to create 45-degree chevron patterns or a bordered ‘rug’ rectangle in the center for a more custom, high-end look.
Step 4: Staining the Field
-
Remove protection:
Carefully peel away the tape and plastic sheeting. Go slowly to avoid pulling up any wood fibers or fresh stain. -
Protect the runner:
Now reverse the process. Tape off the edges of your freshly dried dark runner and cover it gently with plastic or paper to protect it from the lighter stain. -
Apply light stain:
Stir your lighter, natural-toned stain. Apply it to the remaining outer deck boards, working two to three boards at a time to maintain a wet edge. -
Blend the edges:
Be extremely careful near the taped line. Use a smaller brush here to ensure the light stain meets the dark line perfectly without pooling. -
Final reveal:
Once the light stain is dry to the touch, remove all tape and protective coverings. Inspect your crisp lines and touch up any tiny bleed-throughs with a small artist’s brush if necessary.
Enjoy the sophisticated new look of your deck that guides guests naturally toward the garden
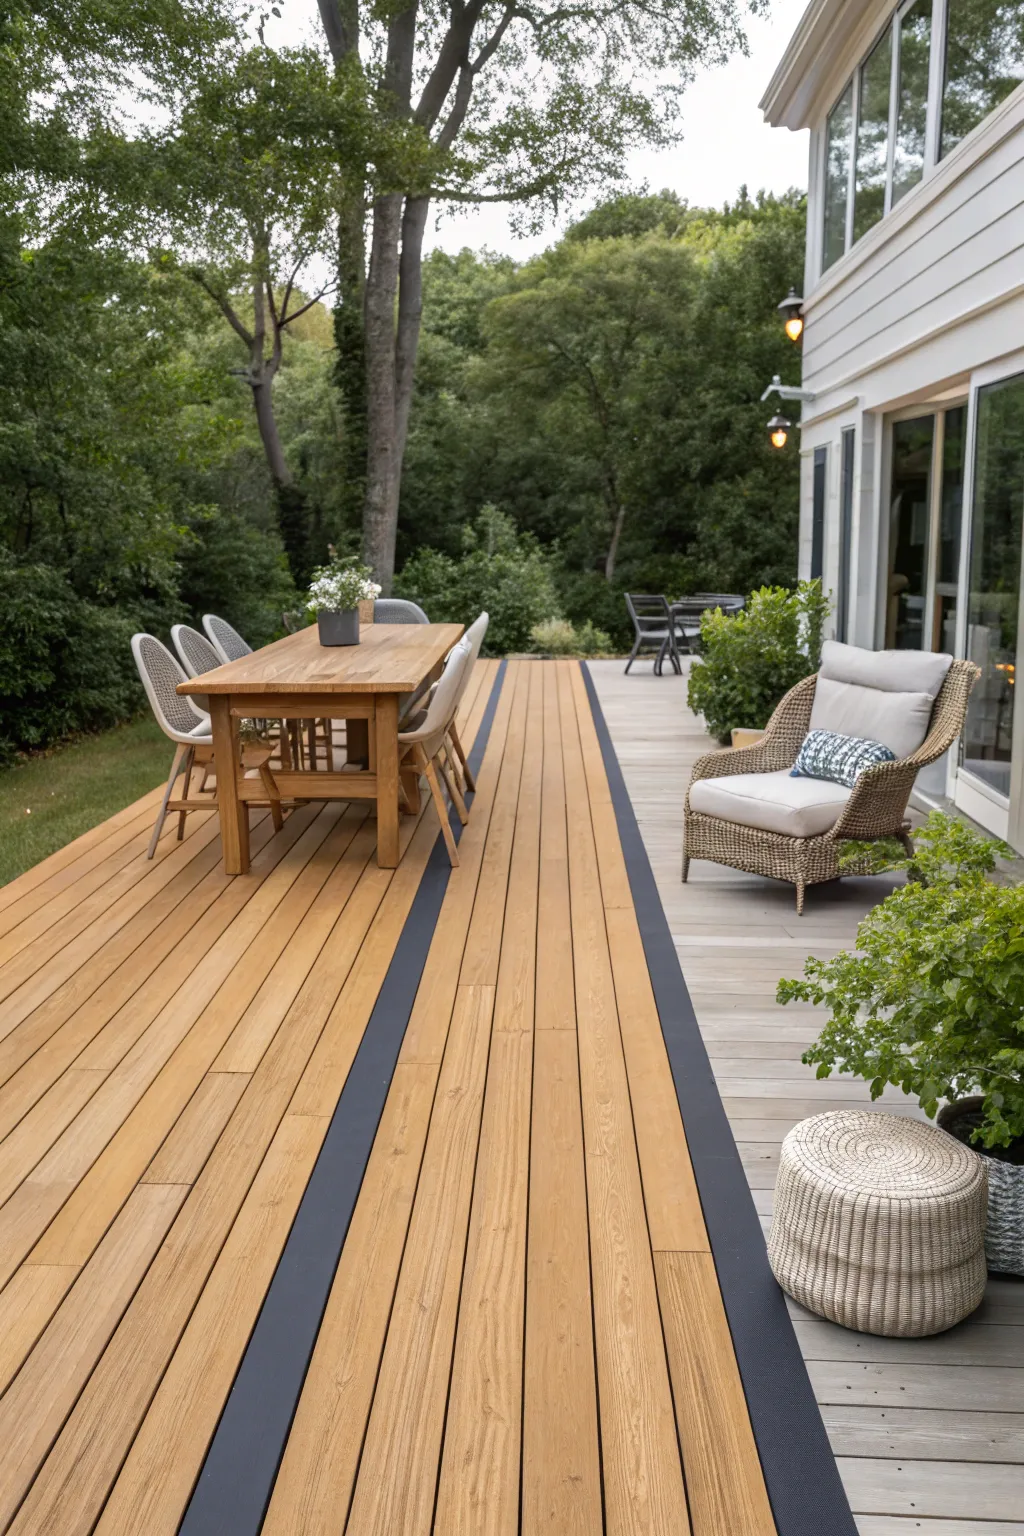
Two-Tone Zone Lines for Dining vs. Lounging Areas

Define distinct outdoor living spaces without building walls by using contrasting stain colors directly on your deck boards. This project creates a stunning visual separation between dining and lounging areas using a golden oak tone for the main surface and sleek charcoal borders.
How-To Guide
Materials
- Deck cleaner and brightener
- Pressure washer (optional but recommended)
- 80-grit sandpaper
- Stiff-bristle scrub brush
- High-quality exterior painters tape (2-inch width)
- Semi-transparent deck stain (Golden Oak or similar)
- Solid or semi-solid deck stain (Charcoal or Black)
- Wide staining brush (4-inch)
- Detail brush (2-inch, angled)
- Paint tray and liners
- Drop cloths or plastic sheeting
- Rags for cleanup
Step 1: Preparation & Cleaning
-
Clear the deck:
Remove all furniture, rugs, and planters from the entire deck surface to ensure you have a completely open workspace. -
Clean surface thoroughly:
Apply a deck cleaner according to the manufacturer’s instructions. Scrub vigorously with a stiff-bristle brush to remove dirt, mildew, and gray wood fibers. -
Rinse and dry:
Rinse the deck thoroughly with a hose or pressure washer (use a low setting to avoid damaging the wood). Allow the wood to dry completely for at least 48 hours before proceeding. -
Sand the wood:
Lightly sand the entire surface with 80-grit sandpaper to open the wood pores. This is crucial for even absorption. Sweep or vacuum up all dust afterward.
Tape Trick
Before applying dark stain, seal the tape edge with a tiny bit of clear stain or the lighter color. This blocks leaks for a crisp line.
Step 2: Creating the Zones
-
Plan your layout:
Decide where your darker ‘zone lines’ will go. In the inspiration photo, two long, parallel boards run the length of the deck to separate the dining area from the walkway. -
Tape off the dark boards:
Here I prefer to apply painter’s tape along the edges of the boards adjacent to the ones being stained dark. Press the tape down firmly to prevent bleed-through. -
Protect the perimeter:
If your dark border meets the house or siding, mask off the wall with plastic sheeting and tape to avoid accidental splashes.
Level Up Designs
Instead of just parallel lines, create a ‘rug’ effect by staining a rectangular border around where your dining table will sit.
Step 3: Applying the Dark Stain
-
Stir the dark stain:
Mix your charcoal or black stain thoroughly to ensure pigment is evenly distributed. Do not shake, as this creates bubbles. -
Cut in edges:
Use your 2-inch angled brush to carefully apply the dark stain along the edges and in the gaps between the boards you are highlighting. -
Fill in the boards:
Use the wider brush or a stain pad to fill in the rest of the dark border boards. Apply with smooth, long strokes following the wood grain. -
Check for drips:
Immediately wipe up any drips that might have landed on the ‘light zone’ wood, although your taping should prevent most of this. -
Remove tape carefully:
While the stain is still slightly tacky but not wet, slowly peel back the painter’s tape at a 45-degree angle. Let the dark stain cure for the time recommended on the can (usually 24 hours).
Step 4: Staining the Main Area
-
Protect the dark lines:
Once the dark stain is fully dry, apply fresh painter’s tape directly over the dark boards to protect them from the lighter stain. Be precise with your alignment. -
Apply light stain to gaps:
Using the angled sash brush, work the Golden Oak stain into the gaps and sides of the remaining deck boards first. -
Stain the surface:
Apply the light stain to the top surfaces using the wide brush or a pad applicator. Work in sections of 2-3 boards at a time to maintain a wet edge and avoid lap marks. -
Back-brushing:
Go back over your applied stain with a dry brush to smooth out puddles and work the product deep into the wood grain. -
Final reveal:
Peel off the tape covering the dark border strips. Inspect for any minor touch-ups needed where the colors meet. -
Let it cure:
Allow the entire deck to dry completely before walking on it or replacing furniture. This usually takes 24-48 hours depending on humidity.
Enjoy your beautifully defined outdoor living space with contrasting zones that look professionally designed


Have a question or want to share your own experience? I'd love to hear from you in the comments below!