If you want that dreamy under the sea vibe without stressing over perfect realism, I’ve got you. These easy painting ideas lean on simple shapes, quick textures, and a few go-to tricks that instantly make your scene feel underwater.
Simple Sun Rays From the Surface
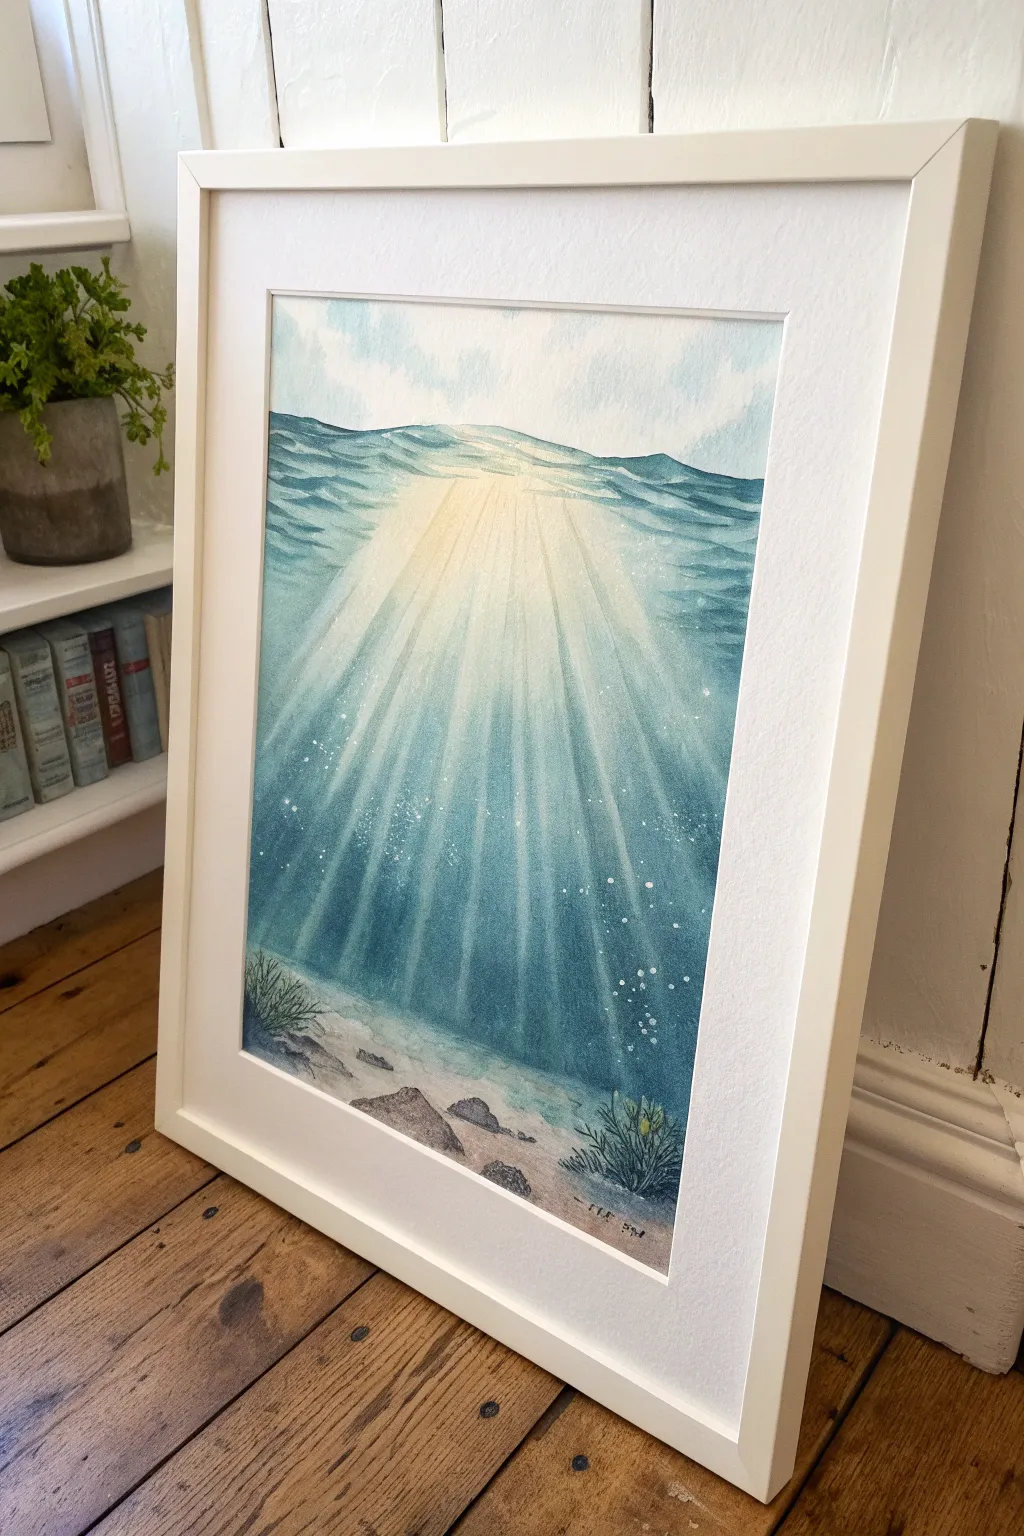

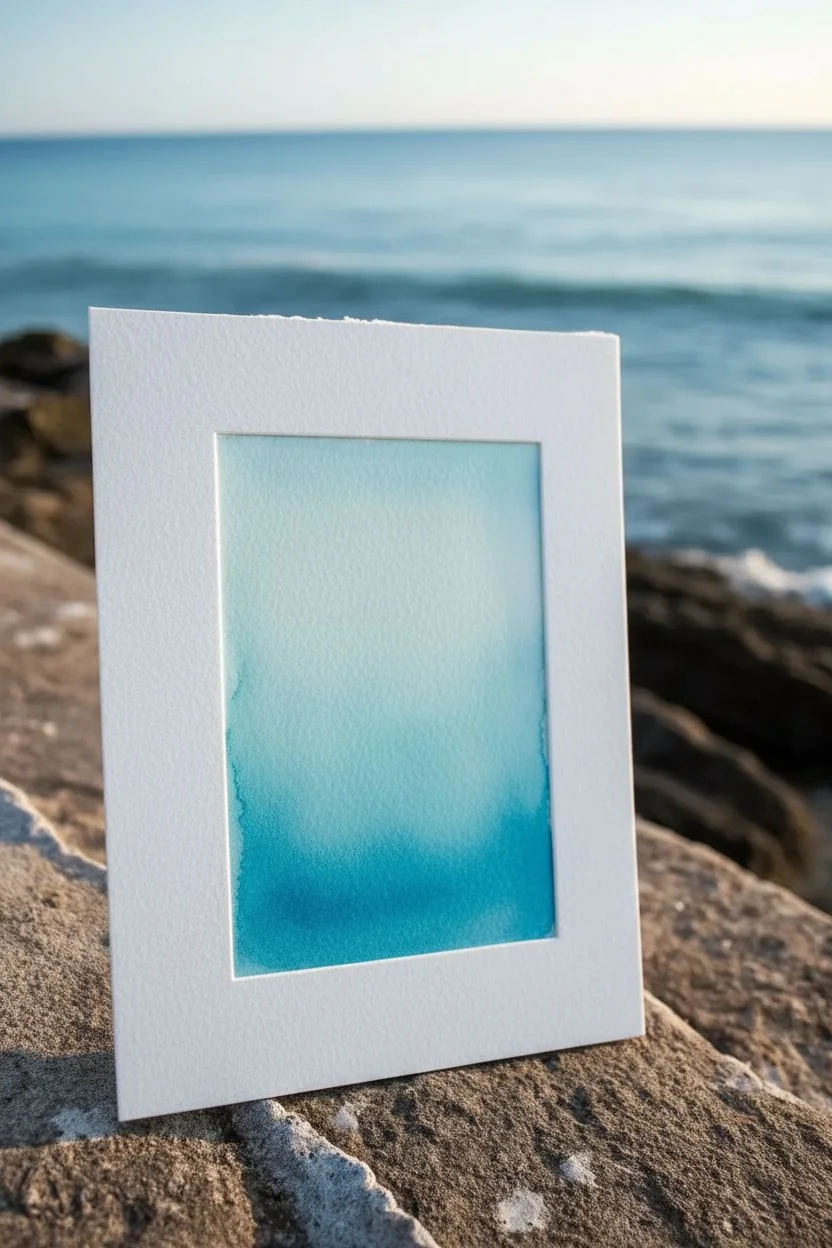
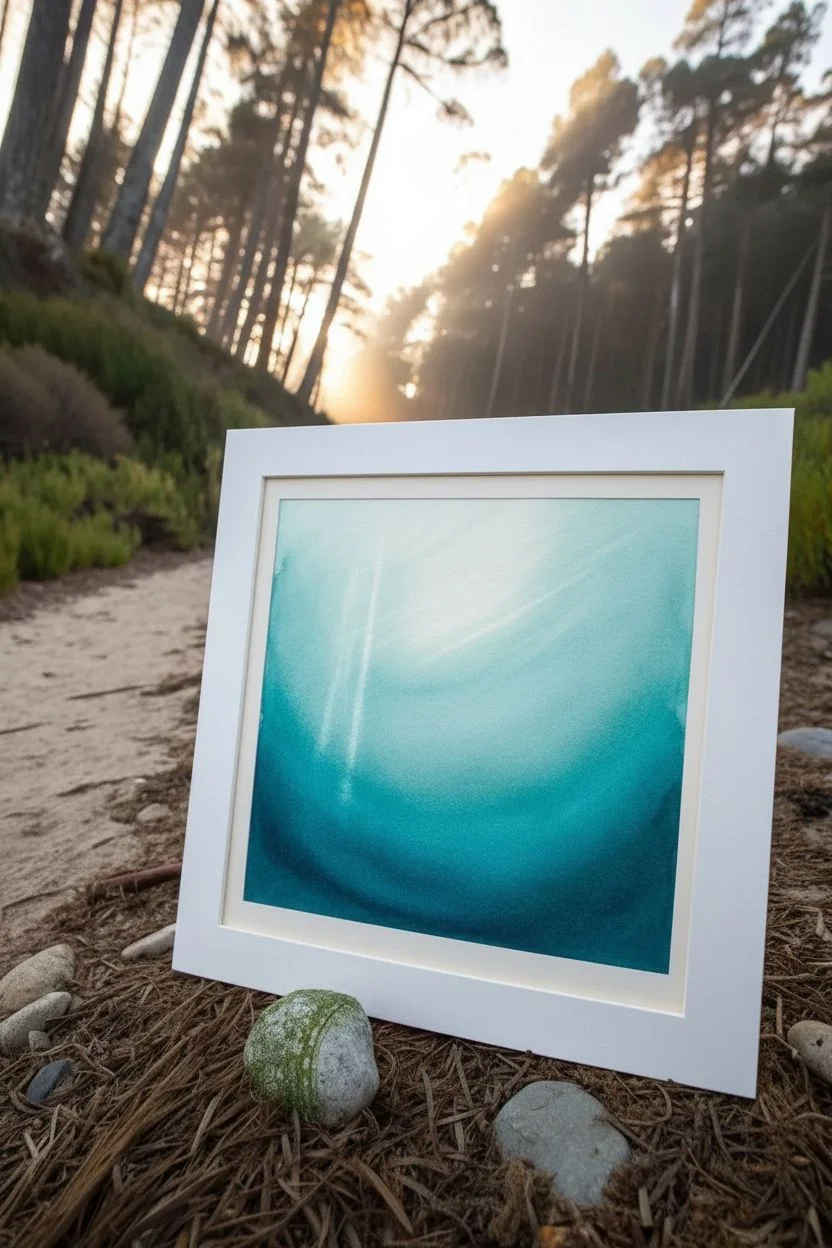
Capture the serene beauty of sunlight filtering through ocean waves with this luminous watercolor project. By layering translucent washes and lifting color, you’ll create a breathtaking depth that looks like you are gazing up towards the surface.
Step-by-Step Guide
Materials
- Cold press watercolor paper (A3 or similar size)
- Watercolor paints (Turquoise, Pthalo Blue, Indigo, Lemon Yellow)
- Masking tape
- Large flat wash brush
- Medium round brush (size 6 or 8)
- White gouache or white gel pen
- Jar of clean water
- Paper towels
- Palette for mixing
- Pencil for light sketching
Step 1: Setting the Scene
-
Secure the paper:
Tape down all four edges of your watercolor paper to a board or table. This prevents buckling when we add water and creates that crisp white border seen in the final piece. -
Sketch the horizon:
Lightly draw a wavy line across the upper third of the paper. This represents the water’s surface from underneath. -
Sketch the seabed:
Add a few faint lines at the very bottom for sand dunes and rocks, keeping it simple as we will paint over these later.
Step 2: Creating the Glow
-
Wet the paper:
Using your large brush, wet the entire area below the surface line with clean water. The paper should be glisten, but not hold puddles. -
Add the central light:
Drop a very dilute wash of Lemon Yellow into the center-top area just below the surface line. This is the source of our sunlight. -
Initial blue wash:
Surround the yellow center with a light Turquoise wash while the paper is still wet. Let the blue bleed slightly into the yellow edges, but try to keep the very center bright.
Straight Lines Made Easy
To get perfectly straight sunbeams, use a ruler to lightly guide your brush, or place a piece of paper over the artwork as a mask while painting the darker shadow sections.
Step 3: Beam Definition
-
Establish the ray paths:
While the first layer is damp, mix a slightly stronger Turquoise. Paint radiating lines starting from the light source outward toward the bottom corners not covering the yellow center. -
Deepen the blues:
Switch to Pthalo Blue. Paint the spaces *between* the sunbeams. By painting the negative space darker, the beams themselves (which are the lighter under-layer) will start to ‘shine’ through. -
Create depth with Indigo:
Mix Indigo with your blue to get a deep ocean color. Paint the outer edges of the paper and the bottom corners, feathering the paint inward. This vignette effect directs the eye toward the light. -
Softening the edges:
Use a clean, damp brush to gently soften any hard lines between the dark blue shadows and the lighter sunbeams. We want a diffused, underwater look. -
Dry completely:
This is crucial; let the main water body dry completely before moving on to the surface or floor.
Make It Sparkle
Mix a tiny pinch of iridescent watercolor medium or silver mica powder into your white gouache for the bubbles. They will catch the light just like real air bubbles underwater.
Step 4: Details: Surface and Floor
-
Paint the surface waves:
Using the medium round brush and a mix of Turquoise and Blue, paint the underside of the waves at the top. Use short, choppy horizontal strokes to look like rippling water. -
Add the sky:
Above the water line, paint a very pale, cloudy sky using diluted blue, leaving white spaces for clouds. -
Paint the seabed:
Mix a sandy beige using a touch of yellow and brown (or mix orange and blue). Paint the bottom area, letting the color fade as it goes deeper into the background. -
Add rocks and focus:
Once the sand is dry, paint grey-brown rocks in the foreground. I like to keep the edges slightly soft so they look submerged. -
Plant life:
Using a dark green-blue mixture, add some seaweed clusters on the rocks. Use quick, upward flicking strokes.
Step 5: Final Magic
-
Add rising bubbles:
Using white gouache or a gel pen, dot tiny bubbles rising along the sunbeams. Cluster them slightly for a natural look. -
Highlight the rays:
If you lost some brightness, use a very dilute white gouache to re-emphasize the strongest sunbeams near the top center. -
Reveal the border:
Carefully peel away the masking tape at a 45-degree angle to reveal your clean, crisp edges.
Frame your masterpiece in a simple white frame to let those deep blues really pop


Bubble Cluster Trails for Instant Movement
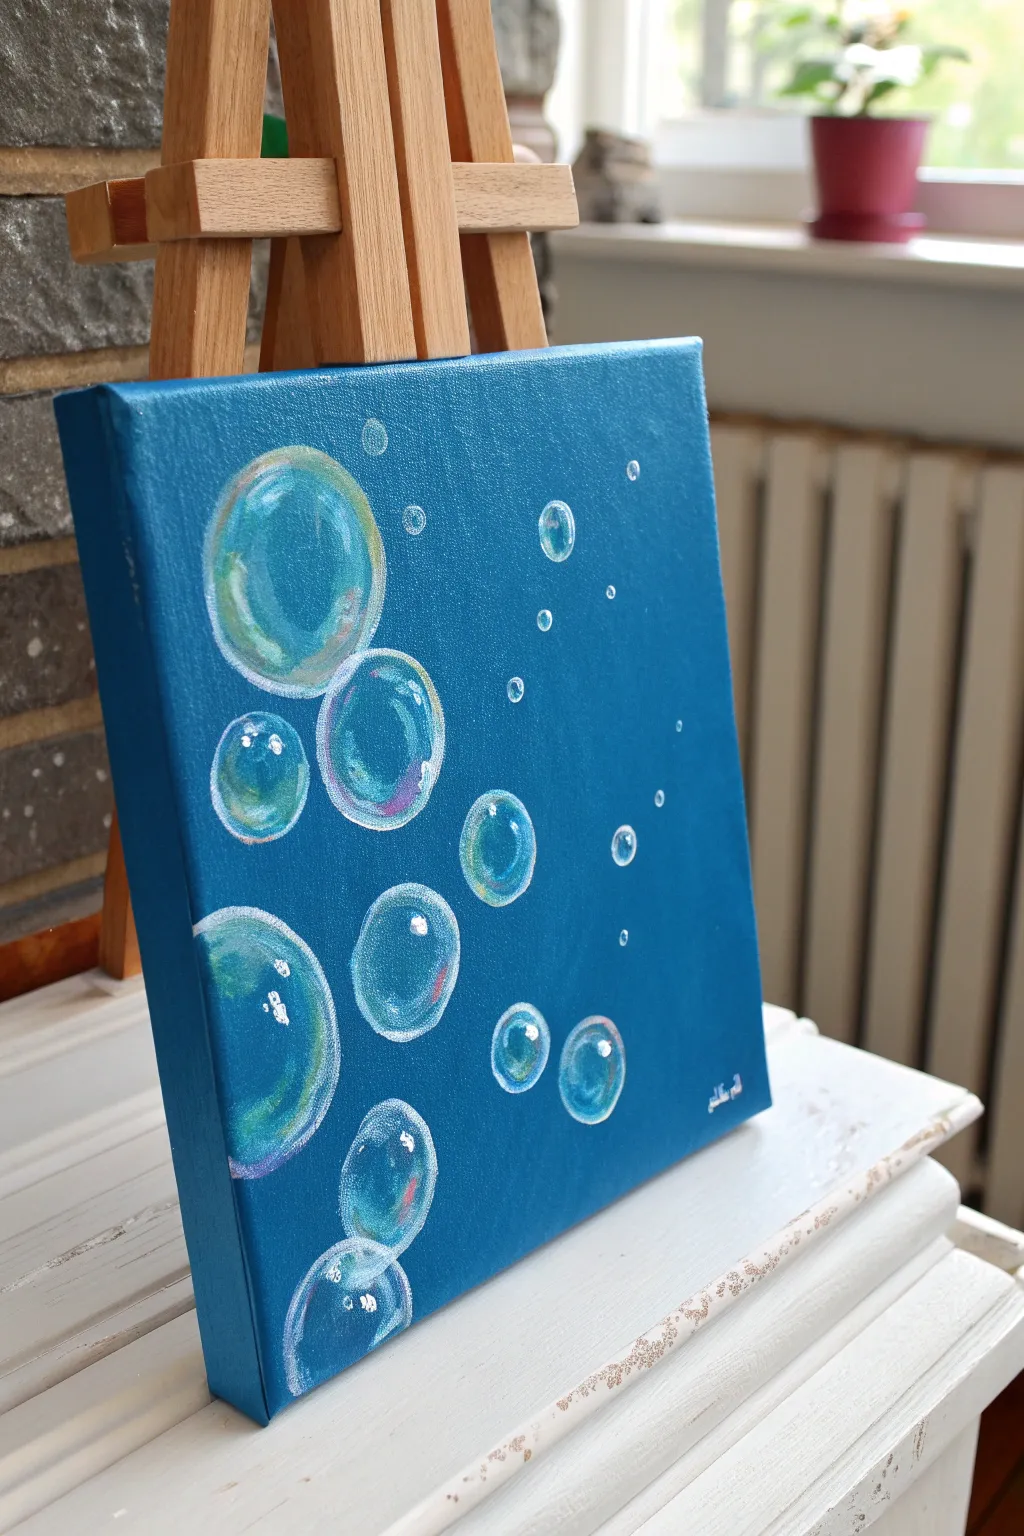
Capture the serene feeling of an underwater current with this simple yet striking acrylic painting. By layering translucent washes over a solid blue background, you’ll create glossy, floating bubbles that seem to lift right off the canvas.
Step-by-Step
Materials
- Small square stretched canvas (e.g., 8×8 or 10×10 inches)
- Acrylic paints: Cerulean Blue, Phthalo Blue (stong dark), Titanium White, and hints of Yellow, Pink, and Light Green
- Large flat brush for the background
- Medium and small round brushes
- Fine liner brush for details
- Cup of water and paper towels
- White chalk or a white charcoal pencil
- Circular objects to trace (bottle caps, coins, small jars)
Step 1: Setting the Scene
-
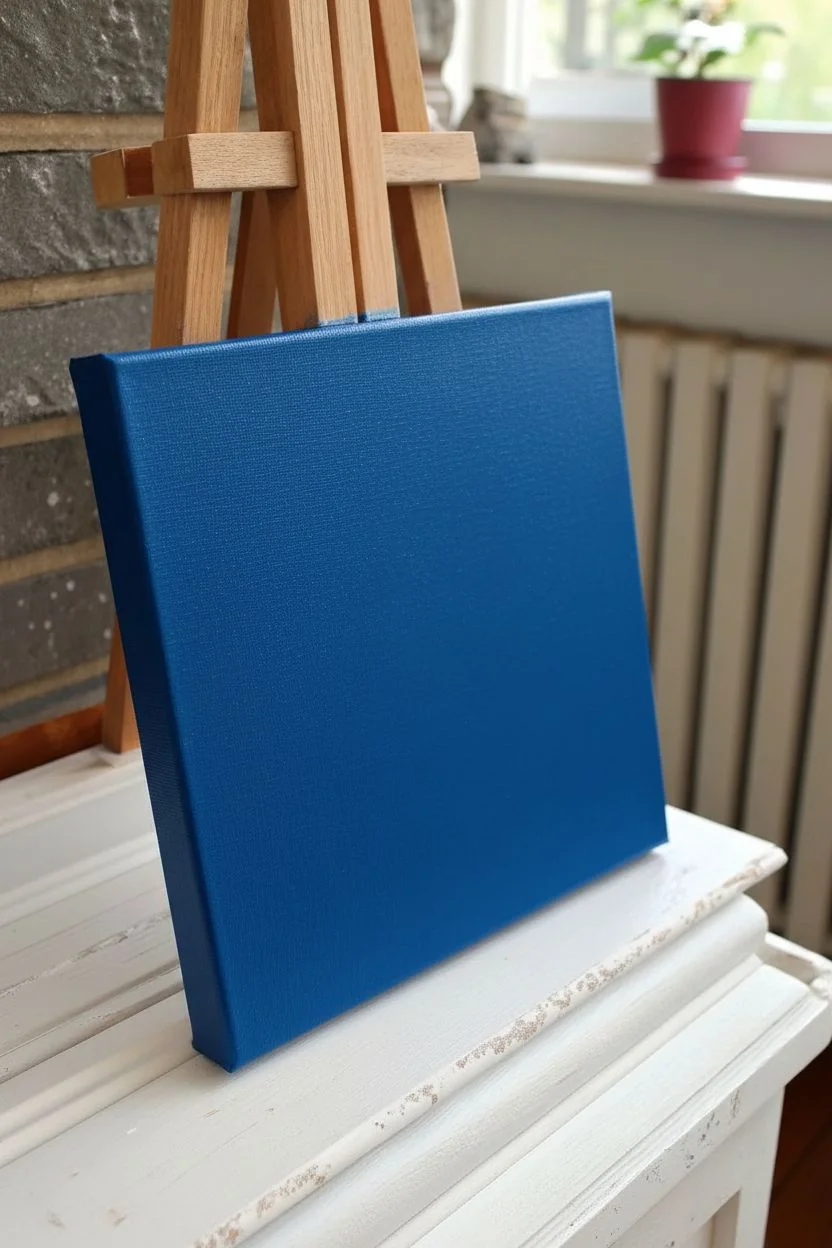
Prepare the canvas:
Start by painting your entire canvas with a solid coat of blue. I like to mix Cerulean Blue with a tiny touch of Phthalo Blue to get that rich, mid-tone ocean color. -
Paint the edges:
Don’t forget to paint the sides of your canvas to give the artwork a finished, professional look without needing a frame. -
Let it dry completely:
Allow the blue base coat to dry fully. If the canvas texture is still showing through too much, apply a second coat and let that dry as well.
Glazing Pro-Tip
If your white shading looks too chalky, mix in a drop of glazing medium instead of water. This makes the paint more transparent and easier to blend.
Step 2: Mapping the Bubbles
-
Plan your composition:
Using your circular objects (caps, coins), lightly trace circles onto the dry canvas with white chalk. Vary the sizes significantly. -
Create a flow:
Arrange the bubbles in a loose, upward-curving path to mimic air rising to the surface. Group some close together and leave others solitary. -
Add tiny floaters:
Draw a few very tiny circles freehand in the empty spaces to represent distant or small bubbles.
Step 3: Bringing Bubbles to Life
-
Outline the shapes:
Mix a very watery, translucent white paint. Using a small round brush, go over your chalk outlines. Keep the line thin and slightly irregular; it doesn’t need to be perfect. -
Thicken the bottom edge:
On the bottom curve of each bubble, thicken the white line slightly to show gravity and weight. -
Start the shading:
Create a ‘glaze’ by mixing a lot of water with a tiny dot of white paint. Gently brush this inside the bubble, focusing on the bottom half, fading out as you go up. -
Add color reflections:
This is the magic step. Mix very watery washes of pink, light green, or yellow. Dab these subtly on the sides of the bubbles or near the bottom curve to suggest soap film iridescence. -
Enhance transparency:
If the center of a bubble looks too cloudy, you can paint a small dot of your original background blue back into the middle to reclaim the transparency.
Wobbly Circles?
Don’t stress about perfect circles. If a shape goes wonky, just wait for it to dry, paint over it with your background blue, and try again.
Step 4: Highlights and Details
-
Create crisp highlights:
Load a fine liner brush with pure, thick Titanium White (don’t add water this time). Paint a sharp, curved line on the upper left or right side of every bubble. -
Add secondary reflections:
Add a smaller highlight dot or a tiny dash on the opposite side of the main highlight. This creates the ‘glassy’ 3D effect. -
Refine the small bubbles:
For the tiniest bubbles, a simple white ring with a single dot of bright white highlight is usually enough detail. -
Clean up:
Once the paint is totally dry, use a damp cloth or soft sponge to gently wipe away any visible chalk marks. -
Final assessment:
Step back and look at the cluster. If any bubble looks ‘flat,’ add a barely-there wash of a lighter blue inside the shape to differentiate it from the background.
Hang your new masterpiece in a bathroom or bright corner to add a splash of aquatic calm to your home


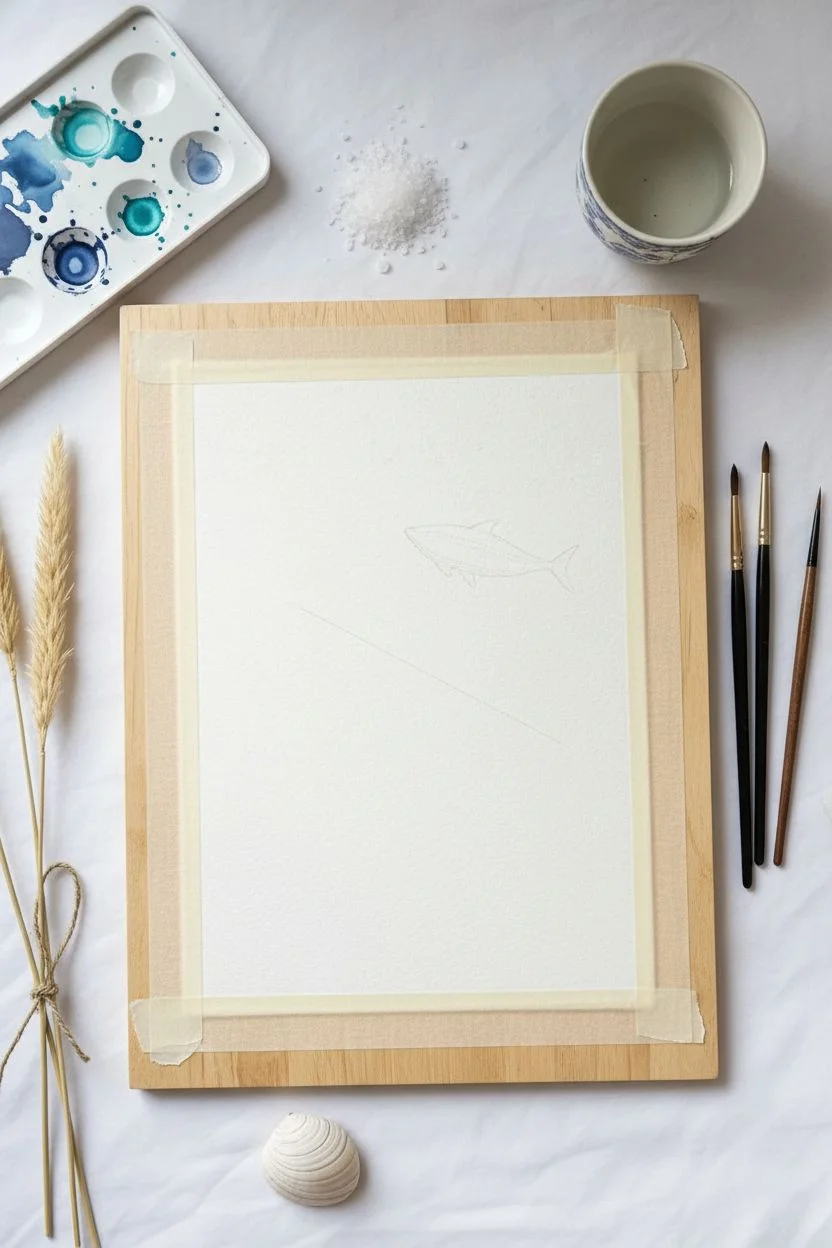
Easy School of Fish With Oval-and-Triangle Shapes
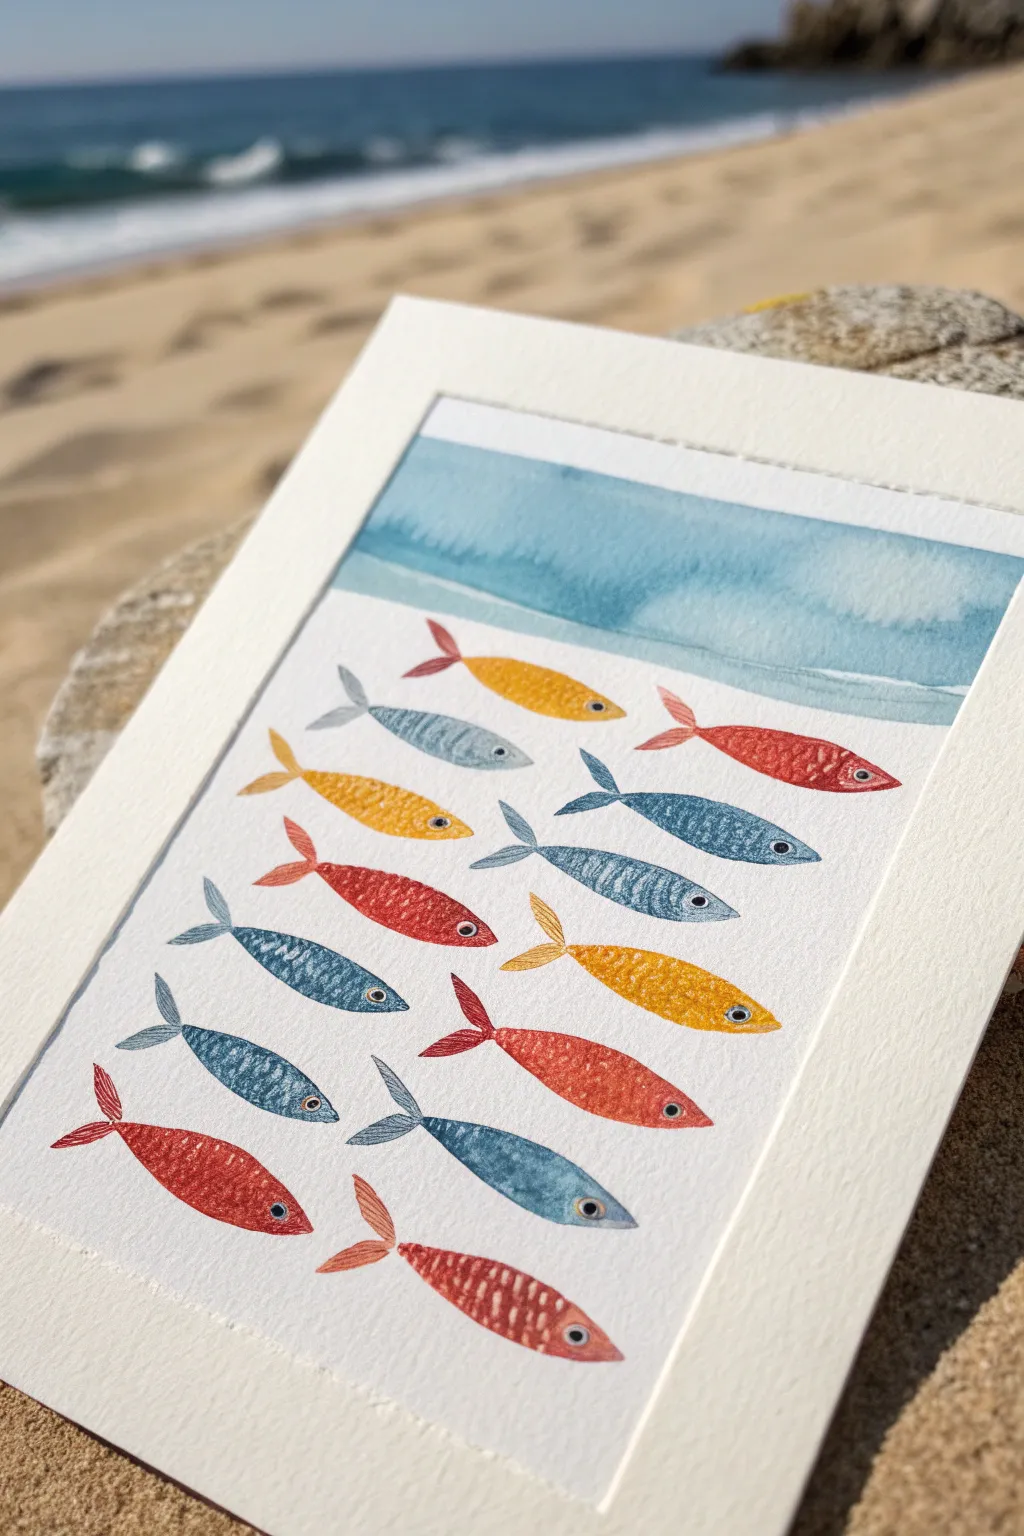
Capture the serene movement of the ocean with this charming watercolor project featuring a colorful school of fish. Using basic shapes and a soothing palette of blues, reds, and yellows, you’ll create a minimalist piece that’s perfect for coastal decor. This approach focuses on simple oval bodies and triangle tails for an effortless, modern look.
Detailed Instructions
Materials
- Cold press watercolor paper (300 gsm)
- Watercolor paints (Indigo, Scarlet Red, Cadmium Yellow, Cerulean Blue)
- Small round brush (size 2 or 4)
- Flat wash brush (size 1 inch)
- Pencil (HB or H)
- Kneadable eraser
- Paper towels
- Painter’s tape or masking tape
- Pot of clean water
Step 1: Preparation and Background
-
Secure the paper:
Begin by taping down all four edges of your watercolor paper to a board or table. This prevents buckling when the paper gets wet and creates a clean white border around your finished piece. -
Sketch the horizon:
Lightly draw a horizontal line about one-third of the way down from the top of the paper. This will separate your underwater scene from the ocean surface area. -
Paint the upper wash:
Using your flat wash brush, wet the area above your horizon line with clean water. Load the brush with a diluted mix of Cerulean Blue and a touch of Indigo. -
Create the gradient:
Sweep the blue color across the wet area, allowing the color to be darker near the horizon line and fade slightly as it goes up. Let this ‘ocean surface’ layer dry completely before moving on.
Uneven Edges?
If your fish outlines look wobble or messy, wait for the paint to dry fully. Then, outline the shapes with a very fine-tip permanent ink pen or a sharp colored pencil for a crisp, illustrated finish.
Step 2: Sketching the School
-
Outline the fish shapes:
With your pencil, lightly sketch about 12 to 14 fish swimming diagonally upwards from left to right. Keep the shapes simple: an elongated oval for the body and a small triangle attached to the back for total. -
Vary the sizes:
Make sure your fish aren’t identical clones; draw some slightly thinner, some plumper, and vary their spacing to make the school look organic. -
Refine the tails:
Soften the points of the triangle tails slightly so they connect smoothly to the oval bodies. Use your kneadable eraser to lighten the pencil lines until they are just barely visible guides.
Level Up: Mixed Media
Instead of painted texture, use colored pencils over the dry watercolor wash. Create scales with cross-hatching or circular motions to add depth and a tactile quality to your fish.
Step 3: Painting the Fish
-
Mix your palette:
Prepare three distinct puddles of paint: a deep red, a golden yellow, and a slate blue. I like to keep the paint consistency somewhat milky—not too thick, but opaque enough to show color. -
Paint the yellow fish first:
Select 3 or 4 scattered fish to paint yellow. Using the small round brush, fill in the oval body and tail shape. Leave a tiny speck of white paper for the eye if you have steady hands, or just paint the whole shape solid for now. -
Add the red fish:
Rinse your brush thoroughly. Paint another 4 or 5 fish with your red mixture. Distribute them evenly so you don’t have clumping of one color in a single spot. -
Fill in the blue fish:
Complete the school by painting the remaining fish with the slate blue color. For visual interest, you can make the belly of the fish slightly lighter by adding a drop of water to the paint on the paper. -
Let the base layers dry:
Wait until every fish is completely bone dry. If the paint is still damp, your details will bleed in the next step.
Step 4: Details and Definition
-
Add skin texture:
Mix slightly more concentrated versions of your red, yellow, and blue paints. Using the very tip of your small brush, paint tiny cross-hatch lines, dots, or scales on the dry fish bodies to give them texture. -
Detail the tails:
Add fine lines to the tail fins using the darker paint mix to suggest the fin structure. -
Paint the eyes:
If you painted over the eye area earlier, mix a thick, creamy white paint (gouache works best, but white watercolor can work) and place a small dot near the front of the head. Let it dry. -
Add the pupils:
Dip the very tip of your brush into black or dark indigo paint. touching it gently to the center of the white eye dot to create the pupil. -
Final touches:
Check for any uneven edges and smooth them out if necessary. Once everything is dry, carefully peel off the tape to reveal your crisp white border.
Frame your new underwater masterpiece in a simple white frame or gift it as a handmade card


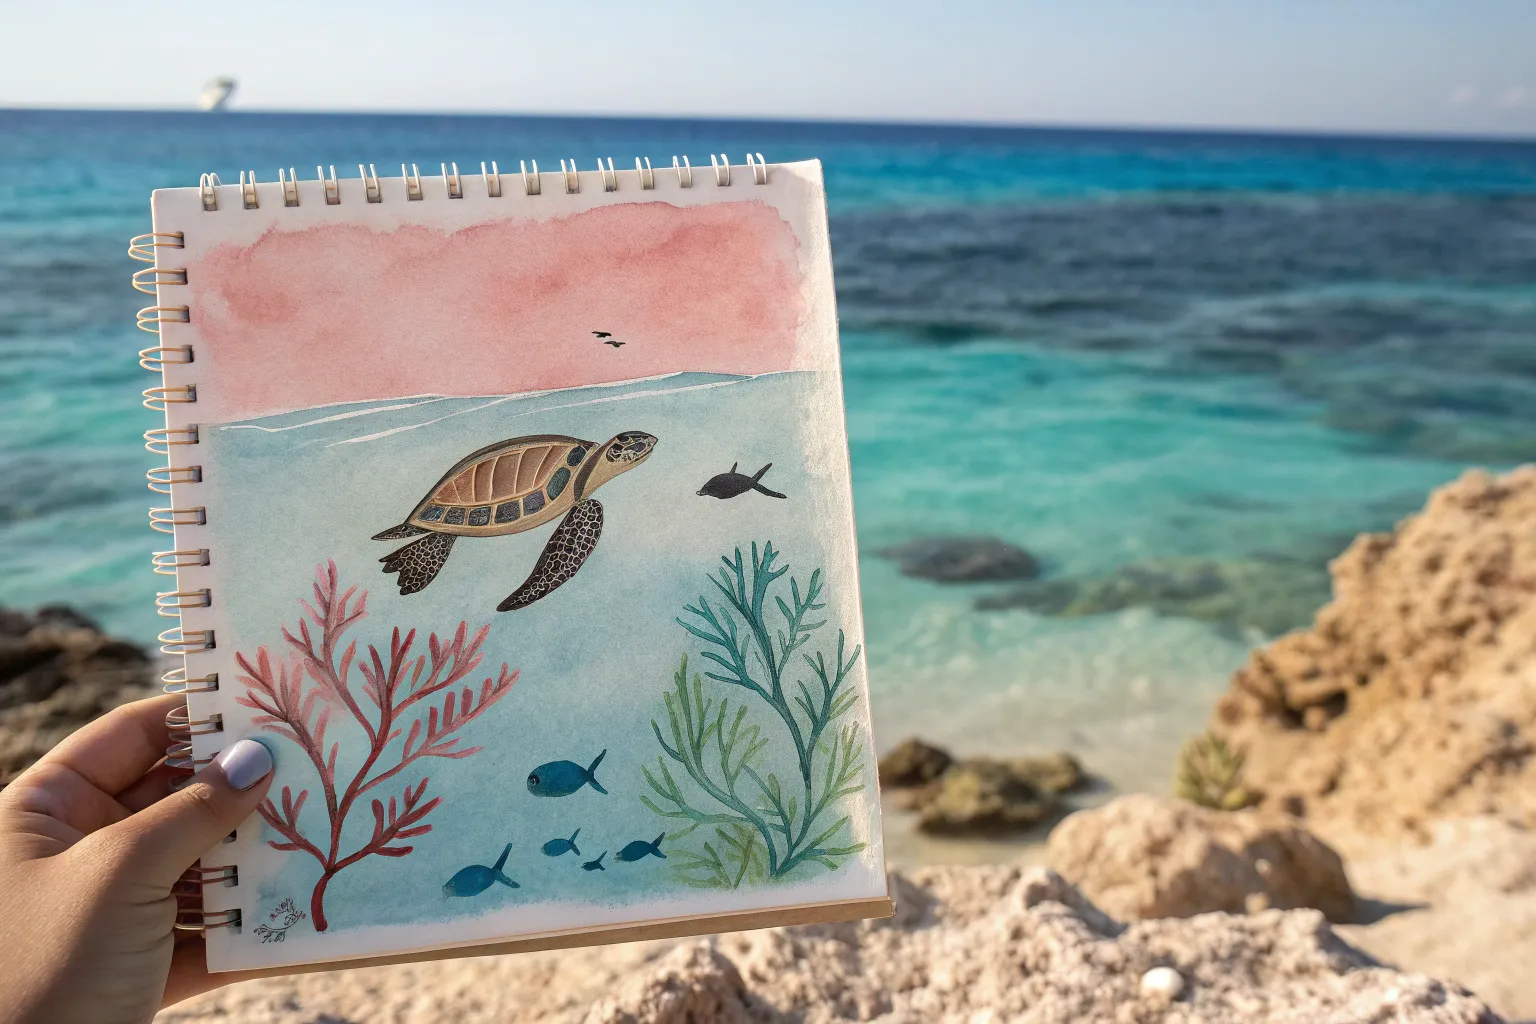
Sea Turtle Silhouette Gliding Through Blue Water
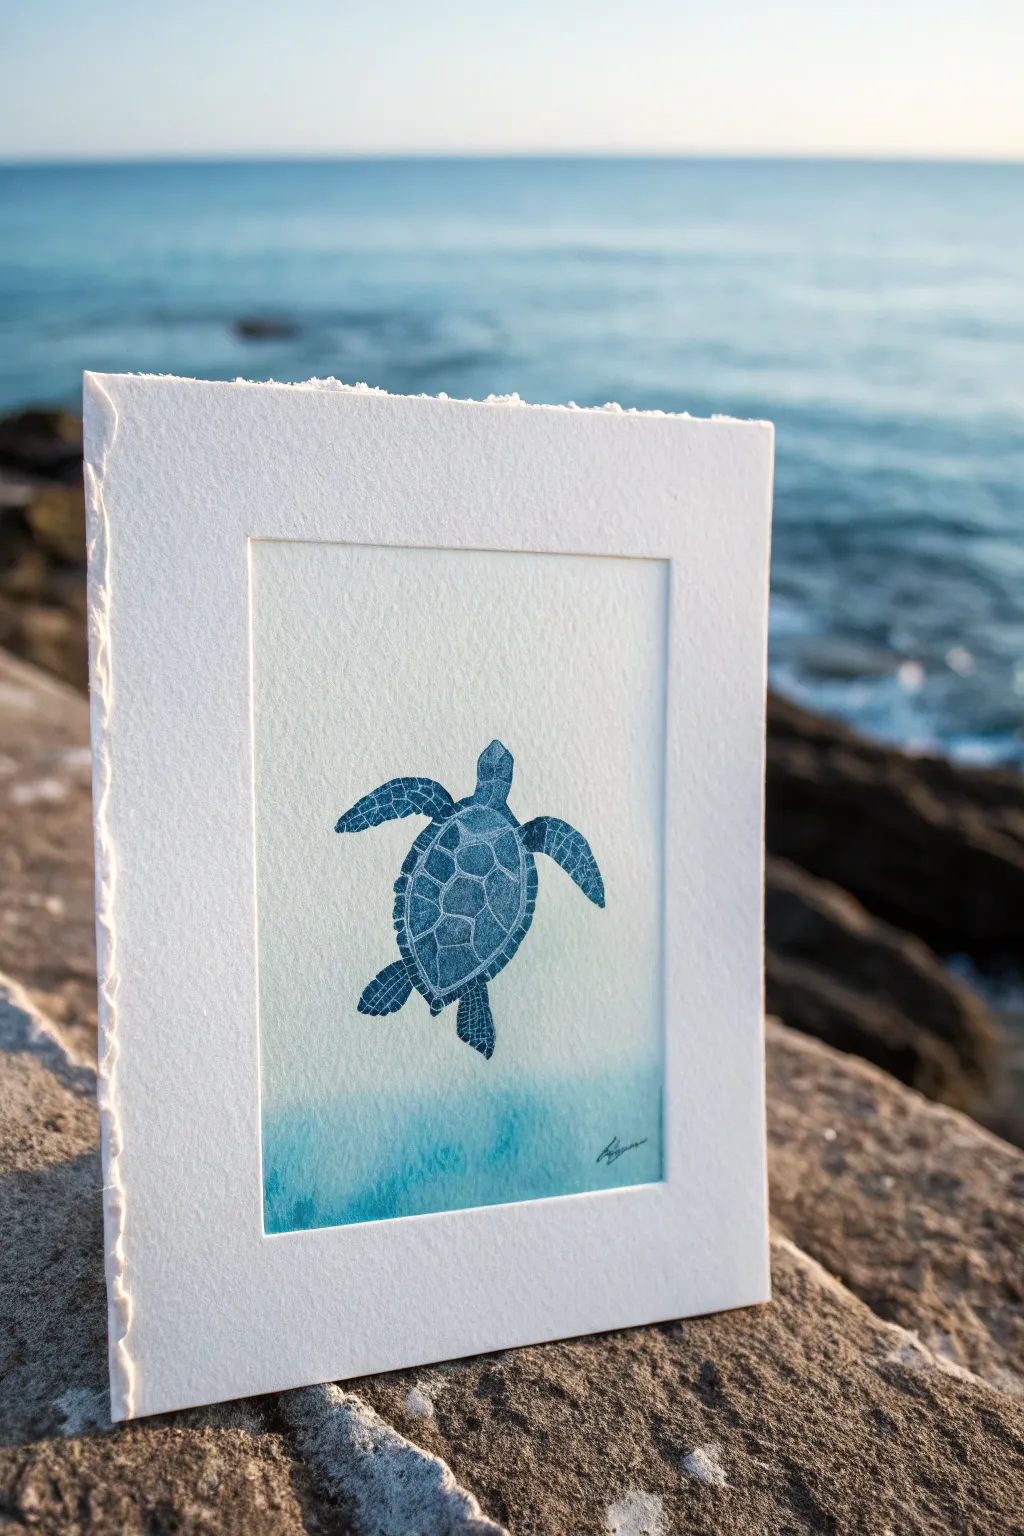
Capture the graceful ascent of a sea turtle with this elegant, minimalist project that combines soft watercolor washes with crisp silhouette detailing. The textured deckle-edge paper adds a wonderful organic feel, mimicking the natural flow of the ocean waves behind it.
Step-by-Step Tutorial
Materials
- Heavyweight watercolor paper (300gsm cold press)
- Small deckle-edge frame mat or cardstock
- Watercolor paints (Cyan, Phthalo Blue, Turquoise)
- White gouache or white gel pen
- Pencil for sketching
- Fine liner brush (size 0 or 1)
- Medium round brush (size 6 or 8)
- Tracing paper (optional)
- Sea turtle reference image
Step 1: Preparing the Background
-
Paper Selection:
Begin by selecting a high-quality, textured watercolor paper. If you want to replicate the photo exactly, look for ‘deckle-edge’ paper cards, which have that beautiful torn, uneven border. -
Masking the Border:
If your paper is larger than your intended frame, lightly mark a rectangular boundary in the center. You want a wide white margin around the artwork space, similar to a built-in mat. -
Mixing the Gradient:
On your palette, prepare a watery mix of Cyan or Turquoise. You want a very transparent, light wash for the upper portion of the water. -
Applying the Wash:
Using your medium round brush and clean water, dampen the lower third of your painting area. Drop in a more saturated Phthalo Blue or Turquoise at the very bottom, letting it naturally bleed upwards into the clear water. -
Softening the Transition:
While the paint is still wet, use a clean, damp brush to gently pull the blue color upward, fading it out completely before you reach the top half of the rectangle. Let this background dry completely.
Uneven Wash?
If your blue background gradient dries with hard lines (runbacks), gently scrub the harsh edge with a damp, clean brush to soften it, or simply paint over it with a slightly darker, transparent layer.
Step 2: Drafting the Turtle
-
Finding a Reference:
Locate a simple reference photo of a sea turtle seen from above. You’re looking for a strong shape rather than color detail. -
Sketching the Outline:
Lightly sketch the turtle in the center of your painted area. Start with an oval for the shell (carapace), then add the head, narrow front flippers extending outward, and smaller rear flippers. -
Refining the Shape:
Go over your sketch to ensure the flippers have a natural curve, like wings in flight. Keep your pencil pressure very light so it won’t show through the paint later.
Level Up: Salt Texture
While the background blue wash is still wet, sprinkle a tiny pinch of table salt into the bottom area. As it dries, the salt pushes pigment away, creating a bubbly, oceanic texture.
Step 3: Painting the Silhouette
-
Mixing the Indigo:
Create a deep, dark blue mix. Combine Phthalo Blue with a touch of Burnt Umber or a tiny dot of Black to get a rich Indigo hue that stands out against the pale background. -
A Solid Base Layer:
Switch to your fine liner brush. Carefully fill in the entire turtle silhouette with this dark blue mixture. Try to keep the edges crisp and verify the symmetry of the shell. -
Waiting Game:
I usually force myself to take a break here because the base layer must be bone dry before the next step. If it’s damp, the fine details will bleed and blur.
Step 4: Adding the Details
-
Mapping the Shell pattern:
Using diluted white gouache or a white gel pen, begin drawing the pattern on the central shell. Start with the ‘scutes’ (the hexagonal plates) down the spine. -
Connecting the Scutes:
Draw the surrounding plates that radiate out from the center spine to the edge of the shell. Keep the white lines very thin and delicate. -
Detailing the Flippers:
For the skin texture on the flippers and head, create a mosaic effect. Draw tiny, irregular shapes that fit together like puzzle pieces, leaving thin dark gaps between them. -
Varying the Texture:
Make the scales larger near the center of the flippers and tiny dots near the edges. This variation creates a sense of realism and dimension. -
Highlighting:
Add a few stronger white accents on the top of the shell or the leading edge of the flippers to suggest sunlight hitting the turtle’s back. -
The Signature:
Once fully dry, sign your name in the bottom right corner of the colored area using the same dark blue paint and a very fine brush. -
Final Assembly:
Place your artwork into a window mount or frame that allows the textured paper edges to breathe, enhancing that coastal aesthetic.
Now you have a serene piece of ocean life ready to display or gift to a beach-loving friend
BRUSH GUIDE
The Right Brush for Every Stroke
From clean lines to bold texture — master brush choice, stroke control, and essential techniques.
Explore the Full Guide
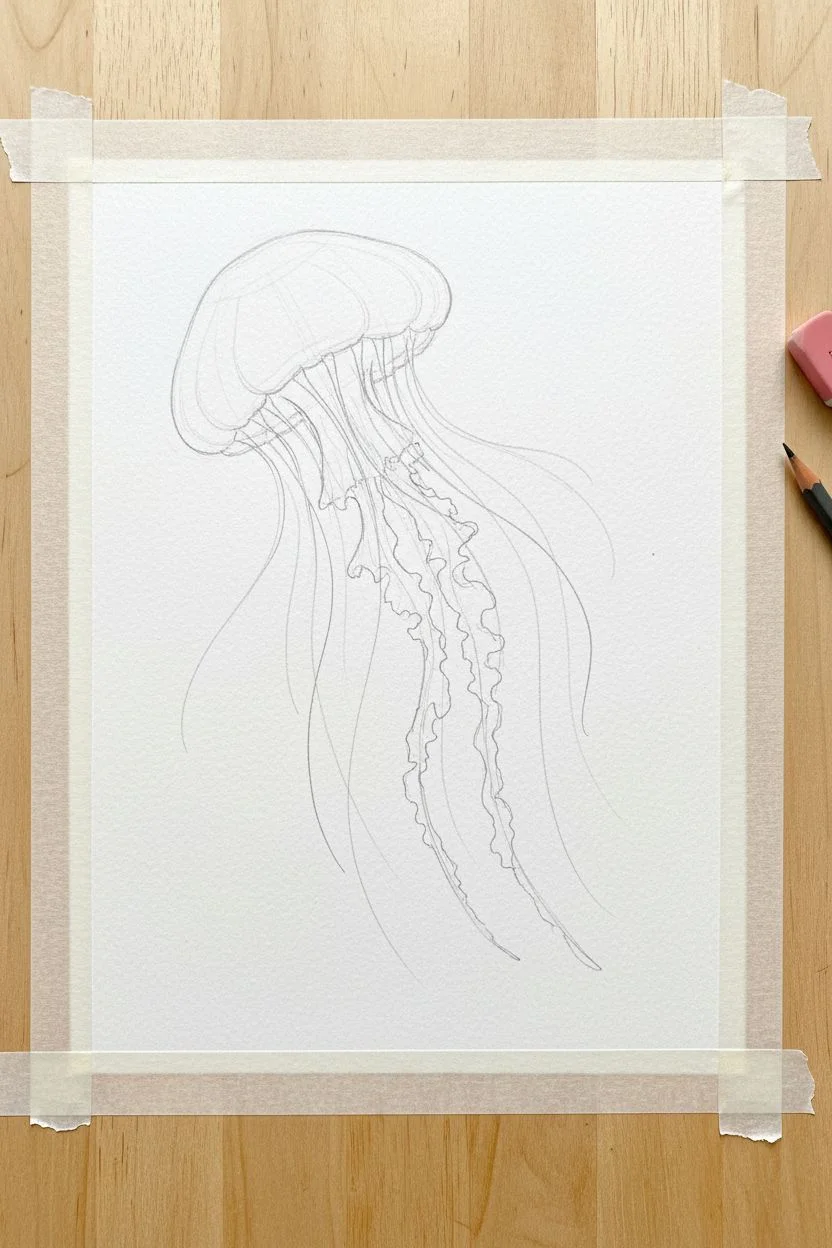
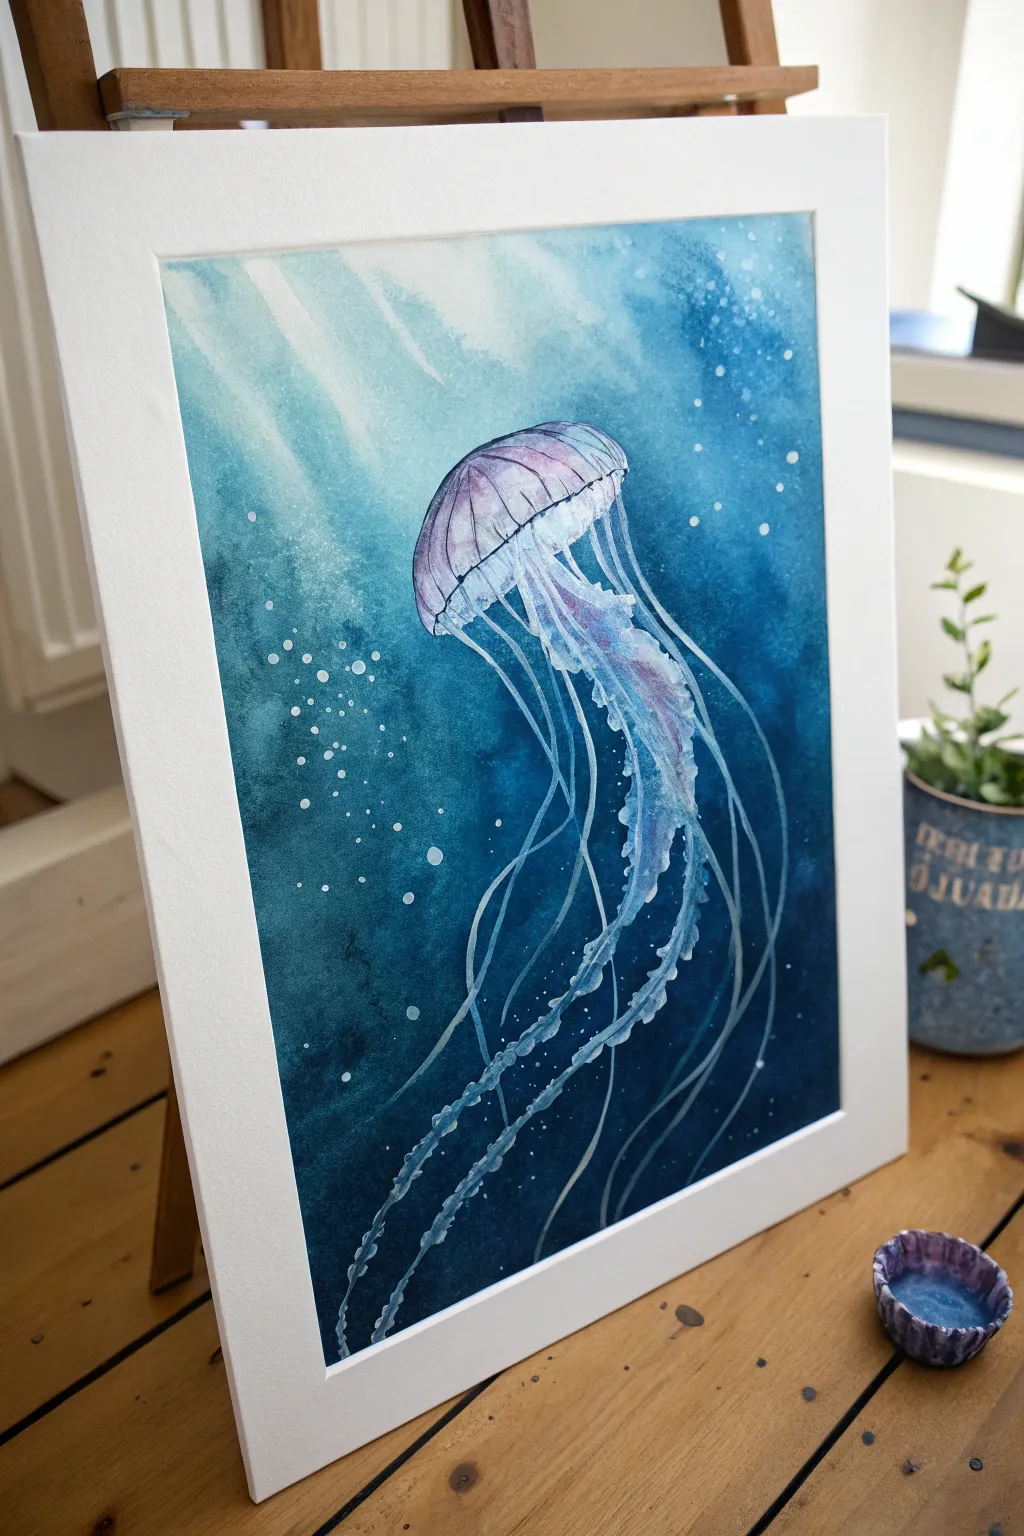
Cute Jellyfish With Flowing Tentacles
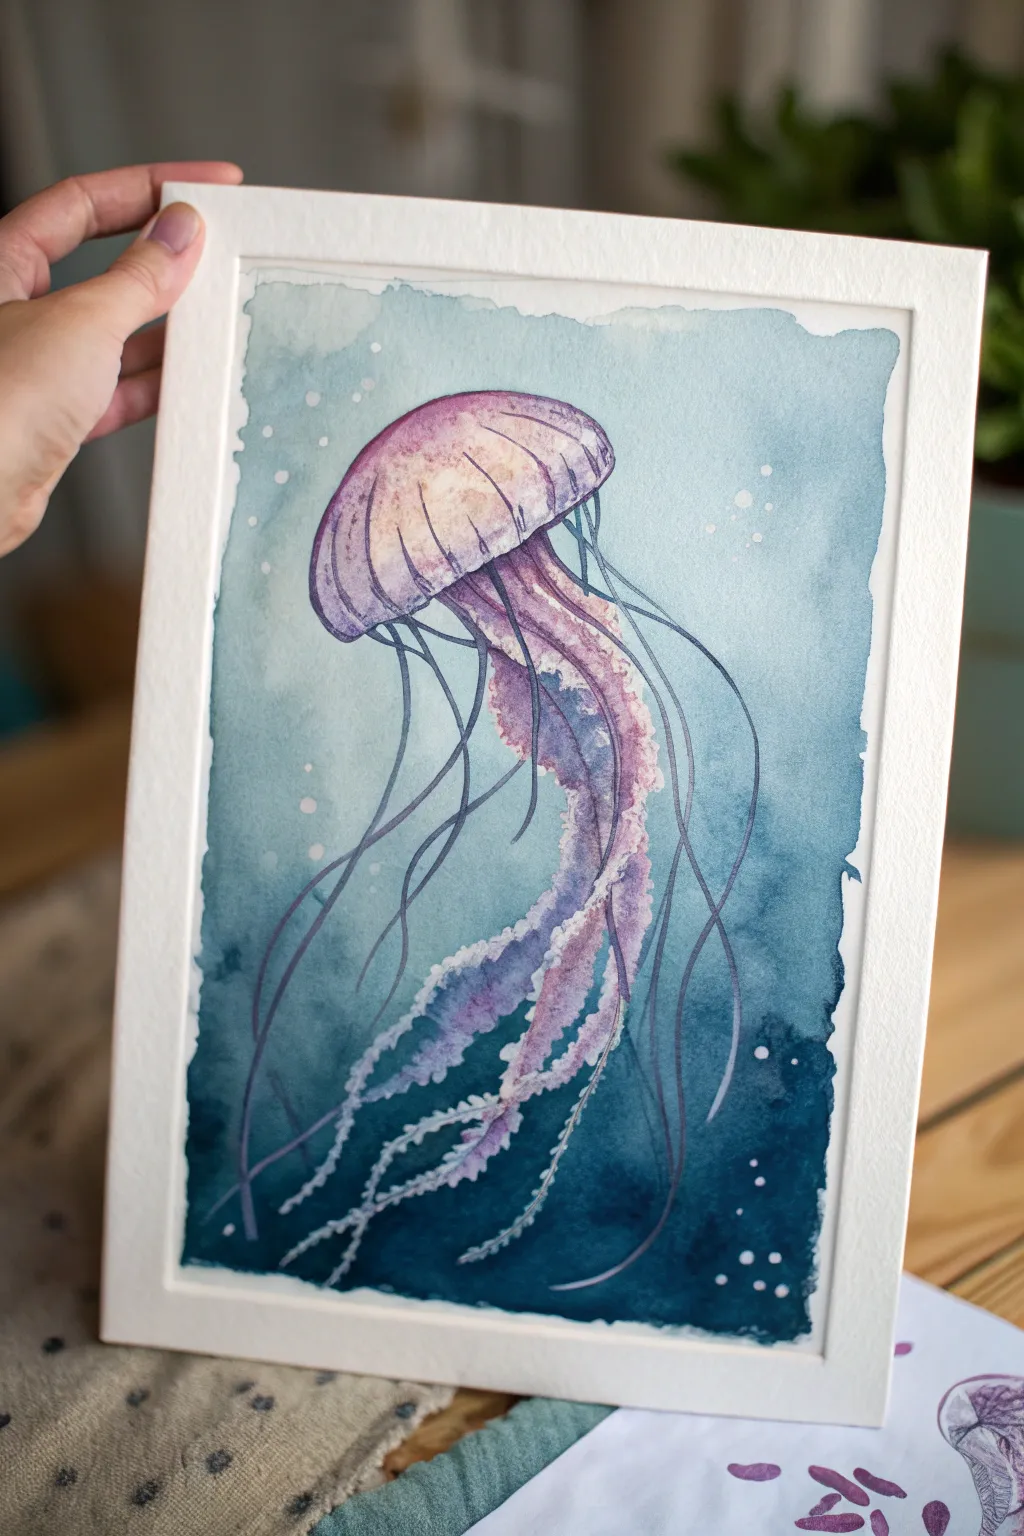
Capture the graceful movement of the deep blue with this mesmerizing jellyfish painting. Using wet-on-wet techniques, you will create a soft, glowing creature that seems to drift effortlessly through an oceanic gradient.
How-To Guide
Materials
- Cold Press watercolor paper (300 gsm)
- Watercolor paints (Indigo, Prussian Blue, Phthalo Blue, Purple, Magenta, Burnt Sienna)
- Round brushes (size 4, size 8, and a rigger/liner brush)
- Masking tape
- Pencil and eraser
- Two jars of water
- Paper towels
- White gouache or white gel pen
- Palette
Step 1: Sketching and Preparing
-
Prepare the paper:
Begin by taping down all four edges of your watercolor paper to a board. This creates that crisp, clean white border seen in the final piece and prevents the paper from buckling under heavy washes. -
Sketch the bell:
Lightly sketch the jellyfish’s bell (the head) near the top center of the page. It should look like a tilted mushroom cap or an umbrella. -
Add tentacle guidelines:
Draw faint, flowing lines extending downwards from the bell. Don’t worry about details yet; just map out the general gesture and curves of where the long tentacles and frilly oral arms will flow.
Edge Control
Watercolors will flow wherever the paper is wet. If you want the jellyfish to stay contained, ensure the background water doesn’t accidentally touch the wet paint of the jellyfish body.
Step 2: Painting the Bell
-
Wet the bell area:
Using clean water and your size 8 brush, wet the inside of the jellyfish bell. The paper should be glisten, but not harbor puddles. -
Drop in color:
While wet, drop in pale purple mixed with a touch of magenta at the top curve. Let it bleed downwards. Add a very diluted burnt sienna near the bottom rim for a warm, translucent glow. -
Define the segments:
While the paint is still damp but settling, use a slightly drier brush with darker purple to paint the vertical stripes or ‘ribs’ of the jellyfish bell, following the curve of the dome.
Level Up: Salt Texture
While the dark blue background wash is still wet, sprinkle a pinch of table salt at the bottom. Brush it off once dry for a stunning, coral-like texture in the deep water.
Step 3: The Frilly Arms
-
Start the oral arms:
Mix a watery purple-pink shade. Using a size 4 brush with a shaky hand motion, paint the thick, central arms. Let the brush skip slightly to create a ruffled, texture effect. -
Deepen the shadows:
While the first layer is still damp, drop darker violet or indigo into the crevices of the ruffles to create depth and volume within the central mass. -
Extend the frills:
Continue these ruffled shapes downward, letting them fade out slightly at the tips. Ensure they look loose and organic rather than rigid.
Step 4: The Ocean Background
-
Wet the background:
Carefully wet the entire background area around the jellyfish with clean water. Be very precise around the bell, but you can leave a tiny dry gap to prevent bleeding. -
Apply the first wash:
Load a large brush with a light turquoise or teal mix. Start at the top and wash downwards, keeping the color light and airy near the surface. -
Deepen the depths:
As you move down the paper, switch to darker blues like Prussian Blue and finally Indigo at the very bottom corners. I find mixing these blues right on the paper creates the most natural gradient. -
Create texture:
While the background is still wet, drop in clean water droplets or sprinkle coarse salt in the upper areas to create ‘blooms’ that look like bubbles or light refraction. -
Dry completely:
Allow the entire painting to bone dry. This is crucial before adding the fine details.
Step 5: Final Details
-
Paint fine tentacles:
Using your rigger or liner brush and a dark indigo mix, paint long, thin, trailing tentacles. Use long, confident strokes, letting them cross over the body and background. -
Add white accents:
Use white gouache or a gel pen to add tiny highlights on the bell’s curve to make it look shiny. -
Create bubbles:
Paint small, scattered white circles in the background water for bubbles. Varied sizes make the scene look more dynamic. -
Highlight the frills:
Add tiny touches of white along the edges of the purple frills to make them pop against the dark blue water. -
Reveal the border:
Once everything is absolutely dry, slowly peel off the masking tape at a 45-degree angle to reveal your crisp white frame.
Frame your underwater masterpiece to bring a splash of calm ocean life into your room
Bright Seahorse With Simple Curled Tail
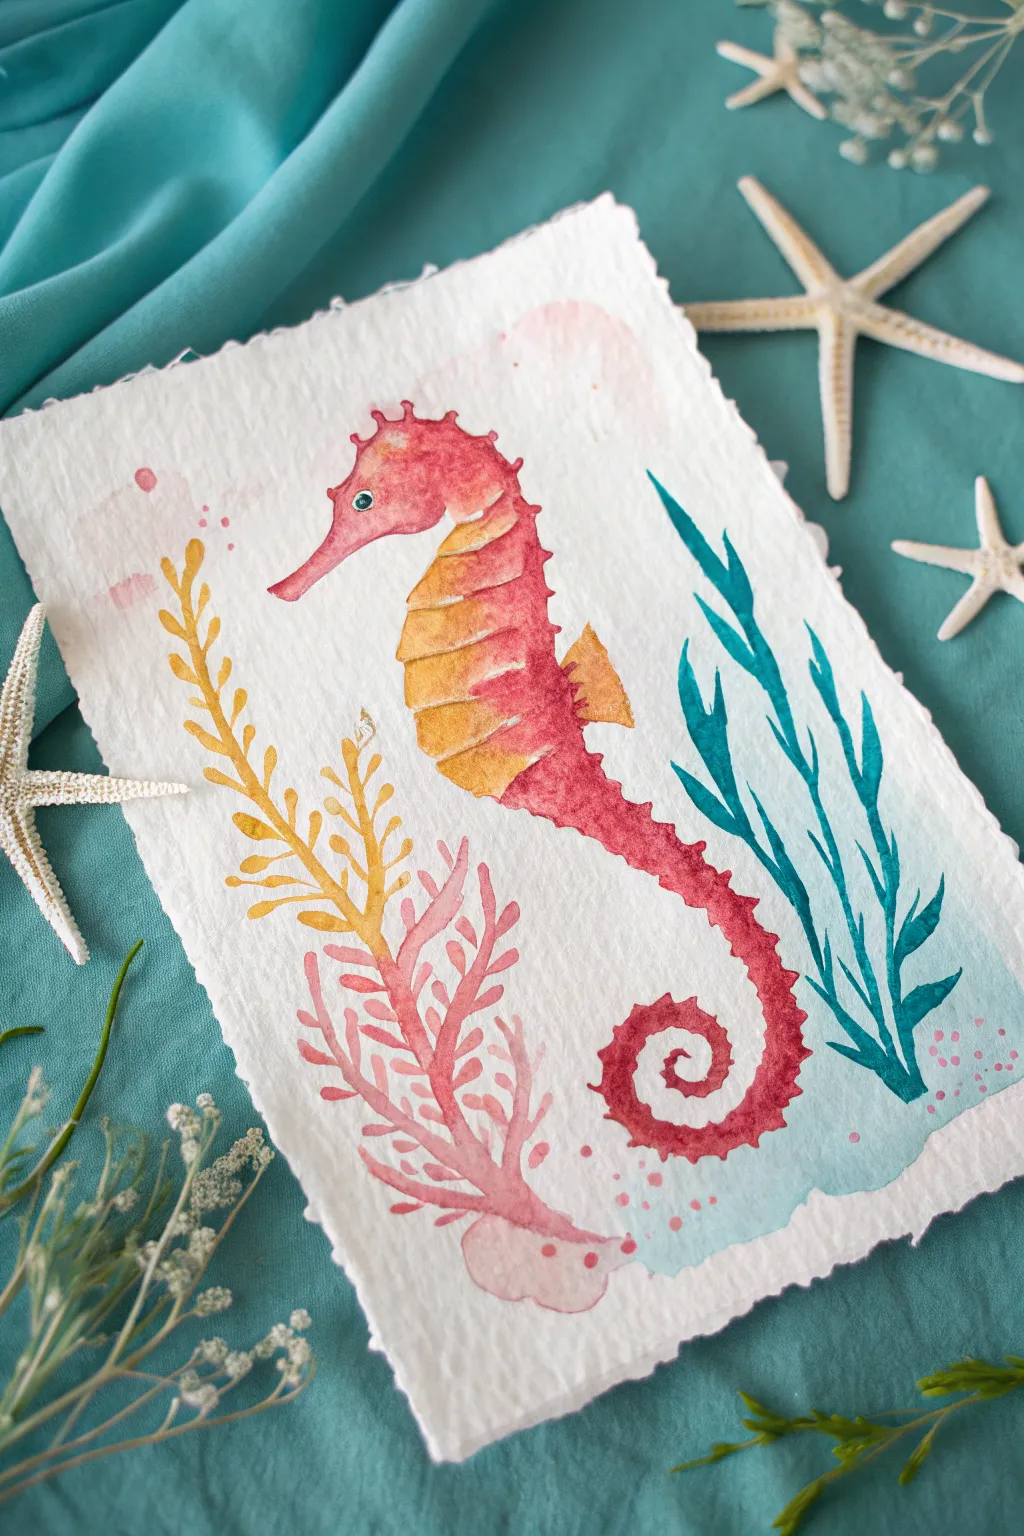
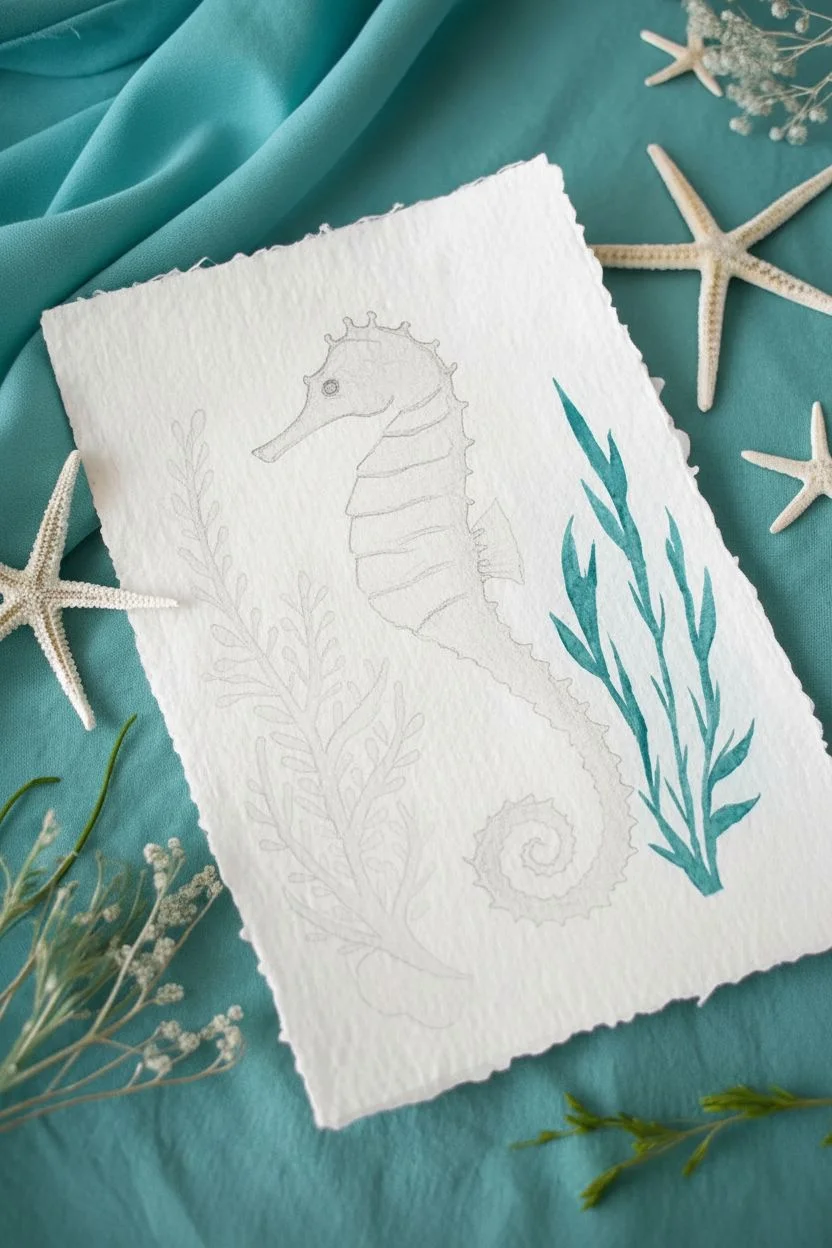
This charming watercolor project captures the magic of the ocean with a vibrant pink seahorse floating among stylized coral and seaweed. The distinctive deckle-edge paper and loose, watery paint application give it a wonderful artisanal feel perfect for beachy decor.
Step-by-Step Guide
Materials
- Cold press watercolor paper (deckle edge preferred, approx. 5×7 inches)
- Watercolor paints (Alizarin Crimson, Cadmium Yellow, Turquoise/Teal)
- Round watercolor brushes (size 4 and 0 for details)
- Pencil (HB or H)
- Kneaded eraser
- Two jars of water
- Paper towels
- Palette for mixing
Step 1: Sketching the Outline
-
Map the Seahorse Shape:
Start by lightly sketching the main S-curve of the seahorse’s body in the center of your paper. Draw a small oval for the head, a wider curve for the belly, and a spiral for the tail. -
Refine the Details:
add the snout, the small fin on the back, and the coronet (the bumpy crown) on top of the head. Define the segmented ridges on the belly area with light horizontal lines. -
Place the Plants:
To the left of the seahorse, sketch a tall, slender seaweed strand with small leaf-like protrusions. Below it, draw a branching coral shape. On the right, sketch three wavy blades of seagrass. -
Lighten Your Lines:
Once you are happy with the composition, gently roll a kneaded eraser over the entire drawing to lift up excess graphite. You want the lines to be barely visible so they don’t show through the translucent paint.
Clean Lines?
If your paint bleeds into neighboring sections (like the red into the yellow belly), wait for the first color to be bone-dry before painting the adjacent shape.
Step 2: Painting the Seahorse
-
Base Wash for the Body:
Mix a watery wash of Alizarin Crimson. Paint the head, back, and tail, leaving the belly area unpainted for now. Let the color pool slightly at the edges for a natural watercolor texture. -
Add the Belly Color:
While the crimson is still slightly damp but not soaking, mix a warm yellow-orange. Carefully paint the belly segments, letting the orange touch the red slightly to create a soft bleed between the colors. -
Deepen the Reds:
Once the first layer is dry, mix a more concentrated red. Paint the ridges along the back spine and the tail segments to add dimension. -
Define the Belly Segments:
Using your size 0 brush and the concentrated red, paint thin lines separating the yellow segments on the belly to give it that ribbed armor look. -
Add the Eye:
Paint a small teal circle for the eye. Once dry, add a tiny dot of black or dark blue in the center, leaving a speck of white paper for the highlight if possible.
Step 3: Creating the Underwater Flora
-
Yellow Seaweed:
Mix a warm yellow ochre or gold. Paint the tall weed on the left using the tip of your round brush to create the small, leaf-like bumps. Start from the bottom and work your way up. -
Pink Coral:
Using a diluted version of your crimson red (so it looks pink), paint the branching coral shape below the yellow weed. Keep your strokes loose and fluid. -
Teal Seagrass:
Mix a bold turquoise or teal color. Paint the wavy grass blades on the right side. Vary the pressure on your brush: press down to widen the blade and lift up to create a sharp, tapered tip. -
Adding Texture Drops:
While the seahorse is dry, splatter a few very tiny drops of diluted red or pink near the head and tail to create ‘bubbles’ or texture. Do the same with teal near the bottom right corner. -
Watery Background Accent:
Mix a very pale, watery wash of blue. Paint a loose, amorphous shape behind the bottom of the seahorse and the plants to suggest water, letting the edges fade out into the white paper.
Add Subtle Sparkle
Once the painting is fully dry, mix a tiny amount of iridescent medium into your final glaze or use metallic watercolor for the dorsal fin to make it shimmer like real scales.
Step 4: Final Touches
-
Highlighting:
If you lost any highlights, use a tiny bit of white gouache or a white gel pen to add a sparkle to the eye or the top of the seahorse’s head. -
Check Edges:
Look over the edges of your plants and seahorse. If you want crisper definitions, use your smallest brush to refine the outlines with a slightly darker shade of the same color.
Now you have a vibrant piece of ocean art ready to brighten up any room

PENCIL GUIDE
Understanding Pencil Grades from H to B
From first sketch to finished drawing — learn pencil grades, line control, and shading techniques.
Explore the Full Guide
Gentle Whale Passing in the Distance
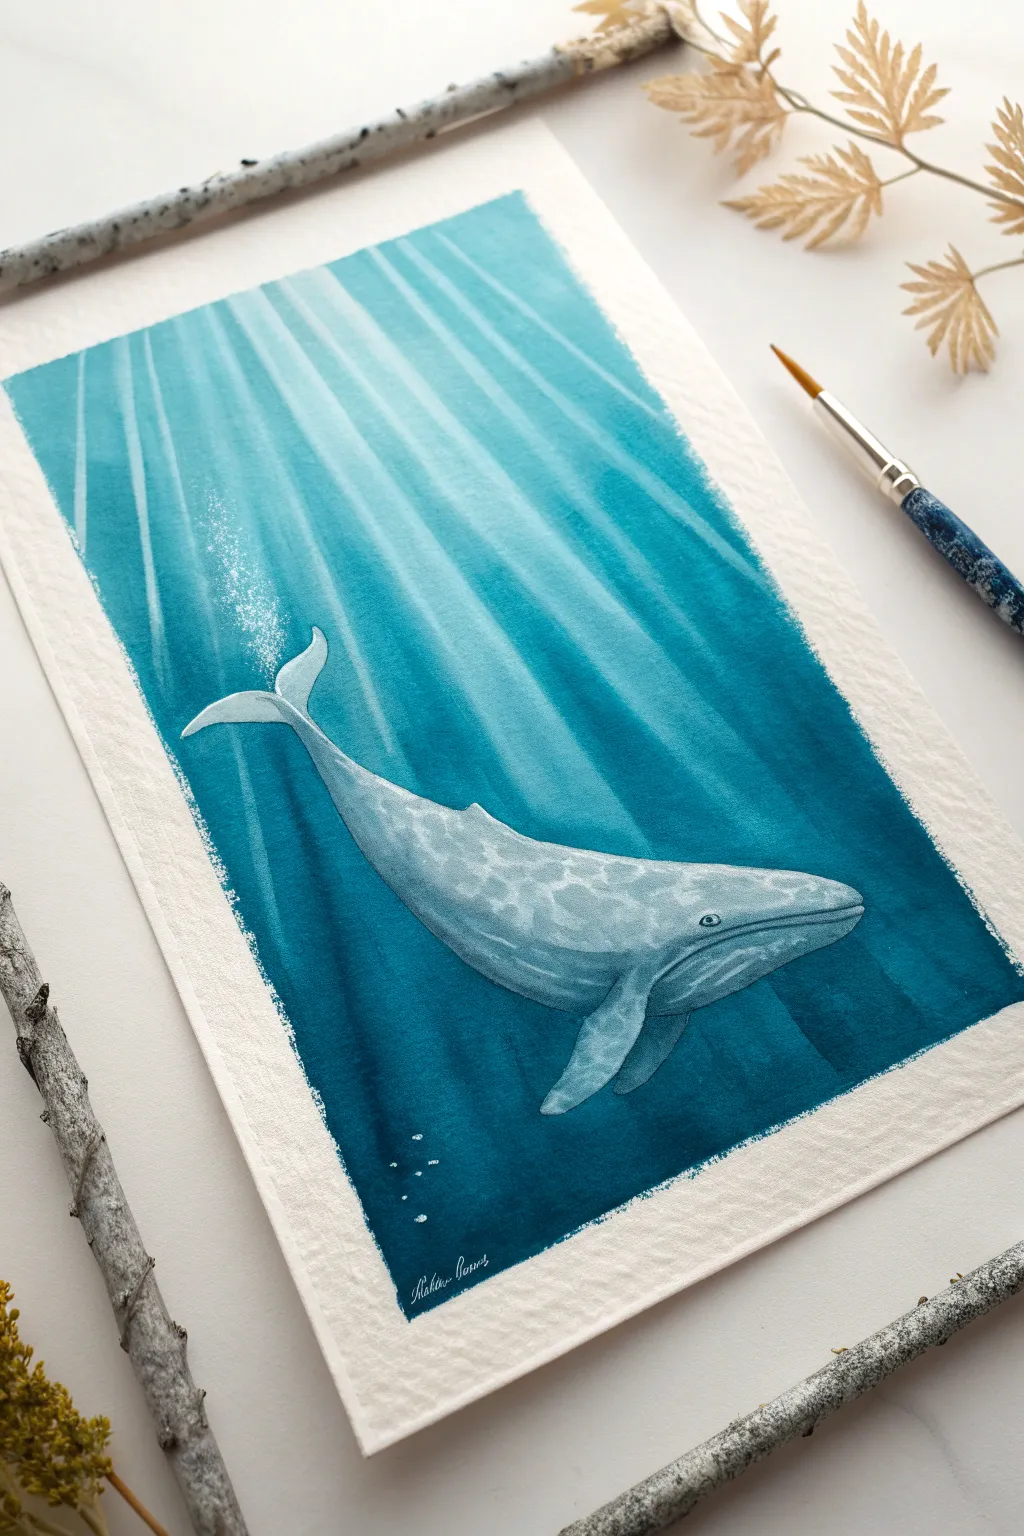
Capture the majestic calmness of a whale gliding through sun-pierced ocean depths with this striking watercolor project. The composition focuses on contrasting the deep teal abyss with the ethereal light filtering from above, framing the gentle giant perfectly.
Detailed Instructions
Materials
- Cold press watercolor paper (300 gsm)
- Masking tape (for clean borders)
- Watercolor paints (Phthalo Blue, Prussian Blue, Turquoise, Payne’s Grey, White Gouache)
- Round brushes (size 8 for washes, size 2 for details)
- Flat brush (1 inch)
- Pencil and eraser
- Two jars of water
- Paper towels
- Salt (optional for texture)
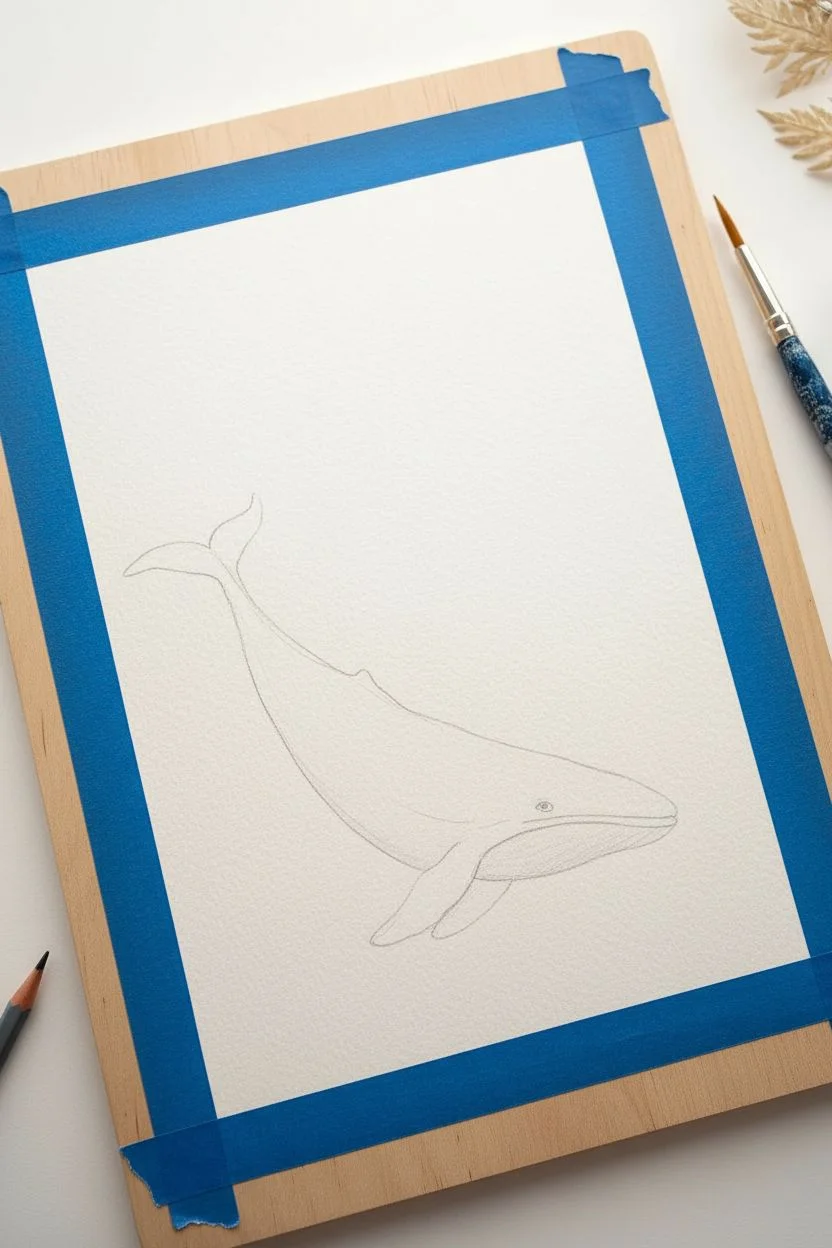
Step 1: Preparation and Sketching
-
Prepare the canvas:
Begin by taping down all four edges of your watercolor paper to a board or table. Press the tape down firmly to ensure crisp, clean white borders when you peel it off later. -
Identify the light source:
Decide where your light is coming from—in this piece, it originates from the top left corner, radiating downwards in diagonal beams. -
Rough sketch:
Lightly sketch the outline of the whale using a pencil. Start with a large curved oblong shape for the body, angling it upwards. Add the tail flukes at the top left and the pectoral fin near the bottom center. -
Refining the details:
Refine the whale’s shape, adding the subtle curve of the jawline and the eye placement. Keep these lines very faint so they don’t show through the final paint.
Uneven Wash?
If your background dries with unintended ‘cauliflower’ blooms, don’t panic. Gently glaze over the area with a slightly damp brush to soften the edges, or turn them into organic water currents.
Step 2: Painting the Ocean Background
-
Mixing the deep blue:
Create a rich, dark ocean mix using Phthalo Blue and a touch of Payne’s Grey. You want a gradient effect, so prepare a watery turquoise version for the lighter top section. -
Applying the wash:
Using your large flat brush, wet the entire paper *around* the whale sketch with clean water. This wet-on-wet technique allows colors to blend seamlessly. -
Creating the gradient:
Start painting from the bottom right corner with your darkest blue mix. As you move diagonally upward toward the top left, introduce more water and turquoise to lighten the color significantly. -
Lifting the light rays:
While the paint is still damp but not soaking wet, use a clean, slightly damp flat brush to ‘lift’ paint away in diagonal streaks. Start from the top surface and drag downward to create those sun rays. -
Deepening the shadows:
Add a second layer of dark blue to the bottom right corner and the areas furthest from the light source to intensify the depth. Let the background dry completely before touching the whale.
Sparkle Effect
Mix a tiny pinch of iridescent watercolor medium or silver pigment into your white gouache for the bubbles and light rays. This makes the water shimmer beautifully when the light hits the paper.
Step 3: Bringing the Whale to Life
-
Base coat for the whale:
Mix a diluted grey-blue using a tiny bit of your background color mixed with white gouache or diluted Payne’s Grey. Paint the entire body of the whale with this pale wash. -
Shadowing the underbelly:
Once the base is dry, use a slightly darker grey-blue to paint along the bottom edge of the whale’s belly and under the fin. This gives the creature volume and roundness. -
Texturing the skin:
Using a size 2 brush and a watery grey mix, dab small, irregular mottling spots along the whale’s back. Looking at reference photos helps, but aim for a randomized pattern. -
Highlighting the top:
The top of the whale catches the sun rays. Ensure this area remains very pale. You can use a specific white gouache highlight along the spine if your base wash got too dark. -
The eye detail:
With your smallest brush and dark Payne’s Grey, carefully paint the eye and the creases around the jawline and mouth. This tiny detail anchors the painting.
Step 4: Final Atmospheric Touches
-
Enhancing the light rays:
If your lifted rays faded too much, take a very dilute white gouache and glaze transparent diagonal beams from the top surface down through the water. -
Adding bubbles:
Load a small brush with opaque white gouache. Add a tiny cluster of bubbles rising from the whale’s blowhole area creating a sense of movement. -
Bottom details:
Add a few tiny stray bubbles deeper in the water near the bottom to balance the composition. -
The reveal:
Wait until the painting is 100% dry—bone dry! carefully peel off the masking tape at a 45-degree angle to reveal your crisp white frame.
Step back and admire the serene underwater world you have captured on paper
Wavy Kelp Forest Using S-Curves
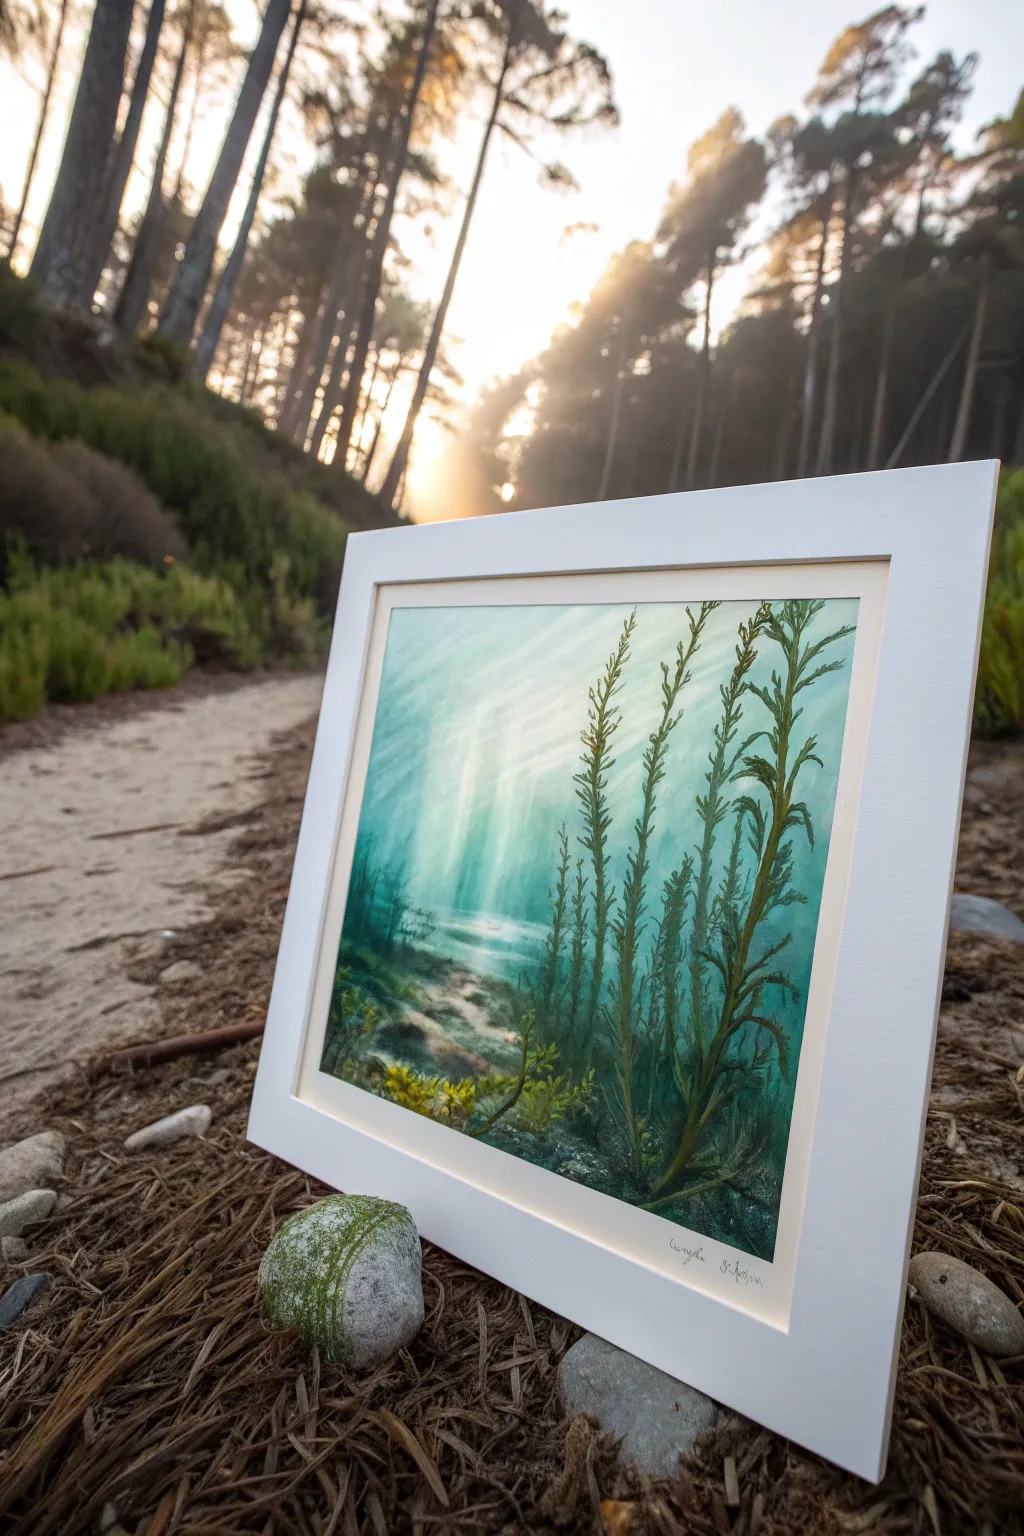
Capture the serene motion of an underwater kelp forest bathed in filtering sunlight with this atmospheric painting. By layering translucent washes and building up S-curved plant life, you’ll create a sense of depth and tranquility perfect for any coastal-themed space.
Step-by-Step Guide
Materials
- Heavyweight watercolor paper or canvas board (approx. 8×10 or 11×14)
- Acrylic paints (Phthalo Blue, Teal, White, Burnt Umber, Yellow Ochre, Sap Green, Dark Green)
- Wide flat brush (1 inch)
- Medium filbert brush
- Small round detail brush (size 1 or 2)
- Palette and water cup
- Paper towels
- Painter’s tape (optional, for masking edges)
Step 1: Setting the Underwater Atmosphere
-
Prepare the gradient:
Begin by establishing the water’s depth. Mix a generous amount of Titanium White with a tiny touch of Phthalo Blue and a hint of Teal. Start painting at the very top of your canvas, using long, horizontal strokes with your wide flat brush. -
Deepen the blue:
As you move down the canvas, gradually add more Teal and Phthalo Blue to your mix. The goal is a smooth ombre effect: very pale, almost white at the top, transitioning to a medium turquoise in the middle. -
Darken the bottom:
For the bottom third, introduce a tiny bit of darker blue or even a touch of green to create the deep, shadowy water near the seabed. Blend the transition areas while the paint is still wet to avoid harsh lines. -
Create light rays:
While the background is slightly damp, take a clean, dry flat brush with a tiny amount of watered-down white paint. Drag it diagonally from the top left corner downward to mimic sunbeams cutting through the water.
Step 2: Building the Seabed
-
Base coat the floor:
Mix Burnt Umber, White, and a touch of Yellow Ochre to create a sandy beige. Paint the bottom section of the canvas, creating an uneven, sloping line where the sand meets the water. -
Add rocky textures:
Using a filbert brush, dab in patches of darker browns and greys to suggest rocks and uneven terrain on the ocean floor. Don’t worry about perfect details here; it’s mostly background texture. -
Soften the distance:
Glaze a very thin, watery layer of your teal water color over the furthest back part of the seabed. This pushes it into the distance and makes the water look murky and realistic.
Uneven Blending?
If your water gradient looks streaky, mist the canvas slightly with water to keep the acrylics workable longer, or use a blending medium to smooth the transition.
Step 3: Painting the Kelp
-
Plan the stalks:
Switch to your small round brush and mix a dark, murky green using Sap Green and a touch of Burnt Umber. Lightly sketch thin, wavy vertical lines rising from the seabed toward the surface. -
Paint the leaves:
Using the same dark green mix, start painting the individual kelp leaves. Use a ‘press and lift’ motion: press the brush down to widen the leaf, then lift as you pull away to create a tapered tip. -
Create the S-curves:
Ensure the leaves follow the motion of the water. Paint them in gentle S-shapes, curving upward and swaying. Vary the direction slightly so they don’t look stiff or uniform. -
Layering density:
Paint the background kelp first using a more diluted, lighter green. These should look faint. Then, use your full-strength dark green for the prominent stalks in the foreground. -
Add highlights:
Mix a little Yellow Ochre and White into your green. delicately paint thin highlights along the top edges of the closest kelp leaves where the ‘sunlight’ would hit them.
Distance Trick
Make plants in the background smaller, paler, and bluer than the foreground plants. This ‘atmospheric perspective’ instantly adds deep realism to underwater scenes.
Step 4: Final Details
-
Foreground variety:
At the very bottom, paint small, bushier seaweed clumps using brighter yellow-greens to add variety to the ocean floor vegetation. -
Refining the seabed:
Use your smallest brush to add sharp little details to the rocks or sand in the immediate foreground, perhaps adding a few small speckles for texture. -
Final glaze:
If the foreground looks too stark, I sometimes apply an extremely thin wash of blue over the shadow areas of the plants to unify the color palette. -
Matting and framing:
Once fully dry, mount your work behind a clean white mat. The white border creates a crisp contrast that makes the teal waters pop intensely.
Step back and admire the peaceful underwater world you have brought to life on your canvas


Looking Up Perspective Toward Rippling Light
Capture the serene beauty of the ocean with this upward-perspective underwater painting. By layering acrylics to build depth and light, you’ll create a breathtaking scene where sunbeams pierce through rippling waves down to a busy ocean floor.
Step-by-Step
Materials
- Large stretched canvas or watercolor paper
- Acrylic paints: Phthalo Blue, Turquoise, Titanium White, Raw Umber, Black
- Large flat brushes (1-2 inch)
- Medium round brushes
- Fine liner brush
- Glazing medium or slow-drying medium
- Spray bottle with water
- Palette for mixing
- White mat board and frame (optional)
Step 1: Setting the Gradient
-
Prepare the canvas:
Start by lightly dampening your entire canvas with a spray bottle. This helps the acrylics blend more smoothly which is essential for that watery transition. -
Create the deep water:
Mix Phthalo Blue with a tiny touch of Black to create a deep, midnight blue. Paint the bottom third of the canvas using long, horizontal strokes, ensuring full coverage. -
Transition to mid-tones:
As you move upward, mix Phthalo Blue with Turquoise. Blend this into the dark blue while both are still wet, working your way up to the middle of the canvas. -
Approach the surface:
For the top third, gradually add Titanium White to your Turquoise mix. The color should become significantly lighter and brighter as you reach the top edge, mimicking the sun hitting the surface. -
Smooth the blend:
Use a large, clean, slightly damp dry brush to sweep horizontally across the transition lines between colors. This softens any harsh stripes and creates a seamless gradient.
Step 2: Surface Effects and Sunbeams
-
Paint the surface ripples:
Using pure Titanium White and a medium round brush, paint zig-zagging, organic lines across the very top of the painting to represent the water’s surface. -
Create refraction:
Below the white surface lines, add choppy, broken strokes of very pale blue. This suggests the light refracting through the choppy water just below the surface. -
Mix the glazing liquid:
Mix a large amount of glazing medium with a small amount of Titanium White. The consistency should be very translucent, almost like skim milk. -
Establish the light source:
Identify a focal point near the top center where the light is strongest. All your sunbeams will radiate outward from this area. -
Paint the first rays:
Using a flat brush and your glaze mixture, pull strokes diagonally downward from the light source. These represent the shafts of light piercing the deep water. -
Intensify the brightness:
I like to add a second layer of slightly more opaque white glaze to the center-most beams to make them appear stronger and closer to the viewer.
Muddy Waters?
If your gradient looks muddy or streaky, let it dry completely. Then, apply a thin wash of blue glaze over the problematic area to unify the tones before re-highlighting.
Step 3: Ocean Floor and Life
-
Texture the seabed:
Mix Raw Umber, deep Blue, and a touch of White to get a muted grey-blue tone. Sponge or stipple this color along the very bottom edge to create the texture of rocks and coral. -
Add depth to the reef:
Use a darker blue-black mix to dapple in shadows within the rocks, giving the seabed dimension so it doesn’t look flat. -
Paint distant fish:
Mix a mid-tone blue that is slightly darker than your water background. Use a small brush to paint tiny, blurry ovals for a school of fish in the distance. -
Add foreground silhouettes:
Switch to a dark navy or black paint and a fine liner brush. Paint clearly defined fish silhouettes closer to the bottom/middle area. Vary their sizes to show perspective. -
Highlight the swimmers:
Add the tiniest sliver of light blue or white to the top edge of the larger fish silhouettes. This catches the ‘sunlight’ coming from above. -
Final highlights:
Add a few sharp, bright white sparkles on the water surface and on the tips of the coral to make the scene pop. -
Mat and frame:
Once fully dry, place a wide white mat over the image and secure it in a simple frame to replicate the clean, gallery look of the inspiration photo.
Sea Life Stencils
For perfectly shaped schools of fish without freehand drawing, cut small fish shapes out of masking tape, stick them to the canvas, paint over them, and peel away.
Hang your new masterpiece in a bright room and enjoy the tranquil underwater view every day
Watercolor Salt Texture for Sparkly Sea Currents
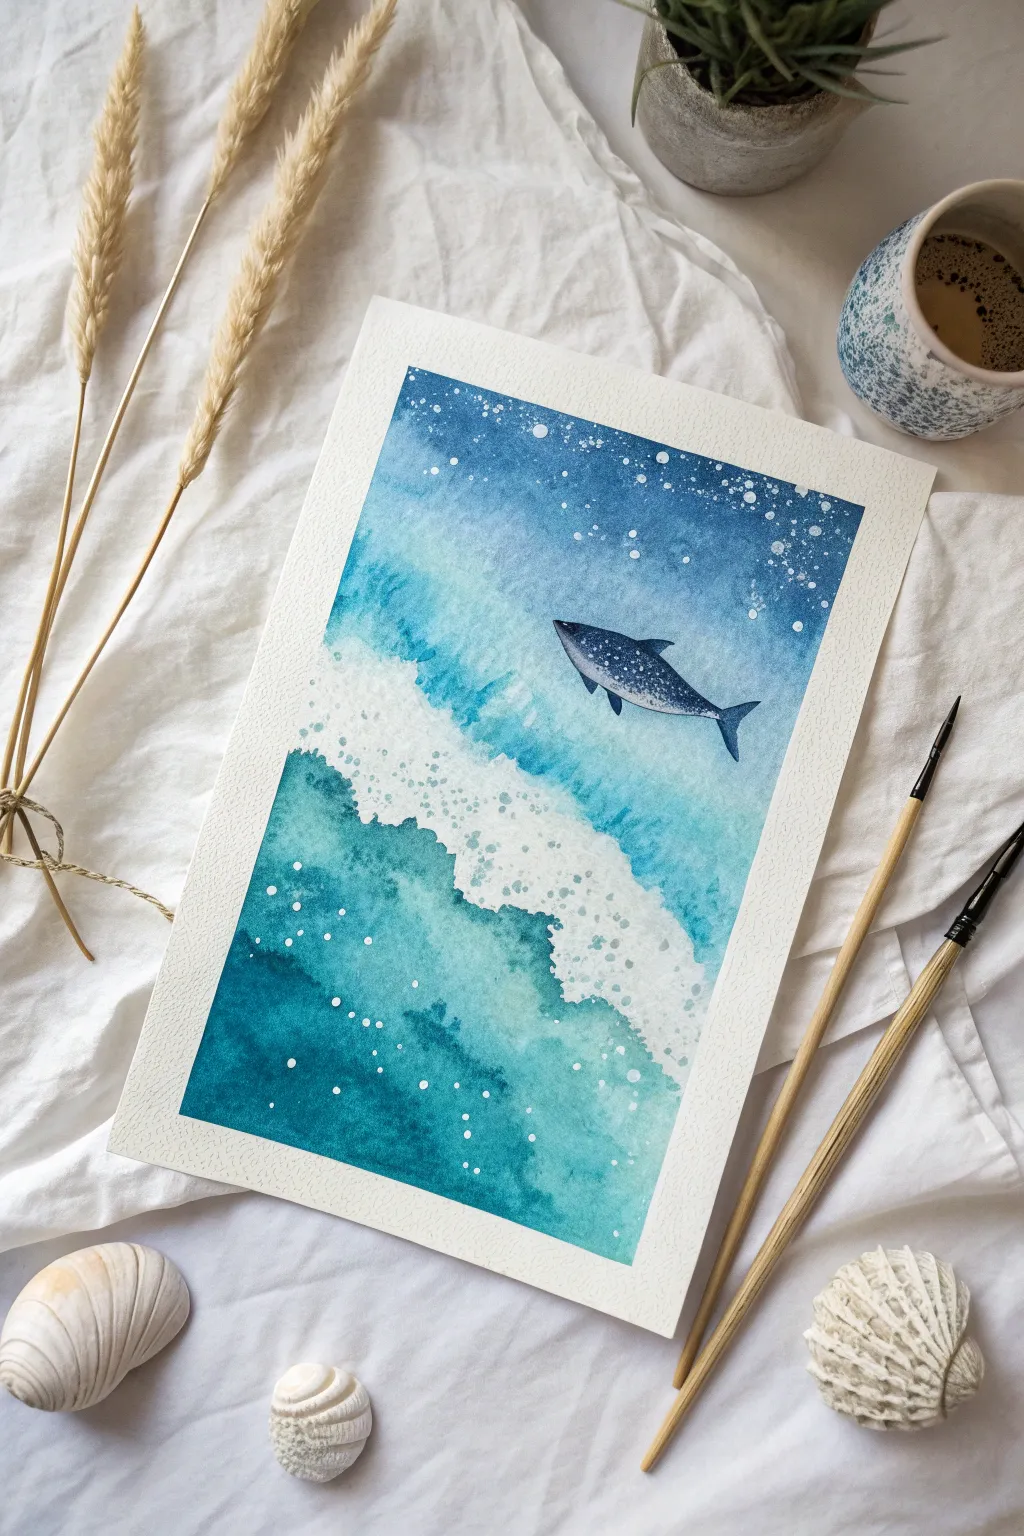
Capture the magic of an underwater encounter with this serene watercolor project featuring a gentle whale shark gliding through textured ocean currents. By combining wet-on-wet blending with salt textures, you’ll create a shimmering, bubbly effect that brings the deep blue sea to life.
Step-by-Step Tutorial
Materials
- Cold press watercolor paper (300 gsm)
- Masking tape
- Watercolor paints (phthalo blue, turquoise, indigo, PAYNE’S gray)
- White opacity medium (white gouache or opaque white ink works best)
- Round watercolor brushes (size 4 and 8)
- Fine liner brush (size 0 or 00)
- Table salt or sea salt
- Clean water and paper towels
- Old toothbrush (optional for splatter)
Step 1: Setting the Scene
-
Taping down:
Begin by taping your watercolor paper securely to a board or table surface using masking tape. This creates that crisp, professional white border seen in the final piece and prevents the paper from buckling under heavy washes. -
Initial sketch:
Lightly sketch the outline of the whale shark swimming diagonally in the upper right quadrant. Keep your pencil lines very faint so they won’t show through the translucent paint later. You can also lightly mark the diagonal line where the wave froth will be, separating top and bottom sections.
Salt Timing
For the best texture, add salt when the paper has a satin sheen—not when there are puddles, but before it starts losing its shine. If it’s too wet, the salt dissolves; too dry, nothing happens.
Step 2: Painting the Ocean Depths
-
Wetting the top section:
Start with the upper portion of the water (above the wave line). Apply clean water to this area, being carefully not to wet the inside of your shark sketch. -
Upper gradient:
While the paper is wet, drop in a mix of phthalo blue and a touch of indigo near the top edge, fading it out into a lighter turquoise as you move downward toward the wave line. -
Creating texture:
While this upper wash is still glossy and wet, sprinkle a pinch of salt near the very top edge. The salt will push the pigment away as it dries, creating star-like textures. -
Wetting the bottom section:
Move to the bottom third of the paper. Wet this area thoroughly with clean water, again preserving that jagged, diagonal negative space in the middle for the foam. -
Deep water wash:
Load your large brush with a saturated mix of turquoise and emerald green. Paint the bottom section, allowing the color to be darkest at the bottom left corner and lighter near the foam edge. -
Softening edges:
Use a clean, damp brush to soften the edges where the blue paint meets the white paper gap. You want the paint to bleed slightly into the white area to look like moving water, but keep the center predominantly white. -
Drying time:
Allow these background layers to dry completely. Brush off the salt crystals once the paper is bone dry.
Step 3: The Whale Shark
-
Base layer:
Mix a dark, moody blue-grey using indigo and Payne’s gray. Paint the body of the shark, carefully flowing around the fins and tail. -
Adding dimension:
While the shark’s body is still damp, lift a little pigment from the belly area using a thirsty brush (a clean brush dried on a paper towel) to create a rounded, 3D highlight. -
Painting fins:
Use the tip of your brush to paint the dorsal and pectoral fins with the same dark mixture, ensuring sharp points. -
White spots:
Once the shark is completely dry, mix your white gouache or ink to a creamy consistency. Using your smallest detail brush, dot tiny patterns of spots along the shark’s back and sides.
Enhance the Sparkle
Mix a tiny amount of iridescent or pearlescent medium into your white gouache for the bubbles. When the light hits your painting, the sea foam will actually shimmer.
Step 4: Froth and Sparkle
-
Rising bubbles:
Load your brush with diluted white gouache. Paint loose, circular bubble shapes rising from the dark bottom section up into the white foam area. -
Foam details:
Stipple the white paint along the edges of your wave gap to create the look of sea foam. Vary the size of your dots—some large clusters, some tiny specks. -
Splatter effect:
For a natural, organic look, dip an old toothbrush or a stiff hog hair brush into the white gouache. Run your thumb over the bristles to flick a fine mist of white spray across the top section and the wave crest. -
Final highlights:
Add a few larger, deliberate white dots in the deep teal section to represent bubbles catching the light. -
The reveal:
Wait until every part of the painting is dry to the touch. Gently peel away the masking tape at a 45-degree angle to reveal your crisp borders.
Now you have a serene slice of ocean life ready to frame or gift to a sea lover
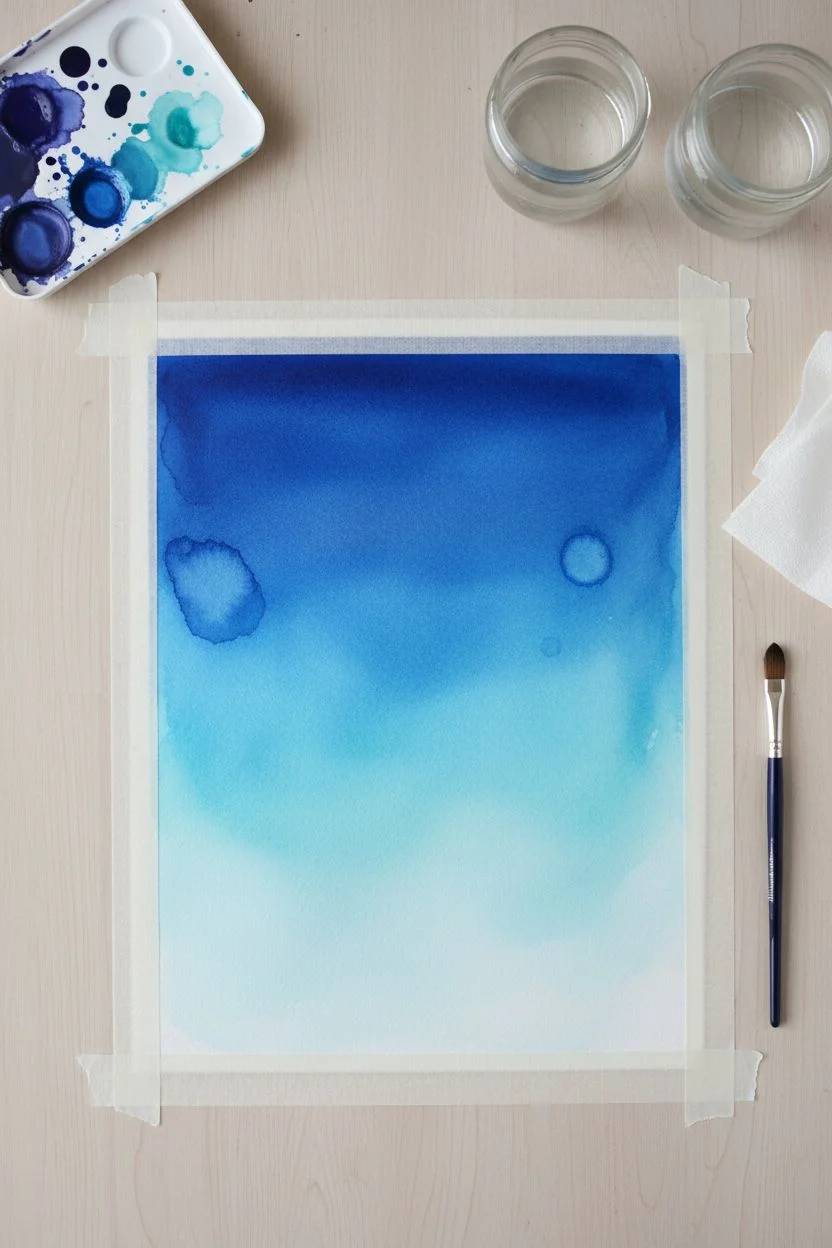
Shimmery Foil-Backed Underwater Painting
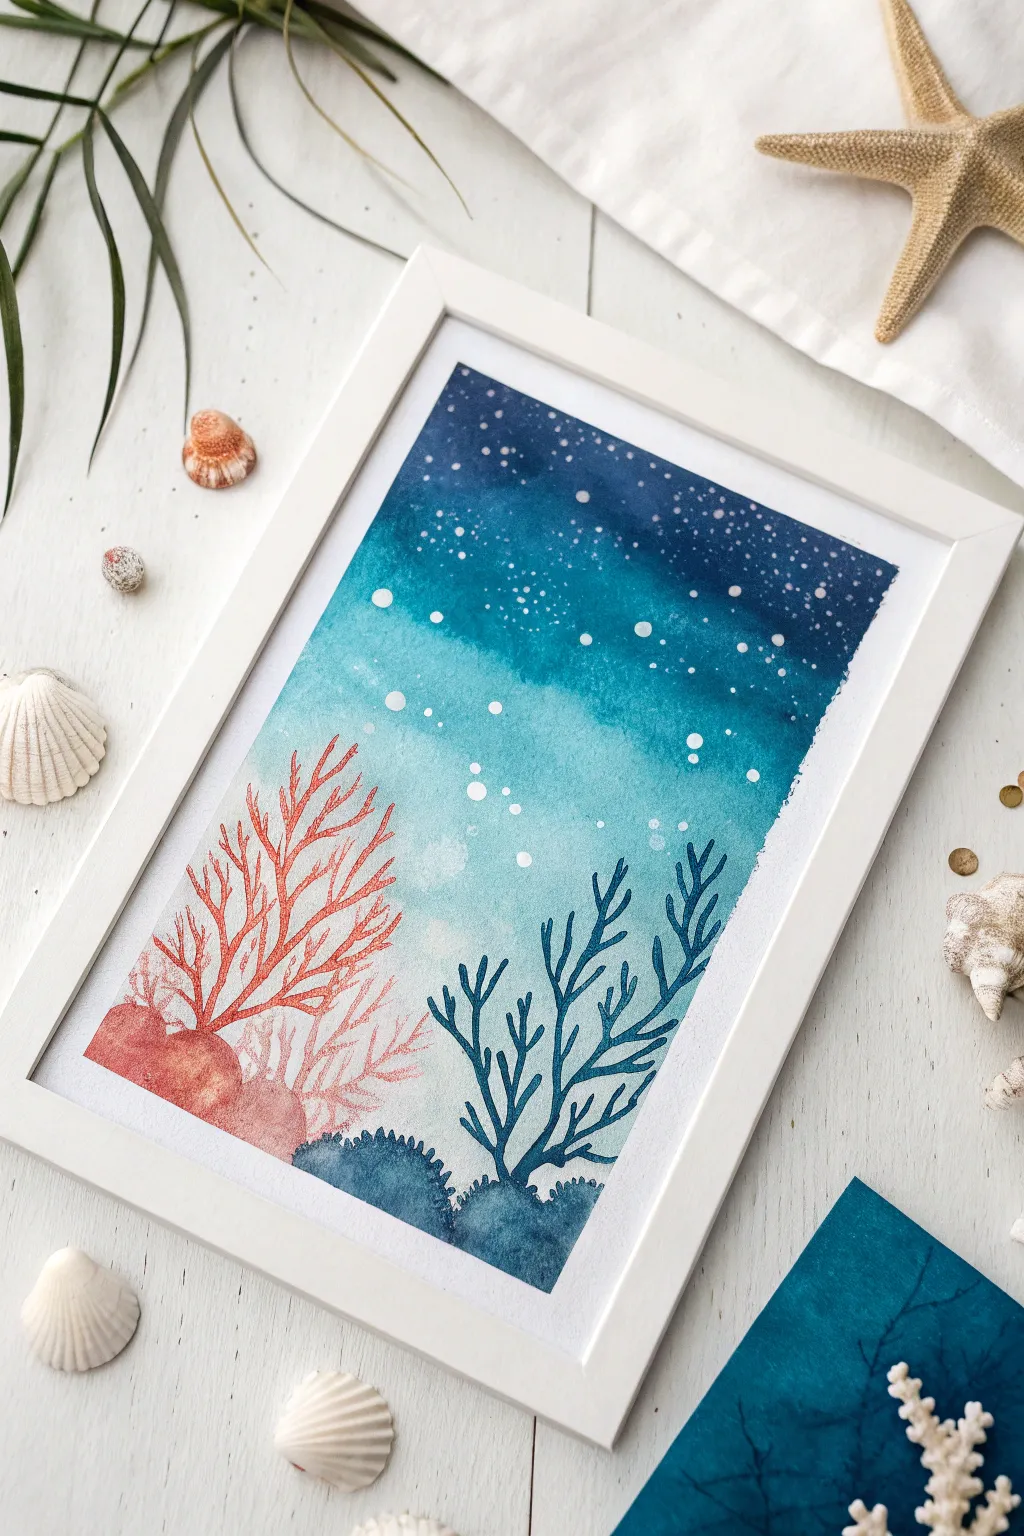
Capture the magic of the deep blue sea with this beginner-friendly watercolor project that uses simple layering techniques to create depth and light. The beautiful gradient background mimics sunlight filtering through the water, perfect for highlighting delicate coral silhouettes.
How-To Guide
Materials
- Cold press watercolor paper (A4 or similar size)
- Watercolor paints (Indigo, Prussian Blue, Turquoise, Hookers Green, Burnt Sienna, Crimson)
- White gouache or white gel pen
- Round watercolor brushes (Size 8 for washes, Size 2 or 0 for details)
- Two jars of water (one for clean, one for dirty)
- Masking tape
- Paper towels
- Hairdryer (optional for speeding up drying)
Step 1: Setting the Scene
-
Secure the paper:
Tape down all four edges of your watercolor paper to a sturdy board or table using masking tape. This creates a crisp white border and prevents the paper from buckling when wet. -
Prepare the background colors:
On your palette, mix a gradient of three blues. You’ll need a deep Indigo for the top, a vibrant Prussian Blue for the middle, and a watered-down Turquoise for the bottom third. -
Apply the first wash:
Using your largest round brush, wet the entire paper surface with clean water until it glistens but doesn’t have puddles. -
Drop in the deep blue:
While the paper is wet, load your brush with the deep Indigo mix and apply it horizontally across the top third of the paper. Let the paint naturally bleed downward. -
Blend the middle tones:
Clean your brush slightly, pick up the Prussian Blue, and paint right below the Indigo, slightly overlapping the two so they merge. Tilt the board to help gravity blend them. -
Finish with the light zone:
Use the watery Turquoise mix for the bottom third. I like to keep this area very light to represent the sandy ocean floor or clearer water. Rinse your brush and soften the bottom edge. -
Create texture:
While the paint is still damp—but not soaking wet—splatter a few drops of clean water onto the dark blue areas. The water will push the pigment away, creating soft ‘blooms’ that look like bubbles or light refraction. -
Dry completely:
This is crucial. Let the background dry 100% until the paper feels room temperature to the touch. Use a hairdryer on a low setting if you are impatient.
Step 2: Painting the Coral Reef
-
Mix the coral colors:
Prepare a warm coral shade by mixing Burnt Sienna with a touch of Crimson. Also, mix a deep cooler blue-green for the foreground seaweed. -
Paint the red coral base:
In the bottom left corner, paint a rounded, organic lump shape using the red-coral mix. Keep the edges soft by dabbing them with a slightly damp brush. -
Add red branches:
Switch to your fine detail brush (Size 2 or 0). Extend thin, branching lines upward from the red base. Make them wavy and organic, creating a fan-like structure. -
Paint faint background coral:
Using a very watered-down version of that same red mix, paint a ghostly, smaller coral shape slightly behind the main one. This transparency creates a sense of distance. -
Paint the blue seaweed base:
Using your deep blue-green mix, paint irregular, bouncy mound shapes along the bottom edge of the paper to anchor your composition. -
Add blue fronds:
Paint long, flowing seaweed strands rising from the blue mounds on the right side. Paint a central stem first, then add small, curved leaves coming off it in a V-shape. -
Vary the heights:
Make sure your seaweed strands are different heights to keep the composition dynamic. Some should reach up into the lighter turquoise middle section.
Salt Texture Hack
While the background wash is still wet, sprinkle a pinch of table salt on the dark blue area. As it dries, the salt absorbs pigment, creating beautiful, starry textures perfect for water.
Step 3: Finishing Touches
-
Add the bubbles:
Dip a detail brush or a toothbrush into white gouache (consistency of heavy cream). Tap the brush over the top dark section to create a galaxy of tiny bubbles. -
Highlight specific bubbles:
Use a white gel pen or the tip of your smallest brush to hand-paint a few larger, distinct circles in the middle section, clustering them as if they are floating upward. -
Reveal the border:
Once everything is bone dry, carefully peel off the masking tape at a 45-degree angle, pulling away from the painting to reveal crisp clean edges.
Make it Sparkle
For a magical finish, use metallic watercolor or mix a bit of iridescent medium into your white gouache for the bubbles. They will catch the light just like real air bubbles underwater.
Frame your underwater masterpiece in white to really make those deep ocean blues pop against the wall
Chalk-Pastel Highlights Over a Painted Ocean
Capture the serene beauty of the deep ocean with this mixed-media project that combines the fluid nature of watercolor with the gentle opacity of chalk pastels. You’ll create a stunning gradient background pierced by light rays, setting the stage for a solitary, graceful jellyfish.
Step-by-Step Tutorial
Materials
- Cold press watercolor paper (A3 or 11×14 inches recommended)
- Watercolor paints (Indigo, Phthalo Blue, Turquoise, Violet)
- Wide flat wash brush
- Medium round brush (size 6 or 8)
- Fine liner brush (size 0 or 1)
- White gouache or white ink
- Soft white chalk pastel
- Masking tape
- Paper towels
- Two jars of water
Step 1: Setting the Scene
-
Tape it down:
Begin by securing your watercolor paper to a board or table using masking tape along all four edges. This creates a crisp white border and prevents the paper from buckling during the heavy wash stages. -
Map the light:
Visualize where your light rays will originate—in this composition, they angle down from the top left. You can lightly sketch the jellyfish shape in the center, but keep the lines very faint so they don’t show through later. -
Wet-on-wet background:
Use your wide flat brush to saturate the entire paper with clean water. The surface should sheen but not have puddles. This prepares the paper for a smooth, diffused gradient. -
Deep ocean depths:
Start applying color from the bottom right corner, moving diagonally up. Use a concentrated mix of Indigo and Phthalo Blue here to create the deepest, darkest part of the ocean. -
Transitioning to light:
As you move toward the top left, introduce Turquoise and water down your mix. Leave streaks of almost white paper where the light rays will fall. If the paint spreads too much into the light areas, lift it out gently with a thirsty, clean brush. -
Intensifying shadows:
While the paper is still damp, drop concentrated Indigo into the corners and around the edges to create a vignette effect, drawing the eye toward the center. Let this background layer dry completely.
Step 2: Painting the Jellyfish
-
The bell shape:
Switch to your medium round brush. Mix a very dilute Violet with a touch of blue. Paint the bell (the mushroom top) of the jellyfish, keeping the center lighter and the edges slightly darker to suggest roundness. -
Adding texture:
While the violet wash is damp, drop in tiny amounts of darker purple along the bottom rim of the bell to give it volume. Let this dry. -
Inner tentacles:
Used the same violet-blue mix to paint the ruffled, thicker ‘oral arms’ that hang directly from the center. Apply these with loose, wavy strokes, allowing the color to fade out toward the bottom. -
The glow effect:
This is where the ‘Chalk-Pastel’ technique shines. Once the paint is bone dry, take your white chalk pastel and gently rub it over the light rays in the background and the top of the jellyfish bell. Smudge it with your finger to create a soft, hazy luminescence.
Fixing Muddy Colors
If your blue background gets muddy or too dark, wait for it to dry completely. Then, use a damp sponge to gently lift pigment off the paper in the areas that should be lighter.
Step 3: Fine Details
-
Long tentacles:
Using your fine liner brush and white gouache (or white ink), paint the long, thin tentacles trailing behind. Keep your hand loose and let the lines cross over each other naturally. -
Defining the bell:
Use the white gouache to outline the rim of the jellyfish bell and add the visible radial lines (canals) running through the transparent top. -
Frills and ruffles:
Add small, dashed white highlights along the ruffled oral arms to make them look textured and three-dimensional against the dark water. -
Bubbles and particles:
Dip a brush or toothbrush into white gouache and gently splatter it over the painting to create sea particles. Paint a few larger, distinct circles to represent rising bubbles. -
The final reveal:
Wait until every element is absolutely dry. Carefully peel away the masking tape at a 45-degree angle to reveal your clean resizing border.
Add Metallic Shimmer
Mix a tiny amount of iridescent medium or pearlescent watercolor into your white gouache for the tentacles. They will catch the light beautifully when viewed from an angle.
Now you have a serene underwater scene ready to be framed and displayed
Abstract Undersea Color Swirl With Hidden Creature Silhouettes
Capture the magic of the ocean’s motion with this mesmerizing watercolor project. The piece features a stylized, rose-like wave vortex and delicate sea creatures, blending vibrant turquoise and deep violet hues into a dreamy seascape.
Detailed Instructions
Materials
- Cold press watercolor paper (140lb/300gsm)
- Watercolor paints (Turquoise, Phthalo Blue, Dioxazine Purple, Magenta, Payne’s Grey)
- White gouache or white gel pen
- Fine liner pen (black or dark purple) for details
- Pencil and eraser
- Round brushes (size 4, 8, and a fine detail brush)
- Painter’s tape or masking fluid
- Clean water and paper towels
Step 1: Sketching and Masking
-
Map out the spiral:
Start by lightly sketching a large spiral shape in the upper center of your paper. This isn’t a perfect circle but rather an organic, shell-like coil that expands outward. -
Add the flow lines:
Extend sweeping curved lines downward from the left of the spiral to create the sensation of a wave wall. Add a few gentle vertical lines in the bottom left corner to represent seaweed or currents. -
Sketch the creatures:
Place a jellyfish in the lower right quadrant and a small sea turtle swimming upwards near the center left. Keeping the sketches faint is key so graphite doesn’t smudge into the wet paint later. -
Mask the highlights (Optional):
If you want pure white lines separating your wave segments (like stained glass), carefully apply masking fluid along the spiral lines with an old brush. Let it dry completely.
Muddy colors?
Wait for each section—especially the spiral segments—to dry before painting its neighbor. If wet blue touches wet orange/purple, it turns brown.
Step 2: Painting the Wave Vortex
-
Paint the center eye:
Load your brush with a watery wash of magenta and pale purple. Dab this into the very center ‘eye’ of the spiral, keeping it soft and diluted. -
Begin the turquoise segments:
Moving outward from the center, paint the individual segments of the spiral using varying shades of turquoise. I like to wet each segment with clean water first, then drop in color for a smooth gradient. -
Deepen the blues:
As the spiral expands to the outer rings, mix stronger Phthalo Blue and Payne’s Grey into your turquoise. Apply the darker pigment at the edges of each segment to create dimension and depth. -
Add violet accents:
While the blue sections are still slightly damp, touch in small amounts of purple near the boundaries of some segments. The colors will bleed together slightly, creating that underwater shimmer.
Step 3: Creating the Background
-
Wash the upper right corner:
For the deep ocean or night sky area in the top right, mix Dioxazine Purple with a touch of blue. Paint a flat wash, letting it fade into the lighter blue of the main water. -
Paint the lower ocean:
Use a very diluted wash of turquoise for the rest of the background water. Keep this area pale so your sea creatures will stand out against it. -
Define the seaweed:
In the bottom left corner, paint the flowing vertical shapes with a mix of green and teal. Layer a darker shade over the top once the first layer is dry to give the seaweed volume. -
Let it dry completely:
Before moving to the fine details, the paper must be bone dry. If you used masking fluid, gently rub it away now to reveal the white lines between your wave segments.
Add sparkle
Mix a tiny pinch of mica powder or iridescent medium into your final turquoise wash for a realistic, shimmering ocean surface effect.
Step 4: Details and Creatures
-
Paint the jellyfish bell:
Fill in the jellyfish’s bell with a purple wash. Once dry, use a fine liner pen or a very small brush with dark purple paint to add a scale-like texture or dots. -
Draw the tentacles:
Using your finest brush or pen, draw long, flowing tentacles dragging downwards. Vary the line thickness to suggest movement. -
Detail the turtle:
Paint the turtle silhouette with a dark blue-grey mix. Once dry, add the shell pattern using white gouache or a white gel pen for high contrast. -
Add sparkles and stars:
In the purple upper right corner, use your white gel pen or gouache to draw a stylized starburst and scatter several small white dots to look like distant bubbles or stars. -
Enhance the spiral:
If your white lines (from masking) look too stark, glaze over them lightly, or if you didn’t mask, define the spiral segments now with thin white or dark blue lines to sharpen the form. -
Final bubbles:
Add a trail of tiny bubbles rising from the seaweed and the turtle using small dots of dark blue and white.
Once framed, this swirling seascape brings a peaceful, rhythmic energy to any room


Have a question or want to share your own experience? I'd love to hear from you in the comments below!