
An underwater mural can turn a plain wall into a whole little ocean you get to live with every day. I pulled together my favorite underwater mural ideas—starting with the classic reef-and-turtle look and ending with a few unexpected deep-water twists.
Dolphin Pod in Open Water
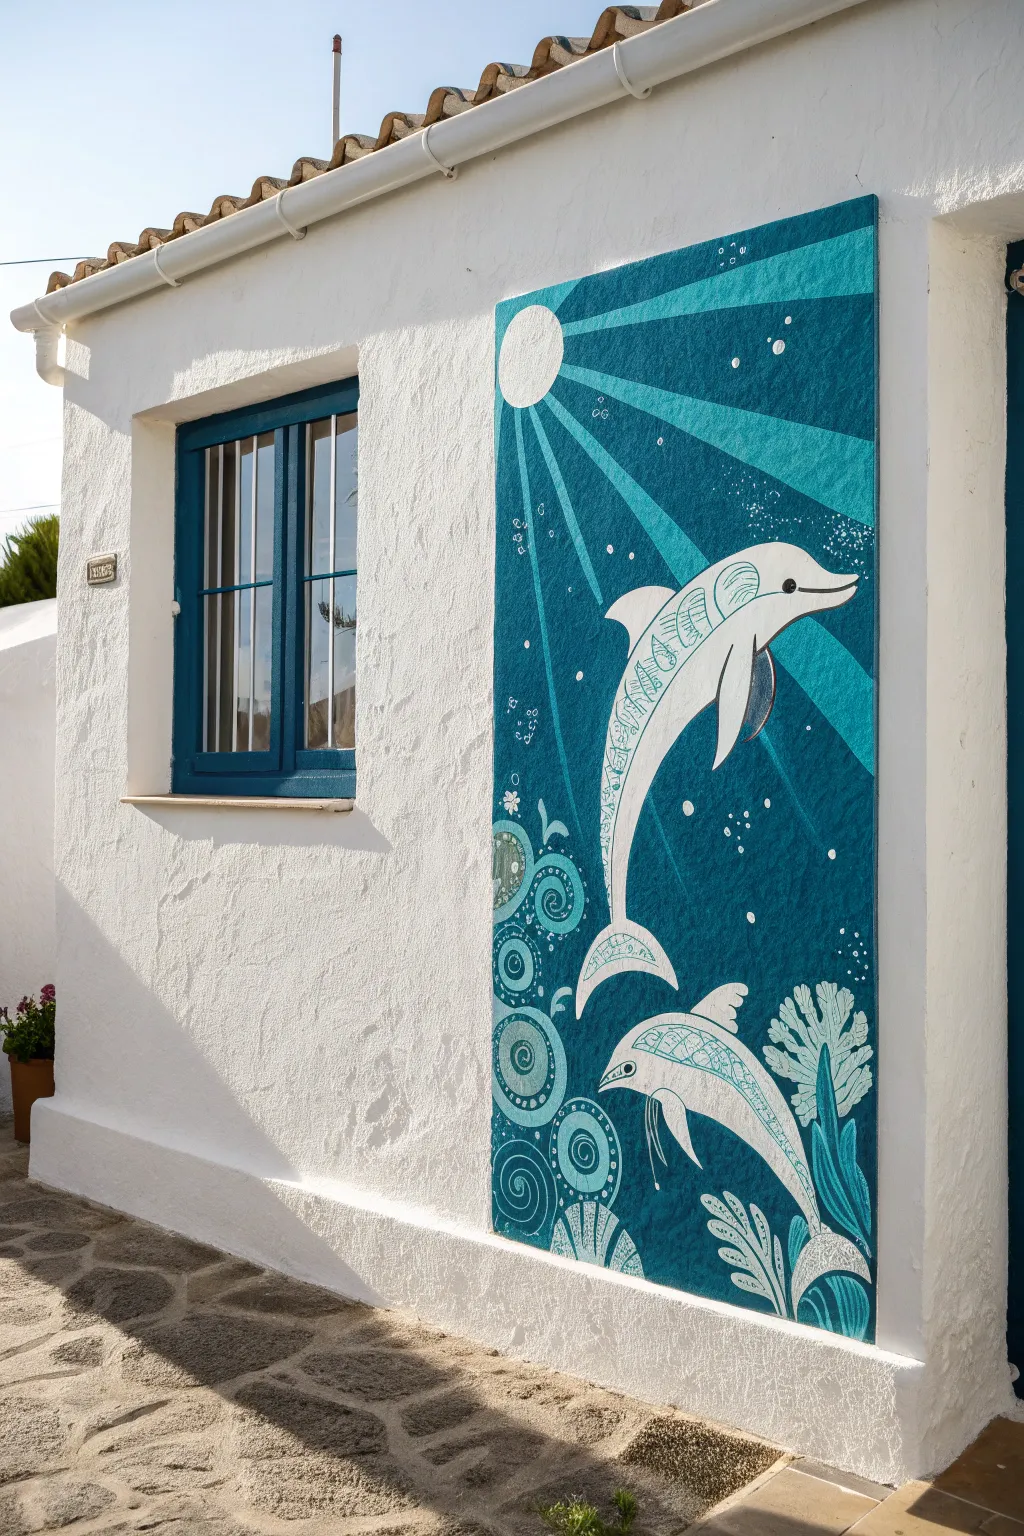
Transform a plain exterior wall into a vibrant underwater escape with this vertical panel mural. Featuring stylized white dolphins against a striking turquoise backdrop, this project uses negative space and crisp lines to create a modern, illustrative look.
How-To Guide
Materials
- Exterior masonry primer
- Exterior acrylic latex paint (white, deep teal, medium turquoise)
- Painter’s tape (various widths)
- Chalk snap line
- Pencil and eraser
- Assorted brushes (2-inch sash brush, round tipped detail brushes)
- Small foam roller and tray
- Stencil material or heavy cardstock (optional for perfect circles)
- Clear exterior matte sealer
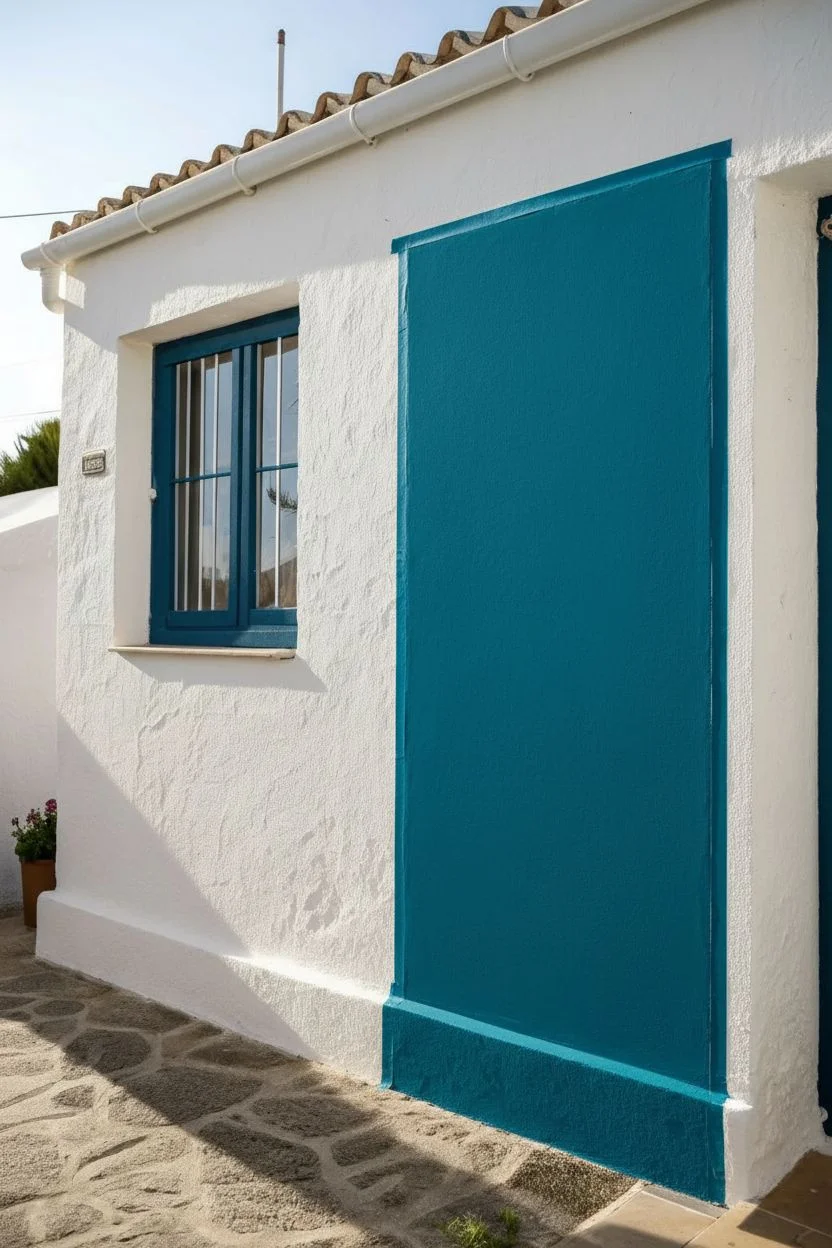
Step 1: Preparation and Base
-
Clean the Surface:
Begin by thoroughly cleaning the exterior stucco or plaster wall. Use a stiff bristled brush and a mild detergent solution to remove any dust, dirt, or loose debris, then rinse and let it dry completely. -
Define the Panel Frame:
Decide on the dimensions of your vertical rectangle. Use a tape measure and a level to mark the corners, then use a chalk snap line to create straight, crisp boundaries for the mural. -
Tape and Prime:
Mask off the outside edges of your rectangle with high-quality painter’s tape to protect the surrounding white wall. Apply a coat of masonry primer within the rectangle to ensure your colors adhere properly to the textured surface. -
Apply the Base Coat:
Using a small foam roller, fill the entire rectangle with your deep teal paint. You may need two coats here to get a solid, opaque coverage over the textured wall. Let this dry overnight.
Stencil Success
Cut a circle from cardboard to use as a template for the sun and bubbles. Tracing a physical object ensures your geometric shapes stay perfectly round on uneven stucco.
Step 2: Sketching and Masking
-
Sketch the Composition:
Lightly sketch your design onto the teal background with a white chalk pencil. Place the sun circle in the top left corner, the large leaping dolphin in the center, and the smaller dolphin below it. Add the swirls and organic shapes at the bottom. -
Structure the Rays:
Use a straightedge to draw lines radiating from the sun circle outward across the mural. These don’t need to be perfectly symmetrical; varying widths add interest. -
Draft the Dolphins:
Refine the dolphin shapes. Look closely at the reference image—these are stylized, almost tribal designs, not photo-realistic. Include the internal geometric patterns on their backs now.
Step 3: Painting the Elements
-
Block in the Sun Rays:
Mix a small amount of white into your deep teal to create a medium turquoise tone. Carefully paint alternating sun rays with this lighter shade to create the effect of light filtering through water. -
Paint the Dolphins:
Using the pure white exterior paint and a medium round brush, fill in the main bodies of the dolphins. You will likely need two layers to make the white pop against the dark background. -
Add Body Details:
Once the white is dry, switch to a fine liner brush and the deep teal paint. Carefully paint the decorative lines, triangles, and geometric patterns inside the white body of the dolphins. -
Create the Swirls:
At the bottom of the panel, paint the spiral wave motifs and sea grass shapes using white and a very pale turquoise mix. Use confident, curving strokes to mimic the movement of water. -
Add the Bubbles:
Scatter groups of small circles throughout the water. I generally like to vary the sizes, placing tiny bubbles near the dolphins’ tails and larger ones floating upward.
Glow Up
Mix a tiny amount of iridescent or pearl medium into the white paint for the sun rays and bubbles. It will catch the sunlight and make the water effect shimmer.
Step 4: Finishing Touches
-
Highlight the Rays:
Take a dry brush with a tiny amount of white paint and lightly drag it along the edges of the sun rays. This creates a soft, textured transition rather than a harsh line. -
Refine Edges:
Use a small angled brush to clean up any edges where the teal and white meet. Sharp, clean lines are key to this illustrative style. -
Remove Tape:
Carefully peel away the painter’s tape while the final touch-ups are still slightly tacky to prevent peeling the paint film. -
Seal the Work:
Once the mural has cured for at least 48 hours, apply a clear exterior matte sealer to protect the colors from UV fading and weather damage.
Step back and admire how this striking vertical slice of ocean life adds a peaceful energy to your outdoor space


Whale Passage Overhead
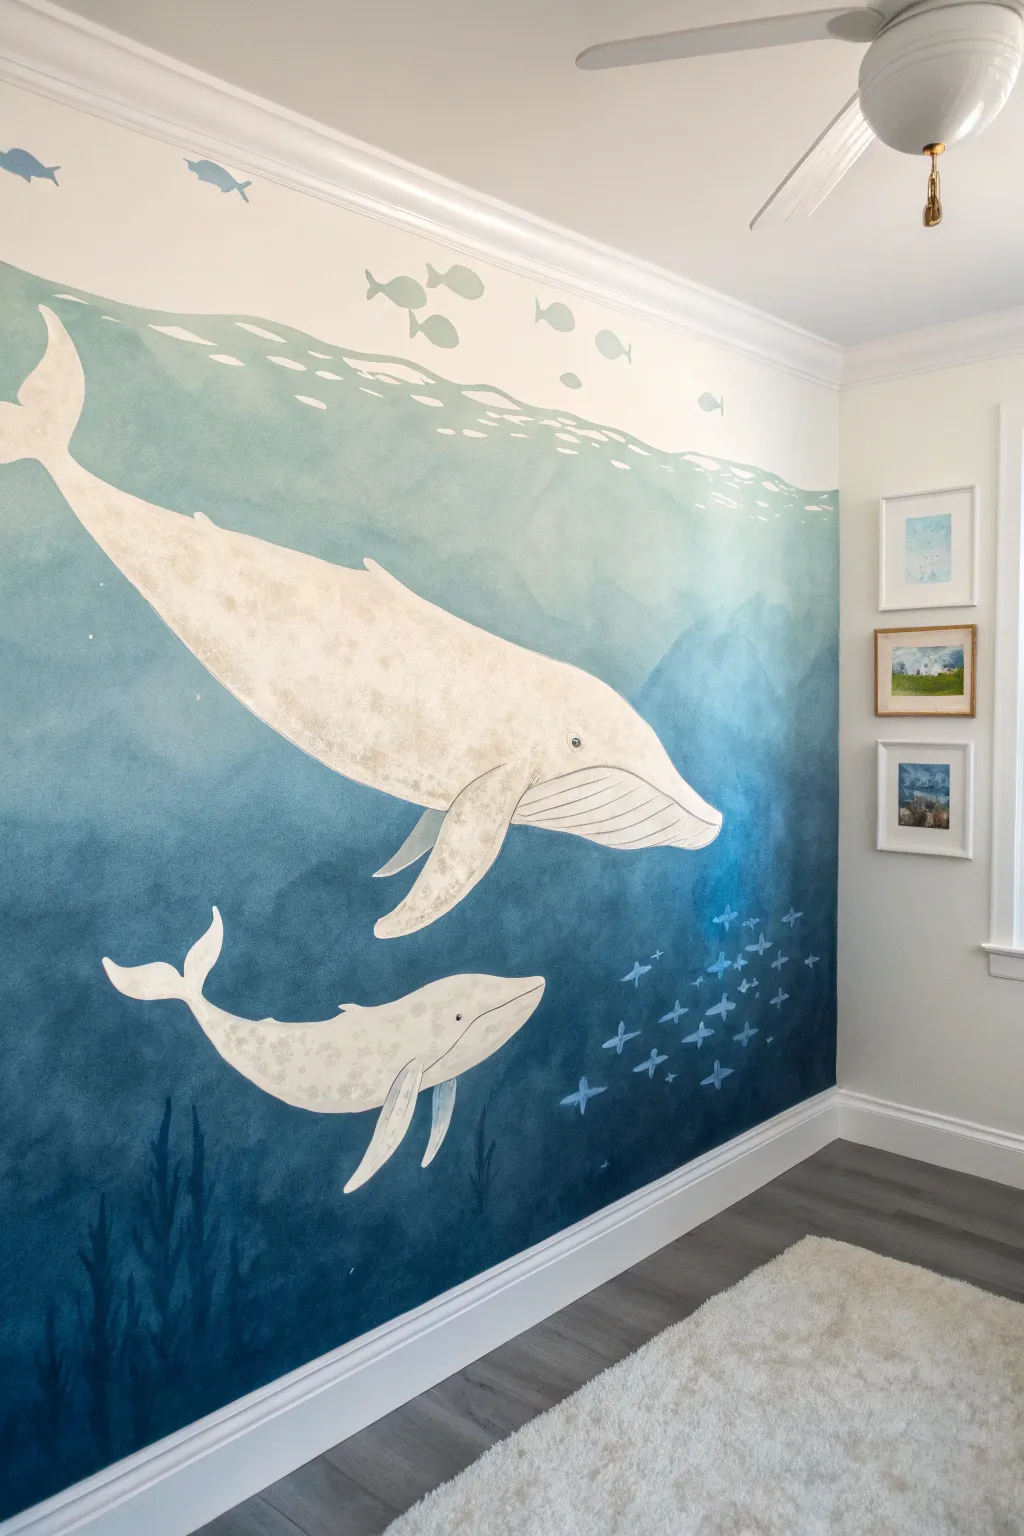
Transform a plain wall into a serene oceanic escape with this breathtaking watercolor-style mural. Featuring a mother and calf humpback whale gliding through a gradient of soothing blues, this project creates a peaceful focal point perfect for a nursery or playroom.
Step-by-Step Tutorial
Materials
- Interior latex paint (white, light aqua, teal, navy, dark indigo)
- Glaze medium (clear)
- Painter’s tape
- Drop cloths
- Large blending brush or sponge
- Assorted synthetic brushes (angled sash, round detail, filbert)
- Chalk or pastel pencil (white or light blue)
- Sea sponge (natural)
- Small roller and tray
- Step ladder
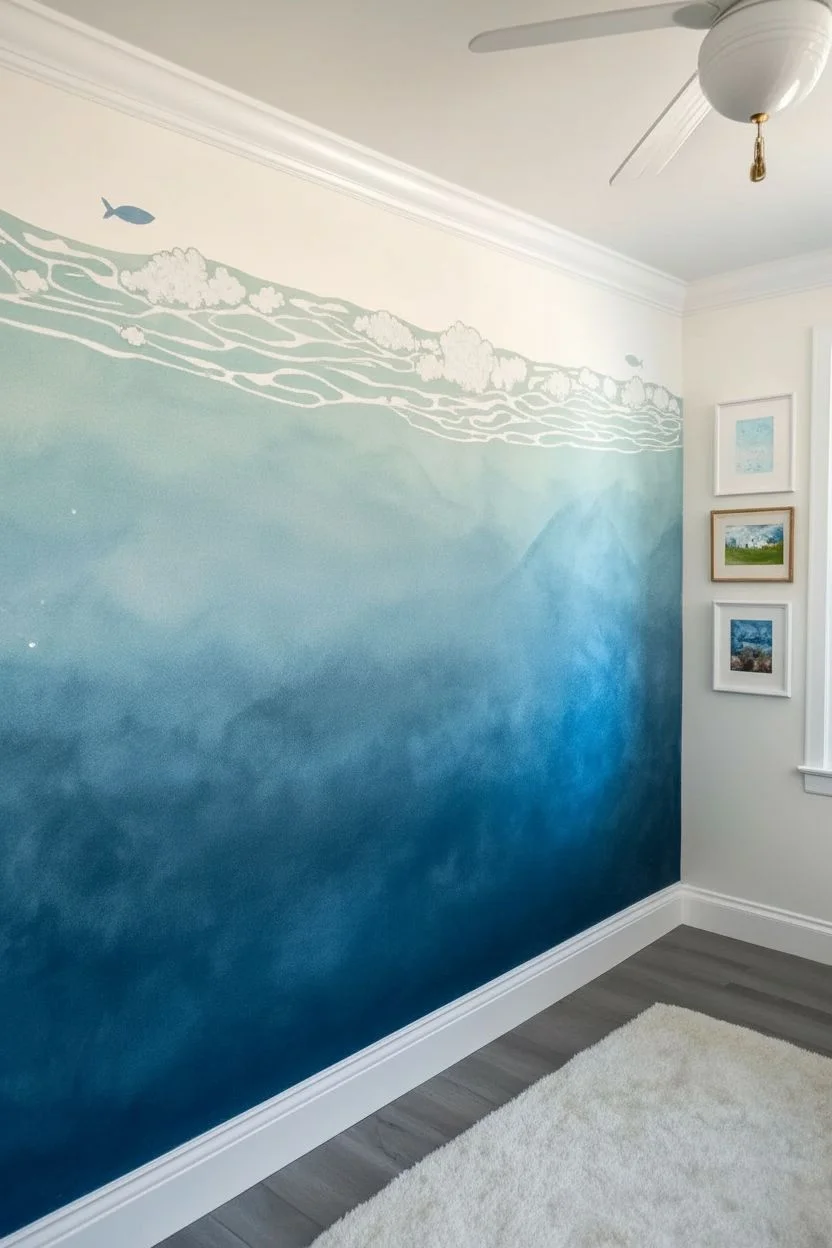
Step 1: Preparation and Gradient Base
-
Clear and prep:
Remove any artwork or furniture from the wall area. Clean the wall surface with a damp cloth to remove dust and grease, then tape off the baseboards, ceiling line, and adjacent walls. Lay down drop cloths to protect your flooring. -
Map the horizon:
Decide where your water line will start. In this design, the water surface is near the top third of the wall. Mark this line lightly with pencil, keeping it organic and wavy rather than perfectly straight. -
Mix the glaze:
Mix your latex paint colors with the clear glaze medium in separate containers. A 4:1 ratio of glaze to paint usually works well to increase translucency and open up the drying time for better blending. -
Apply the deepest blue:
Start at the very bottom of the wall with your darkest indigo mixture. Use a roller or large brush to apply it in an irregular, wavy line that reaches about 1/4 up the wall. -
Blend the mid-tones:
While the bottom layer is wet, apply the navy blue above it. Use a damp sponge or blending brush to feather the two colors together where they meet, creating a soft transition. Continue upward with teal and then light aqua. -
Create the surface light:
As you reach the top water line, blend the light aqua into pure white or very pale blue. Use a separate dry brush to feather out the top edge so it looks like sunlight filtering through the water surface. -
Add surface texture:
Create the rippled water effect at the top boundary by dabbing white paint mixed with glaze using a natural sea sponge. Keep the shapes irregular to mimic waves seen from below.
Step 2: Painting the Whales
-
Sketch the subjects:
Once the background is completely dry (wait at least 4-6 hours), lightly sketch the outlines of the mother and baby whale using a white chalk or pastel pencil. I prefer chalk because it wipes away easily if corrections are needed. -
Block in the shapes:
Fill in the whale bodies with a creamy off-white paint. Don’t worry about perfect opacity yet; a slightly translucent look helps them feel submerged. Use a filbert brush for smooth, curved edges. -
Define the underbelly:
Mix a diluted grey-beige wash. Apply this to the bottom half of the whales to create shadows and roundness. The pleats on the throat should be painted with thin, curved lines following the form of the jaw. -
Add skin texture:
Use a nearly dry sponge or a stippling brush with a darker grey-brown tone to gently dab texture onto the top (dorsal) side of the whales. This mimics their mottled skin pattern. -
Detail the faces:
Switch to a small round brush to paint the eyes (small, dark, and low on the head) and the mouth line. Keeping the eye soft rather than a stark black dot adds to the gentle expression. -
Highlight the fins:
Add bright white highlights to the edges of the pectoral fins and the fluke (tail) where the ‘sunlight’ from the surface would hit them.
Keep it Wet
For the smoothest ombre background, work in 2-foot sections and keep a spray bottle of water handy. Mist the wall lightly if the paint starts to tack up before you’ve finished blending the colors.
Step 3: Final Details
-
Paint the seaweed:
At the bottom dark section, paint vertical, swaying seaweed shapes using a shade slightly darker than your background indigo. This subtle ‘tone-on-tone’ effect adds depth without distraction. -
Add schooling fish:
Near the top surface and the bottom corner, paint small silhouettes of fish. Use simple shapes—just a curved line for the body and a tail flick. Vary their direction to show movement. -
Create background depth:
Mix a very diluted translucent white wash. Paint faint, larger mountain-like shapes behind the whales to suggest distant underwater geography. These should be barely visible. -
Starfish accents:
Scatter clearer, brighter blue star shapes near the bottom right to balance the composition. Use a small angled brush to get sharp points. -
Final highlights:
Add tiny specks of white or pale blue throughout the blue water area to represent bubbles and floating particles catching the light. -
Clean up:
Once fully dry, gently wipe away any remaining chalk marks with a damp cloth and remove the painter’s tape.
Stencils for Scale
Not confident drawing freehand? Project the whale image onto the wall using a cheap projector, or print the whale shape on multiple sheets of paper, tape them up, and use transfer paper to trace.
Step back and admire the calm, underwater world you have brought into your home


Kelp Forest Vertical Flow
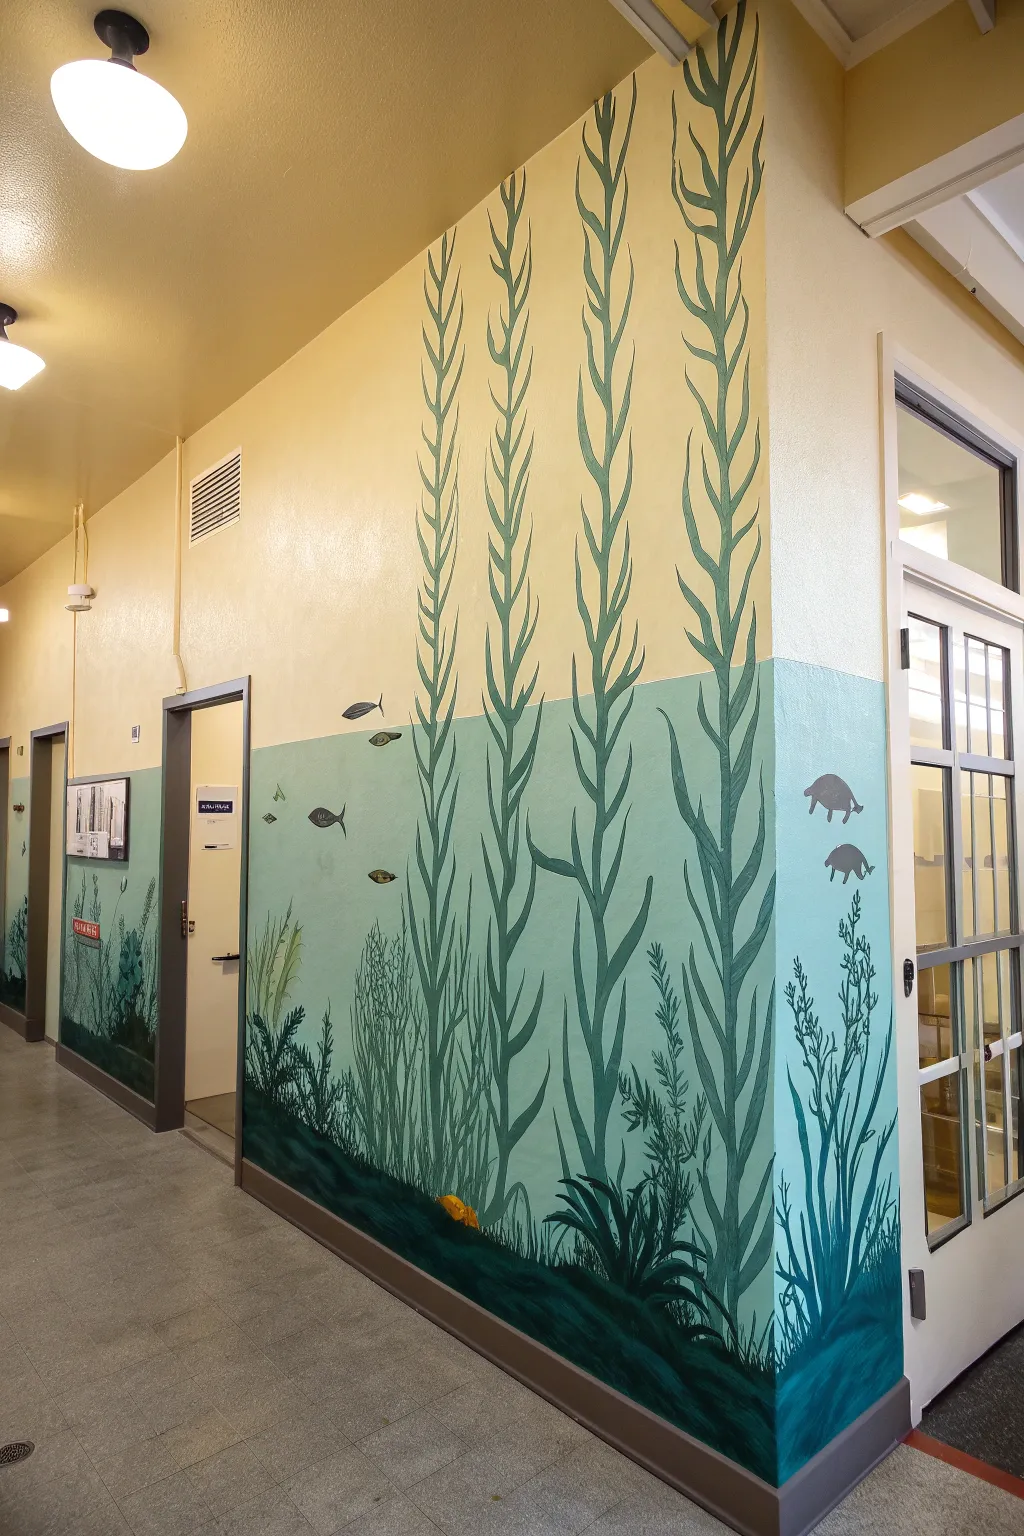
Transform a plain hallway or corner into an immersive underwater scene with this clever two-tone wall mural. By using vertical kelp strands that span from floor to ceiling, you create a sense of height and flow that mimic the natural movement of the ocean.
Detailed Instructions
Materials
- Interior latex paint (pale butter yellow)
- Interior latex paint (soft turquoise/seafoam green)
- Acrylic paints (dark hunter green, olive green, black, white, grey)
- Painter’s tape (2-inch width)
- Laser level or long spirit level
- Pencil and eraser
- Paint rollers and trays
- Assorted brushes: 2-inch angled sash brush, round size 8, liner brush
- Drop cloths
- Step ladder
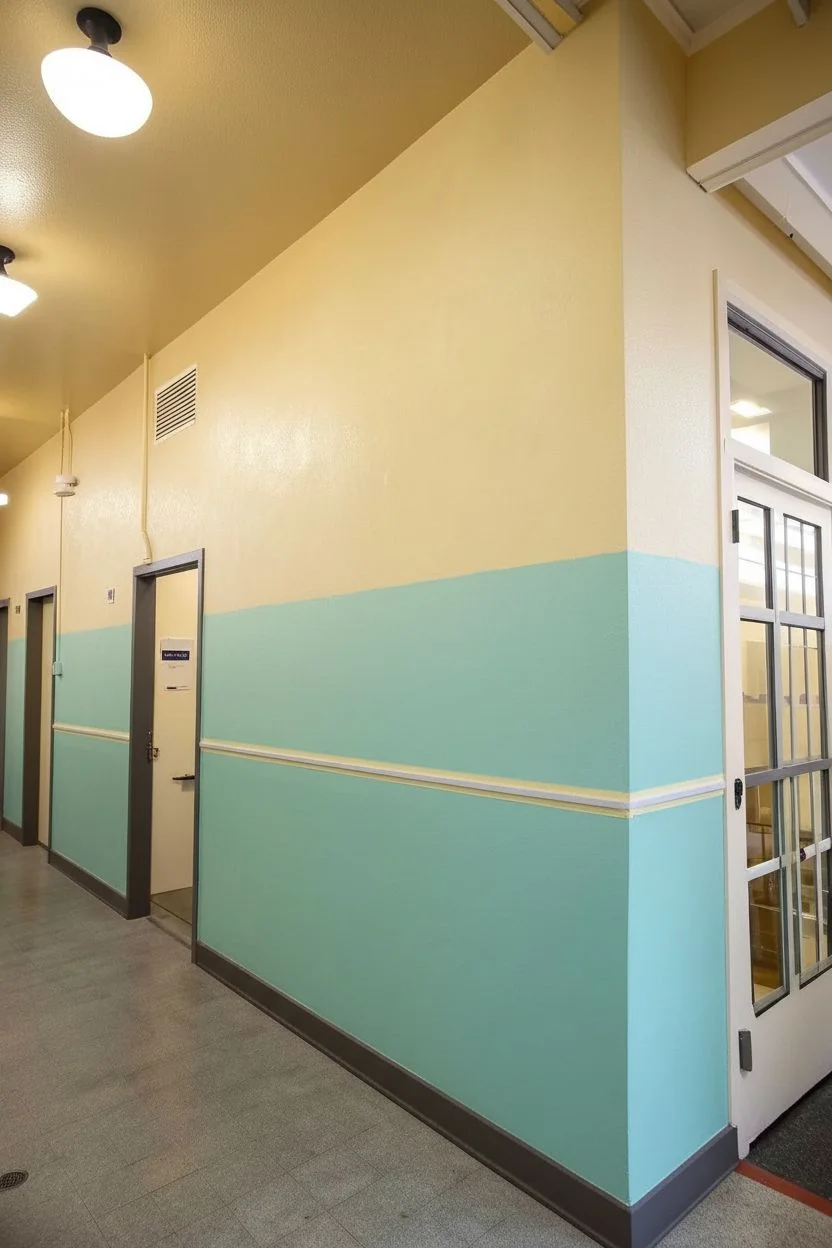
Step 1: Setting the Background
-
Prepare the workspace:
Clear the hallway area and lay down drop cloths to protect the flooring. Clean the walls with a mild detergent and water solution to ensure good paint adhesion, then let them dry completely. -
Paint the upper wall:
Roll two coats of the pale butter yellow paint over the entire wall surface, extending all the way to the floor if you haven’t decided on the exact water line yet. Let this dry for at least 4 hours. -
Establish the horizon line:
Decide on your water level line—in the example, it’s roughly at waist height or chair-rail level. Use a laser level to project a straight horizontal line across all walls involved, including wrapping around corners. -
Mask and paint the water:
Apply painter’s tape just above your laser line. Press the edge of the tape firmly to prevent bleeding. Roll the soft turquoise paint below the tape line, covering the lower section of the wall. -
Remove tape:
Peel off the painter’s tape while the second coat of turquoise is still slightly tacky to get a crisp, clean edge. Allow the base wall colors to cure for 24 hours before starting the detail work.
Step 2: Painting the Kelp Forest
-
Draft the tall kelp:
Lightly sketch the main vertical lines of the giant kelp using a pencil. Make them wavy and organic rather than perfectly straight, extending them from the baseboard all the way to the ceiling molding. -
Block in the kelp stems:
Mix a dark hunter green with a touch of olive acrylic paint. Using the 2-inch sash brush, paint the central stems of the tall kelp, following your pencil lines with a flowing hand motion. -
Add the leaves:
Switch to a smaller round brush. Along the tall stems, paint long, slender leaves (blades) typically found on giant kelp. Angle them upward slightly and vary their lengths for a natural look. -
Create the sea floor:
At the very bottom of the wall, paint a dark, undulating strip using a mix of hunter green and black to represent the dense seabed or substrate. Feathery brushstrokes along the top edge of this dark strip help blend it upward. -
Layer bottom vegetation:
Paint shorter, bushier seaweed clusters near the floor using different shades of green. Mixing white into your green creates a lighter sage color that helps separate these foreground plants from the dark background strip. -
Add detail to the floor plants:
Use a liner brush to add fine, grassy textures. I like to flick the brush upward quickly to create tapering tips on these sea grass elements.
Bleed Prevention
If your blue ‘water’ line bled under the tape, don’t panic. Wait for it to dry fully, then use a small artist’s brush and the original yellow wall paint to carefully cut back in and crisp up the line.
Step 3: Adding Marine Life
-
Sketch the creatures:
Decide where you want your swimming life. Place larger creatures like turtles near corners to use the architecture creatively, and scatter small fish in open negative spaces. -
Paint the silhouettes:
Paint the turtles and fish in a dark grey or muted olive tone. Keep them relatively flat and silhouette-like to match the illustrative style of the kelp. -
Add subtle highlights:
Once the silhouettes are dry, mix a slightly lighter grey or green. Add simple definition lines for fins, shells, or gills, but keep the details minimal to maintain the mural’s graphic look. -
Paint the corner turtles:
For the turtles wrapping around the corner, paint the front half on one wall and the back half on the adjacent wall. Stand back frequently to ensure the body aligns visually when viewed from the center of the hall. -
Final touch-ups:
Inspect the mural for any pencil marks or uneven paint coverage. Use a small brush to sharpen the tips of the kelp leaves or fix any smudges on the yellow background.
Depth Trick
Mix a ‘glaze’ by watering down a tiny bit of white paint. Lightly brush this over the most distant-looking kelp strands to make them look further away in the murky water.
Step back and enjoy the serene, flowing atmosphere your new underwater hallway creates


Jellyfish Drift in Transparent Layers
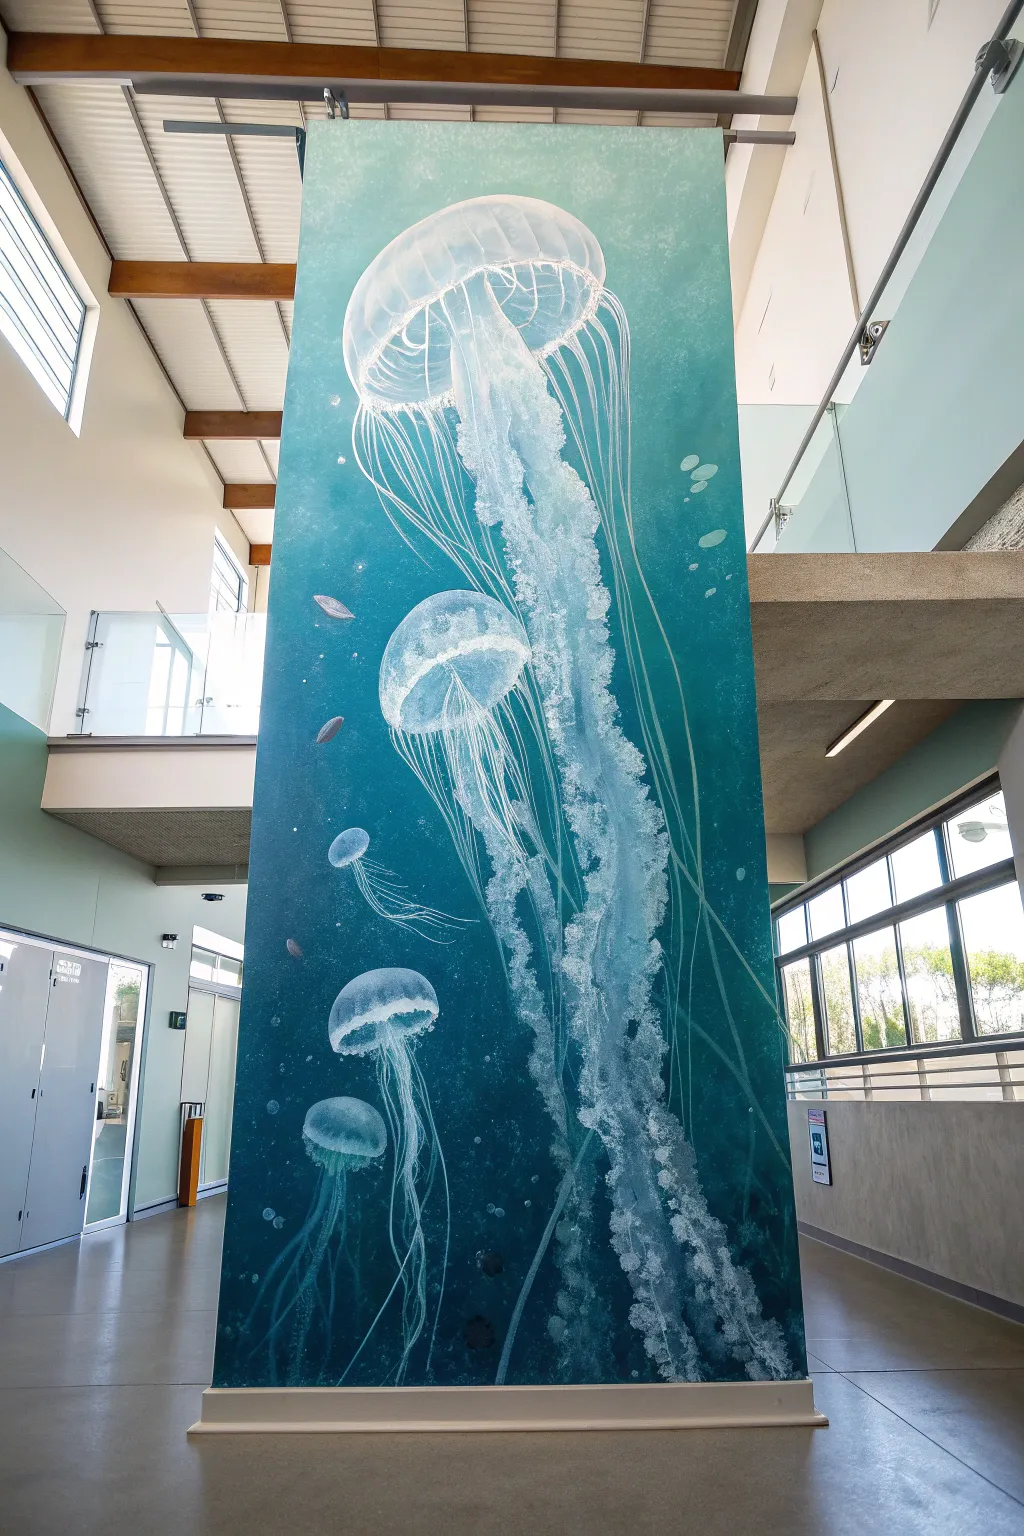
Transform a tall, narrow wall or large canvas panel into a deep-sea window with this towering jellyfish mural. The piece relies on masterful layering of translucent whites over a rich monochromatic blue gradient to create depth and movement.
Step-by-Step Tutorial
Materials
- Large vertical canvas or primed MDF panel
- Acrylic paints: Phthalo Blue, Phthalo Green, Prussian Blue, Titanium White, Black
- Glazing medium or slow-drying retarder
- Large flat brushes (3-4 inch) for background
- Medium filbert brushes
- Fine liner brushes (0 or 00 size)
- Round sponge or stippling brush
- Chalk or pastel pencil for sketching
- Spray bottle with water
- Painter’s tape and drop cloth
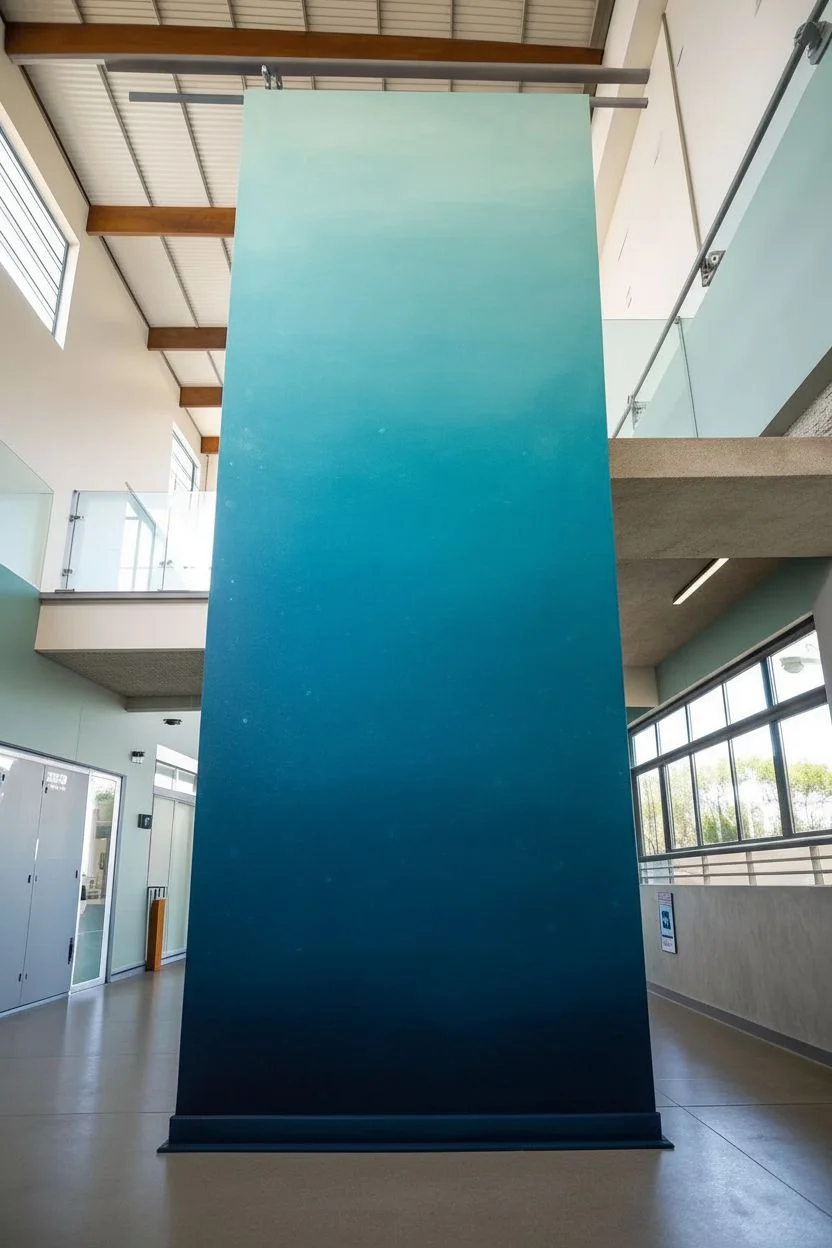
Step 1: Setting the Abyss
-
Prepare the surface:
Begin by cleaning your wall or priming your large canvas panel with white gesso. If working directly on a wall, ensure you tape off the ceiling and floor edges meticulously. -
Mix the deep ocean hues:
Create three distinct mixtures: a light teal (Phthalo Green + White + touch of Blue), a mid-tone ocean blue (Phthalo Blue + touch of Black), and a deep abyss hue (Prussian Blue + Black). You want a smooth transition palette. -
Apply the gradient base:
Start at the top with your lightest teal mixture. Paint the top third of the panel. While still wet, blend into the mid-tone blue for the middle section, and finish with the darkest abyss hue at the bottom. Use a large brush and horizontal strokes to blend the transitions seamlessly. -
Add subtle texture:
I like to create a mottled underwater effect by lightly misting the wet paint with water or dabbing it with a clean, dry rag in random spots. Let the background dry completely, ideally overnight.
Cloudy Glazes?
If your transparent layers look chalky instead of clear, you’re using too much water. Switch to a proper acrylic glazing medium to maintain transparency and pigment richness.
Step 2: Constructing the Jellyfish
-
Sketch the composition:
Using a white chalk pencil, lightly outline the bell shapes of your jellyfish. Place the largest one near the top, dominating the vertical space, with smaller jellies drifting below in a diagonal arrangement to guide the eye downward. -
Base coat the bells:
Mix a very translucent glaze using Titanium White and a generous amount of glazing medium. Paint the basic bell shapes. The goal is to see the blue background through this white layer—this creates the gelatinous look. -
Define the internal structures:
With a slightly more opaque white mixture (less medium), paint the rib-like structures inside the main bell. Follow the curve of the dome to emphasize its volume. -
Highlight the edges:
Use pure Titanium White on a small round brush to paint the rim of the bell. Make this line crisp and bright to suggest light catching the edge of the creature. -
Create the oral arms:
For the thick, frilly ‘arms’ hanging from the center, use a stippling technique. Load a sponge or worn bristle brush with thick white paint and dab it down the center line, creating a cloudy, textured column that fades out at the bottom.
Step 3: Tenatacles and Details
-
Drafting flow lines:
Before painting the fine tentacles, lightly sketch their path with chalk. Ensure they create elegant, waving curves that span nearly the full length of the mural, intertwining slightly without becoming messy. -
Painting the main tentacles:
Using a fine liner brush and fluid white paint (thinned with water for flow), trace long, continuous lines for the tentacles. Vary your pressure to make the lines taper in and out of existence. -
Layering for depth:
Paint some tentacles with bright white (foreground) and others with a diluted, bluish-white (background). This pushes some strands behind others, adding three-dimensionality to the swarm. -
Adding bubbles and debris:
Scatter small bubbles rising from the bottom. Paint small circles with a white outline, leaving the center unpainted or lightly glazed. Add a tiny white dot highlight on the top right of each bubble. -
Final highlights:
Step back and identify the brightest points. Add small touches of pure, thick white to the very top of the jellyfish domes and the brightest parts of the frilly arms to make them pop against the deep blue. -
Seal the work:
Once fully dry (give it 24-48 hours), protect your mural with a clear, non-yellowing acrylic varnish. A satin finish works best to maintain the underwater feel without excessive glare.
Glowing Accent
Mix a tiny amount of phosphorescent (glow-in-the-dark) medium into your final white highlights. The jellyfish will faintly glow when the lights go out at night.
Step back and enjoy the peaceful drift of your new underwater window
BRUSH GUIDE
The Right Brush for Every Stroke
From clean lines to bold texture — master brush choice, stroke control, and essential techniques.
Explore the Full Guide
Octopus in a Rocky Cave
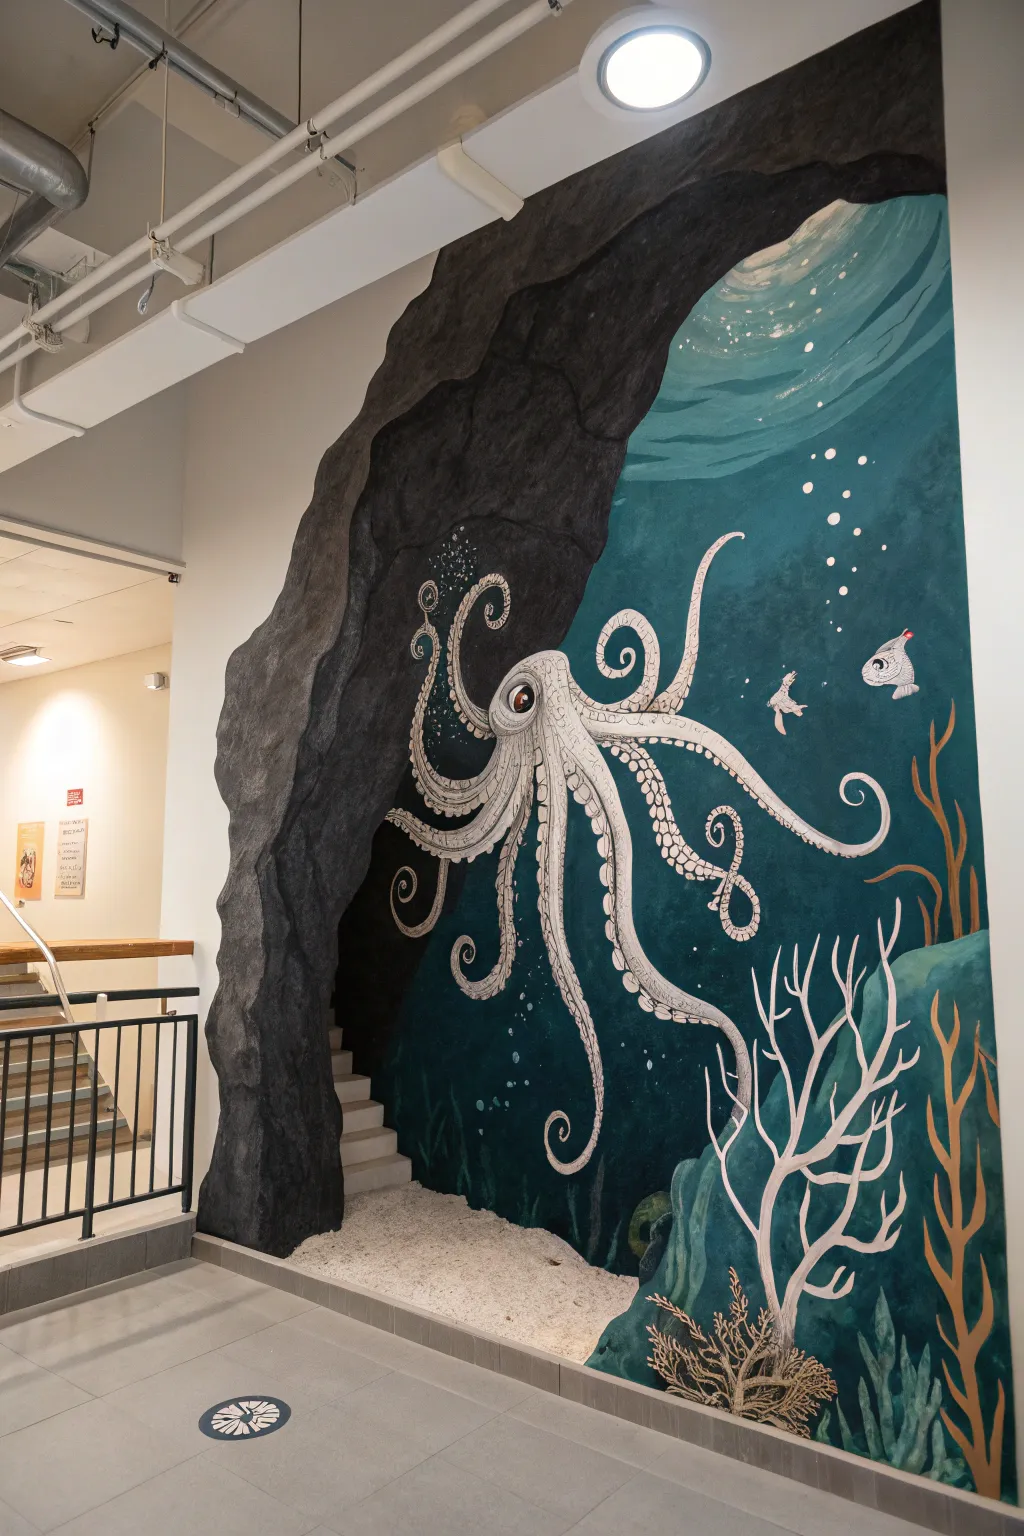
Transform a plain corner or wall section into a deep ocean cavern with this immersive mural project. By combining 3D shading techniques for the cave rocks with stylized illustrative painting for the octopus, you’ll create a stunning focal point that feels like a portal to the underwater world.
Detailed Instructions
Materials
- Interior acrylic latex paint (dark charcoal/black, medium grey, light grey)
- Interior acrylic latex paint (teal, deep blue, turquoise)
- White acrylic paint (high coverage)
- Assorted craft acrylics (coral pink, sandy beige, light green)
- Large painter’s drop cloth
- Painter’s tape
- Large rollers and extension pole
- Assorted synthetic brushes (2-inch sash brush, round brushes for detail, liner brush)
- Chalk or pastel pencil for sketching
- Sea sponges (optional for texture)
- White play sand or pebbles (optional for floor effect)
Step 1: Planning and Background
-
Prep the surface:
Begin by cleaning your wall surface thoroughly to remove any dust or oils. Tape off the ceiling, adjacent walls needed for protection, and the baseboards. Lay down your drop cloth to protect the flooring. -
Sketch the composition:
Using a light colored chalk or pastel pencil, freely sketch the outline of the rocky cave entrance on the left side. It should feel organic and roughly hewn, curving inward. On the right, mark the horizon line for the water surface and roughly position where your octopus will live. -
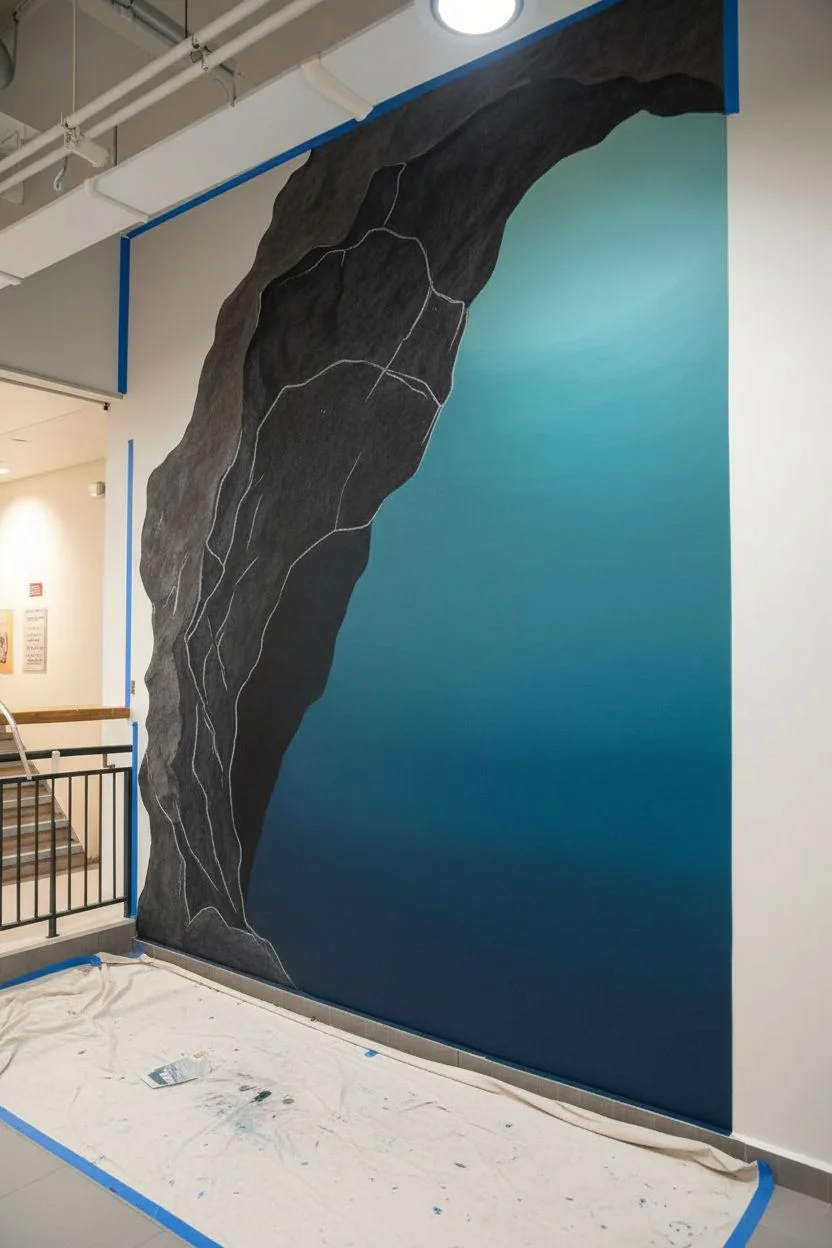
Block in the cave base:
Fill the ‘cave’ area on the left with a dark charcoal grey paint. Don’t worry about texture yet; just get solid coverage to establish the heavy, rocky mass. -
Paint the ocean gradient:
On the right side, paint the ocean water. Start with a lighter teal or turquoise near the ‘surface’ at the top and gradually blend into a deeper, darker blue as you move down the wall. Working while the paint is wet allows for a smooth ombré effect.
Step 2: Sculpting the Rock Formation
-
establish rock volume:
Mix a medium grey shade. Using a large brush, paint irregular, blocky shapes over your dark cave base. Leave the dark charcoal showing in the crevices and recesses to create deep shadows. -
Highlight the stone edges:
Take a lighter grey and highlight the edges of the rocks where the light would hit (facing away from the cave interior). This 3D trompe-l’oeil effect is crucial for making the cave look like it’s protruding into the room. -
Deepen the shadows:
Go back in with pure black or very dark grey to emphasize the deepest cracks and the interior curve of the cave, reinforcing the illusion of depth.
Depth Trick
Keep the ‘cave’ paint very matte to absorb light, while using a satin finish for the water to mimic the liquid sheen.
Step 3: The Octopus and Life
-
Outline the octopus:
Once the blue background is fully dry, use white chalk so sketch the octopus. Focus on the large, bulbous head and the swirling, curling motion of the tentacles. Position it so it looks like it’s emerging from the dark cave. -
Base coat the creature:
Fill in the octopus shape with titanium white paint. You will likely need two or three coats to get a crisp, opaque white against the dark blue water. -
Add dimensional shading:
Mix a very diluted grey wash. Gently shade the underside of the tentacles and the sides of the head to give the octopus volume, rather than looking like a flat sticker. -
Detail the suckers:
Using a small round brush, paint rows of circles along the tentacles for the suckers. Outline them faintly in grey or black ink to make them pop. -
Paint the eye:
Paint a large, expressive eye using gold or amber for the iris and black for the pupil. Add a tiny white dot for the reflection of light—this brings the character to life. -
Create the texture:
Use a liner brush with black or dark grey paint to add stippling and small dots across the octopus skin, giving it that characteristic speckled cephalopod texture.
Glow Up
Mix glow-in-the-dark pigment into the white paint for the octopus suckers and coral tips for a surprise night-time effect.
Step 4: Wait, There’s More: Coral and Atmosphere
-
Plant the seabed:
At the bottom right, paint free-flowing shapes for coral and seaweed. Use white for the striking staghorn coral in the foreground, and muted greens or browns for the background vegetation. -
Add floating friends:
Paint a small, whimsical fish or two near the octopus using simple shapes. A triangle tail and oval body work perfectly for a stylized look. -
Bubbles and light:
Dip the handle end of a brush or a round sponge into white paint to stamp bubbles rising from the deep. Vary the sizes for a natural look. -
Surface reflections:
At the very top of the water section, use watered-down white paint to create wavy, rippled lines representing sunlight filtering through the water surface. -
Optional floor integration:
To truly sell the illusion, I like to place white sand or small white pebbles on the floor at the base of the mural, mimicking the ocean floor spilling into the room.
Step back and admire your new underwater portal, ready to spark imagination every time you walk by


Have a question or want to share your own experience? I'd love to hear from you in the comments below!