When I’m craving something sweet and simple to draw, Valentine’s Day themes always deliver—there’s just so much you can do with hearts, flowers, and little love notes. Here are my favorite valentines day drawing ideas, starting with the classics and drifting into more playful, unexpected directions.
Classic Heart Doodles
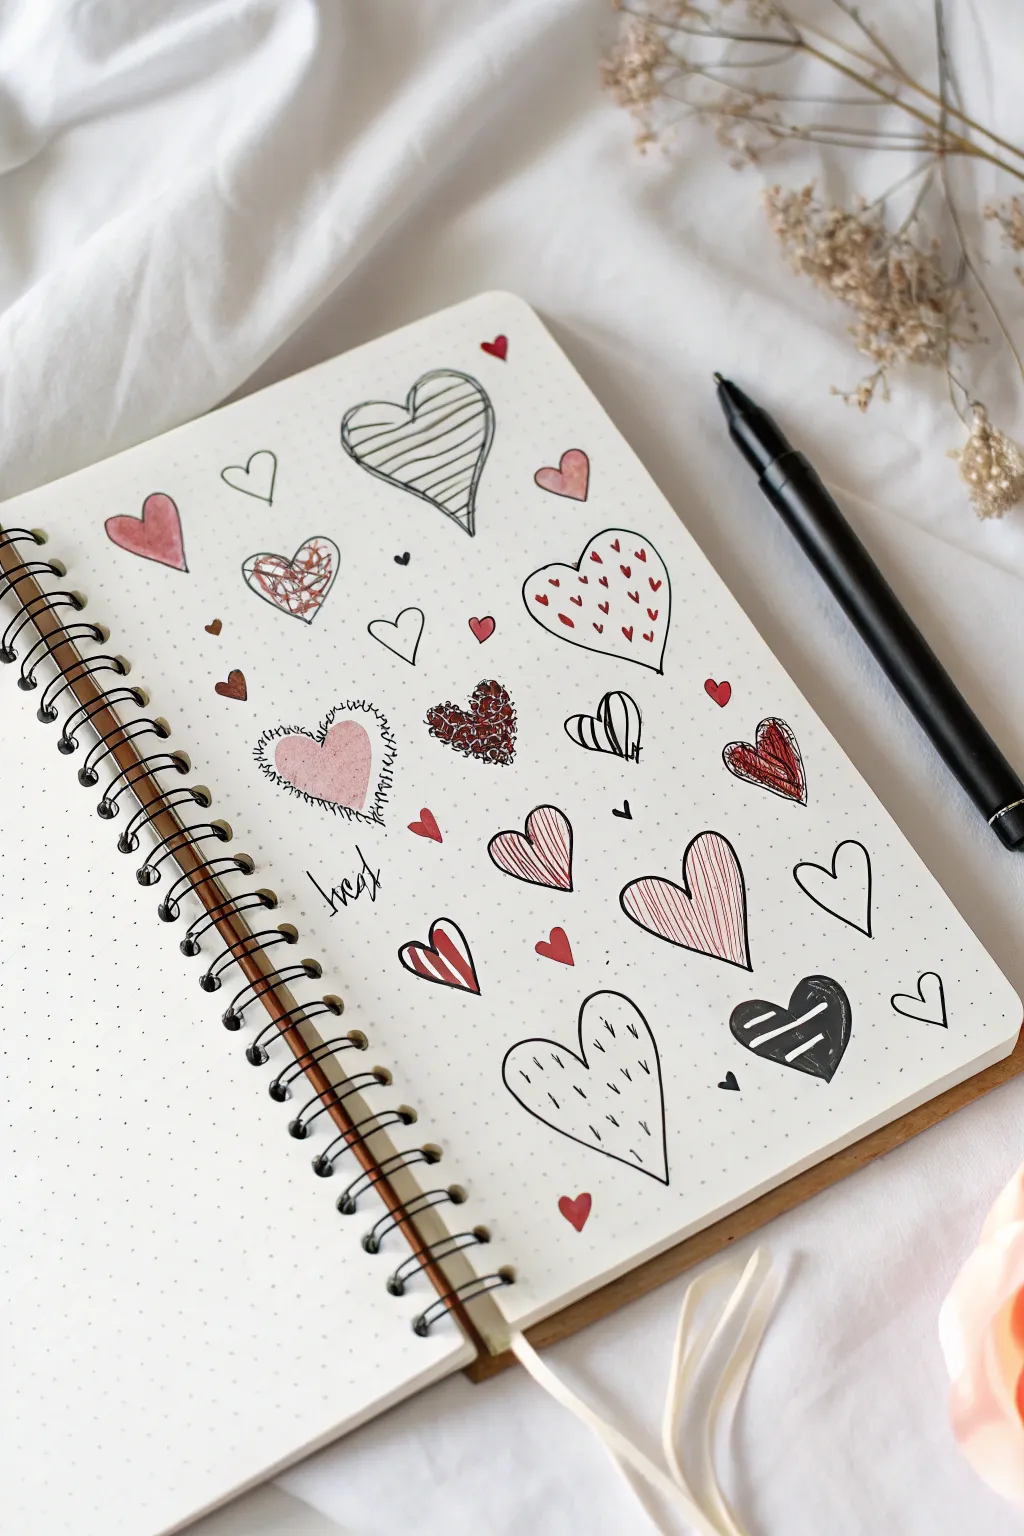
Transform a blank journal page into a charming gallery of love with this collection of hand-drawn hearts. Using simple black lines and touches of red, these diverse doodle styles range from scribbly and energetic to neat and patterned, creating a playful Valentine’s aesthetic.
Detailed Instructions
Materials
- Dotted notebook or bullet journal
- Fine liner pen (black, 0.3mm or 0.5mm)
- Red marker or brush pen
- Pink marker or colored pencil
- Pencil and eraser (optional for sketching)
Step 1: Setting the Composition
-
Map out the spacing:
Before committing ink to paper, visualize the layout of your hearts. Imagine an invisible grid or a scattered cloud pattern to ensure the doodles are evenly distributed across the page without clustering too tightly in one corner. -
Create the anchors:
Start by drawing 3-4 medium-sized heart outlines scattered across the page using your black fine liner. These will serve as the main focal points, giving you a framework to fill in around.
Ink Smearing?
If your red marker smears the black outlines, switch the order: draw the red shapes first, let them dry completely, and then layer the black ink details on top.
Step 2: Textured & Patterned Hearts
-
Draw the striped heart:
Locate a space near the top center. Draw a slightly wonky, hand-sketched heart outline. Fill the interior with horizontal, slightly curved lines to give it volume and a loose, sketched feel. -
Create the confetti heart:
Draw a larger heart outline on the right side. Instead of coloring it in, fill the inside with tiny red triangles and small dots, mimicking falling confetti or sprinkles. -
Sketch the scribble heart:
Find a spot on the left. Instead of a clean outline, use a messy, continuous scribble motion to form a heart shape. Keep the lines energetic and overlapping, adding a few red scribbles in the center for depth. -
Draft the stitched heart:
Draw a soft pink heart shape first. Once executed, take your black pen and draw a loose, shaky outline around it that doesn’t quite touch the color, adding tiny perpendicular tick marks to resemble stitching. -
Design the vertical stripe heart:
Near the bottom right, draw a tall, narrow heart. Fill perfectly with vertical red or pink lines, spacing them closely together so the white of the page barely peeks through. -
Add the chevron heart:
Draw a heart outline and fill the interior with zig-zag lines or simple vertical hatching. Mixing line directions adds great visual interest to the spread.
Make it Pop
Use a metallic gold or silver gel pen to add tiny highlights on the solid red and black hearts for a touch of unexpected elegance.
Step 3: bold & Graphic Hearts
-
Invert the colors:
For a strong contrast, draw a heart shape and fill it completely with black ink. While the ink is wet (or using a white gel pen later), leave two horizontal stripes or simple shapes uncolored to create a negative space design. -
Draw the striped accent:
Create a small heart and fill it with bold, diagonal red stripes. I find that alternating between thin black lines and thick color blocks keeps the page dynamic. -
Add the dashed interior:
Draw a simple outline heart, but inside, fill it with small, vertical dash marks like falling rain or little seeds.
Step 4: Fillers & Micro-Doodles
-
Sprinkle tiny hearts:
Look for empty gaps between your larger designs. Draw tiny, solid red hearts or simple small outlines to bridge the spaces. -
Add tiny details:
Draw extremely small black hearts—some just the size of a sprinkle—floating around the larger motifs to create movement. -
Incorporate colored solids:
Use your pink marker to draw a few standalone solid hearts. These soft blocks of color help balance the heavy black ink work. -
Draw the double outlines:
Take a few of your simpler outline hearts and add a second line inside or outside one half of the shape to give it a shadow effect. -
Write text elements:
If you have a larger gap, sketch a word like ‘love’ or ‘xoxo’ in a messy script font. You can even scribble over it slightly to match the grunge aesthetic of the scribbled heart. -
Final balance check:
Step back and look at your page. If one area feels too empty, add a single dot, a tiny heart, or a small cluster of specks to finish the composition.
Now you have a lively page of doodles ready to be scanned for cards or kept as a journal memory


Simple Rose Sketch
This elegant rose sketch captures the classic beauty of romance with clean lines and delicate shading. Using simple graphite techniques, you will create a realistic-looking flower with detailed leaves and a thorny stem that jumps right off the page.
How-To Guide
Materials
- Spiral-bound sketchbook or drawing paper (medium tooth)
- H pencil (harder lead for light outlines)
- 2B pencil (medium softness for general shading)
- 4B or 6B pencil (soft lead for dark accents)
- Kneaded eraser
- Pencil sharpener
- Blending stump (optional)
Step 1: Constructing the Basic Shape
-
Map the flower head:
Start by lightly sketching a loose oval shape near the upper left of your page. Inside this, draw a smaller, tighter spiral to represent the center of the petals. -
Draw the stem line:
From the bottom of your oval, draw a long, slightly curved diagonal line extending downward toward the bottom right corner. This serves as the spine for your stem. -
Mark leaf positions:
Add three smaller lines branching off the main stem: one pointing right near the top, and two branching near the bottom (left and right) for the lower foliage. Keep these lines faint.
Avoid The Smudge
Place a scrap piece of paper under your drawing hand. This prevents the graphite from smearing across the white page as you work on different sections.
Step 2: Building the Rose Petals
-
Define the center spiral:
Switching to your 2B pencil, darken the central spiral. Make the lines overlap tightly, creating the appearance of unfurled petals deep inside the bloom. -
Add surrounding petals:
Draw larger, cup-shaped curves around the center markings. Let the edges of these petals curl slightly outward, giving the flower volume. -
Create the outer petals:
Sketch the largest petals at the base of the flower head. These should look wider and more relaxed, dipping down before curving back up to meet the flower body. -
Refine the petal edges:
Go back over your petal outlines. Instead of perfect smooth lines, add tiny dips and irregularities to the edges so the petals look organic and soft.
Step 3: Drawing the Greenery
-
Sketch the sepals:
Draw small, leaf-like triangles pointing downward directly from the base of the flower head. These are the sepals that cradle the bloom; make them thin and slightly spiky. -
Shape the leaves:
On your branch lines, draw teardrop shapes for the leaves. The top cluster should have three leaflets, and the bottom cluster should mimic this arrangement. -
Serrated edges:
Outline your smooth leaf shapes with small, jagged teeth. Rose leaves have distinctive serrated margins, so sharp, tiny zig-zags work best here. -
Thicken the stem:
Turn your single stem line into a tube by adding a parallel line. Add small, sharp triangles along the length to create the thorns.
Color It Softly
Once the graphite sketch is done, use watercolor pencils to add a faint wash of crimson to the petals and sap green to the leaves for a mixed-media look.
Step 4: Adding Texture and Shading
-
Shade the petal depths:
Using your 4B pencil, add dark shading where the petals overlap. Concentrate the darkness at the base of the petals to create a sense of depth and shadow. -
Texture the petals:
I like to use very light, curved hatching strokes on the petals following their shape. This suggests the vein texture without overpowering the delicate look. -
Darken the leaves:
Fill in the leaves with a medium gray tone using the side of your pencil. Press harder near the center vein and fade slightly toward the jagged edges. -
Detail the leaf veins:
Draw a distinctive central vein down each leaf, with smaller veins branching diagonally outward. Ensure these lines are darker than your shading. -
Stem shadows:
Shade one side of the stem more heavily than the other to make it look cylindrical rather than flat. Darken the undersides of the thorns. -
Final contrast check:
Take a moment to deepen the darkest shadows under the flower head and between leaves. Use your kneaded eraser to lift off graphite on the petal tips for bright highlights.
This classic rose is now ready to be framed or given as a heartfelt handmade card.


Cupid Arrow Through a Heart
Capture the classic symbol of love with this elegant watercolor painting featuring a rich red heart pierced by a golden-feathered arrow. The textured paper adds a lovely rustic feel, making it perfect for a heartfelt Valentine’s card or framed gift.
Step-by-Step Tutorial
Materials
- Cold press watercolor paper (300 gsm or heavier for texture)
- Watercolor paints (Alizarin Crimson, Burnt Umber, Yellow Ochre, Lamp Black)
- Round watercolor brushes (size 6 for the heart, size 2 for details)
- HB pencil for sketching
- Kneaded eraser
- Ruler
- Jar of clean water
- Paper towels
Step 1: Sketching the Outline
-
Draft the heart shape:
Start by lightly sketching a balanced heart shape in the center of your paper. Keep your pencil pressure very light so the graphite doesn’t show through the translucent watercolor later. -
Position the arrow shaft:
Using a ruler, draw a straight diagonal line passing through the heart from the top right to the bottom left. Leave gaps where the line enters and exits the heart so it looks like it’s going through the tissue. -
Define the arrowhead and fletching:
At the bottom left end of the line, sketch a simple triangular arrowhead. At the top right, sketch the fletching (feathers) creates a slightly curved, leaf-like shape along the shaft. -
Add floating accent:
Draw a tiny, simple heart floating freely just to the right of the feathers for a touch of whimsy. -
Clean up sketch lines:
Use your kneaded eraser to gently lift excess graphite until the lines are barely visible, just enough to guide your painting.
Step 2: Painting the Heart
-
Prepare the red wash:
Mix a vibrant red using Alizarin Crimson with a touch of water. You want a saturated color but fluid enough to move on the paper. -
Paint the first layer:
Using your size 6 brush, fill in the main heart shape. Work quickly to maintain a wet edge so the color dries evenly. -
Add shadow depth:
While the paint is still slightly damp, drop a tiny bit of darker red (mixed with a pinprick of black or green) into the left side of the heart to create a subtle shadow effect. -
Paint the mini heart:
Use the size 2 brush and the same red mix to carefully fill in the small floating heart. -
Let it dry completely:
Wait until the heart is bone dry before painting near it to prevent the colors from bleeding into one another.
Bleeding Hearts?
If red paint bleeds into the arrow shaft, wait for it to fully dry. Then, use a damp, clean stiff brush to gently ‘scrub’ and lift the unwanted color away.
Step 3: Detailing the Arrow
-
Paint the shaft:
Mix a dark grey or black using Lamp Black. With your smallest brush and a steady hand, paint the thin line of the arrow shaft, skipping over the red heart area. -
Fill the arrowhead:
Paint the triangular arrowhead at the bottom. I like to leave a tiny sliver of white paper unpainted on one edge to simulate a metallic gleam. -
Base coat for feathers:
Mix a watery Yellow Ochre or light brown. Paint the overall shape of the feather fletching with a very light wash. -
Add feather texture:
Once the base yellow wash is dry, use a mix of Burnt Umber and Black. With the tip of your size 2 brush, paint delicate diagonal strokes to mimic the individual barbs of the feather. -
Define the quill:
Paint a darker brown line down the center of the feather section to represent the quill spine.
Textured Touch
To get that specific grainy look in the reference image, use rough or cold-press paper and don’t over-wet your brush. This is called ‘dry brush’ technique.
Step 4: Final Touches
-
Enhance texturing:
If the heart looks too flat, you can add a second glaze of red once the first is dry to deepen the color, letting the texture of the paper show through. -
Check entry points:
Use a tiny amount of black paint to add a small shadow right where the arrow shaft ‘enters’ the heart, creating the illusion of puncture. -
Final assessment:
Step back and look at your composition. If needed, erase any remaining stray pencil marks with the kneaded eraser once the paint is 100% dry.
Your beautiful, symbol-rich artwork is now ready to be gifted to someone special.


Love Letter Envelope Sketch
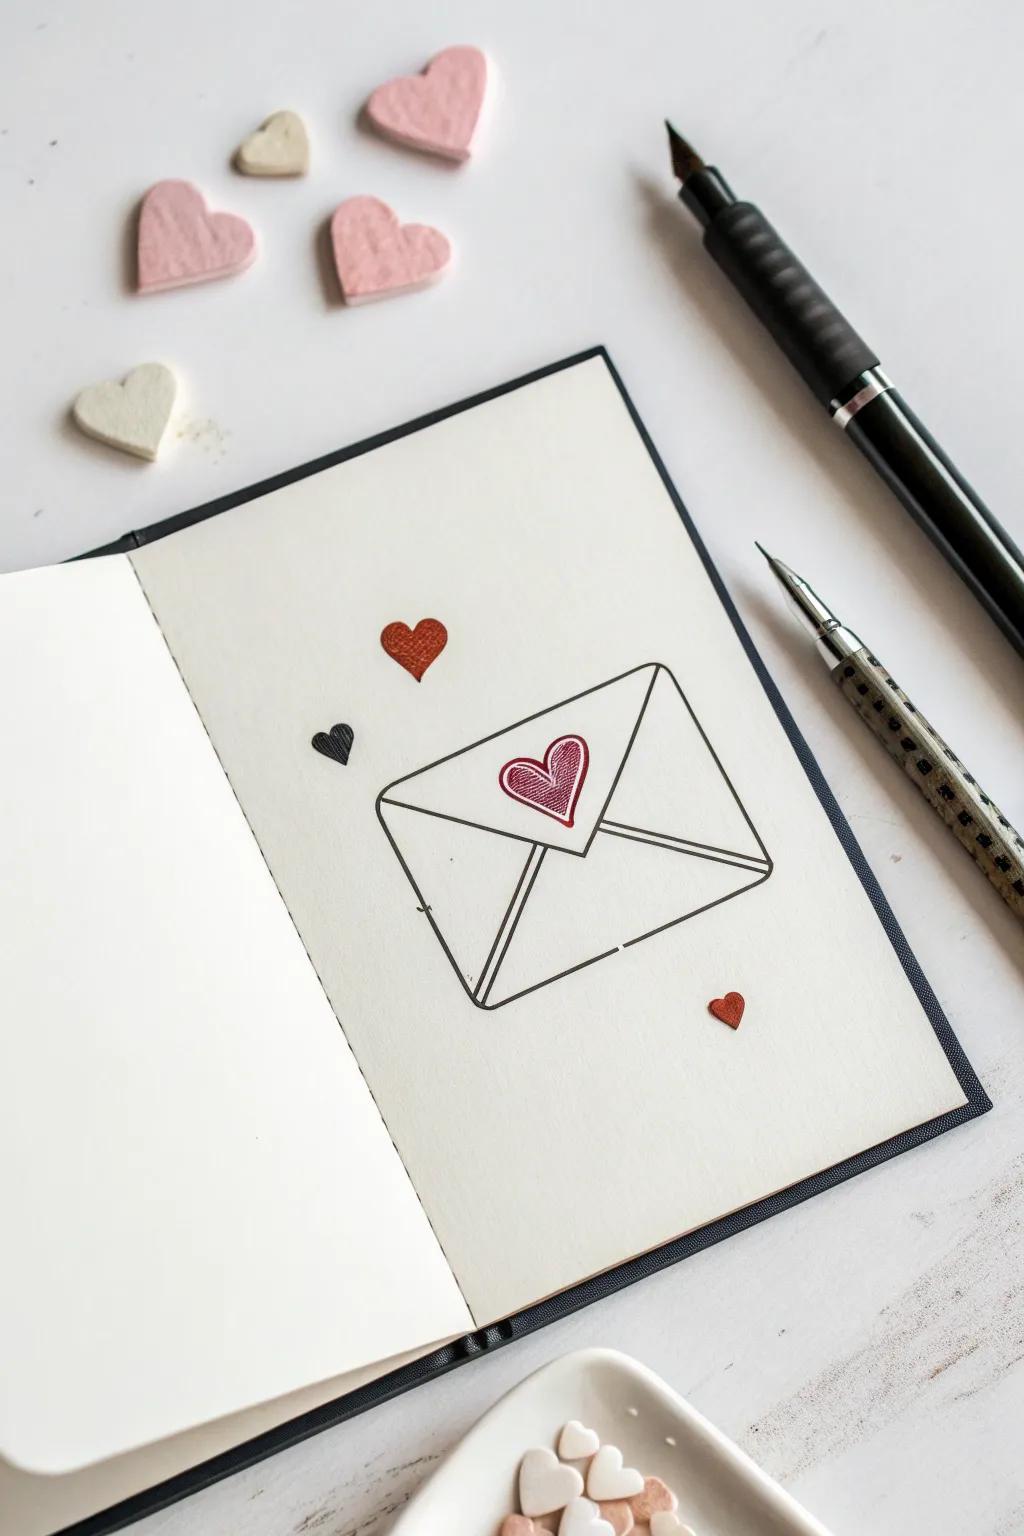
This minimal and charming sketch captures the essence of an old-school love letter with clean lines and pops of red. It is a perfect beginner-friendly project that looks elegant on the crisp page of a sketchbook.
Detailed Instructions
Materials
- Sketchbook with cream or off-white paper
- Fine-liner pen (black, 0.3mm or 0.5mm)
- Small red marker or felt-tip pen
- Pencil (HB for initial sketch)
- Eraser
- Ruler (optional, but helpful for crisp lines)
Step 1: The Structure
-
Outline the rectangle:
Begin by lightly sketching a centered rectangle on your page with a pencil. Tilt it slightly to the right to give the envelope a playful, casual feel instead of a rigid geometric look. -
Define the flap:
Draw a distinctive ‘V’ shape coming down from the top corners of your rectangle. ensure the point of the V reaches just past the center of the rectangle, creating the main flap of the envelope. -
Add the bottom folds:
From the bottom corners, sketch two diagonal lines moving upward toward the center, but stop them short so they don’t quite touch the tip of the top flap. This implies the folded paper structure. -
Ink the main lines:
Using your black fine-liner, trace over your pencil lines. Keep your hand relaxed; slight wobbles add character, but try to keep the corners relatively sharp. Do not ink the top horizontal line of the rectangle where the flap covers it. -
Double-line the flap:
Carefully draw a second line just inside the ‘V’ of the top flap. This small detail adds dimension, making the paper look like it has thickness.
Step 2: The Heart Details
-
Sketch the seal:
Right in the center of the flap’s V, lightly sketch a heart shape. This acts as the wax seal holding the letter closed. -
Add floating hearts:
Draw three small hearts floating around the envelope to create movement. Place one above firmly to the left, one tiny one just to the left of the envelope, and a third small one near the bottom right corner. -
Ink the hearts:
Outline your main central heart with the red marker or felt-tip pen. For an artistic touch, sketch a second, slightly looser red outline around it to mimic the texture of a stamp or seal. -
Fill the floating hearts:
Color in the top floating heart completely with your red marker. For the tiny heart on the left, use black ink to create contrast. The bottom right heart should be filled with red. -
Detailing the seal:
Inside the main central heart, use your fine red pen to add hatching lines—diagonal strokes close together—to fill the space without making it a solid block of color. This mimics texture beautifully.
Smudge Prevention
Fine-liner ink can smear instantly under an eraser. Test your pen on a scrap piece of paper first to see how fast it dries before erasing your pencil guides.
Step 3: Finishing Touches
-
Erase guidelines:
Once you are certain the ink is completely dry—I usually wait at least two minutes to be safe—gently erase all underlying pencil marks. -
Add tiny accents:
If your drawing feels too empty, add a very tiny dot or two near the black heart to balance the composition, though keep it minimal. -
Check line weight:
Look at the bottom folds of the envelope. If they feel too faint, go over them once more with the black pen to make the envelope feel grounded on the page.
Add Watercolor
Instead of red marker, use a tiny drop of watercolor for the hearts. Let the pigment pool slightly at the bottom of the shape for a beautiful gradient effect.
Now you have a timeless symbol of affection captured permanently in your sketchbook
BRUSH GUIDE
The Right Brush for Every Stroke
From clean lines to bold texture — master brush choice, stroke control, and essential techniques.
Explore the Full Guide
Love Birds on a Branch
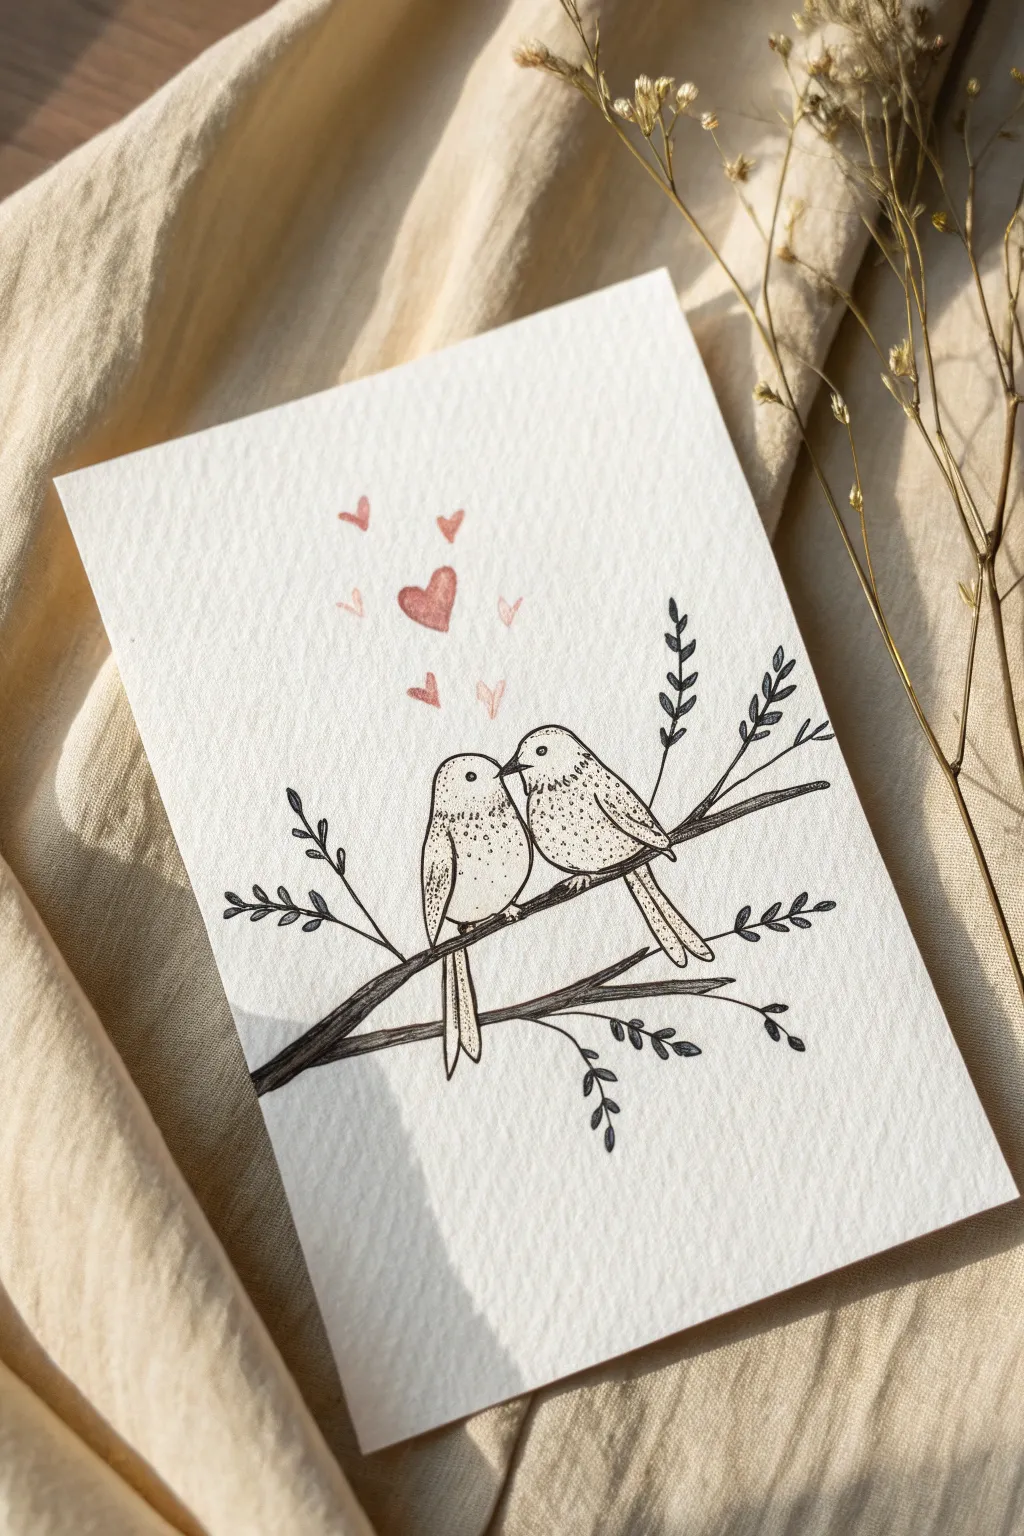
Capture the sweetness of love with this delicate ink illustration featuring two adorable birds perched together. The combination of stippled shading and soft pink hearts creates a charming, minimalist Valentines card that feels both handcrafted and elegant.
Step-by-Step Guide
Materials
- Cold press watercolor paper (A5 or 5×7 inch)
- Fine liner pens (0.1mm and 0.3mm, black)
- Pencil (HB) and eraser
- Watercolor paint (soft red or pink) or colored pencils
- Small round paintbrush (size 2 or 4)
Step 1: Sketching the Composition
-
Draw the Branch Line:
Start by drawing a gentle, upward-curving diagonal line across the lower third of your paper. This will serve as the main branch. Keep your pencil pressure very light so these lines can be erased later. -
Add Secondary Twigs:
From the main branch, sketch a few smaller, thinner shoots extending upwards and downwards. Add small leaf shapes along these twigs to balance the composition. -
Outline the Birds:
Draw two oval shapes resting on the main branch, leaning slightly towards each other. The left bird should be slightly lower than the right one. -
Refine the Anatomy:
Add small circles for heads on top of the ovals and extend long, thin rectangles downwards for the tail feathers. Give them tiny triangular beaks that almost touch, symbolizing a kiss.
Step 2: Inking the Details
-
Trace the Branch:
Using your 0.3mm fine liner, carefully trace over the main branch lines. Add a wood grain texture by drawing imperfect, slightly wavy lines inside the branch shape. -
Outline the Birds:
Switch to the 0.1mm pen for a more delicate touch. Trace the outline of the birds, but use broken or dashed lines in some areas to suggest fluffy feathers rather than a smooth plastic surface. -
Draw the Faces:
Place a small black dot for the eye on each bird. Leave a tiny speck of white paper inside the black dot as a highlight to bring them to life. -
Stipple Shading:
This is where the magic happens. Using the 0.1mm pen, add shading by tapping tiny dots (stippling). Concentrate the dots heavily on the underside of the bellies and under the wings to create volume. -
Wing Details:
Draw a curved line to define the wing on each bird. Fill the wing area with denser stippling than the body, making it appear slightly darker. -
Tail Feathers:
Draw long, straight lines specifically for the tail feathers, adding a few dots at the top where the tail meets the body for a smooth transition. -
Inking the Leaves:
Go back to the leaves on the twigs. Outline them simply and add a center vein line to each one. Keep these dark and crisp to contrast with the textured birds.
Ink Smudging?
Make sure your fine liner is waterproof before adding watercolor! If not, color the hearts with colored pencils instead to avoid ruining your clean lines.
Step 3: Adding Color & Finishing Touches
-
Erase Pencil Marks:
Wait until the ink is completely dry—I usually give it at least 5 minutes to be safe—then gently erase all visible pencil sketches. -
Paint the Main Heart:
Mix a watery red or pink watercolor. Paint a small, floating heart directly above the space between the two birds. Keep the color transparent enough that the paper texture shows through. -
Add Floating Hearts:
Paint 4-5 tiny hearts of varying sizes floating upward from the main heart. Variate the opacity by adding more water for the distant hearts to create depth. -
Optional Leaf Shading:
If you want more contrast, you can lightly darken one half of each leaf with your pen or a very light wash of gray watercolor. -
Final Assessment:
Step back and check the balance. If the birds look too flat, add a few more stippling dots to the darkest shadow areas to increase the contrast.
Texture Tip
For the stippling, hold your pen perpendicular to the paper. Dots made at an angle turn into tiny dashes, which spoils the soft, fluffy feather effect.
Now you have a sweet, minimal piece of art ready to frame or gift to a loved one
Couple Silhouette Under the Moon
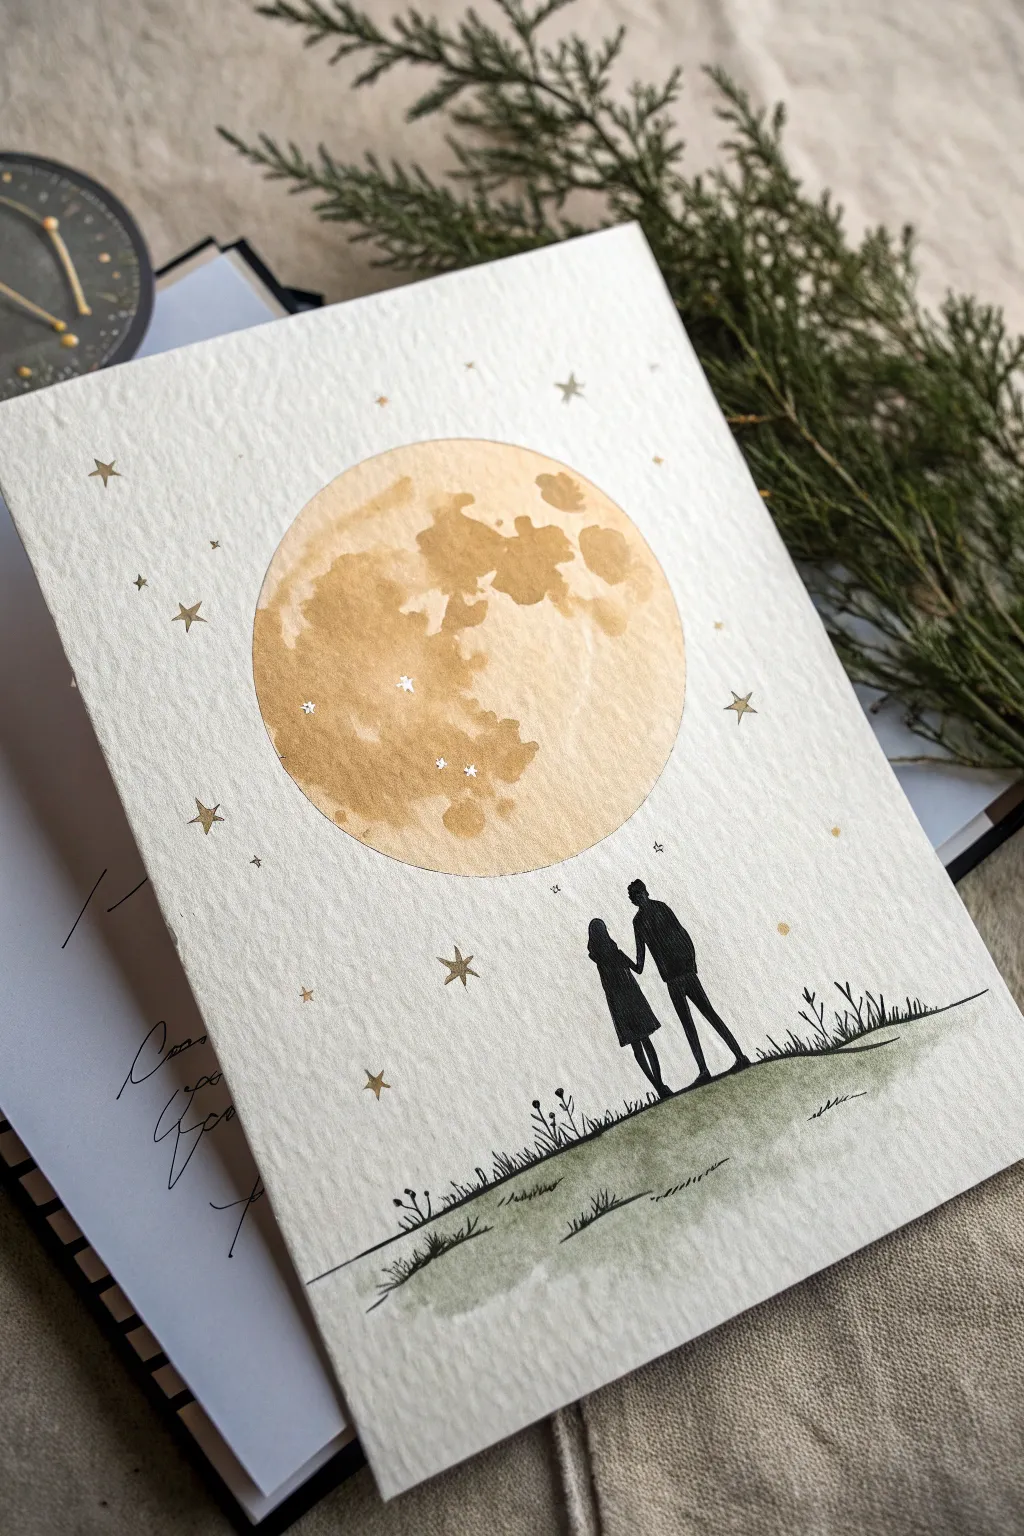
This romantic project combines soft watercolor textures with crisp ink silhouettes to create a dreamy, celestial scene perfect for Valentine’s Day. It captures a couple gazing at a large, cratered moon amidst a field of delicate starlight.
Detailed Instructions
Materials
- Cold press watercolor paper (A5 size or folded card)
- Watercolor paints (Yellow Ochre, Burnt Sienna, Payne’s Grey, Sap Green)
- Round watercolor brush (size 6 or 8)
- Fine liner pen (Black, waterproof, size 0.3 or 0.5)
- Gold gel pen or gold metallic paint
- Compass or round object for tracing (approx. 3-inch diameter)
- Pencil and eraser
- Water cups and paper towels
Step 1: Painting the Moon
-
Outline the shape:
Begin by lightly tracing a perfect circle in the upper center of your watercolor paper using a compass or a round object like a jar lid. Keep the pencil line very faint so it doesn’t show through the paint later. -
Prepare the wash:
Mix a watery wash of Yellow Ochre with a tiny touch of Burnt Sienna on your palette. You want a warm, golden-brown hue that isn’t too dark. -
Base layer:
Wet the inside of the circle with clean water first (wet-on-wet technique), then drop in your golden-brown mixture, letting it bloom and spread naturally. This ensures soft edges. -
Adding craters:
While the moon is still damp but not soaking wet, drop in concentrated dots of Burnt Sienna or a slightly darker brown. Let these bloom to form natural-looking craters and texture. I like to tilt the paper slightly to guide the flow. -
Lifting highlights:
If some areas get too dark, use a thirsty (clean, damp) brush or the corner of a paper towel to lift color out, creating bright spots on the moon’s surface.
Step 2: Creating the Ground
-
Sketch the horizon:
Lightly pencil a low, slightly uneven horizon line near the bottom third of the card. -
Paint the wash:
Mix a very diluted wash of Sap Green with a drop of Payne’s Grey to desaturate it. Paint a quick, loose wash below the horizon line. Keep it uneven and transparent—rough texture looks like grass here. -
Dry completely:
Allow both the moon and the ground wash to dry completely before touching the paper with ink. If the paper is cool to the touch, it’s still wet.
Salt Texture Trick
While the moon paint is still wet, sprinkle a few grains of table salt onto it. As it dries, the salt absorbs pigment, creating unique crater-like textures.
Step 3: Inking the Details
-
Draft the figures:
With your pencil, lightly sketch the silhouette of the couple standing on the horizon line. Keep the shapes simple—focus on the outline of the heads, shoulders, and legs. -
Fill the silhouette:
Using your waterproof fine liner, carefully outline and fill in the couple’s shape. Ensure the ink is solid black for a strong contrast against the light background. -
Draw the grass:
Along the painted horizon line, use quick, upward flicking motions with your pen to create blades of grass. Vary the height and direction to make it look natural. -
Add foreground details:
Add a few taller stalks or simple flower shapes in the grass near the figures to add depth to the foreground. -
Ground texture:
Add a few small, scattered hatched lines in the green watercolor area to suggest earth texture without overworking it.
Make it Shine
Use metallic gold watercolor for the moon instead of brown. It will catch the light beautifully when the card is tilted and adds an elegant touch.
Step 4: Celestial Touches
-
Draw stars:
Using a gold gel pen or metallic paint and a fine brush, draw five-pointed stars scattered around the moon. vary their sizes—some tiny dots and some distinct star shapes. -
Moon details:
Add a few tiny white or gold star specks directly onto the dried watercolor moon for a magical effect. -
Clean up:
Once all ink and paint are fully dry, gently erase any visible pencil lines, especially around the moon’s border.
Now you have a heartfelt, handmade card ready to share with someone special

PENCIL GUIDE
Understanding Pencil Grades from H to B
From first sketch to finished drawing — learn pencil grades, line control, and shading techniques.
Explore the Full Guide
Intertwined Hearts With a Ribbon Banner
Capture the romance of Valentine’s Day with this elegant illustration of two interlocking hearts floating above a classic ribbon banner. The soft watercolor washes and dynamic ink outlines give the piece a timeless, hand-drawn charm perfect for a card or journal entry.
How-To Guide
Materials
- Watercolor paper sketchbook (spiral bound shown)
- Pencil (HB or H for light sketching)
- Eraser (kneaded preferred)
- Fine liner pen (black or dark brown, waterproof)
- Watercolor paints (Alizarin Crimson, Burnt Sienna, or similar warm reds)
- Round watercolor brush (size 4 or 6)
- Gold ink or gel pen (optional for accents)
- Water cup and paper towel
Step 1: Drafting the Shapes
-
Establish the Left Heart:
Begin by lightly sketching the left heart with your pencil. Draw it slightly tilted to the left, making the curves wide and generous. Keep your pressure extremely light so you can erase lines later without damaging the paper tooth. -
Interlock the Right Heart:
Sketch the second heart overlapping the first one firmly on the right side. The inner loops of the hearts should cross over each other. Visualize where the lines would naturally pass underneath to create an authentic ‘linked’ appearance. -
Sketch the Ribbon Curve:
Beneath the hearts, draw a long, gentle ‘S’ curve for the top edge of the ribbon banner. Add a parallel line below it to define the ribbon’s width, slightly tapering the ends. -
Add Ribbon Tails:
At the ends of your main ribbon shape, sketch the folded ‘tails’ tucking underneath. The left tail should dangle downwards, while the right tail flips slightly upward for a dynamic flowing look. Add V-notches at the very tips.
Step 2: Inking the Outline
-
Trace the Hearts:
Using your waterproof fine liner, carefully trace over your pencil lines. For the interlocking sections, be very deliberate: stop your line exactly where one heart passes ‘behind’ the other to preserve the illusion of depth. -
Vary Line Weight:
Go back over certain curves—particularly the outer edges of the hearts and the bottom of the ribbon—to thicken the lines slightly. This adds weight and mimics calligraphystrokes. -
Define the Banner:
Ink the ribbon banner, adding small distinct fold lines where the ribbon bends backward. These small details are crucial for making the ribbon look like fabric rather than a flat shape. -
Clean Up:
Wait at least five minutes for the ink to fully set. Once dry, gently erase all visible pencil marks with your kneaded eraser to leave a clean, crisp outline.
Brush Control Trick
Load your brush with water but blot the excess on a towel before picking up paint. This ‘thirsty brush’ gives you more control and prevents puddles on thin paper.
Step 3: Adding Watercolor Washes
-
Mix Your Palette:
Create a watery mix of a warm red or dusty rose color. You want a translucent tea-like consistency rather than thick opaque paint for that delicate look. -
Paint the Heart Interiors:
Dip your brush and lightly fill in the hearts. Instead of filling them completely solid, leave small slivers of white space near the highlights or center to make them look glossy and dimensional. -
Add Depth to the Hearts:
While the first layer is still slightly damp, drop a tiny bit of more concentrated red pigment into the areas where the hearts overlap. The color will bleed softly, creating natural-looking shadows. -
Wash the Main Ribbon:
Paint the main central strip of the banner with a pale wash of your dusty rose mix. I usually pull the color from left to right in one smooth motion to minimize streaks. -
Darken the Ribbon Folds:
Mix a slightly darker, cooler version of your red (perhaps add a touch of brown). Paint the ‘tails’ and the small folded sections of the ribbon with this darker shade to show that they are in shadow behind the main banner.
Make It Personal
The ribbon banner is the perfect spot for calligraphy. Before the paint dries fully, drop in names or a date using a darker ink so it bleeds slightly into the wash.
Step 4: Final Flourishes
-
Enhance Contrast:
Once the watercolor is bone dry, look at the darker folded areas of the ribbon. Use your fine liner to add tiny hatching lines or texture to deepen the shadows even further. -
Add Golden Accents:
Using gold ink or a yellow ochre paint, dab small dots randomly around the hearts and ribbon. These ‘confetti’ specks add a festive, magical atmosphere to the composition. -
Highlight (Optional):
If your watercolor covered too much white space, use a white gel pen to add tiny reflection lines on the upper curves of the hearts/ribbon for extra shine.
Your charming intertwined hearts are now ready to be the centerpiece of a heartfelt note
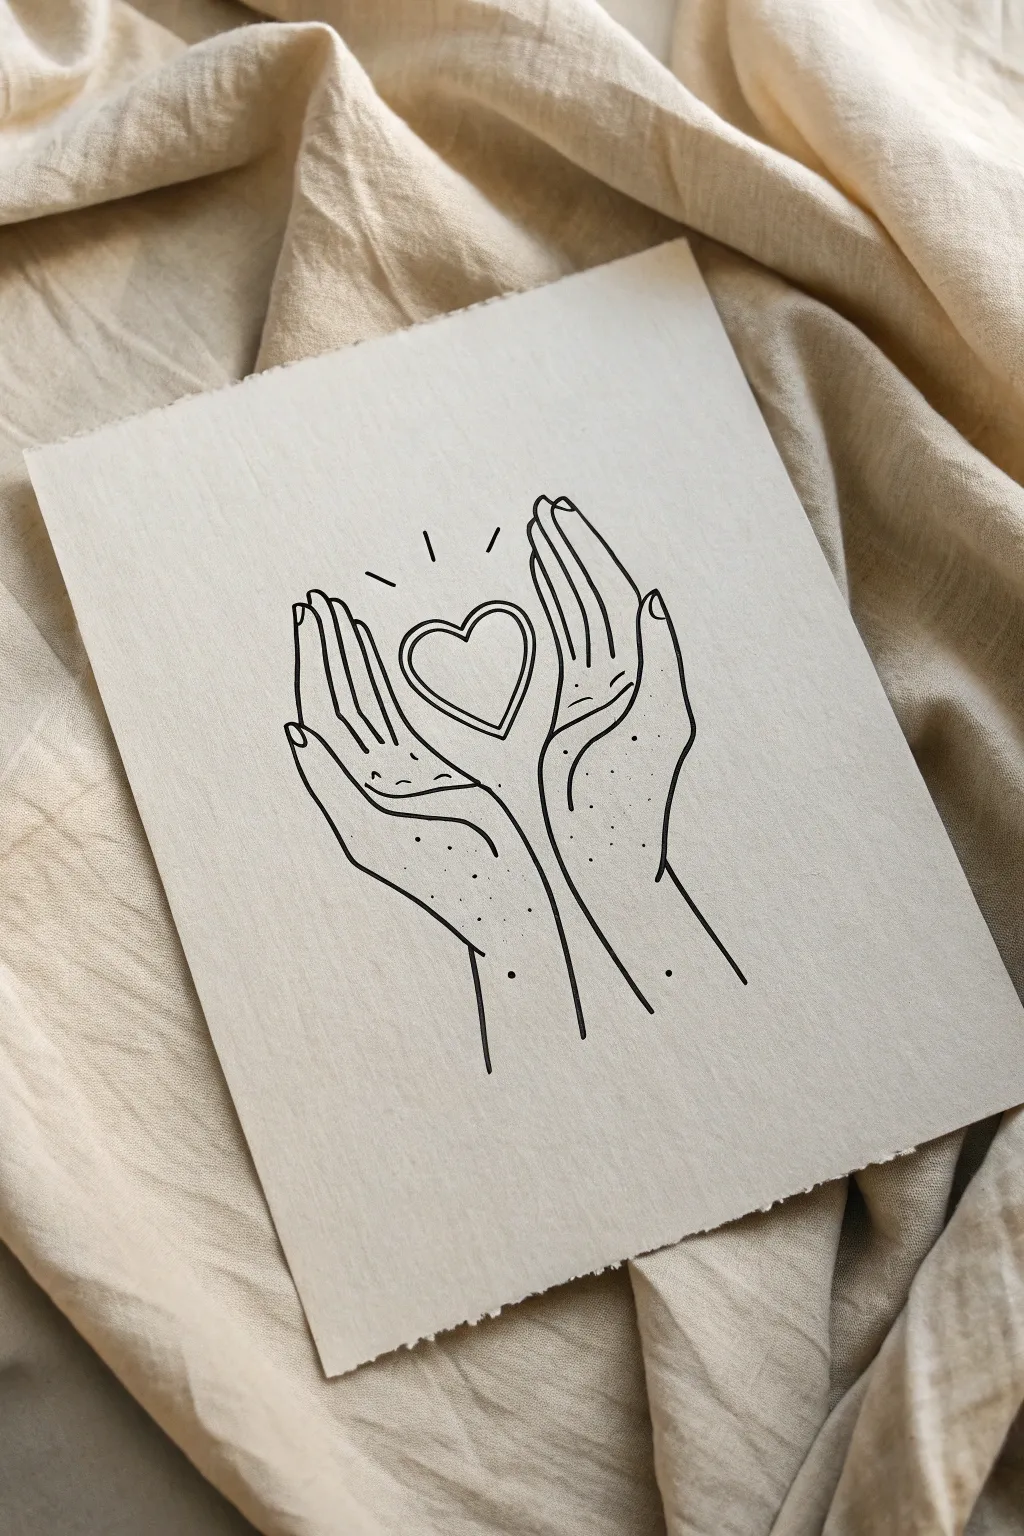
Hands Holding a Heart


Smiling Heart Characters Hugging
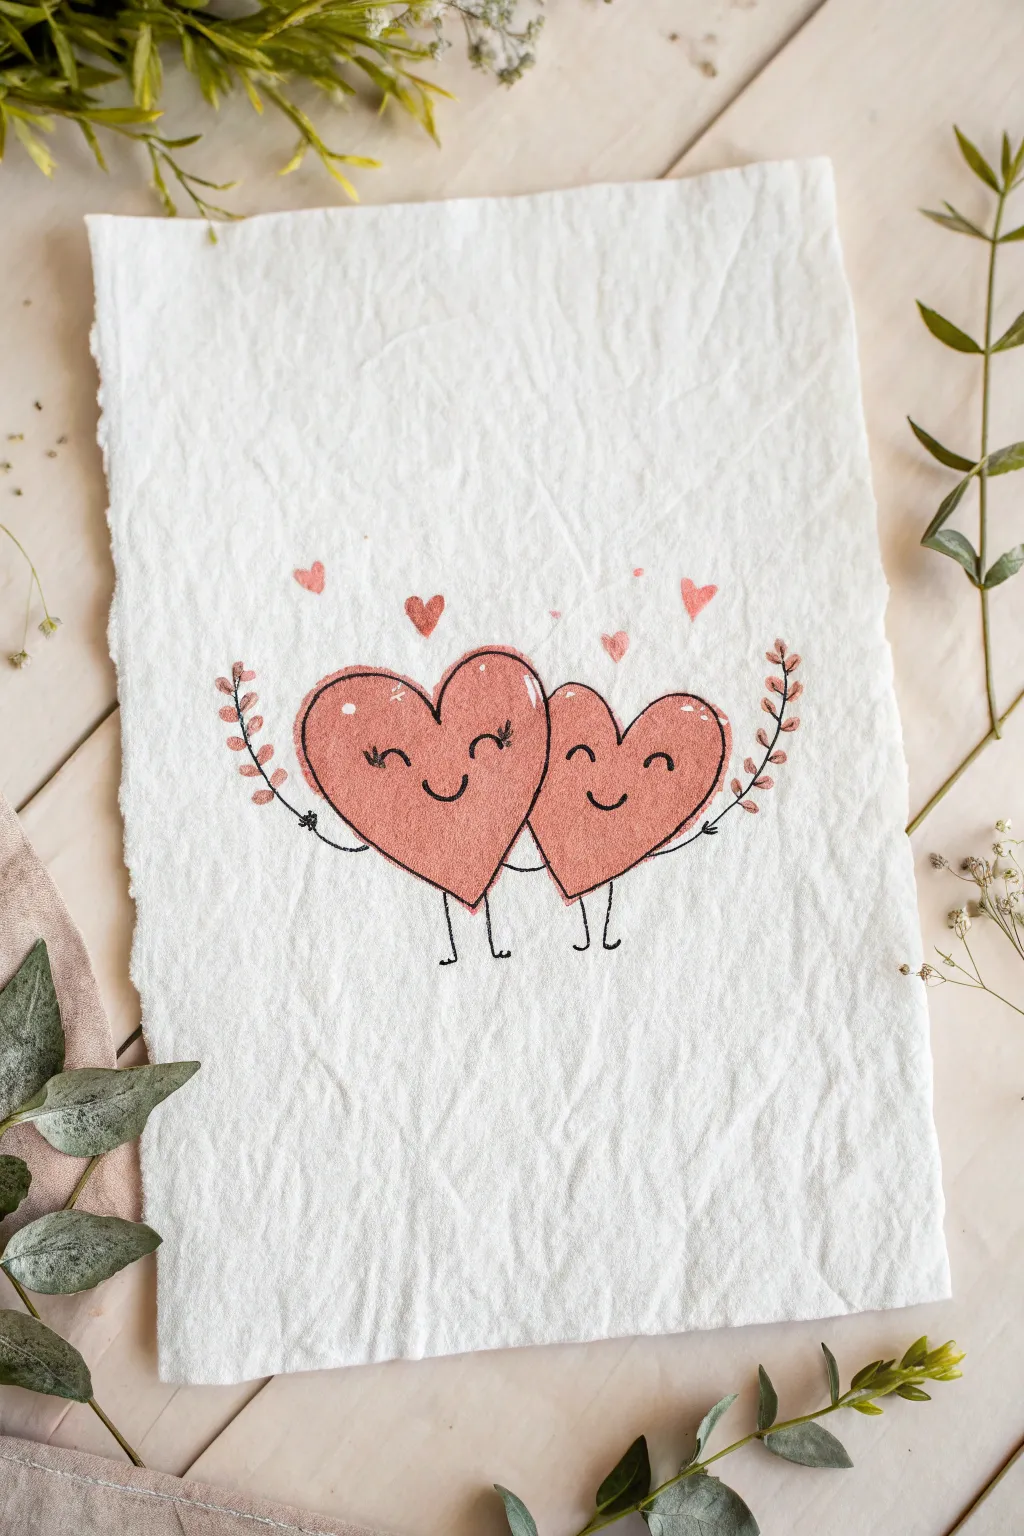
Capture the sweetness of friendship or romance with this delightful illustration of two smiling hearts embracing. The charm of this project lies in the combination of simple line work with the rustic, vintage feel of heavy, deckle-edged watercolor paper.
How-To Guide
Materials
- Heavyweight cold-press watercolor paper with deckle edge (approx. 300gsm)
- Pencil (HB or H for sketching)
- Kneaded eraser
- Watercolors (Vintage Pink, Rose Madder, or a mix of Scarlet and White gouache)
- Round watercolor brush (size 4 or 6)
- Fine liner pen (Black, waterproof, 0.3mm or 0.5mm)
- White gel pen (optional for highlights)
Step 1: Planning and Sketching
-
Paper Preparation:
Begin by selecting a high-quality, textured sheet of paper. If your paper doesn’t have a natural deckle edge, you can gently tear the edges against a ruler to create that soft, handmade look. -
Heart Placement:
Lightly sketch two heart shapes in the center of your page with an HB pencil. Place them side-by-side so they are touching or slightly overlapping in the middle to simulate a hug. -
Adding Personality:
Draw faint guidelines for where the faces will go. The heart on the left should be slightly angled right, and the one on the right slightly angled left. -
Sketching Limbs:
Add simple stick-figure arms. The inner arms should cross over onto the other heart’s ‘back’ to show the embrace. Sketch stick legs with little curved feet at the bottom. -
Floral Accents:
Draw faint curved lines extending outwards from the far sides of the hearts. These will become the leafy branches later.
Step 2: Painting the Design
-
Mixing the Color:
Prepare a watery mix of warm pink watercolor. I like to add a tiny touch of brown or burnt sienna to the pink to give it that muted, vintage rose tone rather than a bright bubblegum color. -
Filling the Hearts:
Carefully paint inside your heart sketches. Let the watercolor pool slightly in some areas to create texture as it dries, but try to keep the edges relatively crisp. -
Adding Confetti:
While you have the pink paint on your brush, dab small heart shapes and dots floating above the main characters. Vary the sizes and opacity slightly for interest. -
Painting Leaves:
Using the very tip of your round brush, paint small, simple tear-drop shapes along the curved branch guide lines you drew earlier. You can use the same pink or darken it slightly for contrast. -
Drying Time:
Allow the paint to dry completely. This is crucial because drawing ink over damp paper will bleed and ruin the crisp lines.
Fixing Bleeding Ink
If your black ink starts to spiderweb, your paper is likely still damp. Stop immediately and hit it with a hair dryer on low for 60 seconds before continuing.
Step 3: Inking and Details
-
Outlining the Hearts:
Once the paper is bone dry, take your black fine liner and trace the outline of the hearts. Use a loose, slightly sketchy hand rather than trying to make a mathematically perfect line. -
Drawing Faces:
Add the facial features. Draw curved arches for closed, happy eyes. Add eyelashes to the left heart for a feminine touch if desired, and draw simple ‘U’ shapes for smiles. -
Adding Cheeks:
Use the pen to draw tiny curved lines at the ends of the smiles to emphasize the cheeks pushing up. -
Inking Limbs:
Go over the pencil lines for the arms and legs. Add tiny three-fingered hands at the ends of the outer arms. -
Defining Branches:
Draw a thin black line through the center of your painted leaves to connect them to the main stem. -
Highlights:
If you want extra dimension, use a white gel pen to add a small curved highlight on the upper curve of each heart, suggesting they are shiny or puffed up. -
Final Cleanup:
Wait a few minutes for the ink to set, then gently erase any remaining visible pencil marks with your kneaded eraser.
Loose Lines
Don’t try to trace the painted edges perfectly. Letting the black ink line stray slightly inside or outside the paint creates a charming, illustrative style.
Now you have a heartwarming piece of art ready to frame or give to someone special
Dessert Doodles With Hearts

Fill a notebook page with these charming, sugary-sweet illustrations perfect for Valentine’s Day. This beginner-friendly project combines bold black outlines with soft pink accents for a modern, minimalistic look.
Step-by-Step Tutorial
Materials
- Sketchbook or bullet journal (spiral bound shown)
- Pencil (HB or similar)
- Eraser
- Black fine liner pen (01 or 03 size)
- Thicker black marker (optional, for filling)
- Pink brush pen or marker (soft pastel tone)
- Red-pink marker or colored pencil (for strawberries)
Step 1: Planning Your Layout
-
Pencil Sketching:
Begin by lightly sketching the placement of your seven main doodles with a pencil. Visualize the page as a grid to keep things balanced: place a cupcake near the top center and scatter smaller items like hearts and strawberries around it. -
Drafting the Cupcake:
Sketch the cupcake liner as a trapezoid shape. Top it with two fluffy cloud-like mounds for frosting. Add small heart shapes floating above it like steam or sprinkles. -
Adding Berry Details:
Draw two strawberry shapes on the left side. For the top one, draw a classic berry shape with a leafy top. For the bottom one, you can make it more stylized or ‘dipped’ looking. -
Sweet Treats & Hearts:
Sketch a lollipop on the right side as a swirl on a stick. Fill the remaining gaps with simple hearts—one solid, one outlines, and perhaps a unique heart-flower hybrid at the bottom center.
Fixing Smudges
If ink smears while erasing, transform the smudge into a shadow with a gray marker or cover it with a tiny solid heart doodle.
Step 2: Inking the Outlines
-
Tracing the Cupcake:
Using your fine liner, go over your pencil lines for the cupcake. Draw vertical lines inside the liner wrapper for texture. When inking the frosting, keep your hand loose to create soft curves. -
Inking the Strawberries:
Outline the strawberries carefully. For the leaves, use sharp, jagged strokes. Dot the inside of the berries with tiny tear-drop shapes or simple dots to represent seeds. -
Lollipop swirls:
Ink the lollipop spiral starting from the center and working outward. Draw the stick straight down. Add the small hearts floating around the page. -
The Heart Flower:
For the bottom doodle, ink the two heart shapes that form the flower head. Draw two stems crossing each other, and add leaves that look like loops with veins drawn inside them. -
Erase Sketches:
Once the ink is completely dry (wait at least 5 minutes to prevent smudging), gently erase all your pencil guides to reveal clean black lines.
Make It Sparkle
Use a white gel pen to add tiny highlights on the strawberries and lollipop for a glossy, sugary effect.
Step 3: Adding Color
-
Soft Pink Tones:
Take your pastel pink marker. Color the top layer of the cupcake frosting completely. For the middle frosting layer, add a stippled texture or small dots to suggest sprinkles. -
Berry Reds:
Use a slightly darker pink or red marker for the top strawberry. Color it in completely, but carefully avoid the tiny seeds if you want them to stay white (or color over them if you inked them black). -
Pattern Play:
For the second strawberry below it, leave the main body white! Instead of coloring it specific red, just color the tiny uniform seed dots black or dark pink for a graphic look. -
Highlighting Hearts:
Color the single floating hearts with your soft pink. For the heart-flower, add a speckled texture inside the hearts rather than filling them solidly; I find this adds a lovely organic feel. -
Candy Swirls:
Color every other stripe on the lollipop swirl to create the peppermint effect. Leave the alternate stripes white for contrast.
Step 4: Last Touches
-
Texture details:
Go back with your black pen. Add tiny hearts or dots onto the pink frosting of the cupcake for extra decoration. -
Stem definitions:
Strengthen the lines on the leaves of the heart-flower doodle if they got lost during erasing. -
Final Cleanup:
Check for any stray pencil marks one last time and brush away eraser dust.
You now have a delightful page of sweet doodles ready to brighten up your journal
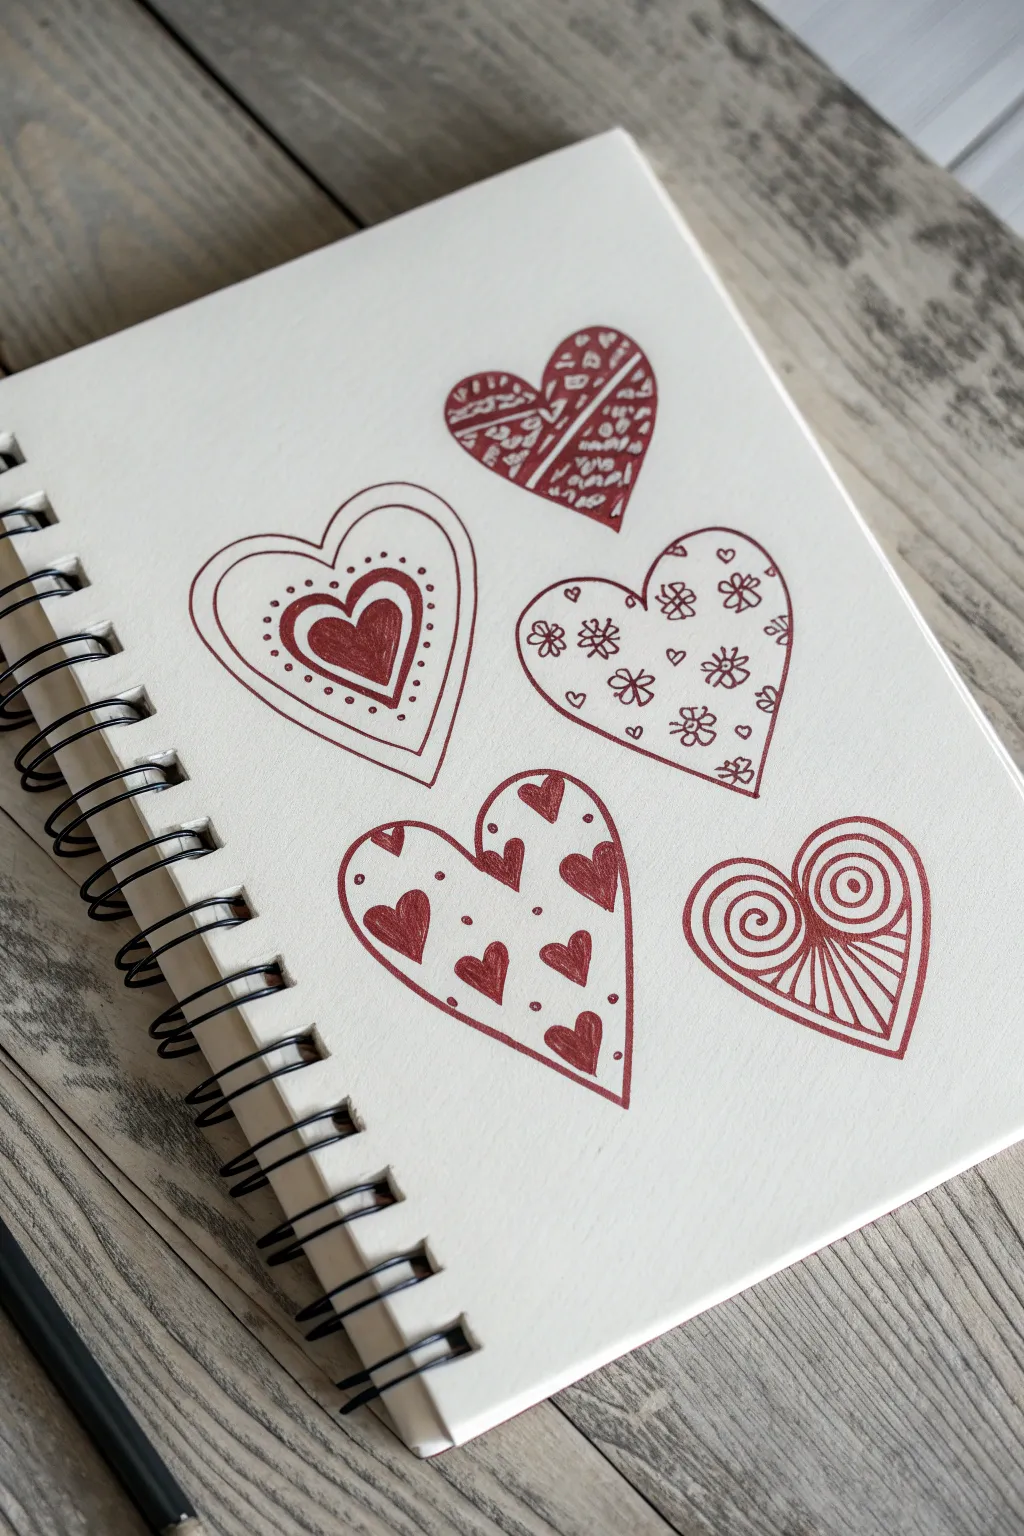
Pattern-Filled Hearts

Explore the charm of monochrome doodle art with this collection of five distinctively patterned hearts. Using just a single reddish-brown pen, you’ll practice linework, negative space, and simple geometric fills to create a cohesive and lovely page layout.
How-To Guide
Materials
- Sketchbook or heavy drawing paper
- Pencil (HB or H)
- Eraser
- Red-brown fine liner or gel pen (0.5mm or similar)
- Ruler (optional)
Step 1: Layout and Basic Shapes
-
Plan the composition:
Visualize where your five hearts will sit on the page. Aim for a balanced scatter: one near the top center, two in the middle row, and two near the bottom. Lightly mark the center points of each heart with your pencil. -
Sketch the outlines:
Using your pencil, draw the five heart outlines lightly. Vary the sizes slightly but keep them relatively consistent. The top heart can be slightly smaller, while the bottom left one is a bit elongated. Don’t worry about perfection; a hand-drawn look adds character. -
Refine the shapes:
Go over your pencil sketches to ensure the curves are smooth and symmetrical enough for your liking. Erase any stray lines that distract you before you start inking.
Ink Smudging?
If you are left-handed or using a very wet gel pen, place a scrap piece of paper under your hand as you draw to prevent smearing your fresh lines.
Step 2: Inking the Top and Middle Hearts
-
Top Heart: Geometric Sections:
Start with the top-center heart. Draw a diagonal line dividing the heart from the bottom left to the top right. Then, draw a second line perpendicular to the first, creating irregular quadrants. -
Top Heart: Filling Patterns:
In the left-hand sections, fill them with solid color but leave small, irregular white shapes to create a ‘terrazzo’ or stone texture. In the right-hand sections, draw simple parallel diagonal hatching lines. -
Middle Left: Nested Layers:
Move to the heart on the left. Draw a smaller heart inside the main outline, leaving a comfortable gap. Then, draw a third, solid-colored heart in the very center. Leave a tiny white highlight on the solid heart to give it dimension. -
Middle Left: Dot Details:
In the space between the outer outline and the inner outline, carefully place small dots. Space them evenly, following the curve of the heart shape. -
Middle Right: Floral Scatter:
For the heart on the right, leave the interior open. Draw small, five-petaled flowers scattered randomly inside. Add tiny circles or miniature hearts in the empty spaces between the flowers to make the pattern look dense and festive.
Step 3: Inking the Bottom Hearts
-
Bottom Left: Hearts Within a Heart:
Outline the large bottom-left heart. Inside, draw several medium-sized hearts in various orientations—some upright, some tilted. Make these solid red-brown. -
Bottom Left: Polka Dots:
In the white space surrounding the solid inner hearts, add small, solid dots. This creates a playful confetti effect. -
Bottom Right: Swirls and Rays:
Draw the outline for the final heart. Inside, draw two large spirals that meet in the center, resembling the curled tops of an ornate gate or a stylized owl’s eyes. -
Bottom Right: Radiating Lines:
From the point where the two spirals meet in the middle, draw straight lines radiating downwards to the bottom tip of the heart, fanning out like sun rays. -
Bottom Right: Upper Curves:
Above the spirals, add curved lines that follow the upper arches of the heart to fill the remaining space.
Add Some Shimmer
Trace over the highlight lines or the dots with a white or gold gel pen after the red ink is dry to add a subtle pop of mixed-media texture.
Step 4: Final Touches
-
Erase pencil marks:
Wait at least 15 minutes to ensure the ink is bone dry. Gently erase all visible pencil sketches from the initial phase to leave a clean, crisp drawing. -
Strengthen lines:
Inspect your work. If any main outlines look too thin compared to the solid fills, go over them a second time to thicken the line weight and make the hearts pop.
Now you have a charming page of patterned hearts ready to be gifted as a card or kept as practice.


Have a question or want to share your own experience? I'd love to hear from you in the comments below!