
If you’re itching to draw a character who looks like they absolutely run the room, a strong villain outfit is your fastest shortcut. I pulled together my favorite designs that lean into sharp silhouettes, dramatic layers, and those deliciously moody color choices.
Layered Tyrant Armor Over Formalwear
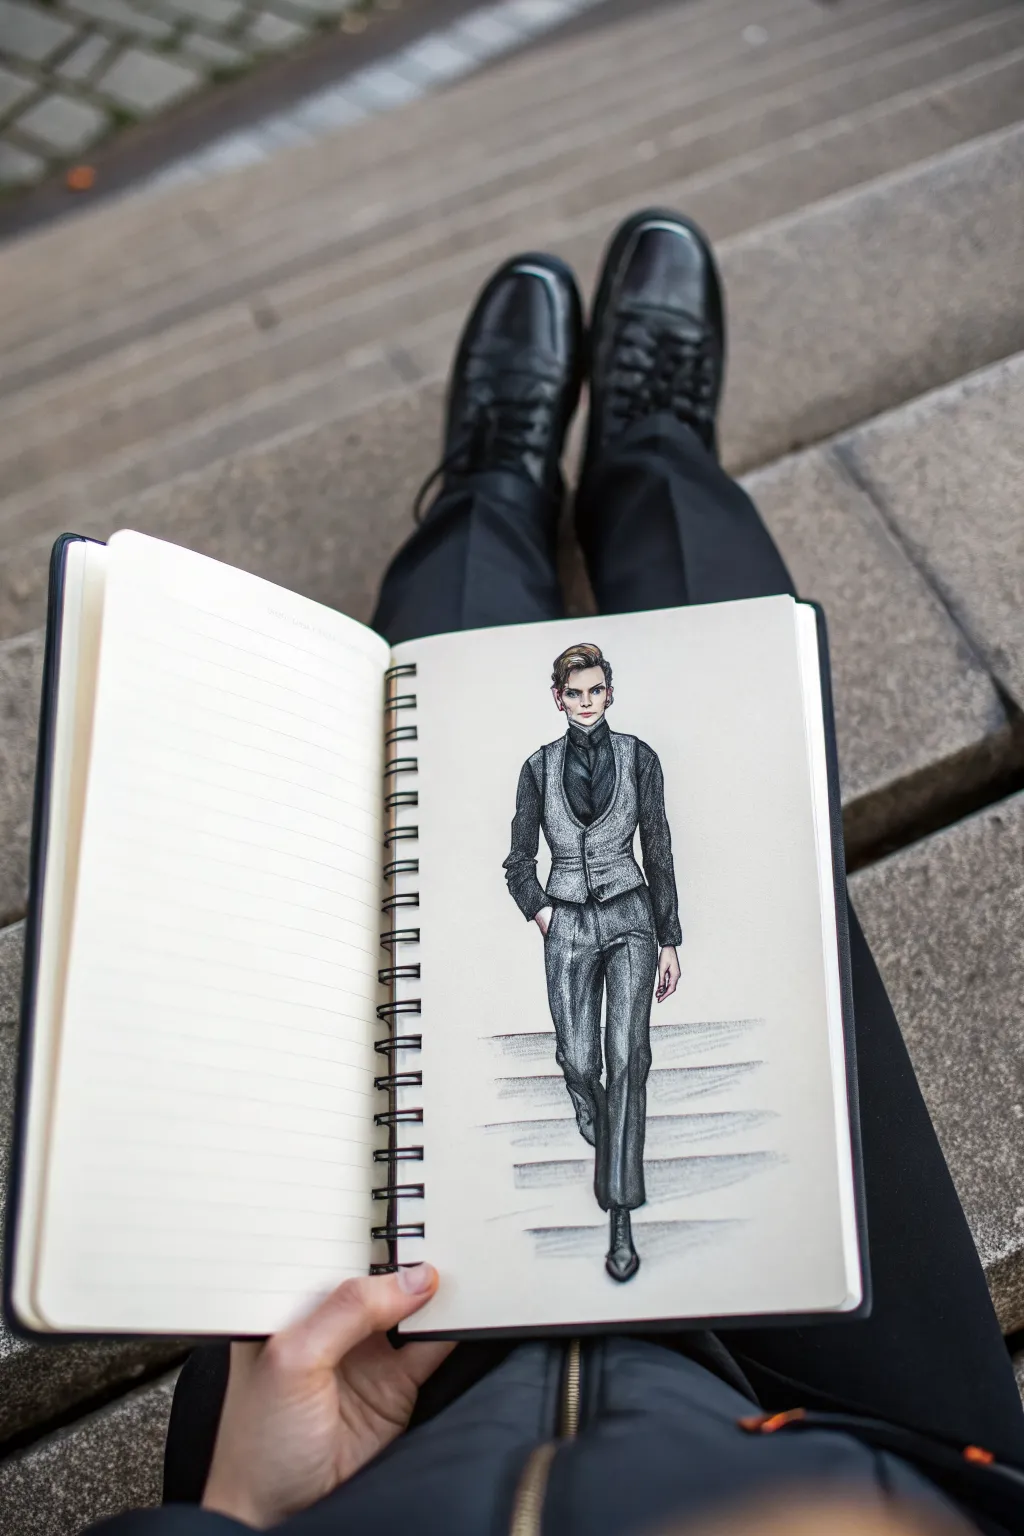
Capture the essence of a sophisticated antagonist with this fashion illustration that blends sharp tailoring with a menacing aura. You’ll layer graphite and ink to create textures ranging from sleek suit fabric to the rough stone of the steps underneath.
Step-by-Step
Materials
- Wire-bound sketchbook (heavyweight paper)
- H and HB graphite pencils
- Fine liner pens (0.1mm, 0.3mm, 0.5mm)
- Cool grey markers (light and medium tones)
- White gel pen
- Kneaded eraser
- Ruler
Step 1: Drafting the Figure
-
Establish the pose:
Start lightly with an H pencil to draw the ‘croquis’ or body framework. Mark a vertical center line to balance weight, sketching the head, shoulders, torso, and hips. Ensure one leg is forward to capture the walking motion. -
Map the proportions:
Since this is a fashion illustration, slightly elongate the legs for a stylized look. The figure should be about 8-9 heads tall. Mark the knee and ankle joints clearly on your framework. -
Outline the garments:
Sketch the silhouette of the outfit over the body form. Draw the fitted vest nipping in at the waist, the high collar of the shirt underneath, and the straight-leg trousers bunching slightly at the ankles. -
Refine the face:
Add facial features, keeping them sharp and angular to convey the ‘villain’ vibe. Draw swept-back hair with quick, directional strokes. -
Sketch the environment:
Using a ruler, lightly draw horizontal lines behind the feet to represent stairs. Perspective isn’t crucial here; simple parallel lines create enough context.
Smudged Ink?
If you accidentally smear wet ink, don’t panic. Turn it into a stylistic choice by adding directional smudges to the background, creating a ‘motion blur’ effect.
Step 2: Inking and Detailing
-
Outline the main shapes:
Switch to a 0.3mm fineliner. Go over your pencil lines, defining the crisp edges of the vest and trousers. Use confident, continuous strokes for the clothing outlines. -
Detail the face and hair:
Use the 0.1mm pen for delicate facial features like the eyes and lips. Ink the hair with flicking motions to suggest texture rather than outlining every strand. -
Add clothing folds:
Look for tension points—knees, crotch, and elbows. Add wrinkles where the fabric would naturally bunch up, using thinner lines than the outer silhouette. -
Erase guidelines:
Once the ink is completely dry, gently rub the entire drawing with a kneaded eraser to remove the initial graphite skeleton.
Step 3: Shading and Texture
-
Apply base tones:
Take a light cool grey marker and fill in the vest. The marker provides a solid foundation that makes the pencil shading on top look richer. -
Deepen the blacks:
For the shirt under the vest, use a darker grey marker or fill it in heavily with a hatched ink pattern. This contrast is key to the ‘layered armor’ look. -
Texture the trousers:
I like to use the side of an HB pencil here to create a soft, woolen texture on the pants. Shade the sides of the legs darker to give them cylindrical volume. -
Cross-hatching details:
Return to your 0.1mm pen to add fine cross-hatching in the deepest shadow areas: under the vest’s lapels, inside the pockets, and beneath the chin. -
Shadow the stairs:
Where the feet touch the steps, add a cast shadow using horizontal graphite strokes. Smudge this slightly with your finger or a blending stump for a hazy effect. -
Add highlights:
Use the white gel pen to add small dots of light in the eyes and on the highest points of the cheekbones. You can also run a thin line along the vest’s edge to separate it from the dark shirt. -
Enhance fabric sheen:
If the vest is meant to look like leather or satin, add stronger white highlights on the chest and shoulders to simulate reflection. -
Final assessment:
Step back and check the contrast. If the outfit blends too much, darken the outlines with a 0.5mm pen to make the character pop off the page.
Material Swap
Swap the grey markers for diluted black watercolor. This creates unpredictable blooms and stains that add a gothic, gritty atmosphere to the villain’s attire.
Your sketchbook now holds a formidable character ready to walk off the page and into a story

Corrupted Ballgown With Battle Details
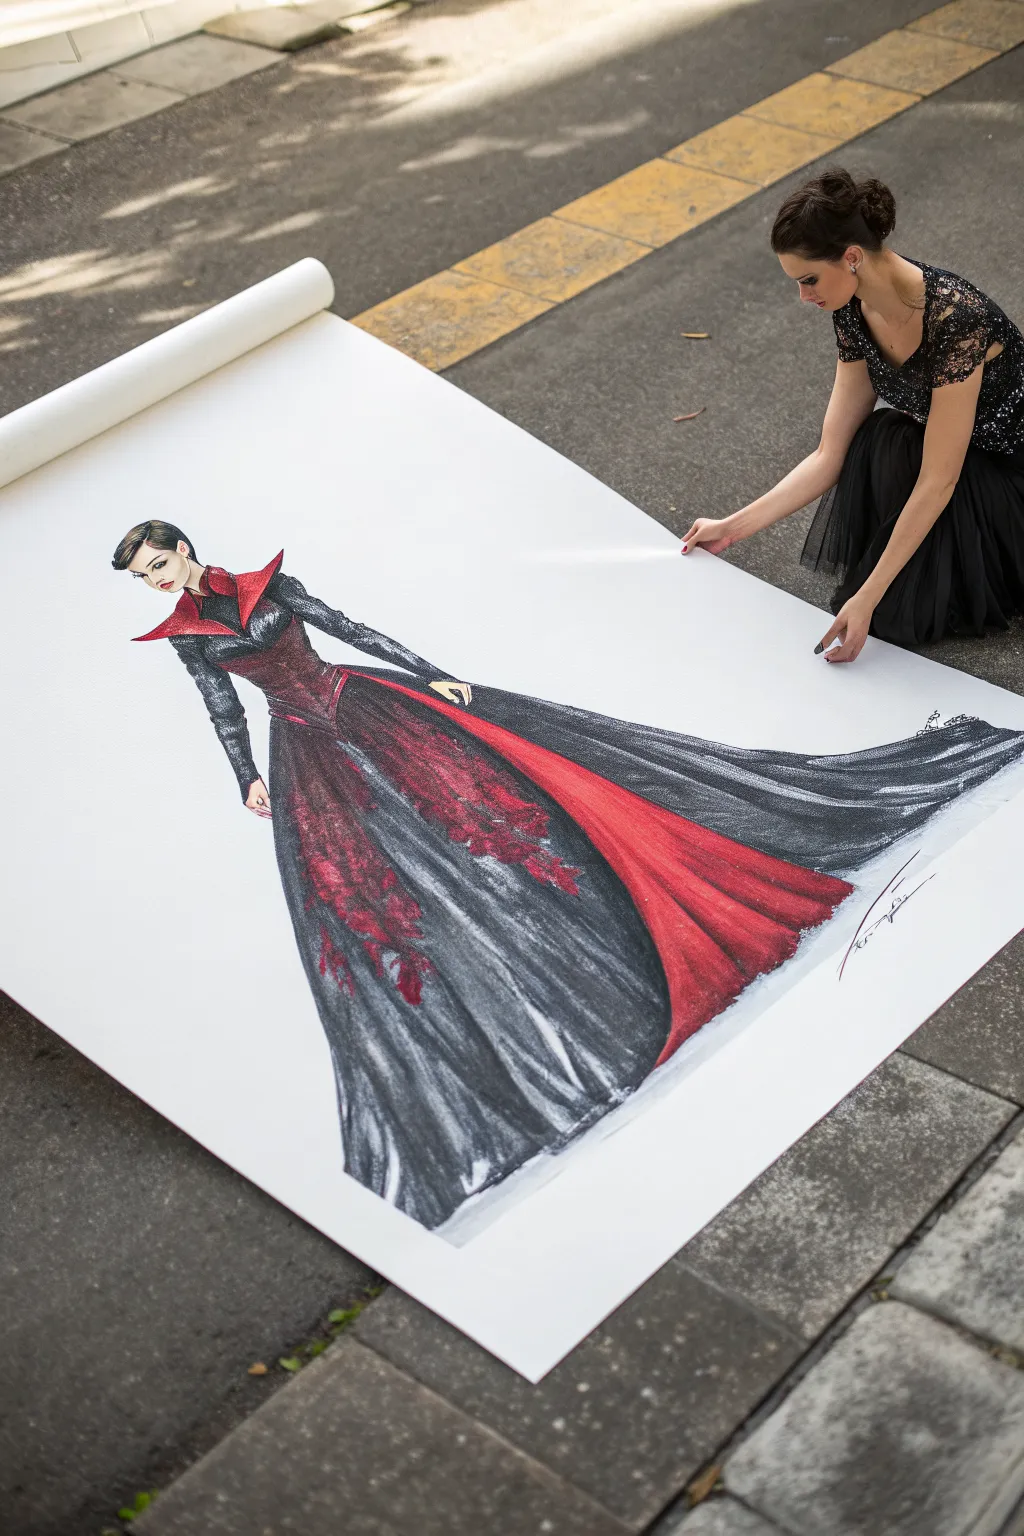
This project takes fashion illustration to the streets with a striking, oversized drawing of a corrupted ballgown featuring sweeping black folds and blood-red accents. Perfect for dramatic impact, this piece uses broad charcoal strokes and vibrant pastels on a long roll of white paper.
Step-by-Step
Materials
- Large roll of heavy-duty white paper (at least 3ft wide)
- Thick willow charcoal sticks
- Compressed charcoal (black)
- Soft pastels (crimson red, deep burgundy, black)
- Fixative spray
- Kneaded eraser
- Paper towels or blending stumps
- Weighted objects (to hold paper down)
Step 1: Setting the Stage
-
Prepare your canvas:
Find a clean, flat surface like a smooth driveway or patio. Unroll a generous length of paper—about 6 to 8 feet—to accommodate the dramatic train of the dress. Use weights on the corners to keep it flat. -
Map the figure:
Using a light touch with a willow charcoal stick, sketch a basic elongated croquis. Position the figure on the left side of the paper to allow plenty of room for the dress train to sweep across to the right. -
Outline the silhouette:
Draft the shape of the gown. Start with the fitted bodice and high, vampire-queen collar, then draw long, sweeping lines to define the massive skirt. Let the lines create a sense of movement toward the right edge.
Clean Edges Pro-Tip
Use masking tape along the very edges of your paper roll before you start drawing. When you peel it off at the end, you’ll have a crisp, professional white border framing your work.
Step 2: Building the Black Layers
-
Base shading:
Switch to a thicker stick of compressed charcoal. Begin filling in the darkest areas of the skirt’s folds, particularly near the hem and the shadows where the fabric gathers. -
Create texture:
Use the side of the charcoal stick to create broad, sweeping strokes. This mimics the heavy drape of velvet or satin. Leave sections of the paper white to act as highlights on the fabric’s ridges. -
Define the bodice:
Darken the sleeves and sides of the torso, pressing harder to create a dense black. This contrast helps the central crimson panel pop later on. -
Blend for softness:
Take a paper towel or blending stump (or even your fingers, if you don’t mind the mess) and smudge the charcoal strokes in the direction of the fabric flow. This softens the texture and creates a more realistic fabric appearance.
Level Up: Mixed Media
Add real dimension by gluing small black lace scraps or red sequins onto the bodice area after the drawing is sealed for a 3D couture fashion look.
Step 3: Adding the Crimson Corruption
-
Apply the red base:
Using a crimson soft pastel, fill in the central panel of the dress, starting from the bodice and flowing down into the skirt’s opening. Keep the color solid and vibrant. -
Detail the collar:
Color the sharp, upturned collar with the same red pastel. Add a touch of black charcoal at the base of the neck to give the collar depth and dimension. -
Add floral embroidery:
With a burgundy pastel and a sharp piece of charcoal, sketch rough floral or vine-like motifs creeping down the sides of the skirt train. This adds that ‘corrupted’ elegance to the design. -
Intensify shadows:
Go back over red areas with a light layer of charcoal in the deep folds to create a dark burgundy shadow, blending slightly to marry the two colors.
Step 4: Refining the Face and Hair
-
Draw facial features:
Switch to a finer piece of charcoal or a charcoal pencil. Carefully verify the proportions of the face, drawing sharp eyebrows and defined eyes. -
Paint the lips:
Use the red pastel to give the figure a bold, dark lip color, matching the dress accents. -
Style the hair:
Fill in the hair using dense black strokes. Keep the style sleek and pulled back to emphasize the high collar. Leave a tiny sliver of white paper for a shine on the hair.
Step 5: Final Touches
-
Extend the train:
I like to stand back at this point to see the whole flow. Extend the black charcoal lines of the train all the way to the paper’s edge, ensuring the ‘fabric’ looks heavy and grounded. -
Clean up edges:
Use the kneaded eraser to clean up any smudges on the white background around the figure, making the silhouette sharp and distinct. -
Sign and seal:
Sign your name with a flourish near the train. Finally, spray the entire drawing with a workable fixative to prevent the massive amount of charcoal dust from smearing.
Roll up your masterpiece carefully or display it flat to show off the grand scale of your villainous design


Chains and Buckles Statement Outfit
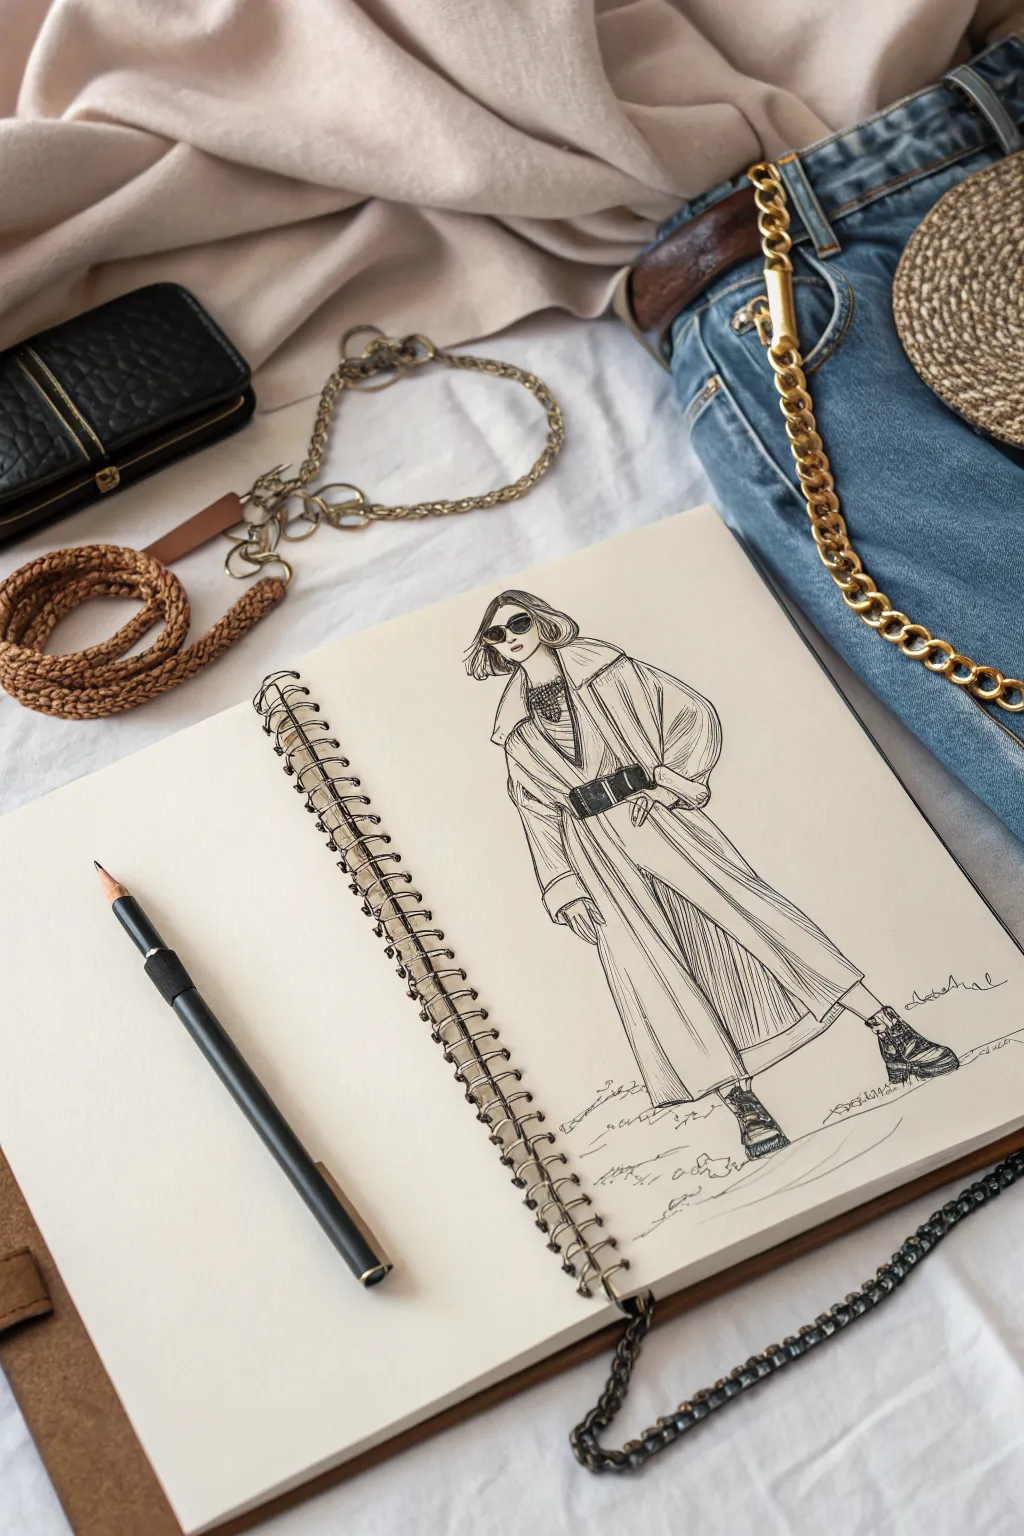
Capture the essence of modern villainy with this sleek, fashion-forward sketch that focuses on texture and attitude. Using clean ink lines and confident hatching, you’ll create a striking trench coat ensemble that looks ready for a high-stakes heist.
Step-by-Step Tutorial
Materials
- Spiral-bound sketchbook (mixed media or smooth drawing paper)
- HB graphite pencil
- Kneaded eraser
- Fine liner pen (0.1mm) in black
- Fine liner pen (0.3mm or 0.5mm) in black
- Ruler (optional for belt details)
Step 1: Conceptualizing the Pose
-
Establish the Line of Action:
Start lightly with your HB pencil. Draw a gentle S-curve to represent the model’s spine and posture. This figure is standing with weight on one leg, so tilt the hip line slightly to create that confident, relaxed stance. -
Map the Proportions:
Using the head-height method, map out an elongated fashion figure (roughly 8.5 to 9 heads tall). Sketch an oval for the head, a trapezoid for the torso, and long lines for the legs. The coat will hide most of the body, but knowing where the knees and ankles are is crucial for the fabric drape. -
Outline the Silhouette:
Draft the oversized trench coat shape over your mannequin. Bell out the sleeves slightly at the elbows and cinch the waist tightly. Extend the coat hem down to the lower calves to create that dramatic, sweeping length.
Loose Lines
Don’t connect every single line perfectly. Leaving small gaps in the long vertical fabric lines makes the trench coat look airy and sketched rather than stiff and rigid.
Step 2: Refining the Details
-
Draft the Accessories:
Sketch the wide belt sitting high on the waist, adding vertical lines for a large buckle. At the feet, draw the shapes of heavy, lug-soled combat boots. Don’t forget the sunglasses—two small ovals slightly low on the nose bridge. -
Add Fabric Folds:
Indicate where the fabric pulls. Draw radiating lines from the cinched belt upwards and downwards. Add a deep V-neck collar shape and the large, folded lapels of the trench coat. -
Refine the Hairstyle:
Sketch a sharp, chin-length bob cut. Keep the lines somewhat jagged at the ends to suggest movement and texture. -
Clean Up the Pencil Work:
Review your sketch. Does the pose feel balanced? Erase any distracting construction lines, leaving only the definitive lines you want to ink.
Smudged Ink?
If you smudge detail work, don’t panic. Incorporate it into the shadows by adding hatching over the smudge, or turn it into a fabric pattern or stain on the ground.
Step 3: Inking the Figure
-
Outline the Coat:
Switch to your thicker fine liner (0.5mm). Trace the outer silhouette of the coat with confident, continuous strokes. I find that pulling the pen toward you helps keep the line steady. -
Detail the Face and Hair:
Use the 0.1mm pen for delicate features. Fill in the sunglasses completely black to give that mysterious, villainous look. Use quick, flicking strokes for the hair strands. -
Ink the Boots:
Use the thicker pen again for the boots. Create a scribble texture on the soles to mimic the heavy tread. Use cross-hatching to darken the inset parts of the boot. -
Define the Belt:
Outline the belt buckle firmly. Fill the belt strap with dense, vertical hatching lines to suggest a stiff leather texture, distinct from the fabric of the coat.
Step 4: Texture and Shading
-
Add Vertical Pinstripes:
Using the 0.1mm pen, draw long, precise vertical lines down the length of the coat and sleeves. These don’t need to be perfectly straight; let them follow the flow of the fabric folds you sketched earlier. -
Create Shadow Depth:
Identify the light source (usually coming from the top left). Add diagonal hatching on the right side of the coat folds, under the collar, and beneath the belt to create volume. -
Intensify the Darks:
Go back to the V-neck opening. Cross-hatch heavily in the area between the lapels to suggest a dark shirt or shadow underneath. -
Ground the Figure:
Scribble some loose, sketchy lines under the boots. This grounding shadow prevents the figure from looking like it’s floating in space. -
Final Erase:
Wait at least five minutes to ensure the ink is totally dry. Gently run your kneaded eraser over the entire drawing to lift the original graphite guide lines.
Keep your wrist loose for those long coat lines and you’ll have a wonderfully stylish sketch in no time


Neon Tech Overlord Exosuit Layers

Learn to draft a compelling character concept by sketching a sleek, high-tech villain exosuit. This tutorial guides you through constructing the anatomical base, layering futuristic armor plating, and adding subtle color touches for a professional finish.
Detailed Instructions
Materials
- Large format drawing paper (A2 or A3 size)
- HB and 2B graphite pencils
- Fine liner pens (0.1mm, 0.3mm, 0.5mm)
- Grey alcohol-based markers (Cool Grey 1, 3, 5)
- Red and flesh-tone colored pencils or markers
- Ruler or T-square
- Kneaded eraser
Step 1: Setting the Foundations
-
Establish the Scale:
Start by drawing a vertical centerline down the middle of your large paper. Use your ruler to mark horizontal guidelines for the head, shoulders, waist, knees, and feet to ensure correct proportions. -
Reference Line Markings:
Add small, dashed lines and measurements (like ‘185cm’) to the left of the figure. This mimics the technical blueprint aesthetic seen in professional costume design sheets. -
Construct the Mannequin:
Using an HB pencil, lightly sketch a basic human mannequin. Focus on a strong, standing pose with legs slightly apart and arms relaxed at the sides. Keep the head shape simple and bald for now. -
Define the Anatomy:
Flesh out the silhouette over your mannequin stick figure. Give the character a muscular build, particularly in the shoulders and thighs, as the suit will hug these forms closely.
Step 2: Designing the Exosuit
-
Draft the Chest Plate:
Sketch the central chest armor. Draw segmented pectoral plates that split down the center, resembling a high-tech ribcage. -
Add Shoulder Protection:
Draw rounded pauldrons on the shoulders. Connect them to the neck collar with angular lines to suggest flexibility and mechanical linkage. -
Detail the Limb Armor:
On the arms and legs, draw segmented panels. Create distinctive knee pads and forearm bracers, using horizontal lines to suggest flexible joints where the suit would bend. -
Refine the Boots:
Sketch heavy, industrial-style boots. Add treads to the soles and reinforcement panels around the ankles for a grounded, tactical look. -
Add Tech Textures:
Lightly pencil in areas of fine cross-hatching or vertical ribbing on the inner thighs, sides of the torso, and forearms to represent the ‘under-suit’ material layers.
Fixing Smudges
If you accidentally smudge the ink, don’t panic. Use an electric eraser for precision, or turn the smudge into a ‘battle damage’ scuff on the armor with a bit of grey marker shading.
Step 3: Inking and Coloring
-
Outline the Contour:
Switch to your 0.5mm fine liner. Ink the main outer silhouette of the character with a clean, confident line. I tend to rotate the paper to keep my hand steady for long curves. -
Detail Inking:
Use the finer 0.1mm and 0.3mm pens for internal details like armor seams, panel lines, and the facial features. Keep these lines thinner to create depth. -
Erase Pencil Guidelines:
Once the ink is completely dry, gently erase all graphite lines with your kneaded eraser to clean up the drawing. -
Apply Base Greys:
Using your Cool Grey markers, fill in the armor plates. Use the lightest grey for the main panels and darker greys for the recessed areas or shadows under the chest and knees. -
Add Skin Tone:
Color the face and neck area with a flesh-tone marker. Keep the shading minimal, focusing on the shadow under the chin and around the eyes. -
Red Accents:
Use a red colored pencil or fine marker to add the ‘neon’ tech elements. Carefully color the textured strips on the arms, thighs, and shoulders. -
Enhance Textures:
Go back over the red areas and grey ‘under-suit’ sections with a very fine pen to add hatching, emphasizing the mesh-like texture of these flexible zones. -
Final Annotations:
Add handwritten notes or scribbles at the bottom near the feet, simulating designer notes or material callouts.
Level Up: Glow Effect
To make the red tech lines truly ‘neon’, outline the red strips with a very thin white gel pen. This creates a highlight that mimics glowing LED embedded in the suit.
Step back and admire your professional-grade character concept ready for the big screen layout.

PENCIL GUIDE
Understanding Pencil Grades from H to B
From first sketch to finished drawing — learn pencil grades, line control, and shading techniques.
Explore the Full Guide
Sinister Ringmaster Tailcoat Remix
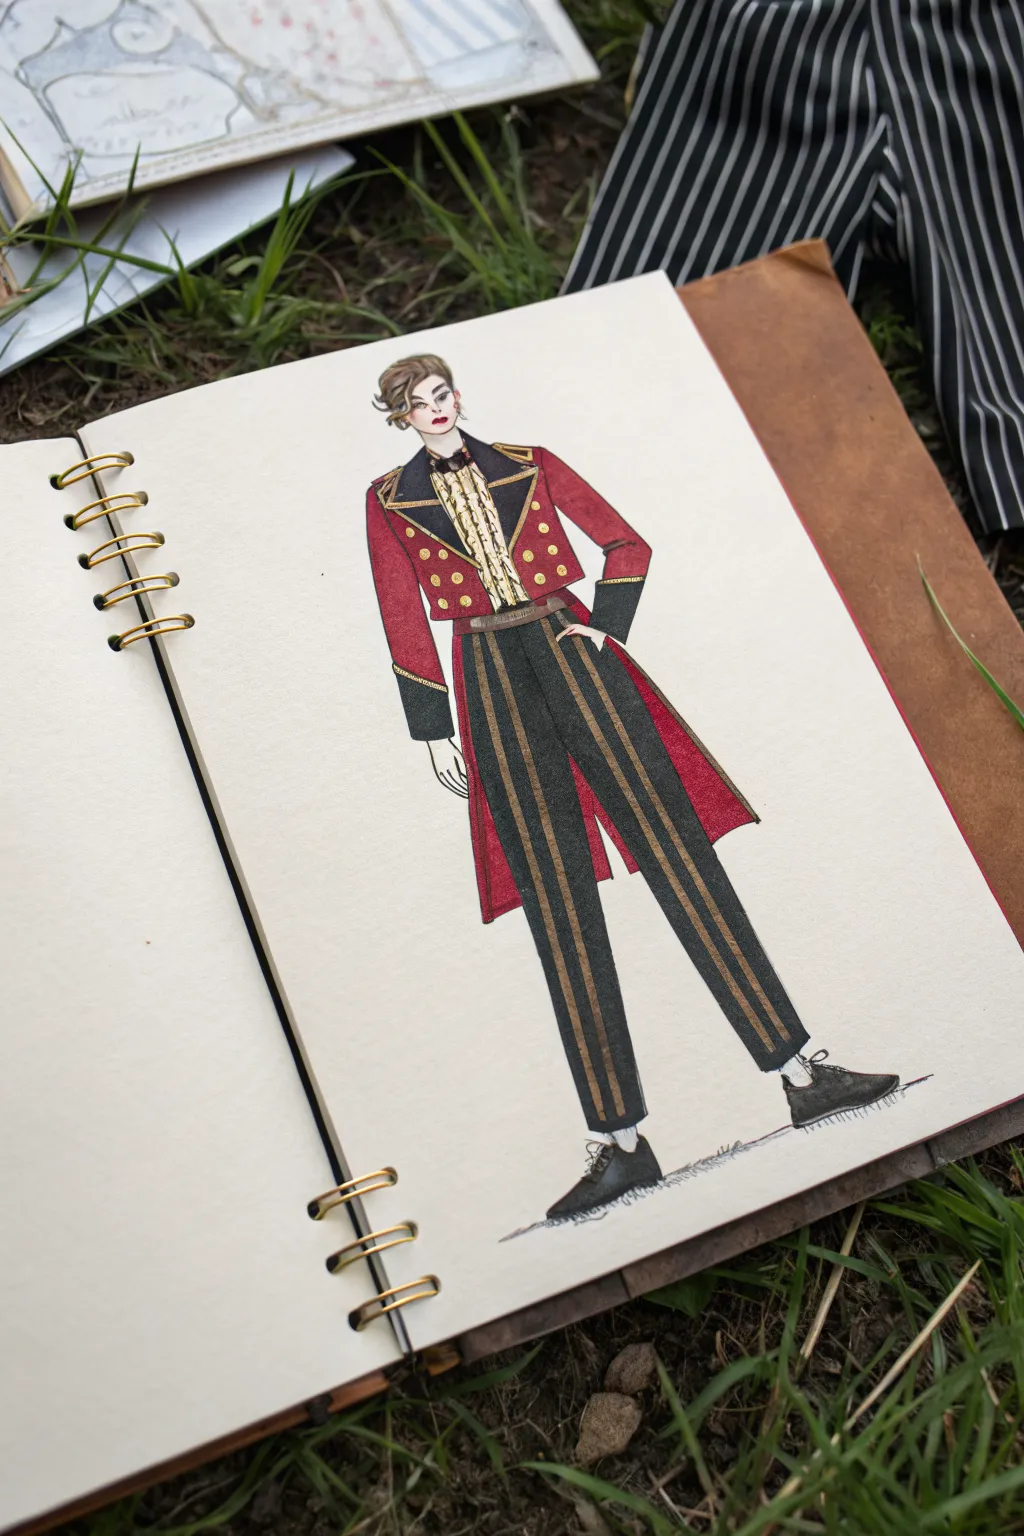
Capture the commanding presence of a villainous ringmaster with this stylized fashion illustration. This project focuses on sharp tailoring, bold scarlet hues, and metallic accents to create a costume design that feels both theatrical and menacing.
Step-by-Step
Materials
- Heavyweight mixed-media paper or sketchbook (smooth texture)
- HB or 2H graphite pencil
- Kneadable eraser
- Fine liner pens (0.1mm, 0.3mm, 0.5mm black)
- Alcohol-based markers (Copic or similar qualities in Dark Red, Cool Grey/Black, Skin Tone, Gold/Mustard)
- White gel pen for highlights
- Gold metallic paint pen or gel pen
Step 1: Sketching the Croquis
-
Establish the pose:
Begin by lightly sketching a standard fashion croquis (figure template). Aim for a strong, confident stance with legs shoulder-width apart and one hand resting firmly on the hip to convey authority. -
Outline the garment silhouette:
Draft the main shapes of the outfit over the figure. Sketch a structured tailcoat with sharp shoulders, a high collar, and tails that extend behind the legs. Draw straight-leg trousers that taper slightly. -
Map out the details:
Refine the pencil sketch by adding lapels, double-breasted button placements, and the ruffled shirt underneath. Mark vertical stripes on the trousers to guide your later coloring.
Bleeding Lines?
If your markers bleed into the fine liner, switch to pigment-based liners (drawing pens) which are waterproof, or do your coloring first and ink the outlines last.
Step 2: Inking and Definition
-
Ink the main lines:
Using a 0.3mm fine liner, carefully trace over your final pencil lines. Use confident, sweeping strokes for the long coat tails and trouser legs to keep the look sleek. -
Detail the face:
Use a finer 0.1mm pen for the facial features. Keep the expression neutral or slightly haughty, emphasizing sharp cheekbones and defined brows. -
Erase guidelines:
Once the ink is completely dry—give it a minute to be safe—gently erase all underlying graphite marks with your kneadable eraser to leave a clean drawing surface.
Step 3: Color Application
-
Base skin tone:
Apply a light wash of skin-tone marker to the face, neck, and hands. Let it dry, then add a second layer under the hairline and chin for subtle shading. -
Rendering the coat:
Fill the jacket and coat tails with a deep, saturated red marker. I find that working quickly helps avoid streak lines in larger areas like the coat tails. -
Shading the red fabric:
Go back in with a slightly darker red or a warm grey marker to add shadows under the arms, beneath the lapels, and where the coat tails fold. -
Coloring the trousers:
Use a dark charcoal or black marker to color the main sections of the trousers, being very careful to leave the vertical stripe gaps white for now. -
Adding the stripes and trim:
Fill the gaps on the trousers with a mustard or gold-colored marker. Use this same color for the inner lining of the coat tails visible near the legs. -
Painting the boots:
Color the shoes with solid black, leaving a tiny sliver of white paper for a natural shine, or wait to add this later with a gel pen.
Add Texture
To make the coat look like velvet, do not blend the marker ink perfectly. Let the strokes overlap slightly to create a rich, dense texture suitable for heavy fabric.
Step 4: Final Details and Highlights
-
Gold embellishments:
Use your gold metallic pen to draw the buttons on the jacket, the belt buckle, and the fine detailing on the lapels. The metallic ink really makes the costume pop. -
Enhancing contrast:
Take a 0.5mm black pen and thicken the outline on the shadowed side of the figure (usually the right side) to give the drawing weight and dimension. -
Adding texture:
Use the fine liner to add tiny stippling or hatching on the shirt ruffle to suggest lace or light fabric texture. -
White highlights:
With a white gel pen, add small dots of light to the gold buttons, the tip of the nose, and the shine on the boots. -
Grounding shadow:
scribble a loose, horizontal shadow under the feet using a light grey marker or pencil. This grounds the figure so it doesn’t look like it’s floating.
Now you have a striking costume design ready for your villain’s debut
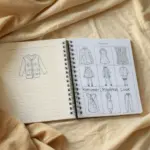
Variant Sheet: One Villain, Three Outfit Twists
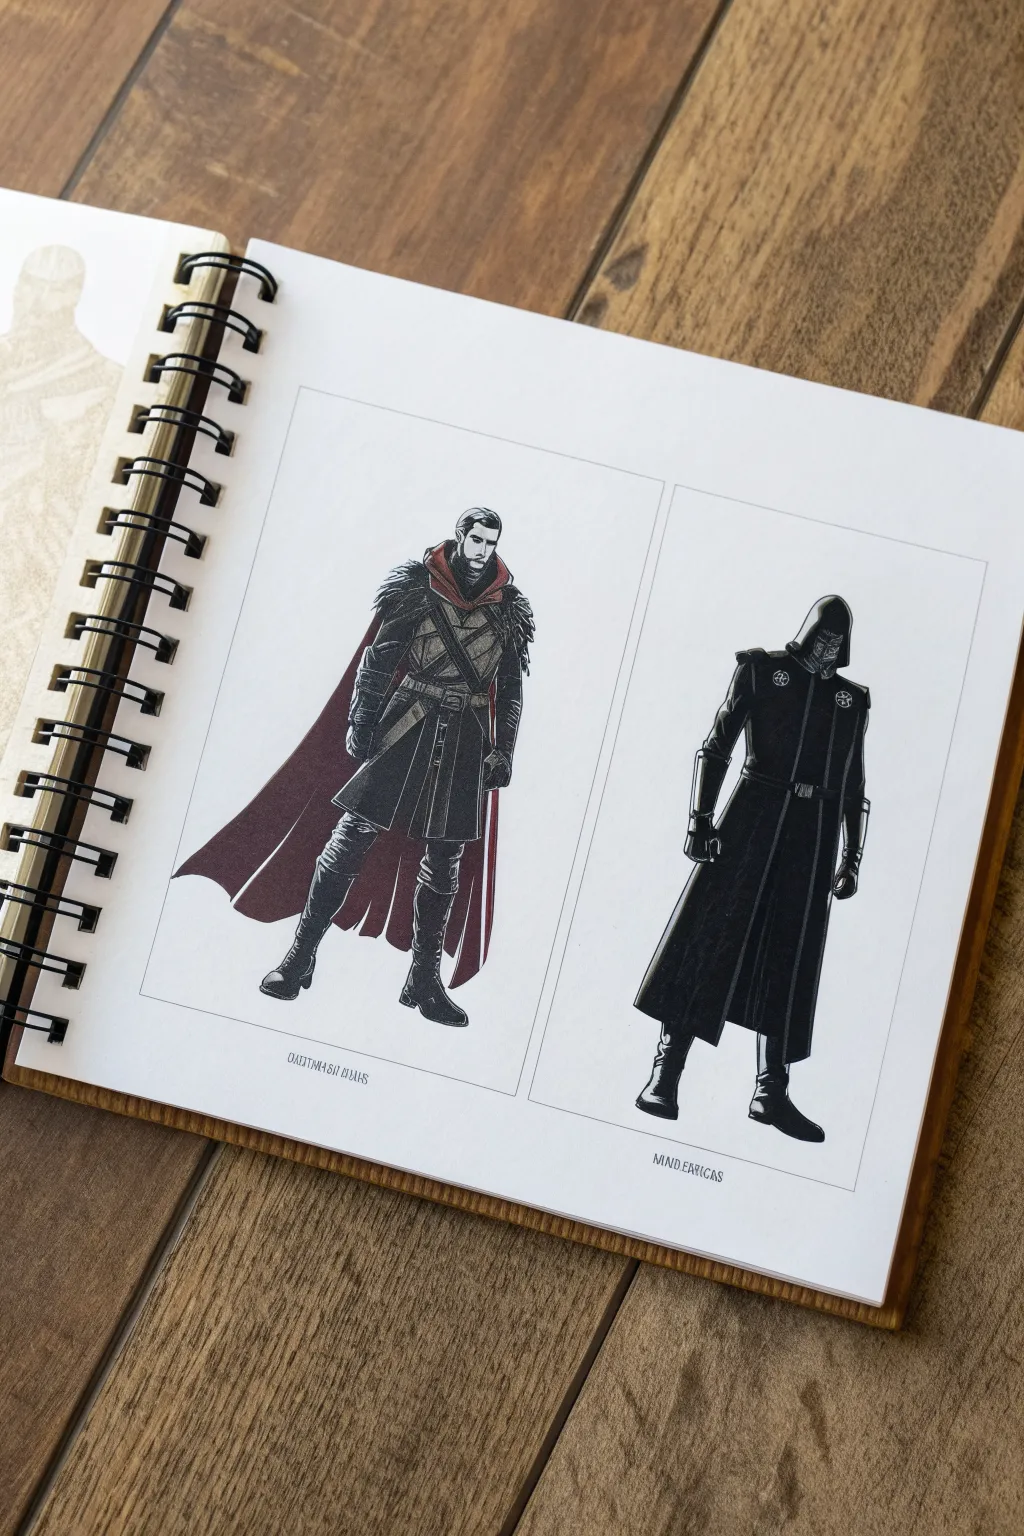
This tutorial guides you through illustrating two distinct villain concepts side-by-side, perfect for exploring costume variations. You’ll create clean, comic-style character designs inked with precision on high-quality sketchbook paper.
Detailed Instructions
Materials
- Spiral-bound sketchbook (mixed media or heavy drawing paper)
- HB or 2B graphite pencil
- Kneaded eraser
- Fine liner pens (sizes 0.1, 0.3, and 0.5)
- Black alcohol marker or India ink (for large fill areas)
- Dark red or maroon colored pencil/marker
- Ruler
Step 1: Planning the Layout
-
Define the frames:
Using your ruler and a light pencil, draw two equal-sized vertical rectangles on your sketchbook page. Leave a comfortable margin between them and at the bottom for captions. -
Establish the poses:
Lightly sketch the stick-figure gesture for both characters. For the left figure, aim for a confident, wide stance with legs apart. For the right figure, use a more rigid, upright military posture. -
Block in body shapes:
Flesh out the mannequins. Keep the proportions realistic—about 7.5 to 8 heads tall. The left figure should feel bulkier due to layered clothing, while the right figure remains slim and streamlined.
Step 2: Penciling the Details
-
Draft the left outfit: The Warlord:
Sketch a fur collar around the shoulders and a flowing cape draping behind. Add a tunic with a crossover chest belt design and knee-high boots. -
Refine the Warlord details:
Draw the facial features, adding a beard for ruggedness. Mark out the folds in the skirt segment of the tunic and the texture of the fur. -
Draft the right outfit: The Enforcer:
Sketch a long, floor-length trench coat with a high collar. Add a hood that obscures most of the face, leaving room for a tactical mask. -
Refine the Enforcer details:
Add military-style epaulets on the shoulders and circular emblems on the chest. Draw vertical piping lines down the front of the coat to emphasize height. -
Add caption placeholders:
Lightly pencil in guidelines below each frame for the character names. Use a fictional script or stylized uneven text to mimic the reference.
Negative Space
When filling large black areas, intentionally leave thin white strips between overlapping dark shapes (like a boot over a pant leg). This prevents the drawing from becoming a flat blob.
Step 3: Inking and Coloring
-
Outline the Warlord:
Use a 0.3 pen to ink the main contours of the left figure. Use short, jagged strokes for the fur collar to suggest texture, and smooth, long lines for the cape. -
Fill the Warlord’s blacks:
Switch to your black marker or brush pen. Fill in the pants, the tunic’s dark panels, and the boots, leaving thin white gaps (negative space) to define the folds and separation between limbs. -
Add color accents:
With the dark red marker or colored pencil, fill in the cape and the collar lining. Keep the shading flat and graphic rather than highly blended. -
Outline the Enforcer:
Ink the right figure with the 0.3 pen. Focus on sharp, clean geometric lines to contrast with the organic feel of the first character. -
Fill the Enforcer’s blacks:
This figure is almost entirely in silhouette. Fill the coat completely with black marker. I find it helpful to leave thin white lines along the seams and piping to maintain readability. -
Ink the frames:
Use a 0.5 pen and your ruler to ink the two rectangular borders. Ensure the corners are crisp. -
Lettering:
Ink the captions below each frame using a 0.1 pen. Mimic the ‘alien’ font style by keeping the letters narrow and slightly inconsistent. -
Final Cleanup:
Wait for all ink to be completely dry to the touch. Gently erase the underlying pencil structure, being careful not to buckle the paper.
Marker Bleed
If your markers bleed through the page, slip a sheet of scrap cardstock behind the page you are working on. This protects the next clean sheet in your book.
Now you have a professional-looking concept art spread ready to expand into a full story
Have a question or want to share your own experience? I'd love to hear from you in the comments below!