I have always felt that adding architectural details to plain drywall is the quickest way to give a room a sense of history and intention. These design concepts explore how structure and paint can work together to create a truly inspiring canvas for your daily life.
Classic White Board and Batten
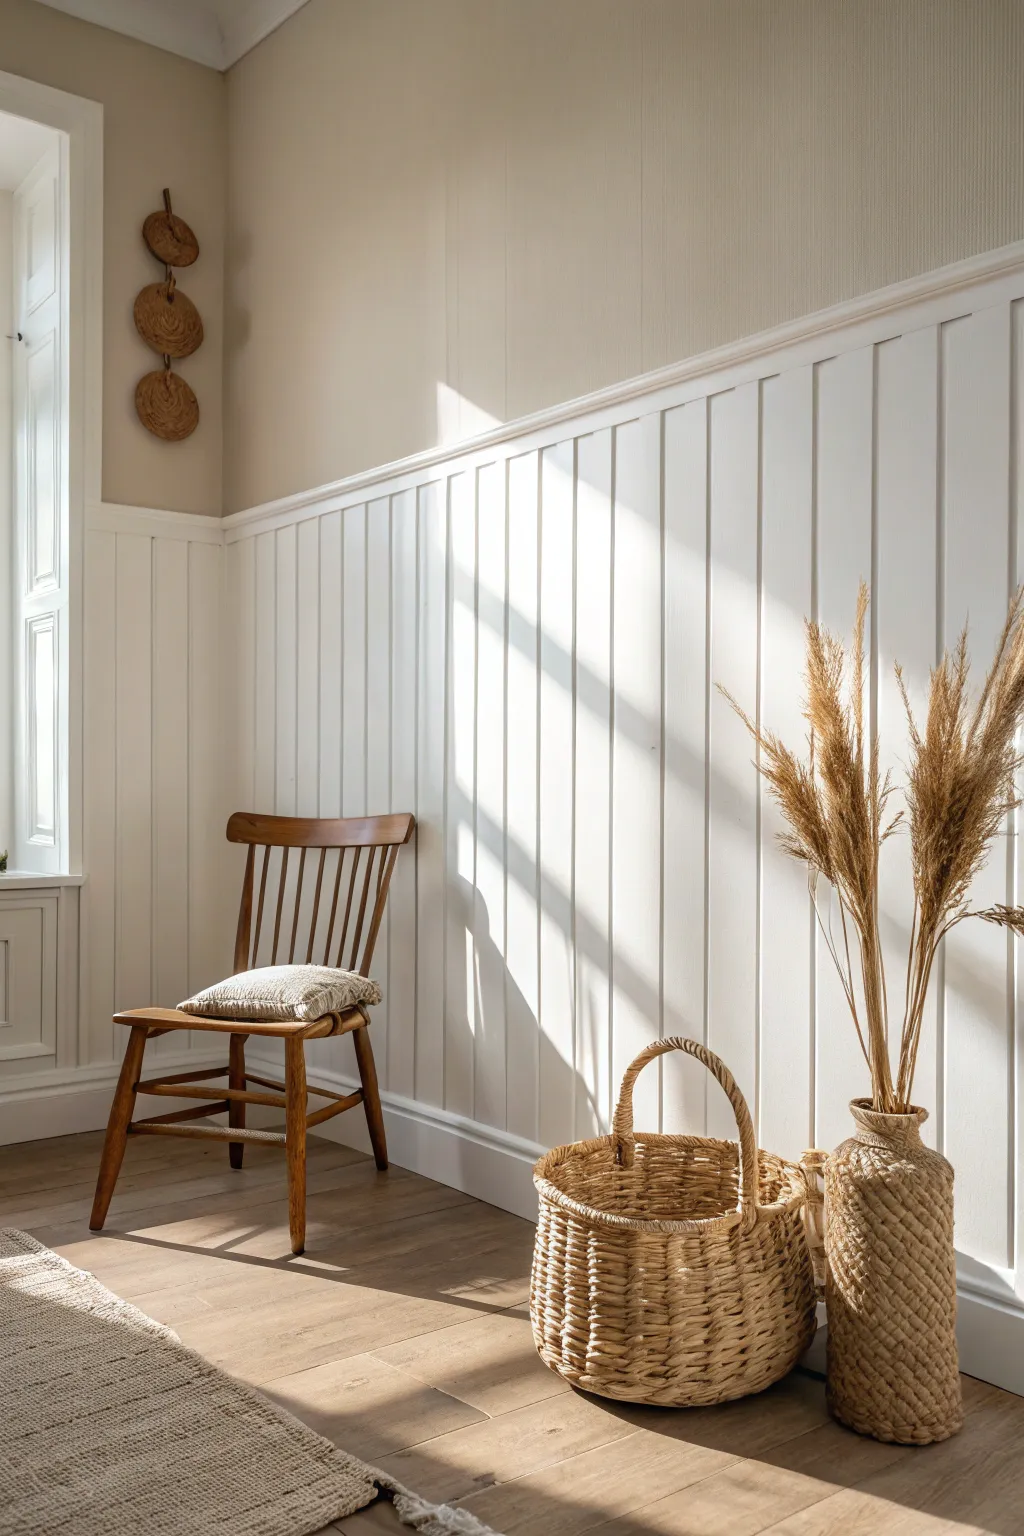
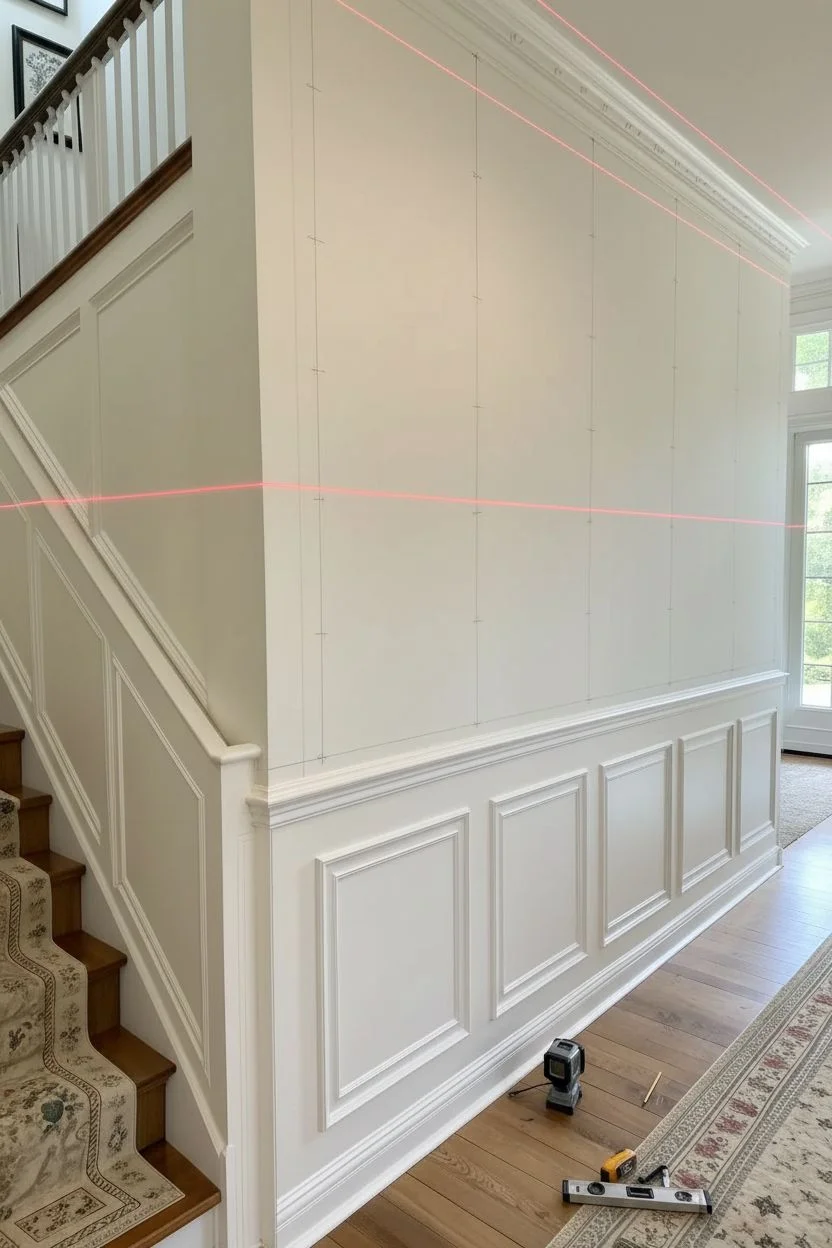
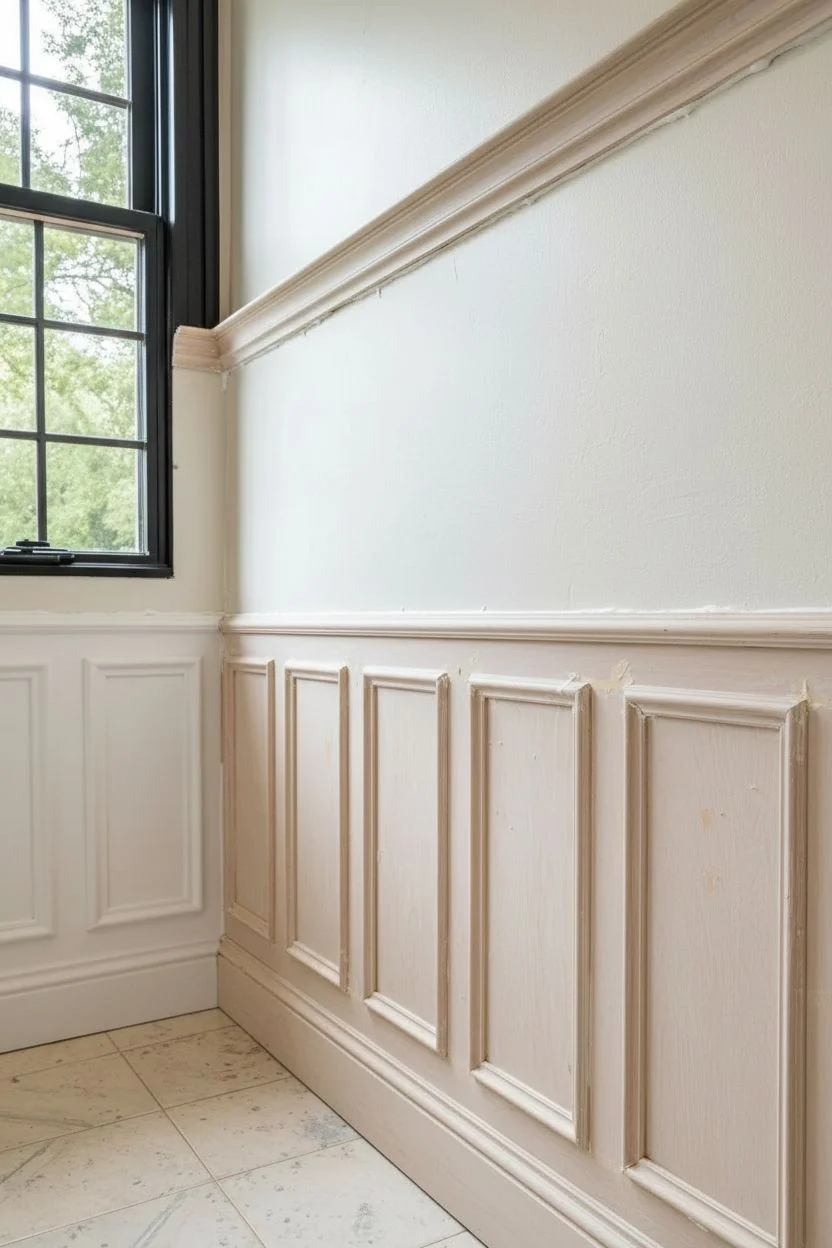
Bring timeless elegance and architectural interest to a plain room with this classic half-wall wainscoting project. By combining vertical planking with a crisp chair rail, you create a sophisticated backdrop that brightens the space and adds significant character. The contrast between the bright white wood and a warm neutral upper wall makes the room feel grounded and cozy.
How-To Guide
Materials
- Vertical tongue-and-groove planks or trim boards (MDF or pine)
- Chair rail molding
- Baseboard molding
- Construction adhesive (Liquid Nails)
- Finish nailer with 1.5-inch brad nails
- Laser level (or long spirit level)
- Miter saw
- Jigsaw (for outlet cutouts)
- Wood filler and sandpaper
- Introduction to Paintable Caulk
- Painter’s tape
- White semi-gloss interior paint
- Paint rollers and angled sash brush
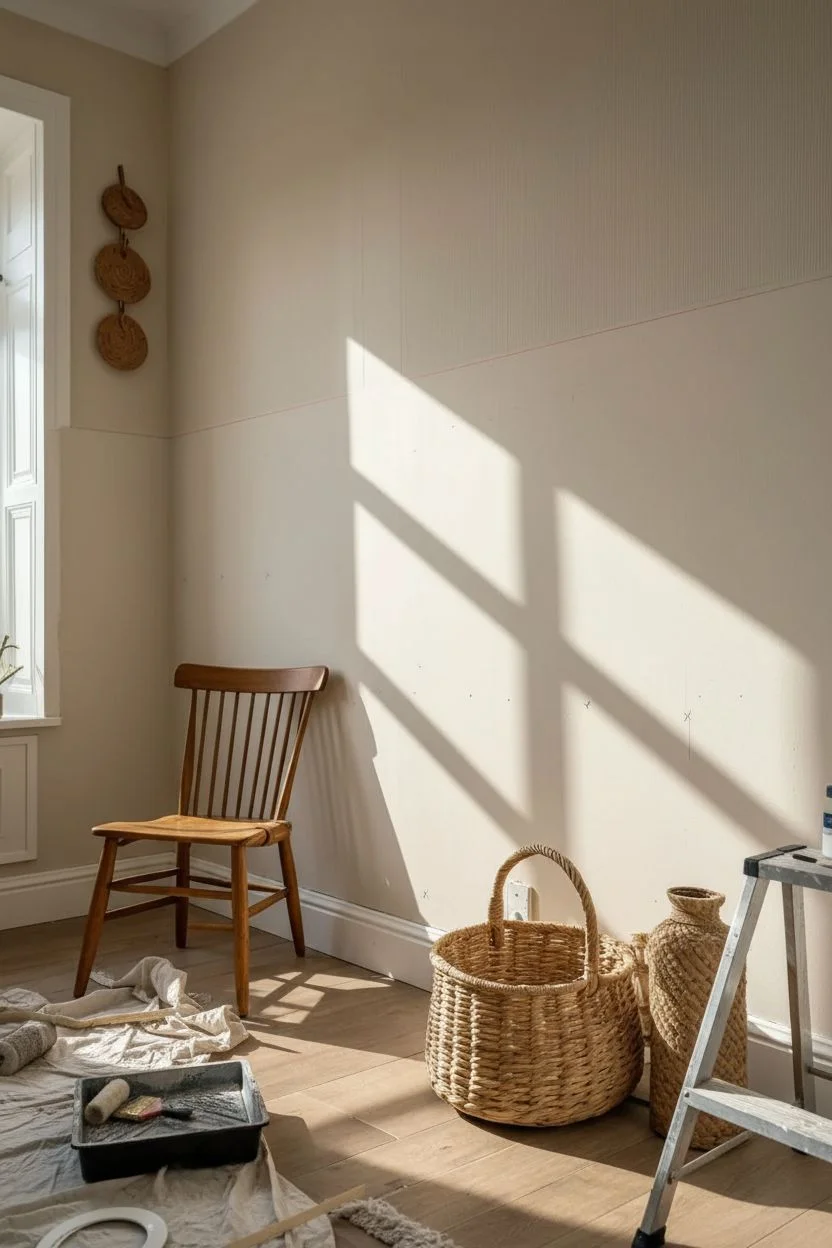
Step 1: Preparation & Wall Marking
-
Clear and demo:
Begin by removing existing baseboards carefully with a pry bar if you plan to reuse them, though installing new, taller baseboards is often easier and looks sharper. -
Determine height:
Decide on the height of your wainscoting; a standard chair rail height is usually between 32 and 36 inches, but going slightly higher (around 40 inches or the rule of thirds) adds a modern touch. -
Level and mark:
Use a laser level or a long spirit level to draw a continuous horizontal reference line around the room at your chosen top height. -
Find studs:
Run a stud finder along the lower wall walls and mark the stud locations with a pencil; you’ll need these solid anchor points for the main trim pieces. -
Paint the upper wall:
Paint the wall space above your line with your chosen contrasting color now, extending slightly below the line, so you don’t have to cut in precisely later.
Wavy Walls?
If your drywall is uneven, planks might pop out. Don’t force them flat. Use extra adhesive and adhere the planks to the studs firmly, possibly using a temporary brace until the glue cures.
Step 2: Installing the Planking
-
Cut boards to size:
Measure the distance from the floor to your top level line and cut your vertical planks; cut them about 1/4 inch short to allow for floor expansion, as the gap will be covered by baseboards. -
Start at the corner:
Begin in an inside corner; apply construction adhesive to the back of the first board and set it in place. -
Ensure plumb:
I like to be extra meticulous with the first board, checking vertical alignment with a level before nailing, as this dictates the straightness for the whole wall. -
Secure the board:
Shoot brad nails into the board at the top and bottom where trim will eventually cover it, and specifically into studs where possible. -
Continue the run:
Install existing boards along the wall using the tongue-and-groove system or spacing them evenly if using square boards; ensure each is pressed tight against the previous one. -
Navigate obstacles:
If you encounter an outlet, hold the board in place, mark the box location, and carefully cut out the rectangle with a jigsaw before installing. -
Rip the final board:
When you reach the next corner, measure the remaining gap and use a table saw or circular saw to rip the final board lengthwise to fit perfectly.
Level Up: Utility Rail
Make the top rail deeper (about 3-4 inches) to create a picture ledge, or add shaker pegs every 8 inches along the top trim for a functional mudroom style.
Step 3: Trim & Finishing Touches
-
Install baseboards:
Cut and install your baseboard molding over the bottom of the vertical planks; this anchors the look and hides the expansion gap at the floor. -
Cap with rail:
Measure, cut, and install the chair rail molding along the top edge of the planks, covering the cut ends for a finished appearance. -
Fill imperfections:
Go over the entire installation with wood filler, patching any visible nail holes, and sand them smooth once dry. -
Caulk the seams:
Run a bead of paintable caulk along the top edge of the chair rail (against the wall) and in the inside corners to ensure a seamless, professional transition. -
Prime and paint:
Apply a high-quality primer if using bare wood, then finish with two coats of semi-gloss white paint for durability and that distinctive clean sheen.
Step back and enjoy the structured, airy atmosphere your new wall treatment brings to your home


Elegant Picture Frame Molding
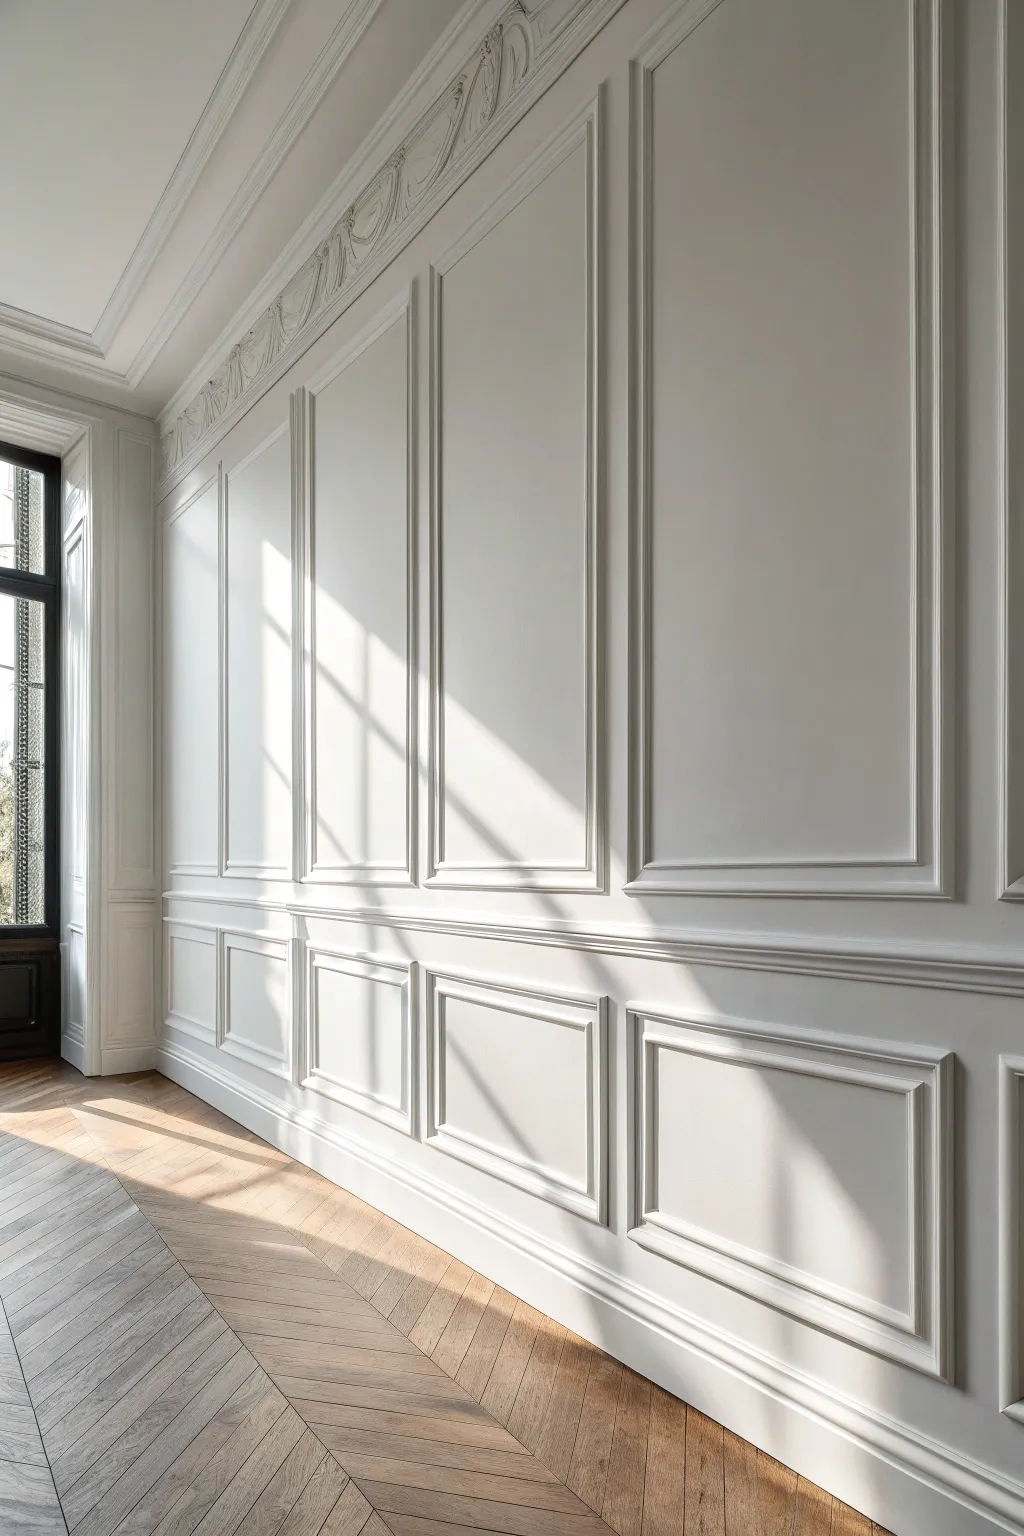
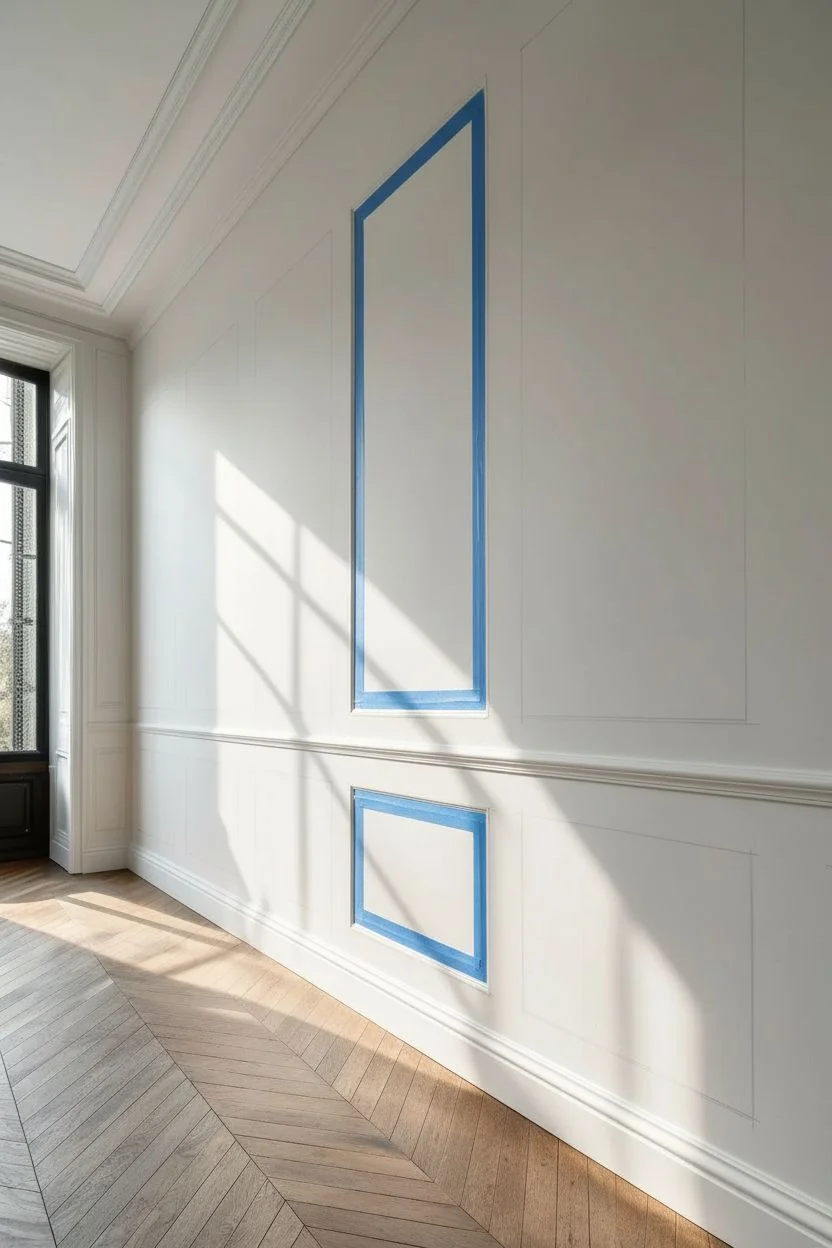
Transform a plain wall into an architectural masterpiece with this floor-to-ceiling picture frame impact. This project uses light and shadow to create depth, giving your room a sophisticated, Parisian-apartment feel.
Step-by-Step Tutorial
Materials
- Picture frame molding (1-1.5 inch wide)
- Chair rail molding
- Baseboards (if minimal existing style)
- Laser level (highly recommended) or spirit level
- Miter saw
- 18-gauge brad nailer with 1.5-inch nails
- Construction adhesive
- Paintable caulk and caulk gun
- Wood filler
- Measuring tape and pencil
- 220-grit sandpaper
- Interior paint (satin or semi-gloss)
Step 1: Planning the Layout
-
Measure the wall:
Measure the total width of your wall and the height from the top of the baseboard to the ceiling. -
Determine box spacing:
Decide on the gap between boxes. A 3.5 to 4-inch gap is standard and visually pleasing. This gap will apply between the boxes and the adjacent walls, ceiling, and chair rail. -
Calculate box widths:
Subtract the total width of your gaps from the complete wall width. Divide the remaining number by how many boxes you want (usually 3 or 5) to determine the exact width of each frame. -
Mark the grid:
Using a laser level, lightly pencil the grid onto the wall. Mark where the chair rail will sit (typically 32-36 inches from the floor) and the outlines of both the upper and lower boxes. -
Visual check:
I like to use painter’s tape to mock up one upper and lower box section just to stand back and ensure the proportions feel right before cutting any wood.
Closing the Gap
Gaps in your mitered corners? Rub the rounded shank of a screwdriver firmly over the joint to compress the fibers together (‘burnishing’), then fill any remaining hairline crack with wood putty.
Step 2: Cutting and Organization
-
Cut the chair rail:
Measure and cut the horizontal chair rail to span the full width of the wall. If the wall is longer than your molding, scarf joint two pieces together with 45-degree angle cuts. -
Cut the box sides:
Set your miter saw to a precise 45-degree angle. Cut the vertical stile pieces for the lower boxes first. -
Cut rails:
Cut the horizontal top and bottom pieces (rails) for the lower boxes. Group these pieces on the floor below their designated spot on the wall. -
Cut upper frames:
Repeat the cutting process for the tall upper boxes. Precision is key here, so measure each designated spot individually if your walls aren’t perfectly square.
Step 3: Installation
-
Install chair rail:
Apply a bead of construction adhesive to the back of the chair rail and nail it into the studs along your marked line. Check for level frequently. -
Start with the bottom:
Begin installing the lower boxes. Apply adhesive to the molding, position the bottom piece first using your level, and tack it in place with the brad nailer. -
Complete the frame:
Add the sides and top piece of the box, ensuring the mitered corners meet tightly. Wipe away any excess glue immediately. -
Install upper frames:
Move to the large upper boxes. I suggest nailing the top horizontal piece first, then the sides, then the bottom, letting gravity help keep the joints tight. -
Secure the molding:
Go back and add nails every 8-10 inches. If you aren’t hitting studs, angle your nails slightly in alternating directions to grip the drywall better.
Use a Spacer Block
Cut a scrap block of wood to the exact width of your spacing gap. Use this ‘spacer block’ between moldings to ensure perfect, consistent distance without measuring every time.
Step 4: Finishing Touches
-
Fill holes:
Fill every nail hole with wood filler. Overfill slightly to account for shrinkage as it dries. -
Fix corner gaps:
If any miter joints have small gaps, press wood filler into the corners to create a sharp, seamless 90-degree angle. -
Sand smooth:
Once dry, sand the filler flush with the wood using 220-grit sandpaper. -
Caulk edges:
Run a thin bead of paintable caulk along the inside and outside edges of every frame and the chair rail where they meet the wall. Smooth with a damp finger. -
Prime and paint:
Apply a high-quality primer if the wood is unprimed. Finish with two coats of satin or semi-gloss paint, using a sprayer for a factory finish or a high-quality sash brush.
Step back and admire how this elegant molding completely redefines the scale and luxury of your space.


Cozy Cottage Beadboard
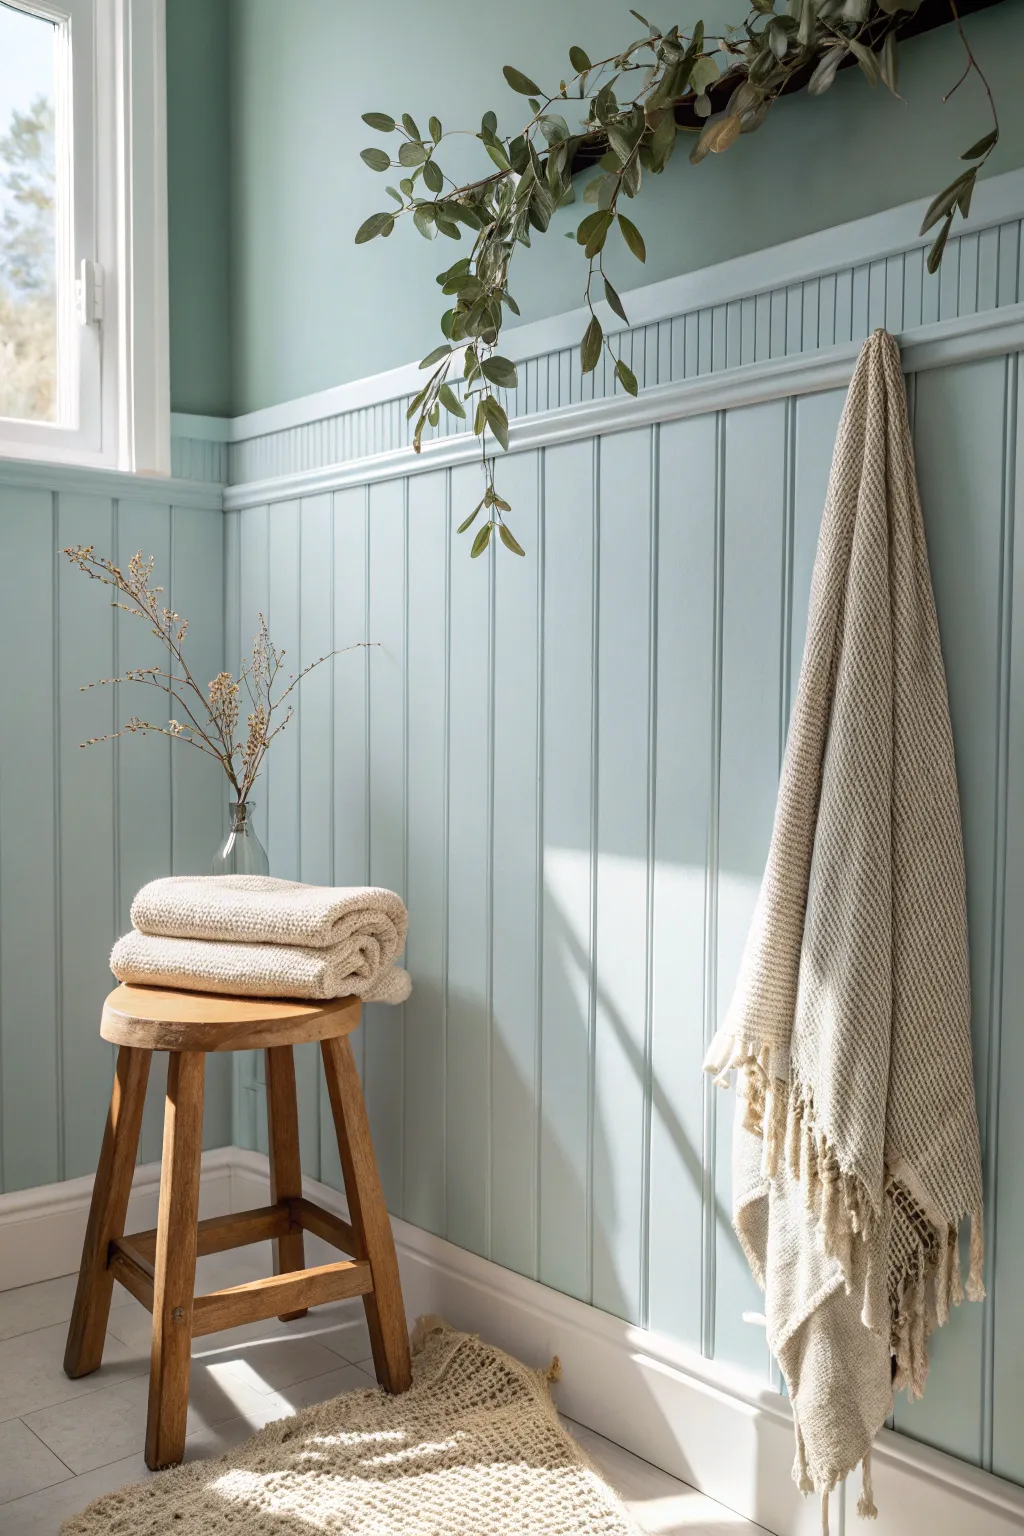
Transform a plain bathroom or hallway into a cozy sanctuary with this faithful recreation of improved beadboard wainscoting. The combination of vertical texture and a soothing pale blue palette adds architectural charm and visual height to any space.
Detailed Instructions
Materials
- 4×8 Beadboard panels (MDF or wood)
- 1×4 Primed pine boards (for top rail)
- Baseboard molding
- Small decorative cap molding
- Construction adhesive
- Brad nailer and 1.5-inch nails
- Circular saw or table saw
- Jigsaw (for outlets)
- Level and tape measure
- Paintable caulk and wood filler
- Interior satin paint (Pale Blue-Green)
- Interior eggshell paint (Sage Green)
- Paint roller and angled sash brush
- Fine-grit sandpaper
Step 1: Preparation and Layout
-
Clear and measure:
Remove all outlet covers, artwork, and existing baseboards from the room. Measure the total linear footage of the walls to determine how many panels you need. -
Establish height:
Determine your wainscoting height. For this project, we are aiming for roughly 48 to 52 inches from the floor (including trim). Mark this height at several points along the wall. -
Snap a level line:
Using a long level or a laser level, draw a continuous horizontal line around the room at your marked height. This ensures your top rail sits perfectly straight, even if the floor is uneven. -
Mark studs:
Use a stud finder to locate wall studs. Mark their locations with a pencil just above your chalk line so the marks remain visible during installation.
Step 2: Installing the Panels
-
Cut panels to size:
Cut your beadboard sheets to the measured height (minus 1/4 inch for floor clearance) using a circular saw. To reduce tear-out, cut with the finished side facing down. -
Apply adhesive:
Flip your first panel over and apply a generous zigzag of construction adhesive to the back. -
Position first panel:
Place the first panel in the corner. Place a level vertically on the edge to ensure it is plumb. Proper alignment here is crucial for the rest of the wall. -
Secure the panel:
Using a brad nailer, shoot nails through the panel into the marked studs. I prefer to shoot nails into the vertical grooves of the beadboard to make hiding them easier later. -
Create outlet cutouts:
For subsequent panels covering outlets, measure the distance from the last panel edge to the outlet box. Transfer these measurements to the new panel and cut carefully with a jigsaw. -
Install remaining panels:
Continue installing panels around the room. Butt the edges tightly against one another. If a seam doesn’t land on a stud, apply extra adhesive behind the seam.
Uneven Walls?
If your corners aren’t perfectly square, don’t force the panel flat. Instead, shim perpendicular gaps behind the panel and use a paintable acrylic caulk to fill the seam for a seamless appearance.
Step 3: Trim and Finishing
-
Install the top rail:
Place the 1×4 flat board horizontally over the top edge of the beadboard so it fits flush against the wall. Nail it into the studs. This creates the ledge seen in the project image. -
Add decorative cap:
Install the small decorative cap molding along the very top edge of the 1×4 rail. Use wood glue and a few brad nails to secure it. -
Install baseboards:
Install your new baseboard molding at the bottom, nailing it through the beadboard and into the bottom plate of the wall. -
Fill and caulk:
Fill all nail holes with wood filler. Run a beat of paintable caulk along the top of the trim, inside corners, and where the baseboard meets the paneling. -
Sand smooth:
Once the filler is dry, lightly sand the patches and any rough edges on the trim. Wipe away all dust with a tack cloth.
Pro Tip: Tougher Paint
Use ‘Door and Trim’ enamel rather than standard wall paint for the wainscoting. It dries to a harder shell that resists scuffs from furniture and makes wiping dust out of the grooves much easier.
Step 4: Painting
-
Prime the surface:
Apply a coat of high-quality primer to the entire wainscoting structure, especially if you used raw wood or MDF. -
Paint the groove detail:
Using the angled sash brush, paint the pale blue satin paint into the vertical grooves and corners first. -
Roll the flat surfaces:
While the groove paint is still wet, use a small foam roller to apply paint to the flat faces of the beadboard for a smooth, brush-free finish. -
Apply second coat:
Allow the first coat to dry completely according to the can’s instructions, then apply a second coat for full coverage/durability. -
Paint upper wall:
Finally, paint the wall space above the wainscoting in a contrasting sage green to replicate the earthy, grounded look of the original image.
Step back and admire how this simple architectural addition has completely softened the mood of your room.


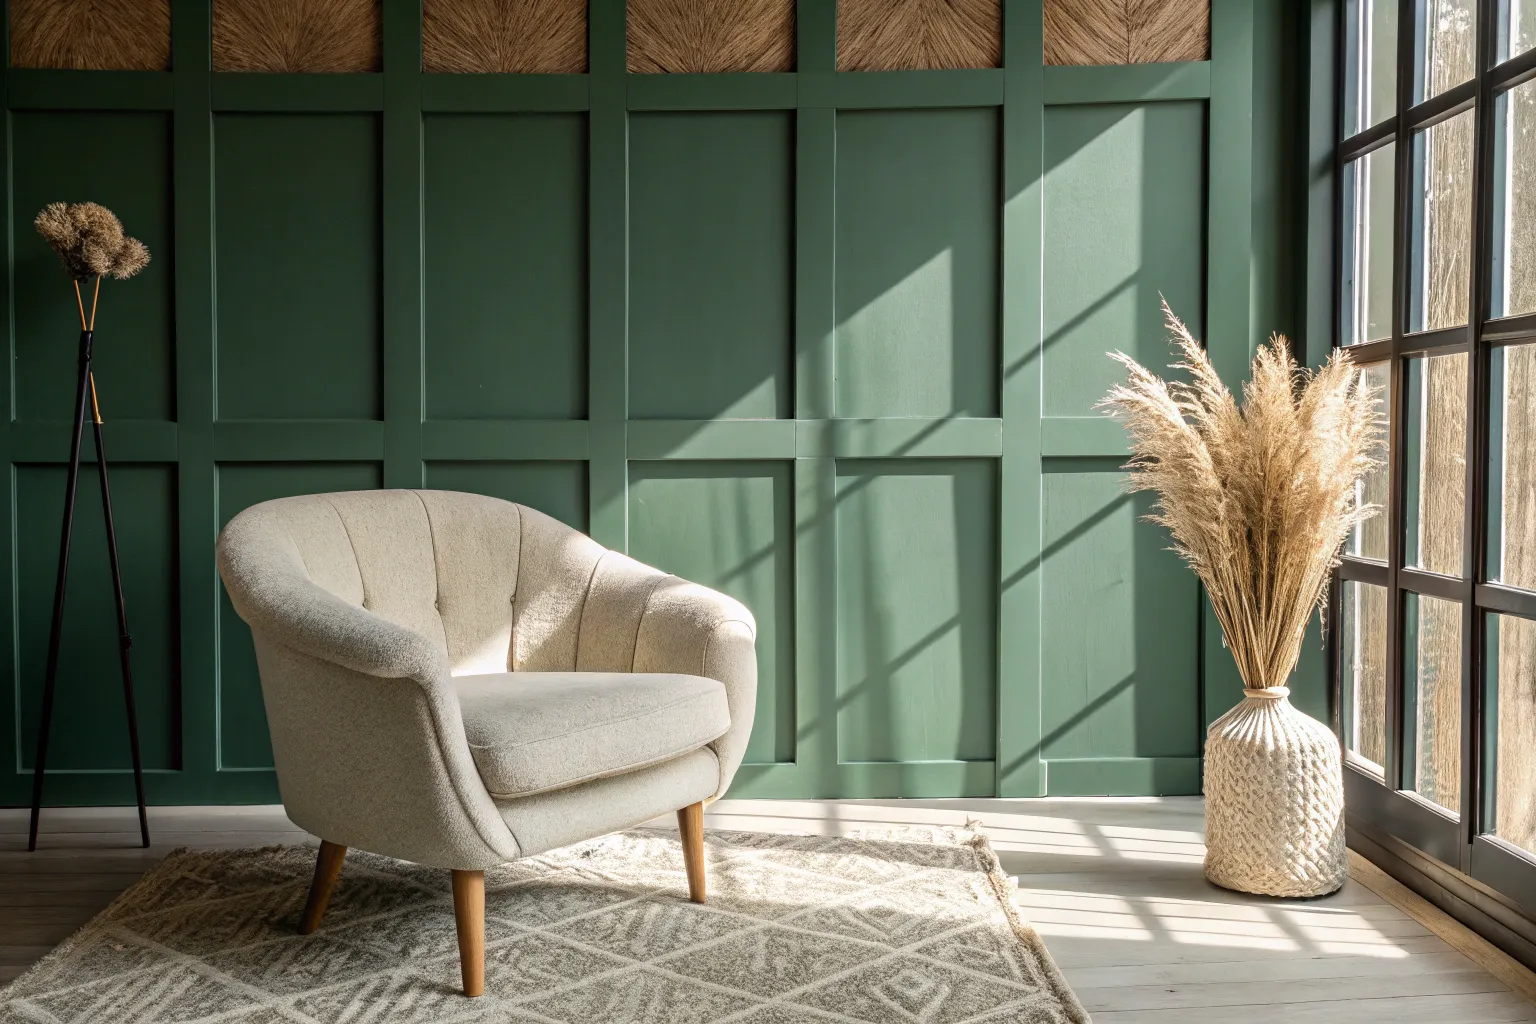
Dramatic Color Drenching
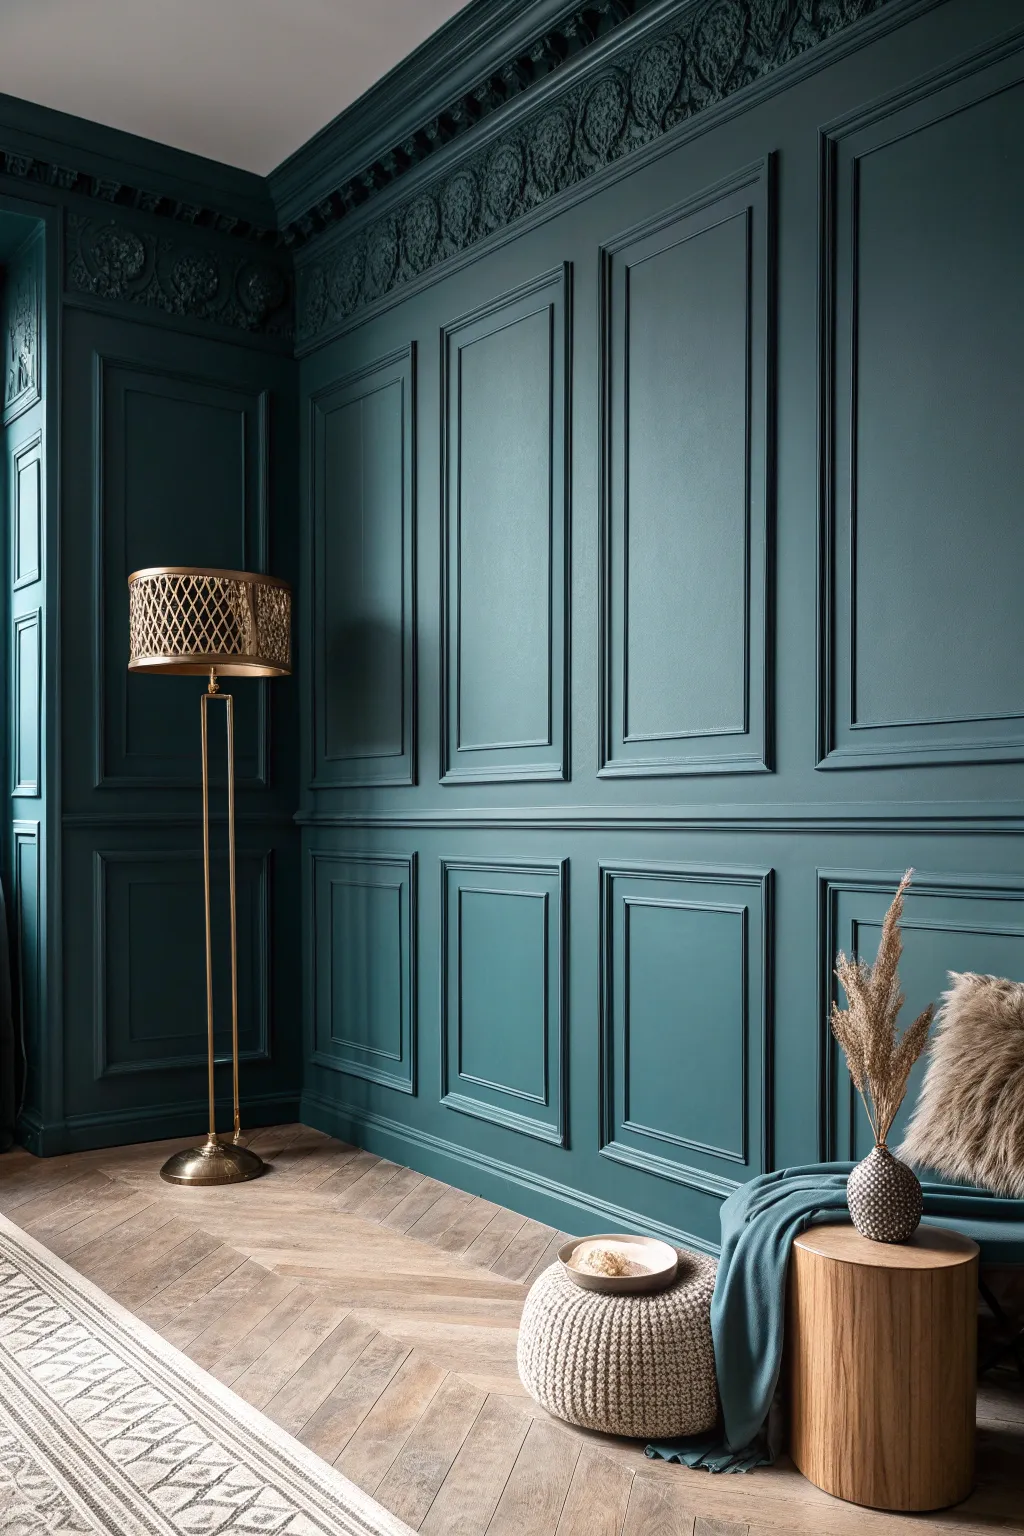
Transform a plain room into a moody, architectural masterpiece with this full-wall wainscoting project. By combining traditional molding with a modern ‘color drenching’ technique, you creates a sophisticated backdrop that feels both historic and contemporary.
Step-by-Step Guide
Materials
- Panel molding strips
- Baseboard molding
- Ornate crown molding
- Miter saw
- Brad nailer and 1.5-inch nails
- Laser level (or 4-foot spirit level)
- Construction adhesive
- Paintable caulk
- Wood filler
- 220-grit sandpaper
- Dark teal interior paint (eggshell or matte)
- Angled sash brush
- Paint roller with medium nap
Step 1: Planning and Layout
-
Measure and Calculate:
Measure your total wall width and height. Decide on the number of vertical panels; an odd number of columns often looks best, with about 3 to 4 inches of spacing between boxes. -
Map the Wall:
Using a pencil and your level, lightly draw the outlines of your boxes directly onto the drywall. This visual guide ensures your symmetry is perfect before you make a single cut.
Mind the Gap
If your walls are wavy, the trim won’t sit flush. Don’t force it flat with nails or the wood will bow. Instead, leave the gap and fill it with extra caulk for a straight visual finish.
Step 2: Installing the Trim
-
Install Baseboards:
Cut your baseboards to length and install them along the floor using construction adhesive and your brad nailer. -
Cut Molding Angles:
Set your miter saw to a precise 45-degree angle. Begin cutting the panel molding strips for your lower, smaller boxes first. -
Secure Lower Boxes:
Apply a zigzag of adhesive to the back of the molding pieces. adhering them to the wall over your pencil marks. -
Nail in Place:
Secure the trim with brad nails, angling the gun slightly to catch the drywall and studs behind. -
Cut Upper Frames:
Proceed to cut the longer vertical strips and horizontal pieces for the large upper rectangular boxes. -
Install Upper Boxes:
Attach the upper boxes, ensuring they align perfectly vertically with the lower boxes for a cohesive column effect. -
Add Crown Molding:
Install the ornate crown molding at the ceiling junction. I find that coping the inside corners gives a much tighter fit than simple mitering.
Step 3: Prep and Paint
-
Fill Holes:
Go over every brad nail hole with wood filler, slightly overfilling to account for shrinkage. -
Sand Smooth:
Once dry, sand the filler flush with the wood using 220-grit sandpaper so the surface creates an invisible transition. -
Caulk Seams:
Run a bead of paintable caulk along every edge where the molding meets the wall. Smooth it with a wet finger to eliminate shadows. -
Clean Up:
Wipe down the entire wall and molding strips with a tack cloth to remove all sanding dust. -
Prime (Optional):
If using raw wood or changing drastic colors, apply a tinted primer to help the dark teal achieve true depth. -
Cut In Edges:
Use your angled sash brush to paint the ornate details of the crown molding and inside the corners of the picture frame boxes. -
Roll the Walls:
Use a roller to cover the flat wall sections and the face of the trim, blending wet edges into your brushwork. -
Apply Second Coat:
Let the paint dry fully, then apply a second coat to ensure a rich, velvety finish that absorbs light beautifully.
The Spacer Secret
Cut a scrap block of wood to your exact spacing width (e.g., 4 inches). Use this ‘spacer block’ between boxes during installation to guarantee identical spacing without constant measuring.
Step back and admire how this bold, monochromatic treatment completely redefines the architectural character of your space.
BRUSH GUIDE
The Right Brush for Every Stroke
From clean lines to bold texture — master brush choice, stroke control, and essential techniques.
Explore the Full Guide
The Two-Tone Contrast
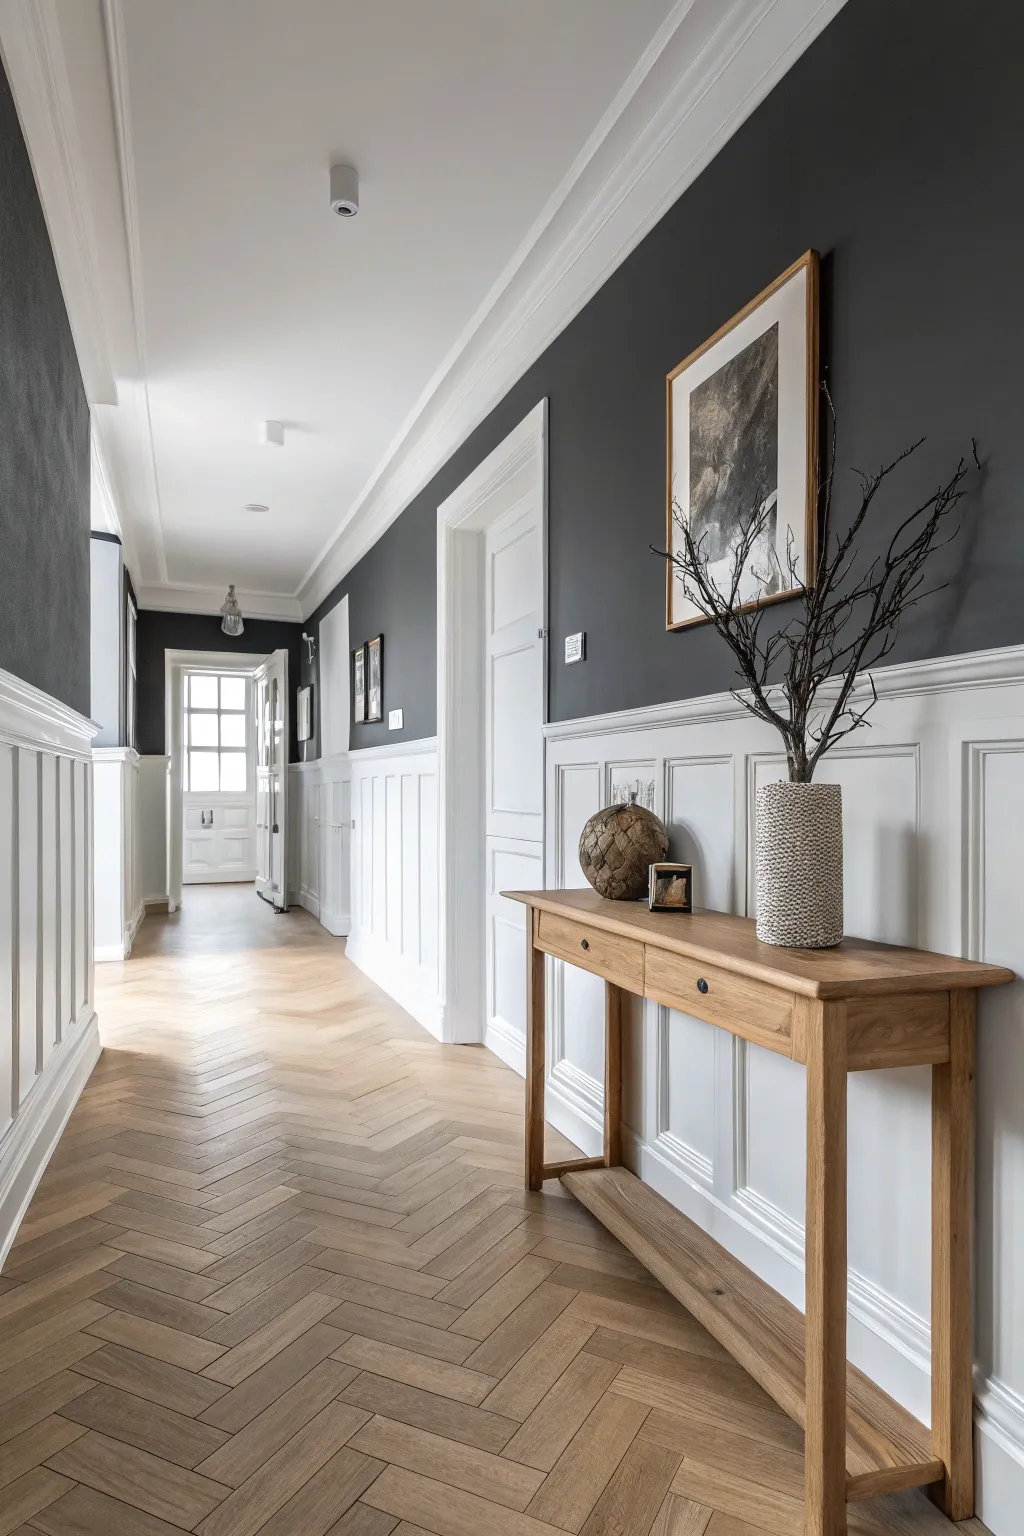
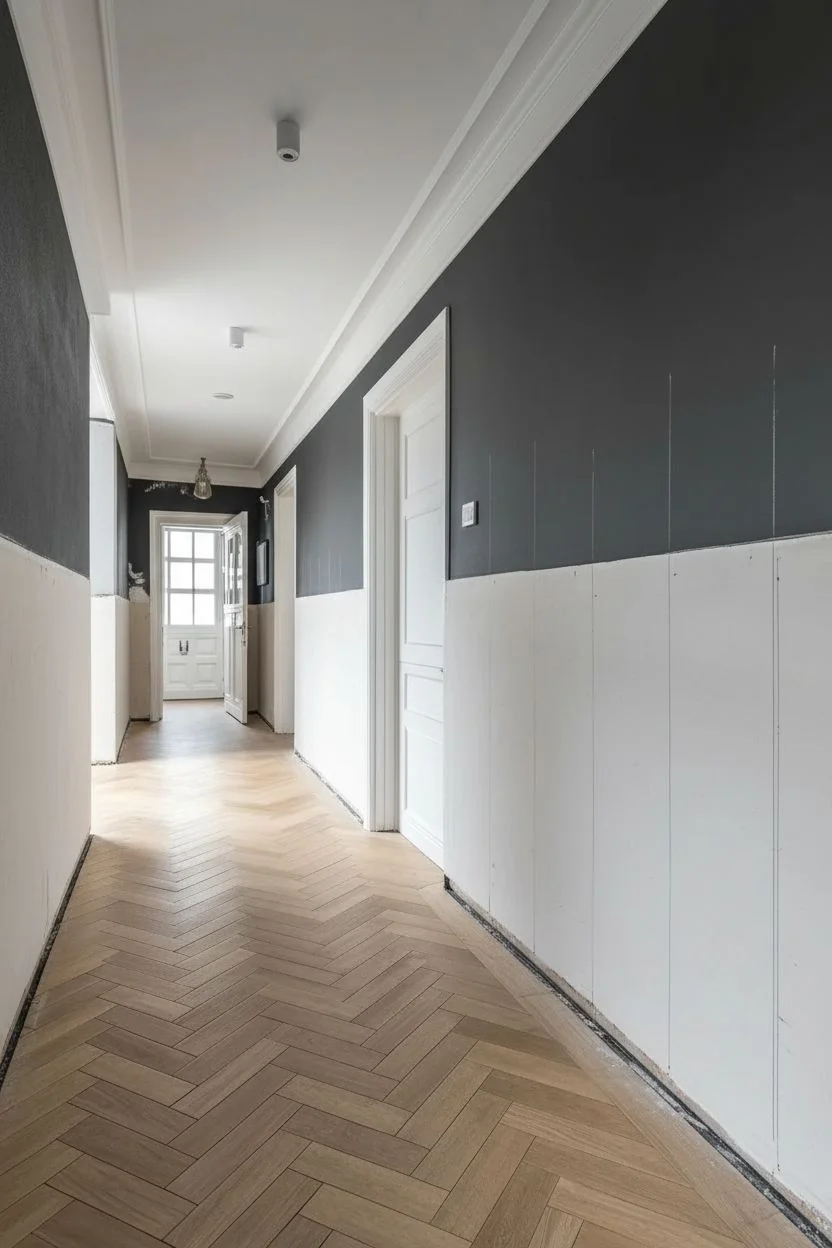
Transform a standard hallway into a sophisticated focal point by combining classic architectural millwork with a bold, high-contrast color palette. This project builds timeless recessed-panel wainscoting on the lower wall to contrast beautifully with deep charcoal tones above.
Step-by-Step
Materials
- 1×6 MDF boards (baseboard and top rail)
- 1×4 MDF boards (stiles)
- Small panel molding (for inside framing)
- Chair rail cap molding
- Construction adhesive
- Brad nailer and 2-inch nails
- Wood filler and paintable caulk
- High-quality painter’s tape
- Dark charcoal latex paint (Matte or Eggshell)
- Bright white enamel paint (Semi-Gloss)
- Level and stud finder
Step 1: Planning and Preparation
-
Clear and prep the canvas:
Remove any existing baseboards and outlet covers carefully. Patch any significant holes in the drywall, sand them smooth, and give the entire wall a quick wipe down to remove dust. -
Determine the height:
Decide on the height of your wainscoting. A general rule of thumb is roughly one-third of the wall height, but for this dramatic look, I usually aim for about 36 to 40 inches from the floor. -
Locate wall studs:
Use a stud finder to mark the location of every wall stud along the length of the hallway. Mark these clearly slightly above your determined height line so you can see them later.
Spacer Block Trick
Cut a scrap piece of wood to the exact width of your desired gap between stiles. Use this ‘spacer block’ to position each vertical board instantly without measuring every single time.
Step 2: Building the Grid frame
-
Install the top rail:
Draw a level line across the entire wall at your desired height. Apply construction adhesive to the back of a 1×6 MDF board, place its top edge against your level line, and nail it securely into the studs. -
Install the new baseboard:
Install the bottom 1×6 board directly against the floor to serve as your chunky baseboard. Use construction adhesive and shoot nails into the bottom plate of the wall. -
Calculate stile spacing:
Measure the distance between the top and bottom rails. Decide on your panel width; for this look, aim for squares or slight rectangles. Divide your total wall length to find equal spacing for the vertical 1×4 stiles. -
Cut and place vertical stiles:
Cut your 1×4 boards to the exact vertical measurement between rails. Adhere and nail the first and last stiles flush with the wall ends, then install the intermediate stiles according to your spacing calculations.
Step 3: Adding Detail and Trim
-
Install the top cap:
To give the wainscoting a finished ledge, install the chair rail cap molding along the very top edge of the upper rail. Ensure miter cuts at corners are tight. -
Cut panel molding:
Measure the interior dimensions of the rectangular ‘boxes’ created by your grid. Cut the small panel molding with 45-degree miters to create picture frames that fit inside these boxes. -
Attach the inner frames:
Install the picture frame molding inside each box. I prefer to use a slightly smaller spacer block to ensure the molding is perfectly centered within the grid square, nailing it in with short pins.
Wall Not Straight?
If your walls are wavy and boards don’t sit flush, don’t force them. Insert thin wood shims behind the board at the gap, nail through the shim, and then cut the excess shim off before caulking.
Step 4: Finishing and Painting
-
Fill the imperfections:
Go over every nail hole with wood filler. Overfill slightly to account for shrinkage, and once dry, sand everything flush with the surface. -
Seal with caulk:
Apply a thin bead of paintable caulk to every seam where boards meet the wall or each other. Smooth this with a damp finger to create a seamless, built-in look. -
Prime the woodwork:
Apply a coat of high-quality primer to the MDF and any bare wall areas inside the panels. This is crucial for a uniform finish on porous materials. -
Paint the upper wall:
Paint the upper section of the wall with your dark charcoal color first. Cut in carefully along the top of the wainscoting cap, but don’t worry about being perfect yet, as the white paint will cover minor overlaps. -
Apply the crisp white:
Once the dark paint is fully dry, tape off the wall just above the cap. Apply two to three coats of semi-gloss white enamel to the wainscoting for durability and easy cleaning. -
Remove tape and touch up:
Peel the tape away while the final coat is still slightly tacky to get a razor-sharp line. Use a small artist brush for any tiny touch-ups needed along the transition.
Step back and enjoy the dramatic visual height and architectural interest you’ve added to your hallway
Floor-to-Ceiling Grid Feature
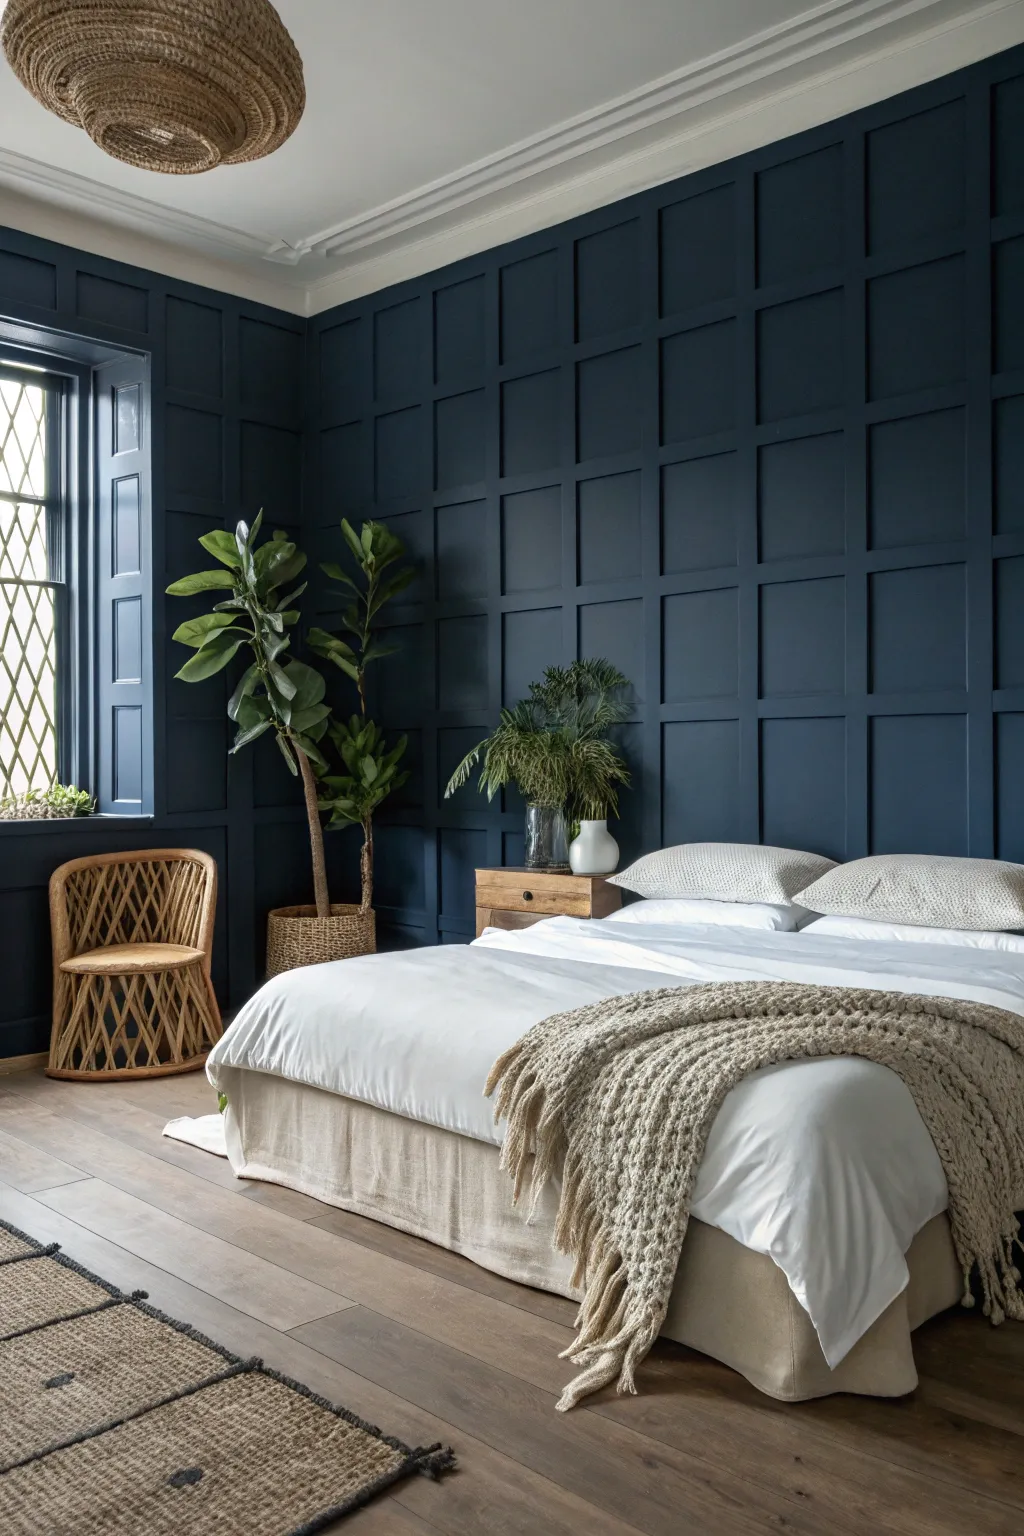
Transform a plain bedroom into a sophisticated retreat with this floor-to-ceiling grid wainscoting. The deep navy finish unifies the texture, creating a bold, modern backdrop that feels both cozy and architectural.
Step-by-Step Tutorial
Materials
- MDF boards (1×3 or 1×4 inch strips)
- Construction adhesive
- Brad nailer and 2-inch nails
- Wood filler
- Paintable latex caulk
- Sandpaper (120 and 220 grit)
- Primer
- Dark navy paint (satin or eggshell finish)
- Level
- Tape measure
Step 1: Planning & Layout
-
Measure and Calculate:
Measure the full width and height of your wall. Determine your grid size by dividing the width by a whole number to get equal spacing (usually between 18 to 24 inches for a balanced look). -
Site Prep:
Remove existing baseboards carefully if you plan to reuse them, though installing a flat board that matches the grid depth usually looks cleaner. -
Mark Studs:
Use a stud finder to locate and mark the wall studs. While adhesive helps, hitting studs with your nails provides the best hold for the vertical pieces.
Step 2: Installing the Grid
-
Base and Top Rails:
Install the bottom baseboard and the top horizontal rail first. If your room has crown molding, you can butt the top rail directly against it. -
Cut Vertical Stiles:
Measure the distance between the top rail and baseboard. Cut your MDF strips to length for the vertical stiles. -
Place First Vertical:
Apply construction adhesive to the back of your first board. Place it flush against the corner wall, ensure it is perfectly plumb with a level, and nail it into place. -
Use a Spacer Block:
Cut a scrap piece of wood to the exact width of your planned grid spacing. I like to use this spacer to position subsequent boards quickly without measuring every single gap. -
Install Remaining Verticals:
Continue installing the vertical boards across the wall, checking for plumb every few boards to ensure they haven’t drifted. -
Cut Horizontal Rails:
Measure the gaps between your vertical stiles individually. Walls often aren’t perfectly straight, so cutting these one by one ensures a tight fit. -
Install Horizontals:
Apply adhesive and nail the horizontal rails between the verticals. Use a laser level or mark pencil lines to ensure they form effortless straight lines across the wall.
Precision Pointer
Walls are rarely perfectly square. Always measure the horizontal gap at both the top and bottom before cutting your rails to ensure a snug fit without gaps.
Step 3: Finishing Touches
-
Fill Nail Holes:
Dab wood filler into every nail hole. Overfill slightly to account for shrinkage, then let it dry completely. -
Sand Smooth:
Sand the filler flush with the wood surface using 120-grit sandpaper, then go over the edges with 220-grit for a polished feel. -
Caulk Seams:
Run a thin bead of paintable caulk along every edge where the wood meets the wall and where boards meet each other. Smooth it with a wet finger to make the transition seamless. -
Prime the Wall:
Apply a coat of primer to the wood strips and the drywall squares. This ensures the dark paint absorbs evenly across both textures. -
Cut In Edges:
Use a high-quality angled brush to paint the inside corners and edges of the grid with your navy paint. -
Roll the Rest:
Use a small foam or microfiber roller to paint the flat faces of the boards and the wall centers. This eliminates brush strokes for a factory-finish look. -
Final Coat:
Once the first coat is dry, apply a second coat to achieve the deep, rich opacity seen in the photo.
Level Up
Paint the window trim and casings in the same navy color. This ‘drenching’ technique integrates the window into the grid for a custom, built-in appearance.
Enjoy the dramatic depth and elegance your new feature wall brings to the space

PENCIL GUIDE
Understanding Pencil Grades from H to B
From first sketch to finished drawing — learn pencil grades, line control, and shading techniques.
Explore the Full Guide
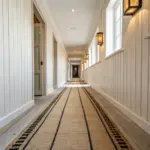
Transitional Stairscase Angles
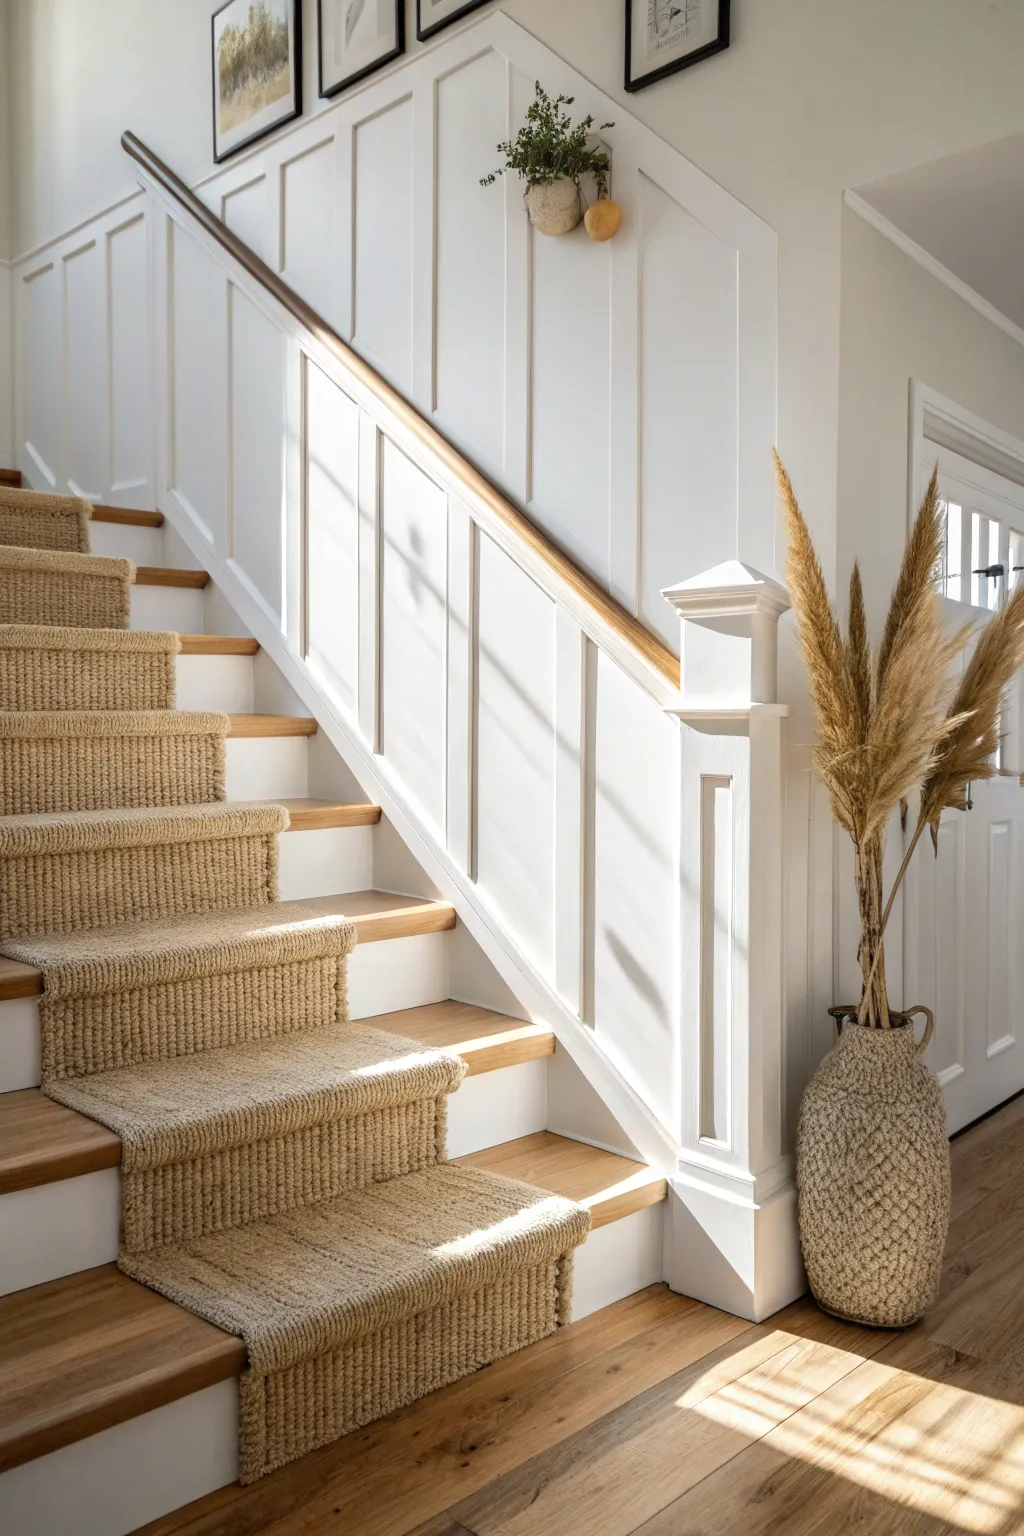
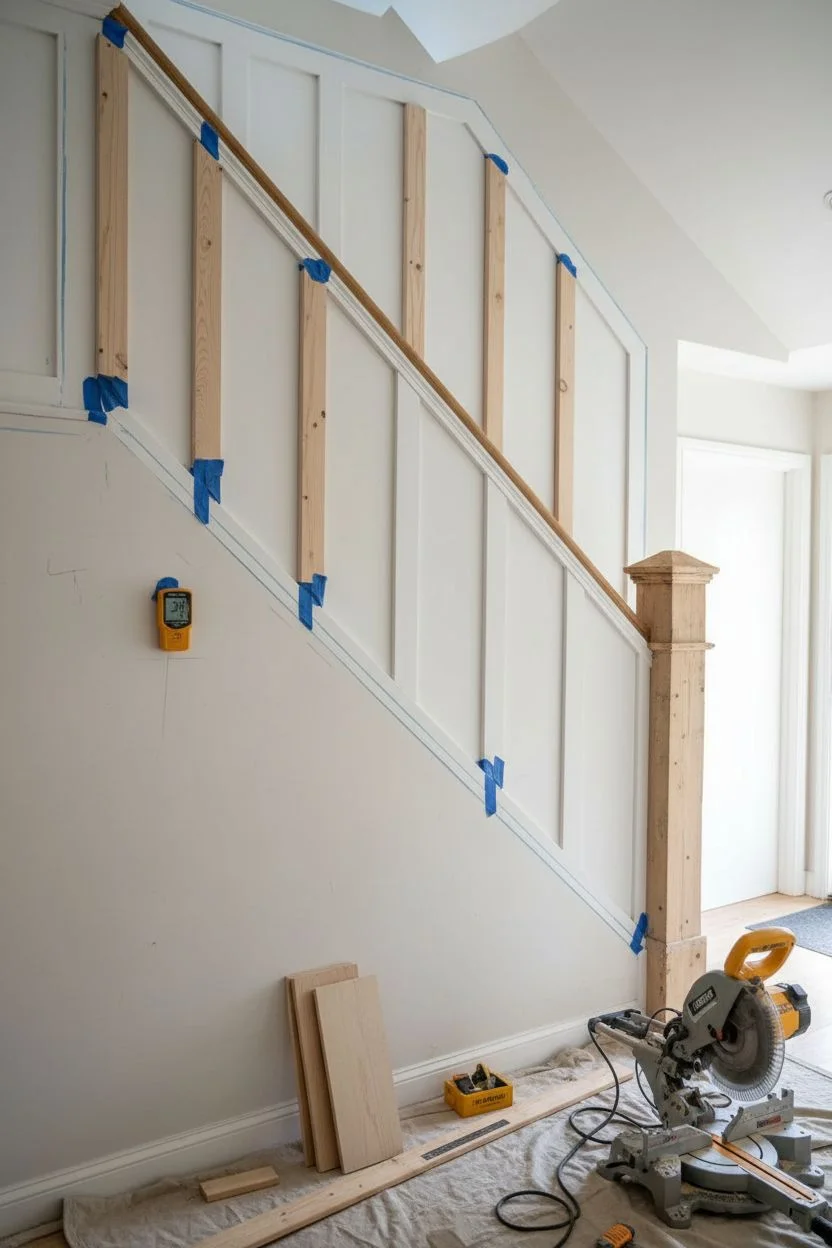
This project transforms a standard hallway into a stunning transitional focal point using classic board-and-batten wainscoting that climbs the stairs. The crisp white woodwork contrasts beautifully with warm wood tones and a textured natural fiber runner, creating a space that feels both grand and inviting.
Step-by-Step
Materials
- 1×3 MDF or Poplar boards (for battens)
- 1×6 MDF boards (for top rail)
- Wood handrail (oak or pine)
- Construction adhesive
- Brad nailer with 1.25 inch nails
- Angle finder tool
- Miter saw
- Paintable caulk and wood filler
- White semi-gloss enamel paint
- Sisal or jute stair runner
- Pneumatic stapler
Step 1: Planning and Layout
-
Determine the pitch:
Place a long straightedge across several stair nosings and use an angle finder to identify the precise pitch angle of your staircase; this number is crucial for all your saw cuts. -
Mark the rail height:
Measure up from the stair tread noses (typically 32-36 inches) at both the top and bottom of the flight to determine the top rail height, then snap a chalk line connecting these points. -
Calculate batten spacing:
Measure the total horizontal length of the wall and divide it to find a pleasing interval for your vertical battens, typically spacing them 12 to 16 inches apart. -
Locate studs:
Use a stud finder to mark the wall studs along your path; nailing into studs provides essential structural rigidity for the handrail system.
Step 2: Installing the Woodwork
-
Install the top rail:
Cut the ends of your 1×6 board at the determined stair angle and install this board along your chalk line using construction adhesive and finish nails. -
Cut vertical battens:
Set your miter saw to the stair angle measured earlier and cut your 1×3 vertical battens, ensuring the top and bottom cuts are parallel so they fit vertically between the skirt board and top rail. -
Test the vertical fit:
I like to dry-fit the first couple of battens using painter’s tape to ensure the cut angle creates a perfectly plumb vertical line before gluing. -
Secure the battens:
Apply a zigzag of construction adhesive to the back of each batten, position it using your layout marks, and secure it firmly with brad nails. -
Update the newel post:
Box in your existing newel post with flat stock wood to create a square column, adding small trim pieces to create the recessed panel effect seen in the image. -
Attach the handrail:
Cut the wooden handrail to length with angled ends and attach it securely to the top of your wainscoting rail, screwing from underneath or using finish nails.
Gaps at the Angles?
If your miter cuts aren’t perfectly flush with the sloped rails, don’t worry. A flexible, paintable caulk is your best friend for hiding small gaps before painting to achieve a flawless finish.
Step 3: Finishing and Styling
-
Fill and sand:
Use spackling paste to fill all nail holes; once dry, sand the filler flush and give the MDF edges a light sanding to smooth out any roughness. -
Caulk for seamlessness:
Run a thin bead of paintable caulk along every edge where wood meets wall or wood meets wood to create that seamless, built-in appearance. -
Paint the woodwork:
Apply a high-quality primer, followed by two coats of bright white semi-gloss paint to the wainscoting, skirt board, risers, and newel post. -
Stain the handrail:
Carefully apply a rich wood stain to the handrail (masking off the white paint thoroughly) to match the tone of your stair treads. -
Install the runner:
Center your sisal runner on the stairs and secure it using a pneumatic stapler, tucking it tightly under the nosing of each tread and into the crease where riser meets tread. -
Add final decor:
Place a large, textured floor vase with tall dried pampas grass near the newel post to soften the angular lines and hang artwork parallel to the stair angle.
Quick Spacing Trick
Cut a scrap block of wood to the exact width of your desired space between battens. Use this as a physical template between boards to install them quickly without measuring every single gap.
Step back and admire how this elegant architectural detail completely elevates the character of your home.
Rustic Vertical Shiplap

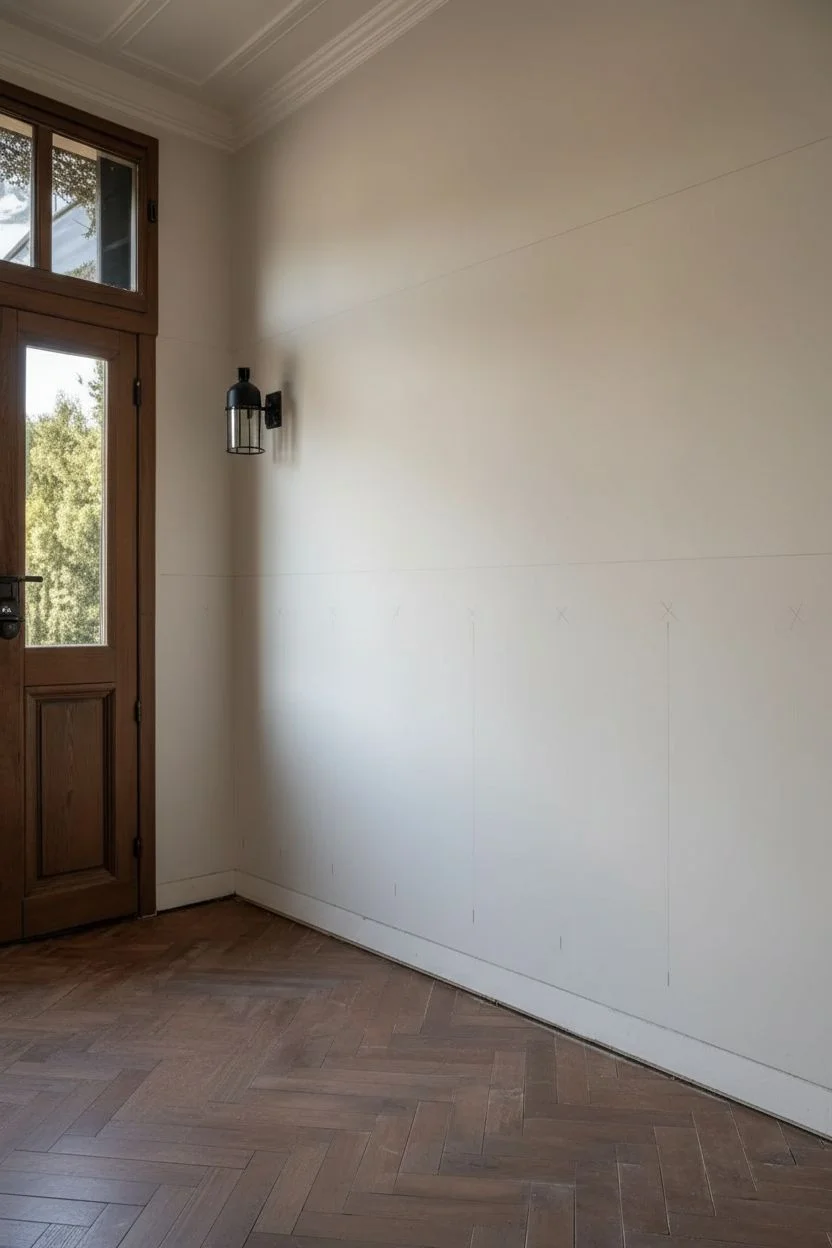
Transform a plain entryway into a cozy, character-filled space by adding texture and height with vertical shiplap. This project combines classic architectural details with a warm, two-tone color palette to create a welcoming rustic-modern aesthetic.
How-To Guide
Materials
- Vertical shiplap boards (primed MDF or pine)
- Top cap molding (chair rail)
- Baseboard trim
- Construction adhesive
- Brad nailer and 18-gauge nails
- Miter saw
- Jigsaw
- Laser level (or standard spirit level)
- Paintable caulk and caulk gun
- Wood filler
- Sandpaper (220 grit)
- Warm cream latex paint (Satin or Semi-Gloss)
- Rust red latex paint (Eggshell or Matte)
- High-quality angled sash brush
- Painter’s tape
Step 1: Wall Prep and Layout
-
Clear the workspace:
Remove any furniture, artwork, or switch plate covers from the wall where you intend to install the wainscoting. -
Remove existing trim:
Carefully pry off the existing baseboards using a pry bar. Save them if you plan to reuse them, though installing new, taller baseboards often looks better with this style. -
Determine styling height:
Decide how high you want your wainscoting. For the look in the image, aim for approximately two-thirds of the wall height, or about 60 to 64 inches from the floor. -
Mark a level line:
Use a laser level or a long spirit level to draw a continuous horizontal line across the wall at your chosen height. This will ensure your vertical boards end evenly. -
Locate studs:
Use a stud finder to mark the location of wall studs just above your level line and near the floor so you know where to nail.
Step 2: Installing Shiplap
-
Cut boards to length:
Measure from the floor to your level line. Cut your vertical shiplap boards to this length using a miter saw. -
Start at the corner:
Place your first board in the corner of the wall. Use a level to ensure it is perfectly plumb (vertically straight). This step is crucial as it dictates the alignment for the rest of the wall. -
Apply adhesive:
Apply a wavy line of construction adhesive to the back of the board. This prevents the panels from rattling later. -
Secure the board:
Nail the board into place using a brad nailer. Shoot nails through the tongue of the board into the studs, and add a few nails at the top and bottom where the trim will cover them. -
Continue the run:
Slide the groove of the next board onto the tongue of the first. I like to use a scrap piece of wood as a tapping block to gently hammer the boards together for a tight fit without damaging the edges. -
Navigate obstacles:
When you encounter electrical outlets or switches, measure their location on the board and carefully cut out the opening using a jigsaw before installation. -
Rip the final board:
When you reach the end of the wall, measure the remaining gap and rip-cut the final board lengthwise to fit the space.
Uneven Walls?
If your drywall is wavy, the top cap might show gaps. Use a ‘back-beveled’ cut on the molding or fill larger gaps with caulk. For severe waves, attach the trim with screws into studs.
Step 3: Trim and Finish
-
Install baseboards:
Install your baseboard trim over the bottom of the visible shiplap. This hides any uneven floor gaps. -
Cap the top:
Measure and cut your top cap molding or chair rail. Nail this horizontally along the top edge of the shiplap boards to create a finished shelf-like edge. -
Fill and sand:
Fill all visible nail holes with wood filler. Once dry, sand the filler smooth with 220-grit sandpaper. -
Caulk the seams:
Run a bead of paintable caulk along the top of the chair rail (where it meets the drywall) and inside corners to ensure a seamless, professional transition. -
Paint the upper wall:
Apply the rust red paint to the upper portion of the wall. Cut in carefully along the ceiling and just above the new wainscoting line. -
Paint the wainscoting:
Once the upper wall is dry, tape off the wall just above the cap trim. Paint the entire wainscoting structure (boards and trim) in a warm creamy beige. Use a brush for the grooves and trim, and a small foam roller for the flat surfaces to achieve a smooth finish.
Pro Tip: Painted Tongues
Paint the ‘tongue’ edge of each board with a brush before installing it. If the wood shrinks in dry weather, this ensures no raw wood stripes appear between the slats.
Enjoy the warm welcome your new customized entryway provides every time you walk through the door


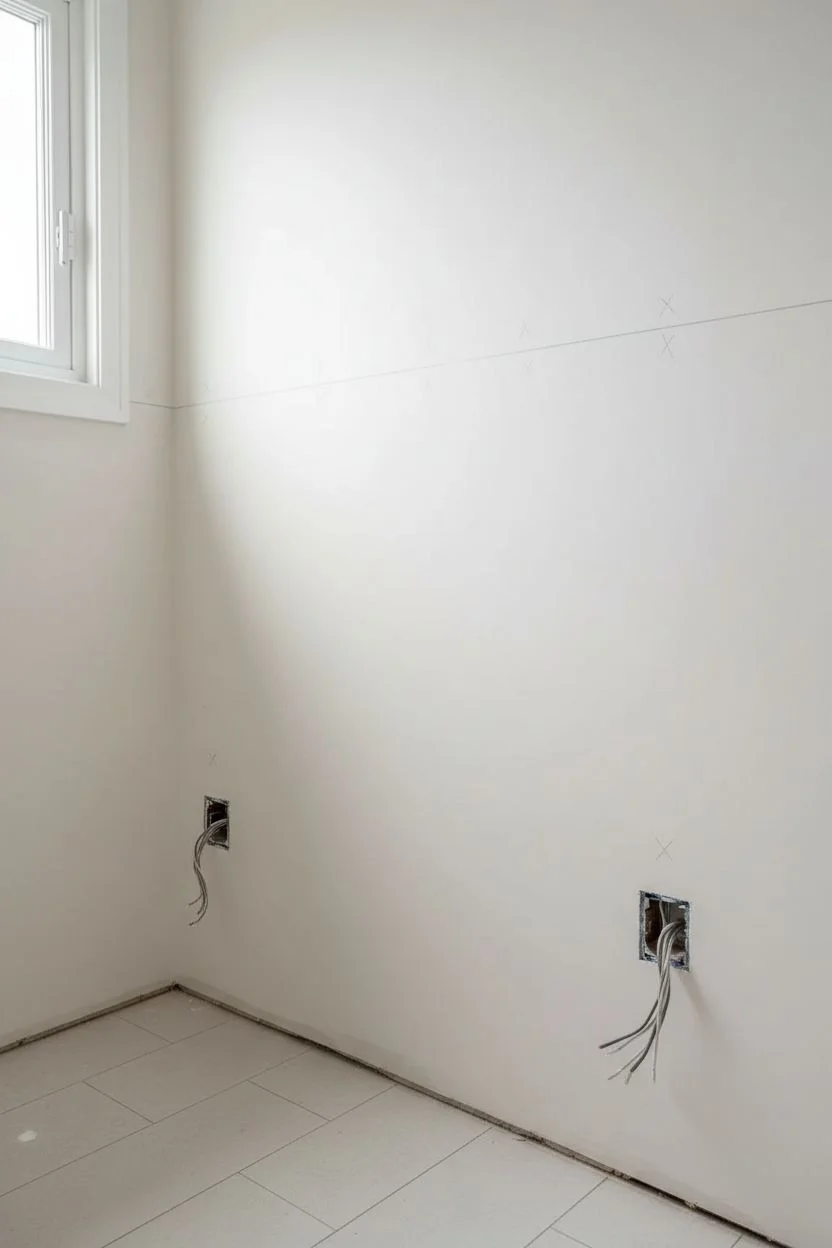
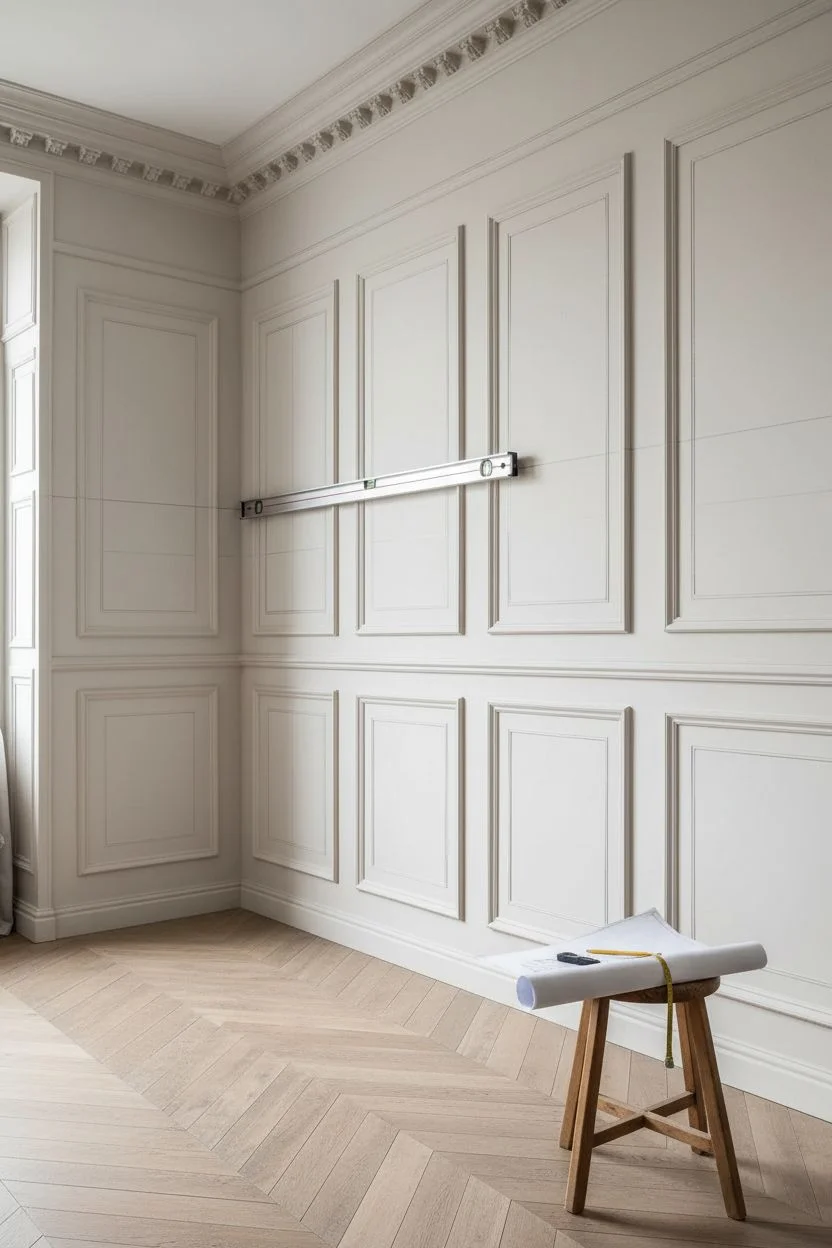
Elevated Height Proportions
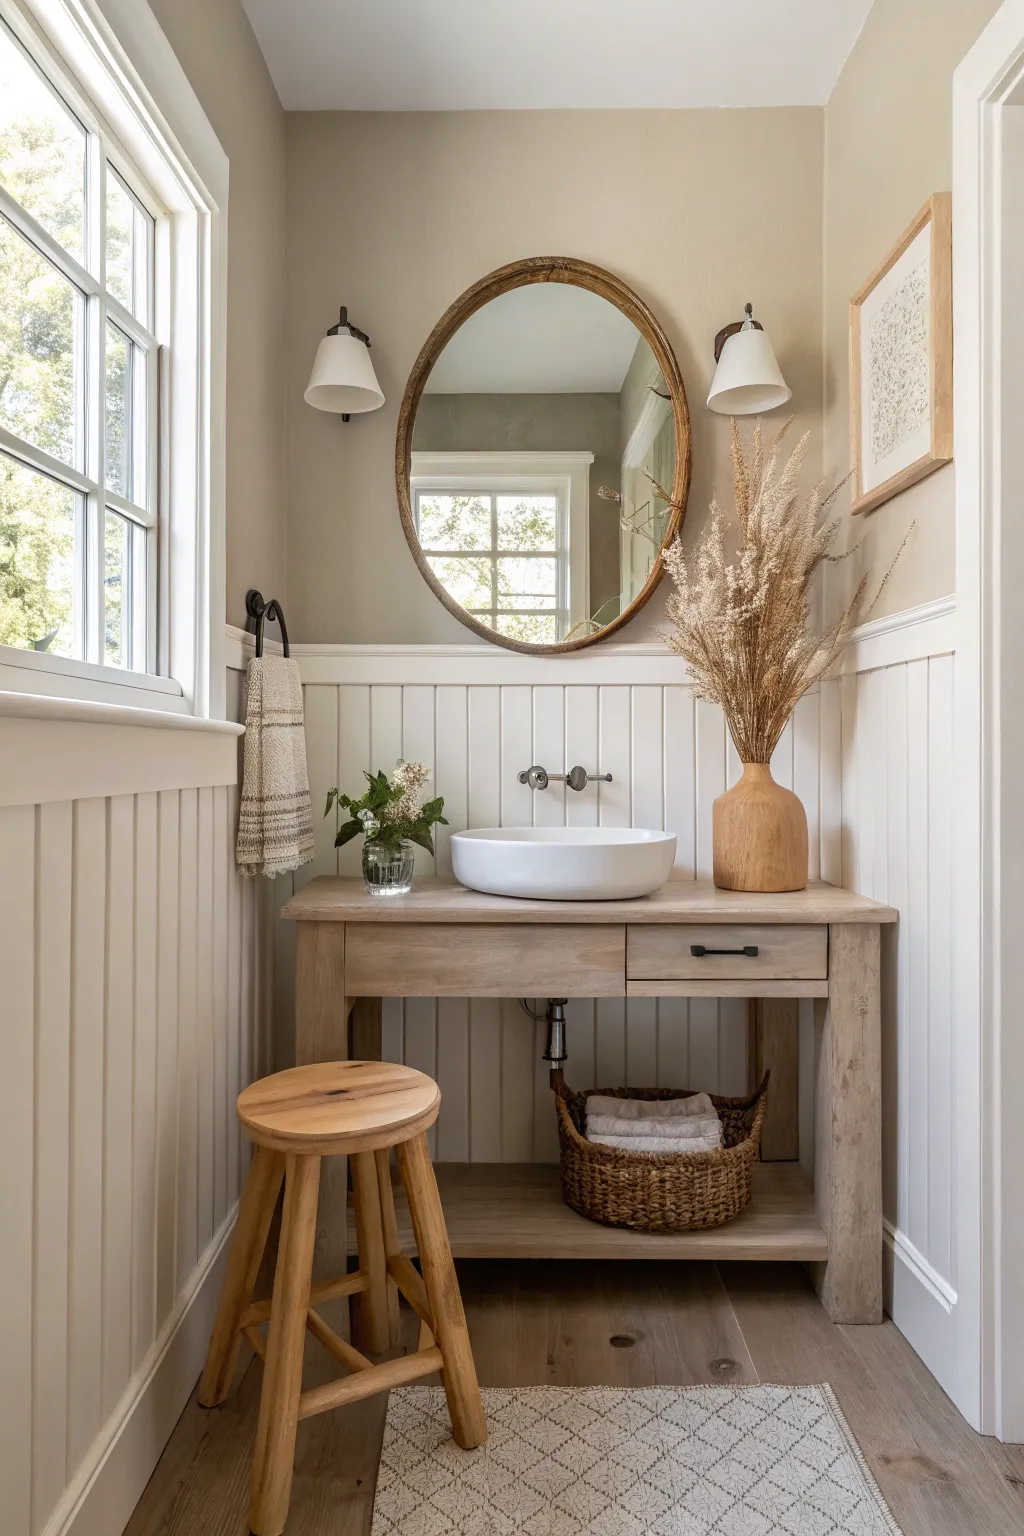
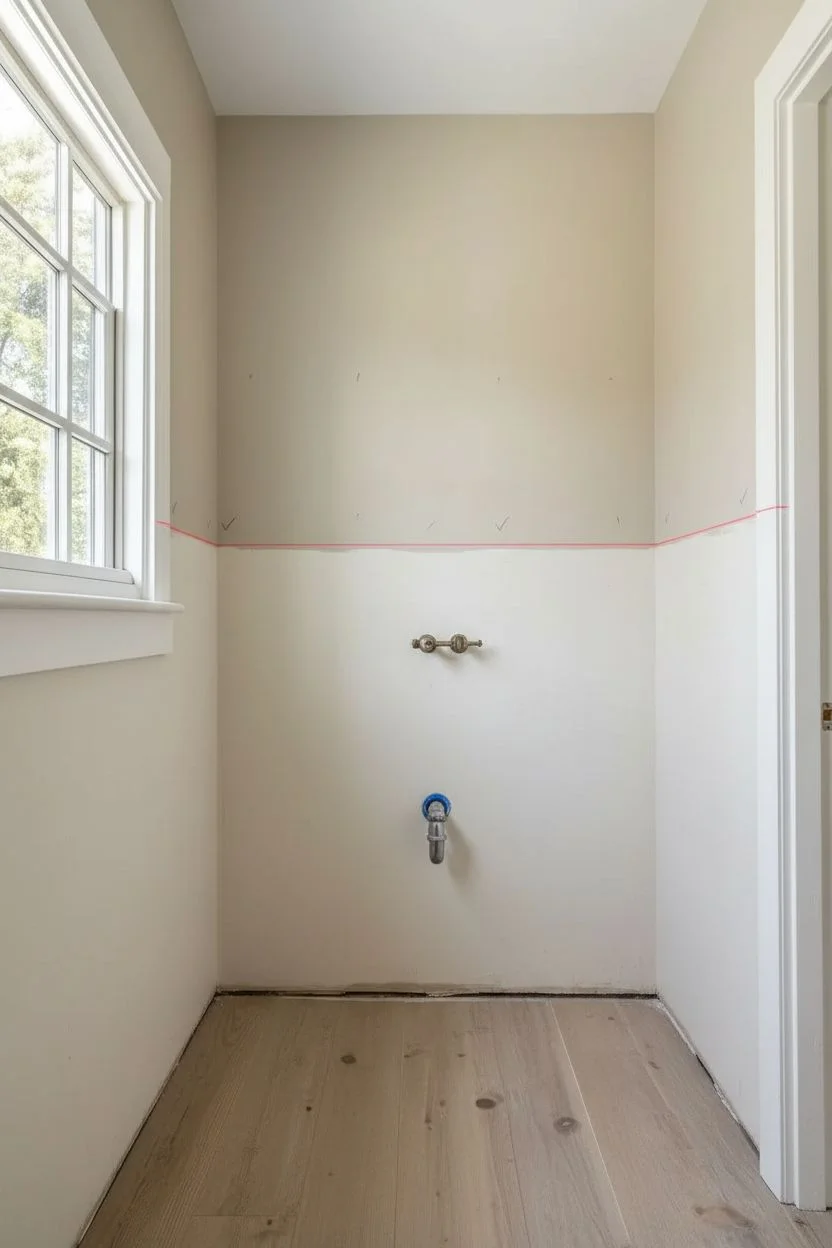
Transform a compact powder room into a visually taller, textured space with this high-profile beadboard installation. By extending the paneling two-thirds up the wall, you create a sophisticated backdrop that frames your vanity and fixtures beautifully.
Step-by-Step
Materials
- Beadboard sheets or tongue-and-groove planks
- 1×6 lumber (for baseboards)
- 1×4 lumber (for top rail)
- Cap molding (with a slight overhang)
- Construction adhesive
- Brad nailer and 1.5-inch nails
- Jigsaw
- Laser level (or 4-foot spirit level)
- Paintable latex caulk
- Wood filler
- High-quality semi-gloss paint (Creamy White)
- Spackle knife
Step 1: Preparation & Layout
-
Determine the golden height:
Measure your total ceiling height and calculate roughly two-thirds of that distance. For standard 8-foot ceilings, a wainscot height of 54 to 60 inches creates that airy, elevated look shown in the photo. -
Clear the walls:
Remove existing baseboards carefully with a pry bar. Because this design features a wall-mounted faucet, ensure your plumbing rough-in is complete and verified before covering the wall. -
Mark your level line:
Using a laser level, project a horizontal line around the room at your chosen finished height. This guide is crucial for keeping the top rail perfectly straight, regardless of floor variance. -
Locate studs:
Use a stud finder to mark the center of every wall stud just above your level line so the marks remain visible during installation.
Pro Tip: Seamless Seams
When joining two beadboard sheets on a long wall, cut the meeting edges at a 30-degree bevel. This overlap hides the seam much better than a simple butt joint when the wood expands.
Step 2: Panel Installation
-
Measure and cut panels:
Cut your beadboard sheets to length, accounting for any gap needed at the floor (usually 1/4 inch for expansion, which the baseboard will hide). -
Map plumbing cutouts:
For the wall-mounted faucet area, apply lipstick or chalk to the pipe nipples, press the panel against them to transfer the mark, and then drill precise holes with a hole saw or spade bit. -
Apply adhesive:
Run a zigzag bead of construction adhesive on the back of your first panel. I find this helps reduce the “bounciness” of thinner beadboard sheets between studs. -
Secure the panels:
Press the panel onto the wall and secure it with a brad nailer, placing nails into the studs and along the top and bottom edges where trim will cover them. -
Navigate the corners:
When you reach a corner, butt the next panel tight. If your walls aren’t perfectly square, you may need to scribe the edge of the panel for a seamless fit.
Step 3: Trim Work
-
Install the baseboard:
Install the 1×6 baseboard along the floor. Nail it through the beadboard into the bottom plate of the wall framing for a solid anchor. -
Attach the top rail:
Place your 1×4 flat trim along the top edge of the beadboard, aligning it with your level line. Nail it securely into the studs. -
Top with cap molding:
Finish the rail by attaching a decorative cap molding or a narrow 1×2 laid flat on top of the 1×4. This creates the small shelf-like ledge seen in the image.
Troubleshooting: Uneven Floors
If your floor dips, don’t follow it with the wainscoting. Keep the top rail level. Cover the resulting gap at the bottom with a shoe molding or quarter-round attached to the baseboard.
Step 4: Finishing Touches
-
Fill the imperfections:
Use wood filler on all nail holes and a paintable caulk for the seams where the panels meet the trim. Make sure to caulk the top edge of the cap molding where it meets the drywall. -
Sand for smoothness:
Once the filler is dry, lightly sand the trim and flat surfaces with 220-grit sandpaper to ensure a professional, furniture-grade finish. -
Prime the wood:
If using raw wood or MDF, apply a high-quality oil-based or shellac-based primer to seal the material and prevent moisture absorption. -
Paint the grooves first:
Use an angled sash brush to paint inside the vertical grooves of the beadboard first. It’s tedious, but it prevents drips that can happen if you try to roll them. -
Roll the finish:
Follow up immediately with a small foam roller on the flat surfaces to smooth out brush marks. Apply two coats of a warm, creamy white semi-gloss paint for durability and style.
Step back and admire how this simple architectural addition gives your room a custom, high-end feel.
Wallpaper and Wood Duo
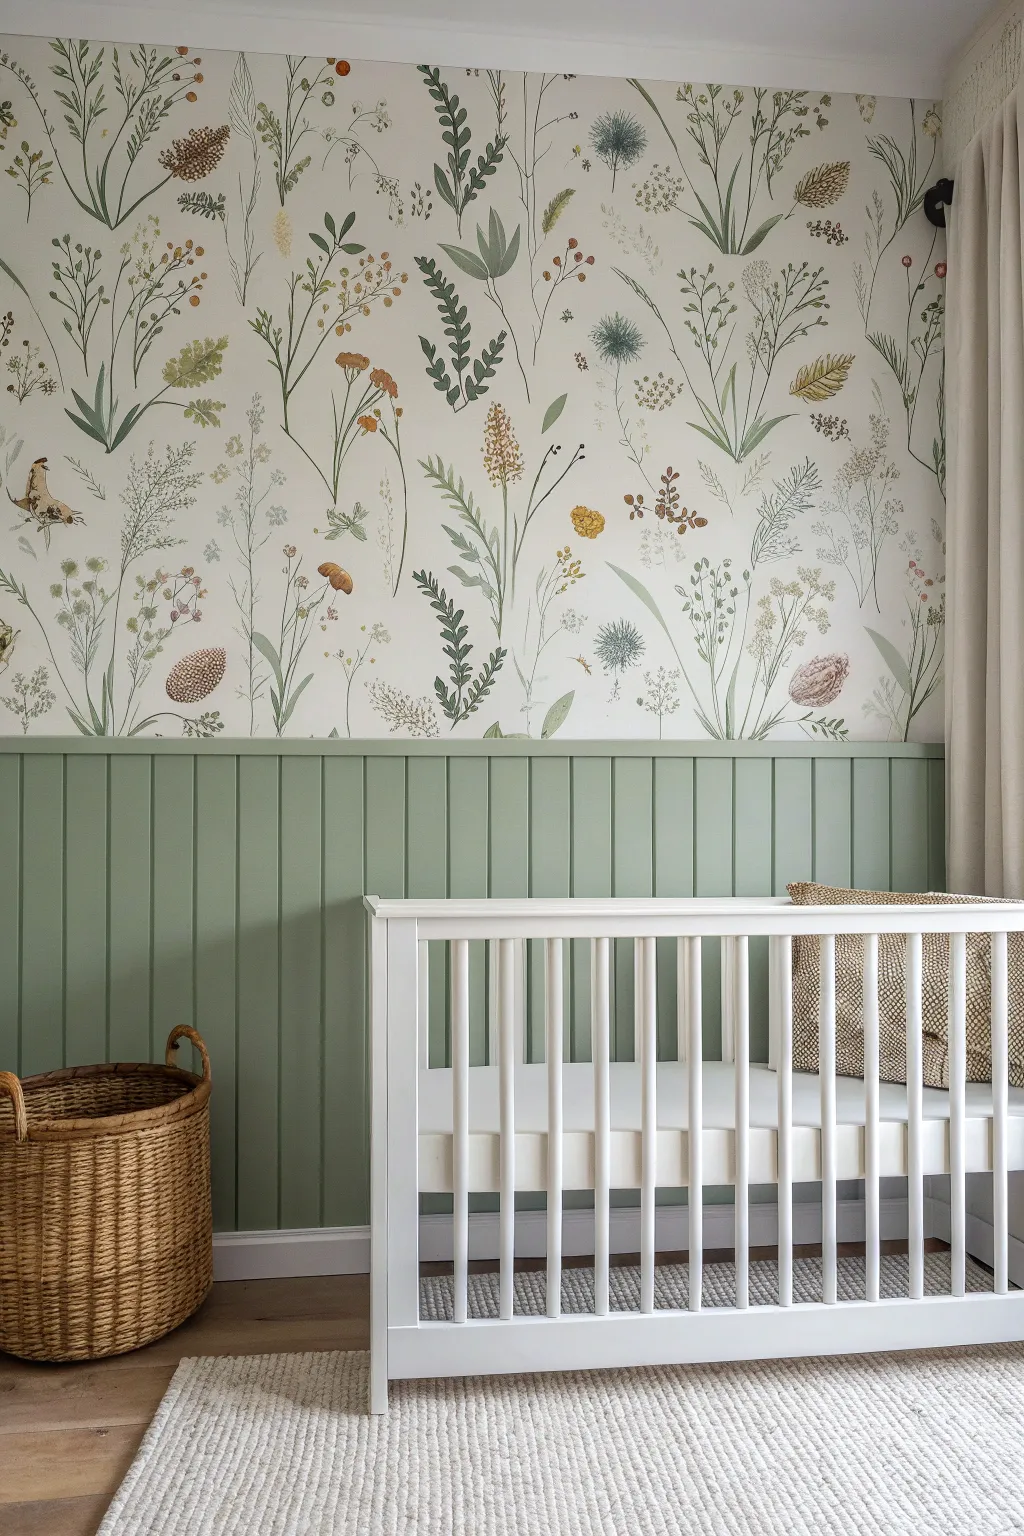

This project balances the grounding, earthy feel of sage green wainscoting with the airy whimsy of a wildflower botanical print. By combining vertical tongue-and-groove paneling with patterned wallpaper, you add instant architectural character and height to any standard room.
Step-by-Step Guide
Materials
- V-groove MDF or pine paneling sheets
- Pre-primed 1×3 lumber (for top rail)
- Construction adhesive
- Brad nailer and 1.5-inch nails
- Wood filler and sandpaper
- paintable caulk
- Sage green interior paint (satin finish)
- Botanical wallpaper rolls
- Wallpaper paste and roller
- Smoothing tool and craft knife
- Laser level (or spirit level)
Step 1: Installing the Wainscot Base
-
Prep the perimeter:
Begin by carefully prying off the existing baseboards with a pry bar. Save them if you plan to reuse them, or prepare new molding for a cleaner look. -
Mark your height:
Determine how high you want the paneling. For this project, measure roughly 40 to 48 inches from the floor. Use a laser level to project a line across the entire room to guide your installation. -
Locate and mark studs:
Use a stud finder to mark the vertical stud locations along the wall. I like to mark these just above my level line so I don’t paint over the marks while working. -
Cut vertical panels:
Measure and cut your V-groove paneling sheets to fit the height from the floor to your level line. If your floor is uneven, measure each section individually for a precise fit. -
Secure the panels:
Apply construction adhesive in a zigzag pattern on the back of the first panel. Press it against the wall, ensuring it is perfectly plumb, and nail it into the studs with your brad nailer. -
Continue the run:
Install the remaining panels, slotting the tongue of the new board into the groove of the previous one. Tap them snugly together with a scrap block before nailing. -
Add the top ledge:
Place the 1×3 trim board horizontally on top of the vertical panels to create the finished ledge. Nail it downward into the panels and at an angle into the wall studs. -
Reinstall baseboards:
Attach your baseboards along the bottom of the new paneling to cover the expansion gap at the floor and ground the structure.
Groove Protection
When painting V-groove paneling, verify no paint pools in the recessed lines. Run a dry brush vertically through the grooves a few minutes after rolling to catch drips.
Step 2: Paint and Polish
-
Fill and seamless:
Fill all nail holes with wood filler. Once dry, sand the filler smooth and lightly scuff the face of the panels to help the paint adhere. -
Caulk the gaps:
Run a thin bead of paintable caulk along the seam where the top rail meets the wall and where the trim meets the panels. This is crucial for that professional, built-in look. -
Deep clean:
Wipe down the entire wood structure with a tack cloth or damp rag to remove every speck of dust before painting. -
Apply the color:
Paint the paneling, baseboard, and top rail with your sage green paint. I usually use an angled brush to get into the grooves first, then immediately follow with a foam roller for a smooth finish. -
Second coat:
Allow the first coat to dry completely according to the can instructions, then apply a second coat for full, rich color saturation.
Seamless integration
For a truly custom look, remove your electrical outlet covers and paint them the same sage green color as the wainscoting so they disappear into the paneling.
Step 3: Wallpaper finish
-
Establish a plumb line:
Starting in a corner or the center of the focal wall, use your level to draw a straight vertical line. This ensures your botanical stems grow straight up, not leaning sideways. -
Apply paste:
If using non-woven paper (recommended), roll the wallpaper paste directly onto the wall space above the wainscoting, covering an area slightly wider than one strip. -
Hang the first strip:
Align the edge of your wallpaper with your pencil plumb line. Leave about two inches of excess paper at the ceiling and overlap the wood rail slightly. -
Smooth and match:
Use a smoothing tool to push out air bubbles, working from the center outward. Align the pattern of the next strip carefully before smoothing it down. -
Trim the excess:
Use a sharp craft knife and a straight edge guide to trim the excess paper at the ceiling and exactly along the top edge of your wainscoting rail.
Step back and enjoy the calming atmosphere of your new nature-inspired room.
The Functional Picture Ledge
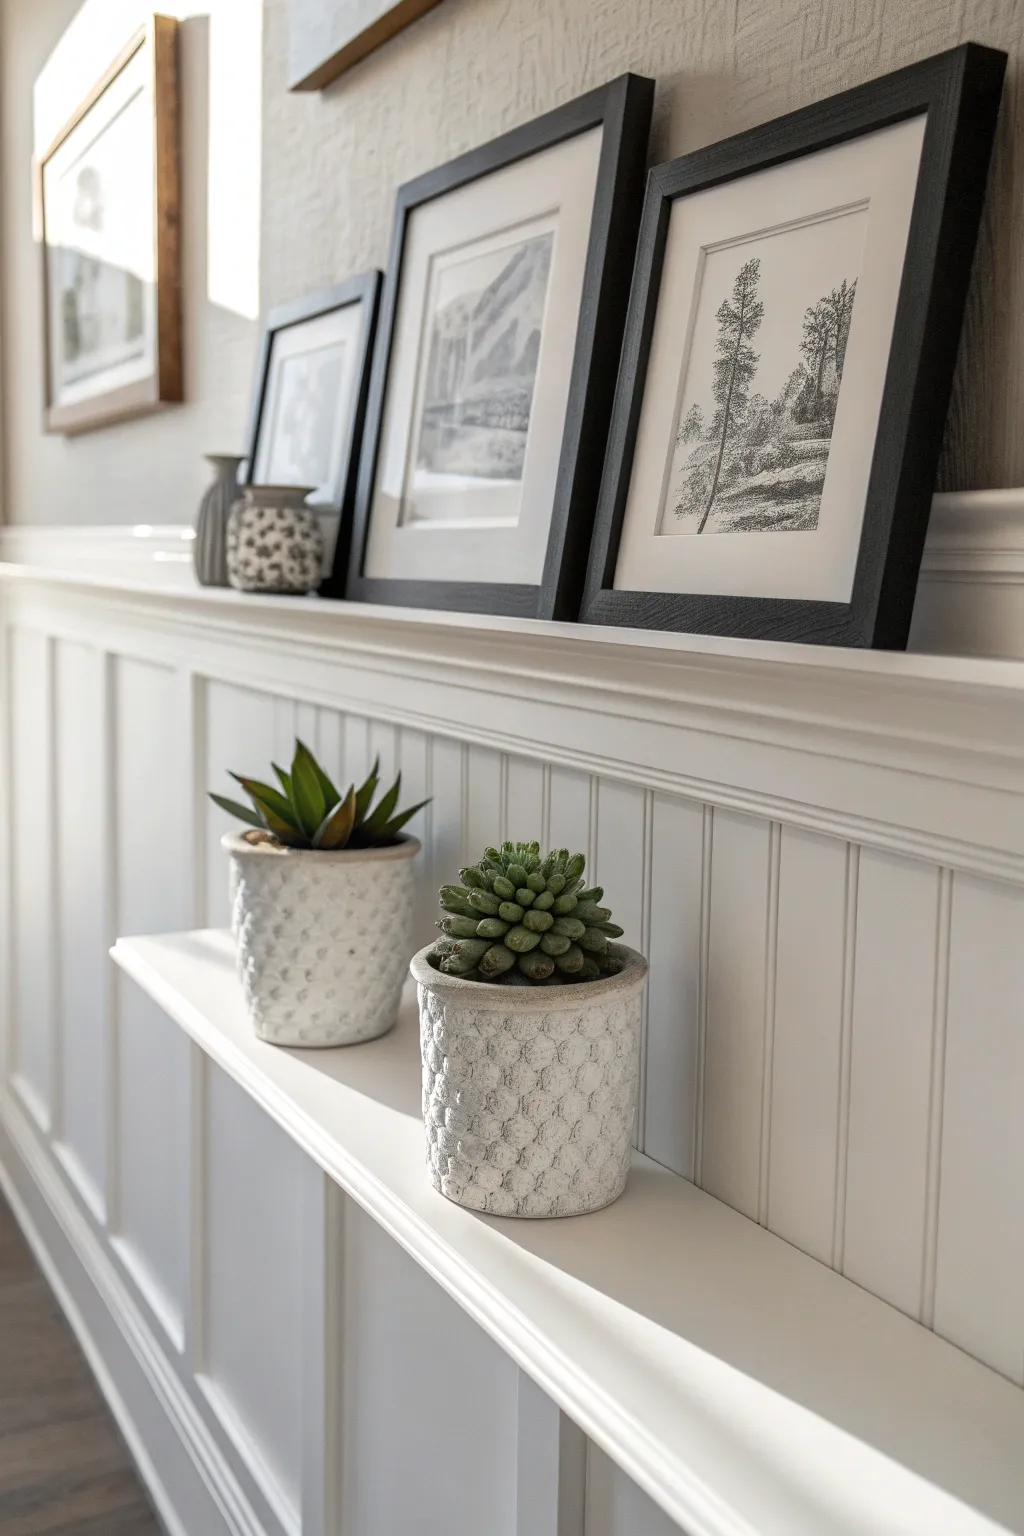
This project combines the classic charm of wainscoting with intelligent storage, creating a stunning focal point that displays art and greenery simultaneously. By mixing board-and-batten style lower paneling with a beadboard upper section, you gain both texture and two functional shelf, surfaces.
Step-by-Step
Materials
- 1×6 MDF boards (baseboard)
- 1×4 MDF boards (battens and rails)
- 1×2 trim boards (shelf caps)
- Beadboard paneling sheets
- Construction adhesive
- 2-inch brad nails
- Wood filler and paintable caulk
- Interior semi-gloss paint
- Brad nailer
- Miter saw
- Level and stud finder
Step 1: Setting the Lower Grid
-
Prep the surface:
Remove existing baseboards carefully and patch any major drywall damage; use a stud finder to mark all vertical studs along the length of the wall. -
Install the new baseboard:
Cut your 1×6 MDF to length and secure it to the bottom of the wall using construction adhesive and nails into the studs. -
Determine tier height:
Mark a horizontal level line at roughly 32 inches from the floor to establish where the lower ‘plant shelf’ will sit. -
Attach the top rail:
Install a horizontal 1×4 board with its top edge aligned perfectly with your level line; this creates the backing for your first shelf. -
Space the battens:
Measure the distance between the baseboard and top rail, then cut vertical 1×4 battens to fit snugly in this space. -
Secure the vertical battens:
Install the battens vertically, spacing them roughly 16 to 20 inches apart, ensuring you hit studs where possible or using adhesive for a firm bond.
Pro Tip: Precise Spacing
Cut a scrap block of wood to the exact width of your desired gap between vertical battens. Use this ‘spacer block’ to position each new board quickly without measuring every single time.
Step 2: Upper Beadboard & Shelves
-
Install the lower shelf cap:
Place a 1×2 or 1×3 board flat on top of the lower rail to create the projecting shelf for your succulents, nailing it down into the rail. -
Cut the beadboard:
Measure the space from the top of your new lower shelf to your desired total height (usually another 12-18 inches) and rip your beadboard sheets to size. -
Mount the beadboard:
Apply adhesive to the back of the beadboard panels and nail them to the wall, resting the bottom edge directly on the lower shelf. -
Install upper rail:
Place a second horizontal 1×4 rail over the top edge of the beadboard, nailing it securely through to the wall studs. -
Create the picture ledge:
Cap the upper rail with a 1×3 or 1×4 board laid flat to create the deep top ledge suitable for leaning large picture frames. -
Add a safety lip (optional):
For extra security, I like to glue a small strips of lattice trim to the front edge of the top shelf to prevent frames from sliding forward.
Step 3: A Seamless Finish
-
Fill the fasteners:
Go over every nail hole with high-quality wood filler, leaving it slightly overfilled to account for shrinkage as it dries. -
Caulk the seams:
Run a thin bead of paintable caulk along every seam where boards meet the wall and where panels meet rails; smooth it instantly with a damp finger. -
Sand until smooth:
Once the filler is dry, sand the patched areas flush and give all MDF edges a light sanding to soften any sharp corners. -
Apply primer:
Coat the entire installation with an oil-based primer (essential for MDF) or a high-quality bonding primer to ensure the paint adheres evenly. -
The final coats:
Finish with two coats of durable semi-gloss white paint, allowing adequate drying time between layers for a hard, furniture-grade finish.
Level Up: Hidden Wiring
Before nailing down the top picture ledge, route a shallow channel in the back of the cap piece. This allows you to run thin LED strip wires invisibly if you want to uplight your artwork later.
Once the paint cures, you can style your new dual-ledge wall with lush greenery below and your favorite prints above for an instant room transformation.
Recessed Hallway Panels
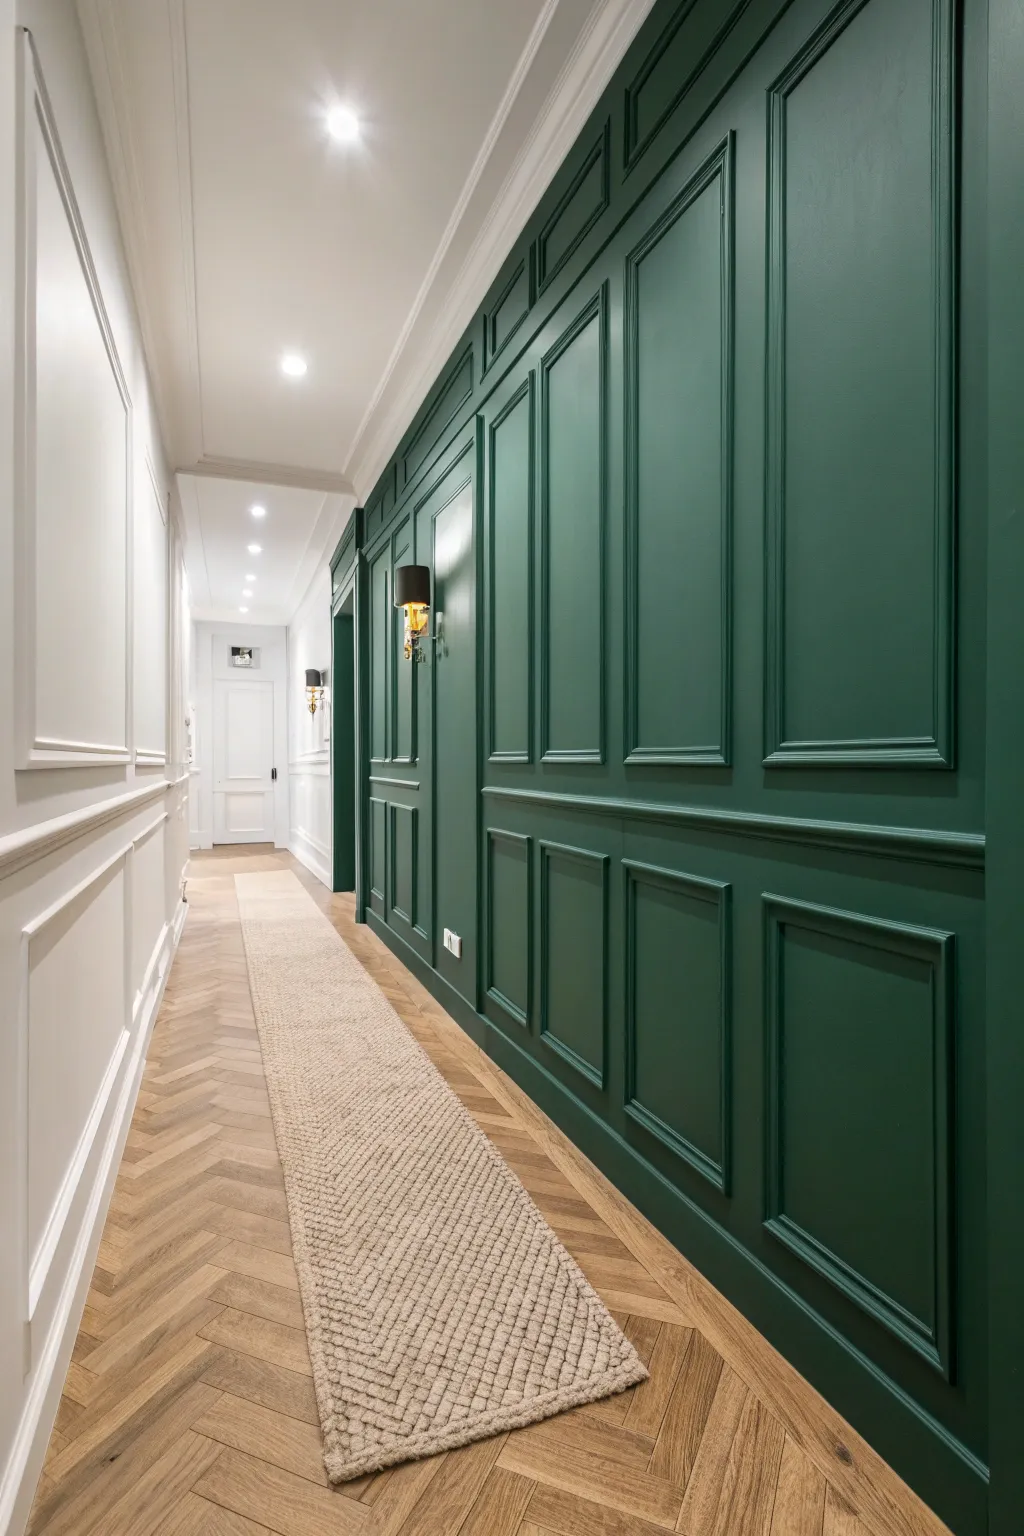
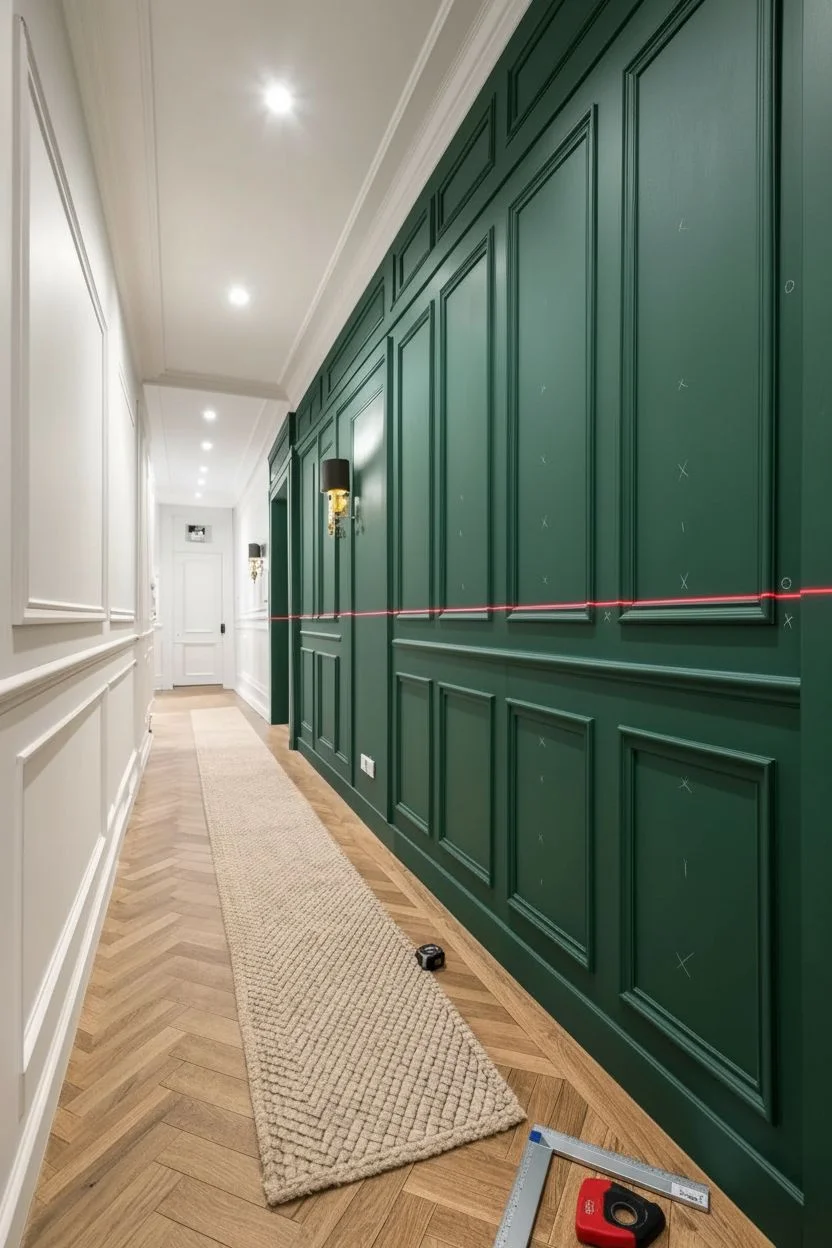
Transform a transitional hallway into a statement passage with this full-height recessed wainscoting project. The combination of geometric gridwork and moody emerald paint creates an architectural feature that feels both historic and modern.
Detailed Instructions
Materials
- 1×4 MDF boards (pre-primed recommended)
- Small panel moulding (base cap or inside corner profile)
- Deep emerald green paint (Satin finish)
- High-quality Primer
- Construction adhesive
- 2-inch brad nails
- 1-inch pin nails
- Wood filler
- Paintable latex caulk
- Sandpaper (220 grit)
- Laser level (or long spirit level)
- Miter saw
- Brad nailer
- Paint sprayer or microfiber roller
Step 1: Planning the Grid
-
Measure and Map:
Measure your total wall length and height to determine your grid layout. The goal is to have symmetrical boxes; calculate the spacing so that the stile (vertical board) width is consistent across the wall. -
Mark the Wall:
Using a laser level, mark the horizontal line for the chair rail—usually about 32 to 36 inches from the floor—which separates the lower square panels from the upper elongated panels. -
Locate Studs:
Use a stud finder to mark all vertical studs along the wall. You will want to nail into these wherever possible for structural stability.
Step 2: Installing the Framework
-
Install Top and Bottom Rails:
Attach your baseboard along the floor and a 1×4 horizontal rail flush against the ceiling using construction adhesive and 2-inch nails. -
Attach the Chair Rail:
Install the horizontal belt rail (chair rail) along the line you marked previously. Check for level continuously as floors are rarely perfectly even. -
Place Vertical Stiles:
Measure the distance between your horizontal rails for the vertical stiles. Cut your 1×4 MDF boards to length. -
Secure the Grid:
Apply adhesive to the back of each vertical stile and nail them into place according to your spacing plan. Use a level on every single board to ensure they remain plumb. -
Double-Check Connections:
Ensure the butt joints where vertical stiles meet horizontal rails are tight. Light sanding may be needed if a board is slightly long.
Spacer Block Magic
Cut a scrap piece of wood to the exact width of your desired panel spacing. Use this ‘spacer block’ between stiles during installation to ensure perfectly consistent spacing without measuring every time.
Step 3: Adding Detail & Finishing
-
Cut Inner Moulding:
Set your miter saw to 45 degrees. Cut the small panel moulding to fit inside each rectangle of the grid formed by the MDF boards. -
Install Panel Moulding:
Fit the moulding inside the boxes so it rests against the inner edge of the MDF grid while flush with the drywall. Secure with a tiny bead of glue and 1-inch pin nails. -
Fill Nail Holes:
Overfill every nail hole slightly with wood filler. I like to let this dry completely before sanding to ensure no shrinkage divots appear later. -
Sand Smooth:
Sand the wood filler flush with 220-grit sandpaper and lightly scuff the MDF surface to help the paint adhere. -
Caulk Seams:
Run a bead of paintable caulk along every seam where the wood meets the wall and where the moulding meets the MDF. Smooth with a damp finger for a seamless look. -
Prime the Surface:
Apply a coat of primer to all woodwork and the drywall inside the panels. This step is crucial for ensuring the deep green color absorbs evenly across different materials. -
Paint Edges:
Using a high-quality angled sash brush, cut in the emerald paint along the intricate edges of the inner moulding. -
Roll the Flat Areas:
Use a foam or low-nap microfiber roller to paint the flat surfaces of the MDF and the drywall centers. This minimizes textures. -
Final Coat:
Apply a second (and potentially third) coat of paint once the previous layer is dry to achieve that rich, saturated depth shown in the photo.
Level Up: Hardware
Plan your grid layout specifically around electrical boxes. Mounting brass sconces directly inside the upper panel sections adds dramatic lighting and elevates the architectural feel.
Step back and admire how this bold color and classic texture completely redefine your hallway space
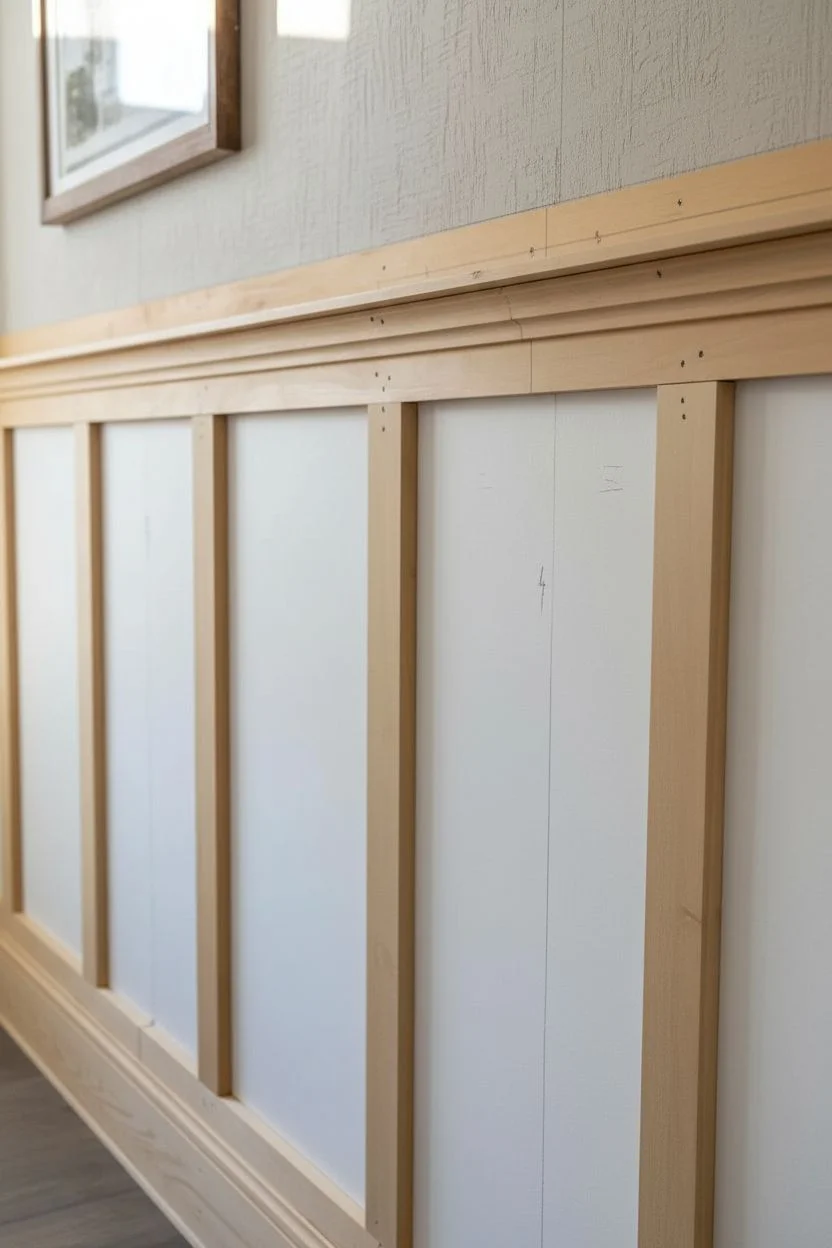
Natural Wood Tones
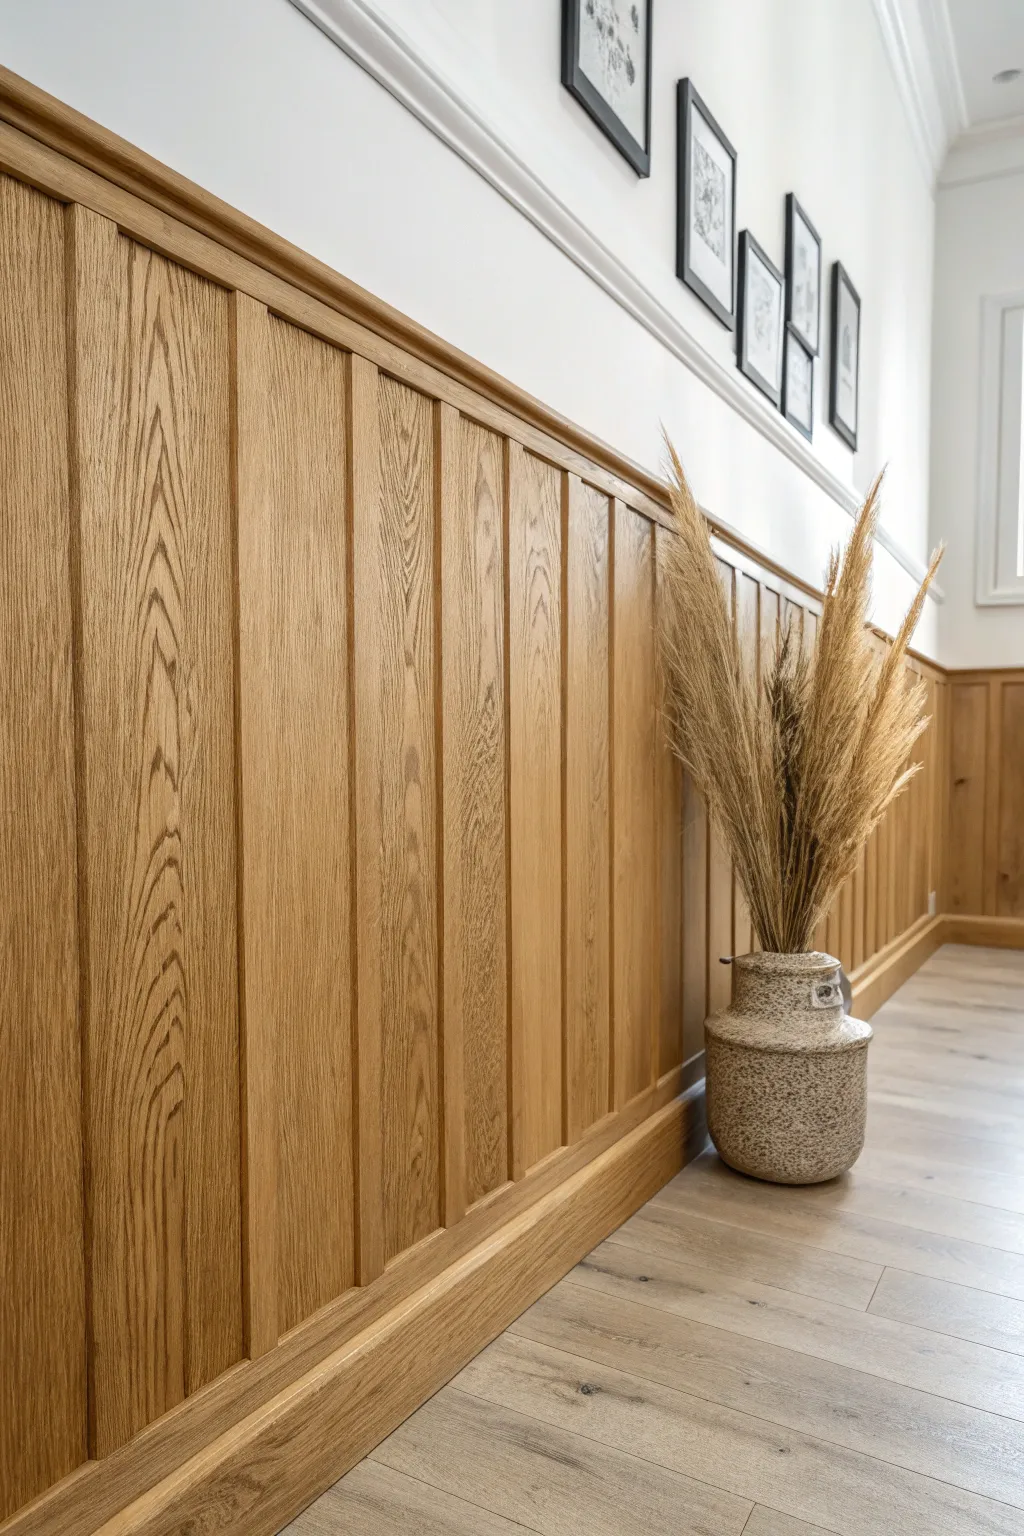
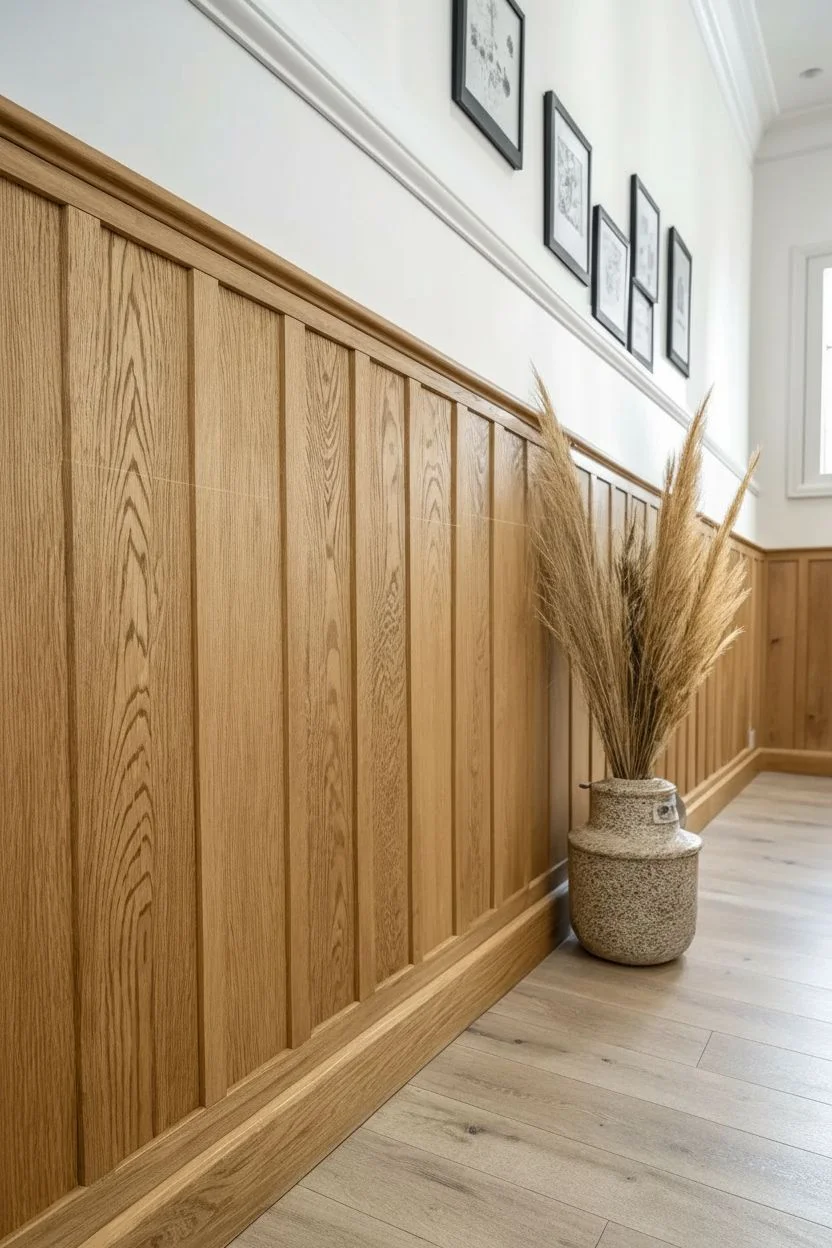
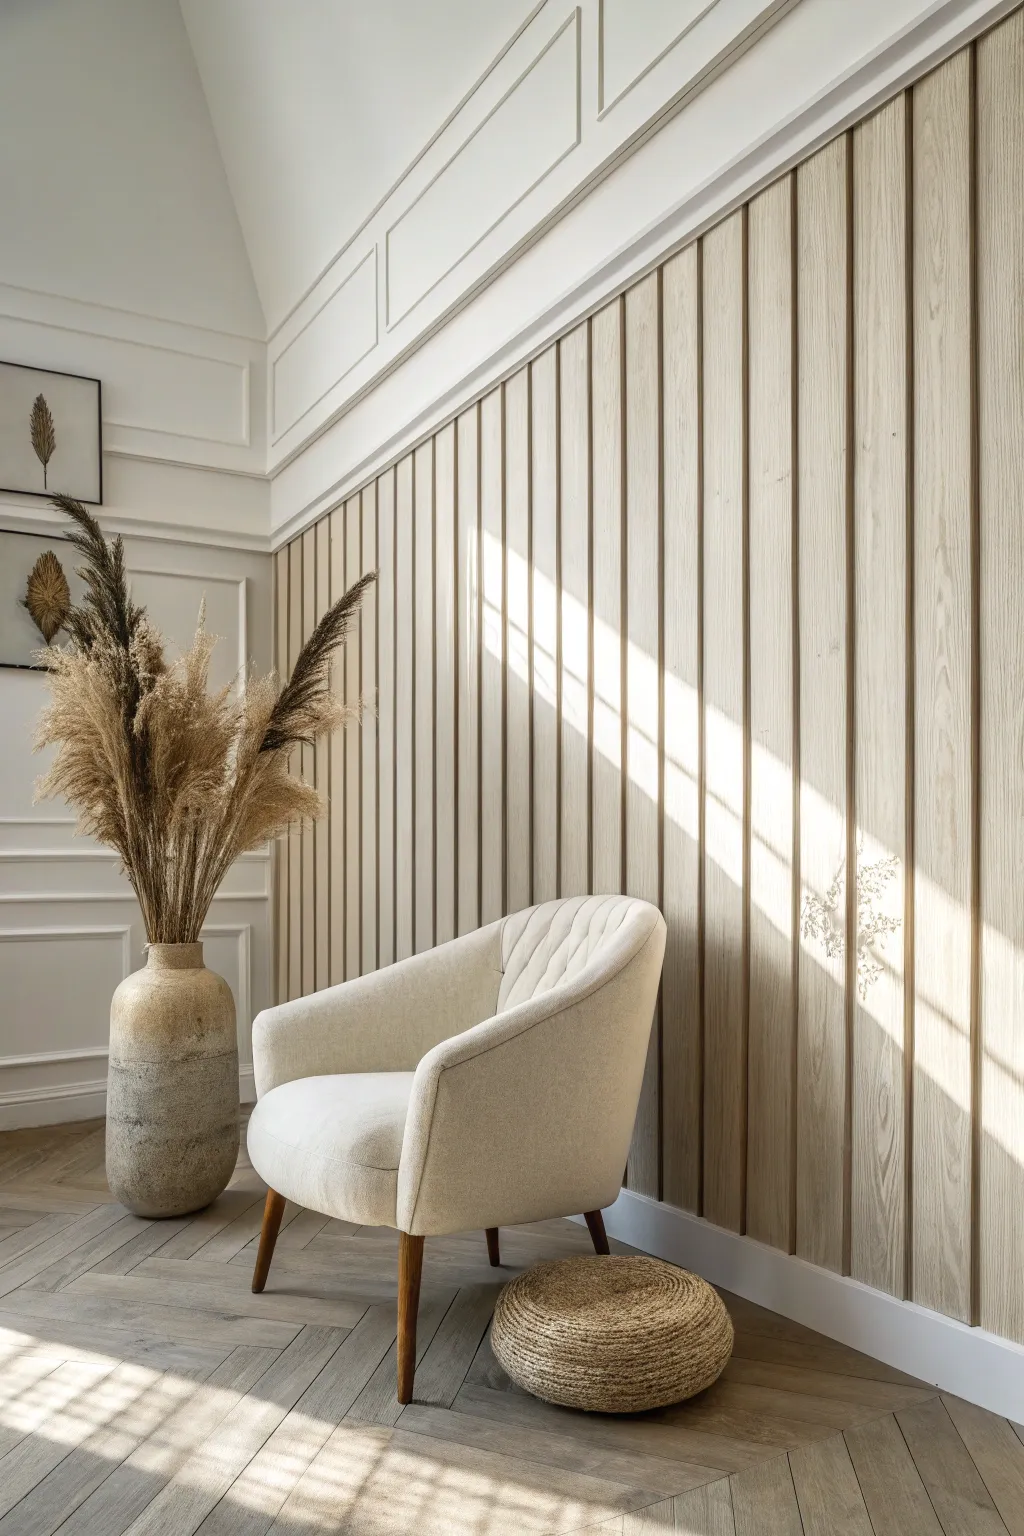
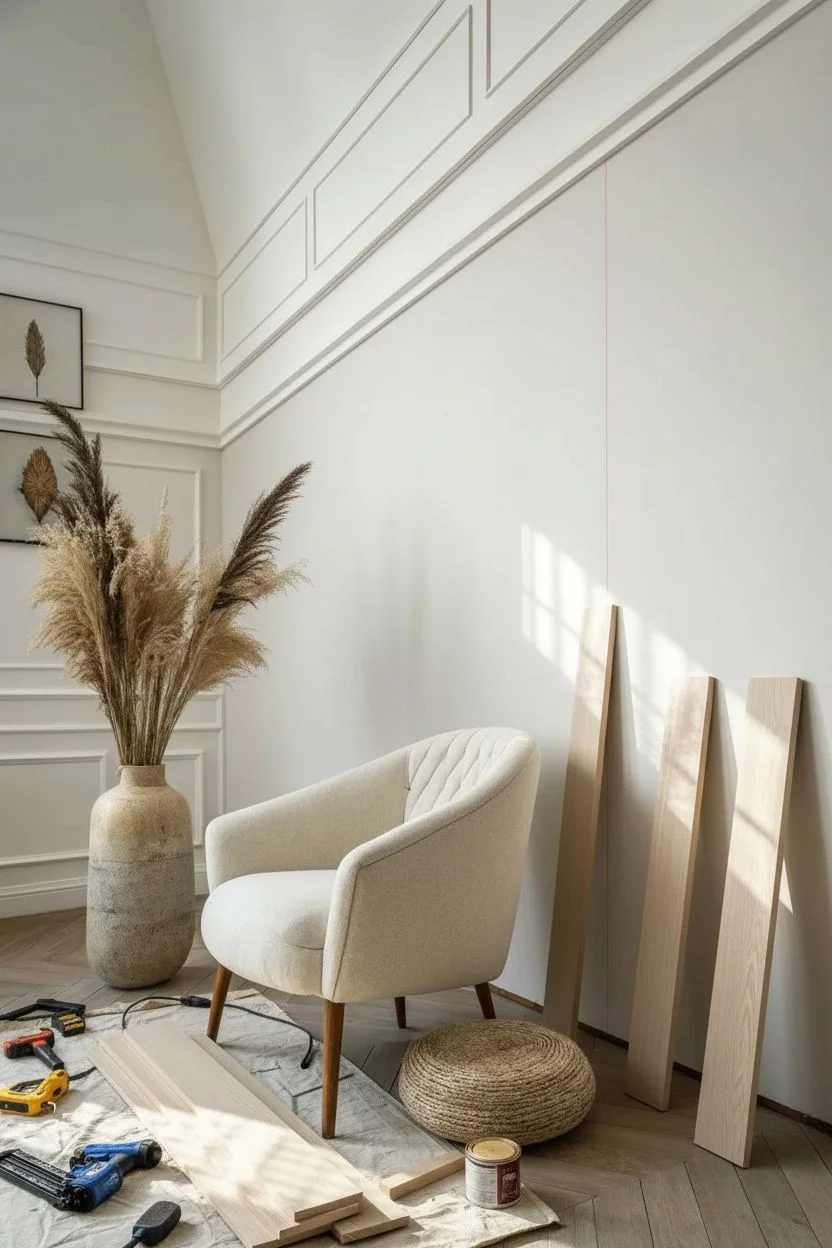
Bring warmth and organic texture to your hallway with this sophisticated take on traditional board and batten. By using natural oak tones and vertical lines, this project creates an illusion of height while adding a modern, cozy architectural feature.
How-To Guide
Materials
- 4×8 sheets of oak veneer plywood (1/4 inch thick)
- Solid oak strips (1.5 inch wide, 1/4 inch thick)
- Solid oak chair rail moulding (with a rabbet or flat back)
- Solid oak baseboard (approx 4-5 inches tall)
- Construction adhesive
- 18-gauge brad nailer and 1-inch nails
- Stainable wood filler
- 220-grit sandpaper
- Matte clear polyurethane or hard wax oil
- Tack cloth
- Table saw or circular saw with edge guide
- Laser level
Step 1: Wall Prep and Panel Installation
-
Clear the workspace:
Remove any existing baseboards along the wall, carefully scoring the caulk line first to avoid peeling the drywall paper. -
Determine height:
Decide on final wainscoting height; the project in the image sits at roughly 42 to 48 inches, which is slightly taller than standard chair rail height for a modern look. -
Mark a level line:
Use a laser level to project a horizontal line across the entire wall at your chosen top height. -
Rip the plywood:
Cut your 4×8 oak plywood sheets into horizontal strips matching your desired height, ensuring the wood grain runs vertically. -
Apply adhesive:
Apply a generous zigzag of construction adhesive to the back of your first plywood panel. -
Mount the panel:
Press the panel against the wall, aligning the top edge with your laser line, and secure it by nailing into the wall studs with your brad nailer. -
Continue paneling:
Repeat the process across the length of the wall, butting the edges tightly together; minimize seams by planning your layout so joints land behind where a vertical batten will eventually go.
Uneven Floor Fix
If gaps appear under the baseboard due to uneven floors, settle the baseboard level first. Then, install a quarter-round or shoe moulding at the bottom, which is flexible enough to follow the floor’s contour.
Step 2: Trim and Batten Details
-
Install the baseboard:
Install the solid oak baseboard directly over the bottom edge of the plywood panels, nailing it through into the wall studs. -
Cap the top:
Install the oak chair rail along the top edge of the plywood; the moulding should overlap the plywood edge to create a clean, finished lip. -
Calculate spacing:
Measure the total wall length and divide by your desired number of bays to ensure equal spacing between vertical battens, aiming for roughly 8 to 10 inches apart. -
Cut the battens:
Measure the distance between the top of the baseboard and the bottom of the chair rail, then cut your oak strips to this exact length. -
Create a spacer:
I find that cutting a scrap piece of wood to the exact width of your bay spacing acts as a perfect template to keep your installation quick and uniform. -
Attach the strips:
Apply a thin bead of glue to the back of a vertical strip, place it against your spacer block, and pin it in place with a few brad nails. -
Repeat the pattern:
Work your way down the wall using the spacer block, ensuring each batten is plumb before nailing it home.
Step 3: Finishing
-
Fill the holes:
Apply a tiny amount of stainable wood filler to all nail holes, leaving it slightly mounded to account for shrinkage as it dries. -
Sand the wood:
Once the filler is dry, hand sand the entire installation with 220-grit sandpaper, focusing on smoothing the filler and softening any sharp edges on the battens. -
Clean the surface:
Remove all sanding dust thoroughly using a tack cloth or a vacuum with a brush attachment to ensure a flawless finish. -
Apply finish:
Using a high-quality brush or rag, apply a matte clear coat or hard wax oil to protect the wood while maintaining its natural, raw appearance. -
Let it cure:
Allow the first coat to dry according to the manufacturer’s instructions, then lightly sand with high-grit paper and apply a final coat for durability.
Pro Tip: Hidden Seams
Plan your layout on paper first. Adjust the starting point so that every vertical seam between the plywood sheets gets covered perfectly by one of your vertical battens for a seamless look.
Step back and admire how the natural wood tones instantly add a layer of custom luxury to your space.
The Gallery Wall Insert
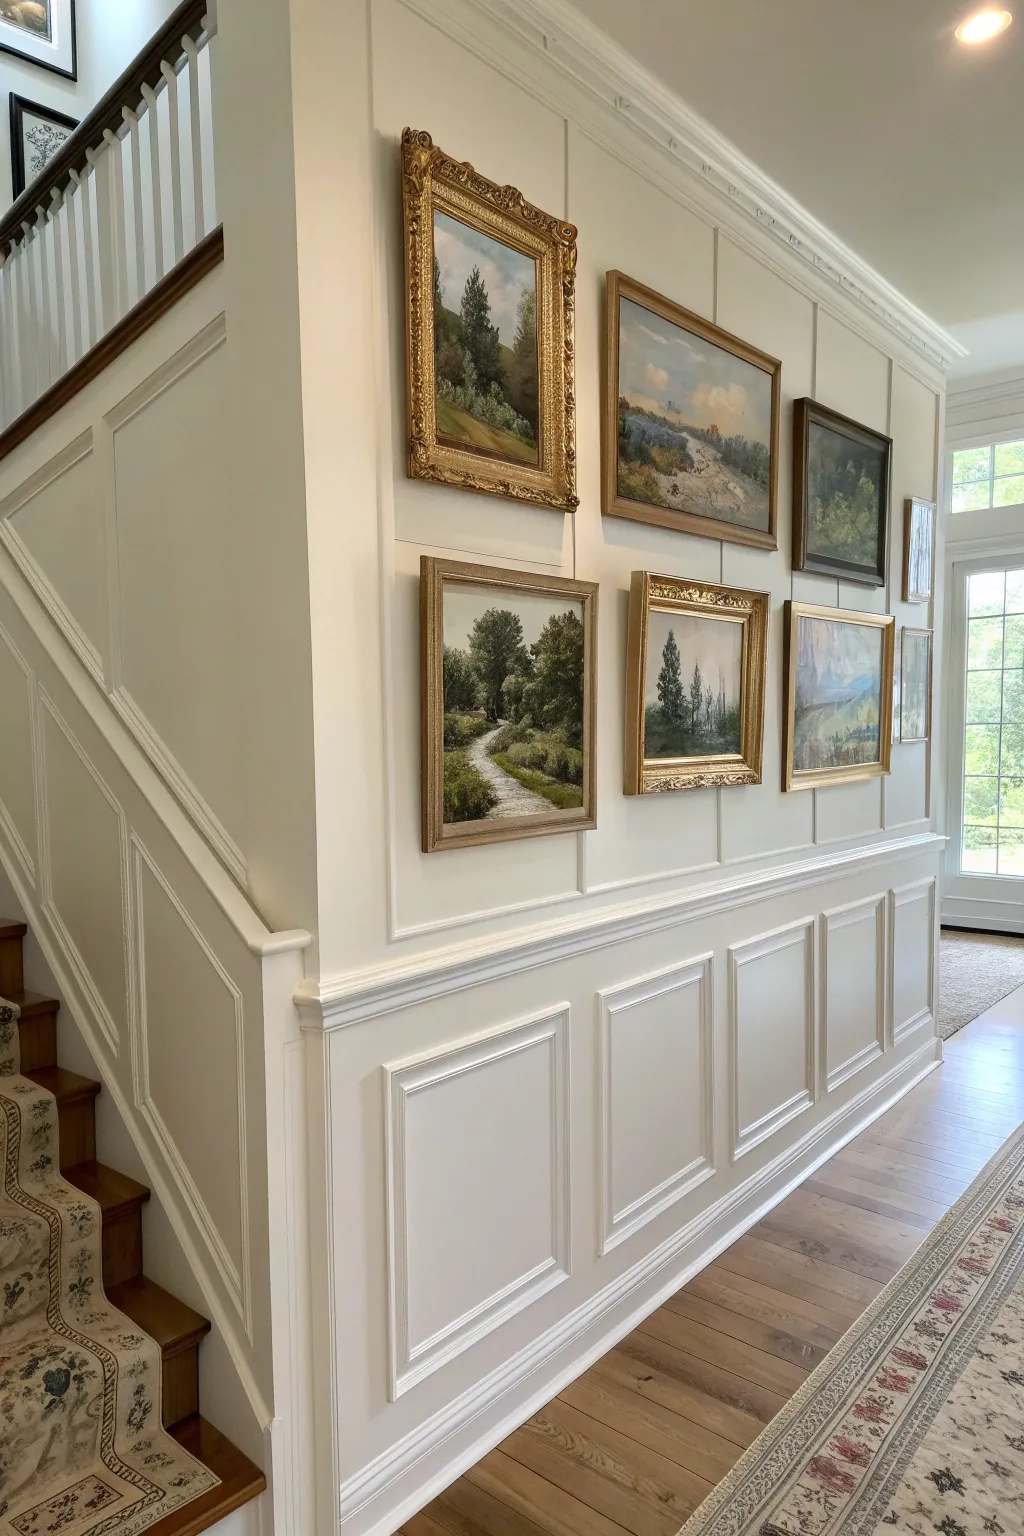
Transform a plain hallway into a sophisticated architectural feature by combining floor-to-ceiling wainscoting with a curated gallery wall. This project creates a structured grid of molding that serves as individual frames for a cohesive collection of vintage-style landscape paintings, adding immense depth and character to your home.
Step-by-Step Guide
Materials
- 1×6 MDF boards (for base and rails)
- 1×4 MDF boards (for vertical stiles)
- Small decorative panel molding (for inside the boxes)
- Chair rail molding (optional separator)
- Construction adhesive
- Brad nailer with 1 1/4″ and 2″ nails
- Miter saw
- Laser level
- Wood filler and paintable caulk
- 220-grit sandpaper
- Interior semi-gloss paint (Warm White)
- Vintage-style landscape art prints
- Ornate gold and wood frames
Step 1: Planning the Grid
-
Measure and calculate:
Measure your total wall length and determine your desired number of panels. Aim for an odd number of vertical panels for better visual balance, ensuring the spaces between ‘stiles’ (the vertical boards) are uniform. -
Mark the layout:
Use a laser level to mark the horizontal lines for your chair rail height and the top rail. Then, mark the vertical center lines for every stile to ensure your grid is perfectly square before cutting any wood.
Step 2: Installing the Structure
-
Install the horizontal rails:
Apply construction adhesive to the back of your 1×6 MDF boards and nail them horizontally along the floor (as baseboard) and at your designated chair-rail height using 2″ brad nails. -
Attach the vertical stiles:
Cut your 1×4 MDF boards to fit vertically between your horizontal rails. Adhere and nail these over your marked center lines, checking constantly with a spirit level to ensure they are plumb. -
Create the upper grid:
Repeat the process for the upper section of the wall, aligning the top vertical stiles directly above the lower ones to create a continuous line from floor to ceiling. -
Cap the top:
Install a final horizontal rail or crown molding at the ceiling line to cap off the wainscoting system cleanly.
Pro Tip: Seamless Corners
When installing the inner panel molding, glue the four corners of the frame together on a flat table first, let them set, and then install the pre-assembled rectangle onto the wall as one piece.
Step 3: Adding the Picture Frames
-
Cut the panel molding:
Using your miter saw, cut the smaller decorative panel molding at 45-degree angles. These will form the inner ‘picture frames’ inside each grid square. -
Create a spacer block:
I like to cut a small block of wood to the exact width needed between the stile and the inner molding (usually about 1.5 inches). Use this as a guide to position your molding quickly without measuring every single time. -
Install inner frames:
Apply a thin bead of wood glue to your mitered molding pieces and secure them inside the grid squares using 1 1/4″ pin nails, ensuring the corners meet tightly. -
Cap the chair rail:
If desired, install a decorative chair rail cap on top of the middle horizontal board to add a distinct visual break between the lower wainscoting and the upper gallery section.
Level Up: Gallery Lighting
Install wireless, battery-operated picture lights above the artwork in the center of each panel. This adds a museum-quality ambiance without requiring expensive electrical work.
Step 4: Finishing Touches
-
Fill the holes:
Fill all nail holes with wood filler, leaving it slightly mounded to account for shrinkage as it dries. -
Caulk the seams:
Run a bead of paintable latex caulk along every edge where the wood meets the wall and where the molding meets the boards. Smooth it with a wet finger for a seamless look. -
Sand smooth:
Once dry, sand the wood filler flush and lightly scuff the MDF surfaces with 220-grit sandpaper to prepare them for paint adhesion. -
Prime and paint:
Apply a coat of primer, followed by two coats of warm white semi-gloss paint. The semi-gloss finish is durable and highlights the shadows of the molding details beautifully.
Step 5: Curating the Gallery
-
Select your artwork:
Choose landscape oil paintings or prints that share a similar color palette—greens, earthy browns, and soft blues work well to replicate the look in the photo. -
Mix frame styles:
Frame your art in a mix of ornate gold and simple dark wood frames. This variety adds a collected, vintage feel rather than looking too uniform. -
Hang the art:
Center each piece of art within the upper panels of your new wainscoting. I prefer to eyeball the height to ensure the visual weight feels balanced within the grid, usually centering the frame slightly above geometric center.
Step back and admire how this architectural upgrade turns a simple hallway into a stunning, personalized gallery.
Contemporary Horizontal Lines
Transform a plain room into an architectural statement with this floor-to-ceiling vertical slat wall. The clean lines draw the eye upward, creating a sense of height while adding warmth through the natural wood texture seen in high-end Japandi interiors.
How-To Guide
Materials
- 1×2 White Oak or Ash boards
- Construction adhesive (heavy duty)
- Brad nailer with 18-gauge nails
- Miter saw (or circular saw)
- Laser level or 4ft spirit level
- Sanding block (220 grit)
- Matte water-based sealer
- Spacer block (custom width)
- Stud finder
- Wood filler (color-matched)
Step 1: Wall & Material Prep
-
Calculate your coverage:
Measure the total width of your wall. Decide on the spacing between slats (the ‘reveal’)—typically 0.5 to 1 inch looks best. Calculate how many boards you need based on the board width plus the gap width. -
Prepare the backdrop:
If your wall color contrasts with the wood, paint the wall now. For the look in the photo, ensure the wall is a clean, matte off-white to blend subtly with the wood tones. -
Remove existing trim:
Carefully pry off the baseboards and crown molding on the target wall. Removing the baseboard allows the slats to run floor-to-ceiling for that seamless, modern appearance. -
Sand the lumber:
Give every board a quick pass with 220-grit sandpaper. Focus on the sharp corners to slightly ease them, which makes the finished wall softer to the touch. -
Pre-finish the boards:
I prefer to apply the finish before installation to avoid dripping glue or sealer on the wall behind. Apply a coat of matte water-based sealer or a light whitewash to keep the wood pale and natural. -
Buff and dry:
Once the first coat is dry, lightly sand down any raised grain with a high-grit sponge and wipe clean. This ensures the wood feels furniture-grade smooth.
Step 2: Installation
-
Create a spacer jig:
Cut a scrap piece of wood to the exact width of your desired gap. Screw a small handle or tape a tab to it so you can easily pull it out from between boards. -
Mark your studs:
Use a stud finder to mark vertical lines where the studs are located along the wall. This helps you know where to aim your nails for maximum hold, though adhesive will do most of the work. -
Set the first board:
Start at the most visible corner. Apply a wavy bead of construction adhesive to the back of the first board. Place it on the wall. -
Level and secure:
This is crucial: Use your level to ensure this first board is perfectly plumb. If it’s crooked, the whole wall will be crooked. Nail it into place with the brad nailer at the top, middle, and bottom. -
Place the spacer:
Place your spacer block firmly against the side of the first installed board. This sets the position for the next slat without measuring. -
Install subsequent boards:
Apply adhesive to the next board, press it tight against the spacer, and nail it into place. Move the spacer down the length of the board as you nail to ensure the gap remains consistent. -
Check for drift:
Every 5 or 6 boards, put the level back on the newest slat. Walls often have subtle waves, so you may need to shim a board slightly to keep everything perfectly vertical. -
Navigate obstacles:
If you encounter an outlet, measure carefully and cut the slat to bridge above and below the faceplate. You may need to extend the electrical box out slightly so the cover sits flush with the wood.
Uneven Ceiling?
If your ceiling height varies (common in older homes), cut all boards to the shortest height measurement. The small gap at the top will disappear visually in the shadow line.
Step 3: Finishing Touches
-
Rip the final board:
When you reach the far end of the wall, measure the remaining space. You likely need to rip (cut lengthwise) the final board on a table saw to fit the last gap perfectly. -
Fill visible holes:
Use a color-matched wood putty to fill the tiny brad nail holes. Since the wood is light, ensure the putty isn’t too dark; test it on a scrap piece first. -
Clean the gaps:
Inspect the gaps between slats for any squeezed-out adhesive. Remove it carefully with a sharp utility knife or chisel before it cures completely.
Add Ambient Light
Before installing the slats, run a channel for an LED strip light along the floor or ceiling edge. The light will graze the vertical wood grain for dramatic evening ambiance.
Step back and admire how the rhythmic vertical lines instantly make your ceiling feel higher and the room more composed.
Tile and Trim Hybrid
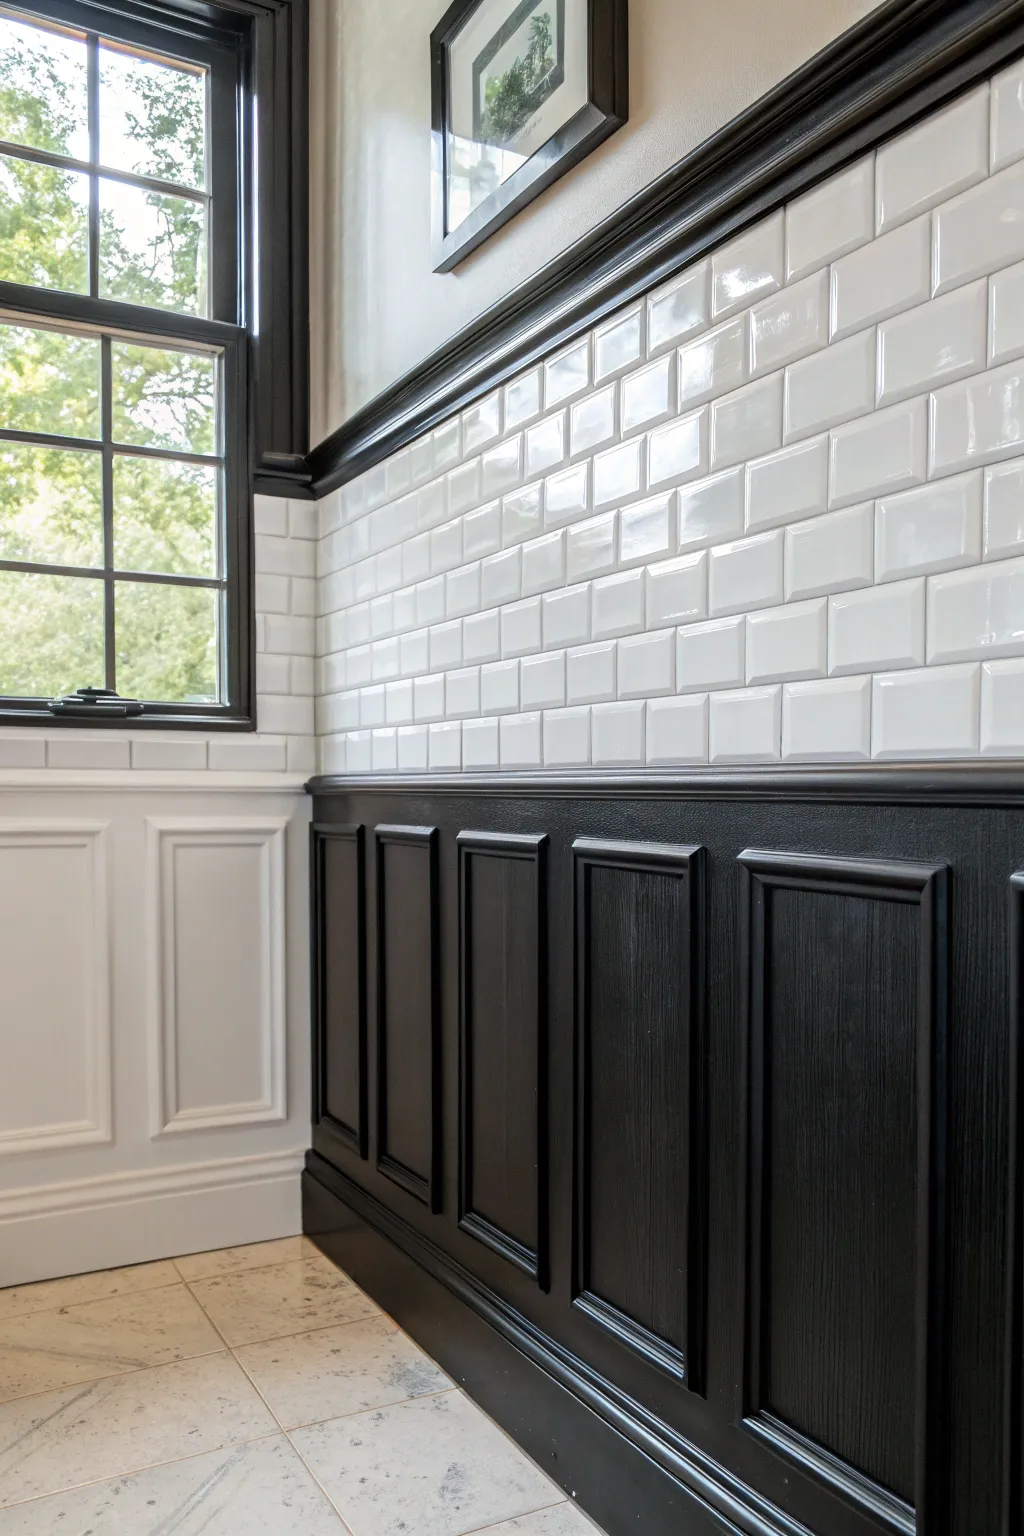
This project creates a stunning visual anchor by pairing moody, architectural wainscoting with the clean brightness of subway tile. The result is a sophisticated texture clash that adds instant history and drama to any bathroom or hallway.
Step-by-Step Tutorial
Materials
- 1/2-inch MDF sheets (ripped to 4-inch strips)
- Base cap molding
- Panel molding (cove or small ogee profile)
- Chair rail molding with a flat top ledge
- Beveled white subway tiles
- Premixed tile adhesive (mastic)
- Charcoal or black unsanded grout
- Semi-gloss black interior paint
- Wood filler and paintable caulk
- Liquid Nails or construction adhesive
- 18-gauge brad nailer
- Notched trowel and grout float
Step 1: Constructing the Paneled Base
-
Establish the height:
Determine how high you want the wainscoting to sit; 36 to 40 inches is standard. Use a laser level to snap a horizontal chalk line around the room representing the top of the stile placement. -
Install the horizontal rails:
Apply construction adhesive to your 4-inch MDF strips. Nail the top horizontal rail along your level line, and install the bottom rail directly above your existing floor (or subfloor if adding new flooring). -
Calculate vertical spacing:
Measure the wall length and divide it to determine the spacing for your vertical stiles. Aim for square or slightly rectangular boxes, roughly 20-24 inches apart. -
Attach vertical stiles:
Cut the vertical MDF strips to fit snugly between the top and bottom rails. Glue and nail them into place at your marked intervals to create the grid. -
Add the inner molding:
To achieve the sophisticated raised-panel look seen in the photo, miter cut the panel molding at 45-degree angles. Install this trim inside each MDF box, creating a picture-frame effect. -
Cap the wainscoting:
Install the chair rail molding on top of the upper horizontal rail. Ensure this piece has a slight projection or flat distinct ledge, as it will need to support the bottom row of tiles.
Troubleshooting: Grout Haze
Dark grout can stain porous surfaces. If a stubborn film remains on your white tiles after sponging, use a dedicated grout haze remover and a microfiber cloth once the grout has fully cured.
Step 2: Painting the Darkwork
-
Fill and sand:
Fill all nail holes and the seams where rails meet stiles with wood filler. Once dry, sand everything smooth with 220-grit sandpaper. -
Caulk the seams:
Run a bead of paintable caulk along every edge where the molding meets the wall or the MDF. This step is crucial for black millwork, as dark paint highlights gaps. -
Apply the dark finish:
Paint the entire lower section with a high-quality semi-gloss black paint. I usually apply three thin coats rather than one thick one to avoid drips and brush marks.
Pro Tip: Paint Additive
For a mirror-smooth finish on the black wainscoting without spraying, I like to mix a conditioner like Floetrol into the paint. It slows drying time, allowing brush strokes to level out.
Step 3: Installing the Upper Tile
-
Protect the woodwork:
Apply a strip of painter’s tape along the top of your freshly painted black chair rail to protect it from adhesive and grout. -
Spread the adhesive:
Using a notched trowel, spread mastic on the wall above the chair rail, working in small 3-foot sections so the adhesive doesn’t skin over. -
Set the first row:
Place your first row of subway tiles directly onto the chair rail ledge, using 1/16-inch spacers for a tight grout line. Use a level to ensure this foundation row is perfectly straight. -
Continue the pattern:
Install subsequent rows in a running bond (brick) pattern. Be sure to stagger the vertical joints so they align with the center of the tile below. -
Finish the top edge:
Once you reach the desired height or ceiling, install a final rail or trim piece to cap the tile, painting it black to match the window trim and wainscoting.
Step 4: Grouting and Final Touches
-
Apply dark grout:
After the adhesive cures (usually 24 hours), mix your charcoal grout. Force it into the joints with a rubber float, holding the float at a 45-degree angle. -
Clean the haze:
Wait about 20 minutes for the grout to firm up, then wipe the tiles with a damp sponge. Rinse the sponge frequently to avoid spreading dark pigment over the white glaze. -
Seal the transition:
Remove the painter’s tape from the chair rail. Run a thin line of black caulk where the dark grout meets the black chair rail for a seamless, waterproof transition.
Step back and admire how the sharp contrast between the glossy tile and matte-finish woodwork completely transforms the room’s character.
Monochrome Greige Palette
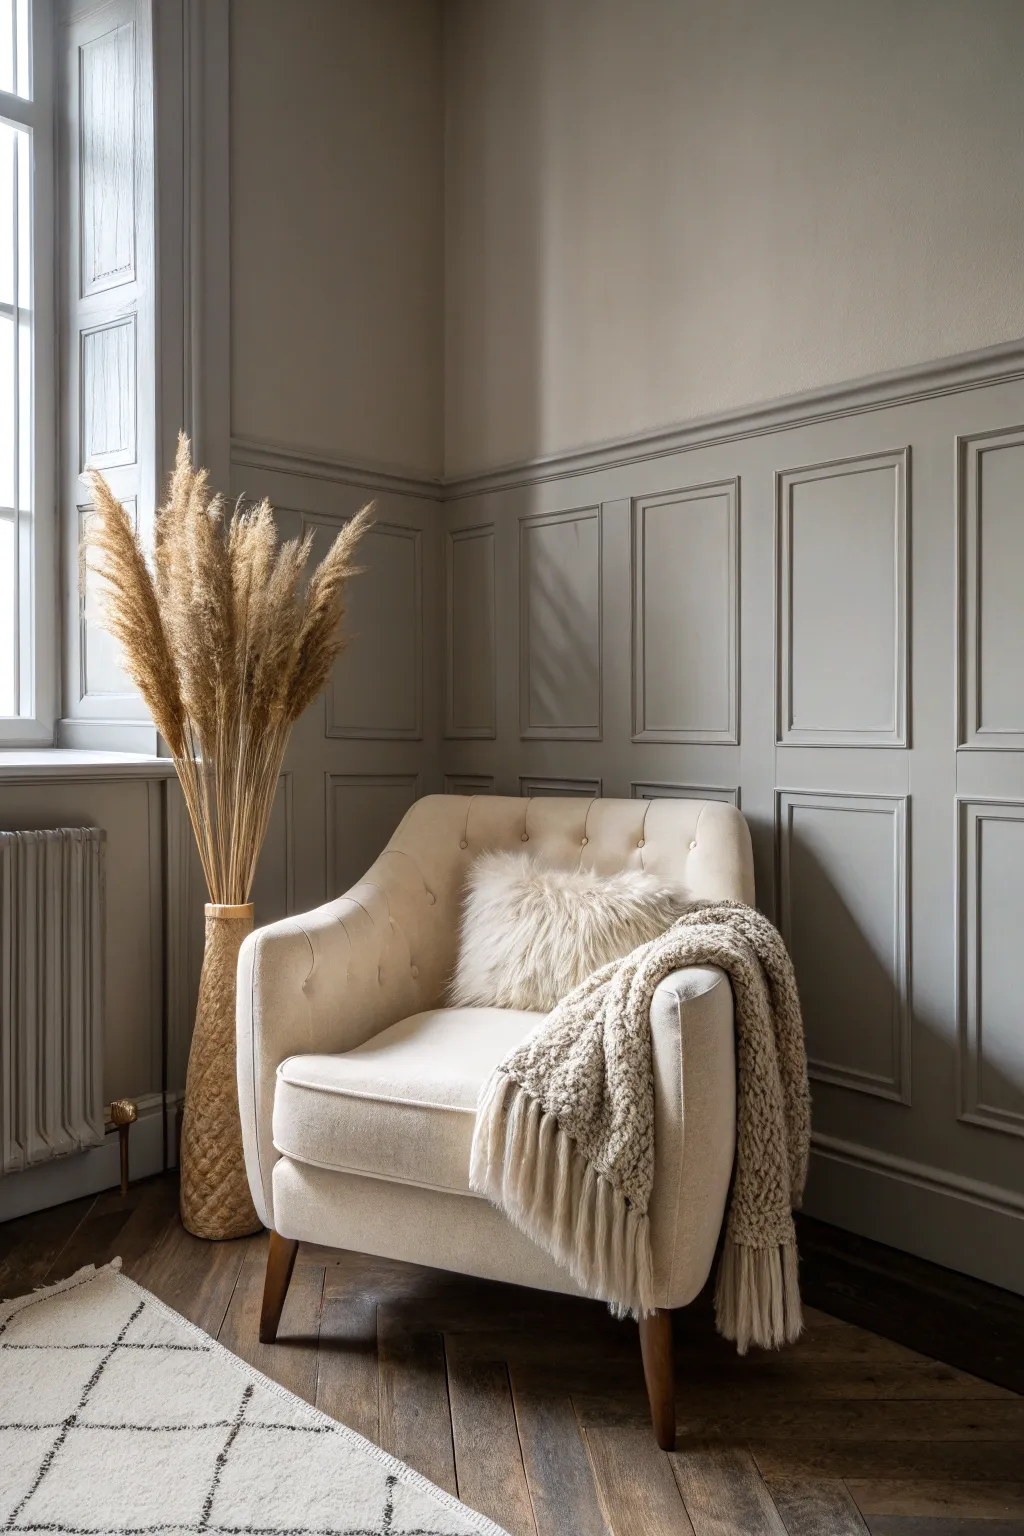

Transform a plain room into a sophisticated, textural masterpiece using classic wainscoting techniques dipped in a modern, moody palette. This project relies on picture frame molding and a monochromatic paint job to create depth and architectural interest without requiring major structural changes.
How-To Guide
Materials
- 1-inch decorative panel molding
- 3-inch chair rail molding
- Construction adhesive (Liquid Nails)
- Brad nailer and 1.25-inch nails
- Miter saw
- Laser level (or 4-foot bubble level)
- Calculated spacing block (scrap wood)
- Paintable latex caulk
- Wood filler
- Fine-grit sandpaper (220 grit)
- High-quality interior paint (Greige, Matte or Eggshell finish)
- Angled sash brush
- Microfiber paint roller
Step 1: Planning the Layout
-
Measure the spans:
Measure the full width of your wall to the millimeter. Decide how many boxes you want; for the look in the image, odd numbers often look best on smaller walls, while even numbers work for long spans. -
Calculate the math:
Take your total wall width, subtract the space you want between boxes (usually 3 to 4 inches) multiplied by the number of spaces. Divide the remaining number by the number of boxes to get the width of each panel. -
Visualize with tape:
Before cutting any wood, use blue painter’s tape to map out your boxes on the wall. This lets you adjust proportions if the panels feel too wide or too narrow for the room’s height. -
Mark the chair rail height:
Determine the height for the horizontal chair rail that separates the upper and lower panels. Standard height is around 32-36 inches from the floor, roughly one-third of the wall height.
Step 2: Installation
-
Install the chair rail:
Cut your chair rail molding to fit the length of the wall. Apply a bead of construction adhesive to the back, check for level using your laser or bubble level, and nail it into the studs. -
Cut the spacer block:
I always cut a scrap piece of wood to the exact dimension of my spacing gap (e.g., 3.5 inches). You will use this as a physical guide to ensure every single box is perfectly spaced without measuring constantly. -
Cut the vertical molding:
Set your miter saw to a designated 45-degree angle. Cut the vertical sides of your bottom boxes first, ensuring the long point of the miter is on the outside. -
Cut the horizontal molding:
Cut the top and bottom pieces for the boxes with opposing 45-degree angles, measuring from the long points to match your calculated panel width. -
Assemble the bottom boxes:
Using your spacer block between the baseboard and the bottom molding piece, adhere and nail the bottom rail. Build the rest of the box up from there, checking level on every piece. -
Repeat for upper panels:
Move above the chair rail. Use your spacer block to establish the gap above the rail, then install the bottom piece of the large upper box. Continue building the frame upward. -
Secure the corners:
For tighter joints, apply a tiny dab of wood glue on the mitered ends before nailing them to the wall. This keeps the corners from popping open during seasonal humidity changes.
Miter Gap Fix
Gap in the corner? Rub the round shaft of a screwdriver firmly over the joint to ‘burnish’ the wood fibers together, then fill with wood filler.
Step 3: The Monochrome Finish
-
Fill the imperfections:
Overfill all nail holes and corner joints with wood filler. Don’t worry if it looks messy now; leave it slightly proud of the surface to sand down later. -
Sand smooth:
Once dry, sand the filler flush with 220-grit paper. Run your fingers over the joints—if you can feel the ridge, you will see it after painting, so sand until perfectly smooth. -
Apply caulk:
Run a thin bead of paintable caulk along every edge where the molding meets the wall and where the molding meets itself. Smooth it with a damp finger for a seamless, built-in appearance. -
Cut in the edges:
Using your angled sash brush, paint the interior edges of the boxes, the chair rail intricacies, and the baseboards first. Use a rich greige color like ‘Revere Pewter’ or ‘Elephant’s Breath’. -
Roll the surfaces:
Immediately follow up with a microfiber roller on the flat wall spaces inside and outside the boxes. Painting the trim and wall the exact same color creates that modern, velvety texture shown in the photo. -
Apply second coat:
Allow the first coat to dry completely, then apply a second coat to ensure full opacity and depth of color.
Level Up: Texture
For a more ornate look, add a smaller, thinner molding profile inside the main picture frame boxes to create a ‘double border’ effect.
Now that your elegant grid is complete, style it with soft textiles to enjoy your sophisticated new space.
Integrated Wall Sconces
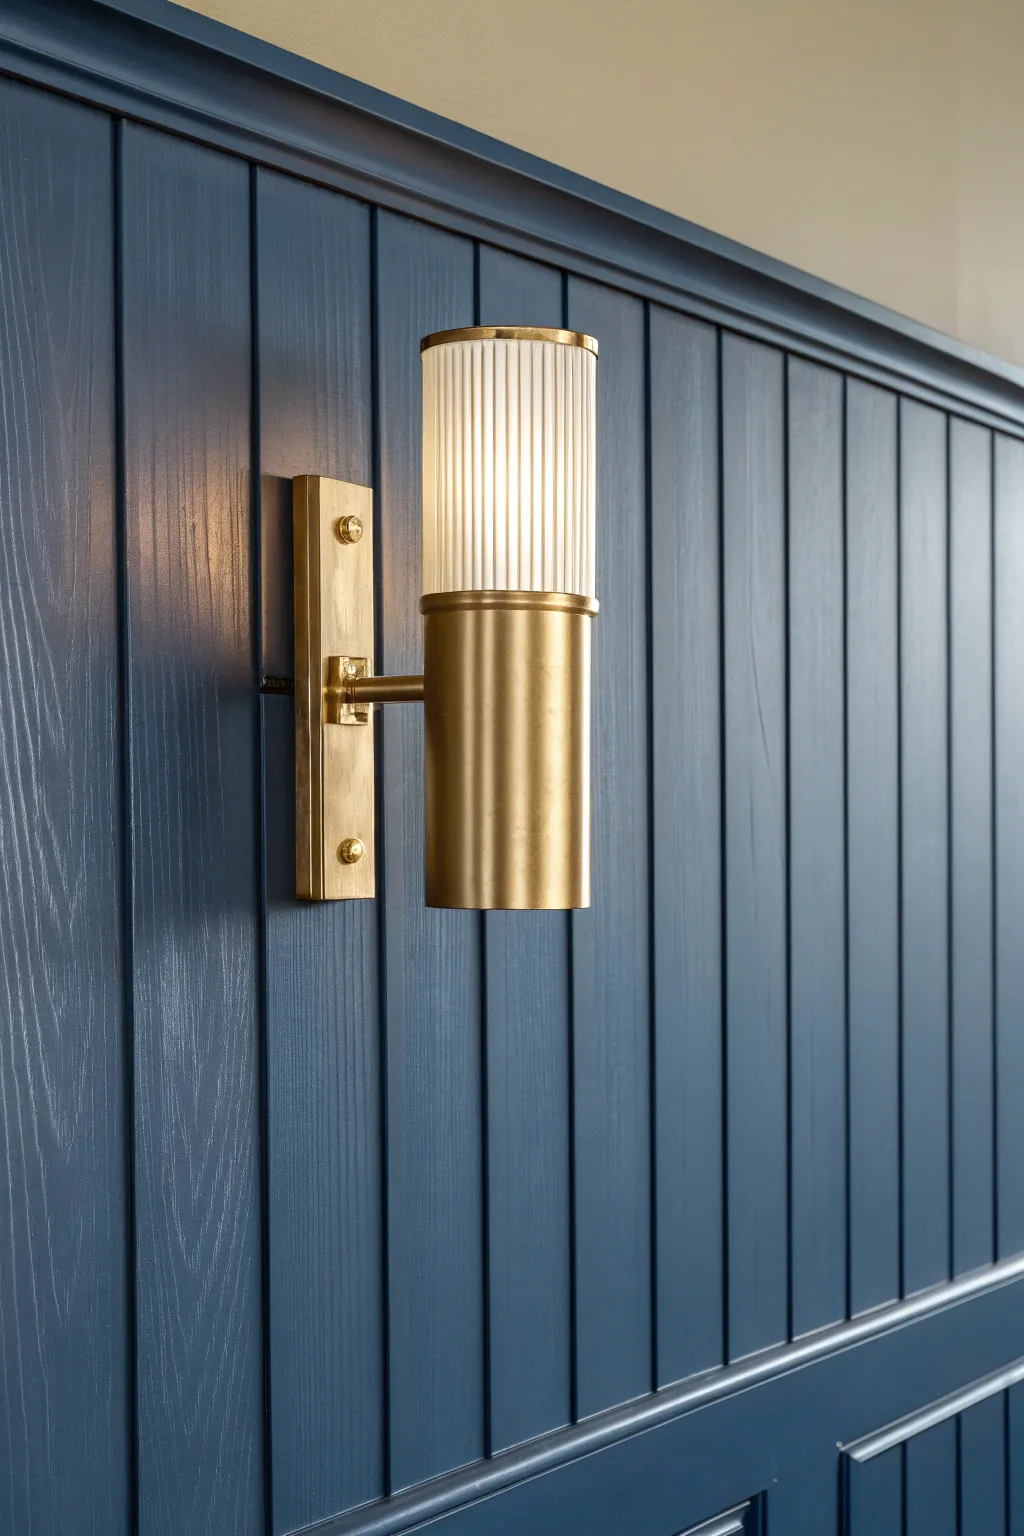
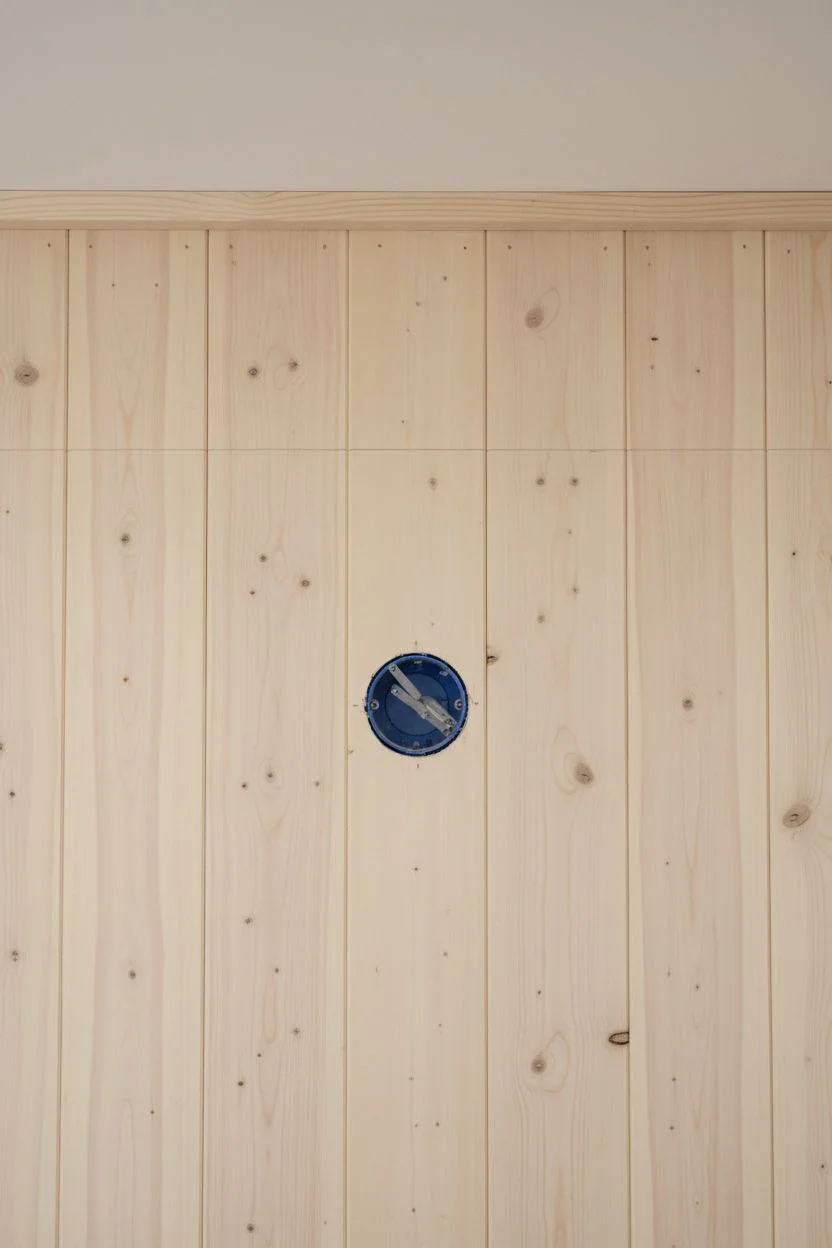
This project creates a sophisticated focal point by pairing the architectural texture of vertical tongue-and-groove wainscoting with the warmth of modern brass lighting. The deep, moody navy finish contrasts beautifully with the fluted glass, resulting in a wall treatment that feels both classic and contemporary.
Detailed Instructions
Materials
- Vertical tongue-and-groove beadboard planks
- Top cap molding or chair rail
- Construction adhesive (Liquid Nails)
- Brad nailer with 1.5-inch nails
- Jigsaw
- Electrical box extender ring
- Brass wall sconce with fluted glass shade
- Wood filler and paintable caulk
- Sandpaper (220 grit)
- Dark navy latex paint (Satin finish)
- High-quality angled sash brush
- Non-contact voltage tester
Step 1: Preparation & Beadboard Installation
-
Safety First:
Begin by turning off the power to the sconce’s circuit at your main breaker box. Verify the power is off using a non-contact voltage tester before touching any wires. -
Measure and Mark:
Determine the desired height for your wainscoting. Mark a level line across the wall to serve as a guide for the top of your boards. -
Locate Wiring:
Identify the center point for your light fixture. If an electrical box exists, remove the old fixture. If not, you will need to rough-in a new junction box at this stage. -
Cut Boards to Length:
Measure and cut your beadboard planks to fit vertically from the baseboard to your marked level line. -
Cut the Fixture Opening:
For the plank that will cover the electrical box, carefully measure the box’s location. Drill a starter hole, then use a jigsaw to cut a clean circle that matches the diameter of your junction box. -
Apply Adhesive:
Apply a zigzag bead of construction adhesive to the back of the first plank. I like to start in the center where the light is and work outward to ensure symmetry. -
Secure the Planks:
Place the plank on the wall, ensuring it’s plumb. Secure it using a brad nailer, shooting nails into the tongue of the board so they are hidden by the next piece. -
Continue Installation:
Install the remaining boards, interlocking the tongues and grooves tightly. Check for plumb every 3-4 boards to keep the lines vertical. -
Install Cap Molding:
Cut your top cap molding to width. Nail it securely to the top edge of the beadboard to create a finished transition.
Troubleshooting: Gaps in Seams
If the beadboard planks separate slightly after drying, don’t panic. Paintable caulk is too flexible for mid-board gaps; use a hardening wood filler, sand flush, and touch up with paint.
Step 2: Finishing the Surface
-
Fill and Sand:
Fill any visible nail holes with wood filler. Once dry, sand the filler and the wood surface lightly with 220-grit sandpaper for a flawless finish. -
Caulk Seams:
Apply a thin bead of paintable caulk where the wainscoting meets the wall, the baseboard, and the trim. Smooth it with a wet finger. -
Prime the Wood:
Apply a coat of high-quality primer. If your final color is very dark, consider using a grey-tinted primer to help with coverage. -
Apply Navy Paint:
Using an angled brush, cut in the grooves and edges with your dark navy paint. Brush carefully to avoid pooling in the vertical lines. -
Roll the Flat Surfaces:
Use a small foam roller or a high-quality brush to paint the flat faces of the boards. Apply two coats, allowing proper drying time between them, to achieve that deep, saturated look.
Level Up: Smart Dimming
Install a smart dimmer switch for this sconce. Being able to dim the light to a low glow emphasizes the texture of the fluted glass and creates a moody evening atmosphere.
Step 3: Fixture Installation
-
Install Box Extender:
Since the wood paneling adds depth to the wall, insert an electrical box extender into the junction box. This ensures the fixture mounts flush against the new wood surface safely. -
Mount the Bracket:
Screw the sconce’s mounting bracket securely into the box extender. Ensure the bracket is perfectly level so the vertical fixture aligns with the beadboard lines. -
Connect Wiring:
Connect the fixture’s wires to the house wiring: black to black (hot), white to white (neutral), and copper to copper (ground), securing them with wire nuts. -
Attach the Fixture:
Tuck the wires gently into the box and slide the brass base over the mounting screws. Secure it with the decorative brass caps provided with your light. -
Final Assembly:
Screw in the appropriate light bulb, then carefully slide the fluted glass shade into place. Restore power at the breaker to test your work.
Enjoy the dramatic transformation this blend of texture and light brings to your space
Intricate Overlay Patterns
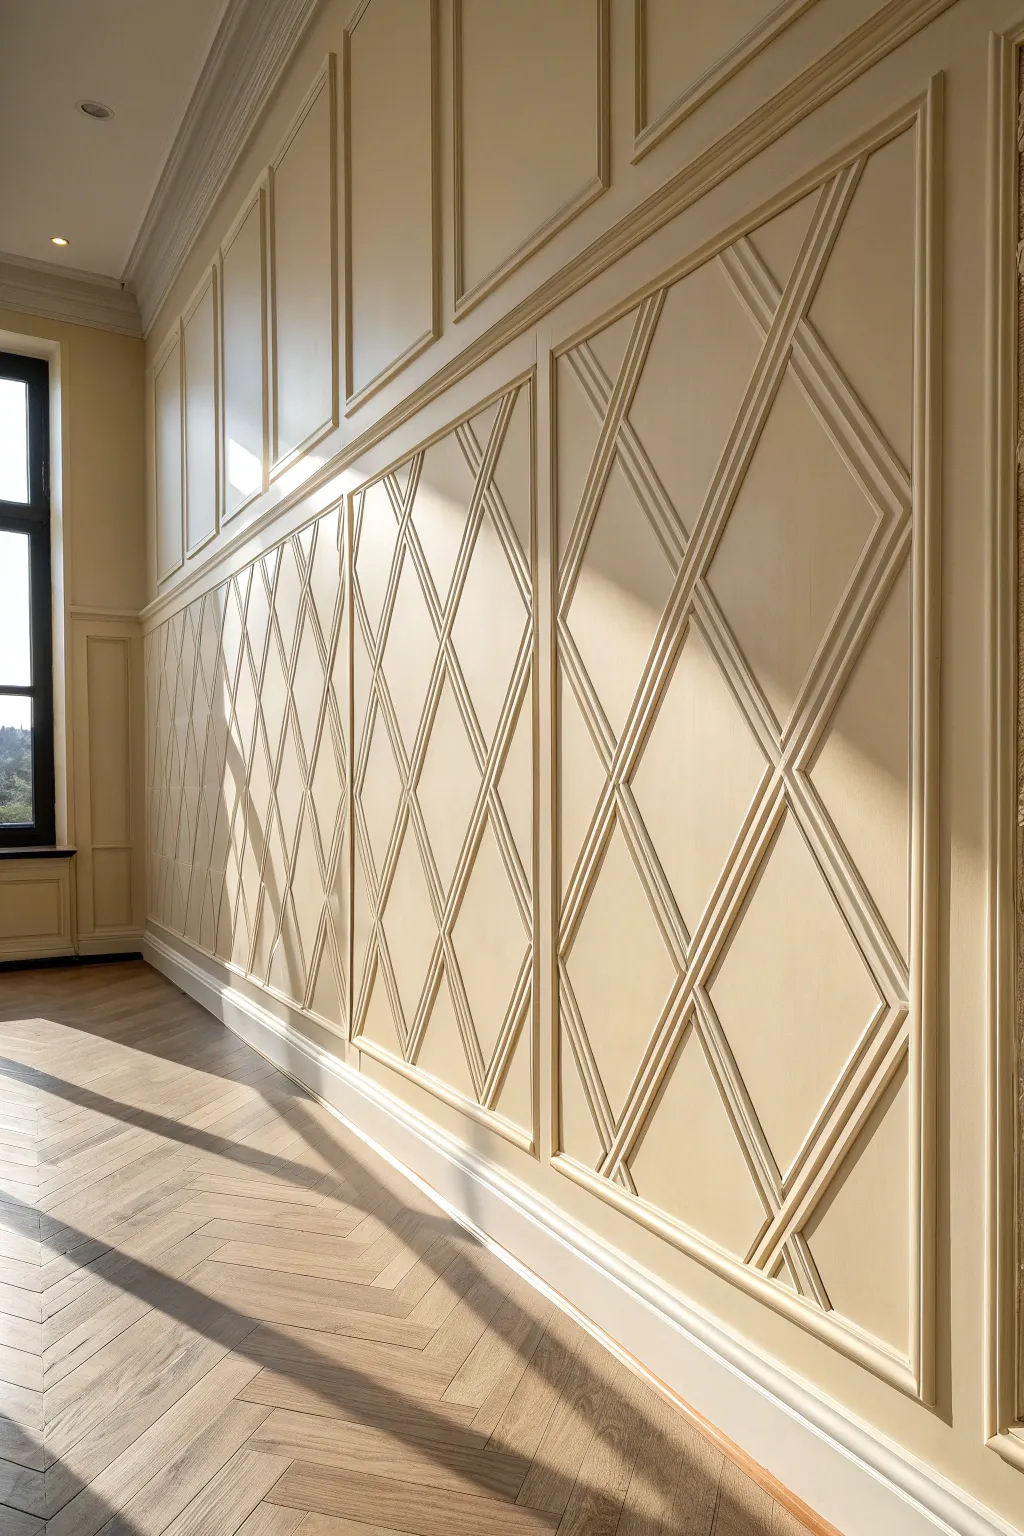
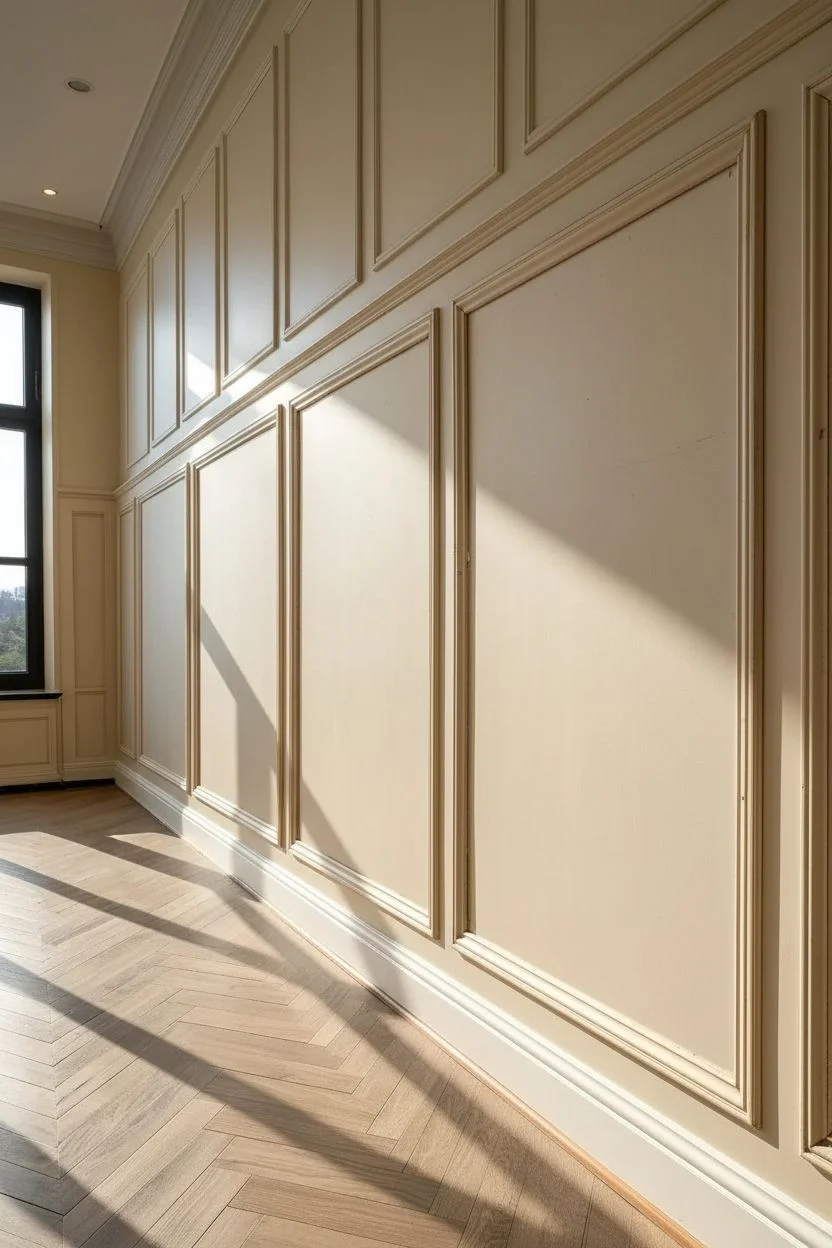
Transform a plain wall into an architectural masterpiece with this intricate overlay pattern. By layering panel molding in a specific diamond grid, you create sophisticated shadows and depth that mimics high-end historic millwork.
Step-by-Step
Materials
- 1×6 Primed MDF or Poplar (Baseboards)
- 1×4 Primed MDF or Poplar (Stiles and Rails)
- Small astragal or half-round distinct panel molding (for the lattice)
- Construction adhesive (Liquid Nails)
- Wood filler
- Paintable latex caulk
- Interior semi-gloss or satin trim paint
- Masking tape
- Spacer blocks (scrap wood)
Step 1: Planning and Framework
-
Calculate the grid:
Measure your total wall width and height. Decide on the height of your wainscoting (usually 1/3 to 2/3 of the wall height). Divide the width into equal sections for the panels, accounting for the width of your vertical stiles (usually 3.5 inches). -
Mark the wall:
Use a long level and a pencil to draw the exact layout directly onto the wall. This sketch is crucial as it allows you to visualize where the diamonds will intersect and ensures your electrical outlets don’t land in awkward spots. -
Install baseboard and top rail:
Apply construction adhesive to the back of your 1×6 baseboard and nail it into the studs with a brad nailer. Repeat this process for the horizontal top rail at your determined height. -
Attach vertical stiles:
Measure the distance between the baseboard and top rail. Cut your 1×4 MDF boards to length and install them vertically on your layout lines to create the recessed ‘boxes’ that will house the lattice work. -
Frame the inner panels:
Inside each rectangular box you’ve created, install a border of your thin panel molding. Miter the corners at 45 degrees. This creates a finished frame that the lattice work will terminate into.
Step 2: Creating the Lattice
-
Find the diamond angle:
This is the trickiest part. Use an angle finder or a bevel gauge to determine the angle required for your lattice to connect from corner to corner. It likely won’t be 45 degrees; for tall panels, the angle is often steeper. -
Create a cutting jig:
Once you have your angle, set your miter saw and lock it. I strongly suggest cutting a ‘master’ pattern piece to test the fit in one box before cutting all your stock. -
Install the primary diagonals:
Start with the longest center diagonals that run continuously from corner to corner essentially forming a large X. Apply a bead of adhesive and pin them in place. -
Install the parallel strips:
To create the double-line effect shown in the image, cut shorter strips at the same angle. Install them parallel to your main X, leaving a gap of about 1.5 to 2 inches. -
Bridge the intersections:
For the lines crossing in the opposite direction, you cannot overlap the wood. Instead, measure and cut individual small segments to fit snugly between the long strips you already installed, creating the illusion of woven latticework. -
Repeat for upper panels:
For the upper section of the wall, measure and install simple rectangular boxes using the same panel molding. Keep precise spacing consistent with the lower panels for vertical alignment.
Use a Spacer Block
Don’t measure the gap for every single parallel strip. Cut a scrap block of wood to your desired gap width and use it as a manual spacer to ensure every diamond is perfectly identical.
Step 3: Seamless Finishing
-
Fill nail holes:
Go over every inch of the wall and overfill nail holes with wood filler. Since this design has many intersection points, check the lattice joints carefully for gaps. -
Sand smooth:
Once dry, sand the filler flush. For the intricate corners of the diamonds, fold your sandpaper or use a sanding sponge to avoid rounding over the crisp edges of the molding. -
Caulk the seams:
Run a thin bead of finish caulk along every edge where the molding meets the wall or the frame. This step is vital to making the separate pieces look like one solid carved panel. -
Prime the surface:
Apply a high-quality primer. If you are painting over raw wood and drywall simultaneously, a bonding primer helps unify the texture of the different materials. -
Apply finish paint:
Paint the entire wall with two coats of satin or semi-gloss paint. I prefer using a paint sprayer for this specific project efficiently cover the intricate angles without leaving brush marks. -
Clean up lines:
If your wainscoting color differs from the ceiling or upper wall, use painter’s tape to get a razor-sharp transition line, removing the tape while the paint is still slightly tacky.
Closing Gap Issues
If your mitered lattice joints aren’t meeting perfectly in the middle, don’t panic. Prioritize the alignment of the pattern; small gaps can be easily hidden with wood filler, but crooked lines cannot.
Step back and admire the sophisticated geometry you’ve built into your home’s architecture.
The Hand-Painted Mural Base
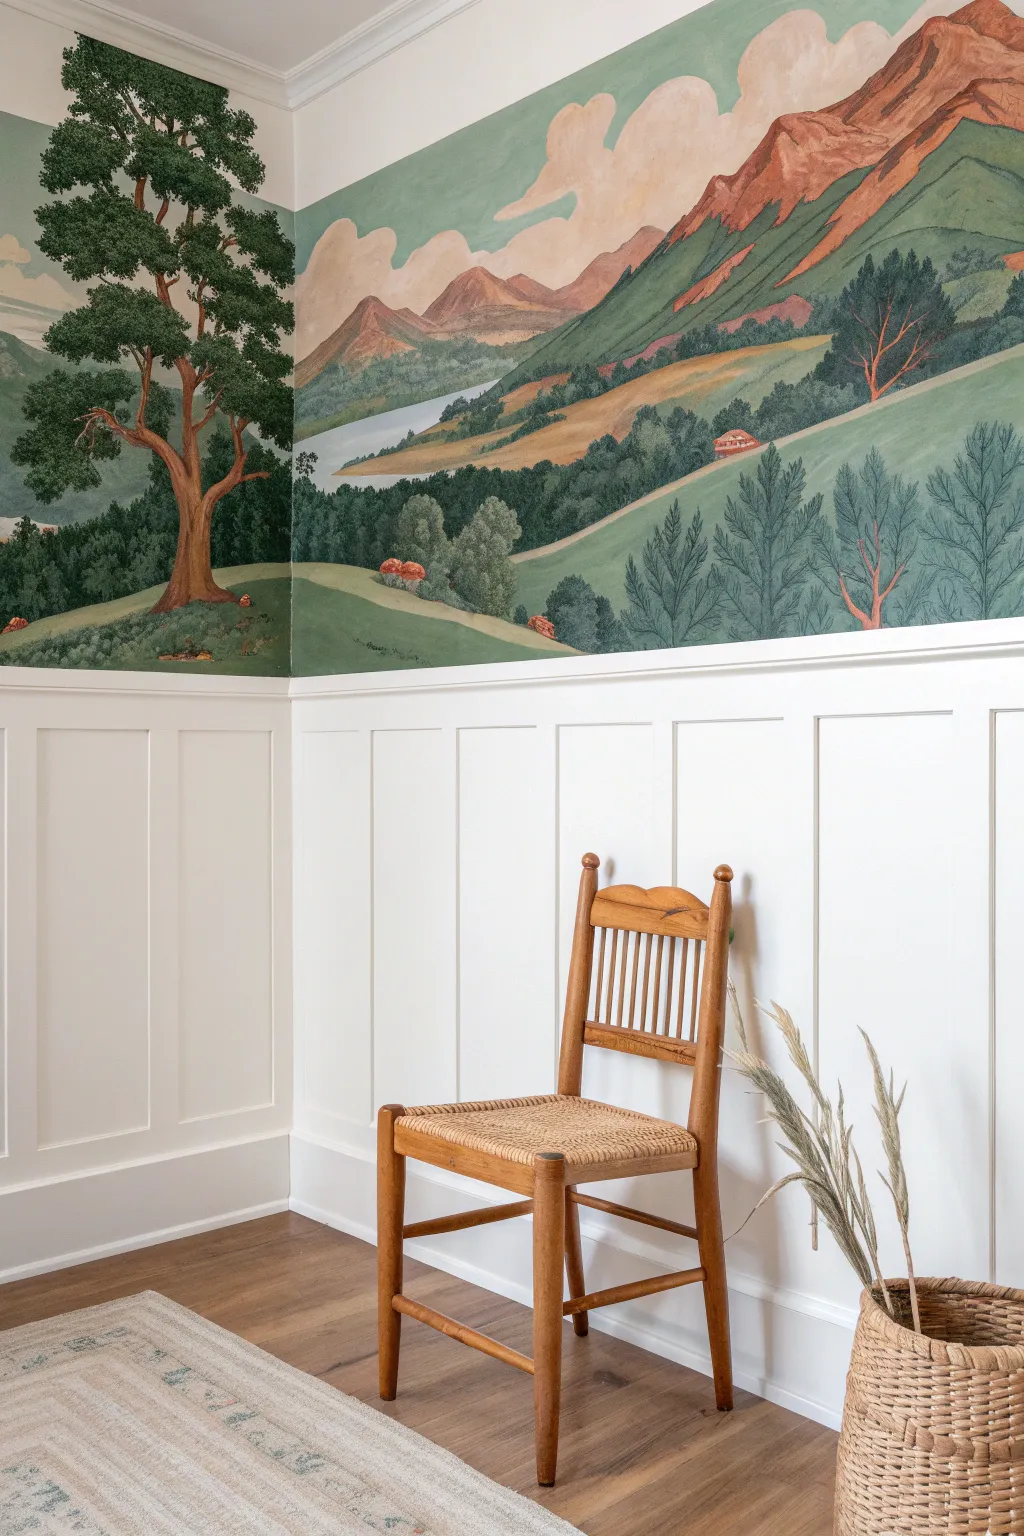
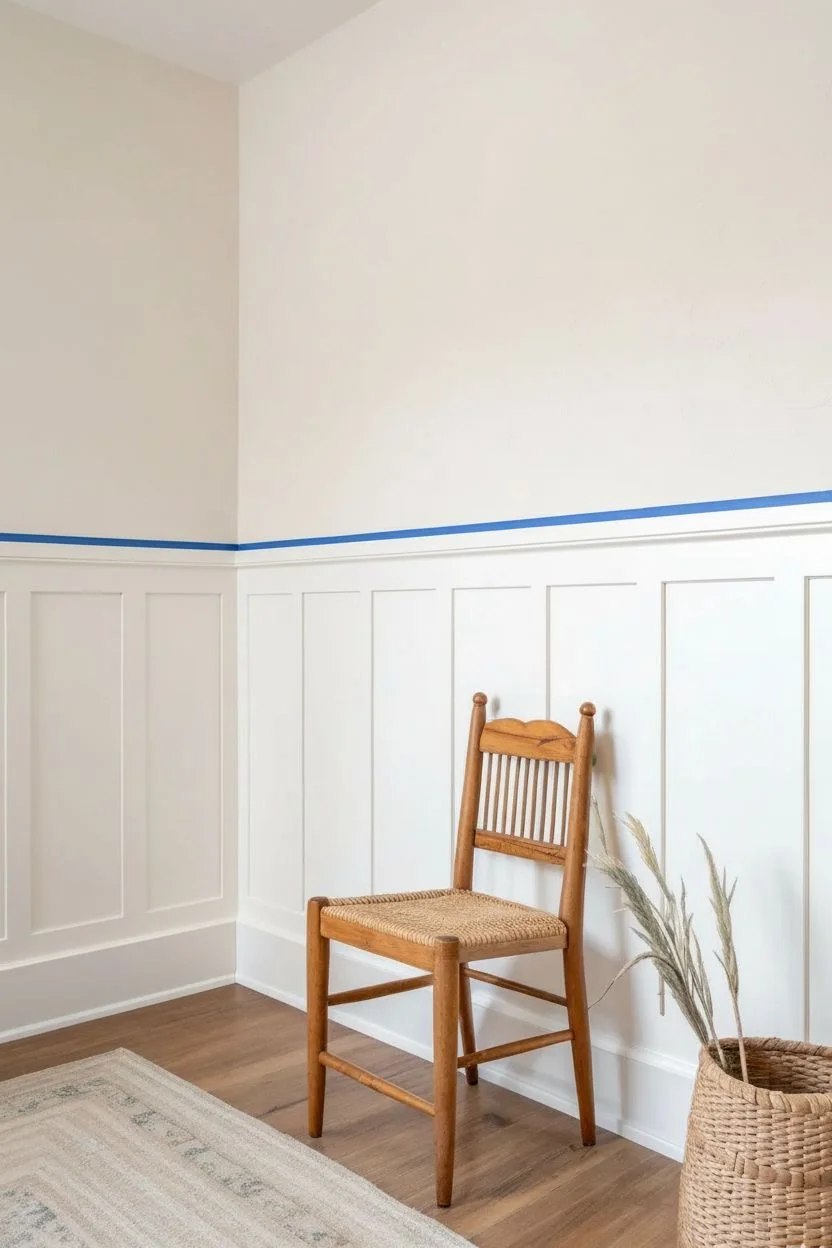
Transform a plain wall into a storybook escape by combining classic architectural paneled wainscoting with a sweeping, folk-art style landscape. This project merges carpentry and artistry to create a room that feels both grounded and expansive.
Detailed Instructions
Materials
- 1×4 MDF boards (for rails and stiles)
- Construction adhesive and brad nailer
- Wood filler and caulk
- High-quality painter’s tape
- Semi-gloss white trim paint
- Matte latex paints (sage green, forest green, terracotta, cream, soft blue)
- Assorted brushes (2-inch sash, varied artist brushes, fan brush)
Step 1: Building the Wainscoting Base
-
Establish the height:
Decide on your wainscoting height, typically about one-third or two-thirds up the wall. Use a laser level to mark a continuous horizontal line around the room for the top rail. -
Install horizontal rails:
Apply construction adhesive to the back of your 1×4 MDF boards. Nail the top horizontal rail along your level line and a bottom rail directly above your existing baseboard (or replace the baseboard entirely for a flush look). -
Measure and cut battens:
Measure the distance between the top and bottom rails. Cut your vertical battens (stiles) to this exact length. -
Space the verticals:
Determine your spacing (usually 16 to 20 inches apart) and mark the wall. Adhere and nail the vertical battens in place, ensuring each is plumb. -
Fill and sand:
Fill all nail holes with wood filler and sand them flush once dry. I prefer to use a sanding sponge here to gently ease the sharp edges of the MDF. -
Caulk the seams:
Run a thin bead of paintable caulk along every edge where the wood meets the wall or other wood pieces to create a seamless, built-in appearance. -
Paint the woodwork:
Apply two coats of semi-gloss white paint to the entire wainscoting section. Let this cure fully for at least 24 hours before taping it off to start the mural.
Bleeding Lines?
To prevent mural paint from seeping under the tape onto your white trim, brush a thin layer of the white base paint over the tape edge first to seal it.
Step 2: Painting the Landscape
-
Protect the trim:
Apply high-quality painter’s tape along the top edge of the wainscoting rail to protect your fresh white paint from the mural colors. -
Sketch the horizon:
Using a light pencil, sketch out the major shapes: the rolling hills, the mountain peaks, the winding path, and the large foreground tree. -
Paint the sky:
Start at the top with the sky. Mix a soft cream and pale aqua. Paint the upper section, using the cream to create billowy, rounded cloud shapes against a pale blue background. -
Block in distant mountains:
Paint the furthest mountain peaks using terra cotta and muted brown tones. Keep the paint somewhat flat to mimic the folk-art style shown in the photo. -
Create the mid-ground lake:
Paint the water body using a desaturated grey-blue. Ensure the water line is level horizontally, fitting it snugly between the mountains and the foothills. -
Layer the green hills:
Working downward, fill in the grassy hills. Use a lighter, yellowish-green for the distant slopes and a deeper, richer sage green for the closer hills to create depth. -
Add distant treelines:
Mix a dark forest green. Using a small flat brush, dab vertical strokes along the ridges of the hills to suggest dense pine forests without painting individual trees. -
Paint the foreground tree trunk:
For the large feature tree, paint the trunk and branches with a warm reddish-brown. I like to add a few highlights on the left side of the trunk to suggest a light source. -
Detail the large foliage:
Use a stippling motion with a round brush and deep green paint to create the clusters of leaves on the main tree, leaving some sky visible through the branches. -
Add charming details:
Using a fine liner brush, paint the small red-roofed cottages and tiny reddish bushes (which look like sheep or shrubs) in the sloping fields. -
The final reveal:
Once the paint is dry to the touch, slowly peel away the painter’s tape at a 45-degree angle to reveal the crisp line between your art and the wainscoting.
Level Up: Vintage Finish
For an aged tapestry look, lightly dry-brush a very diluted brown glaze over the dried mural, focusing on the corners and edges of the wall.
Step back and admire how this architectural detail frames your personal landscape masterpiece.


Have a question or want to share your own experience? I'd love to hear from you in the comments below!