There is nothing quite like transforming a blank white wall into a breathtaking window to another world using just paint and imagination. Whether you are looking to create a cozy reading nook or a dramatic dining room backdrop, these large-scale art concepts will help you find the perfect visual anchor for your space.
Misty Forest Landscapes
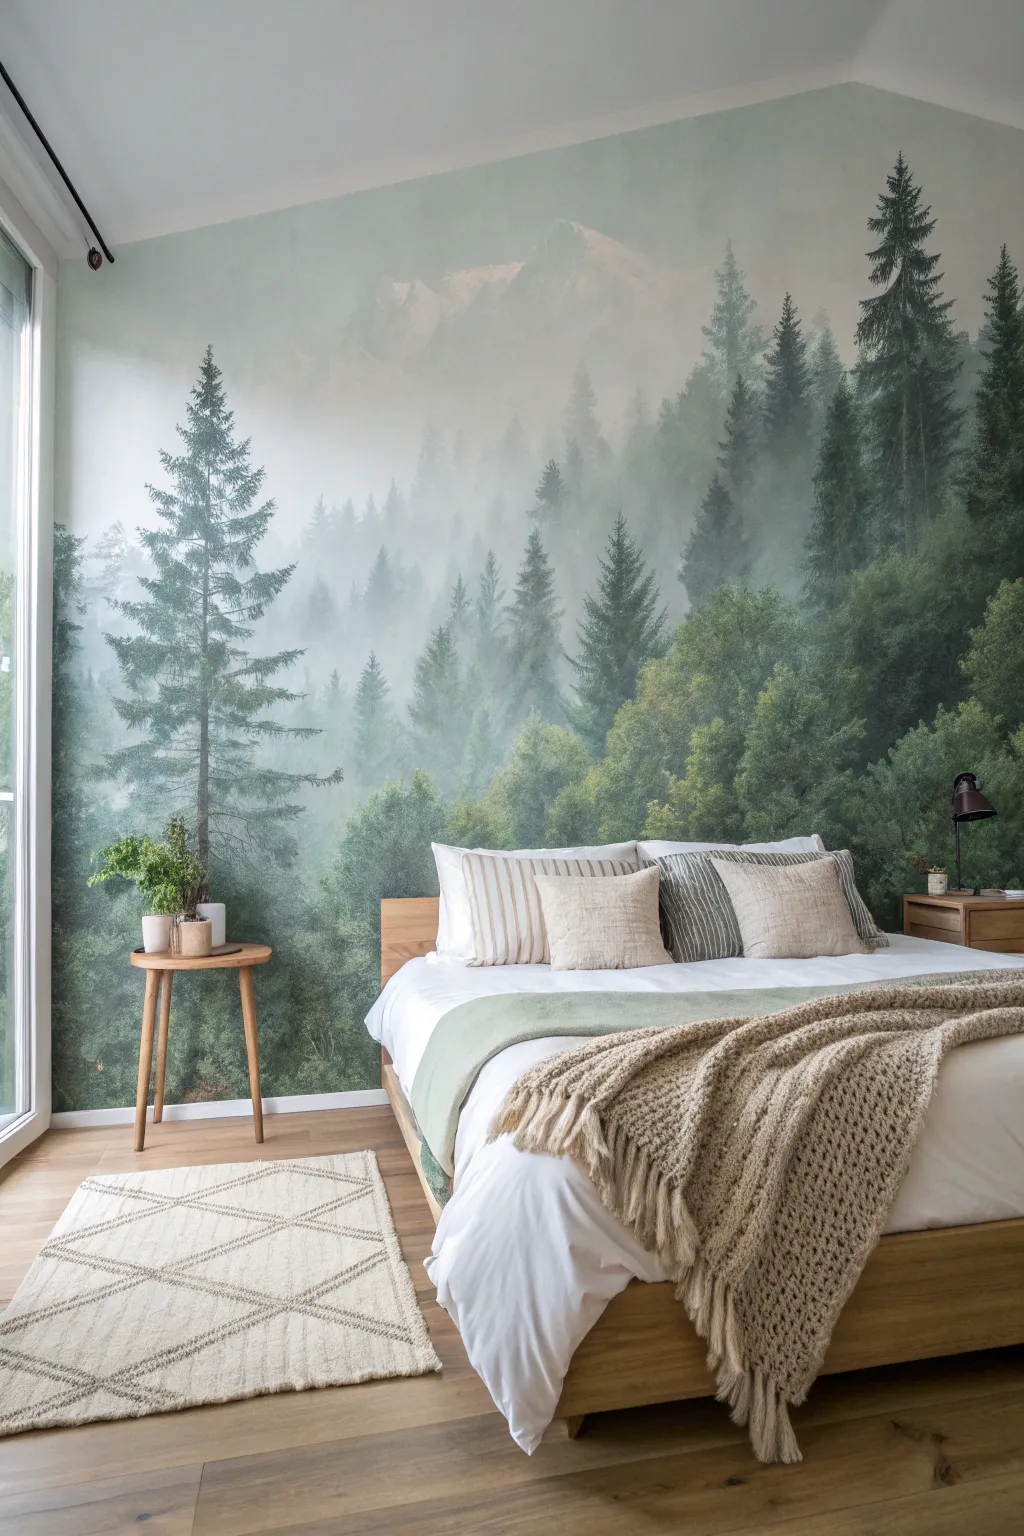
Transform your bedroom into a serene retreat with this immersive hand-painted mural that captures the quiet majesty of a foggy woodland. You will create incredible depth using atmospheric perspective, layering varied shades of green and gray to build a scene that feels like it goes on forever.
Step-by-Step Tutorial
Materials
- Interior latex paint (Eggshell: White, Hunter Green, Charcoal, Beige)
- Acrylic glazing medium
- Assorted angled sash brushes (1” to 3”)
- Natural sea sponges
- 4-inch foam rollers
- Plastic mixing containers
- Painter’s tape and drop cloth
- Spray bottle with water
- Step ladder
Step 1: Preparation and Sky
-
Protect the perimeter:
Clear the wall completely and apply painter’s tape to the baseboards, ceiling line, and adjoining walls. Lay down a drop cloth to catch any drips. -
Apply the atmospheric base:
Mix a large batch of your lightest color—white with a tiny drop of charcoal and green to create a pale mist grey. Roll this over the entire wall as your background. -
Sketch the layers:
Once dry, use a pencil to lightly sketch 4-5 horizontal wavy lines across the wall. These will guide where each layer of trees will sit, starting high for distant mountains and moving lower for foreground trees. -
Paint the distant mountains:
Mix a ‘Mountain’ shade using your base color and a touch more grey. Paint the space above your highest pencil line, defining the mountain peaks. -
create the fade:
While the mountain paint is wet, use a damp sponge or clean roller to drag the bottom edge downward, fading it seamlessly into the white base color to simulate distance.
Step 2: Building the Forest Layers
-
Mix the furthest tree color:
Combine 1 part Hunter Green, 1 part White, and 2 parts Glazing Medium. The glaze makes the paint translucent, which is essential for that foggy look. -
Paint the first tree line:
Using a 1-inch brush, paint small, simple triangular tree shapes along your second highest pencil line. Keep them small and indistinct. -
Blur the roots:
Immediately after painting a section of trees, use a spray bottle to lightly mist the bottom of the trees, then dab with a sponge to blur them into the white space below. -
Mix the middle ground color:
Create a new mix with less white and less glaze—about 1 part Green to 1 part Glaze. These trees should look darker and more solid than the previous layer. -
Paint larger mid-ground trees:
Paint this layer of trees along the next pencil line down. Make them taller than the first layer and start adding rough jagged edges to simulate branches. -
Add misty separation:
I like to let this layer dry briefly, then gently dry-brush a little white glaze over the bottoms of these trees to enhance the separation between layers.
Troubleshooting: Harsh Lines
If your tree bottoms look too abrupt, use a damp sea sponge to dab and drag the wet paint downwards. This feathers the pigment into the background color, effectively simulating rising ground fog.
Step 3: The Foreground and Detail
-
Prepare the darkest shade:
Mix pure Hunter Green with a small amount of Charcoal. Do not add glaze this time; you want full opacity for the closest trees. -
Paint the anchor trees:
Paint the large, detailed trees on the far left and right sides (as seen in the image). These should span from the floor almost to the ceiling. -
Detail the branches:
Switch to a smaller angle brush. Use a dabbing motion to create the texture of pine needles extending out from the main branches of your large trees. -
Fill the forest floor:
Paint the remaining bottom section of the wall with your dark green mixtures, using vertical strokes to suggest dense undergrowth and shrubs. -
Blend the ground:
While the bottom section is wet, dab it with a sponge to soften the texture, ensuring it doesn’t look like a solid block of color but rather organic foliage. -
Final mist touches:
Step back and identify any areas where the contrast is too sharp. Gently dab a sponge with a tiny bit of white paint to add wisps of floating fog between tree trunks. -
Clean up:
Carefully peel away the painter’s tape while the paint is still slightly tacky to ensure crisp edges, then remove your drop cloths.
Level Up: Morning Glow
Mix a tiny drop of warm yellow or peach into a white glaze wash and apply it strictly to the top right corner of the sky and mountain peaks to suggest a sunrise just beginning to break through the mist.
Step back and enjoy the deep, calming atmosphere of your new forest sanctuary.


Oversized Florals
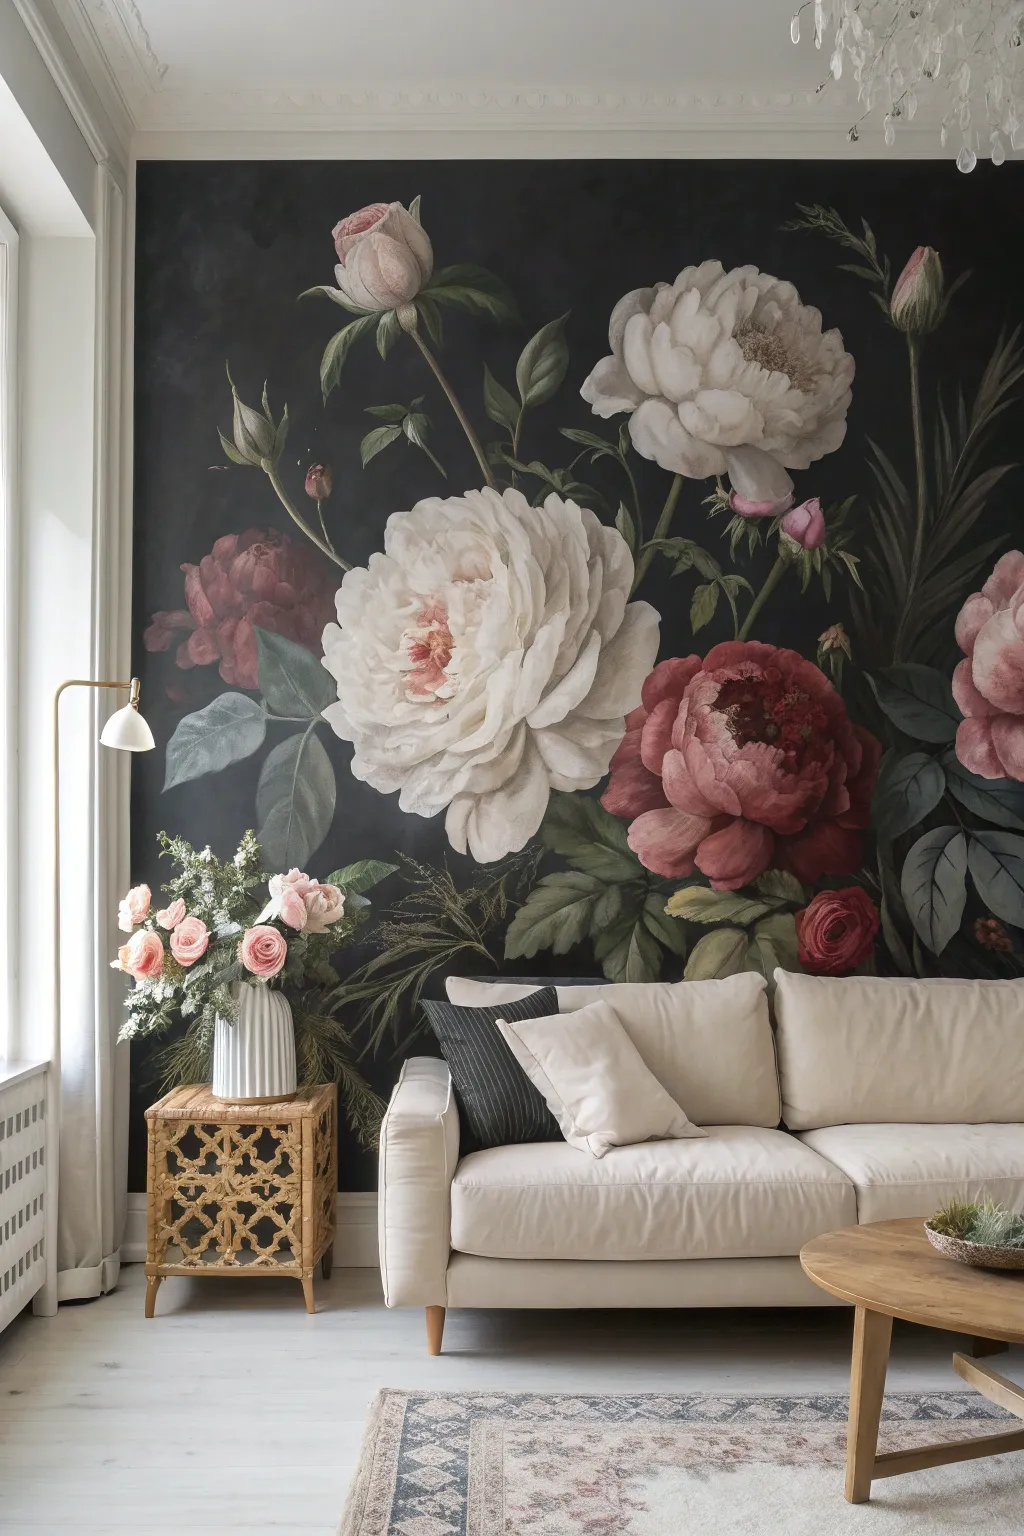
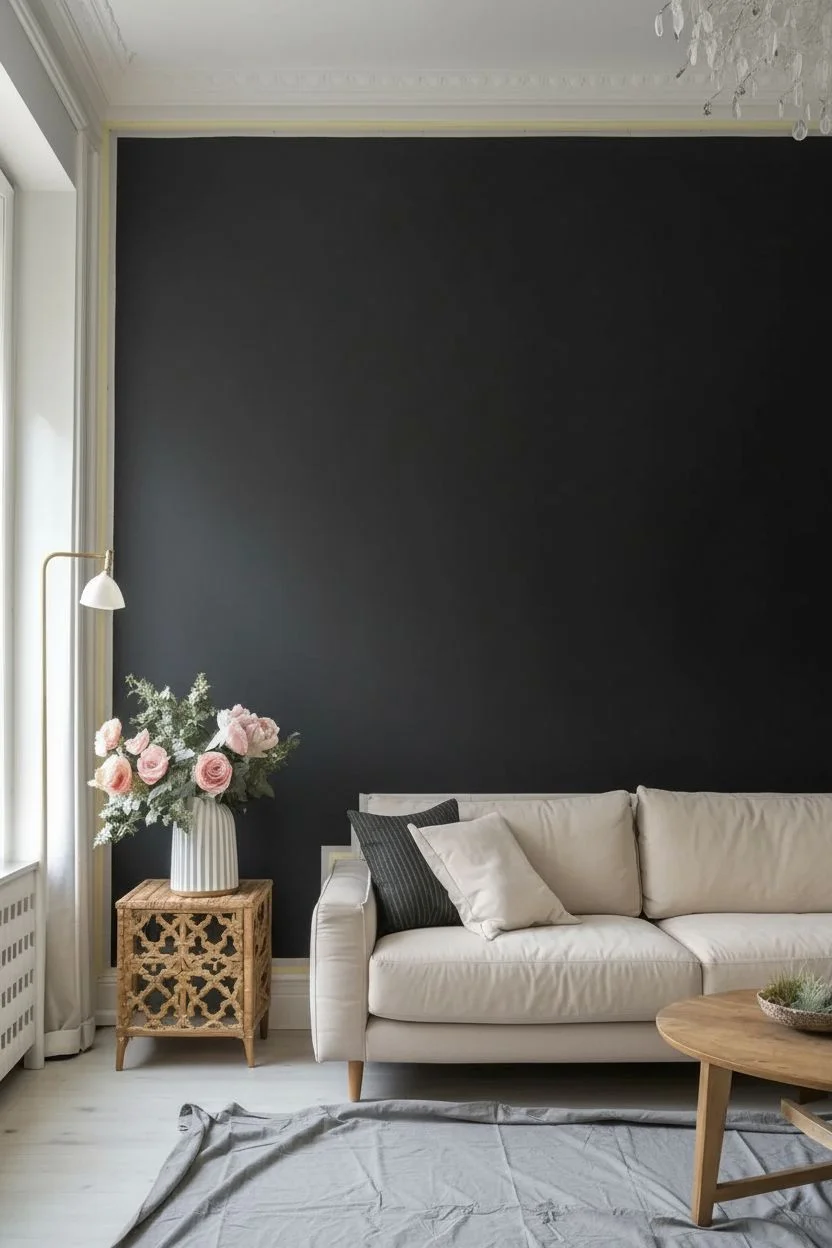
Transform a plain wall into a moody, romantic masterpiece reminiscent of the Dutch Golden Age. This oversized floral mural uses a dark background and large-scale blooms to create a stunning focal point that feels both classic and modern.
Step-by-Step Guide
Materials
- Digital projector
- High-resolution vintage floral image file
- Matte interior latex paint (Black or Charcoal)
- Acrylic paints or latex samples (Cream, Titanium White, Blush Pink, Burgundy, Sage Green, Forest Green, Burnt Umber)
- Acrylic glazing medium
- White chalk or watercolor pencil
- 2-inch angeled sash brush
- Assorted artist brushes (Filbert sizes #8 and #12, Round size #4)
- Painter’s tape and drop cloth
- Step ladder
Step 1: Preparation & Background
-
Prepare the workspace:
Clear the furniture away from the wall to give yourself ample room to move and position the projector later. Patch any holes, sand smooth, and wipe the wall down with a damp cloth to remove dust. -
Mask the edges:
Apply painter’s tape to the adjacent walls, ceiling line, and baseboards to ensure crisp edges. -
Apply the dark base:
Roll on two coats of matte black or charcoal paint over the entire wall. Allow the paint to cure fully overnight; a completely dry surface is essential for the chalk outlining phase.
Step 2: Projection & Outlining
-
Set up the projector:
Connect your device to a digital projector and cast your chosen floral image onto the black wall. Adjust the distance and focus until the composition fills the space exactly how you want it. -
Trace the design:
Using white chalk or a pale watercolor pencil, lightly trace the outlines of the flowers, leaves, and stems. Focus on the main shapes versus tiny details; you just need a map for placement. -
Check the composition:
Turn off the projector and step back to look at your chalk lines. Ensure the scale feels balanced before you open any paint cans.
Blending Troubles?
If your acrylics dry too fast to blend smoothly, keep a spray bottle of water handy to mist the wall lightly, or add more slow-drying retarder medium to your paint mix.
Step 3: Painting the Blooms
-
Mix your mediums:
Mix your acrylic colors with a generous amount of glazing medium. This increases transparency and extends drying time, which is crucial for achieving that soft, blended oil-painting look. -
Base coat the large white flower:
Start with the focal white peony. Using a large filbert brush, block in the petals using a mixture of cream and a touch of raw umber to create a shadowed base tone, avoiding pure white for now. -
Build the highlights:
While the base is tacky, layer Titanium White onto the outer tips and curled edges of the petals. Use a dry, soft brush to feather the white back into the creamy shadow tone for a smooth gradient. -
Define the shadows:
Deepen the crevices between petals with a mix of grey and beige. I like to keep these strokes loose to mimic the organic feel of petals unfolding. -
Start the red flowers:
For the darker blooms, apply a base layer of deep burgundy. Let this dry slightly, then brush a lighter red or dark pink onto the center of each petal, leaving the dark edges visible for separation. -
Add pink highlights:
Mix a soft blush pink and hit the very tops of the red petals where the light would naturally catch, blending gently downward. -
Create center details:
Using a small round brush, stipple small dots of yellow and ochre into the centers of the open blooms to create the pollen-heavy stamens.
Add Texture
For an authentic oil-painting texture, use a palette knife to apply thick, heavy-body acrylic white paint on the highlights of the petals as a final 3D accent.
Step 4: Foliage & Finishing
-
Block in the leaves:
Mix your Forest Green with a little black to create a murky deep green. Paint the leaf shapes, allowing the edges to remain somewhat soft. -
Highlight the greenery:
Add Sage Green to one side of the leaves and stems to suggest light direction. Blend this wet-on-wet into the darker green base. -
Fade into the background:
To achieve the moody ‘chiaroscuro’ effect, use a dry brush with a tiny bit of black paint to feather the outer edges of the flowers and leaves so they seem to recede into the shadows. -
Clean up outlines:
Once the florals are dry, use a small brush and your original wall color to touch up any areas where the paint strayed outside the lines or where chalk marks are still visible. -
Erase chalk marks:
Gently wipe away any remaining visible chalk lines with a damp cloth.
Step back and admire your dramatic, large-scale art installation that brings romance and depth to the entire room.


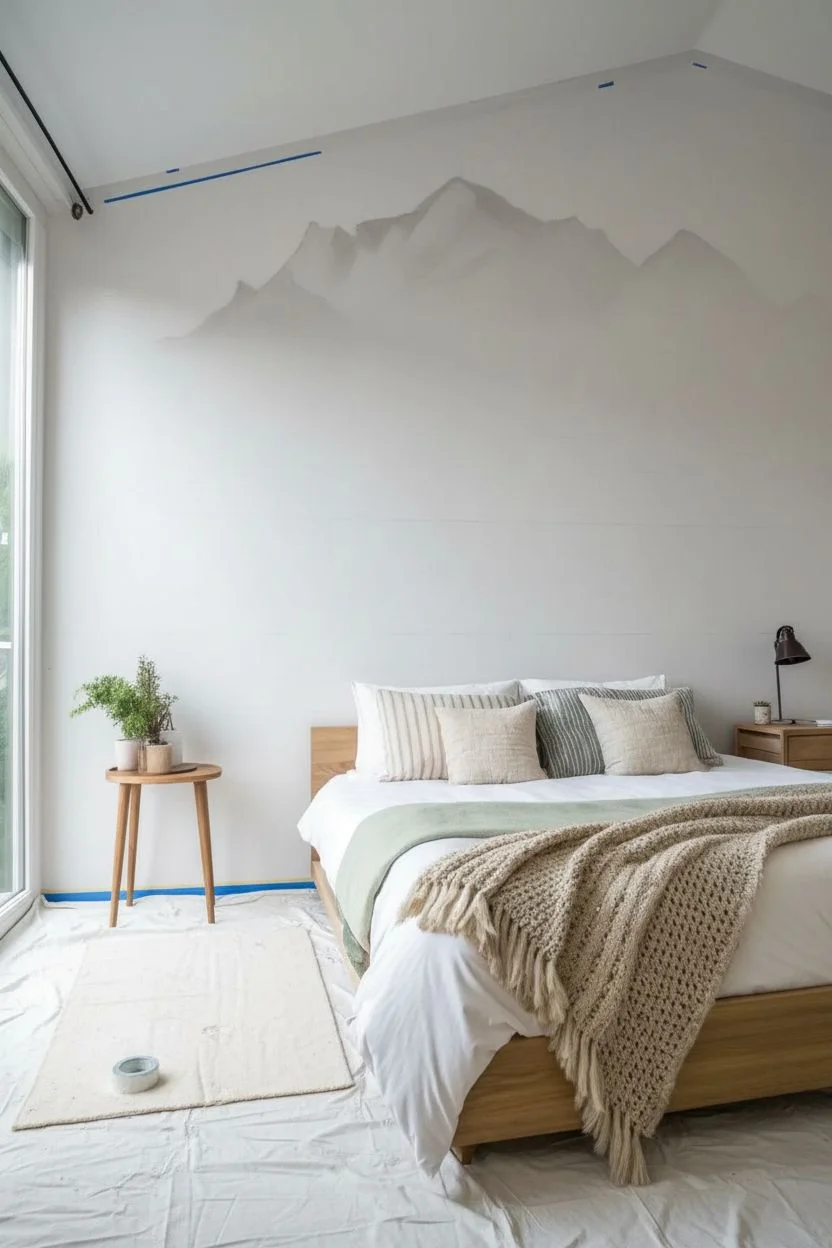
Majestic Mountain Vistas
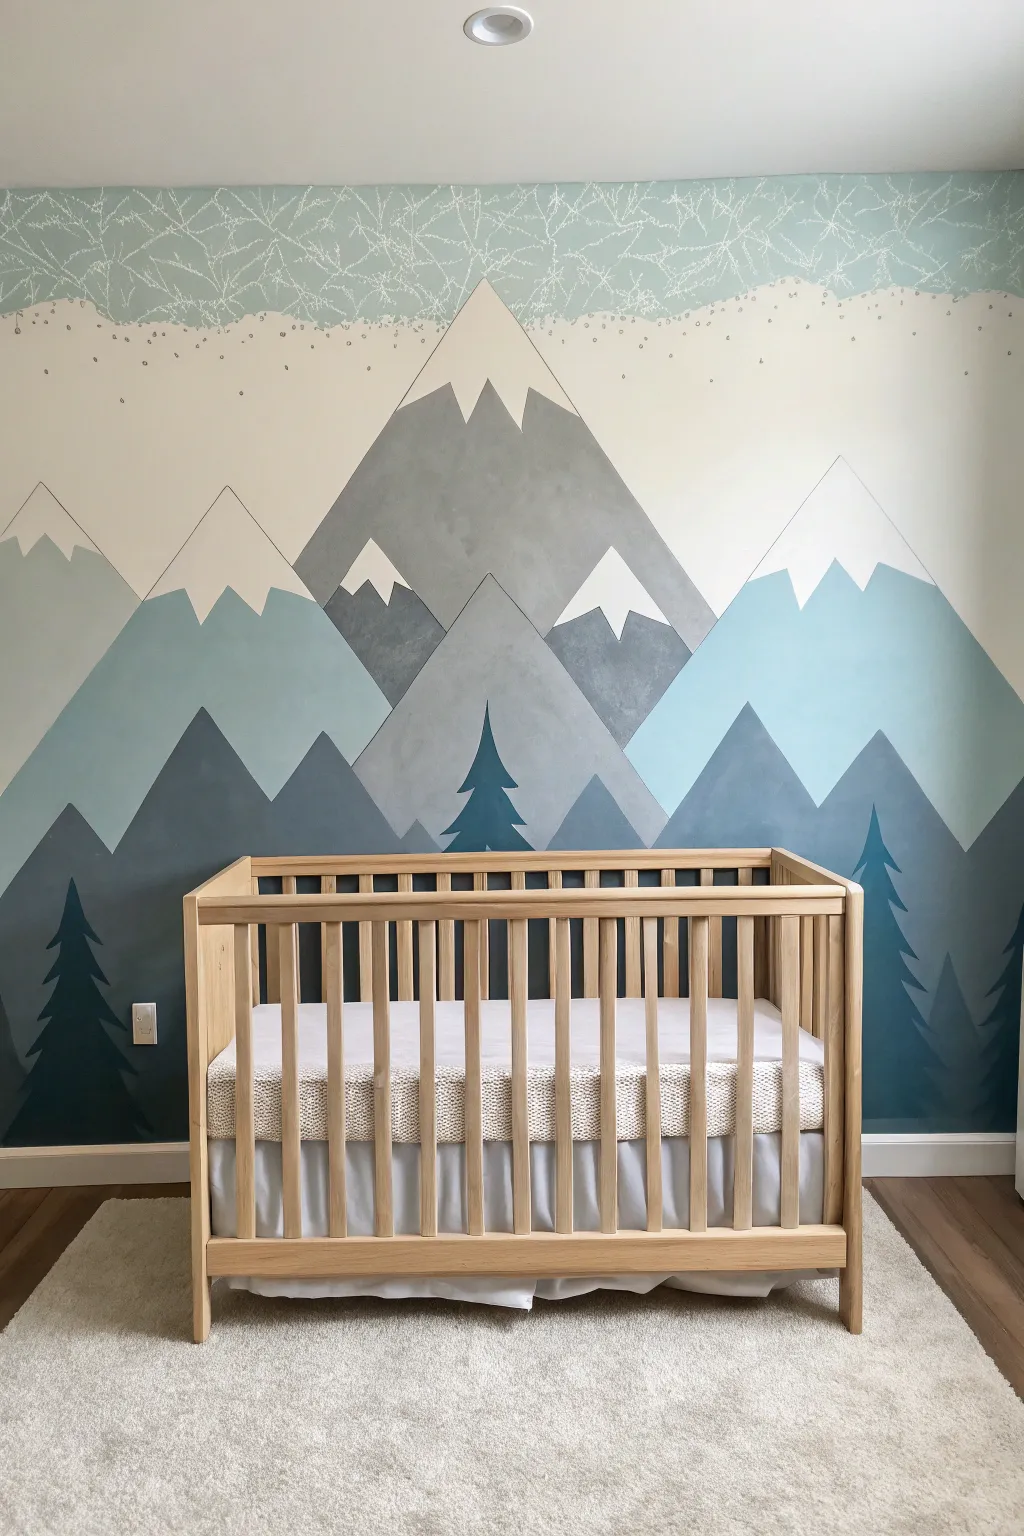
Transform a plain wall into a serene, mountainous escape perfect for a nursery or playroom. This project uses crisp geometric lines, soothing cool tones, and stylized foliage to create a depth-filled landscape that looks impressive but is beginner-friendly.
How-To Guide
Materials
- Interior latex paint (White, Light Blue, Steel Grey, Charcoal, Forest Green)
- Painter’s tape (1-inch and 2-inch widths)
- 4-inch foam roller and handle
- Angled sash brush (2-inch)
- Small artist brushes (flat and fine liner)
- Pencil and large eraser
- Laser level or long spirit level
- Drop cloths
- Damp rag
Step 1: Preparation and Mapping
-
Prepare the canvas:
Clear the room and lay down drop cloths to protect your flooring. Patch any nail holes, sand them smooth, and wipe the wall down with a damp cloth to ensure a dust-free surface. -
Apply the base color:
Roll two coats of your lightest background color—likely a soft white or very pale cream—over the entire wall. Allow this to cure fully, preferably overnight, so the painter’s tape won’t peel it up later. -
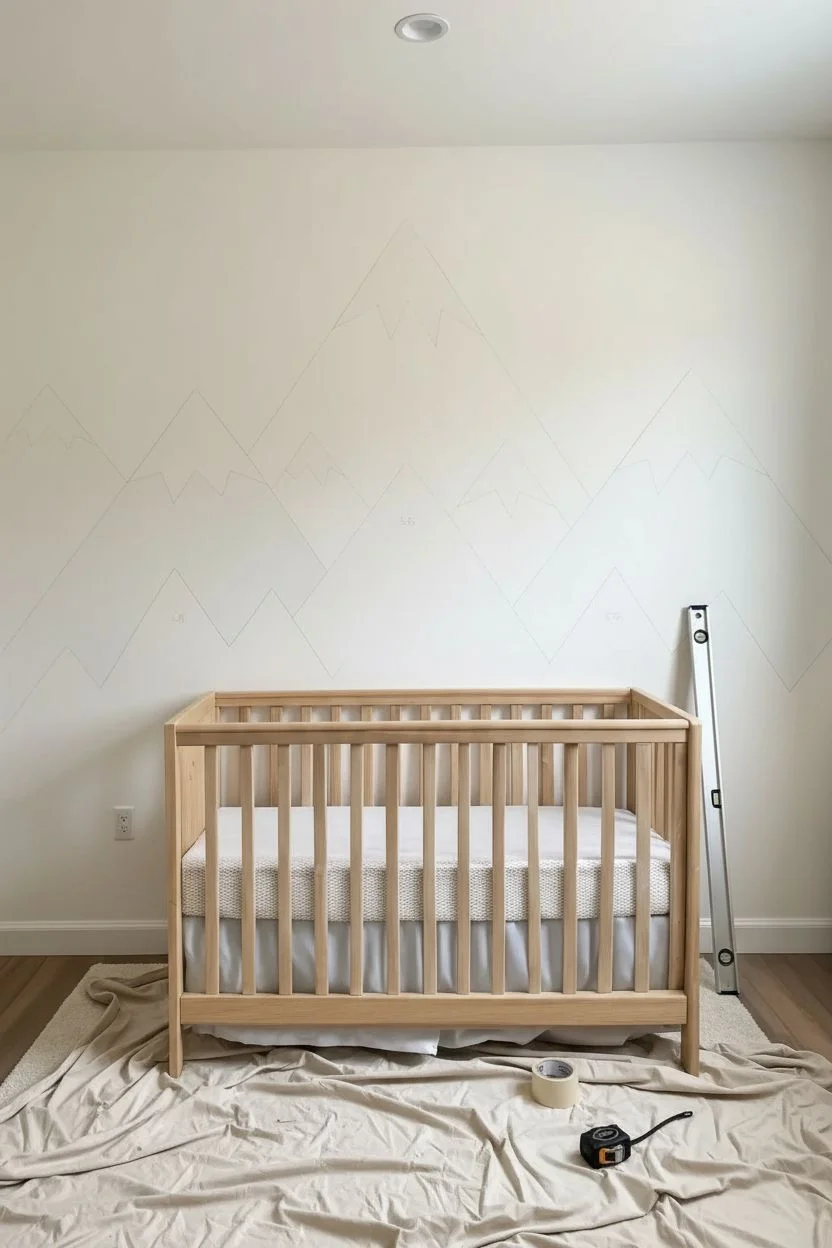
Sketch the layout:
Using a pencil, lightly sketch your mountain ranges directly onto the wall. Draw three layers: large peaks in the back, a massive central mountain, and lower jagged hills in the foreground. -
Mark your colors:
To avoid confusion later, I like to write a tiny initial (like ‘LB’ for Light Blue or ‘G’ for Grey) inside each sketched mountain shape so I don’t mix up the paint cans.
Bleed-Proof Lines
Always brush a thin layer of the *existing* background color over your tape edge before applying the new color. This locks the seal and guarantees razor-sharp geometric lines every time.
Step 2: Painting the Mountains
-
Tape the back range:
Apply painter’s tape along the outside edges of your furthest, lightest blue mountains. Run your finger firmly along the tape edge to secure the seal. -
seal the tape:
Brush a very light layer of your *base wall color* (white) over the edge of the tape. This seals any tiny gaps; if paint bleeds, it will be white-on-white, keeping your future blue lines crisp. -
Paint the background peaks:
Fill in the taped areas with your light blue paint using a foam roller for a smooth finish. Two light coats provide better coverage than one heavy coat. -
The crucial reveal:
Peel the tape off slowly at a 45-degree angle while the paint is still slightly tacky. Let these sections dry completely before moving to the next layer. -
Tape the middle ground:
Once the blue peaks are dry, tape off the outline for the large central mountain and adjacent grey peaks. You can place tape distinctly over the dry blue paint now. -
Paint the middle range:
Apply your steel grey or medium-blue paint to these central shapes. Remember to seal the tape edges again for perfection, then paint, peel, and let dry. -
Execute the foreground:
Repeat the taping process for the lowest, darkest mountains at the bottom. Fill these with your dark charcoal or deep slate blue paint to anchor the visual weight of the mural.
Step 3: Details and Texture
-
Outline the snow caps:
Once the mountains are fully cured, apply tape specifically to create jagged triangular shapes at the summits of your mountains. -
Fill the snow:
Paint these upper triangles with crisp white paint. I prefer using a small brush here rather than a roller to maintain control over the smaller surface area. -
Draft the trees:
Use your pencil to lightly draw simple, elongated triangle shapes for the evergreens. Place them strategically—some overlapping the mountains, some standing alone in the valleys. -
Paint the trees:
Using a small angled artist brush and forest green paint, carefully fill in your tree outlines. Use jagged, horizontal strokes near the bottom of each tree to mimic branches. -
Add sky texture:
Mix a small amount of white paint with water to thin it slightly. Using a fine liner brush, paint delicate, branching ‘crack’ patterns or frost lines in the sky area to mimic the reference artwork’s textured look. -
Clean up:
Check for any pencil marks still visible and gently erase them. Use a small brush to touch up any areas where the lines aren’t perfectly sharp.
Glow-in-the-Dark Magic
Mix a clear glow-in-the-dark additive into the white paint used for the snow caps and the sky texture. During the day it looks normal, but at night the peaks will softly illuminate.
Step back and admire your majestic, hand-painted range that brings the outdoors in.


Serene Waterscapes
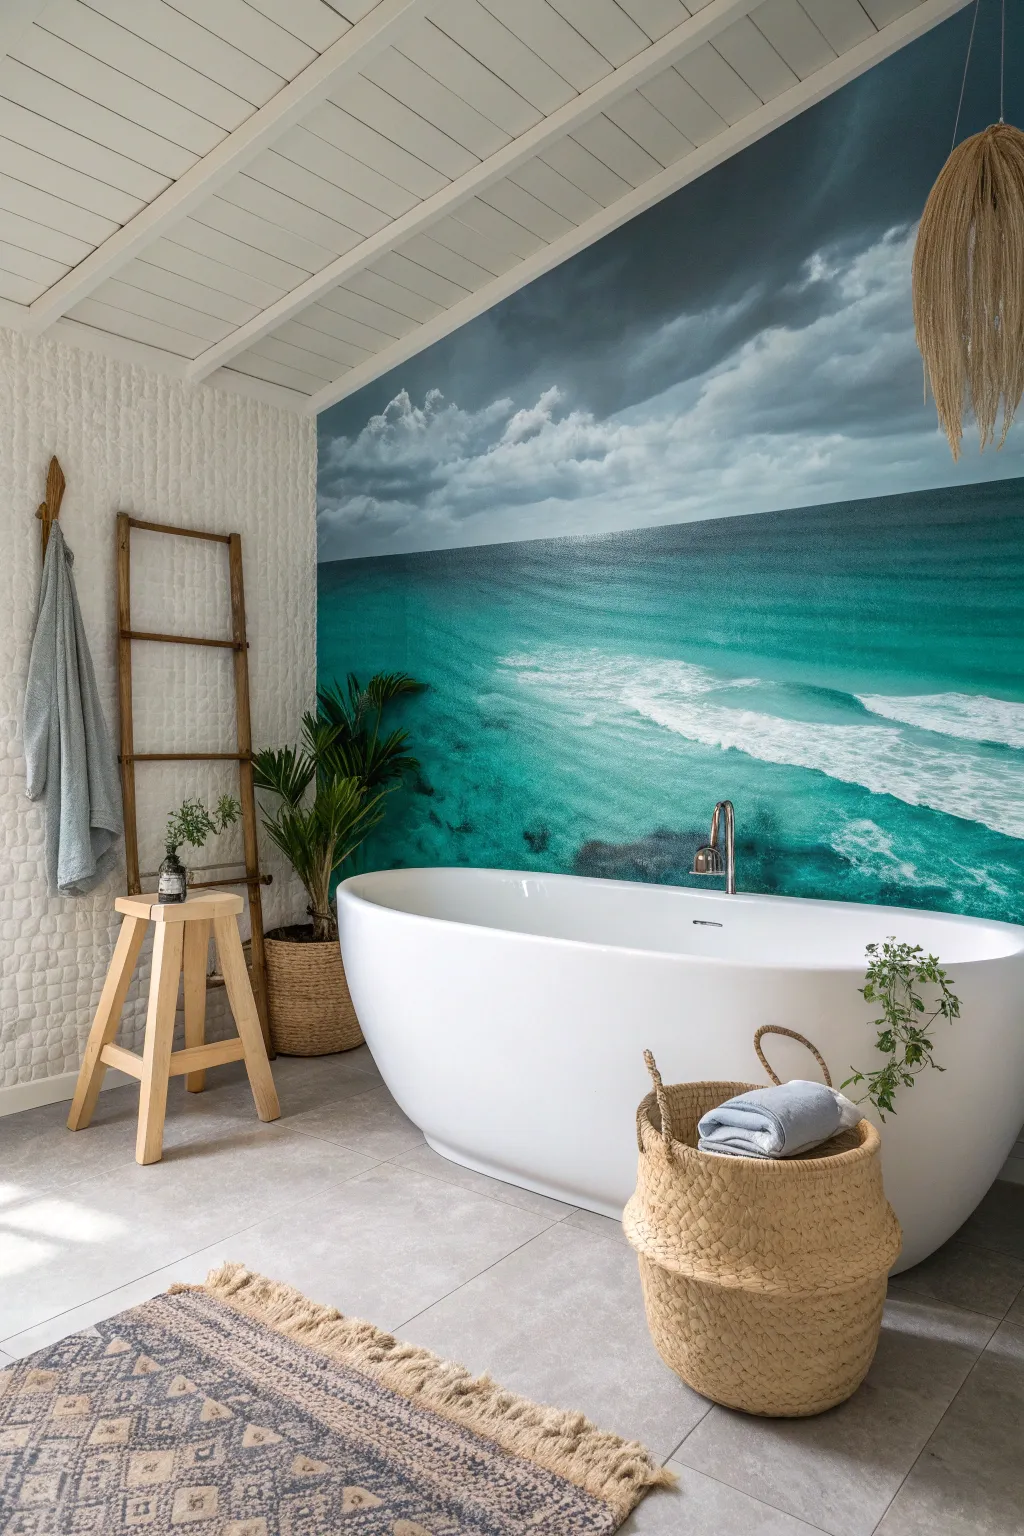
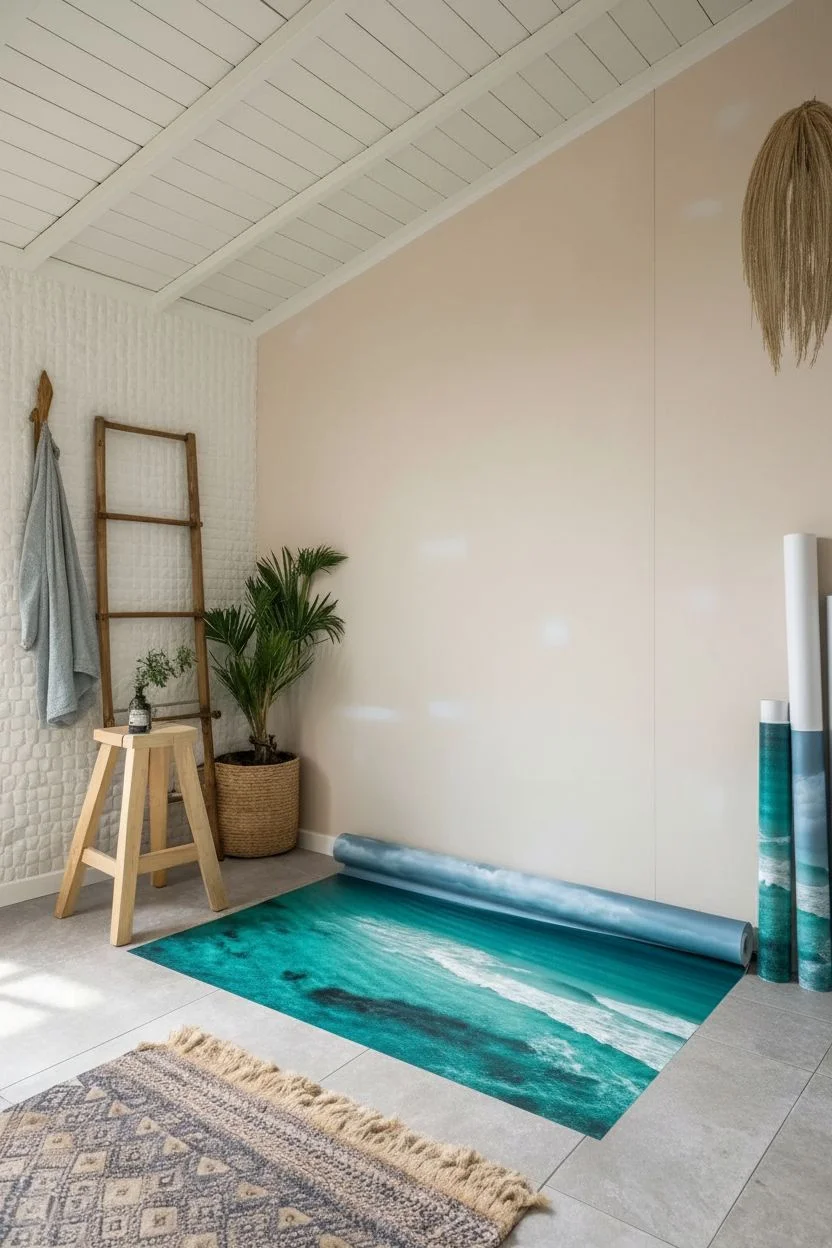
Transform your bathroom or living space into a tranquil seaside sanctuary with this breathtaking floor-to-ceiling ocean view. This project guides you through installing a large-scale photo mural to effortlessly bring the calming energy of crashing waves and open skies right into your home.
Detailed Instructions
Materials
- Custom photo mural panels
- Heavy-duty wallpaper paste
- Paste roller and tray
- Spirit level or plumb line
- Wallpaper smoothing tool
- Sharp utility knife with snap-off blades
- Seam roller
- Sponge and bucket of water
- Metal straightedge
Step 1: Preparation & Layout
-
Clean surface:
Begin by washing the wall thoroughly with sugar soap or mild detergent to remove dust and oils, ensuring better adhesion. -
Smooth imperfections:
Fill any nail holes or cracks with spackle, sand the area smooth once dry, and wipe away the dust. -
Check panels:
Unroll your mural panels flat on a clean floor to verify the sequence and visually check that the horizon line matches perfectly across sheets. -
Mark a guide:
Use your spirit level to draw a strictly vertical pencil line on the wall near the starting corner to guide your first panel’s placement.
Paint Prep Pro Tip
Paint the wall a similar shade of light blue or white before hanging. This helps disguise any tiny gaps that might accidentally occur between seams.
Step 2: Installation
-
Apply adhesive:
Mix the wallpaper paste according to the packet instructions and use a roller to apply a generous, even layer directly to the wall section for the first panel. -
Hang first panel:
Lift the first panel and align its edge precisely with your pencil plumb line, leaving a few inches of excess paper at the top and bottom. -
Smooth out air:
Using the smoothing tool, work from the center of the panel outwards to push out air bubbles and ensure the paper grips the wall firmly. -
Match the pattern:
Paste the wall for the next section and slide the second panel into place, carefully aligning the ocean waves and cloud details at eye level first. -
Secure seams:
I like to gently run a seam roller down the join where the panels meet to ensure the edges don’t lift later. -
Wipe excess paste:
Immediately wipe away any adhesive that squeezes out onto the front of the image using a damp, clean sponge.
Step 3: Finishing Touches
-
Repeat process:
Continue hanging the remaining panels, constantly checking that the horizontal horizon line remains level across the entire wall. -
Trim edges:
Once all panels are up, use a sharp utility knife and a metal straightedge to trim the excess paper at the ceiling line and baseboard. -
Refresh blade:
Snap off a segment of your knife blade frequently; a dull blade can tear the wet paper and ruin the clean edge. -
Cut around fixtures:
If you encounter outlets or faucets, make a small X-cut over the obstacle and carefully trim the excess paper around the fitting. -
Final clean:
Give the entire mural a final gentle wipe with a damp cloth to remove any lingering paste residue. -
Dry slowly:
Allow the mural to dry naturally at a consistent room temperature to prevent the seams from shrinking or opening.
Level Up: Soundscape
Hide a small Bluetooth speaker behind a planter or basket to play ambient ocean sounds, turning the visual mural into a full sensory experience.
Step back and breathe in the serenity of your new everlasting ocean view.
BRUSH GUIDE
The Right Brush for Every Stroke
From clean lines to bold texture — master brush choice, stroke control, and essential techniques.
Explore the Full Guide
Retro Sun Geometrics
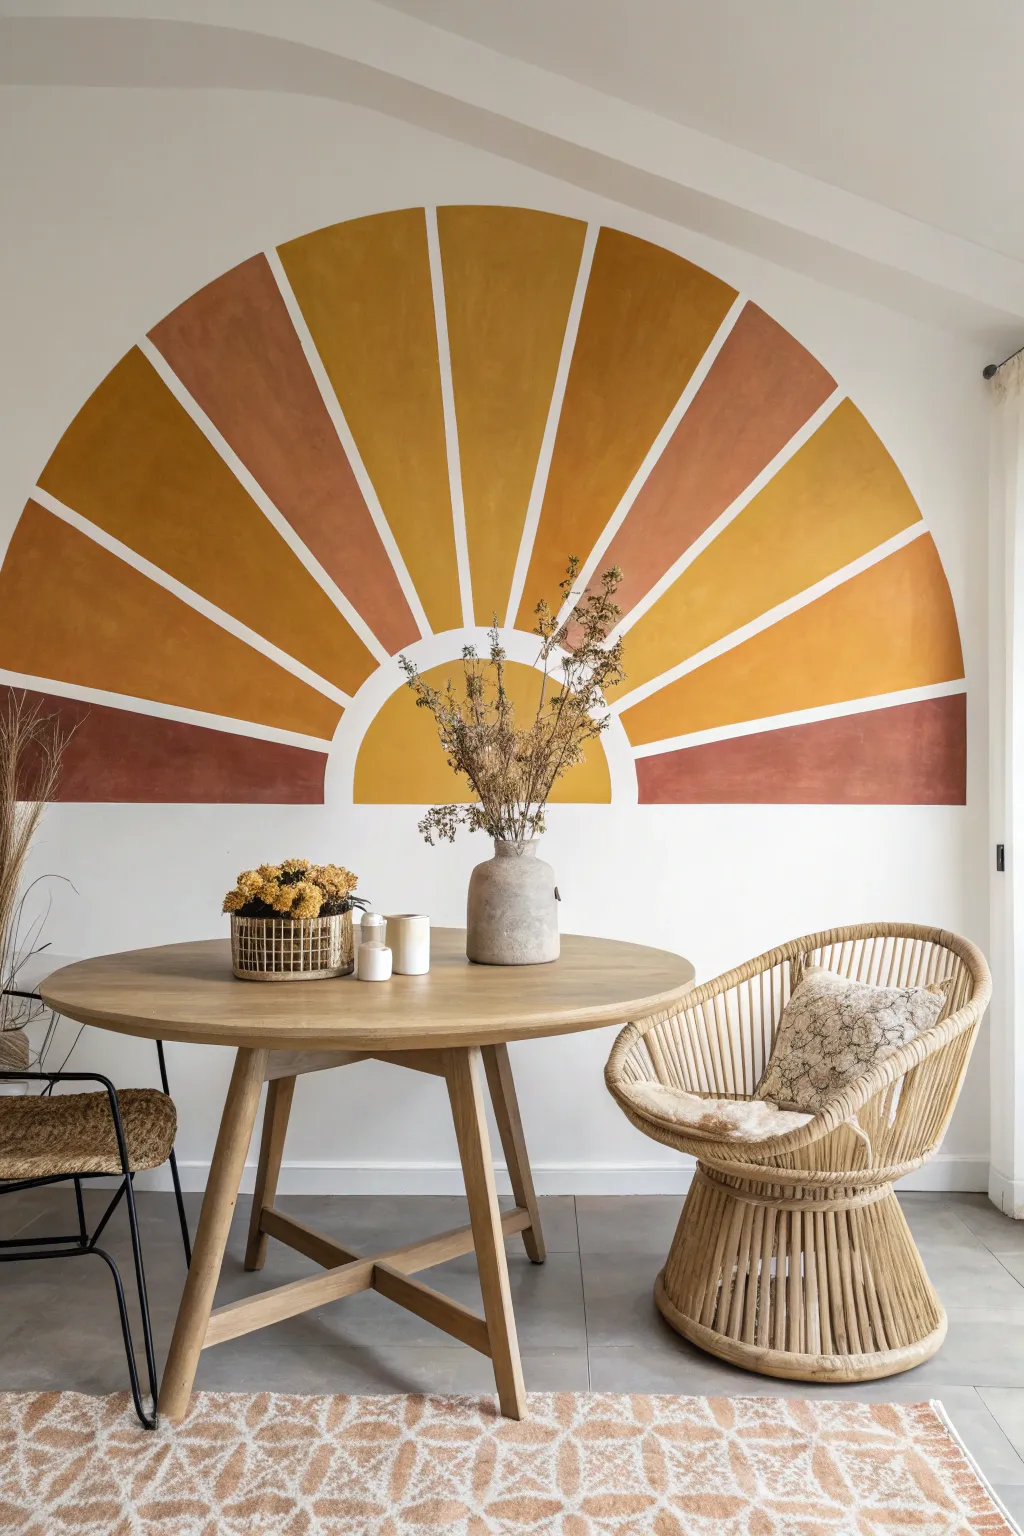
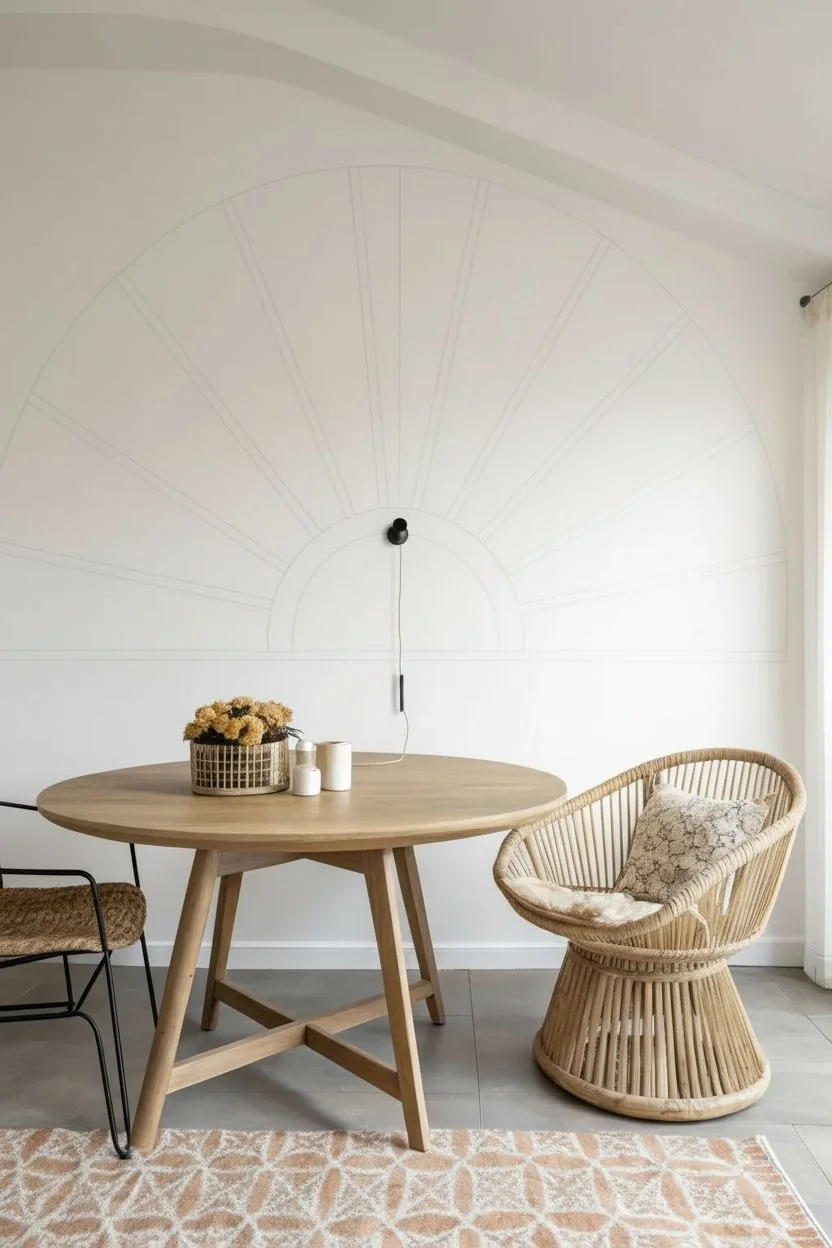
Capture the warmth of a perpetual sunset with this retro-inspired geometric wall mural. This radiating arch design brings a bold 70s boho vibe to your space using a palette of rich, earthy tones and crisp negative space.
How-To Guide
Materials
- Interior latex paint (samples in terracotta, rust, ochre, and mustard)
- Painter’s tape (1-inch width)
- String and push pin (or nail)
- Pencil and eraser
- Measuring tape
- Long level (or laser level)
- Angled sash paintbrush
- Small foam roller and tray
- Base wall color paint (for sealing tape)
Step 1: Drafting the Pattern
-
Establish the horizon:
Decide how high you want the bottom of your mural to sit. Use your level and pencil to draw a long, straight horizontal line across the wall width to serve as the base. -
Set the anchor point:
Measure the center of your horizontal line and mark it. Place a push pin or small nail firmly into this point; this will be the pivot point for your compass. -
Draw the sun:
Tie a piece of string to the pin and a pencil to the other end so the string describes the radius of the small central sun. Pull the string taut and draw a semi-circle. -
Outline the rays:
Lengthen the string significantly to determine the outer edge of the sunburst rays. Draw a second, much larger arch above the first one. -
Mark the segments:
Use a long straight edge or yardstick to draw lines radiating from the center pin to the top arch. Start with a vertical line straight up, then divide the side quadrants evenly to create symmetrical rays.
Bleed-Through Blues?
If paint crept under the tape, wait for it to dry completely. Re-tape slightly outside the bleed area and paint over it with the base wall color (white) to delete the mistake.
Step 2: Taping for Crisp Lines
-
Tape the horizon:
Apply painter’s tape along the bottom horizon line. Ensure the tape is placed *below* your pencil line so the paint sits strictly above it. -
Create the white gaps:
Apply tape directly over your radiating pencil lines. The width of the tape will become the white space between your colors, so keep it centered on your markings. -
Tape the curves:
Taping the arches takes patience. Tear off small, 2-inch pieces of tape and overlap them along the curved pencil lines to create a smooth arc. -
Seal the edges:
To get those perfect razor-sharp lines, I always brush a thin layer of the existing white wall color over the edges of the tape first. This seals any gaps and prevents the colored paint from bleeding under.
Step 3: Painting the Gradient
-
Map your colors:
Plan your gradient before opening cans. Usually, this design works best with the darkest rust tones on the outside edges, fading to lighter yellows toward the top center. -
Cut in the edges:
Using your angled brush, carefully paint the borders of each “ray” section. Be mindful not to dip your brush into the wrong color for adjacent sections. -
Roll the fill:
Use a small foam roller to fill in the centers of the rays and the central sun semi-circle. The foam roller helps achieve a smooth, flat finish without brush strokes. -
Apply second coat:
Allow the first coat to dry according to the can’s instructions (usually 2-4 hours), then apply a second coat for full opacity and richness. -
Remove tape:
Peel off the tape while the second coat is still slightly tacky. Pull the tape slowly at a 45-degree angle away from the painted edge. -
Final touches:
Once the paint is fully cured, gently erase any visible pencil marks in the white gaps. Use a tiny brush to touch up any small imperfections.
Level Up: Surface Texture
To mimic the plaster-like look in the inspiration photo, mix a texture additive into your paint or use a ‘suede’ finish paint instead of standard flat latex.
Step back and enjoy the permanent golden hour glow you just added to your home.
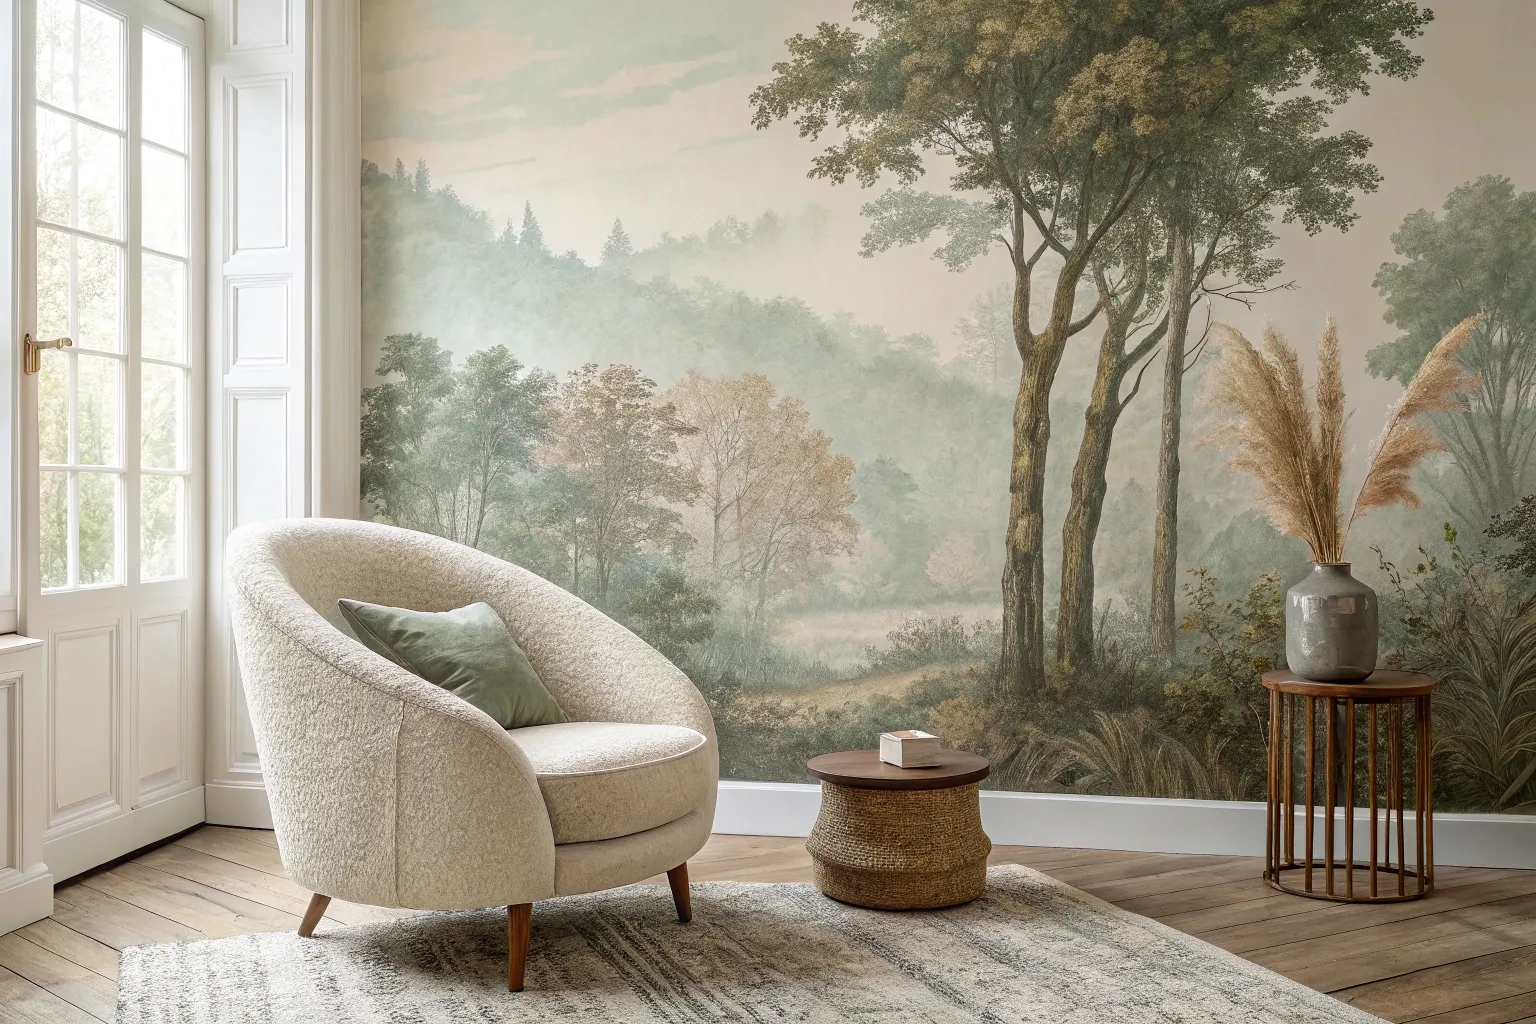
The Painted Headboard
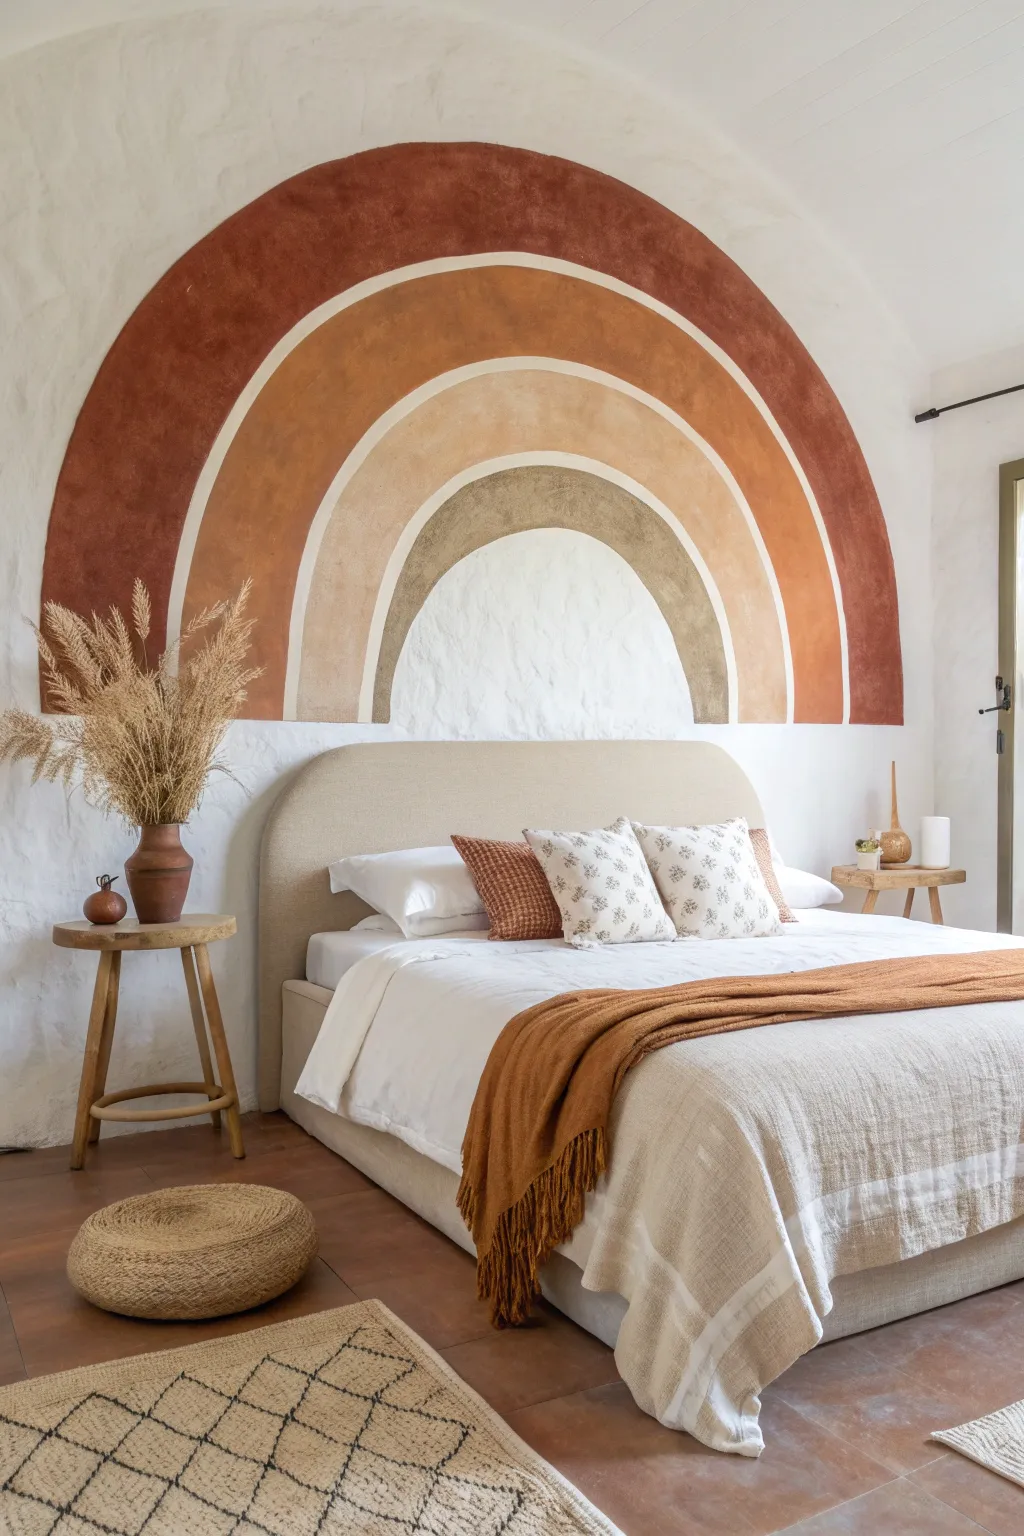
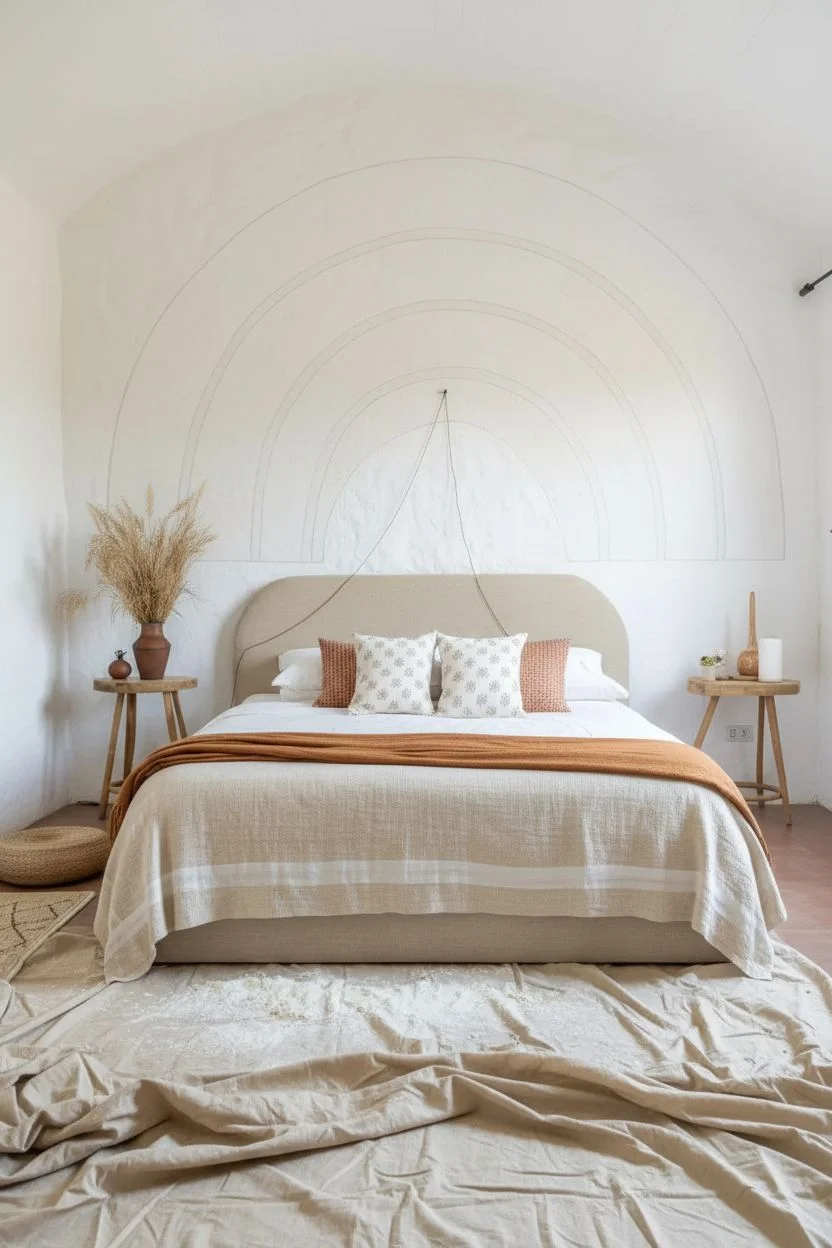
Transform your bedroom with this warm, grounding mural that serves as a creative alternative to a traditional headboard. Using a palette of terracotta, ochre, and neutrals, you will frame the bed with an organic, textured arch that adds instant coziness.
Step-by-Step Guide
Materials
- Interior latex paint (Rust, Ochre, Sand, Taupe)
- White wall paint (for touch-ups)
- 2-inch angled sash brush
- Small flat artist brush
- Non-stretchy string
- Pencil
- Thumb tack or painter’s tape
- Measuring tape
- Drop cloth
- Damp cleaning cloth
Step 1: Preparation & Layout
-
Clear the workspace:
Move your bed and nightstands away from the wall to give yourself ample room to move around the mural area. -
Clean the surface:
Wipe the wall down thoroughly with a damp cloth; removing dust is crucial for adhesion, especially on textured plaster walls. -
Find the center:
Measure the width of your bed to determine the arched width, then mark the center point on the wall just below the mattress line. -
Create a compass:
Tie one end of your string to a pencil and secure the other end to your center mark using a thumb tack or strong tape. -
Sketch the outer arch:
Extend the string to your desired max height and lightly draw the outermost semi-circle, keeping the string taught. -
Define the first band:
Shorten the string by about 5-6 inches (the width of the color band) and draw a second arc inside the first one. -
Mark the negative space:
Shorten the string by another inch to create the gap between colors, then draw the top line for the next band. -
Complete the outlines:
Continue this alternating process—measuring for the color band width then the gap width—until all four arches are sketched.
Steady Hand Trick
Rest your pinky finger on the wall as a stabilizer while you paint curves. It acts like a compass pivot for your hand, giving you smoother control over the brush strokes on the arch.
Step 2: Painting the Bands
-
Start with the darkest color:
Open your rust/terracotta paint and dip the angled sash brush halfway; begin painting the outline of the outermost arch. -
Cut in the edges:
Use the sharp angle of your brush to carefully trace along your pencil lines, creating a crisp edge against the white wall. -
Fill the band:
Fill in the rest of the rust band. If your wall is heavily textured, use a dabbing motion to push paint into the crevices. -
Paint the second arch:
Using a clean brush and the ochre paint, carefully outline and fill the second band, watching the spacing. -
Mind the gap:
I like to work slowly here to ensure the white strip of negative space between the rust and ochre bands stays consistent. -
Apply the neutral tones:
Repeat the process for the third band using the sand/beige paint, filling it in completely. -
Finish the inner arch:
Paint the final, smallest arch with the taupe color, anchoring the design visually. -
Dry and assess:
Let the paint dry for at least 2-4 hours before checking if a second coat is needed for richer color depth. -
Touch up:
Use a small artist brush and white paint to tidy up any accidental drips or smudges in the negative space gaps.
Texture Trouble?
If the wall texture makes perfectly straight lines impossible, don’t worry. Embrace the slightly “wobbly” organic edge; it adds to the handmade boho charm of the piece.
Step back and enjoy the warmth and personality this custom painted headboard brings to your space

PENCIL GUIDE
Understanding Pencil Grades from H to B
From first sketch to finished drawing — learn pencil grades, line control, and shading techniques.
Explore the Full Guide
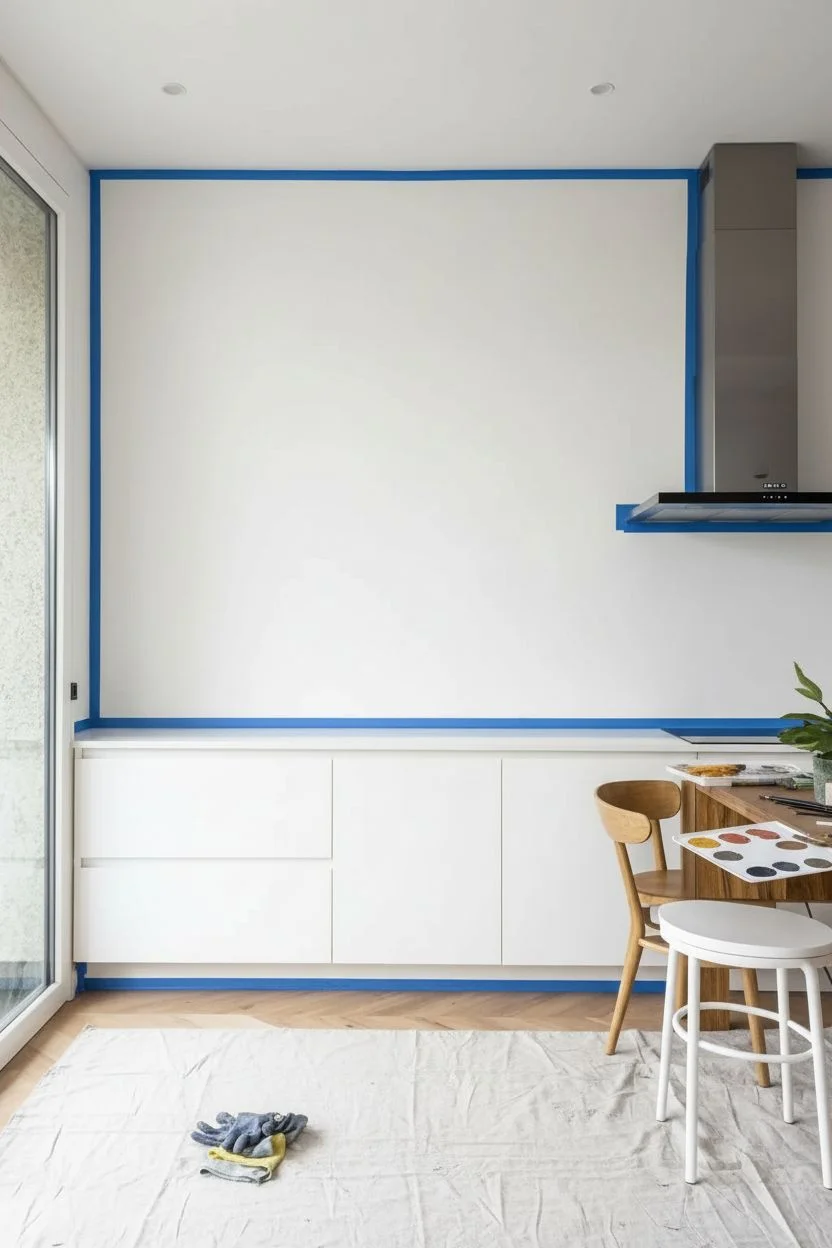
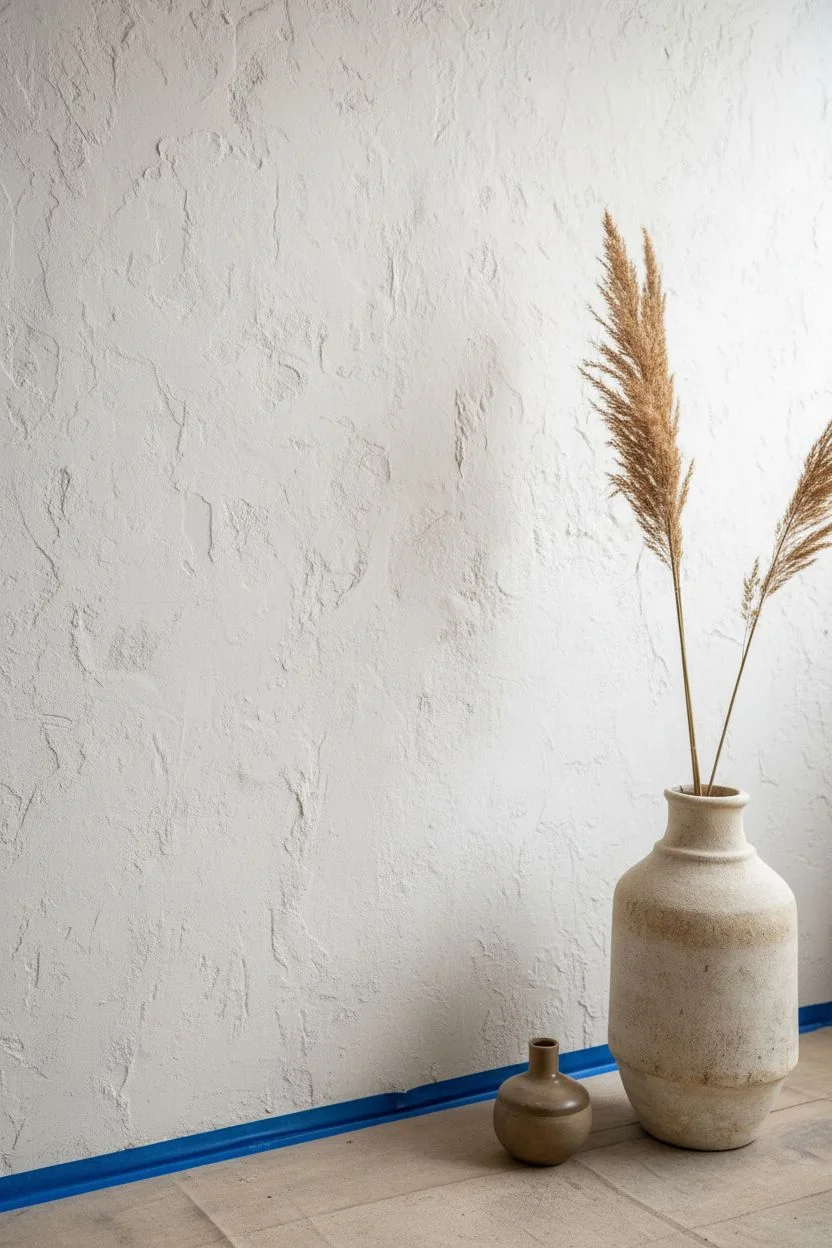
Minimalist Botanical Line Art

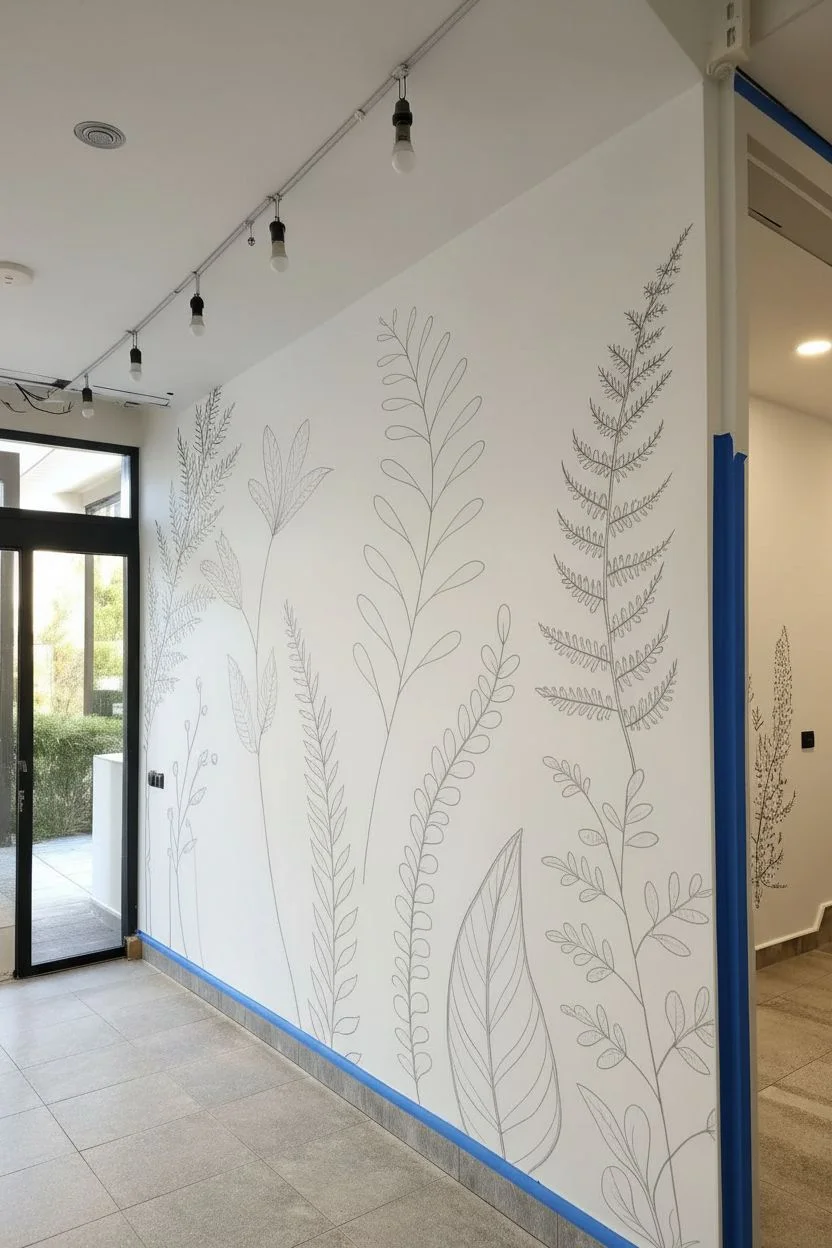
Transform a plain white wall into a modern indoor garden with this hand-drawn botanical mural. Using simple black lines to create varying plant species, this project adds sophisticated visual interest without overwhelming the space.
Step-by-Step Tutorial
Materials
- White satin or eggshell interior wall paint (base)
- Black acrylic paint pens (chisel tip and fine tip)
- Black acrylic paint (optional, for large fills)
- Pencil (HB or lighter)
- White eraser
- Painter’s tape
- Step ladder
- Level
- Damp cloth
Step 1: Wall Preparation & Layout
-
Prepare the canvas:
Ensure the wall is clean, dry, and free of dust. If the current paint is old or colorful, apply a fresh coat of white satin or eggshell paint to create a crisp, high-contrast background. -
Protect the perimeter:
Apply painter’s tape along the skirting boards, adjacent walls, and ceiling edges to ensure your lines have a clean stopping point. -
Draft the composition:
Using a light pencil, sketch the main vertical stems first to establish height and spacing. I find it helpful to vary the heights, with some reaching near the ceiling and others staying lower, to create a natural rhythm. -
Sketch plant varieties:
Lightly outline the leaf shapes attached to your stems. Mix different species shown in the inspiration: tall fern fronds, broad distinct leaves, and slender wheat-like stalks. -
Review the balance:
Step back to the other side of the room to view the pencil sketch as a whole. Check for any empty gaps that need filling or areas that look too cluttered, and adjust with your eraser.
Step 2: Defining the Botanicals
-
Detail the Ferns:
For the fern-style plants (like the tall one on the right), sketch small, repetitive leaflets along the main stem. Keep them angled slightly upward. -
Create the Broad Leaves:
On the lower sections, draw larger, teardrop-shaped leaves with a central vein line. These anchor the design visually near the floor. -
Add Textural Grasses:
Include stems that feature small dots or seed pods rather than leaves to add variety to the texture profile.
Steady Hand Pro-Tip
Can’t draw a straight line? Don’t worry about perfection—organic plants are naturally wavy! Use your pinky finger sliding against the wall to stabilize your hand as you draw.
Step 3: Inking the Design
-
Test your markers:
Prime your black acrylic paint pens on a piece of scrap cardboard to ensure the ink flows smoothly without blotting. -
Trace the main stems:
Start by tracing over your long vertical pencil lines using a chisel-tip marker for a bolder, thicker line weight that anchors the plant. -
Outline the leaves:
Switch to a fine-tip marker to outline the delicate leaves and fronds. This variation in line thickness adds depth to the illustration. -
Add inner details:
Draw the veins inside the leaves using your finest marker tip. Keep these lines light and airy; they don’t need to connect all the way to the leaf edges. -
Fill in dark accents:
If your design includes solid black leaves or thick jagged edges (like the fern stems), fill those areas in now. I prefer to do this slowly to keep the edges sharp. -
Working smoothly:
Work from the top of the wall down towards the floor (or left to right if you are right-handed) to avoid smudging fresh ink with your hand.
Level Up: 3D Pop
Install real wooden hooks or small floating shelves amongst the drawn foliage. Placing a real hanging plant on a hook makes the mural blend seamlessly with reality.
Step 4: Finishing Touches
-
Let it cure:
Allow the paint marker ink to dry completely for at least 2 hours. It may look dry instantly, but let it set to prevent smearing. -
Clean up sketch lines:
Gently erase any visible pencil marks. Be careful not to rub too hard over the painted lines. -
Correct mistakes:
If you slipped or made a line too thick, use a small brush with your white wall paint to ‘erase’ the error and reshape the line.
Enjoy your maintenance-free indoor garden that stays green all year round
Abstract Liquid Marble
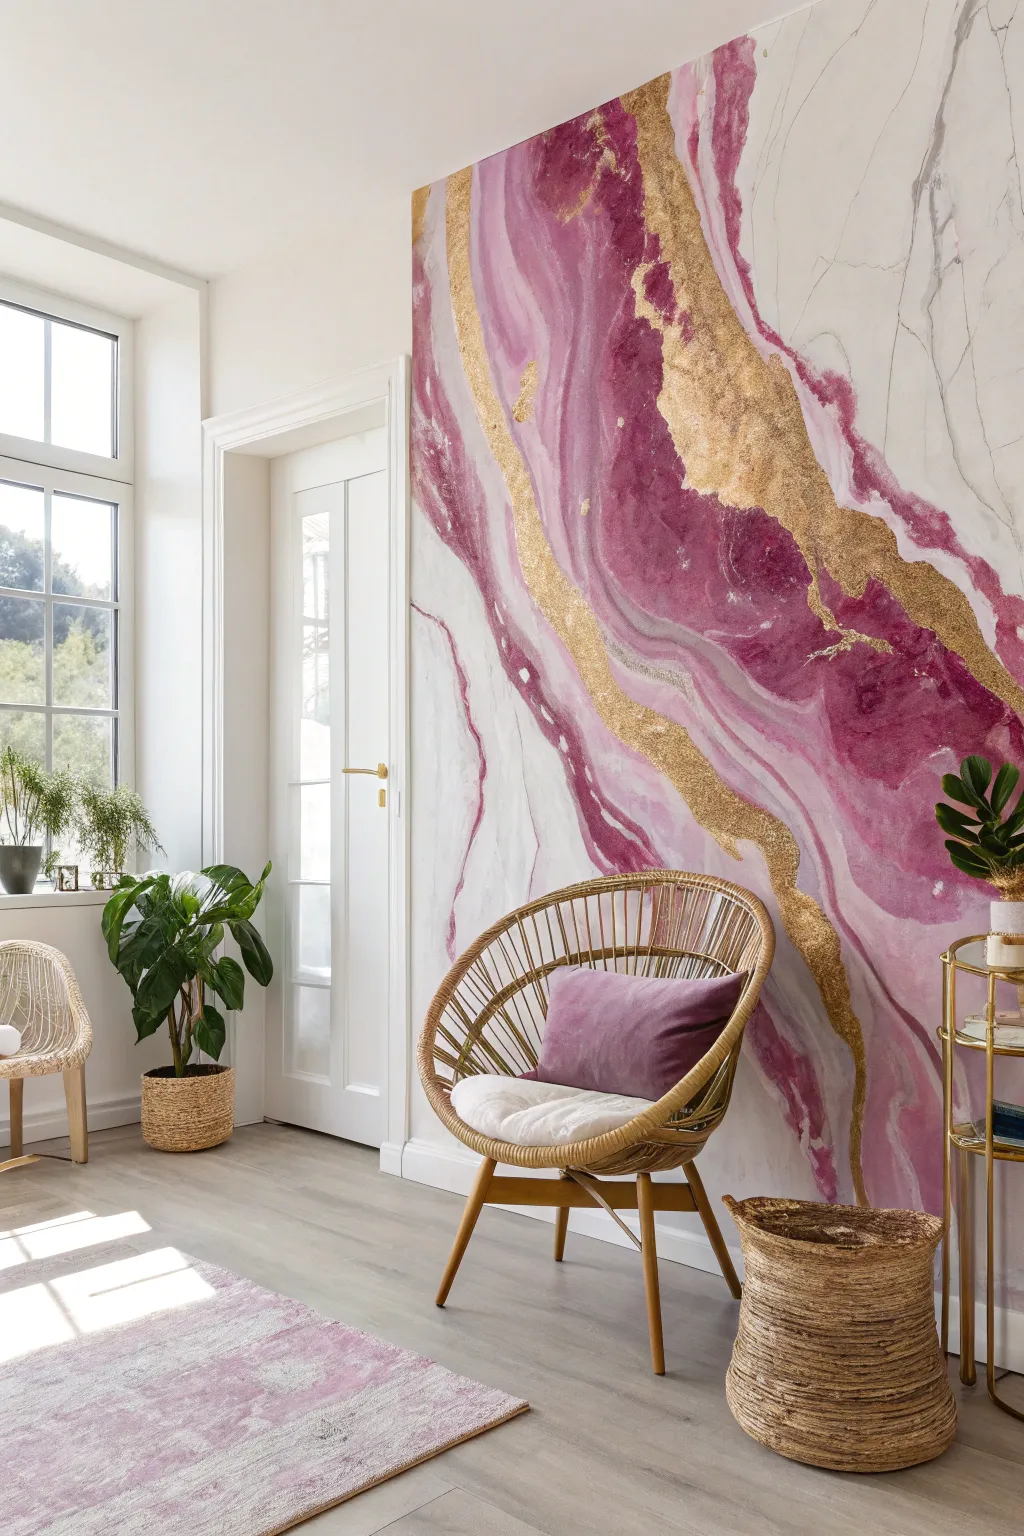
Transform a plain white wall into a breathtaking statement piece that mimics the flow of agate and luxury stone. By layering acrylic glazes and metallic accents, you will create a fluid, organic design that feels both expensive and artistic.
Detailed Instructions
Materials
- White satin latex wall paint (base)
- Acrylic paints (Magenta, Alizarin Crimson, Warm Grey, White)
- Clear acrylic glazing liquid
- Gold leaf composition sheets
- Gold leaf adhesive size
- Water spray bottle (misting setting)
- Natural sea sponges
- Large soft blending brushes
- Assorted small round brushes
- Painter’s tape and drop cloths
Step 1: Preparation & Base
-
Protect the perimeter:
Apply painter’s tape generously to your baseboards, ceiling line, and adjacent walls. Lay down drop cloths, as this technique can involve drips. -
Apply the canvas base:
Roll two coats of bright white satin latex paint onto the entire wall to create a pristine, non-porous surface. Allow this to cure overnight. -
Mix the background glaze:
In a bucket, mix 1 part Warm Grey acrylic paint with 4 parts glazing liquid and 1 part water. It should be very translucent. -
Create subtle veining:
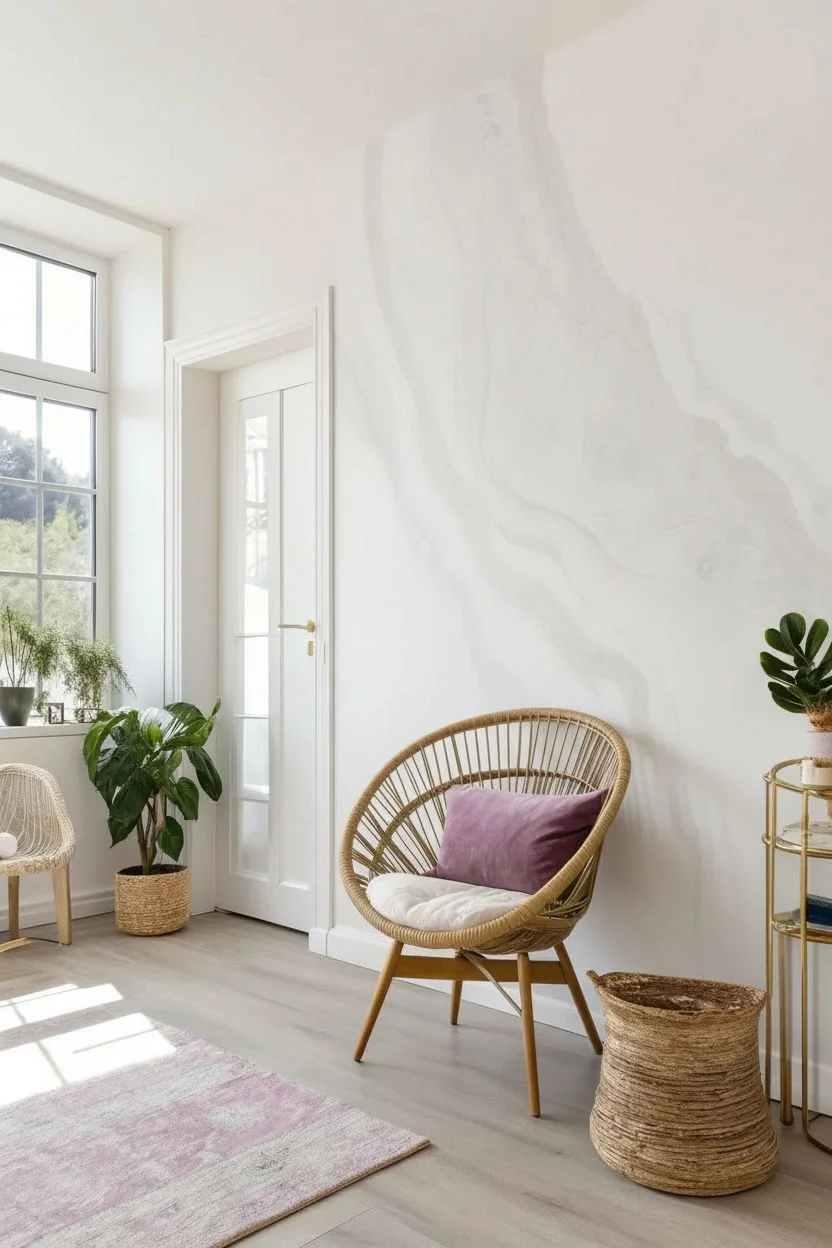
Dip a sea sponge in the grey glaze, wring it out, and lightly blot random, drifting cloud shapes on the white background. I like to keep these very faint to ensure the colorful vein pops later. -
Soften the background:
While the grey glaze is wet, use a large, dry soft brush to feather the sponge marks, creating a smoky, out-of-focus marble effect. Let this dry completely.
Fixing Hard Edges
Paint dried too fast leaving a hard line? Wet a clean sponge and scrub the edge gently. If stubborn, apply a thin layer of white glaze over the line to push it back visually.
Step 2: Painting the Fluid Ribbon
-
Plan the flow:
Lightly sketch the main diagonal path of the agate vein using a watercolor pencil. Aim for an organic, winding river shape. -
Mix main colors:
Prepare three cups: Deep Magenta (mixed with glaze), diluted Pink (magenta + white + glaze), and a milky White glaze. -
Apply the dark core:
Using a medium brush, paint the Deep Magenta along the sketch line in irregular blotches, leaving gaps. -
Encourage the flow:
Immediately mist the wet magenta paint with your water spray bottle. Gravity will cause drips; catch or guide them with a brush to create natural ‘liquid’ streaks. -
Add mid-tones:
Apply the diluted Pink glaze next to the wet magenta. Use a damp soft brush to blend the boundary where the two colors meet. -
Create the white rift:
Paint the milky White glaze along the outer edges of the pink. This acts as a transition zone between the bold color and the white wall. -
Feather out edges:
Work rapidly to feather the outermost edges of the paint into the dry white wall so there are no hard stop lines. -
Intensify contrast:
Once the first layer is tacky, go back in with undiluted Magenta to deepen the darkest pockets of the vein for drama.
Step 3: Gilding the Veins
-
Map the gold:
Identify the high-contrast areas where the deep magenta meets the white or pink. These sharp boundaries are perfect for gold placement. -
Apply adhesive size:
Paint the gold leaf adhesive size in thin, jagged lines following the flow of your colors. Apply it thicker in some spots and thinner in others. -
Wait for tack:
Wait about 15-30 minutes (check your bottle instructions) until the milky glue turns clear and feels sticky to the touch. -
Apply the leaf:
Press the gold leaf sheets onto the sticky areas. Don’t worry about being neat; the jagged, broken look adds to the natural stone aesthetic. -
Burnish and clean:
Use a dry, stiff brush to rub over the gold leaf. The excess flakes will fall away, leaving behind brilliant, sharp metallic veins. -
Final protection:
Once everything is fully cured (give it 24 hours), apply a clear water-based sealer over the gold areas to prevent tarnishing.
Level Up: Depth
Mix a tiny amount of pearlescent medium into your white transition glaze. It adds a shimmering ‘quartz’ quality that reflects light differently than the flat wall paint.
Step back and admire your bespoke luxury wall that brings high-end gallery vibes right into your home.


Whimsical Nursery Storytelling
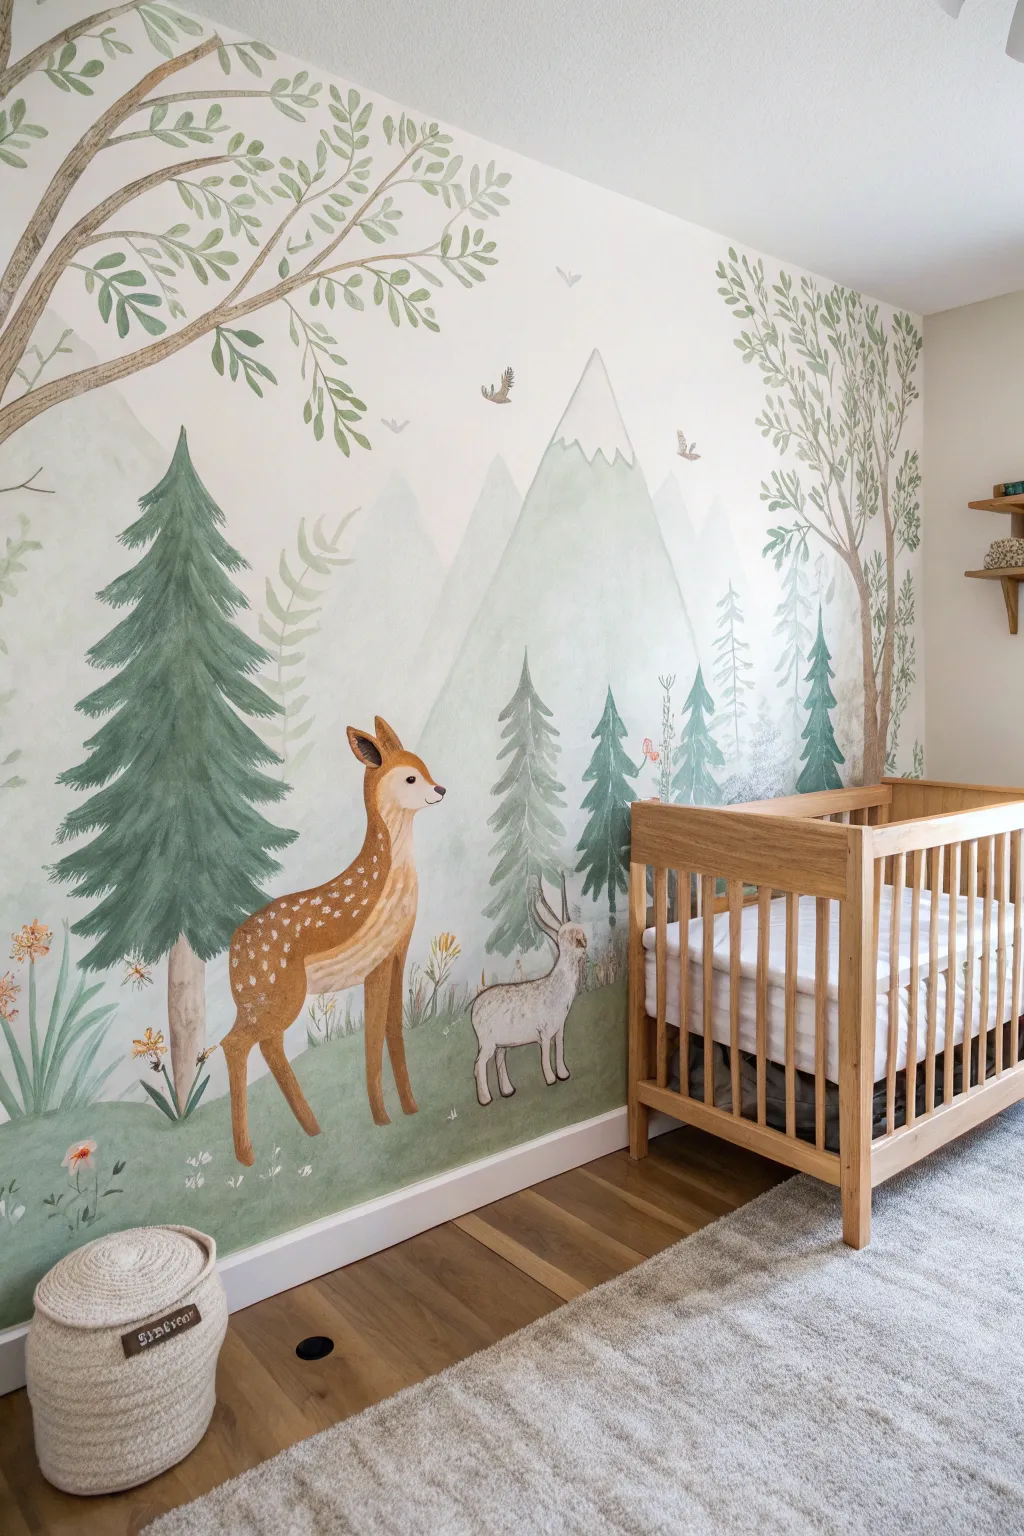
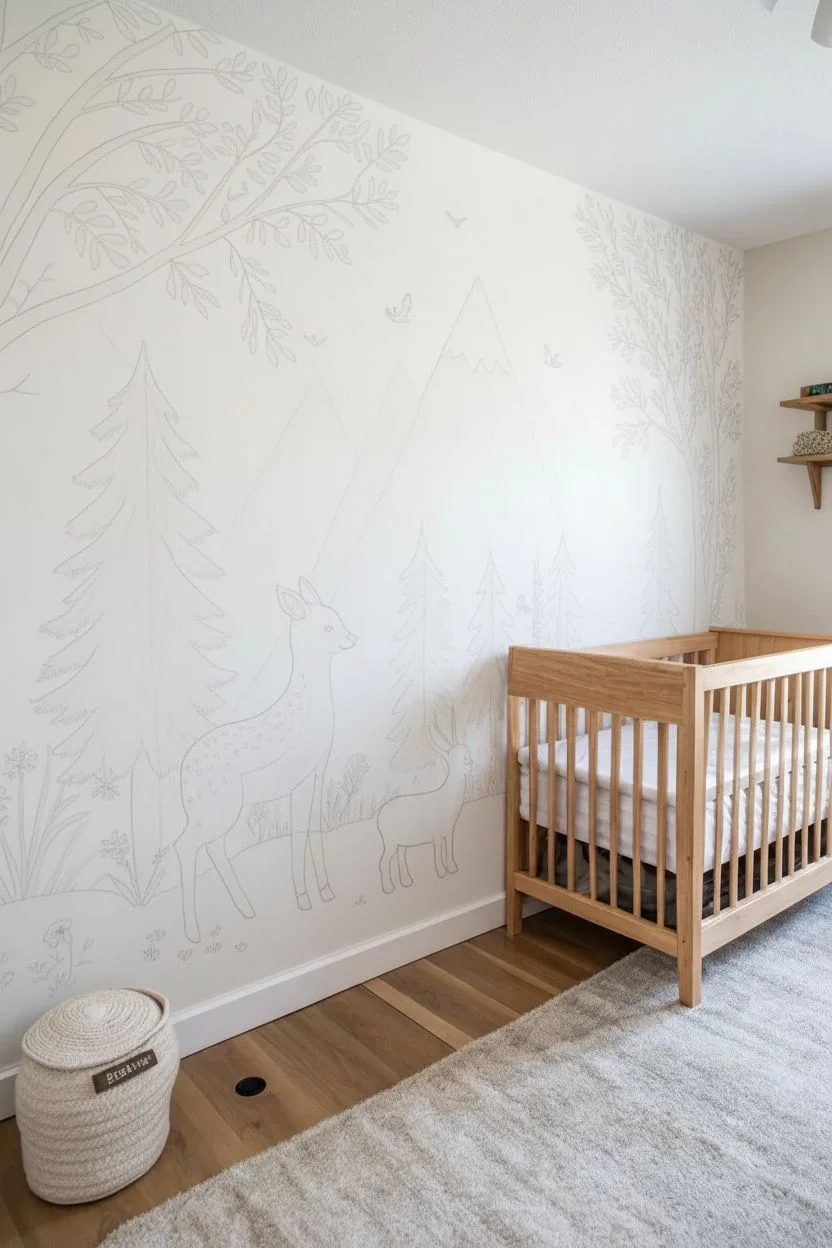
Transform a nursery into a serene storybook setting with this gentle, nature-inspired mural. Using glazing techniques to mimic the soft translucency of watercolor, you will create a calming landscape featuring rolling hills, misty mountains, and friendly forest creatures.
Step-by-Step
Materials
- Matte interior latex wall paint (white, sage green, forest green, warm brown, grey, soft tan)
- Clear acrylic glazing medium
- Pencil or white chalk
- Painter’s tape and drop cloths
- 2-inch angled sash brush
- Assorted round synthetic brushes (sizes 4, 8, and 12)
- Small fine liner brush
- Plastic cups or small trays for mixing
- Ladder or step stool
- Projector (optional)
Step 1: Planning and Sketching
-
Prepare the workspace:
Clear the area of furniture, wipe down the wall with a damp cloth to remove dust, and tape off baseboards and adjacent walls with painter’s tape to ensure crisp edges. -
Map out the landscape:
Using white chalk or a light pencil, loosely sketch the outlines of the mountains in the background and the rolling hills in the foreground. Keep the lines organic and flowing rather than rigid. -
Position the main elements:
Sketch the placement of the large framing trees in the corners and the vertical lines where your pine trees will stand. If you aren’t confident drawing freehand, I find using a small projector to cast the outline of the deer and rabbit onto the wall helps immensely.
Step 2: Painting the Landscape
-
Create the glaze mixture:
To achieve that soft ‘watercolor’ look, mix one part paint with three parts glazing medium (or water, though medium is more durable) in your cups. Do this for your mountain grey and hill greens. -
Paint the distant mountains:
Fill in the mountain shapes with the pale grey glaze mixture. Using the 2-inch brush, keep the edges slightly irregular to mimic hand-painted paper. -
Add snowy peaks:
While the grey is still slightly tacky, brush a translucent white wash over the tips of the mountains, letting it drag down unevenly to resemble snow caps. -
Fill the ground layer:
Apply the sage green glaze to the rolling hills at the bottom. Use long, horizontal sweeping strokes to cover the area, allowing some brush texture to remain visible for depth.
Watery Edge Effect
To heighten the watercolor illusion, keep a damp sea sponge nearby. Lightly dab the edges of the mountains or distant trees while the paint is wet to soften the lines and create a dreamy blur.
Step 3: Creating the Forest
-
Paint the tree trunks:
Using a smaller round brush and warm brown paint (less diluted now), fill in the twisting trunks and branches of the large deciduous trees framing the upper corners. -
Add deciduous leaves:
Dip a round brush into reduced-glaze sage paint. Press the belly of the brush against the wall in clusters around the branches to create leaf shapes, varying the direction of your wrist for a natural look. -
Construct the pine trees:
For the evergreens, start with a vertical line for the trunk. Using a forest green mix, start at the top and brush downward and outward in swooping motions, getting wider as you move down the tree. -
Layer the pines:
Once the first layer of pine needles dries, add a second layer with a slightly darker green to creating shadowing and volume within the branches. -
Paint the tree details:
Use a light hand to add lighter green highlights to the tips of the pine branches where the imaginative light source would hit them.
Level Up: Seasonal Swap
Make the mural interactive by painting tiny, hidden magnets into the branches before the topcoat. You can then attach lightweight paper flowers in spring or paper snowflakes in winter!
Step 4: Animals and Details
-
Block in the animals:
Fill in the outline of the deer with a soft tan and the rabbit with a light grey. Apply the paint smoothly for an opaque base. -
Add fur texture:
Using your smallest brush or a liner brush, mix a slightly darker shade of the base colors and paint tiny, short strokes along the neck and back to simulate fur. -
Detail the faces:
Carefully paint the eyes, noses, and inner ears using a fine liner brush and dark brown or black. A tiny dot of white in the eye brings the character to life. -
Add the fawn’s spots:
Dip the back end of a small brush handle into white paint and gently dot the back of the deer to create the classic fawn pattern. -
Plant the wildflowers:
Scatter small clumps of grass and simplified flower shapes (tiny orange or yellow dots) near the animal’s feet and along the bottom hill line to ground the scene. -
Final whimsical touches:
Paint small, V-shaped silhouettes of birds flying in the distance and erase any remaining visible chalk lines once the paint is fully cured.
Enjoy the peaceful atmosphere your new masterpiece brings to the room.
Stairwell Statement Pieces
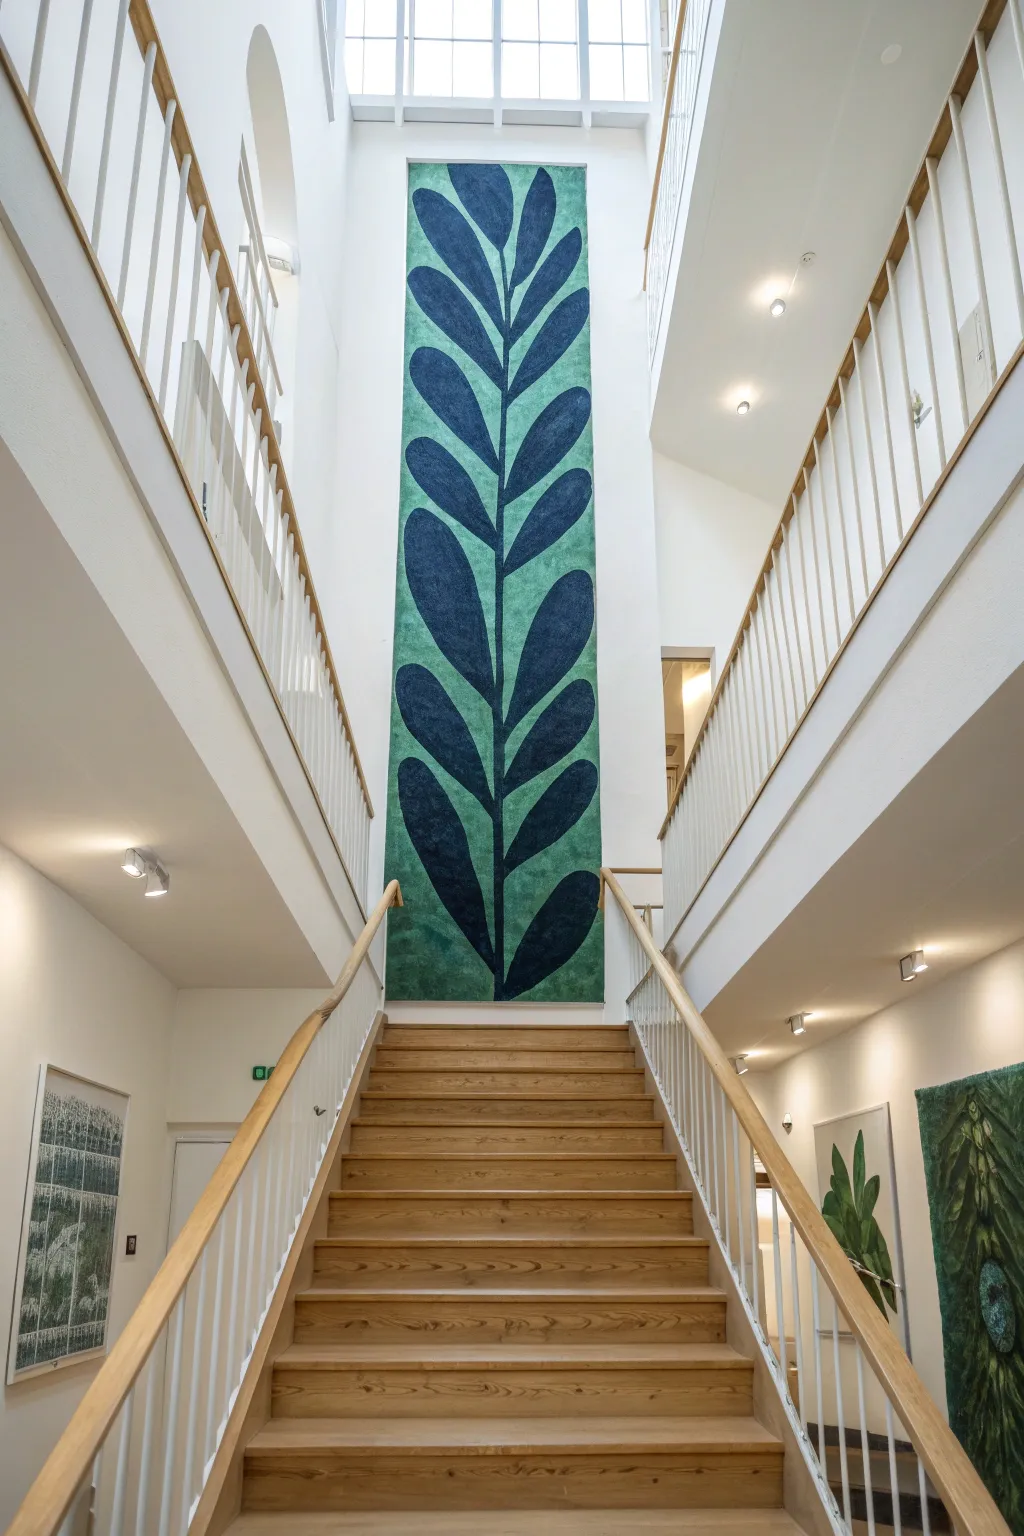
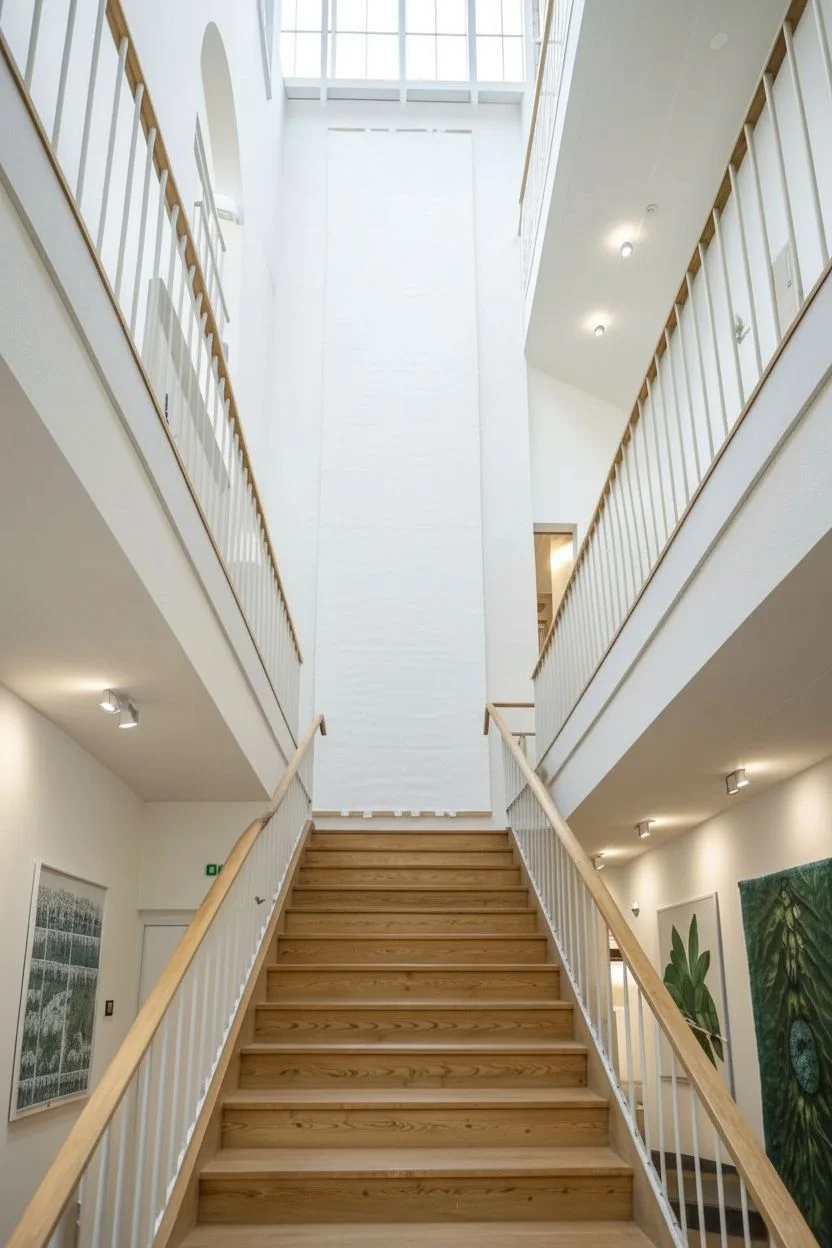
Transform a tall stairwell void into a breathtaking focal point with this large-scale, faux-tapestry mural. By painting on a long canvas runner instead of directly on the wall, you can create museum-worthy art safely on the floor before hanging it for maximum impact.
Step-by-Step Tutorial
Materials
- Heavy-duty cotton canvas roll (width of desired mural)
- White acrylic gesso primer
- Acrylic paints (Teal, Emerald Green, Midnight Blue)
- Large foam roller and tray
- Natural sea sponge
- Cardboard or cardstock
- Chalk snap line
- 2-inch angled sash brush
- Wooden batons (2) equal to canvas width
- Heavy-duty staple gun
- Wall mounting hardware
Step 1: Preparing the Canvas
-
Measure the void:
Carefully measure the height and width of your stairwell wall to determine the scale. Subtract about 6 inches from the width for a breathing room border. -
Cut materials:
Cut your heavy-duty canvas roll to the desired length, adding an extra 6 inches to the top and bottom for wrapping around the mounting batons later. -
Secure the workspace:
Clear a large floor area and lay down a plastic drop cloth. Roll out your canvas flat on top, taping the corners down with painter’s tape to prevent shifting. -
Prime the surface:
Apply a generous coat of white gesso over the entire canvas using a large foam roller. This stiffens the fabric and prevents your expensive paints from soaking right through. -
Sand lightly:
Once the gesso is fully dry, run a fine-grit sandpaper block lightly over the surface to knock down any rough fibers for a smoother painting experience.
Symmetry Hack
To ensure your vine looks perfectly balanced, label one side of your cardboard template ‘A’ and the other ‘B’. Always keep ‘A’ facing up for left leaves and ‘B’ facing up for right leaves.
Step 2: Creating the Background
-
Mix the base color:
Combine your teal and emerald green acrylics to create a rich, mid-tone viridian shade. You want enough paint to cover the background solid. -
Apply base coat:
Roll the base color over the entire canvas. Don’t worry about perfect uniformity; subtle streaks add to the organic, tapestry-like feel. -
Add texture:
While the base is dry to the touch but not fully cured, dampen a natural sea sponge with a slightly lighter teal mixture. -
Sponge technique:
Lightly dab the sponge vertically across the canvas to create a mottled, fibrous texture that mimics velvet or aged felt.
Clean Edges
If the canvas weave makes painting sharp lines difficult, don’t thin your paint with water. Use heavy body acrylics and a stiff brush to push the pigment into the weave without bleeding.
Step 3: Designing the Botanical
-
Establish the center:
Find the exact horizontal center of your canvas at the top and bottom. Use a chalk snap line to create a faint vertical guide running the entire length. -
Create a leaf template:
Sketch a single, large elongated oval leaf shape on a piece of rigid cardboard and cut it out. This ensures every leaf on your vine is uniform. -
Mark spacing:
Starting from the bottom, use a ruler to mark light pencil ticks every 12-18 inches up the center line to indicate where each pair of leaves will stem from. -
Trace the pattern:
Align the base of your cardboard template with your pencil marks. Angle the leaf upwards at about 45 degrees and trace it lightly. Flip the template horizontally for the mirrored leaf on the other side. -
Draw the stem:
Connect the leaves with a gradually tapering central stem running up your chalk line, starting thicker at the base and thinning out at the top tip.
Step 4: Painting and Mounting
-
Outline the motif:
Using your Midnight Blue paint and a steady hand, outline the pencil sketches of the leaves and stem with a liner brush. -
Fill the shapes:
Switch to the 2-inch angled sash brush to fill in the dark leaves. I like to work in long, smooth strokes following the curve of the leaf to simulate leaf veins. -
Double coat:
The dark blue needs to be opaque and bold against the green. Apply a second coat to the leaves once the first is dry to eliminate any transparency. -
Prepare mounting batons:
Cut two wooden batons to the exact width of your canvas. Apply strong wood glue to one face of each baton. -
Attach the artwork:
Place the batons at the very top and bottom edges on the backside of the canvas. Wrap the extra fabric around the wood and secure firmly with a staple gun. -
Install:
Screw the top baton directly into the wall studs or use heavy-duty cleat hangers. The weight of the bottom baton will pull the canvas taut, keeping it perfectly flat against the wall.
Step back and enjoy the drama of your massive, custom-made botanical art piece filling the space.
Faux Architectural Arches
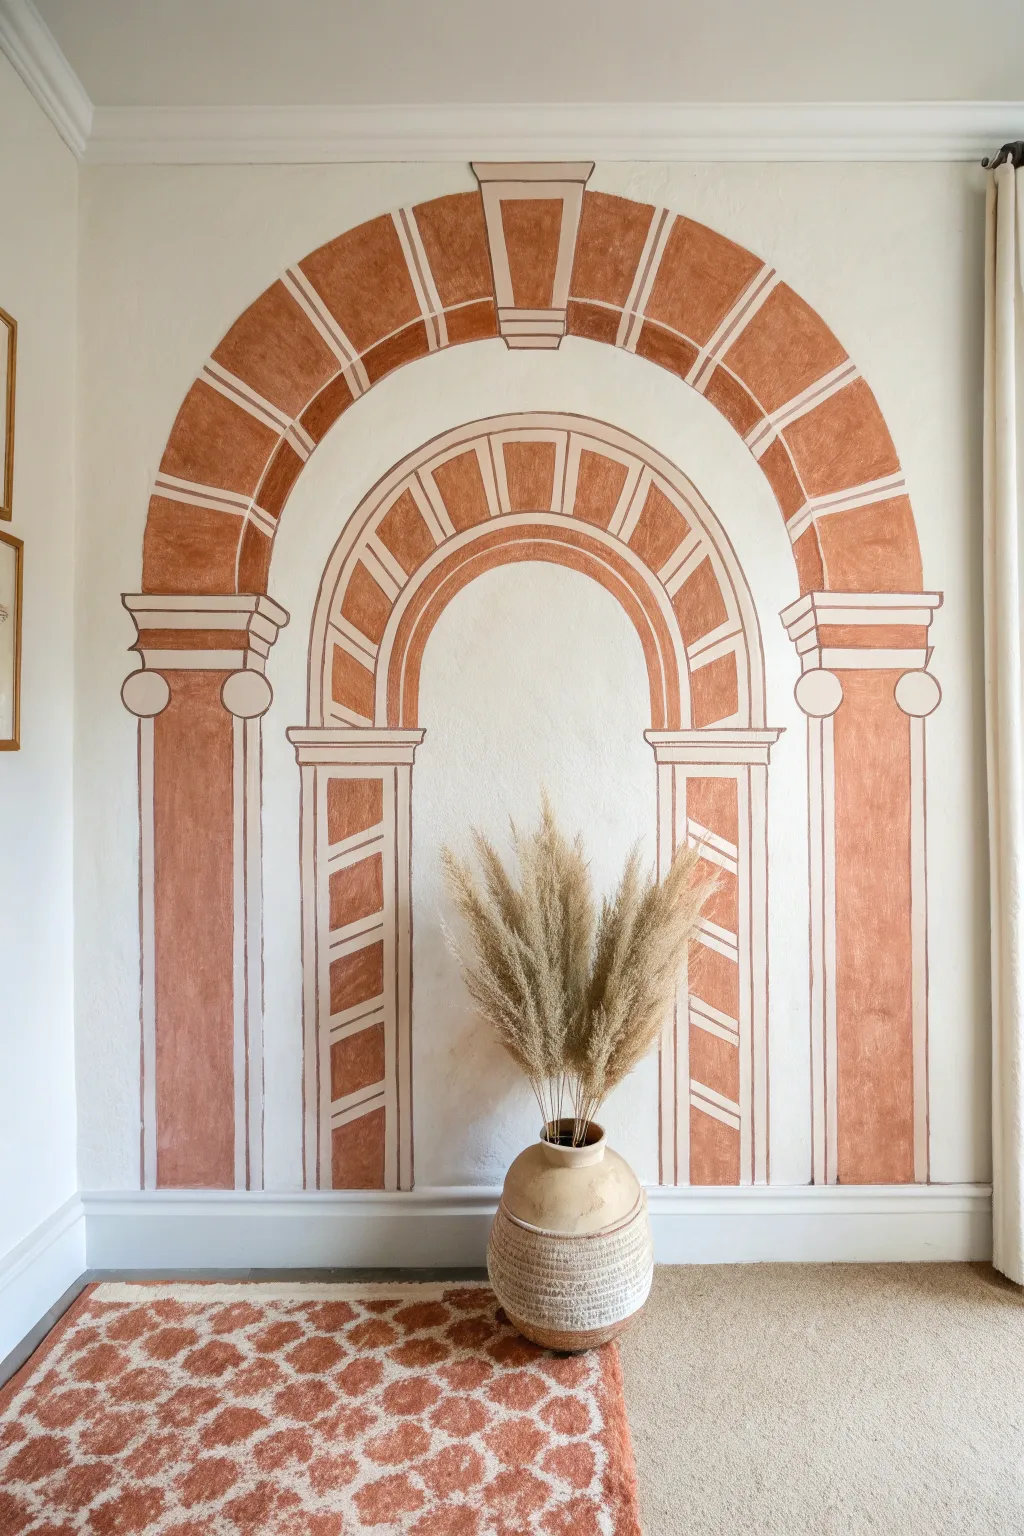
Transform a plain wall into a Mediterranean escape with this faux architectural mural. Using warm earth tones and a clever double-arch design, you’ll create a stunning optical illusion that adds depth and character to any room.
How-To Guide
Materials
- Interior latex paint (terracotta/rust color)
- Acrylic paint (dark brown or burnt sienna)
- Pencil and eraser
- String and thumb tack (or large compass)
- 4-foot level
- Tape measure
- 2-inch angled sash brush
- Small round artist brush (size 4 or 6)
- Fine liner brush
- Painter’s tape (optional)
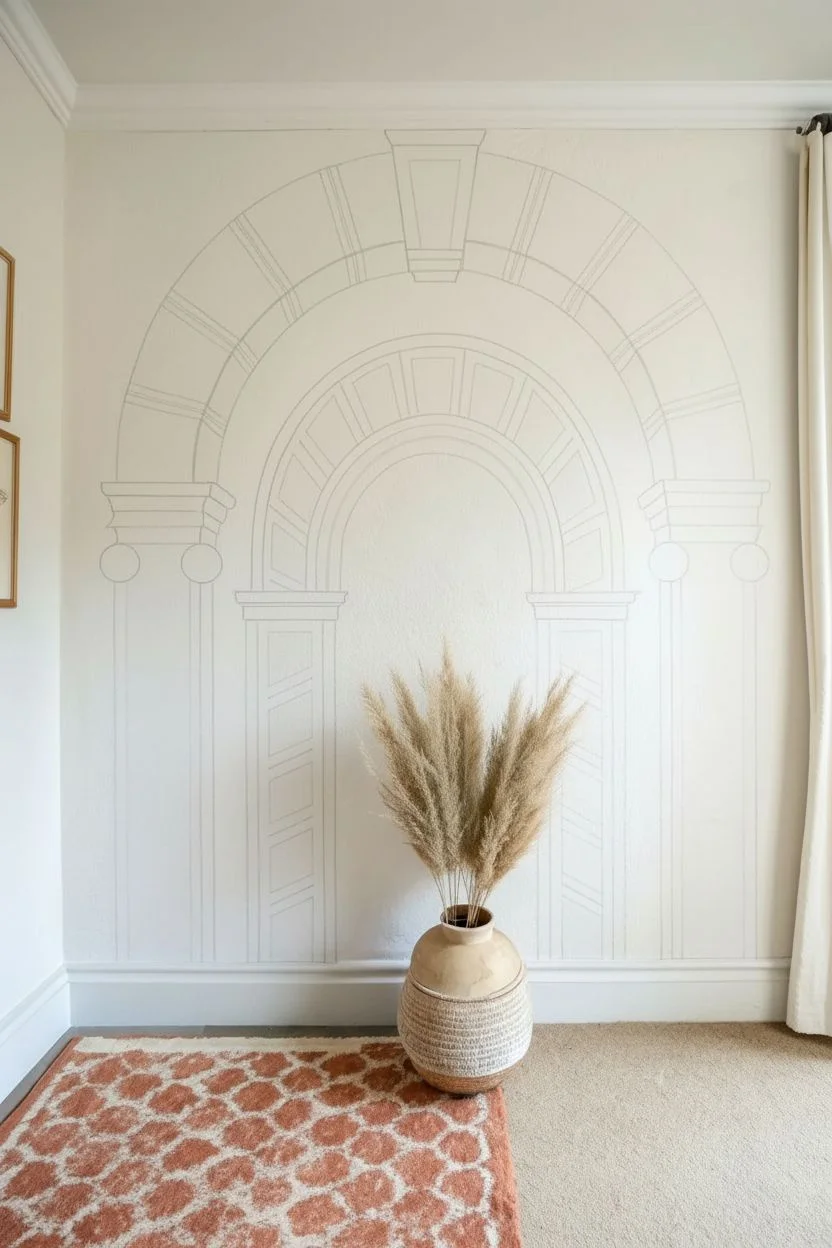
Step 1: Planning and Sketching
-
Find your center:
Measure the width of your wall to find the center point. Mark this spot at the height where you want the peak of your outer arch to be. -
Draw the outer arch curve:
Tie a string to a pencil. Pin the other end of the string to the wall directly below your center mark (about half the desired width of the arch down). Pull the string taut and draw your upper semi-circle. -
Define the outer arch thickness:
Shorten your string by about 6-8 inches (depending on how thick you want the stonework) and draw a second, smaller semi-circle from the same anchor point to create the band for the outer arch. -
Draw the outer columns:
Use a long level to draw straight vertical lines down from the ends of your arch curves to the floor. These form the outer pilasters. -
Create the inner arch:
Repeat the compass process to create a smaller, nested archway inside the first one. Leave a generous gap between the two structures to simulate depth. -
Sketch the capitals:
At the point where the arch curves meet the straight vertical lines, sketch rectangular ‘capitals’ (the decorative tops of columns). These should flare out slightly. -
Mark the voussoirs:
Along the curve of both arches, use a ruler to lightly mark divisions for the stones. I like to start with the keystone (the center wedge) and work my way down symmetrically. -
Detail the inner columns:
Inside the inner set of columns, lightly draw diagonal lines to create a spiraled or candy-cane effect.
Wobbly Lines?
Don’t stress over perfect straightness. A little hand-drawn irregularity actually enhances the fresco aesthetic. If a line is too crooked, simply widen the outline slightly to correct it.
Step 2: Painting the Structure
-
Paint the outer stones:
Dip your 2-inch angled brush into the terracotta paint. Fill in the stone blocks on the outer arch curve, leaving a small gap of unpainted wall between each block to represent mortar. -
Texture the paint:
Don’t aim for perfect opacity. Apply the paint in a slightly cross-hatch or scrubbing motion to give it a weathered, old-world sandstone texture. -
Fill the outer columns:
Paint the vertical shafts of the outer columns solid terracotta, maintaining that textured, hand-painted look. -
Paint the inner arch:
Fill in the blocks of the inner arch just like you did the outer one, being careful to preserve the ‘mortar’ lines. -
Paint the spiral details:
Switch to a smaller round brush. Carefully paint the diagonal stripes on the inner columns, alternating between painted and unpainted sections. -
Add the capitals:
Fill in the sketched capital shapes. These serve as the connecting joints between your vertical columns and curved arches.
Level Up: Aged Stone
For more realism, dilute a little white paint with water and dry-brush it randomly over the dried terracotta areas. This creates a chalky, sun-bleached limestone effect.
Step 3: Outlining and Refining
-
Mix your outline color:
Mix a small amount of dark brown acrylic into your terracotta paint to create a deep rust shade for contrast. -
Outline the voussoirs:
Using a fine liner brush and the darker mix, outline each stone block in the arches. This mimics the shadow and definition of real masonry. -
Define the moldings:
Paint thin, crisp lines horizontally across the top and bottom of the column capitals to define the molding details. -
Outline the columns:
Run a thin line down the edges of all vertical columns to make them pop against the cream background. -
Add final details:
Add small circles or distinct geometric shapes within the capitals if your sketch included them, using the liner brush. -
Clean up:
Once dry, gently erase any visible pencil marks that weren’t covered by paint or outlines.
Step back and admire how this simple paint technique adds grandeur and architectural interest to your space
Soft Ombre Gradients
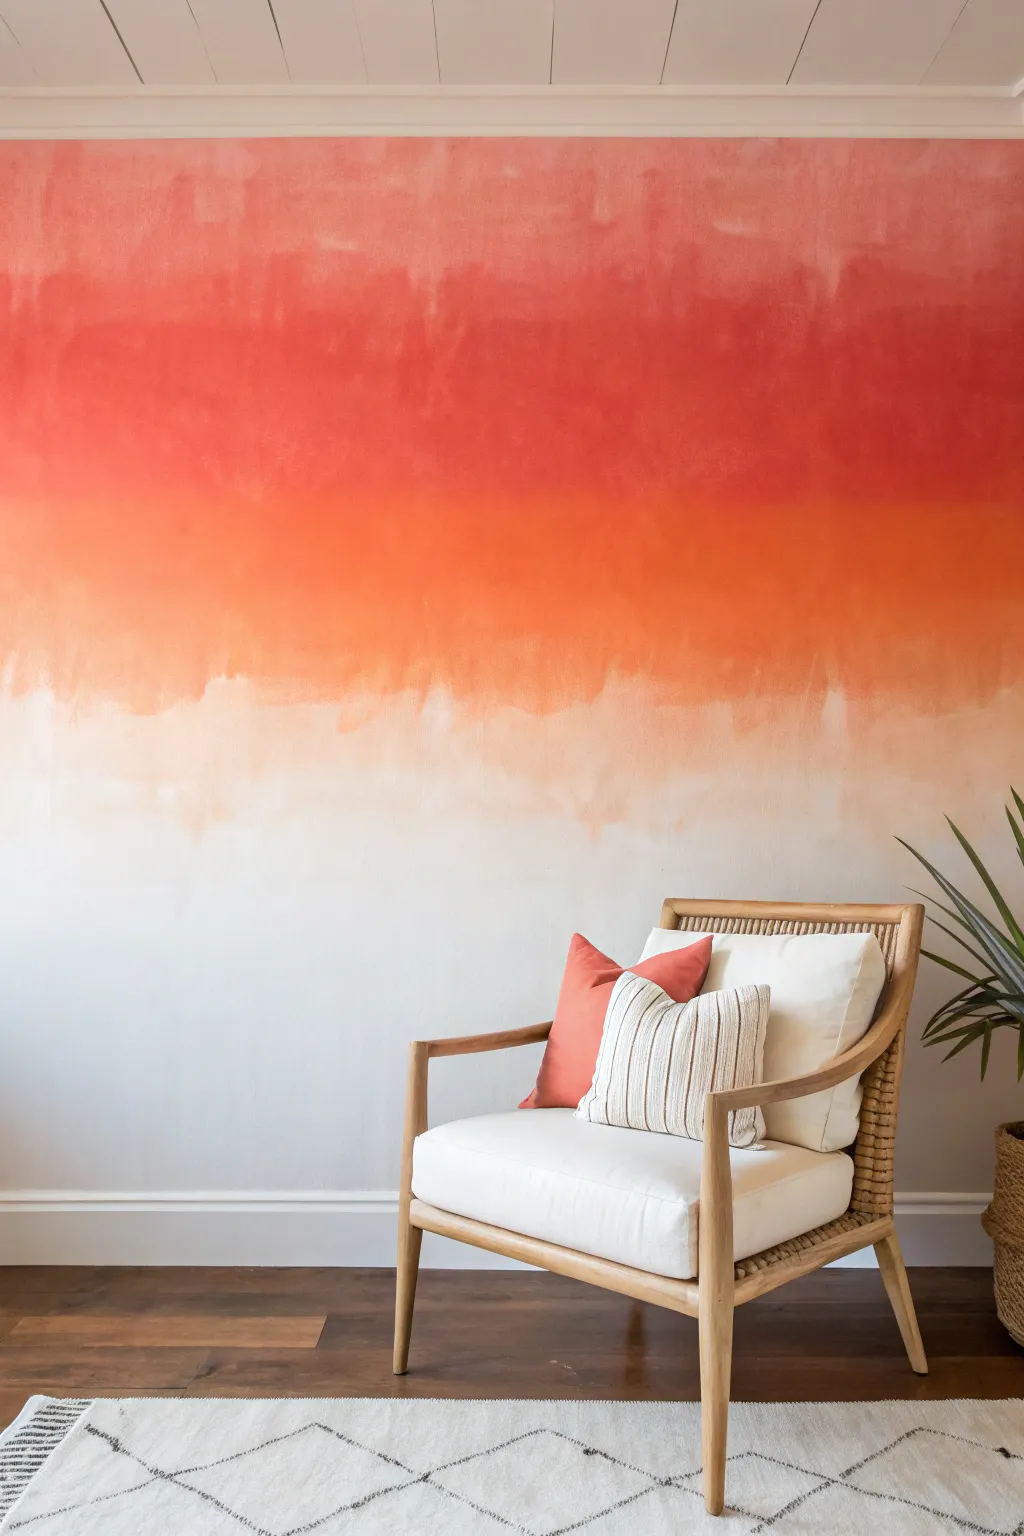
Bring the warmth of a summer evening indoors with this painterly, three-tone gradient mural. Unlike perfectly sprayed fades, this technique uses visible brushstrokes and layering to create an organic, watercolor-inspired wash that adds texture and depth to your space.
Step-by-Step
Materials
- Interior latex paint (White/Cream base)
- Interior latex paint (Deep Coral/Salmon)
- Interior latex paint (Bright Tangerine)
- Clear acrylic glazing liquid
- Painter’s tape
- Canvas drop cloths
- 4-inch wide synthetic paint brushes (3 total)
- Paint roller and tray (for base coat)
- Plastic paint cups or small buckets
- Spray bottle filled with water
- Lint-free rags
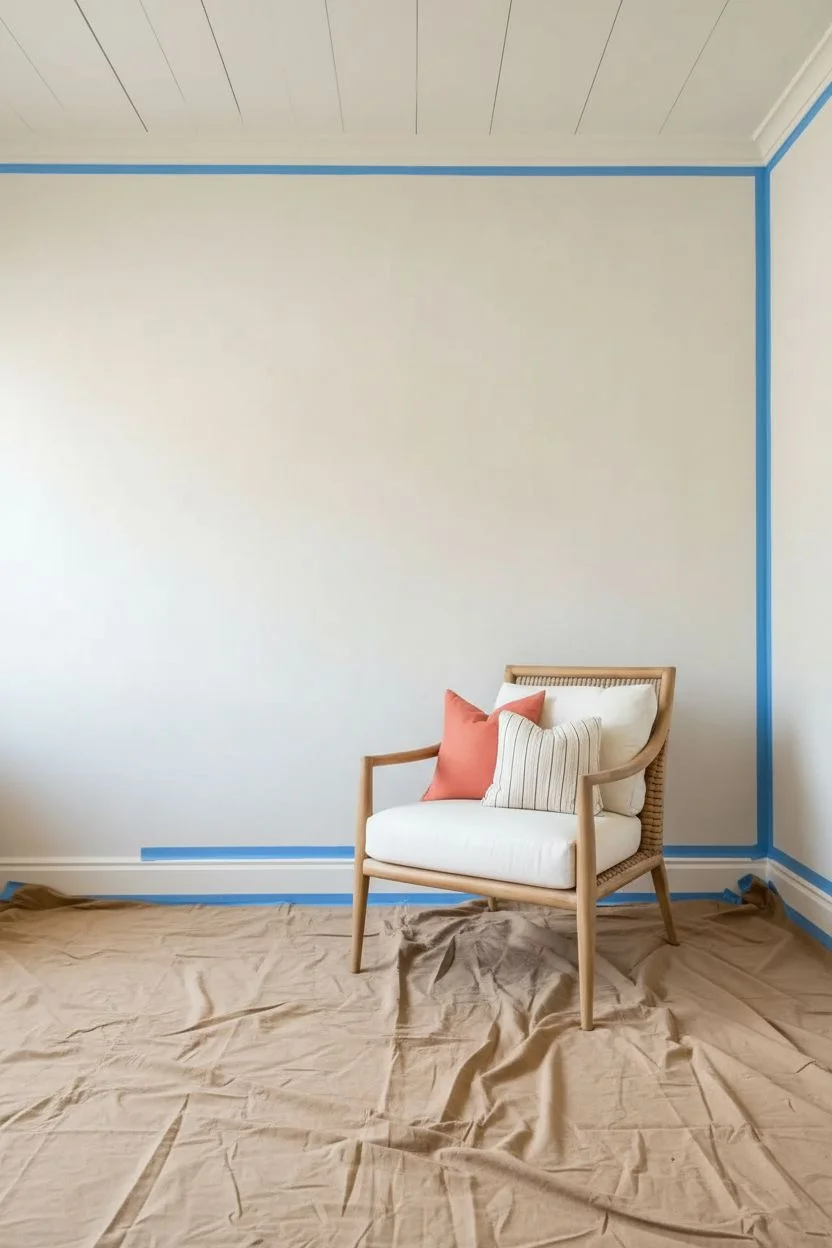
Step 1: Preparation & Base
-
Clear the area:
Move furniture to the center of the room and completely cover the floor with canvas drop cloths, ensuring they are flush against the baseboards. -
Tape the edges:
Apply painter’s tape along the ceiling line, baseboards, and any adjacent walls or trim you want to protect. -
Establishing the canvas:
If your wall isn’t already white or cream, roll on two coats of your lightest base color (the bottom color of the gradient) and allow it to dry completely. A fresh matte or eggshell base works best for gripping the colored layers.
Fixing Hard Lines
If a paint line dries hard before you can blend it, don’t panic. Dip your brush in a tiny amount of glaze (no pigment) and scrub vigorously over the dried line to re-wet and soften it.
Step 2: Mixing & Application
-
Prepare the glaze mix:
In two separate buckets, mix your Coral and Tangerine paints with the clear glazing liquid according to the manufacturer’s ratio (usually 4 parts paint to 1 part glaze). This slows drying time and adds translucency. -
Start at the top:
Dip a wide 4-inch brush into the Deep Coral mixture. Paint the top third of the wall using long, horizontal strokes. -
Create the upper edge:
Ensure the coverage near the ceiling is solid and opaque, but as you work downward, lighten your hand pressure to leave the bottom edge of this red section ragged and uneven. -
Apply the middle tone:
Using a fresh brush, dip into the Tangerine mixture. Apply this color to the middle section of the wall, starting a few inches below the solid Coral section. -
Rough in the orange:
Fill the middle band with the orange paint, again using wide horizontal strokes, leaving both the top and bottom edges of this band feathery and uneven.
Step 3: Blending the Gradient
-
The upper transition:
While the paint is still tacky, use the Coral brush (without adding new paint) to drag the red color down into the Orange section. -
Merging colors:
Take the Orange brush and brush upward into the Coral section. I like to use a rapid cross-hatch motion here to physically mix the two colors on the wall. -
Mist for workability:
If the paint feels too sticky or dry to blend, lightly mist the wall with your water spray bottle to reactivate the latex and get the colors moving again. -
The lower fade:
For the transition from Orange to White, use a clean, dry brush. Start in the white area and brush upward into the damp orange paint. -
Dry brushing effect:
Drag the paint downward into the white space using light, sweeping strokes. The goal is a scratchy, irregular edge rather than a perfect line. -
Soften harsh lines:
Step back to view the whole wall. If you see stripes that look too distinct, mist lightly and use a clean, slightly damp rag to dab and blot the transition line. -
Final drying:
Remove the painter’s tape carefully while the paint is still slightly damp to prevent peeling, then let the mural cure for at least 24 hours.
Textured Twist
For a cloudier look, swap the brush for a large sea sponge during the blending phase. Dabbing the transition zones creates a soft, mottled effect that hides brush marks.
Step back and bask in the warm, artistic glow of your new focal point.
DIY Terrazzo Patterns

Transform a plain white wall into a trendy, high-end feature with this playful faux terrazzo painting technique. Using a palette of warm earth tones, you will create an organic, speckled pattern that mimics the look of real composite stone without the heavy lifting.
Step-by-Step
Materials
- Latex or acrylic craft paints (Terracotta, Mustard, Taupe, Slate Grey, Charcoal)
- Small angled sash brush (1 inch)
- Round artist brushes (sizes 6, 8, and 10)
- Painter’s tape
- Drop cloth
- Plastic palette or paper plates
- Damp rag
- Step ladder
Step 1: Preparation
-
Protect the area:
Clear the space in front of your wall and lay down a drop cloth to catch any accidental drips or splatters. -
Clean the surface:
Wipe the wall down with a damp cloth and mild soap to remove kitchen grease or dust, ensuring the paint adheres perfectly. -
Tape edges:
Apply painter’s tape along the baseboards, ceiling line, and sides of any cabinetry to ensure crisp, clean boundaries. -
Prepare the palette:
Pour small amounts of your chosen paint colors onto a palette or separate paper plates so they are ready to use.
Shape Troubleshooting
If your shapes are looking too similar or uniform, try rotating your wrist as you paint to force more irregular, organic edges.
Step 2: Painting Large Shapes
-
Start with the hero color:
Dip your 1-inch angled brush into your boldest color, such as terracotta, and paint random, irregular shapes across the wall. -
Shape the stones:
Avoid perfect circles or squares; instead, create organic ‘shards’ with soft, rounded corners to mimic broken stone. -
Space them out:
Leave plenty of white space between these initial shapes, as you need room for four or five other colors. -
Add the second color:
Rinse your brush thoroughly and switch to the mustard yellow, painting similar large shapes in the empty zones. -
Check the balance:
I like to step back every few minutes to ensure the colors are distributed evenly and no two similar shapes are right next to each other.
Step 3: Adding Detail & Depth
-
Introduce neutrals:
Switch to a size 10 round artist brush and use the taupe or beige paint to add medium-sized blobs into the gaps. -
Add grey accents:
Use the slate grey paint to create smaller, more angular fragments, varying the direction they ‘point’ for a random feel. -
Create contrast:
Dip a smaller size 6 or 8 brush into the charcoal or black paint to add tiny, high-contrast specks throughout the design. -
Vary size and placement:
Nestle these small dark dots near the larger colored shapes, but try not to let them touch. -
Fill the voids:
Scan the wall for any large empty white patches and fill them with a small pebble shape or a tiny dot.
Level Up: Metallic Pop
For a glamorous twist, swap out one of the accent colors for a metallic gold or copper paint to make your wall shimmer in the light.
Step 4: Finishing Touches
-
Refine the edges:
Look closely at your shapes and use a small brush to smooth out any rough unevenness if you want a cleaner look. -
Second coat if needed:
If any colors look streaky or transparent, dab a little extra paint over them once the first layer is touch-dry. -
Remove tape:
Peel off the painter’s tape slowly at a 45-degree angle while the paint is still slightly tacky to get the sharpest line. -
Final cure:
Allow the entire mural to dry completely according to the paint manufacturer’s instructions before moving furniture back.
Enjoy your fresh, artistic kitchen wall that brings a modern vibe to the space.
Textured Limewash Effect
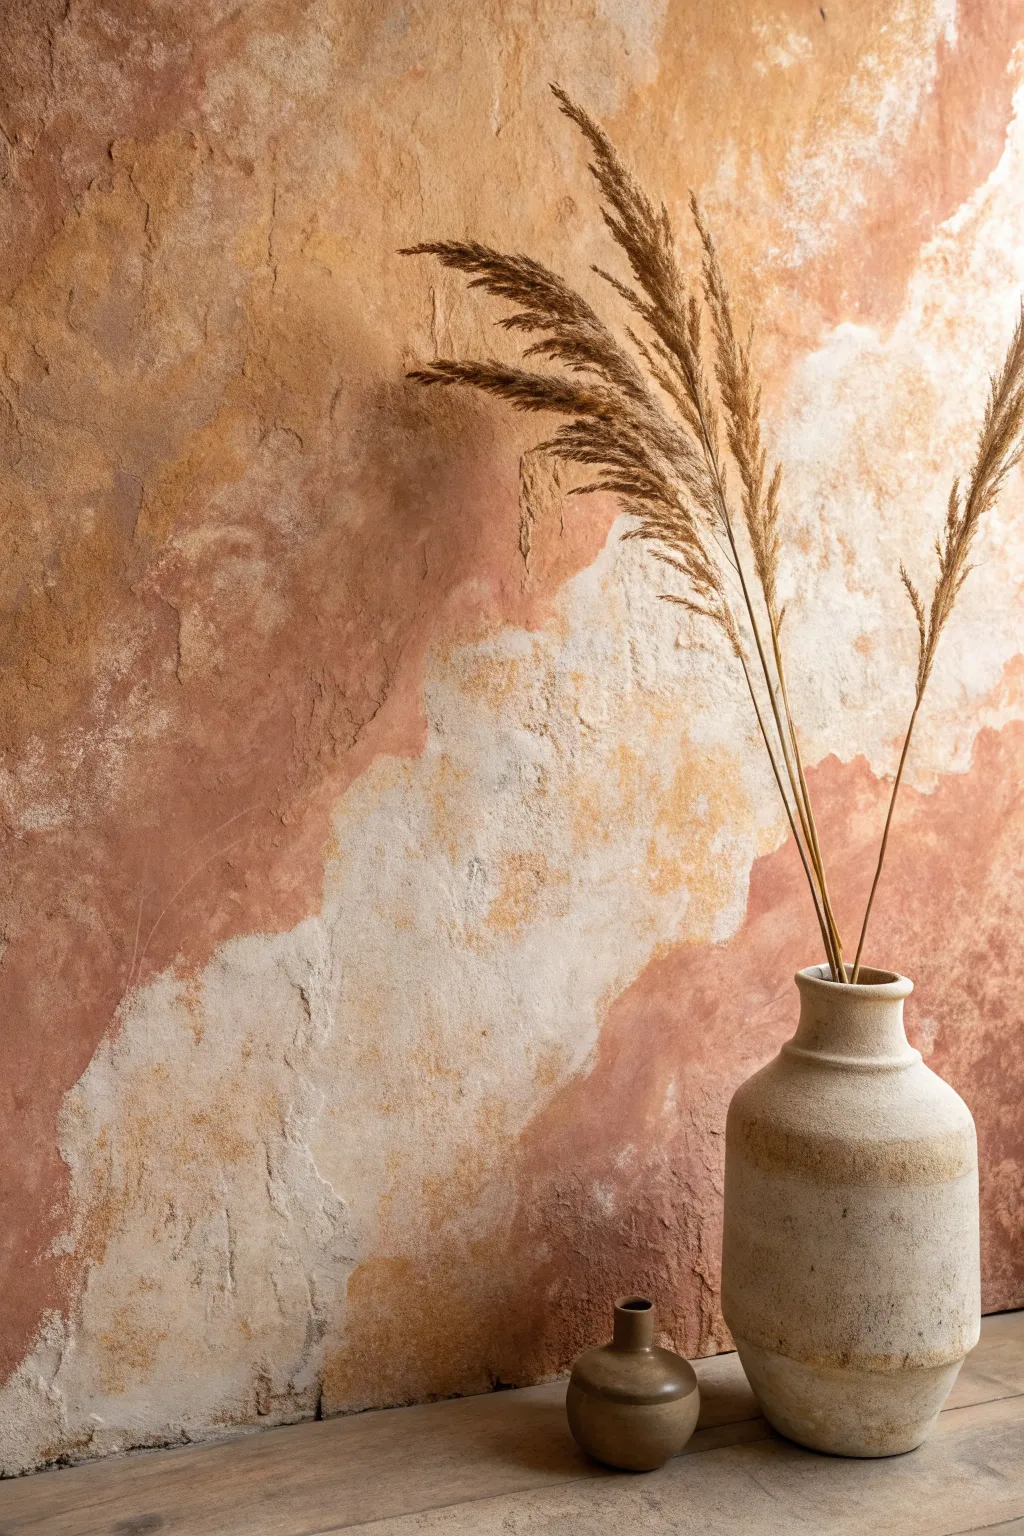
Transform a plain flat wall into a piece of old-world art with this textured faux-finish technique. By layering joint compound and diluted paints, you will recreate the warmth and depth of aged Italian terracotta plaster.
Step-by-Step Tutorial
Materials
- Pre-mixed joint compound
- 6-inch drywall knife
- Matte latex paint (Cream/Off-white base)
- Matte latex paint (Terracotta/Burnt Orange)
- Matte latex paint (Ochre or Golden Brown)
- Large masonry brush or block brush
- Clean lint-free rags
- Mixing buckets
- Blue painter’s tape
- Drop cloths
- Spray bottle with water
Step 1: Creating the Texture Base
-
Prepare the area:
Clear the room and lay down drop cloths to protect your flooring from plaster drips. Tape off baseboards, ceiling lines, and adjacent walls carefully. -
Apply joint compound:
Scoop a generous amount of joint compound onto your drywall knife. Apply it to the wall in random, crisscross pattern strokes rather than smooth lines. -
Create organic imperfections:
Vary the pressure of your knife. Leave some areas thicker and scrape others down to the drywall to create a ‘skip-trowel’ effect that mimics aged stone. -
Knock down ridges:
Once a section is covered, lightly skim over any sharp peaks or high ridges with a clean knife to flatten them slightly without losing the texture. -
Let it cure:
Allow the joint compound to dry completely. This usually takes overnight; the plaster must be entirely white with no grey wet spots before painting. -
Soft sanding:
Run a sanding block lightly over the wall to remove any loose crumbles or dangerously sharp points, then wipe away the dust with a damp cloth.
Too Streaky?
If your brush strokes remain too visible, switch to a natural sea sponge. Dampen it and dab over the wet wash to break up linear marks.
Step 2: Mixing and Applying the Wash
-
Apply base coat:
Roll on a coat of your creamy off-white paint over the entire textured wall. This seals the compound and provides a uniform background color. -
Mix the colored washes:
In separate buckets, dilute your terracotta and ochre paints with water. I like to aim for a 1:1 ratio of paint to water, creating a fluid consistency similar to heavy cream. -
Wet the surface:
Before applying color, mist a small 3×3 foot section of the wall with your spray bottle. This helps the paint glide and settle into the texture. -
Apply the first color:
Dip your masonry brush into the terracotta wash. Apply it in diagonal, organic cloud shapes, focusing on the center of the wall area. -
Feather the edges:
While the paint is still wet, use a damp rag to blot the edges of your colored patch, fading it out so there are no hard lines. -
Add secondary tones:
Introduce the ochre wash in areas adjacent to the terracotta. Allow them to overlap slightly, blending them directly on the wall with your brush.
Step 3: blending and Highlighting
-
Create negative space:
Leave large patches of the wall untouched by the darker colors, allowing the creamy base coat to serve as the ‘plaster’ showing through. -
Soften with water:
If a color looks too heavy, spray it immediately with water and wipe firmly with a rag to lift the pigment, revealing the texture underneath. -
Step back and assess:
Frequently step back 10 feet to view the composition. You want a balanced flow of color that feels random, not a checkerboard pattern. -
Dry brush highlights:
Once the washes are dry to the touch, dip a dry brush lightly into undiluted off-white paint. Offload most of it onto a paper towel. -
Accentuate texture:
Lightly drag the dry brush over the darkest terracotta areas. The white paint will catch only on the raised texture bumps, simulating the look of salt or lime deposits.
Add Ancient Grime
Mix a tiny amount of raw umber acrylic paint with water (1:10 ratio) and glaze it into the deepest crevices with a small artist brush for extra depth.
Enjoy the gentle, warm atmosphere your new Mediterranean-style wall brings to the room
Floor-to-Ceiling Immersion
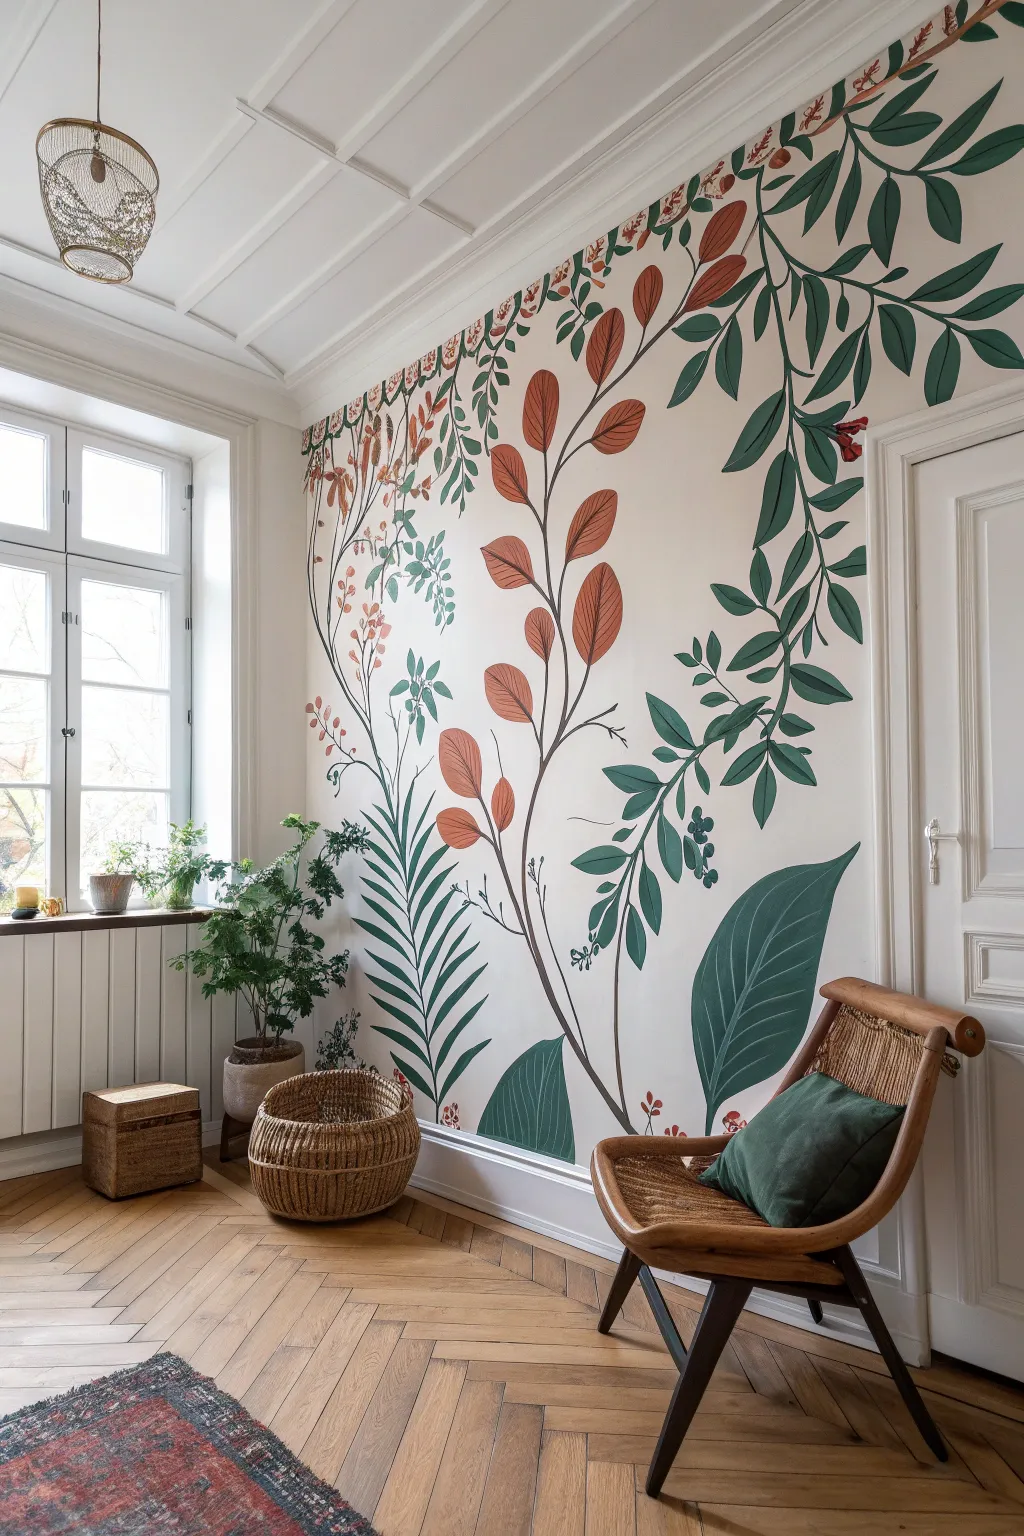
Transform a plain room into an illustrative garden sanctuary with this floor-to-ceiling botanical mural project. Using earthy tones of rust, forest green, and sage, you will create a sweeping organic design that frames the room with nature-inspired elegance.
Step-by-Step
Materials
- Interior latex wall paint (Eggshell finish: Cream base, Forest Green, Sage, Rust, Dark Brown)
- Painter’s tape
- Drop cloths
- Vine charcoal or light gray chalk
- Angled sash brush (2-inch)
- Set of synthetic acrylic brushes (sizes 4, 8, and 12 round; 1-inch flat)
- Stepladder
- Damp clean rags
- Projector (optional)
Step 1: Preparation and Base
-
Prepare the space:
Clear the area of furniture and lay down drop cloths to protect your flooring. Apply painter’s tape to the baseboards, ceiling line (unless painting the border there), and adjacent walls to ensure crisp boundaries. -
Clean the surface:
Wipe down the wall with a mild TSP substitute or warm soapy water to remove dust and oils. This ensures the paint adheres properly and lasts for years. -
Apply the background color:
Roll on two coats of your warm cream base color using a standard roller. Allow the wall to dry completely generally overnight, before attempting to sketch your design.
Step 2: Sketching the Design
-
Map out the composition:
If you aren’t confident freehanding, use a projector to cast a botanical image onto the wall. Alternatively, draw a light grid using a level and chalk to help scale your reference image up to the wall size. -
Sketch the main stems:
Using vine charcoal, lightly draw the sweeping curves of the main stems first. Start from the bottom corners and curve them upwards and inwards to create the framing effect seen in the project image. -
Add leaf outlines:
Sketch the large, broad leaves near the bottom, then work your way up with the smaller, more delicate sprigs. I find vine charcoal is forgiving here because it wipes away easily with a dry cloth if you need to adjust a shape. -
Draft the top border:
Use a measuring tape to lightly mark a horizontal guide near the ceiling. Sketch the repeating floral vine pattern (the frieze) along this guide to crown the mural.
Wobbly Edges?
Don’t stress if your lines aren’t perfect. Let the mural paint dry fully, then use a small angled shader brush and your original cream wall color to ‘cut in’ and sharpen any uneven outlines.
Step 3: Painting the Elements
-
Paint main branches:
Pour a small amount of dark brown paint into a cup. Use a #8 round brush to paint the thin, winding stems over your charcoal lines. Keep your wrist loose to maintain fluid, organic curves. -
Block in green foliage:
Switch to the Forest Green paint. Use a flat 1-inch brush for the centers of the large bottom leaves and an angled sash brush to cut in the sharp points and edges carefully. -
Add contrasting rust tones:
Using the Rust/Terracotta paint, fill in the vertical central stems and the rounded leaves that climb up the middle of the wall. This warm color contrasts beautifully with the cool greens. -
Fill in secondary greens:
Apply the Sage green to the smaller, cascading leaves near the top and outer edges. The variation in green tones adds visual depth without needing complex shading. -
Detail the ceiling border:
Use a small #4 round brush to carefully paint the intricate vine and leaf pattern along the ceiling line. Take your time here, as this acts as a frame for the entire piece.
Level Up: Texture
To mimic a vintage print look, mix a clear glazing medium with a tiny bit of gray paint and lightly drag a dry brush vertically over the finished leaves to create a subtle linen-texture effect.
Step 4: Refining and Finishing
-
Add floral details:
Dip the handle end of a small brush or a dotting tool into the rust or dark red paint to stamp small berries along the thinnest vines. -
Check for coverage:
Step back and look for any patchy areas where the wall color shows through the leaves. Apply a second coat to these specific spots for solid, opaque color. -
Clean up sketch lines:
Once the paint is completely dry to the touch, use a slightly damp microfiber cloth to gently wipe away any visible charcoal or chalk lines remaining around the painted shapes. -
Seal edges and reveal:
Slowly peel away the painter’s tape at a 45-degree angle while the paint is still slightly tacky to prevent chipping. Perform any final touch-ups with a small artist brush and your base wall color.
Enjoy the serene atmosphere of your new hand-painted indoor garden.
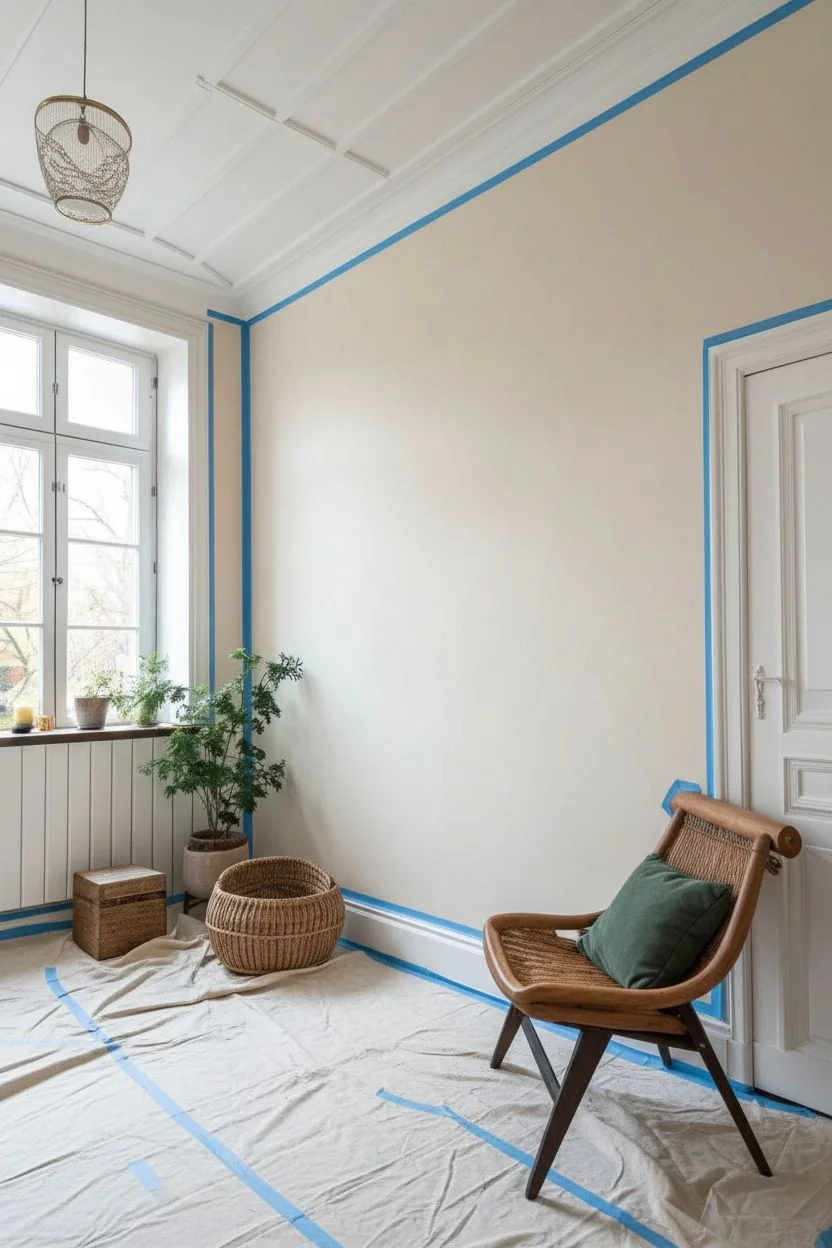
Freehand Brushstroke Patterns
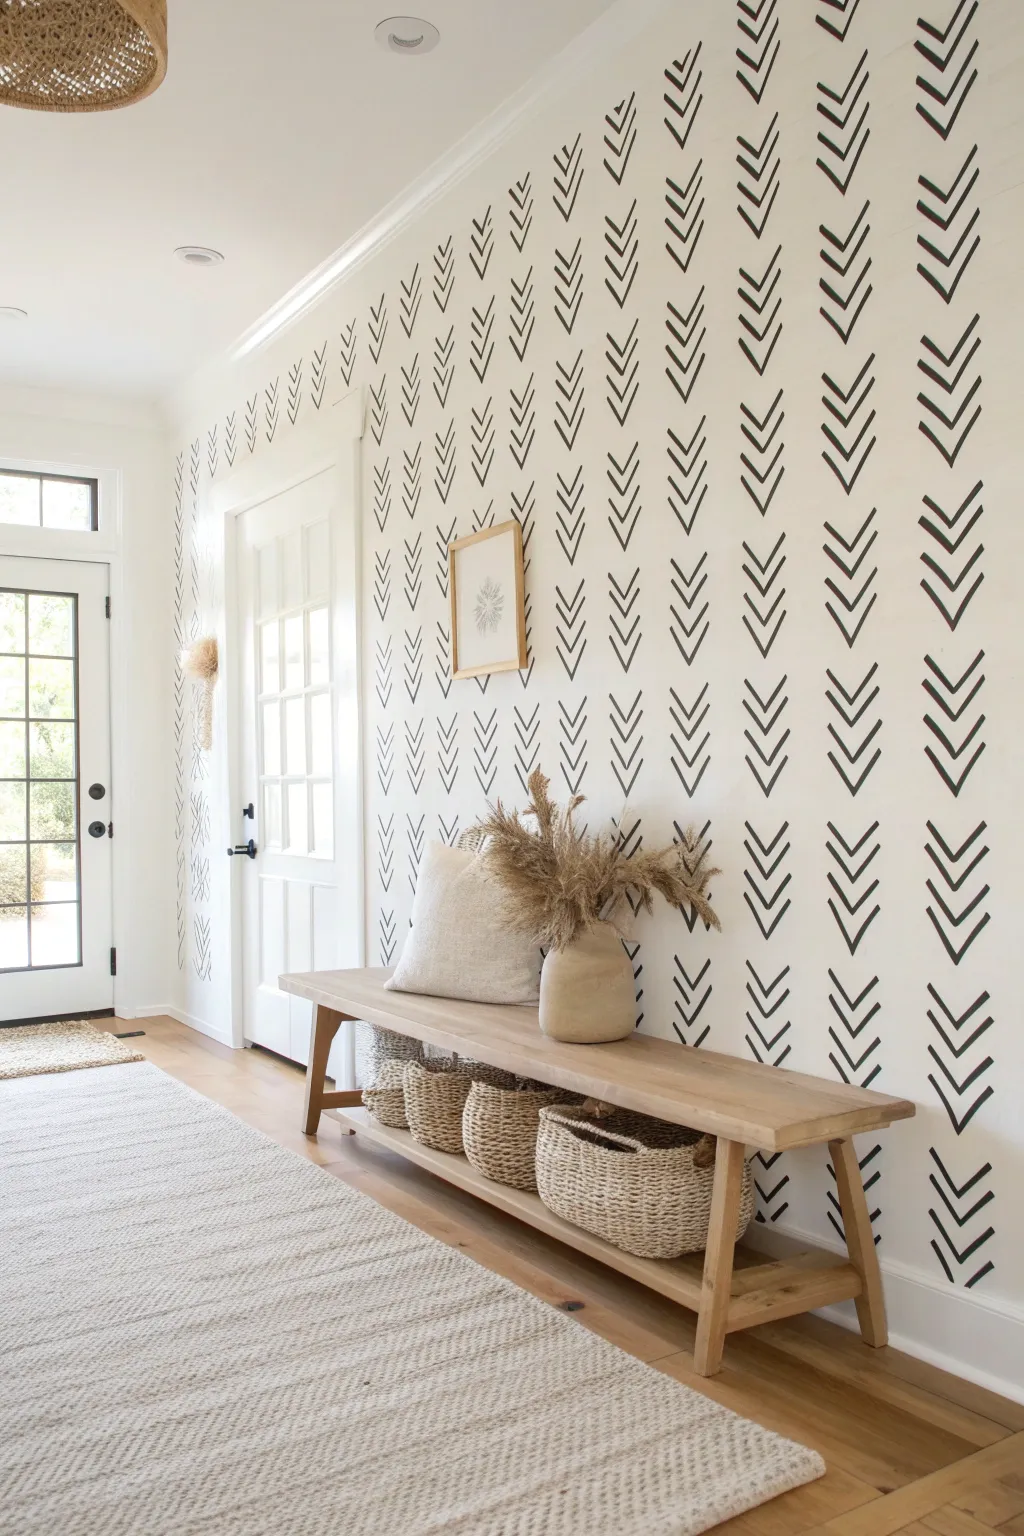
Transform a plain white hallway into a striking design feature using this high-contrast, hand-painted pattern. The beauty of this project lies in the slight imperfections of the brushstrokes, giving the wall an organic, wallpaper-like texture without the hassle of hanging paper.
Step-by-Step Tutorial
Materials
- Black interior latex paint (eggshell or satin finish)
- 1.5-inch angled sash brush
- Pencil
- Large spirit level or laser level
- Measuring tape
- Step ladder
- Drop cloth
- Painter’s tape
- Cardboard block (optional spacer)
- Clean eraser
Step 1: Preparation and Grid Marking
-
Prepare the space:
Clear the area of furniture and lay down a drop cloth to protect your flooring from potential drips. Wipe the wall down with a damp cloth to remove dust and ensure smooth paint adhesion. -
Tape the boundaries:
Apply painter’s tape along the baseboards, ceiling line, and adjacent walls. Press the edges of the tape down firmly to prevent any paint bleed. -
Calculate column spacing:
Measure the total width of your wall. To achieve the look in the photo, you will want columns spaced approximately 6 to 8 inches apart. Divide your total width by your desired spacing to determine how many columns fit comfortably. -
Draw vertical guidelines:
Using a pencil and a long spirit level (or a laser level if you have one), lightly mark vertical plumb lines down the entire height of the wall. These lines will act as the center spine for your chevron columns. -
Mark horizontal references (optional):
If you are worried about keeping the rows even, you can make small tick marks on your vertical lines every 4 inches to indicate where the point of each ‘V’ should land.
Brush Control Pro-Tip
For sharper lines, lead with the ‘toe’ (the longer point) of your angled brush. Apply more pressure in the middle of the stroke and lift quickly at the end to create a tapered, elegant tail.
Step 2: Practicing the Stroke
-
Load the brush:
Dip your angled sash brush about halfway into the black paint. Tap the excess off against the side of the can; you want the brush wet but not dripping. -
Test on cardboard:
Before touching the wall, practice the stroke on a scrap piece of cardboard. Place the brush tip down to start the top of the line, apply pressure as you pull down and inward, then lift off as you reach the center point. -
Refine the V shape:
Create the second stroke by mirroring the first movement on the right side, meeting at the bottom to form a V. The lines should naturally taper at the ends due to the brush shape.
Step 3: Painting the Pattern
-
Start at the top left:
Climb your ladder and begin with the first column on the far left. Center your ‘V’ over the pencil line, starting just below the ceiling tape. -
Paint the left leg:
Execute the left stroke of the chevron, pulling the brush down and diagonal towards your pencil line. -
Paint the right leg:
Complete the ‘V’ by painting the right stroke, creating a clean point where the two lines meet on the guide. -
Establish vertical spacing:
Leave a gap of about 1 to 1.5 inches below your first V. I like to keep a small block of cardboard handy to quickly check this spacing without measuring every time. -
Continue down the column:
Repeat the V shapes all the way down to the baseboard, establishing a rhythm. Don’t worry if every stroke isn’t identical; variation adds character. -
Move to the next column:
Shift the ladder to the next pencil guideline. Aim to align the points of these V shapes horizontally with the ones in the previous column. -
Check your perspective:
Step back frequently to look at the wall as a whole. This ensures your pattern density remains consistent across the surface. -
Handle partial shapes:
When you reach the bottom or top where a full V won’t fit, simply paint the portion of the shape that fits naturally before hitting the tape.
Level Up: Color Play
Soften the contrast by using a deep charcoal or forest green instead of pure black. You can also mix a clear glaze medium into the paint to make the strokes semi-transparent for a watercolor effect.
Step 4: Finishing Touches
-
Remove tape:
Once you have completed all columns, carefully peel off the painter’s tape while the paint is still slightly tacky to ensure crisp edges. -
Erase guidelines:
Allow the paint to dry completely (wait at least 4 hours or overnight). Then, gently use a clean white eraser to remove any visible pencil lines between the paint strokes. -
Touch up:
Use a small artist’s brush and your original wall color to clean up any accidental splatters or strokes that went too wide.
Enjoy the custom, artistic flair this pattern brings to your entryway or hallway
Metallic Gold Leaf Accents
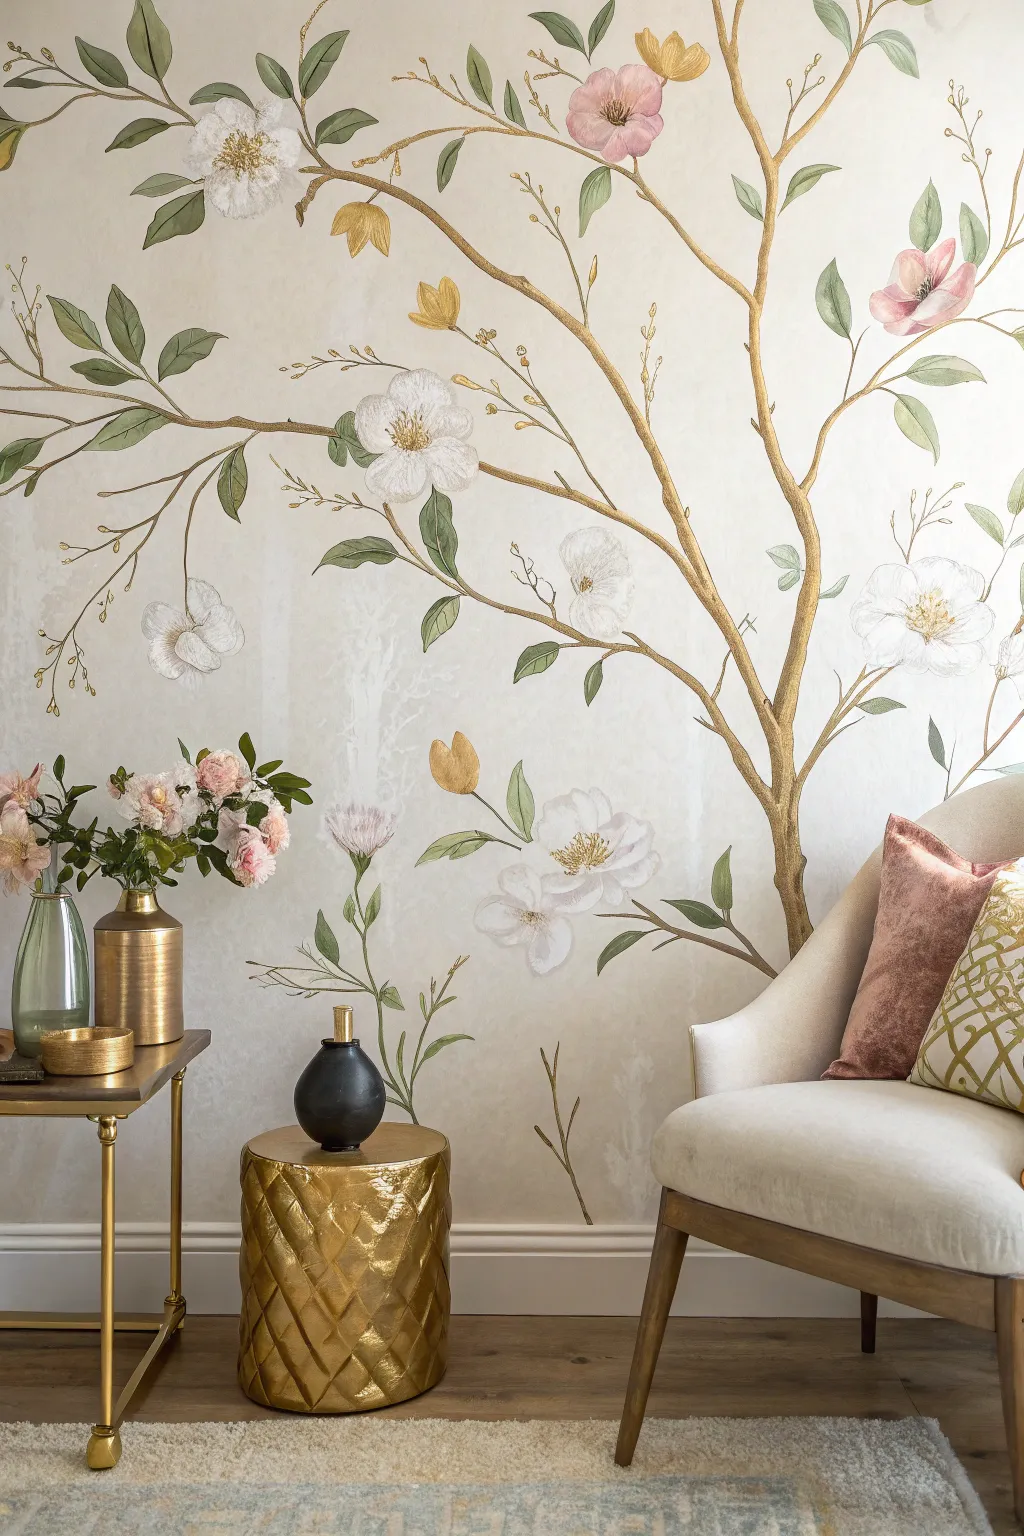
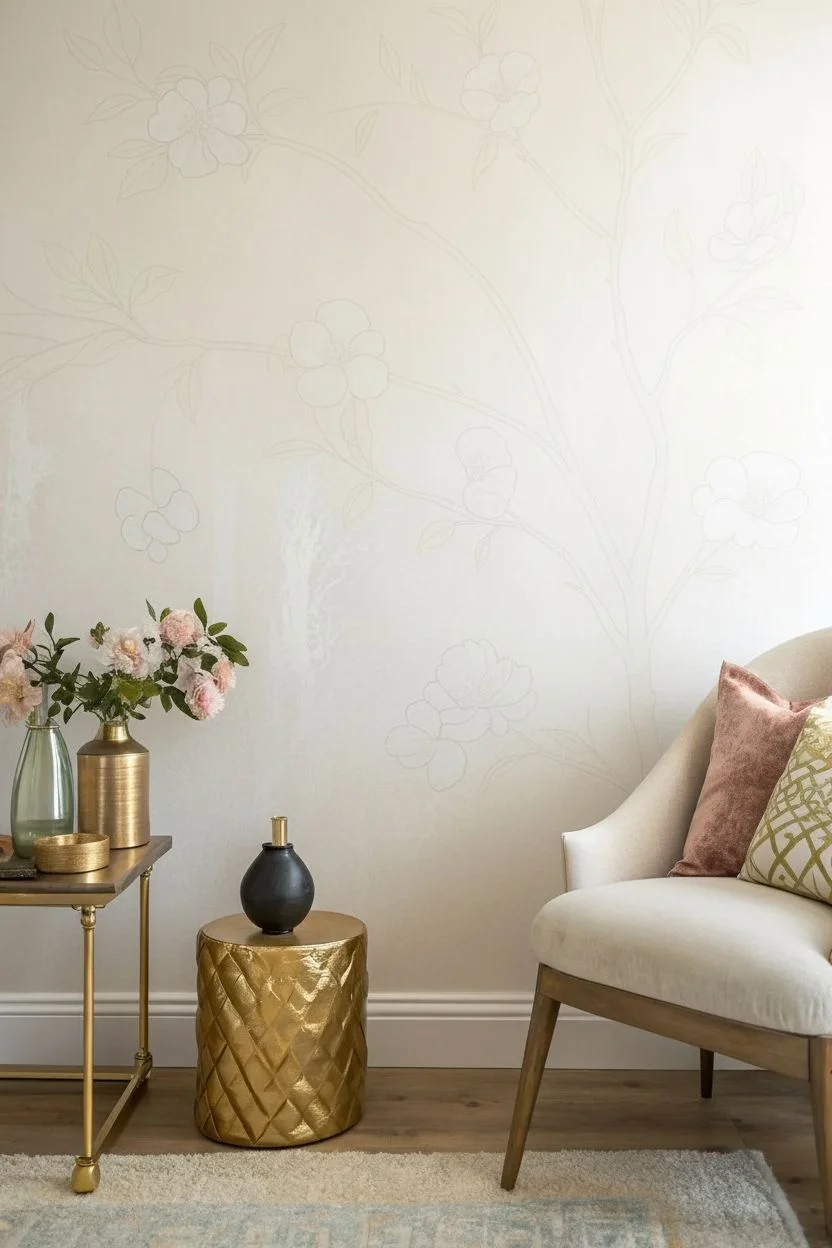
Transform a plain wall into a luxurious botanical scene featuring a sweeping tree with metallic gold branches and delicate soft-focus blooms. This hand-painted project captures the elegance of traditional chinoiserie wallpaper using accessible acrylics and liquid gold leaf.
Detailed Instructions
Materials
- Interior satin latex paint (Cream/Off-white)
- Liquid gold leaf or high-pigment metallic gold acrylic paint
- Acrylic paints (Titanium White, Sap Green, Raw Umber, Alizarin Crimson, Yellow Ochre)
- Acrylic glazing medium
- Chalk or soft pencil
- Synthetic brushes (1-inch flat, #6 round, #2 round, #0 detail liner)
- Natural sea sponge (optional for background texture)
- Paper towels and water cups
Step 1: Preparation & Sketching
-
Prepare the canvas:
Clean the wall surface thoroughly and apply your base coat of cream or off-white satin latex paint. Allow it to dry completely, preferably overnight. -
Add subtle texture:
To mimic the parchment look in the photo, mix clear glazing medium with a little white paint and dab it sporadically over the cream base using a damp sea sponge. -
Map the composition:
Using a piece of chalk or a soft pencil, lightly sketch the main trunk starting from the right side (or your preferred side) and flowing diagonally upward. -
Draw branches:
Extend thinner branches outward from the trunk, ensuring they curve organically and taper off towards the ends. -
Place the blooms:
Lightly circle where the large flowers will sit to ensure you have a balanced layout before you start painting.
Troubleshooting: Shaky Edges?
If your gold branch lines aren’t crisp, don’t wipe them wet. Let them dry completely, then use a small brush with your background wall color to ‘cut in’ and tidy up the edges.
Step 2: The Golden Framework
-
Underpaint the branches:
Mix Yellow Ochre with a touch of Raw Umber to create a dull brownish-yellow. Paint the trunk and branches with this color to provide a solid base for the gold. -
Apply the gold:
Once the underlayer is dry, carefully paint over the branches using liquid gold leaf or metallic gold acrylic. Use a #6 round brush for the thick trunk and switch to smaller brushes as the branches thin out. -
Refine the twigs:
Use a #0 detail liner brush loaded with gold to pull out very fine, wispy twigs from the main branches. -
Add golden buds:
Paint small teardrop shapes in gold scattered along the thinner branches to represent closed buds or decorative gold leaves.
Step 3: Florals & Foliage
-
Block in white flowers:
Mix Titanium White with a tiny amount of glazing medium. Paint the petal shapes for the white flowers, keeping the paint semi-translucent to create a soft, airy look. -
Create pink blooms:
Mix Titanium White with a small dot of Alizarin Crimson. Paint the pink flowers, adding a little extra crimson to the petals’ base while wet to create a gradient. -
Paint green leaves:
Mix Sap Green with a little White. Paint the leaf shapes attached to the branches, varying their direction to look natural. -
Add leaf depth:
While the green is still slightly wet, blend in a darker mix of Sap Green and Raw Umber at the base of the leaves for shadow. -
Detail the veins:
I like to dilute a dark green mix with water until it’s inky, then use the liner brush to paint very subtle veins on the dried leaves. -
Paint flower centers:
For the open white flowers, dab a center of Yellow Ochre mixed with gold, then add tiny dots of Raw Umber for stamens. -
Final highlights:
Review the mural and add touches of gold to the tips of a few green leaves or flower petals to tie the metallic theme together.
Pro Tip: Harmonize Colors
Mix a tiny drop of your background wall color into the white paint used for the flowers. This prevents the blooms from looking too stark and helps them sit naturally within the scene.
Step back and enjoy the shimmering elegance of your new bespoke wall art.
Interactive Interaction Points
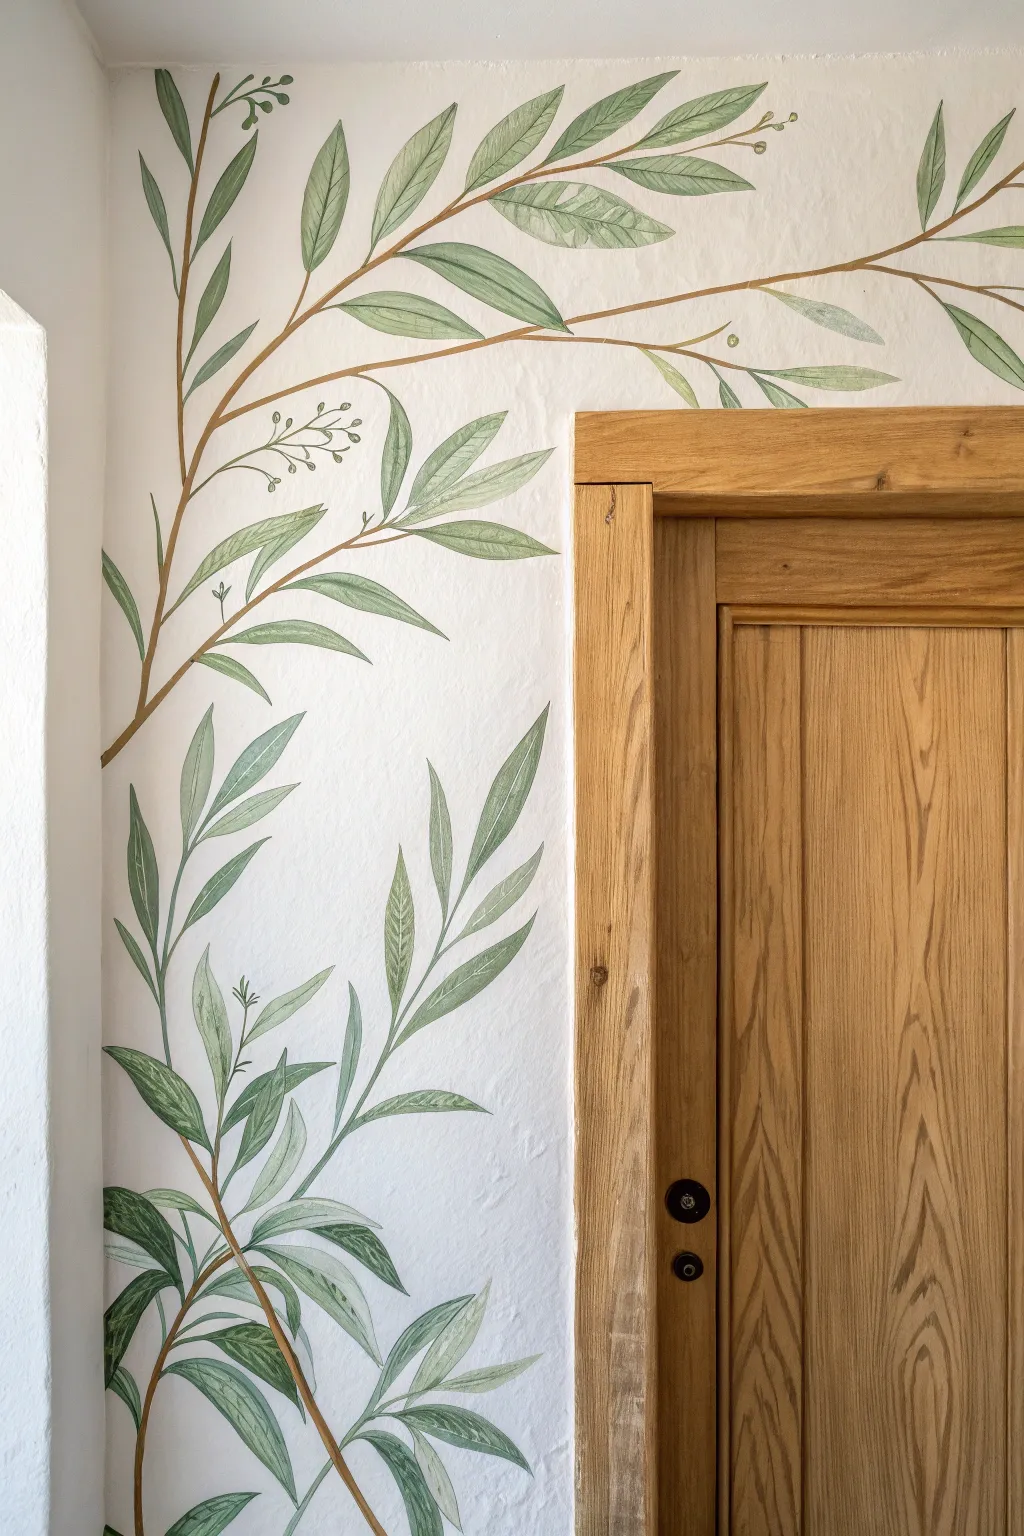
Bring the serenity of nature indoors by framing a doorway or corner with this flowing, watercolor-style vine mural. This project uses diluted acrylics to create soft, translucent leaves that appear to climb naturally up your wall.
Step-by-Step Guide
Materials
- Matte acrylic paints (olive green, sage, forest green, warm brown)
- Acrylic glazing liquid or flow improver
- Round synthetic brushes (sizes #4, #8, and #12)
- HB pencil and quality white eraser
- Painter’s tape
- Palette or disposable plates
- Cup of water and paper towels
- Step ladder (if painting high)
Step 1: Preparation and Sketching
-
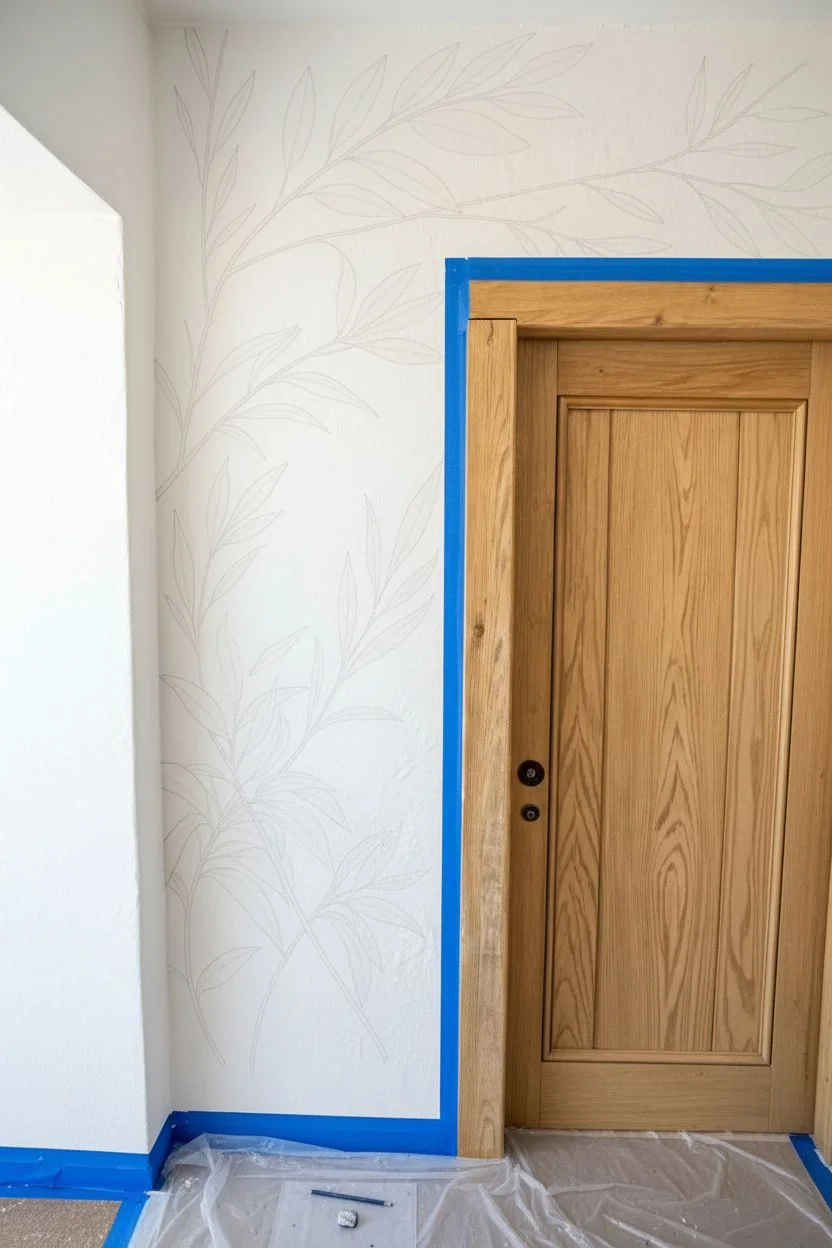
Prepare the workspace:
Ensure the wall surface is clean and dust-free so the paint adheres properly to the texture. -
Protect trim:
Apply painter’s tape carefully along the edge of the door frame or baseboards where your mural will touch. -
Map the flow:
Using a pencil, lightly sketch the main S-curve line of the branch starting from the bottom corner and reaching upward. -
Add secondary branches:
Sketch smaller offshoot branches diverging from the main stem, ensuring they curve naturally toward the ceiling or open wall space. -
Outline leaf placement:
Lightly mark the position of key leaves to ensure the composition feels balanced, but don’t draw every single detail yet.
Step 2: Painting the Structure
-
Mix the branch color:
Combine warm brown acrylic paint with a generous amount of glazing liquid to increase transparency. -
Paint the main stem:
Use the #8 round brush to paint the main branch, applying more pressure at the base and lifting slightly as you move up to tapers. -
Add twigs:
Switch to the #4 brush to pull out thin, delicate twigs from the main branch where you planned your leaf clusters. -
Detail the buds:
Paint the fine, thread-like stems that will hold the small berry clusters shown in the upper section of the design.
Too opaque?
If your leaves look like solid stickers rather than hand-painted watercolor, add more glazing medium. The wall texture should show slightly through the paint.
Step 3: Creating the Foliage
-
Mix leaf shades:
Prepare three shades of green on your palette: a light sage, a medium olive, and a darker forest green, mixing each with glazing liquid. -
Paint base leaves:
Using the #12 brush and the lightest sage color, paint the largest leaves using a ‘press and lift’ motion to create pointed oval shapes. -
Vary the opacity:
I like to add a tiny drop of water to the brush occasionally so some leaves look more washed out and watercolor-like than others. -
Layer depth:
Once the first layer is tacky, use the medium olive green to paint leaves that appear to be behind or overlapping the lighter ones. -
Add movement:
Paint some leaves curving upwards and others drooping slightly downwards to mimic natural growth patterns.
Level Up
Mix a tiny amount of metallic gold paint with your brown branch color. It adds a subtle shimmer that catches the light without looking overly decorative.
Step 4: Details and Refining
-
Paint the veins:
With your smallest brush and the darkest forest green, paint a thin central vein line down the center of the dry leaves. -
Add feathering:
Add tiny, feather-like strokes branching from the central vein to give the leaves texture and realism. -
Create berry clusters:
Dip the tip of a small brush into the olive green and dot small circles at the ends of the fine twig lines to create the buds. -
Connect the elements:
Check for any floating leaves and paint thin brown stems to connect them back to the main branch. -
Clean up:
Once the paint is fully dry, gently erase any visible pencil sketch lines that weren’t covered by paint.
Step back and admire how your new botanical artwork transforms the room with a breath of fresh air
The Unfinished Edge
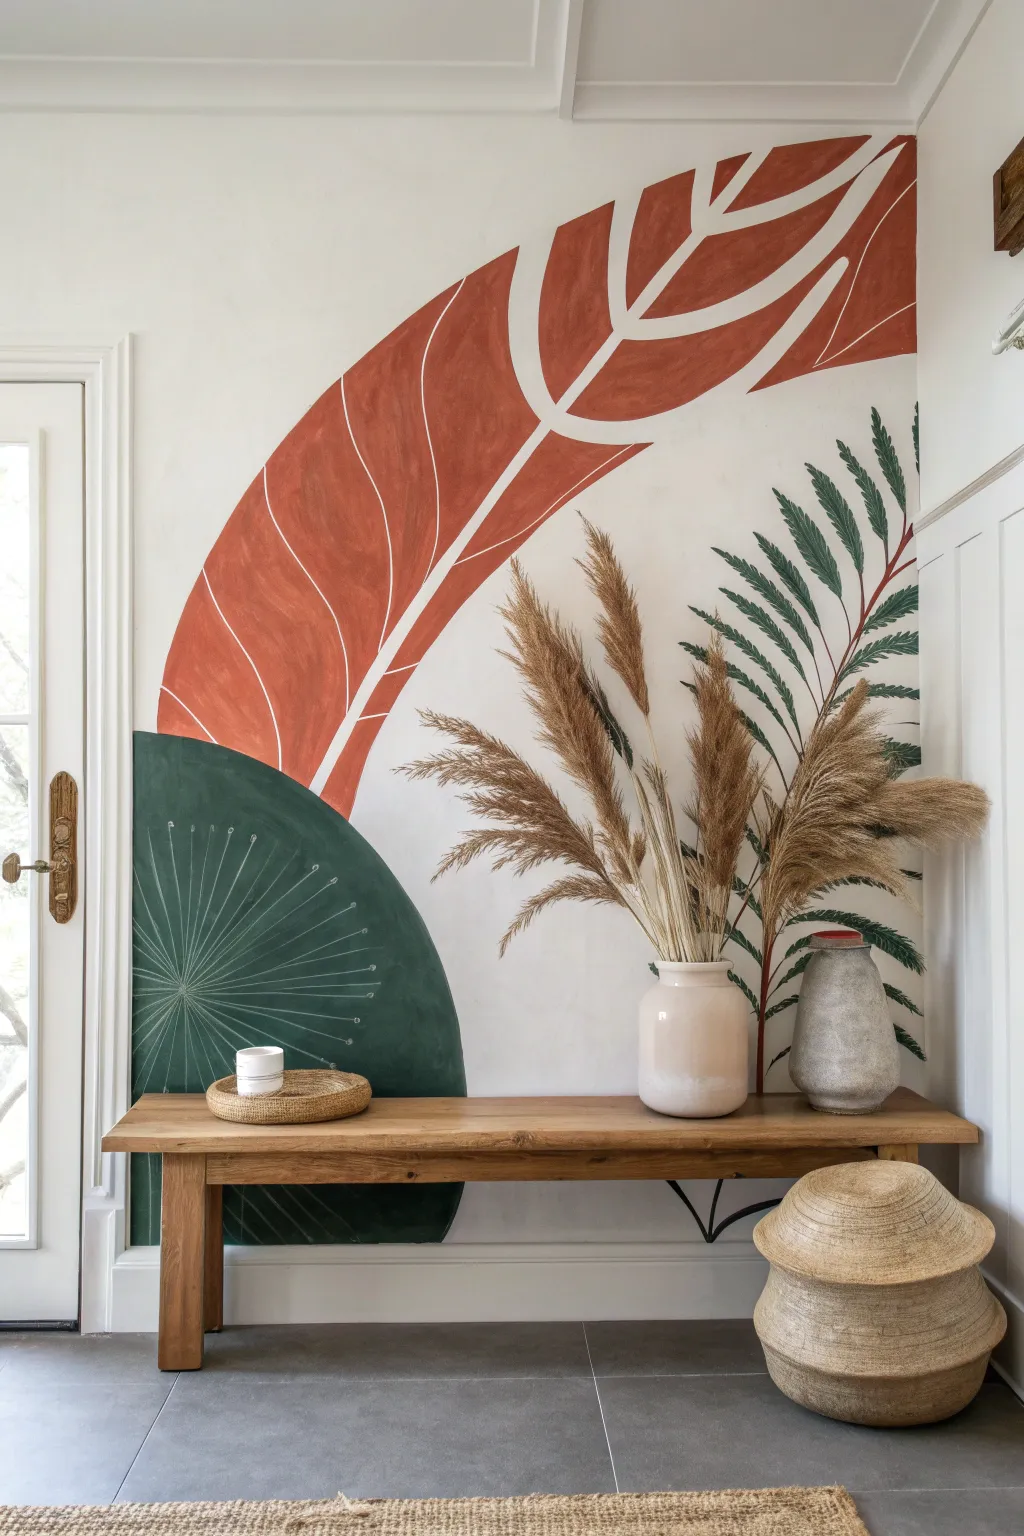
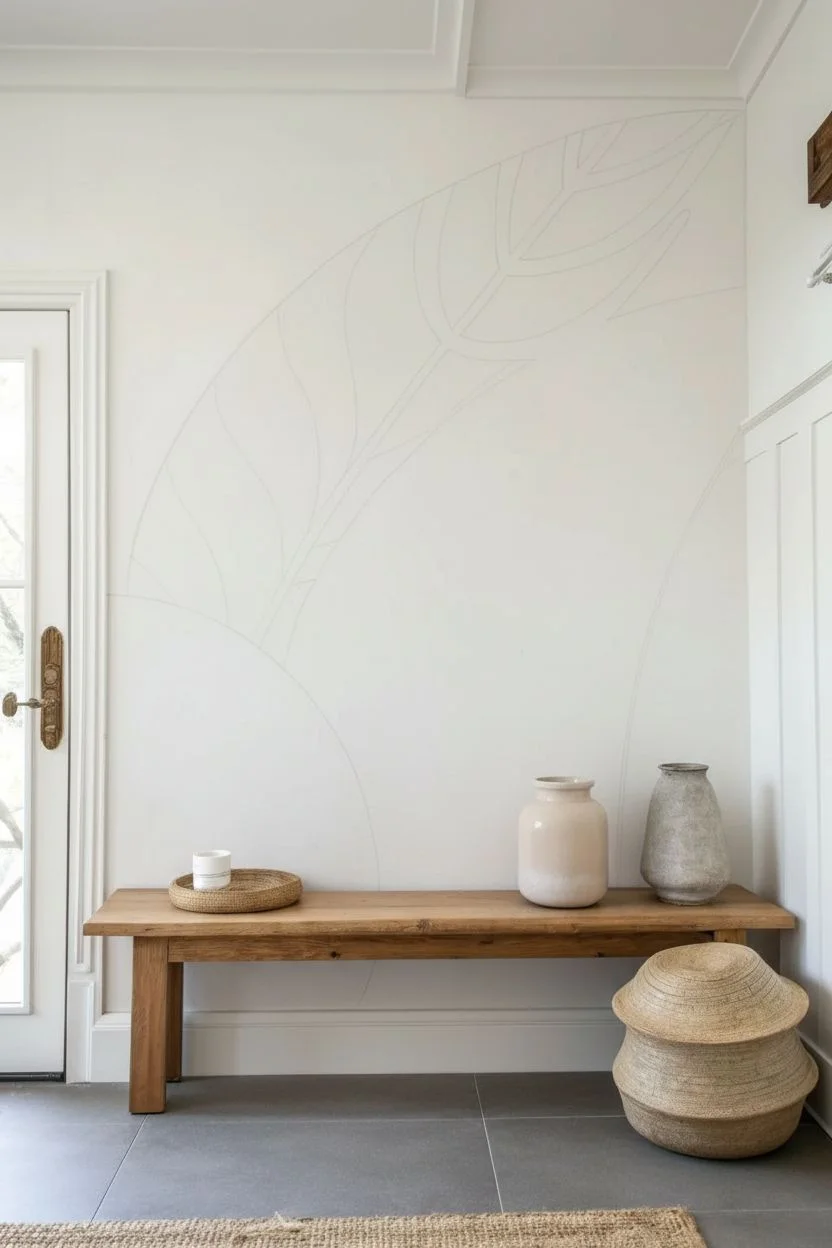
This project combines broad, abstract organic shapes with delicate botanical details to create a stunning feature wall. The interplay between the solid terracotta arch, the grounding green sphere, and the airy fern creates a sophisticated yet relaxed mural perfect for an entryway or nook.
Step-by-Step
Materials
- Latex wall paint (Terracotta/Rust Orange)
- Latex wall paint (Deep Forest Green)
- Latex wall paint (Sage or Olive Green)
- Acrylic paint (Reddish-brown for stem)
- Original wall color paint (for corrections/white lines)
- 2-inch angled sash brush
- Set of round artist brushes (sizes 4, 8, and 10)
- Pencil and white eraser
- Drop cloth
- Step ladder
- Painter’s tape (optional)
Step 1: Mapping the Shapes
-
Clean surface:
Wipe down the wall with a damp cloth to remove any dust or oils, ensuring the paint adheres smoothly. -
Sketch the arch:
Using a pencil, lightly draw the large, curving leaf shape that forms the arch. Start from the left middle and swoop up towards the ceiling corner. -
Outline the semi-circle:
Draw the semi-circle shape in the bottom left corner, allowing it to overlap slightly with the bottom of your arch sketch. -
Position the fern:
Lightly mark a curved line where the main stem of the fern will sit on the right side to ensure balance.
Wobbly Lines?
Don’t stress if your curves aren’t perfect. Let the paint dry completely, then use a small angled flat brush with your background wall color to cut back into the shape and smooth out the edge.
Step 2: Painting the Abstract Background
-
Cut in the rust shape:
Dip your 2-inch angled sash brush into the terracotta paint. Carefully paint along your pencil outline for the large upper leaf shape, creating a smooth, confident edge. -
Fill the form:
Fill in the rest of the terracotta shape. Use long, even strokes to minimize texture. -
Apply second coat:
Once the first layer is dry to the touch, apply a second coat of terracotta for a rich, opaque finish. -
Paint the forest green block:
Using a clean brush (or washed and dried one), outline and fill the dark green semi-circle at the bottom left. -
Create the veins:
Once the terracotta is fully dry, take a medium round artist brush dipped in your original white wall color. Paint the ‘negative space’ veins over the rust shape—a central spine and thick branching veins.
Step 3: Adding the Fern
-
Paint the stem:
Mix a small amount of reddish-brown acrylic or wall paint. Use a thin round brush (size 4) to paint the main stem of the fern, following your guide line. -
Block in dark leaves:
Switch to your deep forest green and a size 8 round brush. Paint the individual fern fronds extending from the stem, pressing down at the base of the leaf and lifting as you pull away to create a tapered tip. -
Layer lighter leaves:
While the dark green is still slightly tacky or dry, use the sage green paint to add overlapping fronds. This creates depth and realism. -
Refine the edges:
Go back with your dark green brush to touch up the connection points where the leaves meet the red stem.
Texture Trick
To mimic the matte look in the image, mix a tablespoon of baking soda into a cup of your terracotta paint. It creates a chalky, plaster-like texture that feels more organic.
Step 4: Final Details
-
Detail the green semi-circle:
Using a very fine artist brush and the white wall paint, draw the thin, radiating starburst lines and dots on top of the dark green bottom shape. -
Review and erase:
Step back to view the whole mural. Gently erase any visible pencil marks that weren’t covered by paint. -
Touch up edges:
I like to keep a small cup of the original white wall paint handy to crisp up the outer edges of the shapes if my hand slipped.
Style your new mural with natural wood furniture and dried grasses to complete the look.


Have a question or want to share your own experience? I'd love to hear from you in the comments below!