If your space feels a little flat, the right wall painting designs can turn one plain wall into a whole mood. In my studio, these are the paint techniques I reach for when I want big visual impact without a full remodel.
Bold Solid-Color Accent Wall
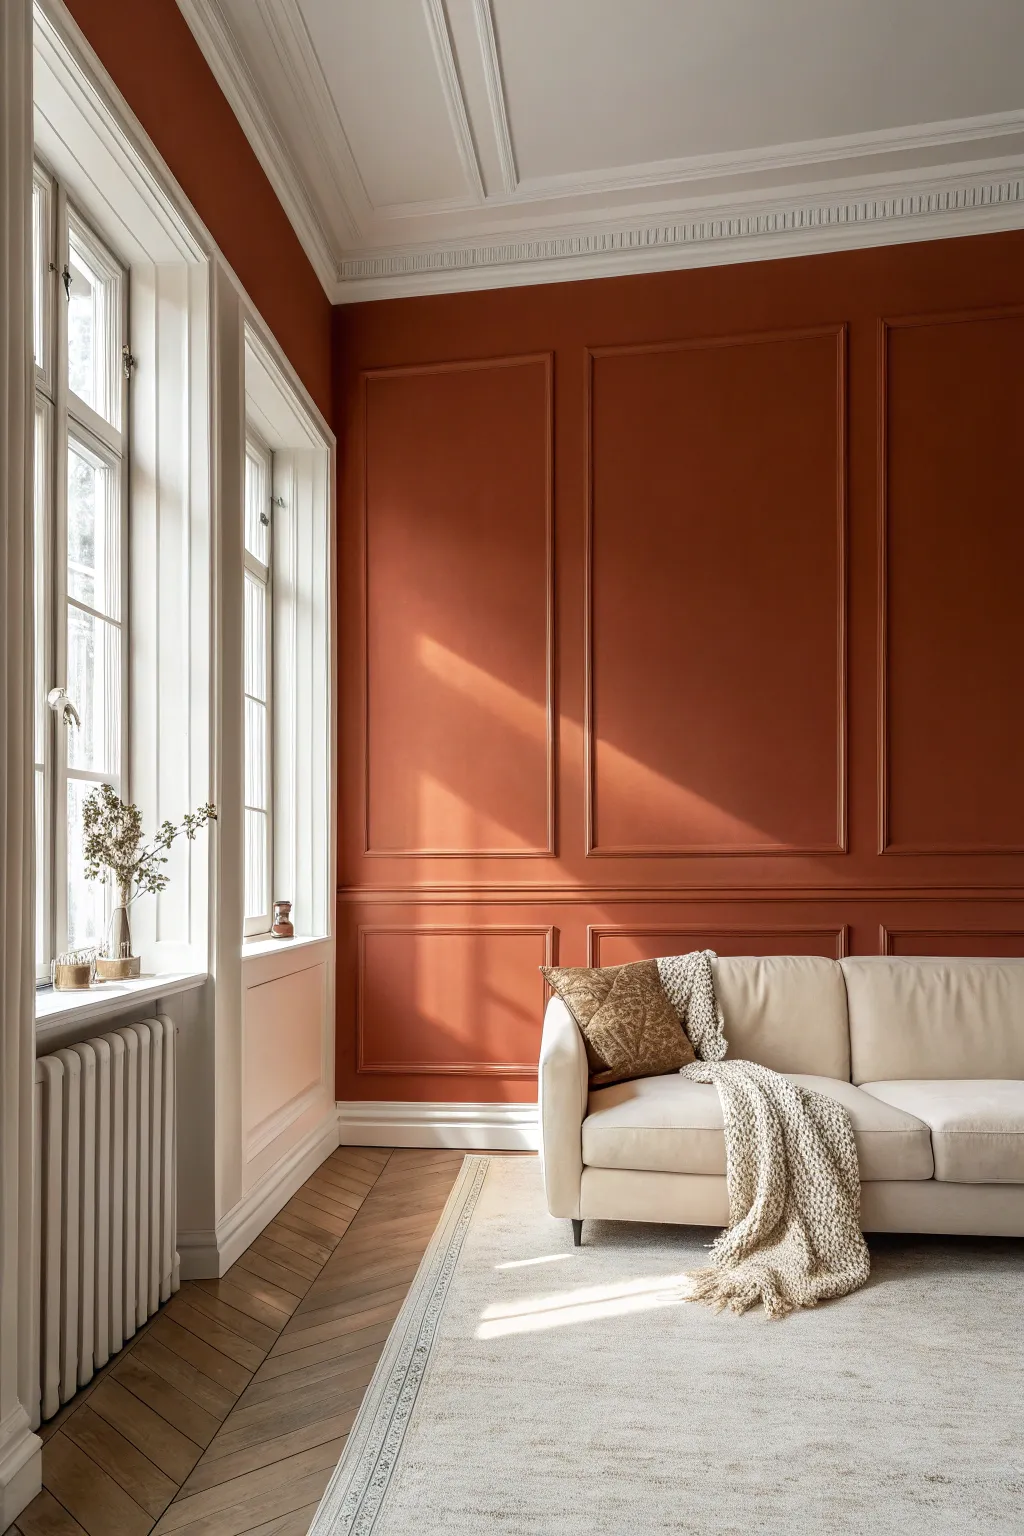
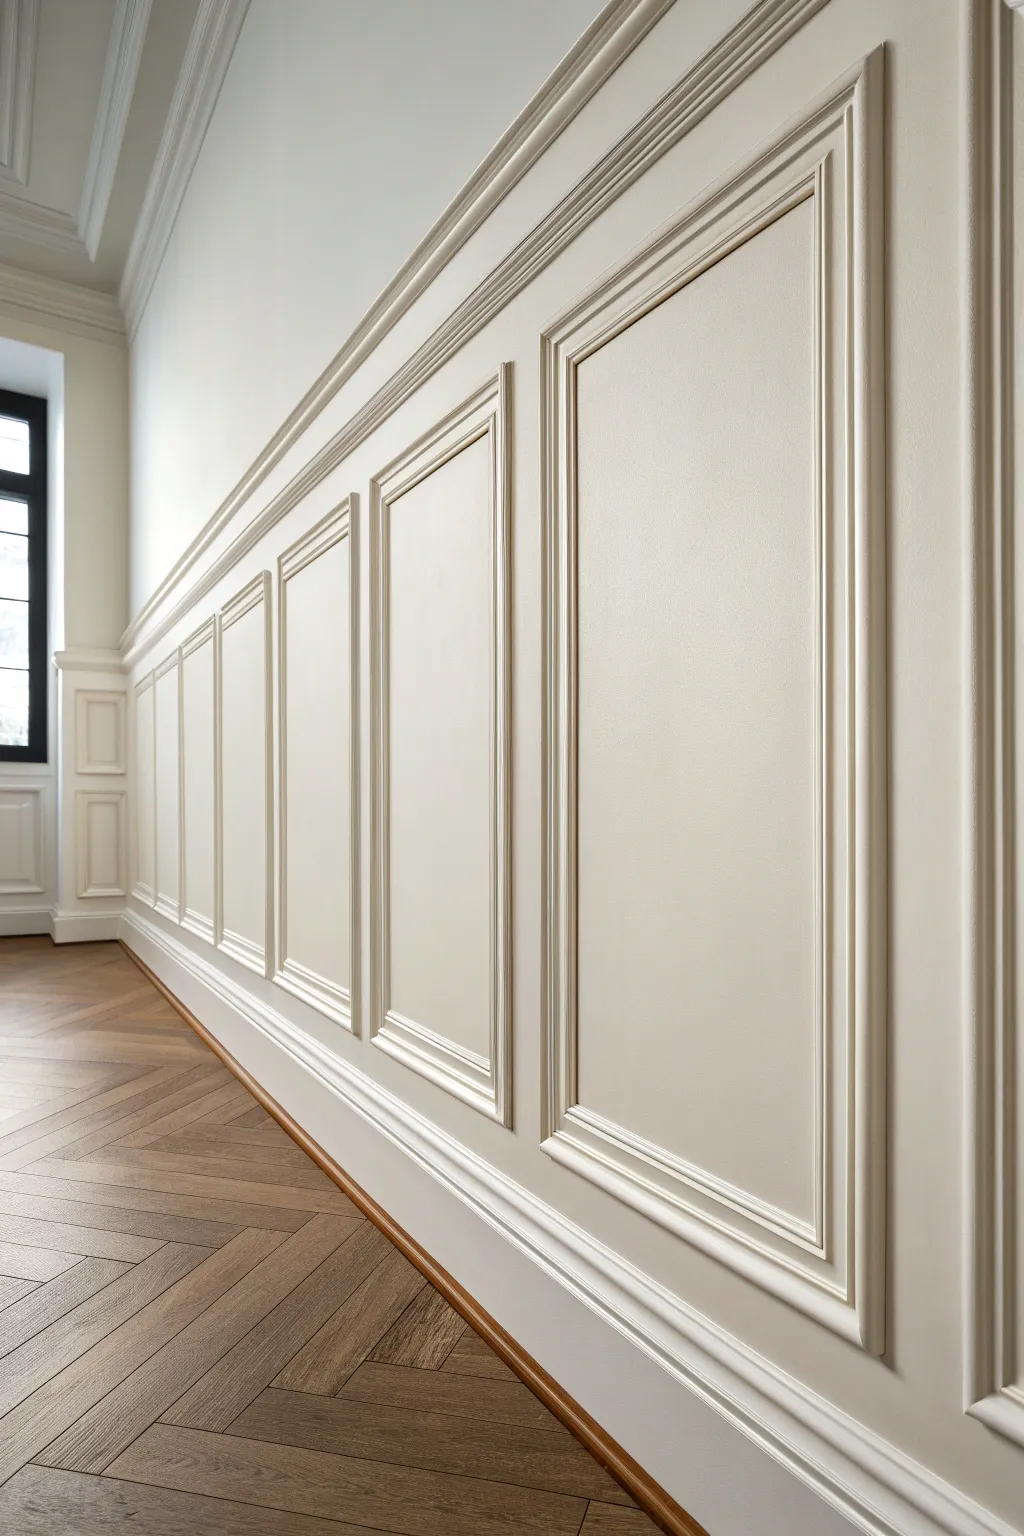
Transform a plain wall into a sophisticated architectural feature by combining classic panel molding with a bold, contemporary color choice. This project uses a rich, burnt orange shade to drench both the wall and trim, creating a seamless and immersive look that feels both historic and modern.
How-To Guide
Materials
- Interior latex paint (matte or eggshell finish)
- Color: Terracotta or Burnt Orange (e.g., Farrow & Ball ‘Red Earth’ or similar)
- Panel molding trim (decorative wood or polyurethane)
- Chair rail molding
- Baseboard molding (if not existing)
- Miter saw (or miter box and hand saw)
- Level (2-foot or longer)
- Tape measure
- Construction adhesive (Liquid Nails)
- Brad nailer (or hammer and finish nails)
- Wood filler
- Fine-grit sandpaper (220 grit)
- Caulk and caulking gun
- Painter’s tape
- 2-inch angled sash brush
- Rollers (microfiber, 3/8 inch nap) and tray
- Drop cloths
- Pencil
Step 1: Planning and Layout
-
Measure the wall:
Start by measuring the total width and height of your accent wall to determine the placement of your panels. -
Define the chair rail height:
Decide on the height of your chair rail. A standard height is usually around 32 to 36 inches from the floor, often about one-third up the wall. Mark this horizontal line across the entire wall using a level to ensure it is perfectly straight. -
Calculate panel spacing:
Determine how many boxes you want across the wall. Measure the remaining width and divide it by your desired number of panels, accounting for a 4- to 6-inch gap between each panel and the edges of the wall. I find sketching this on paper first saves a lot of headaches later. -
Mark the wall:
Using your pencil and level, draw out the exact rectangles for both the upper and lower boxes directly onto the wall. This visual guide will be crucial when you start attaching the wood.
Step 2: Installing the Molding
-
Install the chair rail:
Cut your chair rail molding to the length of the wall. Apply a bead of construction adhesive to the back, position it on your level line, and secure it with a brad nailer. Nail into the studs where possible for maximum hold. -
Cut the panel molding:
Using a miter saw, cut the decorative picture frame molding for your boxes. You will need to cut the ends at 45-degree angles so they fit together to form perfect 90-degree corners. -
Attach the lower boxes:
Beginning with the bottom section, apply adhesive to the back of your cut molding pieces. Press them onto your pencil lines and secure them with brad nails. Repeat this for all lower rectangular boxes. -
Attach the upper boxes:
Move to the section above the chair rail. Just like the lower section, adhere and nail the molding pieces to form the large upper rectangles, double-checking with your level as you go.
Miter Mishaps
If your 45-degree cuts don’t meet perfectly, don’t panic. Use the round shaft of a screwdriver to burnish (rub) the wood fibers together, then fill any remaining gap with wood filler before sanding.
Step 3: Prep for Painting
-
Fill the nail holes:
Take a small amount of wood filler and press it into every nail hole. Overfill slightly as it will shrink when drying. -
Sand smooth:
Once the wood filler is completely dry, sand the spots flush with the molding using 220-grit sandpaper. Wipe away any dust with a tack cloth or damp rag. -
Caulk the seams:
Run a thin bead of paintable caulk along every edge where the molding meets the wall and at the mitered corners. Smooth the caulk with a wet finger to ensure a seamless transition that looks like one solid piece. -
Protect surrounding areas:
Apply painter’s tape to the adjacent walls, ceiling, and floor (if not painting the baseboard). Lay down drop cloths to protect your flooring from spills.
Pro Tip: Box Spacing
Use a scrap piece of wood cut to your exact gap width (e.g., 4 inches) as a spacer block. Place it between moldings as you install to guarantee perfect, uniform spacing without measuring every time.
Step 4: Painting
-
Cut in the edges:
Using your angled sash brush and the terracotta paint, begin by ‘cutting in’ around the perimeter of the wall, the ceiling line, and importantly, inside and around all the molding profiles. -
First coat rolling:
Use a roller to paint the flat wall sections inside and outside the boxes. Roll vertically and maintain a wet edge to avoid lap marks. The first coat might look patchy, but don’t worry. -
Paint the trim:
While the wall paint is drying, use your brush to carefully paint the faces of the molding and the chair rail. Ensure no drips form on the bottom edges of the trim. -
Apply the second coat:
After the recommended drying time (usually 4 hours), apply a second coat to both the walls and the trim. This second layer will provide that rich, deep opacity and true color saturation evident in the photo. -
Remove tape:
While the paint is still slightly tacky (or right after it feels dry to the touch), carefully peel off the painter’s tape at a 45-degree angle to ensure clean, crisp lines.
Now step back and enjoy the depth and architectural character your new accent wall brings to the room


Two-Tone Half Wall With a Crisp Line
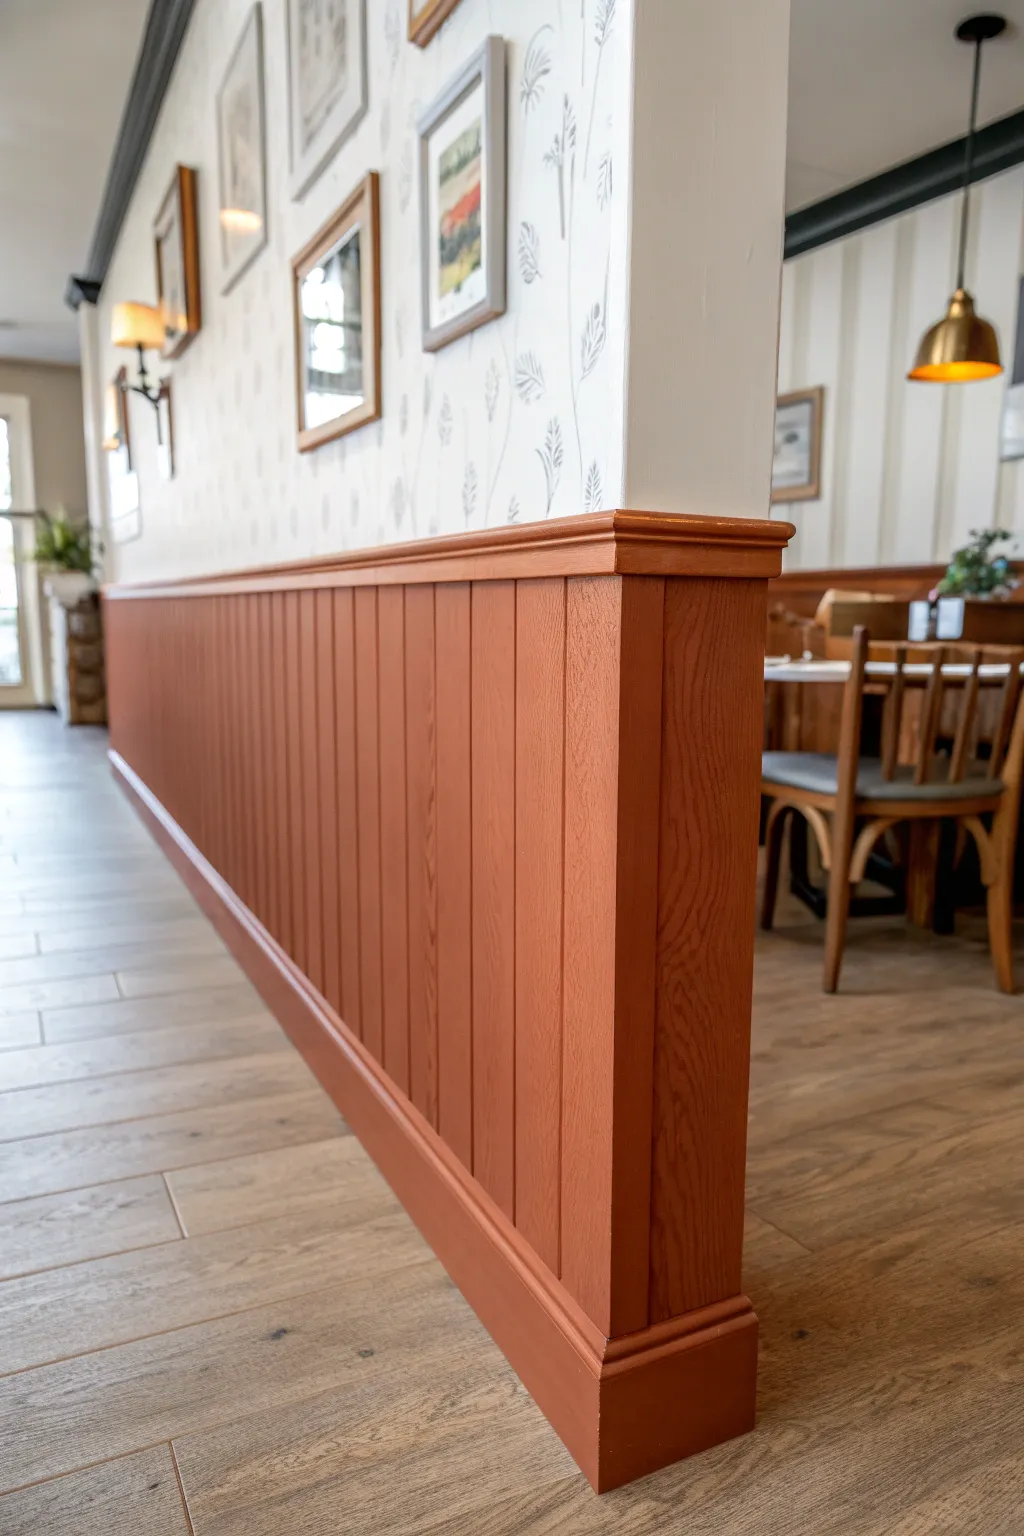
Bring warmth and architectural interest to your space by combining classic vertical paneling with a modern, earthy color palette. This project marries the structured look of beadboard wainscoting with the delicate charm of patterned wallpaper for a sophisticated two-tone effect.
Detailed Instructions
Materials
- Beadboard panels (MDF or wood)
- Chair rail molding (dado rail)
- Baseboard molding
- Construction adhesive
- Finishing nails or brad nailer
- Wood filler
- Fine-grit sandpaper (220-grit)
- Painter’s tape
- Primer (suitable for wood/MDF)
- Terracotta or rust-colored interior paint (satin or semi-gloss finish)
- Patterned wallpaper (botanical print recommended)
- Wallpaper paste
- Paint rollers and angled sash brushes
- Caulk and caulk gun
- Level and measuring tape
- Miter saw
Step 1: Wall Preparation & Wallpaper
-
Measure and mark:
Determine the height of your half-wall. A standard wainscoting height is often around 32 to 36 inches, or one-third of the wall’s total height. Use a tape measure and a long level to draw a horizontal guideline across the room where the top of the paneling will sit. -
Clean the surface:
Wipe down the entire wall to remove dust or grease. If the wall has a glossy finish, lightly sand it to ensure better adhesion for both the wallpaper and the paneling glue. -
Apply the wallpaper:
Starting from a corner, apply your patterned wallpaper to the upper section of the wall. Let the paper extend slightly below your marked guideline—this excess will be covered by the chair rail later, ensuring no gaps appear. -
Smooth and trim:
Use a wallpaper smoother to push out air bubbles. Carefully trim the excess paper at the ceiling line and corners, but leave the bottom edge rough as it will be hidden behind the molding.
Uneven Floor Blues
If floors aren’t level, install the chair rail perfectly level first. Then, scribe the bottom of the baseboard to match the floor’s contour for a perfect fit without gaps.
Step 2: Installing the Beadboard
-
Cut panels to size:
Measure the distance from the floor to your horizontal guideline. Subtract the height of your baseboard if you plan to rest the panels on top of it, or cut to full height if installing baseboards over the panels. Use a circular saw or table saw to cut your beadboard sheets. -
Adhere the panels:
Apply construction adhesive to the back of the beadboard panel in a zig-zag pattern. Press the panel firmly against the lower wall. -
Secure with nails:
Use a brad nailer or finishing nails to secure the panels. nailing into the studs wherever possible. Place nails near the top and bottom edges where molding will eventually cover them. -
Continue installation:
Butt the next panel tightly against the first. I always double-check with a level every few feet to ensure the vertical lines remain truly plumb as you move along the wall. -
Cut out outlets:
Measure and cut holes for any electrical outlets using a jigsaw before securing the panel to the wall. Remember to pull the outlet receptacles forward later so they sit flush with the new wood surface.
Step 3: Adding Trim & Details
-
Install the baseboard:
Measure the floor length and cut your baseboard molding using a miter saw for the corners. Nail it securely at the bottom of the beadboard. -
Add the chair rail:
Measure the length along the top edge of the beadboard. Cut your chair rail molding to fit, mitering any corners at 45 degrees. Nail this into place so it caps the beadboard and covers the bottom edge of the wallpaper. -
Address corner caps:
If you have an outside corner like in the example image, create a clean 90-degree corner with the molding pieces. You may need a small corner guard molding or simply miter the beadboard edges carefully for a seamless join. -
Fill the holes:
Use wood filler to cover all nail holes and any gaps in the mitered joints. Let it dry completely. -
Sand smooth:
Once dry, sand the wood filler flush with the surface using 220-grit sandpaper. Wipe away all sanding dust with a tack cloth. -
Caulk the seams:
Run a thin bead of paintable caulk along the top of the chair rail (where it meets the wallpaper) and all vertical corners. Smooth it with a wet finger for a seamless look.
Level Up: Picture Ledge
Use a deeper chair rail molding (like 2-3 inches deep) to create a functional picture ledge for displaying small framed art or lean-to photos.
Step 4: Painting
-
Protect the wallpaper:
Apply painter’s tape very carefully along the wallpaper just above the chair rail. Press the edge of the tape down firmly to prevent paint bleed. -
Prime the wood:
Apply a coat of high-quality primer to the beadboard, chair rail, and baseboard. If using raw wood, this is crucial; if using pre-primed MDF, you might be able to skip this, but a unified base coat helps. -
Cut in the edges:
Using an angled sash brush, paint the terra cotta color into the grooves of the beadboard and along the intricate edges of the molding. -
Roll the flat surfaces:
Use a foam or low-nap roller to apply paint to the flat faces of the panels. This ensures a smooth finish without brush strokes. Apply two coats for rich color depth. -
Remove tape:
Peel off the painter’s tape while the final coat is still slightly tacky to ensure a crisp, clean line.
Step back and admire how this architectural addition instantly grounds the room with color and texture


Classic Stripes, Big Impact
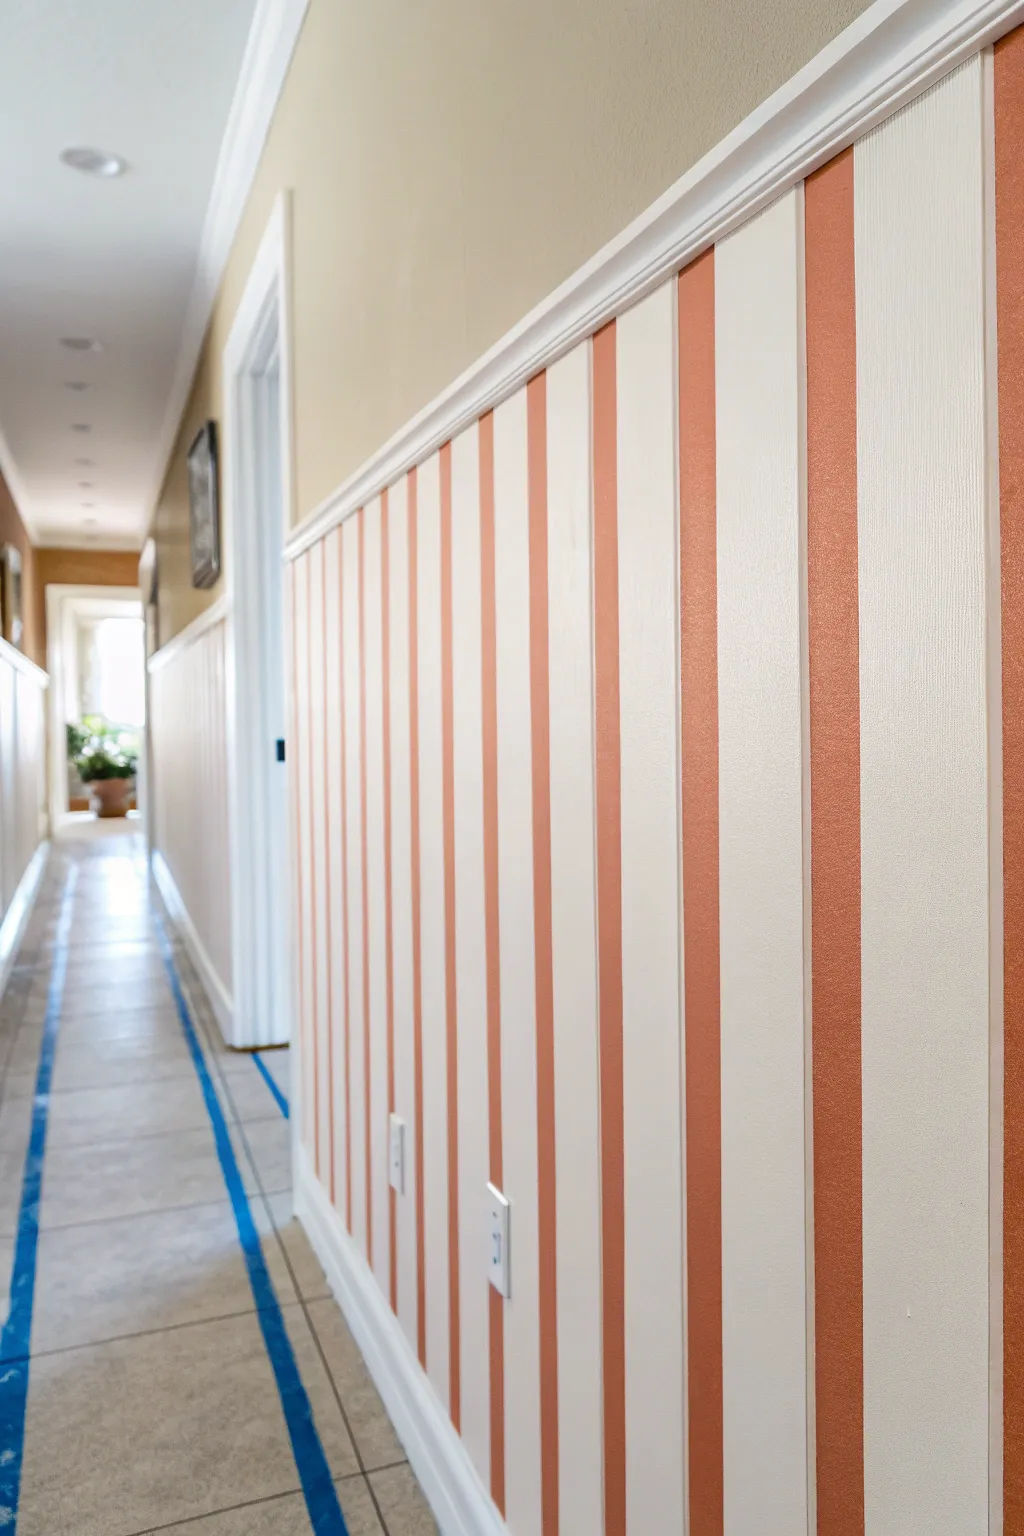
Transform a plain hallway into a sophisticated corridor using nothing but paint and patience. This classic striped wainscoting design pairs a warm cream base with striking copper metallic accents to create an elegant, high-end look without installing actual beadboard.
How-To Guide
Materials
- Interior paint (Satin or Eggshell sheen, Cream/Off-white)
- Metallic interior glaze or paint (Copper/Terracotta)
- Painter’s tape (multi-surface and delicate surface)
- Laser level or bubble level
- Measuring tape
- Pencil
- Small foam roller (4-inch)
- Standard roller and tray
- Angled sash brush (2-inch)
- Credit card or putty knife (for sealing tape edges)
- Clean rags
- Chair rail molding (optional, if not already installed)
Step 1: Preparation and Base Coat
-
Protect the floors:
Before dipping any brushes, run a strip of blue painter’s tape along the floor where it meets the baseboard. As seen in the project photo, you can also add a secondary tape line a few inches out to secure drop cloths. -
Clean the walls:
Wipe down the lower half of your wall with a damp cloth to remove dust or grime, ensuring the tape adheres perfectly later. -
Establish the height:
If you don’t have a chair rail, decide on the height for your faux wainscoting—usually about 32 to 36 inches from the floor—and lightly mark a horizontal line using a level. -
Apply the base color:
Roll two coats of your creamy off-white base color onto the entire lower section of the wall. I find it’s best to paint the molding and baseboards this same color for a cohesive, built-in look. -
Let it cure completely:
This is crucial: allow the base coat to dry for at least 24 hours, or even 48 if possible. If the paint is soft, the tape you apply in the next phase will peel it right off.
Bleed-Through Blues?
If paint bleeds under the tape, let it dry completely. Re-tape along the bad edge, leaving a hairline gap, and dab the correction color over the mistake for a sharp fix.
Step 2: Measuring and Taping
-
Calculate stripe width:
Measure the total length of your wall. Divide this number by your desired stripe width (typically 4 to 6 inches) to see how they will fit. Adjust slightly so you don’t end up with a tiny sliver of a stripe at the end. -
Mark the intervals:
Starting from the most visible corner, use a measuring tape to make small tick marks along the top (under the chair rail) and bottom (above the baseboard) at your calculated intervals. -
Draw vertical guides:
Use a laser level or a long bubble level to lightly connect your top and bottom tick marks with a pencil so you have vertical guide lines. -
Tape the stripes:
Apply vertical strips of painter’s tape. Remember to place the tape on the *outside* of the area you want to paint metallic. You are taping over the areas that will remain creamy white. -
Mark your ‘paint’ zones:
Place a small piece of tape or make a faint ‘X’ inside the vertical columns that will be painted metallic. It’s surprisingly easy to get confused once you start rolling.
Step 3: Painting the Stripes
-
Seal the tape edges:
Run a credit card or plastic putty knife firmly over the edges of the tape to ensure a tight bond. -
The ‘Bleed-Prevention’ trick:
Brush a very thin layer of your *base* color (the cream paint) over the edge of the tape where the stripe will be. This seals any tiny gaps; if paint bleeds under, it will be the base color and invisible. -
Apply the metallic paint:
Using a 4-inch foam roller, apply the copper metallic paint to the untaped columns. Metallic paints are thinner, so rely on thin, even coats rather than one thick gloop. -
Back-brushing:
Immediately after rolling, lightly drag a dry brush from top to bottom through the wet metallic paint. This aligns the metallic flakes vertically for a uniform sheen. -
Second coat:
Allow the first coat to dry according to the can’s instructions (usually 2-4 hours), then apply a second coat for full opacity and richness. -
Remove tape while damp:
Once the final coat is tacky but not fully dry, slowly peel the tape off. Pull it at a 45-degree angle away from the painted stripe to cut a crisp line. -
Touch ups:
Inspect your lines. If any metallic paint seeped through, wait for it to fully dry, then use a tiny artist’s brush and the base cream color to correct it.
Pro Tip: Metallic Sheen
For metallic paints, always finish with stroke in one continuous direction (top to bottom). Roller marks show up easily in metallics, so uniform direction is key.
Step back and admire how this simple technique adds architectural depth and warm elegance to your hallway


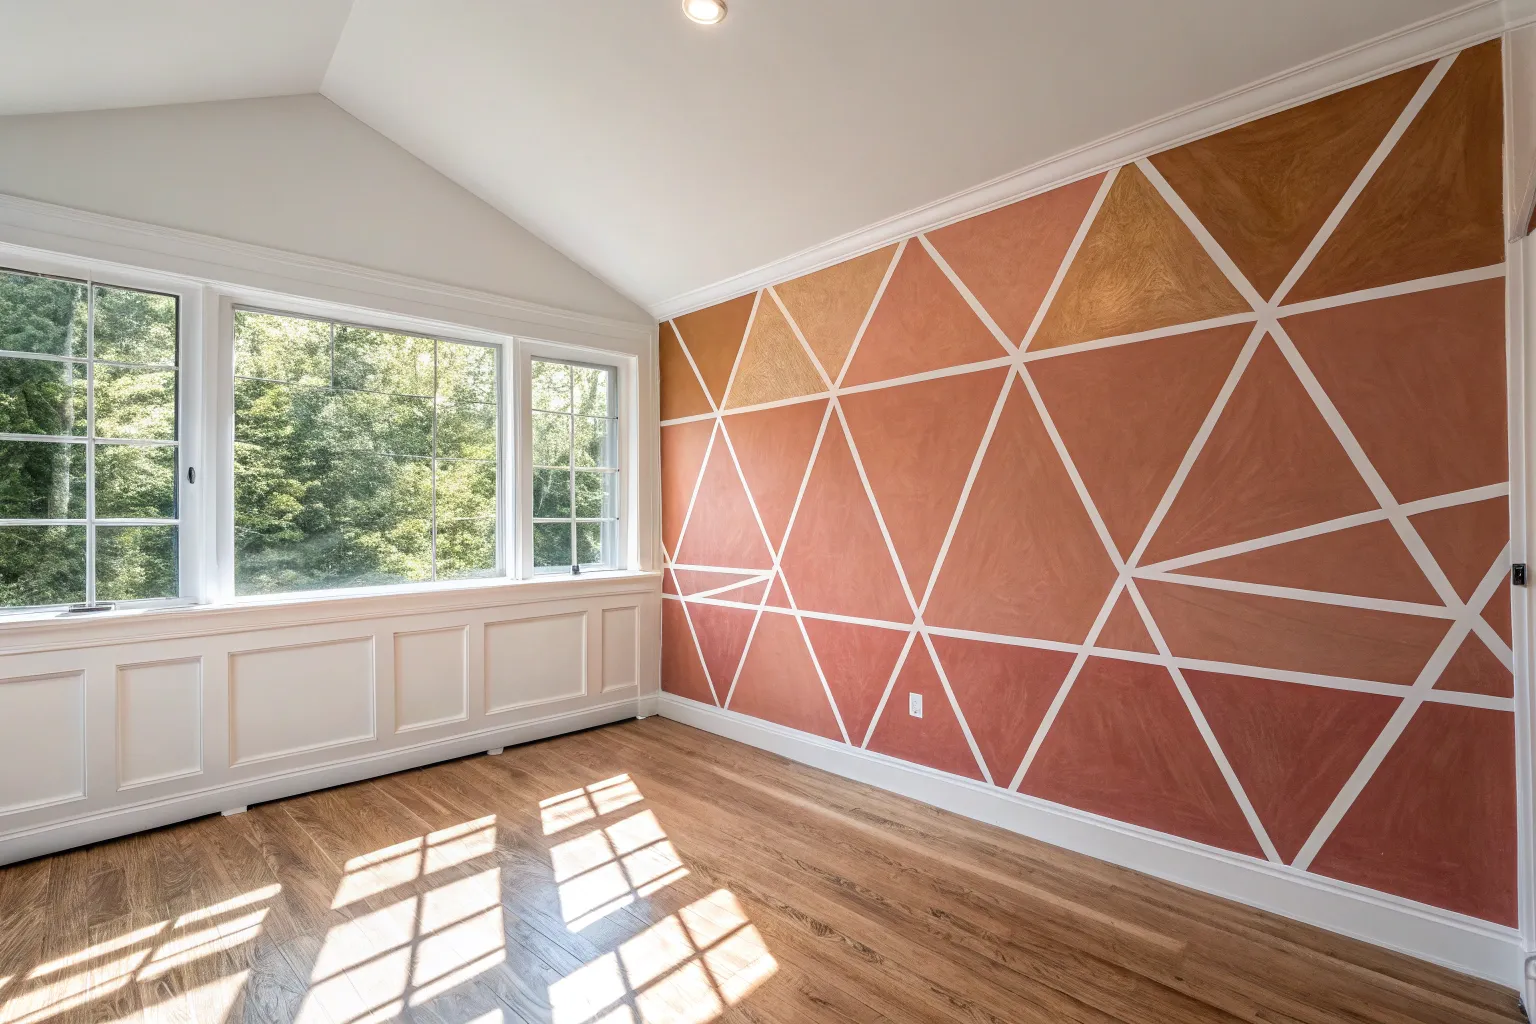
Geometric Color Blocking With Tape
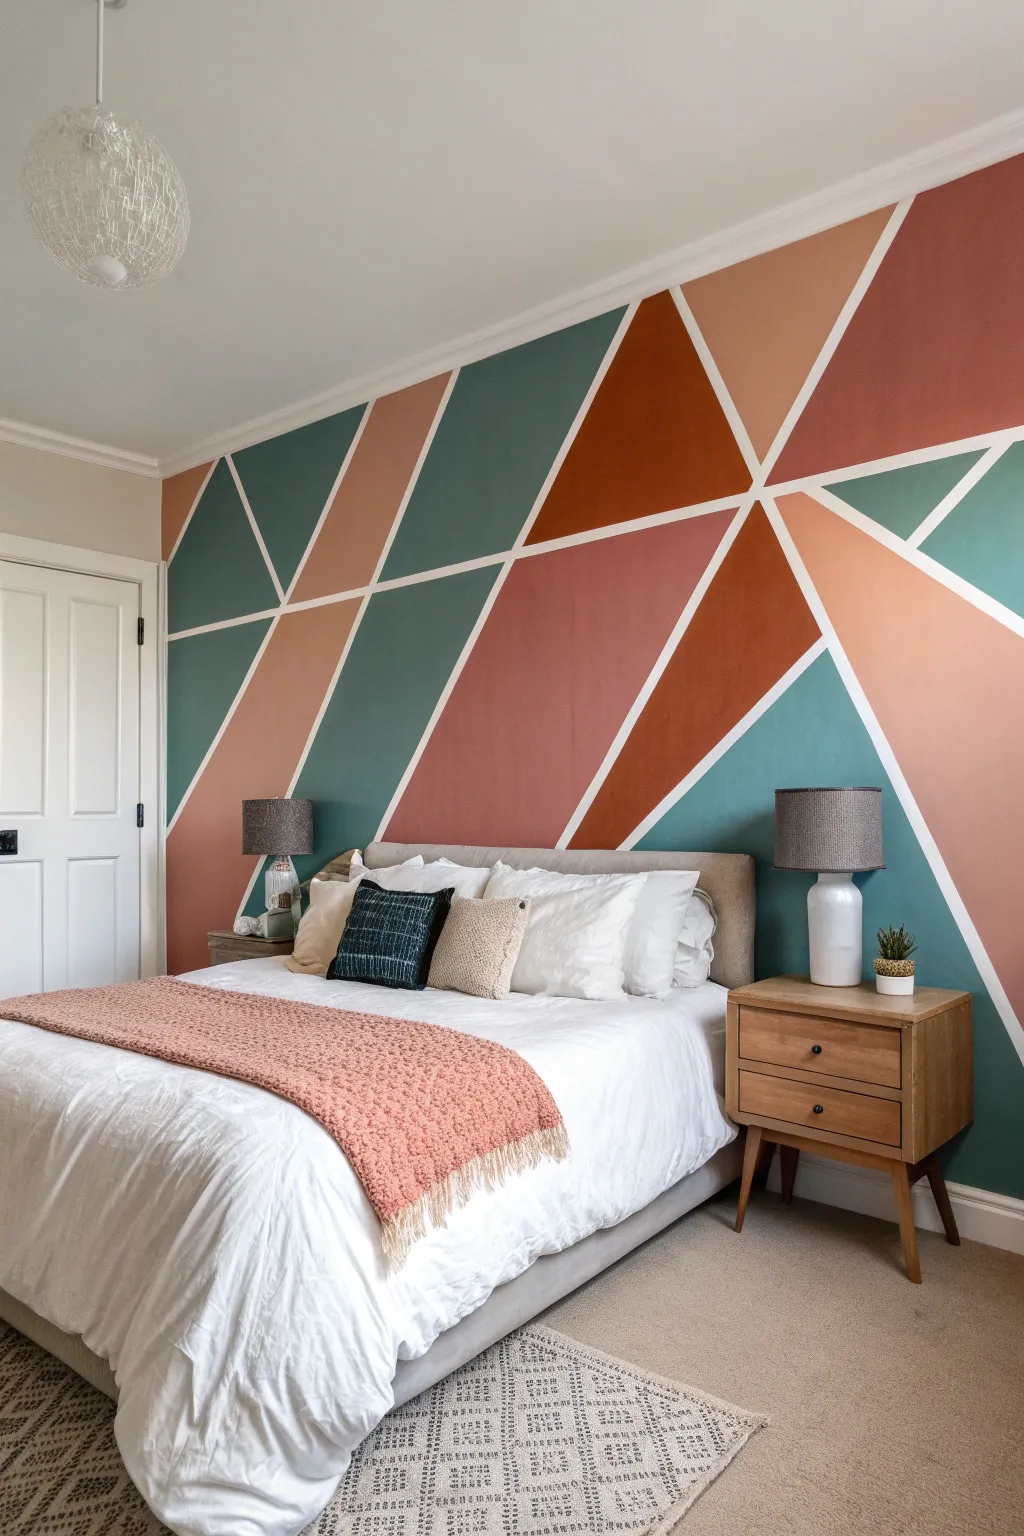
Transform a plain white wall into a stunning focal point with this bold, angular design. By using painter’s tape to create crisp negative space, you can combine earthy terracotta, rust, and teal tones for a modern bohemian vibe.
Step-by-Step Tutorial
Materials
- Interior latex paint (White/Base color)
- Interior latex paint (Teal, Terracotta, Blush Pink, Dark Rust)
- High-quality painter’s tape (1-inch width)
- Paint rollers (smooth surface nap) and tray
- Small angled sash brush
- Tape measure
- Pencil
- Plastic drop cloth
- Damp rag
Step 1: Preparation and Mapping
-
Clear and clean:
Remove all furniture, switch plates, and artwork from the wall. Wipe the surface down with a damp rag to remove dust, ensuring the tape will adhere perfectly. -
Apply the base coat:
Since the white lines in the design are actually the wall color underneath, ensure your base wall color is pristine. Apply a fresh coat of white paint if the current surface is dingy or marked. -
Plan your triangles:
Look at the reference photo to understand the composition. Notice how the lines radiate somewhat diagonally, creating large, irregular triangles. -
Mark anchor points:
Using a pencil, lightly mark a few key intersection points on the wall where multiple lines will meet. This acts as a constellation map before you start taping.
Seal the edges
Painting over your tape with the BASE wall color first is crucial. It fills gaps under the tape so your colored paint creates a perfect, crisp line every time.
Step 2: Taping the Design
-
Run the first main line:
Start with the longest diagonal line that stretches across the middle of the wall. Pull a long strip of painter’s tape, anchor it at the top, and pull it taut to your bottom mark to ensure it’s straight before pressing it down. -
Create secondary shapes:
Add the intersecting lines to create the geometric shards. Press the tape firmly against the wall, especially at the edges, to prevent bleed-under later. -
Intersect the corners:
When overlapping tape strips, I like to use a craft knife or fingernail to firmly bond the intersection point so paint doesn’t sneak into the junction. -
Review the layout:
Step back and look at your taped wall. Does it resemble the balance of the photo? You want a mix of large and medium shapes, avoiding tiny slivers that are hard to paint. -
Seal the tape:
This is the secret step: paint a thin layer of your *base wall color* (white) over the edges of the tape. This forces white paint into any air gaps, sealing them so your colored paint lines will be razor-sharp.
Peeling paint fix
If paint lifts when removing tape, score the edge gently with a utility knife before pulling further. This breaks the seal between the tape and the wall.
Step 3: Painting the Colors
-
Assign your palette:
Mark each taped section with a tiny piece of tape or a sticky note indicating which color goes where. This prevents accidental mistakes once you have a loaded roller. -
Cut in the edges:
Use your angled sash brush to carefully paint the borders of each shape, right up to the tape line and the ceiling/baseboard edges. -
Roll the fill:
Use a small roller to fill in the centers of the shapes. Be careful not to roll over into a neighboring section with a different color. -
Apply second coats:
Let the first coat dry according to the can’s instructions (usually 2-4 hours). Apply a second coat to ensure rich, opaque coverage, especially for the darker teal and rust shades.
Step 4: The Reveal
-
Timing the removal:
Do not wait for the paint to cure completely. The sweet spot for removal is when the paint is dry to the touch but still slightly flexible, usually about an hour after the final coat. -
Peel the tape:
Pull the tape off slowly at a 45-degree angle back toward the painted section. This shearing motion helps cut through the paint film cleanly. -
Touch ups:
If any paint bled through, use a tiny artist’s brush and your base white paint to correct the lines.
Enjoy the dynamic energy your new geometric feature wall brings to the room
BRUSH GUIDE
The Right Brush for Every Stroke
From clean lines to bold texture — master brush choice, stroke control, and essential techniques.
Explore the Full Guide
Smooth Ombre Gradient Wall
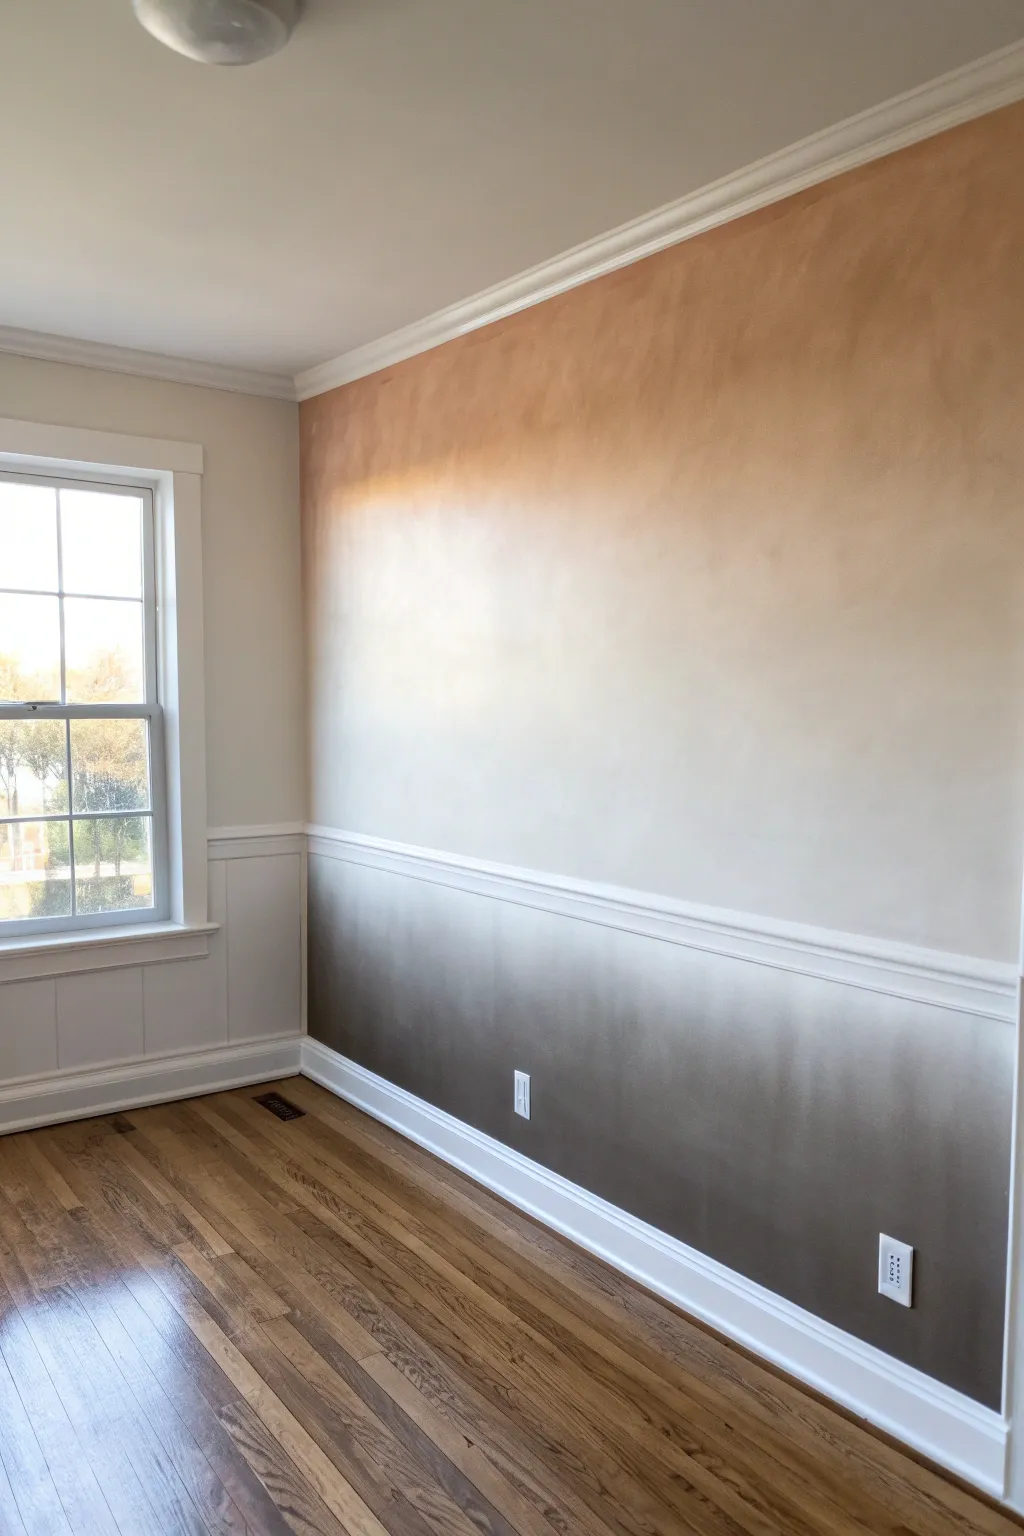
Transform a plain room into a sunrise-inspired sanctuary with this dual-tone ombre technique. By splitting the gradient with a chair rail, you achieve a sophisticated look where a warm peach sky sits gracefully above a grounding charcoal base.
How-To Guide
Materials
- Interior emulsion paint (Warm Peach)
- Interior emulsion paint (Soft White)
- Interior emulsion paint (Dark Charcoal)
- Stiff bristle blending brush or specialized glazing brush
- Two paint rollers and trays
- Painter’s tape
- Drop cloths
- Spray bottle with water (mister)
- Chair rail molding (pre-primed)
- Construction adhesive or nail gun
- Clean finishing rags
Step 1: Preparation and Molding
-
Clear and clean:
Begin by removing any existing switch plate covers, outlets covers, and any art from the walls. Wipe down the surface with a damp cloth to remove dust, as this ensures the smoothest gradient blend. -
Protect your space:
Lay down heavy-duty drop cloths over that beautiful hardwood flooring. Tape off the window trim, baseboards, and ceiling edge with high-quality painter’s tape to keep lines crisp. -
Install the divide:
Measure and install your chair rail molding roughly one-third of the way up the wall. This physical barrier makes the ombre effect much manageable by splitting it into two distinct zones. Caulking the gaps now will save you a headache later. -
Prime the surface:
If painting over a dark color, apply a coat of white primer to the entire wall. Let this dry completely before starting your color application.
Step 2: The Upper Atmosphere (Peach to White)
-
Apply the peach base:
Cut in the peach color along the ceiling line. Using a roller, paint the top 12-18 inches of the wall with your Warm Peach tone. -
Apply the white mid-tone:
Immediately roll your Soft White paint starting just above the chair rail and working upward, stopping about 6 inches from where your peach paint ended. Leave a gap of unpainted wall between the two colors. -
Mix the transition color:
On a paper plate or tray, mix a 50/50 blend of the peach and white paints. Apply this mixture into the empty gap between your two wet colors. -
Blend downward:
Take your clean blending brush (a dry brush works best here) and gently feather the peach paint down into the 50/50 mix. Use cross-hatch strokes (X-motions) to blur the line. -
Blend upward:
Clean or switch brushes, then blend the white section upward into the mixed zone. I find a light mist of water from a spray bottle helps keep the paint workable if it starts to tack up too quickly. -
Final smooth:
Use long, light horizontal strokes across the transition area to soften any visible brush marks, creating that hazy, cloud-like fade.
Uneven Blending?
If brush strokes are too visible, your paint may be drying too fast. Mist the wall lightly with water and use a very soft, dry brush to feather out the harsh lines immediately.
Step 3: The Grounding Fade (Charcoal to White)
-
Apply the dark anchor:
Once the top is drying, move to the bottom section. Cut in and roll your Dark Charcoal paint along the baseboards, covering the bottom 12 inches. -
Apply the white top:
Roll Soft White paint (using a fresh roller sleeve) starting just under the chair rail and working downward, stopping before you hit the charcoal. -
Create the grey middle:
Mix a transition grey using your charcoal and white paints. Apply this stripe between the dark bottom and white top. -
Rapid blending:
Work quickly to blend the charcoal up into the grey mix using your X-motion technique. Dark pigments can be unforgiving, so keep your brush moving constantly. -
Soften the fade:
Blend the white down into the grey using a clean dry brush. Step back frequently to ensure the gradient looks consistent across the length of the wall.
Metallic Magic
Swap the top peach color for a metallic gold glaze, or add pearlizing medium to the white paint. This catches light from the window and adds a shimmering, luxe finish.
Step 4: Finishing Touches
-
Paint the trim:
Once the walls are fully dry (usually 24 hours), remove the tape. Paint the chair rail, baseboards, and window trim with a crisp, semi-gloss white to frame your work. -
Reinstall hardware:
Screw the switch plates and outlet covers back into place. For a seamless look, you might consider painting the covers to match the gradient section they sit in.
Enjoy the peaceful atmosphere your new sunrise gradient brings to the room
Hand-Painted Polka Dot Scatter
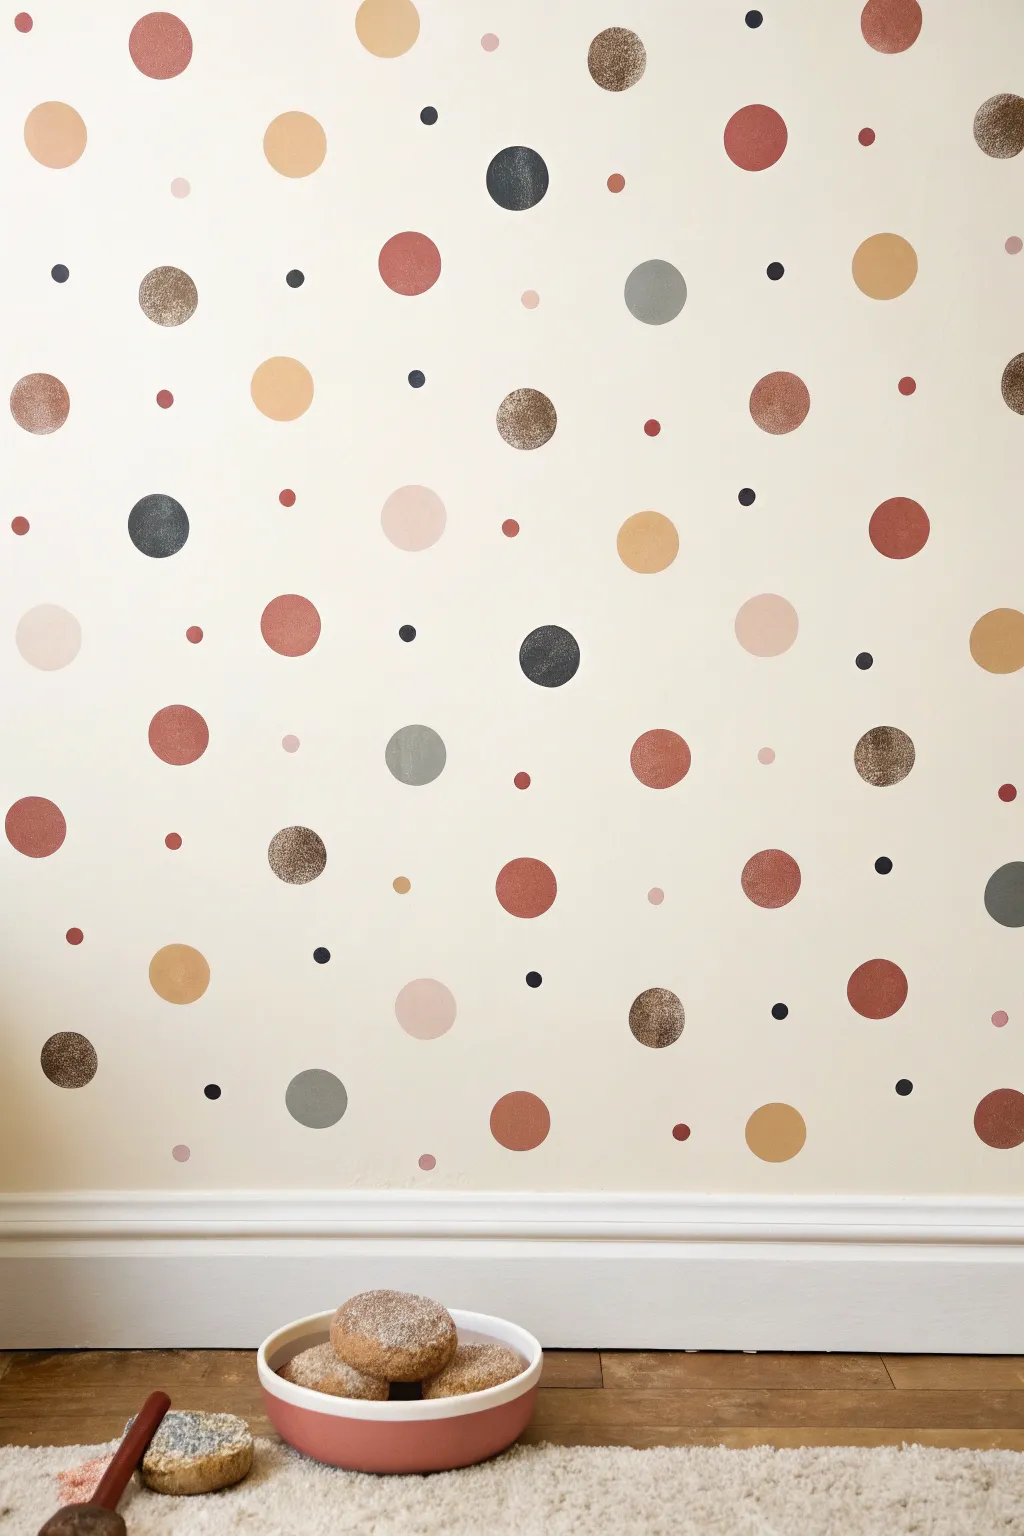
Transform a plain wall into a whimsical feature with this organic, hand-painted polka dot design. The scattered pattern uses a warm palette of terracotta, sage, and mustard to create a cozy, modern nursery or playful bedroom accent.
Step-by-Step Guide
Materials
- Latex interior wall paint (Eggshell finish base coat)
- Small sample pots of paint in assorted earthy colors (terracotta, mustard yellow, sage green, dark chocolate brown, charcoal, pale pink)
- Round foam pouncer sponges (assorted sizes: 1-inch, 2-inch, and 3-inch)
- Small flat artist brushes (for touch-ups)
- Paper plates or palette tray
- Painter’s tape
- Drop cloth
- Bubble level (optional, just for eye-balling)
- Damp rag
Step 1: Preparation & Planning
-
Prep the workspace:
Clear furniture away from the wall you intend to paint and lay down a drop cloth to protect the floor from accidental drips. -
Clean the surface:
Wipe down the wall with a damp rag to remove dust and dirt, ensuring the new paint adheres properly. If your base wall color needs a refresh, paint that layer first and let it cure for at least 24 hours. -
Testing the pattern:
Before touching the wall, practice your spacing on a large piece of cardboard or craft paper. This helps you get a feel for how dense you want the ‘scatter’ effect to be without committing to the wall immediately.
Step 2: Stamping the Large Circles
-
Load the large sponge:
Pour a small amount of your first accent color (e.g., terracotta) onto a paper plate. Dip the largest foam pouncer into the paint, ensuring the face is evenly coated. -
Offload excess paint:
Tap the sponge lightly on a clean part of the plate to remove globs of excess paint. Too much paint causes the shape to slide and drip on the wall. -
Apply the first dots:
Press the sponge firmly against the wall, giving it a slight twist back and forth—without sliding it—to ensure full coverage. Lift straight off to avoid smearing. -
Randomize the placement:
Continue adding large dots in this first color, spacing them out generously. I prefer to step back frequently to ensure the pattern doesn’t look too gridded or linear. -
Repeat with other colors:
Clean your sponge or switch to a fresh one, then repeat the process with your other colors (mustard, sage, charcoal) using the large size only. Leave plenty of empty space for the smaller dots later.
Bleeding Edges?
If paint bleeds under the sponge, your paint is likely too thin or you are pressing too hard. Use less paint and darker colors, or thicken the paint slightly by leaving it on the plate for a few minutes.
Step 3: Adding Medium & Small Details
-
Switch to medium sponges:
Using the 2-inch sponge, begin filling in the larger gaps. Try to place colors next to different neighbors to avoid clustering too much of the same shade together. -
Layering depths:
Aim for a nice distribution where medium dots sit equidistant from the large ones, creating a balanced ‘constellation’ look. -
Introduce the smallest dots:
Load your smallest 1-inch sponge or pouncer. These tiny dots act as confetti, filling small voids and making the pattern feel expansive. -
Using darker accents:
Use your charcoal or dark brown paint sparingly for the smallest dots. These high-contrast points ground the design and draw the eye. -
Check the edges:
Don’t forget to stamp partial circles near the corners, baseboards, and ceiling line. This makes the pattern look like wallpaper that continues beyond the wall boundaries.
Add Metallic Foil
For a glamorous twist, use gold leaf size on a few select small dots instead of paint. Once tacky, press gold foil sheets over them to create shimmering metallic accents throughout the wall.
Step 4: Refining the Shapes
-
Inspect for coverage:
Foam pouncers often leave a bubbly texture or slight transparency in the center. Once the circles are dry to the touch, identify which ones look patchy. -
Fill in centers:
Use a small flat artist brush to carefully paint inside the circles, smoothing out the texture and making the color opaque. -
Fix uneven edges:
If any circle edges are ragged or missed a spot, carefully trace the perimeter with your artist brush to round them out perfectly. -
Erasure technique:
If you made a mistake or a dot is too close to another, wait for it to fully dry, then paint over it with your original wall base color using a small brush. -
Final drying:
Allow the entire wall to cure for 24 hours before moving furniture back against it, ensuring the shapes don’t get scuffed.
Now you have a custom, wallpaper-like effect that brightens the room with warm personality

PENCIL GUIDE
Understanding Pencil Grades from H to B
From first sketch to finished drawing — learn pencil grades, line control, and shading techniques.
Explore the Full Guide
Painted Arch as a Soft Focal Point
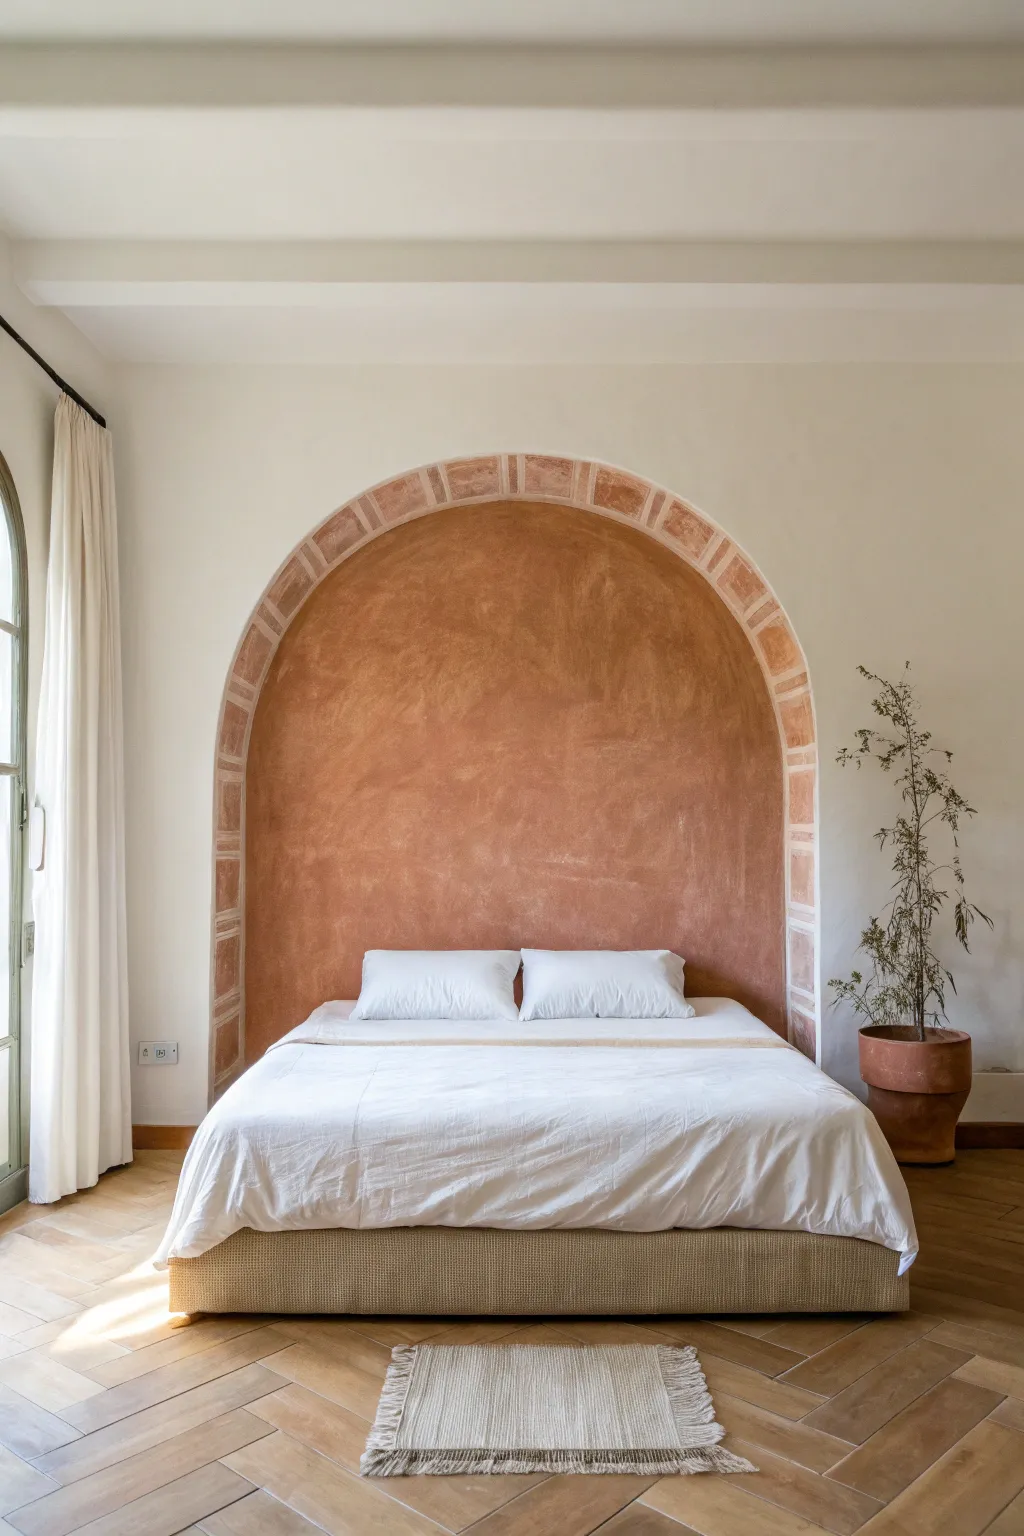
Bring the warmth of a Mediterranean villa into your bedroom with this stunning statement arch. Featuring a rich, textured limewash center framed by a delicate faux-brick border, this project creates an architectural focal point without any remodeling.
Step-by-Step Tutorial
Materials
- Pencil and eraser
- String and push pin (or a large compass)
- Painter’s tape (multi-surface)
- Measuring tape
- Bubble level
- Terracotta colored limewash paint (or chalk paint)
- Lighter peach/sand colored paint (for the mortar lines)
- A medium hue terracotta paint (for the bricks)
- Large block brush (for limewash)
- Small angled sash brush
- Flat artist brush (1/2 inch)
- Drop cloth
- Ladder
Step 1: Drawing the Layout
-
Determine the center:
Measure the width of your bed or the wall area you want to frame. Mark the exact center point on the floor (or baseboard) and project this line vertically up the wall to your desired arch height. -
Set the arch height:
Decide how tall you want the straight sides of the arch to be before they curve. Mark this height on both sides of your center line, ensuring they are level. -
Create the curve guide:
Tie a piece of non-stretchy string to a pencil. Pin the other end of the string to the wall on your center line, exactly halfway between the two side height marks. The length of the string should reach the side marks. -
Draw the outer arch:
Keeping the string taut, swing the pencil in a smooth arc to connect your side marks, creating the top dome of the arch. Extend straight lines down from the side marks to the floor. -
Draw the inner arch:
Shorten your string by about 6-8 inches (this determines the thickness of your brick border). Using the same center pin point, draw a second, smaller arch inside the first one. Draw straight lines down to the floor for this inner section as well.
Natural Texture Hack
Don’t have limewash? Mix regular matte latex paint with a little plaster of Paris or even baking soda. It thickens the paint and creates that authentic, sandy Mediterranean texture when brushed on.
Step 2: Creating the Faux Bricks
-
Mark brick spacing:
Along the curved border you just drew, use a flexible tape measure to mark equal segments for your ‘voussoirs’ (the wedge-shaped stones used in arches). A width of 4-6 inches works well. -
Draw radial lines:
Use a straightedge to connect your center pin point to each mark on the curve, tracing a line only within the border space. This ensures the ‘bricks’ look like they are radiating correctly from the center. -
Continue down the sides:
Once you reach the straight vertical sections of the border, simply draw horizontal lines to create standard rectangular brick shapes down to the floor. -
Tape the border:
Apply painter’s tape along the very outer edge of the large arch and the inner edge of the small arch to protect the wall and the center fill area.
Step 3: Painting the Texture
-
Base coat the border:
Paint the entire border area (over your pencil lines) with your lighter peach/sand color. This will act as the ‘mortar’ color. Let this dry completely. -
Mask the mortar lines:
Using thin painter’s tape or artist tape, mask off the lines separating your bricks. Press the edges down firmly to prevent bleed. -
Paint the bricks:
Using the medium terracotta hue, paint the exposed brick rectangles. I prefer to dab the paint slightly unevenly here to give it an aged, stone-like appearance rather than a solid blocks of color. -
Remove tape and fill center:
Peel off the tape on the border while the paint is still slightly tacky. Now, attention turns to the large central void. -
Apply first limewash coat:
Using a large block brush, apply your dark terracotta limewash to the center arch area. Use ‘X’ shaped brush strokes to create that cloudy, textured movement visible in the photo. -
Build depth:
Allow the first coat to dry until it feels chalky. Apply a second coat using the same crisscross motion, focusing on blending any harsh edges. -
Soften the transition:
If the line between the center fill and the brick border looks too sharp, take a small, dry artist brush and lightly feather a tiny bit of the dark limewash onto the inner edge of the border for a seamless look. -
Final touch-ups:
Inspect your work for any pencil marks still showing through the lighter mortar lines and erase gently if needed, or touch up with a small brush.
Level Up: Aged Patina
Once dry, dilute a tiny drop of dark brown or grey paint in water. Lightly wash this over random bricks and wipe it back immediately with a rag to create the look of centuries-old weathered stone.
Step back and admire how this warm, architectural feature completely transforms the depth and character of your room.
Checkerboard Wall for Graphic Energy
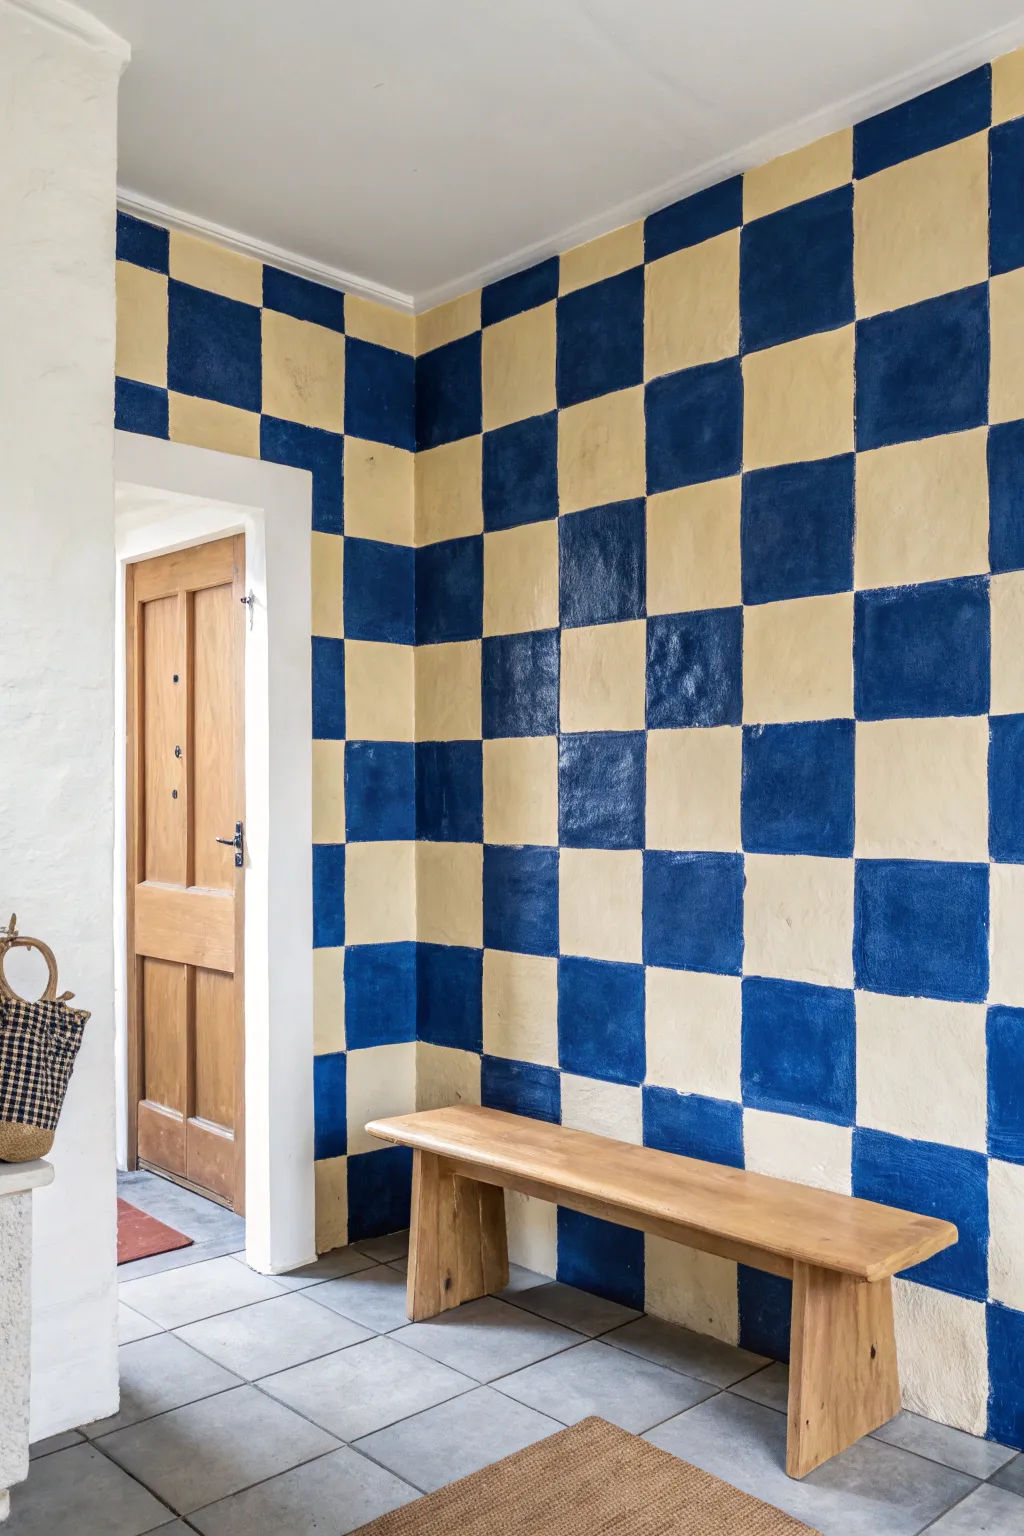
Infuse your space with bold, graphic energy using this oversized checkerboard wall technique. The slightly imperfect, wobbly lines give it a relaxed, artisanal feel that warms up a room instantly.
Step-by-Step
Materials
- Interior latex paint (Deep cobalt blue)
- Interior latex paint (Creamy butter yellow)
- Small roller and tray
- 2-inch angled sash brush
- 1-inch flat artist’s brush
- Pencil
- Tape measure
- Spirit level or laser level
- Drop cloth
- Ladder
Step 1: Preparation & Base Coat
-
Clear and clean:
Remove any furniture, like the bench shown, and cover your floors with a drop cloth. Wipe down the walls to ensure they are dust-free for the best paint adhesion. -
Apply the base color:
Since the cream color is lighter, use it as your base. Roll two coats of the creamy butter yellow paint over the entire wall surface, letting it dry completely between coats according to the can’s instructions. -
Inspect the surface:
Check for any uneven spots or missed patches in your yellow base, as this will form the lighter squares of your checkerboard. Touch up if necessary before moving on.
Uneven Walls?
If your walls aren’t perfectly square, don’t force the grid. Adjust the last row of squares at the floor or corner to be partial cuts. This tricks the eye and hides architectural quirks.
Step 2: Mapping the Grid
-
Determine square size:
Measure the total width and height of your wall to calculate your square size. For the look in the photo, aim for large squares, roughly 12 to 14 inches wide. -
Mark the verticals:
Starting from the corner, measure out your horizontal increments along the ceiling line. Use a pencil to make small tick marks every 12-14 inches. -
Draw vertical guidelines:
Using a level and a pencil, lightly draw vertical lines down from your ceiling marks. Don’t worry if they are faint; they are just guides. -
Mark the horizontals:
Measure down from the ceiling in the same increments (12-14 inches) to create square proportions. Mark these intervals along the corner and the far edge of the wall. -
Complete the grid:
Connect your side marks with a level to create the horizontal grid lines. I prefer to use a very light touch here so the graphite doesn’t show through the yellow paint later. -
X marks the spot:
Review your grid and place a small piece of painter’s tape or a light pencil ‘X’ inside every *other* square. These marked squares will be painted blue, preventing any mix-ups once you start painting.
Texture Trick
For that authentic plaster look, use a mini roller with a thick nap (3/4 inch) for the final coat. It adds subtle stipple texture to the flat latex paint.
Step 3: Painting the Blue Squares
-
Outline the first square:
Dip your 1-inch flat artist’s brush into the deep cobalt blue paint. Hand-paint the outline of your first ‘X’ marked square. Embrace a slightly wobbly line rather than a rigid one to mimic the photo’s organic style. -
Fill in the edges:
Thicken the outline you just created, working carefully near the corners where blue squares meet. This creates a handmade border. -
Fill the center:
Once the edges are defined, use the 2-inch sash brush or a small roller to fill in the center of the blue square. Ensure solid coverage so the yellow doesn’t peek through. -
Work in a pattern:
Move across the wall, outlining and filling only the squares marked with an ‘X’. It helps to work from the top down to avoid smudging wet paint with your arm. -
Handle the corners:
When you reach the room’s corner, carefully paint into the crease. The grid should wrap visually around the corner, continuing the pattern on the adjacent wall. -
Apply a second coat:
Wait for the first coat of blue to dry to the touch. Apply a second coat to the blue squares to achieve that rich, saturated depth seen in the inspiration image.
Step 4: Finishing Touches
-
Check for drips:
While the paint is still slightly tacky, scan for any drips that might have run into the yellow squares and wipe them gently with a damp cloth. -
Erase guidelines:
Once the paint is fully cured (give it 24 hours), use a clean eraser to gently remove any visible pencil lines in the light yellow squares. -
Touch up lines:
If any blue lines look too crooked even for this style, use a small brush and the original yellow paint to neaten the edges slightly.
Step back and admire the playful, graphic impact your new feature wall brings to the room


All-Over Stenciled Pattern Look
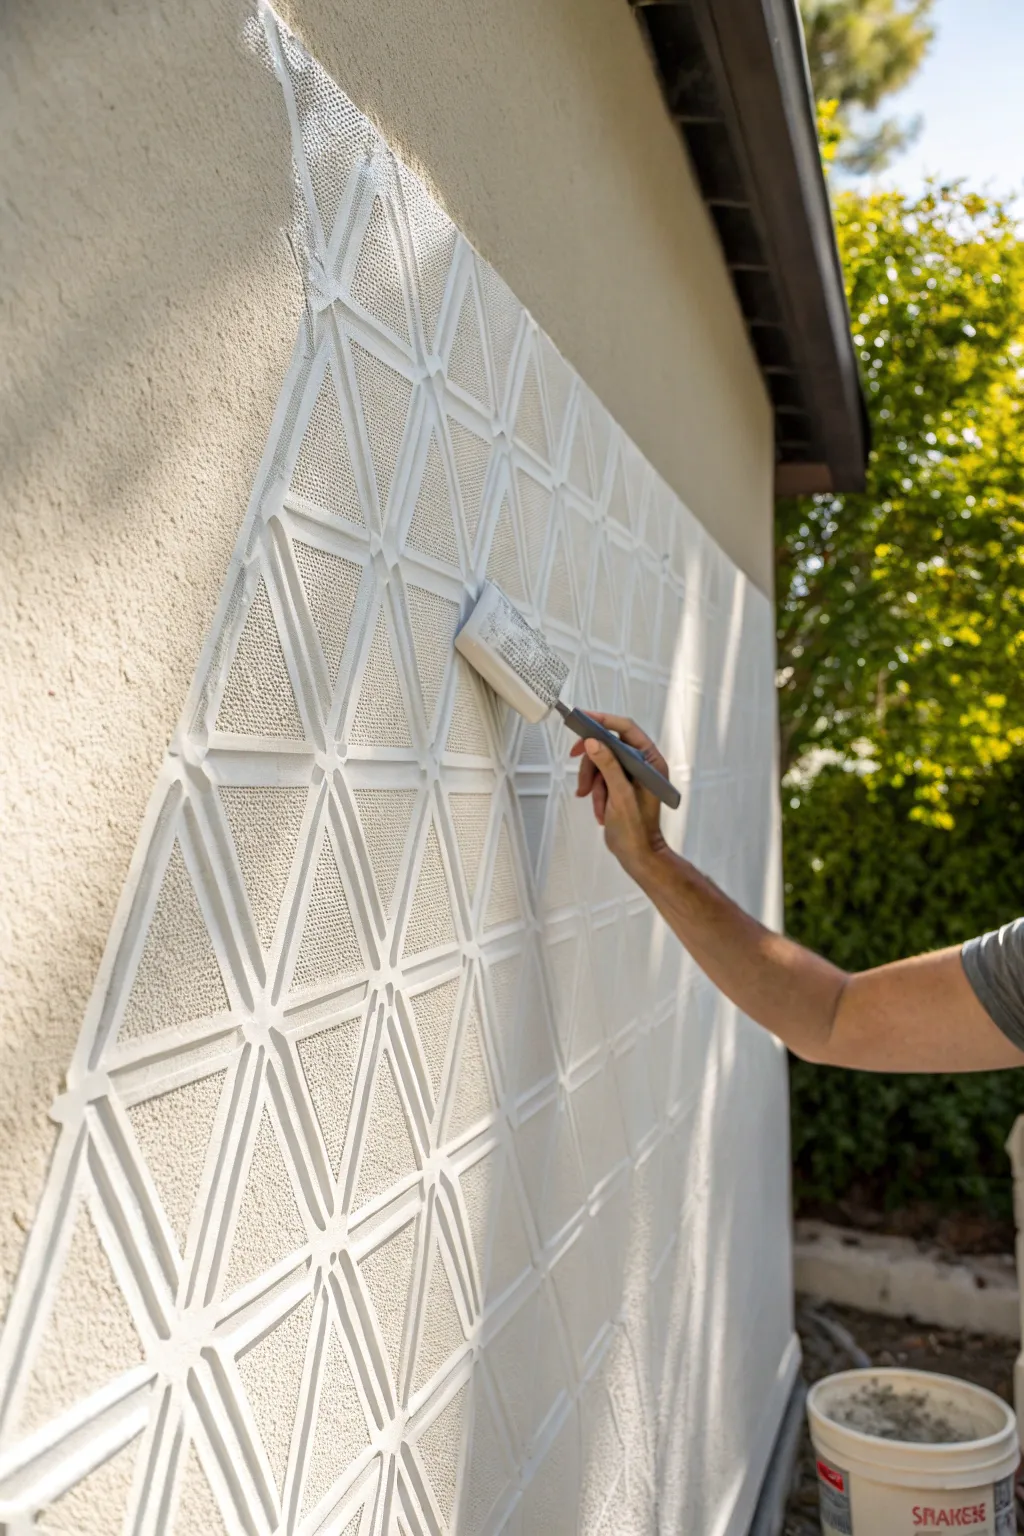
Transform a plain exterior stucco wall into a striking geometric feature with this bold, all-over pattern technique. The clean white lines against the natural texture create a sophisticated, architectural look that instantly upgrades your home’s curb appeal.
Step-by-Step Guide
Materials
- Large geometric wall stencil (triangle/hexagon pattern)
- Exterior masonry paint or elastomeric paint (white)
- Painter’s tape (blue or green)
- Spray adhesive (repositionable)
- Small foam roller (4-inch or 6-inch)
- Paint tray
- Bubble level
- Paper towels
- Drop cloth
- Extension pole (optional for higher reaches)
Step 1: Preparation and Setup
-
Clean surface:
Begin by thoroughly cleaning the exterior wall. Use a pressure washer or a stiff scrub brush with soapy water to remove dirt, dust, and cobwebs. Let the wall dry completely for at least 24 hours. -
Protect area:
Lay down a drop cloth along the base of the wall to catch any drips. Use painter’s tape to mask off adjacent trim, windows, or corners where you don’t want the pattern to go. -
Plan placement:
Hold your stencil up against the wall to determine the best starting point. I prefer starting at the top center or a highly visible corner to ensure the pattern looks balanced. -
Prepare stencil:
Spray the back of your stencil lightly with repositionable spray adhesive. Let it sit for a minute until it becomes tacky but not wet; this prevents adhesive residue on the wall.
Sticky Situation
On rough stucco, tape doesn’t stick well. Rely heavily on the spray adhesive and hold the stencil with your free hand while rolling to prevent shifting.
Step 2: First Application
-
Position stencil:
Press the stencil firmly onto the wall at your starting point. Use a bubble level to ensure the top edge is perfectly horizontal. This first placement is crucial as it sets the alignment for the entire wall. -
Load paint:
Pour a small amount of exterior masonry paint into your tray. Load your foam roller, then offload practically all the paint onto the textured part of the tray or a paper towel. The roller should feel almost dry. -
Check consistency:
Test the roller on a piece of cardboard first. If you push hard and paint squishes out the sides, you have too much paint. Stenciling on textured stucco requires very light layers. -
Apply paint:
Roll over the stencil with light to medium pressure. Because the surface is textured stucco, you aren’t trying to fill every single pore; simply color the raised surfaces to create the design. -
Check coverage:
Lift a corner carefully to inspect the coverage. If it’s too faint, do a second light pass. Avoid pressing hard, as this forces paint under the stencil bridges.
Textured Dimension
For a 3D effect, thicken your paint with a texture additive. This creates a raised, embossed pattern that catches sunlight differently throughout the day.
Step 3: Repeating the Pattern
-
Align registration points:
Carefully peel the stencil off the wall. Move it to the adjacent spot, using the built-in registration marks (parts of the design you just painted) to line it up perfectly. -
Re-level:
Even though you are using registration marks, quickly check with your level occasionally to make sure the pattern isn’t drifting upwards or downwards. -
Continue painting:
Reload your roller sparingly and paint the next section. Work in a consistent direction (e.g., top to bottom, left to right) to maintain a rhythm. -
Clean periodically:
After every 4-5 repeats, check the back of the stencil. If paint starts accumulating, wipe it off so it doesn’t smear your clean lines.
Step 4: Finishing Touches
-
Handle edges:
When you reach corners or the ground level, you may need to bend the flexible stencil into the crease. Use tape to hold the bent stencil in place while you roll carefully. -
Touch up:
Once the entire wall is stenciled and the stencil is removed, walk back and inspect your work. Use a small artist’s brush and your base wall color to correct any significant bleeds. -
Final cure:
Allow the paint to cure fully according to the manufacturer’s instructions before placing any furniture or plants against the new feature wall.
Enjoy the dramatic transformation of your outdoor space with this custom, high-end finish you created yourself
Branch and Leaf Silhouette Mural
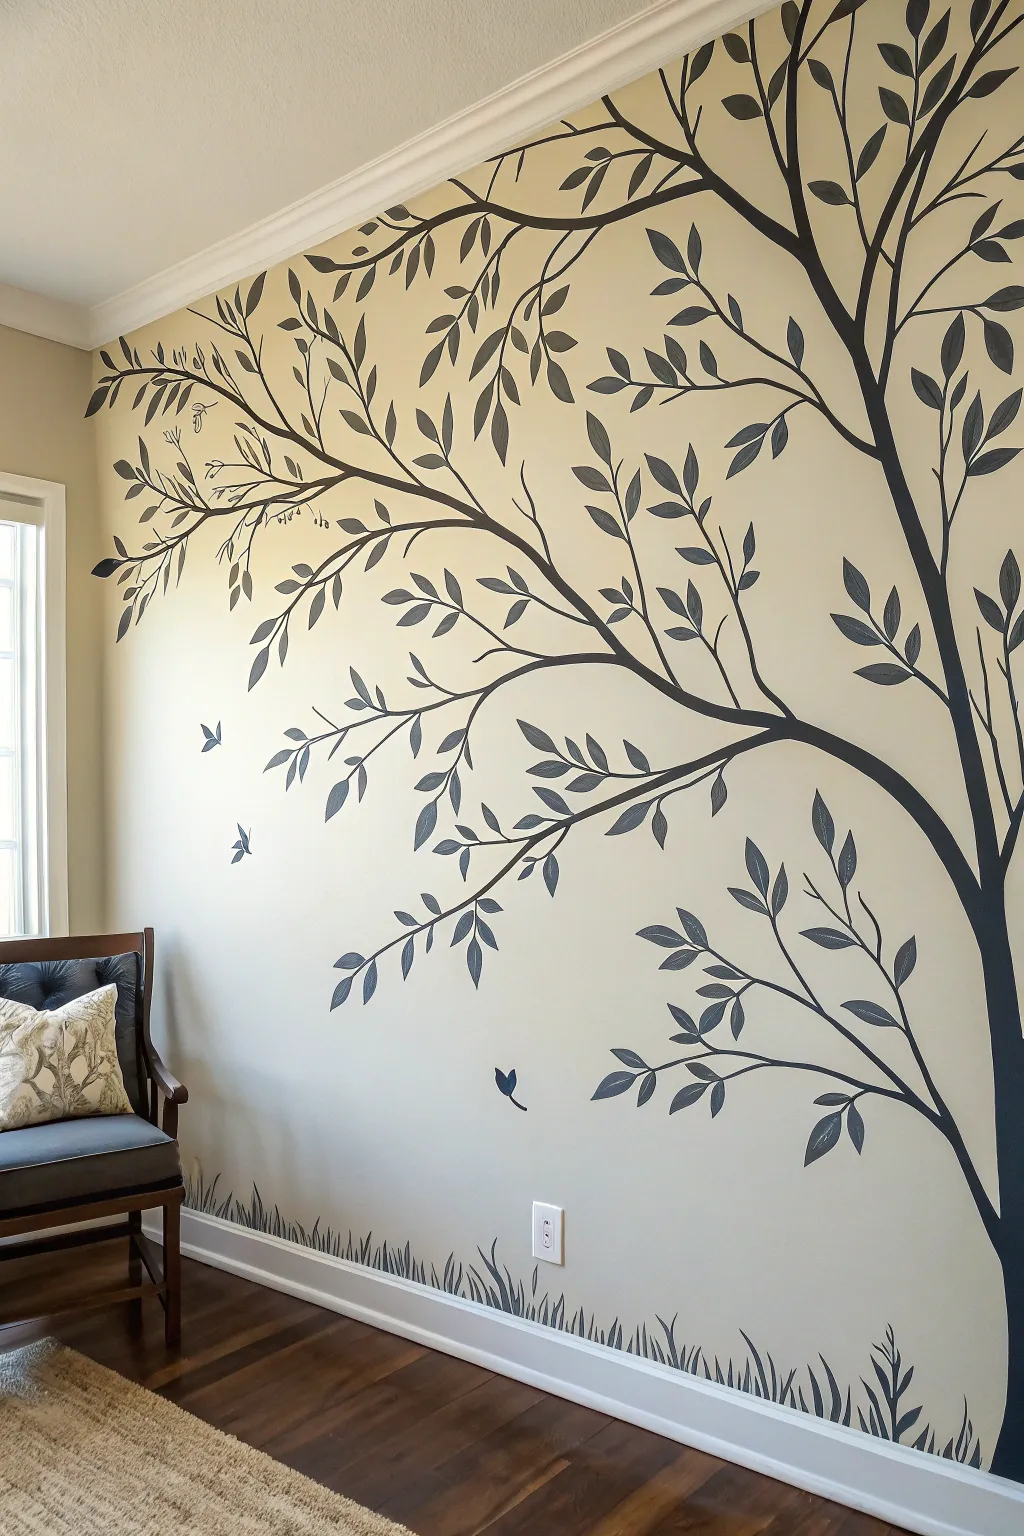
Transform a blank wall into a serene woodland escape with this striking monochromatic tree mural. The high-contrast design features sweeping branches and delicate leaves that create an impactful yet peaceful focal point for any room.
How-To Guide
Materials
- Interior latex wall paint (base wall color, eggshell finish)
- Dark charcoal or black acrylic latex paint (mural color, matte or satin finish)
- Pencil and large eraser
- Projector (optional but recommended)
- Transparency film or digital image of a tree silhouette
- Assorted paintbrushes (1-inch angular sash brush, #4 round brush, #0 liner brush)
- Painter’s tape
- Drop cloths
- Stepladder
- Small roller and tray
Step 1: Preparation & Base Coat
-
Clear and clean the workspace:
Begin by removing all furniture from the wall area to give yourself plenty of room to maneuver a ladder. Clean the wall surface with a mild soap and water solution to remove dust or oils that might prevent paint adhesion. -
Protect your surfaces:
Lay down drop cloths to protect your flooring. Apply painter’s tape along the ceiling line, adjacent walls, and the top edge of the baseboards to ensure crisp edges. -
Apply the background color:
If your wall isn’t already the desired cream or beige tone, roll on two coats of your base interior latex paint. Allow this to dry completely for at least 24 hours before starting the mural work to prevent peeling.
Step 2: Drafting the Design
-
Choose your method:
For the most accurate recreation, I prefer using a digital projector. Set it up on a table or ladder across the room and project your tree silhouette image onto the wall. Adjust the distance until the trunk climbs the full height and branches span your desired width. -
Trace the trunk and major limbs:
Using a pencil, lightly trace the outline of the main trunk on the right side and the thickest primary branches reaching across the wall. Keep your hand steady but don’t worry about being visible; the dark paint will cover pencil lines easily. -
Sketch the smaller details:
Continue tracing the secondary branches and the spray of leaves. If you are free-handing this without a projector, sketch the general motion of the branches first, ensuring they arc gracefully outward rather than looking stick-straight. -
Add the ground and fauna:
Sketch a simple, uneven grassy texture along the bottom just above the baseboard. Don’t forget to lightly mark the positions of the small flying birds or butterflies suspended in the open space on the left.
Wobbly Lines?
If your hand shakes while painting long branches, use a mahl stick (or a yardstick) to brace your wrist against the wall without touching the wet paint.
Step 3: Painting the Silhouette
-
Cut in the trunk edges:
Dip your 1-inch angular sash brush into the dark charcoal paint. Carefully paint along the pencil outlines of the thick trunk and the largest branches to establish strict boundaries. -
Fill the large areas:
Once the edges are defined, fill in the center of the trunk. You can use a small foam roller for the widest parts of the trunk to speed up the process and ensure even coverage. -
Extend the branches:
Switch to a smaller brush as you move away from the trunk. For the medium-sized branches, paint in long, fluid strokes to mimic the organic growth of wood, tapering the thickness as you reach the ends. -
Paint the leaves:
Use a #4 round brush for the leaves. Press down at the base of the leaf to create width, then lift the brush comfortably as you drag it out to create a sharp point. Vary the direction of the leaves slightly so they don’t look like uniform stamps. -
Refine the stems:
Connect the leaves to the main branches using the #0 liner brush. These connections should be incredibly thin and delicate to prevent the tree from looking heavy or clunky. -
Create the grass illusion:
Along the bottom, use upward flicking motions with your medium brush to create the grass blades. Vary the height and angle of the strokes to make it look wild and natural rather than a manicured lawn. -
Detail the flying elements:
Paint the small birds or butterflies using the smallest brush. Focus on the silhouette shape—usually a simple ‘V’ or winged form is enough to convey flight without needing intricate detail.
Add Dimension
Mix a tiny drop of white into your black paint to create a dark grey. Use this to paint a few ‘background’ leaves specifically behind the main ones for depth.
Step 4: Finishing Touches
-
Inspect for coverage:
Step back to the other side of the room to view the full mural. Look for any patchy areas in the dark paint where the wall color shows through and apply a second coat to those specific spots for a solid, opaque silhouette. -
Clean up edges:
Once the paint is tacky but not fully cured, carefully peel away the painter’s tape at a 45-degree angle. If any paint bled under the tape, use a tiny amount of the base wall color to touch it up. -
Erase stray marks:
Check for any visible pencil lines that weren’t covered by paint. Gently erase them, being careful not to scrub the fresh paint.
Enjoy the peaceful atmosphere your new nature-inspired mural brings to your home
Cloud-Wash Texture for a Dreamy Wall

Transform a plain wall into an ethereal masterpiece with this soft, blended cloud-wash technique. By layering warm terracotta, blush, and golden beige tones with a natural sea sponge, you create a hazy, romantic texture that adds depth without overwhelming a room.
How-To Guide
Materials
- Latex interior paint (Base color: Creamy Off-White)
- Latex interior paint (Accent 1: Muted Terracotta/Dusty Rose)
- Latex interior paint (Accent 2: Warm Beige/Sand)
- Large natural decorative sea sponge
- Faux finish glaze medium
- Paint tray and multiple liners
- Painter’s tape
- Drop cloths
- Lint-free rags or cheesecloth
- Paper plates (for off-loading paint)
- Bucket of water
Step 1: Preparation & Base Coat
-
Clear and protect:
Begin by moving furniture away from the wall and laying down drop cloths. Use painter’s tape to mask off baseboards, ceiling edges, and any adjacent walls you want to keep clean. -
Clean the surface:
Wipe down the wall with a damp cloth to remove dust or grease. A clean surface ensures the glaze layers adhere properly and look smooth. -
Apply the base coat:
Roll on a coat of your creamy off-white base color. Two coats are usually best to ensure a solid, opaque background for your texture work. -
Let it cure:
Allow the base coat to dry completely, preferably overnight. If the base is tacky, the sponge might lift the paint later.
Too Blotchy?
If sponge marks look too distinct or heavy, immediately tamp them with a balled-up, lint-free cotton rag. This absorbs excess glaze and creates a softer, more diffused ‘cloud’ effect.
Step 2: Mixing the Glaze
-
Prepare the glaze mixture:
In a paint tray liner, mix your first accent color (the muted terracotta) with the faux finish glaze. A standard ratio is 1 part paint to 4 parts glaze, but check your bottle’s instructions. -
Mix the second color:
Repeat the process in a separate tray for the warm beige color. Keeping the colors separate at this stage gives you more control during application. -
Dampen the sponge:
Soak your natural sea sponge in water until it expands fully, then wring it out thoroughly. It should be damp and soft, not dripping wet.
Add Subtle Shimmer
Mix a small amount of metallic pearl or gold paint into your beige glaze mixture. This catches the light beautifully and gives the wall a high-end, plaster-like luminosity.
Step 3: Sponging Technique
-
Load the sponge:
Dip a rounded edge of the damp sponge into the terracotta glaze mixture. Do not oversaturate it. -
Blot excess glaze:
Press the sponge onto a paper plate or clean part of the tray to remove excess paint. The sponge should leave a textured imprint, not a solid blob. -
Apply the first color:
Start working in a top corner, lightly pressing the sponge against the wall. Rotate your wrist slightly with each dab to vary the pattern and prevent a repetitive ‘stamp’ look. -
Create clusters:
Apply the terracotta color in random, drifting clusters rather than a uniform grid. Leave plenty of open negative space (the base coat) between these clusters. -
Blend edges:
I find it helpful to use a clean, damp rag to softly blot the edges of the wet glaze if the sponge marks look too harsh.
Step 4: Layering & Softening
-
Apply the second color:
While the first color is still slightly tacky or just dry, take a clean area of the sponge (or a second sponge) and dip it into the beige/sand glaze mixture. Off-load the excess. -
Fill the gaps:
Sponge the beige glaze into the white spaces you left earlier, and allow it to slightly overlap the terracotta sections. This creates that third, blended color tone. -
Softening the transition:
For a truly cloud-like effect, take a dry, soft bristle brush or a wad of cheesecloth and very lightly sweep over the wet glaze areas to blur the distinct sponge marks. -
Step back often:
Move back from the wall every few feet to check the overall balance. If an area looks too heavy, blot it with a clean rag. If it looks too bare, add a light touch of glaze. -
Final touches:
Once the main texture is done, look for tiny gaps. You can use a small piece of sponge to dab a tiny bit of the original base coat color back on top if you need to break up a dark patch. -
Remove tape:
Carefully peel away the painter’s tape while the top layer of glaze is still slightly damp to prevent peeling the finish.
Enjoy the calm, artistic atmosphere your new textured wall brings to the space
Chalkboard Wall for Ever-Changing Art
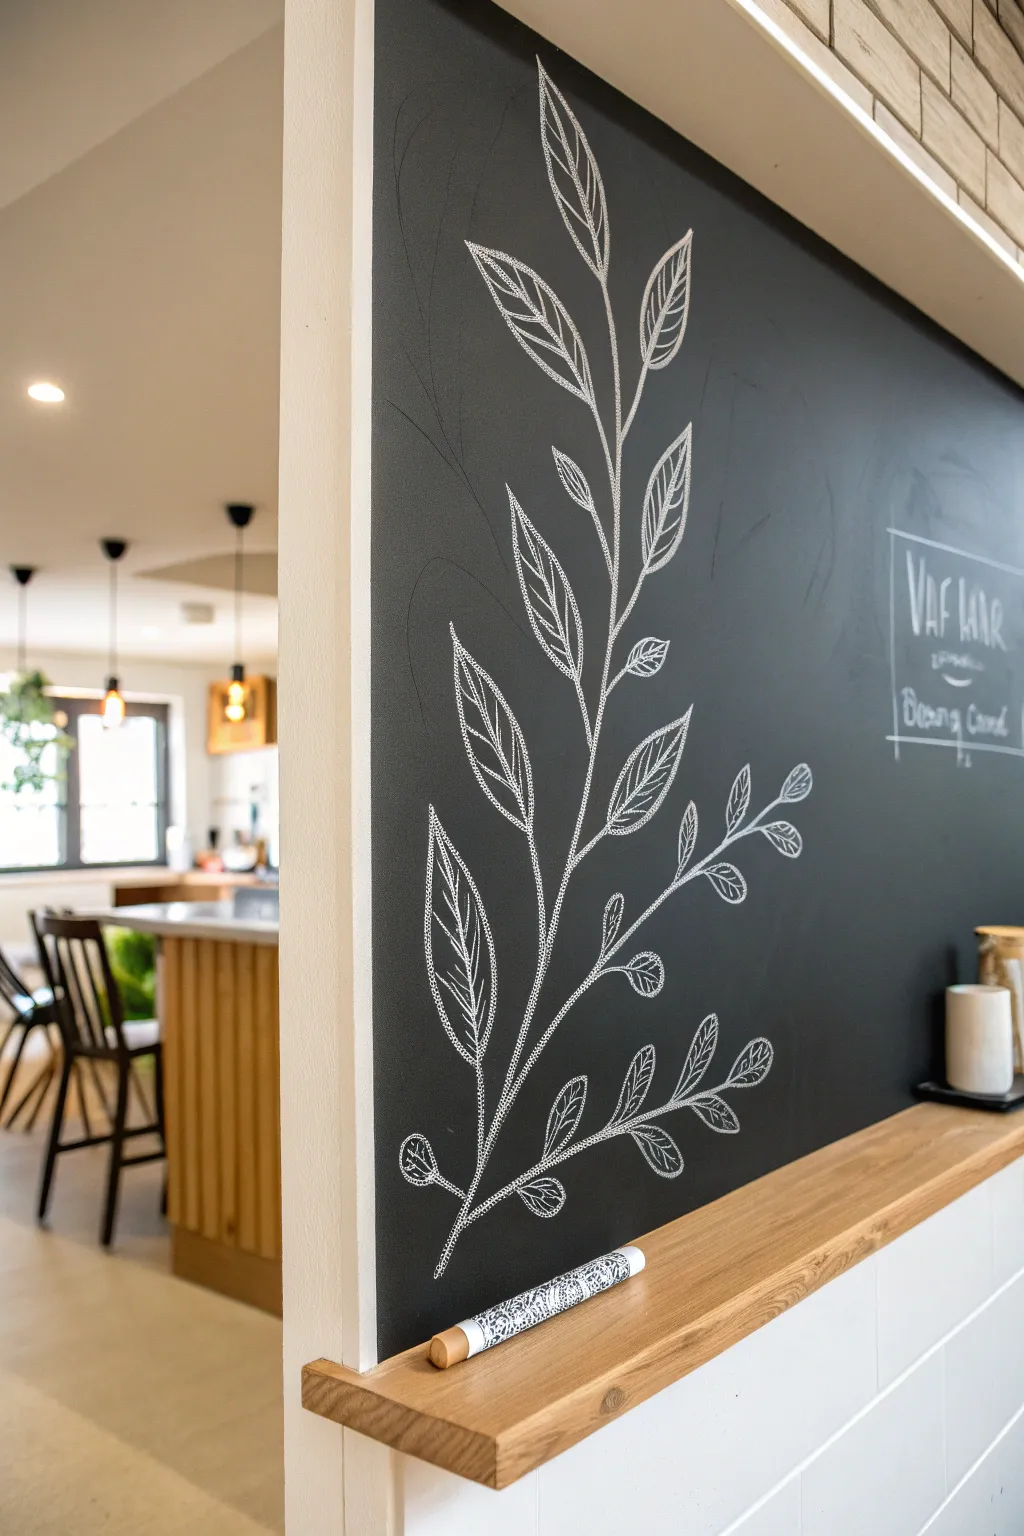
Transform a plain chalkboard wall into a striking focal point with this elegant, free-flowing botanical design. The crisp white lines against the dark background create a modern yet organic look that adds life to your kitchen or dining space without the need for hanging frames.
Step-by-Step Guide
Materials
- Chalkboard wall paint (black)
- Painter’s tape
- High-quality white chalk markers (fine and medium tips)
- Standard white stick chalk (for sketching)
- Damp microfiber cloth
- Cotton swabs (for precise erasing)
- Ruler or level (optional, for text areas)
- Step stool (if drawing high)
Step 1: Preparation & Sketching
-
Prime the Surface:
Ensure your chalkboard wall is clean and completely dry. If it’s a freshly painted wall, make sure you’ve seasoned it by rubbing the side of a piece of chalk over the entire surface and wiping it off; this prevents ‘ghosting’ later. -
Map Out the Curve:
Using a standard stick of soft chalk, lightly sketch the main spine of your branch. Start from the bottom left corner and curve it upwards towards the top center. Don’t worry about perfection; this is just a guide line. -
Placement of Major Branches:
Sketch the primary offshoot lines. Notice how the design has a tall, central leader and two smaller offshoots near the bottom right. Mark these lines lightly with your stick chalk. -
Rough in the Leaves:
Still using the soft stick chalk, draw faint ovals to indicate where the leaves will sit. This helps you visualize the balance of the composition before committing to the permanent marker ink.
Step 2: Drawing the Stem Structure
-
Activate the Marker:
Shake your white chalk marker well and depress the tip on a scrap piece of paper until the ink flows smoothly. A medium tip works best for the main stems. -
Commit to the Main Line:
Trace over your sketched spine line with the chalk marker. Use a steady, confident hand, but remember that organic lines in nature aren’t perfectly straight, so a little waiver adds character. -
Thicken the Base:
Go back over the bottom portion of the main stem to thicken it slightly. This gives visual weight to the bottom of the plant, making it look grounded. -
Add Secondary Stems:
Draw the stems for the individual leaves. Keep these lines slightly thinner than the main spine, branching out at upward angles.
Pro Tip: Perspective
Step back frequently! When working close to the wall, it’s easy to lose track of the overall shape. Viewing it from across the room ensures your branch curves naturally.
Step 3: Adding the Foliage
-
Outline the Leaves:
Switch to a fine-tip chalk marker if you have one, or use a light touch with the medium tip. Draw the leaf shapes, pointing them upwards and outwards. Some should be large and lance-shaped, while others near the bottom can be smaller and rounded. -
Add Central Veins:
Draw a single line down the center of each large leaf. I find it helpful to stop this line just short of the leaf tip to keep the design feeling airy. -
Stipple the Texture:
This is the signature detail of this design. Instead of drawing solid veins, use tiny dots (stippling) to fill the inner areas of the leaves. Concentrate the dots near the center line and fade them out towards the edges. -
Vary the Pattern:
For variety, leave some of the smaller leaves near the bottom more open, drawing casual veins instead of stippling. This creates a nice contrast between the ‘heavy’ and ‘light’ leaves. -
Layering Leaves:
Create depth by drawing a few leaves that appear to be behind others. Stop your line where it intersects with a foreground leaf to maintain the illusion.
Level Up: Seasonal Shifts
Change the leaves with the seasons. Erase just the foliage and add holly shapes for winter, blossoms for spring, or maple leaves for autumn while keeping the same stem.
Step 4: Refining & Finishing
-
Erase Guide Lines:
Allow the chalk marker ink to dry completely—give it at least 10 minutes. Then, gently wipe away the initial stick chalk sketches with a dry cloth or a slightly damp Q-tip. -
Clean Up Edges:
If any marker lines look messy or smudged, use a damp cotton swab to sharpen the edges. The water acts like an eraser for the chalk marker. -
Add the Menu Box:
If you want to include the text section shown on the right, use a ruler to lightly mark a rectangular area. Sketch your ‘Wifi’ or ‘Menu’ header with the stick chalk first to center it. -
Final Lettering:
Trace your text with the marker. Using a mix of block capital letters and cursive script adds a nice cafe-style aesthetic.
Enjoy your new piece of wall art that brings a touch of nature indoors without any watering required
Faux Paneling With Painted Lines
Transform a plain, flat wall into a masterpiece of architectural depth using nothing but paint and tape. This faux paneling technique mimics the shadows and highlights of real molding so convincingly, your guests will have to touch the wall to believe it’s 2D.
Step-by-Step
Materials
- Base wall paint (e.g., Creamy White, Eggshell finish)
- Painter’s tape (various widths: 1-inch and ¼-inch)
- Laser level or long spirit level
- Pencil
- Tape measure
- Glaze medium
- Paint color: 2 shades darker than base (for shadows)
- Paint color: 2 shades lighter than base (for highlights)
- Small angled sash brush
- Fine liner brush or artist’s flat brush
- Clean lint-free rags
- Straight edge or metal ruler
Step 1: Planning and Layout
-
Prep the surface:
Begin with a freshly painted wall in your chosen base color. An eggshell or satin finish works best for this technique as it allows the glaze to move smoothly without instantly soaking in. -
Measure the wall:
Determine the total length of your wall and decide on the number of panels. For the look in the image, aim for large vertical rectangles that sit above a lower chair-rail line. -
Calculate spacing:
A good rule of thumb is to leave about 4 to 6 inches between each panel box and between the boxes and the chair rail. Uniform spacing is critical for a realistic architectural effect. -
Draw the grid:
Using a laser level to ensure perfectly plumb lines, lightly mark the outside corners of your rectangles with a pencil. Connect the dots using a straight edge to outline your ‘panels.’ -
Create the molding width:
To mimic the look of the trim in the photo, draw a second rectangle inside the first one, approximately 2 inches inward. This space between the lines represents the face of the molding.
Uneven Lines?
If your hand shakes on the fine lines, use a mahl stick or rest your hand on a dry straight edge propped against the wall to steady your stroke.
Step 2: Taping the Structure
-
Tape the outer edges:
Apply painter’s tape along the *outside* of your outer pencil lines. Press the edges down firmly with a credit card or fingernail to prevent bleed-through. -
Tape the inner edges:
Apply tape along the *inside* of your inner pencil lines. You now have a defined ‘track’ of exposed wall that represents the molding itself. -
Seal the tape:
Lightly brush a tiny amount of your base wall color over the tape edges. This locks the tape and ensures your next lines will be crisp.
Pro Tip: Miter Magic
For ultra-realism, run a piece of tape diagonally at 45 degrees across the corners before painting the molding box. This creates a crisp ‘miter cut’ gap.
Step 3: Painting Shadows and Highlights
-
Mix the shadow glaze:
Mix one part of your darker paint color with four parts glaze medium. You want a translucent mixture that builds up slowly rather than opaque paint. -
Identify the light source:
Decide where the light enters the room (usually a window). If light comes from the left, shadows will fall on the right and bottom inner edges of the molding. -
Apply the first shadow:
Using the small sash brush, paint the shadow glaze on the sides of the taped ‘molding’ that would be away from the light. Feather the paint out so it fades into the base color. -
Mix the highlight glaze:
Clean your brush or grab a fresh one. Mix your lighter paint color with glaze medium in the same 1:4 ratio. -
Apply the highlights:
Paint the highlight glaze on the edges facing the light source (e.g., the left and top sides). This contrast creates the 3D ‘lift’ effect. -
Remove tape and dry:
Carefully peel off the tape while the paint is still slightly tacky. Let these main molding shapes dry completely before moving to the fine details.
Step 4: Detailed Line Work
-
Create the intricate inner profile:
The image shows a smaller, more delicate line inside the main panel. Using your laser level again, mark a thin rectangle about an inch inside your painted faux molding. -
Paint the thin shadow line:
I prefer using a fine artist’s liner brush here. Dip it in un-thinned darker paint and drag it carefully along the bottom and right sides of this inner rectangle to create a sharp, deep recess shadow. -
Paint the thin highlight line:
Clean the brush and use un-thinned lighter paint on the top and left sides of the inner rectangle. This thin, sharp line mimics the crisp edge of a routered detail. -
Soften the corners:
Real wood molding often has mitered corners. Use a tiny bit of dark glaze to paint a faint diagonal line from the outer corner to the inner corner of your frames to simulate the miter joint. -
Final touches:
Step back and check your work. If any shadow looks too harsh, soften it with a clean, damp rag while it’s fresh. Erase any remaining pencil marks once the paint is fully cured.
With the tape removed and the lines perfected, your flat wall now boasts the sophisticated depth of classic carpentry.
Limewash-Inspired Brushed Movement
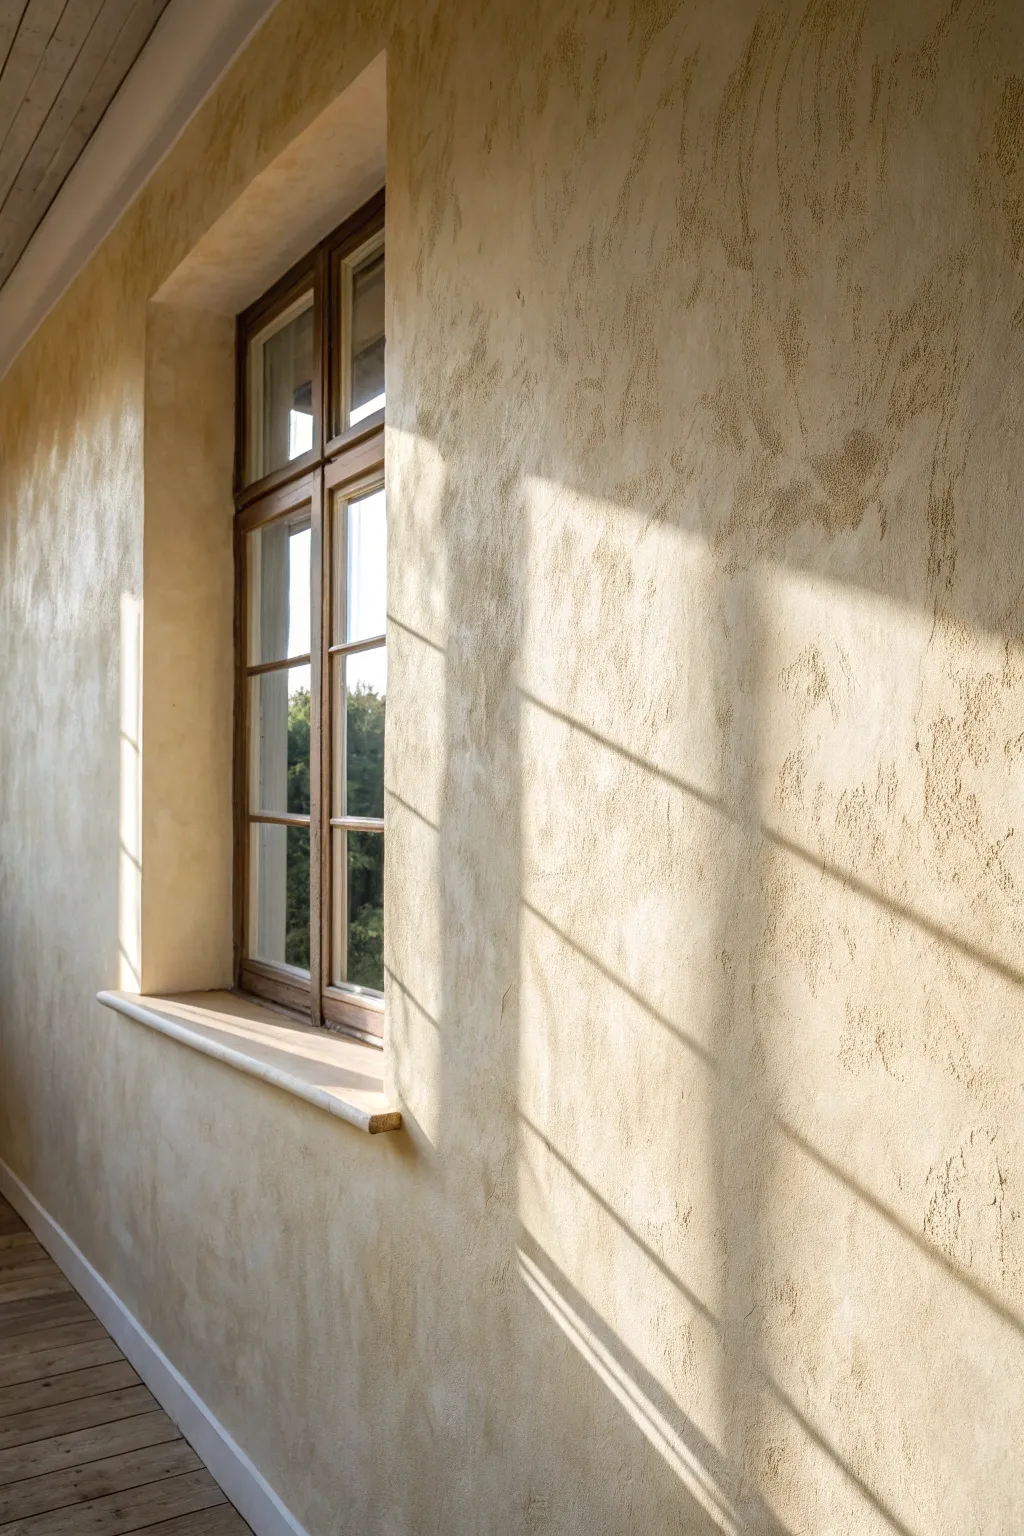
This project captures the timeless, mottled beauty of old-world plaster walls using modern paint techniques. The finish features a warm, sandy beige tone with visible brushstrokes that create depth and movement, especially when catching natural light.
How-To Guide
Materials
- Limewash paint (e.g., Bauwerk Colour or similar mineral paint) in a warm beige/ochre tone
- Large block brush (masonry brush or dedicated limewash brush)
- Painter’s tape
- Drop cloths
- Mineral primer (specifically formulated for limewash adhesion)
- Water spray bottle
- Stir stick
- Clean bucket for mixing
Step 1: Preparation and Priming
-
Protect the area:
Begin by taping off all trim, window sills, and baseboards with high-quality painter’s tape. Lay down drop cloths to protect your flooring, as limewash can be quite splashy due to its thin consistency. -
Clean the walls:
Ensure the wall surface is clean, dry, and free of dust or grease. If there are any holes or significant cracks, fill them with spackling paste and sand smooth. -
Apply the mineral primer:
Roll on a coat of mineral primer designed specifically for limewash. This is crucial because standard latex primers may prevent the limewash from absorbing correctly into the substrate. -
Let the primer cure:
Allow the primer to dry completely according to the manufacturer’s instructions. This usually takes at least 4-6 hours, but leaving it overnight is often safer to ensure a perfect base.
Brushwork Master Tip
Don’t overwork the paint. Lay it down with confidence in your X-pattern and leave it alone. Excessive brushing destroys the natural texture.
Step 2: First Coat Application
-
Mix the paint:
Stir your limewash paint thoroughly. Limewash is composed of water and lime putty, so the pigment tends to settle at the bottom. You want a consistent, milky texture. -
Start at the top corner:
Dip your large block brush into the paint, loading it generously but not so much that it’s dripping uncontrollably. -
Apply with X-strokes:
Apply the paint to the wall using a crisscross or ‘X’ pattern. This chaotic brushwork is the secret to the cloudy, textured aesthetic shown in the photo. -
Maintain a wet edge:
Work in manageable sections (about 3×3 feet). Never let an edge dry completely before joining the next section to it, or you will see lap lines. I find moving quickly helps here. -
Feather the edges:
As you move from one section to the next, feather out the edges of your wet paint so there are no hard stops. -
Allow to dry:
Let the first coat dry. It will look transparent and much darker when wet, but it dries significantly lighter and more opaque.
Level Up: Two-Tone Depth
Mix a tiny amount of darker pigment into your second coat for just specific random patches. This creates an aged, authentic plaster look with deeper shadows.
Step 3: Building Depth and Texture
-
Assess the coverage:
Once the first coat is fully dry (usually 2-4 hours), inspect the wall. You will likely see patchy areas; this is intentional and part of the charm. -
Dampen the wall (optional):
Lightly mist the wall with water using your spray bottle before starting the second coat. This helps the paint spread easier and increases the ‘blooming’ effect. -
Apply the second coat:
Using the same X-stroke technique, apply the second layer. Focus on filling in areas that look too thin while maintaining that brushy texture. -
Create movement:
Vary the pressure on your brush. Press harder to deposit less paint and lighter to tackle thicker areas, enhancing the visible sweeping motion. -
Check detailed areas:
Use a smaller brush if necessary to get into corners or around the window frame, ensuring the brushstrokes blend seamlessly with the main wall area. -
Final drying time:
Allow the second coat to dry completely. As the lime carbonates and cures, the cloudy, velvety texture will fully emerge. -
Remove tape:
Carefully remove the painter’s tape. Pull it away at a 45-degree angle while the paint is still slightly tacky to avoid peeling any finish.
Step back and enjoy the soft, organic warmth your new walls bring to the space
Metallic Accents Over a Matte Base
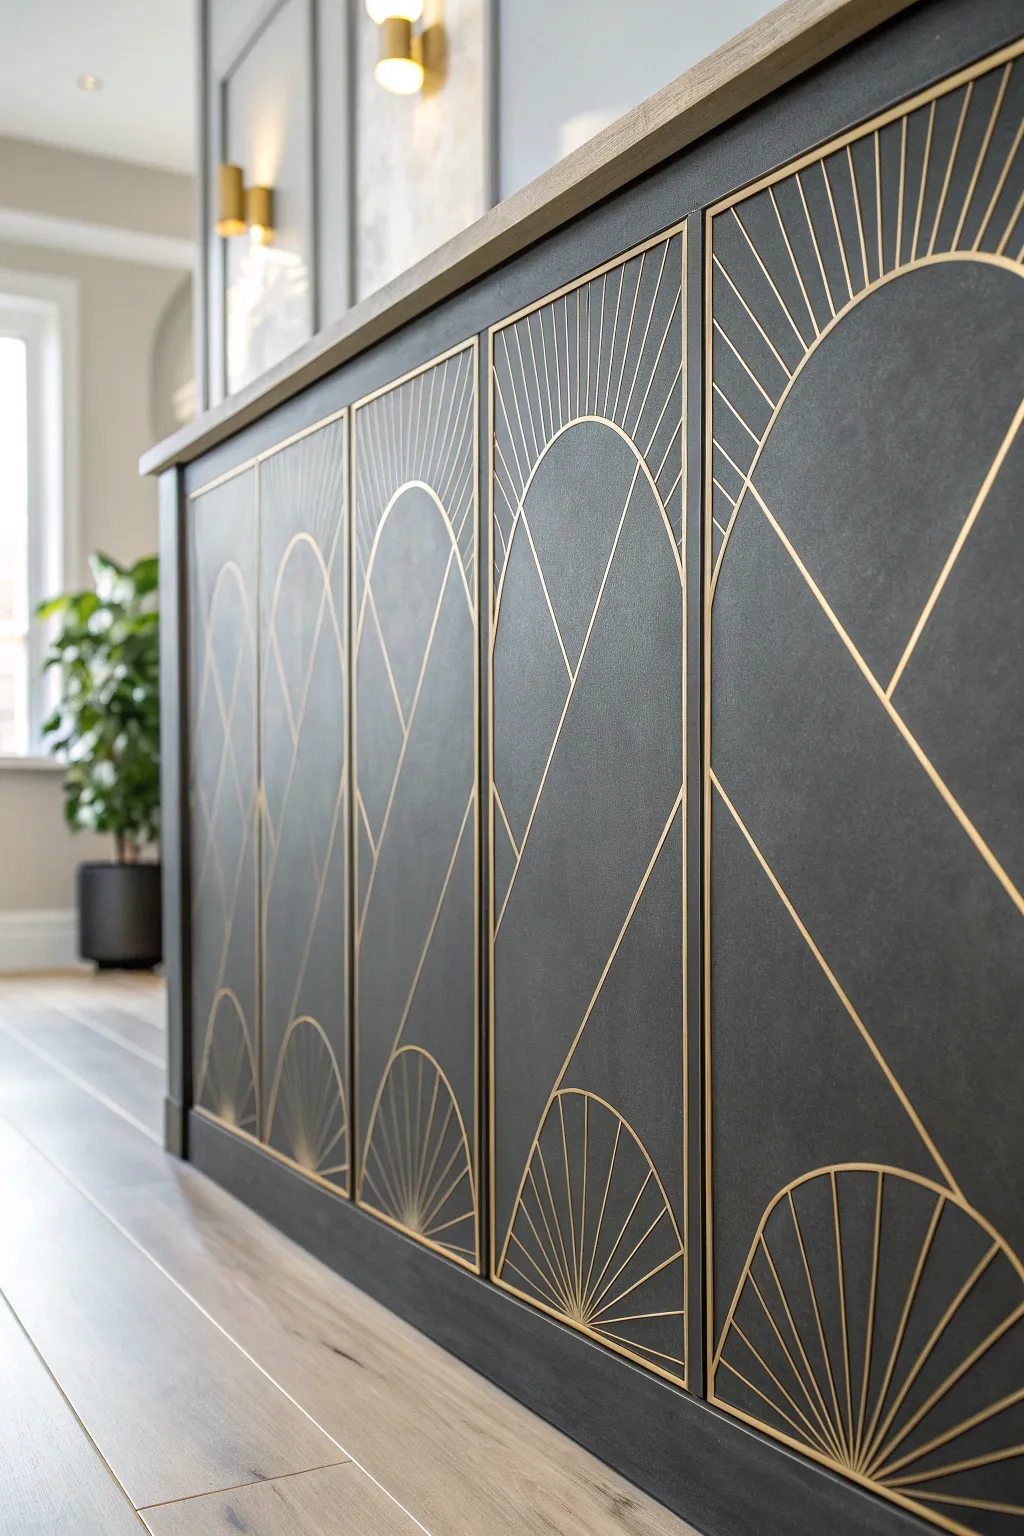
Transform a plain kitchen island or bar front into a sophisticated Art Deco masterpiece using matte charcoal paint and striking gold linework. The contrast between the moody, dark background and the shimmering metallic lines creates a luxurious, high-end look that feels custom-made.
Detailed Instructions
Materials
- High-quality matte black or charcoal paint (chalk paint works well)
- Gold leafing pen or metallic gold acrylic paint
- Painter’s tape (various widths)
- Ruler and yardstick
- Large compass or string and pencil (for arcs)
- Fine-point liner brush (if using liquid paint)
- Pencil and eraser
- Clear matte polyurethane sealer
- Gold metallic washi tape (optional for layout)
- Sandpaper (fine grit)
- Cleaning cloth and degreaser
Step 1: Preparation & Base Coat
-
Clean surface:
Begin by thoroughly cleaning the surface of your island or bar front with a degreaser to remove any kitchen oils or grime. -
Light sanding:
Scuff sand the surface lightly with fine-grit sandpaper to give the paint something to grip, then wipe away all dust. -
Apply base color:
Roll on your first coat of matte charcoal or black paint, keeping your strokes long and even to minimize texture. -
Second coat:
Once dry, apply a second coat for full opacity. The goal is a velvety, non-reflective finish, so ensure your coverage is solid. -
Cure time:
Allow the base paint to cure fully according to the can’s instructions—usually 24 hours—before attempting to drawn on it.
Step 2: Drafting the Design
-
Vertical layout:
Divide your horizontal space into equal vertical panels using a pencil and yardstick. These panels will frame your repeating geometric motif. -
Mark heights:
Determine the highest point of your arches and the baseline for the bottom fans. Mark these consistently across all panels. -
Draw main arch:
Using a large compass (or a string tied to a pencil anchored at the center point), lightly sketch the large central arch within each panel. -
Draw bottom fans:
Sketch the semi-circles at the bottom of each panel. Use your strings/compass to ensure these are identical in size. -
Add radiating lines:
Using a ruler, lightly draw the sunburst lines radiating outward from the top corners and the bottom semi-circles. I like to mark equal spacing first to keep them uniform. -
Connect angled lines:
Draw the connecting diagonal lines that create the ‘V’ shapes intersecting the main arch, completing the geometric structure.
Uneven Gold Lines?
If using a paint pen and the flow skips, store it tip-down for 10 mins. If using a brush, thin your acrylics slightly with water for longer, smoother strokes.
Step 3: Applying the Gold
-
Test your tool:
Before touching the wall, test your gold leafing pen or liner brush on a scrap piece of painted wood to check flow and thickness. -
Trace straight lines:
Begin tracing your vertical panel dividers and straight geometric lines. Use a ruler as a guide for the pen, but wipe the ruler edge frequently to prevent smudging. -
Trace curves:
Carefully trace the arched lines freehand. Go slowly, focusing on consistent pressure to keep the line width steady. -
Fill sunbursts:
Draw the radiating lines in the sunburst sections. Start from the center point and pull the stroke outward for the crispest ends. -
Check consistency:
Step back periodically to ensure the gold sheen is consistent. If a line looks faint, let it dry completely before gently going over it again.
Add Dimension
For a luxe 3D effect, use thin strips of actual wood trim for the straight lines, paint them gold, and glue them on. Use the paint only for the curved sections.
Step 4: Finishing Touches
-
Erase guidelines:
Wait at least 2-4 hours for the metallic medium to fully set, then extremely gently erase any visible pencil marks. -
Clean up edges:
If any gold slipped out of place, use a tiny brush with a bit of the charcoal base paint to ‘cut in’ and cover the mistake. -
Seal:
Protect your work, especially in a high-traffic kitchen area, by applying a clear matte polyurethane topcoat.
Step back and enjoy the touch of classic glamour you’ve just added to your space.
Faux Marble or Terrazzo Painted Illusion
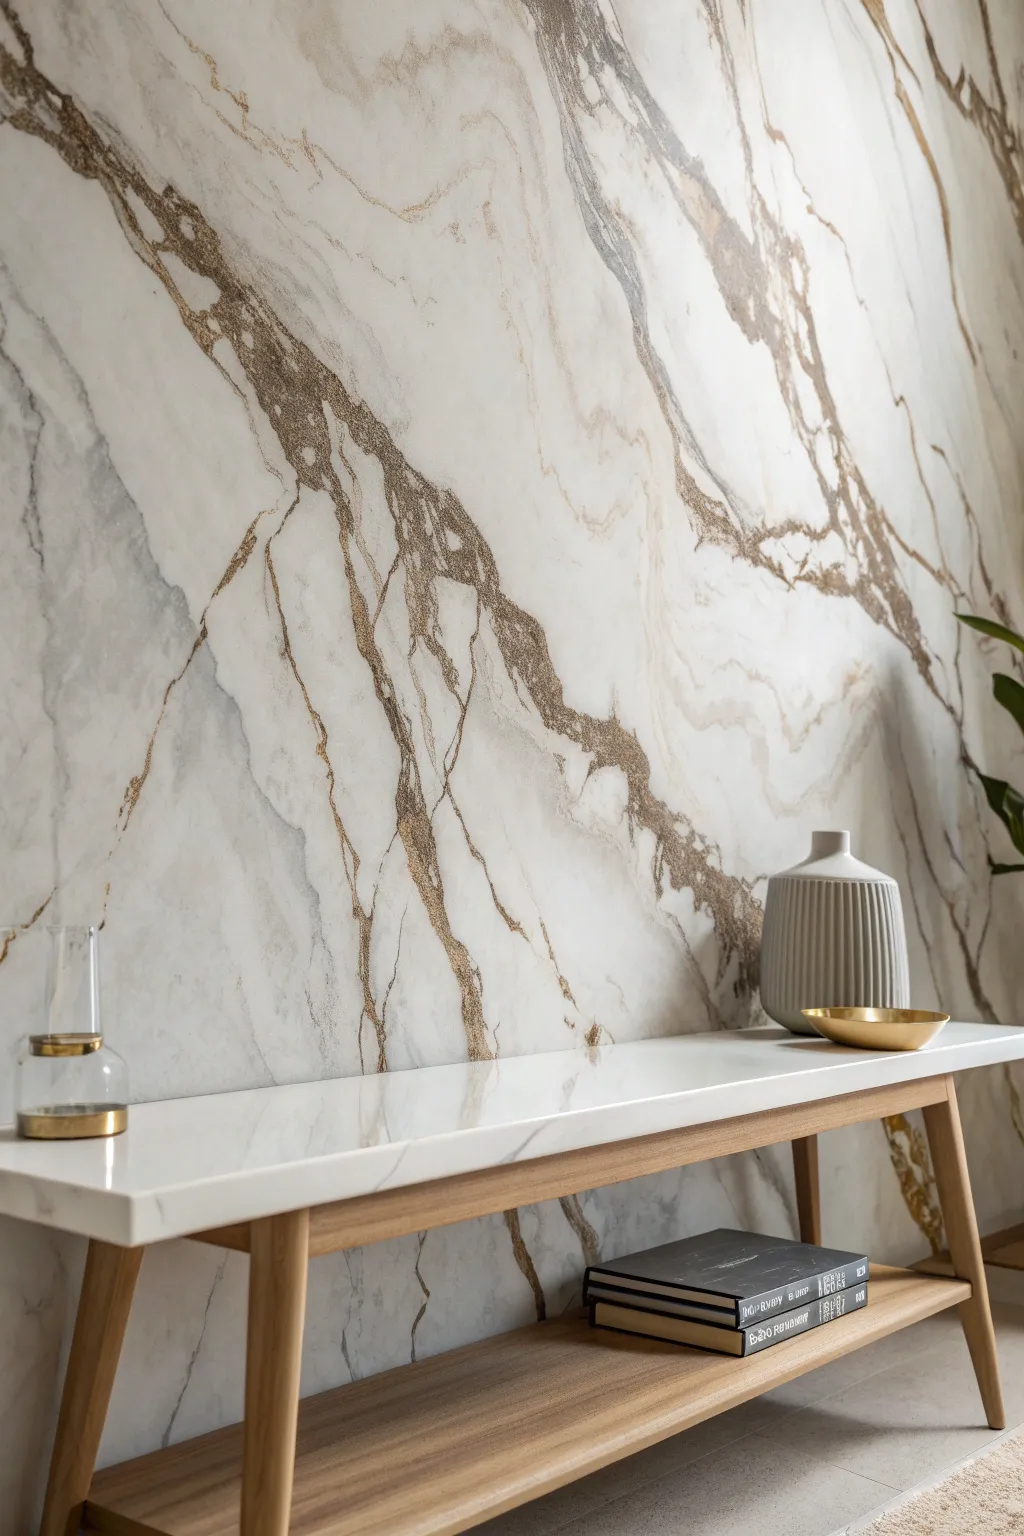
Transform a plain wall into a stunning focal point with this faux marble technique that mimics the organic beauty of high-end stone. This project layers soft grey washes with striking, jagged veins of bronze and taupe to create a sophisticated, dramatic backdrop for any room.
Step-by-Step Guide
Materials
- Satin or eggshell latex paint (pure white base)
- Acrylic glazing medium
- Acrylic paints (cool grey, warm taupe, charcoal, metallic bronze/gold)
- Sea sponge or wool sponge
- Large turkey feather or liner brush
- Soft blending brush (badger hair style or large makeup brush)
- Clean lint-free rags
- Spray bottle with water
- Painter’s tape and drop cloths
- Paper plates or palette
Step 1: Preparation and Base Coat
-
Prep the Surface:
Clean the wall thoroughly to remove dust and oils. Mask off ceilings, baseboards, and adjacent walls with painter’s tape, and lay down drop cloths to protect your floor. -
Apply Base Color:
Roll on two coats of your pure white satin or eggshell latex paint. Allow the first coat to dry completely before applying the second to ensure a solid, bright canvas for your marbling.
Trembling Hand Trick
To avoid lines that look too straight or painted, hold your brush by the very end of the handle and let your hand shake slightly as you drag the vein across the surface.
Step 2: Creating the Smoky Background
-
Mix the Glaze:
Mix one part cool grey acrylic paint with four parts glazing medium. You want a very translucent mixture that stays wet longer than standard paint. -
Apply Cloudy Patches:
Dip a dampened sea sponge into the grey glaze and dab off the excess on a paper plate. Lightly pounce the sponge onto the wall in diagonal, drifting clusters to create the ‘smoke’ of the marble. -
Soften the Edges:
While the glaze is still wet, take a clean, dry blending brush and gently feather the edges of your sponged areas. Use a light, circular motion to blur the paint into the white background so there are no hard sponge marks. -
Layering Depth:
Repeat this process with a very diluted taupe glaze in scattered areas to add warmth. I like to keep these areas minimal to let the white negative space shine through.
Stone Variation
For a Carrera marble look, stick to only cool greys and blues. For a warmer Calacatta Gold vibe, emphasize the taupe and gold metallic veins more heavily.
Step 3: Veining Technique
-
Prepare Veining Mixes:
Create three separate mixtures: a dark charcoal mixed with glaze/water (ink consistency), a warm brown/taupe mix, and a metallic bronze paint. -
Establish Major Veins:
Dip a turkey feather or a long liner brush into the charcoal mix. Hold the tool loosely and drag it diagonally across the wall, twisting your wrist occasionally to create jagged, unpredictable lines rather than straight ones. -
Softening the Primary Veins:
Immediately mist a specific section of a vein with water from your spray bottle. Use a blending brush to gently smudge one side of the line, creating a shadow effect while keeping the other side crisp. -
Adding Secondary Veins:
Using the taupe mixture, add thinner, branching veins that connect to your main charcoal lines. Let these ‘fissures’ trail off into nothingness, mimicking how natural stone cracks. -
Intensify with Metallic:
Load a fine detail brush with undiluted metallic bronze paint. Accentuate parts of the major veins by painting thin highlights right alongside the darkest charcoal sections. -
Create Texture:
For a granular look, splatter tiny speckles of the watered-down grey paint onto the wall by flicking the bristles of an old toothbrush. Keep this subtle and focused around the heavy vein areas.
Step 4: Final Touches
-
Step Back and Assess:
Walk to the other side of the room to view the composition as a whole. Look for areas that feel too empty or too heavy. -
Edit the Design:
If a vein looks too harsh, apply a thin layer of white glaze over it to push it into the background. If an area is too plain, add a faint ‘ghost vein’ with very watery grey paint. -
Clear Coat (Optional):
Once the wall is fully cured (usually 24-48 hours), you can apply a water-based satin polyurethane for sheen and protection, though this is optional for low-traffic walls.
Now you have a luxuriously textured wall that adds timeless elegance to your space without the weight or cost of real stone


Have a question or want to share your own experience? I'd love to hear from you in the comments below!