If you’ve got a blank wall staring back at you, paint is the fastest way to turn it into a real focal point. Here are my favorite wall painting ideas—starting with the classics and gradually getting a little more artsy and unexpected.
Classic Accent Wall in a Bold Color
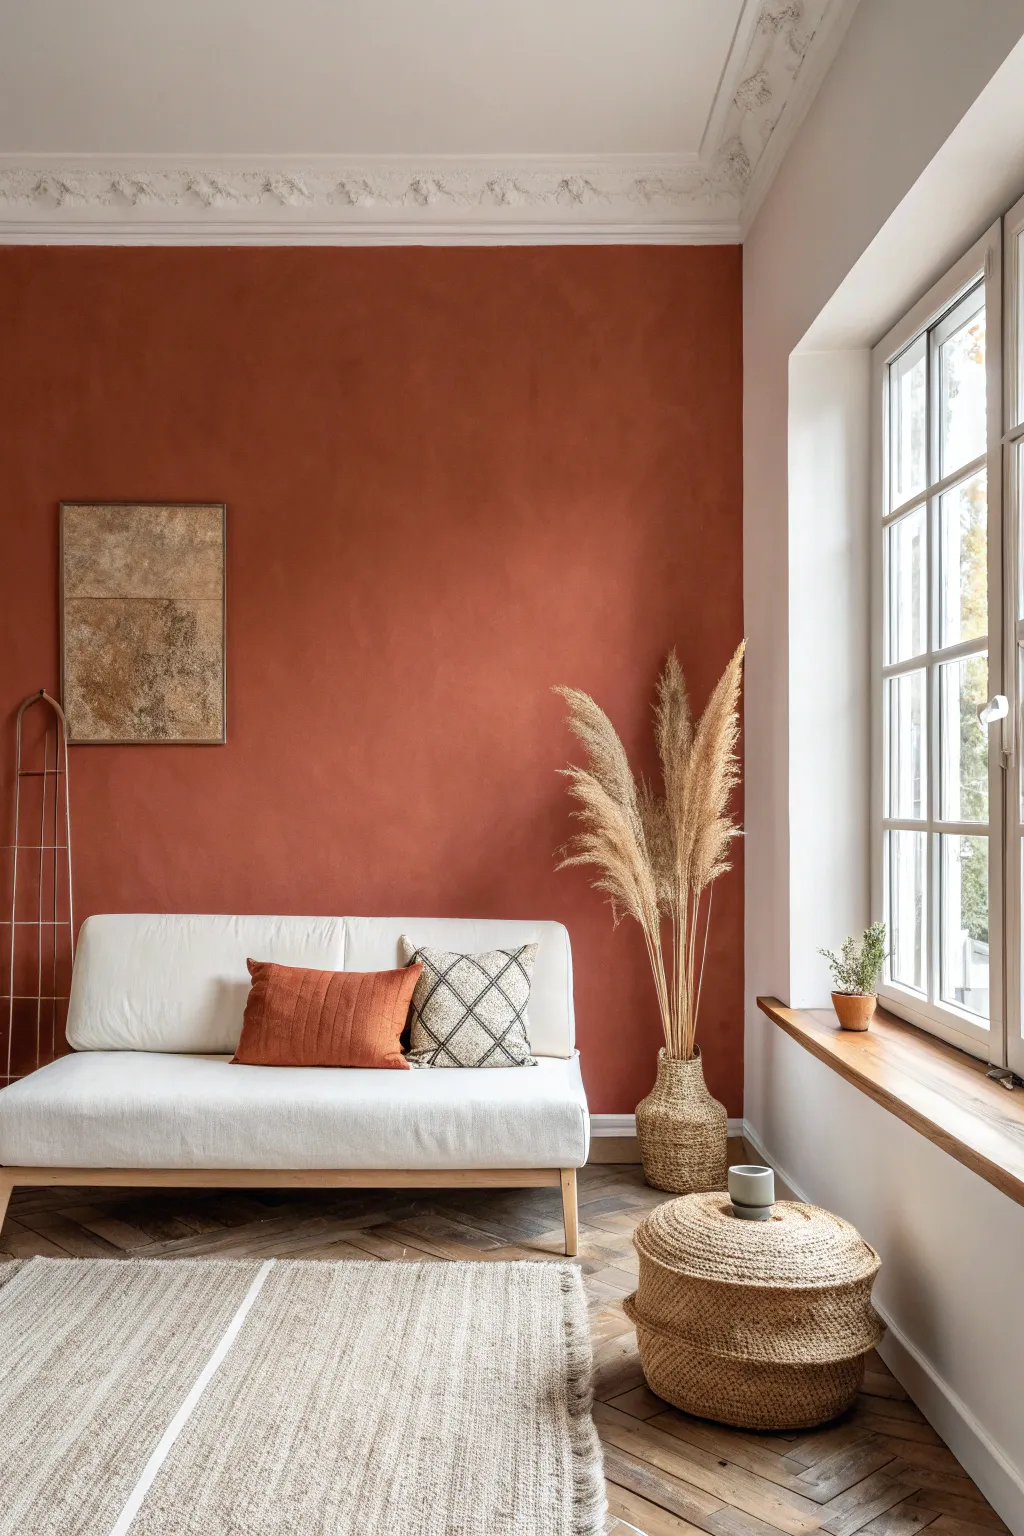
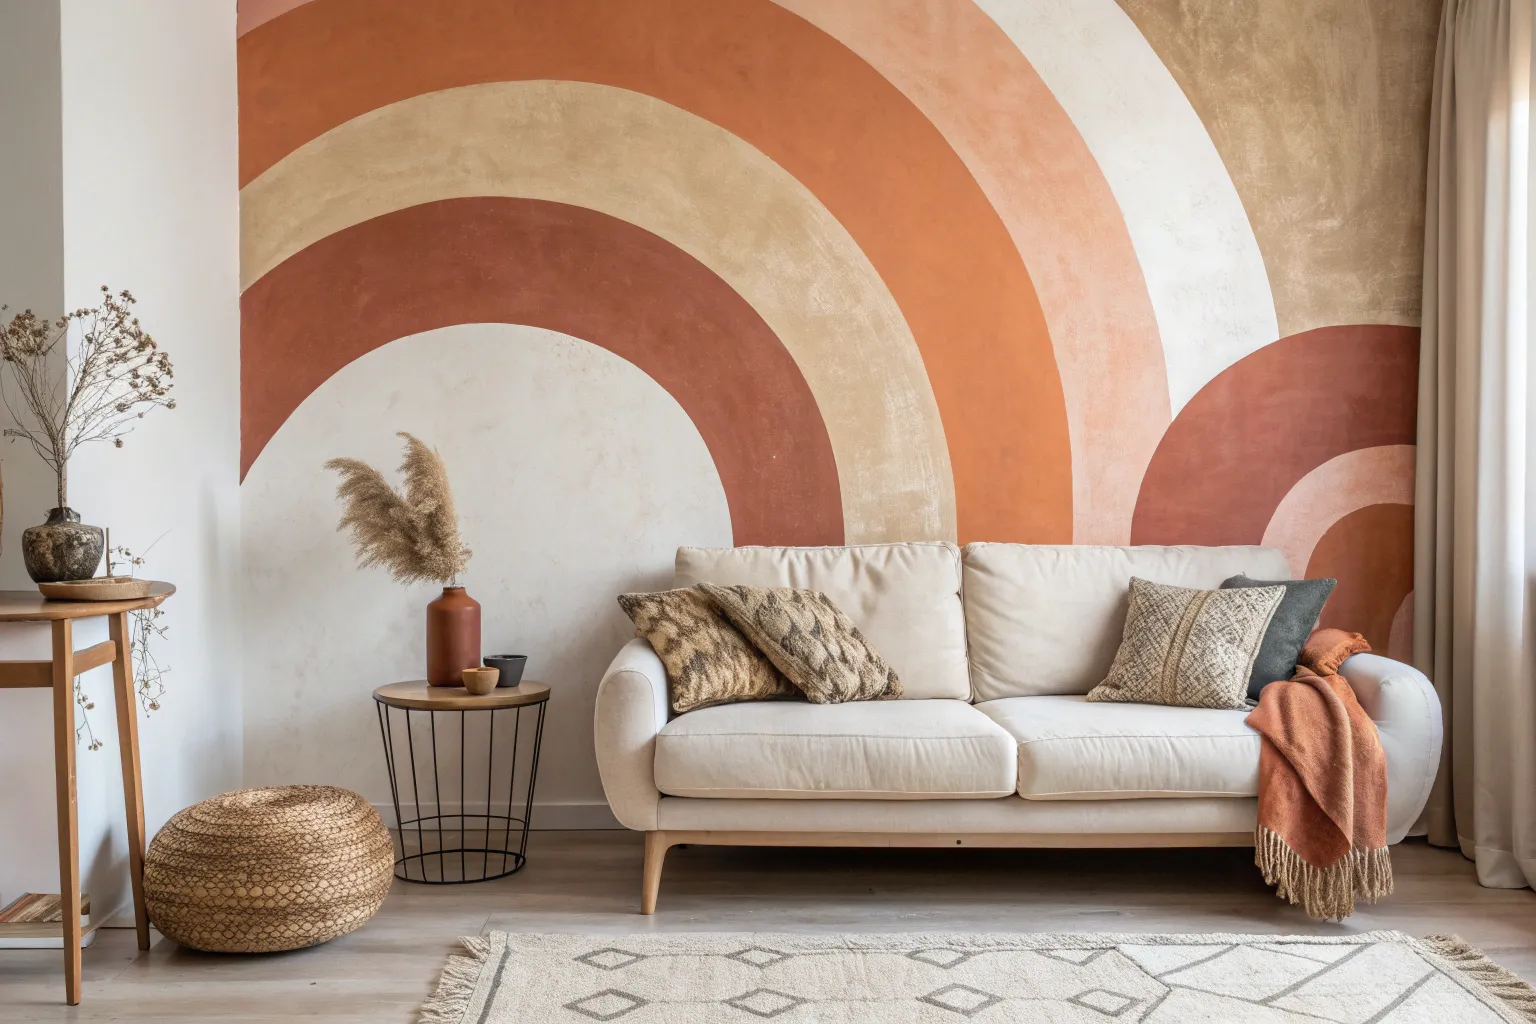
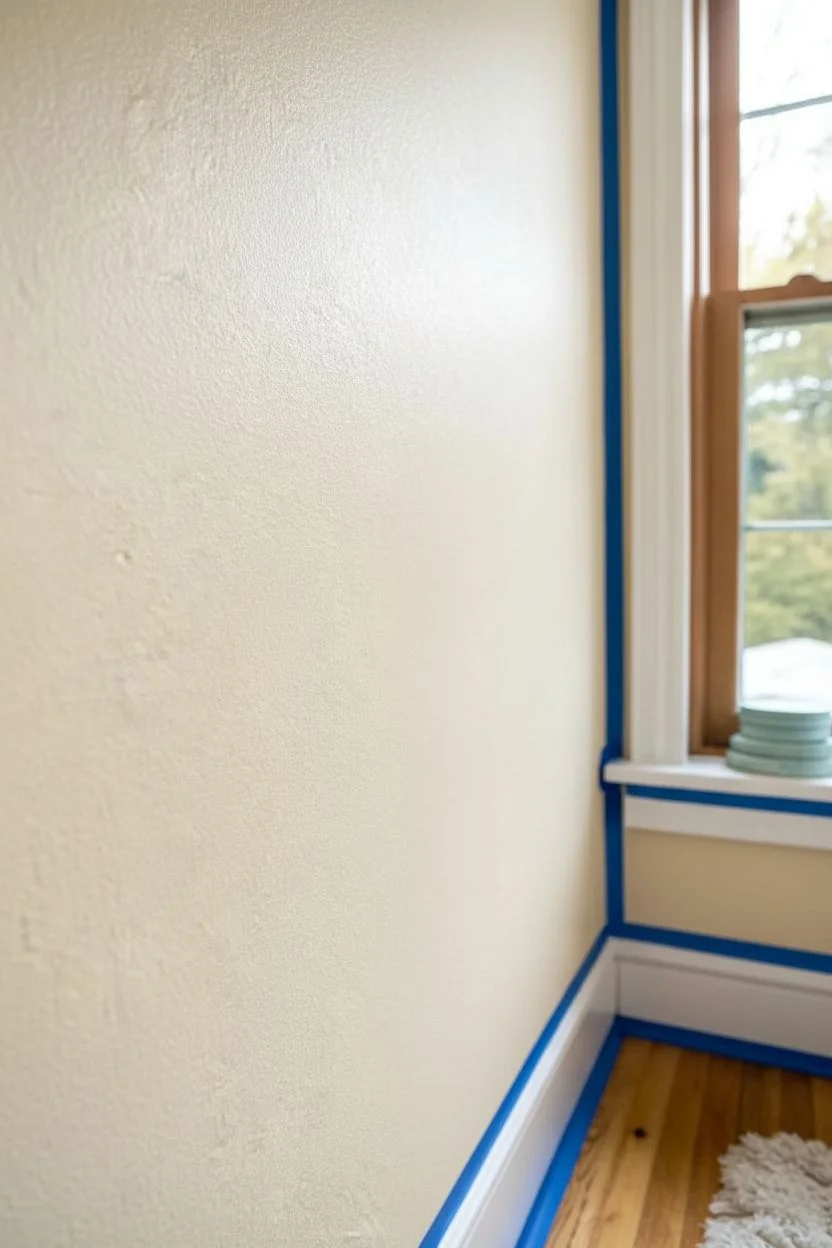
Transform a plain white room into a cozy sanctuary by painting a single accent wall in a rich, earthy terracotta hue. This project utilizes limewash painting techniques to create a subtle, cloud-like texture that adds depth and movement far beyond what standard flat latex paint can achieve.
Step-by-Step Guide
Materials
- High-quality limewash paint (Rust/Terracotta color)
- Mineral-based primer (specifically for limewash)
- Wide block brush (masonry brush)
- Painter’s tape
- Drop cloths
- Spackle and putty knife
- Sandpaper (medium grit)
- Mixing bucket
- Stir stick
- Ladder
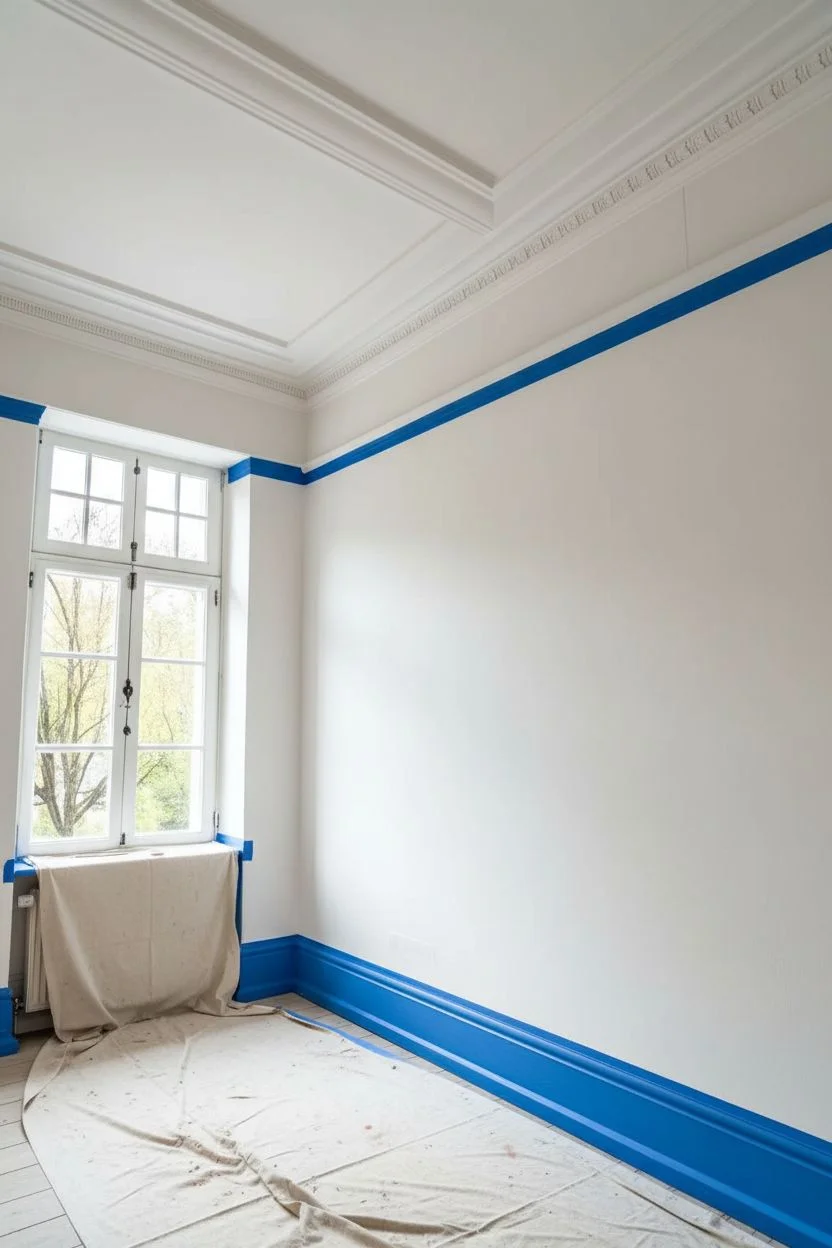
Step 1: Preparation
-
Clear the space:
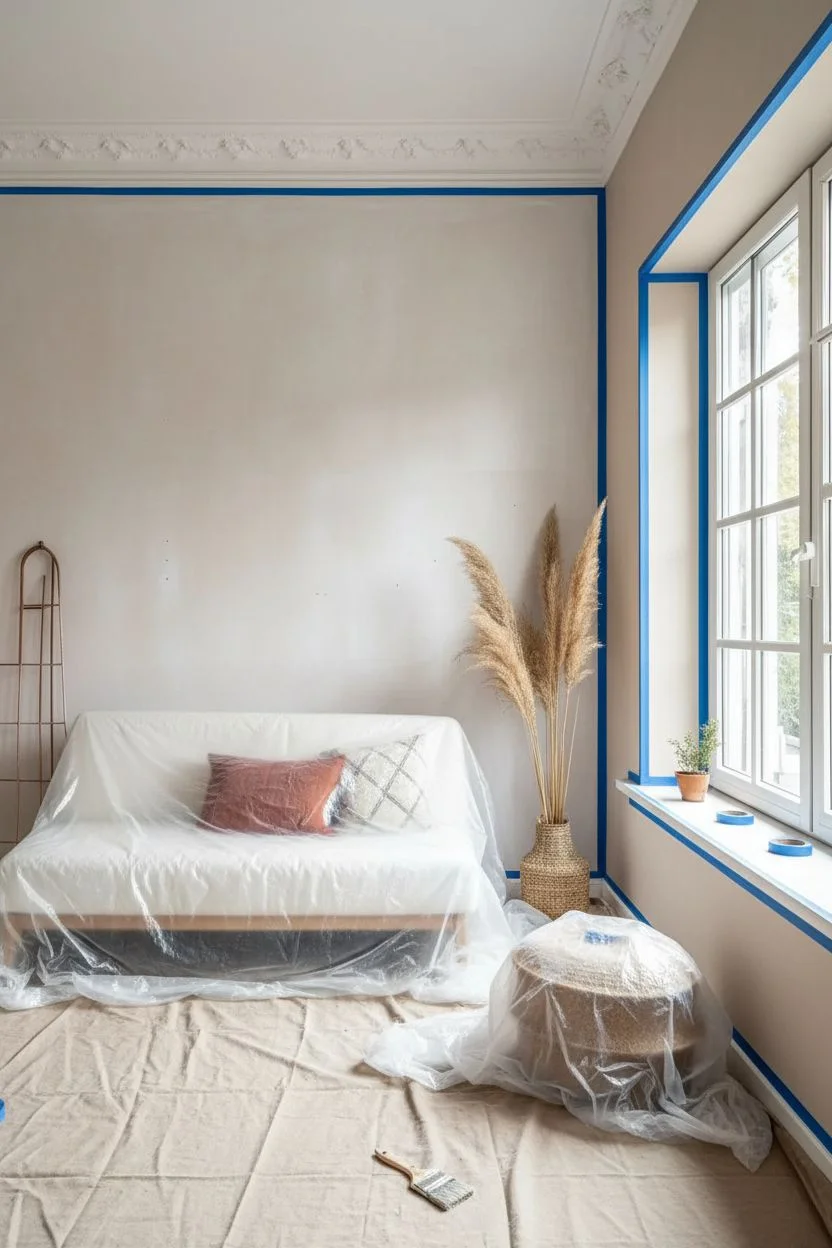
Move all furniture away from the wall you intend to paint. If the room has heavy furniture like the sofa shown, cover it completely with plastic sheeting to protect the upholstery from any rogue splatters. -
Clean surface:
Wipe down the wall with a damp cloth to remove dust and cobwebs. A clean surface is crucial for the primer to bond correctly. -
Repair imperfections:
Fill any nail holes or cracks with spackle. Once dry, sand these spots flush with the wall. Limewash highlights texture, so smooth the base as much as possible unless you want existing dents to show. -
Protect boundaries:
Apply painter’s tape along the skirting boards, adjacent walls, and crucially, right along the edge of the ceiling molding. Press the tape down firmly to prevent bleed-through. -
Protect the floor:
Lay down drop cloths along the entire length of the wall, securing them with tape so they don’t slide around while you work.
Patchy problems?
If you see distinct ‘stop and start’ lines, mist the area lightly with water and feather the edges with a clean brush to blend the dry and wet sections.
Step 2: Priming
-
Apply specialized primer:
Roll on a coat of mineral-based primer designed specifically for limewash. This is a non-negotiable step; standard drywall primer won’t allow the limewash to cure or adhere properly. -
Let it dry:
Allow the primer to dry completely according to the manufacturer’s instructions, usually 4-8 hours. The wall should feel dry to the touch before moving on.
Add depth
For a more dramatic, ancient look, mix a slightly darker shade of limewash and apply it sporadically in the second coat while wet for a mottled effect.
Step 3: Painting
-
Mix the limewash:
Stir the limewash paint thoroughly in your bucket. The pigments settle heavily, so you need to ensure an even consistency before dipping your brush. -
Cut in the edges:
Using a smaller brush or the edge of your block brush, carefully paint the perimeter of the wall along the tape lines. -
Begin the first coat:
Dip your block brush into the paint. Start at the top corner and apply the paint using random, cross-hatch strokes (X-motions). Do not roll this paint; the brush movement creates that beautiful cloudy texture. -
Work in sections:
Paint in organic patches rather than straight lines, keeping a ‘wet edge’ as you move across the wall. I find it easiest to work in 3-foot sections to keep control of the drying process. -
Finish the first layer:
Continue the cross-hatch motion until the entire wall is covered. Don’t worry if it looks patchy or transparent right now; limewash dries much lighter and more opaque than it looks when wet. -
Wait for drying:
Allow the first coat to dry for at least 12 hours. It really needs to cure to build the proper texture depth. -
Apply second coat:
Repeat the cross-hatch painting process for a second layer. This builds the color intensity and enhances the velvety, suede-like appearance. -
Refine the texture:
As you apply the second coat, you can play with the brush strokes. Lighter pressure creates softer clouds, while firmer pressure adds more defined movement.
Step 4: Finishing
-
Remove tape:
Carefully peel off the painter’s tape while the second coat is still slightly damp. This helps create a crisp line without chipping the hardened mineral paint. -
Final cure:
Let the wall cure undisturbed for 24 hours. The color will shift and settle into its final, beautiful patina during this time.
Enjoy the rich, historical atmosphere your new accent wall brings to the room


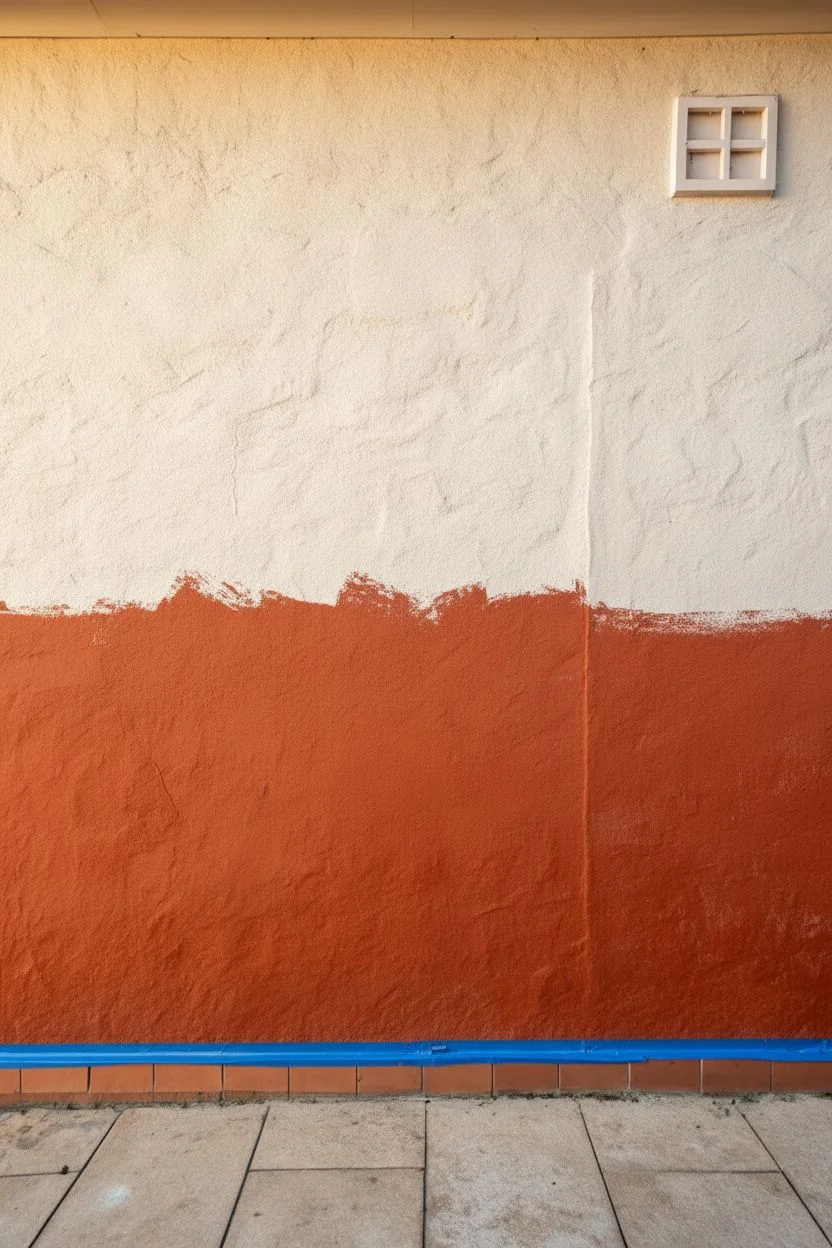
Half-Painted Wall With a Crisp Line

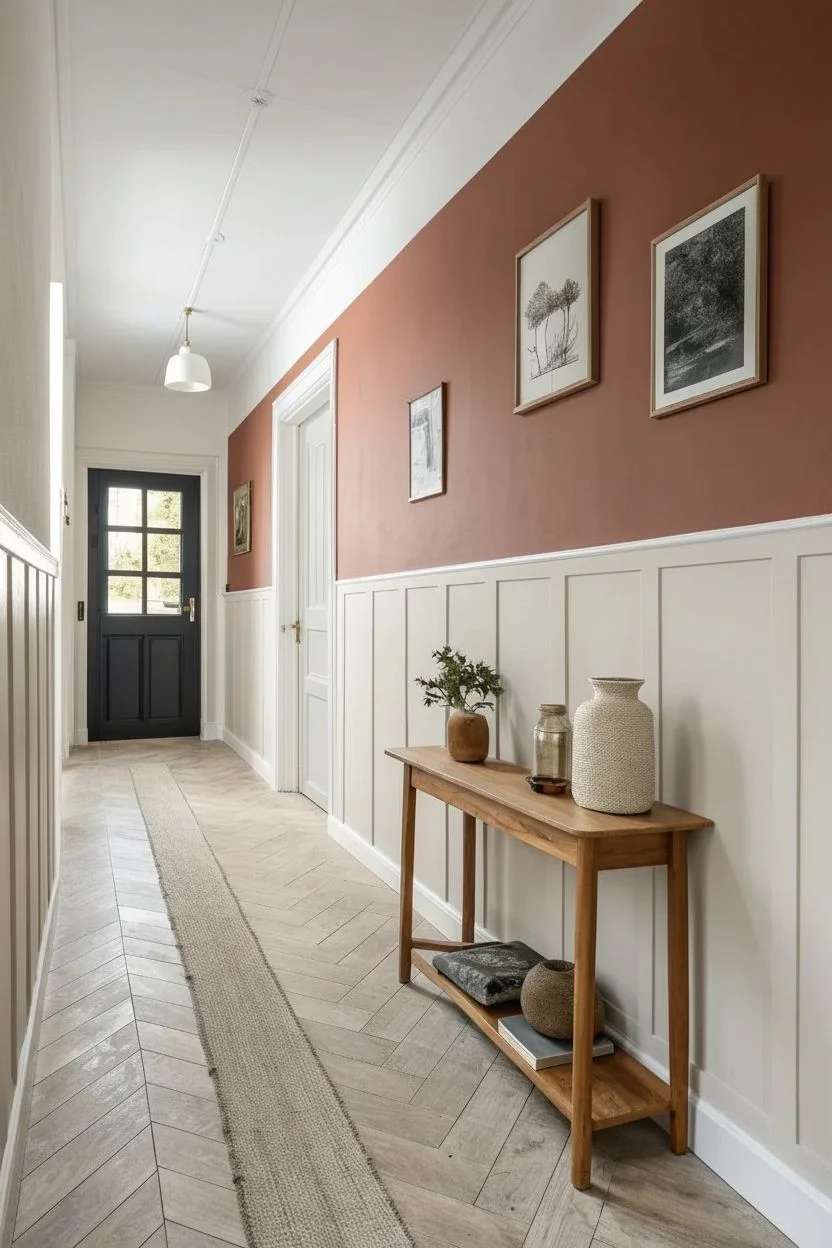
Transform a plain hallway into a sophisticated entryway by combining classic wainscoting with a warm, earthy upper wall. This project creates a stunning visual contrast between the structural beige paneling and the rich terracotta paint above, adding instant character and height to your space.
Step-by-Step
Materials
- MDF or wood paneling sheets (wainscot style)
- Chair rail molding
- Construction adhesive (e.g., Liquid Nails)
- Brad nailer and 1.5-inch brad nails
- Wood filler
- Sandpaper (120 and 220 grit)
- Caulk and caulk gun
- Painter’s tape (high quality)
- Primer (if bare wood/MDF)
- Interior latex paint: Light Greige (Eggshell or Satin finish)
- Interior latex paint: Terracotta/Rust (Matte or Eggshell finish)
- Trim paint: White (Semi-gloss)
- Paint rollers (microfiber) and tray
- Angled sash brush (2 inch)
- Level and measuring tape
- Drop cloths
Step 1: Preparation & Planning
-
Measure and clear:
Begin by removing any existing baseboards if you plan to replace them, or measure precisely to sit your paneling on top. Clear the hallway furniture and lay down drop cloths to protect that herringbone floor. -
Mark your height:
Decide on the height of your wainscoting. A standard chair rail height is around 32-36 inches, but going slightly higher can add drama. Use a level and pencil to mark this horizontal line around the entire hallway. -
Prep the walls:
Fill any holes in the wall above your marked line with spackle. Sand smooth once dry. Clean the walls with a damp cloth to remove dust and grease, ensuring the best paint adhesion.
Uneven Walls?
If your walls aren’t perfectly straight, you might see gaps behind the chair rail. Don’t force the wood back; fill large gaps with caulk for a seamless look.
Step 2: Painting the Upper Wall
-
Cut in the edges:
Start with your terracotta paint. Using an angled sash brush, carefully cut in along the ceiling line (or crown molding if present) and corners. Don’t worry about the bottom edge where the paneling will go, as it will be covered. -
Roll the main color:
Pour your terracotta paint into a tray. Use a roller to apply the paint to the upper section of the wall. Work in ‘W’ shapes to distribute the paint evenly, smoothing it out with vertical strokes. -
Apply a second coat:
The rich pigment of terracotta often needs two coats for full depth. Allow the first coat to dry according to the can’s instructions—usually 2-4 hours—before rolling on the second coat for a velvety, solid finish.
Add Dimension
For a more custom look, paint the vertical battens (strips) in a slightly darker shade of greige than the flat back panels to create subtle depth.
Step 3: Installing the Paneling
-
Cut panels to size:
Measure the distance from the floor (or top of baseboard) to your marked level line. Cut your wainscoting sheets or vertical battens to this exact height using a circular saw or table saw. -
Apply adhesive:
Apply a zigzag of construction adhesive to the back of your first panel. Position it on the wall, checking for level vertical alignment before pressing firmly. -
Secure with nails:
Use a brad nailer to tack the panel in place. Shoot nails into the studs where possible, or at the top and bottom edges where trim will hide them. Repeat this process around the room. -
Install the chair rail:
Measure and cut your chair rail molding to fit the length of the walls. Place it directly on top of the paneling edge to cap it off. Nail it into the studs for a secure hold.
Step 4: Finishing the Woodwork
-
Fill and sand:
Fill all nail holes and seams between panels with wood filler. Once dry, sand these spots flush with 220-grit sandpaper so they disappear under paint. -
Caulk the gaps:
Run a thin bead of caulk along the top of the chair rail (where it meets the terracotta wall) and in inside corners. Wet your finger to smooth the bead for a professional, seamless transition. Let it cure completely. -
Tape off the wall:
Once the caulk is dry, apply painter’s tape along the terracotta wall just above the chair rail to protect your fresh paint job. -
Prime the woodwork:
If your paneling is raw wood or MDF, apply a coat of primer. If it’s pre-primed, you can skip this step, but I usually do a quick spot-prime over filler areas to prevent flashing. -
Paint the panels:
Stir your light greige paint thoroughly. Use a brush to get into the grooves and corners of the paneling first. -
Roll the flat surfaces:
Switch to a small foam or microfiber roller to paint the flat surfaces of the wainscoting. This minimizes brush strokes and gives a sprayed-on look. -
Final coat and peel:
Apply a second coat of greige once the first is dry. While the final coat is still slightly tacky, carefully peel off the painter’s tape at a 45-degree angle to reveal that crisp, satisfying line.
Step back and admire how this split-wall technique adds architectural interest and warmth to your hallway


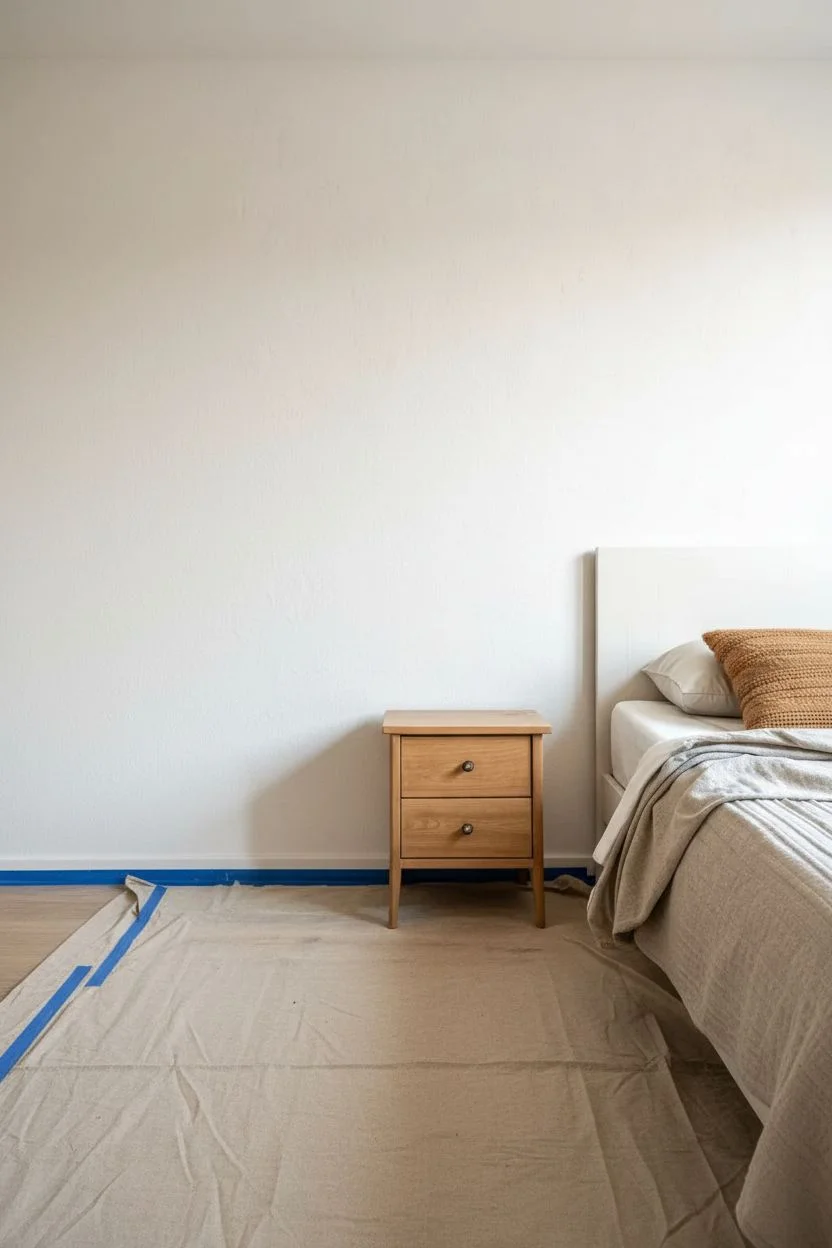
Soft Two-Tone Color Blocking
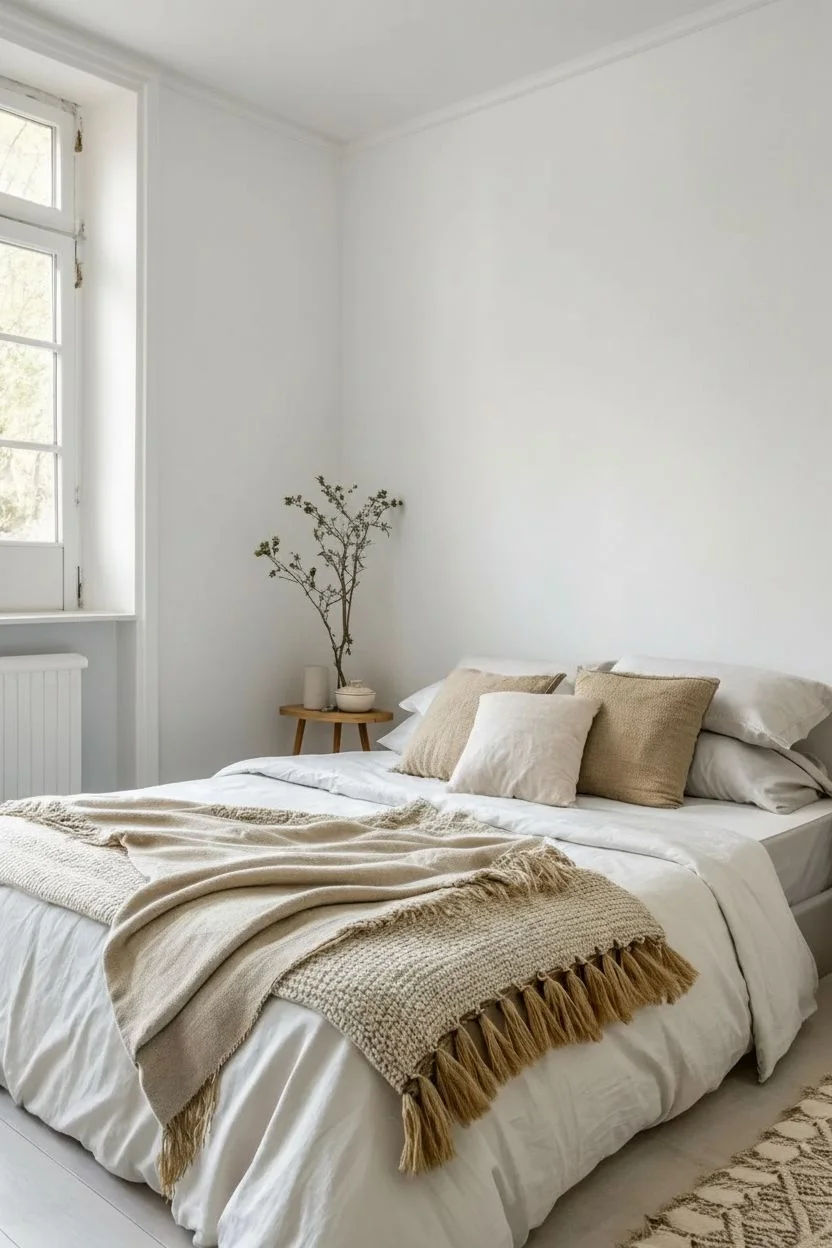
Bring a sense of grounded calm to your bedroom with this minimalist two-tone wall treatment that pairs a crisp white upper with a warm, sandy taupe lower section. This color blocking technique creates an architectural horizon line that visually expands the space while adding cozy texture.
Step-by-Step Guide
Materials
- Interior latex paint (Eggshell finish, White)
- Interior latex paint (Matte or Flat finish, Warm Sand/Beige color)
- Painter’s tape (high quality, medium adhesion)
- Laser level or 4-foot bubble level
- Pencil
- Tape measure
- Drop cloths
- Spackling paste and putty knife
- Sandpaper (120-grit)
- Paint roller (3/8-inch nap)
- Extension pole for roller
- 2-inch angled trim brush
- Paint tray and liners
- Damp rag
Step 1: Preparation & Upper Wall
-
Clear and clean:
Begin by moving all furniture, like the bed and side tables, to the center of the room or out completely. Wipe down the walls with a damp rag to remove dust, ensuring a clean surface for adhesion. -
Patch imperfections:
Inspect the walls for nail holes or dents. Fill these with a small amount of spackling paste, let it dry, and then sand smooth until flush with the wall. -
Protect the room:
Lay down heavy-duty drop cloths over the flooring and secure them near the baseboards to prevent shifting. -
Paint the base coat:
Start by painting the entire wall—or at least the top half and slightly below where you estimate your dividing line will be—with your white interior paint. I find it easier to just refresh the whole wall white first to ensure a seamless look later. -
Dry thoroughly:
Patience is key here. Allow the white base coat to cure for at least 24 hours. If the paint is even slightly tacky, the tape we apply next could peel it right off.
Step 2: Creating the Horizon Line
-
Determine the height:
Decide on the height of your color block. For this specific look, aim for a line that sits about 2/3rds up the wall, or approximately 60-65 inches from the floor, clearing standard headboard height. -
Mark the level:
Using a tape measure, make small pencil marks at your desired height across the wall. Use a laser level to project a perfectly straight line connecting these marks. -
Apply the tape:
Carefully run a long strip of high-quality painter’s tape along your laser line or pencil marks. Press the tape down firmly, especially along the bottom edge where the sand color will meet the white. -
Seal the edge:
To get that razor-sharp line, take your white paint (the upper wall color) and lightly brush it over the bottom edge of the tape. This seals any tiny gaps with white paint so the beige won’t bleed under.
Tape Sealing Trick
For textured walls, use clear matte medium instead of the base color to seal your tape edge. It fills the texture divots invisibly, preventing jagged lines.
Step 3: Applying the Accent Color
-
Cut in the edges:
Open your warm sand/beige paint. Using the angled sash brush, cut in along the corners, baseboards, and around any outlets within the lower section. -
Roll the first coat:
Load your roller with the beige paint. Roll the large open areas below the tape line using a ‘W’ motion to distribute paint evenly. -
Approach the tape carefully:
When rolling near the painter’s tape, offload most paint lower down the wall first, then roll upwards toward the tape with a relatively dry roller to avoid heavy buildup at the ridge. -
Apply second coat:
Wait for the first coat to dry according to the can’s instructions (usually 2-4 hours). Apply a second coat to ensure rich, opaque coverage. -
The crucial reveal:
While the second coat is still slightly wet—not soaking, but tacky—slowly peel off the painter’s tape. Pull it at a 45-degree angle away from the painted area for the cleanest edge. -
Final touches:
Inspect your horizon line. If any tiny bleeds occurred, wait for everything to dry completely, then use a small craft brush and the white paint to touch up.
Line Looks Crooked?
Floors are rarely perfectly level. Measure up from the floor, but rely on a laser level for the actual line. Trust the level, not the baseboards.
Step back and enjoy the warm, enveloping atmosphere your new two-tone wall brings to the room


Vertical Stripes to Add Height
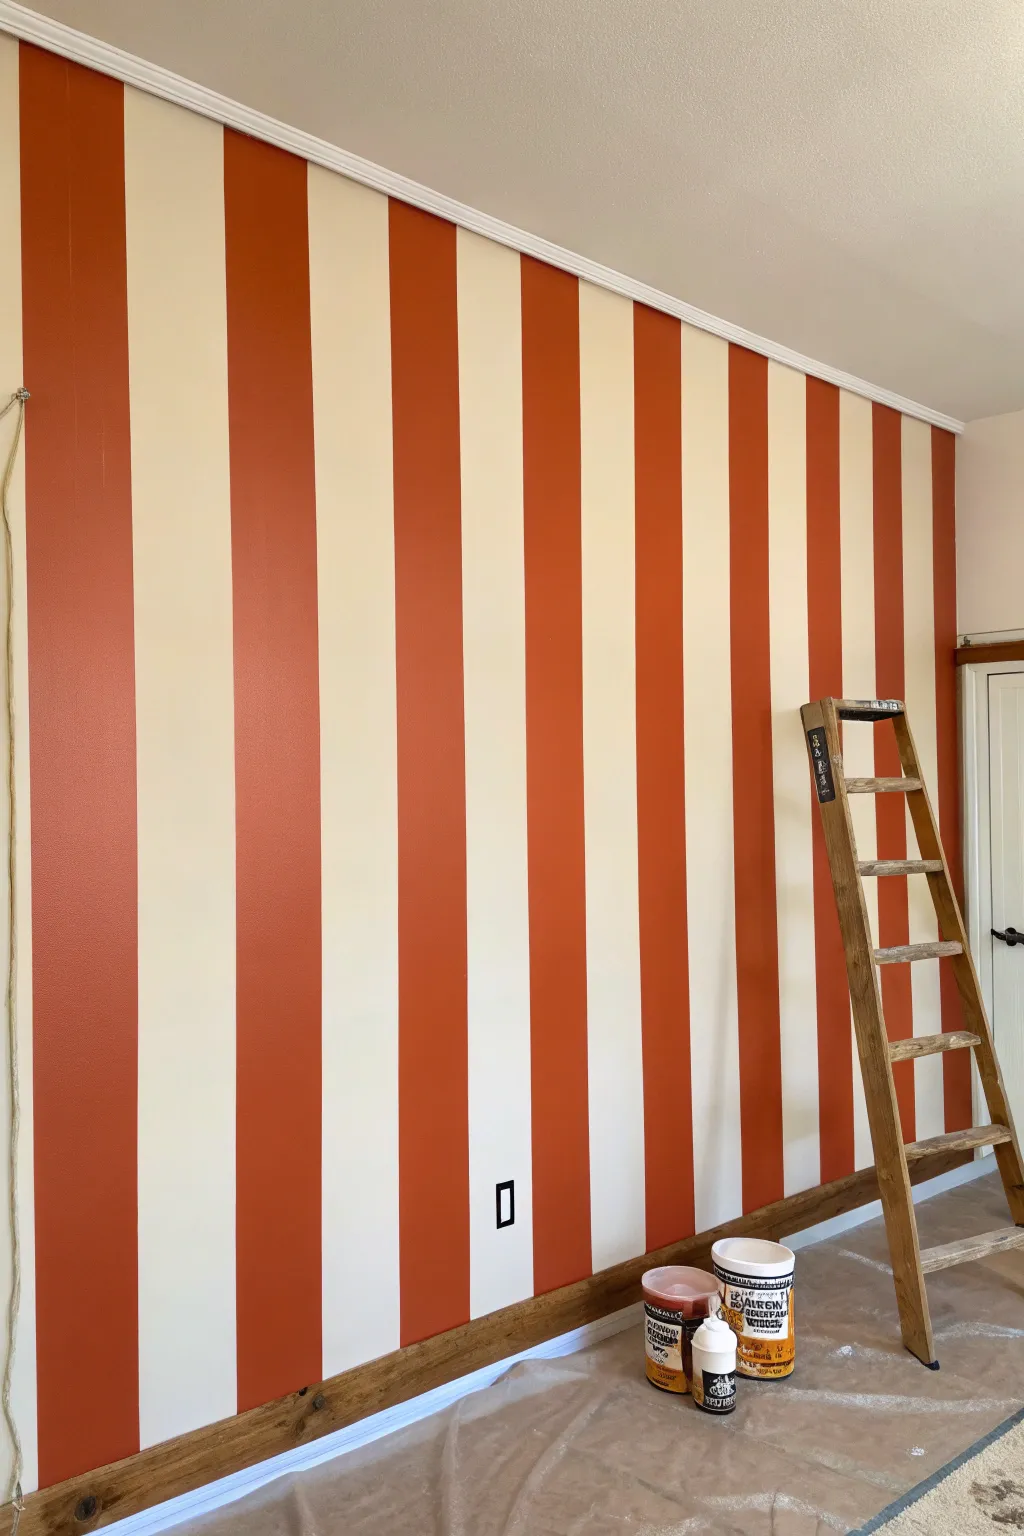
Transform a plain room into a towering masterpiece with these bold, vertical stripes that instantly draw the eye upward. The warm rust-orange and creamy off-white combination creates a cozy yet modern aesthetic perfect for accent walls.
Detailed Instructions
Materials
- Terracotta/Rust Orange latex wall paint (satin or eggshell finish)
- Cream/Off-White latex wall paint (satin or eggshell finish)
- Painter’s tape (high quality, meant for delicate surfaces)
- Laser level or traditional spirit level
- Pencil
- Tape measure
- Calculator
- Paint rollers (9-inch for large areas)
- Small foam roller or trim brush
- Paint tray and liners
- Drop cloths
- Ladder
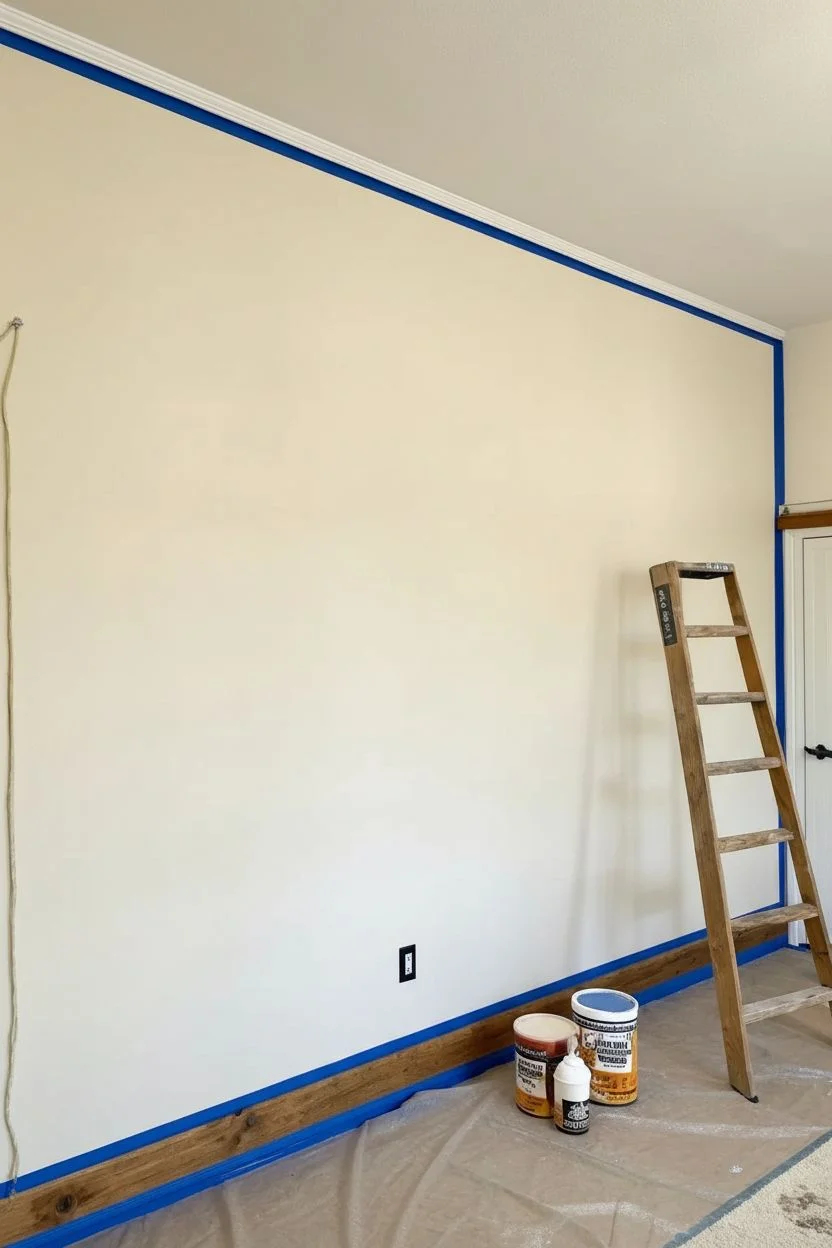
Step 1: Preparation & Base Coat
-
Clear the area:
Remove all furniture from the wall area and lay down heavy-duty drop cloths to protect your flooring from drips and spills. -
Prep the surface:
Ensure the wall is clean, dry, and free of dust. If there are any holes or cracks, fill them with spackling paste and sand smooth once dry. -
Protect the trim:
Apply painter’s tape along the baseboards, ceiling molding, and any adjacent walls to ensure crisp edges. -
Apply the lighter color:
Paint the entire wall with two coats of your cream/off-white paint. This will serve as the base for the lighter stripes. -
Allow for curing:
Let the base coat dry completely for at least 24-48 hours. This is crucial because you will be placing tape directly onto this fresh paint.
Seal for Sharp Lines
For razor-sharp lines, paint over the tape edge with your BASE wall color first. This seals any gaps; the accent color won’t bleed underneath.
Step 2: Measuring & Taping
-
Measure the wall width:
Measure the total width of the wall in inches using your tape measure. -
Calculate stripe width:
Decide on the number of stripes you want (an odd number usually looks best so you start and end with the same color). Divide the total wall width by that number to get the exact width of each stripe. -
Mark the first line:
Starting from one corner, measure out the width of the first stripe and make a small pencil mark at eye level. -
Set the vertical line:
Use a laser level aligned with your mark to project a perfectly straight line from floor to ceiling. If you don’t have a laser, use a long spirit level and draw a very faint pencil line. -
Apply the tape:
Place your painter’s tape along the line. Crucial tip: place the tape on the *outside* of the area you intend to paint orange, so the painted stripe retains its full calculated width. -
Continue marking:
Move across the wall, measuring and taping each section. I find it helpful to put a small piece of tape or an ‘X’ made of tape inside the zones that need to remain white so I don’t get confused later. -
Seal the tape edges:
Once all vertical tape lines are up, run a credit card or putty knife firmly over the edges of the tape to ensure a tight seal against the wall. -
The bleed-prevention trick:
Lightly brush a small amount of the *base color* (the cream paint) over the edge of the tape where the orange stripe will go. This seals the edge; if any paint bleeds under, it will be the base color and invisible.
Uneven Walls?
If your walls aren’t perfectly square, adjust the width of the very last stripe in the least visible corner to trick the eye.
Step 3: Painting the Accent Stripes
-
Cut in the edges:
Using a brush, carefully cut in the terracotta paint at the ceiling and baseboard lines within your designated stripe areas. -
Roll the first coat:
Use a small roller to apply the terracotta paint between the tape lines. Don’t overload the roller to prevent heavy ridges near the tape. -
Apply the second coat:
Once the first coat is dry to the touch (check your paint can for specific times), apply a second coat for full, rich opacity. -
Remove tape while wet:
This is the most satisfying part: carefully peel off the painter’s tape while the second coat of orange paint is still slightly wet. Pull the tape slowly at a 45-degree angle away from fresh paint. -
Touch ups:
Inspect your lines once everything is dry. Use a tiny artist’s brush to fix any small bleeds or uneven spots near the ceiling or baseboards. -
Re-install hardware:
Remove the tape from the baseboards and ceiling, and screw any outlet covers (like the black one shown) back into place.
Now you can stand back and enjoy how much taller and more vibrant your room feels with your new custom striped wall
BRUSH GUIDE
The Right Brush for Every Stroke
From clean lines to bold texture — master brush choice, stroke control, and essential techniques.
Explore the Full Guide
Horizontal Stripes for a Wider Feel
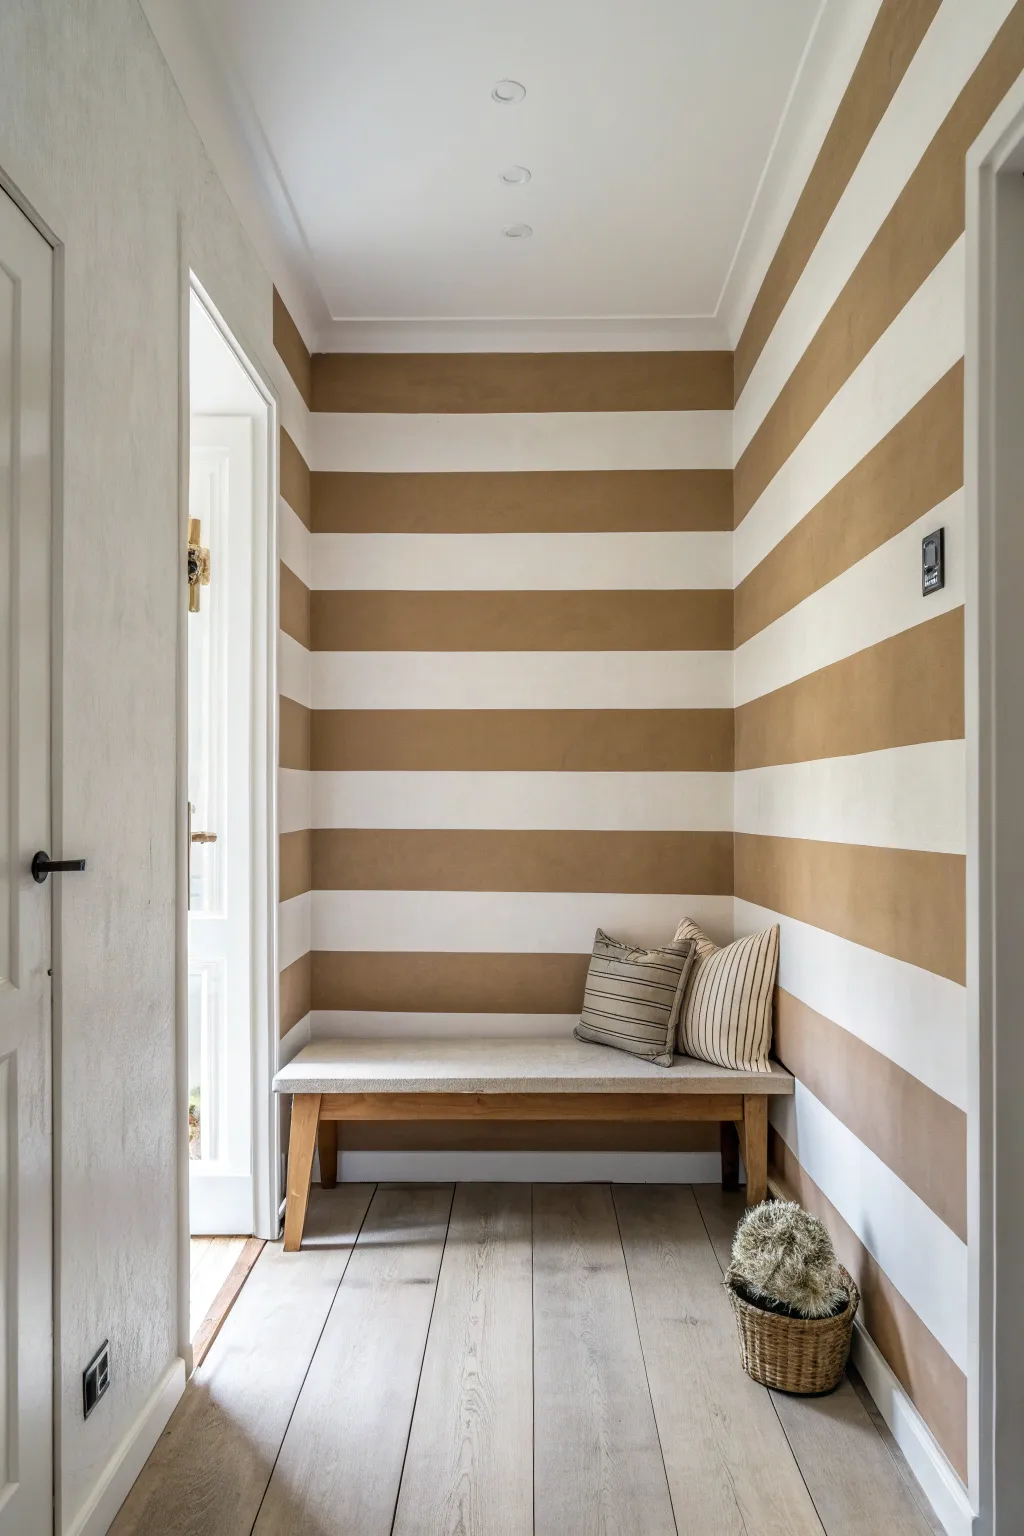
Transform a narrow or compact hallway into a visually spacious retreat with this classic horizontal stripe technique. The warm brown and crisp white bands create an inviting rhythm that instantly draws the eye and broadens the appearance of the room.
Step-by-Step
Materials
- White or Off-White Latex Interior Paint (Main base)
- Warm Brown/Caramel Latex Interior Paint (Accent stripe)
- Painter’s Tape (1.5 – 2 inch width, high quality)
- Laser Level
- Measuring Tape
- Pencil
- Paint Roller (9 inch and 4 inch)
- Paint Tray and Liners
- Angled Sash Brush (2 inch)
- Drop Cloths
- Step Ladder
- Putty Knife or Credit Card
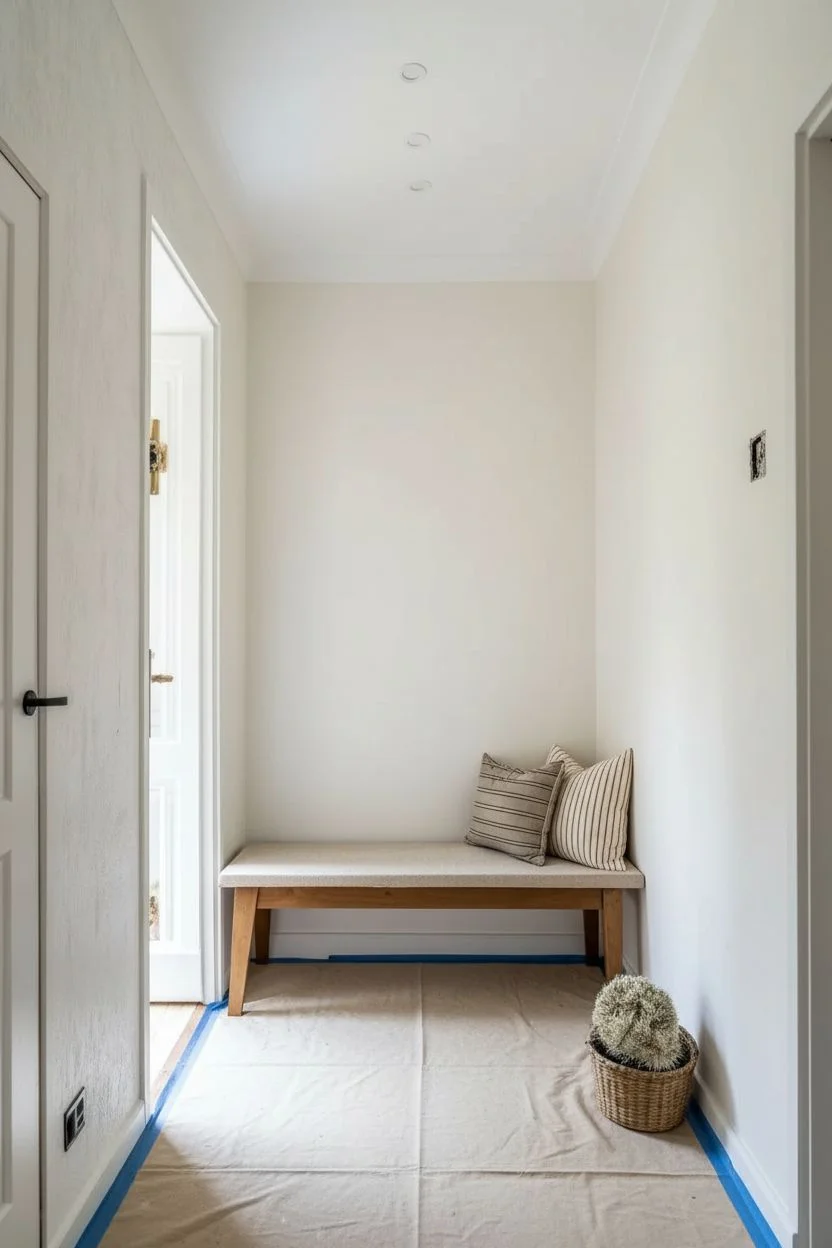
Step 1: Preparation and Base Coat
-
Clear and Clean:
Remove all furniture, switch plates, and outlet covers from the area. Wipe down the walls with a damp cloth to remove dust and grease, ensuring a clean surface for adhesion. -
Protect the Floors:
Lay down drop cloths to cover your flooring entirely, taping the edges to the baseboards if necessary to prevent slippage. -
Apply the Base Color:
Paint the entire wall with your lighter color (white or off-white). This will serve as the background for your stripes. I find two coats usually give the best coverage here. -
Let it Cure:
Allow the base coat to dry completely. Wait at least 24-48 hours before applying tape; if the paint is even slightly tacky, the tape will peel it off later.
Tape Removal Tip
Pull the tape slowly and consistently. If the paint starts to pull up with the tape, lightly score the edge with a razor blade to break the seal before continuing.
Step 2: Measuring and Taping
-
Determine Stripe Width:
Measure the total height of your wall and decide on the number of stripes you want. For the look in the photo, aim for stripes that are roughly 10-12 inches wide. -
Mark the Wall:
Starting from the ceiling, use your measuring tape and pencil to make small tick marks down the wall at your determined intervals. -
Set the Level:
Set up a laser level to project a straight horizontal line across the wall aligned with your first pencil mark. This is much faster and more accurate than a standard bubble level. -
Apply the Tape:
Apply painter’s tape along the laser line. Crucial step: Make sure you put the tape on the *outside* of the area you intend to paint brown. You want the brown stripe to remain the full measured width. -
Mark the Zones:
Place a small piece of tape or a lightly penciled ‘X’ inside every other stripe—the ones that will be painted brown—so you don’t accidentally paint the wrong section. -
Seal the Edges:
Run a putty knife or the edge of a credit card firmly along the tape edges. This activates the adhesive and prevents paint bleed-under. -
The ‘Sealant’ Trick:
Here I prefer to brush a very light layer of the *base* color (white) over the edge of the tape that touches the future brown stripe. This seals the gap; if anything bleeds under, it’s white-on-white and won’t show.
Sheen Variation
For a subtle, high-end look, use the same color for both stripes but change the finish. Use matte for the wide base stripes and semi-gloss for the accent stripes.
Step 3: Painting the Stripes
-
Cut in the Edges:
Using your angled brush and the warm brown paint, carefully cut in along the corners, ceiling (if a brown stripe touches it), and baseboards inside your marked zones. -
Roll the Stripes:
Use a 4-inch or small 9-inch roller to fill in the brown stripes. Apply the paint slightly over the tape edge to ensure a clean line, but don’t flood the tape with too much paint. -
Second Coat:
Allow the first coat of brown to dry to the touch, then apply a second coat for deep, rich color opacity. -
Remove Tape Early:
Do not wait for the paint to fully dry. Carefully peel off the painter’s tape while the second coat is still slightly damp. Pull the tape at a 45-degree angle away from the fresh paint.
Step 4: Finishing Touches
-
Touch Ups:
Inspect your lines once fully dry. If a little bleed-through occurred, use a tiny artist’s brush and the base white paint to correct it. -
Reassemble:
Reattach your switch plates and outlet covers once the wall is fully cured.
Step back and enjoy the expanded feel of your newly striped hallway
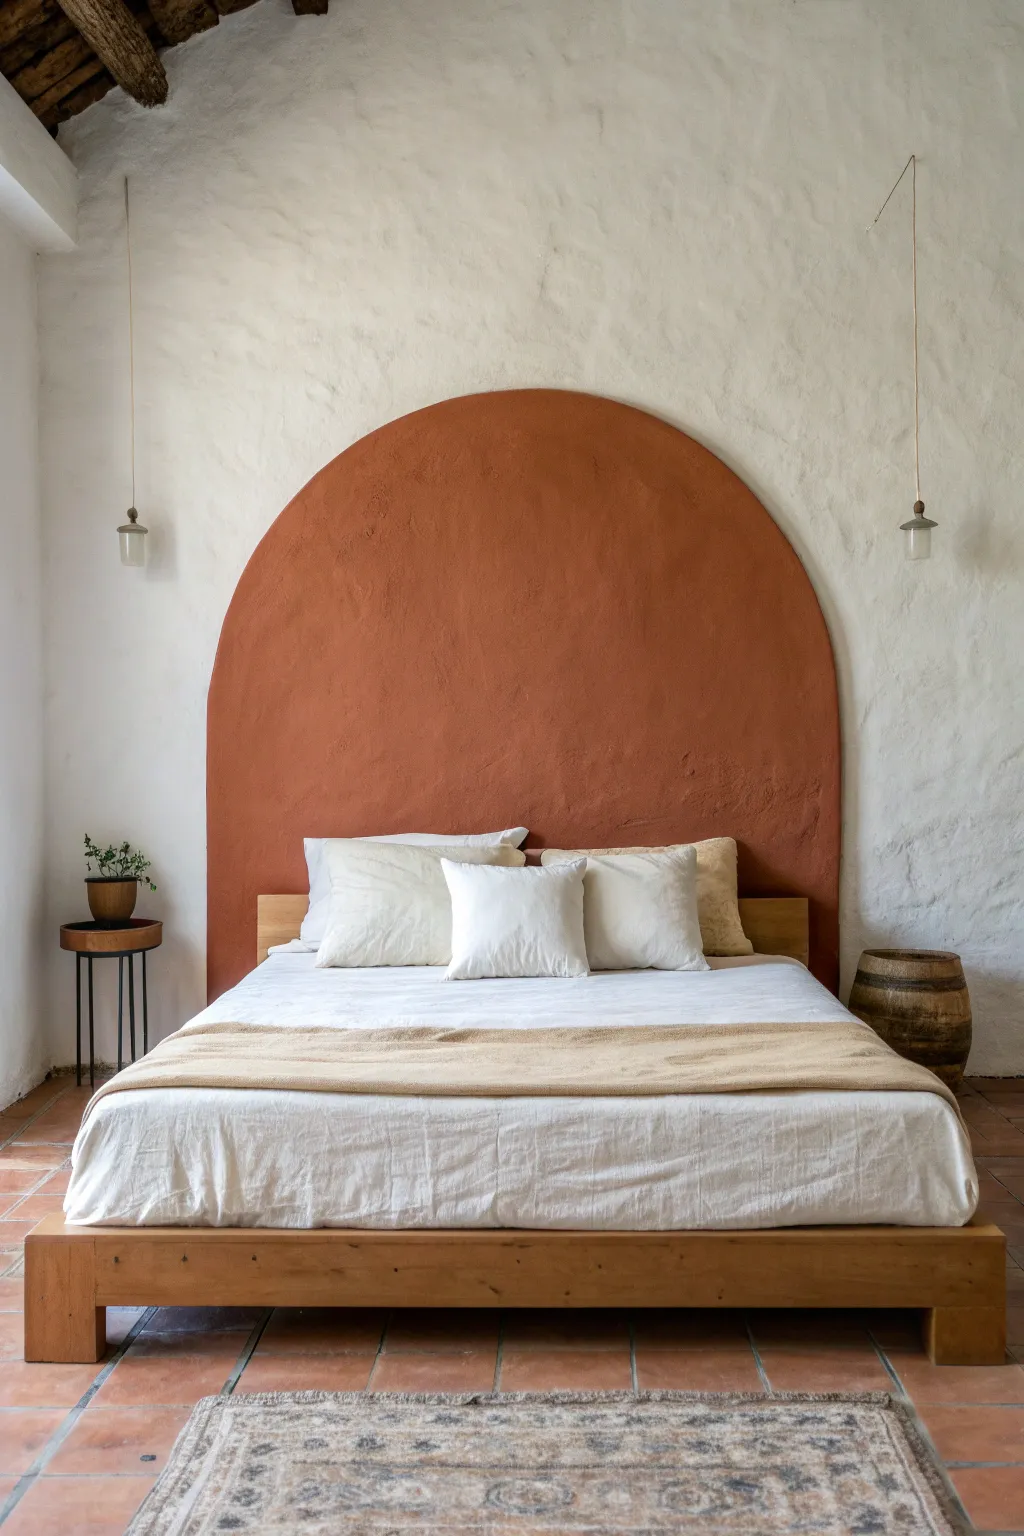
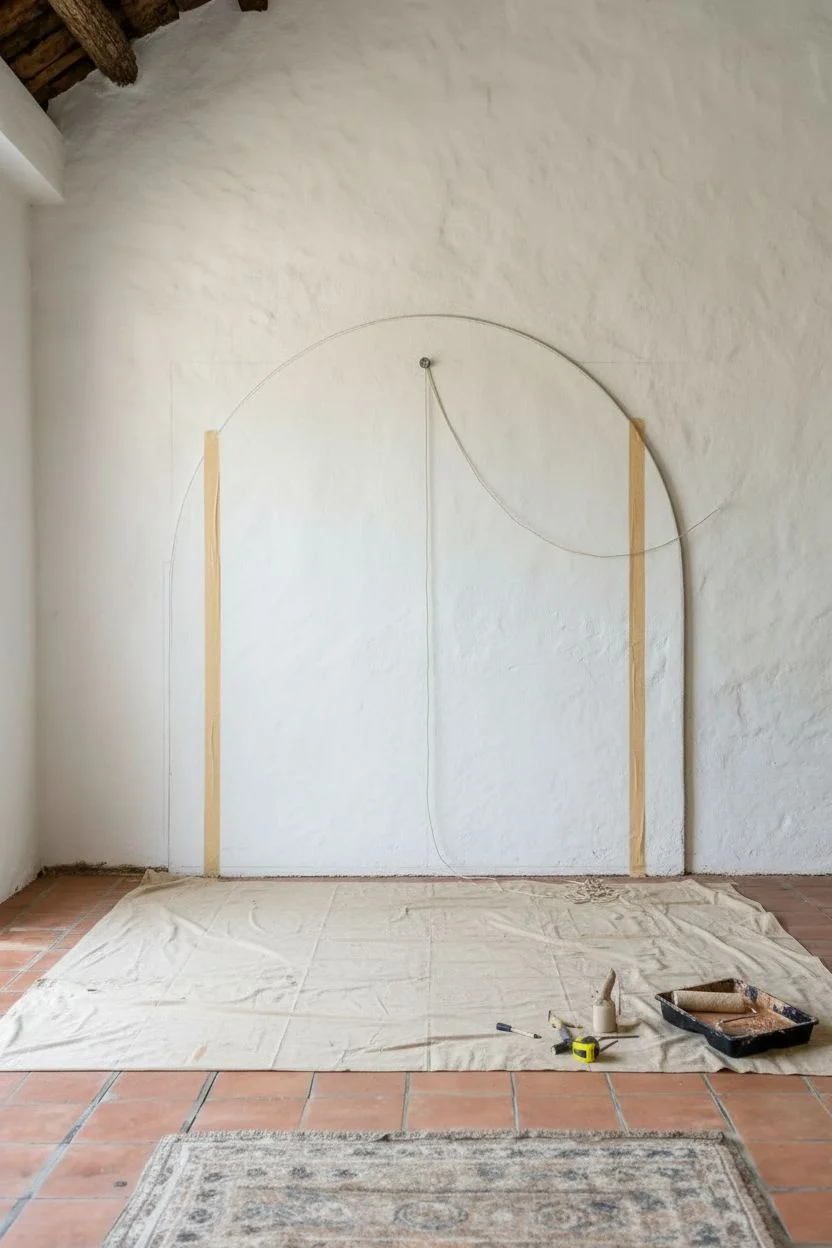
Painted Arch Behind a Bed or Desk

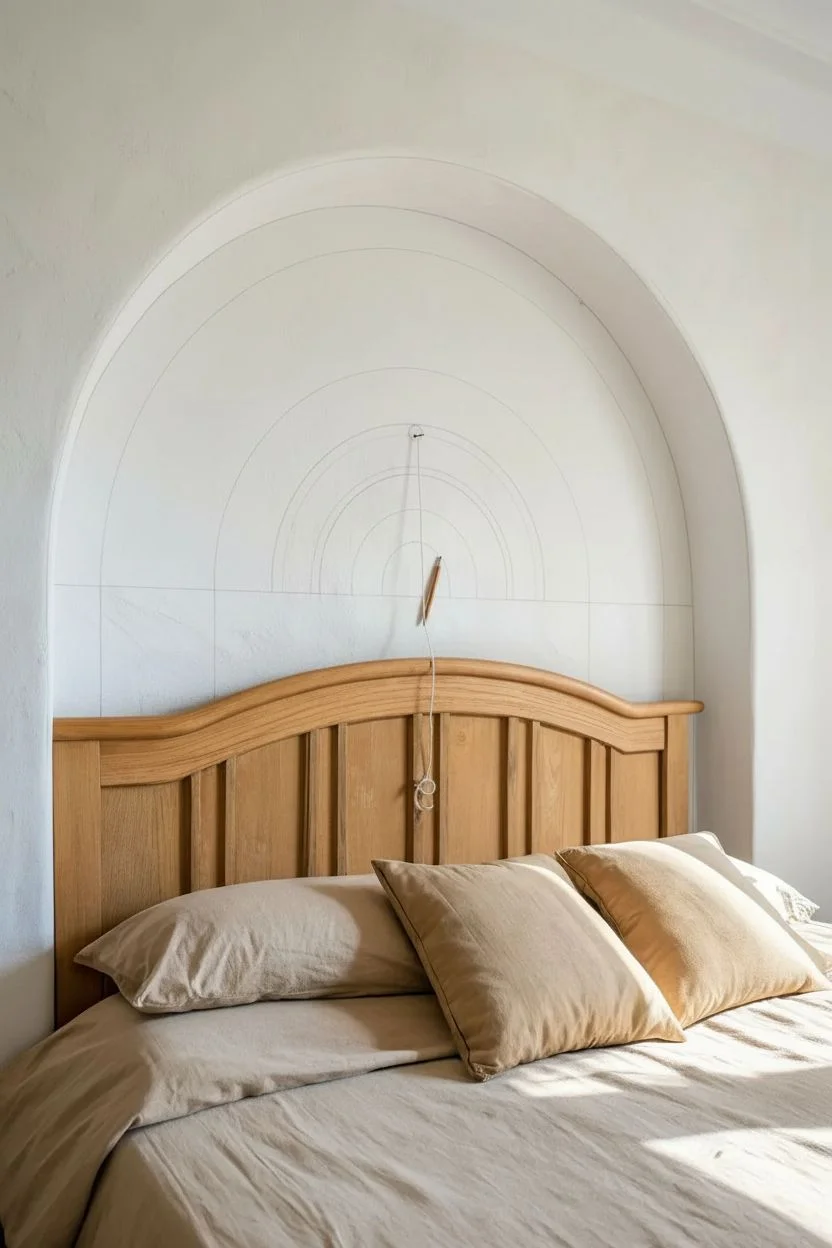
Bring the warmth of a Mediterranean villa into your bedroom with this stunning dual-tone arch feature. By combining a rich terracotta block of color with hand-painted faux stonework, you create an architectural focal point that feels both rustic and refined.
Detailed Instructions
Materials
- Terracotta or rust-colored interior latex paint (matte finish)
- Beige or sand-colored interior latex paint (base for stones)
- Cream or off-white acrylic paint (for mortar lines)
- Pencil
- String and push pin (or nail)
- Tape measure
- Painter’s tape
- Level
- 2-inch angled sash brush
- Small flat artist’s brush (roughly 1/2 inch)
- Fine liner brush
- Clean rag
- Drop cloth
Step 1: Planning and Marking
-
Measure your headboard:
Before putting pencil to wall, measure the width of your headboard. You want your arch to extend slightly beyond it on both sides—about 4 to 6 inches past the frame usually provides the best balance. -
Find the center point:
Mark the center of your headboard width on the wall at the height where the headboard ends. This will be the anchor point for your compass. -
Create a string compass:
Tie a piece of non-stretchy string to a pencil. Measure the string length to match half the desired width of your arch plus an inch or two for clearance. -
Draw the outer arch:
Pin the free end of the string to your center mark. Holding the string taut, swing the pencil in a smooth semi-circle to draw the top boundary of your terracotta section. -
Extend the sides:
Use a long level or a straightedge to drop straight vertical lines down from the ends of your semi-circle to the floor or baseboard. -
Mark the inner arch:
Shorten your string by about 5-6 inches (this determines the thickness of the stone band). Keep the pin in the same center hole and draw a second, smaller inner arch. -
Define the stone band:
Shorten the string one last time by another 5-6 inches. Draw the third and smallest arch. The space between the second and third lines will become your faux stone border.
Wobbly Lines?
If your hand isn’t steady, use 1/4 inch painter’s tape to block out the ‘mortar’ lines before painting the stones. Peel it off while paint is wet for crisp gaps.
Step 2: Painting the Base Colors
-
Outline the terracotta zone:
Using your 2-inch angled brush, carefully cut in along the outermost pencil line and the middle pencil line. This defines the large terracotta color block. -
Fill the color block:
Fill in the rest of the large arch shape with your terracotta paint. Apply two coats for a rich, plaster-like depth, allowing proper drying time between applications. -
Paint the stone base:
Switch to your beige or sand-colored paint. Fill in the curved band between the inner two pencil lines. Don’t worry about being too perfect here; a little texture adds to the stone effect. -
Add the horizontal extensions:
Where the arch curves end, use a level to draw and paint a horizontal strip of the beige stone color extending outward, creating the straight ‘shelf’ look seen in the reference.
Step 3: Detailing the Faux Stones
-
Pencil the mortar lines:
Lightly sketch lines across the beige band to divide it into individual stone blocks. Vary the sizes slightly and angle them to follow the curve of the arch radiating from the center. -
Paint the mortar gaps:
Using the fine liner brush and cream paint, trace over your pencil lines. Keep the lines somewhat uneven to mimic aged mortar rather than perfect tile grout. -
Highlight the stones:
Mix a tiny drop of white into your beige paint. Use the small flat brush to dry-brush the center of each ‘stone,’ leaving the edges darker to create a subtle 3D effect. -
Soften the edges:
I find that dipping a clean, damp rag into water and very lightly dragging it over the painted stones while they are tacky helps blend the brushstrokes for a natural limestone texture. -
Clean up coordinates:
Once everything is fully dry, use a clean eraser to remove any visible stray pencil marks. Check the edges of your terracotta paint and do final touch-ups with the angled brush if needed.
Customize It
Add texture medium or fine sand to the terracotta paint mix. This creates a tactile, stucco-like finish that makes the Mediterranean vibe feel even more authentic.
Step back and admire how this simple paint technique completely transforms the architectural character of your room

PENCIL GUIDE
Understanding Pencil Grades from H to B
From first sketch to finished drawing — learn pencil grades, line control, and shading techniques.
Explore the Full Guide
Painted “Headboard” Shape
Transform your bedroom by painting a bold geometric shape directly onto the wall to serve as a visual headboard. This terracotta arch brings warmth and architectural interest to the space without taking up any actual floor area.
Step-by-Step
Materials
- Latex interior wall paint (terracotta/burnt orange color)
- Painter’s tape
- Measuring tape
- Pencil
- String or twine
- Push pin or tack
- Drop cloth
- Small angled sash brush (1.5 – 2 inch)
- Medium paint roller (semi-smooth or semi-rough nap)
- Roller tray
- Level (optional but helpful)
Step 1: Planning and Marking
-
Clear and clean:
Move the bed away from the wall to give yourself plenty of working space. Wipe the wall down with a damp cloth to remove dust or cobwebs, ensuring the paint adheres properly. -
Determine width:
Measure the width of your bed frame. You generally want the arch to extend slightly beyond the bed on both sides—about 2 to 4 inches past the frame creates a balanced look. -
Mark vertical guides:
Using your measurements, mark the two bottom corners of your arch on the baseboard or lower wall with a pencil. Use a level or tape measure to lightly draw two vertical lines upward to your desired height for the straight sides of the arch. -
Find the center point:
Measure the exact distance between your two vertical lines. Mark the center point strictly in the middle of this width. This center mark is crucial for the next step, which determines the curve. -
Set the anchor:
Decide where the curve should begin. Mark this height horizontally across your two vertical lines. Place your push pin or tack exactly on the center vertical line at this height level.
Uneven Texture?
If your wall has heavy texture like the one in the photo, bleed is more likely. Seal your tape edge with a thin layer of the *original* wall color first to block gaps before applying the terracotta paint.
Step 2: Drawing the Arch
-
Create a compass:
Cut a piece of non-stretchy string slightly longer than the radius of your arch. Tie one end securely around the pencil and the other end around the push pin. -
Test the tension:
Pull the string taught so the pencil tip just touches one of your vertical side marks. The string length must be precise so the curve meets the straight lines perfectly. -
Trace the curve:
Keeping the string tight and the pencil vertical, swing the pencil in a smooth arc from the left vertical line up and over to the right vertical line. I find it helps to do this motion lightly first without marking to ensure the movement feels fluid. -
Tape the straight edges:
Apply painter’s tape along the outside of the two vertical pencil lines you drew earlier. Stop taping exactly where the curve begins; do not try to tape the curved portion. -
Seal the tape:
Run your finger or a clean putty knife firmly along the edge of the painter’s tape to prevent bleed-under. This ensures crisp, professional lines.
Level Up: Limewash Look
For that old-world, plaster vibe seen in the photo, mix clear glaze into your paint or sponge on a slightly lighter shade while wet to create subtle, cloudy color variations and depth.
Step 3: Painting
-
Cut in the curve:
Dip your angled sash brush into the terracotta paint. Carefully paint along the inside of your penciled arch line. Use a steady hand and slow strokes to define the edge. -
Cut in the sides:
Use the brush to paint along the inner edge of the painter’s tape on the vertical sides. This ‘cutting in’ creates a border for the roller. -
Fill the center:
Load your roller with paint and fill in the large middle section of the arch. Use a ‘W’ motion to distribute paint evenly, overlapping your wet edge from the brush work. -
Feather the edges:
As you roll near the cut-in edges, roll as close as safely possible to blend the brush strokes with the roller texture. This prevents a visible ‘frame’ effect. -
Dry and repeat:
Allow the first coat to dry completely according to the can’s instructions (usually 2-4 hours). Apply a second coat, starting with cutting in the edges again followed by rolling the center. -
Remove tape:
While the second coat is still slightly tacky (not fully cured), carefully peel off the painter’s tape at a 45-degree angle. This prevents the dried paint from cracking or peeling with the tape. -
Clean up imperfections:
Once the tape is off, inspect your edges. If any paint bled under or the curve has a wobble, use a tiny artist’s brush and your original wall color to touch up the mistakes.
Allow the wall to cure fully for at least 24 hours before pushing your bed back into place against your new focal point
Simple Geometric Color Blocks
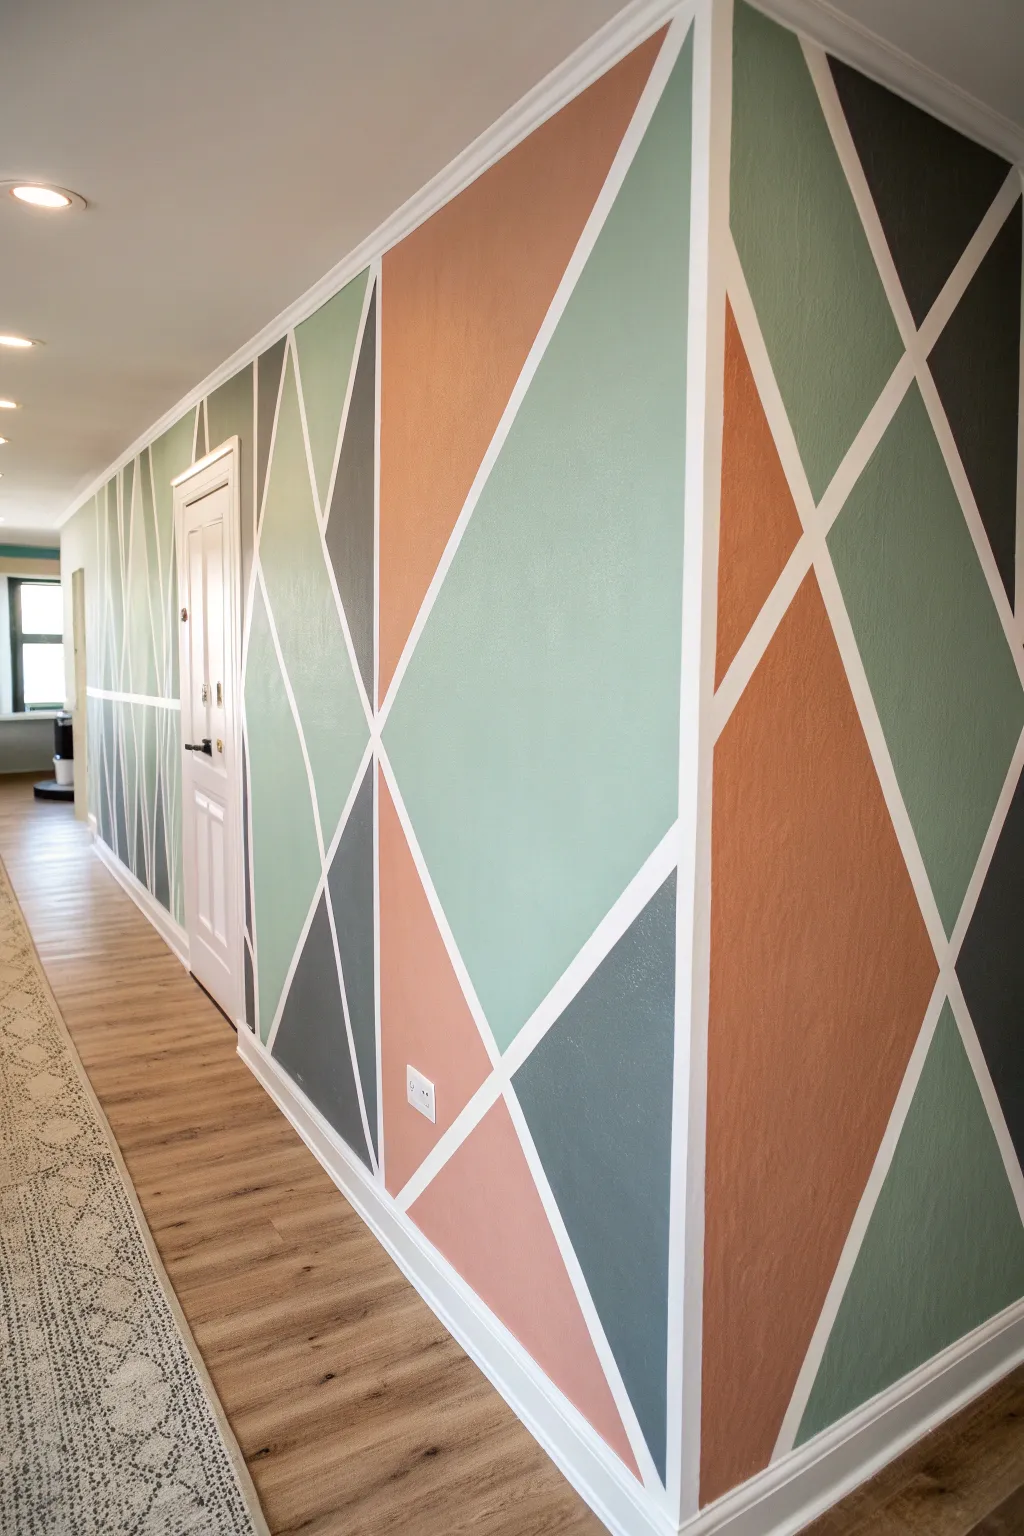
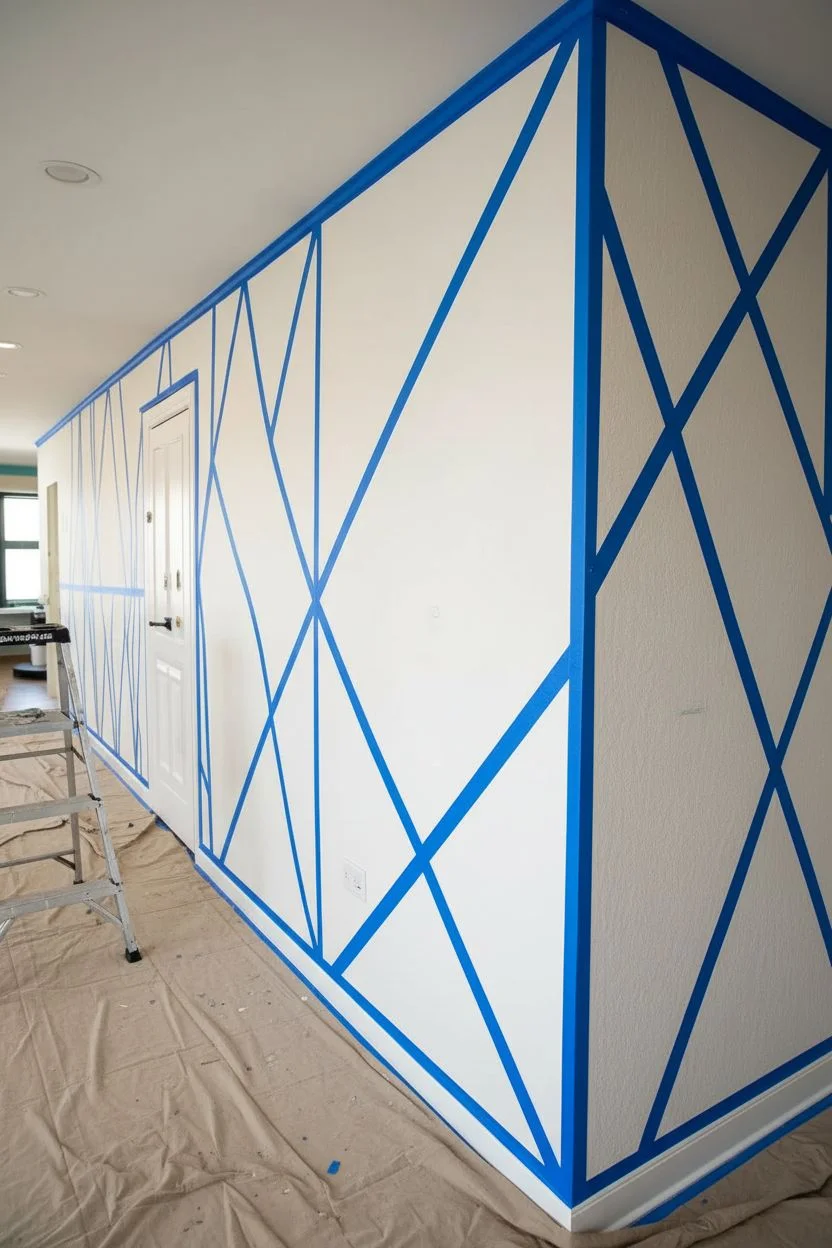
Transform a plain hallway or corner into a modern statement piece with this angular geometric design. By utilizing masking tape and a palette of earthy terracotta, sage, and charcoal tones, you can create a structured yet dynamic mural that adds depth and architectural interest to any room.
Step-by-Step Guide
Materials
- Interior latex paint (Eggshell finish)
- Colors: Terracotta/Peach, Sage Green, Forest Green, Charcoal Grey
- Base wall color paint (White or Off-white)
- Painter’s tape (1-inch width, high quality)
- Paint rollers (4-inch mini rollers)
- Paint tray and liners
- Angled sash brush (2-inch)
- Drop cloths
- Ladder or step stool
- Putty knife or credit card
- Pencil and eraser
- Measuring tape (optional)
Step 1: Preparation & Mapping
-
Prepare the workspace:
Clear the hallway or room area of furniture and decor. Lay down drop cloths to protect your flooring. If your base wall color isn’t already a fresh, clean white (which will act as the lines between shapes), give the entire wall a base coat and let it dry for at least 24 hours. -
Visualize the layout:
Look at the wall and mentally divide it into large sections. Notice how the design in the photo uses large diagonals that span nearly floor to ceiling. You aren’t aiming for tiny triangles, but rather bold, oversized blocks. -
Apply the first tape lines:
Start with the longest lines first. Using high-quality painter’s tape, stretch a long piece diagonally across the wall. Secure it lightly at first so you can step back and adjust the angle. These primary lines will anchor your design. -
Create intersecting shapes:
Add secondary tape lines that intersect with your primary lines to create triangles and trapezoids. Work across corners continuously; the design looks best when lines wrap around bends rather than stopping abruptly. -
Seal the tape edges:
Once you are happy with the geometric arrangement, run a putty knife or an old credit card firmly over every strip of tape. This is crucial to prevent paint from bleeding under the edges and ruining your crisp lines.
Bleeding Lines?
If you peel the tape and see fuzzy edges, don’t panic. Wait for the paint to dry fully (24h), then re-tape exactly over the line and paint the base color over the bleed to erase it.
Step 2: Painting the Design
-
The ‘Bleed-Proof’ trick:
Before adding color, lightly brush a small amount of the *base* wall color (white) over the edges of the tape. If any paint bleeds under, it will be white-on-white, effectively sealing the tape edge perfectly for the colors to come. -
Plan your color placement:
Mark each taped-off section with a tiny piece of tape or a light pencil code indicating which color goes where. Aim for balance—don’t put two dark charcoal sections right next to each other. Spread the terracotta and sage tones evenly. -
Start with the lightest color:
Open your lightest color first (likely the sage or peach). Using a mini-roller, fill in the designated shapes. I find the 4-inch rollers offer much better control for staying within the lines than standard sizes. -
Cut in the corners:
Use the angled sash brush to paint the sharp corners of the triangles where the roller can’t reach. Be careful not to brush over the tape into a neighboring section meant for a different color. -
Move to darker tones:
Once the light sections are done, wash your roller or switch to a fresh liner and move on to the terracotta/orange shapes. Apply two light coats rather than one thick one for the smoothest finish. -
Apply the darkest accents:
Finally, fill in the charcoal and dark forest green sections. These dark colors often require a little extra attention to coverage, so ensure your second coat is thorough to avoid streakiness.
Color Balance Tip
Take a photo of your taped wall with your phone. Use the ‘markup’ tool to scribble colors into the shapes digitally first. This saves you from hating the layout after the paint is wet.
Step 3: The Reveal
-
Check for coverage:
Let the final coat of paint dry to the touch, usually about an hour. Inspect for any thin spots and touch them up lightly if needed. -
Remove tape carefully:
Do not wait for the paint to cure completely. While the paint is still slightly tacky (usually 1-2 hours after the last coat), begin peeling the tape. Pull it slowly at a 45-degree angle away from the painted edge. -
Handle the corner tape:
Be extra gentle when pulling tape out of the wall corners. If the paint seems stuck to the tape, use a craft knife to lightly score the edge before pulling to prevent peeling the paint off the wall. -
Touch up any blemishes:
Inevitably, there might be a tiny spot where paint bled or a line isn’t perfectly straight. Use a small artist’s brush and your base wall color to clean up these minor imperfections.
With those crisp lines revealed, your hallway is now a stunning display of modern art you built yourself


Checkerboard Feature Wall
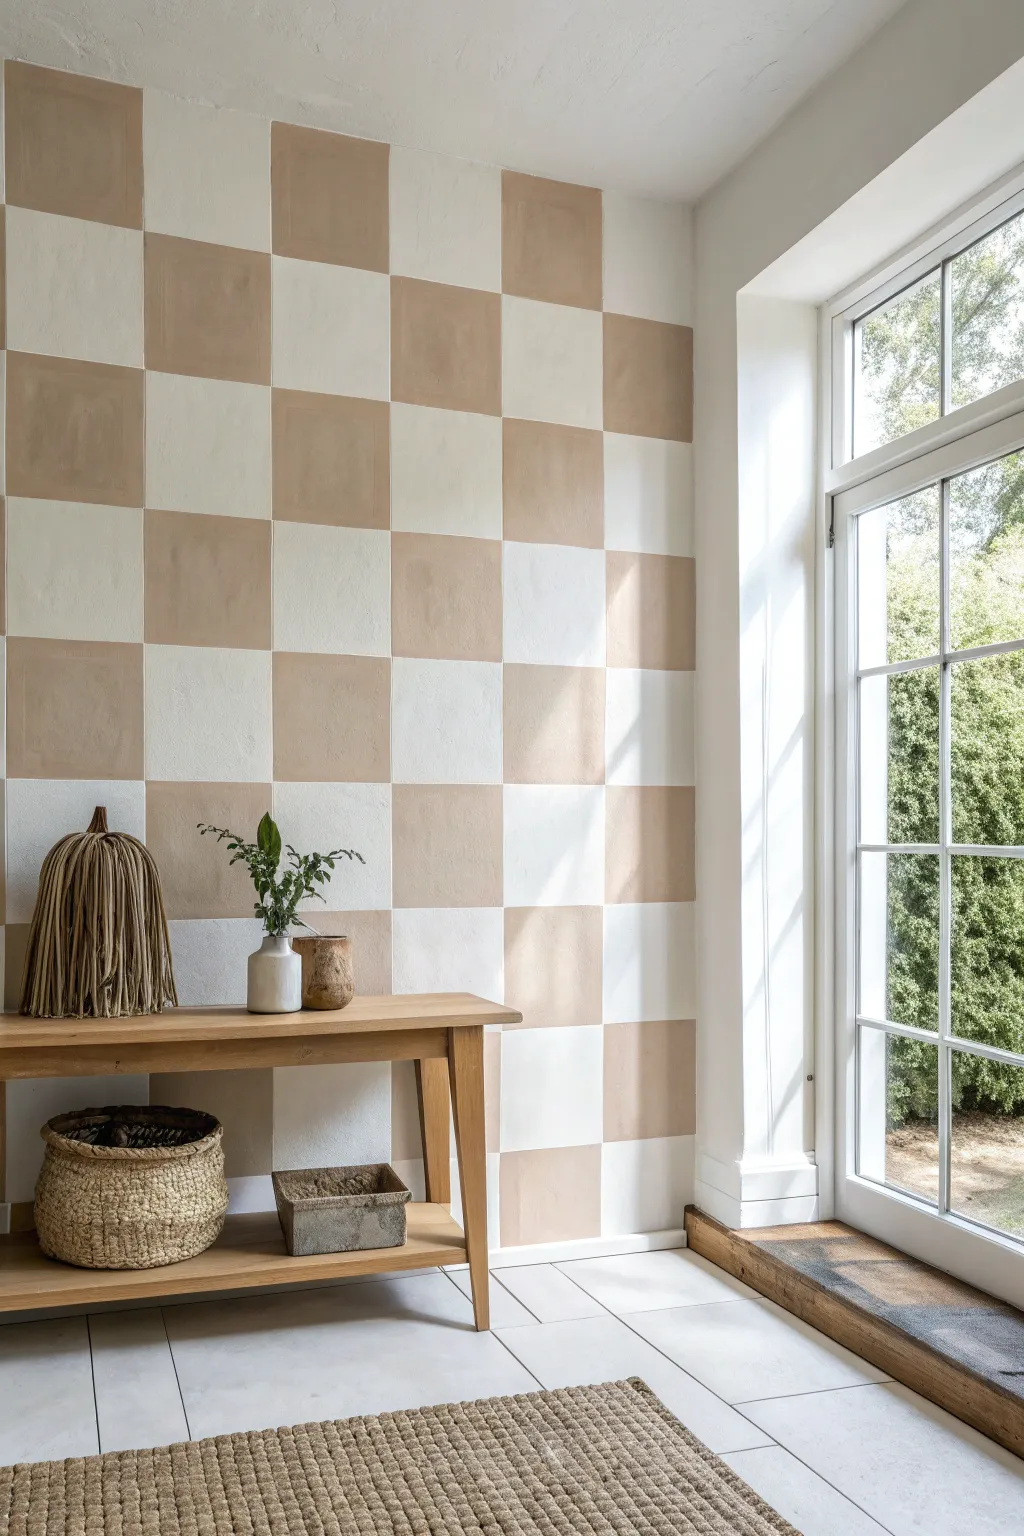
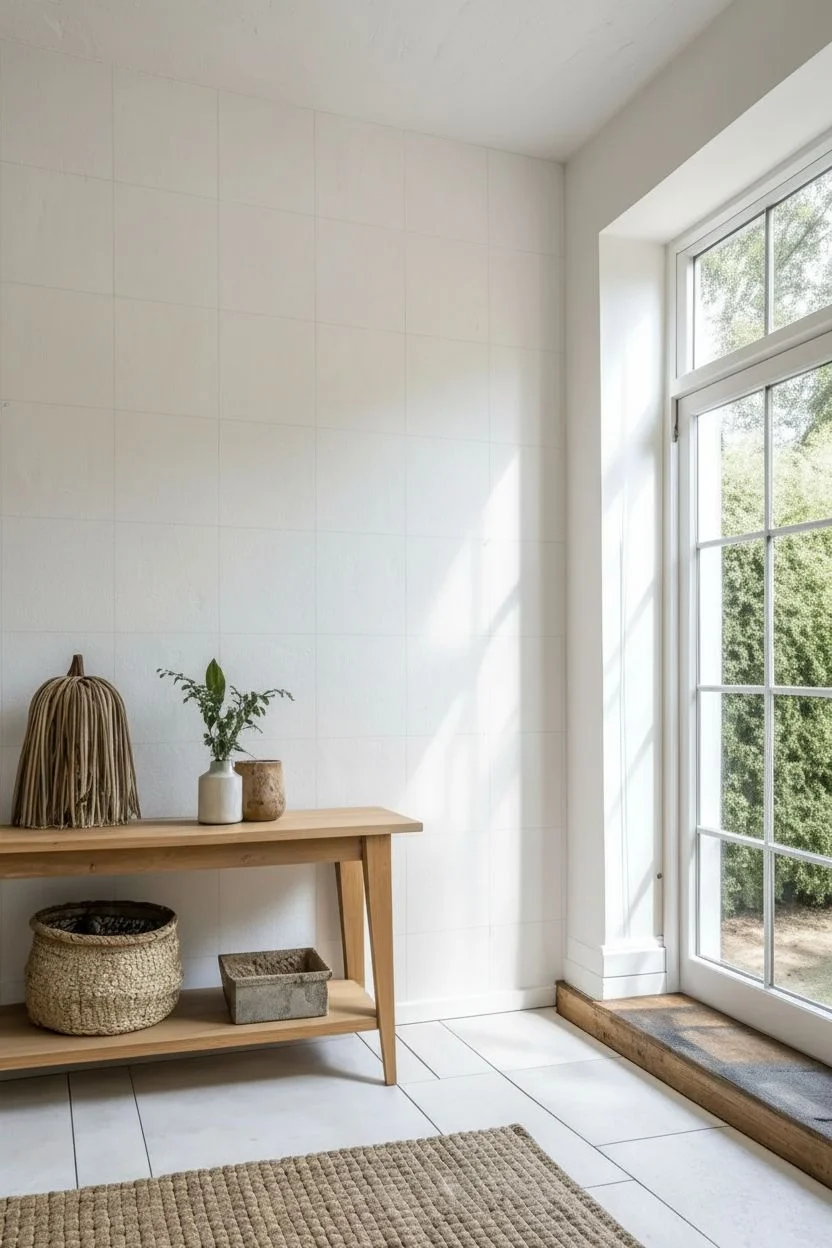
Transform a plain wall into a striking focal point with oversized squares in warm, earthy tones. This large-scale checkerboard pattern creates a modern yet cozy aesthetic that mimics the look of high-end wallpaper at a fraction of the cost.
Step-by-Step Tutorial
Materials
- Warm beige-tan latex wall paint (eggshell or matte)
- White latex wall paint (matching sheen)
- Painter’s tape (1.5-inch or 2-inch width)
- Laser level or long spirit level
- Measuring tape
- Pencil
- 4-inch foam roller or short-nap microfiber roller
- Small roller tray
- Angled sash brush (2-inch) for edges
- Drop cloth
Step 1: Preparation & Mapping
-
Clean the surface:
Begin by wiping down your wall with a damp cloth to remove any dust or grease, ensuring the tape adheres properly and lines stay crisp. -
Base coat application:
Paint the entire wall with your chosen white base color if it isn’t white already. Let this dry completely for at least 24 hours before applying any tape to avoid peeling. -
Measure the wall:
Measure the total width and height of your wall to determine your square size. For the look in the photo, aim for large squares, roughly 18-20 inches wide. -
Calculate the grid:
Divide your wall width by your desired square size. Adjust the size slightly so you end up with whole squares or symmetrical partial squares at the edges. -
Mark vertical lines:
Using a laser level for accuracy, lightly mark vertical pencil lines across the wall at your calculated intervals. -
Mark horizontal lines:
Repeat the process with horizontal lines, creating a complete grid of squares. Double-check a few intersections with a speed square to ensure everything is perfectly perpendicular.
Step 2: Taping the Grid
-
Tape vertical lines:
Apply painter’s tape along your vertical pencil marks. Decide firmly which side of the line the tape goes on—always tape on the ‘outside’ of the squares you intend to paint first. -
Tape horizontal lines:
Apply tape along the horizontal marks. This is where it gets tricky: you cannot paint all checkered squares at once because the corners touch. -
Mark the ‘paint’ squares:
To avoid confusion, place a tiny piece of tape or a light ‘X’ made of tape inside every square that needs to remain white. This visual guide prevents accidental painting.
Bleed-Proof Lines
Always burnish your tape edges firmly with a credit card or putty knife. This creates a tight seal that prevents paint from creeping underneath.
Step 3: Painting the Pattern
-
Seal the tape edges:
I like to brush a very thin layer of the *base* wall color (white) over the edges of the tape first. This seals the tape so any bleed-through matches the base coat. -
Mix your beige paint:
Stir your beige tone thoroughly. Pour a small amount into the roller tray. -
Paint the first set:
You will need to paint in stages. Identify a set of non-touching diagonal squares. Use the foam roller to fill these squares with the beige paint. -
Feather the edges:
Use the angled brush for corners and edges near the ceiling or baseboards where the roller can’t reach. -
Remove tape while damp:
Carefully peel off the tape while the paint is still slightly tacky to prevent it from pulling up dry paint film. -
Allow to dry:
Let this first batch of squares dry completely—ideally overnight—before re-taping for the remaining beige squares. -
Re-tape and finish:
Once the first squares are cured, tape off the white squares carefully to protect them, and paint the remaining beige squares to complete the checkerboard. -
Final touch-ups:
inspect the corners where the squares meet. Use a tiny artist’s brush to fix any gaps or slight bleeds for a clean finish.
Corner Alignment
If corners don’t meet perfectly, don’t panic. A small artist’s brush and a steady hand can square off the tips manually after the tape is removed.
Step back and admire how this bold geometric pattern completely redefines the energy of your room
Hand-Painted Polka Dots With Personality
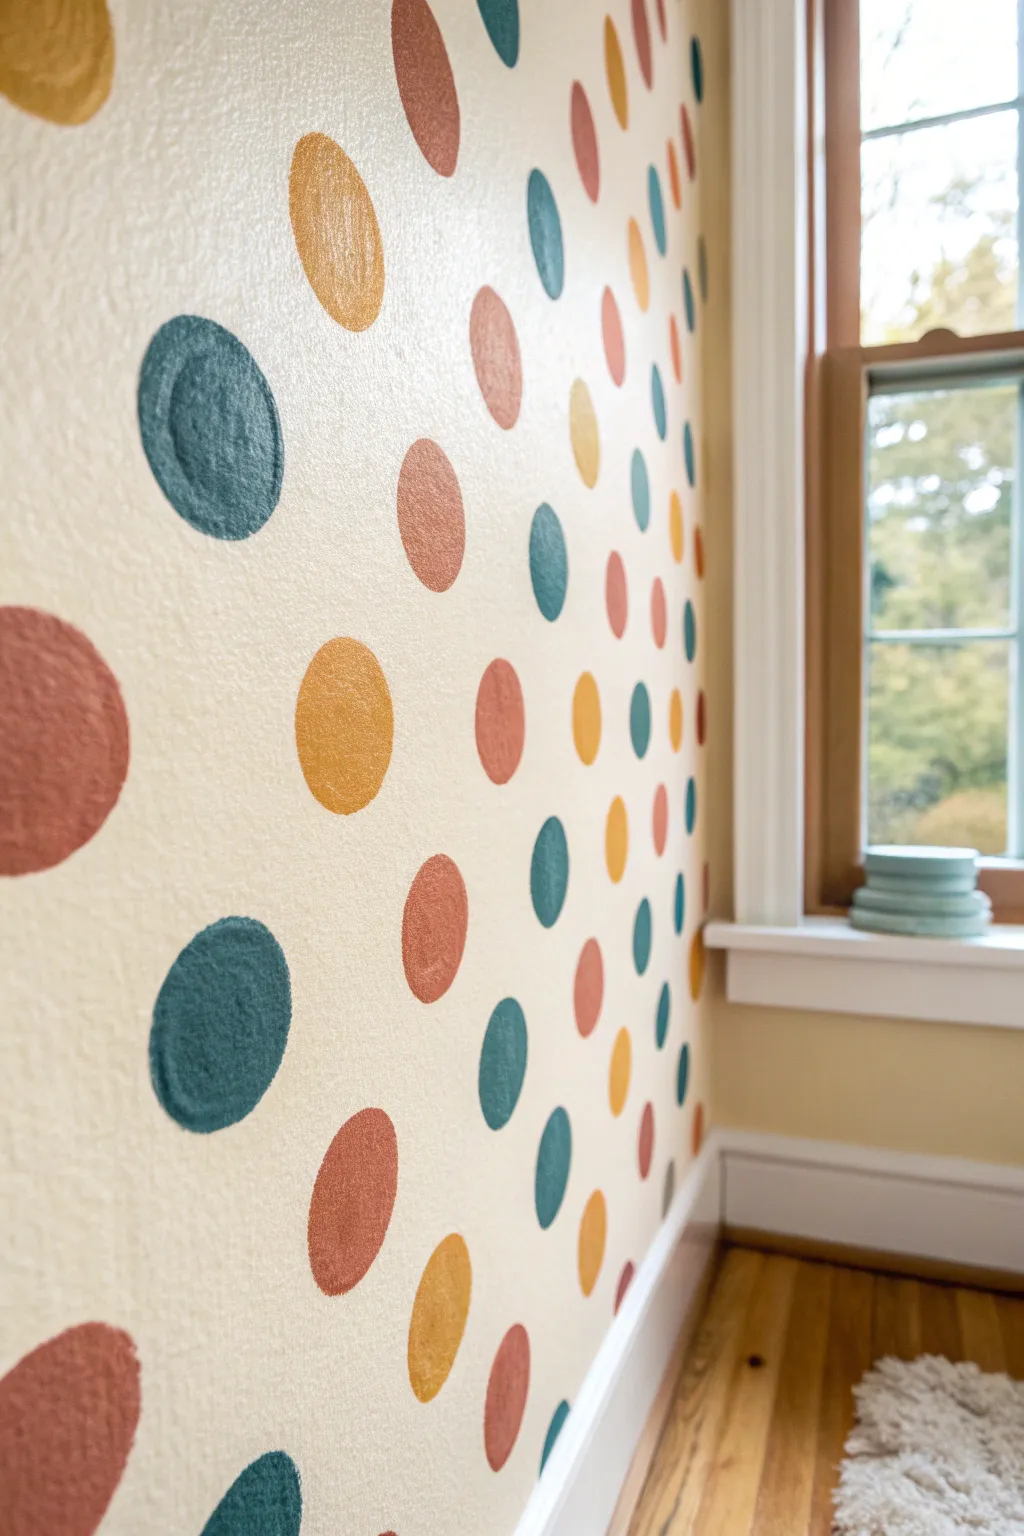
Transform a plain wall into a playful, bohemian feature with this charming hand-painted polka dot technique. The beauty lies in the imperfect, organic shapes that give the room a warm and handcrafted feel without the need for precise stencils.
Step-by-Step
Materials
- Interior latex paint (Eggshell or Satin finish) in base wall color
- Sample pots of accent paint (suggested: Deep Teal, Mustard Gold, Terracotta, Soft Peach)
- Round paint brushes (Size 10 or 12 for the main dots)
- Small angled sash brush (for cutting in)
- Painter’s tape
- Drop cloths
- Pencil
- Tape measure
- Paper plate or painting palette
- Step ladder
Step 1: Preparation & Base Coat
-
Protect the area:
Clear the furniture away from the wall you intend to paint. Lay down drop cloths to protect your flooring and apply painter’s tape to the baseboards, window trim, and adjacent walls to ensure clean edges. -
Clean the surface:
Wipe down the wall with a damp cloth to remove dust and oils. This ensures your paint adheres properly and lasts longer. -
Apply the base color:
Roll on your background wall color. A creamy off-white or light beige works beautifully to make the colored dots pop. Apply two coats if necessary for full coverage. -
Let it dry completely:
Allow the base coat to dry for at least 4-6 hours, or ideally overnight. You want a hard, dry surface before you start adding the decorative dots.
Brush Technique Tip
For rounder dots, spin the handle of the brush between your fingers while keeping the bristles pressed against the wall. This naturally creates a circular shape.
Step 2: Planning the Pattern
-
Determine spacing:
Decide how dense you want your pattern. For the look in the photo, dots are roughly 6-8 inches apart. You don’t want a rigid grid, but you do want balance. -
Mark anchor points:
Using a tape measure and a pencil, lightly mark small ‘X’s or dots on the wall where your painted circles will go. Start from the center and work your way out. -
Stagger the rows:
To create that classic polka dot rhythm, offset every other row. If row one has a dot at 12 inches and 24 inches, row two should have dots at 18 inches and 30 inches. -
Step back and review:
Before opening any paint, step back to look at your pencil marks. This is your chance to adjust any awkward spacing or fill in large gaps.
Level Up: Metallic Pop
Swap one of your matte paint colors for a metallic gold or copper acrylic paint. The shimmer will catch the light and add a sophisticated touch.
Step 3: Painting the Polka Dots
-
Prepare your palette:
Pour a small amount of your first accent color (e.g., Deep Teal) onto a paper plate. Don’t overload the brush; you want control. -
Paint the first color:
Using your round brush, paint a circle over your first pencil mark. Place the brush tip in the center and swirl outward in a spiral motion until the dot reaches about 2-3 inches in diameter. -
Embrace imperfections:
The charm of this style is the hand-painted edge. Don’t try to make them perfect circles; slight wobbles add character and texture. -
Distribute color randomly:
Paint about 25% of your marked spots with this first color. Try to space them out so no two teal dots are right next to each other. -
Switch to color two:
Clean your brush thoroughly or switch to a fresh one. Load up your second color (e.g., Mustard Gold) and repeat the process on another quarter of the markings. -
Apply the remaining colors:
Continue this process with your Terracotta and Soft Peach paints, filling in the remaining pencil marks. Step back frequently to ensure the color distribution feels balanced. -
Check opacity:
Some colors, especially yellows and reds, might be more transparent. Once the first layer is dry to the touch, dab a second coat on those specific dots to make the color rich and solid.
Step 4: Final Touches
-
Inspect the edges:
Look closely at your dots. If paint has pooled at the bottom of a circle due to gravity, gently feather it out with a dry brush before it sets completely. -
Erase guide marks:
If any pencil marks are still visible outside the painted circles, gently erase them once the paint is 100% dry. -
Remove tape:
Peel off your painter’s tape slowly at a 45-degree angle to reveal your crisp baseboard lines.
Enjoy the lively and welcoming atmosphere your new accent wall brings to the space
Wavy Painted Border for a Soft Vibe
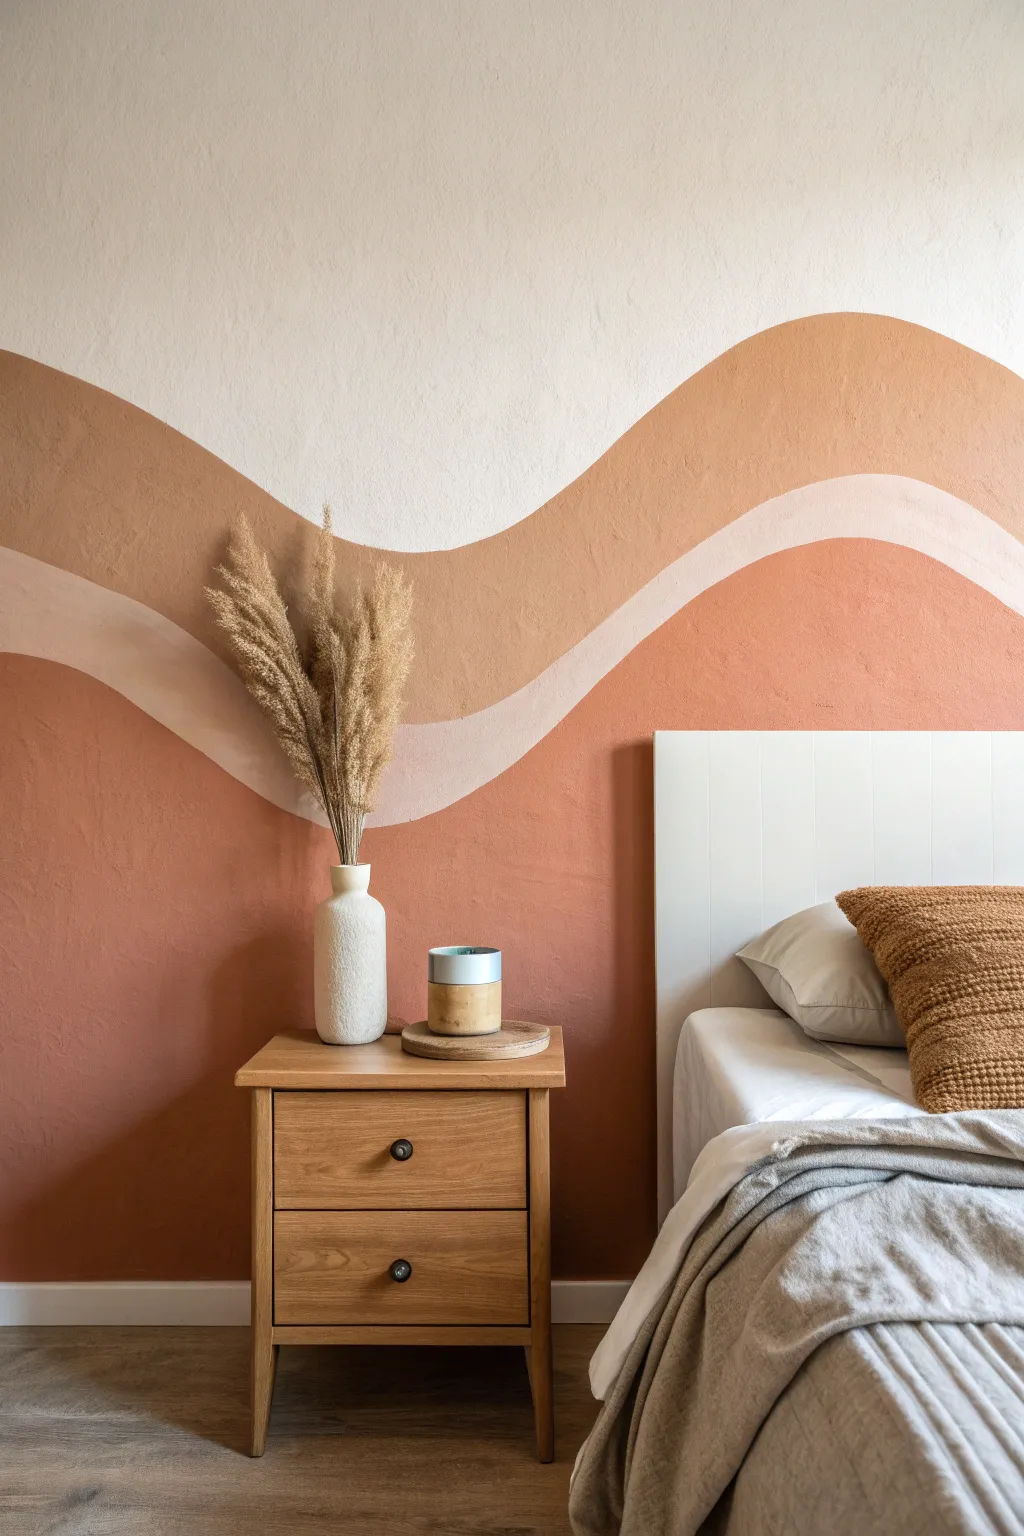
Transform a plain white wall into a warm, desert-inspired sanctuary with this flowing abstract mural. Using a palette of terracotta, rust, and beige, you’ll create soft, organic waves that add instant character and architectural interest to your bedroom.
Step-by-Step Guide
Materials
- Interior latex wall paint (base white wall color)
- Interior latex wall paint (deep terracotta/rust)
- Interior latex wall paint (medium peach/tan)
- Interior latex wall paint (light beige/cream)
- Pencil
- High-quality 2-inch angled sash brush
- Small 1-inch artist brush for refining edges
- Clean, lint-free rags
- Drop cloth
- Painters tape (for baseboards)
- Small roller and tray (optional, for filling large areas)
Step 1: Preparation & Planning
-
Clear and Prep:
Begin by moving all furniture, including the bed and nightstand, away from the wall to give yourself ample working space. Lay down a drop cloth to protect your flooring. -
Clean the Surface:
Wipe down the wall with a damp cloth to remove dust or cobwebs, ensuring the paint adheres properly. If the texture is very rough, a quick dusting with a dry brush works well. -
Tape the Baseboards:
Apply painter’s tape along the baseboard and any adjacent walls you want to protect. Press the tape edge down firmly with your fingertip to prevent bleed-through. -
Visualize the Waves:
Stand back and look at your wall. The design features three main color zones separated by wavy lines. Imagine where you want the highest peaks and lowest dips to fall relative to your headboard or furniture.
Step 2: Drafting the Design
-
Sketch the Top Line:
Using a pencil, lightly draw the uppermost wave line. Keep your wrist loose and draw with your whole arm to create a fluid, organic curve rather than a jagged line. This line marks the transition between the white ceiling area and the top rust color. -
Sketch the Middle Line:
Draw the second wave line below the first. This defines the bottom of the rust section and the top of the thin beige stripe. Let this line mimic the flow of the first one but vary the width slightly for a natural look. -
Sketch the Lower Line:
Finally, draw the third line lower down the wall. This creates the boundary for the thin beige stripe and the large terracotta section at the bottom. -
Step Back and Adjust:
Walk to the other side of the room to check the proportions. If a curve looks too sharp or a section too wide, simply erase the pencil line and re-sketch it until it feels balanced.
Smooth Moves Only
For the smoothest curves, don’t just move your wrist. Lock your wrist and move your entire arm from the shoulder while sketching the pencil guide.
Step 3: Painting the Colors
-
Cut in the Top Section:
Dip your angled sash brush into the medium peach/tan paint (the top colored section). Carefully paint along your top pencil line, keeping the brush bristles smooth to create a crisp edge against the white wall. -
Fill the Top Wave:
Once the top edge is defined, fill in the rest of that top section down to your second pencil line. You can use a small roller here for speed, or stick with the brush for a textured, hand-painted look. -
Paint the Bottom Section:
Switch to your deep terracotta/rust paint for the large bottom section. Start by cutting in along the floor (baseboard tape) and then carefully paint along the bottom-most pencil line. -
Fill the Bottom Area:
Fill in the entire lower portion of the wall with the deep terracotta color. Ensure you get full coverage over any wall texture. -
Let the Main Colors Dry:
Allow these two large sections to dry completely before tackling the middle stripe. Creating a ‘wet edge’ on all lines at once can be tricky, so patience helps here. -
Paint the Middle Stripe:
Using your light beige/cream paint and a steady hand (or a smaller artist brush), paint the strip between the top and bottom sections. This acts as a negative space highlighter separating the bolder tones. -
Refine the Edges:
Inspect your lines where colors meet. If the wall texture made the line bumpy, use the small artist brush to touch up any gaps or wobbly spots for a smoother flow.
Texture Play
Mix a small amount of baking soda or plaster of paris into your paint for the bottom section to create visible texture that mimics the look of authentic adobe walls.
Step 4: Finishing Touches
-
Second Coat:
Assess the opacity. Earth tones often need a second coat for true richness. Repeat the filling process if necessary, being careful near the edges. -
Remove Tape:
Peel off the painter’s tape while the paint is still slightly tacky to prevent peeling the dry film. -
Style the Room:
Once fully dry (usually 24 hours for curing), move your furniture back. Complement the wall with natural textures like the wooden nightstand and dried pampas grass shown in the inspiration.
Enjoy the calm, warm atmosphere your new feature wall brings to the space
Ombre Wall Fade From Dark to Light
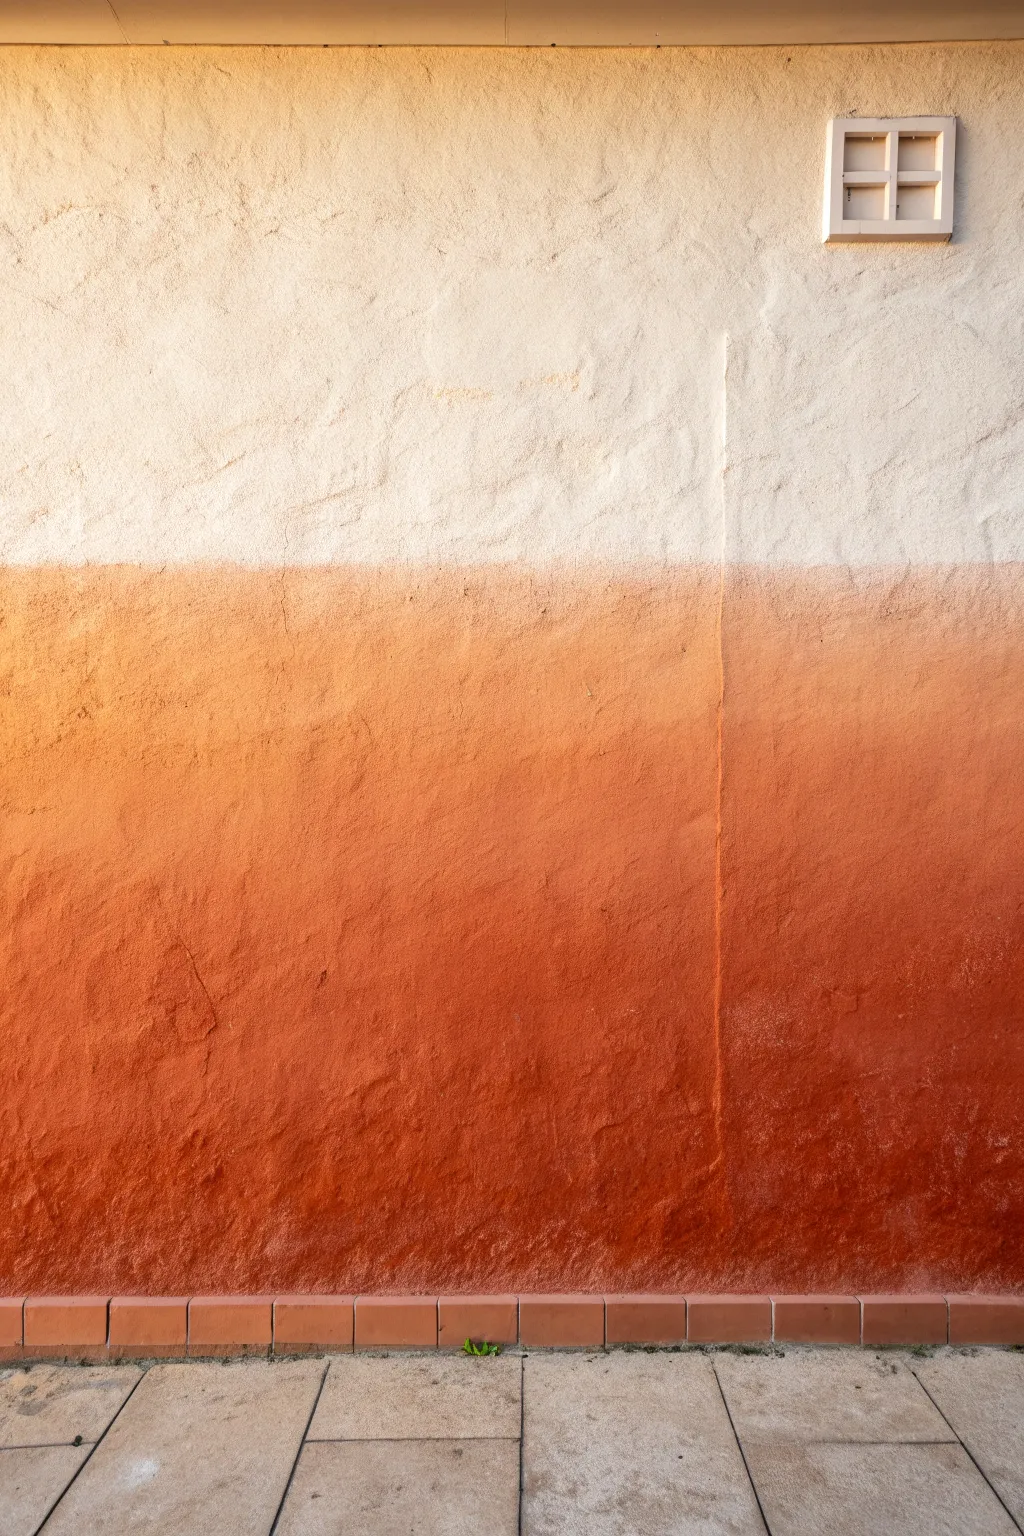
Transform a plain exterior or interior stucco wall into a warm, glowing focal point with this seamless gradient technique. The design mimics the natural shift of a sunset, fading from a deep terracotta at the base to a crisp bone white at the top, emphasizing the wall’s texture.
Step-by-Step
Materials
- Deep reddish-brown exterior masonry paint (base color)
- Warm bone-white exterior masonry paint (top color)
- Medium orange-terracotta masonry paint (transition color)
- Large paint roller and tray
- Extension pole for paint roller
- Wide softness-bristle blending brush (dry)
- Painter’s tape
- Drop cloths
- Water spray bottle (mist setting)
- Stir sticks
- Ladder (if needed for height)
Step 1: Preparation and Base Coat
-
Surface Cleaning:
Begin by thoroughly cleaning the stucco surface. Use a stiff brush or a low-pressure power wash to remove dust and cobwebs, ensuring the texture is ready to grip the paint. -
Protect the Area:
Lay down drop cloths along the base of the wall. If you have tile or brickwork at the bottom like in the photo, apply painter’s tape to the top edge of the tiles to create a sharp, clean line. -
Mix Master Batches:
Stir your three paint cans thoroughly. I like to pour a small amount of the reddish-brown and the white into separate smaller buckets to have ready for the mixing phase later. -
Painting the Top Section:
Start with your lightest color (bone white) at the very top of the wall. Use the roller to apply a solid coat down to about the midway point of the wall. -
Feather the White Edge:
As you reach the middle section where the gradient will start, lift pressure off the roller to create a ragged, uneven bottom edge rather than a straight line. -
Painting the Bottom Section:
Switch to a fresh roller cover or clean the existing one. Apply the deepest reddish-brown color starting from the bottom tape line and working upwards. -
Establish the Dark Zone:
Cover the bottom third of the wall completely with the dark paint, ensuring you get into all the deep crevices of the heavy stucco texture.
Step 2: Creating the Transition
-
Mixing the Mid-Tone:
While the paint is still tacky, take your middle terracotta color. If you didn’t buy a pre-mixed mid-tone, mix your dark and light paints in equal parts in a tray now. -
Applying the Middle Band:
Roll a wide band of this middle orange-terracotta hue between the dark bottom and the white top. Overlap the dark section by about six inches. -
Upward Blending:
While the paint is wet, roll the orange color upward into the white section. Don’t worry about perfection yet; just get the pigment on the wall. -
Mist the Surface:
Lightly mist the transition areas with water using your spray bottle. This keeps the acrylic latex open longer, which is crucial for textured walls that drink up paint. -
Down-Stroking the White:
Dip a brush into the white paint and lightly dry-brush downward into the orange section to soften that upper boundary. -
Up-Stroking the Dark:
Similarly, take a bit of the dark red-brown on a brush and feather it upward into the orange band to break up any hard horizontal lines.
Wet Edge Wonder
Work in vertical sections of 3-4 feet at a time rather than trying to do one huge horizontal stripe. This keeps the paint wet enough to blend perfectly.
Step 3: Blending for the Soft Fade
-
The Dry Brush Technique:
Take a large, clean, dry blending brush. Starting at the white-to-orange transition, use an ‘X’ motion to vigorously scrub the colors together. -
Work Quickly:
Move efficiently across the wall horizontally. If the paint drags or feels sticky, spritz it again with a tiny mist of water. -
Blurring the Lower Transition:
Repeat the cross-hatch blending motion on the lower transition line where the deep red creates the ombré into the orange. -
Step Back and Assess:
Walk back about 10 feet to view the gradient. Look for any areas that seem like stripes rather than a fade. -
Spot Correction:
If you see a stripe, dab a small amount of the lighter color on your brush and stipple it over the dark line, then blend out with the dry brush. -
Final Cleanup:
Remove the painter’s tape fro the bottom tiles immediately while the paint is still damp to prevent peeling the film.
Texture Highlight
Once dry, lightly dry-brush pure white just on the very tips of the textured peaks in the orange section to add incredible depth and a frost-like effect.
Now you have a stunning feature wall that captures the warmth of last light all day long
Simple Mountain or Hill Silhouette Mural
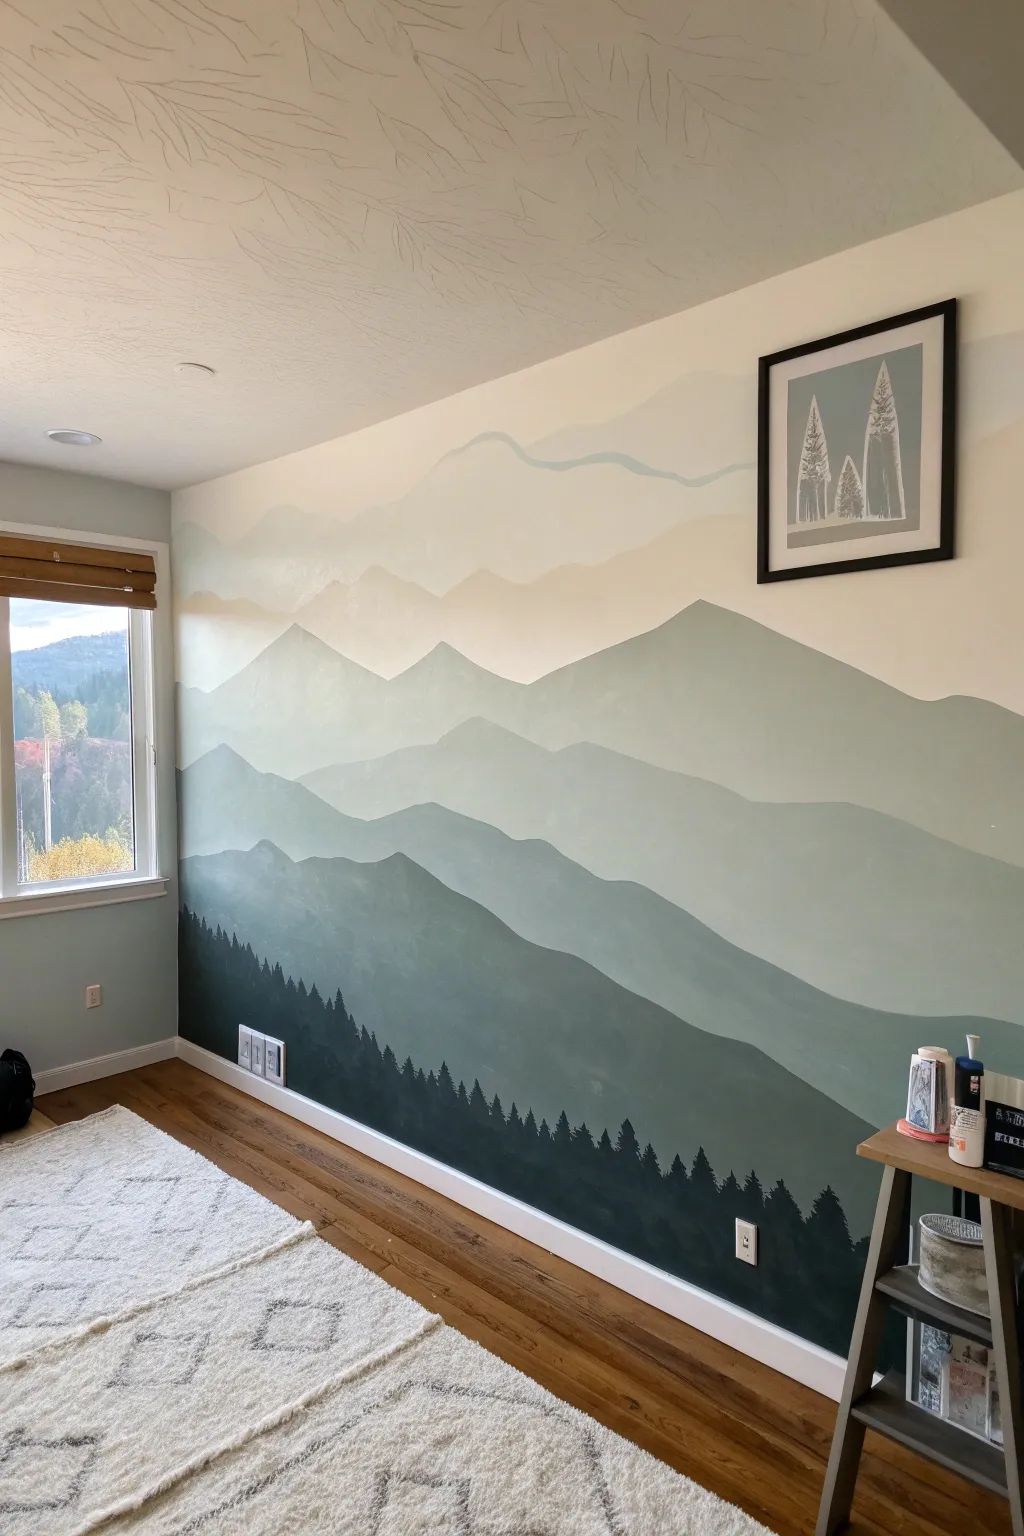
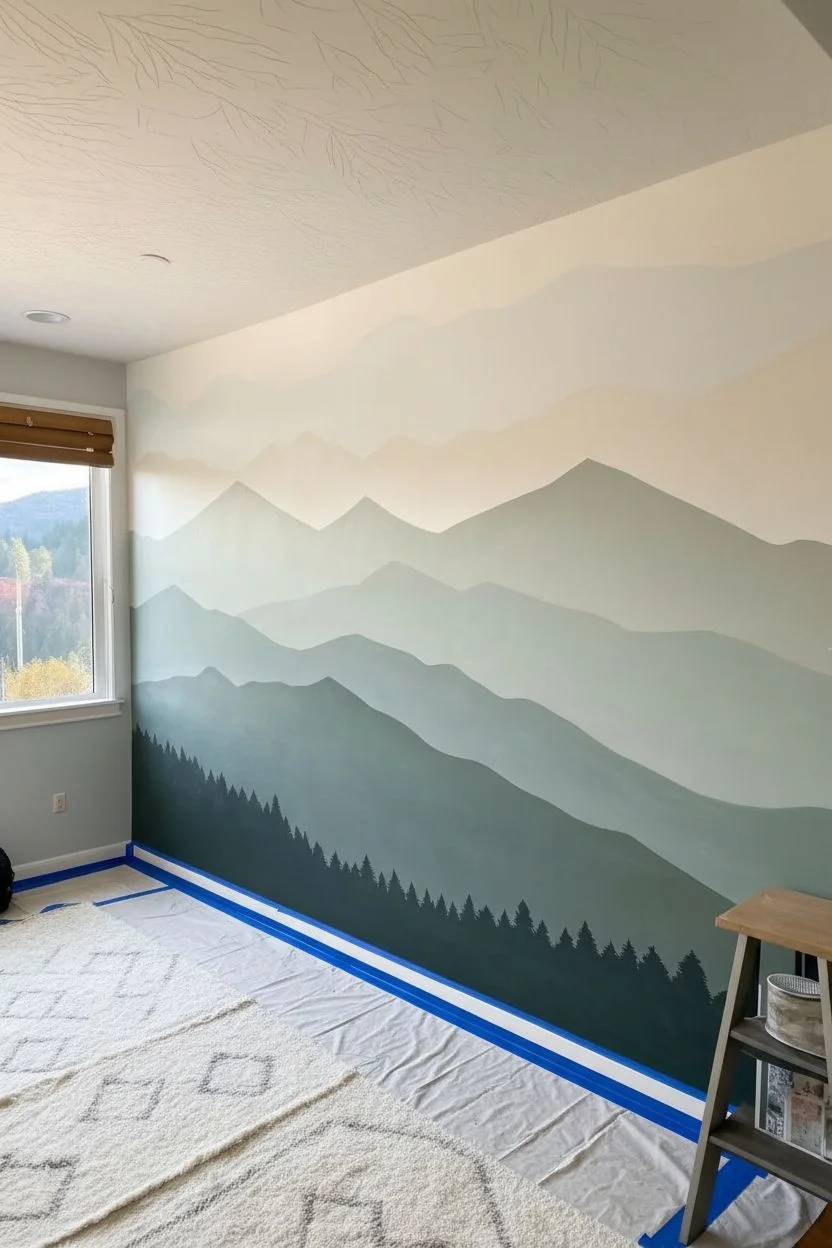
Transform a plain wall into a serene, atmospheric landscape with this layered mountain mural. By gradually lighting your paint colors as you move upward, you create a stunning depth of field that mimics mist settling in a valley.
Step-by-Step Guide
Materials
- Interior latex paint (Deep forest green)
- Interior latex paint (White)
- Painter’s tape
- Drop cloths
- 2-inch angled sash brush
- 4-inch foam roller and handle
- Plastic paint trays (one for each layer)
- Pencil
- Small round artist brush (size 4 or 6)
- Stir sticks
- Paint texture additive (optional, for the ‘misty’ effect)
Step 1: Planning and Preparation
-
Clear and clean:
Remove all outlet covers, vent covers, and furniture from the wall area. Wipe the wall down with a damp cloth to remove dust, ensuring a clean surface for the paint to adhere to. -
Protect the perimeter:
Apply painter’s tape along the baseboards, ceiling line, and adjoining walls. Lay down drop cloths to protect your flooring from drips. -
Sketch the ranges:
Using a pencil, lightly sketch 5-6 wavy lines across the wall to define the varying heights of your mountain ranges. Make the bottom line the most jagged for trees, and the upper lines smoother and rolling.
Step 2: Mixing and Painting Styles
-
Mix the darkest shade:
Pour your deep forest green paint into the first tray. This will be your base color for the very bottom layer of trees and hills. -
Paint the first outline:
Use the angled sash brush to cut in along the pencil line of your lowest mountain range. Don’t worry about being perfectly straight; organic bumps look more natural. -
Fill the bottom section:
Use the foam roller or brush to fill in the entire area below your cut-in line down to the baseboard. This establishes your foreground. -
Add detail with trees:
While the bottom layer is wet or just after drying, use the small round artist brush to hand-paint tiny pine tree silhouettes along the top ridge. Simple vertical jagged strokes work best here. -
Mix the second layer:
For the next range up, mix roughly 4 parts green with 1 part white in a fresh tray. You want a color distinct enough to stand out against the bottom layer. -
Paint the second range:
Cut in the top edge of your second pencil line with the new lighter green. Bring the paint down to slightly overlap the top of the dark green layer below it. -
Blend the transition:
I find it helpful to feather the bottom edge of this new layer slightly if you want a softer look, though a crisp overlap is perfectly fine for this graphic style.
Uneven Coverage?
If the darker greens look patchy after one coat, let them dry completely and apply a second coat. Dark colors often need two passes for full opacity.
Step 3: Creating Atmospheric Perspective
-
Continue lightening:
For the third layer up, mix roughly 3 parts green to 2 parts white. The goal is a steady progression toward a misty gray-green. -
Execute the third layer:
Paint this section just like the previous one, cutting in the top edge and filling down to overlap the layer beneath it. -
Mix the fourth layer:
Increase the white ratio significantly—about 1 part green to 4 parts white. This layer should look quite pastel and airy. -
Paint the upper peaks:
apply this pale green to the upper middle section of the wall. Keep the shapes broad and sweeping to suggest distant, massive peaks. -
Create the sky blend:
For the final, highest mountain shape, use mostly white with just a tiny drop of green. It should almost blend into the unpainted wall color above. -
Finish the sky:
If your original wall color doesn’t match the top of the mural, paint the remaining sky area with plain white or a very pale off-white to complete the gradient.
Add a Focal Point
To mirror the example image, hang a framed print of a similar geometric pine tree in the upper corner to balance the visual weight of the darkened bottom.
Step 4: Finishing Touches
-
Detail check:
Step back and look for any spots where the wall color shows through between layers. Touch these up with the appropriate color mix while you still have them. -
Clean up:
Once the paint is tacky but not fully cured, carefully peel off the painter’s tape at a 45-degree angle to ensure sharp lines. -
Reinstall hardware:
After the wall is completely dry (usually 24 hours), screw your outlet covers and vent grates back into place.
Enjoy the calm vibe your new mountain vista brings to the room
Oversized Botanical Wall Motif
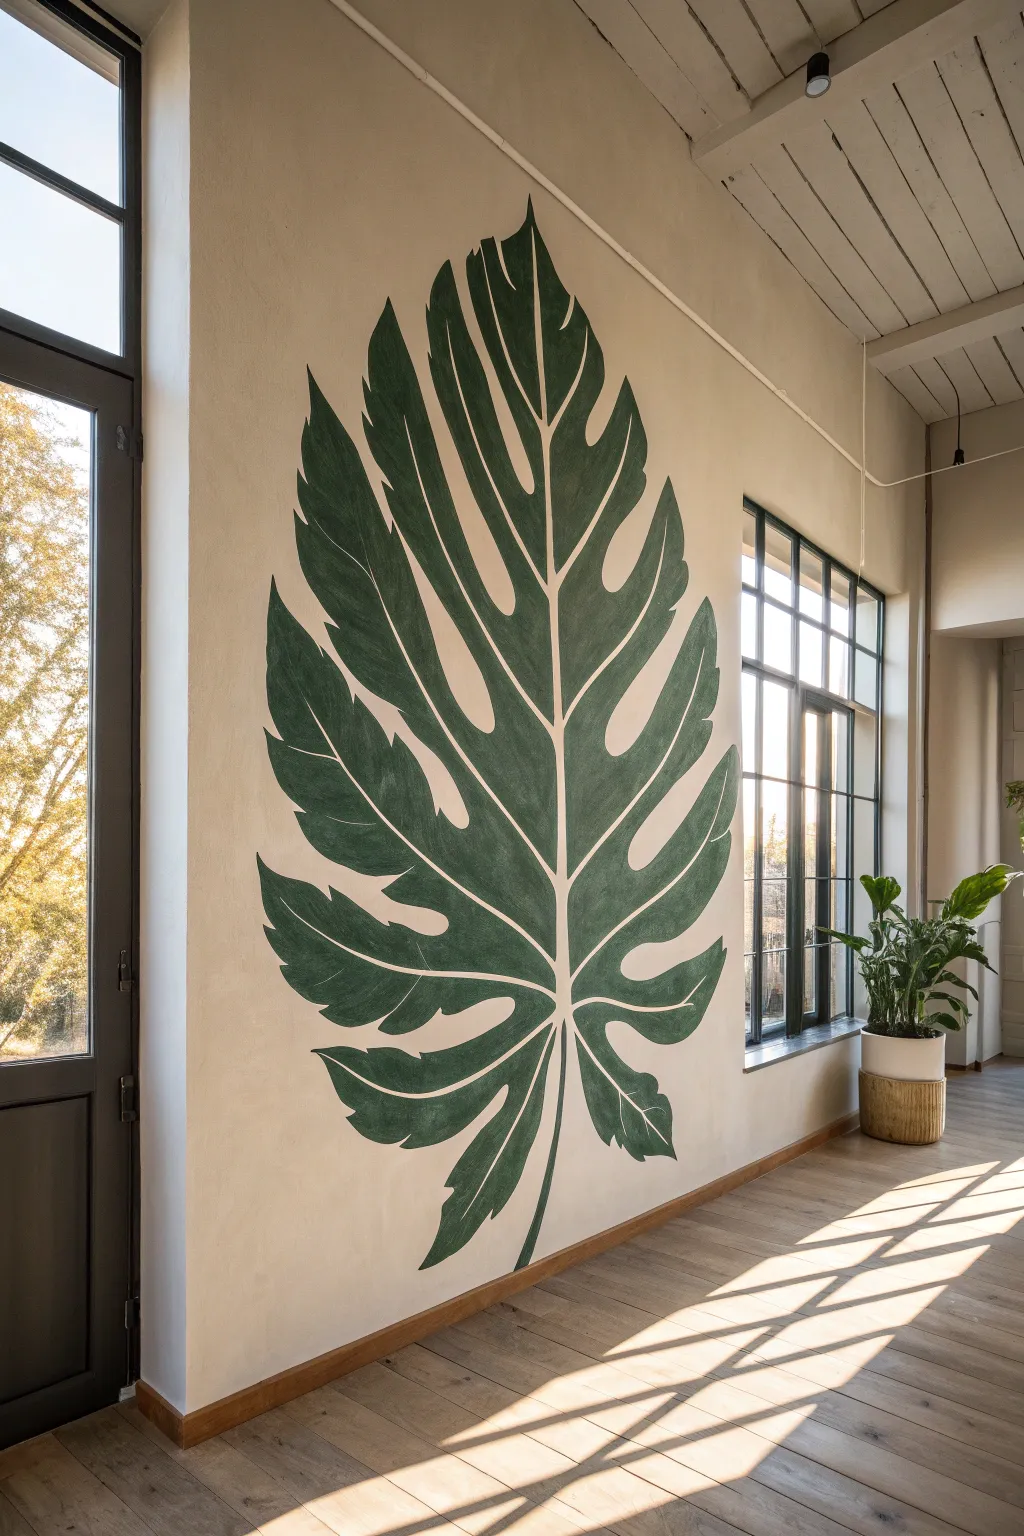
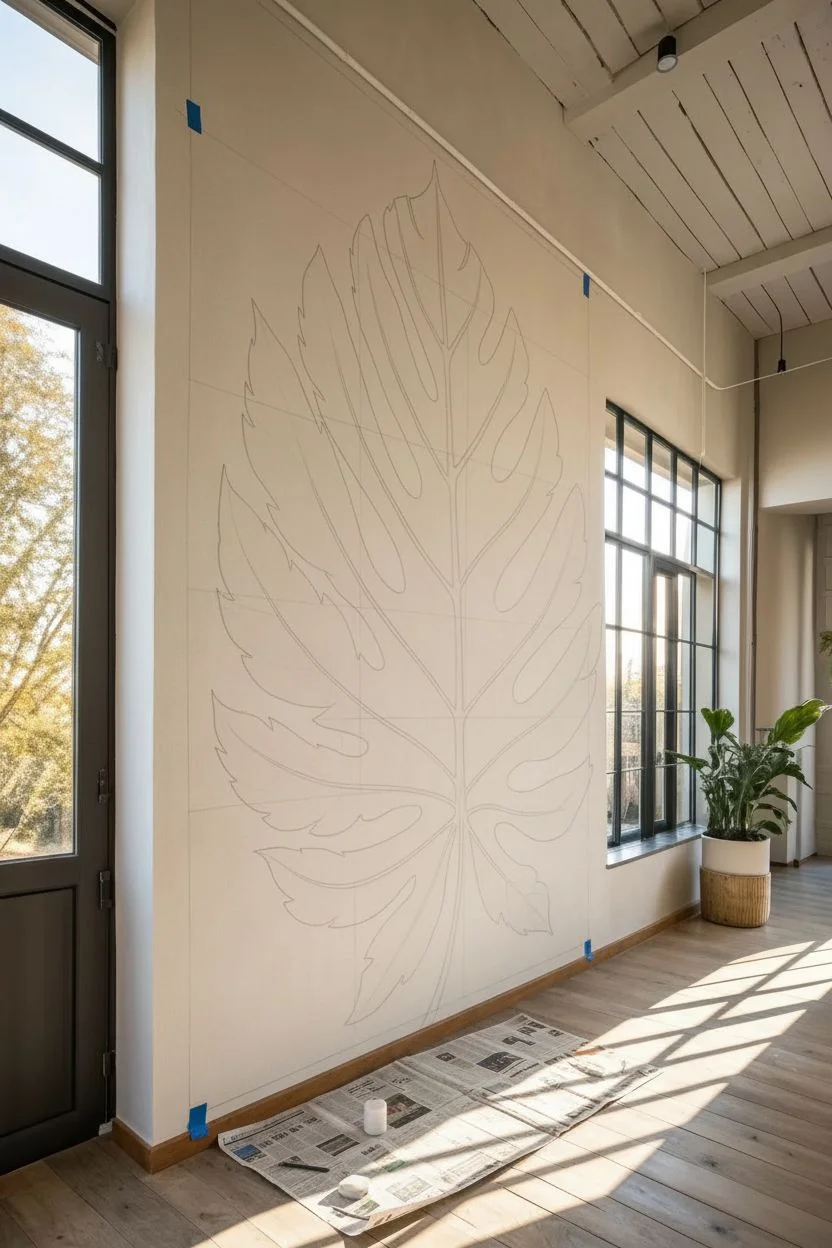
Transform a plain expanse of wall into a lush indoor garden with this dramatic, oversized Monstera leaf mural. The textured brushwork and deep forest green tones create a sophisticated focal point that feels both organic and modern.
Step-by-Step
Materials
- Latex wall paint (deep forest green)
- Small roller and tray (for blocking in large areas)
- 1-inch angled sash brush (for crisp edges)
- 2-inch flat brush (for texture)
- Pencil
- Eraser
- Reference image of a Monstera leaf
- Measuring tape
- Drop cloth
- Painter’s tape (optional)
- Chalk (optional alternative to pencil)
Step 1: Planning and Sketching
-
Prepare your canvas:
Begin by cleaning the wall surface with a damp cloth to remove dust or oils. Lay down a drop cloth at the base of the wall to protect your flooring from stray drips. -
Determine the scale:
Decide on the placement of the leaf. In the example, the leaf starts just above the baseboard and reaches nearly to the ceiling. Use small pieces of painter’s tape to mark the top, bottom, left, and right boundaries. -
Draw the central vein:
Using a pencil or a piece of chalk, lightly sketch the central spine (midrib) of the leaf. It should have a gentle curve to it, rather than being perfectly straight, to make it look natural. -
Outline the general shape:
Sketch a large, rough oval or heart shape around your central vein. Don’t worry about the cuts/holes (fenestrations) yet; just get the overall footprint on the wall. -
Add the fenestrations:
Now, sketch the deep cuts indicative of a Monstera leaf. Draw V-shaped notches extending from the outer edge inward toward the central vein, leaving a solid strip of leaf connected to the center. -
Refine the edges:
Go back over your outline to make the points sharp and the curves smooth. Erase or wipe away your initial rough guidelines so only the final shape remains.
Chalk It Up
Use white chalk instead of pencil for your initial sketch. It’s much easier to wipe away with a damp rag if you make a mistake, and it won’t leave permanent graphite indentations.
Step 2: Painting the Foliage
-
Cut in the perimeter:
Dip your 1-inch angled sash brush into the deep green paint. Carefully paint along your pencil lines to define the sharp outer edges of the leaf sections. -
Define the veins:
Paint along the central vein line, leaving a very thin gap of unpainted wall showing through if you want a highlighted vein look, or paint right up to it if you plan to add the vein detail later with a lighter color. -
Fill the large areas:
For the wider sections of the leaf lobes, use a small roller or a larger brush to fill in the bulk of the green color. This establishes your base coat. -
Add second coat if needed:
Let this initial layer dry for about an hour. If the wall color is showing through significantly, apply a second coat to ensure rich opacity.
Dimensional Veins
Mix a tiny drop of white or light yellow into your green paint. Use a thin liner brush to paint subtle highlights along the veins for a 3D effect.
Step 3: Texturing and Detailing
-
Create directional texture:
Once the base is tacky or dry, use a mostly dry 2-inch flat brush with a small amount of green paint. Brush from the center vein outward toward the leaf tips. -
Mimic organic growth:
The goal isn’t a solid flat color but a slightly streaky, hand-painted look. The brush strokes should follow the direction the veins would naturally grow. -
Clean up the spine:
If you painted over the central vein, you can skip this. If you left a gap, use a small detail brush to tidy up the negative space so the central spine looks consistent in width. -
Refine the points:
Check the tips of each leaf section. Use your angled brush to make sure they end in crisp, sharp points rather than rounded blobs. -
Final inspection:
Step back across the room to view the mural as a whole. Up close, you might miss uneven spots, but from a distance, any lack of symmetry or coverage issues will be obvious. -
Touch-ups and erasing:
Once the paint is fully cured (usually 24 hours), gently erase any visible pencil marks near the edges of the paint.
Enjoy the calm, botanical atmosphere your new oversized mural brings to the room
Painted Frame Panels for Faux Molding

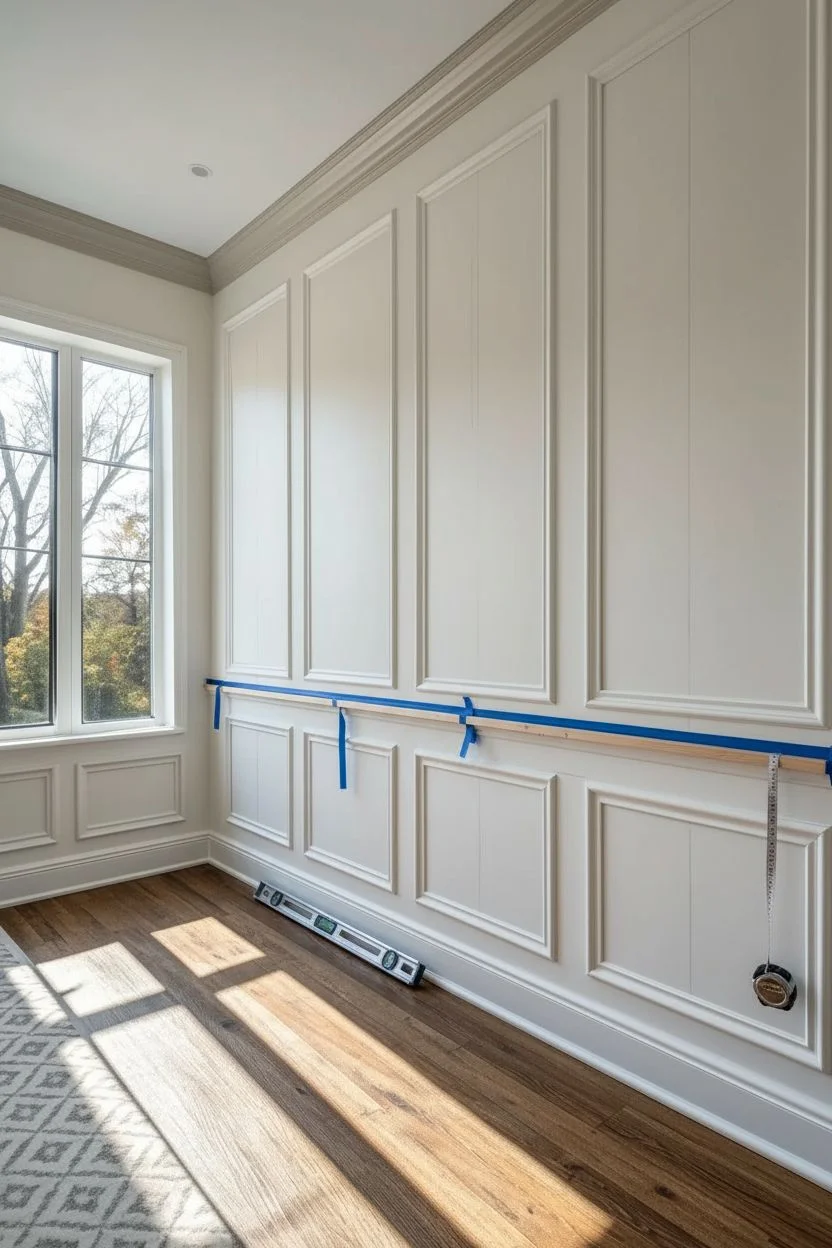
Transform a plain, flat wall into a sophisticated architectural feature using nothing but trim molding and paint. This project creates the illusion of high-end wainscoting or paneling, adding instant depth and classic elegance to any room.
Detailed Instructions
Materials
- Panel molding trim (primed pine or PVC)
- Chair rail molding (optional)
- Measuring tape
- Pencil
- Painter’s tape
- 4-foot level or laser level
- Miter box and hand saw (or power miter saw)
- Construction adhesive (Liquid Nails)
- Caulk gun
- Paintable interior caulk
- Fine-grit sandpaper (220 grit)
- Interior semi-gloss or satin paint (in your chosen wall color)
- Angled sash paintbrush (2-inch)
- Mini foam roller
- Wood filler or spackling paste
- Drop cloth
Step 1: Planning and Layout
-
Measure the Wall:
Begin by measuring the total width and height of your wall. Decide if you want a chair rail (a horizontal divider) or just full-length panels. In the image, there is a distinct upper and lower section separated by a horizontal rail, which creates a classic wainscoting look. -
Calculate Panel Spacing:
Determine how many panels you want across the wall. A good rule of thumb is to leave 3 to 4 inches of space between each box and between the boxes and the ceiling/floor. Sketch this out on paper first to visualize the symmetry. -
Mark the Wall:
Using a pencil and your level, lightly draw the outer dimensions of each box directly onto the wall. Double-check your measurements to ensure the spacing between boxes is consistent. -
Install the Chair Rail (Optional):
If you are including a horizontal divider like the one shown, install this first. Measure the length of the wall, cut your chair rail molding to size, and adhere it using construction adhesive. Ensure it is perfectly level before the glue sets.
Gap Patrol
If your miter corners have gaps, don’t panic. Rub the round shaft of a screwdriver over the joined wood fibers to compress them together, then fill the remaining space with wood filler.
Step 2: Cutting and Installing Trim
-
Measure Cuts for Boxes:
Based on your penciled outlines, measure the lengths needed for the top, bottom, and side pieces of your molding frames. Remember that you will be cutting 45-degree angles, so the measurements should correspond to the outer (longer) edge of the miter cut. -
Cut the Miters:
Set up your miter box or saw. Cut the ends of each trim piece at a 45-degree angle. The angles should face inward so that four pieces create a perfect rectangle. -
Dry Fit the Pieces:
Before gluing, hold the four pieces of a single box up against your wall markings to ensure the corners meet tightly. I always check specifically for square corners; if your walls aren’t perfectly straight, you might need to adjust the angle slightly. -
Apply Adhesive:
Apply a thin bead of construction adhesive to the back of the molding pieces. You don’t need a lot; too much will squeeze out and create a mess. -
Secure the Molding:
Press the molding onto the wall, following your pencil lines. Use painter’s tape to hold the pieces in place while the adhesive dries. If you have a nail gun, you can add a few brad nails for extra security, but strong adhesive works well for lightweight trim. -
Repeat for All Panels:
Continue cutting and installing the molding for all upper and lower boxes. Step back frequently to ensure they look aligned visually, not just by the numbers.
Two-Tone Option
For a bolder look, paint the inside of the frame panels a slightly darker shade than the surrounding trim. This adds dramatic depth and makes the molding pop even more.
Step 3: Finishing and Painting
-
Fill Nail Holes and Gaps:
Once the adhesive is fully cured, remove the tape. Use wood filler to patch any nail holes or corners where the miters have slight gaps. -
Caulk the Edges:
Run a thin bead of paintable caulk along the inside and outside edges where the molding meets the wall. Smooth it with a wet finger to create a seamless transition. This step is crucial for making the molding look like it’s part of the wall rather than just stuck on. -
Sand Smooth:
After the filler and caulk are dry, lightly sand any rough spots, especially at the corners, using fine-grit sandpaper. Wipe away dust with a damp cloth. -
Prime the Trim:
If your molding wasn’t pre-primed, apply a coat of primer to the trim pieces. This ensures the final paint adheres evenly and matches the sheen of the wall. -
Paint the Trim:
Use an angled sash brush to paint the molding. Work carefully to avoid thick drips in the corners. I prefer to paint the trim first before rolling the wall sections. -
Paint the Wall Sections:
Use a mini roller to paint the wall space inside and outside the boxes. For the seamless, monochromatic look in the photo, use the exact same paint color and sheen for both the wall and the trim. -
Apply a Second Coat:
Once the first coat is dry, apply a second coat to ensure rich, consistent coverage. This unifies the texture of the wood trim and the drywall.
Step back and admire how a simple addition of wood and paint has completely redefined the character of your room
Tone-on-Tone Texture With a Dry Brush
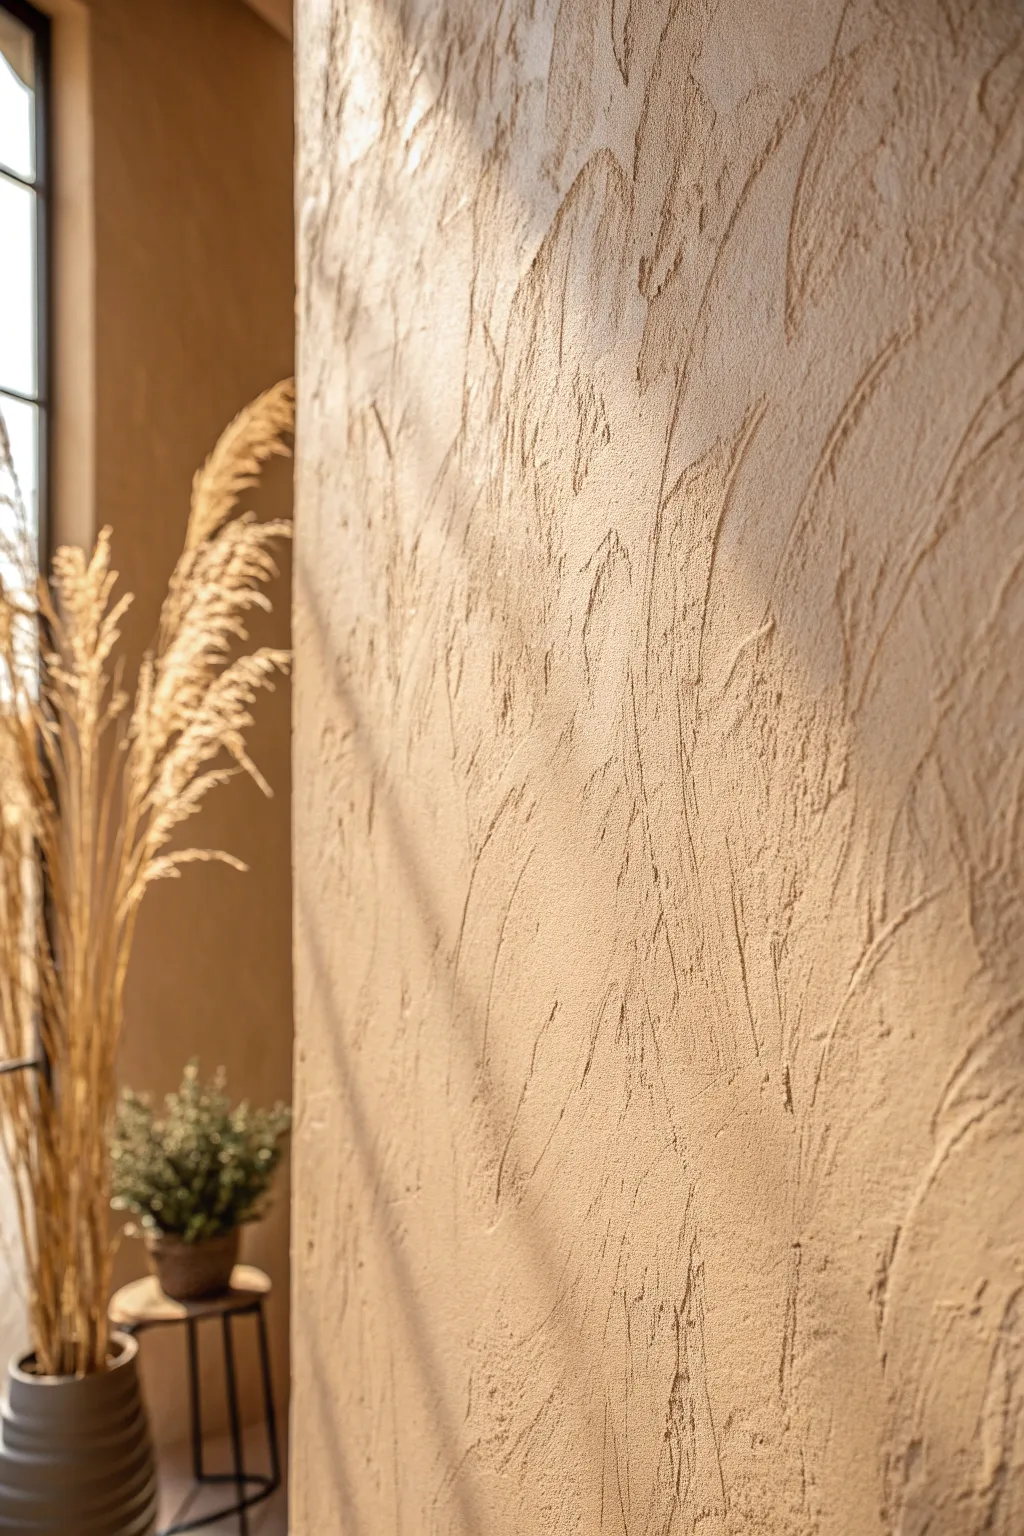
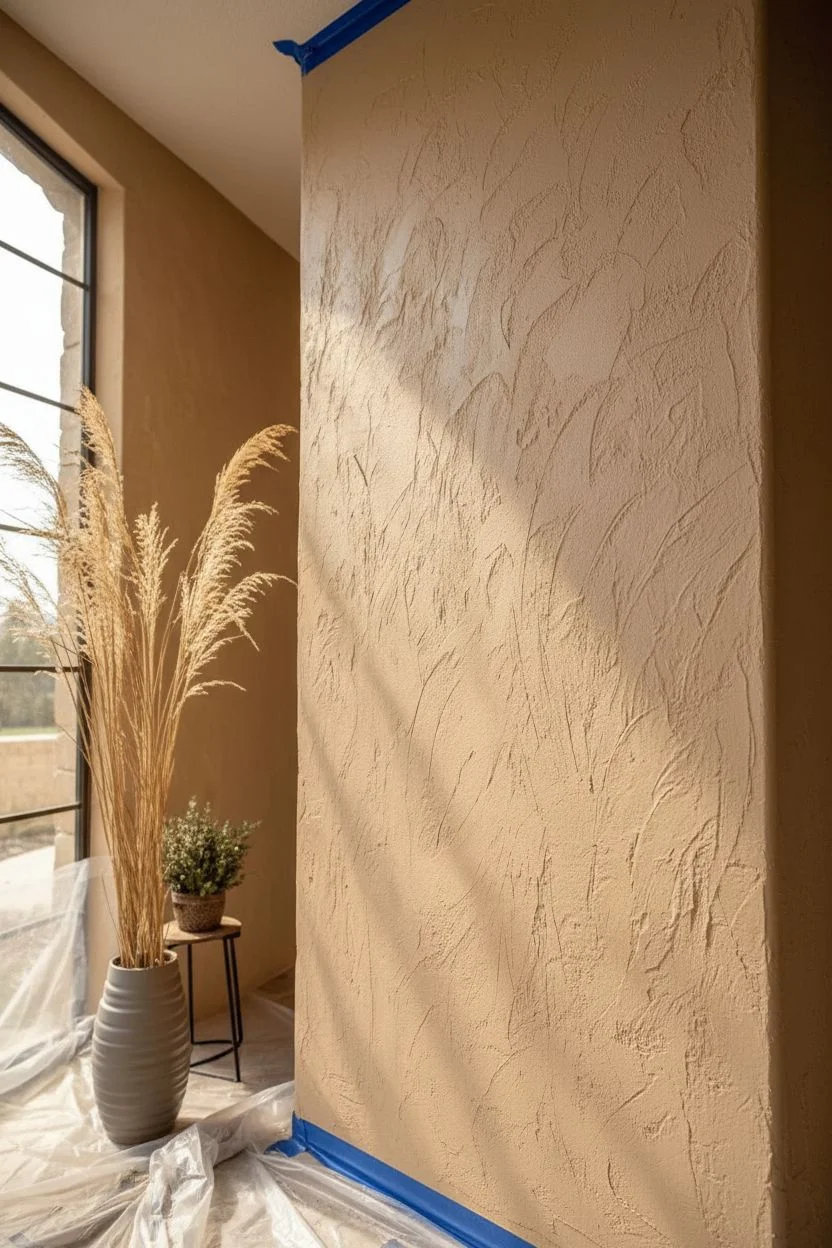
Transform a flat wall into a tactile masterpiece with this sophisticated tone-on-tone technique. By manipulating thick plaster with a dry brush, you create organic, sweeping arches that catch the light beautifully and add immense depth to any room.
Step-by-Step
Materials
- Latex paint (eggshell or matte finish, beige/tan)
- Joint compound or texture medium
- Large bucket for mixing
- Drill with mixing paddle attachment
- Wide stiff-bristled brush (4-6 inches)
- Painter’s tape
- Drop cloths
- Trowel or drywall knife
- P120 grit sandpaper (optional)
- Matte sealer (optional)
Step 1: Preparation and Mixing
-
Protect the area:
Begin by clearing the wall space completely. Tape off all baseboards, ceiling edges, and adjacent walls with high-quality painter’s tape to ensure crisp lines. Lay down drop cloths to catch any heavy splatters. -
Prepare the base:
If your wall is glossy or has a very different color, apply a coat of primer. For walls already close to your desired tone, just ensure they are clean and dry. -
Create the texture mix:
In your large bucket, combine your chosen latex paint with joint compound. A good starting ratio is approximately 2 parts compound to 1 part paint, but you want a consistency thick enough to hold peaks but loose enough to spread. -
Blend thoroughly:
Use the drill with a mixing paddle to blend the mixture. It should look like thick cake batter or hummus. Ensure there are no dry lumps of compound left at the bottom.
Too smooth?
If the brush isn’t leaving deep enough grooves, your mixture is likely too thin or you’re applying it too sparsely. Add more joint compound to the bucket to stiffen the mix.
Step 2: Applying the Texture
-
Load the tool:
Scoop a generous amount of the thickened mixture onto a trowel or wide putty knife. You will be working in sections to prevent the mix from drying out before you can texture it. -
Apply the first patch:
Smear the mixture onto the wall in a section about 3 feet by 3 feet. Don’t worry about smoothness; you actually want a slightly uneven, thick layer (about 1/8 to 1/4 inch thick). -
Rough it in:
Continue spreading until your section is covered. I find it helpful to vary the thickness slightly across the surface to create more interest in the final result.
Add Dimension
For a deeper, aged look, apply a diluted darker glaze over the dried texture and wipe it off immediately with a rag. The dark color will remain in the crevices.
Step 3: Creating the Dry Brush Pattern
-
Proper brush technique:
Take your wide, stiff-bristled brush. The key is that the brush must remain relatively dry—do not dip it into the paint mixture. Clean off excess buildup on a rag frequently. -
Sculpt the arches:
Press the bristles firmly into the wet compound at the top of your section. Drag the brush downward in a sweeping, curved motion, creating a long, vertical ‘C’ shape or arch. -
Overlap the strokes:
Start the next stroke slightly overlapping the previous one. Vary the length and direction of the curves slightly to keep the look organic rather than uniform. -
Create ridges:
As you drag the brush, allow the bristles to plow through the material, leaving distinct ridges and valleys. It’s these ridges that will catch the sunlight later. -
Work continuously:
Move to the next patch immediately. Apply the wet mix, then texture it with the brush, blending the wet edges into the previous section so you don’t see a seam. -
Handling corners:
When you reach corners or edges, use a smaller brush if necessary to maintain the vertical sweeping motion without scraping the adjacent wall.
Step 4: Finishing Touches
-
Check for imperfections:
Step back and view the wall from different angles while it is still wet. If a section looks too flat, add a bit more mix and re-drag the brush. -
Allow to dry:
Let the wall dry completely. Depending on humidity and thickness, this can take 24 to 48 hours. The color will lighten significantly as the joint compound dries. -
Knock down burrs:
Once bone dry, inspect the wall for any extremely sharp peaks that might snag clothing. Gently run a medium-grit sanding sponge over just the sharpest tips to soften them without removing the texture. -
Dust off:
Use a soft vacuum attachment or a clean, dry paintbrush to whisk away any loose dust from the sanding step. -
Seal the surface:
For high-traffic areas, roll on a clear, matte polyacrylic sealer. This protects the plaster from chipping and makes the wall wipeable without altering the raw, earthy look. -
Clean up:
Remove the painter’s tape slowly. Pull the tape away from the texture at a 45-degree angle to ensure a clean edge.
Enjoy the calming atmosphere your new textured wall brings to the space
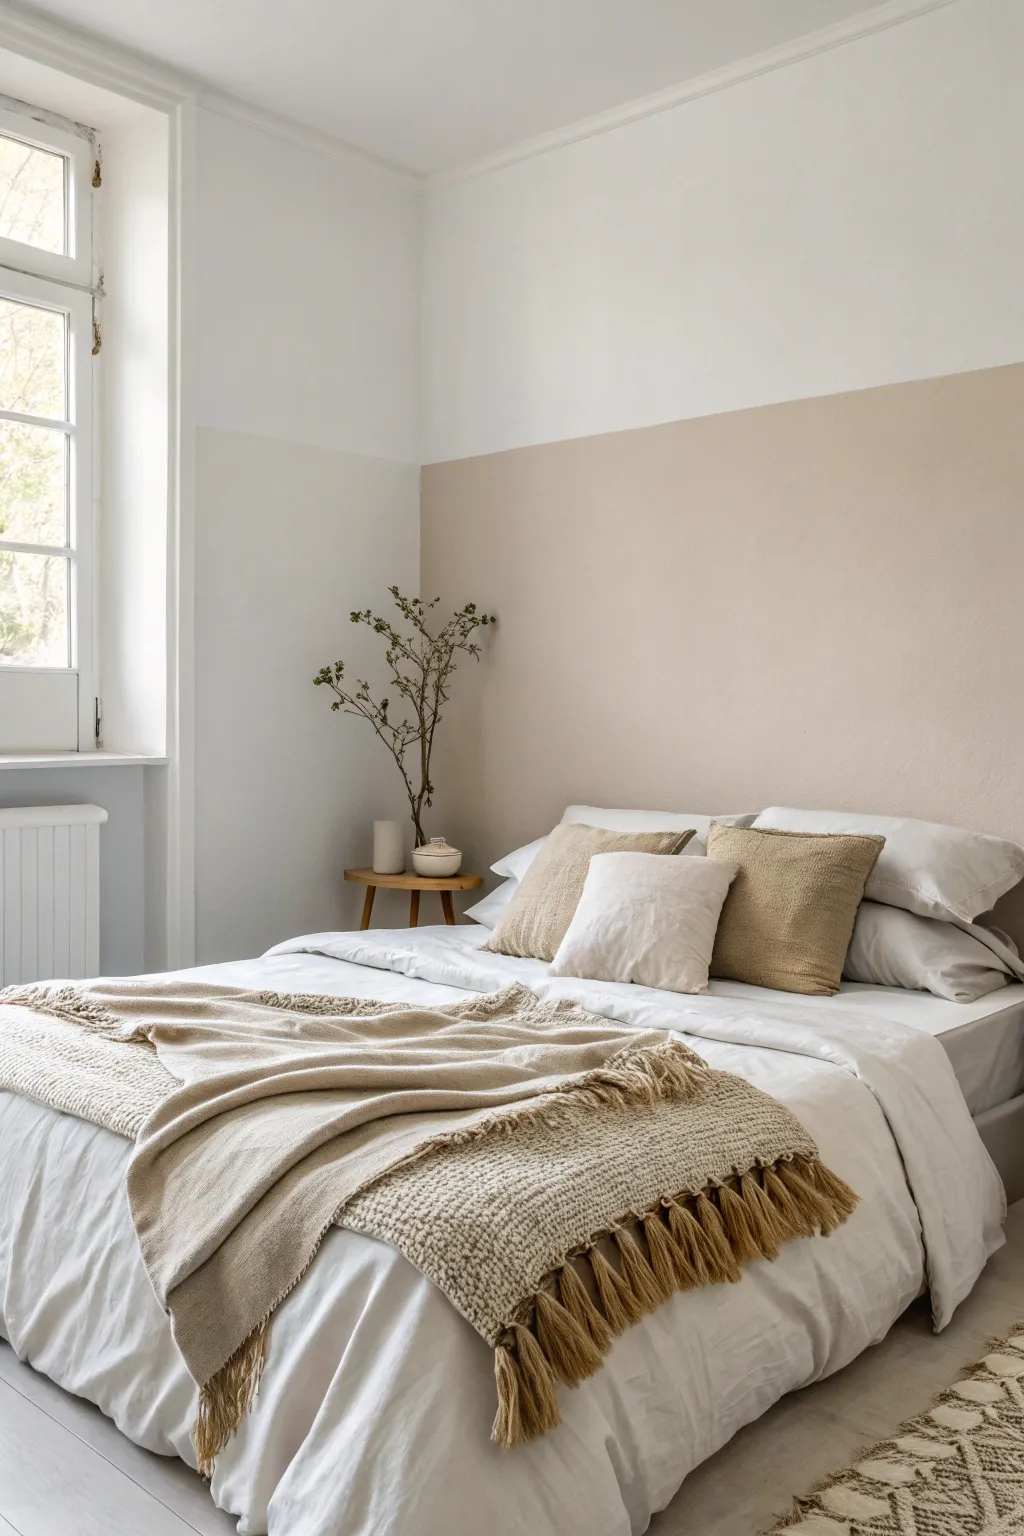
Ceiling Dip or Painted Upper Band
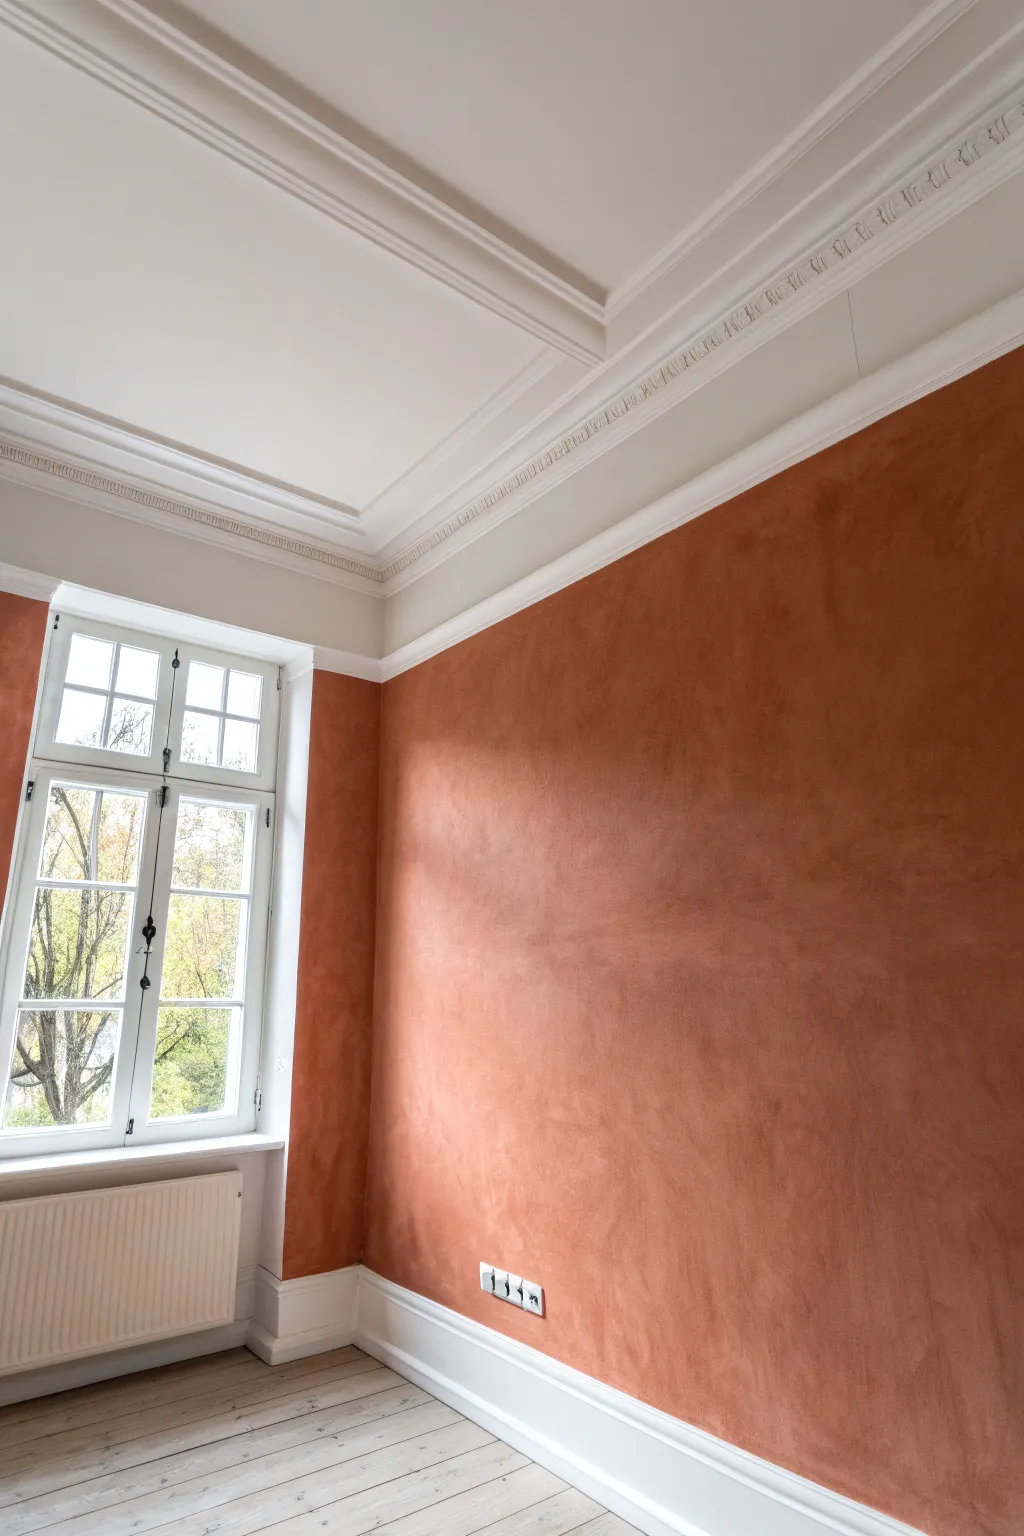
This project transforms a plain room by pairing a rich, earthy lime wash wall finish with a prominent white upper band that visually heightens the space. The result is a stunning contrast between the organic, mottled texture of the terracotta color and the architectural precision of the white molding and ceiling border.
Step-by-Step Guide
Materials
- Painter’s tape (high quality, delicate surface)
- White emulsion paint (for ceiling and band)
- Lime wash paint (Terracotta or Rust color)
- Block brush (masonry brush for texture)
- Angled sash brush
- Medium pile roller and tray
- Measuring tape
- Pencil
- Spirit level or laser level
- Drop cloths
- Damp rags
Step 1: Preparation and Mapping
-
Clear and protect:
Begin by moving furniture to the center of the room and covering floors and radiators with drop cloths. Clean the walls with a mild detergent solution to remove dust or grease, ensuring a clean slate for the lime wash adhesion. -
Measure the band:
Decide on the depth of your upper band. A common choice is to align it with the top of a window frame or door lintel to create visual continuity. In this project, the white band extends roughly 10-12 inches down from the crown molding. -
Mark the line:
Using your measuring tape, mark the desired height of the color transition at several points along the wall. I find using a laser level here saves immense time and ensures a perfectly straight horizon line across the entire room. -
Draw the guide:
Connect your marks lightly with a pencil. Double-check with a spirit level to ensure the line is perfectly horizontal before committing to tape.
Bleeding Lines?
If paint bleeds under the tape, wait for it to fully cure. Re-tape precisely over the line, and use a small artist’s brush to touch up the error with the correct color for a sharp finish.
Step 2: Creating the Upper Band
-
Tape the line:
Apply painter’s tape along your pencil line. Important: Place the tape *below* the line, covering the area that will eventually be terracotta. This allows you to paint the white band freely without worrying about the edge yet. -
Paint the ceiling and band:
Using your white emulsion paint, paint the ceiling, the crown molding, and the upper section of the wall down to your tape line. Use a brush for the molding intricacies and a roller for the flat sections. -
Lock the edge:
To ensure a razor-sharp line later, brush a thin layer of the white base paint over the edge of the tape where the terracotta will eventually meet it. This seals the tape and prevents the dark color from bleeding under.
Level Up: Texture Pop
For more drama, dilute the second coat of lime wash slightly more than the first. The transparency allows the bottom layer’s texture to show through, creating a deeper, more velvety visual effect.
Step 3: Applying the Terracotta Lime Wash
-
Re-tape for colour:
Once the white upper band is completely dry (wait at least 24 hours), remove the old tape. Now, apply a new line of delicate surface tape directly over the white paint, aligning the bottom edge of the tape with your crisp paint line. -
Protect trim:
Apply tape to the top of the baseboards, window frames, and around the radiator to protect them from the lime wash splatters. -
Prepare the lime wash:
Stir your terracotta lime wash thoroughly. The pigments often settle at the bottom, so mix it well until the consistency is creamy and uniform. -
Cut in the edges:
Use an angled brush to ‘cut in’ the color along the corners, around the window, and most crucially, along the taped line of your upper band. -
Apply the first coat:
Using a large block brush, apply the lime wash to the main wall area. Use random, crisscross strokes (X-pattern) rather than straight lines. This technique creates that beautiful, cloudy movement and suede-like texture. -
Maintain a wet edge:
Work in manageable sections, blending the wet edges as you go to avoid harsh overlap marks. Don’t worry if it looks patchy while wet; lime wash changes significantly as it dries. -
Let it dry:
Allow the first coat to dry completely. It will lighten considerably and become more opaque. -
Apply the second coat:
Apply a second coat using the same random X-pattern brush strokes. This layer adds depth and richness to the color, enhancing the clouded texture. -
Remove tape:
While the second coat is still slightly tacky (not fully cured), carefully peel off the painter’s tape at a 45-degree angle. This reveals your crisp, straight transition line.
Step back and admire how the crisp white border frames your warm, textured walls like a piece of art
Negative Space Mural With Minimal Lines
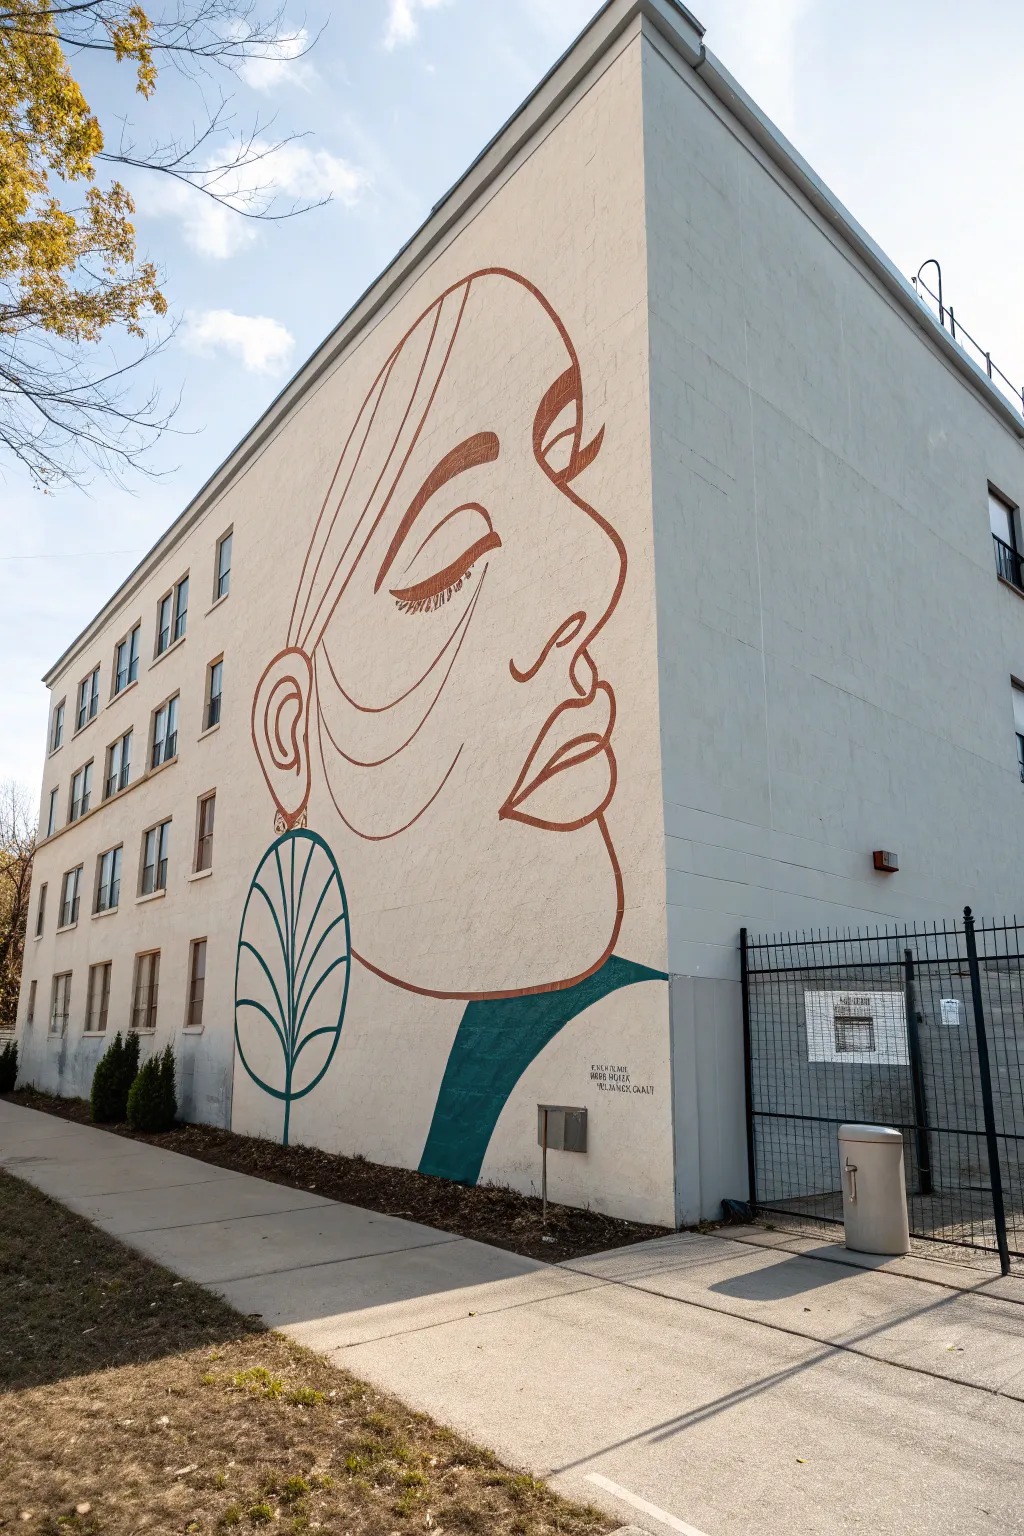
Transform a blank outdoor wall into a striking gallery piece with this large-scale line art mural. By utilizing the existing wall color as your canvas and focusing on fluid, confident strokes, you can create a sophisticated facial profile that plays beautifully with negative space.
How-To Guide
Materials
- Exterior masonry primer (if wall is unpainted)
- Cream or off-white exterior latex paint (base coat)
- Burnt sienna or terracotta exterior paint (for the lines)
- Deep teal or forest green exterior paint (for the leaf/neck)
- Projector (overhead or digital)
- Chalk or watercolor pencils
- Assorted angular sash brushes (2-inch and 3-inch)
- Various round artist brushes (size 10-12 for details)
- Painter’s tape
- Drop cloths
- Ladder or scaffolding (depending on height)
- Extension pole for paint roller
Step 1: Preparation & Base
-
Clean the surface:
Begin by thoroughly cleaning the wall surface. Use a pressure washer or a stiff scrub brush with soapy water to remove dirt, moss, or peeling paint, ensuring a clean bond for your artwork. -
Prime (if necessary):
If you are working on raw brick or concrete, apply a coat of masonry primer. This seals the porous surface and prevents your expensive topcoat from soaking in unevenly. -
Apply the base color:
Roll on two coats of your cream or off-white exterior latex paint. This negative space is crucial; it acts as the skin tone for the figure, so ensure the coverage is solid and opaque. -
Let it cure:
Allow the base coat to dry completely, ideally for at least 24 hours. Painting lines over tacky paint can cause dragging and texture issues.
Step 2: Drafting the Design
-
Set up your projection:
Wait for dusk or evening. Set up your projector on a stable surface facing the wall. Align the image so the profile face fills the vertical space comfortably. -
Trace the primary contours:
Using chalk or a light watercolor pencil, trace the projected lines onto the wall. Focus on the main profile shape—forehead, nose, lips, and chin. -
Detail the features:
Carefully trace the internal lines: the closed eye, the eyebrows, the ear, and the sweeping curves of the hair. Don’t worry about line thickness yet, just get the placement right. -
Draft the neck and leaf earring:
Outline the neck shape at the bottom and the large, stylized leaf shape that hangs like an earring. This element adds a necessary pop of contrasting color. -
Step back and review:
Turn off the projector and view the chalk lines from a distance in daylight. Adjust any curves that look jerky or disproportionate before committing to paint.
Use Gravity
Work from the top of the wall down to the bottom. This prevents your hand from smudging wet paint and ensures any accidental drips don’t ruin finished sections below.
Step 3: Painting the Lines
-
Mix your contour color:
Pour your terracotta or burnt sienna paint into a small bucket. I find slightly thinning the paint with a splash of water helps it flow more smoothly for long, continuous lines. -
Choose the right brush:
Select an angled sash brush for the thicker lines. The angle allows you to cut crisp edges while holding enough paint for long strokes. -
Paint the main profile:
Start with the outermost profile line. Keep your wrist locked and move your entire arm to create confident, sweeping curves rather than shaky, short strokes. -
Add line weight variation:
Vary the thickness of your lines. Make the eyebrows and the upper eyelid thicker to create visual weight, while keeping the hair strands and nose bridge thinner and more delicate. -
Refine the details:
Switch to a smaller round artist brush for fine details like the eyelashes and the intricate curves inside the ear. These require steady precision. -
Clean up edges:
Keep a damp rag and a small brush with your base wall color handy. If a line goes astray, you can quickly wipe it or cultivate a sharper edge by ‘cutting back’ with the cream paint.
Metallic Accents
For a glamorous twist, use exterior gold metallic paint for the earring outline or the eyelids. It will catch the sunlight and add a dynamic, shifting element.
Step 4: Adding Color & Finish
-
Outline the earring:
Using the deep teal paint and a round brush, carefully paint the thin stem and vein system of the large leaf earring. Keep these lines consistent in width. -
Fill the neck block:
Use the same deep teal to fill in the solid shape of the neck/clothing area at the bottom. Use a small roller for the center and an angled brush for the sharp edges to ensure full opacity. -
Final inspection:
Walk across the street or to the back of the yard to view the mural as a whole. Look for any holidays (missed spots) in the solid teal area or breaks in the terracotta lines. -
Clear coat (Optional):
If the wall faces harsh weather or direct southern sun, applying a UV-resistant clear masonry sealer over the finished work will keep the colors vibrant for years.
The result is a stunning, sophisticated mural that turns a simple wall into a conversation piece about negative space and elegance.
Optical Illusion Shadow Blocks
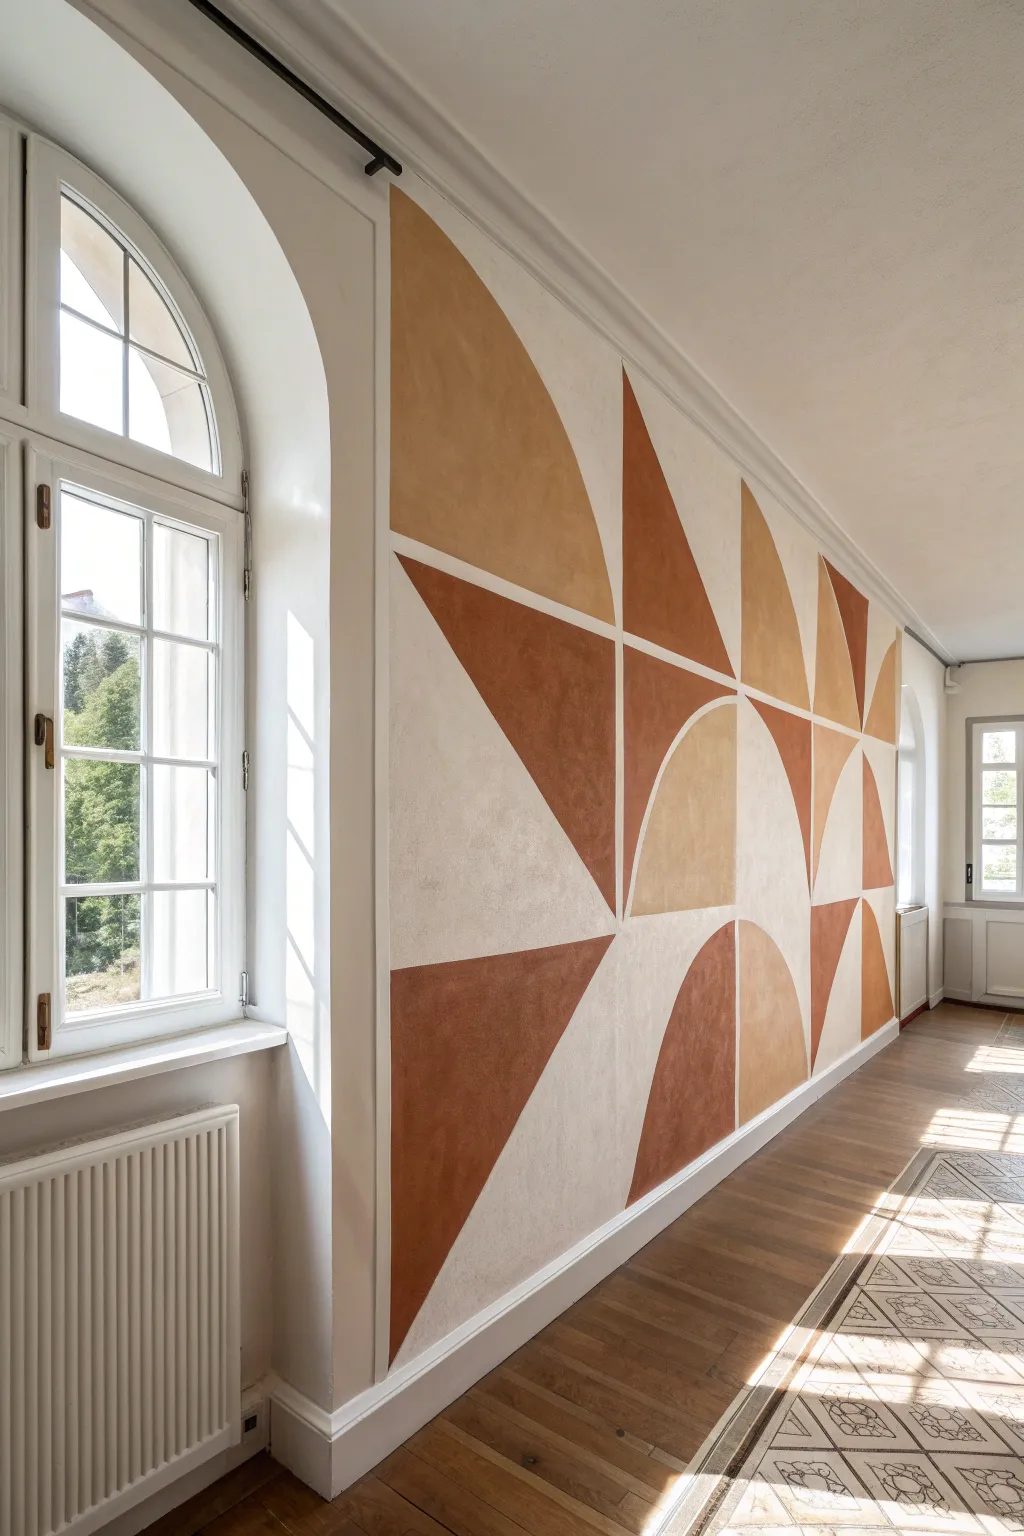
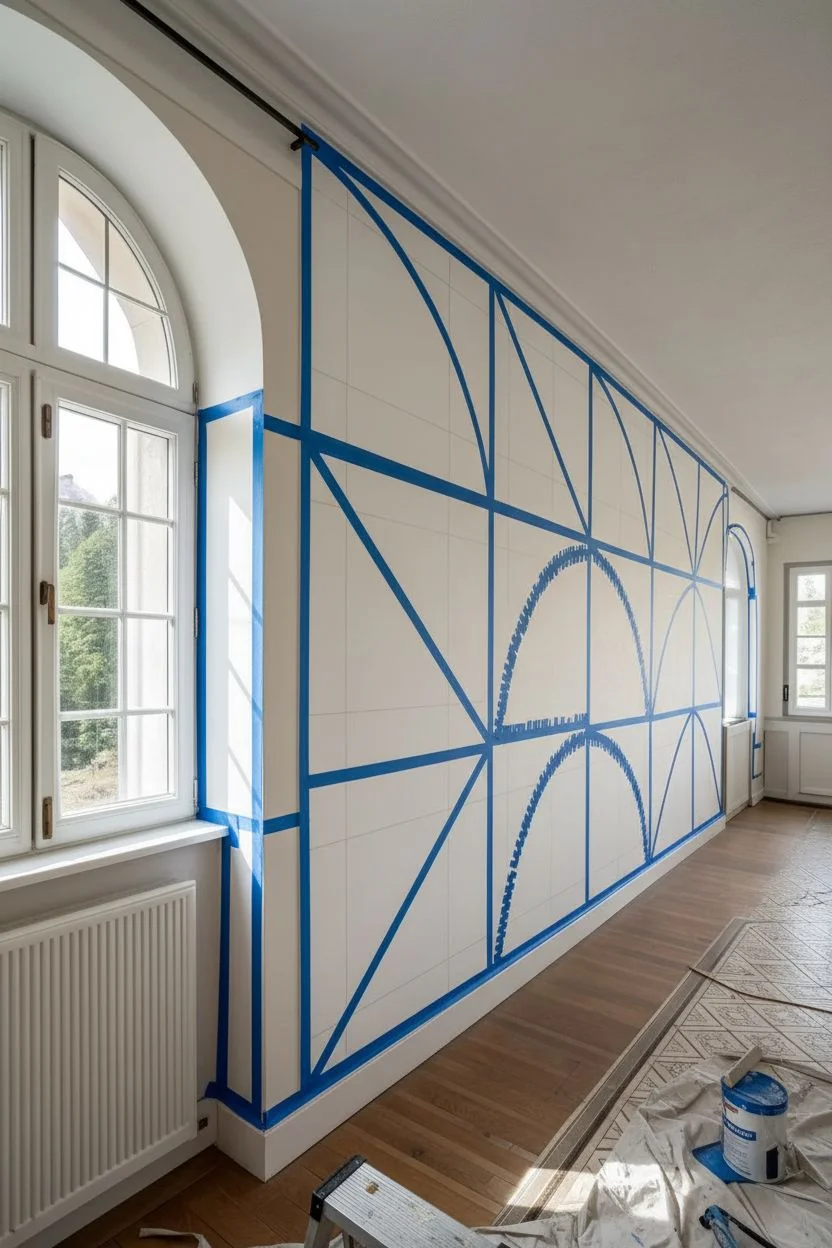
Transform a plain hallway into a gallery-worthy feature with this large-scale geometric mural. Using earthy terracottas and warm beiges in a textured application creates a soft, organic feel that perfectly balances the sharp, modern lines.
Step-by-Step
Materials
- Latex interior paint (white base)
- Acrylic paints or tinting geometric colors (terracotta, rust, ochre, sandy beige)
- Painter’s tape (high quality, 1-inch width)
- Laser level (optional but helpful)
- Long ruler or straight edge
- Pencil
- Large eraser
- Medium sash brush (2-inch)
- Natural sea sponge or lint-free rag
- Glaze medium (acrylic or latex compatible)
- Drop cloth
- Ladder
Step 1: Planning and Layout
-
Prep the surface:
Begin by ensuring your wall is clean, dry, and primed white. If the current wall color is dark, apply a fresh coat of white primer to ensure your earth tones show up true to color. -
Map out the grid:
This design relies on an invisible grid system. Using a pencil and a long straight edge (or laser level), lightly mark out large squares across the wall. These squares will act as the boundaries for your geometric shapes. -
Sketch the shapes:
Within your pencil grid, sketch the shapes. Notice the pattern alternates between sharp triangles and curved quarter-circles. Don’t press too hard with the pencil; you just need a faint guide. -
Tape the straight lines:
Apply painter’s tape along all the straight lines of your design. For points where multiple shapes meet, tape outside the line you intend to paint first, knowing you will have to paint in stages to let sections dry. -
Mask the curves:
For the curved quarter-circle sections, use small, overlapping pieces of tape to create the arc, or carefully freehand these edges later if you have a steady hand. Many painters prefer cutting masking tape into flexible strips for curves.
Step 2: Color Application
-
Mix your glazes:
The look of this wall isn’t flat; it has a mottled, almost fresco-like texture. Mix your paint colors with a clear glazing medium (about 1 part paint to 4 parts glaze) to create translucency. -
Seal the tape edges:
Before adding color, brush a tiny amount of your base wall color (white) over the tape edges. This seals the tape and prevents your colored glaze from bleeding underneath. -
Start with the darkest tone:
Begin applying the deep rust/terracotta color to the designated triangles. Use a sash brush to cut in the edges near the tape, but don’t aim for perfect opacity. -
Create texture:
While the paint is still wet, use a damp sea sponge or rag to gently dab and lift some of the pigment. This creates that clouded, uneven texture that gives the mural its ‘old world’ charm. -
Apply the mid-tones:
Move on to the ochre and sandy beige shapes. I find it helpful to work on non-adjacent sections first so wet colors don’t accidentally merge if the tape fails. -
Layering for depth:
If a section looks too washed out once dry, apply a second thin layer of the glaze mixture, concentrating on the corners or edges to simulate shadow.
Bleed-Through Blues?
If paint seeped under the tape, wait for it to dry completely. Then, use a small angled brush and your base wall white paint to carefully ‘cut’ a straight line over the mistake.
Step 3: Finishing
-
Remove tape carefully:
Once the paint is dry to the touch (usually about an hour for thin glazes), slowly peel back the painter’s tape at a 45-degree angle. Pulling too fast can rip the base coat. -
Tape remaining sections:
Now, tape off the boundaries for the shapes you couldn’t paint in the first round (the ones touching the previously wet areas). Repeat the sealing and painting process. -
Touch up lines:
After all tape is removed, you might see small gaps or white lines between shapes. Use a small artist’s brush to carefully fill these in or sharpen any curved edges that look wobbly. -
Erase guidelines:
Gently erase any visible pencil marks remaining in the unpainted white areas. Be careful not to smudge the pencil lead onto your fresh paint.
Add Metallic Flair
For a luxe upgrade, trace the white gaps between the shapes with a thin gold or copper leafing pen. It adds a subtle shimmer that catches the sunlight beautifully.
Step back and admire the sophisticated warmth your new geometric feature wall brings to the space


Have a question or want to share your own experience? I'd love to hear from you in the comments below!