When a wall stops being just a background and starts acting like a piece of art, the whole room shifts. Here are my favorite wall treatments that add texture, depth, and personality—way beyond basic flat paint.
Classic Board and Batten Grid
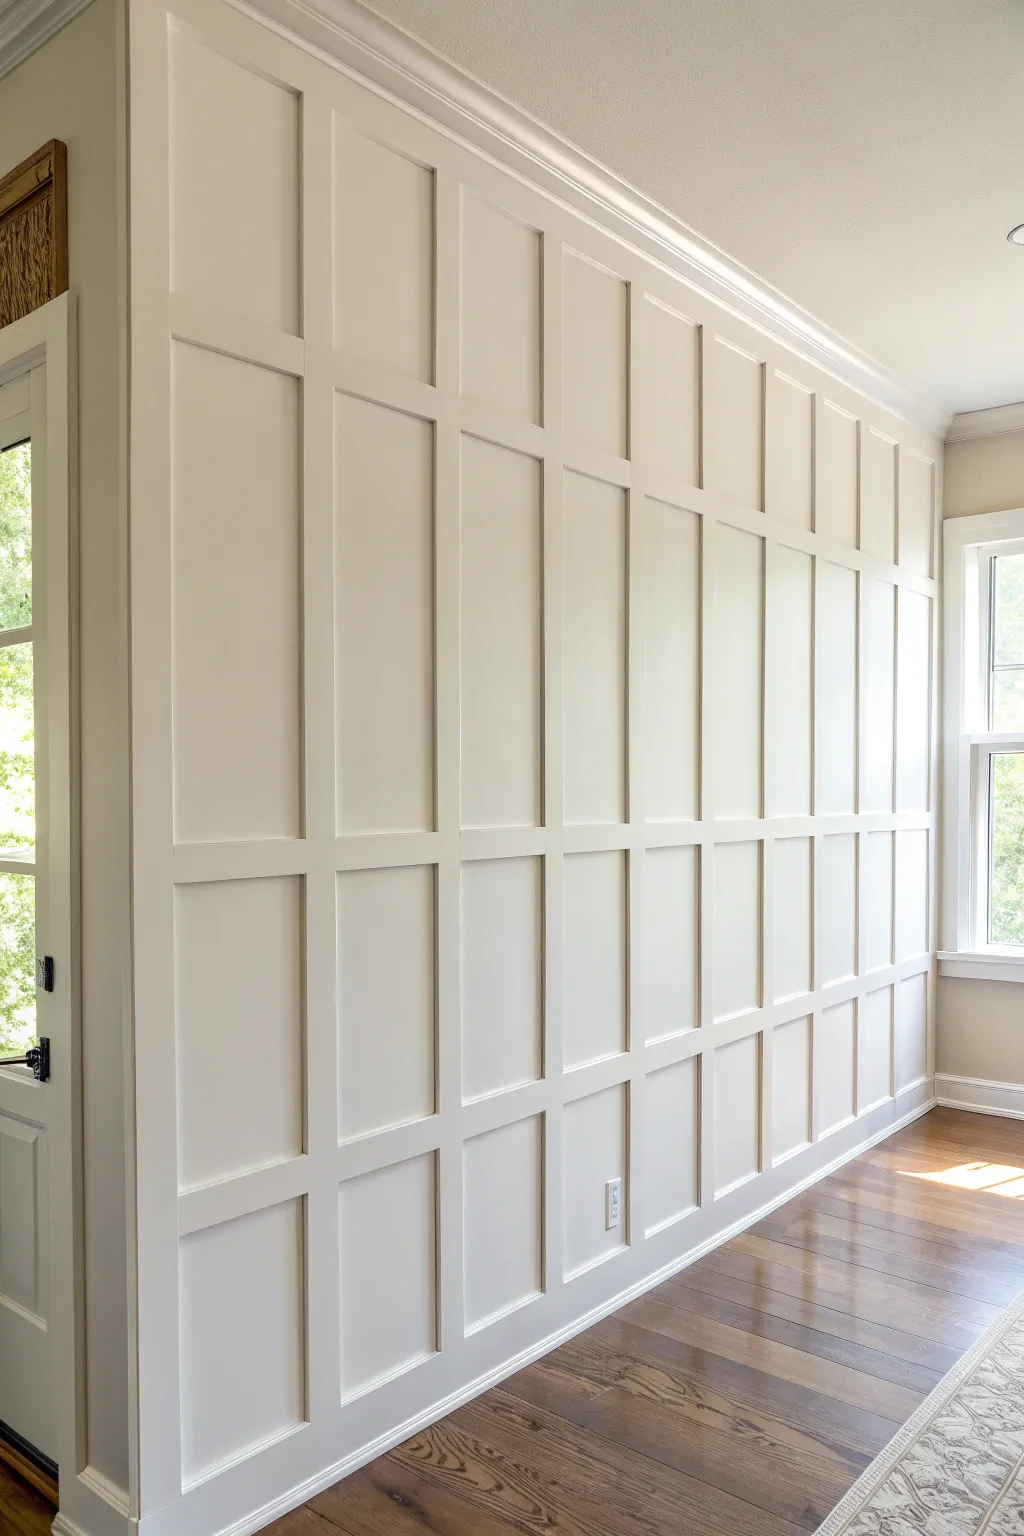
Transform a plain wall into a sophisticated architectural feature with this full-height board and batten grid. By using simple MDF strips and careful spacing, you can achieve a custom millwork look that adds depth and character to any room.
How-To Guide
Materials
- 1×4 Primed MDF boards (for base and top rails)
- 1×3 Primed MDF boards (for vertical battens)
- 1×2 Primed MDF boards (for horizontal rails)
- Construction adhesive (e.g., Liquid Nails)
- Brad nailer with 2-inch nails
- Laser level (highly recommended)
- Tape measure
- Miter saw
- Paintable wood filler
- Fine-grit sanding sponge
- Painters caulk and caulk gun
- Primer and interior semi-gloss or satin paint
- Paint roller (foam or short nap) and angled brush
Step 1: Planning and Layout
-
Measure the wall:
Measure the total width and height of your wall accurately. Decide on the number of columns and rows you want; a classic grid often uses squares or slightly vertical rectangles. -
Calculate spacing:
Subtract the total width of all your vertical battens from the wall’s total width. Divide the remaining number by the number of open spaces (columns) to find the exact gap size between each vertical board. -
Mark the wall:
Using a pencil, mark the locations of your vertical stiles on the wall. I find it helpful to visualize the grid with painter’s tape first to ensure the proportions feel right before cutting any wood.
Spacer Block trick
Cut two scrap wood blocks to the exact height of your grid rows. Use them to hold up the horizontal pieces while nailing. It’s faster and far more accurate than measuring every time.
Step 2: Installing the Frame
-
Remove existing trim:
Carefully pry off the existing baseboards. You can reuse them, but for this look, installing a simple 1×4 flat board as the new baseboard creates a cleaner, integrated foundation. -
Install perimeter boards:
Attach the horizontal 1×4 baseboard along the bottom and a matching 1×4 board along the very top of the wall (flush with the ceiling or crown molding). Apply construction adhesive to the back and secure with brad nails into the studs. -
Secure the outer verticals:
Install the first two vertical 1×3 boards on the far left and far right edges of the wall, creating a full rectangular frame.
Add a Picture Ledge
To add functionality, replace one of the upper horizontal grid rails with a deeper 1×3 or 1×4 board. This creates a narrow shelf perfect for displaying framed art or photos.
Step 3: Building the Grid
-
Install vertical battens:
Cut your 1×3 vertical boards to fit snugly between the top and bottom horizontal rails. Apply adhesive to the back of each board. -
Align and nail:
Place the verticals at your pre-marked measuring points. Use a laser level to ensure they are perfectly plumb (straight up and down) before nailing them into the drywall. Angling your nails slightly helps grip the drywall if you miss a stud. -
Cut horizontal rails:
Measure the distance between each vertical batten individually. Walls are rarely perfectly straight, so cut your 1×2 horizontal spacers specifically for each row to ensure a tight fit. -
Install spacer blocks:
To keep spacing consistent without constant measuring, cut two ‘spacer blocks’ from scrap wood to the exact height you want your grid squares to be. Use these to support the horizontal rails as you install them. -
Attach horizontal rails:
Apply adhesive and nail the horizontal 1x2s into place between the verticals, working your way from the bottom up or top down.
Step 4: Finishing Touches
-
Fill the holes:
Fill every nail hole with wood filler. Overfill slightly, as the filler shrinks when it dries. -
Sand smooth:
Once dry, sand the filler flush with the wood surface using a fine-grit sanding sponge. Wipe away all dust with a tack cloth. -
Caulk the seams:
Run a thin bead of painter’s caulk along every edge where the wood meets the wall and where the boards meet each other. Smooth it with a wet finger for a seamless look. -
Prime the grid:
If your MDF isn’t pre-primed, apply a coat of high-quality primer. Pay special attention to any cut edges of MDF, as they are porous and soak up paint. -
Paint the edges:
Using an angled sash brush, cut in the corners of each grid square. -
Roll the surfaces:
Use a foam roller or a short nap roller to paint the flat faces of the grid and the wall space inside the squares. This minimizes brush strokes and achieves a sprayed-on look. -
Apply final coat:
Once the first coat is dry, lightly sand any rough spots and apply a second coat of paint for a durable, rich finish.
Step back and admire how this elegant grid structure completely redefines the scale and atmosphere of your room.


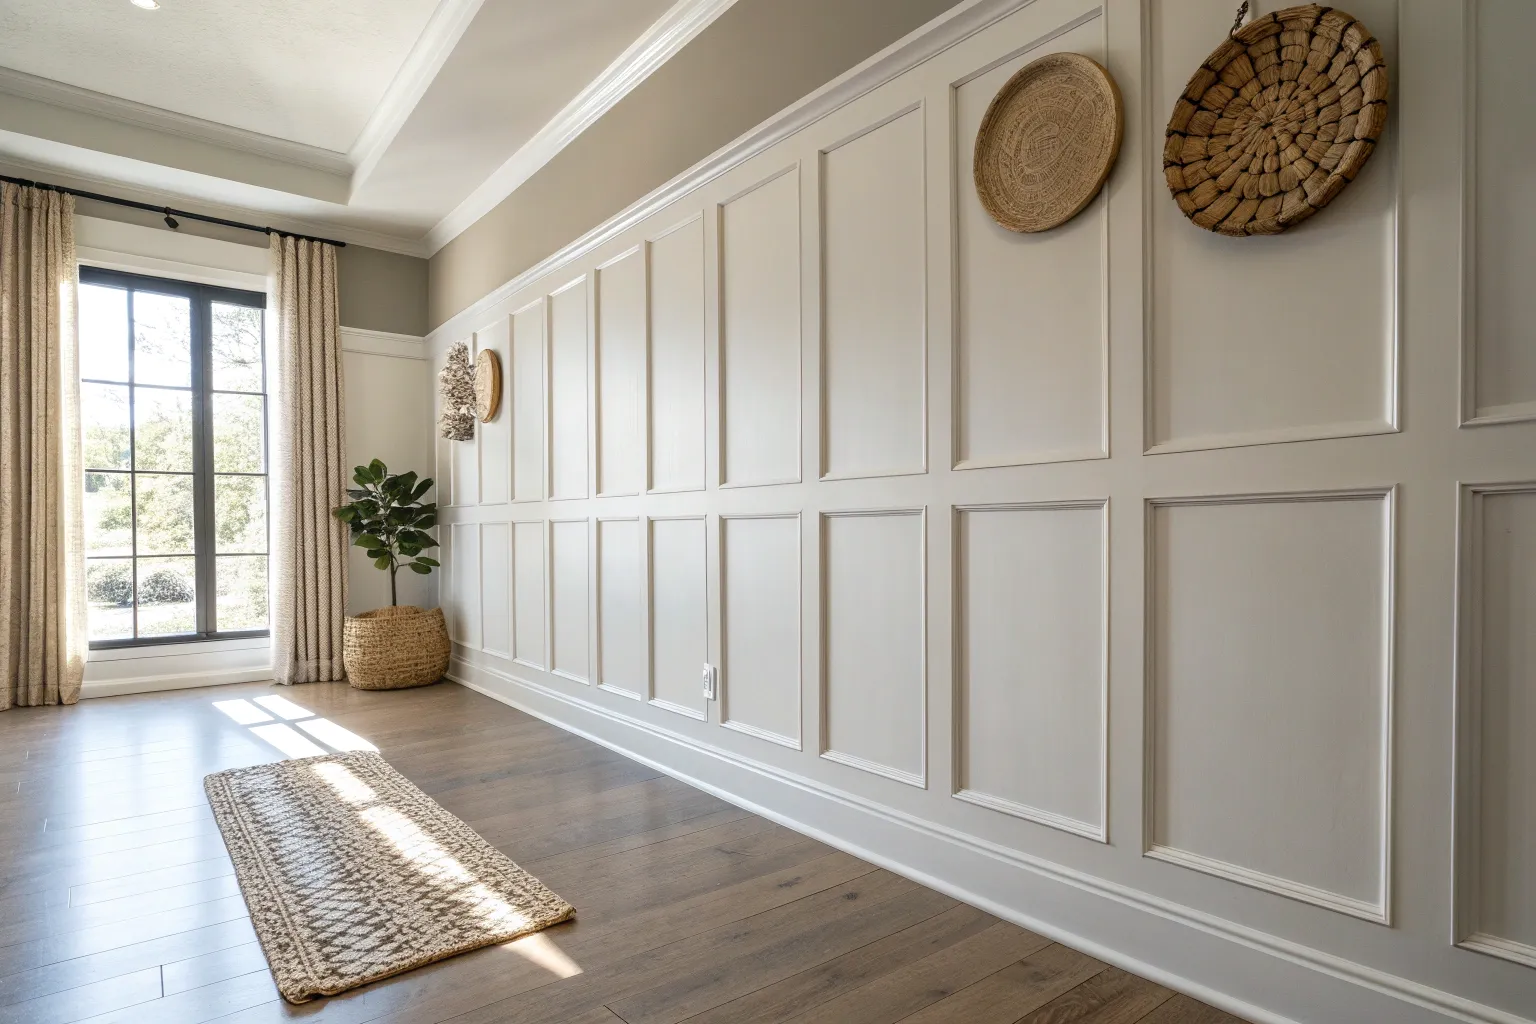
Picture Frame Molding Boxes
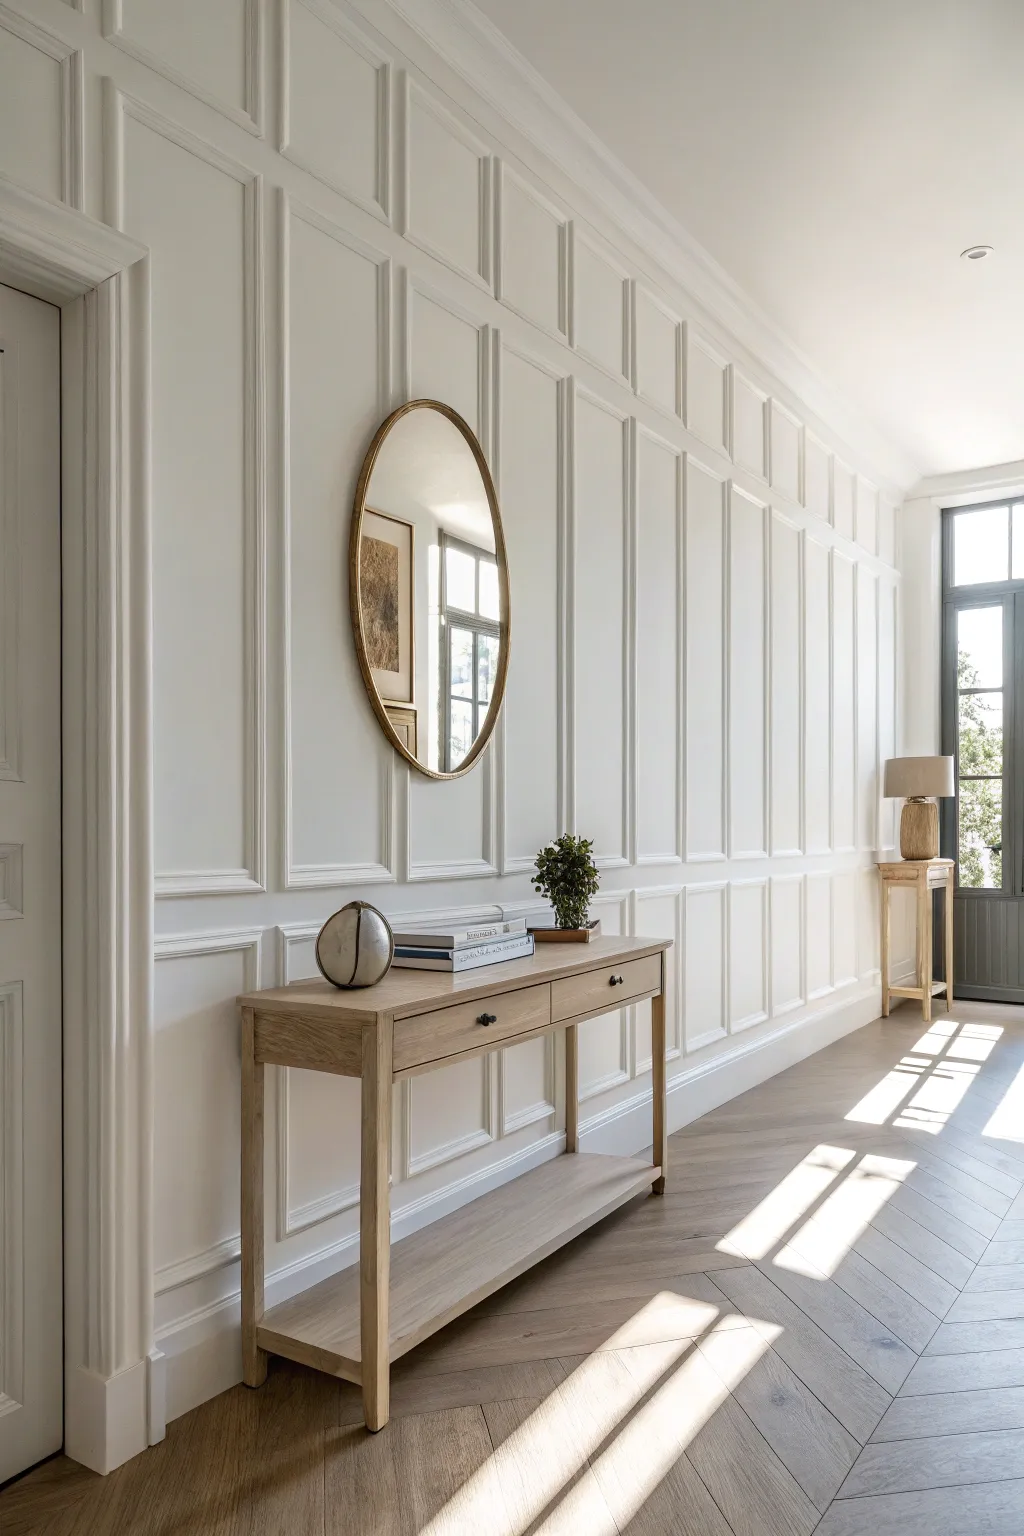
Transform a plain wall into a sophisticated architectural feature with this full-height picture frame molding project. This tutorial guides you through creating a classic grid layout that adds depth, character, and a sense of height to any hallway or room.
Step-by-Step
Materials
- Baseboard molding (optional, if replacing)
- Chair rail molding (optional, for horizontal division)
- Picture frame molding trim (primed pine or MDF)
- Construction adhesive (e.g., Liquid Nails)
- Painter’s tape
- Measuring tape
- Pencil
- Laser level (highly recommended)
- 4-foot box level
- Miter saw
- Brad nailer
- 1 1/2-inch brad nails
- Wood filler
- Fine-grit sandpaper (220 grit)
- Caulk gun
- Paintable latex caulk
- Primer (if using bare wood)
- Interior semi-gloss or satin paint
- Paint roller and sash brush
Step 1: Planning and Layout
-
Measure the wall:
Start by measuring the total width and height of your wall. Sketch the wall on graph paper to visualize your layout. -
Determine box sizes:
Decide on the number of vertical columns and horizontal rows. For the look in the image, aim for two or three vertical sections: a smaller bottom section (wainscoting height) and a taller upper section, or a uniform grid. -
Calculate spacing:
Plan for a consistent gap between boxes, typically 3 to 4 inches. Subtract the total width of all vertical spaces (stiles) from the wall width, then divide the remaining number by the number of columns to get your box width. -
Mark the wall:
Using a pencil and a tape measure, transfer your layout to the wall. Mark the center points of each box first.
Spacer Block Trick
Cut a scrap piece of wood to the exact width of your planned spacing gap. Use this block between boxes as you install to ensure perfect, consistent spacing without measuring every time.
Step 2: Drawing the Grid
-
Set up the laser level:
A laser level is a lifesaver here. Set it to project a horizontal line at the top edge of your lowest row of boxes. -
Tape the outline:
Use painter’s tape to mock up the boxes directly on the wall. This allows you to step back and verify the proportions before making any cuts. -
Adjust as needed:
If a box lands awkwardly on an outlet or switch, slightly adjust your spacing or box sizes now. It’s much easier to fix on tape than wood.
Step 3: Cutting and Installing
-
Cut the molding:
Set your miter saw to a 45-degree angle. Measure and cut the four sides for your first box. I always recommend cutting one test box first to ensure your measurements translate perfectly to reality. -
Apply adhesive:
Apply a zigzag bead of construction adhesive to the back of the molding pieces. This helps hold them in place and reduces the number of nails needed. -
Nail the top piece:
Place the top horizontal piece on your marked line. Check for level one last time, then secure it with your brad nailer, shooting nails into studs where possible or angling them in a ‘V’ pattern into drywall. -
Install the sides:
Fit the vertical side pieces against the mitered corners of the top piece. Ensure the joint is tight before nailing the sides in place. -
Attach the bottom piece:
Slot the bottom piece in to complete the rectangle. If the fit is too tight, trim a hair off the end; don’t force it or the joints will pop open later. -
Repeat the process:
Continue this process for all remaining boxes, checking level frequently as you move across the wall.
Gaps at Corners?
If mitered corners aren’t closing perfectly due to uneven walls, use the round shaft of a screwdriver to burnish (rub) the wood fibers together, then fill the remaining gap with wood filler.
Step 4: Finishing Touches
-
Fill nail holes:
Use wood filler to cover all nail heads. Overfill slightly, as the filler will shrink when it dries. -
Sand smooth:
Once dry, sand the filler flush with the molding using 220-grit sandpaper. Wipe away dust with a tack cloth. -
Caulk the seams:
Run a thin bead of paintable caulk along the inside and outside edges where the molding meets the wall, and at the mitered corners. Smooth it with a wet finger for a seamless look. -
Wait for drying:
Allow the caulk to dry completely according to the manufacturer’s instructions before painting. -
Prime and paint:
If your molding is unprimed, apply a coat of primer. Finally, paint the entire wall and molding in your chosen color. A semi-gloss finish highlights the architectural details beautifully.
Step back and admire the sophisticated depth and texture your new wall treatment brings to the space


Wainscoting With a Chair Rail
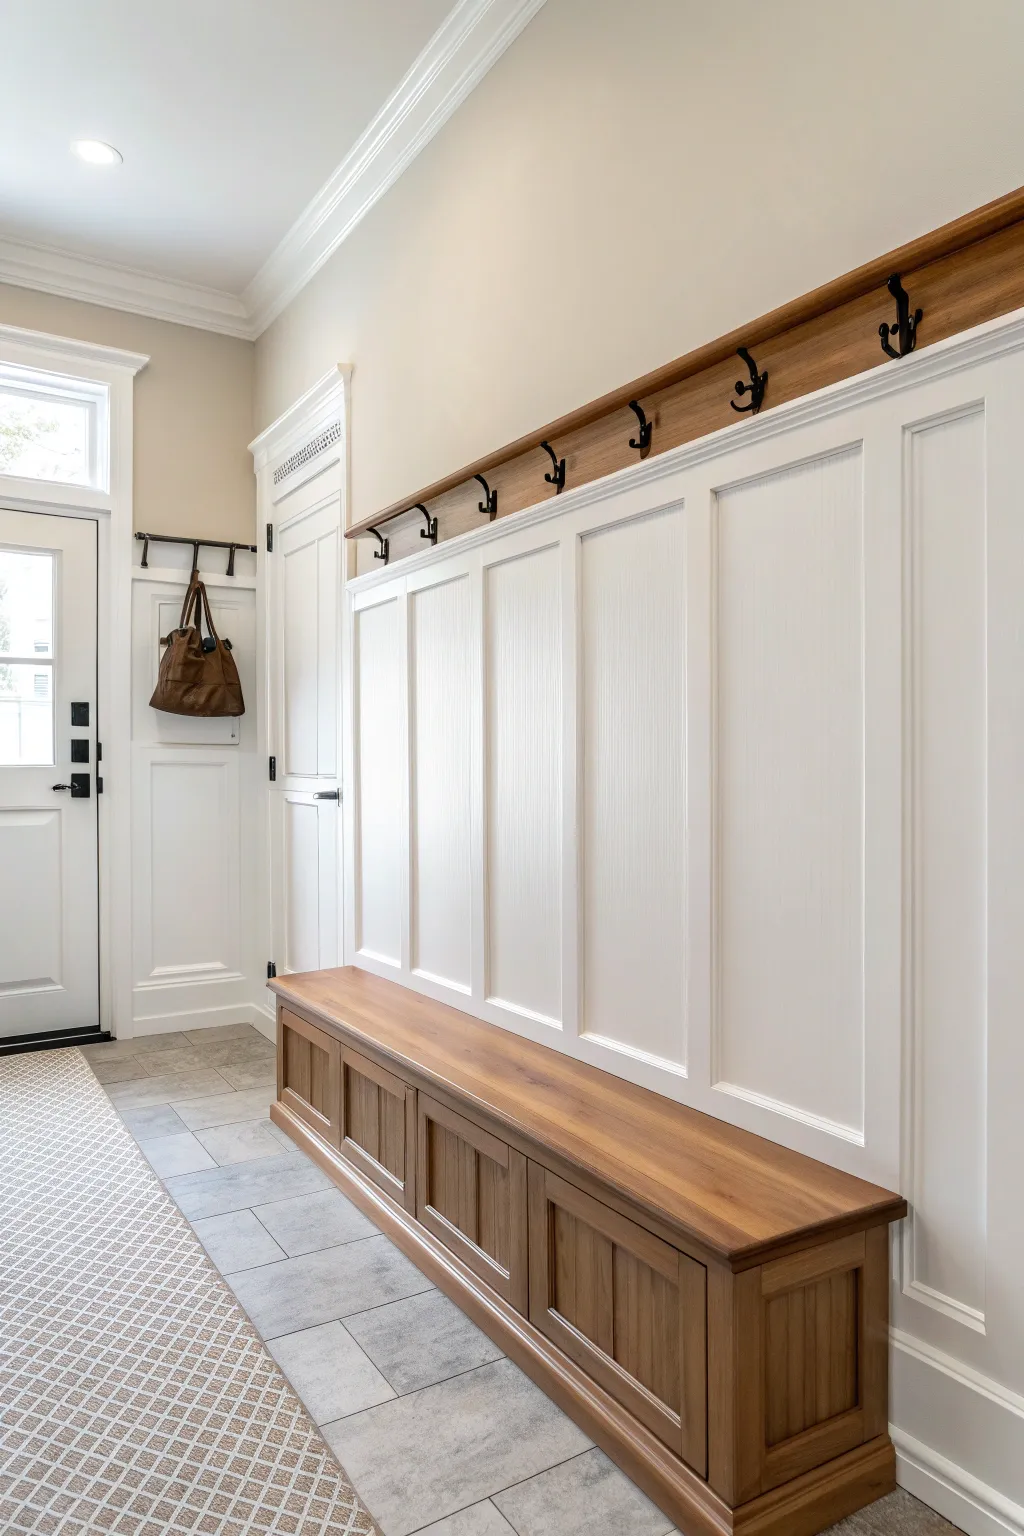
Transform a standard entryway into a functional mudroom with this classic board-and-batten wainscoting and a custom wood bench. The contrast between the crisp white paneling and the rich wood tones creates a sophisticated, timeless look.
Step-by-Step Tutorial
Materials
- 3/4-inch plywood (for bench box)
- Hardwood lumber (oak or maple for bench top and trim)
- 1×4 trim boards (primed MDF or poplar)
- 1×6 trim boards (for header)
- Cove molding
- Baseboard molding
- Double-prong coat hooks (matte black)
- Wood stain (medium walnut or similar)
- Polyurethane sealer
- White interior paint (semi-gloss)
- Construction adhesive
- Wood glue
- Brad nails (1.5 inch and 2 inch)
- Wood filler and caulk
- Sandpaper (120 and 220 grit)
Step 1: Building the Bench Base
-
Construct the frame:
Start by building a sturdy box frame using 3/4-inch plywood. Cut pieces to fit your wall length, ensuring a standard seating height of about 18 inches minus the thickness of your top. Secure the frame directly into the wall studs for maximum stability. -
Face the bench:
Cut hardwood plywood to cover the front face of your frame. Attach it with wood glue and brad nails. Measure and cut 1×3 hardwood lumber to create the vertical stiles and horizontal rails that form the recessed panel look on the front. -
Install the bench top:
Select a premium hardwood board for the seat. Cut it to overhang the base slightly on the front and exposed sides. Sand it thoroughly, starting with 120 grit and finishing with 220 grit for a silky smooth feel. -
Stain and seal:
Apply your chosen wood stain to the bench base and top, wiping away excess with a rag. Once dry, apply 2-3 coats of polyurethane, sanding lightly between coats for durability against bags and shoes.
Spacer Block Trick
Cut a scrap piece of wood to the exact width needed between your vertical battens. Use this as a spacer guide during installation so you don’t have to measure every single gap.
Step 2: Installing the Wainscoting
-
Prep the wall:
Clear the wall surface and mark your stud locations lightly in pencil. Determine the height of your wainscoting; for this high-impact look, go about two-thirds or three-quarters up the wall. -
Install the vertical battens:
Cut vertical 1×4 boards to extend from the bench top to your determined mark. Space them evenly—roughly 16 to 20 inches apart often looks balanced—and nail them into the studs where possible, or use heavy-duty construction adhesive. -
Add panel molding (optional):
If your wall texture is rough, install thin 1/4-inch plywood sheets behind the battens first. For smooth walls, you can simply attach small cove molding inside the varied rectangles for extra detail, although a simple shaker style works great too. -
Attach the top header:
Install a horizontal 1×6 board across the top of your vertical battens. This serves as the mounting plate for your coat hooks later. -
Add the top shelf:
Rip a piece of hardwood (matching the bench stain) to about 3-4 inches deep. Mount this on top of the header board to create a narrow display shelf. I sometimes add a small cove molding under this shelf for a finished transition.
Step 3: Finishing Touches
-
Fill and caulk:
Fill all nail holes on the white woodwork with wood filler. Run a bead of paintable caulk along every seam where wood meets wall or wood meets wood to ensure seamless painting later. -
Paint the woodwork:
Protect your stained bench with painter’s tape and plastic sheeting. Apply a high-quality primer to the raw wood and wall sections if needed. Follow up with two coats of semi-gloss white paint for a washable, durable finish. -
Install hardware:
Once the paint has cured for at least 24 hours, measure equal distances along the top header board. Pre-drill pilot holes to prevent splitting, then screw in your matte black hooks. -
Final clean up:
Remove all painter’s tape carefully. Use a tack cloth to wipe any remaining dust from the stained wood shelf and bench seat.
Hidden Storage
Make the bench seat a hinged lid instead of a fixed top. Use piano hinges along the back to create a spacious storage trunk for seasonal gear.
Step back and admire how this architectural detail completely changes the character of your hallway


Monochrome Trim-on-Trim Color Drenching
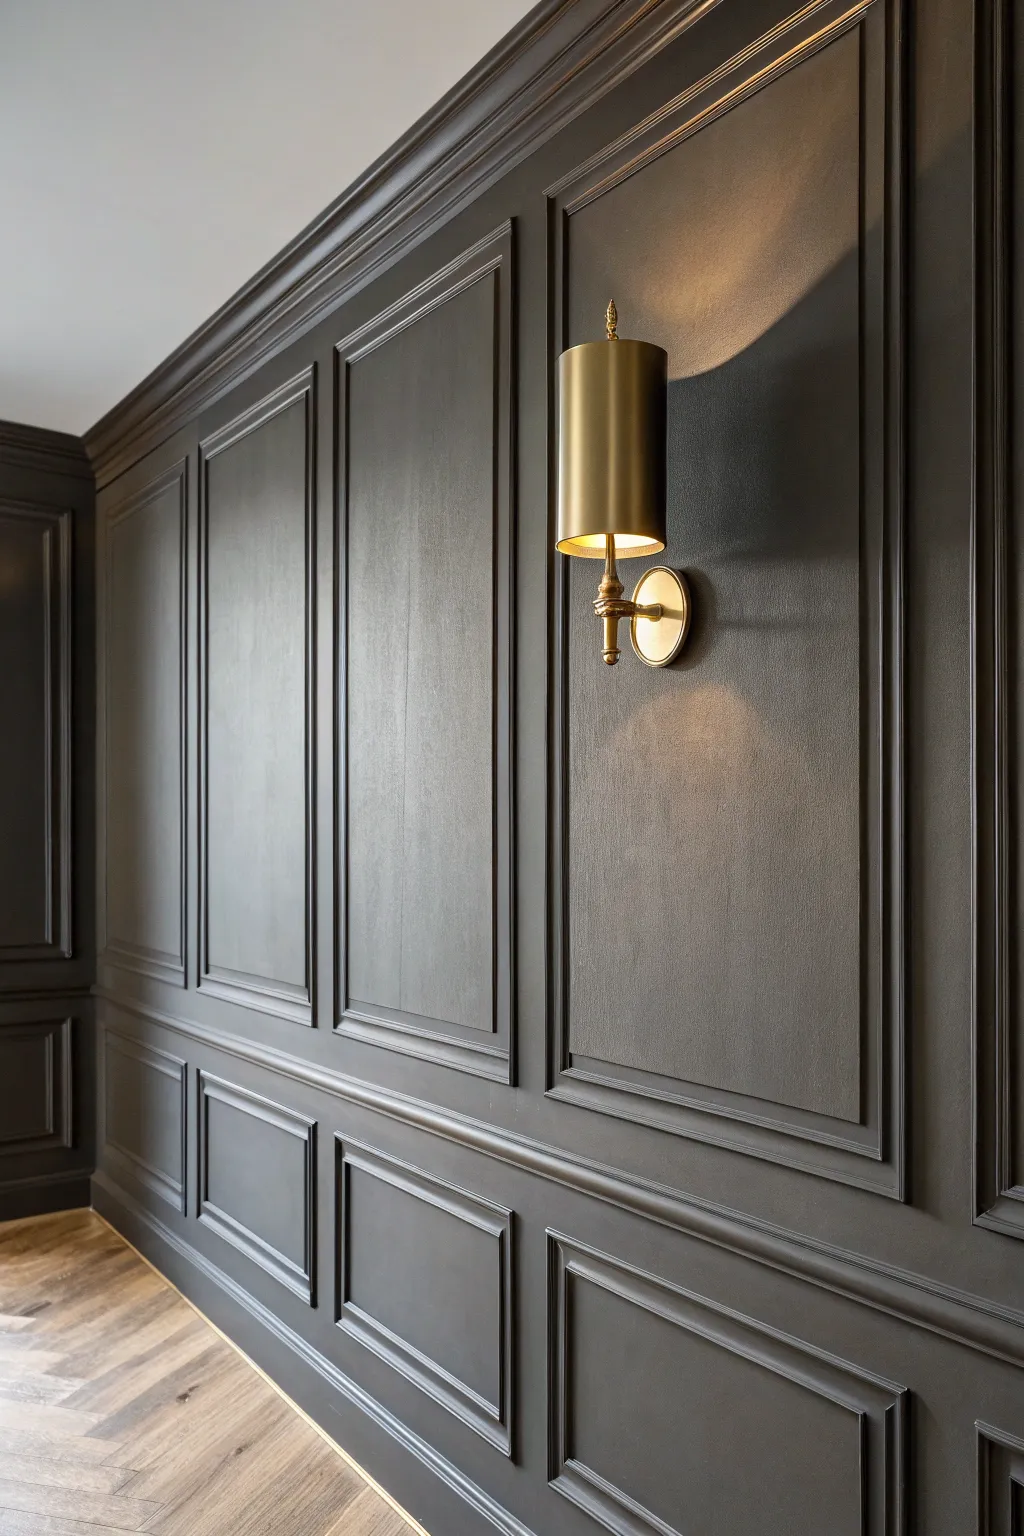
Elevate a plain wall into a sophisticated architectural feature with this monochromatic wainscoting project. By painting the molding and wall in the same rich charcoal hue, you achieve a seamless, high-end look that is both moody and modern.
Step-by-Step Tutorial
Materials
- Panel molding (picture frame molding)
- Chair rail molding
- Baseboard molding
- Measuring tape and pencil
- Laser level
- Miter saw
- Construction adhesive (Liquid Nails)
- Pin nailer or finish nailer with 1-1/2 inch nails
- Wood filler
- Caulk and caulk gun
- Fine-grit sanding block
- High-quality charcoal paint (matte or eggshell finish)
- Angled sash brush (2 inch)
- Microfiber roller and tray
- Gold wall sconce (optional)
- Masking tape
Step 1: Planning and Layout
-
Measure the wall:
Begin by calculating the total width and height of your wall to determine the number of panels you can fit comfortably. A classic layout like the one shown uses a chair rail to split the wall into a larger upper section and a shorter lower wainscoting section. -
Draft the design:
Sketch your design on paper, ensuring consistent spacing between boxes. A standard gap is about 3 to 4 inches between panel frames. -
Mark the wall:
Transfer your measurements to the wall using a pencil. I find using a laser level here is absolutely crucial to keep your vertical and horizontal lines perfectly straight. -
Plan for electrical:
If you intend to install a sconce as pictured, mark its center point within one of the upper panel boxes now, so you can hardwire or place a puck light later.
Uneven Walls?
Walls are rarely perfectly flat. If gaps appear behind the trim, don’t force the wood. Use extra caulk to fill the gaps, smoothing it to create an invisible bridge between the molding and the drywall.
Step 2: Install Molding
-
Cut the horizontal rails:
Start by cutting and installing your baseboards and the chair rail that runs horizontally across the middle of the wall using a miter saw for clean ends. -
Cut the box molding:
Set your miter saw to a 45-degree angle. Cut the four sides for your first box, double-checking the lengths against your wall markings. -
Apply adhesive:
Apply a thin wavy bead of construction adhesive to the back of your molding strips. This helps reduce the number of nails needed and keeps the trim tight to the wall. -
Nail into place:
Secure the molding with a pin nailer. Shoot nails at opposing angles to lock the wood into the drywall effectively. -
Assemble remaining boxes:
Continue cutting and installing the remaining ‘picture frames,’ both above and below the chair rail. Ensure the upper and lower boxes align vertically. -
Verify alignment:
Periodically check your work with the level, especially the vertical stiles, before the glue sets completely.
Create Depth
For a more historic look, use a glossy finish on the trim and a matte finish on the wall in the exact same color. The subtle play of light adds incredible texture.
Step 3: Prep and Paint
-
Fill the nail holes:
Dab a small amount of wood filler into every nail hole. Overfill slightly, as the filler tends to shrink when it dries. -
Sand smooth:
Once dry, sand the filler flush with the molding using a fine-grit sanding block. Wipe away all dust with a tack cloth or damp rag. -
Caulk the seams:
Run a thin bead of paintable caulk along every edge where the molding meets the wall and at the mitered corners. Smooth it out with a wet finger for a seamless transition. -
Protect the floors:
Before painting, apply masking tape to the floor edge and lay down drop cloths to protect your flooring from dark paint splatters. -
Cut in the edges:
Using your angled sash brush, paint the interior bevels of the molding and the corners of the wall first. -
Roll the surfaces:
Use a microfiber roller to apply paint to the flat wall surfaces and the face of the molding. Rolling over your brush strokes while they are still wet helps smooth out the texture. -
Apply second coat:
Allow the first coat to dry completely according to the can’s instructions, then apply a second coat for that deep, saturated ‘drenched’ look. -
Install the sconce:
Once the paint is fully cured, install your gold fixture in the center of the designated panel to complete the high-contrast aesthetic.
Step back and admire how a single color and some wood trim have completely transformed the architecture of your room
BRUSH GUIDE
The Right Brush for Every Stroke
From clean lines to bold texture — master brush choice, stroke control, and essential techniques.
Explore the Full Guide
Two-Tone Blocking With Paneling
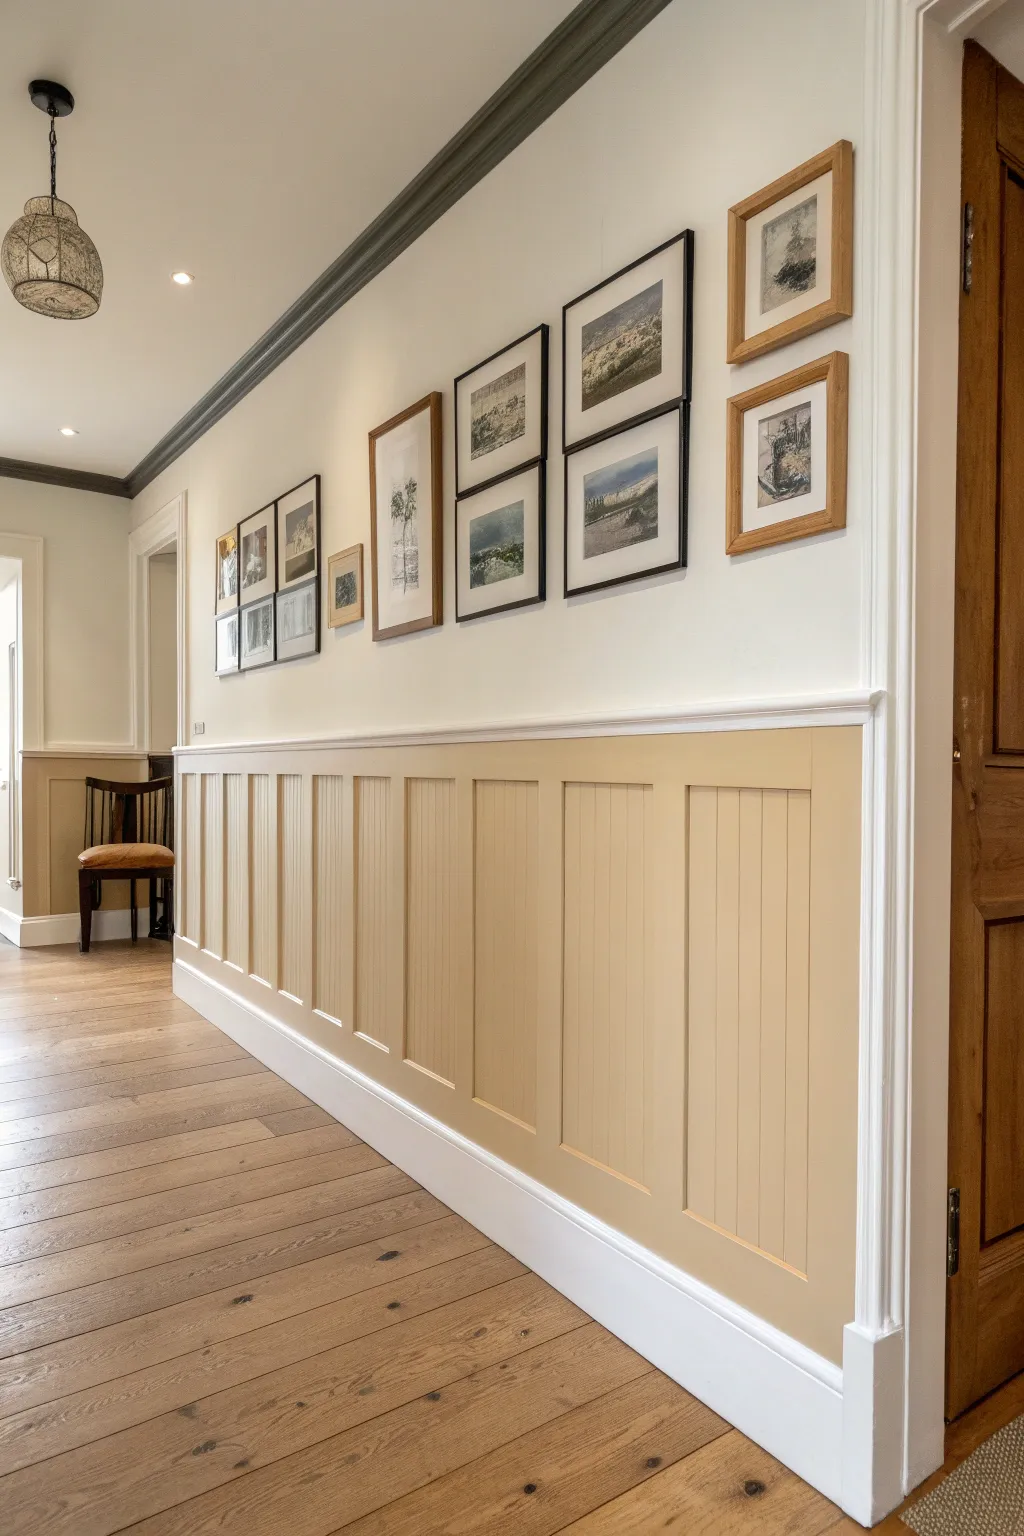
Elevate a plain hallway by installing this classic board-and-batten style wainscoting with charming beadboard inserts. The two-tone effect, achieved by painting the paneling a warm sandy beige against crisp white walls, adds instant architectural character and warmth.
Step-by-Step
Materials
- 4×8 sheets of beadboard paneling
- 1×4 MDF or primed pine boards (for stiles and rails)
- 1×6 MDF or primed pine boards (for baseboards)
- Panel cap molding or chair rail
- Construction adhesive (e.g., Liquid Nails)
- Finishing nails (1.5 inch and 2 inch)
- Wood filler or spackle
- Caulk and caulking gun
- Sandpaper (120 and 220 grit)
- Primer (if using bare wood)
- Interior semi-gloss paint (warm beige for panels, white for trim)
- Circular saw or table saw
- Miter saw
- Level and measuring tape
- Stud finder
Step 1: Preparation and Base Layer
-
Clear and measure:
Remove any existing baseboards and outlet covers from your wall. Measure the total length of the wall to calculate how many beadboard sheets and trim boards you will need. -
Determination of height:
Decide on the height of your wainscot. A common rule of thumb is one-third of the wall height, but going slightly higher, around 36-42 inches, creates the dramatic look seen here. Mark a level line across the entire wall at this height. -
Find studs:
Locate and mark all wall studs using a stud finder. Transfer these marks lightly above your level line so they remain visible during installation. -
Cut beadboard sheets:
Cut your 4×8 beadboard sheets to your desired height using a circular saw. I like to cut them about 1/2 inch shorter than the final height to allow for expansion gaps at the floor. -
Install beadboard:
Apply construction adhesive to the back of the beadboard sheets and press them onto the wall. Secure them with a few finishing nails, ensuring the grooves run vertically. Leave a small gap at the floor and between sheets.
Uneven Walls?
If gaps appear behind your trim due to wavy drywall, don’t force the wood back. Instead, fill gaps with caulk. For larger gaps, use a small amount of spray foam first, trim it when dry, then caulk over.
Step 2: Adding the Grid Structure
-
Install baseboard:
Install the 1×6 baseboard along the bottom over the beadboard. Use 2-inch nails to secure it into the studs. This creates a solid foundation for the rest of the trim. -
Install top rail:
Install a horizontal 1×4 rail along the top edge of the beadboard. Ensure it is perfectly level. The top edge of this board should align with your initial height mark. -
Plan vertical stiles:
Determine the spacing for your vertical battens (stiles). Spacing them 16 to 24 inches apart usually looks balanced. Mark these positions on the wall. -
Cut and attach stiles:
Measure the distance between the top rail and the baseboard for each specific spot (floors can be uneven!). Cut your 1×4 vertical stiles to fit snugly and nail them into place. Apply adhesive for extra hold if you aren’t hitting a stud. -
Add cap molding:
Finish the top edge by installing a cap molding or a small chair rail on top of the upper horizontal rail. This creates a polished ledge.
Step 3: Finishing and Painting
-
Fill holes:
Fill all nail holes with wood filler. Let it dry completely, usually about an hour depending on the brand. -
Sand smooth:
Sand the wood filler flush with the surface and lightly scuff the face of the boards with 220-grit sandpaper to ensure paint adhesion. -
Caulk seams:
Run a bead of paintable caulk along every seam where wood meets wood or wood meets wall. This step is crucial for that seamless, built-in look visible in the photo. -
Prime:
Apply a coat of high-quality stain-blocking primer to the entire wainscoting installation. If your materials came pre-primed, you can skip this, though I usually spot-prime the filled nail holes. -
Paint trim and panels:
Paint the entire lower section—baseboards, beadboard, stiles, rails, and cap—in your chosen warm beige semi-gloss paint. Use a brush for corners and grooves, and a small foam roller for the flat surfaces to get a smooth finish. -
Paint upper wall:
Cut in carefully along the top of the cap molding with your white wall paint. Paint the upper wall completely to create the crisp two-tone contrast.
Pro Tip: Seamless Joints
When joining two pieces of horizontal rail on a long wall, cut the ends at contrasting 45-degree angles (a scarf joint). This overlap makes the seam invisible once glued and sanded.
Step back and admire how this structured paneling transforms your hallway into a sophisticated gallery space
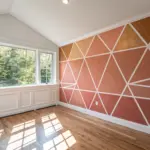
Painted Stripes for Instant Architecture
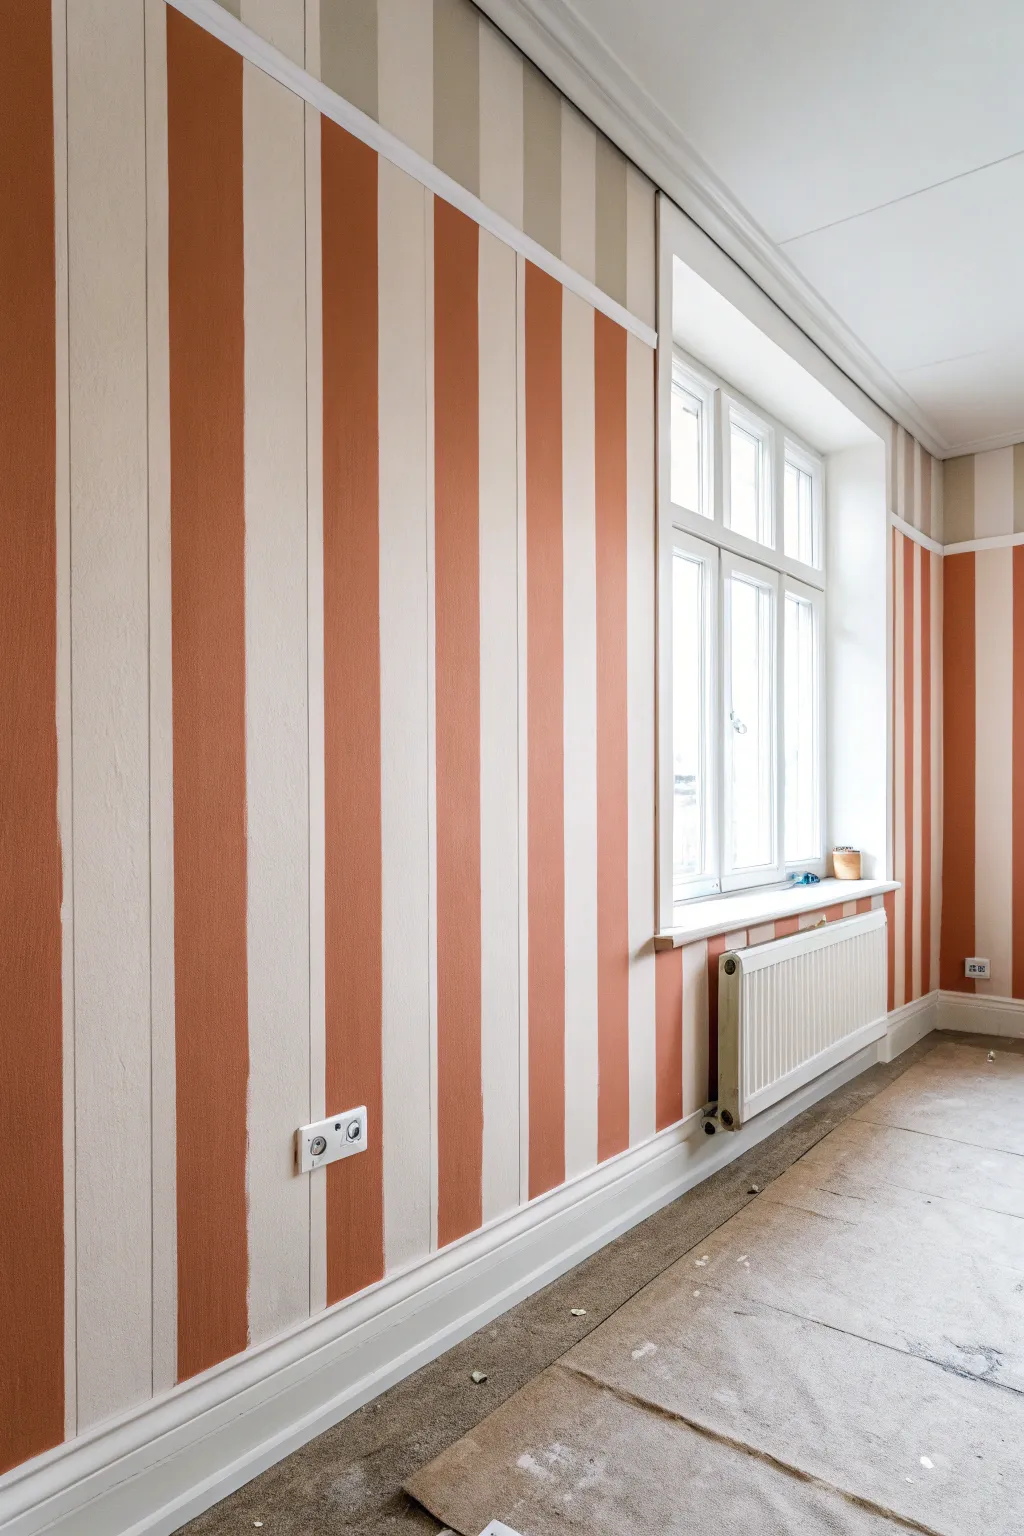
Transform a plain room into an elegant space by implementing the classic appeal of wide, vertical stripes. This project creates the illusion of height and structure, mimicking architectural molding details through clever paint application and color blocking.
Detailed Instructions
Materials
- High-quality painter’s tape (multi-surface or delicate surface)
- Laser level or long spirit level
- Pencil
- Tape measure
- Interior latex wall paint (Cream/Off-White base color)
- Interior latex wall paint (Terracotta/Brick Red contrast color)
- Interior latex wall paint (Greige/Taupe for upper section)
- Small angled sash brush (1.5 – 2 inch)
- Medium roller (3/8 nap) and roller frame
- Paint tray and liners
- Large drop cloths or masking paper for floor protection
- Ladder
- Flat moulding or trim piece (optional, for visual separation)
Step 1: Preparation and Base Coat
-
Prepare the workspace:
Begin by removing all furniture from the area or pushing it to the center of the room. Lay down large drop cloths or masking paper to protect your flooring from paint splatters, especially near the baseboards. -
Clean and patch:
Wipe down the walls with a damp cloth to remove dust and grease. If there are any nail holes or imperfections, fill them with spackle, let dry, and sand smooth. -
Remove hardware:
Unscrew and remove electrical socket covers and switch plates. Place the screws and plates in a small sandwich bag so you don’t lose them during the process. -
Apply the base color:
Paint the entire wall with your lighter base color (the cream or off-white shade). This will serve as the background for your stripes. Use a roller for the main areas and an angled brush for cutting in corners and around trim. -
Let it cure:
Allow the base coat to dry completely. I prefer to wait at least 24 hours before applying tape to ensure the fresh paint doesn’t peel off when the tape is removed later.
Step 2: Measuring and Taping
-
Determine the horizontal break:
Decide on the height for the horizontal division of the wall (where the ‘chair rail’ effect will be). Measure up from the floor and mark this height lightly with a pencil at several points across the room. -
Plan the stripe width:
Measure the total width of your wall. To avoid partial stripes at the ends, divide the wall width by your desired number of stripes (an odd number usually looks best). Around 5 to 7 inches is a good standard width for this architectural look. -
Mark vertical guides:
Using your tape measure, mark the stripe intervals along the top (near the ceiling or upper molding line) and along the horizontal break line you established earlier. -
Draw plumb lines:
Use a laser level or a long spirit level to draw light vertical pencil lines connecting your top and bottom marks. While a laser level is faster, a simple straight edge and pencil work perfectly fine if you take your time. -
Apply the tape:
Apply painter’s tape along your pencil lines. Crucial tip: Be aware of which side of the line you tape on! Place the tape on the ‘base color’ side so that the ‘stripe color’ side remains the correct width. -
Tape the horizontal divider:
Run a continuous line of tape horizontally across the room at your measured height. If you plan to install a physical molding here later, you can skip this, but if you are painting the separation, tape it off now. -
Seal the tape edges:
To get crisp lines, run a flat edge (like a credit card) firmly over the tape edges. For extra insurance against bleeding, lightly brush a tiny amount of the *base* color over the edge of the tape. This seals the gap so the darker stripe color won’t bleed under.
Seal like a Pro
Before painting the colored stripe, paint over the tape edge with your BASE wall color first. This fills voids under the tape, ensuring perfectly crisp lines.
Step 3: Painting the Stripes
-
Paint the lower stripes:
Using the terracotta/brick red color, paint the vertical stripes below your horizontal line. Use a small roller for speed, but switch to a brush near the top and bottom edges for precision. -
Address the upper section:
If your design includes the upper frieze (the top section near the ceiling), paint the alternate stripes in the Greige/Taupe color. This mimics a decorative cornice or frieze detail often found in older homes. -
Apply a second coat:
Let the first coat set for the time recommended on the can, then apply a second coat to ensure rich, opaque color coverage, especially for the darker terracotta stripes. -
Remove tape while wet:
Here is the moment of truth: Carefully peel off the painter’s tape while the final coat is still slightly tacky. Pull the tape slowly at a 45-degree angle away from the painted edge to ensure a sharp line.
Level Up: Texture
For a luxe finish, use a matte paint for the base wall color and a satin or semi-gloss finish for the vertical stripes. The subtle sheen difference adds depth.
Step 4: Finishing Touches
-
Add separation molding (Optional):
If you want a true 3D architectural effect, install a simple flat molding strip or chair rail over the horizontal line where the top and bottom stripe patterns meet. Paint it white to match the base. -
Paint the divider (Alternative):
If not using wood molding, tape off a thin horizontal line where the two sections meet and paint it white to simulate a rail, cleaning up any unevenness where the vertical stripes meet. -
Touch up:
Inspect your lines once dry. If any bleed-through occurred, use a tiny artist’s brush and the base color to carefully tidy up the edges. -
Replace hardware:
Once the paint is fully cured (usually 24 hours), screw the electrical covers back into place.
Step back and admire how this simple technique has given your walls new height and permanent character

PENCIL GUIDE
Understanding Pencil Grades from H to B
From first sketch to finished drawing — learn pencil grades, line control, and shading techniques.
Explore the Full Guide
Venetian Plaster for Polished Depth
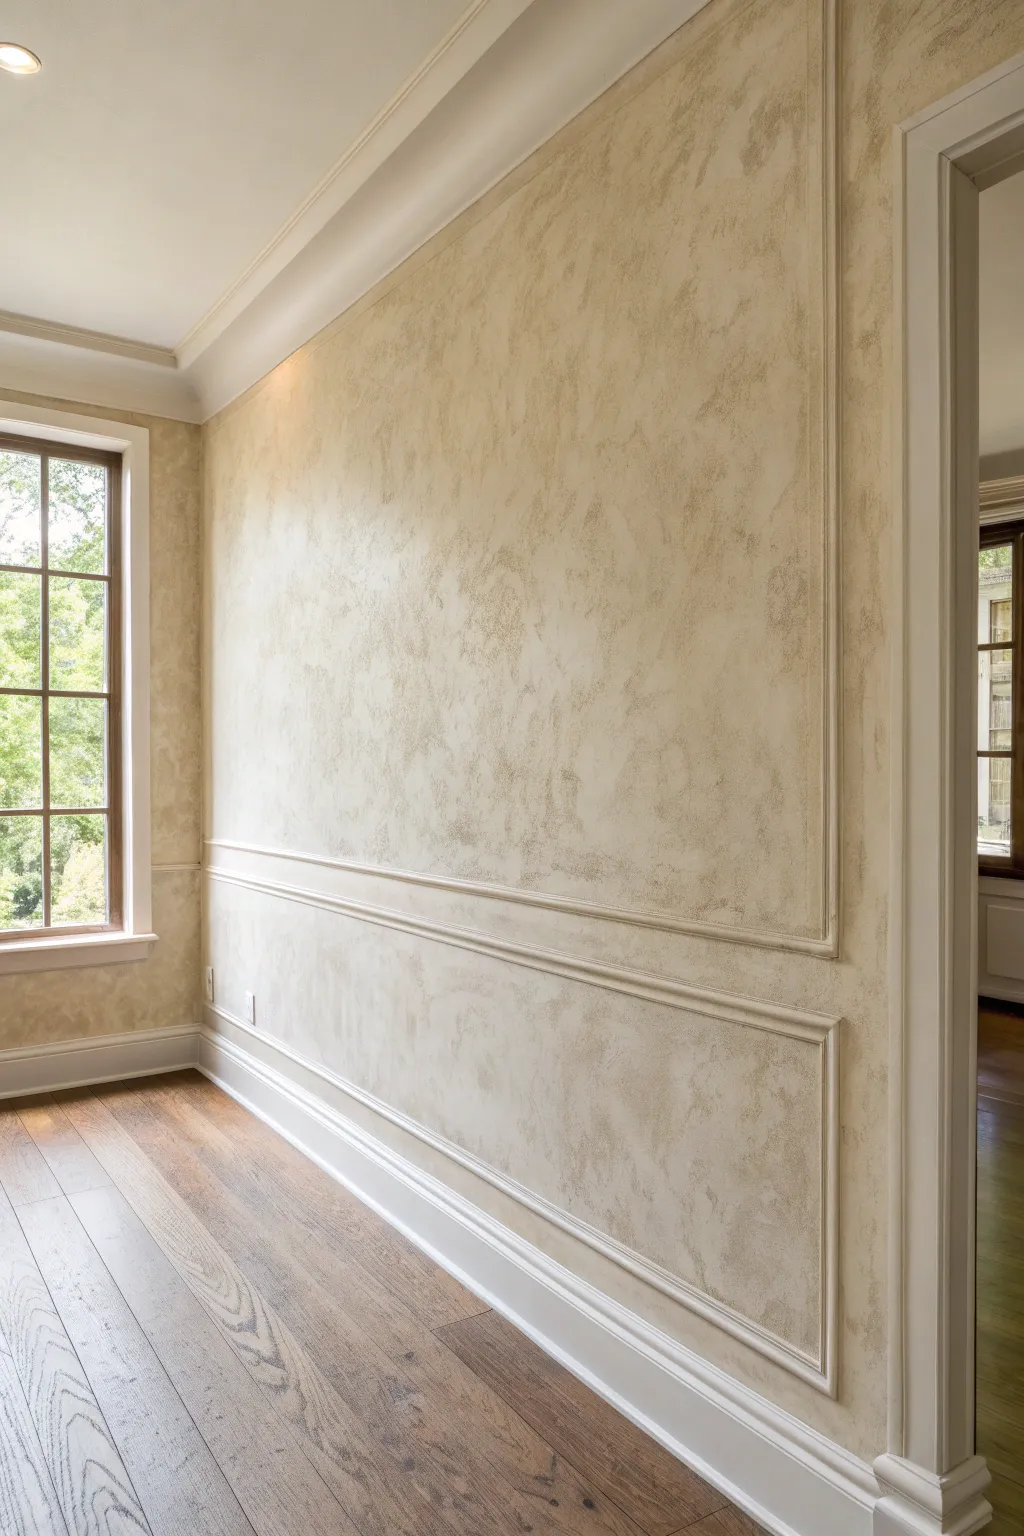
Transform a plain wall into a dimensional masterpiece reminiscent of Italian villas using this layered glazing technique. The result is a sophisticated, cloudy texture that adds depth and warmth without the intense labor of true lime plaster.
Step-by-Step Tutorial
Materials
- Latex glaze extender (clear)
- Satin latex paint (base color – creamy beige)
- Satin latex paint (glaze color – slightly darker tan/taupe)
- Painter’s tape (1.5 inch or wider)
- Panel molding trim
- Miter saw or miter box
- Construction adhesive
- Brad nailer and 1-inch brads
- Caulk (paintable)
- Lint-free cotton rags (t-shirt material)
- Sea sponge (natural)
- 2-inch angled sash brush
- Paint tray and liners
- Roller frame and cover (3/8 inch nap)
- Bucket for mixing
Step 1: Wall Prep & Base Coat
-
Clean surfaces:
Begin by thoroughly cleaning the walls with a mild detergent solution to remove any dust or grease, ensuring the glaze will adhere properly. -
Apply base color:
Cut in the edges and then roll on your base coat of creamy beige satin paint. This lighter color will peek through the clouds of the glaze. -
Second coat application:
Once the first coat is dry, apply a second coat for solid, even coverage. Let this cure for fully 24 hours before glazing. -
Plan the molding layout:
Before glazing, use a pencil and level to lightly mark where your decorative panel molding frames will sit. I find it helpful to tape these shapes out just to visualize the proportions.
Step 2: Creating the Glaze Effect
-
Mix the glaze:
In a bucket, mix 1 part of your darker tan paint with 4 parts clear glaze extender. Stir gently to avoid creating bubbles. -
Wet the sponge:
Soak your sea sponge in water and wring it out completely so it is damp but not dripping. This prevents the sponge from soaking up too much valuable glaze. -
Apply glaze patches:
Dip the sponge into the glaze mixture and dab it onto the wall in random, organic cloud shapes, working in a section about 3 feet by 3 feet. -
Soften the texture:
Immediately take a damp, lint-free rag bunched into a ball and blot the wet glaze. Twist your wrist as you blot to soften the edges and blend the clouds into the base coat. -
Feather the edges:
Leave the outer edges of your working section rough and feathered. This prevents hard ‘lines’ from forming when you move to the next adjacent patch. -
Check your work:
Step back frequently to ensure the texture looks random and balanced, not like a repeating stamp pattern. -
Continue the process:
Work across the entire wall, blending new wet glaze into the feathered edges of the previous sections until the main surface is covered.
Fixing “Heavy” Spots
If a spot looks too dark or blob-like, simply dab a clean rag into your original base coat paint and lightly sponge it over the dark area to knock it back.
Step 3: Installing Architectural Trim
-
Cut the molding:
Using the measurements marked earlier, cut your panel molding strips at 45-degree angles using a miter saw. -
Adhere the frame:
Apply a bead of construction adhesive to the back of the first molding piece and press it onto your marked line. -
Secure with nails:
Use a brad nailer to tack the trim into place, aiming for studs where possible or angling nails to grip the drywall. -
Complete the boxes:
Install the remaining sides of your frame, ensuring corners meet tightly. Repeat for the lower wainscoting section. -
Caulk the gaps:
Run a thin bead of printable caulk along the edges where the trim meets the wall and inside the mitered corners. -
Wipe clean:
Smooth the caulk line with a damp finger or rag instantly for a seamless professional look. -
Paint the trim:
Using a small angled brush, carefully paint the trim molding. You can match the base wall color for a subtle look or choose a crisp white to make the frame pop. -
Final glaze touch-up:
If the trim installation left any marks, lightly dab a tiny bit of glaze near the molding edges to blend everything together seamlessly.
Add Metallic Shimmer
For a truly luxurious finish, mix a small amount of pearlized metallic paint into your clear glaze. It catches the light subtly for a rich, velvety glow.
Enjoy the deep, sophisticated atmosphere your new textured walls bring to the room
Plaster Relief for Sculptural Patterns
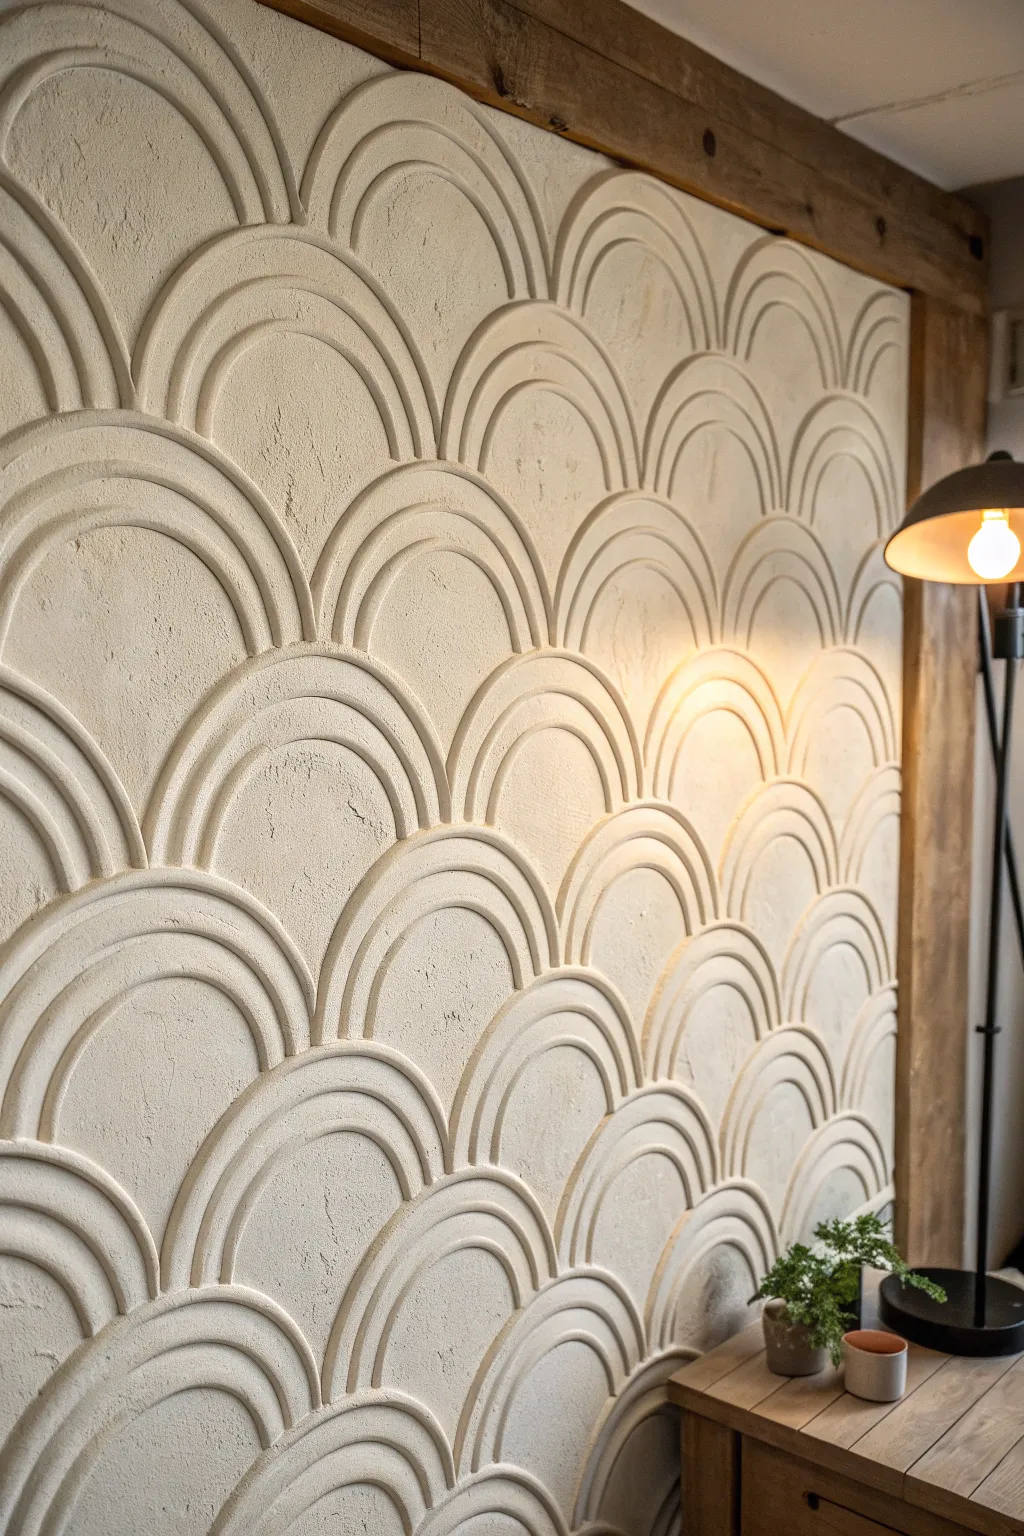
Transform a plain wall into a textural masterpiece with this elegant plaster relief technique. By creating repeating arched scallops, you achieve a sense of movement and shadow that mimics classic Art Deco patterns with a rustic, handmade twist.
Step-by-Step
Materials
- Joint compound or Venetian plaster
- Large bucket for mixing
- Drill with mixing paddle attachment
- Wide putty knife or trowel
- Cardboard or thin plastic sheet (for template)
- Pencil
- Painter’s tape
- Flexible intricate trowel or custom contour tool
- Sanding sponge (medium grit)
- Primer and sealer
- Laser level
Step 1: Preparation & Layout
-
Prepare the surface:
Begin by ensuring your wall is clean, dry, and free of dust. If the wall has a glossy finish, scuff sand it lightly to help the plaster adhere better, then wipe it down with a damp cloth. -
Cover the work area:
Protect your floors and adjacent woodwork with painter’s tape and drop cloths. Plaster work can get messy, and dried compound is difficult to remove from wooden floorboards. -
Create a scallop guide:
Cut a semi-circle template out of sturdy cardboard or a thin plastic sheet. The diameter of the semi-circle determines the size of your scallops; around 10-12 inches wide works well for a statement wall. -
Mark the grid:
Use a laser level to project a straight horizontal line across the bottom of your wall. Trace your template lightly with a pencil in a repeating row to establish your spacing. -
Mark subsequent rows:
For the second row, offset the pattern so the peak of the new scallop sits directly above the valley between the two scallops below it. Continue marking up the wall until you have a faint grid to follow.
Cracking Under Pressure?
If hairline cracks appear as the thick plaster dries, don’t panic. Mix a tiny amount of fresh compound with a drop of water and smooth it into the cracks with your finger, then lightly sand once dry.
Step 2: Applying the Relief
-
Mix the compound:
Mix your joint compound or plaster with a drill paddle until it reaches a consistency similar to peanut butter—thick enough to hold a shape but smooth enough to spread easily. -
Apply the base layer for the first row:
Working on one arched section at a time, apply a thick layer of compound (about 1/4 to 1/2 inch thick) within your pencil guidelines using a wide putty knife. -
Sculpt the ridges:
To create the distinct concentric ridges, I prefer to use a notched trowel or a custom-cut piece of plastic with teeth. Drag this tool through the wet plaster in an arching motion to carve the relief lines. -
Refine the shape:
Immediately smooth out any jagged peaks with a wet finger or a small, clean brush. The goal is soft, rounded ridges, not sharp spikes. -
Complete the first row:
Move to the next marked semi-circle and repeat the process. Ensure the edges of adjacent scallops touch but don’t heavily overlap, keeping the definition clear. -
Work upwards:
Once the bottom row is complete, move to the offset row above. Be careful not to bump the wet plaster below as you work your way up the wall. -
Manage the drying time:
This is a slow process, so only mix enough plaster for about an hour of work. If the plaster starts to set in the bucket, discard it and mix a fresh batch rather than adding water.
Add Metallic Age
Once painted, lightly dry-brush the highest ridges with a metallic bronze or gold wax. This subtle highlight catches the light and mimics the look of an ancient, gilded relief sculpture.
Step 3: Refinement & Finishing
-
Allow to cure:
Let the wall dry completely. Depending on humidity and the thickness of your relief, this can take 24 to 48 hours. The plaster will turn a uniform pale white when fully dry. -
Sand the high spots:
Gently run a medium-grit sanding sponge over the surface to knock down any dangerously sharp ridges or crumbs. Do not over-sand, as you want to preserve the sculptural depth. -
Clean the dust:
Vacuum the wall carefully with a brush attachment to remove plaster dust from the grooves. Dust left behind will ruin your paint finish. -
Prime the surface:
Seal the porous plaster with a high-quality primer. This is crucial; raw compound sucks up paint unevenly, so a good sealer ensures a consistent sheen. -
Paint or glaze:
Apply your final paint color. A matte or eggshell finish looks best to emphasize shadow. Alternatively, apply a diluted glaze over the dried paint and wipe it back to fake an aged, limestone look.
Step back and admire how light plays across the ridges, bringing a timeless architectural elegance to your room


Geometric Molding for a Modern Statement
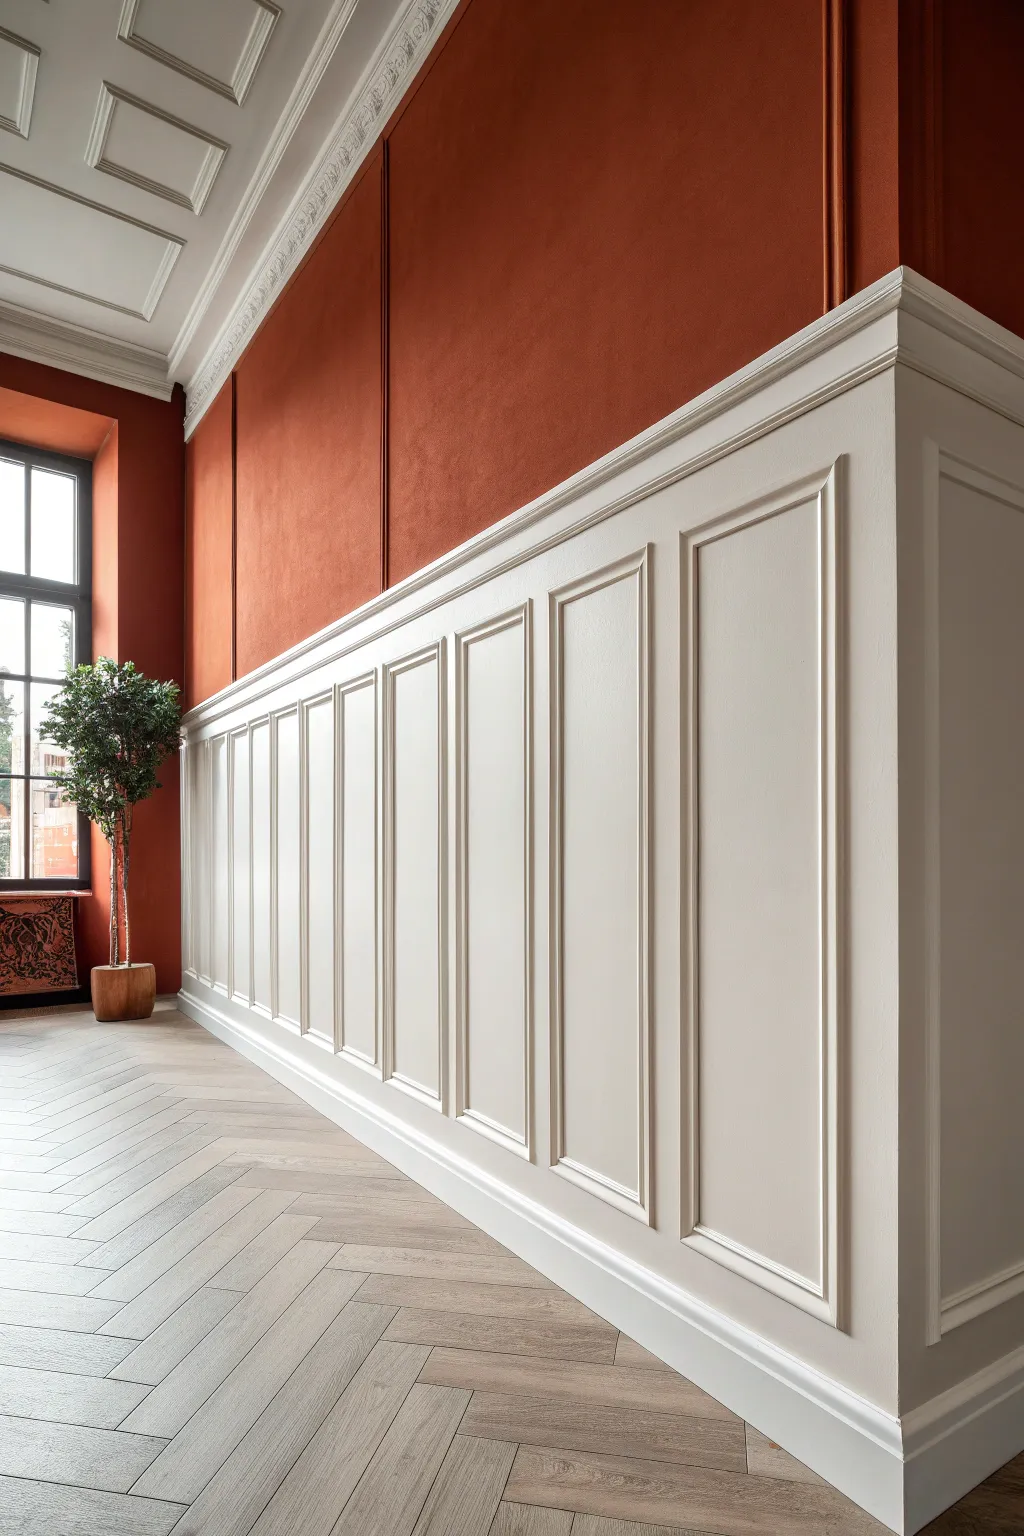
Transform a plain wall into a sophisticated architectural feature by combining bold color with crisp, geometric wainscoting. This project marries traditional panel molding with a modern, high-contrast palette to add depth and elegance to any room.
Detailed Instructions
Materials
- 1×4 primed pine or MDF (for top rail and stiles)
- 1×6 primed pine or MDF (for baseboard)
- Panel molding trim (small profile)
- Chair rail molding (with a cap lip)
- Deep rust/terracotta interior paint (eggshell or satin)
- Crisp white semi-gloss paint
- Construction adhesive (e.g., Liquid Nails)
- 18-gauge brad nailer and nails
- Miter saw
- Laser level (or 4-foot spirit level)
- Wood filler and caulk gun
- Fine-grit sandpaper (220-grit)
- Paint rollers (microfiber) and sash brushes
- Painter’s tape
Step 1: Planning and Wall Prep
-
Measure and calculate:
Begin by determining the desired height of your wainscoting. A good rule of thumb is roughly one-third of the wall height, but for this dramatic look, aim slightly higher, around 36 to 42 inches from the floor. -
Establish the layout:
Measure the total length of the wall. Decide how many panels you want and ensure they are evenly spaced. Sketch this out on paper first, calculating the width of the ‘stiles’ (the vertical flat boards) versus the open panel spaces. -
Mark the wall:
Using a laser level or a long spirit level, draw a clear horizontal line across the entire length of the wall at your chosen top height. This line represents the top of the rail. -
Paint the upper wall:
Before installing any wood, paint the upper portion of the wall with your deep rust color. It’s much easier to cut in a straight line now and cover the overlap with trim later than to paint precisely around installed molding.
Spacer Block Trick
Cut a scrap piece of wood to the exact width needed between your stiles and the inner molding. Use this as a spacer while nailing to guarantee perfectly centered rectangles every time.
Step 2: Installing the Framework
-
Install the baseboard:
Remove existing baseboards if necessary. Install the 1×6 boards along the floor first, securing them into the studs with construction adhesive and brad nails. -
Attach the top rail:
Install the horizontal 1×4 board along your marked level line. Apply adhesive to the back, press it firmly against the wall, and nail it into the studs. -
Mount the vertical stiles:
Cut your 1×4 vertical boards to fit snugly between the top rail and the baseboard. Use the spacing measurements from your sketch. Install them using adhesive and crisscross nailing to secure them to the drywall if studs aren’t available at every interval.
Step 3: Adding Detail and Finishing
-
Install interior molding:
This is where the magic happens. Cut your panel molding trim with 45-degree miters to create ‘picture frames’ inside each rectangular recess. I like to cut a small spacer block of wood to ensure every molding piece is positioned exactly the same distance from the stile edges. -
Secure the inner frames:
Glue and pin nail the molding rectangles into place. Use shorter nails here so they don’t blow through the drywall entirely. -
Add the cap rail:
Install the chair rail molding on top of the 1×4 horizontal rail. This cap piece adds a finished, ledge-like look and hides the top edge of the board. -
Fill and sand:
Fill every nail hole with wood filler and let it dry. Sand the filler flush. Run a bead of paintable caulk along every seam where wood meets wood or wood meets wall to create a seamless, built-in appearance. -
Prime the woodwork:
Apply a high-quality primer to all the wood and the exposed drywall sections inside the frames. This ensures the texture of the wall and the wood blend together uniformly. -
Apply the finish coat:
Paint the entire lower section—baseboards, rails, stiles, and inner drywall—with crisp white semi-gloss paint. Two thin coats are better than one thick one for a durable finish. -
Clean up edges:
If necessary, do a final touch-up of the rust paint where it meets the top of the white cap rail for a razor-sharp transition line.
Dealing with Outlets
If a stile lands on an electrical outlet, adjust your layout slightly left or right. If unavoidable, use a jigsaw to notch the molding and install box extenders so the plate sits flush.
Step back and admire how the crisp white woodwork frames your room against that warm, dramatic color
Wall Mural That Acts Like a Giant Painting
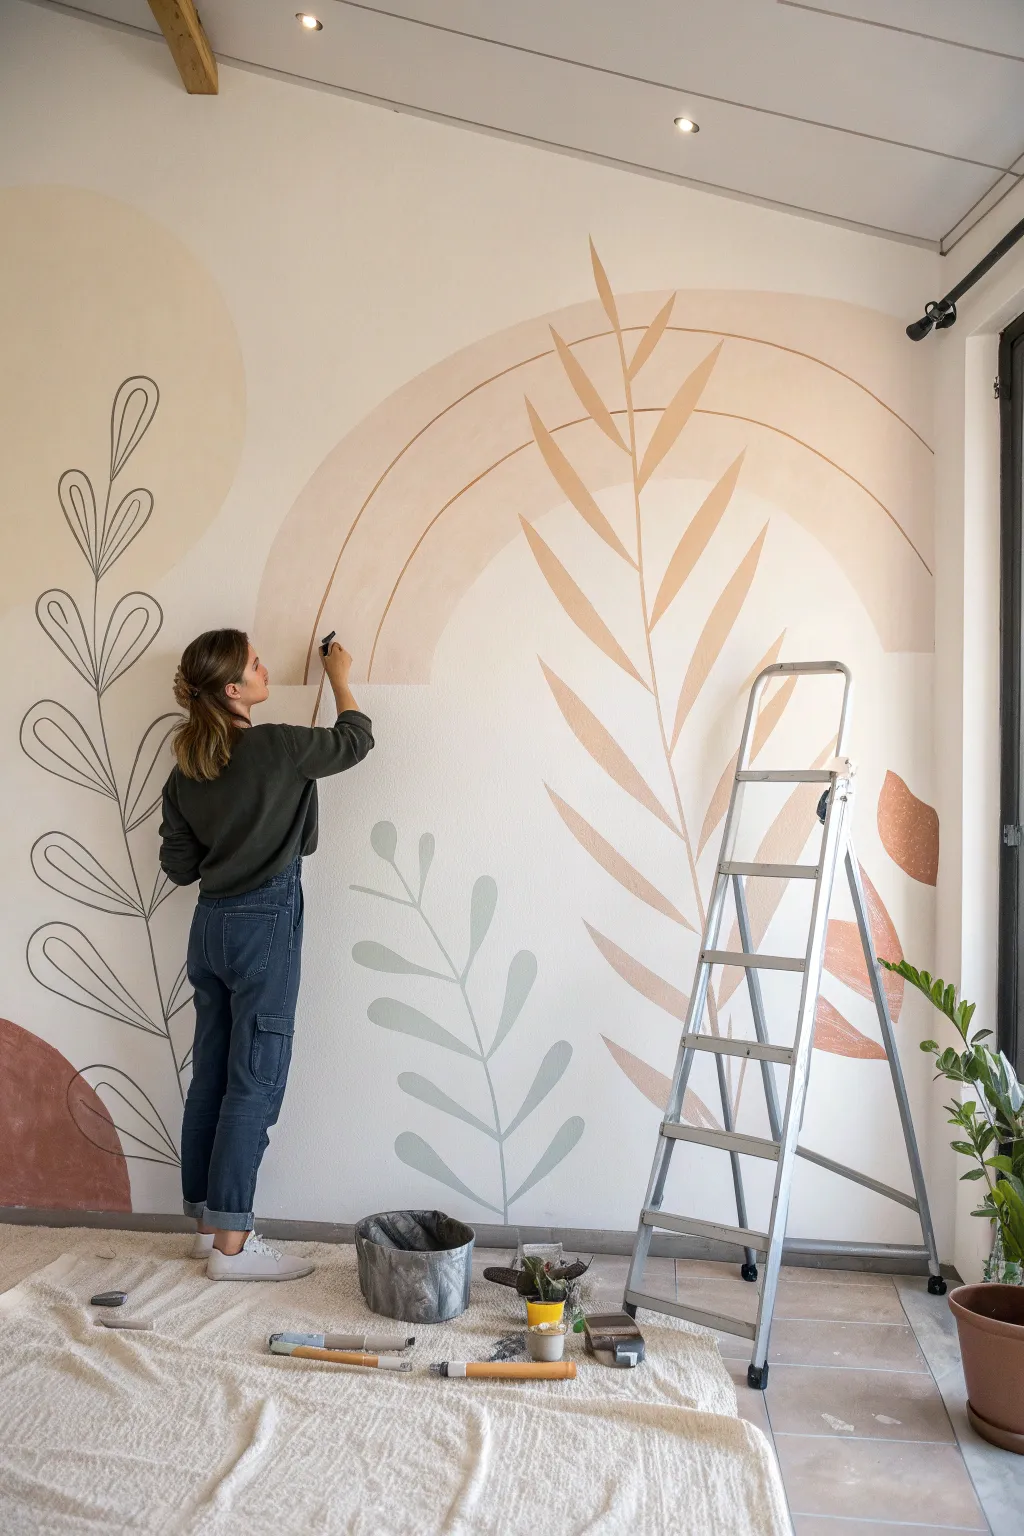
Transform a blank wall into a serene focal point with this large-scale mural featuring organic shapes, oversized leaves, and soothing earth tones. This project combines the freedom of abstract art with structured botanical line work, creating a piece that feels both modern and relaxing.
Step-by-Step Tutorial
Materials
- Interior latex paint (Eggshell finish)
- Colors: Terracotta, Beige/Sand, Sage Green, Charcoal Grey, White (for blending)
- Pencil and large eraser
- Painter’s tape
- Bubble level or laser level
- Angled sash brush (2-inch)
- Small round artist brushes (sizes 4 and 8)
- Flat artist brush (1-inch)
- String and push pin (for arches)
- Drop cloth
- Small paint rollers and tray
- Ladder or step stool
Step 1: Planning and Sketching
-
Prepare the Surface:
Begin by ensuring your wall is clean, dry, and free of dust. If you are painting over a dark color, apply a coat of primer first to ensure your subtle earth tones pop correctly. -
Map Out the Layout:
Stand back and visualize the three main elements: the large abstract circles, the overarching rainbow arches, and the botanical leaves. Lightly mark center points for each major shape with a pencil. -
Draw the Arches:
To create the perfect large arch, use the string method. Tie a string to a pencil, pin the other end to the wall at the center point of your arch base, and keep the string taut as you guide the pencil in a semi-circle. -
Sketch the Botanicals:
Freehand the large leaf shapes. For the grey line-art plant on the left, simply draw a central stem line and mark where leaves will go. For the filled-in leaves, sketch the outer perimeter lightly. -
Refine the Lines:
Step back frequently to check proportions. The beauty of this mural is in its organic feel, so don’t worry if lines aren’t mathematically perfect, but make sure the composition feels balanced.
Clean Curves
For crisp lines on your arches without tape, load your brush moderately and press it flat against the wall, dragging it slowly alongside your pencil line rather than trying to paint ‘on’ it.
Step 2: Painting the Solid Shapes
-
Paint the Large Base Shapes:
Start with the solid, filled-in areas first. Use a small roller or a 2-inch angled brush to fill in the large beige circle on the top left and the terracotta semi-circle at the bottom left. -
Fill the Leaf Shapes:
Mix a soft leafy/orange tone for the large central branch. Using an angled brush, carefully cut in the edges of the leaves first, then fill the centers. I find painting in the direction of the leaf vein helps create a nice texture. -
Paint the Sage Leaves:
Move to the bottom center plant. Using a sage green paint, fill in these rounded leaf shapes. Use a smaller flat artist brush for the tips to keep them sharp. -
Create the Arch:
Paint the large beige rainbow arch. Use the string method again if you need to guide your brush, or trust your confident hand painting along your pencil lines. Apply two coats if necessary for solid coverage.
Add Texture
Mix baking soda or plaster of paris into your paint for specific leaves to give the mural a raised, tactile plaster effect that adds depth and looks high-end.
Step 3: Detail Work and Lines
-
Paint the Line Art Stem:
Mix a dark charcoal grey paint. Using a size 4 round artist brush with a steady hand, paint the long central stem of the plant on the left side. -
Add the Line Art Leaves:
Continue with the grey paint to create the looped, open leaf shapes. Keep your pressure consistent on the brush to maintain an even line width throughout the strokes. -
Add Arch Details:
Once the main beige arch is dry, switch back to a small round brush. Paint the thin, darker terracotta curved line that sits inside the main arch. A steady hand or a ‘pinky rest’ on the dry wall helps here. -
Touch Ups:
Inspect the edges where shapes overlap or come close to the white background. Use a small brush with your wall’s original white paint to clean up any smudges or wobble marks. -
Erase Visible Marks:
After the paint is fully dry (give it at least 24 hours to be safe), gently use a large eraser to remove any visible pencil guidelines that weren’t covered by paint.
Step back and admire how a few simple shapes and colors have completely redefined the atmosphere of your room.


Have a question or want to share your own experience? I'd love to hear from you in the comments below!