I’m obsessed with how a warty pumpkin turns “imperfections” into instant personality, and paint can make those bumps look even more dramatic. Here are my favorite warty pumpkin painting ideas, from classic shading that celebrates natural texture to hands-on ways to build your own raised warts on a smooth pumpkin.
Classic Dry-Brush Highlights on Natural Warts
This project focuses on elevating a natural warty pumpkin into a piece of rustic art by accentuating its unique texture. Using dry-brushing techniques, you will gently highlight the bumps and ridges to create a sophisticated, muted autumn centerpiece.
Step-by-Step Tutorial
Materials
- A medium-sized warty pumpkin (Variegated or Knucklehead variety)
- Acrylic paint (Cream or Antique White)
- Acrylic paint (Sage Green)
- Acrylic paint (Burnt Umber)
- Matte finishing spray (optional)
- Small flat synthetic brush (size 4 or 6)
- Detail round brush (size 1)
- Paper towels
- Palette or small plate
- Water cup
Step 1: Preparation & Cleaning
-
Clean the Surface:
Begin by gently washing your pumpkin with a damp cloth to remove any field dirt. Use a soft toothbrush if dirt is trapped between the warts, but be careful not to scrub away the natural skin colors. -
Dry Completely:
Let the pumpkin air dry fully or towel it off. The surface needs to be completely moisture-free for the dry-brushing technique to adhere properly without smudging. -
Plan Your Palette:
Squeeze a dime-sized amount of Cream, Sage Green, and Burnt Umber onto your palette. You won’t need much paint since we are working with very thin, sheer layers.
Clean Brushes Matter
For effective dry brushing, your brush must be bone dry before you start. If you wash it between colors, squeeze it aggressively in a paper towel or use a hairdryer on cool.
Step 2: Base Enhancement
-
Load the Brush:
Take your flat brush and dip just the tip into the Cream paint. Immediately wipe 90% of the paint off onto a paper towel until the brush looks almost clean. -
Test the Stroke:
Test your dry brush on a scrap piece of paper or the bottom of the pumpkin. You want a faint, dusty scratchy mark, not a solid glob of color. -
Highlight the Warts:
Gently sweep the brush over the raised warts on the orange sections of the pumpkin. Keep the brush moving quickly and lightly, just catching the very tops of the bumps. -
Build Slowly:
Do a second pass on the largest warts. The goal is to make them look like they are catching the light, bringing out that skeletal, bone-like color against the orange skin. -
Soften the Edges:
If you accidentally apply too much paint, quickly use a clean, slightly damp finger to smudge and blend it into the natural pumpkin skin before it dries.
Gilded Glamour
Swap the cream paint for a metallic antique gold or copper. Dry brushing gold solely on the tips of the warts creates a chic, high-end look perfect for a dining table centerpiece.
Step 3: Defining the Stripes
-
Enhance Green Zones:
Switch to a clean flat brush or wash and thoroughly dry your previous one. Pick up a tiny amount of Sage Green and offload most of it onto the towel. -
Feather the Valleys:
Identify the natural green depressed vertical lines (ribs) of the pumpkin. Lightly feather the Sage Green paint into these valleys to deepen the color contrast. -
Check the Transition:
Allow the green dry-brushing to fade naturally as it nears the orange sections. I like to keep this transition rough and organic rather than painting a straight line. -
Shadow Work:
Mix a tiny dot of Burnt Umber with your Sage Green. Use the detail round brush to darken the deepest crevices right next to the largest warts for added visual depth.
Step 4: Stem & Finish
-
The Stem Base:
Using the dark green/brown mix, paint a thin wash around the very base of the stem where it meets the pumpkin shoulder to ground it visually. -
Dry Brush the Stem:
Return to your Cream paint and flat brush. Lightly dust the ridges of the stem itself to coordinate it with the highlighted warts. -
Final Assessment:
Step back from the pumpkin. Look for any warts that seem too flat and give them one last tiny dot of Cream highlight on the very peak. -
Optional Sealing:
If you plan to keep the pumpkin on a porch, give it a light misting of matte finishing spray to protect your paint work from humidity.
Now you have a beautifully textured piece of seasonal decor that highlights nature’s imperfections perfectly


Dark Wash to Deepen Every Crevice
Achieve a hyper-realistic look with this acrylic painting tutorial that focuses on texture and depth. You will learn to capture the subtle interplay of light on warty surfaces and use dark washes to emphasize the pumpkin’s deep ribs.
Step-by-Step Guide
Materials
- Heavy body acrylic paints (Titanium White, Yellow Ochre, Burnt Umber, Raw Sienna, Burnt Sienna, Unbleached Titanium)
- Glazing medium
- Canvas or gessoed panel (8×10 or similar)
- Round brushes (sizes 2, 4, and 6)
- Detail liner brush (size 00)
- Flat shader brush (size 8)
- Palette knife
- Water container and paper towels
Step 1: Base Structure and Blocking
-
Sketch the Form:
Begin by lightly sketching the pumpkin contour on your canvas using thinned Burnt Umber. Focus on the deep indentations of the ribs and the scattered placement of the ‘warts’ or bumps across the surface. -
Mix the Base Tone:
Create a warm, pale base color by mixing Titanium White with a small amount of Yellow Ochre and a touch of Unbleached Titanium. This should be an off-white, creamy hue. -
Apply the Underpainting:
With the #6 round brush, block in the entire pumpkin shape with your base mixture, avoiding the stem area. Don’t worry about perfect smoothness; some brush texture helps build the organic feel later. -
Define the Ribs:
While the base is still slightly tacky, mix Burnt Umber with a tiny bit of glazing medium. Use the #4 brush to paint stripes where the deep crevices between the pumpkin ribs lie. Feather the edges slightly so they aren’t harsh lines.
Step 2: Building Texture and Warts
-
Establish Wart Positions:
Using a slightly thicker mixture of Unbleached Titanium and Yellow Ochre, dab small, raised spots onto the pumpkin surface where you sketched the warts. Let the paint pile up physically to create real texture. -
Deepen the Crevices:
This is where the ‘Dark Wash’ technique shines. Mix Burnt Umber with a generous amount of glazing medium to create a transparent dark wash. Run this carefully along the rib lines, allowing it to pool slightly in the deepest parts. -
Shadowing the Warts:
With your size 2 brush and a mix of Raw Sienna and Burnt Umber, paint a crescent-shaped shadow on the bottom right side of each individual wart. This simple step instantly makes them pop 3D. -
Highlighting the Warts:
Clean your brush and pick up pure Titanium White. Dot a tiny highlight on the top left of each wart, opposite your shadow. This establishes the light source coming from the upper left. -
Adding Surface Noise:
For that speckled, organic skin look, splatter a very thinned Raw Sienna over the pumpkin using an old toothbrush or by flicking a stiff brush. Keep this subtle.
Pro Tip: Physical Texture
Mix modeling paste into your acrylic paint for the warts. This creates actual raised bumps on the canvas that catch the light naturally.
Step 3: The Stem and Final Details
-
Base Stem Color:
Paint the stem shape using a mix of Burnt Umber and a touch of Olive Green (or mix yellow and black to get a dark green-brown). Ensure the base of the stem flares out onto the pumpkin shoulders. -
Stem Striations:
Use the liner brush with a lighter mix of Yellow Ochre and White to paint thin, vertical lines up the stem, following its curve. This mimics the woody, fibrous texture. -
Deepening Stem Shadows:
Apply a dark wash of pure Burnt Umber into the grooves of the stem and right where the stem meets the pumpkin body to anchor it firmly. -
Refining the Rib Shadows:
Go back to your main pumpkin ribs. If the dark wash has dried too light, apply a second layer of the Burnt Umber glaze to truly deepen those crevices. -
Final Highlights:
I like to take a dry flat brush with a tiny amount of Titanium White and lightly drag it over the highest points of the pumpkin ribs (between the warts) to indicate the skin’s sheen. -
Cast Shadows:
To ground the subject, paint a soft shadow underneath the pumpkin using a transparent wash of Burnt Umber and a tiny touch of Blue or Purple to cool it down.
Troubleshooting: Muddy Colors
If your shadows look muddy, let the previous layer dry completely before glazing. Wet-on-wet dark washes can accidentally blend into gray slush.
Allow the painting to cure fully before adding a satin varnish to unify the sheen of the textured warts and smooth skin


Two-Tone Pumpkin With Contrasting Bump Color
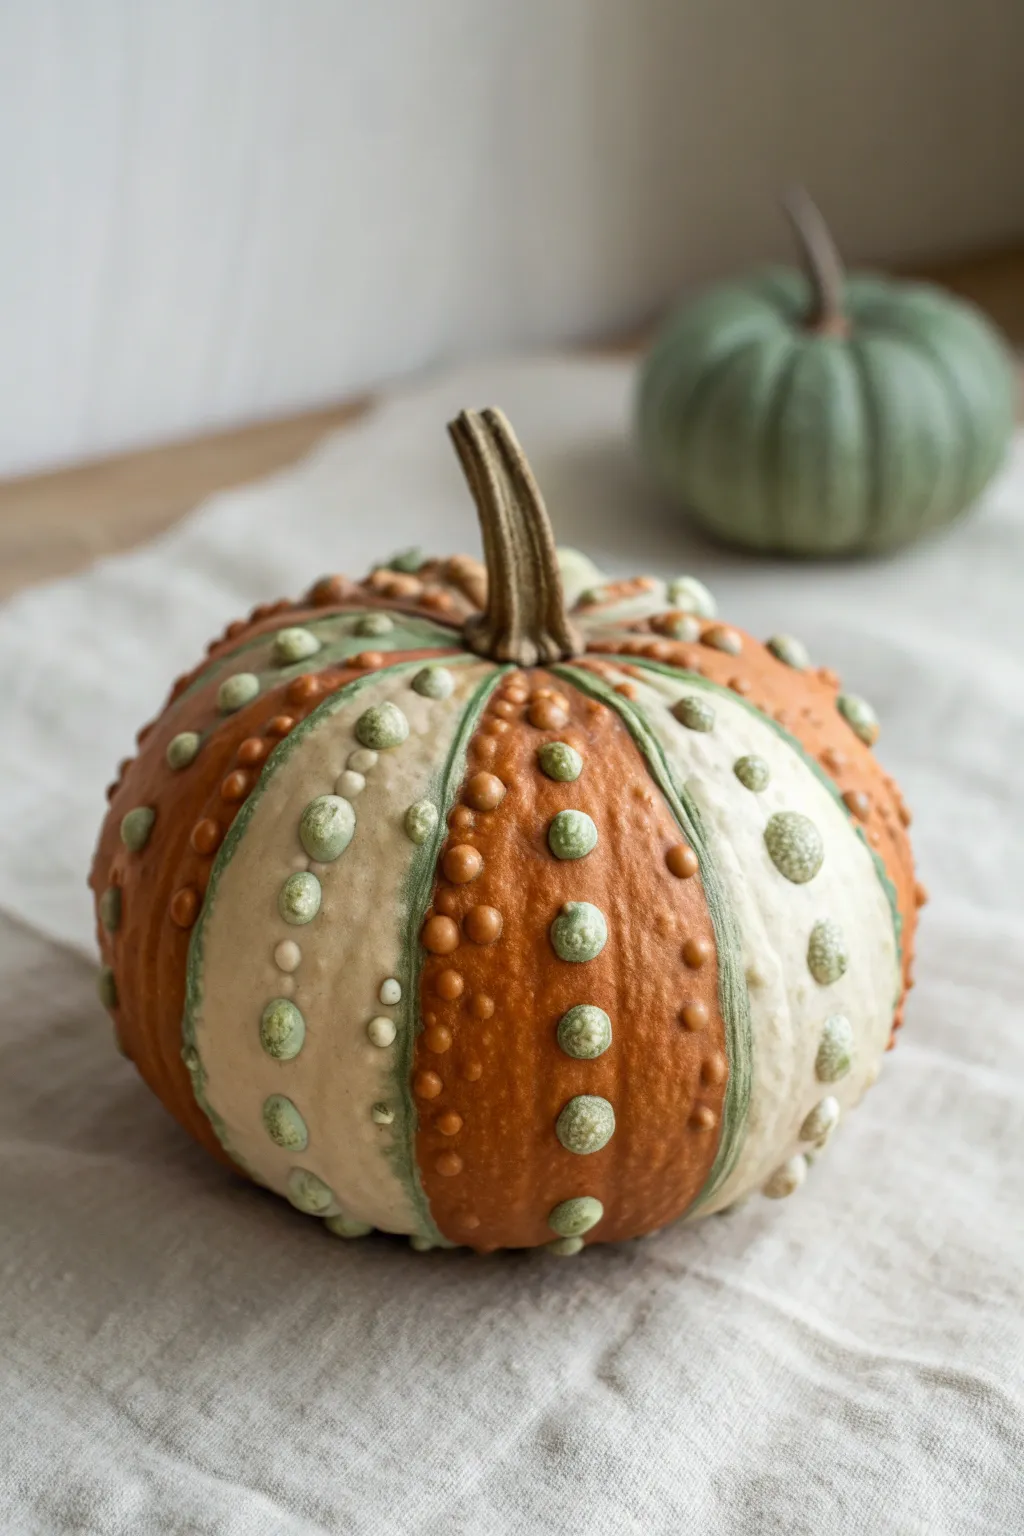
Transform a naturally bumpy pumpkin into a striking centerpiece with this meticulous two-tone painting technique. By highlighting the alternating ribbed sections with contrasting cream and orange hues, and carefully accentuating each wart, you create a sophisticated, textured look that celebrates imperfections.
How-To Guide
Materials
- A medium-sized warty pumpkin (knucklehead variety works best)
- Acrylic craft paints: Burnt Orange, Cream/Antique White, Sage Green
- Medium flat brush (for base stripes)
- Small round detail brush (size 2 or 4)
- Very fine liner brush (size 0 or 00)
- Paper towels
- Water cup
- Palette or paper plate
- Clear matte acrylic sealer spray (optional)
Step 1: Preparation & Base Coating
-
Clean surface:
Begin by thoroughly wiping down your pumpkin with a damp cloth to remove any dirt or field dust. Pay special attention to the crevices around the warts. Let it dry completely before painting. -
Plan your stripes:
Look at the natural vertical ribs of the pumpkin. Decide which sections will be orange and which will be cream. An alternating A-B pattern works best to create visual interest. -
Paint cream sections:
Using your medium flat brush, paint every other vertical section with the Cream or Antique White paint. Don’t worry about being perfectly neat near the edges just yet, but try to avoid painting heavily over the largest warts if you can. -
Apply second coat:
Cream paint often requires a second layer to be fully opaque. Once the first layer is dry to the touch, apply a second coat to ensure a solid, rich color. -
Paint orange sections:
Switch to a clean flat brush and fill in the remaining alternating sections with Burnt Orange. Like the cream sections, you may need two coats to cover the dark pumpkin skin completely.
Uneven Coverage?
If the paint streaks or pulls off previous layers, let it dry COMPLETELY (at least 20 mins) before re-coating. Rushing creates clumps.
Step 2: Defining the Texture
-
Create the grooves:
To give the pumpkin dimension, use a small round brush loaded with Sage Green heavily diluted with a little water. Paint this along the deep vertical recessed lines (the ribs) that separate your orange and cream sections. -
Blend the edges:
If the green lines look too harsh, take a slightly damp, clean brush and gently feather the green paint outward into the colored sections. This creates a soft, shadowed transition rather than a strict stripe. -
Paint green warts on orange:
Now for the fun part: the warts. Using a small detail brush and undiluted Sage Green, carefully paint just the tops of the bumps located within the orange sections. -
Add dimension to green warts:
Allow the green warts to dry, then mix a tiny bit of cream into your green paint. I find adding a tiny dab of this lighter mix to the very top center of each green wart makes them look more three-dimensional. -
Paint warts on cream sections:
For the bumps located on the cream stripes, you have a choice. You can paint them green for uniformity, or keep them cream but shadow underneath them with a diluted gray-green wash to make them pop. -
Refine the small bumps:
Use your finest liner brush to tackle the tiniest nubs and imperfections. A light touch is key here; you just want to highlight the texture, not gloat the paint on.
Step 3: Stem & Finishing Touches
-
Base coat the stem:
Paint the entire stem with a mix of brown and a touch of the Sage Green paint. This ties the design together and covers any dried-out stem coloring. -
Dry brush highlights:
Dip a dry, stiff brush into a lighter tan or cream color. Wipe most of the paint off on a paper towel, then lightly drag the brush over the ridges of the stem to highlight its texture. -
Check for gaps:
Rotate your pumpkin slowly. Look for any spots where the original orange skin is peeking through unintentionally, especially around the base of the warts, and touch up with the appropriate background color. -
Seal (optional):
If you plan to display this outdoors or want a glossy finish, spray the entire pumpkin with a clear acrylic sealer. A matte finish looks most natural for this rustic style.
Level Up: Metallic Touch
Swap the sage green wart paint for a metallic gold or copper. It adds a glamorous, unexpected twist to the rustic texture.
Now you have a custom-painted pumpkin that perfectly highlights nature’s quirky textures


Matte Black Sculptural Warty Pumpkin
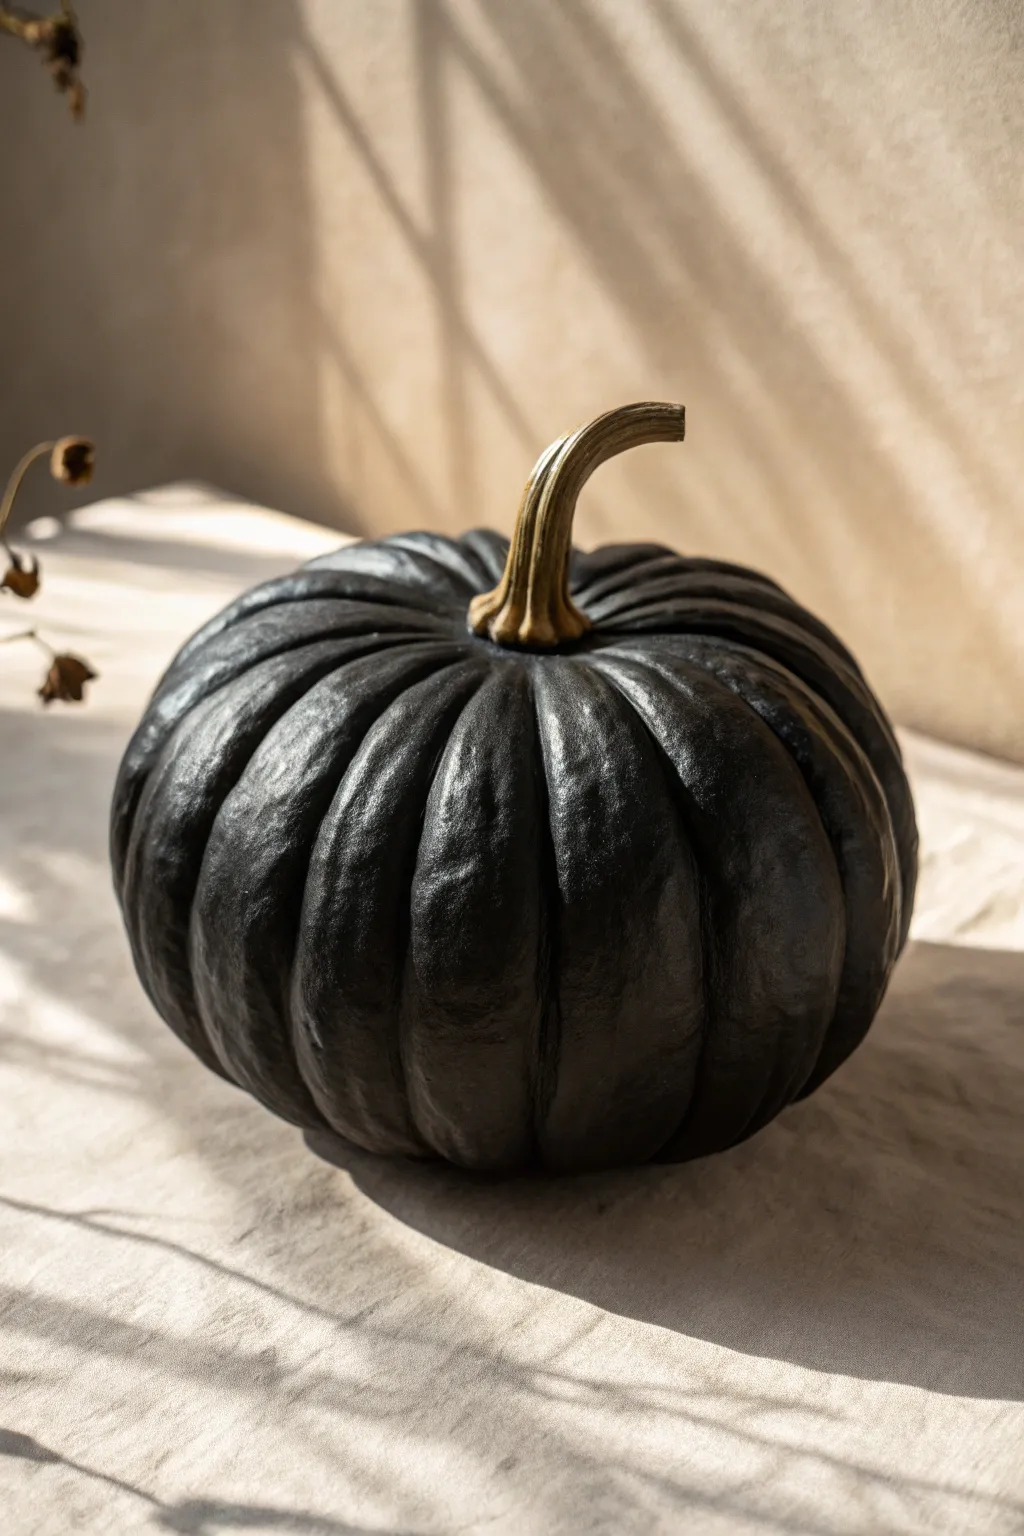
Transform an ordinary pumpkin into a piece of high-end sculptural decor with this sleek, matte black finish. This project relies on building subtle texture underneath the paint to give it a cast-iron or ceramic appearance, perfect for a minimalist autumn display.
Step-by-Step Tutorial
Materials
- Medium-sized pumpkin (real or faux)
- Matte black acrylic paint or chalk paint
- Gesso or texture paste (optional for smoothing)
- Wide flat synthetic brush
- Small round detail brush
- Matte spray sealer or varnish
- Antique gold or raw sienna acrylic paint (for the stem)
- Burnt umber acrylic paint (for stem shading)
- Fine-grit sandpaper
- Painter’s tape
Step 1: Preparation & Base Coat
-
Clean surface:
Begin by thoroughly wiping down your pumpkin with a damp cloth to remove any dirt or oils. If using a real pumpkin, ensure it is completely dry before proceeding. -
Protect the stem:
Use painter’s tape to carefully wrap the base of the stem where it meets the pumpkin flesh. This ensures a crisp line later, though we will be hand-painting the stem for realism. -
Light sanding:
If working with a faux pumpkin that has visible plastic seams, gently sand them down with fine-grit sandpaper until flush with the surface. -
Apply texture (optional):
For a more stone-like feel, stipple a thin layer of gesso over the pumpkin’s body. I find this creates a better ‘tooth’ for the matte paint to grip onto. -
First coat of black:
Load your wide flat brush with matte black paint. Apply the first coat using long, vertical strokes following the natural ribs of the pumpkin. Don’t worry about perfect coverage yet. -
Dry thoroughly:
Let this base coat dry completely. Matte paints dry quickly, but patience here prevents the next layer from lifting the previous one.
Uneven Sheen?
If your black paint dries patchy with shiny spots, a final spray of high-quality ‘dead flat’ varnish is the secret weapon to unify the finish.
Step 2: Building Depth & Finish
-
Second coat application:
Apply a second, thicker coat of matte black. Ensure you get the brush bristles into the deep crevices between the ribs. -
Stipple method:
While the second coat is wet, use a dry, clean brush to gently stipple (tap) the surface. This removes obvious brushstrokes and enhances the cast-iron look. -
Touch up crevices:
Inspect the deep grooves. Use a smaller round brush to fill any spots where the original orange or plastic color might be peeking through. -
Final black layer:
If necessary, add a third coat. The goal is an opaque, velvety finish that absorbs light rather than reflecting it. -
Remove tape:
Once the body paint is dry to the touch, carefully peel away the painter’s tape from the stem. -
Seal the body:
Spray the black section with a dead-flat matte varnish. This protects the finish and unifies the sheen, making it look truly ceramic.
Step 3: Realistic Stem Detailing
-
Base stem color:
Mix a small amount of raw sienna or antique gold with a drop of burnt umber. Paint the entire stem with this earthy, warm tone. -
Vertical grain lines:
Using your smallest detail brush and pure burnt umber, paint very thin, shaky vertical lines up the stem to mimic dried fiber grain. -
Add dimension:
Dilute a bit of black paint with water to make a glaze. Brush this deeply into the twisted crevices of the stem, then wipe the high points immediately with a paper towel. -
Dry brush highlights:
Take a tiny amount of the original light gold color on a dry brush and lightly whisk it over the raised ridges of the stem to make the texture pop. -
Final connection:
Carefully paint the very base of the stem where it meets the black body, ensuring a neat transition without blending the colors.
Level Up: Texture
Mix baking soda into your black acrylic paint before applying. This creates a gritty, stone-like texture that looks incredibly high-end.
Now you have a stunning architectural piece ready to anchor your seasonal vignette
BRUSH GUIDE
The Right Brush for Every Stroke
From clean lines to bold texture — master brush choice, stroke control, and essential techniques.
Explore the Full Guide
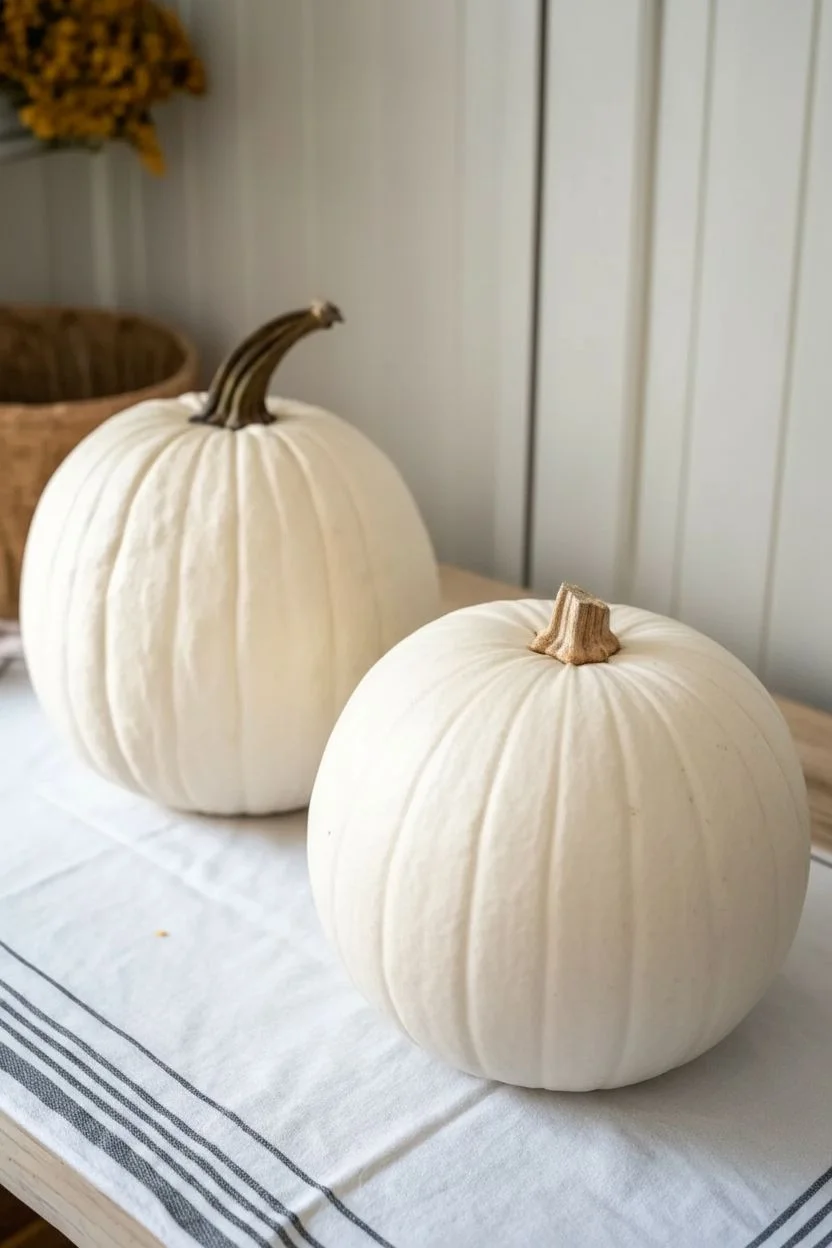
Soft Matte White With Shadowed Bumps

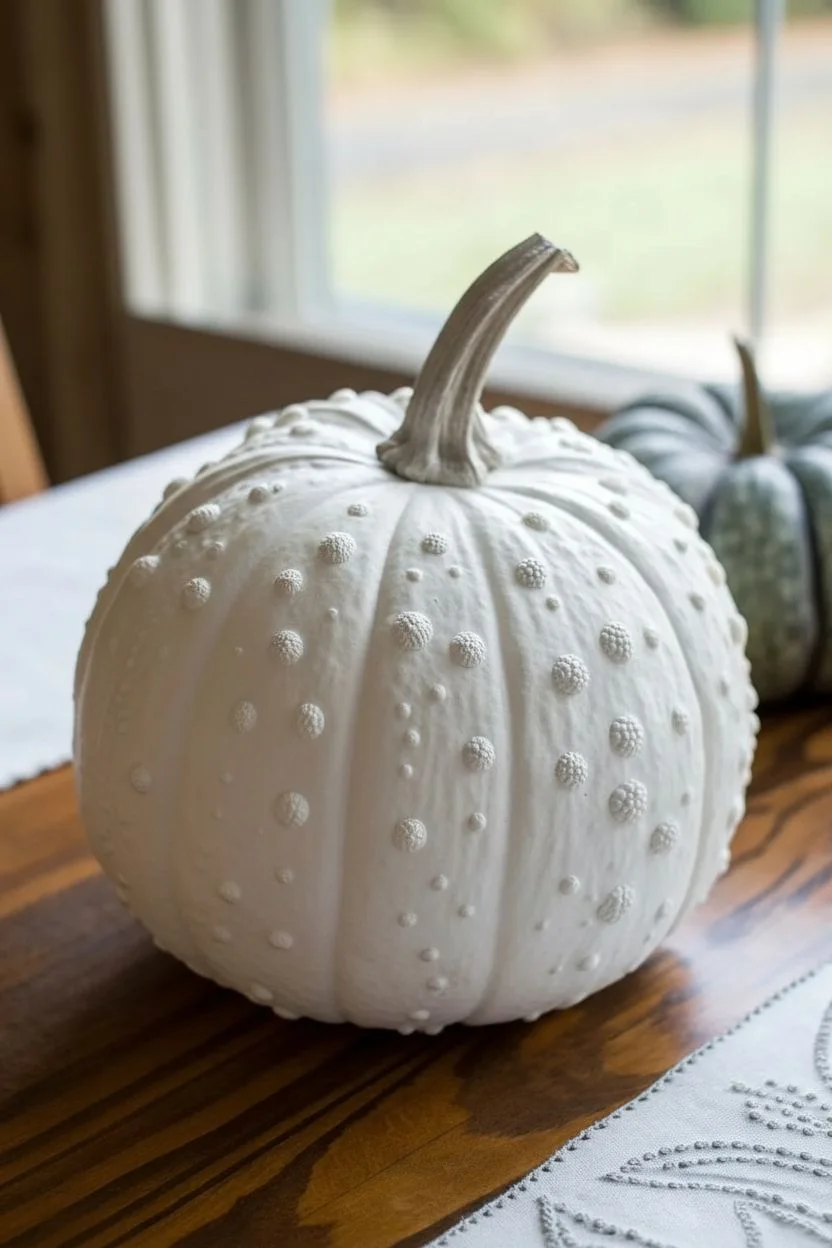
Transform a standard faux warty pumpkin into a high-end decor piece with a finish that mimics sophisticated ceramic or unglazed porcelain. This technique focuses on building subtle depth through shadow rather than bold color, resulting in a soft, ghostly elegance perfect for a neutral fall table.
Step-by-Step
Materials
- Faux pumpkin with warty texture (orange or any base color)
- White chalk paint (ultra-matte finish)
- Soft gray acrylic paint or glazing medium
- Burnt umber or espresso brown acrylic paint
- Wide synthetic flat brush (1-2 inch)
- Small detail brush (round size 2 or 4)
- Lint-free cotton rags or paper towels
- Water cup
Step 1: Creating the Porcelain Base
-
Clean surface:
Begin by wiping down your faux pumpkin with a slightly damp cloth to remove any manufacturing dust or oils that might repel the paint. -
First base coat:
Using your wide flat brush, apply a generous layer of white chalk paint over the entire pumpkin body, avoiding the stem for now. Chalk paint is ideal here because its thick consistency clings well to plastic surfaces. -
Stippling texture:
While the first coat is still wet, use the tip of your brush to stipple (jab repeatedly) into the crevices around the warts. This ensures the white covers every deep recess and prevents original color bleed-through. -
Dry completely:
Allow this first layer to dry fully. Chalk paint dries quickly, but give it about 30-45 minutes to be safe. -
Second coat:
Apply a second coat of white chalk paint. This time, brush in smooth, vertical strokes following the natural ribs of the pumpkin to simulate organic growth lines. -
Check coverage:
Inspect the project for any spots of the original orange showing through, especially under the bumps. Touch up as needed until you have a solid, opaque white form.
Fixing “Muddy” Shadows
If your gray wash looks too dark or dirty, don’t panic. Let it dry, then dry-brush a thin layer of white chalk paint over the top to knock back the intensity.
Step 2: Shadowing & Glazing
-
Mix glaze:
Create a very watery wash using a tiny drop of soft gray paint mixed with a tablespoon of water. It should be the consistency of dirty water, not paint. -
Apply wash:
Working in small sections, brush this gray wash over a cluster of warts and the surrounding skin. -
Wipe back:
Immediately use your lint-free rag to gently dab and wipe away the wash. The gray pigment will settle into the crevices around the base of each wart, creating instant 3D definition. -
Detailing warts:
I like to take a nearly dry brush with a hint of the gray wash and lightly skim the very tops of the larger warts. This highlights their texture without coloring them completely. -
Deepening crevices:
Using your small detail brush, paint a slightly darker gray line deep into the vertical ribs of the pumpkin to accentuate its shape. -
Soften lines:
Before the rib lines dry, use a clean, slightly damp brush to feather the edges outward so the shadow looks soft and natural, not striped.
Step 3: Stem & Finishing
-
Base stem color:
Paint the entire stem with a solid coat of burnt umber or espresso brown acrylic paint. -
Dry brush highlights:
Once the brown is dry, dip a dry brush lightly into your white chalk paint, offload most of it on a paper towel, and lightly whisk it over the ridges of the stem. This brings out the wood grain texture. -
Root shading:
Mix a tiny bit of brown into your white paint to create a beige tone. Paint this around the very base of the stem where it meets the pumpkin to blend the two parts seamlessly. -
Final matte seal:
For durability, apply a clear matte spray sealer. Avoid satin or gloss sprays, as the beauty of this look relies on that dry, chalky ceramic finish.
Level Up: Crackle Effect
Apply a crackle medium between your two coats of white chalk paint. The top layer will fracture slightly as it dries, giving the pumpkin an antique, aged pottery appearance.
Place your finished pumpkin on a natural wood surface or linen runner to let its sophisticated texture shine
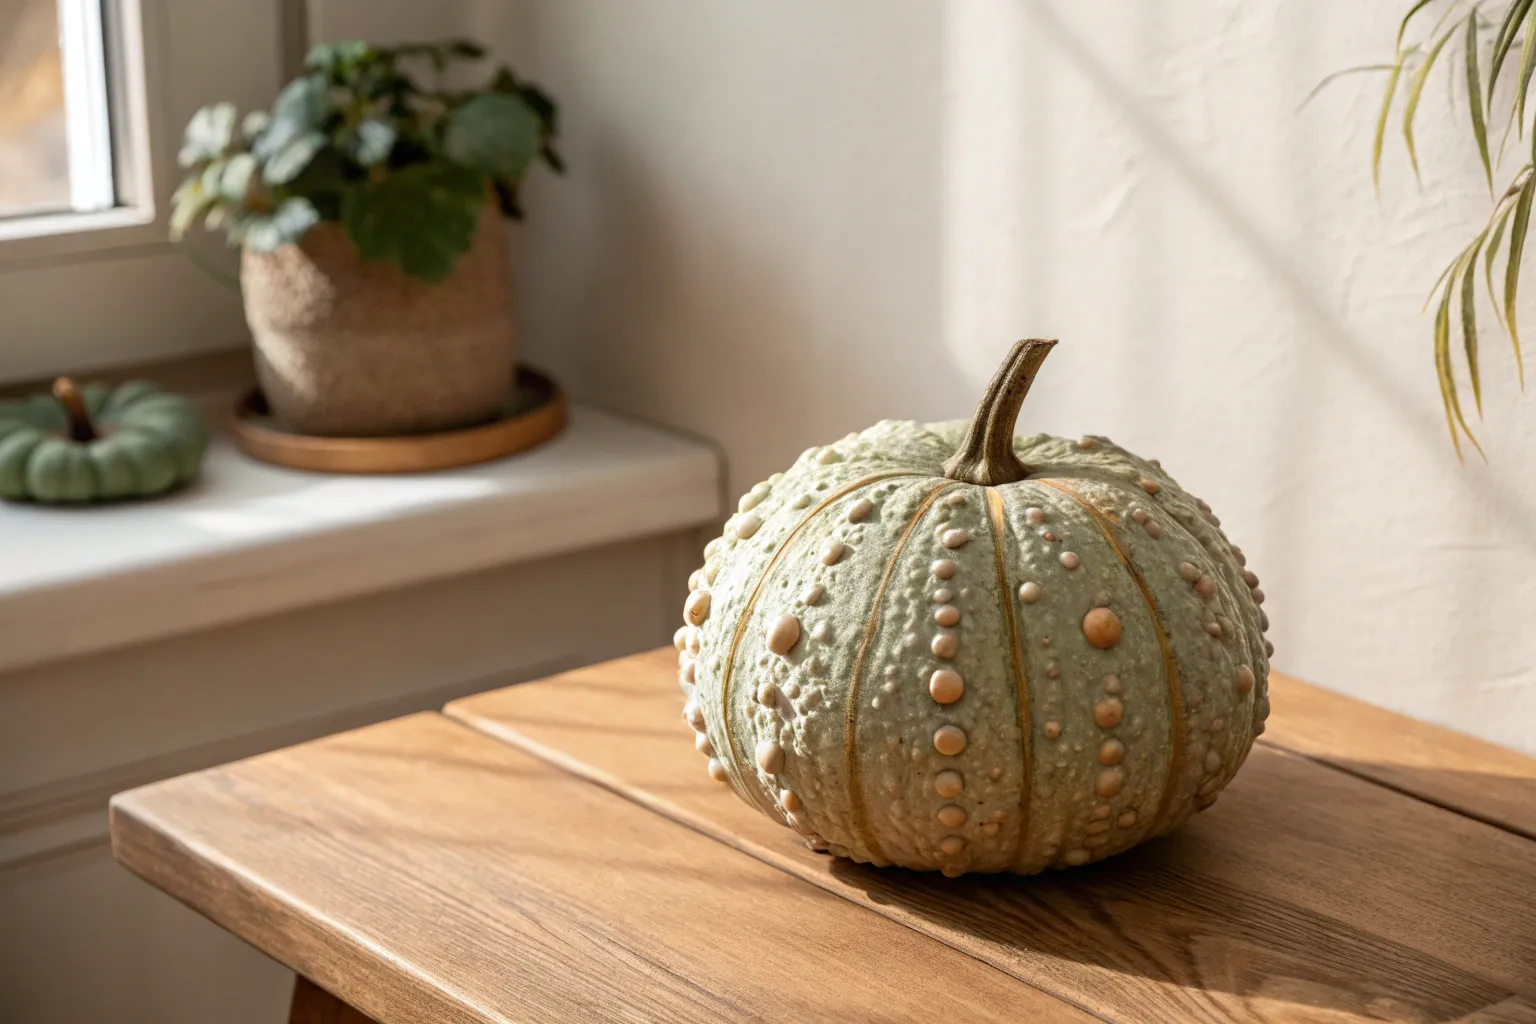
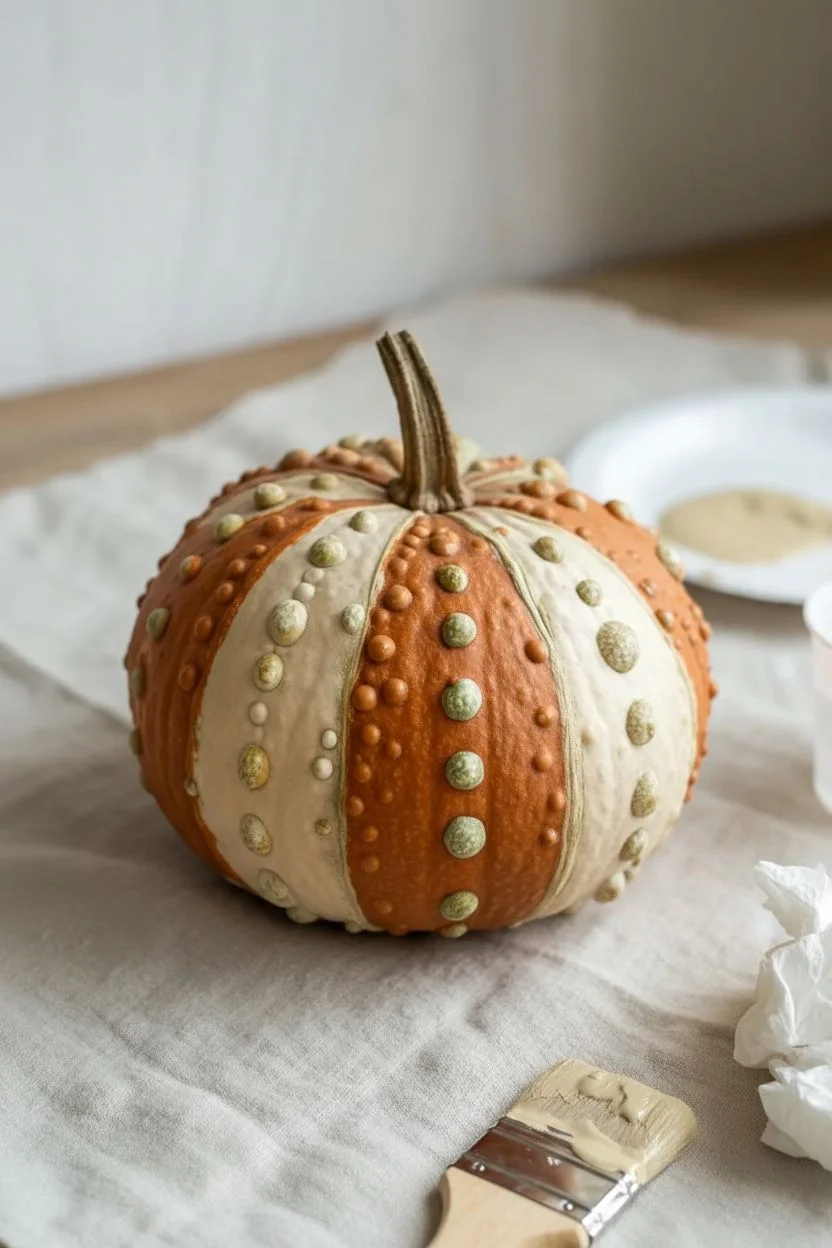
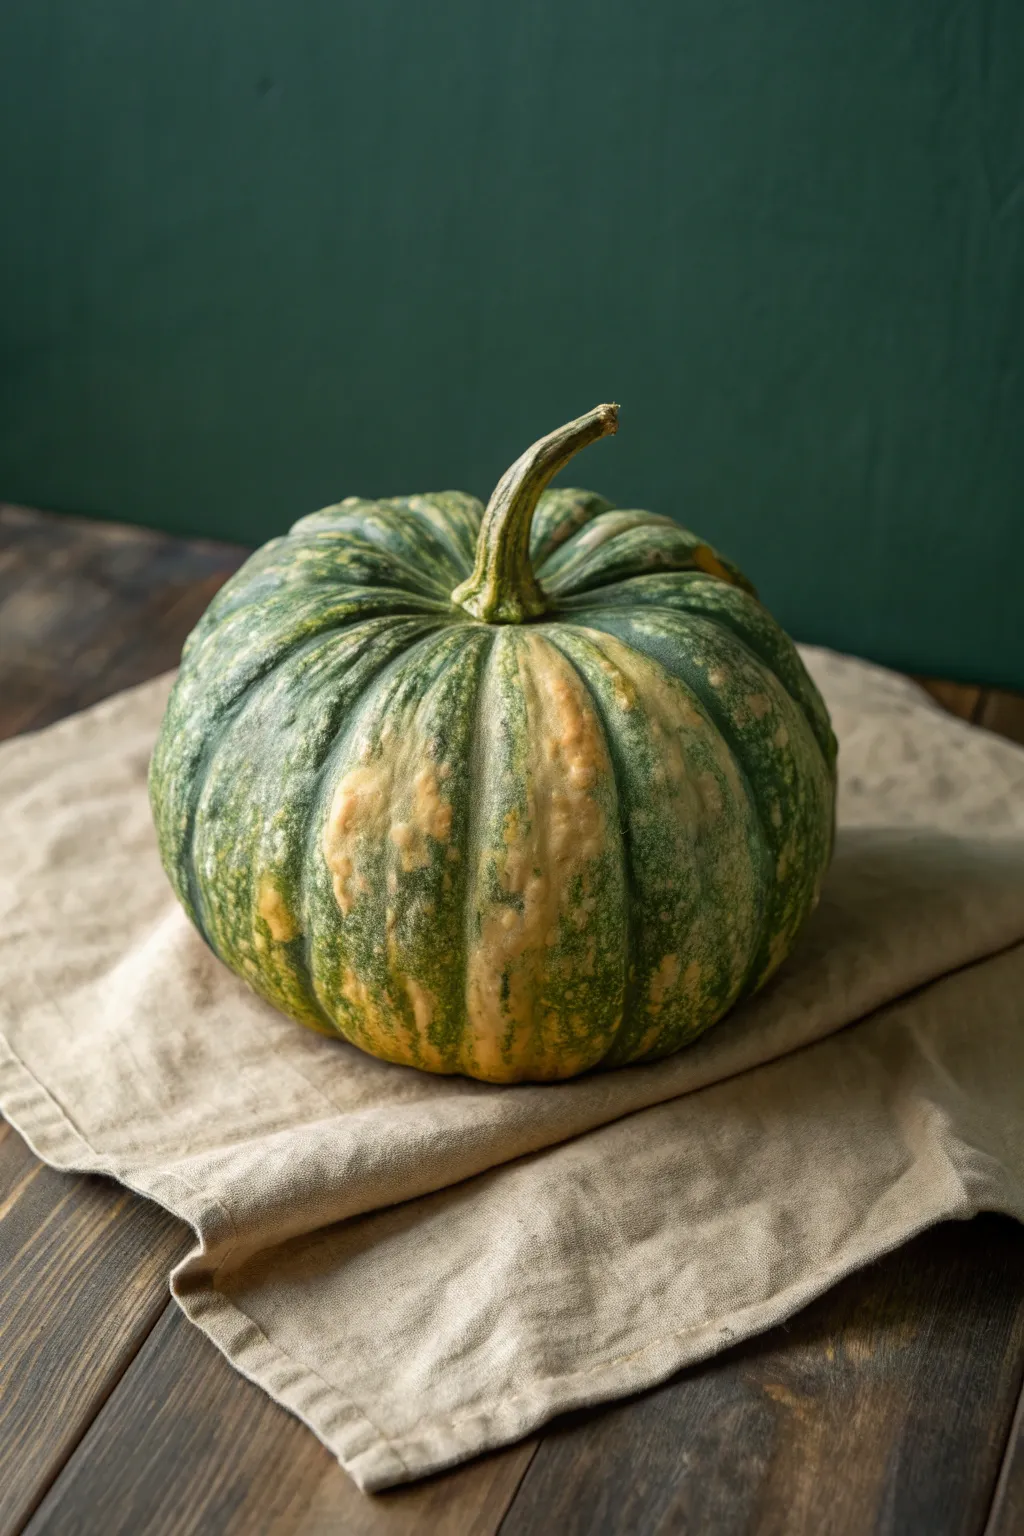
Speckled Toad-Skin Stippling Over the Warts
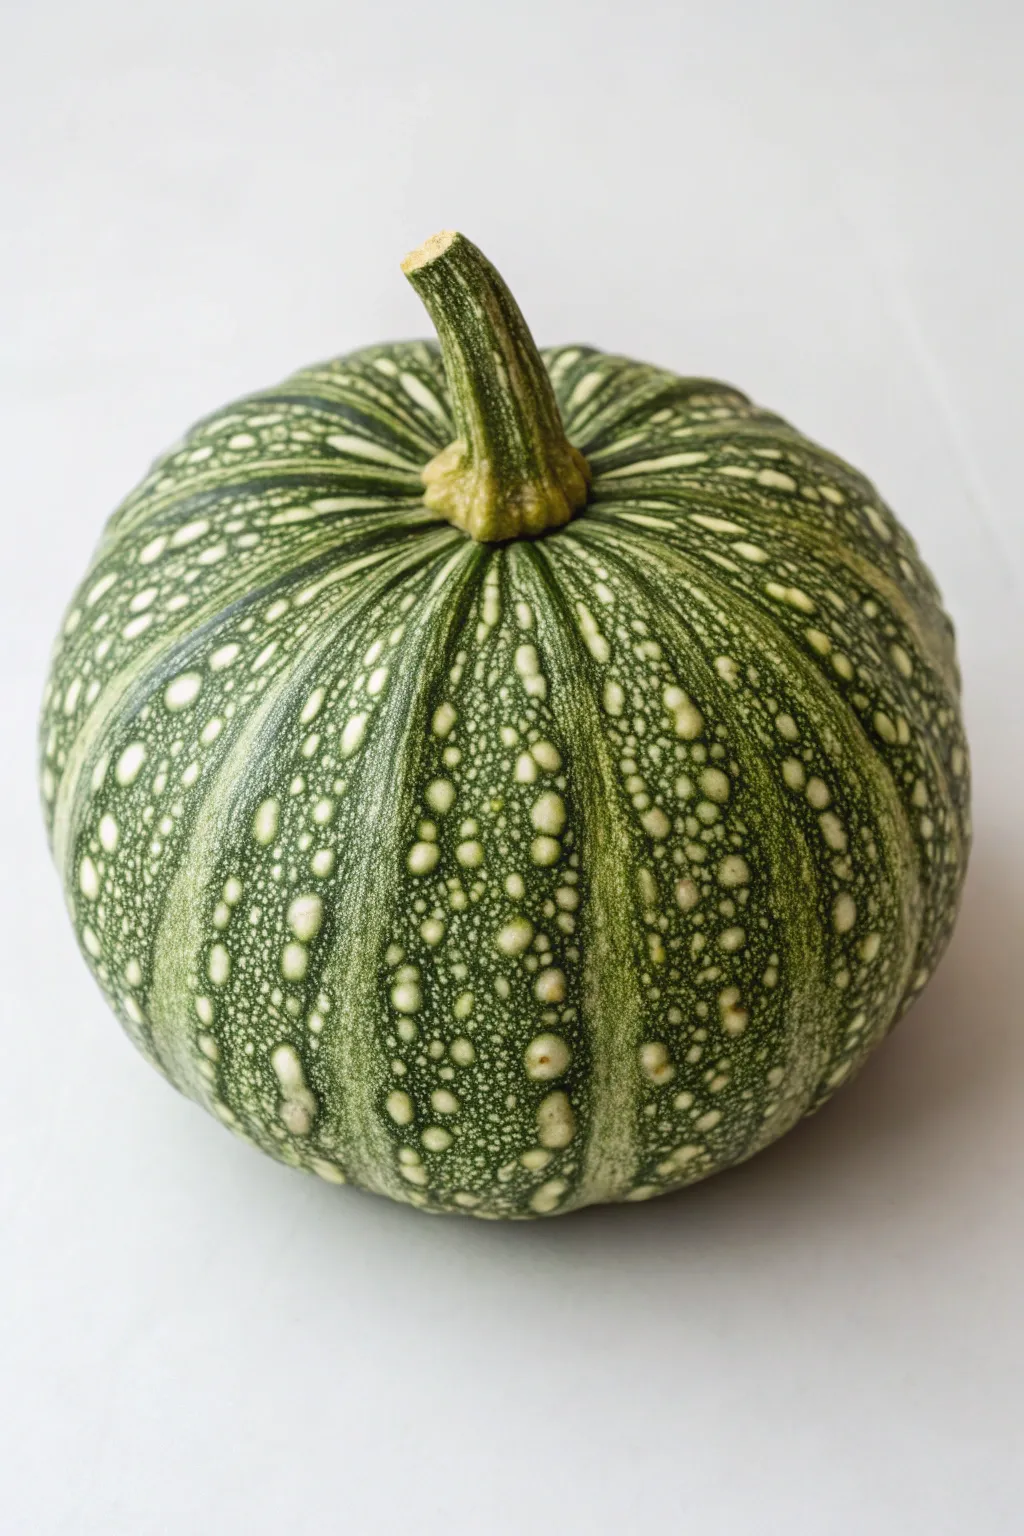
Transform a smooth craft pumpkin into a textured, organic masterpiece with this multi-layered stippling technique. By building up shades of green and adding creamy highlights, you’ll achieve a hyper-realistic, warty finish that mimics the look of an heirloom Kabocha squash.
Step-by-Step Tutorial
Materials
- Faux craft pumpkin (white or cream)
- Matte acrylic paints: Deep Forest Green, Olive Green, Sage Green, and Cream/Off-White
- Modeling paste or heavy structure gel (optional for physical texture)
- Small round sponge applicator or sea sponge
- Fine detail paintbrush (size 0 or 00)
- Medium flat paintbrush
- Palette for mixing
- Paper towels
- Matte spray sealant
Step 1: Base Coat & Gradient
-
Prime the Surface:
Begin by wiping down your faux pumpkin to remove any dust or oils. If the pumpkin is shiny, give it a quick sanding with fine-grit sandpaper to help the paint adhere. -
Apply the Foundational Green:
Mix a small amount of Olive Green with Deep Forest Green. Use your medium flat brush to apply vertical strokes following the natural ribs of the pumpkin. Don’t aim for perfect opacity yet; streakiness adds to the natural look. -
Create Rib Variations:
While the base is still slightly tacky, mix a lighter Sage Green. Paint thin, vertical lines in the deep grooves between the ribs to create depth. -
Blend the Colors:
Use a barely damp brush to feather the edges where the dark and light greens meet. I find that softly dragging the brush downwards helps integrate the colors without turning them muddy. -
Add Stem Detail:
Paint the stem with a mix of Olive Green and a touch of brown or yellow ochre. Create fine, vertical striations up the stem to mimic fibrous growth.
Build Real Texture
Mix modeling paste into your cream paint for the ‘warts.’ When you dot them on, they will dry raised, creating actual tactile bumps.
Step 2: Stippling the Texture
-
Prepare the Sponge:
Dampen a small piece of sea sponge or use a round sponge applicator. Dip it into Deep Forest Green paint and blot the excess onto a paper towel until it creates a dry, mottled texture. -
Layering Dark Speckles:
Gently dab the sponge over the entire green surface of the pumpkin. Focus heavily on the ridges, leaving the grooves slightly less textured. This creates the ‘toad skin’ base. -
Introduce Mid-Tones:
Clean the sponge and switch to the Olive Green. Repeat the stippling process, overlapping the dark green areas but applying less pressure. This creates optical mixing and depth. -
Define the ‘Warts’:
This is where the magic happens. Using the fine detail brush, load it with Cream or Off-White paint. Identify where you want your prominent ‘warts’ to be—usually clustered on the upper ridges. -
Shape the Large Warts:
Paint small, irregular circular shapes for the larger warts. They shouldn’t be perfect circles; make them slightly organic and uneven. -
Add Small Speckles:
Surround the larger cream spots with tiny dots of the same cream color. Cluster them densely near the large spots and let them disperse as they move down the pumpkin. -
Soften the Edges:
If the cream spots look too stark, mix a very watery wash of Sage Green. Lightly glaze over the spots once they are dry to knock back the brightness and integrate them into the skin.
Heirloom Variations
Try this technique with a slate blue base and grey speckles for a ‘Jarrahdale’ variety, or orange with green warts for a ‘Warty Goblin’ look.
Step 3: Finishing Touches
-
Highlight the Stem:
Return to the stem and dry-brush a little Light Green or Yellow Ochre on the raised ridges of the stem for a sun-bleached effect. -
Touch-Up Transition:
Check the area where the stem meets the fruit. Add a small ring of yellowish-green paint to create a realistic transition zone. -
Final Seal:
Once completely dry (give it at least an hour), take the pumpkin outside and spray it with a matte clear coat. This protects the paint and unifies the sheen levels of the different layers.
Now step back and admire how simple paint techniques have turned a basic craft shape into a stunningly realistic botanical specimen.

PENCIL GUIDE
Understanding Pencil Grades from H to B
From first sketch to finished drawing — learn pencil grades, line control, and shading techniques.
Explore the Full Guide
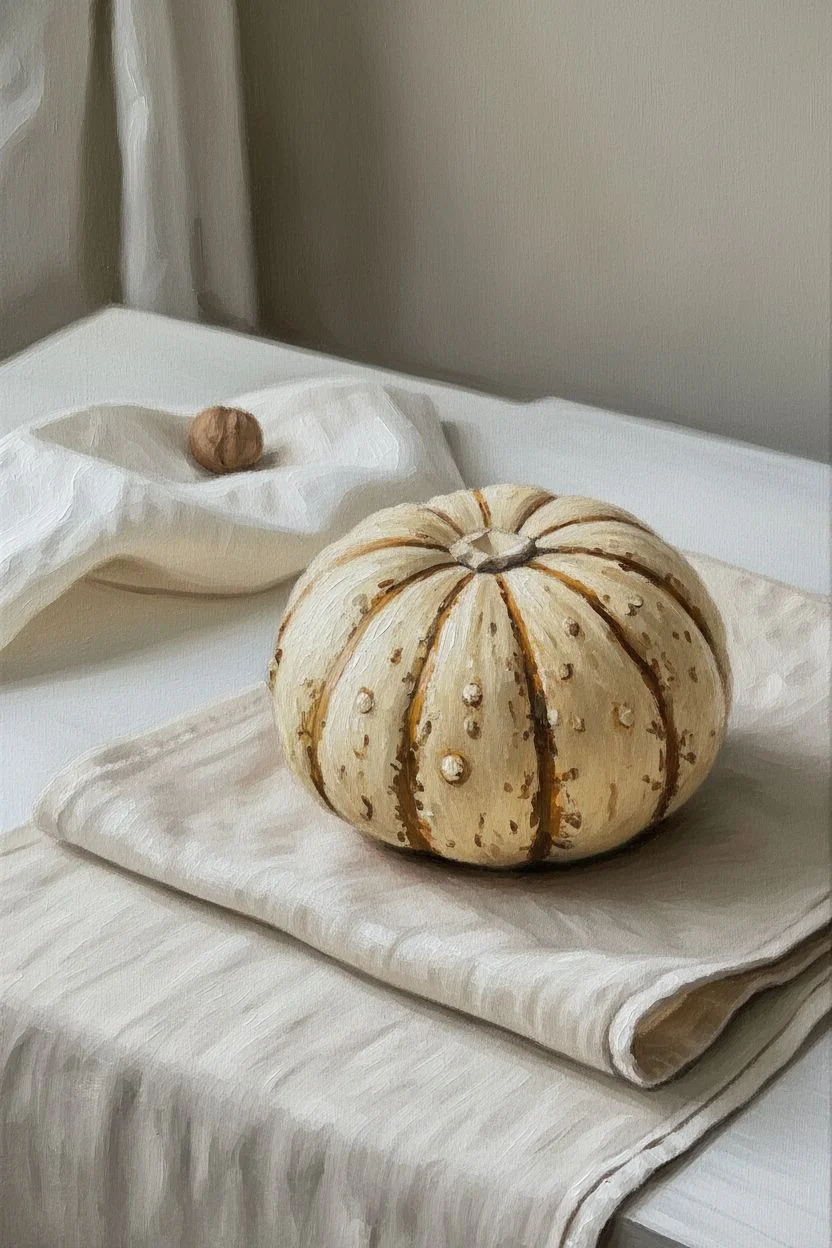
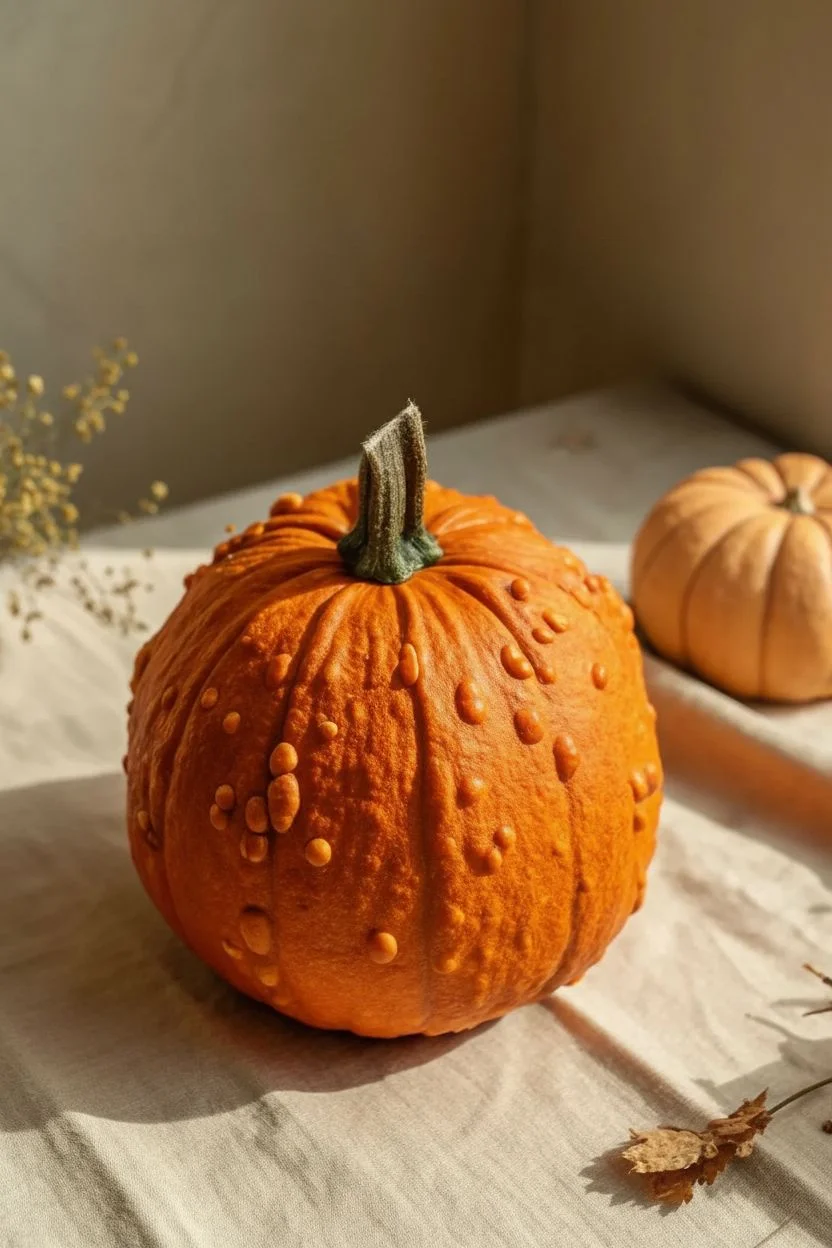
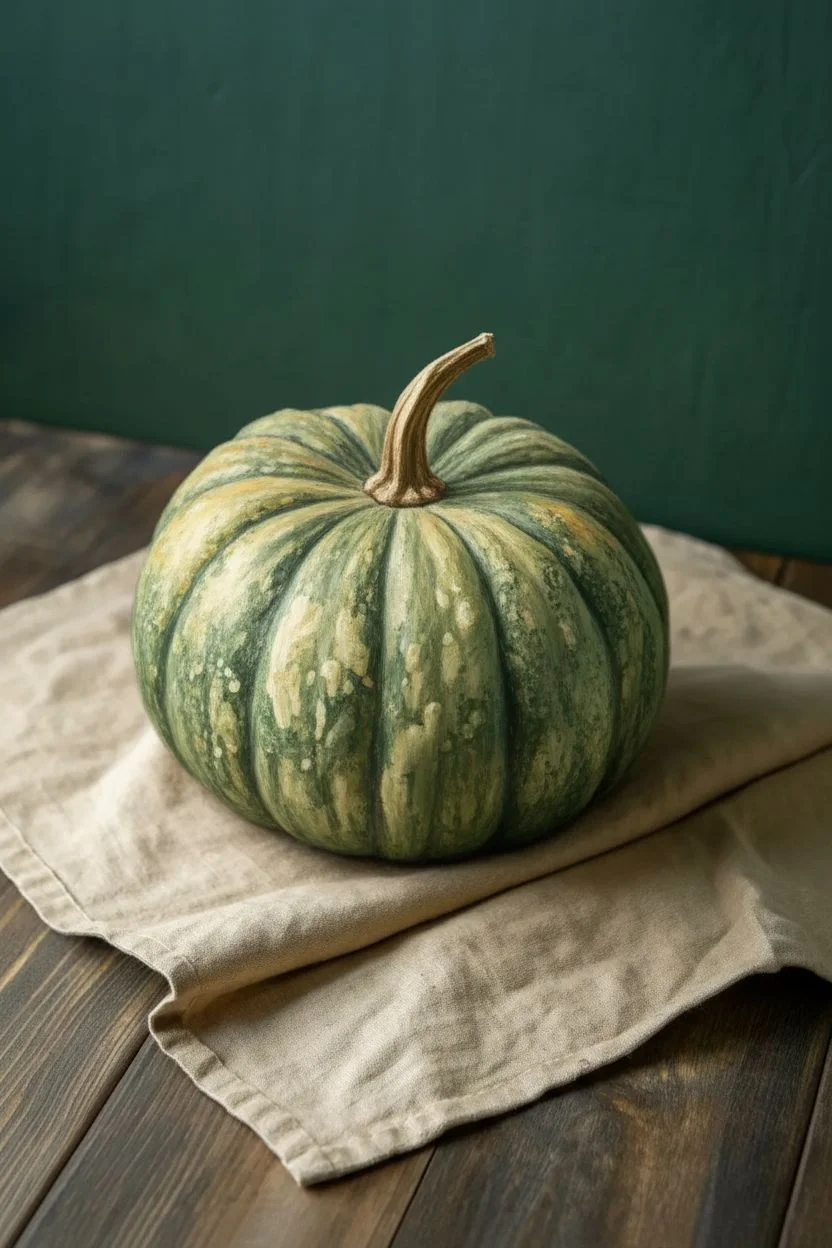
Warm Neutral “Harvest” Palette That Loves Texture
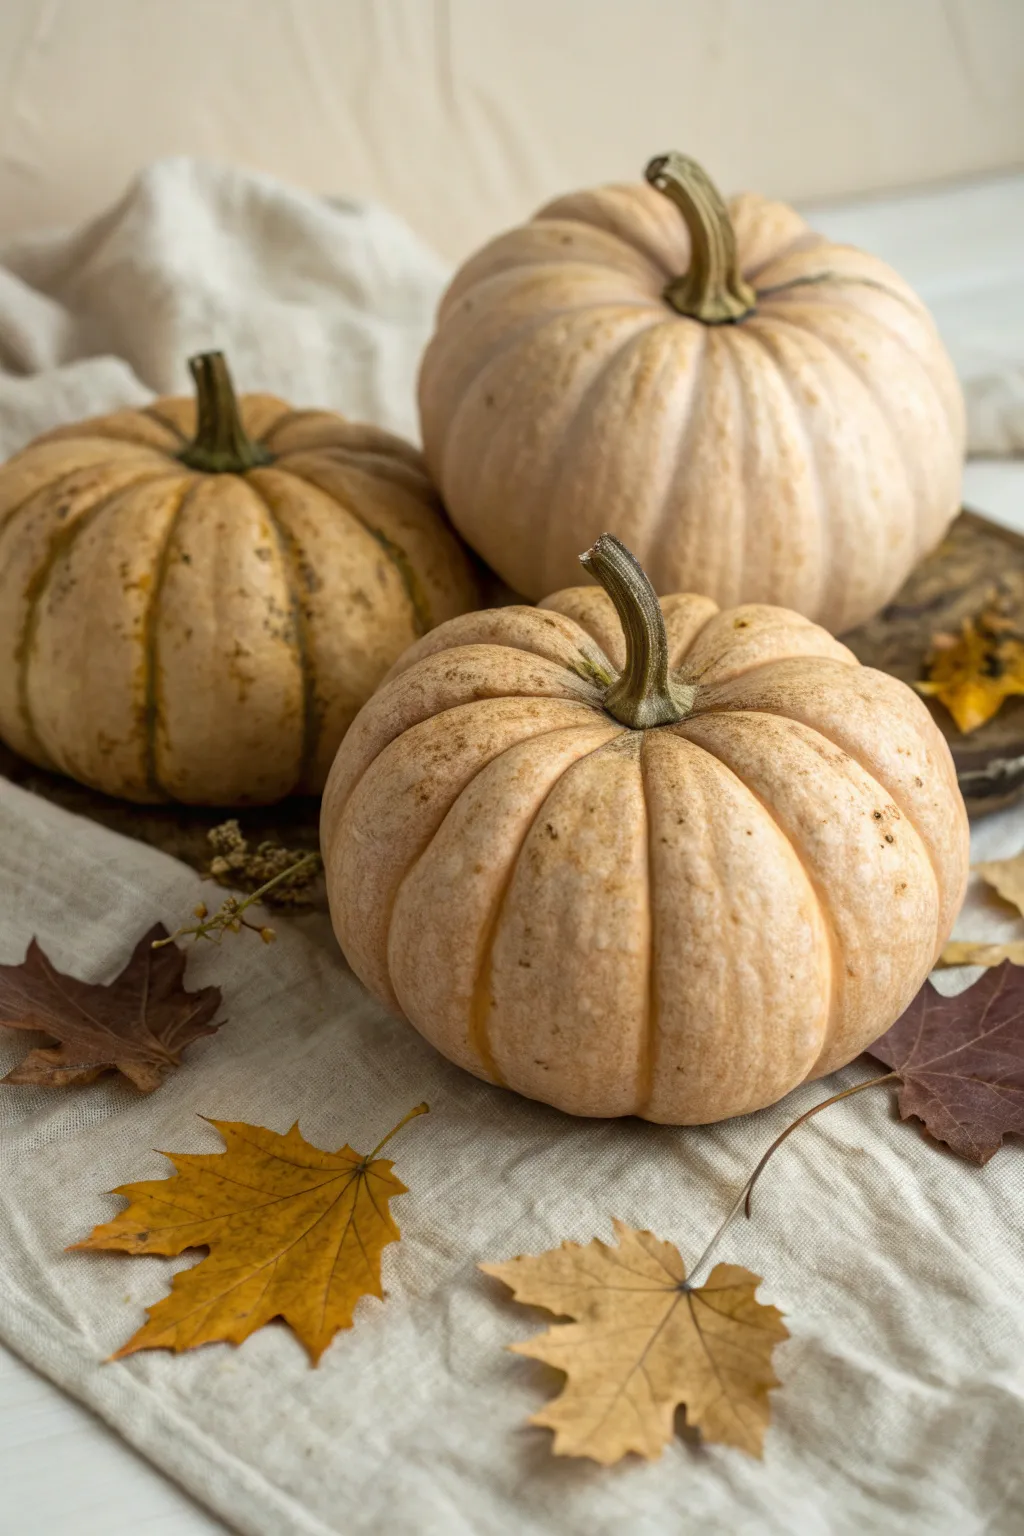
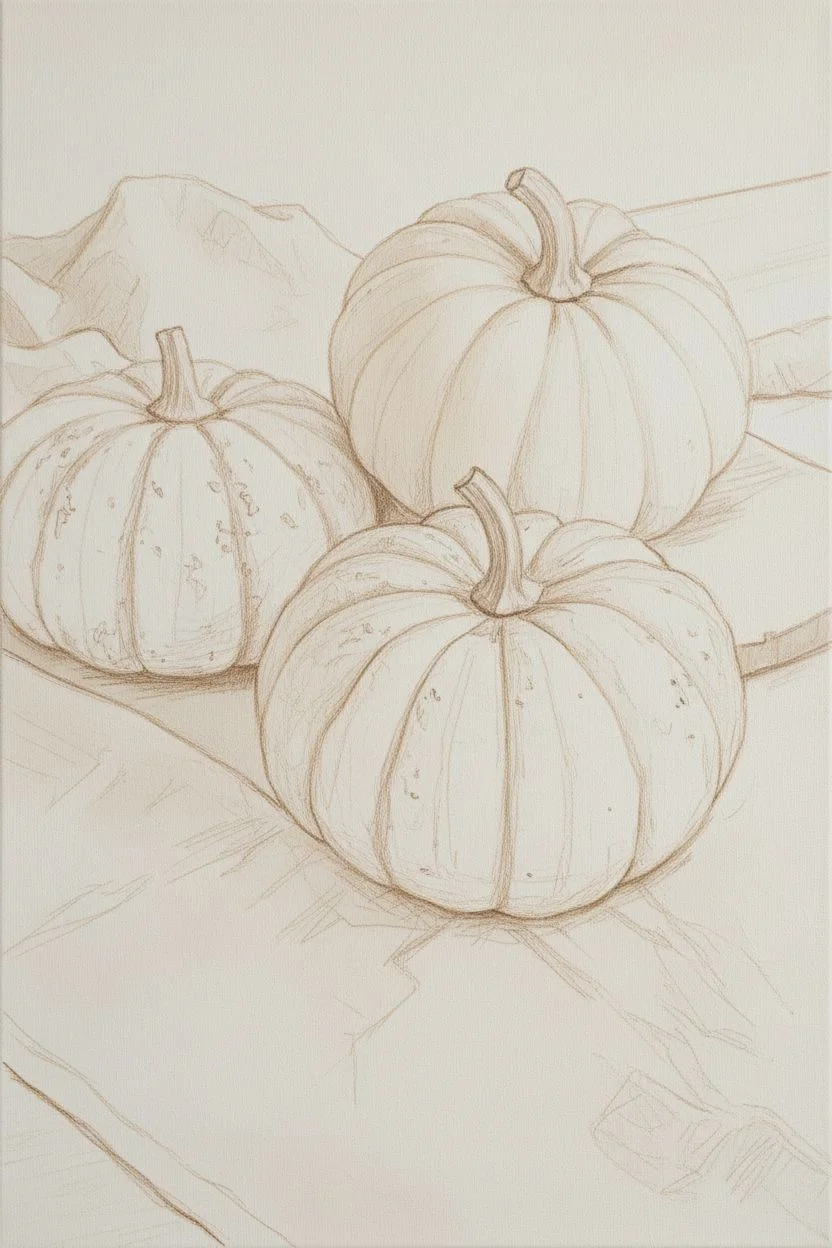
Capture the soft elegance of autumn with this realistic acrylic painting tutorial featuring heirloom pumpkins in a warm, neutral palette. You’ll learn how to build up subtle texture and muted tones to create a cozy, sophisticated harvest scene.
Step-by-Step Guide
Materials
- Canvas board or stretched canvas (16×20 inches recommended)
- Acrylic paints: Titanium White, Unbleached Titanium, Burnt Umber, Yellow Ochre, Raw Sienna, Burnt Sienna
- Assorted brushes: 1-inch flat wash, #8 filbert, #4 round, #0 liner
- Slow-drying medium or retarder
- Palette knife
- Paper towels or rag
- Water jar
- Graphite transfer paper (optional)
Step 1: Setting the Scene
-
Background Wash:
Begin by creating a soft, warm base. Mix Titanium White with a tiny touch of Yellow Ochre and a drop of water to create a milky, off-white wash. Apply this over the entire canvas using your large flat brush to kill the stark white of the canvas. -
Initial Sketch:
Once the wash is dry, lightly sketch the three pumpkins using a diluted mixture of Burnt Umber and water on a small round brush. Focus on getting the varied shapes correct—one central foreground pumpkin, one slightly behind to the left, and a larger one in the back right. -
Mapping the Cloth:
Roughly sketch the folds of the linen cloth underneath the pumpkins. Don’t overthink this; just mark where the major shadows and wrinkles fall to separate the foreground from the background.
Step 2: Building the Pumpkins
-
Base Tone Mixing:
Create your main pumpkin color by mixing Unbleached Titanium with a touch of Raw Sienna and the smallest dot of Burnt Sienna. This should be a pale, warm beige—not bright orange. -
Blocking In:
Using the filbert brush, block in the pumpkin shapes with your base tone. Don’t worry about the ribs yet; just get a solid, opaque layer of color down. I like to add a little slow-drying medium here to keep the paint workable. -
Defining the Ribs:
While the base is still slightly tacky, mix a darker shadow tone adding more Burnt Umber to your base mix. Use the edge of your filbert brush to paint the deep grooves between the pumpkin ribs, curving your strokes to follow the round form. -
Blending the Curves:
Clean your brush and use it slightly damp to soften the hard edges of your shadow lines, blending them outward into the lighter sections. This creates the rounded, dimensional look of the ribs. -
Adding Highlights:
Mix Titanium White with a speck of Yellow Ochre. Apply this highlight to the highest center point of each rib segment, blending softly outward to meet the shadows.
Muddy Colors?
If your beige tones look grey or dirty, stop mixing and rinse your water jar. Using dirty water acts like a grey glaze. Remix fresh color on a clean palette area.
Step 3: Texture and Details
-
Speckling:
Heirloom pumpkins have lovely imperfections. Mix a watery Burnt Umber solution and load a stiff bristle brush or toothbrush. Gently flick subtle speckles onto the pumpkins, concentrating on the shadowed areas for natural texture. -
Painting the Stems:
For the stems, mix Olive Green (or mix Yellow Ochre/black) with Raw Sienna. Paint the twisted, woody shapes using the #4 round brush. Use short, twisting strokes to mimic the dried fiber texture. -
Stem Highlights:
Add definition to the stems by painting thin ridges of a lighter green-beige mix along the twisted edges using your liner brush. -
Deepening Shadows:
Mix a dark glaze using Burnt Umber and a lot of water. carefully glaze the deepest crevices where the pumpkins touch each other and where they sit on the cloth to ground them.
Impasto Texture
Mix heavy gel medium into your highlight paint for the pumpkin ribs. Apply thickly with a palette knife for raised texture you can actually feel.
Step 4: The Autumn Elements
-
Base Leaf Colors:
For the scattered leaves, mix varying shades of Burnt Sienna, Yellow Ochre, and Burnt Umber. Paint the basic jagged leaf shapes on the cloth, keeping them flat at first. -
Leaf Veins and Crispy Edges:
Use your liner brush with dark brown paint to draw fine veins. Add tiny touches of lighter ochre to the tips of the leaves to make them look dried and curled. -
Cloth Shadows:
Return to the cloth background. Mix a cool grey-beige (White + tiny speck of Burnt Umber + speck of Blue if you have it, or just Black). Paint soft shadows under the leaves and in the fabric folds. -
Final Highlights:
Use pure Titanium White on the very highest points of the pumpkin ribs and the crispest edges of the fabric folds to make the light pop. -
Softening Edges:
Check the perimeter of your pumpkins. If lines look too sharp, glaze over the edge slightly with the background color to push them back into the atmosphere.
Step back and admire your quiet, rustic masterpiece that captures the gentle essence of the season
Witchy Face Using Warts as Moles and Chin Bumps
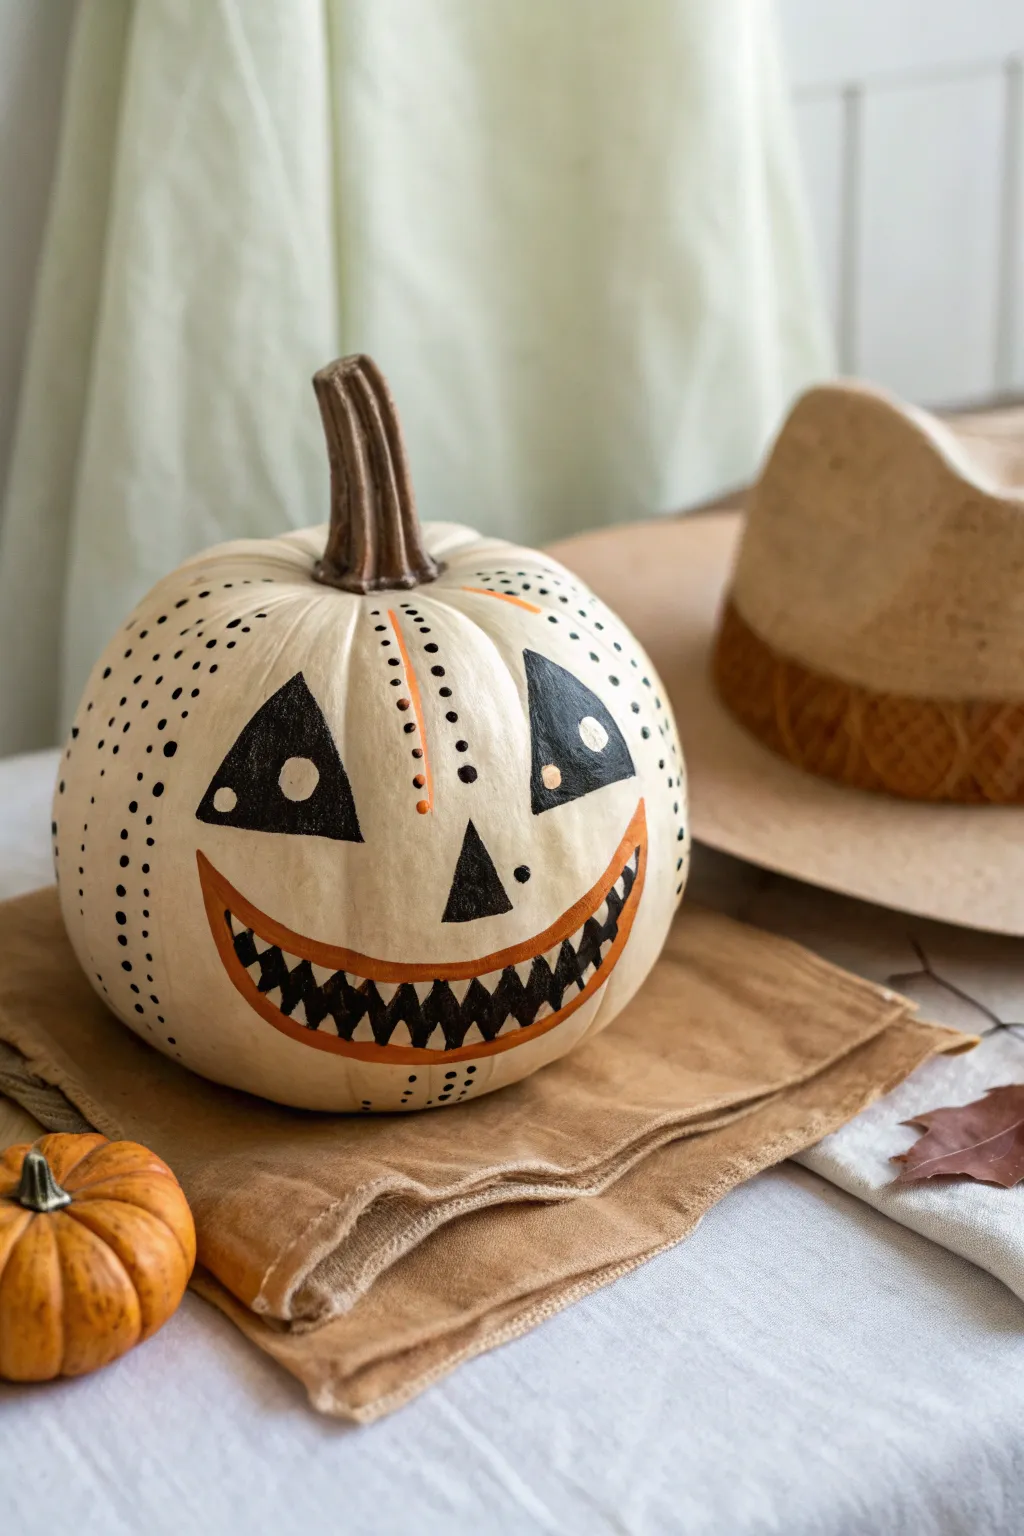
Transform a simple cream-colored pumpkin into a whimsical character with this striking graphic design. The high-contrast black and orange details create a playful yet spooky face that pops against the pale background.
Detailed Instructions
Materials
- Medium-sized white or cream pumpkin (real or faux)
- Black acrylic paint
- Orange acrylic paint
- Fine-tip paintbrush (round or liner)
- Medium flat paintbrush
- Pencil for sketching
- Paper towel
- Cup of water
- Matte sealant spray (optional)
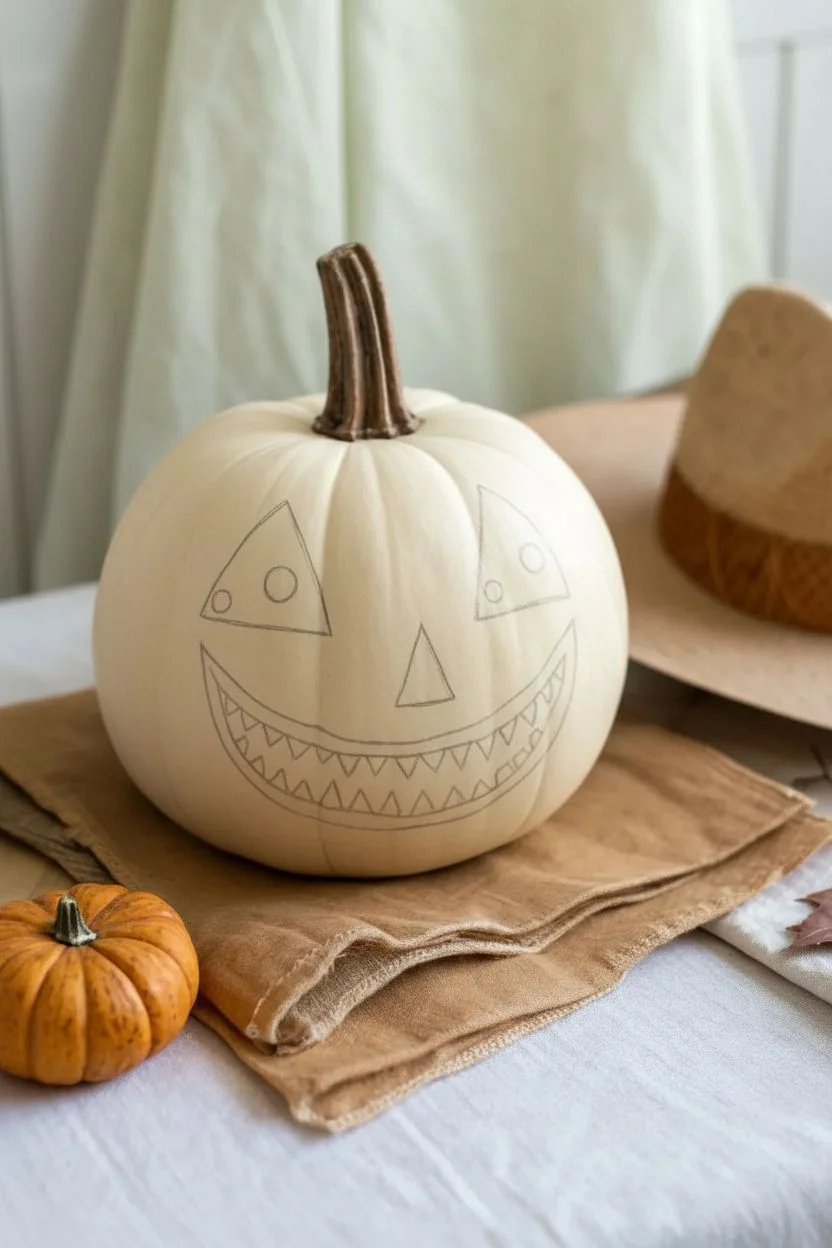
Step 1: Planning and Sketching
-
Clean surface:
Begin by wiping down your pumpkin with a damp paper towel to remove any dust or dirt, ensuring a smooth painting surface. -
Sketch the eyes:
Using a light pencil touch, draw two large, slightly slanted triangles for the eyes about a third of the way down from the stem. -
Sketch the pupils:
Inside each triangle, mark a small circle near the inner corner to serve as the pupil/reflection highlight. -
Add a nose:
Draw a smaller, simpler triangle in the center of the face for the nose. -
Outline the mouth:
Sketch a wide, U-shaped mouth curve that stretches almost to the width of the eyes. -
Detail the grin:
Draw a secondary curved line just above the first to create the lip thickness, then sketch zigzag teeth shapes inside the mouth area.
Wobbly Lines?
If your hand shakes while painting fine lines, try resting your pinky finger on a dry part of the pumpkin to stabilize your hand as you work.
Step 2: Painting the Features
-
Outline in black:
Load your fine-tip brush with black acrylic paint and carefully trace the outer lines of the eyes. -
Fill the eyes:
Switch to a slightly larger brush or continue with the fine tip to fill in the eye triangles black, being careful to leave the circular ‘pupil’ areas unpainted so the white pumpkin shows through. -
Paint the nose:
Fill in the small nose triangle with solid black paint. -
Define the mouth:
For the mouth, paint the jagged teeth black first. I find it easier to paint the negative space (the teeth) before outlining the lips. -
Add chin detail:
Place a small black dot on the lower right cheek area to act as a beauty mark or wart.
Step 3: Adding Polish and Texture
-
Outline the lips:
Rinse your fine brush thoroughly, then dip it into orange paint. Carefully outline the entire mouth shape, creating a thin border around the black teeth. -
Dotted texture:
Using the very tip of your fine brush dipped in black paint, create rows of small stippled dots along the vertical ribs of the pumpkin on the left side. -
Orange accents:
Add a single vertical row of small orange dots down the center forehead of the pumpkin, following a natural groove. -
Right side stippling:
Balance the design by adding a few sparse black dots on the upper right side near the eye. -
Cleanup:
Check for any uneven edges on your black triangles and touch them up with a clean, damp brush or a bit more paint. -
Final dry:
Allow the paint to dry completely for at least an hour before moving the pumpkin.
Give it a Hat
Glue some dried moss around the stem base or top with a tiny burlap witch hat to play up the rustic, crafty aesthetic of the design.
Place your completed pumpkin on a soft cloth or hay bale to greet your autumn guests


Cute Monster Eyes Tucked Between the Warts
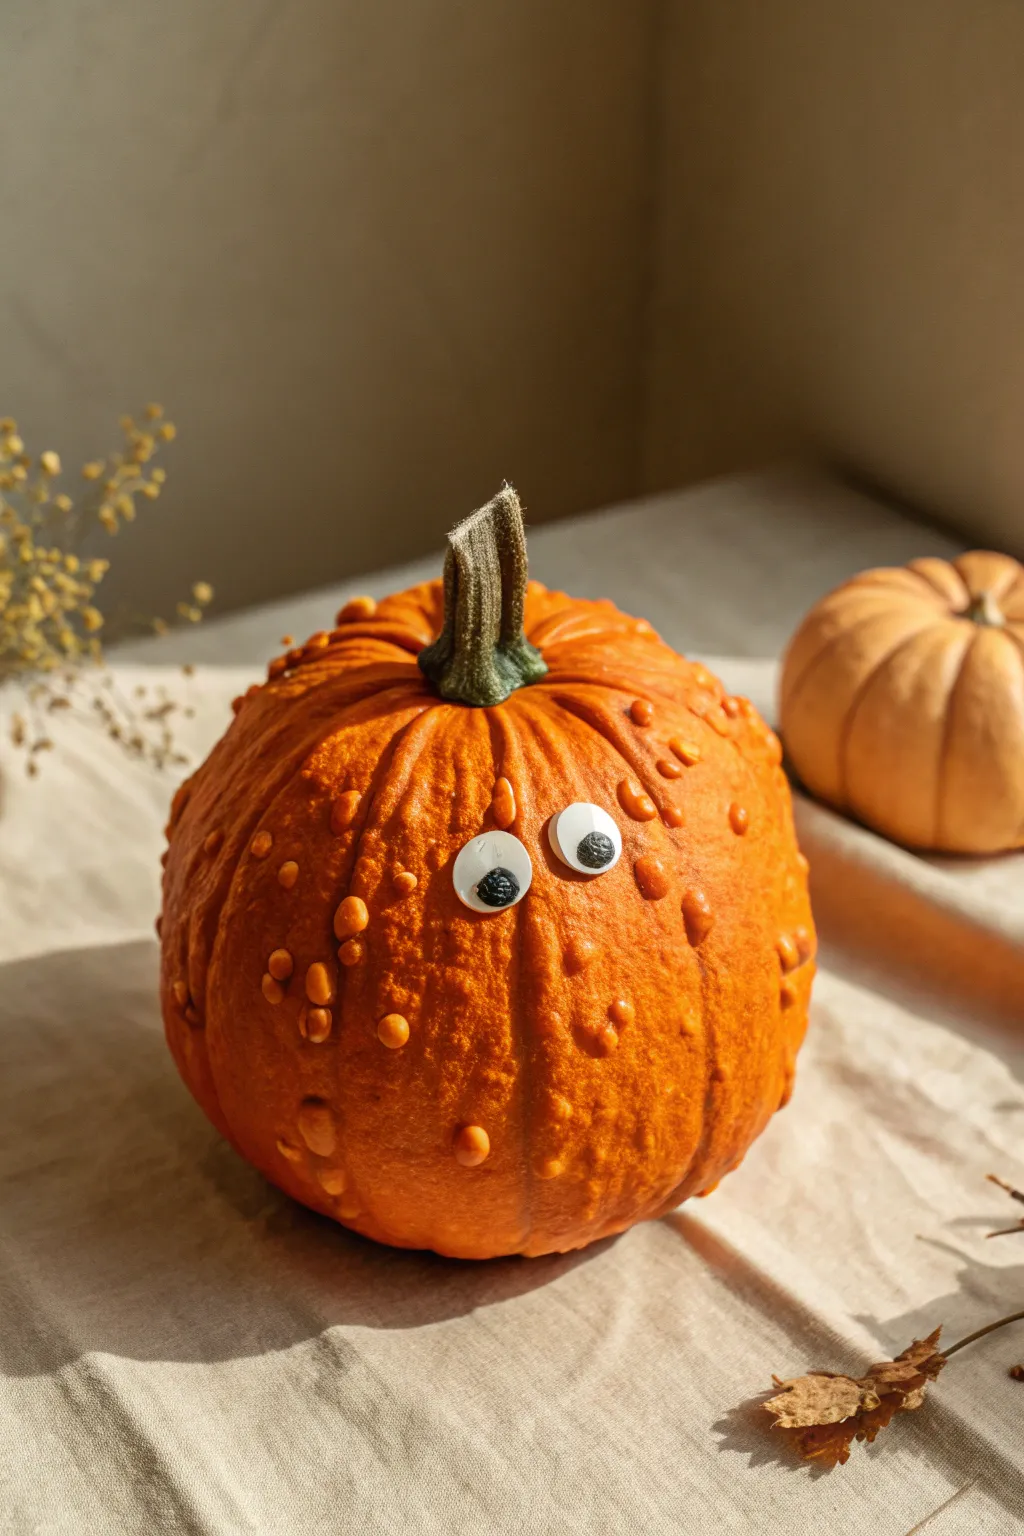
Sometimes the simplest decorations make the biggest impact, transforming a naturally bumpy pumpkin into a quirky little character. This project leans into the pumpkin’s delightful imperfections, using the warts as facial features for a charmingly bewildered monster look.
Step-by-Step Guide
Materials
- A medium-sized warty pumpkin (Knucklehead or Goosebumps variety)
- Two large googly eyes (approx. 1 inch diameter)
- Strong craft glue (E6000) or a low-temp hot glue gun
- tweezers (optional)
- Damp cloth
- Dry towel
Step 1: Preparation & Selection
-
Select your canvas:
Choose a pumpkin with prominent warts. Look specifically for a pumpkin that has a slightly flatter vertical area or a natural recess between clusters of bumps, as this will serve as the ‘face’ where the eyes will sit. -
Clean surface:
Wipe the pumpkin down gently with a damp cloth to remove any field dirt or dust. Pay close attention to the crevices around the warts. -
Dry thoroughly:
Use a dry towel to remove all moisture. The surface must be completely dry for the adhesive to bond securely to the waxy skin. -
Test placement:
Before gluing, hold the googly eyes against the pumpkin in various spots. I like to nestle them right between two or three large warts so the bumps look like eyebrows, cheeks, or noses. -
Check angles:
Rotate the pumpkin to ensure the placement looks good from multiple viewing angles. The eyes shouldn’t be too high up near the stem or too low near the base.
Use Gravity
Make sure your pumpkin is sitting flat on its base before gluing. If it tilts naturally, glue the eyes according to that tilt so the monster doesn’t look like he’s falling over.
Step 2: Applying the Eyes
-
Prepare the adhesive:
If using hot glue, plug in your gun and let it warm up to a low setting to avoid cooking the pumpkin skin. If using craft glue, uncap it and have a paper towel ready for drips. -
Apply glue to the first eye:
Flip one googly eye over. Apply a pea-sized dot of glue to the center of the back. Do not overfill, or the glue will squash out the sides. -
Place the first eye:
Press the eye firmly onto your chosen spot on the pumpkin skin. Hold it in place for 10-15 seconds to ensure the initial bond sets. -
Position the second eye:
Apply glue to the second eye. Place it near the first one, but experiment with the spacing. Placing them slightly askew or touching gives a goofier expression. -
Secure the bond:
Press the second eye down gently. If you are using craft glue instead of hot glue, you may need to hold it slightly longer or use a piece of painter’s tape to hold it while it cures.
Step 3: Finishing Touches
-
Clean up threads:
If you used hot glue, look for those pesky wispy strings of glue that tend to trail off. Use tweezers or your fingers to pull them away for a clean look. -
Inspect the pupils:
Sometimes the black discs inside googly eyes get stuck. Give the pumpkin a gentle shake to make sure the pupils rattle around freely. -
Polish the stem:
Since the pumpkin itself is unpainted, the stem is a focal point. Wipe it down with a slightly damp cloth to reveal its natural green and brown hues. -
Final wipe:
Give the orange skin one last buff with a dry cloth to make the natural waxy surface shine. -
Display:
Set your goofy creation on a neutral cloth or table runner to let its personality shine without visual distractions.
Hair Styles
Glue some dried moss, raffia, or even a small air plant around the base of the stem to give your warty monster a funky, natural hairstyle.
Now you have a wonderfully expressive pumpkin character that required zero carving tools and preserves the pumpkin for much longer
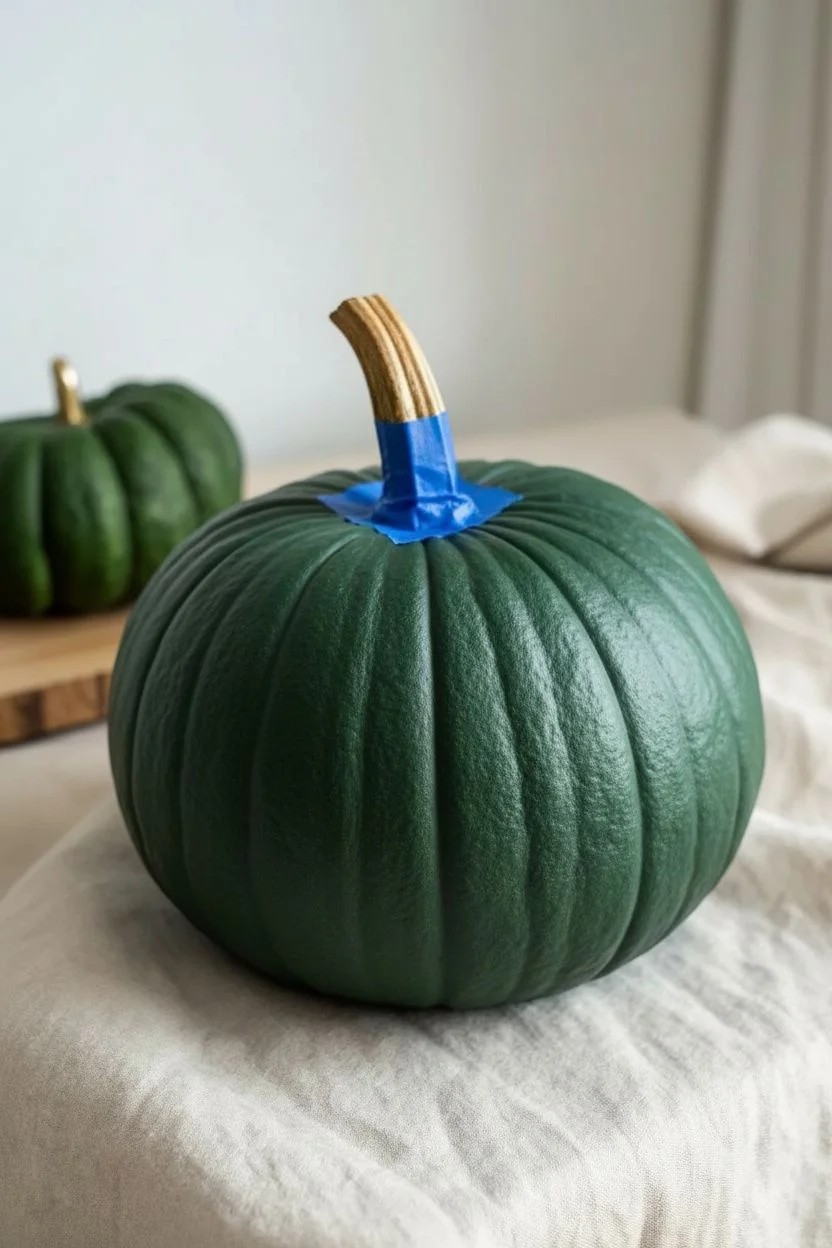
Metallic Accent Rub on the Highest Bumps
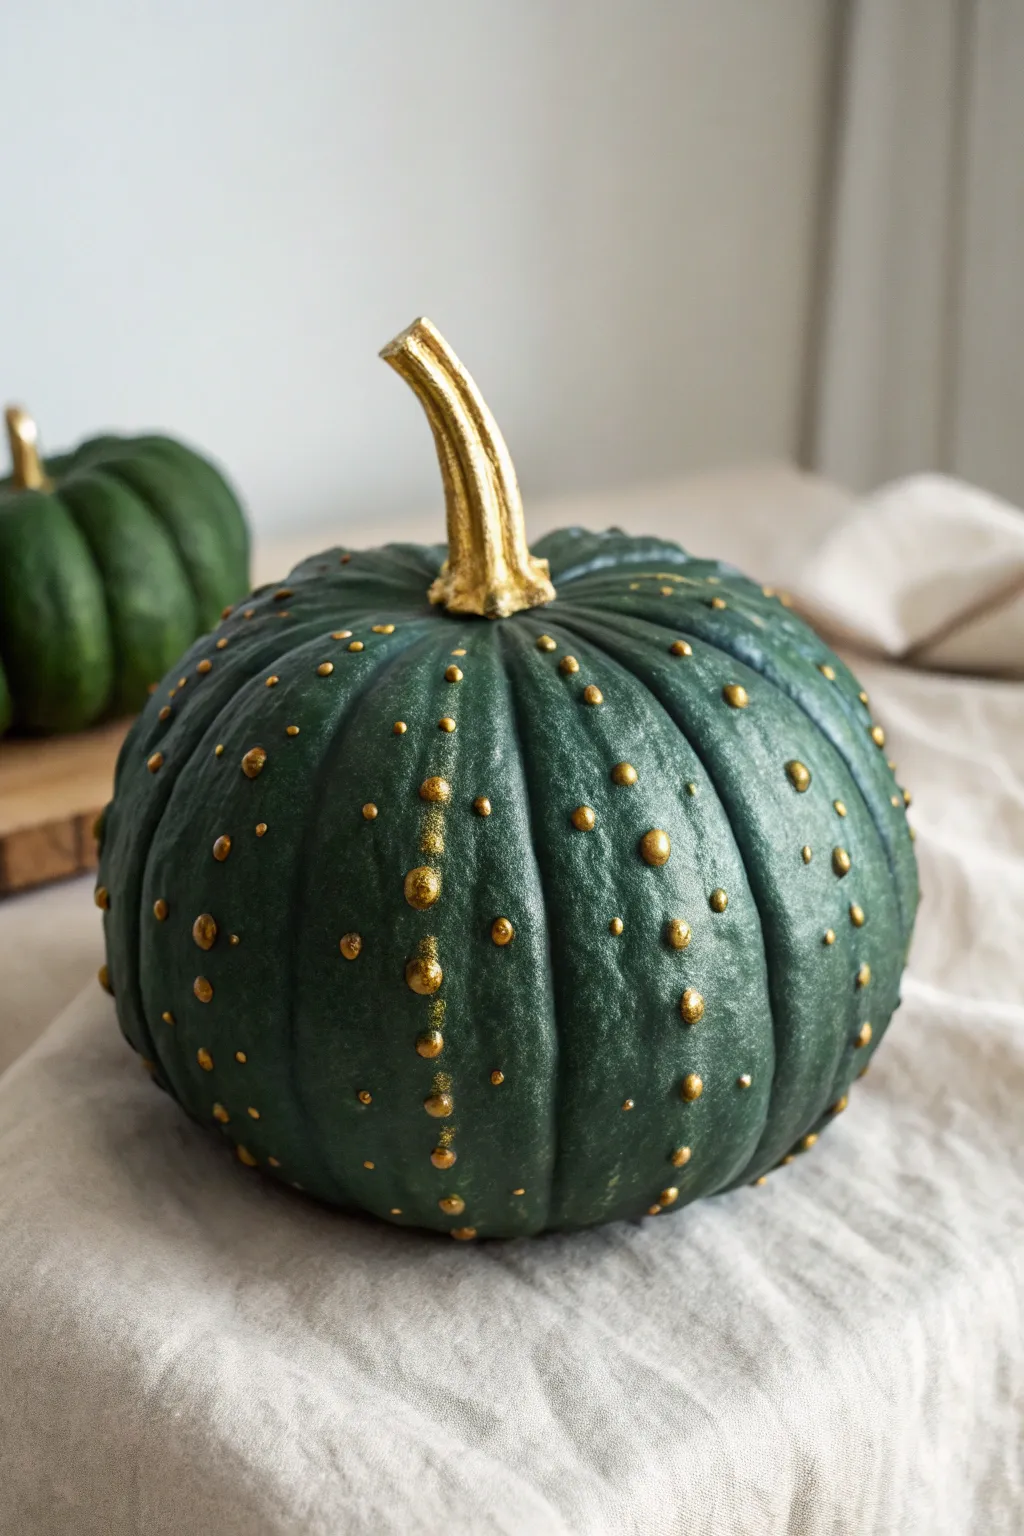
Transform a natural warty pumpkin into a stunning piece of modern decor with this elegant dark green and gold color scheme. By highlighting the unique texture and stem with metallic accents, you elevate a simple squash into an expensive-looking centerpiece.
How-To Guide
Materials
- Real or faux warty pumpkin (medium size)
- Deep forest green acrylic paint
- Metallic gold acrylic paint (liquid)
- Metallic gold leaf paint or gilding wax (for the stem)
- Medium flat synthetic brush
- Small round detail brush
- Lint-free rag or paper towels
- Palette or paper plate
- Matte spray sealer (optional)
Step 1: Preparation and Base Coat
-
Clean the Surface:
Begin by thoroughly wiping down your pumpkin. If using a real pumpkin, wash it with a mild bleach solution to remove dirt and bacteria, then dry completely. For a faux pumpkin, a quick wipe with a damp cloth removes any manufacturing dust. -
Protect the Stem:
Before you start painting the body, decide if you’ll be cautious or use tape. I prefer to wrap a small piece of painter’s tape around the very base of the stem to keep the green paint off the area we want to turn gold later. -
Apply First Green Layer:
Squeeze your deep forest green acrylic onto the palette. Using the medium flat brush, apply a smooth coat over the entire body of the pumpkin, working the bristles into the crevices and around the bumps. -
Check for Coverage:
Let the first coat dry for about 15-20 minutes. Dark colors often need a second pass to look truly opaque, so apply a second coat if you see any orange or original color peeking through. -
Ensure Full Dryness:
Allow the green base coat to dry completely. It should be dry to the touch and not tacky before you move on to the metallic steps, otherwise, colors might muddy together.
Use Your Fingers
For the most natural highlight on the bumps, ditch the brush! Dip your index finger in gold paint, blot it on paper, and gently rub it over the raised warts.
Step 2: Gilding the Details
-
Prepare the Gold Paint:
Dispense a small amount of metallic gold acrylic paint onto your palette. You want a paint that has a high shimmer finish for the best effect. -
Target the Large Warts:
Dip your small round detail brush into the gold. Gently dab the paint onto the very tops of the largest bumps (warts). Don’t paint the sides of the bumps; just hit the peaks to create dimension. -
Enhance Smaller Bumps:
For the tiny, pin-sized bumps, use just the very tip of your brush to dot them with gold. Varying the size of your gold dots preserves the organic look of the pumpkin’s texture. -
Adding Subtle Highlights:
Use a nearly dry brush with a tiny amount of gold to lightly graze the vertical ribs of the pumpkin near the bumps. This shouldn’t be a solid line, but rather a faint shimmer that connects the texture. -
Stem Preparation:
Remove the painter’s tape from the stem base. If you got any green on the stem, wipe it off or let it dry to paint over it. -
Painting the Stem Base:
Switch to your gold leaf paint or gilding wax for the stem, as these provide a richer, more solid metal look than standard acrylic. Carefully paint the base where the stem meets the pumpkin fruit. -
Covering the Stem Shaft:
paint the rest of the stem in long, upward strokes. Ensure you get the gold into the grooves of the stem for a cohesive look. -
Refining the Stem Tip:
Pay special attention to the cut end of the stem. Dab extra gold here to seal it visually and create a finished, sculptural appearance. -
Final Inspection:
Rotate the pumpkin and look for any missed bumps or green spots on the stem. Add small touches of gold where needed to balance the design. -
Sealing the Work:
If you plan to keep this outside or for multiple seasons (if faux), spray the body with a matte sealer to protect the paint from chipping.
Paint Slipping Off?
If acrylic paint beads up on a faux pumpkin’s plastic skin, prime the surface first with a spray primer or lightly sand it to give the paint some grip.
Place your gilded creation on a neutral linen cloth to let those metallic accents truly shine
Ombre Gradient That Wraps Around the Bumps
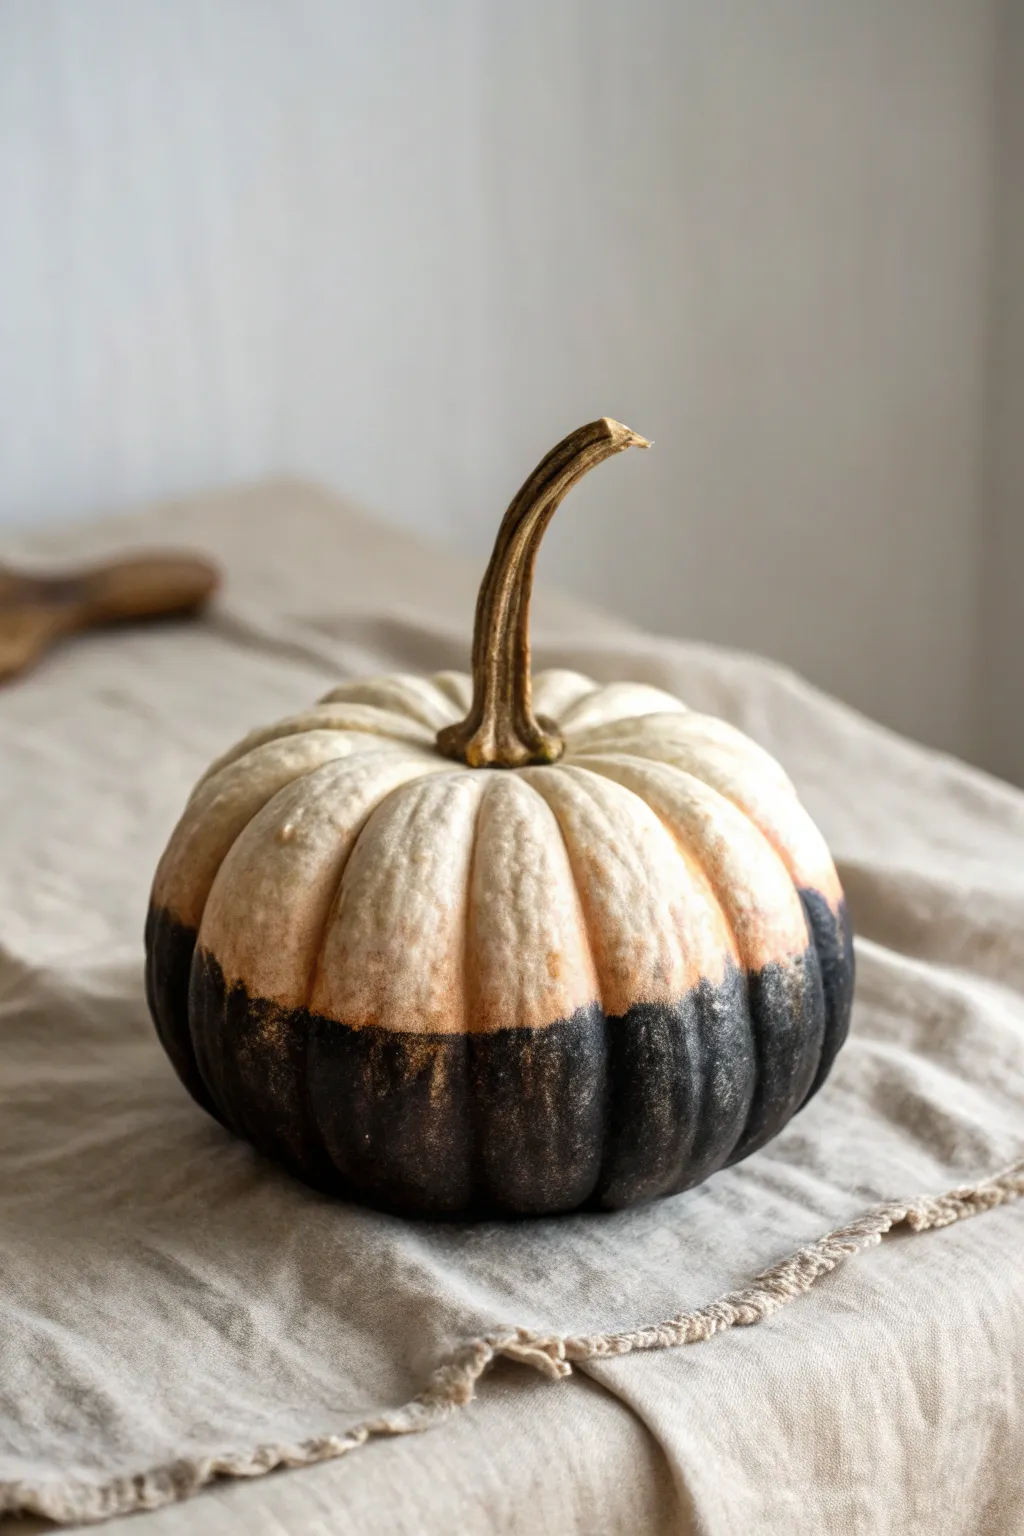
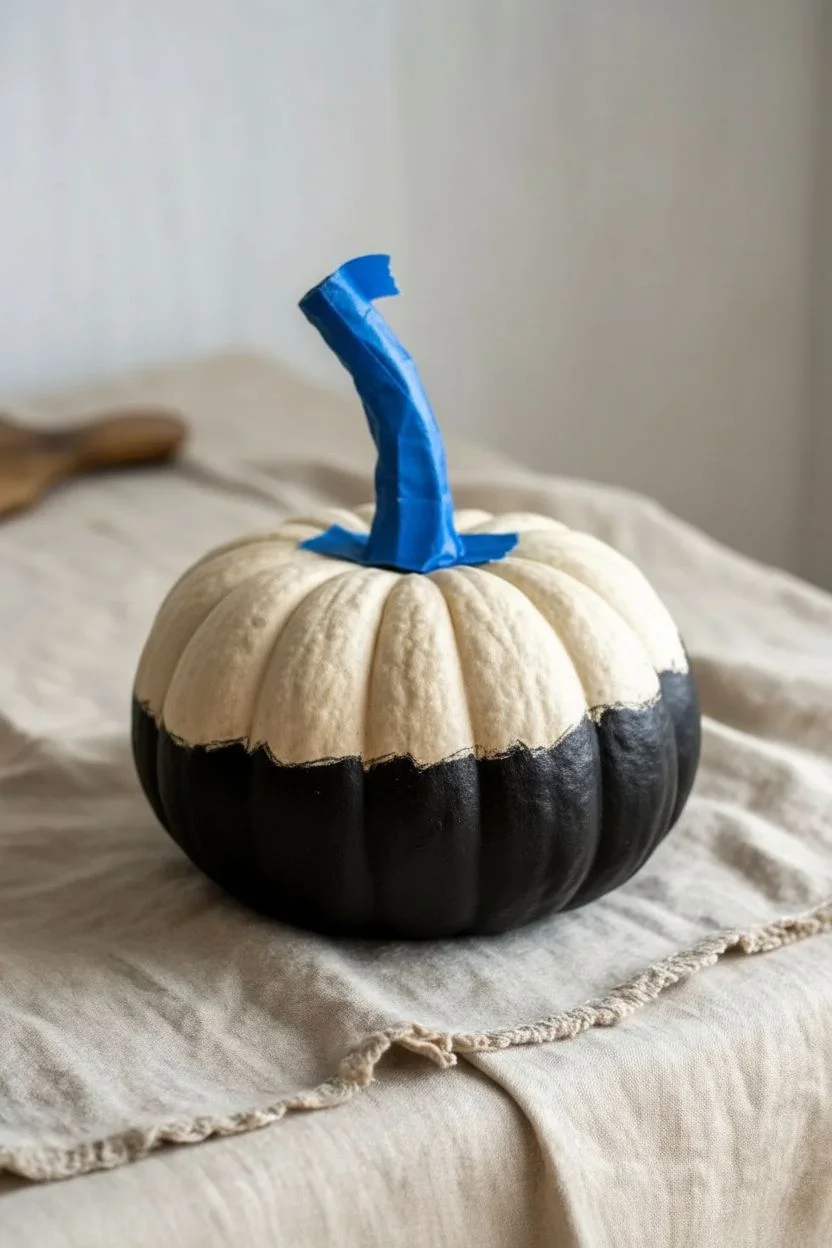
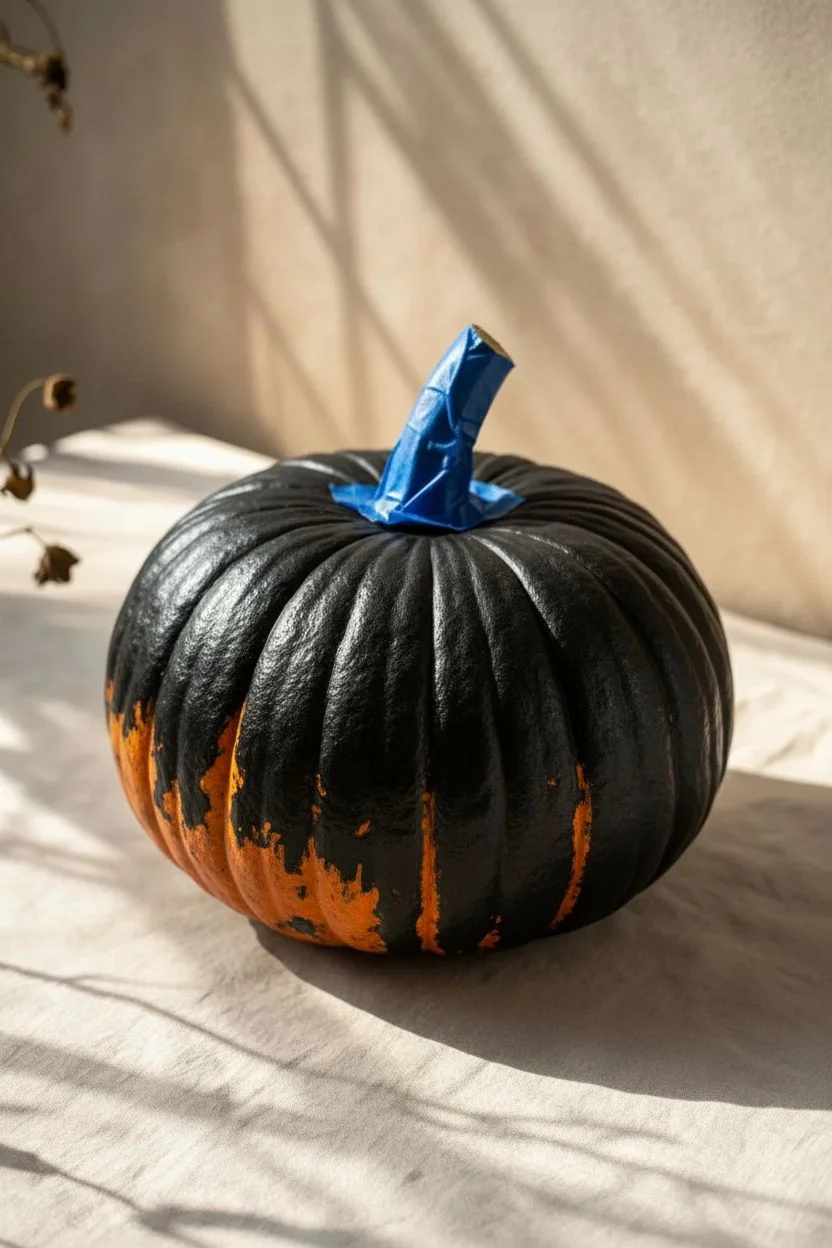
This striking design plays with high contrast by turning a simple white pumpkin into a piece of modern, minimalist decor. The look mimics a pumpkin that has been dipped in ink or soot, featuring a textured, organic transition line that highlights the pumpkin’s natural ribs.
Step-by-Step Tutorial
Materials
- Small white pumpkin (real or faux)
- Black acrylic craft paint (matte finish)
- Bronze or dark gold metallic wax (optional)
- Medium flat paintbrush
- Dry blending brush (stiff bristles)
- Paper towel or rag
- Painter’s tape (optional)
- Clear matte sealer spray
Step 1: Preparation & Base Coat
-
Clean surface:
Begin by thoroughly wiping down your pumpkin with a damp cloth to remove any dirt or oils. If using a real pumpkin, ensure it is completely dry before applying any paint. -
Protect the stem:
Even though we aren’t painting near the top, accidental splatters happen. You can wrap the stem loosely in painter’s tape if you want to be extra cautious and keep that natural brown tone pristine. -
Define the horizon line:
Visualize where you want the black section to end. For this specific look, aim for just below the halfway mark of the pumpkin’s height. You don’t need a straight line; following the natural curve makes it look more organic.
Use a Sponge
For a softer transition line, try dabbing the border with a slightly damp kitchen sponge instead of a brush to create a stippled, airy fade.
Step 2: Painting the Dark Base
-
Initial application:
Load your flat brush with matte black acrylic paint. Start painting from the very bottom center of the pumpkin, working your way upward. -
Fill the crevices:
As you paint into the deep ribs (the valleys between the bumps), make sure to nudge the bristles deep into the grooves so no white spots remain at the bottom. -
Establish the lower coverage:
Continue painting until the bottom third of the pumpkin is solid black. Don’t worry about the top edge just yet; focus on getting a rich, opaque coat on the bottom. -
Flip and check:
Carefully turn the pumpkin over or lift it up to ensure you’ve covered the very bottom completely, including the base where it sits.
Paint Peeling Off?
Real pumpkins have waxy skins that resist paint. If peeling occurs, sand the surface lightly with fine-grit sandpaper before repainting.
Step 3: Creating the Rough Transition
-
Feathering technique:
Now, approaching your imaginary halfway line, stop reloading your brush with paint. Use the residual paint on the brush to drag the color upward. -
Dry bushing the edge:
Switch to your dry, stiff-bristled brush. Without adding water, pick up a tiny amount of black paint and offload most of it onto a paper towel. -
Scrubbing the transition:
Use a scrubbing motion to apply the dry paint just above your solid black line. This creates a faded, dusty effect rather than a sharp stripe. -
Highlighting texture:
Allow the dry brush to hit the raised bumps more than the crevices. The image shows the black crawling higher on the bumps than in the valleys, emphasising the pumpkin’s shape. -
Adding depth (Optional):
If you want a slight shimmer like the example, dab a tiny bit of bronze wax on your finger and rub it strictly over the black painted areas on the highest points of the ribs.
Step 4: Refining & Finishing
-
Inspect the fade:
Step back and look at the gradient. If the line looks too perfect or straight, use your dry brush to scuff up sections randomly to break the uniformity. -
Touch up whites:
If you accidentally got a heavy blob of black too high up, wipe it immediately with a damp rag or paint over it with a touch of cream paint once dry. -
Let it cure:
Allow the pumpkin to sit undisturbed for at least an hour. Acrylic dries fast on the surface, but thicker areas in the grooves need time. -
Seal the work:
To prevent the black paint from chipping or transferring to your tablecloth, take the pumpkin outside and give the bottom half a light misting of clear matte sealer.
Now you have a sophisticated, moody accent piece that perfectly balances rustic texture with modern color
Botanical Vines That Weave Through Wart Clusters
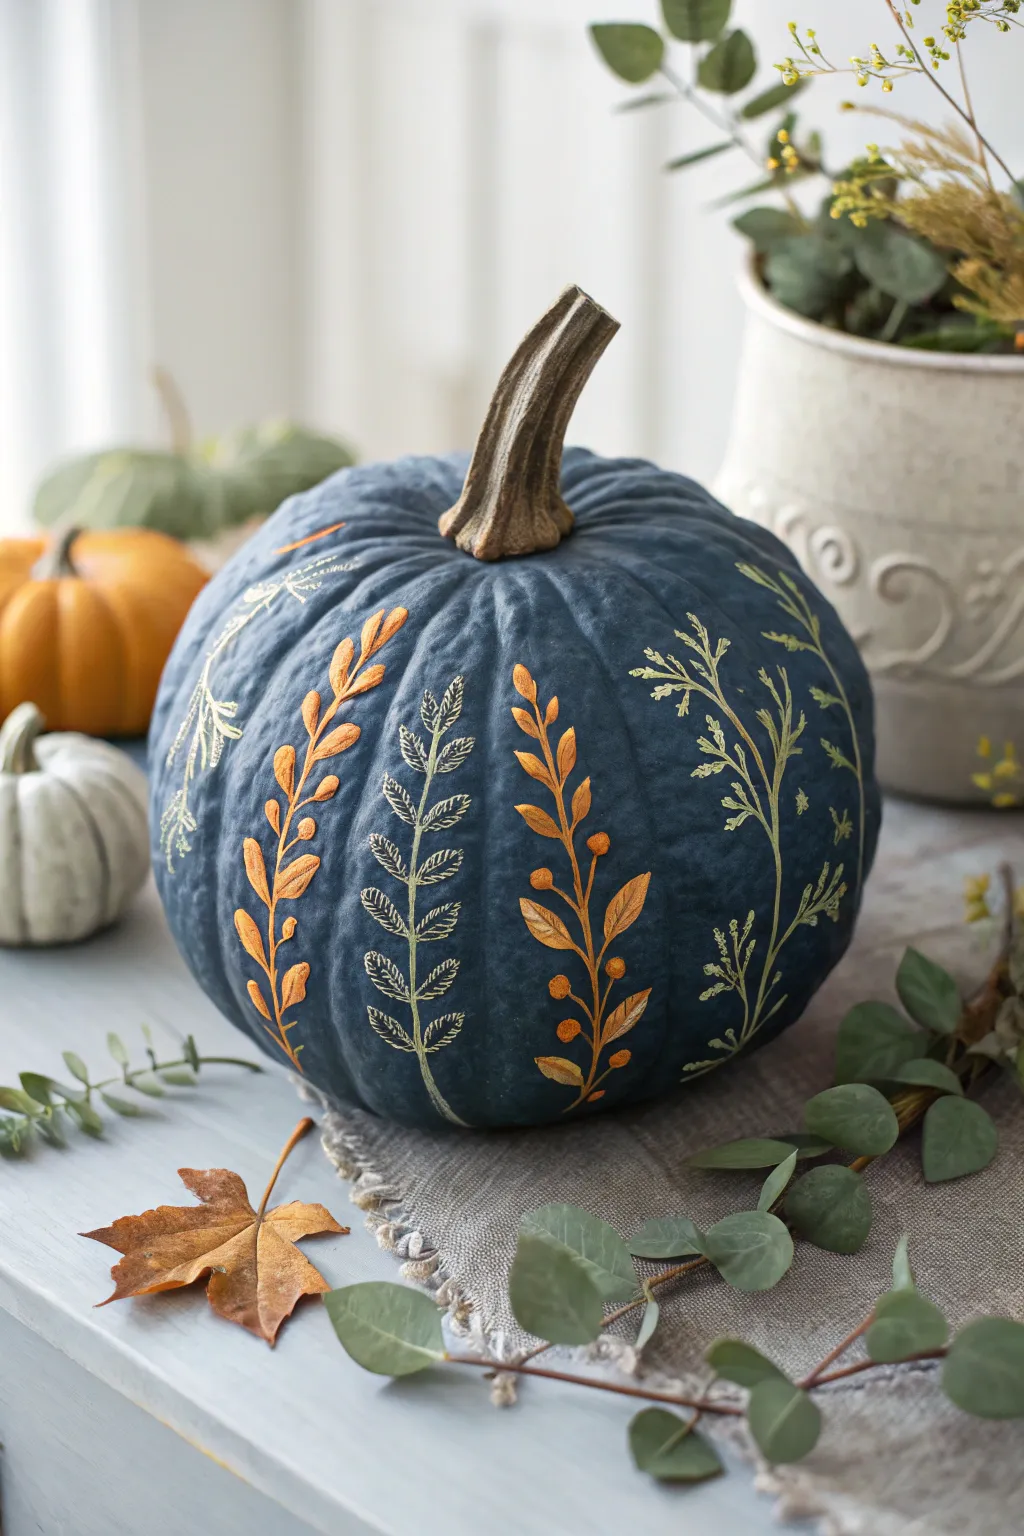
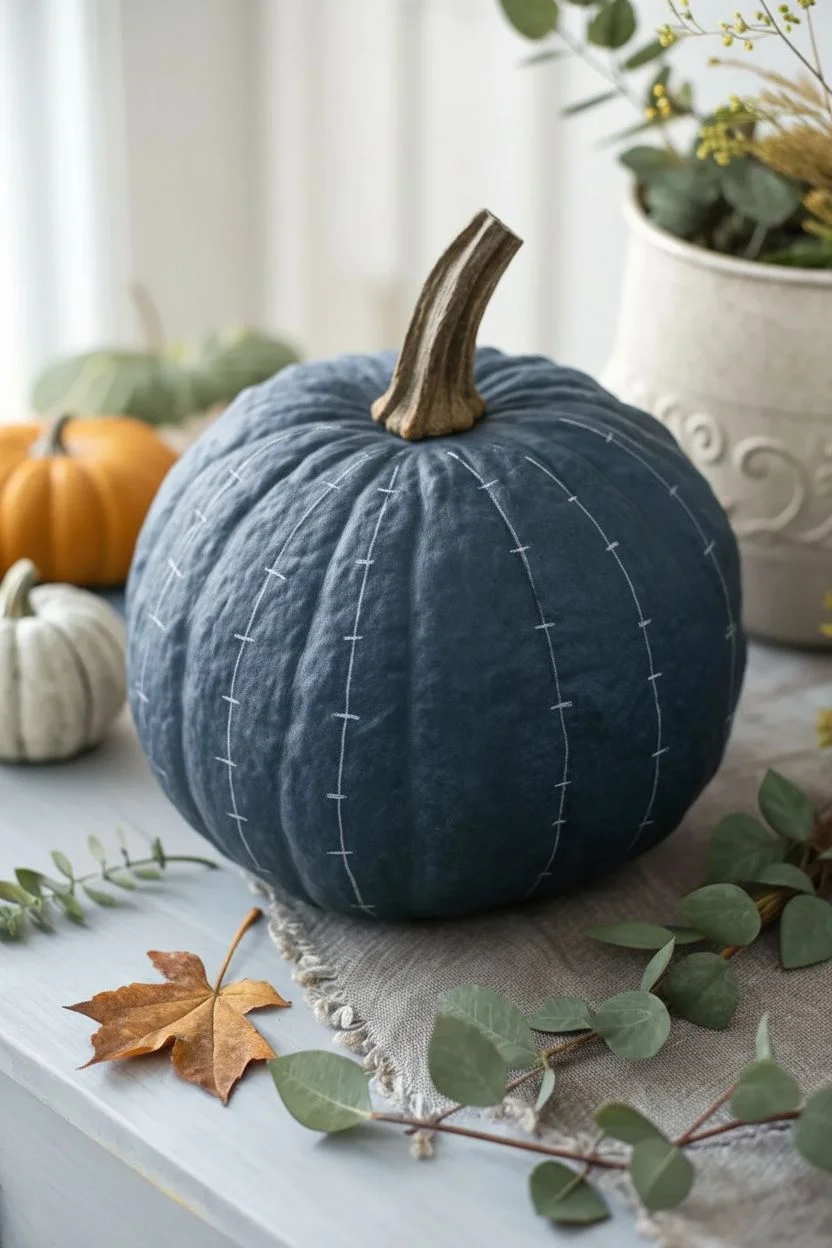
Transform a deep blue pumpkin into an elegant autumn centerpiece with delicate, hand-painted vines. This project balances the rustic texture of the gourd with the shimmer of metallic botanical illustrations for a sophisticated seasonal look.
Step-by-Step
Materials
- Real or faux pumpkin (dark teal, navy blue, or charcoal)
- Acrylic craft paints (metallic copper, metallic gold, sage green, cream)
- Fine liner brushes (size 00 and 0)
- Small round brush (size 1)
- Chalk pencil or white charcoal pencil
- Paper towel
- Palette or small plate
- Matte sealer spray (optional)
Step 1: Preparation and Base
-
Clean surface:
Begin by thoroughly wiping down your pumpkin with a damp cloth to remove any dirt or oils. If you are using a real pumpkin, ensure it is completely dry before starting to prevent paint peeling. -
Assess the canvas:
Study the natural ribs and valleys of your pumpkin. The deepest valleys are the perfect guides for your vertical vines, so identify which channels offer the smoothest path from bottom to stem. -
Apply base coat (optional):
If your pumpkin isn’t naturally dark blue or slate gray, apply two coats of a matte navy or charcoal acrylic paint. Let the first coat dry completely before adding the second for opaque coverage.
Step 2: Drafting the Design
-
Sketch the stems:
Using a chalk pencil, lightly trace a central vertical line up the middle of each valley section where you plan to paint. Don’t worry about being perfectly straight; a slight organic curve looks more natural. -
Mark leaf placement:
Along your chalk lines, make small tick marks where you want leaves to extend. Stagger them on alternating sides of the stem to mimic real plant growth patterns.
Paint sliding off?
Real pumpkin skin can be waxy. If acrylics slide, lightly buff the surface with fine-grit sandpaper or apply a clear matte primer first for better grip.
Step 3: Painting the Gold Vine
-
Mix the copper:
Squeeze a small amount of metallic copper acrylic onto your palette. If the paint feels thick, dampen your brush slightly to improve flow. -
Paint the main stem:
Using a size 1 round brush, paint the central stem following your chalk guide. Start from the bottom and lift pressure as you near the top for a tapered effect. -
Add base leaves:
Switch to a smaller brush. At the bottom of the stem, paint larger, slightly curved leaves. Use a ‘press and lift’ motion: press the belly of the brush down for the leaf width, then lift to create a sharp point. -
Create upper foliage:
As you move up the vine, make the leaves progressively smaller. Add tiny berries or dots near the top using the very tip of your brush handle dipped in paint.
Add dimensional whimsy
After painting, use a tiny dot of craft glue to attach real dried seeds or pressed flower petals over your painted leaves for a mixed-media 3D effect.
Step 4: Painting the Fern Vine
-
Mix sage tones:
Create a soft sage color by mixing a drop of cream into your green paint. You want a color that contrasts gently against the dark background. -
Draft fern structure:
In the valley next to your copper vine, paint a very thin central line using the 00 liner brush. This needs to be delicate, so keep your hand steady and light. -
Paint fronds:
Paint short, rapid strokes extending outward from the center line. Working in downward angles creates a drooping hemlock or fern appearance. -
Add detail:
Go back over a few fronds with a slightly lighter cream mix to add dimension and highlight, making the foliage look sun-kissed.
Step 5: Finishing Touches
-
Incorporate delicate sprigs:
Fill any large gaps with wispy, thread-like sprigs using watered-down cream paint. These should look like dried baby’s breath or fine grasses. -
Clean up:
Once the paint is fully dry, gently wipe away any visible chalk lines with a damp cotton swab or soft cloth. -
Protect the art:
If this pumpkin will be displayed outdoors or in a humid area, lightly mist the painted areas with a matte spray sealer to prevent chipping.
Now you have a stunning, moody botanical artwork ready to anchor your autumn display
Ink-Style Contour Lines to Map Every Bump
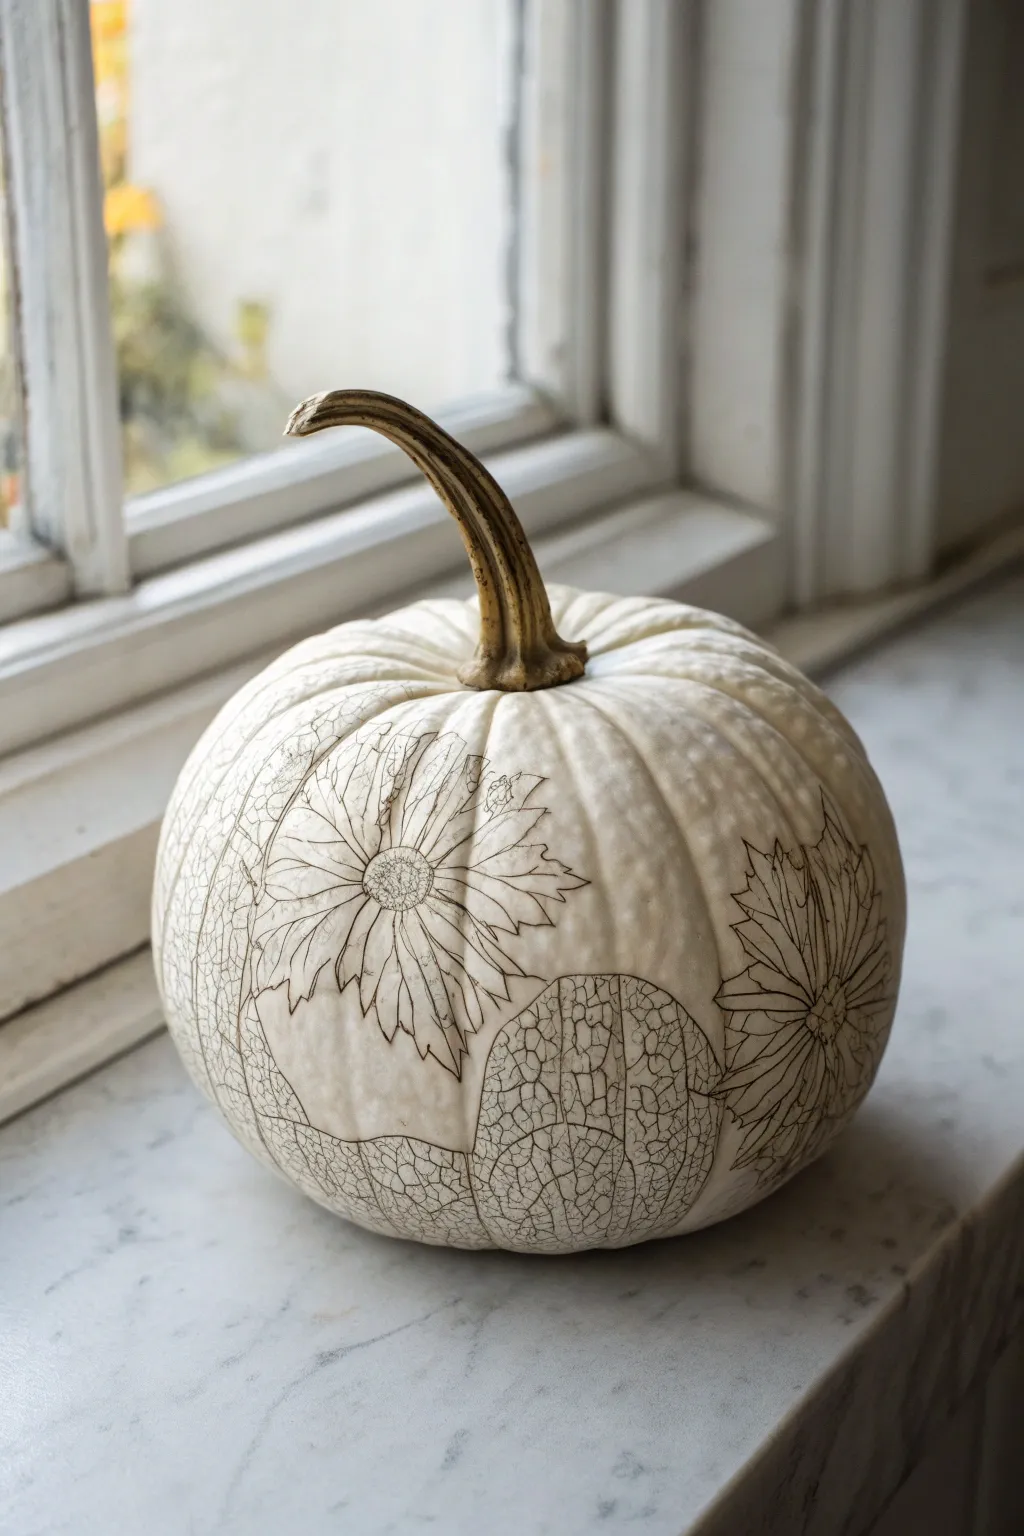
Transform a simple white pumpkin into a piece of fine art by using delicate ink lines to mimic the look of vintage copperplate etchings. This project celebrates the natural irregularities of the gourd, using fine-tipped pens to map out intricate florals and crackled textures directly onto the skin.
Step-by-Step Tutorial
Materials
- White pumpkin (smooth or slightly bumpy)
- Black micron pens (sizes 005, 01, and 05)
- Pencil (HB or 2B)
- Kneaded eraser
- Rubbing alcohol
- Cotton pads
- Matte spray sealant (optional)
- Reference images of dried leaves or botanical illustrations
Step 1: Preparation & Planning
-
Clean surface:
Begin by wiping the entire surface of your white pumpkin with rubbing alcohol on a cotton pad. This removes any natural oils or waxes that might prevent the ink from adhering properly. -
Dry completely:
Let the pumpkin air dry for at least 15 minutes to ensure a perfectly matte, dry canvas. -
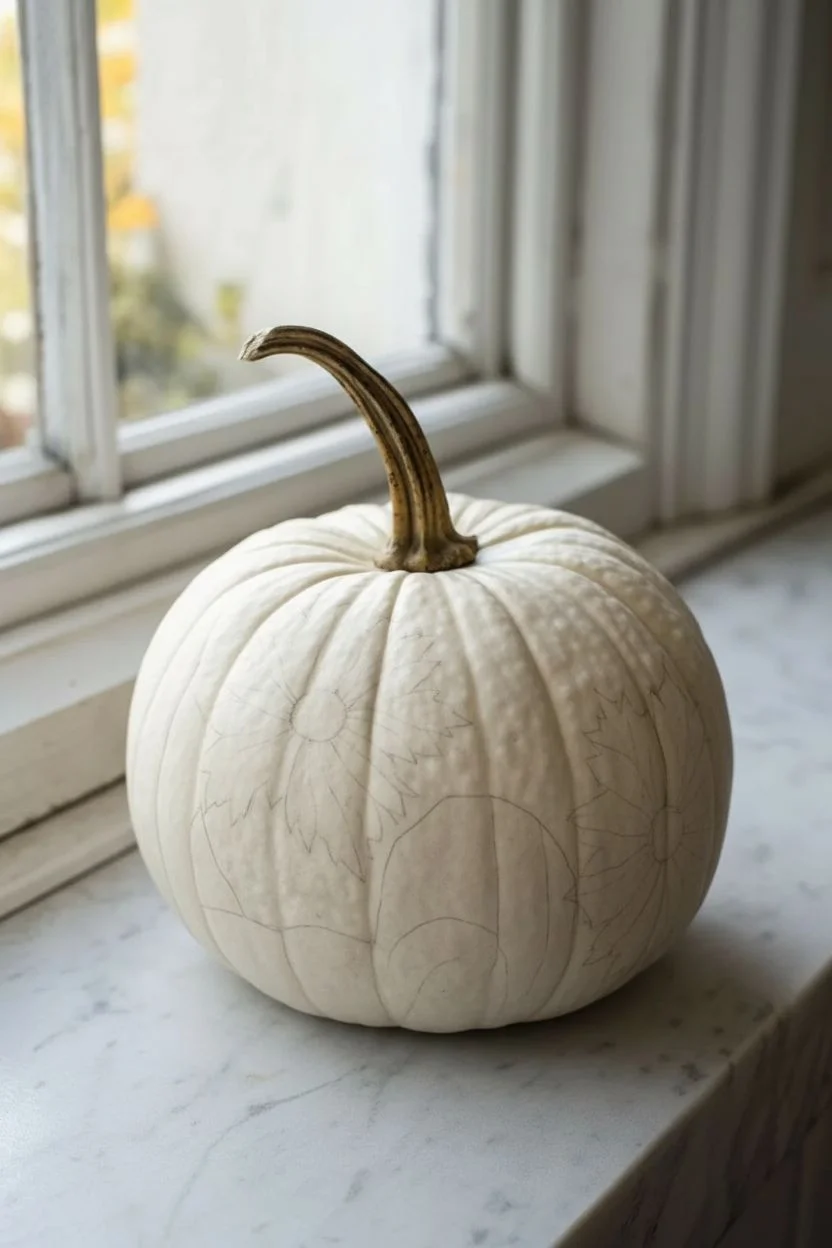
Sketch placement:
Using your pencil, lightly sketch the large shapes of your main floral elements. Don’t worry about details yet; just mark where the center of the flower and the tips of the large leaves will sit. -
Follow the form:
When sketching, let your lines curve with the natural ribs of the pumpkin. If there are bumps or warts, incorporate them into the design rather than fighting them.
Ink Flow Pro Tip
Store your pens tip-down for 30 minutes before starting. Drawing on vertical pumpkin surfaces fights gravity, so this ensures the ink flows smoothly instantly.
Step 2: Drafting the Design
-
Outline main flowers:
Switch to your 05 Micron pen (the thickest of the set) to draw the primary outlines of the flower petals and large leaves. Keep your hand steady but allow for natural wiggles. -
Define leaf veins:
Draw the central vein of each leaf using the 05 pen, but stop short of the tip to keep the look delicate. -
Add secondary details:
Switch to the 01 pen. Draw the secondary veins branching off the main ones in the leaves, and add the inner details to the flower center (the stamen area). -
Erase pencil lines:
Wait at least 10 minutes for the ink to fully set, then gently dab—don’t rub—with a kneaded eraser to lift away visible pencil marks. I prefer dabbing because it prevents smudging the fresh ink.
Step 3: Detailed Texture Work
-
Create the crackle effect:
Using the 005 pen (the finest tip), begin drawing a ‘crackle’ pattern in the negative spaces between leaves or on the lower smooth sections. These look like tiny, interconnected lightning bolts or dried riverbeds. -
Vary line density:
Make the crackle pattern denser near the outlines of the illustrations and more sparse as you move into open white space. This creates shading without using solid black. -
Shade the petals:
Use the 005 pen to add extremely fine hatching lines at the base of each petal, flicking the pen outward to taper the lines. -
Enhance the veins:
Add tiny branching capillaries to the leaves with the 005 pen. These lines should be barely visible from a distance but add richness up close. -
Check contrast:
Step back and look at the pumpkin. If the main flower gets lost in the texture, re-trace its outer edge with the 05 pen to make it pop.
Smudge Rescue
If you accidentally smudge wet ink, turn it into a shadow or a dark bruised spot on the leaf pattern. Don’t try to wipe it off; you’ll just spread the stain further.
Step 4: Finishing Touches
-
Fill small gaps:
Look for awkward empty spots where the design feels unbalanced. Fill these with small rocks or purely abstract contour lines that mimic the pumpkin’s skin texture. -
Dry overnight:
Let the pumpkin sit untouched overnight. Pumpkin skin is less absorbent than paper, so ink takes much longer to cure completely. -
Seal (Optional):
If you plan to keep this on a porch where it might get damp, lightly mist it with a matte spray sealant. Do this in very light coats rather than one heavy one to prevent ink bleeding.
Place your illustrated pumpkin in a well-lit spot to admire the intricate details you have created
Galaxy Night Sky With Stars on the Warts
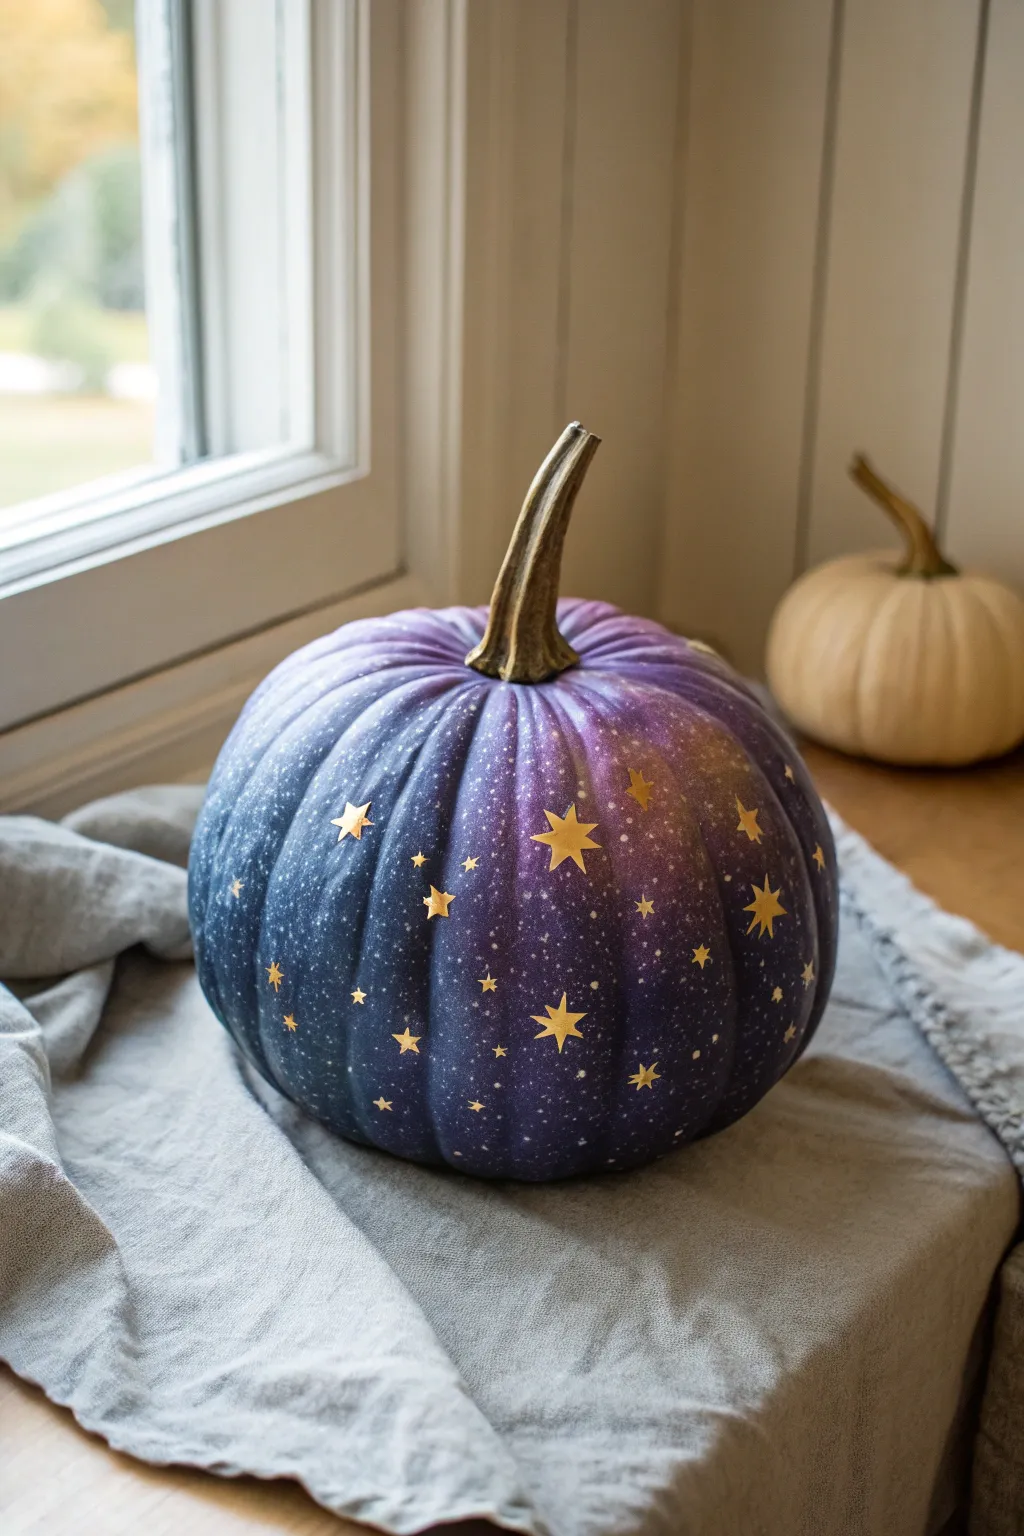
Transform an ordinary pumpkin into a mesmerizing piece of the cosmos with this beginner-friendly painting project. By blending deep blues and purples with shimmering gold stars, you’ll create a sophisticated decoration that looks stunning on a windowsill or mantle.
Step-by-Step
Materials
- Faux or real pumpkin (smooth or warty surface)
- Acrylic paints: Navy Blue, Deep Purple, Black, Magenta
- Gold foil leaf or metallic gold paint pen
- Stiff bristle brush (e.g., toothbrush)
- Sponge applicators or makeup sponges
- Fine detail paintbrush
- White acrylic paint
- Matte finish sealant spray
- Water cup and paper towels
Step 1: Preparation and Base Coat
-
Clean the surface:
Begin by thoroughly wiping down your pumpkin with a damp cloth to remove any dirt or oils, ensuring a clean canvas for your paint. -
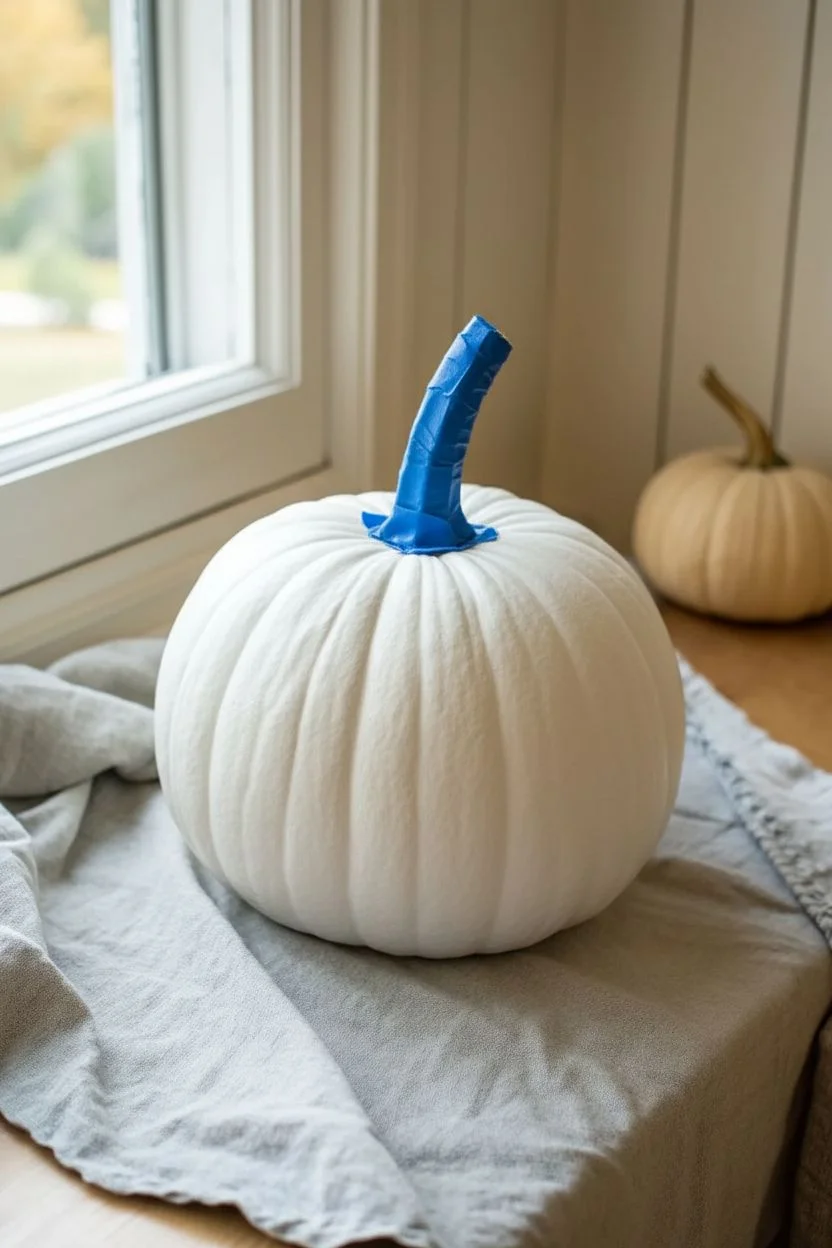
Protect the stem:
Wrap the stem tightly with painter’s tape to keep it natural, or leave it exposed if you plan to paint it later. -
Apply the primer:
If using a real orange pumpkin, apply a coat of white or grey primer first to help the galaxy colors pop; faux pumpkins usually take paint well directly.
Step 2: Creating the Galaxy Gradient
-
Sponge the dark base:
Pour distinct puddles of navy blue and black paint onto your palette. Using a sponge, dab these darkest colors onto the pumpkin, covering about 60% of the surface in irregular patches. -
Blend the mid-tones:
While the dark paint is still slightly tacky, sponge deep purple into the gaps and slightly over the edges of the navy sections to create a seamless transition. -
Add highlights:
Mix a small amount of magenta with the purple or use it straight. Sponge this lighter color into the center of the purple areas to create depth and a glowing nebula effect. -
Smooth the transitions:
I like to take a clean, slightly damp sponge and gently tap over the borders where colors meet to blur any harsh lines. -
Let it dry completely:
Allow the paint to fully cure for at least 30 minutes. The surface must be dry before adding the star details.
Cosmic Depth
Don’t over-blend your galaxy colors! Leaving some distinct patches of pure black and bright magenta creates a much richer, deeper look than a muddy gray-purple mix.
Step 3: The Starry Details
-
Mix the splatter paint:
Dilute a small amount of white acrylic paint with water until it reaches a thin, milky consistency. -
Create the distant stars:
Dip a stiff bristle brush or toothbrush into the thinned white paint. Use your thumb to flick the bristles, spraying a fine mist of white speckles across the pumpkin. -
Control the spray:
Vary your distance from the pumpkin; get close for dense star clusters and move back for a lighter dusting. -
Paint larger stars:
Using a gold paint pen or fine brush with metallic gold paint, freehand several five-pointed stars scattered randomly around the surface. -
Vary the star sizes:
Draw a mix of large ‘hero’ stars and tiny glimmering dots to mimic the variety found in a real night sky. -
Add starbursts:
For a few select stars, elongate the points slightly to create a twinkling cross shape.
Gilded Texture
Instead of painted stars, use actual gold leaf adhesive and foil for the larger stars. The texture catches the light beautifully and looks very high-end.
Step 4: Finishing Touches
-
Seal the artwork:
Once all paint is bone dry, take the pumpkin to a well-ventilated area and apply a light coat of matte sealant spray to protect the design. -
Reveal the stem:
Remove the painter’s tape from the stem. If the natural color doesn’t match the vibe, you can lightly brush it with gold or bronze paint.
Now you have a stunning galaxy pumpkin that brings the magic of the night sky into your home decor
Spooky “Poison” Greens That Pool Around the Texture
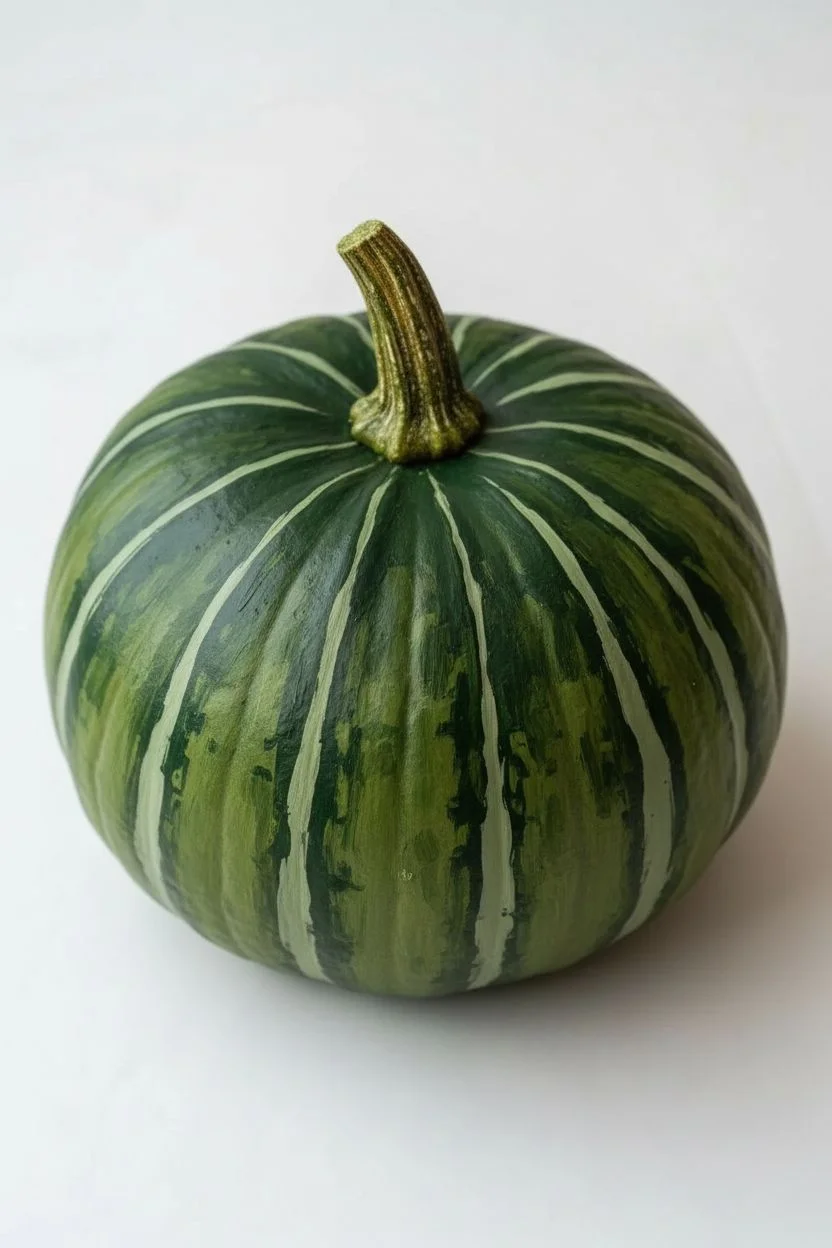
Master the art of painting a realistic warty pumpkin with this guide, focusing on capturing the interplay between deep forest greens and striking patches of pale yellow-orange. This project emphasizes creating convincing texture and depth, making the warty surface look almost three-dimensional on your canvas.
Detailed Instructions
Materials
- High-quality watercolor paper or primed canvas board
- Acrylic paints: Sap Green, Hooker’s Green, Yellow Ochre, Titanium White, Burnt Umber, Raw Sienna
- Synthetic brushes: medium flat brush, small round brush (size 2 or 4), fine detail liner brush
- Water container and paper towels
- Pencil for sketching
- mixing palette
Step 1: Form and Base Layers
-
Outline the Shape:
Begin by lightly sketching the pumpkin’s rounded, squat shape on your surface. Draw vertical curved lines to indicate the deep ribs (lobes) of the pumpkin, converging at the stem area. -
Define the Stem:
Sketch the twisted, woody stem emerging from the depressed center, noting how it curves slightly to one side. -
Block in Base Yellows:
Mix Yellow Ochre with a touch of Titanium White. Using your medium flat brush, paint the highlighted areas of the pumpkin ribs, specifically the sections that will appear yellowish-orange later. -
Apply Base Greens:
While the yellow is still slightly tacky, mix a wash of Sap Green. Apply this to the rest of the pumpkin skin, blending it gently into the yellow edges to avoid harsh lines. -
Deepen the Shadows:
Mix Hooker’s Green with a tiny bit of Burnt Umber. Paint this darker shade into the crevices between the ribs to establish the initial sense of volume and depth.
Natural Imperfections
Don’t aim for perfect symmetry. Varying the size and spacing of your ‘warts’ and mottling creates a much more convincing organic fruit.
Step 2: Building Texture and Wartiness
-
Stipple the Transition:
Using an older, scruffy round brush, stipple a mix of Sap Green and Raw Sienna where the green and yellow zones meet. This creates the speckled, mottled look of the rind. -
Create Wart Highlights:
Mix a thick, opaque pale yellow using White and Yellow Ochre. With a small round brush, dab small, irregular spots onto the yellow patches to simulate raised bumps or warts. -
Shadow the Warts:
Once the highlight dots are dry, use a translucent glaze of Burnt Umber to paint a tiny crescent shadow underneath each ‘wart’ to lift it off the surface visually. -
Strengthen Green Patterns:
Use the liner brush to paint thin, vertical veins of Hooker’s Green running down the ribs. Let these lines break and waver to mimic natural imperfections. -
Enhance the Mottling:
I like to dilute some Hooker’s Green with water and splatter extremely fine droplets over the green sections for that organic, speckled skin texture. Cover the yellow areas with paper if needed.
Step 3: The Stem and Final Details
-
Base the Stem:
Paint the stem with a mix of Raw Sienna and Sap Green. Use vertical brush strokes that follow the twist of the stem. -
Add Stem Grooves:
With the liner brush and Burnt Umber, paint thin, dark lines along the length of the stem to represent the deep woody grooves. -
Highlight the Stem:
Add dry-brushed highlights of Titanium White mixed with a little Yellow Ochre to the ridges of the stem for a dry, textured look. -
Deepen Recesses:
Go back with your darkest green-brown mix and reinforce the deepest shadows at the very bottom of the pumpkin and where the stem meets the fruit. -
Final Glaze:
To unify the colors, apply a very thin, watery glaze of yellow ochre over the entire pumpkin once completely dry. This warms up the greens and integrates the patches.
Muddy Greens?
If your green and yellow blends turn brown or muddy, let the first color dry completely before applying the second, or use a glazing medium.
Step back and admire the spooky, convincing texture you’ve brought to life on your canvas
Build Your Own Paper Mache Warts, Then Paint

For a modern twist on Halloween decor, try this bold, color-blocked pumpkin design. The crisp vertical stripes in contrasting orange, teal, and black create a graphic look that stands out against traditional gourds.
Step-by-Step Guide
Materials
- Faux or real pumpkin (smooth surface works best)
- Acrylic craft paint (orange, teal, black)
- Medium flat paintbrush
- Small flat paintbrush
- Painter’s tape or masking tape (optional)
- Palette or paper plate
- Cup of water
- Paper towels
Step 1: Preparation & Planning
-
Clean the surface:
Whether you are using a real or faux pumpkin, start by wiping it down with a damp cloth to remove any dust or dirt. Let it dry completely. -
Identify the segments:
Examine the natural vertical grooves of your pumpkin. These ribs create built-in guidelines for your stripes. You don’t need to measure perfectly; just follow the pumpkin’s natural shape.
Groove Guide
Don’t fight the pumpkin’s shape. Use the natural vertical indentations as your boundaries for the straightest looking lines.
Step 2: Painting the Base Colors
-
Start with orange:
Load your medium flat brush with bright orange acrylic paint. Select a section between two ribs and paint it from the top stem area down to the base. -
Apply a second coat:
Orange paint can sometimes be translucent. Allow the first coat to dry for about 10-15 minutes, then apply a second layer for full, opaque coverage. -
Skip a section:
Leave the next vertical segment blank for now. Moving directly to an adjacent wet section can cause colors to muddy.
Metallic Pop
Add a thin stripe of gold or silver paint in the grooves between the colors to add a touch of glamour to the design.
Step 3: Adding Contrast
-
Paint the teal stripe:
Once your orange stripe is dry to the touch, pick a segment two spots over (or wherever you want your pattern to land) and paint it with the deep teal color. -
Steady the edges:
Use the edge of your flat brush to carefully define the line within the groove. If you have a shaky hand, I find resting my pinky on the pumpkin helps stabilize the brush. -
Fill with black:
Select another segment to paint black. Because black is so dark, be extra careful at the edges, as it’s harder to correct mistakes later. -
Refine the coverage:
Check your black and teal sections. If the pumpkin’s original color peeks through, add another thin coat after the first has dried.
Step 4: Completing the Pattern
-
Fill the gaps:
Now that your initial stripes are dry, go back and paint the remaining empty segments. You can alternate colors in a specific pattern (Orange-Teal-Black) or paint them randomly. -
Touch up the grooves:
Switch to your small flat brush. Carefully paint deep into the crevices where the colors meet to ensure there are no unpainted gaps showing. -
Clean lines:
If any paint crossed over a line, wait for it to dry fully, then carefully touch it up with the correct color to keep the stripes crisp. -
Clean the stem:
If you accidentally got paint on the stem, wipe it off with a damp paper towel immediately or paint over it with a shade like raw umber for a natural look.
Step 5: Final Details
-
Dry time:
Let the entire pumpkin sit undisturbed for at least an hour to ensure the acrylic paint cures and doesn’t remain tacky. -
Optional sealing:
If this pumpkin will be displayed outdoors, apply a coat of clear matte sealer spray to protect your design from moisture.
Now you have a striking, graphic pumpkin that adds a sophisticated touch to your seasonal collection
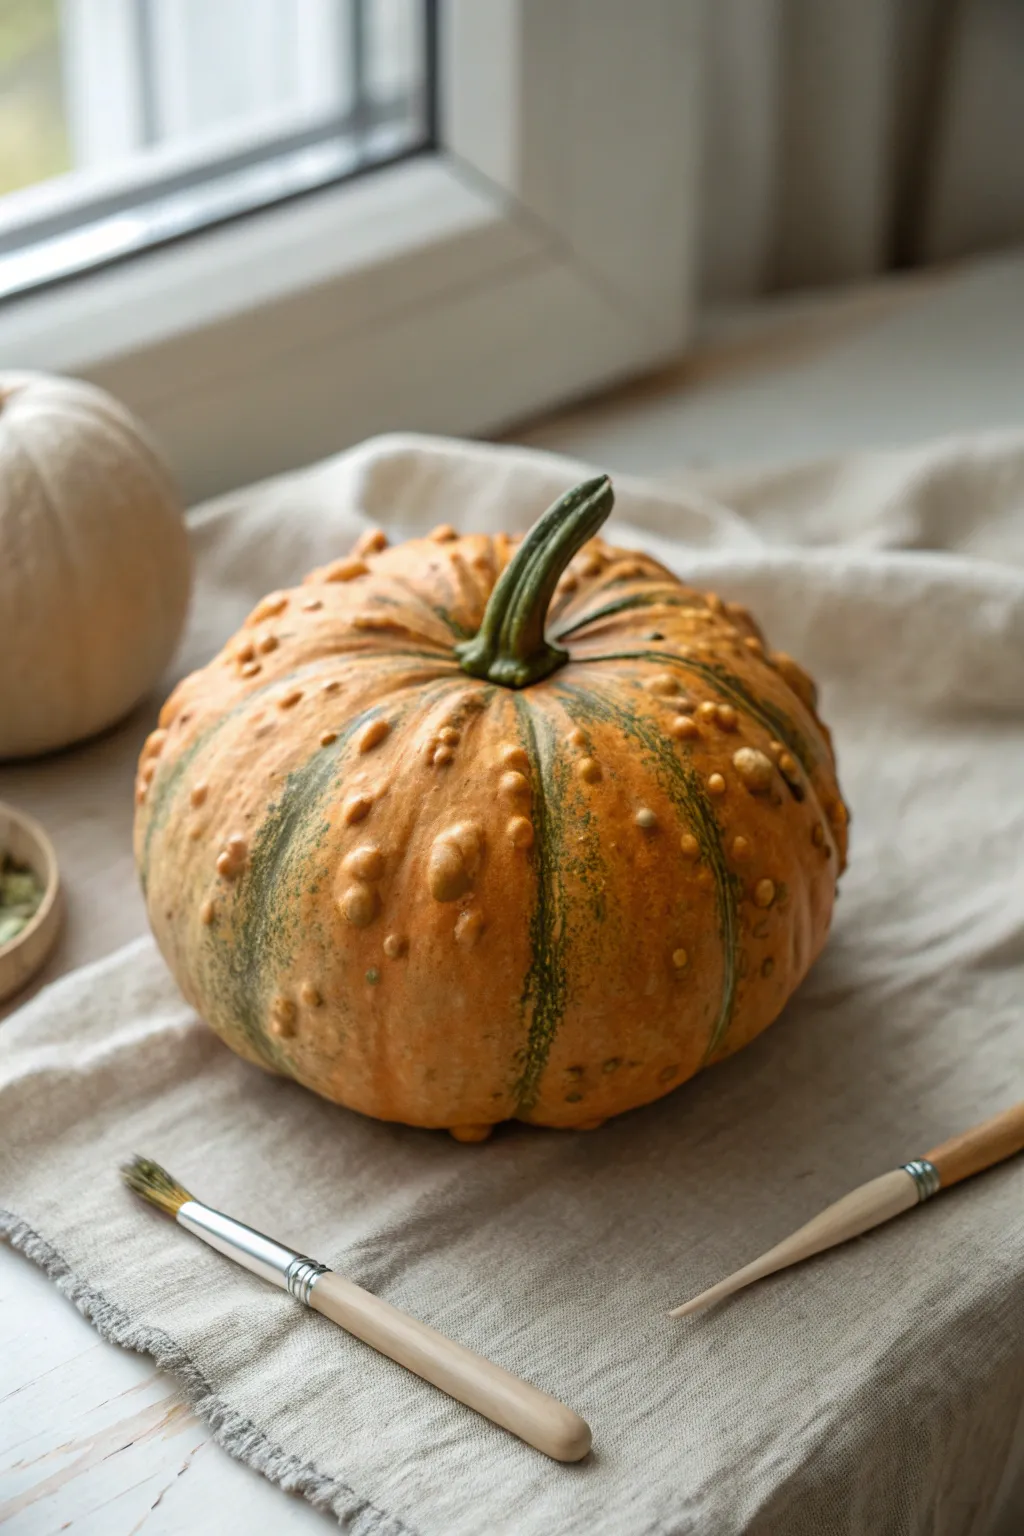
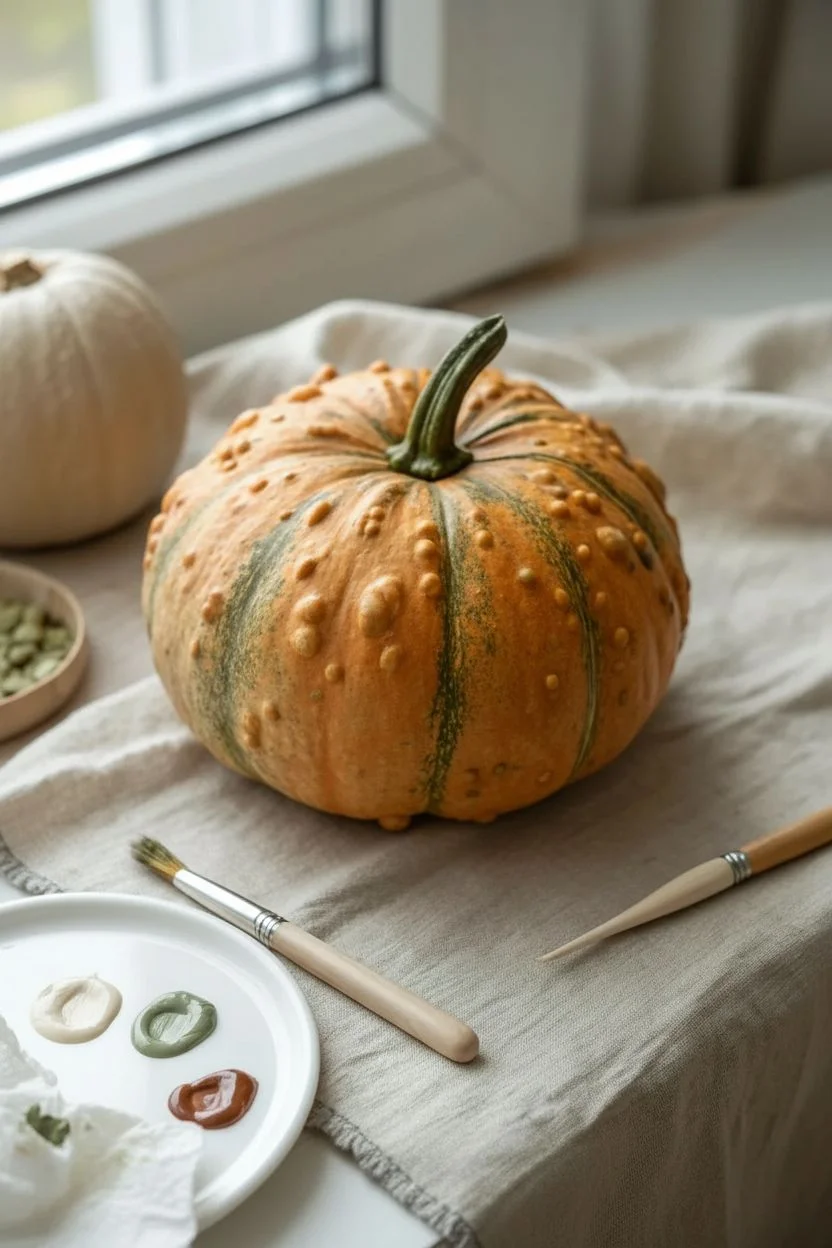
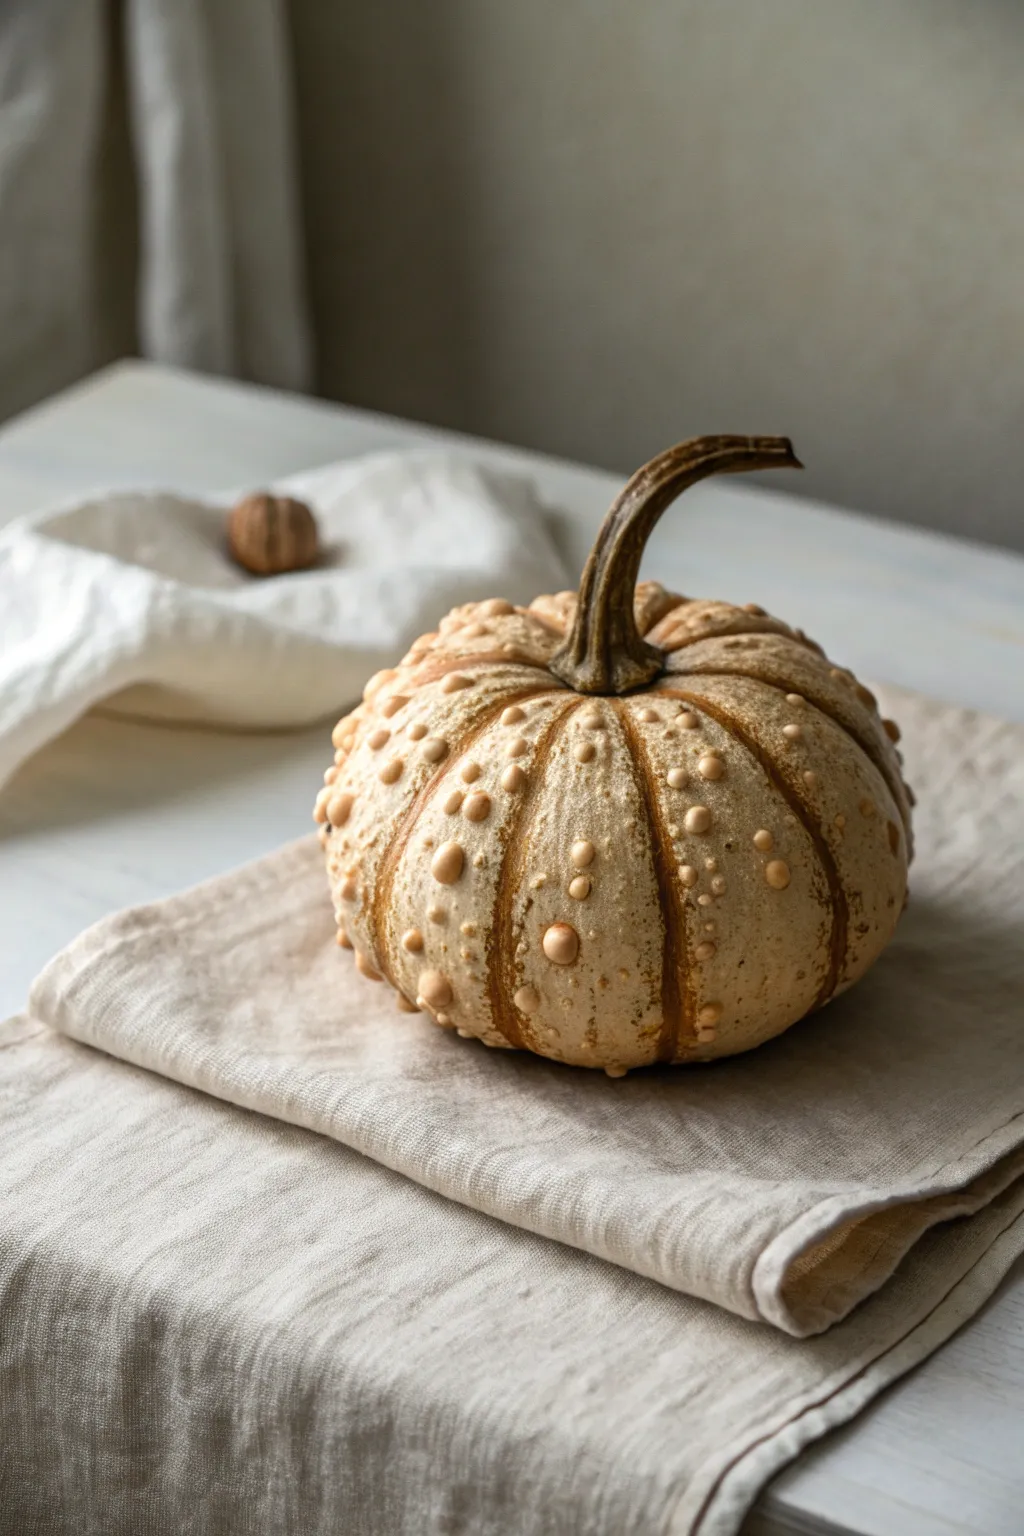
Extra-Raised Warts With Glue Dots and Layered Paint
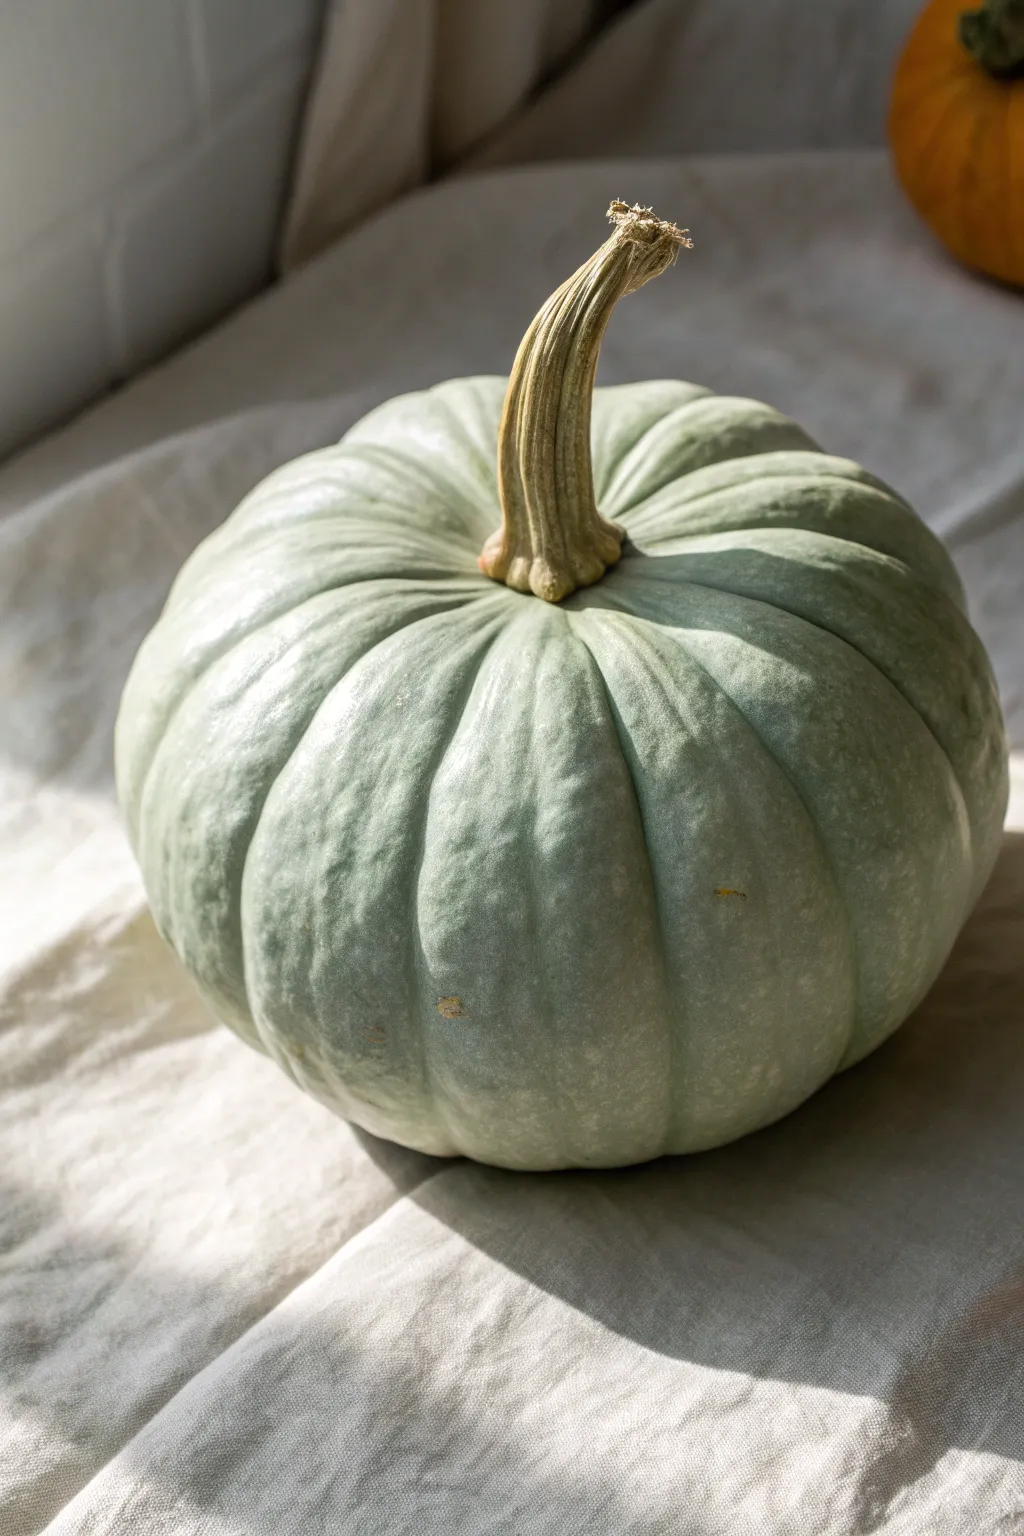
Transform a plain real or faux pumpkin into a sophisticated, heirloom-quality masterpiece featuring subtle raised textures and a soft, sea-glass finish. By combining strategic glue placement with layered paint washes, you’ll create a realistic skin that mimics the prized ‘warty’ look of fancy pumpkin varietals.
Detailed Instructions
Materials
- Medium-sized faux pumpkin (white or orange base)
- Hot glue gun and clear glue sticks
- Chalk paint (Sage Green, Pale Blue, Warm White)
- Matte finish clear coat spray
- Large flat brush
- Small round detail brush
- Natural sea sponge
- Paper towels
- Palette or paper plate
- Jar of water
Step 1: Creating the Texture
-
Clean the surface:
Wipe down your pumpkin with a damp cloth to remove any dust or oils that might prevent the glue and paint from adhering properly. -
Map out texture zones:
Visualize where you want the ‘warts’ to appear. On natural pumpkins, these often cluster near the ribs or toward the top, so aim for an organic, slightly asymmetrical arrangement. -
Apply glue droplets:
Using your hot glue gun on a low setting, gently squeeze out small, individual beading droplets onto the chosen areas. Vary the sizes from tiny pinheads to small peas for realism. -
Flatten peaks:
While the glue is still warm (but not scorching hot), tap the pointy peaks down with a wet finger or a damp spoon back. This kills the ‘Hershey’s Kiss’ shape and makes them look like natural bumps. -
Create major warts:
For larger, more prominent warts, layer a second dot of glue over a dried first one, or use a swirling motion with the gun to create a wider, flatter spread. -
Let it cure:
Allow the glue to cool and harden completely before moving on to any painting steps. This usually takes about 10–15 minutes.
Sticky Situations
If you get ‘glue strings’ while making dots, let them dry completely first. Then, use a stiff brush or old toothbrush to vigorously rub them away before painting.
Step 2: Base Painting
-
Mix the base color:
Combine two parts Sage Green with one part Pale Blue chalk paint. Mixing your own custom shade gives a more natural depth than straight-from-the-bottle colors. -
Apply the first coat:
Using the large flat brush, paint the entire pumpkin, covering the glue dots completely. Chalk paint is thick, which helps camouflage the glossy texture of the glue. -
Dab the crevices:
Use the tip of your brush to stomp paint into the deep ribs and around the base of the stem so no original orange or white shows through. -
Dry and assess:
Let this coat dry fully. If you can still see the transparency of the glue dots, apply a second thin coat specifically over the textured areas.
Rustic Speckle
For a hyper-realistic look, load a toothbrush with watered-down brown paint and flick tiny speckles onto the dried pumpkin to mimic natural garden dirt and imperfections.
Step 3: Layering the Glaze
-
Create a wash:
Dilute the Warm White chalk paint with water until it has the consistency of skim milk. This translucent wash is key for the ‘heirloom’ look. -
Brush on the wash:
Working in sections, brush the white wash over one or two ribs of the pumpkin at a time. -
Wipe back:
Immediately wipe over the wet wash with a dry paper towel or rag. The white paint will cling to the texture of the glue bumps and settle into the crevices, highlighting the details. -
Highlight the warts:
For extra definition, use your finger to lightly rub a tiny amount of undiluted Warm White paint solely onto the very tops of the largest glue bumps. -
Define the ribs:
I like to take a slightly darker mix of green and run a very thin line in the deepest valley between the ribs, blending it out quickly with a sponge for shadow depth. -
Paint the stem:
Paint the stem a tan or brownish-grey color. Dry brush a little of the green/blue mixture at the base where the stem meets the pumpkin for a seamless transition.
Step 4: Finishing Touches
-
Final inspection:
Look for any harsh lines where the wash gathered. Soften these with a damp sea sponge by dabbing gently. -
Seal the work:
In valid, well-ventilated area, spray the entire pumpkin with a matte clear coat. This protects the paint and knocks back any remaining shine from the glue, verifying the realistic skin texture.
Place your beautifully textured pumpkin on a mantel or table runner to enjoy the subtle elegance of this faux heirloom squash


Have a question or want to share your own experience? I'd love to hear from you in the comments below!