There’s something magical about chasing that sunset glow with watercolor—one juicy wash at a time. Here are my favorite watercolor sunset ideas that make the sky the star, with simple shapes and satisfying techniques you can totally pull off.
Classic Sunset Gradient Wash
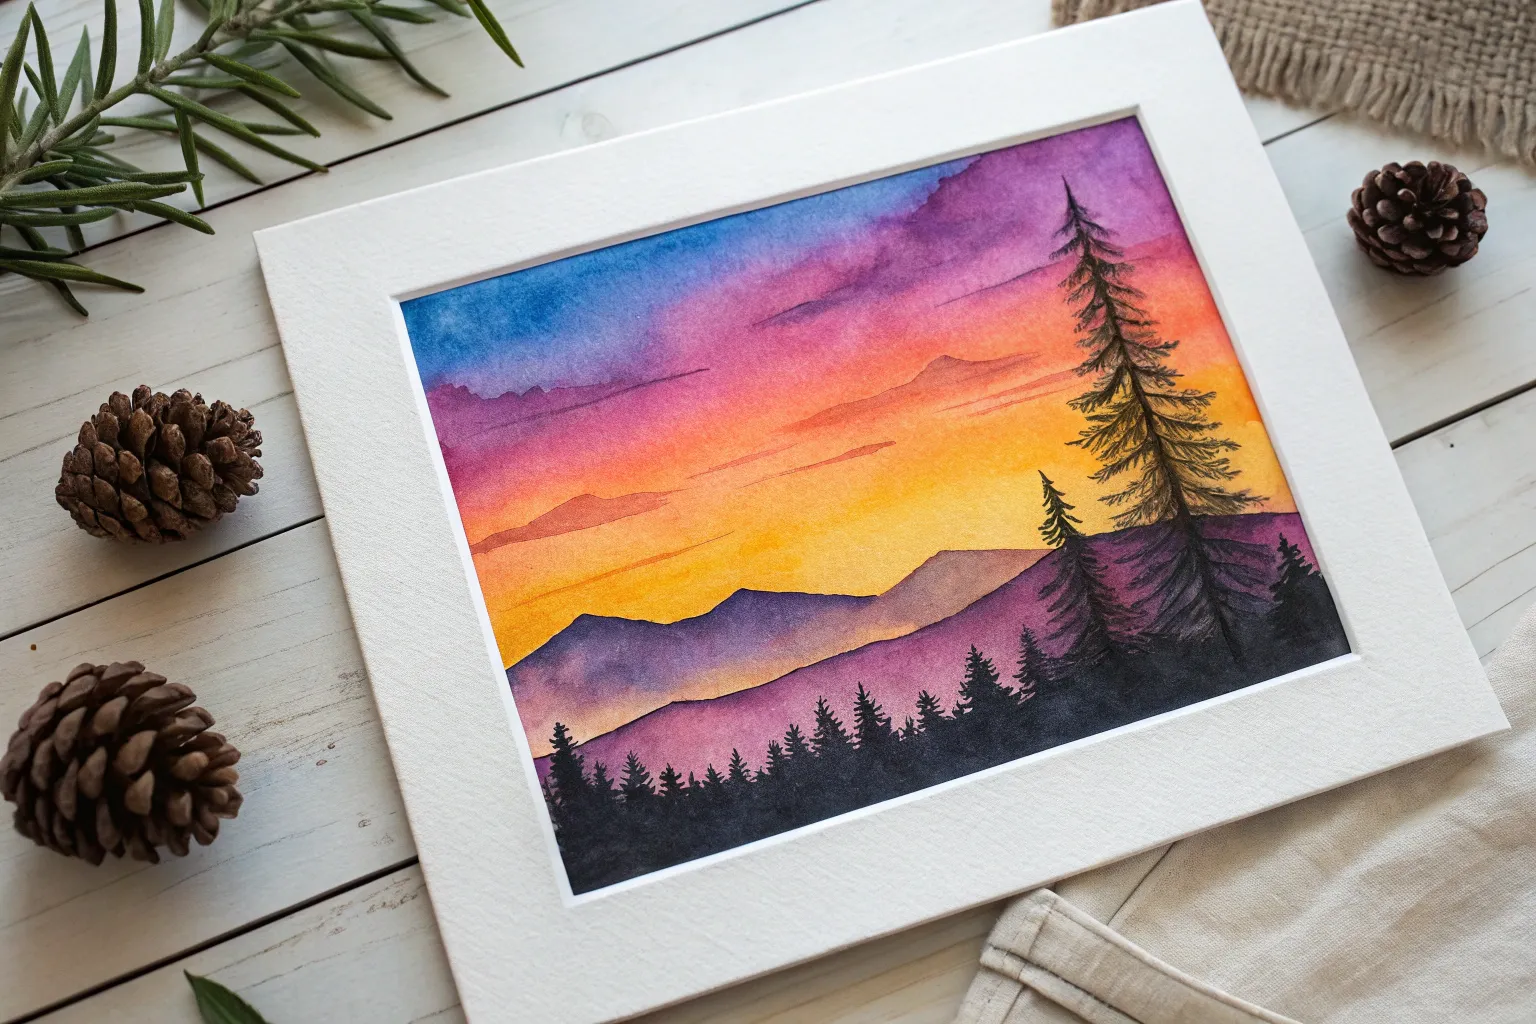
Learn to paint a serene, glowing sunset that transitions smoothly from deep violet to warm gold. This watercolor tutorial focuses on mastering the wet-on-wet technique to create soft, streaky clouds and a striking silhouetted foreground.
Detailed Instructions
Materials
- Cold press watercolor paper (300gsm/140lb)
- Painter’s tape or masking tape
- Flat wash brush (3/4 inch or 1 inch)
- Round brush (size 6 or 8)
- Small detail brush (size 2)
- Watercolor paints: Violet/Purple, Alizarin Crimson or Rose,Cadmium Yellow, Burnt Umber, Payne’s Gray or Ivory Black
- Clean water jar
- Paper towels
Step 1: Preparation and Base Gradient
-
Structure the workspace:
Begin by taping down all four edges of your watercolor paper to a hard board or table. This creates that clean white border shown in the finished piece and keeps the paper flat while wet. -
Pre-wet the sky:
Load your large flat brush with clean water and coat the upper two-thirds of the paper. You want an even sheen, not puddles, to prepare for the wet-on-wet sky. -
Apply the first yellow layer:
While the paper is glistening, pick up a vibrant Cadmium Yellow. Paint a horizontal band just above the center line of the paper, letting the color diffuse softly upwards. -
Transition to orange:
Mix a touch of Alizarin Crimson into your yellow to make a warm orange. Apply this immediately above the yellow band, blending the edges gently where they meet. -
Add the violet top:
Clean your brush and pick up a rich Violet. Paint the very top of the paper, pulling the color downwards to meet the pinkish-orange section. Let gravity help the colors merge.
Fixing “Cauliflowers”
If water blossoms appear in your smooth gradient, don’t scrub! Wait for it to dry, then gently glaze over the imperfection with a very diluted layer of the surrounding color.
Step 2: Creating Texture and Atmosphere
-
Lift out cloud streaks:
Before the sky dries completely, clean your brush and dry it slightly on a paper towel. Gently drag dry streaks diagonally across the purple and pink sections to lift pigment and create soft, white cloud shapes. -
Deepen the cloud shadows:
With a damp round brush, add a slightly more concentrated purple/pink mix into the wet paint at the top of the sky to suggest darker cloud masses. I find this gives the sky instant volume. -
Define the horizon line:
Allow the sky to dry until it is no longer shiny. Now, paint a faint, straight wash of watered-down violet or dull pink across the bottom third to establish the water or distant land. -
Paint the water reflection:
Using the flat brush, drag horizontal strokes of diluted yellow and orange across the bottom section, leaving some white paper showing through for sparkles on the water. -
Add middle-ground ripples:
Switch to a smaller round brush and mix a muted mauve color. Paint thin, horizontal lines over the water area to represent gentle waves or ripples catching the sunset light. -
Final drying time:
Let the entire painting dry completely. The paper must be bone-dry before painting the silhouette to prevent bleeding.
Step 3: The Silhouette Foreground
-
Mix the darkest dark:
Create a thick, opaque mix of Payne’s Gray and Burnt Umber. You want a color that looks nearly black but has warmth. -
Outline the tree line:
Using the tip of your round brush, paint an uneven, jagged line along the bottom edge of the paper. Vary the height to simulate bushes and grasses. -
Fill in the ground:
Fill the area below your jagged line with solid dark paint, anchoring the image. -
Add detailed foliage:
Switch to your smallest detail brush. Use quick, upward flicking motions along the top of the black silhouette to create the look of tall grasses and fine branches. -
Soften the base edges:
If the black looks too stark against the water, you can lightly soften the very bottom edge with a damp brush to make it look like it’s reflecting slightly or sitting in mist. -
The reveal:
Once the black paint is fully dry, carefully peel away the masking tape at a 45-degree angle to reveal the crisp white frame.
Make it Sparkle
For a magical touch, use a white gel pen after the painting is fully dry to add tiny, sharp highlights on the water ripples or a few stars in the upper purple sky.
Now you have a stunning, high-contrast sunset landscape ready to frame.


Ocean Horizon at Golden Hour
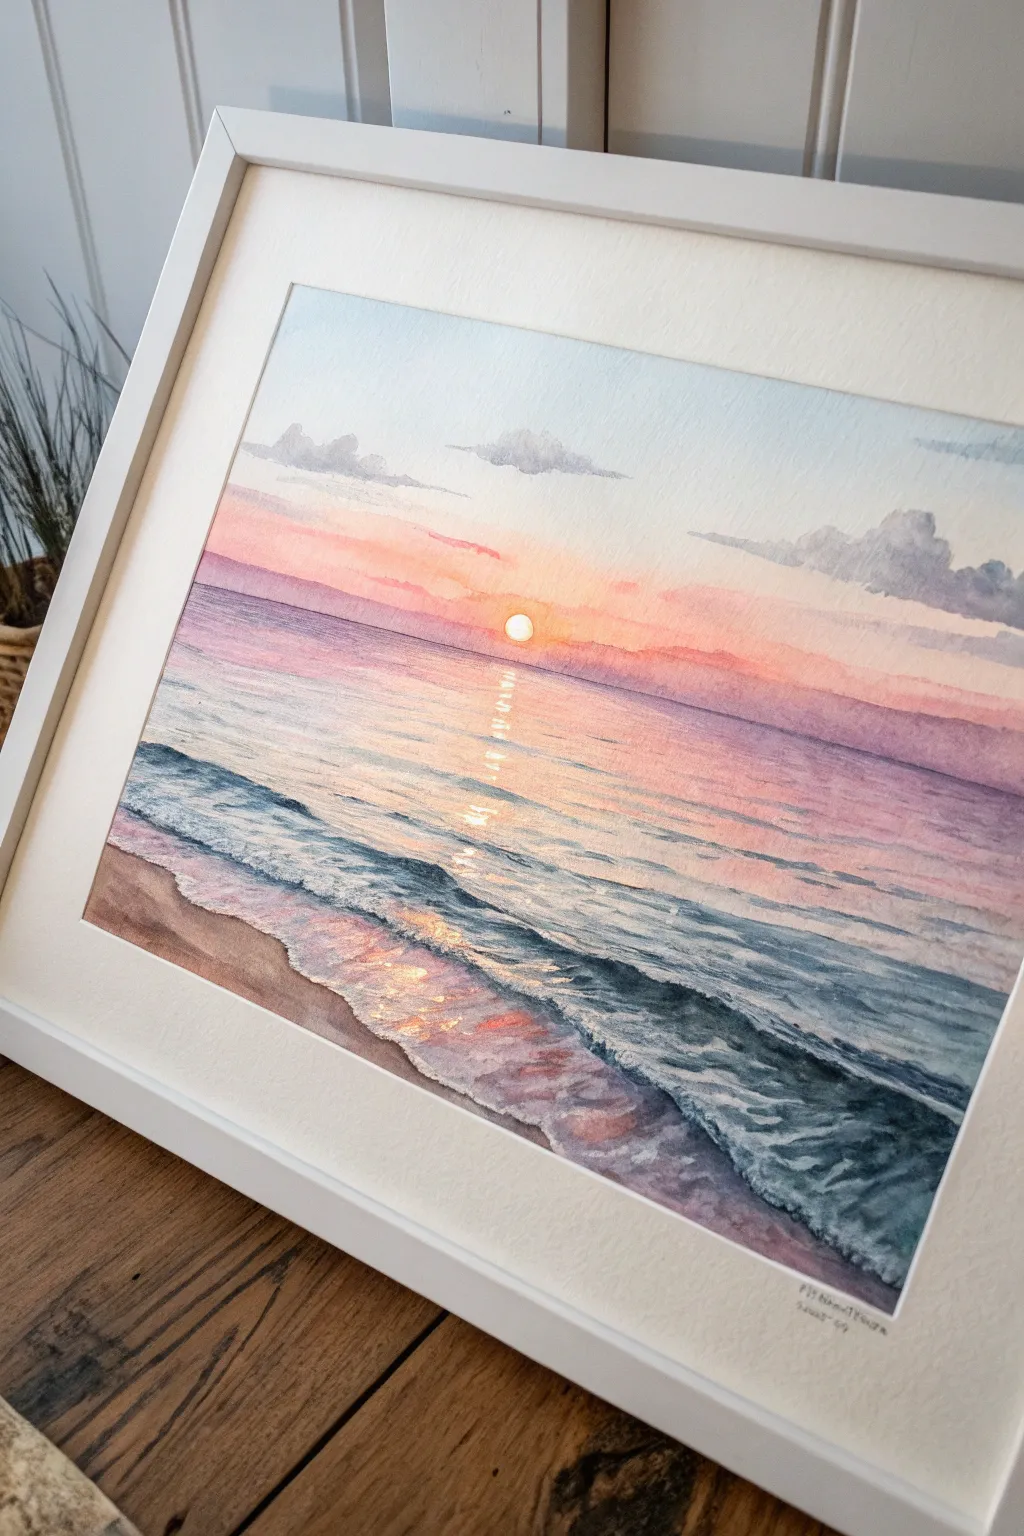
Capture the serene beauty of golden hour with this soft watercolor landscape featuring a glowing sun dipping below the horizon. The delicate blend of pastel pinks, purples, and blues creates a peaceful atmosphere, while the white gouache highlights bring the sparkling water to life.
Step-by-Step
Materials
- Watercolor paper (cold press, 300gsm/140lb)
- Watercolor paints: Rose Madder or Opera Pink, Quinacridone Gold, Ultramarine Blue, Cobalt Blue, Burnt Umber or Sepia
- White Gouache or bleed-proof white ink
- Flat wash brush (3/4 inch)
- Round brushes (sizes 4, 8, and 12)
- Masking tape
- Pencil (HB) and eraser
- Paper towels
- Two jars of water
Step 1: Preparation and Sketching
-
Secure the Paper:
Begin by taping down all four edges of your watercolor paper to a board using masking tape. This creates that crisp white border seen in the framed example and prevents buckling. -
Light Sketching:
Using an HB pencil, draw a straight horizon line about a third of the way down from the top. Sketch the gentle curve of the shoreline at the bottom left, and lightly mark where the main wave will crest. -
Masking the Sun:
To keep the sun perfectly white and bright, carefully paint a small circle of masking fluid just above the horizon line in the center. Allow it to dry completely.
Muddy Colors?
If your pinks and blues are turning grey/brown where they touch, let the first layer dry completely before glazing the second color over it, rather than mixing them wet.
Step 2: Painting the Sky
-
Wet-on-Wet Sky Base:
Pre-wet the sky area with clean water using your flat brush. While the paper is glistening but not soaking, drop in a very pale wash of Ultramarine Blue at the top corners. -
Adding Warmth:
Quickly switch to a soft mix of Rose Madder or pink. Glide this across the middle of the sky, blending it upwards into the blue while the paper is still damp to ensure soft transitions. -
Horizon Glow:
Near the horizon line, introduce Quinacridone Gold or a warm yellow. Let this blend slightly with the pink above but try to keep the area around the masked sun lightest. -
Painting Clouds:
While the sky is still damp, mix a violet-grey using Ultramarine and a touch of Rose Madder. Dab in the soft, fluffy clouds on the right and left, letting the edges diffuse naturally.
Step 3: The Ocean and Horizon
-
Distant Water:
Once the sky is dry, mix a purple-pink hue. Paint the distant ocean water right against the horizon line with horizontal strokes, leaving the center area beneath the sun lighter for the reflection. -
Mid-Ocean Tones:
Gradually transition your paint mix to include more blue as you move down the paper. Continue using horizontal strokes to mimic the surface of the water. -
Sun Reflection Base:
In the center column beneath the sun, use very dilute yellow and pink washes. Leave small gaps of white paper sparkling through here to represent the strongest glare. -
Deepening the Horizon:
I like to add a slightly darker line of purple right on the horizon to separate sky from sea distinctly.
Sparkle Tip
For the finest sparkles on the water, load a toothbrush with white gouache and gently flick the bristles to create a fine mist of spray over the highlight area.
Step 4: Waves and Shoreline
-
Forming the Wave Structure:
Mix a deeper teal-blue using Cobalt Blue and a tiny touch of green or yellow. Paint the body of the crashing wave, leaving the top edge rough to suggest white foam. -
Shadows in the Foam:
Use a diluted grey-blue mix to paint the shadows within the white foam of the crashing wave. This gives the water volume. -
Wet Sand Reflection:
Paint the sand wet-on-dry using Burnt Umber and a touch of Rose Madder. While wet, drop in reflections of the pink sky clouds into the wet sand area. -
Defining the Shoreline:
Darken the edge where the water meets the sand with a stronger brown mix to show the wettest part of the beach.
Step 5: Final Details
-
Remove Masking:
Once the paper is bone dry, gently rub away the masking fluid to reveal the crisp white sun. -
Sun Glare:
Use a damp, clean brush to gently soften the hard edges of the sun if needed, or leave it crisp as shown. -
Sparkling Highlights:
Using white gouache and a fine liner brush (size 0 or 1), paint the bright reflections on the water surface directly under the sun. -
Foam Texture:
Stipple white gouache along the crest of the wave and where the water rushes onto the sand to mimic sea foam and bubbles.
Peel off your tape carefully to reveal those clean edges and enjoy your peaceful sunset scene


Sunset Reflection on a Quiet Lake
Capture the serene beauty of day turning into night with this vibrant watercolor landscape. Rich purples and fiery oranges meet deep calm waters, creating a striking contrast that is surprisingly simple to achieve with wet-on-wet techniques.
Step-by-Step Guide
Materials
- Cold press watercolor paper (140lb/300gsm)
- Watercolor paints: Alizarin Crimson, Cadmium Orange, Ultramarine Blue, Burnt Umber, Purple/Violet
- Large flat wash brush (3/4 inch)
- Medium round brush (size 8)
- Small painting knife or credit card (optional)
- Masking tape
- Paper towels
- Two jars of water
Step 1: Setting the Sky
-
Prepare the paper:
Begin by taping down all four edges of your paper to a board. This prevents buckling when we add lots of water. Lightly sketch a horizon line just a bit below the center of the page. -
Wet the sky area:
Using your large flat brush, apply clean water to the entire sky area, stopping right at your pencil horizon line. The paper should be glisten, but the water shouldn’t be pooling. -
Apply the glow:
While the paper is wet, load your brush with watered-down Cadmium Orange. Painted horizontally across the horizon line, letting the color bleed upward. Keep this brightest near the center. -
Add dramatic clouds:
Mix a vibrant purple using Alizarin Crimson and Ultramarine Blue. While the orange is still damp (but not soaking), drop in loose cloud shapes in the upper sky. Let the purple bleed slightly into the orange for soft edges. -
Deepen the upper sky:
At the very top of the paper, add a wash of pure Ultramarine Blue mixed with a touch of purple to create the night sky coming in. Blend this downwards into your cloud layer.
Muddy Purple Clouds?
If your purple clouds turn brown when touching the orange sunset, let the orange layer dry slightly more before adding purple. Wet-on-damp gives soft edges without mixing the colors too much.
Step 2: Creating the Reflection
-
Mirror the base colors:
I like to work on the water immediately after the sky. Wet the water area below the horizon. Paint a horizontal wash of the same Cadmium Orange just below the horizon line, mirroring the sunset glow. -
Reflect the clouds:
Using your purple mix, paint horizontal strokes in the water area that roughly correspond to the clouds above. Unlike the sky, keep these strokes flatter and slightly more separated to suggest water texture. -
Add deep water tones:
Near the bottom of the paper, introduce Ultramarine Blue. Paint broad horizontal strokes, leaving some gaps where the pink and orange can peek through. This creates the foreground water. -
Soften the blend:
Use a damp, clean brush to gently pass over the transition areas in the water if the lines look too harsh, but try to maintain that horizontal streakiness characteristic of ripples. -
Let it dry completely:
This step is crucial. Walk away and let the entire painting become bone dry before proceeding to the next phase.
Step 3: The Dark Silhouette
-
Mix the darks:
Create a very dark, near-black mixture using Ultramarine Blue and Burnt Umber. It should be thick, with very little water—almost a cream consistency. -
Paint the distant shore:
On the left side of the horizon, paint a thin, low strip of land. Keep the profile low and fairly flat. -
Create the treeline:
On the right side, paint the taller treeline. Use the tip of your round brush to dab vertical shapes, varying the heights to look like pine trees. Ensure the bottom of the trees sits perfectly straight on the horizon line. -
Add the tree reflection:
Immediately beneath the dark trees, paint their reflection into the water. Use horizontal back-and-forth strokes with your dark mix. Make the reflection slightly longer than the actual trees to show movement. -
Distort the reflection:
While the dark reflection paint is wet, take a clean, slightly damp brush and drag it horizontally through the dark paint in a few spots. This ‘cuts’ the reflection and makes it look like ripples are breaking the image. -
Final adjustments:
Look for balance. You might want to add a few very thin, dark horizontal lines in the foreground water to connect the dark trees to the bottom of the painting.
Sparkling Highlights
To add extra sparkle to the water, use a precision knife to gently scratch off tiny horizontal lines in the dark reflection area after the paint is 100% dry, revealing the white paper.
Once fully dry, peel off the tape to reveal your clean edges and frame your peaceful evening scene


Palm Tree Silhouette Sunset
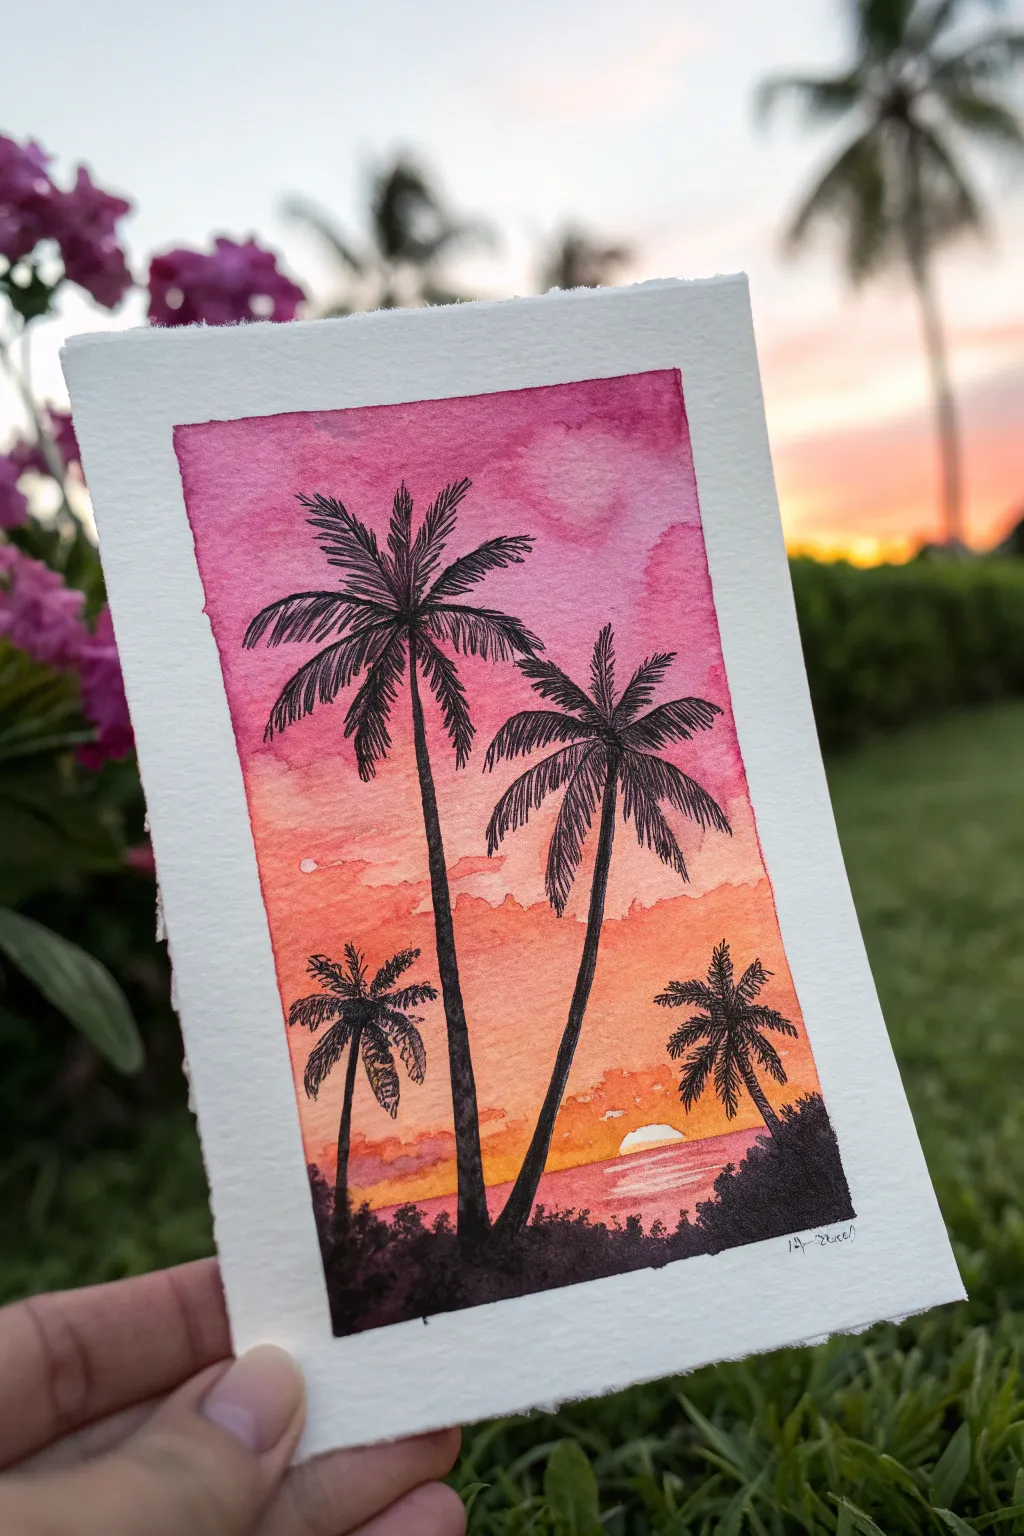
Capture the warmth of a tropical evening with this vibrant watercolor and ink painting. This project combines a glowing pink-and-orange gradient wash with stark black silhouettes for a striking, high-contrast finish.
How-To Guide
Materials
- Cold press watercolor paper (approx. 5×7 inches)
- Watercolor paints (Alizarin Crimson or Rose Madder, Cadmium Orange, Lemon Yellow)
- Masking tape
- Soft round watercolor brushes (size 6 or 8 for wash, size 2 for details)
- Fine liner pen (black, waterproof, sizes 0.3mm and 0.5mm)
- Jar of clean water
- Paper towels
- Pencil (HB or H)
- Ruler
Step 1: Preparation & Sky Wash
-
Paper Setup:
Begin by taping down your watercolor paper to a board or table on all four sides. Leave about a half-inch border to create that crisp frame effect seen in the photo. -
Initial Sketch:
Very lightly sketch the horizon line about 1/4 of the way up from the bottom. Mark the placement of the sun and the vertical lines where your two main palm trees will stand. -
Wet the Sky:
Using your largest clean brush, apply a generous layer of clean water to the entire sky area, stopping right at the horizon line. -
Apply Pink Tones:
Load your brush with a rich pink or rose color. Apply this to the top third of the paper, letting the wet surface help diffuse the pigment downwards. -
Blend the Middle:
Clean your brush slightly and pick up your orange paint. Apply this below the pink, allowing the two colors to bleed together naturally where they meet to create a soft transition. -
Create the Horizon Glow:
For the area just above the horizon and around the sun, drop in a small amount of yellow or very light orange. Keep the sun itself white by carefully painting around it or lifting pigment with a thirsty brush. -
Paint the Water:
While the sky dries, paint the water section below the horizon. Use the same pink and orange tones but apply them in horizontal strokes to mimic ripples. Leave a small vertical gap of white directly under the sun for reflection. -
Complete Drying:
Allow the entire background layer to dry completely. The paper must be bone-dry and warm to the touch before you start the ink work, or the pen lines will bleed.
Pro Tip: Texture
For realistic palm fronds, don’t draw every leaf perfectly parallel. Cross a few lines over each other and vary the lengths to mimic wind-blown foliage.
Step 2: Inking the Silhouettes
-
Establish Tree Trunks:
Switch to your waterproof fine liner pen (0.5mm). Draw the trunks of the two large central palm trees. Make the lines slightly jagged and textured rather than perfectly straight, and taper them as they go up. -
Start the Fronds:
From the center point of the taller tree, draw 5-7 curved lines radiating outward to act as the spines of the palm fronds. -
Add Frond Detail:
Using quick, flicking motions, draw the individual leaves hanging down from each spine. Ensure these lines are distinct and sharp. -
Ink the Second Tree:
Repeat the process for the second large tree. I like to make this one lean slightly away from the center to add dynamic movement to the composition. -
Background Palms:
Draw the two smaller palm trees on the left and right sides. Keep these slightly simpler in detail to push them visually into the distance. -
Create the Ground:
Switch to a brush or a thicker marker if you have one, or continue with the pen. Fill in the bottom foreground with solid black ink or dark paint to create the land silhouette. -
Texture the Foreground:
Along the top edge of the black ground, maintain a bumpy, uneven texture to suggest low foliage and bushes. -
Final Touches:
Check your sun reflection. If needed, use a white gel pen or opaque white gouache to clarify the sun disk and the shimmer lines on the water. -
The Reveal:
Once the ink is fully set, carefully peel away the masking tape at a 45-degree angle to reveal the clean, sharp edges of your painting.
Troubleshooting: Blooms
If you see ‘cauliflower’ marks in your sky, you likely added water while the paint was half-dry. Always wait for a layer to fully dry before re-wetting.
Frame your mini masterpiece or gift it to someone dreaming of a beach getaway
BRUSH GUIDE
The Right Brush for Every Stroke
From clean lines to bold texture — master brush choice, stroke control, and essential techniques.
Explore the Full Guide
Pine Tree Line at Sunset
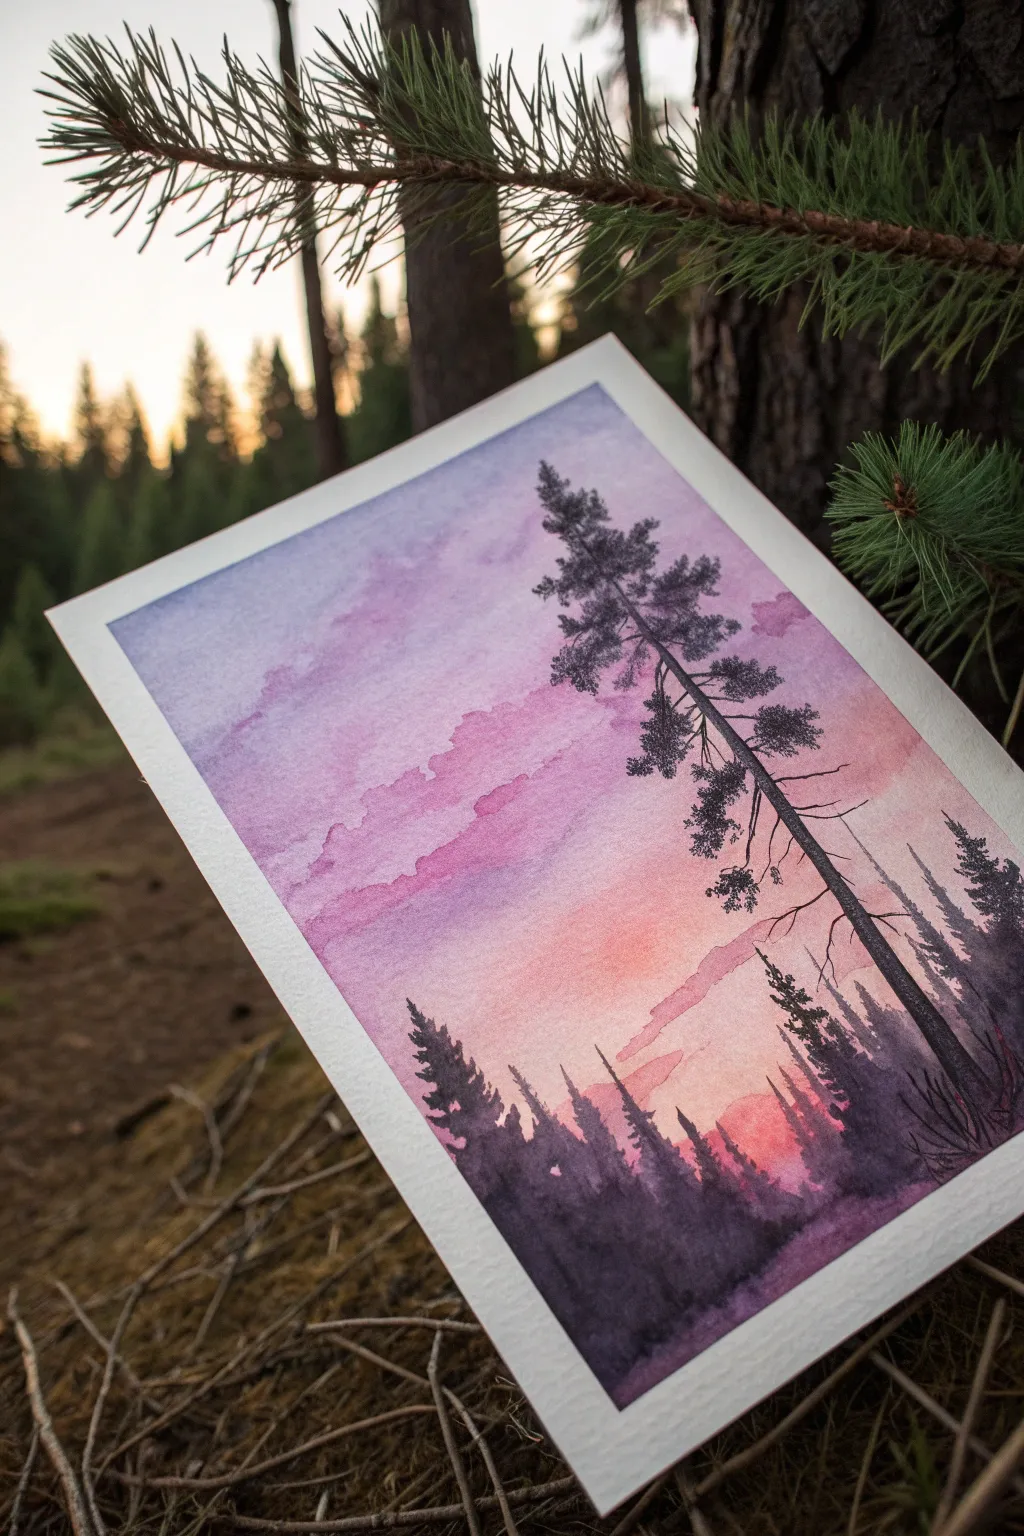
Capture the serene beauty of a twilight forest with this atmospheric watercolor study. By combining soft wet-on-wet washes for the sky with crisp dry-on-dry details for the pines, you’ll create a striking contrast that glows from the page.
Step-by-Step Tutorial
Materials
- Cold press watercolor paper (300gsm)
- Masking tape
- Watercolor paints: Indigo, Alizarin Crimson, Cadmium Yellow/Orange, Ultramarine Blue
- Large flat wash brush (3/4 or 1 inch)
- Round brushes (sizes 6 and 2)
- Rigger or liner brush
- Clean water and jar
- Paper towels
- Pencil (HB)
Step 1: Setting the Scene
-
Prep your surface:
Tape down all four edges of your watercolor paper onto a board. This creates that clean white border seen in the example and prevents the paper from buckling during the heavy washes. -
Plan the composition:
Lightly sketch a low horizon line about a quarter of the way up from the bottom. Mark the position of the main tall pine tree on the right side, extending almost to the top edge. -
Wet the paper:
Using your large flat brush, apply a generous layer of clean water to the entire sky area, stopping just below your horizon line. The paper should glisten evenly but not have puddles.
Cloud Control
To keep clouds soft, pre-wet only the cloud area with clean water before dropping in the heavy pigment. This forces the edges to blur naturally.
Step 2: Painting the Gradient Sky
-
Apply the upper sky:
While the paper is wet, mix a soft purple using Ultramarine Blue and a touch of Alizarin Crimson. Brush this across the top third of the paper, letting the water diffuse the pigment downwards. -
Add pink tones:
Rinse your brush and pick up a diluted Alizarin Crimson or a cool pink. Blend this into the bottom edge of the purple, pulling it down toward the middle of the sky. -
Create the sunset glow:
Near the horizon line, drop in a warm mix of Cadmium Yellow or light orange. Allow this to bleed softly upward into the pink, creating a seamless transition. -
Lift out clouds:
Before the wash dries completely, use a thirsty (damp but clean) brush or a twisted paper towel to gently lift pigment in horizontal, irregular shapes to suggest soft clouds drifting across the purple section. -
Deepen the clouds:
For more drama, add a slightly more concentrated purple mix to the undersides of your lifted cloud areas. Soften the edges immediately so they look fluffy, not hard. -
Initial drying time:
Let this sky layer dry completely. The paper must be bone-dry and warm to the touch before you start the trees to ensure crisp edges.
Step 3: Distant Trees & Foreground
-
Paint the distant tree line:
Mix a watery, pale purple-grey color. Using a size 6 round brush, paint jagged, uneven shapes along the horizon line to represent distant trees. Keep this layer very transparent. -
Darken the mix:
Add more Indigo to your purple mix to create a darker value. Paint a second row of trees slightly lower than the first, overlapping them to create depth. -
Fill the ground:
Using the same dark purple-indigo mix, fill in the ground area at the very bottom. You can use horizontal strokes here to suggest the forest floor.
Muddy Gradient?
If the purple and yellow turn grey where they meet, you likely overlapped them too much while wet. Next time, leave a thin gap of white paper; the water will bridge them.
Step 4: Detailing the Pines
-
Mix the darkest dark:
Create a concentrated mixture of mostly Indigo with a little Alizarin Crimson. It should be the consistency of heavy cream—almost black, but with color depth. -
Paint the main trunk:
Using your rigger or size 2 brush, paint the trunk of the large prominent tree on the right. Start thick at the base and taper it very thinly as it reaches the top of the sky. -
Add main branches:
Extend erratic, spindly branches outward from the trunk. Old pines often have branches that dip down and then curve back up. -
Stipple the foliage:
Switch to an older or specialized textured brush if you have one, or use the tip of your round brush. Dab clusters of the dark mix onto the branches to create pine needles. Keep these clusters sparse near the top and denser near the middle. -
Add surrounding trees:
Using vertically oriented strokes and a jagged motion, paint the smaller silhouette trees along the bottom. Vary their heights and widths so they don’t look like a picket fence. -
Refine the details:
Use your finest brush to add tiny twigs and tips to the tops of the trees. I find that flicking the brush slightly upward helps create realistic pointed tips.
Step 5: Finishing Touches
-
Check contrast:
Step back and assess your painting. If the foreground trees aren’t dark enough against the sunset, apply a second coat of your indigo mix once the first is dry. -
Remove tape:
Wait until the painting is 100% dry. Peel the masking tape away slowly at a 45-degree angle, pulling away from the painted area to preserve the crisp border.
Now you have a tranquil forest silhouette ready to frame or gift to a nature lover
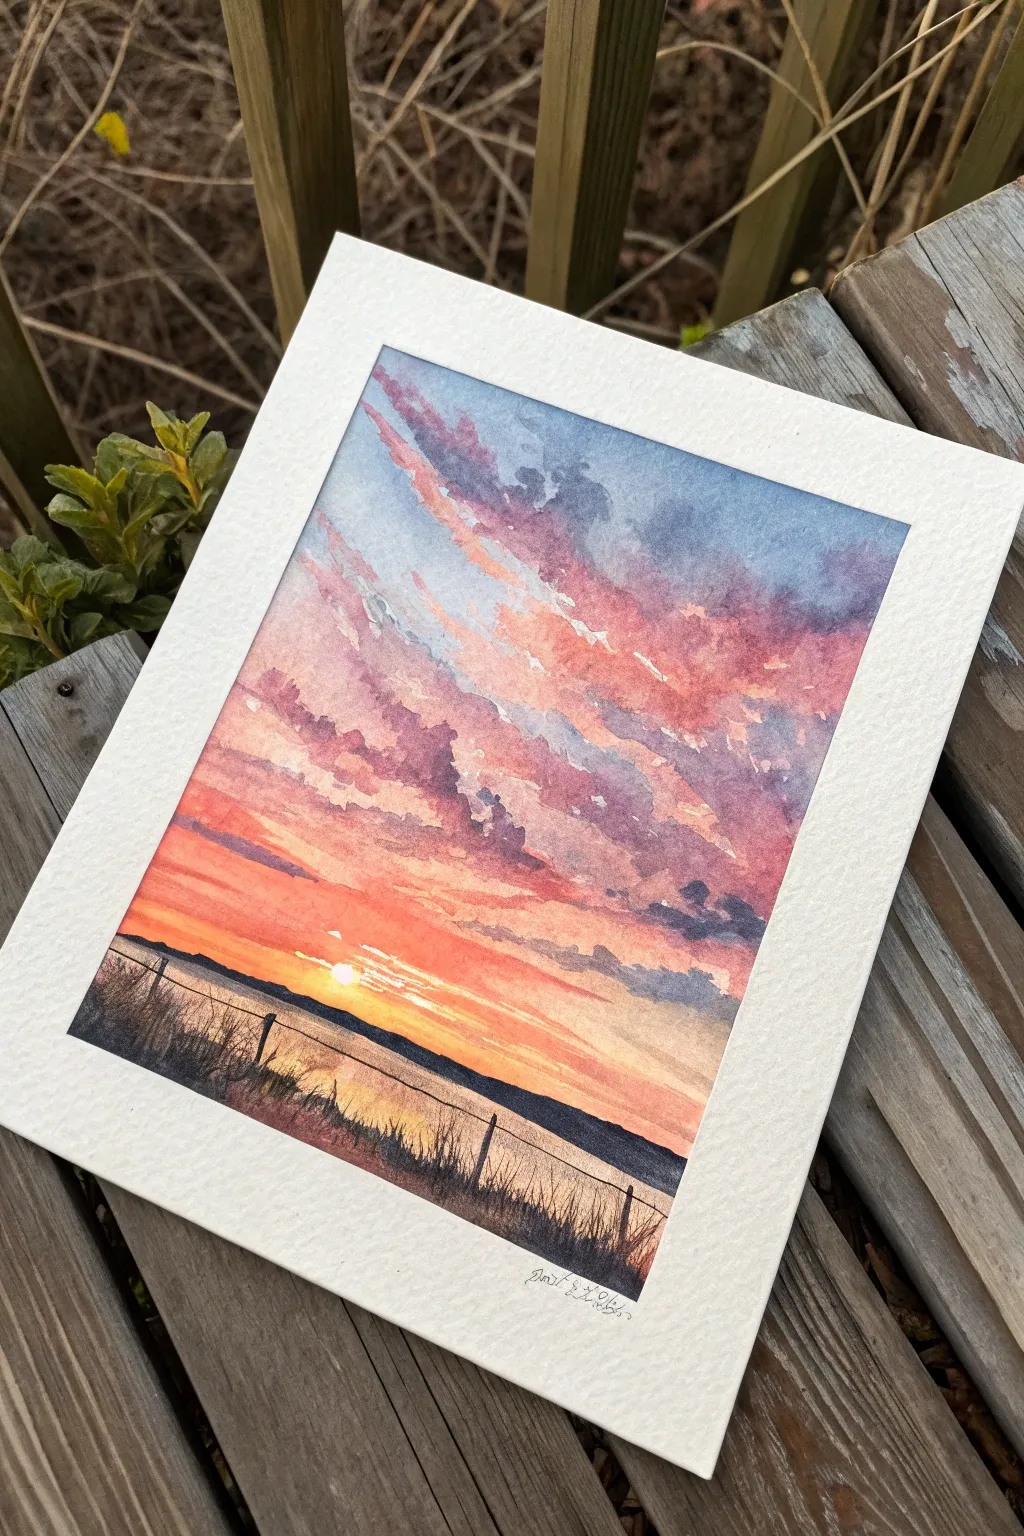
Mountain Ridge Sunset Layers
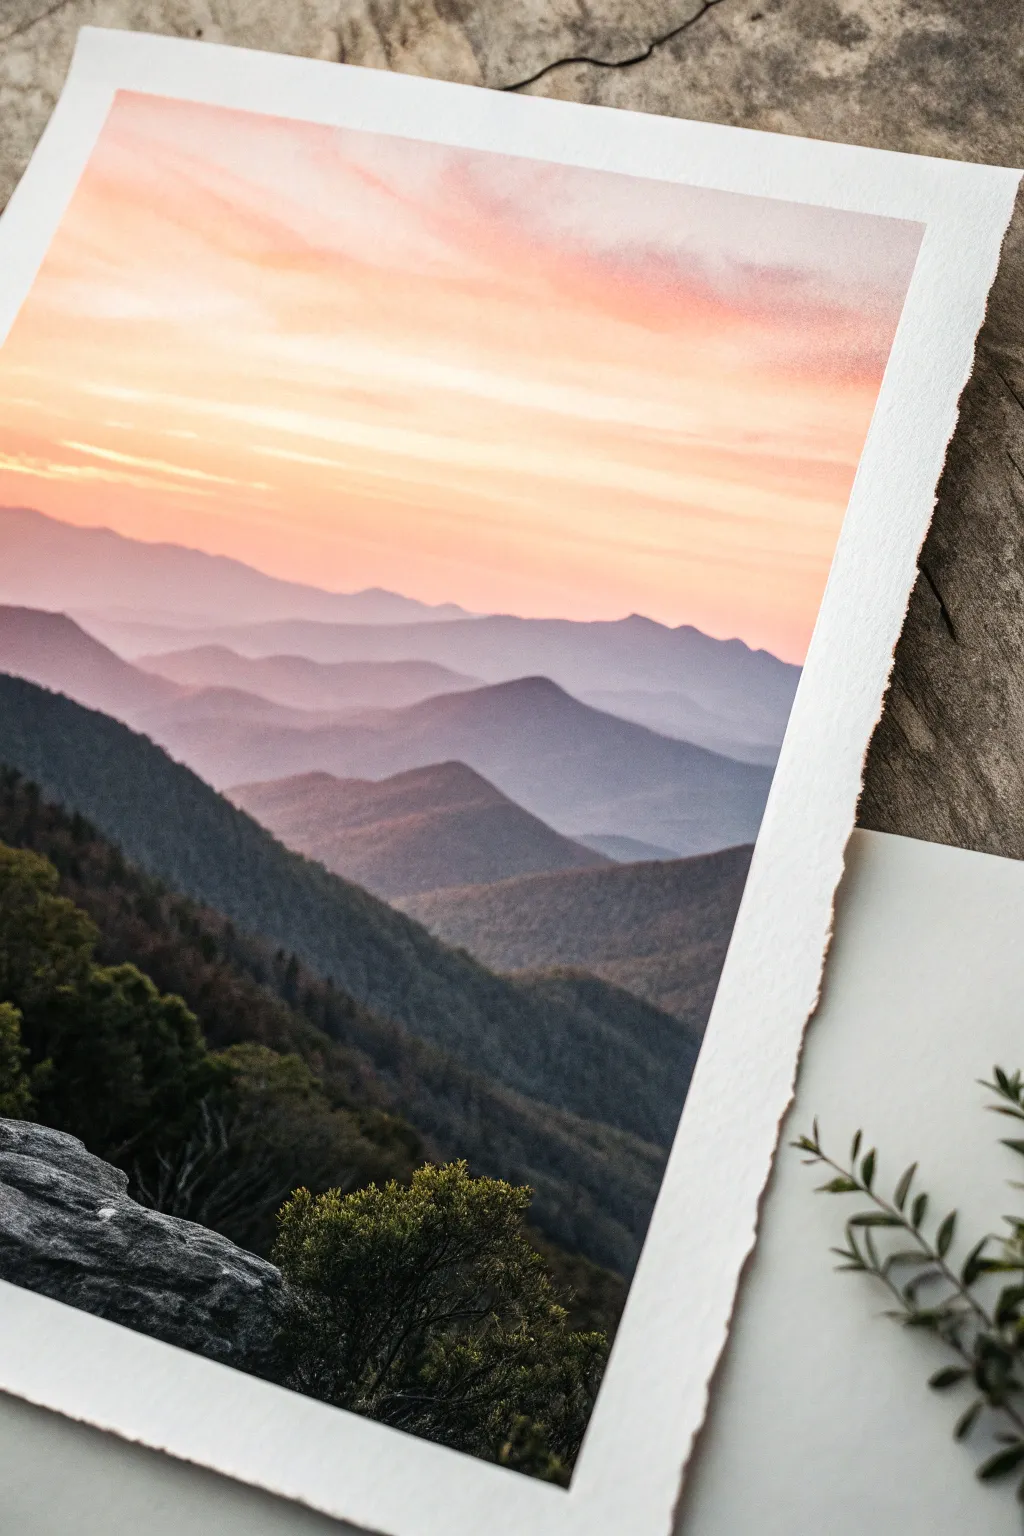
Capture the serene beauty of a fading day with this atmospheric watercolor landscape. You will learn to layer translucent washes to create depth, moving from soft, distant peaks to rich, detailed foregrounds.
Detailed Instructions
Materials
- Cold press watercolor paper (300 gsm)
- Watercolor paints (Indigo, Alizarin Crimson, Burnt Sienna, Yellow Ochre, Paynes Gray, Sap Green)
- Large flat wash brush (1 inch)
- Round brushes (size 6 and size 2)
- Masking tape or gummed tape
- Drawing board
- Two jars of water
- Palette or white plate for mixing
- Paper towels
Step 1: Setting the Sky
-
Prepare your paper:
Tape your watercolor paper down securely to a board. This prevents buckling when we apply wet washes. If you want the beautiful deckle edge shown in the example, you can tear your paper against a ruler beforehand. -
Pre-wet the sky area:
Using your large flat brush, apply clean water to the top third of your paper. We want the surface glisten but not feature puddles. This ‘wet-on-wet’ technique is crucial for a soft, blended sunset. -
Paint the sunset gradient:
Mix a watery wash of Yellow Ochre with a tiny touch of Alizarin Crimson to make a soft peach. Brush this across the wet sky area in horizontal strokes, leaving some white paper showing for the brightest clouds. -
Add warmth to the horizon:
While the paper is still damp, strengthen the color near the horizon line with a slightly more saturated orange mix. Let this color bleed naturally upwards into the paler wash. -
Hint at purple clouds:
Mix a very dilute wash of Alizarin Crimson and a touch of Indigo to make a soft lavender. Gently streak this into the upper sky area to suggest wispy clouds. Let the entire sky layer dry completely.
Fixing “Cauliflowers”
Did water bloom on a mountain? Let it dry, then gently scrub the edge with a damp stiff brush to soften unwanted hard lines.
Step 2: Layering the Mountains
-
Mix your base mountain color:
Create a large puddle of a misty purple-gray using Indigo and a little Alizarin Crimson. This first layer needs to be very watery and pale to represent the furthest, haziest peaks. -
Paint the first ridge:
Using your size 6 round brush, paint the outline of the furthest mountain range right across the horizon. Fill the shape underneath with your pale mix. The edge should be crisp against the sky. -
Darken the mix for the second layer:
Once the first ridge is dry, add a tiny bit more pigment to your purple-gray mix. Paint the next range of mountains slightly lower down, overlapping the first. -
Continue the progression:
Repeat this process two or three more times. For each new mountain layer, add a bit more Indigo and perhaps a touch of Burnt Sienna to the mix. Each subsequent ridge should be slightly darker and warmer than the one behind it. -
Introduce texture:
As you reach the middle ground mountains, use slightly less water. Allow the brush to skip slightly in areas or dab in a little extra pigment while wet to suggest heavily forested slopes.
Step 3: The Detailed Foreground
-
Prepare the darkest values:
For the closest mountain ridge and the foreground, mix a strong, dark green-black using Sap Green, Indigo, and Paynes Gray. You want a creamy consistency, not watery. -
Paint the nearest large slope:
Paint the large, dark mountain slope on the left side. Use the belly of your brush to fill the mass, but use the tip to create an uneven, jagged top edge that suggests a tree line. -
Suggest trees in the shadow:
While this dark layer is still damp, drop in pure Indigo or Paynes Gray into the bottom areas to create deep shadows and volume. -
Detail the immediate foreground shrubbery:
Switch to your size 2 brush. In the bottom right corner, paint the silhouette of bushes and small trees using your darkest green mix. Use stippling motions to distinguish leaves from the smooth distant mountains. -
Add the rocky outcrop:
If you wish to include the rock seen in the bottom left, mix a thick Paynes Gray. Paint the rock shape, leaving small slivers of dry paper to act as highlights on the stone’s edges. -
Final touches:
Assess the painting for balance. I sometimes like to add a few sharp, tiny tree tops on the closest ridge with the smallest brush to enhance the sense of scale. Let everything dry before removing the tape.
Add Morning Mist
Before a mountain layer dries, lift a little paint from the valleys with a clean, damp brush. This creates a realistic foggy effect.
Once fully dry, you will have a stunning landscape that perfectly captures the quiet drama of twilight in the mountains.

PENCIL GUIDE
Understanding Pencil Grades from H to B
From first sketch to finished drawing — learn pencil grades, line control, and shading techniques.
Explore the Full Guide
Cotton Candy Cloud Sunset

Capture the magic of twilight with this vibrant watercolor painting featuring billowing, backlit clouds. You will learn to blend soft gradients for the sky and build dramatic volume in the clouds using purples and warm peaches.
Step-by-Step Tutorial
Materials
- Cold press watercolor paper (140lb/300gsm)
- Watercolor paints: Cerulean Blue, Rose Madder (or bright pink), Cadmium Orange, Dioxazine Purple, Indigo
- Large flat brush (3/4 inch)
- Medium round brush (size 8)
- Small detail brush (size 2 or 4)
- Painter’s tape
- Two jars of water
- Paper towels
- Drawing board
Step 1: Setting the Sky Gradient
-
Prep the paper:
Tape down all four edges of your watercolor paper to a board to prevent buckling and create a clean white border. -
Light sketch:
Very lightly sketch the horizon line near the bottom quarter of the page and outline the major cloud shapes on the right. Keep these lines faint so they disappear under the paint. -
Wet the sky area:
With your large flat brush and clean water, wet the entire sky area, avoiding the main cloud mass on the right. The paper should glisten but not have puddles. -
Apply the blue:
Load your brush with a diluted Cerulean Blue. Start at the top left corner, painting diagonally downwards, fading the color out as you reach the middle of the sky. -
Introduce pinks:
While the paper is still damp, pick up a soft Rose Madder mix. Start painting from the middle diagonal area downwards, letting it gently blend where it meets the fading blue to create soft purples. -
Warm horizon:
Near the horizon line and behind the cloud area, drop in a very pale wash of Cadmium Orange mixed with pink to simulate the glowing sun setting behind the clouds.
Step 2: Creating Wispy Streaks
-
Soft streak details:
While the sky wash is still slightly damp (but not skimming wet), use a size 8 round brush with a slightly stronger pink-orange mix to paint horizontal, wispy cloud streaks across the blue and pink gradient. -
Refine edges:
Soften the edges of these streaks with a clean, slightly damp brush if they look too harsh. The goal is movement, not rigid lines. -
Dry completely:
Let this initial layer dry completely. This is crucial so your big puffy clouds don’t bleed into the background sky.
Muddy Clouds?
Using dirty water dulls colors. When moving from blue sky to orange highlights, change your water or use two jars—one for cool colors, one for warms.
Step 3: Building the Cotton Candy Clouds
-
Base highlight color:
Mix a warm, glowing peach color using Cadmium Orange and a touch of Rose Madder. I like to keep this mixture fairly watery for the light-struck edges. -
Paint cloud tops:
Using the round brush, paint the upper, rounded edges of the cumulus cloud formation on the right side. Keep the edges crisp against the sky. -
Adding shadow wet-in-wet:
Quickly mix a violet shade (Rose Madder + Dioxazine Purple). While the peach tops are still wet, drop this violet color into the body of the cloud, allowing it to bloom naturally into the peach. -
Deepening shadows:
As you move lower into the cloud mass, introduce a mixture of Dioxazine Purple and Indigo. Paint the undersides of the cloud puffs to create volume and weight. -
Layering shapes:
Work in small sections. Paint a peach top, then immediately blend the purple shadow below it. Continue this process until the large cloud mass is filled. -
Adding smaller puffs:
Add smaller, disconnected cloud puffs on the left side of the main mass using the same technique: bright peach tops, purple bottoms.
Level Up: Birds
Once fully dry, use a micron pen or a fine liner brush with black paint to add tiny, distant silhouettes of birds flying toward the light.
Step 4: Final Details and Contrast
-
Horizon silhouette:
Mix a dark, saturated Indigo with Purple. With a smaller brush, paint the very bottom strip of land or distant clouds in a solid, dark value to ground the composition. -
Intensify darks:
Once the clouds are dry, glaze a thin, dark purple layer over the deepest shadow areas to increase the contrast and make the highlights pop. -
Gouache highlights (optional):
If you lost some highlights, you can use a tiny bit of white gouache mixed with orange to reclaim the brightest edges of the clouds. -
Reveal:
Wait until the painting is bone dry, then carefully peel away the tape at a 45-degree angle to reveal your crisp edges.
Enjoy the peaceful warmth your new sunset painting brings to the room
Simple Sunset With Flying Birds
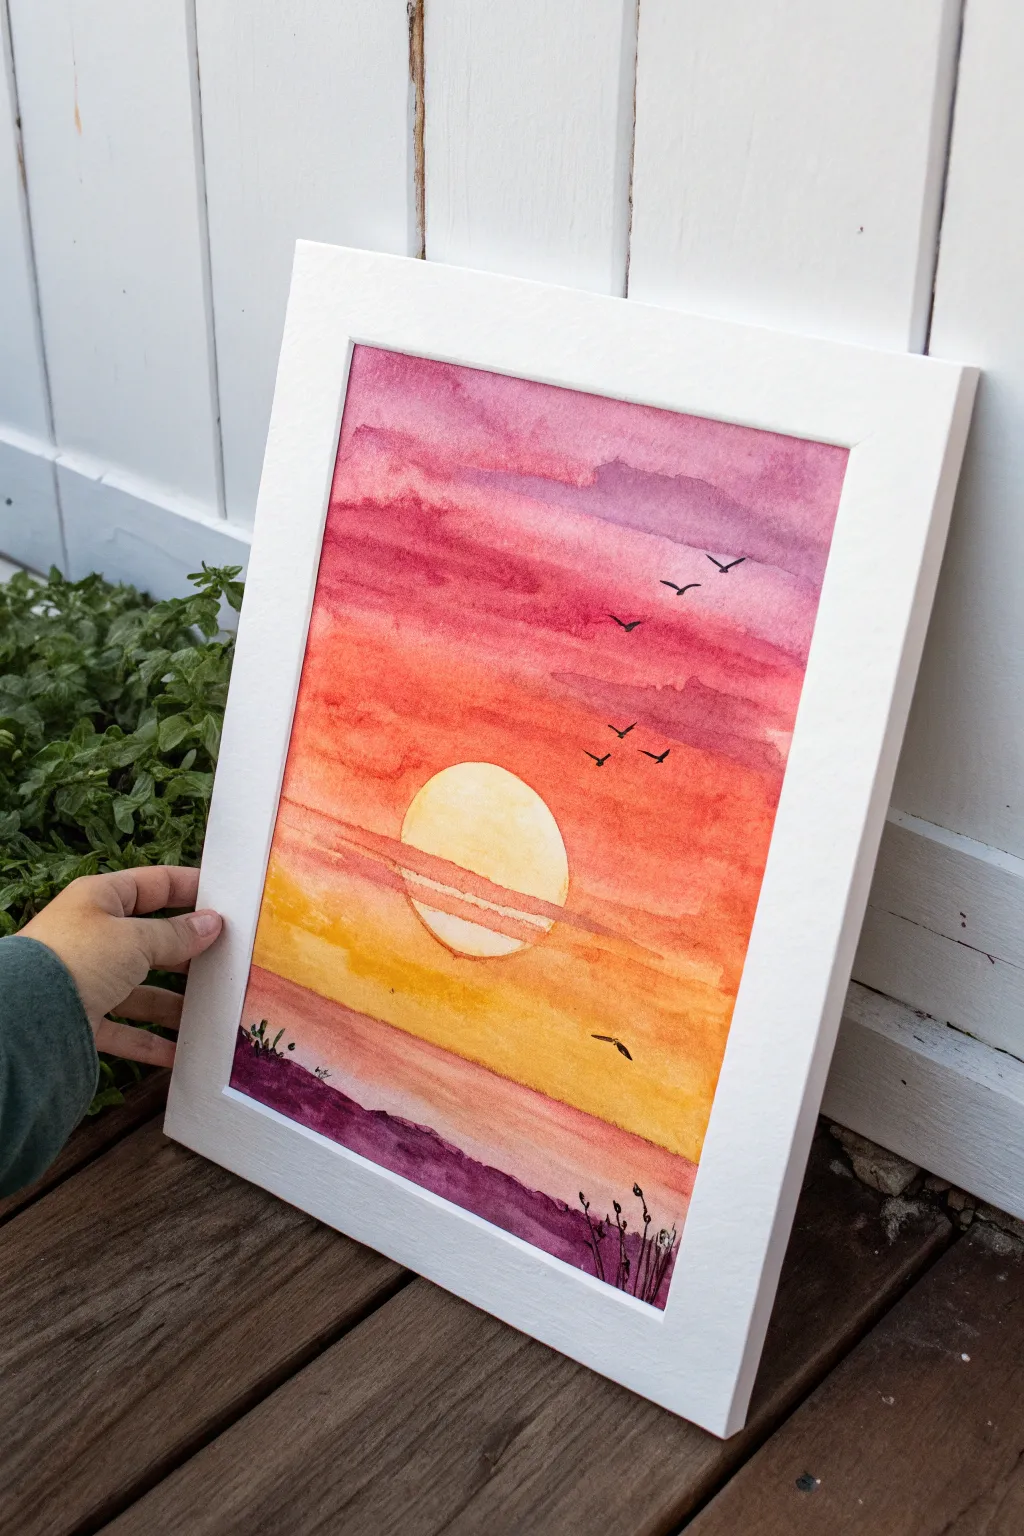
Capture the magic of dusk with this vibrant watercolor study that layers rich bands of pink, orange, and gold. The silhouette details create a striking contrast against the soft glow of the sun, making this an ideal project for practicing seamless washes.
Step-by-Step
Materials
- Watercolor paper (140lb/300gsm, cold press recommended)
- Watercolor paints (Purple, Magenta/Rose, Orange, Golden Yellow)
- Black ink or a fine-tip waterproof fineliner pen
- Flat wash brush (large)
- Round brush (size 6 or 8)
- Masking tape
- Jar or cup (for tracing the sun)
- Pencil
- Paper towels
- Clean water
Step 1: Preparing the Sun and Sky
-
Tape your borders:
Secure your watercolor paper to a board or table using masking tape along all four edges. This creates a crisp white border and prevents the paper from buckling when wet. -
Outline the sun:
Place a small jar base or round object slightly below the center of your page. Lightly trace a circle with a pencil to define where the sun will sit. -
Wet the sky area:
Using your large flat brush and clean water, gently wet the entire paper surface, carefully avoiding the inside of the sun circle. You want the paper glistening but not swimming in puddles. -
Start with purple:
Load your brush with a watery mix of purple. Apply this to the very top of the paper, letting the wet surface carry the pigment downwards in soft streaks. -
Transition to pink:
While the purple is still wet, rinse your brush and pick up a vibrant magenta or rose. Apply this directly below the purple, allowing the colors to bleed together naturally where they meet. -
Add the orange layer:
Moving downward, introduce a bright orange. Paint across the page, bringing the color close to the top of your sun circle. The wet-on-wet technique keeps the transition smooth.
Sun Brightness Tip
To keep the sun incredibly bright, use masking fluid to cover the circle before painting. Rub it off at the end for pure white paper brightness.
Step 2: Creating the Glow and Horizon
-
Paint the golden zone:
Switch to a golden yellow. Paint carefully around the sun circle and fill the area below the horizon line, blending slightly upward into the orange. -
Soften the sun:
Clean your brush and blot it slightly. Gently run the damp bristles along the hard pencil edge of the sun to soften it, dragging a tiny bit of yellow inward so the sun doesn’t look like a sticker. -
Add cloud streaks:
While the background is damp but not soaking, mix a slightly more concentrated reddish-orange. Use the tip of your round brush to sweep thin, horizontal organic lines across the sun and sky to mimic stratus clouds. -
Define the bottom horizon:
Mix a diluted purple wash for the water or distant land at the very bottom. Apply horizontal strokes that fade into the yellow section above, creating a sense of distance. -
Let it dry completely:
This is crucial. Walk away and let the paper become bone dry. If the paper feels cool to the touch, it is still wet.
Preventing Blooms
If cauliflower-like blooms appear in your sky, your brush was too wet when adding color to drying paper. Keep the brush thirsty (damp, not dripping).
Step 3: Silhouettes and Details
-
Paint the foreground land:
Mix a saturated, dark purple. Using your round brush, paint a jagged, organic shape along the bottom edge to represent a rocky shoreline or hill in shadow. -
Add grasses:
Using the very tip of your brush or a fineliner pen, flick upward from the dark purple mound to create thin, wispy grasses and plant stalks. -
Draw the birds:
With a fine brush and black paint (or your waterproof pen), draw small ‘V’ shapes in the sky. Vary their sizes and wing angles to make the flock look natural. -
Final touches:
Check your cloud lines across the sun. If they faded too much, you can carefully re-glaze a thin line of orange over the dry sun create depth. -
Reveal the border:
Once everything is absolutely dry, slowly peel the masking tape away at a 45-degree angle to reveal your clean white frame.
Now step back and admire the warmth of your captured sunset


One Little Boat at Sunset
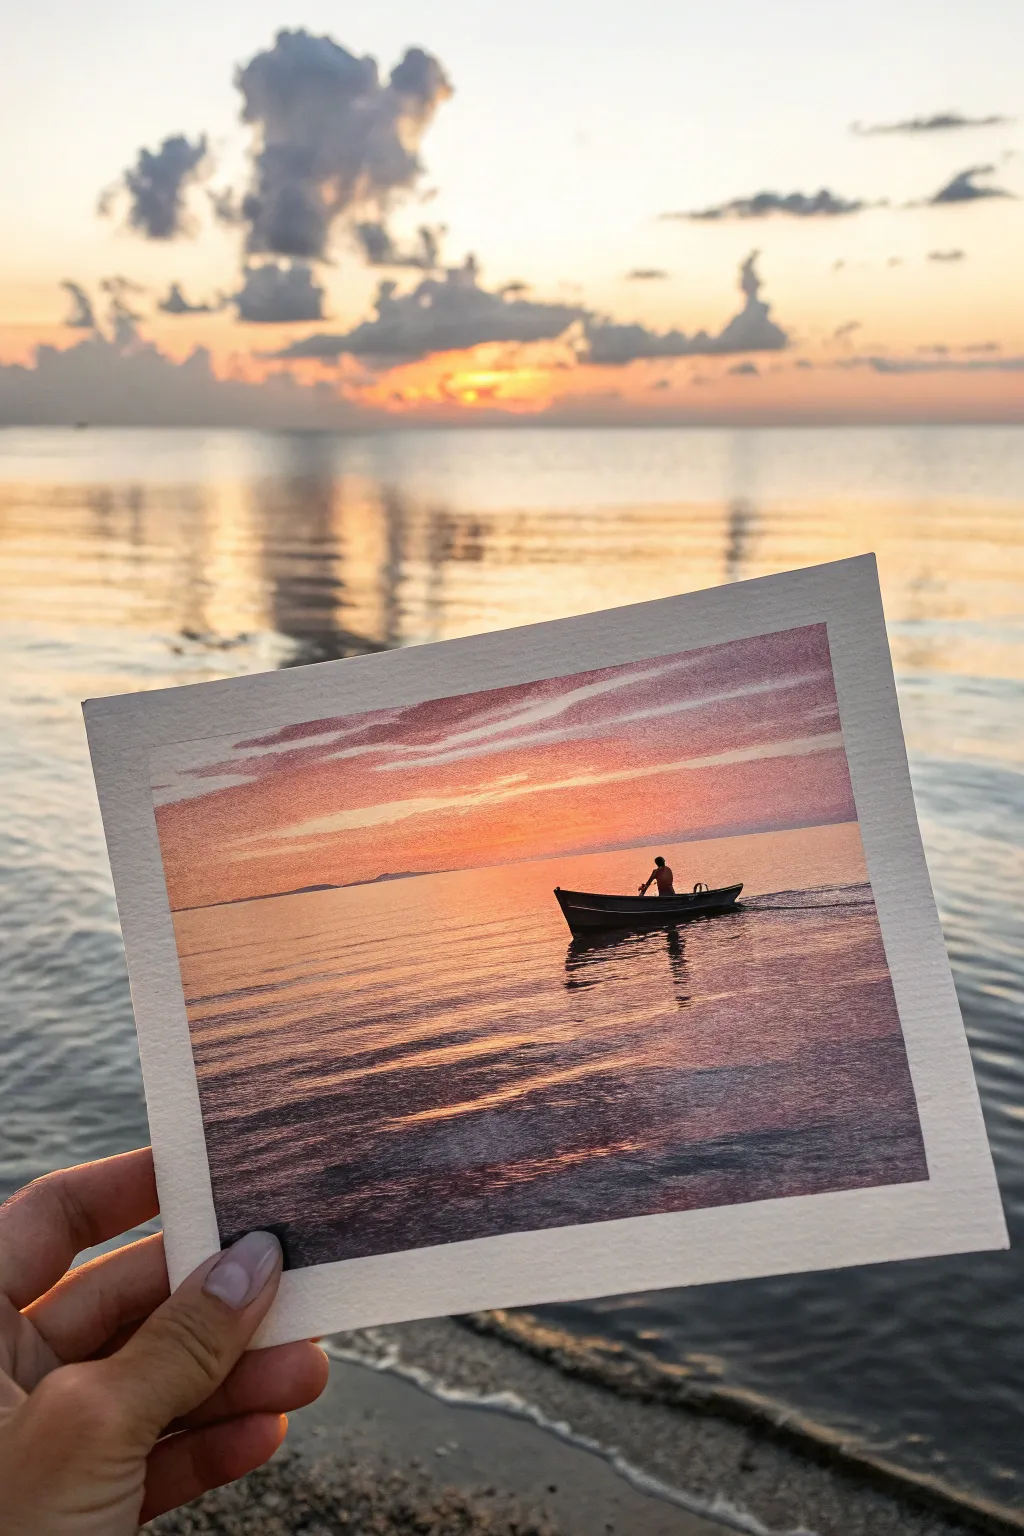
Capture the serene stillness of dusk with this evocative watercolor painting, focusing on the dramatic contrast between a glowing sky and a dark silhouette. This small-format study beautifully renders the way light reflects across gentle ripples on the open water.
Step-by-Step Guide
Materials
- Cold press watercolor paper (approx. 5×7 inches)
- Masking tape
- Watercolor paints (Cadmium Orange, Alizarin Crimson, Burnt Umber, Ultramarine Blue, Yellow Ochre)
- Round brushes (sizes 8 for washes and 2 for details)
- Clean water and blending palette
- Paper towels
- Pencil and eraser
Step 1: Preparation and Initial Wash
-
Secure the paper:
Tape down all four edges of your watercolor paper to a board. This creates a clean white border and prevents the paper from buckling during the wet stages. -
Sketch the horizon:
Lightly draw a straight horizon line about one-third of the way up from the bottom. Mark the small boat’s position slightly to the right of center, but keep the drawing faint. -
Wet the sky:
Using your larger round brush, brush clean water over the entire sky area above the horizon line. The paper should be glistening but not forming puddles. -
Apply the sunset glow:
Drop in a dilute mixture of Yellow Ochre and Cadmium Orange near the horizon line. Let the color bleed upwards, fading into the wet paper. -
Add cloud layers:
While the sky is still damp, mix a soft purple using Alizarin Crimson and a touch of Ultramarine Blue. Paint horizontal, sweeping strokes across the upper sky to suggest striated clouds, leaving some orange showing through. -
Deepen the horizon:
Reinforce the glow right at the horizon line with a stronger mix of orange. This is where the sun has just dipped below, so the color should be most intense here.
Step 2: Painting the Water and Reflections
-
Define the distant land:
Once the sky is dry, mix a pale purple-grey. Paint a very thin, uneven strip just above the horizon line on the left side to represent distant mountains or land. -
Wet the water area:
With a clean brush, wet the water section below the horizon. As you approach the bottom, you can leave it slightly drier to create texture later. -
Mirror the sky:
Repeat the colors from the sky into the water. Start with the orange reflection in the center, directly under where the sun would be. -
Add ripples:
Using a mix of Burnt Umber and Alizarin Crimson, make horizontal zigzag strokes across the water. Keep these strokes wider and looser at the bottom to suggest perspective. -
Leave highlights:
Be careful to leave thin strips of the underlying lighter wash (or even white paper) visible between your dark ripple strokes to mimic light catching the wave crests.
Keeping the Light
To get that shimmering water effect, engage in ‘negative painting.’ Focus on painting the dark shadows of the waves, leaving the light paper untouched for the sparkles.
Step 3: The Boat and Final Details
-
Paint the boat silhouette:
Mix a dense, dark color using Burnt Umber and Ultramarine Blue. Use the size 2 brush to carefully paint the shape of the boat and the figure inside. -
Add the boat’s reflection:
Directly beneath the boat, paint a darker, wavering reflection. I like to break up the edges of this shape with horizontal lines to show the movement of the water. -
Refine the foreground:
Strengthen the dark ripples in the immediate foreground at the bottom of the page. This contrast helps push the horizon further back. -
Soften harsh lines:
If any ripple edges look too sharp, use a damp, clean brush to gently soften one side of the stroke, blending it slightly into the water. -
Remove the tape:
Wait until the painting is completely bone-dry. Carefully peel the tape away at a 45-degree angle to reveal your crisp white border.
Muddy Purple?
If your cloud purples look muddy, it means you mixed orange and blue too aggressively. clean your brush and let the orange layer dry completely before glazing blue over it.
Now you have a peaceful sunset scene that captures the quiet beauty of an evening on the water
Hot Air Balloon Sunset Sky
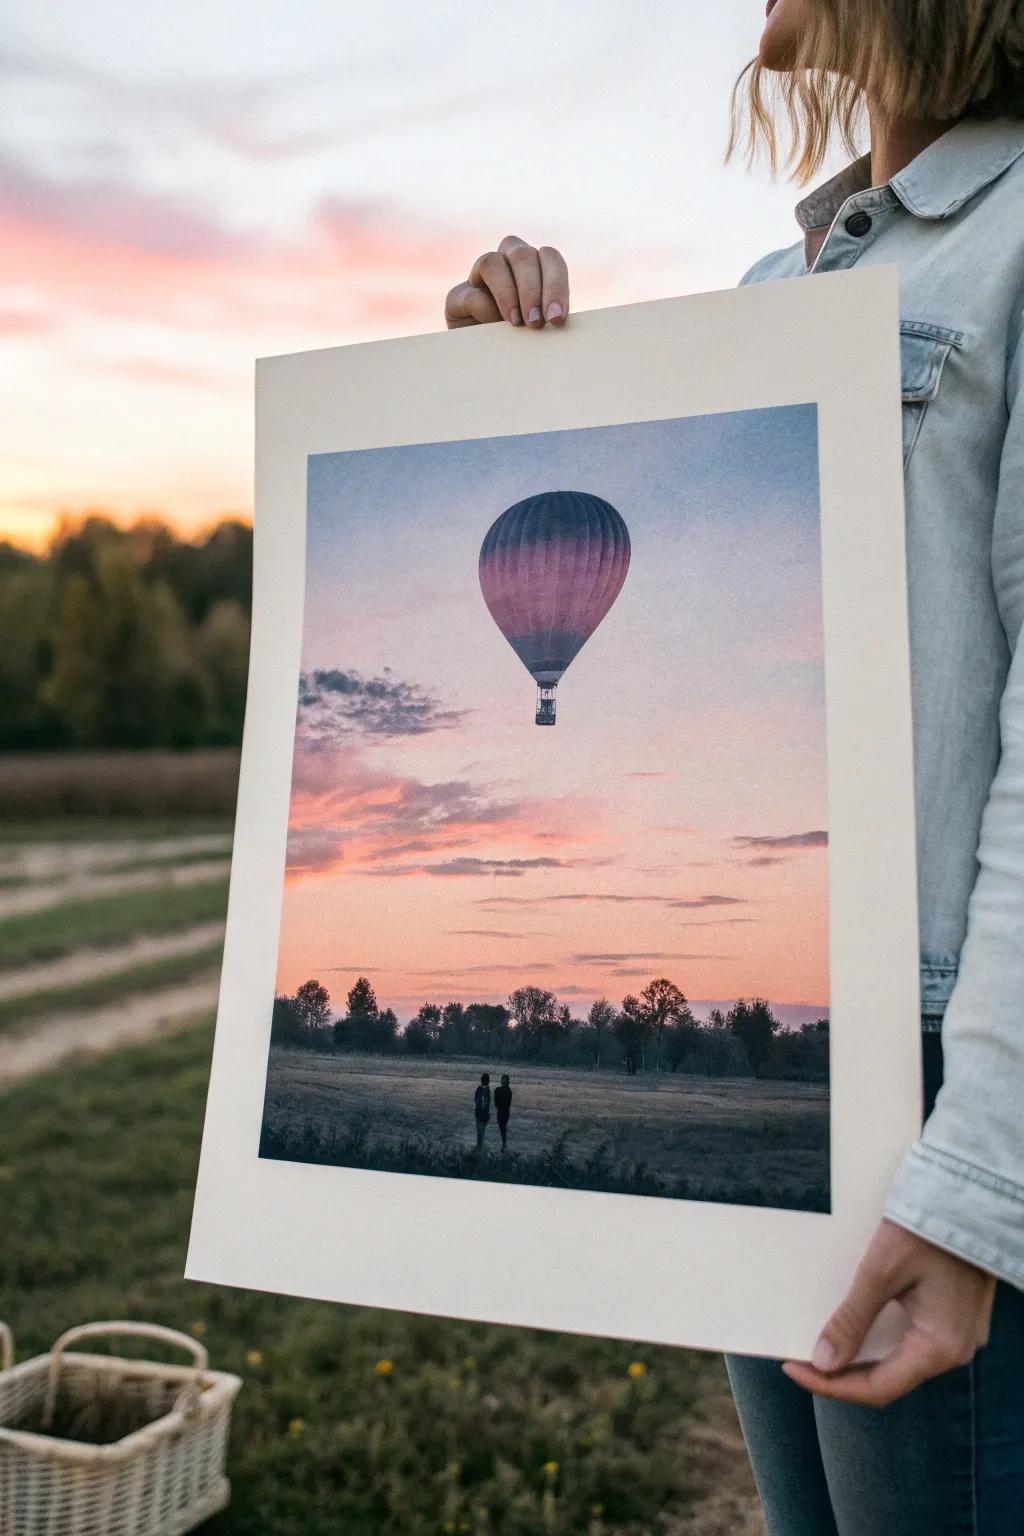
Capture the serene beauty of a hot air balloon drifting through a pastel sunset with this atmospheric watercolor project. You’ll layer soft pinks and purples to create a dreamy sky before anchoring the scene with a darker silhouette landscape.
Detailed Instructions
Materials
- Cold press watercolor paper (140lb/300gsm)
- Watercolor paints (Indigo, Alizarin Crimson, Cadmium Red, Hooker’s Green, Burnt Umber, Ultramarine)
- Masking fluid and applicator
- Large wash brush (flat or mop)
- Medium round brush (size 8 or 10)
- Small detail brush (size 0 or 2)
- Pencil for sketching
- Clean water and paper towels
- Masking tape
Step 1: Preparation & Sky Wash
-
Tape and sketch:
Begin by taping down the edges of your paper to a board to prevent buckling. Lightly sketch the horizon line about one-third up from the bottom and draw a simple oval shape for the balloon in the upper center. -
Mask the balloon:
Apply masking fluid carefully inside the balloon’s oval shape and the tiny basket area below it. This preserves the white paper so you can paint the sky freely without worrying about the edges. -
Wet the sky:
Once the masking fluid is completely dry, use a large clean brush to wet the entire sky area above the horizon line. The paper should be glistening but not forming puddles. -
Paint the upper sky:
Load your large brush with a mix of Ultramarine Blue and a touch of Alizarin Crimson. Apply this to the very top of the paper, letting the color naturally diffuse downwards into the wet paper. -
Add sunset warmth:
Rinse your brush and pick up a soft pink mix using Alizarin Crimson and a tiny bit of Cadmium Red. Paint horizontal strokes across the middle sky area, allowing it to blend softly where it meets the blue above. -
Creating the horizon glow:
Near the horizon line, introduce a warmer, peachier tone by adding more yellow or clear water to your pink mix. Keep this area quite light to suggest the fading sun. -
Lift out clouds:
While the sky is still damp, crumple a clean paper towel and gently dab at the sky in horizontal patches to lift paint and create soft, fluffy cloud textures. -
Dry completely:
Let the entire paper dry bone dry. If the paper feels cool to the touch, it is still wet deep down.
Muddy colors?
If your sunset turns brown, you likely mixed the blue and orange/pink layers while they were too wet. Wait for the blue to dampen slightly more before adding warm tones.
Step 2: Balloon & Landscape
-
Remove masking:
Gently rub away the masking fluid with your finger or a rubber cement pickup to reveal the crisp white shape of the balloon. -
Paint the balloon gradient:
Using a medium round brush, paint the balloon with a vertical gradient. Start with a deep purple at the top and transition to a lighter pink near the bottom, mimicking the sky’s reflection. -
Balloon details:
Once the balloon base is dry, use your smallest brush to paint thin, curved vertical lines to indicate the fabric panels. Paint the basket using a dark mix of Burnt Umber and Indigo. -
Field base layer:
Mix a muted green using Hooker’s Green and a touch of Burnt Umber. Paint the grassy field area below the horizon with horizontal strokes, getting darker as you move closer to the bottom edge. -
Distant trees:
Along the horizon line, stipple in a row of trees using a dark, cool mix of Indigo and Green. Keep the edges soft and irregular to simulate distance. -
Foreground field texture:
I like to use a dry brush technique here. Wipe most of the paint off your brush and skim it over the foreground to create the texture of dry grass and uneven terrain. -
Painting the figures:
Using your smallest brush and a very dark, opaque mixture (Indigo with almost no water), carefully paint the silhouettes of the two small figures standing in the field. -
Final shadows:
Add subtle shadows beneath the figures and darken the very bottom corners of the painting to draw the viewer’s eye toward the center.
Soften edges
To push the tree line further into the distance, run a clean, damp brush along the bottom edge of the trees to blur them slightly into the field.
Step back and admire the peaceful atmosphere of your handmade sunset scene
Sunset With Soft Lifted Highlights
Capture the fleeting beauty of twilight with this vibrant watercolor study that focuses on dramatic cloud structures and glowing horizons. By using lifting techniques and careful layering, you will create soft, illuminated cloud edges that make the sunset feel truly incandescent.
Step-by-Step Guide
Materials
- Cold press watercolor paper (140lb/300gsm, taped down)
- Watercolor paints: Alizarin Crimson, Cadmium Yellow, Ultramarine Blue, Burnt Sienna, Indigo
- Large flat wash brush (3/4 inch)
- Medium round brush (size 8)
- Small liner or rigger brush (size 1 or 2)
- Clean water jars
- Paper towels or a clean cotton rag
- Opaque white gouache or white gel pen (optional)
- Masking fluid (optional)
Step 1: Setting the Scene
-
Establish the horizon:
Begin by lightly sketching a low horizon line about one-third of the way up from the bottom of your paper using an HB pencil. Add a suggestion of distant hills, but keep the lines faint so they don’t show through the final paint. -
Pre-wet the sky area:
Using your large flat wash brush, apply clean water to the entire sky area, stopping just above the horizon line. You want the paper to be glisten with moisture but not have standing puddles, creating the perfect surface for soft wet-on-wet blending.
Bleeding Control
If your cloud shadows are spreading too fast and taking over the highlighted areas, your paper is too wet. Wait 60 seconds and test again.
Step 2: Painting the Sky
-
Apply the glow:
While the paper is wet, drop in a vibrant wash of Cadmium Yellow near the horizon line where the sun will be. Let it diffuse upwards, softening the edges. -
Introduce warmth:
Mix a watery Alizarin Crimson and gently brush it into the mid-sky area, allowing it to touch and blend slightly with the upper edge of the yellow. Be careful not to mix them too much, or you might get unwanted oranges just yet. -
Create the upper atmosphere:
For the top of the sky, mix Ultramarine Blue with a touch of Alizarin Crimson to make a soft violet-blue. Paint this across the top third of the paper, letting gravity pull it down slightly into the pink section. -
Lift the highlights:
Before the wash dries completely, use a clean, damp brush (a ‘thirsty’ brush) or the corner of a paper towel to lift out diagonal streaks of paint. These negative spaces will become the bright, illuminated edges of your clouds.
Gouache Splatter
For a magical, misty effect, try flicking a tiny amount of watered-down white gouache near the bottom grasses to mimic sea spray or dew.
Step 3: Defining the Clouds
-
Mix shadow colors:
Once the first layer is visibly damp but losing its sheen, mix a stronger purple-grey using Ultramarine Blue, Alizarin Crimson, and a tiny dot of Burnt Sienna to neutralize it. -
Form the cloud shapes:
Using the medium round brush, paint the underside of the clouds. Follow the diagonal angles you established with your lifting technique earlier. The paint should bloom slightly but hold its shape better now that the paper is drier. -
Deepen the contrast:
While the cloud shadows are still wet, drop slightly more pigment into the thickest parts of the clouds to create volume. Keep the bottom edges of the clouds softer than the top edges. -
Let it dry:
Allow the sky completely to dry. This is crucial; if you paint the water while the sky is wet, the horizon line will bleed.
Step 4: Water and Horizon
-
Paint the water reflection:
Wet the water area below the horizon. Mirror the sky colors: start with yellow in the center for the sun’s reflection, transitioning to pinks and violets toward the edges. Use horizontal strokes to suggest ripples. -
Define the distant land:
Mix a dark, cool color using Indigo and a touch of Alizarin Crimson. Paint the silhouette of the distant hills along the horizon line. Ensure the bottom edge of these hills is straight and crisp against the water. -
Create the sun flare:
If you lost the white of the paper for the sun, you can carefully re-wet a tiny circle just above the hills and dab it with a tissue, or save this for a touch of gouache later.
Step 5: Foreground Details
-
Mix the darkest darks:
Prepare a thicker, creamy mixture of Indigo and Burnt Sienna. This needs to be opaque enough to cover the background washes. -
block in the foreground:
Using your medium brush, paint the grassy bank in the immediate foreground. Use rough, upward strokes to simulate the uneven texture of earth and grass clumps. -
Paint the grasses:
Switch to your rigger or fine liner brush. With loose, quick upward flicks, paint the tall grasses growing from the bank. Vary the height and direction; nature is rarely perfectly straight. -
Add the fence posts:
Paint vertical posts using the dark mixture. Make them uneven in height and thickness to suggest an old, rustic fence. -
String the wire:
Using the very tip of your liner brush with a diluted dark mix, draw very fine, slightly sagging lines connecting the posts. Broken lines often look more realistic than solid ones here. -
Final highlights:
If needed, use a tiny dot of white gouache for the sun itself to maximize brightness, and perhaps a few thin white highlighting strokes on the top wire of the fence where the light catches it.
Now step back and admire how the dark silhouette amplifies the glowing warmth of your sky
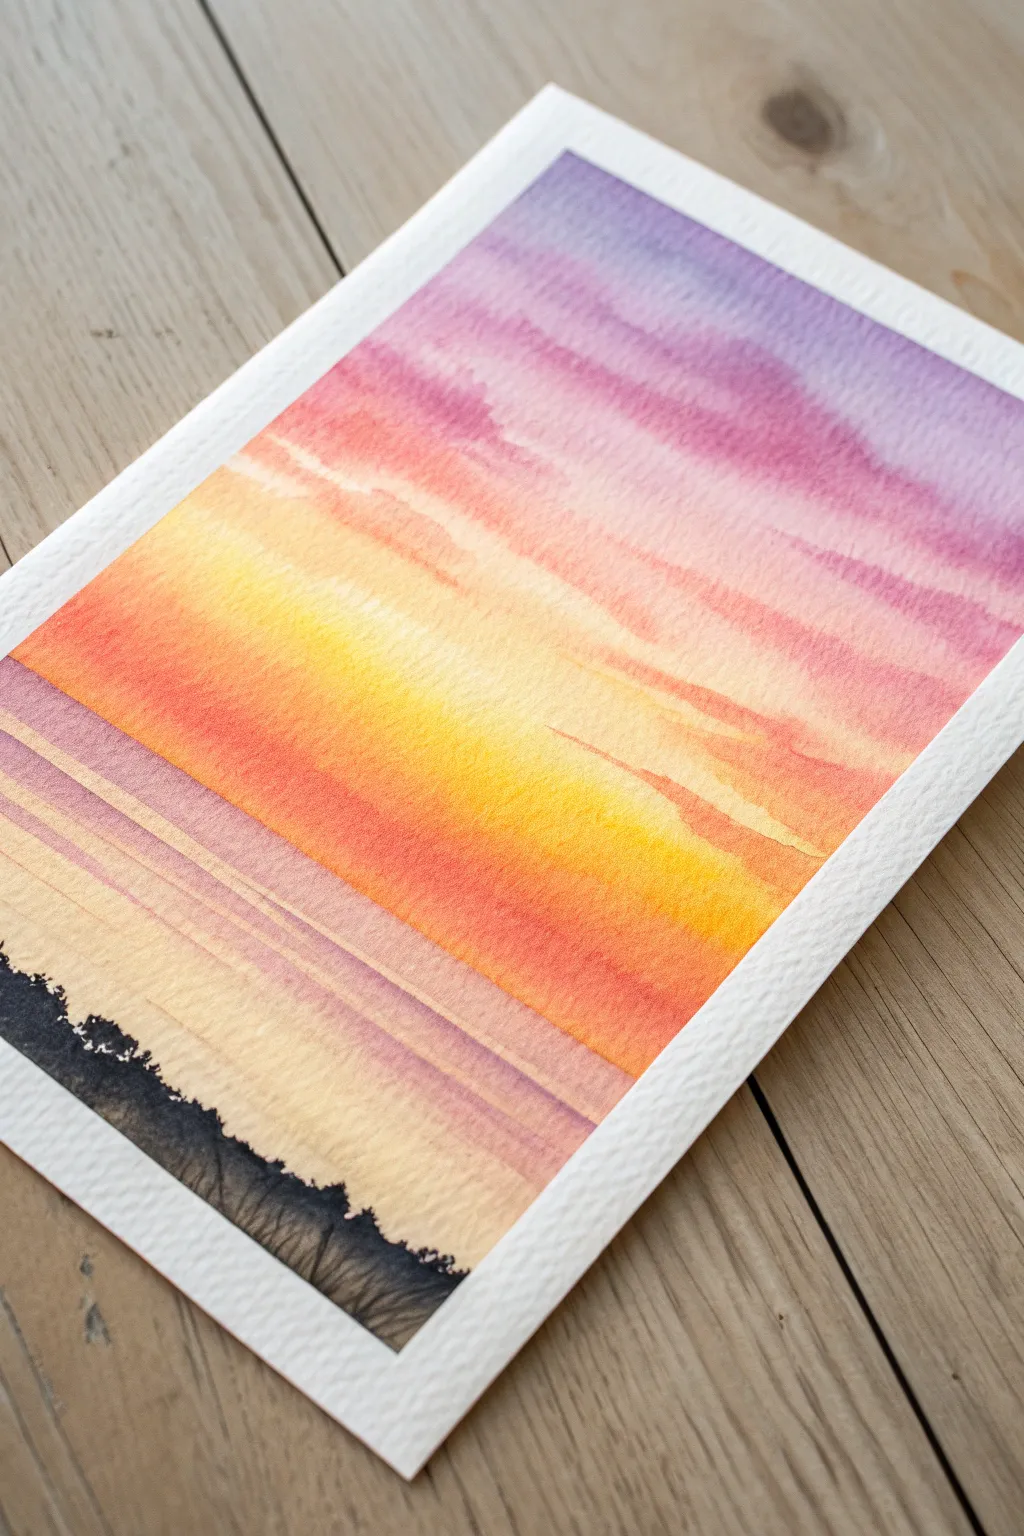
Banding Stripes Sunset Study
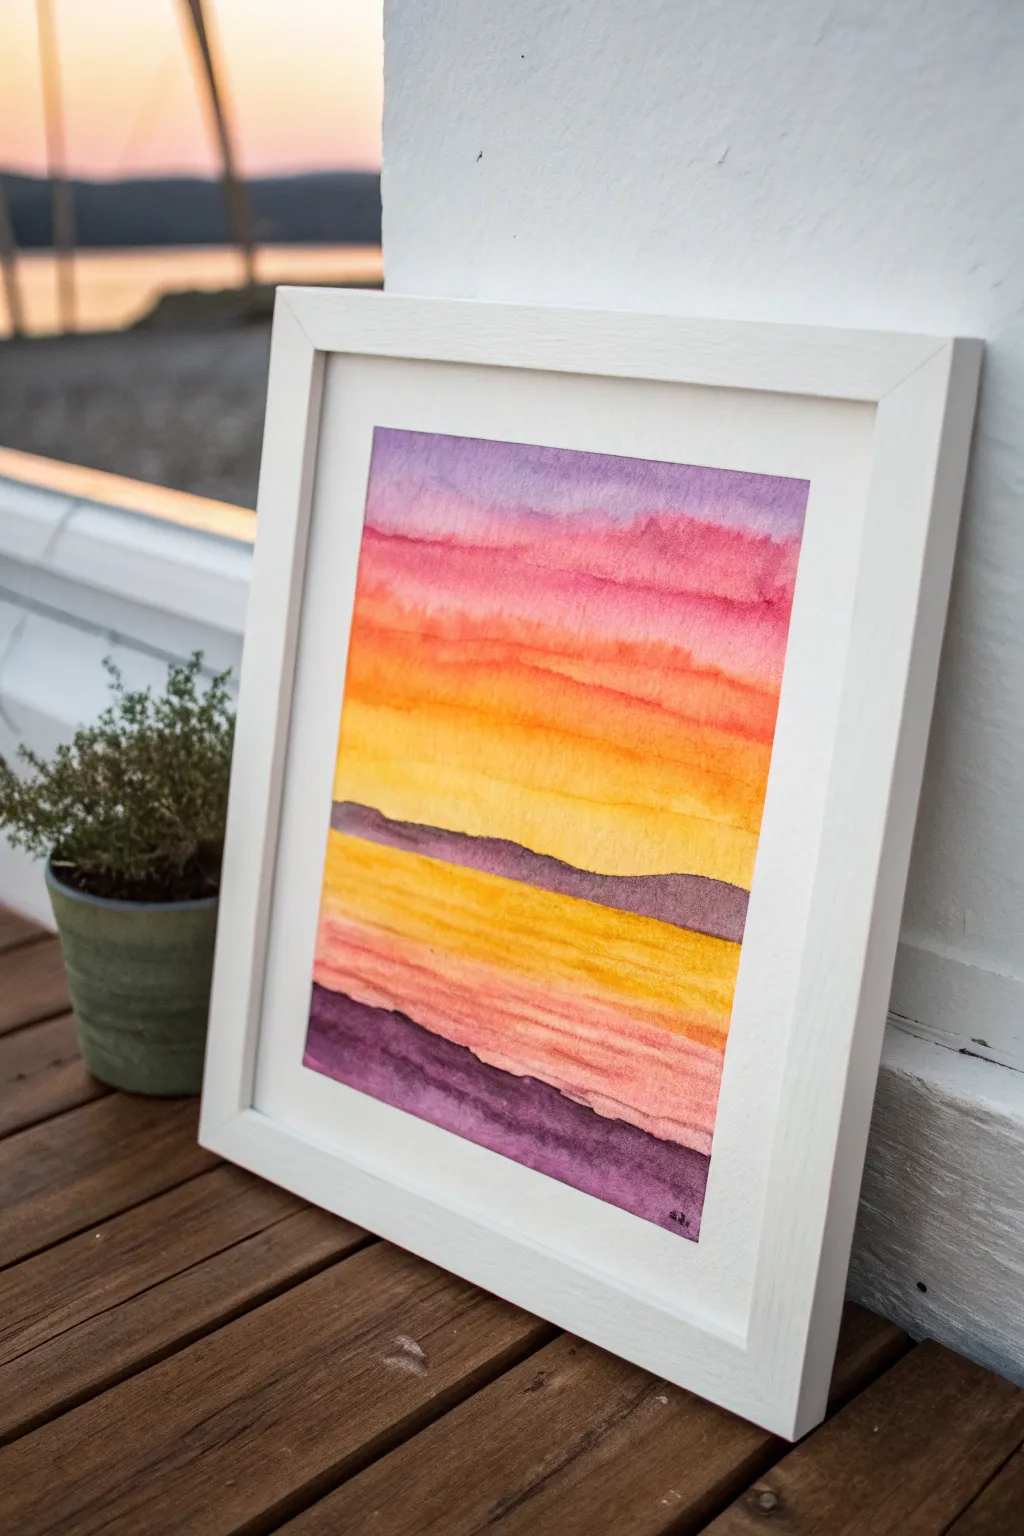
Capture the serene beauty of twilight with this striking watercolor study that focuses on horizontal color banding. By layering washes from soft lavender to intense orange, you’ll create a glowing sunset effect that feels both modern and atmospheric.
Detailed Instructions
Materials
- Cold-pressed watercolor paper (140lb/300gsm)
- Watercolor paints (Purple, Alizarin Crimson, Orange, Cadmium Yellow, Indigo)
- Flat shader brush (3/4 inch)
- Round brush (size 6 or 8)
- Masking tape
- Drawing board or hard surface
- Two jars of water
- Paper towels
Step 1: Preparation and Sky Layering
-
Secure the paper:
Tape your watercolor paper down firmly to your board on all four sides. This creates that crisp white border seen in the final piece and prevents the paper from buckling under heavy washes. -
Mix your sky palette:
Prepare puddles of your sky colors: a diluted purple, a vibrant pink (Alizarin Crimson), a bright orange, and a warm yellow. Keep them separate on your palette to ensure clean bands of color. -
Paint the top band:
Using your flat brush, load up the diluted purple mix. Paint a horizontal strip across the very top of the paper effectively establishing the darkening sky. -
Transition to pink:
While the bottom edge of the purple is still slightly damp, rinse your brush and pick up the pink. Apply a band directly below the purple, letting them touch and bleed slightly for a soft transition, but keep the stroke horizontal. -
Add the orange glow:
Continue moving down the paper with your orange paint. Apply this band with confidence, allowing the natural heavy pigment to create some texture or ‘bloom’ lines, which adds character to the sky. -
Finish the sky with yellow:
Complete the sky portion by painting a broad band of yellow. This should be the brightest part of the painting. Bring this yellow wash down past where you intend the horizon line to be, fading it out slightly as you go lower. -
Let it dry completely:
This is crucial. The sky layer must be bone dry before you add the landmasses or water reflections, otherwise, the dark colors will bleed upward into your clean yellow sky.
Pro Tip: Bloom Control
To get those textured ‘hard lines’ inside the color bands, add a drop of clear water into a drying wash. It pushes pigment to the edges create natural cloud-like textures.
Step 2: Horizon and Foreground
-
Paint the distant hills:
Mix a muted purple by adding a tiny touch of grey or complementary yellow to your original purple. Using the round brush, paint a low, rolling mountain range across the middle of the paper, overlapping the bottom of the yellow sky section. -
Create the water reflection base:
Beneath the distant hills, switch back to yellow. Paint a horizontal section that mirrors the sky’s light, but keep the strokes looser to suggest the movement of water. -
Layer in orange reflections:
While the yellow water base is damp, streak in thin horizontal lines of orange. I find it helpful to use the tip of the round brush here to create ripple effects. -
Add pink water details:
Lower down in the water section, introduce streaks of pink. These should become slightly wider as you move toward the bottom of the page, simulating perspective. -
Paint the foreground land:
Mix a very dark, concentrated purple (Purple plus Indigo). Paint a rugged, uneven landmass at the very bottom of the composition. Make the top edge of this shape undulating to represent rocky terrain. -
Add depth to the foreground:
While the dark purple shape is wet, drop in hints of pure Indigo or black into the bottom-most area to give the landmass weight and solidity. -
Refine the water edge:
Use your dark purple mix to carefully paint a thin, broken line separating the water from the distant hills you painted earlier, sharpening the horizon. -
Final texture check:
Look at the water area. If it feels too flat, glaze a very watery wash of pink over the bottom half of the reflections once dry to unify the colors. -
Remove the tape:
Wait until the painting is completely dry to the touch. Peel the tape away slowly at a 45-degree angle to reveal your crisp edges.
Troubleshooting: Muddy Colors
If your orange and purple layers turn brown where they meet, let the first layer dry completely before adding the next. Wet-on-dry layering keeps colors distinct.
Place your finished piece in a simple white frame to let those vibrant sunset colors truly shine
Polaroid-Style Mini Sunset Series
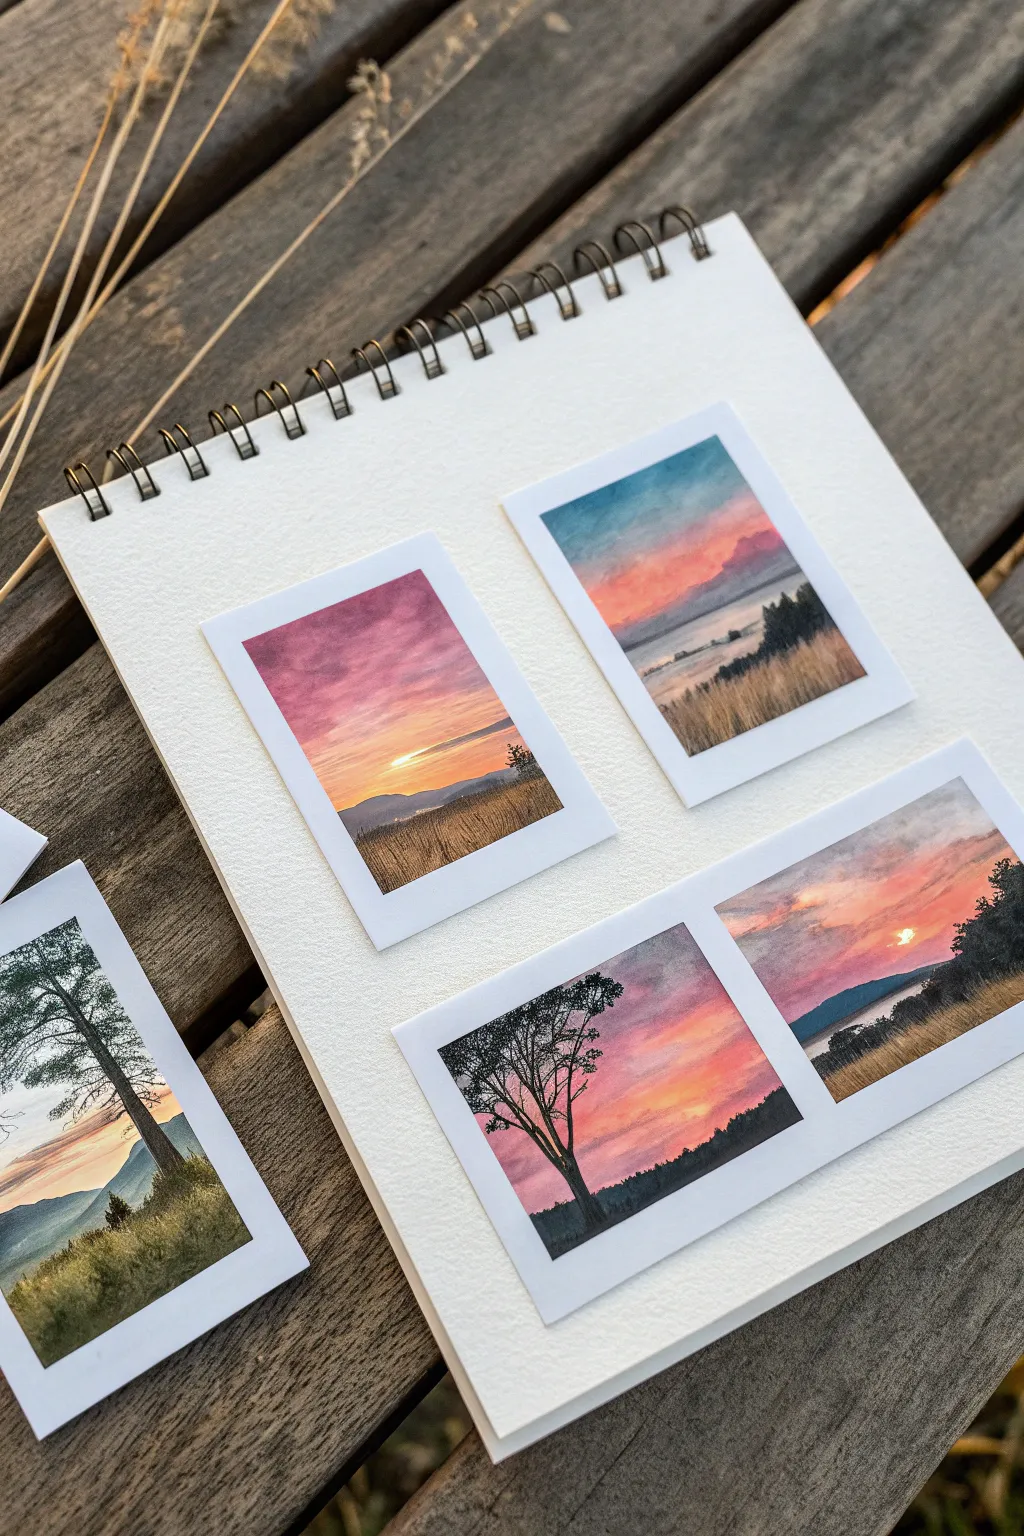
Capture the fleeting beauty of dusk with this charming series of miniature landscapes, framed to look exactly like vintage Polaroid photos. These bite-sized paintings are perfect for practicing gradients and silhouettes without the pressure of filling a large canvas.
How-To Guide
Materials
- Cold press watercolor paper (300 gsm)
- Painter’s tape or washi tape (crucial for clean edges)
- Watercolor paints (Alizarin Crimson, Cadmium Yellow, Ultramarine Blue, Burnt Umber/Black)
- Small flat brush (size 4 or 6)
- Fine round brush (size 0 or 1)
- Jar of clean water
- Paper towels
- Ruler and pencil
- White gouache (optional, for highlights)
Step 1: Preparation & Framing
-
Measure the frames:
Begin by lightly drawing three rectangles on your sketchbook page using a ruler. Standard Polaroid dimensions are roughly 3.5 x 4.2 inches, but you can scale these down to fit your page. -
Tape the borders:
Carefully apply painter’s tape to mask off the edges of your rectangles. To get that classic instant film look, leave a thicker border at the bottom and thinner, equal borders on the top and sides. -
Seal the edges:
Run your fingernail or a plastic card firmly along the inner edge of the tape. This ensures the paint won’t bleed underneath and ruin your crisp white border.
Bleeding Edges?
If paint leaks under the tape, wait for it to dry fully. Then, take opaque white gouache or a white gel pen and carefully paint over the bleed to restore the crisp border.
Step 2: Painting the Sky Gradients
-
Wet-on-wet base:
For the first sunset, brush clean water onto the sky area of the paper. You want it damp and glistening, but not forming puddles. -
Apply the yellow:
Load your flat brush with a watery Cadmium Yellow. Paint a horizontal strip near the bottom third of the frame where the horizon line will be. -
Blend in the red:
While the yellow is still wet, introduce Alizarin Crimson immediately above it. Let the colors bleed slightly where they touch to create a soft orange transition. -
Add the blue twilight:
For the top of the sky, mix Ultramarine Blue with a tiny touch of crimson to deepen it. Apply this to the very top, blending it down into the pinks. If the transition looks harsh, clean your brush and use a damp stroke to soften it. -
Repeat for variety:
Move to the next taped-off box. Try a different mood here—maybe more blue and purple with just a hint of pink at the bottom, or a fiery red sky with dark clouds. Let the skies dry completely before moving on.
Step 3: Adding the Silhouettes
-
Mix a dark hue:
Instead of using straight black, which can look flat, mix Burnt Umber with Ultramarine Blue to create a rich, deep chromatic black. -
Establish the horizon:
With a damp (not soaking) brush, paint the distant mountains or tree lines across the bottom of the sky. Keep this layer slightly translucent to suggest atmospheric perspective. -
Paint foreground grasses:
Switch to your fine round brush. Using the tip, flick upward rapidly from the bottom edge to create thin, wispy blades of grass. Vary the height and direction to make it look natural. -
Add feature trees:
Choose one or two ‘Polaroids’ to feature a prominent tree. Start with the trunk, making it thicker at the base, and let the branches shatter outward into fine twigs. -
Stipple the leaves:
If you are painting a leafy tree, simple stippling or dabbing with the side of the brush works best to create the texture of foliage against the bright sky. -
Create water reflections:
For the scene with the lake, use horizontal, broken strokes of your sky colors in the water area, leaving small gaps of white paper to mimic ripples.
Pro Tip: Consistency
Make your silhouette paint the consistency of milk or cream. If it’s too watery, it won’t be dark enough against the sunset; too thick, and it won’t flow off the fine brush.
Step 4: Final Details
-
Add sun highlights:
If you want a visible sun, you can lift a tiny circle of paint while it’s damp, or add a dot of white gouache or bright yellow once everything is dry. -
The peel:
Wait until the paper is bone dry—cool to the touch. Slowly peel the tape away at a 45-degree angle, pulling away from the painted area to reveal those satisfying crisp edges. -
Clean up:
Erase any visible pencil lines from your initial framing guide to finish the pristine Polaroid effect.
Enjoy your collection of tiny, perfect memories captured in watercolor.
Monochrome Sunset in Warm Tones
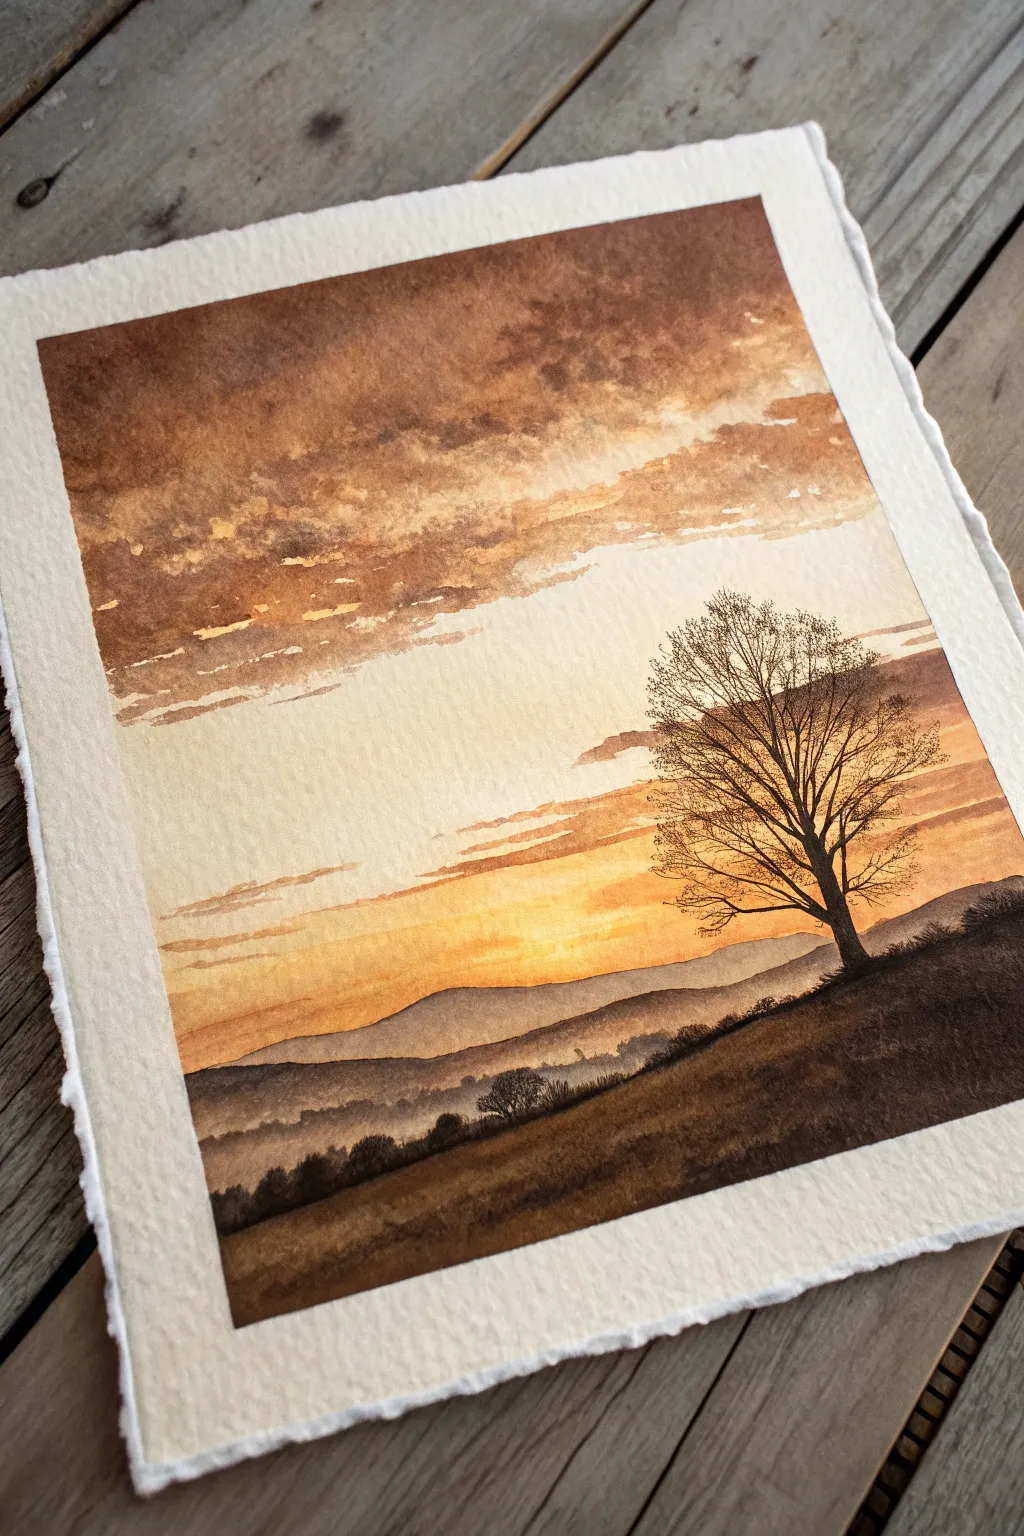
Capture the tranquil beauty of a fading day using a single, rich color palette. This tutorial guides you through creating atmospheric depth and dramatic skies with just varying values of warm brown and sepia tones.
Detailed Instructions
Materials
- Cold press watercolor paper (with deckled edges optional)
- Watercolor paints: Burnt Sienna, Sepia, and Yellow ochre (or a pre-mixed Quinacridone Gold)
- Large wash brush (flat or round)
- Medium round brush (size 8)
- Fine liner or rigger brush for tree details
- Clean water and mixing palette
- Paper towels
- Masking tape
Step 1: Setting the Scene
-
Prep the paper:
Begin by taping down your watercolor paper to a board to prevent buckling. If you are using paper with deckled edges, you might want to tape just inside the edge or use a block. -
Light sketch:
Use an H pencil to very lightly sketch the horizon line. Draw swooping curves for the distant hills, making sure they overlap to suggest distance. Mark the slope of the foreground hill on the right and a simple vertical line for the trunk placement.
Step 2: Painting the Sky
-
Wet-on-wet sky base:
With your large brush, wet the entire sky area with clean water. You want it shiny but not pooling. Leave the sun area—just above the central hills—slightly less wet to control the glow. -
Applying the glow:
Drop a very watery mix of Yellow Ochre or a light wash of Burnt Sienna into that central sun area. Let it diffuse outward, keeping the center heavily diluted to mimic bright light. -
Building clouds:
While the paper is still damp, mix a stronger concentration of Burnt Sienna and Sepia. Paint the upper sky with broad, horizontal strokes. Allow the paint to bleed down slightly, creating soft cloud edges. -
Adding texture:
Dab darker pigment (mostly Sepia) into the wet upper corners to frame the scene. I like to tilt the board slightly so gravity pulls the pigment down, creating those streaky rain-cloud effects. -
Lifting out light:
If the clouds get too heavy, use a thirsty (clean, damp) brush or a twisted paper towel to lift out horizontal streaks of paint, revealing the lighter paper underneath for cloud highlights. -
Lower sky clouds:
Paint thinner, flatter cloud lines near the horizon using a medium round brush. These should remain lighter in value than the top of the sky to enhance the feeling of distance.
Unwanted Blooms?
If cauliflower-like blooms appear in your sky, you likely added water to a drying wash. Embrace them as cloud texture, or soften them with a slightly damp scrub brush once fully dry.
Step 3: Creating Depth with Hills
-
First hill range:
Ensure the sky is completely dry. Mix a light, watery wash of Burnt Sienna. Paint the furthest range of mountains. The top edge should be crisp against the sky, but you can soften the bottom edge with clear water to create mist. -
Second hill layer:
Once the previous layer is dry, mix a slightly darker value. Paint the next range of hills closer to the viewer. Follow the contour of your sketch, ensuring this layer overlaps the previous one. -
Atmospheric mist:
While the bottom of the second hill layer is still wet, drop in a tiny bit of clean water or blot it to create a misty valley floor effect. -
Textured mid-ground:
For the closer rolling hills, use a darker mix of Sepia. Paint them with a slightly rougher brush stroke to suggest vegetation or trees without drawing individual details. -
Mid-ground trees:
Add a few tiny, indistinct bumps along the ridge of the mid-ground hill to represent a distant tree line.
Pro Tip: Drying Check
Watercolor always dries lighter than it looks when wet. For that deep, contrast-heavy silhouette in the foreground, do a second coat of your darkest sepia once the first layer is 100% dry.
Step 4: The Foreground and Tree
-
Foreground slope:
Mix your darkest value—almost pure Sepia or dark brown. Paint the large sloping hill in the foreground. Use broad, confident strokes to fill the shape solid. -
Adding ground texture:
While the foreground wash is damp, drop in concentrated pigment in the lower corners. You can also splatter a tiny bit of clean water to create ‘blooms’ that look like textured grass. -
Painting the trunk:
Wait for the hill to dry completely. Using your rigger or fine liner brush and the darkest paint mix, start the tree trunk from the slope, pulling upward. Keep the trunk thick at the base and taper it as it rises. -
Main branches:
Branch out from the main trunk. Remember that trees are organic; avoid perfect symmetry. Let your hand shake slightly for natural-looking lines. -
Fine twigs:
Switch to the very tip of your fine brush. Add delicate twigs extending from the larger branches. These should be very thin and numerous to create the intricate silhouette against the bright sky. -
Final touches:
Add a few small bushes or tufts of grass along the ridgeline of the foreground hill to ground the tree and break up the smooth line of the slope.
Step back and admire how a limited palette can create such a moody and resonant landscape
Violet-to-Orange Dramatic Sunset
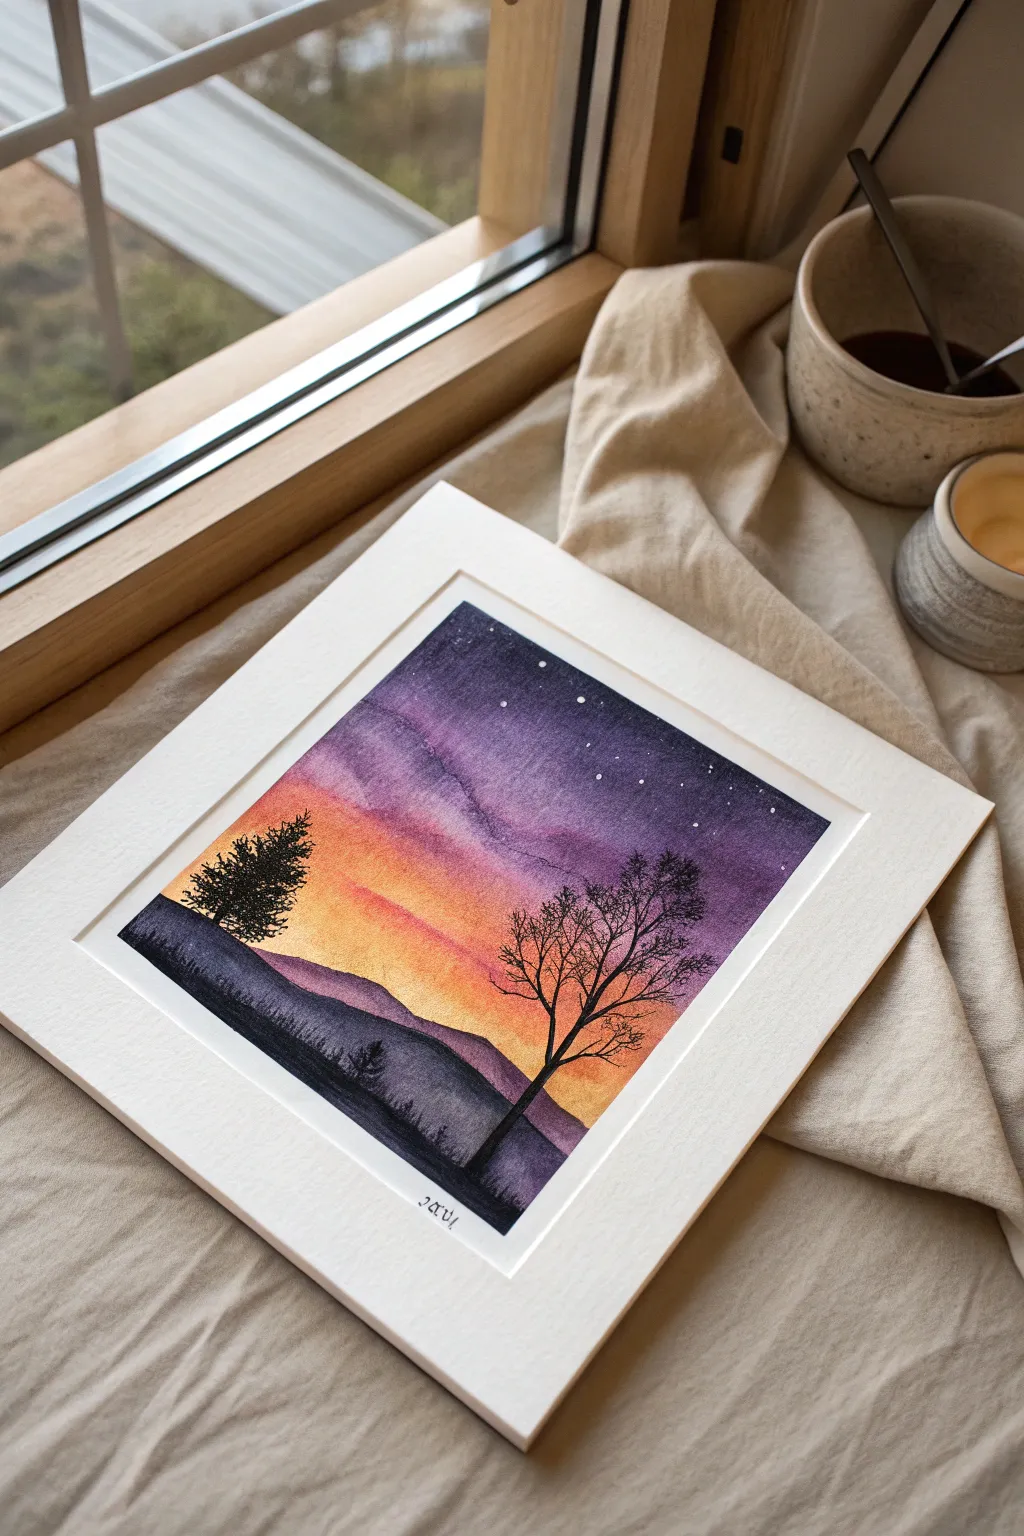
Capture the serene transition from a burning orange sunset to a deep violet night sky with this dramatic watercolor landscape. This piece focuses on mastering a smooth gradient wash and adding high-contrast silhouettes for maximum impact.
How-To Guide
Materials
- Cold press watercolor paper (300 gsm)
- Masking tape
- Pencil and eraser
- Watercolor paints: Cadmium Yellow, Cadmium Orange, Alizarin Crimson, Dioxazine Purple, Payne’s Grey or Black
- Large flat wash brush
- Medium round brush (size 6 or 8)
- Small liner brush (size 0 or 1)
- White gel pen or white gouache
- Jars of clean water
- Paper towels
Step 1: Preparation and The Gradient Sky
-
Secure the paper:
Tape down all four edges of your watercolor paper to a board using masking tape. Ensure the tape is straight to create that crisp white border later. -
Sketch the horizon:
Lightly sketch a low, rolling horizon line about one-third of the way up the paper. Don’t worry about details; just mark where the land meets the sky. -
Pre-wet the sky area:
Use your large flat brush to apply clean water to the entire sky area above your pencil line. It should be glistening with a sheen, but not forming puddles. -
Start with yellow:
Load a clean brush with Cadmium Yellow and paint a horizontal band right above the horizon line. Let the water soften the edges naturally. -
Add the orange layer:
While the yellow is still wet, introduce Cadmium Orange immediately above the yellow strip, slightly overlapping to create a seamless blend. -
Deepen with red/purple:
Mix a bit of Alizarin Crimson with the Orange and apply this above the orange band. As you move higher, start mixing in Dioxazine Purple to transition into cooler tones. -
The midnight zenith:
For the very top of the sky, use pure Dioxazine Purple mixed with a tiny touch of Payne’s Grey. Paint this across the top and let it bleed downwards into the reddish-purple sections. -
Refine the wash:
Tilt your board slightly back and forth to encourage the colors to mingle without streaking. If a section looks too dry, stop working on it to avoid ‘blooms’ or cauliflower textures. -
Let it dry completely:
This is crucial. The paper must be bone dry before you add the foreground. Use a hairdryer on a low setting if you are impatient.
Fixing Back-Runs
If water blossoms appear in your sky, don’t scrub! Wait for it to dry, then gently glaze over the area with a slightly darker wash to disguise the texture.
Step 2: Foreground and Silhouettes
-
Paint the distant hills:
Mix a diluted purple-grey color. Paint the rolling hills in the background, keeping the value lighter than the foreground to create atmospheric depth. Let this layer dry. -
Block in the foreground:
Using a saturated mix of Payne’s Grey and purple (creating a near-black), paint the closest hill at the bottom. The edge can be textured to suggest grass or uneven terrain. -
Outline the main tree:
Switch to your liner brush or small round brush. With your darkest black mix, draw a swaying trunk on the right side of the composition, thicker at the base and tapering upward. -
Add delicate branches:
Extend fine branches outward from the main trunk. Use a ‘shakey’ hand movement to make the twigs look organic and natural rather than stiff and straight. -
Create the pine tree:
On the left side, paint a triangular pine tree silhouette. Use a stippling motion with the tip of your round brush to mimic needle clusters. -
Add small details:
Paint tiny grass blades or distant bushes along the horizon line using the very tip of your brush to break up the smooth hill shape. -
Add stars:
Once the sky is fully dry, use a white gel pen or a tiny dot of white gouache to add a few stars in the darkest purple section at the top. -
Sign and reveal:
Sign your work at the bottom. Finally, slowly peel away the masking tape at a 45-degree angle to reveal the clean, crisp edges.
Level Up: Texture
Make the foreground pop by sprinkling a tiny amount of table salt onto the wet hill paint. Brush it off when dry for a rocky, frosty ground texture.
Now you have a stunning, high-contrast sunset piece ready to frame or gift
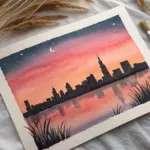
Sunset Over a City Skyline Silhouette
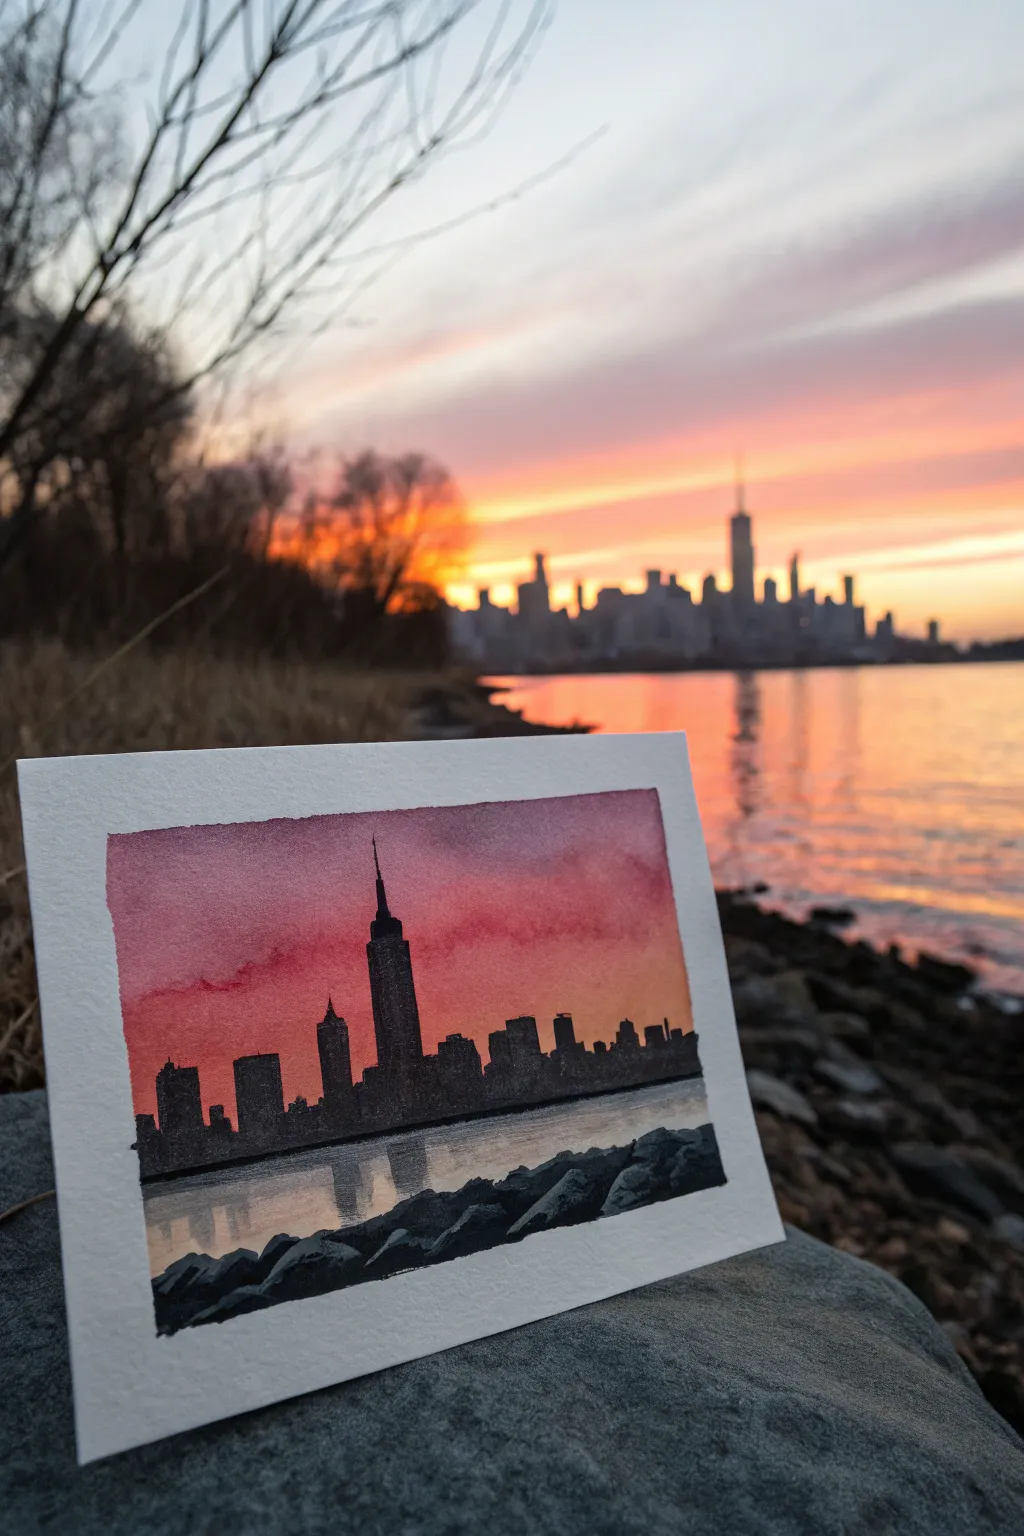
Capture the dramatic contrast of a city skyline against a fiery evening sky with this striking watercolor project. By combining a vibrant wet-on-wet gradient with crisp, dark silhouettes, you will create a postcard-perfect scene that glows with atmospheric depth.
Detailed Instructions
Materials
- Cold press watercolor paper (postcard size, approx 4×6 or 5×7 inches)
- Painter’s tape or masking tape
- Watercolor paints (Alizarin Crimson, Cadmium Orange, Burnt Umber, Lamp Black or Payne’s Gray)
- Flat wash brush (3/4 inch)
- Medium round brush (size 6 or 8)
- Small detail brush (size 0 or 1)
- Jar of clean water
- Paper towels
- Pencil and eraser
Step 1: Setting the Sky
-
Secure the paper:
Tape down all four edges of your watercolor paper to a rigid board or table using painter’s tape. This prevents the paper from buckling when wet and creates that crisp white border seen in the photo. -
Sketch the horizon:
Lightly draw a straight horizontal line across the lower third of the paper. This will separate the sky from the water. Don’t worry about drawing the buildings yet; just mark where they will sit. -
Pre-wet the sky:
Using your large flat brush and clean water, apply an even coat of water to the entire sky area, stopping right at your horizon line. The paper should glisten but not have puddles. -
Apply the warm tones:
Load your brush with Cadmium Orange. Start painting horizontally just above the horizon line, letting the color bleed upwards slightly into the wet paper. -
Blend in the cool tones:
While the orange is still wet, mix Alizarin Crimson with a touch of purple or blue to get a deep berry shade. Paint the top of the sky, bringing the color down to meet the orange. Tilt the board slightly to help them blend in the middle. -
Mirror the water:
Quickly repeat this gradient process in the water section below the horizon line, but make the colors slightly paler and more washed out to suggest reflection. Let the entire paper dry completely before moving on.
Uneven Gradients?
If your sunset sky creates hard lines between colors instead of blending, the paper dried too fast. Next time, re-wet the entire area and work faster with more water on the brush.
Step 2: Planning the Skyline
-
Sketch the silhouette:
With a pencil, lightly outline the shapes of the buildings. Focus on the iconic Empire State Building profile in the center—the tall spire and stepped sides—and vary the heights of the surrounding skyscrapers. -
Outline the rocks:
Sketch a jagged, uneven line heavily in the foreground at the very bottom of the paper to represent the rocky shoreline.
Step 3: Painting the Shadows
-
Mix the darkest dark:
Create a thick, opaque mix of Lamp Black. If it feels too flat, I like to mix Payne’s Gray with Burnt Umber for a rich, warm black that isn’t too stark. -
Fill the skyscrapers:
Using your medium round brush, carefully fill in the building shapes. Ensure the bottom edge of the buildings is perfectly flat against your horizon line. -
Add architectural details:
Switch to your smallest detail brush (size 0 or 1) to paint the needle on the tallest building and the tiny antennas or water towers on the distinct rooftops. Keep your hand steady and lift the brush at the end of the stroke for a sharp point. -
Add the foreground rocks:
Paint the bottom foreground rocks using the same dark black mixture. Make these shapes jagged and irregular to contrast with the straight lines of the city. -
Create rock highlights:
While the rocks are drying, lift out a tiny bit of pigment on the top edges using a clean, damp brush, or add a touch of diluted gray to the tops to show where the light hits the stones.
Add City Lights
Once the black buildings are totally dry, use a white gel pen or opaque white gouache to add tiny dots of ‘windows’ on a few skyscrapers for a sparkling night effect.
Step 4: Reflections and Details
-
Start the reflections:
Mix a diluted, watery gray wash. Using the medium brush, paint vertical streaks directly under the buildings in the water area. -
Soften the reflections:
Before the gray wash dries, use a clean damp brush to horizontally sweep across the reflections, blurring them slightly to make the water look fluid rather than solid. -
Final dry and reveal:
Allow the painting to dry completely. Touch the paper with the back of your hand to check for cold spots; if it’s cold, it’s still wet. Once dry, carefully peel off the tape at a 45-degree angle.
Now you have a serene city moment that fits right in the palm of your hand
Stormy Sunset With Dark Cloud Edges
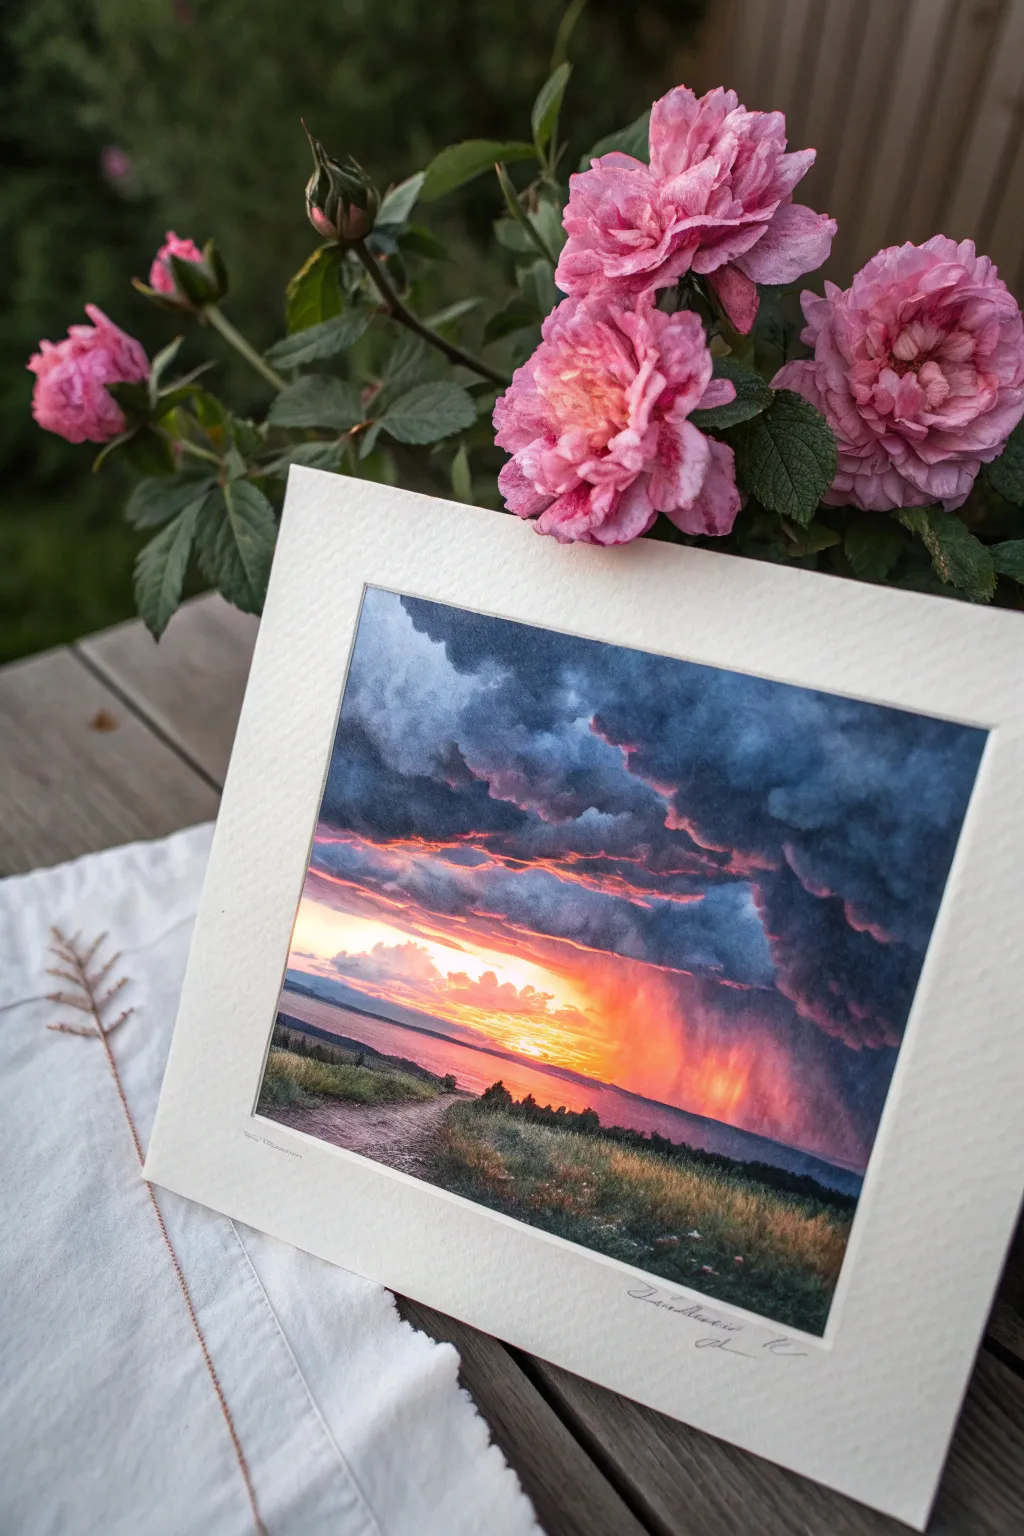
This dramatic watercolor captures the intense contrast between heavy, brooding storm clouds and the fiery glow of the setting sun. By balancing wet-on-wet techniques for the sky with darker, layered details for the landscape, you will create a piece full of mood and atmospheric depth.
Step-by-Step Guide
Materials
- High-quality watercolor paper (cold press, 300 gsm or heavier)
- Watercolor paints: Indigo, Payne’s Grey, Alizarin Crimson, Cadmium Yellow, Burnt Sienna, Sap Green, Ultramarine Blue
- Large flat wash brush (1 inch)
- Round brushes (sizes 8 and 4)
- Small rigger or detail brush
- Masking tape
- Two water containers
- Paper towels or cotton rag
- Mixing palette
Step 1: Preparation and The Glowing Horizon
-
Secure the paper:
Tape down all four edges of your watercolor paper to a board using masking tape. This creates a clean white border and prevents the paper from buckling during heavy washes. -
Sketch the horizon:
Lightly sketch the horizon line about one-third of the way up from the bottom. Keep it faint; you just need a guide for where the water meets the sky. -
Wet the sky area:
Use your large flat brush to apply clean water to the entire sky area, stopping just short of your horizon line. -
Paint the sunset glow:
While the paper is wet, drop in a vibrant mix of Cadmium Yellow near the horizon line. Let it bloom upwards naturally. -
Add warmth:
While the yellow is still damp, introduce streaks of orange (mix Yellow with a touch of Alizarin Crimson) and faint pinks just above the yellow band to create the transition zone.
Soft Edges
For fluffier clouds, pre-wet the paper more heavily. For ominous, sharp cloud bottoms, paint on dry paper then soften slightly with a damp brush.
Step 2: Building the Stormy Sky
-
Mix dark cloud colors:
Prepare a rich, dark mixture using Indigo, Payne’s Grey, and a touch of Alizarin Crimson to warm it up slightly. You want this paint to be creamy, not too watery. -
Paint the upper clouds:
Starting at the very top of the paper, apply your dark mixture into the damp surface. Use a round brush and let the paint bleed down, but control the shape to form heavy cloud masses. -
Create distinct edges:
As you move lower towards the sunset strip, use slightly less water. Carefully paint the bottom edges of the clouds so they look ragged and heavy, hanging over the light below. -
Suggest rain curtains:
On the right side of the painting, while the cloud layer is still damp, drag a semi-dry brush with diluted purple-grey downwards into the orange section to mimic distant falling rain. -
Lift reflected light:
If the clouds get too dark, use a clean, damp thirsty brush to lift out a few soft highlights on the undersides of the clouds, catching the sunset’s glow. -
Let it dry completely:
This is crucial. The sky must be bone dry before you start the horizon line to keep the divide sharp.
Step 3: Landscape and Foreground
-
Paint the water:
Using a diluted mix of your sky colors—purples and pinks—paint the water area. It should be darker than the bright sky but lighter than the land. -
Add water reflections:
While the water wash is wet, drop in a horizontal streak of orange reflecting the sun directly below the brightest part of the sky. -
Define the distant land:
Once the water is dry, paint the thin strip of distant land on the horizon using a mix of Indigo and Burnt Sienna. Keep the top edge crisp against the sky. -
The foreground path:
Sketch the path leading into the scene with a mix of Burnt Sienna and a little violet. Apply it loosely, leaving some texture for the dirt road. -
Layering the grass:
Mix Sap Green with Indigo for a deep, shadowed green. Paint the grassy areas on either side of the path, using upward flicking strokes to suggest tall blades. -
Deepen the shadows:
The foreground should be quite dark to contrast with the bright sunset. Add a second layer of dark green and brown to the bottom corners to anchor the composition. -
Final details:
Use your smallest brush to add tiny details like a few specific grass blades catching the light or small silhouettes of bushes along the horizon line. -
The reveal:
Wait for the entire painting to be completely dry, then slowly peel away the masking tape at a 45-degree angle to reveal your crisp white borders.
Muddy colors?
Avoid overmixing your darks on the palette. Let the Indigo and Alizarin mix partially on the paper to keep the stormy purples vibrant rather than dull grey.
Sign your name in the corner and frame it with a white mat to truly make those dark storm clouds pop
Galaxy Sunset Into Night
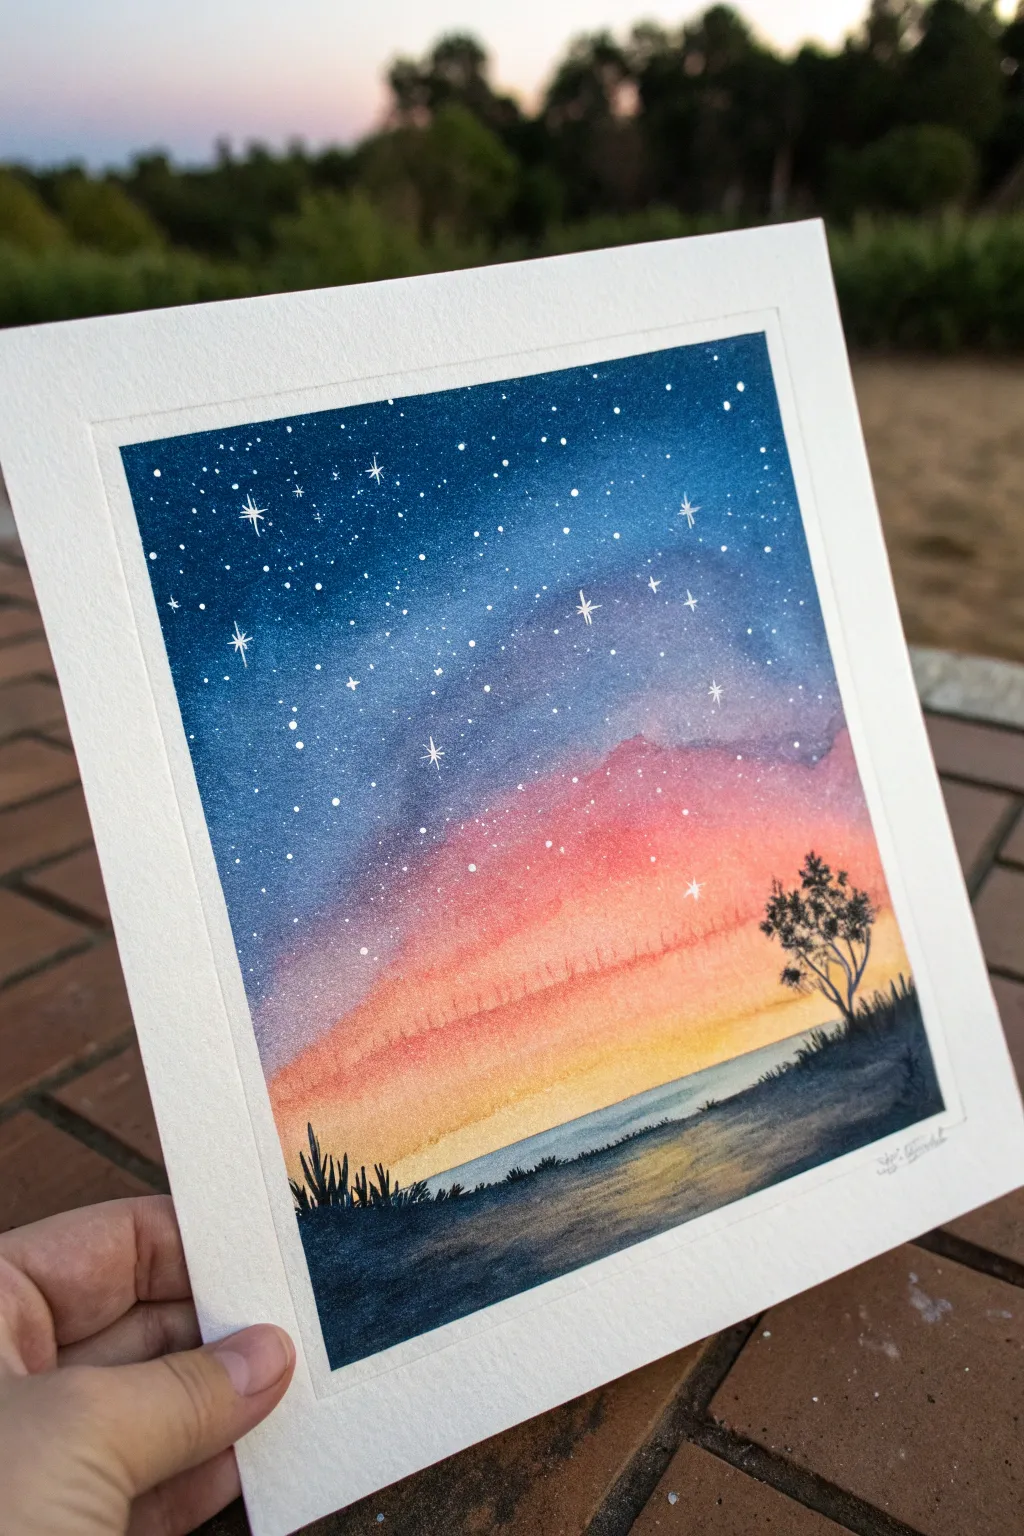
Capture the magic where day meets night with this vibrant watercolor galaxy sunset. This project blends a deep, celestial blue sky into a warm, glowing horizon, grounded by a sharp silhouette landscape.
How-To Guide
Materials
- Watercolor paper (cold press, 300gsm)
- Masking tape
- Watercolor paints (Indigo, Prussian Blue, Alizarin Crimson, Cadmium Yellow, Orange)
- White gouache or opaque white ink
- Large flat wash brush
- Medium round brush (size 6 or 8)
- Small detail brush (size 0 or 1)
- Paper towels
- Two jars of water
- Old toothbrush (optional)
Step 1: Preparing the Sky gradient
-
Tape and wet the paper:
Begin by taping down all four edges of your watercolor paper to a board. This creates a crisp white border and prevents buckling. Using your large wash brush, wet the entire sky area with clean water, stopping about an inch from the bottom where the land will be. -
Apply the yellow horizon:
While the paper is wet, load your brush with a watery Cadmium Yellow. Paint a horizontal band near the bottom of your wet area. Let the color bleed upwards slightly, keeping the very bottom edge soft. -
Add the sunset glow:
Clean your brush and pick up some orange. Blend this into the top edge of the yellow, moving upwards. Then, mix in Alizarin Crimson to transition into a reddish-pink hue as you move higher up the paper. -
Paint the deep night sky:
Now, switch to your deep blues. Start at the very top of the paper with a concentrated Indigo or Prussian Blue. Paint downwards, adding water to the mix as you approach the pink layer to encourage a seamless gradient. -
Smooth the transition:
With a clean, damp brush, gently work the area where the blue meets the pink. I like to tilt the board slightly to help gravity blend the colors naturally, avoiding harsh lines. -
Intensify the darkness:
While the top section is still damp, drop in more concentrated Indigo into the upper corners and top edge. This adds depth and creates that vast ‘night sky’ feeling. -
Let it dry completely:
This is crucial. Let the paper dry until it is room temperature to the touch. If you proceed while it’s damp, your stars will blur and the landscape will bleed.
Bleeding Colors?
If your blue sky bleeds too much into the yellow, turning it green, let the yellow layer dry almost completely before re-wetting slightly to add the blue.
Step 2: Creating the Galaxy
-
Splatter the stars:
Mix white gouache with a tiny drop of water until it has a creamy consistency. Load a brush or an old toothbrush with the mixture. Tap the brush handle against another brush over the blue section to create fine spray of stars. -
Add larger stars:
Using your smallest detail brush and the same white gouache, manually dot a few larger stars scattered randomly in the dark blue area. -
Paint the twinkling stars:
Select a few of the larger white dots you just made. Carefully paint a tiny cross or four-pointed star shape over them to make them look like they are twinkling.
Step 3: Painting the Silhouette
-
Mix the silhouette color:
Mix a very dark, saturated color for the land and tree. Combine Indigo with a touch of dark brown or Payne’s Gray. It needs to be opaque enough to cover the sunset background. -
Define the horizon line:
Using a medium round brush, paint the distant water line or land edge. It doesn’t need to be perfectly straight; a slight unevenness looks more natural for the terrain. -
Paint the foreground:
Fill in the bottom inch of the paper with your dark mixture. Vary the opacity slightly by adding a tiny bit of water in the very foreground to suggest texture in the grass strips. -
Add the tree silhouette:
On the right side, use the tip of your round brush to paint a small, gnarly tree trunk. Use a stippling motion (tapping the brush tip) to create the leafy canopy shapes. -
Detail the grass:
Switch to your detail brush. With quick, upward flicking motions, add tiny blades of tall grass and weeds along the ridge line on the left side and near the tree base. -
Final drying and reveal:
Allow the black silhouette layer to dry completely. Once dry, slowly peel off the masking tape at a 45-degree angle to reveal your clean, crisp borders.
Starry Control
Cover the bottom sunset portion of your painting with a scrap piece of paper while splattering white paint. This keeps stars strictly in the night sky area.
Frame your mini masterpiece or gift it to someone who loves stargazing
Abstract Sunset Shapes and Splashes
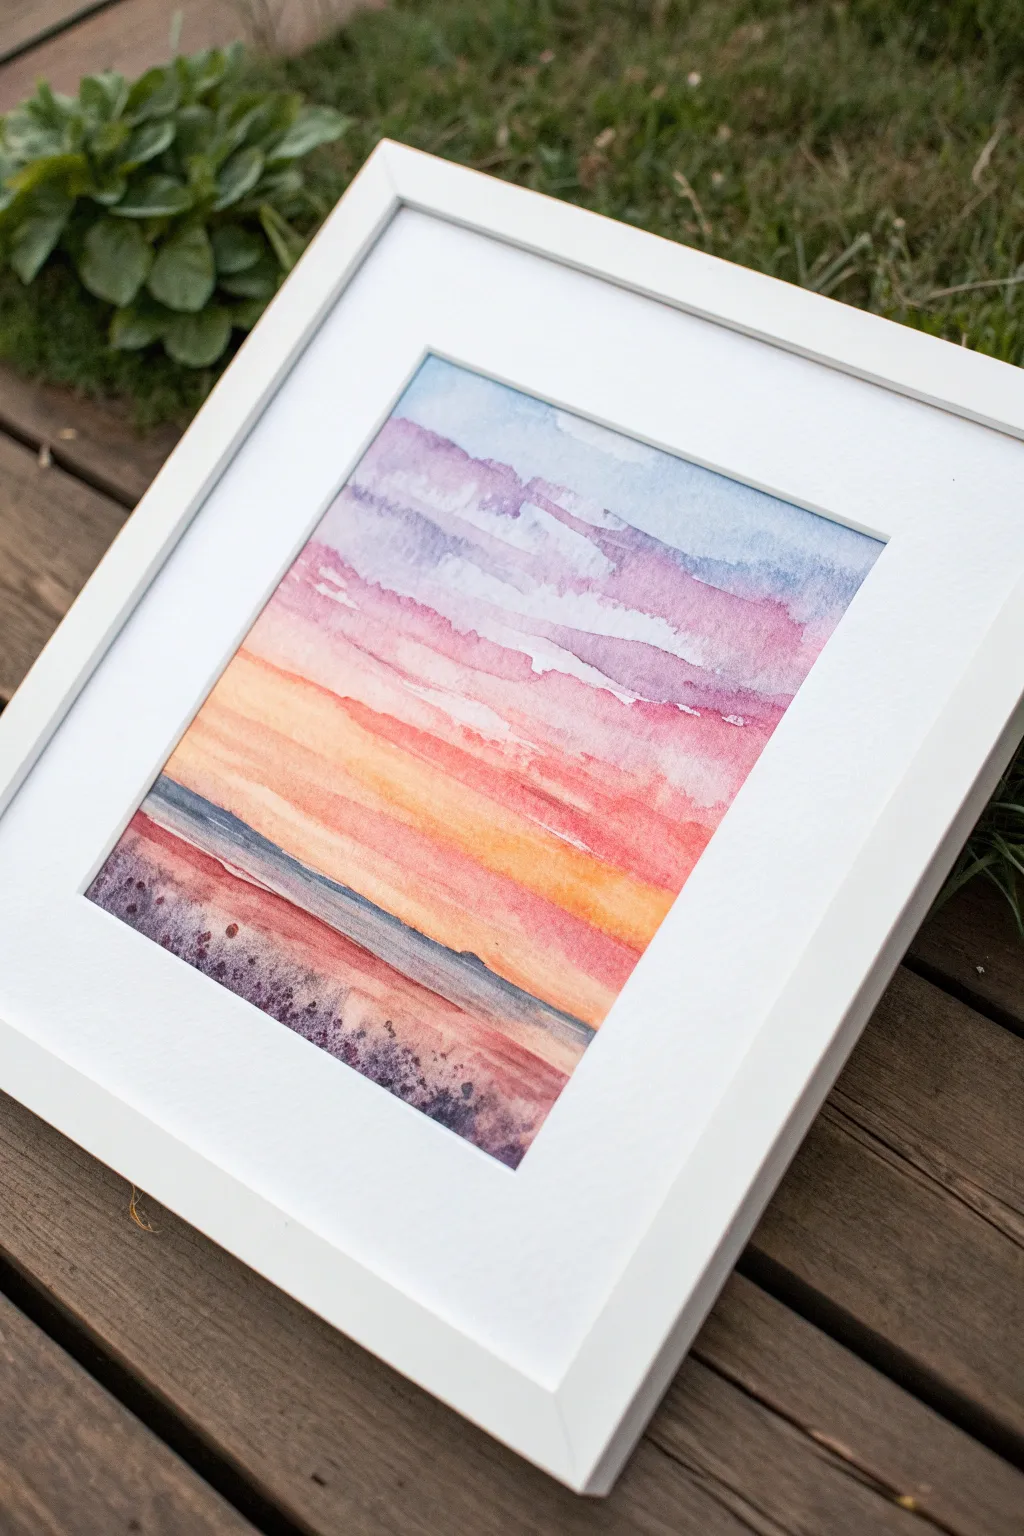
This project captures the gentle transition of a twilight sky using soft, horizontal washes of watercolor. By layering varying hues from cool lavender to warm peach, you’ll create a soothing, abstracted landscape that feels both modern and timeless.
Step-by-Step
Materials
- Cold press watercolor paper (140lb/300gsm)
- Watercolor paints (Lavender, Ultramarine Blue, Alizarin Crimson, Cadmium Orange, Lemon Yellow, Paynes Grey)
- Large flat wash brush (3/4 inch or 1 inch)
- Medium round brush (size 6 or 8)
- Masking tape
- Clean water jar
- Paper towels
- Mixing palette
- White mat and frame (optional, for finishing)
Step 1: Preparation and Sky Layering
-
Secure the paper:
Begin by taping down all four edges of your watercolor paper to a board or table. This creates a crisp white border and prevents the paper from buckling when wet. -
Pre-wet the sky area:
Using your large flat brush and clean water, gently wet the top two-thirds of the paper. You want the surface to be glistening but not holding puddles. -
Mix the upper sky color:
Create a watery mix of Lavender with a tiny touch of Ultramarine Blue. Load your flat brush and apply a broad horizontal stroke across the very top of the wet paper. -
Transition to purple:
While the first stroke is still wet, add a little Alizarin Crimson to your blue mix to create a soft violet. Paint a horizontal band just below the blue one, letting the colors bleed into each other naturally. -
Introduce warmth:
Rinse your brush thoroughly. Mix a diluted Alizarin Crimson (pink) and paint the next band down. The wet paper will help diffuse the hard edges, creating that cloudy, streaked look. -
Intensify the sunset:
As you move toward the middle of the paper, mix Cadmium Orange with a hint of the pink. Apply this across the page, slightly overlapping the pink layer above. -
Add the golden glow:
For the lowest part of the sky, just above the horizon line, use a mix of Lemon Yellow and Orange. Keep this color vibrant and apply it while the orange above is still damp for a smooth gradient. -
Create cloud textures:
While the sky is damp (not soaking wet), use a thirsty, clean brush to lift out horizontal streaks here and there, or drop in slightly more concentrated pigment to suggest drifting clouds. -
Let it dry completely:
Before moving to the horizon and foreground, the paper must be bone dry. Use a hairdryer on a low setting if you need to speed up the process.
Fixing “Cauliflowers”
If water blossoms (cauliflowers) appear in your sky, don’t scrub them! Wait until dry, then gently scrub with a damp rigid brush (erradicator) to soften the hard edge.
Step 2: Horizon and Foreground
-
Establish the horizon line:
Mix a dark, cool color using Ultramarine Blue and Paynes Grey. Switch to your round brush and paint a distinct, straight line across the page where the yellow sky ends. -
Soften the water edge:
Immediately beneath that dark horizon line, clean your brush and drag slightly damp bristles along the bottom edge of the blue paint to pull the color down softly, suggesting distant water. -
Paint the beach base:
Mix a rusty red-orange using Alizarin Crimson and Cadmium Orange, muddying it slightly with a touch of blue. Paint the bottom third of the paper with horizontal strokes. -
Add foreground texture:
While the beach area is wet, drop in concentrated spots of Paynes Grey and violet into the very bottom corners. This adds weight and depth to the foreground sand. -
Create salt effects (optional):
If you want extra texture in the sand, sprinkle a pinch of table salt into the wet foreground paint. I find this creates lovely granular bloom patterns that look like pebbles. -
Splatter for detail:
Load a small brush with dark purple paint and tap it against your finger to splatter tiny dots onto the bottom dry foreground. This mimics texture like rocks or debris. -
Final drying:
Allow the entire painting to dry completely. If you used salt, brush it off gently once the paper is dry. -
Reveal the border:
Carefully peel away the masking tape at a 45-degree angle away from the painting to reveal your crisp white edges.
Metallic Horizon
Add a thin line of metallic gold watercolor right along the horizon line or on the water’s edge. It catches the light beautifully when framed.
Place your finished piece in a white matted frame to enhance the brightness of the colors
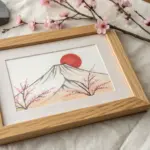
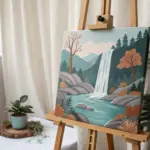

Have a question or want to share your own experience? I'd love to hear from you in the comments below!