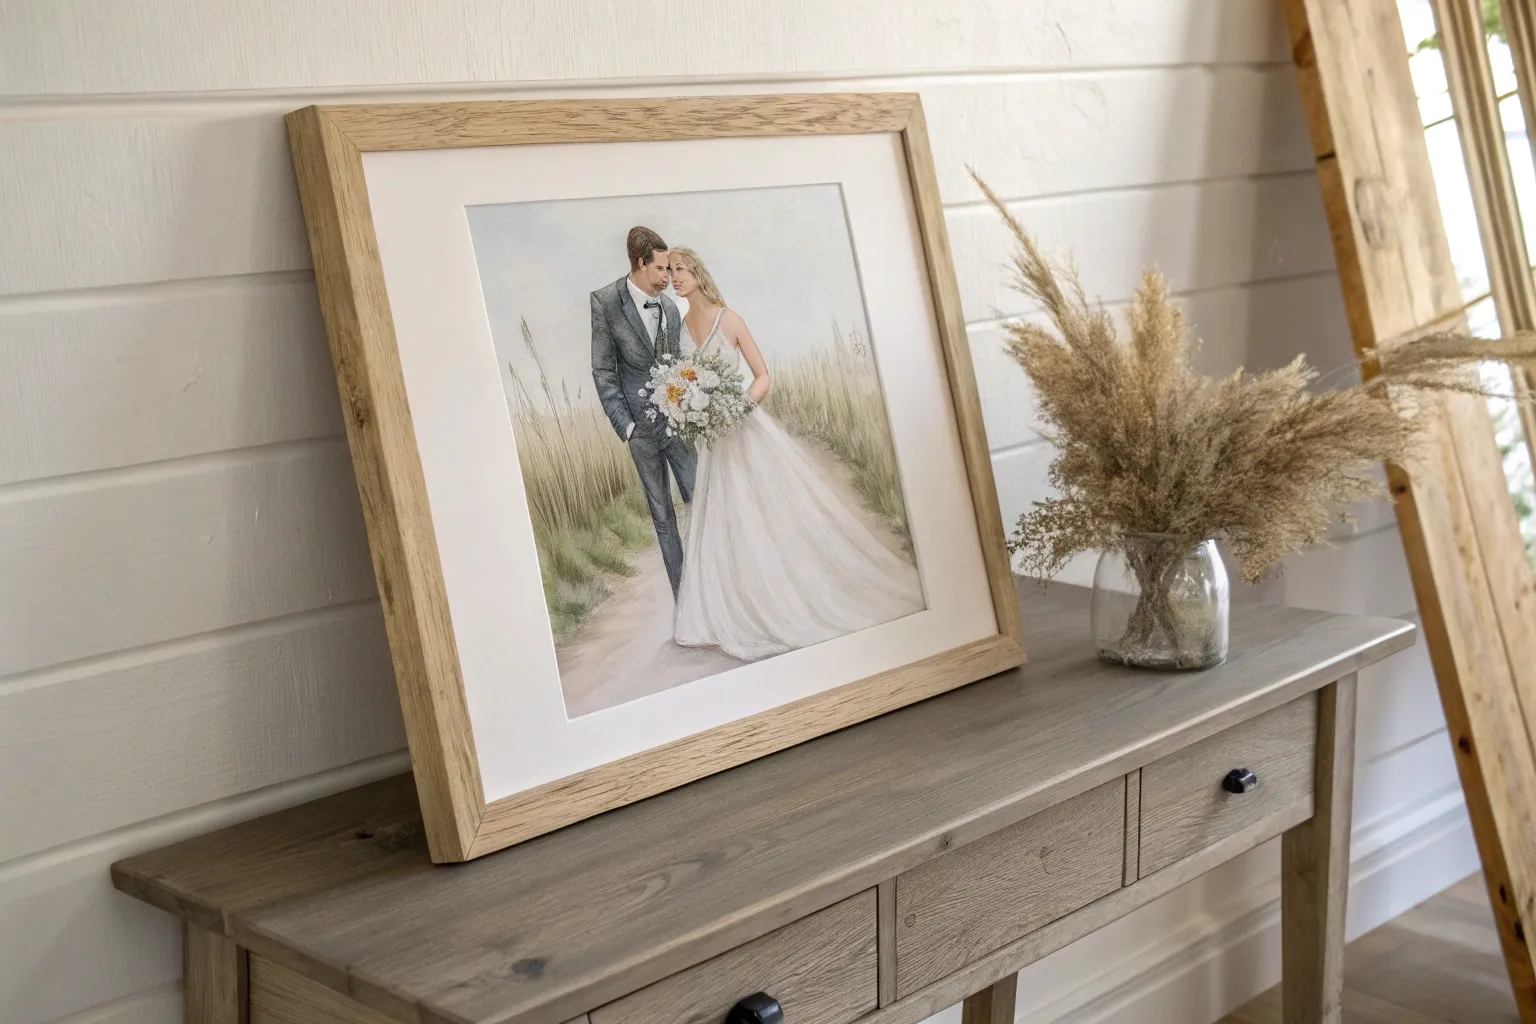
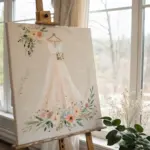
If you want a gift that feels deeply personal, a wedding painting turns one beautiful moment into something the couple can live with every day. Here are my favorite wedding painting gift ideas, starting with the classics and easing into some artsy, unexpected twists.
Ceremony Venue Watercolor With the Couple
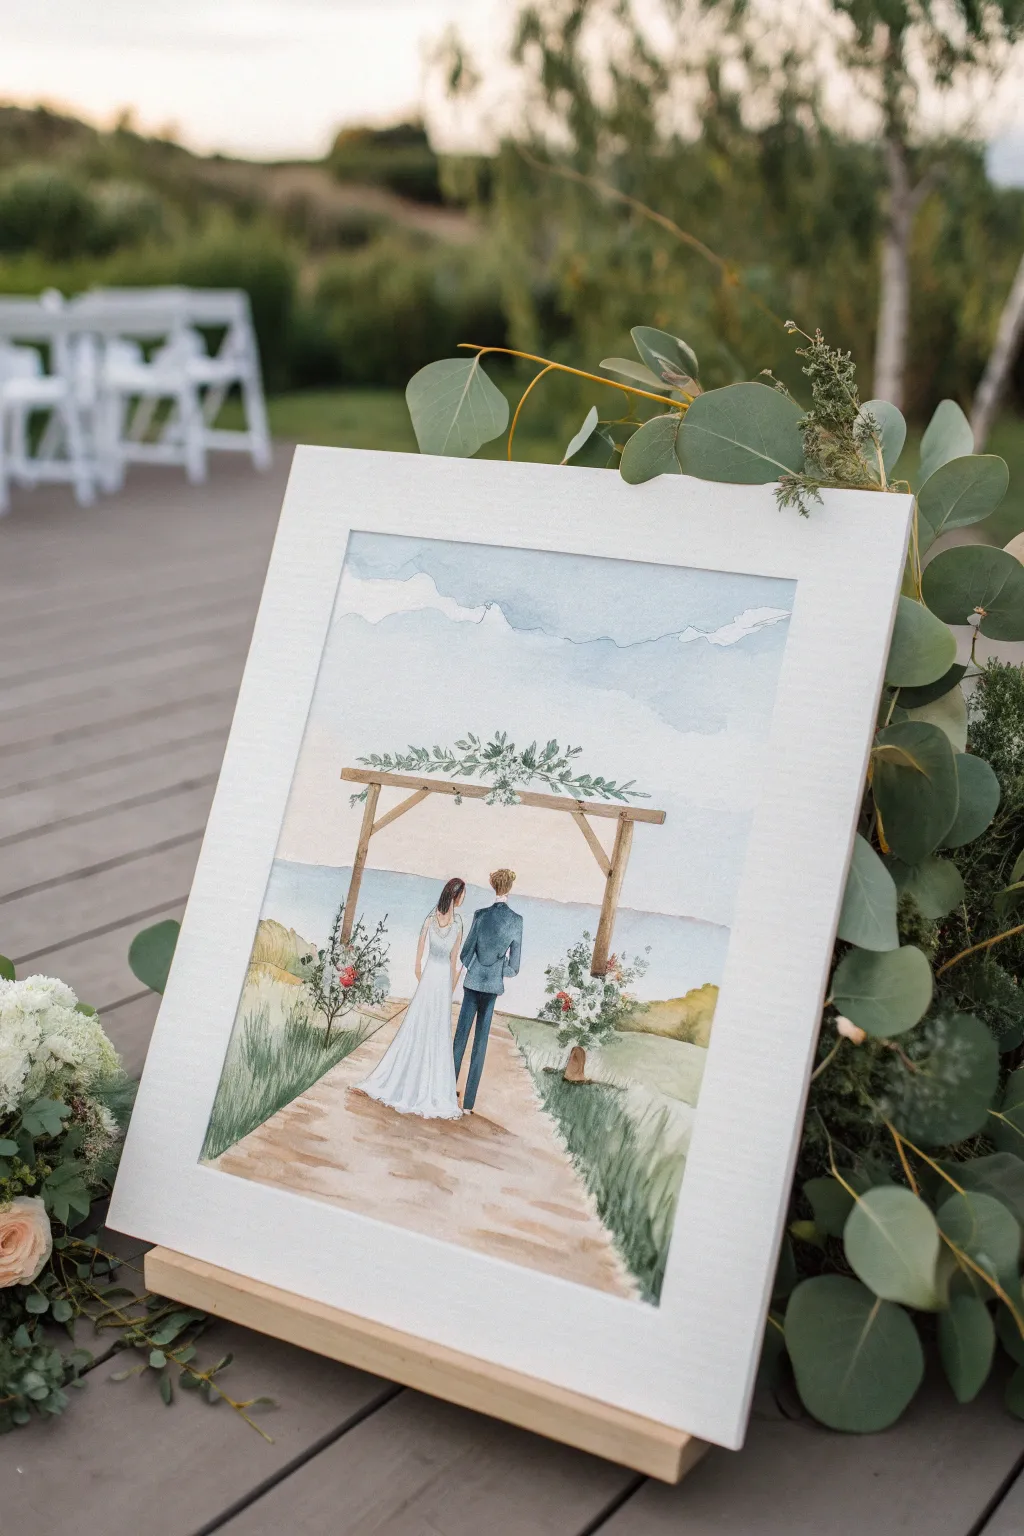
This custom watercolor keepsake captures the magic of the wedding ceremony with a soft, dreamy aesthetic. Featuring the bride and groom at their altar with a scenic landscape backdrop, it makes for a deeply personal and touching gift.
Step-by-Step Guide
Materials
- Cold press watercolor paper (140lb/300gsm)
- Watercolor paint set (pans or tubes)
- Set of watercolor brushes (Round sizes 2, 6, and 10)
- Pencil (HB or 2H)
- Kneaded eraser
- Masking fluid (optional)
- Two jars of water
- Ceramic or plastic mixing palette
- Paper towels
- Wooden display easel (optional, for gifting)
Step 1: Sketching the Scene
-
Establish the horizon:
Begin by lightly drawing a horizon line about a third of the way up the paper using your HB pencil. Keep this line extremely faint so it disappears under the paint later. -
Draft the altar structure:
Sketch the wooden arbor structure centrally. Draw two vertical posts and a crossbeam. Don’t worry about perfect straight lines; a slight organic wobble adds rustic charm. -
Place the couple:
Sketch the outlines of the bride and groom standing beneath the arbor, facing away. Focus on simple shapes first: an oval for heads, a triangle for the dress, and a rectangle for the groom’s suit. -
Refine the details:
Refine the figures by adding the train of the dress, the groom’s arm position, and hair. Sketch loose, bushy shapes at the base of the arbor for floral arrangements and a path leading toward them. -
Clean up the sketch:
Use a kneaded eraser to lift up any heavy graphite lines. You want the sketch to be barely visible, just a ghost on the page to guide your brush.
Muddy Colors?
If your greens or blues look dull, you likely mixed too many colors. Let the layer dry completely, then apply a fresh, pure glaze of color over the top to revive it.
Step 2: Painting the Backdrop
-
Paint the sky:
Mix a very watery wash of Cerulean Blue. Using your largest brush (size 10), wet the sky area first with clean water, then drop in the blue pigment, leaving white negative space for clouds. -
Create distant mountains:
While the sky is still slightly damp, mix a pale purple-grey. Paint the distant mountains along the horizon line. The damp paper will soften the edges, making them look far away. -
Add the sea or horizon:
Below the mountains, paint a strip of soft blue-green for the water or distant land. Keep this layer flat and even. -
Establish the grass:
Mix a light sap green with a touch of yellow ochre. Paint the grassy areas on either side of the path, using upward strokes near the bottom to suggest blades of grass.
Step 3: The Couple and Architecture
-
Paint the arbor:
Mix Burnt Umber with a touch of blue to create a wood tone. Using a size 6 brush, paint the wooden beams. Add a slightly darker mix to the shadowed side of the beams for dimension. -
Detail the groom’s suit:
I like to mix Indigo and Payne’s Grey for a classic suit color. Carefully paint the jacket and trousers, leaving a tiny gap between legs to define them. -
Shadow the wedding dress:
The dress stays the white of the paper. To show folds and form, use a very dilute mix of violet-grey and paint thin shadow lines where the fabric drapes. -
Paint hair and skin:
Use a small size 2 brush to dot in the hair colors (brown or blonde ochre) and a tiny amount of pale orange-pink for the necks and ears.
Use Negative Space
Don’t paint the white flowers! Instead, paint the dark green leaves *around* the white paper shapes. This ‘negative painting’ makes the florals pop.
Step 4: Final Flourishes
-
Paint the path:
Mix a warm beige or light brown. Paint the path using horizontal, broken strokes to suggest dirt or stone texture, getting wider as it comes toward the viewer. -
Add floral greenery:
Load a size 6 brush with varying shades of green. Use a stippling motion (dabbing the tip) to create the bushy floral arrangements at the arbor posts and the garland on top. -
Add floral pops:
Once the greenery is dry, dab small spots of red, pink, or white gouache over the leaves to represent the flowers. -
Define the foreground grass:
Take a deeper green mix and use the fine tip of your brush to flick quick, upward lines in the foreground. This creates texture and frames the couple. -
Final dry and display:
Let the painting dry completely for at least an hour before framing or placing it on your mini easel.
Now you have a timeless, hand-painted memory ready to be gifted.


First Kiss Painting With a Romantic Crop
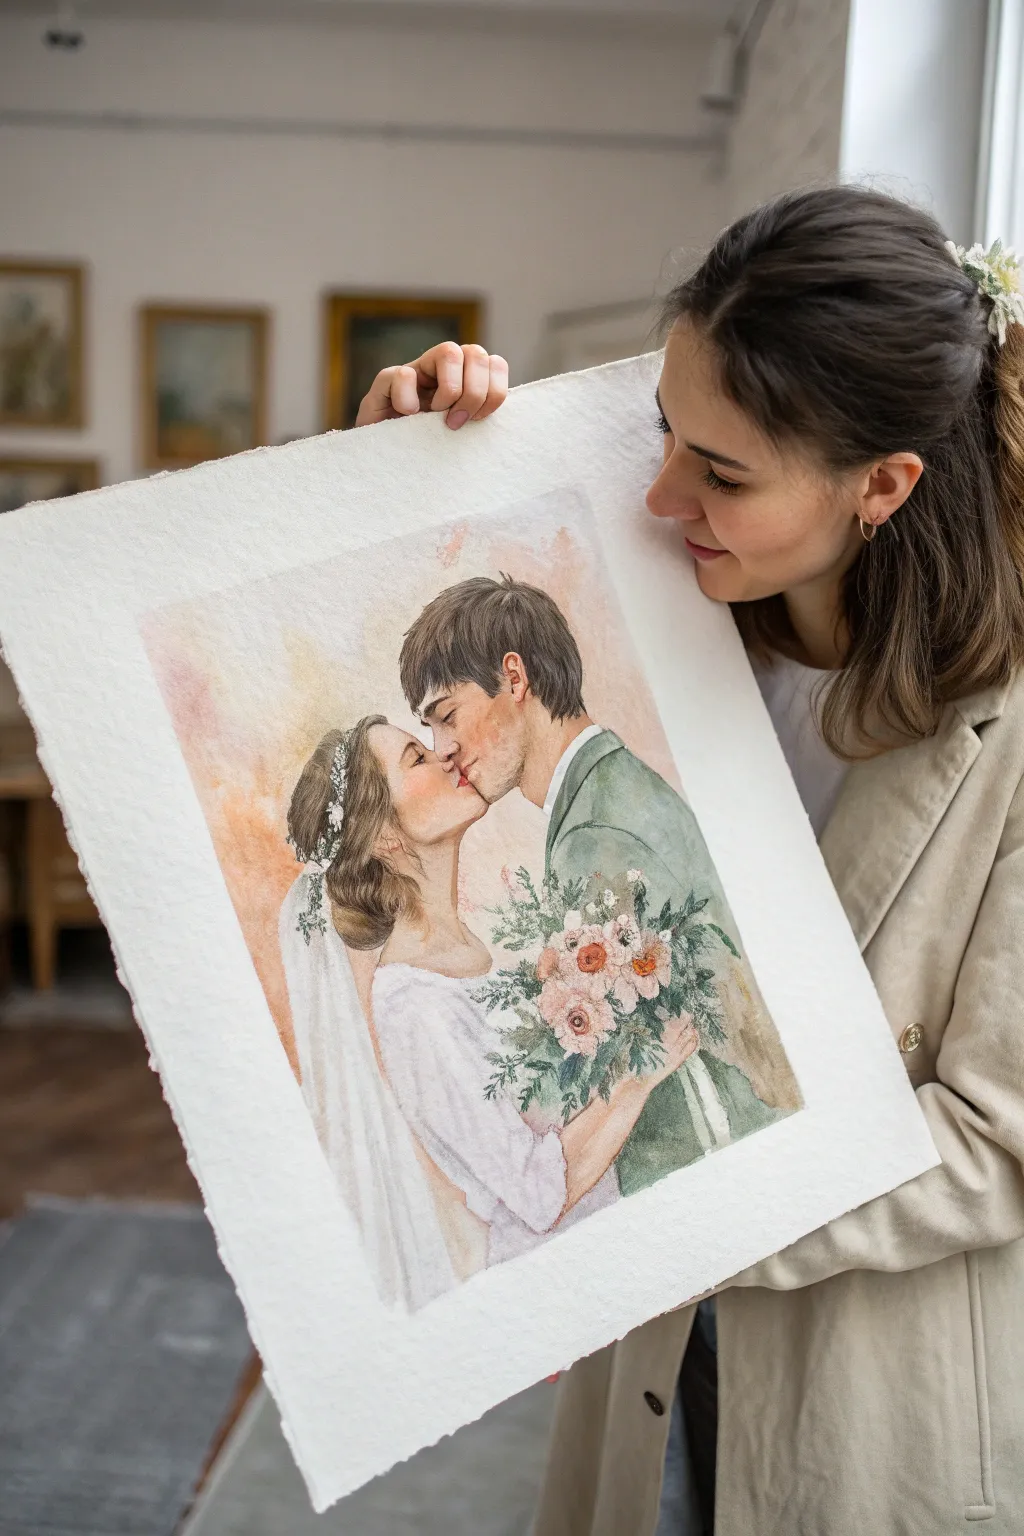
This tutorial guides you through creating a tender, romantic watercolor portrait of a first kiss, emphasizing soft washes and delicate details. By focusing on a cropped composition, you bring intimacy to the couple’s moment, set against a dreamy, abstract wash background.
Step-by-Step Tutorial
Materials
- High-quality watercolor paper (300gsm, cold press, preferably rough edge/deckled)
- Watercolor paints (pans or tubes)
- HB or 2B graphite pencil
- Kneaded eraser
- Round brushes (sizes 2, 6, and 10)
- Masking fluid (optional)
- Palette for mixing
- Two jars of water
- Paper towels
- Reference photo of the couple kissing
Step 1: Preparation and Sketching
-
Paper Selection:
Choose a heavy-weight watercolor paper with a distinct texture. For that authentic, artisanal look shown in the example, tear the edges carefully using a ruler or use pre-made deckled edge paper. -
Crop and Composition:
Study your reference photo and decide on a tight crop. Focus on the heads, shoulders, and the floral bouquet, cutting off just below the chest to keep the attention on the emotional connection. -
Initial Outline:
Lightly sketch the figures using an HB pencil. Focus on getting the proportions of the faces and the angle of the kiss correct, as these are the focal points. -
Refining Features:
Add detail to the hair flow, the groom’s suit lapels, and the general shapes of the bouquet flowers. Keep your pencil pressure very light so the graphite doesn’t show through the translucent paint later. -
Protecting Highlights:
If you are concerned about losing the stark white of the veil or specific flower petals, apply a tiny amount of masking fluid to those areas now and let it dry completely.
Step 2: Painting the Couple
-
Skin Tone Mixing:
Mix a base skin tone using colors like Yellow Ochre, Cadmium Red, and a touch of Burnt Sienna. Test the color on a scrap piece of paper to ensure it isn’t too saturated. -
First Skin Wash:
Apply a very watery, pale wash over the skin areas. Work quickly to avoid hard edges, leaving the paper white for the brightest highlights on the nose and forehead. -
Building Shadows:
While the first layer is still slightly damp, drop in a slightly darker, cooler mix (add a tiny bit of Ultramarine Blue or Alizarin Crimson to your base) under the jawline, around the eyes, and near the hairline to create volume. -
Hair Base Layer:
Wash in the base color of the hair. For brown hair, use Burnt Umber or Sepia. Keep this layer loose and not too dark, allowing the direction of your brushstrokes to mimic the hair’s flow. -
Developing Contrast:
Once the skin and hair base layers are dry, go in with a size 2 brush to deepen the darkest areas—the eyelashes, the separation between the lips, and the deepest shadows in the ears and hair. -
The Groom’s Suit:
Mix a soft sage or forest green for the suit. Apply the paint in sections, keeping the wash slightly uneven to suggest fabric texture and lighting differences.
Soft Edges Pro-Tip
To get that dreamy look on the skin, soften hard paint edges by running a clean, damp brush along the edge of the wet paint before it dries.
Step 3: Dress, Flowers, and Atmosphere
-
The Bride’s Dress:
For the white dress and veil, don’t paint the whole area white. Instead, use a very diluted mix of Cobalt Blue and a touch of gray to paint only the shadows and folds, leaving the white of the paper to represent the fabric itself. -
Floral Bouquet:
Paint the flowers loosely. Use soft pinks and peaches for the blooms, letting the colors bleed slightly into one another. Dabs of varied greens will suggest leaves without needing to paint every single leaf perfectly. -
Detailing the Greenery:
Use the tip of your size 2 brush to draw thin stems and sharper leaves sticking out of the bouquet to add texture and realism to the floral arrangement. -
Background Wash:
Create the romantic atmosphere by wetting the background area around the heads with clean water. Drop in very diluted warm colors—soft oranges, pinks, or yellows—and let them bloom outward, fading to white at the paper’s edge. -
Final Touches:
Assess the painting from a distance. If needed, darken the groom’s hair specifically near the part and add final crisp edges to the suit collar. Remove any masking fluid if used.
Level Up: Metallic Accent
Mix a tiny amount of gold gouache or metallic watercolor and apply it to the bride’s hairpiece or jewelry for a subtle shimmer that catches light.
This heartfelt painting serves as a timeless keepsake that captures the emotion of the day far better than a standard photograph


First Dance Painting With Flowing Motion
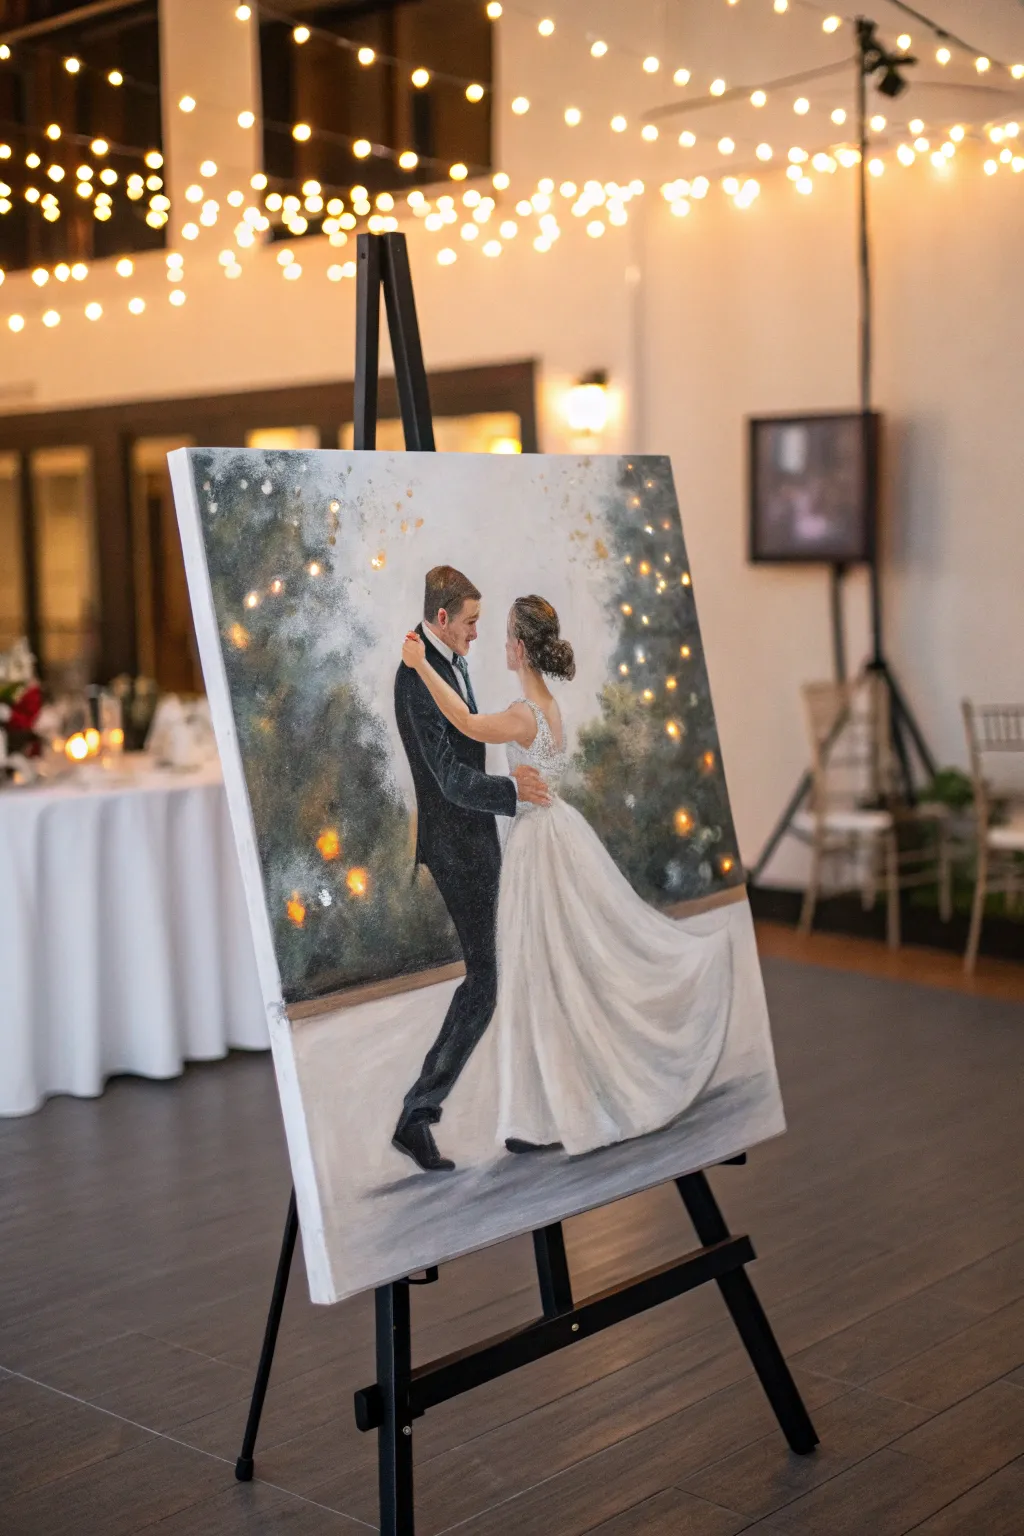
Capture the magic of the first dance with a timeless oil painting that balances realistic portraiture with a dreamy, bokeh-filled background. This project focuses on depicting movement and light, creating a romantic keepsake that feels both classic and contemporary.
Step-by-Step
Materials
- Stretched canvas (24×24 or 30×30 inches)
- Oil paints (Titanium White, Ivory Black, Burnt Umber, Yellow Ochre, Ultramarine Blue, Cadmium Red, Alizarin Crimson, Sap Green)
- Odorless mineral spirits or turpentine
- Linseed oil or painting medium
- Assorted brushes (filberts #4-#10, rounds #2-#6, detail liner #0)
- Palette knife
- Wooden palette
- Reference photo of the first dance
- Easels (tabletop or floor standing)
- Paper towels or rags
- Pencil or charcoal for sketching
Step 1: Preparation and Sketching
-
Prepare the canvas:
If your canvas isn’t pre-primed, apply two coats of gesso and sand lightly between coats for a smooth finish. Even on pre-primed canvas, I like to apply a thin wash of Burnt Umber mixed with mineral spirits to tone the surface, killing the stark white. -
Select your reference:
Choose a photo that shows the full figures of the couple. Look for dynamic poses where the dress is flowing or there is interaction between the couple. -
Sketch the figures:
Using a thin brush with diluted Burnt Umber or a charcoal pencil, lightly sketch the outlines of the bride and groom. Focus on the angles of the limbs and the sweep of the dress to establish the composition. -
Block in the background:
Mix a dark, muted green using Sap Green, Burnt Umber, and a touch of Ultramarine Blue. Roughly scrub this into the background area around the figures, keeping the edges soft and indistinct to create depth.
Muddy Colors?
If your skin tones or background look muddy, stop and clean your brush thoroughly with mineral spirits. Mixing too many colors at once turns paint gray. Let a layer dry before glazing over it.
Step 2: Painting the Figures
-
Underpaint the groom’s suit:
Mix a dark chromatic black using Ultramarine Blue and Burnt Umber. Apply this to the groom’s suit, leaving lighter areas unpainted where the light hits the fabric. -
Underpaint the dress:
Using a mix of Titanium White and a tiny amount of Yellow Ochre and Ivory Black for shadows, block in the main shapes of the dress. Don’t worry about details yet; just establish the light and shadow masses. -
Develop skin tones:
Mix a base skin tone using White, Yellow Ochre, and Cadmium Red. Add touches of Blue or Green to desaturate shadow areas. Paint the faces and hands, paying close attention to the light source. -
Refine the groom’s attire:
Go back to the suit with a smaller round brush. Add deep black for the darkest folds and mix a cool grey (White + Black + Blue) for the highlights on the shoulders and arms to show the fabric’s sheen. -
Sculpt the dress folds:
With a filbert brush, blend the white and grey tones in the dress to create soft, flowing folds. Use a swift, sweeping motion to mimic the fabric’s movement as it twirls.
Add Sparkle
For a magical touch, mix a tiny amount of iridescent medium into the white paint used for the brightest bokeh lights or dress beadwork. It catches the room’s actual light beautifully.
Step 3: Creating Atmosphere
-
Layer the background greenery:
Mix lighter, warmer greens and greys. Scumble these over the dark background using a dry brush technique to create the look of distant foliage or trees. -
Add bokeh lights:
To create the glowing lights in the background, mix Titanium White with a touch of Cadmium Yellow. Use a round brush or your fingertip to dab soft circles into the wet background paint, blending the edges slightly so they look out of focus. -
Refine facial features:
Switch to your #0 liner brush. carefully define the eyes, nose, and mouth. Keep the contrast subtle to avoid a cartoonish look. -
Paint the hair:
Block in the hair colors first, then add highlights using a small round brush. Suggest individual strands rather than painting every single hair, especially where the light catches the updo or the groom’s styling. -
Ground the figures:
Paint the floor area beneath them using horizontal strokes of light grey and taupe. Add cast shadows under their feet using a transparent glaze of black and brown to anchor them to the ground.
Step 4: Final Details
-
Highlight the dress:
Use pure Titanium White to add the brightest highlights on the dress bodice and the peaks of the skirt folds. This adds dimension and mimics the texture of satisfaction or lace. -
Detail the suit accessories:
Add small touches like the white of the collar, the tie, and the shoes. Ensure the shoes have a slight shine by placing a crisp white highlight. -
Softening edges:
Use a clean, dry fan brush or soft filbert to lightly brush over the edges where the figures meet the background. This “loss of edge” helps integrate the couple into the scene realistically. -
Enhance the glow:
Add a few more crisp, bright yellow-white dots in the background for the closest lights, ensuring they overlap some of the darker foliage for contrast. -
Varnish:
Allow the painting to dry completely (which can take several weeks for oils). Once dry to the touch and cured, apply a coat of retouch varnish or final picture varnish to protect the surface and even out the sheen.
Display this masterful piece on an elegant easel to relish the memory of that special dance every day


Minimal Faceless Couple Portrait
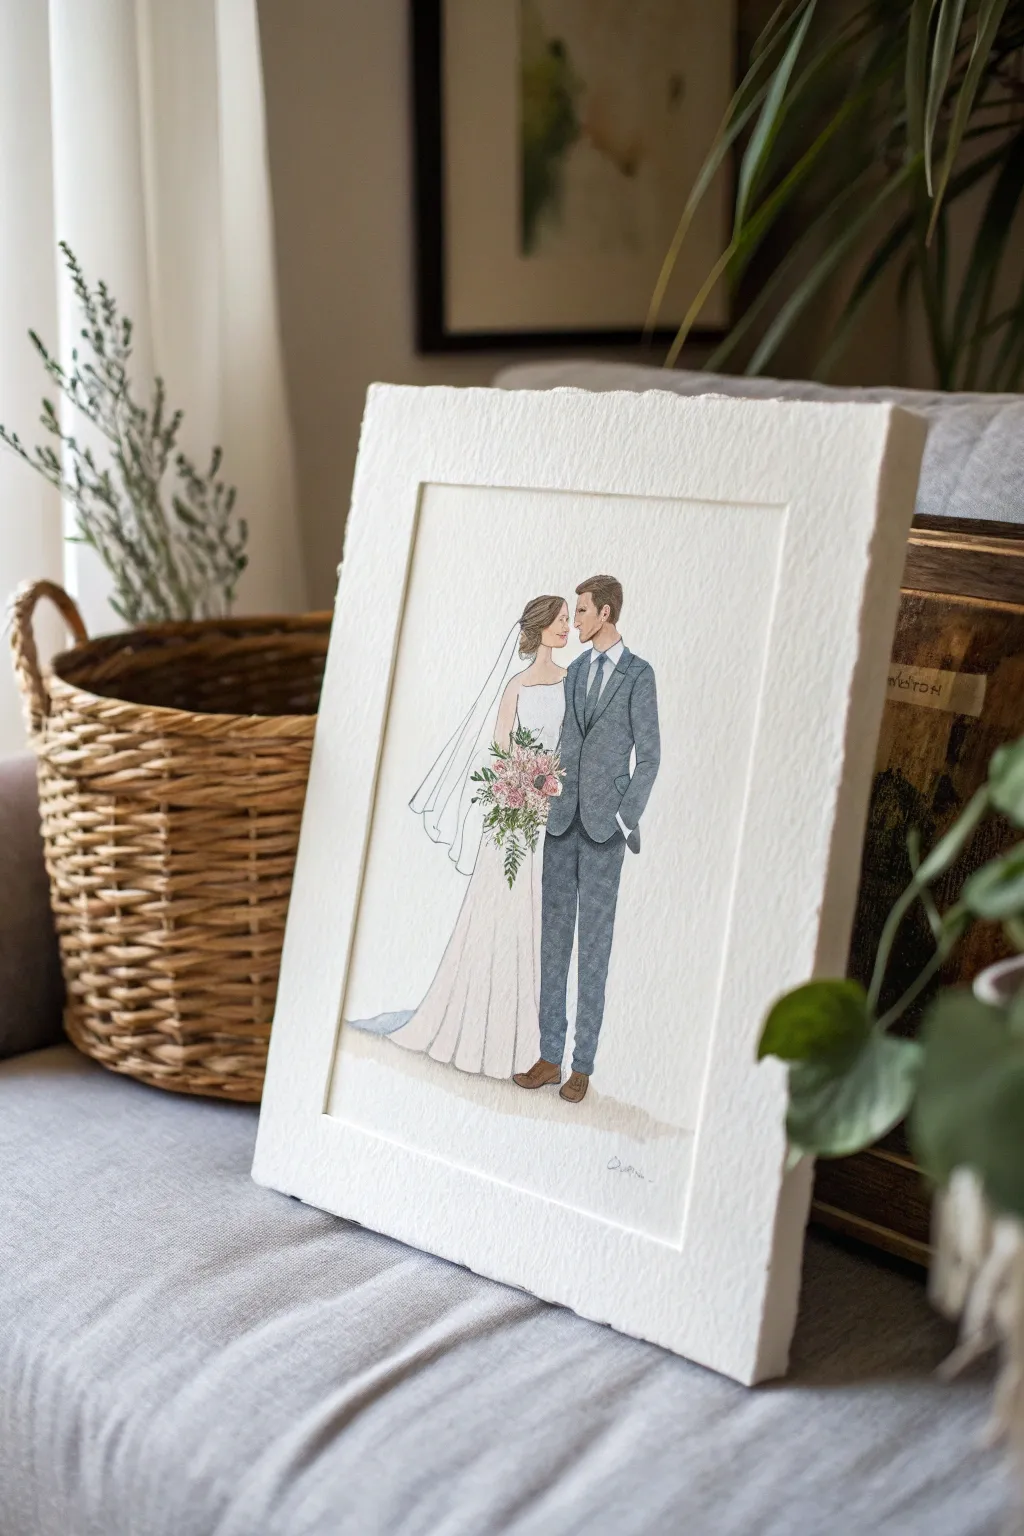
Capture the romance of the big day with this delicate watercolor illustration, perfect for a personalized anniversary or wedding gift. This project combines fine ink linework with soft watercolor washes on beautiful deckled-edge paper for a timeless, artistic look.
How-To Guide
Materials
- Heavyweight watercolor paper (300gsm, cold press)
- Pencil (HB or 2H)
- Kneaded eraser
- Waterproof archival ink pens (sizes 005 and 01)
- Watercolor paints (pans or tubes)
- Small round brushes (sizes 2, 4, and 6)
- Clean water jar
- Paper towel
- Ruler
- Deckled edge ripper or ruler (optional)
- Reference photo of the couple
Step 1: Preparation & Sketching
-
Prepare the paper:
Cut your watercolor paper to the desired size, leaving plenty of white space around the subject. If you want the jagged ‘deckled’ look shown in the example, tear the paper edges against a metal ruler rather than cutting them. -
Analyze reference photo:
Study your reference photo of the couple. Identify the main shapes of their posture—the tilt of the heads, the drape of the dress, and the stance of the groom. -
Draft the skeleton:
Using a light pencil touch, draw stick figures to get the proportions and height differences correct. Ensure the heads are roughly oval shapes and the shoulders align properly. -
Flesh out the forms:
Build upon your stick figures to add volume to the bodies. Sketch the outline of the groom’s suit and the flow of the bride’s gown, paying attention to where the fabric folds. -
Refine details:
Lightly sketch facial profiles, hair shapes, and the bouquet. Keep the details minimal at this stage; you just need guides for the ink.
Master the Floating Mount
To get the shadow effect seen in the photo, use self-adhesive foam core spacers behind your painting to lift it 1/8 inch off the mat board.
Step 2: Inking the Outline
-
Ink the main contours:
Using the 01 size waterproof pen, trace over your pencil lines for the main outlines—the silhouettes, the suit lapels, and the main folds of the dress. -
Add delicate details:
Switch to the finer 005 pen for delicate areas like facial features, hair strands, and the intricate details of the flower bouquet. Use broken lines for hair to keep it looking soft. -
Erase pencil guides:
Wait at least 10–15 minutes to ensure the ink is complete dry. Gently erase all pencil marks with a kneaded eraser to leave a clean, crisp black and white drawing.
Muddy Watercolors?
If colors are bleeding into each other, you aren’t waiting long enough between layers. Use a hairdryer on a low, cool setting to speed up drying.
Step 3: Watercolor Application
-
Paint skin tones:
Mix a very watery, pale wash for the skin. Apply it to faces, necks, and arms. I tend to leave tiny slivers of white paper unpainted on the nose or forehead for natural highlights. -
Color the suit:
Mix a grey-blue tone for the groom’s suit. Paint the jacket and trousers using the size 4 brush. While the paint is wet, drop slightly darker pigment into the shadowed areas (under the arm, between the legs) for depth. -
Detail the hair:
Once the skin is dry, paint the hair. Use a light brown wash first, then add darker strokes on top once the first layer dries to suggest texture and individual strands. -
Dress shadows:
The dress is white, but it needs definition. Dilute a tiny amount of grey or purple to create a ‘shadow’ color. Paint thin lines along the folds of the skirt and veil to give it dimension without making it dark. -
Paint the bouquet:
Use the smallest brush to dab pinks, greens, and creams into the bouquet area. These don’t need to be perfect; loose dabs of color often look more artistic than filling in the lines perfectly. -
Ground the couple:
Mix a light neutral beige or grey wash. Paint a loose, subtle shadow under their feet so they aren’t floating in empty space.
Step 4: Finishing Touches
-
Deepen contrast:
Look at the painting from a distance. If the suit looks too flat, add a second layer of paint to the darkest shadows. -
Add texture to the veil:
If highlighting the veil, use a very dry brush with faint white gouache or extremely pale grey to scumble over the veil area, suggesting transparency. -
Final ink touches:
If any lines got lost under the paint, re-trace them very carefully with the 005 pen to bring back definition. -
Sign and frame:
Sign your work small near the feet. To mimic the photo, mount the artwork on a backing board using foam spacers for a ‘floating’ effect before framing.
This custom portrait preserves a special memory in a light, elegant style that will be cherished for years to come
BRUSH GUIDE
The Right Brush for Every Stroke
From clean lines to bold texture — master brush choice, stroke control, and essential techniques.
Explore the Full Guide
Charcoal Wedding Portrait Sketch
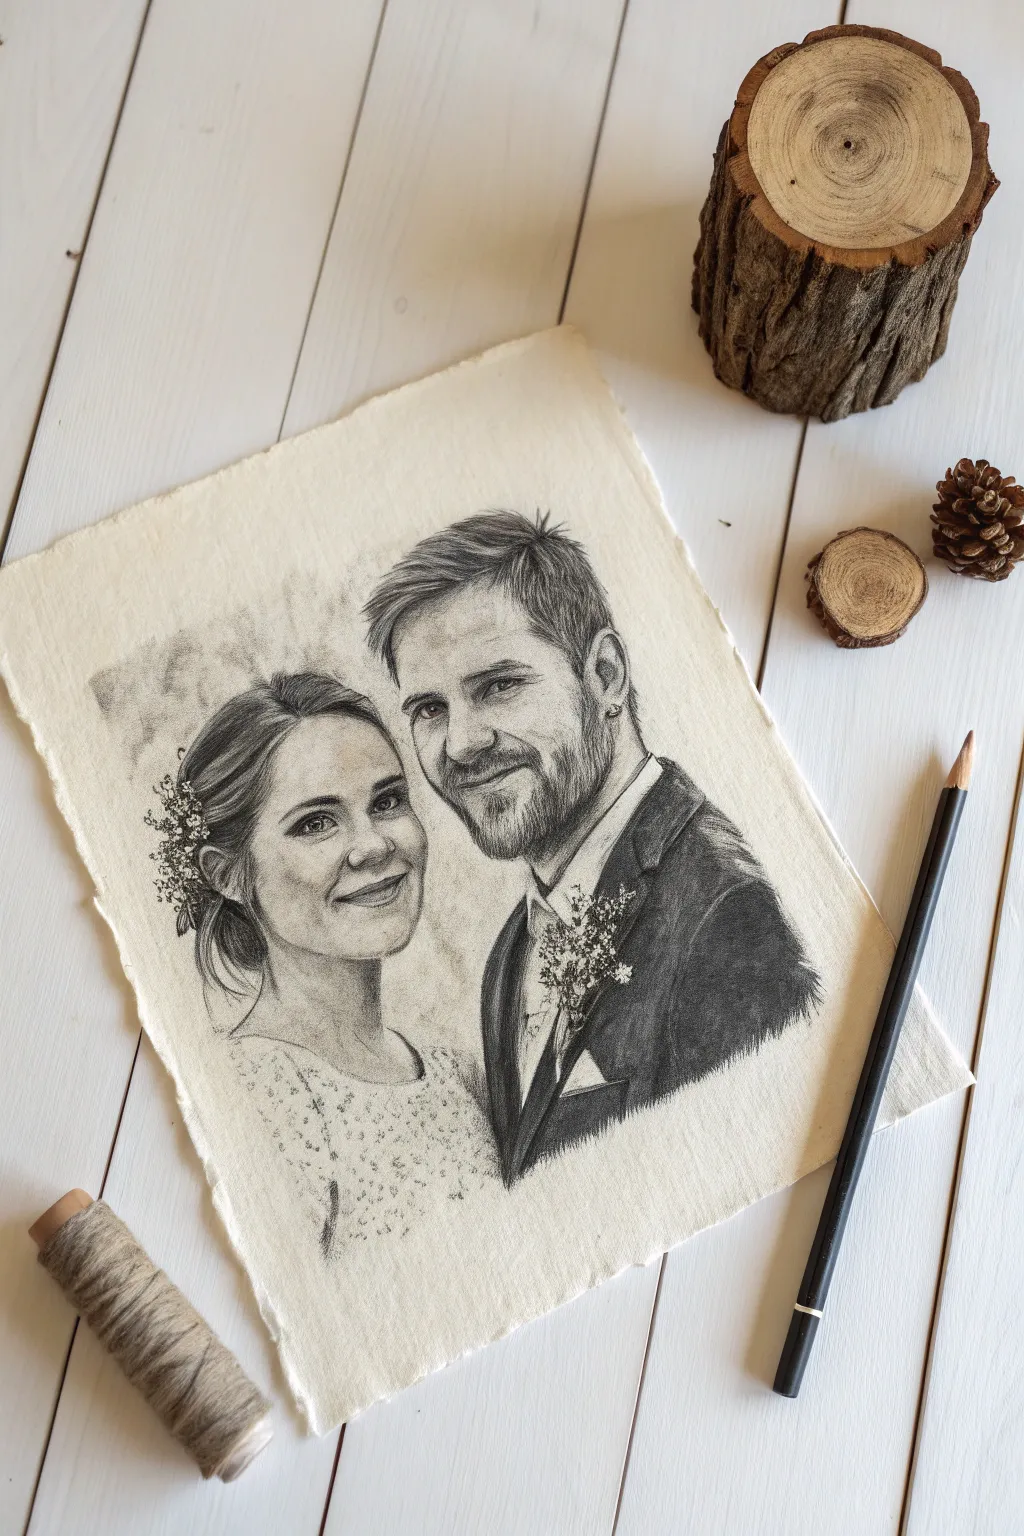
Capture the romance of a wedding day with this elegant charcoal portrait sketch on textured paper. The soft gradients and high contrast of charcoal mediums create a nostalgic, classic aesthetic perfect for an anniversary gift.
Detailed Instructions
Materials
- High-quality reference photo of the couple
- Textured fine art paper (cold press or handmade cotton rag)
- Charcoal willow sticks (soft and medium)
- Charcoal pencils (HB, 2B, 4B, 6B)
- Kneaded eraser
- Paper blending stump (tortillon)
- White pastel pencil or white charcoal pencil
- Fixative spray
- Artist tape
- Drawing board
Step 1: Preparation and Outline
-
Prepare your surface:
Begin by selecting a heavyweight paper with distinct texture or deckled edges to match the rustic look. Tape the paper securely to your drawing board to prevent slipping. -
Establish the composition:
Lightly sketch the basic outlines of the couple using an HB charcoal pencil. Focus on the relative positioning of heads and shoulders, ensuring the eye levels align correctly. -
Map facial features:
Refine the shapes of the eyes, noses, and mouths. Keep your lines faint at this stage; charcoal is unforgiving, so accuracy in this initial mapping is crucial before committing to darker values.
Step 2: Shading and Depth
-
Lay down the base values:
Using a soft willow charcoal stick, gently block in the shadow areas of the faces, such as under the chin, the eye sockets, and the side of the nose. -
Blend the skin tones:
Take your blending stump or a soft tissue and smooth out the willow charcoal. This creates the soft, smoky skin texture seen in the reference, allowing the paper’s grain to show through slightly. -
Build intermediate shadows:
Switch to a 2B charcoal pencil to deepen the shadows around the eyes and jawlines. I find working in layers helps prevent the drawing from looking muddy too quickly. -
Develop textural details:
For the groom’s beard, use short, directional strokes with a sharp 4B pencil. Don’t draw every hair; instead, focus on the patches of shadow and light to suggest volume. -
Define the eyes:
Sharpen your charcoal pencil to a fine point. Carefully draw the pupils and lash lines, leaving tiny untouched spots for the catchlights, called the ‘spark of life.’
Clean Hands, Clear Art
Place a scrap sheet of paper under your hand while drawing. This prevents the oils in your skin from smearing the charcoal or transferring grime to the pristine white areas.
Step 3: Clothing and Hair
-
Block in the hair:
Use a broad stick of charcoal to fill in the hair masses. Follow the natural growth direction of the hair, pressing harder in the roots and parted areas. -
Render the groom’s suit:
Apply heavy pressure with a 6B charcoal pencil or stick to create the deep black of the suit jacket. Use cross-hatching to build density rather than just scrubbing. -
Sketch the bride’s lace:
For the dress, keep the touch extremely light. Use a hard lead or a faint willow stick to suggest the delicate floral pattern without drawing distinct outlines. -
Fade the edges:
Soften the bottom edge of the drawing where the shoulders fade out. Use a clean blending stump to drag the charcoal downward, creating a dreamy vignette effect.
Vintage Tone Upgrade
Instead of pure white paper, start with a cream or toned tan paper. Use white charcoal extensively for highlights to create a stunning, three-dimensional ‘trois crayons’ look.
Step 4: Refinement and Highlights
-
Lift out highlights:
Take your kneaded eraser and mold it into a point. Dab—don’t rub—areas on the forehead, nose bridge, and cheekbones to lift pigment and reveal the light. -
Add floral details:
Sketch the boutonniere and hair flowers using loose, organic shapes. Add small dots of white pastel pencil to simulate baby’s breath or light-catching petals. -
Intensify contrasts:
Go back in with your darkest 6B charcoal to reinforce the deepest blacks in the pupils, nostrils, and suit lapels to make the portrait pop. -
Final background touches:
Lightly smudge some charcoal dust around the heads to create a subtle atmospheric background, keeping it uneven for an artistic feel. -
Preserve the work:
Once satisfied, spray the drawing with a fixative in a well-ventilated area to prevent smudging and lock the charcoal to the paper.
Now you have a deeply personal, handcrafted portrait ready to be framed or gifted for a special occasion
Bridal Party Group Painting Gift
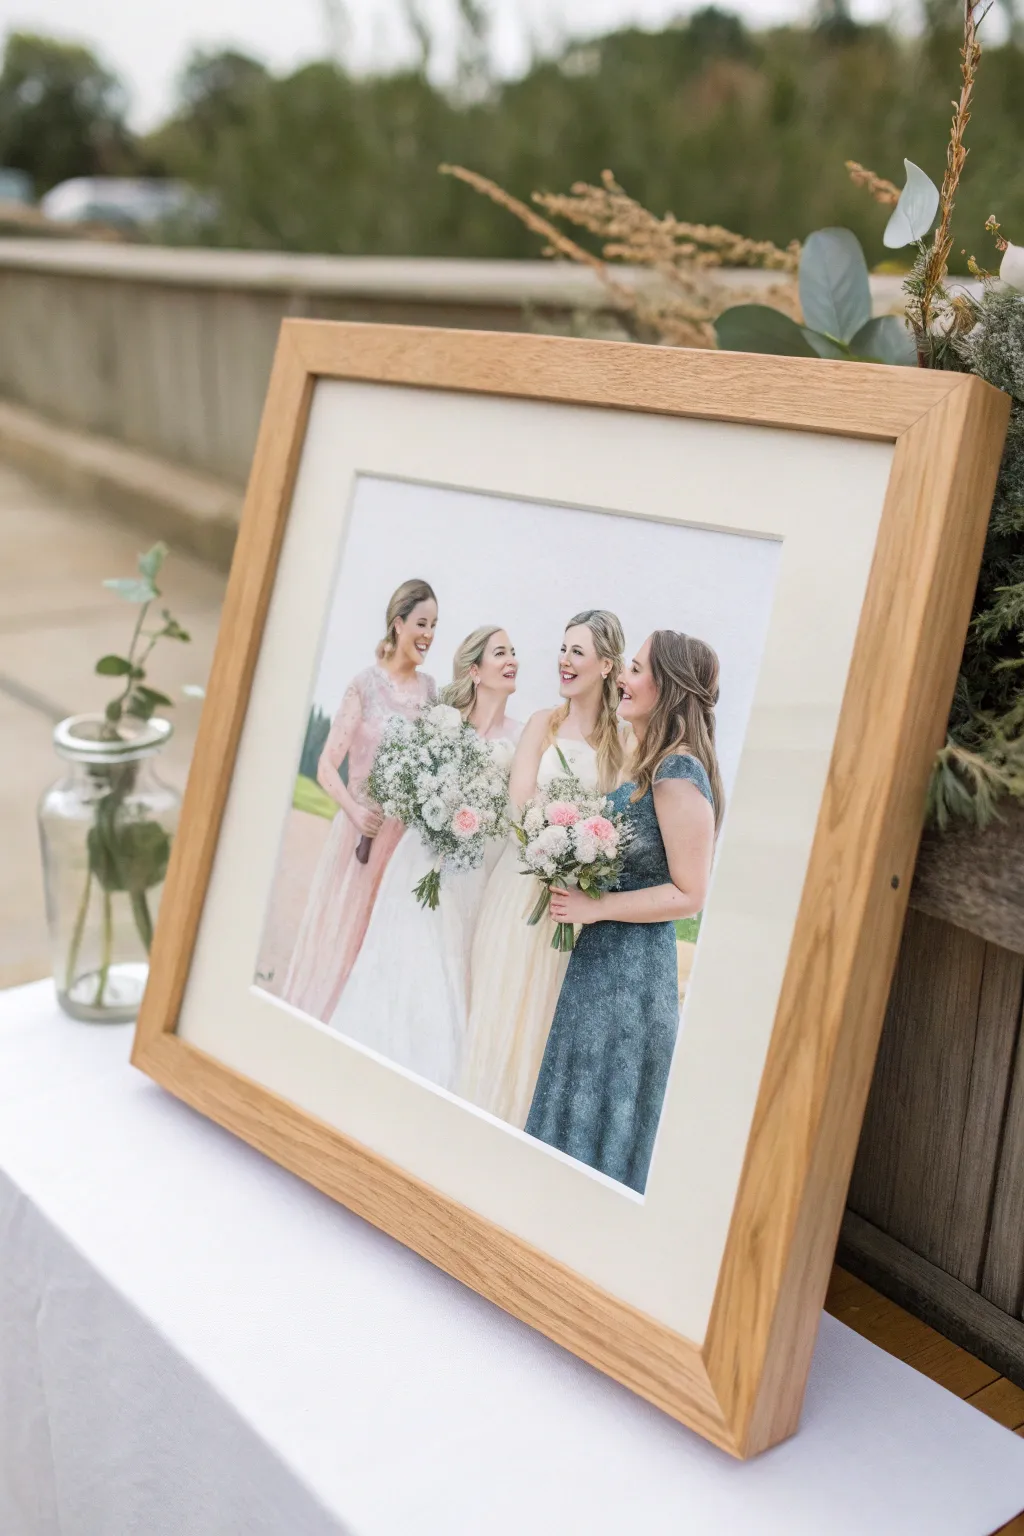
Capture the joy of friendship with a custom group portrait that transforms a favorite wedding photo into a soft, painterly keepsake. This project creates a timeless piece of art focusing on the connection and laughter shared between the bride and her bridal party, framed beautifully in natural oak.
How-To Guide
Materials
- High-resolution reference photo of the bridal party
- Cold press watercolor paper (140lb/300gsm), roughly 11×14 inches
- Watercolor paints (tube or pan set)
- Gouache set (white, primaries, skin tones)
- Round watercolor brushes (sizes 2, 6, and 10)
- Detail liner brush (size 00)
- Painter’s tape
- Pencil (HB) and kneaded eraser
- Tracing light box or transfer paper
- Mixing palette
- Solid oak wood frame (16×20) with cream mount board
Step 1: Preparation and Sketching
-
Prepare your surface:
Begin by taping down your watercolor paper to a hard board using painter’s tape on all four sides. This prevents the paper from buckling when you apply water washes later. -
Transfer the composition:
Using a light box or transfer paper, lightly trace the outlines of the four figures from your reference photo. Focus on the posture, the tilt of the heads, and the drape of the dresses, keeping lines very faint so they do not show through the paint. -
Refine the features:
With your pencil, gently define the facial features. Since this is a group portrait, getting the scale of eyes and smiles accurate is crucial, but don’t over-shade with graphite just yet.
Muddy water warning
If facial tones look gray or muddy, stop immediately. Let the paper dry fully, then gently lift the pigment with a damp, clean brush before reapplying a fresh, clean mix.
Step 2: Applying Base Washes
-
Mix skin tones:
Create a watery mix of skin tones using yellow ochre, a touch of alizarin crimson, and burnt sienna. Test the color on a scrap piece of paper first to ensure it matches the subjects’ complexions. -
Paint the skin base:
Using the size 6 round brush, apply a light, even wash to faces, necks, and arms. Let the watercolor pool naturally in shadowed areas for subtle dimension, but keep this first layer very transparent. -
Dress base colors:
Mix the base colors for the dresses. For the bride, use a very diluted gray-blue or cream; for the bridesmaids, mix the specific pink, cream, and teal shades shown. Apply these as loose, wet washes, leaving white space for the brightest highlights on the fabric. -
Initial hair blocking:
Block in the hair shapes using light washes of yellow ochre (for blondes) or burnt umber (for brunettes). Don’t worry about individual strands yet; just focus on the overall shape and volume.
Step 3: Building Detail and Texture
-
Deepen the shadows:
Once the base layers are completely bone dry, mix slightly more saturated versions of your dress colors. Paint into the folds of the fabric to create depth, particularly around the waistlines and where the dresses drape. -
Refine facial features:
Switch to your size 2 brush. Carefully paint the eyes, eyebrows, and smiles. Use a mix of burnt sienna and ultramarine for a softer dark tone than pure black, which can look harsh. -
Add hair texture:
Layer darker strokes over the dried hair sections to suggest movement and strands. Leave the original light wash visible in areas where the light hits the crown of the head. -
Bouquet basics:
For the bouquets, use a stippling motion with greens for foliage. Lightly dab in soft pinks and whites for the flowers, keeping the edges indistinct to maintain that dreamy, painterly quality.
Pro Tip: Soft focus
Keep the background completely white or create a barely-there gray vignette. This minimalist approach mimics high-end editorial photography and keeps focus on the figures.
Step 4: Gouache Highlights and Finishing
-
Opaque dress details:
Use white gouache mixed with a tiny bit of the dress color to add opaque highlights to the silk or lace textures. This brings the fabric forward and makes it look substantial. -
Enhance the flowers:
I like to use pure white gouache on the tip of a detail brush to add baby’s breath or highlights to the roses in the bouquets, making them pop against the dresses. -
Final facial highlights:
Add tiny dots of white gouache to the eyes for a spark of life, and softly highlight the cheekbones and nose tips to enhance the glowing, happy expressions. -
Review and clean up:
Step back and assess the color balance. Erase any visible pencil lines that weren’t covered by paint, assuming the paint is fully dry. -
Framing the piece:
Once finished, mount the painting behind a cream mat board. Place it into the oak frame, ensuring no dust is trapped between the glass and the artwork.
Place your framed masterpiece on the gift table and watch the bride delight in this personalized memory.

PENCIL GUIDE
Understanding Pencil Grades from H to B
From first sketch to finished drawing — learn pencil grades, line control, and shading techniques.
Explore the Full Guide
Wedding Portrait With Kids Included
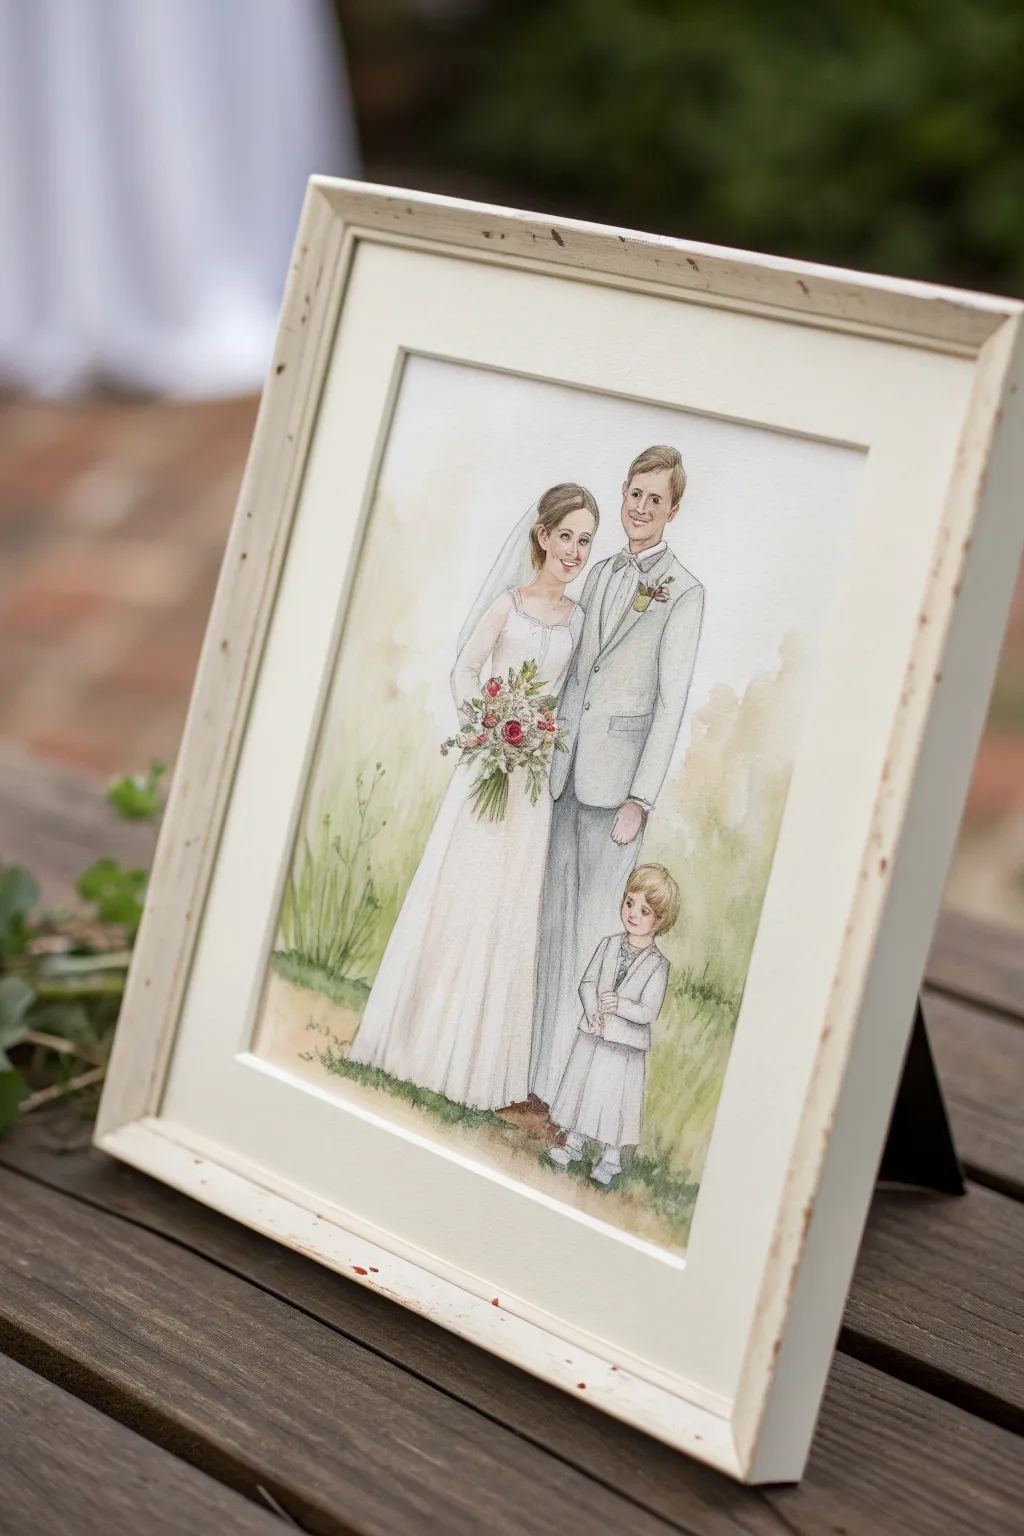
Capture the magic of a growing family’s big day with this charming watercolor illustration style wedding portrait. The soft washes and delicate linework create a timeless keepsake that celebrates love and new beginnings.
Step-by-Step Guide
Materials
- Cold press watercolor paper (140lb/300gsm)
- Set of watercolor paints (pans or tubes)
- H or HB pencil for sketching
- Kneaded eraser
- Waterproof fine liner pens (sepia or dark grey, 0.1mm and 0.3mm)
- Round watercolor brushes (sizes 2, 6, and 8)
- Clean water jar and paper towels
- Painter’s tape or masking tape
- Distressed white wooden frame (8×10 or 11×14)
Step 1: Planning and Sketching
-
Prepare your surface:
Tape your watercolor paper down to a hard board using painter’s tape on all four sides. This prevents the paper from buckling when wet and leaves a crisp white border for framing later. -
Compose the figures:
Using your reference photo, lightly sketch the basic shapes of the bride, groom, and child. Start with ovals for heads and simple stick figures to get the height relationships correct, especially the child standing in front. -
Refine the details:
Flesh out the sketch with more detail. Focus on the flow of the wedding dress and the suit lapels. Keep your pencil pressure very light so the graphite doesn’t show through the translucent paint later. -
Capture likenesses:
Pay careful attention to facial features. You don’t need hyper-realism here; just capture the angle of the jaw and the smile lines. Sketching the hair shapes accurately does a lot of heavy lifting for recognition. -
Add nature elements:
Lightly sketch in the surrounding environment. Add indications of tall grass near the hem of the dress and a few vague tree shapes in the background to ground the figures.
Loose Background Trick
Don’t overwork the background trees. Keep the brush very wet and the pigment light. The goal is a dreamy ‘bokeh’ effect, not detailed botanical illustrations.
Step 2: Inking and Outline
-
Ink the drawing:
Once you are happy with the pencil sketch, go over your lines with a waterproof fine liner. I prefer using a sepia or dark grey pen rather than stark black for a softer, more romantic look. -
Vary line weight:
Use a slightly thicker pen (0.3mm) for the main outlines of the clothing and bodies, and a very fine nib (0.05mm or 0.1mm) for delicate facial features and hair strands. -
Erase pencil marks:
Wait at least 15 minutes for the ink to dry completely to avoid smudging. Then, gently use a kneaded eraser to lift all visible pencil lines, leaving just the clean ink drawing.
Personalize the Details
Ask the couple for a photo of the bridal bouquet and boutonnières specifically. Painting the exact flowers they chose creates an incredibly meaningful connection.
Step 3: Watercolor Painting
-
Paint the skin tones:
Mix a watery wash of yellow ochre and a touch of alizarin crimson. Test the color on a scrap piece of paper first. Apply this lightly to faces and hands, leaving tiny white spots for highlights on noses and cheeks. -
Wash in the background:
Wet the background area with clean water first (wet-on-wet technique). Drop in soft greens and pale yellows for an out-of-focus garden feel, letting the colors bleed naturally. Keep this very pale so the couple stands out. -
Paint the groom’s suit:
Mix a soft grey using cobalt blue and a touch of burnt umber. Paint the suit in sections, letting each section dry slightly before painting the next to create distinct edges between lapels and sleeves. -
Define the dress:
The bride’s dress is white, so you are actually painting shadows, not the dress itself. Use a very diluted cool grey or lavender to paint the folds and shadows where the fabric drapes. -
Add color to details:
Using a size 2 brush, carefully paint the bouquet with reds and pinks, the boutonniere, and the hair colors. Layer the hair color, starting light and adding darker strokes for depth. -
Ground the subjects:
Paint the grass at their feet using a mix of sap green and olive green. Use short, upward strokes to mimic blades of grass overlapping the hem of the dress and the child’s shoes. -
Final touches:
Once everything is bone dry, look for areas that need more definition. You might add a slightly darker shadow under the chin or deepen the color of the bouquet leaves.
Step 4: Framing and Finishing
-
Remove the tape:
Peel the tape away slowly at a 45-degree angle, pulling away from the artwork to ensure the paper doesn’t tear. -
Mount artwork:
Place the finished painting inside the mat board if you are using one. Secure it on the back with archival tape. -
Distress the frame (optional):
If your white frame looks too new, lightly sand the edges and corners with fine-grit sandpaper to reveal a bit of wood underneath, matching the rustic aesthetic in the example. -
Assemble:
Clean the frame glass thoroughly on both sides. Place the artwork into the frame and secure the backing.
Present this framed masterpiece to the happy couple and watch their faces light up at seeing their family captured in art
Wedding Painting With the Couple’s Pet
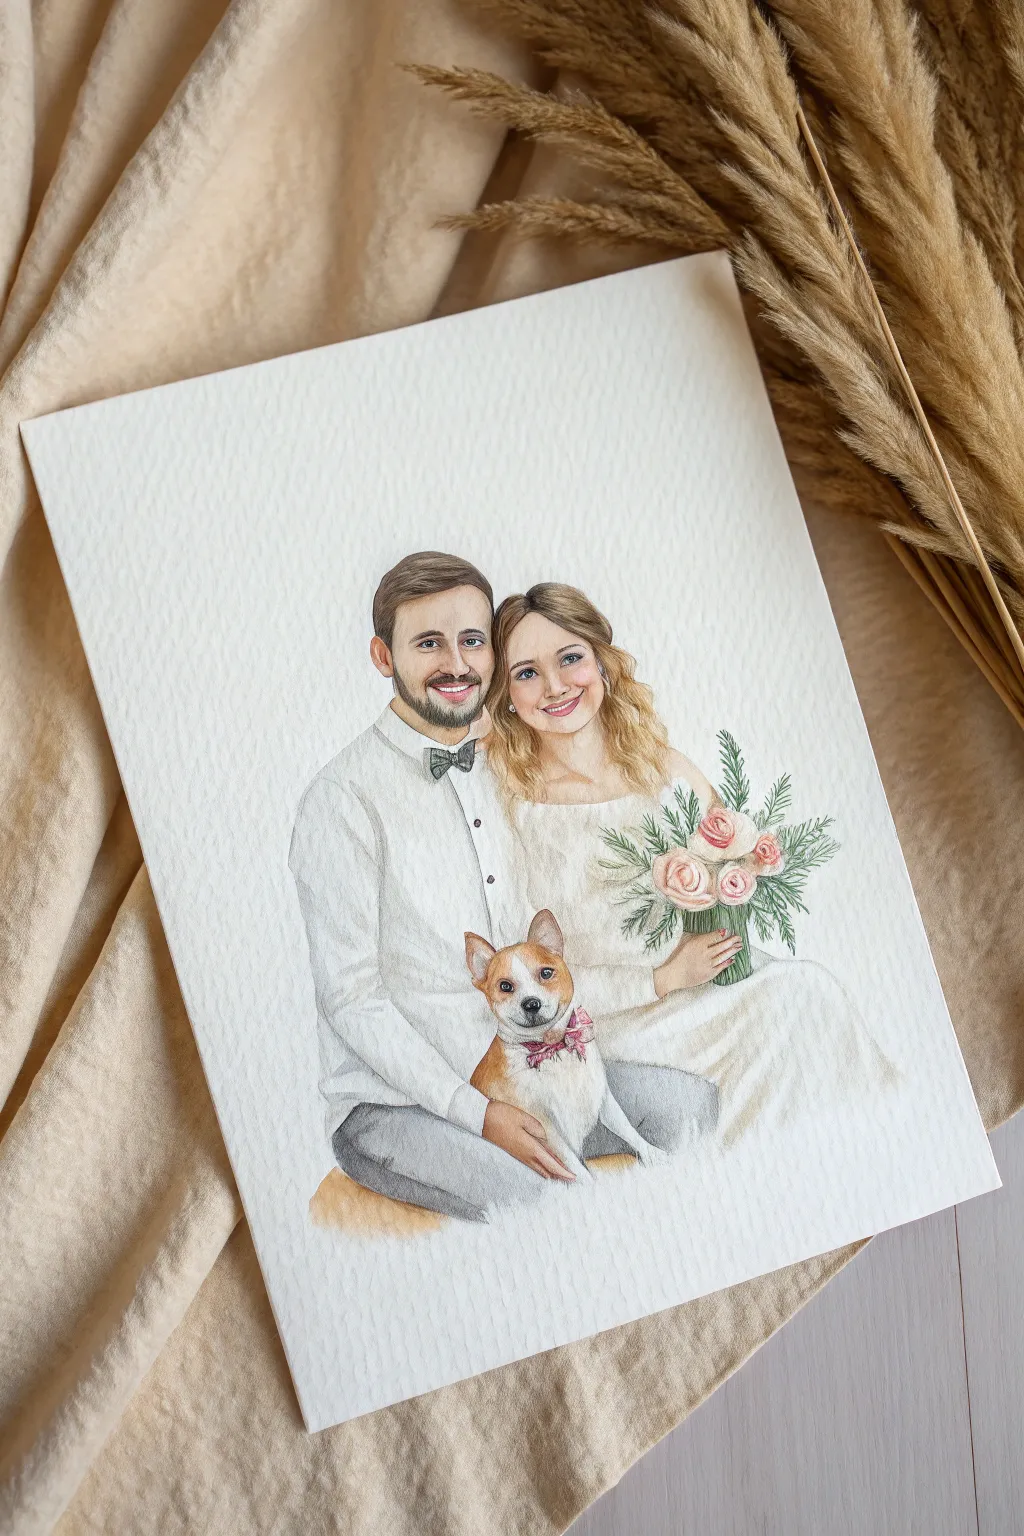
Capture the warmth of a new family unit with this delicate watercolor portrait featuring the happy couple and their beloved pet. The soft washes and fine details on textured paper create a timeless keepsake that celebrates every member of the wedding party, paws included.
Step-by-Step
Materials
- High-quality watercolor paper (cold press, at least 300 gsm)
- HB pencil for sketching
- Kneaded eraser
- Watercolor paints (pans or tubes)
- Round synthetic brushes (sizes 0, 2, and 6)
- Jar of clean water
- Paper towels
- Reference photo of the couple and pet
Step 1: Planning and Sketching
-
Analyze your reference:
Before putting pencil to paper, study your reference photo carefully. Note the relative heights of the couple and exactly where the pet sits—usually centered or on a lap to create a triangular composition. -
Outline the basic shapes:
Using an HB pencil with a very light hand, rough in the oval shapes for the heads and larger blocks for the torsos. Don’t worry about features yet; just get the proportions and placement right on the page. -
Detail the faces:
Refine the facial features, paying close attention to the eyes and smiles. For the pet, lightly mark the direction of the fur and the shape of the ears. -
Add clothing and accessories:
Sketch the groom’s shirt collar and bowtie, and the bride’s dress neckline. Draw the bouquet loosely, focusing on the main flower shapes rather than individual petals. -
Clean up the sketch:
Take your kneaded eraser and gently roll it over the entire drawing. You want the graphite lines to be barely visible—just faint guides—so they don’t muddy the transparent watercolor later.
Eye Focus Trick
Paint the irises first, let them dry, then add the pupil. Leave a tiny white speck of unpainted paper in the pupil for the ‘catchlight’—it brings the portrait to life instantly.
Step 2: Painting Skin and Fur
-
Mix skin tones:
Create a base skin tone using a mix of yellow ochre and a touch of cadmium red or alizarin crimson. Add plenty of water to keep it very pale. -
Wash in the base layer:
Apply a thin wash of the skin tone to the faces, neck, and hands. Leave small negative spaces (unpainted white paper) for highlights on the nose, cheeks, and forehead. -
Deepen the shadows:
While the first layer is still slightly damp, drop in a slightly more concentrated mix of the skin tone (perhaps with a touch of burnt sienna) under the chin, around the eyes, and hairline to build volume. -
Paint the pet’s base coat:
Mix a warm brown or tan for the dog’s fur. Apply this wet-on-dry, using short, directional strokes to mimic the texture of short hair, leaving white paper for the chest and muzzle markings. -
Refine animal features:
I like to use a size 0 brush here to add the dark details of the dog’s eyes and nose with a mix of ultramarine and burnt umber (avoiding pure black), leaving tiny white highlights for life.
Step 3: Attire and Details
-
Detail the hair:
Paint the hair in layers. Start with a light wash of the lightest hair color (yellow ochre for blonde, raw sienna for brown). Let it dry, then add darker strokes for individual strands and shadows. -
Shape the white clothing:
Painting white clothes requires painting the *shadows*, not the light. Mix a very watery grey using cobalt blue and a tiny touch of brown. Paint the folds of the shirt allowing the white paper to represent the fabric itself. -
Add contrast with pants:
Paint the groom’s trousers with a stronger grey mix. Use wet-on-dry strokes to create crisp edges against the white shirt. -
Paint the bouquet:
Use soft pinks for the roses, swirling the pigment loosely. Add touches of sap green for the leaves and stems, keeping the foliage airy and not too dense. -
Finalize details:
With your smallest brush and a fairly dry mix of paint, add the crisp details: the groom’s bowtie, eyelashes, the dog’s red collar, and the buttons on the shirt. -
Ground the subjects:
Add a very faint, warm wash underneath the figures to suggest a seat or ground, anchoring them so they don’t look like they are floating in space.
Muddy Colors?
If your shadows look dirty, you’re likely overworking wet paint. Let layers dry completely (bone dry!) before adding a glaze of shadow on top.
Step back and admire how a few simple washes of color have brought this loving family moment to let on paper


Signature Guestbook Canvas With a Painted Couple

Transform a traditional guestbook into a frameable piece of art with this custom watercolor-style illustration. Featuring a delicate portrait of the happy couple surrounded by a botanical wreath, this ample canvas provides plenty of white space for guests to leave their warm wishes.
Step-by-Step
Materials
- High-quality watercolor paper or bristol board (A3 or larger)
- Pencils (HB and 2B)
- Fine liner pens (0.1mm and 0.3mm in dark grey or black)
- Watercolor paints or alcohol markers
- Soft synthetic watercolor brushes (sizes 2 and 4)
- Eraser
- Reference photo of the couple
- Large ornate frame (cream or white)
- Mounting board or foam core
- Masking tape
Step 1: Drafting the Portrait
-
Prepare your workspace:
Tape your watercolor paper down to a flat board using masking tape. This prevents the paper from buckling when you apply paint later. -
Sketch the figures:
Using an HB pencil, lightly sketch the outline of the couple in the center of the page. Focus on capturing the posture—the groom’s stance and the bride’s leaning pose—rather than tiny facial details at this stage. -
Refine the pose:
Add details like the drape of the wedding dress and the cut of the suit. Keep your lines loose and light so they can be easily erased if needed. -
Draw the wreath guide:
Lightly sketch a large oval or circle around the couple. This will serve as the spine for your botanical wreath border.
Use A Lightbox
Not confident drawing freehand? Print your reference photo, tape it to a window or lightbox, and trace the main outlines lightly onto your watercolor paper.
Step 2: Inking and Coloring
-
Outline the figures:
Trace over your pencil sketch with a 0.1mm fine liner. Use broken, sketchy lines for the hair and dress fabric to keep the illustration feeling soft and organic. -
Paint the skin tones:
Mix a very watery wash of peach, brown, and white. Apply this gently to the faces and arms, letting it dry completely before adding a second, slightly darker layer for shadows. -
Color the suit:
For the groom’s suit, use a dark grey or navy watercolor. I prefer not to use pure black as it can look too harsh; a deep charcoal grey adds more depth. -
Detail the hair:
Using a size 2 brush, add streaks of color for the hair. Leave some white paper showing to represent shine and highlights. -
Shade the dress:
The dress is mostly white, so use a very pale grey wash to paint the shadows in the folds of the skirt. This gives the fabric volume without coloring it in.
Metallic Touches
Once the painting is dry, use a gold or silver gel pen to add tiny accents to the bride’s jewelry or the wreath leaves for a subtle sparkle.
Step 3: The Botanical Border
-
Sketch the leaves:
Along your oval guide line, draw individual leaves using a pencil. Vary the size ingrained direction to make the wreath look natural. -
Ink the wreath:
Go over the leaves with your fine liner. You can add tiny berries or buds for extra texture. -
Add gentle color:
If you want color on the wreath, add very faint washes of sage green or pale pink, keeping it much lighter than the central figures so it doesn’t distract. -
Add text:
Above the couple, lightly pencil the names or a phrase like ‘Happily Ever After’. Trace this with a slightly thicker pen or calligraphy marker. -
Clean up:
Once the ink and paint are 100% dry, gently erase all remaining pencil marks.
Step 4: Assembly
-
Mount the artwork:
Center your artwork on a piece of sturdy mounting board or foam core. This provides a hard surface for guests to write on. -
Frame without glass:
Place the mounted artwork into the frame. Crucially, leave the glass out so guests can sign directly on the paper. -
Set up the station:
Place the framed piece on an easel. Provide permanent, acid-free pens nearby for guests to use.
This personalized artwork will become a cherished keepsake filled with the love and signatures of your favorite people
Live Wedding Painting as the Ultimate Gift
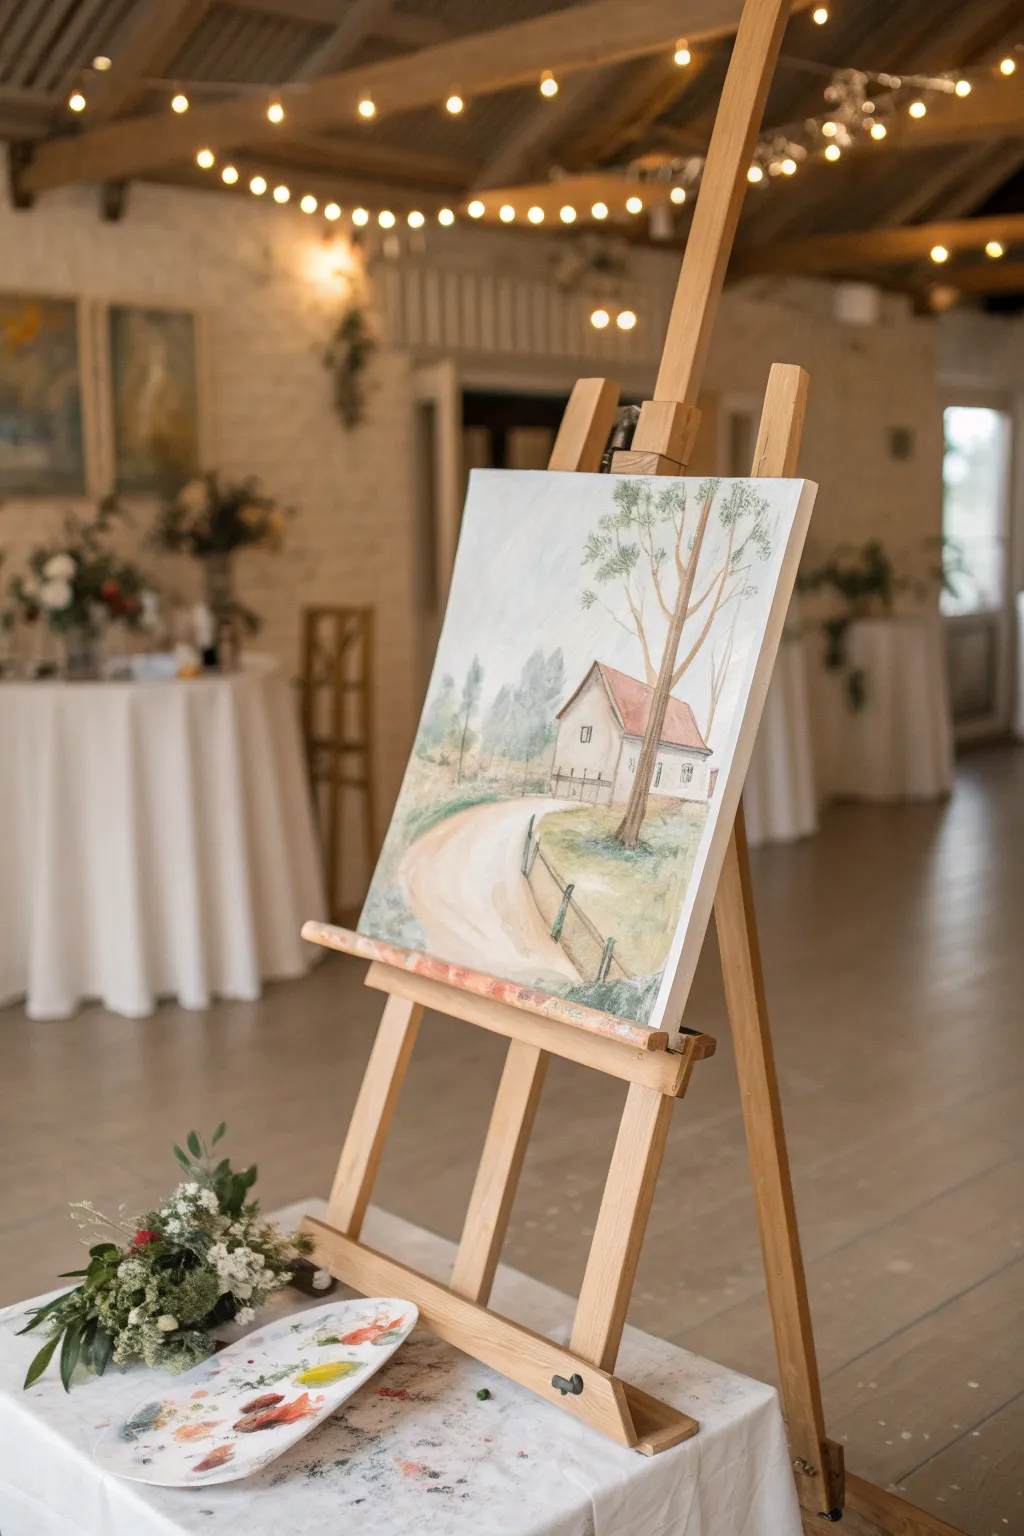
Capture the romantic simplicity of a wedding venue with this watercolor landscape project, replicating the charming cottage scene displayed on the easel. This style focuses on soft washes and delicate details to create a timeless, airy memento of a special location.
Detailed Instructions
Materials
- High-quality watercolor paper (stretched on a frame or block, approx. 16×20 inches)
- Watercolor paint set (essential colors: Sap Green, Burnt Sienna, Yellow Ochre, Ultramarine Blue, Alizarin Crimson, Paynes Grey)
- White gouache for highlights
- Large flat wash brush (1 inch)
- Round watercolor brushes (sizes 4, 8, and 12)
- Fine liner brush (size 1 or 0)
- Graphite pencil (HB or H) and kneadable eraser
- Two containers of water
- Palette for mixing
- Paper towels
- Wooden easel (optional, for authentic display)
Step 1: Sketching the Venue
-
Establish the Horizon:
Begin by lightly drawing a low horizon line about one-third of the way up the canvas. This establishes the ground plane and ensures the sky takes up a significant portion of the composition for that airy feel. -
Draft the Architecture:
Sketch the basic perspective of the cottage. Start with the corner of the house nearest to you, drawing the angled roofline sloping down to the right. Add the gable end facing the viewer slightly to the left. -
Add Structural Details:
Lightly pencil in the windows—two small rectangular ones on the side wall and one on the front face. Sketch the foundation line and the subtle indication of a fence running parallel to the path. -
Place the Hero Tree:
Draw the main tree trunk in the foreground on the right side. It should be tall and slender, reaching all the way to the top edge of the canvas, intersecting the house sketch slightly.
Speedy Art Pro Tip
For live painting vibes, keep your pencil sketch minimal. Let the watercolor edges define the shapes rather than filling in lines; it creates a fresher, more spontaneous look.
Step 2: Layering the Background
-
Sky Wash:
Mix a very dilute wash of Ultramarine Blue and a touch of Paynes Grey. Wet the sky area with clean water first, then drop in the pigment, keeping it extremely faint to suggest a cloudy, overcast day. -
Distant Trees:
While the sky is still slightly damp but not soaking, mix a cool, pale grey-green using Sap Green and Paynes Grey. Paint fuzzy, indistinct tree shapes in the distance behind the house to create depth. -
Base Ground Layer:
Mix Yellow Ochre with a tiny bit of Burnt Sienna. Apply a loose wash for the grassy areas around the house and the foreground, leaving the path area white for now. -
Initial Drying:
Let these large base layers dry completely. This prevents your crisp architectural lines from bleeding into the soft background.
Step 3: Defining the Cottage
-
Roof Color:
Mix Burnt Sienna with a touch of Alizarin Crimson for a terracotta roof tone. Paint the roof sections, ensuring the color is solid but somewhat transparent to keep the watercolor look. -
Shadows and Walls:
For the white walls, use a very watery mix of Paynes Grey and Ultramarine to paint shadows under the eaves and on the side of the house away from the light source. Leave the main wall sections the white of the paper. -
Window Details:
Switch to your size 4 round brush. Use a darker grey-brown mix to paint the interior frames of the windows and the subtle dark lines under the roof trim. -
The Sandy Path:
Mix a very pale wash of Yellow Ochre and Burnt Sienna. Paint the curved path leading up to the house, using horizontal strokes that follow the curve of the road.
Muddy Color Fix
If your greens and browns start blending into a muddy gray, stop immediately. Let the paper bone dry completely before adding another layer of distinct color on top.
Step 4: Foreground and Foliage
-
Painting the Main Trunk:
Mix a strong brown using Burnt Sienna and a touch of Paynes Grey for contrast. Paint the tall tree trunk on the right, varying the pressure to make the bark look organic. -
Adding Branches:
Extend thinner branches upward from the main trunk using the liner brush. Ensure they taper off elegantly as they reach the top of the canvas. -
Tree Foliage:
Use a size 8 brush and a mix of Sap Green and Yellow Ochre. Stipple the leaves onto the branches of the main tree, keeping the clusters somewhat sparse so the sky shows through. -
Fence Construction:
Using the liner brush and a dark grey-green, paint the vertical posts of the fence along the path. Add thin, sweeping lines for the wire or rails connecting them. -
Deepening the Grass:
Add patches of darker green (Sap Green mixed with a little Blue) around the base of the tree and along the fence line to ground the objects.
Step 5: Final Touches
-
Refining Edges:
Revisit the roofline and corners of the house. If they look too soft, use a fine brush with slightly darker pigment to crisp up the edges. -
Adding Texture:
I like to dry-brush a little texture onto the path and the tree bark to give it grit and age. Use a nearly dry brush with dark pigment to lightly skim over the paper’s tooth. -
Highlights:
If you lost any crucial white areas, use a tiny amount of white gouache to add sparkles to the windows or the brightest part of the fence. -
Final Assessment:
Step back and view the painting from a distance, just like a live painter would. Strengthen any shadows that feel too weak to ensure the house pops against the background.
Now you have a charming, venue-inspired landscape ready to display on an easel for guests or gift to the happy couple
Night Silhouette Wedding Painting With Sparkle Lights
This romantic project combines the softness of a watercolor wash with the crisp contrast of a black silhouette to capture a magical wedding moment. The gold star accents add a touch of sparkle, making it a perfect commemorative gift for newlyweds.
Step-by-Step
Materials
- Cold press watercolor paper (140lb/300gsm)
- Watercolor paints (Indigo, Payne’s Grey, Violet, Burnt Sienna, Yellow Ochre)
- Black gouache or black acrylic paint
- Gold paint pen or metallic gold watercolor
- Painter’s tape or masking tape
- Large flat wash brush
- Small round detail brush (size 0 or 1)
- Pencil and eraser
- Mixing palette
- Jar of clean water
- Paper towels
- Ruler
Step 1: Creating the Twilight Sky
-
Prepare your canvas:
Begin by taping down the edges of your watercolor paper to a hard board or your work surface. This prevents the paper from buckling when it gets wet and creates a clean white border for framing later. -
Sketch the horizon:
Lightly sketch a gentle slope for the hill at the bottom third of the paper. You don’t need to draw the couple yet; just mark where the ground ends and the sky begins. -
Mix your sky colors:
Prepare three puddles of paint: a deep indigo or navy blue for the top, a softer violet-blue for the middle, and a very pale, warm mix of yellow ochre and burnt sienna for the horizon glow. -
Apply the first wash:
Using the large flat wash brush, wet the entire sky area with clean water until it glistens but isn’t dripping. This wet-on-wet technique allows colors to blend seamlessly. -
Paint the gradient:
Starting at the very top, apply the deep indigo. Work your way down, rinsing your brush slightly and picking up the violet shade for the middle section. Finally, blend the pale yellow mix near the horizon line, letting it fade into the purple above. -
Add texture:
While the paint is still damp, you can gently drop in a few spots of plain water or slightly darker blue in the upper corners to create subtle cloud-like textures. -
Initial drying phase:
Let this layer dry completely. The paper must be bone dry before you add the silhouette, or the black paint will bleed into the sky.
Uneven Gradients?
If your sky colors aren’t blending smoothly, your paper might be drying too fast. Mist the paper lightly with a spray bottle before applying paint to keep the surface workable longer.
Step 2: The Silhouette & Stars
-
Sketch the couple:
Once the sky involves no moisture, use a pencil to lightly outline the silhouette of the couple. Focus on the identifiable shapes: the curve of the dress, the groom’s stance, and their profiles facing each other. -
Paint the ground:
Switch to your black gouache or acrylic paint. Start by filling in the hill at the bottom. Use uneven, upward flicking strokes along the top edge of the hill to simulate tufts of grass. -
Fill the figures:
Using your small detail brush, carefully fill in the couple’s silhouette. Gouache is opaque, so one coat should cover the background, but apply a second thin layer if you can see the horizon line through the figures. -
Refine the edges:
Pay close attention to small details like hair or the groom’s collar. Sharp, clean edges are what make a silhouette readable. -
Draw the string lines:
Use a ruler and your gold paint pen (or a fine brush with metallic gold paint) to draw straight diagonal lines across the upper sky, mimicking hanging fairy lights. -
Add the hanging stars:
Along the gold lines, paint five-pointed stars. Vary their sizes slightly, making some hang directly on the line and others dangle slightly below. -
Create background stars:
I like to take a stiff brush with white gouache or white ink and gently splatter tiny dots across the upper dark blue section for a distant starry effect. Keep the spray away from the couple. -
Final gold accents:
Add a few tiny free-floating gold dots or smaller stars in the upper corners to balance the composition. -
Reveal the border:
Once absolutely everything is dry, slowly peel away the painter’s tape at a 45-degree angle to reveal your crisp white edges.
Add Dimension
Mix a tiny drop of white gouache into your blue sky mix for the middle transition area. This adds a ‘milky’ opacity that enhances the dreamy, twilight atmosphere.
Frame this beautiful piece in natural wood to complement the warm tones of the sunset


Have a question or want to share your own experience? I'd love to hear from you in the comments below!