When I paint weddings, I’m always chasing that mix of romantic light and real, teary-eyed joy that photos can’t quite translate. Here are my favorite wedding painting ideas—starting with the classics everyone loves, then drifting into more playful, artsy directions.
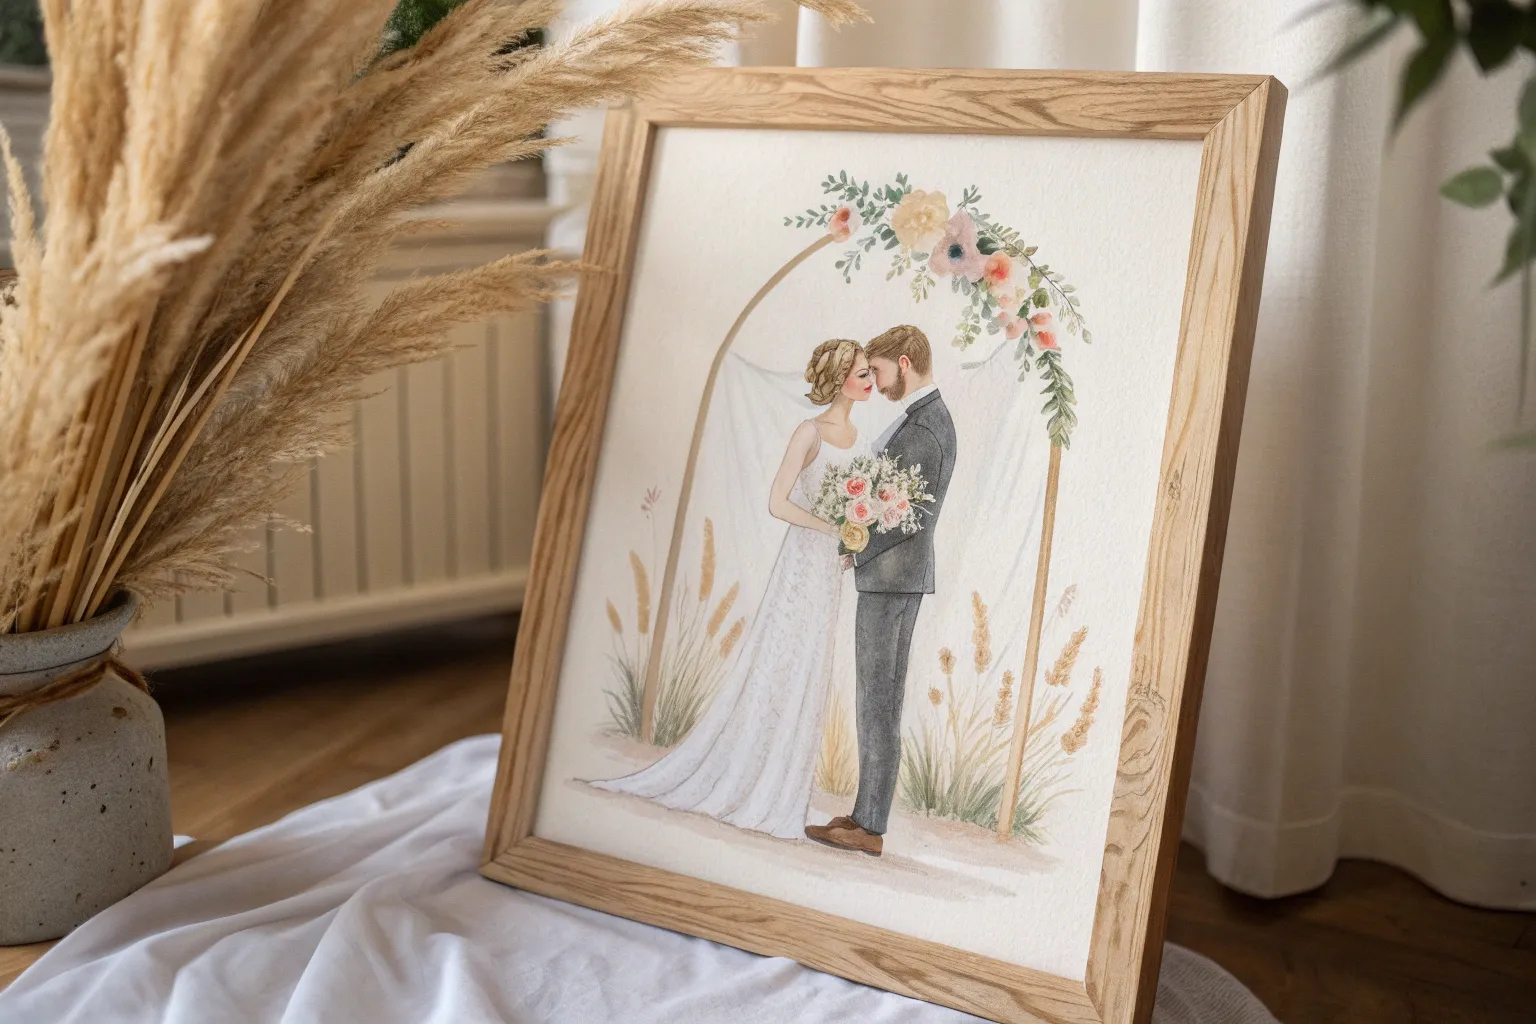
The First Kiss Centerpiece
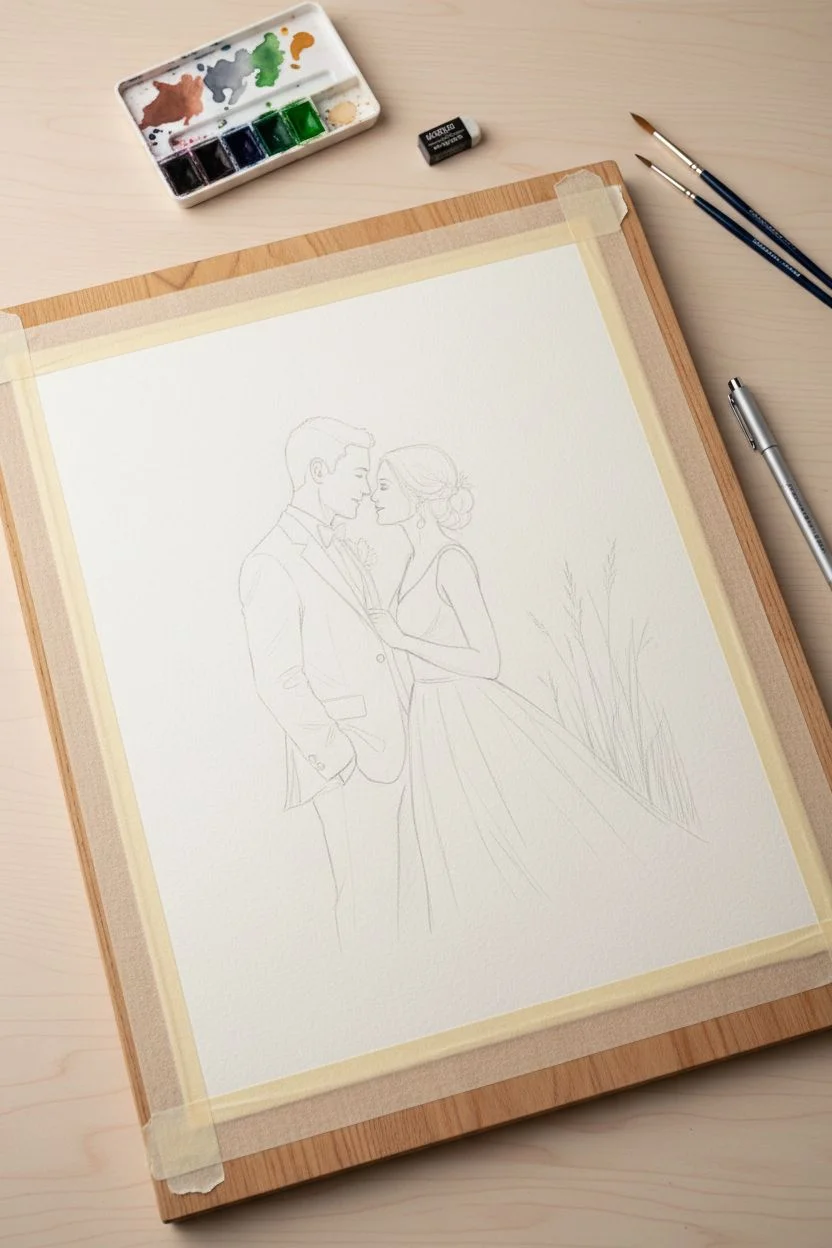
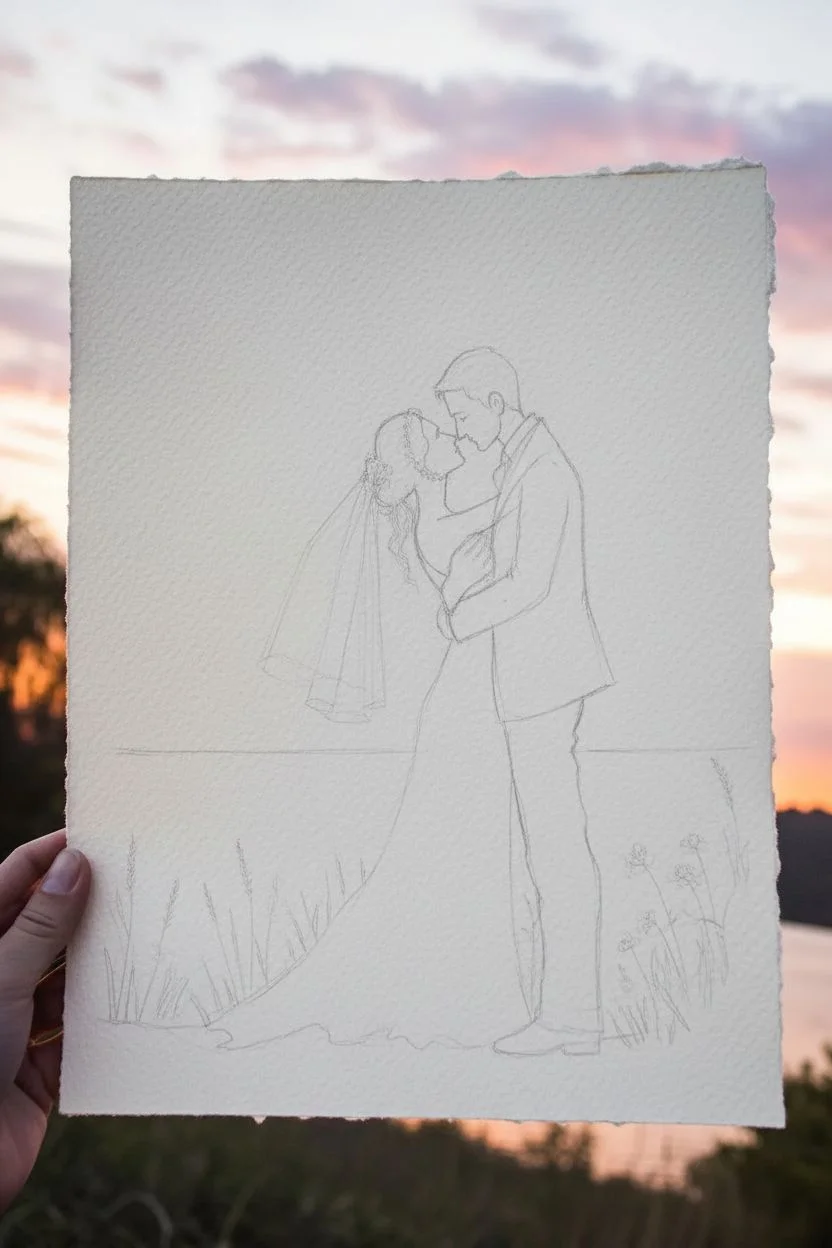
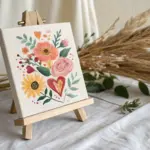
Immortalize the precise moment you said “I do” with a breathtaking, custom watercolor portrait displayed as a decor centerpiece. This project guides you through creating a soft, romantic painting of a couple’s first kiss, framed elegantly to greet guests at the reception.
How-To Guide
Materials
- High-quality hot press watercolor paper (16×20 inches recommended)
- Watercolor paints (tube or pan set)
- Round brushes (sizes 2, 6, and 12)
- Detail liner brush (size 00)
- Masking fluid
- Painter’s tape
- Pencil (HB) and kneaded eraser
- Reference photo of the couple
- Palettes for mixing
- Large white wooden frame with custom mat
- Wooden floor easel for display
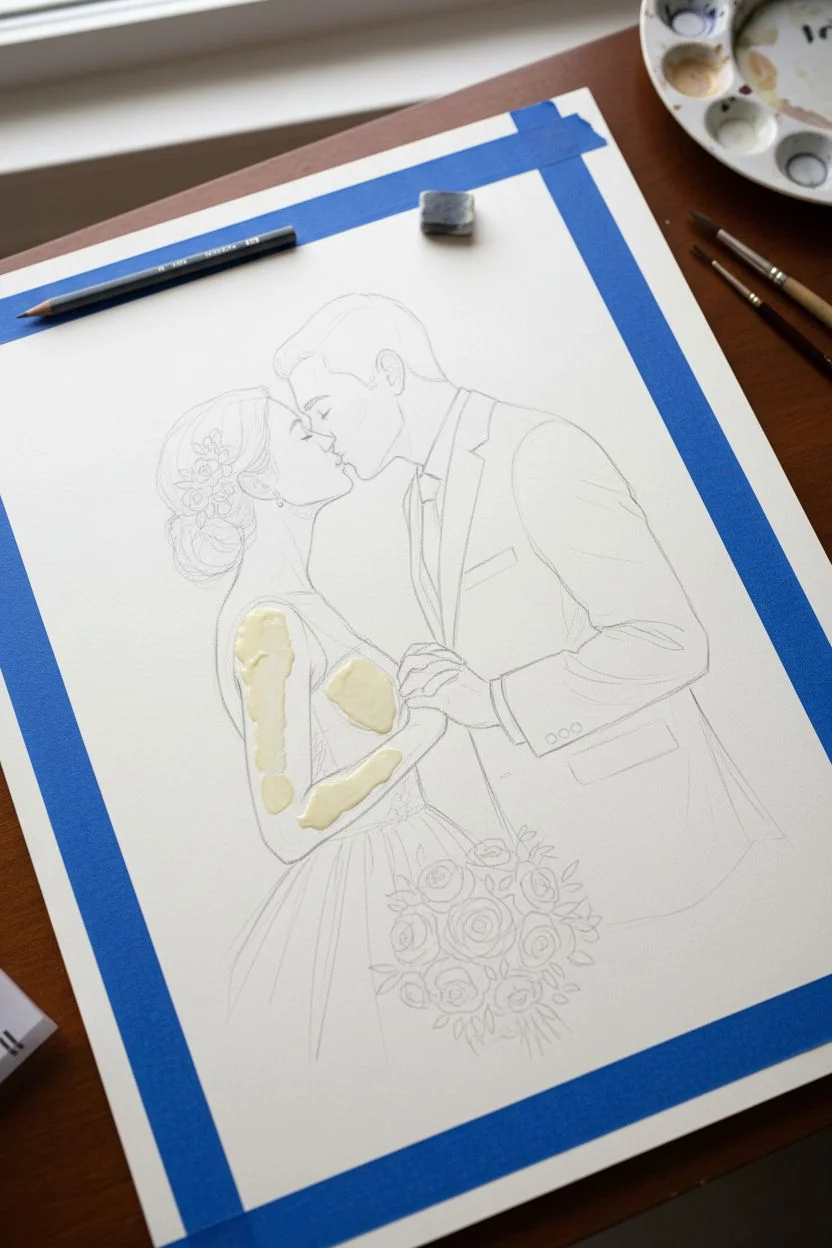
Step 1: Preparation & Sketching
-
Secure the paper:
Begin by taping down all four edges of your watercolor paper to a rigid board using painter’s tape. This prevents the paper from buckling when you apply water washes. -
Outline the figures:
Lightly sketch the couple’s profile using the HB pencil. Focus on the main shapes—the tilt of the heads, the drape of the dress, and the suit jacket—keeping lines faint so they disappear under the paint. -
Detail the bouquet:
Sketch the bouquet loosely. You don’t need every petal; just mark the general circles for the roses and the directions of the eucalyptus leaves. -
Protect the white:
Apply masking fluid to the brightest highlights, such as the white flowers in the hairpiece, the brightest parts of the dress, and any intense highlights on the bouquet.
Troubleshooting Blooms
If you get ‘cauliflower’ or back-run blooms in your washes, don’t panic. Gently lift the excess water with a thirsty, damp brush, or embrace the texture for the bouquet area.
Step 2: Painting the Background & Skin
-
Paint the sky wash:
Mix a very dilute wash of peach and soft blue. Wet the sky area with clean water first, then drop in the peach near the horizon line and blue at the top, letting them blend softly for a sunset effect. -
Establish the horizon:
Paint a faint sea line using a mix of turquoise and grey. Keep this undefined and blurry to ensure the focus stays on the couple. -
Base skin tones:
Mix a skin tone using yellow ochre, a touch of cadmium red, and white. Apply a thin, even wash over the faces and hands, leaving the masked highlights alone. -
Shadowing the faces:
Once the base is dry, mix a slightly darker, cooler version of your skin tone (add a tiny bit of violet). Paint the shadows under the jawline, around the eyes, and the side of the neck to create dimension.
Step 3: Attire & Details
-
The white dress:
Painting white requires painting the shadows, not the light. Use a very watery mix of payne’s grey and violet to paint the folds and creases of the dress sleeves, leaving the majority of the paper white. -
The groom’s suit:
Paint the suit jacket using a light grey or lavender-grey wash. Build up darker values in the lapels and under the arms to show form. -
Hair texture:
For the hair, start with a mid-tone wash (brown or black). Once dry, go in with your size 2 brush and a darker pigment to paint individual strands and the shape of the bun. -
Floral work:
Paint the bouquet roses using soft pinks and creams. Wet the flower shapes and drop in pigment at the center, letting it bleed outward for a soft, blooming look. -
Greenery accents:
Use a cooler green for the eucalyptus leaves extending from the bouquet. Make these strokes quick and loose to suggest movement.
Level Up: Welcome Text
Before framing, use a light pencil to guide hand-lettering a welcome message or the date in modern calligraphy on the mat board below the painting.
Step 4: Refining & Framing
-
Remove masking:
Rub off the dried masking fluid gently with your finger or a rubber cement pickup to reveal the crisp white paper underneath. -
Final details:
Using the 00 liner brush, add the finest details: eyelashes, the sparkle in the hairpiece, and crisp edges on the suit collar. -
Mounting the art:
Center your finished painting within the mat board and secure it with archival tape. Ensure the margins are equal on all sides. -
Framing:
Place the matted artwork into the white wooden frame. Clean the glass thoroughly on both sides before closing the backing. -
Display setup:
Set up a wooden floor easel at your venue entrance or near the head table and carefully position the framed masterpiece for guests to admire.
Now you have a stunning, personalized work of art that captures the romance of the day forever


First Dance Under String Lights
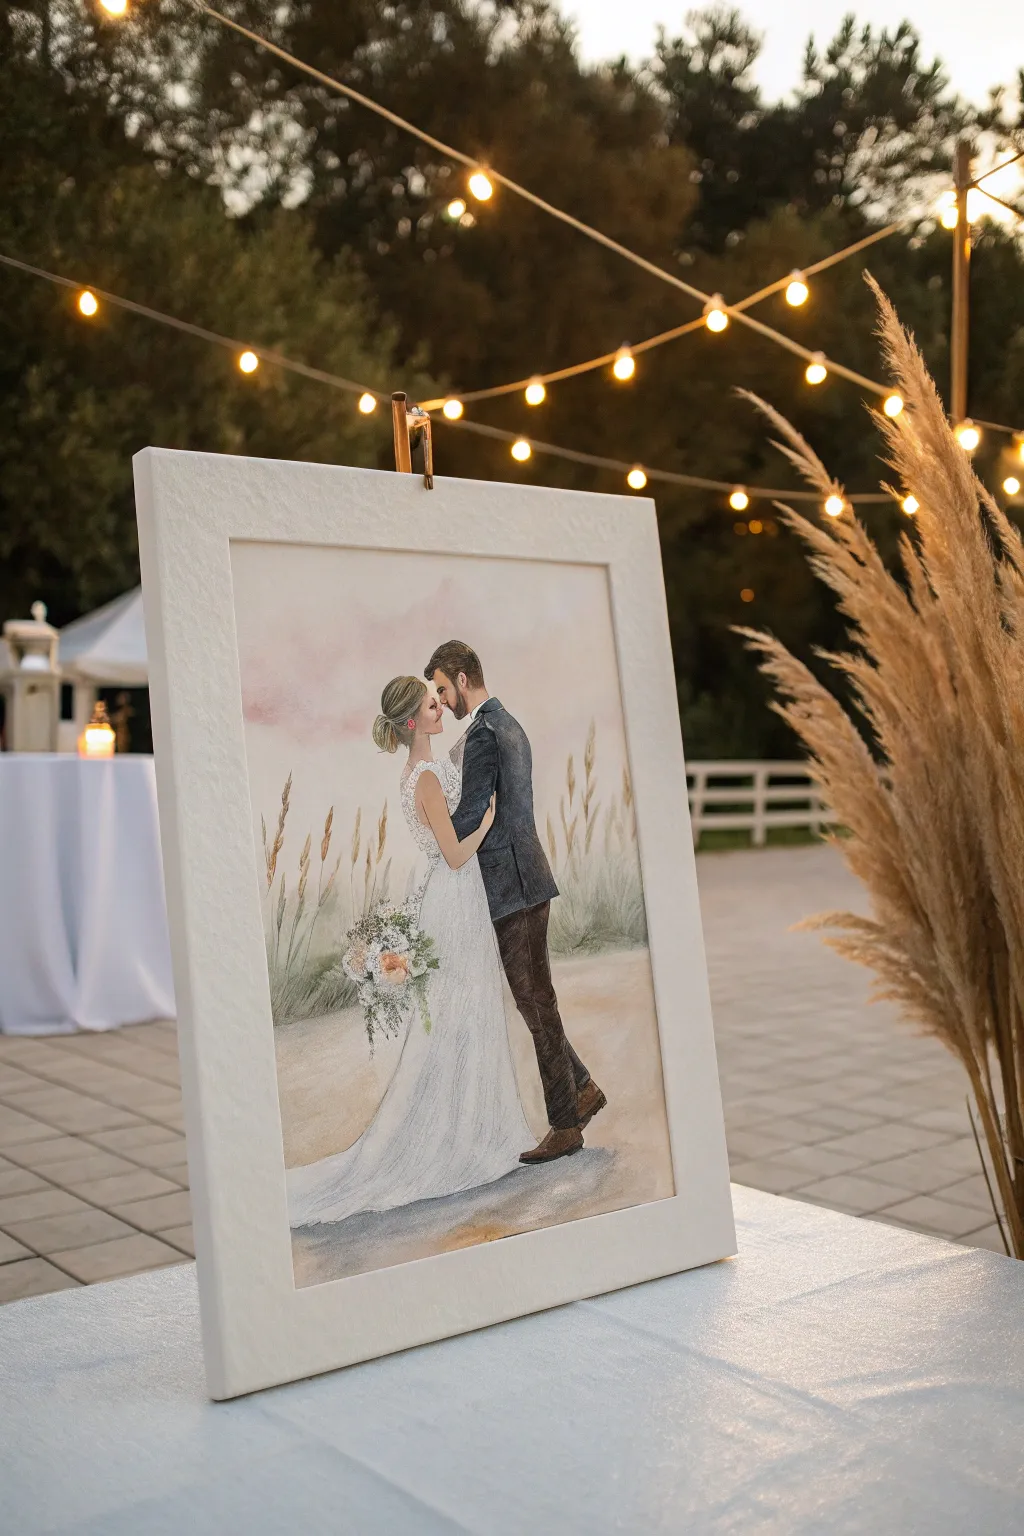
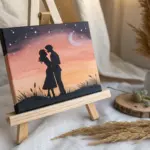
Capture the romance of a couple’s first quiet moment together with this mixed media watercolor portrait. Featuring soft sunset hues and delicate grassy textures, this piece creates a timeless keepsake perfect for displaying at the reception itself or gifting later.
Step-by-Step Tutorial
Materials
- High-quality hot press watercolor paper (140lb)
- Watercolor paints (Payne’s Grey, Burnt Sienna, Yellow Ochre, Rose Madder, Sap Green)
- Colored pencils (wax or oil-based for details)
- Graphite pencil (HB) and kneaded eraser
- Round watercolor brushes (sizes 2, 6, and 10)
- Fine liner pen (sepia or dark grey)
- Masking tape
- Drawing board
- Reference photo of couple
- White gel pen (optional for highlights)
Step 1: Sketching and Preparation
-
Paper prep:
Begin by taping your watercolor paper securely to a drawing board on all four sides. This prevents buckling when we add the washes later. -
Establish the composition:
Using your HB pencil, lightly sketch the outline of the bride and groom. Focus on the negative space between them to get the posture right. Place them slightly off-center to allow room for the tall grasses later. -
Refining details:
Add the key details like the groom’s suit lapels, the flow of the bride’s dress, and facial profiles. Keep these lines very faint; watercolor is transparent, and we don’t want heavy graphite showing through. -
Lighten the sketch:
Roll your kneaded eraser gently over the entire drawing to lift excess graphite, leaving just a ghost image to guide your painting.
Step 2: Painting the Figures
-
Skin tones:
Mix a very dilute wash of Yellow Ochre and a touch of Rose Madder. Paint the faces and arms, lifting out pigment with a clean, damp brush to create highlights on the cheeks and nose. -
The groom’s suit:
For the jacket, create a deep navy using Payne’s Grey with a hint of blue. Apply this wet-on-dry for crisp edges, but soften the interior folds with water to show fabric movement. -
Trousers texture:
Paint the trousers using a mix of Burnt Sienna and Payne’s Grey for a warm dark brown. Let the brushstrokes follow the line of the leg to suggest the fabric’s drape. -
The wedding dress:
This is mostly negative space. Use a very pale, watery grey-blue to shadow the folds at the bottom of the skirt, defining the shape without painting the whole dress white. -
Bouquet details:
Dab small spots of green and muted florals (peach and white) for the bouquet. Keep this loose and impressionistic rather than painting every petal.
Pro Tip: Hair Texture
Don’t paint hair as a solid block. Paint the main shape in a mid-tone, then use colored pencils to draw individual strands in highlights and shadows on top.
Step 3: Background and Details
-
Sky wash:
Turn the board upside down to let gravity help. Wet the sky area with clean water, then drop in faint pink and soft purple for a romantic sunset gradient, fading to white as it nears the horizon line. -
Painting the grass:
Once the background is dry, use your size 2 brush with a mix of Sap Green and Yellow Ochre. Paint vertical, wispy strokes for the tall grass stems surrounding the couple. -
Adding seed heads:
Dab the tops of the stems with a thicker mixture of Ochre and Burnt Sienna to create the fluffy seed heads of the pampas grass. -
Refining with pencils:
I find that watercolor sometimes lacks sharp definition, so switch to colored pencils now. Use a dark brown pencil to deepen the shadows in the groom’s suit and hair. -
Facial features:
Very carefully use a sharp colored pencil to define the eyes, nose, and mouth. The pencil gives you more control than a brush for these tiny, crucial details. -
Dress lace:
Use a white colored pencil or a very fine white gel pen to scribble delicate lace patterns on the bodice of the dress. -
Grounding shadows:
Add a wash of violet-grey under the couple’s feet and the hem of the dress to ground them, so they aren’t floating in space. -
Final touches:
Assess the contrast. If the darks have faded during drying, glaze another layer of watercolor over the darkest parts of the suit.
Level Up: Metallic Accent
Use gold leaf or metallic gold watercolor paint for the wedding rings or to add a subtle shimmering halo around the couple’s heads for an ethereal effect.
Frame your artwork in a deep mount and display it on an easel to welcome guests to the celebration


Venue Portrait With the Couple
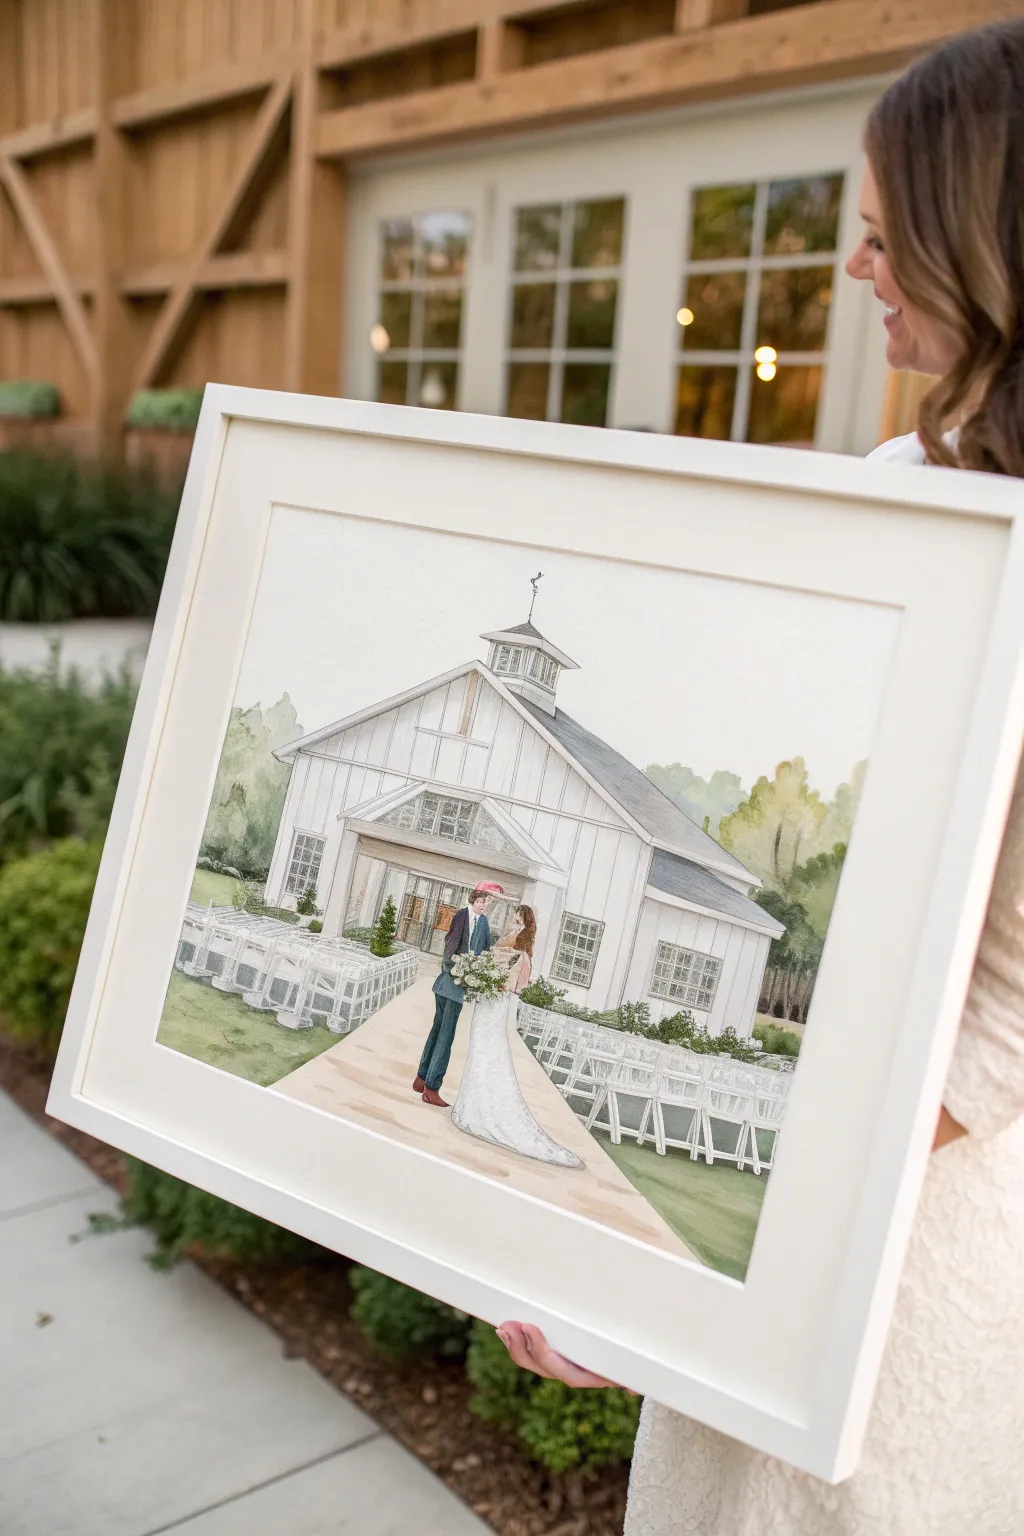
Capture the magic of the wedding day with this elegant watercolor portrait featuring the couple in front of their venue. The style relies on clean architectural lines, soft washes for the landscape, and delicate detailing for the bride and groom.
Step-by-Step Guide
Materials
- Hot press watercolor paper (140lb or 300gsm)
- Watercolor paint set (essential colors: Sap Green, Burnt Umber, Ultramarine Blue, Alizarin Crimson, Paynes Grey)
- Fine liner pens (waterproof, varying sizes .005 to .03)
- Pencil (H or 2H hardness)
- Kneaded eraser
- Ruler
- Round watercolor brushes (sizes 0, 2, and 6)
- White gouache or white gel pen
- Masking fluid (optional)
- Reference photo of the venue and couple
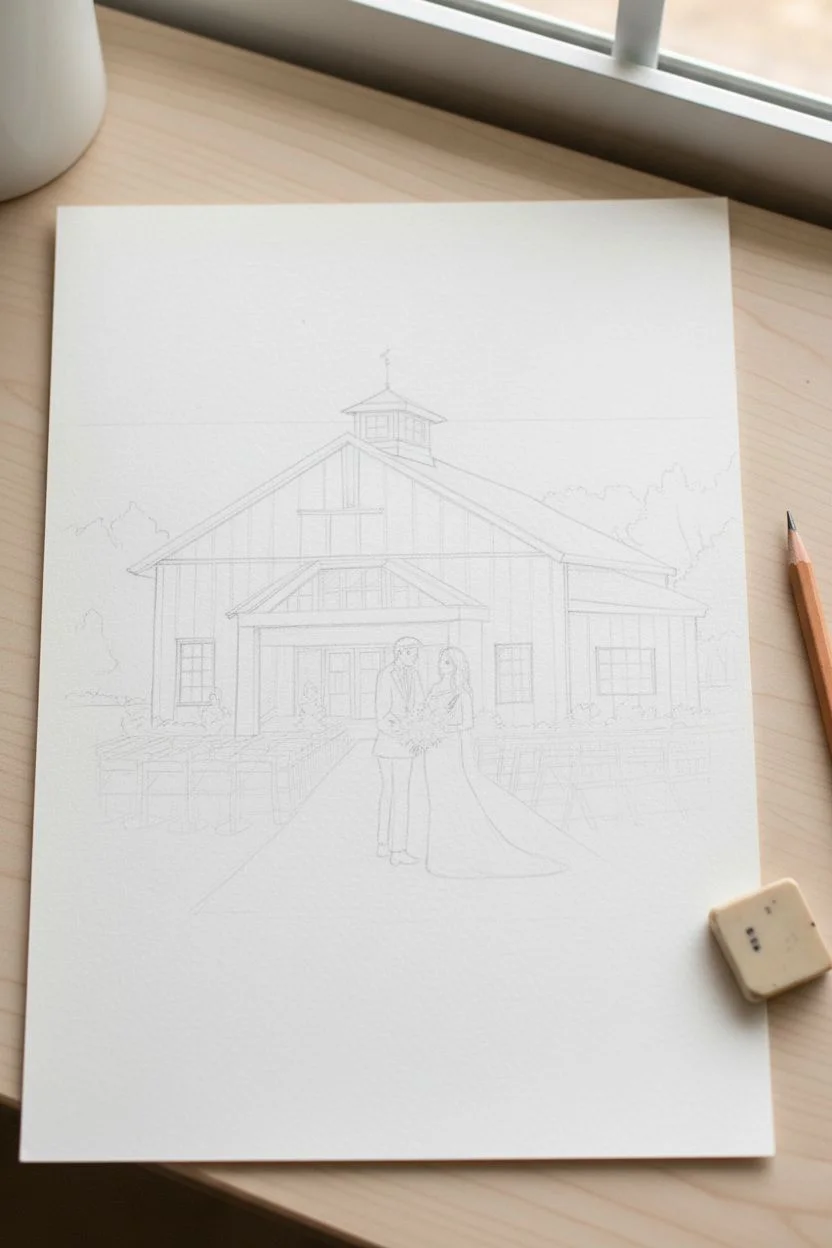
Step 1: Drafting the Scene
-
Establish the horizon:
Begin by lightly drawing a horizon line about a third of the way up the paper. This anchors your building and gives you a reference point for perspective. -
Sketch the venue structure:
Using your ruler and H pencil, block out the main shape of the barn or venue. Focus on the roof angles and vertical lines of the walls, keeping your pencil pressure very light so lines disappear later. -
Add architectural details:
Refine the building sketch by adding windows, the entryway, and any cupolas or spires. Pay attention to the perspective on the windows; they should follow the vanish points established by your roofline. -
Place the couple:
Draw the outline of the couple in the foreground on the path. Since they are the focal point but small in scale, focus on the gesture and silhouette rather than facial features. -
Sketch surroundings:
Lightly pencil in the path leading to the couple, the arrangement of chairs on the lawn, and the loose shapes of background trees.
Architectural Shortcut
Use a light box or a bright window to trace the complex perspective lines of the building directly from a printed photo to ensure structural accuracy.
Step 2: Inking and Definition
-
Ink the main lines:
Using a waterproof fine liner (size .01 or .03), go over your pencil lines for the building structure. Use a ruler for the siding and roof edges to maintain that crisp architectural look. -
Detail the chairs:
Ink the rows of reception chairs. Don’t try to draw every single leg perfectly; use suggestive lines to create the impression of rows without overcrowding the drawing. -
Refine organic shapes:
Switch to a looser hand for the trees and bushes. Use broken, jagged lines to suggest leaves rather than drawing a solid outline. -
Erase guidelines:
Once the ink is completely dry—I usually give it at least 20 minutes to be safe—gently erase all graphite marks with a kneaded eraser.
Step 3: Watercolor Application
-
Wash the sky:
Mix a very dilute wash of blue and water. Paint the sky area carefully around the roofline. Keep it pale to ensure the white building pops against it. -
Paint the roof:
Mix Paynes Grey with a touch of blue for the roof. Apply this in sections, perhaps lifting a little color with a paper towel while wet to create a weathered texture. -
Shadows on the white building:
The building is white, but it needs dimension. Mix a very watery, pale violet-grey. Paint thin shadows under the eaves and inside the porch area to create depth without darkening the walls. -
Layer the greenery:
Start with a light yellow-green wash for the lawn and trees. Once dry, come back with a darker mix of Sap Green and Burnt Umber to add shadows to the bushes and the underside of tree canopies. -
Color the path:
Use a warm beige or diluted Burnt Sienna for the walkway. Let your brush strokes follow the direction of the path to lead the eye toward the couple. -
Paint the couple:
Using your smallest size 0 brush, paint the groom’s suit and the bride’s hair. Use a tiny touch of skin tone for exposed skin, and leave the dress pure white (or use white gouache later).
Texturize the Gown
Mix a tiny amount of iridescent medium into the white gouache for the dress details to give the bride a subtle shimmer when the light hits the painting.
Step 4: Final Touches
-
Deepen contrast:
Mix a dark grey/black and carefully paint the window panes. This high contrast makes the white window frames stand out beautifully. -
Highlight the bride:
If you lost the brightness of the wedding dress, use white gouache or a gel pen to reclaim the highlights and add texture to the lace. -
Frame the piece:
Once fully dry, place a clean white mat board over the image to check the composition before placing it into a simple white box frame.
Now you have a timeless keepsake that perfectly preserves the memory of the venue and the happy couple


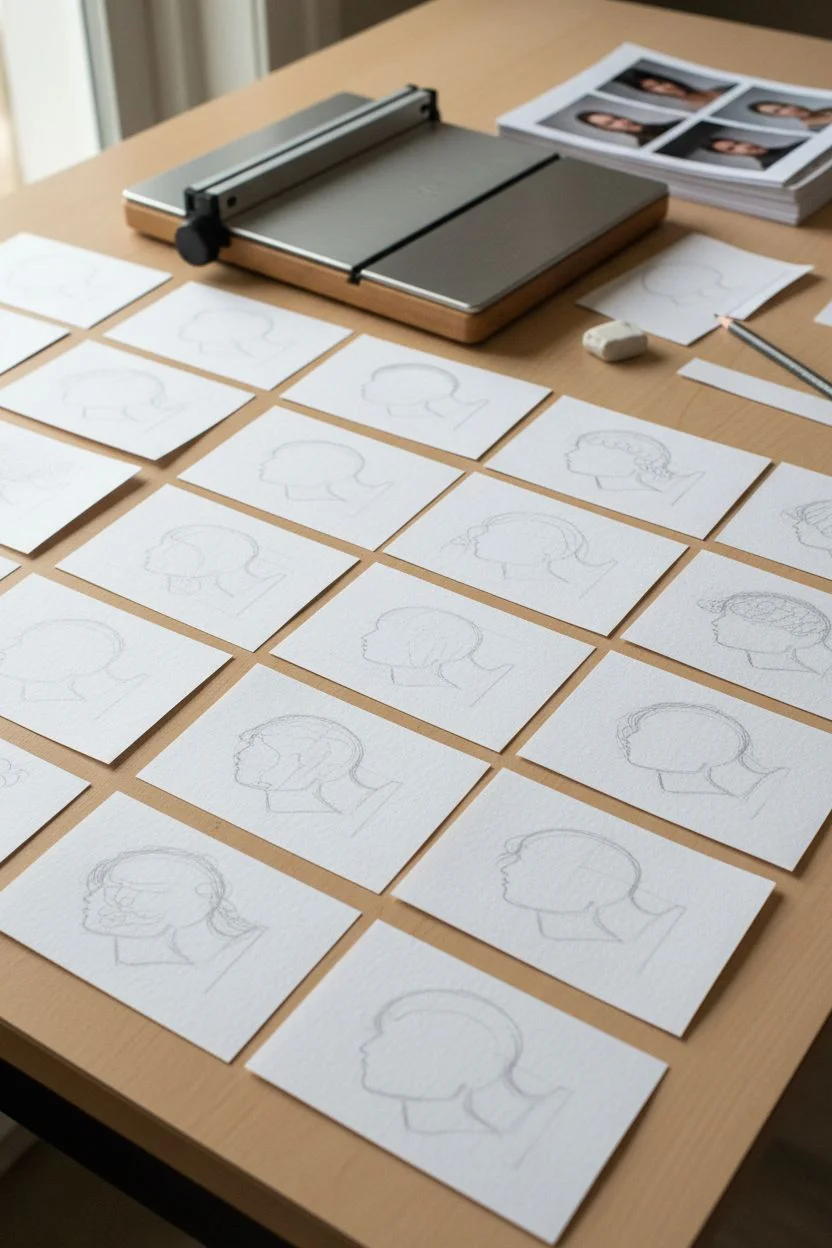
Guest Sketches as Mini Keepsakes
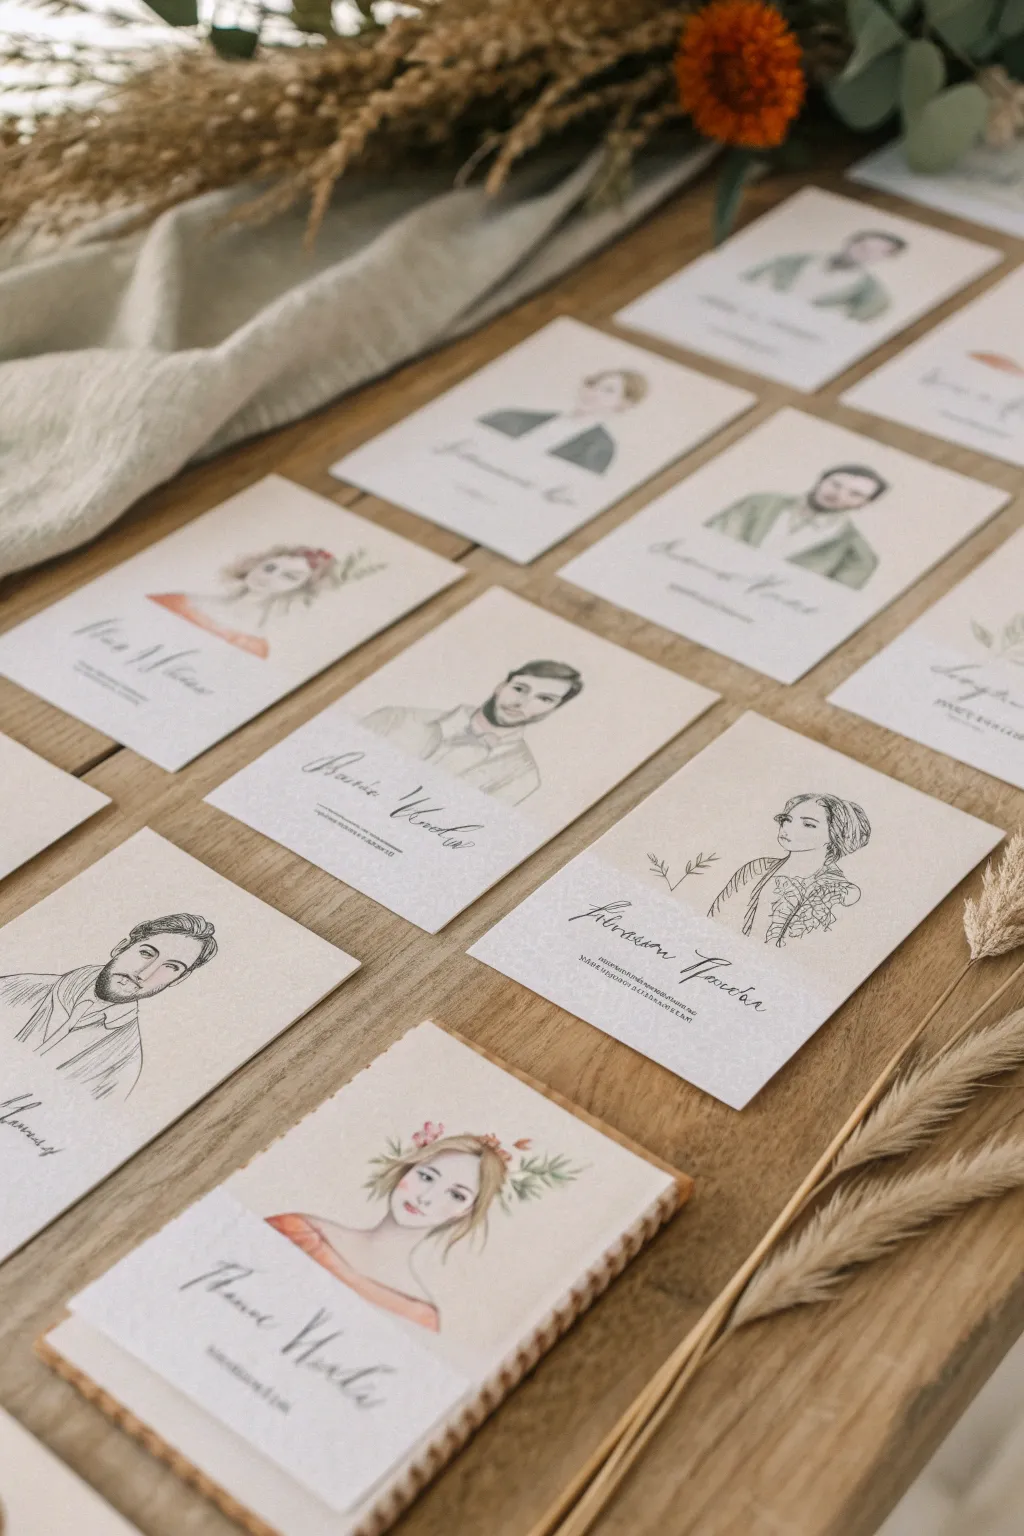
Transform your guest list into a stunning art installation with these personalized watercolor mini-portraits. These delicate keepsakes serve double duty as unique escort cards and cherished take-home favors that your loved ones will treasure.
Detailed Instructions
Materials
- High-quality watercolor paper (cold press, 300gsm)
- Pencil (HB or 2B)
- Kneaded eraser
- Fine liner pens (black or sepia, waterproof, 0.1mm – 0.3mm)
- Watercolor paint set
- Small round brushes (sizes 2 and 4)
- Paper trimmer or guillotine
- Reference photos of guests
- Calligraphy pen or nib
- Black ink or gouache
Step 1: Preparation & Setup
-
Gather photos:
Collect clear headshots of your guests. It helps to organize them digitally first so you can batch your painting process. -
Cut the paper:
Using your paper trimmer, cut your watercolor paper into uniform rectangles. A size of 4×6 inches or A6 works beautifully for these portraits. -
Light sketching:
Lightly sketch the basic shapes of the head and shoulders using an HB pencil. Keep your lines faint, focusing on capturing the distinctive hair shape and jawline.
Step 2: Drawing the Portraits
-
Refine features:
Add the facial features with your pencil. Don’t worry about hyper-realism; aim for a simplified, illustrative style that captures the essence of the person. -
Inking the lines:
Trace over your pencil sketch with a waterproof fine liner pen. Use varied pressure to create dynamic line weights—thicker for outer contours, thinner for delicate details like eyelashes. -
Erase guidelines:
Wait until the ink is completely dry to prevent smudging, then gently lift away the graphite lines with a kneaded eraser.
Fixing Smudges
If you accidentally smudge ink or paint, wait for it to dry fully. Use an electric eraser for small lifts or cover the error with a tiny application of white gouache
Step 3: Watercolor Application
-
Mix skin tones:
Prepare a few base skin tone washes on your palette. I like to keep them quite watery and transparent to maintain that soft, romantic look. -
Paint the face:
Apply the skin wash to the face area. You can leave small white spaces for highlights on the nose or forehead. -
Add warmth:
While the skin tone is still slightly damp, drop in a touch of rose or diluted red to the cheeks for a natural blush effect. -
Hair coloring:
Paint the hair using broad strokes that follow the direction of the strands. Start with a lighter wash and add darker pigment to the shadowed areas for volume. -
Clothing tint:
Add a simple wash of color for the clothing. Keep this loose and less detailed than the face to direct focus upward. -
Accessory details:
If the guest has distinctive accessories like glasses or a floral crown, paint these carefully with a smaller brush.
Deckled Edges
For a vintage, high-end look, tear your paper against a ruler instead of cutting it. This creates a soft, feathery ‘deckled’ edge that elevates the entire presentation
Step 4: Finishing Touches
-
Embellish with florals:
Optionally, add delicate botanical sprigs alongside the portrait or near the corners for a cohesive wedding theme. -
Calligraphy names:
Once the painting is fully dry, use your calligraphy pen to write the guest’s name below the portrait in a flowing script. -
Add table numbers:
If using as escort cards, write the table number in a smaller, simpler font below the name. -
Flatten cards:
Watercolor paper can buckle slightly; place the finished dry cards under a heavy book overnight to flatten them perfectly before display.
Arrange these charming miniatures on a table to welcome your guests with a personal artistic touch
BRUSH GUIDE
The Right Brush for Every Stroke
From clean lines to bold texture — master brush choice, stroke control, and essential techniques.
Explore the Full Guide
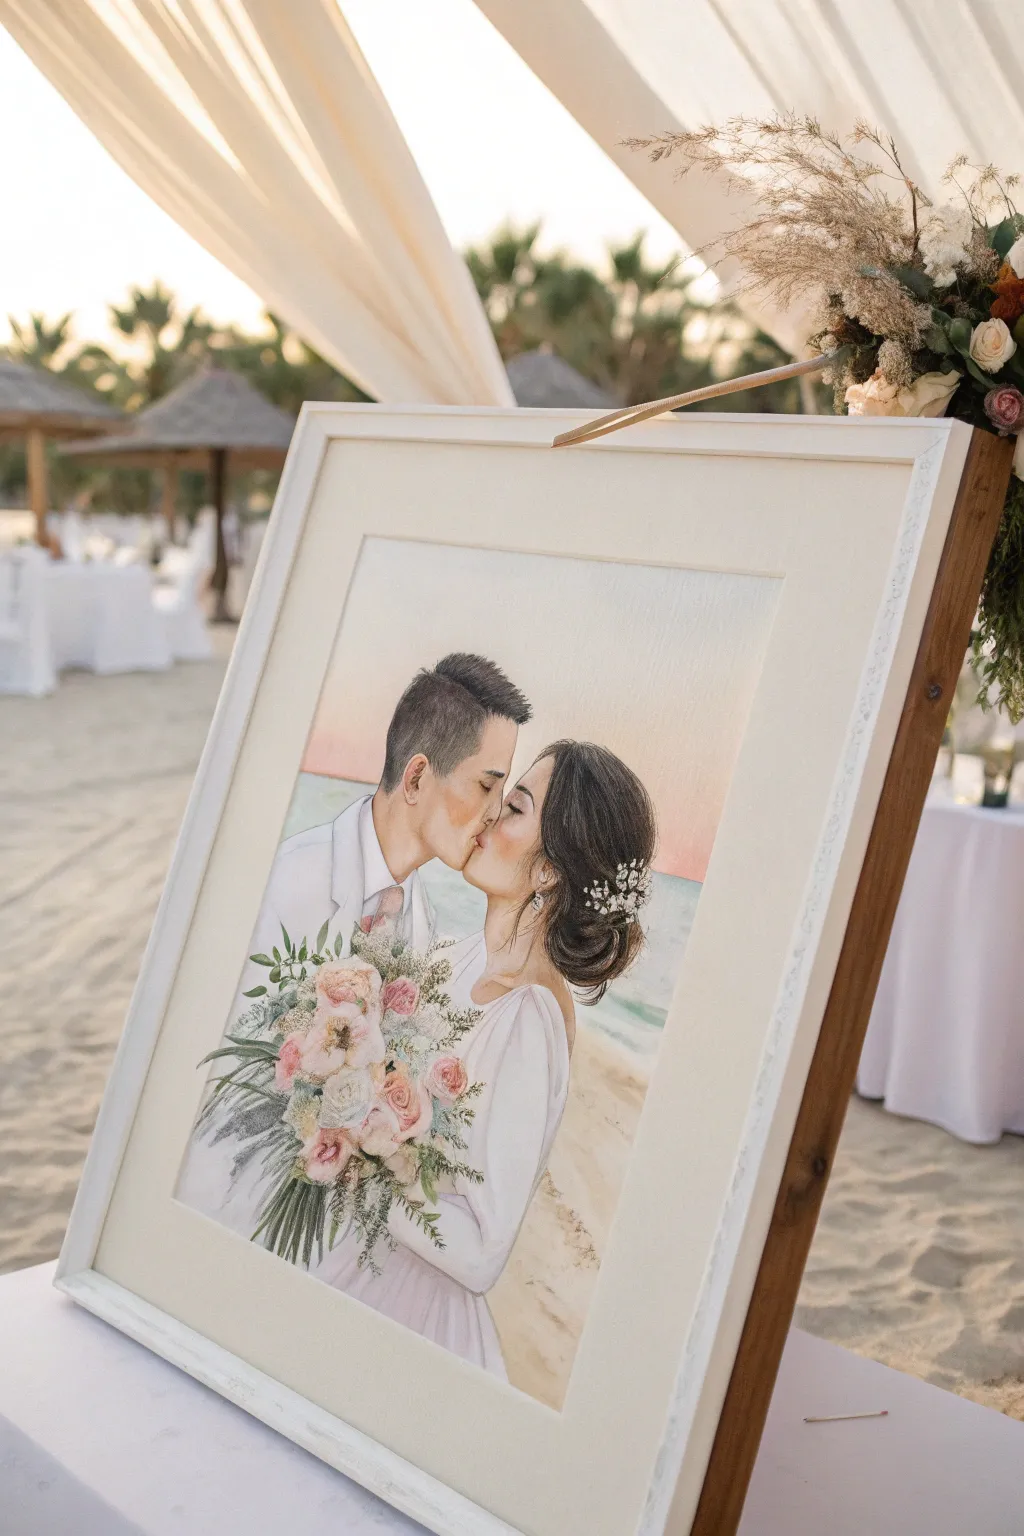
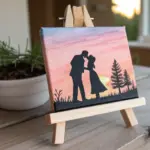
Golden Hour Couple Silhouette
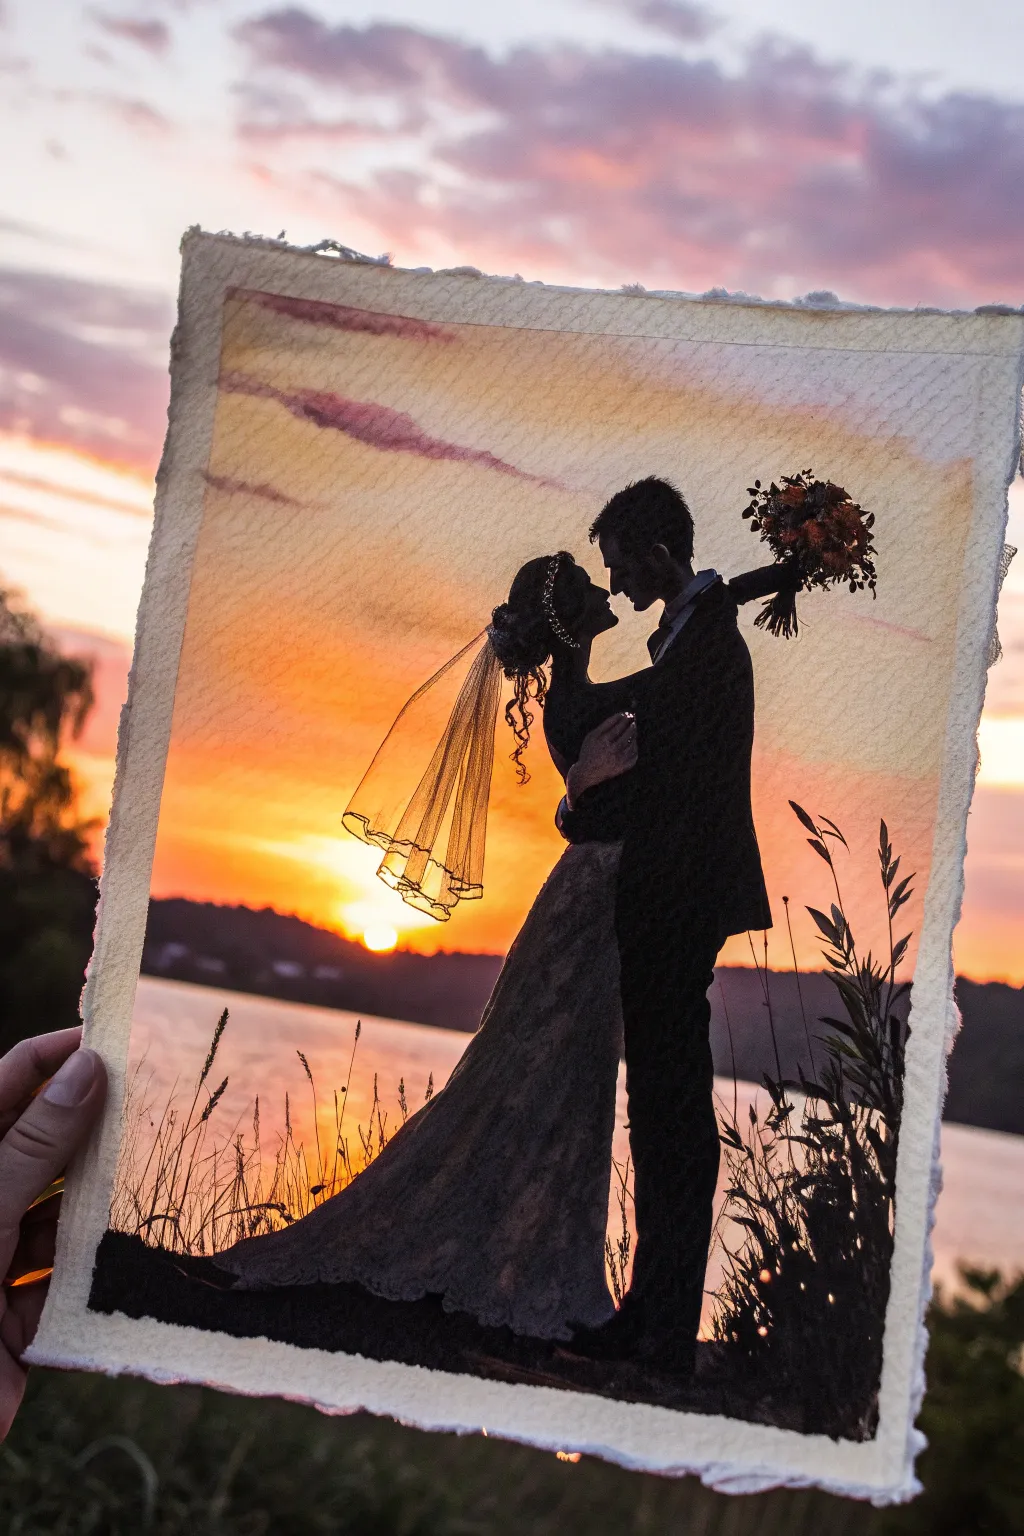
Capture the romance of the golden hour with this dramatic watercolor silhouette painting. Using rich warm tones and striking black contrast, this project creates a timeless keepsake that mimics the beauty of a real sunset.
Detailed Instructions
Materials
- Cold press watercolor paper (300 gsm)
- Watercolor paints (Cadmium Yellow, Cadmium Orange, Alizarin Crimson, Ultramarine Blue, Burnt Sienna)
- Black gouache or waterproof black India ink
- Round watercolor brushes (sizes 4, 8, and 12)
- Fine detail brush (size 0 or 00)
- Pencil (HB or H)
- Masking tape
- Mixing palette
- Paper towels
- Jar of clean water
- Ruler or straight edge (optional)
Step 1: Preparation & Sketching
-
Paper Selection:
Choose a high-quality, heavy-weight watercolor paper. For that authentic, rustic look seen in the photo, gently tear the edges of the paper using a ruler as a guide to create a soft, deckled effect. -
Reference Photo:
Select a wedding photo with a clear profile view. If you don’t have a perfect silhouette photo, any side-profile shot of the couple embracing will work well once filled in with black. -
Outline the Couple:
Lightly sketch the outline of the couple in the center of the paper. Focus only on the outer shape—the hair, the profile of the faces, the dress flow, and the bouquet. Don’t worry about internal details like facial features or fabric folds. -
Horizon Line:
Draw a faint horizon line roughly one-third up from the bottom of the page. This will separate your glowing water reflection from the background hills. -
Grounding Vegetation:
Sketch rough, spiky shapes in the bottom corners to represent tall grasses and wildflowers. These will frame the couple and add depth to the composition later.
Bleeding Lines?
If black paint bleeds into the sky, your background wasn’t dry enough. Let it dry, then fix the edge with a bit of opaque white gouache mixed with the sky color to cover the mistake.
Step 2: Painting the Sky & Water
-
Wet-on-Wet Sky:
With a large brush, wet the sky area above the horizon line with clean water, avoiding the couple’s silhouette. The paper should be glistering but not swimming in puddles. -
Adding Yellow Glow:
Immediately drop diluted Cadmium Yellow near the horizon line where the sun would be setting. Let it bloom naturally into the wet paper. -
Building the Sunset:
While the paper is still wet, introduce Cadmium Orange above the yellow, blending upwards. I find that moving quickly here prevents hard edges from forming. -
Upper Sky Tones:
Mix a soft purple using Alizarin Crimson and a touch of Ultramarine Blue. Apply this to the very top of the sky and streak a few horizontal clouds through the orange section. -
Painting the Water reflect:
Mirror the sky colors below the horizon line. Use horizontal strokes to suggest ripples, starting with yellow in the center and moving to orange and purple towards the edges. -
Distant Hills:
Once the sky is damp but not soaking, mix a dull purple-grey. Paint the distant hills along the horizon line. Soften the bottom edge of these hills so they blur slightly into the water. -
Dry Completely:
Let the background dry completely. The paper must be bone dry before you add the silhouette, or the black ink will bleed into your beautiful sunset.
Step 3: The Silhouette
-
Filling the Shape:
Using black gouache or India ink for maximum opacity, carefully outline the couple’s silhouette. A size 4 brush works well for the main body shapes like the suit and dress. -
Fine Details:
Switch to your size 0 or 00 brush. Paint the intricate details: the stray hairs of the bride’s updo, the groom’s nose and chin, and the delicate stems of the bouquet. -
Veil Transparency:
For the veil, don’t use solid black. Dilute your black paint significantly with water to create a transparent grey wash. Outline the veil edges with a slightly darker grey to define the shape against the sunset. -
Foreground Grasses:
Load your brush with solid black again. Paint the grassy foreground at the very bottom, using quick, upward flicking motions to create tapered grass blades and weed stems. -
Connecting the Elements:
Ensure the couple’s feet are grounded in this black grassy area so they don’t look like they are floating. -
Final Touches:
Check for any light patches in your black silhouette and apply a second coat if needed for a true, deep black. Erase any visible pencil marks from the sky area very gently.
Add Some sparkle
Once the painting is dry, use a metallic gold gel pen or gold watercolor paint to add tiny highlights on the bride’s hair accessories or the rim of the veil for a magical touch.
Frame your masterpiece in a floating glass frame to show off those beautiful deckled edges you created.
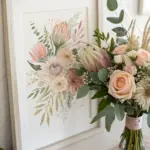
Abstract Palette Inspired by Wedding Florals
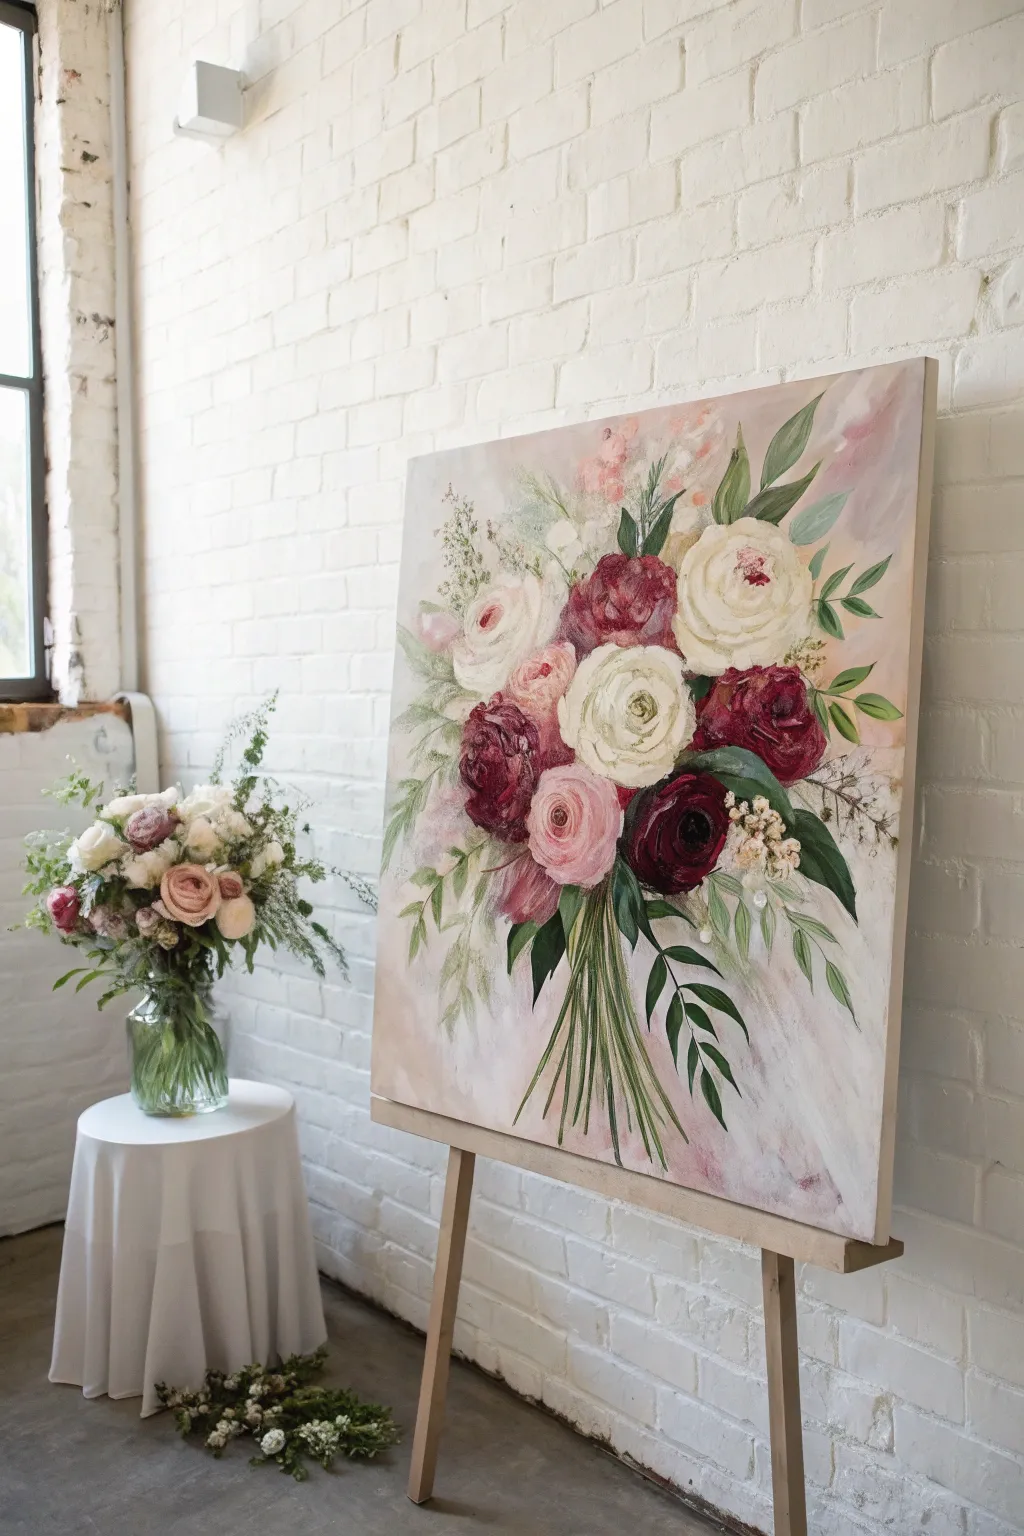
Immortalize the beauty of wedding florals with this elegant acrylic painting tutorial that transforms a fleeting bouquet into lasting art. By layering soft washes with bold, impasto strokes, you’ll create a romantic and textured centerpiece that captures the spirit of the big day.
How-To Guide
Materials
- Large square canvas (approx. 24×24 inches)
- Acrylic paints (Titanium White, Alizarin Crimson, Cadmium Red, Hooker’s Green, Sap Green, Yellow Ochre, Burnt Umber, Ivory Black, soft pastel pink)
- Assorted brushes (large flat wash brush, medium filbert, lush round brushes, small liner brush)
- Palette knife
- Water container and paper towels
- Easel
- Reference photo of the bridal bouquet
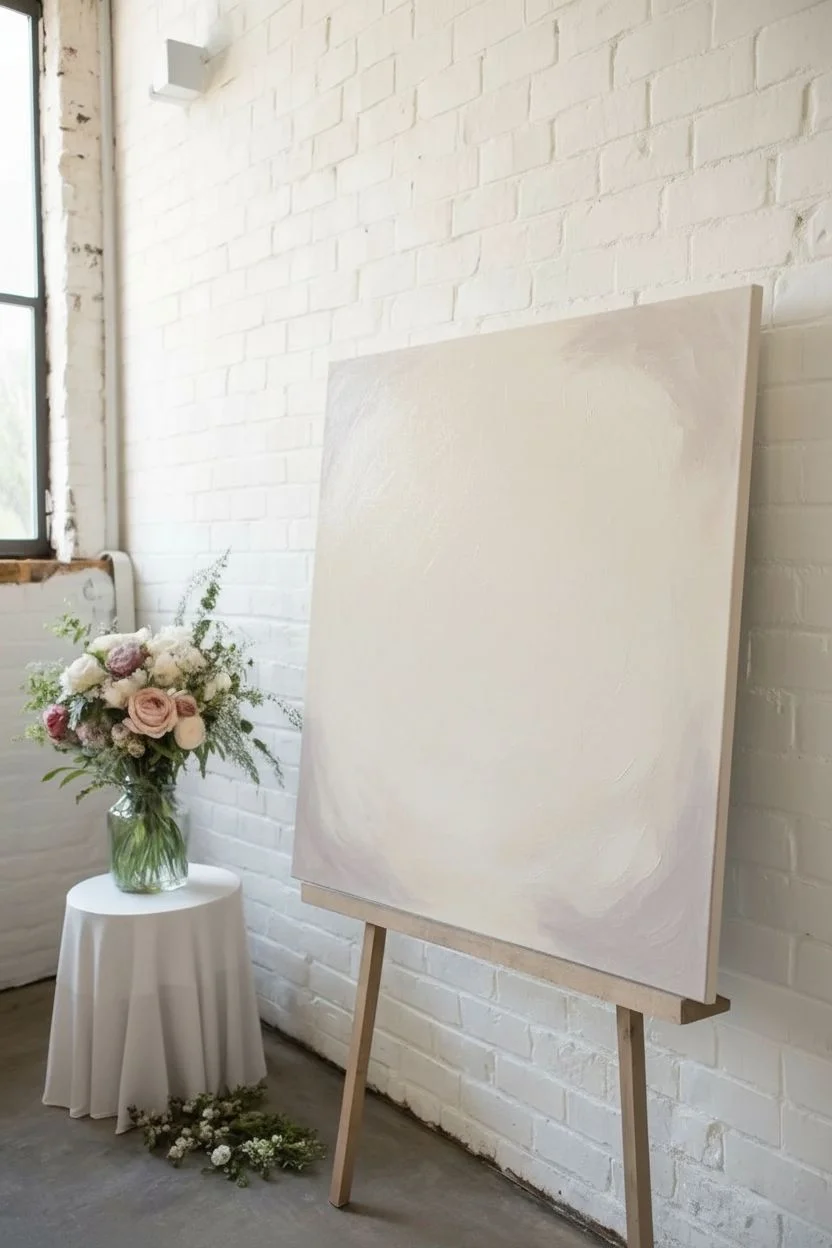
Step 1: Setting the Background
-
Prepare the canvas:
Begin by setting up your canvas on the easel. Ensure the surface is clean and primed. -
Mix a base wash:
Create a very diluted wash of paint using Titanium White with a tiny touch of Burnt Umber and pastel pink. You want a creamy, vintage off-white tone that isn’t stark. -
Apply the background:
Using your largest flat brush, cover the entire canvas in loose, sweeping strokes. Don’t worry about perfect coverage; let some texture show through. -
Add background depth:
While the background is still slightly damp, mix a whisper-light grey-purple shade. Add subtle cloud-like scumbles near the corners and edges to create an atmospheric vignette effect.
Step 2: Sketching and Blocking
-
Map the composition:
Using a small round brush and watery Burnt Umber, lightly sketch the general shape of the bouquet. Focus on the large circular forms of the roses and the cascading direction of the stems. -
Block in darks:
Identify the darkest areas of the bouquet—usually the deep red roses and shadows between blooms. Mix Alizarin Crimson with a touch of Green or Black to get a deep maroon and paint these shapes loosely. -
Block in greens:
Mix Sap Green with a little Yellow Ochre for brighter leaves and Hooker’s Green with Blue for cooler shadows. Roughly block in the foliage shapes around the flowers. -
Establish light flowers:
For the white and pink roses, lay down base shapes using simple circles of Titanium White and soft pastel pink. Keep these flat for now; detail comes later.
Muddiness Monitor
Work light to dark or vice versa, but let layers dry between major color changes. If your pinks turn grey, stop and clean your water and brush thoroughly.
Step 3: Building Floral Form
-
Develop the red roses:
Using a medium filbert brush, layer pure Alizarin Crimson and Cadmium Red over your dark blocks. Use curved, C-shaped strokes to mimic overlapping petals. -
Sculpt the white roses:
Mix a creamy white (White + tiny yellow ochre). Paint the outer petals of the white roses first, working inward. Add touches of light grey-green to the centers for depth. -
Create the pink blooms:
I particularly enjoy using a loaded brush here to create texture. Mix various shades of pink and swirl them together on the canvas to form the soft, cup-shaped ranunculus or garden roses. -
Refine the foliage:
Switch to a smaller round brush. Paint specific leaf shapes—long pointed eucalyptus leaves in cool greens and rounded fern-like leaves in warmer olive tones.
Bridal Texture Boost
Mix a modeling paste or gel medium into your white and pink paints before applying the final petals. This creates literal 3D ridges that mimic real flowers.
Step 4: Highlights and Details
-
Add stem structure:
Mix a fresh, bright yellow-green. Using a liner brush or the edge of a flat brush, pull long, straight lines downward from the flowers to create the bundle of stems at the bottom. -
Highlight the petals:
Mix pure Titanium White with a glazing medium or just water. carefully highlight the top edges of the rose petals where the light would hit. -
Deepen the shadows:
Go back in with your darkest maroon (Crimson + Black). Sharpen the spaces between petals and underneath the main flower heads to make the bright colors pop. -
Add filler flowers:
Use the tip of a small brush to dot in clusters of ‘baby’s breath’ or wax flowers using thick white paint. Keep these irregular and airy. -
Final texture check:
Step back from the easel. If any flower looks too flat, use a palette knife to carefully scrape a bit of thick paint onto the highlighted petals for an oil-painting look. -
Soften edges:
Finally, drag a dry, clean brush lightly over the outer edges of the bouquet where it meets the background to blur the lines slightly, enhancing the romantic, dreamy feel.
Allow your beautiful floral tribute to dry completely before signing and sealing it as a cherished keepsake

Have a question or want to share your own experience? I'd love to hear from you in the comments below!