If you’ve been itching to try wine glass painting but want something genuinely easy, this is the fun part where it all clicks. These beginner-friendly ideas are my studio favorites because they look impressive fast, even if you’re just getting comfortable painting on glass.
Classic Polka Dot Party Glasses
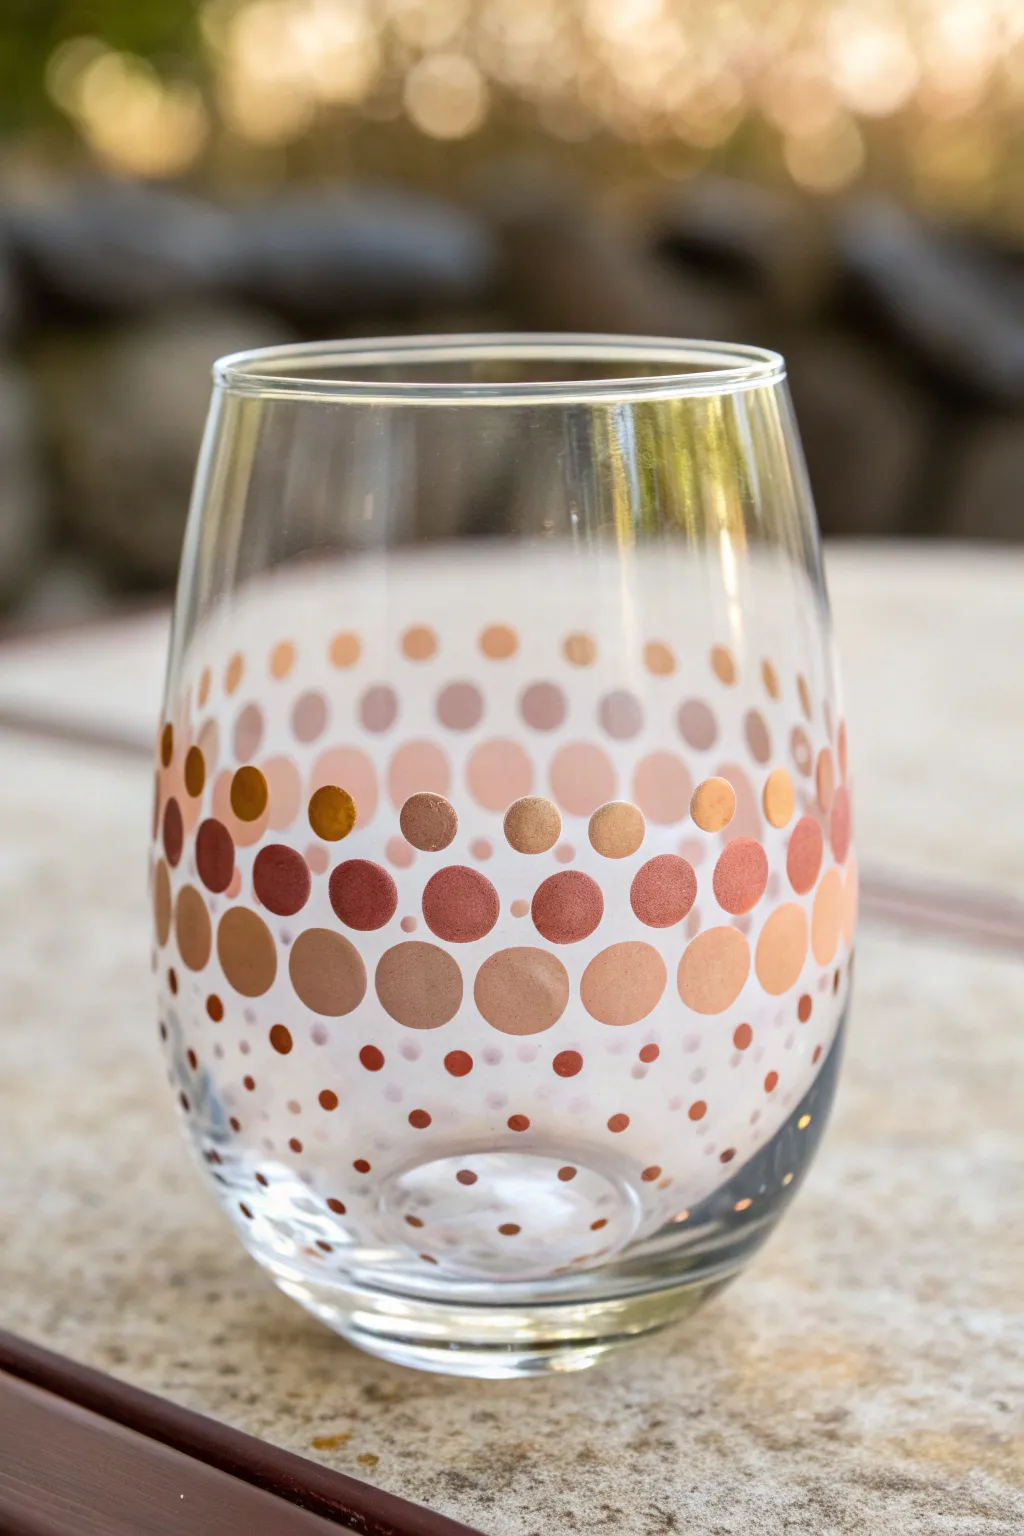

Transform a simple stemless wine glass into a chic party accessory with warm, metallic tones. This project uses dots of varying sizes in copper, bronze, and rose gold to create a bubbly, effervescent effect that looks far more expensive than it is.
How-To Guide
Materials
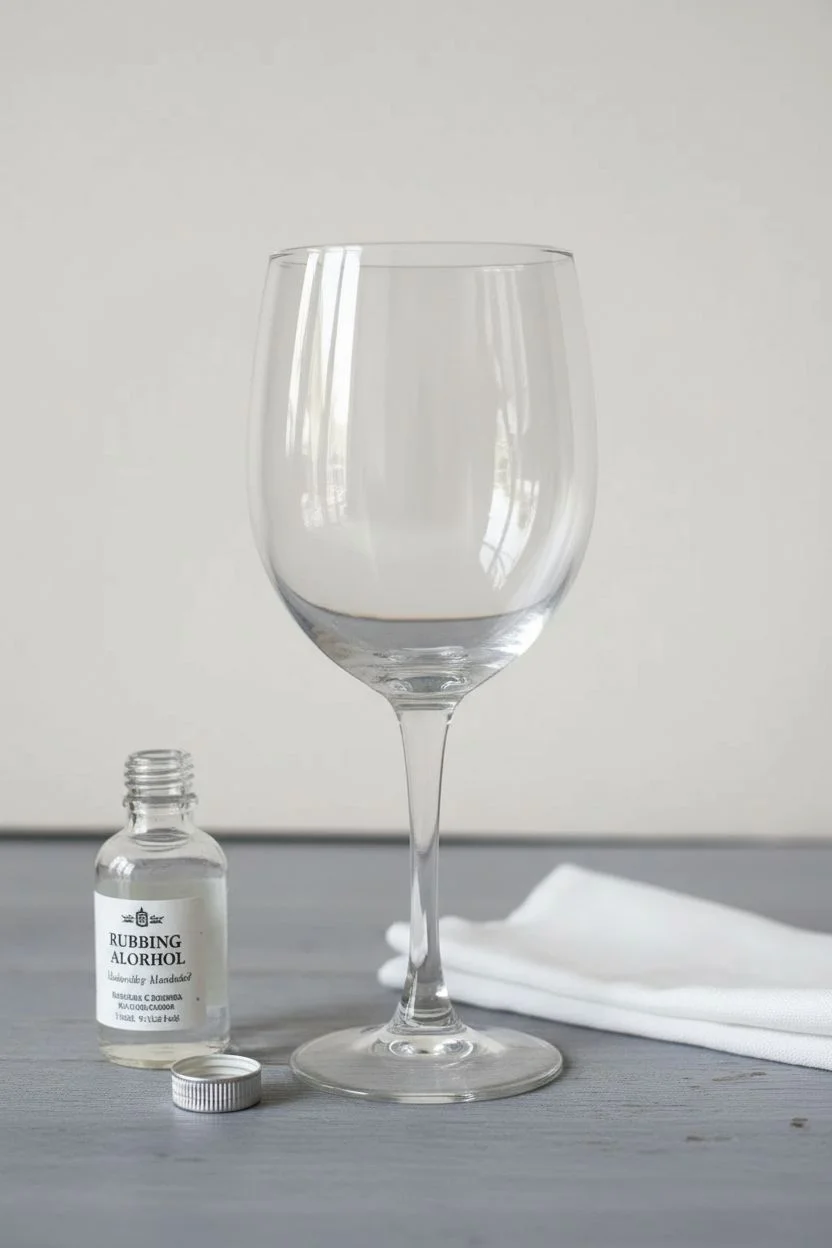
- Stemless wine glass
- Rubbing alcohol
- Cotton pads or paper towel
- Multi-surface acrylic enamel paints (Metallic Copper, Bronze, Rose Gold, Champagne Gold)
- Foam spouncers (various sizes: small, medium, large)
- Cotton swabs (Q-tips)
- Paint palette or paper plate
- Oven (for curing)
Step 1: Preparation
-
Clean the surface:
Before painting, wipe down the entire exterior of the wine glass with rubbing alcohol and a cotton pad. This removes oils and fingerprints that could prevent the paint from adhering properly. -
Prepare your palette:
Squeeze out small amounts of your metallic paints onto a palette. I like to keep colors separate initially but placing them close together allows for easy switching.
Fixing Smudged Dots
If a dot smears, don’t panic! Quickly dampen a Q-tip with rubbing alcohol and wipe away the mistake while it’s wet. Dry the spot instantly before repainting.
Step 2: Creating the Main Pattern
-
Load the large spouncer:
Select a medium-to-large foam spouncer (about 1/2 inch diameter). Dip it into your first metallic shade—let’s start with a rich bronze. -
Offload excess paint:
Dab the spouncer on a clean part of your palette once or twice. You want the sponge loaded but not dripping to ensure crisp circle edges on the glass. -
Stamp the center row:
Press the spouncer firmly onto the glass in the middle section to create your first dot. Lift straight up to avoid smearing. -
Continue the primary row:
Space out similar large dots around the circumference of the glass. Leave roughly half an inch of space between them for other colors. -
Add color variety:
Wipe your spouncer or switch to a fresh one, and fill in the gaps in your main row with a contrasting metallic, like rose gold or copper. -
Create the second tier:
stamp a second row of large dots slightly below the first, staggering them so they sit in the windows of the row above.
Step 3: Adding Dimension and Detail
-
Switch to a medium spouncer:
Using a slightly smaller foam pouncer, begin adding rows above and below your main central band. -
Use lighter shades:
For these outer rows, try using lighter shades like champagne gold or a pale copper to create a fading, gradient effect. -
Fill empty spaces:
Look for larger gaps between your main dots and stamp a medium dot there. The overlap creates depth and visual interest. -
Prepare the smallest tool:
For the tiniest dots at the very top and bottom, I find a simple cotton swab works perfectly. Dip the end into your paint. -
Dot the upper rim area:
Gently dot the area above your painted band, spacing the dots further apart as you move upward to simulate bubbles floating away. -
Dot the base:
Repeat the process near the bottom of the glass, concentrating more small dots near the base to ‘ground’ the design. -
Inspect and touch up:
Hold your glass up to the light to check for thin spots. If a dot looks too transparent, wait for it to dry slightly and carefully stamp a second coat over it.
Pro Tip: Consistency
Twist your wrist slightly when lifting the sponge off the glass. This simple motion breaks the paint seal and helps keep the circle edges perfectly round and crisp.
Step 4: Curing
-
Dry time:
Allow the glass to air dry for at least one hour before handling. Consult your specific paint bottle for full cure times (often 21 days for air curing). -
Oven baking method:
For a dishwasher-safe finish, place the glass in a cool oven. Set the temperature to 350°F (175°C) and bake for 30 minutes. Turn the oven off and let the glass cool completely inside before removing.
Once baked, your stunning metallic glassware is ready to add a sparkle to your next gathering


Tiny Heart Confetti Pattern
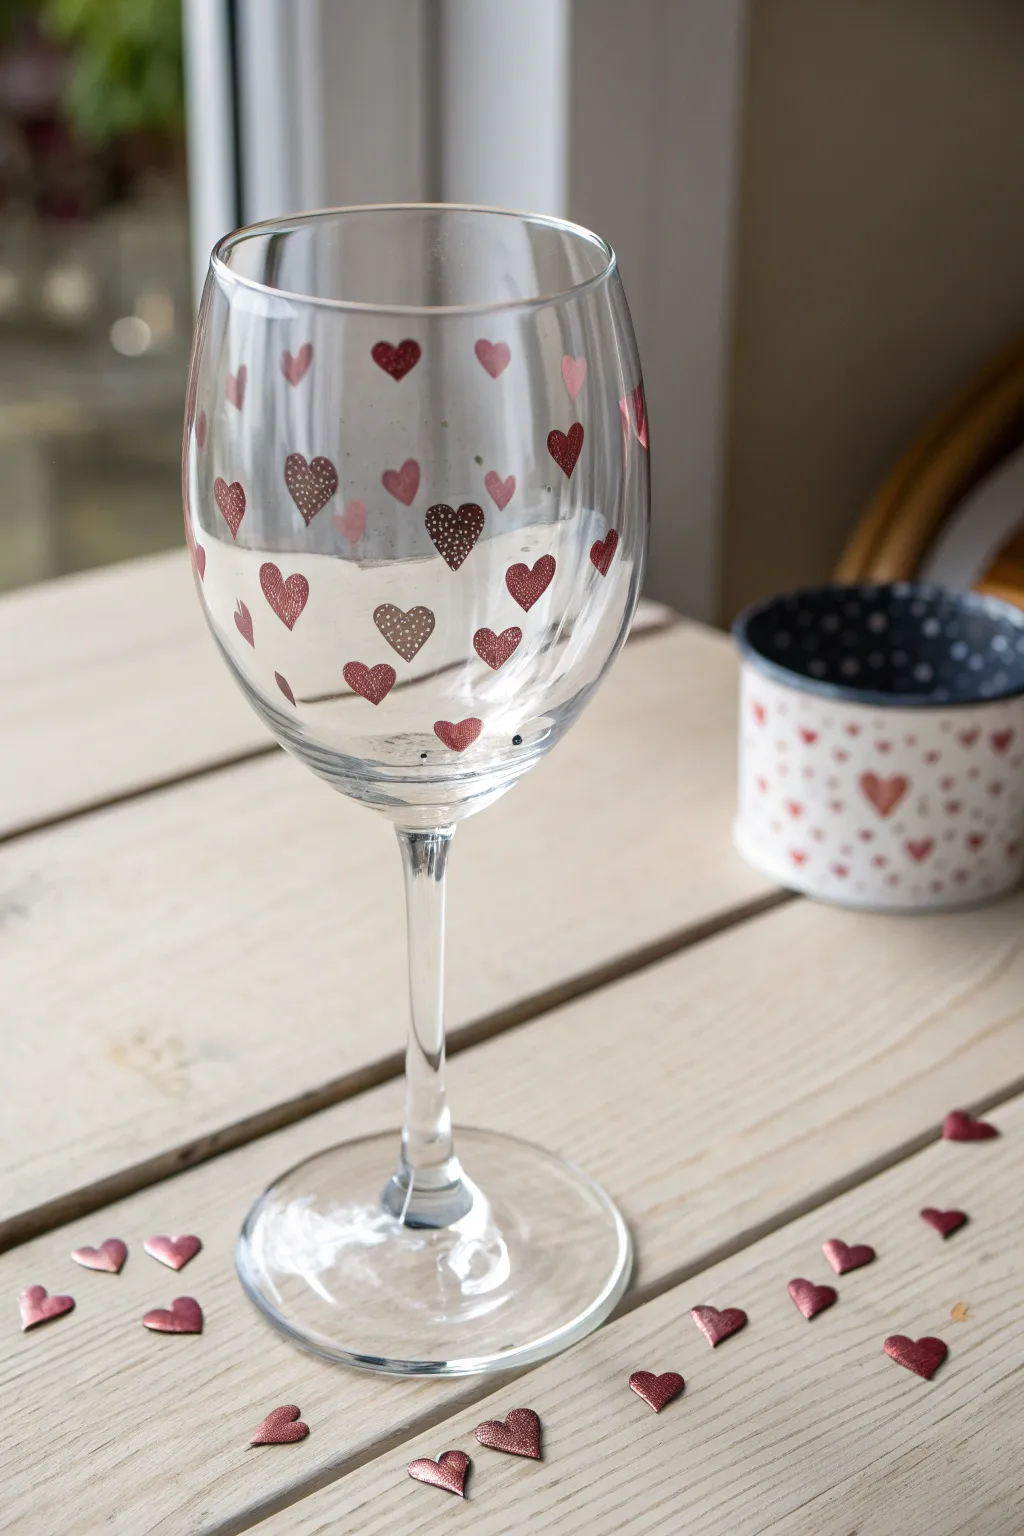
Transform a plain wine glass into a romantic vessel with this delicate, scattered heart pattern. The design features a mix of solid, outlined, and dotted hearts in varying shades of dusty rose and burgundy for a whimsical confetti effect.
Step-by-Step Guide
Materials
- Clear wine glass
- Rubbing alcohol and cotton pads
- Enamel glass paints (shades like dusty rose, burgundy, metallic copper, and mauve)
- Small fine-tip paintbrushes (size 0 or 00)
- Dotting tool or a toothpick
- Paper plate or palette
- Oven for baking (optional, check paint instructions)
Step 1: Preparation
-
Clean the surface:
Before you begin painting, it is crucial to remove any oils or fingerprints from the glass. Wipe the entire exterior of the wine glass bowl thoroughly with rubbing alcohol and a cotton pad. -
Let it dry:
Allow the glass to air dry completely for a few minutes to ensure a pristine surface for the paint to adhere to. -
Prepare your palette:
Squeeze dime-sized amounts of your chosen enamel paint colors onto the paper plate. I like to keep the colors distinct but close enough to compare the shades.
Paint Slipping?
If the paint is too thin and sliding down the curve, let it sit on your palette for 5-10 minutes to thicken slightly before applying it to the glass.
Step 2: Painting the Base Layer
-
Start with solid hearts:
Using your fine-tip brush, paint small solid hearts scattered randomly around the glass. Start with your darkest burgundy color first. -
Vary the sizes:
Keep the hearts relatively small, about the size of a fingernail or smaller, but vary them slightly so they don’t look uniform. -
Rotate the glass:
Turn the glass frequently as you work to ensure the pattern wraps around the entire bowl evenly without clustering too much in one spot. -
Add secondary colors:
Rinse your brush or switch to a clean one. Paint more solid hearts using the dusty rose and mauve shades, filling in the gaps between the burgundy hearts.
Step 3: Adding Detail and Texture
-
Create dotted hearts:
Dip a toothpick or very fine dotting tool into the metallic copper or a lighter pink paint. Gently tap small dots in the shape of a heart directly onto the glass. -
Paint outlined hearts:
Use the very tip of your smallest brush to paint the outline of a heart without filling perfectly in the center, giving a sketched look. -
Layer patterns:
Go back to some of your earlier solid hearts that are semi-dry. Use a contrasting color and a toothpick to add tiny polka dots on top of the solid color for extra detail. -
Check density:
Hold the glass up against a light source to check the distribution. Add tiny micro-hearts in empty spaces to balance the ‘confetti’ look.
Steady Hand Trick
Rest your painting hand’s pinky finger against the glass stem or base to stabilize your brush strokes while you paint the delicate hearts.
Step 4: Finishing Touches
-
Clean up edges:
If any heart looks smudged or wonky, use a damp cotton swab or a toothpick to gently scrape away the mistake while the paint is still wet. -
Dry cure:
Allow the painted glass to sit undisturbed for at least 1 hour until the paint is dry to the touch. -
Full curing:
Follow the specific instructions on your paint bottle. Most enamel paints require 21 days of air curing or baking in the oven to become dishwasher safe. -
Baking method (optional):
If baking, place the glass in a cool oven, heat to 350°F (175°C), bake for 30 minutes, turn off the oven, and let the glass cool down completely inside with the door closed.
Enjoy sipping from your lovely new custom glassware designed with love


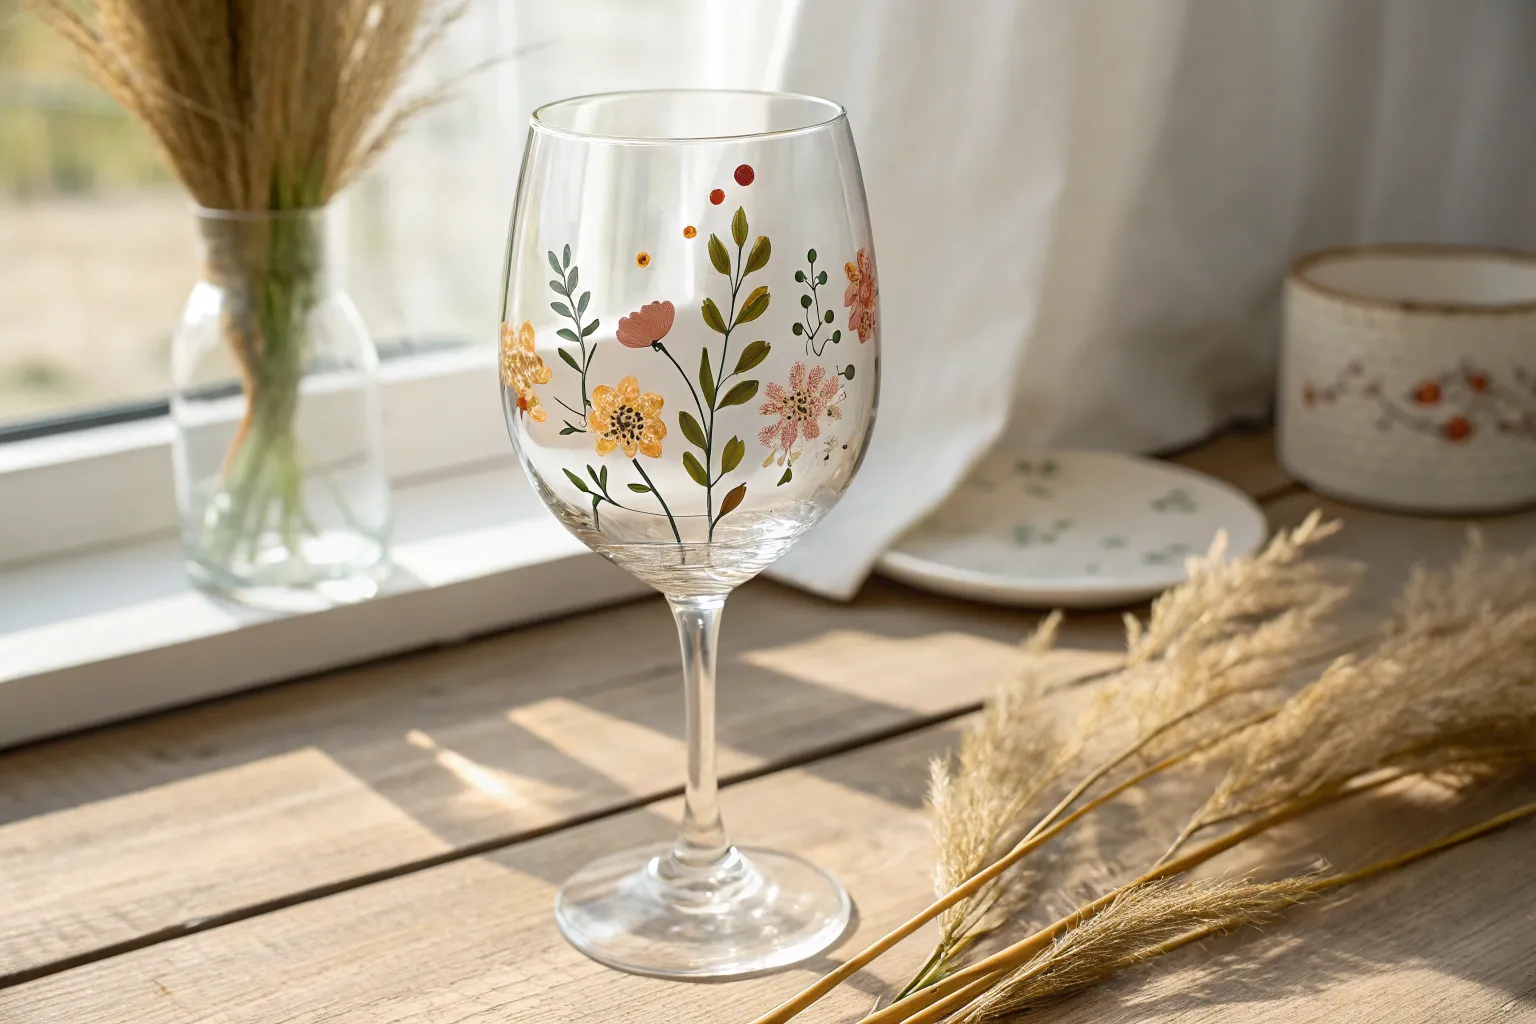
Simple Daisy Blooms Around the Bowl
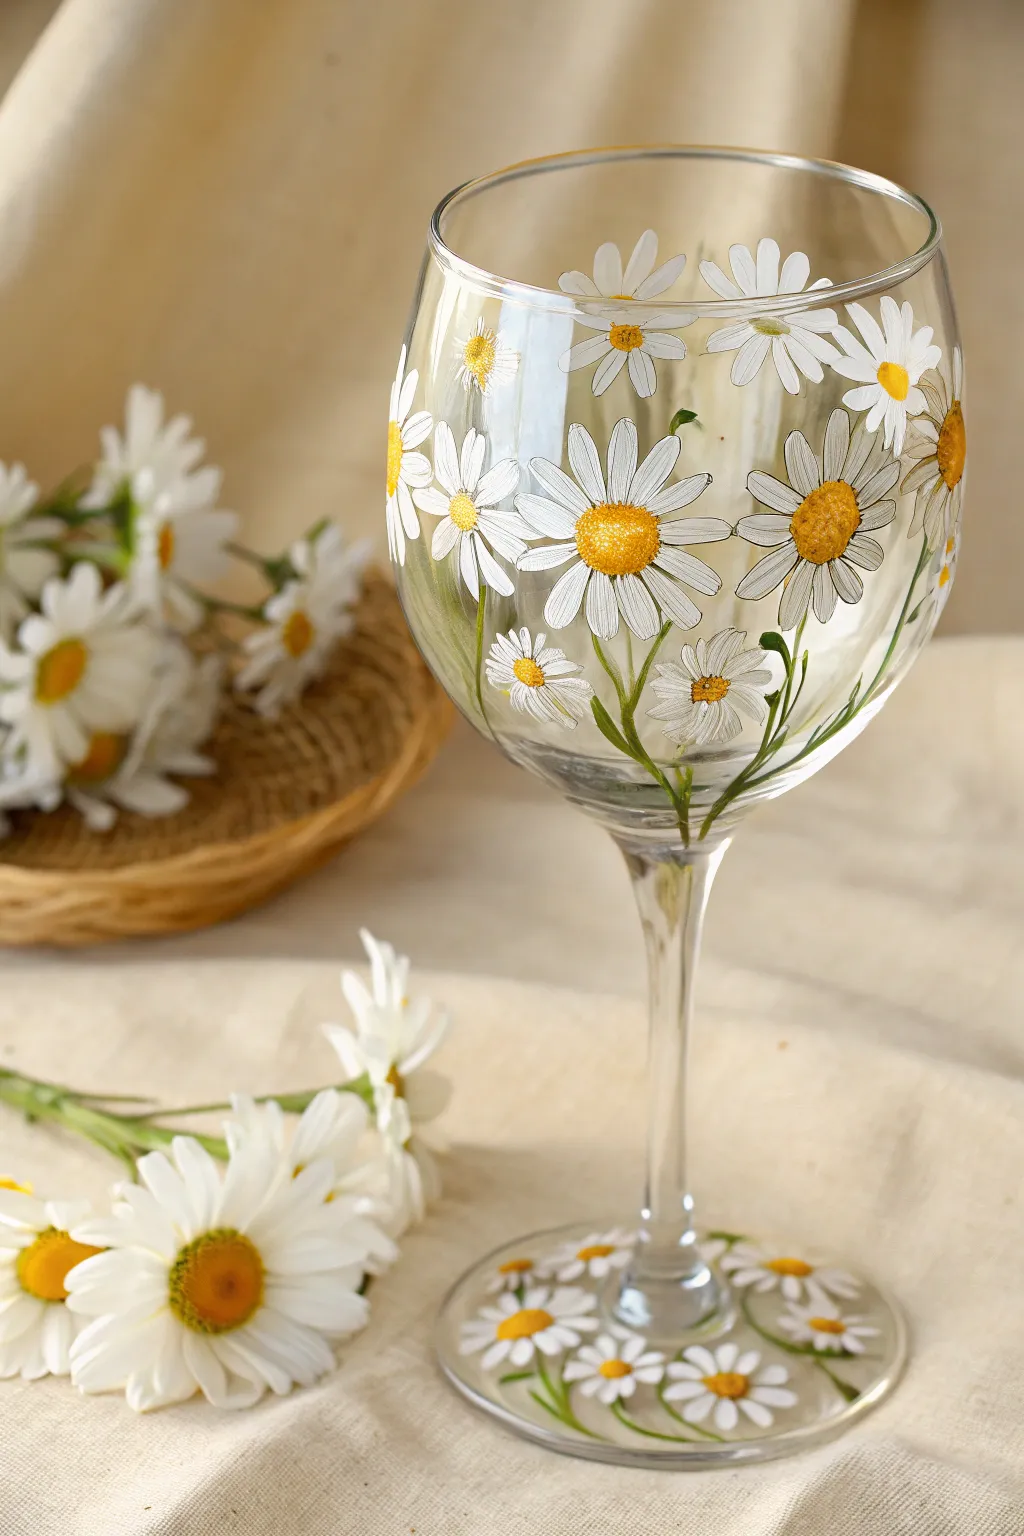
Bring the freshness of a summer meadow to your next toast with this lighthearted project. Delicate white daisies with sunny centers dance around the bowl and base of the glass, creating a cheerful, airy floral design.
Step-by-Step
Materials
- Clear stemmed wine glass
- Rubbing alcohol
- Cotton pads or paper towel
- Gloss enamel glass paints (White, Golden Yellow, Ochre/Deep Yellow, Sage Green)
- Small round paintbrushes (sizes #0 and #2)
- Fine liner brush (size #00 or #000)
- Fine-tip black glass paint marker or liner (optional for outlines)
- Palette or small dish
- Oven (for curing)
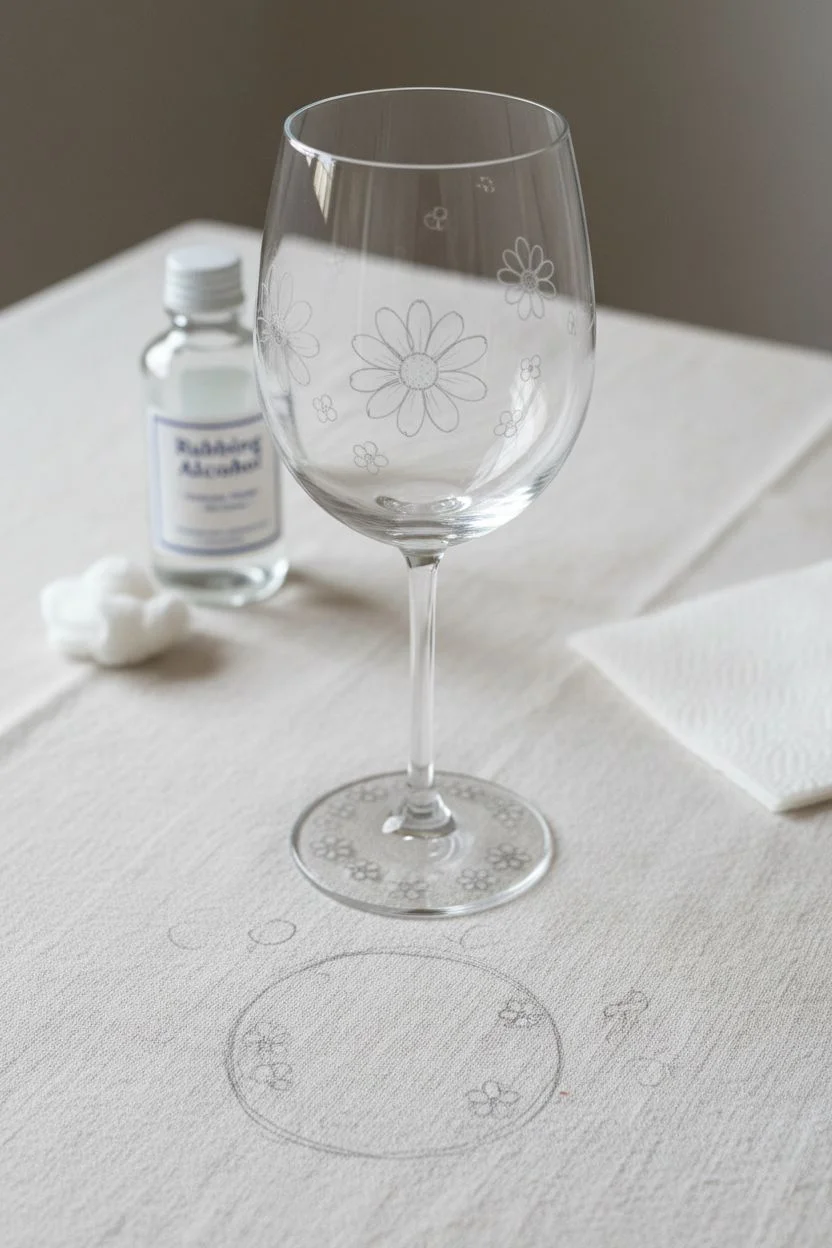
Step 1: Preparation & Planning
-
Clean surface:
Before you begin painting, it’s crucial to remove any oils or fingerprints. Wipe down the entire exterior of the wine glass, including the base, with a cotton pad soaked in rubbing alcohol. -
Plan placement:
Visualize where your main blooms will sit. I like to plan for three or four large ‘hero’ daisies around the widest part of the bowl, leaving space between them for smaller filler flowers and stems.
Step 2: Painting the Petals
-
Load the brush:
Load your #2 round brush with opaque white enamel paint. You want a creamy consistency—not too thick, but opaque enough to cover in one or two coats. -
Paint large petals:
Start with the main flowers. Press the belly of the brush down and pull outward to create elongated teardrop shapes for the petals. Arrange these radially around an empty center circle. Don’t worry about perfect symmetry; natural irregularities look better. -
Second coat:
Let the first layer of white dry for about 15-20 minutes. If the glass transparency is showing through too much, carefully apply a second coat over the petals for a solid, crisp white. -
Add filler flowers:
Using a smaller #0 brush, paint tinier versions of the daisies in the gaps between the large blooms. Vary the angles so some look like they are facing sideways or upwards. -
Paint the base:
Flip the glass upside down or hold it carefully by the stem. Paint a ring of small, simple daisies around the flat foot of the glass to mirror the design on the bowl.
Paint Consistency Tip
If your white paint is too sheer, don’t gloop it on thick. Apply multiple thin layers, drying in between, to avoid drips and uneven textures.
Step 3: Adding Centers & Details
-
Yellow centers:
Once the white petals are dry to the touch, dip your #2 brush into the Golden Yellow paint. Dab a generous circle in the center of each daisy. -
Texture the centers:
While the yellow is still wet, pick up a tiny amount of the darker Ochre/Deep Yellow on the very tip of your brush. Gently stipple (dot) the bottom edge of the yellow centers to create a shadowed, 3D textured effect. -
Outline petals:
This step makes the design pop. Using a very fine liner brush with thinned grey/black paint (or a fine-tip glass paint marker), carefully outline each white petal. Use broken, wispy lines rather than a solid heavy border for a delicate, sketched look. -
Detail the centers:
Add tiny stippled dots along the edge where the yellow center meets the white petals using your liner brush. This mimics the fuzzy texture of a real flower center.
Garden Variety
Mix a tiny drop of pink or light blue into your white paint for a few random petals to give the impression of reflected light or wildflowers.
Step 4: Stems & Greenery
-
Draft the stems:
Switch to your liner brush and the Sage Green paint. Draw thin, curving lines extending downward from the flower heads on the bowl. Let them converge naturally toward the top of the stem. -
Connect the base:
On the foot of the glass, paint short, curved green stems connecting the small daisies, creating a wreath-like effect. -
Add leaves:
Paint small, slender leaves along the main stems on the bowl just by pressing down and lifting your brush. Keep the greenery sparse to maintain the airy feel of the design.
Step 5: Finishing Up
-
Clean edges:
Inspect your work for any stray paint marks or smudges. Use a damp cotton swab or a toothpick to gently scrape away any mistakes before the paint fully hardens. -
Dry time:
Allow the glass to air dry for at least 24 hours (or as recommended by your specific paint brand) before handling heavily. -
Cure in oven:
Place the glass in a cool oven. Turn the heat to 350°F (175°C) and bake for 30 minutes. Turn the oven off and let the glass cool completely inside the oven to prevent cracking.
Once cooled, your custom glassware is ready to sparkle at your next garden party or dinner gathering


Bold Color Block Stripes
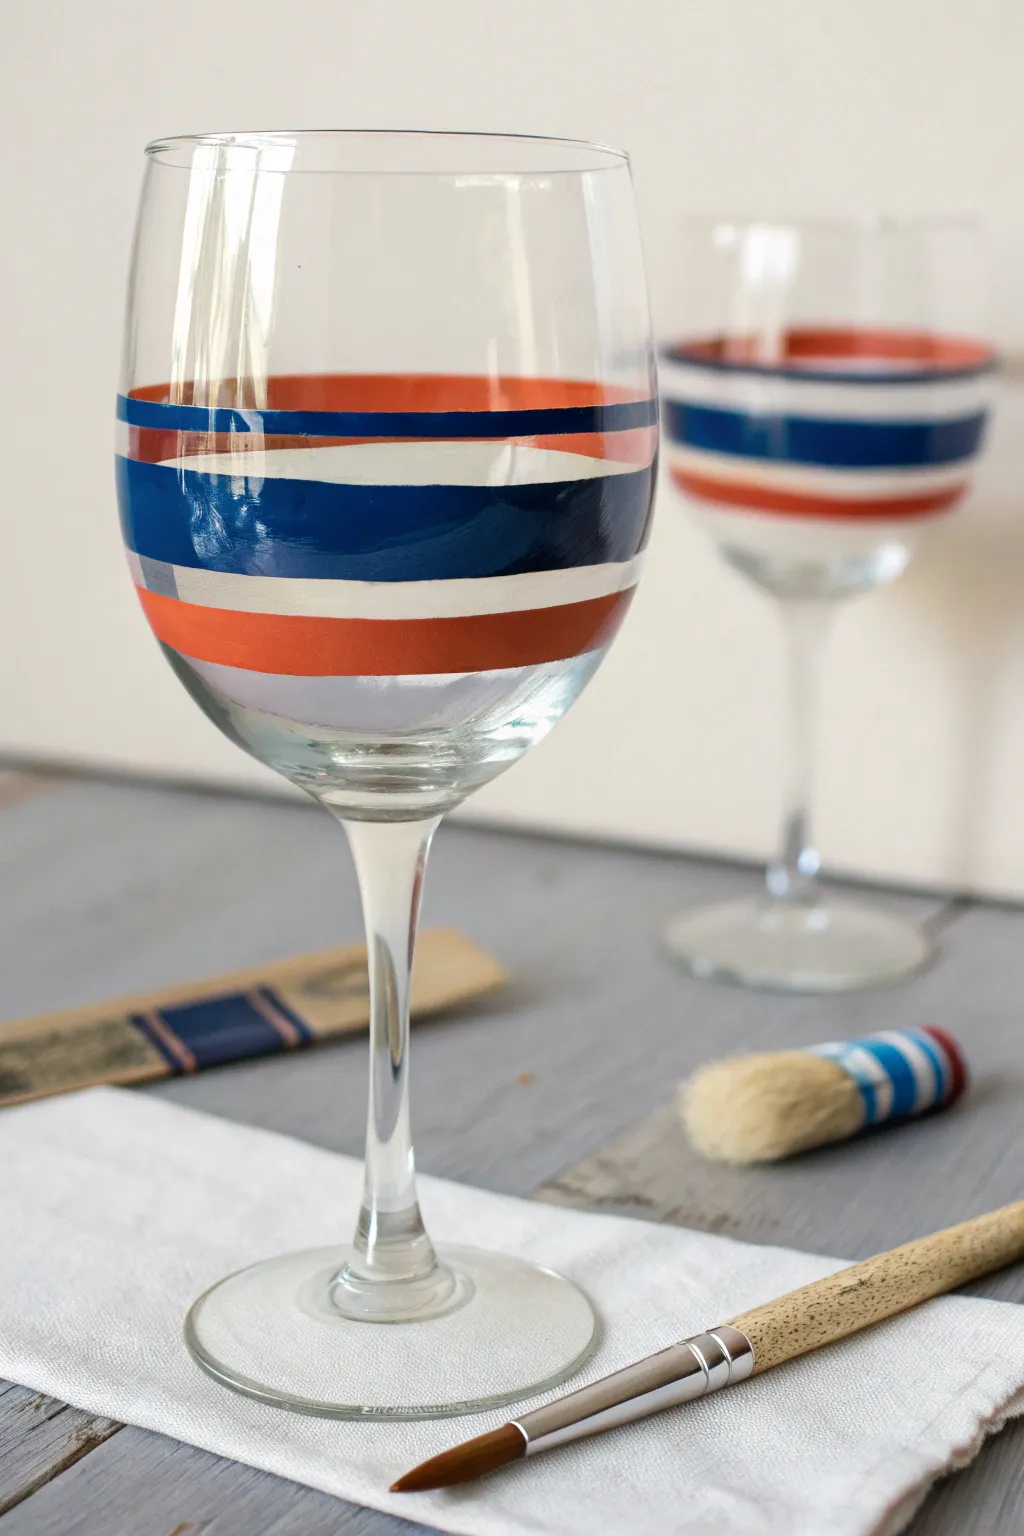
Achieve a modern, preppy look on your glassware with these bold, horizontal stripes. The combination of navy, burnt orange, and white creates a crisp design that feels both casual and sophisticated.
Step-by-Step Tutorial
Materials
- Clean wine glasses
- Rubbing alcohol
- Cotton pads
- Enamel craft paint (Navy Blue, Burnt Orange, White)
- Flat shader paintbrush (medium size)
- Painter’s tape or wash tape (optional)
- Paper plate or palette
- Oven for curing (optional based on paint brand)
Step 1: Preparation
-
Clean the glass:
Before adding any color, ensure the glass surface is pristine. Wipe the exterior of the wine glass bowl thoroughly with rubbing alcohol and a cotton pad to remove residual oils or dust. -
Dry completely:
Allow the alcohol to evaporate completely so the surface is dry to the touch, ensuring the best possible adhesion for your paint.
Steady Hand Trick
Rest your painting hand’s pinky finger on the glass stem or base for stability. This anchors your hand while you rotate the glass with the other.
Step 2: Painting the Stripes
-
Prepare your palette:
Squeeze out small dollops of your navy blue, burnt orange, and white enamel paints onto your paper plate. -
Start with the orange stripe:
Load a flat shader brush with burnt orange paint. Freehand a band roughly half an inch wide around the upper middle section of the glass bowl. I like to rotate the glass slowly while holding the brush steady to keep the line relatively straight. -
Let it set slightly:
Allow this first stripe to dry for just a minute or two. This prevents the colors from accidentally muddying if your hand slips while painting the adjacent stripes. -
Add the navy band:
Clean your brush thoroughly. Pick up the navy blue paint and create a thicker band immediately below the orange one. This stripe is the focal point, so make it slightly wider than the first. -
Paint the white accent:
Using a clean brush again, paint a thinner white stripe directly beneath the navy blue band. This brightness adds contrast and separates the darker colors. -
Finish with orange:
Add a final band of burnt orange at the bottom of your design, mirroring the top stripe to frame the bold blue center. -
Refine the edges:
If your edges are a bit jagged, you can carefully smooth them out with a slightly damp brush while the paint is still wet, or embrace the painterly, handcrafted look shown in the photo.
Tape It Up
Don’t trust your freehand skills? Apply strips of Washi tape or painter’s tape to the glass first to mask off perfect, crisp straight lines.
Step 3: Finishing Up
-
Check for opacity:
Hold the glass up to the light. If the stripes look streaky or too sheer, wait for the first coat to dry to the touch (usually 15-20 minutes) and apply a second coat over the existing lines. -
Clean the rim:
Ensure there is at least an inch of unpainted glass near the rim where lips will touch. If you painted too high, wipe the paint away with a damp paper towel before it cures. -
Let it cure:
Follow the instructions on your specific bottle of enamel paint. Most require air drying for 21 days or baking in a cool oven that is heated to 350°F for 30 minutes to make the design dishwasher safe.
Once baked and cooled, your custom nautical glassware is ready for your next dinner party
BRUSH GUIDE
The Right Brush for Every Stroke
From clean lines to bold texture — master brush choice, stroke control, and essential techniques.
Explore the Full Guide
Easy Leafy Vine Wrap
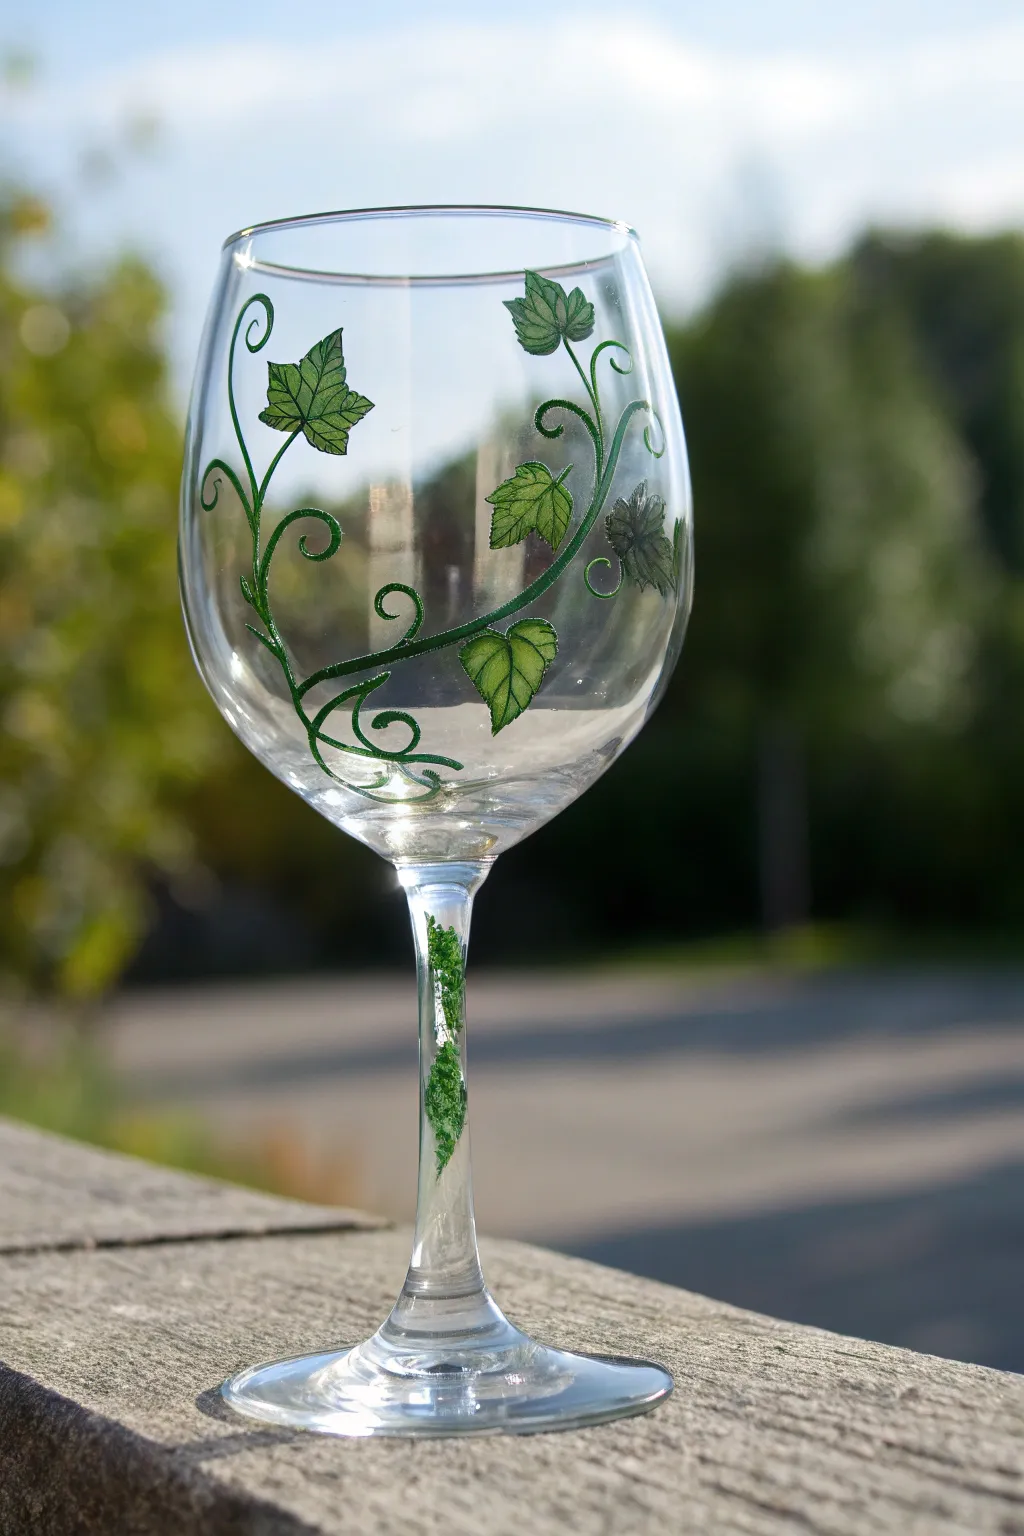
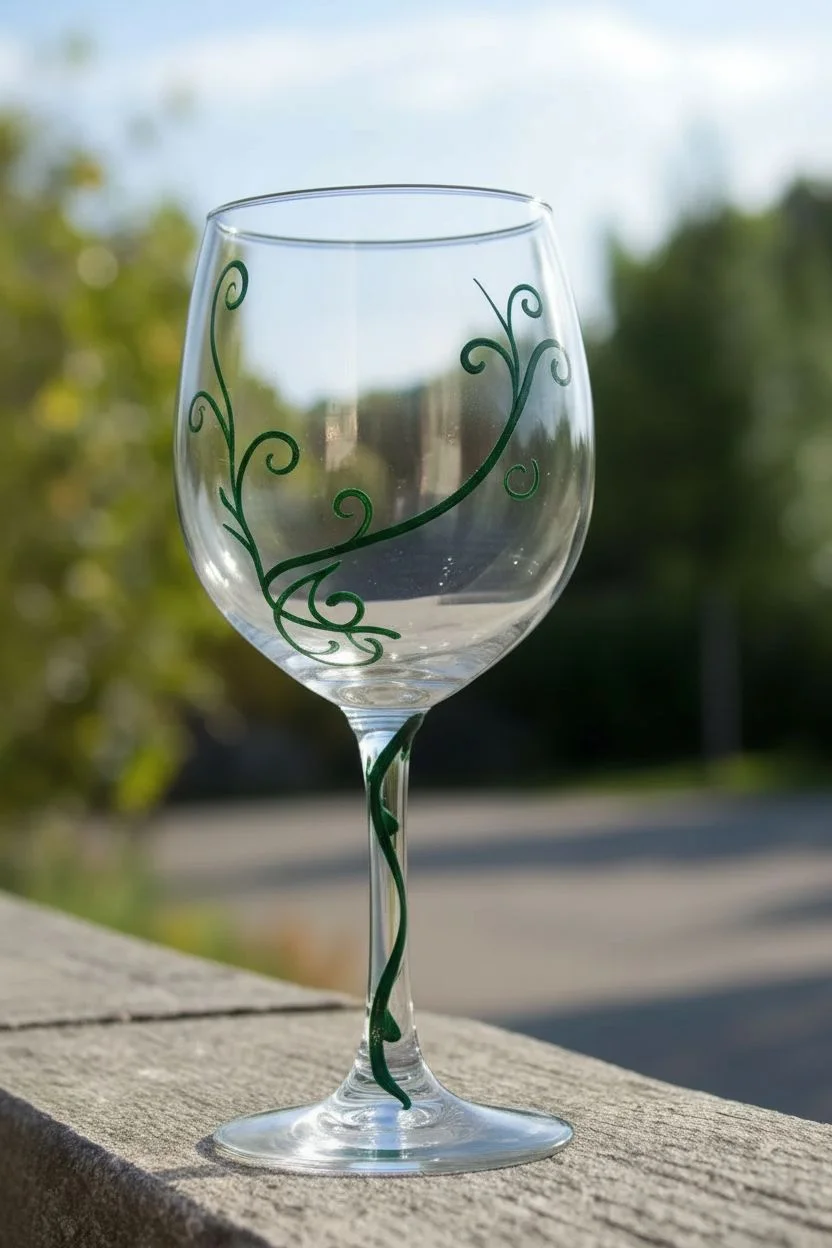
Transform a plain wine glass into an enchanted garden goblet with this elegant ivy design. The translucent green leaves and delicate swirling vines wrap organically around the bowl and stem, creating a stunning piece that looks far more complex than it actually is.
How-To Guide
Materials
- Clear wine glass
- Rubbing alcohol
- Cotton pads or paper towel
- Enamel glass paint (leaf green)
- Enamel glass paint (dark forest green)
- Fine liner brush (size 0 or 00)
- Small round brush (size 2)
- Small flat brush or filbert brush
- Palette or small dish
- Water cup for rinsing
- Oven (for curing, if paint requires)
Step 1: Preparation and Vine Structure
-
Clean the surface:
Before dipping your brush, thoroughly wipe down the wine glass with rubbing alcohol using a cotton pad. This removes any oils or fingerprints that could prevent the paint from adhering properly. -
Do not touch painted areas:
Once cleaned, try to hold the glass by the rim or the base, avoiding the main bowl area where you’ll be painting. -
Load the liner brush:
Squeeze a small amount of the dark forest green enamel paint onto your palette. Thin it slightly with a tiny drop of water if it feels too thick; you want an inky consistency for smooth lines. Load your fine liner brush. -
Start the main vine:
Starting near the bottom of the bowl, paint a long, sweeping S-curve that travels diagonally upward. Let your hand relax to create a natural, organic flow rather than a stiff line. -
Add gentle curls:
Branching off the main vine, add smaller swirling tendrils. Create little loops and curlicues—some tight like a spring, others loose and open. This gives the ivy that classic climbing look. -
Extend to the stem:
Extend a vine specifically down the neck of the glass and partially onto the stem. This connects the design elements and makes the glass look wrapped in foliage. -
Thicken selected areas:
Go back over the main vine lines and thicken them slightly in random spots to mimic the uneven texture of a real plant stem. Keep the curlicue tips whisper-thin.
Uneven Lines?
If your vines look shaky, rest your pinky finger on the glass surface (on a dry spot!) to stabilize your painting hand while drawing curves.
Step 2: Painting the Leaves
-
Outline leaf shapes:
Using the same dark green mixture and liner brush, outline the shapes of the ivy leaves along the vine. Make typical three-to-five point ivy shapes. Place them sporadically—don’t overcrowd the vine. -
Add stem leaves:
Don’t forget to outline a few smaller leaves cascading down the stem of the glass where you extended the vine earlier. -
Switch to lighter green:
Clean your brush and switch to the lighter leaf green paint. Use your small round or flat brush for this step. -
Fill the leaves:
Gently fill in the leaf outlines. The beauty of this look is transparency, so apply the paint somewhat thinly. It’s okay if brush strokes are slightly visible; it adds texture. -
Dry briefly:
Let the green fill dry for about 15-20 minutes. The paint doesn’t need to be fully cured, just dry enough that you won’t smear it when adding details. -
Detail the veins:
Reload your fine liner brush with the dark forest green. Carefully paint a central vein down the middle of each leaf. -
Add branching veins:
From the central vein, paint tiny diagonal lines branching outward to the tips of the leaf points. This step instantly makes the flat green shapes look like realistic foliage.
Add Some Glimmer
Mix a tiny amount of gold enamel paint into your lighter green, or add tiny gold dots along the vine curves for a magical, sun-kissed effect.
Step 3: Finishing Touches
-
Review and refine:
Rotate the glass and look for any gaps visually. If a spot looks too empty, I sometimes add a tiny unattached spiral or a very small floating leaf to balance the composition. -
Clean up edges:
If you made any mistakes or smudges, use a damp cotton swab or a toothpick to gently scrape away the wet paint before it sets. -
Allow to cure:
Follow the instructions on your specific brand of enamel paint. Most require air drying for 21 days or baking in the oven to become dishwasher safe.
Enjoy sipping from your garden-inspired creation at your next dinner party
Sunny Citrus Slice Motifs
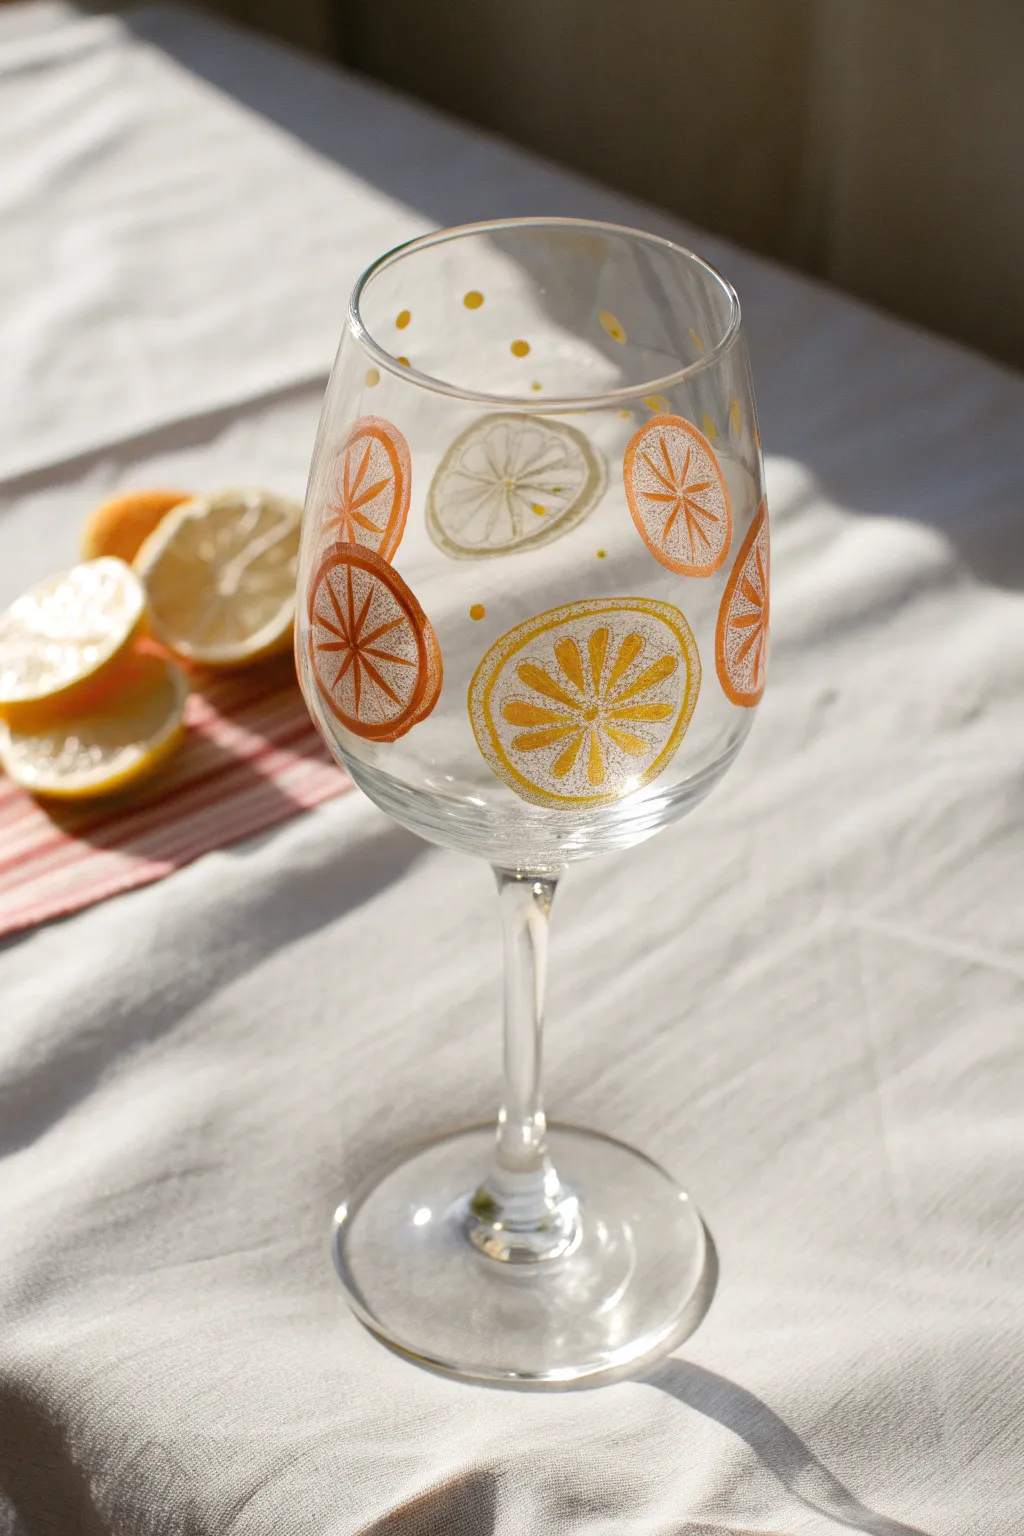
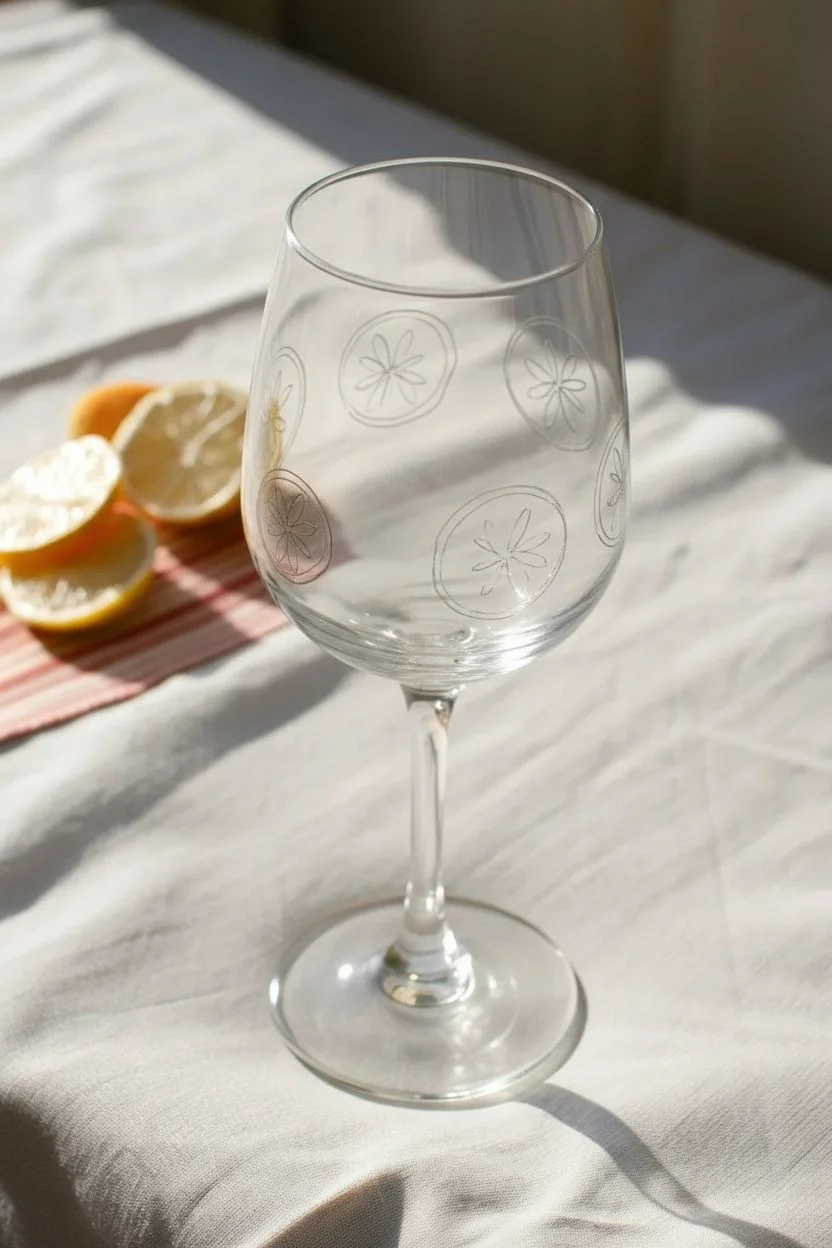
Capture the refreshing zest of summer with this cheerful glassware painting project featuring sun-ripened orange and lemon slices. Lightly textured citrus wheels float across the glass, accompanied by tiny polka dots, creating a breezy, sophisticated look perfect for outdoor brunch.
Step-by-Step Guide
Materials
- Clear stemmed wine glass (washed and dried)
- Rubbing alcohol
- Cotton pads or paper towel
- Enamel glass paints (opaque orange, transparent yellow, white)
- Small round detail brush (size 1 or 2)
- Fine liner brush (size 00)
- Foam pouncer or small sponge (optional textures)
- Paint palette
- Oven (for curing)
Step 1: Preparation & Planning
-
Clean the Surface:
Before painting, wipe the entire exterior surface of the wine glass with rubbing alcohol on a cotton pad. This removes invisible oils and fingerprints that could prevent the paint from adhering properly. -
Map Your Layout:
Plan where your citrus slices will go. Visualize 4-5 large slices spaced randomly around the bowl of the glass. Aim for variety in height—some near the rim, others closer to the stem.
Use a Template
Tape a drawing of citrus slices inside the glass. You can now trace the lines directly on the outside without freehanding circles.
Step 2: Painting the Citrus Slices
-
Mix Your Base Tone:
For the orange slices, mix a touch of white into your opaque orange enamel paint to soften it slightly, giving it a creamy, sorbet-like opacity. -
Paint the Rinds:
Using your small round brush, paint a circle for the outer rind of your first orange. It doesn’t need to be geometrically perfect; a hand-drawn look adds charm. Keep the line thickness consistent, about 2-3mm. -
Fill the Lemon Rinds:
Clean your brush and repeat the process for the lemon slices using a bright, sunny yellow. I like to alternate colors as I move around the glass to keep the composition balanced. -
Create the Wheel Structure:
Switch to your fine liner brush. Inside each rind circle, paint a small dot in the absolute center. From this center point, paint straight, thin lines radiating outward to the rind like bicycle spokes, dividing the fruit into triangular wedges. -
Add the Fruit Segments:
With the same color paint but perhaps diluted slightly for transparency, fill in the triangular wedges. Leave a tiny gap of clear glass between the colored wedge and the ‘spoke’ lines you just painted to define the segments clearly. -
Create Texture:
To mimic the juicy pulp of real citrus, dab your brush gently inside the wet paint of the segments. This stippling motion breaks up the smooth finish and adds that realistic, textured look seen in the photo. -
The White Lemon Variation:
For visual interest, consider making one slice a very pale lemon or grapefruit. Mix a generous amount of white into your yellow paint and create a slice using this paler tone.
Step 3: Details & Curing
-
Add Polka Dots:
Using the handle end of your paintbrush or a dotting tool, dip into the yellow paint. Gently press small dots into the empty spaces between the fruit slices, especially near the rim. -
Refine Edges:
Check your rinds. If the paint has thinned too much, go over the outer circle one more time to make the color pop. -
Clean Up:
If you made any mistakes or smudges, use a cotton swab dipped in rubbing alcohol to wipe them away while the paint is still wet. -
Initial Drying:
Allow the glass to dry completely according to your paint manufacturer’s instructions, usually at least 1 hour to the touch, but often 24 hours before baking. -
Bake to Set:
Place the glass in a cool oven. Turn the oven on to 350°F (or the temperature specified on your paint bottle). Once it reaches temperature, bake for 30 minutes. Turn the oven off and let the glass cool completely inside before removing.
Add Dimension
Mix a tiny bit of white texture medium or sand into the paint for the fruit pulp area to give the glass actual tactile grip.
Now pour a refreshing drink and enjoy the sunshine through your new custom glass

PENCIL GUIDE
Understanding Pencil Grades from H to B
From first sketch to finished drawing — learn pencil grades, line control, and shading techniques.
Explore the Full Guide
Watermelon Wedge Border

Brighten up your summer sips with this delightful hand-painted watermelon design. The scattered wedge pattern circles the entire glass, creating a playful and colorful look perfect for outdoor entertaining.
How-To Guide
Materials
- Clear wine glass
- Rubbing alcohol
- Cotton pads
- Enamel glass craft paint (bright red)
- Enamel glass craft paint (bright green)
- Enamel glass craft paint (black)
- Small flat paintbrush
- Fine liner or detail paintbrush
- Palette or small plate
- Oven for baking (optional, check paint instructions)
Step 1: Preparation
-
Clean surface:
Before you unscrew any paint caps, thoroughly wash your wine glass with warm, soapy water to remove any factory residue. -
Degrease glass:
Wipe down the entire outside surface of the glass bowl with rubbing alcohol on a cotton pad. This ensures there are no oils from your fingers that could repel the paint.
Step 2: Painting the Fruit
-
Load red paint:
Squeeze a small amount of bright red enamel paint onto your palette. -
Paint triangle shapes:
Using your small flat brush, paint several triangle shapes randomly around the glass. Varing the angle of each triangle makes the pattern feel more dynamic. -
Refine the edges:
Smooth out the edges of your triangles while the paint is wet to ensure they look crisp. Don’t worry about the bottom edge perfectly, as we’ll cover it later. -
Dry fruit layer:
Allow the red triangles to dry completely. Enamel paint can be thick, so I usually give this at least one hour so the next colors don’t smear.
Uneven Lines?
If your black outlines are shaky, you can gently scrape away excess paint with a toothpick or craft knife once it’s dry to tidy them up.
Step 3: Adding the Rind
-
Load green paint:
Prepare your bright green enamel paint on the palette. -
Paint rind base:
Using a clean flat brush or the liner brush, paint a slightly curved green stripe directly underneath the bottom edge of each red triangle. -
Connect colors:
Ensure the green stripe touches the red paint, or leave a tiny hairline gap of clear glass if you prefer a stylized look. The green line should curve slightly to mimic a real melon slice. -
Check opacity:
If the green looks too translucent, let the first coat dry briefly and apply a second thin layer for better coverage. -
Short drying break:
Let the green paint dry to the touch before moving on to the outlining step.
Add Some Sparkle
Mix a tiny pinch of fine glitter into the red paint before applying it to give the watermelon flesh a juicy, sugary shimmer.
Step 4: Outlining and Seeds
-
Outline the wedges:
Load your fine liner brush with black enamel paint. Very carefully outline the entire perimeter of each watermelon wedge, enclosing both the red fruit and green rind. -
Separate fruit and rind:
Paint a thin black line between the red section and the green section to separate the flesh from the rind. -
Add detail line:
Paint another thin black line at the very bottom of the green rind to give it a finished edge, creating a ‘crust’ look. -
Paint seeds:
Using the very tip of your liner brush, dab small teardrop or oval shapes onto the red part of the wedges. Scatter about 5-8 seeds per slice. -
Final drying:
Let the glass sit undisturbed for at least 24 hours (or as directed by your paint manufacturer) to fully cure. -
Bake to set:
For dishwater resistance, place the glass in a cold oven, heat to 350°F (175°C), bake for 30 minutes, and let it cool completely inside the oven.
Now you have a charming custom glass ready for your next summer gathering
Dotted Pineapple With Spiky Crown
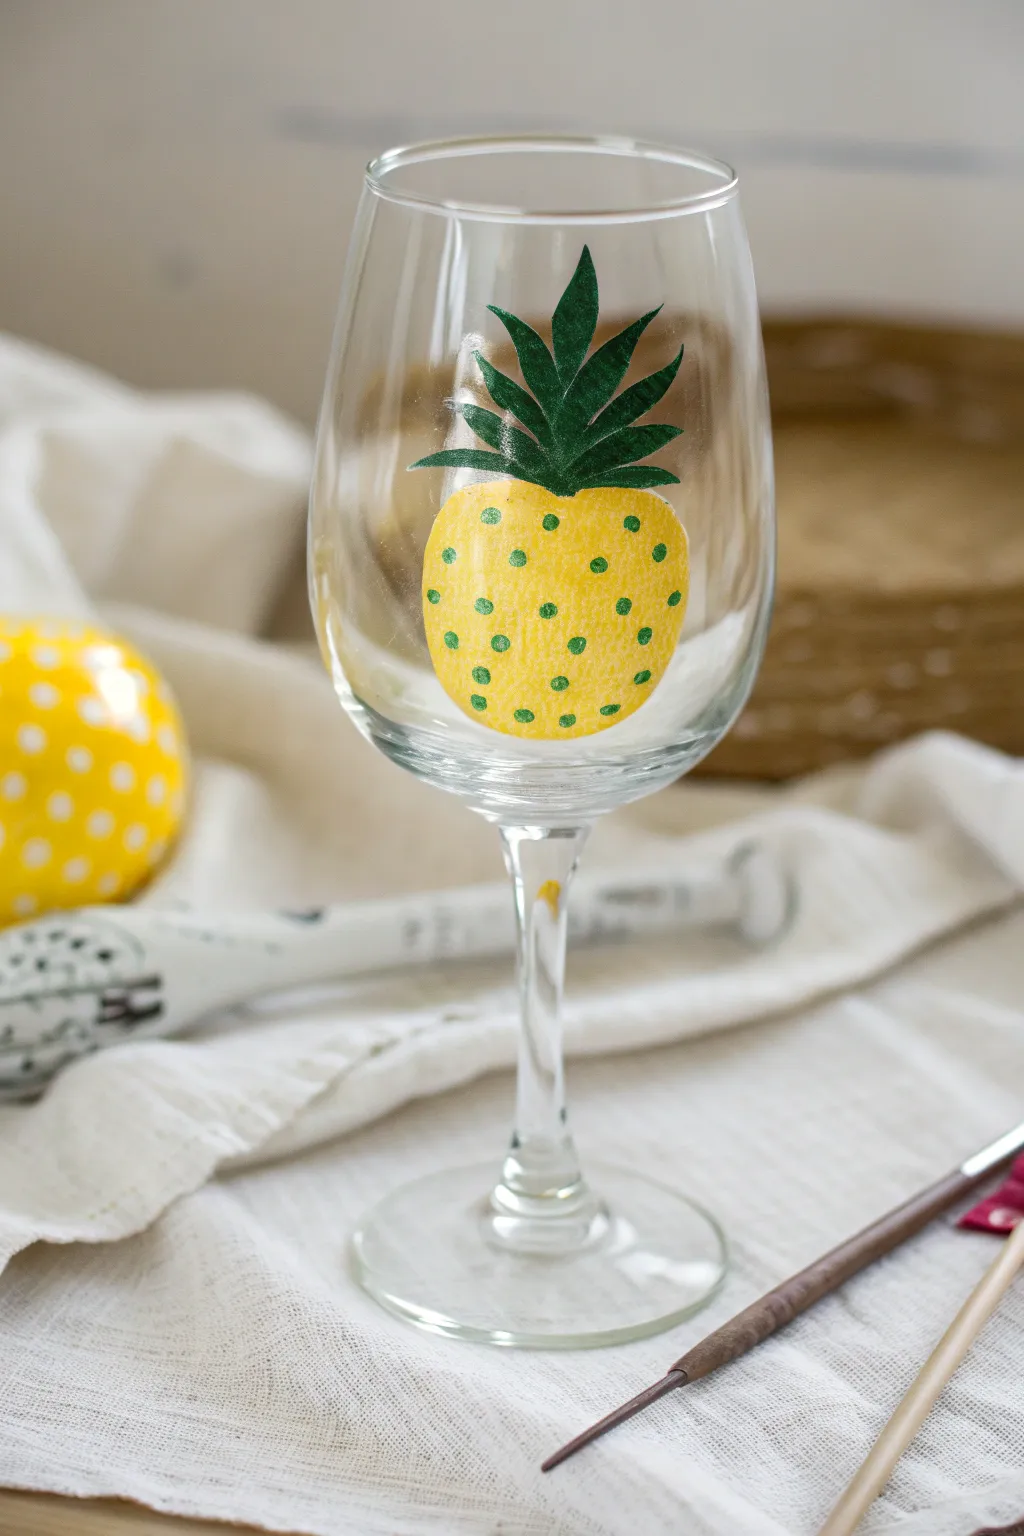
Bring a tropical twist to your stemware with this cheerful pineapple design that’s surprisingly simple to paint. The design features a bright yellow fruit body accented with playful green polka dots and topped with a bold, leafy crown.
Step-by-Step Guide
Materials
- Clear wine glass
- Rubbing alcohol and cotton pad
- Yellow enamel paint (plaid or primary)
- Dark green enamel paint
- Medium round paintbrush
- Small detail brush (liner or size 0)
- Use of a brush handle end or dotting tool
- Paper towels
- Small paint palette or paper plate
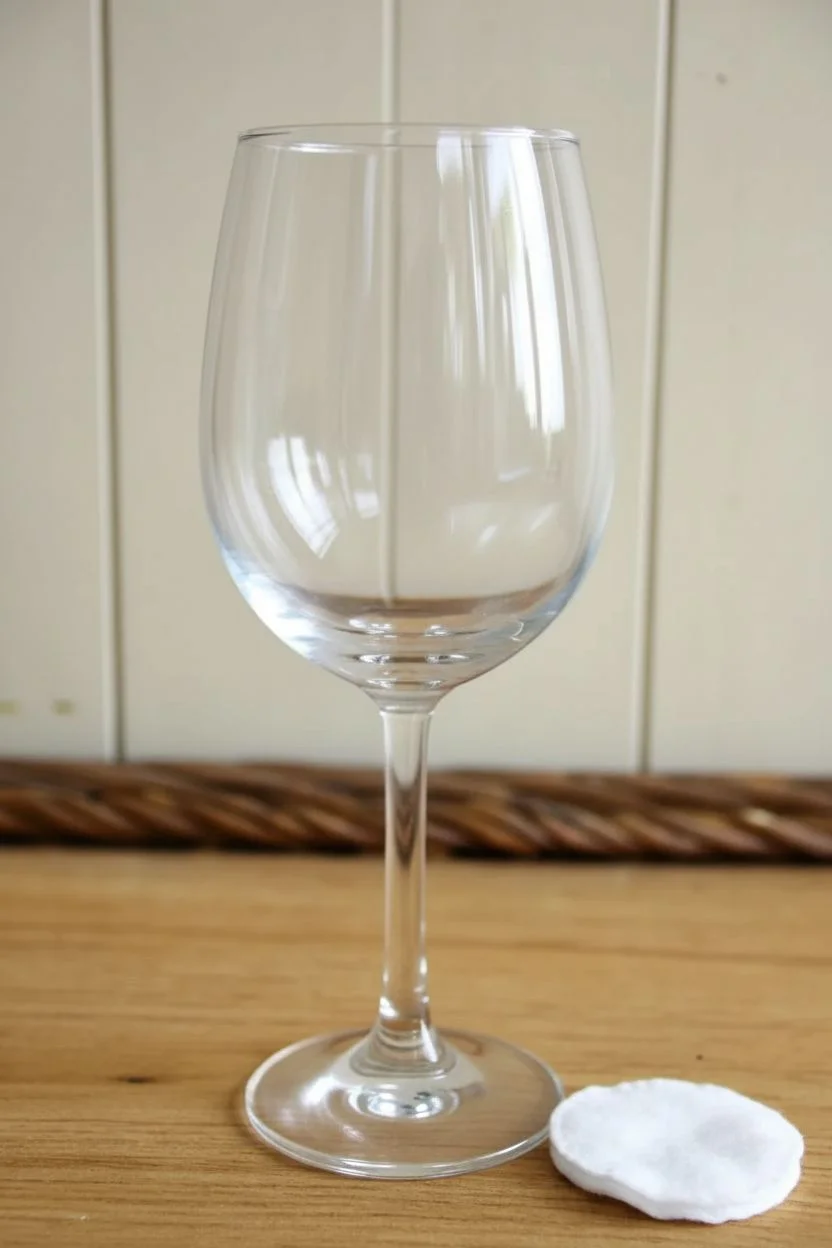
Step 1: Preparation & Base Shape
-
Clean the surface:
Before you even open the paint, wipe down the exterior of your wine glass with rubbing alcohol and a cotton pad. This removes oils and fingerprints that could prevent the paint from adhering properly. -
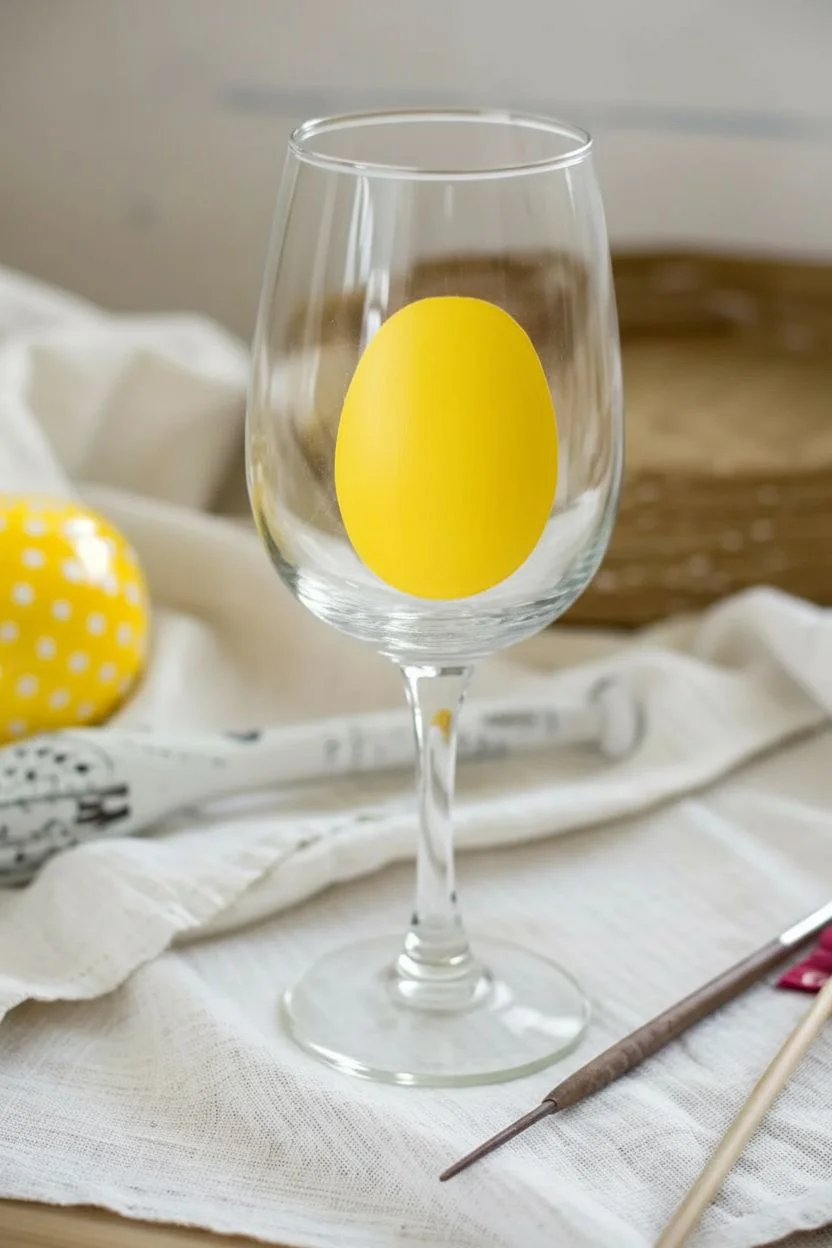
Outline the pineapple body:
Load your medium round brush with yellow enamel paint. Start by painting an oval shape on the belly of the glass. It shouldn’t be a perfect circle; aim for an upright oval with a slightly flattened top and bottom to mimic a pineapple’s silhouette. -
Fill in the color:
Once the outline is set, fill in the entire oval with the yellow paint. You may need a generous amount of paint to get good opacity on the glass, but be careful of drips. -
Check for coverage:
Hold the glass up to the light to see if the yellow layer is even. If it looks streaky, I like to let it dry for about 10 minutes and then gently apply a second coat for a solid, sunny pop of color. -
Let the base dry:
Wait until the yellow shape is dry to the touch before moving on to the next steps. This prevents the green paint from blending into the yellow and creating a muddy mess.
Step 2: Adding the Details
-
Prepare the green paint:
Squeeze a small amount of dark green enamel paint onto your palette. -
Paint the first leaf:
Using your small detail brush, paint a central, upright leaf springing from the top center of the yellow oval. Make it pointed at the tip, looking like a tall blade of grass. -
Add side leaves:
Paint two slightly curved leaves on either side of the center one, angling them outward. They should be slightly shorter than the middle leaf. -
Fill in the crown:
Continue adding smaller leaves near the base of the crown, filling in gaps to create a lush, spiky look. Ensure the bottom of the leaves connects directly to the top edge of the yellow fruit. -
Prepare for dotting:
Dip the non-brush end of your paintbrush handle (or a dedicated dotting tool) into the green paint. You want a decent amount of paint on the tip. -
Create the polka dots:
Press the handle tip gently onto the dry yellow paint to create green polka dots. Start in the center to establish your spacing. -
Complete the pattern:
Continue adding dots in a somewhat organized grid or alternating pattern across the entire yellow oval. Re-dip your tool frequently to keep the dots consistent in size. -
Refine the edges:
If any dots along the edge look incomplete, carefully add a partial dot to make the pattern look like it wraps naturally around the fruit’s curve.
Dotting Perfection
Don’t have a dotting tool? The flat head of a nail or the end of a chopstick works perfectly for consistent circles.
Step 3: Finishing Up
-
Clean up errors:
If you made any stray marks, use a damp cotton swab or a toothpick to gently scrape or wipe away the wet paint before it sets. -
Allow to cure:
Place the glass in a dust-free area to dry completely. Most glass enamel paints require 24 hours to dry before they can be handled safely. -
Bake based on instructions:
Check your paint bottle’s instructions. Many glass paints need to be baked in a home oven (usually placing the glass in a cold oven, heating to 350°F, and baking for 30 minutes) to become dishwasher safe.
Add Some Sparkle
Sprinkle fine gold glitter over the wet yellow paint before adding the dots for a glamorous, textured finish.
Now you have a refreshing piece of custom glassware ready for your next summer gathering


Mermaid-Scale Scallops in Pastels
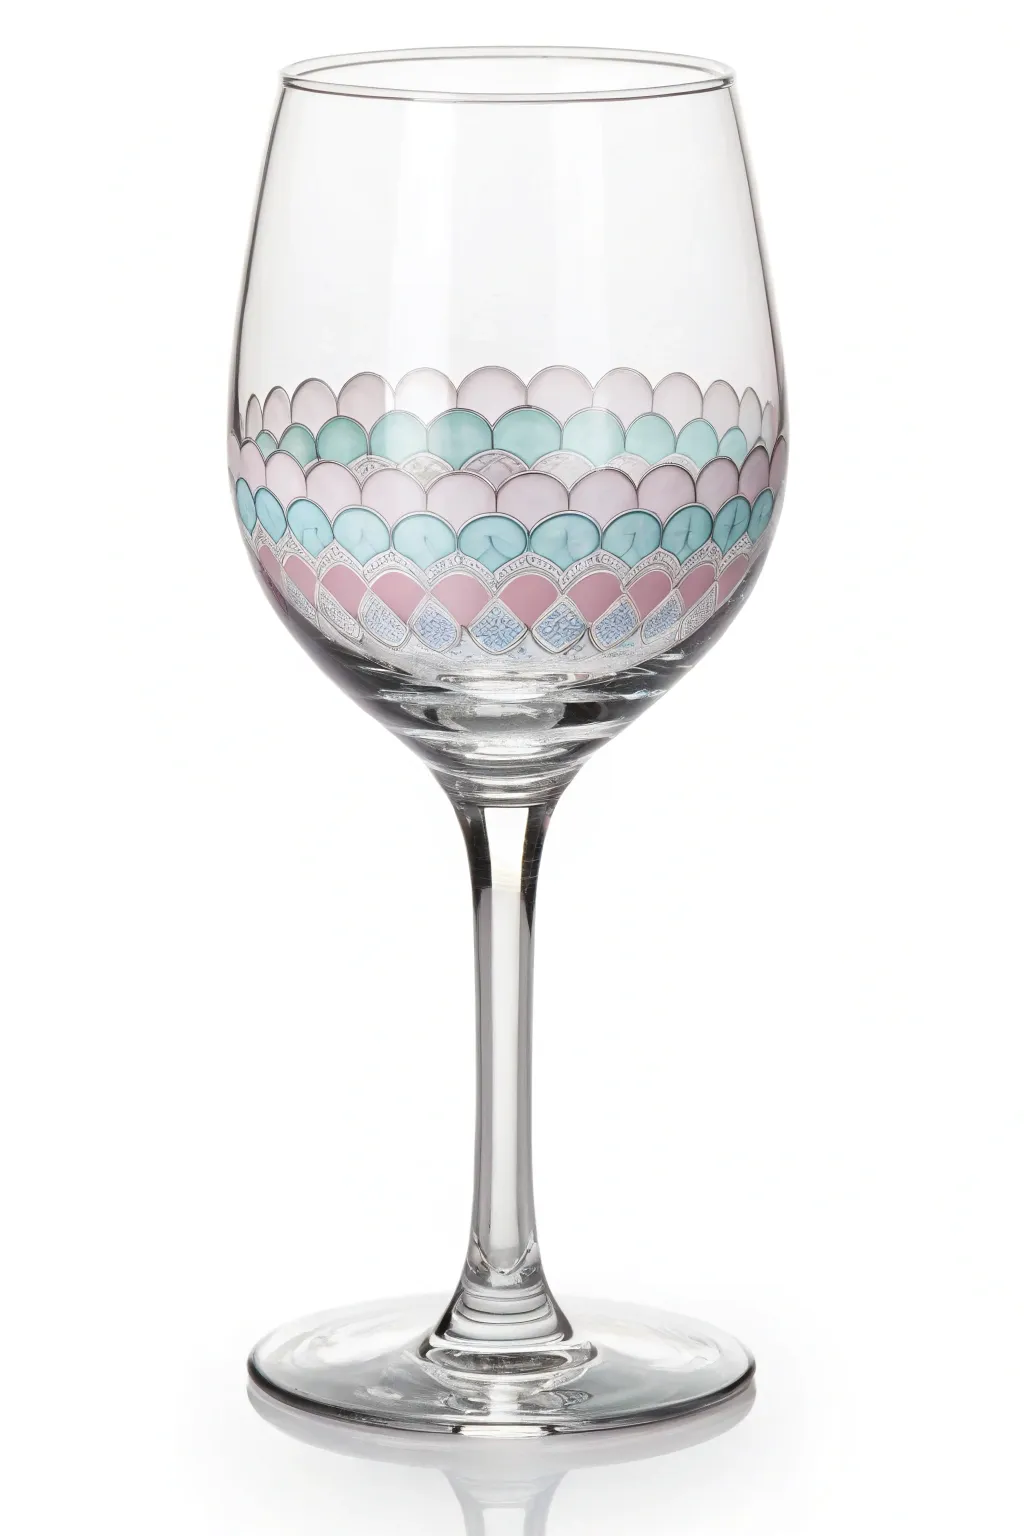
Transform a plain wine glass into an oceanic treasure with this delicate mermaid scale design. Using soft pastel enamels and precise outlining, you’ll build up rhythmic rows of scallops that look like sea glass caught in the light.
Step-by-Step Tutorial
Materials
- Clear white wine glass
- Rubbing alcohol and cotton pads
- Enamel glass paints (opaque pastel pink, light teal/mint, lavender, darker teal)
- Fine-point or liner paintbrush (size 0 or 00)
- Small flat shader brush (size 2)
- Dimensional glass outliner paint (silver or pearl)
- Palette or small dish
- Paper towels
- Oven for curing (optional, depending on paint brand)
Step 1: Preparation and Planning
-
Clean the surface:
Before putting any paint on the glass, wipe the entire bowl down thoroughly with rubbing alcohol on a cotton pad to remove oils and fingerprints. -
Establish the baseline:
Decide where you want your scale pattern to start. Visually mark a line about one-third of the way up the bowl from the stem connection point. -
Mix your palette:
Squeeze out small amounts of your pastel pink, mint, lavender, and teal paints onto your palette so they are ready to go.
Step 2: Painting the Scales
-
Paint the first bottom row:
Starting at your established bottom line, paint a row of small, inverted teardrop shapes or semi-circles using the flat shader brush. -
Alternate colors:
For this bottom row, I like to use a deeper teal or pink to anchor the design visually. Ensure the paint is applied smoothly but with enough opacity to show the color. -
Start the second row:
Begin the next row immediately above the first. Position the center of each new scale directly above the valley between the two scales below it. -
Create the brick-lay pattern:
Continue painting this row, nesting the scallops tightly. Use a contrasting pastel color like mint or lavender for variety. -
Build the middle section:
Paint the third and fourth rows, moving upward. Keep your brush strokes consistent to maintain the same scale size across the glass. -
Incorporate soft pinks:
Introduce your pastel pink shades heavily in these middle rows to mimic the warm glimmer of a shell’s interior. -
Paint the top rows:
As you reach the fifth and sixth rows, switch to your lightest, most translucent shades to create an airy feeling near the top of the design. -
Check for gaps:
Look closely at the intersection points of your scales. If there are large clear gaps, dab a tiny bit of paint to fill them, though small gaps will be covered by the outline later. -
Let the base coats dry:
Allow the painted scales to dry completely according to the manufacturer’s instructions—usually at least one hour—before moving to outlining.
Wobbly Lines?
If your hand is shaking while outlining, rest your pinky finger on the glass surface (make sure it’s dry!) to stabilize your hand while drawing the arches.
Step 3: Detailing and Outlining
-
Prepare the outliner:
Tap the nozzle of your silver or pearl dimensional outliner tube on a paper towel to remove air bubbles and ensure a smooth flow. -
Trace the top arches:
Carefully draw a curved line over the top arc of every single painted scale. Keep the pressure steady to avoid blobs. -
Add detail to bottom scales:
For the bottom-most row of scales, you can add a little extra texture by stippling or dotting the interior with the silver outliner to look like glitter. -
Connect the pattern:
Ensure the silver lines connect at the corners where the scales meet, creating a continuous, fishnet-like lattice over the colors. -
Refine the edges:
Check the very top row of scales. Finish them with a clean, confident silver arch to leave a polished upper edge. -
Clean up mistakes:
If a line goes astray, use a damp cotton swab or toothpick to wipe it away immediately before it sets.
Pro Tip: Ombre Effect
Mix a tiny drop of white medium into your paint for each ascending row. This creates a gradient fade from dark at the bottom to light at the top.
Step 4: Finishing Up
-
Final drying time:
Let the glass sit undisturbed for 24 hours to allow the paint and outliner to fully harden. -
Cure the paint:
Follow your paint brand’s instructions for curing—this usually involves placing the glass in a cool oven, heating it to 350°F (175°C) for 30 minutes, and letting it cool inside the oven.
Once baked and cooled, your shimmering mermaid glass is ready for a seaside toast
Soft Ombre Fade From Base to Mid-Glass
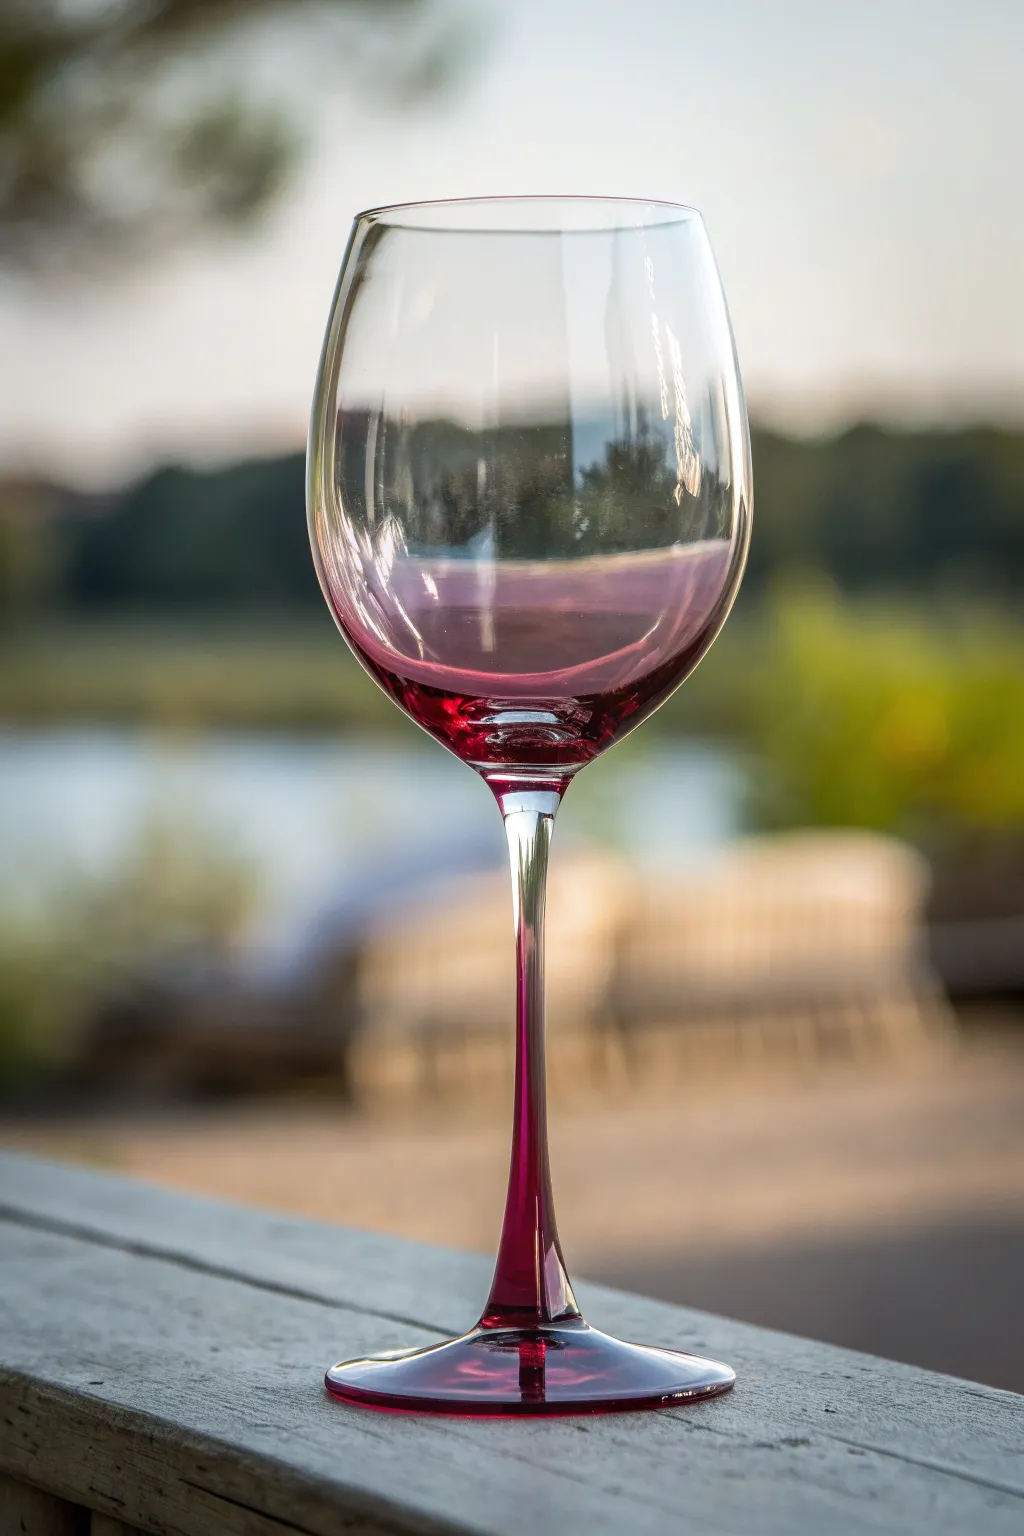
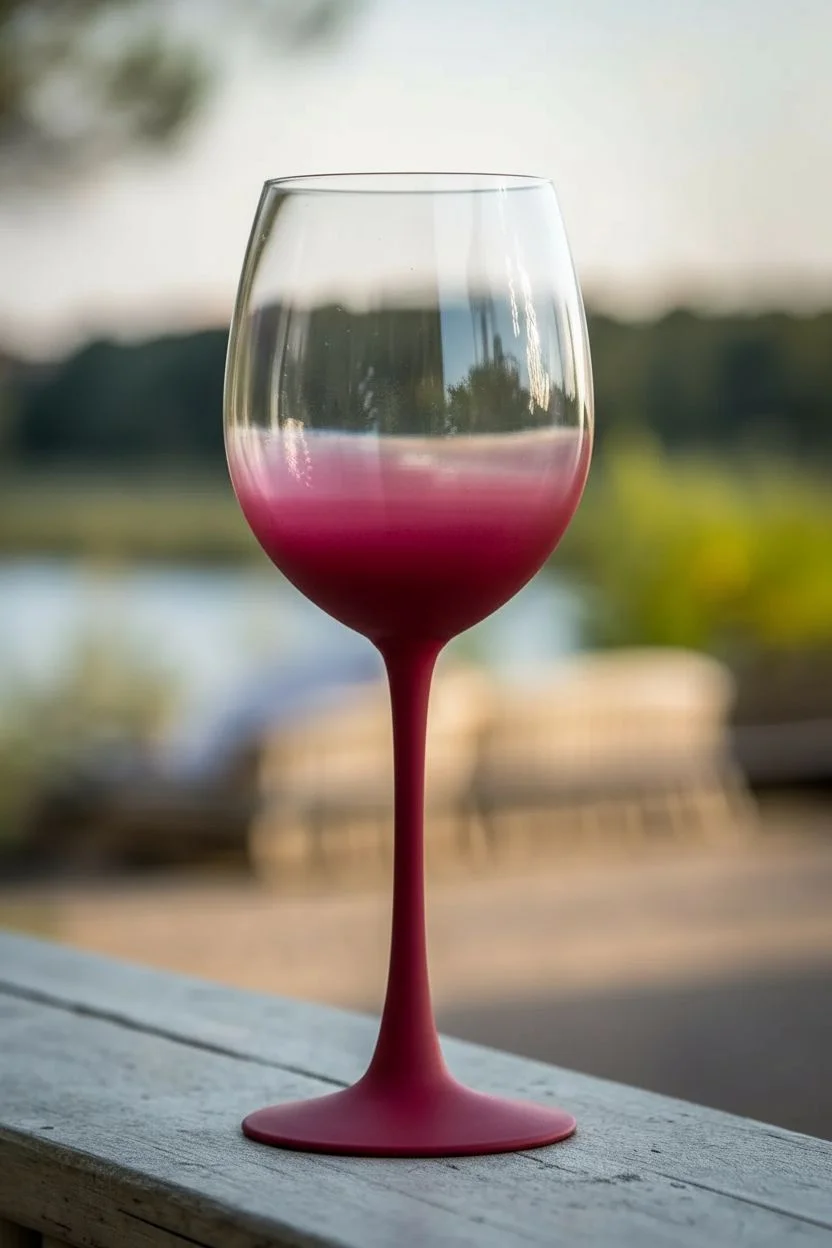
Achieve a sophisticated, stained-glass effect with this elegant project that transforms a plain wine glass into a work of art. The deep crimson hue climbs from the base up the stem and softly fades into the bowl, creating a seamless transition perfect for evening entertaining.
Step-by-Step Guide
Materials
- Clear wine glass (cleaned with rubbing alcohol)
- Pebeo Vitrea 160 glass paint (Crimson or Deep Magenta)
- Pebeo Vitrea 160 Thinner (or clear medium)
- Soft synthetic fan brush or wide flat brush
- Cosmetic sponge wedges
- Lint-free cloth
- Rubbing alcohol
- Palette or small dish
- Oven for curing
Step 1: Preparation & Base Coat
-
Clean surface:
Begin by thoroughly wiping down your wine glass with rubbing alcohol and a lint-free cloth. This removes any oils or fingerprints that could prevent the paint from adhering properly. -
Prepare the paint:
Squeeze a generous amount of the crimson glass paint onto your palette. In a separate spot, pour out a small amount of the thinner or clear medium. -
Paint the foot:
Dip your flat brush into the pure crimson paint. Apply a smooth, even coat to the entire foot (base) of the glass. Don’t worry about transparency yet; you want strong color here. -
Coat the stem:
Continue painting up the stem with the full-strength color. Use long vertical strokes to minimize brush marks, ensuring the stem is fully coated all the way around.
Step 2: Creating the Ombre Fade
-
The transition point:
Apply the undiluted paint to the very bottom curve of the bowl, extending up about half an inch. This is where the color will be darkest on the drinking vessel itself. -
Mix a mid-tone:
On your palette, mix a little clear medium into your crimson paint (approx. 2:1 ratio of paint to medium). This creates a slightly more translucent version of your color. -
Apply the mid-tone:
Paint the next half-inch band above the dark bottom layer using this mixture. Gently overlap the edge of the previous layer while the paint is still wet. -
Feather with a sponge:
I like to grab a cosmetic sponge wedge at this stage. Lightly dab the line where the dark paint meets the mid-tone paint to blur the harsh line. -
Dilute further:
Add significantly more clear medium to your mixture now, creating a very pale, watery tint. -
Paint the fade:
Apply this pale tint for another half-inch upward. The color should be very faint now, barely tinting the glass. -
The final blend:
Using a clean, dry sponge wedge, tap the top edge of the paint very gently, pulling the pigment upward slightly so it disappears into the clear glass. -
Smooth the stem:
Check the stem for any drips or pooling paint. If you see excess, use your brush to smooth it out before the paint begins to set.
Sponge Technique Tip
Dampen your cosmetic sponge slightly before dabbing the paint. A bone-dry sponge tends to absorb too much product, lifting the paint off sharply rather than blending it.
Step 3: Curing & Finishing
-
Initial dry time:
Let the glass sit undisturbed for at least 24 hours. This air-drying phase is crucial for the paint to level out and harden slightly before baking. -
Prepare the oven:
Place the glass into a cool, unheated oven. Placing it in a preheated oven can cause the glass to crack due to thermal shock. -
Set the temperature:
Set your oven to 325°F (160°C). Once the oven reaches this temperature, set a timer for 40 minutes. -
Cool down:
After 40 minutes, turn the oven off. Do not open the door. Leave the glass inside until the oven is completely cool to finish the curing process safely.
Frosty Finish
For a ‘frosted glass’ look instead of a glossy finish, mix a matte medium into your paint or dab the wet paint with a coarse textured sponge all over.
Your beautiful ombre glasses are now ready to add a splash of color to your next dinner party
Starry Night Sky With Dots and Swirls
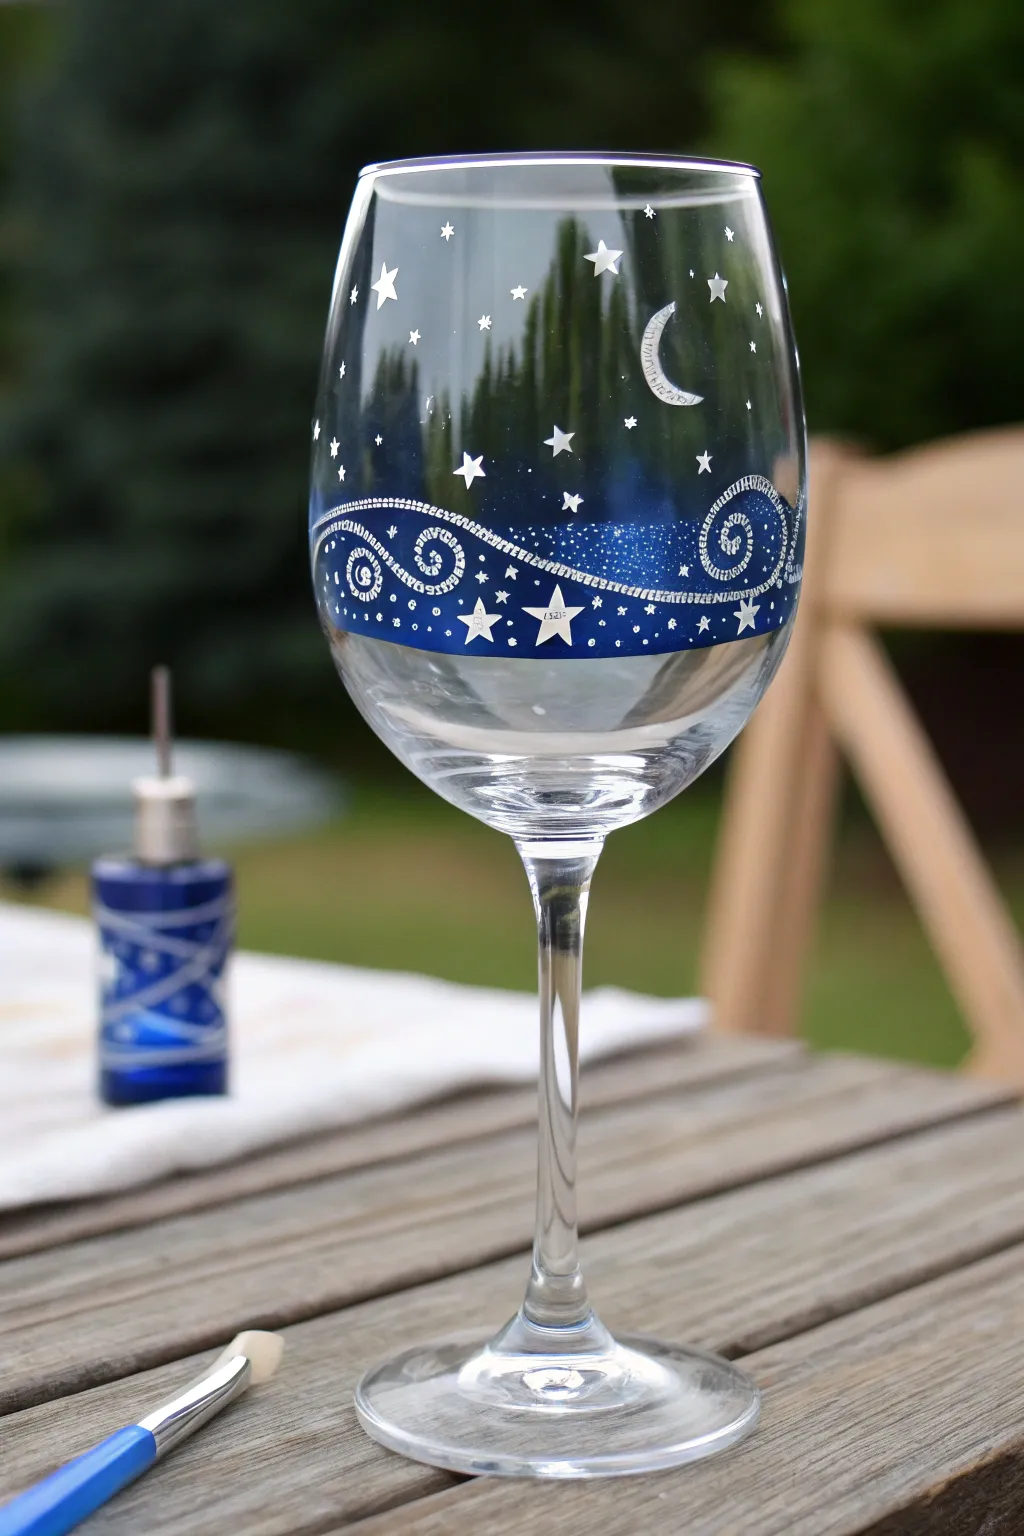
Capture the magic of a clear midnight sky on your wine glass with this elegant starry night design. A swirling band of deep blue, adorned with delicate white crescents and twinkling stars, transforms ordinary glassware into an enchanting piece of art.
Detailed Instructions
Materials
- Clear stemmed wine glass
- Rubbing alcohol and paper towel
- Deep blue enamel or multi-surface glass paint
- White enamel or multi-surface glass paint
- Medium flat brush (size 6 or 8)
- Small round detail brush (size 0 or 1)
- Toothpick or dotting tool
Step 1: Preparation and Base Layer
-
Clean the surface:
Before laying down any paint, thoroughly wipe the exterior of the wine glass bowl with rubbing alcohol on a paper towel. This removes oils and fingerprints that could prevent the paint from properly adhering to the glass. -
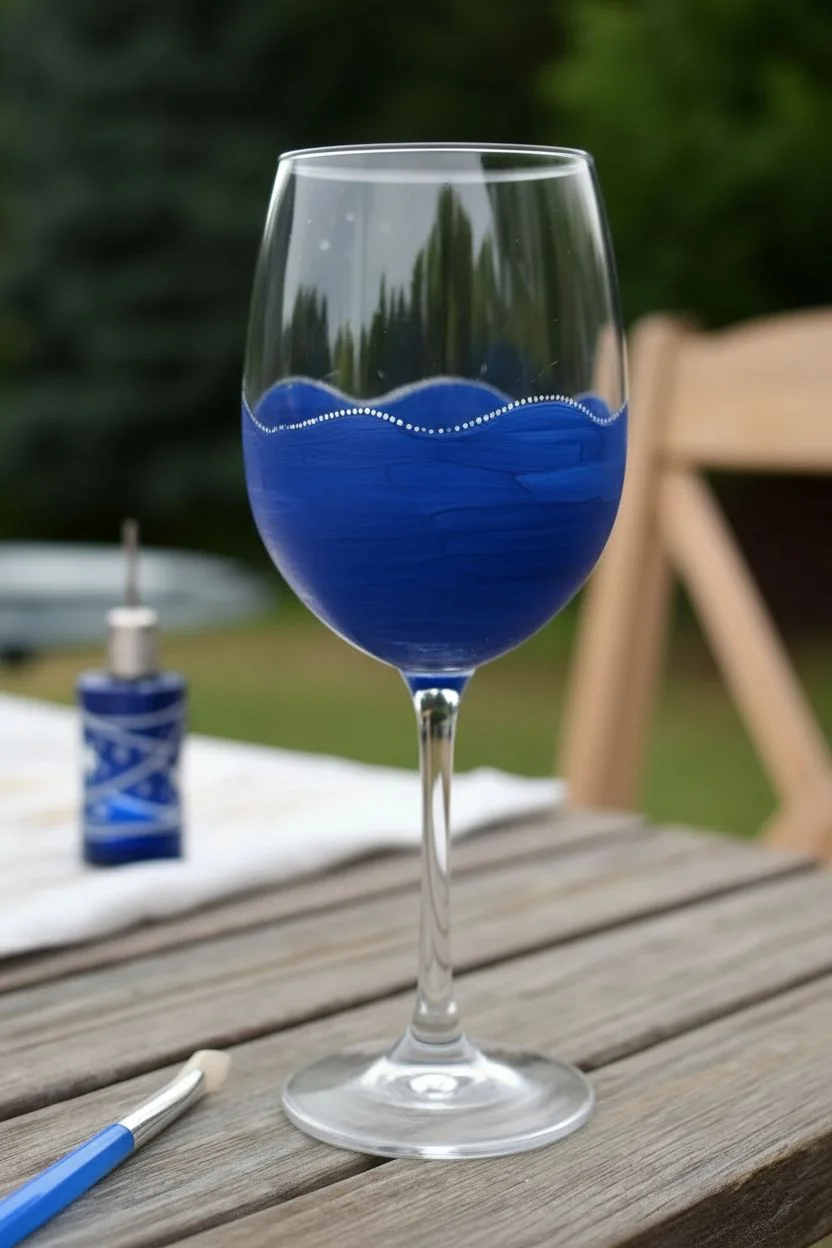
Outline the wave:
Using your medium flat brush and the deep blue paint, carefully paint a single, wavy line around the lower third of the glass bowl. Let this line undulate gently, curving up and down to create movement. -
Fill the band:
Fill in the area below your wavy line with the same deep blue paint. Bring the paint down to about an inch above where the stem meets the bowl, creating a solid band of color. -
Smooth the edges:
While the paint is wet, refine the bottom edge of your blue band to make sure it is straight and even all the way around the glass. -
Check opacity:
Glass paint can be translucent. If the first coat looks streaky or too see-through, let it dry strictly according to the bottle’s instructions, then apply a second coat for a rich, opaque midnight blue.
Paint Consistency Pro Tip
Glass surfaces are slippery. If your paint isn’t sticking, dab a tiny bit of paint on a sponge first to thicken it slightly before applying to the glass.
Step 2: Painting the Swirls
-
Load the detail brush:
Once your blue base is completely dry to the touch, switch to your finest detail brush and dip it into the white paint. You want a creamy consistency that flows easily. -
Create the main spirals:
Paint large, curling spiral shapes directly over the blue band. Start from the center of the swirl and wind outwards, spacing them out across the wave pattern. -
Add texture to swirls:
Instead of solid lines, go back over your white spirals and add tiny hash marks or dashes perpendicular to the curve. This gives the swirls a rope-like or textured appearance. -
Connect the design:
Connect your large spirals with long, flowing dotted lines or dashed trails that follow the upper curve of the blue wave. This creates a cohesive flow around the glass.
Fixing Wobbly Lines
Make a mistake? Don’t panic. While the paint is wet, use a damp cotton swab or a toothpick to gently wipe or scrape away errant marks for a clean edge.
Step 3: Adding Celestial Details
-
Paint the moon:
Choose a spot on the clear glass above the blue wave. Paint a delicate crescent moon shape in white, adding tiny texture lines inside the crescent just like you did with the swirls. -
Add larger stars:
Paint a few large, five-pointed stars inside the blue band. I find it easiest to paint a small ‘V’ shape first, then cross it to form the star points. -
Scatter clear-glass stars:
Using the fine brush, paint various sizes of stars on the clear glass portion above the wave. Mix five-pointed stars with simple four-pointed glimmer shapes. -
Create the majestic star:
Paint one larger, focal star centered in the blue band, perhaps slightly lower than the others, to anchor the design. -
Apply the dot details:
Dip a toothpick or the end of a paintbrush into white paint. Gently dot hundreds of tiny speckles inside the blue band to represent distant galaxies and clusters. -
Fill empty spaces:
Look for any large gaps on the clear upper glass and add tiny single dots or very small stars to balance the composition without overcrowding it. -
Cure the paint:
Check your specific paint brand for curing instructions. Most glass paints require either 21 days of air drying or a specific bake time in a home oven to become dishwasher safe.
Once fully cured, your custom starry night glass is ready to add a celestial sparkle to your next evening gathering
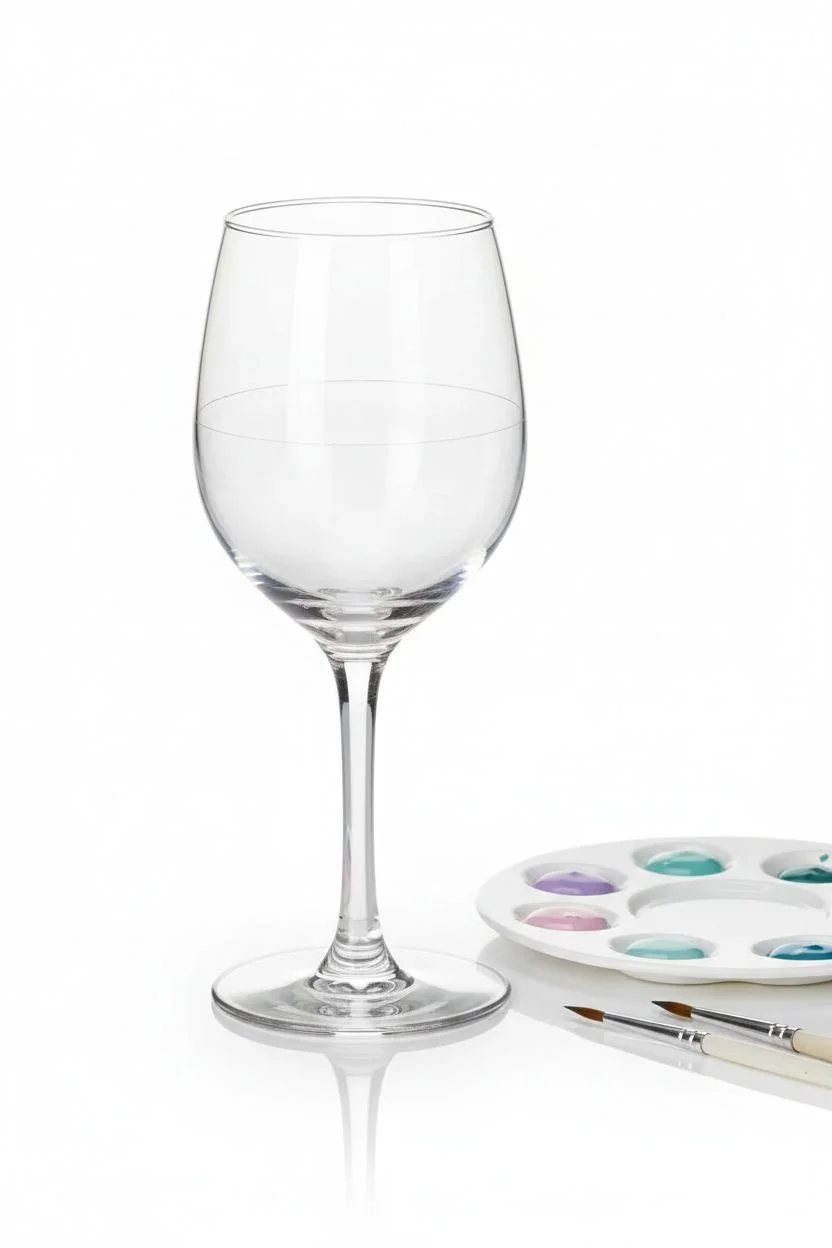
Minimal Monogram Letter on the Front
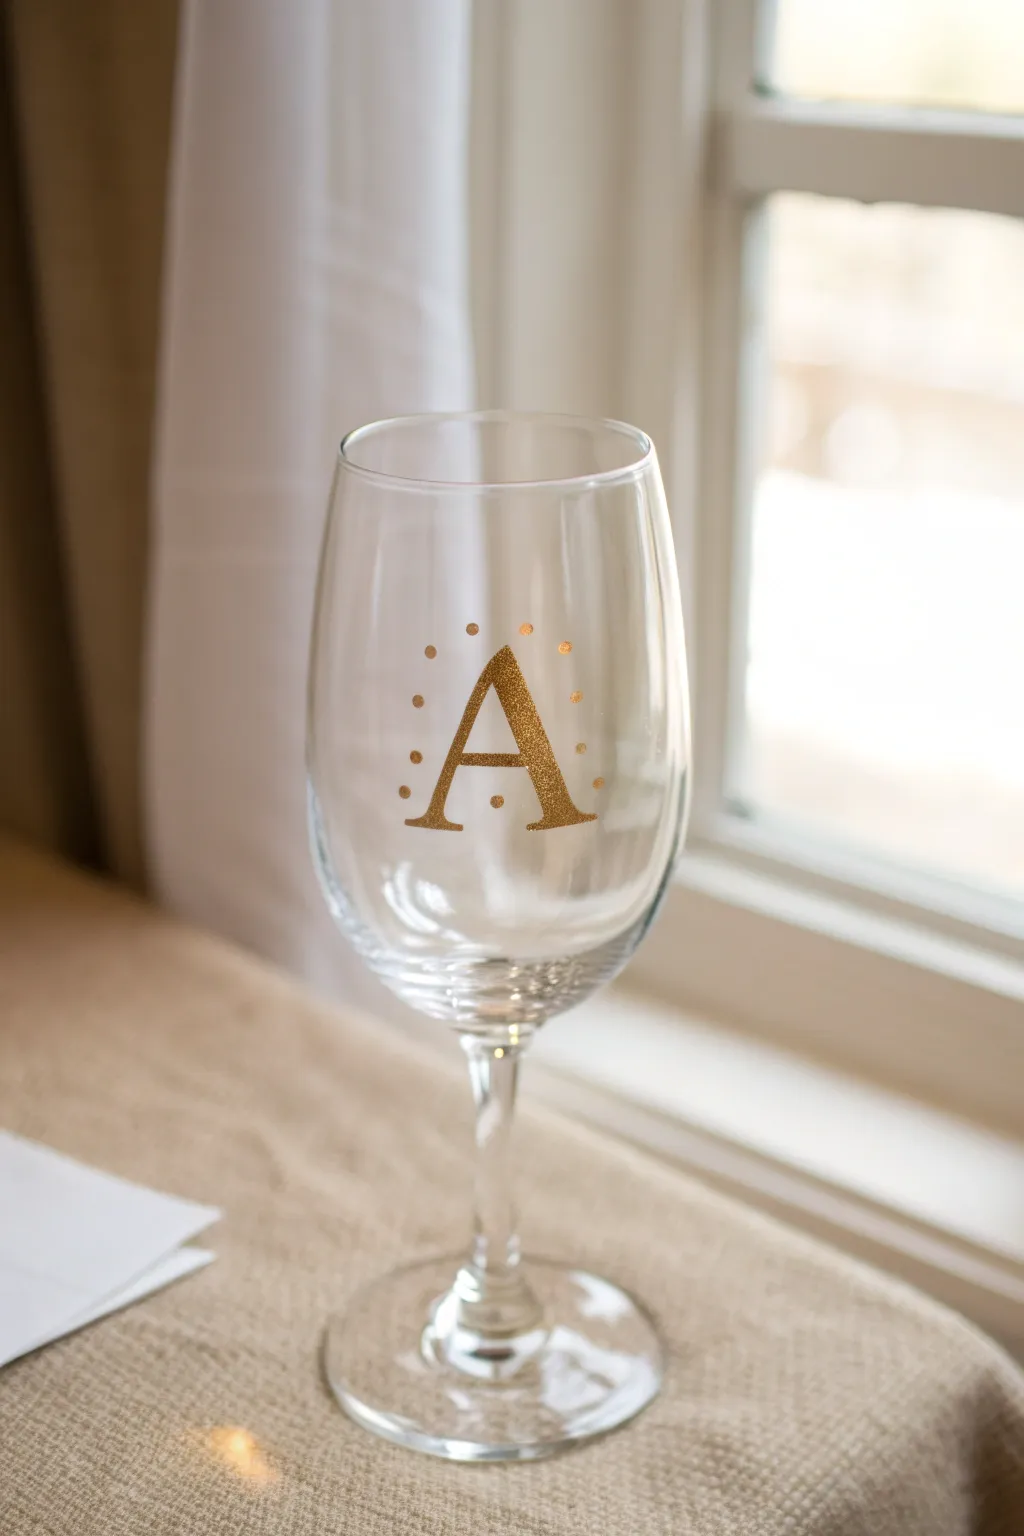
Elevate a simple clear wine glass into a personalized gift or party favor with a shimmering monogram. This project uses glitter gold paint to create a sophisticated focal point surrounded by a delicate halo of dots.
Step-by-Step Tutorial
Materials
- Clear wine glass
- Rubbing alcohol
- Cotton pads or paper towel
- Adhesive stencil vinyl or painter’s tape
- Printed letter ‘A’ template (or letter of choice)
- Craft knife or scissors
- Multi-surface metallic gold glitter acrylic paint
- Small foam pouncer or sponge brush
- Fine detail paintbrush (size 0 or 1)
- Cotton swabs (for cleanup)
- Oven (for curing, optional)
Step 1: Preparation
-
Clean the surface:
Before you apply any paint, wipe the exterior of the wine glass thoroughly with rubbing alcohol using a cotton pad. This removes oils and fingerprints that could prevent the stencil or paint from sticking properly. -
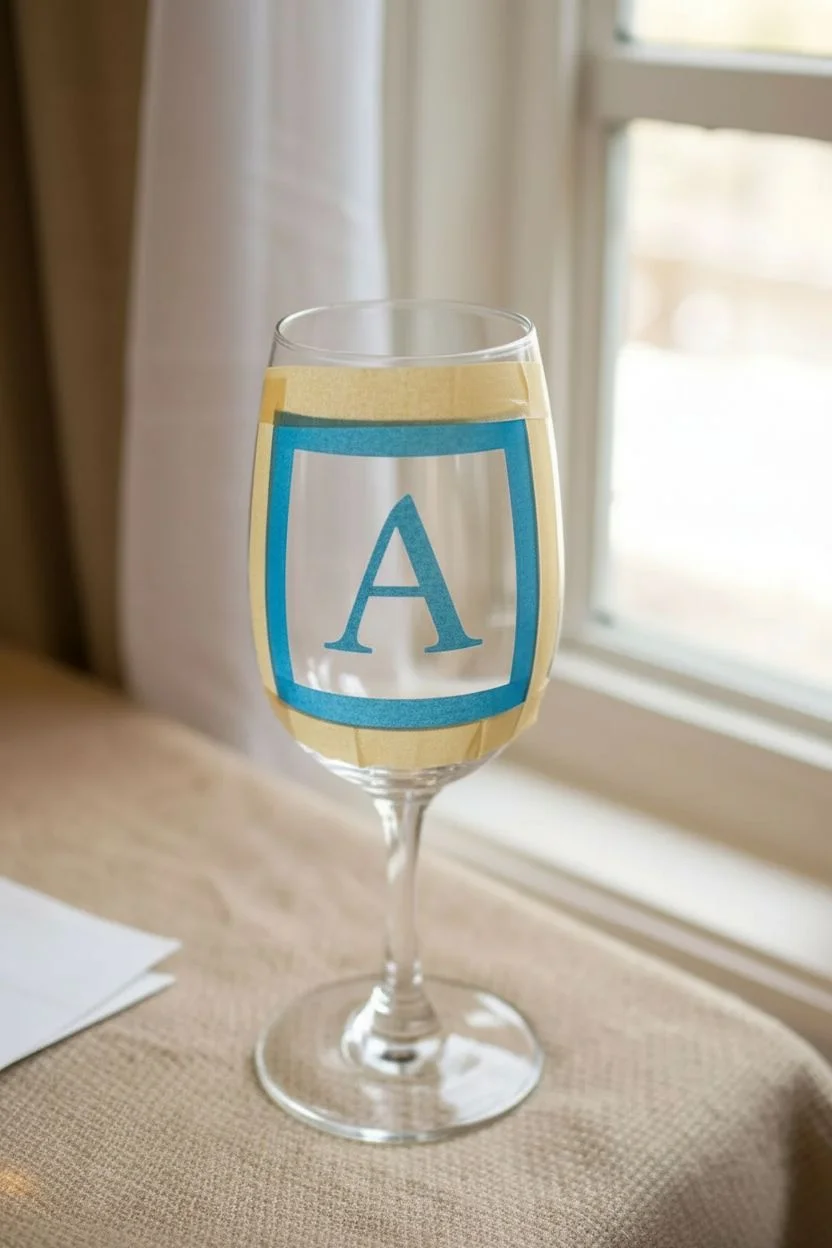
Create your stencil:
Print out your desired letter on regular paper to get the sizing right for your glass. Place a piece of adhesive vinyl over the printed letter and carefully trace and cut out the letter shape using a craft knife to create a negative stencil. -
Apply the stencil:
Peel the backing off your vinyl stencil and position it centrally on the curve of the glass. Press down firmly, paying special attention to the edges near the cut-out letter to ensure a tight seal against paint bleeding. -
Masking tape check:
If your stencil doesn’t have a lot of excess vinyl around the letter, add some painter’s tape around the outside edges to prevent accidental smudges while painting.
Step 2: Painting the Monogram
-
Load the sponge:
Pour a small amount of metallic gold glitter paint onto a palette or paper plate. Dab your foam pouncer into the paint, then tap off the excess onto a clean spot on the plate. -
First coat application:
Use a straight up-and-down pouncing motion to apply the paint over the stencil opening. Avoid brushing side-to-side, as this can force paint under the stencil edges. -
Let it dry:
Allow the first layer to dry to the touch, usually about 15-20 minutes. Glitter paints are often translucent, so don’t worry if it looks patchy right now. -
Build the opacity:
Apply a second and possibly third coat using the same pouncing technique until the gold coverage looks solid and sparkly. -
Remove the stencil:
While the final coat is still slightly tacky (but not wet), carefully peel away the vinyl stencil. Pulling it off before the paint fully hardens helps ensure crisp lines.
Use the Stick End
For perfectly round dots, skip the bristles! Dip the wooden handle end of your brush into the paint and stamp it onto the glass. It works like a perfectly circular stamp every time.
Step 3: Adding Details & Curing
-
Prepare the detail brush:
Dip the tip of your fine detail brush or the handle end of a paintbrush into the gold glitter paint. -
Dot placement:
Gently touch the brush to the glass to create small dots around the letter. I like to start with the four ‘corners’ to establish symmetry, then fill in the gaps. -
Vary spacing:
Keep the dots fairly loose and irregular around the perimeter of the letter to give it a whimsical, hand-painted feel rather than a rigid geometrical circle. -
Cleanup edges:
If any paint seeped under your stencil earlier, use a damp cotton swab or a toothpick to gently scrape away the excess paint for a sharp edge. -
Air drying:
Allow the glass to air dry completely for at least 24 hours instructions on your specific paint bottle usually recommend. -
Oven curing method:
For durability, place the glass in a cool oven. Turn the heat to 350°F (175°C) and bake for 30 minutes. Turn the oven off and let the glass cool completely inside the oven before removing. -
Hand washing strictly:
Even after curing, it is best to hand wash your new glitter glass to preserve the sparkle for years to come.
Why is it peeling?
If paint peels up with the stencil, you likely waited too long. Remove the stencil while the paint is still slightly tacky. If it’s already dry, score the edge lightly with a craft knife first.
Enjoy using your elegant new glassware at your next dinner party or wrap it up as a beautiful handmade present
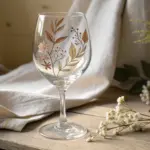
Paint-From-the-Inside “Floating Flowers”
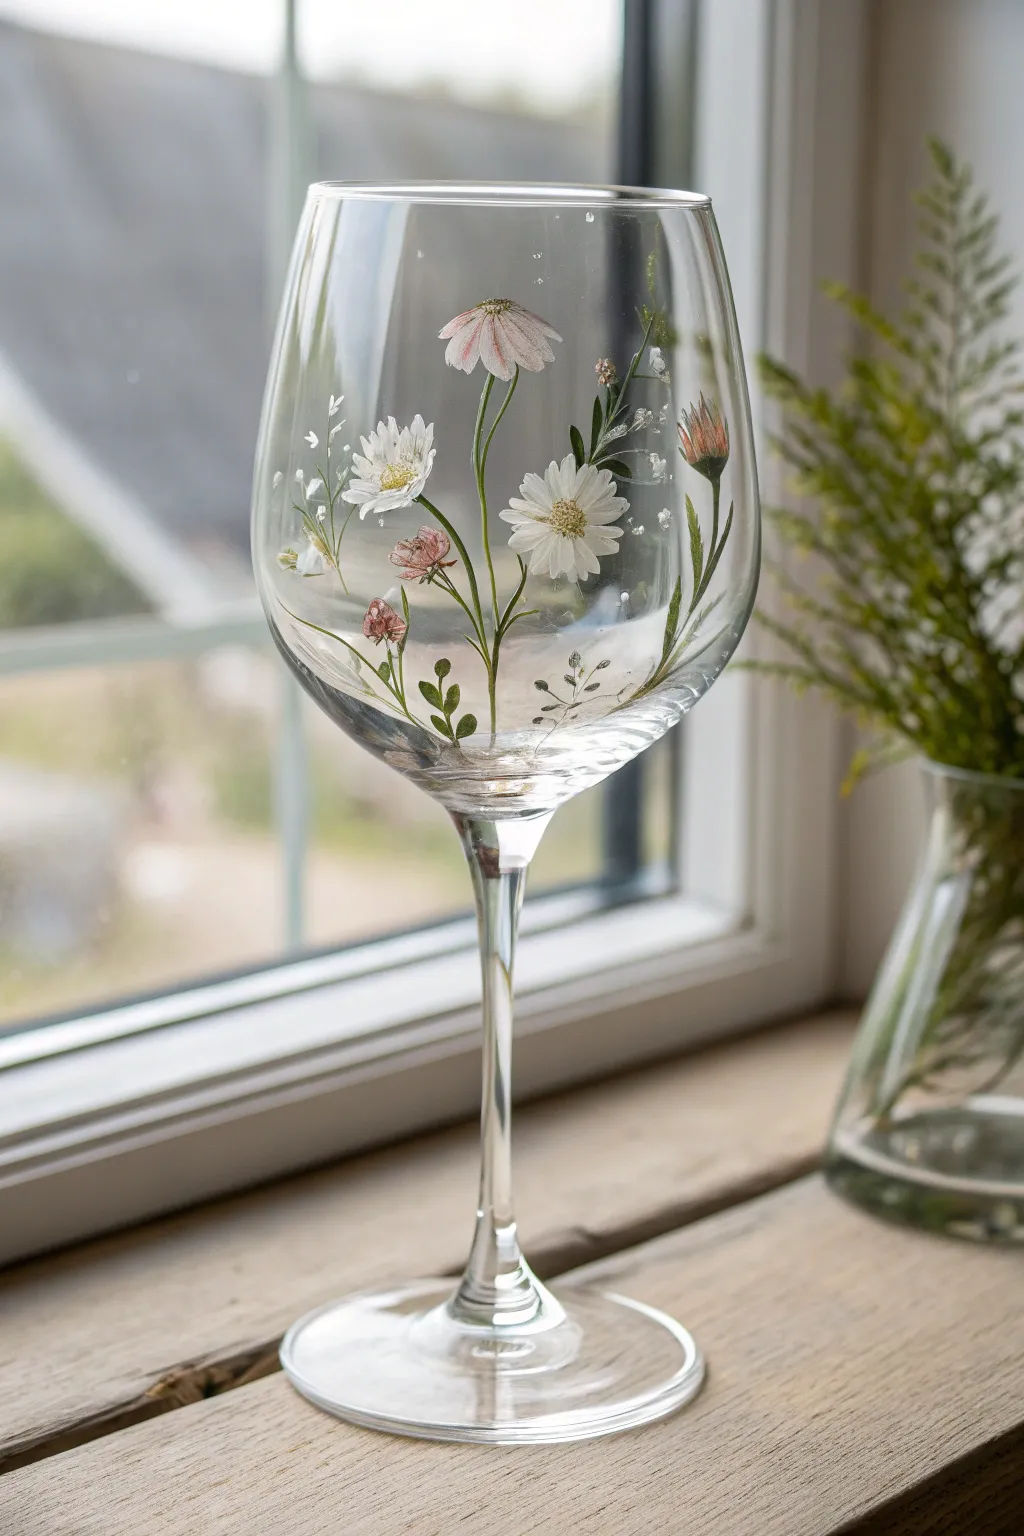
Achieve a stunning, ethereal look by painting delicate wildflowers on the interior surface of the glass, protecting the design and giving it a floating appearance. This technique creates depth and keeps the exterior smooth to the touch, perfect for decorative display pieces.
Step-by-Step Guide
Materials
- Large, clear wine glass (red wine shape works best)
- Enamel glass paints (white, sage green, forest green, pale pink, coral)
- Rubbing alcohol and cotton pads
- Fine liner brush (size 00 or 000)
- Small round brush (size 1 or 2)
- Palette or small dish
- Paper towels
- Q-tips (for corrections)
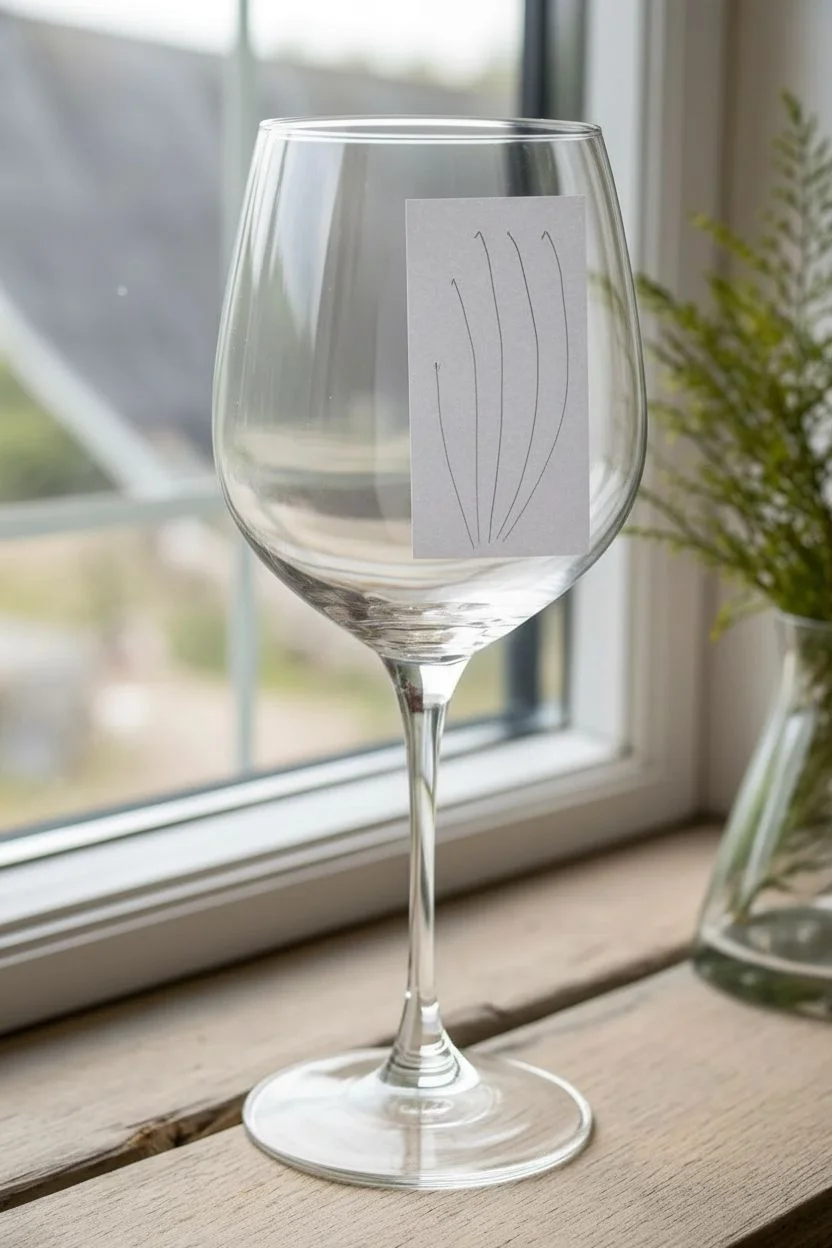
Step 1: Preparation & Planning
-
Clean surface:
Thoroughly wipe down the inside of the wine glass with rubbing alcohol on a cotton pad to remove any oils or dust. Let it dry completely. -
Map the design:
Since you are painting inside, the image will be reversed. Visualize where your five main flower stems will rise from the center bottom. You can tape a sketch on the outside of the glass as a guide if you need help with placement.
Step 2: Painting the Foliage Base
-
Mix greens:
On your palette, put out a drop of sage green and a drop of forest green. I like to slightly mix them in the middle for a third shade. -
First stems:
Using your fine liner brush and the lighter sage green, paint three long, thin lines starting from the very bottom center and curving gently up the sides of the glass. -
Darker accents:
Switch to the darker forest green and add two more stems between the lighter ones, varying their heights so the arrangement looks natural. -
Add leaves:
With the liner brush, add tiny, elongated leaves along the stems. For variety, paint some leaves as simple single strokes and others as small branching fern-like shapes. -
Dry time:
Allow the green stems to dry for about 15-20 minutes. This prevents your flower colors from accidentally mixing with the wet green paint.
Stroke of Genius
Rest your hand on a small towel or sponge inside the glass while painting. This stabilizes your shaky hand without smudging the glass surface with finger oils.
Step 3: Adding the Blooms
-
White daisy petals:
Using the small round brush and white enamel, paint the large daisy on the right side. Start at the flower center and pull small strokes outward to form the petals. -
Layering the daisy:
While the white is still tacky, add a second layer of slightly shorter petals on top to create volume. This makes the flower look full. -
Pink cosmos:
Mix a tiny bit of white with your pale pink. On the tallest stem, paint a downward-facing flower head with broad, soft strokes to mimic a cosmos or poppy shape. -
Tiny wildflowers:
Using the tip of your liner brush and pure white, dot clusters of tiny flowers on the smaller side stems. Think of these as baby’s breath or gypsophila. -
Coral buds:
With the coral paint, add small, tight buds on the lower stems. A simple oval shape with a green line underneath works perfectly. -
Centers and details:
Once the white daisy petals are dry, use a dot of yellow or gold mixed with brown to stipple the center of the flower.
Seasonal Shift
Change the vibe by swapping the color palette. Use burnt orange and metallics for autumn foliage, or icy blues and whites for a winter frost theme.
Step 4: Refining & Curing
-
Highlighting stems:
Go back with your lightest green mix and add very thin highlights to the sides of the main stems to give them dimension. -
Clean up:
If any paint smudged where it shouldn’t be, dip a Q-tip in rubbing alcohol and carefully wipe it away before the paint cures. -
Floating petals:
For an extra touch of realism, paint one or two tiny petals ‘falling’ near the bottom of the glass, detached from any stem. -
Air cure:
Let the glass sit undisturbed for at least 24 hours (or up to 21 days for full durability depending on your paint brand) before doing anything else. -
Baking (Optional):
If your chosen enamel paint allows for heat setting, place the glass in a cool oven, heat to 350°F (176°C) for 30 minutes, and let it cool completely inside the oven.
Place your finished glass on a windowsill where sunlight can illuminate your beautiful floating garden from creating a lovely stained-glass effect
Faux Stained Glass Using Simple Outlines
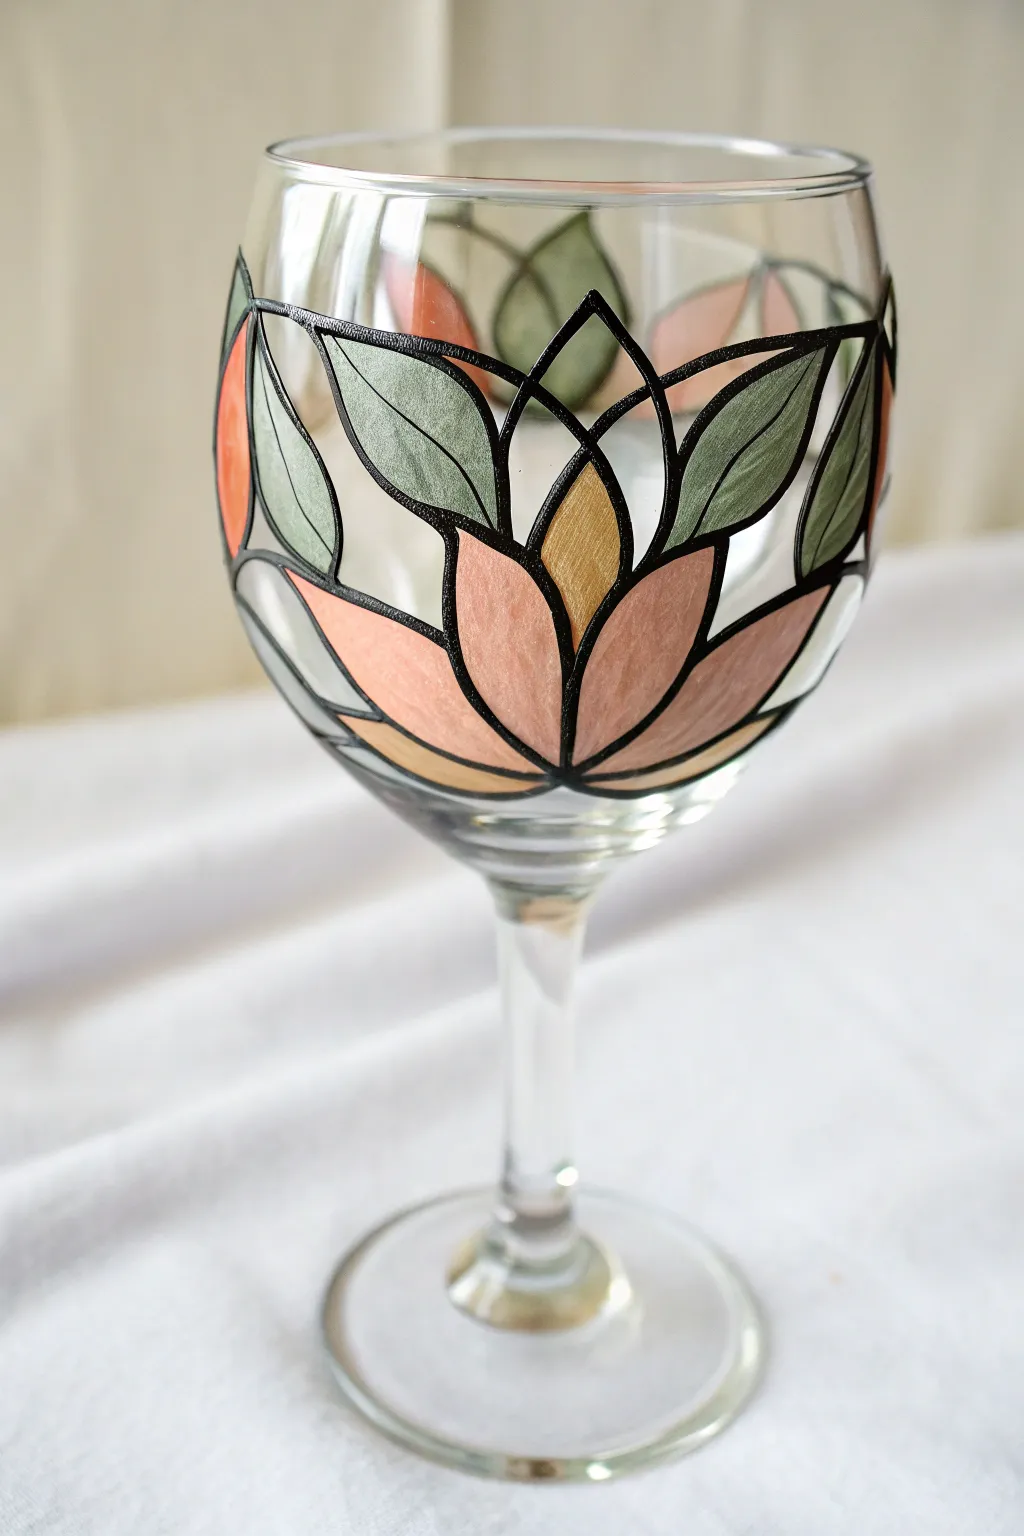
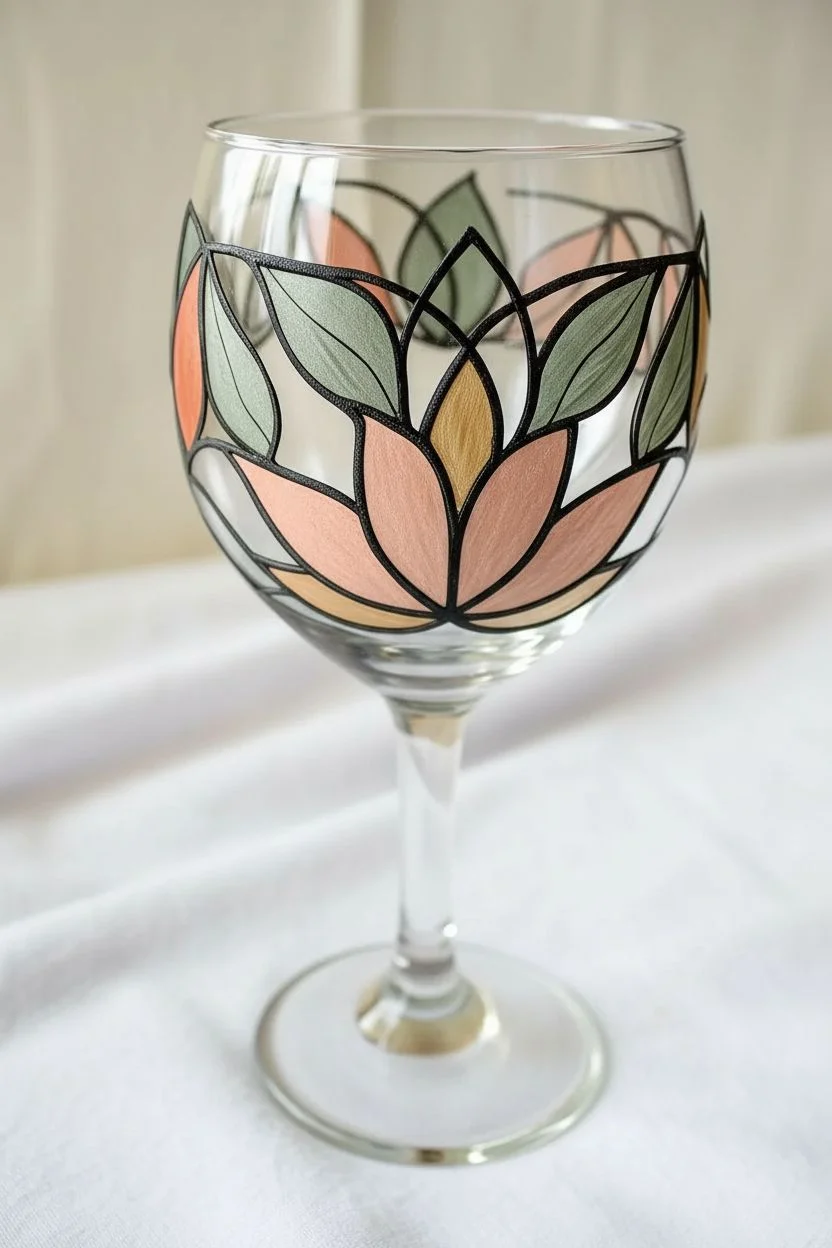
Transform a plain piece of glassware into a stunning, translucent work of art that mimics the elegance of traditional stained glass. This easy-to-master technique uses bold outlining and sheer washes of color to create a beautiful, light-catching floral design.
Detailed Instructions
Materials
- Clear stemmed wine glass (washed and dried)
- Rubbing alcohol
- Cotton pads or paper towel
- Liquid leading or 3D glass outline paint (black)
- Glass paints (solvent-based or transparent enamel) in blush pink, sage green, and golden yellow
- Small round paintbrush (size 0 or 1)
- Floral pattern template (printed or hand-drawn)
- Tape
- Cotton swabs (for clean up)
- Palette or small plastic lid
Step 1: Preparation & Outlining
-
Clean surface:
Begin by thoroughly wiping down the outside of the wine glass with rubbing alcohol on a cotton pad. This removes oils and fingerprints that could prevent the paint from adhering properly. -
Prepare the design:
Sketch or print a simple floral pattern featuring lotus-like petals and leaves. The design should fit the curve of your glass bowl. -
Secure template:
Roll your paper template into a cylinder and place it inside the wine glass. Tape it securely to the rim so the design presses against the glass from the inside. -
Test the flow:
Before touching the glass, squeeze a small line of your liquid leading onto a paper towel to release any air bubbles and ensure the line comes out smoothly. -
Trace main petals:
Carefully trace the central flower petals using the liquid leading. Apply steady, even pressure to create a raised, consistent black line directly over the template lines. -
Complete the outline:
Continue tracing the surrounding leaves and decorative curves. I find it easiest to rotate the glass slowly as I work to keep my hand steady. -
Critique and correct:
Inspect your lines immediately. If you smear a line or make a mistake, wipe it away quickly with a cotton swab or toothpick before it starts to set. -
Allow to cure:
Let the black outlines dry completely according to the bottle’s instructions. This usually takes at least 6 to 8 hours, or overnight, to ensure the ‘walls’ are solid enough to hold the paint.
Fixing Wobbly Lines
If your black outline looks shaky while wet, use a toothpick to gently push the paint back into a straight line. Once dry, you can carefully slice off rogue bumps with a craft knife.
Step 2: Painting & Finishing
-
Prepare colors:
Squeeze a small amount of blush pink, sage green, and golden yellow glass paint onto your palette. These paints are often quite fluid, so you don’t need much. -
Fill the central petal:
Dip your small brush into the golden yellow paint. Fill the very center petal of the flower, gently pushing the paint up against the black outline without going over it. -
Add pink tones:
Clean your brush and switch to the blush pink. Fill the larger, lower petals of the flower. Use a ‘flooding’ technique where you drop enough paint to self-level and eliminate brush strokes. -
Paint the foliage:
Use the sage green paint for the upper leaves and surrounding foliage shapes. The goal is a sheer, even wash of color that allows light to pass through. -
Check for gaps:
Hold the glass up to a light source to check for pinholes or missed spots in your color fill. Dab a tiny bit more paint into any empty crevices. -
Dry the paint:
Place the glass upright in a dust-free area and let the colors dry. Creating a tent with a cardboard box can help protect the sticky surface. -
Bake to cure (optional):
Check your paint brand’s instructions. Many glass paints require baking in a home oven (usually placing the glass in a cold oven, heating to 325°F/160°C, and baking for 30-40 mins) to make the design dishwasher resistant.
Textured Glass Effect
For a vintage look, dab the wet colored paint with a small sponge or crumpled plastic wrap. This creates a textured, frosted appearance similar to privacy glass.
Now you have a custom piece of functional art perfect for your next dinner party
Textured “Sea Glass” Frosted Look With Sponging
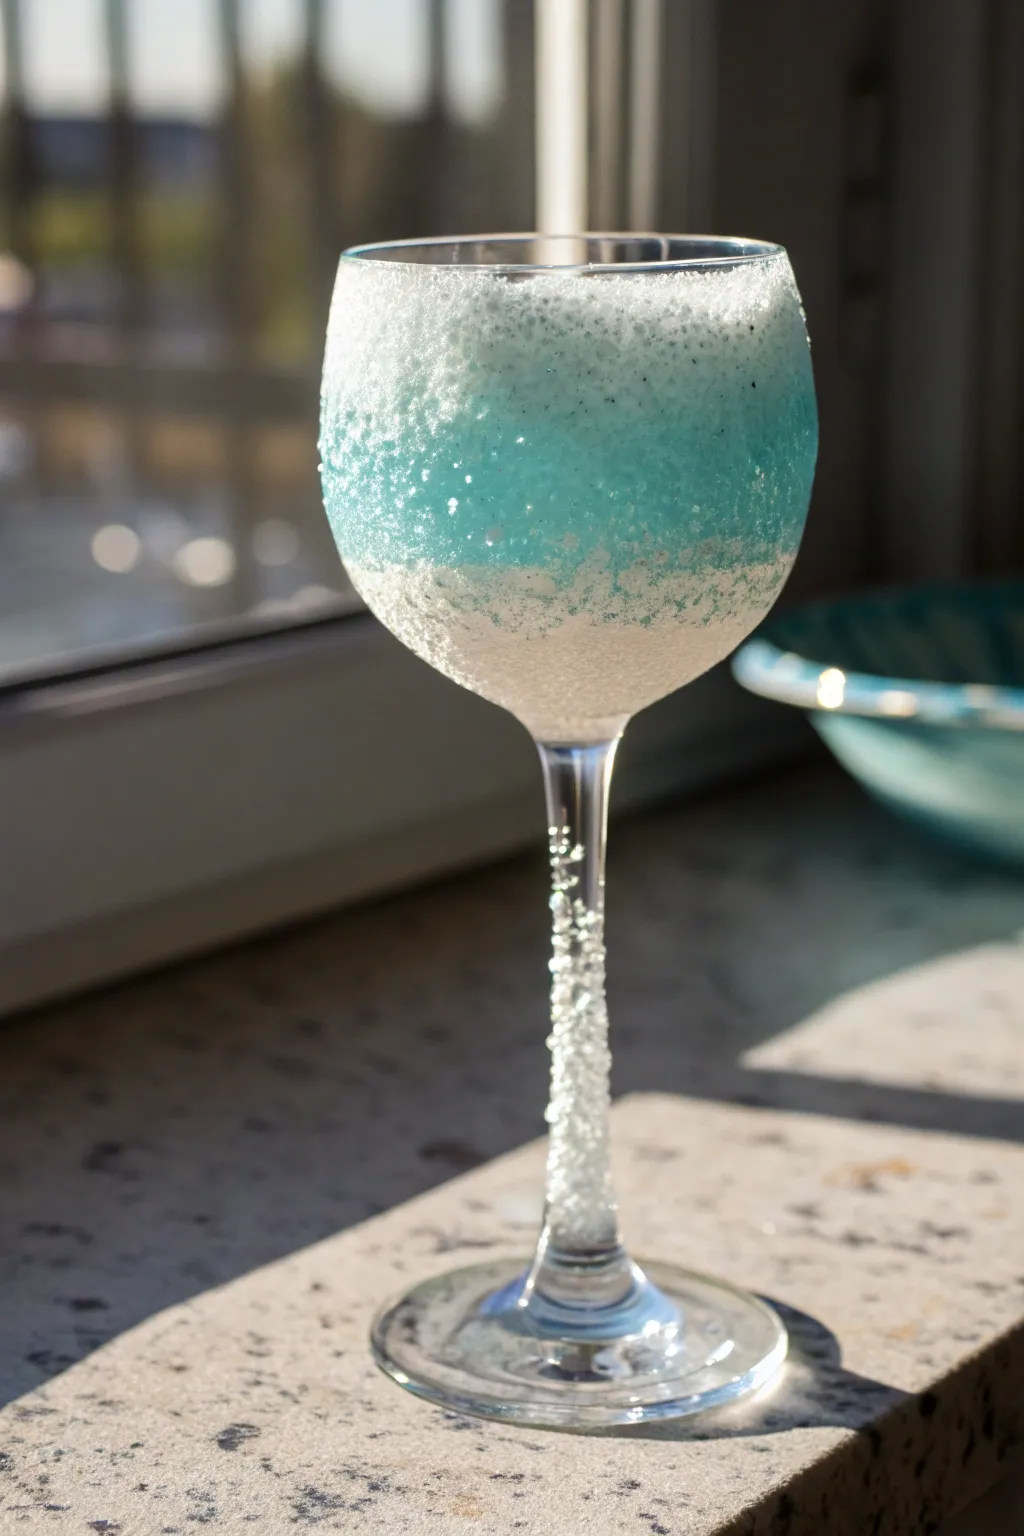
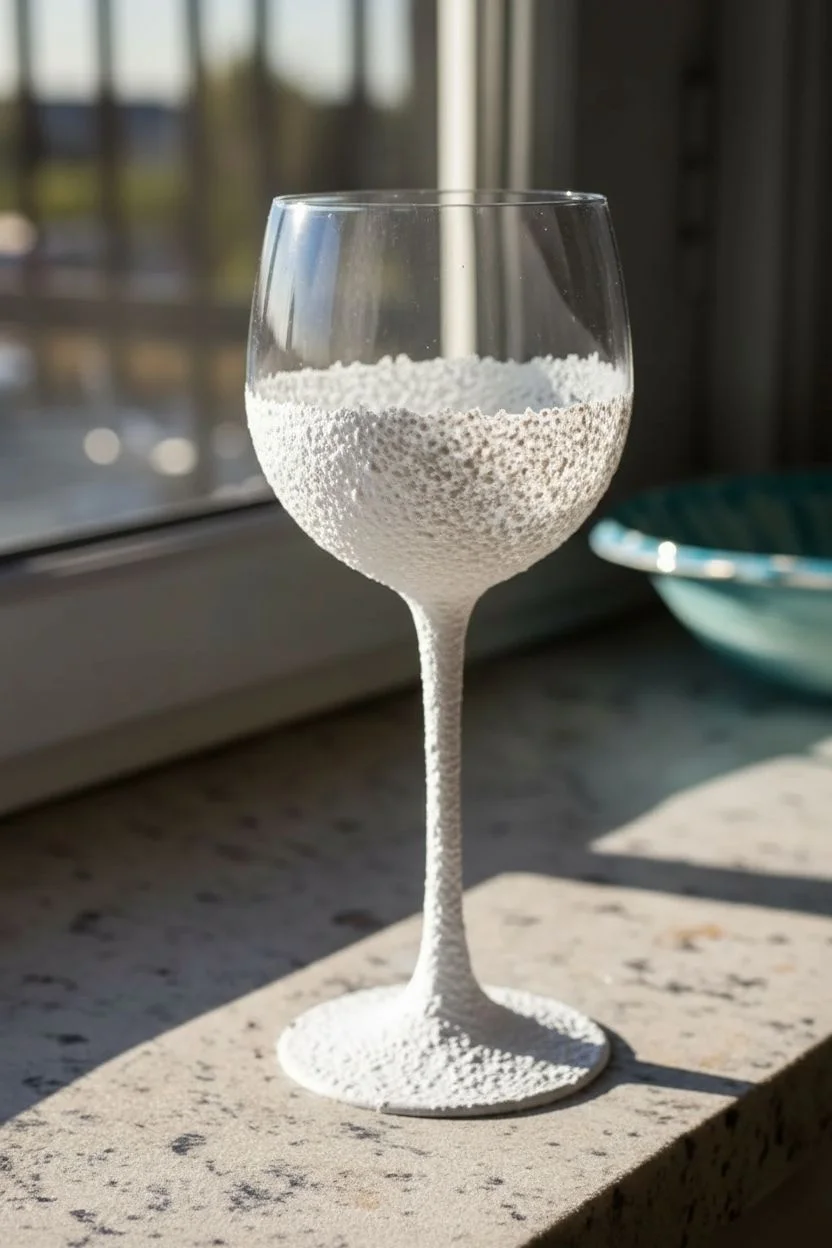
Transform a plain wine glass into a shimmering piece of coastal decor that looks like it washed ashore after a winter storm. This project uses sponging techniques to create a beautiful gradient from icy whites to ocean blues, complete with a crystallized texture that feels as unique as it looks.
Step-by-Step Tutorial
Materials
- Standard wine glass (thoroughly cleaned)
- Rubbing alcohol
- Cotton rounds or paper towels
- Glass-safe acrylic craft paint (White)
- Glass-safe acrylic craft paint (Turquoise or Teal)
- Natural sea sponge or textured craft sponge
- Fine glitter (White/Iridescent)
- Medium-grit textured medium (optional, for extra crunch)
- Paper plate or palette
- Sealant spray (clear gloss or matte depending on preference)
Step 1: Preparation and Base Coat
-
Clean the Surface:
Before painting, wipe down the entire exterior of the wine glass with rubbing alcohol on a cotton round to remove any oils or fingerprints, ensuring the paint adheres perfectly. -
Prepare Your Palette:
Squeeze a generous amount of white glass paint onto your paper plate. Next to it, add a smaller amount of your turquoise or teal paint. -
Sponge the Base:
Dampen your sea sponge slightly and wring it out completely so it is just pliable, not wet. Dip it into the white paint, dab off the excess on a clean spot of the plate, and begin patting it onto the bottom third of the glass bowl. -
Creating Texture:
Work your way around the glass using a light pouncing motion. You don’t want a solid, flat coat; aim for a stippled texture that lets a tiny bit of light through. -
Stem Work:
Continue bringing the white paint down the stem. For the narrow stem, you might need to pinch the sponge to get better coverage without smudging it too much. -
Initial Drying:
Allow this initial white layer to dry to the touch, which usually takes about 15 to 20 minutes depending on your paint brand.
Sponge Selection Tip
Use a natural sea sponge rather than a synthetic kitchen sponge. The irregular holes create a much more organic, ‘sea foam’ pattern.
Step 2: Creating the Gradient
-
Mix the Mid-Tone:
On your palette, drag a small amount of turquoise into the white pile to create a pale, icy blue. This will serve as your transition color. -
Apply the Transition Layer:
Sponge this pale blue mixture starting just above your white section, blending slightly downwards into the white to create a soft, ombre effect. -
Add the Deep Blue:
Pick up pure turquoise on a clean area of your sponge. Apply this to the upper portion of the glass bowl, fading it down into the paler blue section. -
Refine the Blend:
While the paint is still wet, lightly tap over the lines where colors meet to soften the transition. I find that a clean, dry corner of the sponge works best for blurring these harsh lines.
Level Up: Sea Charm
Before sealing, wrap a piece of rustic twine around the top of the stem and hot glue a tiny starfish or seashell charm for added beach vibes.
Step 3: Adding the Frosty Crystal Effect
-
Apply Wet White Layer:
To get the heavy texture seen in the photo, dab a fresh, thick layer of white paint over the very bottom of the bowl and the stem. -
The Sugar/Glitter Coat:
While the paint is nice and wet, sprinkle your fine iridescent glitter directly onto the paint. If you want that extra chunky ‘salt’ look, mix a little coarse crafting sand or heavy texture medium into the wet paint before applying. -
Highlight the Rim:
Lightly sponge a very thin layer of white right at the top rim to mimic sea foam, but keep it irregular for a natural look. -
Texture the Upper Bowl:
In the blue sections, lightly press the sponge to create air bubbles and ridges in the paint. If the paint has started to dry, add a tiny bit more paint to revive the texture. -
Stem Detailing:
Coat the stem heavily with the white paint and immediately roll it in a shallow dish of the glitter/texture mix to ensure the ‘frosted’ look is most concentrated here. -
Final Cure:
Let the glass sit undisturbed for at least 24 hours to cure. -
Seal the Texture:
Once fully cured, spray a light coat of clear sealant over the glass to prevent the textured bits and glitter from flaking off over time.
Now you have a stunning, frosty glass perfect for summer sipping or coastal decorating


Have a question or want to share your own experience? I'd love to hear from you in the comments below!