If you’ve been craving fresh wine painting ideas, you’re in the right headspace—wine is basically an excuse to play with shine, reflections, and rich color. I pulled together a mix of classic wine-themed art (bottles, glasses, vineyards) and crafty painted wine glasses you can make for your next cozy creative night.
Sunset Scene Inside a Wine Glass Silhouette
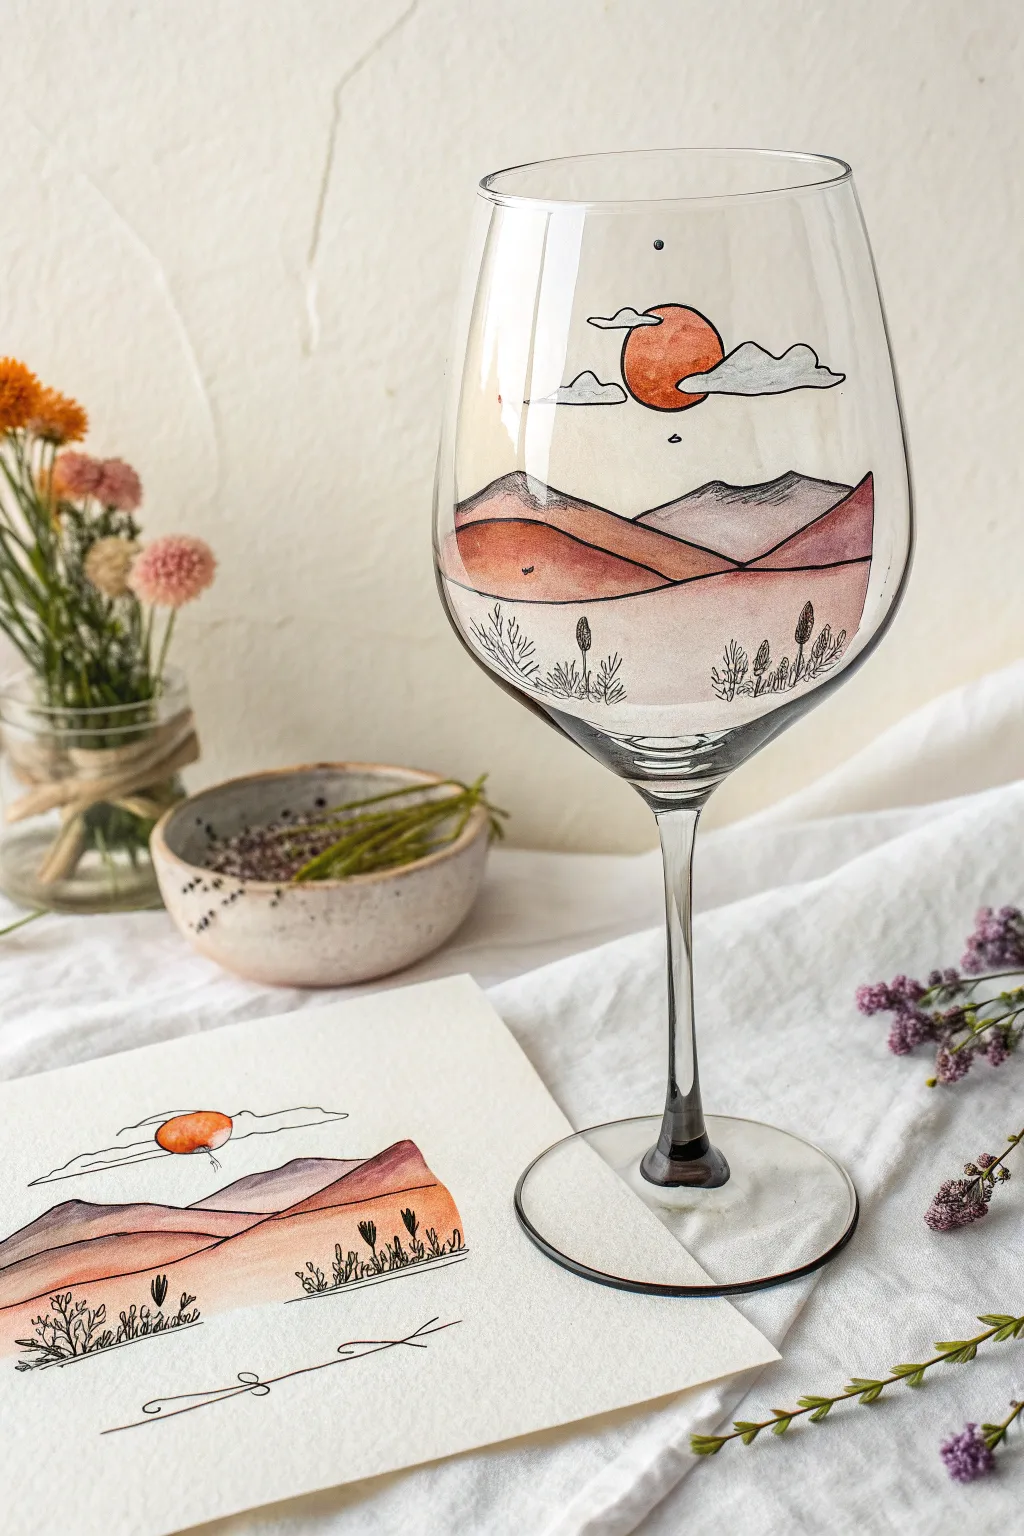
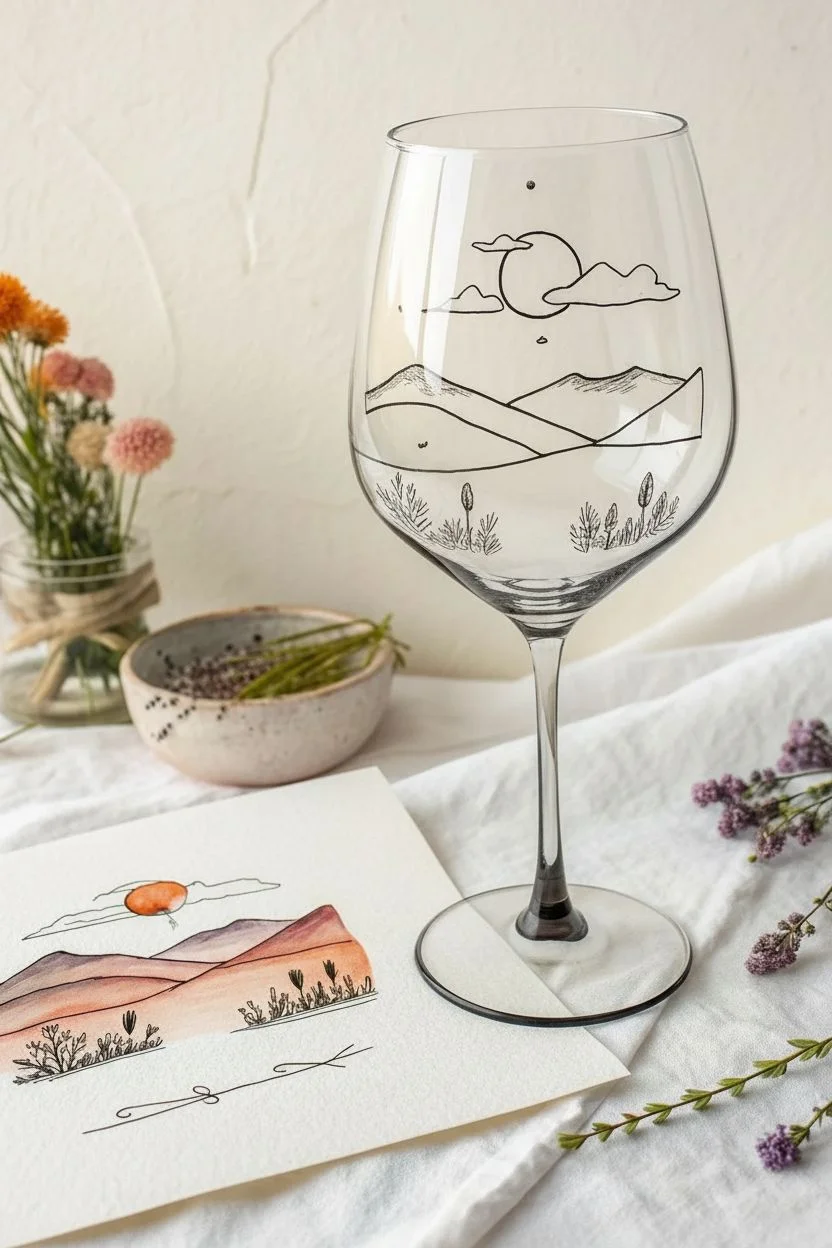
Transform ordinary glassware into a stunning canvas with this delicate sunset scene featuring rolling hills, stylized clouds, and fine botanical details. The translucent nature of the glass allows light to filter through the warm desert tones, creating a luminous effect that mimics golden hour.
How-To Guide
Materials
- Large wine glass (clean and grease-free)
- Glass paints or multi-surface acrylics (terra cotta, mauve, pale pink, orange, white)
- Black oil-based paint marker or fine-point glass liner
- Rubbing alcohol
- Cotton rounds
- Fine detail paintbrush (size 0 or 1)
- Small flat brush
- Paper plate or palette
- Oven (for curing, optional depending on paint type)
Step 1: Preparation & Outlining
-
Clean surface:
Begin by wiping down your wine glass thoroughly with rubbing alcohol and a cotton round. This removes fingerprints and natural oils that prevent paint adhesion. -
Plan your horizon:
Visualize where your landscape will sit. The design works best in the lower third of the bowl, allowing the clear glass above to represent the sky. -
Draw the hills:
Using your black oil-based paint marker or glass liner, draw the outline of the rolling hills. Create three distinct layers: a foreground slope, a middle ridge, and distant peaks. -
Add celestial details:
Above the highest peak, draw a simple circle for the sun. Add stylized clouds crossing in front of it using organic, slightly squiggly lines. -
Sketch vegetation:
In the lowest foreground section, use the very tip of your marker to sketch tiny, vertical stalks and leafy clumps. Different heights add interest here. -
Let the ink set:
Allow your black outlines to dry completely for at least 15-20 minutes to prevent smudging when you add color.
Use a Template
Draw your design on paper first, cut it out, and tape it inside the glass. You can then trace the lines directly onto the exterior surface.
Step 2: Adding Color
-
Mix the sun color:
Combine a touch of orange with a tiny bit of terra cotta to get a warm, burnt-orange hue. -
Paint the sun:
Carefully fill in the sun circle. I gently tap the paint in place rather than brushing it to keep the layer opaque. -
Mix the hill tones:
Prepare three shades of pinkish-brown. Use pale pink for the foreground, a dusty mauve for the middle, and a darker terra cotta for the back hills. -
Paint the background hills:
Start with the furthest hills using your darkest terra cotta mix. Carefully stay within your black lines. -
Fill the middle ground:
Paint the middle ridge with the dusty mauve shade. Try to keep the paint application thin to maintain some translucency. -
Color the foreground:
Use the palest pink shade for the front slope. This creates atmospheric perspective.
Step 3: Clouds & Finishing Touches
-
Paint the clouds:
Use a specialized glass white or a very light gray to fill in the clouds. If the white is too opaque, mix in a tiny drop of clear medium or water. -
Refine the lines:
Once the paint is fully dry (give it an hour), you may need to go back over some black outlines with your marker if paint overlapped them. -
Add details:
Draw tiny black dots or ‘dust motes’ in the sky area to balance the composition. -
Curing:
Follow the instructions on your specific paint bottle. Most glass paints require either 21 days of air drying or baking in a cool oven (usually 350°F for 30 mins) to become dishwasher safe.
Fixing Smudges
If you make a mistake while the paint is wet, quickly wipe it away with a damp cotton swab or a toothpick wrapped in a bit of wet paper towel.
Enjoy displaying your custom glassware or gifting it to a wine-loving friend


Watercolor Bleeds That Mimic Wine Stains
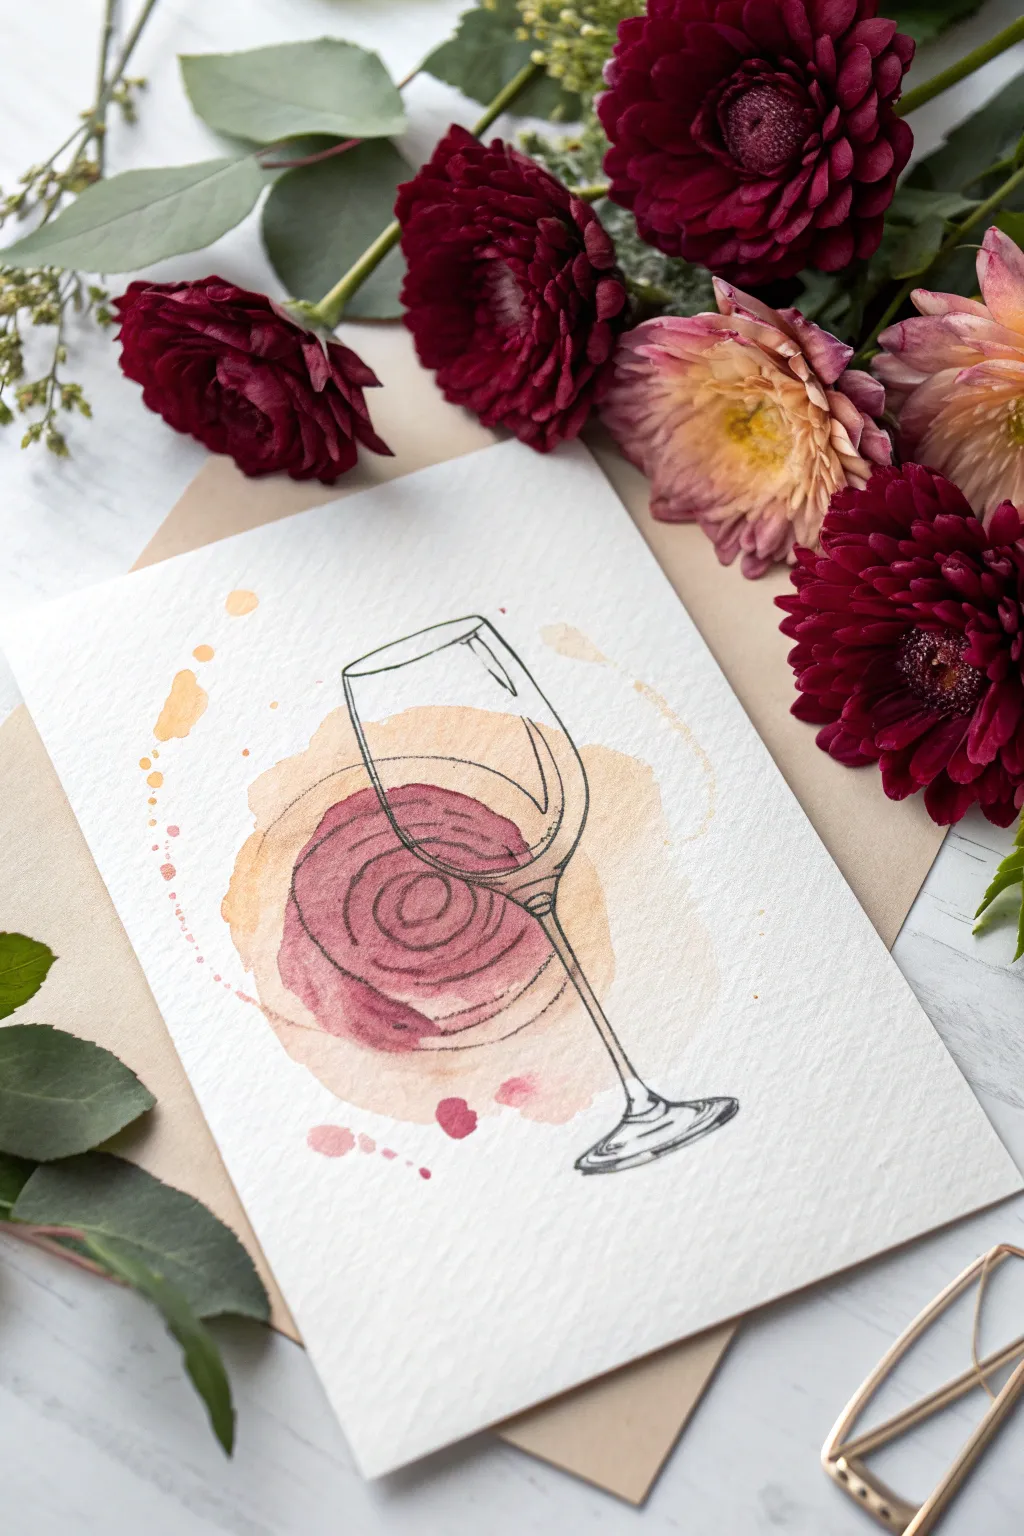
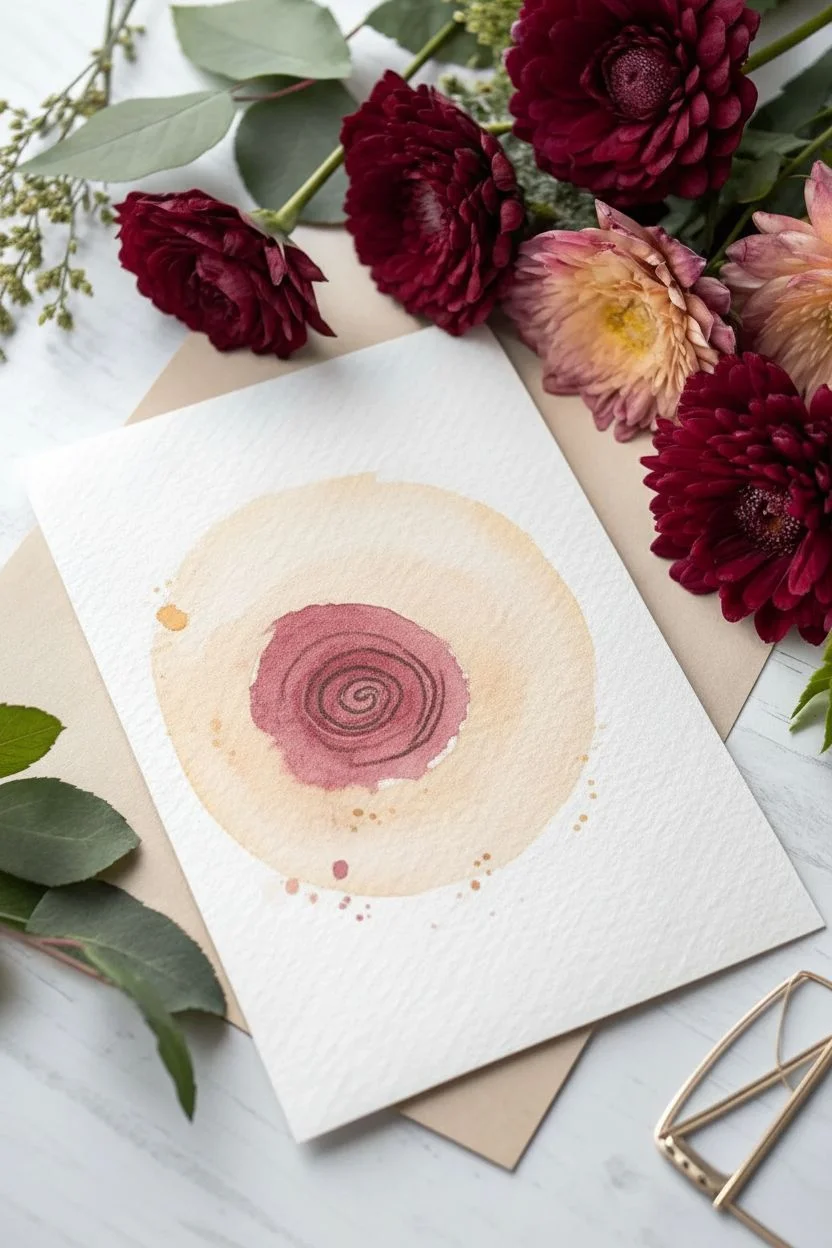
This elegant project combines the precision of ink line art with the beautiful unpredictability of watercolor washes. By layering loose, stain-like pools of color behind a crisp illustration, you create a piece that feels both casual and sophisticated.
Step-by-Step Tutorial
Materials
- Cold press watercolor paper (A5 size)
- Fine liner pen (waterproof, black, size 03 or 05)
- Pencil and eraser
- Watercolor paints (Alizarin Crimson, Burnt Sienna, Yellow Ochre)
- Round watercolor brush (size 6 or 8)
- Clean water jar
- Paper towels
- Palette or mixing dish
- Kraft paper envelope (optional for styling)
Step 1: Creating the Wine Stain Base
-
Mix your colors:
Prepare two distinct puddles of paint on your palette. For the outer ring, mix a very watery, pale wash using Yellow Ochre with a touch of Burnt Sienna. For the center ‘wine’ color, mix Alizarin Crimson with a tiny bit of Burnt Sienna to deepen it into a Merlot shade. -
Paint the first wash:
Using your round brush, paint a loose, irregular circle with the pale ochre mixture in the center of your paper. Don’t try to make it perfect; let the edges be wobbly and natural. -
Add the wine center:
While the first wash is still slightly damp but not soaking, load your brush with the red wine mixture. Drop this color into the center of the ochre shape, allowing it to bleed outwards slightly without reaching the very edge. -
Create the swirl effect:
Dip your brush into the red mixture again and paint a loose spiral shape inside the wet red patch. This mimics the look of sediment or the bottom of a wine glass stain. -
Splatter details:
Load your brush with watery ochre paint and tap the handle against your finger to flick small droplets around the main shape. Repeat this sparingly with the red mixture near the bottom. -
Dry completely:
This is crucial. Let the watercolor layer dry 100% before moving on. The paper must be bone dry to the touch, or your ink lines will bleed.
Natural Texture
To get a realistic ‘dried wine’ edge on your watercolor stain, drop clear water or salt into the center of the wet paint while it dries. This pushes pigment to the edges.
Step 2: Inking the Illustration
-
Sketch the outline:
Lightly sketch the wine glass shape with a pencil over your dried watercolor stain. Position the bowl of the glass so it roughly encompasses the watercolor ‘stain’, but offset it slightly for an artistic, asymmetrical look. -
Refine the glass shape:
Draw the rim as an elongated oval. Extend two lines down for the bowl, tapering inward. Add a long, slender stem and a flat oval foot. -
Ink the rim:
Using your waterproof fine liner, trace over your pencil lines. For the rim, break the line slightly on one side to suggest a reflection or highlight. -
Draw the liquid level:
Inside the bowl, draw a curved line to indicate the surface of the wine. It should cut across the background stain, helping to integrate the two elements. -
Ink the bowl and stem:
Trace the rest of the glass with confident strokes. You might want to thicken the line slightly on the underside of the bowl to imply shadow. -
Detail the foot:
Outline the base of the glass. Draw a second, partial inner oval on the foot to show the thickness of the glass and how it curves. -
Add reflection lines:
Add a few very short, curved hatching lines on the side of the bowl and on the foot of the glass to suggest glossiness. -
Erase pencil marks:
Once the ink is completely distinct and dry, gently erase all underlying pencil sketches to clean up the illustration.
Step 3: Final Touches
-
Assess the balance:
Look at the composition. If the background feels too plain, you can add a few more tiny paint splatters now that the line art defines the space. -
Optional texture:
If you want more definition in the ‘stain’, you can use the fine liner to add very loose, broken concentric circles inside the red painted area, accentuating the swirl.
Use Real Wine
For a truly authentic touch, you can actually paint the stain using real red wine instead of watercolor paint. The color will dry to a pale, vintage purple-grey hue.
Now you have a chic piece of art perfect for a kitchen wall or a handmade greeting card


Minimal Line Art Wine Glass With One Pop of Color
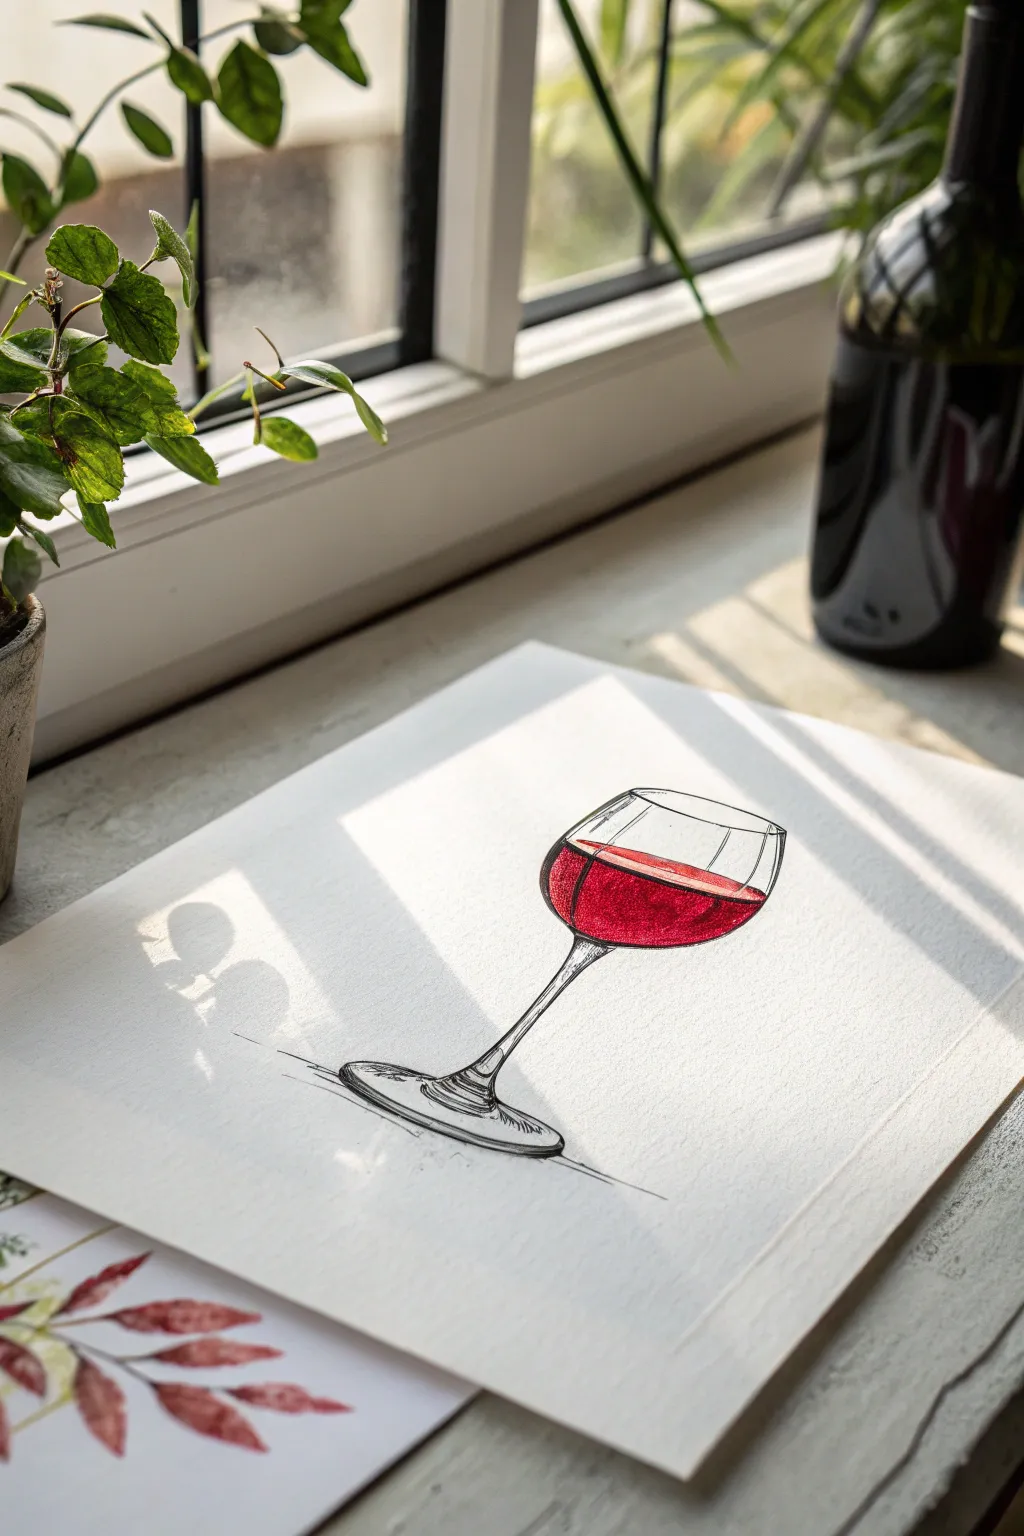
This elegant project combines the simplicity of fine line art with a bold, juicy splash of watercolor. It captures the sophisticated look of a glass of red wine using crisp ink contours and a single, vibrant focal point of color.
How-To Guide
Materials
- Cold press watercolor paper (300 gsm)
- Fine liner pen (0.3mm or 0.5mm, waterproof/archival black ink)
- Watercolor paints (Alizarin Crimson, Cadmium Red, and a touch of Burnt Umber)
- Round watercolor brush (size 4 or 6)
- HB pencil
- Kneadable eraser
- Clean water and paper towels
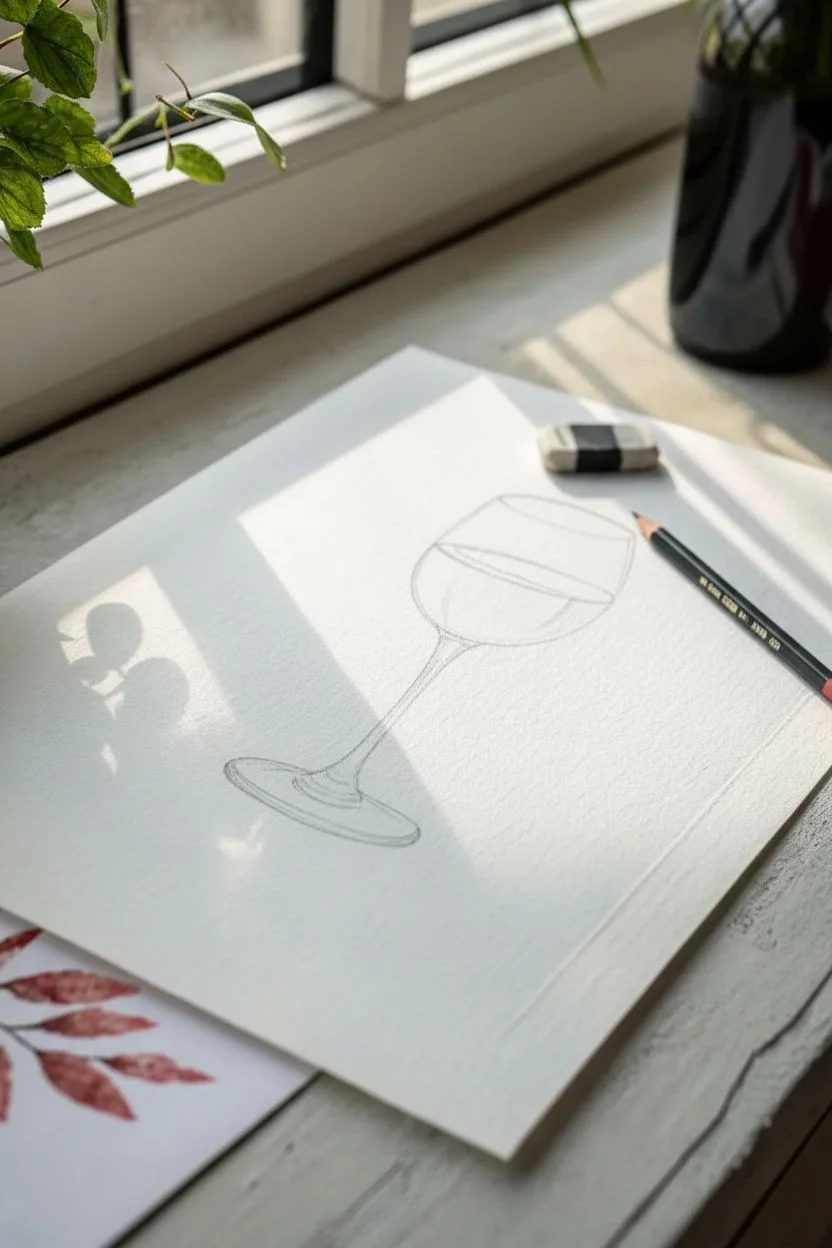
Step 1: Sketching the Structure
-
Draft the rim:
Begin lightly with your HB pencil. Draw a narrow horizontal oval near the top center of your page to represent the opening of the glass. -
Shape the bowl:
From the sides of your oval, draw a large U-shape that tapers inward slightly as it goes down, forming the bowl of the wine glass. Keep your lines very faint so they are easy to erase later. -
Add the stem:
Draw a unified visual line straight down from the center of the bowl’s bottom. Thicken this line slightly to create the stem, flaring it out gently at the top where it meets the bowl and firmly at the bottom for the base. -
Define the base:
Sketch a flatter oval at the bottom of the stem for the foot of the glass. Make sure the curve of the base roughly matches the perspective of the rim oval. -
Mark the wine level:
Inside the bowl, draw a curved line to indicate the surface of the wine. Add a second, slightly lower curved line parallel to it to suggest the thickness of the liquid against the glass.
Step 2: Inking the Outlines
-
Trace the primary lines:
Switch to your waterproof fine liner. Carefully go over your pencil marks, starting with the rim. I find that breaking the line slightly in the back of the rim adds a nice illustrative touch. -
Add contour details:
Ink the sides of the bowl and the stem. Don’t worry about making a machine-perfect continuous line; a sketch-like quality works beautifully here. -
Detail the wine surface:
Draw the contour of the liquid surface. Add a tiny floating oval or reflection line on top of the liquid to suggest glossiness. -
Suggest dimension:
Add a few small, vertical hatching lines on the stem and the base to create shadow and curvature. Ink a quick horizon line behind the glass if desired to ground it. -
Clean up:
Wait at least 15 minutes for the ink to dry completely to prevent smearing. Gently erase all visible pencil marks with the kneadable eraser.
Smudgy Ink Lines?
Even waterproof pens can smear if not fully dry. Test your pen on a scrap piece of watercolor paper first, let it dry for 10 minutes, and run a wet brush over it to ensure it holds.
Step 3: Adding the Splash of Color
-
Mix your red:
On your palette, mix Alizarin Crimson with a little Cadmium Red for a bright base. If you want a deeper Merlot look, add a tiny dot of Burnt Umber. -
Wet the wine area:
Use clean water to lightly dampen the area inside the glass where the wine sits. Avoid the very top surface line to keep a sharp edge. -
Drop in color:
Load your brush with the red mix and touch it to the wet paper. Let the color bloom naturally toward the edges. -
Deepen the hues:
While the paint is still wet, drop a more concentrated, darker mix of red (less water) along the bottom curve and left side of the liquid area. -
create a highlight:
Lift a small sliver of paint out with a dry brush or paper towel on the upper right side of the liquid to create a highlight, or simply paint around a white spot. -
Add reflections:
Paint a very faint, watery red line just below the rim of the glass or on the base to show light refracting through the drink.
Make It Sparkle
Once the red paint is 100% dry, use a white gel pen to add sharp, crisp highlights on the glass curve and the surface of the wine for an extra glossy effect.
Now you have a chic, modern piece of art perfect for framing in a kitchen or dining area


Tiny Hearts Painted Wine Glasses for Beginners
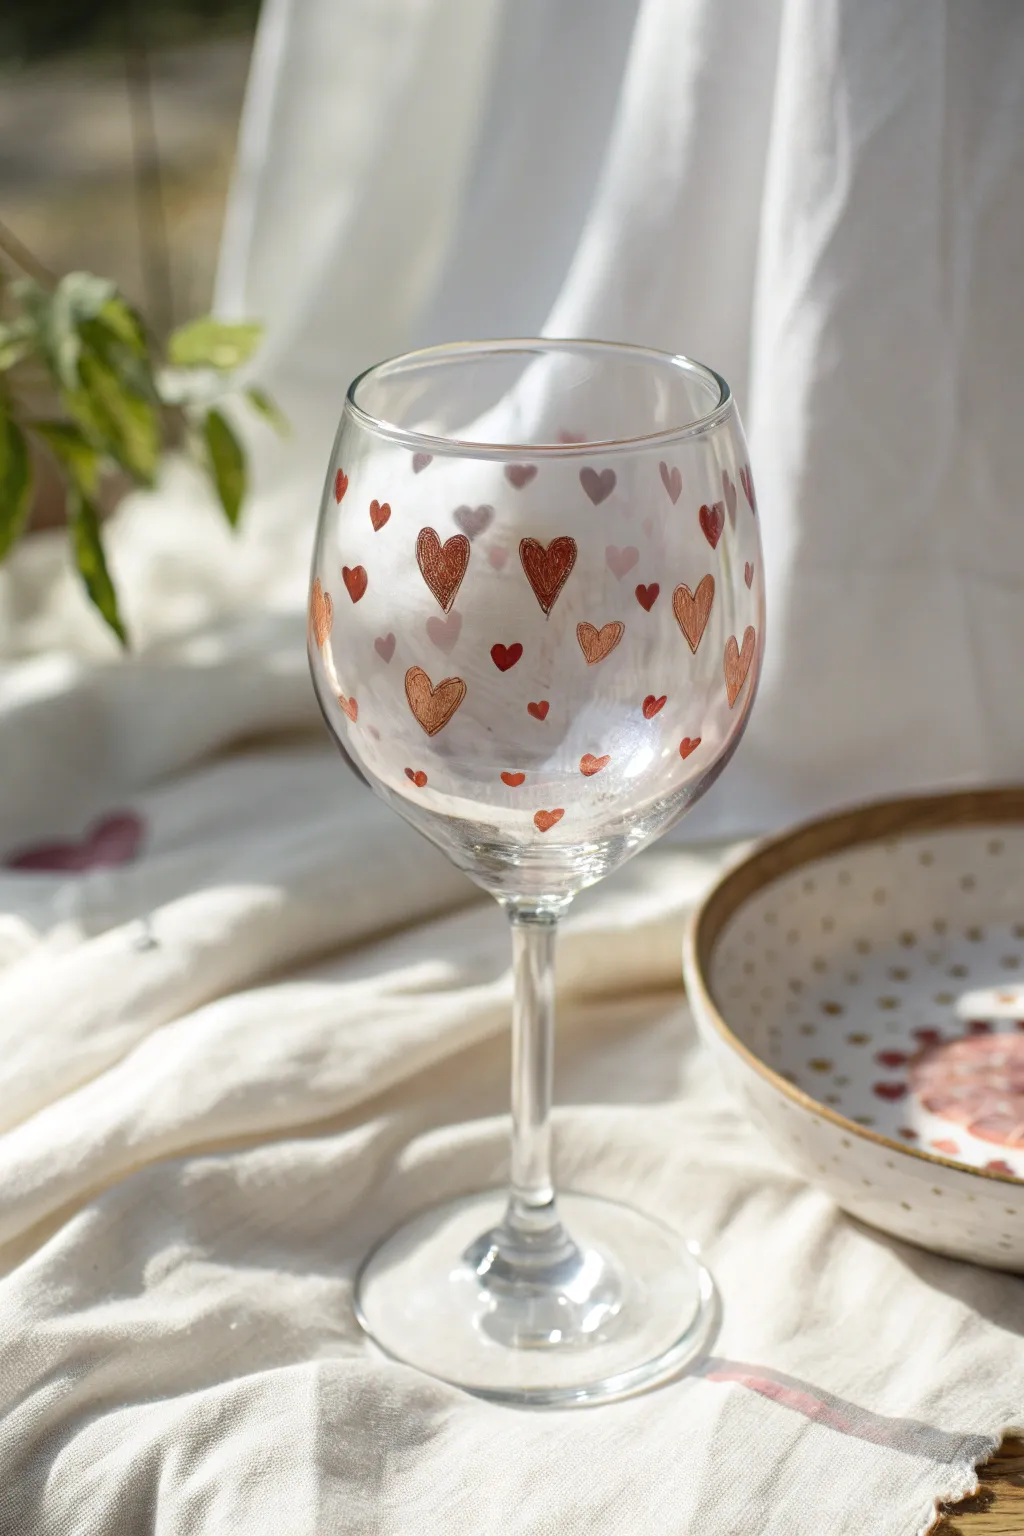
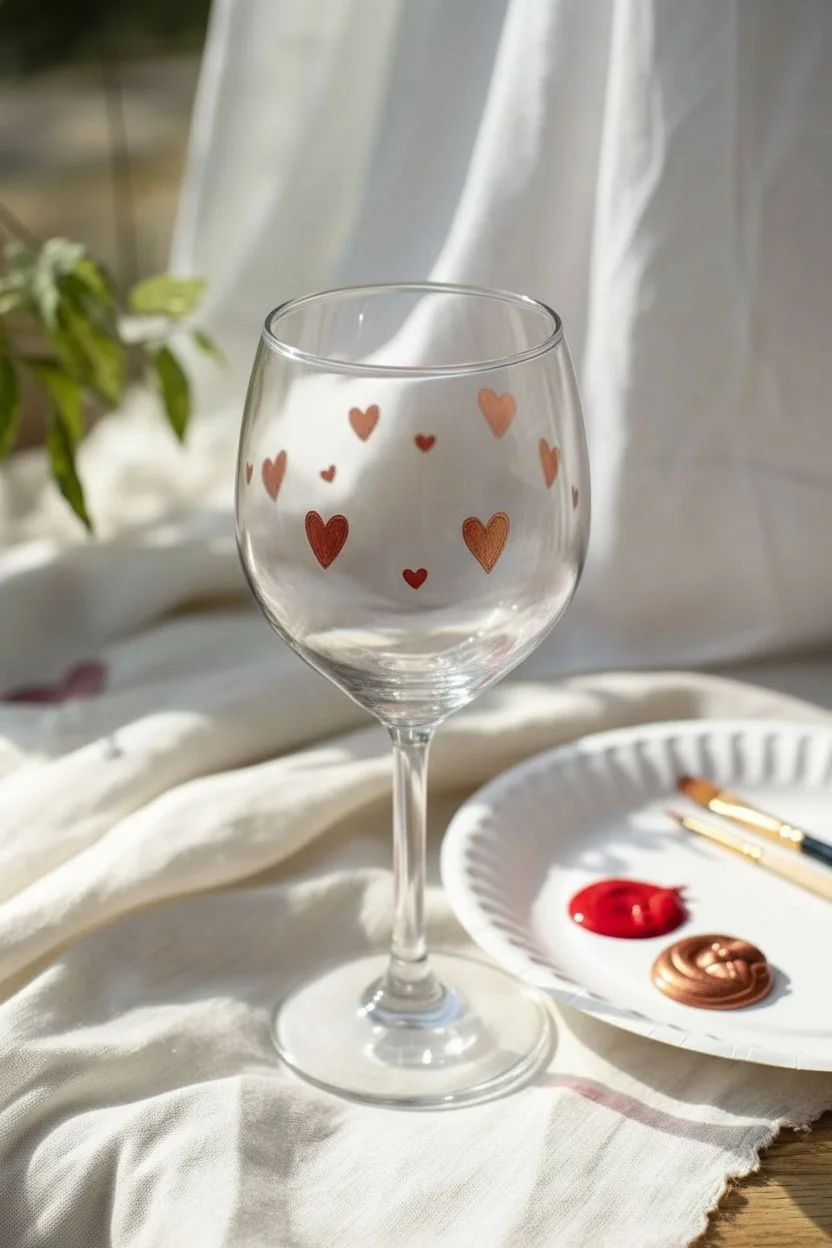
Transform a plain wine glass into a romantic vessel with a cascade of hand-painted hearts. This beginner-friendly design mixes metallic and matte finishes for a whimsical, floating effect that looks beautiful from every angle.
Step-by-Step Guide
Materials
- Clear wine glass (stemmed or stemless)
- Rubbing alcohol
- Cotton pads or paper towel
- Red enamel craft paint (glass-safe)
- Metallic copper or bronze enamel craft paint (glass-safe)
- Fine detail paintbrush (size 0 or 00)
- Small round paintbrush (size 2)
- Paper plate or palette
- Oven (for curing, optional depending on paint)
Step 1: Preparation
-
Clean the surface:
Before laying down a single drop of paint, thoroughly wipe the exterior of the wine glass bowl with rubbing alcohol and a cotton pad. This removes invisible oils or fingerprints that prevent paint adhesion. -
Let it dry:
Allow the alcohol to evaporate completely for a few moments so you have a pristine, dry canvas. -
Prepare your palette:
Squeeze a dime-sized amount of both the red and the metallic copper paint onto your palette.
Smudged a heart?
Don’t panic! Use a wet Q-tip to wipe away the mistake immediately. If the paint has started to dry, a toothpick can gently scrape the edges clean without ruining the glass
Step 2: Painting the Gold Hearts
-
Start with large metallic outlines:
Dip your fine detail brush into the copper paint. Randomly scatter three to five medium-sized heart outlines around the middle and upper section of the glass bowl. -
Create the scribble fill:
Instead of filling these outlines solidly, use the very tip of the brush to create a scribbled, textured fill inside the golden hearts. This gives them a hand-drawn, sketched look. -
Add solid metallic hearts:
Switch to the slightly larger round brush. Paint a few solid copper hearts interspersed among the outlined ones, keeping them slightly smaller than the outlined versions. -
Check spacing:
Rotate the glass to ensure the metallic hearts are distributed evenly without being perfectly symmetrical.
Step 3: Adding the Red Accents
-
Paint tiny red hearts:
Using the fine detail brush and red paint, create very small solid hearts in the empty spaces. Think of these as confetti floating between the larger metallic shapes. -
Vary the saturation:
For some hearts, load the brush heavily for opaque color. For others, use slightly less paint to create semi-transparent, delicate hearts that look softer. -
Add micro-hearts:
To add depth, paint tiny red dots or minuscule hearts near the top rim and fading down toward the stem. -
Layering check:
Ensure none of the wet paints are smearing into each other; since the hearts are spaced out, this should be easy to manage.
Level Up: Frosted Look
Sponge a thin layer of translucent frosting medium inside the large hearts before outlining them for a cloudy, textured effect against the clear glass
Step 4: Finishing Touches
-
Review the bottom curve:
I always like to add a few extra tiny hearts right where the bowl curves into the stem to ground the design. -
Allow initial drying:
Let the glass sit undisturbed for at least one hour until the paint is dry to the touch. -
Clean up edges:
If any hearts look messy, use a damp cotton swab or a toothpick to gently scrape away excess paint while it is tacky but not fully cured. -
Cure the paint:
Follow the instructions on your specific paint bottle. Most glass enamels require either 21 days of air drying or a bake method (usually 350°F for 30 minutes) to become dishwasher safe.
Once baked and cooled, your custom glassware is ready for a festive toast or a thoughtful gift
BRUSH GUIDE
The Right Brush for Every Stroke
From clean lines to bold texture — master brush choice, stroke control, and essential techniques.
Explore the Full Guide
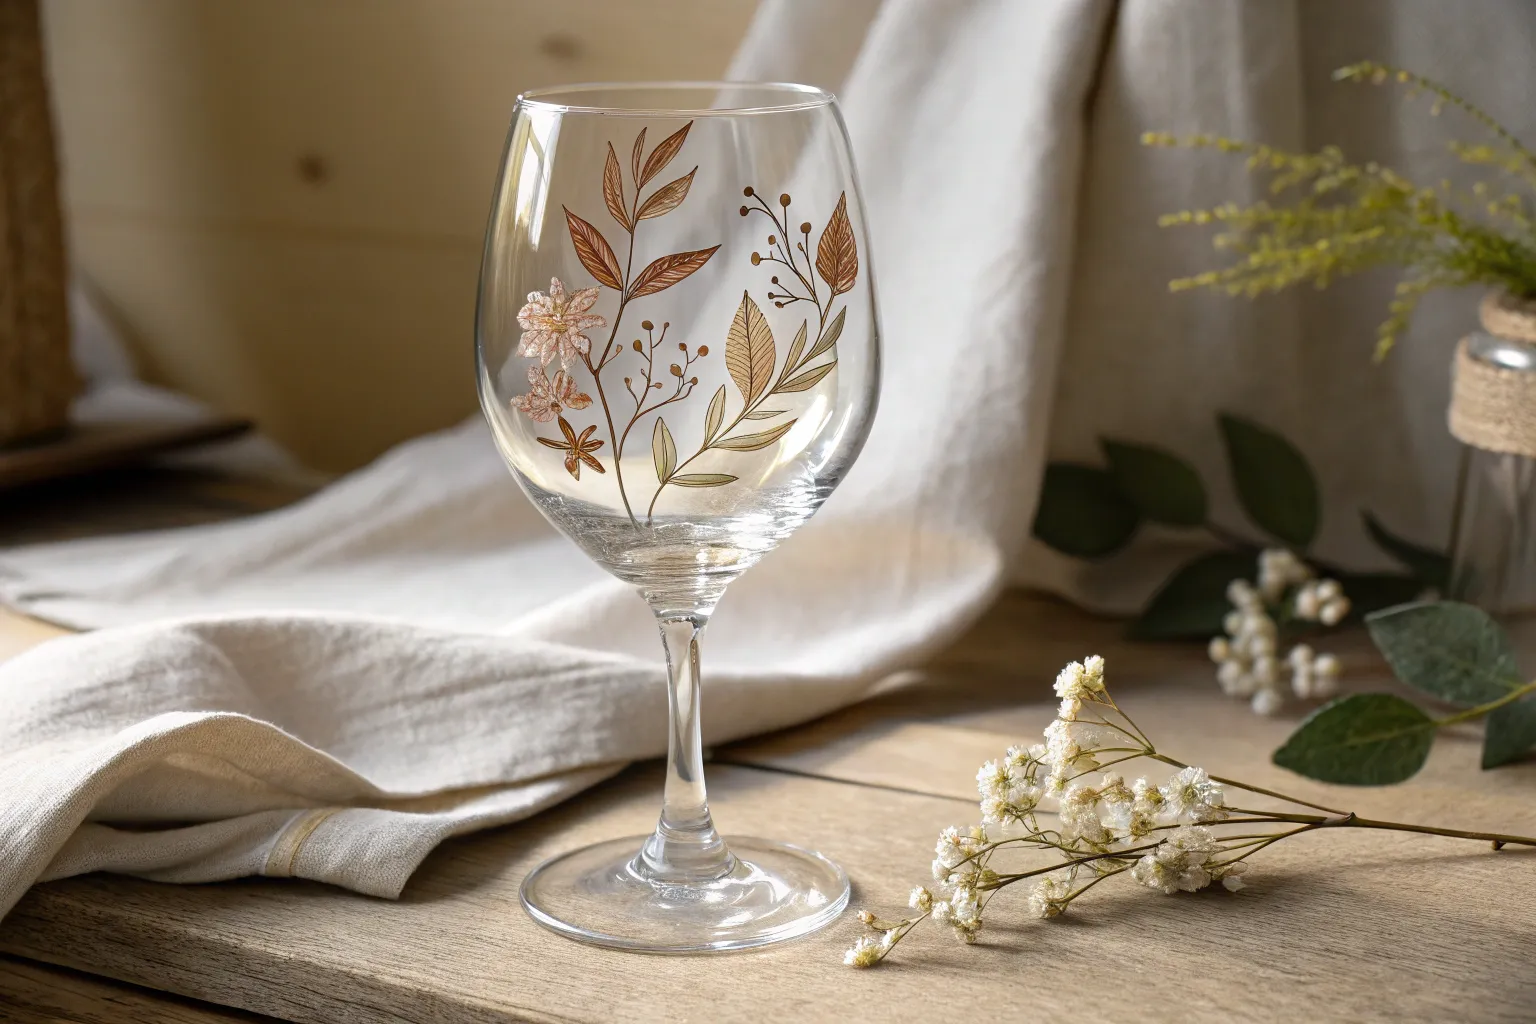
Floral Vine Wrap Around the Wine Glass Bowl
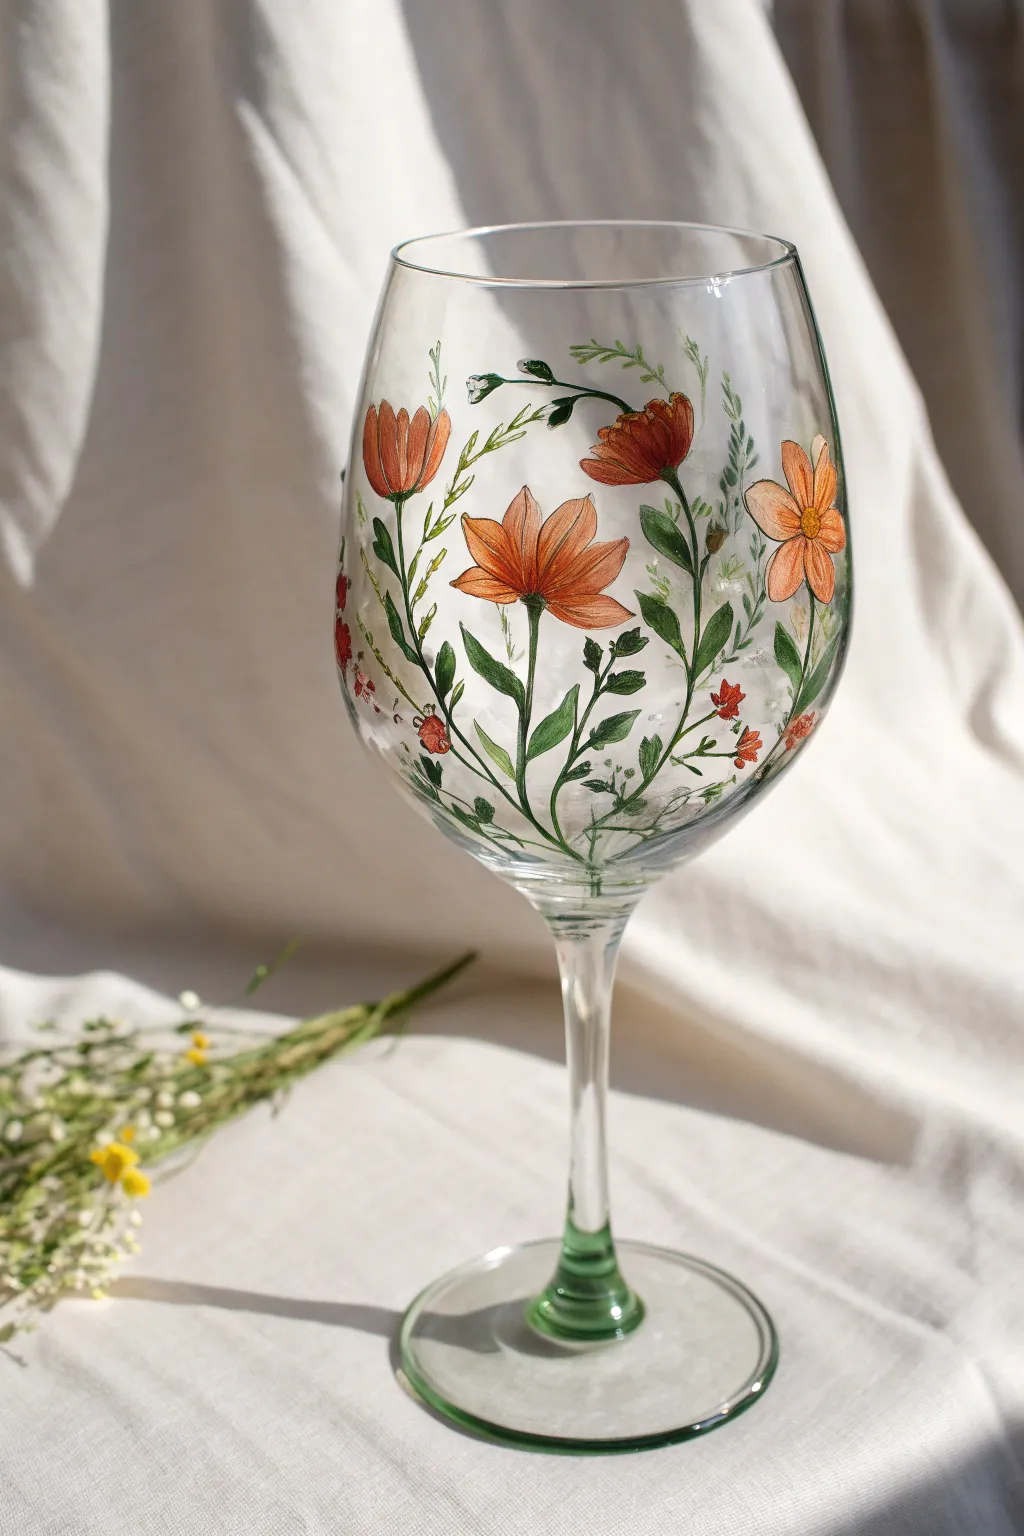

Transform a plain glass into a botanical masterpiece with this delicate floral wrap design. Featuring warm orange blooms and trailing greenery that circle the bowl, this project brings an elegant, hand-painted touch to your next dinner party.
Step-by-Step Tutorial
Materials
- Red wine glass (clear)
- Enamel glass paints (orange, red, yellow, sap green, dark green, white)
- Rubbing alcohol and paper towels
- Fine detail brushes (liner sizes 00 and 1)
- Small flat brush (size 2)
- Palette or small plate
- Cotton swabs (for mistakes)
- Oven (for curing)
Step 1: Preparation & Base Composition
-
Clean surface:
Before touching any paint, thoroughly wipe down the outside of the wine glass bowl with rubbing alcohol on a paper towel. This removes fingerprints and oils that prevent paint adhesion. -
Observe the flow:
Plan your composition. Notice how all the stems originate from the bottom of the bowl near the stem connection, curving upwards and outwards like a natural bouquet growing from the base. -
Paint the main stems:
Load a liner brush with sap green mixed with a tiny drop of water to improve flow. Paint 4-5 main stems starting from the very bottom center of the bowl, allowing them to wave gently upward. Vary their heights so flowers land at different levels.
Transparency Trick
Don’t aim for solid opacity. Glass paint looks best when brushstrokes are visible, creating a ‘stained glass’ effect when light hits the wine.
Step 2: Painting the Blooms
-
Mix your petal color:
On your palette, create a warm orange tone by mixing orange with a touch of yellow. You want a color that feels translucent and sunny, not opaque like acrylics. -
Form the large open flower:
Choose a prominent stem for the main focal flower. Using the size 1 brush, paint five pointed oval petals radiating from a center point. Keep the paint somewhat thin to let light pass through. -
Add side profile blooms:
For the flowers shown in profile (like tulips or poppies), paint three petals clustered together in a ‘cup’ shape at the ends of other stems. Use a slightly deeper orange mixed with a hint of red for these to show depth. -
Detail the petals:
Once the base orange is tacky but not fully dry, use a very fine liner brush with a darker reddish-orange to add thin, hair-like streaks starting from the center of the bloom outward. This mimics the texture seen in the photo. -
Add flower centers:
For the open-faced flower, dot the center with yellow paint. While wet, add tiny stippled dots of orange around the edge of the yellow center for a textured pollen look. -
Create buds:
Paint small, tight oval shapes in dark orange at the tips of shorter stems to represent unopened buds.
Stem Customization
Instead of painting the stem green, try wrapping florists wire with beads around the stem for a 3D textured vine effect that matches the paint.
Step 3: Foliage & Details
-
Paint broad leaves:
Using the dark green paint, add broader, pointed leaves along the lower parts of the main stems. Focus on the base where the stems converge to create visual weight at the bottom. -
Add delicate ferns:
I like to switch to the smallest 00 liner brush here. Mix sap green with a little white for a lighter shade. Paint delicate, feathery fronds branching off the upper parts of the stems, filling the empty spaces between flowers. -
Incorporate filler flowers:
Using a tiny dotting motion with red paint, create clusters of small wildflower specks on separate, thin stems. These add a nice contrast of scale against the larger blooms. -
Add white highlights:
To make the greenery pop, add extremely thin highlights of white mixed with green to the top edges of the main leaves and stems where the light would hit. -
Tint the stem (optional):
If you want the look of the photo, paint the actual glass stem and foot with a translucent layer of green glass paint. Apply it in long, vertical strokes down the stem for a smooth finish.
Step 4: Finishing Touches
-
Inspect and clean:
Hold the glass up to the light to check for see-through spots that need a second coat. Use a cotton swab dampened with alcohol to clean up any stray smudges. -
Dry time:
Let the paint dry for at least 1 hour before handling, and 24 hours to fully set before curing. -
Bake to cure:
Place the glass in a cold oven. Set temperature to 350°F (176°C) and bake for 30 minutes. Turn the oven off and let the glass cool down completely inside the oven to prevent cracking.
Once baked, your glass is ready to handle hand-washing and hold your favorite vintage
Citrus Slices and Fresh Sprigs on Stemless Glasses
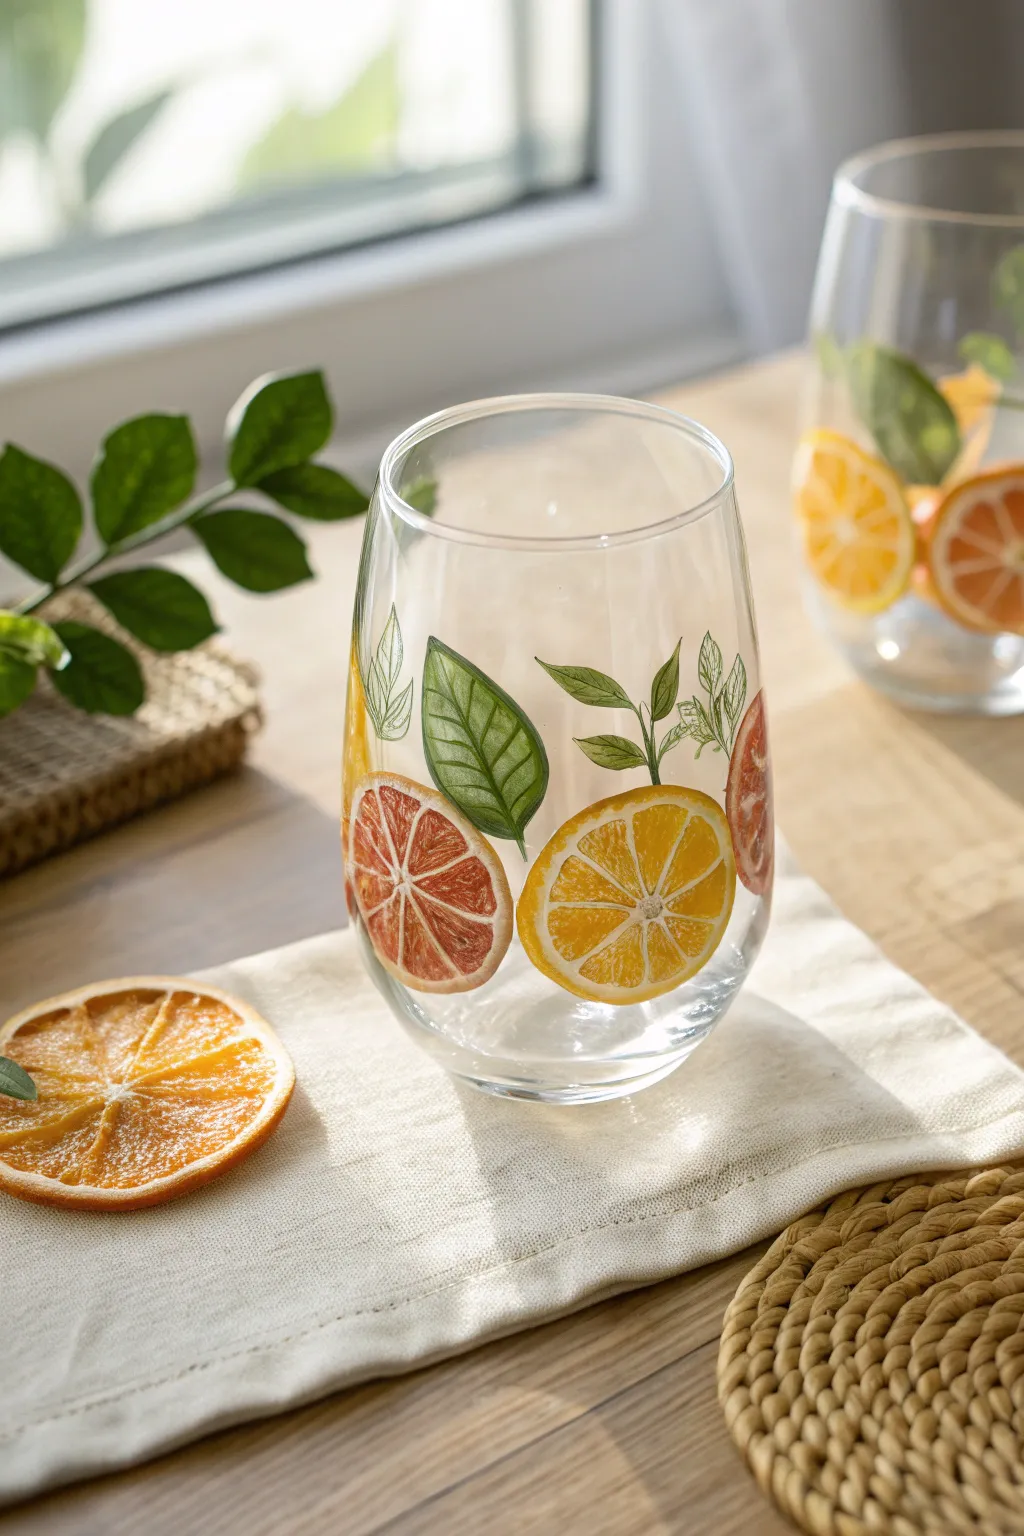
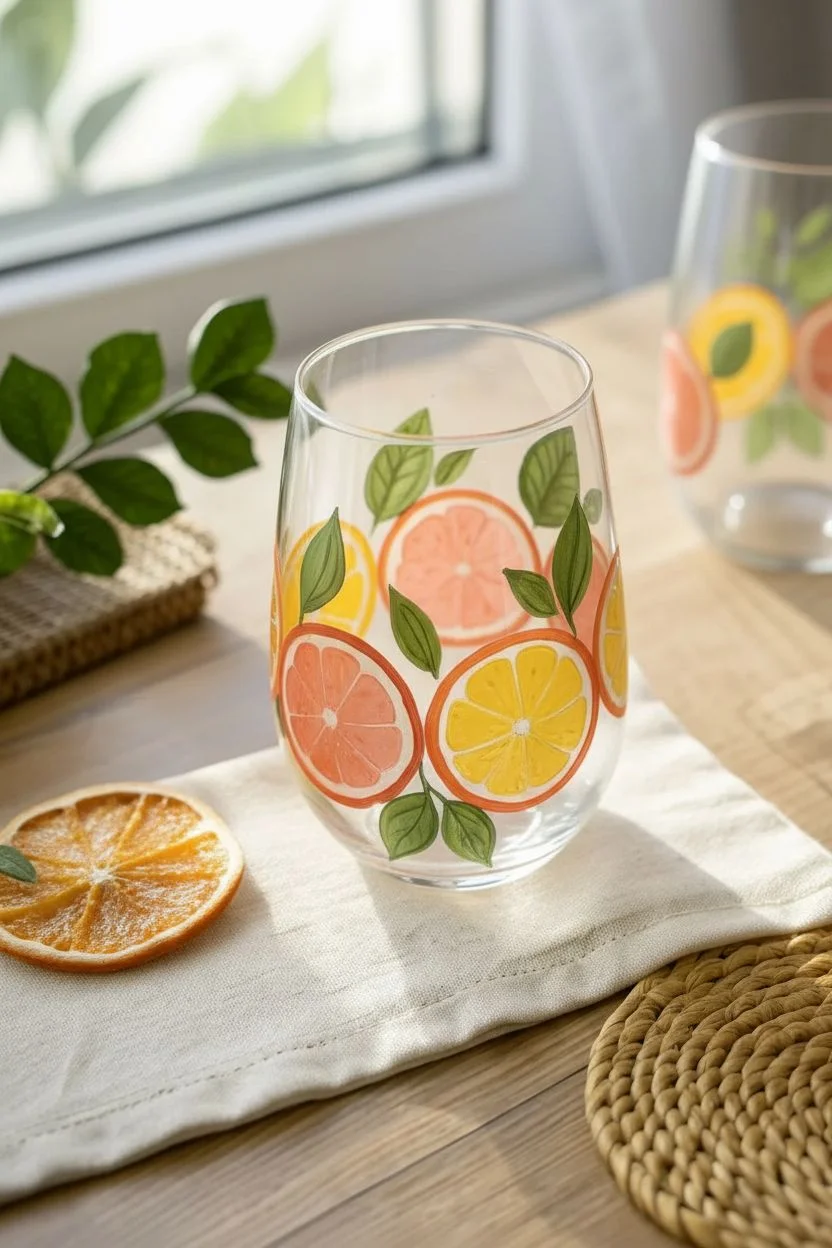
Bring the refreshing charm of a sunlit orchard to your table with these hand-painted stemless wine glasses. Featuring vibrant orange and grapefruit slices nestled among detailed green foliage, this project uses translucent glass paints to create a luminous, stained-glass effect.
How-To Guide
Materials
- Stemless wine glasses (thoroughly cleaned)
- Rubbing alcohol and cotton pads
- Enamels or multi-surface acrylic paints (Orange, Yellow, Red, Dark Green, Light Green, White)
- Detail brush (size 0 or 00)
- Small flat brush or filbert brush (size 2 or 4)
- Palette or paper plate
- Water cup and paper towels
- Oven for curing (optional, depending on paint brand)
Step 1: Preparation and Base Shapes
-
Clean surface:
Before making a single mark, wipe the entire exterior of the glass with rubbing alcohol. This removes unseen oils or fingerprints that prevent paint adhesion. -
Mix citrus colors:
On your palette, prepare two main citrus tones. For standard oranges, mix a bright orange with a tiny touch of yellow. For the blood orange or grapefruit slices, mix red with a drop of orange and white to get a soft, coral-pink hue. -
Paint circle foundations:
Using the flat brush, paint simple circles around the bottom half of the glass. Vary the sizes slightly. Don’t worry about perfect opacity yet; a slightly sheer layer allows light to pass through, mimicking real fruit flesh. -
Add rind base:
While the inner circles dry, carefully paint a thin ring around the outside of each circle using a slightly darker version of your fruit color. This defines the peel. -
Block in leaves:
Mix a medium grassy green. With the tip of your flat brush or a round brush, paint leaf shapes emerging from the top and sides of the fruit slices. Use a simple teardrop motion: press down near the fruit and lift as you pull away to create a pointed tip.
Juicy Texture Trick
Use a dry brush or sponge to stipple the inner fruit flesh rather than painting smooth strokes. This mimics the cellular structure of citrus.
Step 2: Adding Details and Veins
-
Paint the pith:
Once the base circles are dry to the touch, mix a warm white (white with a pinhead of yellow). Using your smallest detail brush, paint a thin line just inside the outer rind circle to represent the pith. -
Create fruit segments:
Using the same warm white mixture, paint lines radiating from the center of the fruit to the pith, like spokes on a wheel. I usually paint 8 to 10 spokes per slice. -
Add the center core:
Dab a small, irregular spot of white in the very center where all the spokes meet. -
Texture the flesh:
Load your brush with a watery wash of your original fruit color. Gently dab inside the triangular segments to add texture without completely covering the transparency. This makes it look juicy. -
Outline the leaves:
Switch to a darker green paint. With your detail brush, outline the green leaf shapes you painted earlier to give them crisp edges. -
Draw leaf veins:
Paint a central vein down the middle of each leaf, then add smaller diagonal veins branching off. Keep these lines very delicate. -
Sketch stems:
Connect the leaves with thin, fluid lines representing stems. You can add tiny, uncolored leaf outlines (just green line work) in the background for extra depth.
Paint Slipping?
If paint beads up on the glass, the surface is too oily. Clean again with alcohol and let dry completely. Apply clearer coats first for grip.
Step 3: Final Touches and Curing
-
Highlight the rind:
Mix a pale yellow-orange. Add tiny, stippled dots along the outer rind of the orange slices to simulate that bumpy citrus texture. -
Refine lines:
Check your white segment lines. If they look too faint against the fruit color, go over them one last time with a creamy, opaque white to make them pop. -
Inspect and clean:
Look for any stray paint marks or smudges on the clear glass areas. Scrape them away gently with a damp toothpick or a cotton swab dipped in alcohol. -
Air dry:
Let the glasses sit undisturbed for at least 24 hours (or up to 21 days for full air-curing depending on manufacturer instructions). -
Bake to set:
For durability, place glasses in a cold oven. Set temperature to 350°F (175°C). Once it reaches temperature, bake for 30 minutes. Turn oven off and let glasses cool completely inside before removing.
Fill your new glasses with a cool beverage and enjoy the endless summer vibes.

PENCIL GUIDE
Understanding Pencil Grades from H to B
From first sketch to finished drawing — learn pencil grades, line control, and shading techniques.
Explore the Full Guide
Galaxy Night Sky Painted on Wine Glassware
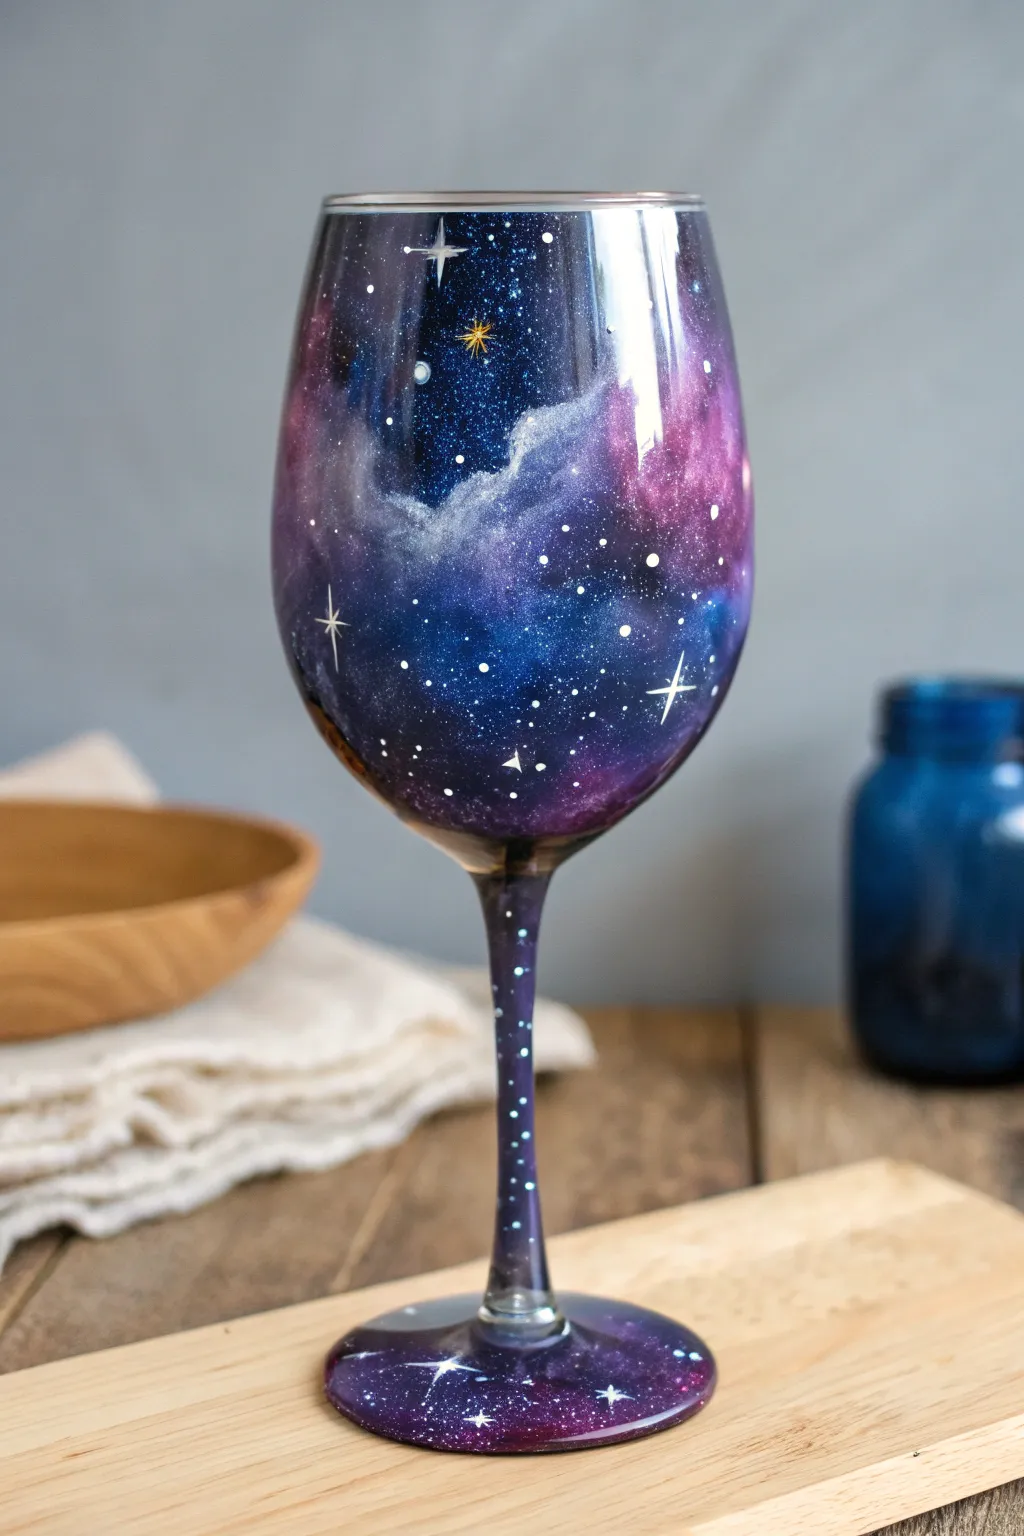
Transform ordinary stemware into a handheld universe with this mesmerizing galaxy painting technique. By layering deep blues, purples, and shimmering metallic highlights, you’ll create a dimensional night sky that swirls perfectly around the curve of the glass.
Step-by-Step
Materials
- Wine glass (thoroughly cleaned with rubbing alcohol)
- Enamel or multi-surface acrylic paints (Dark Blue, Phthalo Blue, Purple, Magenta, Black, White)
- Metallic silver or gold paint (optional)
- Makeup sponges or sea sponges
- Small detail brushes (liner brush, round brush)
- Rubbing alcohol
- Paper towels
- Palette or paper plate
- Gloss varnish or dishwasher-safe sealer (if paints aren’t bake-to-cure)
Step 1: Setting the Celestial Stage
-
Prep the surface:
Before putting any paint down, wipe the entire outer surface of the wine glass with rubbing alcohol on a paper towel. This removes oils and fingerprints that could cause the paint to peel later. -
Map the clear spaces:
Decide which areas you might want to leave slightly translucent to let light through, or if you want full coverage. For this specific look, we are going for full coverage from the rim down to the base, but keeping the layers thin enough to see fluidity. -
Sponge the base layer:
Load a makeup sponge with a mix of Deep Blue and Black. Dab this onto the glass starting near the stem and working upwards. Use a bouncing motion to create a textured, cloudy effect rather than streaks. -
Extend the darkness:
Continue sponging the dark base coat all the way down the stem and onto the top of the base of the glass. The transition doesn’t need to be perfect yet, just get the deep color established. -
Dry time:
Let this first dark layer dry completely. If you are impatient like me, a hair dryer on a cool setting can speed this up, but patience yields better durability.
Pro Tip: Handling
Place your hand inside the bowl of the goblet and spread your fingers to hold it while painting. This prevents smudging wet paint on the outside surface.
Step 2: Creating the Nebula Clouds
-
Introduce colors:
On your palette, prepare your Purple, Magenta, and Phthalo Blue. Using a fresh corner of your sponge, pick up some Purple and dab it randomly over the dark blue base, creating cloud-like clusters. -
Layering lighter hues:
While the purple is still slightly tacky, sponge Magenta into the center of the purple patches. The colors should blend slightly on the glass, creating that soft, nebulous glow. -
Adding depth with blue:
Use Phthalo Blue in the spaces between the purple clusters. Blend the edges where the blue meets the purple by lightly tapping with a clean part of the sponge. -
Create the milky way streak:
This is crucial for the galaxy look seen in the photo. Mix a tiny drop of White with Phthalo Blue to make a light, icy blue. Sponge a diagonal swoosh across the main part of the bowl. Keep the edges soft and feathery. -
Highlighting the nebula:
Take a very small amount of pure White on a sponge. Dab it very lightly into the center of your icy blue streak and the brightest parts of the pink clouds to add intense luminosity. -
Stem continuity:
Don’t forget the stem and base. lightly sponge some purple and blue down the stem to continue the theme, ensuring the galaxy feels connected from top to bottom.
Level Up: Zodiac Sign
Personalize the glass by arranging the larger white stars into a specific constellation matching the recipient’s zodiac sign or a recognizable shape like the Big Dipper.
Step 3: Stars and Constellations
-
Splatter stars:
Water down some white acrylic paint until it is inky. Dip a stiff brush (or toothbrush) into it, and flick the bristles with your thumb to spray tiny white specks across the glass. This creates the distant star field. -
Painting large stars:
Using your finest liner brush and pure White paint, dot specific larger stars onto the darker areas of the glass where they will stand out most. -
Painting the twinkle:
Select a few of the largest white dots to turn into twinkling stars. Paint a thin cross (+) through the dot, and then a smaller ‘x’ over that center to create the classic 8-point flare shape seen in the image. -
Adding golden accents:
For warmth, paint a few selected stars with metallic gold or add a tiny yellow center to the largest white stars. This subtle color variation adds realism. -
Rim cleanup:
Paint generally shouldn’t touch the area where your lips go. Wipe the top rim clean with a damp cloth or ensure you have left a small clear margin at the very top. -
Final cure:
Follow the instructions on your specific paint bottle for curing. Most enamels require either 21 days of air drying or baking in a cool oven (usually 350°F for 30 mins) to become dishwasher safe.
Once baked and cooled, your cosmic creation is ready to be filled with your favorite vintage for a truly stellar evening.
Stained-Glass Inspired Geometric Panels on Wine Glasses
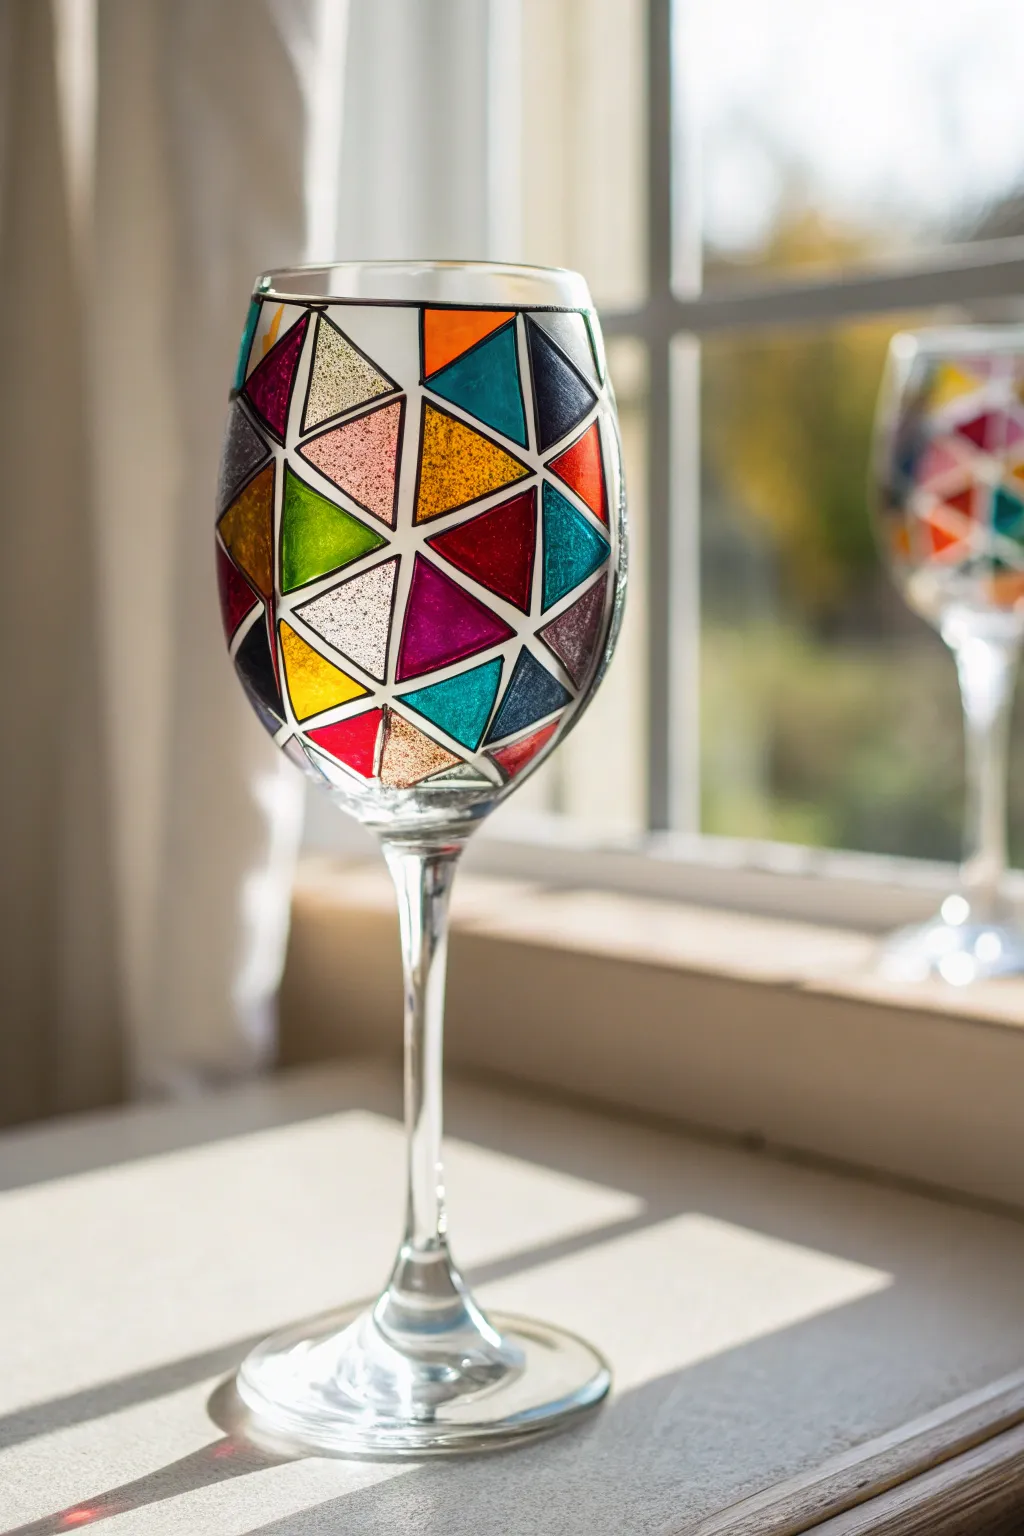

Transform a plain wine glass into a vibrant kaleidoscope of color with this stained-glass inspired project. Using geometric patterns and translucent paints, you’ll create a stunning vessel that catches the light beautifully through its colorful triangular panels.
Detailed Instructions
Materials
- Clear white wine glass
- Rubbing alcohol
- Cotton pads or paper towel
- Liquid leading (black)
- Glass paints applied with nozzle (solvent-based or acrylic enamel)
- Small paintbrush (optional, for touch-ups)
- Painter’s tape or washable marker (for guidelines)
- Q-tips (for cleanup)
Step 1: Preparation & Planning
-
Clean the Surface:
Begin by thoroughly wiping down the entire exterior of the wine glass with rubbing alcohol and a cotton pad. This removes any oils or fingerprints that could prevent the leading and paint from adhering properly. -
Plan Your Pattern:
Visualize the geometric design. While you can freehand this, you might find it helpful to use a washable marker to sketch out a few anchor points or triangles directly on the glass to ensure your pattern stays relatively consistent. -
Secure Your Workspace:
Lay down a paper towel or placemat. Since you will be rotating the glass constantly, find a comfortable seated position where you can prop your elbow on the table for steady hands.
Step 2: Creating the Framework
-
Start the Top Rim:
Using the black liquid leading bottle, carefully draw a continuous line around the upper rim of the glass, leaving just enough space at the top for lips to touch widely without hitting the paint. -
Draw Vertical Anchors:
Draw three or four long, diagonal lines extending from your top rim line down towards the stem. These will act as the main ‘spines’ of your geometric web. -
Connect the Triangles:
Begin connecting these spines with cross-lines to form triangles. Vary the sizes and angles slightly to prevent the pattern from looking too rigid or uniform. -
Work in Sections:
Don’t try to outline the entire glass at once. Draw a section of triangles, let the leading set slightly for about 10 minutes so you don’t smudge it, and then rotate the glass to continue the web. -
Finish the Outline:
Continue the pattern until you reach the base of the bowl where it meets the stem. Close off your shapes so there are no open gaps where paint could leak out later. -
Allow to Cure:
Let the black leading dry completely according to the manufacturer’s instructions. This usually takes at least 6 to 8 hours; I prefer to leave it overnight to ensure the ‘walls’ are solid.
Clean Lines Pro-Tip
If you make a mistake with the black leading, don’t wipe it while wet! Let it dry completely, then use a craft knife or razor blade to simply peel the mistake off the glass cleanly.
Step 3: Adding Color
-
Choose Your Palette:
Select 5-6 distinct glass paint colors. For the look in the photo, choose jewel tones like deep teal, magenta, lime green, bright yellow, and a sparkly silver or clear texture. -
Fill the First Triangle:
Squeeze the glass paint nozzle directly into the center of a triangle. Gently nudge the paint outward toward the black leading lines using the tip of the bottle, ensuring it touches the black border completely. -
Pop Bubbles:
Keep a close eye on fresh paint for tiny air bubbles. If you see one, pop it immediately with a clean pin or the tip of the nozzle before the paint creates a skin. -
Distribute Colors:
Work strictly one color at a time. Fill scattered triangles around the glass with your first color (e.g., teal) to ensure an even distribution, rather than clustering all the blue in one spot. -
Rotate Carefully:
Be mindful of gravity. Since glass paint is fluid, keep the painted surface relatively horizontal until it sets slightly to prevent drips. -
Add Texture:
For the specific look in the photo, include a few panels filled with a clear, glittery, or textured glass medium. This adds contrast against the solid bold colors. -
Fill Remaining Gaps:
Continue rotating and filling until every triangle is vibrant and full. Check for any missed spots or areas where the paint looks too thin and add a drop more if needed. -
Final Cure:
Allow the finished piece to dry in a dust-free area. Most glass paints require 24-48 hours to air cure, or can be baked in a home oven for durability.
Make It Sparkle
Mix fine cosmetic glitter into clear glass medium before painting specific triangles. Alternatively, sprinkle glitter onto wet paint for a textured, sugared-glass effect.
Once fully cured, your new geometric glass is ready for a festive toast


Have a question or want to share your own experience? I'd love to hear from you in the comments below!