If you’re craving a big, satisfying project, a winter mural is basically instant atmosphere on a wall. I love how a few cool blues, crisp whites, and one cozy pop color can turn any space into a whole seasonal scene.
Snowman Crowd Mural
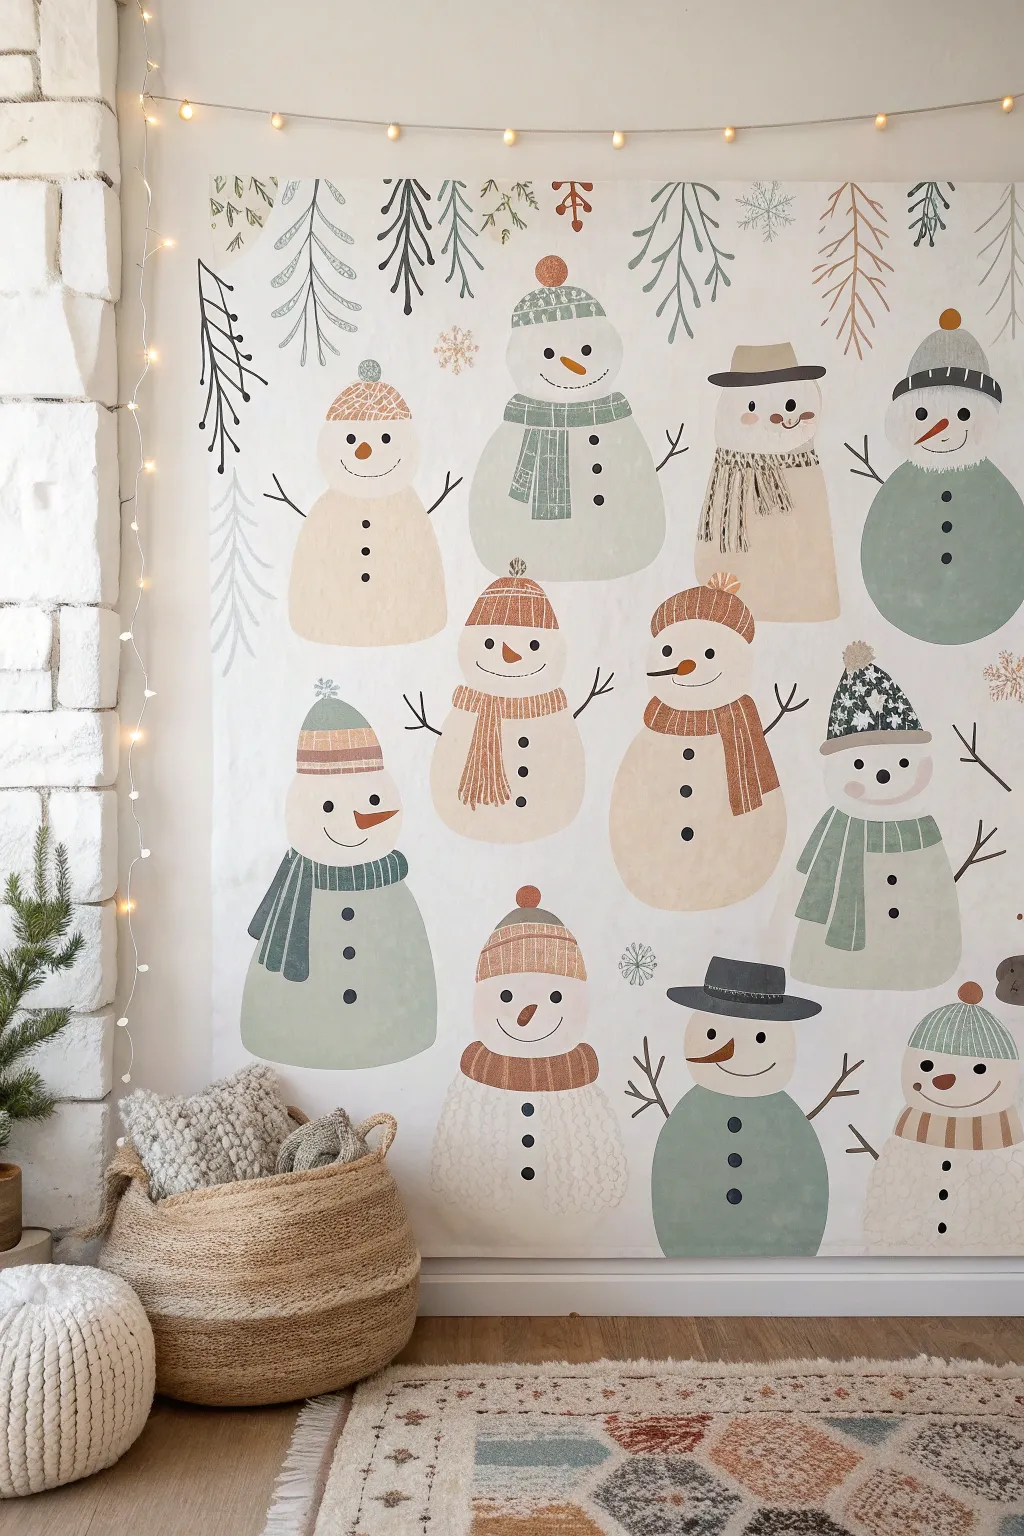
Transform a blank drop cloth or canvas into a cozy winter scene featuring a charming crowd of unique snowmen. This large-scale tapestry adds instant holiday warmth without the commitment of painting directly on your walls, and its soft, muted color palette fits perfectly with modern farmhouse or Scandinavian decor.
Step-by-Step Tutorial
Materials
- Large canvas drop cloth or heavy cotton fabric (approx. 5′ x 7′)
- Gesso (white primer)
- Acrylic craft paints (creams, sages, rusty oranges, slate blues, browns)
- Fabric medium (optional but recommended for softer feel)
- Assorted paintbrushes (1-inch flat, medium round, fine liner)
- Pencil and eraser
- Painter’s tape or push pins
- String lights and Command hooks for hanging
Step 1: Preparation and Sketching
-
Prep the Surface:
Begin by ironing your canvas or drop cloth thoroughly to remove any deep creases. If the fabric is very raw or darker than you’d like, apply a thin, even coat of white Gesso over the entire surface to create a bright, primed base that makes the colors pop. -
Map Out the Crowd:
Hang the fabric temporarily on a wall or lay it flat on a large floor space. Use a pencil to lightly sketch the positions of your snowmen. Aim for varied heights and overlapping slightly to create depth. -
Define the Shapes:
Refine your pencil sketches. Draw simple stacked circles for bodies, oval heads, and triangular carrot noses. Don’t worry about perfect symmetry; the charm lies in their wobbly, organic shapes.
Uneven Paint Coverage?
If the fabric texture is showing through too much, don’t overwork wet paint. Let the first coat dry fully, then apply a second layer for opacity.
Step 2: Painting the Bodies
-
Mix Your Base Palette:
Mix your acrylic paints with a little fabric medium if you have it. Create a palette of ‘winter whites’—pure white, cream, warm beige, and very pale grey—so each snowman has a slightly different shade. -
Block in the Snowmen:
Using a 1-inch flat brush or a medium round brush, fill in the snowman body shapes. I usually start with the lightest cream bodies first, then move to the slightly darker beige ones to keep my water clean. -
Add Subtle Texture:
While the body paint is still slightly wet, you can dab a dry brush with a tiny bit of darker beige or grey around the edges of the curved shapes to give them a rounded, dimensional look. -
Let the Base Dry:
Allow the painted bodies to dry completely before moving on to accessories. This prevents your scarf colors from muddying the clean white snow.
Step 3: Accessories and Details
-
Paint the Hats:
Select your accent colors—muted sages, dusty blues, and terracotta oranges. Paint a variety of hats: beanies with pom-poms, structured top hats, and fedoras. Vary the colors so no two identical hats are right next to each other. -
Dress Them in Scarves:
Paint broad stripes for scarves around their necks. Make some hang long and straight, while others can be wrapped snugly. Use the same muted palette to maintain cohesion. -
Add Patterns:
Once the hat and scarf base coats are dry, switch to a smaller round brush. Add stripes, polka dots, or simple zig-zags to the accessories using a contrasting lighter color (like cream). -
Create Faces:
Using a fine liner brush and black or dark brown paint, carefully dot on the eyes and classic coal smiles. Use a small amount of bright orange for the carrot noses, keeping the strokes sharp. -
Button Up:
Dot three or four coal buttons down the center of each body using the dark paint. Vary the size of the dots slightly for a hand-painted feel. -
Arm Them:
Use a liner brush with thinned brown paint to create stick arms. Make them branch out in different directions—some waving up, some resting at their sides.
Pro Tip: Color Harmony
Limit your palette to 4-5 core colors and mix them with white to create variations. This ensures all snowmen look like they belong in the same family.
Step 4: Finishing Touches
-
Background Foliage:
In the empty white spaces above the snowmen, sketch loose designs of hanging pine branches, sprigs, and snowflakes. Paint these with light, feathery strokes using sage green and dusty brown. -
Add Snowflakes:
Fill any remaining gaps with delicate star shapes or standard snowflakes in a soft beige or grey-blue to tie the composition together. -
Set the Paint:
Once fully dry (give it overnight), you can heat set the fabric by ironing the back side of the tapestry on medium heat if you used fabric medium. -
Hang and Light:
Mount the tapestry on the wall using small nails or Command strips at the corners. For the final magical touch, drape a strand of warm fairy lights across the top and down the sides.
Enjoy your festive, handmade mural that brings a quiet joy to your winter evenings


Reindeer Face Focal Point

Transform a plain exterior wall into a festive focal point with this charming reindeer mural. Featuring stylized antlers and simple botanical accents, this large-scale project uses earthy tones to create a warm, inviting winter scene.
Step-by-Step Tutorial
Materials
- Exterior masonry primer (white or beige)
- Exterior latex paints (dark brown, medium brown, cream, dark grey/black, orange-brown)
- Assorted paintbrushes (large angled sash brushes, medium filbert, fine round liner)
- ChALK or charcoal stick for sketching
- Painter’s tape
- Drop cloth
- Ladder or step stool
- Small roller and tray (optional for large fill areas)
- Paper towels or rags
Step 1: Preparation and Sketching
-
Clean the surface:
Begin by thoroughly cleaning the exterior wall to remove dirt, dust, and spiderwebs. Let the surface dry completely before starting, as moisture will trap underneath the paint. -
Establish the scale:
Step back and visualize where the reindeer head needs to sit. I like to mark the top of the antlers and the bottom of the chest first to ensure the composition fits nicely between windows or architectural features. -
Sketch the outline:
Using a light-colored chalk or charcoal stick, sketch the basic contour of the deer’s head, neck, and the large sweeping antlers. Keep your lines loose; this is just a guide for your brush. -
Add botanical guides:
Sketch the placement of the surrounding plant stems and leaves near the bottom, along with the star and snowflake floating above the head.
Rough Wall Pro-Tip
On highly textured stucco, “stamping” with a nearly dry brush rather than dragging it helps get paint into deep crevices without drips.
Step 2: Blocking in Color
-
Paint the antlers:
Mix a dark, rich brown for the antlers. Using a medium filbert brush or a small sash brush, fill in the antler shape. The textured wall might require you to dab the paint into the crevices for solid coverage. -
Fill the neck and body:
Apply the medium rusty-brown shade to the lower neck and body area. Use smooth, downward strokes where possible, but don’t worry about fur texture yet; just aim for an opaque base layer. -
Block in the face:
Use a warm cream color to fill in the face, snout, and the front of the neck. Paint right up to where the darker fur begins, blending slightly if the paint is wet, though a hard edge is fine for this illustrative style. -
Detail the ears:
Fill the outer ear shape with the cream color and add the dark brown distinct markings inside the ear lobes while you have your darker palette handy.
Troubleshooting Drips
Exterior paint can run quickly on vertical surfaces. Keep a damp rag on your belt loop to immediately wipe away drips before they tack up.
Step 3: Adding Details and Texture
-
Define facial features:
Switch to a smaller round brush and dark grey or black paint. Carefully paint the large, almond-shaped eye, the nose, and the thin mouth line. Add a tiny white dot to the eye for a lifelike glint. -
Create fur texture:
Using a fine liner brush and dark brown paint on the cream sections, paint wiggly, loose lines to suggest fur texture on the neck. Repeat this with lighter cream paint on the darker body sections for contrast. -
Add spots:
Dip the handle end of a brush or a small round brush into white or cream paint. Dot the lower back of the deer to create a speckled pattern. -
Outline main shapes:
To make the image pop against the wall, use a thin brush with dark brown or black paint to outline the jawline, ears, and neck. Vary the line thickness slightly for a hand-drawn look.
Step 4: Surrounding Elements
-
Paint the stems:
Use a long liner brush and grey paint to create the tall, curvy stems of the plants rising from the bottom right. -
Add leaves and berries:
Paint simple leaf shapes in outline style using grey. Add pops of color with solid orange-brown almond shapes for leaves and small circles for berries. -
Paint the celestial icons:
Above the antlers, paint the star using a brownish-red tone and the delicate snowflake with a thin grey or blue-grey line. Keep these geometric and simple. -
Final touches:
Step back about ten feet to view the whole mural. Touch up any patchy areas where the stucco texture shows through too much, and erase any visible chalk lines with a damp cloth.
Once dry, your woodland friend will welcome visitors with rustic charm all winter long


Cardinals in Bare Winter Branches
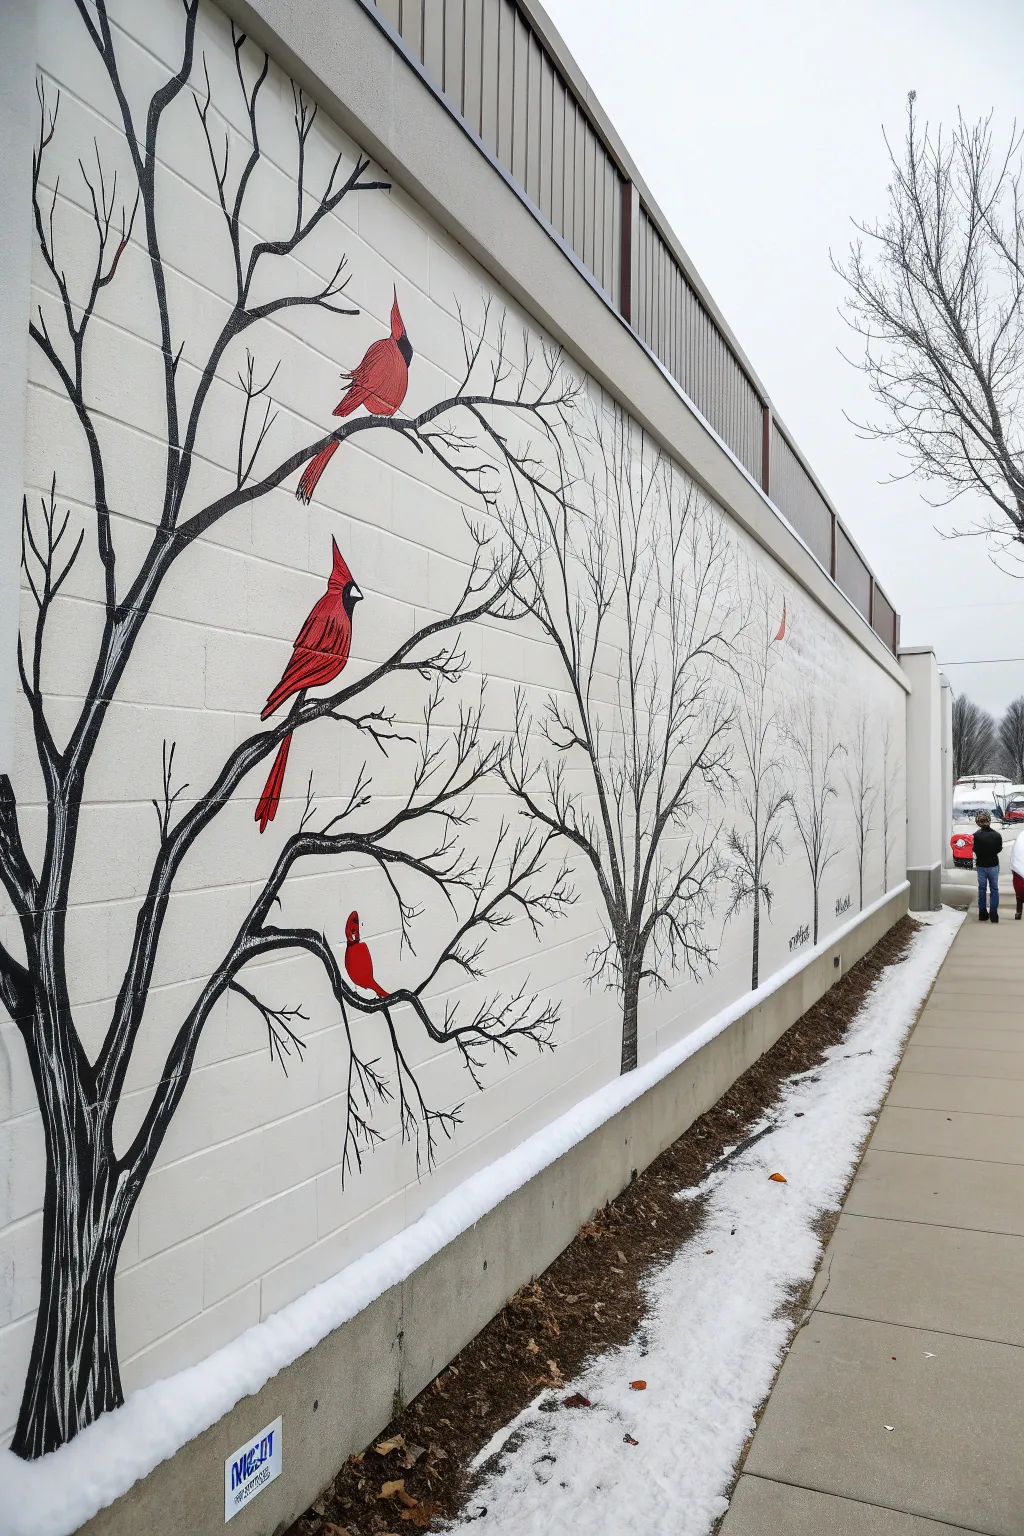
Transform a plain exterior wall into a striking winter scene featuring stark black silhouettes of bare trees and vibrant red cardinals. This high-contrast mural uses simple shapes and negative space to create a sophisticated look that pops against white brick.
Step-by-Step
Materials
- Exterior masonry primer (white)
- Exterior acrylic latex paint (black)
- Exterior acrylic latex paint (bright red)
- Exterior acrylic latex paint (dark red/burgundy)
- Painters tape
- Chalk or charcoal stick for sketching
- Assorted paintbrushes (2-inch sash brush, 1-inch flat brush, liner brush)
- Drop cloths
- Ladder or step stool
- Small plastic cups for paint
- Clear exterior sealer (optional)
Step 1: Preparation and Background
-
Clean surface:
Begin by thoroughly cleaning the brick wall with a pressure washer or stiff bristle brush and soapy water to remove dirt and mildew. Let the wall dry completely for at least 24 hours. -
Protect area:
Lay down drop cloths along the base of the wall to protect the sidewalk or ground from paint drips. Use painter’s tape to mask off any metal flashing or trim at the top and bottom of the wall. -
Prime the wall:
Roll on a coat of white exterior masonry primer if the wall isn’t already a clean white. This ensures your black and red colors will stand out vividly and adhere properly to the textured surface.
Brick Texture Trick
When painting on textured brick, ‘stipple’ (poke) your brush into the deep pores rather than wiping across. This prevents white speckles from showing through the black trunks.
Step 2: Sketching the Composition
-
Establish the foreground:
Using a piece of chalk or charcoal, sketch the largest tree on the left side. Focus on creating a thick, sturdy trunk that extends from the ground to the top edge. -
Add main branches:
Draw the primary branches extending outward and upward from the main trunk. Keep the angles sharp and irregular to mimic the look of winter growth. -
Create depth:
Sketch a second, slightly smaller tree further down the wall. Continue adding smaller and thinner trees as you move to the right to create a sense of atmospheric perspective. -
Position the birds:
Mark the locations for your cardinals with simple oval shapes. Place larger birds on the foreground tree and smaller dots or shapes on the distant trees to maintain perspective.
Interactive Element
Add a single painted red feather drifting down near the bottom of the wall, or paint a small cardinal at kid-height so children can pose for photos ‘holding’ the bird.
Step 3: Painting the Trees
-
Outline trunks:
Load your 2-inch sash brush with black exterior paint. Carefully outline the edges of your sketched trunks, working the bristles into the grout lines of the brick for a crisp edge. -
Fill in trunks:
Fill the interior of the tree trunks with solid black paint. I find it helps to dab the brush into deep crevices rather than just brushing across them to ensure full coverage. -
Paint main branches:
Switch to a 1-inch flat brush to paint the thicker branches connected to the trunk. Taper your strokes as you move away from the center to make the branches naturally thin out. -
Add detail twigs:
Use a liner brush or small round brush to paint the finest twigs at the ends of the branches. Allow your hand to shake slightly to give these twigs a natural, organic jaggedness. -
Fade distant trees:
For the trees furthest to the right, consider mixing a tiny drop of white into your black paint to create a charcoal grey. This subtle shift mimics atmospheric haze.
Step 4: Adding the Cardinals
-
Base coat birds:
Paint the silhouette of the cardinals using the bright red exterior paint. Use a small flat brush to define the crest on the head and the long tail feathers. -
Second coat:
Apply a second coat of bright red once the first is dry to ensure the color is opaque and vibrant against the white background. -
Add shadows:
While the red is still slightly tacky or just dry, paint the underside of the belly and the lower wing feathers with the darker red or burgundy paint to give the bird volume. -
Face details:
Use your liner brush and black paint to create the distinctive black mask around the beak and eye area of the cardinals. -
Beak highlight:
Add a tiny triangle of orange or lighter red for the beak to make it distinct from the red body. -
Final touches:
Check the connection points where the birds’ feet would grip the branches. Create small black strokes over the red leg area to look like talons gripping the wood.
Step back and enjoy the striking contrast of your permanent winter garden that requires no watering at all


Mitten and Scarf Pattern Mural
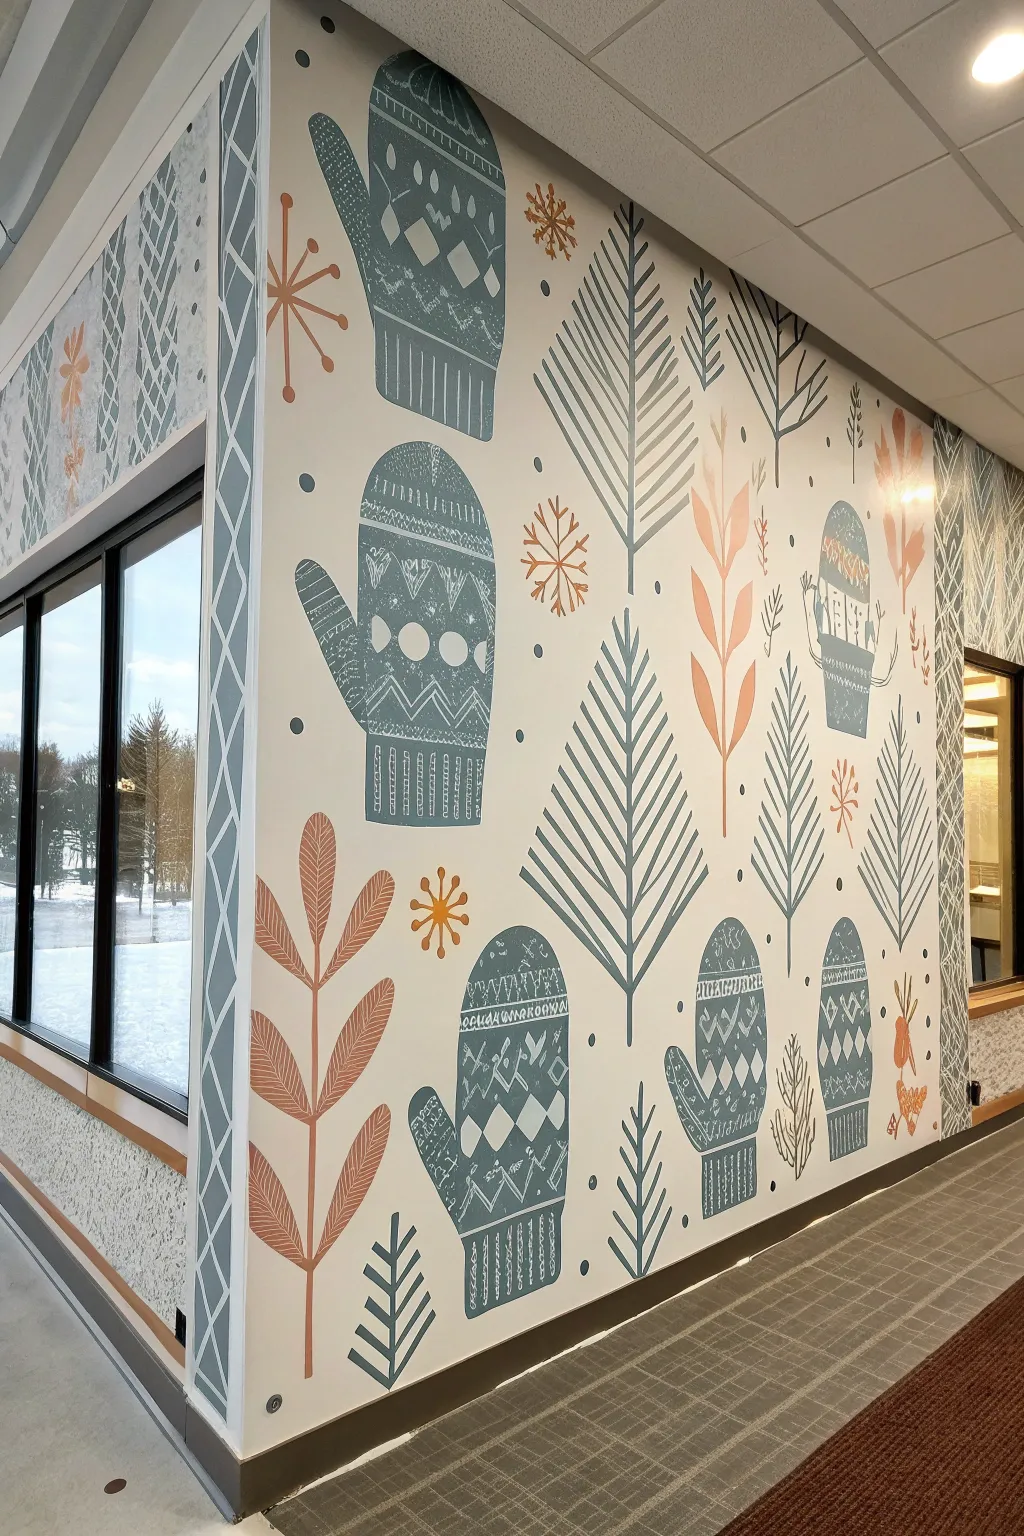
Transform a plain wall or hallway into a cozy winter wonderland with this large-scale mural featuring stylized mittens and woodland motifs. The design uses a limited color palette of teal, rust, and white to create a modern, Scandinavian-inspired repeats pattern that feels both festive and sophisticated.
How-To Guide
Materials
- Interior latex paint (Eggshell finish: White/Cream base, Teal/Blue-Grey, Rusty Orange)
- Pencil and large eraser
- Overhead projector (optional but recommended)
- Transparency film or digital image for projection
- High-quality painter’s tape (1-inch and 2-inch widths)
- Assorted paintbrushes (2-inch sash brush, 1-inch flat brush, fine liner brush)
- Small foam roller and tray
- Drop cloth
- Damp rag for mistakes
- Laser level or long spirit level
- Cardstock for stencils (alternative to projection)
Step 1: Preparation & Base Coat
-
Prep the surface:
Begin by cleaning your wall thoroughly to remove dust and oils. Use spackle to fill any small holes or dents, sand them smooth, and wipe clean with a damp cloth. -
Protect the area:
Lay down your drop cloth along the baseboards. Apply painter’s tape along the ceiling line, baseboards, and any window trim to ensure crisp edges. -
Apply the background color:
Roll on your base color—a warm, creamy off-white or light beige works best to make the motifs pop. Apply two coats for even coverage, allowing the first coat to dry fully (usually 2-4 hours) before starting the second.
Step 2: Layout & Border Design
-
Mask the decorative border:
Before tackling the main pattern, create the decorative border seen on the corners. Use a laser level to tape off a vertical strip about 4-6 inches wide along the corner edge. -
Draft the diamond pattern:
Inside this taped vertical strip, use 1-inch painter’s tape to create a lattice or diamond design. Apply the tape diagonally in one direction, then cross it in the other direction. Press the edges firmly to prevent bleed. -
Paint the border:
Using your teal paint and a small roller or brush, paint over the taped lattice design. Use a ‘dry brush’ technique specifically on the edges of the tape to minimize bleeding. Let this dry completely before peeling the tape to reveal the white geometric lines.
Bleed-Proof Lines
To get razor-sharp lines on the tape border, paint over the tape edge with your BASE wall color first. This seals the tape, so any bleed matches the wall, keeping the colored layer crisp.
Step 3: Mapping the Motifs
-
Plan your placement:
Decide on the scale of your mittens and trees. I find it helpful to sketch the layout on paper first to ensure the repeating elements are balanced and don’t clump together. -
Project or trace the shapes:
If using a projector, shine your design onto the wall and lightly trace the outlines of the mittens, trees, and leaves with a pencil. If drawing freehand or stenciling, cut cardstock templates for the main mitten shape and trace them randomly but evenly across the wall. -
Sketch the trees:
Draw simple, stylized triangular tree shapes between the mittens. Vary the styles—some can be full triangles with internal lines, others just a central trunk with upward-sweeping branches.
Level Up: Texture
Mix a clear glaze medium into your paint for the mittens to create slightly translucent, varied brushstrokes. This mimics the uneven ink distribution of a real screen print.
Step 4: Painting the Elements
-
Block in the mittens:
using a 1-inch flat brush, fill in the mitten outlines with the teal paint. Don’t worry about the internal white patterns yet; just create solid silhouettes. Ensure the paint is opaque, applying a second coat if the background shows through. -
Paint the foliage:
Switch to the rusty orange paint for the leafy branches. Use a medium round brush to paint a central stem, then add leaf shapes extending outward. Keep the strokes fluid and organic to contrast with the geometric mittens. -
Paint the trees:
Return to the teal paint for the evergreen trees. For the ‘skeleton’ trees, paint a central vertical line and then use quick, confident strokes for the branches. For the solid triangular trees, fill the shape entirely. -
Add accent snowflakes:
Using the orange paint and a finer brush, add small snowflake or starburst icons in the empty spaces. Keep them simple—just intersecting lines works perfectly.
Step 5: Detailed Pattern Work
-
Detail the mittens:
Once the teal mitten silhouettes are bone dry, switch to your fine liner brush and the original wall color (cream/white). Carefully paint the Nordic patterns—zigzags, dots, and stripes—directly onto the dried mitten shapes. -
Detail the solid trees:
Similarly, add the internal branch structure to any solid teal trees using the white paint. Painting negative space lines like this gives the trees a stylized, graphic look. -
Add texture marks:
To mimic a block-print look, add some small dots or varying line weights around the motifs. Imperfection here adds to the hand-drawn charm. -
Final touches:
Step back and check the overall balance. Use your small eraser to remove any visible pencil lines, and use the damp rag (or a small brush with base color) to touch up any smudges.
Remove your tape carefully and enjoy the warmth of your custom Nordic winter scene.
BRUSH GUIDE
The Right Brush for Every Stroke
From clean lines to bold texture — master brush choice, stroke control, and essential techniques.
Explore the Full Guide
Interactive Community Snowstorm Wall

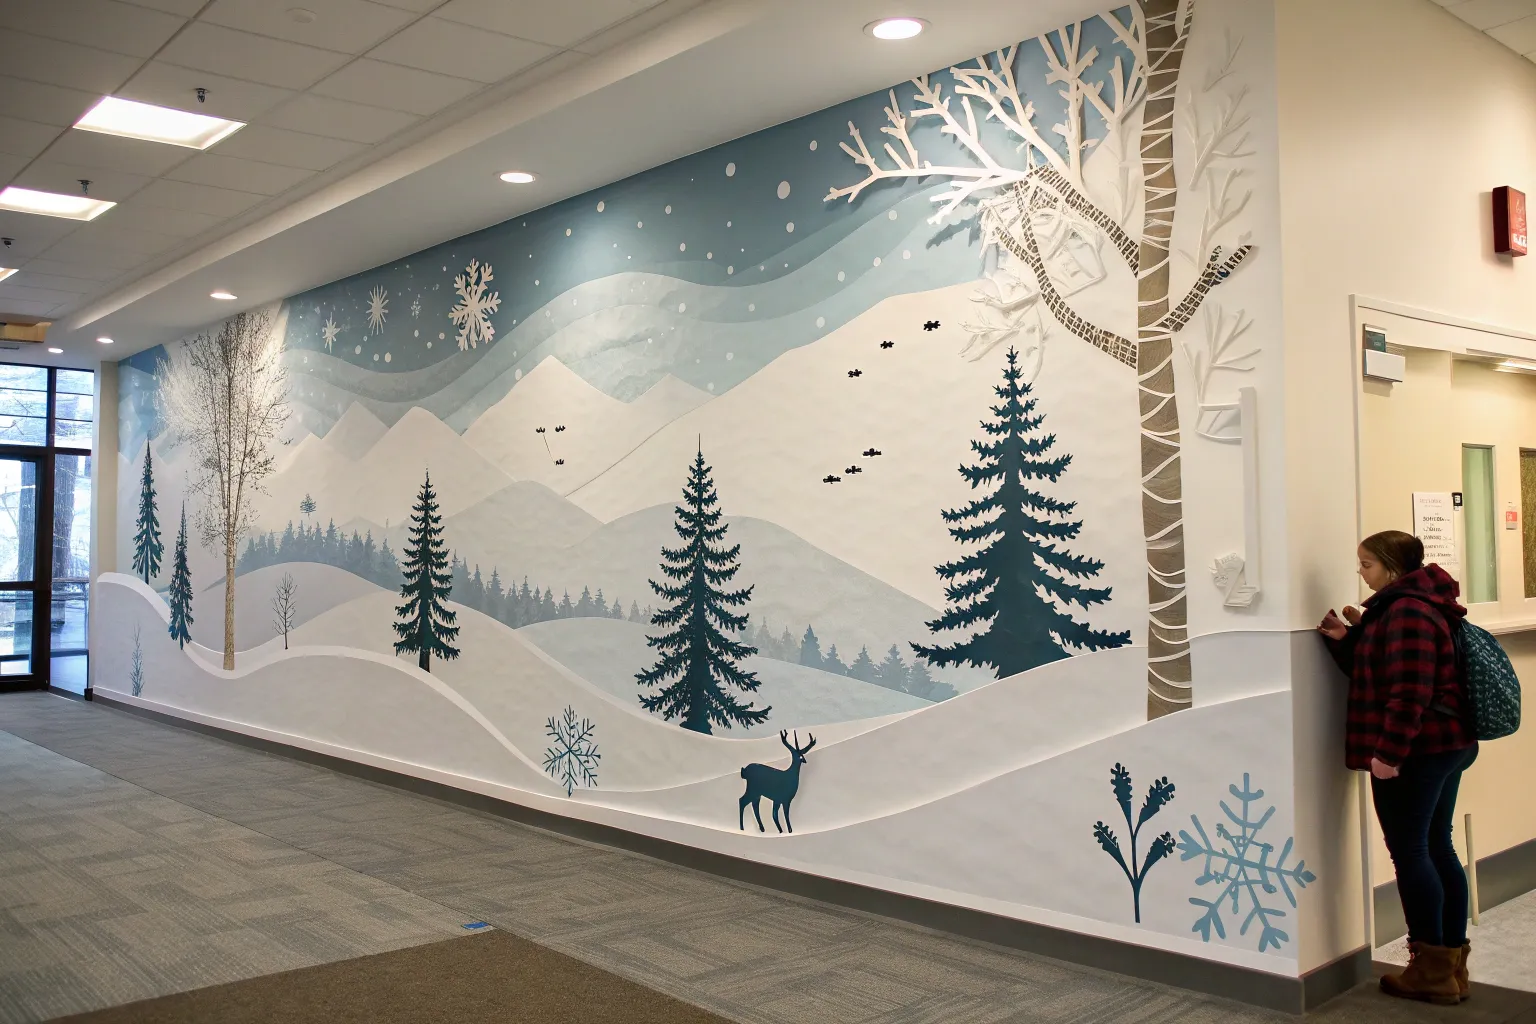
Transform a plain cinder block wall into a breathtaking snowy landscape featuring a deep blue starry night and a layered pine forest. This project uses stylized geometric shapes and a limited color palette to create depth and atmosphere on a grand scale.
Step-by-Step Tutorial
Materials
- Exterior masonry primer
- Exterior latex paints (Deep indigo, steel blue, cyan, white, cream/beige)
- Painter’s tape or chalk lines
- Large and medium paint rollers with extension pole
- Assorted paintbrushes (1-inch to 4-inch sizes)
- Smaller detail brushes for stars
- Drop cloths
- Ladder or scaffolding
- Pencil and chalk for sketching
- Cleaning supplies (TSP or similar)
Step 1: Preparation and Background
-
Clean and Prime:
Before putting any color on the wall, scrub the cinder blocks thoroughly with a scrub brush and masonry cleaner to remove dirt and debris. Once dry, apply a heavy coat of exterior masonry primer to seal the porous surface. -
Establish the Horizon:
Decide where your snow line meets the mountains. The mural is roughly split in half, but a slightly lower horizon line adds grandeur to the sky. Snap a chalk line or use tape to mark this separation. -
Paint the Sky:
Roll on two coats of your deepest indigo paint for the top portion of the wall. This creates the ‘night’ backdrop. Ensure the paint gets deep into the mortar grooves for solid coverage. -
Base the Snow:
For the lower section, roll on a cool, pale white or very light blue-grey. This serves as the foundation for your snowy foreground and should cover the entire bottom half.
Uneven Surface Woes
If the cinder block texture makes straight lines jagged, tape them off firmly and paint the base color over the tape edge first to seal it before applying the new color.
Step 2: Mountains and Mid-Ground
-
Sketch the Peaks:
Using white chalk, sketch the jagged outlines of the mountains over the dark sky. Create variety by making the central peaks largest and tapering them off towards the sides. -
Define the Light Source:
Decide which direction the ‘moonlight’ is coming from—in this mural, it’s the right. This means the right slopes of your mountains will be bright cream/white, and the left slopes will be shadowed. -
Map the Shadows:
Paint the shadowed (left) sides of the mountains using a medium steel blue. Use crisp, straight strokes to mimic the geometric style shown here. -
Highlight the Peaks:
Fill in the illuminated (right) slopes with your cream or off-white paint. I find that doing a second coat here really makes the mountains pop against the dark sky. -
Create Atmospheric Haze:
Just below the mountains, paint a horizontal band of lighter blue. This represents distant hills and atmospheric perspective, blending the base of the mountains into the snowy foreground.
Step 3: The Cosmic Sky
-
Add the Moon:
Near the top right peak, paint a simple, solid circle in cream for the moon. It doesn’t need to be perfectly round; a slight organic feel works well with the folk-art style. -
Splatter Stars:
Dip a stiff-bristled brush into watered-down white paint. Flick the bristles with your thumb to create a spray of tiny stars across the indigo sky section. -
Paint Larger Stars:
Go back in with a small detail brush and manually paint a few distinct four-point stars or larger dots to vary the celestial texture.
Scale It Up
To get proportions right on a huge wall, take a photo of the blank wall, doodle your design digitally first, then use a grid system to transfer the drawing accurately.
Step 4: Foreground Forest
-
Plan Tree Placement:
Chalk out vertical lines where your trees will stand. Place the largest, most detailed trees in the immediate foreground (right side) and smaller, fainter trees in the distance (left side). -
Paint Distant Trees:
Using a light blue-grey paint, stamp or dab in the shapes of the furthest trees. These should be simple silhouettes without much internal detail. -
Layer the Mid-Ground Trees:
Mix a slightly darker teal or steel blue. Paint the medium-sized trees, giving them jagged, sawtooth edges to represent pine boughs. -
Detail the Hero Trees:
For the large trees in the foreground, use your darkest navy or black-blue. Start with a central trunk line, then paint swooping, upward-curving branches coming off it. -
Add Texture to Branches:
Inside the large tree shapes, use a lighter blue to paint internal leafy shapes or ‘teardrops’ on the branches. This stylization mimics folk art patterns rather than realistic needles. -
Ground the Bases:
Use your white base color to paint swirly, uneven drifts at the bottom of the trees, making them look like they are buried deep in snowdrifts.
Step back across the street to admire how your layered blues create a deep, chilly winter atmosphere right on your wall


Have a question or want to share your own experience? I'd love to hear from you in the comments below!