Capturing the essence of magic on canvas allows us to explore a world of mystical atmosphere and enchanting storytelling through color and shadow. These artistic prompts are designed to help you conjure up everything from celestial themes to cozy, hidden cottages in your sketchbook or on a finished canvas.
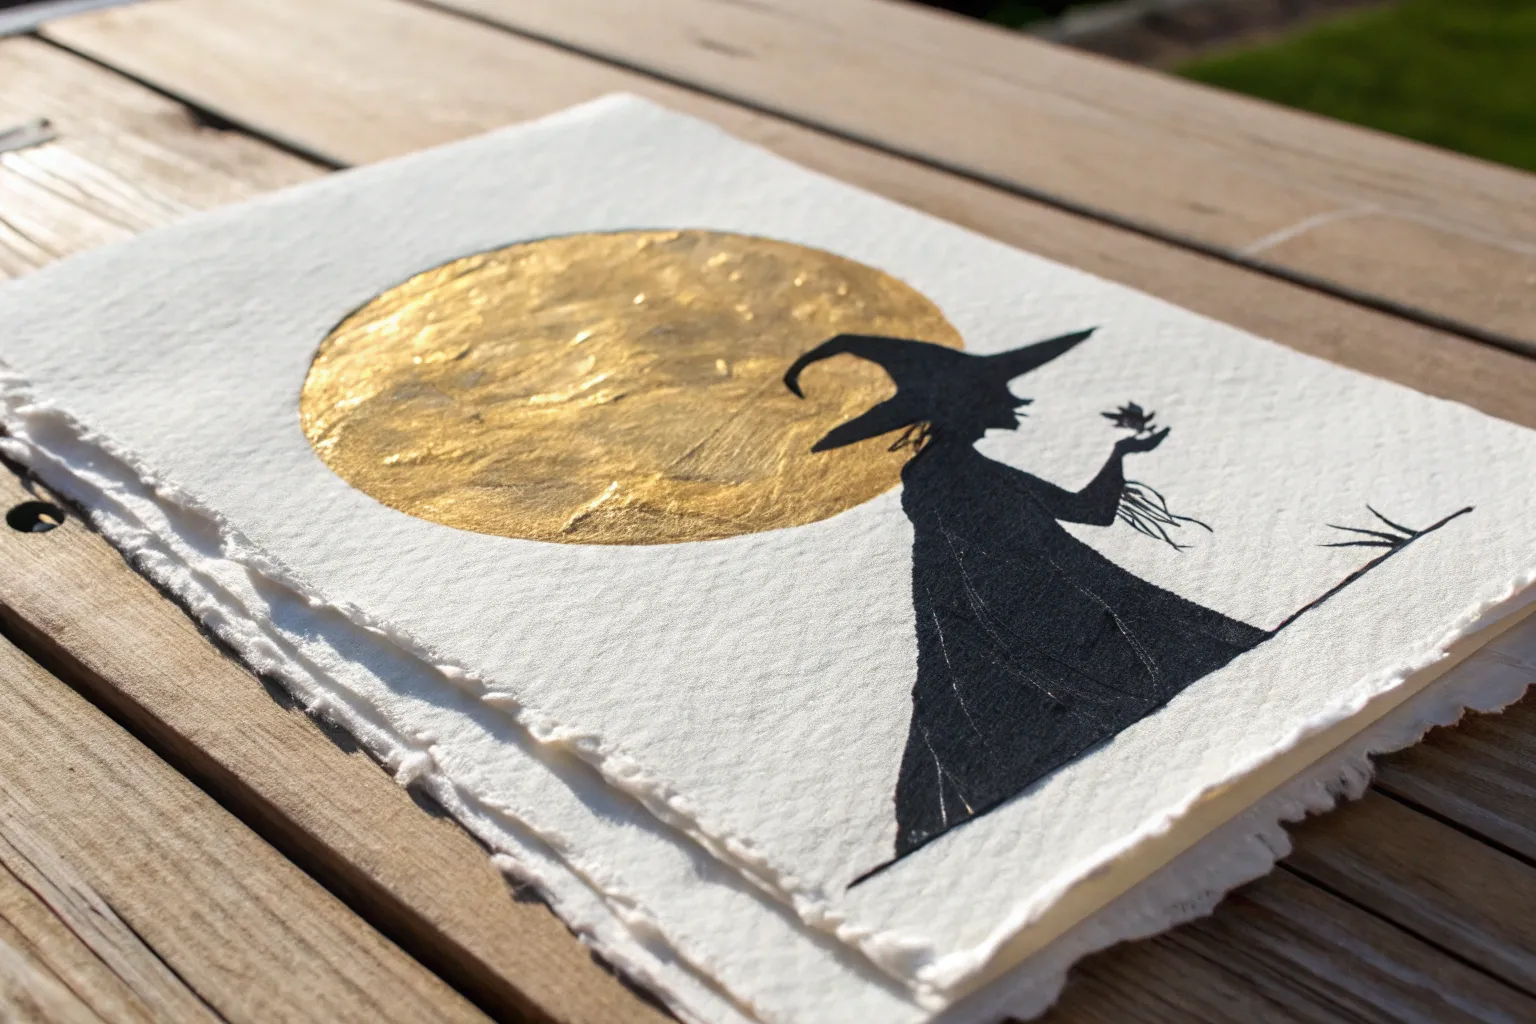
The Classic Moonlit Silhouette
Capture the magic of Halloween with this high-contrast painting that pairs a textured, luminous moon with a crisp dark silhouette. Using metallic watercolors and opaque ink creates a stunning interplay of shimmer and shadow suitable for framing.
Step-by-Step Guide
Materials
- Heavyweight cold-press watercolor paper (300gsm)
- Metallic silver watercolor paint (or diluted gray ink)
- Black India ink or opaque black gouache
- Round watercolor brush (size 6 or 8)
- Fine liner brush (size 0 or 1)
- Pencil and kneaded eraser
- Compass or large circular object for tracing
- Paper towel
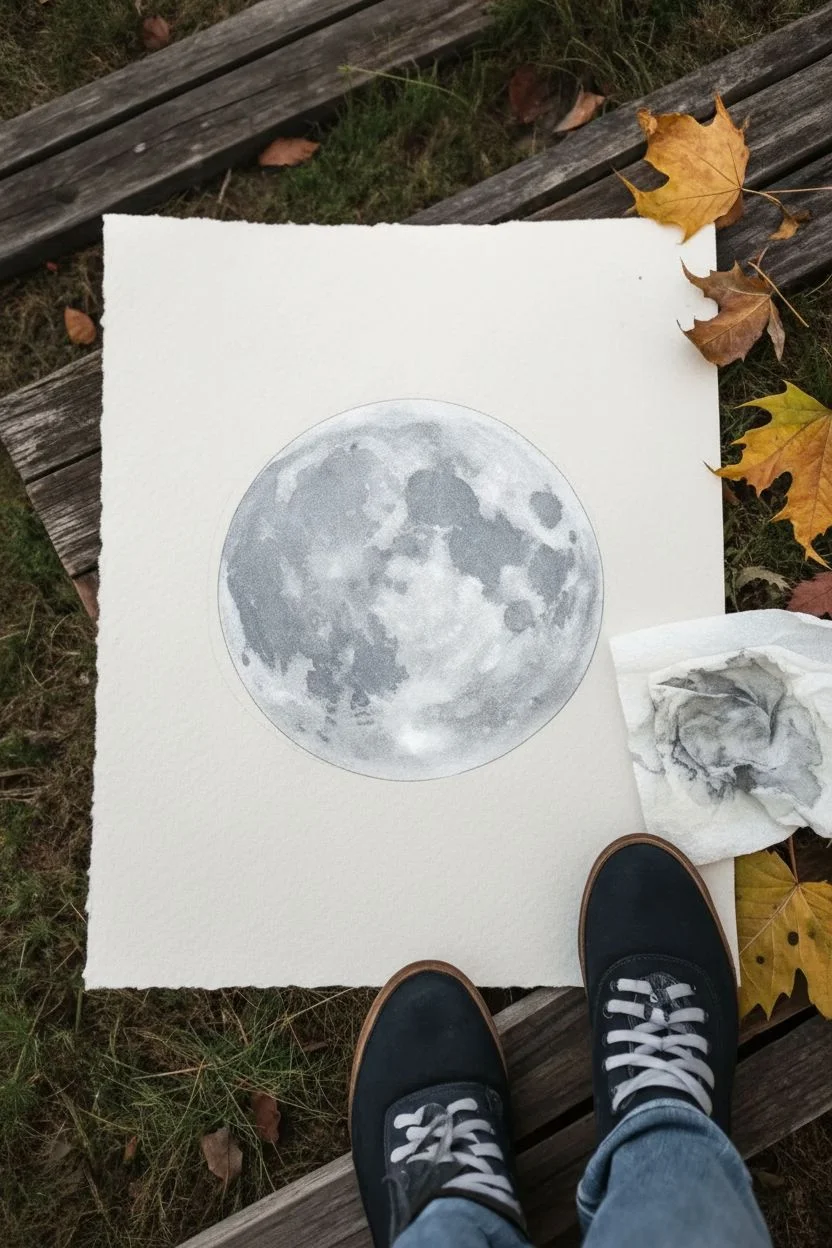
Step 1: Creating the Moon
-
Prepare the paper:
Start with a square sheet of textured watercolor paper. If you want the rustic look shown in the example, carefully tear the edges against a ruler to create a deckled effect. -
Outline the shape:
Place your circular object or compass near the center-bottom of the page. Lightly trace a perfect circle with your pencil to serve as the moon’s boundary. -
Mix the lunar wash:
Load your larger round brush with metallic silver paint or a very watery gray wash. Ensure there is plenty of water in the mix to allow for flow. -
Fill the base layer:
Paint the entire interior of the circle with your silver wash. Work quickly to keep the edge wet so you don’t get unwanted drying lines. -
Add crater texture:
While the base is still wet, drop in concentrated spots of darker gray or slightly thicker silver paint. Let them bloom naturally to create ‘craters’. -
Lift highlights:
I like to scrunch up a small piece of paper towel and gently blot a few areas of the wet moon to lift pigment, creating cloud-like textures and highlights. -
Allow to dry:
Let the moon layer dry completely. The paper must be bone-dry before you start the black ink, or the silhouette will bleed.
Step 2: Painting the Witch
-
Sketch the posture:
Using a light hand, sketch the outline of the witch inside the moon. Focus on the sharp point of the hat and the angle of the broomstick. -
Refine the silhouette:
Draw the flowing shape of the dress and the legs dangling below. Ensure the broomstick extends just slightly outside the moon’s right edge. -
Outline with ink:
Switch to your fine liner brush and black ink. Carefully trace the outer edges of your pencil sketch to lock in the shapes. -
Fill the solids:
Fill in the body, hat, and dress with solid black. Use smooth strokes to ensure opacity so no silver shows through the figure. -
Paint the broom handle:
Draw a straight, consistent line for the broom handle. A steady hand is key here, or you can use a ruler as a guide for your brush. -
Create the broom tail:
For the bristles, use quick, flicking motions with a semi-dry brush. Start from the binding of the broom and flick outward to create a scratchy, realistic texture.
Clean Edges
If your black ink bleeds into the silver moon, the base layer wasn’t dry enough. Wait for the moon to fully cure or use a hair dryer before painting the silhouette.
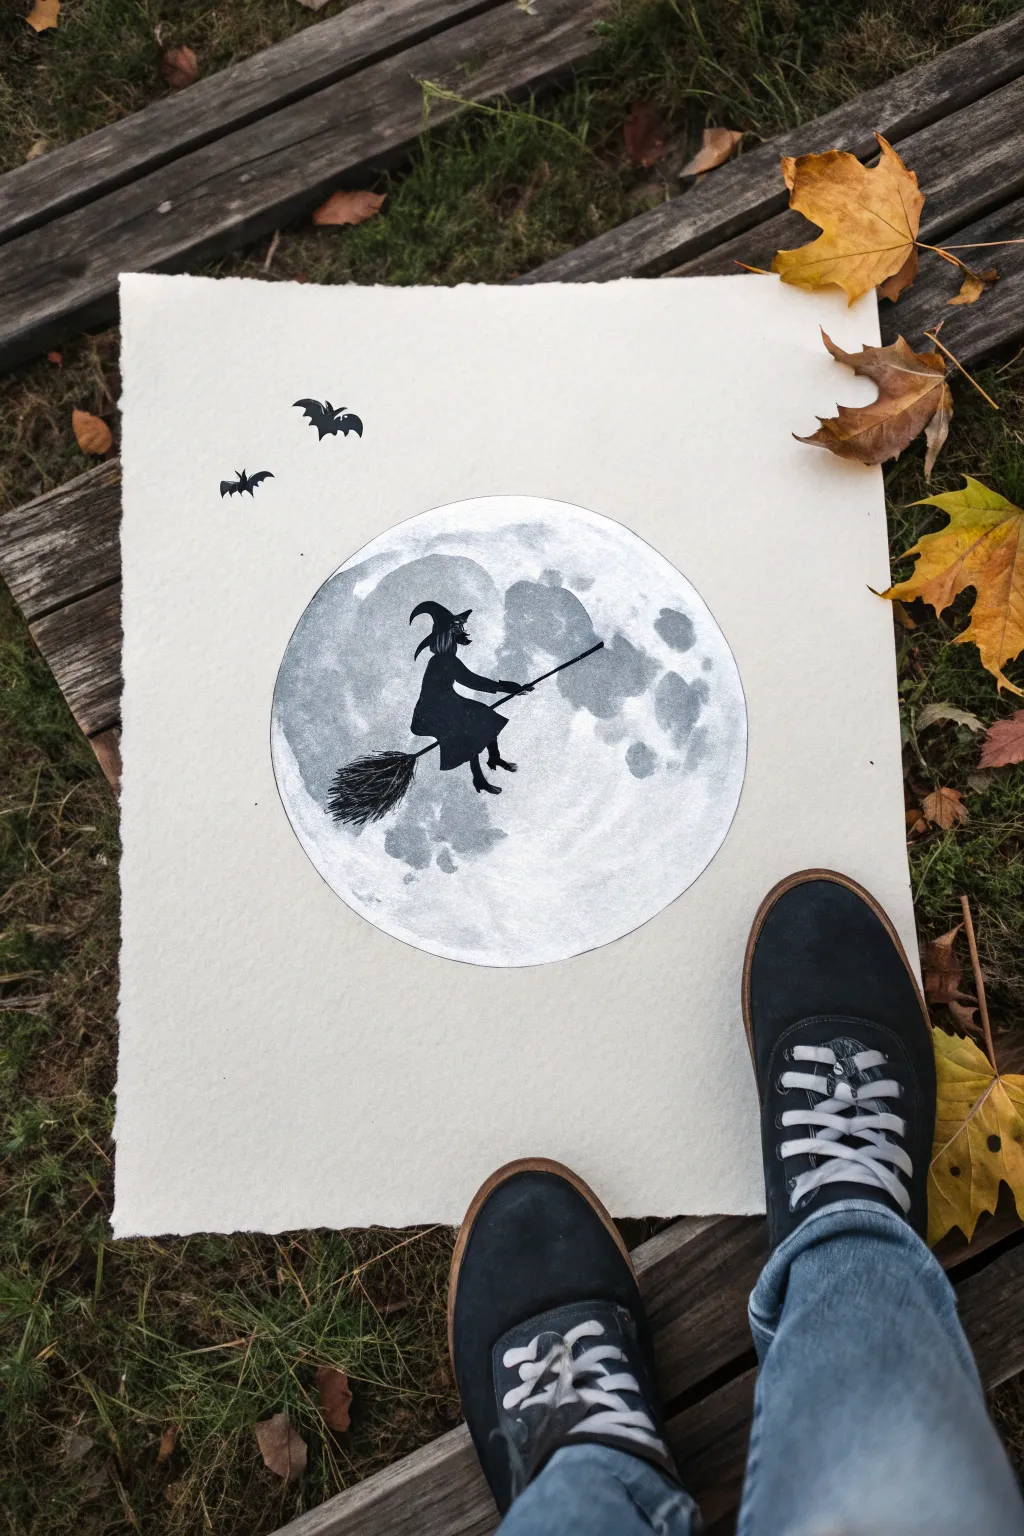
Step 3: Final Details
-
Position the bats:
Lightly sketch two small bats in the upper left corner, outside of the moon’s perimeter. Make one slightly larger than the other for perspective. -
Paint the bats:
Fill in the bats with solid black ink. Keep their wings sharp and angular to mimic the spooky aesthetic. -
Clean up:
Once the black ink is 100% dry, gently erase any visible pencil lines around the moon or the figures. -
Flatten the art:
If the water buckled the paper slightly, place the finished (dry) piece under a heavy book overnight to flatten it out.
Level Up
Splatter tiny droplets of white opaque gouache or white ink around the bats and upper corners to create a distant starry sky effect.
Now you have a marvellously moody piece of art ready to display for the spooky season.


Black Cat Familiar

Capture the mystic charm of a fluffy black cat accompanied by a tiny pumpkin friend. This watercolor tutorial focuses on building rich, textured fur and striking contrast between the dark coat and bright yellow eyes.
Step-by-Step Guide
Materials
- Cold press watercolor paper (300 gsm)
- Watercolor paints (Lamp Black, Payne’s Grey, Gamboge Yellow, Cadmium Orange, Sap Green)
- White gouache or white gel pen
- Round brushes (size 6, size 2, and size 00 for details)
- HB pencil and kneaded eraser
- Water jars and paper towel
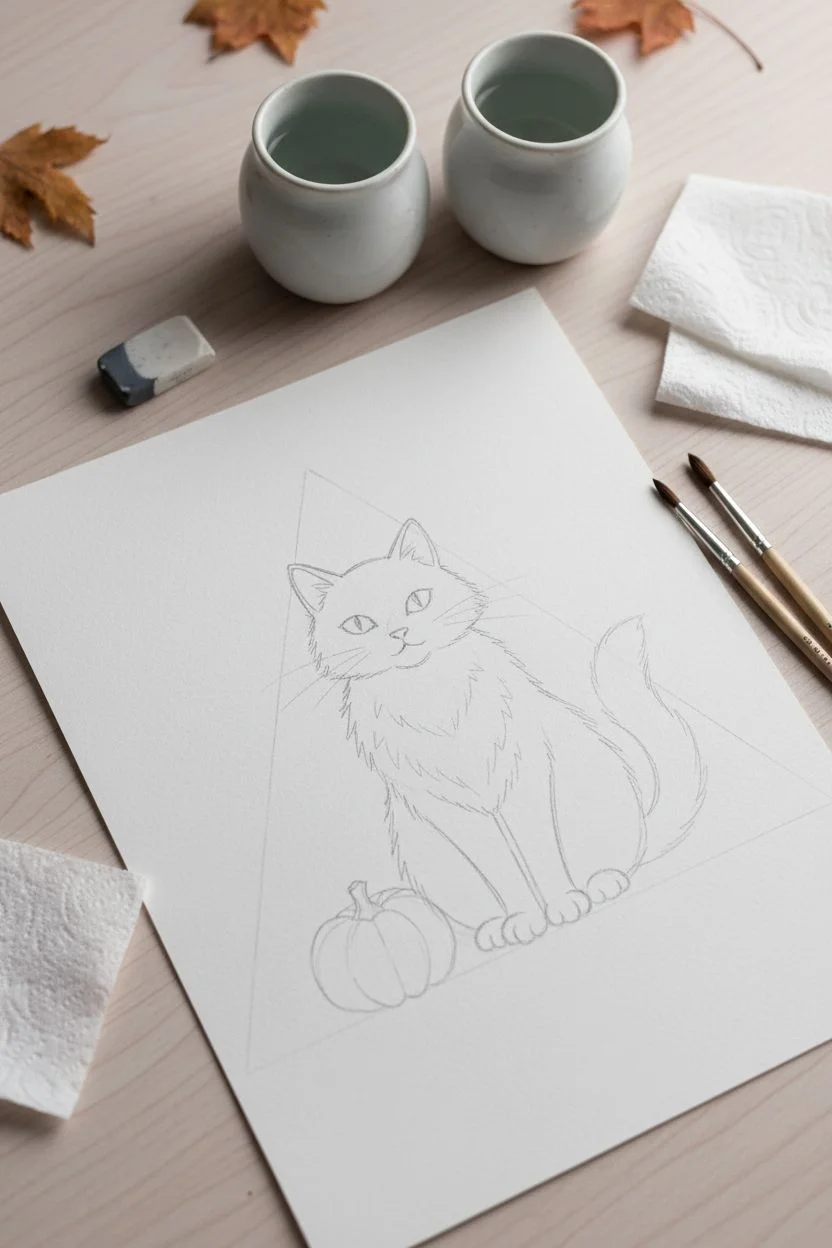
Step 1: Sketching the Silhouette
-
Outline the form:
Begin with a light pencil sketch of the cat’s body, using a large triangle shape as a guide for the seated posture. -
Add features:
sketch the ears at the top corners and place two almond shapes for eyes about one-third of the way down the face. -
Rough in the fur:
Draw jagged, zig-zag lines along the cheeks and chest to indicate where the fluffiest fur will be. -
Place the pumpkin:
Sketch a small, round pumpkin shape sitting near the cat’s front left paw.
Fur Texture Tip
Don’t paint the cat solid black! Leave small gaps or lighter grey areas between brush strokes to show the separation of fur clumps.
Step 2: Base Colors
-
Bright eyes:
Using a size 2 brush, fill the eye shapes with a clean, bright yellow like Gamboge; let this dry completely before touching the surrounding area. -
Pumpkin wash:
Apply a dilute wash of Cadmium Orange to the pumpkin body, leaving the top center slightly lighter for a highlight. -
Cat base layer:
Mix a watery, light grey using your black paint and cover the cat’s body, avoiding the eyes and the pumpkin. -
Initial texture:
While the grey wash is still damp, drop in slightly darker grey on the shadow side (right side) to suggest form.
Level Up
Mix a touch of purple or deep blue into your black paint. This adds richness and depth to the coat that plain black often lacks.
Step 3: Building the Black Coat
-
Defining the face:
Once the base is dry, use a concentrated black mix to paint around the yellow eyes, being careful to keep the edges sharp. -
Creating fur texture:
Switch to a size 6 brush and apply jagged, downward strokes along the chest and flanks to mimic long fur layers. -
Painting the edges:
Use the tip of your brush to flick paint outward along the silhouette, giving the cat a scruffy, fluffy outline rather than a smooth one. -
Deepening shadows:
Apply the darkest black pigment to the areas under the chin, between the legs, and where the tail wraps around. -
Leaving definition:
Leave the previous lighter grey visible in small patches on the chest and paw tops to distinguish individual limbs.
Step 4: Details & Contrast
-
Pumpkin details:
Paint thin, curved vertical lines on the pumpkin with a darker orange mix to create ribs. -
Stem work:
Paint the pumpkin stem with Sap Green, dabbing a little brown at the very tip for realism. -
Grounding shadows:
Mix a watery grey wash and paint a puddle-like shadow underneath the cat and pumpkin to ground them. -
Eye pupils:
Using your smallest brush (size 00) and thick black paint, draw magnificent vertical slit pupils in the center of the yellow eyes. -
Nose and mouth:
Add a small inverted triangle for the nose and two curved lines for the mouth using a dark grey tone.
Step 5: Finishing Touches
-
Ear details:
Use fine strokes to add wispy hairs coming out of the ears. -
Sparkle:
Add a tiny dot of white gouache or gel pen to the upper corner of each pupil to bring the cat to life. -
Whiskers:
I prefer using a white gel pen here to draw long, sweeping whiskers that stand out crisply against the black fur.
Now your spooky familiar is ready to guard your home for the season.


Magical Moon Phases
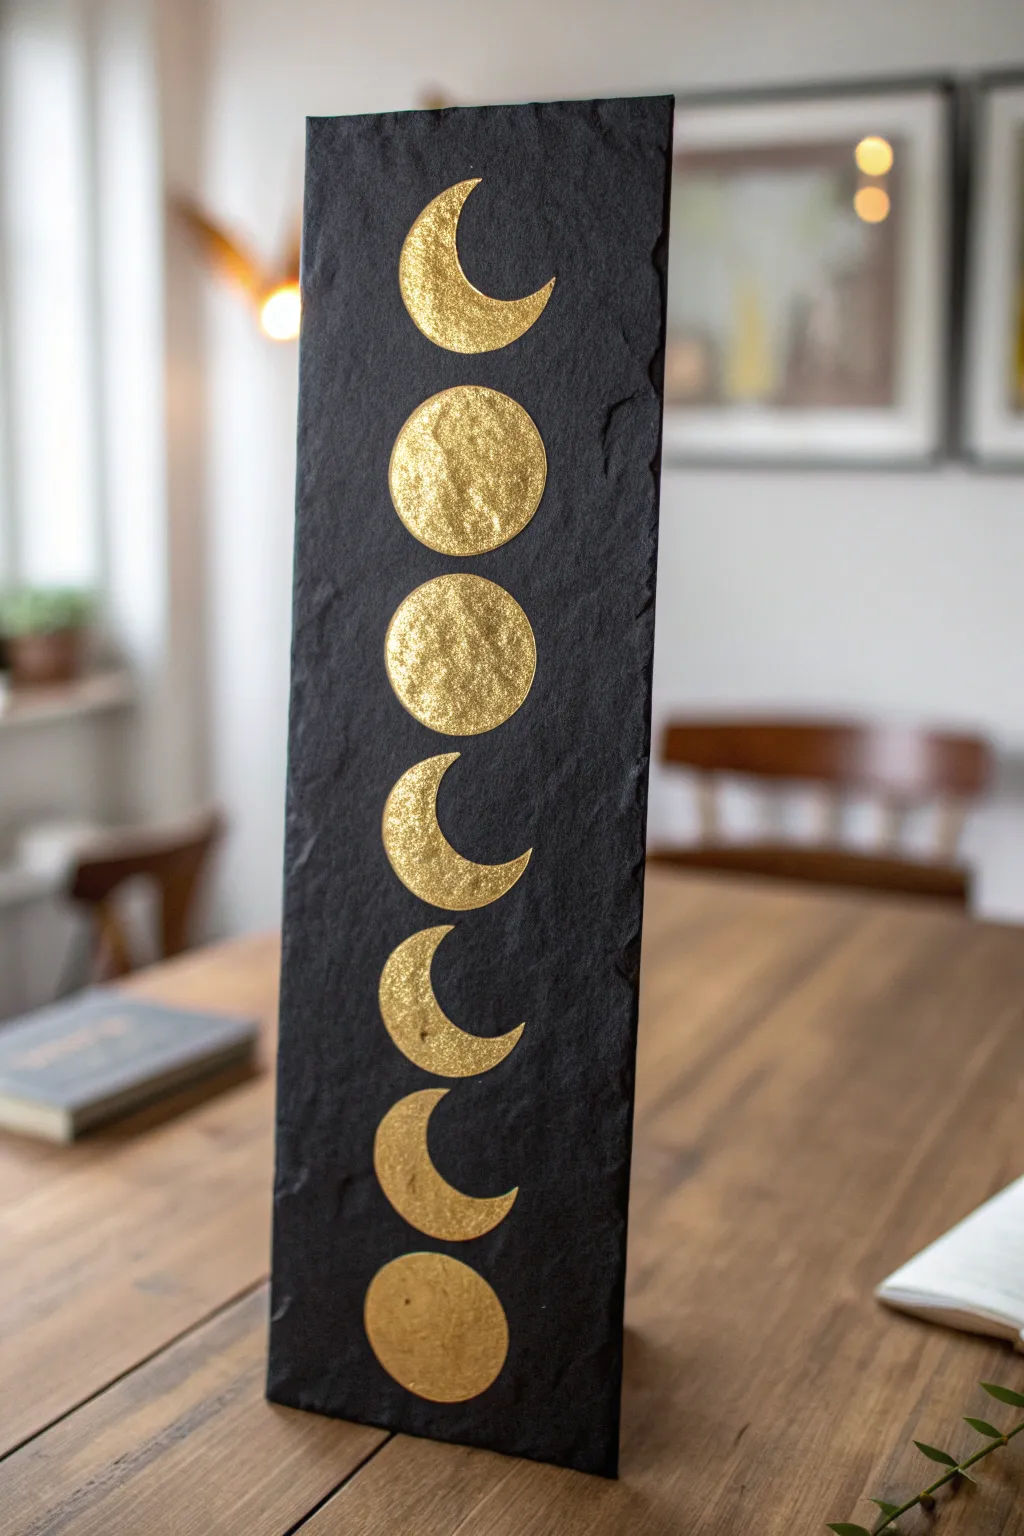
Capture the mystic energy of the night sky by combining raw, dark stone with the brilliant luminosity of gold leaf. This stunning vertical piece relies on the natural texture of slate to create a high-contrast, witchy altar decoration or wall hanging.
Step-by-Step Guide
Materials
- Rectangular black slate tile (approx. 4″ x 12″)
- Imitation gold leaf sheets
- Metal leaf adhesive (sizing)
- Small round paintbrush
- Stiff-bristled dry brush
- White charcoal pencil or chalk
- Ruler
- Spray sealant (gloss or matte)
- Small circular object (for tracing)
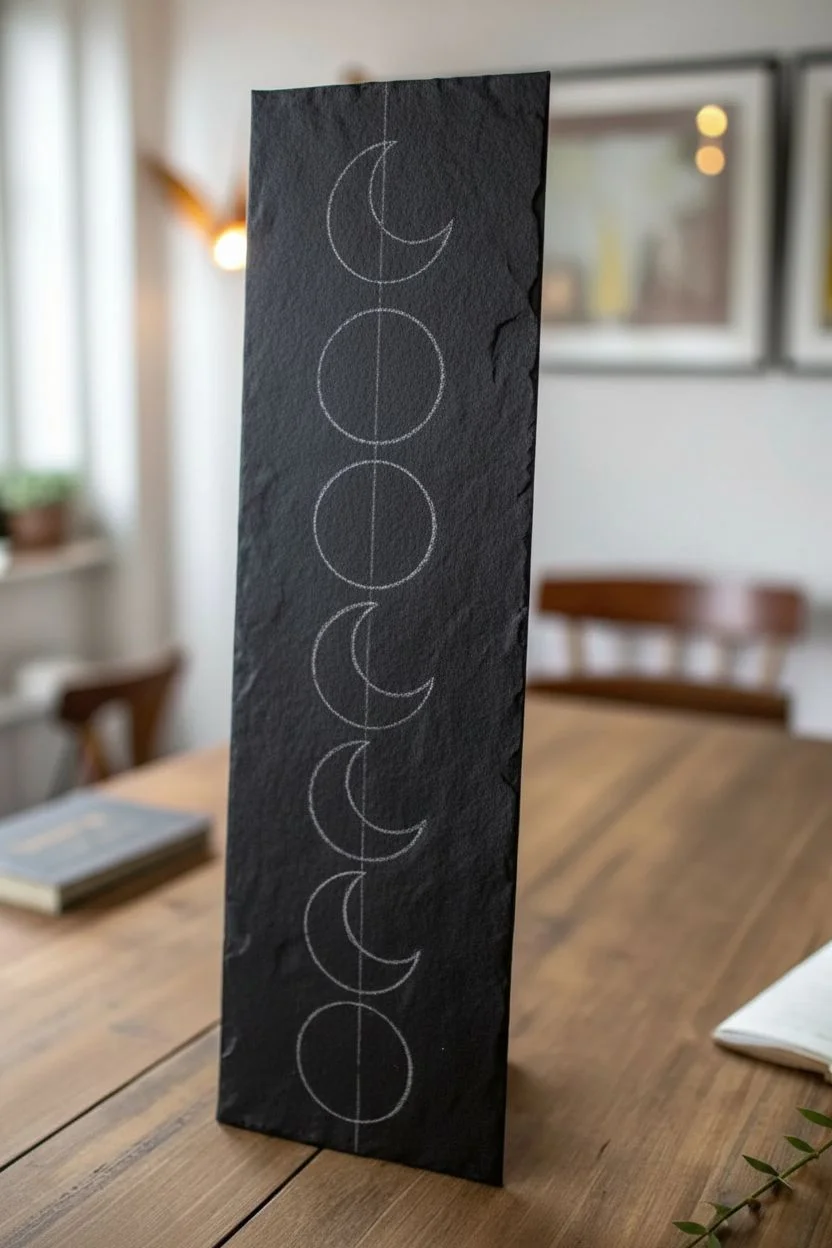
Step 1: Preparation & Layout
-
Clean surface:
Wipe down your slate tile with a damp cloth to remove any stone dust or oils, as these can prevent the adhesive from sticking properly. -
Dry completely:
Allow the slate to air dry fully before starting your sketch; moisture will tamper with the gold leaf process. -
Measure center:
Using your ruler and white charcoal pencil, lightly mark the vertical center line of the slate to ensure your moons align perfectly. -
Mark spacing:
Make small tick marks along the center line to determine where each of the seven moon phases will sit, keeping the spacing equal. -
Trace outlines:
Use a small bottle cap or stencil to trace seven circles centered on your tick marks using the white charcoal. -
Define phases:
Modify the circles into crescents where needed by drawing an inner curve, creating the waxing and waning shapes shown in the reference.
Step 2: Applying Adhesive
-
Apply size:
Dip your small round brush into the metal leaf adhesive and carefully fill in the outlines of your moon shapes. -
Refine edges:
Work slowly around the curved edges to keep them crisp, as the gold leaf will stick exactly where the glue is placed. -
Clean tools:
Wash your glue brush immediately with warm soapy water, as the adhesive becomes very difficult to remove once dry. -
Wait for tack:
Let the adhesive sit for about 15 to 20 minutes (or according to bottle instructions) until it turns from milky to clear and feels tacky to the touch. -
Test tackiness:
Touch a knuckle lightly to the glue; it should feel sticky like tape but not wet enough to leave residue on your skin.
Chalk It Up
Use white charcoal or chalk for sketching rather than graphite. Graphite is hard to see on black slate and can permanently scratch the stone, whereas chalk wipes away effortlessly.
Step 3: Gilding Process
-
Apply leaf:
Gently lay a sheet of gold leaf over the top tacky moon, using the tissue paper backing to press it down firmly without touching the metal directly. -
Cover all areas:
Continue applying leaf sheets or scraps until all the adhesive-covered moon phases are completely obscured by gold. -
Initial burnish:
Rub the back of the protective tissue paper in circular motions to ensure the leaf is fully adhered to the textured slate crevices. -
Dry brush removal:
Take your dry, stiff-bristled brush and vigorously scrub over the moons to break away the excess gold leaf. -
Clean up:
Continue brushing until only the glued shapes remain, sweeping the gold dust off the slate surface. -
Touch ups:
If I notice any spots I missed, I like to use a tiny bit of glue and a scrap of flake to fill in the gaps.
Celestial Spray
Create a starry background by dipping a toothbrush in diluted white acrylic paint and flicking the bristles to splatter tiny ‘stars’ across the black slate around your golden moons.
Step 4: Finishing
-
Remove markings:
Use a slightly damp Q-tip or cloth to carefully wipe away any visible white charcoal guidelines. -
Seal artwork:
Spray the entire piece with two light coats of clear sealant to prevent the golden moons from tarnishing over time.
Place your finished slate on an easel or shelf to reflect the light and bring a touch of cosmic magic to your space.


Painted Tarot Card
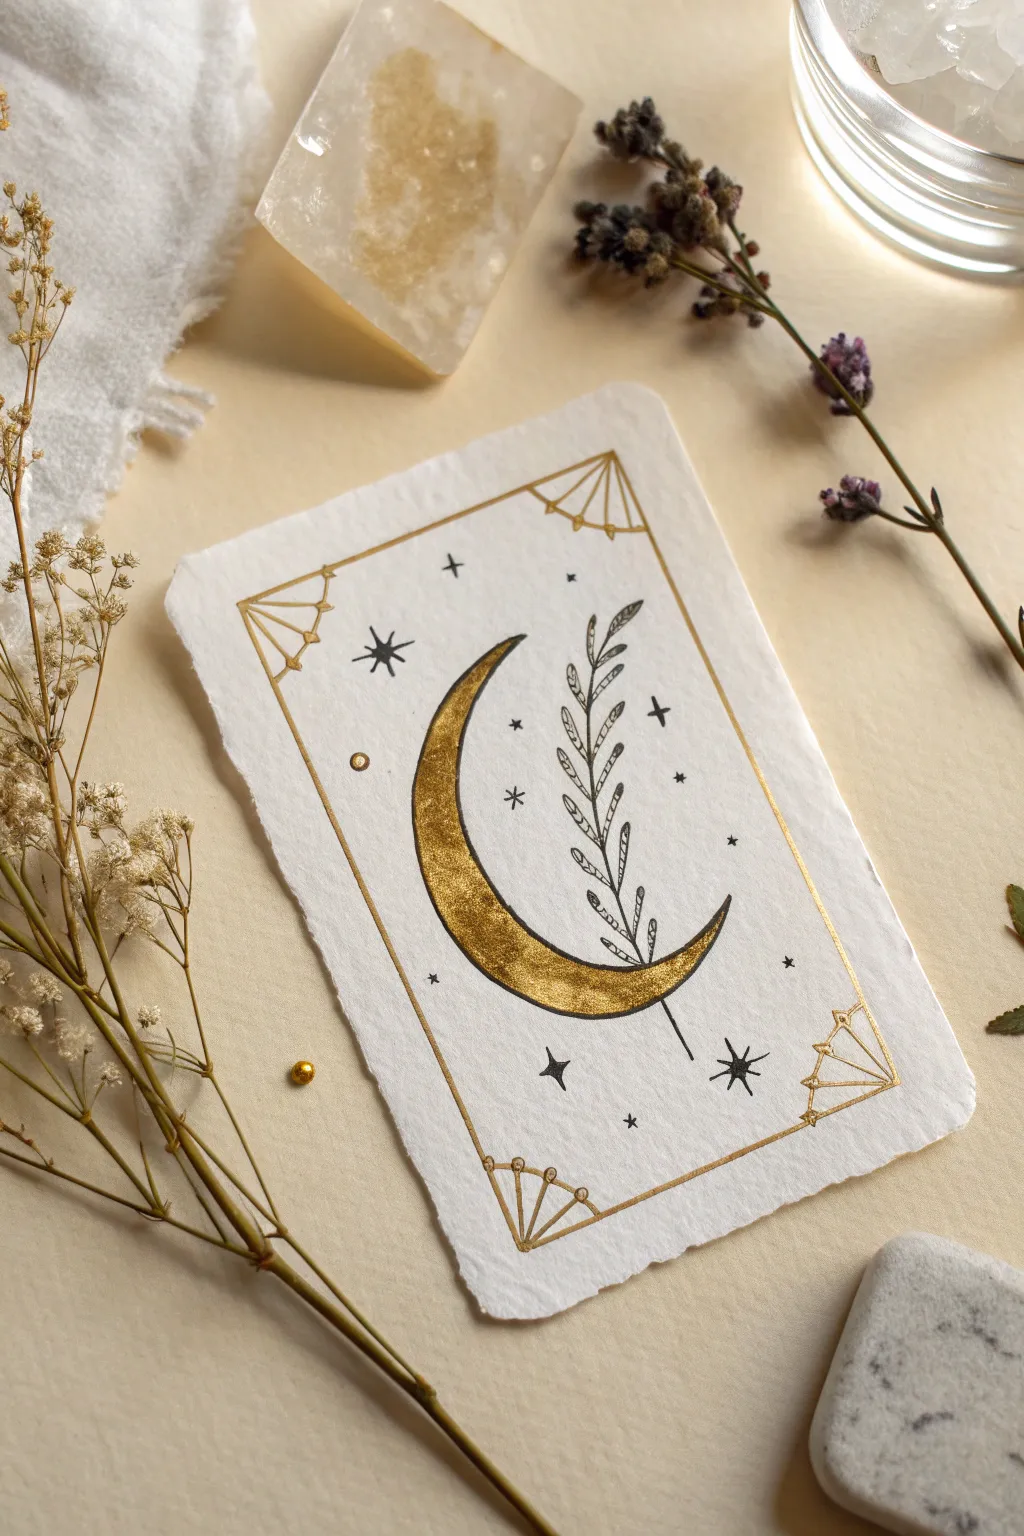
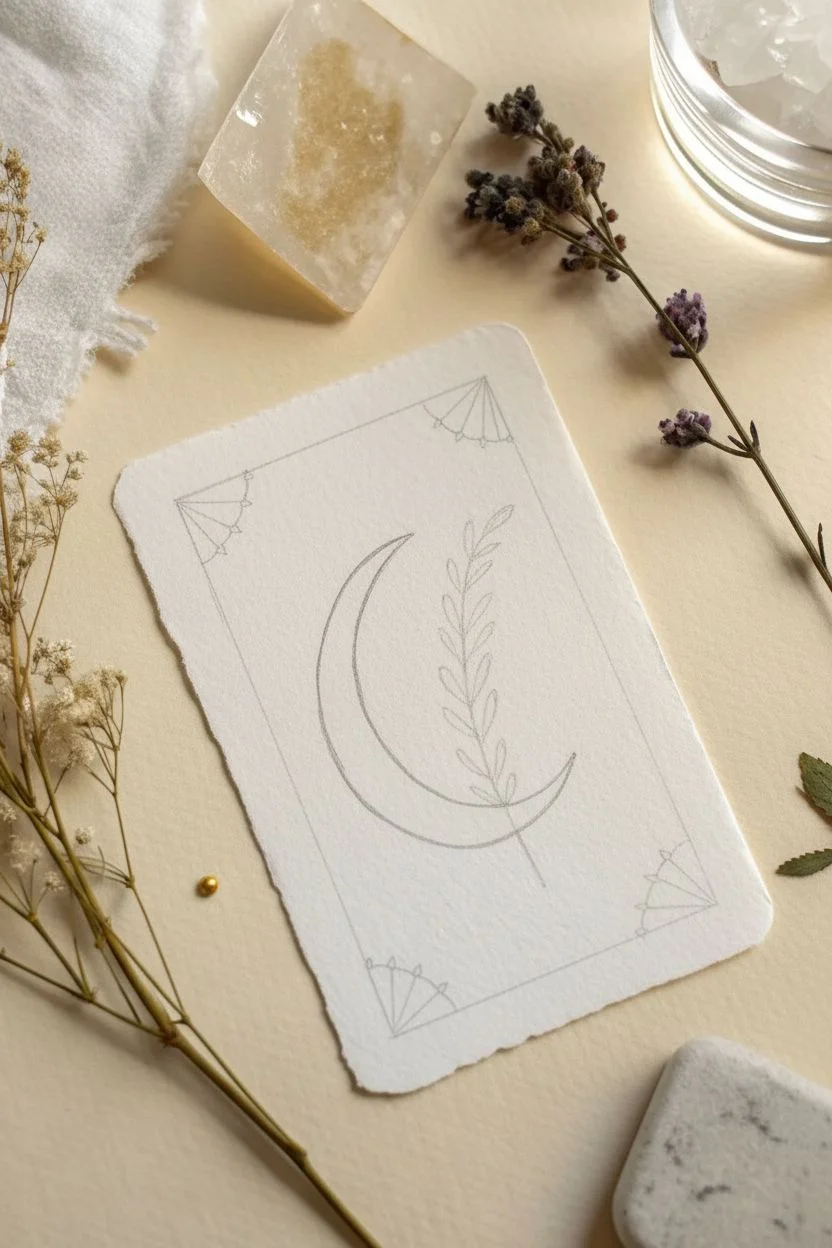
Create your own mystical oracle card featuring a luminous crescent moon and delicate botanical details. This project combines the shimmer of metallic gold watercolor with precise ink linework on textured handmade paper for an authentic, witchy aesthetic.
How-To Guide
Materials
- Handmade cotton paper (deckle edge)
- Metallic gold watercolor pan or gouache
- Synthetic round brush (Size 0 or 1)
- Black archival fineliner (01 and 03 sizes)
- HB Pencil
- Kneaded eraser
- Ruler
Step 1: Planning the Layout
-
Prepare your paper:
Start with a piece of handmade cotton paper, roughly 3×5 inches. If you have a large sheet, tear it against a ruler to create a soft, deckled edge rather than cutting it with scissors. -
Mark the border:
Using a ruler and a very light pencil touch, sketch a rectangular inner border about half an inch from the paper’s edge. -
Sketch corner details:
In two opposite corners (top right and bottom left), lightly draw a quarter-circle fan shape connecting to the border corner. -
Outline the moon:
Sketch a large crescent moon shape in the center, slightly offset to the left. I like to make the bottom curve slightly thicker to weigh the composition visually. -
Placement for botanicals:
Draw a faint curved line intersecting the moon to guide where the plant stem will go. Add rough ovals where the leaves will sit.
Boosting the Shine
For a truly magical effect, apply a second coat of gold paint just to the center of the moon once the first layer is dry. This builds physical texture and makes the metallic pigment reflect more light.
Step 2: Applying the Gold
-
Mix the metallic paint:
Add a few drops of water to your gold watercolor pan. Let it sit for a minute to soften, then mix until it reaches a creamy, opaque consistency. -
Paint the moon:
Carefully fill in the crescent moon shape with your size 0 brush. Load the brush generously so the gold pools slightly for a rich texture. -
Paint the border lines:
Using the very tip of your brush, paint over your pencil border lines. Keep a steady hand, but don’t worry if the line varies in thickness; it adds to the hand-painted charm. -
Fill corner accents:
Paint the outer lines of your corner fans and add the internal ‘spokes’ within the quarter-circles. -
Add gold accents:
Dip the tip of your brush in gold and place three single dots inside the border: one near the moon curve and two in the empty space on the right. -
Let it dry completely:
Wait until the gold is completely dry and set. This is crucial because wet paint will ruin your ink pens in the next phase.
Ink Skipping?
If your fineliner skips or stops writing when crossing the gold paint, don’t force it. The waxy binders in watercolor can clog nibs. It is safer to lift the pen and draw ‘behind’ the gold elements.
Step 3: Inking Details
-
Draw the stem:
Switch to your 03 black fineliner. Draw the main stem of the plant, starting from below the moon and curving upward through the crescent. -
Outline the leaves:
Draw the outline of each small leaf along the stem. Keep the shapes simple and slightly pointed at the ends. -
Add leaf veins:
Switch to a finer 01 pen if you have one. Draw tiny hatch marks or a central vein inside each leaf for texture. -
Draw larger stars:
Draw four-pointed stars (a cross shape with curved inward sides) in the open negative spaces. Place a larger one near the bottom right and smaller ones scattered above. -
Stipple the background:
Using the 01 pen, add tiny dots and small ‘plus sign’ stars around the moon and botanical sprig to fill the empty void without clustering them too closely. -
Final clean up:
Once you are certain the ink is dry, gently dab (do not rub) with a kneaded eraser to lift any visible pencil marks without smudging the gold.
Place your finished piece on your altar or frame it as a miniature work of celestial art
BRUSH GUIDE
The Right Brush for Every Stroke
From clean lines to bold texture — master brush choice, stroke control, and essential techniques.
Explore the Full Guide
The Solitary Cottage
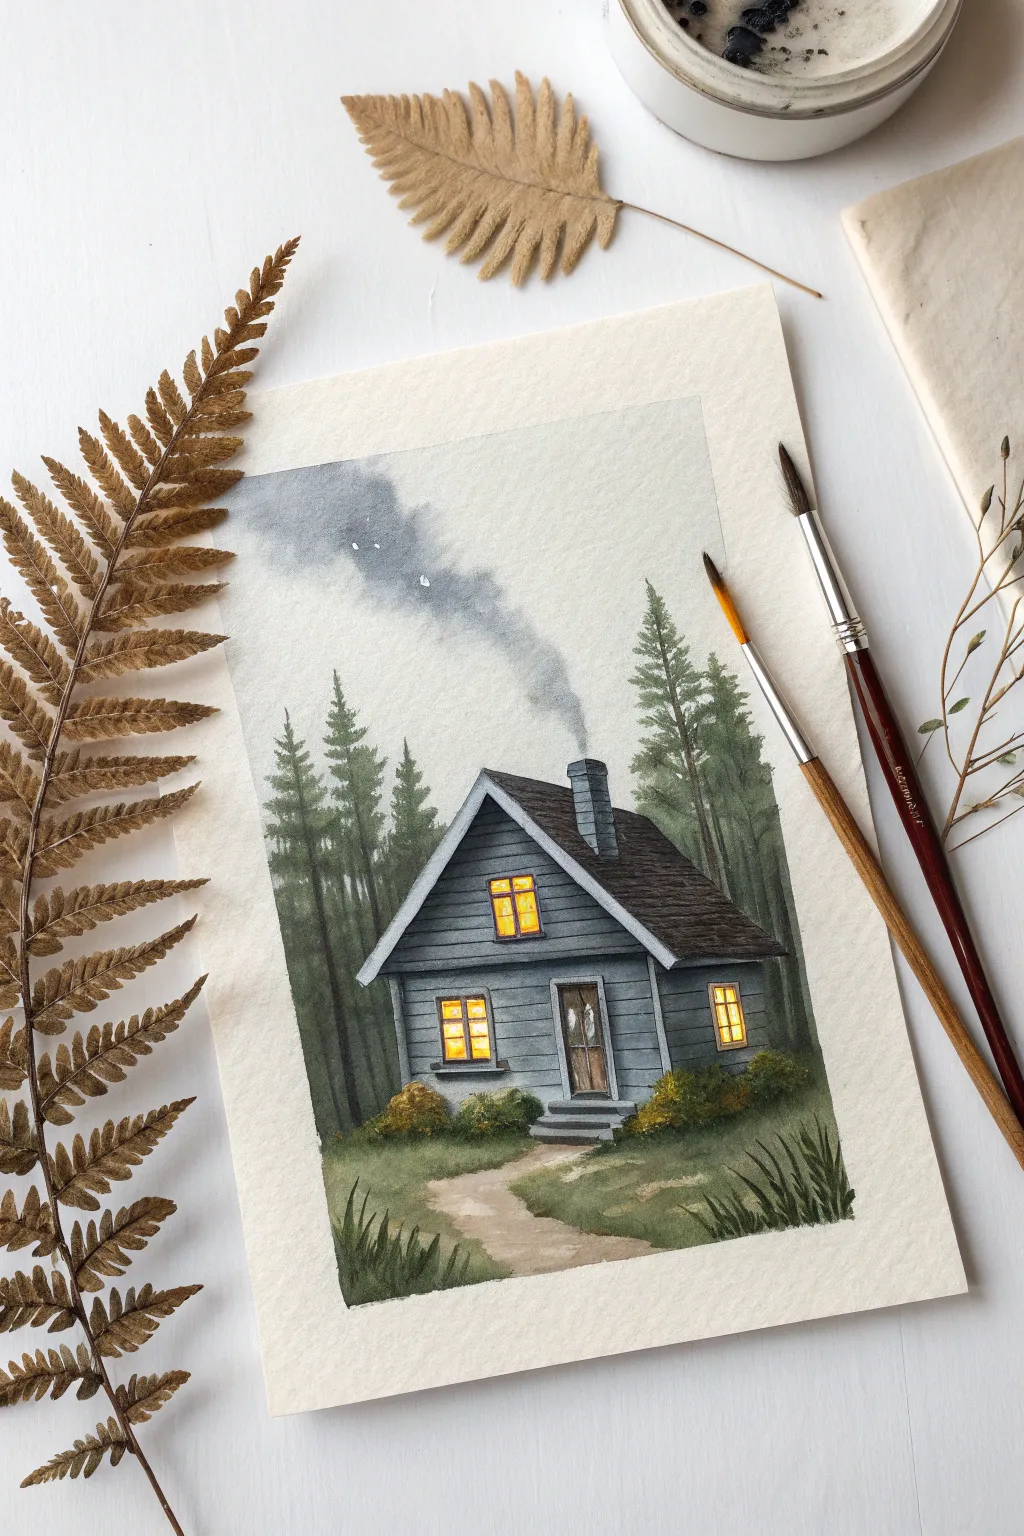
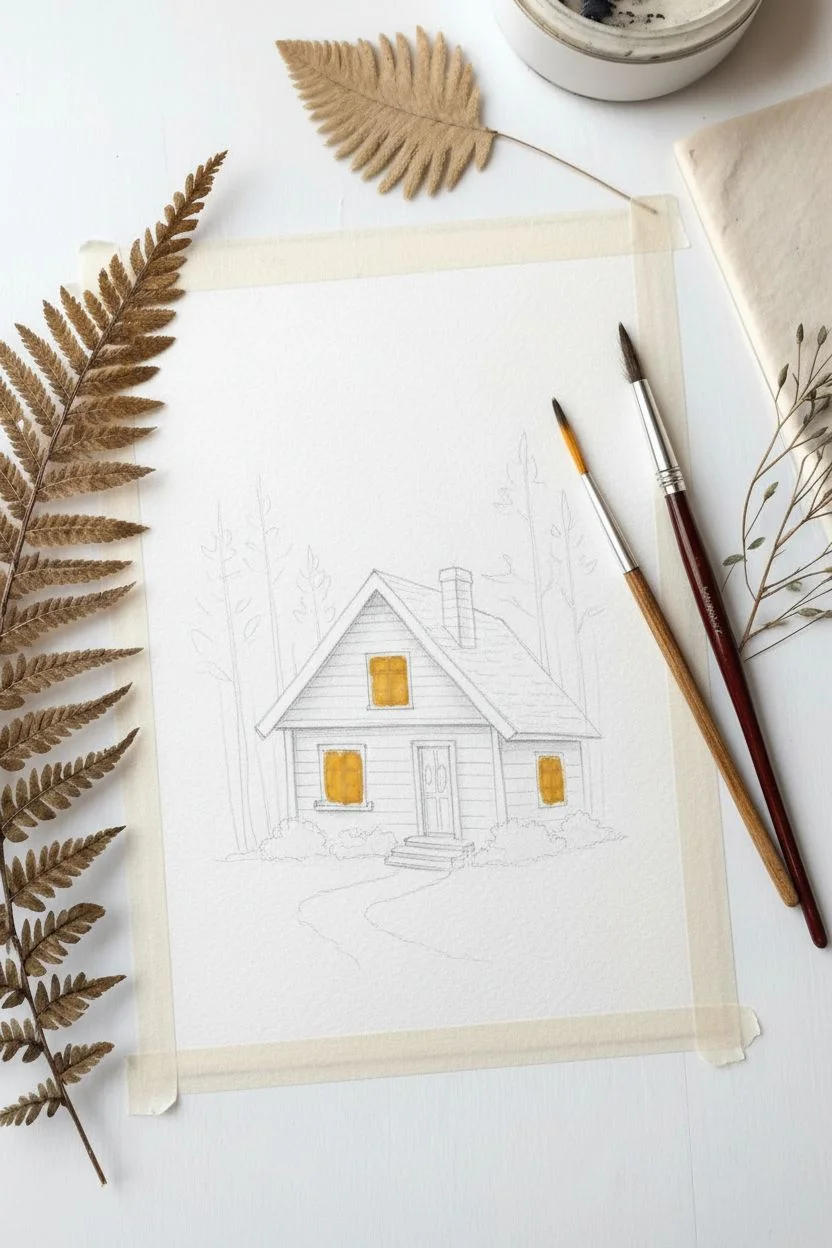
Capture the moody comfort of a witch’s solitary cabin with this watercolor tutorial. You will balance muted, cool tones in the forest with the warm, inviting glow of lit windows to create a high-contrast atmosphere.
Step-by-Step
Materials
- Cold press watercolor paper (300gsm)
- Watercolor paints (Payne’s Grey, Sap Green, Burnt Umber, Yellow Ochre, Cadmium Yellow)
- White Gouache
- Round brushes (protection size 6 and detail size 1)
- HB Pencil and kneadable eraser
- Masking tape
- Paper towels
Step 1: Sketching and Masking
-
Secure the paper:
Tape down all four edges of your paper to a flat board to prevent buckling and create a clean white border. -
Draft the cottage:
Using an HB pencil, lightly sketch the outline of the cabin slightly off-center. Focus on the sharp peak of the roof and the perspective of the side wall. -
Outline the environment:
Sketch vertical lines to indicate where the pine trees will stand behind and beside the house, and draw a winding path leading to the front door. -
Protect the lights:
If you have masking fluid, apply it over the window panes to keep them pure white. If not, just be very careful to avoid painting inside these squares during the next steps.
Smoke Signal
To make the smoke look soft and billowing, dab the wet grey paint with a crumpled tissue immediately after applying it. This lifts the color and creates organic, fluffy textures.
Step 2: The Misty Forest
-
Sky wash:
Dilute Payne’s Grey with plenty of water. Apply a very faint, uneven wash to the upper half of the paper to create a moody, overcast sky, leaving a blank area where the smoke will eventually go. -
Distant trees:
Mix a watery grey-green using Sap Green and a touch of Payne’s Grey. Paint the silhouettes of the furthest trees, keeping the edges soft and indistinct to push them into the background. -
Mid-ground shadows:
Once the first layer is dry, mix a stronger, darker green. Paint the closer pine trees with more defined jagged branches, overlapping the lighter trees behind them. -
Ground layer:
Wash a muted olive green over the foreground, carefully painting around the dirt path area.
Level Up: Framing
Use a darker, more saturated green mix to paint a few pine branches encroaching from the very top corners. This creates a natural ‘frame’ that draws the viewer’s eye straight to the cottage.
Step 3: Constructing the Cabin
-
Siding base:
Mix a cool blue-grey for the house siding. fill in the walls, but leave the trim around the windows and door unpainted or lighter for now. -
Roof texture:
Use a concentrated dark brown or charcoal mix for the roof. Apply it with short, horizontal strokes to suggest shingles, letting the color vary slightly for texture. -
Wood panel details:
When the blue-grey walls are fully dry, use your size 1 brush and a darker shade of grey to paint thin horizontal lines across the siding to mimic wooden planks. -
Door and stairs:
Paint the door with a warm brown and add the concrete steps in a medium grey, adding a thin shadow line under each step for dimension. -
Deepen the shadows:
Apply a dark glaze (transparent layer) of Payne’s Grey under the roof eaves and beneath the house where it meets the ground to anchor the structure.
Step 4: Illumination and Atmosphere
-
Ignite the windows:
Remove masking fluid if used. Paint the window panes with a bright Yellow Ochre. While still wet, drop in a dot of Cadmium Yellow or orange in the centers to make them glow. -
Path and foliage:
Paint the path with a very watery light brown. Use a fairly dry brush to dab dark green bushy shapes around the base of the house, adding texture to the landscaping. -
Rising smoke:
I like to wet the paper above the chimney first, then drop in a cloudy grey pigment, letting it bloom and soften naturally as it drifts upward. -
Foreground grasses:
Use your smallest brush to flick upward strokes of dark green in the bottom corners of the paper to create wild grass blades. -
Magic sparkles:
Using white gouache, add tiny opaque dots into the smoke or the dark trees to represent sparks, stars, or fireflies.
Peel off your tape to reveal the crisp border and enjoy the serenity of your woodland hideaway


Have a question or want to share your own experience? I'd love to hear from you in the comments below!