Whenever I need a subject that feels both wild and soulful, I reach for wolf painting—it’s instantly dramatic and endlessly flexible. Here are my favorite wolf painting ideas, starting with the classics and drifting into more playful, unexpected twists.
Wolf Pack Under Moonlight
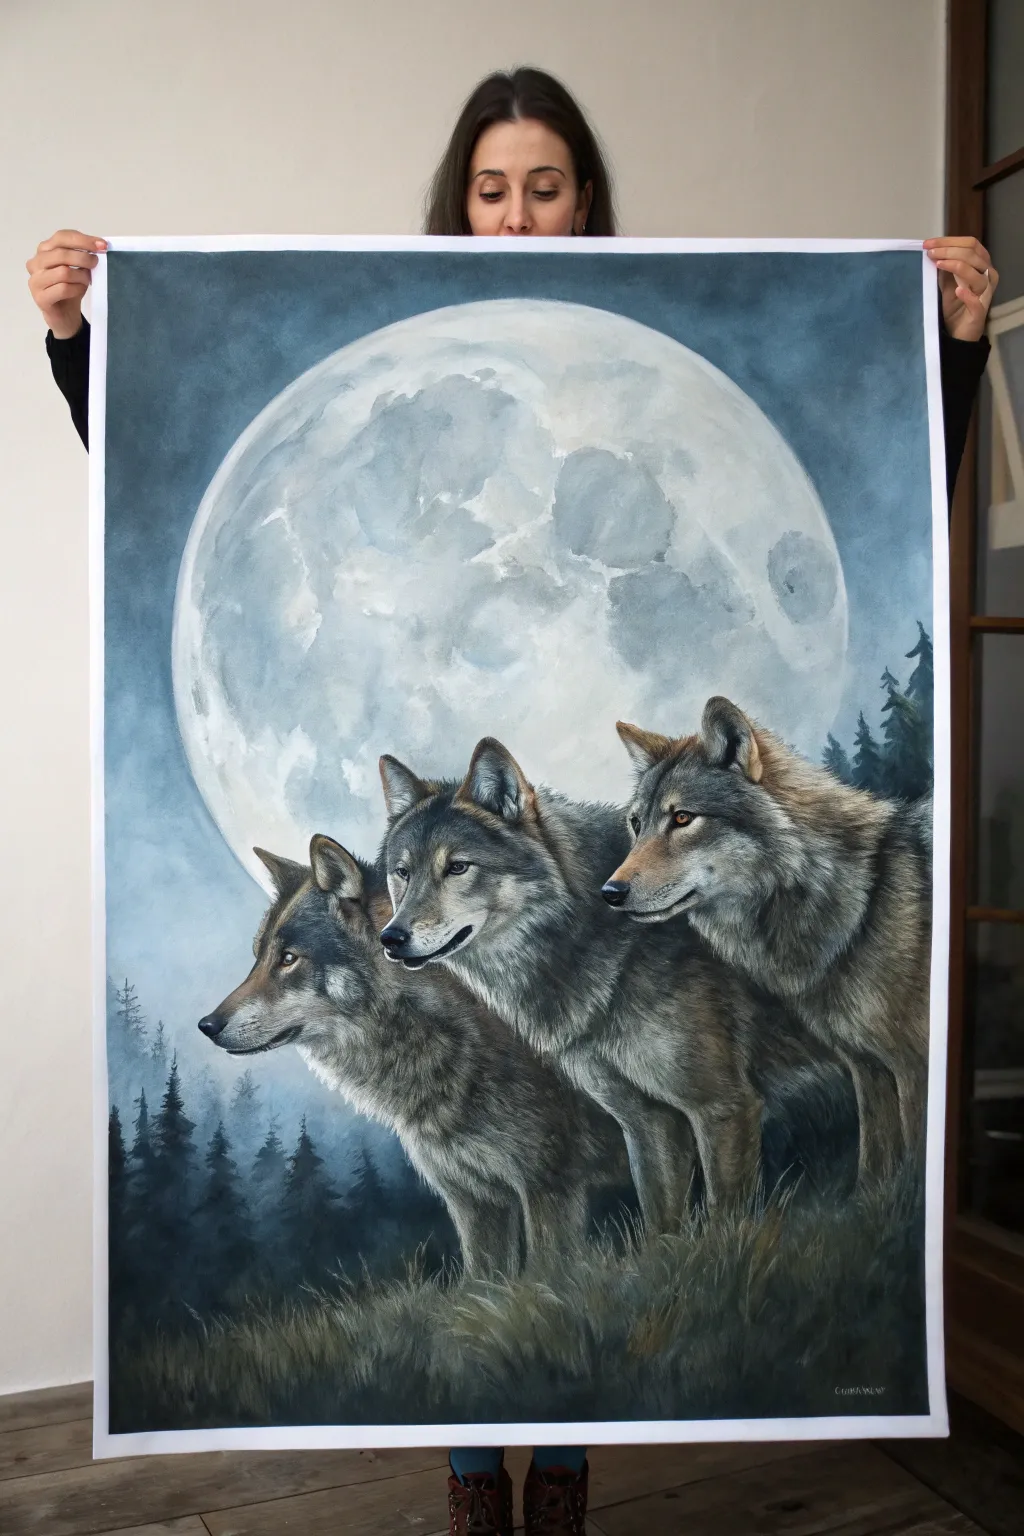
Capture the mystic beauty of the wild with this striking composition featuring three wolves profiled against a massive, detailed moon. The blend of soft moonlight and misty forest textures creates a dramatic atmosphere perfect for any large canvas.
Step-by-Step
Materials
- Large watercolor paper block (A2 or similar size)
- Watercolor paints (Payne’s Grey, Indigo, Lamp Black, Burnt Umber, Yellow Ochre, Ultramarine Blue, White Gouache)
- Masking fluid
- Large round plate or compass (for the moon stencil)
- Graphite pencil (HB) and kneaded eraser
- Wide flat wash brush
- Medium round brushes (size 6 and 8)
- Fine liner brush (size 0 or 00) for fur details
- Paper towels and two water jars
Step 1: Planning and Sketching
-
Outline the massive moon:
Center your large round object or compass on the paper, leaving about 2-3 inches of sky at the top. Trace a perfect circle very lightly with your pencil. This moon dominates the composition, so size matters here. -
Sketch the wolf profiles:
Lightly sketch the three wolves in the lower right and center. Arrange them diagonally: the largest, rightmost wolf stands highest, the middle wolf slightly lower, and the leftmost wolf lowest. Overlap them slightly to create depth. Focus on the shape of their snouts, ears, and neck ruffs rather than individual hairs. -
Mark the horizon:
Indicate a soft, uneven line for the grassy hill at the bottom where the wolves stand, and lightly mark where the treeline will fade into the background fog on the left. -
Protect the moon:
Using a clean brush (dip it in soap first to protect bristles), apply masking fluid carefully over the entire moon circle. This reserves the bright white paper while you paint the dark sky.
Uneven Moon Shape?
If your masking fluid edge was jagged, don’t worry. Use opaque white gouache to carefully tidy up the outer rim of the moon after the sky is painted, creating a perfect sphere again.
Step 2: Atmospheric Background
-
Prepare the sky wash:
Mix a large puddle of deep night sky color using Indigo and Payne’s Grey. You want a rich, dark blue-black that feels cool and nocturnal. -
Paint the night sky:
Wet the paper area outside the moon and wolves with clean water. While damp, apply your dark mix, letting it be darkest at the top corners and slightly lighter near the horizon line to suggest atmosphere. -
Create the misty treeline:
While the sky wash is still damp but not soaking, drop in faint shapes of pine trees on the left side using a slightly more concentrated grey-blue mix. The damp paper will fuzz the edges, creating a perfect foggy effect. -
Remove the mask:
Once the background is completely bone-dry, gently rub off the masking fluid to reveal the crisp white circle of the moon.
Step 3: The Moon and Wolves
-
texture the moon:
Dilute Payne’s Grey to a very watery consistency. Paint wet-on-dry inside the moon circle to create craters and maria (the dark spots). Dab with a paper towel to lift color and create soft cloud-like textures on the lunar surface. -
Base coat for the wolves:
Mix a warm grey using Burnt Umber and Ultramarine. Apply a wash over the wolf bodies, keeping the muzzles and chest areas lighter. I like to drop in hints of Yellow Ochre around the ears and neck while this layer is wet for subtle warmth. -
Define the features:
Once the base dry, use a smaller brush to paint the eyes (amber/ochre), black nose tips, and the dark lining of the mouths. This anchors the faces before you start the fur. -
Layering fur texture:
Using your medium brush and a darker grey-brown mix, start adding fur clumps. Work in the direction of hair growth—back from the nose, down the neck. Build this up in layers, letting each dry before adding darker strokes on top.
Level Up: Cosmic Glow
After everything is dry, lightly glaze a very transparent ring of dilute iridescent blue or silver watercolor around the moon’s edge to give it an ethereal, magical halo.
Step 4: Final Details
-
Deepen the shadows:
Use a concentrated mix of Indigo and Sepia to paint the darkest shadows between the wolves’ overlapping bodies and under their chins. This separation is crucial for making them look like three distinct animals. -
Add fine whiskers and hairs:
Switch to your fine liner brush. With white gouache, add tiny highlights in the eyes and delicate whiskers on the muzzles. Use dark paint for fine guard hairs on their outlines. -
Paint the foreground grass:
Using quick, upward flicking motions with a fairly dry brush, paint the grass at the bottom. Use dark greens and blacks to silhouette the grass against the lighter fur of the wolves’ legs. -
Check values:
Step back and look at the painting. Ensure the sky is dark enough to make the moon pop, and that the wolves have enough contrast against both the moon and the dark forest.
Hang your masterpiece in a prominent spot where the moonlight can inspire you every day


Northern Lights Behind a Wolf Silhouette
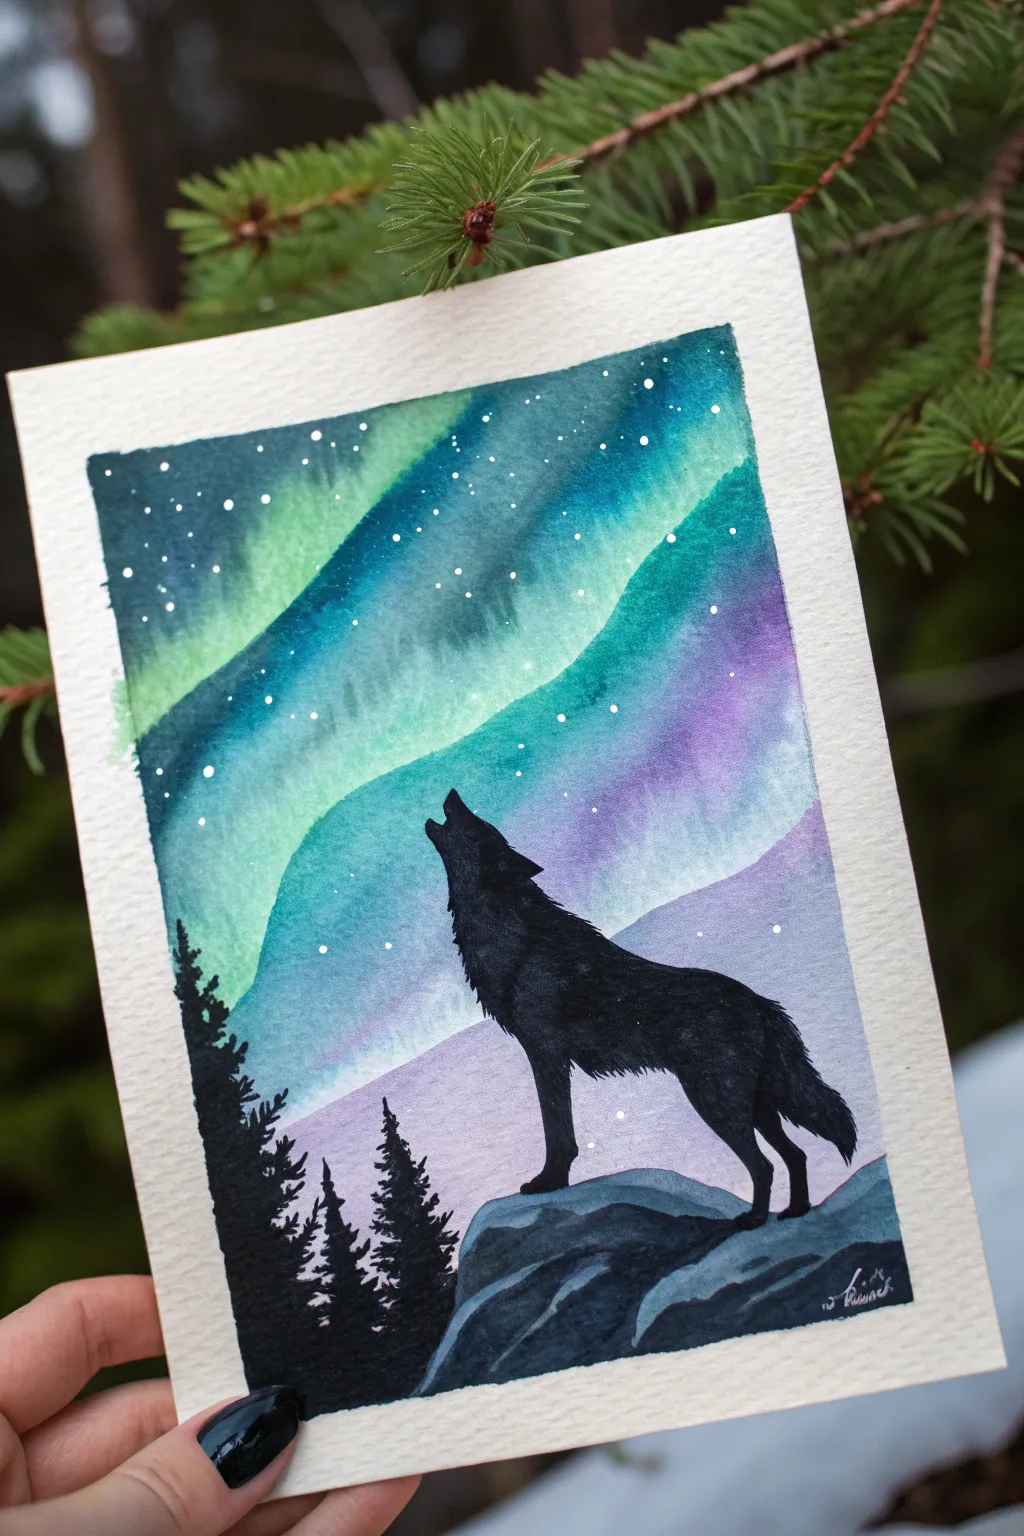
Capture the magic of the Arctic wilderness with this vibrant watercolor piece featuring a stark black wolf silhouette against glowing Northern Lights. The contrast between the deep, dark foreground and the luminous teal and violet sky creates a breathtaking atmospheric effect.
How-To Guide
Materials
- Cold press watercolor paper (300 gsm)
- Masking tape
- Watercolors (Teal, Prussian Blue, Phthalo Green, Violet/Purple)
- Black gouache or india ink
- Round watercolor brushes (Size 8 for washes, Size 2 for details)
- White gel pen or white gouache
- Paper towels
- Pencil and eraser
- Water cups
Step 1: Preparation and Sketching
-
Prep your surface:
Begin by taping down all four edges of your watercolor paper to a board or table. This creates that crisp white border seen in the final piece and prevents the paper from buckling when wet. -
Sketch the silhouette:
Lightly sketch the outline of the howling wolf in the lower right center. Add a rough, jagged line for the rock formation underneath the wolf. Keep these pencil lines faint, as they will be covered in black later. -
Outline the trees:
Indicate where your pine trees will go on the left side. You don’t need detailed branches yet, just a vertical line to mark their placement and height.
Step 2: Painting the Sky (Wet-on-Wet)
-
Pre-wet the paper:
Using your large round brush, apply clean water to the entire sky area, stopping just above your rock and wolf sketch. The paper should be glistening but not forming puddles. -
Lay in the green:
While the paper is wet, load your brush with a vibrant teal or phthalo green. Paint sweeping, diagonal strokes across the sky to mimic the dancing aurora ribbons. -
Add deep blues:
Introduce Prussian blue into the upper corners and between the green ribbons. Allow the blue to bleed slightly into the teal edges to create a soft, diffused glow. -
Include violet hues:
Drop some watered-down violet or purple into the lower sky area, just above the horizon line. This adds a mystical transition color before the dark landscape begins. -
Strengthen the contrast:
While the paint is still damp, add more saturated blue to the top edges to deepen the night sky. The darker the top creates more luminosity for the aurora. -
Let it dry completely:
This is crucial—wait until the paper is bone dry. If it feels cool to the touch, it is still wet. I usually take a break here to ensure no smudging happens in the next phase.
Aurora Glow Tip
Keep the center of your green ribbons almost white or very pale yellow. This central brightness makes the aurora look like it is emitting light rather than just being painted green.
Step 3: Silhouettes and Details
-
Paint the rock formation:
Mix a dark grey using your black and a touch of blue (or use watered-down black gouache). Paint the rock the wolf stands on, leaving a few lighter patches or adding highlights later to suggest texture. -
Fill the wolf silhouette:
Using pure black gouache or very concentrated watercolor, carefully fill in your wolf sketch. Use a small size 2 brush for the fur texture along the neck and tail to keep the edges sharp. -
Create the pine trees:
With the same black paint, create the trees on the left. Start with a vertical line, then use a stippling motion to tap out branches that get wider towards the bottom. -
Texture the wolf:
Once the main black layer is dry, you can dry-brush a tiny bit of lighter grey/blue on the wolf’s flank to suggest bulky fur texture, though a solid silhouette works beautifully too. -
Add the stars:
Dip an old toothbrush or stiff brush into white gouache (or use a white gel pen). Flick or tap the brush to splatter tiny white stars across the sky, concentrating more on the darker blue areas. -
Detail the stars:
Use your white gel pen to add a few larger, specific stars manually if the splatter missed any key composition spots. -
Peel the tape:
Slowly peel the masking tape away from the paper at a 45-degree angle. This reveals the clean, professional border that frames your night scene.
Fixing “Blooms”
If water drops create cauliflower-like blooms in your drying sky, don’t panic. Gently blend them out with a damp brush, or incorporate them as cloud textures in the night sky.
Admire the stark beauty of your wolf standing guard under the polar lights.


Galaxy Sky Inside a Wolf Shape
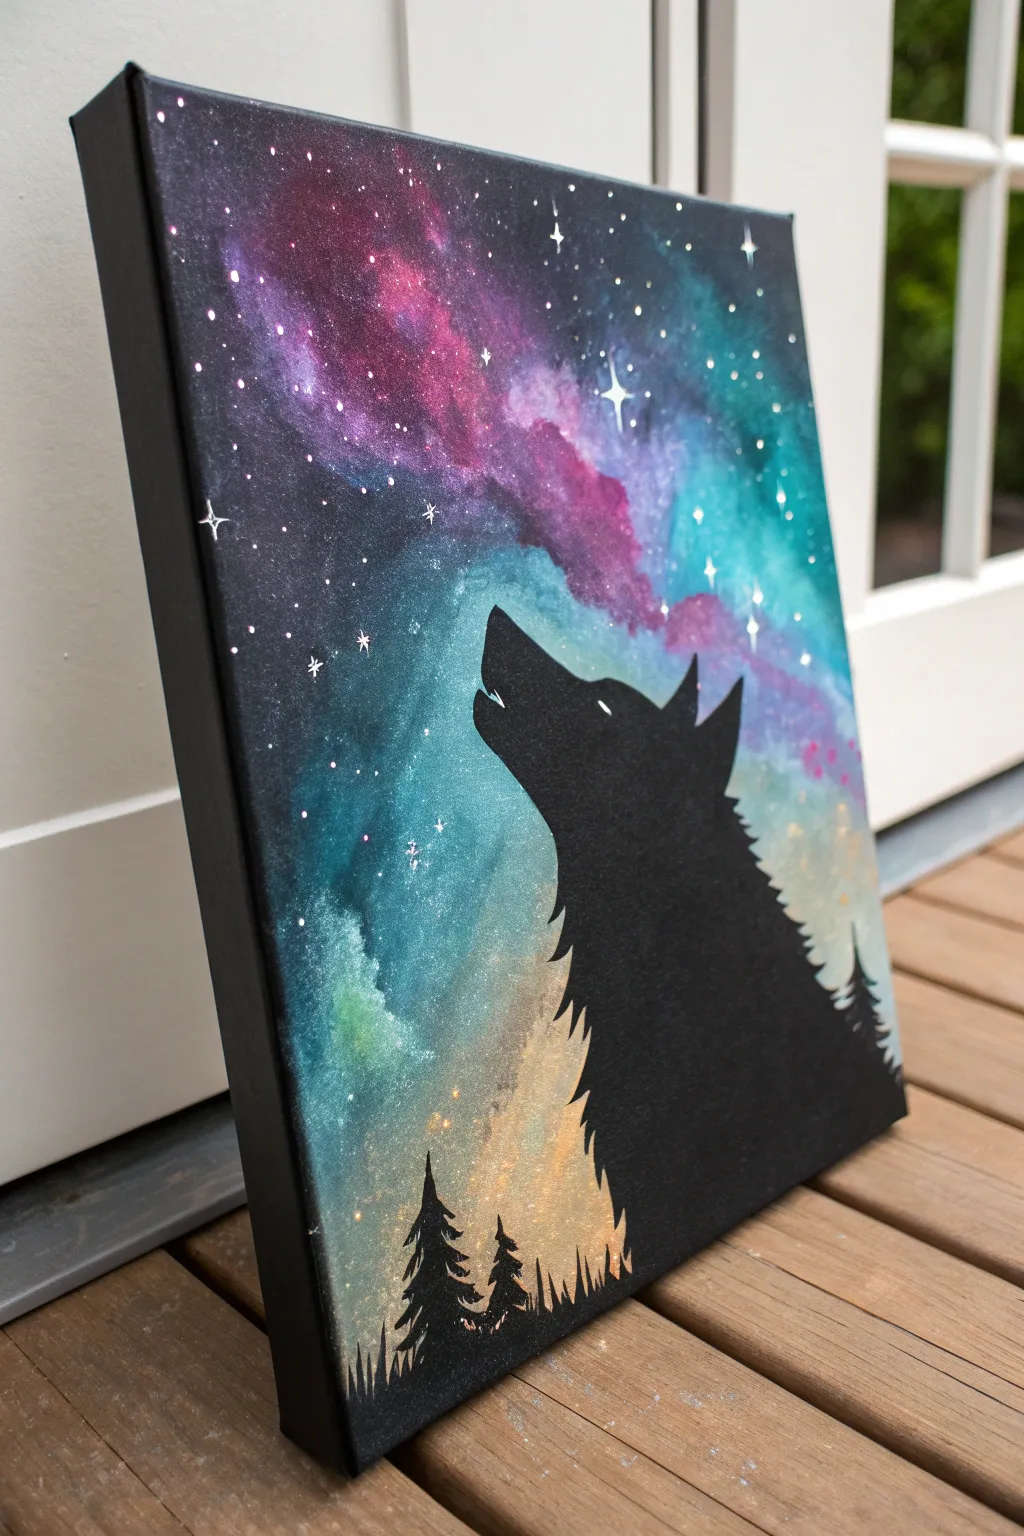
Capture the mystic beauty of a howling wolf set against a vibrant, shimmering galaxy sky. This project combines simple silhouette painting with fun sponge blending techniques to create a stunning, stellar atmosphere.
Detailed Instructions
Materials
- Stretched canvas (e.g., 11×14 or similar)
- Black acrylic paint
- Acrylic paints (Teal, Purple, Pink, Dark Blue, White)
- Sponge applicators or kitchen sponge pieces
- Small round detail brush (size 0 or 1)
- Medium flat brush
- Old toothbrush (optional)
- Pencil
- Water cup and paper towels
- Wolf silhouette stencil or printout (optional)
Step 1: Setting the Stage
-
Prep the Canvas:
Start with a clean, white stretched canvas. If your canvas isn’t pre-primed, give it a quick coat of gesso, but standard store-bought canvases are usually ready to go. -
Map the Composition:
Visualize where your galaxy band will flow. In this piece, the brightest colors sweep diagonally from the bottom left toward the top right. You can lightly sketch this flow with a pencil if it helps guide you.
Starry Hack
If you don’t have a toothbrush for stars, dip a paintbrush in watery white paint and tap the handle against another brush over the canvas.
Step 2: Creating the Galaxy
-
Base Colors:
Squeeze out your teal, purple, pink, and dark blue paints onto a palette. Don’t be shy with the paint; galaxy art needs good coverage. -
Sponging the Teal:
Dip a damp sponge into the teal paint. Dab it onto the canvas, focusing on the lower-left corner and sweeping upward through the middle. Keep the texture cloudy by using a pouncing motion rather than dragging the sponge. -
Adding the Purple and Pink:
With a fresh section of the sponge (or a new one), pick up some purple. Dab this near the top edge of the teal, blending the wet edges slightly where they meet. Add touches of pink into the purple areas for that glowing nebula effect. -
Deepening the Space:
Take your dark blue or black paint on a sponge and fill in the remaining corners (top left and bottom right). Work this dark color into the edges of your bright nebula colors to create depth and contrast. -
Smooth the Transitions:
I like to go back over the border areas with a clean, slightly damp sponge to soften any harsh lines between the colors. The goal is a seamless, dreamy fog. -
Allow to Dry:
Let this colorful background layer dry completely. This is crucial before moving to the stars to prevent muddy colors.
Level Up: Glitter
Mix a tiny amount of iridescent glitter medium into your teal and pink paints before applying for a galaxy that truly sparkles in the light.
Step 3: Stars and Sparkle
-
Flicking the Stars:
Slightly water down some white acrylic paint. Dip an old toothbrush or a stiff bristled brush into it, and using your thumb, flick the bristles to spray fine mist droplets across the canvas. -
Adding Major Stars:
Using your smallest detail brush, hand-paint a few larger, brighter stars. To make the ‘twinkle’ cross shapes, paint a thin vertical line crossed by a shorter horizontal line, tapering the ends to sharp points. -
Dry Again:
Ensure all your stars are fully dry before starting the black silhouette. Wet white paint can turn gray if you paint black over it too soon.
Step 4: The Wolf Silhouette
-
Sketch the Outline:
Lightly sketch the outline of the howling wolf head and neck. If you aren’t confident drawing freehand, print a silhouette, cut it out, and trace lightly around it with a pencil. -
Paint the Fur Texture:
Using your small detail brush and black paint, carefully outline the wolf. For the back of the neck and chest, use short, quick flicks outward to mimic the texture of fur, rather than a straight smooth line. -
Fill the Shape:
Switch to a larger flat brush to fill in the main body of the wolf with solid black. Apply a second coat if the galaxy background shows through. -
The Eye Detail:
Use a tiny dot of white paint to add the closed eye slit. This small detail gives the wolf expression and focus.
Step 5: Finishing Touches
-
Add the Pine Trees:
At the very bottom edge, use the detail brush to paint small black triangles. Add texture by dabbing the brush side-to-side moving downward to create pine branches. -
Paint the Edges:
Don’t forget the sides of your stretched canvas. Paint them black to frame the piece professionally without needing an external frame. -
Final Seal:
Once fully dry (give it a few hours), apply a clear gloss varnish spray to make the galaxy colors pop and protect your masterpiece.
Step back and admire your celestial wolf glowing against the night sky


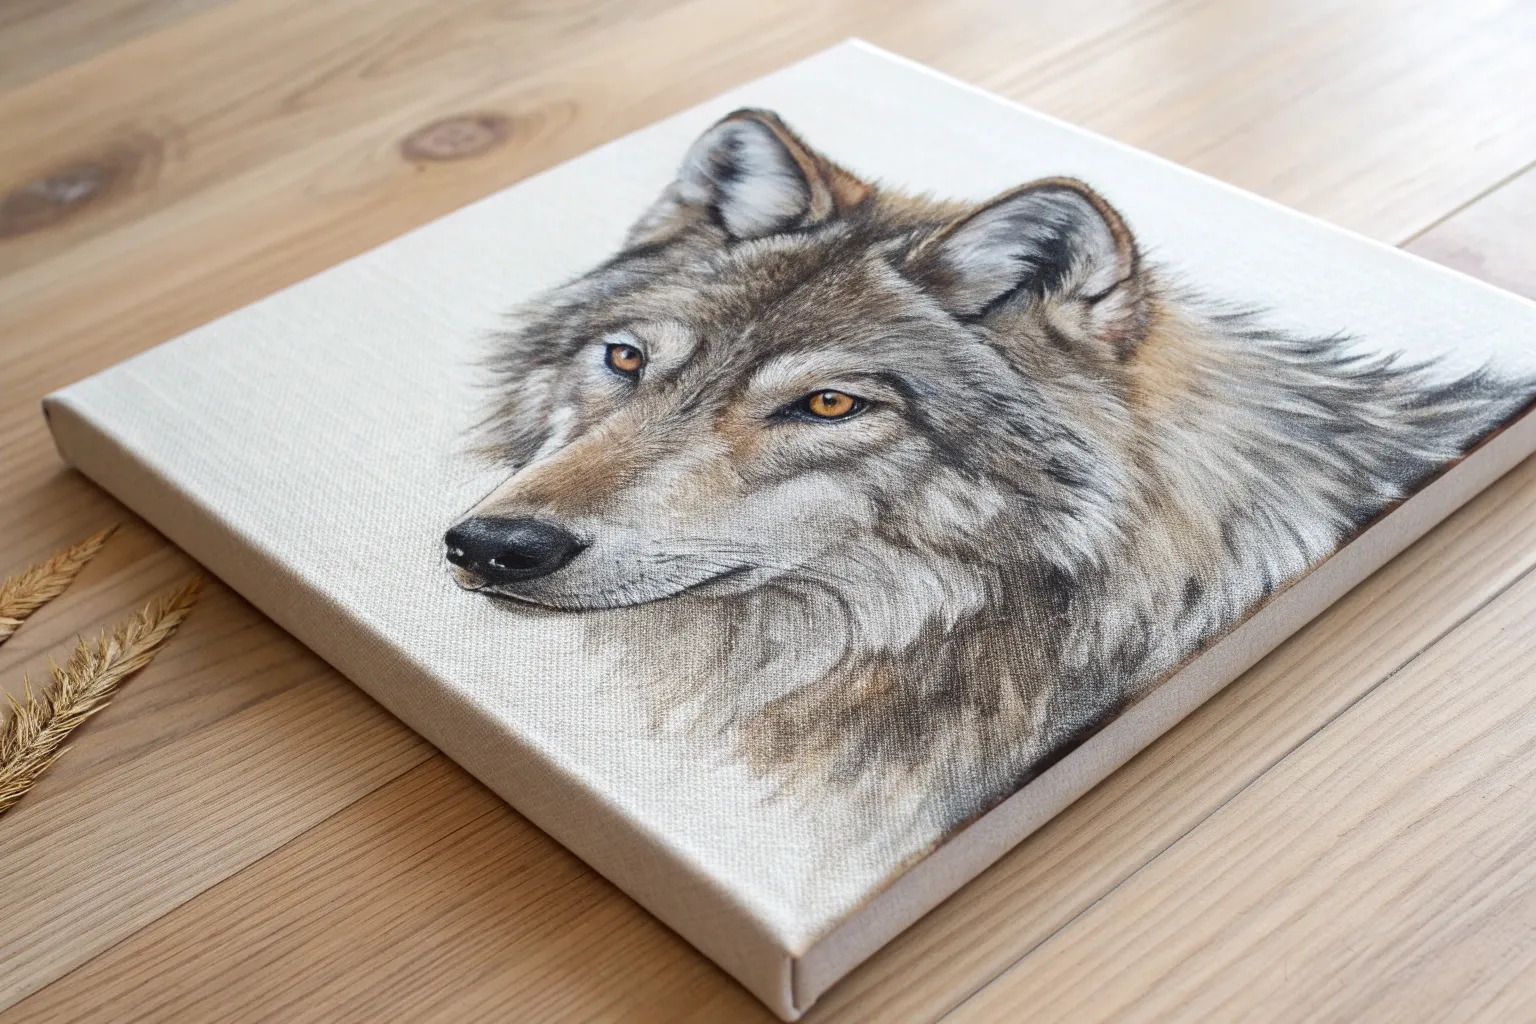
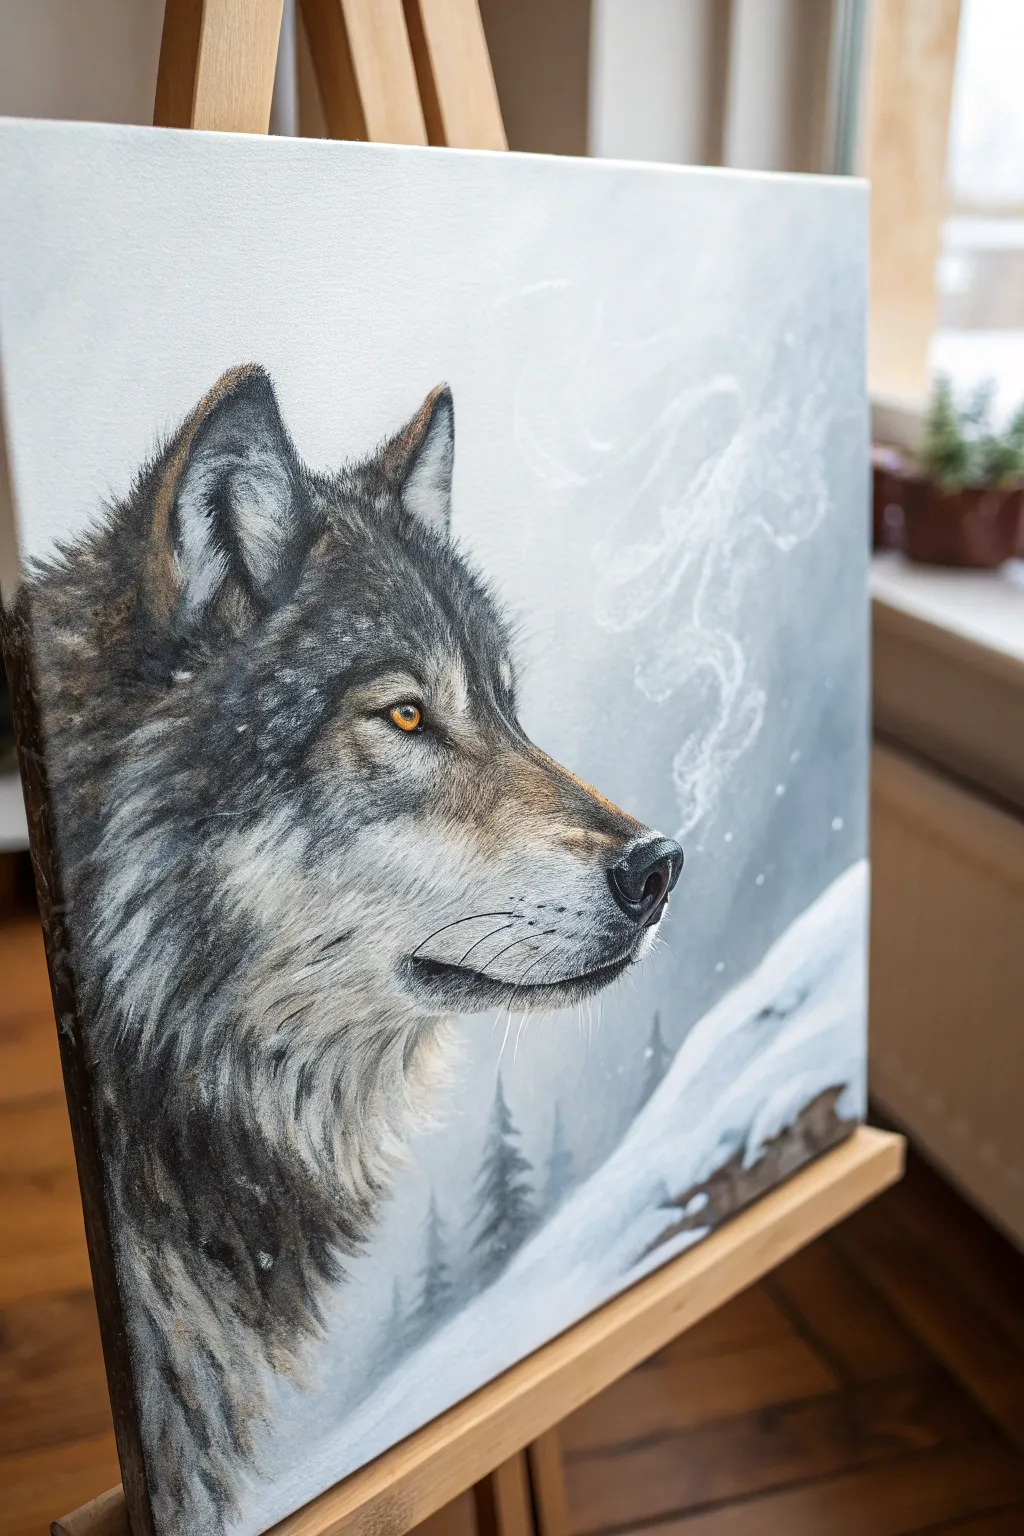
Watercolor Wolf With Wet-on-Wet Fur
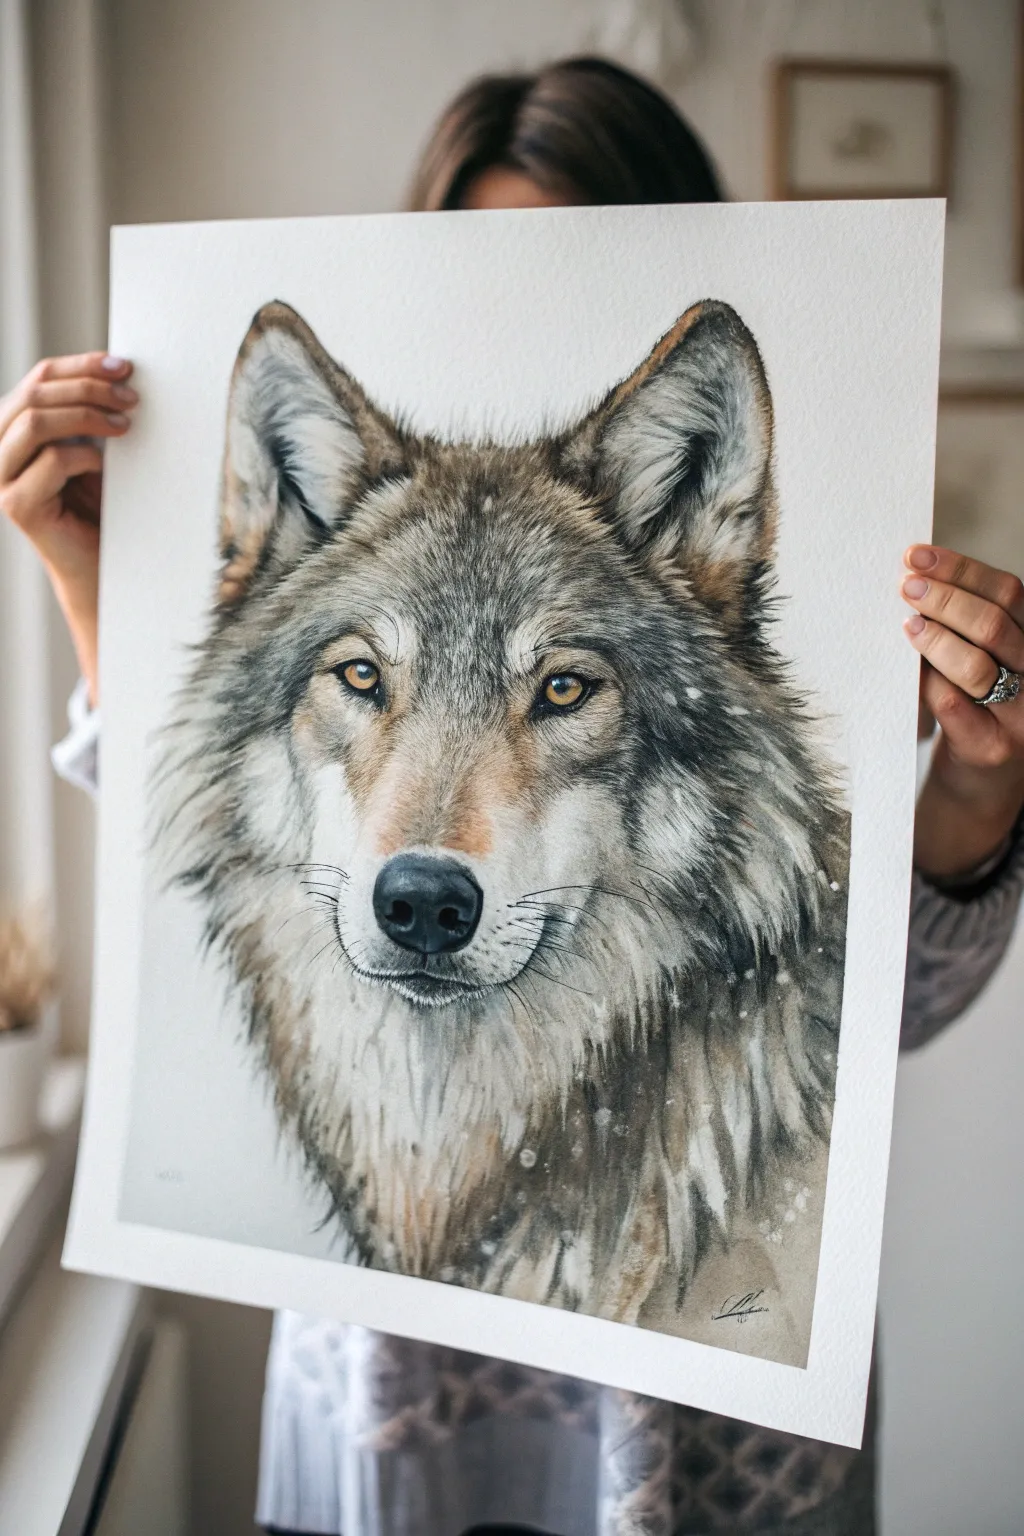
Capture the intense, soulful look of a grey wolf using soft watercolor washes and precise detailing. This project balances the loose, snowy feel of wet-on-wet fur with sharp, defined features like the eyes and nose.
Step-by-Step Guide
Materials
- High-quality watercolor paper (cold press, at least 140lb/300gsm)
- Watercolor paints (Payne’s Grey, Burnt Umber, Yellow Ochre, Lamp Black, Burnt Sienna)
- White gouache or white gel pen
- Round brushes (flats for washes, fine liners for fur)
- Masking fluid (optional)
- Pencil and eraser
- Two jars of water
- Paper towels
Step 1: Sketching and Base Layers
-
Outline the form:
Begin with a light pencil sketch of the wolf’s head. Focus on getting the proportions of the ears and snout correct, as these define the character. Lightly mark the direction of the fur clumps. -
Protect the highlights:
If you want pure white snow speckles later, apply small dots of masking fluid randomly over the fur area now. Also, mask the tiny highlights in the pupils to keep them crisp. -
First wet-on-wet wash:
Wet the entire muzzle and neck area with clean water. Drop in a very dilute mix of Payne’s Grey and Burnt Umber. Let the colors bleed and soften to create the undercoat. -
Warming the tones:
While the paper is still slightly damp, add touches of Yellow Ochre and Burnt Sienna around the eyes, the bridge of the nose, and the base of the ears to simulate the brownish fur tones. -
Dry completely:
Allow this initial layer to dry fully. The paper should be flat and deeply stained with soft color before moving to details.
Muddy Colors?
Avoid overworking wet areas. If you layer too many colors while damp, they turn brown-grey. Let layers dry completely between glazes.
Step 2: Painting the Features
-
The golden eyes:
Mix a rich Yellow Ochre with a tiny touch of brown. Paint the irises carefully, leaving the masked highlights alone. Add a darker rim around the iris while wet for depth. -
Detailing the pupils:
Once the iris is dry, use thick Lamp Black paint for the pupils. Ensure the edges are sharp, as the eyes are the focal point of the portrait. -
Defining the nose:
Paint the nose pad with a dark mix of Payne’s Grey and Black. Lift a little pigment from the top of the nose with a thirsty brush to create a soft highlight and leather-like texture. -
Darkening the ears:
Use a darker brown-grey mix to fill in the inner ears. Use quick, upward strokes to suggest the longer hairs inside the ear flap.
Level Up: Atmosphere
Add a very faint, cool blue wash to the background around the wolf’s head to make the warm tones of the fur pop and suggest a chilly day.
Step 3: Creating Fur Texture
-
Layering mid-tones:
Switch to a smaller round brush. Start creating clumps of fur on the forehead and cheeks using short, directional strokes with a medium-strength grey-brown mix. -
Building the ruff:
Work down the neck. Here, I like to use slightly wetter strokes that overlap, mimicking the thick, layered winter coat. Keep the edges soft to suggest movement. -
Darkest accents:
Mix a strong black-grey. Add the darkest markings around the eyes (the ‘eyeliner’), the markings on the forehead, and the tips of the ears. This brings contrast to the face. -
Fine liner details:
Use your finest liner brush or rigger brush to paint individual stray hairs on the outer edges of the silhouette. This breaks the hard outline and makes the wolf look fluffy. -
Adding whiskers:
With a quick, confident hand and a fine liner brush loaded with black ink or paint, sweep in the whiskers on the muzzle.
Step 4: Wintery Finishing Touches
-
White fur accents:
Using white gouache, paint fine white hairs over the darker patches on the chin and cheeks. This adds incredible realism and depth. -
The snowfall effect:
It’s time for the snow. If you used masking fluid, rub it off gently now. To add more snow, flick white gouache off an old toothbrush or paint specific snowflakes with a brush. -
Fading the bottom:
Use clean water to soften the bottom edge of the painting, letting the fur texture fade out into the white of the paper for a vignette look. -
Final assessment:
Step back and check your values. Deepen shadows under the chin or behind the ears if the image looks too flat.
Once the snowflakes are dry, your majestic winter wolf is ready to be framed and displayed
BRUSH GUIDE
The Right Brush for Every Stroke
From clean lines to bold texture — master brush choice, stroke control, and essential techniques.
Explore the Full Guide
Acrylic Wolf With Dry-Brush Highlights
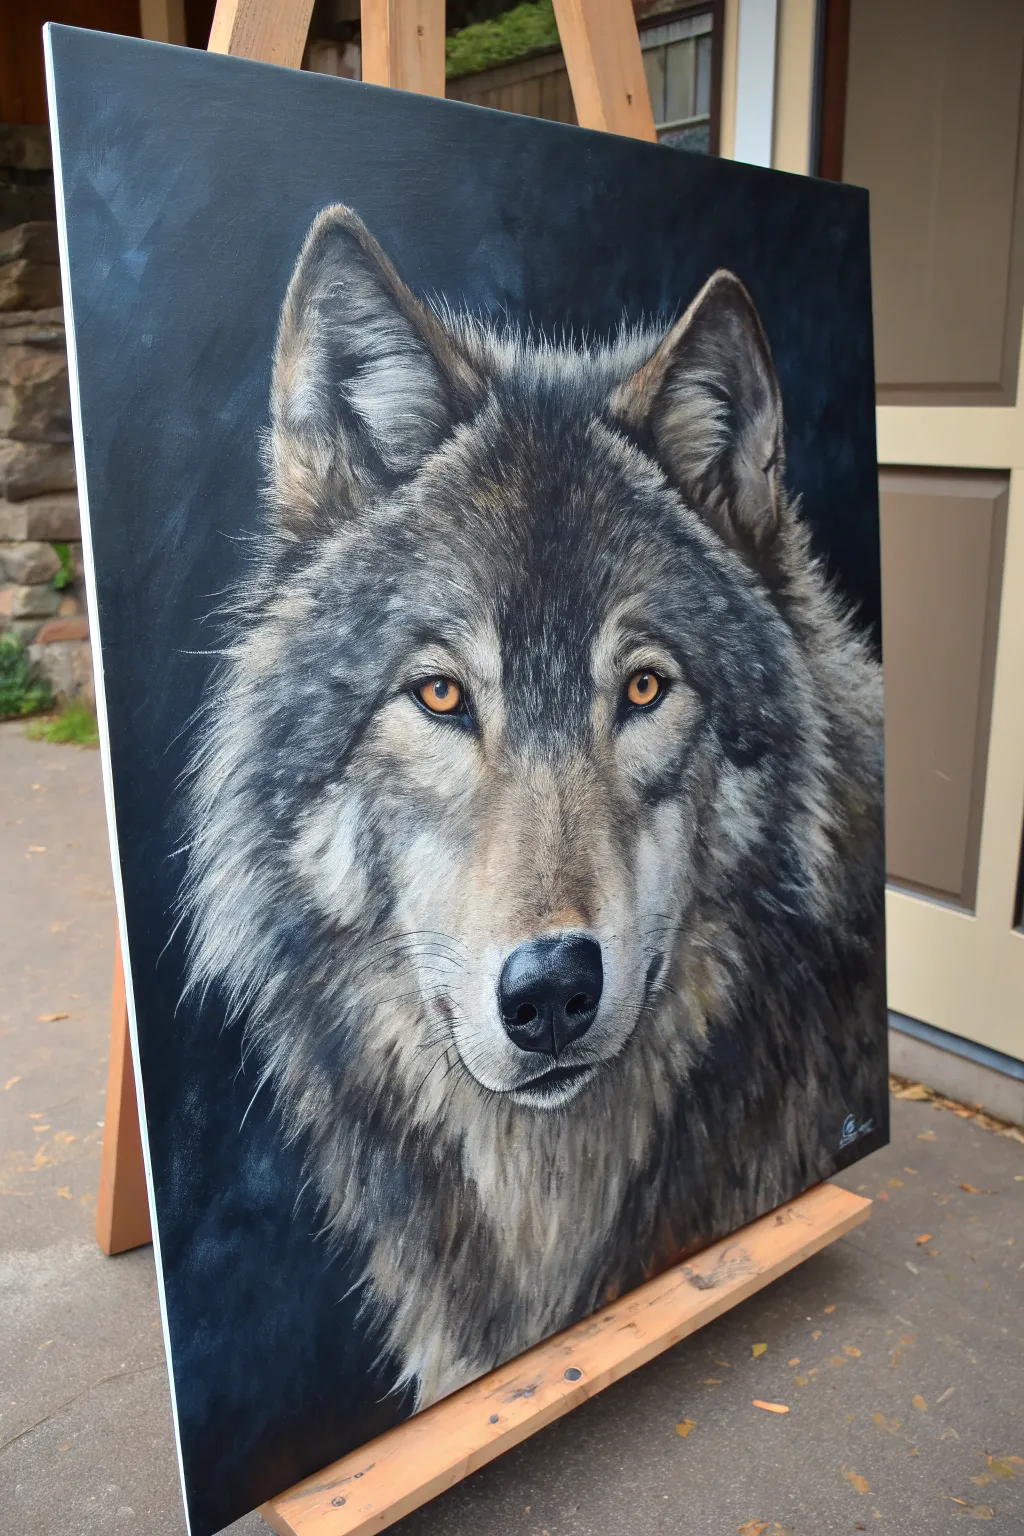
Capture the intense gaze and rugged beauty of a grey wolf in this detailed acrylic painting project. You will focus on building up layers of fur texture against a dramatic dark background to make the subject truly pop.
Detailed Instructions
Materials
- Large stretched canvas (e.g., 24×30 inches)
- Heavy body acrylic paints (Titanium White, Mars Black, Burnt Umber, Raw Sienna, Yellow Ochre, Ultramarine Blue)
- Assorted synthetic brushes (large flat shader, medium filbert, fine liner)
- Old, stiff bristle brush (for dry brushing)
- Palette for mixing
- Water cup and paper towels
- Chalk or charcoal pencil for sketching
- Easel
Step 1: Preparation and Underpainting
-
Tone the Background:
Start by painting the entire background area around where the wolf will be. Mix Mars Black with a tiny touch of Ultramarine Blue to create a deep, cool midnight tone. Apply this thickly and smoothly with a large flat brush, leaving the center blank for the wolf’s head to ensure the colors stay bright. -
Sketch the Contours:
Using a white chalk or charcoal pencil, lightly sketch the outline of the wolf’s head. Pay close attention to the large triangular ears, the broad muzzle, and the placement of the eyes, which should be roughly one-third of the way down the face. -
Block in Basic Values:
With a medium filbert brush, block in the darkest areas of the fur using a mix of Mars Black and Burnt Umber. Focus on the deep shadows inside the ears, around the neck ruff, and the markings above the eyes. -
Mid-tone Base Layer:
Mix a warm grey using White, Black, and a touch of Raw Sienna. Apply this to the main areas of the face—the cheeks, forehead, and bridge of the nose—to kill the white of the canvas and provide a base for the fur texture.
Pro Tip: Keep it Random
Avoid making fur strokes too uniform or parallel. Vary stroke lengths and slightly cross them over each other to mimic the chaotic, organic growth pattern of real animal hair.
Step 2: Building the Features
-
Painting the Eyes:
The eyes are the focal point. Paint the iris with a base of Yellow Ochre and Raw Sienna. Once dry, deepen the outer edges with Burnt Umber to create roundness. -
Adding Eye Details:
Use a fine liner brush with Mars Black to paint the pupil and the thick eyeliner rim around the eye. Add a tiny, crisp dot of Titanium White overlapping the pupil and iris for the reflection. -
Nose Construction:
Paint the nose pad with solid Mars Black. While the paint is still wet, blend in a tiny bit of grey on the top curve to show light hitting the leather texture. -
Nose Texture:
Stipple tiny dots of lighter grey on the nose using the very tip of a small brush to mimic the wet, bumpy texture of a canine nose.
Level Up: Color Glazing
Once fully dry, apply a very thin glaze (paint + water) of Burnt Sienna over the mid-tone fur areas. This unifies distinct brushstrokes and adds a warm, realistic glow to the coat.
Step 3: Fur Texture and Details
-
Dark Fur Direction:
Switch to a smaller round brush. Working over your dark base layers, flick thin lines of black mixed with a little water to define the direction of the fur growth. The fur should fan out from the center of the face and flow heavily downward on the neck. -
Layering Mid-tones:
Mix a lighter grey-brown. Paint thin strokes overlapping the dark areas, but don’t cover them completely. This layering creates depth. -
Dry-Brushing the Mane:
I like to use an old, stiff bristle brush for this step. Load it with a light grey (mostly White with a touch of Black and Blue), wipe most of the paint off on a paper towel, and lightly drag it over the neck ruff to catch the texture of the canvas. -
Ear Details:
Inside the ears, paint distinct, long strokes of creamy white and pale tan. Keep the edges of the ears dark to separate them from the background. -
Forehead texture:
Around the eyes and forehead, the fur is much shorter. Use short, controlled dashes of grey and tan rather than long sweepy strokes. -
Highlighting the Muzzle:
The muzzle area turns almost white. Use Titanium White with a tiny drop of Raw Sienna to warm it up, painting fine hairs that overlap the black mouth line. -
Final Whiskers:
With your thinnest liner brush and watered-down black paint, pull long, confident strokes for the whiskers. Do this quickly to keep the lines smooth. -
Defining the Edges:
Check the silhouette where the fur meets the black background. Paint final wisps of light grey fur extending into the black space to make the wolf look fluffy rather than cut out.
Now you have a striking piece of wildlife art that commands attention in any room
Monochrome Wolf in Black, White, and Gray
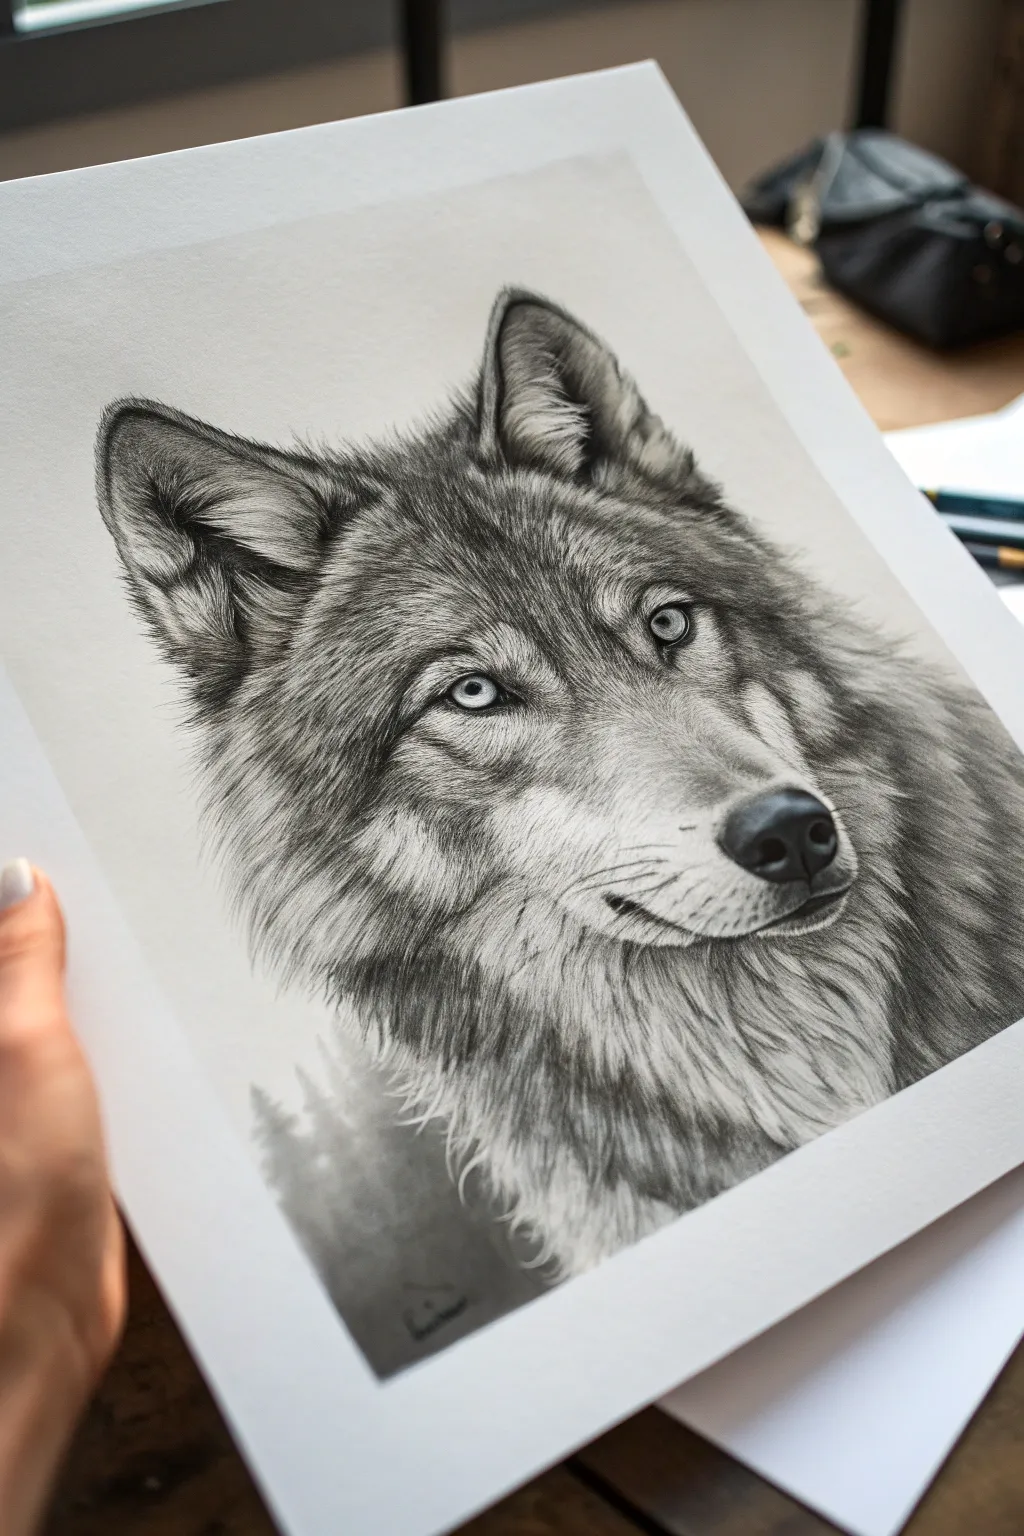
Capture the intense gaze and rugged texture of a wolf using only graphite pencils and careful shading. This monochromatic approach emphasizes the beautiful interplay of light and shadow, creating a lifelike and soulful portrait.
Step-by-Step
Materials
- High-quality drawing paper (smooth bristol or hot press watercolor paper)
- Graphite pencils (H, HB, 2B, 4B, 6B, 8B)
- Mechanical pencil with 0.5mm HB lead
- Kneaded eraser
- Fine-point eraser pen (optional but helpful)
- Blending stumps (tortillons)
- Tissues or soft cloth
- Reference photo of a wolf
Step 1: Sketching the Framework
-
Light Outline:
Begin with a very light H pencil sketch to map out the wolf’s head shape. Focus on the triangular ears, the elongated snout, and the alignment of the eyes. -
Mapping Features:
Mark the exact placement of the eyes, nose, and mouth line. Ensure the eyes are level and the pupils are centered before proceeding. -
Directional Guidelines:
Lightly sketch directional lines indicating which way the fur grows. This is crucial for realism later on—fur flows away from the nose and eyes, sweeping back over the ears.
Muddy Fur?
If fur looks like a solid gray blob, you’ve over-blended. Re-establish texture by drawing sharp, dark hairs back over the smudged area and lifting highlights with an eraser.
Step 2: The Eyes and Nose
-
Defining the Pupils:
Using a 4B pencil, fill in the pupils, ensuring they are the darkest points on the page. Leave a tiny, crisp white circle for the catchlight. -
Iris Details:
Shade the iris using an HB pencil, radiating lines outward from the pupil. Darken the upper rim of the iris where the eyelid casts a shadow. -
Eye Surroundings:
Darken the skin around the eyes (the tear ducts and eyelids) with a 6B pencil to create contrast against the lighter fur. -
Nose Foundation:
Fill in the nostrils with your darkest pencil (8B). Shade the nose pad with a 2B, using a stippling motion (tiny dots) to create a leathery texture.
Step 3: Layering the Fur
-
Base Layer:
Start with an H or HB pencil. Draw short, light strokes following your directional guidelines to create a base layer of gray fur across the face. -
Building Mid-Tones:
Switch to a 2B pencil. In areas where the fur is darker (like the markings above the eyes and the sides of the snout), add a second layer of strokes. -
Defining Clumps:
Fur isn’t individual strands but clumps. Use your mechanical pencil to draw V-shaped shadows between tufts of fur, particularly around the cheeks and neck Ruff. -
Contrast on Ears:
The inside of the ears requires deep shadows. Use a 4B or 6B pencil to shade the deep crevices, leaving the wispy outer hairs light against the dark interior. -
Blending Softly:
Use a blending stump to gently smudge the mid-tones, smoothing out the pencil strokes slightly so they look like soft undercoat rather than wire.
Pro Tip: Indenting
Before shading, use a stylus or empty pen to press ‘invisible’ lines into the paper. When you shade over them, the indented lines stay white, creating perfect whiskers.
Step 4: Refining Details and Depth
-
Enhancing Dark Fur:
Take your 6B or 8B pencil and punch up the darkest areas of the fur pattern—usually the tips of the ears, the eyeliner markings, and the shadows under the jaw. -
Adding Highlights:
Mould your kneaded eraser into a sharp point or wedge. Firmly dab or stroke it across the drawing to lift graphite, creating bright white highlights on the nose bridge and cheek fur. -
Whisker Details:
Using a very sharp mechanical pencil or eraser pen, create the fine whisker spots on the muzzle. If drawing dark whiskers, use quick, confident strokes so they taper at the end. -
Neck Texture:
The fur on the neck is longer and thicker. Use longer, flowing strokes with a 4B pencil, varying the pressure to suggest depth and layering. -
Subtle Background:
To make the wolf pop, add a very faint, misty background suggestion at the bottom, perhaps hinting at treetops with soft, out-of-focus shading.
Take a moment to step back and admire the soulful expression you have captured in your drawing

PENCIL GUIDE
Understanding Pencil Grades from H to B
From first sketch to finished drawing — learn pencil grades, line control, and shading techniques.
Explore the Full Guide
Ink Outline Wolf With Loose Washes
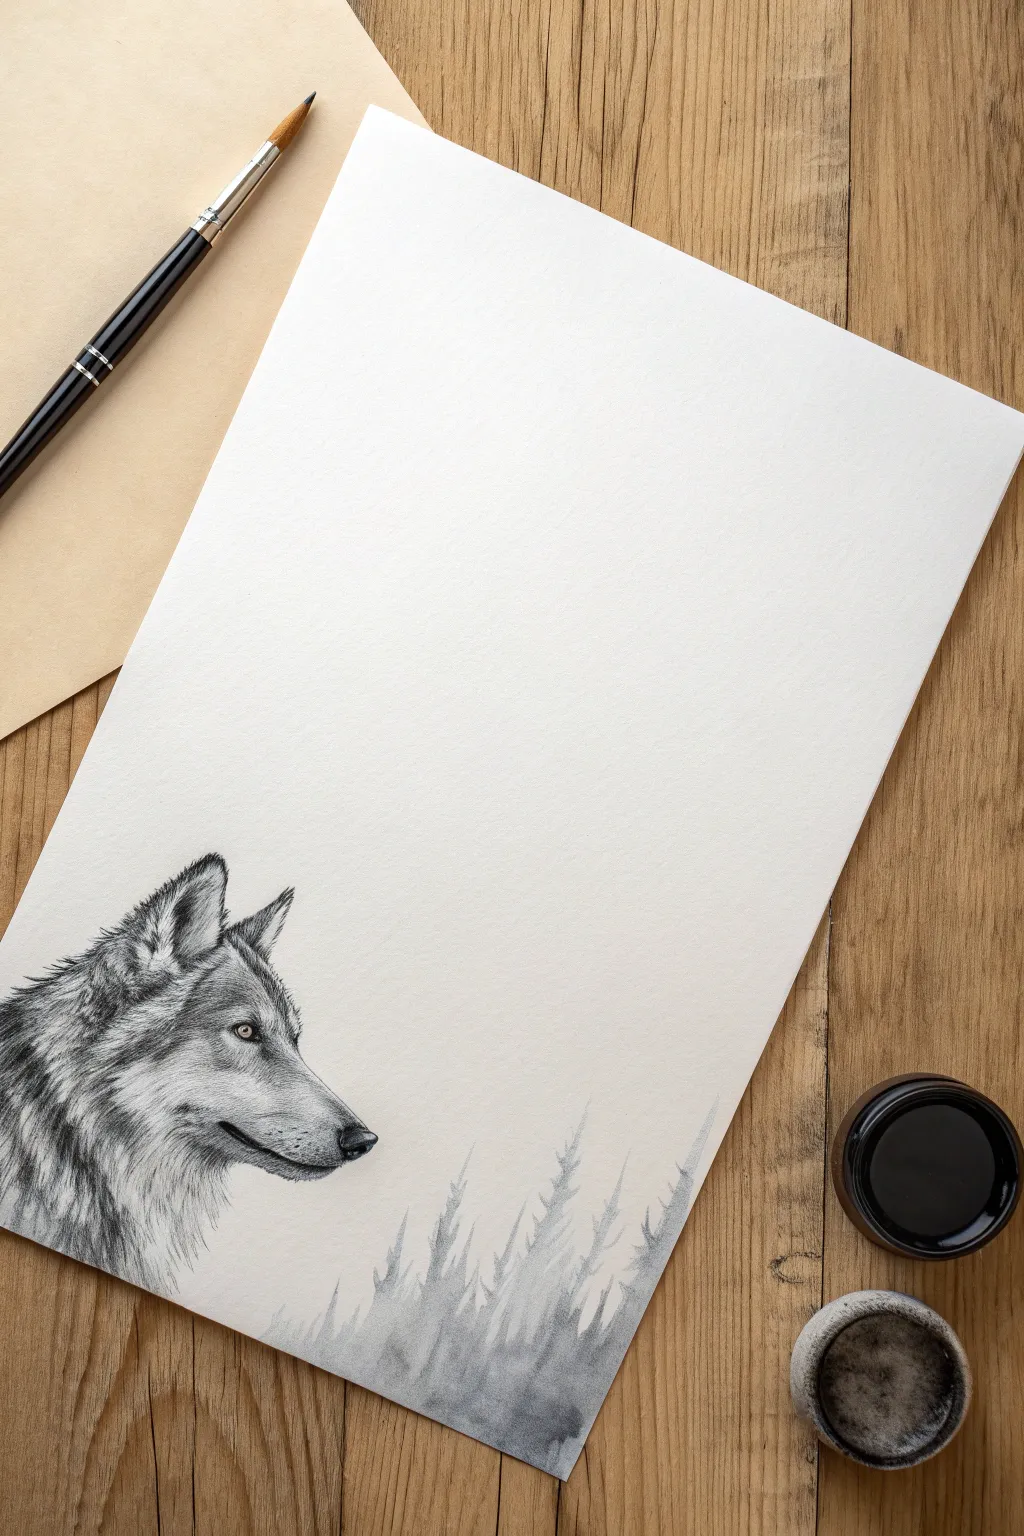
Capture the quiet intensity of a wolf using a blend of sharp detailing and ethereal washes. This project combines precise pen or pencil work for the fur with soft, diluted ink movements to create a misty forest base.
Step-by-Step Tutorial
Materials
- Heavyweight watercolor paper or mixed media paper (smooth texture preferred)
- Fine liner pens (sizes 0.1, 0.3, and 0.5) or a sharp HB graphite pencil
- India ink or diluted black watercolor paint
- Round watercolor brush (size 6 or 8)
- Small detail brush (size 2)
- Clean water jar
- Paper towels
- Pencil and eraser for sketching
Step 1: Drafting the Wolf
-
Establish placement:
Begin by deciding where your wolf will sit. For this composition, place the head in the bottom left corner, leaving ample white space above and to the right for an atmospheric effect. -
Sketch the basic shapes:
Lightly sketch the circle for the head and a tapered muzzle shape extending outward. Keep lines faint so they can be easily erased later. -
Refine the profile:
Outline the triangular ears, keeping them alert and upright. Define the strong jawline and the slope of the nose, ensuring the proportions feel natural. -
Add facial features:
Place the eye just above the muzzle line, shaped like an angled almond. Sketch the nose tip and the mouth line, giving the wolf a calm, neutral expression.
Fur Direction Tip
Always stroke pen lines in the direction hair grows. On the nose, it grows down; on the cheeks, it sweeps back. This flow is crucial for realism.
Step 2: Detailed Fur Texture
-
Start the fur around the eye:
Using your finest pen (0.1) or a very sharp pencil, begin making short, directional strokes radiating away from the eye. These strokes should be tiny and dense. -
Build density on the muzzle:
Work down the nose bridge with short strokes. Keep the hair shorter here than on the neck. Leave tiny gaps of white paper to suggest highlighted hairs catching the light. -
Darken the markings:
Switch to a 0.3 pen to deepen the dark patch around the eye, the tip of the nose, and the line of the mouth. This contrast brings the face to life. -
Create the neck ruff:
Moving down to the neck, lengthen your strokes significantly. Use sweeping, curved lines to mimic the thick, layered fur of the wolf’s winter coat. -
Layering for volume:
Go back over the neck area with your 0.5 pen, adding darker shadows deep in the fur. The variation in line weight is what gives the coat its realistic 3D volume. -
Finish the ear details:
Fill the inside of the ears with fluffy, light strokes, while keeping the outer edges of the ears darker and more defined. I like to keep the ear tips fairly sharp.
Ink Bleeding?
If your detailed pen lines blur when you add the wash nearby, stop immediately. Your pen ink isn’t waterproof or dry enough. Wait longer or switch to archival ink.
Step 3: The Misty Wash
-
Prepare your wash:
Dilute a small amount of India ink or black watercolor in a palette well until you have a medium-gray tone. -
Wet the bottom edge:
Take your clean round brush and apply clear water to the very bottom of the paper, moving upwards into jagged, tree-like shapes. -
Drop in the color:
While the paper is damp, touch your ink-loaded brush to the bottom edge. Let the pigment bleed upward into the wet areas naturally. -
Guide the trees:
Use the tip of your brush to gently pull the pigment upward into triangular pine shapes. Keep these loose and abstract; they shouldn’t be detailed trees, just silhouettes. -
Fade out the edges:
Rinse your brush and use clean water to soften the upper edges of your pine shapes so they look like they are disappearing into fog. -
Connect to the wolf:
Bring the very faintest wash near the wolf’s chest, ensuring the drawing blends seamlessly into this atmospheric base without covering your detailed line work.
Once dry, erase any visible pencil sketch lines to reveal a crisp, atmospheric portrait suitable for framing
Geometric Wolf With Faceted Shapes
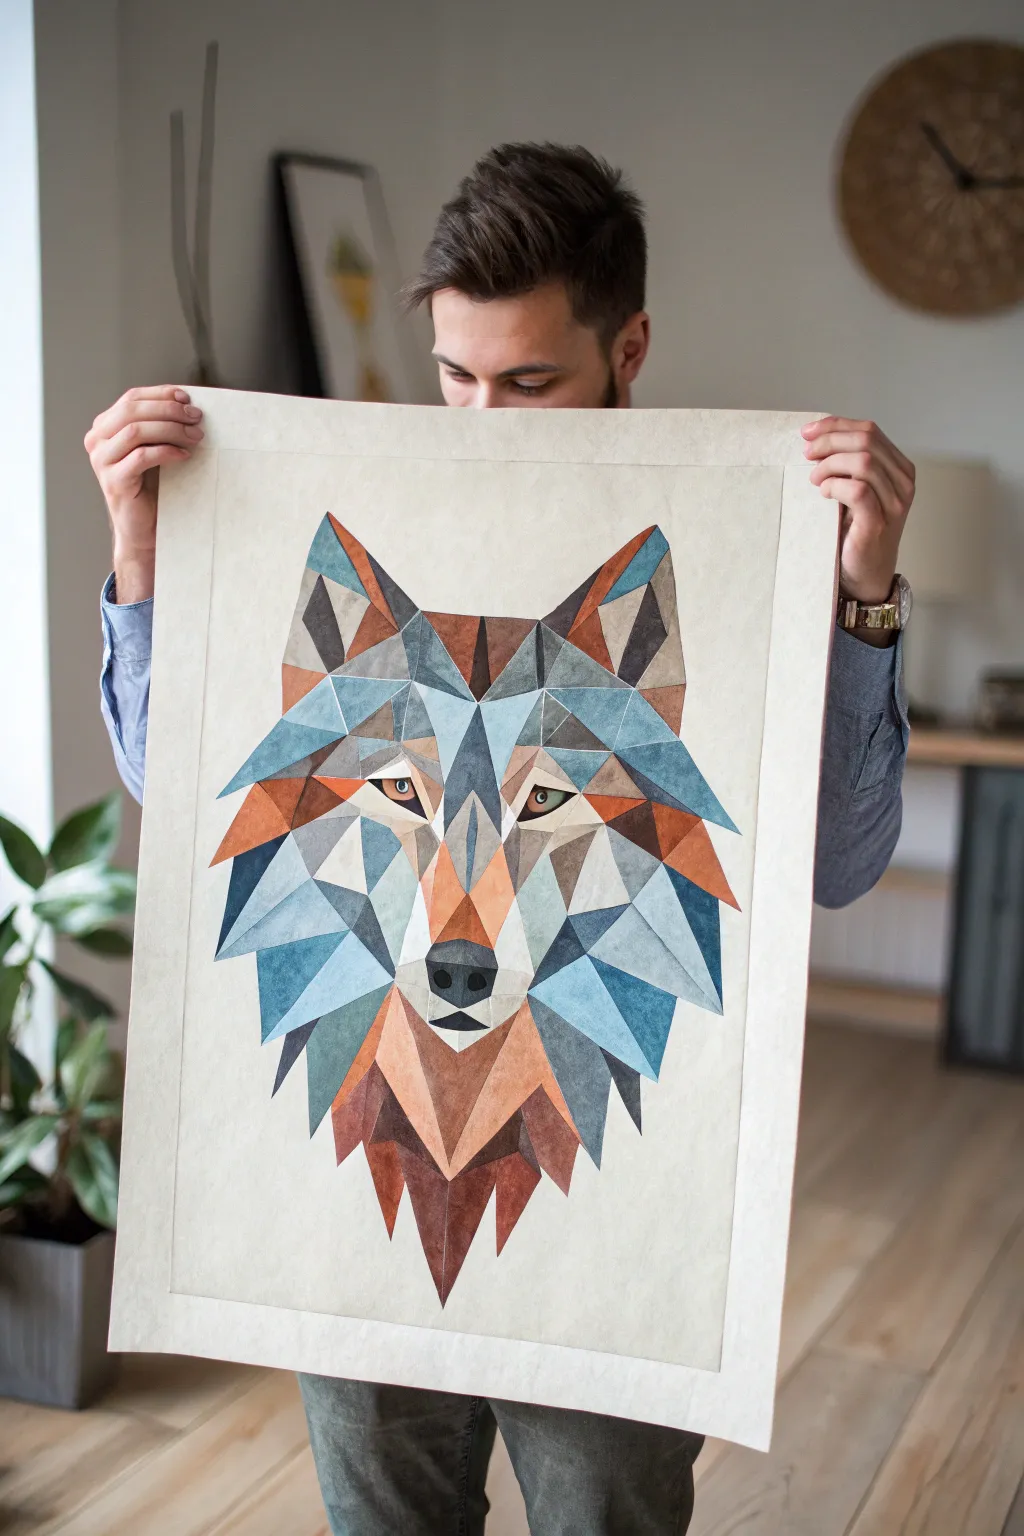
This striking project transforms a classic wolf portrait into a modern masterpiece using a mosaic of sharp angles and faceted shapes. By blocking out varied tones of crystalline blues, rusty oranges, and slate grays, you’ll create a stunning optical depth that looks incredibly professional.
Step-by-Step
Materials
- Heavyweight watercolor paper or mixed media board (A2 or similar large size)
- Pencil (HB or H)
- Ruler or straight edge
- Watercolor or gouache paints
- Palette for mixing
- Masking fluid (optional but recommended)
- Low-tack masking tape or drafting tape
- Fine detail brushes (sizes 0, 2, and 4 flat/angled brushes)
- Eraser (kneaded)
- Reference grid or printout
Step 1: Planning and Sketching
-
Create the framework:
Begin by lightly sketching a central vertical line to ensure symmetry for the wolf’s face. Mark the top of the ears and the bottom of the neck fur to establish the overall height. -
Map the main shapes:
Using your ruler, lightly draw the largest triangular shapes first: the tall triangles for the ears, the diamond shape of the snout, and the broad fan of the cheek fur. -
Subdivide into facets:
Break these large shapes down into smaller geometric polygons. Focus on connecting corners to corners; avoid curves entirely. The goal is to create a ‘low poly’ mesh that defines the contours of the face. -
Refine the details:
Pay special attention to the eyes and nose. Even these organic features should be drawn with straight lines—hexagons for the eyes and a pentagon for the nose tip—to maintain the style. -
Clean the lines:
Once your geometric mesh is complete, use a kneaded eraser to lighten the pencil lines until they are just barely visible, removing any smudges.
Step 2: Color Blocking Strategy
-
Prepare your palette:
Mix three main color families: cool blues (slate, teal, ice blue), warm earth tones (rust, burnt sienna, tan), and neutrals (warm grays and cream). You will need light, medium, and dark versions of each. -
Masking borders (optional):
For razor-sharp edges between shapes, you can apply thin low-tack tape along the lines of a few non-adjacent sections. Alternatively, rely on a steady hand and a good flat brush. -
Paint the shadows first:
Identify the darkest facets, such as the inner ears, the deep fur under the cheeks, and the nose. Fill these with your darkest grays and deep rust browns to anchor the image. -
Apply the mid-tones:
Work on the main fur sections. Use slate blues for the shadowed side of the snout and burnt orange for the bridge of the nose. Keep the paint consistent—try not to blend colors within a single shape. -
Add the highlights:
Fill the remaining shapes with your lightest tints—cream and pale ice blue. These usually sit on the forehead, the tip of the muzzle, and the top edges of the cheek ruffs.
Clean Edge Secret
Work on non-adjacent shapes first. Let a blue triangle dry completely before painting the brown one next to it. This prevents wet colors from bleeding across the line.
Step 3: Refinement and Finishing
-
Detail the eyes:
Paint the irises a piercing amber or pale yellow. Use a very fine brush to add a tiny, sharp black pupil, keeping the edges crisp. -
Check for gaps:
Inspect the white spaces between your painted shapes. The goal is to have the shapes touch perfectly, but if tiny white hairlines separate them, it adds to the mosaic effect. -
Crispen the edges:
I find that going back with a very slightly damp angled brush can help straighten out any wobbly edges where two colors meet. -
Add texture (optional):
For a ‘stonewashed’ look like the reference, you can gently lift a little pigment from the center of larger shapes with a paper towel while the paint is damp, leaving the edges darker. -
Final border:
If you want the faux-matted look shown in the photo, use a ruler to draw a very faint border around the artwork, or simply adhere a paper cutout frame over the edges.
Metallic Upgrade
Replace the grey or light tan sections with metallic silver or gold leaf paint. The shimmer emphasizes the faceted planes and makes the artwork pop in the light.
Step back and admire how your collection of simple shapes has come together to form a focused, intense wolf gaze


Abstract Wolf With Color-Blocked Background
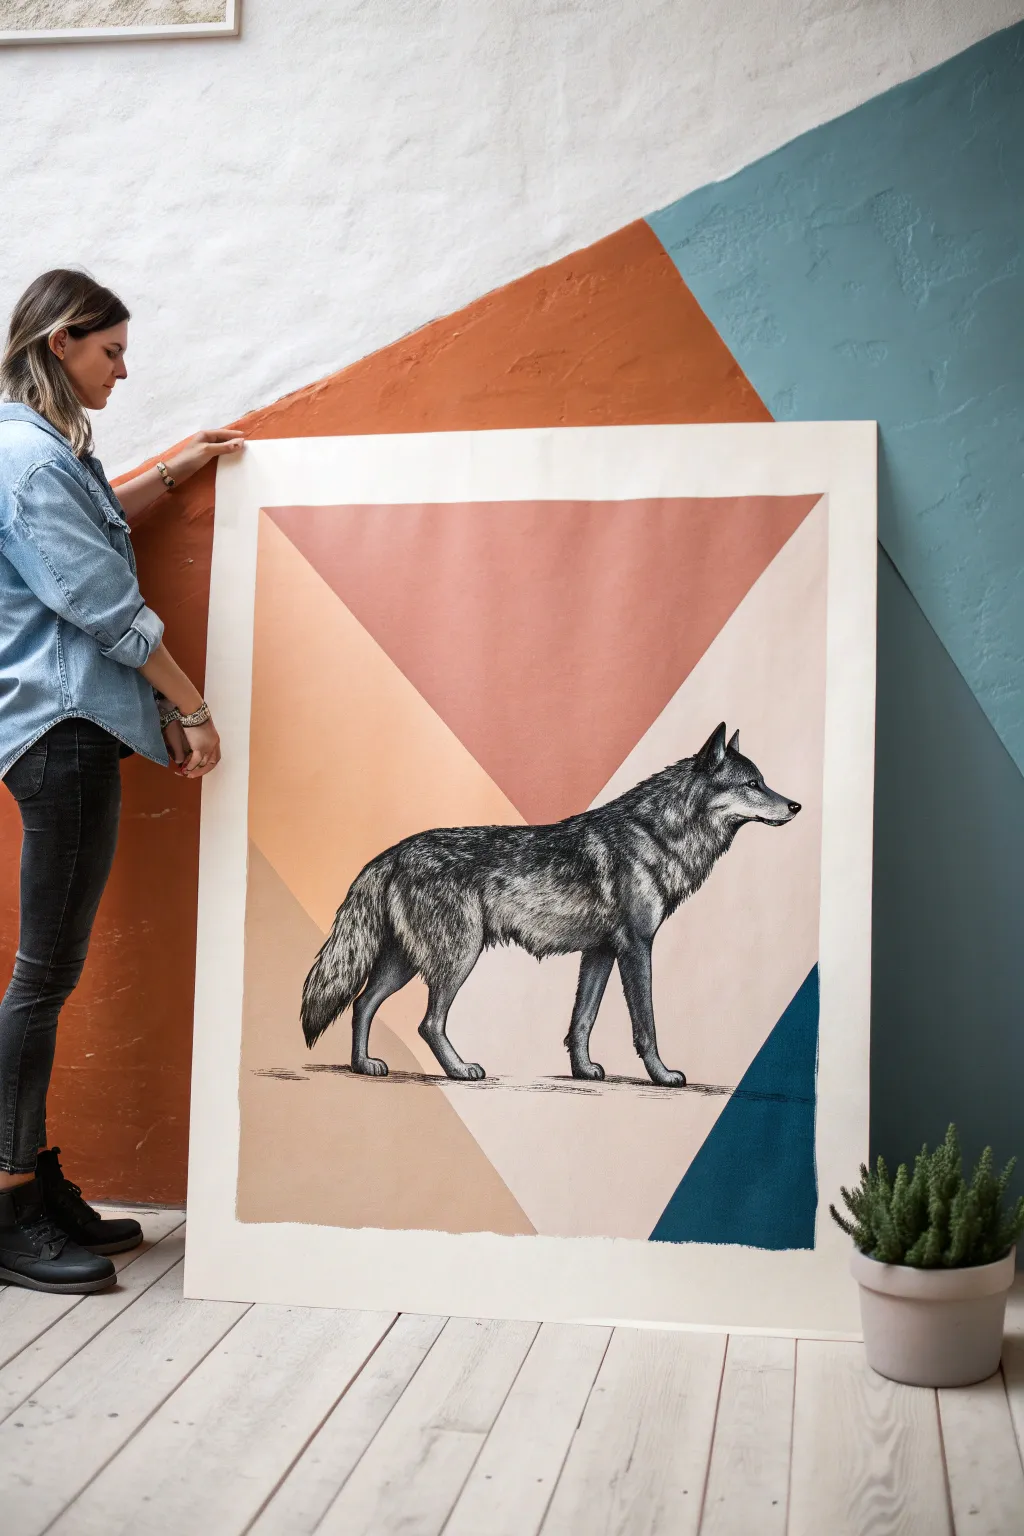
This striking artwork combines the raw, wild beauty of a realistic wolf sketch with the modern, clean lines of geometric color-blocking. The contrast between the detailed charcoal-style animal and the flat, muted background hues creates a sophisticated focal point for any room.
Detailed Instructions
Materials
- Large heavy-weight watercolor paper or illustration board (at least 18×24 inches)
- Masking tape or painter’s tape (low tack)
- Acrylic paints (terracotta, peach/tan, deep teal, white)
- Wide flat brush (1-2 inch) for background
- Charcoal pencils (soft, medium, hard)
- Graphite pencils (HB, 2B, 4B)
- Kneaded eraser
- Fixative spray (workable and final)
- Fine liner pens (optional for details)
- Ruler
- Reference photo of a wolf profile
Step 1: Planning the Geometry
-
Prep your surface:
Begin by taping down your large paper to a flat work surface or board. This prevents buckling when you apply wet paint later and gives you crisp, clean edges. -
Map the wolf placement:
Before drawing any lines, decide where your wolf will stand. Lightly sketch a very faint outline or oval in the center to reserve that space. You want the wolf to be the star, so ensure it has breathing room. -
Draw the geometric guides:
Using a ruler and a light pencil touch, draw a large ‘X’ or intersecting diagonal lines across the paper. Create large triangular zones like the ones shown: a top V-shape, side triangles, and a bottom section. -
Mask the first shapes:
Choose which color sections you want to paint first. Apply masking tape along your pencil lines to section off non-adjacent triangles. Press the tape edges down firmly so paint doesn’t bleed underneath.
Fixing Smudges
Charcoal dust can ruin your pristine painted background. Keep a sheet of clean scrap paper under your drawing hand at all times to prevent smearing dust onto the paint.
Step 2: Blocking in Color
-
Mix your palette:
Prepare your acrylics. Aim for a muted, earthy palette. Mix a soft peach-tan, a warm terracotta rust, and a deep teal. I find adding a touch of white to the peach helps it cover the paper more essentially. -
paint the first sections:
Using your wide flat brush, fill in the exposed triangles. Apply the paint smoothly in long, even strokes. If the paper tooth shows through too much, let it dry and apply a second coat. -
Peel and wait:
Carefully peel back the tape while the paint is still slightly damp to avoid tearing the dried film. Let these sections dry completely—at least 30 minutes—before taping over them. -
Paint remaining sections:
Once the first shapes are dry, tape off the remaining triangles. Paint your deep teal and any remaining peach sections. Be mindful of the central area where the wolf will go; paint right up to your rough wolf outline or even over it if your charcoal will be dark enough to cover it. -
Create the ‘ground’:
Notice the dark shadow line under the wolf’s paws. While painting, ensure the color block creates a horizon line or simply leave space to draw a ground shadow later.
Add Metallic Flair
For a luxe touch, trace the boundary lines between the color blocks with a gold or copper paint pen after the painting is dry. It adds a subtle shimmer to the geometry.
Step 3: The Wolf Portrait
-
Refine the outline:
With the background fully dry, lightly sketch the final profile of the wolf using an HB pencil. Focus on accurate proportions: the snout length, the ear position, and the slope of the back. -
Start with mid-tones:
Using a medium graphite or charcoal pencil, start shading the main muscle groups. Don’t go pitch black yet. Establish the grey tones of the fur on the neck and shoulder. -
Build fur texture:
Switch to a sharper pencil. Draw fur using quick, short strokes that follow the direction of hair growth. Pay attention to the ruff around the neck where the fur is longer and thicker. -
Deepen the shadows:
Now, come in with your softest charcoal (or a 4B/6B pencil). Darken the nose, the eye pupil, the inner ear, and the deep shadows under the belly and tail. This high contrast makes the drawing pop against the flat background. -
Add highlights:
Use your kneaded eraser to lift pigment out of the drawing. Dab or swipe to create white fur highlights on the cheek, shoulder blade, and the tip of the tail. This subtractive method adds incredible realism. -
Ground the subject:
Underneath the paws, use horizontal charcoal strokes to create a cast shadow. This physically connects the wolf to the color-blocked background so it doesn’t look like a floating sticker. -
Seal the work:
Once you are happy with the details, take the artwork outside or to a ventilated area. Spray a light coat of workable fixative first to set the charcoal, followed by a final fixative to protect the whole piece.
Hang your masterpiece in a spot with good lighting to let the texture of the charcoal really shine
Wolf Breath in Cold Winter Air
Capture the serene majesty of a wolf against a frosty backdrop in this acrylic painting tutorial. You will learn to layer fur textures and create the ethereal effect of warm breath meeting icy air, bringing a sense of life and temperature to your canvas.
Step-by-Step Tutorial
Materials
- Canvas (square format, e.g., 16×16 or 20×20 inches)
- Acrylic paints: Titanium White, Mars Black, Burnt Umber, Raw Sienna, Yellow Ochre, Phthalo Blue
- Brushes: Large flat brush, medium filbert, small round brush, fine liner brush
- Container of water
- Palette
- Pencil for sketching
- Paper towels
- Mixing Medium (optional, for glazing)
Step 1: Setting the Scene
-
Sketch the Outline:
Begin by lightly sketching the profile of the wolf on your canvas. Focus on the triangular shape of the ears, the slope of the snout, and the strong jawline. Don’t worry about fur details yet; just get the proportions right. -
Map the Background:
Draw a faint diagonal line for the snowy hill in the lower right corner and indicate the positions of distinct pine trees in the distance. -
Paint the Sky Gradient:
Mix Titanium White with a tiny touch of Phthalo Blue and Mars Black to create a very pale, cool grey. Using a large flat brush, paint the entire background sky area, blending it to be slightly lighter near the wolf’s face to create contrast. -
Add Distant Trees:
Mix a darker grey-blue using Phthalo Blue, Black, and White. With a medium filbert brush, gently dab in the shapes of the distant pine trees. Keep edges soft and misty to suggest they are far away in the fog.
Step 2: Blocking in the Wolf
-
Base Coat the Fur:
Mix a mid-tone grey using Black and White. Apply this to the main body of the wolf’s head and neck. It doesn’t need to be detailed, just a solid underpainting to hide the canvas. -
Establish Dark Values:
Use Mars Black mixed with a little Burnt Umber. Block in the darkest areas: the inner ear, the nose tip, the area around the eye, and the deep shadows in the neck fur. -
Define the Eye:
Paint the iris with Yellow Ochre mixed with a dot of Raw Sienna. Outline the eye with pure Black and add a tiny, sharp dot of Titanium White for the reflection to make it look alive. -
Warm Tones on the Snout:
Glaze a thin layer of Raw Sienna and Burnt Umber over the bridge of the nose and behind the ear. This adds the characteristic brownish warmth found in timber wolves.
Pro Tip: Fur Direction
Always paint fur strokes in the direction the hair grows. On the snout, hair grows toward the nose; on the neck, it flows downward and back. This adds realism.
Step 3: Detailing Fur and Atmosphere
-
Layering Dark Fur:
Switch to a small round brush. Mix a dark charcoal grey and begin flicking brushstrokes in the direction of hair growth. Start from the back of the neck and move forward. -
adding Mid-Tone Fur:
Lighten your grey mix. Apply shorter, more deliberate strokes over the dark layer, particularly on the cheeks and forehead. Let the dark layer show through in the gaps to create depth. -
Highlighting the Mane:
Using a very light grey (almost white), use a fine liner brush to add the longest, brightest hairs on the neck ruff and the chin. These strokes should be crisp and confident. -
Refining the Face:
Add tiny, precise white hairs around the muzzle and eyebrows. Use a diluted black to paint the whisker spots on the snout. -
Painting the Snowy Ground:
Block in the snow hill at the bottom with white. Add subtle blue-grey shadows on the underside of the snow drift to give it volume and form.
Troubleshooting: Muddy Fur?
If your fur looks muddy, you likely didn’t let the dark underlayer dry completely. Let the base layer dry fully before adding lighter highlight strokes on top.
Step 4: The Breath Effect
-
Mixing the Breath Color:
Create an extremely transparent glaze using water or mixing medium and Titanium White. It should be milky, not opaque. -
Applying the Wisps:
Gently swirl this glaze coming from the wolf’s mouth and nose. Use a dry brush to soften the edges immediately, making it look like steam dissipating into the air. -
Structuring the Vapour:
I find it helpful to add a second, slightly more opaque layer of white just near the nostrils to show the density of the breath before it fades out. -
Final Whiskers:
Using your inkiest black on a liner brush, paint long, sweeping whiskers extending from the muzzle. These should overlap the fur you’ve already painted. -
Snow Flurries:
Dip an old toothbrush or stiff brush in watered-down white paint. Gently flick it to splatter tiny snow specks across the background and lightly over the wolf’s coat.
Step back and admire how the subtle breath effect transforms a standard portrait into a cold, atmospheric winter scene
Mixed Media Wolf With Paper Collage Fur
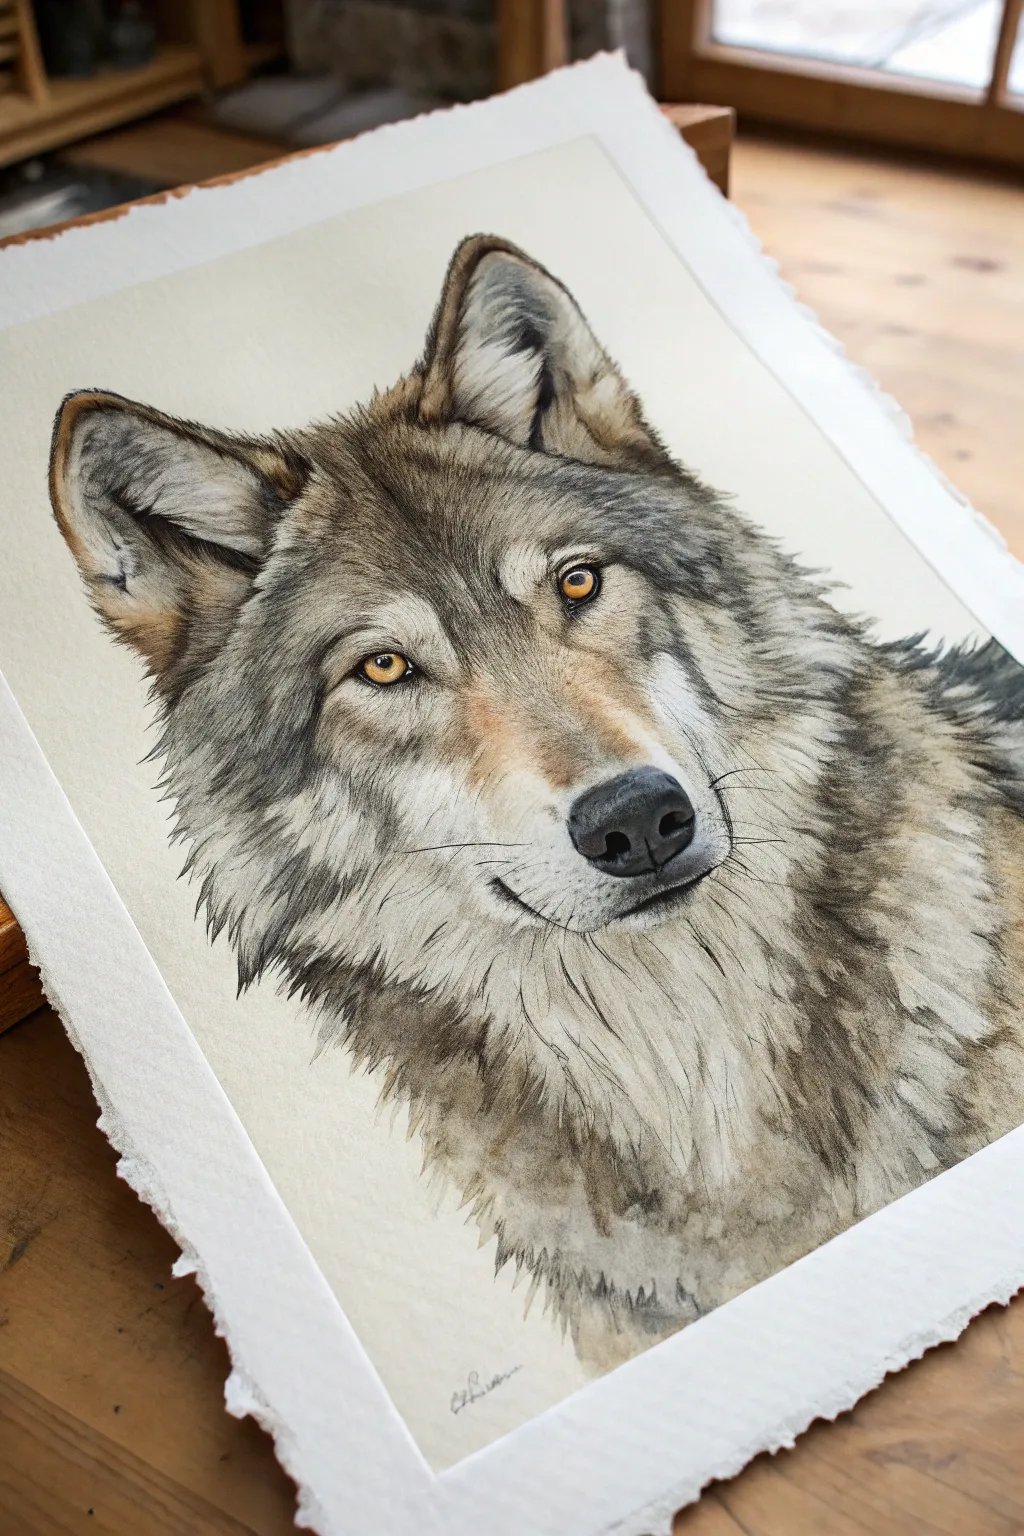
Capture the intense gaze and wild spirit of a wolf with this detailed watercolor tutorial. Using layered glazes and fine brushwork, you will build up realistic fur textures and piercing amber eyes that seem to look right through you.
Step-by-Step Guide
Materials
- Heavyweight watercolor paper (300gsm cold press recommended)
- Pencil (HB or 2H)
- Kneaded eraser
- Watercolor paints (Payne’s Grey, Burnt Umber, Yellow Ochre, Burnt Sienna, Lamp Black)
- Round brushes (sizes 2, 4, and 8)
- Fine liner brush (size 0 or 00)
- Clean water jars
- Paper towels
- Masking tape
Step 1: Initial Sketching
-
Prepare your surface:
Begin by taping your watercolor paper to a board or table to prevent buckling. Leave a generous border around the edge if you want that classic framed look later. -
Outline the basic shapes:
Using an HB or 2H pencil, lightly sketch the oval shape of the wolf’s head. Mark lines for eye placement and the center line of the muzzle to ensure symmetry. -
Detail facial features:
Refine the sketch by drawing the almond shapes of the eyes, the triangular ears, and the nose structure. Keep your pencil pressure very light so graphite doesn’t muddy the paint later. -
Map the fur direction:
Lightly indicate the direction of the fur growth with faint arrows or lines. Notice how the fur fans out from the nose and sweeps back over the ears and ruff.
Step 2: Painting the Eyes and Nose
-
Base coat for the eyes:
Apply a wash of Yellow Ochre to the irises. While wet, drop in a tiny touch of Burnt Sienna near the top edges to create a shadow from the eyelid. -
Deepen the gaze:
Once the base is dry, use a size 2 brush to paint the pupils with Lamp Black. Carefully outline the eyes with a dark mix of Payne’s Grey and Black. -
Paint the nose:
Fill the nose shape with a diluted wash of Payne’s Grey. While it’s damp, drop concentrated black into the nostrils and the bottom edge for depth, leaving the top slightly lighter for a highlight.
Wet-on-Wet Fur Tip
For softer fur areas like the neck, dampen the paper slightly before painting strokes. The lines will bleed just enough to look fluffy.
Step 3: Building Fur Layers
-
Underpainting the face:
Create a very watery mix of Yellow Ochre and a touch of Burnt Umber. Apply this pale wash to the bridge of the nose, forehead, and cheeks where the fur is warmest. -
Cool shadows first pass:
Mix a watery grey using Payne’s Grey. Apply loose strokes to the neck ruff and behind the ears to establish the underlying shadow shapes before adding detail. -
Start the muzzle texture:
Switch to a size 4 brush. Using a mix of Burnt Umber and Grey, start flicking small strokes outward from the nose bridge, following your directional arrows. -
Darken the ears:
Paint the inside of the ears with a darker, warmer brown mix. Use quick, short strokes for the fluffy inner ear fur, leaving some white paper showing for highlights. -
Mid-tone fur details:
With a mix of Payne’s Grey and Burnt Umber, work on the forehead and cheeks. Use short, layered strokes to simulate shorter hairs, building density slowly.
Level Up: Eye Sparkle
Leave a tiny spec of unpainted white paper in the pupil for a catchlight, or add it at the end with a dot of opaque white gel pen.
Step 4: Fine Details and Finishing
-
Define the ruff:
For the longer neck fur, use longer, sweeping strokes with a size 8 brush. Keep the edges ragged and uneven to mimic a natural, wild texture. -
Intensify darks:
I like to go back in with my darkest mix (Black and Payne’s Grey) now to punch up the contrast. Carefully darken the markings around the eyes and the very tips of the ears. -
Add fine hairs:
Using your size 0 liner brush, paint individual stray hairs on the outer edges and white whiskers on the muzzle. If you need white whiskers over dark paint, a bit of white gouache works wonders here. -
Final glaze check:
Assess the overall tone. If the fur looks too flat, glaze over shadow areas with a very diluted purple-grey wash to push them back. -
Sign and reveal:
Once everything is bone dry, carefully peel away the masking tape to reveal crisp, clean edges. Sign your artwork at the bottom.
Now step back and admire the soulful expression you have brought to life on paper
Tape-Resist Wolf With Starry Sky Splatter
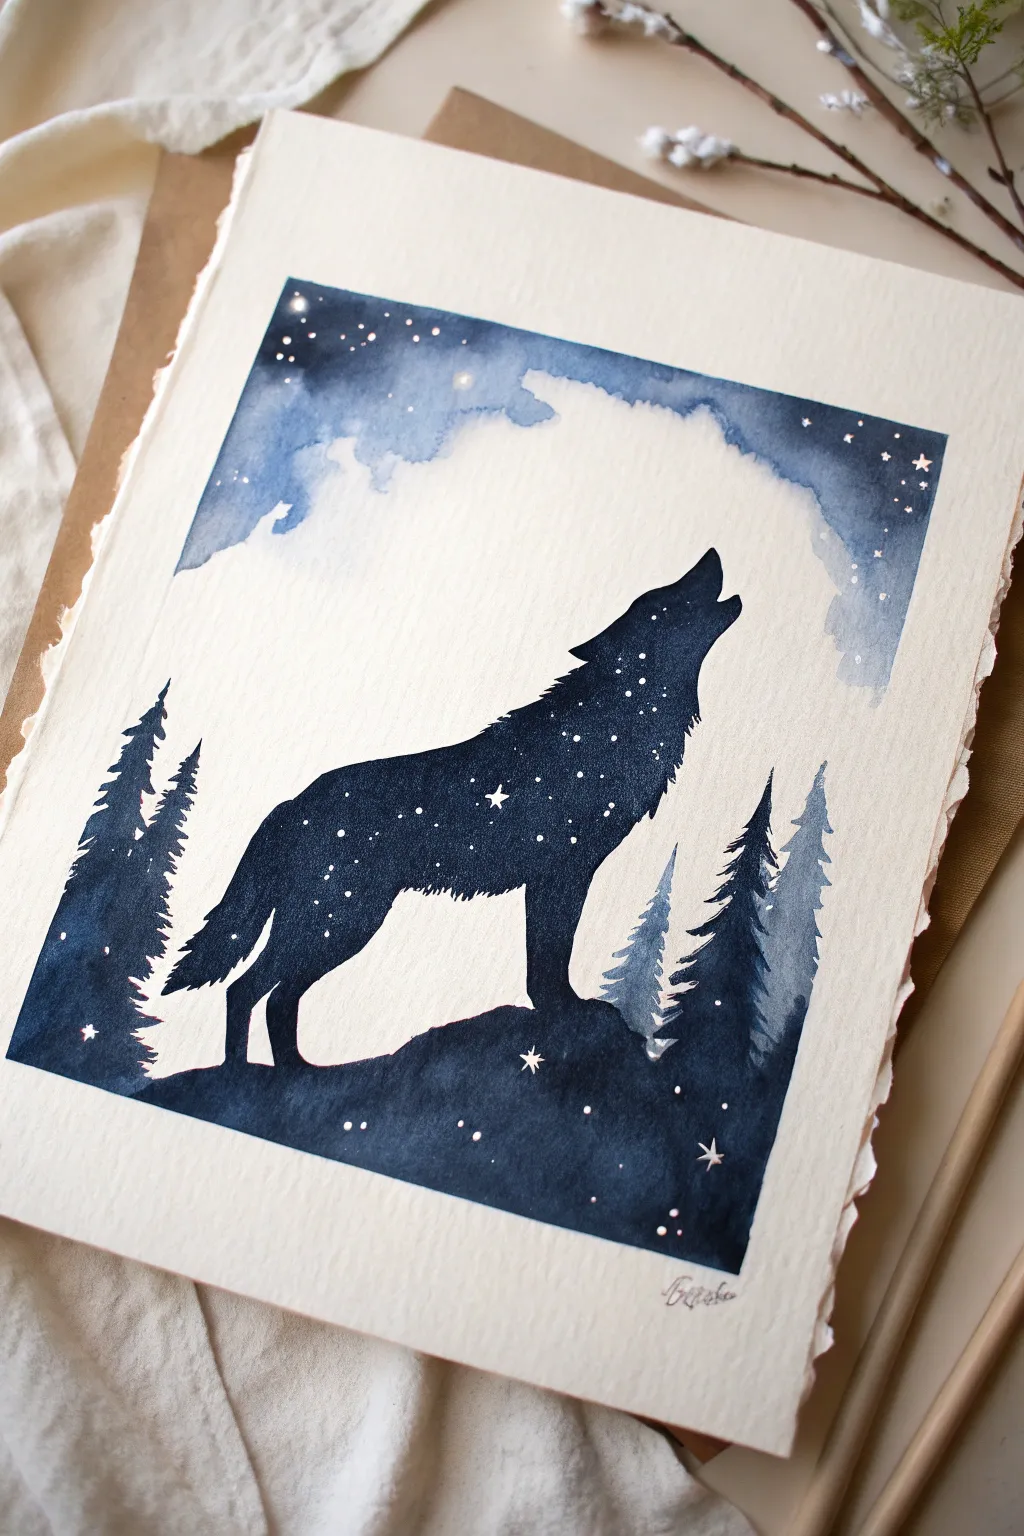
This striking watercolor piece captures the mystical spirit of the wolf by blending a deep indigo silhouette with a starry galaxy effect. The negative space technique creates a beautiful howling form contained within a crisp, rectangular border, surrounded by misty pine trees.
Step-by-Step
Materials
- Cold press watercolor paper (minimum 140lb/300gsm)
- Painter’s tape or masking tape
- Liquid masking fluid (frisket)
- Old paintbrush or rubber color shaper (for applying masking fluid)
- Watercolor paints: Indigo, Payne’s Grey, and Prussian Blue
- White opacity gouache or white gel pen
- Round watercolor brushes (sizes 2, 6, and 10)
- Pencil and eraser
- Palette for mixing
- Two cups of water
- Paper towels
Step 1: Preparation & Drawing
-
Tape the borders:
Begin by taping down all four edges of your watercolor paper to a board. Use painter’s tape to create a crisp rectangular frame for your scene, pressing the edges down firmly to prevent paint bleeding. -
Sketch the outline:
Lightly sketch the silhouette of a howling wolf in the center of your taped area. Focus on the shape of the snout pointing upward and the shaggy texture of the neck fur. Keep the lines faint so they don’t show through later. -
Define the hill:
Draw an uneven, rocky line beneath the wolf’s paws to create the hill or cliff it is standing on. This ground area will eventually be painted dark to anchor the composition. -
Apply masking fluid:
The article title suggests tape-resist, but for a complex shape like a wolf, masking fluid is superior. Carefully fill in the entire wolf shape with masking fluid using an old brush. Let this dry completely until it is tacky-free and yellowish.
Step 2: Painting the Sky
-
Wet-on-wet sky:
Using your largest brush, wet the paper above the wolf silhouette with clean water. You want it glistening but not forming puddles. -
Drop in color:
Load a size 10 brush with diluted Indigo or Prussian Blue. Touch the top corners of the sky and let the paint bloom downward. Leave the area around the wolf’s head lighter to suggest moonlight or atmospheric glow. -
Add cloud texture:
While the paint is still damp, lift out some pigment using a crumpled paper towel to create soft, white cloud shapes near the wolf’s snout. This creates that dreamy, misty atmosphere. -
Paint the background stars:
For the stars in the sky, use a toothbrush or stiff brush dipped in white gouache to flick tiny specks onto the upper dark blue areas. Add a few specific larger stars by hand with a white gel pen once the paint is dry.
Uneven Edges?
If paint bled under your tape or masking fluid, don’t panic. Use a stiff, damp brush to gently scrub the unwanted paint, then blot with a tissue to lift it back to white.
Step 3: Creating the Forest & Foreground
-
Paint distant trees:
Mix a watery, pale wash of Payne’s Grey. Paint a few small pine trees on the right side of the composition. Keep them light and blurry to make them look far away. -
Paint foreground trees:
Using a much more saturated, darker mix of Indigo, paint the prominent pine trees on the left and right sides. Use the tip of your brush to tap in jagged branches. -
Fill the ground:
Paint the hill beneath the wolf with your darkest Indigo mix. Ensure this dark section connects seamlessly with the foreground trees to frame the scene.
Make It Golden
Swap the white stars for metallic gold watercolor or gold leaf pen. Painting the internal stars in gold adds a regal, magical warmth that contrasts beautifully with the blue.
Step 4: The Galaxy Wolf
-
Remove the mask:
Once the sky and surroundings are 100% dry, gently rub the masking fluid away with your finger or a rubber cement pick to reveal the clean white paper of the wolf shape. -
Fill the silhouette:
Now, paint inside the wolf shape. Instead of solid black, use a rich, concentrated Indigo. I like to make the bottom legs and chest darker, fading slightly lighter towards the top of the head. -
Blend the edges:
Carefully paint up to the edges of your original sketch. Use the tip of a small round brush to create small, jagged strokes that mimic fur texture along the back and neck. -
Add internal stars:
Wait for the wolf silhouette to dry completely. Then, using your white gel pen or a fine brush with white gouache, dot ‘stars’ inside the wolf’s body to create the celestial galaxy look. -
Highlight details:
Add a few larger, four-pointed sparkles inside the wolf for emphasis, perhaps near the heart or shoulder area. -
Final reveal:
Slowly peel away the painter’s tape around the border. Pull the tape away from the paper at a 45-degree angle to ensure a crisp, clean edge.
Step back and admire how the negative space and celestial details bring your wild wolf to life
Constellation Wolf With Moon Phases
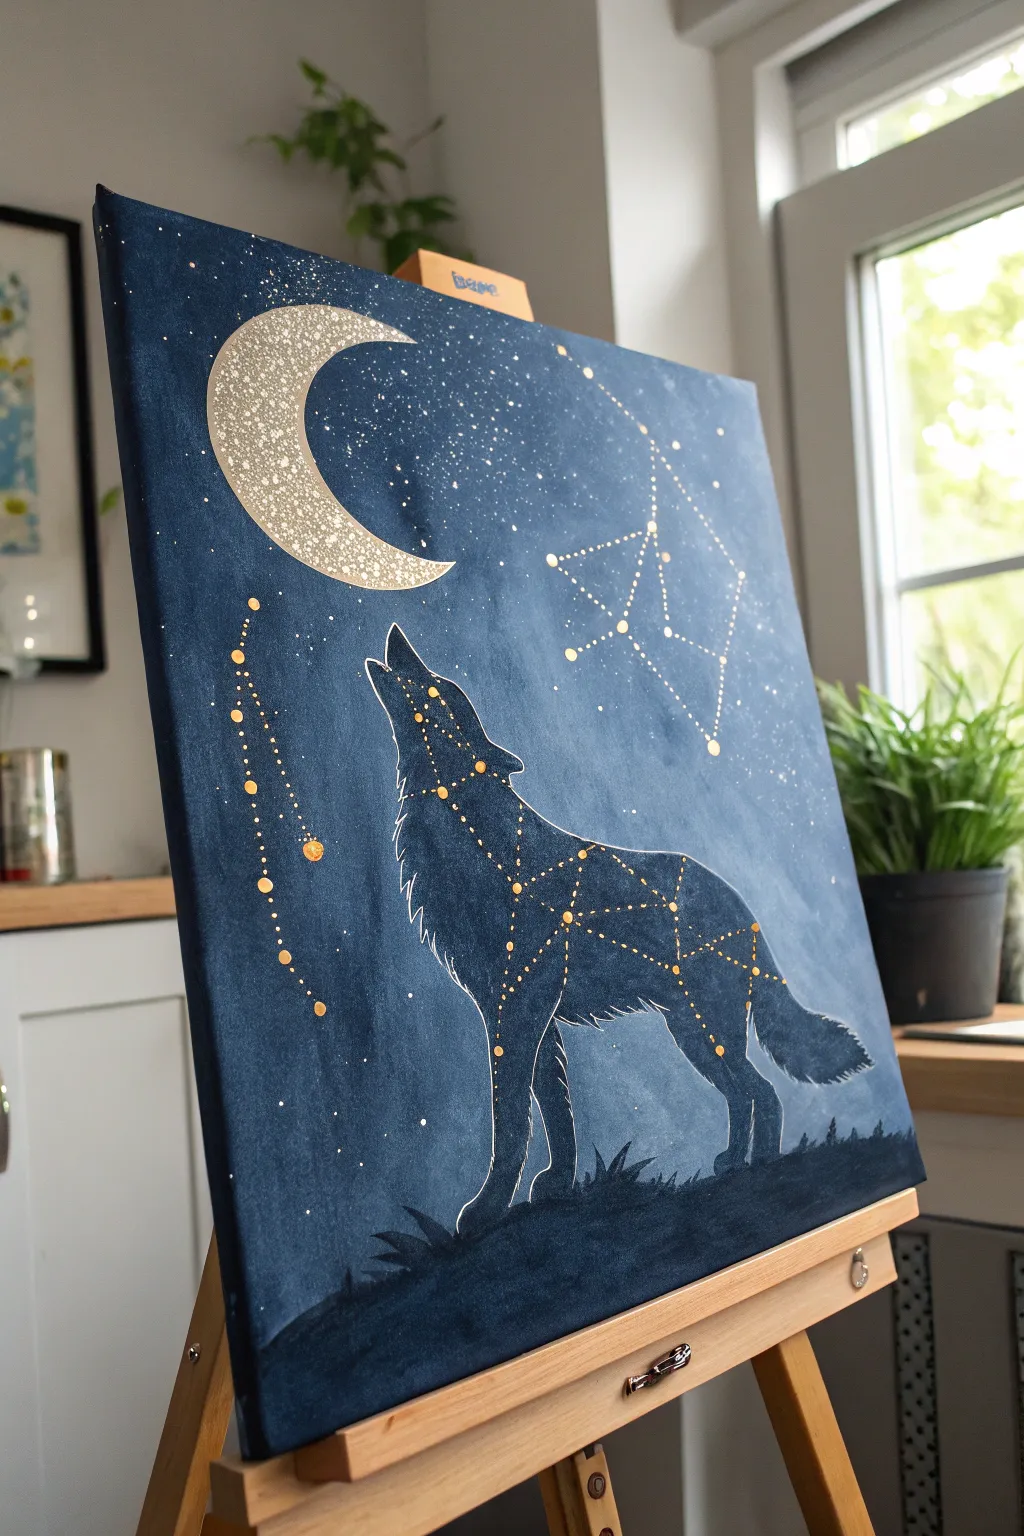
This ethereal canvas captures the majestic connection between wildlife and the cosmos, featuring a howling wolf silhouette formed by starlit constellations. The deep navy background contrasts beautifully with the shimmering gold accents of the moon and stars, making it a sophisticated addition to any space-themed decor.
Detailed Instructions
Materials
- Canvas (rectangle, medium to large size)
- Acrylic paints: Midnight Blue, Paynes Grey, Black, White, Titanium White
- Metallic Gold acrylic paint or Gold Leaf paint
- Fine detail brushes (sizes 0 and 00)
- Medium flat brush (for background)
- White or yellow chalk / tracing paper
- Ruler or straight edge
- Toothbrush or splatter brush
- Palette and water cup
Step 1: Setting the Night Sky
-
Mix the base color:
Create a deep, rich void color by mixing Midnight Blue with a touch of Black. You want a color that is almost black but retains a distinct blue hue. -
Apply the background:
Using a medium flat brush, cover the entire canvas with your dark mixture. Paint in smooth, horizontal strokes to ensure even coverage. -
Add subtle depth:
While the base is still slightly tacky, mix a tiny amount of lighter blue or Paynes Grey into your base color. unevenly blend this into the center areas to create a soft, nebular glow, preventing the background from looking flat. -
Create the terrain:
At the very bottom of the canvas, paint a silhouette of jagged ground and tufts of grass using pure Black. Keep the edges crisp against the dark blue sky.
Step 2: Creating the Wolf Silhouette
-
Draft the outline:
Once the background is bone dry, lightly sketch the outline of a howling wolf using white chalk. Focus on the posture: head tilted back, chest puffed out, and a bushy tail trailing behind. -
Fill the silhouette:
Mix a semi-transparent glaze using Midnight Blue and a lot of water (or glazing medium). Paint inside your wolf outline. You want the wolf to be slightly lighter than the background, looking like a ghostly shadow rather than a solid object. -
Define the edges:
Using a fine liner brush and Titanium White mixed with a drop of water for flow, carefully line the outer edge of the wolf. Keep the line extremely thin, breaking it occasionally to suggest fur texture.
Wobbly Lines?
If you struggle with steady lines for the constellations, use a gold paint marker instead of a brush. The firm tip makes drawing geometric connections much easier.
Step 3: The Celestial Moon
-
Sketch the crescent:
In the upper left quadrant, draw a large crescent moon shape. Use a jar lid or compass if you need help getting the curve perfect. -
Base coat the moon:
Fill the crescent shape with a solid coat of pale cream or off-white paint to block out the dark background. -
Apply gold texture:
Once the white base is dry, stipple Metallic Gold paint over the moon using an old, scruffy brush or a sponge. This creates a cratered, textured surface that catches the light.
Make It 3D
Add tiny self-adhesive rhinestones or gold leaf flakes to the major star points on the wolf for a piece of art that truly sparkles in the evening light.
Step 4: Connecting the Stars
-
Plot the constellations:
Visualize the geometric shape of the wolf. Place small gold dots at key anatomical points: the ear tip, the snout, the shoulder joint, the elbow, the hip, and along the spine. -
Connect the dots:
Using a ruler and your finest brush loaded with gold paint, draw straight lines connecting these main ‘star’ points. This creates the ‘constellation’ map inside the wolf’s body. -
Add background constellations:
To the right of the moon, paint a free-floating constellation pattern using the same dot-and-line technique to balance the composition. -
Create the falling stars:
On the left side, paint a series of gold dots descending in a curve. Make the top dots smaller and the bottom dots slightly larger to simulate movement or a trailing tail.
Step 5: Final Magical Touches
-
Splatter the stars:
Dilute some white paint with water until it’s inky. Load a toothbrush, aim it at the canvas, and flick the bristles with your thumb to spray a fine mist of stars near the moon and upper sky. -
Highlight the nodes:
Go back to the main intersection points on the wolf’s constellation lines and add a tiny dot of pure white in the center of the gold dots to make them shine brighter. -
Clean up:
Wait for everything to dry completely, then use a damp cloth to gently wipe away any visible chalk guidelines.
Hang your celestial wolf in a well-lit area to let the metallic gold elements truly shimmer against the deep blue night


Have a question or want to share your own experience? I'd love to hear from you in the comments below!