There’s something so satisfying about turning a humble chunk of wood into a tiny piece of art you can hold in your hand. These wood block art ideas are my favorite kind of projects—simple, modular, and ridiculously customizable, whether you’re decorating a wall or styling a shelf.
Classic Grid Gallery Blocks
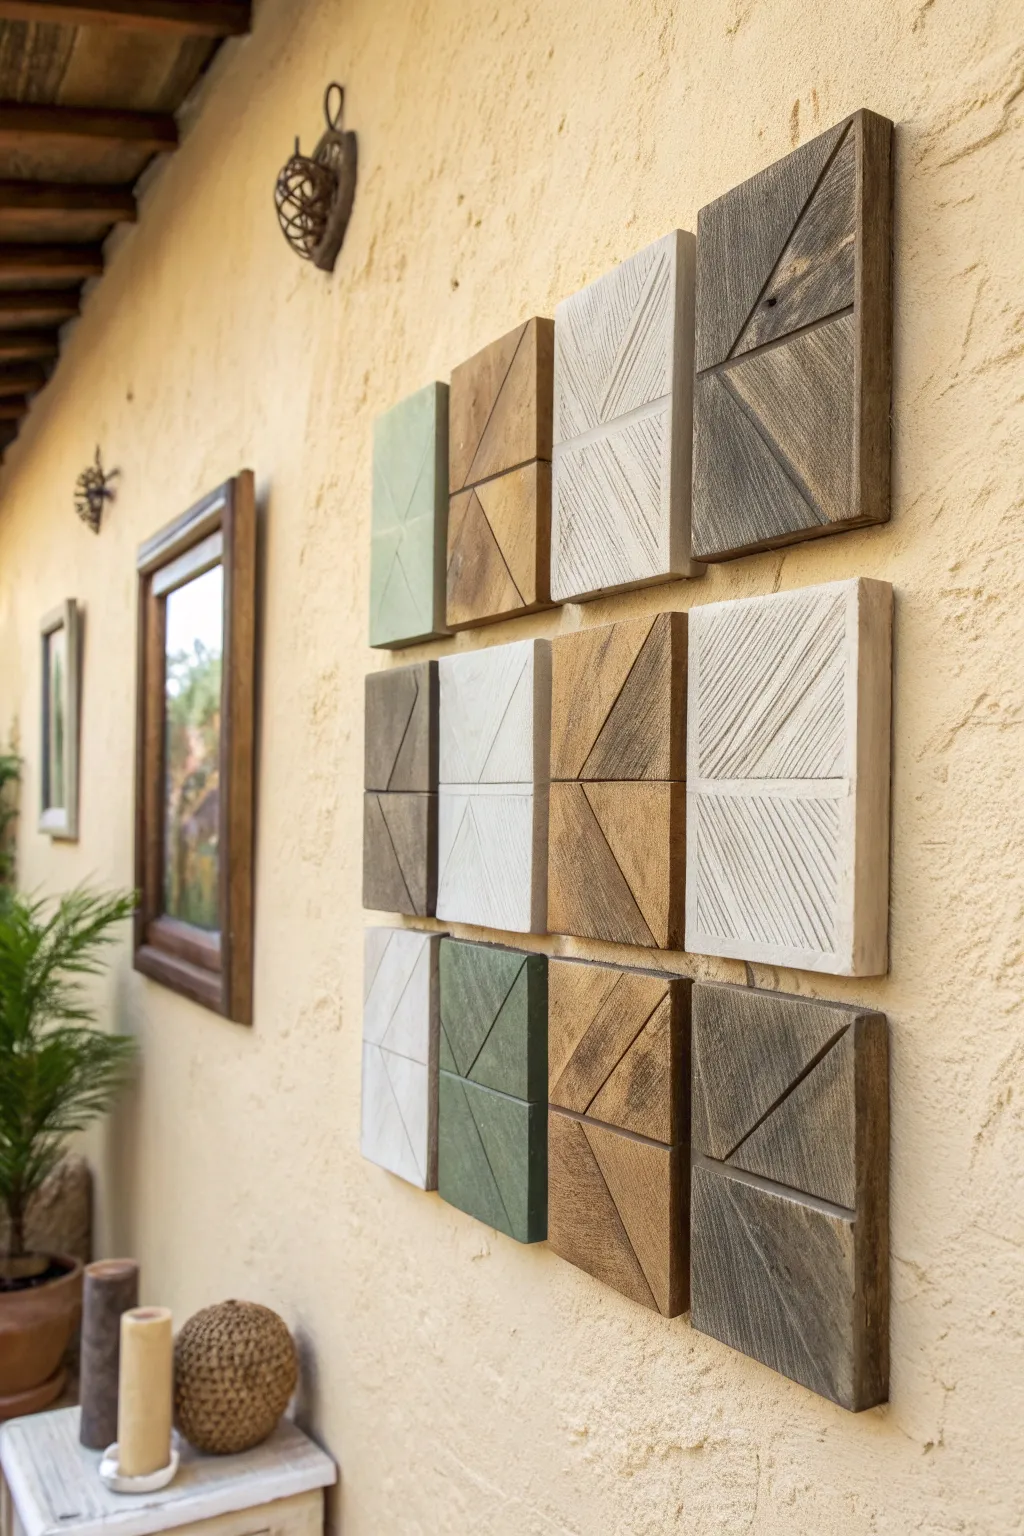
Transform simple scrap wood into a stunning gallery wall feature with this textured block grid. The interplay of diagonal grain patterns and muted earthy tones creates a sophisticated, modern-rustic aesthetic perfect for warming up a hallway or patio wall.
How-To Guide
Materials
- 1×6 or 1×8 pine boards (enough for 11 squares)
- Miter saw or hand saw with miter box
- Wood glue
- Clamps
- Sandpaper (80, 120, and 220 grit)
- Wire brush (optional for texture)
- Wood stain (Dark Walnut or Espresso)
- Acrylic paints (Sage Green, Cream/Off-White, Gray)
- Small paintbrush or rag for staining
- Double-sided mounting tape or sawtooth hangers
- Measuring tape
- Pencil
Step 1: Preparing the Blocks
-
Determine your size:
Decide on the dimension for your squares. For a balanced look like the photo, 5×5 inches or 6×6 inches works well. Measure the width of your lumber—this will dictate the size of your squares to minimize cutting. -
Cut the primary squares:
Using your saw, cut 11 identical square blocks from your lumber. Ensure the corners are perfectly 90 degrees so they hang straight in the final grid. -
Create the diagonal cuts:
Set your miter saw to a 45-degree angle. Take each square block and cut it diagonally from corner to corner, creating two equal triangles for each block. -
Plan the grain orientation:
Before gluing them back together, rotate one triangle 90 degrees relative to its partner. This is the secret to that dynamic geometric look—having the wood grain run in perpendicular directions on the same block adds visual depth. -
Glue and clamp:
Apply a bead of high-quality wood glue to the cut edges. Press the two triangles together in their new orientation to reform the square. Clamp tightly and wipe away any squeeze-out immediately with a damp cloth.
Step 2: Texturing and Refining
-
Wait for the cure:
Allow the glue to dry completely according to the manufacturer’s instructions, usually overnight, to ensure the bond is strong enough for sanding. -
Surface sanding:
Sand the faces of the blocks starting with 80-grit sandpaper to level out any unevenness where the triangles meet. Work your way up to 120-grit for a smoother feel, but don’t over-sand; you want to keep some rustic character. -
Add texture:
For that weathered, reclaimed look seen in the photo, take a wire brush and drag it firmly along the direction of the grain on each triangle. This opens up the pores and creates grooves that will catch the stain beautifully. -
Create the center definition:
If the glued seam has become too invisible, use the edge of a folded piece of sandpaper or a small triangular file to gently deepen the groove between the two halves, defining the geometric split.
Fixing Gaps
If your triangles don’t meet perfectly in the middle, mix some sawdust from your cuts with wood glue to create a filler paste. Press this into the gap before sanding for an invisible fix.
Step 3: Finishing and Installation
-
Apply base stains:
Select about half of your blocks to remain natural wood tones. Apply your dark walnut or espresso stain to these blocks. Wipe it on, let it sit for a minute, and wipe off the excess. Vary the wipe-off times to create different shades of brown. -
Create the color wash:
For the painted blocks (green, white, gray), dilute your acrylic paints with water (roughly 1 part paint to 1 part water). You want a wash, not an opaque coat, so the wood grain shows through. -
Paint the accent blocks:
Brush the diluted paint onto the remaining blocks. I find it works best to paint one triangle section at a time to keep edges crisp. Wipe back quickly with a rag if the color looks too heavy. -
Distress the finish:
Once the paint and stain are bone dry, lightly scuff the edges and corners with 220-grit sandpaper. This reveals a bit of raw wood and unifies the grid with a cohesive, aged appearance. -
Seal the artwork:
Apply a clear matte spray sealer to all blocks. This protects the finish without adding an artificial glossiness. -
Layout planning:
Lay your finished blocks on the floor. Arrange them in a 3-column by 4-row grid (leaving the top-left spot empty as shown, or fill it if you prefer). Experiment with rotating the blocks so the diagonal lines create interesting larger patterns. -
Mounting the grid:
Attach heavy-duty double-sided mounting tape or sawtooth hangers to the back of each block. Start by mounting the bottom-center block first and work your way out and up, using a level and a small spacer (like a tile spacer or piece of cardboard) to keep gaps consistent.
Level Up: Texture Pop
Use a gouge tool or a Dremel to carve deeper parallel lines into just the painted blocks before staining. This 3D texture adds incredible tactile variety to the wall.
Step back and admire how the simple rotation of wood grain turns basic squares into a captivating architectural statement.


Black-and-White Abstract Mark Blocks
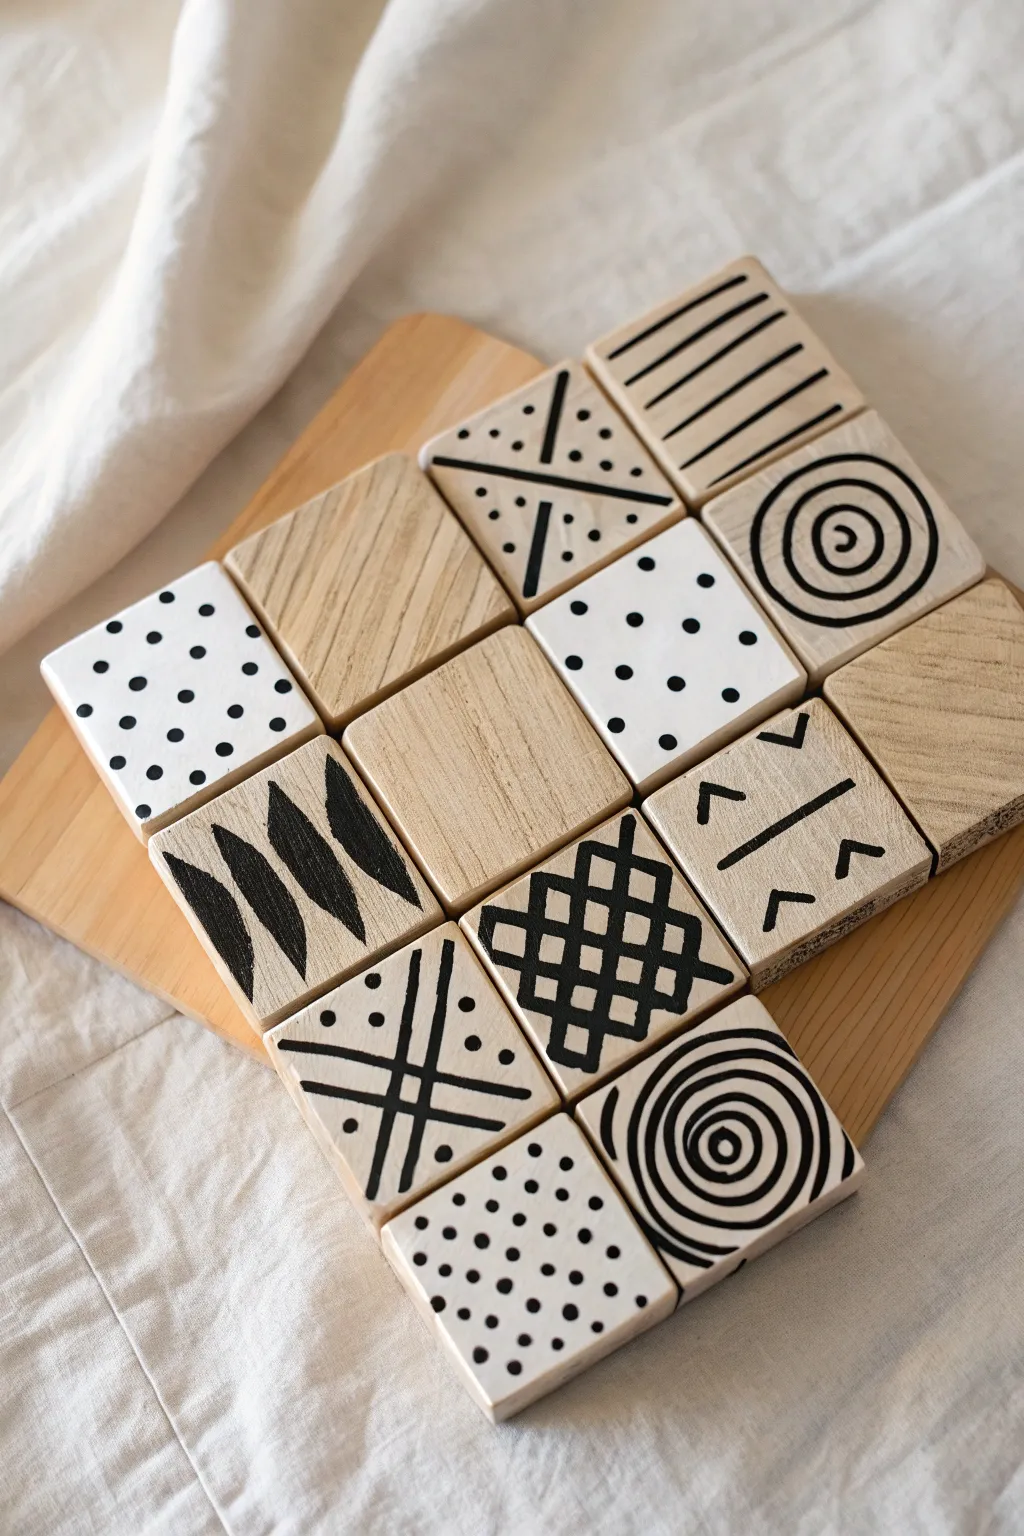
Transform plain wooden squares into a striking collection of modern art pieces using high-contrast black and white designs. This project combines geometric precision with organic hand-drawn marks for a sophisticated, tactile puzzle or display set.
Detailed Instructions
Materials
- Unfinished wooden craft cubes or flat square tiles (approx. 2-3 inches)
- Fine-grit sandpaper (220 grit)
- White acrylic paint (matte finish)
- Black acrylic paint or black paint pen (medium tip)
- Mod Podge or clear matte sealant spray
- Flat paintbrush (approx. 1 inch)
- Detail brush (round, size 0 or 1)
- Pencil and eraser
- Ruler
- Washi tape or painter’s tape
Step 1: Preparation & Base Coat
-
Select your blocks:
Choose about 16 wooden squares for a balanced grid. Ensure they are roughly the same thickness and size for a uniform look when arranged. -
Sand the surfaces:
Lightly sand the top face and edges of each wood block. You want a super smooth surface so your painted lines stay crisp and don’t bleed into the grain. -
Clean the dust:
Wipe each block down with a barely damp cloth or a tack cloth to remove all sawdust. Any leftover dust will create bumps in your paint. -
Sort the designs:
Decide which blocks will remain natural wood and which will get a white background. In the reference, about half are white and half are natural. -
Paint the white bases:
For the blocks designated as white, apply a thin, even layer of matte white acrylic paint. Let it dry completely to the touch. -
Apply a second coat:
Add a second coat of white to ensure full opacity. Brushing in the opposite direction of the first coat helps minimize visible brushstrokes.
Step 2: Creating the Patterns
-
Draft the grid patterns:
For the cross-hatch or grid designs, lightly use a ruler and pencil to mark spacing. This ensures your lines stay parallel and perpendicular. -
Draw the spirals:
Freehand the spiral designs lightly with a pencil first. Start from the center and slowly work your way outward to keep the spacing consistent. -
Paint thick stripes:
For the bold parallel line blocks, use your flat brush or a broad paint pen. If you want perfection, use washi tape to mask off the lines on the natural wood blocks. -
Create the polka dots:
Dip the non-brush end of a paintbrush into black paint and stamp it onto a white block. This creates uniform, perfectly round dots. -
Paint the abstract arrowheads:
On a natural wood block, paint the large, bold leaf or arrowhead shapes. Press down firmly with the brush at the start of the shape and lift as you taper to a point. -
Detail the ‘X’ blocks:
Paint a large cross on a white block. Once the main lines are down, add decorative dots or smaller lines in the negative spaces. -
Execute the fine grid:
Using a fine-tip paint pen or your smallest brush, carefully trace over your pencil grid lines. Imperfections here actually add to the hand-crafted charm. -
Add squiggles and dashes:
Fill remaining blocks with simpler marks like small dashes, carets (^), or loose squiggles. Vary the density so some blocks look ‘busier’ than others.
Bleeding Lines?
If paint bleeds into the wood grain, apply a thin layer of clear matte medium or sealant over the raw wood *before* painting your black designs. This creates a barrier for sharper lines.
Step 3: Sealing & Finishing
-
Check for smudges:
Once all black paint is fully dry, gently erase any visible pencil marks. Be careful not to scrub the paint itself. -
Seal the artwork:
Apply a thin layer of matte Mod Podge or spray with a clear matte sealant. This protects the unfinished wood from oils and keeps the white paint from yellowing. -
Dry and cure:
Let the blocks sit in a well-ventilated area for at least 24 hours to fully cure before stacking or arranging them, so they don’t stick together.
Add Dimension
Instead of just painting, try using a wood burning tool for the designs on the natural blocks. The burned texture contrasts beautifully with the flat black paint on the white blocks.
Now you can rearrange your grid layout endlessly to create new abstract compositions whenever the mood strikes


Stencil Silhouette Wood Blocks
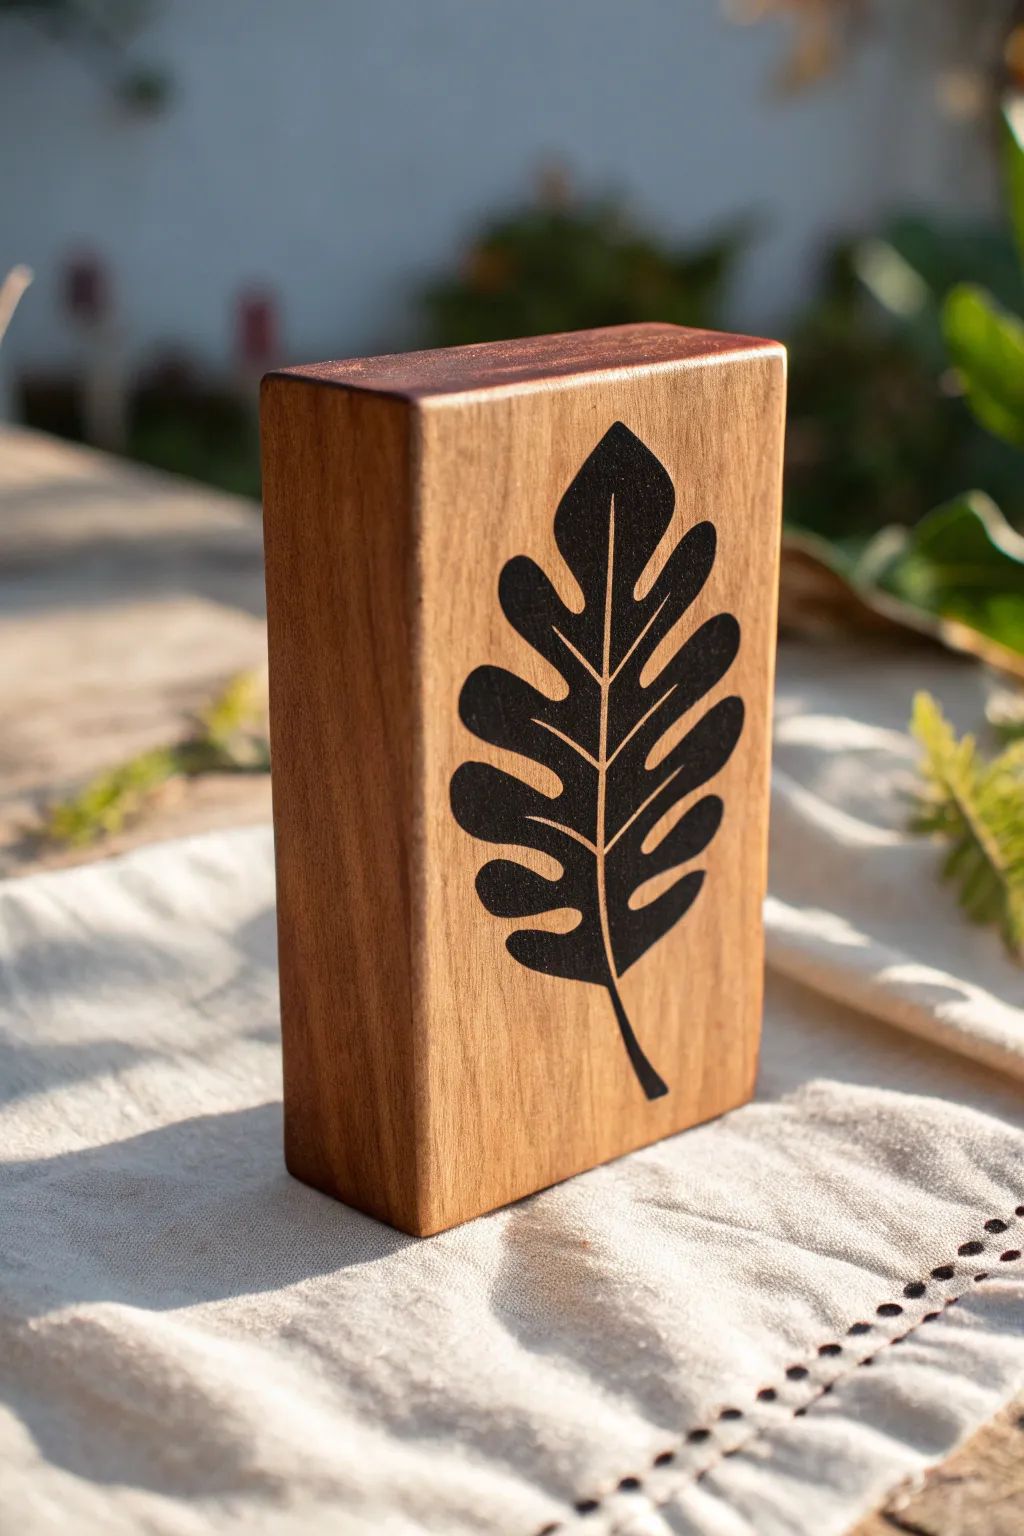
This project combines the rustic warmth of natural wood with a sleek, modern botanical graphic for a striking desktop or shelf accent. The high-contrast black leaf against the rich wood grain creates a minimalist look that is deceptively simple to achieve.
Step-by-Step Guide
Materials
- Rectangular hardwood block (oak, walnut, or pine, approx. 4″ x 6″ x 1.5″)
- Sandpaper (120, 220, and 400 grit)
- Black acrylic paint (matte finish)
- Adhesive vinyl or contact paper
- Cutting mat and craft knife (X-Acto)
- Leaf template (printed on paper)
- Stencil brush or cosmetic sponge
- Painter’s tape
- Clear matte wood varnish or spray sealer
- Lint-free cloth
- Tack cloth
Step 1: Preparing the Wood Canvas
-
Initial sand:
Begin by sanding your wooden block thoroughly with 120-grit sandpaper to remove any rough saw marks or splinters. -
Refining the surface:
Switch to 220-grit sandpaper and sand with the grain until the surface feels smooth to the touch. -
Polishing:
For a professional finish, do a final light pass with 400-grit sandpaper. This ensures the stencil will adhere perfectly flat. -
Cleaning:
Wipe the block down with a tack cloth or a slightly damp lint-free cloth to remove every speck of dust. -
Sealing the grain:
Apply a very thin coat of clear matte varnish to the front face where the stencil will go. Let it dry completely. I find this creates a barrier that prevents the black paint from bleeding into the wood grain later.
Step 2: Creating the Stencil
-
Selecting the design:
Print out a leaf silhouette design that fits nicely within the dimensions of your block face, leaving about a half-inch margin on all sides. -
Attaching the vinyl:
Tape your printed design on top of a sheet of adhesive vinyl or contact paper. -
Cutting the design:
Place everything on a cutting mat. Using a sharp craft knife, carefully cut out the leaf shape, pressing through both the paper and the vinyl. -
Weeding:
Remove the inner leaf shape from the vinyl sheet. You are creating a negative stencil, so keep the surrounding vinyl intact and discard the leaf shape itself. -
Applying the stencil:
Peel the backing off your vinyl stencil and adhere it to the center of the wood block. Smooth it down firmly, paying special attention to the edges of the leaf cutout.
Bleeding Edges?
If paint bleeds under the stencil, lightly sand the area with high-grit sandpaper to remove the excess paint, then reseal the wood before trying again.
Step 3: Painting and Finishing
-
Load the sponge:
Dip your stencil sponge lightly into the black acrylic paint, then dab most of it off onto a paper towel until the sponge is almost dry. -
First coat:
Lightly dab the sponge over the stencil opening. Use an up-and-down pouncing motion rather than brushing side-to-side to prevent paint from sneaking under the vinyl. -
Building opacity:
Allow the first coat to dry for about 10 minutes, then apply a second thin coat to ensure solid black coverage without any streaks. -
Removing the stencil:
While the paint is still slightly tacky (but not wet), carefully peel away the vinyl stencil at a sharp angle. -
Touch-ups:
If there are any tiny bleeds, use a craft knife to gently scrape away the excess paint once fully dry. -
Final protection:
Apply two coats of clear matte varnish over the entire block, letting it dry between coats, to protect the wood and seal the design.
Add Depth
Before removing the stencil, lightly sponge a dark grey near the leaf’s center spine to create a subtle shadowed 3D effect.
Place your finished block on a mantel or desk to bring a touch of nature indoors


Paint-Pen Doodle Pattern Blocks
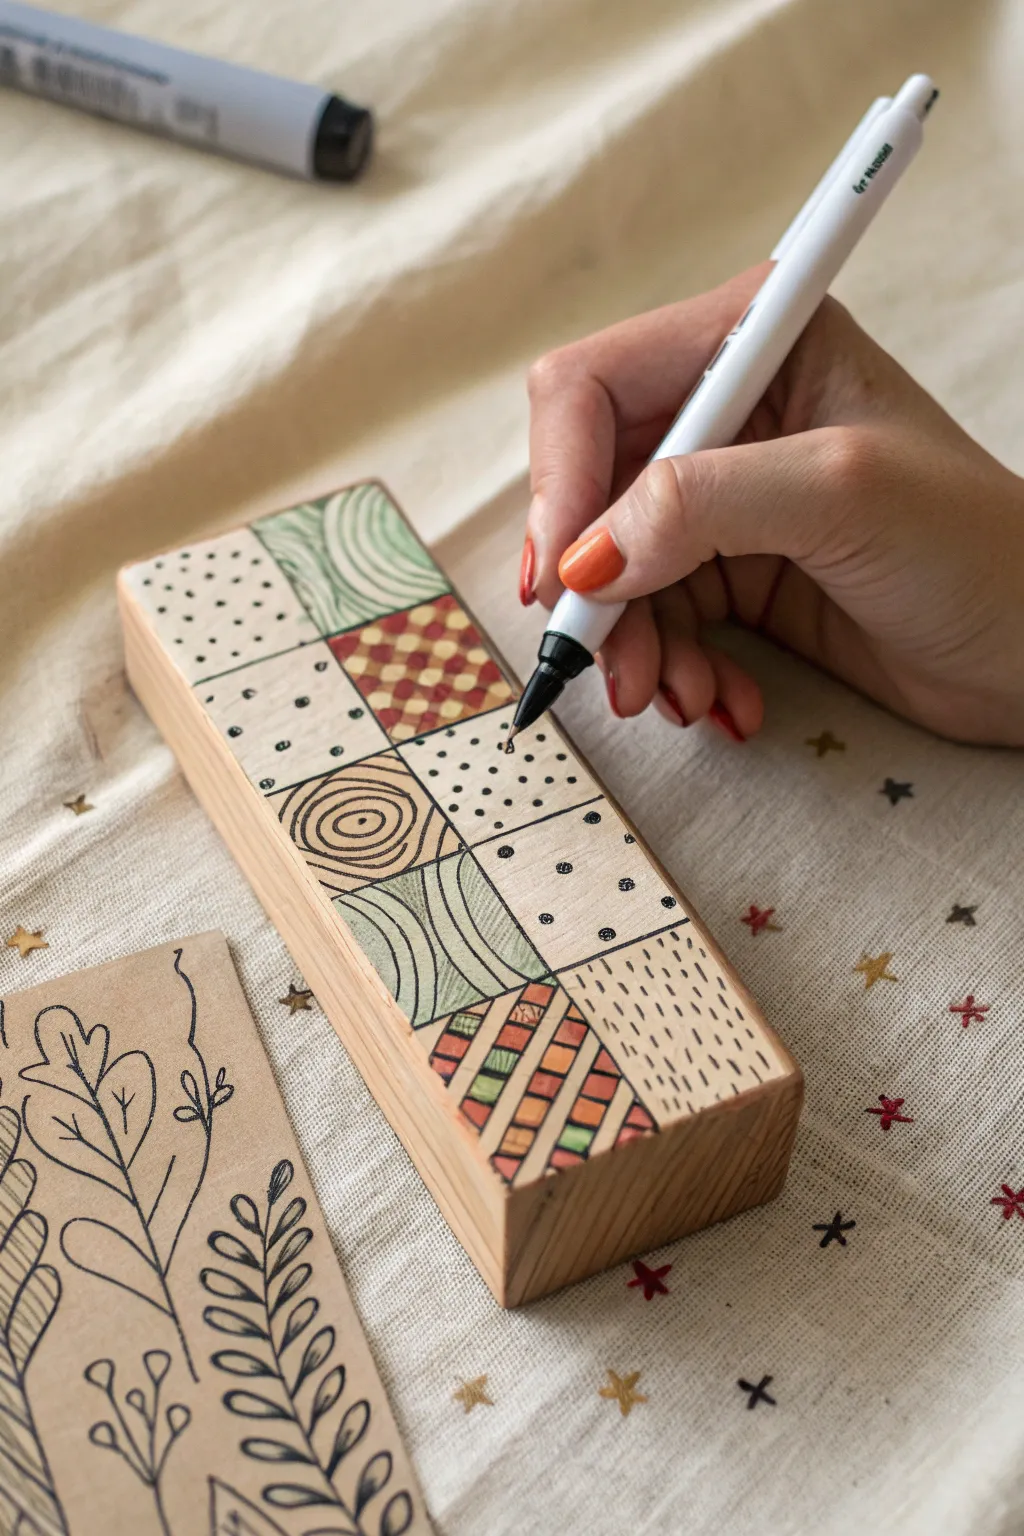
Transform a simple scrap of wood into a tactile piece of art by creating a patchwork of intricate patterns. This project combines the meditative quality of doodling with natural textures for a modern, rustic desk accessory.
How-To Guide
Materials
- Rectangular wood block (sanded smooth)
- Pencil and eraser
- Ruler
- Fine-point black permanent marker or drawing pen
- Fine-point white paint pen
- Colored markers (muted greens, reds, oranges)
- Clear matte sealer (spray or brush-on)
- Fine-grit sandpaper (optional)
Step 1: Preparation & Grid Layout
-
Prepare the surface:
Ensure your wooden block is clean and smooth. Run a fine-grit sandpaper (around 220 grit) over the face you intend to decorate if there are any rough splinters that might snag your pen tip. -
Measure the width:
Using your ruler, measure the total width of your block. You want to create roughly equal squares, so divide that measurement to determine how wide each column should be. -
Draft the grid lines:
Lightly sketch a grid onto the wood face using a pencil. For the look in the photo, aim for a 2-column layout with multiple rows, creating a series of squares down the length of the block. -
Check the proportions:
Step back and look at your pencil grid. The squares don’t have to be mathematically perfect, but they should feel balanced. Adjust any lines now before committing to ink.
Bleeding Lines?
Wood grain can act like a straw, pulling ink sideways. If your lines look fuzzy, switch to a pigment liner or paint pen instead of standard felt-tip markers.
Step 2: Adding Color & Base Patterns
-
Color selection:
Choose a muted, earthy color palette. The example uses sage green, burnt orange, and a deep terracotta red to complement the natural wood tone. -
Fill solid squares:
Select a few random squares in your grid to fill entirely with color or structural patterns. Use your colored markers to create base shapes like wide curved stripes or plaid backgrounds. -
Draw the swirls:
In one square, use a fine-tip black pen to draw a concentric swirl pattern. Start from the center and spiral outward, keeping the line weight consistent. -
Create the plaid texture:
For a plaid square, color a checkerboard pattern first using red and brown markers. Once the ink is dry, overlay thin black cross-hatching to simulate fabric texture. -
Add organic curves:
In a green-colored square, use your black pen to draw flowing, curved lines that echo each other, similar to topographical map lines or wood grain.
Step 3: Detailing & Finishing
-
Incorporate negative space:
Leave some squares the natural wood color. In these spaces, draw simple, repetitive motifs like small black polka dots or tiny dashes. -
Vary dot density:
When creating a dotted square, vary the spacing slightly to give it a hand-drawn feel. I find that tapping the pen vertically rather than dragging it creates the roundest dots. -
Create the ‘rain’ pattern:
Fill one of the bottom squares with short, vertical dashes. Arrange them in loose rows to look like falling rain or stitching. -
Add a geometric lattice:
For a complex square, draw a diagonal grid. Color in alternating sections with orange and green, leaving others blank, and outline everything firmly in black. -
Define the grid borders:
Go over the original pencil grid lines with your black pen to clearly separate the different pattern zones. Use a ruler if you want a sharp look, or freehand it for a rustic vibe. -
Highlight with white:
Once the colored ink is completely dry, use a white paint pen to add tiny highlights or dots on top of the darker squares. This adds dimension and brightness. -
Erase guide lines:
Wait at least 15 minutes to different ensure all ink is cured. Gently erase any visible pencil marks from your initial sketch. -
Seal the art:
To prevent the ink from bleeding into the wood grain over time, apply a light coat of clear matte sealer. A spray sealer is best here to avoid smearing your hard work.
Make It a Game
Instead of pre-planning, roll a die to decide what pattern goes in the next square. 1=dots, 2=stripes, 3=solid color, and so on for a fun randomization challenge.
Display your patterned block on a shelf or use it as a whimsical paperweight to brighten your workspace
BRUSH GUIDE
The Right Brush for Every Stroke
From clean lines to bold texture — master brush choice, stroke control, and essential techniques.
Explore the Full Guide
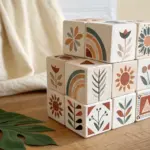
Decoupage Collage Story Blocks
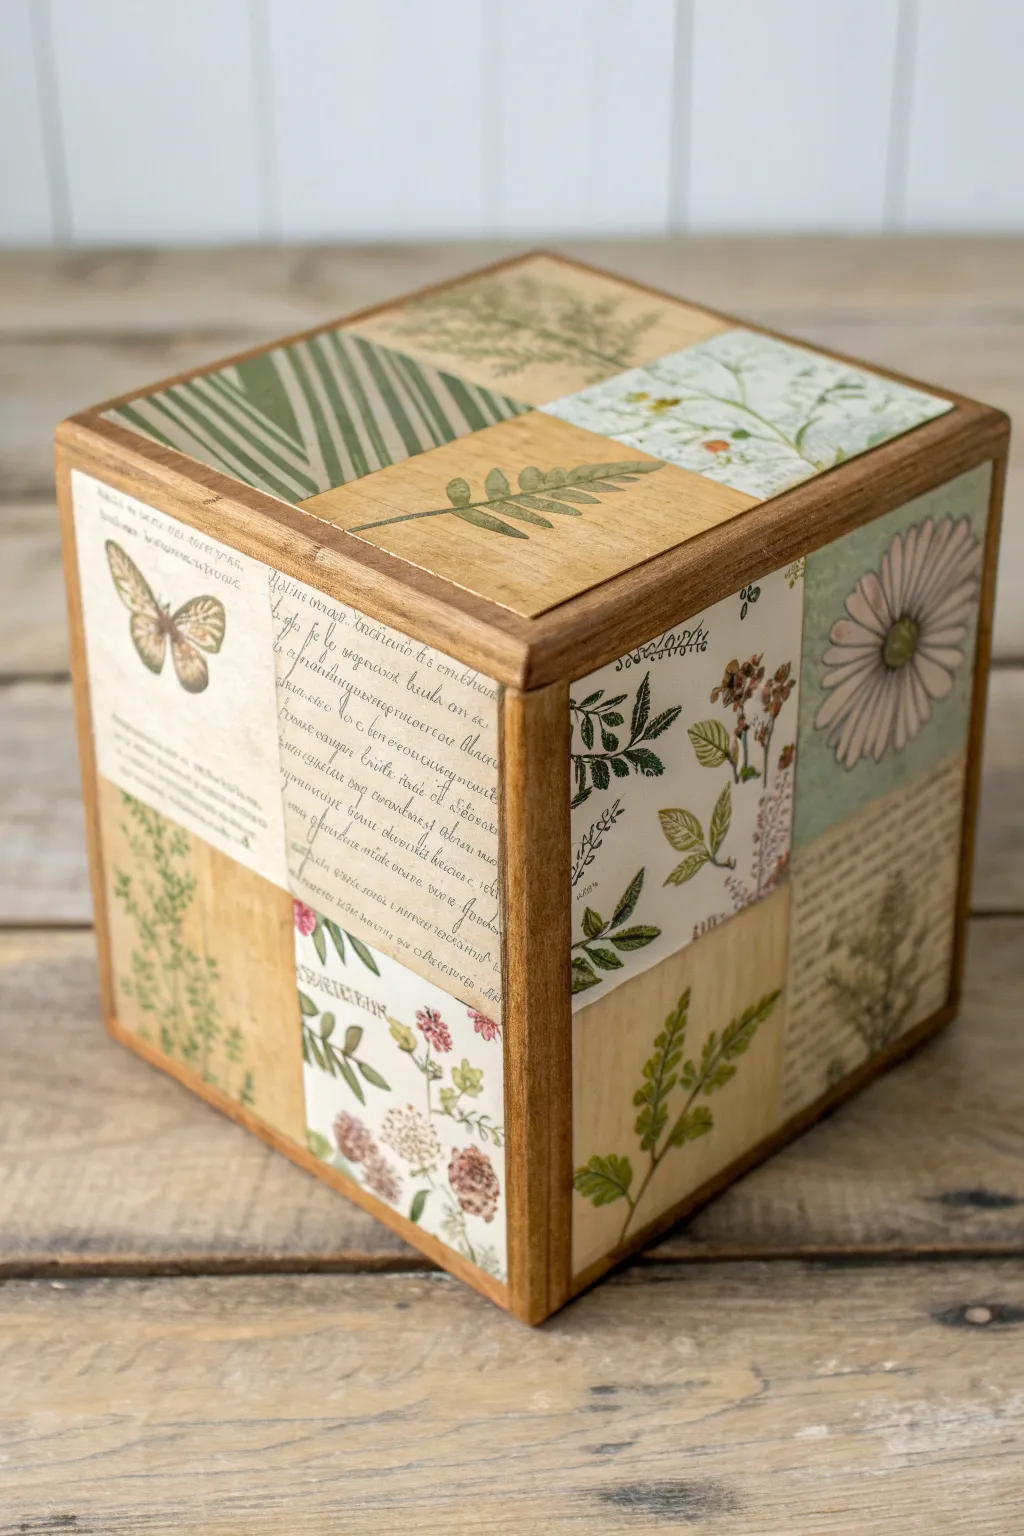
Transform a simple wooden cube into a vintage-inspired piece of home decor using decoupage techniques. This project combines botanical illustrations, script patterns, and natural wood grain to create a charming, nature-themed accent piece.
Step-by-Step Guide
Materials
- Unfinished 4 to 6-inch wooden block (e.g., pine or birch)
- Scrapbook paper with botanical, script, and vintage nature prints
- Mod Podge (Matte finish)
- Dark wood stain (e.g., Early American or Walnut)
- Foam brushes
- Scissors and a craft knife
- Fine-grit sandpaper (220 grit)
- Ruler and pencil
- Soft cloth or paper towels
- Protective sealant (optional)
Step 1: Preparing the Wood Block
-
Sand the surfaces:
Begin by sanding the entire wooden block with fine-grit sandpaper. Focus on smoothing out any rough patches on the faces and softening the sharp edges and corners just slightly so they feel nice to touch. -
Clean the dust:
Wipe the block thoroughly with a tack cloth or a slightly damp paper towel to remove all sanding dust. It’s crucial that the surface is clean so the stain adheres evenly. -
Stain the edges:
Using a foam brush or rag, apply a dark wood stain to the edges and corners of the block. You don’t need to stain the very center of the faces since they will be covered, but ensure visible borders are coated. -
Wipe excess stain:
Let the stain sit for a minute or two, then wipe away the excess with a clean cloth. This reveals the beautiful wood grain while keeping the color richness. -
Dry completely:
Allow the stained block to dry fully according to the manufacturer’s instructions, usually a few hours or overnight.
Smooth Operator
To prevent paper wrinkles, dampen the back of thicker scrapbook paper slightly with a sponge before applying glue. This relaxes the fibers for a smoother lay.
Step 2: Planning the Collage
-
Measure the faces:
Measure the dimensions of one face of your cube. You want to leave a small border of exposed stained wood, so subtract about 1/4 inch from your total measurement for the paper square size. -
Select your papers:
Choose four distinctive patterns for each face: a botanical print, a script text, a geometric pattern (like stripes), and perhaps a floral illustration. Contrast is key here. -
Cut the quadrants:
Instead of one large sheet per face, cut your selected papers into four equal smaller squares. If your final face design size is 4×4 inches, you need four 2×2 inch squares. -
Arrange the layout:
Lay out the four small squares on a table to test different combinations. Mix busy patterns like script with simpler foliage images to prevent the design from looking cluttered.
Functional Art
Turn this into a heavy-duty bookend by drilling a hole in the bottom before starting and filling the cavity with sand or lead weights, then plugging it back up.
Step 3: Decoupage Application
-
Apply base adhesive:
Working on one face of the block at a time, brush a thin, even layer of Mod Podge onto the wood area where the papers will sit. -
Position first square:
Place your first paper square into one corner of the designated area. Press it down gently from the center outward to push out air bubbles. -
Align the remaining squares:
Place the remaining three squares to complete the grid on that face. Ensure the edges touch tightly without overlapping to create a seamless patchwork look. -
Smooth the surface:
Use a brayer or the edge of an old credit card to smooth the papers down firmly. I find this step essential for ensuring no air pockets remain trapped underneath. -
Move to other sides:
Repeat the gluing and smoothing process for the remaining five sides of the cube, varying the pattern placement so no two adjacent sides look exactly the same. -
Initial drying:
Let the glue dry for about 20 minutes until the paper feels secure and isn’t cold or damp to the touch.
Step 4: Sealing and Finishing
-
Apply top coat:
Brush a layer of Mod Podge over the entire face of the block, covering both the paper and the exposed wooden edges. This seals the paper and unifies the sheen. -
Watch for brushstrokes:
Use long, smooth strokes in one direction to minimize texture. If you see white streaks, don’t worry—matte Mod Podge dries clear. -
Sand for distressed look (optional):
Once completely dry, lightly run your fine-grit sandpaper over the edges of the papers and the corners of the block to give it a worn, aged appearance. -
Final seal:
Apply one last thin coat of sealer or Mod Podge to protect your sanding work and ensure durability.
Place your finished story block on a shelf or desk to add a touch of handcrafted botanical charm to your room
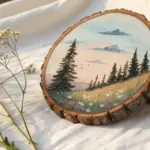
Photo Transfer Memory Blocks
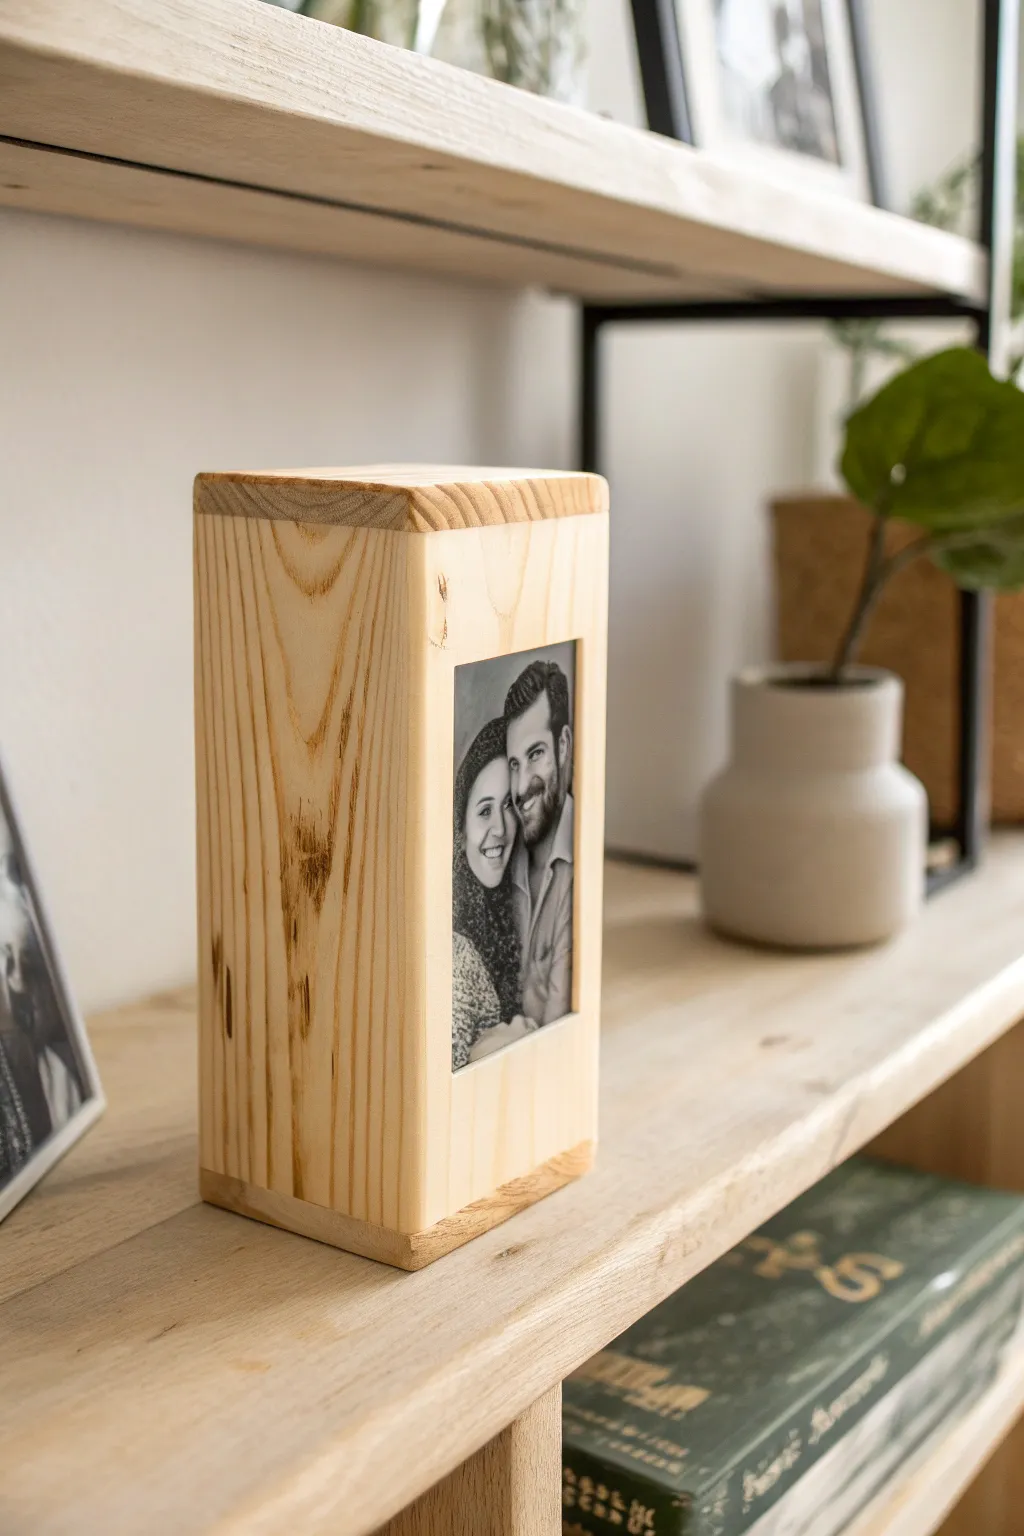
Transform a simple piece of lumber into a modern, minimalist photo display that highlights the natural beauty of wood grain alongside your cherished memories. This project uses a direct photo transfer technique to create a seamless, integrated look where the image appears almost printed directly onto the timber.
Step-by-Step
Materials
- Unfinished wood block (e.g., 4×4 post cut or craft block)
- Laser-printed photo (black and white, reversed)
- Matte gel medium or photo transfer medium
- Foam brush
- Old credit card or brayer
- Sponge and water
- Fine-grit sandpaper (220 grit)
- Clear matte sealer or Mod Podge
- Rag or towel
Step 1: Preparation
-
Prepare your photo:
Standard inkjet prints bleed, so ensure you use a laser printer for your image. Convert your photo to black and white for a classic look and, crucially, mirror-image (flip horizontally) the photo before printing so text or directional details appear correctly solely on the finished block. -
Dimension the print:
Measure your wooden block’s face carefully. Trim your printed photo slightly smaller than the width of the block to leave a nice border of natural wood showing on all sides. -
Sand the surface:
Sand the face of the wood block where the photo will go. You want it extremely smooth; any rough texture or splinters will interrupt the transfer process and leave gaps in the image. Wipe away all dust with a tack cloth.
Step 2: The Transfer Process
-
Apply the medium:
Using a foam brush, apply a generous, even coat of gel medium directly onto the face of the printed photo (the ink side). Do not apply it to the wood. -
Position the print:
Carefully place the paper, medium-side down, onto the wood block. Once it touches the wood, try not to slide it around to avoid smearing the medium. -
Smooth it out:
Immediately use an old credit card or a brayer to smooth the paper down. Start from the center and push outward to the edges to remove all air bubbles. Good contact is essential for a clean transfer. -
Let it cure:
Patience is key here. Let the block sit undisturbed for at least 8 hours, or ideally overnight. If you rush this step, the image will peel off with the paper.
Paper Removal Pro Tip
Be gentle when rubbing off the paper fibers. If you push too hard, you might accidentally rub the ink right off the wood. Taking breaks lets you see where paper residue remains.
Step 3: Revealing the Image
-
Wet the paper:
Once fully dry, take a wet sponge or rag and saturate the paper backing. Let the water soak in for a minute or two until the paper becomes translucent and the image starts to show through. -
Rub away the backing:
Gently rub the wet paper with your fingertips or a soft sponge in a circular motion. The paper fibers will start to pill and roll off. I find using just my fingers gives the best control to avoid rubbing too hard. -
Clear the haste:
You likely won’t get all the paper off in the first pass. Let the wood dry slightly; you will see a white hazy residue appear. Wet it again and gently rub until only the ink remains. -
Clean the edges:
If any transfer medium squished out the sides during application, use your fine-grit sandpaper to sand the edges of the block clean for a sharp, crisp border.
Tinted Wood Effect
Before transferring the photo, apply a diluted whitewash or very light gray stain to the wood block. This gives the final image a softer, more weathered background tone.
Step 4: Finishing Touches
-
Seal the image:
To protect the photo and eliminate any final lingering paper haze, brush on a thin layer of clear matte sealer or Mod Podge over the image. -
Treat the wood:
For the exposed wood areas around the photo, you can apply a light wax or wood conditioner to bring out the grain pattern without darkening the block too much.
Place your finished memory block on a shelf or desk to enjoy a timeless piece of personalized decor

PENCIL GUIDE
Understanding Pencil Grades from H to B
From first sketch to finished drawing — learn pencil grades, line control, and shading techniques.
Explore the Full Guide
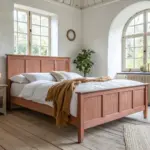
Seasonal Swap-Out Block Sets
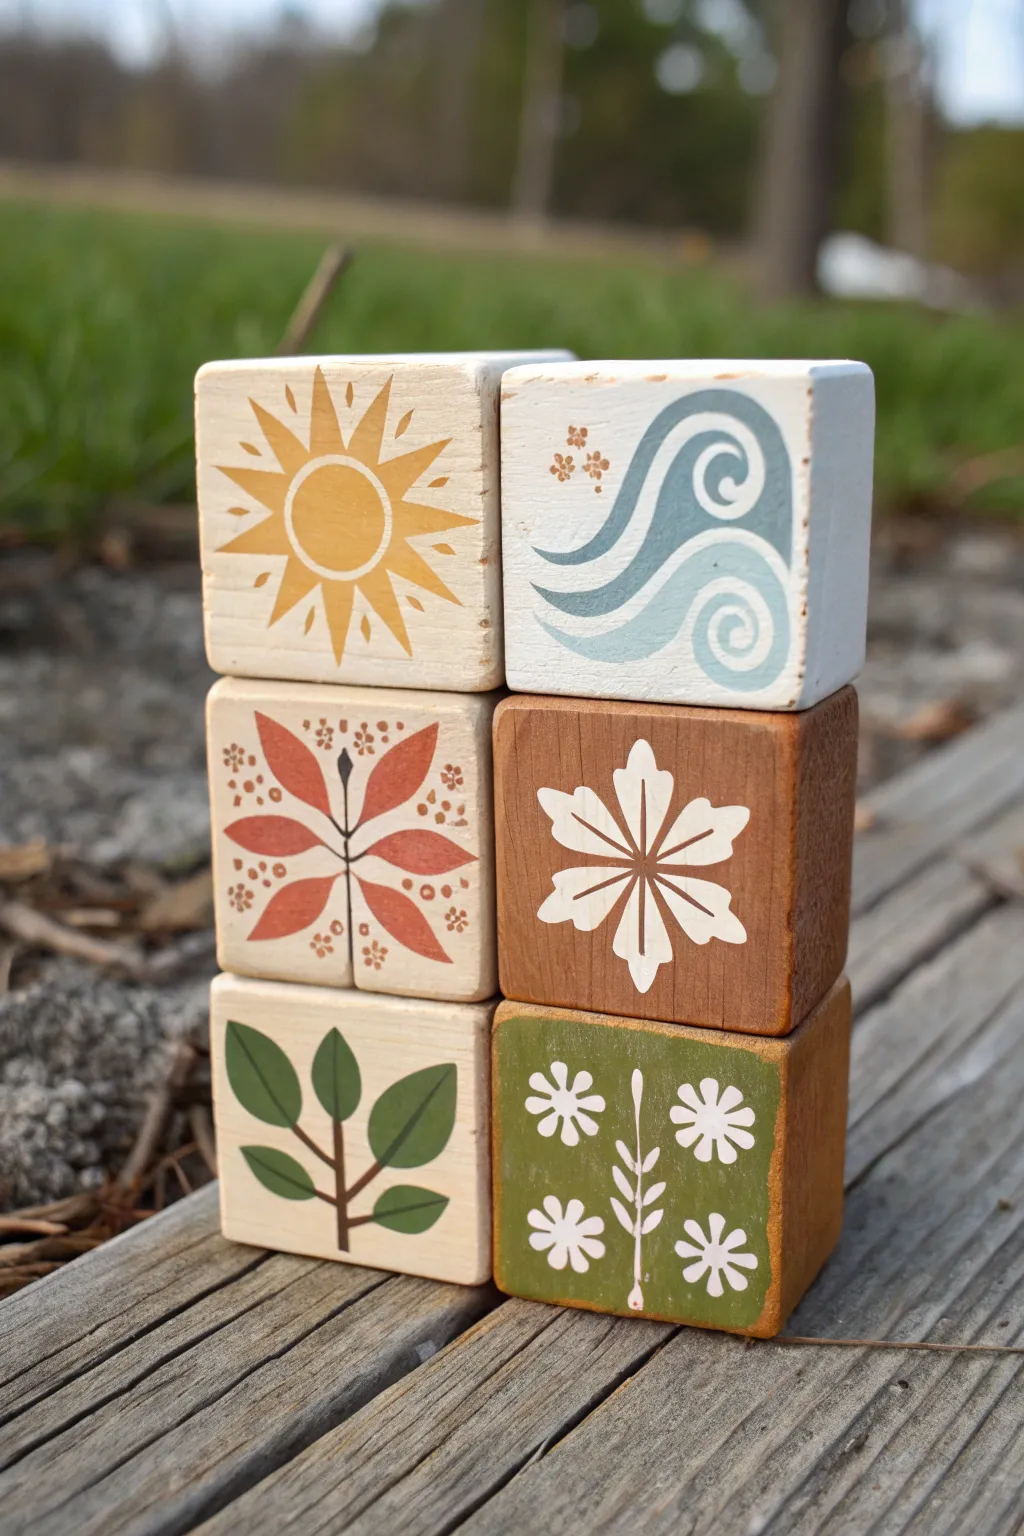
Celebrate the changing year with this charming set of six painted wooden blocks, featuring stylized symbols for weather and nature. The blend of natural wood grain, soft washes, and crisp stenciled motifs creates a rustic yet modern aesthetic perfect for shelf decor.
Step-by-Step
Materials
- Six 2-inch wooden cubes (unfinished pine or birch)
- Sandpaper (150 and 220 grit)
- Acrylic paints (Cream, Mustard Yellow, Slate Blue, Terracotta, Olive Green, Espresso Brown, White)
- Small flat paintbrushes (1/2 inch)
- Fine detail brushes (sizes 0 and 00)
- Pencil for sketching
- Matte finish sealant spray or Mod Podge
- Paper towels
- Painters tape (optional)
- Ruler or straight edge
Step 1: Preparation & Base Coats
-
Sand the blocks:
Begin by sanding all six sides of each wooden block. Start with 150 grit to smooth out any rough saw marks, then finish with 220 grit for a velvety surface that takes paint well. Wipe away all dust with a tack cloth or slightly damp paper towel. -
Sort your palette:
Decide which blocks will receive a full wash and which will stay natural. In this set, you’ll need two distinct background styles: a raw, natural wood look and a transparent color wash. -
Apply the white wash:
For the ‘Wave’ block (top right), mix a small drop of white acrylic paint with water to create a milky consistency. Brush this over the wood, letting the grain show through, and wipe off excess immediately for a whitewashed effect. -
Stain the darker blocks:
For the ‘Snowflake’ (middle right) and ‘Flower Field’ (bottom right) blocks, create faux stains using watered-down acrylics. Use watered-down Espresso Brown for the snowflake block and a wash of Olive Green for the flower field block. Paint evenly and let dry completely.
Bleeding Lines?
If paint bleeds into the wood grain, your wash was too watery or the wood too porous. Seal raw wood with clear matte medium before painting detailed designs.
Step 2: Painting the Designs
-
Sketch the Sun:
On a natural wood block, lightly pencil a circle in the center. Draw triangular rays radiating outward, mixing shorter and longer spikes for visual interest. Between the rays, add small dots or dashes. -
Paint the Sun:
Fill in your sun sketch with Mustard Yellow paint. Use a fine liner brush to keep the points of the rays sharp. You may need two coats for opacity. Once dry, add the tiny accent dots between the rays. -
Sketch the Waves:
On the whitewashed block, draw two large, swirling wave shapes that interlock. They should look like stylized ‘S’ curves on their side. -
Paint the Waves:
Using Slate Blue, paint the thickest parts of the waves first. I find it easiest to rotate the block as I paint the curves to keep my hand steady. Add lighter blue or white highlights inside the swirls for dimension. -
Create the Autumn Leaf:
On a natural block, draw a central vertical stem. Sketch large, tear-drop shaped leaves radiating symmetrically from the center—two pointing up, two horizontal, two pointing down. -
Color the Autumn Leaf:
Paint the leaves with Terracotta or deep orange. Keep the central vein thin and dark (using dark brown or black). Add clusters of tiny dots around the leaves using the tip of a toothpick dipped in brown paint. -
Draft the Snowflake Flower:
On the brown-stained block, mark the center point. Draw a six-pointed star shape, but soften the edges so they look like petals. Add a central line down each petal. -
Paint the Snowflake:
Fill in the shape with opaque White paint. This will likely require 2-3 layers to stand out against the dark wood. Use your finest brush to paint the thin, dark line down the center of each petal, revealing the background color or painting it in dark brown. -
Design the Green Sprout:
On a natural block, draw a simple vertical line with oval leaves branching out in pairs. This mimics a young sapling. -
Paint the Sprout:
Use a deep Olive Green for the leaves and a Dark Brown for the stem. Ensure the leaves have pointed tips for a crisp look. -
Detail the Flower Field:
On the green-washed block, paint simple white daisies. Create a central vertical vine with small leaves, then add four flowers—two on the left, two on the right. Use the tip of your brush to press and lift, creating instant petal shapes.
Make it Interactive
Paint different seasonal icons on the reverse side of each block (e.g., a pumpkin behind the flower) so you can rotate them for a year-round calendar.
Step 3: Finishing Touches
-
Distress edges (Optional):
Once all paint is bonemat-dry, take your sandpaper and very lightly scuff the edges of the blocks. This reveals a bit of raw wood and enhances the rustic, handled feel. -
Seal the artwork:
Spray the blocks with a matte clear coat. Do this in a well-ventilated area. A matte finish is crucial here to maintain the natural look; a glossy finish would look too plastic.
Stack them up on your mantle or bookshelf to bring a touch of handcrafted nature indoors
Stacked Woodland Animal Nursery Blocks
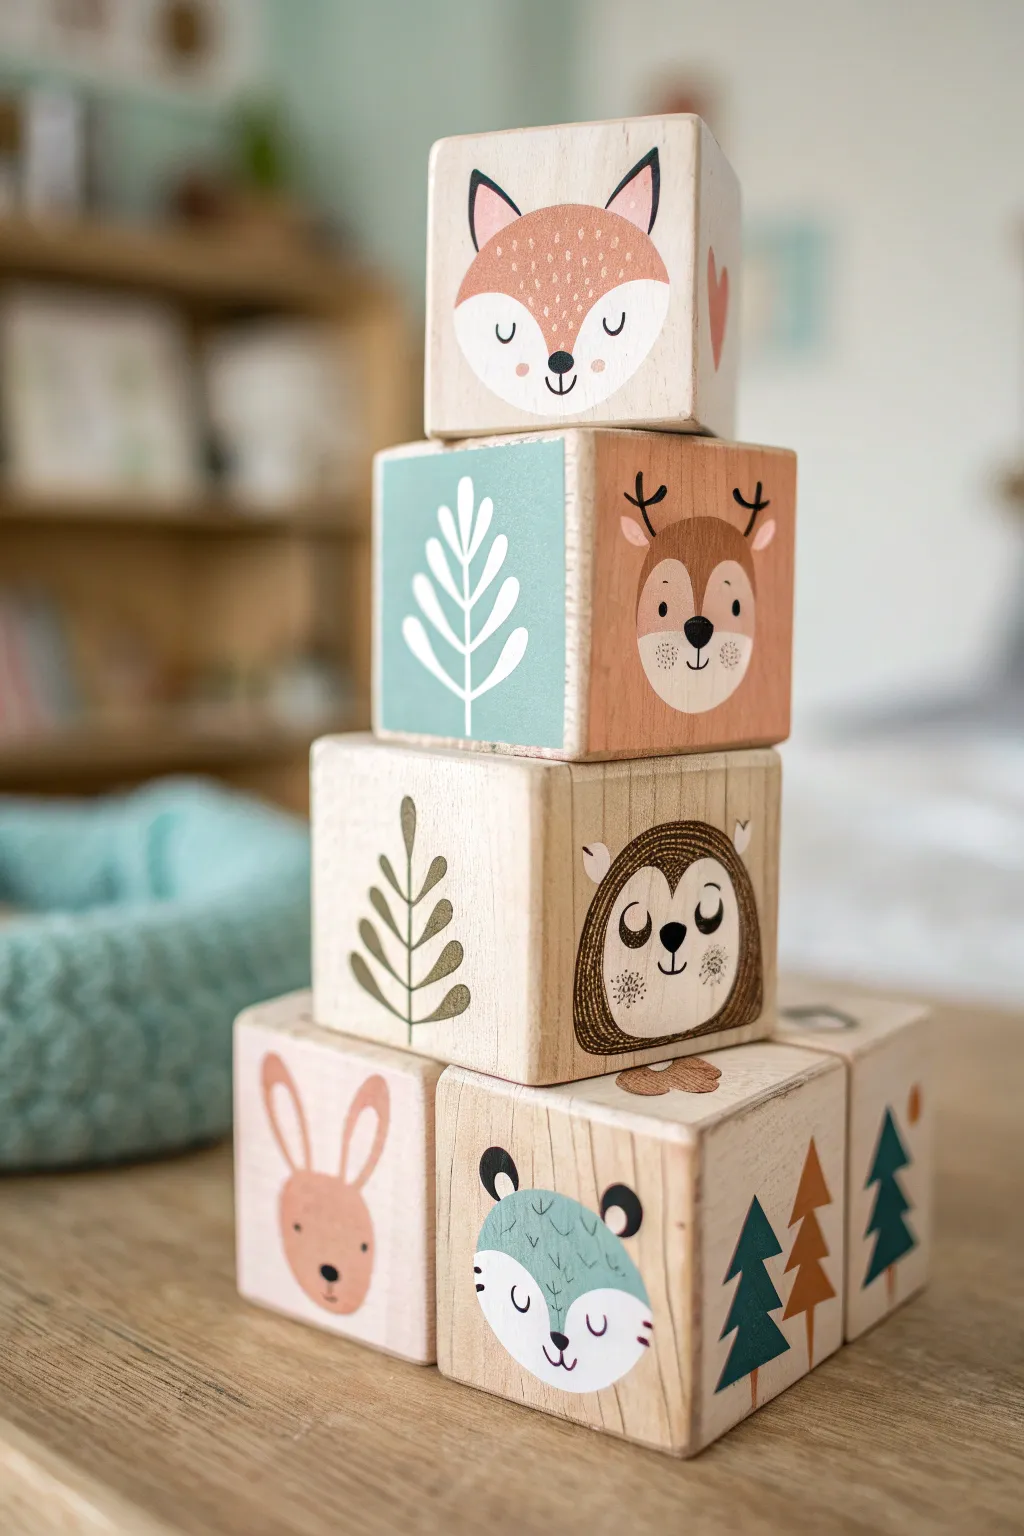
Bring the charm of the forest into the nursery with these delightful wooden stacking blocks featuring sweet animal faces and nature motifs. This tutorial guides you through creating a soft, Scandinavian-inspired set perfect for play or display.
Step-by-Step Guide
Materials
- Unfinished wooden blocks (2-inch or desired size)
- Fine-grit sandpaper (220-grit)
- Acrylic paints (white, soft pink, terracotta, sage green, forest green, warm brown, black)
- Small flat brush
- Fine liner brush (size 0 or 00)
- Pencil and eraser
- Matte water-based sealant or Mod Podge
- Painter’s tape (optional)
Step 1: Preparation and Base Shapes
-
Sand the surface:
Begin by lightly sanding all sides of your wooden blocks with 220-grit sandpaper. You want the surface to be impeccably smooth to ensure your painted lines are crisp and clean. Wipe away any dust with a barely damp cloth. -
Plan your layout:
Decide which animal faces or patterns will go on which face of the blocks. In the reference, we have a fox, deer, hedgehog, rabbit, and bear, mixed with leaf and tree patterns. Sketch a rough plan on paper first to balance the colors. -
Sketch the outlines:
Using a pencil very lightly, draw the main shapes onto the wood. For the fox and bear, draw the curved line that separates the white face mask from the rest of the head. For the deer and rabbit, outline the main head shape. -
Block in background colors:
Some sides, like the one with the white fern leaf, need a full background color. Paint one square face with sage green using your flat brush. For the animal faces, leave the natural wood exposed as the background where appropriate, or paint the specific animal fur colors (like the terracotta for the fox’s upper head). -
Paint the white face masks:
Using white acrylic paint, fill in the lower face areas for the fox and the mask area for the bear/badger. You may need two thin coats to get good coverage over the wood grain. Let this dry completely before adding details on top.
Natural Wood Tip
For the cleanest look on unpainted areas, seal the bare wood with clear matte sealer BEFORE painting. This stops paint from bleeding into the wood grain.
Step 2: Adding Animal Characteristics
-
Deer details:
Mix a warm brown shade and paint the main circle for the deer’s head. While that dries, you can paint the rabbit’s head shape in a soft pinkish-terracotta tone. -
Hedgehog spikes:
For the hedgehog, paint a dark brown arch shape. Once dry, use a lighter brown or tan to add the inner face shape. Then, take your fine liner brush and add small, quick strokes around the edge of the dark arch to simulate spikes or texture. -
Ears and antlers:
Go back to the deer and add small antlers using dark brown paint and a liner brush. For the fox and rabbit, paint the ears in their respective colors—terracotta with black tips for the fox, and pinkish-brown for the rabbit. -
Botanical sides:
On the sage green background you painted earlier, use white paint and a fine brush to draw a simple fern or leaf pattern. Start with a central stem and paint paired leaves extending outward. On another block, paint simple triangular pine trees in forest green and metallic gold or copper. -
Dry time:
Ensure all base layers are fully dry. Painting fine details on wet paint will result in muddy colors and blurred lines.
Level Up: Texture
Mix a tiny amount of baking soda into your acrylic paint for the animal fur sections. It creates a subtle, flocked texture that feels lovely to touch.
Step 3: Fine Details and Finishing
-
Eyes and noses:
Using your smallest liner brush and black paint, add the facial features. Paint small U-shapes for sleeping eyes (like on the fox) or simple black dots for open eyes (like on the deer). Add small inverted triangles or ovals for noses. -
Whisker spots and cheeks:
Dip the non-brush end of a paintbrush into pink paint to stamp perfect little circular cheeks on the animals. For the hedgehog and deer, add tiny freckles or whisker spots with the very tip of your liner brush. -
Highlighting:
Add a tiny speck of white to the black noses or open eyes to bring them to life. This catchlight makes the characters look friendly and dimensional. -
Clean up edges:
If any paint bled over the edge of the block face, sand it gently away once dry or touch it up with a bit of paint if you colored the whole side. -
Seal the blocks:
Because these might be handled often, apply a thin coat of matte water-based sealant. I like to let the first coat cure overnight before adding a second, ensuring the finish is durable but not sticky.
Now you have a charming set of heirloom-quality blocks ready to decorate a shelf or spark a little one’s imagination


Alphabet Learning Art Blocks
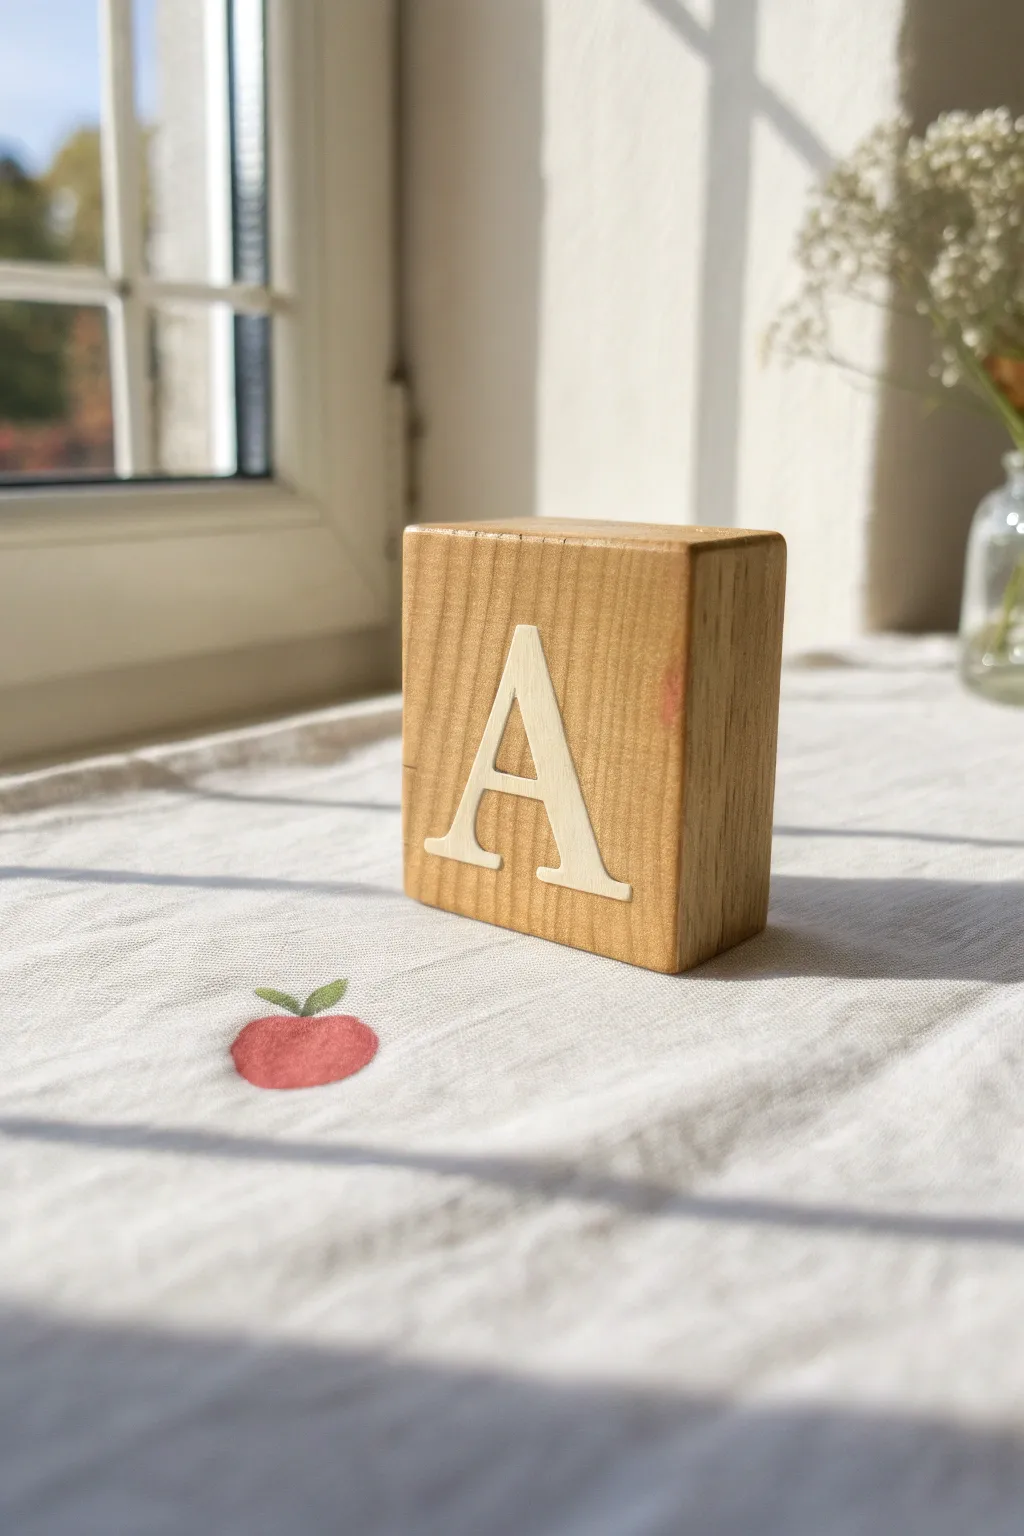
Embrace the beauty of natural materials with this understated alphabet block project, featuring a crisp, cream-colored letter set against the warmth of unfinished wood. The result is a timeless learning tool that doubles as charming nursery decor, capturing the essence of Montessori-inspired simplicity.
Step-by-Step Tutorial
Materials
- Unfinished wooden block (approx. 2-3 inches)
- Fine-grit sandpaper (220-grit)
- Cream or off-white acrylic paint
- Self-adhesive vinyl or stencil film
- Medium-tack transfer tape
- Craft knife or electronic cutting machine
- Small flat paintbrush
- Mod Podge or clear matte sealant
- Ruler
- Pencil
Step 1: Preparing the Wood Surface
-
Sand the block:
Begin by sanding all six sides of your wooden block with 220-grit sandpaper. Focus on smoothing the edges and corners so they are soft to the touch and safe for little hands. -
Clean the surface:
Wipe away all sawdust with a clean, slightly damp cloth or a tack cloth. A perfectly dust-free surface is crucial for a crisp stencil seal later on.
Bleed Patrol
If paint bleeds into the wood grain, wait for it to dry fully, then gently scratch the excess paint off with a craft knife or lightly sand it away with the grain.
Step 2: Creating the Stencil
-
Choose your typeface:
Select a serif font that mimics the classic look in the photo—Times New Roman or Garamond works beautifully. Size the letter ‘A’ to fit comfortably on the block face with about a 1/4 inch margin on all sides. -
Cut the stencil:
Using an electronic cutting machine or a craft knife and steady hand, cut the letter ‘A’ out of your adhesive vinyl. You want the negative space (the outline of the letter), so carefully weed out the actual letter shape. -
Apply transfer tape:
Place a piece of transfer tape over your vinyl stencil and burnish it firmly to ensure the vinyl lifts cleanly from its backing paper.
Step 3: Positioning and Sealing
-
Center the design:
Mark the center of the block face lightly with a pencil if needed. Position your stencil, ensuring the serif feet of the ‘A’ are level with the bottom edge of the block. -
Adhere the stencil:
Press the stencil firmly onto the wood, paying special attention to the inner edges of the letter design. Remove the transfer tape slowly at a sharp angle. -
Seal the edges:
To prevent paint bleeding into the wood grain—a common issue on unfinished blocks—brush a very thin layer of Mod Podge or clear matte medium over the open letter area, sealing the edges of the stencil. -
Let it dry:
Allow this clear sealing layer to dry completely. It creates an invisible barrier that ensures your colored lines remain razor-sharp.
Double-Sided Fun
Add an illustrated element to the back of the block that corresponds to the letter, like a simple painted apple for ‘A’ or a boat for ‘B’.
Step 4: Painting the Letter
-
First coat application:
Dip your flat brush into the cream acrylic paint. Apply a thin, even coat over the stencil. Brush from the stencil tape inward toward the center of the letter to further discourage bleeding. -
Dry and assess:
Let the first coat dry to the touch. It will likely look a bit streaky, which is normal. Resist the urge to add more paint while it’s wet. -
Second coat application:
Apply a second thin coat of paint for full opacity. I usually find two coats are enough, but a third very light coat may be necessary depending on your paint’s pigment load. -
Remove the stencil:
While the final coat is still slightly tacky (not fully cured), carefully peel away the vinyl stencil. Pulling while wet helps prevent the paint from chipping along the edges. -
Weed inner details:
Use the tip of your craft knife or a weeding tool to carefully lift the small triangle of vinyl from the inside detail of the ‘A’.
Step 5: Final Touches
-
Clean up edges:
If any tiny seepages occurred despite your best efforts, gently scrape them away with the tip of your craft knife or sand them off lightly once the paint is bone dry. -
Protect the work:
For durability, apply a coat of clear matte sealant over the entire face of the block, or wax the wood with a natural beeswax finish for a soft, organic sheen that protects the unpainted wood.
Once the sealant cures, your classic alphabet block is ready for playtime or display
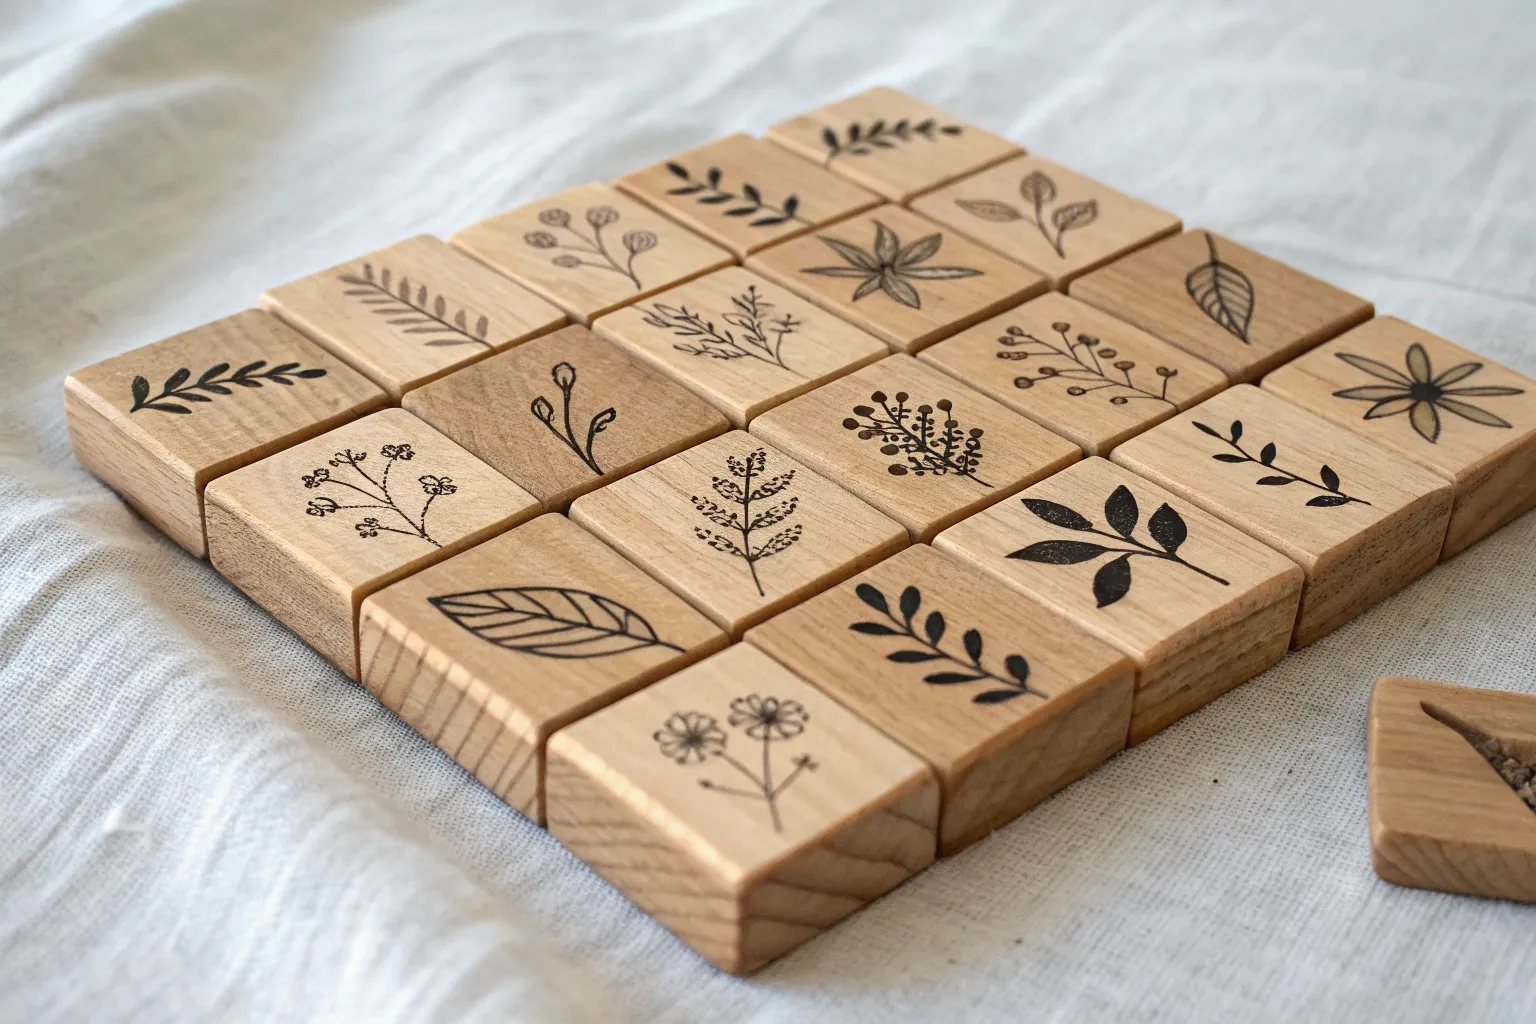
DIY Wood Block Stamp Printing
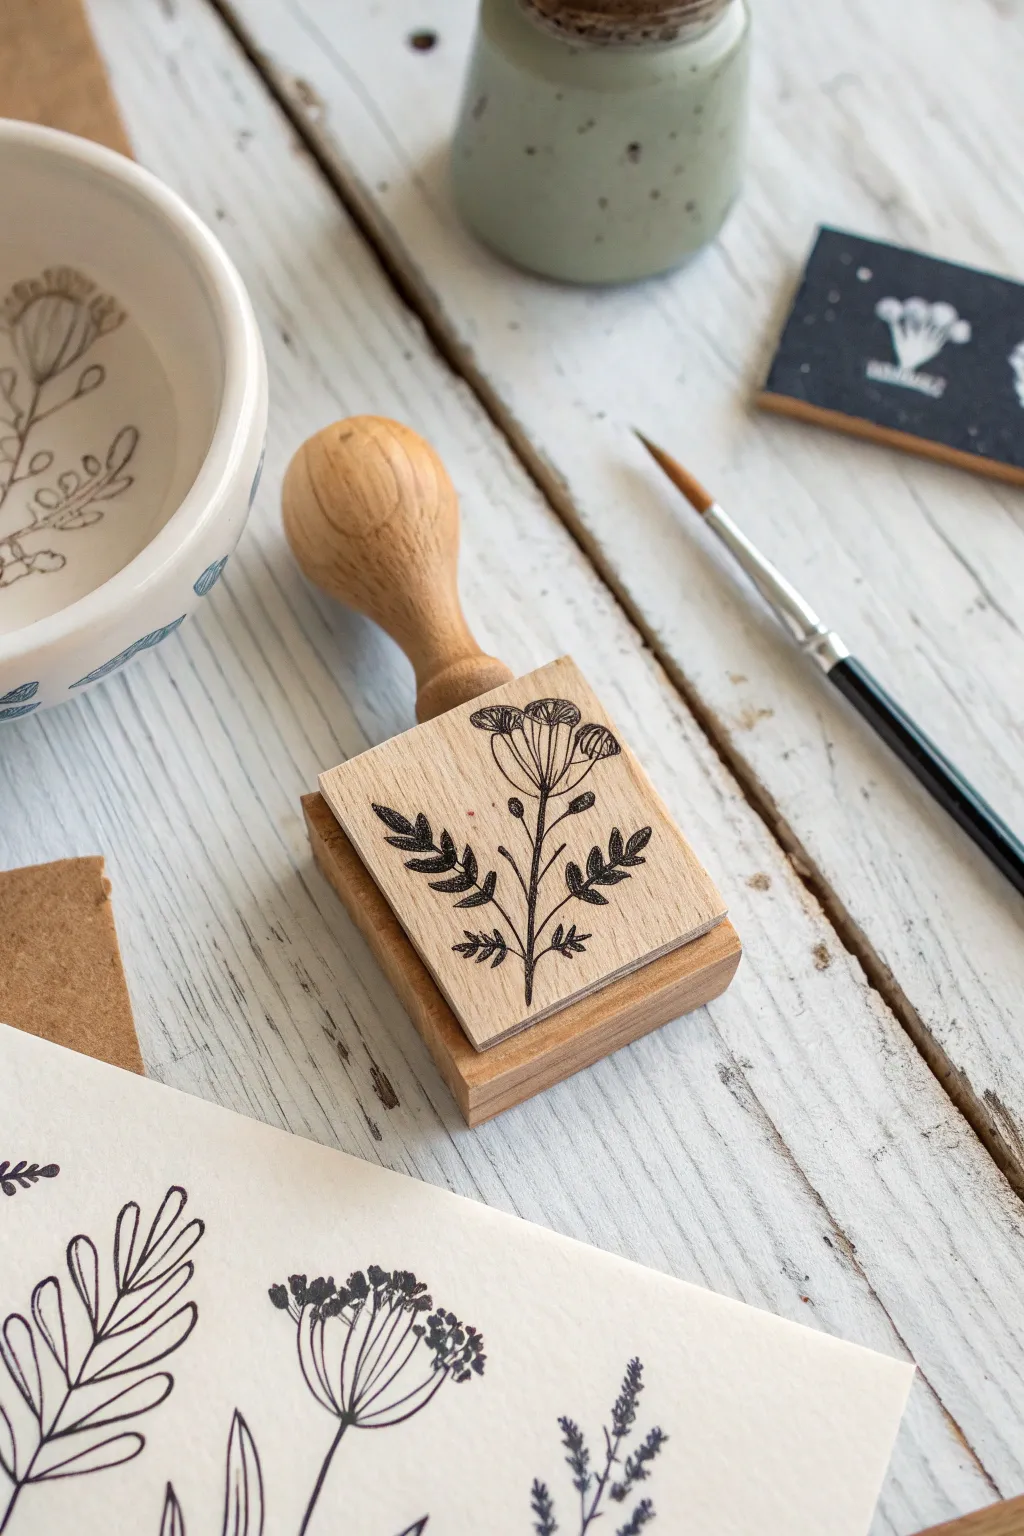
Create beautiful, rustic impressions with a custom-carved wooden stamp featuring delicate botanical line art. This project combines the tactile joy of carving with the elegance of nature-inspired prints, perfect for stationery or fabric design.
Detailed Instructions
Materials
- Small block of soft carving wood (basswood or boxwood)
- Wooden stamp handle (pre-made or turned)
- Wood glue or strong epoxy
- Carbon paper and pencil
- Fine wood carving tools (V-gouges and U-gouges)
- Sandpaper (fine grit)
- Black pigment ink pad
- Paper or cardstock for testing
Step 1: Preparation and Transfer
-
Sand the block face:
Begin by sanding the top surface of your small wood block until it is perfectly smooth. This is crucial for a clean print; any grain texture might show up in your final design if left rough. -
Draft your design:
Sketch a simple floral design on a piece of paper. Keep in mind that fine lines can be tricky to carve, so focus on distinct shapes like the trumpet-like petals and saw-toothed leaves shown in the example. -
Mirror the image:
Remember that your stamp will print in reverse. If your flower has a specific direction, flip your drawing horizontally before transferring. -
Transfer to wood:
Place a piece of carbon paper face down on the sanded wood block, then place your drawing on top. Trace over your lines firmly with a pencil to transfer the botanical design onto the wood surface.
Step 2: Carving the Relief
-
Outline with a V-gouge:
Using a small V-gouge, carefully carve along the transferred lines. You are carving away the negative space, leaving the lines raised. Go slowly and maintain a shallow, consistent depth. -
Define the petals:
Carve the interior details of the flower head. For the delicate lines inside the petals, use your finest tool and barely graze the surface to create thin, raised ridges. -
Clear the leaves:
Work around the leaves. I find it helpful to carve away from the stem outward to the leaf tips to prevent chipping the delicate connection points. -
Remove background material:
Once the main outline is isolated, switch to a wider U-gouge to remove the bulk of the wood in the background areas. You don’t need to go very deep, just enough so the background doesn’t touch the ink pad. -
Check your work:
Lightly brush away any wood dust. Look at the block from a low angle to spot any high points in the background that might accidentally pick up ink.
Uneven Ink Transfer?
If your print looks patchy, your wood block might not be perfectly flat. Briefly sand the face on a flat surface with fine-grit sandpaper to level the raised design.
Step 3: Assembly and Finishing
-
Sand the background:
If there are rough ridges in the carved-out background deeply enough, you can largely ignore them, but a quick pass with folded sandpaper can smooth out any distracting splinters. -
Attach the handle:
Apply a strong wood glue or epoxy to the center of the block’s back. Press the clear-finished wooden handle firmly into place and clamp or weigh it down while it dries. -
Clean the surface:
Wipe the carving face with a slightly damp cloth to remove any remaining graphite or dust before inking.
Pro Tip: Conditioning
Rub a tiny drop of linseed oil into the carved face before the first use. It seals the wood, helps the ink release cleaner, and extends the life of your stamp.
Step 4: Testing and Printing
-
Ink the stamp:
Dab your stamp onto the black ink pad. Instead of pressing the stamp into the pad, I prefer to hold the pad and tap it repeatedly onto the stamp face to ensure even coverage without flooding the crevices. -
Test print:
Press the stamp firmly onto scrap paper. Apply even pressure on the handle, rocking it ever so slightly to ensure the edges make contact. -
Assess and refine:
Examine the test print. If you see ‘noise’ in the background, go back with your gouge and carve those stray high spots down further. -
Final stamping:
Once satisfied, stamp your design onto your final paper stock or card. Re-ink carefully between each impression for a consistent, crisp black look.
Enjoy the timeless look of your handmade wooden stamp on all your future correspondence
Illusion Shadow-Box Depth Blocks
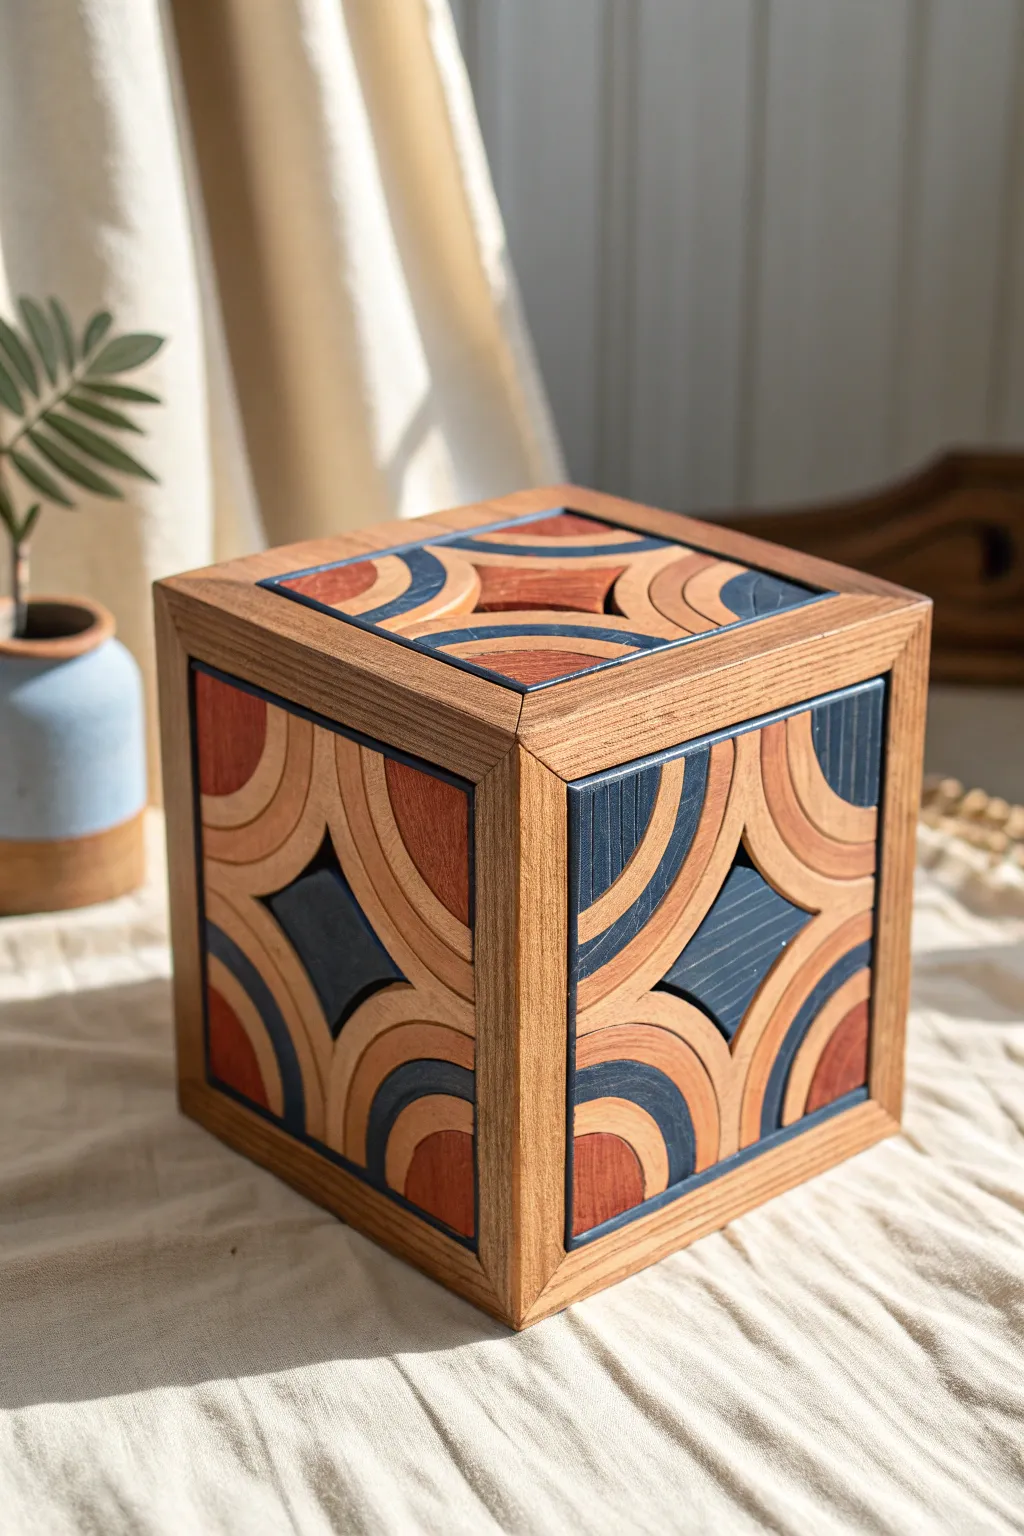
This stunning wooden cube features an intricate interplay of curved inlays and negative space, creating a mesmerizing optical illusion of depth. The rich combination of dyed blue wood against natural stained oak and mahogany tones turns a simple box into a sophisticated sculptural centerpiece.
Detailed Instructions
Materials
- Basswood or plywood sheets (1/8 inch thick) for the base panels
- Assorted wood veneers or thin craft wood (oak, mahogany, and a light wood like maple)
- Deep blue or indigo wood stain
- Wood glue
- Square dowels or hardwood strips (3/4 inch) for the frame
- Scroll saw or laser cutter
- Sandpaper (220 and 400 grit)
- Clear matte polyurethane or Danish oil
- Painters tape
- Clamps
- Compass and pencil
Step 1: Designing the Panels
-
Drafting the Pattern:
Begin by drawing a 5×5 inch square on paper. Locate the exact center. Using a compass, draw arcs from each corner inward to create the ‘orange peel’ or four-pointed star shape in the middle. -
Layering the Arcs:
Draw concentric bands within these arcs to create the segmented look. You will need three distinct bands for each corner quadrant to match the reference: an outer corner piece, a middle arch, and an inner arch. -
Transferring Template:
Make copies of your design. You will need six completed square panels for a full cube, or five if leaving the bottom open. Glue the paper templates onto your veneer or thin craft wood sheets using temporary spray adhesive.
Gaps in Veneer?
Mix sawdust from your sanding step with a tiny drop of wood glue to create a perfectly color-matched filler. Press into gaps, let dry, and sand smooth.
Step 2: Cutting and Staining
-
Cutting Components:
Using a scroll saw with a fine blade, carefully cut out all the segmented arc pieces. Keep the pieces organized by grouped quadrant to avoid mixing them up. -
Preparing the Base:
Cut six squares of 1/8-inch plywood or heavier basswood backing that are slightly smaller than your frame dimensions providing a substrate for the marquetry. -
Staining for Contrast:
Select the pieces intended to be dark blue (the central diamond shape and the middle arch bands). Apply a deep indigo stain to these specific wood pieces and let them dry completely. -
Natural Tone Application:
Oil or lightly stain the remaining pieces in two different natural tones—reddish for the outer corners and light oak for the inner bands—to distinguish the layers.
Step 3: Assembly and Framing
-
Initial Glue-Up:
Dry-fit a single face panel on your plywood backing to ensure tight seams. Once satisfied, glue the veneer pieces down, starting from the center and working outward. -
Pressing the Panels:
Place a flat board and weights over the glued panels for at least an hour. I find this pressure is crucial for preventing the thin wood veneers from curling as the glue cures. -
Creating the Frame:
Cut your hardwood strips into 12 distinct pieces with 45-degree mitered ends to create the cage-like edges of the cube. -
Routing Grooves:
Before assembly, use a router table or a dado blade to cut a groove (rabbet) on the inside edge of your frame pieces to accept the decorative panels. -
Sub-Assembly:
Glue four frame pieces around one completed panel to make a single side. Repeat this for all faces. Use painter’s tape to hold miters tight while drying. -
Constructing the Cube:
Join the framed panels together. It is easiest to assemble three panels into a corner first, checking for squareness, before adding the remaining sides. -
Final Surface Prep:
Once the full cube is assembled and dry, gently sand the outer hardwood frame to flush up the corner joints. Be careful not to sand through the veneer on the faces. -
Sealing:
Apply a clear matte finish or Danish oil over the entire piece. This will unify the sheen and make the blue stain pop against the warm wood tones.
Make it Functional
Turn this art object into a tissue box by cutting an oval slot in the center of the top panel’s diamond shape before the final assembly step.
Place your finished geometric cube near a window to watch how the changing daylight highlights the depth of the marquetry

Have a question or want to share your own experience? I'd love to hear from you in the comments below!