There’s something ridiculously satisfying about painting wood blocks—they’re small, solid, and you get to design six tiny canvases at once. I love how a handful of blocks can turn into modular art you can stack, swap, and style a dozen different ways.
Geometric Color-Blocked Blocks
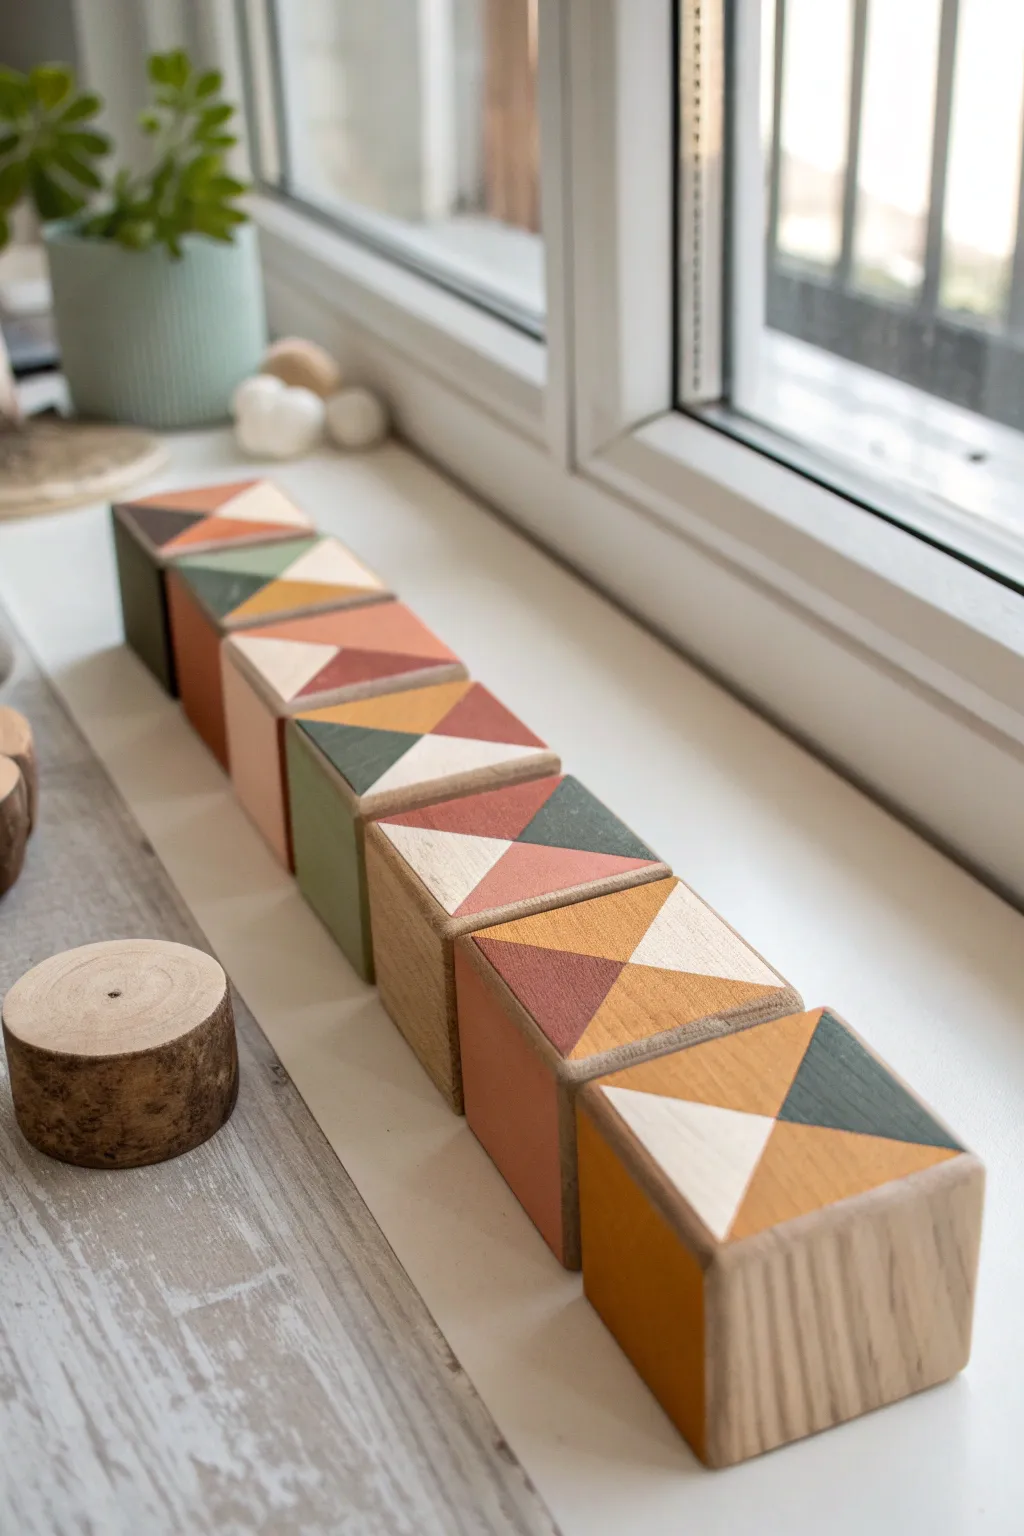
These stylish wooden blocks feature a warm, earthy color palette and sharp geometric lines that bring a modern boho touch to any shelf or play area. By using tape to create crisp triangles, you can achieve professional-looking results with just a few simple materials.
Step-by-Step Tutorial
Materials
- Unfinished wooden blocks (2-inch cubes recommended)
- Painter’s tape or washi tape
- Acrylic craft paints (muted earth tones: rust, mustard, sage green, dark grey, cream/white)
- Sandpaper (fine grit)
- Small flat paintbrush
- Sealant (spray matte finish or Mod Podge, optional)
- X-Acto knife or craft knife (optional)
- Ruler
Step 1: Preparation
-
Sand the blocks:
Begin by lightly sanding all sides of your wooden blocks to remove any rough edges or splinters. Wipe away the dust with a clean, dry cloth or a tack cloth to ensure the paint adheres smoothly. -
Plan your palette:
Choose your acrylic paint colors. The example uses a cohesive mix of deep rust, mustard yellow, sage green, charcoal, and an off-white. Grouping your paints ahead of time ensures the final set looks harmonious.
Tape Master Tip
Run a credit card or bone folder firmly over the tape edges before painting. This extra pressure creates a tighter seal on the wood grain.
Step 2: Creating the Design
-
Mark the center:
On the face of the block you want to paint, use a ruler to lightly find the center point. You can do this by drawing very faint pencil lines from corner to corner to make an ‘X’. -
Tape the first division:
To create the four-triangle pattern, you need to paint in stages. Apply a strip of painter’s tape diagonally across the block face, connecting two opposite corners. -
Tape the second division:
Apply a second piece of tape connecting the other two corners, crossing the first piece in the middle. Ensure the tape edges are pressed down firmly to prevent paint bleed. -
Isolate the first triangle:
Since you want four colors touching at the center, you can’t paint them all at once. Identify one triangle section to paint first and tape off the boundaries surrounding it completely. -
Seal the tape edges:
For super crisp lines, I like to brush a tiny amount of your base wood color or clear matte medium over the tape edge first. This blocks any colored paint from seeping underneath. -
Paint the first section:
Apply your first color (e.g., rust) to the exposed triangle. Use a small flat brush and paint away from the tape edge rather than towards it to minimize bleeding. -
Remove tape and dry:
Carefully peel back the tape while the paint is still slightly wet to avoid peeling up dried acrylic. Let this section dry completely before moving on. -
Tape the opposite section:
Once the first triangle is dry, re-tape the block to expose the triangle directly opposite the one you just painted. This prevents the wet tape from ruining your fresh work. -
Paint the second section:
Fill this opposite triangle with a contrasting color, perhaps the cream or white tone. Again, remove the tape promptly and let it dry. -
Tape the remaining sections:
Now that two opposing triangles are defined and dry, tape over them carefully to protect them, leaving the remaining two unpainted triangles exposed. -
Paint the final triangles:
Paint the remaining two sections with your other chosen colors, like the sage green or charcoal. Be very precise with your taping here so the center point remains sharp. -
Side coloration (optional):
The image shows some sides of the blocks painted in solid colors that coordinate with the top triangles. If desired, tape off the edges of the side faces and paint them solid colors for added dimension.
Step 3: Finishing Touches
-
Touch ups:
Inspect the lines where the triangles meet. If there is any bleed or unevenness, use a very fine detail brush or a paint pen to carefully tidy up the edges. -
Light sanding:
For a slightly distressed or organic look, you can do a very gentle pass with fine sandpaper over the painted areas, though this is optional if you prefer the crisp modern look. -
Seal the wood:
To protect the paint from chipping during play or dusting, apply a clear matte sealant. A spray sealant is easiest for even coverage without brush strokes. -
Final cure:
Let the blocks sit for at least 24 hours to ensure the paint and sealant are fully cured and hardened before handling or stacking.
Pattern Play
Mix up the designs! Instead of just X-patterns, try dividing some blocks simply in half diagonally or into smaller squares for variety.
Stack your new geometric creations on a windowsill or shelf to enjoy their structural beauty


Soft Ombre Block Sets
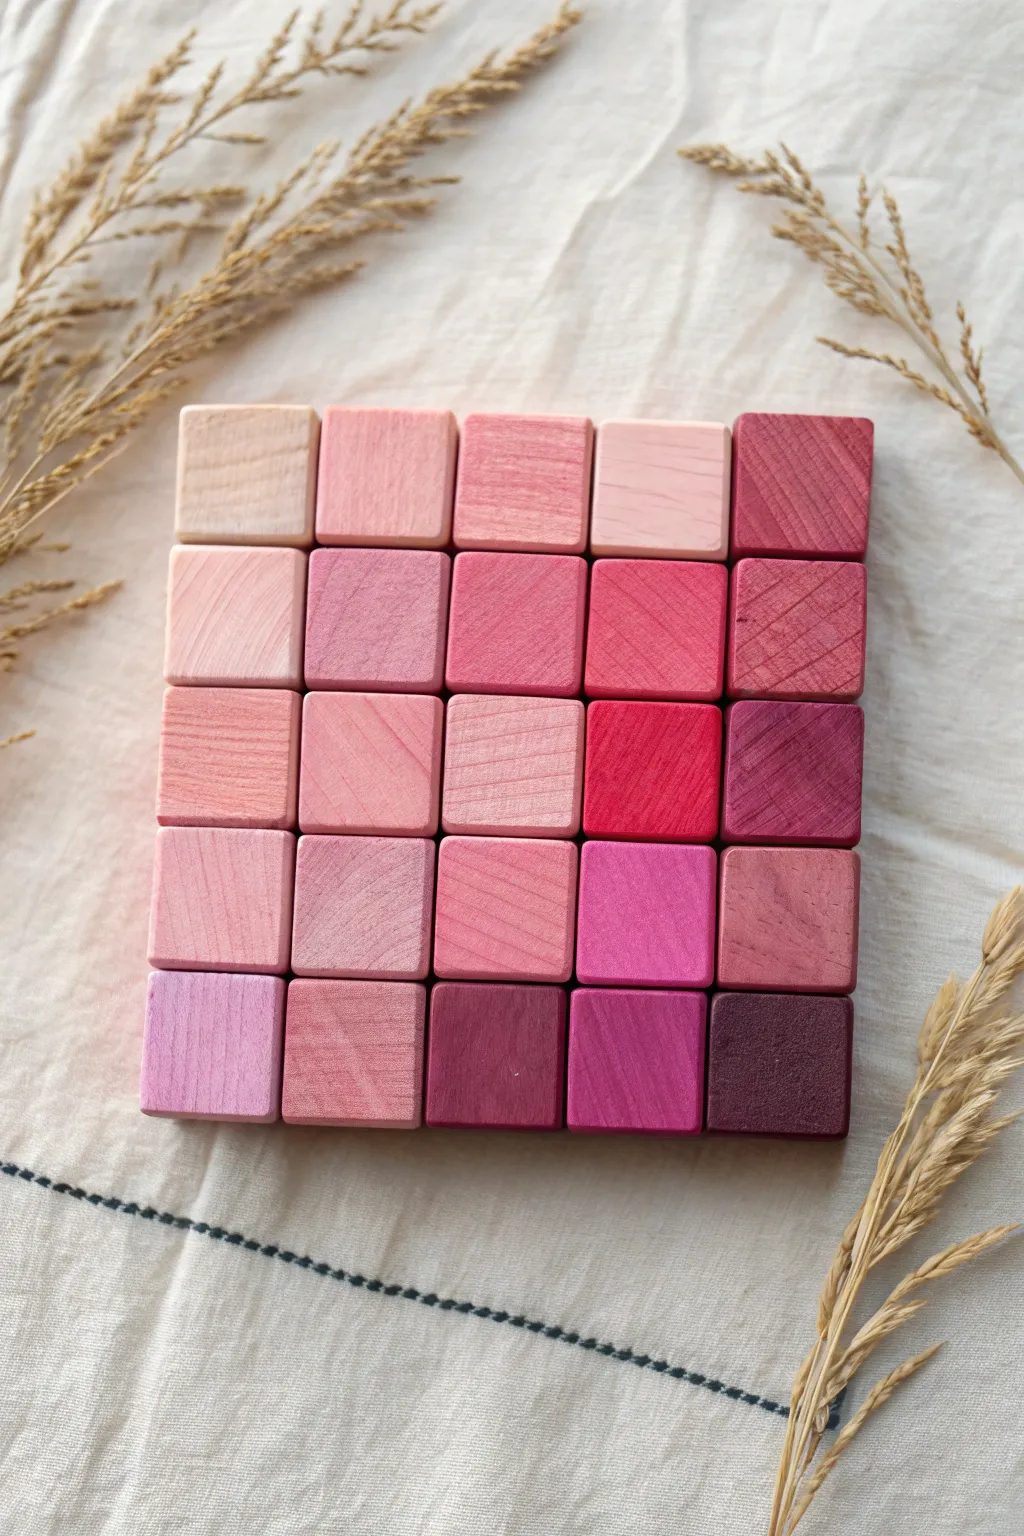
Transform simple wooden cubes into a stunning gradient of pinks and berries with this soothing ombre project. The translucent finish allows the natural wood grain to shine through, creating an organic and modern decorative set perfect for styling or play.
Step-by-Step
Materials
- 25 Wooden cubes (1.5-inch or 2-inch unfinished hardwood)
- Sandpaper (220-grit)
- Tack cloth or microfiber towel
- Watercolor paints or liquid watercolors (Red, Alizarin Crimson, Purple)
- White liquid watercolor (optional, for pastel opacity)
- Wide flat brush or sponge brush
- Mixing palette or small cups (at least 5)
- Water jar
- Spray bottle with water
- Clear beeswax polish or water-based matte sealant
- Clean cotton rag
Step 1: Preparation & Planning
-
Inspect the Wood:
Begin by checking your wooden cubes for any rough patches or splinters. Since we are creating a grid, consistency is key, so ensure all blocks are uniform in size. -
Sand for Smoothness:
Lightly sand all six faces of every cube using 220-grit sandpaper. This opens up the wood pores to accept the stain evenly without leaving scratches. -
Clean the Surface:
Wipe away every speck of sanding dust with a tack cloth. Dust trapped under the paint will create a gritty texture. -
Plan Your Gradient:
Arrange your unpainted blocks in a 5×5 grid on your workspace so you can visualize the color progression. We are aiming for a transition from pale blush to deep burgundy.
Step 2: Creating the Color Wash
-
Mix the Base Shades:
Prepare five separate mixing cups. In the first cup, put a tiny drop of red into a generous amount of water to create a very pale wash. In the last cup, mix a strong concentration of red and a touch of purple for the darkest shade. -
Fill the Middle Tones:
For the three middle cups, create graduating intensities. I like to add a tiny drop of white liquid watercolor to the lighter shades to give them a slightly milky, soft appearance. -
Test the Colors:
Use a scrap piece of wood or the bottom of one block to test your five shades. The colors will dry lighter than they appear wet, so adjust your concentration accordingly. -
Dampen the Wood:
Before painting, lightly mist the blocks with water from a spray bottle. This ‘pre-wetting’ helps the color bloom and prevents harsh brush strokes.
Uneven Blotches?
If the stain looks blotchy, the wood might have had glue residue. Sand the spot down to raw wood and re-apply the specific color wash for that block.
Step 3: Painting the Grid
-
Paint the Lightest Row:
Dip your brush into the palest wash (Cup 1) and paint the first row of five blocks. Apply the wash quickly to all sides, wiping away excess with a rag to keep the grain visible. -
Apply the Second Tier:
Move to the second row using the mixture from Cup 2. Ensure each face is covered. If the color feels too similar to the first row, add slightly more pigment to the cup immediately. -
Work Through the Gradient:
Continue painting rows 3, 4, and 5, using progressively darker cups. For the darkest blocks (the bottom right corner specifically), you might want to do a second coat to deepen the saturation. -
Customizing Individual Blocks:
To mimic the random, organic look of the image, don’t make every block in a row identical. Dip a block from row 3 briefly into the row 4 cup to create subtle variation. -
Dry Completely:
Stand the blocks on a wire rack or parchment paper. Let them dry for at least 2-3 hours. The wood needs to be bone dry before sealing.
Level Up: Texture
Use a texturing hammer or wire brush gently on a few blocks before painting. The pigment will settle into the indentations for a rustic, tactile look.
Step 4: Finishing Touches
-
Check for Raised Grain:
Water-based paints often raise the wood grain. Run a hand over the blocks; if they feel fuzzy, do a very gentle pass with 220-grit sandpaper, just enough to smooth them without removing color. -
Apply Sealant:
Scoop a small amount of beeswax polish onto a clean cotton rag. Rub it vigorously into the wood. This protects the color and brings out the richness of the grain. -
Buff and Shine:
Let the wax sit for 15 minutes, then use a fresh cloth to buff the blocks to a satin sheen. -
Final Arrangement:
reassemble your 5×5 grid, placing the lightest blocks at the top left and the darkest saturation at the bottom right to complete the ombre effect.
Arrange your beautiful new blocks on a shelf or tray to bring a warm, artistic touch to your space


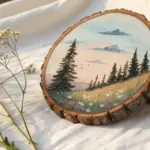
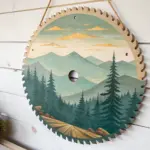
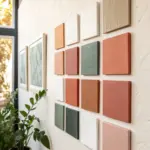
Mini Landscape Blocks for a Wall Grid
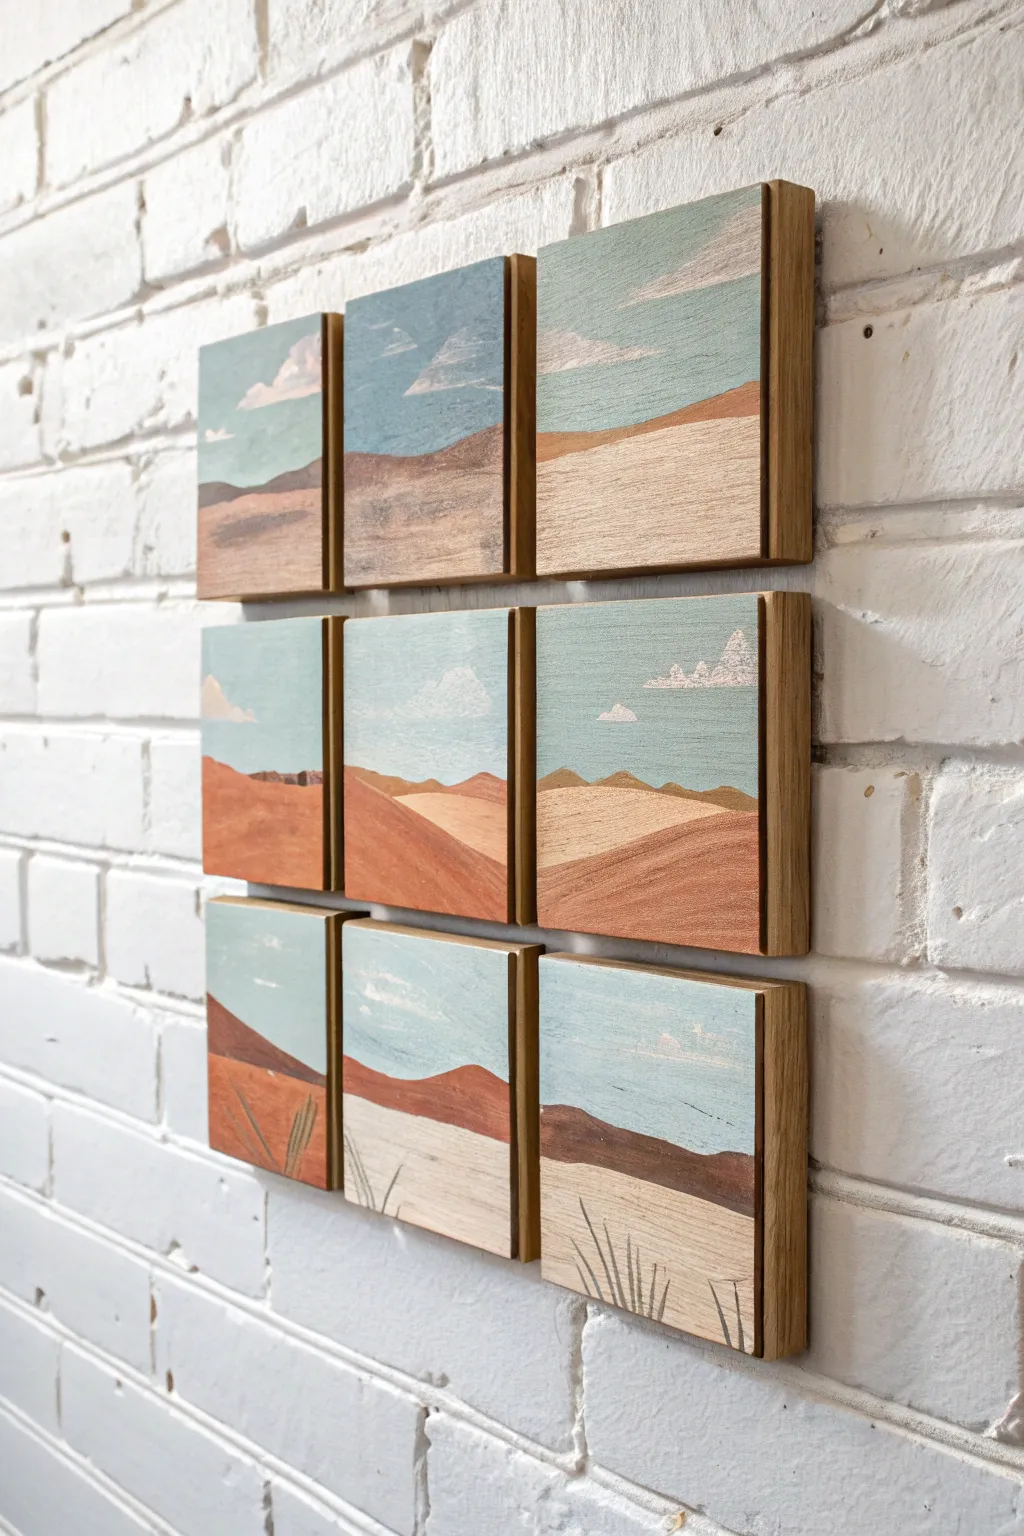
Transform a blank wall into a window overlooking arid dunes with this segmented block art project. Using a grid of nine thick wooden panels, you will paint a continuous but broken landscape in soft hues of teal, terracotta, and sand.
How-To Guide
Materials
- 9 square wood blocks (approx. 4×4 or 6×6 inches, at least 1-inch depth)
- Acrylic paints (Teal, white, burnt sienna, yellow ochre, raw umber)
- Small flat brushes (size 4 or 6)
- Small round detail brush (size 0 or 1)
- Painter’s tape or masking tape (optional)
- Fine-grit sandpaper (220 grit)
- Matte spray varnish
- Command strips or heavy-duty mounting tape
- Palette for mixing
Step 1: Preparing the Canvas
-
Sand the surfaces:
Begin by lightly sanding the front face of each wooden block. The goal isn’t to remove all texture, but to ensure there are no splinters that might catch your brush bristles. -
Clean the wood:
Wipe away all sawdust with a damp cloth or tack cloth. A dusty surface will prevent the acrylics from adhering properly and can make your paint look gritty. -
Plan the grid:
Lay your nine blocks out on a flat table in a 3×3 square arrangement. This is crucial because you need to visualize how the horizon lines and hills will flow from one block to the next.
Step 2: Painting the Sky and Clouds
-
Mix the sky color:
Create a muted teal by mixing a standard teal or turquoise with a generous amount of white and a tiny touch of raw umber to desaturate it. You want a soft, dusty blue-green look. -
Paint the upper sections:
Apply this sky mixture to the top half or two-thirds of each block. Don’t measure straight across; vary the horizon line height slightly to create interest for the landscape below. -
Add first cloud layers:
While the sky is still slightly tacky or just dry, mix a stark white with a tiny bit of your sky color. Paint flat, elongated cloud shapes near the top edges using horizontal strokes. -
Detail the clouds:
Use a nearly dry brush with pure white paint to scumble the tops of the clouds, giving them a wispy, organic texture typical of desert skies.
Uneven Horizon Lines?
If landscape lines represent discontinuous jumps between blocks, don’t worry! Retouch the edges with paint while the blocks are side-by-side to realign them.
Step 3: Building the Landscape
-
Establish the horizon:
Mix a dark brownish-red using burnt sienna and a little raw umber. Paint the furthest range of hills right where your sky ends. Make sure these lines connect visually across adjacent blocks. -
Create mid-ground dunes:
Mix yellow ochre with white to create a pale sandy color. Paint large, swooping dune shapes below the dark horizon. I like to keep my brushstrokes horizontal here to mimic the grain of the sediment. -
Add foreground warmth:
For the closest dunes (at the bottom of the grid blocks), use a rich terracotta color. This creates depth by placing warmer, darker colors in the front and paler colors in the distance. -
Let the wood show:
Consider leaving small slivers of the raw wood exposed between color transitions or at the very bottom edge. This celebrates the material and adds a rustic charm.
Wood Grain Wonder
Dilute your acrylics slightly with water for the ‘sand’ sections. This creates a semi-transparent wash that lets the natural wood grain show through the paint.
Step 4: Final Details and Assembly
-
Paint vegetation:
Switch to your smallest round brush. Mix a dark, muted olive green. Paint simple spiky agave or yucca shapes in the bottom foreground blocks (the bottom row of the grid). -
Refine the edges:
Check the sides of your blocks. If any paint dripped over deeply, sand it off gently. The sides should remain clean, raw wood to act as a natural frame. -
Seal the work:
Once fully dry, take the blocks to a ventilated area and apply a light coat of matte spray varnish. This protects the paint from dust without adding an artificial glossy sheen. -
Dry run the layout:
Place the finished blocks back into their 3×3 grid on the floor. Double-check that you haven’t accidentally rotated any blocks and that the landscape still flows continuously. -
Install on the wall:
Use a level and command strips to mount the blocks. Start with the center block and work outward, leaving a small, consistent gap (about 1/4 to 1/2 inch) between each square.
Step back and admire your segmented desert view as it brings warmth and depth to your space


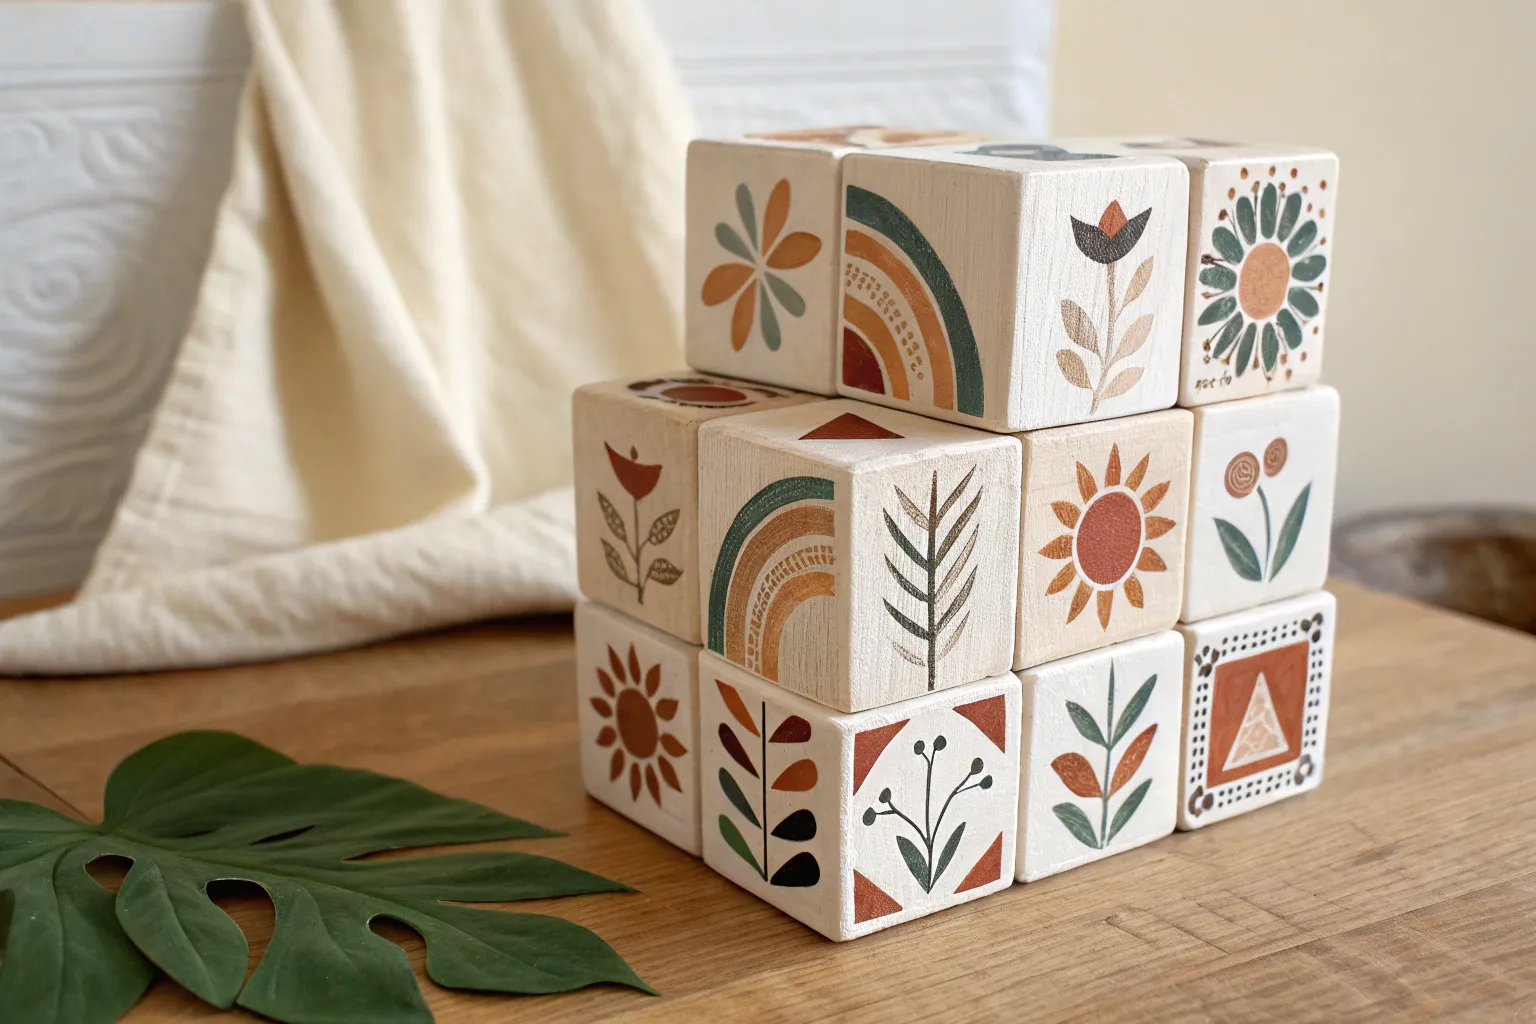
Abstract Pattern Sampler Blocks
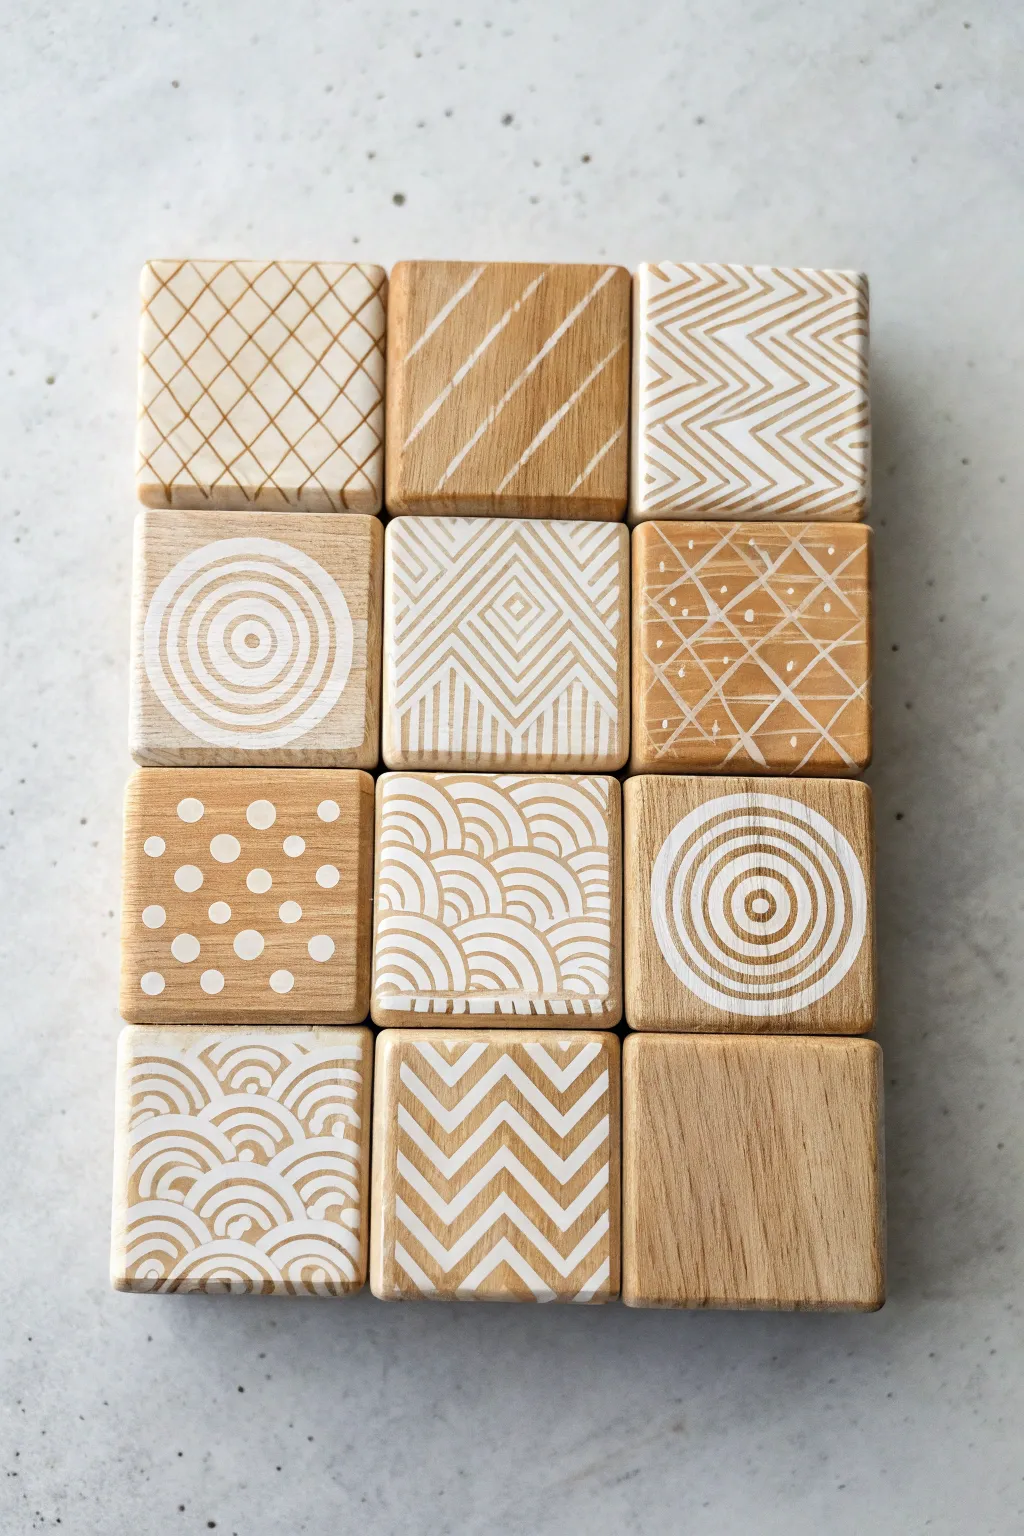
Transform plain wooden cubes into a striking piece of decor using simple white geometric patterns. This project celebrates the natural grain of the wood by overlaying it with crisp, modern designs like chevrons, scallops, and concentric circles.
Detailed Instructions
Materials
- Unfinished wooden blocks (2-inch cubes recommended)
- Fine-grit sandpaper (220 grit)
- White acrylic paint or specialized white paint pen (fine tip)
- Small round detail brush (size 0 or 1) if using liquid paint
- Ruler or straight edge
- Pencil (light mechanical pencil works best)
- Matte spray sealant (optional)
- Eraser
Step 1: Preparation
-
Sand the surfaces:
Begin by lightly sanding each face of your wooden blocks with 220-grit sandpaper. Focus on smoothing any rough edges or splinters to ensure a clean canvas for your painting. -
Wipe away dust:
Use a clean, dry cloth or a tack cloth to remove all sanding dust. Even tiny specks of sawdust can ruin the crispness of fine painted lines. -
Plan your grid:
Arrange your blocks in a 3×4 grid on your workspace. This helps you visualize the balance of patterns—alternating between dense designs like the scallops and simpler ones like the diagonal stripes.
Bleeding Lines?
If paint bleeds into the wood grain, switch to a thicker heavy-body acrylic or seal the raw wood with a clear matte medium before painting your white designs.
Step 2: Drafting the Design
-
Mark geometric guides:
For the checkerboard-style diamond pattern (top left), use your ruler to lightly mark grid points along the edges. Connect these points diagonally with very faint pencil lines. -
Sketch circular centers:
For the concentric circle blocks, locate the exact center of the square face. Lightly sketch the circles freehand or use a small compass to create your guides, spacing them evenly. -
Draw wave guides:
For the scallop or fish-scale patterns, draw faint horizontal lines across the block first. These will serve as base lines to keep your arched rows straight and uniform.
Make it a Puzzle
Paint patterns on all six sides of the blocks so they can be rearranged into endless new abstract compositions or used as a functional puzzle toy.
Step 3: Painting Linear Patterns
-
Paint straight diagonals:
Start with the simplest designs, like the diagonal stripes. Load your fine liner brush with white acrylic paint. Keep the paint consistency fluid but not watery to ensure opaque coverage in one stroke. -
Create the chevron:
For the zig-zag patterns, paint the diagonal strokes in one direction first, then meet them with the opposing strokes. If you’re using a paint pen, keep consistent pressure to avoid blobs at the angles. -
Execute the cross-hatch:
On the diamond grid block, paint your diagonal lines in one direction first. Let them dry completely before painting the perpendicular lines to prevent the wet paint from dragging at the intersections. -
Detail the starburst:
For the block with the starburst/geometric lines (second row, right), paint the radiating lines carefully. Add the small dots afterward to fill the negative space without overcrowding.
Step 4: Painting Curved Patterns
-
Paint concentric circles:
Using your detail brush, carefully trace your circular guides. I find it helpful to rotate the block itself rather than my hand to get a smoother curve. -
Layer the scallops:
Start painting the bottom row of arches for the scalloped pattern. As you move up to the next row, position the peak of each new arch directly above the valley of the two arches below it. -
Add detail to the diamond:
For the nested diamond block (second row, center), paint the squares starting from the center and working outward. This prevents your hand from smudging the wet paint of the outer lines. -
Paint the dots:
For the polka dot block, dip the non-brush end of your paintbrush into the white paint and stamp it onto the wood. This creates perfectly round, uniform dots every time.
Step 5: Finishing Touches
-
Clean up sketch lines:
Allow the paint to cure fully—wait at least an hour or two. Once dry, gently erase any visible pencil marks, being careful not to rub too hard over the painted areas. -
Check opacity:
Inspect your lines. If the wood grain shows through too much on certain strokes, go back and carefully apply a second thin coat of white paint to brighten them up. -
Seal the wood:
To protect the raw wood and your design, apply a light coat of matte spray sealant. Hold the can about 12 inches away to avoid soaking the wood, which could raise the grain again.
Arrange your finished blocks on a shelf or coffee table to enjoy a modern, handcrafted accent piece
BRUSH GUIDE
The Right Brush for Every Stroke
From clean lines to bold texture — master brush choice, stroke control, and essential techniques.
Explore the Full Guide
Pastel Animal Nursery Blocks
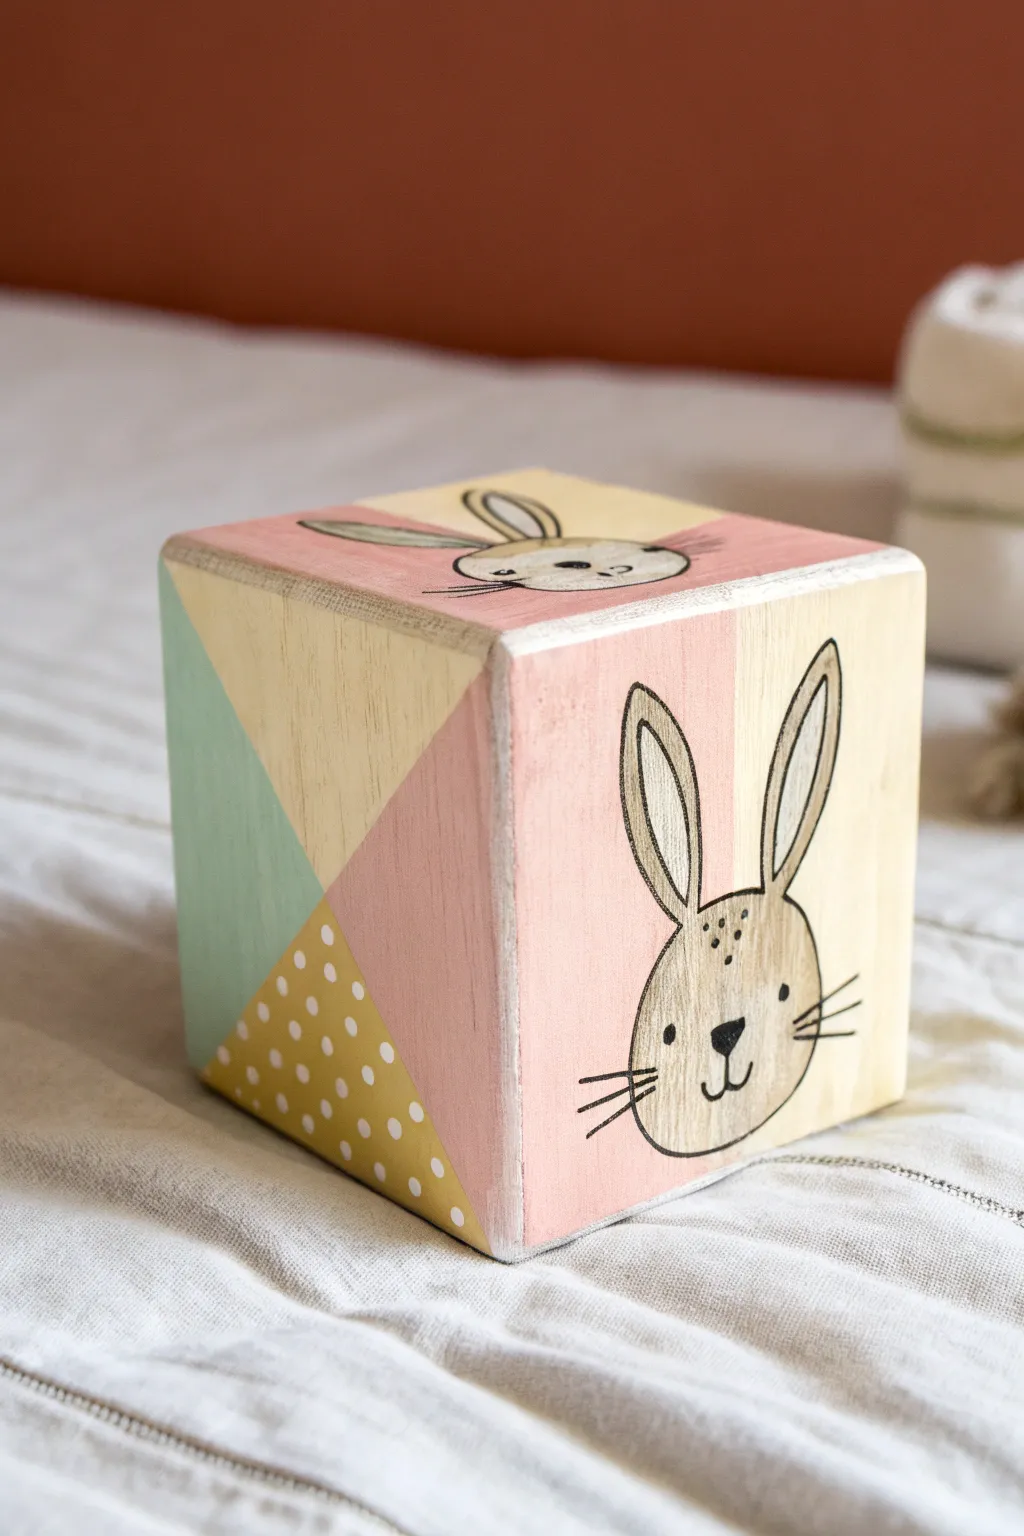
Soft pastels and charming hand-drawn details come together in this delightful nursery block project. The combination of geometric color-blocked sides and sweet animal illustrations creates a modern heirloom feel that’s perfect for play or display.
Detailed Instructions
Materials
- Unfinished solid wood block (approx. 3-4 inch cube)
- Fine-grit sandpaper (220-grit)
- Acrylic paints (pastel pink, cream/pale yellow, sage green, darker mustard yellow)
- Flat shader brush (medium size)
- Fine liner brush
- Pencil and eraser
- Masking tape or painter’s tape
- Black fine-point paint pen or permanent marker
- White paint pen (optional for highlights)
- Clear matte sealant spray or varnish
Step 1: Preparation & Geometric Base
-
Sand and smooth:
Begin by sanding your wooden block thoroughly on all sides. Pay special attention to the corners and edges, slightly rounding them off so they are soft to the touch and safe for little hands. -
Wipe clean:
Use a tack cloth or slightly damp rag to remove all sawdust. The surface needs to be perfectly clean for the crisp geometric lines we’ll be creating. -
Plan the geometric side:
On one face of the block, use your pencil to lightly draw diagonal lines dividing the square into four distinct triangles. This creates the dynamic ‘quilt’ pattern seen on the left side of the block. -
Tape the first sections:
Apply painter’s tape along your pencil lines to mask off two non-touching triangles (like the top cream section and bottom mustard section). Press the tape edges down firmly with your fingernail to prevent paint bleed. -
Paint the first triangles:
Paint the top triangle in a pale cream color and the bottom triangle in a mustard yellow. Use your flat brush and apply thin, even coats. I prefer two thin coats over one thick one for the smoothest finish. -
Remove tape and dry:
Peel the tape away while the paint is still slightly tacky to keep edges crisp. Let these sections dry completely before moving on. -
Paint remaining triangles:
Once dry, tape over the painted sections to expose the remaining two triangles. Paint the left one a soft sage green and the right one a dusty pink. Remove tape and let dry. -
Paint the animal panel backgrounds:
For the sides featuring the bunny, paint the background in vertical stripes or solids. For the main face, tape off a vertical line and paint the left half dusty pink and the right half cream.
Step 2: Details & Character
-
Add polka dots:
Return to the geometric side. Dip the end of a paintbrush handle or a dotting tool into cream paint and carefully stamp polka dots onto the mustard yellow triangle. -
Sketch the bunny:
On the pink-and-cream side, lightly sketch the bunny’s head shape with a pencil. Position it centrally near the bottom edge, with tall ears reaching toward the top corners. -
Fill the bunny shape:
Mix a diluted wash of light brown or beige acrylic paint. Fill in the bunny’s head and ears, keeping the paint semi-transparent so the wood grain or background color subtly peeks through for a rustic look. -
Outline the features:
Once the brown paint is bone dry, use a black fine-point paint pen to draw the outline of the head and ears. Keep your hand loose to achieve that sketchy, illustration style. -
Draw the face:
Using the same black pen, draw two small solid ovals for eyes, a triangular nose, and a simple mouth. Add three long whiskers on each cheek extending outward. -
Add ear details:
Draw inner ear shapes with the black pen. You can leave them the base brown color or tint them slightly lighter with a diluted white wash. -
Highlight and accent:
Add tiny freckles on the bunny’s cheeks and small white highlights in the eyes using a white paint pen to bring the character to life. -
Distress edges (optional):
For a vintage feel, lightly sand the very edges and corners of the block again to reveal a bit of raw wood, softening the transition between the painted panels. -
Seal the block:
Finish the project by applying a coat of clear matte sealant. This protects your artwork from chipping and makes the block easy to wipe clean.
Clean Lines Hack
To prevent paint bleeding under tape, seal the tape edge with a thin layer of the *base* color (or clear medium) before applying the new color.
Mix It Up
Create a whole forest set by painting different woodland creatures like foxes or bears on other blocks, keeping the same pastel color palette for unity.
Your charming nursery block is now ready to add a touch of handmade warmth to any shelf or toy box
Stamped Repeat Patterns on Block Faces
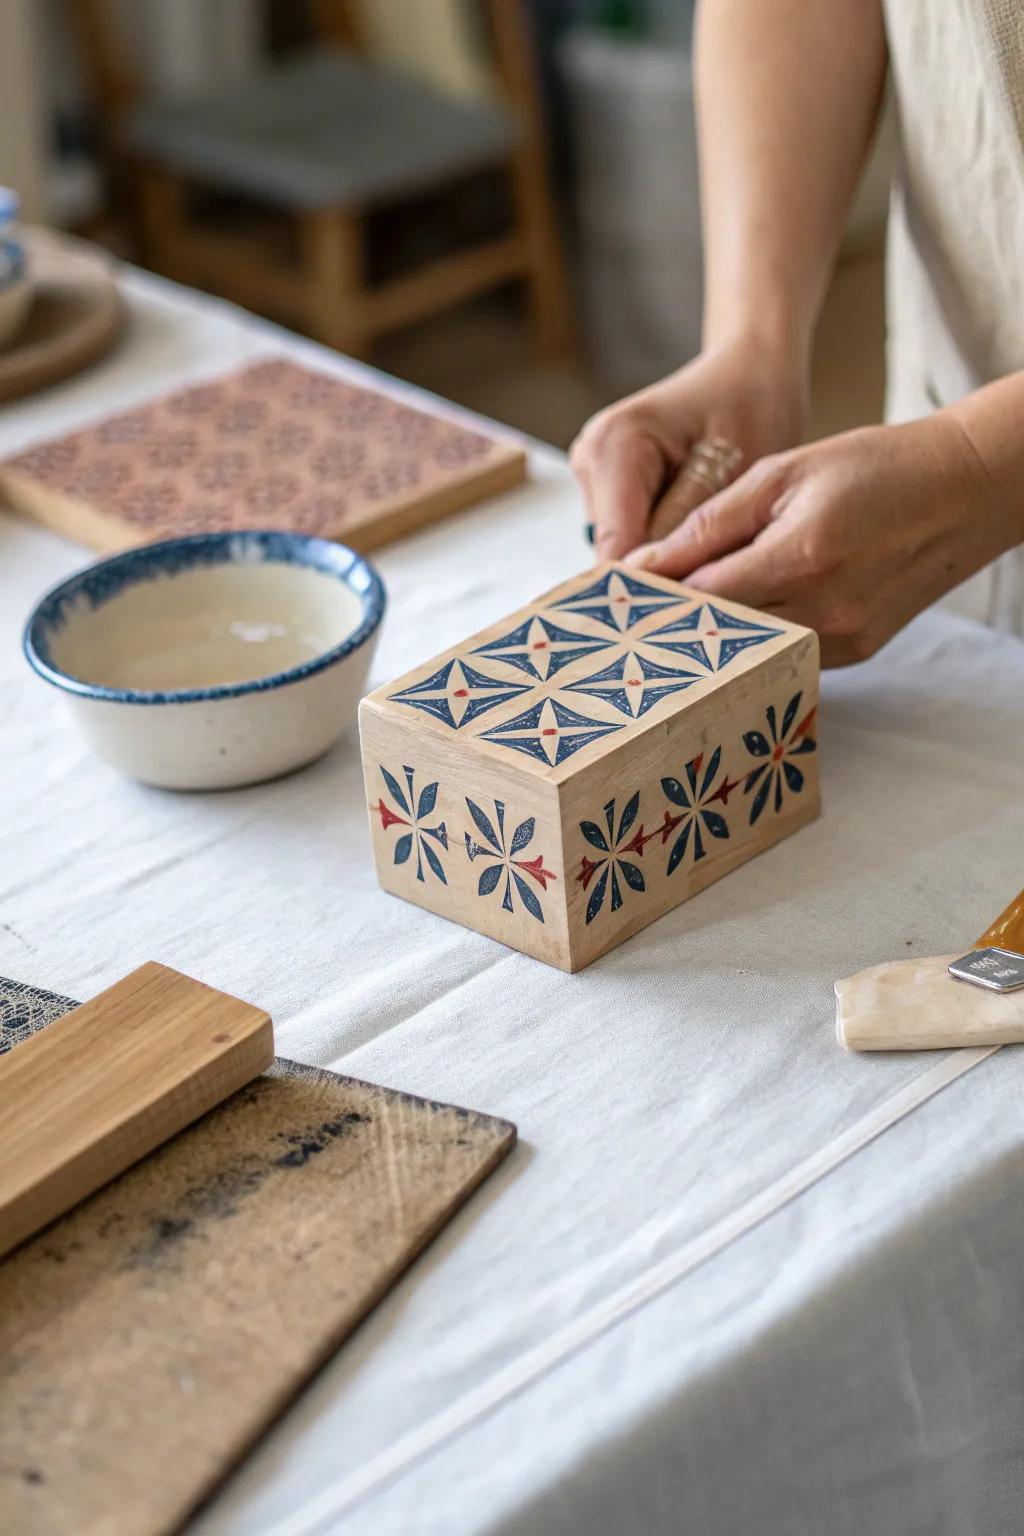
Transform a plain wooden block or box into a decorative object using traditional stamping techniques. This project features a striking repeat pattern of blue and red geometric starbursts that wrap around the faces of the wood for a cohesive, folky aesthetic.
How-To Guide
Materials
- Unfinished smooth wooden block or box
- Rubber or foam block for carving stamps
- Lino carving tools (V-gouge and U-gouge)
- Pencil and eraser
- Ruler
- Craft knife
- Balsa wood scraps (for mounting stamps)
- Acrylic paint or block printing ink (Dark Blue and Red)
- Sponge daubers or small brayer
- Fine-grit sandpaper (220 grit)
- Clear matte varnish or wax finish
- Scrap paper for testing
- Paper towels
Step 1: Designing and Carving the Stamps
-
Draft the design:
Begin by sketching your geometric starburst pattern on a piece of paper. The design in the image uses a square tile format divided into four triangular quadrants, creating an ‘X’ shape in negative space. -
Transfer to carving block:
Transfer your pencil sketch onto the rubber carving block. You’ll need two separate stamps for this design: one larger square stamp for the main blue pattern and a smaller detail stamp for the red accents. -
Carve the main stamp:
Using your V-gouge tool, carefully carve away the negative space from the main square block. You want to leave the four petals or leaf shapes raised. I find it helpful to crave shallowly at first, then go deeper to ensure clean lines. -
Carve the accent stamp:
Carve the second, smaller stamp for the red details. This appears to be a simple diamond or small four-point star that sits in the center of the larger blue motifs. -
Mount the stamps:
Cut pieces of scrap wood or balsa slightly larger than your rubber stamps. Glue the rubber to these wooden backers; this gives you a handle and ensures even pressure when stamping without your fingers getting in the ink.
Step 2: Preparing the Surface
-
Sand the wood block:
Take your wooden box or block and sand all faces lightly with 220-grit sandpaper. This ensures the wood grain doesn’t interfere with the stamp impression. -
Wipe clean:
Remove all sanding dust with a slightly damp paper towel or tack cloth. The surface must be completely dry before applying any ink.
Uneven Ink Fix
If your stamped image looks patchy on the wood, your surface might be too rough. Lightly sand again between attempts, or place a thin foam mat under the wood block to provide a little ‘give’ while pressing.
Step 3: Applying the Pattern
-
Plan the layout:
Lightly mark a grid on the top face of your wood block with a pencil. This grid will help you align the square stamps perfectly so the pattern flows seamlessly. -
Ink the main stamp:
Load a sponge dauber or brayer with dark blue acrylic ink. Apply a thin, even layer to the raised surface of your main square stamp. Avoid over-inking, as this causes the paint to squish into the grooves. -
Stamp the top face:
Press the stamp firmly onto the wood, following your pencil grid. Apply even pressure, rocking slightly to ensure the corners transfer, then lift straight up. Repeat to fill the top face. -
Stamp the sides:
Continue the pattern onto the side faces of the block. Notice in the image how the side patterns are rotated; you can play with orientation here to create visual interest. -
Allow to dry:
Let the blue layer dry completely. Acrylics dry fast, but block printing ink might need an hour or more depending on humidity. -
Add red accents:
Take your smaller detail stamp and ink it with red paint. Carefully align this stamp in the center of the negative space formed between the blue stamped squares. -
Complete the pattern:
Stamp these red accents across all faces where the blue pattern meets, creating the secondary starburst effect.
Vintage Fade
For a rustic, aged look, lightly sand the painted surface with high-grit sandpaper after the paint dries but before sealing. This distresses the pattern slightly for an antique feel.
Step 4: Finishing
-
Erase guidelines:
Once the paint is fully cured—wait at least 24 hours to be safe—gently erase any visible pencil grid lines. -
Seal the wood:
Protect your work by applying a clear matte varnish or a furniture wax. This seals the raw wood and protects the paint from chipping during handling.
Now you have a unique, hand-printed wooden object perfect for storing trinkets or gifting

PENCIL GUIDE
Understanding Pencil Grades from H to B
From first sketch to finished drawing — learn pencil grades, line control, and shading techniques.
Explore the Full Guide
Marbled Swirl Blocks
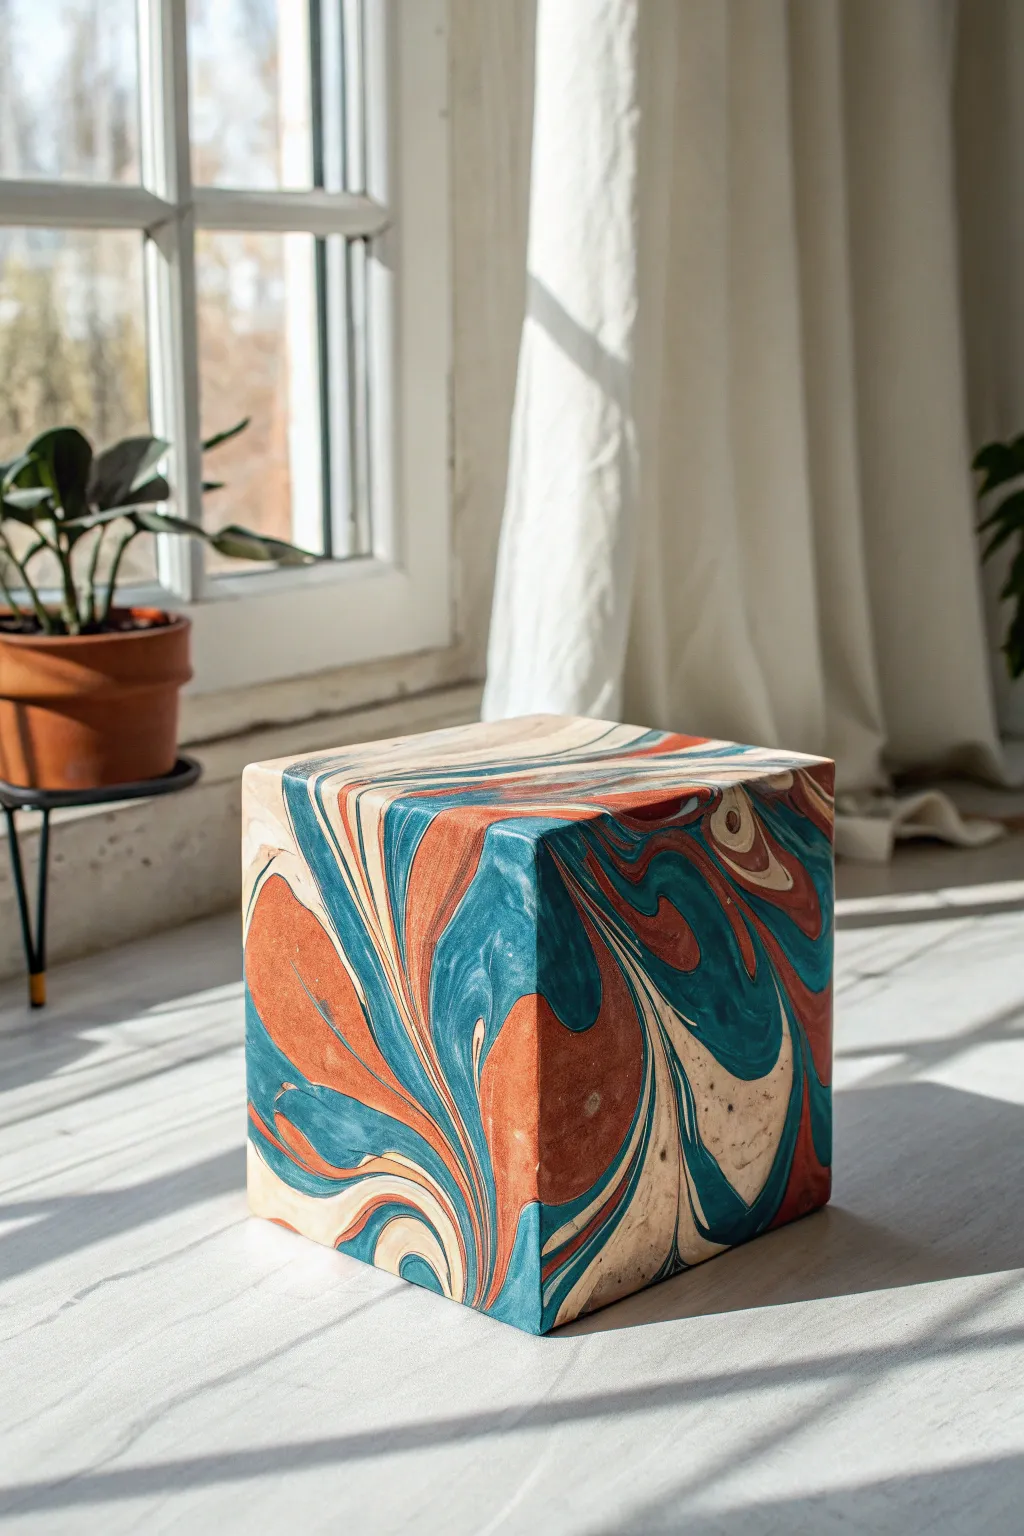
Transform a simple wooden block into a stunning piece of modern decor with the magic of hydro-dipping. This technique creates organic, swirling patterns in rich teal, rust, and cream tones that wrap seamlessly around the cube’s edges.
How-To Guide
Materials
- Solid wood block (sanded smooth)
- White or cream acrylic primer (spray or brush-on)
- Deep tub or bucket (larger than the block)
- Spray paints (Teal/Petrol Blue, Terra Cotta/Rust, Cream/Beige)
- Painter’s tape
- Stir stick or skewer
- Gloves
- Dust mask/respirator
- Clear matte or satin sealant spray
- Fine-grit sandpaper (220 grit)
Step 1: Preparation
-
Smooth the Surface:
Begin by sanding your wooden block on all sides with fine-grit sandpaper. You want the surface to be impeccably smooth so the paint adheres evenly without distinct grain texture showing through. -
Clean the Wood:
Wipe away all sanding dust with a tack cloth or a slightly damp rag. Ensure the wood is completely dry before moving to the next step. -
Prime the Base:
Apply a coat of white or cream primer to the entire block. This light base coat is crucial because it makes the subsequent marble colors pop and ensures true color representation. Let it dry completely according to the manufacturer’s instructions. -
Create a Handle:
To dip the block without getting fingerprints on it, create a temporary handle. I like to use a strong loop of painter’s tape attached firmly to one side (the side that will be the bottom), or you can screw a long eye-hook into the bottom face.
Water Temperature Matters
Use cool to lukewarm water (around 70°F/21°C). If water is too hot, paint dries too fast; too cold, and it clumps up rather than spreading.
Step 2: The Marble Dip
-
Prepare the Water Bath:
Fill your tub or bucket with cool tap water. The container needs to be deep enough to fully submerge the block. Work in a well-ventilated area, preferably outdoors. -
Spray the First Color:
Shake your spray paint cans vigorously. Hold the teal can about 8-10 inches from the water and spray a few bursts onto the surface. The paint should float on top. -
Layer the Colors:
Immediately follow with sprays of the terra cotta and cream paints. Alternate colors and spray in different spots to create a random distribution. -
Swirl the Pattern:
Working quickly before the paint films over, use a stir stick or skewer to gently swirl the floating colors. Don’t overmix; simple, broad strokes create the best marble veins. -
The Dip:
Holding your tape handle or eye-hook, slowly lower the block into the water at a 45-degree angle. This angle helps the pattern wrap around the corners naturally. Submerge it until the water covers all visible sides. -
Clear the Surface:
While the block is still submerged, blow gently on the water surface or use a piece of cardboard to push the remaining floating paint aside. This prevents a double-layer of paint from ruining the design as you pull the block out. -
Remove and Assess:
Lift the block out of the clear water. Inspect the swirling pattern—it should look wet and glossy.
Paint Skinning Over?
Work faster! Spray paint films over on water in seconds. Have all cans uncapped and ready before spraying the first color.
Step 3: Finishing Touches
-
Drying Phase:
Set the block down on its unfinished bottom side (or hang it by the eye-hook) to dry. Let it sit undisturbed for at least 24 hours to ensure the thick paint layers cure fully. -
Remove Handle:
Once dry to the touch, carefully remove the tape or unscrew the eye-hook from the bottom. -
Touch-ups:
If there are any bubbles or rough spots where water droplets sat, you can very lightly sand them with high-grit sandpaper, though be careful not to remove the pattern. -
Seal the Design:
To protect the finish and unify the sheen, spray the entire block with a clear matte or satin sealant. Apply two light coats rather than one heavy one to avoid drips. -
Final Cure:
Allow the sealant to cure for another 24 hours before using the block as a stand, paperweight, or decor item.
Your new marbled art piece is now ready to add a splash of sophisticated color to any shelf or table
Face-by-Face Color Story Blocks
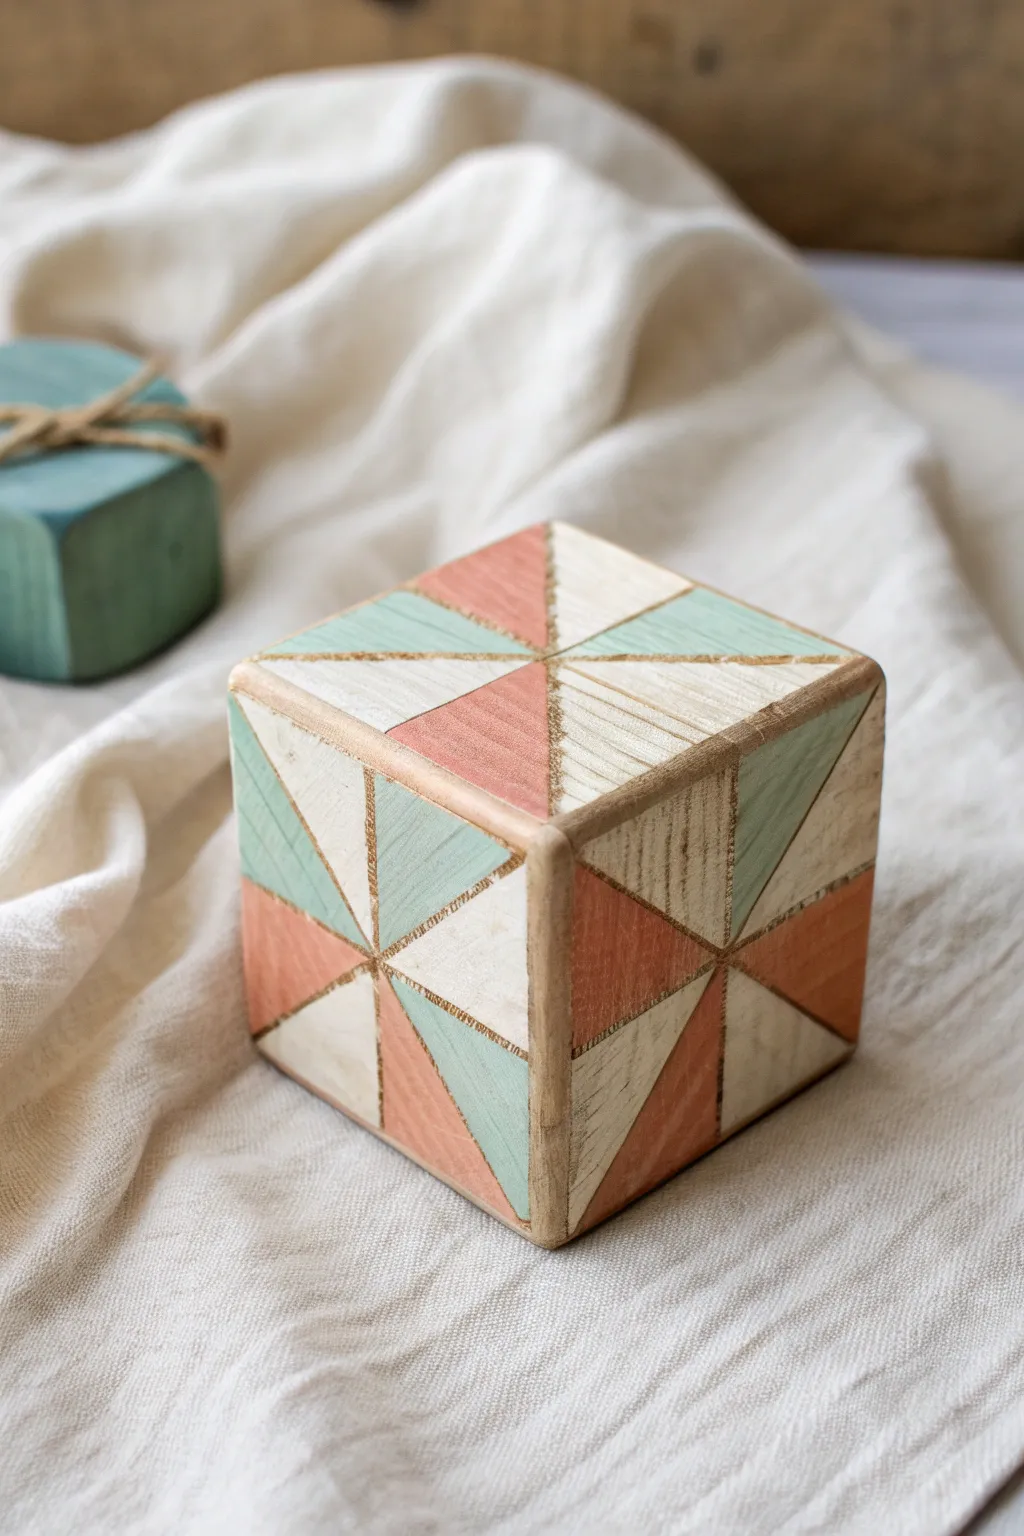
Transform a simple wooden cube into a sophisticated piece of decor using a geometric starburst pattern. This project relies on clean lines, a soft pastel palette of mint and peach, and the natural beauty of exposed wood grain to create a modern quilt-like effect.
How-To Guide
Materials
- Unfinished wooden block (approx. 2-3 inch cube)
- Fine-grit sandpaper (220 grit)
- Acrylic craft paints (creamy white, soft mint green, muted peach/coral)
- Small flat shader brush (size 2 or 4)
- Fine liner brush (size 0 or 00)
- Ruler
- Pencil
- Painter’s tape or masking tape (optional but helpful)
- Clear matte acrylic sealer spray or varnish
Step 1: Preparation & Mapping
-
Smooth the Surface:
Begin by sanding your wooden block on all sides. You want a very smooth surface so the geometric lines stay crisp, so focus especially on rounding off any sharp corners just slightly to prevent splintering. -
Clean the Dust:
Wipe away all sanding dust with a slightly damp cloth or tack cloth. Any leftover dust will make your paint finish grainy. -
Find the Center:
Using your ruler, lightly mark the exact center point on one face of the cube with a pencil. Repeat this for all visible faces you plan to paint. -
Draw the Diagonal X:
Connect the corners of the square face to the center point, creating a large ‘X’ shape. This divides the square into four large triangles. -
Bisect the Squares:
Draw a vertical line and a horizontal line through the center point, cutting the face into a ‘plus’ sign. You should now have eight equal triangular sections radiating from the center. -
Repeat the Pattern:
Continue this mapping process on adjacent sides. It helps to ensure the lines meet up at the edges where the faces join, creating a continuous flow.
Uneven Lines?
If your unpainted gaps are uneven, don’t worry. Use a gold metallic paint pen to draw over the gaps. It covers mistakes and adds a luxe finish.
Step 2: Painting the Design
-
Plan Your Palette:
Decide which triangles will be which colors. In the example, notice how colors alternate: two white sections, flanked by alternating peach and mint sections. It helps to mark a tiny ‘W’, ‘P’, or ‘M’ in each triangle lightly. -
Method 1: Freehand Technique:
If you have a steady hand, use a small flat shader brush to paint the first color (e.g., the creamy white). Paint inside the lines, leaving a small gap of unpainted wood between each triangle. This exposed wood creates the ‘grout line’ effect. -
Method 2: Masking Technique:
For razor-sharp lines, apply painter’s tape along the pencil lines. Paint your first color, let it dry completely, remove the tape, and re-mask for the next section. This takes longer but guarantees straight edges. -
Apply the Cream Sections:
Paint the sections designated for the creamy white color first. I like to do opposite triangles simultaneously to keep the workflow balanced. Apply two thin coats for opacity. -
Paint the Mint Triangles:
Next, fill in the mint green sections. Be careful near the center point where all the shapes converge; a fine liner brush is perfect for getting sharp points in the middle. -
Add the Peach Accents:
Finally, paint the peach or coral sections. Ensure you are maintaining that consistent gap of raw wood between every single shape. -
Refine the Edges:
Check the edges where the cube faces meet. If paint has wrapped around where it shouldn’t, gently scrape it off with a craft knife or lightly sand it back.
Mix It Up
Try a monochrome palette using three shades of the same color (e.g., dark blue, medium blue, light blue) for a moody, ombre effect.
Step 3: Finishing Touches
-
Enhance the Grid Lines:
If your unpainted gaps look messy or uneven, use a gold pen or a very fine brush with diluted brown paint to carefully define the grid lines between the triangles. -
Distress the Look (Optional):
For the slightly rustic look seen in the photo, take your sandpaper and very lightly scuff over the painted areas, focusing on the edges and corners. This exposes a bit more wood grain. -
Seal the Project:
Protect your work with a spray of clear matte acrylic sealer. This will keep the colors true and prevent the raw wood lines from looking dirty over time.
Display your finished block on a shelf or stack several together for a custom art installation


Galaxy and Night-Sky Blocks
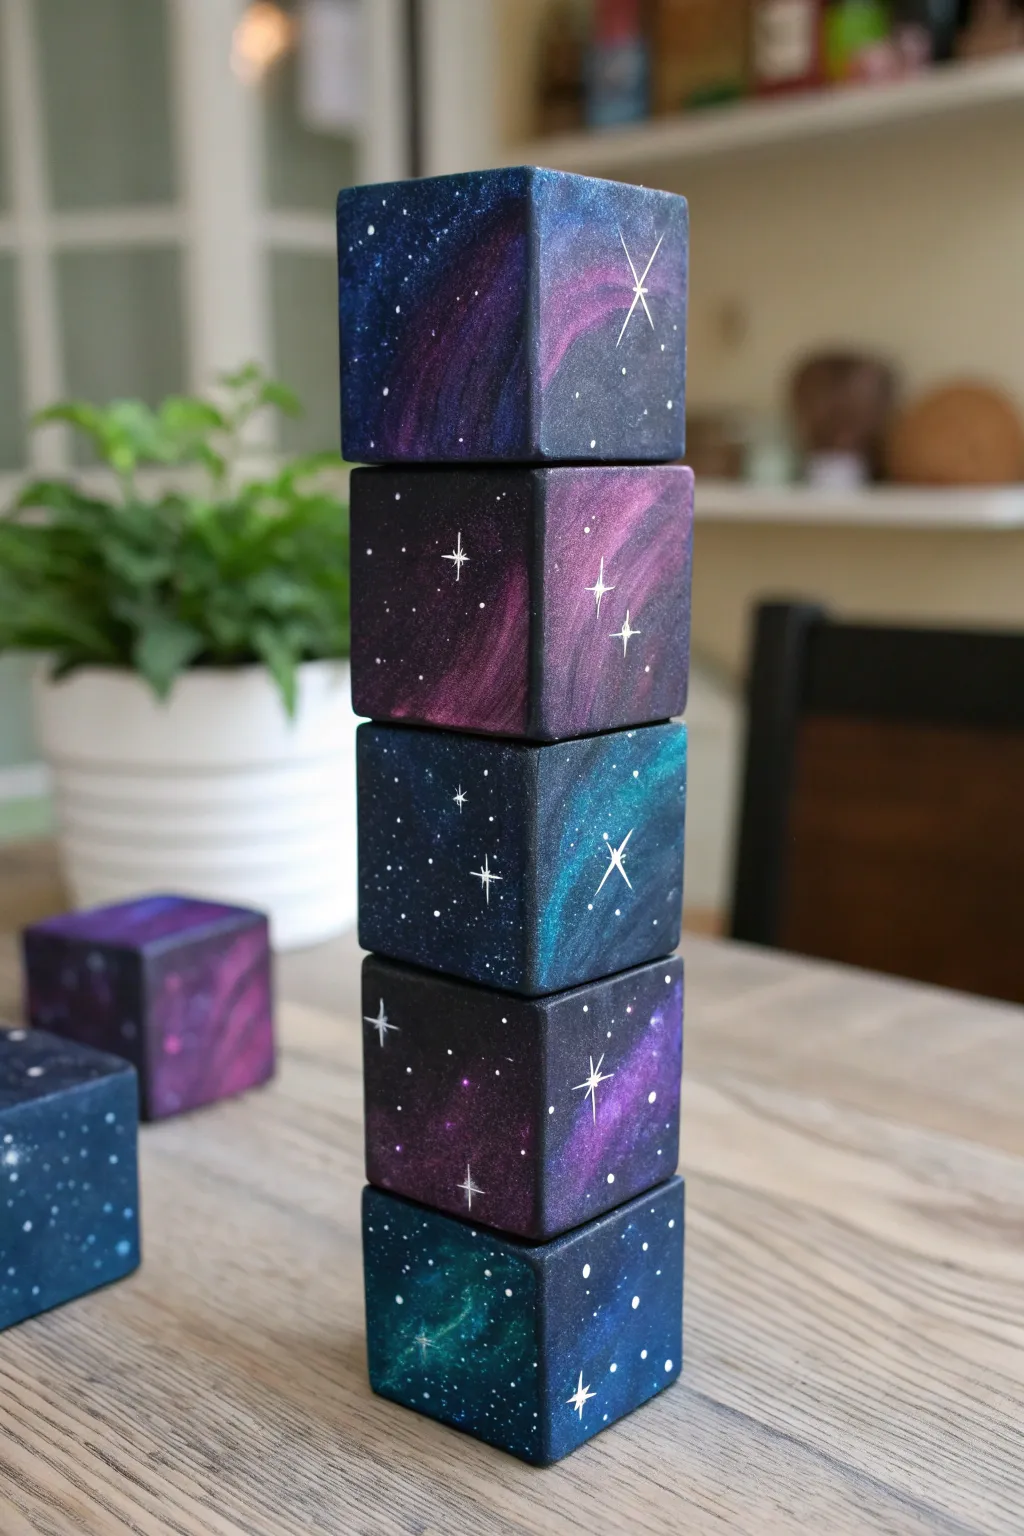
Transform simple wooden cubes into a stunning vertical nebula with these galaxy-themed decorative blocks. The rich layers of purple, teal, and midnight blue create a mesmerizing depth that looks beautiful stacked or scattered.
Step-by-Step Guide
Materials
- Unfinished wooden blocks (2-inch or 3-inch cubes)
- Sandpaper (220 grit)
- Black acrylic paint (or matte gesso)
- Acrylic paints: Midnight Blue, Teal/Turquoise, Magenta/Deep Purple, White
- Makeup sponges or small kitchen sponge pieces
- Stiff bristle brush (e.g., old toothbrush)
- Fine detail brush (size 0 or 00)
- Medium flat brush
- Matte or satin spray varnish
Step 1: Preparation and Base Coat
-
Sand the surfaces:
Begin by lightly sanding all sides of your wooden blocks with 220-grit sandpaper. Focus on softening the sharp corners and edges just slightly to prevent paint from chipping later. -
Clean the dust:
Wipe every block down with a slightly damp cloth or a tack cloth to remove all sawdust. A clean surface is crucial for a smooth base coat. -
Apply the black base:
Using your medium flat brush, paint every side of the blocks completely black. Work in thin, even layers to avoid brush strokes. -
Second coat:
Once dry, apply a second coat of black to ensure absolute opacity. You want a deep, void-like background for your colors to pop against.
Cosmic Cloud Depth
For a glowing effect, mix a tiny bit of white into your teal or magenta for the very center of the gas clouds. It makes the nebula look like it’s emitting light.
Step 2: Creating the Nebula Clouds
-
Prepare your sponges:
Cut your makeup sponge or kitchen sponge into small wedges. You will need a separate fresh side for each main color. -
Start with dark blue:
Dip a sponge lightly into Midnight Blue paint and dab off the excess on a paper towel until it’s almost dry. Gently dab cloud-like shapes onto the black blocks, keeping the edges soft and hazy. -
Layer in purple:
While the blue is tacky or just dry, take a fresh sponge with Magenta or Deep Purple. Sponge this color partially over the blue areas, creating a gradient effect. -
Add bright accents:
Using the Teal or Turquoise paint, sponge small, focused highlights into the center of your nebula clouds. Use a light hand here so the color doesn’t overwhelm the darker tones. -
Blend limits:
Be careful not to cover the entire black background. Leaving negative space is what makes the galaxy look deep and realistic.
Step 3: Stars and Details
-
Prepare the spatter paint:
Mix a small amount of white acrylic paint with a few drops of water. The consistency should be like heavy cream or melted ice cream. -
Create distant stars:
Dip a stiff bristle brush or old toothbrush into the thinned white paint. Test on a scrap paper first, then flick the bristles with your thumb to spray fine misty stars across the blocks. -
Paint major stars:
I like to switch to a fine detail brush now. Dip it in unthinned white paint and place random dots for brighter, closer stars among the mist. -
Draw star crosses:
Select a few focal points on each block face. Using your detail brush, paint a thin vertical line crossed by a shorter horizontal line to create twinkling star flares. -
Add center glow:
Place a tiny, concentrated dot of white right in the intersection of your star crosses to make them look like they are glowing intensely.
Constellation Customization
Before sealing, use the fine liner brush to connect specific stars with thin lines to replicate real constellations like the Big Dipper or Orion.
Step 4: Finishing Touches
-
Dry completely:
Allow the blocks to sit undisturbed for several hours or overnight. Even if the surface feels dry, the sponge layers can hold moisture underneath. -
Seal the artwork:
Take the blocks outside or to a well-ventilated area. Spray them with a matte or satin varnish to protect the paint from scratches and UV light. -
Cure time:
Let the varnish cure according to the can’s instructions before stacking the blocks to prevent them from sticking together.
Now you have a universe of possibilities right in the palm of your hand to stack and display.
Glow-in-the-Dark Constellation Blocks
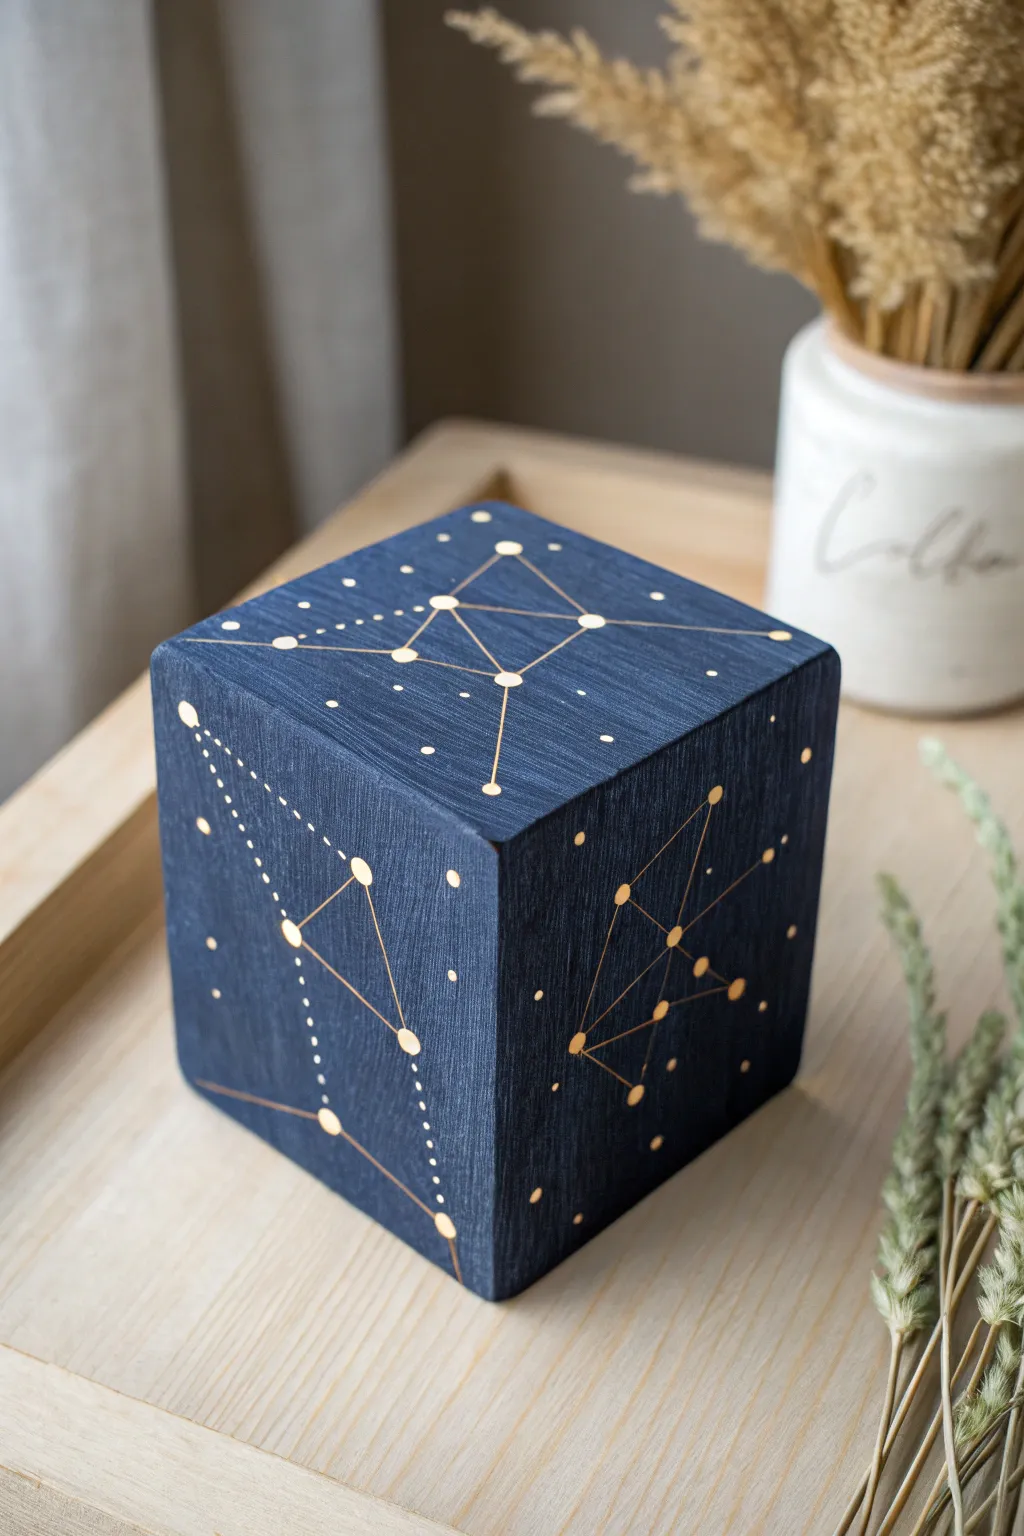
Transform a simple wooden block into a mesmerizing piece of cosmic art that brings the night sky indoors. This project features a rich navy blue background adorned with delicate gold constellations and tiny stars, creating an elegant desktop accessory or shelf accent.
Detailed Instructions
Materials
- Solid wooden block (cube shape, sanded)
- Navy blue acrylic paint (matte finish)
- Metallic gold paint pen (fine tip)
- White or light yellow fine tip paint pen (for stars)
- Detail paintbrush
- Pencil
- Ruler
- Design templates or constellation reference images
- Clear matte varnish or sealant spray
- Sandpaper (fine grit)
Step 1: Preparation and Base Coat
-
Prepare the surface:
Inspect your wooden block for any rough edges or splinters. Use fine-grit sandpaper to smooth out all six sides, paying special attention to softening the sharp corners slightly for a more professional finish. -
Clean the dust:
Wipe the entire block down with a slightly damp cloth or tack cloth to remove all sanding dust. The surface needs to be perfectly clean for the paint to adhere smoothly. -
Apply the first coat:
Using a flat brush, apply a coat of navy blue acrylic paint to the top and sides. Paint with the grain of the wood where possible. -
Paint the bottom:
Wait until the painted sides are dry to the touch, flip the block over, and paint the bottom face. -
Sand between coats:
Once the first layer is fully dry, lightly sand the surface with very fine sandpaper. This knocks down any raised wood grain and ensures a super smooth final texture. -
Apply the second coat:
Add a second layer of navy blue paint. This should provide full opacity so the wood color doesn’t peek through. Let this dry completely—I usually give it a few hours to be safe.
Step 2: Mapping the Cosmos
-
Choose your constellations:
Select which constellations you want to feature. You can pick zodiac signs relevant to you or simply choose ones with interesting geometric shapes. -
Sketch the main stars:
Using a pencil, very lightly mark the positions of the main stars (the ‘dots’) for your chosen constellation on one face of the block. Don’t press hard, or you’ll dent the soft wood. -
Connect the dots:
Use a ruler and pencil to lightly draw the connecting lines between your star points to verify the shape looks correct and centered before committing to ink. -
Repeat for all sides:
Continue this sketching process on the remaining visible sides of the block, ensuring the designs flow nicely from one face to another without looking cluttered.
Smudged Ink?
If you smudge gold ink, wait for it to fully dry. Then, carefully paint over the mistake with a tiny bit of the navy base color. Don’t wipe wet ink; it smears.
Step 3: Adding the Details
-
Draw the star points:
Take your metallic gold paint pen (or a detail brush with gold paint) and create solid dots over your pencil marks. Vary the size slightly—some stars are brighter and bigger than others. -
Connect the constellations:
With a steady hand and ruler, draw thin gold lines connecting the star points. Ensure the lines are delicate; a heavy hand can make the design look clunky. -
Add dotted lines:
For added visual interest, use a series of tiny dots instead of solid lines for some connections, or to show ‘imaginary’ lines leading off the edge of the block. -
Create background stars:
Using a white or very pale yellow fine-point pen, dot tiny specks randomly in the empty navy spaces to represent distant stars. Keep them much smaller than the constellation points. -
Clean up sketch marks:
Once the metallic ink is absolutely dry, gently erase any visible pencil lines. Be extremely careful not to smudge your gold work.
Glow Up
Mix glow-in-the-dark medium into your white paint for the tiny background stars. They’ll look normal by day but create a magical effect when the lights go out.
Step 4: Finishing Touches
-
Protect the artwork:
In a well-ventilated area, spray the block with a clear matte varnish. This seals the wood and protects your delicate line work from scratching or fading. -
Let it cure:
Allow the varnish to cure fully according to the manufacturer’s instructions before handling or displaying your new cosmic creation.
Now you have a stunning piece of the universe captured right on your desk, ready to inspire your next big idea

Have a question or want to share your own experience? I'd love to hear from you in the comments below!