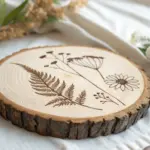
I love painting on wood slices because that little circle instantly turns your idea into a charming, finished-looking piece of art. The natural bark edge does so much of the framing for you, so even simple mini scenes feel special and gift-ready.
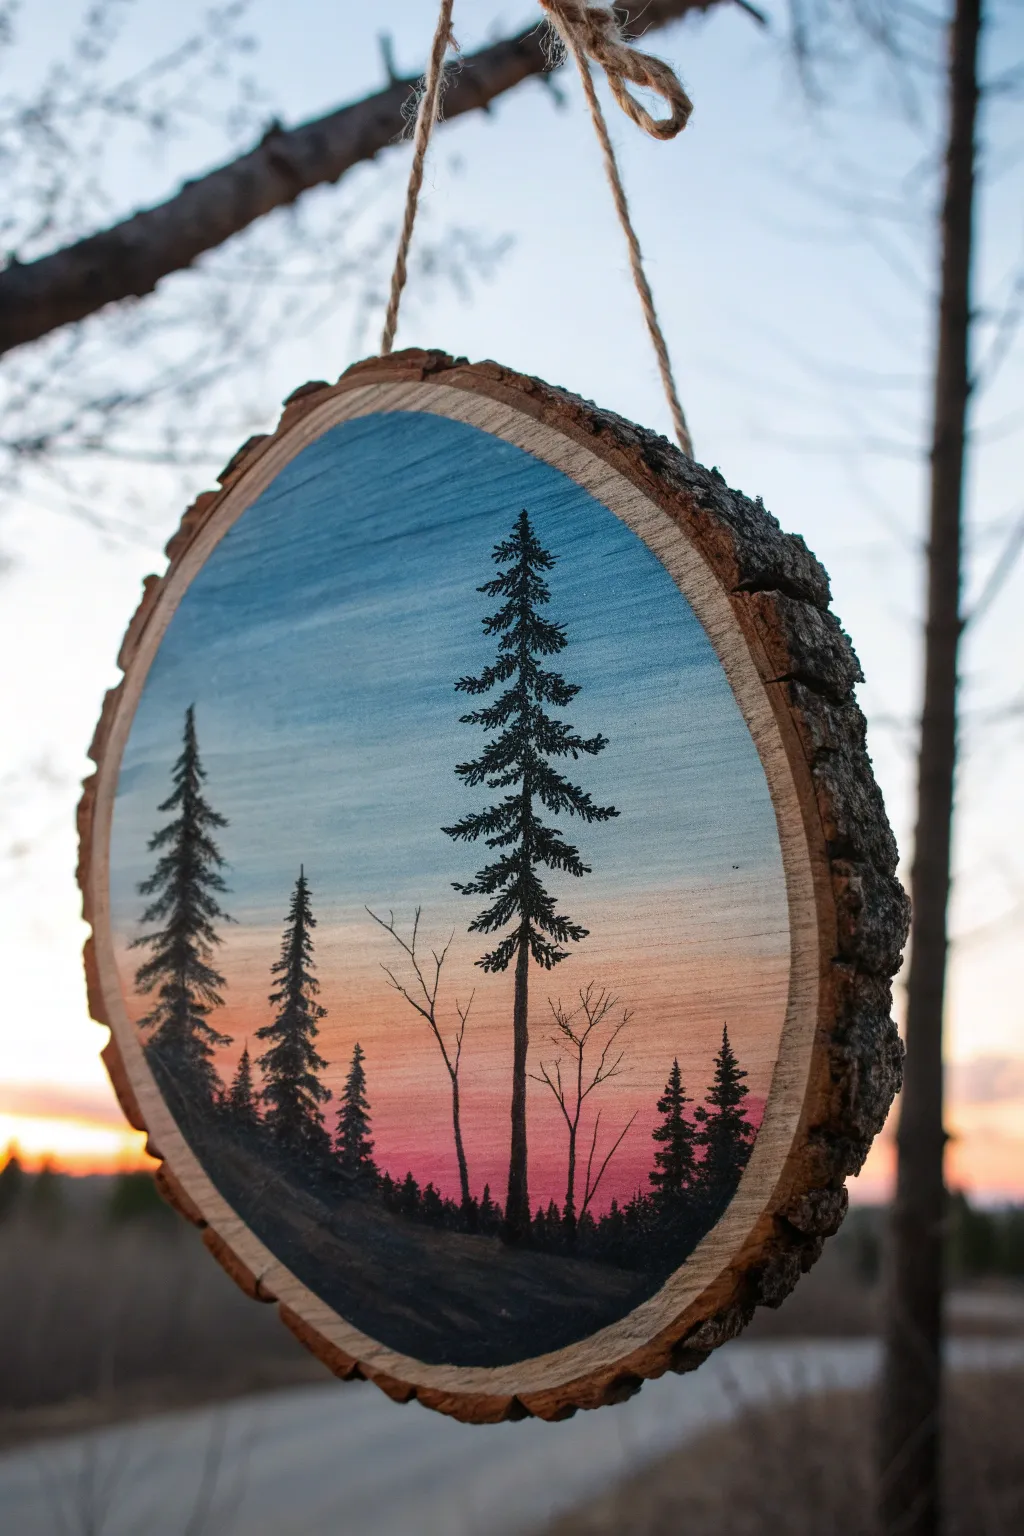
Sunset Mountain Silhouette
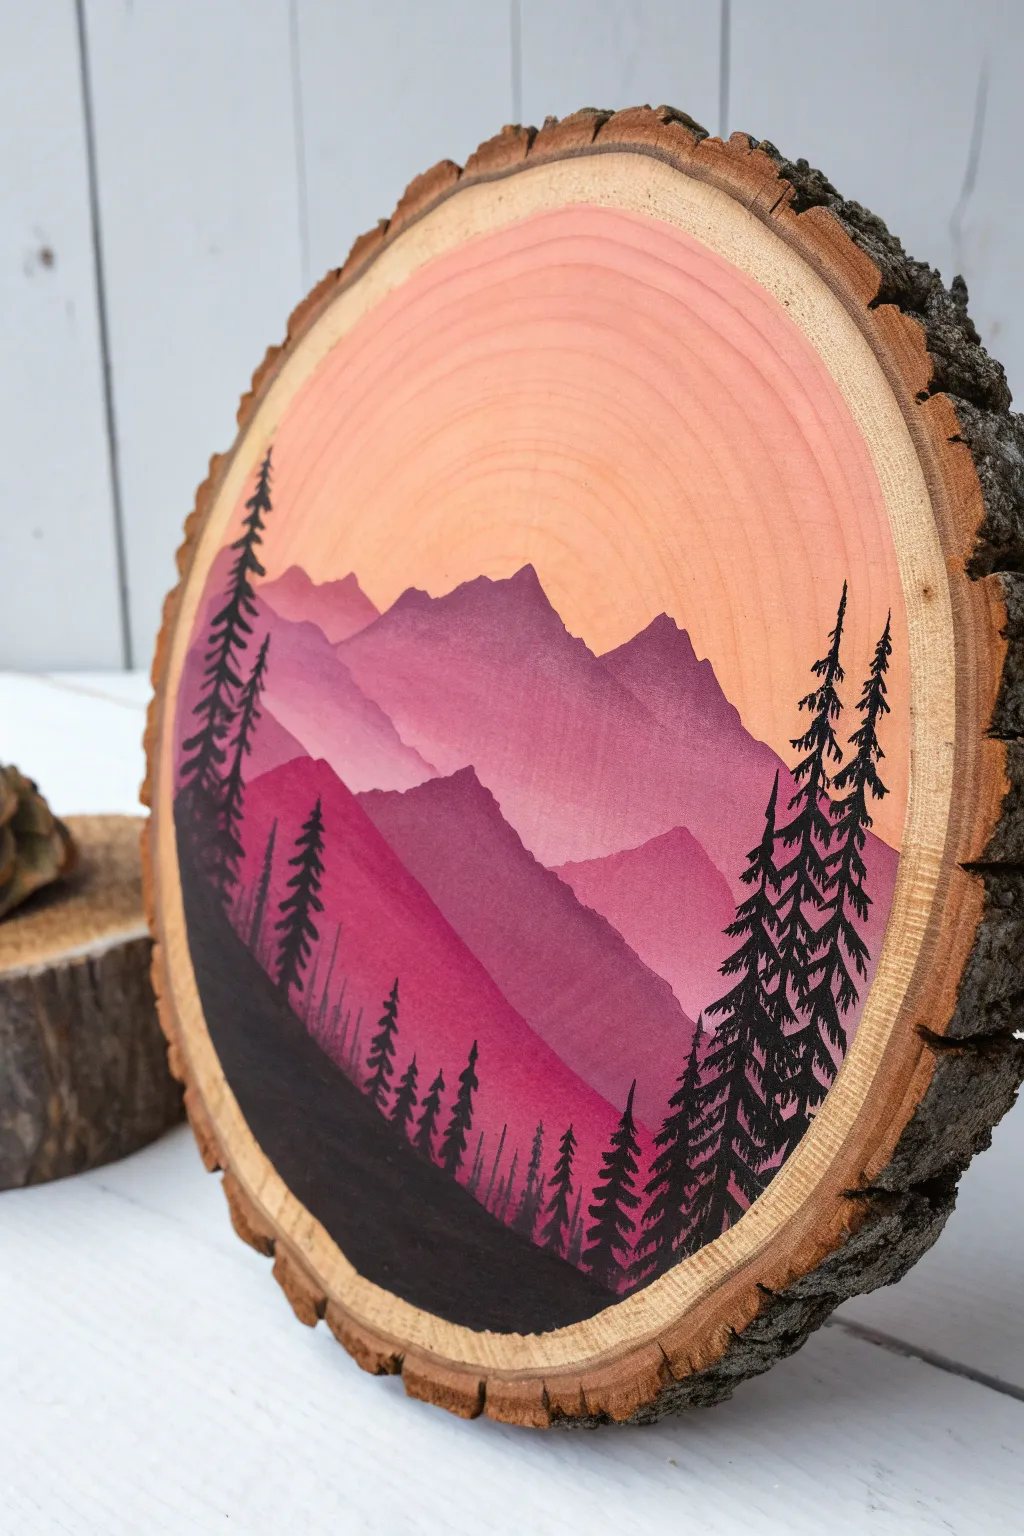
Capture the serene beauty of twilight on rustic timber with this layered mountain landscape. The natural grain of the wood actually becomes part of your sky, adding warmth and texture to the gradient sunset behind the silhouetted pines.
Step-by-Step Tutorial
Materials
- Large round wood slice (basswood or pine, with bark intact)
- Acrylic paints: Titanium White, Magenta/Deep Purple, Peach/Light Orange, Black
- Flat shader brushes (medium and small)
- Detail liner brush (size 0 or 00)
- Palette or mixing plate
- Water cup and paper towels
- Fine-grit sandpaper (optional)
- Clear matte or satin varnish spray
Step 1: Preparation & Sky
-
Prepare the surface:
Inspect your wood slice for any rough patches. If the cut surface feels too jagged, give it a light sanding with fine-grit sandpaper to ensure your brushes glide smoothly. Wipe away any dust with a barely damp cloth. -
Determine the horizon:
Visualize where your mountain range will begin. For this composition, we are leaving the top third largely unpainted to let the wood grain serve as the upper atmosphere. -
Mix the sky gradient:
Mix a small amount of Peach/Light Orange with a lot of water to create a semi-transparent wash. You want this to stain the wood rather than cover it opaquely. -
Paint the sunset glow:
Apply this wash in a wide arc near the top-middle of the slice. Feather the edges outward so it fades naturally into the raw wood at the top. This creates that soft, glowing sunset effect.
Step 2: Layering the Mountains
-
Mix the furthest mountain color:
Create a light mauve by mixing White with a tiny dot of Magenta/Purple. This layer needs to be opaque, so don’t dilute it too much. -
Paint the first peaks:
Using a medium flat brush, paint a jagged mountain ridge about one-third down from the top. Fill in everything below this line with the same light mauve color. Let this dry completely—I usually wait about 10 minutes here. -
Create the mid-range color:
Add a bit more Magenta/Purple to your previous mix to darken it slightly. It should be visibly bolder than the first layer. -
Add the middle range:
Paint a second, slightly lower mountain range directly over the first dried layer. Vary the peak shapes so they don’t look identical to the one behind it. Fill the area below solid. -
Mix the deep foreground color:
Prepare a rich, deep berry color by using mostly Magenta/Purple with just a hint of Black to desaturate it slightly. Avoid making it pure black yet. -
Paint the nearest mountains:
Apply this darkest mountain layer near the bottom third. Create distinct, sharp peaks on the left and right sides to frame the composition, dipping lower in the center. -
Solidify the base:
Paint the very bottom curve of the wood slice largely solid black or extremely dark purple to act as the ground for your trees.
Bleeding Lines?
If paint bleeds into the wood grain, your wash is too watery or the wood is too thirsty. Seal the raw wood with clear matte medium first, let it dry, then paint your sky wash on top.
Step 3: Silhouettes & Detailing
-
Load the detail brush:
Switch to your fine liner brush (size 0 or 00). Thin your black paint slightly with water until it has an ink-like consistency; this helps the paint flow smoothly for thin lines. -
Establish the tree trunks:
On the right side, paint two vertical lines extending up past the mountain ridges. Make them slightly wobbly to look organic, not ruler-straight. -
Add right-side branches:
Starting from the top of the trunks, use quick, downward strokes to create pine boughs. Keep the top branches very small and widen them as you move down the tree. -
Create the left-side forest:
Repeat the process on the left side with one or two tall trees. Ensure these overlap the lighter mountain layers to create depth. -
Fill the treeline:
Between your tall foreground trees, add tiny vertical lines and small triangular shapes along the bottom black ridge. These represent a distant forest deep in the valley. -
Seal the artwork:
Once the black paint is bone dry (give it at least an hour), take the wood slice outside and mist it with a clear matte or satin spray varnish to protect the wood and pop the colors.
Pro Tip: Atmospheric Haze
To make distant mountains look misty, mix a tiny bit of the sky color (peach) into your light purple mountain mix. This color harmony ties the landscape together perfectly.
Display your rustic landscape on a small easel or attach a hook to hang it on the wall


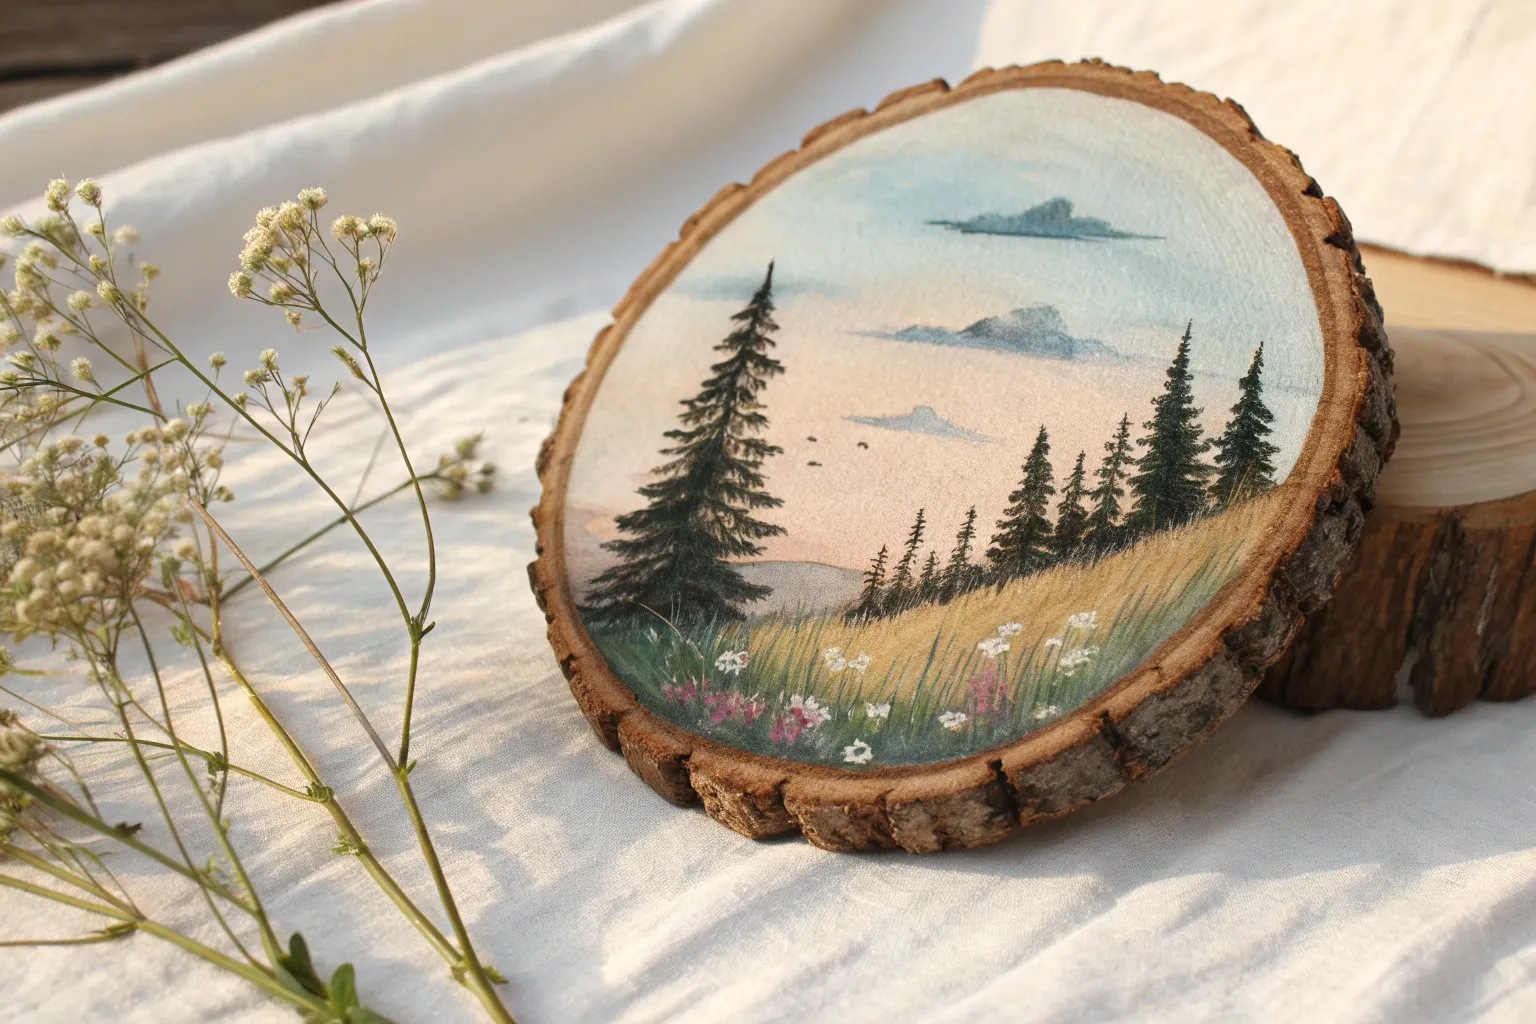
Pine Forest Gradient Sky
Capture the serene beauty of twilight in the forest with this striking wood slice ornament. The design features a smooth gradient sky fading from deep teal to warm coral, set against crisp black pine silhouettes.
Detailed Instructions
Materials
- Wood slice with bark edge (approx. 3-4 inches diameter)
- Acrylic paints (Titanium White, Phthalo Blue or Teal, Orange, Magenta/Pink, Carbon Black)
- Gesso or white acrylic primer
- Flat shader brushes (medium and small)
- Detail liner brush (size 00 or 000)
- Jute twine or rustic string
- Cup of water and paper towels
- Palette or paper plate
- Drill with small bit (if slice isn’t pre-drilled)
- Clear matte varnish (optional)
Step 1: Preparing the Canvas
-
Surface Check:
Inspect your wood slice for any loose bark or rough patches on the face. Lightly sand the surface if needed to ensure your paintbrush glides smoothly, but be careful not to damage the rustic bark rim. -
Priming:
Apply a thin, even coat of gesso or white acrylic paint to the face of the wood slice. Leave a tiny border of natural wood showing near the bark if you like that framed look, or paint right to the edge. -
Let it Dry:
Allow the base coat to dry completely. This white background is crucial because it makes the sunset colors pop rather than sinking into the wood grain.
Muddy Sky Fix
If your blue and orange mix into a brown mess while blending, let it dry completely. Paint a thin layer of white over the middle area and try blending again with fresh paint.
Step 2: Painting the Gradient Sky
-
Mixing the Top Color:
On your palette, mix a small amount of Phthalo Blue or Teal with a touch of Titanium White to create a dusty, medium blue. This will be the upper portion of your sky. -
Mixing the Horizon Colors:
Prepare a warm coral tone by mixing orange with a little magenta and white. You want a soft sunset hue, not a neon orange. -
Applying the Blue:
Using a flat brush, paint the top third of the wood slice with your blue mixture. Use horizontal strokes. -
Applying the Coral:
Clean your brush quickly and paint the bottom third of the sky area with your coral/pink mixture. -
Creating the Transition:
While both paints are still wet, mix a tiny bit of white between the blue and coral sections on the wood. Use a clean, slightly damp brush to blend the area where the colors meet, creating a soft, whitish-purple transition zone. -
Smoothing the Gradient:
Work the brush back and forth horizontally to eliminate hard lines. If the paint dries too fast, mist it lightly with water to keep blending until you have a seamless fade from blue to white to coral.
Add Starlight
Make it a night scene by flicking a toothbrush loaded with watered-down white paint over the blue section to create tiny stars before you paint the trees.
Step 3: Adding the Silhouettes
-
Planning the Horizon:
Once the sky is bone dry, load a small flat brush with black acrylic. Paint a solid black, sloping hill at the very bottom of the slice to ground your composition. -
The Main Tree Line:
Switch to your fine detail liner brush. Dip it in water to thin the black paint slightly so it flows like ink. Paint a thin vertical line for the trunk of the tallest central tree. -
Adding Pine Texture:
Using the very tip of the liner brush, dab small, irregular horizontal strokes starting from the top of the trunk. Make the branches wider as you move down the tree to create that classic conical pine shape. -
Secondary Trees:
Paint a few medium-sized trees to the left of the center tree using the same technique. Vary their heights so they look natural rather than uniform soldiers. -
Background Trees:
Fill in the distant background on the right side with smaller, simpler tree jagged shapes. These don’t need much detail; just suggestions of triangular pine tops peeking over the hill. -
Bare Branches:
To add realism, paint one or two very thin, leafless deciduous trees or saplings in the foreground. Use a shaky hand on purpose to give the branches a natural, organic wiggle. -
Touch Ups:
Check the density of your black silhouettes. If the sky color is peeking through the trees too much, apply a second coat of black to make them truly opaque.
Step 4: Finishing Touches
-
Drilling:
If your slice wasn’t pre-drilled, carefully drill a small hole near the top center, ensuring you don’t split the bark. -
Sealing:
Once the painting is fully cured (give it at least an hour), apply a coat of clear matte varnish to protect the artwork from dust and moisture. -
Stringing:
Cut a length of jute twine, thread it through the hole, and tie a secure knot at the top to create a hanger.
Hang your rustic masterpiece in a window or on the tree to enjoy those peaceful forest vibes all year round


Wildflower Meadow Dots
Embrace the natural beauty of wood grain with this delicate floral design that uses the tree’s own growth rings as a backdrop. By painting a gentle curve of wildflowers along the bottom edge, you create a sweet meadow scene that feels organic and effortless.
Step-by-Step Tutorial
Materials
- Medium-sized wood slice (approx. 3-4 inches diameter) with bark intact
- Fine-grit sandpaper (220 grit)
- Acrylic paints (Soft yellow, dusty pink, lavender, olive green, dark green, black)
- Fine detail paintbrushes (Size 0 and 00 round)
- Jute twine for hanging
- Power drill with small bit (optional, if slice isn’t pre-drilled)
- Clear matte sealer spray or varnish
- Paper palette or plate
- Cup of water and paper towels
Step 1: Preparation & Base
-
Surface Prep:
Before painting, ensure your wood slice is perfectly smooth. Lightly sand the face of the slice with 220-grit sandpaper to remove any rough fibers that could catch your brush. Wipe away all dust with a dry cloth. -
Drill the Hole:
If your slice doesn’t have a hole yet, carefully drill a small opening near the top edge, roughly half an inch from the bark. Ensure it’s centered so the ornament hangs straight. -
Study the Grain:
Look closely at the concentric circles of the wood grain. We will be using the bottom third of the slice for the painting, following the natural curve of the rings as a guide for our meadow floor.
Step 2: Painting the Greenery
-
Mix Your Greens:
Create two shades of green on your palette: a lighter, muted olive green and a deeper forest green. Having variation will give the stems depth. -
Draft the Stems:
Using your thinnest brush (size 00) and the darker green, paint 5 to 7 thin, curved lines rising from the bottom edge of the wood. Vary their heights and angles slightly so they look wind-swept rather than stiff. -
Add Main Leaves:
On the central stems, paint elongated, pointed leaves. Press the belly of the brush down and lift up quickly to create a tapered leaf shape. Keep these sparse to leave room for the flowers. -
Create Fern-like Textures:
For the stems on the far right, use small, flicking strokes to create fern-like or feathery leaves. Use the lighter olive green here to differentiate plants.
Brush Control Tip
Add a tiny drop of water to your acrylic paint to improve flow. ‘Inky’ consistency paint makes painting thin, crisp stems on textured wood much easier than thick paint.
Step 3: Adding the Blooms
-
Paint the Yellow Daisy:
Choose a spot on the left side for the largest flower. Using soft yellow paint, dab five petal shapes radiating from a center point. Keep the paint somewhat sheer if you want a bit of wood grain showing through. -
Add the Pink Bloom:
Slightly to the right and lower than the daisy, paint a dusty pink flower. Make these petals slightly longer and thinner, like a cosmos or daisy. I like to let this dry briefly before adding details. -
Purple Sprigs:
On the tall stem to the right, add tiny clusters of lavender dots to simulate small wildflowers like statice or lavender. Group them near the top of the stem. -
Flower Centers:
Dip the very tip of your brush or a toothpick into black paint. Add a solid dot to the center of the yellow flower and a tiny, delicate dot to the pink flower’s center. -
Berry Accents:
Using a reddish-pink shade, add tiny distinct dots floating near the greenery stems to represent wild berries or buds waiting to open.
Seasonal Switch
Change the flower colors to match the seasons! Try ochre and burnt orange flowers for autumn, or holly berries and pine needles for a winter version.
Step 4: Finishing Touches
-
Leaf Highlights:
Go back over a few of the larger dark green leaves with a sheer uneven layer of the lighter olive green. This adds dimension without needing complex shading. -
Floating Petals:
Paint a singular small green leaf or a falling petal floating unattached on the far left side. This tiny detail balances the composition. -
Drying Time:
Allow the acrylic paint to dry completely. Since wood is porous, give it at least 30 minutes to ensure no moisture is trapped. -
Seal the Artwork:
Take your project outside or to a ventilated area. Spray a light, even coat of matte clear sealer over the face of the wood. This prevents the paint from chipping and keeps the wood from yellowing too much over time. -
Attach the Hanger:
Cut a 6-inch length of jute twine. Thread it through the drilled hole and tie a secure knot at the end to create a loop for hanging.
Hang your new rustic artwork in a sunny spot and enjoy your miniature meadow

Single Botanical Sprig
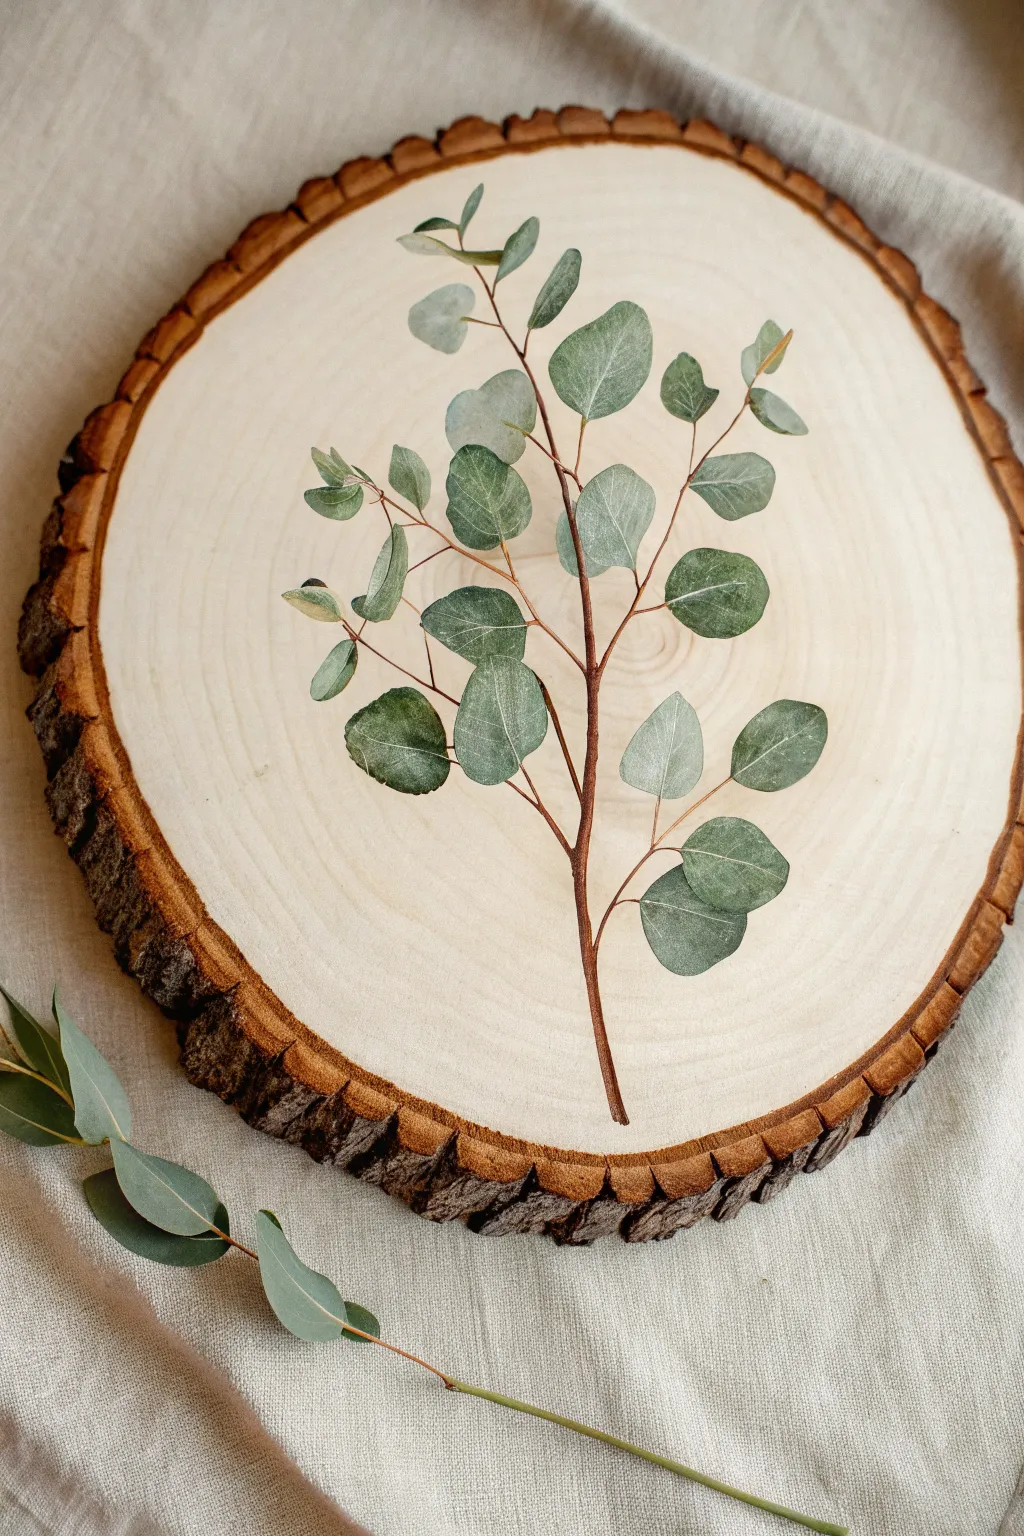
Capture the delicate beauty of nature with this minimalist eucalyptus sprig painted directly onto a rustic wood slice. The contrast between the rugged bark edge and the fine, translucent leaves creates a stunning piece of organic decor perfect for a mantel or gallery wall.
Step-by-Step
Materials
- Large wood slice with bark (approx. 10-12 inches)
- Fine grit sandpaper (220 grit)
- Acrylic paints (Titanium White, Sap Green, Burnt Umber, Hooker’s Green, Raw Sienna, Unbleached Titanium)
- Matte acrylic medium or water for thinning
- Round synthetic brushes (sizes 0, 2, and 4)
- Detailed liner brush (size 00 or 000)
- Palette or mixing plate
- Paper towels
- Pencil (HB or lighter)
- Clear matte varnish (spray or brush-on)
- Real eucalyptus branch (optional, for reference)
Step 1: Preparation & Sketching
-
Prepare the surface:
Begin by sanding the face of your wood slice with 220-grit sandpaper. You want the surface to be exceptionally smooth so your brush doesn’t skip over the wood grain. Wipe away all dust with a slightly damp cloth or tack cloth. -
Seal the wood (optional):
If your wood is very porous, apply a thin layer of clear matte medium or gesso to the painting area. This prevents the paint from soaking in too quickly, though painting directly on raw wood works too if you prefer a more stained look. -
Map out the stem:
Using a light pencil grip, sketch a gently curved central line for the main stem. It should start near the bottom center and curve naturally upwards, leaning slightly to the right or left for an organic feel. -
Add leaf placement:
Sketch the placement of the leaves branching off the main stem. Establish the pairs of leaves typical of eucalyptus, making sure they vary in angle and size. Keep your pencil lines very faint so they won’t show through the translucent paint layers later.
Step 2: Painting the Stem
-
Mix your stem color:
Combine Burnt Umber with a touch of Raw Sienna and a tiny dot of Sap Green. You want a reddish-brown hue that mimics a dried woody stem. Add a drop of water to make the paint flow smoothly like ink. -
Paint the main line:
Using your size 2 round brush, paint the main stem. Apply slightly more pressure at the bottom for a thicker base, and lift gently as you move up to create a tapering effect. -
Add branch connections:
Switch to your liner brush to paint the thinner offshoot stems that connect to the leaves. These should be very delicate. I find it helpful to roll the brush tip in the paint to keep a sharp point. -
Create dimension:
Once the base stem is dry, mix a slightly darker brown (more Burnt Umber) and add a thin shadow line along one side of the stem to give it roundness.
Pro Tip: Dusty Look
To get that signature powdery look of eucalyptus, use a dry brush technique with pure white paint as a final layer. Lightly drag it over the dried green leaves.
Step 3: Creating the Leaves
-
Mix base leaf greens:
Prepare three different pools of green on your palette: a cool silvery-green (Sap Green + White + touch of Blue/Grey), a warm green (Sap Green + Unbleached Titanium), and a darker shadow green (Hooker’s Green + Burnt Umber). -
Paint the first leaf layer:
Using the size 4 brush, block in the leaves with the silvery-green mix. Don’t worry about perfect coverage; a little transparency makes the leaves look more realistic. Paint in the direction of the leaf growth. -
Blend wet-on-wet:
While the base green is still damp, drop a tiny amount of the warm green near the tips or edges of some leaves. Gently blend the transition with a clean, slightly damp brush to create softness. -
Add depth with shadows:
Apply the darker shadow green near the base of the leaves where they attach to the stem. This anchors the leaf and adds volume. -
Refine leaf shapes:
Go back with your size 0 or 2 brush to neaten the edges of the leaves. Eucalyptus leaves have smooth margins, so keep your strokes clean. Let this layer dry completely.
Troubleshooting: Absorbent Wood
If the wood drinks your paint & colors look dull, don’t just pile on thick paint. Apply a layer of matte medium over the dried dull area, let it dry, then repaint.
Step 4: Details & Veining
-
Mix a vein color:
Create a very pale, almost white green by mixing Titanium White with a speck of your silvery-green mix. It should be barely visible against the leaf color. -
Paint central veins:
With your finest liner brush, paint a very thin line down the center of each leaf. Keep the line broken or very faint in some areas so it doesn’t look like a cartoon outline. -
Add secondary veins:
Paint tiny, thread-like veins radiating from the center line. Less is more here; you only need a suggestion of texture. -
Highlight the leaves:
Mix a watery glaze of Titanium White. Lightly brush this over the curved parts of the leaves that would catch the light. This ‘dusty’ look is characteristic of eucalyptus. -
Final touch-ups:
Step back and assess the composition. If any stems look disconnected, use your liner brush to join them. Add a final dark accent to the very bottom of the main stem to ground it. -
Varnish:
Allow the painting to cure for at least 24 hours. Apply a spray matte varnish to protect the artwork without adding an unnatural shine, sealing the wood and paint together.
Hang your botanical masterpiece or display it on a stand to bring a permanent touch of greenery into your home.
BRUSH GUIDE
The Right Brush for Every Stroke
From clean lines to bold texture — master brush choice, stroke control, and essential techniques.
Explore the Full Guide
Rustic Wreath Initial
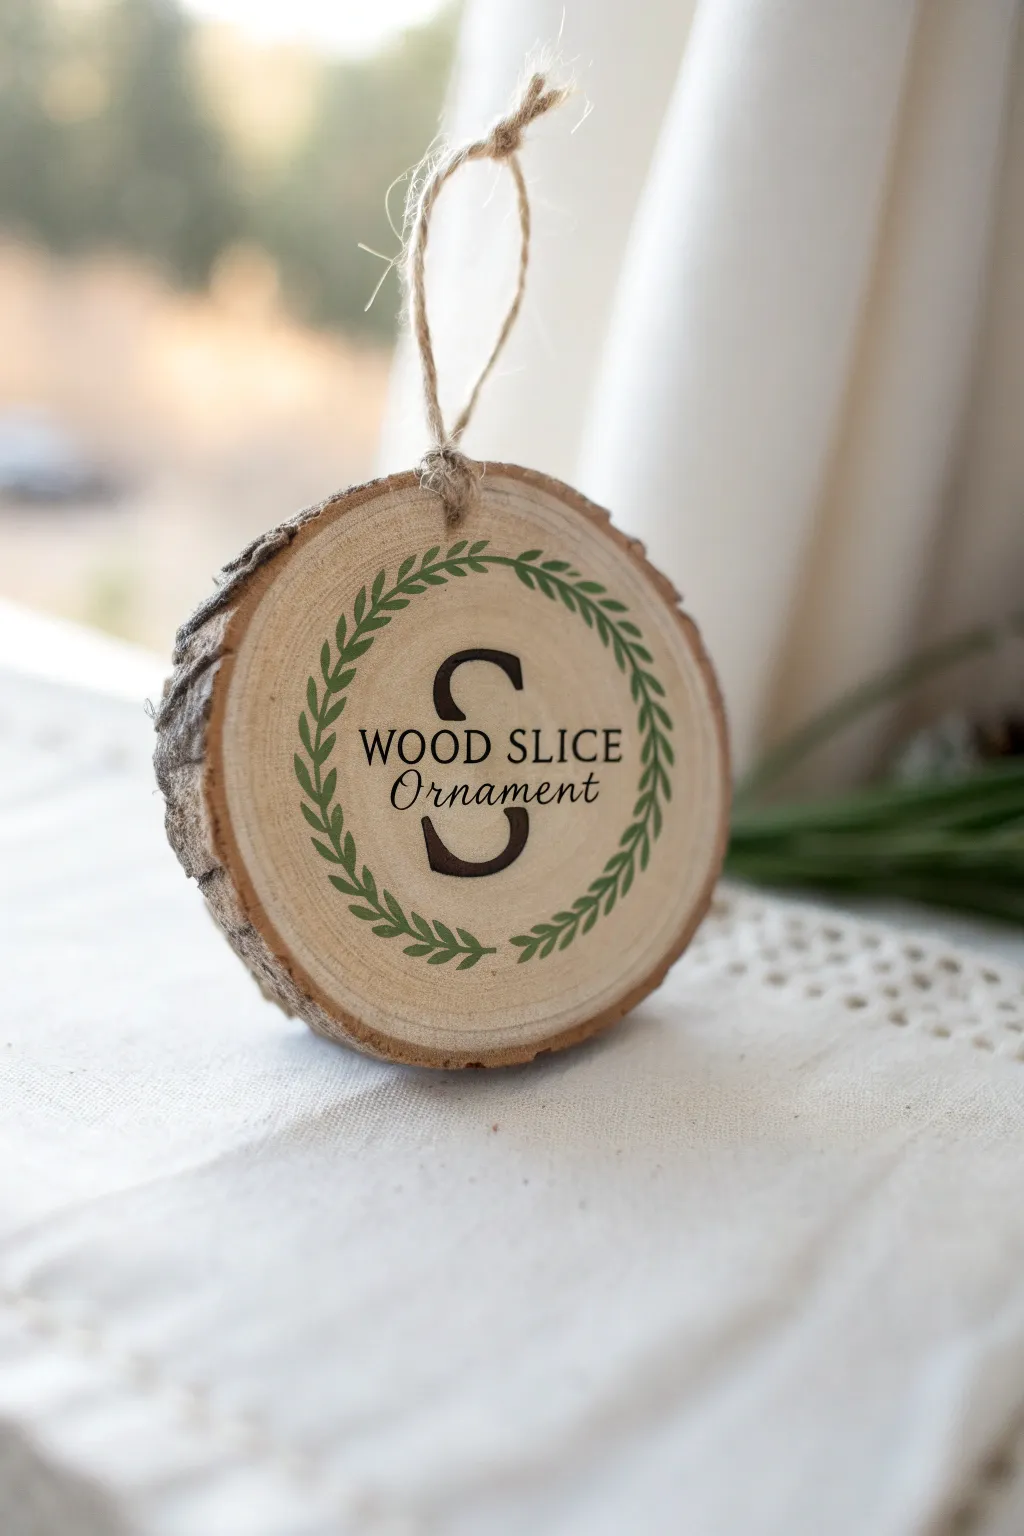
Bring a touch of forest charm to your holiday decor with this elegant wood slice ornament featuring a classic laurel wreath and monogram. The natural bark edge provides a rustic frame for the clean, typography-inspired design, making it a perfect personalized gift or tree decoration.
How-To Guide
Materials
- Unfinished wood slice with bark edge (approx. 3-4 inches diameter)
- Fine-grit sandpaper (220 grit)
- Matte acrylic paint (forest green and black)
- Fine-point detail paintbrush (size 0 or 00)
- Graphite transfer paper and a stylus (or ballpoint pen)
- Printed template of your design (circle wreath + initial)
- Jute twine
- Power drill with small drill bit (if wood slice is undrilled)
- Clear matte varnish or spray sealer
- Pencil and eraser
Step 1: Preparation
-
Drill the Hole:
If your wood slice didn’t come pre-drilled, select a spot near the top edge where the bark is secure. Carefully drill a small holes large enough for your twine to pass through. -
Sand the Surface:
Take your fine-grit sandpaper and gently sand the face of the wood slice. You want a very smooth surface so the paint doesn’t bleed into the grain, but be careful not to damage the bark rim. -
Clean the Dust:
Wipe the wood surface with a slightly damp cloth or a tack cloth to remove all sawdust. A clean surface is crucial for crisp lines.
Step 2: Transferring the Design
-
Prepare Your Template:
Create or print a design featuring a circular laurel wreath and a large serif initial letter in the center. Ensure the printout matches the size of your wood slice. -
Position the Transfer Paper:
Cut a piece of graphite transfer paper slightly smaller than your wood slice. Place it dark-side down onto the wood surface. -
Trace the Pattern:
Tape your printed design over the transfer paper to keep it steady. Using a stylus or ballpoint pen, trace the outline of the wreath leaves and the central letter firmly. -
Check the Transfer:
Lift one corner of the paper to ensure the design is transferring clearly. If it’s too faint, press harder. Once done, remove the papers to reveal the graphite guide.
Bleeding Lines?
If paint bleeds into the wood grain, seal the raw wood with a clear matte medium *before* painting. This fills the pores for sharper lines.
Step 3: Painting
-
Paint the Monogram:
Dip your fine detail brush into the black acrylic paint. Carefully fill in the large initial letter first. Use slow, steady strokes to keep the edges sharp. -
Add Secondary Text:
If you are including smaller text (like a name or ‘Ornament’), switch to your smallest brush or even a fine-tip paint pen for better control over the delicate script. -
Paint the Leaves:
Switch to forest green paint. For the laurel wreath, paint the stem first with a thin line, then fill in each small leaf. I find that painting from the stem outward helps create a natural leaf shape. -
Refine Edges:
Once the first coat is dry, inspect your work. If the wood grain soaked up too much paint, apply a second thin coat to make the colors opaque and bold. -
Clean Up:
Allow the paint to fully dry (at least 30 minutes). Use a clean eraser to gently remove any visible graphite lines that weren’t covered by paint.
Design Variation
Try wood burning the initial outline first, then filling it with paint. The burned edge creates a barrier and adds extra texture.
Step 4: Finishing Touches
-
Seal the Wood:
Apply a thin layer of clear matte varnish over the face of the ornament. This protects the paint from scratching and keeps the wood from yellowing over time. -
Add the Hanger:
Cut a 6-inch length of jute twine. Thread it through the drilled hole. -
Secure the Knot:
Tie a secure knot at the ends of the twine to create a loop, ensuring the knot is tight enough to hold the weight of the wood.
Hang your personalized slice on the tree and enjoy the natural warmth it adds to your home
Snowy Cabin Ornament
Capture the serene beauty of a snowy forest retreat on a rustic wood slice canvas. This charming ornament features a cozy cabin nestled between snow-dusted pine trees, perfect for adding a handmade touch to your holiday decor.
Step-by-Step
Materials
- Wood slice with bark intact (approx. 3-4 inch diameter)
- Acrylic paints: Titanium White, Ultramarine Blue, Burnt Umber, Burnt Sienna, Hooker’s Green, Carbon Black, Mars Black, Cadmium Red
- Gesso or white acrylic primer
- Small flat brush
- Small round brushes (sizes 0 and 2)
- Detail liner brush (size 00 or 000)
- Jute twine for hanging
- Power drill with small bit
- Palette and water cup
- Clear matte or satin varnish
- Paper towels
Step 1: Preparation & Sky
-
Drill the Hole:
Before painting, drill a small hole near the top edge of your wood slice. It’s crucial to do this first so you don’t ruin your finished painting later. -
Prime the Surface:
Apply a thin layer of titanium white acrylic or gesso to the face of the wood slice. Don’t paint all the way to the bark; leave a small ring of natural wood visible for a rustic frame effect. -
Mix the Sky Gradient:
Create a soft winter blue by mixing Ultramarine Blue with plenty of Titanium White. You want a pale, icy blue tone. -
Paint the Sky:
Apply your blue mix to the upper two-thirds of the wood slice. As you move downward, blend in a touch more white to create a hazy, atmospheric horizon line. -
Lay the Snow Base:
Using pure Titanium White, paint the bottom third of the slice to represent the snowy ground. Use sweeping, slightly uneven strokes to mimic drifting snow rather than a flat surface.
Cabin too flat?
Add a shadow line of dark brown under the snowy roof overhang and down one side of the cabin. This small contrast instantly adds 3D dimension and realism.
Step 2: Background & Midground
-
Background Trees:
Mix a dark, muted teal-grey using Hooker’s Green, a touch of Blue, and a tiny bit of Black. Using a small round brush, dab in a distant tree line right where the sky meets the snow. -
Soften the Horizon:
While the tree line is wet, you might want to blunt the tops slightly so they look far away. Ensure the trees vary in height for a natural look. -
Sketch the Cabin Shape:
Once the background is dry, mix Burnt Umber with a little water to make a thin wash. Use your liner brush to outline the simple pentagon shape of the cabin front and the parallelogram of the roof. -
Block in the Cabin:
Fill the walls of the cabin with a solid coat of Burnt Sienna. For the roof, use Titanium White, letting it overhang the walls slightly to look like thick, piled snow.
Step 3: Details & Foreground
-
Cabin Details:
Mix Burnt Umber and Black. Use your liner brush to paint horizontal lines for logs on the cabin walls. Add a small chimney on the roof using a mix of red and brown. -
Adding Warmth:
Paint small rectangular windows. Fill them first with a bright Cadmium Red mixed with a speck of yellow to mimic a warm, glowing interior light. -
Foreground Pines:
Mix a deep, dark green using Hooker’s Green and Mars Black. Paint two large pine trees flanking the cabin—one on the left, one on the right. Use a stippling motion to create detailed, pine-needle textures. -
Snow on Trees:
Load a small round brush with thick Titanium White paint. Gently dab snow onto the upper edges of the pine branches. Be careful not to cover all the green; you want the heavy branches to peek through. -
Winter Foliage:
Paint a few tiny, bare twigs or bushes in the very front foreground using thinned brown paint to add depth to the snowbank. -
Falling Snow:
Dilute white paint with water until it’s the consistency of ink. Dip a stiff brush (or toothbrush) into it and flick the bristles to splatter tiny snowflakes across the entire scene. -
Larger Flakes:
Use the tip of your liner brush or a toothpick to dot a few larger, distinct snowflakes in the sky area. -
Finishing Touches:
Once completely dry, seal the painting with a matte varnish. Thread the jute twine through the hole and tie a loop for hanging.
3D Snow Effect
Mix baking soda or white texture paste into your white paint for the roof and tree branches. This creates a puffy, real snow texture that stands off the wood.
Now you have a rustic piece of winter art ready to hang on the tree or gift to a friend

PENCIL GUIDE
Understanding Pencil Grades from H to B
From first sketch to finished drawing — learn pencil grades, line control, and shading techniques.
Explore the Full Guide
Spring Blossom Branch
Capture the fleeting beauty of spring on a rustic canvas with this elegant wood slice painting. Using soft acrylics, you’ll create a gentle flowering branch that contrasts beautifully against the natural wood grain and rough bark edge.
Step-by-Step Tutorial
Materials
- Medium-sized wood slice (approx. 8-10 inches) with bark intact
- Fine grit sandpaper (220 grit)
- Soft cloth or tack cloth
- Acrylic paints: Burnt Umber, Raw Sienna, Titanium White, Alizarin Crimson, Sap Green
- Small round brush (size 2)
- Fine liner brush (size 00 or 0)
- Flat brush (size 6) for mixing/larger areas
- Palette or paper plate
- Cup of water
- Paper towels
- Matte or satin spray varnish (optional)
Step 1: Preparation and Branch Structure
-
Smooth the surface:
Before painting, lightly sand the face of the wood slice with 220-grit sandpaper. You want a smooth surface so your brush glides easily, especially for the thin twigs. Wipe away all dust with a tack cloth. -
Mix your brown hues:
On your palette, create two shades of brown. Mix Burnt Umber with a tiny touch of water to make it fluid for the dark shadows. For the lighter wood tones, mix Burnt Umber with a little Raw Sienna and Titanium White. -
Paint the main branch base:
Using the size 2 round brush, start from the bottom left edge. Paint the thickest part of the branch in a diagonal upward curve towards the center. Use the darker brown mix first to establish the shape. -
Add secondary branches:
Switch to your liner brush. Extend smaller branches off the main stem, reaching towards the top right and upper left. Keep your hand loose and let the lines taper naturally at the ends. -
Highlight the wood:
While the dark brown is still slightly tacky or just dry, layer your lighter brown mix on the top edges of the branches to suggest sunlight hitting the wood. This creates immediate dimension. -
Detail the bark texture:
With the very tip of your liner brush and the darkest Burnt Umber, add tiny, broken lines along the length of the main branch to mimic rough bark texture.
Uneven Wood Surface?
If your paint bleeds into the wood grain, apply a coat of clear matte medium or gesso over the specific area you plan to paint first. This seals the pores for crispy lines.
Step 2: Blossoms and Buds
-
Mix the pink palette:
Prepare three shades of pink. A medium pink (Alizarin Crimson + White), a very pale highlight pink (mostly White + tiny dot of red), and a deeper pink for centers. -
Block in main flowers:
Using the size 2 brush and the lightest pink, paint 5-petal flower shapes. Space them out naturally—some fully open, some facing sideways. I like to keep the paint slightly watery here for a semi-transparent petal look. -
Add depth to petals:
While the base layer is wet, drop a small amount of the medium pink near the center of each flower and blend it outward slightly. This creates a soft gradient from the center out. -
Create flower buds:
At the tips of the thin twigs, paint small teardrop shapes using a mix of medium and dark pink. These represent closed buds about to open. -
Define the centers:
Once the petals are dry, use the liner brush and a mix of Burnt Umber and Alizarin Crimson to paint a tiny star or dot cluster in the very center of each open bloom. -
Paint the stamens:
This step makes the flowers pop. With your finest liner brush and a mix of White and Raw Sienna, paint delicate, hair-thin lines radiating from the flower centers. Add tiny dots of pure Raw Sienna at the tips for pollen.
Step 3: Greenery and Finishing Touches
-
Mix a fresh green:
Combine Sap Green with a little White and a touch of Raw Sienna to get a natural, spring-leaf color rather than an artificial bright green. -
Add small leaves:
Tuck small, pointed leaves around the flower clusters and near the buds using the liner brush. Press down at the base of the leaf and lift up quickly to create a sharp point. -
Connect the buds:
Paint the calyx (the green cup at the base of the flower) on the buds and connect them firmly to the brown twigs with thin green stems. -
Final highlights:
Add tiny specks of Titanium White to the edges of the finest petals and the tops of the buds to simulate morning light. -
Seal the piece:
Allow the painting to cure for at least 24 hours. Once dry, lightly mist with a matte or satin varnish spray to protect the artwork without making it too glossy.
Pro Tip: Transparency
For a watercolor effect with acrylics, dilute your paint with glazing medium instead of water. This creates transparent layers without breaking down the paint’s binding properties.
Hang your finished piece or display it on a stand to bring a permanent touch of spring into your home
Little Lighthouse Seascape
Capture the serenity of a twilight coast with this detailed wood slice painting. The rich blues of the sea contrast beautifully with the warm pinks on the horizon, while a steadfast lighthouse beam cuts through the evening sky.
Step-by-Step Guide
Materials
- Large wood slice (approx. 8-10 inches diamter, smooth surface)
- Pencil for sketching
- Gesso or white primer
- Acrylic paints: Teal/Turquoise, Phthalo Blue, White, Black, Burnt Umber, Deep Red, Yellow Ochre, Pink
- Flat shader brushes (medium and small)
- Fine liner brush (for details)
- Cup of water and paper towels
- Matte or glossy varnish (optional)
Step 1: Preparation & Sketching
-
Prime the Surface:
Since wood is porous, start by applying a thin, even layer of gesso or white acrylic paint to the face of the wood slice. Don’t paint the bark edge. Let this dry completely to create a smooth, bright base for your colors. -
Establish the Horizon:
Using a pencil, lightly draw a horizon line about one-third of the way up from the bottom. It doesn’t need to be perfectly straight, as land will cover part of it. -
Outline the Subject:
Sketch the rocky cliff on the right side, sloping down towards the water. Place your lighthouse on top of the cliff, ensuring it stands tall and vertical. Add the small keeper’s house attached to its base.
Uneven Wood Texture?
If the wood slice is too rough, sand the face with fine-grit sandpaper (220 grit) before priming. A rough surface makes detailed lines, like the windows, difficult.
Step 2: Painting the Sky & Sea
-
Create the Gradient Sky:
Start at the very top of the sky with a deep teal color. As you work your way down, mix in increasing amounts of white to lighten the tone. -
Blend the Sunset:
Near the horizon line, blend a soft pink into the pale teal. Use horizontal strokes to create a smooth transition where the colors meet, mimicking the fading light of dusk. -
Paint the Deep Ocean:
For the water, use a rich teal or turquoise mixed with a touch of Phthalo Blue. Paint the entire water area, keeping the color solid and opaque. -
Add Sea Texture:
Once the base blue is dry, use a fine brush with white paint to add delicate, horizontal squiggles for waves. Make the waves smaller and closer together near the horizon to suggest distance. -
The Distant Island:
Paint the small landmass on the far left horizon using a very dark brown or black-green. Keep the silhouette simple and flat.
Step 3: Building the Rocks & Lighthouse
-
Base Color for Cliff:
Fill in the rocky cliff shape with a medium grey or beige tone. Let this dry fully before adding texture. -
Define Rock Strata:
Using a liner brush and dark grey or diluted black paint, draw diagonal lines to create the cracked, layered look of the rock face. Thicken some lines to create deep crevices. -
Paint the Lighthouse Structure:
Fill in the lighthouse tower and the keeper’s house with bright white paint. You may need two coats to ensure the wood grain doesn’t show through. -
Add Architectural Details:
Use a liner brush and black paint to carefully outline the lighthouse, the windows, and the lantern room at the top. Paint the roof of the house a deep red or maroon.
Pro Tip: Perspective
Make your ocean waves thinner and closer together near the horizon line, and slightly thicker near the bottom edge. This simple trick instantly adds depth.
Step 4: Lighting & Finishing Touches
-
The Beam of Light:
To create the lighthouse beam, mix a very transparent wash of white and yellow. Paint a wide cone shape extending from the lantern room across the sky. -
Soften the Beam:
While the beam paint is wet, gently feather the edges so it looks like soft light rather than a solid white triangle. -
The Stars:
Dip the tip of a toothpick or a very fine brush into white paint. Dot tiny stars scattered across the darker, upper portion of the sky. -
Grassy Texture:
Mix a dark brownish-green. Use quick, upward flicking motions with your smallest brush along the top edge of the cliff to create tall grasses around the lighthouse base. -
Foreground Foliage:
Add a few bare, branching twigs in the bottom right corner using dark brown paint to frame the scene. -
Seal the Artwork:
Allow the entire painting to dry for at least 24 hours. I usually apply a brush-on varnish at this stage to protect the paint and make the colors pop.
Hang your finished piece or display it on a stand to bring a permanent breath of ocean air into your home


Galaxy Night Portal
Transform a rustic wood slice into a mesmerizing deep-space portal with this galaxy painting. Featuring a swirling nebula of purples and pinks surrounded by a star-studded void, this project balances natural texture with cosmic beauty.
Step-by-Step
Materials
- Large wood slice (approx. 8-10 inches, bark intact)
- Acrylic paints (Black, Prussian Blue, Violet, Magenta, White)
- Gesso or white acrylic primer
- Flat shader brushes (medium and large)
- Small round detail brush (size 0 or 00)
- Sponge dabber or small piece of kitchen sponge
- Palette for mixing
- Cup of water and paper towels
- Spray varnish (gloss or satin finish)
Step 1: Preparing the Void
-
Prime the surface:
Begin by painting a circle of white gesso or primer in the center of your wood slice. Leave a generous border of natural wood showing (about 1-2 inches) to frame your galaxy. Let this dry completely to ensure your colors pop. -
Establish the background:
Mix a small amount of black with Prussian Blue to create a deep midnight navy. Paint the entire primed circle with this dark base coat, carefully maintaining the crisp edge where the paint meets the raw wood.
Muddy Galaxy?
If your spiral colors look muddy or gray, you are likely blending while the paint is too wet. Let the dark base layer dry fully before adding the pink and purple layers on top.
Step 2: Creating the Nebula
-
Map the spiral:
While the base is still slightly tacky or just dry, load a flat brush with violet paint. Start from the center and paint a loose, wide spiral shape moving outward. Use soft, sweeping strokes. -
Blend the edges:
Use a barely damp, clean brush to gently feather the edges of your violet spiral into the dark blue background. You want a smoky transition, not hard lines. -
Add depth with magenta:
Mix a little magenta with white to create a soft pink. Apply this to the inner sections of your violet spiral arms, focusing more intensity toward the center of the galaxy. -
Brighten the core:
Take pure white and mix it with a tiny drop of yellow or orange if you have it, or stick to a warm creamy white. Dab this into the very center of the spiral to create the glowing galactic core. -
Enhance the swirl:
Using a dry flat brush or a small piece of sponge, lightly dab pure violet and magenta over the spiral arms to build texture. This stippling motion mimics the gas clouds of a nebula. -
Deepen the contrast:
If the outer edges look too light, go back in with your dark blue-black mix and darken the space between the spiral arms to make the bright colors stand out more.
Step 3: Stargazing Details
-
Create distant stars:
Thin down some white paint with water until it has an ink-like consistency. Load a brush, hold it over the painting, and tap the handle against another brush to splatter tiny specks across the surface. Cover the wood border with paper first to keep it clean. -
Paint major stars:
Using your smallest detail brush and pure, un-thinned white paint, carefully place specific dots that are slightly larger than the splatter. Place these randomly, but include a few near the center. -
Draw star crosses:
Select 3 to 5 of your larger dots to turn into twinkling stars. Paint a thin vertical line through the dot, followed by a shorter horizontal line intersecting it. I like to taper the ends of these lines to make them look like glimmering light. -
Add final highlights:
Mix a very pale lavender (white with a touch of violet). Add tiny, thin streaks along the curves of the spiral arms to suggest movement and flow within the galaxy. -
Seal the artwork:
Allow the painting to dry for at least 24 hours. Once cured, apply a coat of clear spray varnish to protect the paint and give the galaxy a slight, realistic sheen.
Cosmic Glitter
For a magical shimmering effect, mix a tiny amount of iridescent painting medium or ultra-fine holographic glitter into your varnish or topcoat before sealing.
Now you have a piece of cut timber that holds an entire universe within its rings
Moon Phases Around the Rim
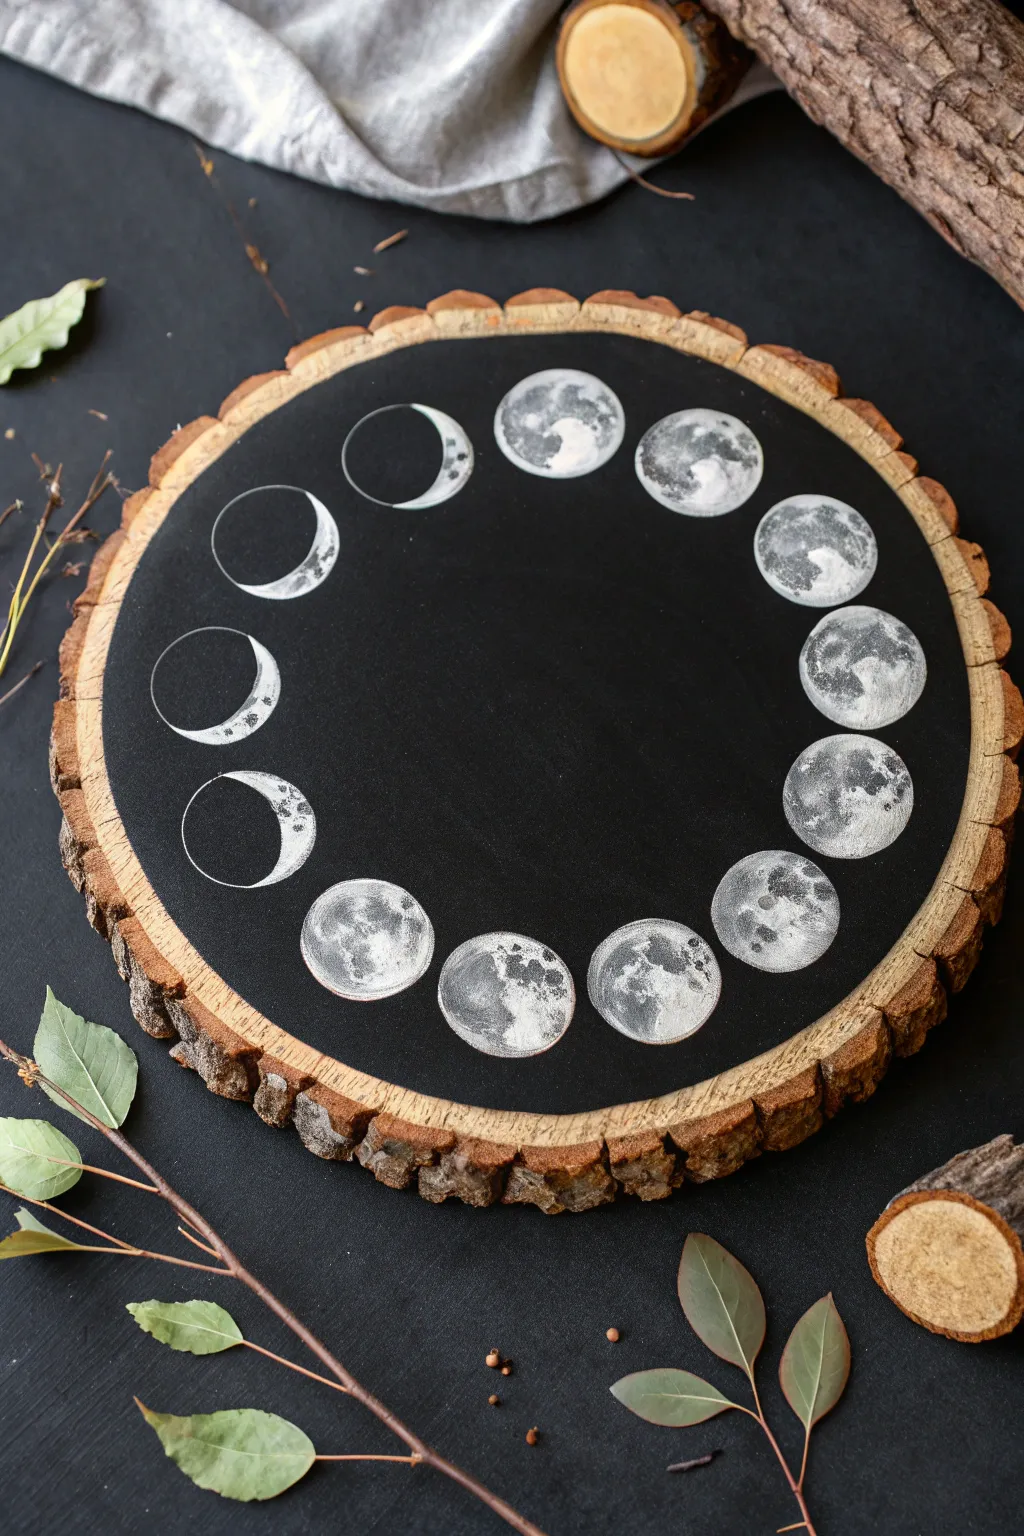
Capture the magic of the night sky with this striking wood slice art piece that tracks the waxing and waning of the moon. Using a stark black background highlights the intricate texture and soft glow of each painted lunar phase for a display that feels both rustic and cosmic.
Detailed Instructions
Materials
- Large wood slice with bark edge (approx. 10-12 inches diameter)
- Black acrylic paint (matte finish)
- White acrylic paint
- Grey acrylic paint (or mix black and white)
- Circular sponge stipplers (small, approx. 1 inch)
- Small flat paintbrush
- Fine detail paintbrush (size 0 or 00)
- Painter’s tape or masking tape
- Protractor or printed circle template (optional)
- Pencil or white chalk pencil
- Paper plate or palette
- Water cup and paper towels
Step 1: Preparing the Night Sky
-
Define the Canvas:
Begin by deciding how much wood grain you want to leave visible. I prefer leaving about a 1-inch border of natural wood showing just inside the bark edge. Use painter’s tape to mark this boundary if you need a guide, or freehand a large circle. -
Paint the Background:
Load a flat brush with matte black acrylic paint. Fill in the center circle completely. Apply smooth, even strokes that follow the curve of the wood slice. -
Add a Second Coat:
Wood is porous and will soak up the first layer. Once the first coat is dry to the touch (usually 15-20 minutes), apply a second coat of black to ensure an opaque, deep void for your background. -
Plan the Arrangement:
Visualize a clock face. You need to fit roughly 12-13 moons in a circle. Lightly mark the 12, 3, 6, and 9 o’clock positions first with a white chalk pencil to space them evenly, then fill in the gaps with two additional marks between each main point.
Fixing Wobbly Circles
If your hand isn’t steady, trace the rim of a small medicine cup or large coin with a white chalk pencil first. The chalk wipes away easily after painting.
Step 2: Painting the Moons
-
Create the Base Circles:
Dip a circular sponge stippler into grey paint (mix a little white and black if needed). Dab off the excess on a paper towel until it’s almost dry. -
Stamp the Full Moons:
Gently press the sponge onto your marked spots. Don’t worry about the specific phases yet; just create faint grey circles at every position to establish the size and placement. -
Define the Phases:
Using a small brush and black paint, carefully ‘erase’ parts of the grey circles to create the crescents and gibbous shapes. Follow a reference image of the lunar cycle so your waxing and waning directions are accurate. -
Initial Highlights:
Switch to pure white paint. With a very dry small brush or a tiny piece of sponge, dab white onto the illuminated side of each moon. -
Focus on Texture:
Texture is key here. Don’t paint smoothly; use a dabbing or stippling motion to mimic the cratered surface. Keep the paint thicker and brighter on the ‘sunlit’ edge of each phase.
Step 3: Detailing and Refining
-
Adding Craters:
Mix a dark grey color. using your fine detail brush, add tiny, irregular blotches and curved lines inside the white areas to represent major craters and lunar ‘seas’ (maria). -
Softening Transitions:
The line between light and dark on the moon (the terminator line) shouldn’t be razor sharp. Use a barely damp brush to slightly blur the white paint into the black shadow area for a realistic spherical look. -
Brightening the Glow:
Go back with pure, unmixed titanium white. Add tiny highlights to the very center of the brightest moons and the sharpest edges of the crescents to make them pop against the black. -
Cleanup:
If any black paint strayed onto the natural wood border, use a damp Q-tip or a tiny bit of sandpaper to gently remove it. -
Sealing (Optional):
If you plan to use this as a trivet or coaster, apply a clear matte polycrylic sealer over the entire face. If it’s just wall art, the acrylic paint is durable enough on its own.
Adding Stardust
Flick an old toothbrush loaded with watered-down white paint across the black center before painting the moons to create a distant galaxy effect.
Hang your lunar cycle art in a cozy corner to enjoy a little piece of the cosmos right in your home
Honeybee and Honeycomb
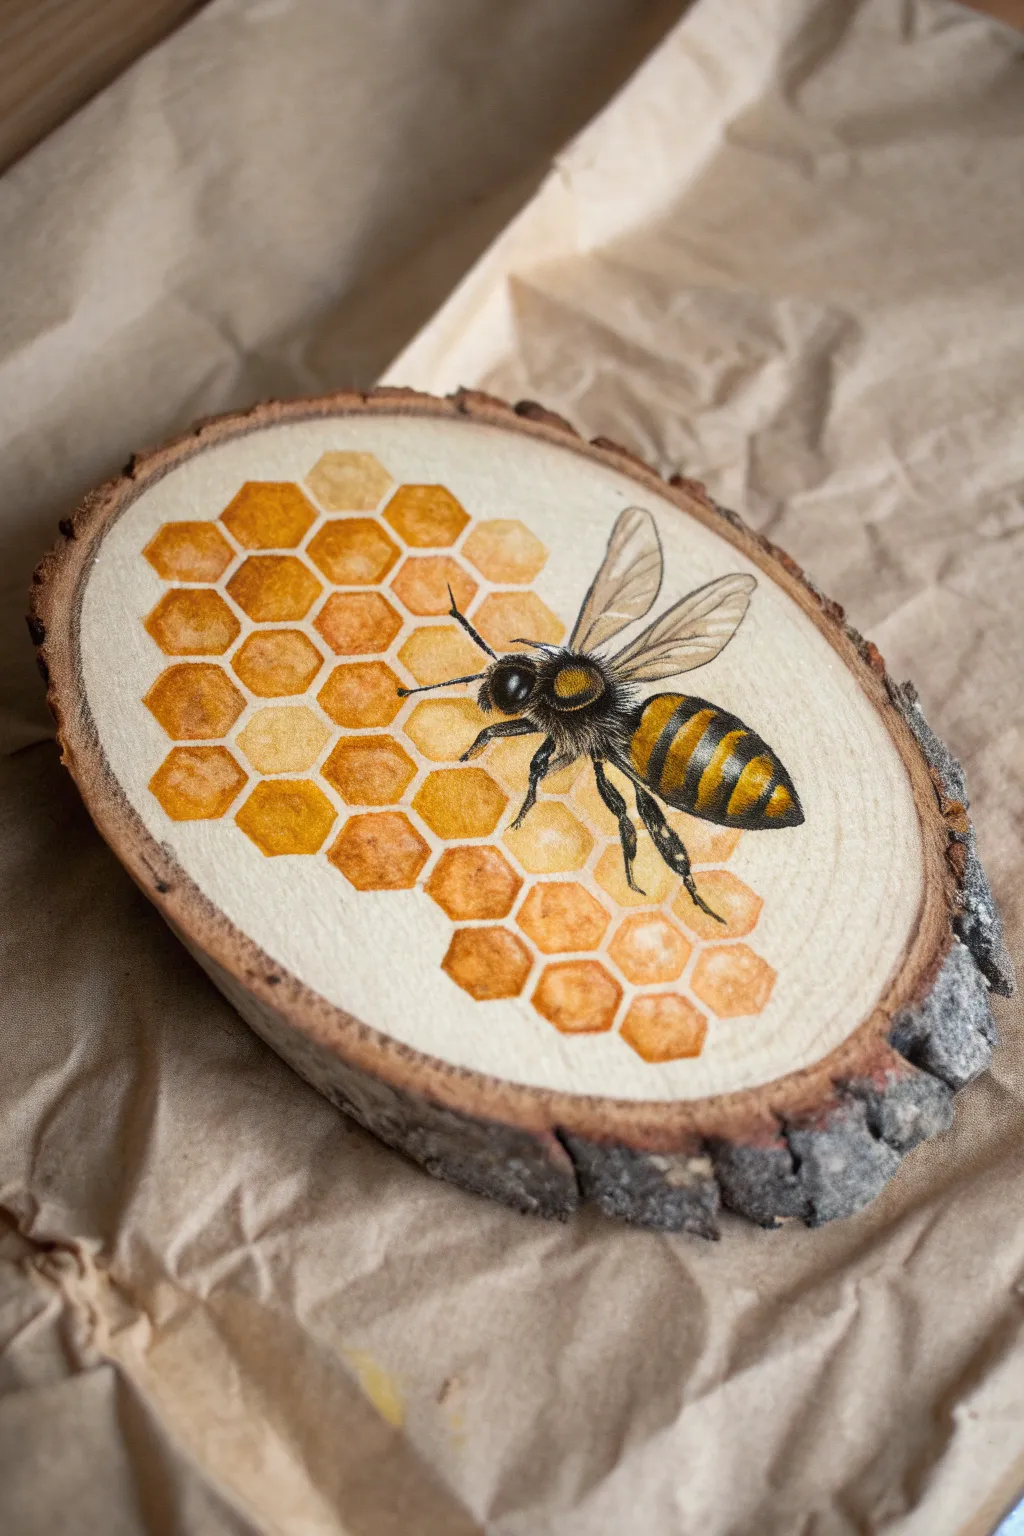
This charming project captures the delicate beauty of a honeybee at work, contrasting warm, amber hexagons with fuzzy, striped textures. Using the natural grain of a wood slice as a rustic canvas, you’ll create a piece of art that feels organic and inviting.
How-To Guide
Materials
- Oval wood slice (approx. 4-6 inches wide)
- Fine-grit sandpaper (220 grit or higher)
- Gesso or clear watercolor ground (optional but recommended)
- Watercolor paints or fluid acrylics
- Synthetic sable brushes: small round (size 2 or 4) and fine liner (size 0 or 00)
- Pencil (HB) and kneaded eraser
- Micron pen or fine black detail brush
- Paper towels
- Water cup
- Matte varnish spray
Step 1: Preparation and Sketching
-
Prepare the surface:
Begin by sanding the top face of your wood slice until it is extremely smooth to the touch. Wood grain can snag delicate brushes, so take your time here. Wipe away all dust with a slightly damp cloth. -
Prime the wood (optional):
If you plan to use watercolors, applying a thin layer of watercolor ground or clear gesso helps the pigment sit on top rather than soaking instantly into the thirsty wood fibers. -
Sketch the honeycomb:
Using a light hand and an HB pencil, draw a cluster of hexagons on the left side of the slice. Start with a central hexagon and build outwards, letting the cluster fade off loosely at the edges. -
Sketch the bee:
Draw the outline of the honeybee on the right side, facing the honeycomb. Focus on basic shapes first: an oval for the abdomen, a rounded thorax, and the delicate wing positions.
Bleed Control
If paint bleeds into the wood grain too much, apply a very thin line of clear matte medium around your pencil outlines before painting to act as a barrier.
Step 2: Painting the Honeycomb
-
Base wash for cells:
Mix a warm golden-yellow, like yellow ochre or raw sienna, with plenty of water. Paint the interior of the hexagons, leaving some slightly lighter or unpainted spots in the center of a few cells to suggest light reflection. -
Adding amber depth:
While the first layer is still slightly damp, drop in a richer burnt sienna or amber color near the bottom edges of the hexagons. This creates a gradient that mimics liquid honey pooling at the bottom. -
Define the outlines:
Using a slightly thicker mix of burnt orange or brown, carefully outline the hexagon walls. Keep the lines relatively thin but allow for slight variation in thickness to maintain an organic feel. -
Soften edges:
For the outer hexagons that fade away, use a clean, damp brush to feather the edges of the paint, blending them gently into the natural wood tone.
Step 3: Painting the Bee
-
Yellow stripes:
Paint the yellow stripes on the bee’s abdomen using a bright, opaque yellow (like cadmium yellow). You want this color to pop against the darker segments. -
Dark segments:
Fill in the black stripes, the head, and the thorax using a dark grey or soft black. Avoid solid jet black initially; a dark charcoal tone allows you to build up texture later. -
Creating fuzz texture:
Once the dark base is dry, use your smallest liner brush with tiny, rapid strokes to pull the paint slightly outward at the edges of the thorax and head. This creates the signature fuzzy appearance of a bee. -
Wing transparency:
For the wings, use a very watery wash of grey or diluted white. You want the wood grain to still show through slightly, giving the impression of gossamer transparency. -
Wing veins:
I find that using a sepia tone rather than stark black works best for the delicate veins in the wings. Use your finest liner brush to draw these structural lines with a steady hand.
3D Honey Droplets
Add a drop of clear UV resin or dimensional glaze over a few honeycomb cells. It dries hard and glossy, perfectly mimicking real liquid honey.
Step 4: Final Details
-
Highlights:
Add tiny touches of white paint to the bee’s eyes and the top of the abdomen stripes to make them look shiny and three-dimensional. -
Legs and antennae:
Paint the delicate legs and antennae using black ink or paint. Pay attention to the joints in the legs; making them angular adds realism. -
Clean up:
Erase any visible pencil marks carefully, ensuring the paint is completely dry before rubbing the surface. -
Seal the piece:
Finish by spraying the wood slice with a matte varnish to protect the paint from fading and moisture without adding an unnatural gloss.
Hang your finished piece or display it on a stand to bring a touch of warm, buzzing nature into your home
Songbird on a Twig
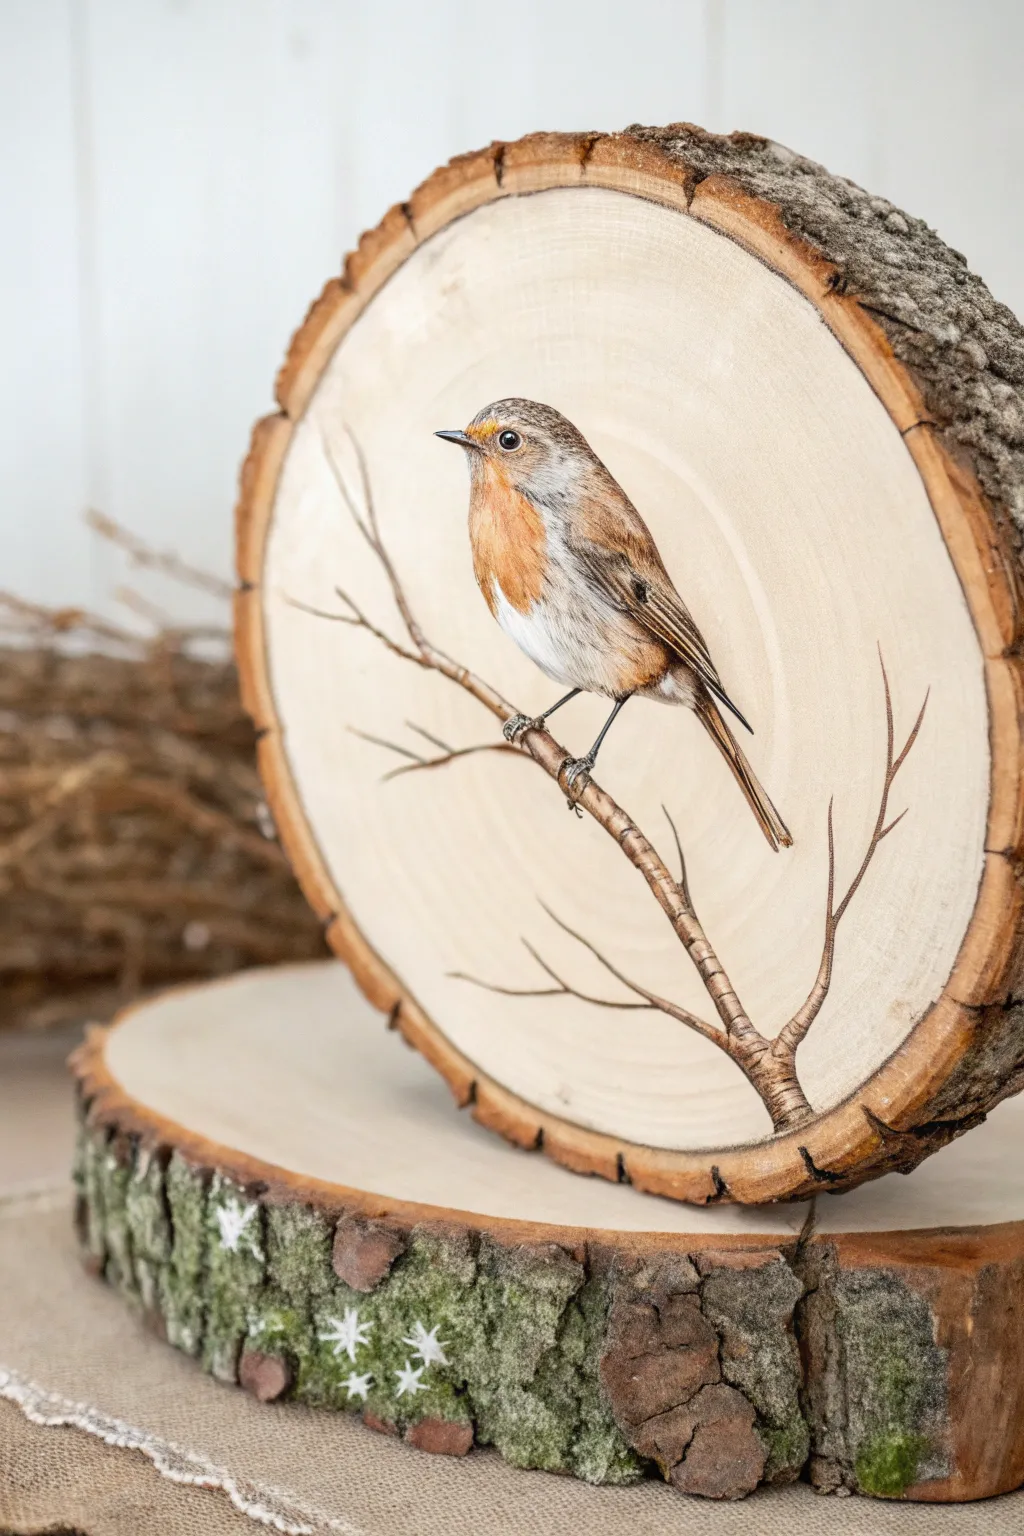
Capture the delicate beauty of a European Robin perched on a slender twig with this nature-inspired wood slice painting. Using the natural wood grain as a backdrop adds warmth and texture, making the bird appear perfectly at home in its rustic setting.
Step-by-Step
Materials
- Large wood slice (approx. 8-10 inches diameter) with bark intact
- Fine-grit sandpaper (220-grit)
- Clear gesso or matte acrylic medium
- Acrylic paints (Titanium White, Burnt Sienna, Burnt Umber, Yellow Ochre, Paynes Grey, Mars Black)
- Detail brushes (sizes 000, 0, and 1)
- Flat brush (small)
- Graphite transfer paper and stylus (optional)
- Reference photo of a robin
- Palette
- Water cup and paper towels
- Matte spray varnish
Step 1: Preparation & Sketching
-
Prep the surface:
Begin by sanding the face of your wood slice gently with 220-grit sandpaper. You want a surface smooth enough for fine details but still retaining the wood’s visual character. Wipe away all dust with a tack cloth or slightly damp paper towel. -
Prime the wood:
Wood is thirsty and will soak up paint quickly. Apply a thin layer of clear gesso or matte medium over the painting area. This seals the pores without hiding the beautiful grain. -
Establish the composition:
Lightly sketch the twig entering from the bottom right and branching upward. Position the robin slightly off-center on the main branch for a balanced look. If you aren’t confident sketching freehand, lightly trace a printed reference using graphite transfer paper. -
Refine the outline:
Go over your sketch lightly with a pencil to ensure the proportions are correct—focus on the round belly and the specific angle of the beak.
Clear Gesso Magic
Don’t skip the clear gesso! It acts as a barrier, stopping paint from bleeding into the wood fibers (feathering) while keeping the natural grain visible.
Step 2: Painting the Branch
-
Base coat the twig:
Mix Burnt Umber with a touch of White to create a medium brown. Using a size 1 brush, paint the main structure of the branch. Keep the lines organic and slightly uneven to mimic real wood. -
Add shadows:
While the base is still slightly tacky, use darker Burnt Umber on the underside of the twig and at the junctions where smaller twigs branch off. -
Highlight the bark:
Mix a light tan using White and a tiny dot of Burnt Sienna. With your size 0 brush, paint thin, broken lines along the top edge of the twig to simulate sunlight hitting the bark. -
Define the texture:
Use your finest brush (000) and watered-down Mars Black to add tiny cracks and knots along the branch, especially near the bottom where it’s thicker.
Step 3: Painting the Robin
-
Block in base colors:
Start with the robin’s signature red breast. Mix Burnt Sienna with a little Yellow Ochre and block in the chest area. Use a medium grey (White + Paynes Grey) for the wings and back, and pure White for the underbelly. -
Blend the transitions:
Before the paint fully dries, use a slightly damp, clean brush to soften the edges where the orange chest meets the white belly and the grey wings. -
Detail the face:
I like to switch to the smallest brush here. Use Paynes Grey to carefully paint around the eye and the beak area. Paint the beak with a dark charcoal mix, adding a tiny white highlight on the top curve. -
Create the eye:
Paint the eye a solid Mars Black. Once dry, add a single, crisp dot of Titanium White near the top right of the pupil to bring the bird to life. -
Feather texture – Chest:
Mix a lighter orange shade. Using the tip of your 000 brush, make tiny, flicking downward strokes over the orange base coat to simulate fluffy feathers. -
Feather texture – Wings:
Mix darker greys and browns. Paint thin, linear strokes following the curve of the wing to suggest the primary flight feathers. Layer lighter grey strokes on top for depth. -
Feather texture – Belly:
Use slightly watered-down light grey to shadow the white belly feathers, fluffing them out over the line of the branch so the bird looks like it’s truly sitting on it. -
Painting the feet:
Use a dark grey-brown mix to paint the thin legs and toes gripping the branch. A tiny line of light grey on the front of the legs will make them look cylindrical rather than flat.
Paint Soaking In?
If your colors look dull after drying, the wood likely absorbed the binder. Add a second coat of paint to bring back the vibrancy and opacity.
Step 4: Finishing Touches
-
Refine contours:
Check the edges of your bird. If the paint bled into the wood grain, careful detailing with an opaque white or wood-toned mix can clean up the silhouette. -
Final dry:
Allow the painting to dry completely, preferably overnight, to ensure all thick areas are cured. -
Protective seal:
Spray the surface with a matte varnish to protect the paint without adding an unnatural gloss.
Now you have a charming woodland friend preserved beautifully on timber to display on your shelf
Woodland Mushroom Cluster
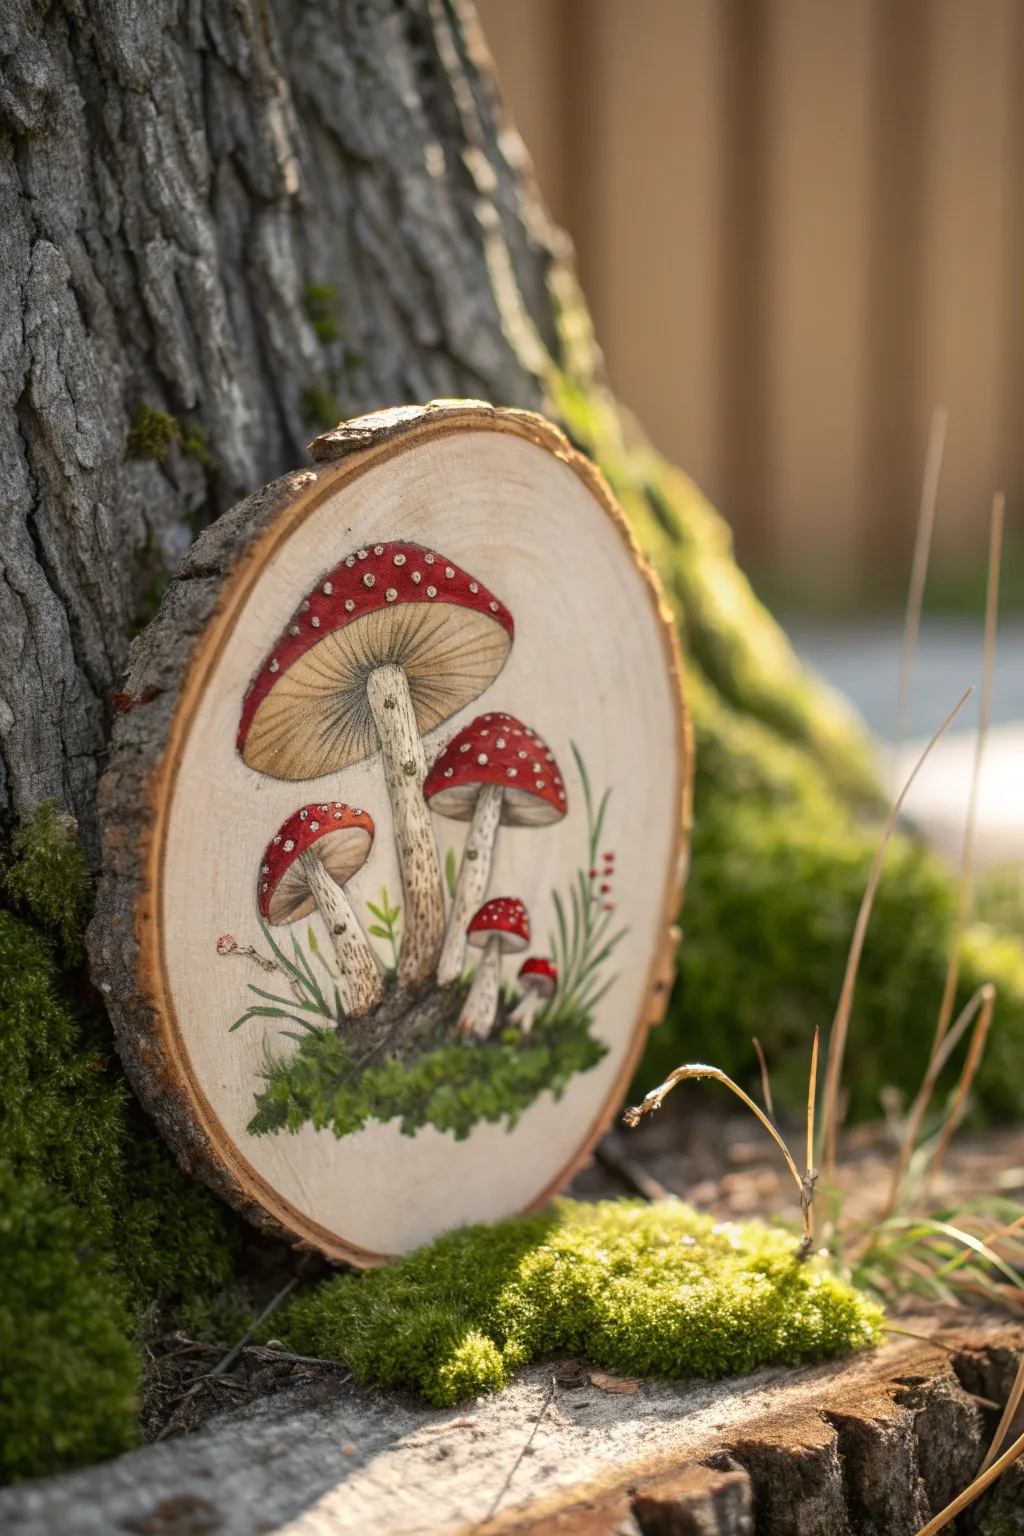
This rustic wood slice painting captures the charm of the forest floor with a cluster of vibrant Amanita mushrooms. The combination of detailed illustration and the natural wood grain creates a beautiful, organic piece of decor that brings a touch of the outdoors inside.
How-To Guide
Materials
- Wood slice (approx. 4-6 inches diameter, sanded smooth)
- Acrylic paints (Titanium White, Cadmium Red, Burnt Umber, Raw Sienna, Sap Green, Yellow Ochre)
- Pencil for sketching
- Fine liner brush (size 0 or 00)
- Small flat brush
- Round brush (size 2)
- Matte varnish or sealant
- Paper palette
- Water cup and paper towels
Step 1: Preparation and Sketching
-
Surface Prep:
Ensure your wood slice is clean and free of dust. If the surface feels rough, give it a quick pass with fine-grit sandpaper to ensure your brush glides smoothly over the grain. -
Outline the Composition:
Lightly sketch the mushroom cluster using a pencil. Place the largest mushroom near the top center, leaning slightly left. Add a medium-sized mushroom to its right, and a smaller, distinct one to the left. Don’t forget the tiny babies near the bottom right. -
Sketch Stipes and Details:
Draw the stems (stipes) for each cap, making them thicker at the base and slightly distinct at the skirt area. Outline the clumps of moss at the very bottom where the stems meet the wood.
Step 2: Base Layers
-
White Underpainting:
Paint the entire shape of the mushrooms (caps and stems) with a thin layer of Titanium White. This primes the wood and ensures the red paint will pop rather than sinking into the wood grain. -
Applying the Red:
Once the white is dry, paint the caps with Cadmium Red. Leave the very edges slightly lighter or unpainted if you want a faded look, but aim for solid coverage on the main domes. -
Base Tone for Stems:
Mix a tiny amount of Raw Sienna with Titanium White to create a warm off-white. Paint the stems with this cream color, avoiding the bright white look of the primer layer.
Paint Bleeding?
If paint bleeds into the wood grain, apply a layer of clear matte medium or sealer over your pencil sketch before painting. This creates a barrier.
Step 3: Shading and Texture
-
Gills and Undersides:
Mix Yellow Ochre with a touch of Burnt Umber. Using your fine liner brush, paint thin, radiating lines under the main cap to represent the gills. Start from the stem and flick outward toward the rim. -
Stem Texture:
Using a watered-down Burnt Umber, stipple small dots and short dashes along the stems to give them a rough, earthy texture. Focus the darker marks near the base and under the skirt. -
Shadowing the Caps:
Mix a small amount of Burnt Umber into your red. Paint a thin shadow line along the bottom edge of the red caps where they curve inward, blending it upward slightly to create volume. -
Adding the Spots:
Reload your small round brush with thick Titanium White. Dot the red caps with the classic Amanita spots. Vary the sizes—some large and irregular, others tiny speckles—to make it look natural.
Add Dimension
Use textured craft snow or 3D fabric paint for the white spots on the caps. This creates raised bumps that you can actually feel for a tactile finish.
Step 4: Mossy Ground and Finest Details
-
Painting the Moss:
Mix Sap Green with a little Burnt Umber for a dark base color. Stipple this mixture at the base of the stems. While wet, dab in lighter green highlights to create a fluffy moss texture. -
Adding Grass Blades:
Using your liner brush and the lighter green mix, pull quick, upward strokes out from the moss to create delicate blades of grass and small fern-like leaves. -
Defining Edges:
Use a very dilute grey-brown mix to outline the separation between the gills and the stem, and to define the overlapping areas of the mushrooms. Keep this line very subtle. -
Final Highlights:
Add a few tiny pure white highlights to the top of the mushroom stems and the edges of the moss to imply sunlight hitting the forest floor. -
Sealing the Work:
Allow the painting to cure for at least 24 hours. Apply a layer of matte varnish to protect the paint without adding an unnatural shine, preserving the wood’s rustic feel.
Now you have a charming piece of woodland art ready to display on a shelf or hang on your wall
Mini Pet Portrait Badge
Transform a rustic slice of nature into a charming keepsake with this adorable cat portrait project. Featuring a simple line-art style and soft pink hues, this ornament adds a touch of whimsy to any window or holiday tree.
Step-by-Step
Materials
- Small wood slice (approx. 2-3 inches diameter)
- Sandpaper (medium grit)
- Pink acrylic paint (light pastel shade)
- Black acrylic paint or black paint marker (fine tip)
- Small flat paintbrush
- Fine liner brush (if not using paint marker)
- Pencil and eraser
- Jute twine
- Scissors
- Hot glue gun and glue sticks
- Clear matte sealer (optional)
Step 1: Preparing the Canvas
-
Sand the surface:
Take your wood slice and gently sand the front face until it feels smooth to the touch. This ensures your paint glides on easily without getting caught in the wood grain. -
Clean the dust:
Wipe the wood slice with a slightly damp cloth or a dry tack cloth to remove all sanding dust. Let it dry completely before moving on. -
Plan the placement:
Visualize where the cat face will sit. Aim for the center, leaving a nice border of natural wood showing around the edges to frame the portrait.
Step 2: Painting the Base
-
Outline the head shape:
Using a pencil, lightly sketch the outline of the cat’s head. Draw a simple rounded shape with two triangular ears pointing upward on top. -
Fill with color:
Dip your small flat brush into the pink acrylic paint. Carefully fill in the shape you just sketched. -
Refine the edges:
Use the edge of your flat brush to neaten up the perimeter of the head and the tips of the ears. -
Apply a second coat:
If the wood grain is showing through too much after the first layer dries, apply a second coat of pink for a solid, opaque look. I like to let this dry for about 15-20 minutes to be safe.
Smooth Lines Tip
If you struggle with brush control for thin black lines, a black Posca paint pen or even a permanent Sharpie marker works wonders on wood.
Step 3: Adding the Details
-
Outline the silhouette:
Once the pink paint is fully dry, take your black paint marker or fine liner brush with black paint. Carefully trace the entire outer edge of the pink shape to create a bold, cartoon-style outline. -
Draw the inner ears:
Inside each ear triangle, draw a smaller triangle shape to give the ears depth and definition. -
Add the eyes:
Place two small, curved semicircles near the middle of the face for squinting, happy eyes. -
Create the nose and mouth:
Draw a small rounded triangle for the nose right between the eyes. From the bottom of the nose, draw two curved lines branching out to form the signature cat smile. -
Add whisker spots:
On the cheeks, add three tiny dots or small stylized star shapes on each side to represent whisker pads or blushing cheeks. -
Seal the artwork:
Optional: lightly brush a coat of clear matte sealer over the painted area to protect your design from scratches or fading.
Bleeding Lines?
If the paint bleeds into the wood grain, your paint might be too watery. Use heavier body acrylics or prime the area with clear gesso first.
Step 4: Finishing Touches
-
Cut the twine:
Cut a piece of jute twine to your desired hanging length, usually about 6-8 inches works well. -
Form the loop:
Fold the twine in half and tie a knot at the open ends to create a secure loop. -
Attach the hanger:
If your wood slice has a bark rim, apply a dab of hot glue to the top edge (or the back, depending on preference). Press the knotted end of the twine into the glue. -
Secure the twine:
Hold the twine in place for a few seconds until the glue cools and hardens completely. You can wrap a little extra twine around the circumference if you want a decorative border, though a simple top loop keeps the focus on the cat.
Hang your new little friend in a sunbeam and enjoy the handmade charm it brings to your space
Hand-Lettered Quote Plaque
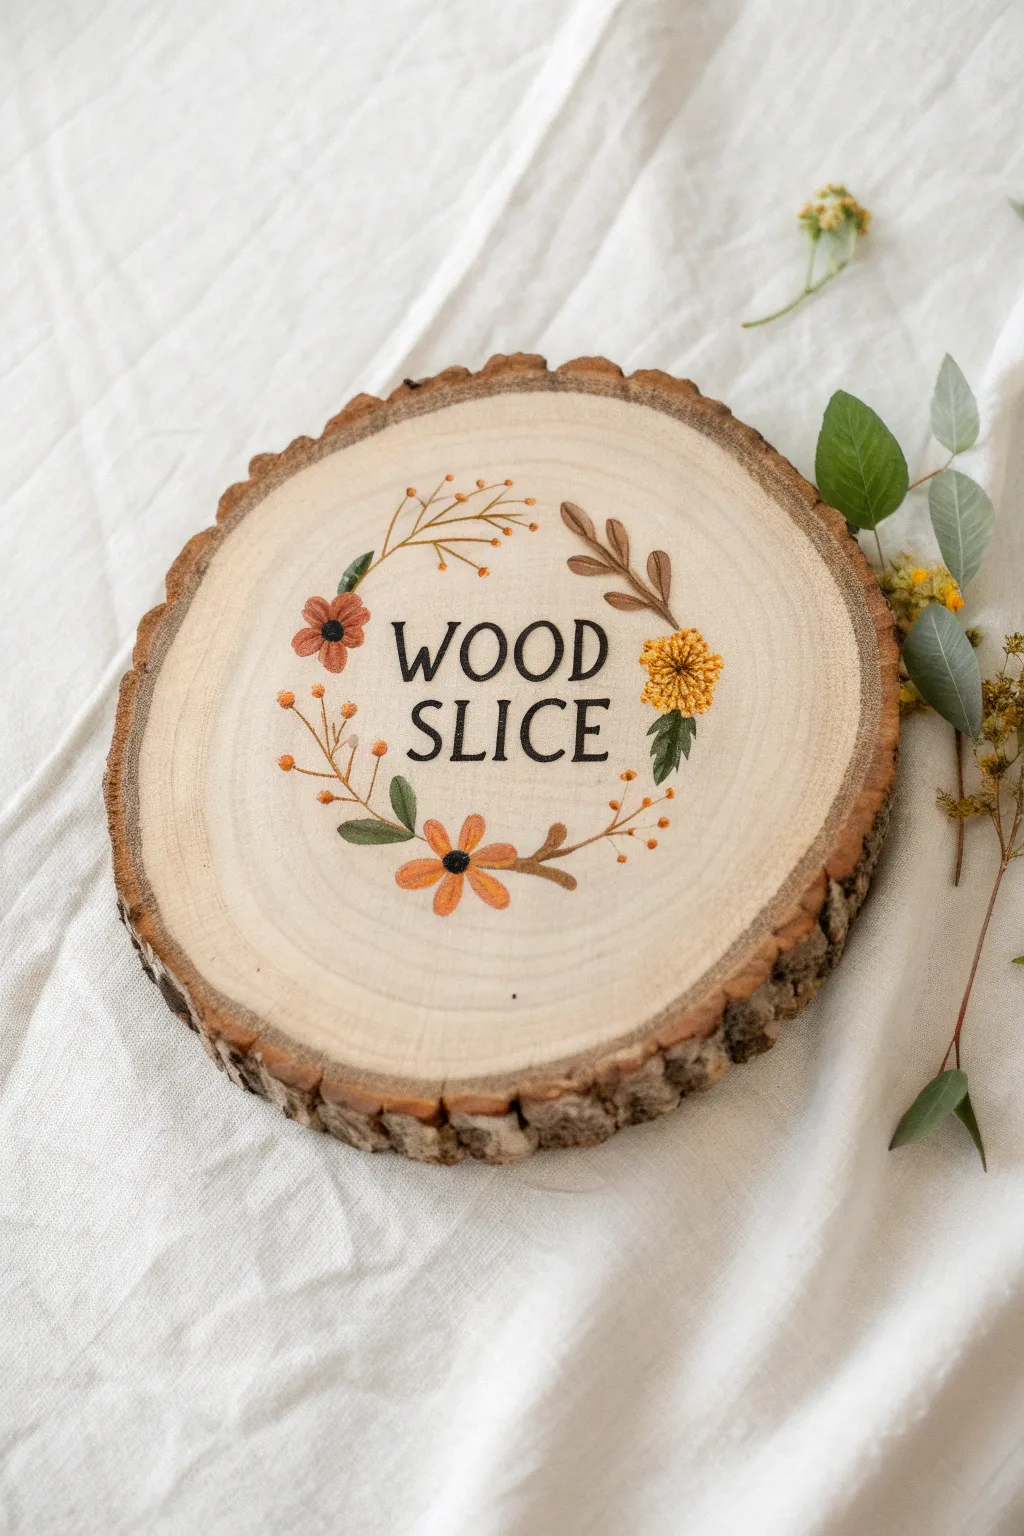
Transform a rustic wood slice into a charming piece of decor with warm autumnal tones and crisp hand-lettering. This project combines simple botanical illustrations with bold typography to create a cozy, personalized plaque perfect for hanging or display.
Step-by-Step Tutorial
Materials
- Wood slice with bark edge (approx. 6-8 inches diameter)
- Sandpaper (fine grit, 220-400)
- Pencil and eraser
- Black brush pen or fine-tip paint marker
- Acrylic paints (colors: burnt orange, mustard yellow, sage green, brown)
- Detail paintbrushes (round size 0 and 2)
- Matte finish sealant spray or varnish
- Palette for mixing
- Paper towels and water cup
Step 1: Preparation & Lettering
-
Smooth the Canvas:
Begin by sanding the face of your wood slice thoroughly. You want the surface to be as smooth as possible so your brush pen doesn’t snag on the grain. Wipe away all sawdust with a damp cloth or tack cloth before proceeding. -
Center the Text:
Using a pencil, lightly sketch two horizontal guidelines in the absolute center of the slice to keep your text straight. Sketch the word ‘WOOD’ on the top line and ‘SLICE’ on the bottom line using a serif font style. Focus on even spacing between the letters. -
Ink the Outline:
Go over your pencil sketches with a black fine-tip paint marker or a brush pen. Use steady, deliberate strokes. If using a paint marker, shake it well first to ensure opaque coverage. -
Thicken the Downstrokes:
To mimic calligraphy, go back and thicken the vertical lines (downstrokes) of each letter. Add small serifs (the little feet) to the ends of the strokes for a classic look. Let the black ink dry completely before erasing any visible pencil lines.
Smooth Moves
Using a wood conditioner or a layer of clear gesso and sanding it before painting prevents the paint from bleeding into the wood grain.
Step 2: Painting the Floral Wreath
-
Sketch the Wreath Frame:
Lightly sketch a circle around your text to serve as a guide for the wreath. Mark loose placements for the main flowers: one on the left, one on the bottom, and a cluster on the right. -
Paint the Primary Blooms:
Using burnt orange paint and a size 2 brush, paint the five-petal flower at the bottom center. Repeat this shape on the left side with a slightly darker, reddish-orange tone. Don’t worry about the centers yet; just lay down the petal shapes. -
Create the Texture Flower:
For the yellow flower on the right, mix a mustard yellow. Instead of painting smooth petals, use a stippling motion (dabbing the brush tip) to create a fuzzy, textured look, forming a tight circular cluster. -
Add Greenery:
Switch to your sage green paint and a size 0 brush. I find it easiest to paint the stems first, flowing outward from the flowers along the circular guide. Add small, almond-shaped leaves to the stems, varying the green shade slightly for depth by mixing in a little white or yellow. -
Paint Brown Sprigs:
With a thin brown mix, add the fern-like sprig near the top right. Paint a central stem and add long, teardrop-shaped leaves coming off it. Add a smaller brown twig detail near the bottom orange flower. -
Detail the Wispy Fillers:
Using a very diluted orange or brown paint, add delicate, thin lines branching out into the empty spaces. Add tiny dots at the ends of these lines to represent buds or berries.
Step 3: Refining Details
-
Add Flower Centers:
Once the orange petals are dry, use your black paint marker or a tiny brush with black paint to add the centers. A simple solid black dot works well for the orange flowers. -
Highlight the Leaves:
Mix a tiny bit of white into your green paint. Add a very thin line down the center of the larger green leaves to suggest a vein and catch the light. -
Enhance the Yellow Bloom:
Add depth to the textured yellow flower by dabbing a slightly darker orange-brown color near the base of the flower head, blending it gently into the yellow stippling. -
Final Cleanup:
Inspect your work for any stray pencil marks and gently erase them. If the black lettering looks faded against the wood, carefully go over it one more time for maximum contrast. -
Seal the Project:
To prevent the raw wood from yellowing or the paint from chipping, spray the entire surface with a matte clear coat. Apply in light, even mists rather than one heavy coat to avoid drips.
Make it Magnetic
Instead of a wall hanger, glue a heavy-duty magnet to the back. A small wood slice makes a fantastic, rustic refrigerator magnet.
Now you have a beautifully lettered custom plaque ready to add a natural touch to any room.
Geometric Color-Block Rings
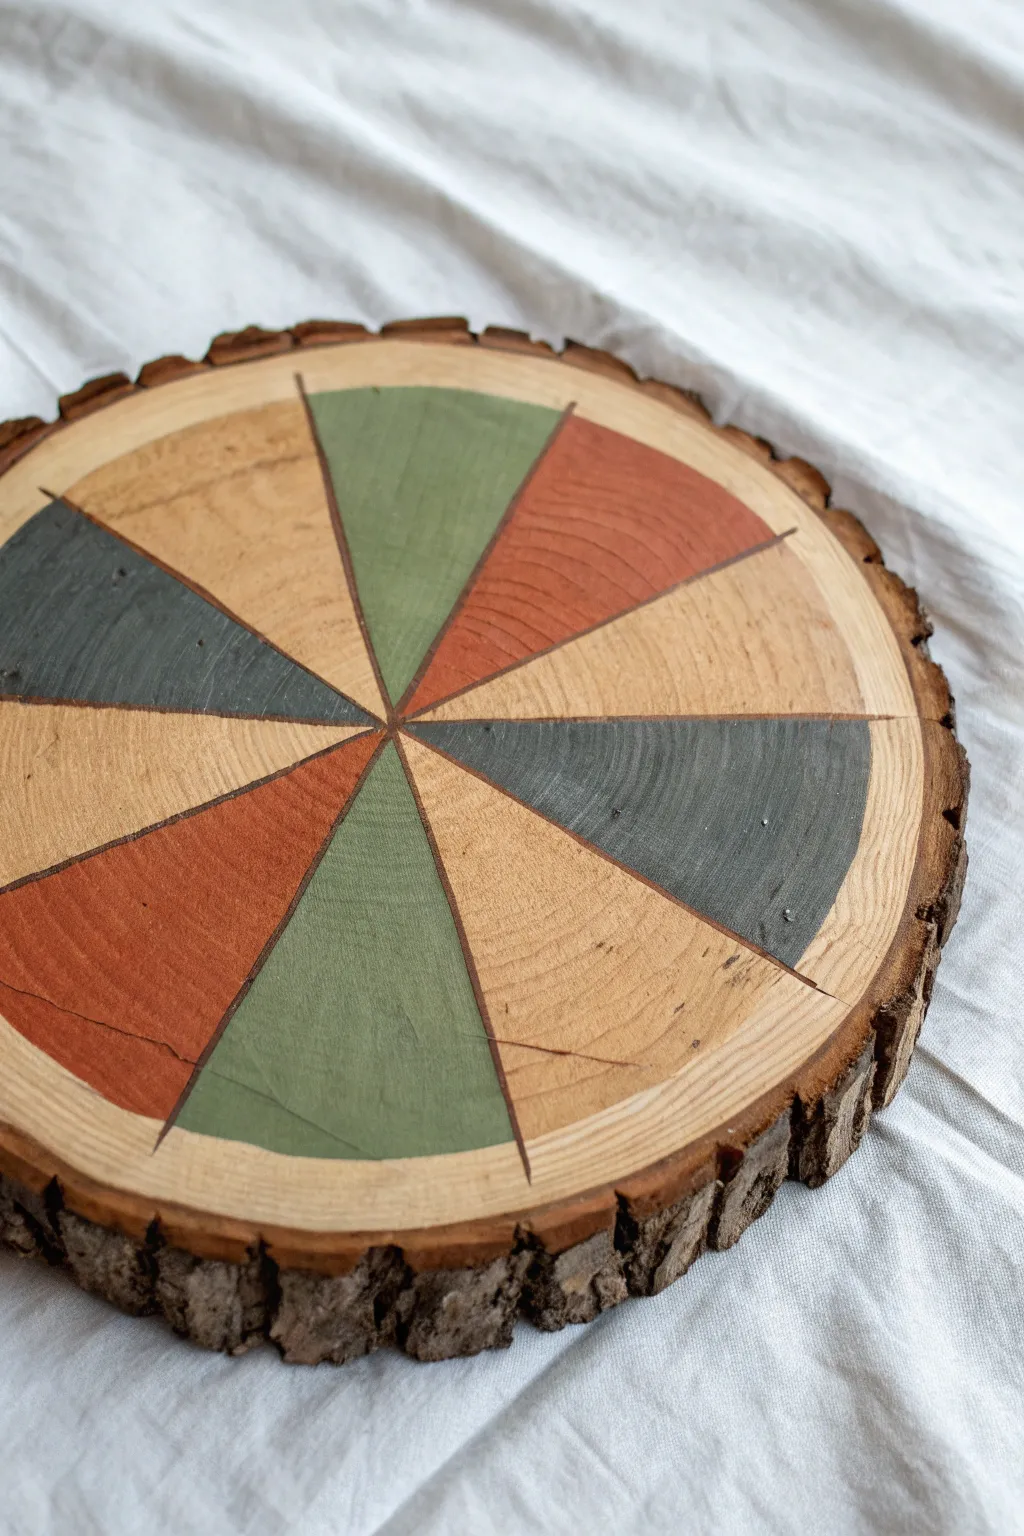
This rustic project combines the natural charm of raw wood bark with crisp geometric design. By painting alternating sectors in muted earth tones like sage, terracotta, and slate, you create a striking pinwheel effect that feels both modern and grounded.
Step-by-Step Guide
Materials
- Medium-sized wood slice (7-9 inches diameter) with bark intact
- Pencil
- Ruler
- Protractor (optional but helpful)
- Wood burning tool (pyrography pen) or fine-tip permanent marker
- Acrylic craft paints (Sage Green, Terracotta, Slate Blue)
- Small flat paintbrush
- Fine detail paintbrush
- Sandpaper (fine grit)
- Clear matte varnish or polyurethane sealer
- Painter’s tape (optional)
Step 1: Preparation and Mapping
-
Surface Prep:
Begin by sanding the top surface of your wood slice. You want it relatively smooth so your lines will be crisp, but don’t worry about getting it glass-smooth; a little texture adds character. -
Find Center:
Locate the approximate center of the wood slice. Since wood slices are irregular, measure the width and height to find the middle point and mark it lightly with a pencil. -
Draw the First Line:
Using your ruler, draw a single straight line through the center point, extending all the way to the edges where the bark begins. -
Create Quadrants:
Draw a second line perpendicular to the first, creating a cross shape. You now have the circle divided into four roughly equal sections. -
Subdivide Sections:
Divide each quadrant in half with diagonal lines passing through the center. You should now have eight pie-shaped wedges. -
Final Divisions:
Depending on the size of your slice, you may want to divide these eight sections once more to create sixteen narrow wedges, as seen in the inspiration photo. Use a protractor if you want mathematical precision, or eyeball it for a more organic feel.
Bleeding Lines?
If paint bleeds into the wood grain, lightly score the boundaries with a craft knife before painting. This severs the wood fibers and stops capillary action.
Step 2: Defining the Lines
-
Heat Up:
If using a wood burning tool, plug it in and let it heat up fully. A chisel tip or a writing tip works best for straight lines. -
Test the Tool:
Briefly test the heat on the back of the wood slice or a scrap piece to ensure you have a steady hand before committing to the front. -
Score the Lines:
Carefully trace over your pencil lines with the wood burner. Move at a slow, consistent pace to create dark, even grooves. These scorched lines will act as mini-barriers for the paint later. -
Alternative Method:
If you don’t have a wood burning tool, retrace your pencil lines with a thick, dark brown or black permanent marker. I find a paint pen also works well here for a solid, opaque line.
Metallic Pop
Swap the unpainted wood sections for gold leaf or metallic gold paint. The contrast against the matte earth tones creates a stunning, high-end look.
Step 3: Adding Color
-
Plan Your Pattern:
Decide on your color sequence. The example uses a repeating pattern: Slate Blue, Unpainted Wood, Sage Green, Terracotta. Mark a tiny dot of the intended color in each wedge so you don’t lose track while painting. -
First Color Application:
Start with the darkest color (Slate Blue). Use your small flat brush to fill in the designated wedges, painting from the center outward toward the bark. -
Detailing Edges:
Switch to a fine detail brush to get the paint right up to the wood-burned lines without crossing over them. The grooves help, but a steady hand is still key. -
Second Color:
Move on to the Terracotta sections. Apply the paint in thin, even layers. You may need two coats for full opacity, allowing the first coat to dry completely before adding the second. -
Third Color:
Paint the Sage Green sections. Keep the brush strokes consistent with the grain of the wood where possible for a smoother look. -
Touch Ups:
Once all paint is dry, check your edges. If any paint crossed the scorched lines, you can carefully re-burn or re-draw the line to crisp it up.
Step 4: Sealing
-
Clean Up:
Gently erase any visible pencil marks remaining in the unpainted wood sections. -
Applying Varnish:
Stir your matte clear varnish gently. Apply a thin coat over the entire surface, including the bark rim if you want to protect it from shedding. -
Dry and Display:
Let the varnish cure according to the bottle instructions. Your geometric wood slice is now ready to serve as a coaster, wall art, or trivet.
Place your finished piece on a coffee table or hang it up to bring a splash of organized nature into your home
Dot Mandala From the Center
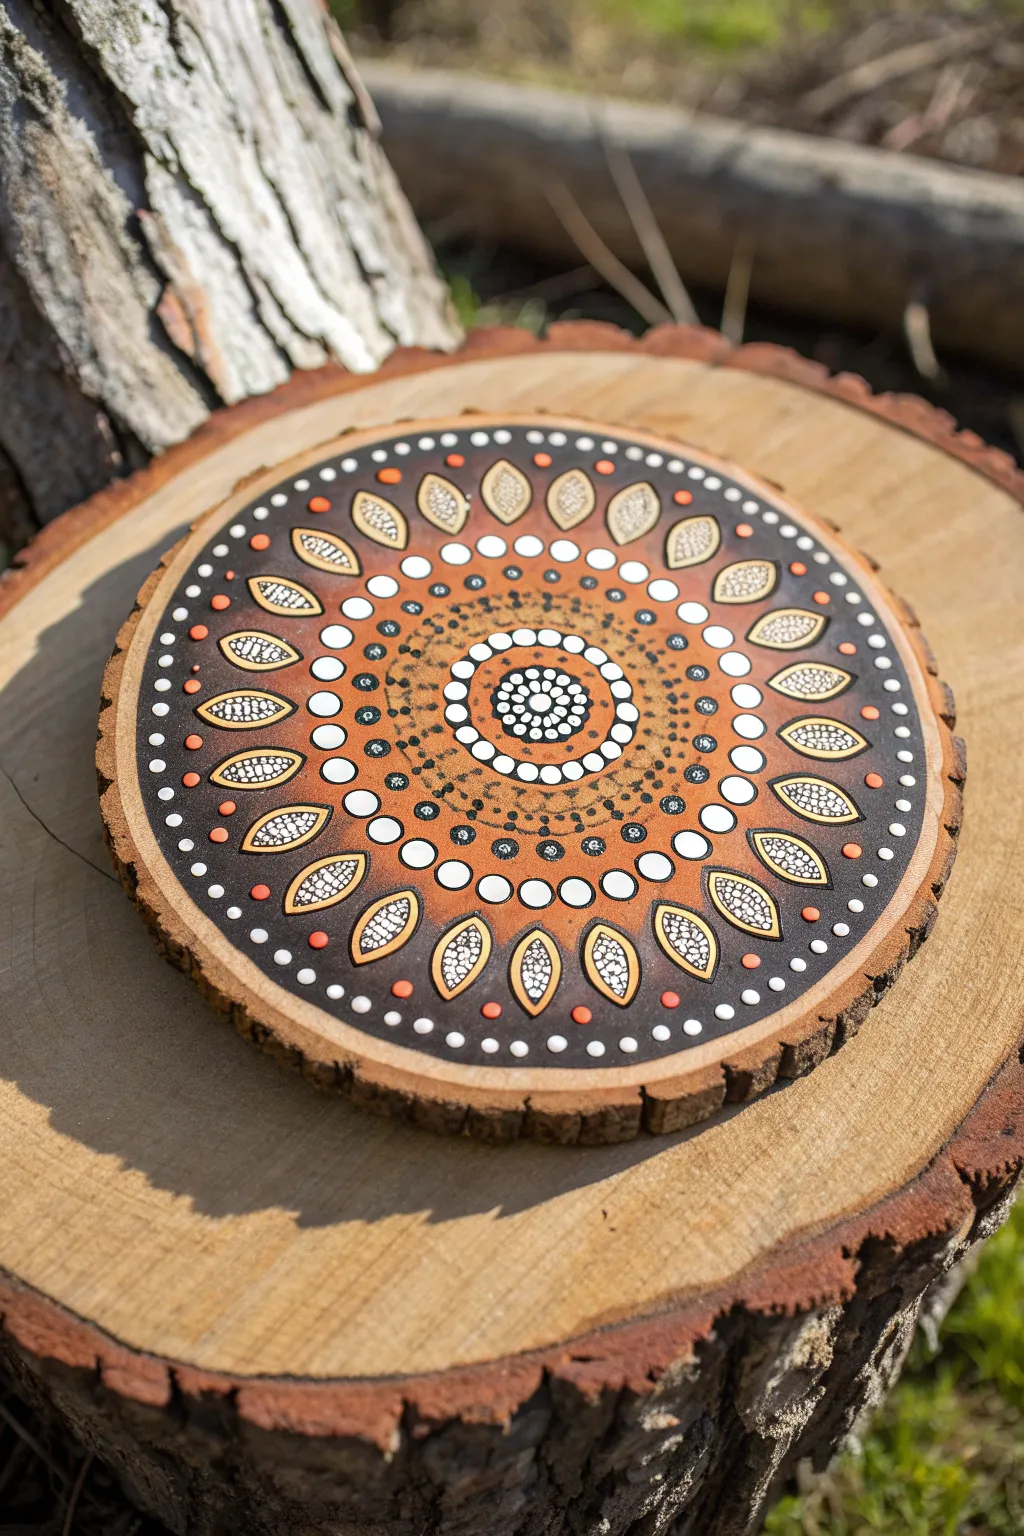
This rustic yet intricate mandala project uses the natural warmth of a wood slice as its canvas, blending earthy oranges, browns, and crisp whites. The design radiates from a singular central flower, expanding into rhythmic rings of dots and petals that create a mesmerizing, meditative focal point.
Step-by-Step Tutorial
Materials
- Round wood slice (approx. 6-8 inches diameter, sanded smooth)
- Acrylic paints: Black, White, Burnt Sienna, Burnt Umber, Deep Orange/Terracotta
- Dotting tools (various sizes from fine needle to expansive flat-end rods)
- Fine detail paintbrush (00 or 000 size)
- Compass and pencil
- Ruler
- Cotton swabs and damp cloth (for mistakes)
- Clear matte or satin varnish (spray or brush-on)
Step 1: Preparation and Base
-
Prepare the surface:
Ensure your wood slice is clean and free of sawdust. If the surface feels rough, give it a quick sanding with fine-grit sandpaper to create a smooth foundation for your dots. -
Establish the grid:
Find the exact center of the wood slice using a ruler. Use a compass to lightly draw concentric guide circles starting small near the center and expanding outward to the edge. -
Draw radial lines:
Using a protractor or just your eye and a ruler, lightly sketch radial lines (like pizza slices) to divide the circle into equal sections—aim for 16 or 32 sections to keep the symmetry tight. -
Apply the background wash:
Mix a watery wash using Burnt Sienna and a touch of black. Paint a wide ring around the middle section of the wood, leaving the very center and the outer rim natural. This creates that moodier, burnt-orange background visible in the mid-section.
Uneven Dots?
If your paint peaks or leaves ‘hershey kiss’ tops, your paint is too thick. Mix in a drop of pouring medium or water to get a creamy consistency that self-levels.
Step 2: The Central Core
-
Start the center dot:
Place a large black dot in the very center using a large dotting tool. Let this dry completely before moving to the next layer. -
Add the first white ring:
Using a smaller tool, place a ring of medium-sized white dots directly onto the dry black center dot, creating a flower-like cluster. -
Frame with contrast:
Use a fine tool to place tiny white dots around the perimeter of the main black center circle, defining its edge against the natural wood. -
Create the orange halo:
Moving outward, dot a ring of Deep Orange circles around your central cluster. Keep the spacing tight and consistent. -
Expand with white:
Add a ring of larger white dots outside the orange ring. I find that reloading the tool for every single dot ensures they remain identical in size.
Go 3D
For a tactile finish, use puffy paint or specific ‘liquid pearl’ pens for the final white highlight dots. This adds physical texture that catches the light.
Step 3: Expanding the Pattern
-
Form the petal shapes:
Switch to your detail brush. On the burnt-orange background ring, paint outline teardrop or leaf shapes radiating outward. Use black paint for a high-contrast look. -
Fill the petals:
Inside each black petal outline, carefully paint a smaller white teardrop shape. Once that’s dry, use your finest tool or a toothpick to stipple tiny black dots inside the white area for texture. -
Add inter-petal details:
Between the tips of these petals, place a medium white dot. Below that dot, walk smaller orange dots down toward the center to fill the gap. -
Create the outer dark ring:
Paint a broad band of black (or very dark brown) on the outer third of the wood slice face, covering your pencil grid lines.
Step 4: The Outer Rim Details
-
Paint large outer petals:
Over the dry black ring, paint large, varied petal shapes using a mixture of pale yellow or cream. Outline these shapes sharply with a thin black line. -
Texture the outer petals:
Just like the inner petals, fill these cream shapes with a dense collection of tiny black dots. This ‘stippling’ effect mimics the texture of seeds or pollen. -
Dot the perimeter:
Finish the design by placing a final ring of alternating white and orange dots near the very edge of the bark, framing the entire piece. -
Walk the dots:
Add subtle decorative chains of tiny dots around the outer petals using white paint. Load your tool once and touch the wood repeatedly to create dots that naturally decrease in size. -
Erase and Seal:
Once the paint is cured (wait at least 24 hours), gently erase any visible pencil lines. Finish with a clear matte varnish to protect the wood and pop the colors.
Now you have a stunning, nature-inspired mandala that perfectly balances rustic charm with precise geometry


Have a question or want to share your own experience? I'd love to hear from you in the comments below!