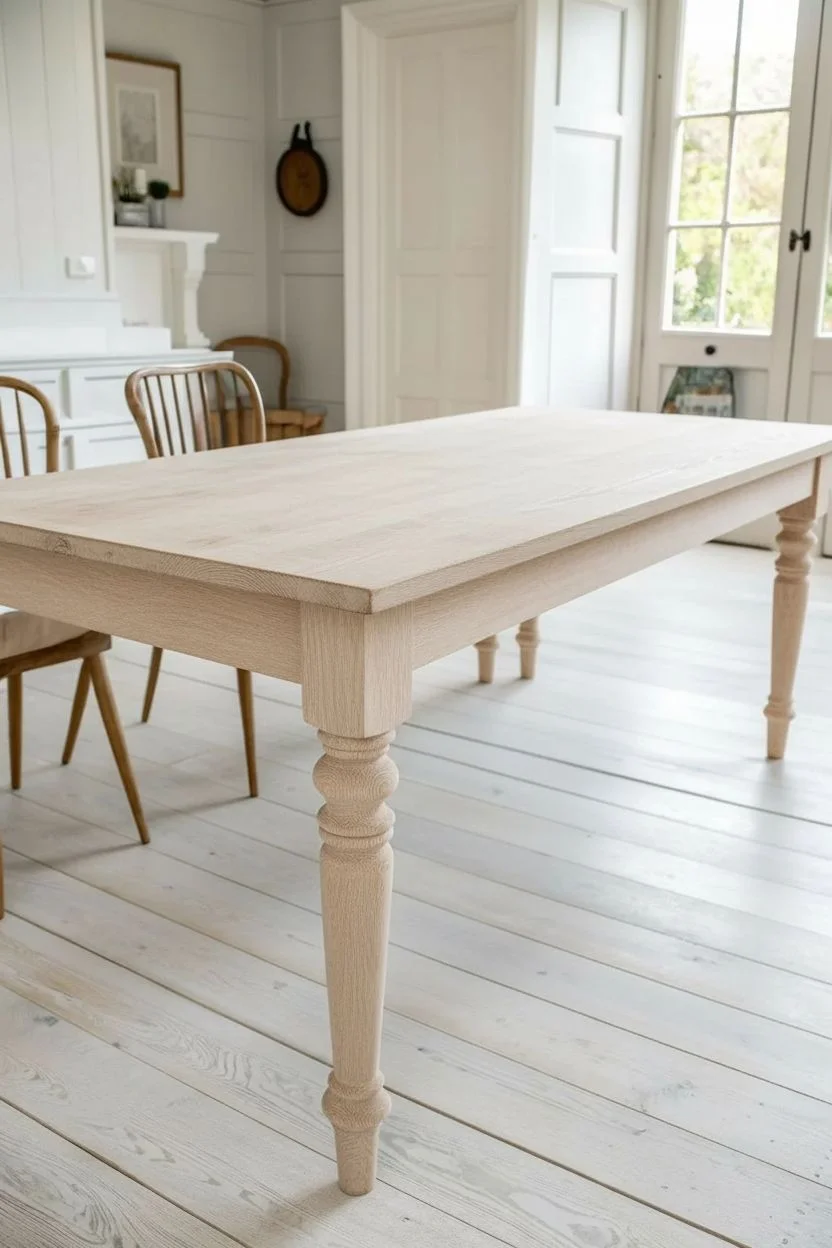
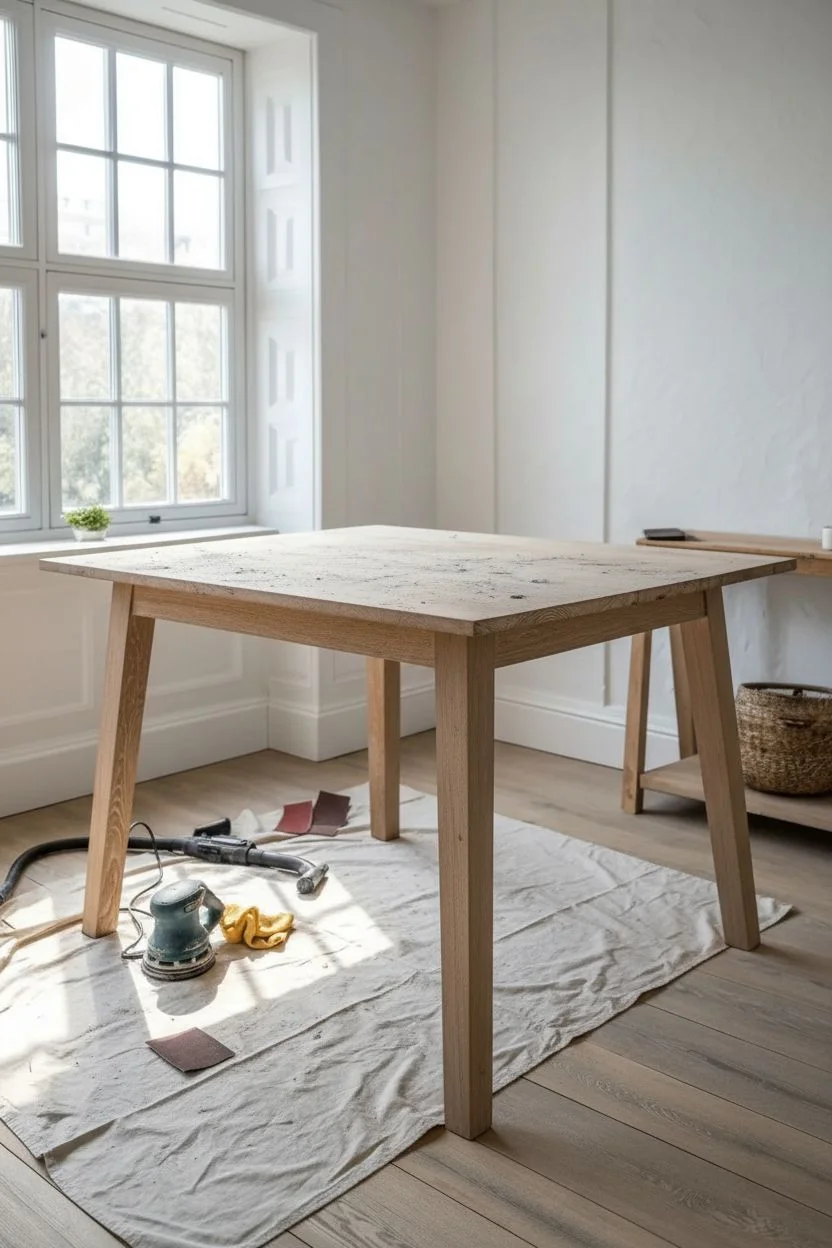
A wooden table is basically a blank canvas that lives right in the middle of your home, so it deserves something more exciting than “meh brown.” Here are my favorite wood table painting ideas that turn scuffs, orange-y tones, and tired finishes into something you actually want to show off.
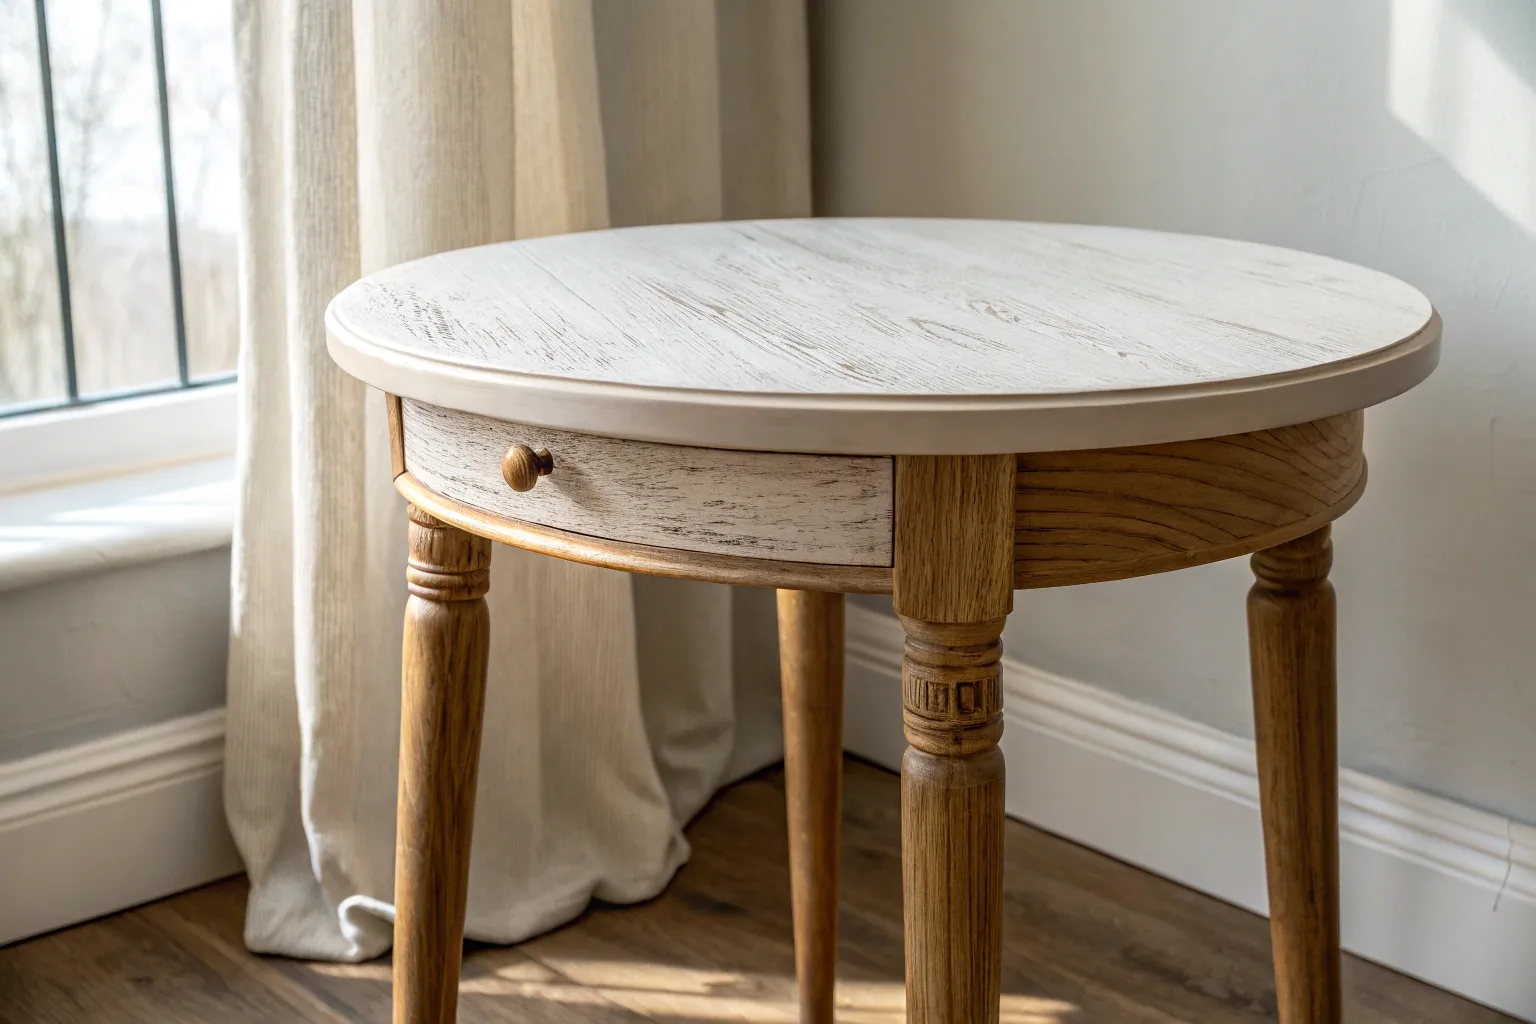
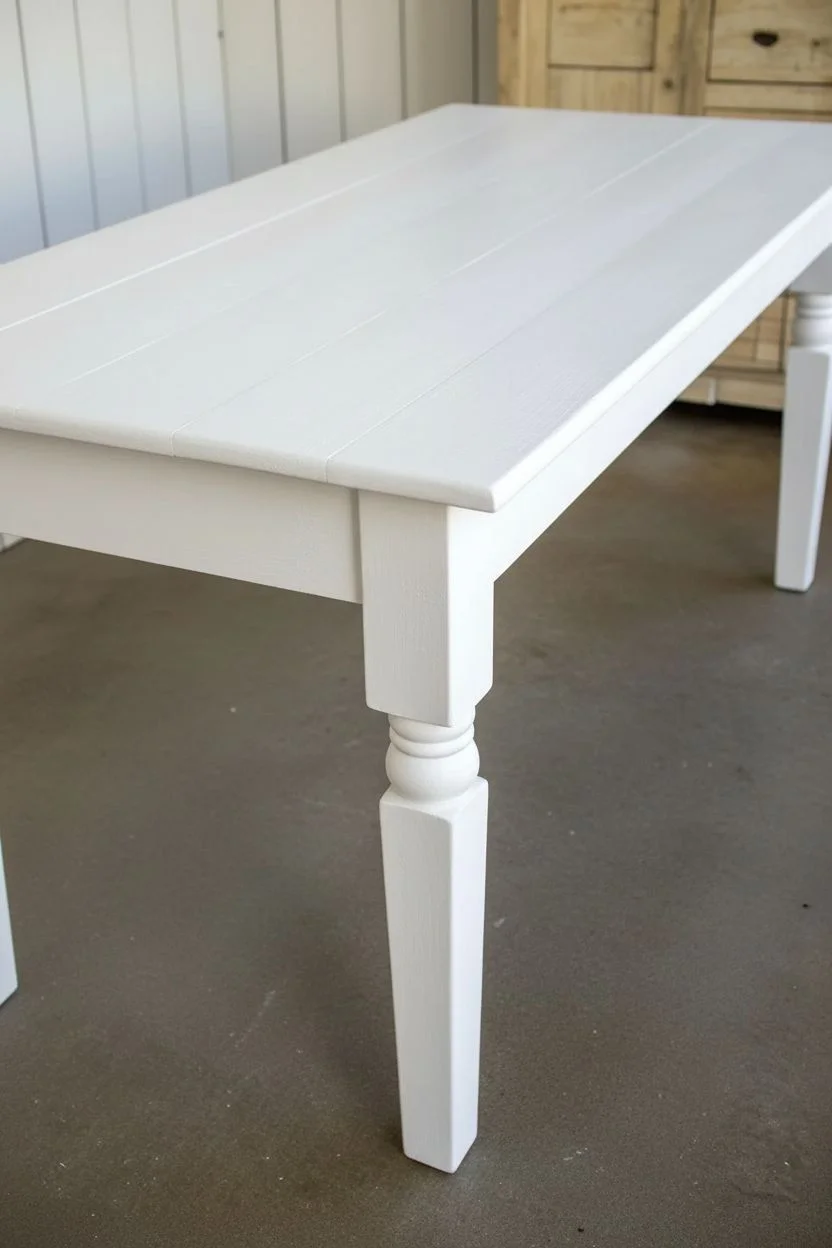
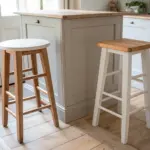
Classic Two-Tone: Painted Base and Natural Wood Top
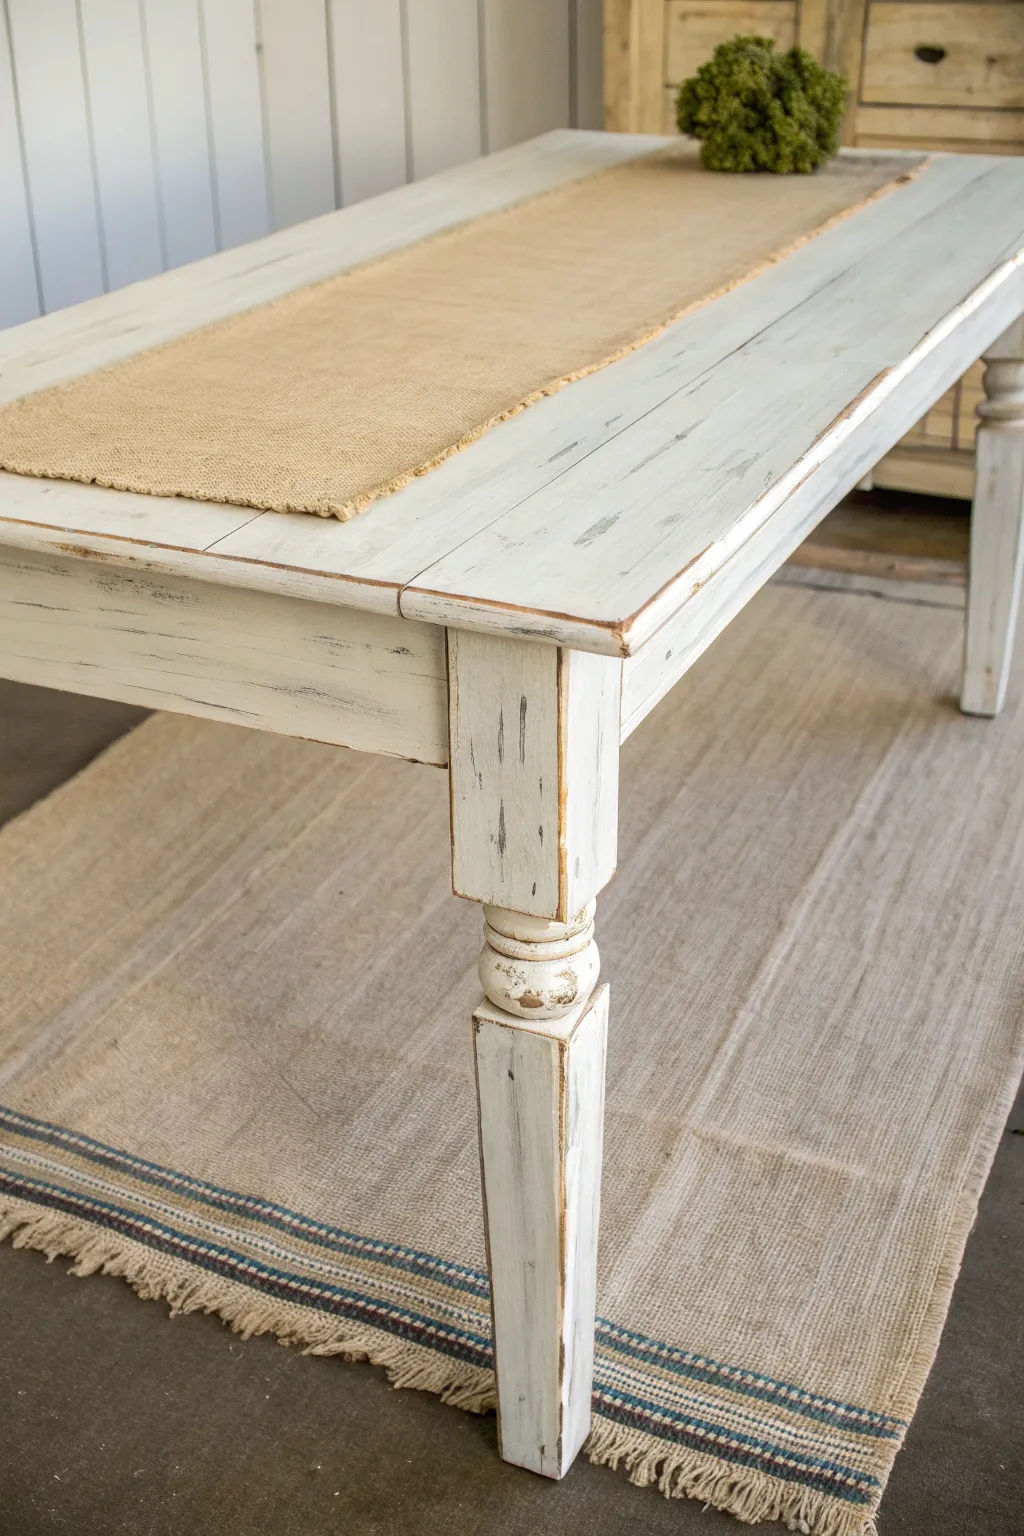
Transform an outdated pedestal table into a bright, airy centerpiece with this layered whitewash technique. The finish combines a sturdy, solid white base with a soft, weathered wood top that highlights the natural grain while keeping the look fresh and modern.
Step-by-Step Guide
Materials
- Round wood pedestal table
- Orbital sander with 80, 120, and 220-grit sandpaper
- Chemical paint stripper (optional, for thick existing finish)
- Plastic scraper
- Chalk-style paint or mineral paint (Creamy White)
- White wash mixture (50/50 water and white latex paint)
- Clean lint-free rags
- High-quality synthetic bristle brush
- Water-based matte polyurethane topcoat
- 220-grit sanding block
- Tack cloths
- Painters tape
Step 1: Stripping and Base Prep
-
Evaluate the Surface:
Begin by cleaning your table thoroughly with a degreaser to remove years of furniture polish or oil. If the existing finish is very thick or glossy, apply a chemical stripper according to the manufacturer’s directions and scrape off the sludge with a plastic scraper. -
Initial Sanding:
Using your orbital sander and 80-grit paper, sand the entire tabletop to remove the remaining old finish. Move in the direction of the wood grain to avoid swirl marks. -
Refine the Surface:
Switch to 120-grit sandpaper to smooth out the roughness from the coarse sanding. Follow this immediately with 220-grit paper for a silky smooth feel. -
Rough the Base:
For the pedestal base and legs, you don’t need to strip it down to bare wood since it will be painted solid. Simply scuff sand deeply with 120-grit sandpaper to give the new paint a surface to grip. -
Clean Up Dust:
Vacuum every crevice of the table, focusing on the details in the pedestal. Wipe the entire piece down with a tack cloth to ensure absolutely no dust remains.
Uneven Whitewash?
If your whitewash looks blotchy, lightly dampen the wood with a moist rag before applying the paint mixture. This helps the wood absorb the pigment more evenly.
Step 2: Creating the Weathered Top
-
Mix the Wash:
Create your whitewash solution by mixing equal parts white latex paint and water in a container. Stir thoroughly until the consistency is like heavy cream or milk. -
Apply the Wash:
Working in sections, brush the whitewash mixture liberally onto the bare wood top. I usually like to tackle about a quarter of the table at a time so the paint doesn’t dry too fast. -
Wipe Back:
Immediately after applying, take a clean lint-free rag and wipe off the excess paint. Rub in the direction of the grain. The goal is to leave pigment in the wood grain while letting the wood tone show through. -
Check Consistency:
Continue this process across the entire top. Step back occasionally to ensure the opacity is even. If one spot looks too white, wipe it harder; if it’s too dark, apply a little more wash and wipe gently. -
Dry and Light Sand:
Let the top dry completely (at least 2 hours). Once dry, very lightly run a fine-grit sanding block over the surface to knock down any raised grain fibers and soften the look further.
Step 3: Painting the Base and Distressing
-
Paint the Pedestal:
Apply your first coat of creamy white chalk or mineral paint to the base. Use a high-quality synthetic brush to get into the curves of the pedestal without leaving heavy brush strokes. -
Apply Second Coat:
Allow the first coat to dry according to the can’s instructions, then apply a second coat for solid, opaque coverage. Chalk paints generally dry quickly, often within 30-60 minutes. -
Distress the Edges:
Once the base paint is fully dry, take a 220-grit sanding block and gently rub along the raised edges, the feet, and curves of the pedestal. Remove paint just until the wood underneath peeks through to create that time-worn look shown in the image.
Pro Tip: Grain Direction
Always end your brush strokes and wiping motion in the direction of the wood grain. Cross-grain strokes will show up as scratches once the whitewash dries.
Step 4: Sealing and Protection
-
Seal the Top:
The dining surface needs durable protection. Apply a coat of water-based matte polyurethane using a specialized topcoat brush or a foam applicator. Long, even strokes are key here. -
Sand Between Coats:
Let the sealer dry for at least 2 hours. Hand sand lightly with 320-grit sandpaper or a fine sanding sponge to smooth out any dust nibs, then wipe clean. -
Final Layers:
Apply 2-3 more coats of polyurethane to the tabletop for maximum durability, sanding lightly between each one. For the painted base, one or two coats of sealer or a clear wax finish is sufficient to protect the paint.
Now you have a stunning, durable table ready for family meals and gatherings.


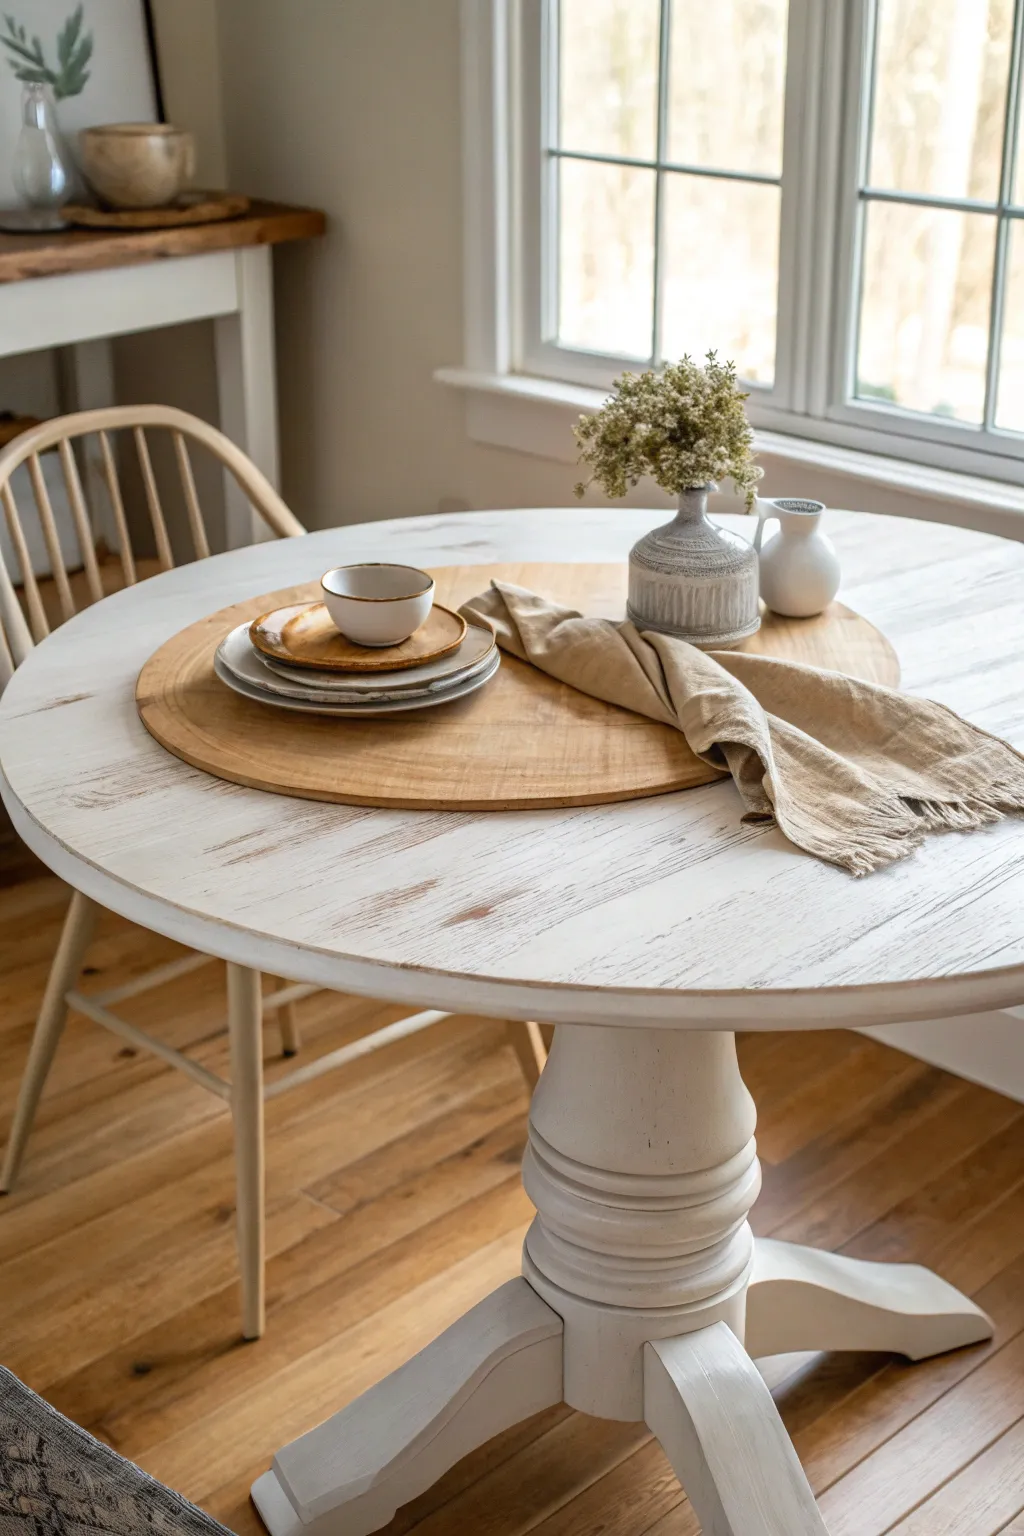
All-Over Solid Color for a Clean, Modern Table
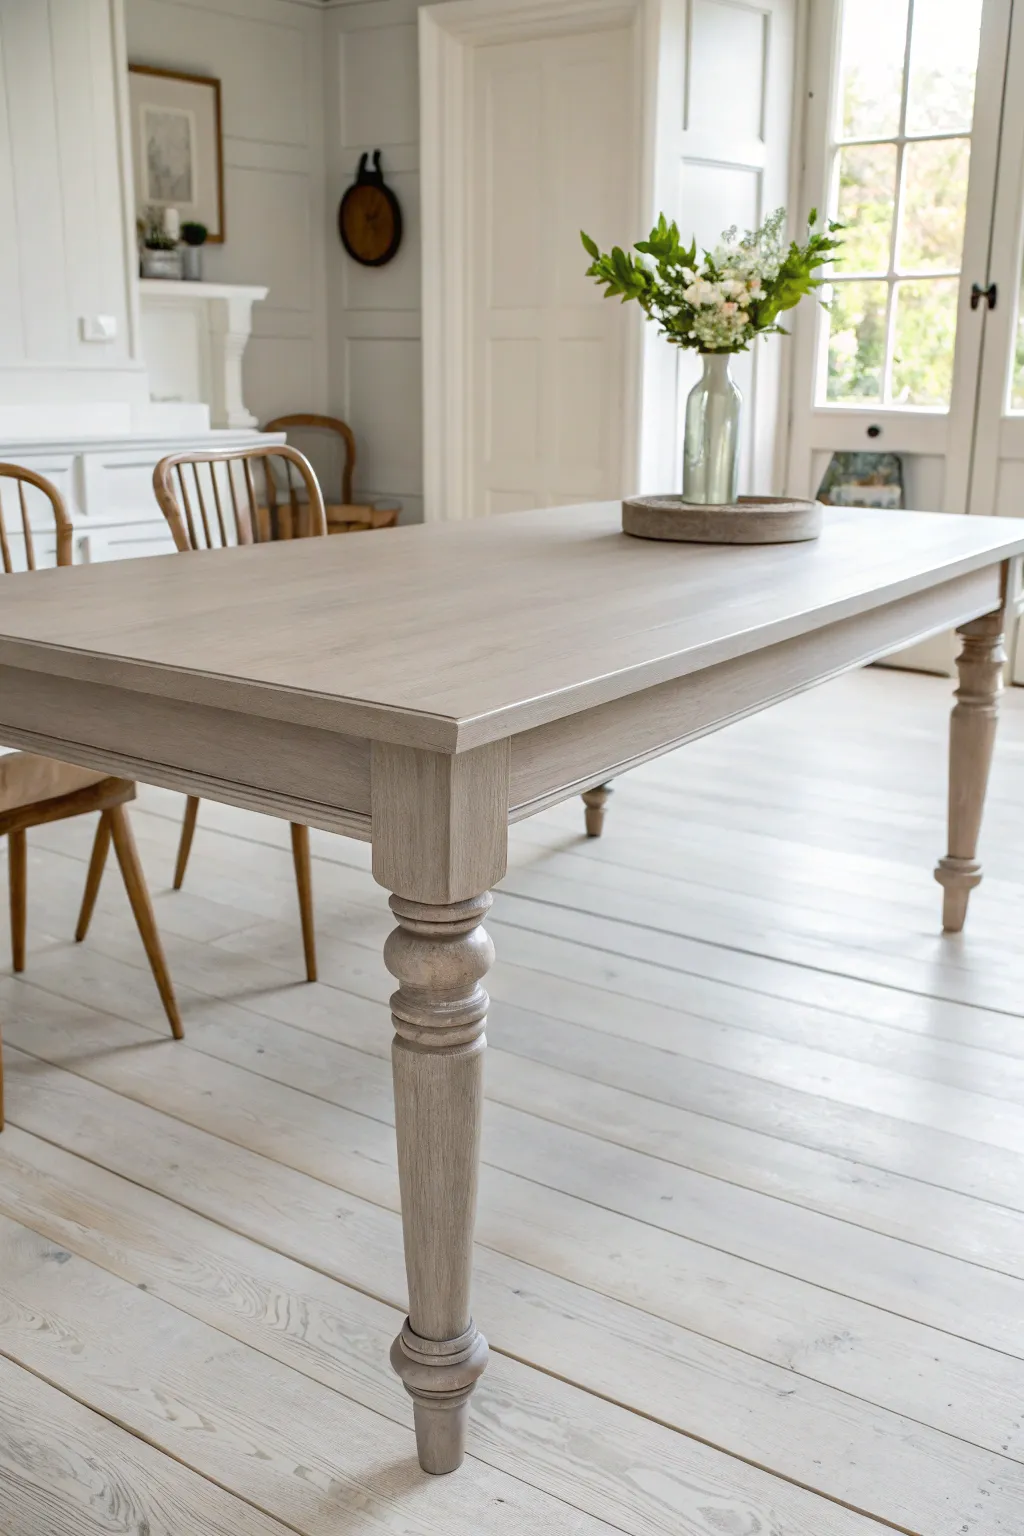
Transform a traditional wooden dining table into a breezy, modern farmhouse centerpiece with this subtle wash technique. Instead of hiding the wood under heavy paint, this method uses a diluted gray-beige glaze to highlight the natural grain while neutralizing yellow tones for a sophisticated, airy finish.
Detailed Instructions
Materials
- Solid wood dining table (preferably oak or pine)
- Course, medium, and fine grit sandpaper (80, 150, 220)
- Orbital sander
- Tack cloths
- Water-based matte polyurethane or polycrylic
- Light gray latex paint (warm undertone)
- Water for dilution
- Wide synthetic bristle brush (3-4 inch)
- Lint-free cotton rags
- Painter’s tape
- Drop cloths
- Pre-stain wood conditioner (optional)
Step 1: Preparation & Stripping
-
Assess the surface:
Before creating this light finish, you must reach raw wood. If your table has a thick, glossy varnish, apply a chemical stripper first to remove the bulk of the old finish, following the manufacturer’s safety instructions. -
Initial sanding:
Using an orbital sander with 80-grit sandpaper, remove any remaining finish or stain. Move the sander slowly with the grain to avoid swirl marks. -
Refine the surface:
Switch to 150-grit sandpaper to smooth out the roughness left by the heavy sanding. Pay special attention to the turned legs, which may require hand-sanding with a flexible sponge or folded paper to navigate the curves. -
Final smoothing:
Finish the sanding process with 220-grit paper. The wood should feel noticeably smooth to the touch. This step is crucial because scratches will absorb more pigment and look like dark streaks later. -
Clean deeply:
Vacuum the entire table thoroughly to remove dust from crevices. Wipe it down twice with fresh tack cloths to ensure absolutely no dust remains.
Pro Tip: Grain Direction
Always wipe off the wash in one continuous motion from one end of the table to the other. Stop-and-start wiping creates blotchy patches that look messy.
Step 2: Creating the Wash
-
Mix the wash solution:
In a plastic container, mix your light gray latex paint with water. I generally prefer a 1:1 ratio for a balance of color and transparency, but test on a scrap piece or hidden leg area first. -
Adjust consistency:
The mixture should have the consistency of heavy cream or milk. If it’s too thick, add water in small increments; if too thin, add a touch more paint.
Level Up: Cerused Look
For more drama, use a wire brush to open the grain before painting. Apply white wax into the grooves after sealing for a striking, two-tone cerused effect.
Step 3: Application Technique
-
Work in sections:
Plan to work on one distinct area at a time—do the tabletop first, then individual legs. This prevents the wash from drying before you can wipe it back. -
Apply the wash:
Dip your synthetic brush into the mixture and brush it onto the wood in long, even strokes following the direction of the wood grain. Ensure full coverage but don’t puddle the liquid. -
Let it sit briefly:
Allow the wash to penetrate the wood for about 1-2 minutes. The longer it sits, the more opaque the final look will be. -
Wipe back:
Take a clean, lint-free rag and gently wipe away the excess wash. Wipe in long, continuous motions with the grain. Your goal is to leave pigment in the grain pores while revealing the wood structure. -
Check for lap lines:
Inspect the edges of your section. Keep a damp edge to blend the next section seamlessly so you don’t get harsh overlapping lines. -
Address these legs:
For the turned legs, brush the wash into the crevices and curves. When wiping back, use a balled-up rag to get into the details, leaving slightly more pigment in the deep creases to accentuate the shape.
Step 4: Finishing & Protection
-
Dry time:
Allow the table to dry completely, preferably overnight. The water in the wash raises the grain slightly, so the surface might feel fuzzy. -
Light scuff sand:
Very gently run a piece of 320-grit sandpaper or a brown paper bag over the surface to knock down the raised grain without removing your color. -
First coat of sealer:
Apply a coat of water-based matte polyurethane using a high-quality brush. Water-based is essential here because oil-based poly will amber over time and ruin the cool gray tone. -
Sand between coats:
Once dry (check can instructions, usually 2 hours), lightly sand with fine grit paper again to ensure a professional, smooth feel. -
Final coats:
Apply 2-3 additional coats of the matte poly for a durable dining surface. Let the table cure for at least 72 hours before placing heavy objects or dishes on it.
Enjoy your beautifully refreshing table makeover and the light, modern vibe it brings to your dining space


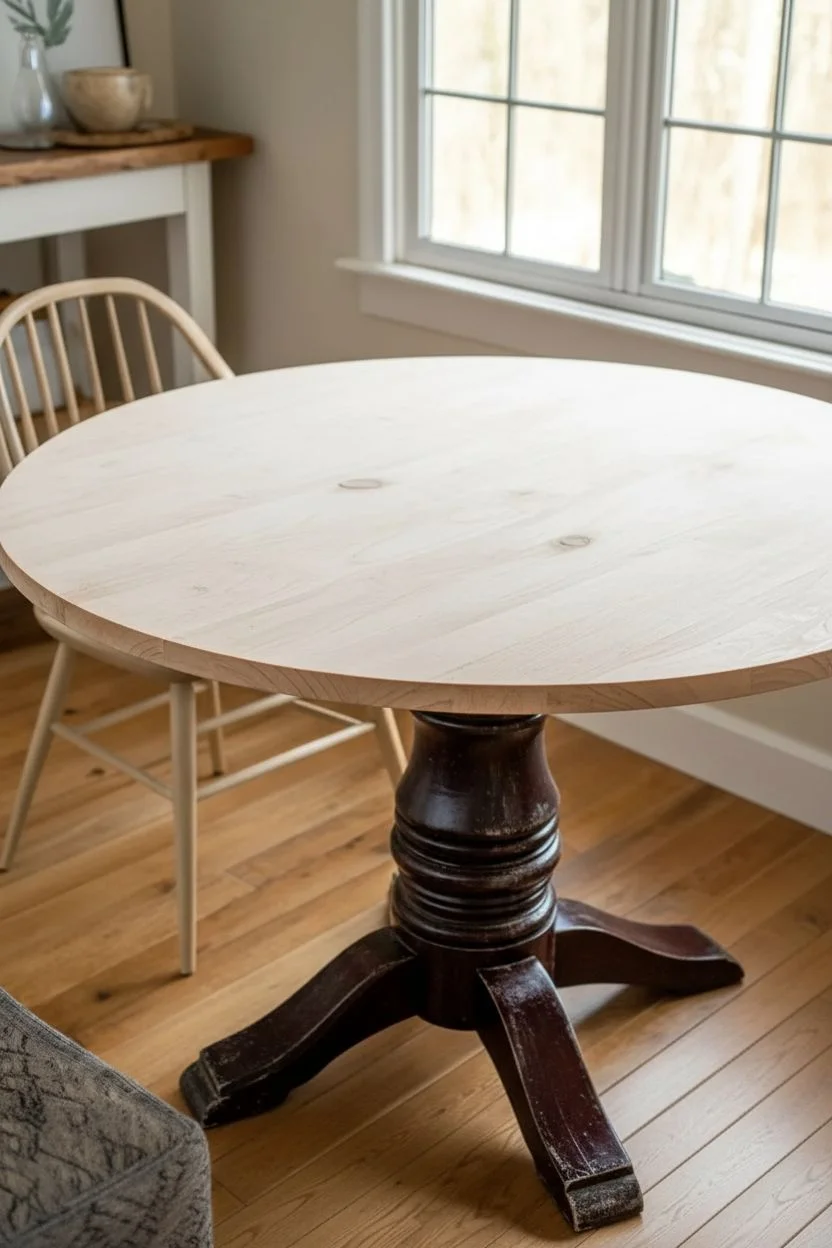
Soft Whitewash to Calm Down Orange-Toned Wood
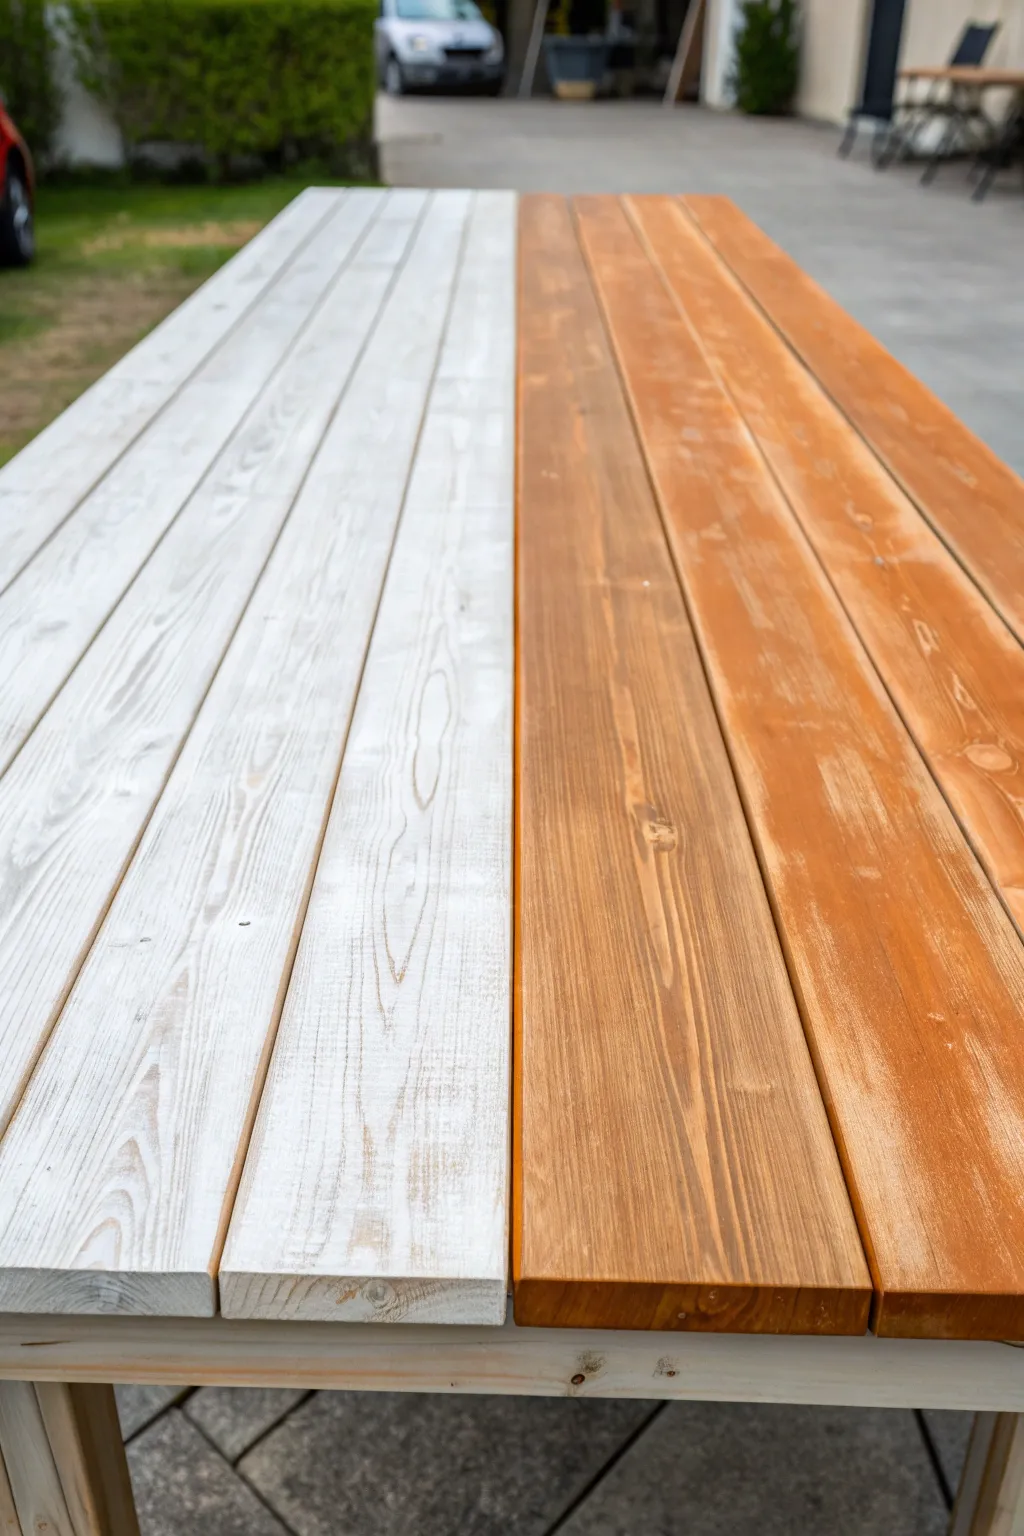
Transform vibrant orange-toned wood into a soft, breezy farmhouse finish using a simple whitewashing technique. This side-by-side comparison shows exactly how a translucent white glaze can neutralize warm undertones while keeping the beautiful wood grain visible.
How-To Guide
Materials
- White latex or chalk paint
- Water (for diluting)
- Clean mixing container
- Paint stir stick
- High-grit sandpaper (220-grit)
- Tack cloth or microfiber rag
- Wide synthetic bristle brush (3-4 inch)
- Clean, lint-free cotton rags
- Matte or satin polyurethane sealer
Step 1: Preparation & Cleaning
-
Assess the Surface:
Begin by examining your table. Ensure the existing finish is clean and free of any wax or oil polish, which can repel the whitewash. -
Light Scuff Sanding:
Take your 220-grit sandpaper and lightly run it over the wood planks. You aren’t trying to strip the distinct orange color; you simply want to scuff the glossy topcoat so the new paint adheres. -
Remove Dust:
Wipe the entire table down thoroughly with a tack cloth. Remove every speck of sawdust, as trapped dust will create gritty lumps in your smooth whitewash. -
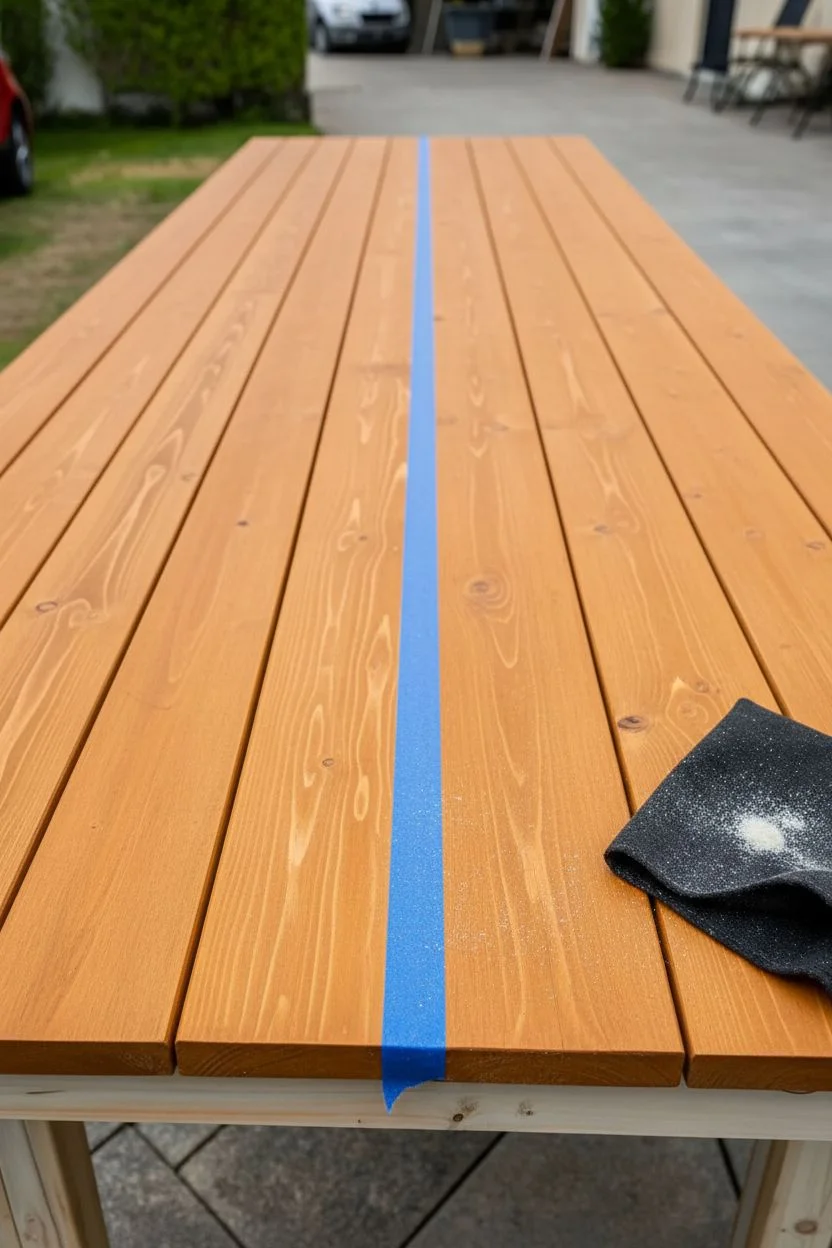
Tape Off (Optional):
If you are doing a split design like the reference photo to test the look, apply painter’s tape deeply into the groove between two center planks to get a crisp dividing line.
Wiping Technique
Don’t scrunch the rag. Fold it into a flat pad to ensure even pressure. This prevents ‘stop marks’ where your hand lifted off the wood.
Step 2: Mixing the Wash
-
Pour the Paint:
Pour a small amount of white latex or chalk paint into your mixing container. -
Add Water Gradually:
Slowly add water to the paint. I like to start with a 1:1 ratio mixture—equal parts paint and water. -
Stir Thoroughly:
Mix the solution vigorously with a stir stick until the consistency resembles heavy cream or whole milk. It should be runny but still opaque in the bucket. -
Test the Opacity:
Brush a tiny bit onto a scrap piece of wood or an unseen underside of the table. If it’s too solid, add more water; if it’s too transparent, add a touch more paint.
Step 3: Applying the Whitewash
-
Load the Brush:
Dip your wide synthetic brush into the wash mixture, tapping off the excess to prevent messy drips. -
Apply with Grain:
Brush the mixture onto the wood surface, moving in long strokes ranging from one end of the plank to the other. Always follow the direction of the wood grain. -
Work in Sections:
Don’t try to paint the whole table at once. Focus on 2-3 planks at a time so the paint doesn’t dry fully before you can manipulate it. -
Let it Sit Briefly:
Allow the wash to sit on the wood for about 30 to 60 seconds. The longer it sits, the more opaque the final white tone will be. -
Wipe Back:
Use a clean, lint-free cotton rag to gently wipe away the excess paint. Wipe in the direction of the grain to push the pigment into the wood pores while revealing the texture. -
Evaluate Coverage:
Check your progress. You should see the orange tone muted significantly, replaced by a softer, beachy blonde hue. -
Second Coat (Optional):
If the orange is still too strong for your taste, wait for the first layer to dry completely (about 1 hour) and repeat the brush-and-wipe process for a brighter white finish.
Wire Brush Effect
Before painting, scrub the raw wood with a wire brush to open the grain deeply. The white paint will settle into these grooves for high contrast.
Step 4: Sealing and Finishing
-
Dry Time:
Let the whitewash dry completely, ideally overnight, to ensure all moisture has evaporated from the wood grain. -
Final Light Sanding:
Run a piece of fine-grit sandpaper very gently over the surface to knock down any raised grain fibers, making the table feel buttery smooth. -
Apply Sealer:
Using a clean brush, apply a coat of clear matte or satin polyurethane. Look for a water-based formula that won’t yellow over time. -
Protect the Finish:
Ensure you seal the ends of the planks well, as moisture tends to seep in there first.
Enjoy the lighter, more modern look of your refreshed table surface


Farmhouse Distressed Finish for a Timeworn Wood Table Look
Achieve the charm of a generations-old heirloom with this heavy distressing technique. By layering white paint over dark wood and strategically sanding it back, you’ll create a perfectly imperfect finish that adds instant character to any dining room.
Step-by-Step Tutorial
Materials
- Wooden dining table (unsealed or previously stained dark)
- Medium-grit sandpaper (100–120 grit)
- Fine-grit sandpaper (220 grit)
- Electric orbital sander (optional but recommended)
- Dark walnut wood stain (if table is raw wood)
- White or cream chalk-style paint
- 2-inch synthetic bristle paint brush
- Clean lint-free rags
- Clear matte polycrylic topcoat
- Tack cloth
- Drop cloths
Step 1: Preparation and Base Coat
-
Assess the surface:
Examine your table. If it has a shiny, thick varnish, you will need to sand it down to raw wood first. If it is already raw or just has a light stain, give it a quick scuff sand with medium-grit paper to help the new layers adhere. -
Establish the dark base:
The key to this look is the dark wood showing through deeply. If your table is light pine or unfinished, apply a coat of dark walnut stain with a lint-free rag. Wipe away excess and let it dry completely, usually overnight. -
Clean thoroughly:
Before painting, wipe the entire table down with a tack cloth to remove every speck of dust. Any debris left behind will create unwanted bumps in your smooth finish. -
Apply the first coat:
Brush on your white chalk-style paint, following the direction of the wood grain. Don’t worry about perfect opacity here; a slightly thinner coat allows for easier distressing later. -
Dry and cure:
Allow this first coat to dry fully according to the can’s instructions, typically 2–4 hours for chalk paint. -
Apply the second coat:
Add a second coat of white paint for better coverage. Pay special attention to the turned legs and apron, ensuring paint gets into the crevices, but keep the application relatively thin to avoid drips.
Dry Brushing Trick
If you sanded too much off, don’t restart! Simply ‘dry brush’ a tiny amount of white paint back over the spot to feather it out and blend the mistake.
Step 2: Distressing and Finishing
-
Begin coarse sanding:
Once the paint is bone dry, wrap 100-grit sandpaper around a sanding block. Start sanding the flat tabletop surface with moderate pressure, moving exclusively with the grain. -
Create distinct wear patterns:
Focus your sanding efforts on areas that would naturally wear down over time, like the corners, the edges of the planks, and the perimeter of the table. Sand until the dark wood stain underneath is clearly visible in these spots. -
Distress the surface cracks:
If your table has grooves between planks, like the project image, run the sandpaper aggressively along these lines to widen the reveal of the dark wood. -
Introduce surface scratches:
For the random ‘scuff’ marks on the flat surface, use the edge of your sanding block or folded sandpaper to make short, choppy sanding strokes deep into the paint layer. -
Work the legs:
Move to the table legs. Use the sandpaper to highlight the raised rings and curves of the turned wood. I find that wrapping the paper around the leg and twisting creates a natural wear pattern on the high points. -
Smooth the finish:
Switch to 220-grit sandpaper and lightly go over the entire piece. This isn’t to remove more paint, but to soften the transition between the paint and the exposed wood, making the surface feel buttery smooth. -
Final clean:
Vacuum up the significant amount of dust created during distressing, then wipe everything down with a fresh tack cloth to ensure the surface is pristine. -
Seal for protection:
Apply a coat of clear matte polycrylic using a high-quality synthetic brush. Polycrylic is preferred over polyurethane as it won’t yellow the white paint over time. -
Sand between coats:
Once the sealer is dry, very lightly sand with 220-grit paper to knock down any raised grain or bubbles. -
Final seal:
Apply two more thin coats of polycrylic, allowing sufficient drying time between each. This ensures your dining table can withstand daily use and spills.
Paint Peeling?
If paint peels off in sheets during sanding, the underlying finish was too glossy. Sand deeper to remove the old gloss, prime the spot, and repaint.
Invite your family and friends over to enjoy a meal on your gorgeous, durable new centerpiece.
BRUSH GUIDE
The Right Brush for Every Stroke
From clean lines to bold texture — master brush choice, stroke control, and essential techniques.
Explore the Full Guide
Painted Pedestal Base on a Round Wooden Table
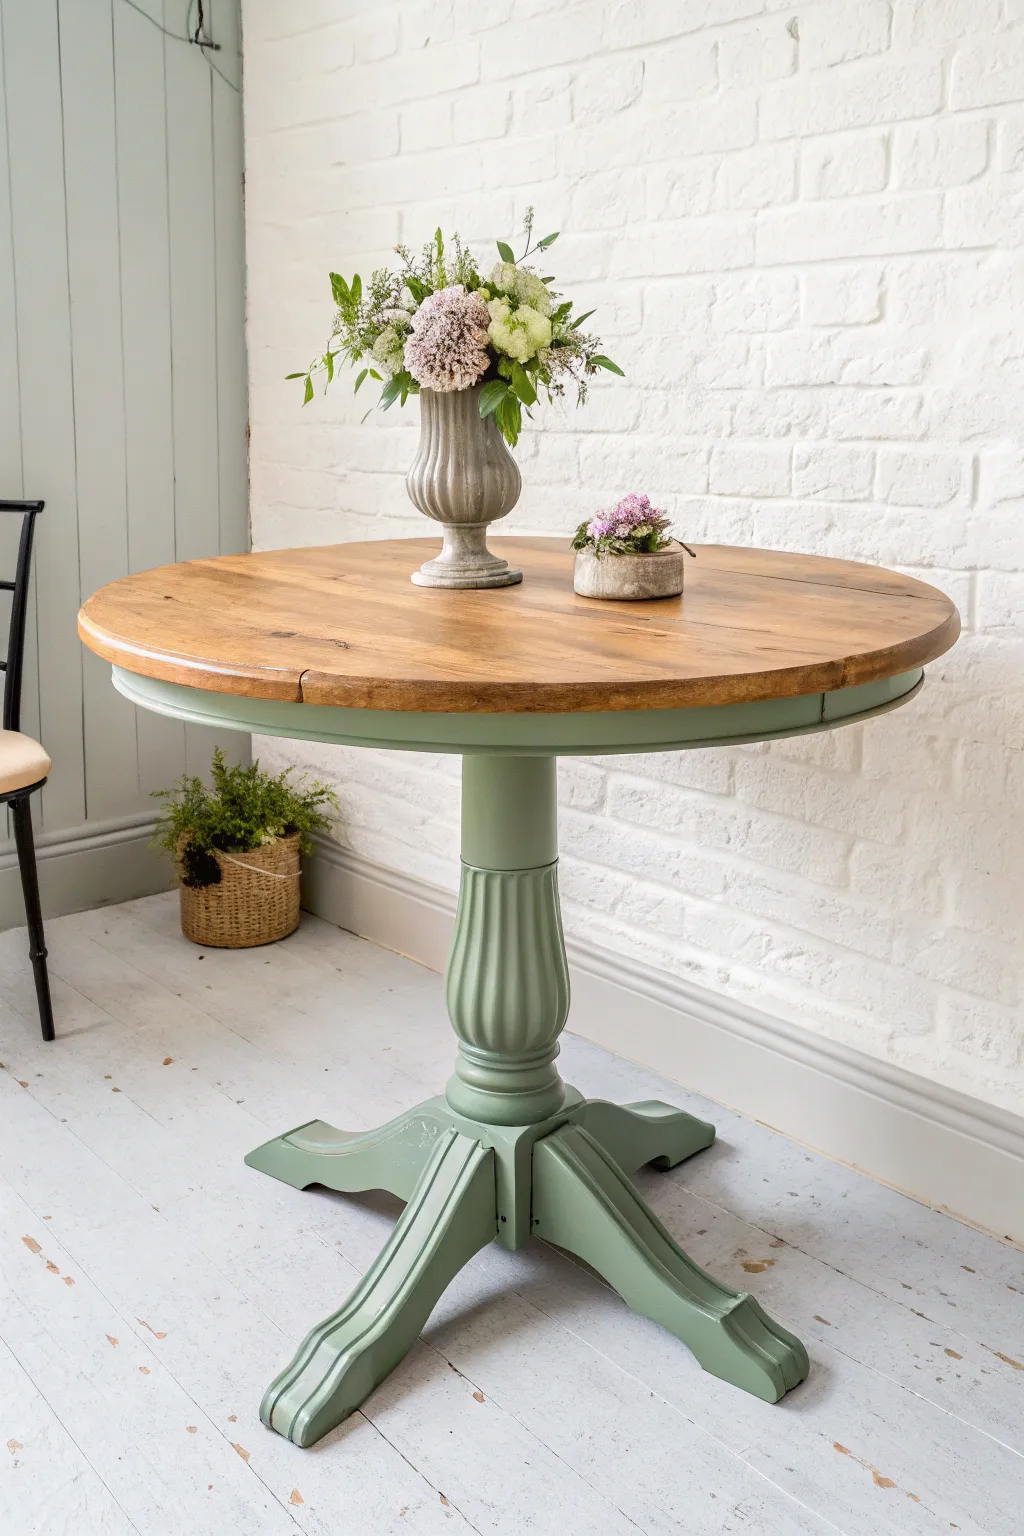
Transform a dated pedestal table into a country-chic centerpiece by pairing a warm, natural wood top with a soft sage green base. This two-tone approach highlights the beautiful grain of the tabletop while giving the legs a fresh, modern update that fits perfectly in farmhouse or cottage interiors.
How-To Guide
Materials
- Round wooden pedestal table (pedestal separates from top if possible)
- Orbital sander
- Sandpaper discs (80, 120, and 220 grit)
- Wood stain (medium oak or walnut tone)
- Polyurethane topcoat (matte or satin)
- Sage green chalk paint or mineral paint
- Furniture wax (clear) or protective sealant for paint
- High-quality synthetic bristle brush (2-inch)
- Small detail brush
- Painter’s tape
- Tack cloth or lint-free rags
- Screwdriver or wrench (for disassembly)
Step 1: Prep and Dismantle
-
Separate the pieces:
Flip the table over carefully and remove the screws or bolts connecting the pedestal base from the tabletop. Working on these pieces separately makes sanding and painting infinitely easier. -
Clean thoroughly:
Wipe down the entire table with a de-greasing cleaner to remove years of furniture polish, oils, and dust. This ensures your new finish will adhere properly.
Pro Tip: Fluted Details
When painting the fluted (grooved) section of the pedestal, always brush vertically with the grooves, not across them. This hides brush strokes and prevents paint buildup.
Step 2: Restoring the Tabletop
-
Heavy sanding:
Using an orbital sander with 80-grit paper, strip away the old finish on the tabletop. Move slowly to ensure you remove all old varnish without gouging the wood. -
Smooth the surface:
Switch to 120-grit sandpaper to remove the scratches left by the coarse paper. Follow this with a final pass using 220-grit for a glass-smooth finish. -
Clean dust:
Vacuum the wood dust thoroughly and wipe the surface with a tack cloth. Any remaining dust will create a bumpy finish. -
Apply stain:
Apply your chosen wood stain with a rag or staining pad, working with the grain. Wipe off excess stain after a few minutes, depending on how dark you want the tone. -
Seal the wood:
Once the stain is completely dry (check the can’s instructions), apply three coats of polyurethane. Lightly sand with a high-grit sanding sponge between coats for a professional durable surface.
Step 3: Painting the Pedestal Base
-
Scuff sand the base:
You don’t need to strip the base to bare wood. Just give it a good scuff sanding with 120-grit paper to help the paint grip the curved surfaces. -
Tape off hardware:
If there are metal feet or bolts you can’t remove, cover them precisely with painter’s tape. -
First coat of green:
Apply your sage green chalk or mineral paint. Use a high-quality synthetic brush to minimize brush strokes. Don’t worry if coverage looks patchy on the first coat. -
Tackle the details:
Use a smaller detail brush to get paint into the deep grooves of the fluted pedestal and the curves of the feet where a larger brush might cause drips. -
Apply second coat:
After the first coat is dry to the touch, apply a second coat for full, opaque coverage. I find that painting in thin layers prevents drips on these vertical surfaces. -
Check for imperfections:
Look closely for any runs or drips, especially in the crevices of the pedestal design, and smooth them out before the paint fully cures.
Level Up: Whitewash Top
Instead of a standard stain, try a diluted whitewash on the raw wood top before sealing. This creates a beachy, driftwood aesthetic that pairs beautifully with the sage base.
Step 4: Finishing Touches
-
Seal the paint:
If using chalk paint, apply a clear furniture wax with a lint-free cloth or wax brush to seal and protect the color. Buff it to a soft sheen once dry. -
Reassemble:
Once both the top and base are fully cured (wait at least 24 hours), carefully reattach the top to the pedestal base. -
Optional distressing:
For a slightly more rustic look, you can run a sanding block gently over the raised edges of the pedestal feet before waxing to reveal a peek of wood.
Enjoy your refreshed dining table that perfectly blends rustic warmth with modern color
Moody Black or Charcoal for a High-Contrast Statement Table
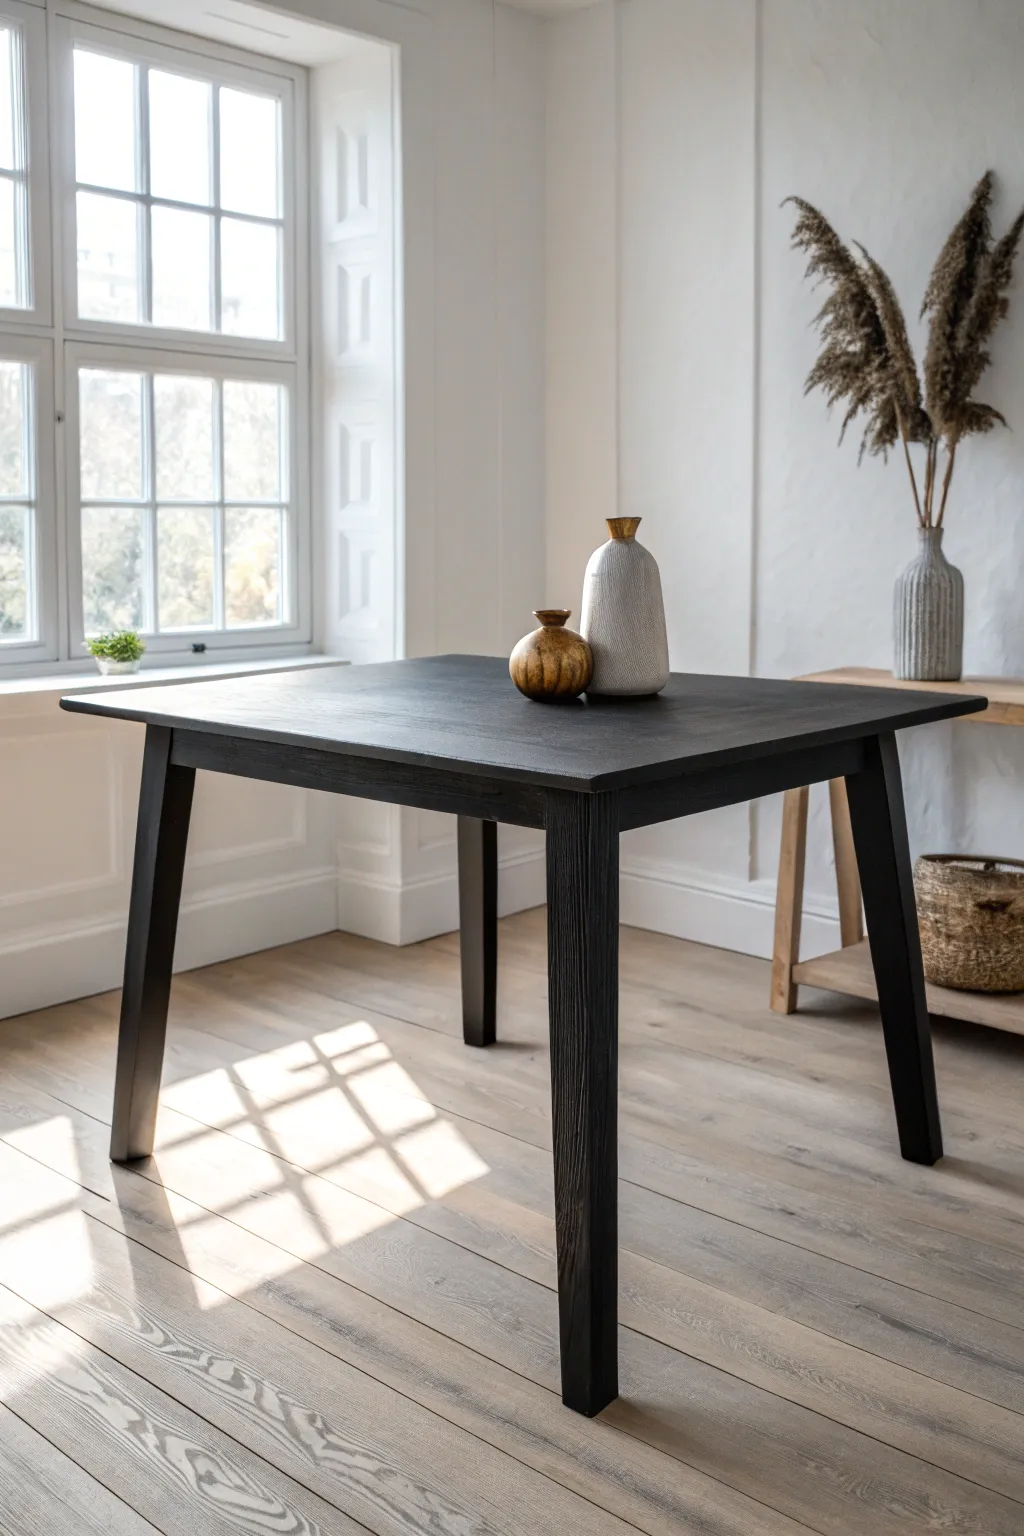
Bring deep, moody sophistication to your dining space with this matte charcoal finish that completely transforms a standard wooden table. This project focuses on achieving a smooth, opaque look that still hints at the natural wood texture beneath, creating a high-contrast statement piece.
Detailed Instructions
Materials
- Wooden dining table (unfinished or previously finished)
- Course-grit sandpaper (80-100 grit)
- Medium-grit sandpaper (150-180 grit)
- Detail sander or sanding block
- Tack coth or microfiber rags
- Degreasing cleaner (like TSP or simple dish soap)
- Oil-based bonding primer (tinted gray recommended)
- Matte or Satin Black/Charcoal furniture paint (chalk or mineral paint works well)
- High-quality synthetic bristle brush (2-inch flat)
- Small foam roller (for the top surface)
- Water-based polyurethane topcoat (matte finish)
- Drop cloth
- Painter’s tape
Step 1: Preparation & Sanding
-
Assess and clean:
Begin by removing any dust or grease from the table using a degreasing cleaner. If the table has a heavy varnish, give it a good scrub to ensure your sandpaper doesn’t gum up immediately. -
Initial coarse sanding:
Use your orbital sander with 80-100 grit paper to strip away the old clear coat or stain. You want to expose the raw wood fibers, but you don’t need to remove every single speck of old stain if it’s deep in the grain. -
Smoothing the surface:
Switch to 150-grit sandpaper to smooth out the scratches from the coarse paper. Run your hand over the top frequently to check for rough patches. -
Detail work:
Don’t forget the legs and apron. I usually switch to a sanding sponge here to get around the curves and sharp corners of the legs without flattening them. -
Dust removal:
Vacuum the entire table thoroughly. Follow up with a tack cloth to pick up the fine dust that settles in the grain.
Step 2: Priming for Depth
-
Applying primer:
Brush on a coat of bonding primer. Since we are going for a pure black look, asking the paint counter to tint your primer gray helps achieve coverage faster and prevents white spots from showing through distress marks later. -
Smooth the primer:
Once the primer is fully dry, lightly scuff it with fine 220-grit sandpaper. This knocks down any brush strokes or texture raised by the moisture. -
Wipe clean:
Remove the sanding dust with a damp rag one last time before the real color goes on.
Sticky Situation?
If the finish feels tacky after drying, humidity is likely the culprit. Move the table to a drier room or run a dehumidifier. Don’t add more coats until it feels dry to the touch.
Step 3: Painting the Void
-
Legs first:
Flip the table if manageable, or just start underneath. Use your synthetic brush to paint the inside facets of the legs and the apron. Long, vertical strokes work best here. -
Tabletop technique:
For the large flat top, use a small foam roller to apply the charcoal paint. This minimizes brush marks. Work in small sections, always maintaining a ‘wet edge’ to overlap slightly. -
Smoothing the top:
immediately after rolling a section, lightly drag a clean, dry brush over the wet paint from end to end (a technique called ‘laying off’) to ensure the finish looks consistent with the wood grain direction. -
Dry and repeat:
Let the first coat dry according to the manufacturer’s instructions. Apply a second coat using the exact same method. Two coats are usually sufficient for a deep, opaque black. -
Check coverage:
Inspect the table in good lighting. If you see any uneven patches, apply a thin third coat rather than trying to touch up spots, which can look patchy.
Grain Game
To emphasize the wood texture even more, use a wire brush to open the grain before priming. The black paint will settle into the grooves for a rich, tactile surface.
Step 4: Sealing and Protecting
-
Topcoat preparation:
Ensure the black paint has cured for at least 24 hours. Gentleness is key here. -
Apply matte sealer:
Using a high-quality brush or a fresh foam roller, apply a thin layer of matte water-based polyurethane. A matte finish is crucial to replicating the modern look in the reference image. -
Wait and sand:
Let the first coat of poly dry, then very lightly sand with super-fine 320-grit paper. This removes any dust nibs for a factory-smooth feel. -
Final coat:
Apply the second and final coat of polyurethane. Be vigilant about catching drips on the edges of the table while they are wet. -
Curing time:
Allow the table to cure for several days before placing heavy objects or hot dishes on it to prevent indentations in the fresh finish.
Enjoy your bold new dining centerpiece that anchors the room with modern elegance

PENCIL GUIDE
Understanding Pencil Grades from H to B
From first sketch to finished drawing — learn pencil grades, line control, and shading techniques.
Explore the Full Guide
Bold Pop Color Base to Wake Up a Plain Wood Table
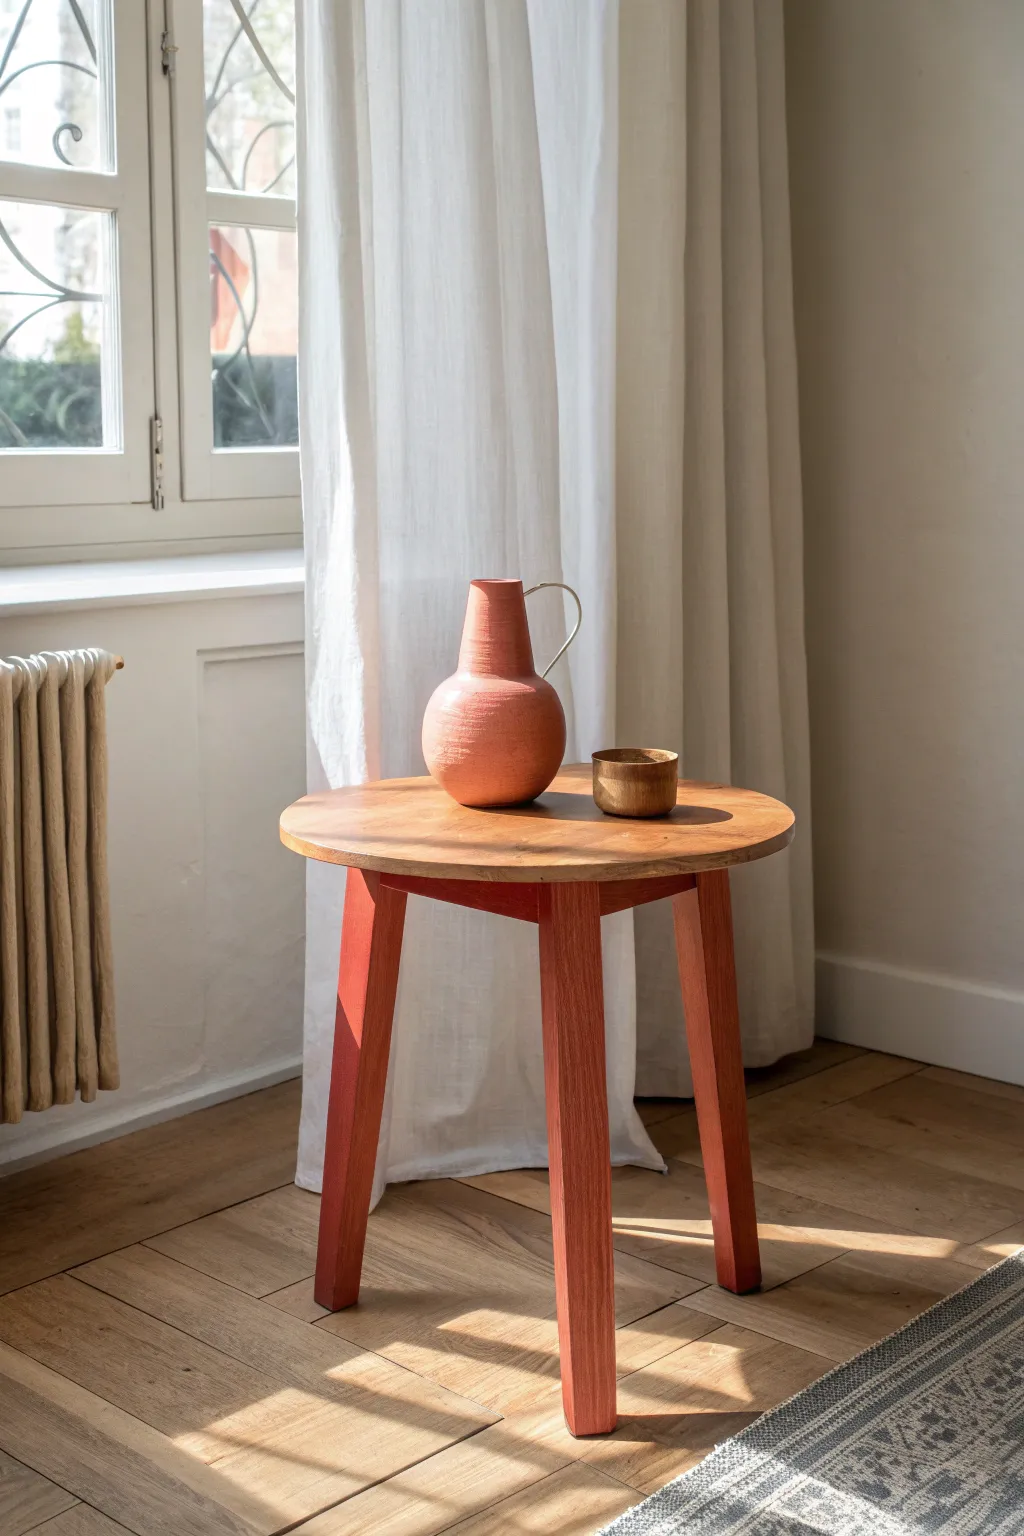
Transform a basic wooden side table into a statement piece with this clever two-tone technique. By leaving the top natural and painting the legs a warm, earthy terracotta, you create a sophisticated yet playful contrast that instantly warms up a room.
Step-by-Step Tutorial
Materials
- Small round wooden side table (tripod style works best)
- Sandpaper (120-grit and 220-grit)
- Painter’s tape (high quality)
- Terracotta or warm burnt orange chalk paint
- Small angled paintbrush
- Clear matte polyurethane or furniture wax
- Clean lint-free cloths
- Wood cleaner or mild soap solution
- Drop cloth
Step 1: Cleaning and Prep
-
Assess the wood condition:
Begin by inspecting your table. If it has an existing thick varnish or paint, you will need to strip it down to raw wood first. If it’s relatively raw or just has a light oil finish, a good cleaning is your starting point. -
Clean the surface thoroughly:
Wipe down the entire table—both the legs and the tabletop—with a wood cleaner or a mild soap solution. This removes oils, dust, and grime that could prevent the paint from glowing. -
Sand the tabletop:
Using 120-grit sandpaper, sanding the top surface of the table in the direction of the wood grain. The goal is to reveal the fresh, light wood underneath and remove any old stains. -
Sand the legs:
Give the legs a lighter sanding with the same grit. Since these will be painted, you just need enough ‘tooth’ for the paint to grip effectively. -
Smooth everything out:
Switch to 220-grit sandpaper and go over the entire piece again. This ensures a buttery smooth finish on the wood top and a professional base for the legs. -
Remove sanding dust:
Use a tack cloth or a slightly damp rag to remove every speck of saw dust. I find that skipping this step almost always results in a gritty paint finish later.
Get a Sharper Line
For a perfect edge, apply a thin layer of clear matte sealer over your painter’s tape edge first. This seals the gap, so any bleed-through is clear, not colored.
Step 2: Creating the Paint Line
-
Flip the table:
Turn the table upside down on a soft surface or drop cloth. This makes accessing the underside and the tricky angles of the joinery much easier. -
Determine the cut-off point:
Decide exactly where the color should stop. In this design, the paint covers the legs and the structural cross-beams under the table, but stops strictly at the edge of the round top. -
Apply painter’s tape:
Carefully run painter’s tape along the underside edge of the round tabletop, just past where the legs attach. You want to protect the wood grain of the top from getting any stray brush strokes. -
Seal the tape edge:
Press the edge of the tape down firmly with your fingernail or a credit card. This prevents paint from bleeding under the tape and ruining your crisp line.
Uneven Paint Coverage?
If the wood grain is still showing through after two coats, don’t just glob on more paint. Use a primer tinted close to your topcoat color, then repaint.
Step 3: Painting the Base
-
Stir the paint:
Open your terracotta chalk paint and stir it thoroughly to ensure the pigment is evenly distributed from the bottom up. -
Paint the difficult angles first:
Using a small angled brush, paint the tight corners where the legs meet the cross-beams. Getting these done first prevents paint buildup in the crevices. -
Apply the first coat to the legs:
Paint the long surfaces of the legs using long, smooth strokes. Don’t overload your brush; thin, even coats are key for a durable finish. -
Let it dry:
Allow the first coat to dry completely according to the manufacturer’s instructions, usually about 1-2 hours for chalk paint. -
Sand lightly between coats:
Once dry, run a very fine sandpaper (like 300-grit) quickly over the legs to knock down any raised grain, then wipe away the dust. -
Apply the second coat:
Apply a second coat of paint for full opacity. The terracotta color should look rich and solid now, completely hiding the wood grain underneath. -
Remove tape while damp:
Carefully peel off the painter’s tape while the second coat is still slightly tacky. This helps ensure a razor-sharp line without pulling up dried paint chips.
Step 4: Sealing and Finishing
-
Seal the painted legs:
Once the paint is fully cured, apply a clear matte wax or polyurethane to the legs to protect the color from scuffs and moisture. -
Protect the natural wood top:
Apply a clear sealant or furniture oil to the raw wood top. This brings out the warmth of the grain and protects it from water rings. -
Buff to a sheen:
If using wax, let it dry for a few minutes and then buff vigorously with a clean cotton cloth until the surface feels smooth and not sticky.
Place your newly refreshed table near a window and enjoy how the sunlight highlights the contrast between the natural grain and the bold base color
Color-Blocked Sections for a Playful Painted Wood Table
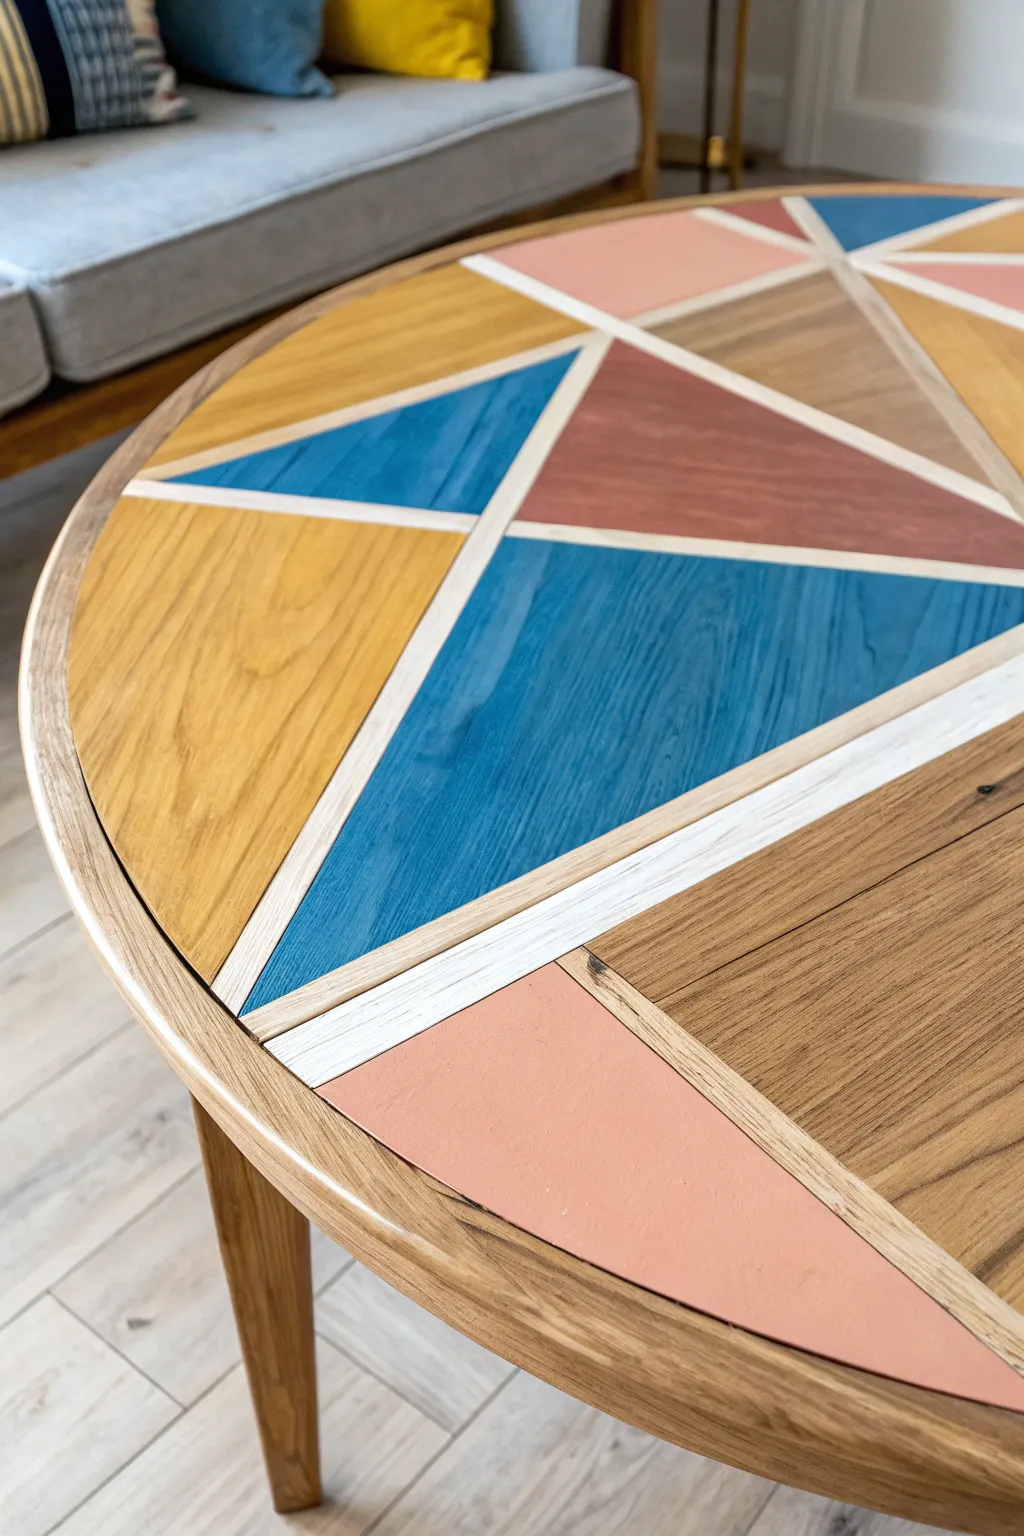
Transform a plain round wooden table into a statement piece with this vibrant geometric design. By combining natural wood tones with bold sections of mustard, teal, and terracotta, you’ll create a modern, playful surface that feels both artistic and functional.
Step-by-Step Guide
Materials
- Round wooden coffee table (unfinished or sanded down)
- Painter’s tape (high quality, various widths)
- Ruler or straight edge
- Pencil
- Sandpaper (120 and 220 grit)
- Wood stain (walnut or similar warm tone)
- Acrylic or chalk paint (Mustard Yellow, Deep Teal, Terracotta/Salmon)
- Small foam rollers or high-quality synthetic brushes
- Clear protective topcoat (polycrylic, matte or satin finish)
- Tack cloth
- Exacto knife or craft blade
Step 1: Preparation and Mapping
-
Surface prep:
Begin by sanding the entire table surface with 120-grit sandpaper to remove any old finish, then switch to 220-grit for a smooth base. Wipe away all dust using a tack cloth. -
Find the center:
Measure across the table to find the exact center point and mark it lightly with a pencil. This will be the anchor for your radiating geometric lines. -
Draft the design:
Using a long straight edge, draw lines radiating from the center to the edge, creating large triangular ‘pie’ slices. Then, draw intersecting lines across those slices to create smaller triangles and trapezoids, mimicking the photo’s asymmetrical, shattered-glass look.
Bleeding Lines?
If paint seeps under the tape, don’t panic. Wrap a tiny piece of sandpaper around a craft stick or credit card edge to sand specifically inside the narrow channel without scratching the painted zones.
Step 2: Taping and Staining
-
Masking the lines:
Apply thin painter’s tape (or cut standard tape into thin strips) directly over your pencil lines. These taped areas will become the light wood dividers between colors later. -
Seal the tape edges:
Press the tape down firmly with a credit card or smoothing tool. I like to apply a very thin layer of clear matte medium or the base wood color over the tape edges to prevent bleed-under. -
Select wood tone zones:
Decide which triangles will remain visible wood grain (like the darker brown sections in the image). Mark them lightly with a piece of tape so you don’t paint them by accident. -
Stain application:
Apply your chosen wood stain to the designated ‘wood-look’ sections using a rag or foam brush. Let the stain penetrate, then wipe off excess. Allow this to dry completely before moving to paint.
Add Metallic Flair
For a glam upgrade, paint the thin divider lines with gold or copper metallic leaf paint instead of leaving them as raw wood. Use a fine liner brush for precision.
Step 3: Painting the Color Blocks
-
Masking off zones:
You will need to work in stages since wet distinct colors can’t touch. Tape off the boundaries of your first color group (e.g., all the Blue sections). -
Applying the first color:
Using a small foam roller for the smoothest finish, apply the Deep Teal paint. Use light coats to avoid ridges. Two coats are usually better than one thick one. -
Yellow sections:
Once the blue is dry to the touch, carefully move your masking tape to expose the areas destined for Mustard Yellow. Apply your yellow paint, ensuring consistent coverage. -
Terracotta sections:
Repeat the process for the Terracotta/Salmon triangles. Be patient with the drying times between colors; rushing here is the enemy of crisp lines. -
The reveal:
Once all paint is dry, slowly peel back all the tape strips. pull the tape at a 45-degree angle away from the paint edge to ensure a sharp line.
Step 4: Finishing Touches
-
The raw lines:
The thin lines where the tape used to be should now be raw, light wood. If any paint bled through, carefully scrape it away with an Exacto knife or spot-sand with folded sandpaper. -
Clean up:
Give the entire table a very gentle wipe with a tack cloth to remove any final debris without damaging the fresh paint. -
Protective coat:
Apply a clear polycrylic topcoat over the entire table surface. I prefer a matte finish to keep the modern look, but satin works well too. Use long, even strokes. -
Final cure:
Let the first coat dry according to the can’s instructions, lightly sand with high-grit paper if needed, and apply a second coat for durability.
Now you have a stunning, custom piece of furniture that brings a splash of geometric color to your living space


Painted Tabletop Border for a Subtle ‘Framed’ Finish
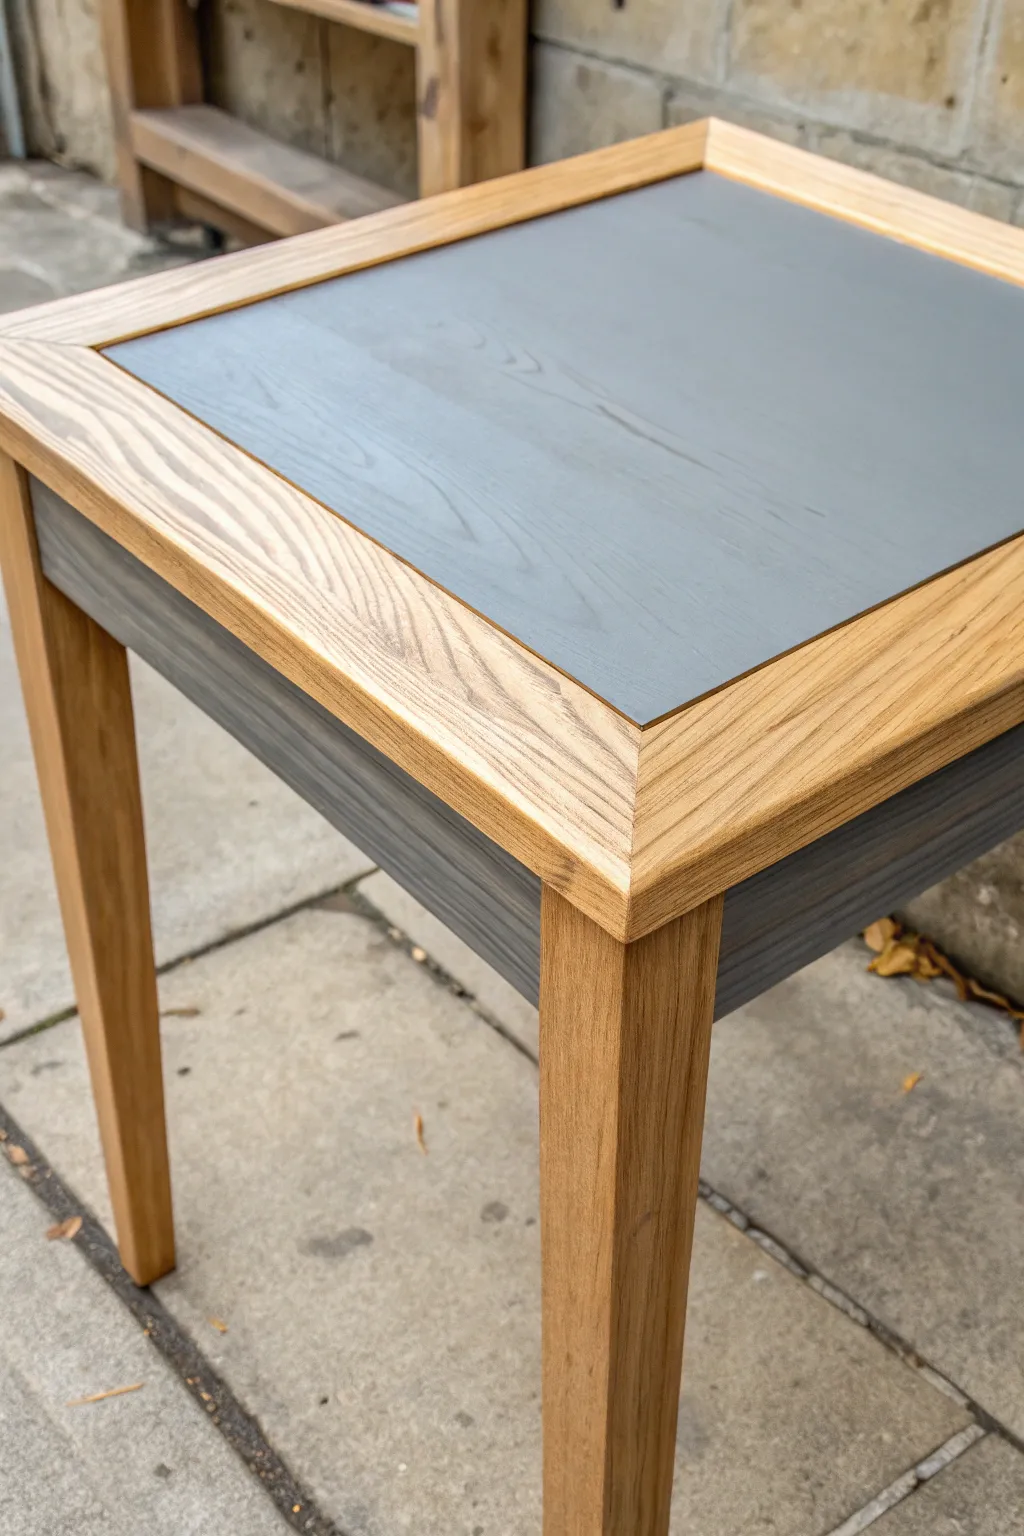
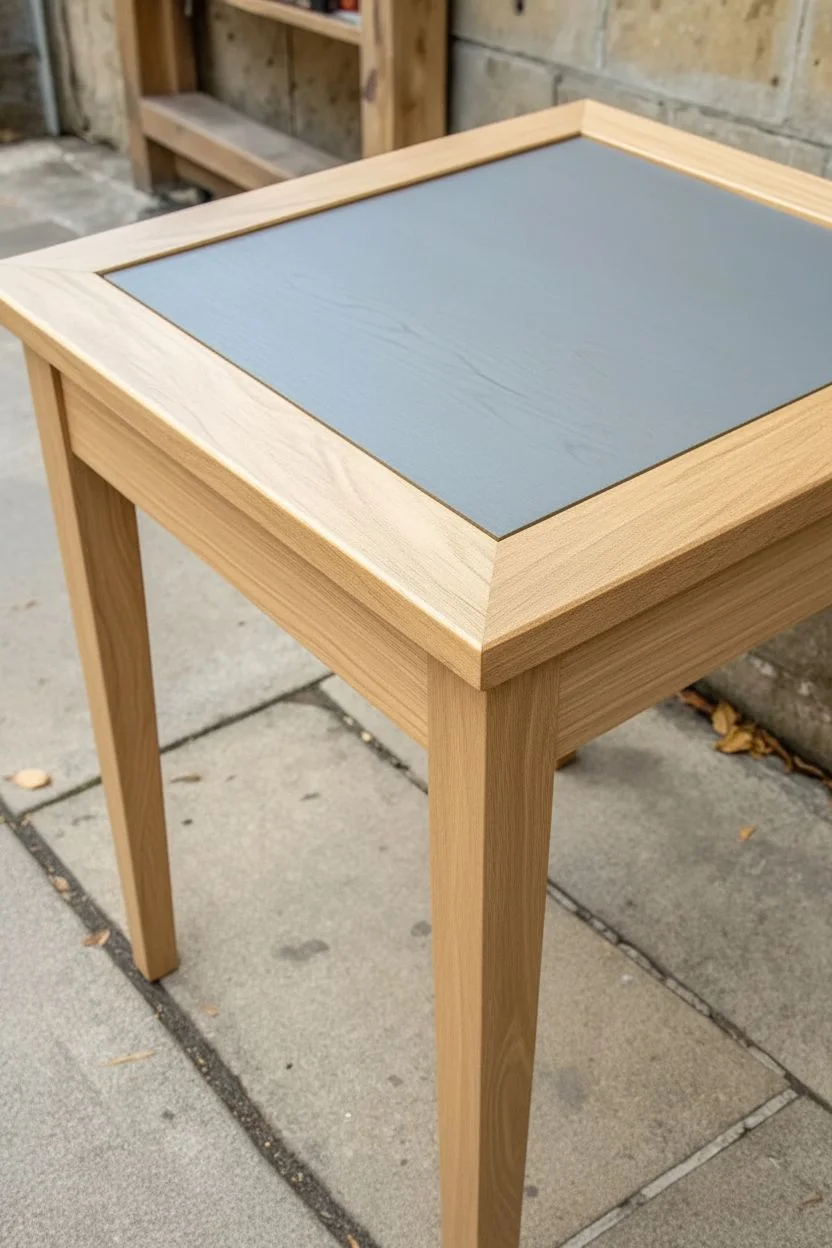
Achieve a sophisticated, modern look by contrasting natural wood grain with a sleek painted center. This project transforms a simple table into a framed masterpiece by highlighting the joinery with a cool grey panel and matching apron, creating a subtle yet striking border effect.
How-To Guide
Materials
- Wooden side table (preferably unfinished oak or ash)
- Grey furniture paint (matte or satin finish)
- Painter’s tape (high-quality delicate surface)
- Sandpaper (120, 180, and 220 grit)
- Tack cloth or microfiber rag
- Small foam roller
- Angled synthetic paint brush (1.5 inch)
- Clear matte polyurethane or polycrylic topcoat
- Wood filler (if needed for gaps)
Step 1: Preparation and Sanding
-
Assess the surface:
Begin by inspecting your table. If it has an existing heavy varnish, you will need to strip it back to raw wood to get that clean natural border look shown in the image. -
Initial coarse sanding:
Use 120-grit sandpaper to remove any old finish or rough spots. Sand in the direction of the wood grain to avoid unsightly scratches. -
Refining the surface:
Switch to 180-grit sandpaper for a smoother pass. Pay special attention to the mitered corners of the frame where the grain direction changes. -
Cleaning up dust:
Use a tack cloth or a damp microfiber rag to completely remove all sawdust. Any dust left behind will ruin the smooth finish of your paint.
Bleeding Lines?
If paint seeps under your tape, don’t panic. Wait for it to dry fully, then wrap 220-grit sandpaper around a sharp sanding block. Gently sand the wood side only to remove the stray pigment.
Step 2: Masking the Design
-
Tape the inner border:
This is the most critical step. Apply painter’s tape exactly along the seam where the center panel meets the outer frame. Press the edge of the tape down firmly with your fingernail or a credit card. -
Tape the legs:
Apply tape to the top of the legs where they meet the apron (the skirt piece connecting the legs). This ensures the legs stay natural while the apron gets painted. -
Protect the frame top:
Cover the entire top surface of the outer wood frame with tape or paper to protect it from accidental drips while you paint the center. -
Seal the tape edge:
I like to apply a very thin layer of clear matte sealer along the tape edge first. This creates a barrier so the grey paint won’t bleed underneath the tape.
Step 3: Painting the Center and Apron
-
First coat on center panel:
Using a small foam roller, apply the grey paint to the center square. A roller provides a smoother, brush-stroke-free finish that looks like a slate insert. -
Painting the apron:
Use the angled brush to paint the recessed apron (skirt) underneath the tabletop. Work carefully into the corners where the apron meets the legs. -
Checking for coverage:
Allow the first coat to dry according to the paint can’s instructions. Don’t worry if it looks slightly patchy; thin coats are better than thick ones. -
Sanding between coats:
Lightly sand the painted surfaces with 220-grit paper to knock down any raised grain or bubbles, then wipe away the dust. -
Second coat application:
Apply a second coat to both the center panel and the apron. This should provide full, opaque color depth similar to the reference photo. -
Removing the tape:
While the second coat is still slightly tacky (not fully dry), carefully peel back the painter’s tape at a 45-degree angle. This prevents the dried paint from cracking at the edge.
Go Geometric
Instead of a solid grey block, use tape to create a diagonal split in the center panel. Paint one half grey and leave the other natural for a striking, asymmetrical modern art look.
Step 4: Finishing and Sealing
-
Touch-ups:
Inspect the transition lines between the wood and paint. If any paint bled through, carefully scrape it away with a craft knife or lightly sand it off. -
Seal the natural wood:
Apply a clear matte polyurethane or polycrylic to the raw wood frame and legs. This brings out the grain color without adding a glossy shine. -
Seal the painted areas:
Continue applying the clear coat over the painted grey sections as well. A continuous topcoat over the whole piece unifies the finish and protects the paint from scratches. -
Final cure:
Let the table cure for at least 24 hours before placing any heavy objects on it to ensure the finish hardens completely.
Now you have a custom piece that perfectly balances rustic warmth with contemporary color
Stencil Mandala Centerpiece on a Wooden Table Top
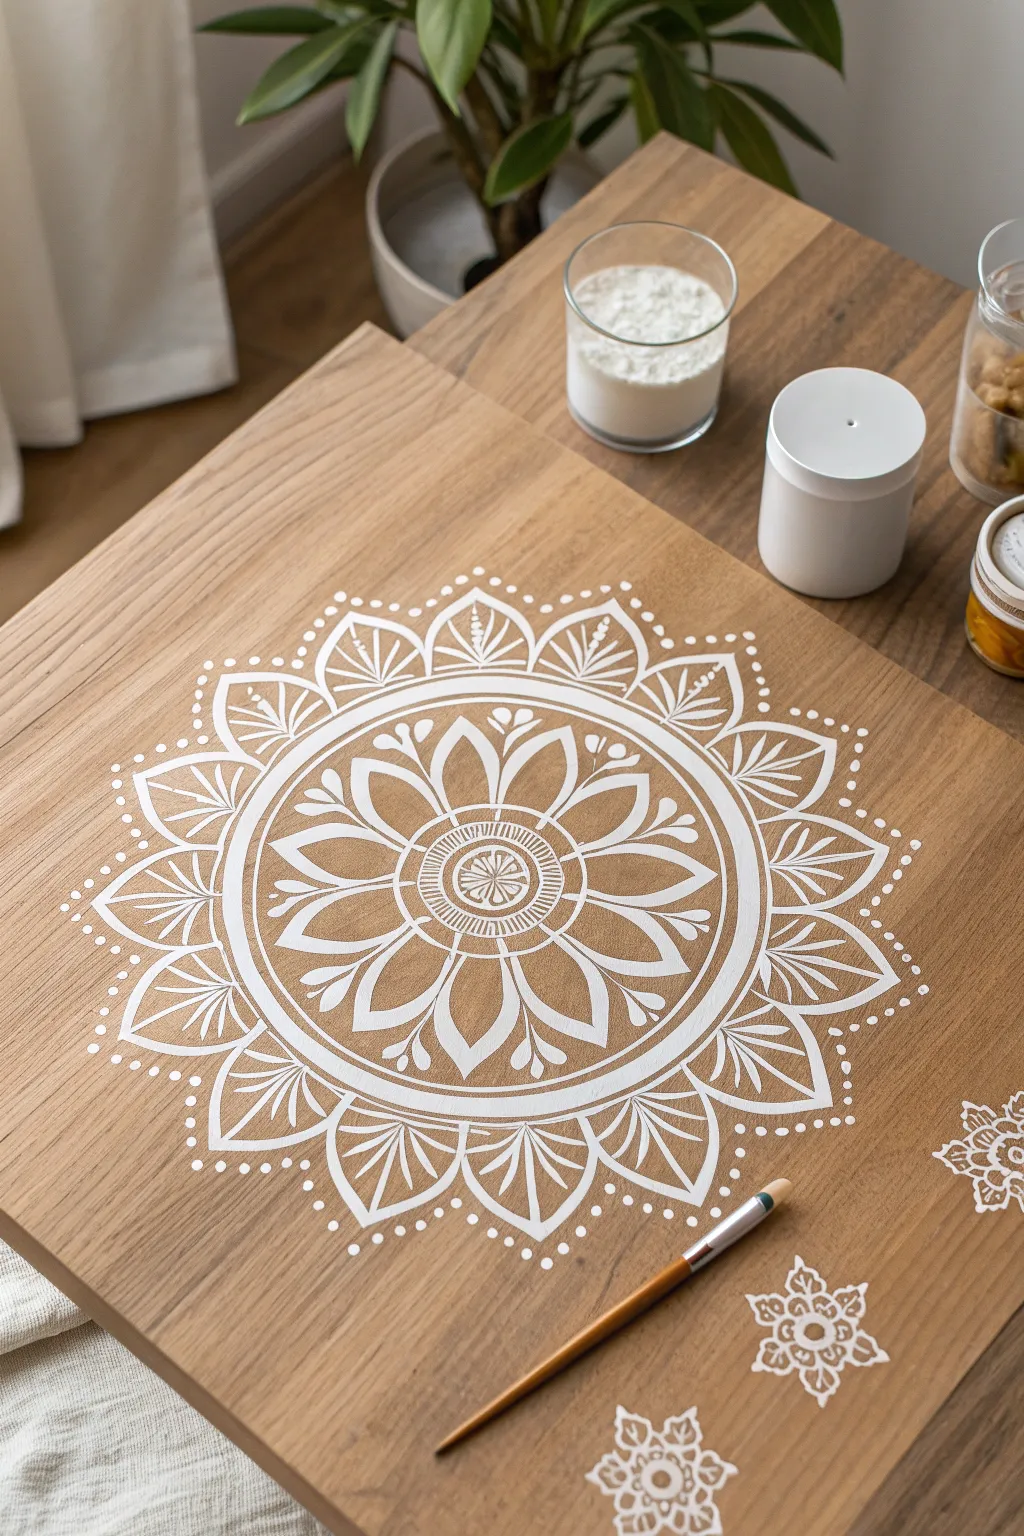
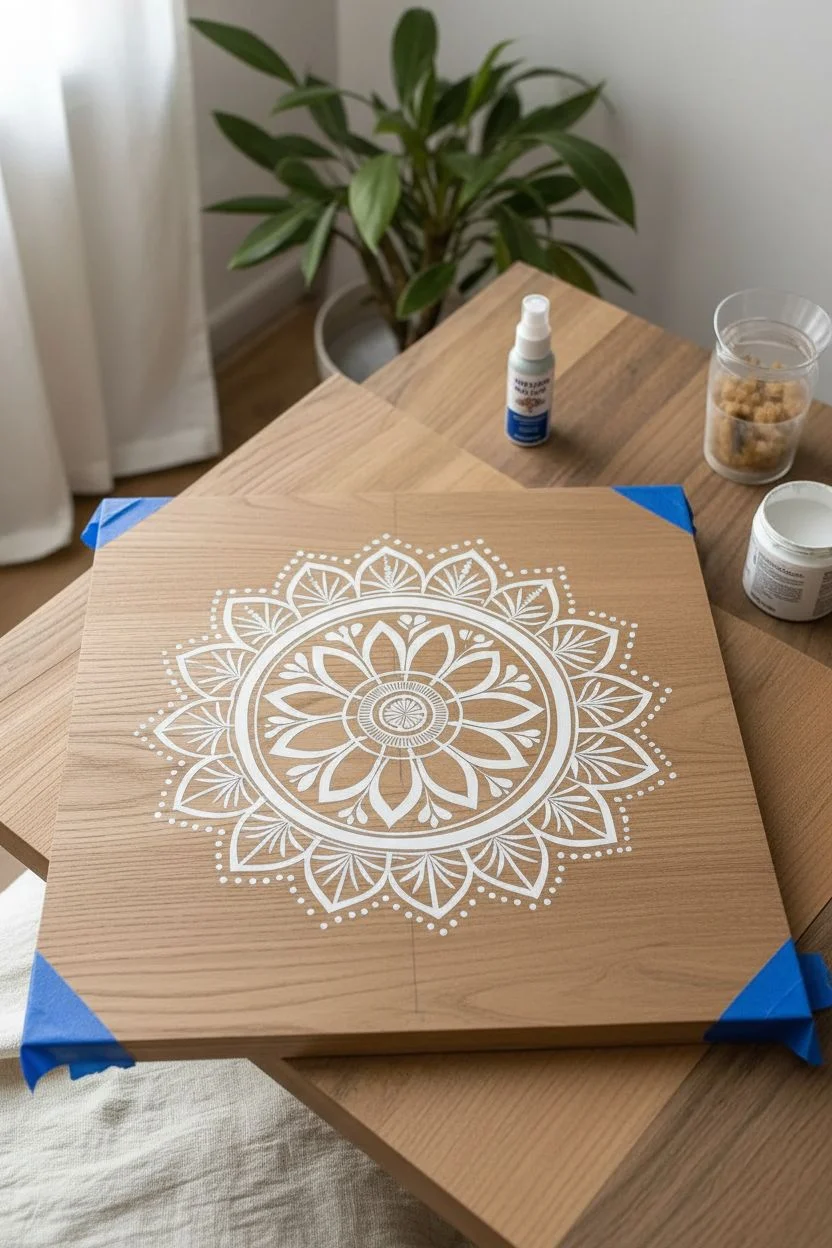
Transform a plain wooden table into a bohemian masterpiece with this crisp, intricate white mandala design. The contrast of bright white paint against natural wood grain creates a stunning focal point, while additional corner flourishes add a custom, hand-painted touch.
Step-by-Step Tutorial
Materials
- Wooden side table (raw or stripped)
- Large mandala stencil (approx. 12-16 inches diameter)
- Matching small floral motif stencil
- Chalk paint or acrylic paint (Titanium White or Cream)
- Stencil brush (stiff bristles) or high-density foam roller
- Painter’s tape or stencil spray adhesive
- Fine grit sandpaper (220 grit)
- Small detail brush (round tip, size 2 or 4)
- Matte polyacrylic sealer
- Paper towels
- Measuring tape
- Pencil
Step 1: Preparation & Planning
-
Clean the surface:
Ensure your wooden table surface is completely clean and dry. If the wood has a glossy finish, lightly sand it with 220-grit sandpaper to create a ‘tooth’ for the paint to adhere to, then wipe away all dust with a tack cloth or damp rag. -
Find the center:
Using a measuring tape, measure the width and length of the table top to find the exact center point. Mark this spot lightly with a pencil; this is crucial for ensuring your main mandala sits perfectly in the middle. -
Position the main stencil:
Place your large mandala stencil on the table, aligning its center point with your pencil mark. Step back to visually confirm it looks balanced from all angles. -
Secure the stencil:
Once perfectly positioned, secure the stencil firmly. You can use painter’s tape on the edges, but for a design this intricate, I prefer using a light mist of stencil spray adhesive on the back to prevent the inner details from lifting.
Bleed Patrol
Paint bled under the stencil? Don’t panic. Wait for it to dry completely, then gently scrape the excess paint away with an X-Acto knife or sand it off with a tiny piece of folded sandpaper.
Step 2: Stenciling the Centerpiece
-
Load the brush lightly:
Dip just the tip of your stencil brush into the white chalk paint. Offload almost all the paint onto a paper towel until the brush feels nearly dry. This ‘dry brush’ technique is the secret to crisp lines. -
Start stenciling:
Apply the paint using a vertical up-and-down dabbing motion (or swirling motion if you are very careful) over the stencil openings. Do not drag the brush, as this forces paint under the edges. -
Build opaque layers:
Do not try to get solid white coverage in one pass. Apply a thin, translucent layer first, let it dry for a few minutes, and then apply a second or third coat until you achieve that bright, opaque white look. -
Check your progress:
Carefully lift one corner of the stencil to peek at your work. If the lines look crisp, proceed. If you see bleeding, your brush was too wet—wait for it to dry and sand away the mistake before continuing. -
Remove the stencil:
Once you are satisfied with the coverage, peel the stencil up slowly and vertically while the paint is still slightly tacky to avoid pulling up dried paint chips.
Step 3: Adding Details & Finishing
-
Position accent motifs:
Take your smaller floral stencil and position it randomly near the corner of the table, or wherever the negative space feels too empty. Secure it just like you did the main design. -
Paint corner details:
Repeat the dry-brush stenciling process for these smaller accents. Using varying sizes of motifs here creates a lovely ‘scattered’ effect. -
Hand-touch corrections:
Inspect your work closely. If there are small bridges (gaps) left by the stencil design that disrupt the flow, use a small detail brush to fill them in manually for a hand-painted look. -
Add dot accents:
To mimic the style in the image, use the back end of your paintbrush or a dotting tool. Dip it in paint and add tiny dots around the outer rim of the mandala or between the petal shapes for extra texture. -
Let it cure:
Allow the paint to dry completely, ideally overnight. Chalk paint dries fast, but a full cure ensures durability. -
Seal the surface:
Protect your artwork by applying 2-3 coats of matte polyacrylic sealer. Use a soft synthetic brush and long, smooth strokes to avoid brush marks, letting each coat dry according to the manufacturer’s instructions.
Pro Tip: Custom Colors
For a subtle, aged look, mix a tiny drop of ochre or raw sienna into your white paint. It cuts the brightness and makes the design look distinctively vintage rather than starkly modern.
Now you have a customized piece of furniture that serves as both a functional table and a beautiful work of art
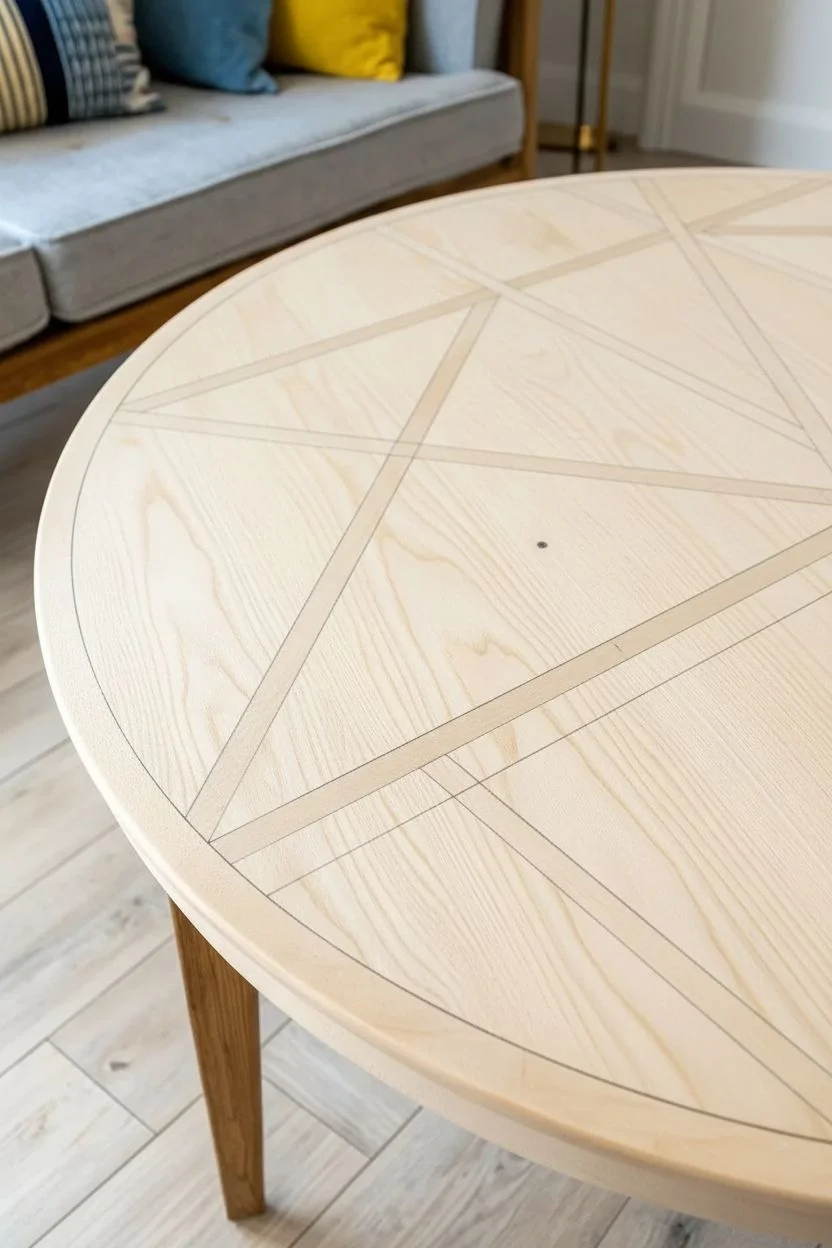
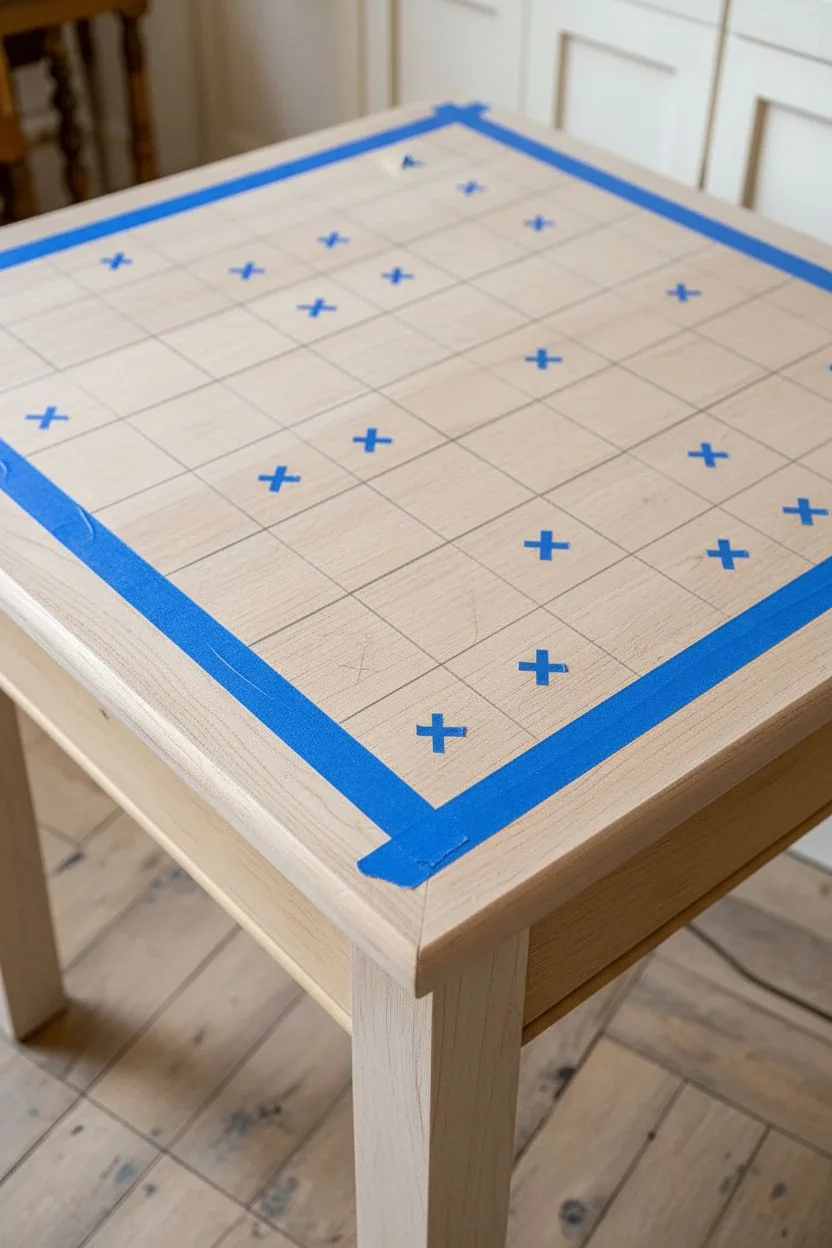
Geometric Tape Pattern for a Crisp Modern Wood Table
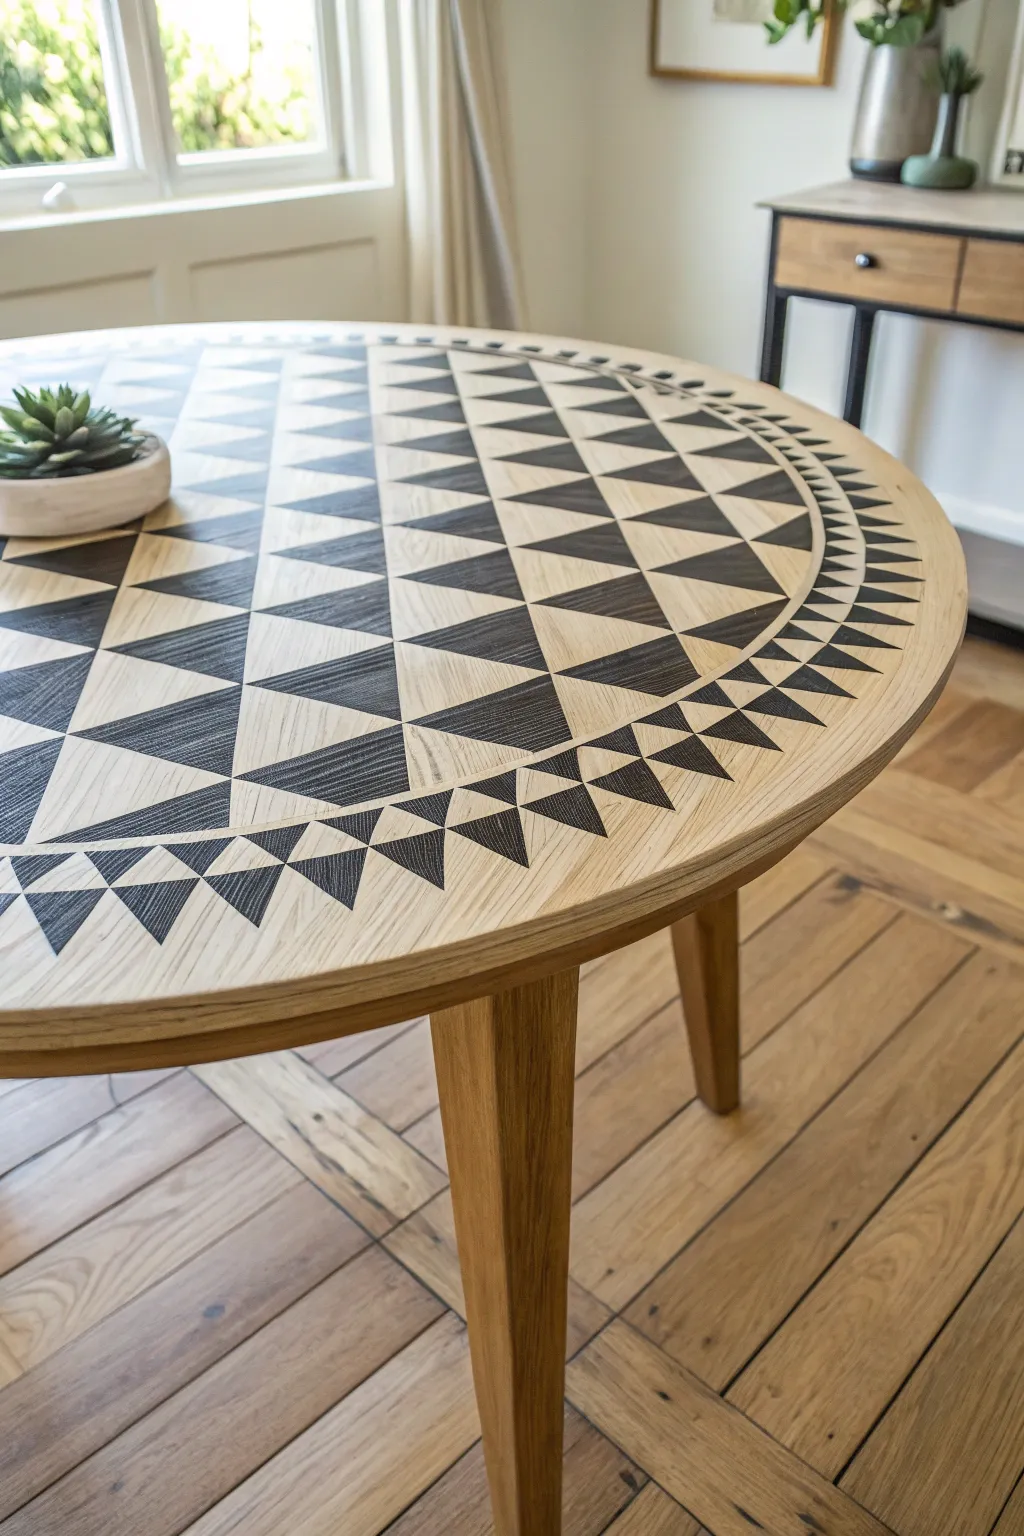
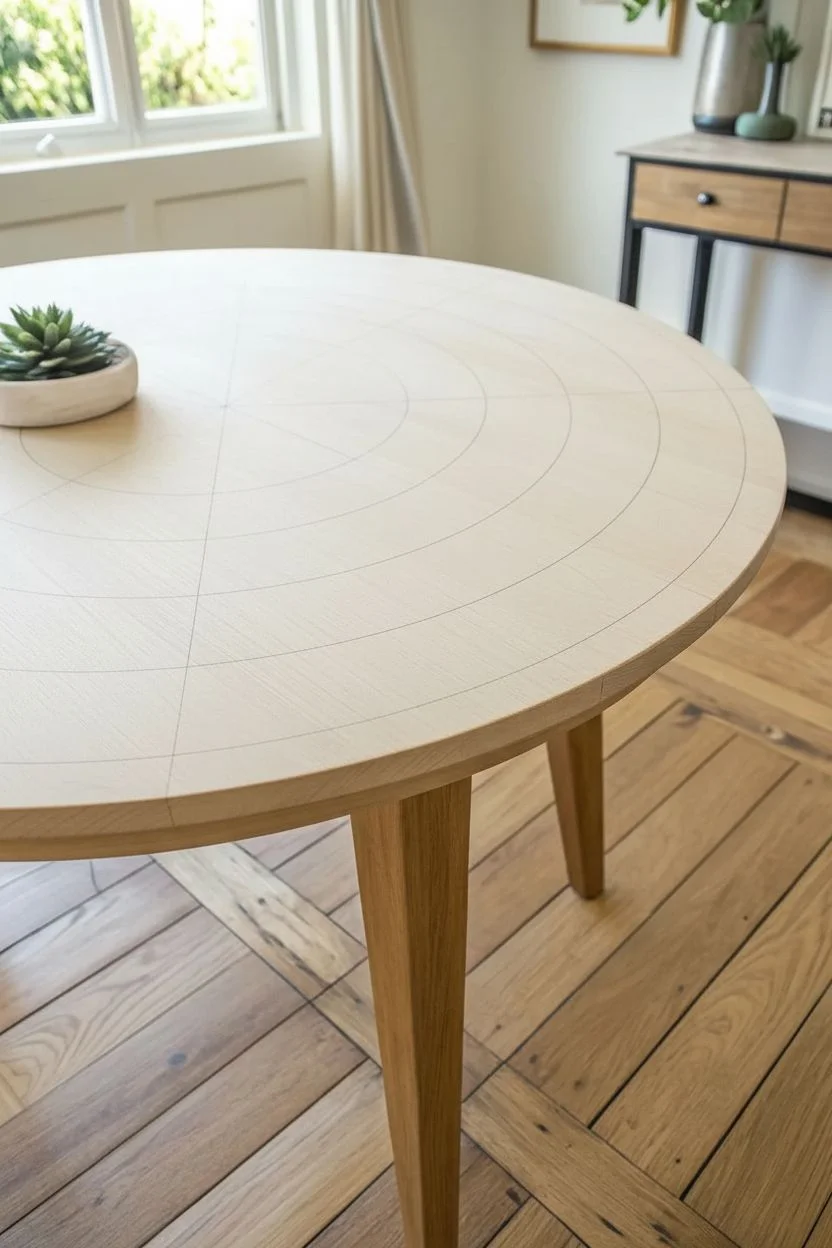
Transform a plain wooden table into a modern statement piece with this intricate high-contrast design. By using precise taping techniques and wood stain or paint, you can create a stunning radial pattern that feels both handcrafted and remarkably professional.
Step-by-Step
Materials
- Round wooden table (sanded to bare wood)
- Black wood stain or matte black paint
- Painter’s tape (various widths, especially narrow 1/4 inch)
- Pencil
- String and pushpin (or a large compass)
- Protractor
- Ruler or straight edge
- X-Acto knife or craft blade
- Clear matte polyurethane topcoat
- Sanding block (220 grit)
- Lint-free rags or foam brushes
- Tack cloth
Step 1: Preparation & Mapping
-
Sand the surface:
Begin by sanding your table top down to the bare wood using an orbital sander or sanding block. Start with medium grit and finish with 220 grit for a silky smooth base. Wipe away all dust with a tack cloth. -
Find the center:
Measure across the table to find the exact center point. Mark this lightly with a pencil. This central point is crucial for the entire radial design. -
Draw concentric circles:
Using a string tied to a pencil and anchored at the center with a pushpin (or a large beam compass), lightly draw a series of concentric circles. Leave wider gaps for the main triangle rows and a narrower gap for the outer border detail seen in the image. -
Mark radial lines:
Use a protractor to mark degrees around the outer edge. For the main pattern, you’ll need evenly spaced segments. Draw straight lines from the center point to these outer marks, creating pie-slice sections across the table.
Bleeding Lines?
If stain bleeds under the tape, don’t panic. Once dry, use a sharp craft knife to gently scrape away the excess dark pigment, revealing the light wood underneath.
Step 2: Creating the Design
-
Tape the grid:
Apply strips of painter’s tape along your pencil lines to mask off the areas that will remain light natural wood. Start by taping off the circular rings that separate the triangle rows. -
Define the triangles:
Now, tape the diagonal lines within each ring section to form the triangle shapes. This is the most time-consuming part; ensure your tape edges are pressed down firmly to prevent bleeding. -
Cut precise corners:
Use an X-Acto knife to carefully trim overlapping tape at the corners of your triangles. You want crisp, sharp points, not messy overlaps. -
Seal the tape edges:
A little trick I always use is to brush a tiny amount of clear matte artist medium or a very light coat of clear varnish over the tape edges. This seals them and ensures the black stain won’t creep underneath.
Step 3: Staining & Finishing
-
Apply the dark stain:
Using a foam brush or rag, carefully apply the black wood stain (or paint) to the exposed wooden triangles. Use a ‘dry brush’ technique—using very little product—to maintain control and prevent pooling. -
Check for coverage:
If the first coat looks patchy, let it dry according to the manufacturer’s instructions and apply a second thin coat for solid opacity. -
Remove the tape:
This is the satisfying part. Carefully peel back the painter’s tape while the stain is still slightly tacky (not fully cured) to avoid chipping the edges. Pull at a 45-degree angle away from the painted area. -
Touch up lines:
Inspect your lines. If there’s any small bleed, allow the stain to dry completely, then use a tiny detail blade to gently scrape it away, or touch it up with a fine brush and wood-colored paint. -
Final sand:
Once completely dry, very lightly run a fine-grit sanding block over the entire surface. This knocks down any raised grain from the staining process and unifies the texture. -
Seal the table:
Apply a clear matte polyurethane topcoat to protect your work. Use long, even strokes with a wide brush. Let it dry, sand lightly, and apply a second or third coat for durability.
Mix It Up
For a bolder look, try alternating stain colors. Use a deep walnut for the inner circles and black for the outer border to create added depth and dimension.
Enjoy your custom geometric table, a piece that proves a little patience with tape can yield incredible, high-end results
Checkerboard Tabletop for Retro Kitchen Energy
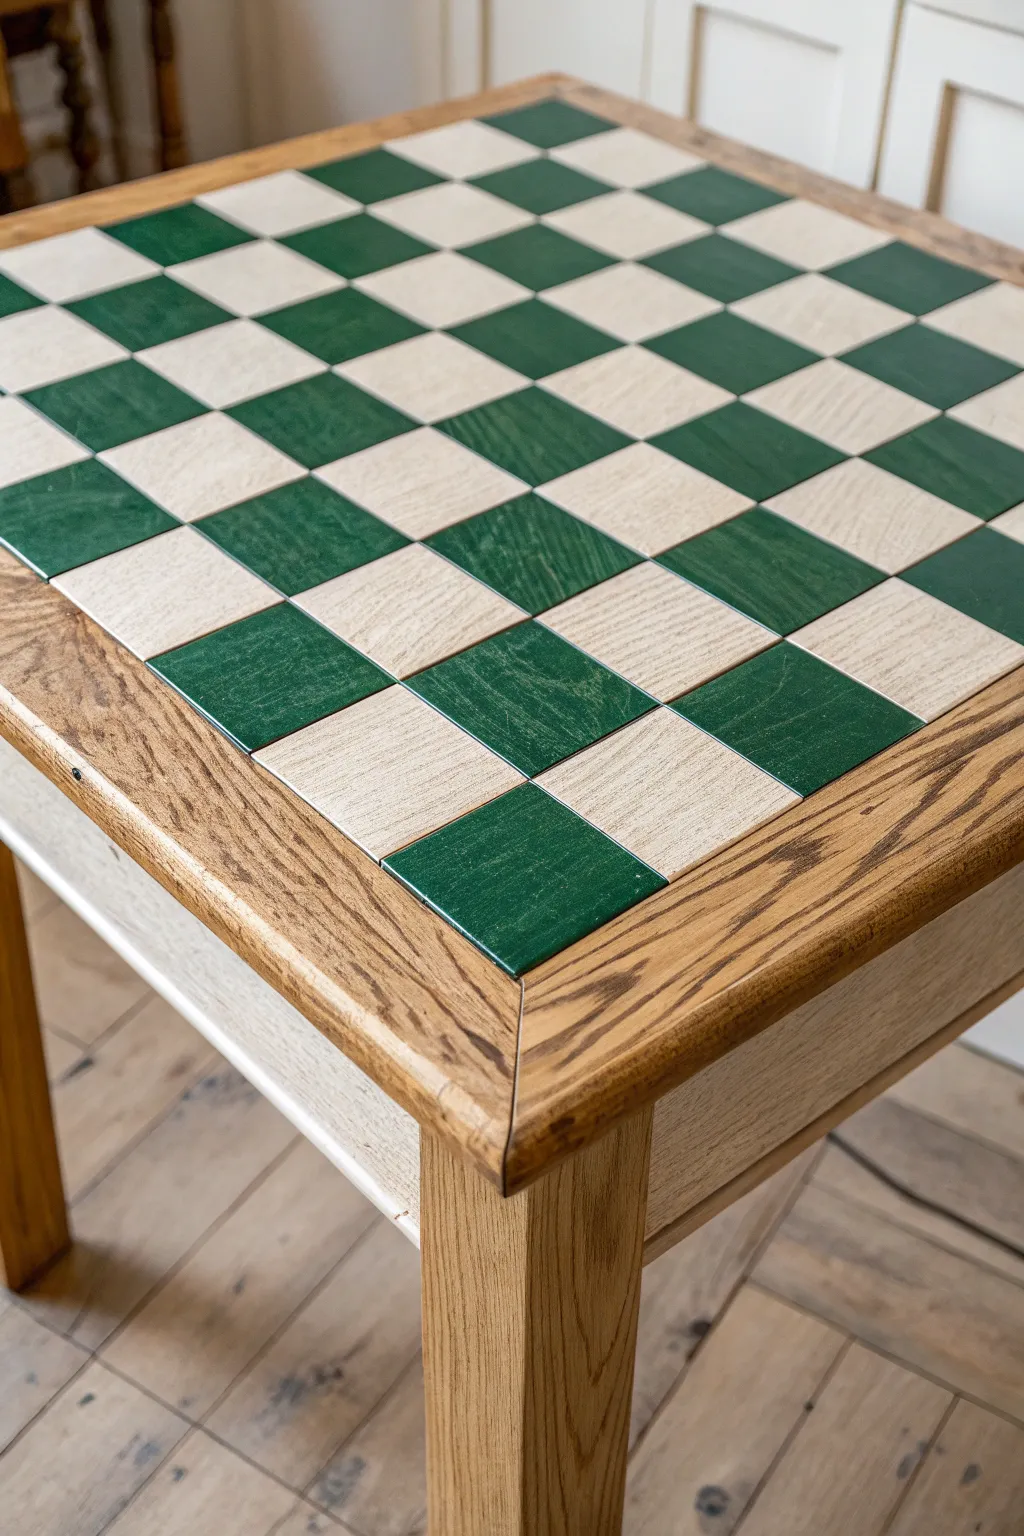
Transform a plain wooden table into a charming vintage-style game board with this simple painting technique. The natural wood grain shines through for a rustic, lived-in feel perfect for a cozy kitchen nook.
Detailed Instructions
Materials
- Square wooden table (unfinished or sanded down)
- Painter’s tape (1-inch width works well)
- Ruler or framing square
- Pencil
- Deep forest green acrylic paint or wood stain
- Clear matte polyurethane sealer
- Fine-grit sandpaper (220 grit)
- Small foam brush or flat synthetic brush
- Lint-free tack cloth
Step 1: Preparation & Mapping
-
Surface Prep:
Begin by ensuring your table surface is completely clean and smooth. If the table has an existing finish, sand it down to raw wood using a palm sander or by hand until the grain is exposed and even. -
Dust Removal:
Wipe away every speck of sanding dust using a tack cloth. This step is crucial because any leftover dust will create bumps in your painted squares. -
Calculate the Grid:
Measure the inner playing area of your table. Decide how large you want your squares (classic chessboards are 8×8 grids). Divide your total width by the number of desired squares to get your precise square size. -
Mark the Border:
If your table needs a border like the one in the photo, measure in from the edge and mark it lightly with a pencil. Tape off this outer wood border to protect it from stray paint later. -
Draw the Grid:
Using a long ruler or straight edge, lightly draw your grid directly onto the wood with a pencil. Double-check your measurements as you go to ensure the squares remain uniform.
Bleeding Lines?
If paint bleeds under the tape, let it dry fully. Then, gently scrape the excess paint away with an X-Acto knife or use a tiny bit of sandpaper to erase the error.
Step 2: Painting the Pattern
-
Mark Dark Squares:
To avoid confusion during painting, place a tiny ‘X’ made of tape or a faint pencil mark inside every square that needs to be painted green. Vintage boards usually have a dark square in the bottom-left corner. -
Tape First Set of Rows:
Tape off the vertical lines first. It’s often easier to tape the *outside* lines of a specific column of squares you intend to paint, painting row by row or column by column rather than trying to tape the whole board at once. -
Seal the Tape Edges:
Run a credit card or smooth tool firmly over the tape edges. This prevents paint bleed-under and ensures those crisp, professional lines we want. -
Mix the Wash:
For that semi-transparent look that shows wood grain, mix your forest green paint with a small amount of water (about 2:1 ratio). I prefer testing this on a scrap piece of wood first to ensure the opacity is just right. -
Apply First Coat:
Using a small foam brush, apply the green wash to the marked squares. Use light strokes in the direction of the wood grain. Don’t overload the brush; thin layers are better. -
Remove Tape Wet:
Carefully peel back the tape while the paint is still slightly wet. This helps prevent the dried can paint from peeling up with the adhesive. -
Tape Second Set:
Allow the first set of squares to dry completely—at least an hour. Then, tape off the horizontal lines (or the remaining alternating squares) to complete the checkerboard pattern. -
Paint Remaining Squares:
Apply the green wash to the remaining ‘X’ marked squares, maintaining the same consistency and brush stroke direction as before.
Step 3: Finishing Touches
-
Light Distressing:
Once all paint is totally dry, gently run fine-grit sandpaper over the painted squares. This simulates wear and helps the painted texture merge seamlessly with the unpainted wood squares. -
Clean Again:
Use the tack cloth one final time to remove the fine dust created by the distressing process. -
Seal the Surface:
Apply a coat of clear matte polyurethane over the entire tabletop, including the border. This protects the game board from spills and scratches during heavy gameplay. -
Final Light Sanding:
After the first coat of sealer dries, do a very light sanding to knock down any raised grain, then wipe clean. -
Second Coat:
Apply a second and final coat of polyurethane for a durable, furniture-grade finish.
Level Up: Drawer Storage
Add a small wooden drawer or attach a pouch underneath the table edge to store your checkers or chess pieces so they never get lost.
Now you have a functional piece of art ready for game night or just morning coffee
Decoupage-and-Paint Mix for a ‘Too Damaged to Sand’ Wood Table
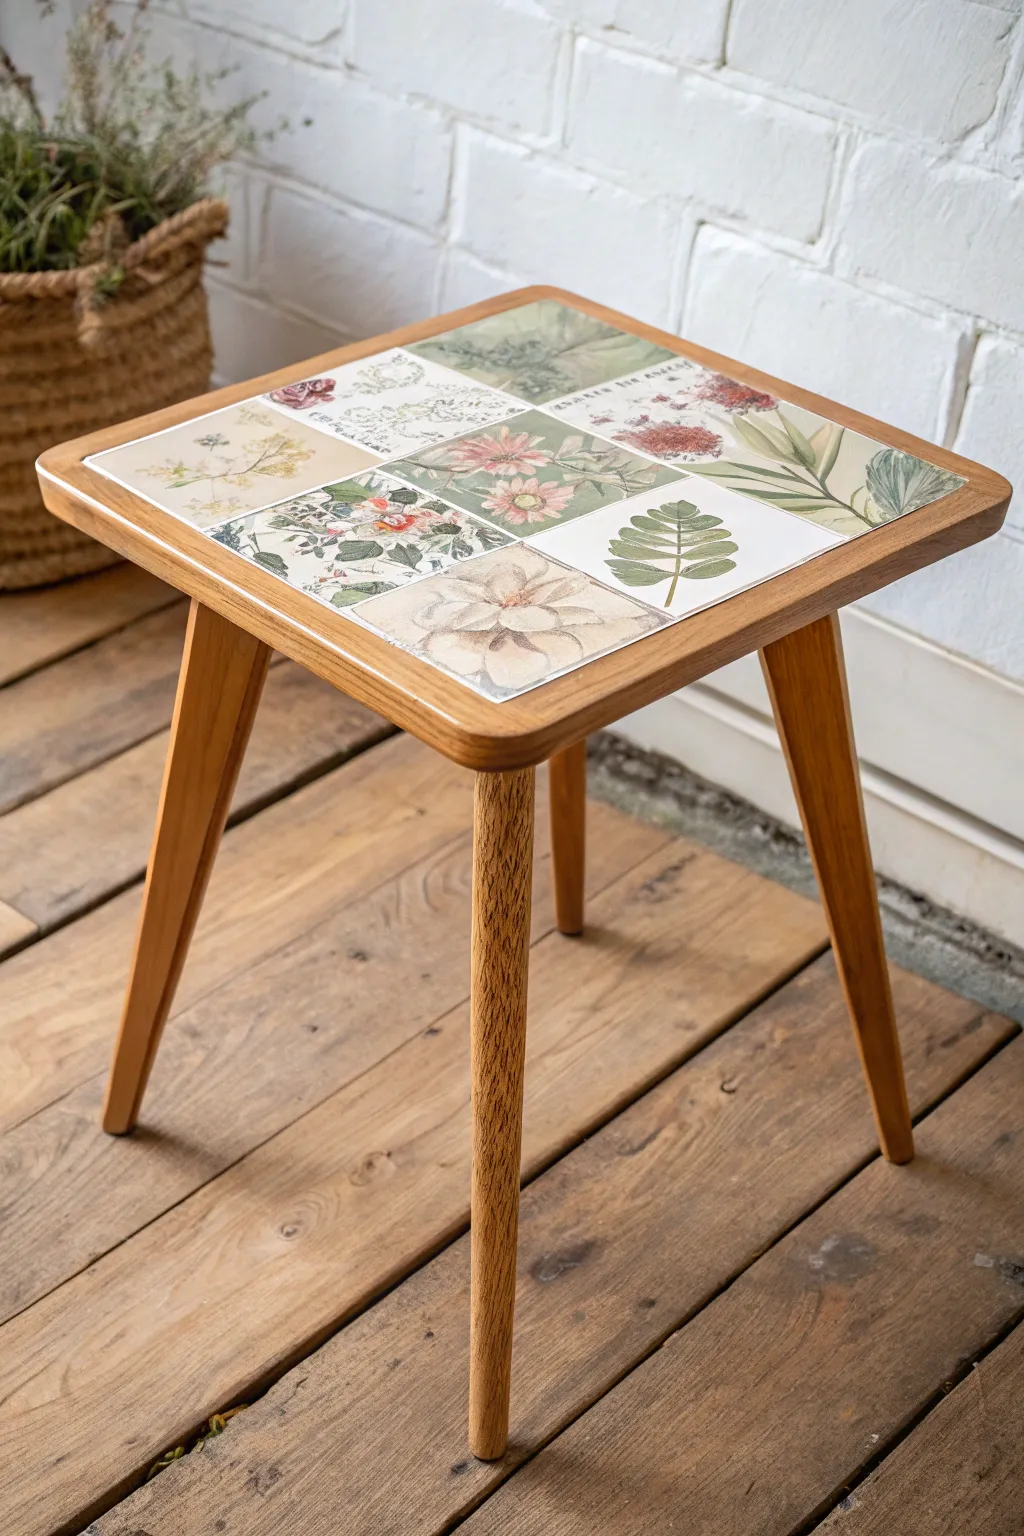
Transform a plain or damaged wooden side table into a lovely botanical focal point without heavy sanding. By arranging nature-inspired prints in a neat grid on the tabletop, you create a faux-tiled look that feels fresh and organic.
How-To Guide
Materials
- Small wooden side table (square top preferred)
- Botanical prints or scrapbook paper
- Mod Podge (Matte or Satin finish)
- White acrylic paint (warm or cream tone)
- Painter’s tape
- Paper cutter or scissors
- Ruler
- Pencil
- Foam brushes
- Fine-grit sandpaper (220-grit)
- Clear spray sealant or polyurethane
- Damp cloth
Step 1: Prep and Base Coat
-
Clean the surface:
Wipe down the entire table with a damp cloth to remove dust and grime. If the existing finish is very glossy, give it a quick scuff with fine-grit sandpaper to help the paint adhere, then wipe clean again. -
Tape off edges:
Apply painter’s tape carefully around the edges of the tabletop where the wood meets the top surface. This protects the natural wood finish of the rim and legs while you paint the top. -
Apply base paint:
Using a foam brush, paint the top surface of the table with your white or cream acrylic paint. Apply thin, even strokes. -
Let it dry and repeat:
Allow the first coat to dry completely, which usually takes about 20-30 minutes. Apply a second or third coat until you have a solid, opaque background that covers any imperfections.
Step 2: Designing the Grid
-
Select your prints:
Choose nine botanical images that share a similar color palette—muted greens, soft pinks, and vintage creams work beautifully together. I like to mix leafy fern patterns with floral blooms for variety. -
Measure the tabletop:
Measure the length and width of the painted area. Divide this measurement by three to determine the exact size each of your nine squares needs to be. -
Cut the squares:
Using a ruler and paper cutter for straight lines, cut your botanical paper into nine equal squares based on your calculations. -
Test the layout:
Lay the squares dry on the table to check the fit. There should be a tiny gap between them if you want a ’tiled’ look with grout lines, or fit them snugly together for a seamless collage.
Smooth Operator
To prevent paper wrinkling, lightly mist the back of your paper squares with water a moment before gluing. This relaxes the fibers for a smoother lay-down.
Step 3: Decoupage Application
-
Apply adhesive to the table:
Lift one square at a time. Brush a thin, even layer of Mod Podge directly onto the painted table surface where the first square will go. -
Place the paper:
Carefully press the paper square onto the wet Mod Podge. Start from one corner and smooth it down to avoid trapping air bubbles. -
Smooth out bubbles:
Use your fingers or a brayer tool to gently smooth the paper from the center outward, ensuring edges are fully adhered. -
Complete the grid:
Repeat this process for the remaining eight squares, aligning them carefully with the first one to keep the grid straight. -
Seal the top:
Once all paper is dry (about 15 minutes), brush a coat of Mod Podge over the entire top surface. This seals the paper and unifies the sheen. -
Let cure:
Allow this top coat to dry for at least 1-2 hours before handling.
Vintage Patina
For an aged look, dip a sponge in diluted brown paint and lightly dab the edges of the table and paper squares before the final seal.
Step 4: Finishing Touches
-
Remove tape:
Gently peel away the painter’s tape while the final top coat is still slightly tacky to ensure a crisp edge. -
Clean up edges:
If any paint or glue bled under the tape, carefully scrape it away with a fingernail or use a tiny bit of damp cloth to tidy the wood rim. -
Final protection:
For extra durability against coasters and coffee cups, apply a final layer of clear polyurethane or spray sealant over the decoupaged top.
Now you have a charming, nature-inspired side table that breathes new life into your room
Paint-Dipped Legs for a Quick, Artsy Wood Table Refresh

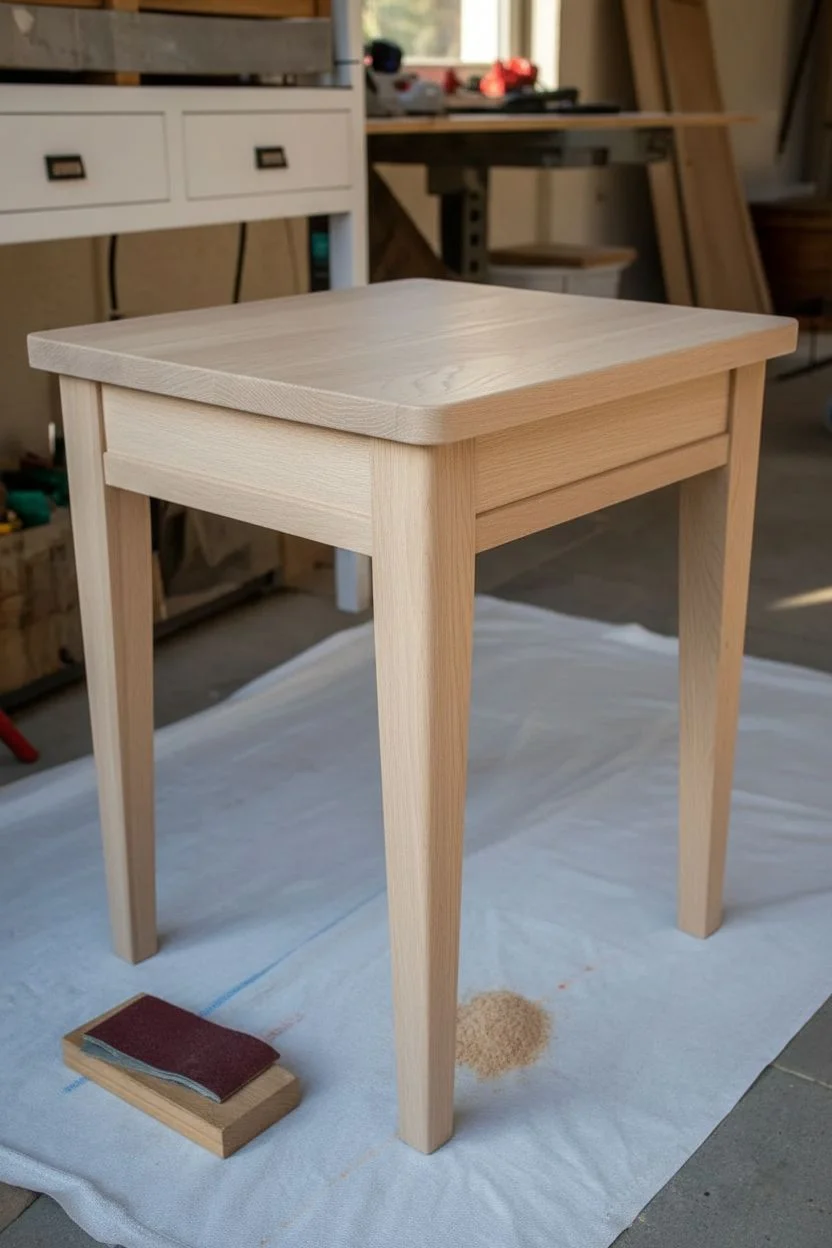
This project transforms a simple wooden side table into a contemporary statement piece by combining the warmth of natural grain with bold pops of color. The distinctive “dipped” effect on the legs and a matching accent apron create a unified, custom furniture look that is surprisingly easy to achieve.
Detailed Instructions
Materials
- Unfinished wooden side table or stool
- Sandpaper (120 and 220 grit)
- Painter’s tape (high quality)
- Small foam roller
- Small angled paintbrush
- Terracotta or burnt orange acrylic latex paint (satin finish)
- Clear matte polyurethane or polycrylic sealant
- Ruler or tape measure
- Pencil
- Tack cloth or clean rag
- Drop cloth
Step 1: Preparation & Sanding
-
Assess the wood:
Begin by inspecting your table for any rough spots or existing finish. If the table is raw wood, give it a quick sanding with 220-grit paper to smooth the grain. -
Remove old finish:
If repurposing an old table with a previous shiny finish, you’ll need to sand more aggressively with 120-grit paper to create a surface the new paint can grip. -
Clean the surface:
Wipe down the entire piece thoroughly with a tack cloth or a slightly damp rag to remove every speck of dust. Dust is the enemy of crisp paint lines.
Bleeding Lines?
If paint seeped under the tape, wait for it to dry fully. Then, gently scrape the excess paint away using a sharp craft knife or razor blade held flat against the wood.
Step 2: Painting the Apron
-
Tape the apron borders:
Apply painter’s tape carefully around the recessed apron area. You want to mask off the legs and the underside of the table top so only the recessed panel is exposed. -
Seal the tape edges:
Press the tape down firmly with your fingernail or a credit card to prevent paint bleed. I find this extra seconds and effort makes a huge difference later. -
Apply the first coat:
Using a small foam roller or brush, apply a thin, even layer of terracotta paint to the apron panels. Don’t worry about full opacity yet. -
Let it dry:
Allow the first coat to dry completely according to the paint can’s instructions, usually about 1-2 hours. -
Apply the second coat:
Add a second coat to ensure rich, solid color coverage, then carefully peel away the tape while the paint is still slightly tacky to keep the edge crisp.
Paint-Lock Pro Tip
Before applying your color, paint a thin layer of clear sealant over the tape edge first. This fills any tiny gaps with clear finish, ensuring your colored line is razor sharp.
Step 3: Creating the Dipped Legs
-
Measure the leg height:
Decide how high you want the “socks” to go. Measure usually 3 to 4 inches up from the bottom of one leg and make a small pencil mark. -
Mark all legs:
Repeat this measurement exactly on all four legs to ensure the table looks level visualy. -
Apply the tape line:
Wrap painter’s tape around each leg, aligning the bottom edge of the tape perfectly with your pencil mark. Ensure the tape overlaps itself tightly. -
Protect the upper leg:
Add a little extra masking paper or tape above your line to protect the bare wood from accidental brush splatters. -
Paint the feet:
Paint the exposed bottom section of the legs. Brush vertically, moving away from the tape line initially to avoid forcing paint under the edge. -
Check coverage:
Inspect the legs after the first coat dries. If the wood grain is showing through too much, apply a second coat for a bold, dipped look. -
Remove tape:
Once the final coat is set but not fully cured, slowly pull the tape off at a 45-degree angle.
Step 4: Sealing and Finishing
-
Lightly sand unpainted areas:
Give the unpainted top and upper legs one final, very gentle pass with 220-grit sandpaper if the grain raised during handling. -
Mix the sealant:
Stir your clear matte polycrylic gently. Do not shake the can, as this creates bubbles that will ruin the smooth finish. -
Seal the wood:
Apply the protectant over the entire piece—both the painted sections and the raw wood. This unifies the sheen and protects the raw timber from stains. -
Apply final coat:
After the sealant dries, lightly sand with high-grit paper and apply one final coat of polycrylic to the table top for extra durability.
Let the table cure for a full 24 hours before placing any heavy objects on top to ensure the finish is rock hard


Have a question or want to share your own experience? I'd love to hear from you in the comments below!