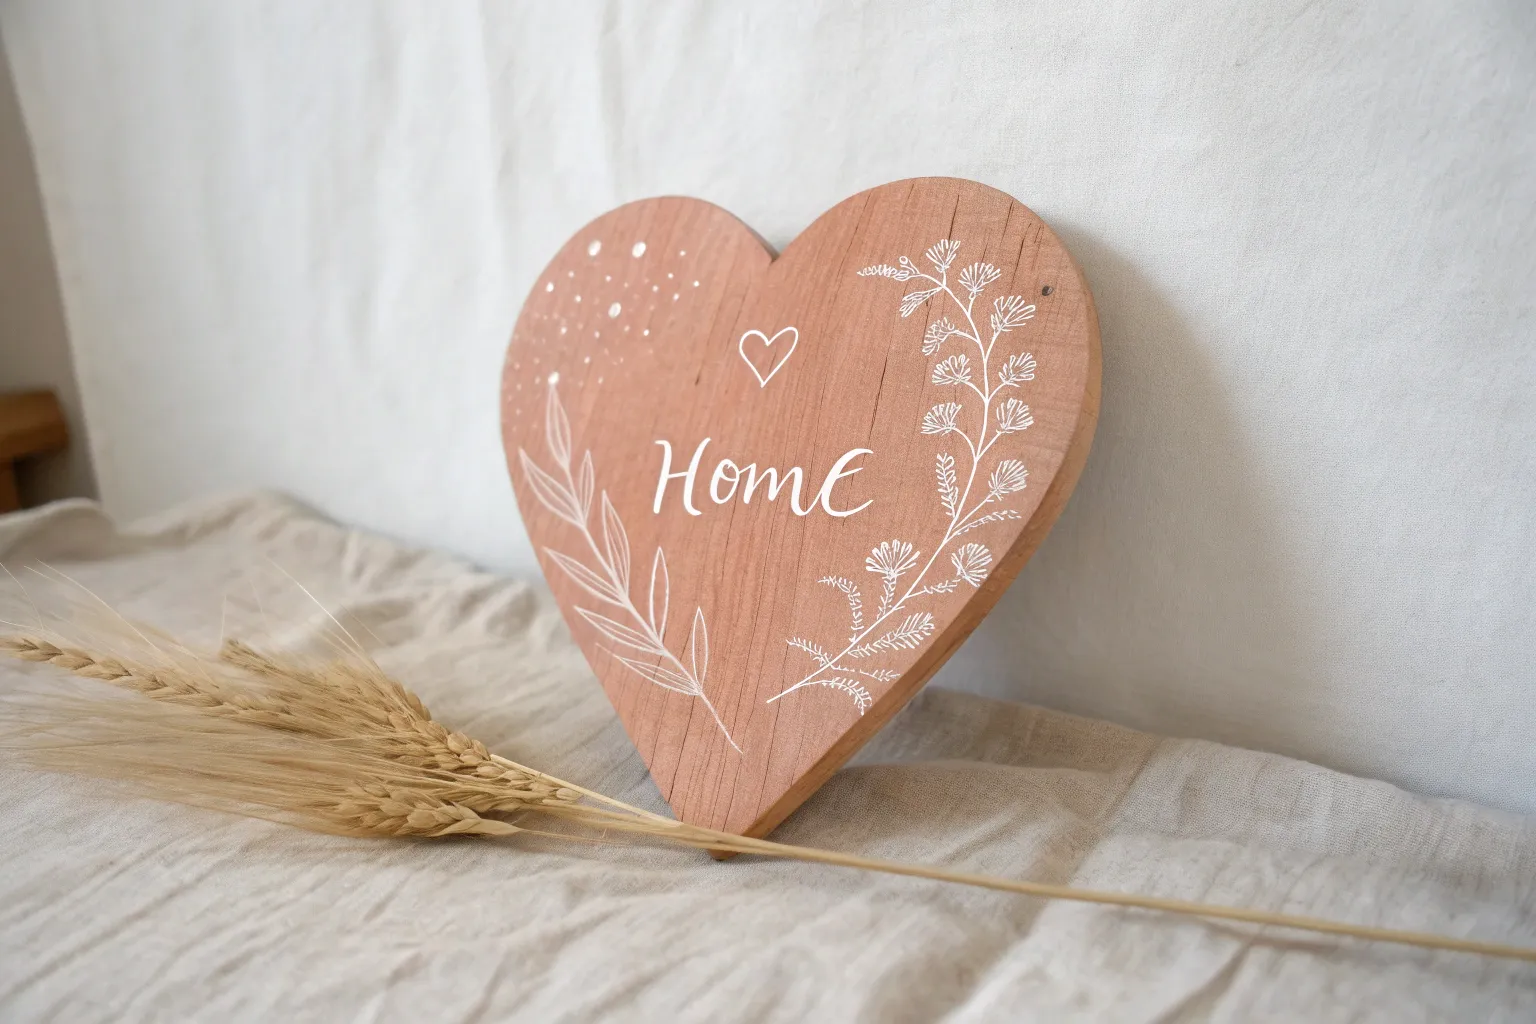
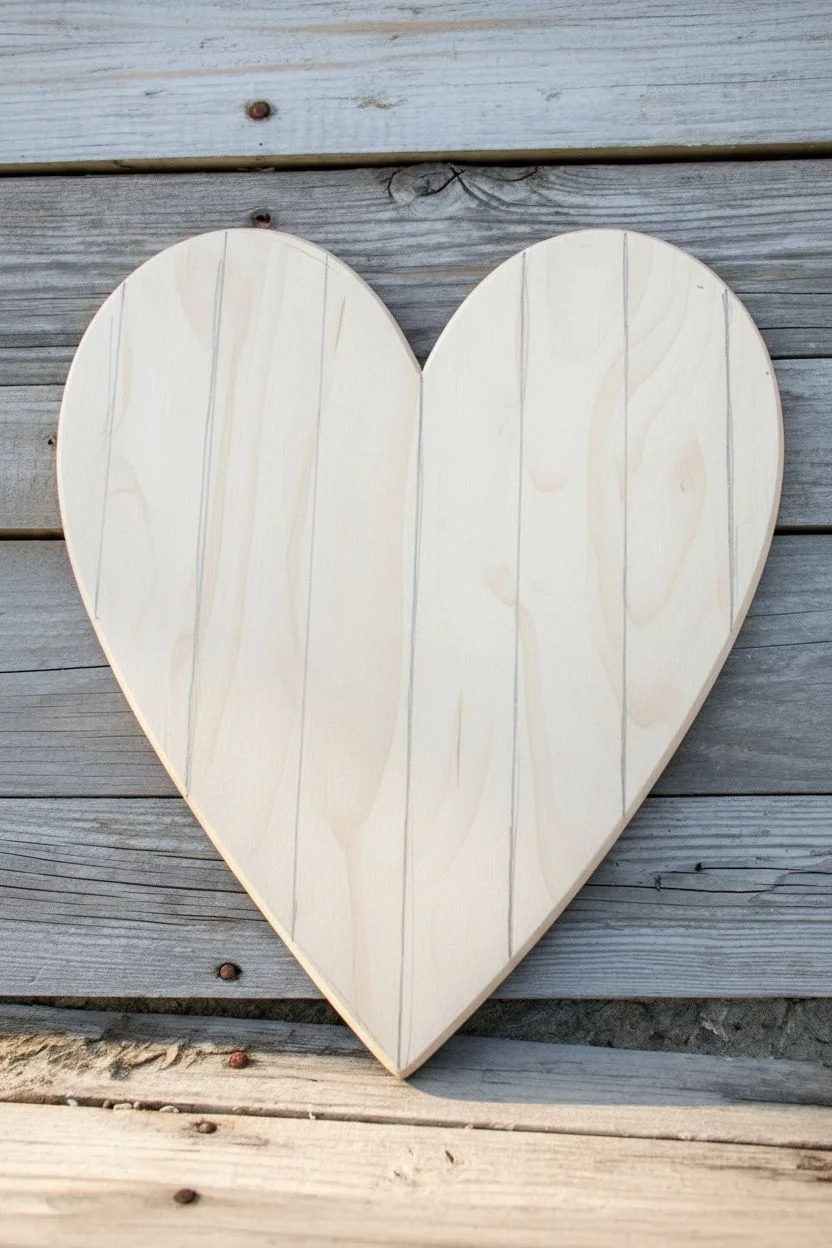
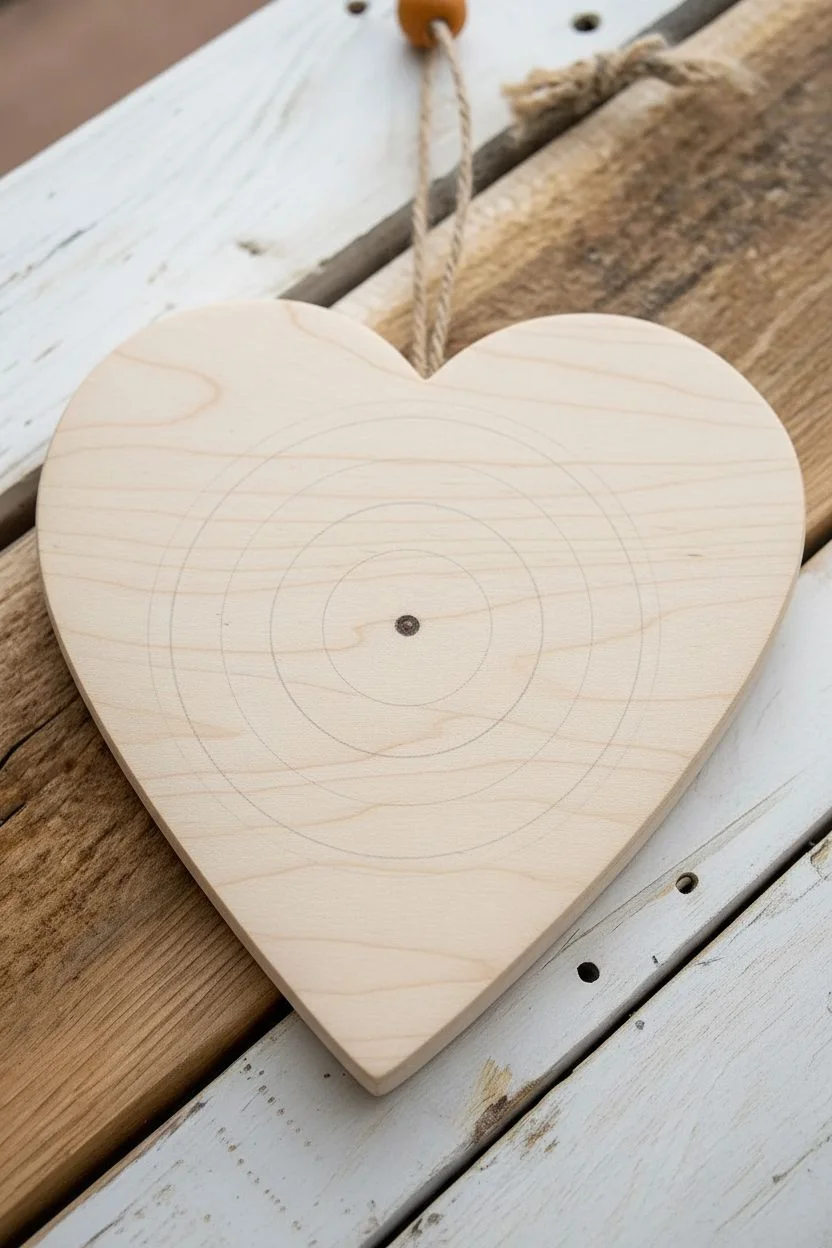
Wooden hearts are the sweetest little canvases—small enough to finish in one sitting, but big enough to try a real technique. Here are my favorite wooden heart painting ideas you can make for gifts, garlands, or just to sprinkle a little love around your space.
Classic Conversation-Message Wooden Hearts
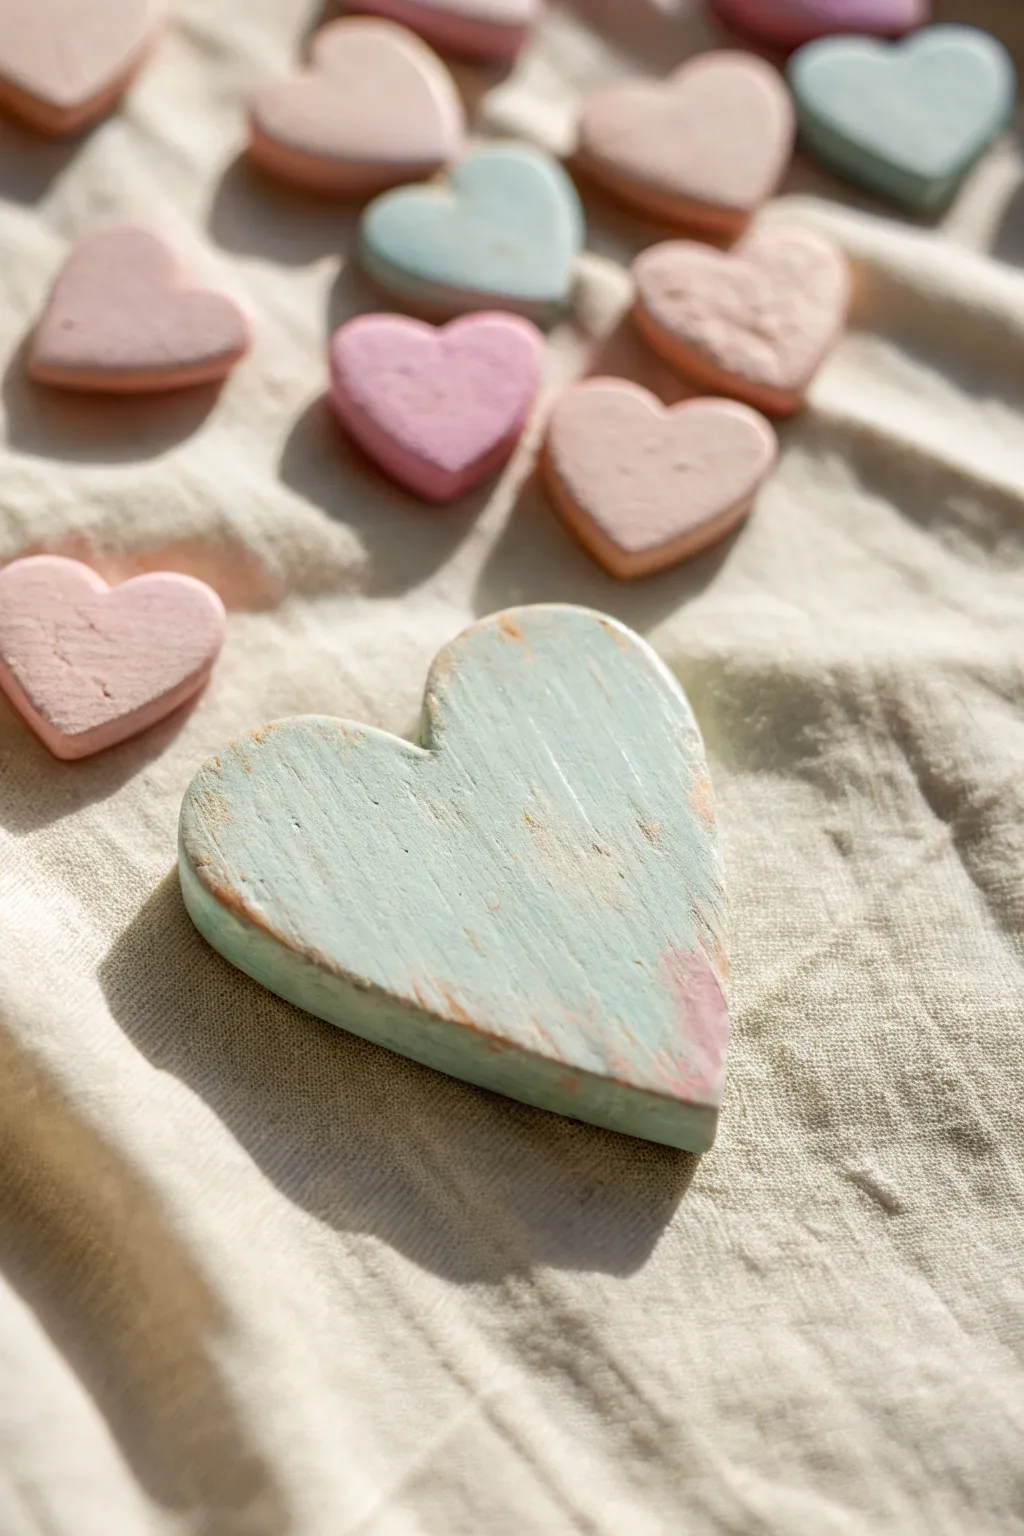
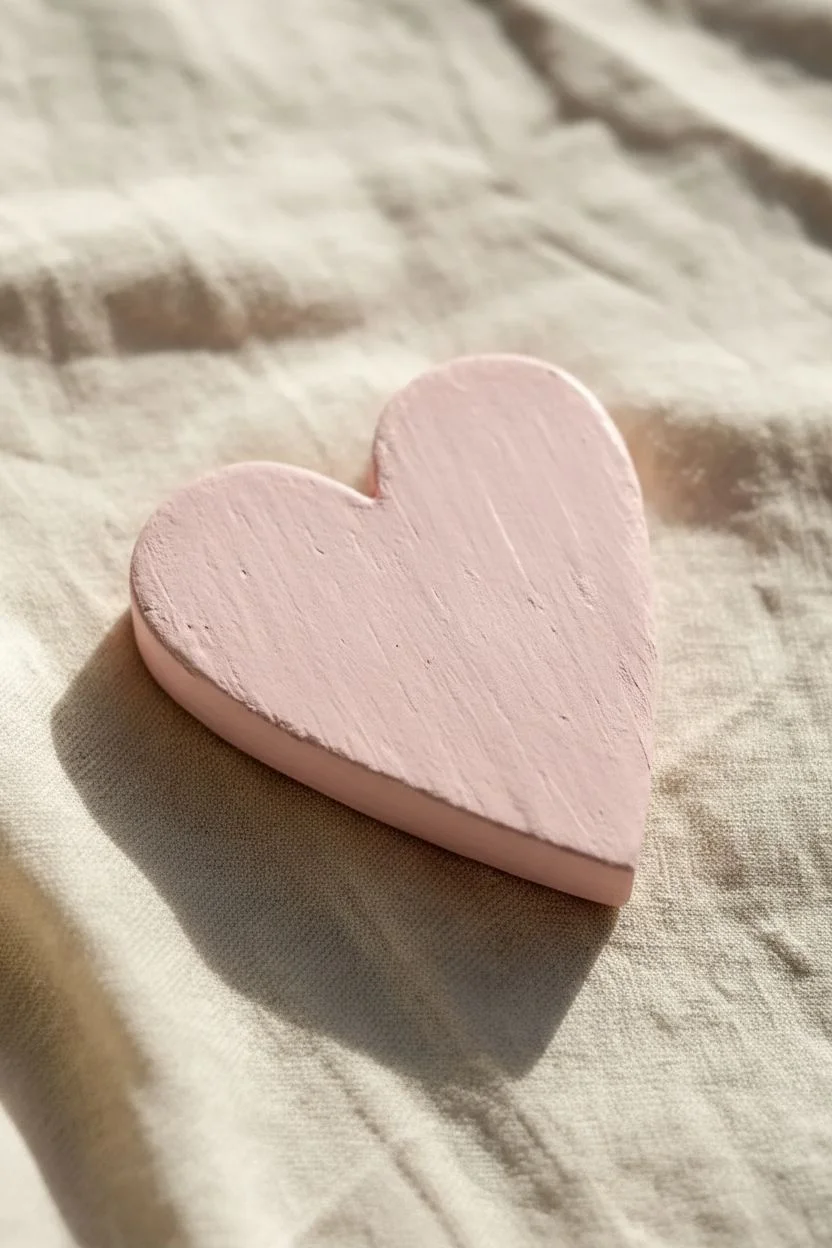
Embrace a soft, vintage aesthetic with these beautifully distressed wooden hearts painted in soothing pastel tones. This project recreates the look of weathered, time-worn treasures using a simple layering technique that reveals glimpses of raw wood and contrasting colors.
Step-by-Step Guide
Materials
- Unfinished wooden hearts (one large, several small)
- Acrylic craft paints (Mint Green, Baby Pink, Soft Peach)
- Fine-grit sandpaper (220 grit) or a sanding block
- Medium flat brush
- Small fine-detail brush (optional)
- Old candle or beeswax puck
- Clean cotton rag or paper towels
- Matte clear varnish or spray sealer
- Drop cloth or palette
Step 1: Preparation & First Layer
-
Surface Prep:
Begin by lightly sanding your wooden hearts to remove any rough splinters or manufacturing burrs. Wipe them down with a dry cloth to ensure no dust remains, as dust can prevent the paint from adhering smoothly. -
Base Color Application:
For the large heart, choose a contrasting base color if you want a two-tone distress, or stick to raw wood for a natural look. If painting a base, apply a thin coat of baby pink or peach let it dry completely. -
Applying the Resist:
This is the secret to easy distressing. Take your old candle or beeswax and rub it firmly along the edges of the heart and randomly across the surface. Pay special attention to the curves where natural wear would occur. -
Wax check:
Hold the heart up to the light to ensure you have deposited enough wax. You should see a slight sheen on the edges and high points of the wood grain texture.
Step 2: Painting & Distressing
-
Top Coat Application:
Dip your flat brush into the Mint Green paint. Apply a generous coat over the entire top surface of the large heart, painting right over the waxed areas. Don’t worry if the paint beads up slightly on the wax; that’s part of the process. -
Painting the Minis:
While the large heart dries, paint your smaller hearts. Use a mix of Baby Pink, Soft Peach, and Mint Green. I like to keep these simple with just one solid coat to create a soft background effect. -
Drying Time:
Allow the top coat on the large heart to dry completely. It should feel chalky and cool to the touch, not tacky. If you are impatient, a hair dryer on a low setting works wonders here. -
The Reveal:
Take your sandpaper or sanding block and gently rub over the painted surface. Start with the edges where you applied the wax. The paint should flake off easily in those spots, revealing the wood or base color beneath. -
Surface Distressing:
Continue sanding lightly across the flat surface of the heart. The goal is to highlight the wood grain texture, so sand in the direction of the grain rather than against it. -
Dusting Off:
Use a dry bristle brush or a clean cloth to vigorously wipe away all the paint dust and loose wax particles. The finish should look worn and matte.
Paint peeling too much?
If large chunks of paint peel off during sanding, your wax layer was too heavy. Next time, use less pressure with the candle or use a finer grit sandpaper for more control.
Step 3: Finishing Touches
-
Adding Dimension:
If the heart looks too flat, dry brush a tiny amount of white or cream paint over the very center to create a subtle highlight. -
Pink Accents:
To mimic the look in the photo, you can dab a very small amount of watered-down pink paint onto a cloth and smudge it onto a corner of the mint heart for a stained, vintage feel. -
Sealing the Work:
To protect that perfect distressed finish, apply a thin layer of matte varnish. Avoid glossy finishes, as they will ruin the rustic, shabby chic vibe. -
Arrangement:
Once everything is dry, arrange your large heart as the centerpiece with the smaller hearts scattered around it to complete the collection.
Add a Message
Use a fine-tip white paint marker or alphabet stamps to add conversation heart phrases like ‘BE MINE’ or ‘HUG ME’ to the smaller pink hearts before sealing.
Enjoy displaying your charming collection of vintage-inspired wooden hearts on a mantle or table


Solid Color Hearts With Crisp White Script
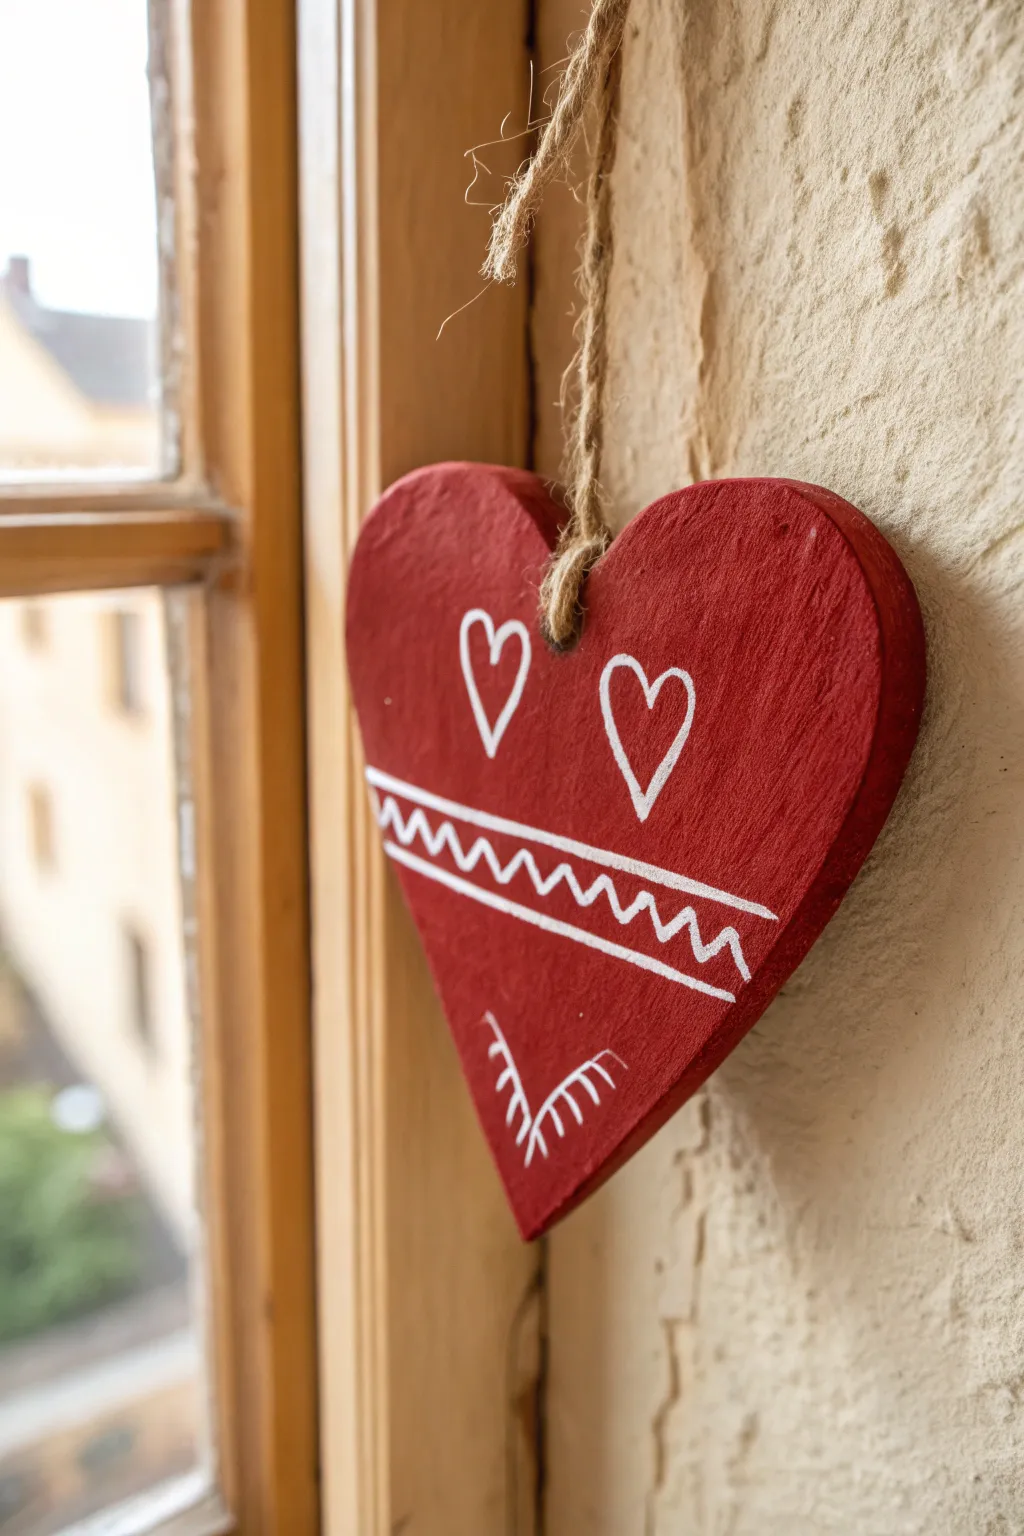
This charming rustic ornament captures a traditional folk-art aesthetic with its deep red base and simple, stitch-like white details. It evokes a cozy, handcrafted feel perfect for holiday décor or a heartfelt gift.
Step-by-Step
Materials
- Wooden heart cutout (approx. 4-6 inches wide)
- Red acrylic paint (deep crimson or berry shade)
- White paint pen (fine point) or white acrylic paint with a liner brush
- Jute twine or rustic string
- Flat paintbrush (medium size)
- Sandpaper (fine grit, 220 or higher)
- Clear matte sealer (optional)
- Pencil
- Piece of scrap paper
Step 1: Preparation and Base Coat
-
Sand the Wood:
Begin by lightly sanding your wooden heart cutout. Focus on smoothing the edges and flat surfaces to ensure the paint adheres evenly without splinters. -
Wipe Clean:
Use a dry cloth or tack cloth to remove all sawdust residue. A clean surface is crucial for a smooth base coat. -
First Coat of Red:
Load your flat brush with the deep red acrylic paint. Apply an even layer across the front face of the heart, following the grain of the wood. -
Dry and Repeat:
Allow the first coat to dry completely to the touch. I usually wait about 20 minutes unless using a hair dryer to speed things up. Apply a second coat to ensure opaque, solid coverage. -
Paint the Edges:
Don’t forget the sides. Carefully paint the thickness of the heart so the raw wood doesn’t show from the side angles. Let the entire piece dry thoroughly before moving on.
Paint Pen Blobs?
If your paint pen releases too much ink, quickly dab it gently with a dry cotton swab to lift the excess, then let it dry and touch up with red paint if needed.
Step 2: Adding the Designs
-
Sketch the Layout:
Lightly sketch your design elements with a pencil directly onto the red paint. Draw two parallel curved lines across the middle, two hearts in the top section, and a V-shape near the bottom tip. -
Prime the Paint Pen:
If using a paint pen, shake it well and press the nib on scrap paper until the white ink flows smoothly. This prevents sudden globs on your project. -
Outline the Top Hearts:
Start with the top section. Trace over your pencil drawings to create two simple white heart outlines side-by-side above the midline. -
Create the Center Band:
Draw the two long, curved horizontal lines across the widest part of the heart. Keep your hand steady to maintain consistent thickness. -
Add the Zigzag:
Inside the two parallel lines you just drew, add a continuous zigzag pattern. Try to keep the peaks and valleys roughly the same height, mimicking a sewing stitch. -
Detail the Bottom:
Move to the bottom tip. Draw a central V-shape or arrow pointing down. Add small hatch marks along the outside of the V lines to create a fern or feather effect. -
Clean Up Lines:
Inspect your white lines. If any look faint, carefully go over them a second time once the first pass is dry to make the white pop against the red. -
Erase Marks:
Once the white paint is completely cured (give it at least an hour), gently erase any visible pencil marks remaining around your design.
Distress for Depth
Make it vintage! After the white paint dries, lightly sand over the designs and edges with fine-grit sandpaper to reveal bits of wood or undercoat.
Step 3: Finishing Touches
-
Seal the Project:
To protect your handiwork, apply a thin layer of matte clear sealer. This locks in the design without making the rustic wood look too glossy. -
Prepare the Hanger:
Cut a length of jute twine, approximately 10-12 inches long depending on how low you want it to hang. -
Attach the Twine:
Thread the twine through the pre-drilled hole at the top of the heart. If your wood didn’t come with a hole, you can drill a small one now or hot glue the twine to the back. -
Secure the Knot:
Bring the ends of the twine together and tie a secure overhead knot. Trim any excess fuzz from the twine ends for a neat finish.
Hang your folk-art heart in a window or on a door handle to add a splash of rustic warmth to your home


Ombre Wooden Hearts for Easy Drama
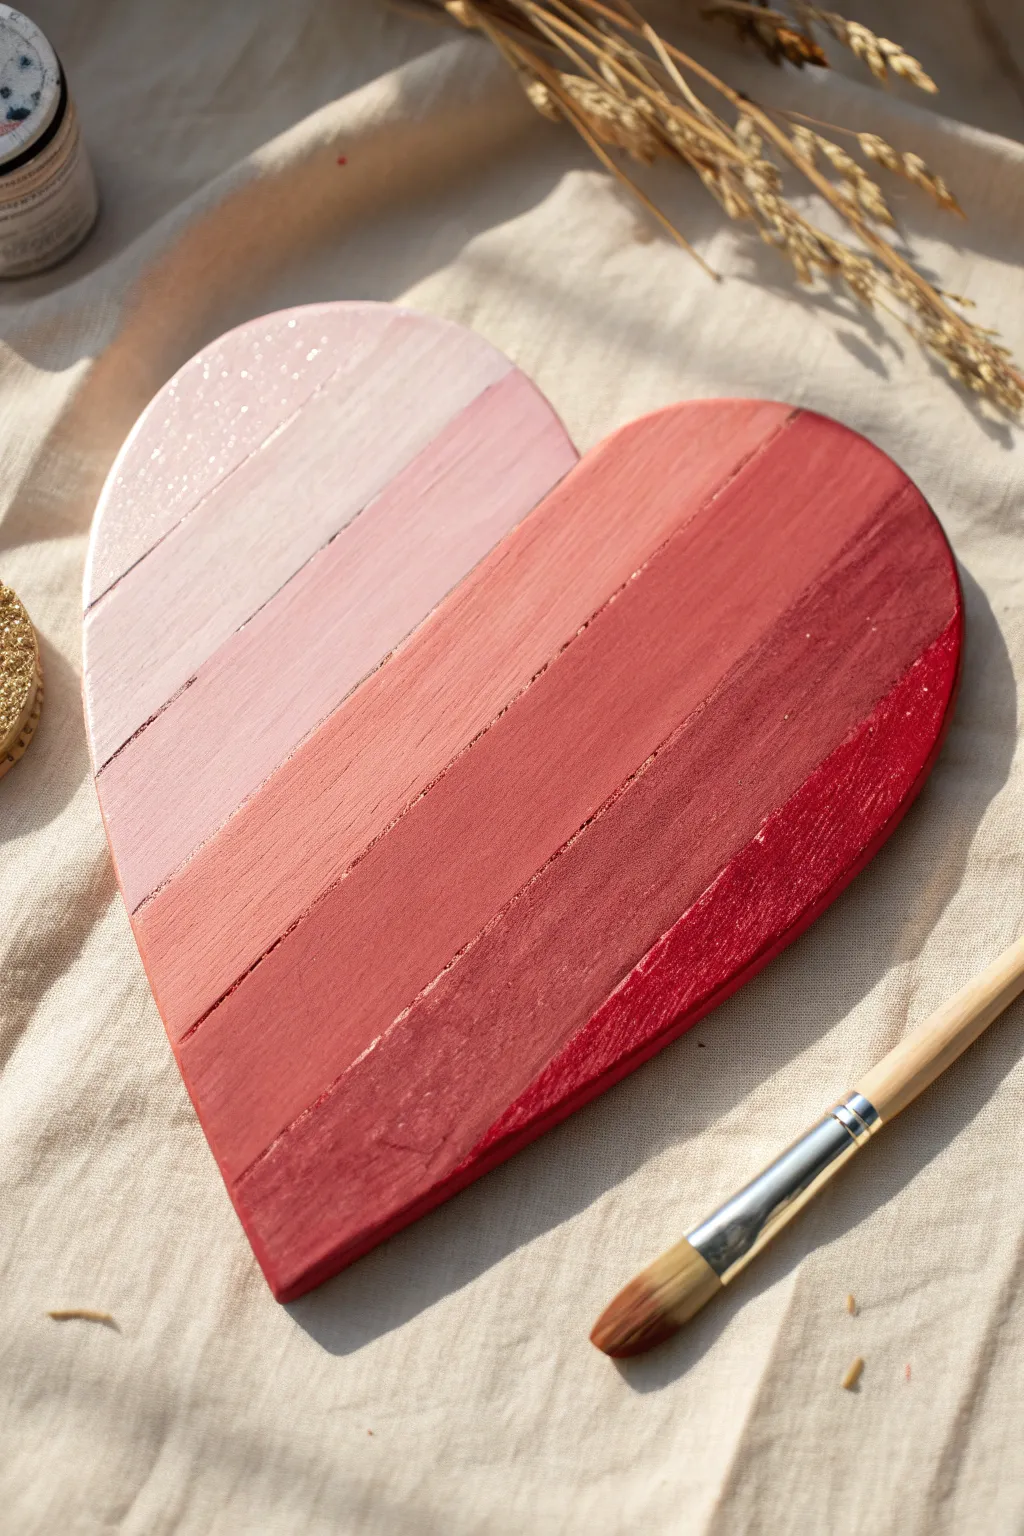

This project transforms a simple wooden surface into a stunning gradient display that moves seamlessly from soft blush to deep crimson. The slat-like texture of the wood makes painting clean lines incredibly easy, resulting in a professional-looking ombre effect with minimal fuss.
Step-by-Step Guide
Materials
- Wooden heart plaque (preferably with horizontal grooves or slats)
- Acrylic paints: White, Blush Pink, Coral, Deep Red, Burgundy
- Flat shader brush (size ~1/2 inch)
- Paper plate or palette
- Water cup and paper towels
- Fine-grit sandpaper (optional)
- Clear matte sealer (optional)
Step 1: Prepping the Surface
-
Check the wood texture:
Examine your wooden heart. If the surface is rough, lightly sand it with fine-grit sandpaper to ensure the paint glides on smoothly. -
Clean the surface:
Wipe away any sawdust with a damp cloth or tack cloth. A clean surface is crucial for crisp paint adhesion. -
Plan your gradient:
Count the number of slats or sections on your heart. This particular design uses roughly six distinct horizontal bands, so you will need to prepare six shades of paint.
Groove Control
Don’t overload your brush when painting near the grooves. Too much paint will seep into the cracks and ruin the separation between colors.
Step 2: Mixing the Gradient
-
Prepare the lightest shade:
On your palette, squeeze out a generous amount of white paint and a tiny dot of blush pink. Mix until you have a very pale, milky pink color. -
Prepare the medium tones:
Create your next shade by adding slightly more pink to the white base. For the third shade, use the straight blush pink. -
Prepare the darker tones:
For the fourth shade, mix coral with a touch of the blush pink. The fifth shade should be pure deep red. -
Prepare the darkest shade:
Finally, mix deep red with a small amount of burgundy or a tiny dot of black to create the richest, darkest color for the bottom tip.
Step 3: Painting the Ombre Layers
-
Paint the top slat:
Starting at the very top left curve of the heart, apply your lightest pale pink mixture using the flat shader brush. -
Cover the top right:
Continue with the same pale shade on the top right curve. Ensure the brush strokes follow the direction of the wood grain. -
Apply the second layer:
Moving down to the next slat or section, apply your second lightest pink mixture. Paint carefully along the groove line—the physical indentation makes it easy to keep straight. -
Paint the middle section:
Transition to the blush pink for the third stripe. If you enjoy a softer look, you can slightly blend the wet edge with the previous color, though distinct bands work best for this slat style. -
Add the coral tone:
Paint the fourth stripe using your coral mixture. The warmth should really start to show here. -
Apply the deep red:
Paint the fifth stripe with the pure deep red acrylic. Ensure full coverage, especially near the jagged edges of the heart shape.
Metallic Accent
Once the paint is dry, dry-brush a tiny bit of metallic gold paint over the raised edges of the slats for a distressed, glamorous shimmer.
Step 4: Finishing Touches
-
Paint the bottom tip:
Apply your darkest burgundy-red mixture to the very bottom point of the heart. -
Check the edges:
Inspect the sides of the wooden heart. You can either paint them to challenge the front colors or paint the entire edge a solid dark red for a framed effect. -
Clean up grooves:
If paint pooled in the grooves between slats, use a dry brush or a toothpick to gently clear it out before it dries completely. -
Allow to dry:
Let the heart dry completely for at least one hour. Acrylics dry fast, but thicker layers need time. -
Seal (Optional):
Once fully dry, apply a coat of clear matte sealer if you plan to handle the heart frequently or hang it outdoors.
Hang your new ombre heart on a door or lean it on a mantle for an instant splash of romantic color


Tiny Floral Bouquet Painted Inside a Heart
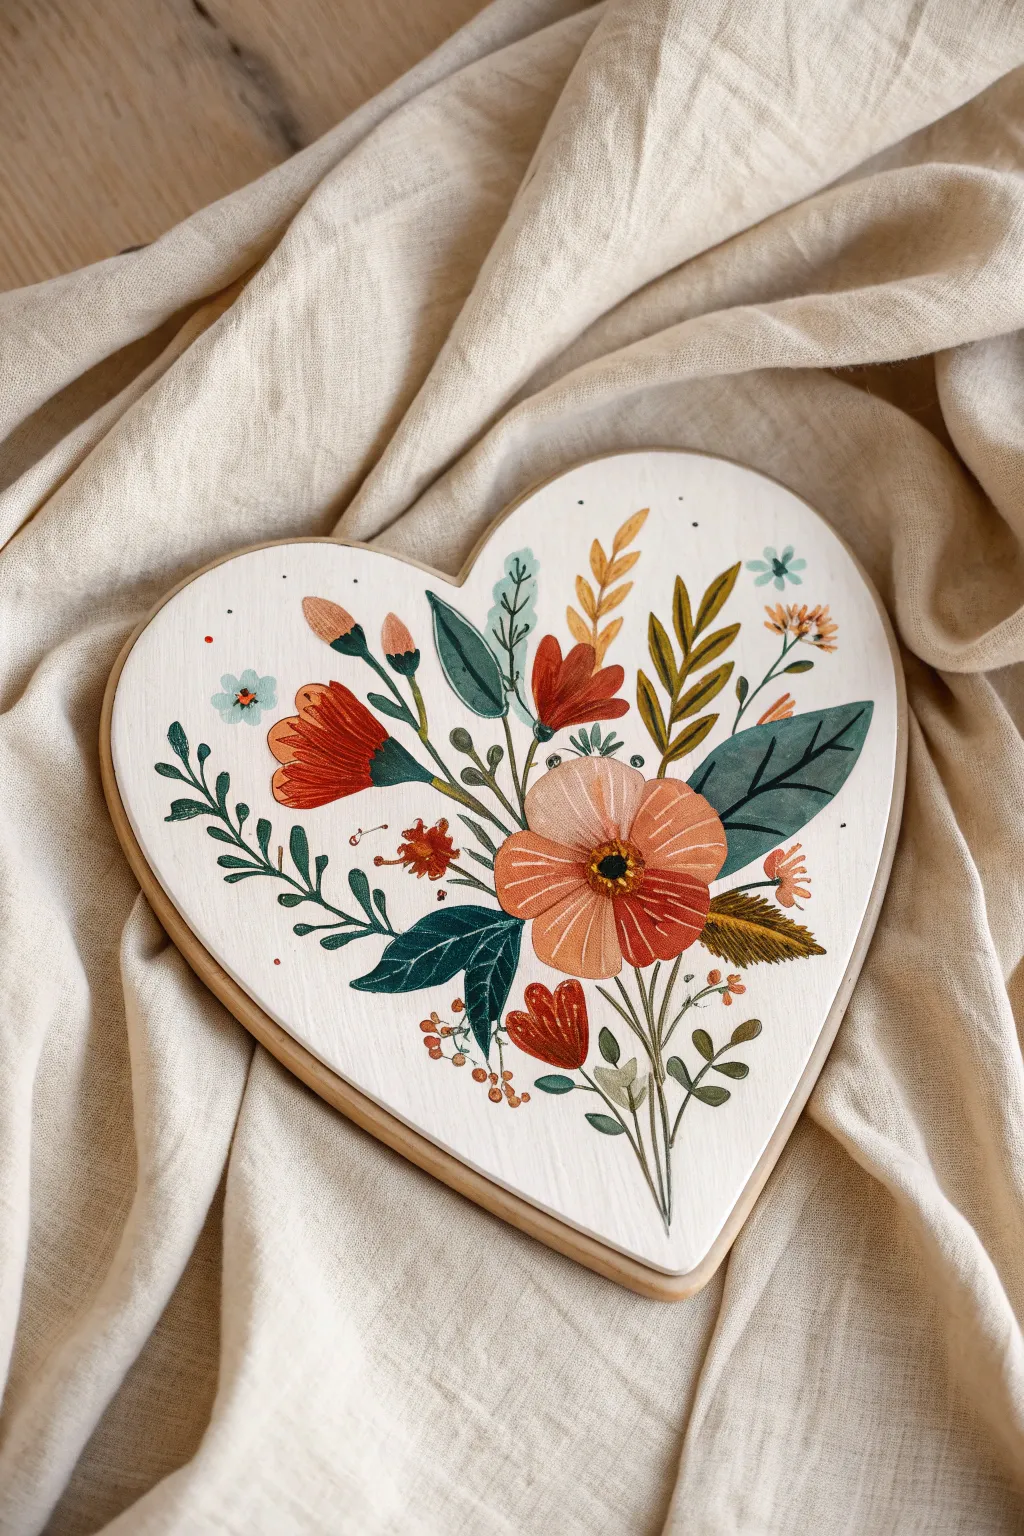
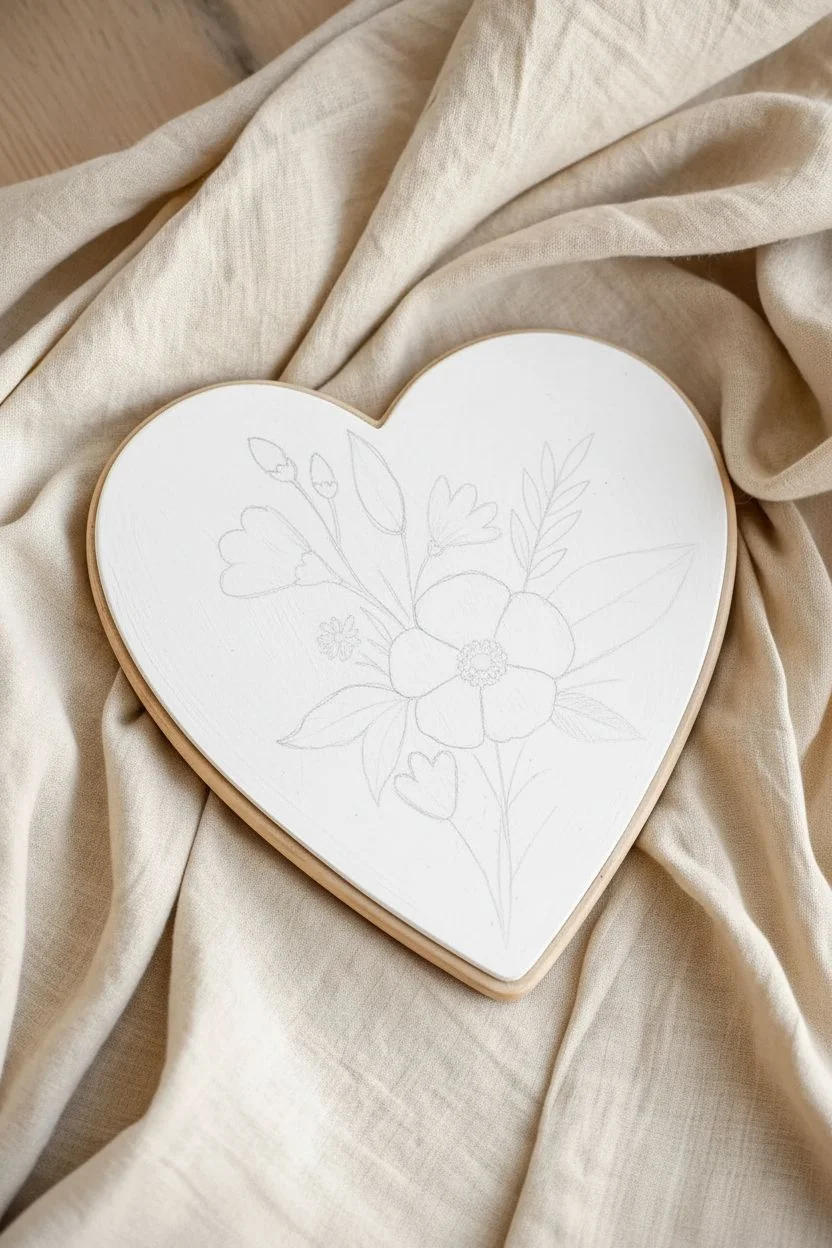
Transform a simple wooden heart into a charming piece of folk art with this detailed painting tutorial. This project features a stylized bouquet in warm autumnal tones of rust, peach, and teal, set against a crisp white background for a clean, modern finish.
Step-by-Step
Materials
- Unfinished wooden heart plaque (approx. 6-8 inches)
- Sandpaper (220 grit)
- White or cream acrylic paint (matte finish)
- Acrylic paints: Rust Red, Terracotta, Peach/Coral, dark Teal, pale Aqua, Olive Green, Mustard Yellow, Black, and Metallic Gold (optional)
- Round synthetic brushes (sizes 2, 4, and 6)
- Detail liner brush (size 0 or 00)
- Pencil for sketching
- Palette or small plate
- Paper towels and water cup
- Matte or satin spray varnish
Step 1: Preparation & Base Coat
-
Sand the surface:
Begin by lightly sanding your wooden heart to remove any rough grain or splinters. Focus on the edges to ensure a smooth, rounded feel. Wipe away all dust with a slightly damp cloth or tack cloth. -
Apply the background:
Using a larger brush, coat the entire top surface of the heart with your white or cream acrylic paint. I like to apply two thin coats rather than one thick one to avoid brush marks. Let the first coat dry completely before adding the second. -
Paint the edges:
Carefully paint the sides of the heart. You can choose to leave the back plain or paint it to match. Ensure the coverage is solid along the rim where the top meets the side. -
Sketch the bouquet:
Once the base is bone dry, lightly sketch the main stems and larger flower placements with a pencil. Don’t worry about tiny details yet; just establish the flow. The main bouquet should stem from the bottom center and fan out slightly to the right.
Step 2: Painting the Main Blooms
-
Paint the central flower:
Start with the large, open flower near the center-right. Mix a warm peach/coral tone. Using a size 4 or 6 round brush, paint large, rounded petal shapes that radiate from a center point. Keep the paint somewhat opaque. -
Add the rust-colored blooms:
Using the rust red paint, create the two tulip-shaped flowers on the left side. Paint the bottom of the flower wider and taper slightly at the top, leaving jagged, petal-like edges. -
Create the lower heart bud:
Near the bottom center, paint a small heart-shaped bud in that same rust red color. This anchors the bottom of the arrangement. -
Add secondary yellow flowers:
Using mustard yellow or gold, paint the fern-like sprig at the top right and the textured leaf shape extending to the right of the main peach flower. Use short, decisive strokes.
Clean Lines
If your fine lines look shaky, thin your acrylic paint with a tiny drop of water. Ink-like consistency helps the paint flow smoothly off the liner brush without skipping.
Step 3: Leaves & Greenery
-
Paint the large teal leaves:
Mix a deep teal green. Paint the prominent, large leaf on the far right side. Make this leaf broad and pointed. Add a second, smaller teal leaf tucked behind the rust flowers on the left. -
Add trailing vines:
Switch to a darker olive green and your liner brush. Paint the long, thin stems that curve out to the left side. Add small, teardrop-shaped leaves along these vines. -
Paint support stems:
Connect your main flowers to the bottom center ‘root’ area with thin, confident lines using the olive green or a brownish-green mix. -
Insert filler leaves:
Using a lighter aqua or mint shade, paint small sprigs near the top left and interspersed among the larger blooms to balance the color palette.
Custom Palette Idea
Swap the palette to match the season; try icy blues and silvers for winter, or bright pinks and lime greens for a spring version.
Step 4: Details & Line Work
-
Detail the main flower:
Add dimension to the central peach flower. Use a slightly darker coral or red to paint thin lines radiating from the center outward on each petal. Paint a dark black or brown center circle, then dot the middle with tiny yellow or gold specks. -
Define the rust flowers:
On the rust-colored tulip shapes, use a liner brush and dark red or brown paint to add vertical striation lines. This gives the petals texture and form. -
Add leaf veins:
Once the large teal leaf is dry, use a very fine liner brush with black or dark navy paint to draw a central vein and delicate side veins. -
Paint tiny filler flowers:
Scatter small details around the composition. Paint tiny blue four-petal flowers on the left and right. Add clusters of small orange berries on thin brown stems near the bottom. -
Add finishing dots:
Dip the non-brush end of your paintbrush (or a stylus) into paint to add tiny dots. Place a few red dots around the perimeter for whimsy and add dark centers to the small blue flowers.
Step 5: Finishing
-
Erase guidelines:
Check closely for any visible pencil sketch marks that weren’t covered by paint. Gently erase them with a soft white eraser. -
Seal the artwork:
Allow the painting to cure for at least 24 hours. Once set, apply a matte or satin spray varnish in light, even coats to protect your beautiful handiwork from dust and fading.
Hang your finished heart on a wall gallery or prop it on a shelf to bring a touch of handcrafted warmth to your room
BRUSH GUIDE
The Right Brush for Every Stroke
From clean lines to bold texture — master brush choice, stroke control, and essential techniques.
Explore the Full Guide
Wraparound Vine Border on a Wooden Heart
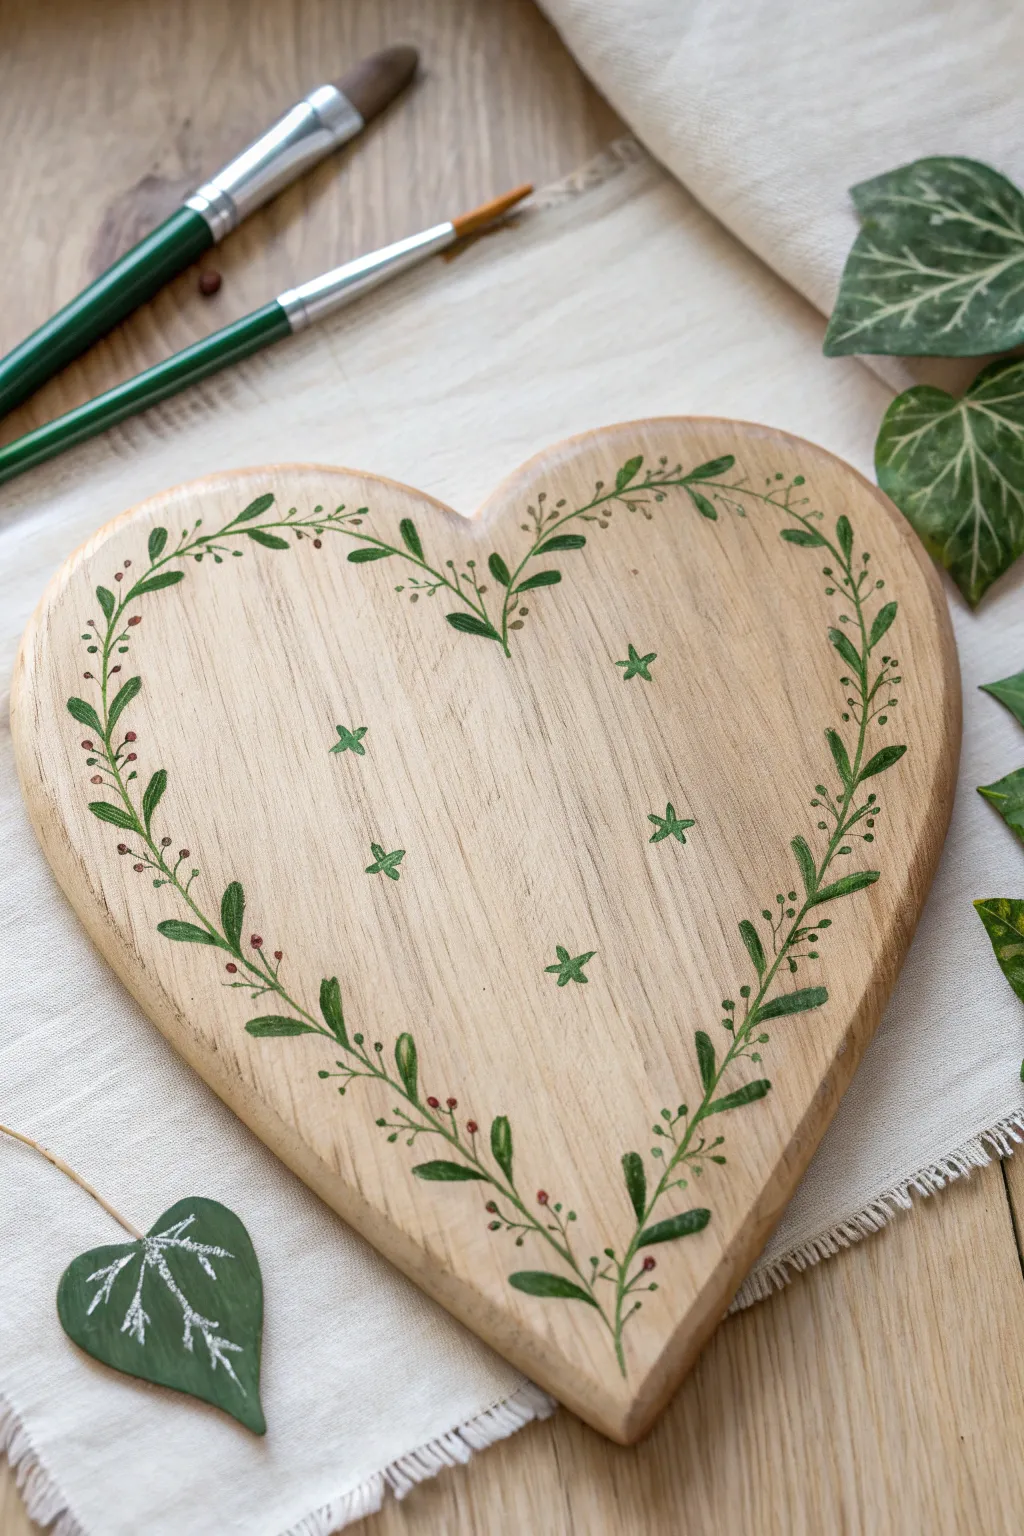
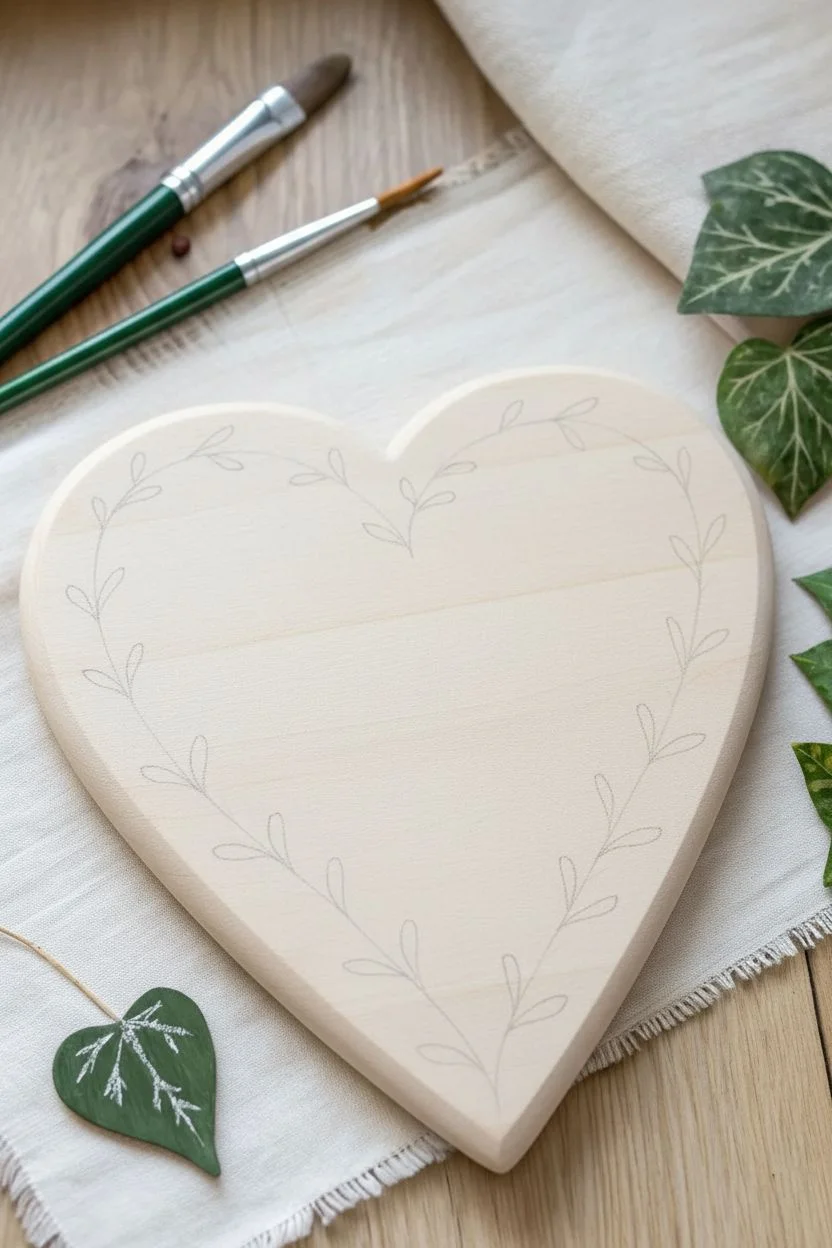
Capture the simple elegance of nature with this delicate wooden heart project. Featuring a trailing ivy-inspired vine border and minimalist star accents, this piece brings a touch of organic warmth to any room.
Step-by-Step Guide
Materials
- Unfinished wooden heart plaque (approx. 6-8 inches)
- Fine grit sandpaper (220 grit)
- Acrylic paints: Olive Green, Forest Green, Deep Red or Burgundy
- Round synthetic brushes: sizes 2 and 00 (detail brush)
- Pencil and eraser
- Paper palette or plate
- Water cup and paper towels
- Matte or satin clear varnish (optional)
Step 1: Preparation
-
Sand the Surface:
Begin by lightly sanding the entire surface of your wooden heart. Focus especially on the edges to ensure they are smooth. Wipe away all dust with a slightly damp cloth or tack cloth. -
Draft the Vine Design:
Using a pencil, very lightly sketch two main curved lines starting from the bottom point of the heart. Curve them upwards along the left and right edges, letting them meet or nearly meet at the top center dip of the heart. -
Add Leaf Placement:
Along your main vine lines, sketch small tick marks where you want your leaves to go. Aim for alternating placement—left, then right—rather than perfectly opposite pairs for a more natural look.
Step 2: Painting the Vines
-
Paint the Central Stems:
Load your size 2 brush with thinned Forest Green paint. I find that adding a tiny drop of water helps the paint flow smoother for long lines. Carefully trace over your pencil lines to create the main stems. -
Create the Leaves:
Switch to the finer detail brush. Using the same Forest Green, paint small, elongated oval leaves at your tick marks. Press down at the base of the leaf and lift up as you pull away to create a tapered point. -
Add Variation:
While the green is still wet on your palette, mix in a tiny bit of Olive Green. Go back and touch up some of the leaves or paint new smaller ones to add depth and variety to the color tone. -
Paint Branching Shoot:
Add tiny, thin branching stems coming off the main vine in between the leaves. These should be very delicate and curve slightly.
Jittery Lines?
If your vine lines look shaky, don’t worry. Just thicken the line slightly in those spots or add a leaf right over the mistake to hide it naturally.
Step 3: Details & Accents
-
Add Berries:
Dip the very tip of your detail brush or the handle end of a brush into the Deep Red paint. Dot tiny berries along the vine, placing them at the ends of the small branching stems or near leaf clusters. -
Paint Center Stars:
In the open space in the center of the heart, lightly pencil in 4-5 small star or cross shapes. They act as filler elements. -
Detail the Stars:
Paint these stars using the Forest Green. Use short, flicking strokes to create a simple 4 or 5-point cross shape. Keep them sparse so the wood grain still shows through. -
Let it Dry:
Allow the paint to dry completely for at least 30 minutes. The acrylics should be matte and dry to the touch. -
Erase Pencil Marks:
Once you are absolutely sure the paint is dry, gently erase any visible pencil sketch lines that weren’t covered by paint.
Rustic Rope Hanger
Drill two small holes at the top lobes of the heart and thread a piece of jute twine through to create a hanger that matches the rustic aesthetic.
Step 4: Finishing Touches
-
Optional Leaf Veins:
For extra detail, you can mix a lighter green (Forest Green + White) and paint a hair-thin line down the center of the larger leaves. -
Seal the Wood:
To protect your work, apply a thin coat of matte or satin varnish over the entire heart. This seals the raw wood and keeps the paint vibrant.
Hang your beautiful botanical heart on a door or wall to admire your handiwork
Polka Dot Hearts With a Retro Feel
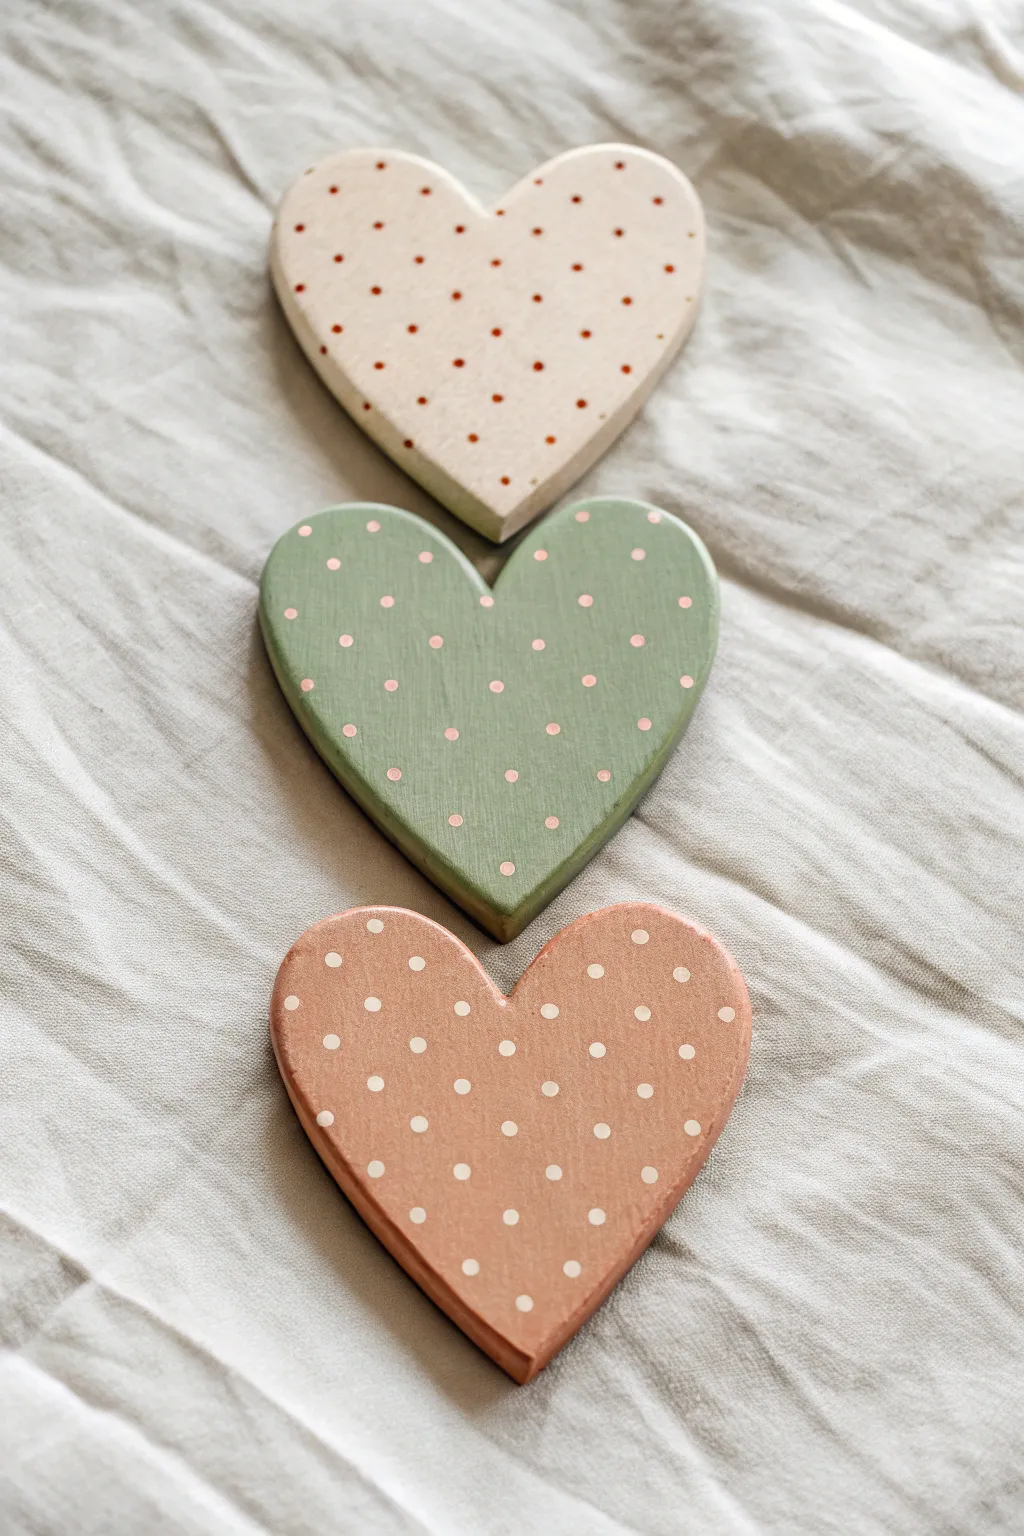
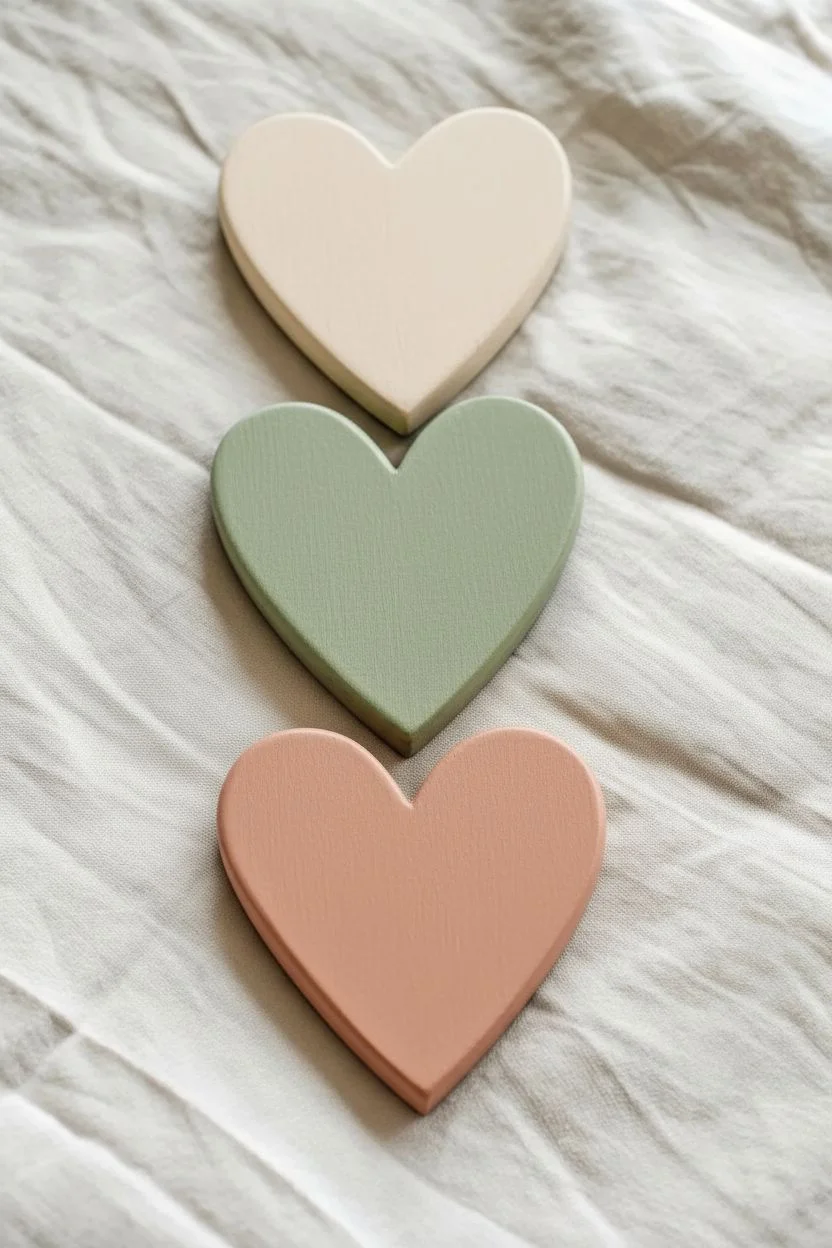
Achieve a charming vintage vibe with these smooth, pastel-dipped wooden hearts adorned with contrasting polka dots. The soft color palette of cream, sage, and dusty rose creates a cohesive and nostalgic trio perfect for nursery decor or a rustic wedding display.
Step-by-Step Tutorial
Materials
- 3 wooden heart cutouts (smooth finish, medium size)
- Fine-grit sandpaper (220-grit)
- Acrylic craft paints: Cream, Muted Sage Green, Dusty Rose
- Flat shader brush (approx. 1 inch)
- Medium round brush or dotting tool
- Small wooden skewer or toothpick (optional)
- Matte finish sealer (spray or brush-on)
- Paper towels
- Water cup
- Palette or paper plate
Step 1: Preparation & Base Coat
-
Sand for smoothness:
Begin by lightly sanding your wooden hearts, paying special attention to the curved edges and the cleft of the heart. Wipe away all dust with a slightly damp paper towel to ensure a flawless painting surface. -
Organize your palette:
Pour out a quarter-sized amount of your three main base colors (Cream, Sage Green, and Dusty Rose) onto your palette. -
Paint the cream heart:
Using your flat shader brush, apply an even coat of cream paint to the first heart. Brush in the direction of the wood grain for the best finish. -
Paint the edges:
Don’t forget the sides! Carefully run your brush along the thickness of the wood to ensure the color wraps around completely. -
Paint the green heart:
Rinse your brush thoroughly and switch to the Muted Sage Green. Apply a base coat to the second heart, smoothing out any visible brushstrokes quickly before the paint starts to set. -
Paint the rose heart:
Clean the brush again and paint the third heart with the Dusty Rose shade. Aim for full, opaque coverage. -
Check transparency:
Let the first coats dry for about 10-15 minutes. If you can still see the wood grain through the paint, apply a second thin coat to all three hearts for a solid, matte look. -
Full drying time:
Allow the base coats to dry completely—at least 30 minutes—before attempting any dot work. If the base is wet, the dots will bleed.
Step 2: Applying the Polka Dots
-
Select dot colors:
For a cohesive look, use the colors you already have. Use the Dusty Rose paint for dots on the Sage Green heart, Cream paint for dots on the Dusty Rose heart, and Dusty Rose paint for dots on the Cream heart (or mix it up as you prefer). -
The central anchor dot:
Dip the round end of a brush handle or a dotting tool into your accent paint. Place your first dot directly in the center of the heart to anchor your pattern. -
Create the vertical line:
Imagine a vertical line running through that center dot. Space out dots evenly above and below it until you reach the top and bottom edges. -
Start the offset rows:
Move to the left of your center column. Place the next dot in the space ‘between’ the vertical positions of the center column, creating a classic brick or diamond repeat pattern. -
Maintain spacing:
Continue this offset pattern outward toward the edges. Keep your spacing consistent; the gaps between dots should roughly equal the width of two dots. -
Load paint frequently:
I find it best to re-dip the tool into the paint after every single dot. This ensures each polka dot is the same size and roundness. -
Handle the edges:
When you reach the curved edges of the heart, apply partial dots where the pattern naturally falls off the wood. This makes it look like the pattern continues seamlessly. -
Repeat for all hearts:
Clean your tool and repeat the grid process for the remaining two hearts, ensuring you switch paint colors for contrast on each one. -
Dry flat:
Let the dots dry completely while the hearts lay flat. Acrylic dots are thicker than brush strokes and may take an hour or more to fully cure. -
Seal the deal:
Once absolutely dry, finish with a light coat of matte sealer to protect the surface and eliminate any tackiness.
Perfect Circles
Use the back end of a drill bit or a pencil eraser dipped in paint for varied dot sizes. Press straight down and lift straight up—no swirling—for a perfect circle.
My dots look like peaks!
If the paint leaves a tiny peak in the center of the dot when you lift the tool, gently tap the drying panel on the table to help the paint settle flat.
Display these lovely hearts together on a shelf or attach ribbon to the backs to hang them as a sweet vertical garland

PENCIL GUIDE
Understanding Pencil Grades from H to B
From first sketch to finished drawing — learn pencil grades, line control, and shading techniques.
Explore the Full Guide
Gingham or Checker Pattern Wooden Hearts
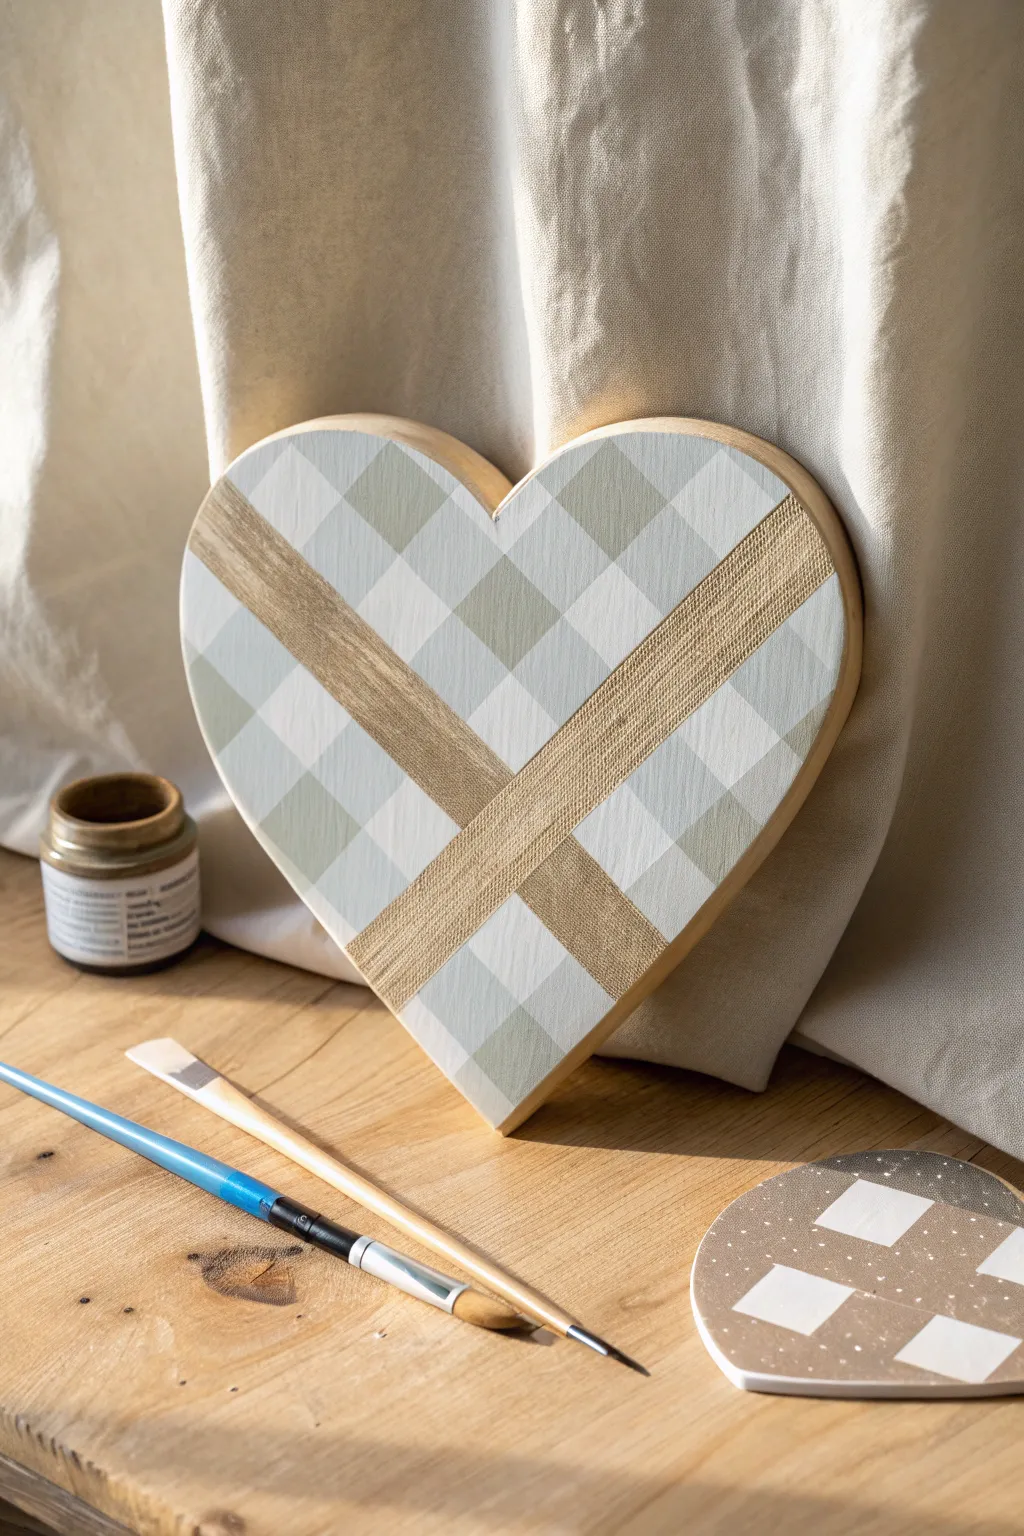
This rustic-chic wooden heart combines a soft grey gingham pattern with a striking metallic gold cross accent. It perfectly balances farmhouse charm with a touch of elegance, making it an ideal décor piece for shelves or mantels.
How-To Guide
Materials
- Large wooden heart blank (standing or hanging)
- White acrylic paint (matte or satin)
- Soft grey acrylic paint
- Metallic gold acrylic paint
- Painter’s tape (various widths, preferably 0.5 inch and 1 inch)
- Flat shader brushes (medium)
- Small round detail brush
- Ruler or straight edge
- Pencil
- Palette or paper plate
Step 1: Base Preparation
-
Sand the Wood:
Begin by lightly sanding your wooden heart with fine-grit sandpaper to remove any rough patches or splinters. -
Wipe It Down:
Use a tack cloth or a slightly damp paper towel to remove all sanding dust. A clean surface ensures your paint adheres smoothly. -
Apply the Base Coat:
Paint the entire front surface of the heart with white acrylic paint. Use long, even strokes to minimize brush marks. -
Dry and Repeat:
Let the first coat dry completely. If the wood grain is still showing through, apply a second coat of white for full, opaque coverage.
Step 2: Creating the Gingham Pattern
-
Map the Vertical Stripes:
Once the white base is bone dry, use your ruler and pencil to lightly mark vertical guidelines. Place strips of painter’s tape vertically across the heart, spacing them evenly apart (about the width of the tape itself). -
Paint Vertical Grey:
Paint the exposed wood between the tape strips with a light coat of grey paint. I find it helpful to brush away from the tape edge to prevent bleeding. -
Remove and Dry:
Carefully peel up the vertical tape while the paint is still slightly wet to get crisp lines. Let this layer dry fully before moving on. -
Map the Horizontal Stripes:
Apply new strips of painter’s tape horizontally across the heart, using the same spacing width as before to create a grid. -
Paint Horizontal Grey:
Paint the exposed horizontal rows with the same grey paint. This creates the classic check pattern. -
Add the Darker Squares:
Here is the key to the gingham look: Identify the squares where the vertical and horizontal grey stripes intersect. Paint these specific squares with a slightly darker shade of grey (or a second coat of the same grey) to simulate the overlapping fabric effect. -
Reveal the Pattern:
Gently remove all horizontal tape strips. allow the entire gingham pattern to cure completely, preferably for at least an hour.
Bleeding Lines?
If paint bleeds under the tape, seal the tape edges with a thin layer of the *base color* (white) first before applying the contrasting color.
Step 3: The Gold Accent
-
Mask the Cross Band:
To create the diagonal gold band, place two strips of tape diagonally across the heart, leaving a gap about 1 inch wide in the center. -
Protect the Background:
Ensure the tape is pressed down firmly, especially over the ridges created by previous paint layers, to prevent gold paint from seeping under. -
Apply Metallic Gold:
Fill in the diagonal space between the tape strips with metallic gold acrylic paint. You may need 2-3 coats for a rich, solid shimmer. -
Texture the Gold (Optional):
Before the gold dries, lightly drag a dry brush through it lengthwise to give it a brushed metal or fabric texture. -
Final Reveal:
Peel away the diagonal tape to reveal your crisp gold stripe crossing the soft gingham background. -
Touch Ups:
Inspect the edges where the gold meets the gingham. Use a small detail brush and white paint to tidy up any bleeds. -
Seal the Project:
Finish by applying a clear matte sealer over the entire heart to protect your paint job and unify the sheen.
Rustic Edge
For a vintage look, lightly sand the edges of the heart after the paint dries to reveal a bit of raw wood, then apply an antique wax.
Place your finished heart on a shelf where the light can catch that beautiful gold accent
Distressed Barn-Wood Stripe Heart Illusion
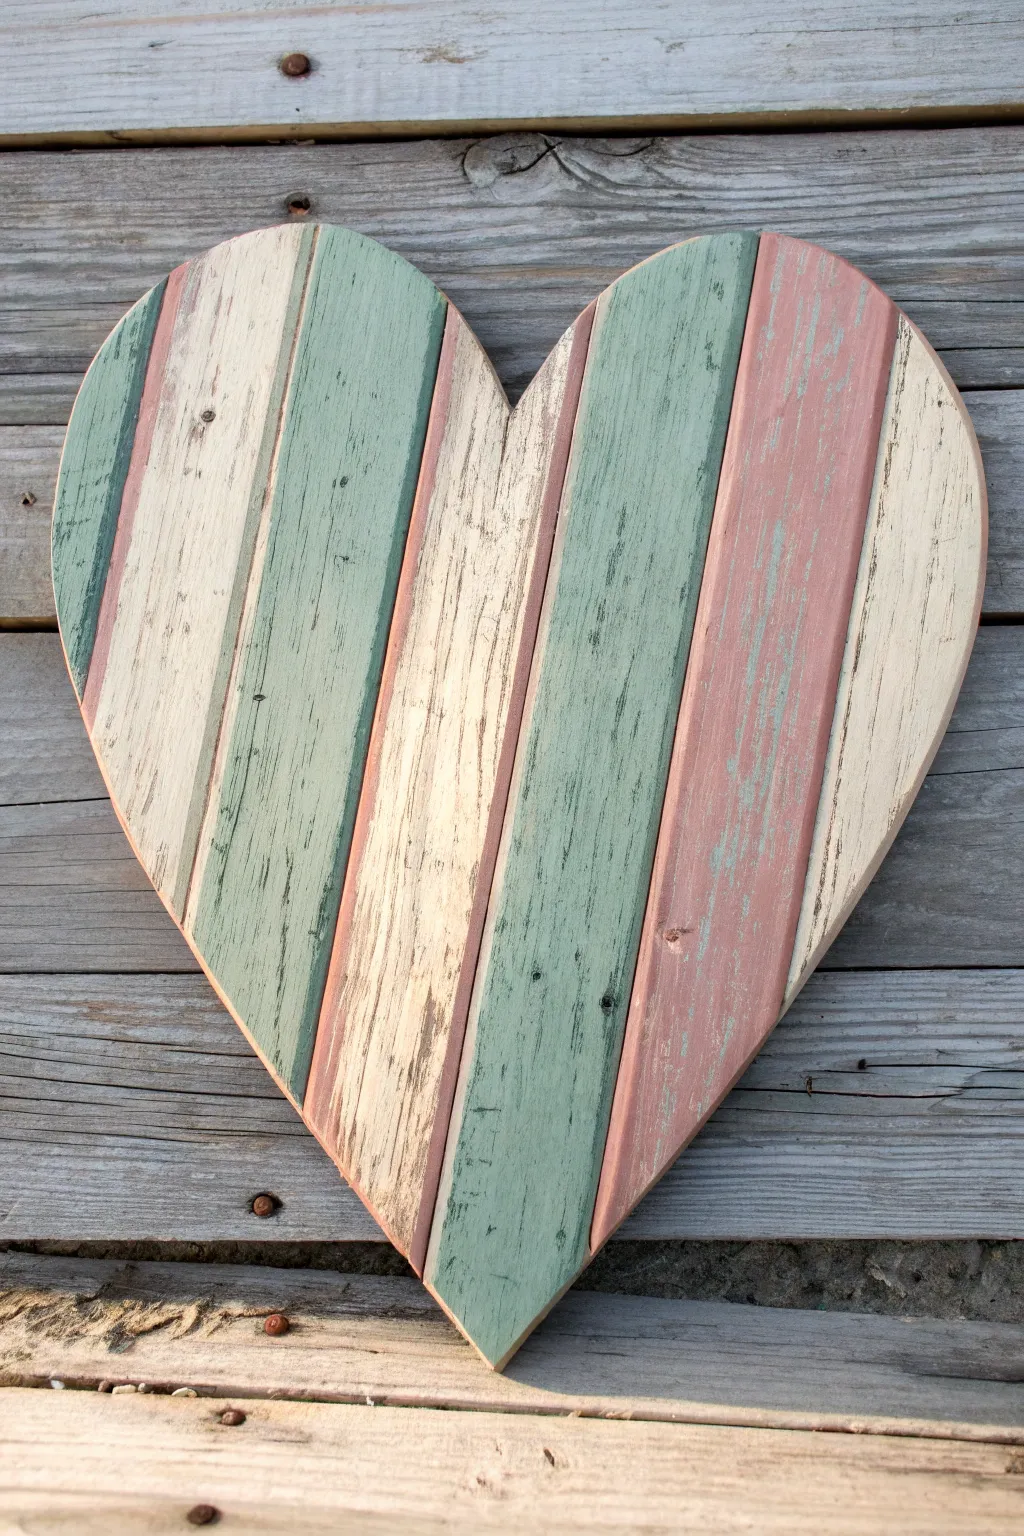
Capture the rustic charm of reclaimed timber with this clever painting technique that transforms a simple wooden cutout into a weathered masterpiece. Using a palette of cream, mint, and muted rose, you’ll create a convincing plank effect perfect for farmhouse decor enthusiasts.
Step-by-Step Guide
Materials
- Large wooden heart cutout (smooth surfaced)
- Acrylic craft paints: Cream, Muted Teal/Mint, Dusty Rose
- Dark grey or brown acrylic paint (for shading)
- Painter’s tape or masking tape (1 inch width)
- Ruler and pencil
- Medium flat synthetic brush
- Small stiff-bristled brush or old toothbrush
- Fine grit sandpaper (220 or similar)
- Dark wax or antiquing glaze (optional)
Step 1: Planning and Base Work
-
Prepare the surface:
Start with a clean, smooth wooden heart cutout. If the edges are rough, give them a quick sanding with fine-grit sandpaper to ensure a professional finish. -
Draft the plank lines:
Using your ruler, measure and mark vertical lines across the front of the heart to simulate wooden planks. Space them unevenly—some wider, some narrower—to mimic the random look of salvaged barn wood. -
Draw the ‘planks’:
Lightly draw these vertical lines from top to bottom with a pencil. Don’t worry if they aren’t perfectly straight; a little wobbliness adds to the aged character.
Paint Bleeding?
If paint bleeds under the tape, don’t panic. Since this is a rustic look, you can sand the mistake down or cover it with your dark ‘gap’ shadow line later.
Step 2: Creating the Stripes
-
Select your color logic:
Decide on a repeating but non-uniform pattern for your colors. In the example, we alternate between a wide mint stripe, a narrow rose stripe, and a wide cream stripe. -
Tape the first set:
Apply painter’s tape over the sections you want to keep unpainted for now. Tape *outside* the pencil lines of your first chosen color group (e.g., the cream sections). -
Paint the first color:
Load your flat brush with cream paint. Apply a thin, streaky coat to the exposed wood sections. Don’t aim for full opacity—letting some wood grain show through is essential for the distressed look. -
Remove and dry:
Carefully peel back the tape while the paint is still slightly tacky to prevent tearing. Let these stripes dry completely before moving on. -
Prepare the next color group:
Once dry, re-tape the heart to expose the next set of stripes—for instance, the wide mint green sections. Ensure the tape covers the edges of your previously painted cream lines. -
Apply the second color:
Paint these sections with your Muted Teal or Mint paint. Again, keep the strokes vertical and rough. I like to dry-brush the ends near the curves to keep it looking weathered. -
Paint the accent stripes:
Repeat the taping and painting process for the final narrow stripes using the Dusty Rose paint. Allow the entire heart to dry thoroughly.
Step 3: Distressing and Detailing
-
Sand for texture:
Take your fine-grit sandpaper and lightly scuff the surface of the entire heart. Focus heavily on the edges and the centers of the ‘planks’ to reveal the wood beneath the paint. -
Create the gaps:
Dip a very thin brush or an angled shader into watered-down dark grey or brown paint. Carefully trace over your original vertical pencil lines to create shadows that look like gaps between boards. -
Softening the lines:
Immediately after painting a gap line, wipe it gently with a paper towel or your finger to smudge it slightly, making the shadow look accumulated over time rather than drawn on. -
Adding wood imperfections:
Use a small, stiff brush to flick or stipple tiny spots of dark paint onto the cream sections to mimic wormholes or knots. -
Dry brushing (Scumbling):
Dip a dry brush into a tiny amount of cream paint, wipe most of it off, and lightly drag it vertically over the colored sections. This makes the teal and pink look sun-faded. -
Enhance the perimeter:
Darken the outer edge of the heart with a touch of dark wax or diluted brown paint to give it a vignetted, finished appearance.
Natural Wood Tone
Apply a light wood stain or watered-down brown paint to the raw wood heart *before* starting the steps. This ensures the distressed areas reveal a rich wood tone.
Hang your charmingly weathered heart on a gallery wall or prop it on a mantle for instant cottage appeal


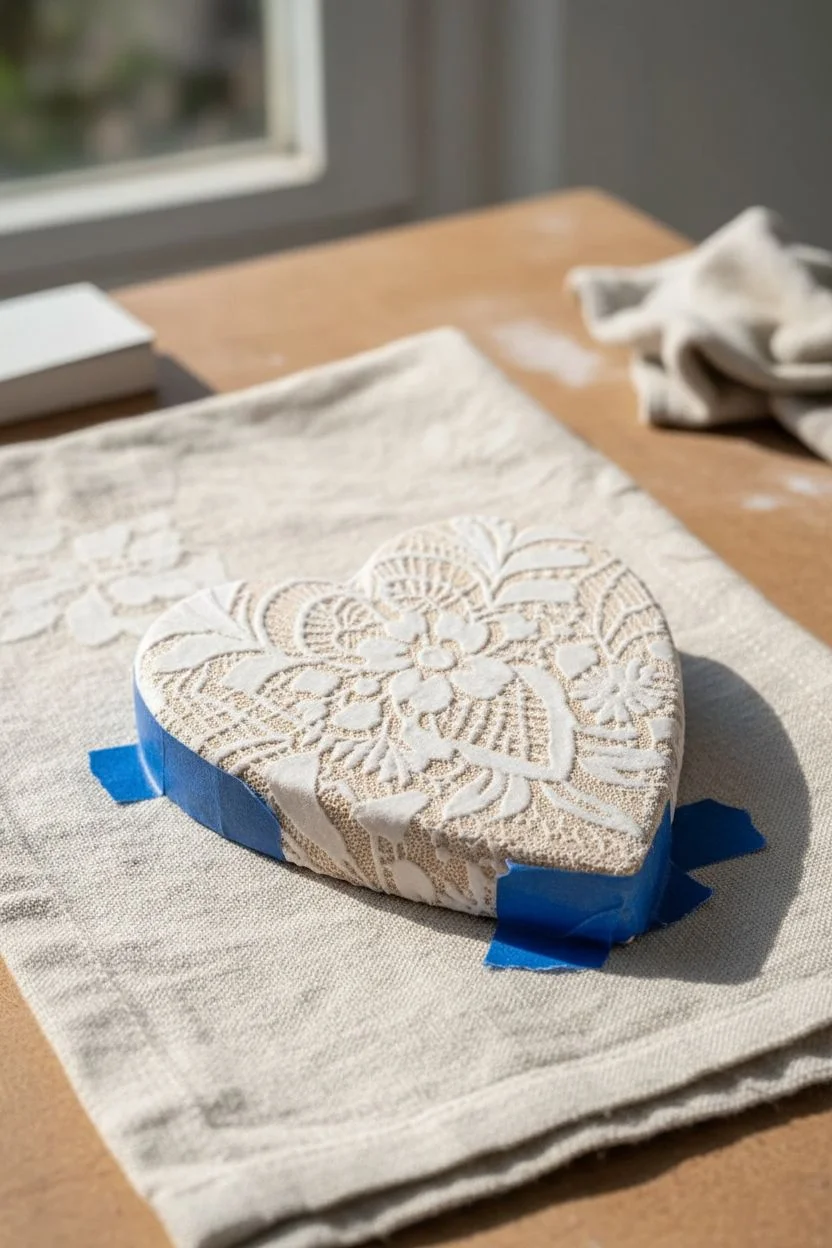
Lace-Pattern Hearts Using Paint Resist
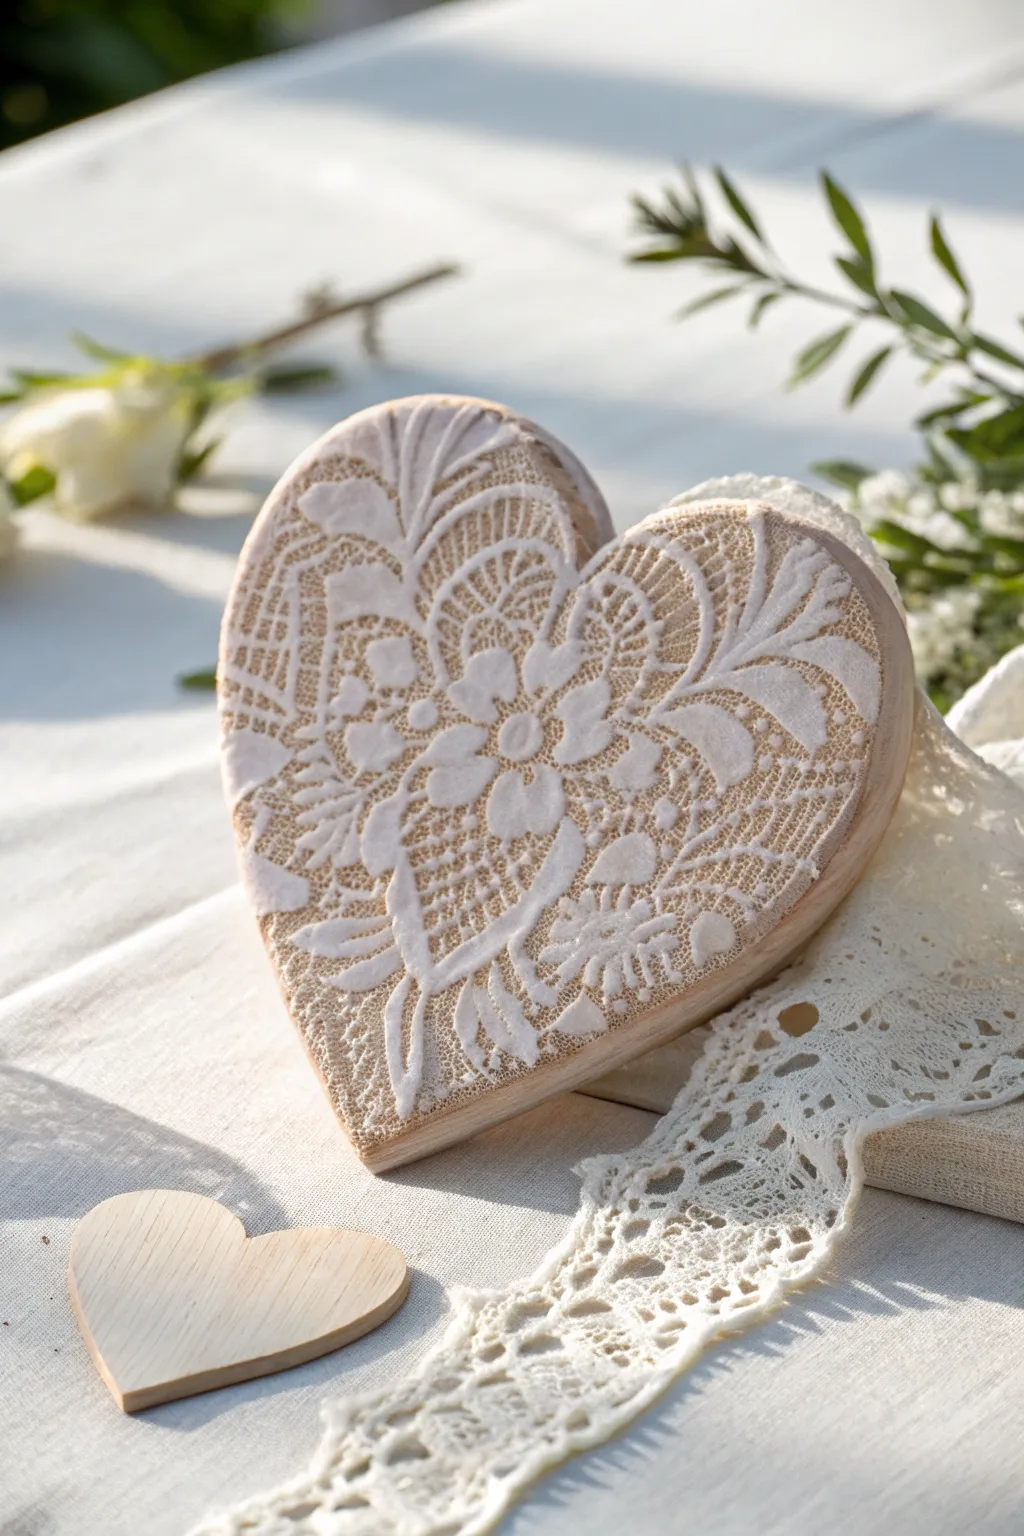
Marry the rustic charm of natural wood with the delicate elegance of lace in this stunning project. By using a clever stencil or resist technique, you create a textured, raised effect that mimics traditional textile artistry on a solid surface.
Detailed Instructions
Materials
- Unfinished wooden heart (approx. 4-6 inches)
- White or cream chalk paint (thick consistency)
- Lace fabric remnant (with a distinct, open motif)
- Pencil
- Fine-grit sandpaper (220 grit)
- Stencil brush or cosmetic sponge
- Painter’s tape or spray adhesive
- Matte clear sealant spray
- Small palette knife (optional for texture)
- Paper towels
Step 1: Preparation & Surface
-
Sand the surface:
Begin by sanding your wooden heart with 220-grit sandpaper. You want the surface to be exceptionally smooth so the lace pattern transfers cleanly without catching on wood fibers. -
Clean dust:
Wipe the heart down thoroughly with a slightly damp paper towel or tack cloth to remove every speck of sawdust. -
Select your lace:
Choose a section of your lace fabric that has a strong floral or geometric motif. Place the heart under the lace to visualize exactly where the pattern will fall. -
Secure the stencil:
Position the lace tightly over the top of the heart. Pull it taut and secure it to the back or sides using painter’s tape. It feels a bit like wrapping a present; the tighter the fabric, the crisper your lines will be.
Use spray adhesive
For the sharpest lines, lightly mist the back of your lace with repositionable spray adhesive before placing it on the wood. It stops the fabric from shifting mid-painting.
Step 2: Creating the Lace Relief
-
Prepare the paint:
Load your stencil brush or cosmetic sponge with a small amount of white chalk paint. Dab the excess off onto a paper towel until the brush is almost dry. -
First pass:
Begin dabbing (do not brush!) straight up and down over the lace. Use a light touch to prevent paint from bleeding under the threads. -
Build the texture:
Once the initial layer is tacky but not fully dry, apply a second, heavier coat. For this project, you want the paint to feel slightly raised. -
Optional texture boost:
If you want the super-raised look seen in the photo, I sometimes gently swipe a palette knife with thick paint over the densest parts of the floral pattern, using the lace as a screen. -
Remove the lace:
Wait until the paint is mostly dry to the touch but not fully cured (about 10-15 minutes). Carefully un-tape one side and peel the lace straight up and off the wood in one smooth motion.
Step 3: Finishing Touches
-
Inspect edges:
Look closely at the design. If any bold bridges of paint are too sharp, you can gently tap them with a clean finger to soften the look. -
Clean the perimeter:
If any paint smudged onto the sides of the heart where you didn’t want it, use a damp Q-tip or a tiny bit of sandpaper to remove it. -
Distress lightly:
For a worn, vintage feel, take your fine sandpaper and extremely gently scuff the highest points of the dried white paint. This makes the ‘lace’ look embedded in the wood. -
Seal the work:
Take the heart to a well-ventilated area and apply a light coat of matte clear sealant spray. This protects the porous chalk paint without adding unwanted shine. -
Add embellishments:
While the heart is beautiful on its own, you can glue a small loop of actual matching lace or ribbon to the back for hanging.
Paint bleeding under?
Your paint was likely too thin or your brush too wet. Let it dry, sand it off completely, and try again with much thicker paint (chalk paste works wonders) and a drier brush.
Now you have a timeless, textured decoration that adds a soft romantic touch to any shelf or wall
Stenciled Mandala Dot Art on a Wooden Heart
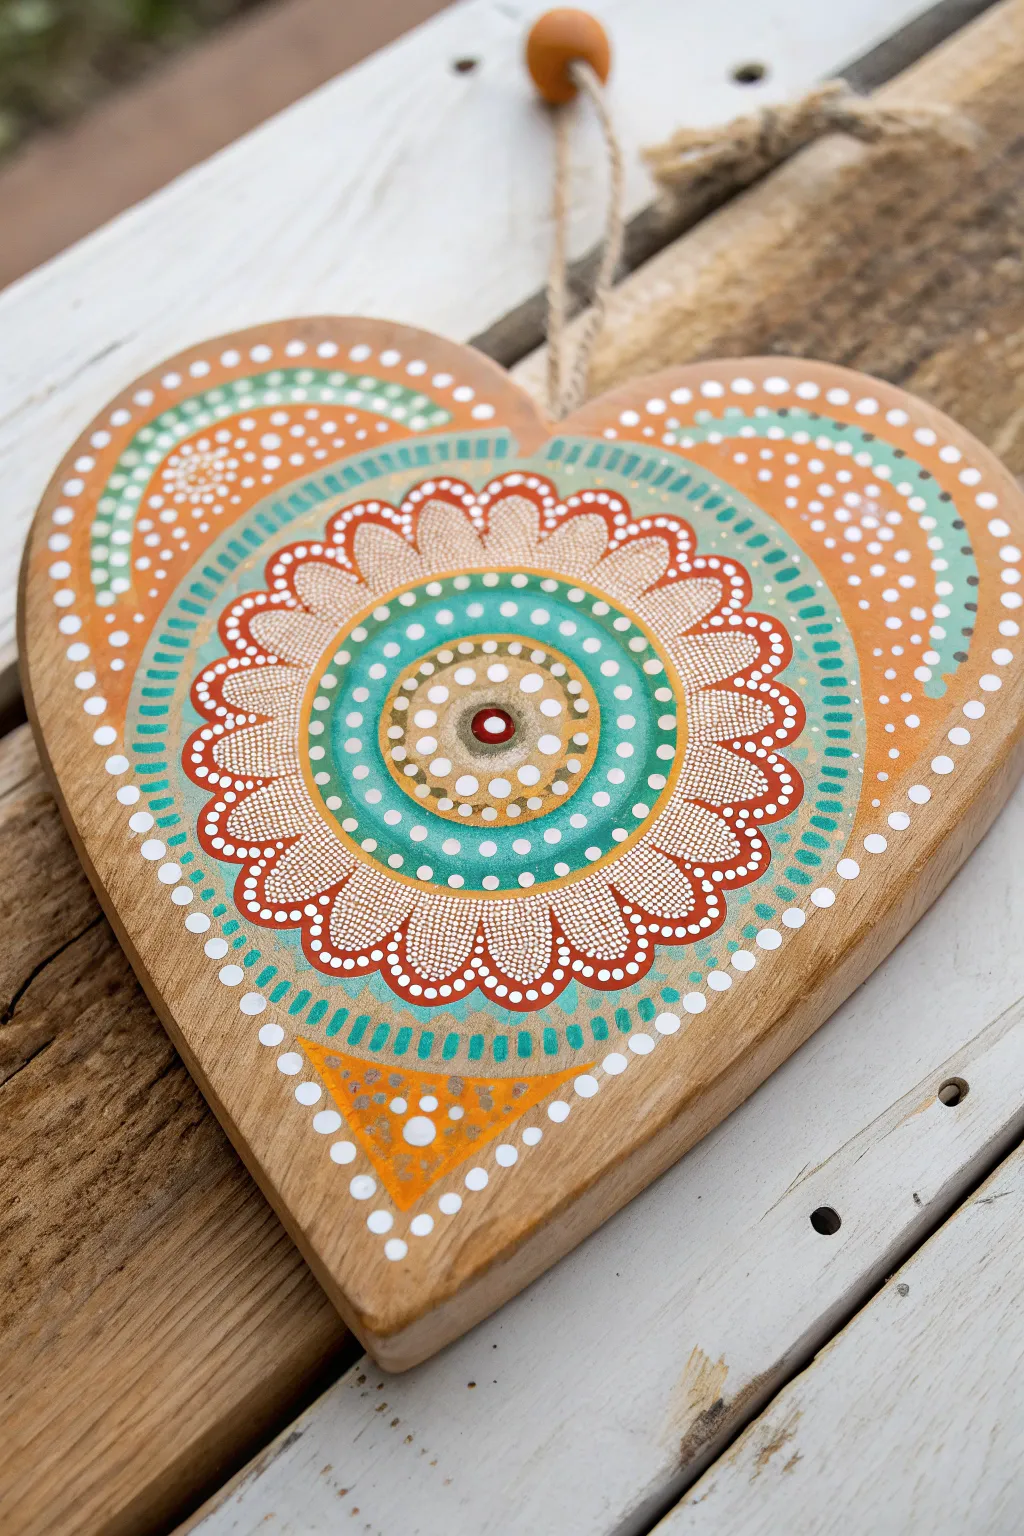
Transform a simple wooden blank into a mesmerizing piece of wall art using vibrant dotting techniques. This project combines geometric precision with the flowing, organic feel of a mandala, featuring warm ochres and cool teals for a perfectly balanced look.
Step-by-Step Guide
Materials
- Wooden heart blank (approx. 6-8 inches)
- Acrylic paints: White, Teal/Turquoise, Burnt Orange/Terracotta, Light Peach/Beige
- Set of dotting tools (various sizes)
- Small fine-liner paintbrush (for teardrop shapes)
- Compass and pencil (optional for guidelines)
- Matte or glossy clear varnish
- Jute twine and a wooden bead for hanging
- Palette or paper plate
- Damp cloth for clean-up
Step 1: Preparation and Base Guidelines
-
Prepare the surface:
Start by lightly sanding your wooden heart to ensure a smooth painting surface. Wipe away any dust with a damp cloth. -
Find the center:
Locate the visual center of your heart shape. This dot will be the anchor for your entire mandala. -
Sketch light guidelines:
Using a compass or by lightly tracing circular objects, draw faint concentric circles radiating from your center point. These won’t be painted over directly but will help keep your dot layers symmetrical.
Uneven Dots?
If your paint peaks or forms Hershey’s Kisses shapes, add a tiny drop of pouring medium or water to your paint to thin it slightly for smoother, flatter dots.
Step 2: The Central Mandala Flower
-
The central anchor:
Place a medium-sized dot of Burnt Orange/Terracotta right in the center. While the paint is wet, drop a tiny white dot in the middle to create a highlight. -
First beige ring:
Using a smaller dotting tool, encircle the center dot with a ring of small Light Peach dots. Keep them tightly spaced. -
Expanding rings:
Create the next ring using slightly larger dots of Burnt Orange. Follow this with a ring of White dots, increasing the spacing slightly as the circle grows. -
Building the teal band:
Mix a soft Teal color. Create a thick, solid band of color around your existing rings. Let this dry completely before proceeding. -
Decorating the teal band:
Once the teal band is dry, use a medium tool to place White dots evenly around the center of the band. Add tiny White dots along the inner and outer edges of the teal ring for extra detail. -
Creating the flower petals:
Paint large, scalloped petal shapes radiating outward from the teal band using Burnt Orange. Use a fine liner brush to outline the shape first, then fill it in. -
Adding petal details:
Inside each orange petal, use your smallest tool to fill the space with rows of tiny graduated White dots. Start with slightly larger dots near the teal center and reduce the size as you move to the petal tip.
Step 3: Outer Borders and Accents
-
The turquoise decorative arch:
Paint a curved band of Teal that frames the top of the central flower. Instead of a solid line, use small, short brushstrokes or ‘dashes’ to create a textured, stitched look. -
Top arches:
Above the dashed teal line, add sweeping arches of Burnt Orange dots that follow the upper curves of the heart. Use larger dots for the main curve and fill the space above with graduated dots in Light Peach and White. -
Side and bottom filler:
Fill the remaining space on the sides and towards the bottom tip with larger dots of Burnt Orange, decreasing in size as they reach the edges. -
The bottom triangle:
At the very bottom point of the heart, paint a small inverted triangle in Burnt Orange. Decorate it with a few large White dots to anchor the design. -
Final white outline:
Using a medium-small tool, walk a line of bright White dots along the detailed outer perimeter of your main mandala design, highlighting the separation between the sections.
Walking the Dots
To get perfectly graduated size dots without changing tools, dip your tool once and dot repeatedly. The paint runs off, naturally making each subsequent dot smaller.
Step 4: Finishing Touches
-
Top coating:
Allow the paint to cure for at least 24 hours. Applying a varnish too soon can smear the dots. Once dry, apply a coat of matte or gloss varnish to seal the wood and protect the paint. -
Stringing the hanger:
Cut a length of jute twine. Thread a wooden bead onto the twine if desired, pass the ends through the hole at the top of the heart, and tie a secure knot.
Hang this charming piece in a sunny spot to let those intricate details shine
Mini Sunset Landscape Painted on a Heart
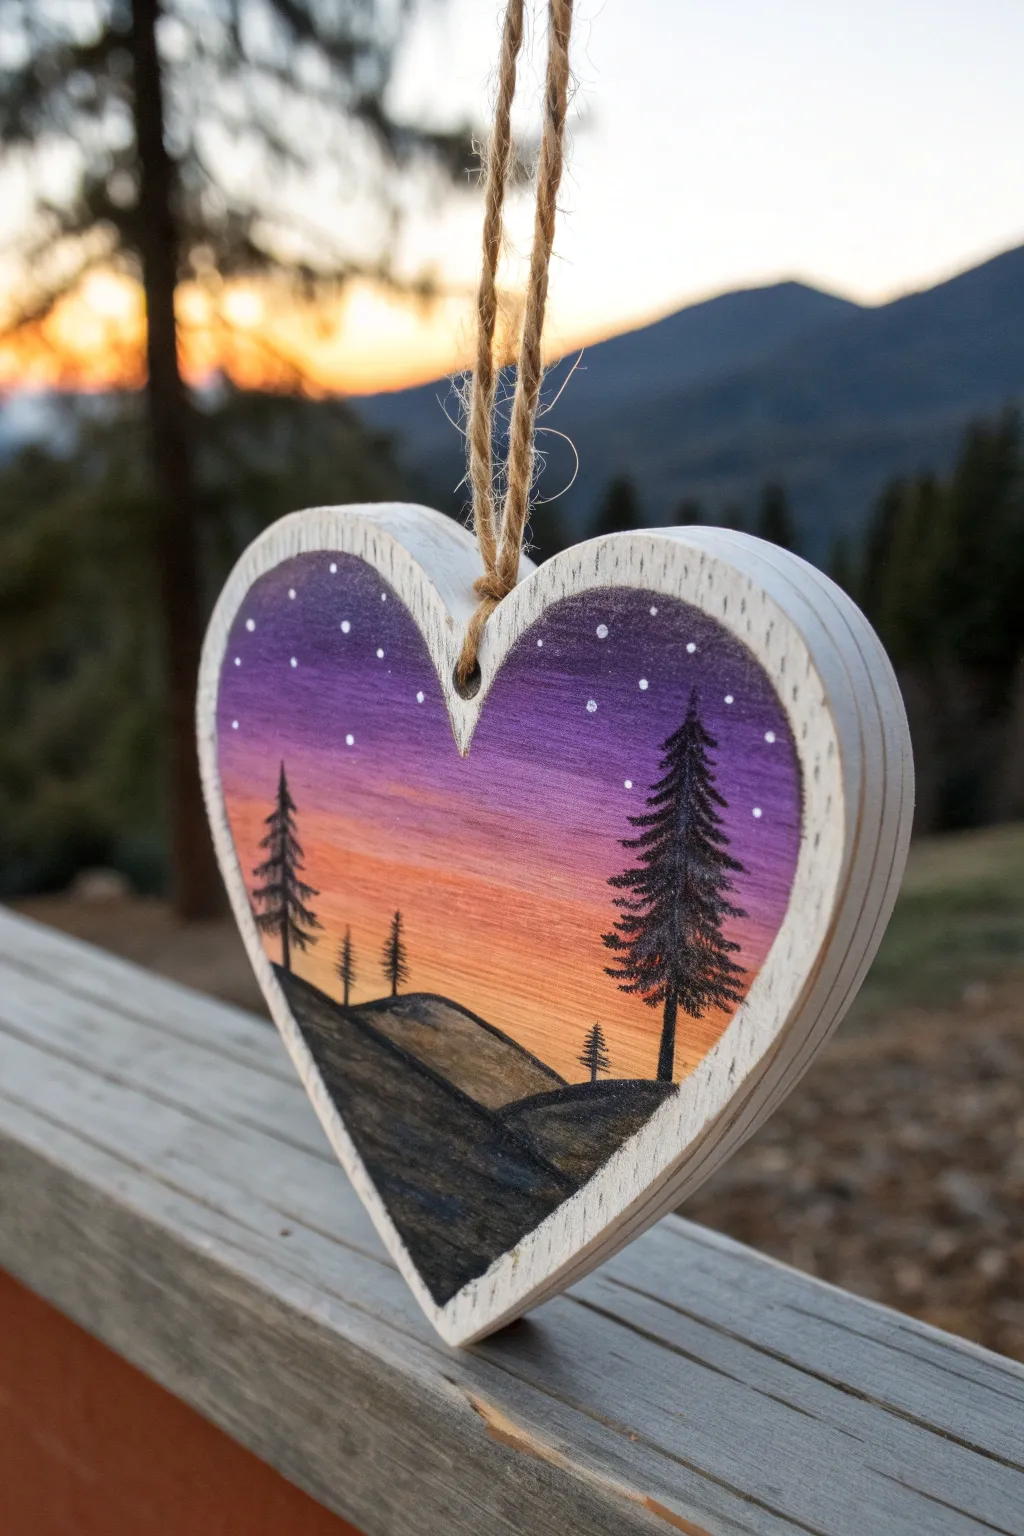
Capture the serene beauty of dusk on a rustic wooden ornament with this blending-focused project. You’ll create a seamless gradient sky transitioning from deep violet to warm peach, framing a delicate silhouette of pine trees.
How-To Guide
Materials
- Chunky wooden heart ornament (approx. 3-4 inches wide) with hanging hole
- Jute twine for hanging
- White gesso or primer
- Acrylic paints: Deep Violet, Magenta, Peach or Light Orange, Titanium White, Carbon Black
- Flat shader brush (size 4 or 6)
- Small round detail brush (size 0 or 00)
- Fine liner brush (optional, for tree branches)
- Water cup and paper palette
- Matte spray varnish
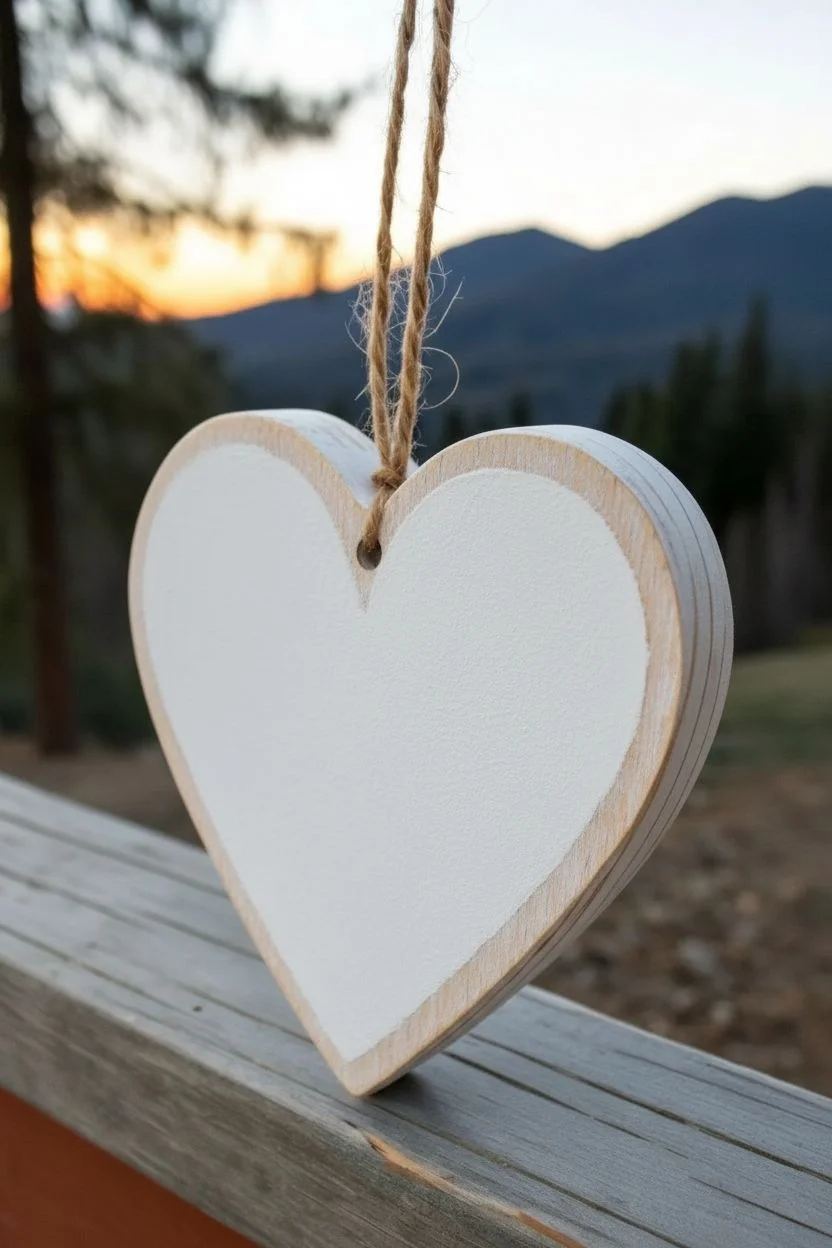
Step 1: Preparing the Base
-
Prime the Surface:
Since raw wood can be very absorbent, apply a thin coat of white gesso to the front face of the heart. This creates a bright barrier that helps your gradient colors pop. -
Whitewash the Sides:
While the face dries, mix a tiny drop of white paint with water to create a wash. Lightly brush this onto the thick wooden edges of the heart to give it a distressed, rustic look without covering the natural wood grain entirely.
Blending Trouble?
If acrylics dry too fast to blend, mix a drop of ‘slow drying medium’ or ‘retarder’ into your paints. This keeps them wet longer for smoother gradients.
Step 2: Painting the Gradient Sky
-
Lay the Top Color:
Load your flat brush with Deep Violet. Paint the top third of the heart, curving your brush strokes slightly to follow the heart’s upper arches. -
Add the Mid-Tone:
Without cleaning your brush thoroughly, pick up some Magenta. Blend this right below the violet, working the wet paints together where they meet to create a soft, purplish-pink transition. -
Create the Horizon:
Clean your brush well. Pick up your Peach or Light Orange paint and apply it to the bottom third of the sky area. Blend it upward into the magenta while everything is still slightly wet for a smooth sunset effect. -
Refine the Blend:
If the transition lines look harsh, use a very slightly damp, clean brush to gently sweep back and forth over the meeting points of the colors. I find a light touch works best here to avoid lifting the paint. -
Dry Completely:
Let this gradient layer dry fully before moving on to the silhouettes. The background must be bone-dry so the black paint doesn’t bleed.
Pro Tip: Tree texture
Don’t paint solid triangles for trees. Leave little gaps of sky showing through the branches to make the pines look airy and realistic.
Step 3: Detailing the Landscape
-
Paint the Foreground Hills:
Using black paint, block in the lowest hill at the very bottom point of the heart. Make the top edge irregular and slightly curved to suggest rugged terrain. -
Add Distance Hills:
Mix a tiny speck of white into your black to create a very dark charcoal grey. Paint a second, smaller hill shape behind the first one on the left side to add depth to your landscape. -
Start the Main Tree:
Switch to your smallest detail brush or liner brush. Paint a singular vertical line on the right side of the heart emerging from the foreground hill. This serves as the trunk for your large pine tree. -
Foliage Technique:
Starting at the top of the trunk, use tiny tapping motions to create branches. Keep the top branches very short and widen them as you move down the tree, forming a jagged triangular shape. -
Secondary Trees:
Repeat this process on the left side with a slightly smaller tree, and perhaps a tiny distant tree near the center. Varying the heights makes the scene look more natural. -
Highlight the Hills:
Mix a dark grey wash (black with water and a touch of white) and glaze it over the top curves of your hills. This separates the hill layers and implies moonlight or starlight hitting the ridges.
Step 4: Finishing Touches
-
Add Stars:
Dip the very tip of your detail brush handle (or a toothpick) into pure white paint. Gently dot a constellation of stars into the violet section of the sky. -
Varnish:
Once the artwork is completely cured (give it an hour or so), take it outside and spray a light coat of matte varnish to seal the paint and protect it from scratches. -
Attach Twine:
Cut a length of jute twine, thread it through the hole at the top center, and knot it securely to create a loop for hanging your mini masterpiece.
Hang this charming decoration in a window or on a tree to bring a little piece of the wild outdoors inside.
Starry Night Galaxy Heart With Splatter
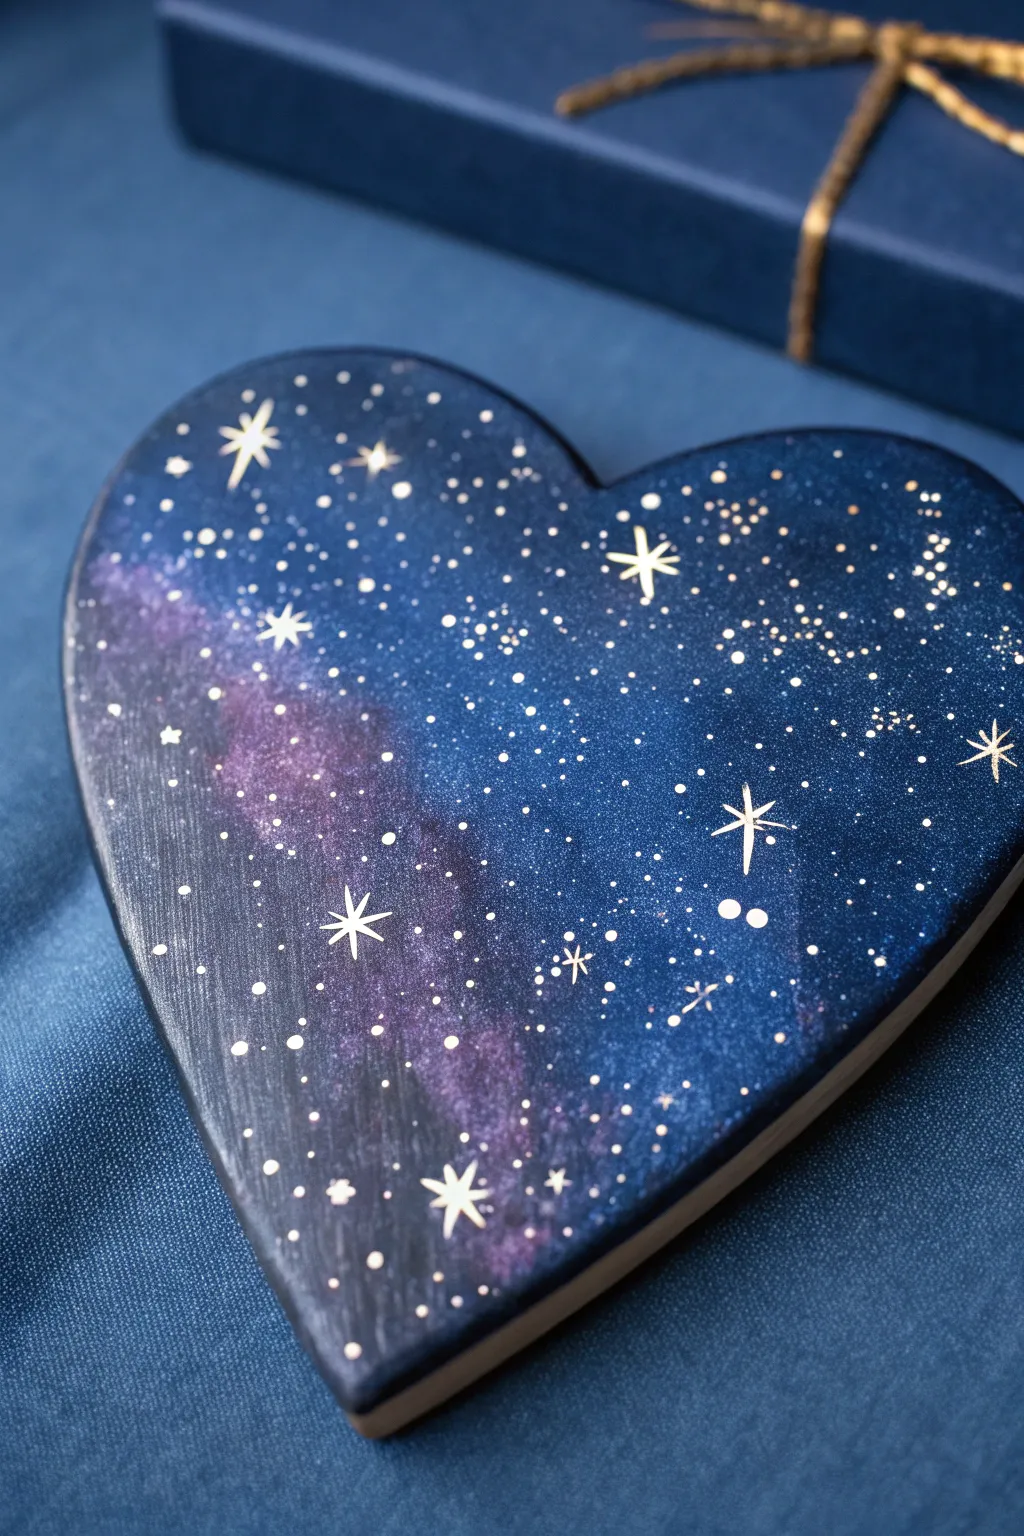
Capture the magic of the cosmos on a simple wooden heart with this deep, dreamy galaxy painting. Combining rich navy blues, nebulous purples, and crisp bright stars, this project transforms a plain craft shape into a piece of stardust you can hold in your hand.
Step-by-Step
Materials
- Wooden heart cutout (approx. 4-6 inches)
- Acrylic paints: Black, Navy Blue, Royal Blue, Deep Purple, Magenta, Titanium White
- Flat paintbrushes (large for base coat)
- Sponge dabbers or a small piece of creating sponge
- Detail liner brush (size 0 or 00)
- Old toothbrush (for spatter effect)
- Cup of water and paper towels
- Gloss varnish or sealant (optional)
Step 1: Setting the Background
-
Prepare the wood:
Ensure your wooden heart is smooth and free of dust. If the surface feels rough, give it a quick sanding with fine-grit sandpaper and wipe clean. -
Base coat application:
Mix a small amount of black with your navy blue paint to create a very deep, midnight blue. Apply this mixture over the entire front surface of the heart using a flat brush. -
Paint the edges:
Don’t forget the sides. Carry that deep midnight blue over the edges of the heart to give the piece a finished, professional look from every angle. -
Let it dry completely:
Allow this base layer to dry fully before moving on. Since we will be sponging over it, a wet base coat will just turn muddy.
Fixing Big Splatters
Accidentally dropped a huge blob of white? Don’t wipe it! Let it dry, paint over it with the dark blue base color, and sponge the area again.
Step 2: Creating the Galaxy Nebula
-
Sponge on the mid-tones:
Dip a sponge dabber or cosmetic sponge into the Royal Blue paint. Dab off the excess on a paper towel until the texture is soft and airy, then lightly press it onto the heart in a diagonal swooping motion. -
Add purple depth:
Using a fresh part of the sponge, pick up Deep Purple. Overlap this slightly with the Royal Blue, concentrating on the center of your diagonal nebula band. -
Highlight with magenta:
Mix a tiny bit of white with Magenta to make it pop against the dark background. I find that sponging this sparingly into the center of the purple areas creates a glowing, dimensional effect. -
Blend the transitions:
If any edges look too harsh, go back with a sponge carrying a tiny bit of the original Navy Blue base color and dab around the edges of your nebula to soften them into the darkness.
Nebula Shape Tip
Don’t make your galaxy band a straight line. Give it a gentle ‘S’ curve or widen it at one end to make the movement look organic and natural.
Step 3: The Starry Splatter
-
Prepare splatter paint:
Dilute a small dollop of Titanium White paint with a few drops of water until it reaches the consistency of heavy cream or ink. -
Test the splatter:
Dip an old toothbrush into this thinned white paint. Test it on a piece of scrap paper first by running your thumb across the bristles to flick the paint. -
Create distant stars:
Hold the toothbrush about 6-8 inches above the heart and flick the bristles to create a fine mist of white dots across the entire surface. Vary the density, perhaps adding a few more near the nebula band.
Step 4: Hand-Painted Details
-
Identify major stars:
Look for spots where a few splatter dots clumped together or where the composition feels empty. These are great spots for your larger ‘hero’ stars. -
Paint star centers:
Using your finest detail brush and pure Titanium White (undiluted), place a solid white dot where you want a large star. -
Draw the cross:
From the center of the dot, pull very thin, quick lines outward—one vertical and one horizontal—creating a simple cross shape. Keep the pressure very light at the end of the stroke for a tapered point. -
Add diagonal flares:
For the largest stars, paint a smaller ‘X’ shape diagonally through the center cross. This creates the classic 8-point glint seen in the reference photo. -
Add variance:
Don’t make every star the same. Leave some as simple dots, make some 4-pointed crosses, and save the 8-pointed complex stars for just 3 or 4 focal points. -
Final drying and sealing:
Let the white details dry completely for at least an hour. To protect your galaxy and make the dark colors rich and glossy, finish with a coat of high-gloss varnish.
Display your shimmering heart on a shelf or attach a ribbon to the back to let your galaxy float freely
Botanical Line Art Over a Soft Painted Wash

Achieve a beautifully weathered look with this simple yet elegant project that transforms a plain wooden blank into a piece of soft, rustic decor. The finished heart features a delicate blushing wash that highlights the natural wood grain, perfect for hanging on a wall or gifting to a loved one.
Step-by-Step Tutorial
Materials
- Unfinished wooden heart blank (approx. 4-6 inches)
- Acrylic paint (soft pink or peach)
- Acrylic paint (white or cream)
- Water (for diluting)
- Flat synthetic paintbrush (1 inch)
- Fine-grit sandpaper (220 grit)
- Jute twine or hemp cord
- Paper towel or rag
- Small mixing palette or plastic lid
- Scissors
Step 1: Preparing the Base
-
Sand the surface:
Begin by lightly sanding your wooden heart blank with fine-grit sandpaper. You want to smooth out any rough edges or splinters, but don’t polish it too perfectly—some texture helps the paint wash settle nicely. -
Wipe it clean:
Use a dry cloth or paper towel to wipe away all the sanding dust. The surface needs to be dust-free for the wash to adhere evenly. -
Check the hole:
If your heart blank doesn’t have a pre-drilled hole, drill a small one near the top center now. If it already has one, ensure no wood shavings are clogging it.
Grain Direction
Always paint and wipe in the direction of the wood grain. Going across the grain will make the finish look dirty or scratchy rather than intentionally distressed.
Step 2: Creating the Wash
-
Mix your blush tone:
On your palette, mix a small amount of pink or peach acrylic paint with a drop of white to soften the hue. You’re aiming for a muted, vintage rose color rather than a bright bubblegum pink. -
Dilute the paint:
Add water to your paint mixture gradually. I like to aim for a consistency similar to heavy cream or whole milk—thin enough to be translucent but pigmented enough to show color. -
Test the consistency:
Make a tiny swipe on the back of the heart or a scrap piece of wood. If it’s opaque like regular paint, add more water. If it runs off instantly without leaving color, add a touch more paint.
Step 3: Applying the Finish
-
Apply the first wash:
Load your flat brush and apply the paint wash in long, vertical strokes following the direction of the wood grain. Cover the entire front surface quickly. -
Wipe back the excess:
Immediately take a dry paper towel or rag and gently wipe over the wet paint. This removes excess pigment and allows the wood grain to show through, creating that signature weathered look. -
Build the edges:
Dip just the tip of your brush into slightly undiluted paint and lightly brush the outer edges of the heart. This creates a subtle vignette effect, making the heart look naturally aged. -
Distress the surface:
Once the paint is dry to the touch (which should happen quickly with a wash), take your sandpaper and lightly scuff the surface again. Focus on the edges and raised areas to reveal raw wood. -
Dry brush highlights:
For extra dimension, dip a dry brush into a tiny amount of white paint, wipe almost all of it off, and lightly drag it vertically across the center of the heart. This mimics the look of sun-bleached wood. -
Re-sand if needed:
If the paint raised the grain of the wood, do one final, very light pass with the sandpaper to ensure the finish feels smooth in the hand.
Paint Too Opaque?
If you apply the paint and it covers the grain completely, don’t panic. While it’s still wet, wipe firmly with a damp cloth to lift the pigment back off.
Step 4: Assembly
-
Cut the twine:
Cut a length of jute twine, roughly 12 to 14 inches long. This will give you plenty of room to create a secure knot and a generous hanging loop. -
Thread the loop:
Fold the twine in half to find the center, then push the folded end through the hole in the heart from front to back. -
Secure the hanger:
Thread the loose ends of the twine through the loop you just pushed through the hole and pull tight (a lark’s head knot). Alternatively, just feed a single strand through and tie it off at the top. -
Create the twisted look:
To match the image, twist the two strands of twine around each other as they go up, then tie a simple overhand knot at the very top to join them. -
Trim the ends:
Snip off any excess twine above the knot to keep the hanger looking neat and professional.
Now you have a charming, rustic accent piece ready to add a soft touch to your home decor
Geometric Color-Block Hearts With Clean Edges
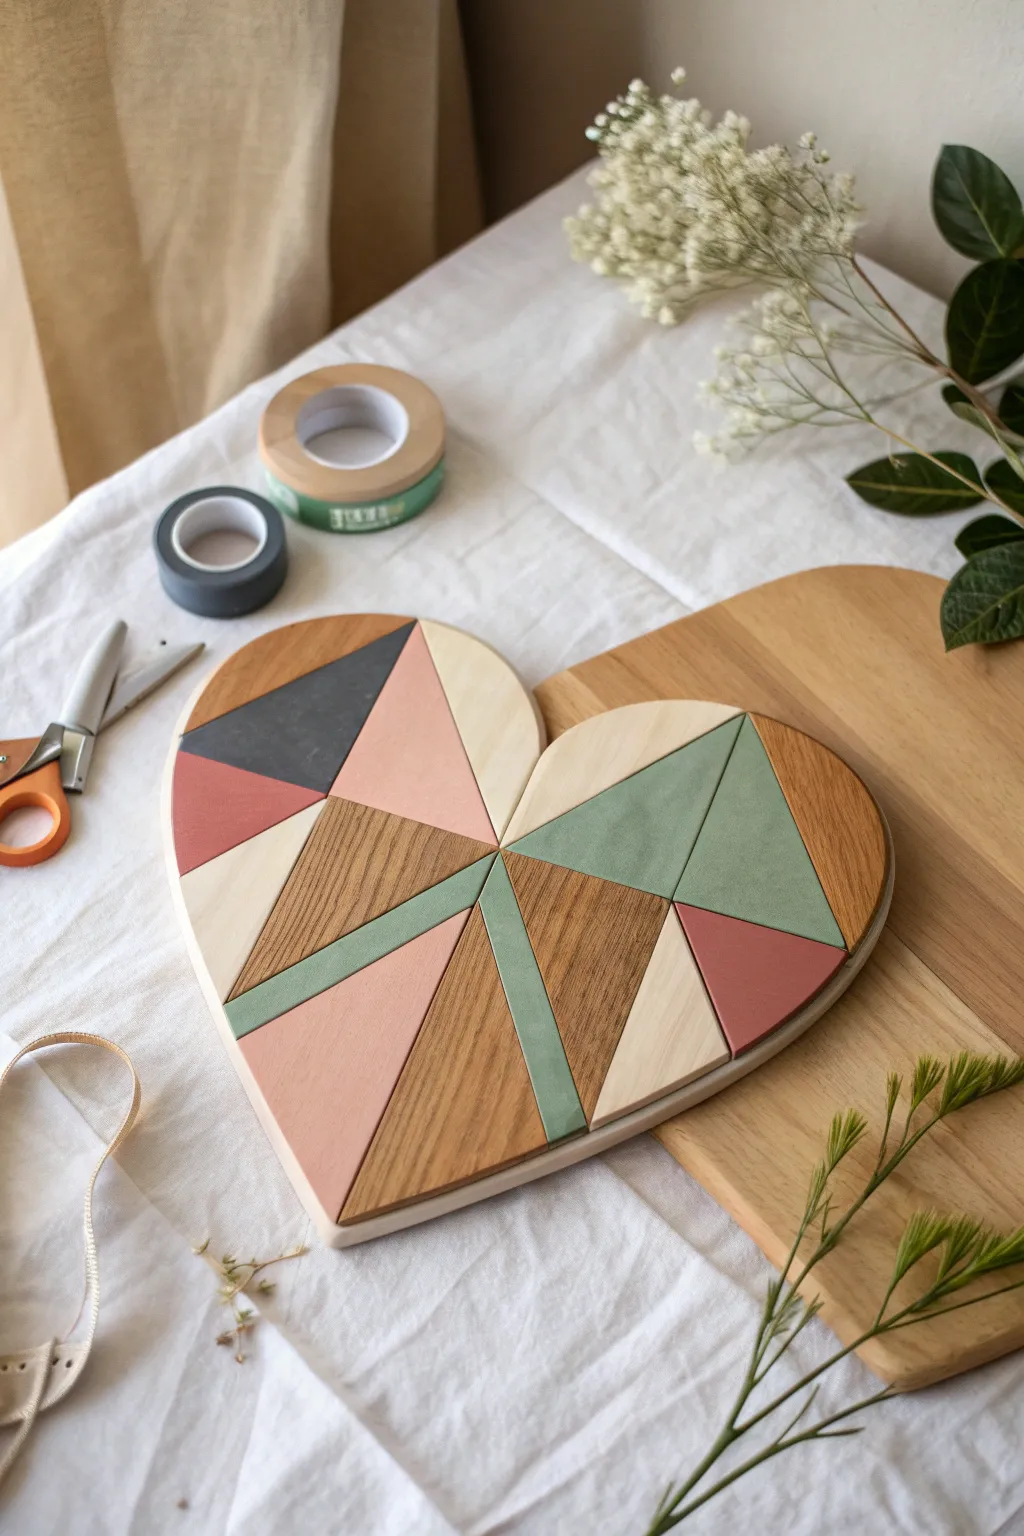
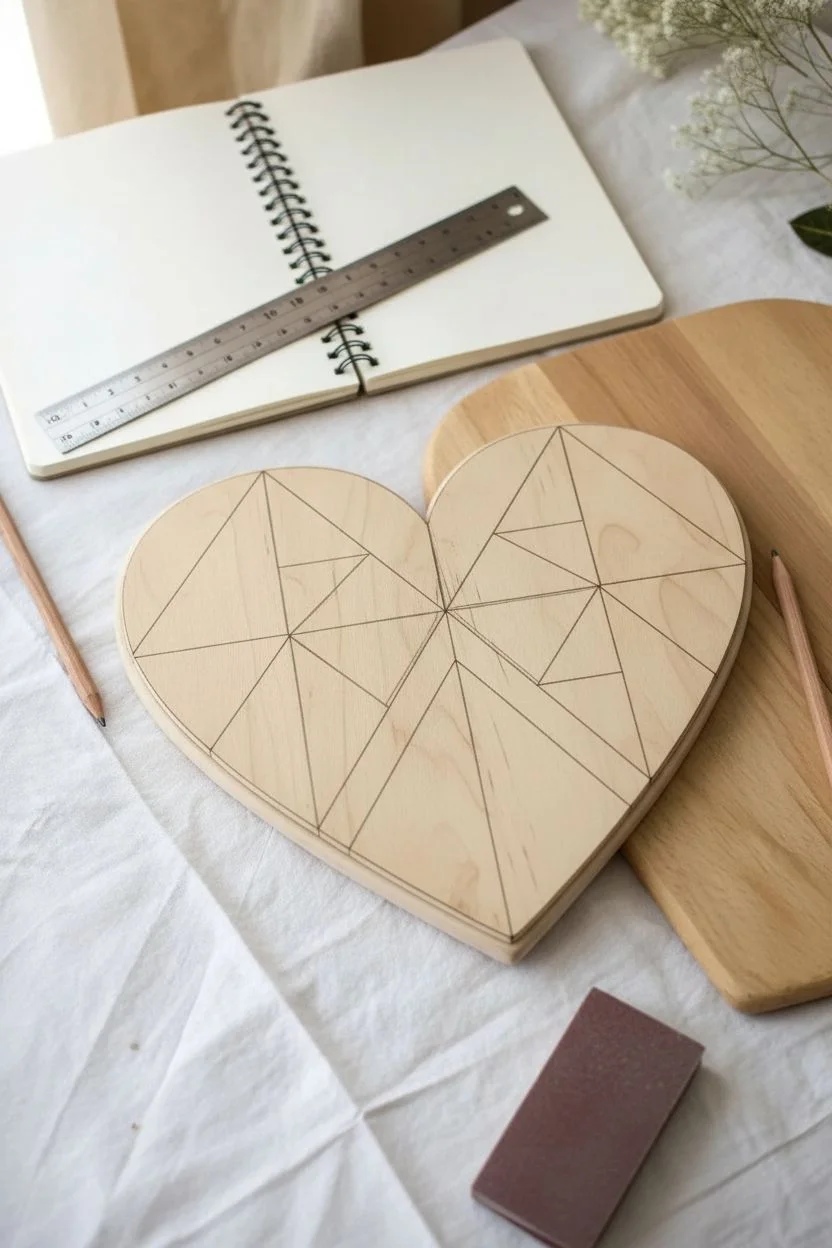
Transform a simple wooden heart into a sophisticated piece of decor using geometric blocking and a muted, earthy color palette. This project achieves sharp, professional lines by isolating each section, resulting in a design that looks like intricate marquetry or a modern puzzle.
Step-by-Step
Materials
- Unfinished wooden heart surface (solid wood or plywood)
- Pencil and ruler
- Painter’s tape or washi tape (in various widths)
- Acrylic craft paints (dusty pink, sage green, charcoal grey, cream)
- Wood stain (light oak or walnut)
- Small flat synthetic paintbrushes
- X-Acto knife or craft knife
- Matte clear sealant or polyurethane
- Sandpaper (fine grit)
Step 1: Preparation and Design
-
Prep surface:
Begin by sanding your wooden heart with fine-grit sandpaper to ensure a perfectly smooth base. Wipe away all dust with a tack cloth or slightly damp rag. -
Plan triangles:
Use a pencil and ruler to draw your geometric design directly onto the wood. Aim for a mix of large and medium triangles that interconnect. -
Balance the layout:
Create a focal point near the center where several triangles meet, as seen in the inspiration image, to give the design structure.
Step 2: Creating the Stained Sections
-
Select wood elements:
Decide which triangles will remain as natural wood grain. Keeping about 30-40% of the surface as stained wood adds beautiful warmth. -
Tape boundaries:
Apply your painter’s tape along the pencil lines surrounding the areas designated for stain. Press the edges down firmly with your fingernail. -
Apply stain:
Brush a light coat of wood stain onto the exposed sections. Wipe off excess immediately with a cloth for a clean look. -
Dry thoroughly:
Allow the stain to dry completely according to the manufacturer’s instructions before moving to the next step.
Bleed-Proof Lines
Before painting your color, brush a thin layer of the *base* color (or clear matte medium) over the tape edge to seal it perfectly.
Step 3: Painting the Color Blocks
-
Tape first color group:
Mask off the sections intended for your first paint color (e.g., sage green). Ensure you are taping over fully dry areas only. -
Seal edges (optional):
I like to brush a tiny amount of matte medium or clear sealer along the tape edge first. This prevents color bleed ensuring crisp lines. -
Apply base color:
Paint the first set of triangles with the sage green. Use two thin coats rather than one thick one for the smoothest finish. -
Remove tape:
Peel back the tape while the paint is still slightly tacky to avoid pulling up dry chips of paint. -
Repeat for pinks:
Once dry, mask off the next set of triangles and paint them with the dusty pink shade. -
Add contrast:
Continue the process for the charcoal grey and cream sections. These darker and lighter tones add necessary depth. -
Detail lines:
In some areas, you can leave a very thin strip of raw wood between color blocks to act as a separator line, using thin washi tape to mask it.
Make it a Puzzle
Instead of painting one board, cut separate wood triangles, paint them individually, and glue them onto a heart backer for real 3D texture.
Step 4: Finishing Touches
-
Clean up:
Use a craft knife to very gently scrape away any tiny paint bleeds that might have occurred despite your best efforts. -
Final sand:
Very lightly scuff the painted surface with high-grit sandpaper (like 400 grit) to unify the texture of the paint and wood. -
Seal project:
Apply a coat of matte clear sealant over the entire heart. This protects the wood and enriches the paint colors without adding distracting shine.
Display your geometric heart flat on a table as a tray or mount it on the wall for a touch of modern art
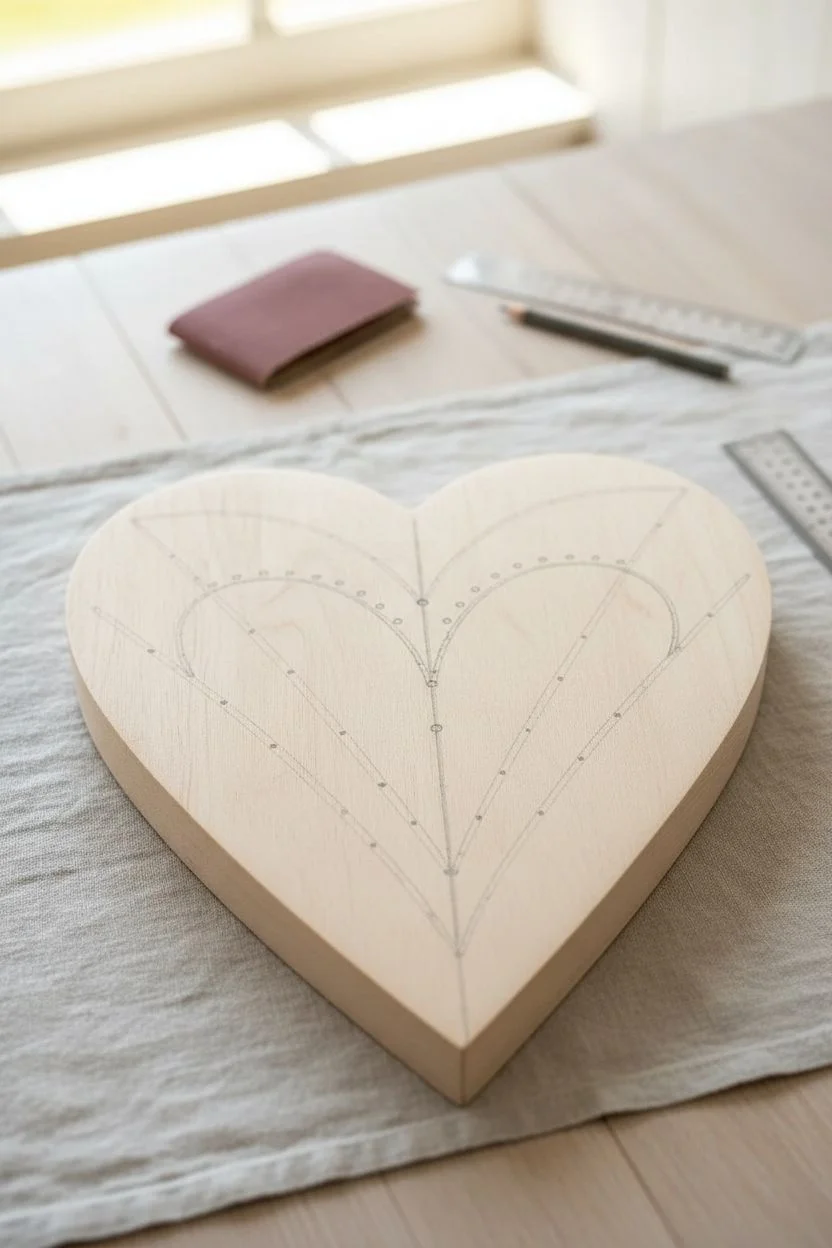
Gold-Accented Hearts With Painted Foil Details
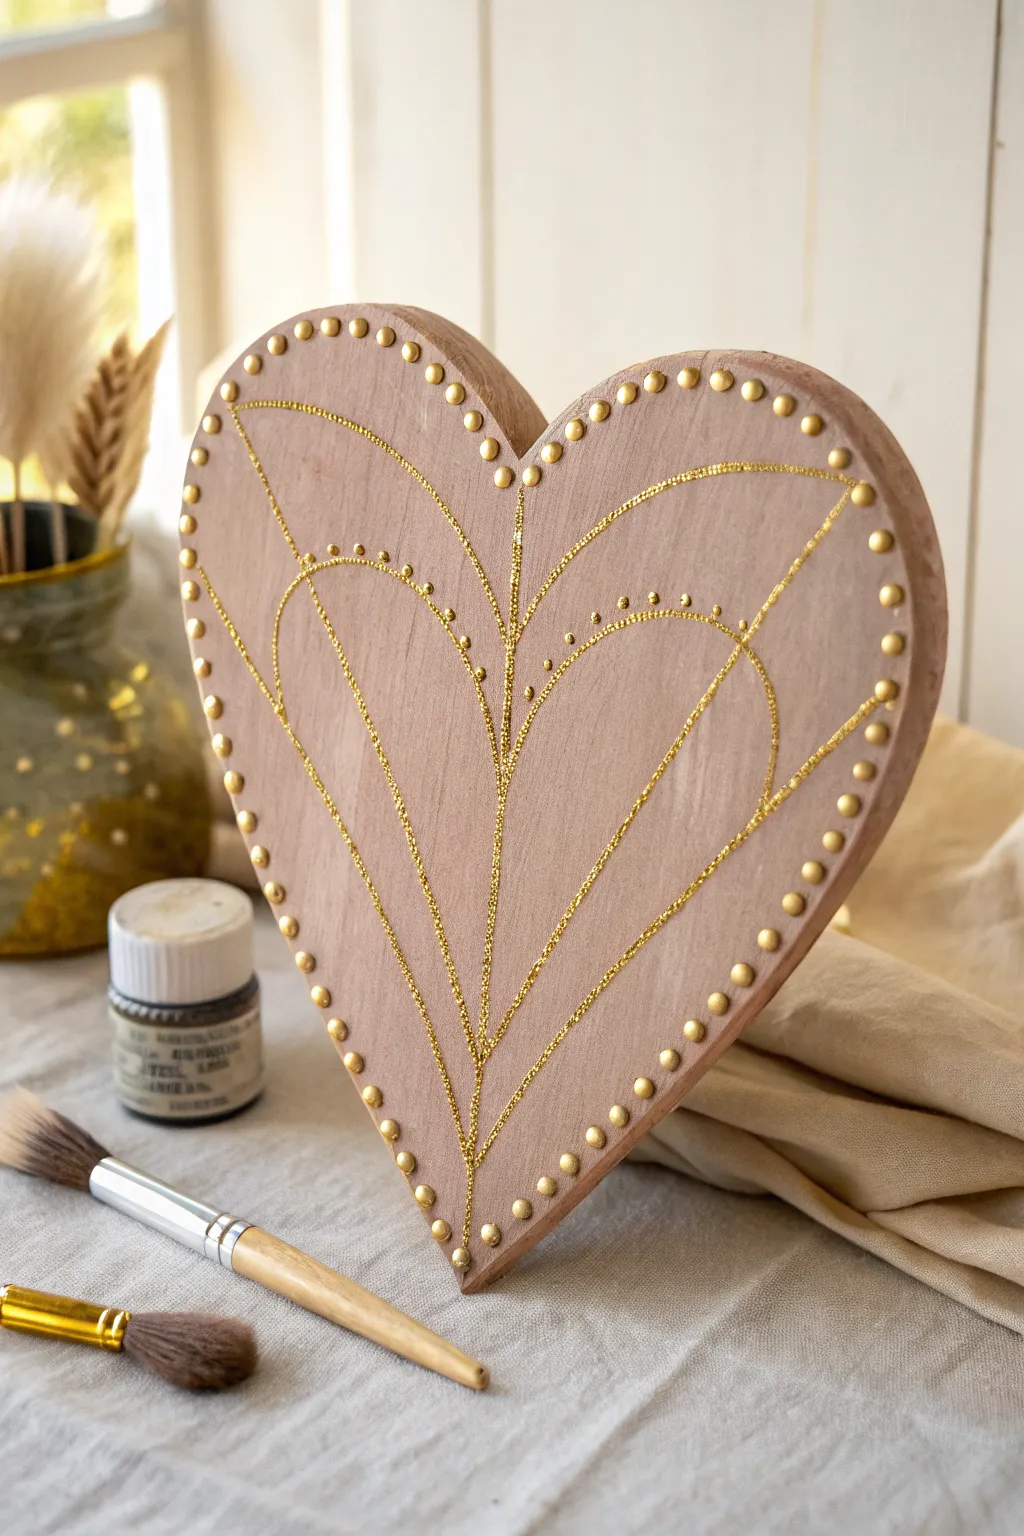
This elegant project elevates a simple wooden shape into a luxe decorative piece using metallic accents. By combining the rustic warmth of natural wood with shimmering gold foil lines and studded borders, you create a sophisticated heart perfect for mantel displays or thoughtful gifts.
How-To Guide
Materials
- Large wooden heart cutout (approx. 8-10 inches)
- Gold leaf adhesive pen or fine-tip glue pen
- Gold foil transfer sheets or gold metallic paint
- Gold semi-round pearl stickers or brass upholstery tacks (small)
- Fine detail paintbrush (size 0 or 00)
- Pencil for sketching
- Clear matte varnish (optional)
- Ruler or flexible measuring tape
- Soft cloth for burnishing
Step 1: Preparation and Planning
-
Surface Prep:
Begin by lightly sanding your wooden heart with fine-grit sandpaper to ensure a totally smooth surface. Wipe away any dust with a tack cloth or slightly damp rag. -
Reference Lines:
Using a ruler, lightly mark a vertical centerline down the middle of the heart. This will act as the anchor for your symmetrical design. -
Sketch the Design:
With a pencil, very faintly sketch your design. Start at the bottom point of the centerline and draw curved lines radiating upward and outward, mimicking the veins of a leaf or stylized branches. Keep the pressure light so marks can be erased later. -
Add Detail Elements:
Draw the secondary curves that connect the main branches, creating ‘scalloped’ shapes between the main lines. Mark small dots along these inner curves where you plan to add extra gold details.
Step 2: Applying the Gold Detail
-
Trace with Adhesive:
Using a gold leaf adhesive pen or a fine brush dipped in gilding size, carefully trace over your pencil lines. You need a steady hand here; apply enough adhesive to be sticky but not so much that it pools. -
Wait for Tacky Stage:
Allow the adhesive to dry until it reaches the ‘tacky’ stage. It should feel sticky to the touch but not wet. This usually takes 5-15 minutes depending on the brand. -
Apply Gold Foil:
Press a sheet of gold foil (shiny side up) firmly onto the tacky lines. Rub the back of the foil sheet with a soft cloth or a stiff brush to ensure it adheres to the glue. -
Peel and Reveal:
Swiftly peel back the foil sheet. The gold should remain only where you applied the adhesive, creating shimmering metallic lines. -
Clean Up Edges:
If there are any jagged edges or stray bits of flakes, use a dry, stiff brush to gently sweep them away. You can also touch up any missed spots with a tiny bit more glue and foil. -
Alternative: Metallic Paint:
If you don’t have foil, you can replicate this look using high-quality liquid gold leaf paint and a size 0 liner brush. Simply paint over your sketch lines with smooth, flowing strokes. -
Adding Painted Dots:
Dip the tip of a stylus or the back end of your paintbrush into gold paint. Dot this along the inner curved lines you sketched earlier to create the delicate beaded detail shown in the center design.
Foil Not Sticking?
If the foil lifts off with the sheet, the glue was likely too wet. Wait 5 more minutes for it to become properly tacky. If it’s too dry, reapply a thin layer.
Step 3: The Studded Border
-
Mark Spacing:
I find it helpful to plan the border first. Lightly mark small dots around the perimeter of the heart, spacing them about 1/2 inch apart to ensure even placement. -
Apply Border Elements:
Place your gold semi-round pearl stickers firmly onto your marked spots. If you are using real upholstery tacks for a more permanent finish, gently tap them in with a crafting hammer, using a piece of fabric to protect the stud head. -
Check Symmetry:
Step back and look at your border. If using stickers, nudge them slightly to correct any uneven gaps before the adhesive sets fully.
Add Antique Charm
Use a dark wax or walnut stain on the wood before adding gold to make the metallic elements pop. You can also lightly sand the foil for a distressed look.
Now you have a stunning, light-catching centerpiece that brings a touch of organic glamour to your home decor
Negative-Space Heart Designs That Let the Wood Grain Shine
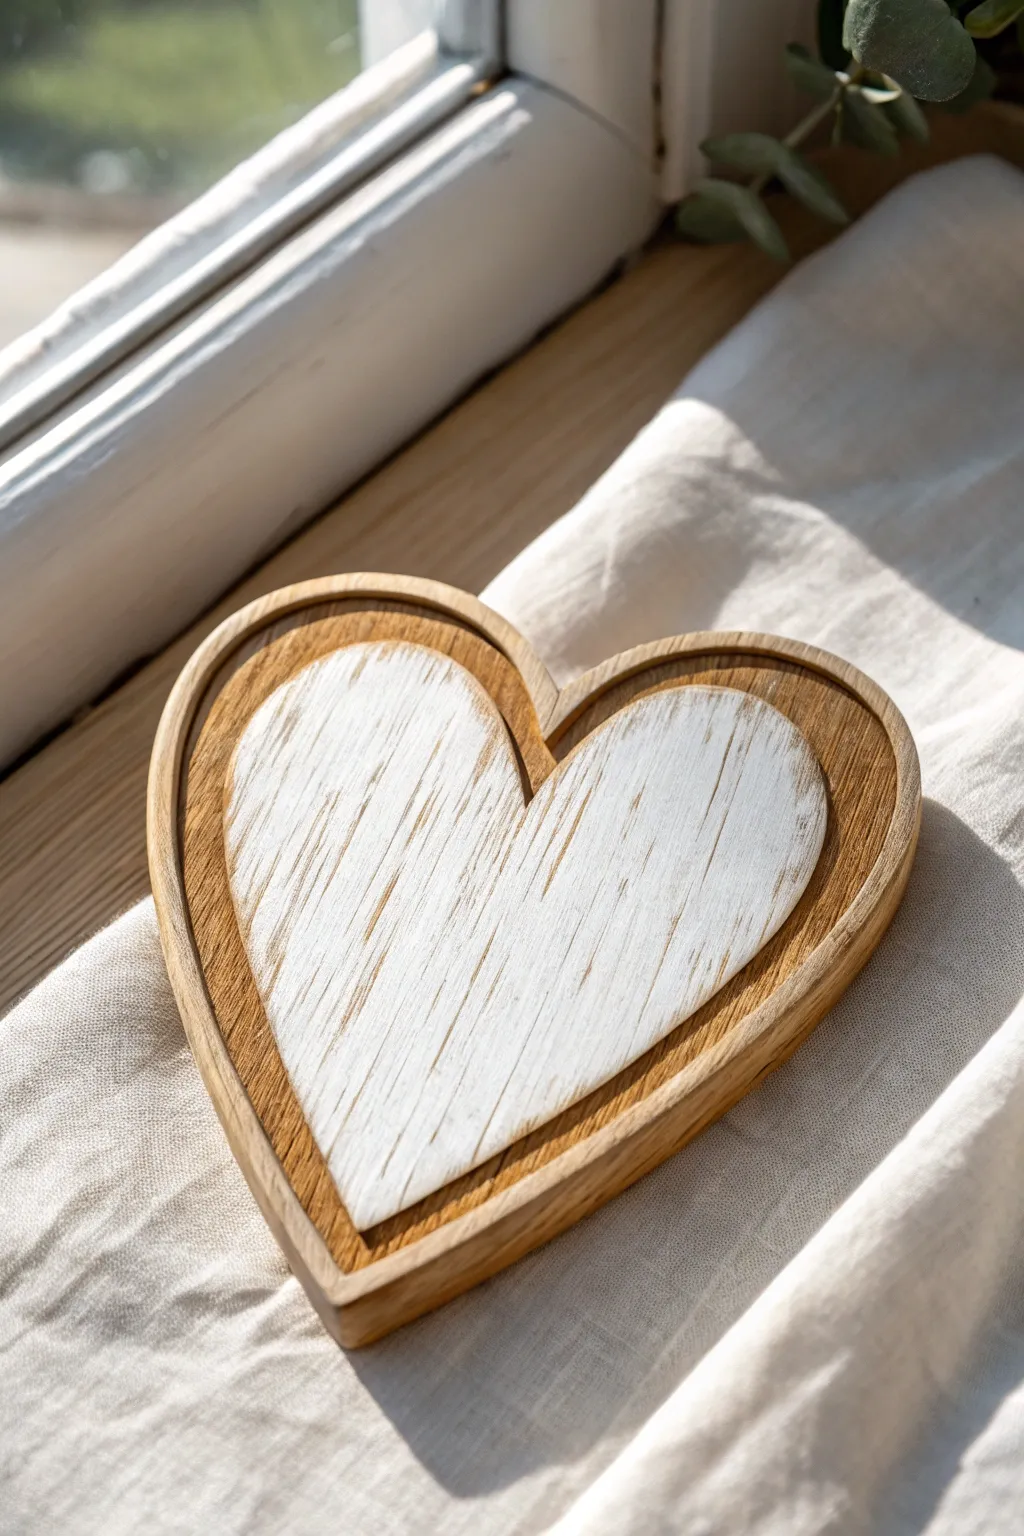
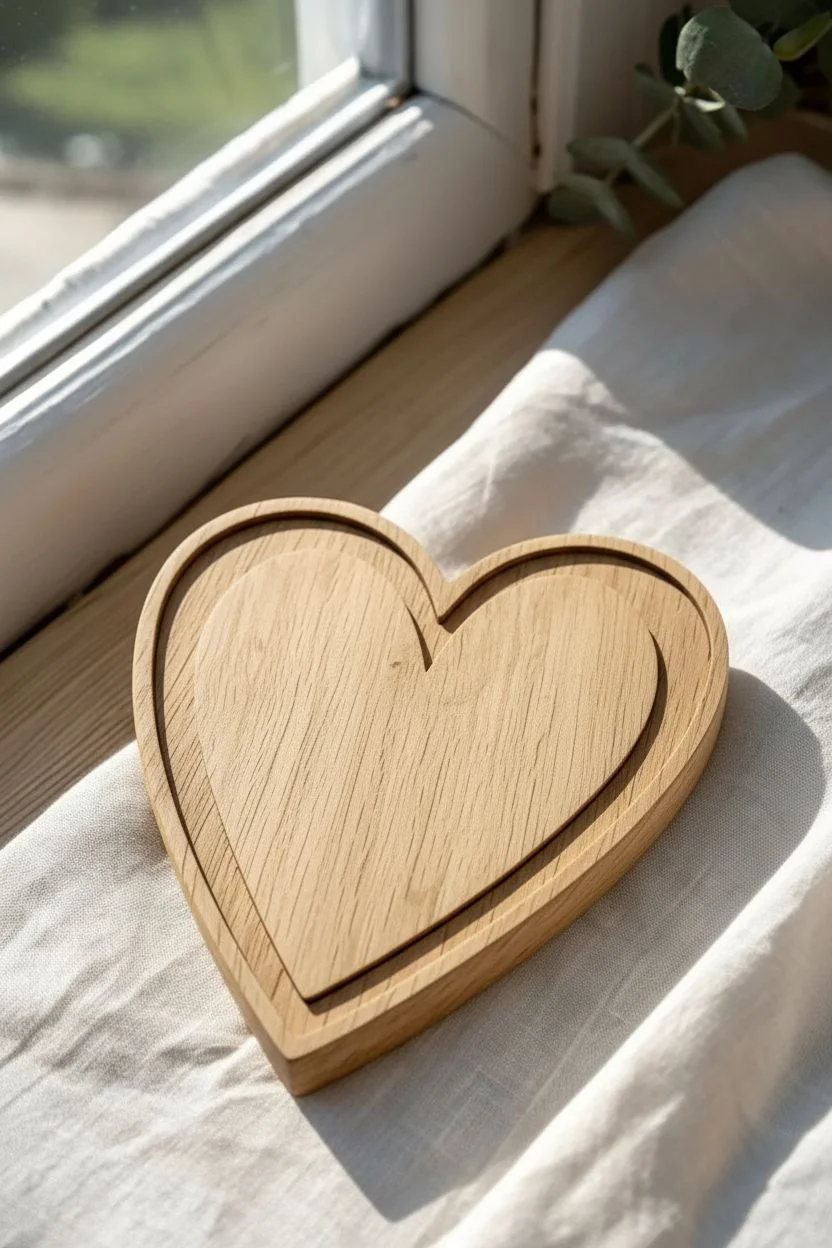
This rustic project combines the warmth of natural oak with a soft, weathered white finish for a timeless look. By nesting a painted cutout inside a wooden tray, you create a beautiful dimensional piece that highlights the wood’s texture through negative space.
Step-by-Step Tutorial
Materials
- Heart-shaped wooden tray (with raised rim)
- Heart-shaped wood cutout (sized to fit inside the tray with a reveal)
- White chalk paint or matte acrylic paint
- Sandpaper (medium grit, 120-150)
- Wood glue or strong craft adhesive
- Small paintbrush (flat)
- Clean rag or paper towel
- Clear matte varnish or wax (optional)
- Pencil
Step 1: Preparation & Fit Check
-
Check the sizing:
Before painting or gluing, place your wood cutout inside the heart tray. Ensure there is a pleasing, even gap between the cutout and the tray’s rim, usually about a quarter to a half-inch of the natural wood base showing. -
Sand the surfaces:
Lightly sand the top surface of the inner heart cutout to open up the wood grain, which helps it accept the whitewash effect later. Wipe away any dust with a tack cloth or clean rag. -
Prepare the tray:
Check the wooden tray for any rough spots, especially around the rim. Give them a quick sand if needed, but leave the wood natural to provide contrast against the white insert.
Step 2: Creating the Whitewash Finish
-
Mix your paint:
Create a wash by mixing your white chalk paint with a small amount of water. You want a consistency slightly thinner than heavy cream so that it doesn’t cover the wood entirely opaque. -
Apply the first coat:
Paint the top surface of the heart cutout using long, vertical strokes that follow the direction of the wood grain. Don’t worry about perfect coverage; unevenness adds charm. -
Let it tack up:
Allow the paint to sit for just a minute or two until it starts to feel tacky but isn’t fully dry. -
Distress while wet:
Take a dry rag and gently wipe back some of the paint in the direction of the grain. This removes excess pigment and reveals the wood texture underneath. -
Driftwood effect:
If the coverage looks too solid, use a piece of 150-grit sandpaper to scuff the edges and surface lightly while the paint is still barely damp. This creates that ‘driftwood’ texture seen in the photo. -
Dry completely:
Let the painted heart dry fully. This usually takes about 20-30 minutes for chalk paint. -
Final sanding pass:
Once bone dry, take your sandpaper and do a final hard pass over the painted surface. Focus on scratching through the white paint to let the dark wood grain show through in vertical streaks.
Grain Direction Trick
Orient the wood grain of the inner heart to match the grain direction of the outer tray. This alignment makes the finished piece look professional and intentional.
Step 3: Assembly
-
Clean the tray:
Make sure the inside of the wooden tray is completely free of dust so the glue adheres properly. -
Apply adhesive:
Apply a generous swirl of wood glue to the back of the painted heart cutout. Keep the glue away from the very edge to prevent it from squishing out onto the visible tray base. -
Position the heart:
Carefully lower the painted heart into the tray. I find it helpful to look directly from above to ensure the gap around the edges is perfectly even. -
Press and hold:
Press down firmly in the center of the heart for at least 30 seconds to set the initial bond. -
Weight it down:
Place a heavy book or weight on top of the heart and let it cure according to your glue’s instructions (usually 1-2 hours). -
Optional sealing:
If this piece will be handled often, apply a clear matte wax or varnish over the entire piece to protect the finish without adding unwanted shine.
Too Much White?
If you painted the heart too opaque, don’t restart. Use a coarser grit sandpaper (like 80-grit) to aggressively scratch off the top layer until the wood peeks through.
Place your finished heart on a windowsill or mantle where the natural light can catch the beautiful texture of the wood grain


Have a question or want to share your own experience? I'd love to hear from you in the comments below!