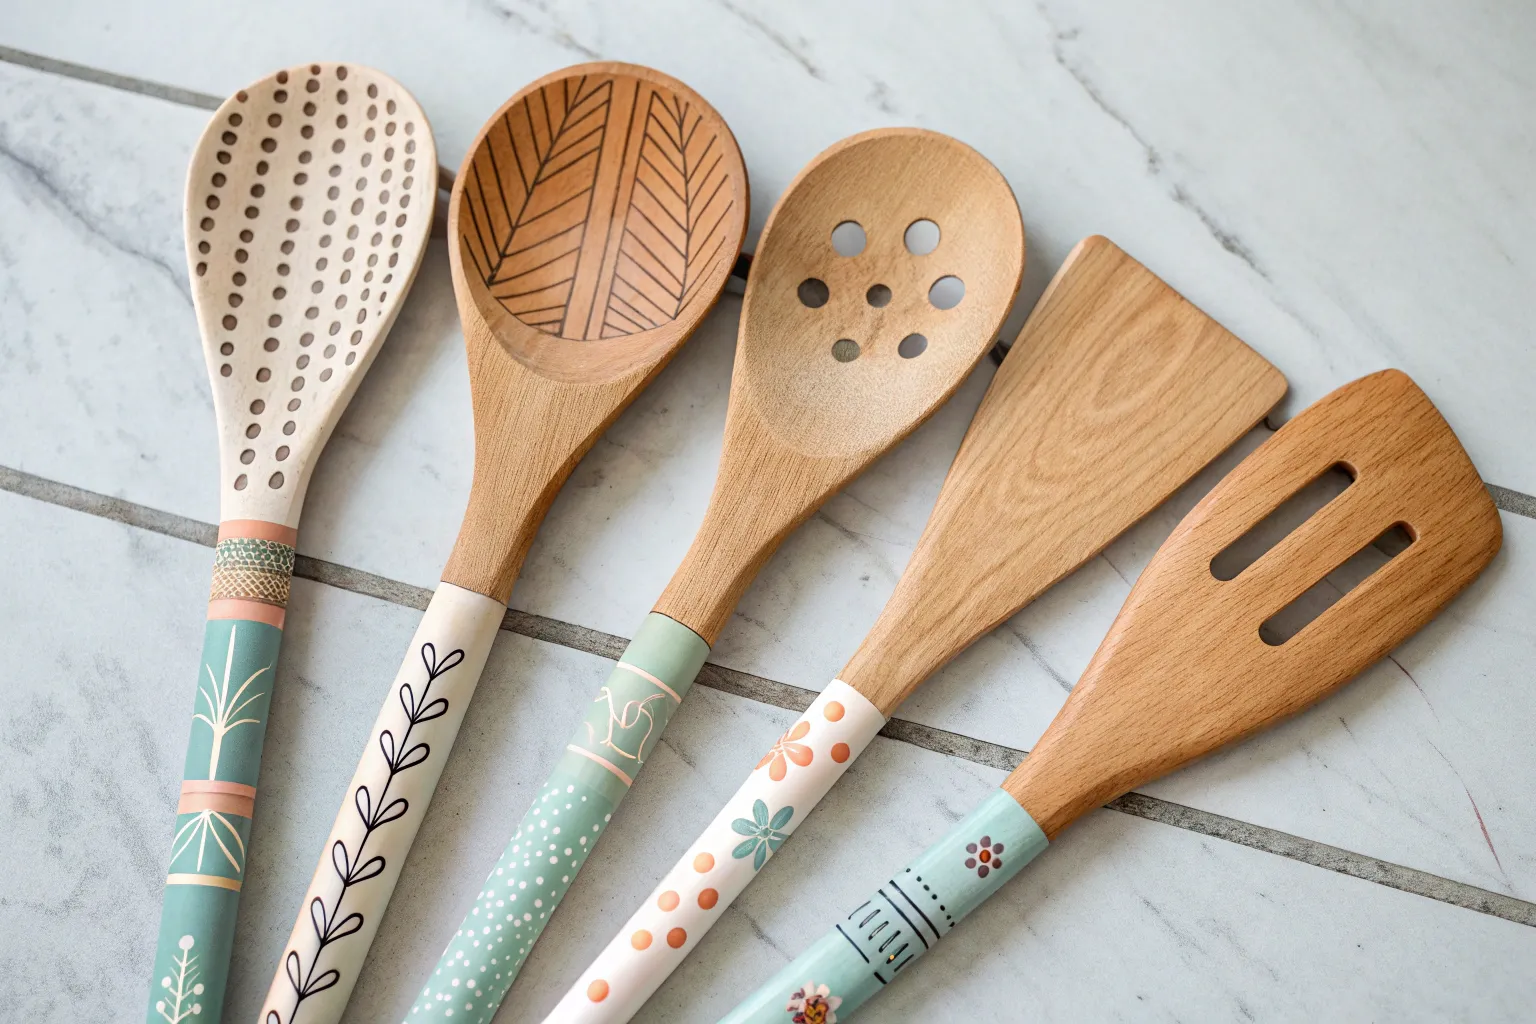
A plain wooden spoon is basically a tiny, ready-to-paint canvas—plus it’s already shaped like something fun. Here are my favorite wooden spoon painting ideas to help you turn everyday utensils into cute décor, gifts, or just a satisfying little art project.
Classic Polka Dot Handles
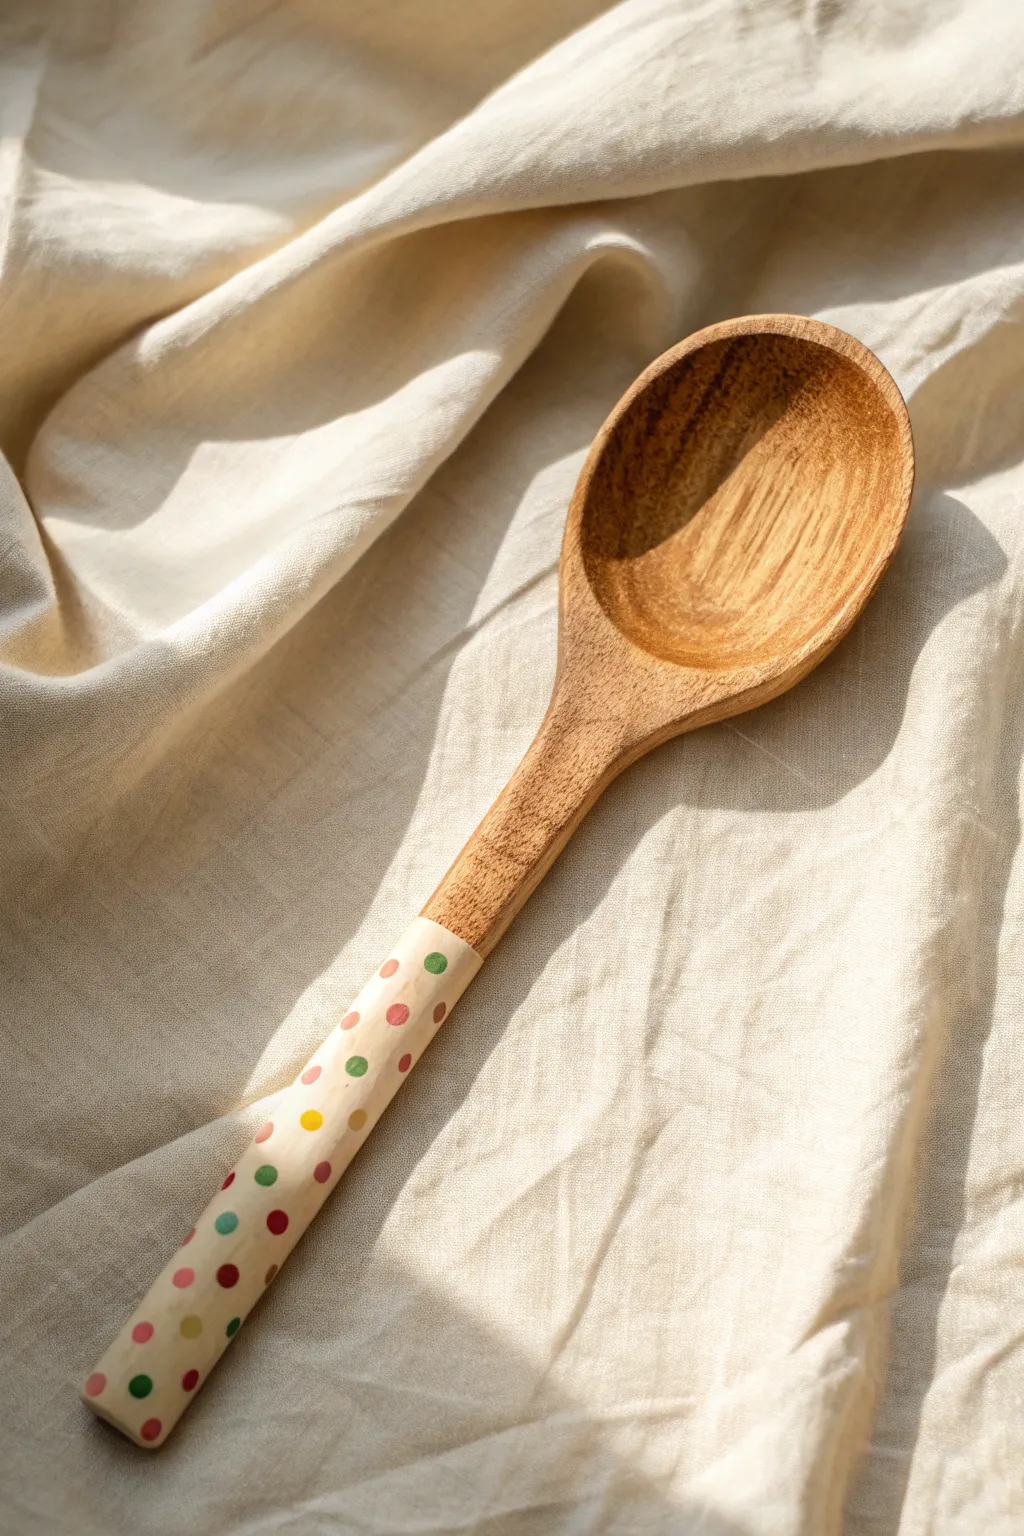
Transform a plain kitchen utensil into a whimsical piece of functional art with this classic polka dot design. The creamy base coat provides the perfect neutral backdrop for a scatter of cheerful, colorful dots that look like a celebration on a spoon.
Step-by-Step Tutorial
Materials
- Wooden spoon (clean and dry)
- Painter’s tape or masking tape
- Fine-grit sandpaper (220 grit)
- Acrylic craft paint (Cream/Off-White for base)
- Acrylic craft paints (Red, Forest Green, Mustard Yellow, Dusty Rose)
- Medium flat paintbrush
- Small round paintbrush or toothpick/dotting tool
- Water-based polyurethane sealant (food-safe if using near food)
- Paper plate or palette
- Paper towels
- Cup of water
Step 1: Preparation & Base Coat
-
Define the Painting Area:
Decide how far up the handle you want the paint to go. Wrap a piece of painter’s tape tightly around the neck of the spoon where the handle meets the scoop to create a crisp, clean line. -
Prep the Surface:
Lightly sand the handle area below the tape with fine-grit sandpaper. This roughs up any existing varnish and helps the acrylic paint adhere much better to the wood. -
Clean the Wood:
Wipe the sanded area with a slightly damp cloth or paper towel to remove all sanding dust. Let the wood dry completely before moving on. -
Apply First Base Layer:
Using your medium flat brush, apply a thin, even coat of the cream or off-white acrylic paint to the handle. Brush in the direction of the wood grain for the smoothest finish. -
Let it Set:
Allow this first coat to dry for about 15-20 minutes. It doesn’t need to be fully cured, but it should be dry to the touch. -
Build Opacity:
Apply a second coat of the cream paint. Depending on your paint’s quality, you might even need a third coat to ensure the wood grain doesn’t show through. Let this base dry completely, preferably for an hour.
Uneven Dots?
If your dots look lumpy or have raised peaks, gently tap the handle on the table surface immediately after painting to help the wet paint settle flat.
Step 2: Adding the Polka Dots
-
Prepare Your Palette:
Squeeze dime-sized amounts of your dot colors—red, forest green, mustard yellow, and dusty rose—onto your palette. -
Choose Your Tool:
For consistent dots, you can use the non-brush end of a small paintbrush. Dip the end into the paint, or use a specific dotting tool if you have one on hand. -
Start with Red:
Dip your tool into the red paint and press gently onto the handle to create dots. Scatter them randomly, leaving plenty of white space between them for the other colors. -
Clean Between Colors:
Wipe your tool clean with a paper towel before switching colors to avoid muddying the pigments. -
Add Green Accents:
Repeat the process with the forest green paint. Try to place these dots in emptiness areas, keeping the spacing somewhat irregular for a playful, organic look. -
Fill with Yellow:
Add the mustard yellow dots next. I tend to step back occasionally to look at the whole handle to ensure the colors are balanced and not clumping in one spot. -
Finish with Dusty Rose:
Fill in the remaining gaps with the dusty rose dots. This muted tone bridges the gap between the bright splashes of color. -
Dry the Design:
Let the polka dots dry completely. Because the paint is thicker in dot form, give this at least 2-3 hours to ensure they won’t smear during sealing.
Pro Tip: Consistent Size
Use household items for different dot sizes! A toothpick makes tiny specks, a Q-tip makes medium circles, and a pencil eraser stamps perfect large dots.
Step 3: Finishing Touches
-
Remove the Tape:
Carefully peel away the painter’s tape. Pull it away from the painted area at a 45-degree angle to keep the line sharp. -
Apply Sealant:
Brush a coat of water-based polyurethane or a food-safe sealant over the painted handle. This protects your design from chipping and water damage during washing. -
Final Cure:
Let the spoon cure according to the sealant manufacturer’s instructions—usually 24 hours—before using it in your kitchen.
Once fully cured, your custom confetti spoon is ready to stir up some joy in your next baking session


Minimal Dipped Handle Color Block
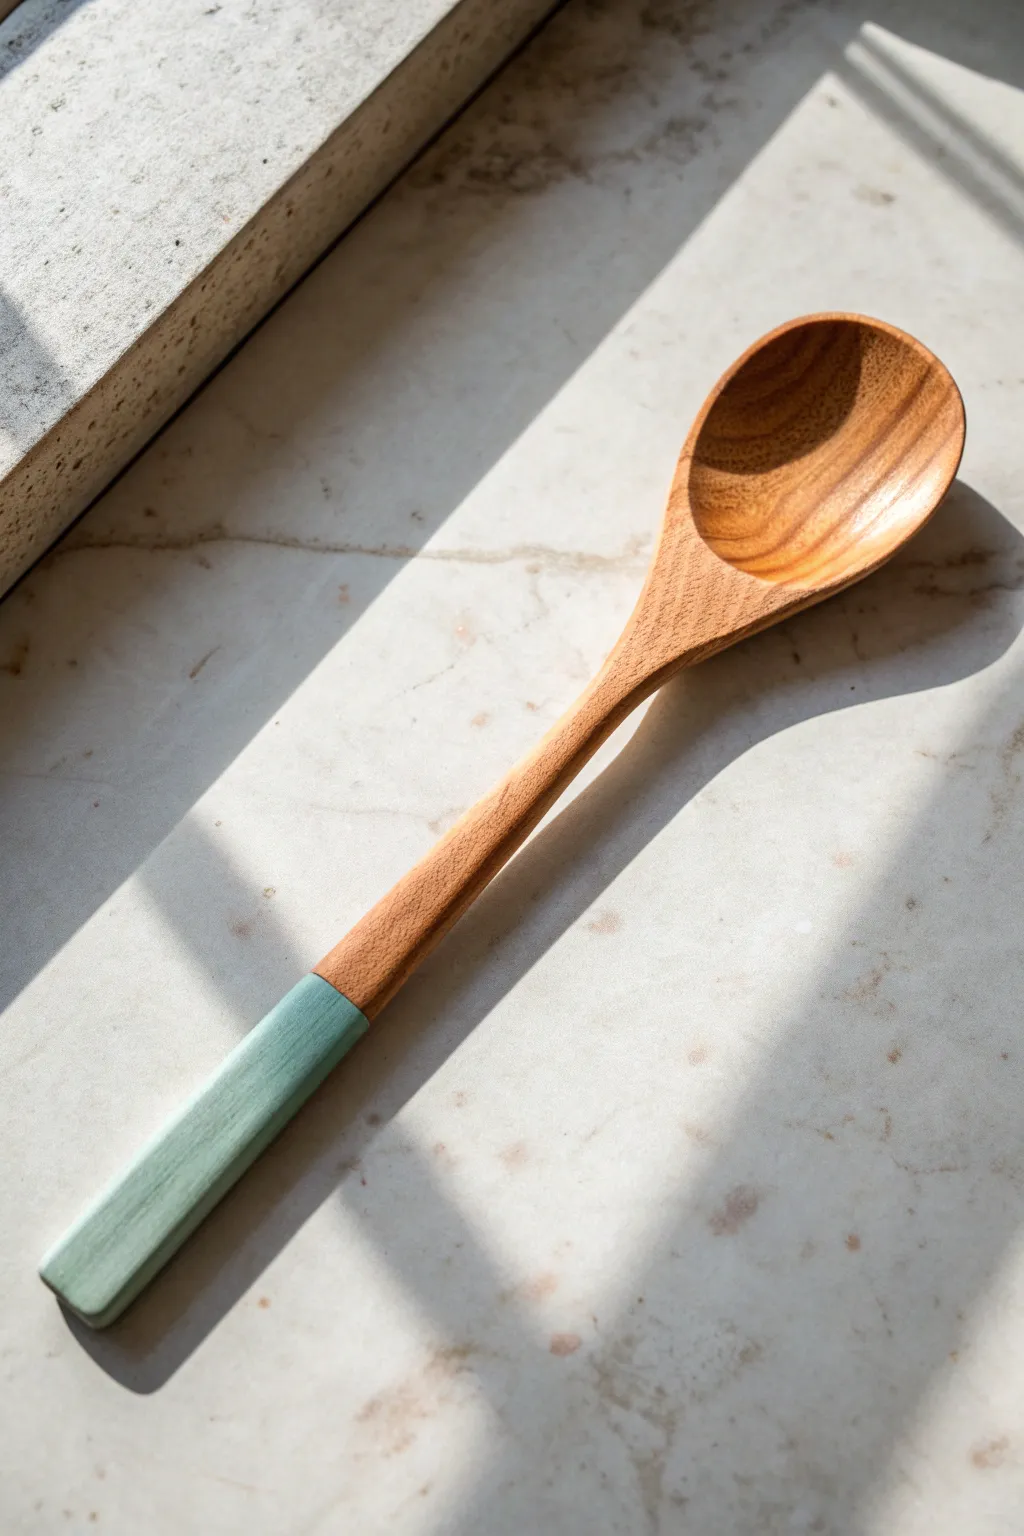
Bring a touch of modern serenity to your kitchen with this elegantly simple dipped spoon project. By focusing on a single block of muted sage green, you highlight the natural beauty of the wood grain while adding a contemporary pop of color.
Step-by-Step
Materials
- Wooden spoon (smooth grain, preferably unfinished)
- Painter’s tape or masking tape
- Fine-grit sandpaper (220-400 grit)
- Acrylic craft paint (sage green or pastel mint)
- Small flat paintbrush
- Matte or satin clear sealant (food-safe if possible, mod podge, or polycrylic)
- Ruler
- Pencil
- Paper towel or cloth
Step 1: Preparation
-
Clean the surface:
Begin by wiping down your wooden spoon with a slightly damp cloth to remove any dust or oils that might interfere with paint adhesion. -
Initial light sanding:
Even if the spoon feels smooth, give the handle area a quick, light sanding with fine-grit sandpaper to create a better ‘tooth’ for the paint to grab onto. -
Wipe away dust:
Carefully wipe away all sanding dust. I like to use a barely damp paper towel for this to ensure no particles get trapped under the tape. -
Measure the handle:
Decide how far up the handle you want the color to go. A good rule of thumb is about 1/4 to 1/3 of the total spoon length. Measure from the bottom end using your ruler. -
Mark the line:
Make a tiny, faint mark with a pencil at your measured height. This small guide will help ensure your tape is level.
Bleeding Lines?
If paint bleeds under the tape, wait for it to dry fully, then gently scratch the excess off with a toothpick or lightly sand the line back to perfection.
Step 2: Painting
-
Apply painter’s tape:
Wrap a piece of painter’s tape tightly around the handle, aligning the bottom edge of the tape with your pencil mark. -
Seal the tape edge:
Press down firmly on the edge of the tape where it meets the wood. You can run your fingernail or a credit card along this edge to prevent paint bleed. -
Mix your paint:
If your sage green isn’t quite the right shade, mix in a tiny drop of white to soften it or slate grey to mute it until you achieve that perfect matte pastel look. -
Paint the first coat:
Using a flat brush, apply a thin, even coat of paint to the exposed bottom section of the handle. Brush in the direction of the wood grain. -
Paint the bottom edge:
Don’t forget to dab paint onto the very bottom circular end of the spoon handle so the color looks solid from all angles. -
Allow to dry:
Let the first coat dry completely. This usually takes about 15-20 minutes for acrylics, but check your bottle’s instructions. -
Apply second coat:
Add a second coat of paint for full opacity. Two thin coats are always better than one thick, gloppy coat. -
Smooth the texture:
Inspect the paint while wet to ensure there are no brush bristles left behind or uneven ridges.
Step 3: Finishing Touches
-
Remove the tape:
This is the satisfying part. Before the paint is 100% rock-hard dry (but after it’s set), carefully peel back the painter’s tape at a 45-degree angle to reveal your crisp line. -
Clean up edges:
If a tiny bit of paint bled under the tape, carefully scrape it away with a craft knife or a toothpick while the paint is still somewhat fresh. -
Seal the paint:
Once the color is fully cured, apply a matte or satin clear sealant over the painted area only. This protects the paint from chipping during hand-washing. -
Let it cure:
Allow the sealant to cure fully according to the manufacturer’s directions before using the spoon. -
Condition the wood:
Finish by rubbing a food-safe mineral oil or spoon butter onto the unpainted wooden bowl part to make the grain pop and match the richness of the painted handle.
Pro Sealing Tip
For the crispest line, brush a tiny amount of clear matte medium over the tape edge BEFORE painting your color. This seals the gap perfectly.
Enjoy using your stylish new utensil or displaying it as a piece of functional kitchen art


Crisp Stripes With Tape
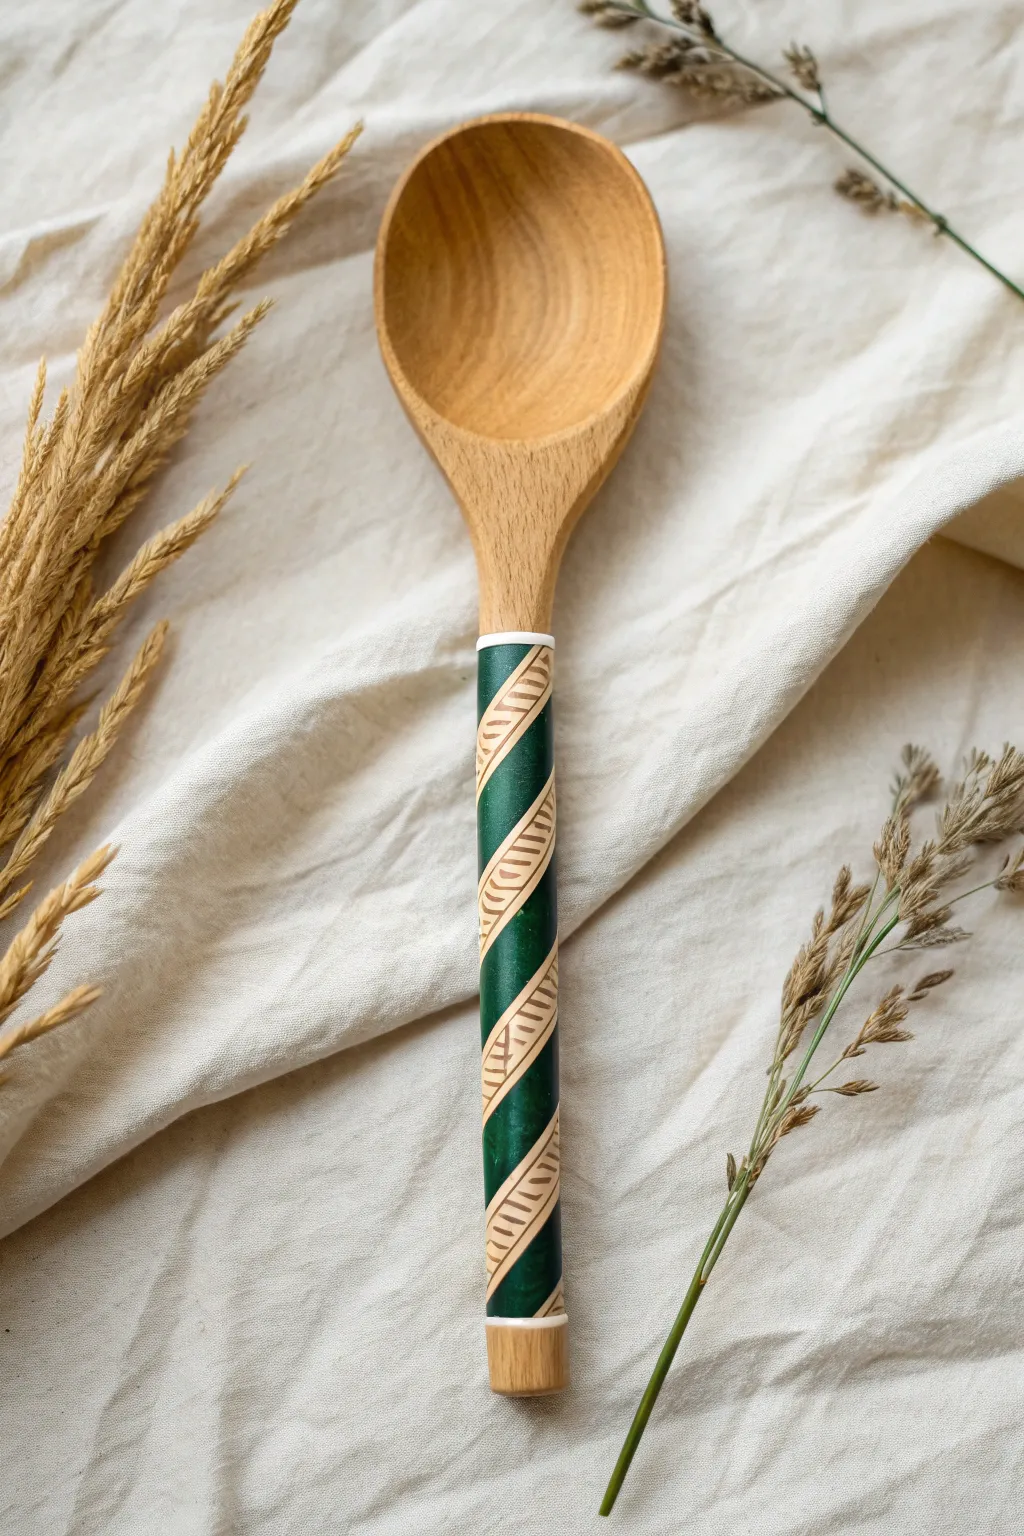
Transform a plain kitchen utensil into a piece of rustic art with this elegant spiral design. By combining deep hunter green paint with carved-look negative space, you achieve a sophisticated pattern that feels both modern and traditional.
Step-by-Step Tutorial
Materials
- Wooden spoon (plain, light wood like beech)
- Painter’s tape (1/4 inch or 6mm width)
- Acrylic paint (deep hunter green or emerald)
- Small flat paintbrush
- Fine-grit sandpaper (220 grit)
- Pencil
- Ruler or flexible measuring tape
- Matte or satin clear sealant (food-safe for handle)
- Small craft knife (optional)
- Damp cloth
Step 1: Preparation
-
Smooth the surface:
Begin by lightly sanding the handle of your wooden spoon. Even new spoons often have a slight varnish or rough grain that interferes with paint adhesion. Focus specifically on the area where the handle meets the bowl, but leave the bowl itself untouched. -
Wipe it down:
Use a barely damp cloth to remove all sanded dust. The wood must be bone dry before you begin taping or painting. -
Define the boundaries:
Decide where you want your painted section to start and stop. Use a pencil to lightly mark a stopping point near the top of the handle and another near the bottom, leaving about an inch of exposed wood at the very end of the handle. -
Apply the top border:
Wrap a piece of painter’s tape perfectly horizontally around the neck of the spoon (where the handle meets the bowl) to create a crisp upper boundary line. -
Apply the bottom border:
Repeat this process at the bottom of the handle, creating a horizontal tape line to mark the end of your design.
Clean Lines Secret
Before applying green paint, brush a thin layer of clear matte medium or white paint over the tape edges. This seals the gap, so any bleed is invisible.
Step 2: Creating the Spiral Mask
-
Begin the spiral:
Start taping your main spiral. Anchor your narrow 1/4 inch tape just below the top horizontal border. Angle the tape downwards to begin the helix shape. -
Wind the tape:
Wind the tape down the length of the handle. Aim for consistent spacing between the winds; for this design, the gaps (where the paint will go) should be roughly twice as wide as the tape itself. -
Secure the end:
Once you reach the bottom border tape, press the spiral tape down firmly and trim any excess. -
Burnish the edges:
This is crucial for crisp lines: run your fingernail or the back of a spoon firmly over all the tape edges. This prevents paint from bleeding underneath.
Paint Peeling Off?
If the paint lifts when you remove the tape, you likely pulled too fast or the paint was too thick. Lightly sand the area and touch up carefully.
Step 3: Painting & Patterning
-
Apply the base coat:
Using your small flat brush, paint the exposed wood between the tape spirals with your deep green acrylic paint. I find that brushing in the direction of the wood grain gives the smoothest finish. -
Let it dry:
Allow this first coat to dry completely. If the wood grain is still showing through too much, apply a second coat for opacity. -
Paint the leaves:
The image shows a ‘negative space’ effect on the spiral. To achieve this easily, you can actually paint the leaf veins *over* the green paint using a light beige or tan paint that matches the wood tone. Use a very fine liner brush to paint small, diagonal dashes resembling a fern pattern. -
Alternative method: Scratching:
If you prefer the authentic texture shown in the photo, wait until the green paint is dry to the touch but not fully cured (about 20 minutes). Use a craft knife or a toothpick to gently scrape away the green paint in diagonal dashes, revealing the wood underneath. -
Create the V-shape:
Whether painting or scratching, ensure your dashes form a ‘V’ shape pointing up the handle, mimicking the structure of a wheat stalk or braided rope.
Step 4: Finishing Touches
-
Initial peel:
Carefully peel away the tape while the paint is still slightly tacky (if you painted the details) or fully dry (if you scratched them). Pull the tape slowly at a 45-degree angle away from the paint. -
Clean up:
Use a toothpick to gently scrape away any tiny bits of paint that might have bled under the tape edges. -
Seal the handle:
To protect your work from hand oils and water, apply a coat of matte or satin clear sealant over the painted section. Do not seal the bowl of the spoon if you intend to use it for cooking. -
Final cure:
Let the spoon cure for at least 24 hours before handling or displaying it.
Now you have a stunning, nature-inspired utensil that looks lovely in a ceramic jar on your counter.


Simple Floral Vines Up the Handle
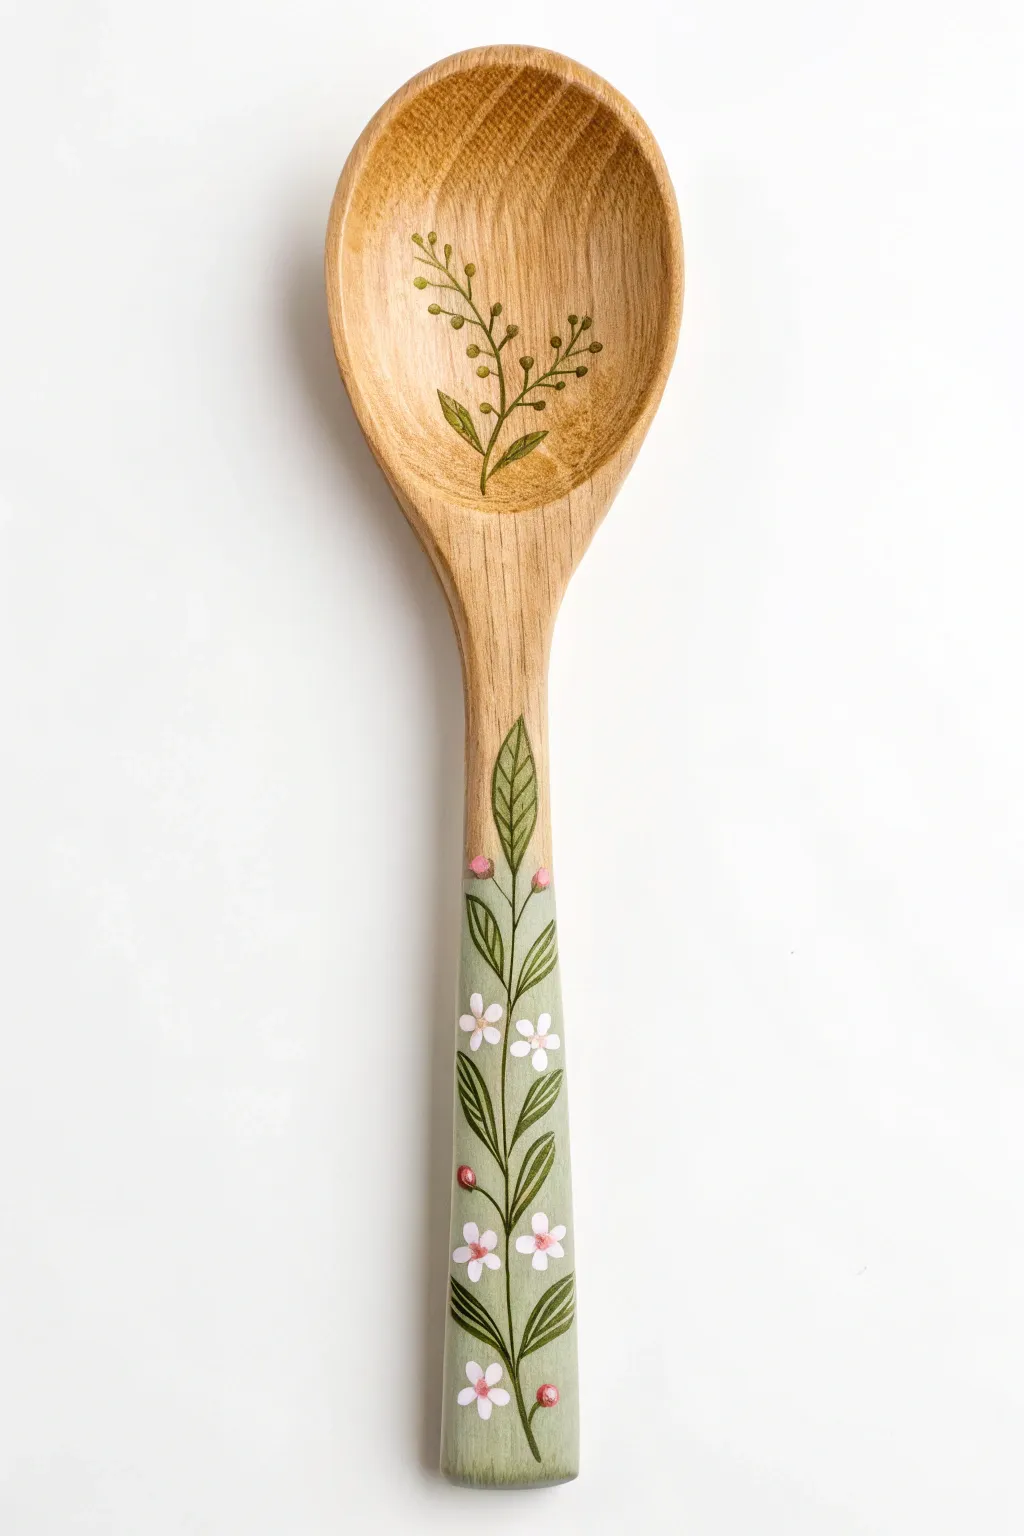
Transform a plain kitchen utensil into a piece of functional art with this delicate vine design. The handle features a soft sage background adorned with climbing floral motifs, while the bowl showcases subtle, naturalistic greenery directly on the wood grain.
Detailed Instructions
Materials
- Unfinished wooden spoon
- Fine grit sandpaper (220-400 grit)
- Acrylic paints: Sage green, dark olive green, titanium white, soft pink, deep red
- Small flat brush (size 4 or 6)
- Fine liner brush (size 0 or 00)
- Matte or satin sealant/varnish (food-safe if intended for use)
- Palette or paper plate
- Water cup and paper towels
Step 1: Preparation & Base Coat
-
Prepare the surface:
Begin by lightly sanding the entire spoon to remove any rough patches or existing finish. Wipe away all dust with a slightly damp cloth to ensure a smooth painting surface. -
Mix the background color:
Create a soft sage green by mixing white with a touch of olive green and a tiny drop of brown or grey to mute it. You want an opaque, pastel shade. -
Paint the handle base:
Using the flat brush, paint the handle of the spoon with your sage mixture. Start from the bottom edge and work your way up, stopping cleanly where the handle widens into the neck of the spoon. -
Apply a second coat:
Let the first layer dry completely. Apply a second thin coat of the sage green to ensure solid, even coverage without brushstrokes showing through.
Brush Control Trick
Thin your acrylic paint with a drop of water until it has an ink-like consistency. This helps the liner brush glide smoothly over the wood grain for sharp lines.
Step 2: Painting the Handle Vines
-
Draft the central stem:
Switch to your fine liner brush and load it with dark olive green paint. Draw a thin, wavy line centered on the painted handle, starting from the bottom and winding gently upward to the top of the painted section. -
Add main leaves:
Paint pairs of leaves branching off the main stem. Use a ‘press and lift’ motion: press the brush down to create the belly of the leaf, then lift as you pull away to form a sharp tip. -
Intertwine smaller leaves:
In the spaces between the larger leaves, add smaller, slender leaves or stems that curve outward. This creates a lush, intertwined look. -
Detail the leaf veins:
For the largest leaf at the top (the transition point), use a slightly lighter green or diluted white to adding a very fine center vein line for added dimension.
Step 3: Adding Handle Florals
-
Paint flower petals:
Mix titanium white with just the smallest speck of pink. Using the tip of your round brush, dot five small petals in a circle to form flowers scattered along the vine. -
Add detail to centers:
Once the petals are dry, use the very tip of your liner brush to place a tiny dot of deep red or dark pink in the center of each flower. -
Create buds:
At the ends of some smaller branches, paint small oval shapes using pink or red to represent closed flower buds. -
Highlight the buds:
Add a microscopic highlight of white to the top resulting buds to make them look spherical and shiny.
Personalize It
Swap the sage green for a navy blue background and paint the flowers in bright yellow or gold for a striking, high-contrast folk art look.
Step 4: Decorating the Bowl
-
Paint the inner stem:
Inside the concave bowl of the spoon, paint a free-floating vine using the dark olive green. Start from the bottom center and curve it upwards and to the right. -
Add tiny botanical sprays:
Instead of full leaves, paint tiny, hair-thin branches extending from this main stem. Use the very lightest touch possible with your liner brush. -
Add seed pods or berries:
At the tips of these tiny branches, add small dots using a lighter green or an ochre shade to mimic seeds or pollen buds. -
Paint accent leaves:
Near the base of this inner vine, paint two or three distinct, larger leaves similar to the ones on the handle to tie the design together. -
Seal the artwork:
Allow all paint to cure for at least 24 hours. Apply a food-safe sealant (like beeswax or a specific wood bowl finish) over the entire spoon to protect your work.
Now you have a charming, hand-painted accent piece ready to brighten up your kitchen.
BRUSH GUIDE
The Right Brush for Every Stroke
From clean lines to bold texture — master brush choice, stroke control, and essential techniques.
Explore the Full Guide
Tiny Fruit Pattern Spoon Set
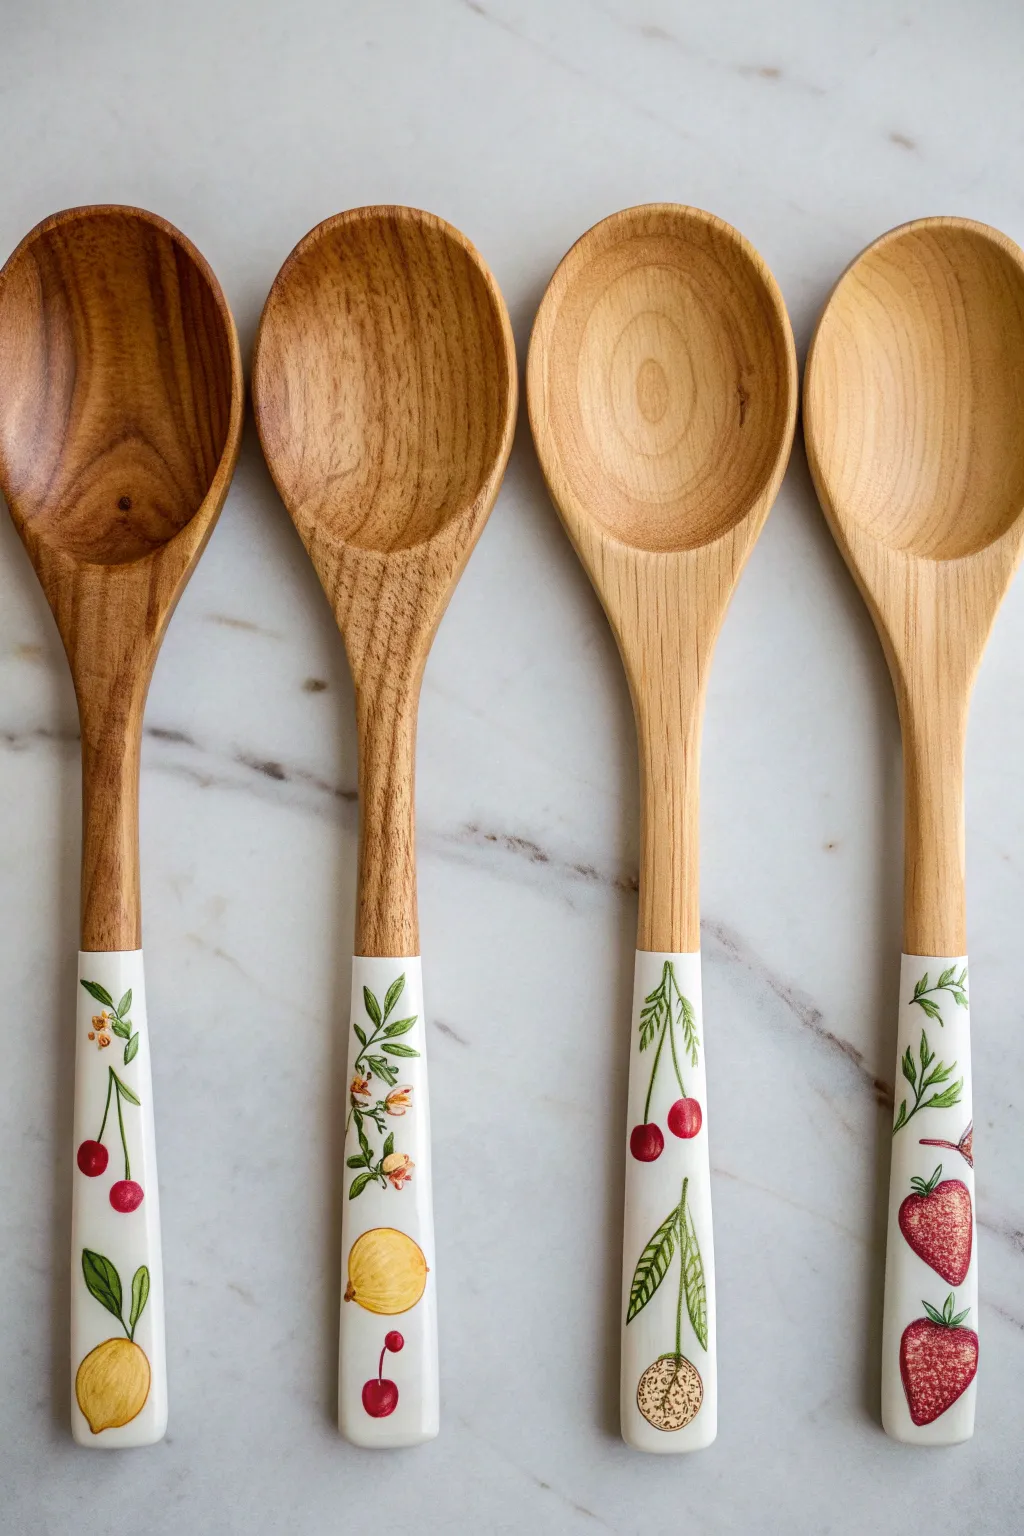
Bring a touch of vintage botanical charm to your kitchen with this delightful spoon set featuring hand-painted micro-fruits. By isolating the design on the handle with a crisp white background, you create a modern yet rustic utensil that looks lovely displayed in a crock.
How-To Guide
Materials
- Set of 4 wooden spoons (light wood like beech or maple works best)
- Sandpaper (fine grit, approx. 220)
- Painter’s tape or masking tape
- White acrylic paint (matte or satin finish)
- Detail brushes (sizes 0, 00, and 1)
- Acrylic paints: red, deep red, lemon yellow, golden yellow, leaf green, olive green, brown, pink
- Clear sealant (food-safe polycrylic or beeswax finish)
- Pencil
- Palette or small plate
- Water cup and paper towels
Step 1: Prepping and Base Coating
-
Clean surface:
Begin by lightly sanding the handles of your wooden spoons to remove any existing factory finish or roughness. This helps the paint adhere better. -
Define the area:
Decide how high up the handle you want your design to go. Measure the same distance from the bottom on all four spoons and wrap a tight ring of painter’s tape around each handle to create a crisp line. -
Seal the tape:
Run your fingernail or a credit card firmly over the edge of the tape to ensure a tight seal, preventing paint from bleeding underneath. -
Base coat application:
Apply a coat of white acrylic paint to the handle area below the tape. Use long, smooth strokes to minimize brush marks. -
Build opacity:
Allow the first layer to dry completely, then apply a second and third coat until you have a solid, opaque white background. Let this cure fully—ideally for a few hours—before painting the designs.
Step 2: Designing the Motifs
-
Plan the layout:
Lightly sketch your designs onto the white paint with a pencil. Plan for four distinct themes: lemons and cherries, yellow floral buds, hanging cherries, and strawberries. -
Strawberry base:
On the first spoon, paint the strawberry shapes using a mix of red and deep red. Create a gradient by putting the darker red at the bottom and lighter red near the top. -
Cherry pops:
For the cherry spoon, paint varied sizes of circles in bright red. Add a tiny dot of darker maroon on one side of each fruit to create a shadow for volume. -
Lemon zest:
On the third spoon, paint oval lemon shapes using lemon yellow. I like to add a touch of golden yellow near the bottom curve to make them look ripe and round. -
Floral buds:
For the final spoon, create small yellow-orange blobs for the fruit/buds and tiny pink accents for the flowers using the very tip of your smallest brush.
Tape Bleed Fix
If paint seeps under the tape, wait for it to dry fully. Then, lightly scrape the excess off with an X-Acto knife or layer a tiny bit of the original wood color paint over the mistake.
Step 3: Adding Details and Stems
-
Greenery framework:
Switch to your size 0 or 00 liner brush. Use olive green mixed with a little water to make the paint flow smoothly, and paint thin stems connecting your fruits. -
Leaf variation:
Paint the leaves. For the strawberries, make jagged, three-part leaves. For the cherries and lemons, paint smooth, elongated ovals. Vary your greens by mixing in a little yellow or brown for a natural look. -
Strawberry seeds:
Once the red berries are dry, use your finest brush or a toothpick to dot tiny yellow or cream-colored seeds onto the strawberries. -
Highlights:
Add a tiny speck of pure white to the top curve of the cherries and the side of the lemons to mimic light hitting a glossy surface. -
Fine outlines:
If you want a more illustrative look, very lightly outline some leaves or fruit edges with watered-down brown paint, but keep it subtle.
Vintage Patina
For an aged look, mix a tiny drop of brown paint into a clear glazing medium and brush it lightly over the finished white handles before sealing to antique them.
Step 4: Finishing Up
-
Remove tape:
Carefully peel off the painter’s tape. Pull it away from the painted area at a 45-degree angle to get the cleanest line. -
Touch ups:
If any paint bled under the tape, use a damp toothpick to gently scrape it away, or touch it up with a small brush. -
Sealing:
Apply 2-3 coats of a food-safe sealant (like a water-based polycrylic) over the painted handle only. Do not seal the bowl of the spoon if you intend to use it for cooking. -
Final cure:
Let the spoons cure according to your sealant’s instructions (often 24-48 hours) before handling or displaying them.
Display your beautiful new utensil set in a ceramic jar to show off your handiwork
Herb Labels and Botanical Sprigs

Transform a simple wooden kitchen utensil into a piece of functional art with delicate botanical illustrations. This project features a graceful green sprig in the spoon’s bowl and a charming painted cuff on the handle for a cohesive, nature-inspired look.
Step-by-Step Tutorial
Materials
- Light-colored wooden spoon (beech or bamboo works well)
- Fine-grit sandpaper (220-400 grit)
- Acrylic paints (White, Sap Green, Olive Green, Dusty Pink/Mauve)
- Fine detail paintbrush (size 0 or 00)
- Small flat paintbrush
- Pencil
- Food-safe sealant (like beeswax, mineral oil, or specialized wood sealer)
- Painter’s tape
- Water cup and paper towels
Step 1: Preparation
-
Prep the surface:
Begin by lightly sanding the inside of the spoon bowl and the handle area where you plan to paint. This removes any factory finish or rough grain, giving your paint a smooth surface to grip. -
Wipe clean:
Use a barely damp cloth or paper towel to wipe away all the sanding dust. The wood needs to be completely dry and dust-free before any paint touches it. -
Tape the handle:
Measure about 1.5 to 2 inches up from the bottom of the handle. Wrap a piece of painter’s tape around the handle at this mark to create a clean, crisp line for your painted cuff.
Bleeding Lines?
If paint bleeds under your tape on the handle, wait for it to dry, then gently scrape the excess away with a craft knife or flexible razor blade for a crisp edge again.
Step 2: Painting the Handle Cuff
-
Base coat application:
Using your small flat brush, paint the area below the tape with white acrylic paint. Apply thin, even strokes going with the grain of the wood. -
Layering the white:
Allow the first coat to dry completely. Since wood is porous, the first layer might look streaky. Apply a second or third coat until you have a solid, opaque white background. -
Remove the tape:
Carefully peel off the painter’s tape while the last coat is still slightly tacky to ensure a sharp edge. Let the white band cure fully before adding details. -
Detail the cuff:
With your fine detail brush and the dusty pink or mauve paint, sketch a tiny floral cluster near the top of the white band. Keep the lines delicate and loose. -
Add lower leaves:
Switch to your green paint. Below the pink flower, paint two small leaves stemming upwards. I like to mix a tiny bit of white into the green here to soften the color against the white background.
Step 3: Painting the Bowl
-
Sketch the design:
Very lightly sketch a simple sprig design inside the bowl of the spoon with a pencil. Draw a central stem that curves slightly, with three to four leaves branching off on each side. -
Paint the stem:
Load your fine detail brush with a mix of sap green and a touch of water to improve flow. Paint the central stem first, using a confident, singular stroke if possible. -
Paint the leaves:
Paint the outline of each leaf shape attached to the stem. Fill them in gently with a wash of green. Don’t worry about perfect opacity; a slightly translucent look mimics watercolor and looks lovely on wood. -
Add leaf veins:
Once the base green is dry, use a darker shade (mix olive green with a tiny dot of black or brown). Paint a thin central vein down the middle of each leaf for added realism. -
Fine details:
At the very top of your sprig, add tiny dots or short dashes to represent buds or smaller growth, giving the plant a natural, organic finish.
Burn It In
Instead of painting the outlines, use a wood burning tool to etch the botanical design first, then fill inside the burned lines with watercolor or thinned acrylics.
Step 4: Finishing Touches
-
Dry completely:
Let the spoon sit undisturbed for at least 24 hours to allow the acrylic paint to fully cure and harden. -
Seal the artwork:
Apply a food-safe sealant over the painted areas. If this spoon is for display only, a standard clear craft varnish works. If you intend to use it, use multiple coats of a non-toxic clear sealer or beeswax finish. -
Final buff:
Once the sealant is dry, give the unpainted wood sections a quick rub with mineral oil or spoon butter to condition the wood and make the grain pop.
Now you have a beautifully customized utensil that brings a touch of the garden right into your kitchen

PENCIL GUIDE
Understanding Pencil Grades from H to B
From first sketch to finished drawing — learn pencil grades, line control, and shading techniques.
Explore the Full Guide
Monochrome Black-and-White Patterns
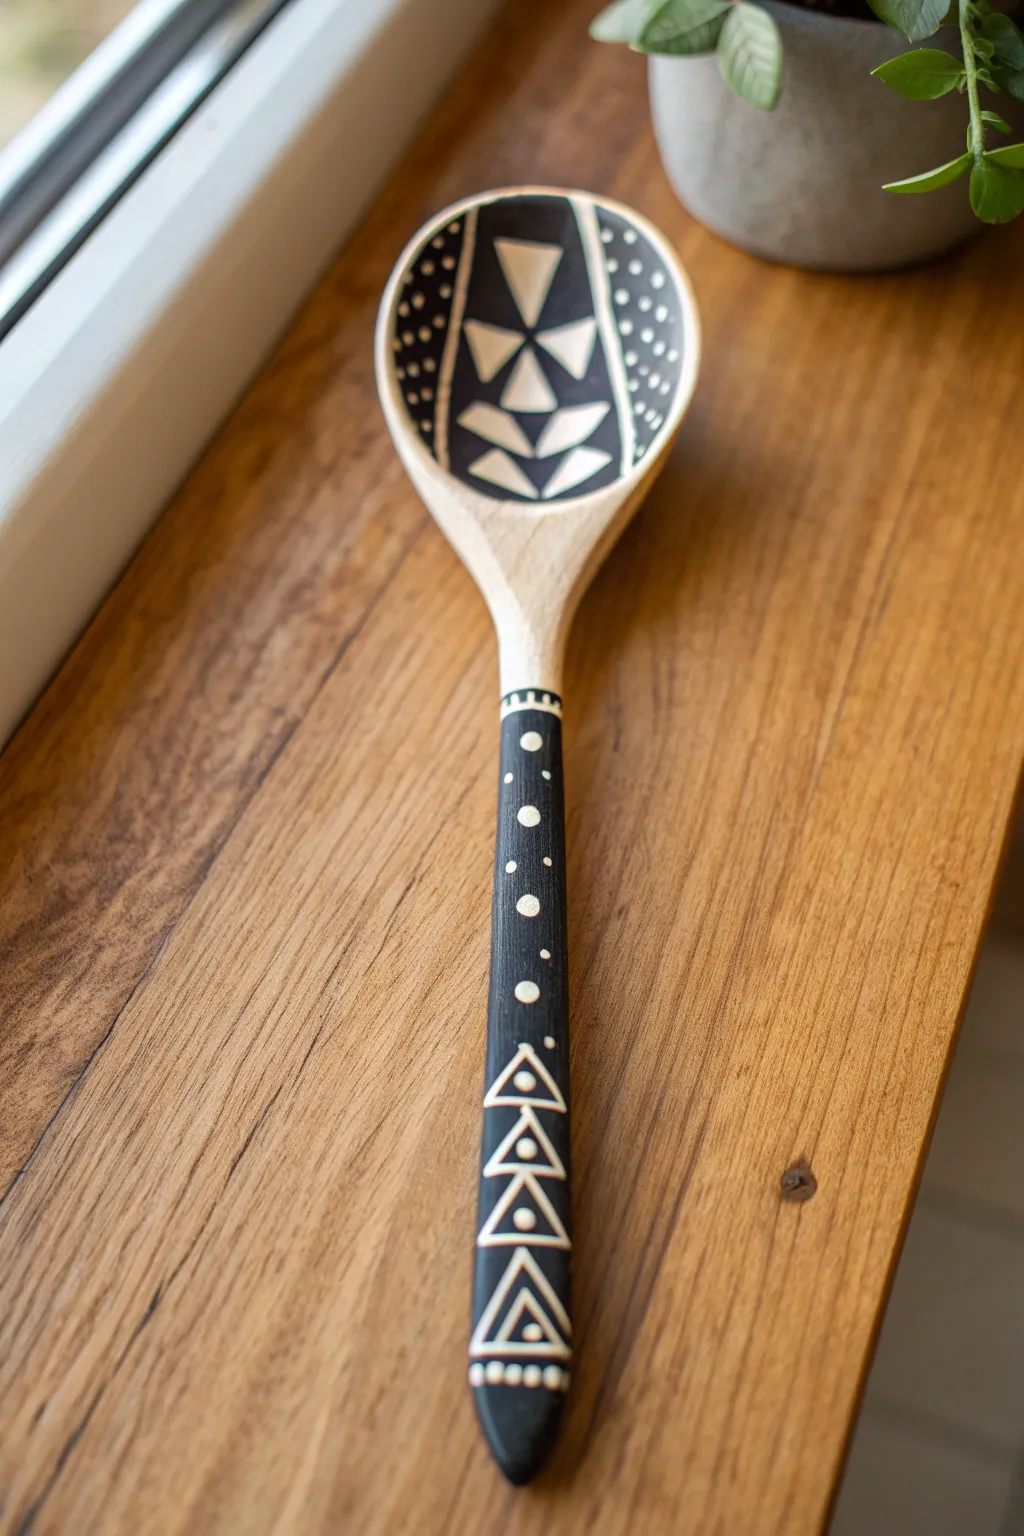
Transform a plain wooden utensil into a striking piece of kitchen decor with this high-contrast monochrome design. The bold black background sets the stage for crisp white geometric patterns, creating a modern yet handcrafted aesthetic.
Step-by-Step Guide
Materials
- Wooden mixing spoon (clean and dry)
- Fine-grit sandpaper (220 grit)
- Black acrylic paint (matte finish recommended)
- White liquid acrylic paint or paint pen (extra fine tip)
- Flat paintbrush (small)
- Detail paintbrush (0 or 00 size, script liner works well)
- Painter’s tape or masking tape
- Pencil and eraser
- Water-based protective varnish (matte or satin)
- Paper palette or paper plate
Step 1: Preparation & Base Coat
-
Sand the surface:
Begin by lightly sanding the entire spoon, paying special attention to the inside of the bowl and the handle where you’ll be painting. This removes any existing waxy finish and gives the paint something to grip. -
Clean thoroughly:
Wipe the spoon down with a slightly damp cloth to remove all sanding dust, then let it dry completely before starting. -
Mark the handle limit:
Decide where the handle design will stop (usually just below the neck of the spoon) and wrap a piece of painter’s tape around this spot to create a crisp line. -
Paint the handle base:
Using your flat brush, paint the entire handle below your tape line with black acrylic paint. Apply thin, even strokes. -
Paint the bowl interior:
Carefully paint the interior of the spoon’s bowl black. Leave a small rim of natural wood showing at the very edge to frame the design nicely. -
Apply a second coat:
Once the first layer is dry to the touch, apply a second coat of black to ensure full opacity. No wood grain should show through the black areas. Let this dry completely—I usually wait about 20 minutes.
Step 2: Drafting the Design
-
Remove the tape:
Gently peel off the painter’s tape from the spoon neck. You should have a clean line where the black paint ends. -
Sketch the primary lines:
Using a pencil very lightly, draw two vertical lines inside the spoon bowl to create a central column used for the triangles. This divides the bowl into three sections: a center strip and two side curves. -
Outline the triangles:
Sketch a series of stacked geometric shapes in that central bowl column—start with an inverted triangle at the top, followed by hourglass-like stacked triangles going down. -
Plan the handle pattern:
Lightly mark out the handle design. The top half will feature dots, and the bottom half (near the hanging hole or end) will feature nested triangles.
Uneven Dots?
If your brush makes messy dots, try dipping the non-brush end (the handle tip) or a toothpick into the paint and stamping it onto the wood for perfect circles.
Step 3: Painting the Details
-
Fill the central bowl shapes:
Switch to your white paint pen or fine detail brush. Fill in the sketched geometric shapes in the center of the spoon bowl with solid white. -
Dot the bowl sides:
In the black areas on either side of the central column, paint small white dots. Start densely near the top edge and space them out as you go down, or just keep a consistent random pattern. -
Outline the central column:
Carefully paint thin white vertical lines bordering your central triangle stack to separate it cleanly from the dotted sections. -
Detail the handle transition:
Where the black paint starts on the handle, paint a small horizontal line with tiny vertical tick marks or loops, creating a decorative cuff. -
Paint handle dots:
On the upper portion of the black handle, add a vertical line of medium-sized dots running down the center, flanked by tiny dots on the sides. -
Paint handle triangles:
On the lower portion of the handle, paint a stack of large open triangles. Inside each large triangle, paint a smaller outline, and finally a dot in the very center of each. -
Finish the handle tip:
Add a final decorative stripe or row of dots at the very bottom tip of the handle to balance the design.
Add Some Color
Swap the white details for metallic gold or silver paint to give the spoon a festive, glamorous look perfect for holiday decor.
Step 4: Sealing and Finishing
-
Clean up sketches:
Allow the white paint to dry fully (at least an hour). If any pencil marks are still visible, gently erase them now. -
Seal the artwork:
Apply two thin coats of water-based protective varnish over the painted areas. Do not varnish the unpainted wood if you plan to use this for food, though this specific design is best suited for display.
Hang your stunning new geometric spoon on a wall hook or place it in a utensil jar to add an instant artistic touch to your kitchen
Rainbow Handle Ombre Fade
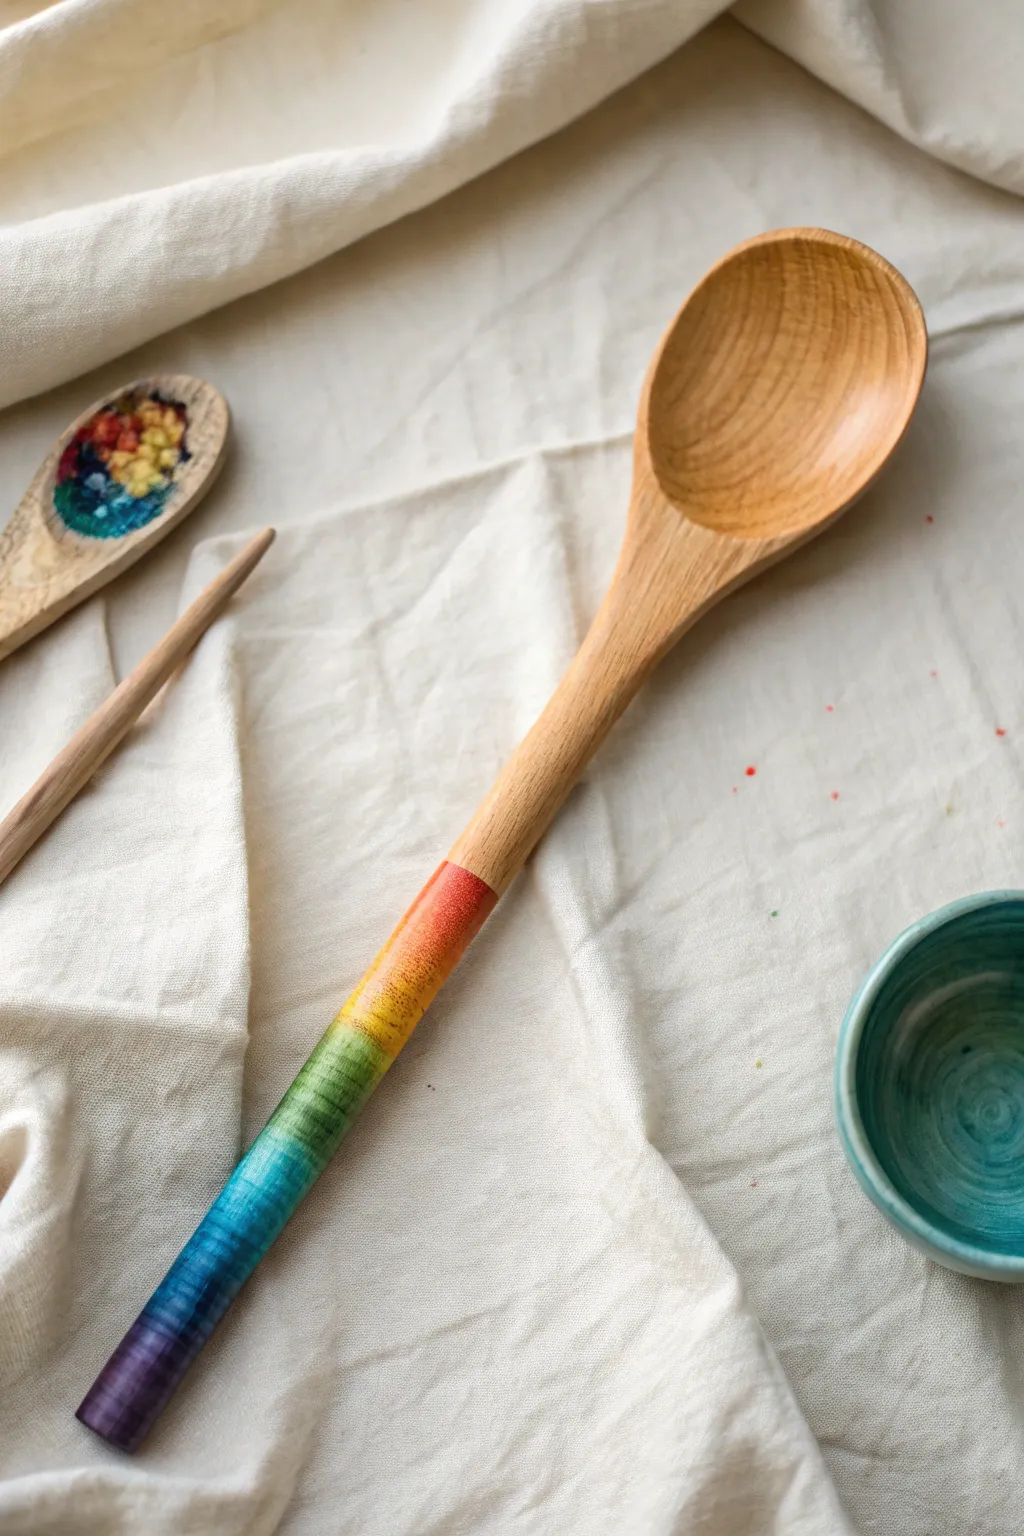
Transform a plain kitchen utensil into a vibrant piece of functional art with this striking rainbow gradient technique. The handle features a seamless transition from warm reds to cool purples, creating a cheerful ombre effect that keeps the natural wood grain visible for an organic feel.
Step-by-Step
Materials
- Large wooden spoon (unfinished or sanded)
- Non-toxic acrylic craft paints (Red, Orange, Yellow, Green, Blue, Purple)
- Masking tape or painter’s tape
- Small flat brushes (size 4 or 6)
- Soft blending brush or makeup sponge
- Medium-grit sandpaper (180-220 grit)
- Clean cloth or rag
- Food-safe sealer (like beeswax, mineral oil, or shellac)
Step 1: Preparation
-
Prepare the surface:
Start with a clean, dry wooden spoon. If the spoon has a previous finish or feels rough, lightly sand the handle area with medium-grit sandpaper to ensure the wood is porous enough to accept the paint. -
Define the paint zone:
Decide how far up the handle you want the rainbow to go. In our example, the color stops before reaching the neck of the spoon. Wrap a piece of masking tape securely around the handle at this stopping point to create a crisp, clean line where the natural wood meets the paint.
Muddy Transitions?
If your colors turn brown where they meet, let the first color dry completely before adding the next. Then, use a damp brush to reactivate just the edge for a cleaner blend.
Step 2: Painting the Gradient
-
Water down your paints:
Squeeze a small amount of each paint color onto your palette. I like to mix a tiny drop of water into each color; you want a consistency closer to ink or a stain rather than thick paint. This transparency allows the wood grain to show through. -
Start with red:
Begin at the top of your taped section (closest to the spoon bowl). Apply a band of red paint about an inch wide. Don’t worry about the bottom edge being perfect, as you’ll be blending it. -
Add the orange band:
Apply the orange paint directly below the red. While both paints are still slightly wet, use a clean, dry blending brush to gently sweep back and forth where the two colors meet, blurring the transition. -
Continue with yellow:
paint a band of yellow below the orange. Using the same technique, blend the bottom edge of the orange into the top edge of the yellow to create a soft, golden transition. -
Applying the green:
Clean your brush thoroughly or switch to a fresh one. Apply your green band next. Blending yellow into green can sometimes get muddy, so use a very light touch to merge them just enough to look seamless. -
Transition to blue:
Paint the blue section below the green. Allow the cyan and green tones to overlap slightly to create a teal hue in the middle of the transition. -
Finish with purple:
Apply purple to the very end of the handle. Ensure the very tip of the handle is fully covered. Blend the blue boundary down into the purple for that final cool-toned fade. -
Check for gaps:
Rotate the spoon slowly to ensure the bands wrap all the way around evenly. Touch up any spots where the bare wood might be peeking through unintentionally. -
Dry and assess:
Let the paint dry completely, which should take about 20-30 minutes since the layers are thin. If the colors look too pale, you can repeat the process with a second thin layer to boost saturation.
Add Some Sparkle
Before sealing, dry-brush a tiny amount of metallic gold paint lightly over the transitions. It adds a magical shimmer without overpowering the rainbow effect.
Step 3: Finishing Touches
-
Remove the tape:
Once the paint is dry to the touch, carefully peel away the masking tape. Pull it away at a 45-degree angle to ensure a sharp, clean line. -
Light sanding:
For a super smooth, professional feel, you can very gently pass over the painted handle with high-grit sandpaper (400+) just once or twice. This knocks down any raised wood grain without removing the color. -
Seal the spoon:
Since this is a kitchen tool, protection is vital. Apply a food-safe sealer over the entire spoon. Mineral oil or a beeswax conditioner works well; rub it in generously with a cloth and let it soak in according to the product instructions. -
Buff to a shine:
After the sealer has cured or soaked in, take a clean, dry rag and buff the handle briskly. This will bring out a soft satin sheen that makes the colors pop.
Enjoy brightening up your kitchen utensil jar with this splash of daily color


Mandala Dot Art on the Spoon Bowl
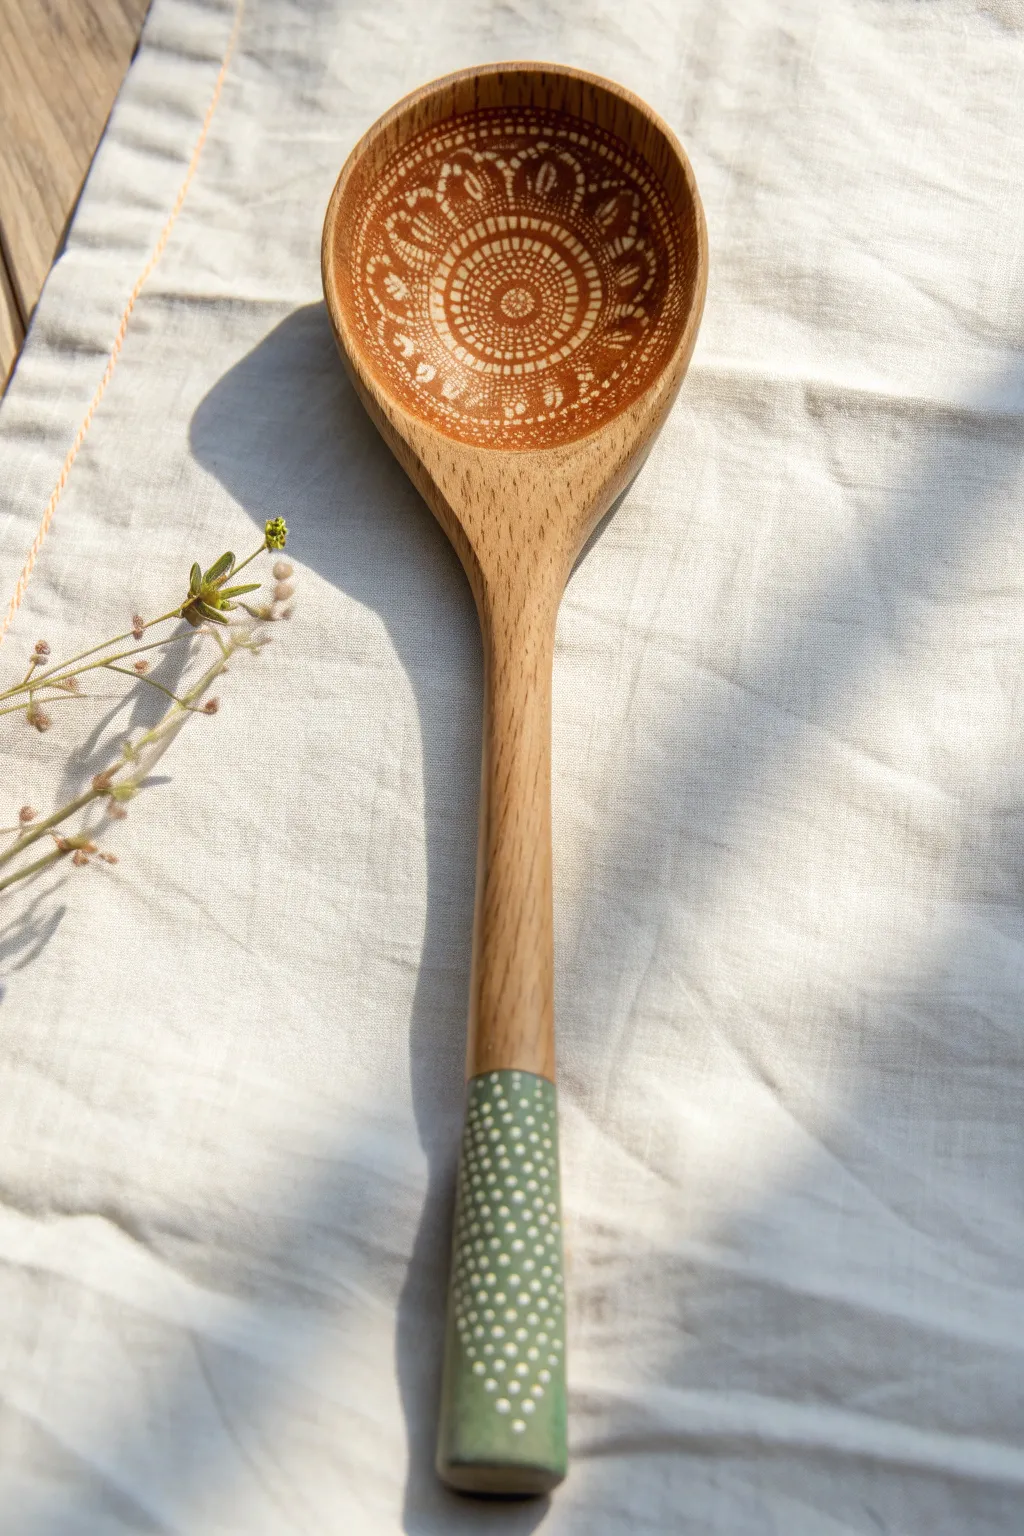
Transform a plain wooden kitchen utensil into a piece of functional art with this delicate mandala design. The contrast of intricate white dotwork against natural wood grain, paired with a sage green dipped handle, creates a stunning bohemian aesthetic perfect for kitchen display.
Step-by-Step Guide
Materials
- Wooden spoon (smooth, unfinished or lightly sanded)
- White acrylic paint (high flow or fluid heavy body)
- Sage green acrylic paint (matte finish)
- Dotting tools (various sizes, from fine to medium)
- Masking tape or painter’s tape
- Fine-grit sandpaper (400 grit)
- Clear sealant (food-safe if intended for use, or standard varnish for decor)
- Damp cloth
- Palette or small dish
Step 1: Preparation & Handle Base
-
Sand the surface:
Begin by lightly sanding the entire spoon with fine-grit sandpaper. This ensures a smooth surface for your dots to adhere to. Wipe away any dust with a damp cloth and let it dry completely. -
Tape the handle:
Decide how far up the handle you want the green section to go (about 3-4 inches from the bottom is standard). Wrap a piece of masking tape tightly around the handle at this line to ensure a crisp edge. -
Paint the handle base:
Using the sage green acrylic paint, apply an even coat to the bottom section of the handle below your tape line. Smooth out any brushstrokes and let it dry. -
Apply second coat:
If the wood grain is still showing through, apply a second coat of green paint for solid, opaque coverage. Carefully peel off the tape while the paint is still slightly tacky to avoid chipping the edge.
Step 2: Mandala Bowl Design
-
Find the center:
Locate the exact center of the spoon’s bowl. Use your smallest dotting tool to place a single, perfect white dot right in the middle. -
Create the first ring:
Using a slightly larger tool, place small dots tightly around your center dot. Aim for consistency in spacing, keeping them close but not touching. -
Expand with concentric circles:
Continue adding rings of dots, varying the size of your dotting tool for each new ring. For the third ring, I like to use very fine dots to create a ‘border’ effect around the previous larger ones. -
Add petal shapes:
Instead of a simple circle, use a larger dotting tool to create a ring of 8-12 evenly spaced large dots further out. Then, use a smaller tool to walk smaller dots around these large ones, creating a petal or scallop shape. -
Fill the gaps:
Look for empty spaces between your scallop shapes and fill them with tiny micro-dots. This adds the intricate, lacy look characteristic of mandala art. -
Create the outer rim:
Work your way toward the edge of the spoon bowl. Finish with a final ring of varied dots—perhaps teardrop shapes or alternating large and small dots—following the curve of the spoon’s rim.
Uneven Dots?
If dots look peaked or uneven, your paint might be too thick. Mix in a drop of pouring medium or water to thin it slightly for smoother, flatter dots.
Step 3: Handle Detail & Finishing
-
Dot the handle:
Return to the sage green handle section. Using white paint and a small tool, cover this green area with a uniform pattern of small dots. You can arrange them in straight rows or a random confetti pattern. -
Drying time:
Allow the entire spoon to dry for at least 24 hours. The dots are thicker than standard paint layers and need extra time to cure fully. -
Remove imperfections:
If you notice any peaked points on your dots (like little Hershey’s Kisses), you can very gently sand them flat once they are 100% dry, though be careful not to scratch the paint off. -
Apply sealant:
To protect your work, apply a sealant. If this spoon is for decoration only, a spray varnish works well. If you might use it lightly, apply a food-safe sealant like beeswax or butcher block oil over the unpainted wood, and a non-toxic sealer over the painted parts.
Use a Template
Struggle with symmetry? Lightly draw guide circles in the bowl with a white charcoal pencil before painting. The pencil washes off easily later.
Now you have a beautifully detailed spoon that adds a touch of artisan charm to your kitchen decor
Painted Spoon Face Characters
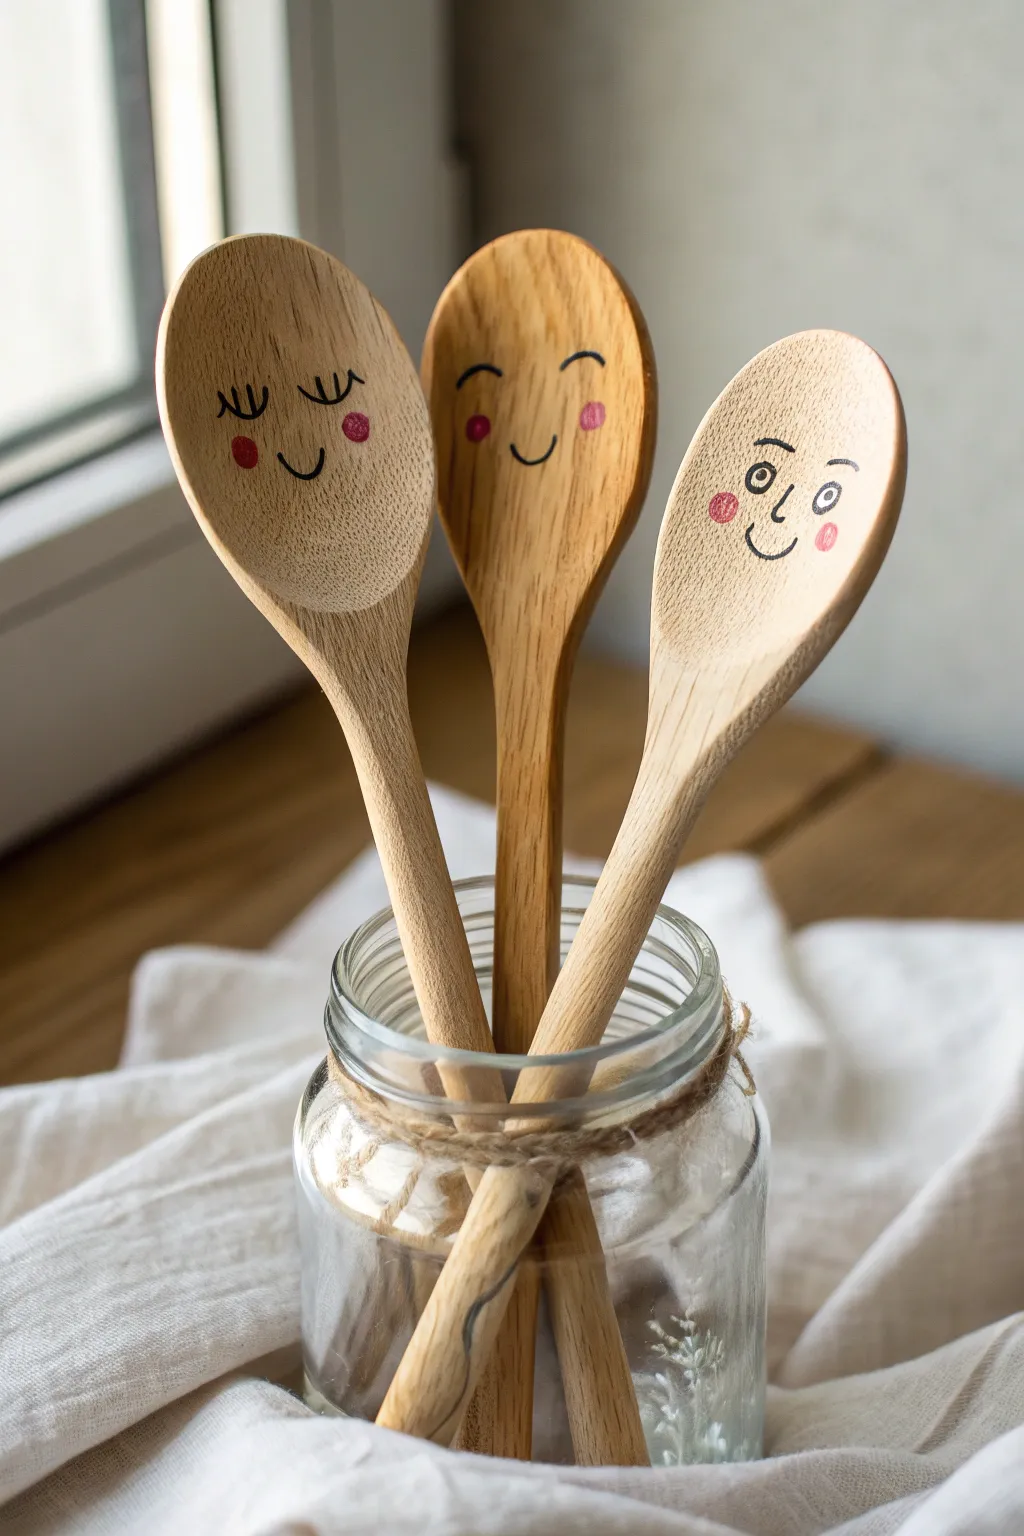
Bring three quirky personalities to life using simple kitchen staples and a touch of paint. This project transforms plain wooden spoons into a charming family of characters with minimalist facial expressions and rosy cheeks.
Step-by-Step Tutorial
Materials
- 3 wooden spoons (natural finish)
- Black permanent marker (fine tip) or black acrylic paint pen
- Pink or red acrylic paint
- Small round paintbrush or cotton swab
- Pencil and eraser
- Clear matte varnish or sealant spray (optional)
- Glass jar and twine (for display)
Step 1: Face Placement & Sketching
-
Prepare the surface:
Ensure your wooden spoons are clean and dry. If the wood feels rough, give the scoop part a very light sanding with fine-grit sandpaper to ensure your marker lines don’t bleed. -
Sketch the ‘Sleepy’ face:
On the first spoon, use a pencil to lightly sketch two curved lines facing downward for closed eyes. Add vertical eyelashes to the top of the curves. Draw a small, simple ‘U’ shape for a smiling mouth centered below. -
Sketch the ‘Happy’ face:
For the middle spoon, sketch two upward-curving arcs for happy, squinting eyes. Give this character a slightly wider smile than the first one. Position the features slightly higher on the spoon’s bowl to create variety. -
Sketch the ‘Surprised’ face:
On the third spoon, draw two small circles for open eyes with tiny dots in the center for pupils. Add eyebrows above them and a quirky, lopsided smile to give it a curious expression. -
Review and refine:
Take a moment to look at your light pencil sketches. You can easily erase and reposition the features now if they look off-center or uneven.
Bleed Prevention
Wood grain can make ink feather. Test your marker on the back of the spoon handle first. If it bleeds, apply a clear matte sealer first, let dry, then draw.
Step 2: Adding Personality
-
Trace the sleepy eyes:
Using your fine-tipped black permanent marker or paint pen, carefully trace over the pencil lines for the closed eyes. Use a steady hand to add the vertical eyelash strokes. -
Ink the happy expression:
Move to the second spoon and ink the upward curves for the eyes. I find it helpful to rotate the spoon slightly as I draw the curve to keep the line smooth. -
Complete the open eyes:
For the third spoon, trace the circles carefully. Dot the pupils in the center, making sure they are looking in the same direction to avoid a cross-eyed look. -
Draw the smiles:
Ink the mouth lines on all three spoons. Vary the thickness slightly if using a paint pen—pressing a bit harder in the middle of the curve adds character. -
Add eyebrows:
Don’t forget the small floating eyebrows on the third spoon; these little lines do a lot of heavy lifting for the facial expression. -
Erase pencil marks:
Allow the ink to dry completely to avoid smudging. Once safe, gently erase any visible pencil guidelines.
Make Them Wear Hats
Use fabric scraps or felt to create tiny beanies or glued-on bows for the tops of the spoons to give them seasonal themes.
Step 3: Rosy Cheeks & Finishing Touches
-
Prepare the cheek color:
Squeeze a tiny dot of pink or red acrylic paint onto a palette or scrap paper. If the red is too intense, mix in a speck of white or a drop of water to soften it. -
Apply the first set of cheeks:
Dip the back end of a small paintbrush or a cotton swab into the paint. Dab it once on scrap paper to remove excess blobs, then stamp two circles onto the first spoon. -
Create variation:
Repeat the cheek stamping process for the other two spoons. Place them slightly differently on each face—some closer to the eyes, some lower near the mouth—to distinguish their personalities. -
Let the paint dry:
Set the spoons aside, perhaps propped up in a mug, to let the cheek paint dry thoroughly. Acrylics dry fast, but thick dots might take twenty minutes. -
Seal the artwork:
If these are purely decorative, a light coat of matte clear spray will protect the drawing from fading. If you plan to use them, ensure you use a food-safe sealant like beeswax or mineral oil. -
Arrange the display:
Clean a small glass jar or mason jar. Wrap a length of rustic twine around the neck of the jar several times and tie a simple knot. -
Final assembly:
Place your finished spoons into the jar, fanning them out so all three expressions are clearly visible.
Your trio of wooden characters is now ready to add a smile to your kitchen counter
Color-Coordinated Spoon Display Set
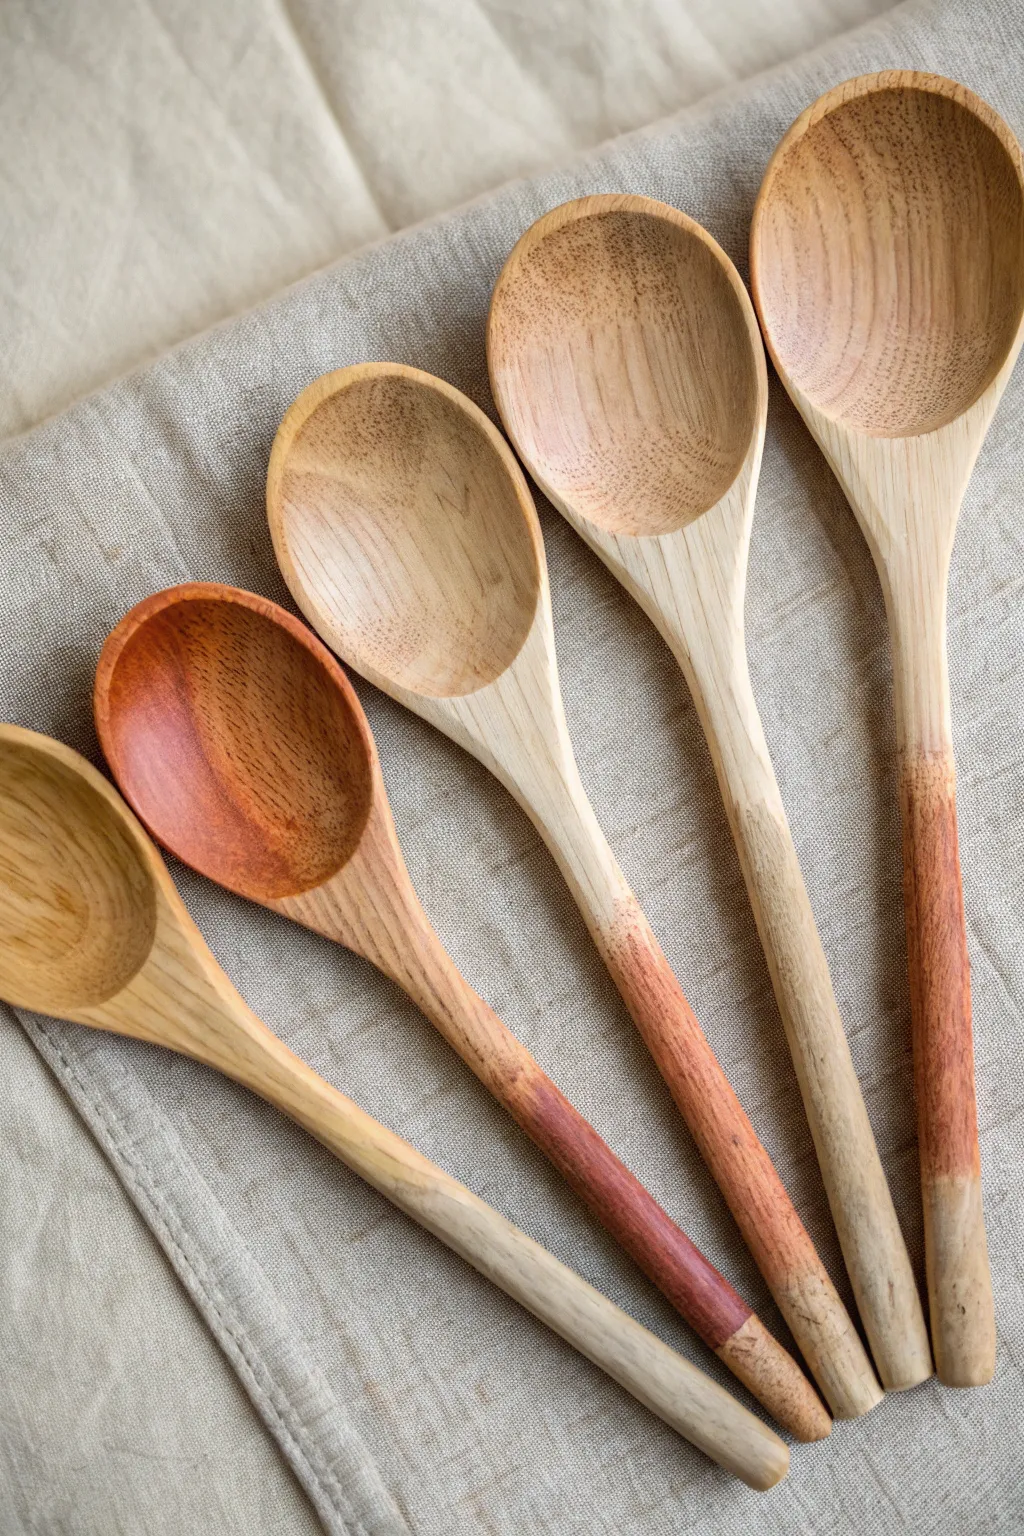
Elevate simple kitchen utensils into a stunning, color-coordinated display piece with this subtle staining project. By using diluted acrylics or wood stains, you can create a beautiful graduated effect that highlights the natural wood grain.
Step-by-Step
Materials
- Unfinished wooden spoons (assorted sizes)
- Sandpaper (fine grit, 220-400)
- Acrylic paints (burnt sienna, red ochre, white)
- Or: Water-based wood stain
- Small mixing bowls or cups
- Water used for dilution
- Soft paintbrushes or foam brushes
- Clean rags or paper towels
- Painter’s tape (optional)
- Food-safe mineral oil or wood wax (for sealing)
Step 1: Preparation & Sanding
-
Inspect the canvas:
Begin by selecting your wooden spoons. Look for unfinished wood with a light, clean grain that will take stain well. -
Smooth the surface:
Lightly sand the entire surface of each spoon using fine-grit sandpaper (around 220 grit). This opens the pores of the wood and ensures an even color application. -
Clean up dust:
Wipe away every speck of sanding dust with a slightly damp cloth or tack cloth. Any remaining dust can create blotchy spots later.
Patchy Stain Fix
If the stain looks blotchy, sand the area back down lightly. Wipe it with a damp cloth to pre-raise the grain, then re-apply the stain sparingly.
Step 2: Creating the Wash
-
Mix the base color:
In a small container, mix your acrylic paint with water. You want a ‘wash’ consistency—think heavy cream or skim milk depending on how translucent you want the grain to show. -
Test the opacity:
I always test the wash on a spare piece of wood or the very tip of a handle first. If it covers the grain completely, add more water. It should stain the wood, not coat it like plastic. -
Prepare varied shades:
To mimic the image, mix slight variations of warm earthy reds and browns. You might want one spoon more reddish-brown and others left natural.
Try Vegetable Dyes
For a truly natural, food-safe vibrant color, skip paint and use beet juice (red), turmeric paste (yellow), or blackberry juice (purple) as stains.
Step 3: Staining the Handle Base
-
Plan the dip line:
Decide where the color on the handle will stop. The image shows a soft transitioning edge about 2 inches from the bottom, rather than a hard tape line. -
Apply the wash:
Using a foam brush or rag, apply your diluted paint wash to the bottom section of the handle. -
Feather the edge:
Immediately use a clean, slightly damp rag to wipe the upper edge of the paint upwards. This creates that soft, faded transition instead of a harsh stop. -
Wipe back excess:
Wipe the painted area gently with a rag to remove excess surface liquid, allowing the pigment to settle into the grain. -
Repeat for intensity:
If the color is too faint, let it dry for a few minutes and apply a second coat, focusing the pigment at the very bottom for an ombré effect.
Step 4: Staining the Bowl (Optional Accent)
-
Select an accent spoon:
Choose one spoon to feature a stained bowl, like the second spoon from the left in the photo. -
Apply color to the bowl:
Brush your wash inside and outside the bowl of the spoon. Work quickly so the wood absorbs the moisture evenly. -
Blend the neck:
Where the bowl meets the handle, use your damp rag to feather the color out so it fades naturally into the unpainted wood of the handle. -
Dry thoroughly:
Prop the spoons up so the wet surfaces touch nothing. Let them dry completely, preferably overnight.
Step 5: Finishing & Sealing
-
Smooth the grain again:
Water-based washes raise the wood grain. Once dry, run your high-grit sandpaper (400) very lightly over the stained areas to make them buttery smooth again. -
Seal for protection:
To make the set food-safe and bring out the richness of the colors, apply a generous coat of food-safe mineral oil or spoon butter. -
Buff to a shine:
Let the oil soak in for 20 minutes, then buff vigorously with a soft cotton cloth. This gives that soft, satin sheen seen in the photo.
Now you have a gorgeous, custom set of utensils ready for display in a crock or hanging on a rack
Metallic Accents on Tips and Edges
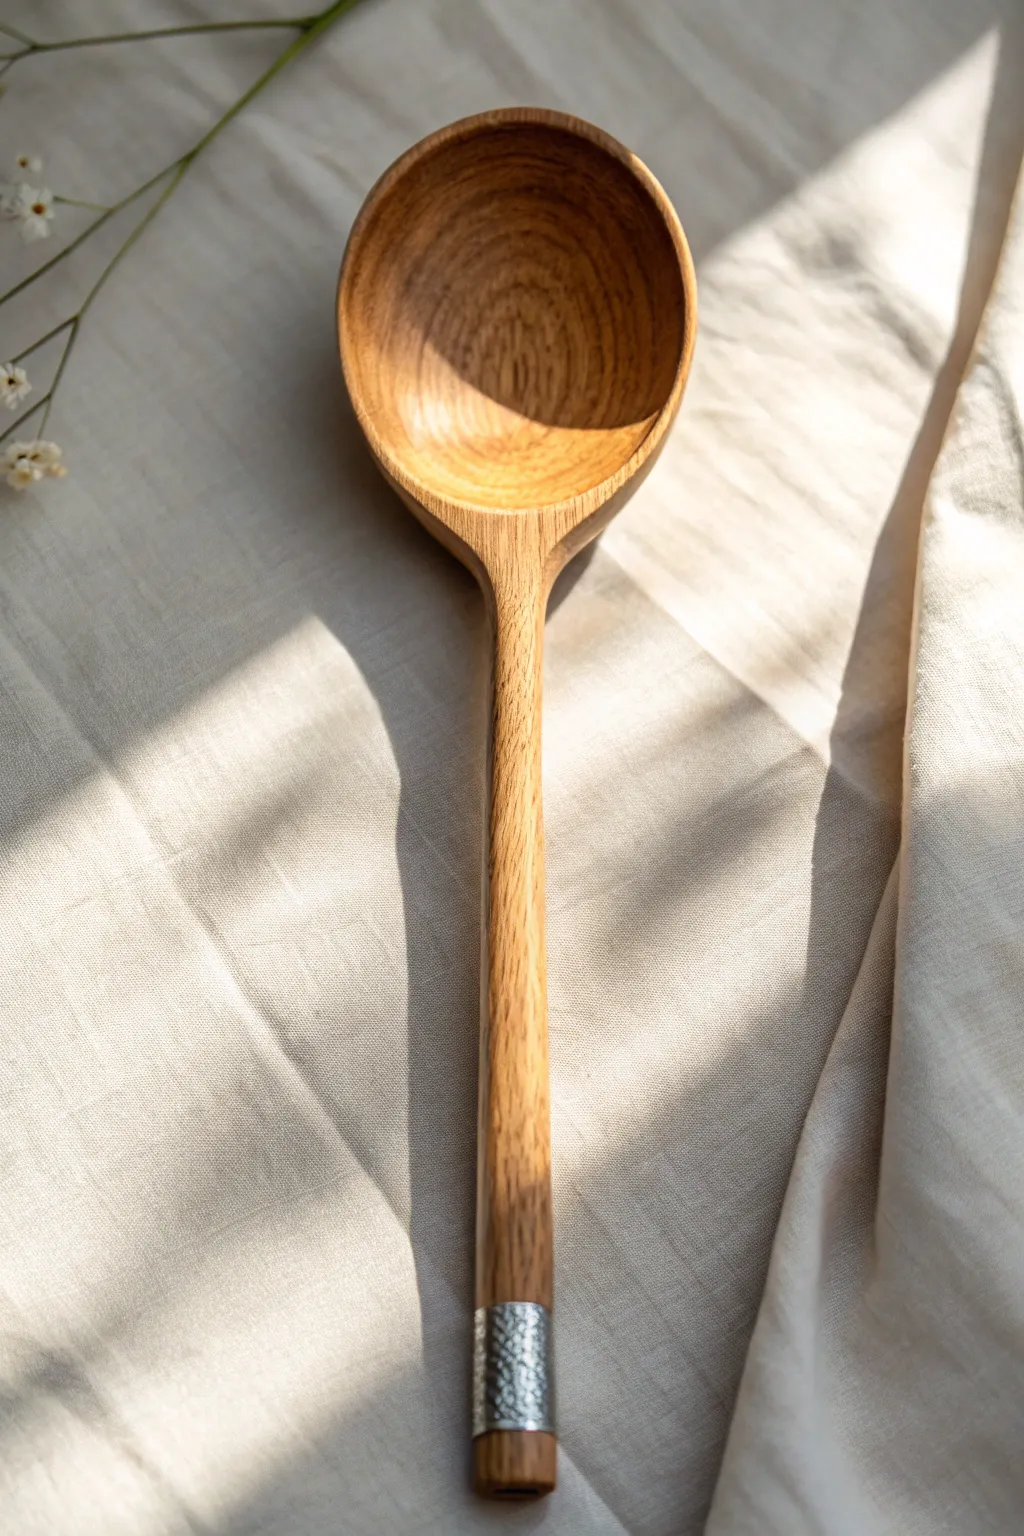
Elevate a simple kitchen essential into a piece of modern art with nothing but a touch of metallic shine. This project focuses on adding a crisp, textured silver band to the handle of a wooden spoon, creating a stunning contrast between natural grain and industrial chic.
How-To Guide
Materials
- Wooden ladle or spoon (unfinished or sanded)
- Painter’s tape (high quality)
- Metallic silver paint (acrylic or enamel)
- Small flat brush
- Medium-grit sandpaper
- Fine-grit sandpaper
- Clear sealant (food-safe if using near food)
- Sea sponge or stippling brush (optional for texture)
Step 1: Preparation
-
Clean surface:
Begin by wiping down your wooden spoon with a slightly damp cloth to remove any dust or manufacturing residue. -
Sand the handle:
Focusing on the bottom two inches of the handle, lightly sand the wood with medium-grit sandpaper to ensure a smooth base. -
Smooth it out:
Follow up with fine-grit sandpaper to remove any scratches left by the previous step, making the surface velvety smooth. -
Dust off:
Wipe the area thoroughly with a dry cloth or tack cloth; any remaining dust will get trapped in the paint. -
Measure the accent:
Decide how large you want your metallic tip to be. For the look in the image, measure about 1 to 1.5 inches up from the bottom of the handle. -
Apply tape:
Wrap painter’s tape tightly around the handle at your measured mark. Press the edge of the tape down firmly with your fingernail to prevent paint bleed.
Tape Sealing Trick
Before painting silver, brush a tiny amount of clear matte medium over the tape edge. This seals the gap completely, ensuring a razor-sharp line.
Step 2: Painting the Accent
-
Base coat:
I like to start with a very thin layer of silver paint. Brush it downwards, away from the tape edge, to further minimize the risk of bleeding. -
Inspect coverage:
Let the first coat dry for about 15 minutes. Don’t worry if the wood grain still shows through; this is just the foundation. -
Create texture:
To mimic the hammered metal look seen in the photo, apply the second coat using a dabbing motion. You can use a stippling brush or even a small piece of sea sponge. -
Build thickness:
Dab on enough paint so that the texture becomes slightly raised and uneven, catching the light like real metal. -
Check the end:
Don’t forget the very bottom face of the handle. Paint this circular area solid silver to complete the dipped illusion. -
Dry thoroughly:
Allow the textured paint to dry completely. Since the layer is thicker, give it at least an hour or two.
Go for Gold
Swap silver for antique gold or copper leaf paint. For extra luxury, use actual gold leaf sheets with sizing glue instead of standard paint.
Step 3: Finishing Touches
-
Remove tape:
Carefully peel back the painter’s tape at a 45-degree angle. Do this slowly to ensure a crisp, clean line. -
Touch ups:
If any paint seeped under the tape, gently scrape it away with a craft knife or use a tiny bit of sandpaper to remove it. -
Seal the metal:
Apply a coat of clear sealant only over the painted silver section. This protects the metallic finish from tarnishing or chipping. -
Oil the wood:
Rub a food-safe mineral oil or wood conditioner over the un-painted portions of the spoon to bring out the rich golden tones of the grain. -
Final cure:
Let the spoon sit for 24 hours before handling extensively to ensure the paint and oil have fully cured.
Now you have a sophisticated utensil that looks beautiful displayed in a ceramic crock or hanging in your kitchen
Folk Art Birds on the Spoon Bowl
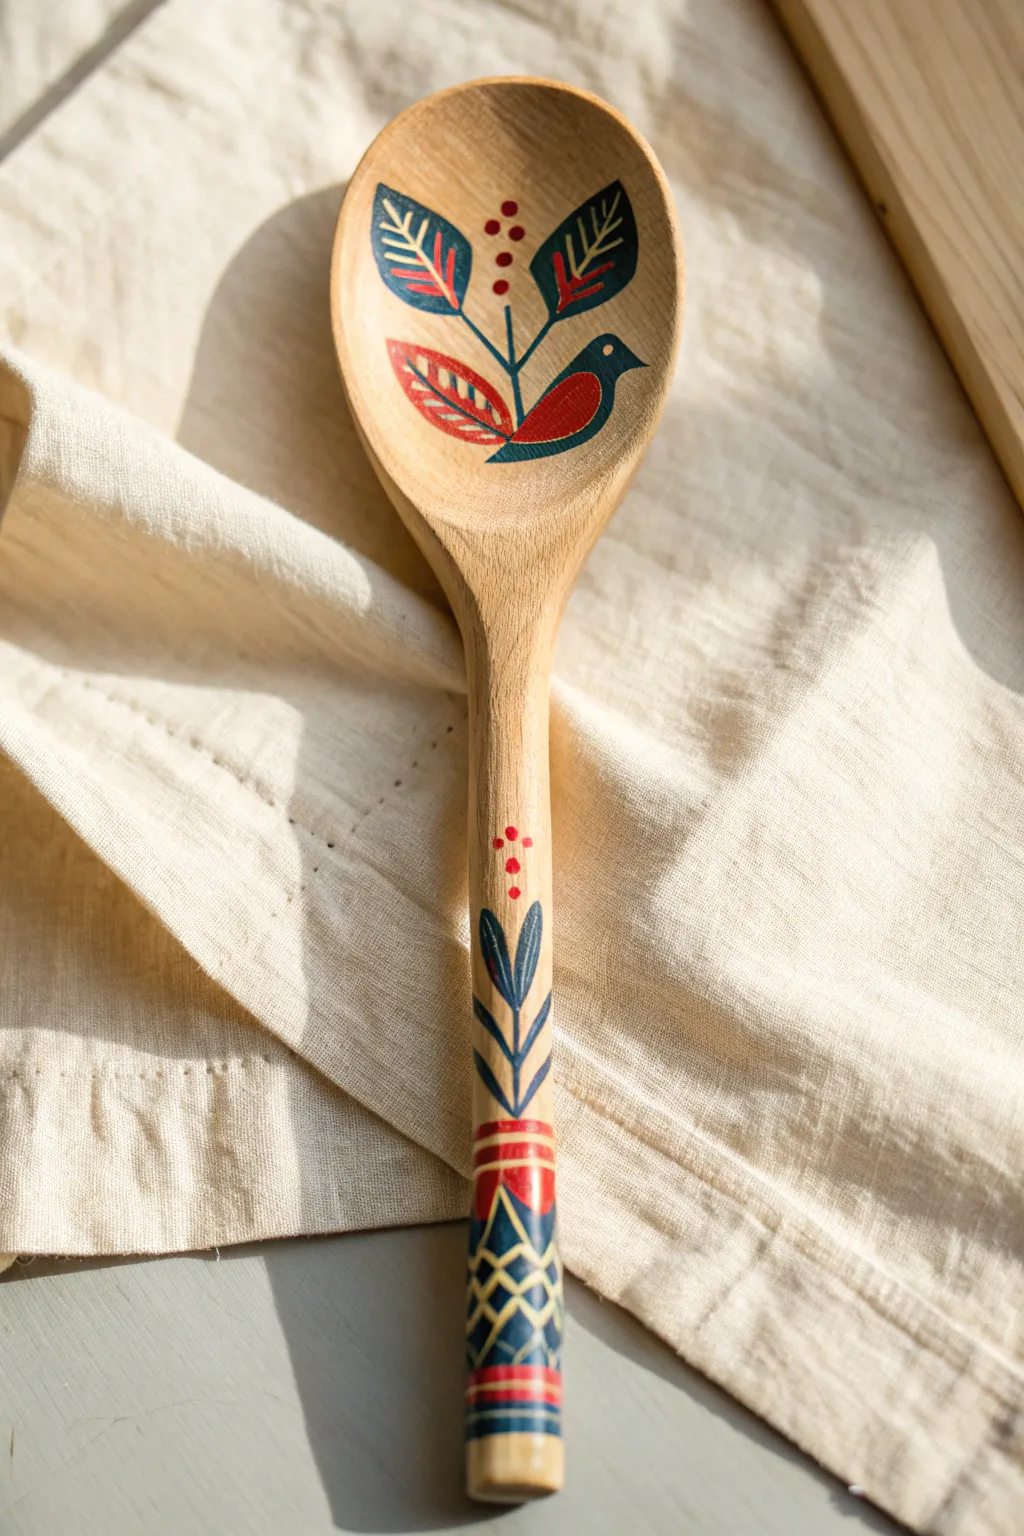
Transform a simple wooden kitchen utensil into a piece of rustic art with this Scandinavian-inspired design. Featuring a charming bird motif nestled among leaves in the bowl and detailed geometric patterns along the handle, this project uses a classic red, blue, and gold color palette for a timeless look.
Detailed Instructions
Materials
- Unfinished wooden spoon (smooth sanded)
- Acrylic paints (Navy Blue, Deep Red, Yellow Ochre/Gold, White)
- Fine detail brushes (Round size 0, 1, and 2)
- Small flat brush (size 4)
- Pencil and eraser
- Palette or small plate
- Water cup and paper towels
- Clear matte or satin acrylic sealer (food-safe if intended for use)
- Fine-grit sandpaper (optional)
Step 1: Preparation and Sketching
-
Prepare the surface:
Ensure your wooden spoon is clean and dry. If the wood feels rough, give it a quick pass with fine-grit sandpaper to create a smooth canvas for your brushwork. -
Sketch the bowl design:
Lightly draw the central motif inside the bowl using a pencil. Start with a central vertical stem line, then add two large leaf shapes on the left and one large leaf on the top right. Below the top right leaf, sketch a simple bird profile facing right. -
Sketch the handle details:
Move down to the handle. Mark out a section near the neck for vertical leaves. Further down, draw horizontal bands to create zones for the geometric crisscross pattern near the bottom.
Steady Hands Tip
Rest your pinky finger on the dry wood of the spoon handle while painting detailed lines. This acts as a stabilizer, preventing your brush hand from shaking on the curved surface.
Step 2: Painting the Bowl Motif
-
Block within the blue leaves:
Using your navy blue paint and a size 2 round brush, fill in the top right leaf shape. Keep your strokes smooth and follow the curve of the leaf. -
Paint the red leaf:
Switch to deep red and fill in the bottom left leaf shape. Painting on curved wood can be tricky, so I find it helpful to rotate the spoon rather than contorting my wrist. -
Fill the mixed leaf:
For the top left leaf, paint the outer shape in navy blue first. Let it dry slightly, then carefully paint the inner section, leaving the blue outline visible. -
Paint the bird:
Fill the bird’s body with deep red. For the wing and tail feathers, use navy blue. Add a tiny beak in navy blue as well. -
Add the stem:
Use a size 0 or 1 liner brush with navy blue to paint the thin central stem connecting all the elements. -
Detail the leaves:
Once the base colors are dry to the touch, mix yellow ochre with a tiny bit of water for flow. Paint the veins on the blue leaf and the red leaf. Add decorative hatch marks or veins to the mixed leaf as well. -
Accenting the bird:
Use the yellow ochre to add a small eye to the bird and details on the wing. Add small white dots around the stem for a whimsical touch.
Step 3: Decorating the Handle
-
Paint the neck foliage:
Just below the bowl on the handle, paint two vertical navy blue leaves stemming upward. Add a central red dot or small red accent below them. -
Create the geometric base:
Further down the handle, paint a block of navy blue. Allow this to dry completely before proceeding, as you will be layering lighter colors on top. -
Add red bands:
Paint horizontal bands of red above and below your blue block. You can also add a red band in the middle of the blue section if you wish to break it up. -
Paint the lattice pattern:
Using your finest brush and yellow ochre paint, carefully draw a crisscross diamond pattern over the dried navy blue section. Taking a deep breath before each line helps steady your hand. -
Add final geometric details:
In the open spaces of your yellow lattice, paint small triangles or diamonds using a lighter blue or teal if you have it (or mix blue with a touch of white).
Add Antique Flair
For an aged, heirloom look, lightly sand the painted areas with high-grit sandpaper after drying but before sealing. This distresses the design slightly for a vintage aesthetic.
Step 4: Finishing Touches
-
Review and refine:
Look over the entire spoon. Clean up any stray pencil marks with an eraser. If any paint lines look shaky, you can carefully touch them up with the background color or the original paint color. -
Seal the artwork:
Once the paint is fully cured (usually 24 hours), apply a clear acrylic sealer. If you plan to use this spoon for food service, ensure you use a certified food-safe sealant like beeswax or specific food-safe epoxy.
Display your beautiful folk art spoon in a ceramic jar or hang it on the kitchen wall to enjoy your handiwork every day
Seasonal Spoon Characters for Decor
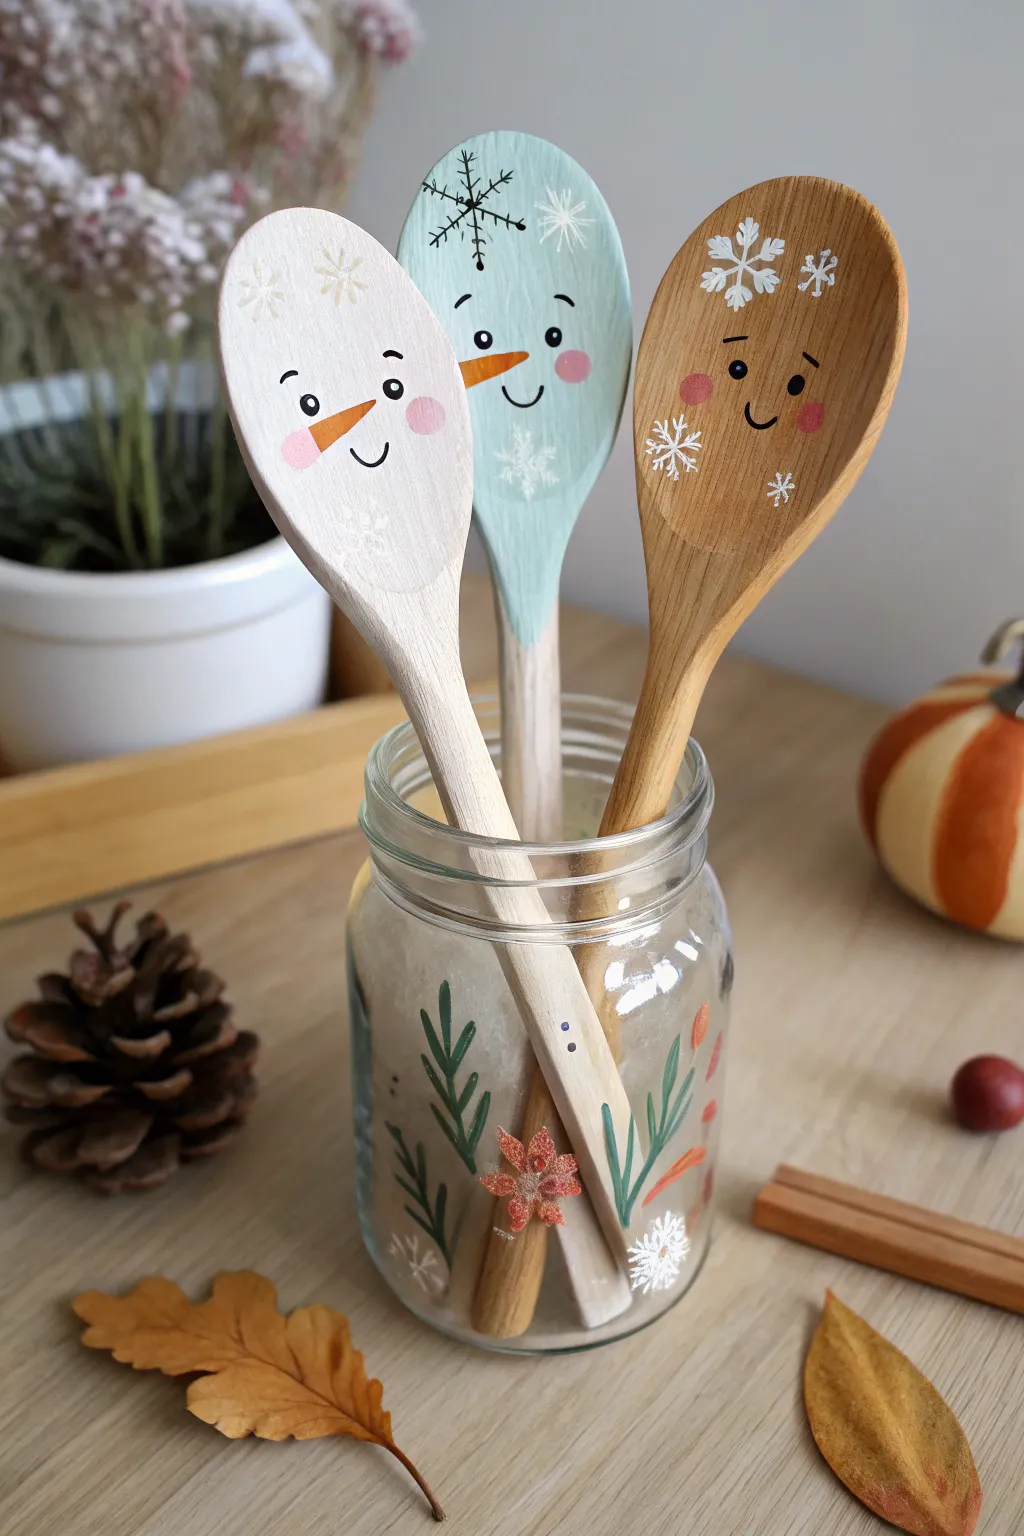
Transform ordinary kitchen utensils into a charming winter family with this delightful wooden spoon craft. Perfect for adding a touch of rustic cheer to your countertop, these painted characters feature varying natural and painted finishes adorned with delicate snowy details.
Step-by-Step Guide
Materials
- 3 clean wooden spoons (smooth, unfinished wood works best)
- Acrylic paints: White, Light Blue/Teal, Orange, Black, Pink
- Paintbrushes: Flat brush (medium), fine liner brush, and a very small detail brush
- Glass jar (mason jar style)
- Small artificial greenery or pine sprigs (painted or decal)
- Matte spray sealer or Mod Podge
- Masking tape or painter’s tape
- Pencil
- Mixing palette
- Water cup and paper towels
Step 1: Painting the Base Coats
-
Prep the surface:
Ensure your wooden spoons are clean, dry, and free of any food oils. Lightly sand them if there are any rough splinters to ensure a smooth painting surface. -
Mask the natural spoon:
For the rightmost spoon which remains natural wood, you won’t need a base coat. For the other two, decide where the ‘neck’ ends. Place a strip of masking tape around the handle where the spoon scoop meets the stick to create a clean line if you only want to paint the top part, though painting gradually down the neck often looks softer. -
Apply the white base:
Take the first spoon and paint the entire scoop area with white acrylic paint. You may need two coats to fully cover the wood grain, allowing the first layer to dry completely before adding the second. -
Apply the blue base:
On the second spoon, mix a soft teal or light blue shade. Paint the scoop area just like the white one. I like to feather the paint slightly down the handle rather than having a hard stop line, which gives it a more rustic, dipped look. -
Dry thoroughly:
Stand the spoons upright in a heavy mug or jar to dry untouched for at least 20-30 minutes.
Uneven Lines?
If your fine lines are shaky, try resting your pinky finger on the dry part of the spoon to stabilize your hand while painting the smiles.
Step 2: Creating the Faces
-
Sketch the features:
Using a pencil very lightly, sketch the placement of the eyes, carrot nose, and mouth on all three spoons. Keep the faces centered on the curve of the spoon. -
Paint the noses:
Using a small round brush and orange paint, fill in the carrot shapes. Make them elongated triangles pointing towards the side. Start slightly thicker at the base and taper to a point. -
Add the eyes:
Dip the handle end of a paintbrush into black paint to create perfect dots for eyes. For the smiling eyes on the natural wood spoon, use a fine liner brush to paint small semi-circles instead. -
Draw the smiles:
With your finest liner brush and thinned black paint (add a tiny drop of water to make it flow like ink), carefully trace the smile lines. Add small perpendicular tick marks at the ends of the smile for the classic snowman look. -
Rosy cheeks:
Dip your finger or a stiff brush into pink paint, dab most of it off onto a paper towel, and gently stipple pink circles onto the ‘cheeks’ of each character. The dry brush technique creates a soft, blushing effect. -
Highlight the eyes:
Once the black eyes are fully dry, add a tiny speck of white paint to each black dot to bring the characters to life.
Make it Sparkle
While the white snowflake paint is still wet, sprinkle ultra-fine iridescent glitter over them for a frosty, glistening ice effect.
Step 3: Snowy Details & Finishing
-
Paint snowflakes:
Using your fine liner brush and white paint, create delicate snowflakes on the natural wood and blue spoons. Start with a crossed ‘X’ and ‘plus’ sign, then add tiny V-shapes to the ends of the lines. Add simple white asterisks on the white spoon using a very pale grey or cream so they show up subtlely. -
Jar preparation:
While the spoons cure, take your clean glass jar. You can paint festive foliage directly onto the glass using acrylics mixed with a glass medium, or simply place decals if you aren’t comfortable painting on rounded glass. -
Painting jar foliage:
If painting the jar, use long, sweeping strokes with green paint to create pine needles and leaves. Add a small ‘poinsettia’ shape in reddish-orange near the bottom for a pop of color. -
Seal the spoons:
Once all paint is completely dry (give it at least an hour), spray the spoons with a matte clear sealer. This protects the paint from chipping and keeps the wood looking fresh. -
Assemble the display:
Fill the jar with some faux snow, white crinkle paper, or even rice to help the spoons stand upright. Arrange your three characters at slightly different angles to they look like they are chatting.
Now you have an adorable trio of winter characters ready to brighten up your kitchen shelf
Decoupage Collage Over Paint Base
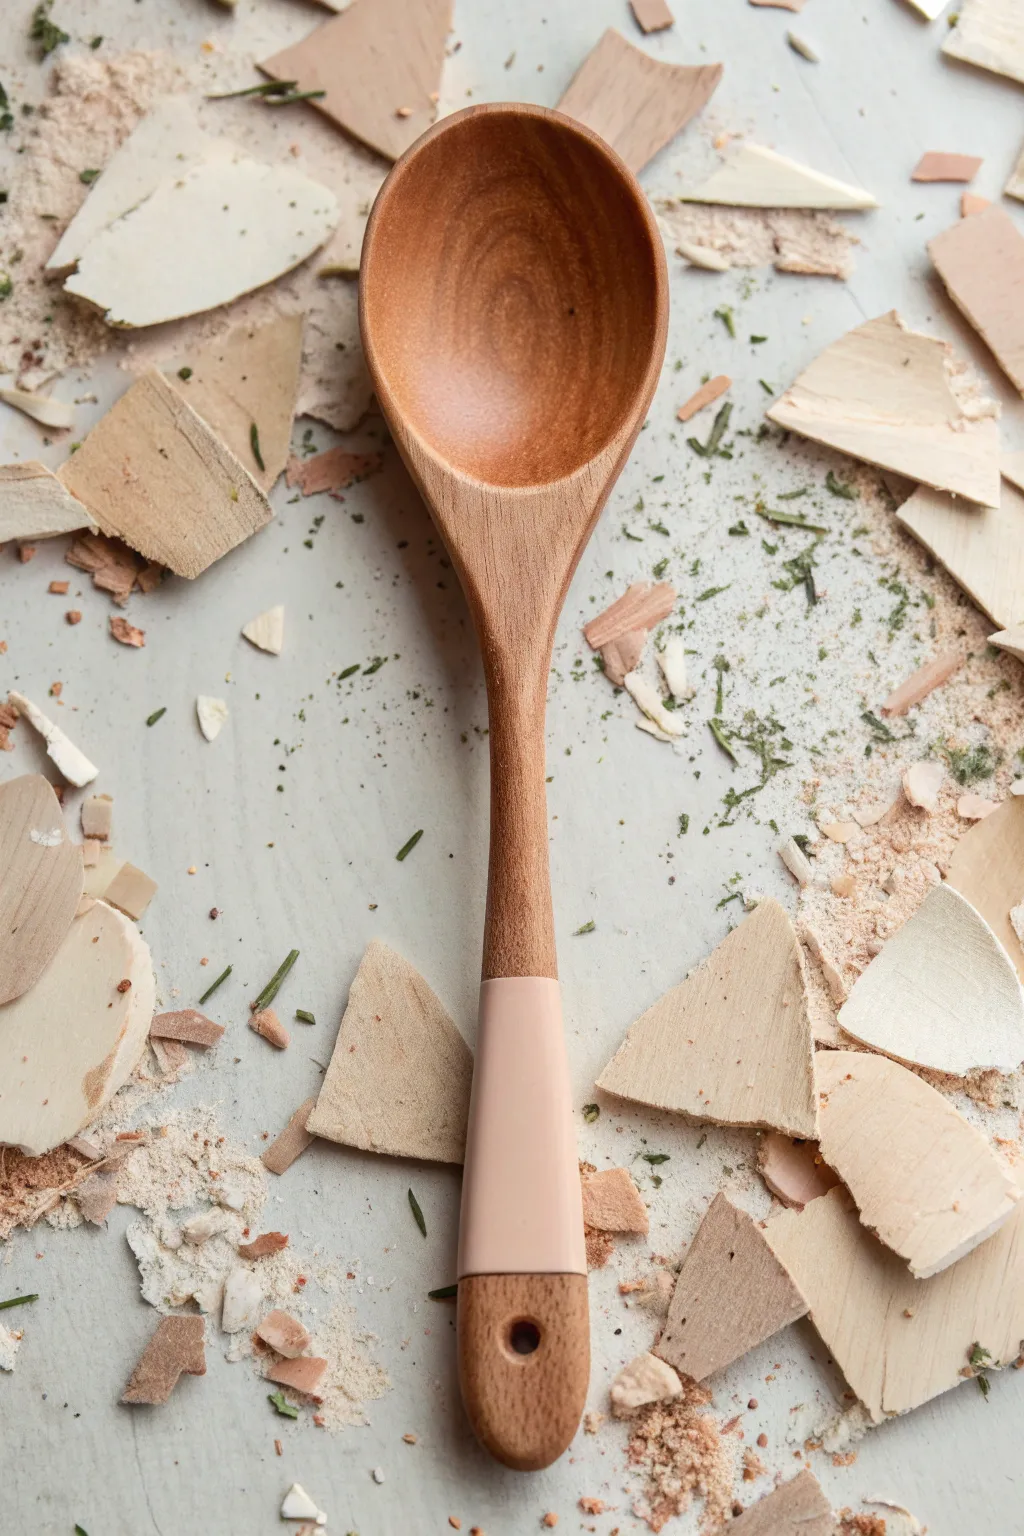
Achieve a modern, understated look with this clean-lined design that combines raw wood beauty with a soft touch of color. This project transforms a basic kitchen utensil into a piece of functional art using a precise taping technique and a creamy matte finish.
Step-by-Step
Materials
- Wooden spoon (unfinished or sanded)
- Painter’s tape (high-quality edging)
- Fine-grit sandpaper (220-400 grit)
- Pale blush or nude acrylic craft paint (matte finish)
- Flat paintbrush (medium width)
- Matte sealant or clear coat (food safe if using near handle)
- Ruler
Step 1: Preparation and Taping
-
Surface Prep:
Begin by lightly sanding the entire handle of your wooden spoon. You want to remove any existing varnish or rough spots to ensure the paint adheres smoothly to the wood grain. -
Dust Removal:
Wipe the spoon down thoroughly with a slightly damp cloth to catch all the sanding dust, then let it dry completely before moving forward. -
Determine the Line:
Decide where you want your color block to start and end. In this design, the color occupies just a small segment of the lower handle, leaving the rounded end exposed. -
First Tape Application:
Apply your first strip of painter’s tape around the handle to mark the top edge of your painted section. Press the edge of the tape down firmly with your fingernail to prevent bleed-through. -
Second Tape Application:
Measure about 2-3 inches down from your first tape line (or whatever length you prefer) and wrap a second piece of tape to mark the bottom edge of the painted section. -
Seal the Edges:
I like to run a very thin layer of clear matte medium or sealant right over the tape edges first. This creates an invisible barrier so if anything seeps under, it’s clear instead of colored.
Bleeding Edges?
If paint bleeds under the tape, wait for it to dry fully. Then, gently scratch the excess paint away with a craft knife or use a sanding block to neaten the line.
Step 2: Painting the Section
-
First Coat:
Load your flat brush with the pale blush acrylic paint. Apply a thin, even coat to the exposed wood between your two tape lines. Brush in the direction of the wood grain for the smoothest finish. -
Drying Time:
Allow this first layer to dry to the touch, which usually takes about 15 to 20 minutes depending on your room’s humidity. -
Second Coat:
Apply a second coat of paint to ensure full opacity. The color should look solid and creamy, completely hiding the wood grain underneath. -
Smoothing:
Inspect the painted area while wet. If there are ridges from brushstrokes, very lightly smooth them out with the tip of your brush. -
Tape Removal:
While the second coat is still slightly tacky (not fully cured), carefully peel away the painter’s tape. Pulling while slightly wet helps create a crisp, sharp line without chipping dry paint.
Choosing Paint
Use ‘multi-surface’ acrylics for better adhesion on wood. They are formulated to bond tight without a primer, keeping your dipped section durable.
Step 3: Finishing Touches
-
Cleanup:
If there are any tiny jagged edges where the paint meets the wood, you can gently scrape them away with a toothpick or lightly sand just the edge with high-grit sandpaper. -
Sealing:
Once the paint is bone dry, brush a clear matte sealant over the painted section. Extend the sealant slightly past the paint lines onto the wood to protect the edges from peeling during use. -
Curing:
Let the spoon cure for at least 24 hours before handling extensively. If you plan to wash this spoon, check the cure time on your sealant bottle, which can sometimes be up to a few weeks for full water resistance. -
Oil the Wood:
To finish the unpainted parts of the spoon, especially the bowl, rub in some food-safe mineral oil or spoon butter to bring out the rich color of the natural wood grain.
Now you have a chic, customized utensil ready to display or gift
Mixed Media Texture With Buttons or Fabric
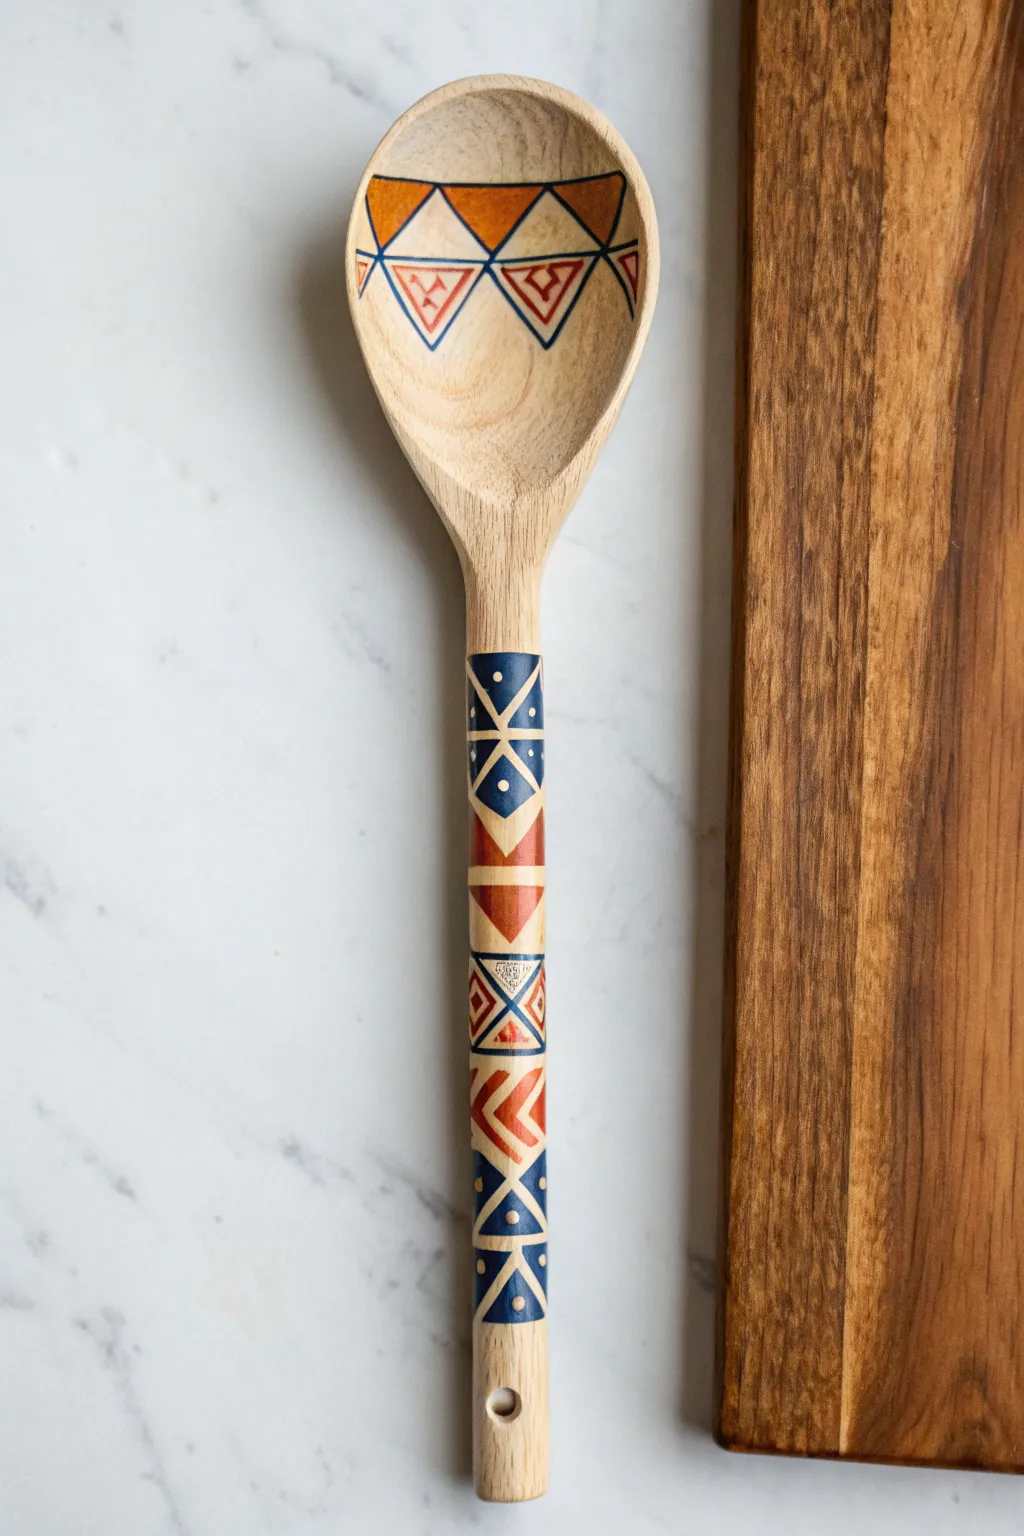
Transform a plain kitchen utensil into a piece of folk art with this striking geometric design. Using a warm palette of burnt orange and navy blue, you’ll create intricate patterns that wrap around the handle and nestle inside the spoon’s bowl.
Detailed Instructions
Materials
- Unfinished wooden spoon (light wood like beech or bamboo works best)
- Acrylic paints (Navy blue, burnt orange/terracotta, white)
- Fine-point detail brushes (Size 0 and 00)
- Pencil and eraser
- Ruler or measuring tape
- Painter’s tape or masking tape
- Clear acrylic sealer (matte or satin finish)
- Sandpaper 220-grit
Step 1: Preparation and Base Patterns
-
Prep the surface:
Begin by lightly sanding your wooden spoon with 220-grit sandpaper to handle any rough spots. Wipe away all dust with a damp cloth or tack cloth to ensure a smooth painting surface. -
Sketch the bowl design:
Inside the spoon bowl, use your pencil to lightly draw a horizontal line about an inch down from the top edge. Draw a second line parallel to it, creating a band. Sketch zig-zags within this band to form the triangular sections shown in the reference. -
Sketch the handle design:
Moving to the handle, mark off distinct sections. You will need about five to six vertical segments. I like to use a ruler here to keep the spacing somewhat consistent, though a hand-drawn look adds charm. -
Detail the handle segments:
Sketch the specific patterns into each handle segment. Alternate between X-patterns, horizontal chevrons, and stacked triangles. Don’t worry about perfection; faint guidelines are all you need.
Shaky Hands?
If painting fine lines is difficult, try using acrylic paint pens instead of brushes. They offer the control of a marker with the opacity of paint.
Step 2: Painting the Bowl
-
Outline the bowl triangles:
Using your navy blue paint and the finest brush (size 00), carefully paint the thin outlines of the triangles inside the spoon bowl. -
Fill the top triangles:
Identify the downward-pointing triangles along the top edge. Fill these in solidly with your burnt orange paint. You may need two coats for full opacity. -
Add inner details:
Inside the upward-pointing empty triangles, paint smaller inner triangles or symbols. Use the terracotta color for the lines and add a tiny dot or geometric glyph in red or blue if desired. -
Clean up edges:
If your lines wobbled, wait for the paint to dry completely, then use a tiny bit of white paint (or the bare wood color mixed) to tidy up the negative space.
Add Texture
Since this section mentions texture, try gluing small seed beads onto the centers of the painted dots for a tactile 3D element.
Step 3: Painting the Handle
-
Paint the blue X-block:
Starting near the neck of the spoon, paint the background of the first segment deep navy blue, leaving negative space for the X shape and four small diamonds, or paint the whole block blue and add the details in lighter colors on top once dry. -
Add the dots:
While the blue block is wet (or after drying if layering), carefully place a small white or light wood-colored dot in the center of the four triangular quadrants created by the X. -
Create the chevron stack:
Move down to the next segment. Paint bold, thick V-shapes (chevrons) in burnt orange. Stack two or three of them, leaving a thin line of unpainted wood between them for contrast. -
The diamond segment:
For the middle section, paint a diamond shape with a contrasting outline. Use red or orange for the outer lines and fill the center with a lattice pattern or a solid color. -
Repeat the chevron:
Below the diamond section, repeat the burnt orange chevron pattern. This repetition brings balance to the overall design. -
Final blue segment:
Near the bottom of the handle, replicate the navy blue geometric style from the top. Paint triangles pointing moving inward, leaving a zig-zag of unpainted wood in the center. Add a small dot in the center of each blue triangle.
Step 4: Finishing
-
Erase guidelines:
Once the paint is 100% dry (give it at least an hour), gently erase any visible pencil marks. Be careful not to rub too hard over the painted areas. -
Seal the wood:
Apply a coat of clear acrylic sealer or a food-safe wax if you intend to use this for serving dry goods. If it’s purely decorative, a standard matte varnish provides a great protective finish.
Display your spoon in a jar on the counter to add a pop of artisan color to your kitchen


Have a question or want to share your own experience? I'd love to hear from you in the comments below!