A plain wooden star is basically a blank canvas with built-in charm, and it’s one of my favorite shapes to paint because every point can become part of the design. Here are my go-to wooden star painting ideas—starting with the classics everyone loves, then sliding into the artsy, unexpected stuff.
Classic Plaid Christmas Wooden Star
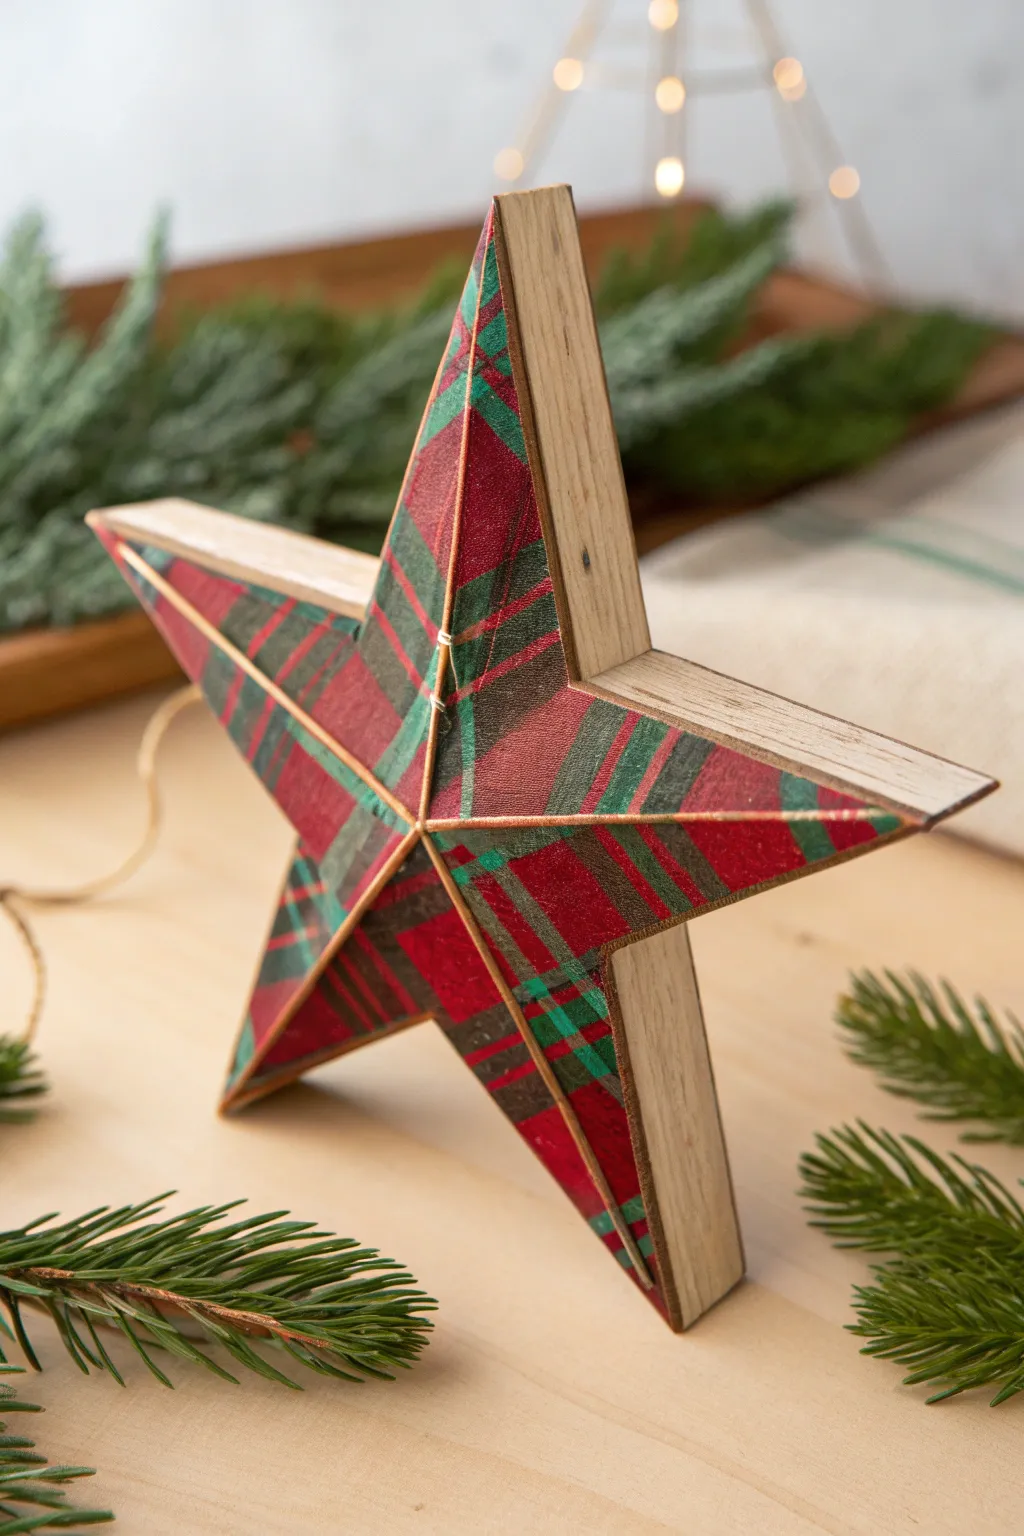
Bring a touch of traditional warmth to your holiday decor with this charming plaid wooden star. The rustic wood edges combined with the classic tartan pattern create a timeless piece that looks festive on a mantel or nestled within bookshelf greenery.
Step-by-Step Guide
Materials
- Thick wooden star blank (approx. 1 inch thick)
- Plaid patterned scrapbook paper or wrapping paper (red and green tartan)
- Mod Podge (Matte finish)
- Sharp craft knife (X-Acto)
- Cutting mat
- Pencil
- Sandpaper (medium grit)
- Foam brush or soft flat paintbrush
- Gold paint pen or thin gold washi tape (optional for bevel lines)
- Ruler
Step 1: Preparation & Cutting
-
Prep the wood:
Begin by lightly sanding your wooden star blank to ensure any rough edges or splinters are removed. Wipe away the dust with a slightly damp cloth so your adhesive works perfectly. -
Trace the shape:
Place your plaid paper face down on your cutting mat. Position the wooden star face down on top of the paper, aligning the pattern so the plaid lines run straight or at a pleasing angle. -
Mark the outline:
Use a pencil to trace tightly around the entire star. If your star has a beveled or 3D effect carved into the front, you will need to trace the individual triangular facets instead of the whole shape at once. -
Cut the paper:
Remove the wooden star and carefully cut out your traced shape using a sharp craft knife or scissors. Cut slightly inside your pencil line to avoid overhang. -
Create the 3D facets (Optional):
To mimic the faceted look in the photo, cut your paper star into five diamonds or ten triangles that meet in the center, following the geometry of the star’s points. This creates the illusion of depth.
Wrinkle Rescue
If bubbles appear under the paper while gluing, prick them with a tiny pin and smooth the air out with your finger before the glue sets.
Step 2: Adhering & Details
-
Apply base adhesive:
Apply a thin, even layer of Mod Podge to the front face of the wooden star using a foam brush. Don’t let it pool or it will wrinkle the paper. -
Position the paper:
Carefully lay your cut paper piece(s) onto the wood. If doing the faceted look, apply one triangle at a time, lining them up perfectly with the points and center. -
Smooth it out:
Use your fingers or a dedicated burning tool to smooth the paper from the center outward, pushing out any trapped air bubbles. -
Seal the surface:
Once the base layer is dry to the touch (about 15-20 minutes), apply a top coat of Mod Podge over the paper to seal and protect it. -
Let it dry:
Allow the star to dry completely for at least an hour. The glue will turn from milky white to clear. -
Clean up edges:
If there is any slight paper overhang, use your sandpaper in a downward motion along the edges of the wood to shear off the excess paper for a crisp finish. -
Add gold accents:
To define the segments and add a bit of shine, use a gold paint pen and a ruler to draw thin lines from the center to the tip of each point, and from the center to the inner valleys. -
Finish the sides:
Leave the thick sides of the star raw wood for a rustic look, or apply a light wood stain if you prefer a darker contrast.
Vintage Vibe
Before sealing, lightly distress the paper edges with brown ink or fine sandpaper to make the star look like an antique heirloom.
Place your finished star on a shelf to add immediate holiday cheer to your room


Metallic Gold Wooden Star Ornament Look
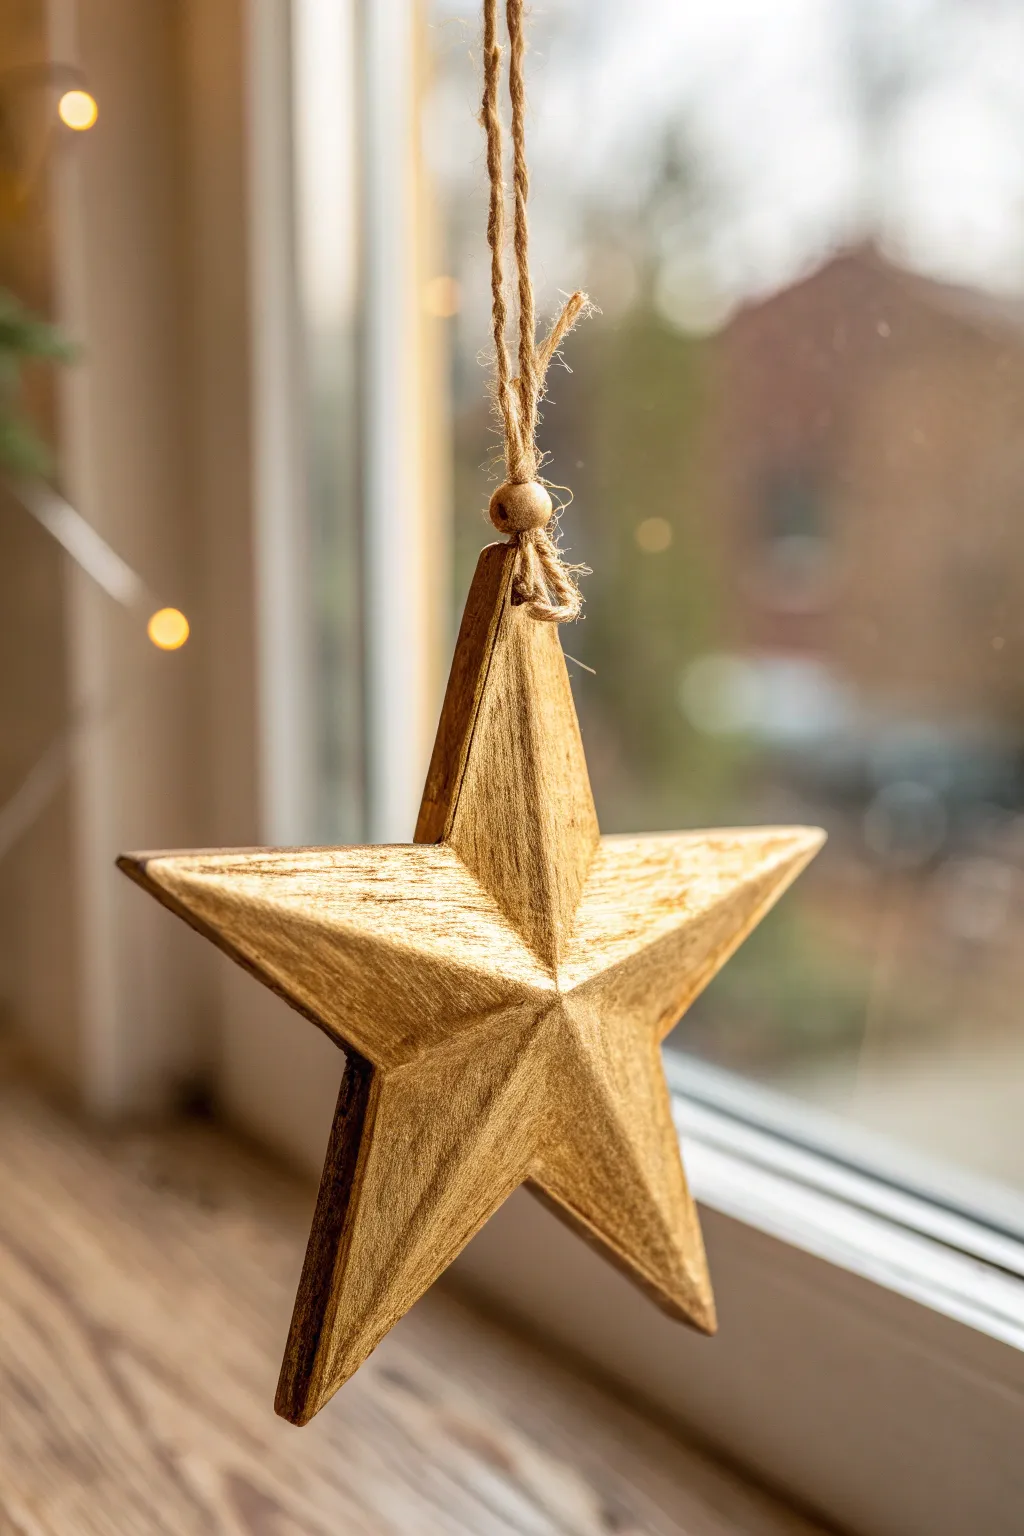
Transform a plain wooden faceted star into a warm, metallic treasure that catches the holiday light beautifully. This project focuses on achieving a vintage gold finish that enhances the wood’s natural grain rather than hiding it.
Step-by-Step
Materials
- Unfinished faceted wooden star (approx. 4-6 inches)
- Metallic gold acrylic paint (warm gold tone)
- Dark walnut or antique glazing medium
- Soft flat paintbrush
- Lint-free rag or paper towel
- Jute twine
- Small wooden bead
- Hot glue gun or strong craft glue
- Scissors
- Fine-grit sandpaper (optional)
Step 1: Preparation and Base Coat
-
Surface Prep:
Inspect your wooden star for any rough splinters. If needed, give it a very light pass with fine-grit sandpaper to smooth it out, but don’t over-sand as we want to keep some texture. -
Clean the Surface:
Wipe the star down with a dry cloth to remove any sawdust, ensuring the paint will adhere properly. -
Apply First Gold Layer:
Using your flat paintbrush, apply a generous coat of metallic gold acrylic paint to the front of the star. Brush with the grain of the wood where possible. -
Cover the Sides:
Don’t forget the thick edges; paint the sides thoroughly to ensure the raw wood is completely covered when viewed from an angle. -
Painting the Back:
Once the front is touch-dry, flip the star over and paint the flat back side in the same gold tone. -
Drying Time:
Allow the first coat to dry completely for about 20-30 minutes. If the wood is very absorbent, you might see the grain soaking it up. -
Second Coat Application:
Apply a second coat of gold paint. This layer builds up the metallic sheen and ensures solid coverage.
Too Heavy on Glaze?
If the dark wash makes the star look muddy, dampen your rag slightly and wipe firmly to remove more brown pigment, revealing the gold underneath.
Step 2: Antiquing and Texturing
-
Create the Wash:
Mix a small amount of dark walnut glaze or slightly watered-down brown acrylic paint. You want a translucent wash, not a solid paint. -
Apply the Glaze:
Brush this dark wash lightly over the gold surface, focusing on getting it into the crevices and low points of the facets. -
The Wipe-Back Technique:
Immediately take your lint-free rag and gently wipe away the excess dark glaze. I like to leave more darkness in the dips and edges while revealing the bright gold on the raised ridges. -
Dry Brushing Highlights:
Once the glaze is dry, dip a dry brush into a tiny amount of fresh gold paint. Lightly whisk this across the highest points of the star to make the metallic finish pop again.
Make It Sparkle
Mix a tiny pinch of gold glitter into your final highlight coat. The subtle texture catches window light beautifully without looking messy.
Step 3: Assembly and Hanging
-
Prepare the Twine:
Cut a length of jute twine, approximately 10-12 inches long, depending on how low you want the ornament to hang. -
Create the Loop:
Fold the twine in half to create a loop. Thread the loop end through your small wooden bead. -
Knotting the Bead:
Tie a secure knot right beneath the wooden bead to keep it in place, leaving about an inch of loose tail below the knot. -
Attaching the Hanger:
Apply a dab of hot glue to the top point of the star (or the back, depending on your star’s design) and firmly press the loose tail ends of the jute into the glue. -
Reinforce the Bond:
For extra security, you can add a small dot of glue over the twine ends where they attach to the wood. -
Final Check:
Hold the ornament up by the string to ensure it hangs balanced and straight. Adjust the knot or bead placement slightly if needed before the glue fully cures.
Hang your finished star in a window or on the tree to enjoy its warm, festive glow all season long


Candy Cane Stripe Wooden Star
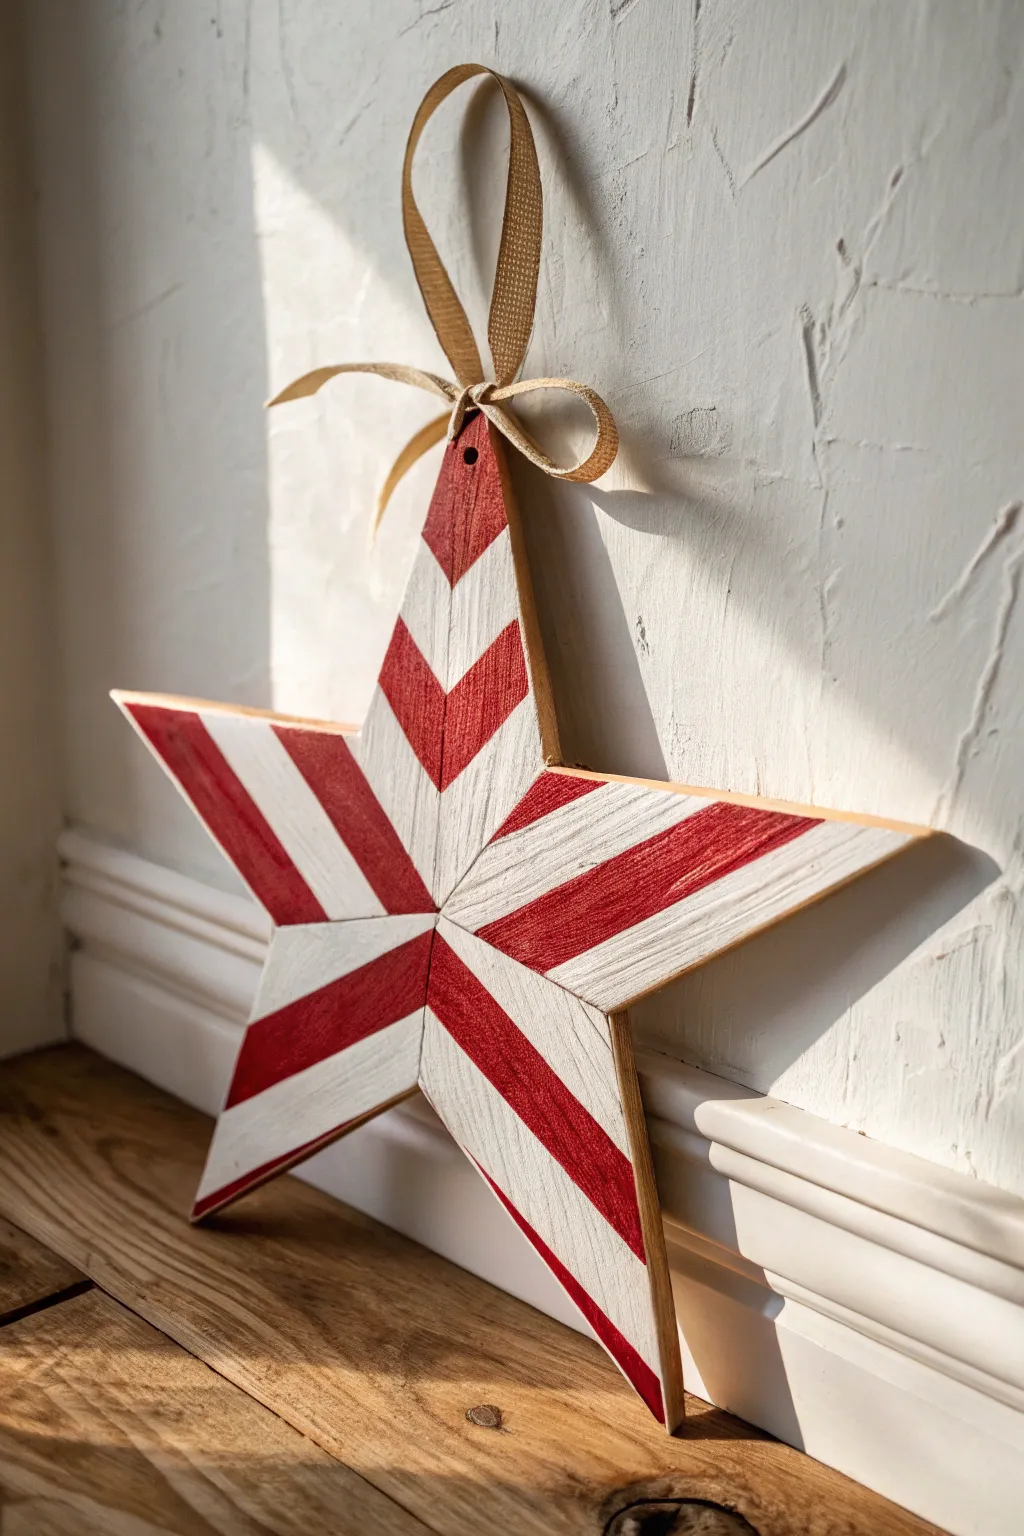
Transform a plain wooden decoration into a festive focal point with this classic candy cane stripe design. This project captures the charm of holiday peppermints using crisp red and white lines arranged in a clever chevron pattern that emphasizes the star’s shape.
Detailed Instructions
Materials
- Unfinished wooden star (approx. 10-12 inches)
- Red acrylic craft paint (bright holiday red)
- White acrylic craft paint or chalk paint
- Painter’s tape or masking tape (0.5 inch width recommended)
- Flat shader paintbrush (medium size)
- Small round paintbrush (for touch-ups)
- Fine-grit sandpaper (220 grit)
- Gold fabric ribbon (0.5 – 1 inch width)
- Pencil and ruler
- Scissors
- Hot glue gun or stapler (optional for ribbon)
Step 1: Preparation and Base Coat
-
Prepare the surface:
Before dipping your brush, lightly sand the entire surface of the wooden star. This removes any rough splinters and ensures the paint adheres smoothly. Wipe away the dust with a slightly damp cloth. -
Apply the white base:
Paint the entire front and sides of the star with white acrylic paint. Since we want a solid foundation, use long, even strokes following the general direction of the wood grain. -
Add a second coat:
Once the first layer is dry to the touch (usually about 20 minutes), apply a second coat of white. This ensures the wood color doesn’t bleed through and provides a stark contrast for the red stripes later. -
Define the center lines:
Using a ruler and a pencil with a very light hand, draw a line from the tip of the star’s top point straight down to the center. Repeat this effectively for every point, creating a ‘spine’ down the middle of each of the five points.
Clean Lines Pro-Tip
Before painting red, brush a thin layer of WHITE paint over the tape edges first. This seals the gap with the base color, so any bleed is invisible.
Step 2: Creating the Chevron Pattern
-
Establish the stripe angle:
The key to this look is the chevron meeting at the center spine. Place a strip of painter’s tape across one specific point of the star at a 45-degree angle. Press it down firmly. -
Mirror the tape:
Place a corresponding piece of tape on the *other* side of that same point’s center line. The two pieces of tape should meet at the spine you drew, forming a ‘V’ shape. -
Continue the pattern:
Use a spacer (like a scrap piece of tape) to create even gaps, then lay down the next set of taped ‘V’ shapes. I find it easiest to tape off all the white sections first so I can paint the red sections continuously. -
Seal the edges:
Run a fingernail or a credit card firmly along the edges of every piece of tape. This is crucial for preventing paint bleed and getting those crisp candy cane lines.
Step 3: Painting and Finishing
-
Paint the red stripes:
Load your flat brush with bright red acrylic paint. Fill in the exposed spaces between the tape. Be generous with the paint but try not to force it under the tape edges. -
Remove the tape:
Here is the satisfying part—carefully peel back the painter’s tape while the red paint is still slightly wet. Pulling it off at a sharp angle usually gives the cleanest edge. -
Touch up irregularities:
Inevitably, a little paint might bleed or a line might wobble. Use the small round brush and a dab of white paint to clean up any runaway red specks once the red is fully dry. -
Determine hanging orientation:
Decide which point will be the top. Most stars look best with a single point facing directy upward. -
Create the hanging loop:
Cut a length of gold ribbon approximately 12 inches long. Fold it in half to create a loop. -
Attach the ribbon:
You can either hot glue the ribbon ends to the back of the top point, or thread it through a pre-drilled hole if your wooden blank has one (as seen in the photo). Tie a simple bow at the base of the loop for extra decoration. -
Distress (Optional):
If you want a rustic farmhouse look rather than a pristine finish, lightly sand over the dried red stripes with 220-grit sandpaper to reveal slivers of the white and wood beneath.
Level Up: Glitter
While the red paint is wet, sprinkle ultra-fine iridescent glitter onto the red stripes. It dries into the paint for a subtle, sugary frost effect.
Hang your new candy-striped star on a wall or door to instantly evoke the sweet nostalgia of the holiday season


Snowman Face Wooden Star
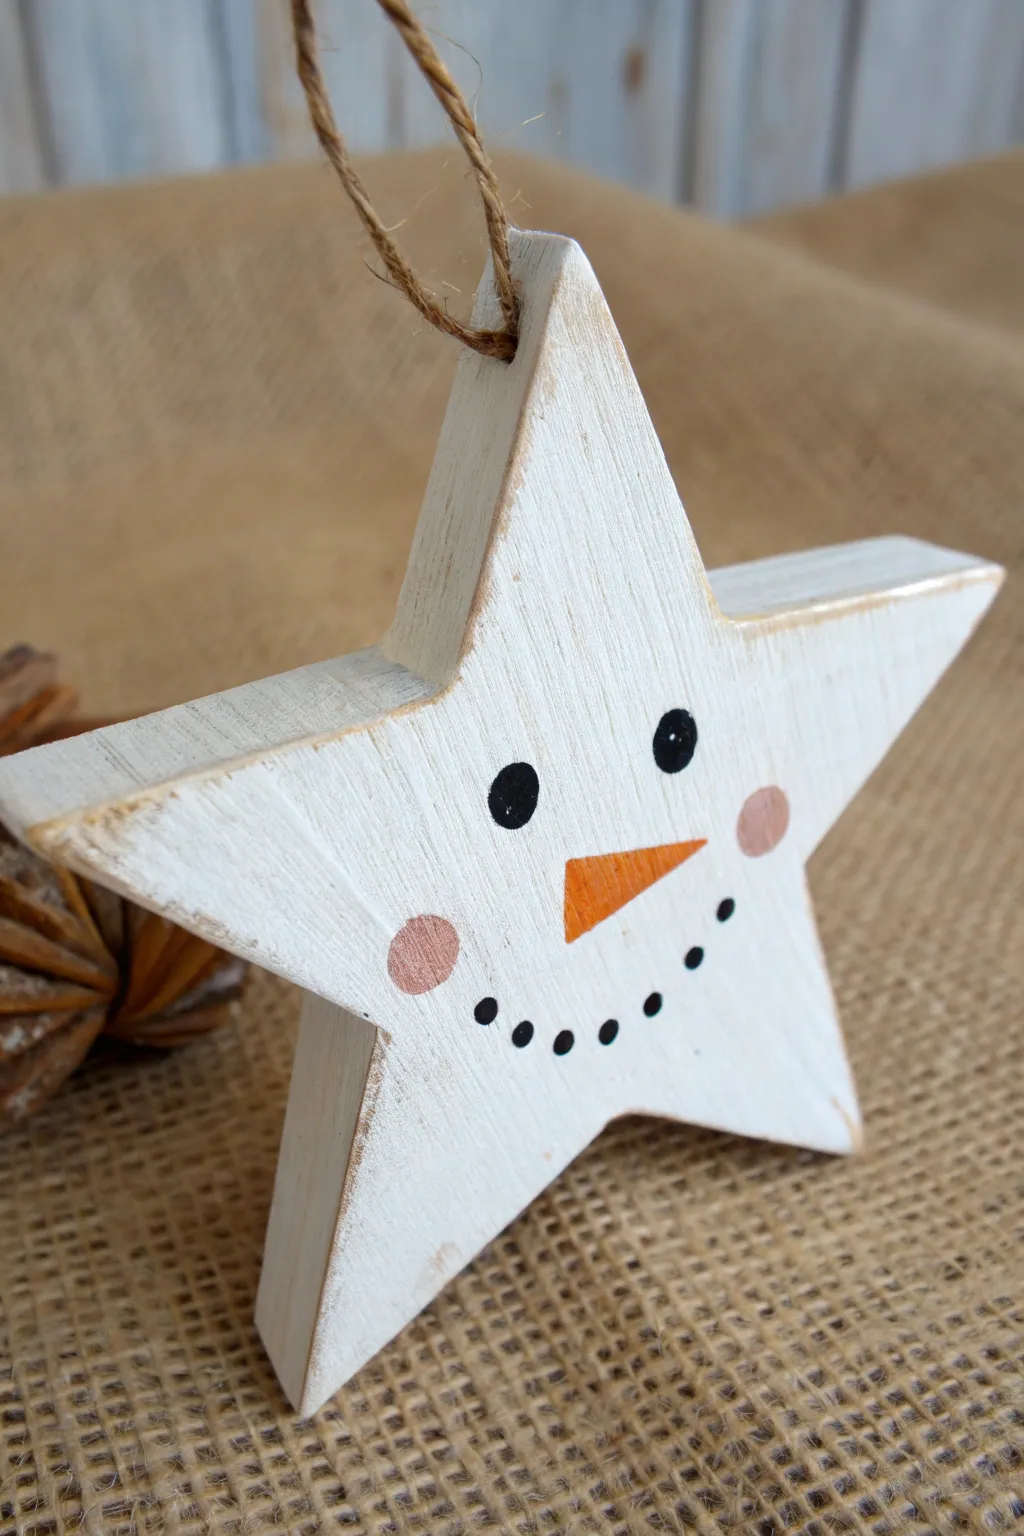
Transform a simple wooden shape into a charming winter character with this distressed snowman ornament project. Its whitewashed finish and simple dotted features give it a cozy, rustic feel that fits perfectly on any farmhouse-style tree.
How-To Guide
Materials
- Unfinished wooden star (approx. 4-6 inches)
- White acrylic paint (matte finish)
- Black acrylic paint
- Orange acrylic paint
- Soft pink or blush acrylic paint
- Sandpaper (medium grit, around 100-150)
- Small flat paintbrush
- Fine-point detail brush (size 0 or 00)
- Round foam pouncer or q-tip (small)
- Jute twine
- Paper towels
- Water cup and palette
- Drill with small bit (if star is undrilled)
Step 1: Base Preparation
-
Prepare the surface:
If your wooden star feels rough, give it a very light sanding to smooth down any splinters. Wipe away the dust with a damp paper towel or tack cloth to ensure the paint adheres properly. -
Drill the hanging hole:
If your star doesn’t already have a pre-made hole, carefully drill a small hole through the top point of the star. Ensure it’s centered so the ornament hangs straight. -
Apply the base coat:
Using your flat brush, apply a coat of white acrylic paint to the front, back, and sides of the star. Don’t worry about perfect coverage; a slightly uneven coat adds to the rustic charm we are aiming for. -
Let it dry completely:
Allow the first coat to dry fully. Since wood absorbs moisture, this shouldn’t take too long, but patience here prevents the paint from peeling during the sanding step. -
Distress the edges:
Take your sandpaper and gently run it along the edges and points of the star. You want to sand away just enough white paint to reveal the raw wood underneath, creating that weathered, vintage look.
Step 2: Painting the Face
-
Plan the placement:
Visualize the center of the star as the snowman’s face area. The cheeks should align roughly with the lower two inner corners of the star. -
Paint the eyes:
Load the handle end of a paintbrush or a large dotting tool with black paint. Press firmly twice near the upper middle section to create two perfectly round eyes. -
Add the rosy cheeks:
Dip a small foam pouncer or a Q-tip into the soft pink paint. Dab off most of the excess paint onto a paper towel until it’s almost dry, then gently press onto the star below and to the side of the eyes to create soft, flushed cheeks. -
Draft the nose:
Using the detail brush and orange paint, sketch a small triangle shape between the eyes. I like to angle the nose slightly upwards and to the right to give the snowman a whimsical expression. -
Fill in the nose:
Carefully fill in the orange triangle. You can make the base slightly rounded rather than distinctively sharp to make it look more like a carrot. -
Create the smile base:
Dip the handle of your smallest brush or a toothpick into black paint. You will need seven small dots for the classic coal smile. -
Dot the details:
Start by placing the center dot of the mouth at the lowest point. Then, add three dots curving up towards the cheek on the left, and three dots curving up on the right.
Paint Smudges?
If you smudge a black eye dot, let it dry completely, adhere a tiny piece of painter’s tape over it to lift any loose flakes, then paint over it with white before retrying.
Step 3: Finishing Touches
-
Dry the details:
Let the face details dry completely. If you move on too quickly, you risk smudging the black dots, which are hard to fix on white. -
Add light highlights (Optional):
If you want extra dimension, add a tiny speck of white paint to the black eyes and the orange nose with a needle or toothpick. -
Seal the work:
Apply a very light coat of clear matte sealer spray if you plan to store this ornament for years, though the raw distressed look holds up well without it. -
Prepare the hanger:
Cut a piece of jute twine approximately 8 inches long. Fold it in half to create a loop at one end. -
Attach the twine:
Thread the looped end through the drilled hole from front to back. Pull the tails through the loop and tighten gently to secure it with a lark’s head knot. -
Knot the top:
Tie a simple overhand knot at the loose ends of the twine to complete the hanger loop.
Make It Sparkle
While the white paint is still wet, sprinkle ultra-fine clear or iridescent glitter over the surface. It mimics the look of fresh frost on the snowman’s face.
Hang your cheerful star on a prominent branch to enjoy its simple wintry smile all season long
BRUSH GUIDE
The Right Brush for Every Stroke
From clean lines to bold texture — master brush choice, stroke control, and essential techniques.
Explore the Full Guide
Evergreen and Berries Wooden Star
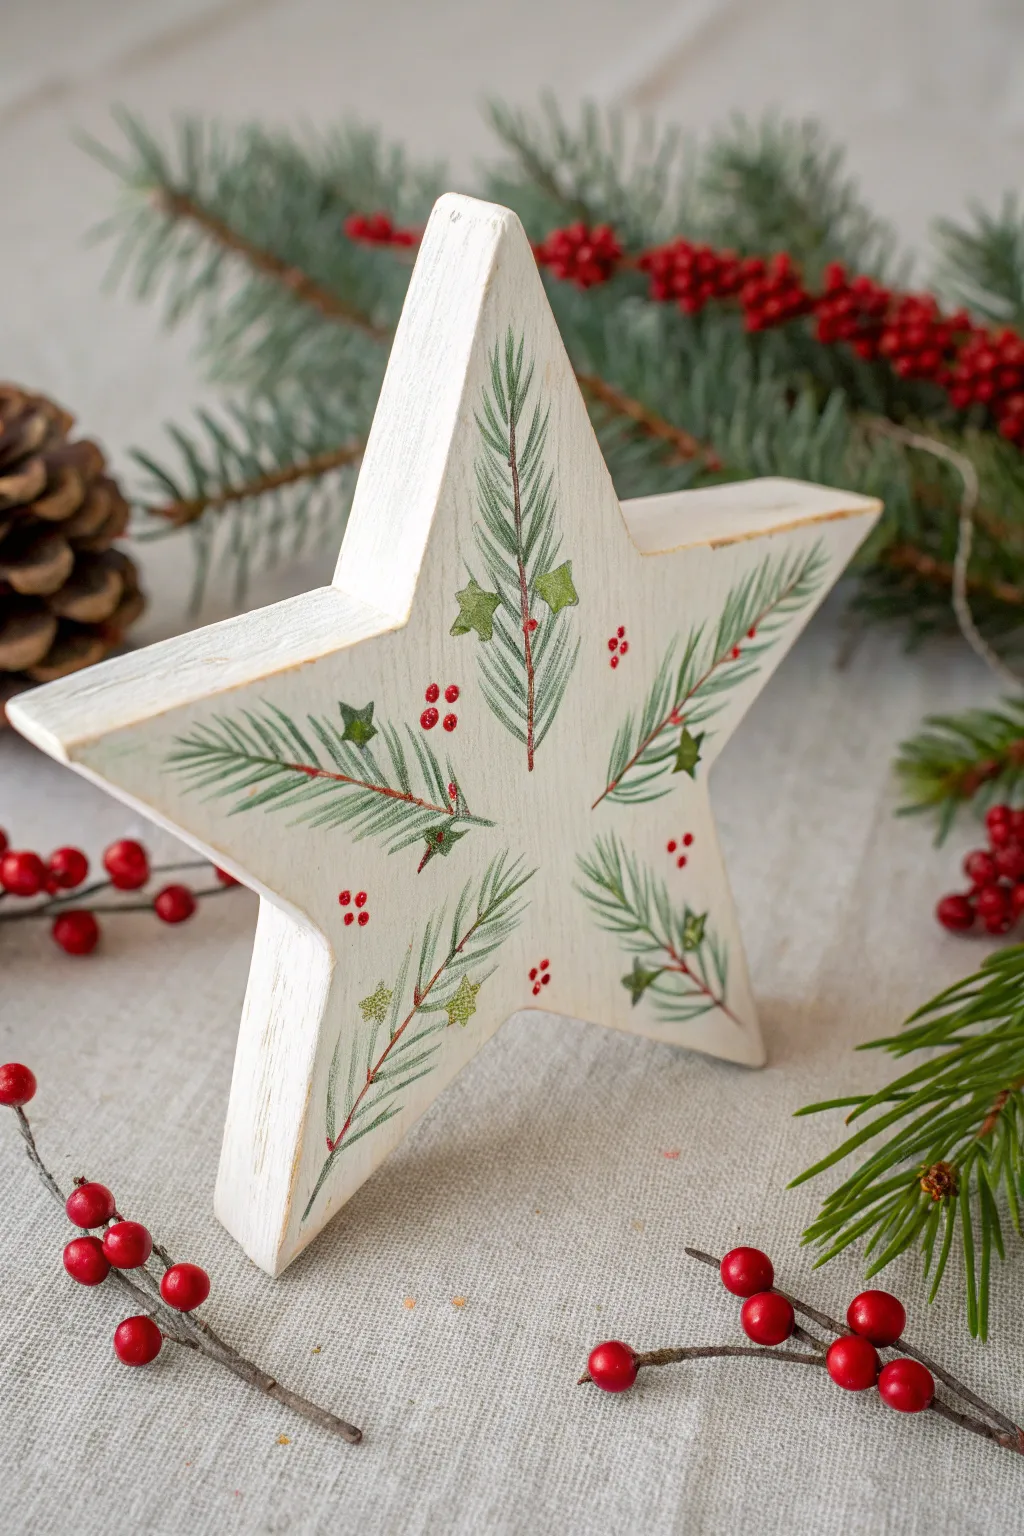
Capture the essence of a winter forest with this beautifully rustic wooden star, featuring hand-painted evergreen sprigs and delicate red berries. The distressed white background makes the traditional Christmas colors pop, creating a charming decoration perfect for mantels or tabletops.
Step-by-Step Guide
Materials
- Wooden star decorations (chunky style)
- White acrylic paint or chalk paint
- Fine grit sandpaper (220 grit)
- Acrylic paints: Forest Green, Brown, Bright Red, Lime Green
- Detail brushes (liner brush #0 or #1, small round brush #2)
- Flat brush (1/2 inch) for base coating
- Water cup and paper towels
- Pencil (H or HB for light lines)
- Matte sealer or varnish spray
Step 1: Preparing the Base
-
Sand the wood:
Before opening your paints, give the wooden star a quick sanding. Smoothing out rough edges now ensures your painted details will glide on without getting caught in wood grain. -
Apply base coat:
Using your flat brush, paint the entire star with white acrylic or chalk paint. You can paint the sides or leave them raw if you prefer a more contained look, but painting them gives a cleaner finish. I like to do two thin coats rather than one thick one. -
Distress edges (Optional):
Once the white paint is completely dry, use your sandpaper to gently distress the edges. Rub slightly until the raw wood peeks through, giving it that rustic farmhouse feel shown in the photo.
Needle Tip
For the finest pine needles, slightly water down your green paint to an ink-like consistency. It flows off the brush smoother for sharp, tapered lines.
Step 2: Painting the Evergreen Sprigs
-
Plan the placement:
Visualize a center point in the middle of the star. Lightly sketch five lines radiating outward from the center toward the five points of the star. These will be the spines of your pine branches. -
Paint the stems:
Load a liner brush with watered-down brown paint. Follow your pencil guides to paint thin, delicate stems. They don’t need to be perfectly straight; a little wobble looks more organic. -
Start the needles:
Switch to your Forest Green paint. Using the very tip of your small round brush or liner brush, start painting needles. Begin at the tip of the branch nearest the star’s point. -
Work inwards:
Paint short, quick strokes angling backward from the tip down towards the center stem. Keep your strokes loose and feathery rather than stiff and uniform. -
Mix your greens:
To add depth, mix a tiny bit of white or lime green into your Forest Green. Paint a few highlight needles over the darker ones while they are still slightly wet to create dimension. -
Complete the five points:
Repeat this process for all five radiating branches. Vary the length of the needles slightly so they don’t look identical.
Add Sparkle
While the red berry paint is still wet, sprinkle a tiny pinch of super-fine clear or iridescent glitter onto just the berries for a frosty, magical effect.
Step 3: Adding Festive Details
-
Paint secondary sprigs:
Look for empty white spaces between the main branches. Add smaller, shorter evergreen fern-like sprigs radiating from the center into these gaps to fill out the design. -
Add holly stars:
Using a lighter Lime Green paint, paint small, simple five-point star shapes (resembling holly leaves) scattered along the branches. The photo shows pairs of these green stars nestled near the stems. -
Create berry clusters:
Dip the handle end of a paintbrush into Bright Red paint. This is the easiest way to make perfect dots. Dot groups of three berries near the green ‘holly’ stars. -
Add single berries:
Add tiny single red dots further out on the branches or floating in the white space for balance. Keep them small and delicate. -
Final dry:
Let all your detailed work dry completely. The berries will take the longest because the paint is thicker. -
Seal the piece:
Finish by applying a clear matte sealer. This protects your hard work from dust and fading, ensuring the white stays crisp for seasons to come.
Place your finished star among fresh greenery to complete the woodland theme
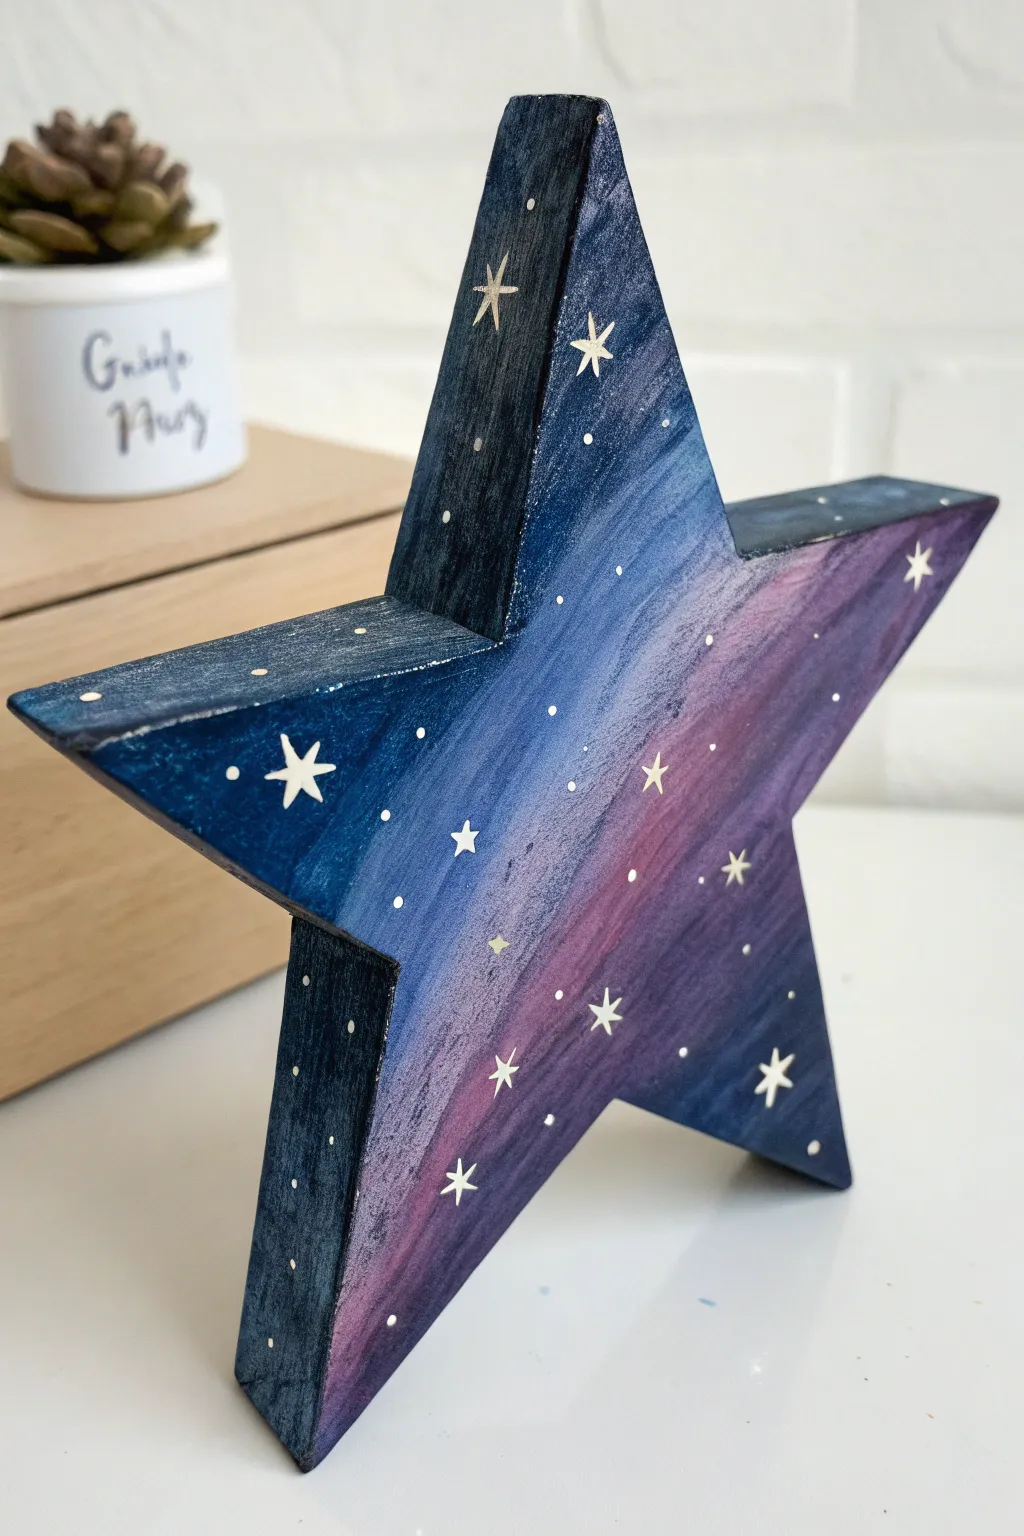
Silent Night Silhouette Wooden Star

Transform a simple wooden cutout into a breathtaking slice of the midnight sky with this celestial painting project. By layering deep blues and splattering crisp whites, you’ll create a dimensional galaxy effect that brings a touch of winter magic to any mantle or porch.
Detailed Instructions
Materials
- Large wooden star cutout (approx. 12-18 inches, standing)
- Sandpaper (medium and fine grit)
- Tack cloth
- Deep navy blue acrylic paint
- Black acrylic paint
- Titanium white acrylic paint
- Flat paint brushes (1-inch and 1/2-inch)
- Small round detail brush (size 0 or 1)
- Old toothbrush
- Stiff bristle brush
- Matte or satin clear sealant spray
- Painter’s pyramids or small blocks to elevate the star
Step 1: Preparation & Base Coat
-
Sand the surface:
Begin by sanding the entire wooden star with medium grit sandpaper to smooth out any rough saw marks, especially on the thick edges. Follow up with fine grit sandpaper for a silky finish. -
Clean the wood:
Wipe away all sawdust using a tack cloth. This step is crucial because any leftover dust will create bumps in your galaxy background. -
Mix the midnight hue:
On your palette, mix a generous amount of deep navy blue with a small touch of black. You want a color that looks almost black but retains a rich blue undertone. -
Apply the first coat:
Using the 1-inch flat brush, paint the entire front surface of the star. Brush with the grain of the wood for the smoothest application. -
Paint the edges:
Don’t forget the thick sides of the star. Paint these with the same midnight navy mixture to ensure the piece looks finished from all angles. -
Let it dry and repeat:
Allow the first coat to dry completely for about 20-30 minutes. Apply a second coat to ensure opaque, solid coverage where no wood grain shows through.
Cosmic Cloud Tip
For a nebular look, sponge a tiny bit of metallic silver or lighter blue paint in random cloudy patches before adding your splatter.
Step 2: Creating the Galaxy Effect
-
Create a subtle gradient:
While the second coat is still slightly tacky, take a small amount of pure navy blue (without black) on the 1/2-inch brush. Lightly blend it into the center of the star, fading outward. This creates a subtle ‘glow’ effect in the middle of the darkness. -
Prepare the splatter paint:
Dilute a small dollop of titanium white paint with a few drops of water. The consistency should be like heavy cream—fluid enough to fly off bristles, but thick enough to stay opaque. -
Test the splatter:
I always test my splatter technique on a piece of cardboard first. Dip an old toothbrush into the thinned white paint and run your thumb across the bristles. -
Apply the star field:
Hold the toothbrush about 6-8 inches away from the wooden star. Flick the bristles to spray a fine mist of tiny white dots across the blue surface. Vary the density; clusters of stars look more natural than an even spray. -
Add larger distant stars:
Dip the handle end of a paintbrush into the un-thinned white paint. Gently dot the surface in random spots to create slightly larger, distinct distant stars among the mist.
Level Up: Glow
Mix glow-in-the-dark medium into your white paint for the splatter step. Your star will charge in the sun and illuminate your porch at night.
Step 3: Hand-Painting the Stars
-
Paint the hero stars:
Using your smallest round detail brush and pure titanium white paint, identify 5-7 spots for your main stars. Paint a small central dot for each. -
Add the points:
Carefully pull paint outward from each central dot to create five distinct points. Keep your hand steady and lift the brush at the end of each stroke to taper the points into sharp tips. -
Vary sizes:
Make sure your hand-painted stars aren’t all identical. Make one or two slightly larger than the rest to create visual interest and hierarchy. -
Dry thoroughly:
Allow the star details and splatter to dry completely. Since the dots of paint can be thick, give this at least an hour. -
Seal the project:
Take the project to a well-ventilated area. Spray the entire star with a matte or satin clear coat. This protects the paint from moisture, especially if you plan to display it outdoors.
Place your finished galaxy star on a snowy railing or mantle to enjoy your piece of the night sky

PENCIL GUIDE
Understanding Pencil Grades from H to B
From first sketch to finished drawing — learn pencil grades, line control, and shading techniques.
Explore the Full Guide
American Flag Wooden Star
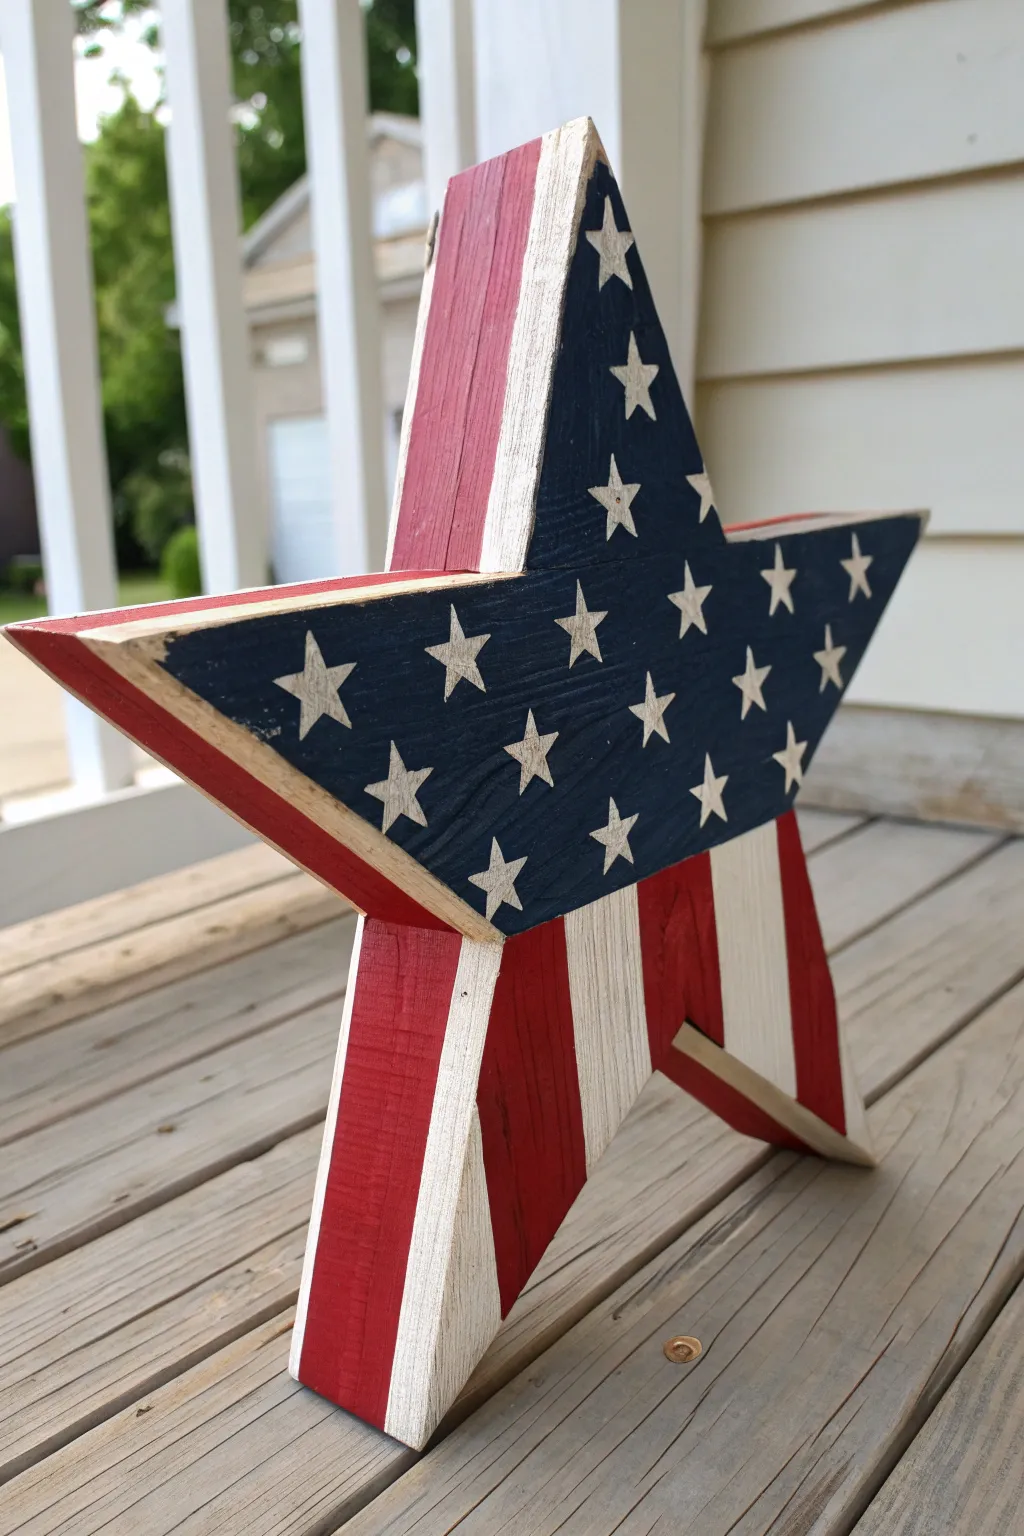
Celebrate American pride with this chunky, free-standing wooden star that brings a rustic touch to your porch or mantle. The design cleverly maps the Stars and Stripes onto a five-pointed shape, with details that wrap around the thick edges for a dimensional look.
Step-by-Step Tutorial
Materials
- Thick wooden craft star (approx. 1-1.5 inches deep)
- Acrylic craft paints: Navy Blue, Barn Red, Antique White
- Painter’s tape (1/2 inch or 1 inch width)
- Small flat brush (1/2 inch)
- Detail brush or fine point brush
- Star stencil (optional but recommended)
- Pencil
- Ruler
- Sandpaper (medium grit)
Step 1: Preparation & Base Coat
-
Sand the surfaces:
Before dipping your brush, give the entire wooden star a quick sanding. Focus on the cut edges to smooth out any splinters, as this rustic look is better when it’s safe to touch. -
Wipe away dust:
Use a tack cloth or a slightly damp rag to remove all sawdust. Paint adheres much better to a clean surface. -
Paint the white base:
Paint the entire star with your Antique White paint. This will serve as the primer and the white stripes. You might need two coats to get solid coverage, especially on the end grain of the wood.
Tape Sealing Trick
Before painting red, lightly brush Antique White over the tape edges. This fills any tiny gaps with the base color, ensuring your red lines are razor-sharp.
Step 2: Creating the Blue Field
-
Mark the blue section:
Visualize a horizontal line connecting the two inner corners of the horizontal arms. Use your pencil and ruler to lightly mark this line across the front of the star. -
Tape the line:
Apply painter’s tape just below your pencil line, pressing down firmly to seal the edge. This protects the lower half where the stripes will go. -
Paint the blue field:
Paint the entire upper area—the top point and the upper halves of the side points—with Navy Blue. Ensure you get into the corners near the tape. -
Paint the top edges:
Carry the Navy Blue paint onto the *side* edges of the top point and the upper arms. This creates a cohesive look from all angles. Remove the tape immediately while the paint is still wet for a crisp line.
Vintage Glaze
Mix 1 part brown paint with 4 parts water. Brush it over the dry finished star and wipe it off immediately with a rag for an aged, antique tea-stained look.
Step 3: Painting the Stripes
-
Wait for drying:
Ensure the blue paint is completely dry before moving to this step to avoid smudging. -
Mark the stripes:
On the lower legs and lower half of the side arms, use a ruler to mark vertical lines for your stripes. Space them about 3/4 inch to 1 inch apart, depending on the size of your star. -
Tape the white stripes:
Protect the areas that should remain white with painter’s tape. Press the edges down firmly with your fingernail or a credit card to prevent the red paint from bleeding under. -
Paint the red stripes:
Fill in the exposed wood sections with Barn Red paint. Don’t forget to paint the *side* edges of the star legs to match the front pattern, creating a wrap-around effect. -
Check the arm edges:
Also check the side thickness of the horizontal arms; the red stripes should continue from the face onto the sides here as well. -
Remove tape:
Peel off the tape carefully. If any red paint bled under, touch it up with a small brush and white paint once dry.
Step 4: Adding the Stars
-
Position your stencil:
Take a small star stencil and place it over the dry blue field. If you are free-handing, lightly sketch star positions with a pencil first to ensure even spacing. -
Stipple the stars:
Using a fairly dry brush or sponge with Antique White paint, gently stipple over the stencil. Less paint is better here to prevent blobs. -
Paint side stars:
Don’t forget the depth! Add a couple of stars to the blue-painted thickness on the sides of the top point for that extra detail shown in the project image. -
Refine by hand:
I like to use a tiny detail brush to sharpen the points of the stars if the stenciling looks a bit fuzzy.
Step 5: Finishing Touches
-
Distress edges (Optional):
For a rustic farmhouse look, take your sandpaper and gently scuff the edges of the star where the paint colors meet, revealing a tiny bit of raw wood. -
Seal the project:
Apply a clear matte or satin acrylic sealer to protect your work, especially if this star will live outdoors on a porch.
Set your finished star on a sunny porch rail and enjoy the patriotic flair it adds to your home
Distressed Americana Wooden Star Set
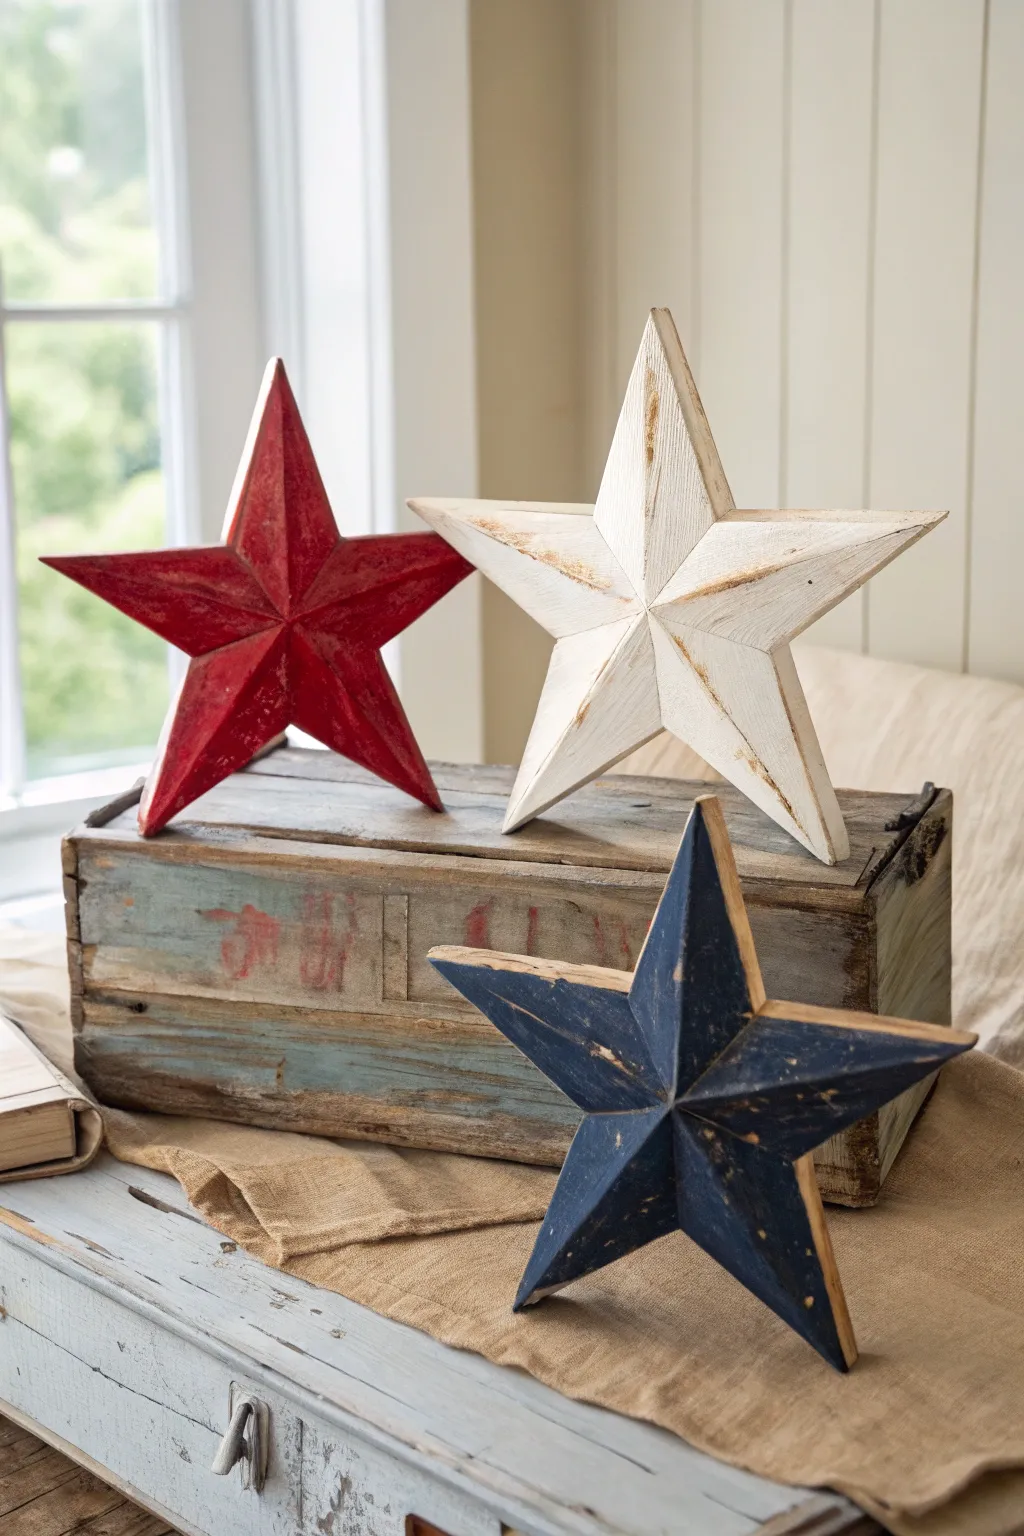
Bring a touch of vintage farmhouse charm to your home with this set of distressed wooden stars. The classic red, white, and blue palette is softened with clever sanding techniques to create a weathered, heirloom look that fits perfectly on a mantle or shelf.
Step-by-Step Guide
Materials
- Three unfinished wooden stars (approx. 8-10 inches)
- Acrylic craft paint: Barn Red, Antique White, and Navy Blue
- Dark walnut wood stain (gel stain recommended)
- Medium-grit sandpaper (100-120 grit)
- Fine-grit sandpaper (220 grit)
- Foam brushes
- Soft cotton rags or old t-shirt scraps
- Matte clear coat sealer (spray or brush-on)
- Newspaper or drop cloth
Step 1: Preparation & Staining
-
Surface Prep:
Begin by lightly sanding your unfinished wooden stars with 220-grit sandpaper. You want to remove any rough splinters or factory fuzz, but don’t worry about making them perfectly smooth—imperfections add to the rustic character. -
Base Stain Application:
Before painting any color, apply a coat of dark walnut wood stain to the entire surface of each star. Using a foam brush or rag, work the stain into the grain. -
Wipe and Dry:
After letting the stain sit for about 3-5 minutes, wipe away the excess with a clean rag. This dark underlayer is crucial because it will peek through later when we distress the paint. -
Full Cure:
Allow the stain to dry completely. Depending on your humidity and stain type, this might take anywhere from 4 hours to overnight. If you paint too soon, the stain might bleed into your colors.
Wax Resist Method
Before painting, rub a cheap candle along the edges of the stained wood. Paint won’t stick to the wax, making the distressing step effortless and much more natural-looking.
Step 2: Painting the Trio
-
Painting the Red Star:
Take your Barn Red acrylic paint and apply a single coat to the first star. Paint with the grain of the wood. Since we are going for a distressed look, it doesn’t need to be perfectly opaque. -
Painting the White Star:
Apply the Antique White paint to the second star. White paint is often thinner, so if the dark stain shows through too much for your liking, you can add a second thin coat after the first is dry to touch. -
Painting the Blue Star:
Coat the third star with Navy Blue paint. Ensure you get into the crevices where the star points meet, but keep the layer relatively thin to make sanding easier later. -
Dry Time:
Let all three stars dry completely. Acrylics usually dry fast, but give them at least an hour to harden so the paint doesn’t gum up on your sandpaper in the next phase.
Paint Bleed Through?
If the stain bleeds pink into your white paint, the stain wasn’t dry enough. Seal the stain with a quick spray of shellac or clear sealer before repainting the white layer.
Step 3: Distressing & Finishing
-
Edge Sanding:
Using your medium-grit (100-120) sandpaper, firmly sand the edges and sharp points of the stars. I usually focus heavily on the tips, sanding until the raw wood and dark stain are clearly visible. -
Surface Distressing:
Move to the flat surfaces and center ridges of the stars. Lightly scuff the paint in random patches to reveal the dark walnut stain underneath. This mimics years of natural wear and tear. -
Clean Up Dust:
Once you are happy with the level of distressing, use a tacky cloth or a slightly damp rag to wipe off all the sanding dust. The colors will look dull right now, but the sealer will fix that. -
Applying Sealer:
Finish the project by applying a matte clear coat. This protects the wood and enriches the contrast between the paint and the exposed dark stain without adding an unnatural shine.
Arrange your beautiful new star trio on a crate or shelf to enjoy that timeless hand-hewn aesthetic all year round


Navy and Cream Farmhouse Wooden Star
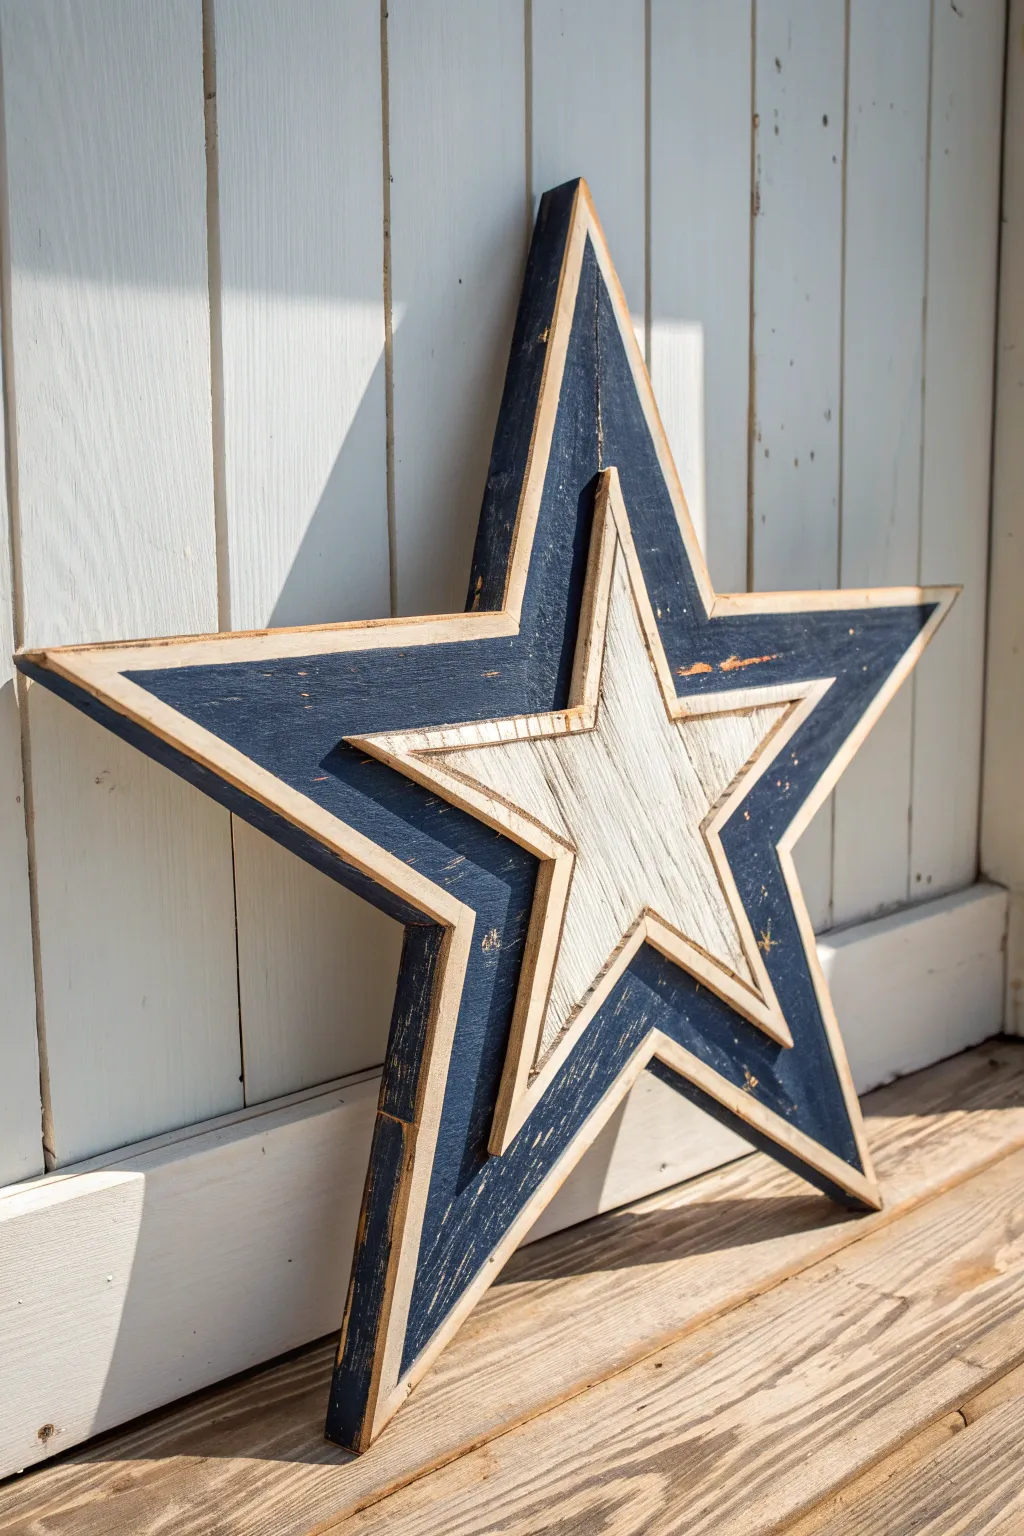
Bring a touch of patriotic or farmhouse charm to your porch with this dimensional wooden star project. Featuring two distinct layers—a deep distressed navy base and a creamy white center—this piece relies on simple cuts and clever layering to create striking depth.
Step-by-Step
Materials
- 1×12 pine board or 3/4-inch plywood sheet
- Jigsaw or scroll saw
- Sandpaper (80, 150, and 220 grit)
- Navy blue chalk paint or acrylic paint
- Cream or off-white chalk paint
- Pencil and ruler
- Star template (paper or cardboard)
- Wood glue
- Brad nailer or small hammer and finish nails
- Paintbrushes (1-inch foam and fine detail)
- Clear matte sealer (polyurethane spray)
Step 1: Cutting the Forms
-
Draft the Large Star:
Begin by drawing your largest star shape onto your wood. You can print a large template or use geometric drafting methods to ensure the five points are symmetrical. Aim for a width of about 20-24 inches for the base. -
Draft the Smaller Star:
Inside the first star or on a separate section of wood, draft a second, strictly smaller star. This one needs to be about 60% of the size of the larger one so the navy border remains visible later. -
Cut the Shapes:
carefully follow your lines with a jigsaw to cut out both star shapes. Take your time around the sharp inner corners to keep the points distinct. -
Refine the Edges:
Use 80-grit sandpaper to smooth out any rough saw marks on the outer edges of both stars. You want clean lines, but don’t round over the sharp geometric points too much.
Use a Router
For the crisp, light-colored edges seen in the photo, use a router with a 45-degree chamfer bit on all edges before painting. It creates a perfect bevel.
Step 2: Painting and Distressing
-
Paint the Base Layer:
Apply a generous coat of navy blue chalk paint to the face of the larger star. I prefer chalk paint here because it sands off easily for that weathered look later. -
Paint the Top Layer:
Coat the smaller star in your cream or off-white paint. Coverage doesn’t need to be perfect since we are going for a rustic finish, but ensure the wood grain is mostly hidden. -
Edge Detailing:
Using a steady hand or a small detail brush, paint the beveled edges if you routed them, or simply leave the cut sides raw for contrast. In the reference image, there is a distinct light wood border effect. -
Create the Faux Border:
To mimic the image precisely, sand or route a 45-degree bevel on the edges, or carefully sand through the paint right at the perimeter to reveal a strip of raw wood about 1/4-inch wide on all sides. -
Distress the Surfaces:
Once fully dry, take 150-grit sandpaper and scuff the flat painted surfaces. Focus heavily on the ridges of the wood grain and the tips of the stars to reveal the timber underneath. -
Clean the Dust:
Wipe both stars down thoroughly with a tack cloth or slightly damp rag to remove all sanding dust before assembly.
Uneven Points?
Drafting a star is tricky. Draw a circle first, mark 5 points at 72-degree intervals, and connect every second dot to create a perfect pentagram.
Step 3: Assembly and Finishing
-
Align the Layers:
Place the creamy white star directly on top of the navy star. Use a ruler to measure from the tips of the small star to the tips of the large star to ensure it is perfectly centered. -
Glue the Center:
Lift the small star, apply a liberal amount of wood glue to its back, and press it firmly back into position. -
Secure with Nails:
Use a brad nailer with 1-inch nails (or a hammer and finish nails) to secure the top star to the bottom one. Place nails in the center area where they are less visible or easily covered with a dab of paint. -
Final Touch-ups:
If your nailing disturbed the paint, dab a tiny bit of cream paint over the nail heads. You can sand this spot lightly once dry to blend it in. -
Seal the Project:
To protect that raw wood exposure from yellowing or drawing moisture, spray the entire assembly with a clear matte polyurethane sealer, especially if it will live outdoors.
Now you have a bold statement piece ready to lean against your wall or hang prominently above the mantle
Minimal Black-and-White Wooden Star
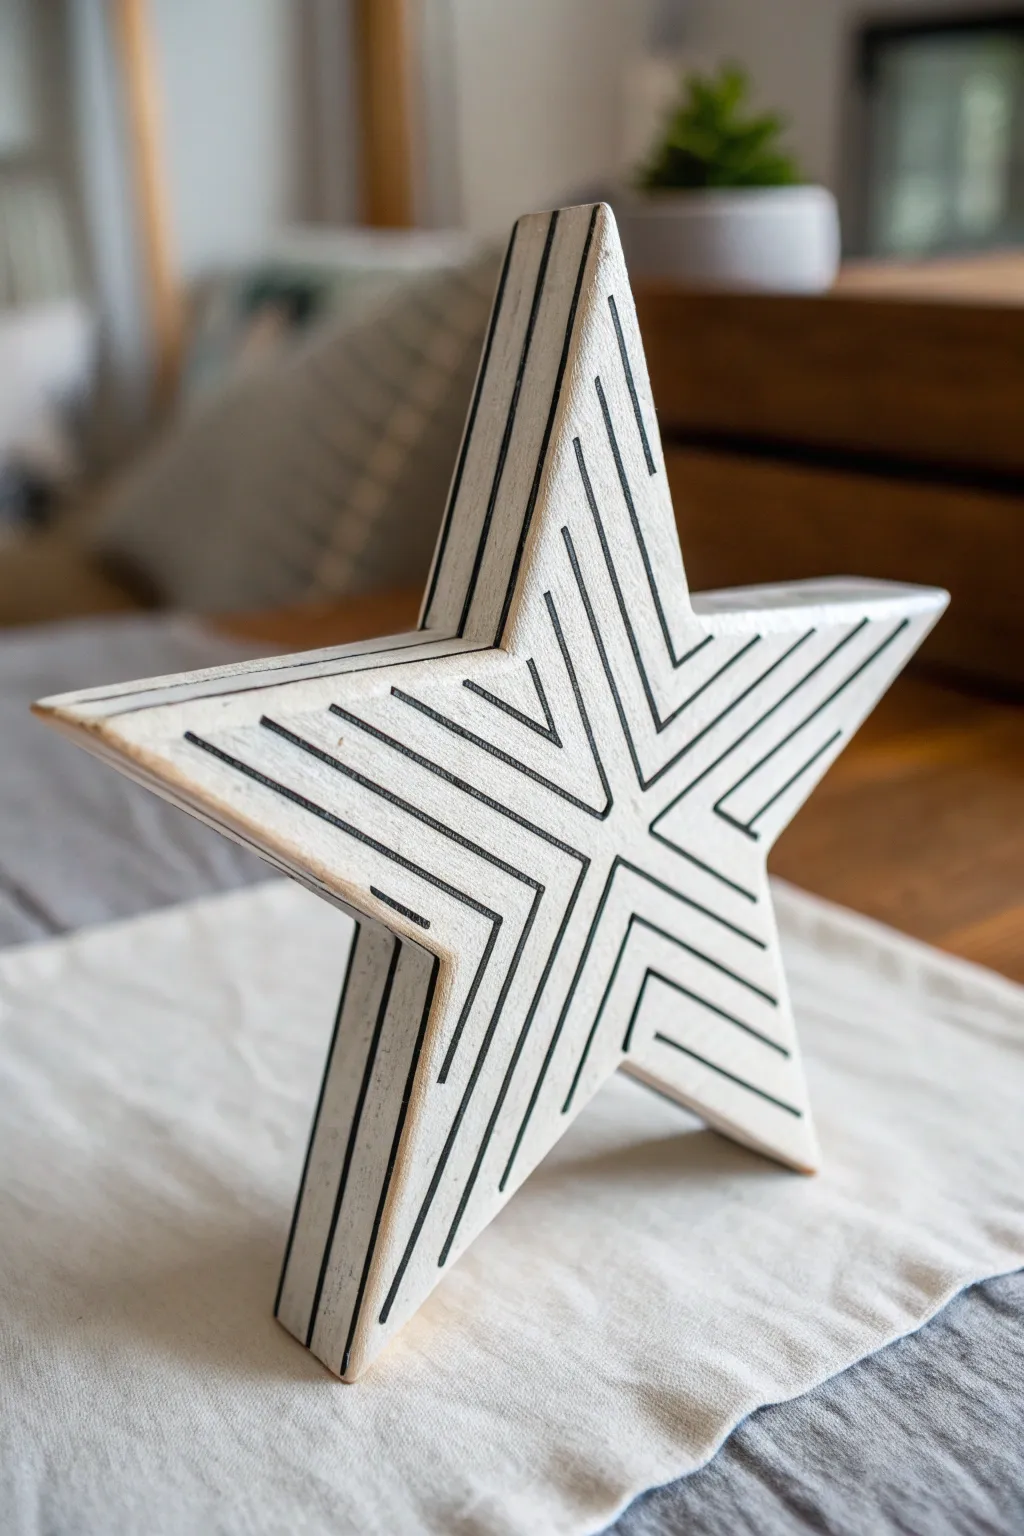
This striking wooden star combines rustic charm with modern geometric precision. The high-contrast black lines against the whitewashed wood create a dynamic sense of movement, making it a perfect accent piece for shelves or mantels.
Step-by-Step Guide
Materials
- Unfinished chunkier wooden star (freestanding)
- White acrylic paint or white chalk paint
- Black acrylic paint pen (medium or fine tip)
- Black acrylic paint pen (extra fine tip)
- Pencil
- Ruler or straight edge
- Sandpaper (medium grit and fine grit)
- Matte clear sealant spray
- Wide flat paintbrush
- Paper towel or rag
Step 1: Preparation & Base Coat
-
Sand the surface:
Begin by sanding your wooden star thoroughly. Start with medium grit to remove any rough patches, paying attention to the cut edges. Follow with fine grit sandpaper to ensure a smooth surface for painting. -
Wipe it clean:
Remove all sanding dust with a slightly damp cloth or tack cloth. Any remaining dust will create bumps in your paint finish. -
Apply the first coat:
Using a wide flat brush, apply a layer of white acrylic or chalk paint. For this project, you want a slightly distressed look, so the coat doesn’t need to be perfectly opaque. -
Create a whitewash effect:
While the paint is still slightly tacky but mostly dry, gently wipe parts of the wood with a dry paper towel or rag. This exposes just a hint of the wood grain underneath, adding depth. -
Light distressing (Optional):
If you want clearer wood accents like the reference photo, take a fine-grit sanding block and gently rub the very edges and points of the star to reveal the raw wood beneath the white paint.
Clean Lines Hack
If you struggle with steady hands, apply strips of painter’s tape or washi tape to mask off the areas between lines. It takes longer but guarantees sharp edges.
Step 2: Mapping the Geometry
-
Find the center:
Locate the exact center point of the star where all the internal angles would meet if lines were drawn inward from the valleys. -
Draw the main spines:
Using a ruler and a light pencil touch, draw straight lines from the center point out to the tip of each of the five star points. These will serve as your primary guides. -
Draw the valley lines:
Draw lines from the center point to the inner ‘valleys’ of the star. You should now have ten distinct triangular sections radiating from the center. -
Plot the chevrons:
Within each star point (which is now divided in half), you will create a chevron or ‘V’ pattern. Place ruler marks at even intervals—about 1/4 inch apart—along the central spine line of one point. -
Connect the angles:
Align your ruler from a mark on the spine line parallel to the outer edge of the star point. Lightly pencil in these V-shapes. The lines should look like they are nesting inside each other, getting smaller as they reach the center. -
Repeat around the star:
Continue this pattern for all five points. The goal is for the lines from adjacent points to meet roughly at the ‘valley’ lines, creating a continuous geometric flow.
Step 3: Inking & Finishing
-
Test your pen:
Before touching the wood, press your black paint pen on a scrap piece of paper to ensure the ink is flowing smoothly but not puddling. -
Trace the main lines:
I find it easiest to start with the medium tip pen. Carefully trace over your pencil lines, starting from the center and pulling the pen outward toward the edges. Keep consistent pressure. -
Detail the edges:
Stop your lines just milimeters before the edge of the wood to keep that clean, bordered look. Do not wrap the lines over the side of the star. -
Refine with fine tip:
If your design gets crowded near the center of the star, switch to the extra-fine tip pen to keep the lines distinct and prevent them from bleeding into a black blob. -
Clean up sketch lines:
Allow the paint pen ink to cure fully—wait at least an hour to be safe. Then, gently erase any visible pencil marks that weren’t covered by the ink. -
Seal the project:
To protect the white paint from yellowing and the black ink from smudging, apply a light coat of matte clear spray sealant. Hold the can about 10 inches away and do a quick, even pass.
Ink Bleeding?
If the black marker bleeds into the wood grain, your base coat was too thin. Apply a layer of clear matte medium over the white paint before using the pen.
Place your star on a bookshelf or side table to add a touch of modern geometric flair to your decor
Soft Ombré Wooden Star Gradient
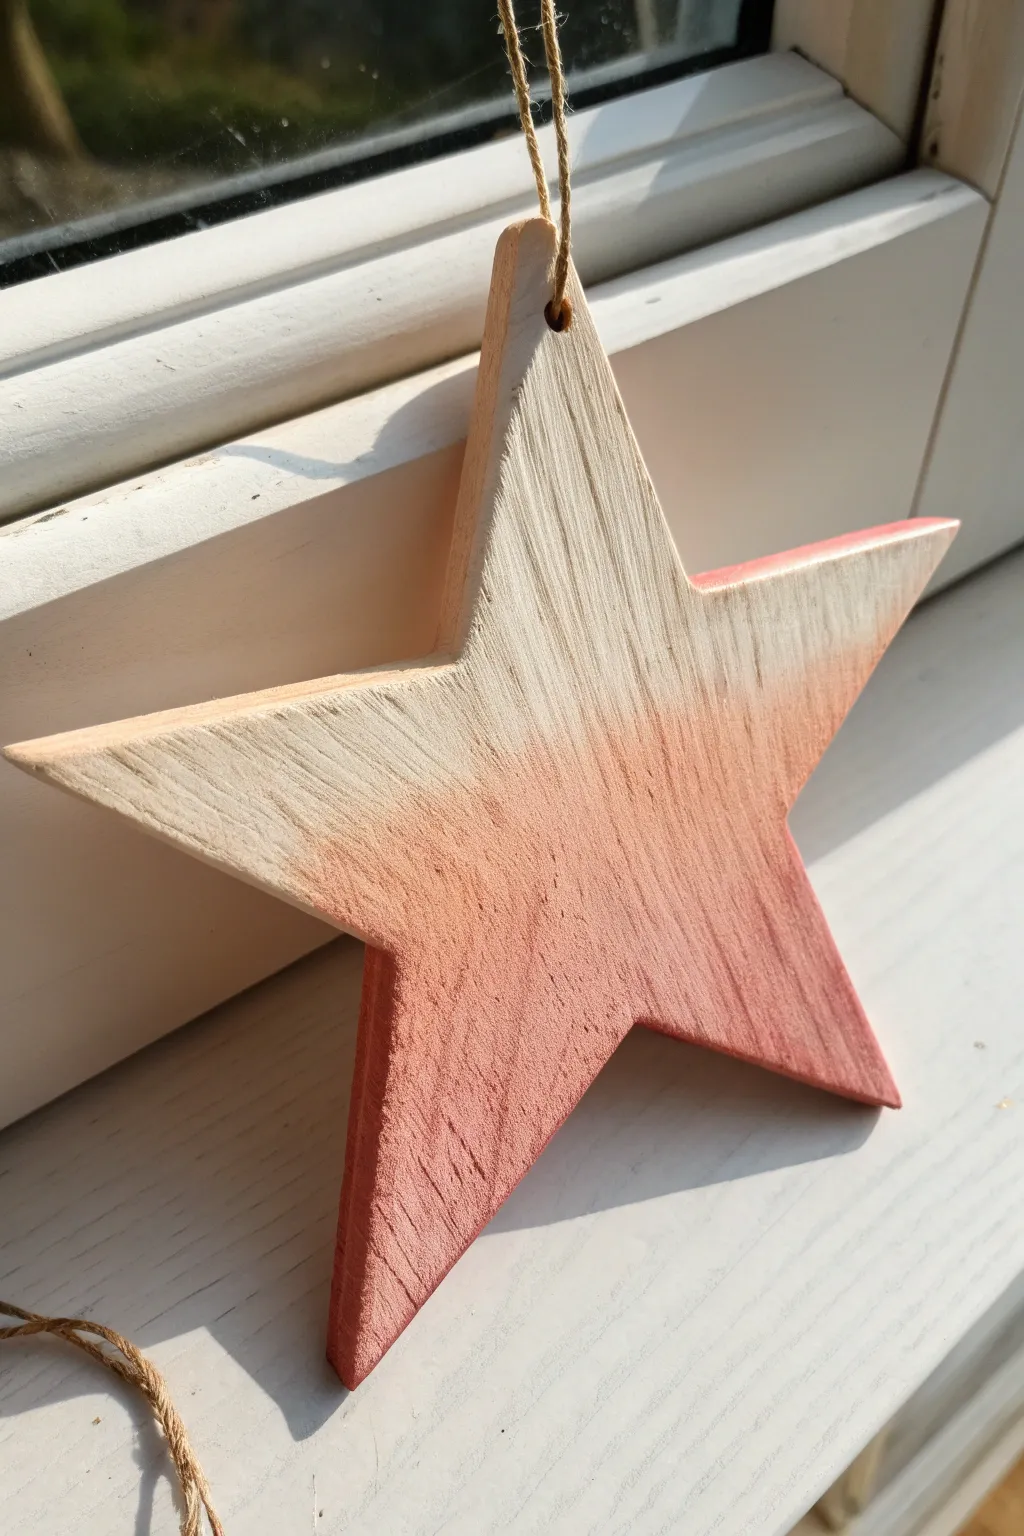
This project transforms a simple wooden star into a piece of modern rustic decor by applying a soft, graduated color wash. The result is a dreamy transition from natural wood grain to a warm, dusty pink that glows beautifully in natural light.
Step-by-Step Tutorial
Materials
- Unfinished wooden star ornament (approx. 4-6 inches)
- Sandpaper (220-grit)
- Acrylic paint (Dusty Rose or Salmon Pink)
- Acrylic paint (White – optional for mixing)
- Small bowl or palette for water
- Soft flat paintbrush (size 6 or 8)
- Paper towels or lint-free rag
- Jute twine for hanging
- Clear matte sealer (optional)
Step 1: Preparation
-
Sand the Wood:
Begin by lightly sanding the entire surface of your wooden star. You want to smooth out any rough edges or splinters, especially around the points, which ensures the paint soaks in evenly. -
Dust Off:
Wipe the star thoroughly with a clean, dry cloth or a tack cloth to remove all sawdust. Any leftover dust will create speckles in your smooth gradient. -
Prepare Your Paint Wash:
Squeeze a dime-sized amount of dusty rose acrylic paint into your palette. To get that translucent look where the wood grain shows through, we aren’t using straight paint. Add water gradually until you have a consistency similar to skim milk or watercolor.
Step 2: Creating the Ombré Effect
-
Mark the Start Line:
Visualize where you want the color to begin. In the example, the fade starts just above the halfway point. You can lightly mark this with a pencil if you need a guide, or just eyeball it for a more organic feel. -
First Wash Application:
Dip your brush into the watered-down paint mix. Start painting from the bottom tip of the star upwards. Cover the bottom half completely with this first, very light wash. -
Feather the Edge:
As you reach the top of your painted section (near the middle of the star), clean your brush in water and blot it on a paper towel so it’s damp but paint-free. Use this damp clean brush to gently drag the wet paint edge upward, fading it out into the unpainted wood. -
Blotting Technique:
If the transition look harsh, I find a quick dab with a crumpled paper towel along the fade line helps soften the look instantly. -
Adding Depth:
Let the first layer dry for about 5-10 minutes. The wood will absorb the moisture quickly. -
Second Layer:
Apply a second coat of the paint wash, but this time, don’t go as high up as the first layer. Stop about half an inch below your previous fade line. This builds darker color at the bottom. -
Saturating the Tips:
Apply a third layer of wash, or even slightly thicker paint, focusing strictly on the bottom two points of the star. This creates the darkest part of the gradient anchor. -
Check the Edges:
Don’t forget the sides/thickness of the star. Make sure to wrap your gradient effect around the edges so it looks finished from every angle.
Uneven Blotches?
If the wood absorbs paint unevenly, lightly dampen the entire star with plain water before painting. This ‘pre-wetting’ opens the pores evenly for a smoother gradient.
Step 3: Finishing Touches
-
Dry Time:
Allow the star to dry completely. This usually takes about 30 minutes since the layers were thin. -
Gentle Distress (Optional):
If the grain isn’t showing through enough for your taste, take your sandpaper and do one very light pass over the painted area to bring the wood texture back. -
Seal the Wood:
To protect the piece and deepen the wood tone slightly, apply a thin coat of clear matte sealer over the entire star. This locks in the color without making it glossy. -
Stringing:
Cut a length of jute twine, approximately 8 inches long. Thread it through the pre-drilled hole at the top point. -
Secure the Knot:
Tie a secure overhand knot at the ends of the twine to create a loop. Trim any excess fuzz from the twine for a tidy look.
Add Sparkle
While the paint is still wet on the bottom tips, sprinkle a tiny pinch of extra-fine champagne glitter for a subtle, frosty shimmer.
Hang your new star in a window where the light can highlight the delicate transition of color
Galaxy Night-Sky Wooden Star
Transform a plain wooden block into a piece of the cosmos with this stunning galaxy-themed painting project. The deep blue blending into ethereal purples creates a dreamy, dimensional look perfect for shelf decor or a nursery.
Detailed Instructions
Materials
- Thick wooden star shape (freestanding)
- Acrylic paints: Black, Midnight Blue, Phthalo Blue (or similar bright blue), Purple, Magenta, White
- Flat paintbrushes (medium and small)
- Fine detail liner brush (size 0 or 00)
- Makeup sponge or small paint sponge
- Painter’s palette or paper plate
- Cup of water
- Paper towels
- Matte or Gloss varnish spray (optional)
Step 1: Base Coating
-
Prepare the wood:
Ensure your wooden star is clean and smooth. If there are rough edges, give them a light sanding with fine-grit sandpaper and wipe away the dust with a damp cloth. -
Paint the edges dark:
Start by painting the sides (the thickness) of the star. Mix a little black with your midnight blue to create a very deep, almost black, navy color. Apply this to all the side edges for a solid border. -
Create the dark frame:
Using that same dark navy mixture, paint the outer perimeter of the front face of the star. Paint inward about half an inch to an inch, but keep the inner edge uneven and organic rather than a straight line.
Star Shape Trick
Struggling with hand-painting stars? Paint a simple cross first (+), then add a diagonal cross (x) over it. Connect the outer tips with curved lines for a perfect sparkle shape.
Step 2: Creating the Galaxy Blend
-
Apply the mid-tones:
While the dark edge is still slightly tacky or wet, take your Phthalo Blue (bright blue) and paint the next section inwards. Overlap slightly with the dark navy to encourage blending. -
Blend the transition:
Use a slightly damp brush to blur the line where the dark navy meets the bright blue. You want a gradient effect, not stripes. -
Add the purple nebula:
Toward the center of the star, introduce your purple paint. I like to streak this in diagonally to simulate the movement of a galaxy cloud. -
Highlight with magenta:
Mix a tiny bit of white into your magenta to make it pop. Paint this into the very center of your purple area, blending outwards softly. -
Create the sponge effect:
For a truly cloudy, galactic texture, take a small makeup sponge. Dab it into a mix of white and light blue, tap off the excess, and very lightly sponge it over the blue and purple transition areas. This creates that ‘dusty’ nebula look. -
Darken the tips:
If the tips of the star have lost their depth, go back with pure black or the dark navy mix and carefully darken just the pointed ends to frame the glowing center. -
Linear texture:
The example image shows some visible brushstrokes following the direction of the points. You can emulate this by using a dry brush to drag the dark colors slightly into the light colors, following the angles of the star arms. -
Dry thoroughly:
Let this gradient layer dry completely before moving on to the stars. The background needs to be set so the white paint sits crisp on top.
Step 3: Stargazing Details
-
Prepare detailed stars:
Thin down your white acrylic paint slightly with water until it has an ink-like consistency. This helps it flow smoothly off a fine liner brush. -
Paint the large stars:
Using your smallest liner brush, paint a few five-pointed stars scattered across the surface. Place a large one on the blue section and a couple near the edges. -
Add medium glimmers:
Paint simple four-pointed crosses (like little plus signs with longer vertical lines) in the purple and magenta areas to represent distant glimmering stars. -
Dot the background:
Using the very tip of your brush or a toothpick, dot tiny white specks randomly all over the galaxy. Vary the pressure to create different sizes of dots. -
Don’t forget the sides:
Add a few small dots and simple stars to the dark sides of the wooden block. This ensures the piece looks finished from every angle. -
Seal the cosmos:
Once the white paint is fully dry, apply a coat of matte varnish spray to protect the paint, or gloss varnish if you want it to shine like glass.
Level Up: Metallic Pop
Instead of plain white for the stars, use metallic silver or champagne gold paint. It catches the light beautifully when the star is displayed on a shelf.
This celestial star is now ready to bring a touch of the universe into your home decor
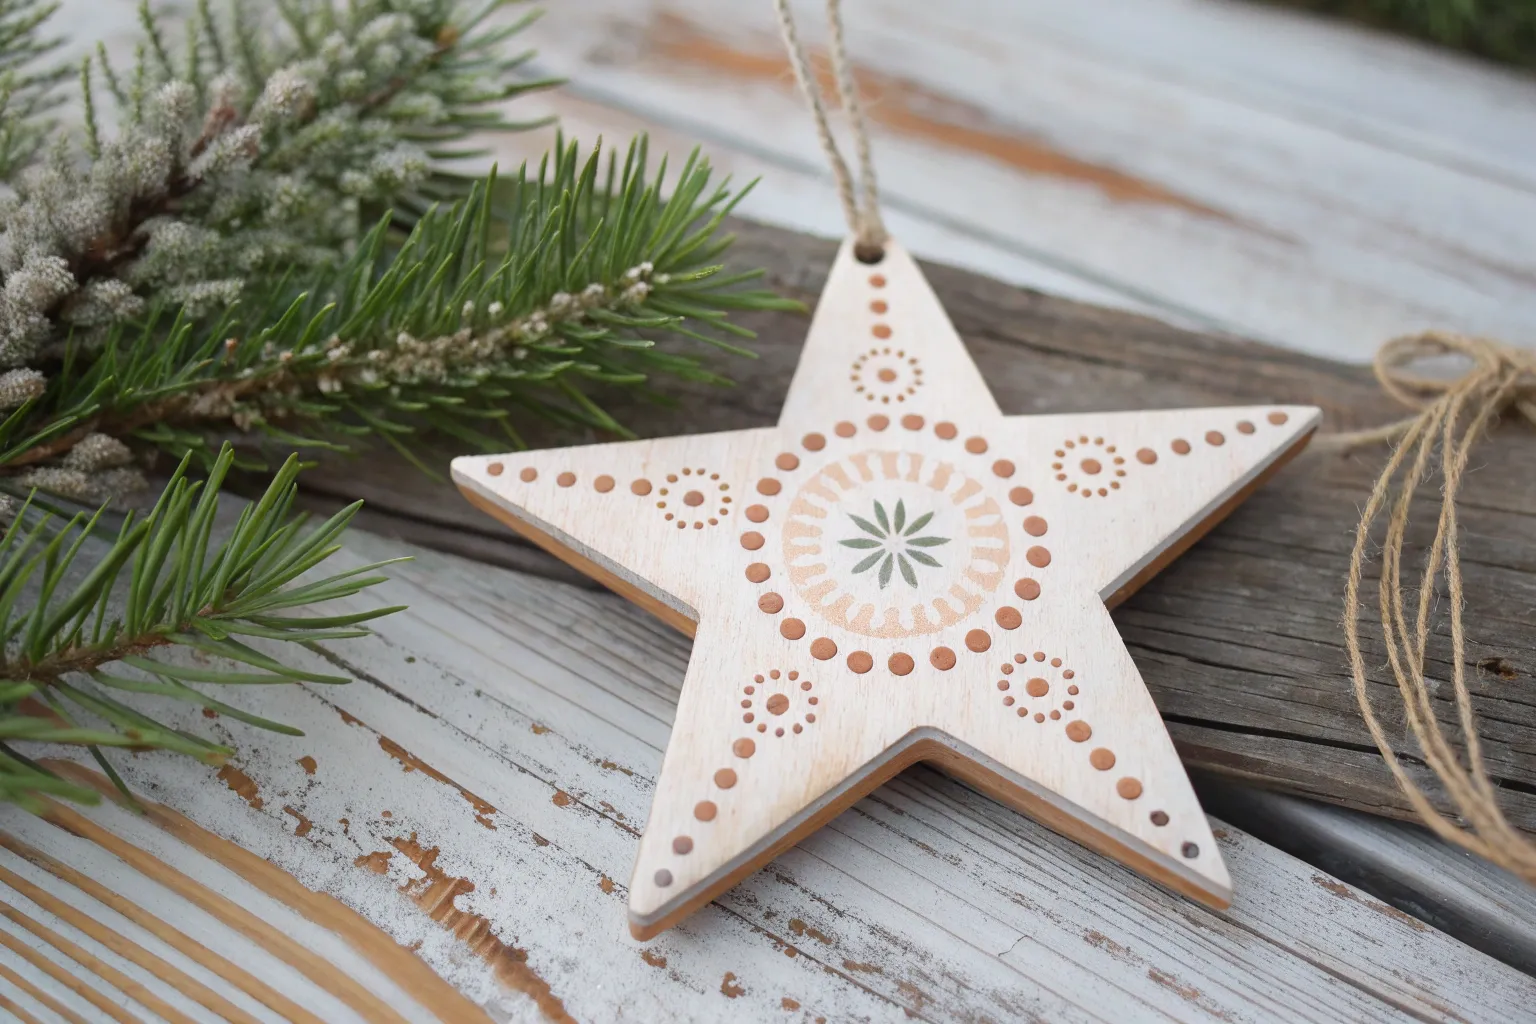
Boho Folk Floral Wooden Star
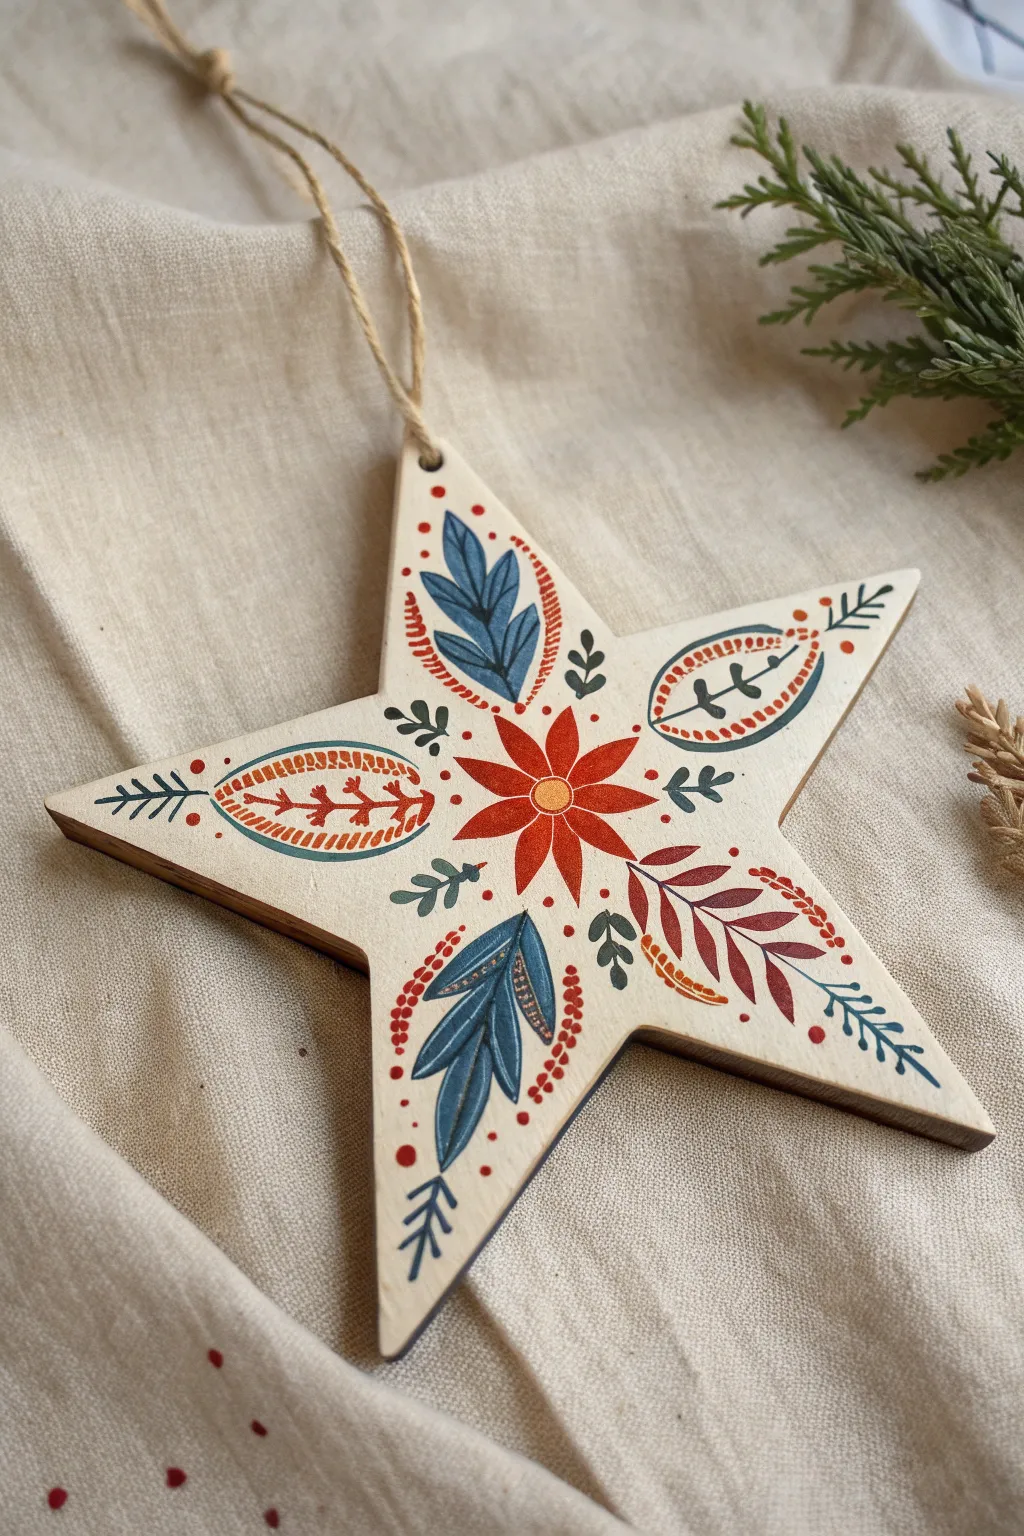
This charming project transforms a simple blank wooden star into a festive keepsake using a warm palette of rust reds and slate blues. Inspired by traditional folk art, the symmetrical botanical design feels both rustic and refined, perfect for hanging on your tree or gifting to a loved one.
Step-by-Step Guide
Materials
- Unfinished wooden star ornament (sized 4-5 inches)
- Acrylic paints: Cream/Off-white (base), Rust Red, Slate Blue/Denim, Deep Teal Green, Mustard Yellow
- Fine detail paintbrushes (sizes 0 and 00)
- Small flat brush (for base coat)
- Pencil and eraser
- Jute twine for hanging
- Matte varnish or sealant
Step 1: Preparation & Base Coat
-
Preparing the wood:
Before laying down any paint, quickly inspect your wooden star for rough edges. If necessary, give the edges a light sanding with fine-grit sandpaper to ensure a smooth finish. -
Applying the base color:
Using a small flat brush, coat the entire front surface of the star with a cream or off-white acrylic paint. This neutral background mimics the look of raw canvas or parchment. -
Letting it dry completely:
Allow the base coat to dry thoroughly. Applying multiple thin coats is better than one thick one to avoid visible brushstrokes. Wait until it’s dry to the touch before proceeding.
Steadier Hands
Rest your painting hand on a clean coffee mug while working. The raised height matches the ornament and stabilizes your brush strokes.
Step 2: Painting the Central Flower
-
Drafting the center:
Lightly sketch a small circle in the absolute center of the star using a pencil. This will anchor your entire symmetric design. -
Painting the flower center:
Fill in the central circle with mustard yellow paint. Once dry, outline it very delicately with a thin ring of rust red. -
Creating the main petals:
Paint eight pointed petals radiating from the center using rust red. Make them long enough to reach about one-third of the way into the star’s arms. Keep the petal shapes simple and unified. -
Adding details:
I like to add a tiny white or cream dot in the center of the yellow circle to give it a little highlight.
Wobbly Lines?
If your thin lines look shaky, thin your acrylic paint with a tiny drop of water. Ink-like consistency flows much smoother perfect lines.
Step 3: Adding the Foliage Motifs
-
Planning the five arms:
Visualize the star’s arm designs. Three arms will feature large internal leaf shapes, and two arms will feature branching red fern-like leaves. Sketching these outlines lightly first is highly recommended. -
Painting the blue leaf clusters:
On the top and bottom-left arms, paint a cluster of three slate blue leaves. The central leaf should point toward the star tip, with two smaller leaves flanking it. -
Refining the blue leaves:
Once the blue paint is dry, use your finest brush (size 00) and the cream base color to paint a thin central vein down the middle of each blue leaf. -
Painting the patterned pods:
On the left and right horizontal arms, paint a large oval ‘pod’ shape. Outline it in slate blue. Inside, paint a central rust red stem with small branching veins. -
Adding the red ferns:
On the bottom-right arm, paint a large fern frond using rust red. Draw a central curved stem and add tear-drop-shaped leaves coming off both sides. -
Filling the gaps with greenery:
Looking at the negative space between the main motifs, paint small sprigs of greenery using deep teal. Simple three-leaf clovers or tiny vines work perfectly here.
Step 4: Fine Details & Finishing
-
Adding dotted accents:
Dip the non-brush end of your paintbrush or a toothpick into rust red paint. Create dotted borders around the blue leaf clusters and the side pods to mimic stitching or beads. -
Painting the tips:
At the very tip of each star point, paint a small stylized branch. Use slate blue for the side points and blue/teal for the bottom points, keeping clear of the main designs. -
Checking for balance:
Step back and look at the star. If any areas feel too empty, add tiny red dots or small teal leaves to balance the composition. -
Sealing the work:
Once the paint is fully cured (give it at least an hour), apply a coat of matte varnish. This protects the delicate line work and gives the ornament a finished, professional look. -
Attaching the hanger:
Thread a length of jute twine through the hole at the top of the star. Tie a sturdy knot to create a loop for hanging.
Hang your finished star on a branch or in a window to enjoy the cozy folk art vibes all season long


Have a question or want to share your own experience? I'd love to hear from you in the comments below!