Even the most detailed floral drawing begins with a few simple shapes and lines. Once you understand structure, proportion, and the subtle logic of petals, drawing realistic flowers becomes both quicker and more rewarding.
Observing Nature: The Quiet Foundation

Before touching paper, take a moment to really look at a flower. Notice how each bloom grows out from its center in consistent radial symmetry. The number of petals, their overlap, and the gentle curvature of veins follow natural patterns that can be repeated with ease once you understand them.
Trained observational habits matter more than artistic skill. Rotate a freshly cut flower under soft light and trace its form with your eyes. That visual imprint helps when sketching from memory or reference photos later.
For beginners, sturdy species like tulips, daisies, and lilies are good starting points—they have defined petals and clear symmetry, making their anatomy easy to capture.
Step-by-Step: The Foundational Sketch

These steps turn what seems complex into a manageable structure. The secret is layering precision gradually.
- Outline the Core Shape. Begin with a light pencil circle indicating the flower’s diameter. Add central guidelines crossing at right angles to establish symmetry.
- Map Petal Placement. Sketch petal “slices” radiating out from the center, adjusting spacing to match your chosen species.
- Shape the Petals. Replace the rough slices with curved outlines, observing how real petals vary slightly in length and taper.
- Add the Stem and Leaves. A slender, lightly curved line carries the flower’s rhythm downward. Leaf venation should follow the natural branching pattern, typically pinnate or parallel.
- Refine Edges and Details. Use erasing and restating—redrawing with lighter or darker pressure—to bring the form alive.
At this stage, the drawing should already read as a recognizably realistic bloom, even before shading.
Light, Volume, and Texture

Realism comes from light. Flowers reflect and absorb brightness in delicate gradients that reveal their three-dimensional form. The goal is not heavy contrast but subtle tone control.
- Direction of Light. Choose a single light source. Petals nearest to it get the lightest tone; those behind or bent downward stay in shadow.
- Gradual Shading. Use layered strokes that follow the curvature of each petal. Circular hatching creates smooth transitions.
- Highlight and Reflection. Leave small unshaded zones where light bounces off thin tissue or glossy areas.
The same applies to leaves. Emphasize the central vein (the midrib), then blend softly outward to maintain dimensionality.
Understanding Floral Structure

Each plant family has its own geometric tendencies. Recognizing these helps one draw faster and more accurately—almost instinctively.
| Flower Type | Typical Petal Pattern | Common Center Features | Example Observation |
|---|---|---|---|
| Daisy-like composites | Spiral/radial, 10–30 petals | Dense disc florets at core | Textured circular core contrasts with smooth petals |
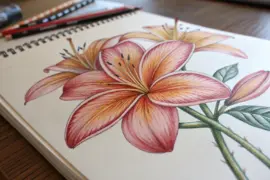
| Lilies | Six petals (often in two layers of three) | Prominent stamens | Elongated petals curve outward softly |
| Roses | Overlapping spiral, layered | Hidden pistil, layered density | Outer petals unfold, inner curl tightly |
| Tulips | Cup-shaped, symmetrical | Simple central stigma | Smooth petal bodies reflect light cleanly |
Knowing that petal growth often follows the Fibonacci sequence in angular spacing allows one to lay them out evenly without mechanical measuring.
Adding Depth Quickly

To enhance realism within minutes, work efficiently rather than hurriedly.
- Block shadows early using broad side-of-pencil shading.
- Reinforce midtones around folds and overlaps.
- Blend edges slightly with a stump or cotton swab—just enough to mute texture without losing structure.
A small fine-tipped eraser can lift highlights along petal tips or veins with high precision.
Choosing the Right Tools
While no brand is necessary, tool selection still affects result quality:
- Pencils: Use HB or 2B for outlines, 4B–6B for shading.
- Paper: Medium-grain drawing paper catches gradual tonal shifts well.
- Blending Tools: Paper stumps or soft tissues allow smooth gradients.
Graphite lends classic depth, but colored pencils or watercolor washes can be added later once the form is correct.
Practicing With Purpose
Repetition builds fluidity. Drawing the same flower several times accelerates understanding far more than switching subjects often. Slightly vary petal angles, stem curves, and light direction each time.
In my own practice, I found that timing matters less than rhythm. A steady, attentive fifteen minutes can produce more lifelike results than an hour spent overworking details. Once familiar with structure and value, flowers practically draw themselves.
Quick Creative Variations
To expand your drawing exercises, adapt these easy modifications:
- Cross-sections: Draw the flower viewed from the side or diagonally to practice perspective.
- Dry petals: Capture texture loss and curling edges.
- Cluster compositions: Combine several blooms into balanced arrangements by overlapping forms gently.
Integrating these short sketches into your regular creative routine maintains fluency and observation skills.
Bringing It All Together
The technique for drawing realistic flowers hinges on observation, proportion, and controlled shading. Once those principles click, anyone—from dedicated hobbyists to casual sketchers—can produce naturalistic floral drawings in minutes. The process feels meditative: structured yet spontaneous, quick yet richly detailed.