If you’ve got a little pile of stones and a craving to make something cute, animal painted rocks are the sweetest place to start. I’m sharing my go-to animal rock painting ideas—from classic favorites to a few playful twists that’ll make your rocks feel like tiny characters.
Ladybug Dot Rocks
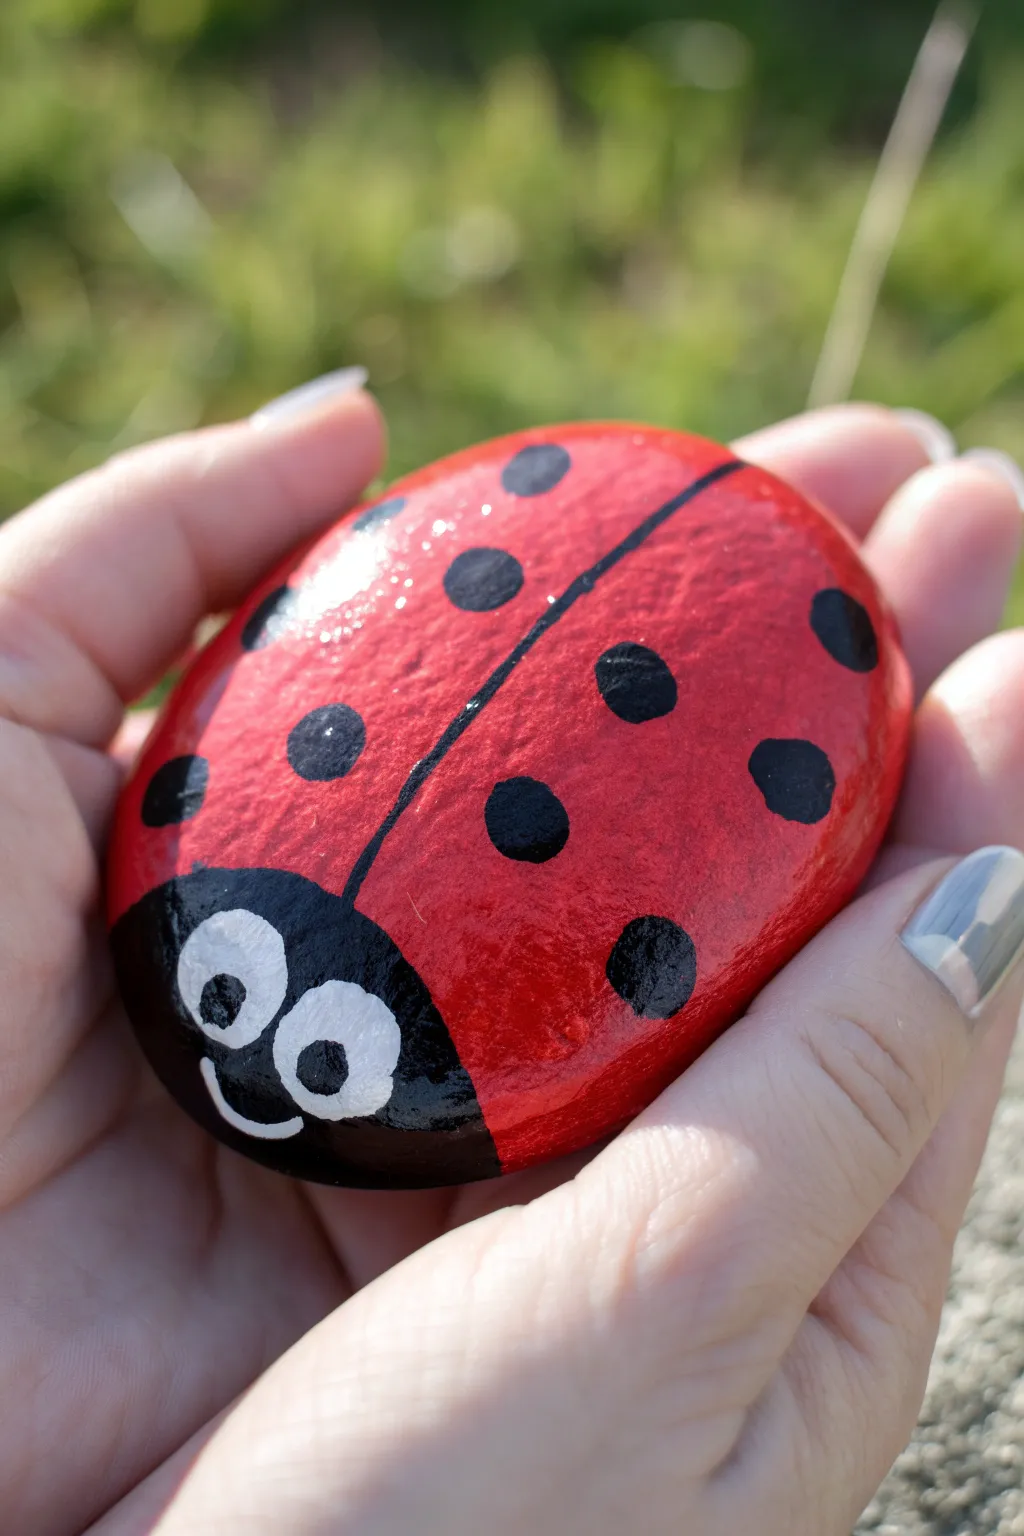
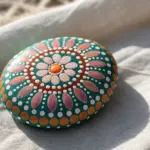
Transform a smooth river stone into a cheerful garden friend with this classic ladybug design. Featuring a vibrant red shell, bold black spots, and oversized expressive eyes, this glossy creation is perfect for brightening up flower beds or gifting as a pocket talisman.
Detailed Instructions
Materials
- Smooth oval river rock (palm-sized)
- Acrylic paint (Bright Red, Black, White)
- Flat paintbrush (medium size)
- Round detail paintbrush (small/fine tip)
- Dotting tool or the handle end of a paintbrush
- Pencil
- Clear gloss varnish or sealant (spray or brush-on)
- Water cup and paper towels
Step 1: Base and Body
-
Clean the canvas:
Begin by thoroughly washing your rock with soap and water to remove any dirt or oils. Let it dry completely before starting, as moisture trapped under the paint can cause peeling later. -
Paint the red shell:
Using your medium flat brush, coat the entire top surface of the rock with bright red acrylic paint. You may need to apply two or three thin layers to get a solid, opaque color, allowing each coat to dry fully in between. -
Create the head shape:
Once the red base is dry, use a pencil to lightly sketch a curved line across the front third of the rock to demarcate the head area. -
Fill the head section:
Paint the marked head section with black acrylic paint. Use your smaller round brush near the edges to keep the line against the red crisp and clean. -
Divide the wings:
With the fine tip brush and black paint, draw a straight line down the center of the red body, starting from the black head section and extending all the way to the back of the rock.
Step 2: Spots and Details
-
Plan the spots:
Dip a small round brush or a dotting tool into black paint. I like to visualize a symmetrical pattern first to ensure the ladybug looks balanced. -
Paint the dots:
Carefully press your tool onto the red surface to create the black spots on either side of the center line. Vary the size slightly or keep them uniform depending on your preference. -
Establish the eyes:
Switch to white paint. Using the round brush or a large dotting tool, paint two large, touching white circles onto the black head area. -
Add the pupils:
Once the white circles are dry to the touch, add smaller black dots inside them looking towards the side or up for a goofy expression. -
Create the smile:
Use your finest detail brush and white paint to draw a small, simple curve underneath the eyes for a smile. -
Highlights:
Add tiny white specks to the black pupils to give the eyes a lively sparkle. -
Clean up edges:
Look over your rock for any smudges or uneven lines. You can touch up the red background carefully if any black paint went astray.
Uneven Coverage?
If your red paint looks streaky or translucent, don’t rush. Apply multiple thin coats rather than one thick gloop, letting each layer dry completely for a smooth, solid finish.
Step 3: Finishing
-
Dry thoroughly:
Allow the painted rock to sit undisturbed for several hours or overnight to ensure every layer is completely cured. -
Apply sealant:
Finish by applying a clear gloss varnish over the entire painted surface. This not only protects the paint from weather but gives the ladybug that classic shiny, beetle-shell look.
Use What You Have
Don’t have professional dotting tools? The handle end of a paintbrush, a Q-tip, or even the head of a pin can create perfect circles for your spots and eyes.
Place your little beetle in a sunny spot in the garden to greet visitors


Wide-Eyed Owl Rocks
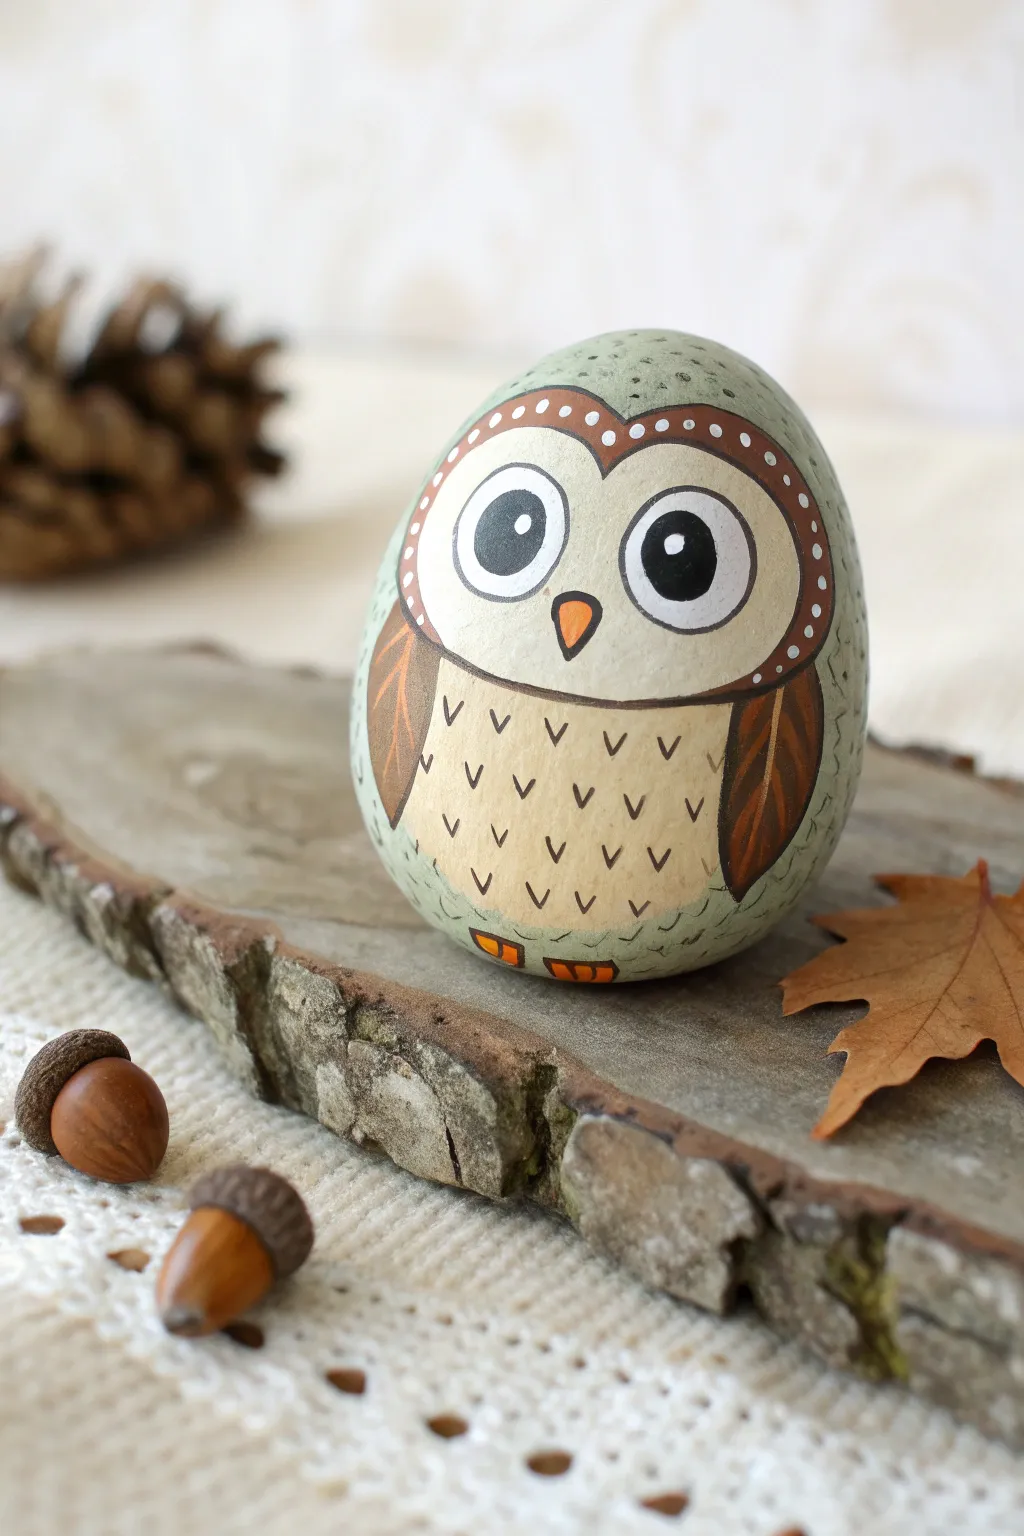
This charming project transforms a simple egg-shaped stone into a wide-eyed owl with a soft, natural color palette. The sage green feathers and speckled belly details give it a cozy woodland feel that’s perfect for autumn decor.
Step-by-Step
Materials
- Smooth, egg-shaped river rock
- Acrylic paints (Sage green, cream/beige, white, dark brown, burnt orange, black)
- Medium flat brush
- Small round brush
- Fine liner brush (size 00 or 000)
- Dotting tool or toothpick
- Pencil for sketching
- Matte finish sealant spray or varnish
Step 1: Base and Blocking
-
Clean the canvas:
Begin by scrubbing your rock with soap and water to remove any dirt or oils. Let it dry completely before starting, as moisture trapped inside can ruin the paint later. -
Sketch the outline:
Using a pencil, lightly draw the main shapes: a large oval for the belly area, two leaf-like shapes on the sides for wings, and the curved brow line for the face mask. -
Paint the background:
Mix a soft sage green. Paint the entire back and top of the rock, carefully painting around your sketched belly and wing areas. You might need two coats for opaque coverage. -
Fill the belly:
Paint the large oval belly area with a cream or light beige color. Apply this evenly, ensuring it meets the sage green edge neatly. -
Create the face mask:
Use the same cream color to fill in the face area above the belly. This shape should curve over the eyes like a heart top, connecting to the belly section seamlessly. -
Block in the wings:
Paint the wing shapes on either side using a medium brown tone. These should look like leaf shapes tucked against the owl’s sides.
Pro Tip: Steady Hands
For the tiny ‘v’ feathers and eye outlines, rest your pinky finger on a dry part of the rock to stabilize your hand while painting fine details.
Step 2: Facial Features
-
Outline the head:
Using a small round brush and dark brown paint, carefully create a thick band outlining the top of the face mask, separating the cream face from the sage head. -
Paint the eye whites:
Paint two large white circles in the center of the face mask. They should be close together but not quite touching. -
Add the beak:
Below the eyes, paint a small, inverted triangle in burnt orange for the beak. Outline it thinly in black to make it pop. -
Create the pupils:
Once the white circles are bone-dry, paint large black circles inside them. Leave a significant amount of white showing to give him that surprised look. -
Add eye details:
Outline the large white eyes with a thin black line. Then, add a tiny white reflection dot inside each black pupil at the ‘1 o’clock’ position for life.
Step 3: Feather Details
-
Decorate the forehead:
Dip a dotting tool or the end of a paintbrush handle into white paint. Add a row of evenly spaced dots along the dark brown band on the forehead. -
Texture the belly:
Switch to your finest liner brush. Using dark brown paint diluted slightly with water, paint small ‘v’ shapes in rows across the cream belly to simulate feathers. -
Detail the wings:
Add a central vein line and angled branching lines on the brown wings using a lighter tan or orange-brown color to mimic flight feathers. -
Add head feathers:
On the sage green head area, paint scattered, tiny curved dashes using a slightly darker green or grey to add texture without overwhelming the color. -
Paint the feet:
At the very bottom of the cream belly, paint two small orange semi-circles for feet. Add vertical brown lines to separate the toes. -
Final outlines:
Revisit your main sections (wings, belly, face) and neaten up the borders with a very fine crisp line of dark brown or black if needed for definition. -
Seal the rock:
Once all paint is completely cured (I usually wait overnight), spray with a matte varnish to protect your artwork from chipping.
Troubleshooting: Blotchy Paint?
If your cream or sage paint looks streaky, don’t keep brushing wet paint. Let the first layer dry fully, then apply a second thin coat for a solid finish.
Now you have a wise little companion ready to perch on your desk or hide in a garden pot.


Cute Turtle Shell Patterns
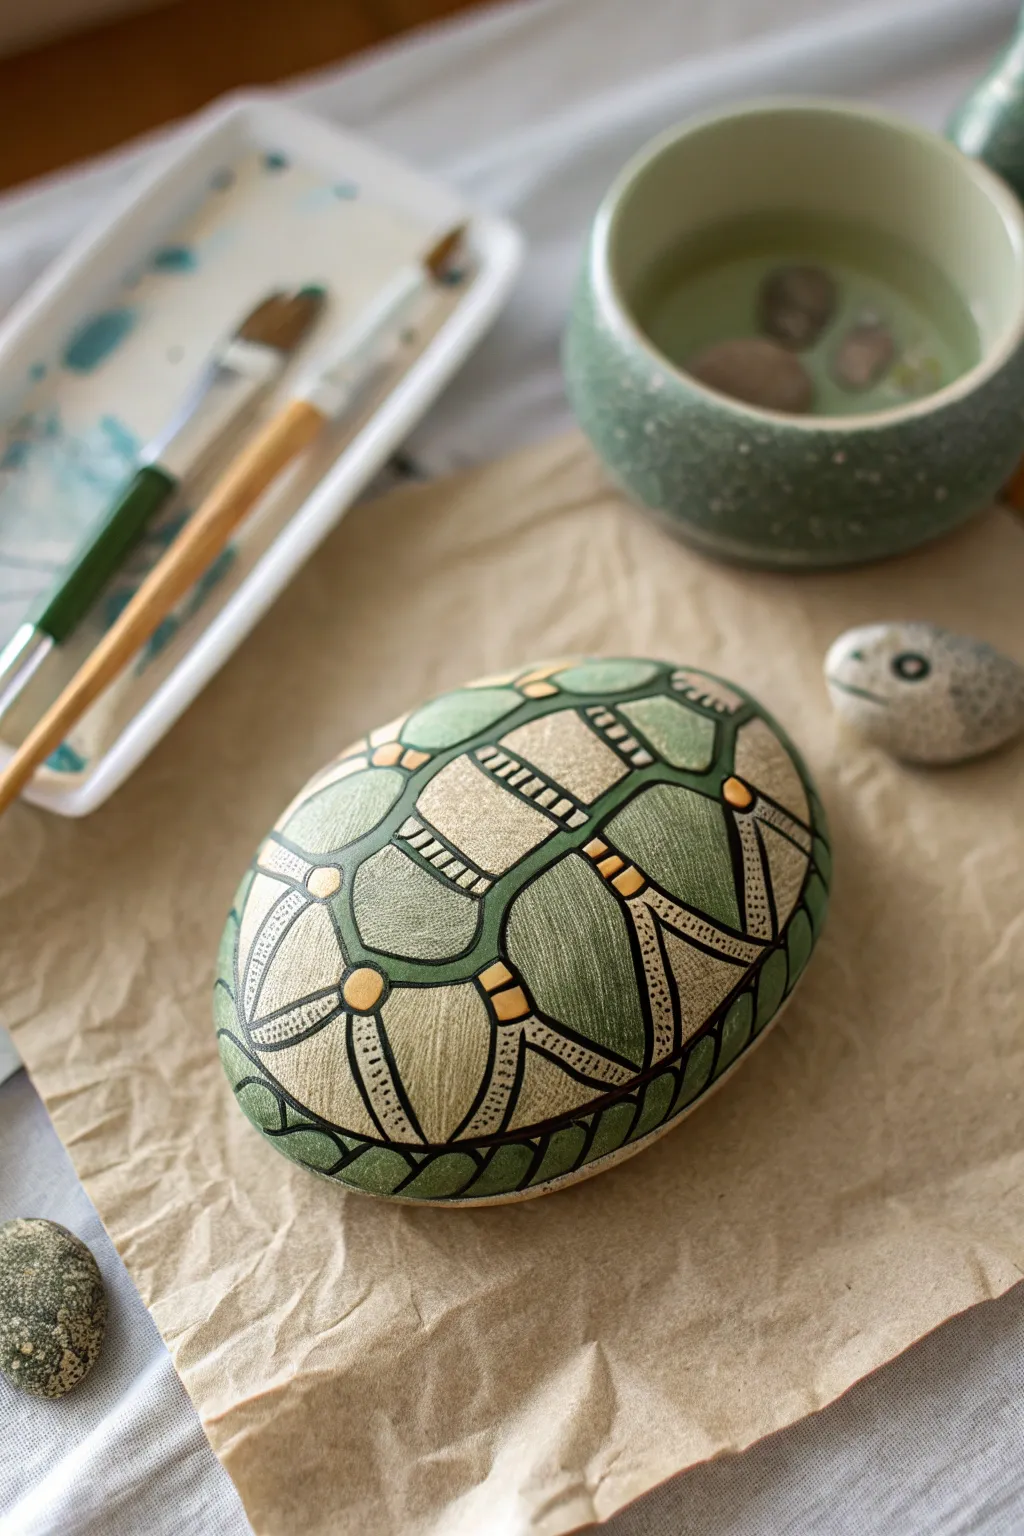
Transform a simple smooth stone into an intricate work of art with this stylized turtle shell design. The pattern combines soothing sage greens and creamy beige tones with precise linework for a sophisticated, textured look.
Detailed Instructions
Materials
- Smooth, oval river rock (palm-sized is ideal)
- Acrylic paints (dark hunter green, sage green, cream/beige, yellow ochre)
- Fine liner brushes (size 0 and 00)
- Small flat shader brush
- Pencil and eraser for sketching
- Black acrylic paint pen (extra fine tip) or black lining paint
- Gloss or matte varnish sealer
Step 1: Base and Sketching
-
Clean your canvas:
Start by scrubbing your rock with warm soapy water to remove any dirt or oils. Let it dry completely before you begin, as moisture can trap under the paint and cause peeling later. -
Apply base tone:
Paint the entire surface of the rock with a creamy beige or light sandy color. Depending on the opacity of your paint, you may need two coats to hide the stone’s original color. Allow full drying time between layers. -
Establish the central line:
Using a light pencil, draw a faint vertical curving line down the center of the rock to act as your spine. This helps keep the shell symmetry aligned. -
Sketch the scutes:
Draw the central row of hexagonal shapes (the scutes) along your spine line. Flank these with larger, curved geometric plates on either side, ensuring they contour with the rock’s shape. Don’t worry about perfection; organic variation looks natural.
Steady Hand Trick
Rest your painting hand’s pinky finger on a dry part of the rock or your table while outlining. This anchors your hand, significantly reducing shakes for cleaner lines.
Step 2: Color Blocking
-
Paint the outer plates:
Using your sage green and a small flat brush, fill in the large curved sections on the sides of the shell. Leave a small gap between shapes where the beige base coat can show through. -
Fill the central scutes:
For the middle row of shapes, stick to the cream base color but add a very light wash of watered-down beige to give them a slight tonal difference from the unpainted separator lines. -
Add the border rim:
Paint a continuous band of dark hunter green around the bottom edge of the rock. This grounds the design and mimics the marginal scutes of a real turtle shell. -
Create the lower pattern:
Inside that dark green border rim, use a lighter green to paint a series of repeating semi-circles or arches. This adds a nice decorative finish to the edge.
Step 3: Detailing and Texture
-
Begin the black outlines:
Using your extra fine paint pen or a liner brush with black paint, carefully trace over the pencil lines separating your colored sections. Keep the pressure steady for consistent line width. -
Connect the joints:
Where the plates meet, draw small circles or ‘nodes’ in yellow ochre. Outline these in black to create the look of connecting joints found in the reference image. -
Add stripe details:
On the central cream scutes, paint horizontal clusters of small rectangular hash marks using thick black lines. This mimics the growth ridges often seen on turtle shells. -
Stipple the texture:
I like to take a very dry brush with a tiny amount of black paint and gently stipple or dot the edges of the beige scutes. This creates a weathered, shadowy texture rather than a flat color. -
Detail the side and back plates:
Inside the green side plates, add faint, thin hatching lines in a lighter green or cream color. These lines should follow the curve of the rock to emphasize its roundness. -
Refine the border:
Go back to the bottom rim and outline the semi-circles in black, adding small lines connecting the arches to the main shell pattern above.
Metallic Upgrade
Replace the beige or yellow accents with metallic gold acrylic paint. The subtle shimmer will make the ‘joints’ of the shell look like inlaid precious metal.
Step 4: Final Touches
-
Highlighting:
Mix a tiny bit of white into your sage green and add a subtle highlight to the center of each green plate. This enhances the 3D domed effect of the shell. -
Clean up lines:
Check for any wobbly black lines. If you spot mistakes, you can carefully touch them up with the original background color once the black ink is totally dry. -
Seal the work:
Once you are absolutely certain the paint is dry (give it a few hours), apply a varnish. A satin or gloss finish works best here to make the shell look wet and polished.
Display your stone in a garden pot or use it as a striking paperweight on your desk


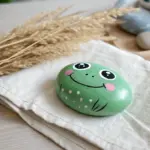
Smiling Frog Face Rocks
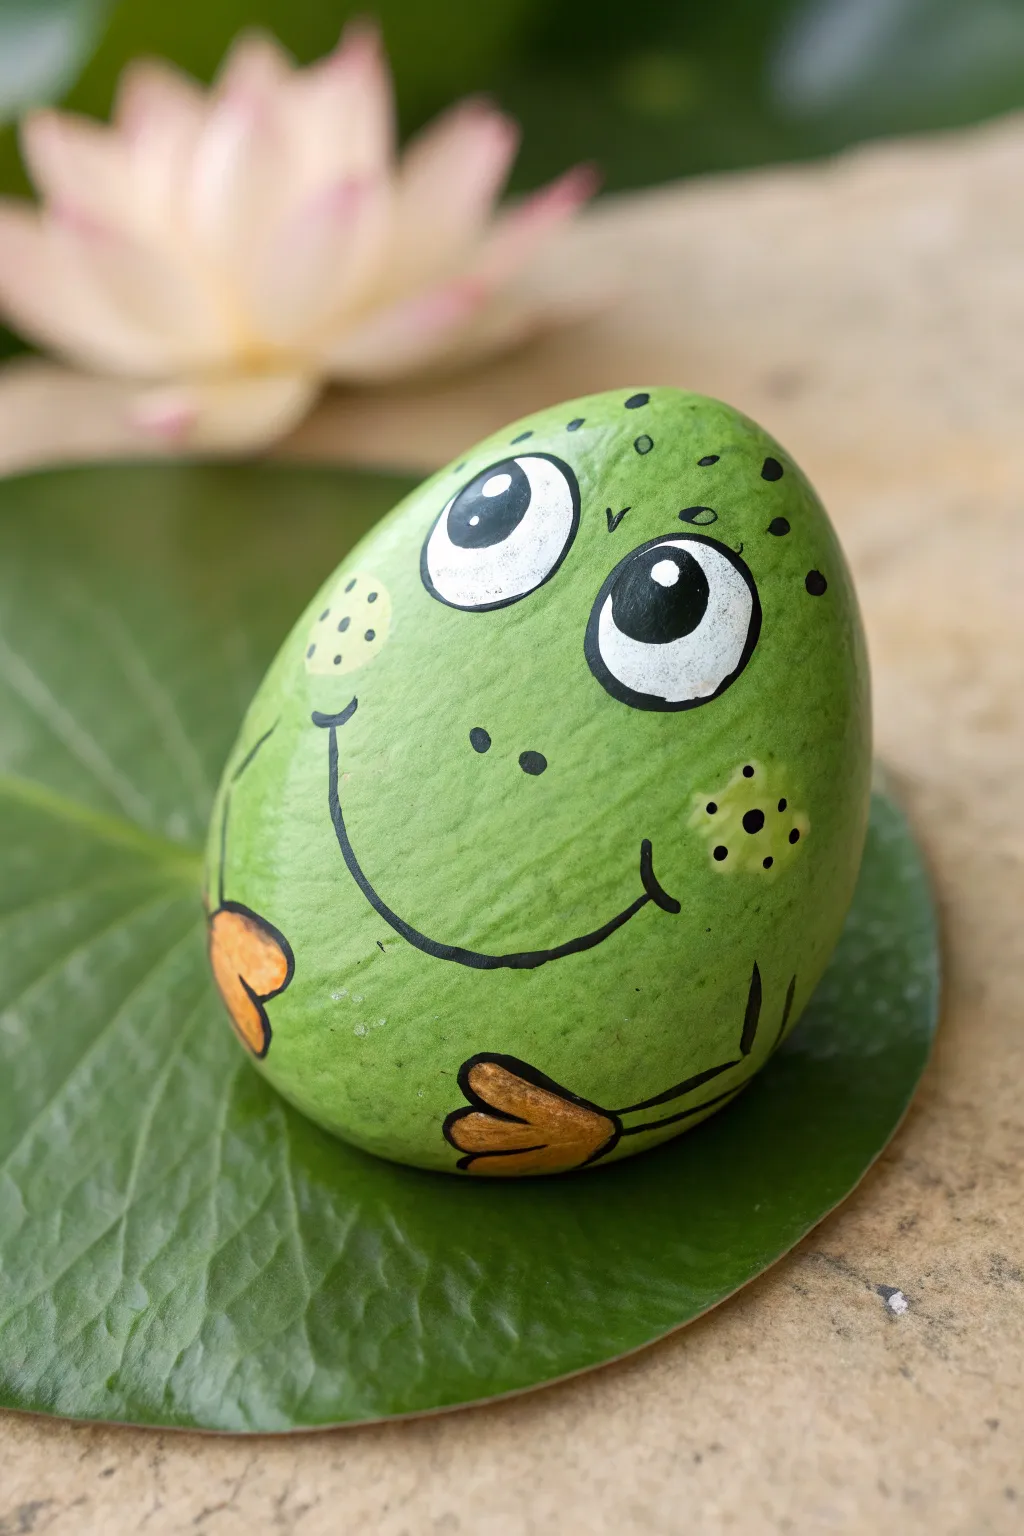
Transform a simple garden stone into a cheerful, buggy-eyed frog with just a few strokes of paint. This adorable character features a friendly grin and charming foot details, making it a perfect addition to a potted plant or garden bed.
Step-by-Step Guide
Materials
- Smooth, egg-shaped rock (medium size)
- Acrylic paints: Bright green, white, black, orange, pale yellow or light green
- Paintbrushes: Flat brush for base coating, fine detail round brush (size 0 or 1)
- Black paint pen or fine, permanent marker
- Pencil for sketching
- Acrylic sealer (glossy or matte)
Step 1: Base Coat and Sketching
-
Clean Your Canvas:
Begin by scrubbing your rock with warm, soapy water to remove any dirt or oils. Let it dry completely before starting to ensure the paint adheres properly. -
Green Base Layer:
Using a flat brush, apply a coat of bright green acrylic paint over the entire visible surface of the rock. You might need two or three coats to get a solid, opaque coverage. Let each layer dry fully before adding the next. -
Light Sketching:
Once the green base is bone dry, lightly use a pencil to map out the frog’s face. Draw two large ovals near the top for eyes and a wide, U-shaped curve for the smile.
Paint Pen Prep
If your markers keep clogging on the textured rock, scribble them on a piece of scrap paper every few strokes to get the ink flowing again.
Step 2: Face and Details
-
Painting the Eyes:
Fill in the two large eye ovals with white acrylic paint. This is crucial for making the expression pop, so apply a second coat if the green underneath shows through. -
Adding Pupils:
When the white is dry, paint two large black circles inside the white ovals. Position them slightly inward to give the frog a cute, focused expression. -
Eye Highlights:
To bring the character to life, add a tiny dot of white paint near the top edge of each black pupil. This reflection makes the eyes look wet and lively. -
The Smile:
Using your fine detail brush and black paint (or a paint pen if you prefer more control), trace over your pencil line for the mouth. Add small, upward ticks at the corners of the smile for extra cheer. -
Nostrils and Eyebrows:
Paint two small black dots between the eyes for nostrils. Add tiny, curved lines above the eyes to suggest eyebrows or creases.
Step 3: Body Accents
-
Painting the Feet:
Near the bottom of the rock, paint two small shapes resembling hearts or webbed toes using orange paint. One should be on the left side and one near the bottom center. -
Outlining the Feet:
Once the orange is dry, carefully outline the foot shapes with your thin black brush or pen. Add a small line down the center of the ‘toes’ to define the webbing. -
Cheek Patches:
Mix a very pale yellow or light green shade. Paint irregular, blotchy patches on the cheeks (sides of the face) to add texture and interest. -
Adding Speckles:
Inside the light cheek patches, dot three or four tiny black specks. I find this really helps break up the solid green and makes it look more organic. -
Top Spots:
Add a few random black dots near the top of the head and sides for classic frog markings. -
Protect Your Work:
Allow the entire rock to cure for at least 24 hours. Finish by applying a clear acrylic sealer to protect your frog from the elements if he’s going to live outside.
Lumpy Rock?
Use the rock’s natural shape to your advantage. If there is a bump, make that the nose or an eye to give the frog a 3D effect.
Place your new smiling friend on a broad leaf or beside a pond for a charming surprise
BRUSH GUIDE
The Right Brush for Every Stroke
From clean lines to bold texture — master brush choice, stroke control, and essential techniques.
Explore the Full Guide
Simple Fish With Bubble Details
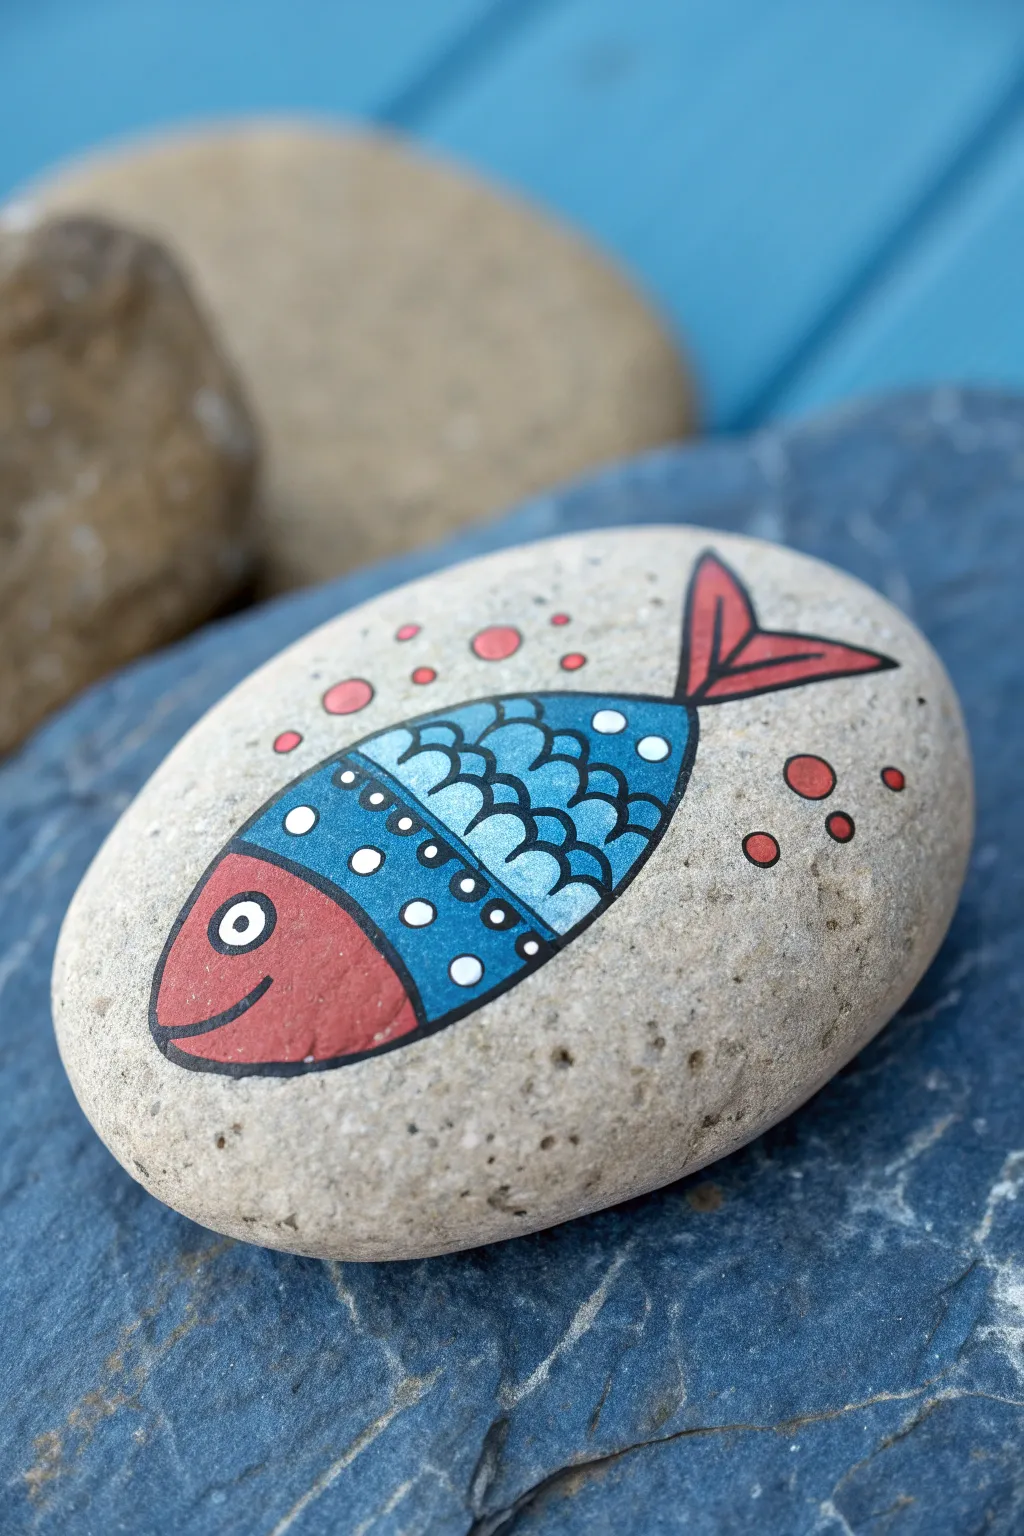
Transform a smooth garden pebble into a cheerful swimming companion with this vibrant fish design. The combination of bold outlines, playful scales, and dot patterns creates a folk-art style that looks beautiful in any potted plant or rock garden.
Step-by-Step Tutorial
Materials
- Smooth, flat oval rock (palm-sized is ideal)
- Acrylic paints (Red, Medium Blue, Light Blue, White)
- Fine-point black paint pen or liner brush with black acrylic paint
- Small round paintbrush
- Pencil and eraser
- Sealer (spray or brush-on varnish)
Step 1: Sketching the Outline
-
Prepare the Surface:
Begin with a clean, dry stone. If your rock is dark, you might want to paint a white oval shape first as a primer, but for light grey stones like this one, working directly on the surface works perfectly. -
Draft the Shape:
With a pencil, lightly sketch a simple almond or football shape in the center of the rock for the fish’s body. -
Define the Sections:
Draw a curved vertical line about one-third of the way from the left to separate the head from the body. -
Add the Tail:
Sketch a triangular, forked tail fin at the right end of the body. -
Plan the Patterns:
Lightly sketch the internal details: a curved line for the gill area, a section for the polka dots, and the scalloped scale shapes towards the tail.
Paint Pen Clogging?
If your black outline pen stops flowing over the acrylic paint, scribble it quickly on a scrap piece of paper or cardboard to get the ink moving again.
Step 2: Adding Color
-
Paint the Head:
Fill in the head section using your bright red acrylic paint. You may need two coats to get a solid, opaque color. -
Paint the Tail:
Use the same red to fill in the tail fin shape. While you have red on your brush, you can dab a few small circles around the fish to create bubbles. -
Base Coat the Body:
Paint the middle section of the fish body with your medium blue paint. This will be the background for the white dots later. -
Paint the Scales Area:
For the rear section of the body, paint the background in a lighter blue shade. If you don’t have light blue, simply mix a little white into your medium blue. -
Let it Dry:
I always emphasize patience here—let the paint dry completely before moving to the next step to prevent smudging.
Step 3: Detailing and Outlining
-
Outline Everything:
Using a fine-point black paint pen, carefully trace over all your pencil lines. Outline the entire fish, the division between head and body, and the tail. -
Draw the Eye:
Paint a small white circle on the red head. Once dry, outline it with the black pen and add a small black dot in the center for the pupil. -
Add the Mouth:
Draw a small curved smile line near the bottom front of the red head section. -
Detail the Scales:
With your black pen, draw scalloped ‘U’ shapes on the light blue section to create the appearance of scales. Overlap them slightly like roof shingles. -
Create the Dot Pattern:
Dip the handle end of a paintbrush into white paint to create perfect dots on the dark blue section. Make some larger and some smaller for variety. -
Add Decorative Dots:
Use the very tip of your brush or a toothpick to add tiny white dots along the curved line that separates the dotted section from the scales. -
Outline the Bubbles:
Circle your red background bubbles with the black paint pen. -
Final Seal:
once the paint is fully cured (usually 24 hours), apply a clear spray sealer or varnish to protect your artwork from the elements.
Make it Sparkle
Mix a tiny amount of silver glitter into your sealer or use a metallic silver paint for the scales to give your fish a shimmering, wet look.
Place your finished fish rock near a garden pond or birdbath for a delightful splash of color
Puppy Dog Portrait Rocks
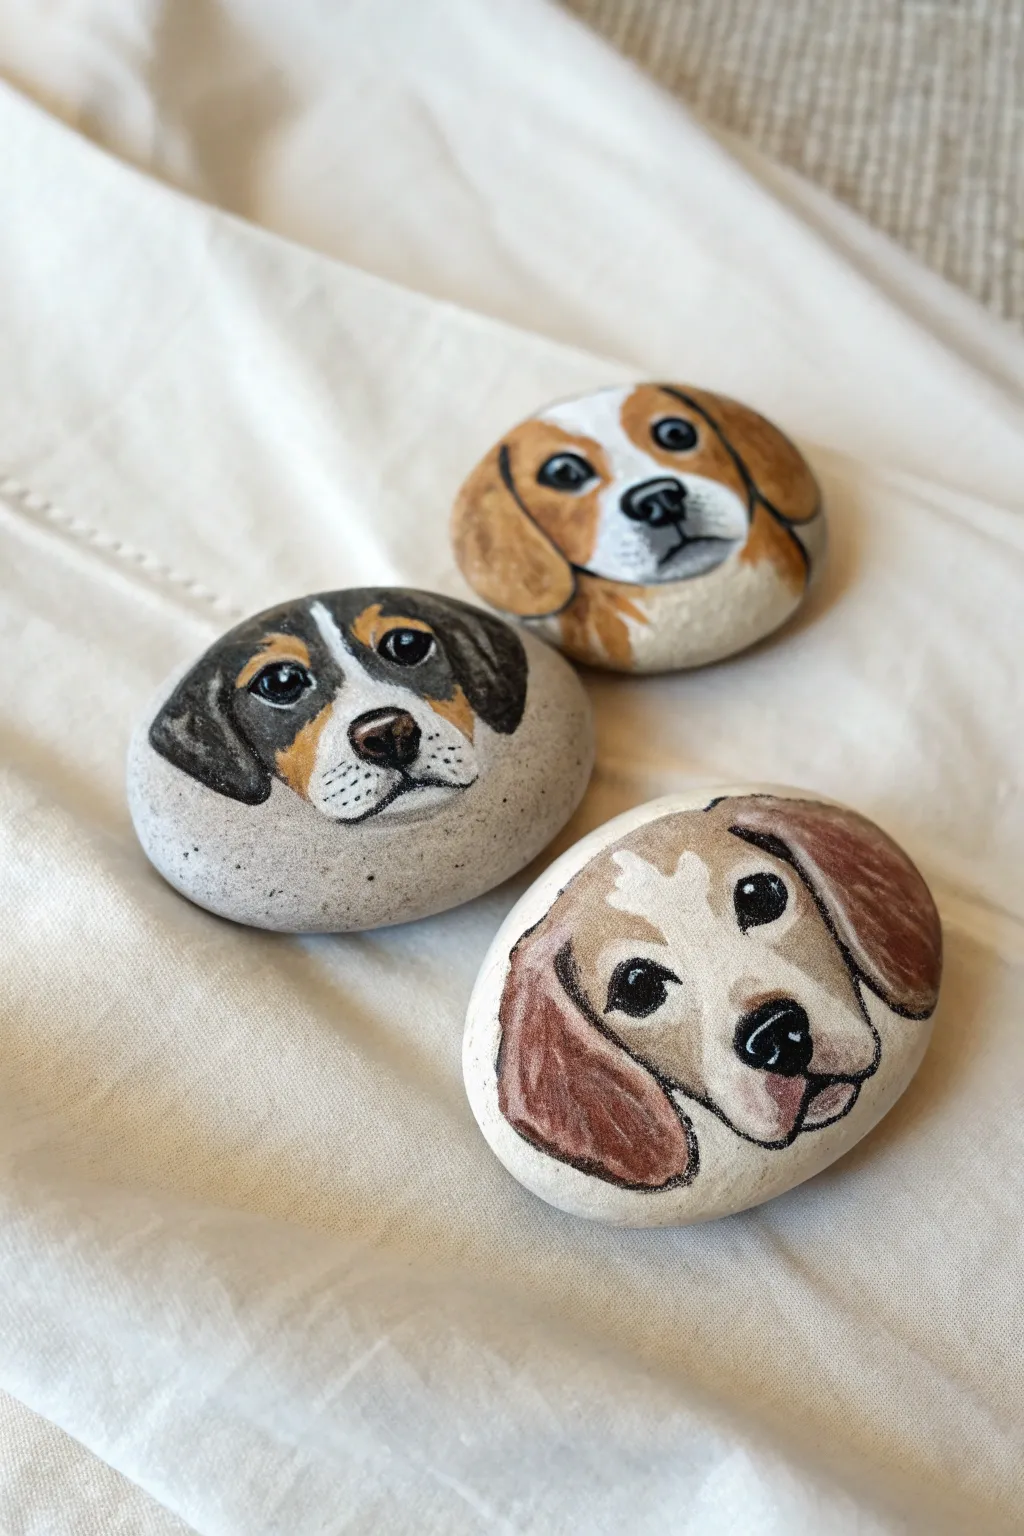
Transform smooth river stones into adorable beagle puppy portraits that capture their sweet, soulful expressions. This project uses a layering technique with acrylics to build realistic fur textures and deep, shiny eyes on an unusual canvas.
Detailed Instructions
Materials
- Smooth, rounded river stones (approx. 2-3 inches wide)
- Acrylic paints (Titanium White, Mars Black, Burnt Sienna, Yellow Ochre, Raw Umber)
- Fine detail brushes (sizes 000, 0, and 1)
- Small flat brush (size 4)
- Pencil for sketching
- Palette or small dish for mixing
- Water cup and paper towels
- Matte or satin clear sealant spray
Step 1: Preparation and Sketching
-
Clean the canvas:
Wash your stones thoroughly with soap and water to remove any dirt or oils. Let them dry completely, as any moisture will prevent the paint from adhering properly. -
Determine placement:
Examine your rock’s shape. Choose the flattest or most evenly rounded side for the face. Visualize where the snout and ears will sit to maximize the rock’s natural contours. -
Sketch the outline:
Using a pencil, lightly sketch the basic oval shape of the dog’s head. Add the floppy ears on the sides and mark the position of the eyes and nose. Don’t worry about fur details yet, just get the proportions right.
Stone Selection Tip
Choose stones with a slight texture rather than perfectly polished ones; acrylic paint grips better on a slightly matte surface.
Step 2: Blocking in Colors
-
Base coat the white areas:
Mix a tiny touch of Yellow Ochre into your Titanium White to create a warm off-white. Use the size 4 flat brush to fill in the muzzle, the strip between the eyes, and any white patches on the ears. -
Paint the tan markings:
Mix Burnt Sienna with a little Yellow Ochre for a classic beagle brown. Paint the ears and the areas around the eyes, blending slightly where the brown meets the white for a softer transition. -
Add dark accents:
If you are painting the tricolor beagle (the one with black), use Mars Black to fill in the darker patches on the ears or head. For the lighter brown dogs, use a Raw Umber for the darker fur sections. -
Let it dry:
Allow these base layers to dry completely. Acrylics dry darker, so don’t panic if the colors look slightly different than you expected while wet.
Make It a Magnet
After sealing, glue a strong round ceramic magnet to the back of the stone to turn your portrait into adorable fridge art.
Step 3: Creating the Face
-
Paint the nose foundation:
Use solid black to paint the triangular shape of the nose. Add a small vertical line coming down from the center of the nose to begin the mouth. -
Define the eyes:
With your smallest brush (000), paint two solid black circles for the eyes. Ensure they are evenly spaced and level with each other to avoid a lopsided look. -
Add snout definition:
Mix a light grey (white plus a speck of black) and carefully outline the bottom of the muzzle and the mouth line. I like to feather this line slightly so it looks like fur rather than a hard cartoon outline. -
Highlight the nose:
Mix a dark grey and paint a curved highlight on the top ridge of the nose. Add tiny dots of pure white on the nostrils to make them look wet and shiny.
Step 4: Detailing and Texture
-
Create fur texture:
Using your fine liner brush, paint short, thin strokes of lighter colors over the dark patches, and darker strokes over the light patches. Follow the direction hair would naturally grow—outward from the nose and down the ears. -
Refine the ears:
Add depth to the ears by painting darker brown or black shadows underneath where the ear flaps fold over. This separation gives the portrait dimension. -
Sparkle the eyes:
This is the most crucial step for personality. Dip the tip of a toothpick or the handle end of a brush into white paint and place a single, crisp dot in the upper corner of each pupil. This ‘catchlight’ brings the dog to life. -
Add whisker spots:
On the white part of the muzzle, use a very diluted black or grey paint to make tiny dots where the whiskers would originate. -
Outline for contrast:
If your rock color is similar to the paint color, use a very thin wash of dark brown or black to verify the outer edges of the dog’s head, separating it essentially from the stone background. -
Final inspection:
Step back and look at the trio. Since rocks are porous, you might need a second coat on the white areas to make them truly opaque. Touch up any rough edges.
Step 5: Finishing
-
Seal the artwork:
Once the paint is bone dry (wait at least 24 hours to be safe), take the rocks to a well-ventilated area. Apply a light coat of clear spray sealant to protect the paint from chipping and UV fading.
Enjoy your new pack of low-maintenance, rock-solid puppies that will brighten up any garden or desk space

PENCIL GUIDE
Understanding Pencil Grades from H to B
From first sketch to finished drawing — learn pencil grades, line control, and shading techniques.
Explore the Full Guide
Whiskered Cat Face Rocks
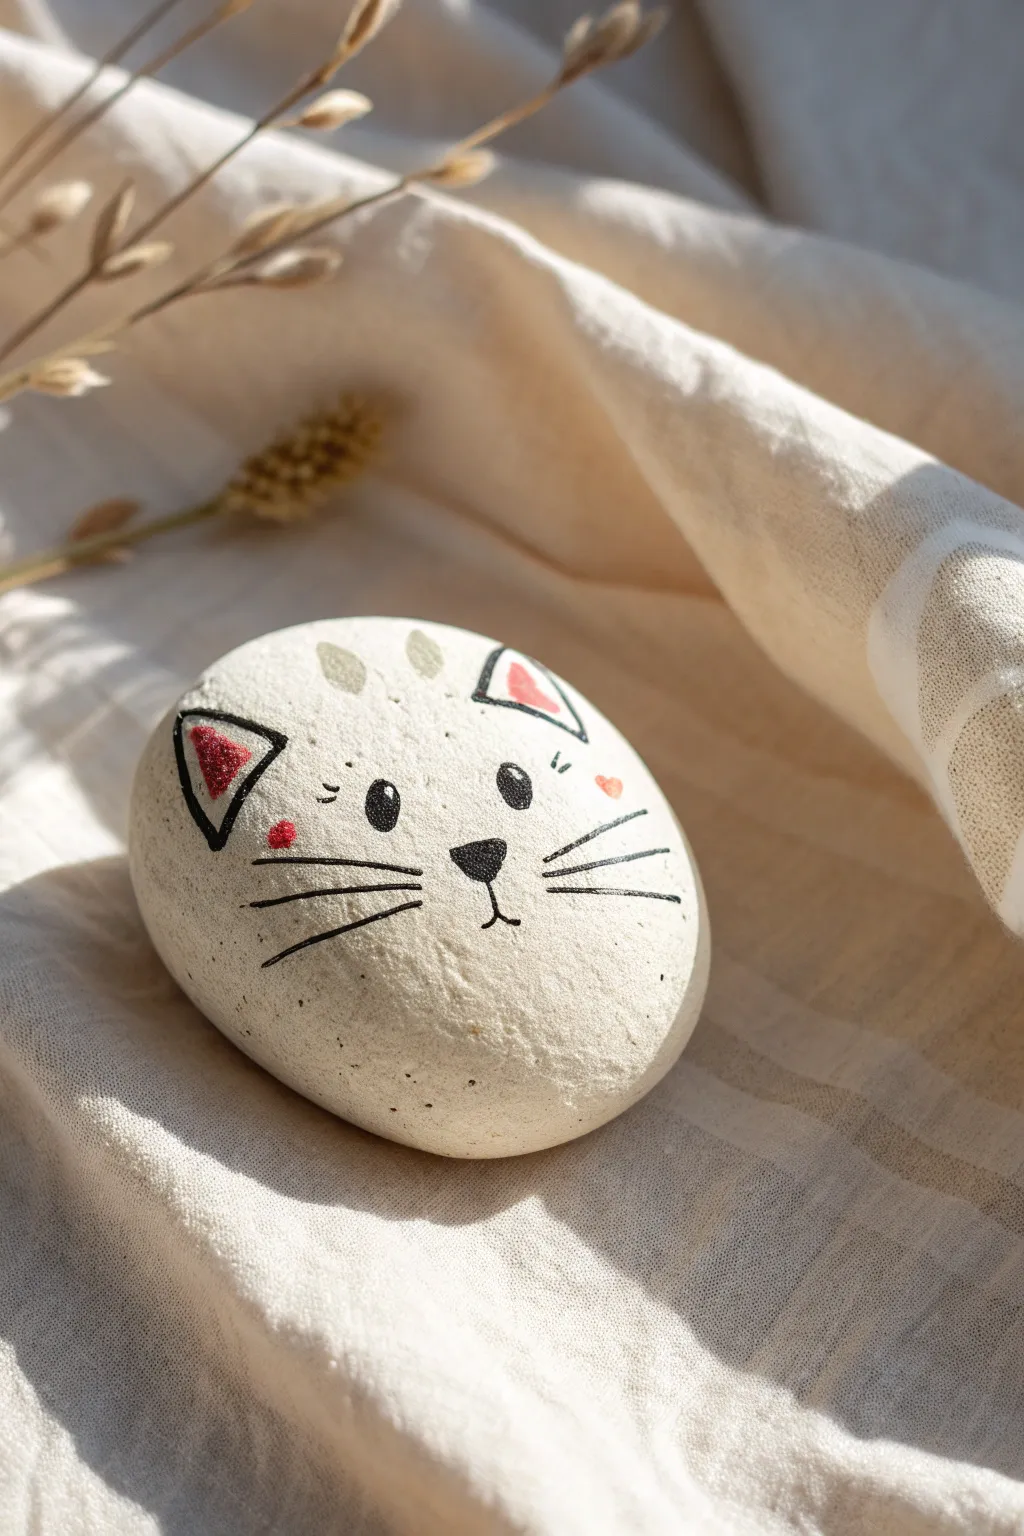
Transform a smooth, round stone into an adorable feline friend with a minimalist design that emphasizes sweet details. This whiskered cat face uses a bright white base and fine linework to create a clean, modern look perfect for garden decor or paperweights.
Step-by-Step Guide
Materials
- Smooth, round river rock (palm-sized)
- White acrylic paint (high opacity)
- Wide flat paintbrush
- Fine liner brush (size 00 or 000)
- Black acrylic paint or black paint pen (extra fine tip)
- Pink acrylic paint (soft pastel shade)
- Red acrylic paint (bright shade)
- Pale grey or beige acrylic paint
- Pencil/Light colored chalk pencil
- Matte finish sealant spray
Step 1: Base Preparation
-
Clean the Stone:
Begin by thoroughly washing your rock with soap and water to remove any dirt or oils. Let it dry completely in the sun or with a cloth. -
Prime the Surface:
Apply a base coat of white acrylic paint using your wide flat brush. I like to paint one side, let it dry, and then flip it to ensure even coverage. -
Build Opacity:
Add a second or third coat of white paint as needed until you can no longer see the original color of the stone underneath. -
Drying Time:
Allow the final layer of white paint to cure fully for at least an hour. A completely dry surface is crucial for the fine details coming next.
Fixing Wobbly Lines
If your hand shakes while outlining, don’t wipe it! Let the mistake dry completely, paint over it with your white base color, and try the line again.
Step 2: Drafting and Coloring
-
Sketch the Face:
Very lightly sketch the placement of the eyes, nose, and ears using a pencil. Keep your lines faint so they don’t show through the final paint. -
Paint the Ear Triangles:
Using the liner brush, paint two small triangles for the inner ears. Use red for the left ear and a softer pink for the right ear to create a playful asymmetrical look. -
Add Cheeks and Accents:
Paint a small red circle on the left cheek and a tiny pink heart shape on the right cheek near the eye level. -
Top Pattern Details:
Mix a very pale grey or beige. Paint two small, soft oval shapes at the very top center of the rock, between the ears, to suggest fur markings.
Level Up: Texture
Use a toothbrush to gently speckle the background with diluted grey paint before drawing the face to give the stone an eggshell-like texture.
Step 3: Fine Linework Details
-
Outline the Ears:
With black paint and your finest brush (or a paint pen), draw sharp triangles around the colored inner ear sections. -
Draw the Nose:
In the center of the face, paint a small, inverted soft triangle for the nose using solid black. -
Create the Eyes:
Paint two vertical ovals for eyes. Leave a tiny speck of white unpainted in each, or go back later with a dot of white, to add a life-like glint. -
Add the Mouth:
Draw a thin anchoring line straight down from the bottom of the nose triangle, splitting into a gentle curve to the left and right for the mouth. -
Whiskers – Left Side:
Start near the nose/cheek area and pull three long, sweeping lines outward toward the left edge of the rock. Apply less pressure at the end of the stroke for a tapered look. -
Whiskers – Right Side:
Repeat the process on the right side, drawing three whiskers that mirror the left ones. -
Eye Lashes and Brows:
Add two tiny dashes above each eye for expressive eyebrows, and add two small lashes extending from the outer corner of each eye.
Step 4: Finishing Up
-
Check for Smudges:
Look over your work carefully. If any black lines look shaky, you can tidy them up with a tiny bit of white paint once the black is dry. -
Final Seal:
Once the entire design is bone dry (wait at least 24 hours to be safe), spray the rock with a matte sealant to protect your artwork from chipping.
Place your charming new cat rock in a sunny spot on your desk or gift it to a cat-loving friend to brighten their day
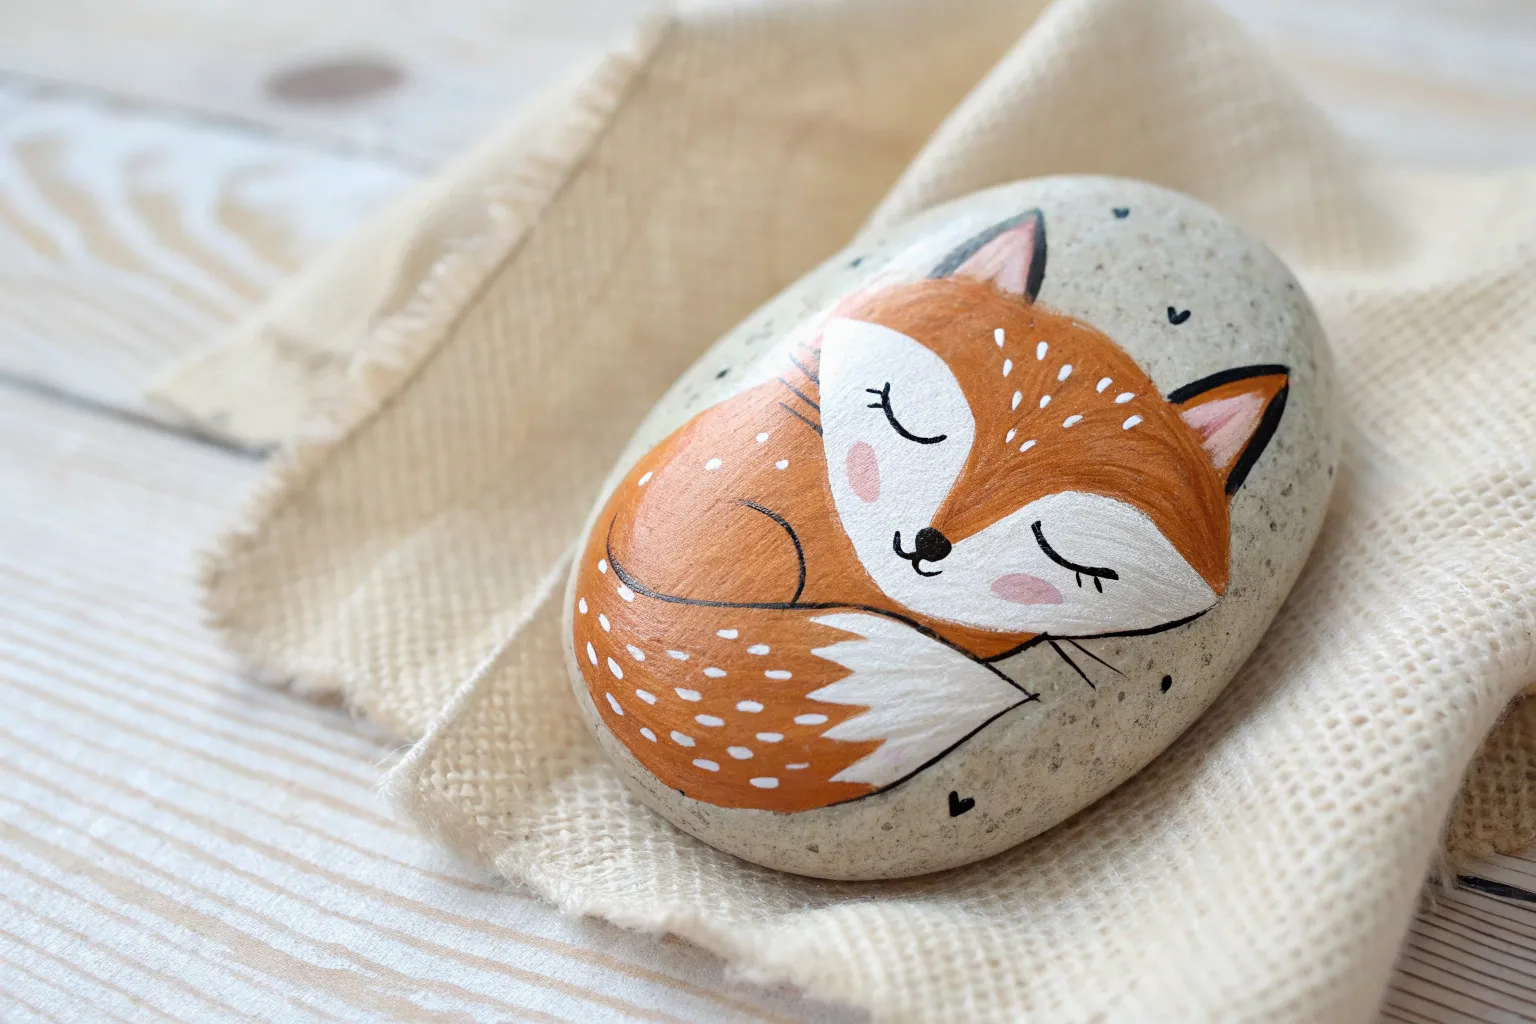
Cozy Fox Woodland Rocks
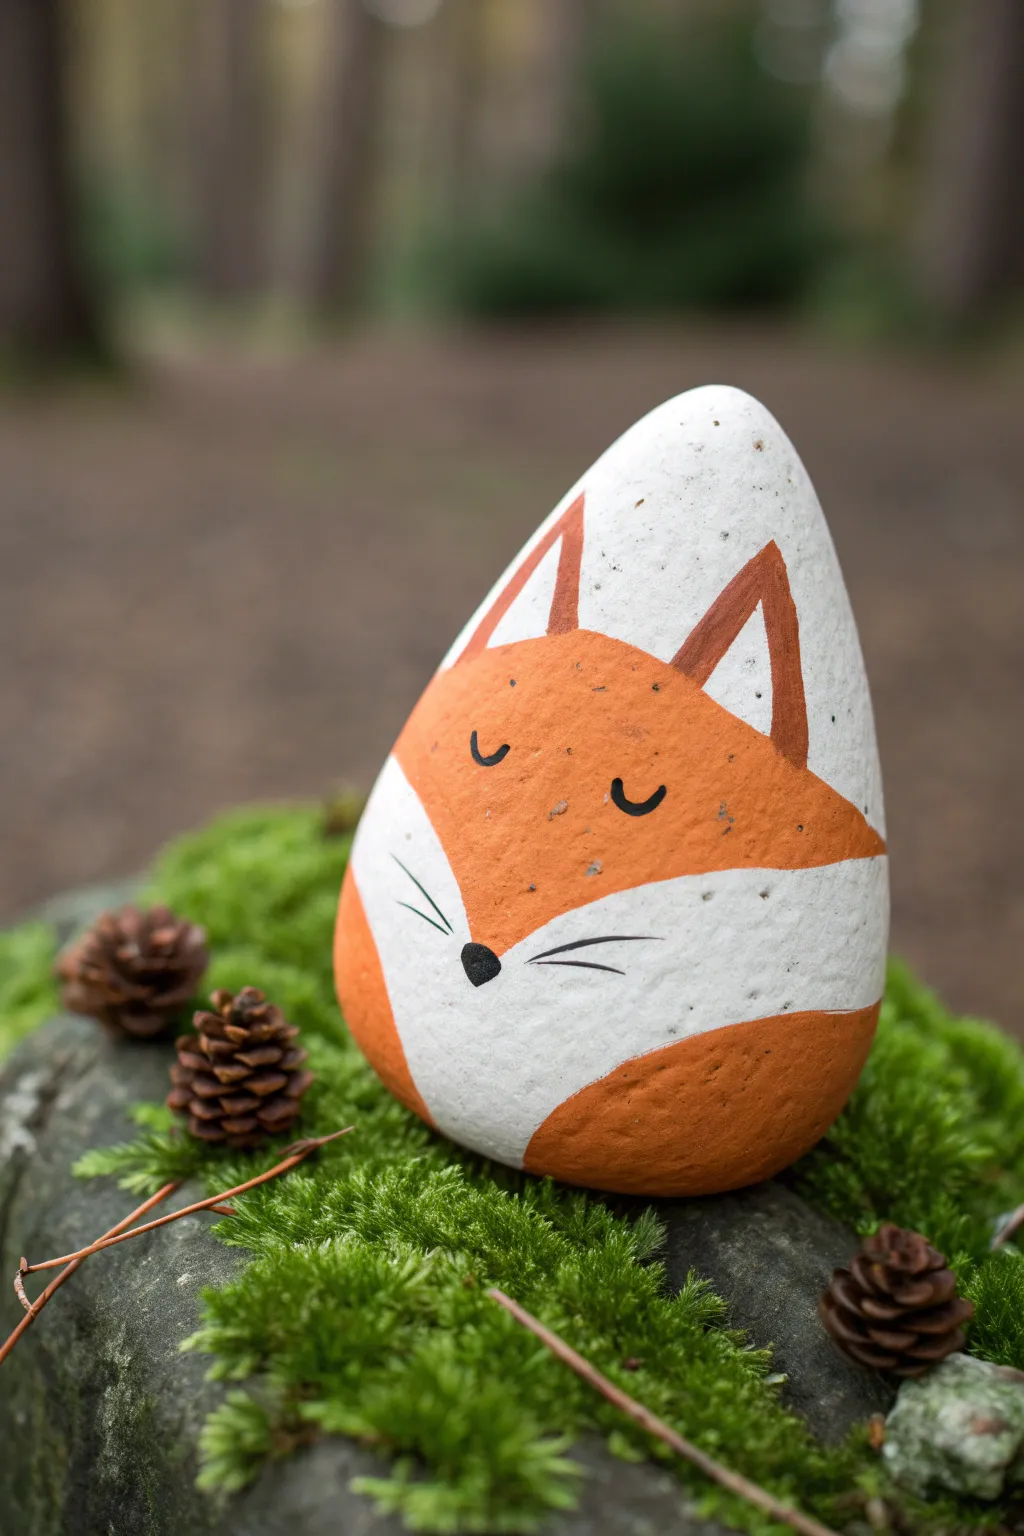
Transform a simple teardrop-shaped stone into a peaceful woodland creature with this minimalist fox design. The stark contrast between the bright white base and earthy orange tones creates a modern yet rustic piece of decor perfectly suited for a mossy garden spot.
Step-by-Step
Materials
- Smooth, teardrop-shaped river rock (flat bottom preferred)
- White acrylic paint or gesso
- Terracotta or rust-orange acrylic paint
- Burnt sienna or dark brown acrylic paint
- Black acrylic paint or fine-tip paint pen
- Small flat brush
- Fine liner brush
- Pencil for sketching
- Matte spray varnish
Step 1: Base Preparation
-
Clean the stone:
Begin by scrubbing your rock with warm soapy water and a stiff brush to remove any dirt or grit. Let it dry completely in the sun or with a hairdryer before starting. -
Prime the surface:
Using your flat brush, coat the entire rock with white acrylic paint. This creates a uniform canvas and ensures your orange tones will pop. -
Apply a second coat:
Painting rocks often requires patience; let the first white layer dry, then add a second coat to achieve full, opaque coverage where no grey stone shows through.
Uneven Lines?
If your hand shakes while painting the line between the orange and white, use a piece of flexible masking tape or washi tape to mask off the white area before painting the orange.
Step 2: Mapping the Fox
-
Sketch the face shape:
Once the white base is bone dry, use a pencil to lightly sketch a curved ‘V’ shape about halfway down the rock. This line separates the orange forehead from the white muzzle. -
Outline the body:
Extend curved lines down the sides of the rock to suggest the fox’s folded body or tail wrapping around, leaving a central white belly area. -
Draft the ears:
Draw two large triangles near the top point of the rock. Inside these triangles, sketch slightly smaller ones to define the inner ear structure.
Go Seasonal
Add a tiny painted red scarf around the bottom curve of the fox for a winter theme, or paint small flowers on the white belly for a spring version.
Step 3: Blocking in Color
-
Paint the face:
Load your brush with the terracotta or rust-orange paint. Carefully fill in the area above the ‘V’ line you sketched earlier, covering the top portion of the rock up to the ears. -
Fill the body sections:
Continue with the orange paint to fill in the side sections you marked for the body. Maintain a clean, crisp edge against the white central area. -
Refine the edges:
Go back over the borders where orange meets white to ensure the lines smooth and symmetrical. I find it helpful to turn the rock upside down to see if the symmetry holds up. -
Paint the outer ears:
Using a smaller brush, outline the large triangles of the ears with the same rust-orange color, or create a custom mix by adding a tiny dot of brown to your orange for definition. -
Define the inner ears:
Switch to the burnt sienna or dark brown paint. Carefully paint thick lines along the outer edges of the ear triangles, giving them a distinct, graphic look.
Step 4: Adding Details
-
Paint the nose:
Using black paint and a small round brush, paint a small, inverted soft triangle at the very bottom point of the orange face mask. -
Add the whiskers:
With a very fine liner brush or a paint pen, draw three delicate whiskers on each side of the white muzzle area, radiating slightly downward. -
Create the eyes:
Paint tight ‘U’ shapes in the middle of the orange face area to create the look of sleeping, closed eyes. Ensure they are level with each other. -
Add texture marks:
For a rustic touch, you can lightly stipple a few tiny brown or black specks onto the orange fur area to mimic natural texture, though sticking to solid blocks of color works too.
Step 5: Finishing Touches
-
Clean up highlights:
If any orange paint smudged onto the white areas, use a clean brush with white paint to tidy up the edges once the orange is dry. -
Seal the rock:
Once all paint is cured, take the rock outside and spray it with a matte clear varnish. This protects the paint from weather if you plan to keep your fox outdoors.
Place your sleeping fox among ferns or at the base of a tree to add a whimsical touch to your garden path.


Chubby Panda Rocks
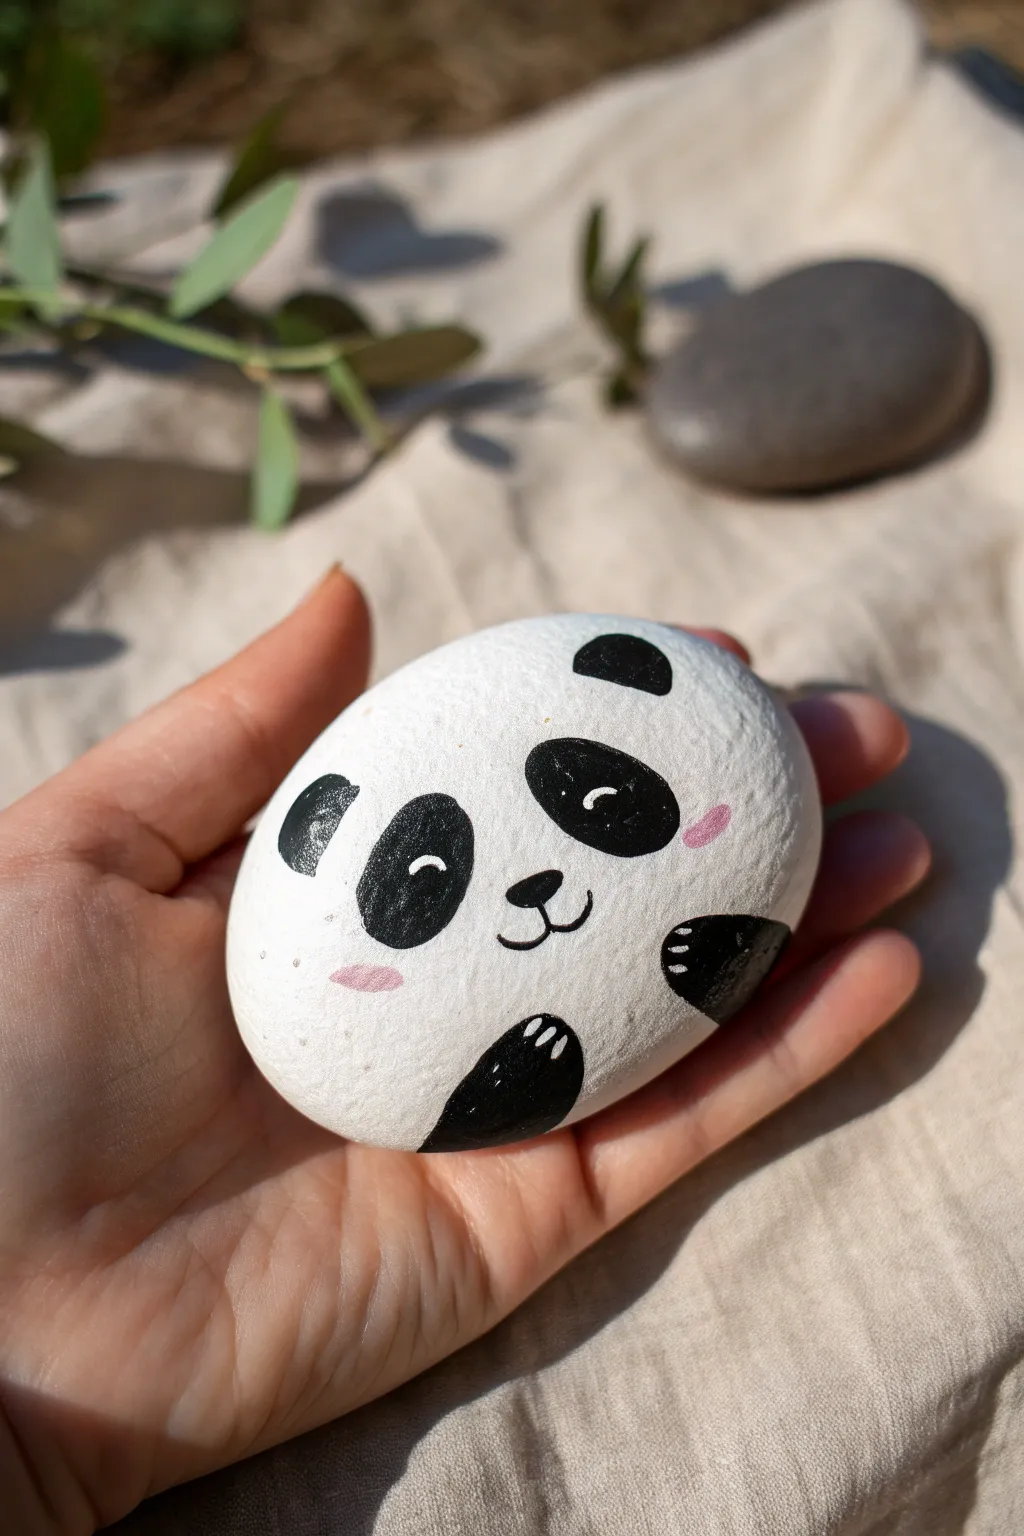
Turn a simple oval stone into an adorable, rounded panda face with this easy-to-follow guide. The key is in finding the perfect smooth shape to give your panda that delightful chubby look.
How-To Guide
Materials
- Smooth, oval-shaped river rock (palm-sized)
- White acrylic paint (high opacity)
- Black acrylic paint
- Light pink acrylic paint
- Flat paintbrush (medium size)
- Small round detail brush
- Dotting tool or toothpick
- Matte or sealant spray (optional)
- Water cup and paper towels
Step 1: Fulfilling the Base
-
Clean and prep:
Begin by washing your stone with warm soapy water to remove any dirt or oils. Let it dry completely before starting, as moisture will prevent the paint from sticking properly. -
First white coat:
Using your medium flat brush, apply a generous layer of white acrylic paint. Cover the top surface entirely. -
Check coverage:
Most white paints are semi-transparent, so don’t worry if the stone shows through at first. Allow this layer to dry, then apply a second or third coat until you have a solid, opaque white surface.
Stone Selection
The shape does the heavy lifting here. Look for a stone that is flatter rather than perfectly spherical, as it provides a better ‘canvas’ for the face.
Step 2: Painting Features
-
Outline the eyes:
Switch to black paint and your detail brush. Paint two large, slightly slanted oval patches for the panda’s eye markings. I like to space them widely to emphasize the chubby face effect. -
Add the ears:
Paint two small semi-circles at the very top edge of the stone for the ears. Keep them relatively small and rounded. -
Paint the nose:
In the center space between the eye patches, paint a small, inverted triangle with rounded corners for the nose. -
Add the mouth:
Using the very tip of your detail brush or a fine liner, draw a thin ‘w’ shape extending down from the nose to create a smiling mouth. -
Create the paws:
Near the bottom edge of the stone, on the right side, paint a rounded black shape curving inward for an arm. Repeat on the bottom center for a little foot peeking up. -
Add paw prints:
Once the black paws are dry, use white paint and a dotting tool (or toothpick) to add tiny dots for claws or pads on the black paw shapes. -
Rosy cheeks:
Dip your finger or a dry brush lightly into the pink paint. Dab it gently on the cheeks, just outside the black eye patches, to create a soft blush.
Step 3: Final Details
-
Eye highlights:
The panda needs eyes! Inside the large black eye patches, paint small white curved lines or crescents near the top to suggest closed, smiling eyes. -
Refine the edges:
Look over your work. If any black lines feel shaky, you can use a tiny bit of white paint to clean up the edges once the black is fully dry. -
Add texture:
If you want a furry look, use a nearly dry brush with a tiny bit of grey or dirtied white to stipple very faint texture around the edges, though a smooth finish is classic for this style. -
Final drying:
Let the entire rock sit for at least an hour to ensure all thick layers of paint are cured. -
Seal the deal:
To protect your panda from scratches or weather, apply a coat of clear matte sealant spray.
Uneven White Paint?
If your white base looks streaky, stop brushing over wet paint. Let it dry 100% between coats. Patience creates that smooth porcelain finish.
Place your new cheerful friend on a desk or in a garden pot to bring a smile to anyone who sees it
Fluffy Bunny With Long Ears
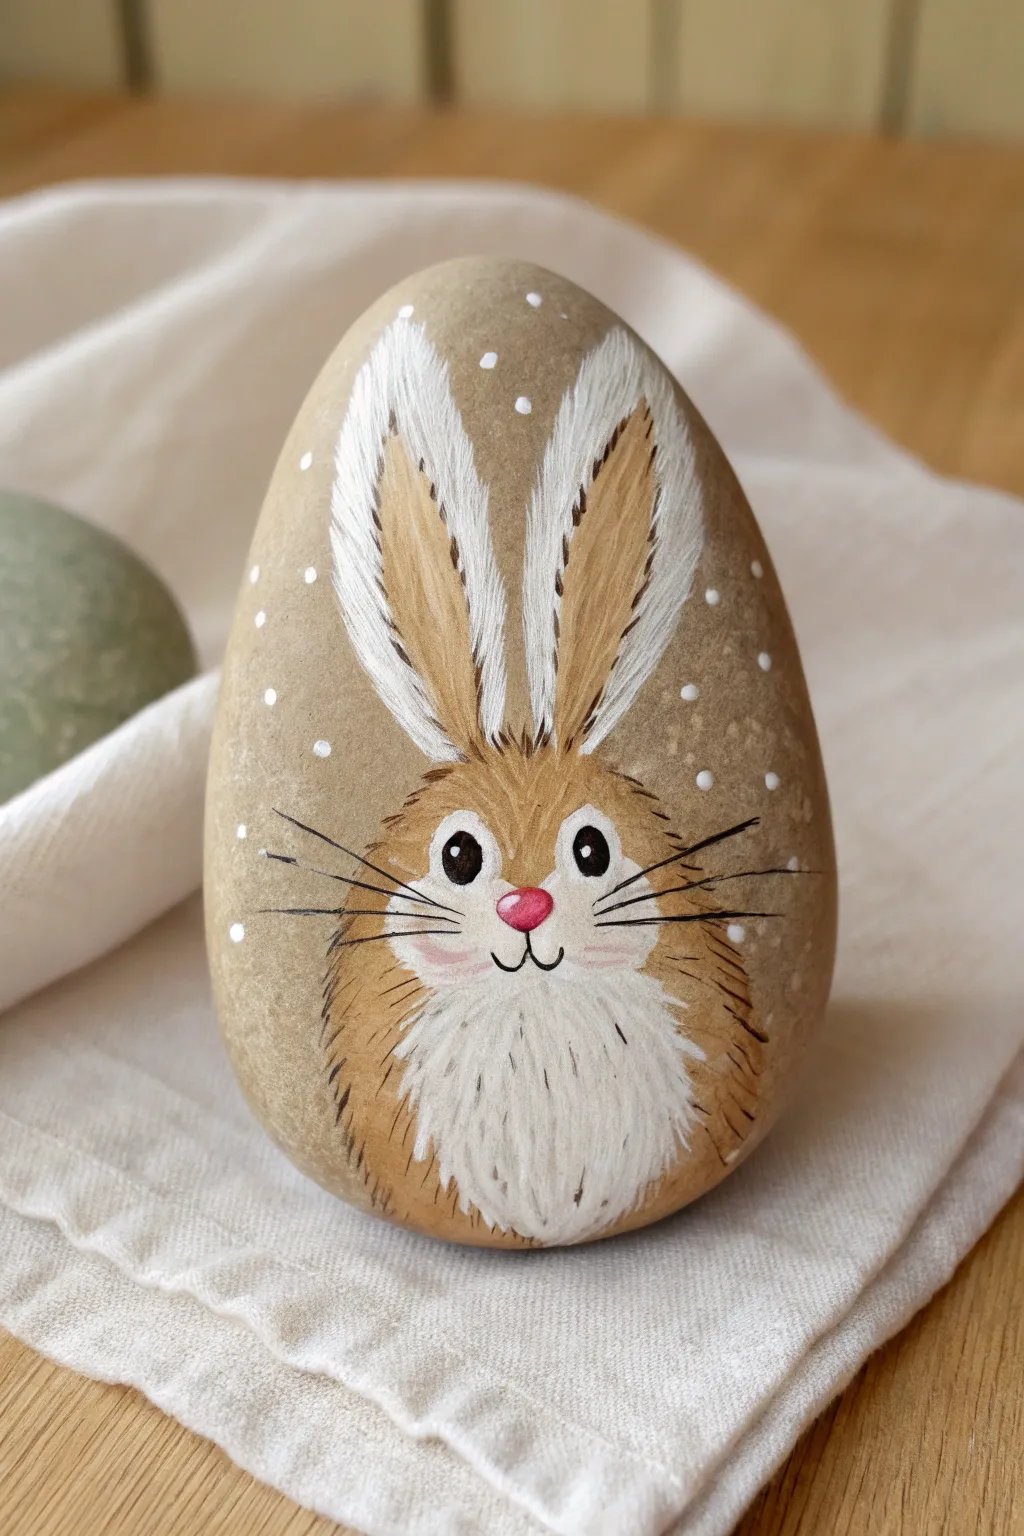
Transform a simple smooth stone into an adorable, fluffy rabbit featuring bright eyes and impressive ears. This charming painted rock uses soft brushstrokes to mimic fur texture, creating a delightful piece of decor perfect for spring or Easter.
Step-by-Step
Materials
- Smooth, oval-shaped river rock (tan or beige base color is ideal)
- Acrylic paints (White, Black, Pink, Tan/Light Brown)
- Fine detail paintbrush (size 0 or 00)
- Small flat brush or filbert brush
- Pencil for sketching
- Matte varnish or sealant
Step 1: Preparation and Base
-
Clean Your Canvas:
Begin by scrubbing your stone with warm soapy water to remove any dirt or grease. Dry it completely before starting; paint won’t stick well to a damp surface. -
Assess the Background:
This design works best on a naturally tan or beige stone. If your rock is dark grey, paint a base coat of light sandy beige over the entire surface and let it dry thoroughly. -
Sketch the Outline:
Lightly sketch the bunny’s shape with a pencil. Draw a round body near the bottom, a slightly smaller circle for the head, and two tall, pointed ears stretching toward the top of the stone.
Fur Texture Tip
For realistic fur, use a ‘dry brush’ technique. Wipe most paint off your brush on a paper towel before painting, so the bristles leave scratchy, separate lines rather than a solid blob.
Step 2: Building the Form
-
Paint the Ears:
Mix a light tan color. Using your flat brush, fill in the shape of the ears, making them solid tan. Don’t worry about the fur texture just yet; we need a solid base. -
Create the Head and Body:
Using the same tan shade, paint a rounded shape for the head and the shoulders/body area. Extend this color slightly outward with short, flicking strokes at the edges to suggest fluffiness. -
Add the Chest Fur:
Switch to white paint. On the lower part of the body, paint a large, rounded patch for the chest fur. Use downward strokes to blend the bottom edge softly. -
Detail the Ear Interiors:
Paint the outer edges of the ears with white, pulling the paint inward with quick, short strokes to look like soft fur lining the ears.
Make It 3D
Glue a tiny white pom-pom to the back of the rock for a tail, or create small felt ear shapes and glue them on top of the painted ears for mixed-media fun.
Step 3: Face and Features
-
Adding the Eyes:
Paint two solid black circles in the center of the head area. Make them relatively large to give a cute, innocent expression. Space them slightly apart. -
The Pink Nose:
Just below and between the eyes, paint a small, inverted triangle or heart shape using bright pink paint. -
Cheek Blush:
Mix a tiny amount of pink with white to make a very pale blush color. Gently dry-brush this onto the cheeks just under the eyes for a rosy glow. -
The Mouth:
Using your finest detail brush and black paint (thinned slightly with water helps flow), draw a small ‘w’ shape stemming from the bottom point of the nose. -
Eye Highlights:
Dip the back of your brush handle or a dotting tool into white paint. Place a small white dot in the upper right corner of each black eye pupil. This brings the bunny to life immediately.
Step 4: Fur Texture and Details
-
Layering Tan Fur:
Using the fine brush and the original tan color, paint thin, short lines overlapping the white chest area slightly. This integration makes the fur look layered and natural. -
White Fur Accents:
Clean your fine brush and load it with white. Paint wispy, hair-like strokes on the tips of the ears and around the cheeks to enhance the fluffy effect. -
Drawing Whiskers:
With thinned black paint and a steady hand, paint three to four long, thin whiskers extending out from the cheek area on each side. Keep these lines confident and swift. -
Whisker Base Dots:
Add three tiny black dots on each side of the muzzle where the whiskers originate. -
Outline Definition:
Use extremely fine black lines to loosely outline parts of the ears and the side of the body. Don’t make a continuous line; use broken strokes to maintain the hairy texture. -
Background Accents:
Dip a toothpick or small dotting tool into white paint. Add random small dots around the bunny on the exposed stone background to simulate snow or magic dust. -
Seal the Artwork:
I usually wait overnight to ensure all layers are bone dry. Finish by applying a coat of matte varnish to protect your bunny without adding unnatural shine.
Enjoy displaying your charming woodland friend on a shelf or hiding it in the garden for someone to find
Gentle Elephant With Layered Ears
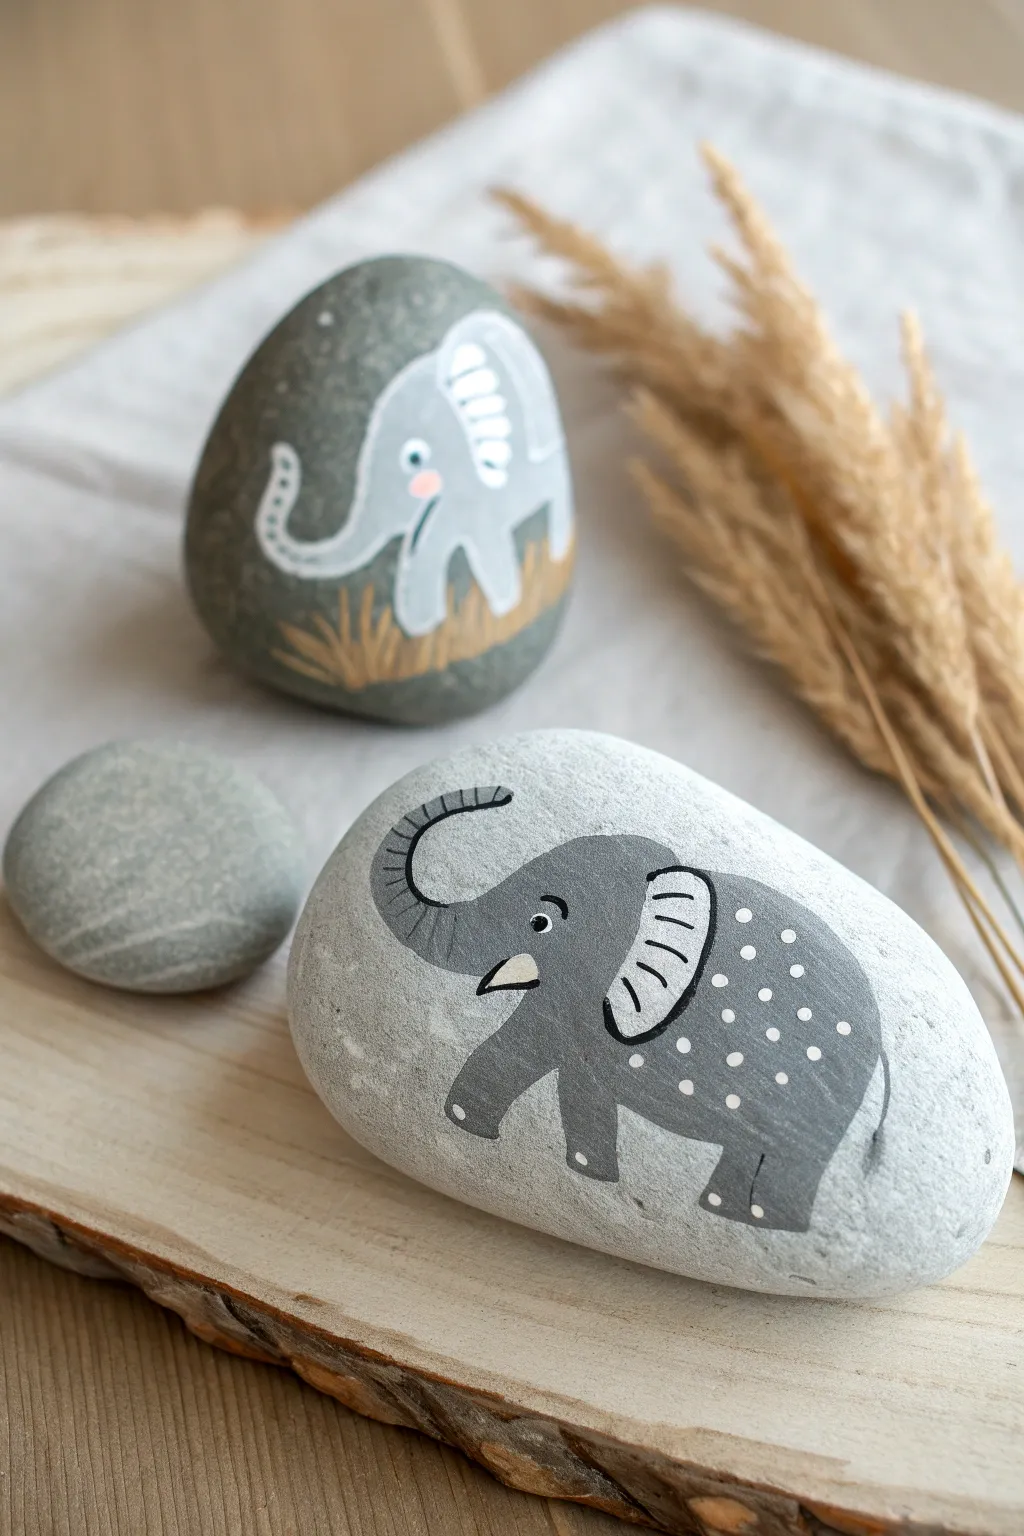
Transform a simple smooth stone into a charming little friend with this easy-to-follow guide. The clean grey tones and sweet dotted pattern make this painted rock a delightful piece of decor or a heartwarming gift.
Detailed Instructions
Materials
- Smooth, oval-shaped river rock (cleaned and dried)
- Titanium White acrylic paint
- Grey acrylic paint (medium shade)
- Black acrylic paint or fine tip paint pen
- Flat paint brushes (small and medium)
- Fine detail brush or liner brush
- Dotting tool or toothpick
- Matte or satin spray sealant
Step 1: Preparing the Stone
-
Clean the Surface:
Begin by thoroughly washing your rock with soap and water to remove any dirt or oils that might prevent the paint from sticking. Let it dry completely. -
Base Coat Application:
Using a medium flat brush, paint the entire surface of the rock with Titanium White acrylic paint if your rock isn’t naturally light, or leave the natural stone visible if it is light enough like the example. For the best result, I find a light wash or just painting the area where the elephant will go works well.
Smooth Operator
If your rock has a rough texture, apply a coat of white gesso and sand it lightly once dry. This creates a silky smooth canvas perfect for fine details.
Step 2: Painting the Elephant Body
-
Outline the Shape:
Mix a medium grey shade. Using a small brush, lightly outline the elephant’s body. Start with a large oval for the body and a rounded shape for the head. -
Add the Legs:
Paint four stout legs extending from the bottom of the oval. Make the legs slightly wider at the bottom to give them a sturdy look. -
Create the Trunk:
From the head shape, paint a trunk that curves upwards in an ‘S’ shape. Keep the width consistent, tapering slightly at the very tip. -
Fill in the Color:
Fill in the entire outline with your grey paint. If the paint looks streaky, let the first layer dry and apply a second coat for solid coverage. -
Paint the Ear:
Using the same grey (or a slightly lighter mix if you want contrast), paint a large, floppy ear shape attached to the side of the head. It should be roughly tear-drop shaped but wider. -
Add the Tail:
Use a detail brush to paint a thin, curved line at the back for the tail.
Make It a Duo
Paint a second, smaller rock with a baby elephant facing the opposite direction to create a sweet parent-and-child scene similar to the photo.
Step 3: Adding Details and Personality
-
Define the Ear:
Once the grey paint is dry, use white paint on a fine brush to fill in the inner part of the ear, leaving a grey border around the edge. -
Add the Tusk:
Paint a small, triangular white tusk jutting out from where the trunk meets the face. -
Outline Work:
Switch to a fine black paint pen or a liner brush with black paint. Carefully outline the entire elephant, including the legs, trunk, and tail. -
Ear Details:
Outline the white inner ear section with black. Add three small curved lines inside the white area to suggest wrinkles or folds. -
Trunk Texture:
Draw small, curved horizontal lines along the length of the trunk to give it texture and movement. -
Facial Features:
Paint a small black circle for the eye, leaving a tiny speck of white (highlight) near the top to make it look alive. Add a small eyebrow line above it. -
Toe Details:
Add small white semi-circles or dots at the bottom of the feet to represent toenails. -
Patterning:
Using a dotting tool or the tip of a toothpick dipped in white paint, add scattered dots across the elephant’s grey body to give it a whimsical texture. -
Sealing:
Allow the paint to cure fully for at least 24 hours. Finish by spraying a light coat of matte sealant to protect your artwork from chipping.
Now you have a sturdy little companion that’s perfect for brightening up a bookshelf or hiding in the garden for someone to find
Flamingo One-Leg Pose
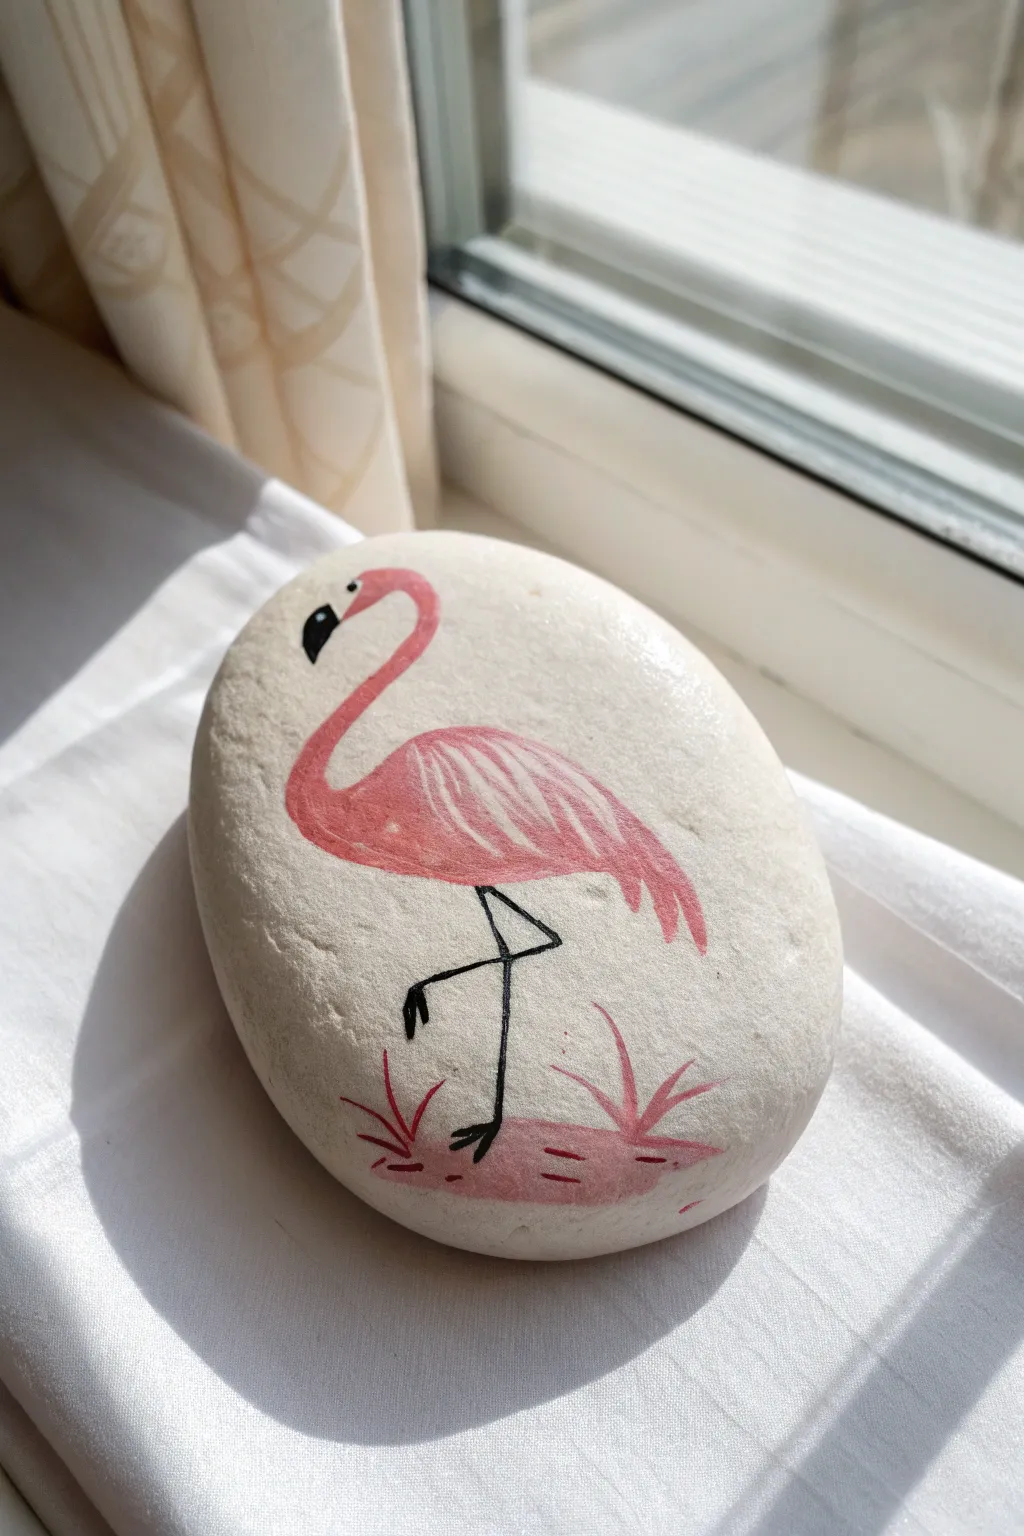
Capture the elegance of a flamingo striking its signature pose with this clean and charming rock painting project. The design uses the natural creaminess of the stone as a backdrop for the vibrant pink bird, making it a lovely minimalistic piece.
Step-by-Step
Materials
- Smooth, oval-shaped river rock (white or cream)
- Acrylic paints (bright pink, light pink, black, white)
- Fine detail paintbrush (size 0 or 00)
- Medium round paintbrush (size 2-4)
- Pencil for sketching
- Eraser
- Spray gloss varnish or sealer
Step 1: Sketching the Form
-
Clean your canvas:
Before starting, ensure your rock is washed with soapy water and completely dry to help the paint adhere properly. -
Outline the head and neck:
Using a pencil, lightly draw a curved ‘S’ shape near the upper left quadrant of the rock to form the flamingo’s long neck and small head. -
Draw the body:
Connect the neck to a larger oval shape for the body. The body should tilt slightly downward to the right to suggest the bird’s posture. -
Sketch the legs:
Draw a straight line down for the standing leg and a bent triangle shape for the tucked leg. Don’t worry about thickness yet; just get the positioning right. -
Mark the water:
Sketch a small, uneven oval patch at the bottom of the rock to represent the shallow water or ground the flamingo is standing on.
Leg Logic
Make sure the standing leg is directly under the center of gravity (the middle of the body), or your bird will look like it’s falling over.
Step 2: Applying Base Colors
-
Paint the body base:
Mix a bright pink acrylic with a tiny touch of white to get a standard flamingo pink. Fill in the body oval, leaving the neck alone for a moment. -
Paint the neck and head:
Using the same pink mix and a thinner brush, carefully paint the curved neck and head shape. Smooth out the connection point where the neck meets the body. -
Add the wing shape:
While the body paint is still slightly tacky, use a darker or unmixed bright pink to paint a swooping wing shape over the main body, extending slightly past the tail end. -
Create the ground:
Paint the ground patch at the bottom using a very watered-down pink wash. You want this to look like a watercolor splash rather than a solid opaque block. -
Let it dry:
Allow these base pink layers to dry completely before you start adding details to prevent muddying the colors.
Step 3: Detailing and Finishing
-
Feather texture:
Load a fine brush with white paint. Paint thin, curved lines inside the wing area to simulate individual feathers, following the curve of the bird’s back. -
Add wing tips:
At the tail end of the wing, paint small, downward-pointing strokes in a deeper pink to give the wing feathers some definition and movement. -
Paint the beak:
Paint the beak area white first. Once dry, add a black tip that curves downward, leaving a small white section near the face. -
Add the eye:
With your finest brush or a dotting tool, place a tiny black dot for the eye within the white section of the face area. -
Outline the legs:
Using thin black paint, trace over your pencil lines for the legs. Thicken the ‘knees’ slightly (remembering that flamingo knees bend backward) and add three webbed toes at the bottom. -
Ground details:
Add a few small pink dashes and simple grass strokes (just v-shapes) in the pink ground area to suggest reeds or ripples in the water. -
Final clean up:
Once the paint is fully dry, gently erase any visible pencil sketch marks that weren’t covered by paint. -
Seal the artwork:
Protect your flamingo by applying a coat of clear spray sealer. I find a gloss finish really makes the pink pop against the white stone.
Sparkle Up
Mix a tiny pinch of edible glitter or iridescent medium into the pink paint for the wing to give your flamingo a magical shimmer in the sun.
This serene little bird naturally brings a touch of tropical warmth to any garden corner or windowsill
Snail Spiral Shell Rocks
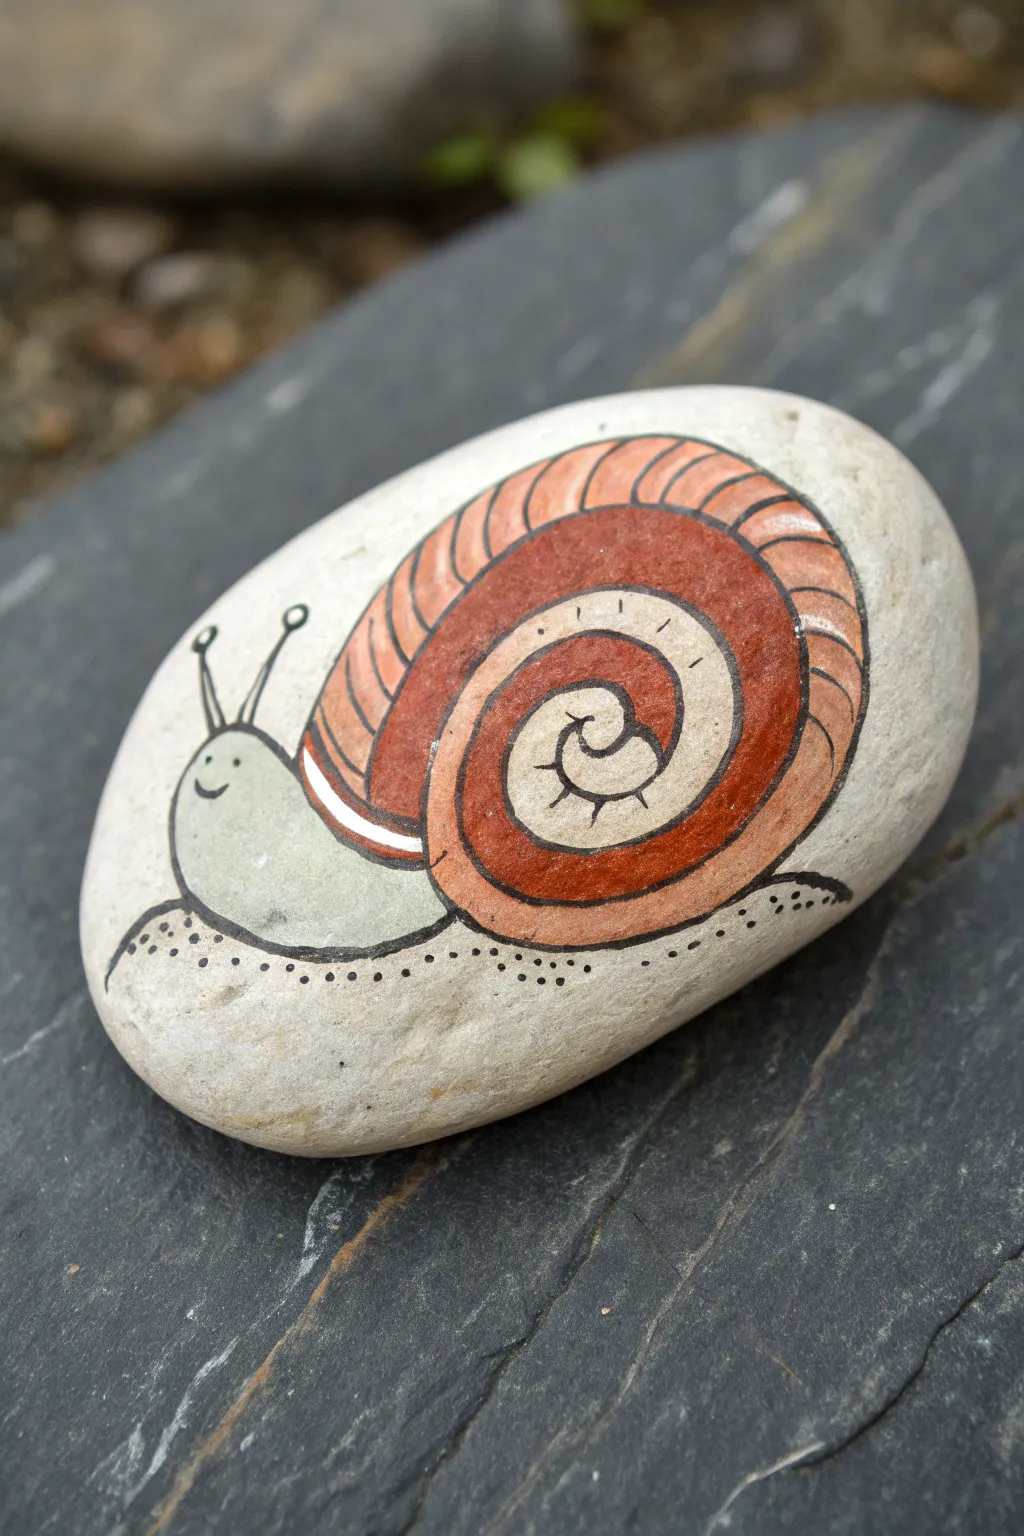
Transform a smooth, rounded stone into a charming garden companion with this stylized snail design. The warm terracotta tones of spiral shell contrast beautifully with the cool slate-grey of the snail’s body.
Detailed Instructions
Materials
- Smooth, oval river rock (light-colored)
- Acrylic paints (Terracotta/Brick Red, Light Peach, Sage Green, Titanium White, Black)
- Fine detail paintbrush (round #0 or #1)
- Medium flat paintbrush
- Black acrylic paint pen (extra fine tip)
- Acrylic varnish (matte or satin)
- Pencil and eraser
- Palette or mixing plate
- Water cup and paper towels
Step 1: Preparation and Sketching
-
Clean Your Canvas:
Begin by thoroughly washing your stone with soapy water and a scrub brush to remove any dirt or oils. Let it dry completely in the sun or use a hairdryer to speed things up. -
Sketch the Spiral:
Using a pencil, lightly draw a large spiral shape that takes up the majority of the rock’s surface. This will be the main shell. -
Draft the Body:
Sketch the snail’s soft body emerging from the bottom left of the shell. It should look like a rounded teardrop shape extending forward. -
Add Antennae:
Draw two thin lines extending upward from the head area, topped with small circles for the eye stalks.
Step 2: Base Colors
-
Paint the Shell Base:
Mix a light peach or sand color and fill in the outer ring of the spiral shell. Apply two thin coats for opaque coverage, allowing drying time in between. -
Fill the Inner Shell:
Using the same light peach mix, paint the very center of the spiral, leaving a wide gap between the outer ring and the center for the darker color. -
Apply the Terracotta:
Use a brick red or terracotta acrylic to fill in the wide middle band of the spiral shell. This creates the bold contrast in the shell structure. -
Paint the Snail Body:
Mix a soft sage green by combining a touch of green, grey, and plenty of white. Fill in the body shape completely. I usually find two coats are needed here to hide the stone’s texture. -
Refine the Edges:
Once the main blocks of color are dry, use a small brush to touch up any areas where the colors might have accidentally overlapped or left gaps.
Uneven Lines?
If your black outlines look shaky, rest your wrist on a table while drawing. Alternatively, clean up mistakes by painting over them with the original background color once the ink is dry.
Step 3: Details and Outlines
-
Outline the Spiral:
Switch to your extra-fine black paint pen or a liner brush with thinned black paint. carefully outline the entire spiral shape to define the segments. -
Outline the Body:
Trace the perimeter of the sage green body, ensuring a smooth, continuous line that connects seamlessly to the shell. -
Add Shell Texture:
Draw curved hatch lines inside the outer peach ring and the inner peach center. These lines should follow the curve of the spiral to give it volume. -
Detail the Red Band:
Add a few curved definition lines inside the terracotta band, mirroring the curves of the lighter sections. -
Create the Face:
Draw two tiny black dots for eyes and a small curved smile on the front of the face. Don’t forget to outline the antennae and fill in the small circles at the tips. -
Add the Trail:
Draw a wavy line underneath the snail’s body to represent the ground. Add small stippled dots along this line to suggest texture or slime trail. -
Highlight the Shell:
Using a very fine brush and pure white paint, add a thin, curved highlight line along the bottom edge where the red band meets the body to separate the forms visually.
Add Some sparkle
For a magical touch, paint over the snail’s slime trail dots with a glitter glaze or metallic silver paint to make it shimmer in the sunlight.
Step 4: Finishing
-
Clean Up:
Allow all ink and paint to dry completely. Gently erase any visible pencil marks that weren’t covered by paint. -
Seal the Rock:
Apply a coat of satin or matte varnish over the entire painted surface. This protects your artwork from weather if you plan to place it outdoors.
Your patient little snail is now ready to hide among your flower pots or welcome guests on the front porch
Iridescent Dragonfly Wing Rocks
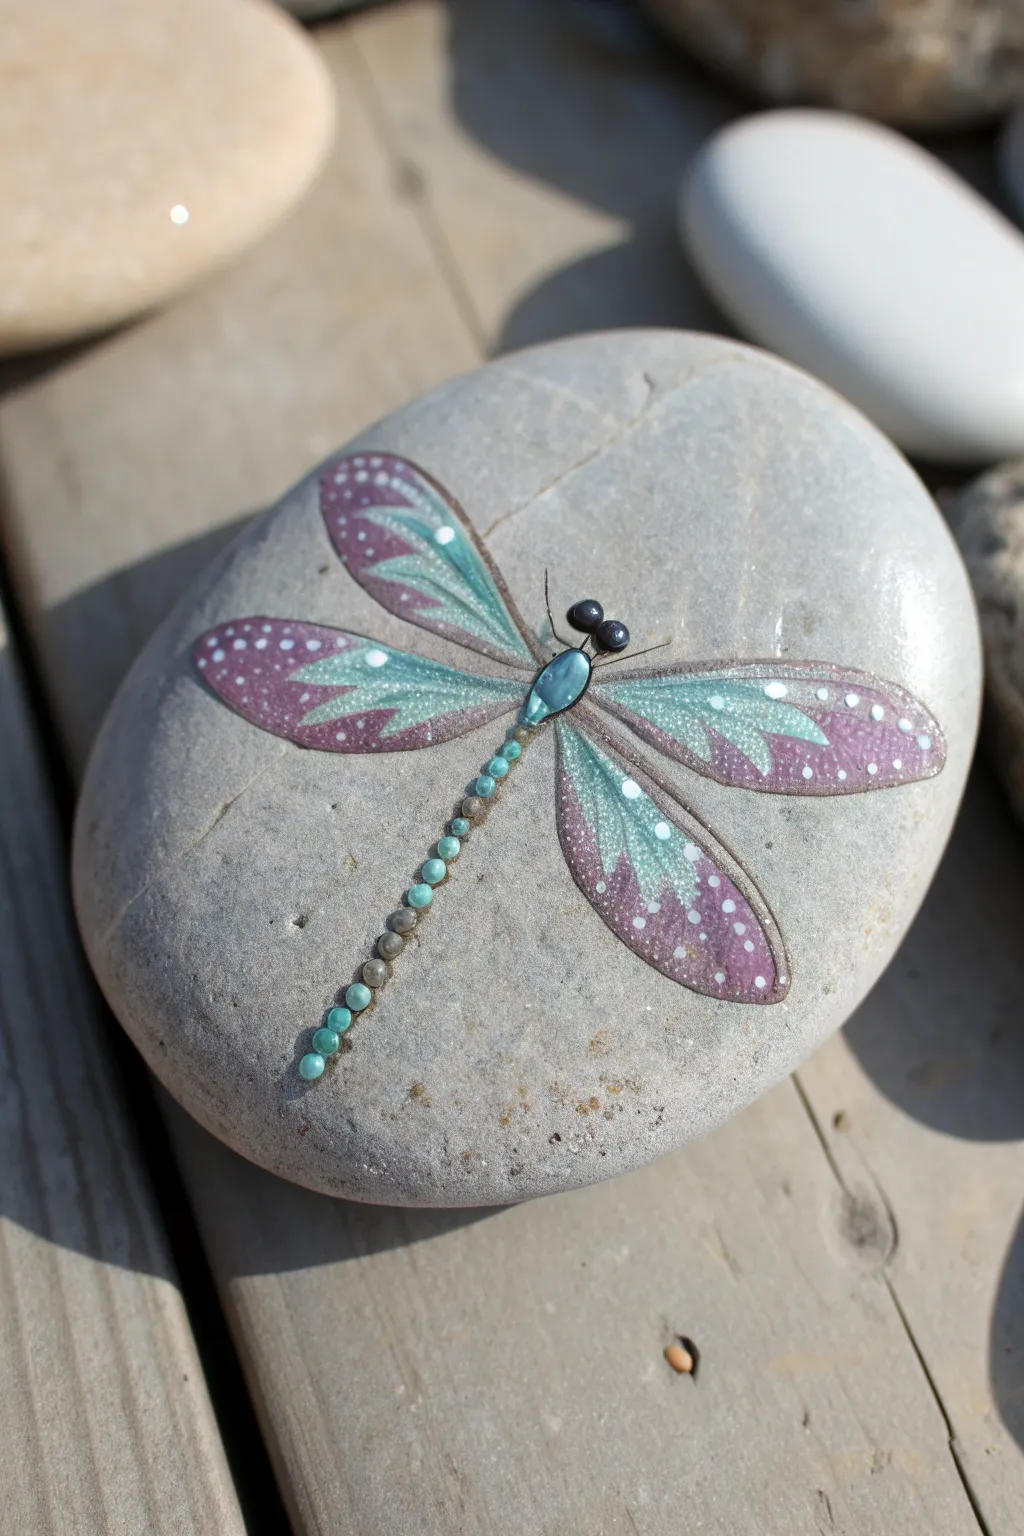
This elegant rock painting project brings a sense of whimsy with its delicate, iridescent wings and jewel-like segmented body. The smooth grey stone provides the perfect natural canvas for the teal and lavender hues to really pop.
Step-by-Step Guide
Materials
- Smooth, oval river rock (medium size)
- Acrylic paints: Teal/Turquoise, Lavender/Pale Purple, White, Black, Grey
- Iridescent or metallic medium/glitter finish
- Fine detail brushes (size 0 and 00)
- Pencil for sketching
- Dotting tools (various small sizes)
- Gloss varnish or resin for sealing
Step 1: Planning the Design
-
Clean and prep:
Start by washing your stone with soap and water to remove any dirt or oils. Let it dry completely before beginning. -
Find the center:
Locate the center point of your rock where the dragonfly’s thorax (chest) will sit. This helps ensure the wings spread evenly across the surface. -
Sketch the outline:
Lightly sketch the dragonfly shape with a pencil. Draw a small oval for the thorax, a long line for the tail, two small circles for the head, and four long, petal-shaped wings extending outward.
Sticky Paints?
If your acrylics get tacky while blending the teal and lavender, dampen your brush slightly to smooth the transition without lifting the paint underneath.
Step 2: Painting the Wings
-
Base coat for wings:
Mix a very watery wash of white paint. Fill in the four wing shapes thinly so the texture of the rock still peeks through slightly; this creates transparency. -
Add the lavender sections:
Using your lavender paint, carefully colour the outer tips and the inner base areas of each wing, leaving the middle section open for the next colour. -
Add the teal sections:
Paint the middle sections of the wings with teal, blending it slightly where it meets the lavender to create a soft transition. -
Apply shimmer:
Once the base colours are dry, apply a thin layer of iridescent medium or a very fine glitter glaze over the entire wing area to give it that insect-wing sheen. -
Outline the wings:
With a fine liner brush and black paint diluted to an inklike consistency, outline each wing. Keep your hand steady and the lines very thin. -
Paint the veining:
Using the same thin black paint, draw a central vein down each wing and gentle, curving lines branching off it to mimic natural wing structures.
Level Up: 3D Body
Instead of painting the body dots flat, use ‘puff paint’ or dimensional fabric paint for the tail segments to give the dragonfly actual texture you can feel.
Step 3: Creating the Body and Details
-
Paint the thorax:
Paint the central oval (thorax) with a solid teal colour. I like to add a tiny highlight of white on one side to make it look like a polished gem. -
Dot the tail:
Using a dotting tool, create the tail segments. Alternate between teal and grey dots, starting larger near the body and getting progressively smaller toward the tip. -
Paint the head:
Paint the two head circles black. Add two tiny white dots (catchlights) on the black circles to simulate shiny eyes. -
Add antennae:
Draw two very fine, short black lines extending from the head for antennae. -
Add decorative white dots:
Using your smallest dotting tool or even a toothpick, add tiny white dots along the edges of the wings on top of the lavender and teal paint for extra sparkle.
Step 4: Finishing Touches
-
Clean up sketch lines:
Once the paint is totally cured, gently erase any visible pencil marks from your initial sketch. -
Seal the artwork:
Apply a coat of gloss varnish or resin. This protects the stone outdoors and makes the iridescent wings and dotted body look permanently wet and shiny.
Now you have a stunning garden accent that captures the fleeting beauty of a dragonfly
Crosshatched Octopus Texture Rocks
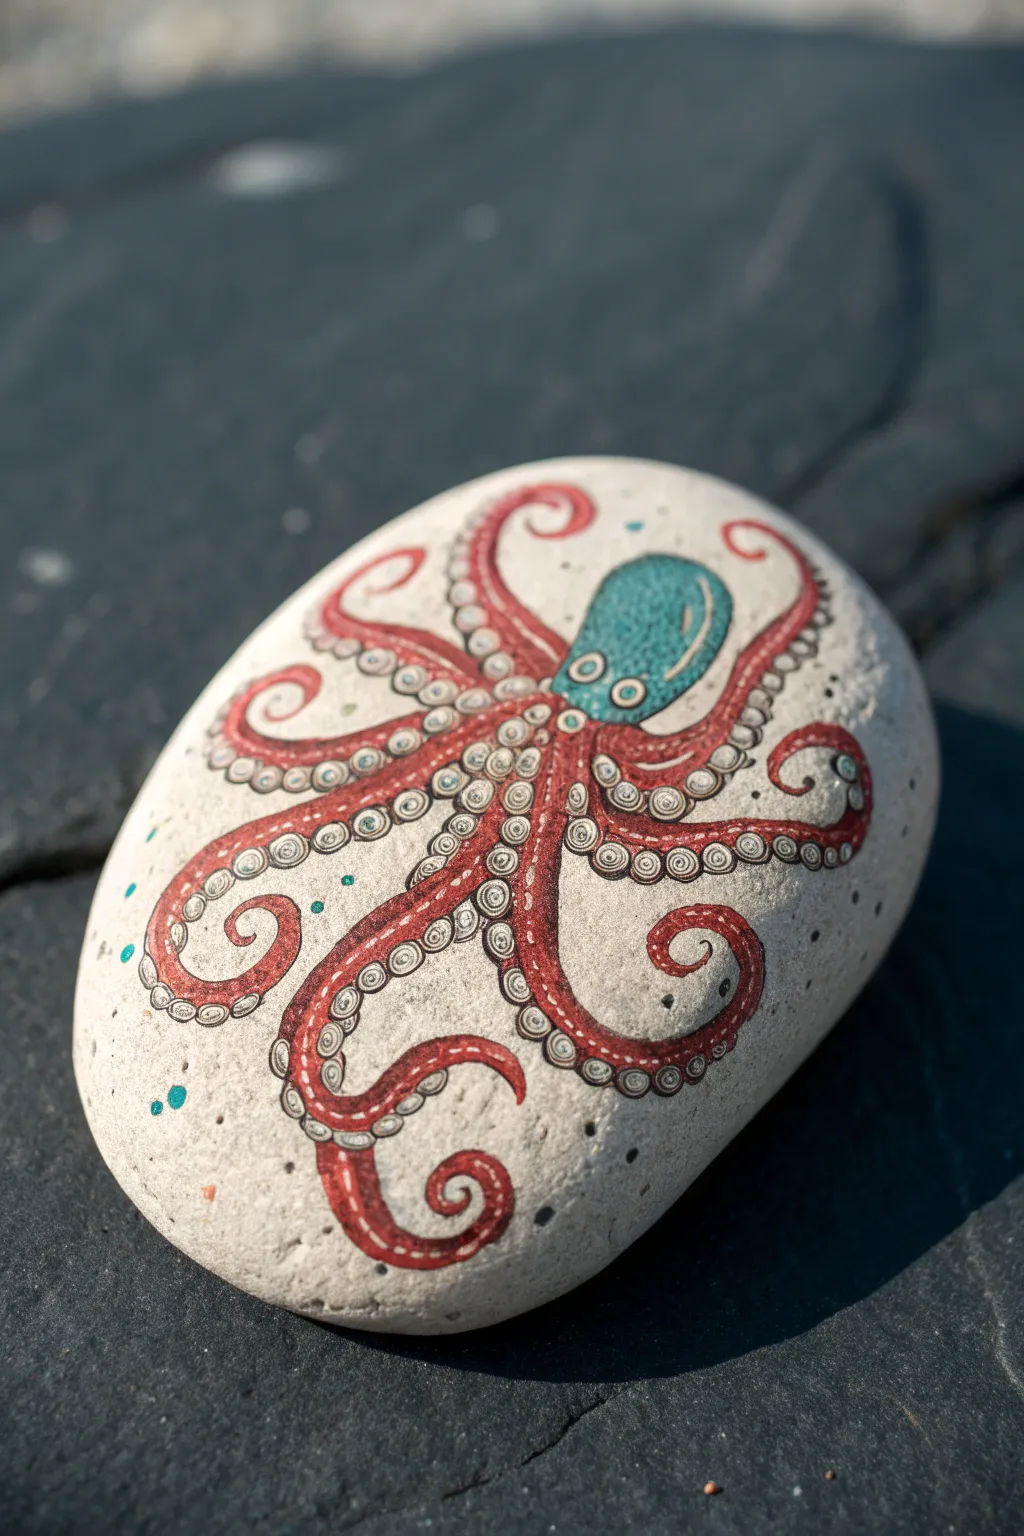
Capture the intricate beauty of the deep sea with this detailed octopus design, featuring striking red tentacles and a teal head against a natural stone background. The clever use of crosshatching and fine linework gives the suction cups incredible texture and depth.
How-To Guide
Materials
- Smooth, oval-shaped river rock (light gray or white)
- Pencil and eraser
- Acrylic paint markers (fine tip: teal/blue-green, terracotta red/burnt orange, white)
- Micron pens or ultra-fine black waterproof liner (005 and 01 sizes)
- Matte spray sealant or clear varnish
Step 1: Planning and Base Color
-
Stone Prep:
Begin by washing your stone thoroughly with soap and water to remove any dirt or oils. Let it dry completely before starting. -
Pencil Sketching:
Lightly sketch the bulbous head of the octopus near the top-right third of the stone. It should look somewhat like a rounded balloon. -
Leg Placement:
Draw eight flowing tentacles radiating from the base of the head. Curve the tips into spirals, varying their lengths and directions to create movement. -
Coloring the Head:
Using a teal or blue-green paint marker, fill in the head shape. You may need two thin coats for full opacity, allowing drying time in between. -
Coloring the Tentacles:
Fill the length of each tentacle with a terracotta or reddish-orange paint marker. Leave the sketch lines visible if possible, or re-sketch them lightly once dry.
Step 2: Detailed Linework
-
Defining the Outline:
Once the paint is fully dry, take your fine black waterproof liner (size 01) and carefully outline the entire octopus shape, including the head and every tentacle curve. -
Adding Eyes:
Near the bottom of the teal head, draw two small white circles using a white paint pen. Once dry, outline them in black and add small black dots for pupils. -
Suction Cup Foundations:
Along one edge of each tentacle, draw a continuous row of small circles. These should graduate in size, getting smaller as they reach the spiral tips. -
Detailing the Cups:
Switch to your ultra-fine (005) pen. Draw a smaller circle inside each suction cup circle to create a rim effect. -
The Crosshatching Technique:
Inside the innermost circle of each suction cup, add tiny, delicate hatch marks or swirls. This mimics the texture of the suction cups and gives the piece its illustrative style. -
Body Texture:
Add subtle texture to the red skin of the tentacles by drawing very short, broken lines or tiny dots along the side opposite the suction cups. -
Head Highlights:
Add a small, curved white highlight line on the upper right side of the teal head to make it look three-dimensional and glossy. -
Atmospheric Details:
Using the teal paint marker, gently dot a few tiny specks of color around the stone’s background to suggest water bubbles or sea spray. -
Final Clean Up:
Check for any smudges or unfinished edges. Use the white paint pen to touch up any areas where the red or teal might have bled outside the lines. -
Sealing:
Allow the ink to cure for at least 24 hours. Finish by spraying the rock with a matte or satin sealant to protect your intricate line work from fading or chipping.
Ink Smearing?
If your black liner smears when applying sealant, your ink wasn’t waterproof or fully dry. Ensure you use microns or pigment liners and wait 24h before sealing
Add Some Sparkle
For a magical underwater effect, mix a tiny bit of metallic gold or silver paint into your teal head color, or dot the suction cup centers with metallic gel pen
Place your finished octopus in a garden pot or use it as a striking paperweight to bring a bit of ocean wonder to your desk
Stacked Animal Totem Rocks
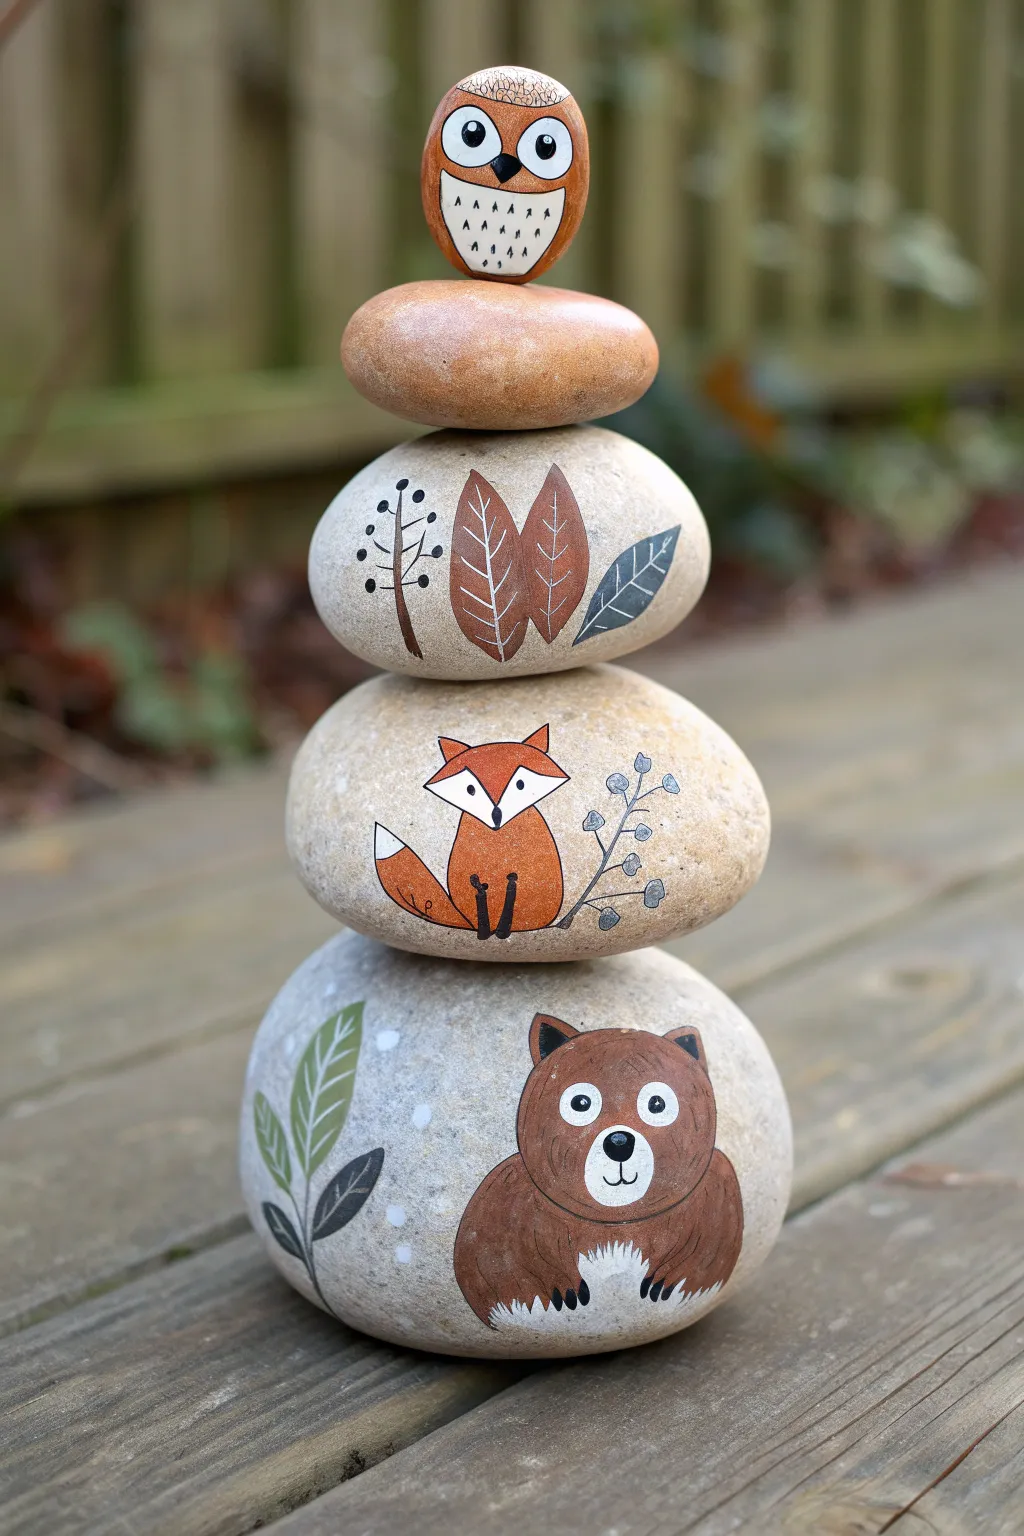
Bring the forest to your garden with this adorable stack of hand-painted river stones featuring a bear, fox, and watchful owl. This vertical totem creates a charming rustic display perfect for a porch, garden path, or bookshelf accent.
Step-by-Step Guide
Materials
- 5 smooth, flat river stones of graduating sizes (large to small)
- Acrylic paints (brown, orange, white, grey, black, green, blue-grey)
- Set of paintbrushes (flat brush for base layer, fine liner brushes for details)
- Pencil for sketching
- Outdoor waterproof sealant (spray or brush-on)
- Strong craft adhesive (like E6000) or construction adhesive
- Clean water cup and paper towels
Step 1: Stone Preparation & Layout
-
Clean and sort:
Begin by scrubbing your stones with warm soapy water to remove any dirt or oils, then let them dry completely. Sort them by size to verify they stack stably in a totem shape. -
Arrange the stack:
Identify your largest stone for the base (the bear), the second largest for the fox, the middle stone for the leaves, a smaller filler stone, and the smallest round one for the owl.
Stone Selection Tip
Look for stones with flat bottoms and tops. This makes stacking much easier and requires less glue to keep the totem stable.
Step 2: The Bear Base
-
Sketch the outline:
On your largest stone, lightly pencil in a rounded shape for the bear’s body and head, centering it on the rock’s face. -
Base coat blocking:
Fill in the bear’s body shape with a medium brown acrylic paint. While you have the brown out, paint the small ears at the top of the head. -
Adding texture:
While the brown is still slightly wet, add tiny strokes of a darker brown color to create a fur-like texture around the edges. -
Facial features:
Paint a white circle for the muzzle and white paws at the bottom. Once dry, use black paint and a fine liner brush to add the nose, mouth, eyes, and claws. -
Surrounding foliage:
Finish the base stone by painting a simple green stem with leaves curving up the left side using sage and olive tones.
Step 3: The Fox & Leaf Layers
-
The Fox Stone:
On the second largest stone, sketch a sitting fox. Paint the body and head shape with a vibrant terracotta orange. -
Fox details:
Paint the tip of the tail and the cheeks white. Use black with your finest brush to add the triangular ears, eyes, nose, and distinct legs. -
Fox foliage:
To the right of the fox, paint a delicate twig with greyish-blue berries or buds to balance the composition. -
The Leaf Stone:
Take the third stone and paint two large central leaves in a reddish-brown tone. Add intricate white veining once the base color is dry. -
Botanical accents:
Flank the central leaves with a black twig silhouette on the left and a blue-grey leaf on the right for variety.
Make It Personal
Try swapping the foliage for seasonal themes—painted snowflakes for winter or tiny flowers for spring give this a totally new vibe.
Step 4: The Owl & Assembly
-
The Filler Stone:
Select your fourth stone (the filler). You can leave this one natural or apply a very light wash of color to separate the patterned stones. -
Owl base:
On the smallest top stone, paint the entire rock a warm orange-brown hue. Let this dry completely. -
Owl details:
Paint a large white heart-shape or circle for the face area. Add huge black and white circles for eyes and a small triangular beak. -
Feather texture:
Using a fine liner brush and black paint, add small ‘v’ shapes or dashes on the chest to mimic feathers. -
Final assembly:
Stack your stones to check alignment one last time. Apply a strong adhesive between each layer and let it cure fully according to the glue instructions. -
Sealing:
Coat the entire totem with a waterproof outdoor sealant to protect your artwork from the elements.
Place your finished totem in a special spot and enjoy your handcrafted slice of nature
3D Sleeping Fawn Illusion Rocks
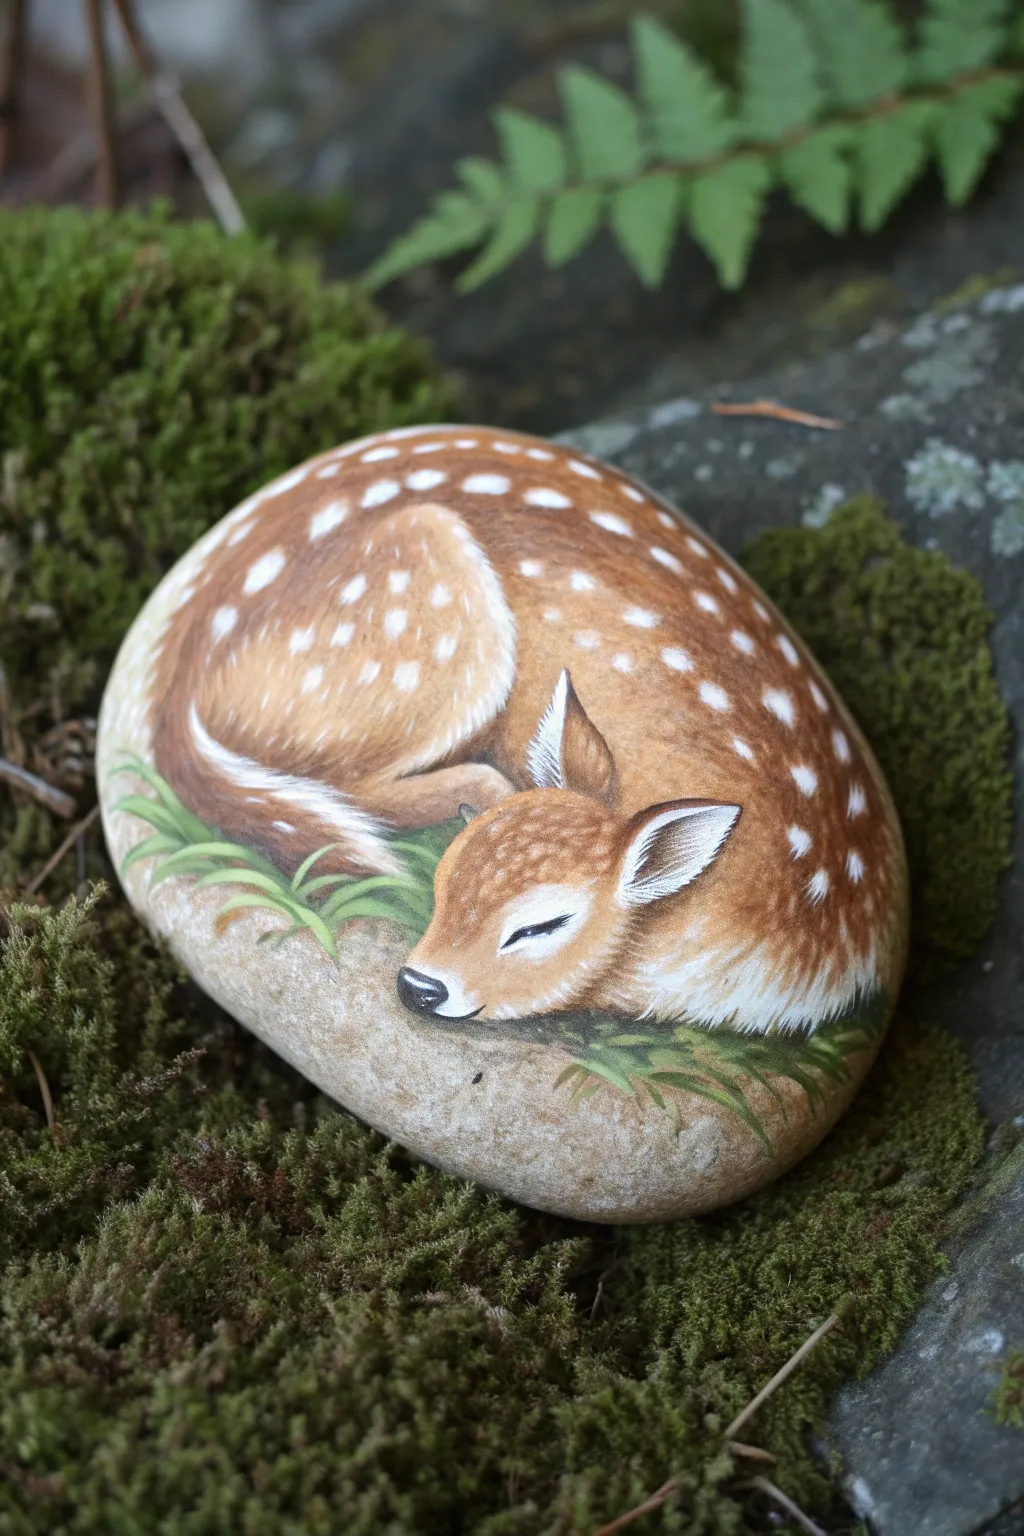
Transform a smooth garden stone into a serene, sleeping fawn curled up for a nap. This painting guide mimics the soft textures of animal fur to create a gentle 3D illusion that looks perfectly at home nestled in a patch of moss.
Step-by-Step Tutorial
Materials
- Smooth, oval-shaped river rock (approximately palm-sized)
- Acrylic paints (Titanium White, Burnt Umber, Burnt Sienna, Raw Sienna, Black, Leaf Green)
- Pencil for sketching
- Assorted brushes (flat shader, small angled brush, fine liner)
- Matte varnish or sealant
- Palette for mixing paint
- Cup of water and paper towels
Step 1: Base Sketch and Background
-
Rock Selection:
Choose a rock that is naturally rounded and smooth. The shape of the stone does half the work for you; look for one that already resembles the curled shape of a sleeping animal. -
Clean Your Surface:
Scrub the rock with soap and water to remove any dirt or grit, then let it dry completely. Paint adheres best to a clean, dry surface. -
Outline the Shape:
Lightly sketch the curled fawn directly onto the stone. Draw a large oval for the body and a smaller, tucked-in oval for the head. Mark the position of the ears and the curved line of the back leg. -
Block in the Base Color:
Mix Burnt Sienna with a touch of White to create a warm, mid-tone brown. Paint the entire body area of the fawn with this color, avoiding the inner ear and the belly area. -
Paint the Light Areas:
Using a creamy off-white mixture, fill in the fawn’s underside, the chest, the inner ears, and the lower jaw. Blend the edges slightly where the white meets the brown base coat while the paint is still wet for a softer transition.
Step 2: Developing Form and Shadow
-
Deepen the Shadows:
Mix Burnt Umber with a tiny bit of Black. Apply this darker shade into the crevices where the body parts overlap—specifically under the chin, behind the ear, and where the leg tucks against the belly. -
Layering the Mid-Tones:
Using Raw Sienna, glaze over the upper back and top of the head to add warmth and dimension. This color variation makes the fur look richer and less flat. -
Softening Edges:
Use a dry brush technique to soften the transition between the dark brown back and the lighter belly. Gently drag small amounts of the brown paint over the white area to simulate fur texture.
Fur Realism Tip
Work in layers for the fur! Start with darker base colors and layer lighter, thinner strokes on top. The top layer should be the lightest and finest strokes.
Step 3: Fine Details and Fur Texture
-
Creating Fur Texture:
Switch to your finest liner brush. Mix a lighter version of your base brown (add more white). Paint tiny, short strokes following the curve of the body to create individual hairs. -
Adding the Spots:
Dip a small round brush or the handle end of a paintbrush into pure White. Dot irregular spots along the fawn’s back and flank. Keep them organic, not perfectly round, and vary their sizes. -
Refining the Face:
With a fine liner and Black paint, carefully draw the closed eye. It should be a simple, dark curve with a few tiny lashes. Paint the nose black, adding a tiny white highlight on the top to make it look wet. -
Ear Details:
Inside the ears, use white paint and very fine strokes to create the fluffy inner ear hair. Outline the outer rim of the ear with a dark brown line to separate it from the head.
Level Up: Hidden Fawn
Paint the background of the rock (around the fawn) with a camouflage pattern of leaves and dappled sunlight to make the fawn look truly hidden in the forest floor.
Step 4: Final Touches and Sealing
-
Adding Grass:
Mix Leaf Green with a little yellow. Using the liner brush, paint wispy blades of grass overlapping the bottom edge of the fawn. This grounds the animal, making it look like it’s resting in a meadow rather than floating. -
Highlighting the Grass:
Add a few strokes of lighter green to the grass tips to suggest sunlight hitting the blades. -
Leave Natural Stone Visible:
I prefer to leave the very bottom of the rock unpainted or lightly washed with diluted brown to blend the painting into the natural stone texture. -
Final Inspection:
Step back and look at your fawn. If any dark shadows look too harsh, soften them with a thin glaze of the mid-tone brown. -
Preserve Your Work:
Once the paint is completely dry (wait at least 24 hours to be safe), apply a coat of matte varnish. Matte is best here because a glossy finish can ruin the soft, realistic look of fur.
Place your finished rock in a garden bed or under a tree to surprise visitors with a moment of quiet nature


Have a question or want to share your own experience? I'd love to hear from you in the comments below!