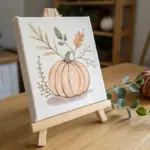
There’s something extra satisfying about turning a simple stone into a tiny piece of Thanksgiving art. These Thanksgiving painted rocks ideas are cozy, quick to make, and perfect for decorating, gifting, or sharing a little seasonal kindness.
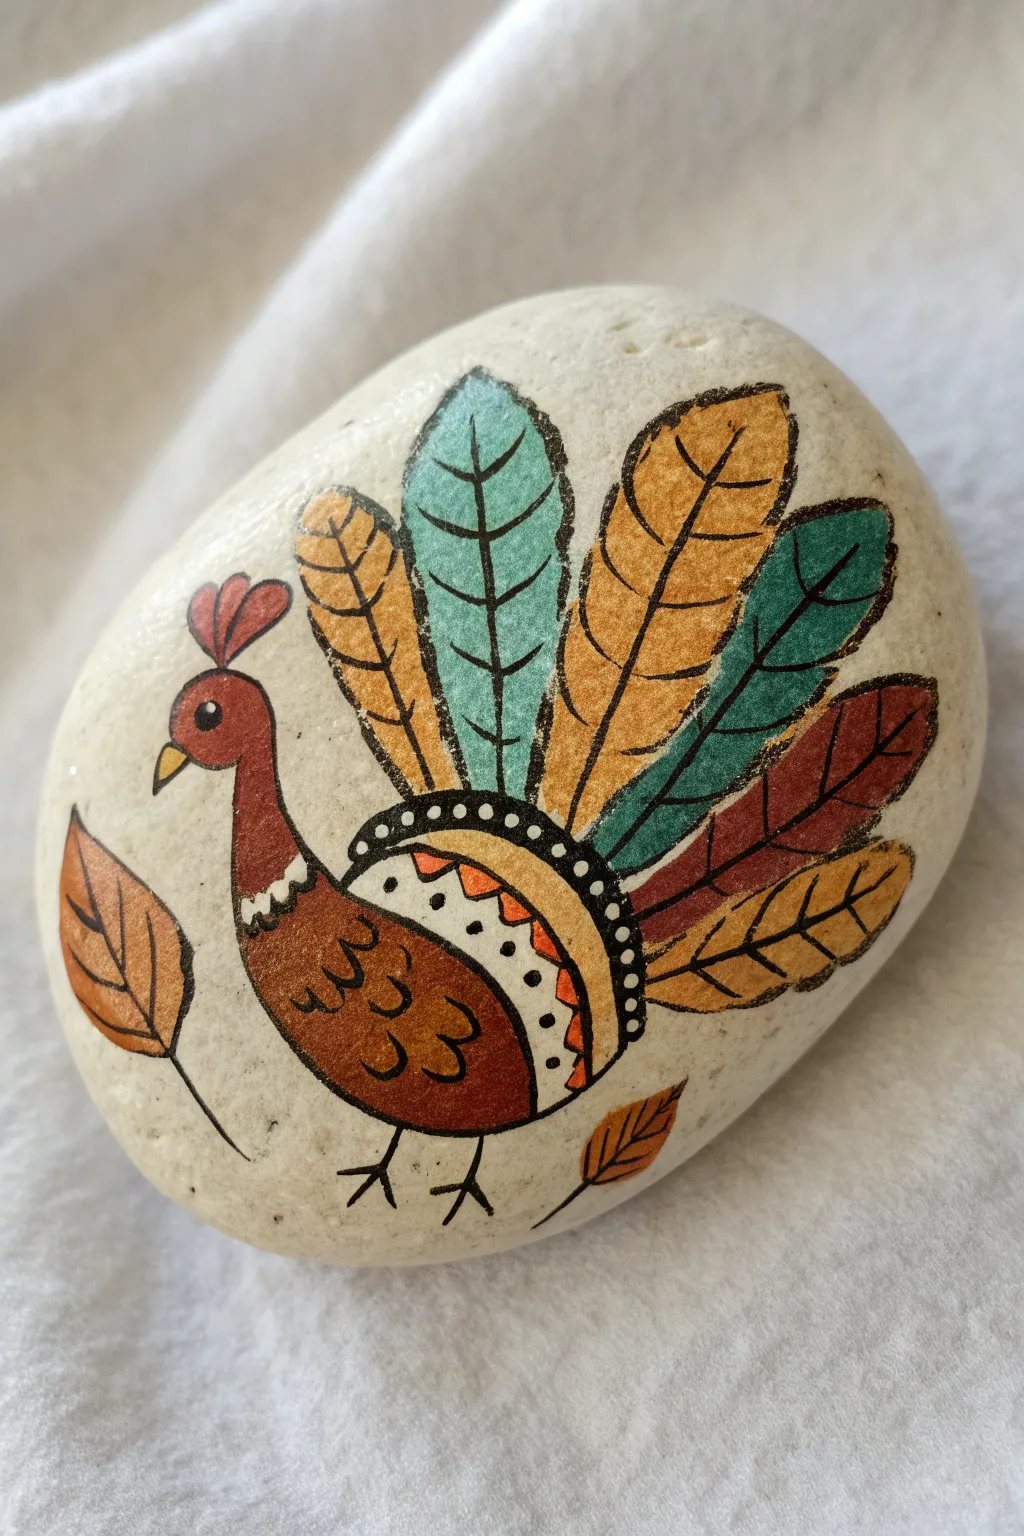
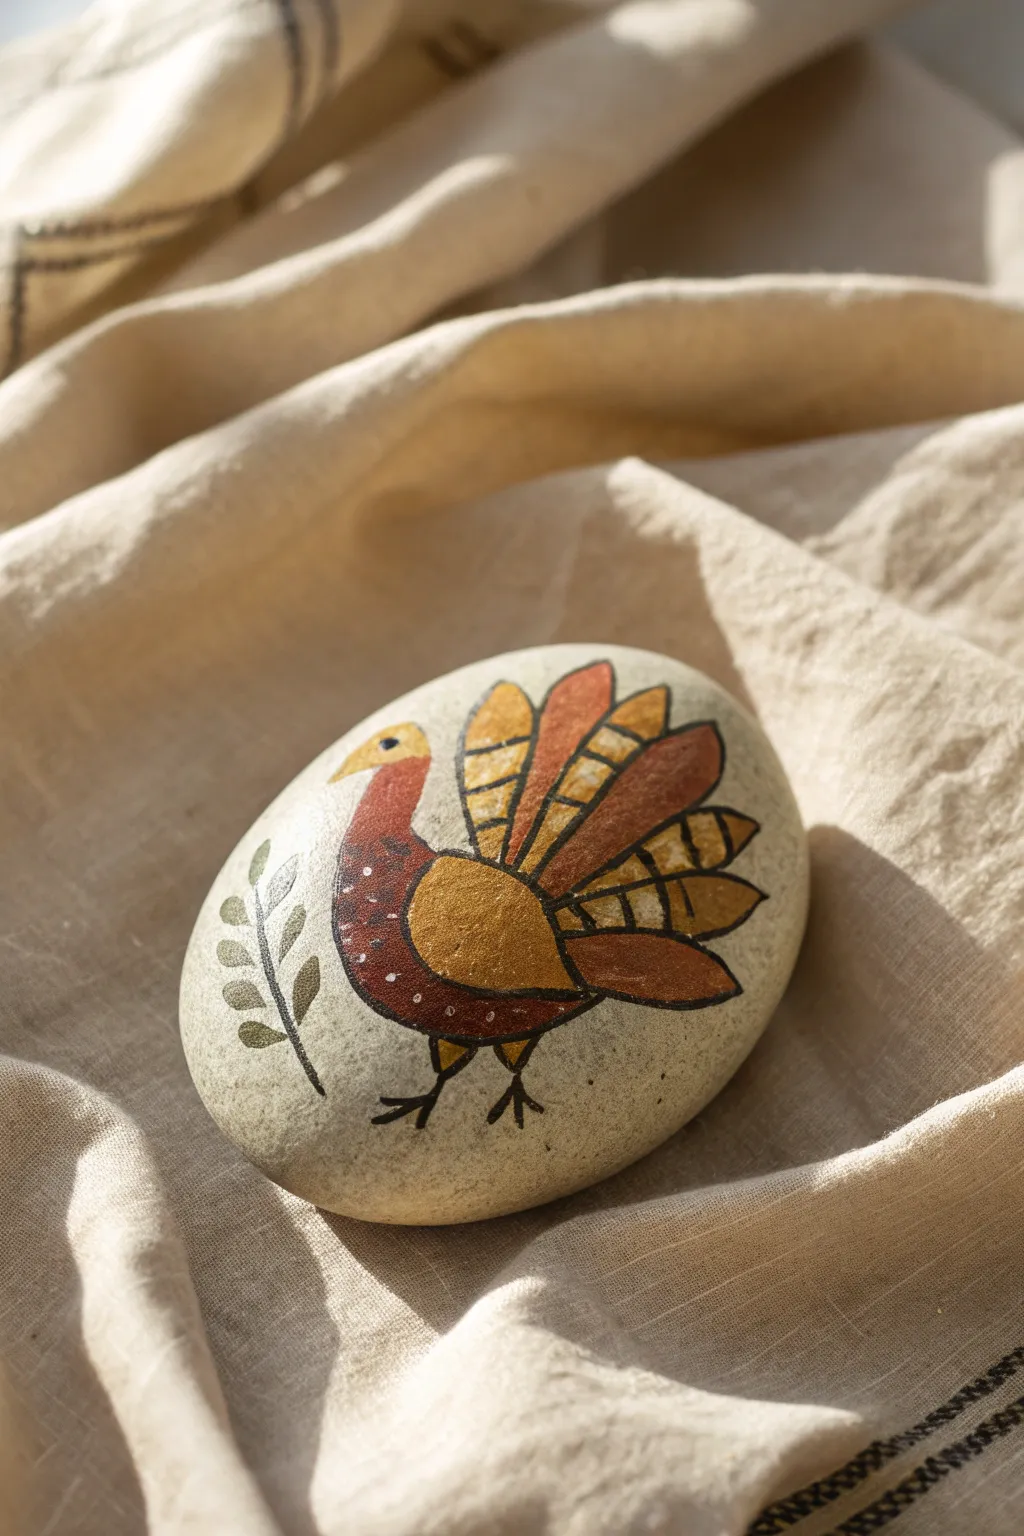
Classic Cute Turkey Rock
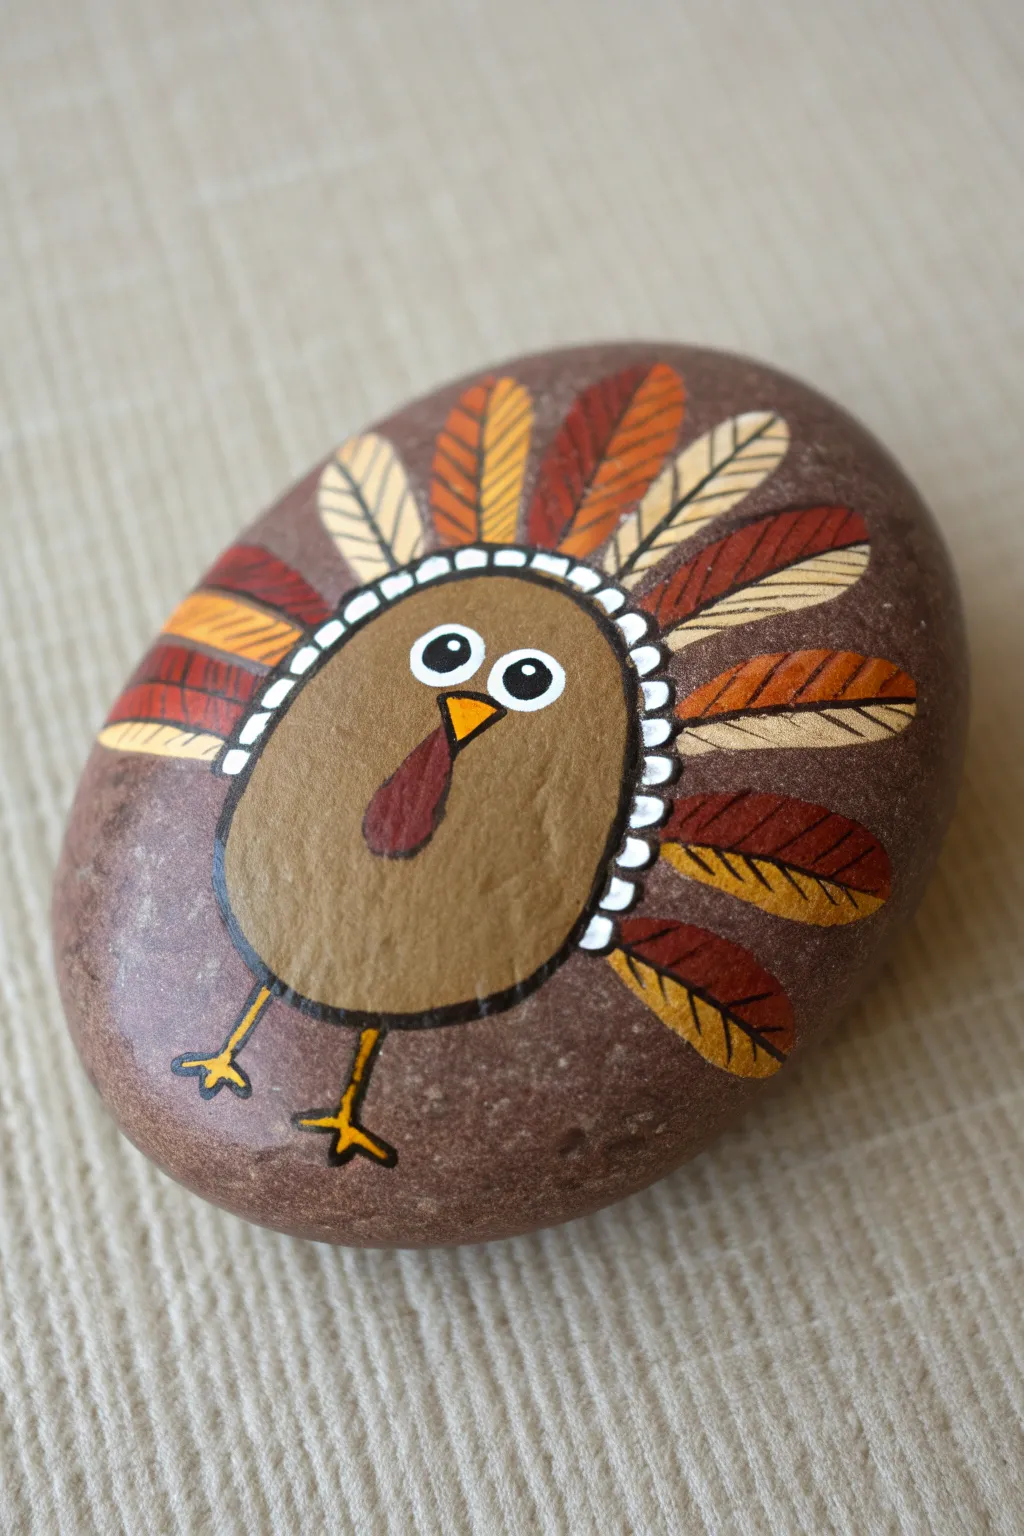
This adorable turkey design embraces the natural texture of a smooth stone while adding a festive pop of color. With its wide eyes and stylized feather fan, it makes a charming Thanksgiving decoration for your table or garden.
Step-by-Step Tutorial
Materials
- Smooth, oval-shaped river rock (reddish-brown tone preferred)
- Acrylic paints: medium brown, white, black, orange, dark red, and tan/cream
- Fine detail paintbrush (size 0 or 00)
- Small flat paintbrush
- Dotting tool or toothpick
- Clear acrylic sealer (spray or brush-on)
- Pencil (optional for sketching)
Step 1: Painting the Turkey Body
-
Clean surface:
Begin by washing your rock with soap and water to remove any dirt or oils, then let it dry completely to ensure the paint adheres well. -
Outline the body:
Using a pencil or a very thinned-down brown paint, lightly sketch a large oval shape in the lower center of the rock. This will be the turkey’s main body. -
Fill the body:
Mix a medium brown shade using brown and a touch of white or yellow to warm it up. Fill in the oval shape completely using your small flat brush. -
Second coat:
Once the first layer is dry to the touch, apply a second coat of the medium brown to ensure the rock’s color doesn’t show through. Let this dry thoroughly.
Uneven Dotting?
If your white dots around the body look irregular, practice on paper first. Dip your tool freshly for every single dot to keep the size consistent.
Step 2: Creating the Feather Fan
-
Plan the feathers:
Visualize a semi-circle radiating from the top and sides of the brown body. You will be painting roughly 9 to 11 individual elongated oval shapes. -
Base coat feathers:
Using your fine detail brush, paint the outline of the feathers. Alternate the colors: paint one dark red, one orange, one tan, and repeat the pattern around the body. -
Fill the feathers:
Fill in each feather shape with its respective color. You might need two coats for the lighter tan and orange colors to stand out against the darker rock. -
Feather details:
Once the base colors are dry, use a very fine brush or a black paint pen to draw a thin line down the center of each feather. -
Add texture:
Paint tiny diagonal hatch marks coming off the center line of each feather to mimic the barbs. Use black paint for the tan feathers, and a lighter tan or yellow paint for the dark red and orange feathers to create contrast.
Step 3: Adding the Details
-
Outline the body:
Take your fine brush and black paint to carefully outline the entire brown body oval, giving it a crisp edge against the rock background. -
Dot border:
Use a dotting tool or the back end of a paintbrush dipped in white paint. Place a ring of closely spaced white dots all around the outside edge of the brown body, slightly overlapping the line where the feathers meet the body. -
Paint the eyes:
Near the top of the brown oval, paint two white circles side-by-side. Make them fairly large for a cute expression. -
Pupils:
Once the white is dry, add two smaller black circles inside the white ones. I find that placing them slightly cross-eyed or looking in one direction adds character. -
Eye highlights:
Add a tiny speck of white inside each black pupil to bring the turkey to life. -
Beak:
Paint a small, sharp inverted yellow-orange triangle directly between and slightly below the eyes. -
Wattle:
Using deep red paint, draw a teardrop shape hanging down from the side of the beak to create the wattle. -
Legs and feet:
At the bottom of the body, use black paint to draw two stick legs. Add three little toes at the end of each stick using a bright yellow or gold paint to make them pop. -
Final outline:
Use your finest brush and diluted black paint to outline the beak, wattle, and yellow feet for sharpness. -
Seal:
Allow the entire project to cure for 24 hours. Apply a clear acrylic sealer to protect your artwork from chipping or weather damage.
Pro Tip: Sharp Lines
For the finest black outlines on the feathers and feet, use a super-fine point paint marker (0.7mm) instead of a brush for better control.
Place your finished turkey rock on a napkin at dinner for a handmade touch that guests will love to take home

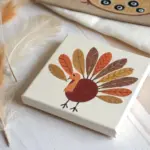
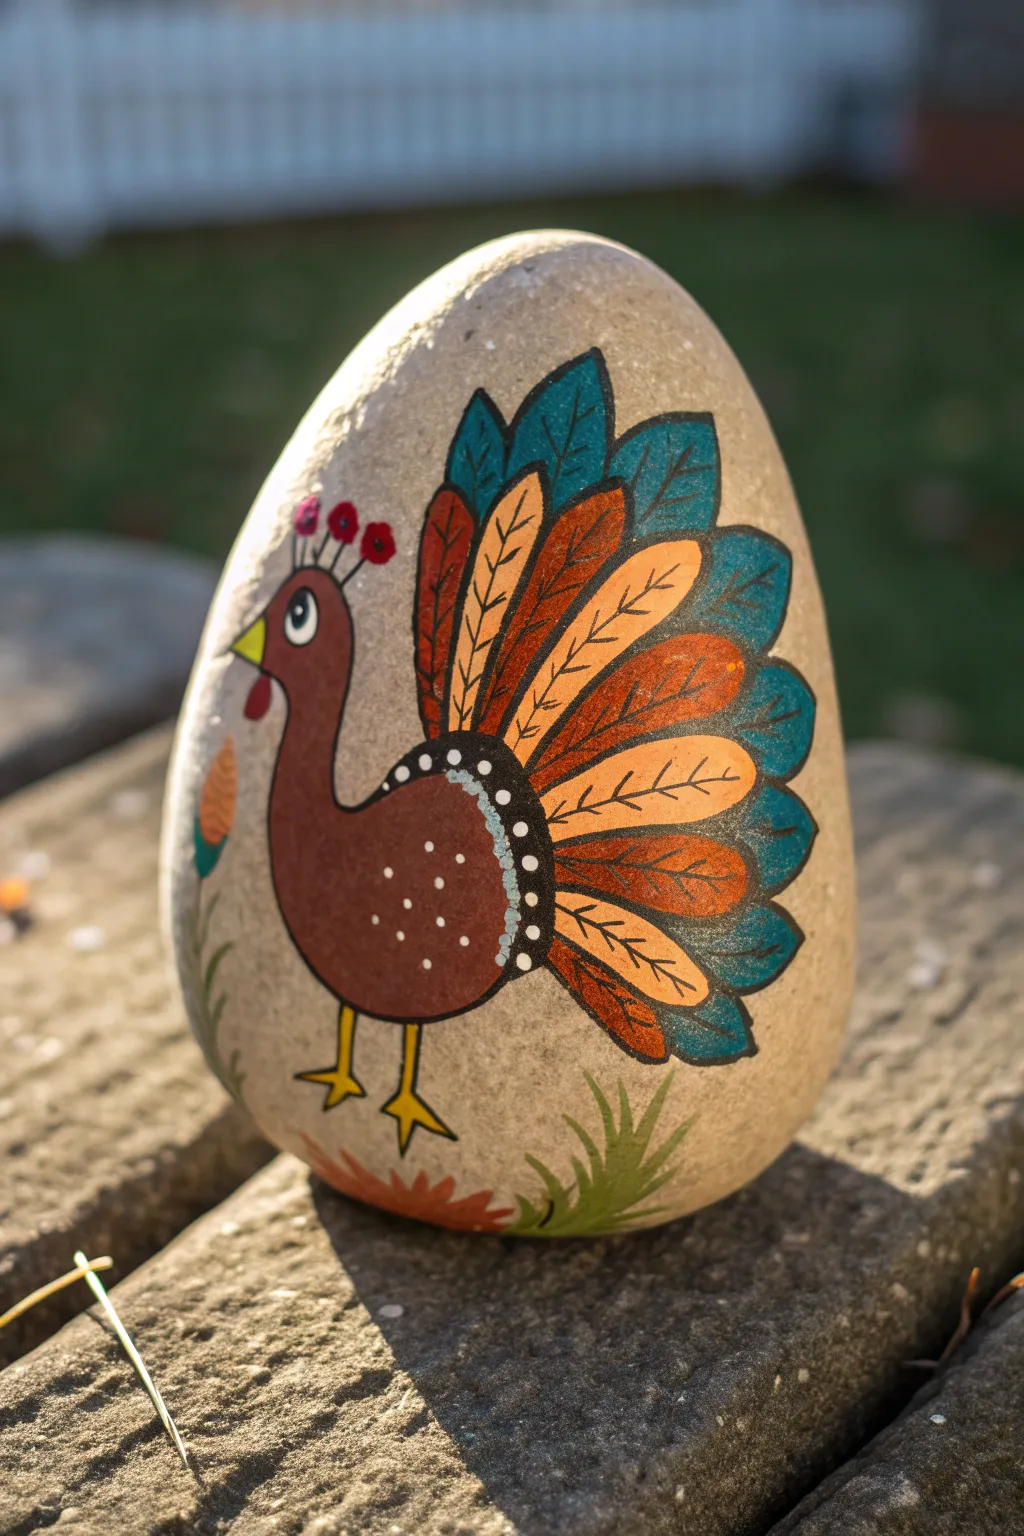
Turkey With Bold Black Outline
This charming little turkey features clean lines and a festive color palette, invoking a cozy folk art aesthetic perfectly suited for Thanksgiving decor. The design relies on bold outlining and contrasting patterns to create a character that pops right off the smooth stone.
Detailed Instructions
Materials
- Smooth, flat rock (light color preferred)
- Pencil and eraser
- Extra-fine point black paint pen (e.g., Posca 0.7mm)
- Acrylic paints (burnt sienna, teal/turquoise, mustard yellow, orange, dark red)
- Fine detail paintbrush (size 0 or 00)
- Clear matte or satin sealer spray
Step 1: Sketching the Base Shape
-
Clean your canvas:
Begin by washing your rock with soap and water to remove any dirt or oils. Let it dry completely before starting; a damp rock will ruin your paint adhesion. -
Sketch the body:
Using a pencil, lightly sketch a teardrop shape for the turkey’s body, slightly tilted to the left. At the narrow top end, add a small circle for the head connected by a sleek, curved neck. -
Outline the tail fan:
Draw the expansive tail feathers behind the body. Start with a central feather sticking straight up, then fan out mirror-image feathers on either side. Aim for large, leaf-like shapes. -
Add wing and feet:
Sketch a semi-circle detail on the body for the wing area and draw two simple stick legs with three toes each at the bottom.
Ink Flow Pro-Tip
Test your black paint pen on a scrap of paper before touching the rock. Blobs happen often when the tip is first pressed down, and you want that ink flowing smoothly first.
Step 2: Building the Colors
-
Paint the body:
Fill in the main body and neck with burnt sienna or a rich reddish-brown. Leave the semi-circle wing area unpainted for now. You may need two thin coats for full opacity. -
Fill the feathers:
Paint the tail feathers in an alternating pattern. Use teal for the central and lower feathers, and mustard yellow or gold for the ones in between. Let the colors block out the pencil lines. -
Add accent feathers:
If your fan is wide enough, paint the lowest, outermost feathers in a dark red or burgundy tone to frame the tail. -
Detail the wing area:
Paint the semi-circular sash across the body. Cream or white works well for the base, topped with a smaller orange stripe inside. This creates that decorative, patterned look. -
Paint the beak and wattle:
Use a tiny dot of yellow for the beak and add the red crest (comb) on top of the head. -
Add falling leaves:
Sketch and fill in two simple leaf shapes floating near the turkey—one to the left and one to the bottom right—using orange or brownish-orange paint.
Step 3: outlining and Details
-
Outline the body:
Once all paint is 100% dry, take your extra-fine black paint pen. Trace the entire outline of the turkey’s body and head with a steady hand. -
Define the feathers:
Outline each tail feather individually. Draw a central vein line down the middle of each feather, then add angled lines branching off it to create the vane texture. -
Decorate the wing sash:
Outline the decorative wing area. Add small black dots along the upper white curve and tiny triangles or zig-zags inside the orange band. -
Add texture to the body:
Draw small ‘U’ shapes or scallops on the brown body paint to resemble chest feathers. This adds a lovely texture without needing more paint. -
Finishing the face:
Draw the eye, leaving a tiny speck of white (or adding a white dot later) for the highlight. Outline the yellow beak. -
Legs and leaves:
Trace over your pencil lines for the stick legs. Finally, outline the floating leaves and draw a central vein down each one. -
Seal the artwork:
Allow the black ink to cure for at least an hour. Finish by spraying a light coat of matte or satin sealer to protect your design from chipping.
Level Up: Metallic Pop
Swap the mustard yellow paint for a metallic gold acrylic. It will catch the light beautifully and give the turkey’s plumage a more festive, high-end finish.
Place your finished stone on a mantel or at a place setting to bring a bit of handmade warmth to your holiday


Polka-Dot Feather Turkey
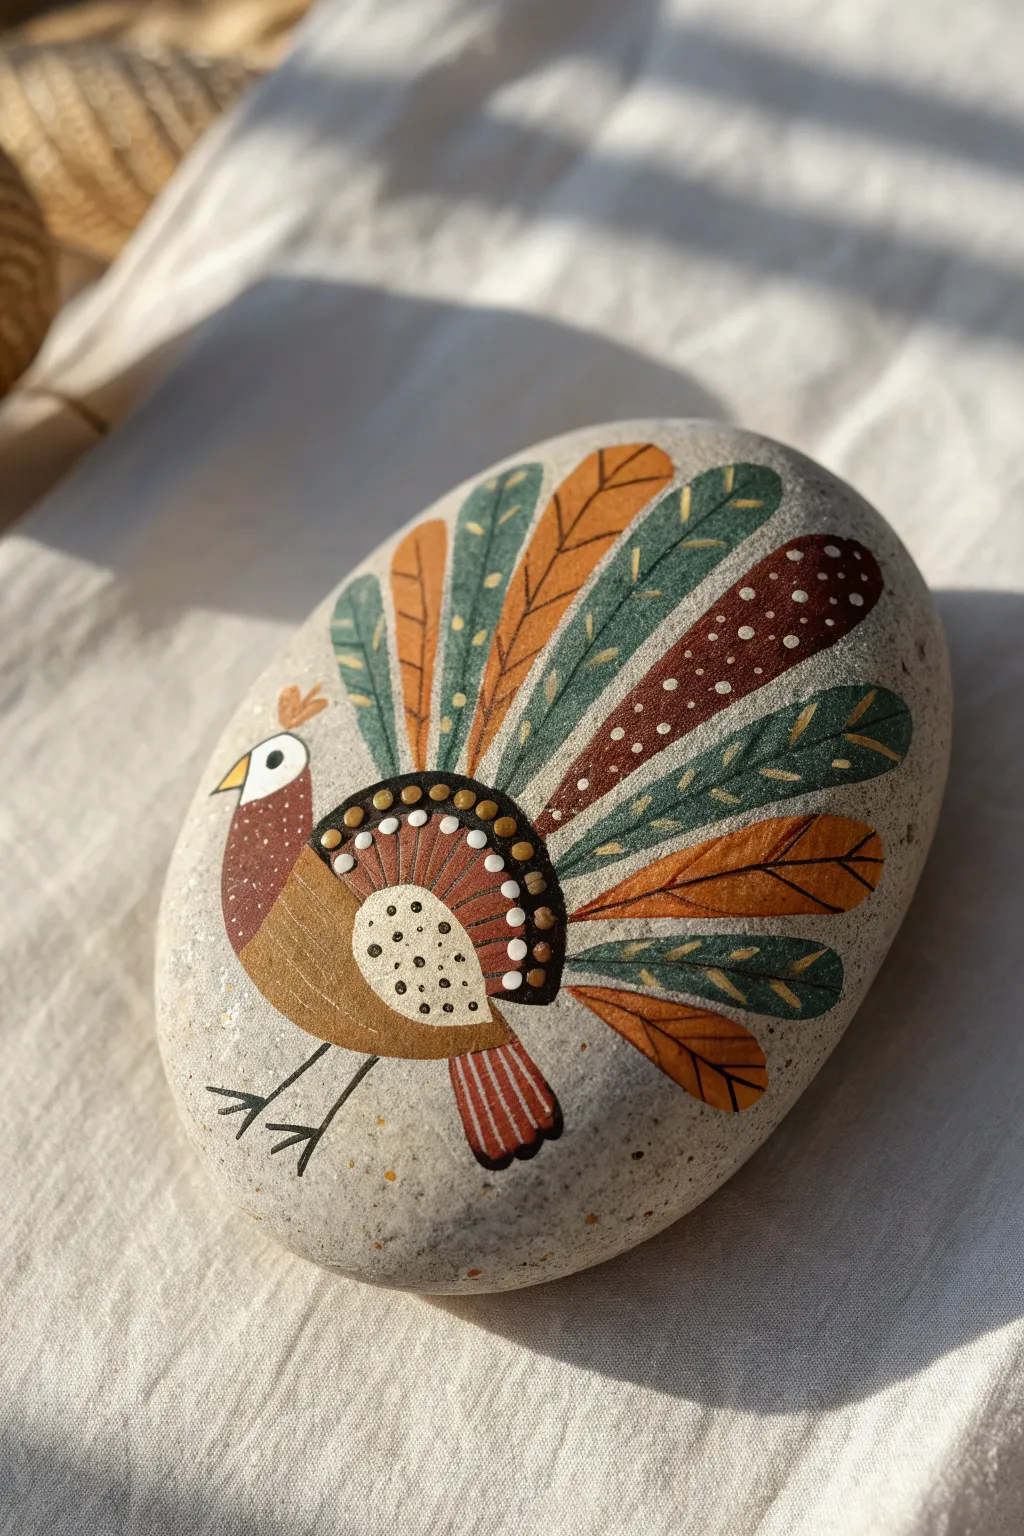
This charming painted rock features a rustic, folk-art inspired turkey with a beautifully fanned tail. The design combines muted earth tones with crisp white detailing, making it a perfect decorative piece for your Thanksgiving table setting.
Step-by-Step Guide
Materials
- Smooth, oval river rock (medium to large size)
- Acrylic paints (burnt sienna, ochre yellow, deep teal, rust red, and white)
- Fine point black paint pen or liner brush
- Small round paint brushes (sizes 0 and 2)
- Dotting tool or toothpick
- Pencil and eraser
- Clear matte sealant spray
Step 1: Preparation and Sketching
-
Clean the stone:
Begin by washing your stone with soapy water to remove any dirt or oils. Let it dry completely in the sun or with a hair dryer to ensure the paint adheres properly. -
Draft the body:
Using a light pencil, sketch two overlapping oval shapes near the bottom left of the rock. The larger oval will be the main body, and a smaller, elongated oval angled upward will form the neck and head. -
Outline the feathers:
Draw long, petal-like shapes radiating from the back of the turkey’s body to create the tail fan. Make sure they curve gently to follow the rounded shape of the stone.
Smooth Moves
If your paint feels too thick or leaves brush strokes, mix a drop of water into your acrylics on the palette to create a creamier consistency that glides easily.
Step 2: Painting the Base Colors
-
Paint the body:
Fill in the main body oval with a warm ochre or light brown paint. For the neck and head area, use a rust red or burnt sienna shade. -
Block in feather colors:
Paint the tail feathers in an alternating pattern. I like to switch between deep teal, ochre, and rust red. You may need two coats for the lighter colors to be opaque. -
Add the wing detail:
Once the body paint is dry, paint a teardrop-shaped wing in the center of the body using a contrasting color like rust red or dark brown. -
Create the face:
Paint a small white circle for the eye area on the head. Add a small triangular beak in yellow or orange pointing to the left. -
Paint the legs:
At the bottom of the body, paint a small fan shape in rust red to represent the upper leg feathers.
Place Setting Idea
Paint a small white banner across the turkey’s body or under its feet. Write a guest’s name inside it to turn this rock into a custom Thanksgiving place card.
Step 3: Adding Details and Texture
-
Outline major shapes:
Using a very fine liner brush or a black paint pen, carefullly outline the body, the wing, and each individual tail feather. This separation makes the design pop. -
Add feather veins:
Inside each tail feather, draw a central line (or rachis). Then, add small diagonal dashes or ‘V’ shapes along that line to simulate the feather barbs. -
Detail the polka dots:
Using the back of a paintbrush or a dotting tool dipped in white paint, add a row of dots along the curve where the tail meets the body. Add smaller dots inside the wing shape for texture. -
Finish the face:
Place a tiny black dot inside the white eye circle for the pupil. Add a small crest or wattle on top of the head using three tiny loops. -
Draw the feet:
With your black paint pen, draw two simple stick legs extending from the bottom, ending in three-pronged feet. -
Add decorative accents:
If you have empty space on the wing or tail feathers, add tiny white dots or dashes to mimic the folk art style shown in the reference.
Step 4: Finishing Touches
-
Clean up lines:
Check for any smudges or uneven edges. If needed, touch up the background with a little bit of grey or beige paint to match the stone, effectively ‘erasing’ mistakes. -
Seal the artwork:
Allow the paint to cure for at least 24 hours. Finish by spraying a light coat of matte clear sealant over the entire rock to protect your turkey from chipping.
Place your completed turkey rock on a mantel or use it as a festive paperweight to welcome the holiday season


Leaf-Feather Turkey Twist

This charming project combines simplistic folk art shapes with warm autumn hues to create a turkey that feels both decorative and playful. The design focuses on bold outlines and repetitive patterns, making it an approachable piece for artists of all skill levels.
How-To Guide
Materials
- Smooth, light-colored river rock (palm-sized)
- Pencil and eraser
- Fine-point black paint pen or liner marker
- Acrylic paints (Burgundy red, golden yellow, pumpkin orange, olive green, cream/off-white)
- Small round paintbrushes (sizes 0 and 2)
- Clear spray sealant or varnish (matte or satin finish)
Step 1: Sketching the Outline
-
Stone preparation:
Begin by washing your stone with warm soapy water to remove any dirt or oils. Let it dry completely before starting, as moisture can trap beneath the paint. -
Basic shapes:
Using a pencil, lightly sketch a simple teardrop shape on the left side of the rock for the turkey’s body. The rounded bottom should sit lower, curving up into a narrower neck. -
Adding feathers:
Draw the tail feathers fanning out from the back of the teardrop body. Start with a large fan shape, then divide it into individual segments resembling oversized flower petals. -
Wing detail:
Sketch a smaller, semi-circle shape inside the main body teardrop to define the wing. Add a small beak and a tiny eye circle on the head.
Steady Hand Trick
Rest your pinky finger on the dry part of the rock while outlining. This anchors your hand for smoother, more confident lines.
Step 2: Blocking in Color
-
Painting the body:
Load your brush with burgundy red paint. carefully fill in the main body area, avoiding the wing section and the head. You may need two thin coats for full opacity. -
Detailing the head:
Switch to golden yellow paint and fill in the head area. While you have the yellow out, paint every other tail feather with this warm shade. -
Filling the remaining feathers:
Use pumpkin orange to fill in the alternating tail feathers. If the colors touch, be careful to let the first set dry slightly to prevent bleeding. -
Coloring the wing:
Use the olive green paint for the semi-circle wing shape. This earthy tone helps ground the warmer colors. -
Inner feather ring:
Paint a curved band of burgundy red at the base of the tail feathers, right where they connect to the body. This creates a layered effect.
Step 3: Adding Details
-
Black outlining:
Once the base colors are completely dry to the touch, use your fine-point black paint pen to trace over all your original pencil lines. Go slowly to keep the lines crisp. -
Feather texture:
Inside each orange and yellow tail feather, draw a few short, horizontal lines or hatch marks with the black pen to mimic texture. -
Wing definition:
Draw three vertical lines inside the olive green wing to suggest structure. Add the small legs and feet at the bottom using simple stick-figure lines. -
White dots:
Dip the very tip of a brush handle or a toothpick into cream or off-white paint. Add a row of small dots along the red band at the base of the tail feathers. -
Body patterns:
Continue adding white or cream decorative dots onto the lower part of the red body and the green wing. Painting small flower-like clusters of dots adds a nice folk-art touch. -
Final eye detail:
Use the black pen to fill in the pupil of the eye, leaving a tiny speck of the yellow background showing if possible, or add a tiny white catchlight dot later. -
Sealing the work:
Allow the entire design to cure for at least 24 hours. Finish by spraying a light coat of clear varnish over the rock to protect it from chipping and weather.
Personalized Place Cards
Paint a name on the exposed stone surface beneath the turkey feet to execute colorful, reusable place settings for Thanksgiving dinner.
Now you have a festive little turkey ready for your table setting or garden path
BRUSH GUIDE
The Right Brush for Every Stroke
From clean lines to bold texture — master brush choice, stroke control, and essential techniques.
Explore the Full Guide
Wide-Eyed Cartoon Turkey
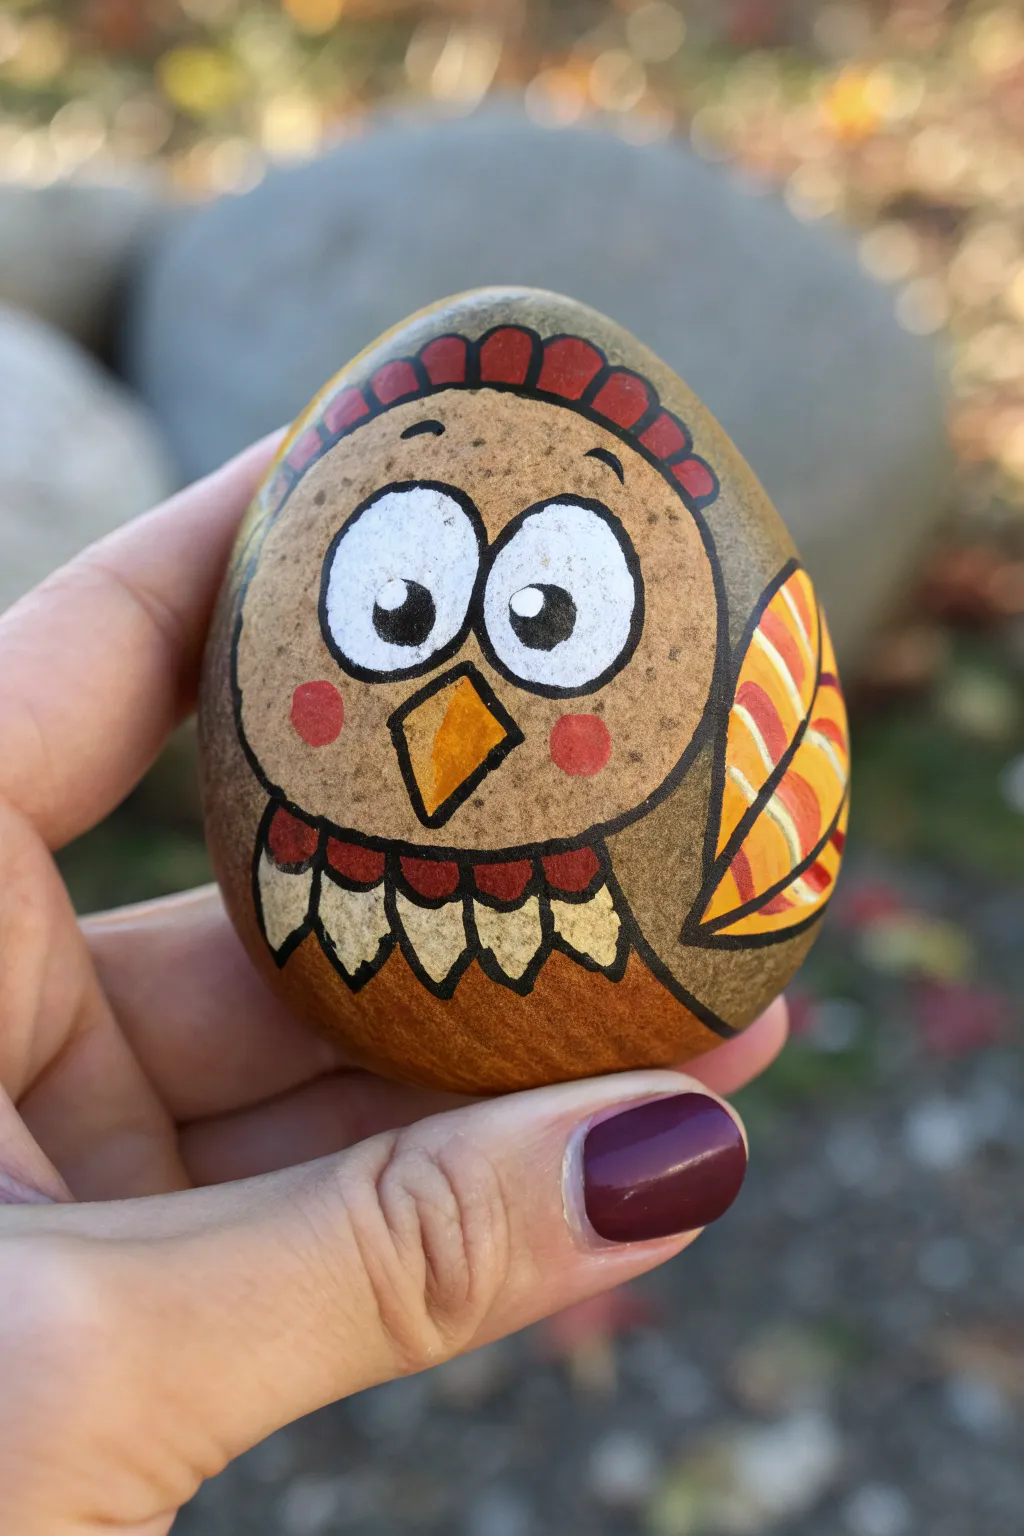
This charming project transforms a simple egg-shaped stone into a wide-eyed turkey with just a few colors and steady linework. The finished piece features adorable rosy cheeks and stylized feathers, making it a perfect Thanksgiving accent or place setting marker.
Detailed Instructions
Materials
- Smooth, egg-shaped rock (roughly palm-sized)
- Acrylic paints (brown/tan, white, black, red, yellow, orange)
- Fine liner paintbrush
- Medium flat paintbrush
- Pencil for sketching
- Black paint pen (fine or ultra-fine tip)
- Sealer (spray or brush-on varnish)
Step 1: Base and Body
-
Clean the surface:
Before starting, ensure your rock is scrubbed clean with soap and water and dried completely to help the paint adhere properly. -
Sketch the outline:
Using a pencil, lightly draw a large oval shape for the turkey’s face, leaving a border of the natural rock showing around the edges if you like that look, or plan to paint the background later. -
Paint the face base:
Mix a light tan or beige color using brown and white acrylics. Fill in the large oval shape you just sketched, applying two coats if necessary to get solid coverage. -
Add the body color:
Beneath the face oval, paint a curved section in a warmer, reddish-brown tone to represent the turkey’s body. Let the base layers dry completely before moving on.
Step 2: Facial Features
-
Sketch the eyes:
Lightly draw two large, touching circles in the upper center of the face area. Make them slightly oversized for that cartoonish look. -
Paint the whites:
Fill these circles carefully with white paint. You will likely need two or three thin layers to make the white pop against the tan background. -
Add the beak:
In the space directly below the eyes, paint a downward-pointing triangle using a golden yellow or orange paint. -
Create rosy cheeks:
Dip a fingertip or a round sponge dauber into red paint, dab off the excess, and gently stamp two soft circles on either side of the beak for blush. -
Detail the head feathers:
Along the top curve of the face, paint a series of small red scallops or humps to act as the turkey’s comb or head feathers.
Uneven Paint?
If your tan base coat looks streaky, sand it very lightly with fine-grit sandpaper after it dries, then apply a second coat for a super smooth finish.
Step 3: Feather Details and Outlines
-
Paint the side wing:
On the right side of the rock, paint a curved leaf-like shape. Fill this with diagonal stripes of yellow and orange to suggest wing feathers. -
Add chest feathers:
Where the face meets the brown body, paint a row of small, downward-pointing scallops. I like to fill these with an off-white or cream color to distinguish them from the face. -
Outline everything:
Once all paint requires is bone dry, take your black paint pen and carefully outline every feature: the eyes, the face oval, the beak, and the individual feathers. -
Add the pupils:
Draw two large black circles inside the white eyes. Leave or paint a tiny white dot in each pupil to create a ‘catchlight’ reflection. -
Refine facial expressions:
Use the pen to draw small eyebrows above the eyes and a line down the center of the beak for extra detail. -
Detail the wing:
Use the black pen to draw the central spine of the wing feather and outline the colored stripes. -
Seal the artwork:
Finish by applying a clear sealer to protect your design from chipping and to give the rock a polished sheen.
Make It 3D
Glue small googly eyes over the painted eyes for a silly, kinetic effect that kids will especially love.
Display your rock on the mantle or tuck it into a centerpiece arrangement for a festive touch
Modern Color-Block Turkey
Capture the warmth of autumn with this intricately detailed folk art turkey design painted on a smooth river rock. Featuring earthy tones and delicate line work, this piece combines simple shapes with sophisticated patterning for a charming Thanksgiving decoration.
Step-by-Step
Materials
- Smooth, light-colored river rock (oval shape preferred)
- Pencil and eraser
- Acrylic paints (burnt orange, deep red, gold/ochre, warm brown, white, forest green)
- Fine point black permanent marker (0.1mm or 0.3mm) or very fine liner brush
- Fine detail paintbrushes (sizes 0 and 00)
- White paint pen (extra fine point) or a toothpick
- Matte or satin spray sealant
Step 1: Planning and Sketching
-
Clean surface:
Begin by washing your stone with soap and water to remove any dirt or oils, then let it dry effectively. -
Sketch the body:
Lightly sketch a large, backward ‘C’ shape or kidney bean shape on the left side of the rock for the turkey’s main body. -
Add the neck:
Extend a curved neck upwards from the top left of the body, capping it with a small circular head. -
Outline the tail:
Draw a large fan shape expanding from the back of the body toward the right side of the rock. Divide this fan into two main sections: an inner semicircle and a larger outer ruffle.
Step 2: Base Colors
-
Paint the body:
Fill the lower body curve with a warm burnt orange paint. Paint the upper wing area—the kidney bean shape inside the body—with a mid-tone brown. -
Color the neck:
Use a deep ruddy brown or rust color for the neck and head. Paint the beak a small triangle of yellow or gold. -
Fill the inner tail:
Paint the semi-circle section of the tail closest to the body with a light beige or cream wash. -
Paint the outer feathers:
For the outer tail feathers, you’ll want to alternate colors or create a gradient. I prefer using a mix of ochre and light brown for the main feather body, leaving the tips unpainted for now. -
Add feather tips:
Paint the scalloped tips of the tail feathers with a deep, maroon red. Let all base layers dry completely before moving on.
Ink Confidence
If you’re nervous about using a brush for outlines, a Micron 01 pen is perfect. Just confirm the paint underneath is 100% dry or it will ruin the nib.
Step 3: Detailed Line Work
-
Outline the turkey:
Using your fine black marker or liner brush, carefully outline the entire turkey silhouette, including the separate sections of the body and wing. -
Detail the feathers:
Draw radiating lines in the inner tail semi-circle (like bicycle spokes). Then, outline each individual feather in the outer ring, connecting the maroon tips to the ochre centers. -
Add wing details:
Draw scalloped scale patterns inside the brown wing section. Paint small red accents inside these scallops for depth. -
Create the face:
Draw a small circle for the eye with a white dot highlight. Add the wattle and comb details in red on the head.
Metallic Pop
Swap the ochre paint for a metallic gold acrylic. Using gold on the beak and feather centers makes the turkey shimmer beautifully in candlelight.
Step 4: Finishing Touches
-
Decorative dots:
Using a white paint pen or a toothpick dipped in paint, add a row of tiny white dots along the curved line that separates the inner tail from the outer feathers. -
Neck ornamentation:
Add a similar row of tiny white dots along the collar where the neck meets the body. -
Flora accents:
In the negative space below the turkey, paint two simple sprigs: one in rust red resembling grain or leaves, and one in forest green with simple oval leaves. -
Draw legs:
Use the black fine liner to draw two stick legs with three-toed feet extending from the bottom of the body. -
Final texture:
Add tiny black speckles randomly around the background of the rock to give it an organic, speckled eggshell appearance. -
Seal the work:
Allow the ink to cure for several hours to prevent smearing, then finish with a coat of spray sealant.
Now you have a timeless piece of autumnal decor to centerpiece your holiday table

PENCIL GUIDE
Understanding Pencil Grades from H to B
From first sketch to finished drawing — learn pencil grades, line control, and shading techniques.
Explore the Full Guide
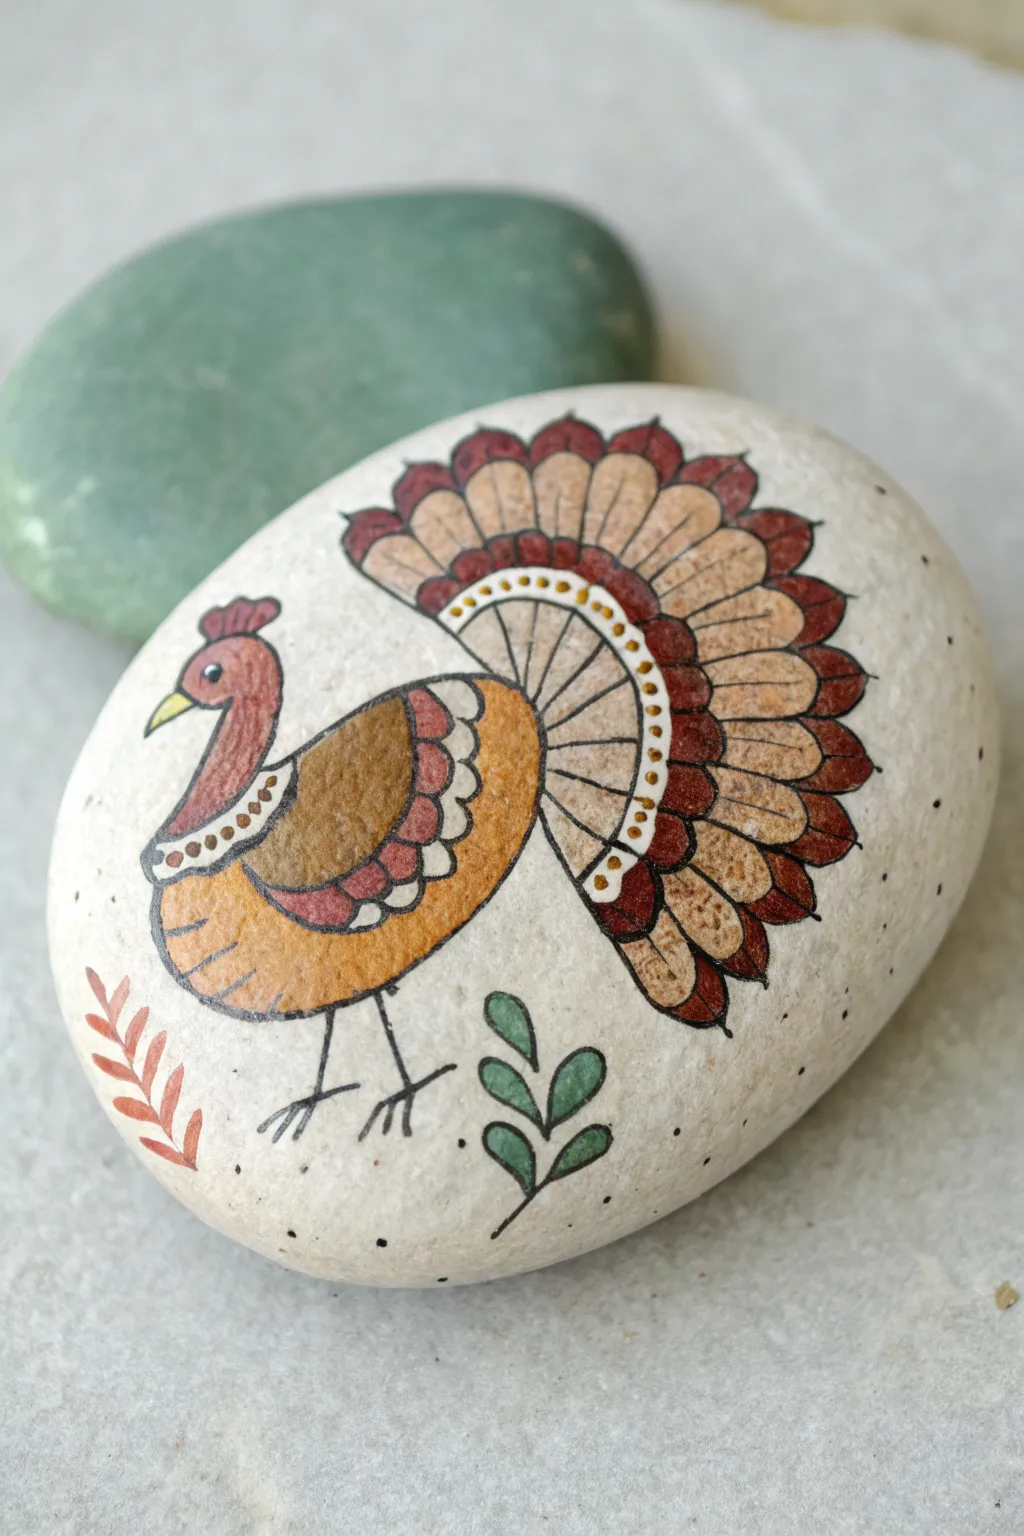
Muted Rustic Turkey Palette
Embrace the understated beauty of autumn with this sophisticated take on a classic Thanksgiving symbol. This project uses warm, earthy tones on a natural stone background for a piece that feels both festive and elegantly rustic.
Detailed Instructions
Materials
- Smooth, light-colored oval river rock (cleaned and dried)
- Acrylic paints: Burnt Sienna (reddish-brown), Mustard Yellow, Deep Orange, Cream/Off-White, Black
- Fine detail paintbrushes (sizes 0 and 00)
- Small flat shader brush (size 2)
- Pencil for sketching
- Palette or small plate for mixing
- Matte finish sealant (spray or brush-on)
- Cup of water and paper towels
Step 1: Preparation and Sketching
-
Clean Your Canvas:
Begin by washing your stone thoroughly with soap and water to remove any dirt or oils. Let it dry completely, ideally in the sun, to ensure the paint adheres properly. -
Assess the Shape:
Hold your rock to find the best orientation. For this turkey, an oval shape positioned horizontally works best to accommodate the spread of the tail feathers. -
Sketch the Body:
Using a pencil, lightly draw a simple teardrop shape on the left side of the rock for the turkey’s body. The tapered top will become the neck and head. -
Outline the Feathers:
Sketch a fan shape extending from the back of the body toward the right side of the rock. Divide this fan into individual feather segments, similar to petals on a flower. -
Add the Details:
Lightly sketch the legs at the bottom and a simple leafy branch curving up along the left side of the turkey.
Smooth Lines Pro-Tip
If your black outlines feel jagged, add a drop of water to the paint until it has an inky consistency. This helps the paint flow off the brush seamlessly for crisp lines.
Step 2: Blocking in Color
-
Paint the Body Base:
Load your small flat brush with Burnt Sienna. Fill in the main body shape, leaving a small gap near the center for the wing. You may need two coats for opacity. -
Define the Wing:
Mix a little Mustard Yellow with a touch of Burnt Sienna to create a golden-brown hue. Paint the oval wing shape right in the center of the turkey’s body. -
Start the Tail Feathers:
Now, alternate colors for the tail feathers. Paint every other feather section with your Deep Orange paint. -
Complete the Tail Fan:
Fill in the remaining tail feather sections using Mustard Yellow. Don’t worry about perfect edges yet; we will outline later. -
Beak Paint:
Use a tiny amount of Mustard Yellow on a detail brush to fill in the small triangular area for the beak. -
Paint the Leaf Sprig:
Mix a muted green by combining a tiny bit of black with yellow, or use a pre-mixed olive green. Carefully paint the small leaves along the sketched branch line on the left.
Place Setting Level-Up
Paint a different name on the back of each rock to create custom, reusable Thanksgiving place cards that guests can take home as favors.
Step 3: Detailing and Outlining
-
Outline the Turkey:
I like to slightly water down my black paint for smoother lines here. Using your finest detail brush (size 00), carefully outline the entire body, head, and wing. -
Outline the Tail:
Continue with the thinned black paint to outline each individual tail feather, separating the orange and yellow sections clearly. -
Add Feather Details:
Paint horizontal stripes across the tail feathers. The lines don’t need to be perfectly straight; a slightly organic curve looks more natural. -
Highlight the Stripes:
Once the black stripes are dry, take a very small amount of Cream or Off-White paint. Add tiny dash marks inside some of the feather segments between the black lines to add texture. -
Body Dots:
Dip the non-brush end of your paintbrush into the Cream paint. gently dot a pattern onto the red-brown chest of the turkey for a speckled effect. -
Face and Legs:
Use the black detail brush to paint the eye as a simple dot. Then paint the legs using thin, stick-figure lines ending in three toes. -
Stem Work:
Finally, paint a thin black line connecting the green leaves to create the stem of the foliage sprig. -
Seal the Deal:
Allow the paint to cure for at least 24 hours. Apply a matte spray sealant to protect your artwork without adding an unnatural glossy shine.
Place this charming little turkey on your mantel or holiday table to add a touch of handmade warmth to your celebration
Glitter-Accent Turkey Feathers
Transform a smooth, egg-shaped stone into a festive Thanksgiving decoration with this stylized turkey design. The character features a rich brown body and an elegant tail fan shimmering with fine glitter accents.
Step-by-Step
Materials
- Smooth, egg-shaped rock (approx. 4-5 inches tall)
- Acrylic paints (dark brown, burnt orange, golden yellow, teal/turquoise, white, red, deep green)
- Fine glitter paint (gold and turquoise)
- Fine detail brushes (sizes 0 and 00)
- Small flat brush (size 2 or 4)
- Black fine-point paint pen or permanent marker
- Paint palette or mixing surface
- Water cup and paper towels
- Clear acrylic sealer spray (gloss or matte)
Step 1: Painting the Turkey’s Form
-
Clean Your Canvas:
Begin by washing your rock with warm, soapy water to remove any dirt or oils. Let it dry completely in the sun or with a hairdryer before you start painting. -
Outline the Shape:
Using a pencil sketch or very thinned brown paint, lightly outline the turkey’s shape. Draw a curving neck and round body shape towards the left side of the rock. -
Fill the Body:
Mix a smooth dark brown shade. Using your flat brush, fill in the entire body shape you just outlined. You may need two coats to get a solid, opaque coverage. -
Paint the Legs:
With a small round brush and yellow paint, add two thin legs extending from the bottom of the body, ending in three-toed feet. -
Add Facial Features:
Paint a small yellow triangle for the beak. Below the beak, add a red tear-drop shape for the wattle. On top of the head, dab three small red dots on thin stems for a whimsical crest. -
Paint the Eye:
Once the brown is dry, add a circle of white for the eye. When the white is dry, add a smaller black pupil looking upward or sideways for personality.
Step 2: Creating the Plumage
-
Outline the Tail Fan:
Lightly sketch a large fan shape behind the turkey’s body. Divide this fan into individual feather sections—think of them like long, slender leaves radiating from the turkey’s back. -
Color Blocking the Feathers:
Paint alternating feathers with your golden yellow (or light orange) and teal paints. I find it easiest to paint all the yellow feathers first, rinse my brush, and then do the teal ones. -
Adding Outer Feathers:
Paint a second layer of shorter, wider feathers peeking out from behind the main fan using a darker shade of teal or blue to create depth. -
Detailing the Wing:
Where the tail meets the body, paint a semi-circular wing shape. Use a black paint pen or thin brush to add a decorative dotted border along the edge of this wing area. -
Drawing the Veins:
Using a very fine liner brush or black paint pen, draw a central line down each tail feather. Add small V-shapes or diagonal lines branching off the center to simulate feather texture. -
Defining the Edges:
Outline the entire turkey body, the legs, and each individual feather with your black fine-point pen to make the design pop clearly against the stone background.
Wobbly Lines?
If your hand shakes while outlining, try resting your wrist on a sturdy object like a book or a heavy mug. This stabilizes your hand for smoother strokes.
Step 3: Final Flourishes
-
Spotted Details:
Use the tip of a toothpick or a size 00 brush to add tiny white dots onto the brown body of the turkey for a speckled texture. -
Adding Vegetation:
At the base of the rock, paint a few simple blades of grass with green paint and a small flower or leaf in red/orange to ground your turkey in a scene. -
Applying Glitter Accents:
Once all paint is dry, carefully apply fine glitter paint over the yellow and teal feathers. This adds a subtle shimmer that catches the sunlight without obscuring the colors underneath. -
Protect Your Art:
Allow the rock to cure for at least 24 hours. Finish by spraying a clear acrylic sealer over the entire rock to protect it from weather if you plan to place it outdoors.
Texture Boost
Use actual metallic gold paint instead of yellow for the feathers to give the turkey a rich, premium look that glows beautifully in candlelight.
Place this cheerful little turkey on your porch or dining table to greet your guests with festive charm


Mandala-Style Turkey Tail
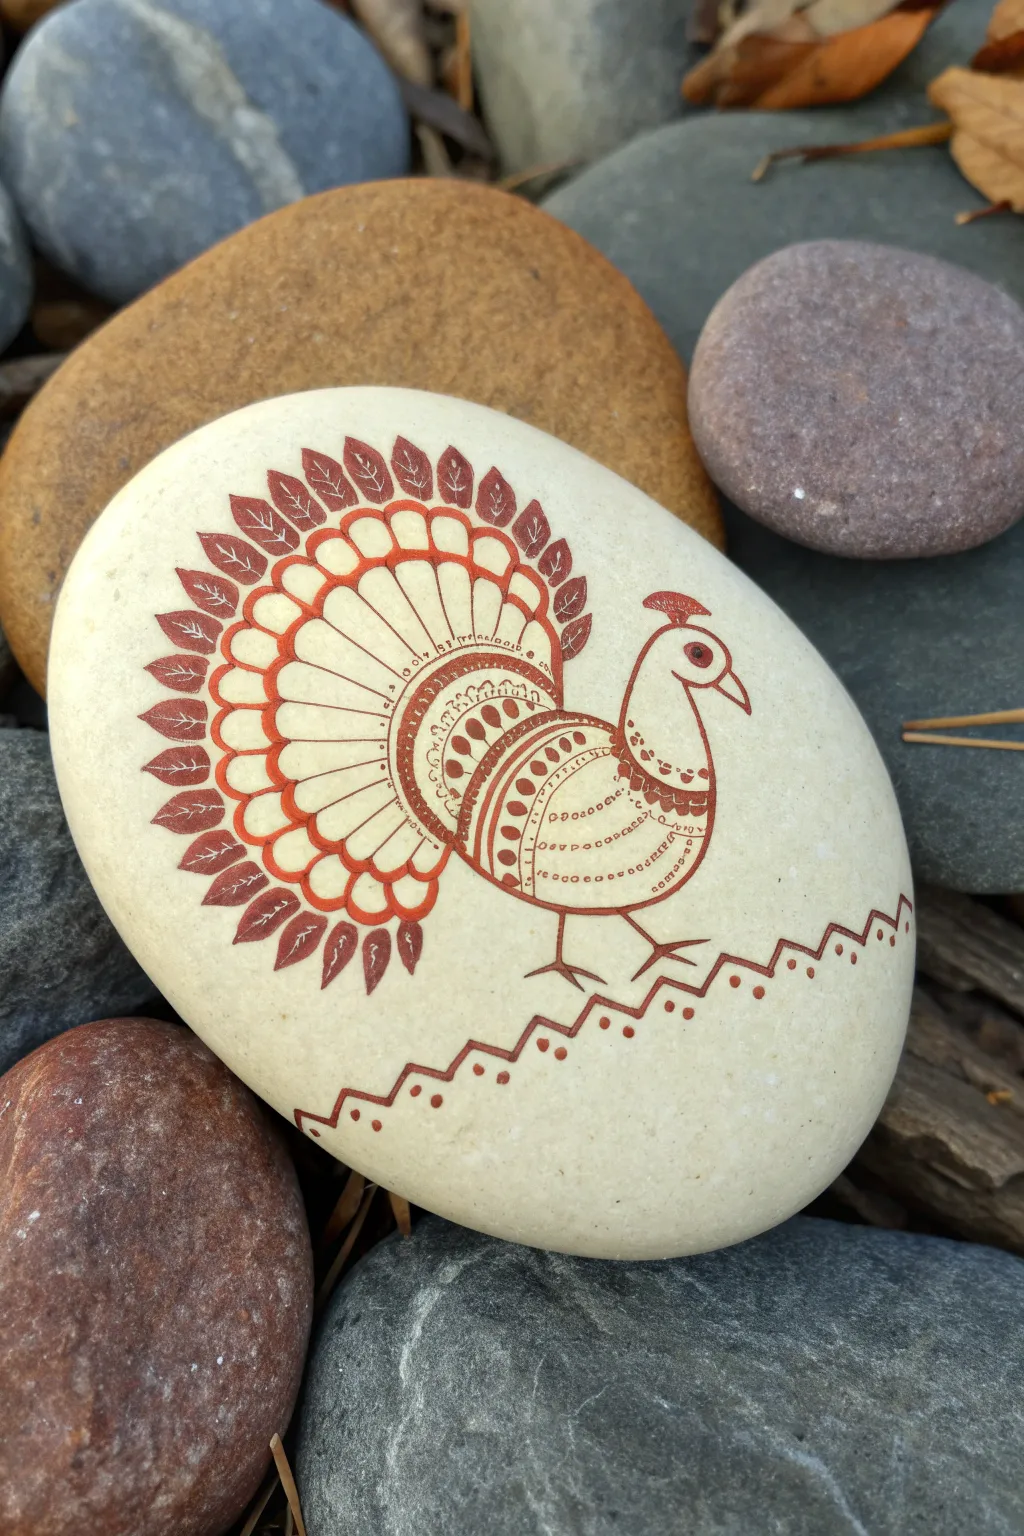
Embrace the intricate beauty of mandala art with this elegant turkey design, featuring monochromatic reddish-brown line work on a smooth river stone. The repeating patterns and leaf motifs give this piece a sophisticated, henna-inspired look perfect for Thanksgiving decor.
Detailed Instructions
Materials
- Smooth, flat river rock (preferably white or cream)
- Fine-point permanent marker or paint pen (terracotta or reddish-brown)
- Extra-fine point marker (same color, for details)
- Pencil
- Eraser
- Clear matte sealant spray
Step 1: Preparation & Outline
-
Stone Selection:
Begin by finding a rock that is naturally light in color—white or cream works best to let the reddish-brown ink pop. Ensure it has a smooth, flat surface for steady line work. -
Clean the Surface:
Wash the stone thoroughly with soap and water to remove any dirt or oils, then let it dry completely. -
Sketch the Base Shape:
Lightly sketch the turkey’s body profile in pencil on the right side of the rock. Draw a simple oval for the body and a curved neck leading to a small round head with a beak. -
Map the Tail Fan:
Behind the body, lightly sketch a large, semi-circular fan shape that extends outward. This will guide your mandala pattern later.
Steady Hands Tip
Rest your wrist on a table or stable surface while drawing. For curved lines, pivot the rock with your other hand instead of moving your drawing hand.
Step 2: Drawing the Body Details
-
Outline the Body:
Using your fine-point marker, carefully trace over your pencil lines for the turkey’s head, neck, and main body oval. Add a small eye and beak. -
Segment the Body:
Inside the body oval, draw two curved vertical lines to create sections. This divides the wing area from the chest. -
Add Decorative Dots:
Switch to your extra-fine point marker. In the neck and chest area, add tiny dots along the inner edge of your outline for a delicate, decorative border. -
Detail the Wing:
Inside the wing section, draw rows of small semi-circles or loops. Fill these with solid dots or small dashes to mimic the texture of feathers.
Step 3: Creating the Mandala Tail
-
Draw the Inner Arc:
Start the tail by drawing a solid arc close to the body. Divide this arc into small sections with radial lines. -
Fill the Inner Patterns:
Inside each small section of that first arc, draw a tiny teardrop shape and fill it in solidly with your marker. -
Create the Main Feathers:
Draw larger, elongated U-shapes radiating outward from the first arc. These form the primary structure of the tail fan. -
Add Scalloped Edges:
At the top of each U-shape, draw a scalloped or rounded cap. This connects the feathers and creates a unified border. -
Draw the Leaf Tips:
For the outermost layer, draw a pointed leaf shape extending from the center of each scalloped edge. These should look like individual leaves fanning out. -
Texture the Leaves:
Draw a central vein in each leaf tip and add tiny diagonal lines on either side to create a veined texture. I find turning the rock helps me keep these angles consistent.
Metallic Twist
Use a metallic copper or gold pen for the dot details inside the tail feathers to give the turkey a subtle, festive shimmer.
Step 4: Final Touches
-
Add Legs and Ground:
Draw thin stick legs with three toes each. Below the turkey, draw a zigzag line across the bottom of the rock to represent the ground. -
Decorate the Ground Line:
Add a small dot inside each downward point of the zigzag line and perhaps a few floating dots above it for balance. -
Erase Guidelines:
Wait at least 15 minutes for the ink to fully set, then gently erase any visible pencil marks. -
Seal the Artwork:
Finish by spraying a light coat of clear matte sealant over the rock to protect the design from fading or smudging.
Now you have a beautifully intricate turkey stone that adds an artistic touch to your holiday table
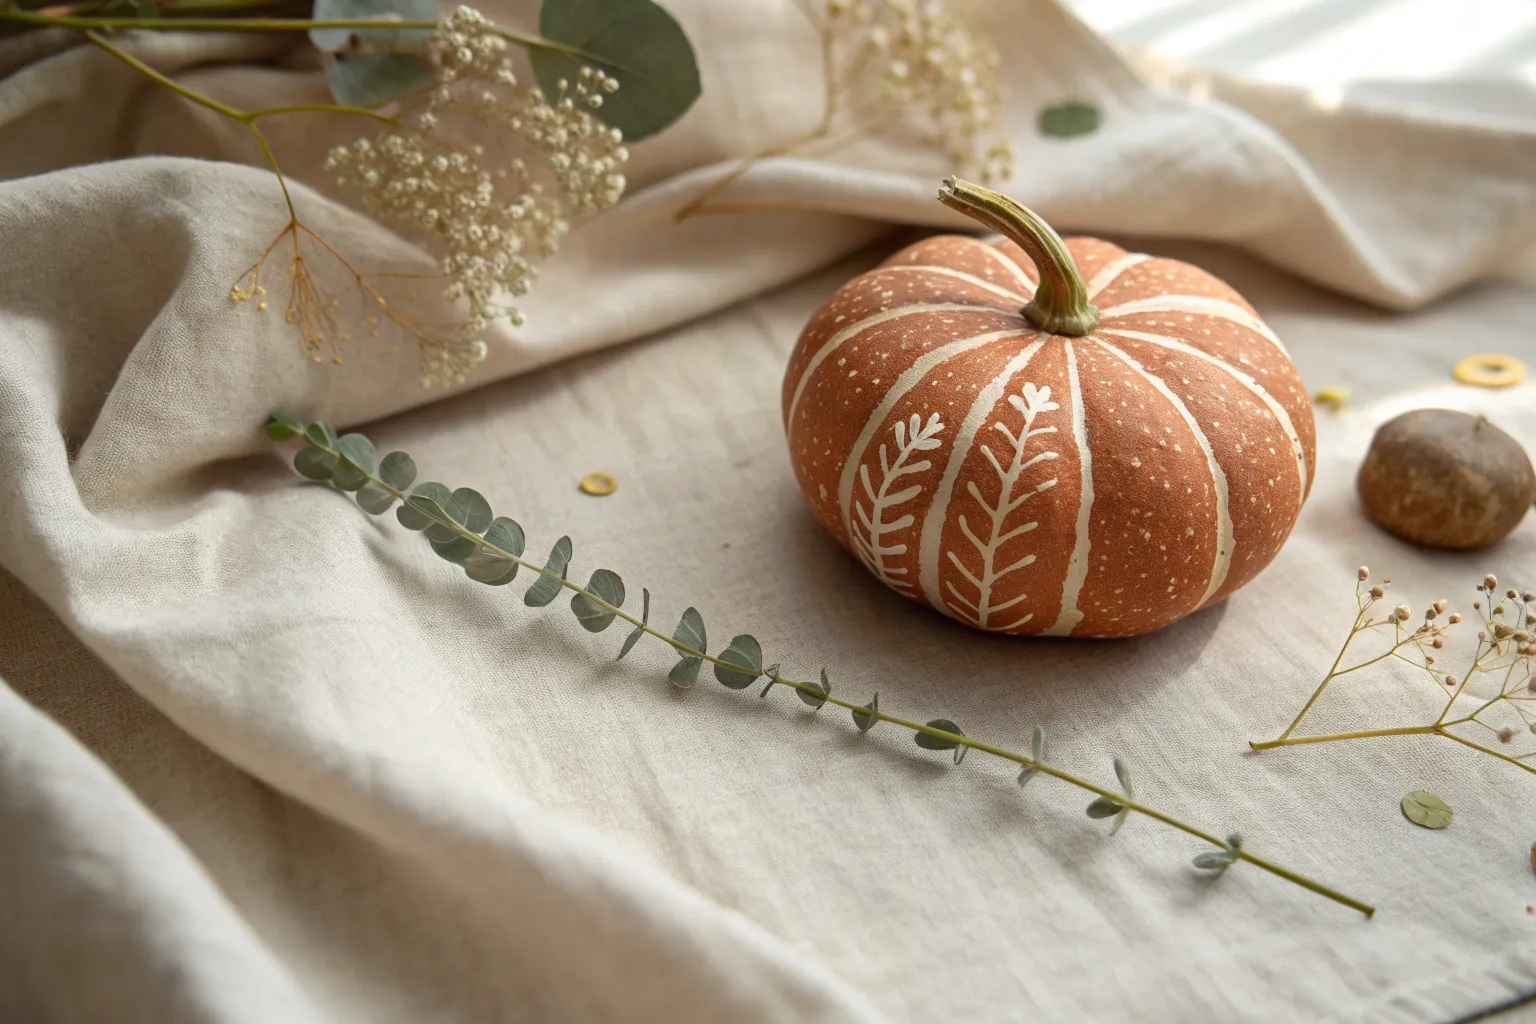
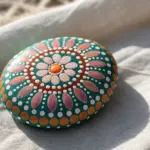
Mandala Pumpkin Rock

Transform a smooth, oval stone into a sophisticated autumnal decoration using classic mandala dotting techniques. This design features warm terracotta tones, muted greens, and crisp white dots that mimic the radiating ribs of a stylized pumpkin.
Step-by-Step Guide
Materials
- Smooth, oval river rock (palm-sized)
- Acrylic paints: Pumpkin orange, terracotta/burnt sienna, muted sage green, creamy off-white
- Set of dotting tools (various sizes)
- Fine detail paintbrush (00 or 000 size)
- Black acrylic paint (for center accent)
- Gloss varnish or sealer
Step 1: Base and Center
-
Prepare the canvas:
Begin by washing and drying your rock thoroughly. Paint the entire surface with two coats of terracotta or burnt sienna paint to create a warm, solid base, allowing it to dry completely between layers. -
Mark the center:
Find the approximate center of the rock’s top face. Using your largest flat-head dotting tool, place a large pumpkin orange circle right in the middle. This will be the hub of your flower-like design. -
Add the pupil:
Once the orange center is dry, use a medium dotting tool to place a black dot directly in the center of the orange circle, then add a tiny white highlight dot on the black one for depth. -
Create the first ring:
Using a small-to-medium dotting tool and off-white paint, place a ring of evenly spaced dots immediately surrounding the large orange center circle. Aim for tight spacing without the dots touching.
Step 2: Building the Petals
-
Draft the petal shapes:
Using a fine liner brush and the same terracotta base color (or slightly lighter for visibility), lightly sketch eight to ten petal shapes radiating from the white dot ring. These should look like elongated tear-drops. -
Outline the petals:
Use your smallest dotting tool or a toothpick with off-white paint to create outlines for these petals. Instead of a solid line, create the outline using a chain of tiny, uniform dots. -
Fill the petals:
Inside each petal outline, paint a solid, elongated oval using a slightly darker terracotta or rust shade. This creates a textured, ‘carved’ look against the lighter dots. -
Highlight the fills:
Add horizontal texture to the solid petal fills by painting tiny, lighter orange horizontal dashes across them, resembling the ridges of a pumpkin.
Fixing Smudges
Smudged a wet dot? Wait for it to dry completely, paint over it with the terracotta base color, let that dry, and re-dot. Wiping it wet often makes a bigger mess.
Step 3: Outer Layers and Green Accents
-
Start the green ring:
In the ‘V’ spaces between the tips of your main petals, place medium-sized ovals using the muted sage green paint. These serve as the secondary tier of the mandala. -
Frame the green ovals:
Surround each green oval with a double border of dots. The first inner border should be peach or light orange dots, and the outer border should be tiny white dots for high contrast. -
Connect the design:
Use a medium dotting tool to place a single, larger peach-colored dot at the very tip of each main terracotta petal, bridging the gap between the green sections. -
Expand the background:
Fill the triangular negative spaces between the petals with gradients of tiny dots. Start with creamy white near the center and transition to peach or light orange as you move outward.
Metallic Twist
Swap the off-white paint for metallic gold or copper. The metallic sheen catches the light beautifully and adds a luxurious feel to your Thanksgiving table setting.
Step 4: Border and Finish
-
Establish the horizon line:
Decide where the decorative top ends and the bottom of the rock begins. Use a large dotting tool to create a bold row of large white dots encircling the entire rock, acting as a frame. -
Add the bottom tier:
Beneath the large white row, add a secondary row of slightly smaller white dots. Stagger them so they sit in the spaces between the larger dots above, creating a honeycomb effect. -
Refine with top dots:
Go back to your green ovals. Once dry, add a ‘top dot’—a smaller, lighter green or white dot—placed gently on top of the dried green base to create a 3D domed effect. -
Clean up details:
Inspect your white dot chains. If any look uneven, use a very fine brush to touch them up. I find walking away for five minutes helps me spot irregularities immediately upon returning. -
Seal the stone:
Allow the stone to cure for at least 24 hours. Apply a coat of gloss varnish to protect the paint and make the colors pop, giving it that polished ceramic look.
Place your finished mandala rock in a bowl with natural stones for a stunning centerpiece.
Simple Pumpkin Patch Trio
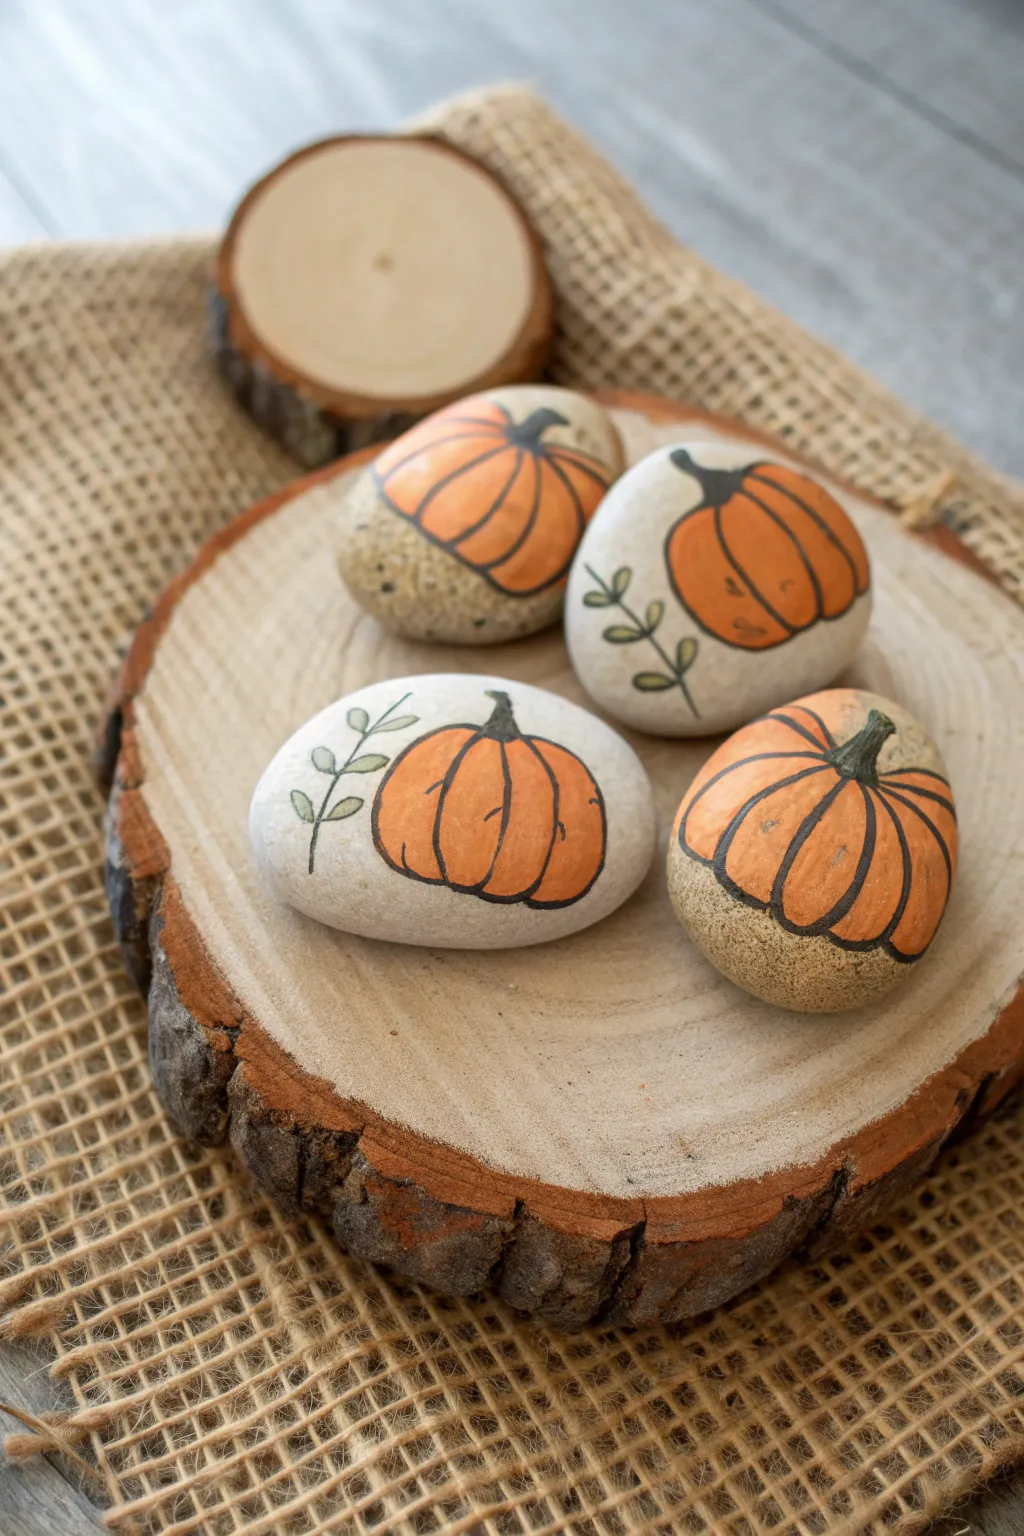
Embrace the harvest season with these minimalist painted stones, featuring charming orange pumpkins on a natural rock canvas. This project uses the stone’s original color as a background, adding subtle touches of gold and green foliage for an organic, farmhouse feel.
How-To Guide
Materials
- Smooth, light-colored river rocks (oval or round shapes)
- Orange acrylic paint (pumpkin orange)
- Black fine-tip paint pen or permanent marker
- Green paint pen or small brush with sage green paint
- Gold glitter paint or fine gold glitter mixed with Mod Podge
- Small flat paintbrush
- Very fine detail brush
- Pencil (optional)
- Matte spray sealer or varnish
Step 1: Preparation & Planning
-
Clean the canvas:
Before you begin, scrub your rocks with warm soapy water and let them dry completely. This ensures the paint adheres properly and doesn’t flake off later due to dust or oils. -
Choose your orientation:
Examine the shape of each rock. Position them so the flattest, smoothest side is facing up to act as your painting surface. -
Sketch the outline:
Lightly sketch a broad oval or rounded pumpkin shape in the center of the rock using a pencil. Keep the shape somewhat imperfect and organic, just like real pumpkins.
Step 2: Painting the Pumpkin
-
Base coat application:
Using a small flat brush, fill in your pencil outline with bright orange acrylic paint. Depending on your paint’s opacity, you might need a second coat after the first one dries to get a solid, vibrant color. -
Create the segments:
Once the orange paint is fully dry, take your black fine-tip paint pen. Draw curved vertical lines starting from the top center and swooping down to the bottom to create the pumpkin’s ribs. -
Outline the shape:
Go over the outer perimeter of the orange shape with the black pen to define the pumpkin clearly against the stone background. -
Add the stem:
At the top center where your segment lines meet, draw a small, slightly curved stem. You can fill this in solid black or use a dark green or brown if you prefer a touch more color.
Natural Texture Tip
Don’t prime the whole rock white first! Leaving the natural grey or beige stone exposed around the pumpkin creates that trendy rustic look.
Step 3: Adding Details & Polish
-
Draw the foliage:
On a few of your rocks, use a green paint pen or a fine brush with sage green paint to add a simple leaf sprig next to the pumpkin. Draw a thin stem extending outward, then add tiny oval leaves along it. -
Applying the sparkle:
For a bit of contrasting texture, choose one or two rocks to dip in gold. Paint the bottom third of the stone with gold glitter paint, creating a curved line where it meets the raw stone. -
Refine the lines:
Check your black outlines. If the paint pen skipped over any rough patches in the stone, go back and carefully fill those gaps to ensure the lines are bold and continuous. -
Initial drying:
Allow all paint and glitter to dry completely for at least an hour. If the paint is still tacky, the sealer might smudge your hard work. -
Seal the deal:
Spray the finished rocks with a clear matte sealer. This protects the design from scratches and weather if you plan to place them outside.
Fixing Wobbly Lines
If your black outline gets messy, wait for it to dry completely, then carefully paint over the mistake with the original orange or a dab of grey that matches the rock.
Arranged on a wood slice or scattered on a table runner, these little stones bring a cozy, handmade touch to your holiday decor
Indian Corn Painted Rock
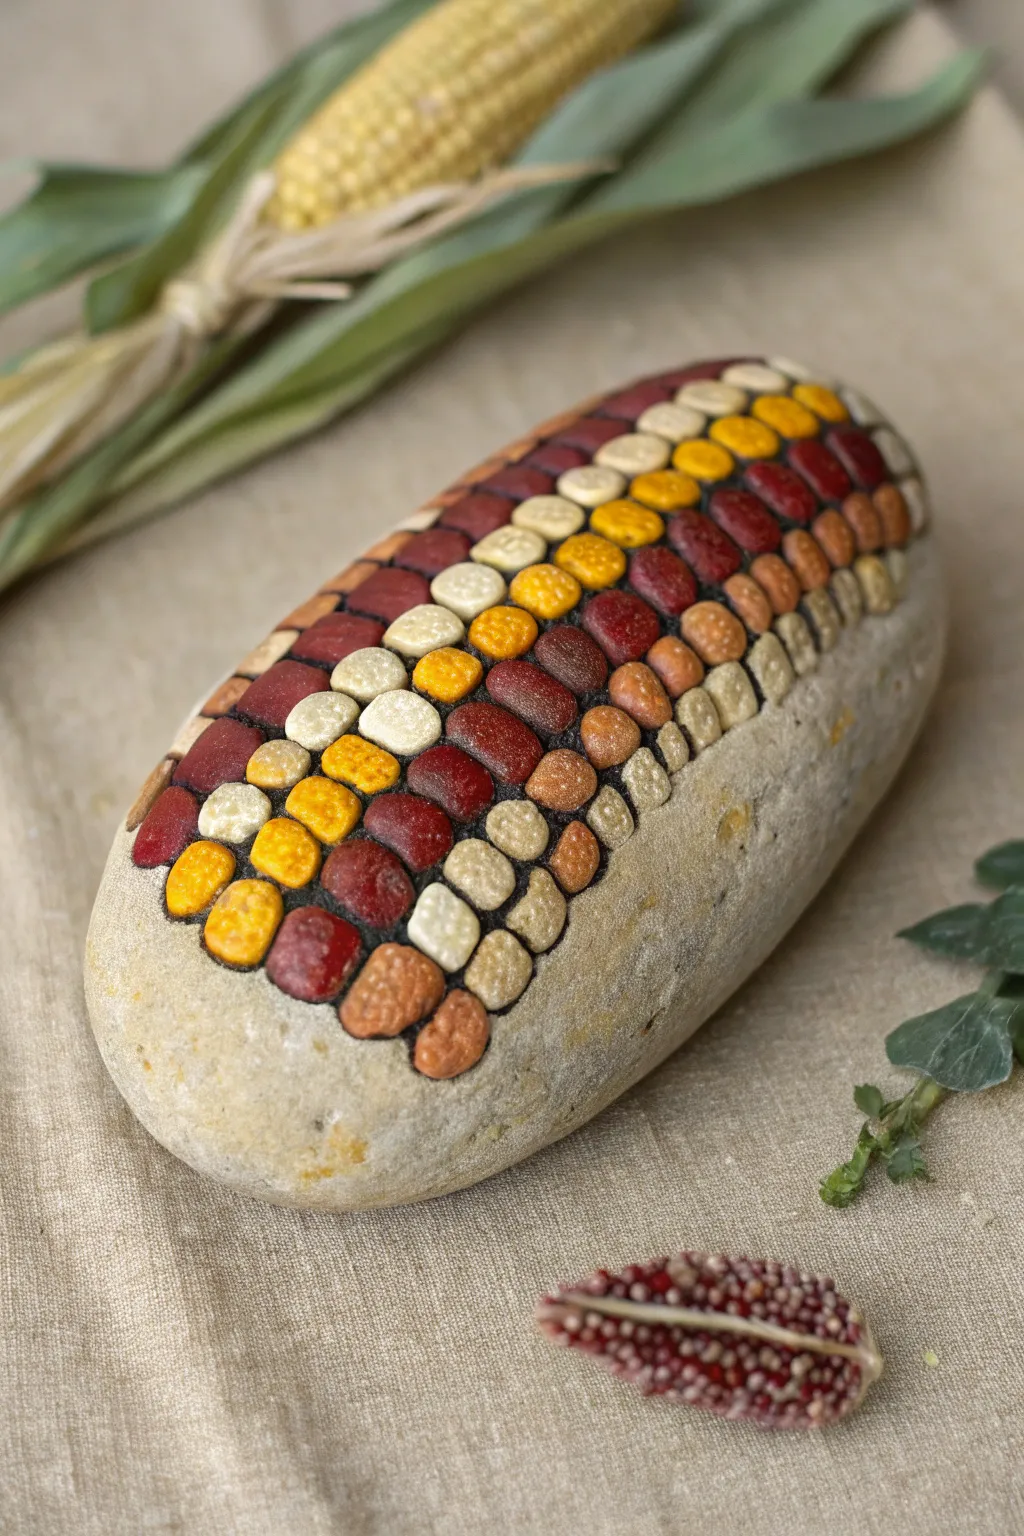
Transform a simple garden stone into a festive harvest decoration with this trompe-l’œil Indian corn project. By arranging colorful painted kernels on a natural stone background, you’ll create a durable and charming centerpiece perfect for Thanksgiving tables.
Detailed Instructions
Materials
- Smooth, oblong river rock (approx. 4-6 inches long)
- Acrylic paints (Burgundy, deep red, mustard yellow, cream/off-white, burnt orange, brown, black)
- Fine detail paintbrushes (size 0 and 00)
- Small flat brush
- Pencil
- Palette or paper plate
- Water cup and paper towels
- Matte or satin spray sealant
Step 1: Preparation & Mapping
-
Clean surface:
Begin by thoroughly washing your rock with soap and water to remove any dirt or oils. Let it dry completely before starting. -
Establish the shape:
Lightly sketch an elongated oval shape on the top surface of the rock using a pencil. This will be the main area where the corn kernels sit. -
Grid the kernels:
Inside your oval, sketch a grid of small, rounded squares or rectangles. These don’t need to be perfectly uniform; natural corn has variation, so allow some kernels to be slightly larger or irregular. -
Dark base coat:
Using a small brush and black or very dark brown paint, fill in the spaces *between* your sketched kernels. This creates the deep shadow gaps found in real dried corn.
Paint Looking Flat?
Real corn isn’t perfectly flat. Add a second, smaller highlight dot of pure white to the very top of each kernel to make them pop 3D.
Step 2: Painting the Kernels
-
Mix your palette:
Prepare your acrylic colors. You’ll need a variety of autumn hues: burgundy, rust orange, golden yellow, and a creamy white. -
Start with dark reds:
Select random kernels within your grid to paint with the deep burgundy. Since Indian corn often has bands of color, you might cluster a few dark ones together. -
Add orange tones:
Paint another scattering of kernels with burnt orange or rust. Try to place these next to the red ones to create a natural gradient effect. -
Fill in yellows:
Use your mustard yellow for the next set of kernels. I find that placing bright yellows near the center of the cob helps give the rock dimension. -
Complete with cream:
Fill the remaining empty kernal spots with the off-white or cream paint. If the paint looks thin, let it dry and add a second coat for opacity.
Step 3: Detailing & Dimension
-
Highlighting:
Mix a tiny amount of white into each of your base colors to create a lighter shade. Dab a small highlight on the top-center of each kernel to make them look rounded and plump. -
Shadowing edges:
With a very fine brush and watered-down brown paint, gently glaze the bottom edges of the kernels where they meet the black background to soften the transition. -
Define the perimeter:
Paint a faint, irregular border of light beige or tan around the entire cluster of kernels to suggest the chaff or where the husk would attach. -
Texture dots:
For added realism, use the tip of a toothpick or a size 000 brush to add tiny stippling dots on a few kernels, mimicking the texture of dried maize. -
Clean up lines:
If any kernel paint spilled into the gaps, re-apply a tiny line of black paint between them to keep the separation crisp.
Stone Selection Tip
Look for a rock that is naturally beige or tan. The natural stone color acts as a perfect neutral background, saving you from painting the whole base.
Step 4: Finishing Touches
-
Dry completely:
Allow the rock to sit undisturbed for at least an hour to ensure all thick layers of acrylic are fully hardened. -
Seal the work:
Take the rock to a well-ventilated area and apply a light coat of matte or satin spray sealant. This protects the paint from chipping and gives the corn a natural, slight sheen.
Place your finished rock alongside real gourds or dried leaves for a beautiful, everlasting autumn display
Fall Leaf Spotlight Rock
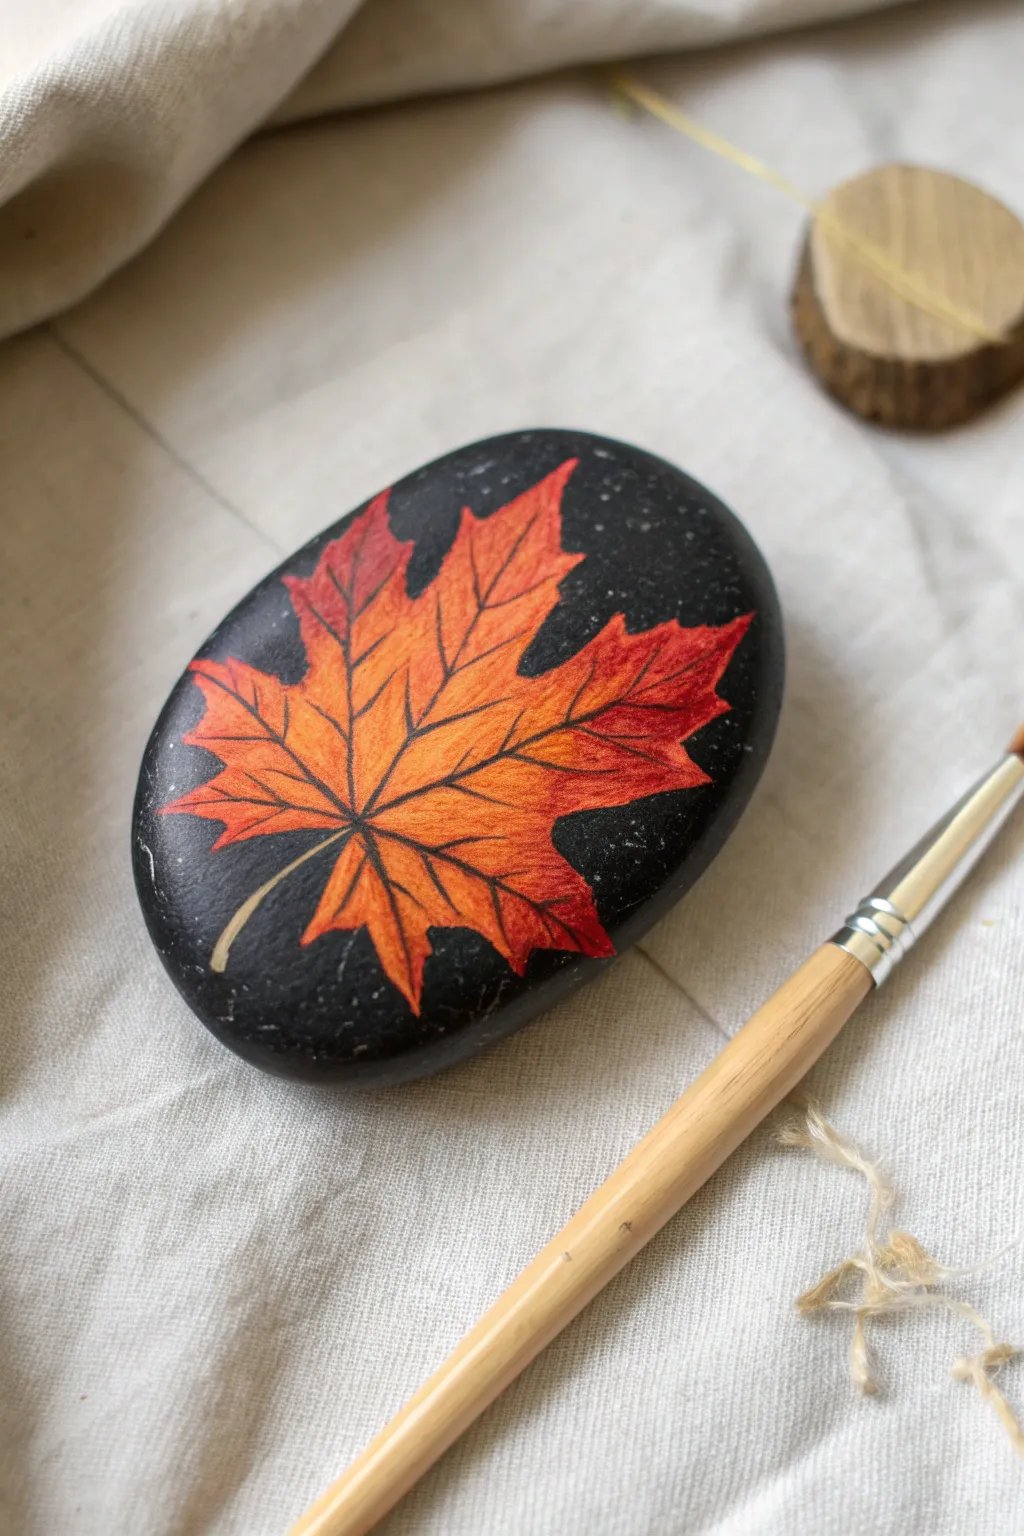
This stunning rock painting captures the fiery hues of autumn against a dramatic dark background, making the leaf pop as if illuminated by spotlight. It’s a perfect centerpiece for your Thanksgiving table or a thoughtful seasonal gift for a nature lover.
How-To Guide
Materials
- Smooth, oval river rock (dark grey or black ideally, otherwise paint it black first)
- Black acrylic paint (matte or satin)
- White colored pencil or chalk pencil (for sketching)
- Acrylic paints: Cadmium Orange, Burnt Sienna, Cadmium Yellow, Deep Red/Crimson, Titanium White
- Fine liner brush (size 0 or 00)
- Small flat brush (size 4 or 6)
- Palette for mixing
- Water cup and paper towels
- Spray sealer (matte or gloss)
Step 1: Preparing the Canvas
-
Clean the surface:
Begin by washing your stone with warm soapy water to remove any dirt or oils that might repel the paint. Let it dry completely. -
Base coat application:
If your rock isn’t naturally black, apply two smooth coats of black acrylic paint using your flat brush. Allow the first coat to dry fully before applying the second to ensure solid coverage. -
Sketching the shape:
Once the black base is bone dry, lightly sketch the outline of a five-pointed maple leaf using a white colored pencil. Start with the central vein, then add the side veins to guide your symmetric points. -
Drawing the ragged edges:
Refine the outline by drawing the characteristic serrated, jagged edges of the maple leaf. Keep your lines faint so they are easy to cover later.
Uneven Coverage?
If your orange looks streaky over the black or white base, let it dry completely and apply a second thin coat. Two thin layers are always smoother than one thick glob.
Step 2: Color Blocking
-
Base layer of white:
Because acrylics can be translucent, first fill in your leaf shape with a thin layer of Titanium White mixed with a tiny drop of yellow. This creates a luminous primer that will make your fall colors vibrant. -
Mixing the mid-tone:
On your palette, mix a vibrant orange using Cadmium Orange and a touch of Cadmium Yellow. This will be the main body color of the leaf. -
Applying the orange:
Paint the entire leaf area with your orange mix, covering the white primer completely. Don’t worry about shading just yet; aim for solid, flat color. -
Adding the yellow center:
While the orange is still slightly tacky, blend a small amount of pure Cadmium Yellow into the very center of the leaf where the veins meet. This creates an inner glow.
Add Some Sparkle
Mix a tiny amount of gold metallic paint into your yellow center highlight. It gives the leaf a magical, sun-kissed shimmer when the rock catches the light.
Step 3: Shading and Texture
-
Creating the gradient:
Mix a reddish-orange hue using your orange and a dot of Deep Red. Apply this to the tips of the leaf lobes, brushing inward toward the center to create a soft gradient. -
Deepening the tips:
Take your pure Deep Red and apply it to the very sharpest points of the leaf tips. Use a slightly dry brush to feather the red back into the orange for a textured transition. -
Adding burnt edges:
For a realistic withered look, mix a tiny bit of Burnt Sienna with red. Dab this lightly along the very outer jagged edges to simulate the drying process of a real leaf. -
First distinct veins:
Using your smallest liner brush and watered-down black paint (inky consistency), carefully paint the main central vein running from the stem to the tip. -
Branching out:
Continue with the liner brush to add the primary veins extending to the other four main lobes. Keep your hand steady and your pressure light. -
Subtle details:
Paint smaller, capillary veins branching off the main ones. These should be extremely thin—try lifting the brush so only the very tip touches the stone.
Step 4: Final Touches
-
Highlighting the veins:
To give the veins dimension, mix a pale peach color (white + tiny bit of orange). Paint extremely thin highlights right alongside the main black veins on the side facing the light source. -
Painting the stem:
Paint the stem at the bottom using a mix of yellow-ochre or light brown. Make it slightly thicker at the base where it connects to the leaf and taper it off to a point. -
Cleaning up:
If any paint went outside the lines, use a small brush with black paint to tidy up the background edges, sharpening the silhouette of the leaf. -
Sealing the work:
Once you are absolutely certain the paint is dry (I usually give it an hour to be safe), take the rock outside and apply a coat of spray sealer to protect your artwork from scratches.
Place your warm, glowing autumn leaf rock on a mantle or doorstep to welcome the crisp fall season.
Give Thanks Hand-Lettered Rock

Embrace the gratitude of the season with this elegantly simple painted rock featuring hand-lettered text and fall-inspired botanical accents. The creamy background and deep teal lettering create a sophisticated look perfect for a Thanksgiving centerpiece or a thoughtful hostess gift.
Step-by-Step
Materials
- Smooth, oval river rock (approx. 3-4 inches wide)
- Acrylic paint: cream/off-white, dark teal/forest green, burnt orange, mustard yellow, muted red, sage green
- Fine point detail brushes (sizes 00 and 1)
- Small flat brush (size 4 or 6)
- Flicker brush or old toothbrush (optional for speckling)
- Pencil and eraser
- Black or dark grey fine tip paint pen (optional alternative to brush lettering)
- Matte sealant/varnish
Step 1: Base Preparation
-
Clean the surface:
Begin by washing your stone thoroughly with soap and water to remove any dirt or oils. Let it dry completely before starting your work. -
Apply the base coat:
Using your flat brush, paint the entire top surface of the rock with a cream or off-white acrylic paint. This creates a clean, ceramic-like canvas for your design. -
Ensure full coverage:
Depending on the opacity of your paint, you may need a second or third coat. Allow each layer to dry fully to avoid streaking. -
Add texture (optional):
To mimic the speckled stoneware look in the photo, dip an old toothbrush or stiff brush into slightly watered-down brown or grey paint. Run your thumb over the bristles to gently flick tiny speckles across the dry base coat.
Jagged Letters?
If your brush strokes feel shaky or rough, switch to a fine-tip acrylic paint marker for the lettering. It offers more control than a brush while keeping the opaque look.
Step 2: Designing the Layout
-
Sketch the text:
Lightly pencil in the words ‘GIVE’ and ‘THANKS’. Center ‘GIVE’ in the upper half using a larger size, and ‘THANKS’ directly below it in a slightly more condensed style. Aim for a classic serif font look. -
Plan the botanicals:
Sketch curving stems on the left and right sides of the text. Add a small horizontal stem beneath the word ‘THANKS’ and a tiny sprig above the word ‘GIVE’.
Step 3: Lettering
-
Paint ‘GIVE’:
Load a size 1 detail brush with dark teal paint. Carefully fill in your pencil sketch for ‘GIVE’, focusing on varying the line weight—make downstrokes slightly thicker and crossbars thinner. -
Paint ‘THANKS’:
Switch to your finer 00 brush for the word ‘THANKS’. Use the same dark teal color but keep the letters slightly tighter and more uniform in height. -
Refine edges:
Once the lettering is dry, go back and touch up any rough edges with the cream background paint if needed to sharpen the text.
Gilded Edge
For a luxe touch, paint the very edge of the stone with metallic gold paint. It frames the design beautifully and catches the candlelight on a dinner table.
Step 4: Botanical Details
-
Paint the stems:
Using the 00 brush and dark teal or a dark brown, paint the thin, curving lines for the stems you sketched earlier. -
Add first leaves:
Start adding small, tear-drop shaped leaves along the stems. Use sage green for the leaves closest to the base on the left side. -
Layer fall colors:
Continue adding leaves in alternating colors. Use burnt orange, mustard yellow, and muted red randomly along the vines to create that autumn palette. -
Paint the berries:
Add small red dots or ‘berries’ at the tips of the right-side vine and near the top ornamentation. I find using the back end of a brush handle makes perfect little dots. -
Fill the bottom sprig:
Paint the small horizontal sprig below ‘THANKS’ with a mix of burnt orange and red leaves. Add a few tiny floating dots around it for whimsy.
Step 5: Finishing Touches
-
Erase guidelines:
Once you are absolutely certain the paint is 100% dry, very gently erase any visible pencil marks. -
Inspect details:
Check your leaves and letters. If any colors look transparent, carefully dap a second layer of paint on top to make them pop. -
Seal the rock:
Protect your artwork with a coat of matte spray varnish or brush-on sealer. A matte finish preserves the natural, stone-like aesthetic better than a glossy one.
Place your finished stone on a napkin as a place setting or nestle it among pumpkins for a seasonal display
Grateful Script With Gold Accents

Bring a touch of sophisticated charm to your Thanksgiving decor with this minimalist painted rock. Featuring graceful black calligraphy and delicate gold flourishes on a warm neutral base, this stone serves as a beautiful reminder to pause and reflect.
Detailed Instructions
Materials
- Smooth, oval river rock (medium size)
- Acrylic paint (warm beige/taupe for the base)
- Acrylic paint marker (black, fine tip)
- Acrylic paint marker (metallic gold, fine tip)
- Paintbrush (flat, medium size)
- Pencil (optional, for sketching)
- Sealer (spray or brush-on varnish, matte or satin finish)
Step 1: Preparing the Canvas
-
Clean the Stone:
Begin by thoroughly washing your river rock with warm, soapy water to remove any dirt or oils. Scrub it gently, rinse well, and let it dry completely before starting. -
Mix the Base Color:
Create a warm, neutral tone for your background. I like to mix a little bit of white into a standard beige or taupe acrylic paint to get that soft, creamy look seen in the photo. -
Apply the Base Coat:
Using a flat brush, paint the entire top surface of the stone. Use smooth, long strokes to minimize brush marks. -
Layer for Opacity:
Let the first coat dry fully. If the rock’s natural color is showing through, apply a second coat to ensure a solid, opaque background. -
Final Drying Time:
Before moving on to the lettering, ensure the base coat is bone dry. This prevents the paint pens from digging into the layer underneath.
Step 2: Lettering the Sentiment
-
Practice Makes Perfect:
If you are new to faux calligraphy, practice writing the word ‘grateful’ on a scrap piece of paper first to get a feel for the spacing and flow. -
Lightly Sketch:
Use a pencil to very lightly trace the word across the center of the stone. This acts as a guide to keep your lettering centered and straight. -
Outline the Script:
Taking your fine-tip black paint marker, carefully write the word ‘grateful’ over your pencil lines using a standard cursive style. -
Thicken the Downstrokes:
To achieve the calligraphy look, retrace the parts of the letters where your pen moved downward. Thicken these lines while leaving the upstrokes thin and delicate. -
Refine the Edges:
Go back over any shaky edges on your thickened downstrokes to smooth them out, making the text look bold and confident.
Smudged Marker?
If you accidentally smudge the black ink, let it dry completely. Then, use a small brush and your base beige color to carefully paint over the mistake like ‘white-out’ before redrawing.
Step 3: Adding Golden Accents
-
Prime the Gold Pen:
Shake your metallic gold paint pen well and press the tip on a scrap surface until the ink flows smoothly. -
Draw the Top Flourish:
Start slightly above the text. Draw a gentle, concave curve that dips down slightly in the middle and flares up at the ends, mirroring the curve of the stone. -
Add Top Details:
Above that first curve, add a shorter, parallel curved line in the center and a few tiny dots for decoration. -
Create the Bottom Flourish:
Below the word, draw a wider curve that mirrors the top design. Start from the left, swoop down under the text, and curve back up on the right side. -
Layer the Bottom Lines:
Add a second thin gold line just underneath the main bottom curve to give the design depth and elegance. -
Add Decorative Dots:
To finish the design, draw three small stems dropping from the bottom gold line, capping each one with a round gold dot. -
Add Highlights (Optional):
If you want extra shine, add a tiny dot of white paint to the thickest parts of the black letters to mimic a light reflection.
Make it Sparkle
While the gold paint is still wet, sprinkle a tiny pinch of ultra-fine gold glitter on the decorative dots for a textured, 3D shimmmery effect.
Step 4: Final Touches
-
Let Everything Cure:
Allow the paint marker designs to dry completely. Metallic markers can sometimes take a little longer to set than standard colors. -
Erase Guide Lines:
If any pencil marks are still visible, gently erase them now, being careful not to rub off the paint. -
Seal the Rock:
Finish by applying a coat of clear sealer. A spray sealer works best here to avoid smearing the ink, especially over the black lettering.
Place this lovely stone on your holiday table or gift it to a friend to share the spirit of gratitude this season
Family Name Place-Setting Rocks
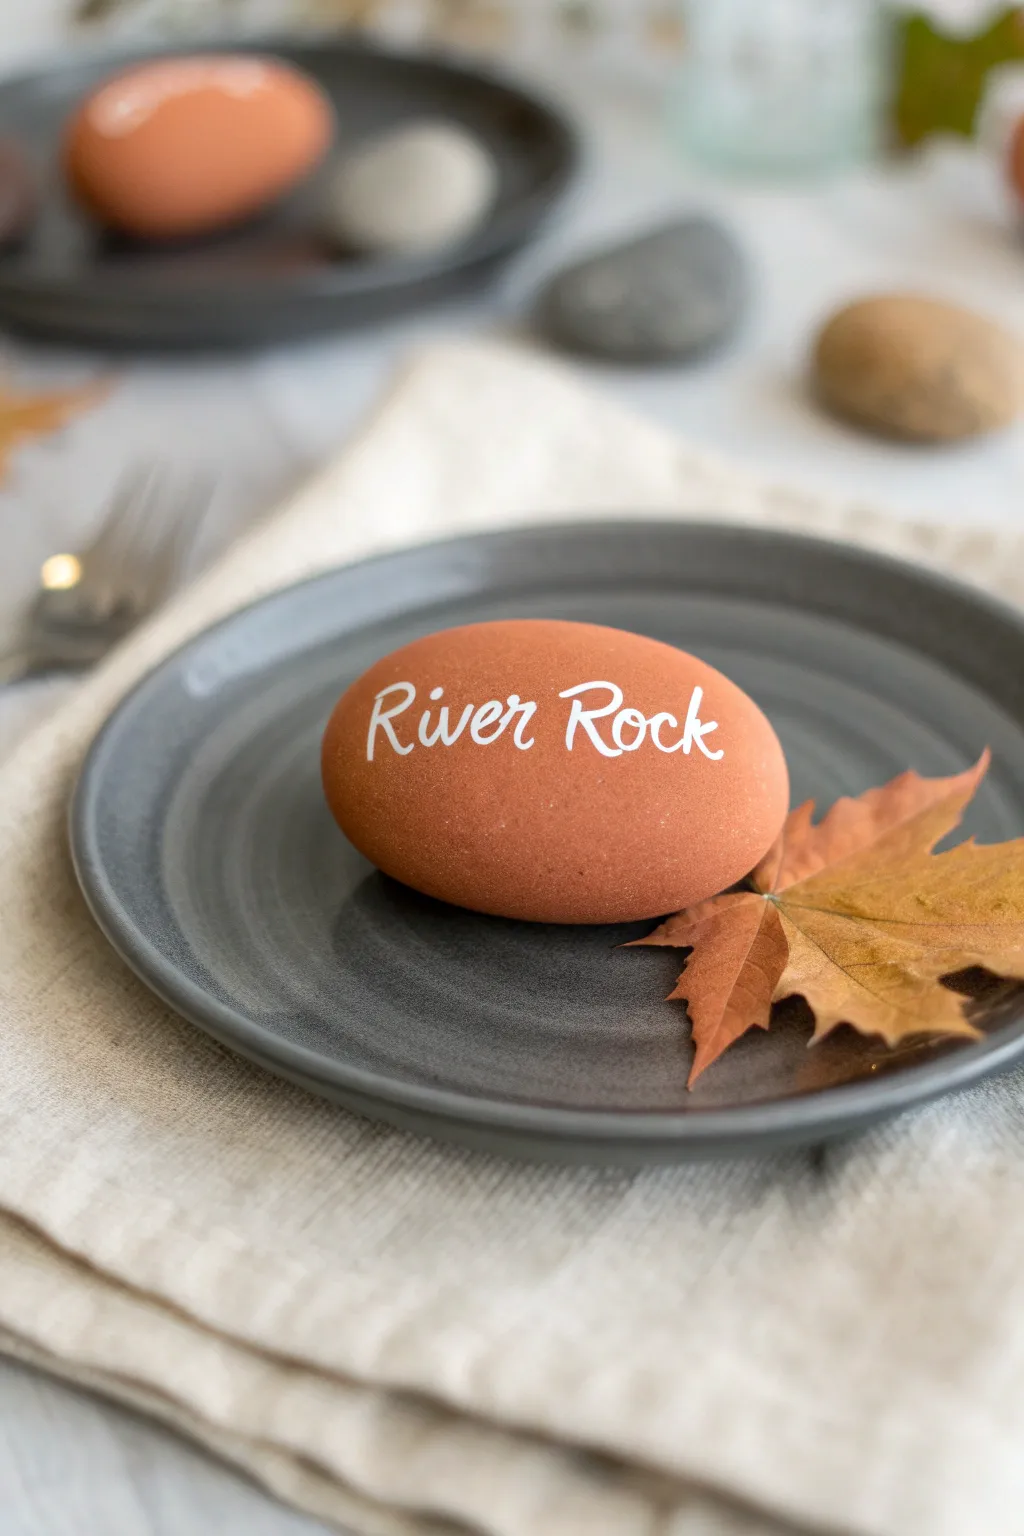
Bring an earthy, sophisticated touch to your Thanksgiving table with these smooth river stone place settings. The warm terracotta hue creates a perfect backdrop for elegant white script, making each guest feel truly welcomed.
Step-by-Step Tutorial
Materials
- Smooth river rocks (palm-sized, oval shape preferred)
- Terracotta or warm reddish-brown acrylic craft paint
- Flat paintbrush (medium size)
- White paint pen (fine point) or white liner brush with acrylic paint
- Matte finish spray sealant (optional)
- Small piece of sandpaper (fine grit)
- Dish soap and water
- Paper towels
Step 1: Preparing the Stone Canvas
-
Clean the surface:
Begin by thoroughly washing your river rocks with warm water and a drop of dish soap to remove any dirt or oils that might prevent paint adhesion. -
Dry completely:
Pat the stones dry with a paper towel and let them air dry for at least 30 minutes to ensure no moisture remains in the porous surface. -
Sand for smoothness:
If your rock has any rough patches or bumps where you intend to write, gently lightly sand that area with fine-grit sandpaper to create a perfect writing surface. -
Wipe away dust:
Use a slightly damp cloth to wipe away any stone dust created by the sanding process.
Step 2: Applying the Base Color
-
Load the brush:
Squeeze out your terracotta acrylic paint and load your flat paintbrush evenly. -
Apply the first coat:
Paint the entire top surface of the rock using smooth, long strokes. Don’t worry about the bottom yet. -
Let it dry:
Allow the first coat to dry for about 15-20 minutes. It should be dry to the touch before proceeding. -
Check opacity:
The natural dark color of the rock might show through; apply a second coat of terracotta paint to achieve a solid, rich color saturation. -
Paint the underside:
Once the top is fully dry, flip the rock over and paint the bottom if you want a fully finished look, though painting just the visible top is often sufficient. -
Full cure time:
Let the base coat dry completely for at least an hour. I find that waiting a bit longer prevents the paint pen from scratching the base layer later.
Smooth Moves
If your paint pen tip keeps getting clogged or dragging, the base coat might be too rough. Lightly buff the dried base paint with a brown paper bag before lettering.
Step 3: Lettering and Finishing
-
Practice your spacing:
Sketch the name or phrase on a piece of scrap paper first to determine the sizing and spacing needed to fit comfortably on the rock’s curve. -
Prime the pen:
Shake your white paint pen well and depress the nib on scrap paper until the ink flows smoothly. -
Begin the lettering:
Starting in the center of the rock to ensure balance, write the middle letters of the name first, then work outward. -
Connect the script:
Use fluid, confident motions to connect the letters in a casual cursive style. Light pressure helps keep the lines crisp. -
Thicken downstrokes:
To mimic faux-calligraphy, go back and carefully thicken the downstrokes of each letter (any line where your pen moved downward). -
Clean up edges:
If any lines look shaky, use a very small brush with a tiny bit of the terracotta base color to ‘erase’ or straighten the white edges. -
Allow ink to set:
Le the lettering dry completely for 30 minutes to prevent smudging during the sealing process. -
Seal the rock:
Hold a matte spray sealant about 12 inches away and apply a light mist to protect the paint without making the rock look unnaturally glossy.
Golden Touch
For a glitzier Thanksgiving vibe, swap the white paint pen for a metallic gold one, or dip just the very back edge of the rock in gold glitter paint.
These personalized stones make beautiful keepsakes that your guests can take home after dinner
Pumpkin Pie Slice Rock
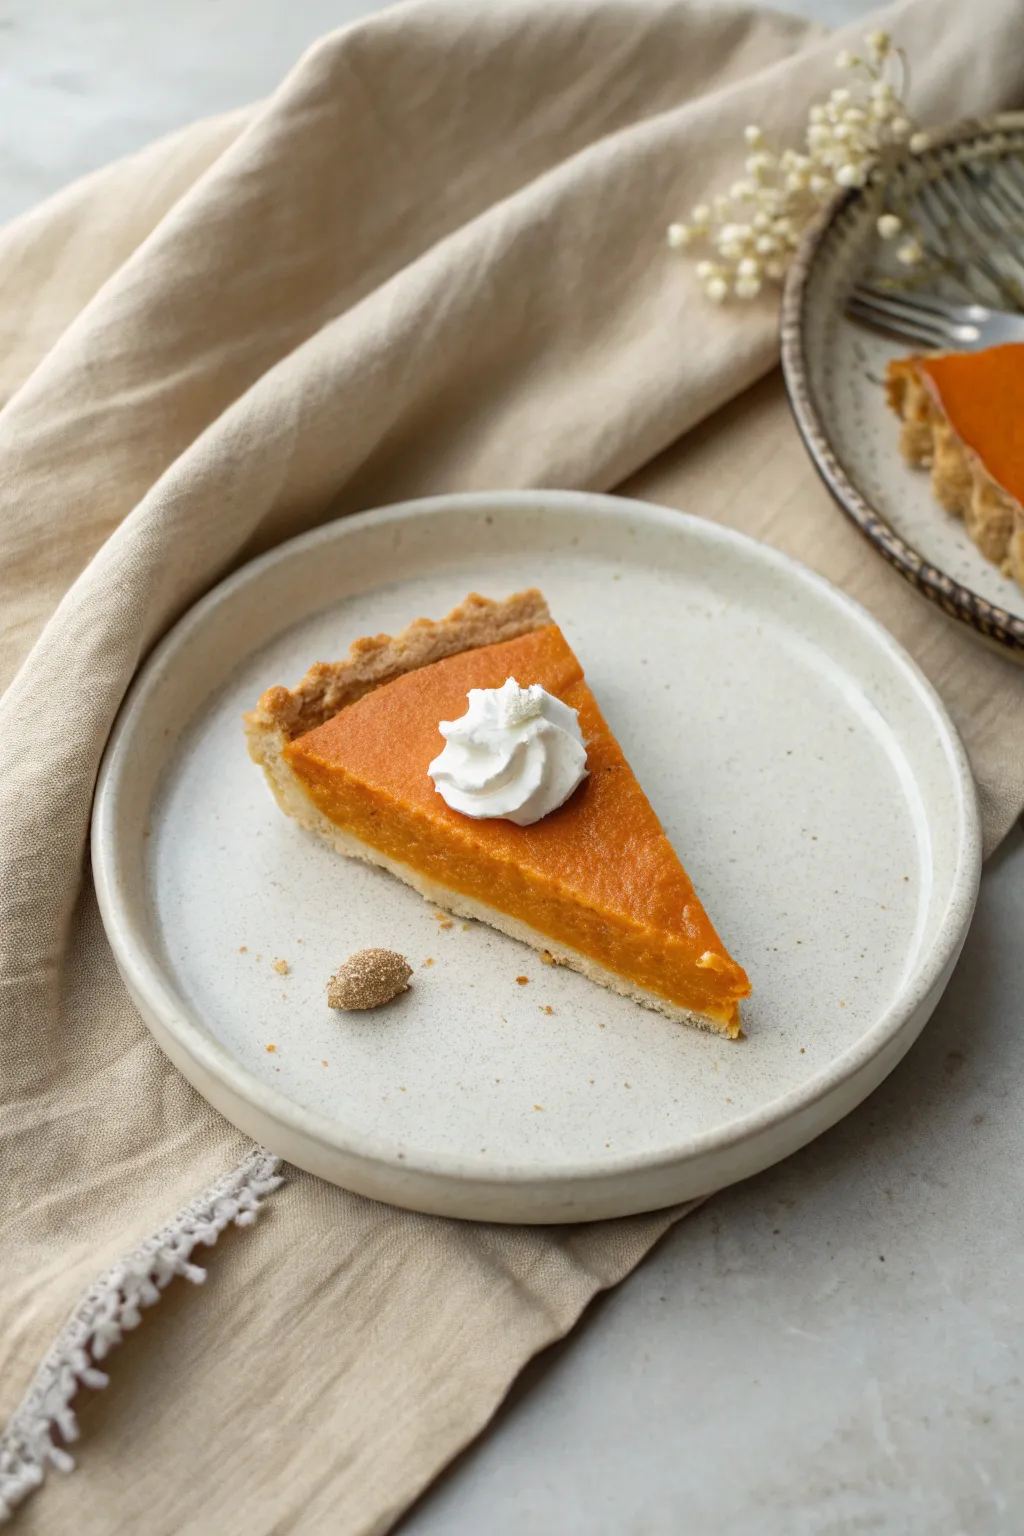
Transform a triangular stone into a mouth-watering slice of pumpkin pie that looks good enough to eat. This project focuses on realistic texture layering and clever shading to mimic that perfect custard filling and flaky crust.
Detailed Instructions
Materials
- Triangular-shaped river rock (smooth surface)
- Acrylic paints: Pumpkin Orange, Burnt Sienna, Yellow Ochre, Titanium White, Raw Umber, and Cream
- Paintbrushes: Flat brush (medium), round brush (small), and a fine liner brush
- Small piece of sea sponge or textured kitchen sponge
- Toothpick or stylus tool
- Matte spray varnish
- Gloss varnish (optional)
Step 1: Base Coat & Crust
-
Surface Prep:
Begin by washing your triangular rock with soap and water to remove any dirt or oils. Let it dry completely before starting. -
Prime the Surface:
Apply a base coat of Titanium White mixed with a tiny drop of Yellow Ochre to the entire top surface. This creates a warm, neutral canvas that will make your orange pop later. -
Mapping the Crust:
Using a mixture of Yellow Ochre and a touch of Burnt Sienna to create a ‘baked dough’ color, paint a 1/2-inch border along the shortest edge of your triangle. This is your back crust area. -
Side Crust:
Extend a thinner line of this crust color along the bottom edges of the two long sides of the triangle to represent the pastry holding the filling. -
Texturing the Dough:
Mix a slightly lighter version of your crust color (add more Cream or White). Using a small, scruffy brush, dab this onto the crust area to simulate a flaky, baked texture.
Make it Matte
Real pie crust isn’t shiny. Avoid high-gloss sealers for the crust portion; a matte finish spray looks much more realistic for baked goods.
Step 2: The Pumpkin Filling
-
Base Orange Layer:
Mix Pumpkin Orange with a small amount of Yellow Ochre for a natural, cooked squash tone. Paint the entire triangular center, meeting the crust borders cleanly. -
Creating Depth:
While the base orange is still slightly tacky, mix a darker shade using Pumpkin Orange and a tiny dot of Burnt Sienna. Apply this near the crust line and carefully blend it outward toward the tip. -
Sponge Texture:
To get that distinctive pumpkin custard look, dip a small piece of sponge into your original orange mix. Blot off most of the paint on a paper towel, then lightly stipple over the filling area. -
Highlighting:
Mix a lighter orange using Pumpkin Orange and White. Gently stipple this onto the center of the slice and near the tip to make the filling look moist and dimensional. -
Crust Shadow:
Using a thin brush and a watery wash of Burnt Sienna, paint a very fine line right where the orange filling meets the back crust to create separation and shadow.
Step 3: Whipped Cream & Details
-
Dollop Foundation:
Load a round brush with pure Titanium White. In the upper center of the slice, paint a fluffy, cloud-like shape for the whipped cream dollop. -
Swirl Definition:
Mix a very light grey (White with a microscopic dot of Raw Umber). Use a fine liner brush to paint curving shadow lines inside the white dollop to create the look of swirled cream. -
Highlighting the Cream:
Add pure white highlights to the tops of the swirls you just defined, making the cream look glossy and freshly provided. -
Stray Crumbs:
Dip a toothpick into your darkest crust color. Dot a few tiny specks onto the orange filling near the crust or on the ‘plate’ area of the rock if visible. -
Final Varnish:
Once everything is bone dry, spray the rock with a matte varnish to seal it. -
Glossy Touch:
I like to add a tiny dab of gloss varnish just on the orange filling to mimic the moisture of the pie, keeping the crust area matte.
Add Some Spice
For a ‘nutmeg’ effect, load an old toothbrush with watery brown paint and flick tiny speckles over the finished orange section.
Now you have a zero-calorie slice of Thanksgiving pie that will last forever
Cozy Harvest Mug Rock
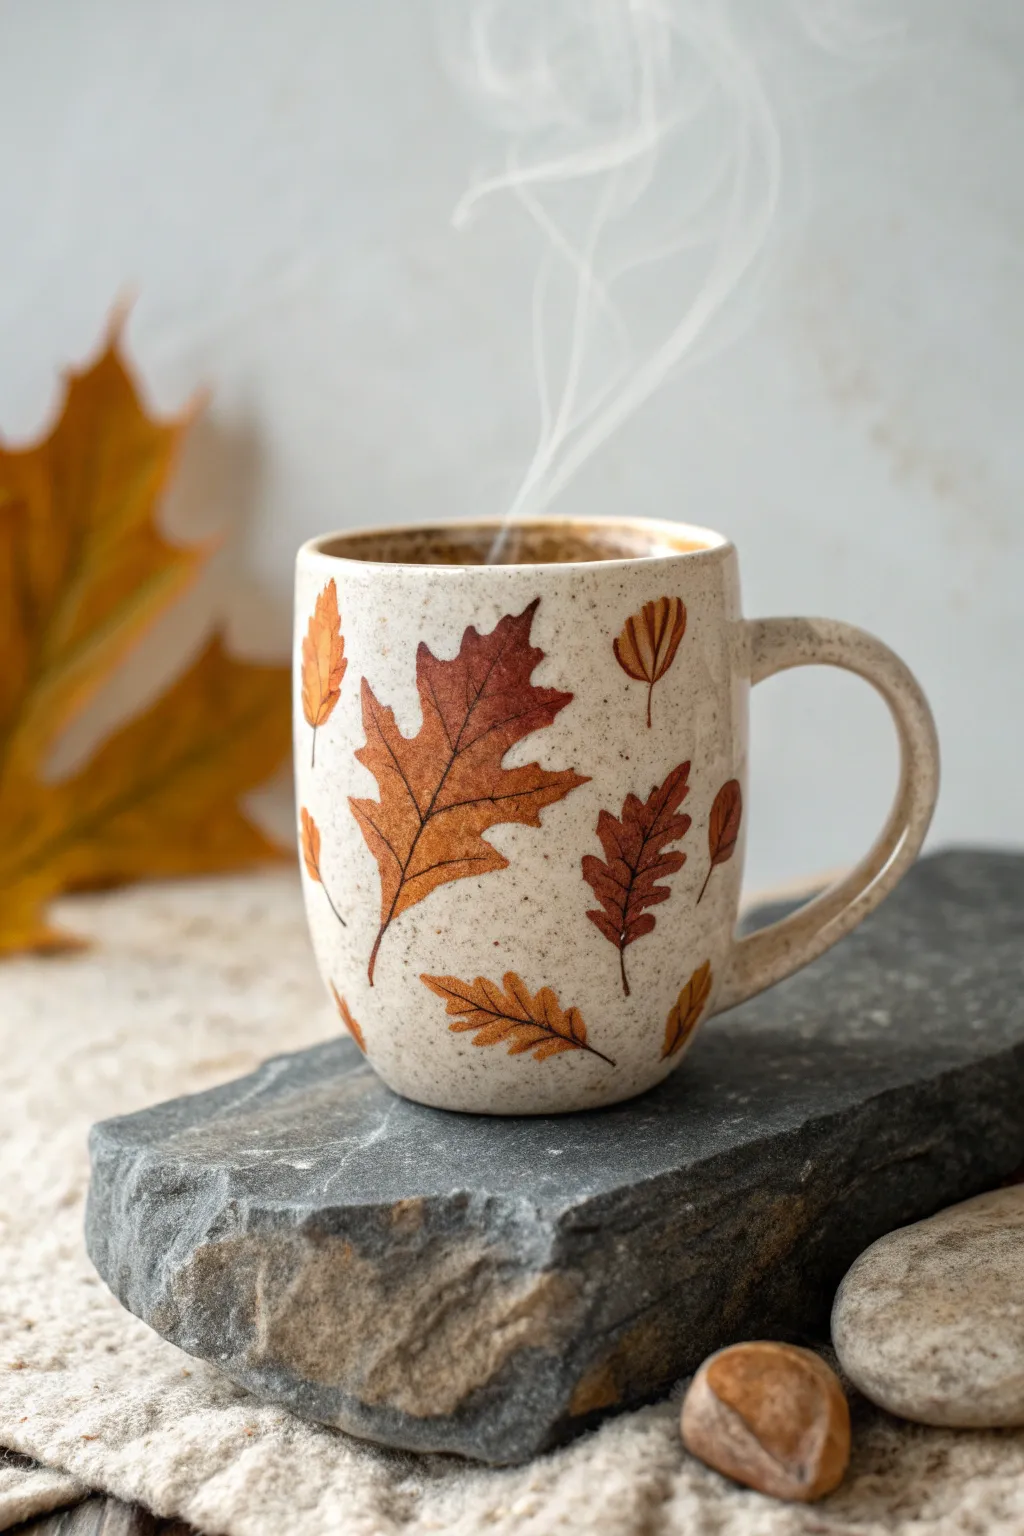
Transform a simple stone into a comforting cup of fall warmth with this clever trompe l’oeil design. By painting a beige, speckled mug surface directly onto a cylindrical rock, you can create a permanent decoration perfect for a Thanksgiving centerpiece.
Step-by-Step Guide
Materials
- Smooth, cylindrical or blocky river rock (palm-sized)
- Acrylic paints: Cream, Burnt Sienna, Raw Umber, deep orange, yellow ochre, white
- Posca paint pens (Brown, Black, Orange) – optional but helpful for details
- Small flat brush
- Fine liner brush
- Old toothbrush (for splattering)
- Matte spray sealant
Step 1: Prepping the Canvas
-
Clean Your Stone:
Begin by scrubbing your rock with soap and water to remove any dirt or oils. Let it dry completely before starting, as moisture will prevent the acrylics from adhering properly. -
Base Coat Application:
Mix a warm cream color using white and a tiny drop of yellow ochre or brown. Coat the entire rock with this mixture using a flat brush. You may need two to three coats to get a solid, opaque finish that hides the gray stone underneath. -
Create the Speckled Texture:
Once the cream base is dry, mix a watery brown paint. Dip an old toothbrush into it and run your thumb across the bristles to flick tiny speckles onto the rock. This mimics the rustic ceramic glaze look shown in the photo.
Step 2: Painting the Mug Features
-
Define the Rim (Top):
Paint an oval shape on the top surface of the rock using a dark brown (Raw Umber) to represent the coffee or tea inside. Leave a thin rim of the cream color around the edge to show the thickness of the heavy ceramic mug. -
Define the Rim (Shadow):
Just under the cream rim on the outside, paint a very faint, thin line of diluted brown. This creates a shadow that helps the top look dimensional and distinct from the sides. -
Optional Handle Illusion:
If your rock shape allows, paint a C-shaped handle on the side. Use the cream color for the handle itself, and paint dark shadows inside the ‘C’ and underneath it to make it look like it’s protruding from the mug.
Ceramic Texture Trick
Mix a tiny pinch of baking soda into your cream base coat paint. It creates a subtle grittiness that feels just like real unglazed stoneware pottery.
Step 3: Adding the Foliage
-
Drafting Leaf Shapes:
Using a very light pencil or a diluted ochre paint, sketch out the placement of your leaves. Aim for a mix of oak leaves (wavy edges) and simpler oval leaves scattered randomly around the ‘mug’ surface. -
Painting the Oak Leaf:
Fill in your largest leaf shape with a rusty orange-brown. I like to mix Burnt Sienna with a touch of orange for that classic dried oak leaf color. Don’t worry about veins yet; just get the silhouette color down. -
Adding Smaller Leaves:
Paint the smaller surrounding leaves in varying shades—use a brighter orange for some and a muted yellow-brown for others to create variety. -
Detailing the Veins:
Switch to your fine liner brush or a brown paint pen. Carefully draw the central vein down the middle of the large oak leaf, then branch out with smaller veins toward the lobes. -
Shadows and Contrast:
To make the leaves look like they are printed on the ceramic rather than floating, paint a very subtle wash of darker orange on one side of the leaf veins to suggest slight depth. -
Adding Stems:
Extend thin brown lines from the bottom of each leaf to create delicate stems. Keep these lines crisp and fine for a professional look. -
Leaf Texture:
For added realism, lightly stipple a tiny bit of darker brown near the edges of the oak leaf to make it look slightly dried and textured.
Level Up: 3D Steam
Glue a small tuft of pulled cotton ball or white fiberfill to the center of the dark ‘coffee’ top. Shape it into a rising swirl for a fun 3D steam effect.
Step 4: Finishing Touches
-
Base Shadow:
To ground your mug, paint a soft, dark grey shadow around the very bottom edge where the rock meets the table. This helps create the illusion that the object is sitting on a surface. -
Highlighting:
Add a small, curved vertical stroke of white paint on the upper side of the mug (opposite the light source). This reflection mimics the glossy ceramic surface. -
Steam Effect (Optional):
If you want to suggest steam, use a dry brush with a tiny amount of white paint to create wispy, barely-there swirls rising from the dark ‘coffee’ oval on top. -
Seal the Work:
Once absolutely dry, finish with a matte spray sealant. A matte finish is better than gloss here, as it preserves the stoneware pottery aesthetic we are aiming for.
Place your finished rock near a window or on a stack of books for a cozy autumn vignette that never gets cold
Sunset Turkey Silhouette Scene

Capture the serene beauty of a twilight sky with this elegant rock painting project. By blending warm hues behind a crisp black silhouette of a wild bird, you create a peaceful scene perfect for Thanksgiving decor.
Detailed Instructions
Materials
- Large, smooth river rock (fist-sized or larger)
- Acrylic paints: Titanium White, Light Pink, Coral or Salmon, Orange, Yellow, Black
- Flat shader brushes (medium and large)
- Fine liner brush (size 0 or 00)
- Small cup of water
- Paper towels
- Paint palette or paper plate
- Clear acrylic sealer/varnish (spray or brush-on)
Step 1: Prepping the Canvas
-
Clean the stone:
Begin by thoroughly washing your rock with warm, soapy water to remove any dirt or oils. Use a scrub brush if needed. -
Dry completely:
Let the rock dry fully in the sun or use a hairdryer to speed things up; moisture inside the stone can ruin the paint later. -
Base coat:
Paint the entire face of the rock with a layer of Titanium White. This priming step ensures your sunset colors will pop rather than sinking into the grey stone.
Step 2: Painting the Sunset Sky
-
Prepare your palette:
Squeeze out your sky colors: light pink, coral/salmon, orange, and a touch of yellow. -
Top section:
Using a clean flat brush, apply the light pink to the upper third of the rock. Don’t worry about the bottom edge being perfect yet. -
Middle section:
While the pink is still slightly wet, paint the middle band with your coral or salmon color. Blend the top edge upward into the pink using long, horizontal strokes to create a soft transition. -
Lower section:
Paint the bottom third with orange, mixing in a tiny bit of yellow near the very base for a subtle glow. Blend this upward into the coral band. -
Smooth the gradient:
Clean your brush, leave it slightly damp but not dripping, and lightly sweep back and forth over the transition lines to soften the gradient further. I find a very light touch works best here to avoid lifting the paint. -
Let it cure:
Allow the background to dry completely. It must be bone dry before you add the silhouette, or the black paint will muddy the colors.
Uneven Gradients?
If your sky colors aren’t blending well, your paint might be drying too fast. Mix a tiny drop of acrylic retarder or water into your paints to keep them workable longer.
Step 3: Adding the Silhouette Details
-
Outline the bird:
Switch to your fine liner brush and black paint. Lightly sketch the outline of the bird’s body in the center-right area of the rock. -
Fill the body:
Fill in the bird shape with solid black. Use a slightly larger brush for the main body area to get smooth, opaque coverage. -
Refine the bird:
Go back with the liner brush to add the neck, head, beak, and tail feathers. Keep the edges sharp. -
Add the eye:
Once the black head is dry, use a dotting tool or the back of a paintbrush to place a tiny white dot for the eye. Add a speck of black in the center for the pupil. -
Ground the scene:
Paint a solid black strip along the very bottom edge of the rock to represent the ground. -
Paint the grass:
Using quick, upward flicks with the liner brush, create blades of grass rising from the ground. Vary the heights and angles for a natural look. -
Add thin trees:
Paint two vertical, wavy lines on either side of the bird for small saplings. Keep them thin and delicate. -
Tree details:
Add small, upward-reaching branches to your trees. You can add tiny leaves or buds by gently pressing the tip of the brush against the branches. -
Final touches:
Inspect the silhouette for any transparent spots and add a second coat of black if needed for solid opacity.
Silhouette Sharpness
Thin your black paint slightly with water until it has an ink-like consistency. This helps the paint flow smoothly off the liner brush for crisp, sharp details without clumps.
Step 4: Protection
-
Allow to dry:
Let the rock sit undisturbed for at least 24 hours to ensure all layers are fully cured. -
Seal the artwork:
Apply a coat of clear acrylic sealer. This protects the paint from weather and chipping, especially if you plan to leave it outdoors.
Place your finished stone in the garden to catch the evening light or gift it as a unique seasonal decoration


Have a question or want to share your own experience? I'd love to hear from you in the comments below!