
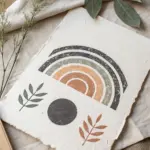
A memorial canvas can be a quiet, beautiful way to keep someone’s presence close while honoring the life they lived. I’m sharing my favorite memorial canvas ideas—from classic photo-and-text layouts to more artistic, symbolic tributes you can paint yourself.
Classic Photo With Name and Dates
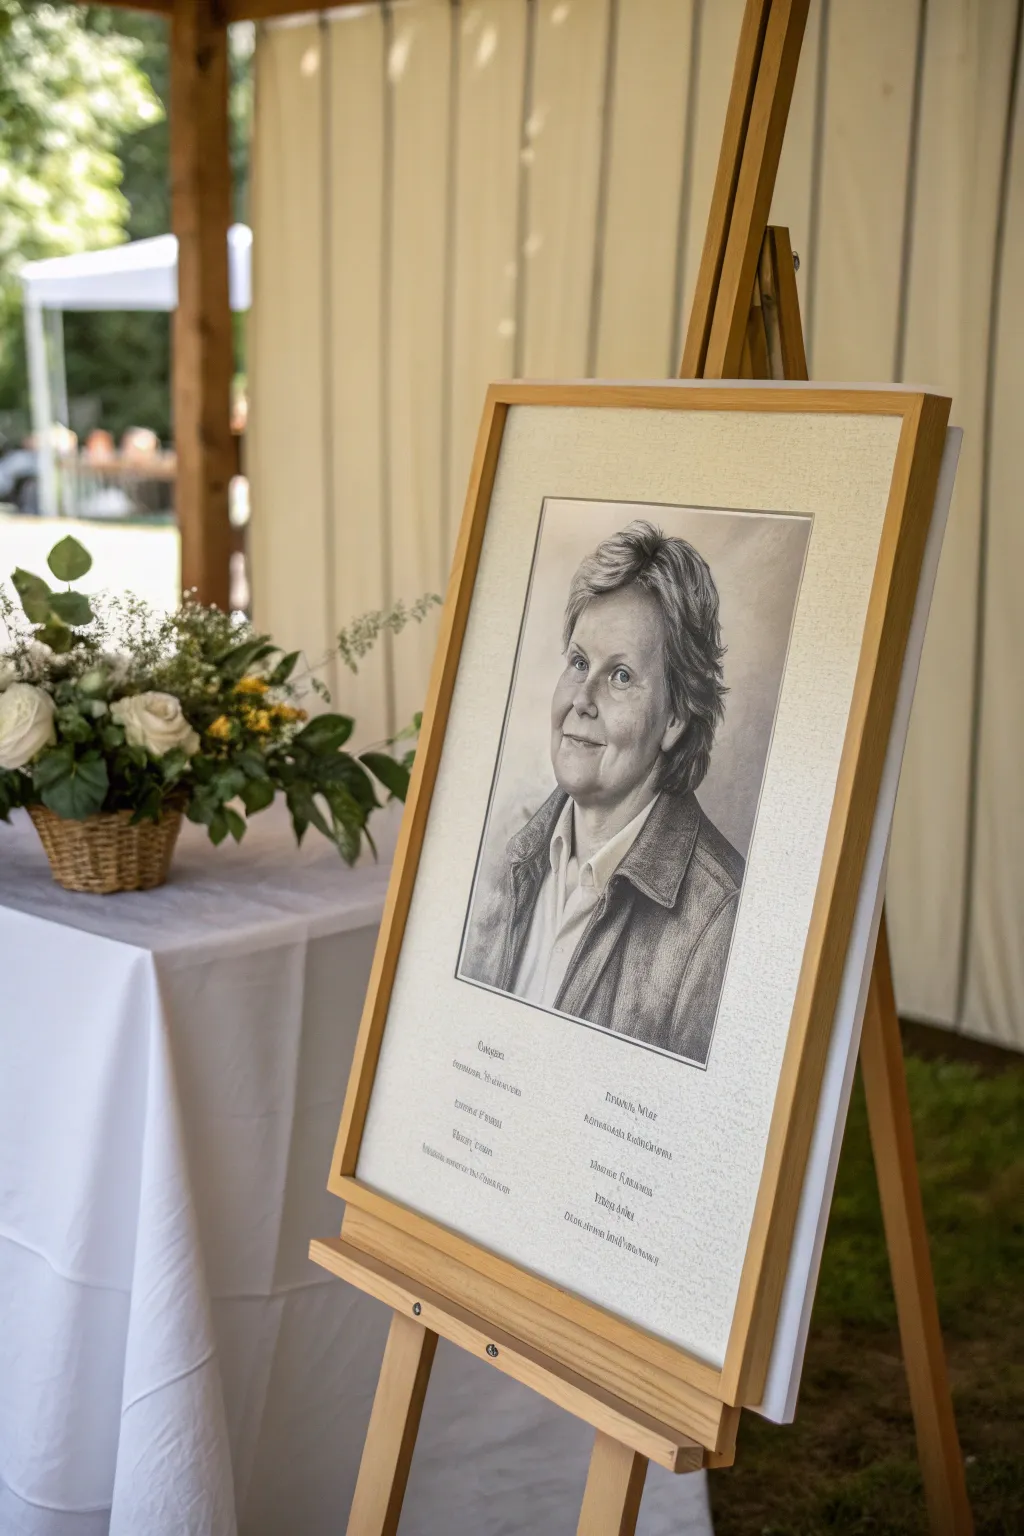
This elegant project transforms a classic photograph into a soft, hand-drawn style memorial piece framed on an easel. It combines digital preparation with traditional framing techniques to create a dignified and timeless tribute to a loved one.
Step-by-Step Guide
Materials
- High-resolution digital photo of the subject
- Digital editing software (Photoshop, GIMP, or similar photo-to-sketch app)
- Heavyweight fine art paper or textured cardstock (A3 or A2 size)
- High-quality inkjet printer
- Light wood frame (approx. 16×20 or 18×24 inches)
- Custom cut mat board (off-white or cream)
- Wooden display easel
- Pencil for signing (optional)
- Ruler and T-square
- Double-sided framing tape or photo corners
Step 1: Digital Preparation
-
Select the photo:
Choose a clear, well-lit photograph of your loved one. A head-and-shoulders composition works best for this classic portrait style, ensuring their expression is the focal point. -
Convert to grayscale:
Open your image in your editing software and convert it to black and white. Adjust the contrast and brightness levels to ensure there is a good range of gray tones without losing detail in the shadows. -
Apply sketch filter:
Use a ‘pencil sketch’ or ‘charcoal’ filter effect. If doing this manually, I usually duplicate the layer, invert it, set the blend mode to ‘Color Dodge’, and apply a Gaussian Blur until the lines mimic a drawing. -
Soften the edges:
Use a soft eraser tool or a vignette effect to fade the edges of the portrait, particularly around the shoulders, so the image blends gently into the white background rather than having a hard rectangular border. -
Add memorial text:
Below the portrait area, add your text digitally. Choose a classic serif font that mimics engraving or formal typography. Center the text and include the name, dates, and perhaps a short poem or list of family members as seen in the example.
Fixing “Flat” Images
If the print looks flat, lightly trace over key facial features (eyes, jawline) with a real 2B pencil to add depth and authentic graphite sheen.
Step 2: Printing and Assembly
-
Test print:
Print a small draft version on regular paper first. Check for typos in the names and ensure the ‘sketch’ effect looks realistic and not too pixelated. -
Final printing:
Load your heavyweight fine art paper into the printer. The texture of the paper contributes significantly to the ‘real drawing’ look. Print at the highest quality setting. -
Prepare the frame:
Disassemble your light wood frame. Clean the glass thoroughly on both sides with glass cleaner and a microfiber cloth to remove any dust or fingerprints. -
Mount the artwork:
Place your printed artwork face up. Position the mat board over it to decide exactly how much white space you want around the image. Mark the position lightly with a pencil if needed. -
Secure the print:
Flip the mat board and print over. Use archival framing tape or photo corners to secure the top edge of the print to the back of the mat board. Let the print hang freely to prevent buckling with temperature changes. -
Final assembly:
Place the glass, mat, and print sandwich into the frame. Insert the backing board and secure the clips or points on the back of the frame. -
Display setup:
Set up your wooden easel in the desired location. Ensure the legs are locked securely so it doesn’t wobble. -
Adjust height:
Place the framed portrait onto the easel ledge. Adjust the height of the ledge so the center of the portrait sits around eye level for seated or standing guests. -
Floral accent:
Position a simple floral arrangement on a side table nearby to complement the natural wood tones without obstructing the view of the portrait.
Paper Choice Matters
Use cold-press watercolor paper for printing. Its rough texture grabs the ink and mimics the grain of a charcoal drawing perfectly.
Now you have a serene and professional-looking tribute ready for display


Angel Wings Framing the Tribute

This elegant and serene painting features a pair of elongated, feathery angel wings beneath a simple gold halo, set against a warm beige background. Its vertical orientation and soft, textural strokes make it a peaceful, uplifting focal point for any memorial space.
Step-by-Step
Materials
- Large rectangular stretched canvas (e.g., 24×36 inches)
- Beige or warm white acrylic paint (base coat)
- White acrylic paint (heavy body preferred)
- Black or dark grey charcoal pencil or thin acrylic marker
- Gold leaf paint or metallic gold marker
- Various flat brushes (1-inch and 1/2-inch)
- Small round detail brush
- Palette knife (optional for texture)
- Graphite pencil and eraser
- Medium mixing medium or water
- Matte varnish spray
Step 1: Preparation and Sketching
-
Prime the Surface:
Begin by coating your entire canvas with a warm beige acrylic paint. I like to mix a tiny drop of raw sienna into white to get that perfect ‘parchment’ look. Let this base layer dry completely before moving on. -
Outline the Wings:
Using a light graphite pencil, sketch the large vertical teardrop shapes that will form the wings. Position them high on the canvas, leaving space at the very top for the halo. -
Define Feather Layers:
Inside your wing outlines, lightly sketch three tiers of feathers: short, rounded coverts at the top, medium-length secondary feathers in the middle, and long, finger-like primary feathers extending to the bottom. -
Sketch the Halo:
Draw a flattened oval hovering centered above the space between the wings to represent the halo.
Step 2: Painting the Wings
-
Block in Base White:
Take your flat brush and apply a thin wash of white paint over the feather shapes. Don’t aim for solid opacity yet; you want the beige background to slightly show through to add warmth. -
Build Feather Texture:
Using heavy body white paint, start painting individual feathers. Use downward, sweeping strokes for the long bottom feathers and shorter, curved dabs for the top sections. -
Add Shadow Depth:
Mix a very dilute grey or taupe wash. Apply this sheer color under the layers of feathers where one tier overlaps another to create separation and depth. -
Layer Highlights:
Once the shadows are dry, go back in with pure titanium white. Paint the centers and tips of the feathers to make them pop forward. -
Create Texture:
For a more tactile feel, use a palette knife or a dry brush with thick white paint to drag across the feathers, mimicking the fibrous texture of a bird’s wing. -
Soften the Edges:
Take a clean, slightly damp brush and gently run it along the outer edges of the wings to ensure they don’t look like rigid cutouts.
Feather Flow
Paint the feathers from top to bottom. Overlapping lower layers with upper ones (top-down) mimics real bird anatomy and prevents messy paint ridges.
Step 3: Details and Finishing
-
Outline with Charcoal:
To get that illustrative style shown in the photo, trace the edges of your feathers with a charcoal pencil or a black paint marker. Keep the line loose and broken rather than solid and continuous. -
Smudge the Lines:
If using charcoal, gently use your finger or a blending stump to smudge the black lines slightly into the white paint, creating a soft, aged shadow effect. -
Paint the Halo:
Fill in the halo oval with metallic gold paint. You may need two coats to ensure it reflects light beautifully. -
Refine the Halo Edge:
Use your charcoal pencil to add a very faint shadow or outline to the bottom curve of the halo, giving it a sense of dimension. -
Final Assessment:
Step back and look at the symmetry. If one wing feels heavier, add a few strokes of white to the other side to balance the visual weight. -
Seal the Work:
Because charcoal can smudge easily, lightly mist the entire canvas with a matte varnish spray once you are happy with the result. Do this in a well-ventilated area.
Fixing Smudges
If the charcoal outline gets too dark or messy, don’t wipe it. Wait for it to dry/set, then simply paint over the mistake with your heavy body white paint.
Hang this peaceful artwork where it can catch the daylight and serve as a gentle reminder of comfort


Dandelion Seeds Turning Into Birds
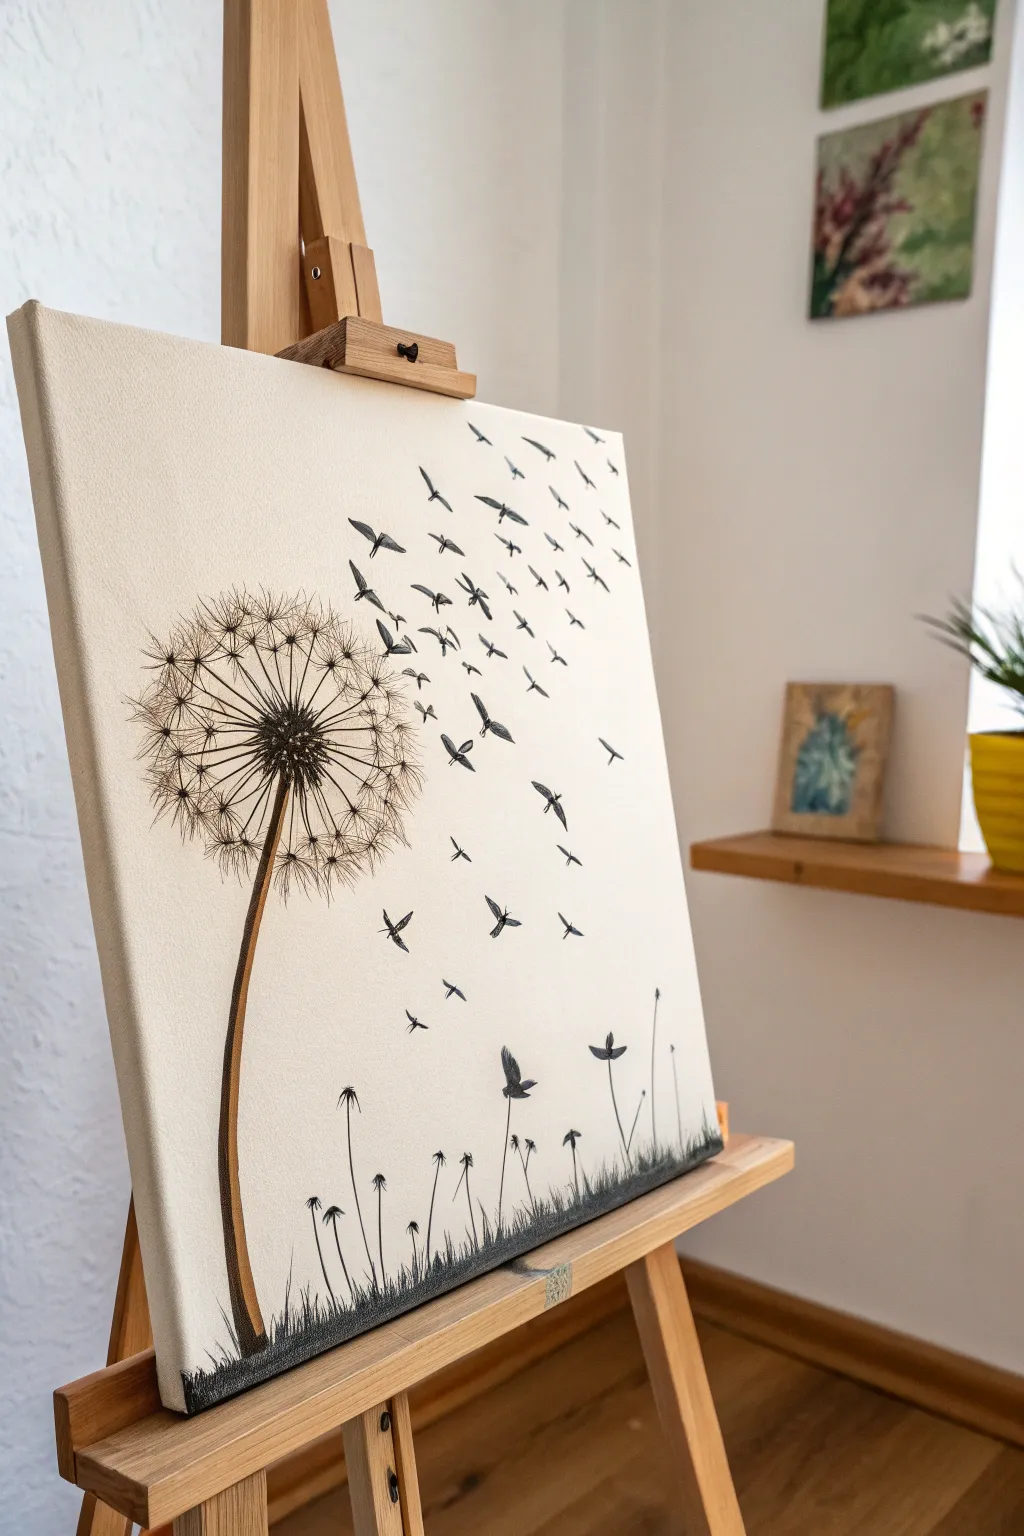
This poignant memorial canvas captures a sense of release and freedom, featuring a delicate dandelion whose seeds transform into a flock of birds ascending into the sky. The stark contrast of black silhouettes against a clean, off-white background creates a minimalist yet emotionally resonant piece perfect for remembrance.
How-To Guide
Materials
- Stretched canvas (rectangular, e.g., 16×20 inches)
- Acrylic paint (Titanium White, Unbleached Titanium or Cream)
- Black acrylic paint or ink (High viscosity for opacity)
- Fine liner brushes (sizes 000, 0, and 1)
- Flat brush (2 inch) for background
- Pencil (HB or H for light sketching)
- Eraser
- Reference photo of dandelion and birds
- Palette for mixing
- Water cup and paper towels
Step 1: Preparing the Canvas
-
Base coat mixing:
Begin by creating a soft, off-white background color. Mix a large amount of Titanium White with a very small touch of Unbleached Titanium or Cream to get a warm, neutral tone that mimics heavy paper or parchment. -
Applying the background:
Use your large 2-inch flat brush to coat the entire canvas. Apply the paint in smooth, horizontal strokes to ensure an even finish without distracting texture. Let this layer dry completely. -
Second coat:
Apply a second coat of your background color to ensure full opacity, covering the raw canvas weave thoroughly. Allow this to dry for at least an hour until it is warm to the touch.
Step 2: Sketching the Composition
-
Mapping the stem:
Using a very light hand and an H pencil, draw a curved line starting from the bottom left quadrant, reaching upward to where the flower head will sit. This creates the dandelion’s stem. -
Defining the flower center:
Lightly sketch a small circle at the top of your stem line to mark the dense center of the dandelion seed head. -
Radiating lines:
Draw faint, straight lines radiating outward from that center point, forming a sphere shape. Make the lines on the right side slightly shorter or more sparse, hinting at where the seeds are blowing away. -
Bird trajectory:
Sketch a sweeping, invisible S-curve or arc moving from the right side of the flower head up toward the top right corner. This will be the path your birds follow. -
Bird placement:
Along that invisible path, lightly mark small ‘V’ shapes or simple triangles where each bird will go. Start small near the flower to represent detaching seeds, and get slightly larger as they move further away.
Uneven Lines?
If your fine lines look shaky or thick, thin your black paint with a few drops of water or flow improver until it has an ink-like consistency. This helps the paint glide off the brush.
Step 3: Painting the Dandelion
-
Painting the stem:
Load a size 1 round brush with black acrylic paint. Carefully paint the stem, keeping it thin but slightly wider at the base. You might want to mix a tiny bit of brown into the black for the stem to give it subtle organic warmth. -
Creating the core:
Use the tip of a smaller brush to stipple small black dots densely in the center circle you sketched earlier. This creates the texture of the seed head’s attachment point. -
Drawing the filaments:
Switch to your finest 000 liner brush. With thinned black paint (add a drop of water for better flow), paint the fine, hair-like stalks radiating from the center. Keep your hand loose to ensure the lines are straight but delicate. -
Adding the pappus:
At the end of each radiating filament, paint tiny, star-like bursts or ‘Y’ shapes to represent the fluffy white pappus (the parachute part of the seed). Use quick, flicking motions. -
Building density:
Go back over the center area and add more overlapping filaments and fluff to create a sense of three-dimensional depth, leaving the outer edges airier.
Pro Tip: Hidden Meaning
Customize the number of birds to represent specific family members or years passed. It adds a deeply personal layer of symbolism that only you need to know about.
Step 4: Transformation and Details
-
The transition zone:
Focus on the right side of the flower head. Here, paint seeds that look like they are just detaching. Instead of a full star-shape fluff, begin to morph the shape slightly into a ‘V’ or wing shape. -
Painting the first birds:
Moving along your sketched trajectory, paint the birds closest to the flower. These should be small and abstract, looking half-seed, half-bird. Keep them dense and chaotic, as if caught in a sudden gust. -
Refining the flock:
As you move upward and outward, paint the birds with more distinct wing shapes. Vary their angles—some banking left, some right—to create dynamic movement. Use full opacity black paint here for a stark silhouette look. -
The distant flyers:
For the birds at the very top of the canvas, make them slightly smaller again to suggest distance. Ensure their wings are spread wide to imply soaring freedom. -
Grounding the scene:
At the very bottom of the canvas, use uneven, vertical flicking strokes to create a silhouette of grass blades. Vary the heights to make it look natural. -
Adding wildflowers:
Intersperse the grass with a few tall, thin stems topped with tiny silhouette flower shapes or seed pods. This adds interest to the bottom edge without distracting from the main subject. -
Final check:
Step back and look at the overall flow. If the connection between the dandelion and the birds feels disconnected, add a few tiny floating specks or seeds in the gap to bridge the visual space.
Once dry, this serene artwork serves as a beautiful daily reminder of transformation and hope


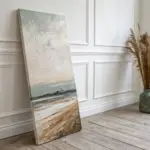
Sunrise Landscape With Favorite Place
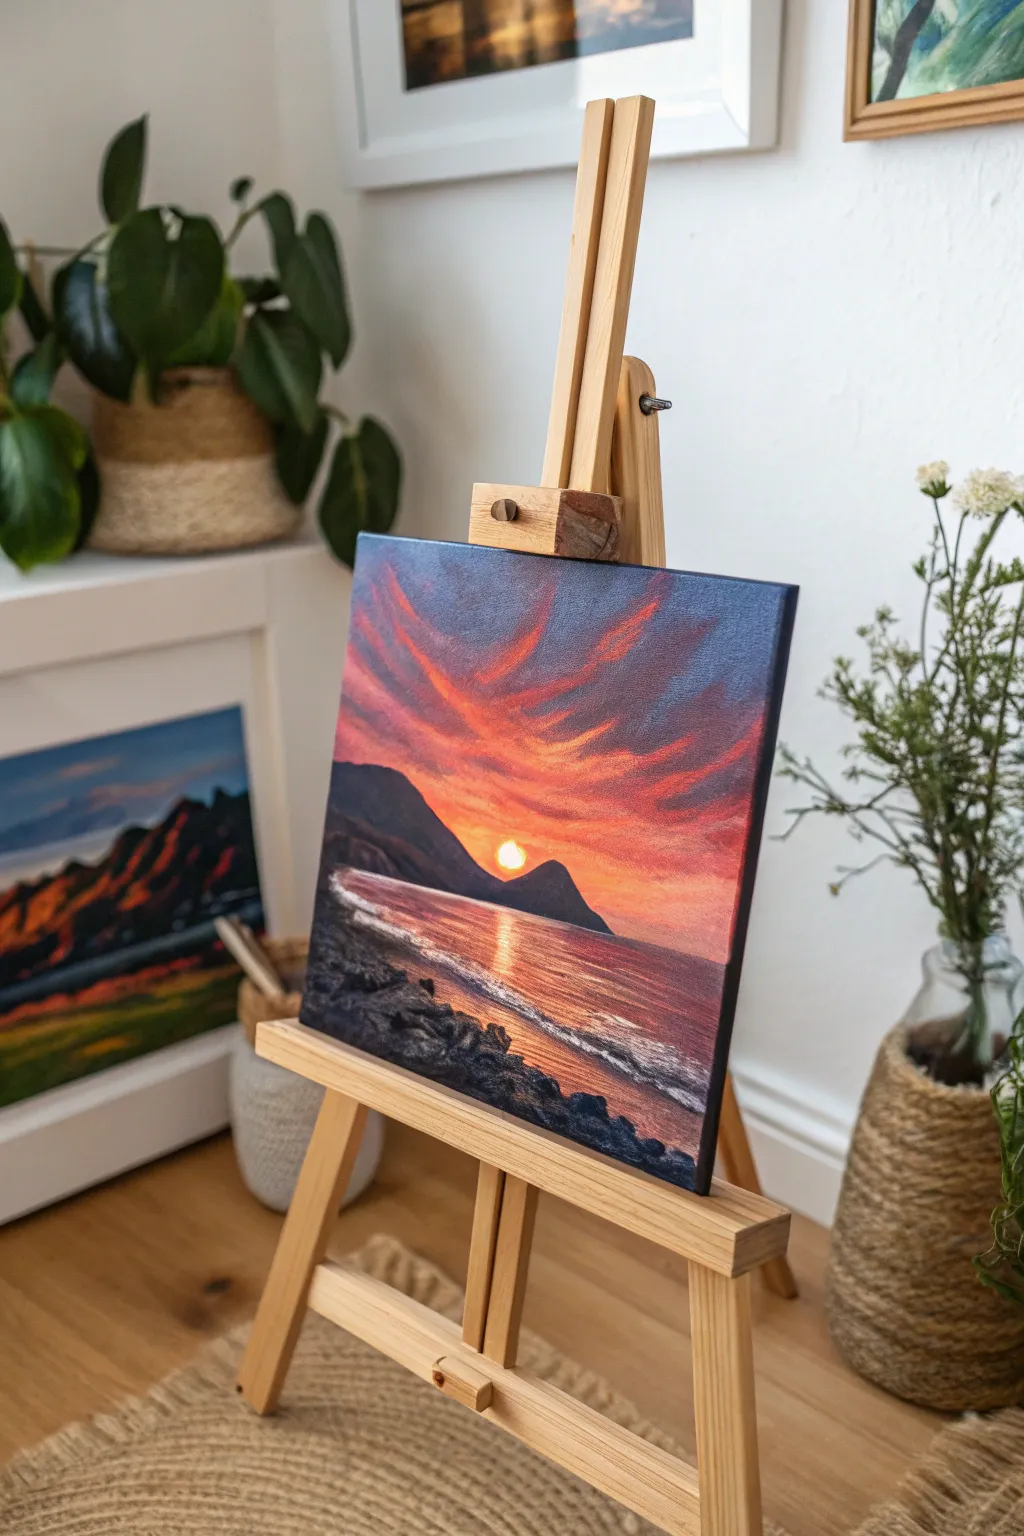
Capture the serene beauty of a beloved coastal memory with this vibrant acrylic landscape. This memorial piece features a dramatic sunset glowing over calm waters, creating a peaceful and reflective tribute that warms any room.
How-To Guide
Materials
- Square stretched canvas (e.g., 10×10 or 12×12 inches)
- Acrylic paints (Titanium White, Mars Black, Cadmium Yellow, Cadmium Orange, Alizarin Crimson, Ultramarine Blue, Burnt Umber)
- Set of brushes (1-inch flat, medium filbert, small round, fine liner)
- Palette knife (optional for texture)
- Cup of water and paper towels
- easel
Step 1: Setting the Scene
-
Prime the canvas:
Begin by applying a thin, even coat of Titanium White across the entire canvas if it isn’t pre-primed. Let this dry completely to ensure your colors pop. -
Sketch the horizon:
Using a small round brush with watered-down Burnt Umber or a pencil, lightly mark your horizon line about one-third of the way up from the bottom. Sketch the basic outline of the mountains on the left and the coastline.
Muddy Skies?
If your sky colors turn brown while blending, stop and rinse your brush more often. Only blend neighbors on the color wheel (like red and orange), not opposites like blue and orange.
Step 2: Painting the Sky
-
Base gradient:
Start at the top with a mix of Ultramarine Blue and a touch of Alizarin Crimson for a deep purple. Blend downwards into pure Alizarin Crimson, then Cadmium Orange, and finally Cadmium Yellow near the horizon where the sun will be. -
Blending the transition:
While the paint is still wet, use a clean, dry flat brush to sweep back and forth horizontally between color bands. This creates that seamless, soft gradient typical of sunsets. -
Adding dramatic clouds:
Mix Alizarin Crimson with a tiny bit of Ultramarine Blue. Using the edge of a filbert brush, flick diagonal strokes upwards from the horizon to create the wispy, streaky clouds shown in the reference. -
Highlighting the clouds:
Mix a light peach color using White and Orange. Carefully paint the undersides of your dark clouds to show where the setting sun is catching them. -
Creating the sun:
Where the mountains meet the water, paint a small, crisp circle using pure Titanium White mixed with a tiny drop of Yellow. This is your focal point, so keep the edges sharp.
Make It Personal
To make this memorial truly special, gently paint a silhouette of two small figures sitting on the rocks or a specific bird flying toward the horizon to represent a loved one.
Step 3: The Mountains and Sea
-
Blocking in mountains:
Mix Mars Black with a little Ultramarine Blue and Purple to create a cool, dark tone. Fill in the mountain shapes, ensuring the edges against the sky are clean. -
Painting the water base:
Mirror the sky colors in the water. Paint the area below the horizon with horizontal strokes of purple, fading into orange and yellow towards the center reflection. -
Adding the sunpath:
Using a small flat brush and a mix of White and Yellow, paint horizontal dashes directly under the sun. Make the strokes narrower near the horizon and wider as they come forward. -
Water ripples:
With a fine liner brush and dark purple paint, add thin horizontal lines across the water to suggest gentle waves interfering with the light.
Step 4: Foreground Details
-
Rocky shore base:
In the bottom left corner, paint the rocky shoreline using a mix of Black and Burnt Umber. Use a dabbing motion to create a rough, stony texture rather than smooth strokes. -
Highlighting rocks:
Mix a visible grey-blue for highlights. With a small brush or palette knife, tap the top edges of the rocks to give them dimension and form. -
Shoreline foam:
Where the water meets the rocks, use Titanium White on a small brush to stipple a jagged, foamy line. Pull a few thin, translucent white lines out into the water to show receding waves. -
Final adjustments:
Step back and check your contrast. If the sun needs to be brighter, add a final dot of pure thick White right in the center. -
Varnish:
Once the painting is fully dry (wait at least 24 hours), apply a gloss varnish to protect the surface and unify the sheen of the different paint colors.
Place your finished canvas on a small easel or shelf where it can serve as a daily reminder of peace and fond memories
BRUSH GUIDE
The Right Brush for Every Stroke
From clean lines to bold texture — master brush choice, stroke control, and essential techniques.
Explore the Full Guide
Photo “Frame Within a Painting” Scene
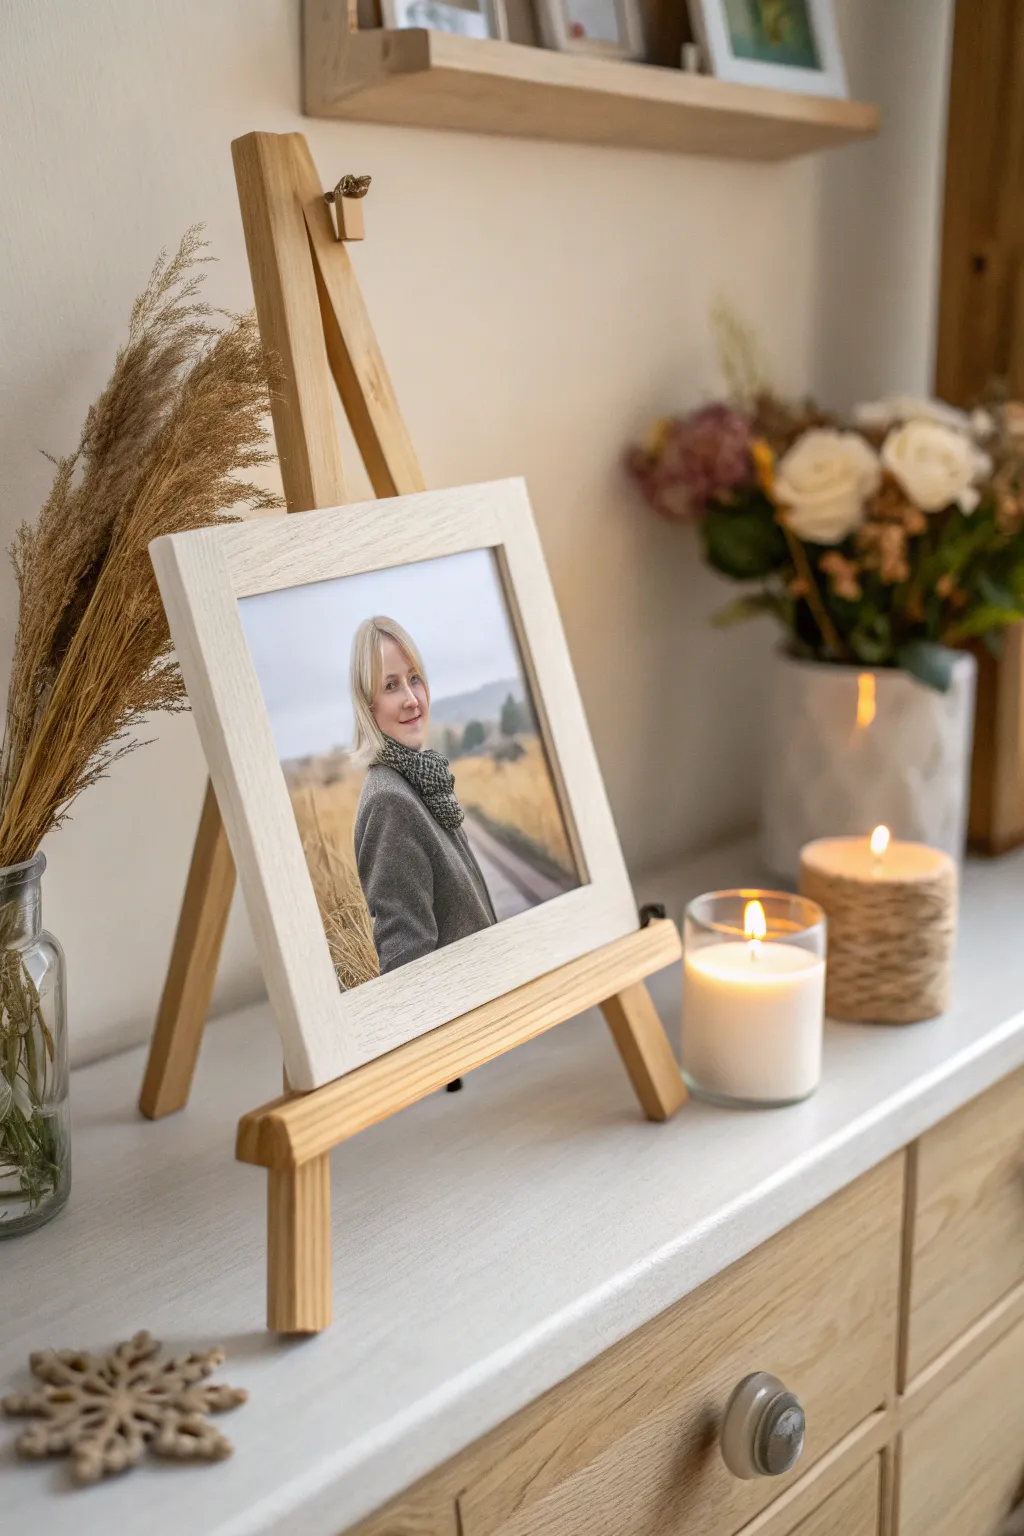
Create a serene and respectful memorial tribute by mounting a cherished photograph on a sturdy backing and displaying it on a tabletop easel. This project transforms a simple print into a dedicated decor piece that feels both intentional and filled with warmth.
Detailed Instructions
Materials
- High-quality photo print (approx. 8×10 or 5×7)
- Small wooden tabletop easel (pine or beechwood)
- Wide-profile wooden picture frame (white or light wash)
- Acid-free foam core board or backing board
- Spray adhesive or photo-safe glue stick
- Craft knife or box cutter
- Self-healing cutting mat
- Metal ruler
- Glazier points or backing clips
- Small screwdriver or picture framing tool
- Glass or acrylic glazing (optional, usually included with frame)
Step 1: Preparing the Image
-
Select the photo:
Choose a high-resolution image of your loved one. A digital file works best so you can edit it for brightness and contrast before printing. -
Print the photograph:
Print the image on high-quality matte or semi-gloss photo paper. Matte paper often reduces glare when displayed near candles or lights. -
Measure the opening:
Take the backing out of your chosen wooden frame and measure the exact dimensions of the opening where the photo will sit. -
Trim the print:
Place your photo on the cutting mat. Using a metal ruler as a guide, carefully trim the photo to match your frame’s inner dimensions.
Step 2: Mounting and Framing
-
Cut the backing board:
If your frame didn’t come with sturdy backing, cut a piece of foam core to size. This rigid support keeps the photo flat over time. -
Apply adhesive:
In a well-ventilated area, spray a light, even coat of adhesive onto the foam core board. I find waiting about 30 seconds for it to get tacky prevents bubbles. -
Mount the photo:
Align the top edge of your photo with the backing board and slowly smooth it down, working from the center outward to push out any air pockets. -
Clean the glass:
If you are using glass, clean both sides thoroughly with glass cleaner and a microfiber cloth to ensure no dust is trapped inside. -
Assemble the layers:
Place the glass (if using) into the frame first, followed by the mounted photo facing outward. -
Secure the backing:
Insert the original frame backing behind your foam core. Press the glazier points or flexible tabs down firmly to lock everything in place.
Rustic Texture Trick
To match the raw wood look, lightly sand the frame edges with fine-grit sandpaper. It exposes the grain and creates a softer, more organic finish.
Step 3: Setting the Scene
-
Adjust the easel angle:
Loosen the wing nut or screw on the top of your wooden easel. Adjust the back leg until it stands stable at your desired viewing angle. -
Position the frame:
Set the finished frame onto the easel ledge. Ensure it is centered and that the top holder (if your easel has one) slides down to grip the frame top. -
Tighten hardware:
Once the frame is secure, tighten all easel hardware so nothing shifts. -
Create the vignette:
Place the easel on your surface. Arrange dried wheat stalks or grasses in a tall glass jar to the left for height and texture. -
Add gentle lighting:
Position a pillar candle in a glass holder to the right. The flickering light adds a peaceful ambiance to the memorial space. -
Final touches:
Complete the arrangement with a small seasonal element, like a wooden snowflake or a sentimental token, at the base of the easel.
Loose Easel Leg?
If the back leg keeps sliding, apply a small drop of hot glue or stick a piece of felt to the base of the leg to create friction against the table surface.
Now you have a beautifully framed memory that stands proudly as a focal point of love and remembrance

Have a question or want to share your own experience? I'd love to hear from you in the comments below!