If you’ve been itching to paint something that feels powerful, romantic, and a little bit luxe, king and queen canvas painting is such a satisfying direction. I’m sharing my favorite ideas that lean into crowns, gold accents, and that “we rule together” energy—whether you’re painting for your bedroom or your living space.
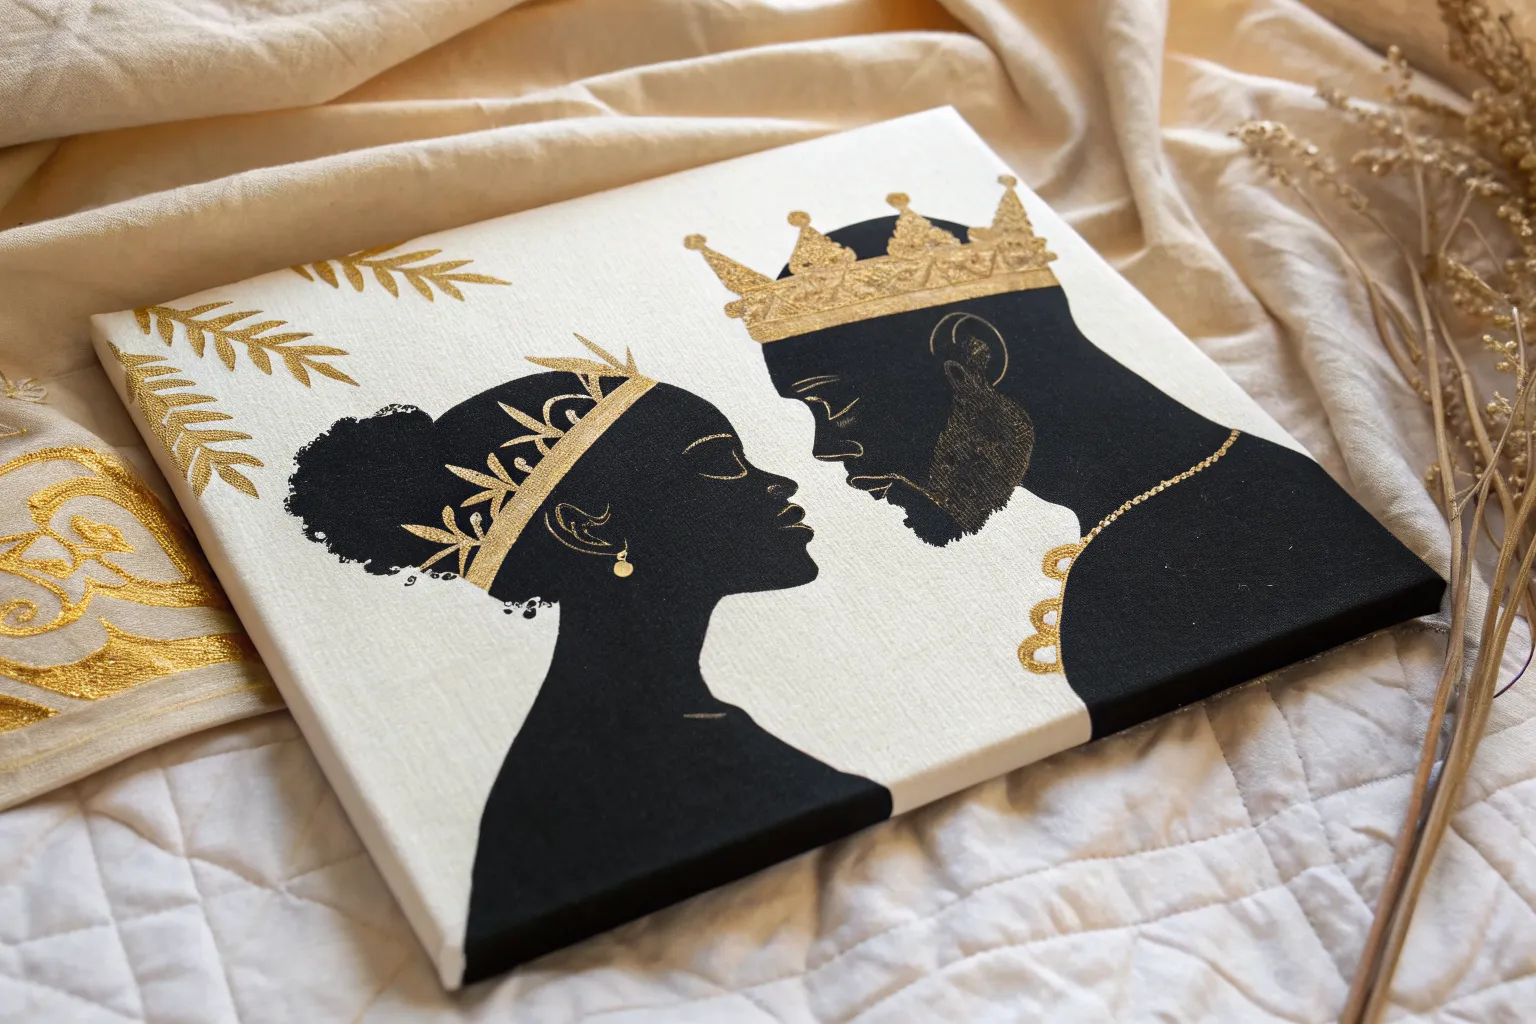
Classic King and Queen Crown Diptych

Create a bold statement for your bedroom or living space with this striking pair of black canvases featuring shimmering gold crowns. The design uses negative space and texture to create a regal, high-contrast look that feels both modern and classic.
Step-by-Step Guide
Materials
- Two 16×20 stretched canvases
- Matte black acrylic paint
- Gold leaf adhesive size (or spray adhesive/Mod Podge)
- Gold leaf sheets or fine gold glitter
- Adhesive vinyl or contact paper (for stencils)
- Wide flat paintbrush
- Detail paintbrush or sponge dauber
- Soft-bristle brush (for brushing off excess)
- Die-cut machine (Cricut/Silhouette) or X-Acto knife
- Ruler and pencil
- Clear sealant spray (gloss or matte)
Step 1: Base Preparation
-
Prime the Surface:
Begin by laying out your two canvases on a protected surface. Even if they are pre-primed, a quick coat of gesso can help smooth the texture if you prefer a sleeker finish, though the raw canvas texture adds nice character here. -
Paint the Background:
Apply a generous coat of matte black acrylic paint over the entire front and sides of both canvases. Use a wide flat brush to ensure even coverage. -
Second Coat Application:
Once the first layer is dry to the touch, apply a second coat of black paint. Look at the canvas from different angles to ensure there are no white spots showing through the weave. -
Full Curing:
Allow the painted canvases to dry completely, ideally overnight. The surface must be perfectly dry so the stencil adhesive doesn’t peel up the paint later.
Clean Lines Troubleshooting
Paint bleeding under the stencil? Before adding gold adhesive, paint a thin layer of BLACK paint over the stencil edges first to seal them perfectly.
Step 2: Designing the Stencil
-
Create the Template:
Find or create two crown clipart designs—one ‘King’ style with crosses and arches, and one ‘Queen’ style with fleur-de-lis accents. Scale them to fit comfortably within your canvas dimensions, leaving about 2-3 inches of negative space on all sides. -
Cut the Stencil:
Using a die-cut machine is the easiest method here; simply cut the crown shapes out of adhesive vinyl. If cutting by hand, tape your template over contact paper and carefully trace the lines with an X-Acto knife. -
Weed the Pattern:
Remove the *inside* shape of the crown. You want to create a negative stencil where the crown area is open and the surrounding area is covered by vinyl.
Level Up: Gemstones
Add 3D texture by gluing small rhinestones or flat-back pearls onto the points of the crowns or along the headband area for extra royal bling.
Step 3: Applying the Gold
-
Position the Vinyl:
Carefully transfer your vinyl stencil onto the center of the first black canvas. Use a ruler to ensure it is centered horizontally and creates a pleasing visual weight vertically. -
Seal the Edges:
Press down firmly along all cut edges of the vinyl. I like to run a credit card or scraper tool over the edges to prevent the gold size from bleeding underneath. -
Apply Adhesive Size:
Using a sponge dauber or soft brush, apply a thin, even layer of gold leaf adhesive (size) inside the stencil area. It will look milky white at first. -
Wait for Tackiness:
Wait for the adhesive to turn clear and become tacky (usually 15-30 minutes depending on the brand). It should feel sticky like tape, but not wet. -
Apply Gold Leaf:
Gently lay sheets of gold leaf over the sticky areas. If you are using fine glitter instead for a textured look like the photo, sprinkle it generously over the adhesive now. -
Burnish the Gold:
If using leaf, use a soft, dry brush to gently rub the gold into the canvas texture. If using glitter, press it down firmly with a piece of parchment paper to ensure good contact. -
Second Canvas:
Repeat the stencil placement, adhesive application, and gold application steps for the second canvas, ensuring the height of the crown matches the first canvas.
Step 4: Finishing Touches
-
Refine the Edges:
Once the gold is set, slowly peel back the vinyl stencil at a sharp angle. Do this carefully to create crisp lines. -
Dust Off Excess:
Take your soft-bristle brush and sweep away any loose gold leaf flakes or stray glitter particles from the black background. -
Touch Ups:
If any black paint peeled up, use a tiny detail brush to dab black paint over the mistake. If edges are ragged, you can carefully clean them up with the black paint as well. -
Seal the Work:
Spray the entire canvas with a clear sealant. This prevents the gold leaf from oxidizing (tarnishing) over time and keeps glitter from shedding.
Hang your royal duo side-by-side to instantly add a touch of majesty to your room

Afrocentric Royal Couple Portrait Set
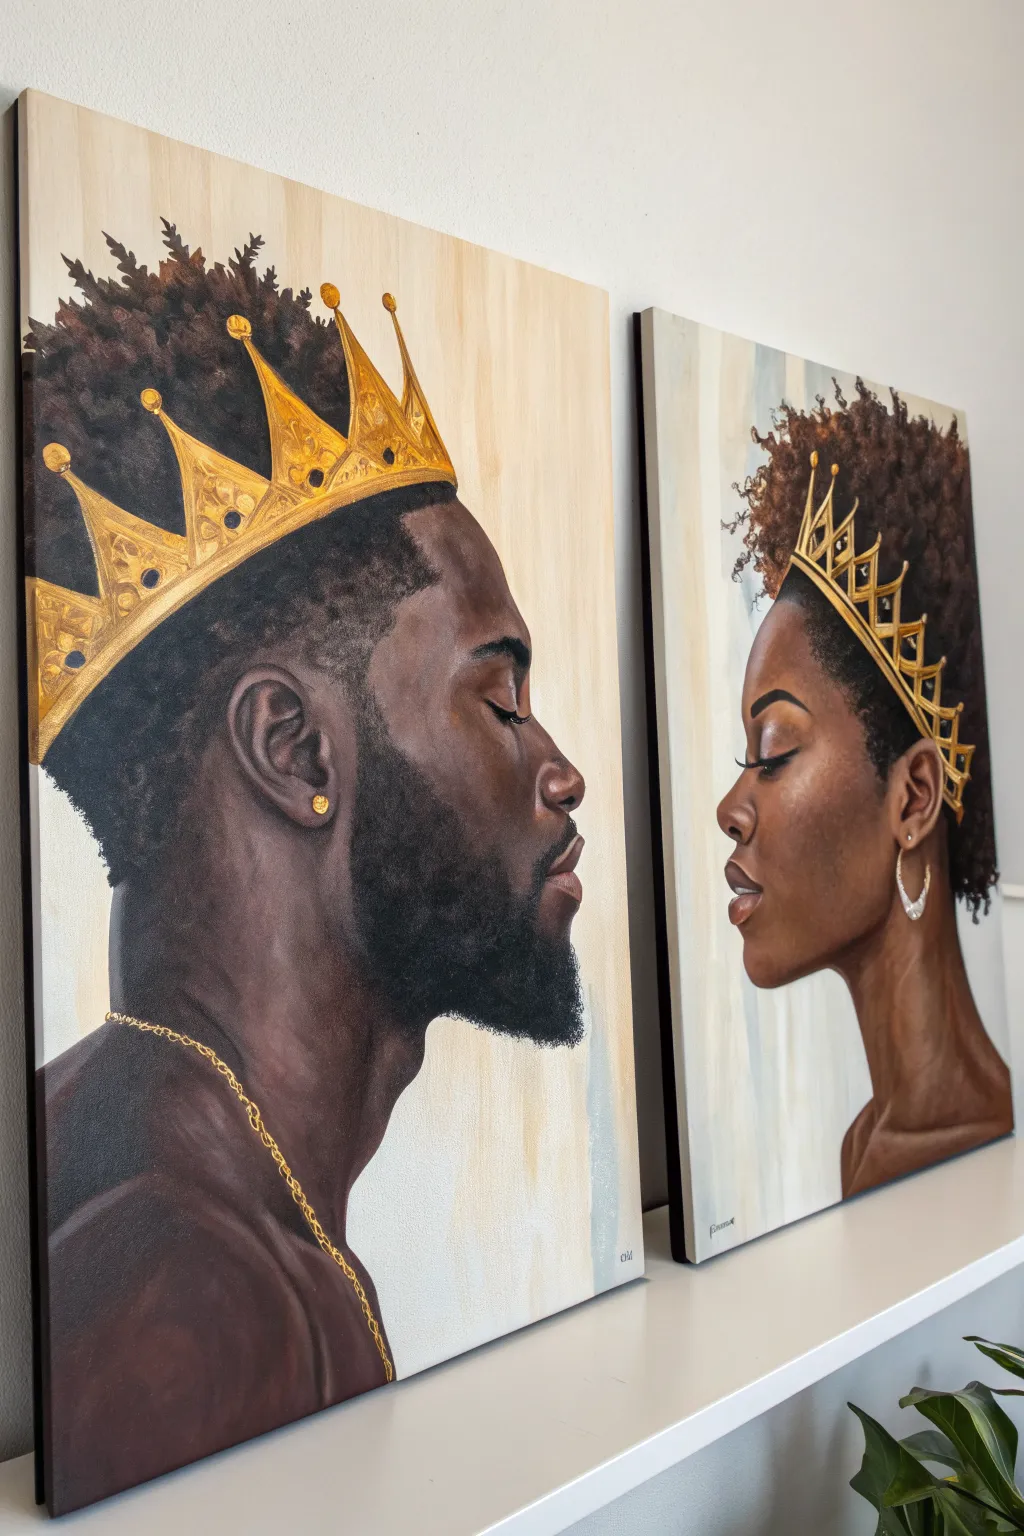
Capture the regal elegance of this afrocentric royal couple with a stunning two-canvas acrylic portrait set. This project focuses on rich, luminous skin tones and metallic gold accents to create a powerful statement piece for any home.
Step-by-Step Tutorial
Materials
- Two large stretched canvases (e.g., 24×36 inches)
- Acrylic paints: Burnt Umber, Raw Sienna, Yellow Ochre, Mars Black, Titanium White, Cadmium Red, Metallic Gold
- Assorted brushes: Large flat brush, medium filbert, lush round brushes, stiff bristle brush, fine liner
- Graphite paper and pencil (for tracing outline)
- Slow-drying blending medium
- Gold leaf (optional, for extra shine)
- Gold leaf adhesive size (if using leaf)
- Easel
- Palette knife
- Water container and rags
Step 1: Preparation and Sketching
-
Prepare the background:
Start by mixing a very pale wash of Yellow Ochre and Titanium White. Apply this loosely over both canvases to create a warm, neutral backdrop rather than stark white. Let this dry completely. -
Outline the profiles:
Lightly sketch the profiles of the man and woman facing each other. Ensure the noses, chins, and eyes align horizontally between the two canvases. If you aren’t confident in freehand drawing, project an image or use graphite paper to transfer the basic silhouettes. -
Map the features:
Define the placement of the crowns, ears, necklines, and jewelry. The crowns should sit comfortably on the head shapes, angling slightly back.
Muddy Skin Fix
If skin tones look gray or muddy, you likely used too much black or mixed complementary colors too much. Let it dry, then glaze over with a thin wash of Burnt Sienna to warmth back in.
Step 2: Painting Skin Tones
-
Establish the shadow layers:
Mix Burnt Umber with a touch of Mars Black and a drop of slow-drying medium. Paint the darkest areas first: under the chin, the back of the neck, and the deep recesses of the ear. -
Apply mid-tones:
Create a rich mid-tone using Burnt Umber, Cadmium Red, and a small amount of Yellow Ochre. Block in the main areas of the face, blending the edges into the shadow areas while the paint is still slightly wet. -
Build transitions:
Mix a lighter tone using Raw Sienna and White. Apply this to the cheekbones, forehead, and the bridge of the nose. Use a clean, dry filbert brush to soften the transition between shadow, mid-tone, and highlight. -
Refine the details:
Switch to a smaller round brush. Carefully paint the eyelids, nostrils, and lips. The lips should have a slightly pinker hue, achieved by adding a bit more Cadmium Red and White to your skin mix. -
Add high-contrast highlights:
For that glowing skin effect, mix Titanium White with a tiny dab of Yellow Ochre. Apply small, purposeful highlights on the tip of the nose, upper cheekbone, brow bone, and the cupid’s bow.
3D Crown Effect
Use modeling paste mixed with yellow ochre to build up the crown’s shape before painting it gold. This adds physical texture that catches light beautifully.
Step 3: Hair and Texture
-
Base coat for hair:
Paint the hair shape solid Mars Black. For the beard on the male figure, extend the black down the jawline but feather the edges outward. -
Create texture:
Using a stiff bristle brush or a sponge, stipple a dark brown (Burnt Umber/Black mix) over the borders of the hair to create a natural, coiled texture. I like to keep this loose to suggest volume. -
Add soft highlights:
Dry brush a small amount of lighter brown on the very top edges of the curls to separate them from the background and give the hair dimension.
Step 4: The Crowns and Jewels
-
Base layer for gold:
Paint the silhouette of the crowns and jewelry with a flat Yellow Ochre. This provides a solid underpainting for the metallic pigments. -
Apply metallic paint:
Layer your Metallic Gold paint over the ochre base. You will likely need two coats for full opacity. -
Shadows and depth:
Mix a tiny bit of Burnt Umber into your gold paint. Use a fine liner brush to paint the structural details, filigree patterns, and shadow sides of the crown points. -
Brightest shine:
Mix Titanium White with Gold. Apply sharp, tiny highlights to the tips of the crown, the jewelry, and the rim of the earrings to make them sparkle. -
Optional gold leaf:
For a truly royal finish, apply adhesive size to the flattest parts of the crowns. Wait for it to get tacky, then press gold leaf sheets onto the canvas, brushing away the excess. -
Final accessories:
Use a liner brush to paint the gold chain on the male figure and the earrings on the female figure, following the same base-shadow-highlight method used for the crowns. -
Clean up edges:
Review the background. If any paint smudged, touch up the pale background wash to create a crisp, clean profile line against the figures.
Hang your diptych with a few inches of space between them to let the gaze connect the two pieces


Faceless Silhouettes With Floating Crowns
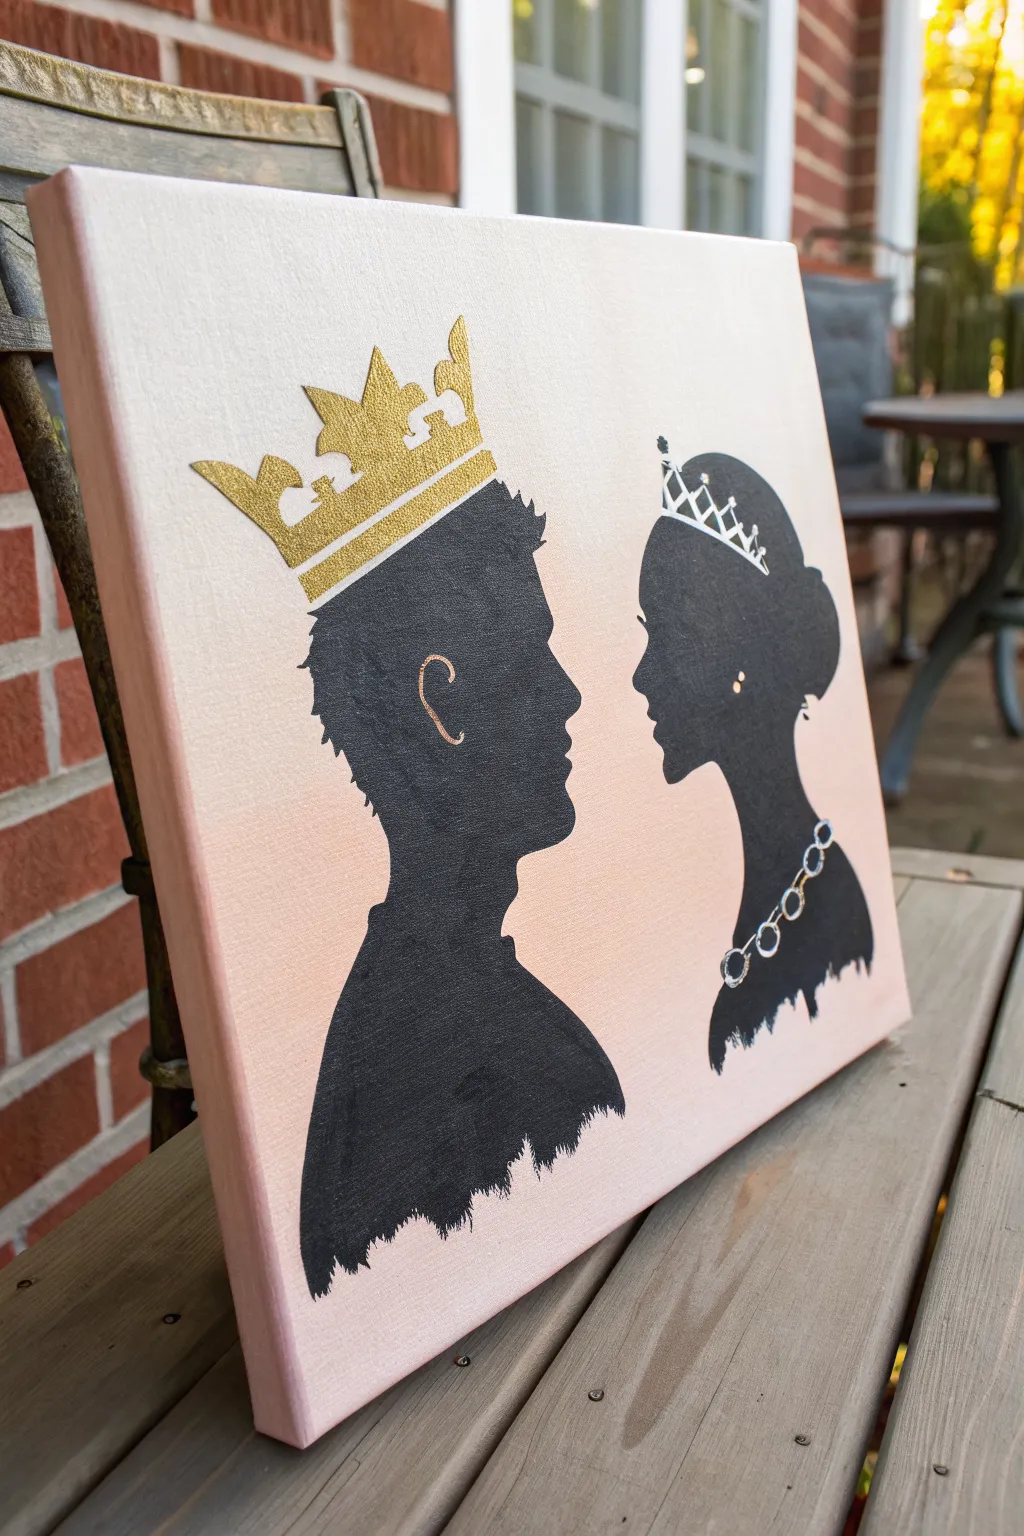
Create a striking piece of wall art featuring regal silhouettes set against a soft, gradient background. This project combines smooth acrylic blending with crisp stenciling and metallic accents for a modern, elegant finish.
How-To Guide
Materials
- Rectangular stretched canvas (e.g., 16×20 inches)
- Acrylic paints: Blush pink, Titanium White, Mars Black
- Gold glitter cardstock or vinyl (for the King’s crown)
- Silver paint pen or loose silver glitter
- Gold paint pen
- Wide flat paintbrush (approx. 2 inches)
- Small round detail brush
- Pencil
- Profile silhouette templates (printed or hand-drawn)
- Craft glue or decoupage medium
- Scissors or craft knife
- Transfer paper (carbon paper)
Step 1: Preparing the Background
-
Prime the canvas:
If your canvas isn’t pre-primed, apply a coat of gesso. Even on pre-primed canvases, a fresh coat of Titanium White helps acrylics blend smoother. Let this dry completely. -
Mix your gradient colors:
Prepare two puddles of paint on your palette: pure Titanium White and a soft mix of Blush Pink with a generous amount of white. Keep a spray bottle of water handy to keep the paints wet. -
Apply the darker tone:
Using your wide flat brush, paint the bottom third of the canvas with the pink mixture. Use horizontal strokes for a clean look. -
Start the blend:
While the pink is still wet, rinse your brush slightly and pick up some white. Paint the middle section, overlapping the pink area. Use long, sweeping strokes to feather the colors together where they meet. -
Finish the gradient:
Paint the top third of the canvas with pure Titanium White, blending it down into the middle section. The goal is a seamless transition from pink at the bottom to white at the top. Allow the background to dry fully, ideally overnight.
Step 2: Creating the Silhouettes
-
Prepare your templates:
Print out side-profile silhouettes of a male and female face. Cut roughly around them so you can position them on the canvas to check the spacing. -
Transfer the outlines:
Place a sheet of transfer paper behind your printouts. Tape them in place on the dry canvas. Trace the outline of the faces firmly with a pencil or stylus. -
Outline the shapes:
Using a small round brush and slightly watered-down Mars Black acrylic, carefully outline the traced silhouettes. Getting a crisp edge here is crucial for the final look. -
Fill in the black:
Switch to a slightly larger brush to fill in the interior of the silhouettes with Mars Black. You may need two coats to ensure it is opaque and solid black. -
Create the rough edge:
At the bottom of the neck and shoulder area, use a dry, stiff brush to create a jagged, raw edge rather than a straight line. This gives it a stylish, ‘torn’ appearance.
Clean Lines Hack
If you struggle with shaky hands while painting the outline, use a black permanent marker for the very edge before filling in with paint.
Step 3: Adding Royal Details
-
Cut the King’s crown:
Draw or trace a crown shape onto the back of your gold glitter cardstock. Cut it out precisely with scissors or a craft knife. -
Attach the crown:
Apply craft glue to the back of the glitter crown and press it firmly onto the canvas, positioned just above the male silhouette’s head, tilting it slightly for character. -
Paint the Queen’s tiara:
For the female silhouette, use a silver paint pen to draw a delicate tiara directly onto the black hair area. Start with the structured base and add points. -
Add earring details:
Using the gold paint pen, draw a small ‘C’ shape for the ear detail on the male silhouette, and a simple dot earring on the female silhouette. -
Detail the necklace:
Draw a chain necklace on the female silhouette using the silver paint pen or a small brush with white/silver paint. Create linked circles that follow the curve of the neck. -
Enhance the tiara sparkle:
I like to dab a tiny bit of glue on the points of the painted tiara and sprinkle a pinch of loose silver glitter for extra dimension, shaking off the excess once dry.
Make it 3D
Glue small rhinestones or flat-back crystals onto the Queen’s tiara and necklace for a jewelry effect that catches the light.
Hang your royal masterpiece in a well-lit area to let those metallic accents really shine


Fixing Each Other’s Crowns Scene
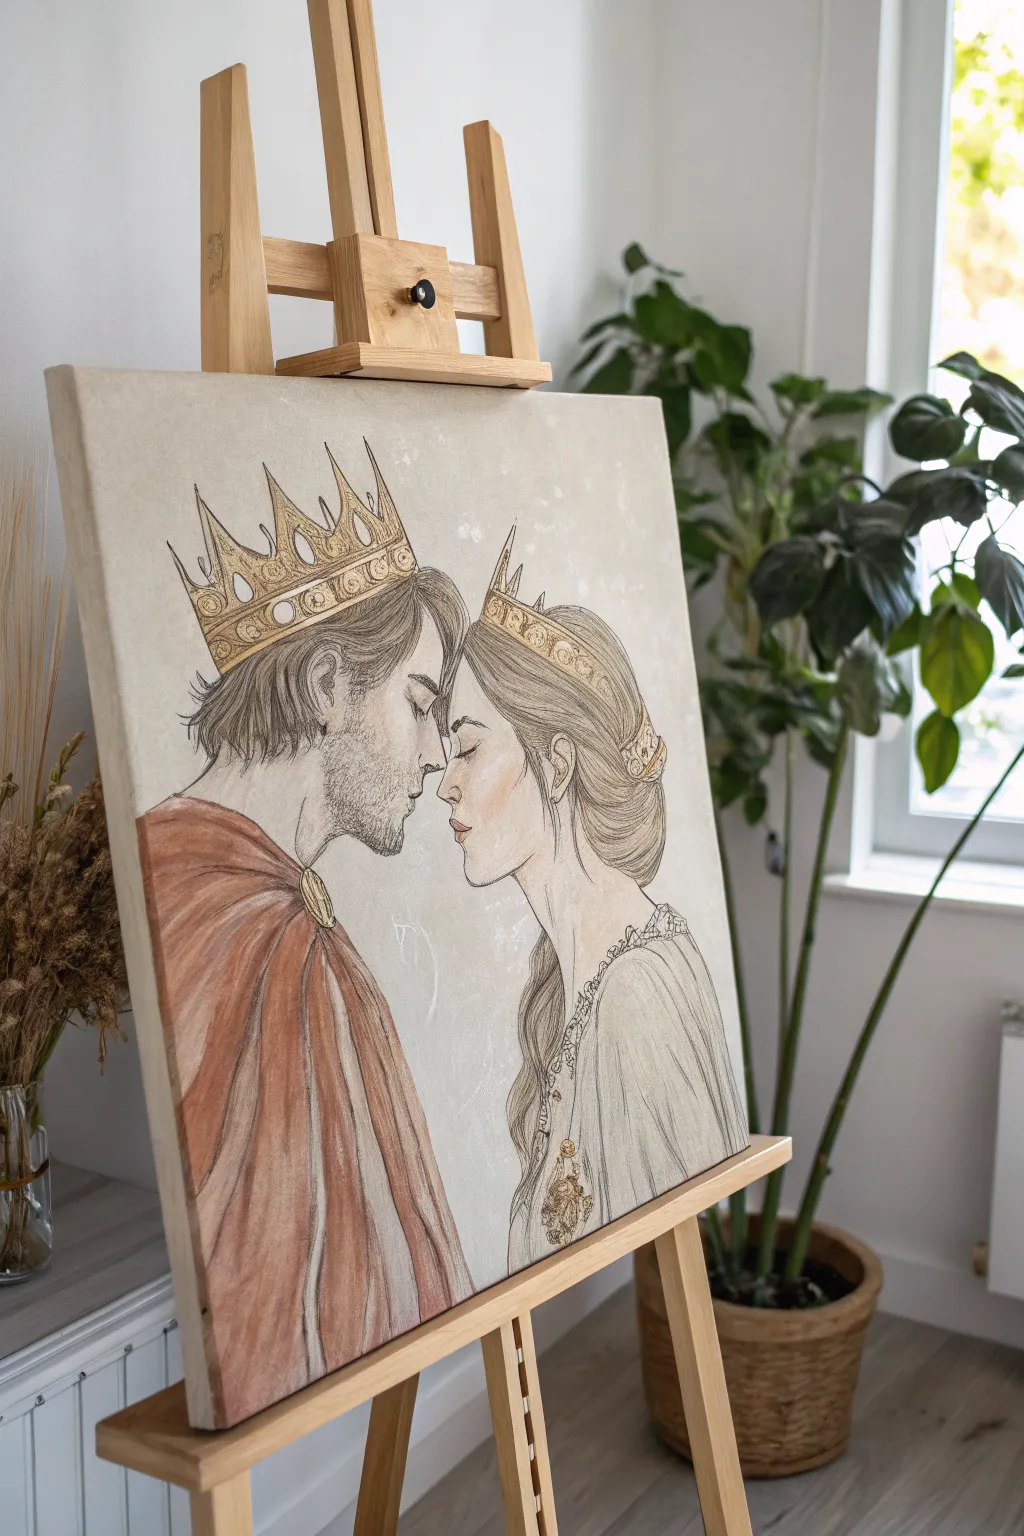
This elegant artwork combines delicate pencil sketching with washed-out acrylics to capture a tender moment between a king and queen. By balancing precise line work with soft coloring, you will create a piece that feels both classical and romantic.
Step-by-Step Tutorial
Materials
- Square stretched canvas (approx. 20×20 inches or size of choice)
- Graphite pencils (HB for initial sketch, 2B and 4B for defining lines)
- Acrylic paints (Burnt Sienna, Raw Umber, Titanium White, Yellow Ochre, Gold Metallic)
- Fine liner pens (sepia or dark brown, 0.3mm and 0.5mm)
- Soft round brushes (sizes 4 and 8)
- Fine detail brush (size 0 or 00)
- Matte medium or clear gesso (optional foundation)
- Palette for mixing
- Kneadable eraser
Step 1: Laying the Foundations
-
Prime the Surface:
If your canvas feels too rough for detailed pencil work, apply a thin coat of clear gesso or matte medium. This provides a smoother ‘tooth’ for the graphite to grip without losing the texture of the canvas weave. -
Scale the Composition:
Lightly mark the center of the canvas. The noses of your subjects should almost touch right at this center line. Sketch two oval shapes for the heads to ensure they are proportionate and fit well within the canvas boundaries. -
Profile Outlining:
Using an HB pencil, carefully draw the side profiles. Focus on the gentle slope of the noses, the curve of the lips, and the jawlines. Keep your hand light; these are just guide marks that can be adjusted. -
Adding the Crowns:
Sketch the crowns sitting atop their heads. The King’s crown should be taller with sharp triangular points, while the Queen’s can be more like a tiara, sitting slightly further back on the head with ornate curves.
Step 2: Detailing the Sketch
-
Refining Facial Features:
Switch to your 2B pencil to darken the eyes (closed with long lashes) and the connection of the lips. Add the details of the King’s beard with short, directional strokes that mimic hair growth. -
Hair Texture:
Draw the flow of hair. For the King, use loose, slightly messy waves. For the Queen, sketch strands pulling back into a low, elegant bun, focusing on the sweep of hair near the ear. -
Inking the Lines:
Once you are happy with the sketch, trace over your key lines with a sepia or dark brown fine liner. I find that using brown instead of black keeps the drawing feeling warm and vintage-style. -
Erase Guide Lines:
Wait at least 15 minutes for the ink to fully set, then gently remove the initial graphite marks with a kneadable eraser to clean up the canvas.
Smudged Pencil?
If your graphite smudges on the canvas, lightly dab (don’t rub) with a kneadable eraser. For future prevention, keep a sheet of clean paper under your hand while working.
Step 3: Applying Color Washes
-
Mixing Flesh Tones:
Mix a very diluted wash of Burnt Sienna, a touch of Yellow Ochre, and plenty of Titanium White. You want a watery consistency, almost like watercolor. -
Painting Skin:
Apply the flesh tone wash to the faces. Don’t worry about perfect coverage; a slightly streaky or transparent look adds to the artistic, illustrative style. Let the canvas texture show through. -
Adding Blush:
While the skin tone is still slightly damp, dab a tiny amount of watered-down red or pink onto the Queen’s cheek and the tip of her nose for a soft, flushed look. -
Fabric Base Layers:
Mix a warm terracotta color using Burnt Sienna and a drop of Red. Paint the King’s cloak broadly, following the drape of the fabric over his shoulder. -
The Queen’s Gown:
Use a mix of Titanium White with a tiny hint of Raw Umber for the Queen’s dress. Paint loosely, creating vertical strokes that suggest folds in the fabric.
Add Real Texture
Instead of just painting the gold details, use gold leaf adhesive and transfer sheets for the crowns. This creates a brilliant, reflective shine that catches the light.
Step 4: Gilding and Final Touches
-
Gold Base:
Using a small round brush, paint the base of the crowns with Yellow Ochre. This acts as a primer so the metallic paint pops later. -
Metallic Accents:
Once the ochre is dry, carefully apply Gold Metallic paint to the crowns and the brooch on the King’s cloak. Use the size 0 brush for the filigree details inside the crowns. -
Deepening Shadows:
Mix a diluted Raw Umber wash. Apply this gently under the jawlines, in the folds of the King’s red cloak, and in the deeper waves of the hair to create dimension. -
Enhancing Hair:
Use a darker brown paint or a 4B pencil to add deeper strands into the hair, specifically where the hair meets the crown or tucks behind the ear. -
Dress Details:
With your finest brush and diluted dark brown paint, add intricate lace patterns to the neckline of the Queen’s dress. Keep the lines broken and delicate. -
Final Highlights:
Add tiny dots of pure Titanium White to the highest points of the gold crowns and the bridge of the nose to bring the portrait to life.
Step back and admire the subtle romance captured in the gentle lines of your royal portrait.
BRUSH GUIDE
The Right Brush for Every Stroke
From clean lines to bold texture — master brush choice, stroke control, and essential techniques.
Explore the Full Guide
Royal Titles With Bold Typography
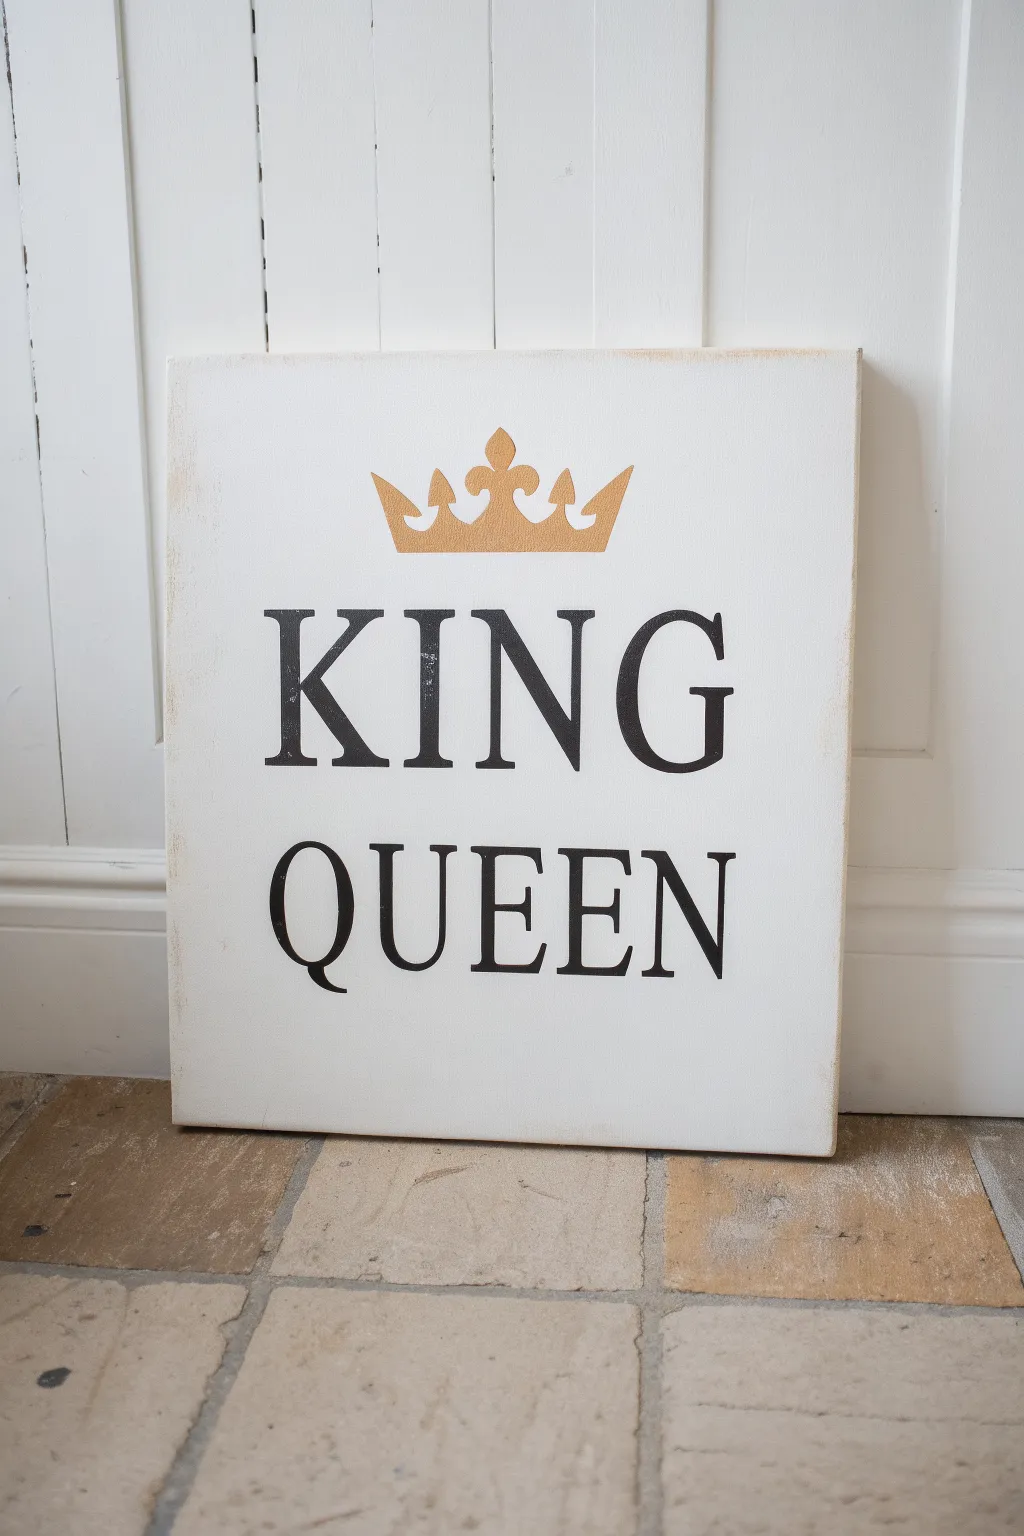
Achieve a majestic look with this simple yet striking canvas art featuring bold typography and a glimmering crown. This project balances clean, modern lines with a touch of distressed charm perfect for any royal-themed decor.
Step-by-Step Tutorial
Materials
- Square stretched canvas (16×16 or similar)
- White acrylic paint (matte)
- Black acrylic paint
- Metallic gold acrylic paint
- Wide flat paintbrush
- Small round paintbrush
- Stencil vinyl or contact paper
- Transfer tape
- Cutting machine (Cricut/Silhouette) or craft knife
- Fine-grit sandpaper
- Makeup sponge or stencil brush
- Painter’s tape
Step 1: Preparing the Base
-
Prime the canvas:
Start by giving your canvas a solid foundation. Even if it came pre-primed, apply a coat of white matte acrylic paint with a wide flat brush to create a smoother, more opaque surface. -
Build texture:
Apply a second coat of white paint once the first is dry. Use crisscross strokes rather than straight lines to build a subtle texture that will catch the ‘aging’ later on. -
Fully dry the base:
Let the canvas dry completely for at least an hour. It must be bone dry before applying any stencils, or the adhesive will pull up your paint.
Step 2: Creating the Stencils
-
Design the layout:
Using design software or a word processor, create your layout. Choose a bold serif font (like Times New Roman or Garamond) for the words ‘KING’ and ‘QUEEN’. Find a simple silhouette of a crown to place centered above them. -
Size the elements:
Scale your text so ‘KING’ is slightly larger than ‘QUEEN’ to create visual weight, and ensure the crown fits proportionally above. The text should span about two-thirds of the canvas width. -
Cut the stencil:
Cut your design out of stencil vinyl or contact paper. If you don’t have a cutting machine, I find printing the design on paper, taping it under a sheet of transparency film, and cutting with a craft knife works perfectly. -
Weed the design:
Remove the positive space—the actual letters and the crown shape—leaving the negative space intact to serve as your painting guide.
Clean Lines Secret
Using a makeup wedge sponge instead of a brush prevents paint from seeping under the stencil because it applies less pressure and less wet paint.
Step 3: Applying the Design
-
Transfer to canvas:
Use transfer tape to lift your vinyl stencil. Align it carefully on your canvas. Measure from the sides to ensure the text is centered, then press it down firmly. -
Burnish the edges:
Rub over the stencil edges with a credit card or scraper tool. This step is crucial to prevent paint from bleeding under the vinyl. -
Seal the stencil:
Lightly brush a very thin layer of your white base paint over the stencil cutouts. This tricks any potential bleed into being the background color, creating perfectly crisp lines later.
Make It 3D
Add tiny adhesive flat-backed gems or pearls to the points of the gold crown for a textured, jewel-encrusted royal effect.
Step 4: Painting the Details
-
Paint the crown:
Dip a makeup sponge or stencil brush into the metallic gold paint. Offload most of the paint onto a paper towel until the sponge is almost dry. -
Dab, don’t brush:
Use a vertical up-and-down dabbing motion to apply the gold paint. Apply 2-3 thin coats for a rich, solid gold finish, letting each dry briefly in between. -
Paint the typography:
Switch to black acrylic paint for the text. Using a fresh sponge, dab the black paint over the ‘KING’ and ‘QUEEN’ lettering, being careful not to overload the sponge. -
Remove the stencil:
Peel off the vinyl stencil slowly while the paint is still slightly tacky but not wet. Pull at a sharp angle to shear the vinyl away from the paint for the cleanest edge. -
Touch up:
Once the stencil is removed, inspect your letters. Use a tiny round brush and white paint to clean up any rough edges or bleed that might have occurred.
Step 5: Distressing and Finishing
-
Sand the edges:
Take a piece of fine-grit sandpaper and gently rub along the very edges and corners of the canvas. You want to wear away the paint slightly to reveal the canvas weave beneath. -
Add surface age:
Very lightly sand over the gold crown and black letters in a few random spots. This knocks back the ‘newness’ and gives the piece a vintage, hand-painted feel. -
Antique glaze (optional):
For a warmer look, mix a tiny drop of brown paint with water. Dip a rag in it, wring it out almost completely, and wipe it quickly over the edges of the canvas.
Hang your new royal artwork proudly in a prominent spot to command attention in the room
Regal Throne Vibes With Dramatic Lighting

Create a striking minimalist statement piece featuring regal silhouettes seated on ornate golden thrones. By combining precise black forms with metallic gold accents against a stark white background, you achieve a modern yet luxurious look that commands attention.
Detailed Instructions
Materials
- Large vertical canvas (approx. 36×48 inches)
- Acrylic paint: Matte Black, Titanium White, and Rich Gold (metallic)
- Wide flat brush for background
- Medium round brush for figures
- Fine detail liner brush for chair scrollwork
- Pencil and eraser
- Tracing paper or projector (optional but recommended)
- Painter’s tape
- Ruler or straight edge
- Gold paint pen (optional for fine details)
Step 1: Preparation & Background
-
Prime the canvas:
Begin by applying a fresh coat of Titanium White acrylic over the entire canvas, even if it came pre-primed. This ensures a uniform, bright surface that will make the black pop. -
Smooth the texture:
Use a wide flat brush and cross-hatching strokes to minimize brush ridges. Allow this base layer to dry completely before sketching. -
Plan the composition:
Lightly sketch a floor line near the bottom third of the canvas using a ruler to ensure the chairs sit level. Position your two figures facing right, leaving negative space above for visual balance.
Clean Lines Hack
For the straight floor line or simpler chair legs, use painter’s tape. Burnish the edge down firmly to prevent bleed-under, resulting in a razor-sharp edge.
Step 2: Drafting the Forms
-
Outline the chairs:
Sketch the ornate chairs first. Focus on the scrolling legs and the tall, decorative backs. Don’t worry about filling them in yet; just capture the elaborate Rococo-style outlines. -
Sketch the figures:
Draw the profile silhouettes of the King and Queen seated on the chairs. Pay attention to posture—straight backs convey royalty. The King should be slightly larger and further left, while the Queen sits delicately to the right. -
Refine the details:
Add the crowns on their heads and define the Queen’s raised hand. I find it helpful to look at negative space here to ensure the profiles look human and natural. -
Transfer method:
If you aren’t confident drawing freehand, project an image of silhouettes onto the canvas and trace the pencil lines lightly for perfect proportions.
Texture Twist
For a mixed-media upgrade, apply gold leaf sheets to the crowns and chairs instead of paint. The real metal reflects light brilliantly and adds a rich texture.
Step 3: Painting the Gold Elements
-
Base coat the gold:
Using your Rich Gold metallic paint and a medium brush, fill in the chair frames and the crowns. Don’t worry about perfect opacity on the first pass; metallic paints often need two layers. -
Add dimension to the gold:
Once the first gold layer is dry, add a second coat. While wet, mix a tiny drop of brown into your gold to paint subtle shadows in the crevices of the chair legs and scrollwork for depth. -
Highlight the metal:
Mix a little white into your gold paint and touch the highest points of the chair carvings and the tips of the crowns to simulate light reflecting off metal.
Step 4: Applying the Silhouette
-
Outline the black areas:
Switch to Matte Black paint. Carefully outline the bodies of the figures, cutting in sharply against the white background. A steady hand is crucial here for the facial profiles. -
Fill the forms:
Fill in the rest of the body shapes with solid black. Use smooth strokes to avoid visible brush texture, aiming for a flat, shadow-puppet appearance. -
Define the intersection:
Carefully paint black exactly up to the edge of the gold chair seats. The black represents the figures’ clothing, so ensure it looks like they are sitting *on* the cushion, overlapping parts of the chair back where necessary. -
Add the floor line:
Using your straight edge and liner brush, paint a thin, clean black line beneath the chair legs to ground the composition so the figures aren’t floating.
Step 5: Refining & Finishing
-
Sharpen edges:
Inspect the meeting points between the black figures, gold chairs, and white background. Use a small brush with white paint to clean up any stray black marks for a crisp, laser-cut look. -
Enhance gold details:
If painting fine details on the chair legs is difficult with a brush, use a gold paint pen to re-define the curlicues and intricate patterns over the dried paint. -
Verify opacity:
Check the large black areas in bright light. If the canvas weave shows through, apply a second coat of black for a truly opaque, void-like finish. -
Final varnish:
Once the painting has cured for at least 24 hours, apply a satin varnish to protect the artwork and unify the sheen of the different paints.
Hang your regal masterpiece in a well-lit area to let those metallic accents truly shine

PENCIL GUIDE
Understanding Pencil Grades from H to B
From first sketch to finished drawing — learn pencil grades, line control, and shading techniques.
Explore the Full Guide
King and Queen Chess Piece Still Life
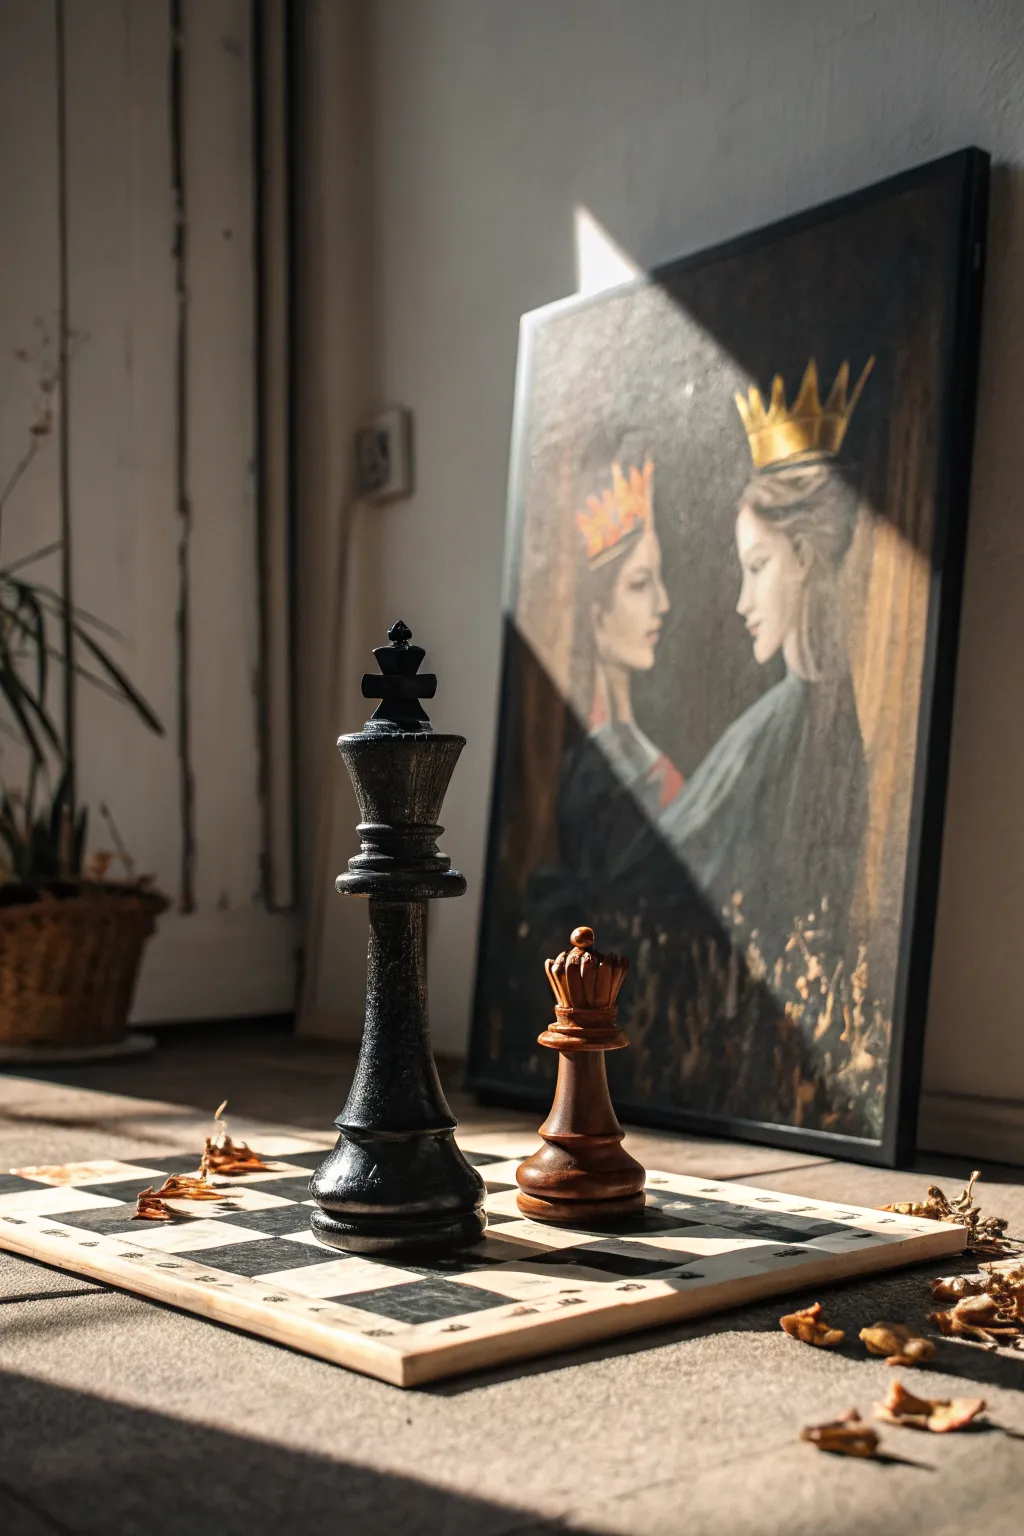
Create a regal and moody atmosphere with this painting of two crowned queens facing off in profile. This project focuses on capturing soft facial features, intricate crown details, and a dramatic interplay of light and shadow.
How-To Guide
Materials
- Canvas panel or stretched canvas (16×20 inches recommended)
- Acrylic paints (Titanium White, Mars Black, Burnt Umber, Yellow Ochre, Cadmium Red, Metallic Gold)
- Set of acrylic brushes (flat shader, filbert, and fine liner)
- Graphite pencil (HB or 2B) and eraser
- Palette for mixing
- Jar of water and paper towels
- Reference image of two women in profile (optional but helpful)
Step 1: Sketching the Composition
-
Establish the profiles:
Begin by lightly sketching the two profiles facing each other. Place them slightly off-center to create dynamic tension, ensuring their foreheads and noses align horizontally to suggest a direct gaze. -
Map the crowns:
Draw the basic shapes of the crowns on each head. Make the left crown slightly more pointed and the right crown perhaps a bit taller or simpler, differentiating the two characters. -
Define the clothing lines:
Sketch the necklines and shoulders. The figure on the left should have a higher collar or regal attire, while the figure on the right can have a sweeping fabric drape across the chest. -
Add hair volume:
Outline the mass of hair for both figures. Keep the lines loose, focusing on projected volume rather than individual strands at this stage.
Pro Tip: Soft Transitions
Use a dry, clean brush to gently blend wet paint edges on the face. This ‘sfumato’ technique creates the soft, dreamlike quality seen in the skin tones.
Step 2: Blocking in the Background and Base
-
Create a dark background:
Mix a dark, muddy grey using Burnt Umber and Mars Black. Paint the entire background around the figures, painting right up to the pencil lines to define the negative space. -
Base tone for skin:
Mix Titanium White with a tiny touch of Burnt Umber and Yellow Ochre to create a pale flesh tone. Apply a flat layer to the faces and necks. -
Underpainting the hair:
Use a dark brown mix for the hair areas. I find it helpful to purposefully leave visible brushstrokes here to suggest direction and texture early on. -
Blocking the garments:
Paint the clothing. Use a dark charcoal grey for the left figure’s darker attire and a lighter, muted grey-blue for the right figure’s draped dress.
Level Up: Texture Play
Use a palette knife to apply the metallic gold on the crowns. The thick, raised texture will catch the room’s light, making the jewelry pop off the canvas.
Step 3: Refining Features and Details
-
Shadowing the faces:
Mix a slightly darker version of your skin tone. Carefully paint shadows under the jawline, around the eye sockets, and the side of the nose to give the profiles dimension. -
Painting the eyes and lips:
Using a small round brush, add details to the eyes and lips. Keep the contrast soft—use brown instead of black for eyelashes and a muted pink for the lips to maintain the painting’s ethereal look. -
Adding hair highlights:
Mix a lighter brown or dirty blonde shade. With a filbert brush, sweep in highlights following the curve of the hairstyle to create shine and volume. -
Developing the clothes:
Add fold details to the clothing. On the right figure, use lighter grey strokes to show where the fabric bunches or catches light.
Step 4: The Crowning Glory
-
Base gold layer:
Paint the crown shapes with a flat layer of Yellow Ochre mixed with a dot of Burnt Umber. This acts as a solid base for the metallic paint. -
Applying metallics:
Once the base is dry, apply Metallic Gold paint over the ochre. Use distinct, vertical strokes to mimic the structure of the gold metal. -
Adding crown highlights:
Mix a little White into your Gold or use pure White for the absolute brightest points on the crown tips to make them sparkle. -
Final lighting touch-up:
To mimic the photo’s atmosphere, you might want to glaze a very thin, watery layer of white or heavy gel medium diagonally across part of the canvas to simulate a shaft of light hitting the painting.
Step back and admire the quiet power of your royal dual portrait
Day and Night King and Queen Pair
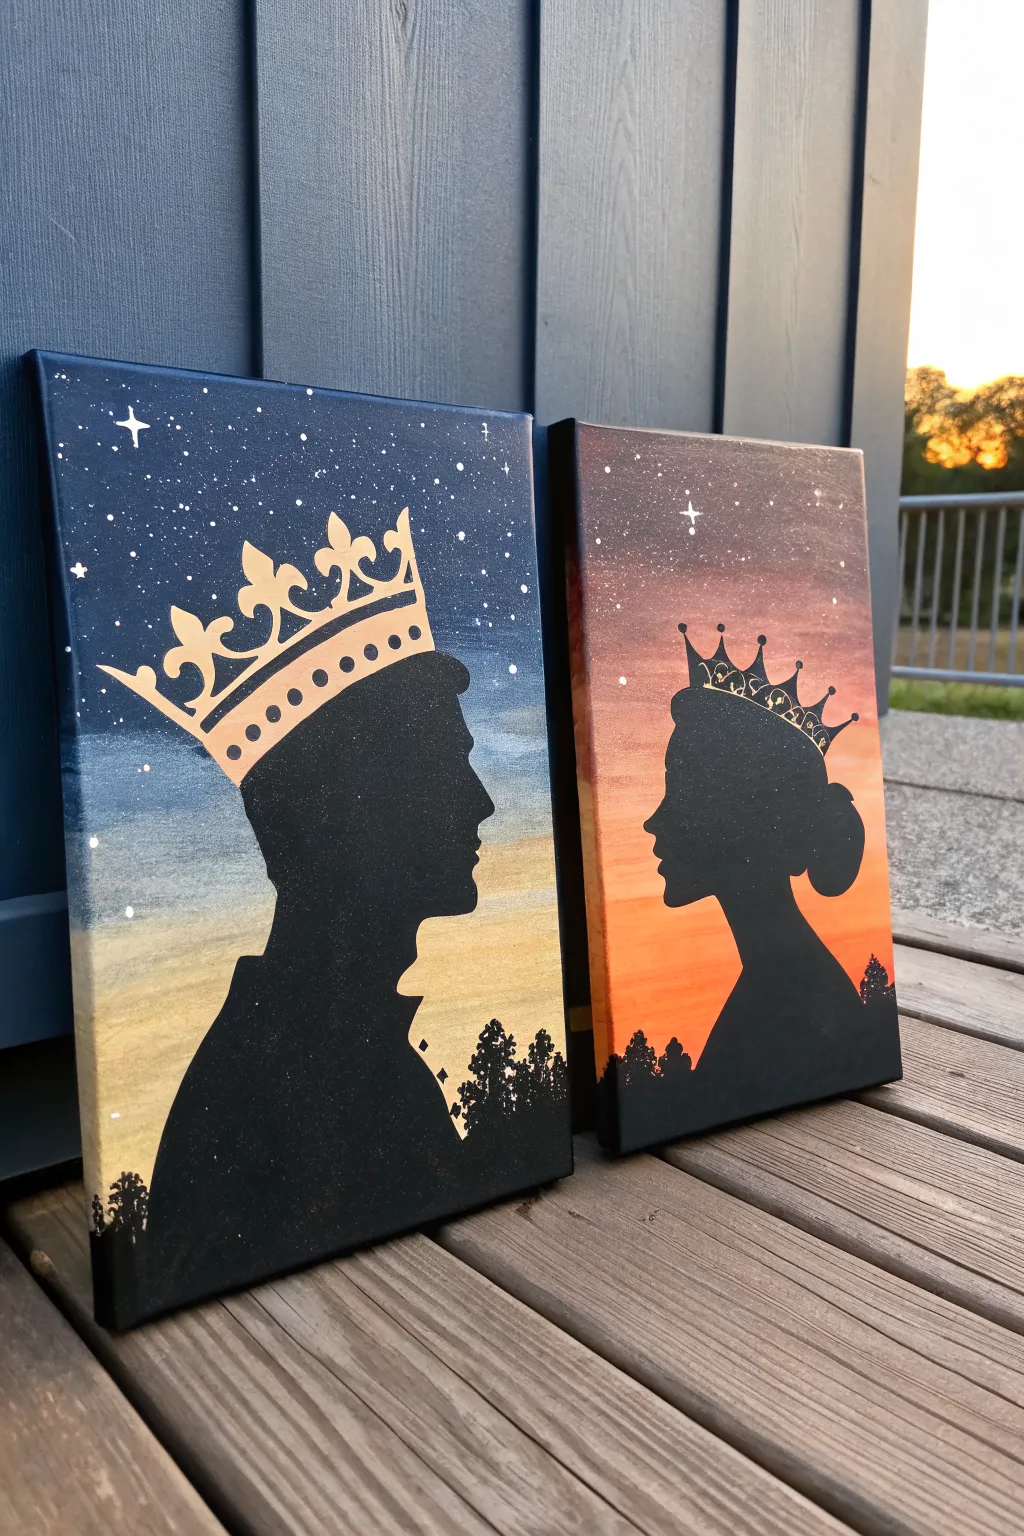
These complementary canvases capture the romance of day turning to night with stunning king and queen silhouettes set against blended skies. Metallic gold crowns add a regal touch to the deep blues and fiery oranges of this elegant couple’s set.
Step-by-Step Guide
Materials
- Two stretched canvases (e.g., 11×14 or 12×16 inches)
- Acrylic paints: Black, Titanium White, Navy Blue, Violet, Orange, Vermilion Red, Yellow
- Metallic gold paint or gold leaf pen
- Flat paintbrushes (large and medium)
- Fine liner brush
- Pencil
- Silhouette template (optional)
- Painter’s tape or masking tape
- Old toothbrush (for stars)
- Palette or paper plate
- Water cup and paper towels
Step 1: Preparation & Sky Basework
-
Set up your workspace:
Place both canvases side-by-side on a covered surface. Decide which canvas will be the ‘King’ (Night) and which will be the ‘Queen’ (Sunset) so you can paint them simultaneously while colors are fresh. -
Paint the Night gradient:
For the King’s canvas, start at the top with pure Navy Blue mixed with a tiny drop of Black. As you move down, blend in lighter blues, transitioning to a mix of White and Blue near the middle-bottom to create a horizon glow. -
Paint the Sunset gradient:
For the Queen’s canvas, begin at the very top with a mix of Violet and a little Black. Blend downwards into Red, then Orange, and finally a warm Yellow near the bottom horizon line. -
Refine the blends:
While the paint is still wet, use a clean, slightly damp large brush to sweep back and forth horizontally across the transition areas. This smoothens the gradient so there appear to be no hard lines between colors. -
Let the background dry:
Allow the gradients to dry completely. Acrylics dry darker, so don’t worry if the colors look slightly different wet. If the coverage looks thin, apply a second coat using the same blending technique.
Fixing the Gradient
If your sky blending looks streaky or dry patches form too fast, dip your brush in a little acrylic glazing liquid or water to keep the paint workable longer.
Step 2: Adding the Stars
-
Prepare the ‘star’ paint:
Dilute a small amount of Titanium White paint with water until it reaches an ink-like consistency. -
Splatter the stars:
Dip an old toothbrush into the watered-down white paint. Hold it over the canvas and run your thumb across the bristles to flick tiny specks onto the sky. Focus heavier splatters on the top, darker portions of each canvas. -
Add feature stars:
Using your fine liner brush, paint a few larger, cross-shaped stars or brighter dots on the darker upper sections to add variety to the galaxy effect.
Step 3: Painting the Silhouettes
-
Draft the outlines:
Once the background is 100% dry, lightly sketch the profiles of the King and Queen in pencil. The King faces right, and the Queen faces left. You can also print a profile template, cut it out, and trace around it for accuracy. -
Fill in the silhouettes:
Using a medium flat brush and pure Black paint, carefully fill in the head and shoulder shapes. Use steady strokes and ensure the paint is opaque; you may need two coats here for solid coverage. -
Create the tree line:
At the bottom of the silhouettes, where the shoulders meet the canvas edge, dab the tip of your brush (or use a fan brush) to create jagged, uneven textures representing distant treetops along the horizon. -
Refine the edges:
I usually switch to a small liner brush here to sharpen the details of the noses, lips, and eyelashes. Clean, crisp edges are crucial for recognizable profiles.
Make It 3D
Glue tiny flat-back rhinestones onto the painted crowns for real sparkle, or use gold leaf sheets instead of paint for an ultra-metallic, reflective finish.
Step 4: The Royal Crowns
-
Sketch the crowns:
Lightly draw the crown shapes sitting atop the heads. The King’s crown should be taller with broad points, while the Queen’s can be more delicate and tiara-like. -
Paint the base gold:
Fill in the crown shapes using your metallic gold paint. Metallic acrylics can be semi-transparent, so apply thin layers, letting each dry before adding the next to build up a rich shine. -
Add crown details:
Once the gold base is dry, use a very fine brush or a black paint pen to add small decorative details, dots, or jewels inside the gold sections to give the crowns dimension. -
Final touch-ups:
Inspect your edges. If any gold went onto the black silhouette, touch it up with black paint. Paint the sides of your canvas black (or continue the gradient) for a finished, gallery-ready look.
Now hang your masterpieces side-by-side to enjoy the contrast of day and night united


Floral Queen and Laurel King
This elegant canvas project combines classic silhouette artistry with a touch of royal flair, featuring shimmering gold figures surrounded by delicate floral accents. The finished piece offers a sophisticated, custom-made feel perfect for celebrating an anniversary or wedding.
Step-by-Step
Materials
- Pre-stretched white canvas (16×20 or similar)
- Metallic gold acrylic paint (high pigment)
- Pink and moss green acrylic paints
- Silhouette stencil or printout
- Carbon transfer paper
- Pencil and eraser
- Fine detail brushes (sizes 0 and 1)
- Flat shader brush (size 4 or 6)
- Sponge dabber (optional)
- Matte finish spray sealer
Step 1: Preparation and Transfer
-
Prepare your canvas surface:
Ensure your stretched canvas is clean and taut. If the weave is very rough, you might want to apply a layer of gesso and sand it smooth once dry, although the raw texture works well for this rustic-chic look. -
Source your silhouette images:
Find or create profile view silhouettes of a male and female figure. You can use photos of yourself and a partner or find stock vector images. Size them on your computer so they fit comfortably side-by-side on your canvas. -
Position the transfer paper:
Place a sheet of carbon transfer paper (dark side down) onto the center of the canvas. Tape it lightly at the corners with painter’s tape to prevent slipping. -
Trace the outlines:
Lay your printed silhouettes over the transfer paper. Using a pencil and firm pressure, trace the outline of both heads, the man’s crown, and the woman’s floral wreath. Don’t worry about shading yet; just get the clean outer lines.
Step 2: Painting the Gold Elements
-
Outline the silhouettes:
Using your smallest detail brush and the metallic gold paint, carefully trace over the transferred pencil lines for the faces, necks, and shoulders. -
Fill the silhouette interiors:
Switch to the flat shader brush to fill in the large areas of the heads and shoulders. Apply the gold paint in thin, even layers. Metallic paint can be tricky, so two or three thin coats often look better than one thick, gloppy one. -
Detail the King’s crown:
Use the size 0 brush to paint the intricate lattice work and jewels of the crown. Leave the negative space (the white background showing through the crown design) clean to define the structure. -
Create the Queen’s leaves:
Paint the foliage in her hair using gold for the base leaves, but leave small gaps where the white floral details will go later. -
Add texture (optional):
If you want that slightly stippled look seen in the photo, take a nearly dry sponge dabber with a tiny bit of gold paint and gently tap over the dried silhouette to break up brush strokes.
Metallic Shine Secret
For extra shimmer, apply a layer of ‘interference gold’ medium or a clear gloss varnish specifically over the gold painted areas once the base coat is fully dry.
Step 3: The Floral Wreath
-
Draft the wreath placement:
Lightly sketch the curved branches of the surrounding wreath with a pencil. Aim for an organic, asymmetrical shape that frames the couple from the bottom up. -
Paint the gold stems:
Using your fine liner brush and gold paint, draw the main stems and the larger leaves of the wreath. vary the pressure on your brush to make the leaves taper naturally. -
Add secondary leaves:
Mix a tiny drop of green into your gold paint to create an antique bronze shade. Use this to paint the smaller, secondary leaves tucked behind the main gold ones for depth. -
Paint the pink blossoms:
Switch to your pink acrylic. Paint small, circular rose shapes along the wreath and a few scattered near the tops of the branches. Keep the paint somewhat loose rather than perfectly geometric.
Paint Looking Streaky?
Metallic acrylics are often semi-transparent. Let the first coat dry 100% before adding a second. Dragging a brush through semi-dry paint causes streaks.
Step 4: Final Details
-
Detail the Queen’s wreath:
Go back to the female silhouette. Using white or very pale gray paint, add the tiny detailed leaves and berries over the gold foliage in her hair to make the hairpiece pop. -
Highlight the roses:
Add tiny swirls of darker pink or white inside the pink rose buds to give them definition and simulate petals. -
Clean up edges:
Look closely at your silhouette edges. If any gold paint bled or looks uneven, use a tiny brush with white paint (or gesso) to ‘erase’ the mistake and sharpen the line. -
Erase pencil marks:
Once the paint is completely bone-dry (wait at least an hour), use a clean eraser to gently remove any visible pencil lines from your initial sketch. -
Seal the artwork:
Take the canvas to a well-ventilated area and apply a light coat of matte spray sealer. This protects the metallic paint from tarnishing and keeps the white canvas dust-free.
Hang your royal portrait in a well-lit spot to let the metallic gold catch the light throughout the day
Graffiti-Inspired Royals With Paint Drips
Merging street art aesthetics with classic portraiture, this large-scale canvas project captures a powerful ‘King and Queen’ duo. The high-contrast black silhouettes against a warm beige background create a striking visual, while gold accents and intentional drips add a raw, artistic edge.
Step-by-Step Tutorial
Materials
- Large stretched canvas (e.g., 36×48 inches)
- Acrylic paint: Beige/Tan (background), Black (figures), Metallic Gold
- Gesso (optional but recommended for priming)
- Projector or large carbon transfer paper
- Pencil and eraser
- Wide flat brush (2-3 inch) for background
- Round detail brushes (sizes 0, 2, 4)
- Filbert brush (size 6-8) for larger black areas
- Palette or mixing tray
- Water cup and paper towels
- Spray bottle with water (for drips)
- Painter’s tape (optional)
Step 1: Preparation and Background
-
Prime the Surface:
Start by ensuring your canvas is clean. If it’s a raw canvas, apply a coat of gesso to create a smooth surface; if pre-primed, you can skip straight to the color. -
Apply the Base Color:
Mix a warm beige or tan acrylic paint. Using your wide flat brush, cover the entire canvas with smooth, even strokes. You may need two coats to ensure the white canvas doesn’t peek through, letting the first coat dry completely before applying the second. -
Create the Grunge Effect:
Before the background is perfectly uniform, I like to create some subtle texture. Take a slightly darker shade of tan or dilute some black heavily with water, and flick or sponge it lightly onto the corners and edges to prevent the background from looking too ‘plastic.’ -
Add Initial Gold Drips:
Mix your metallic gold paint with a little water to thin it. Load a brush heavily and press it against the top edge of the canvas, letting gravity pull the paint down in long, organic drips. Do this specifically in the top right corner area as seen in the reference.
Clean Lines Pro Tip
For ultra-crisp edges on the gold crown or jewelry, use a small flat angled brush (shader). This allows you to cut sharp lines better than a round brush.
Step 2: Drafting the Design
-
Prepare the Reference Image:
You will need a high-contrast photo of two subjects looking away from each other. If you aren’t confident freehanding, edit your photo digitally to turn it into a black-and-white threshold image (stencil style) to see exactly where the shadows fall. -
Transfer the Outline:
Project the image onto your dried beige canvas using a digital projector. Trace the outlines of the faces, the hair, the crown, and the main shadow shapes lightly with a pencil. Focus on the boundary lines between light and dark. -
Define the Crown:
Sketch the crown floating above the space between the two heads. Ensure the points of the crown are sharp and the base has a slight curve to give it dimension.
Level Up: Texture
Mix a little modeling paste into your black paint for the hair or beard areas to create actual physical 3D texture on the canvas.
Step 3: Painting the Figures
-
Block in the Darkest Areas:
Using your black acrylic paint and a filbert brush, start filling in the distinct large shadow shapes. This includes the hair, the beard, the back of the neck, and the deep shadows under the chin. -
Refining Facial Features:
Switch to a smaller round brush (size 2 or 4) to paint the facial features. Carefully paint the eyebrows, eyelids, nostrils, and lips. The key here is painting the *shadows*, not the lines; let the beige background represent the skin. -
Hair Texture Details:
For the man’s hair and beard, use a stippling motion with a stiff brush to create texture at the edges. For the woman’s hairline, use very fine strokes to mimic combed-back hair. -
Clothing Shadows:
Paint the clothing areas using broad, loose strokes. You don’t need perfect detail here; rough, dry-brush strokes can help suggest the texture of fabric folds without needing photorealism. -
Highlighting with Beige:
If you accidentally paint over a highlight, don’t worry. Just take your original background beige color and paint back into the black areas to reclaim the light, redefining the nose bridge or cheekbone if necessary.
Step 4: Gold Accents and Finishing Touches
-
Gilding the Crown:
Fill in the main body of the crown with black first, then use your metallic gold paint to add bold highlights on the rim and the points. The contrast is what makes the metal look shiny. -
Jewelry Details:
Using a fine detail brush (size 0), paint the woman’s hairpiece and earrings with gold. Add a simple gold chain or collar detail to the man’s outfit for balance. -
The Bottom Corner Logo:
In the bottom right corner, sketch and paint a graffiti-style crown tag or signature in gold. Keep the lines loose and street-art inspired. -
Final Drip Work:
Add a few intentional black drips. Water down a small amount of black paint, load a brush, and touch it to the top left corner (the ‘shadow’ drip area). Use a spray bottle to mist it gently if the drip stops moving before you want it to. -
Seal the Artwork:
Once the painting is completely dry (give it at least 24 hours), apply a satin or matte varnish to protect the surface and unify the sheen of the black and beige paints.
Hang your royal masterpiece in a prominent spot where the gold can catch the light.
Split-Face Surreal King and Queen

These striking companion pieces contrast a stark, grayscale King against a softer, color-touched Queen, uniting them through their opposing profiles. The project involves painting two separate canvases that work together to create a cohesive, regal narrative suitable for a statement wall.
Detailed Instructions
Materials
- Two equal-sized stretched canvases (approx. 18×24 or 24×36 inches)
- Acrylic paints: Titanium White, Mars Black, Burnt Umber, Yellow Ochre, Cadmium Red (light wash)
- Metallic acrylic paints: Rich Gold, Bright Silver
- Liquid gold leaf or gilding wax (optional for extra shine)
- Graphite transfer paper
- Pencil and eraser
- Synthetic brushes: Large flat (background), medium filbert (skin blending), fine liner (details)
- Painters tape
- Easel
- Palette and water container
Step 1: Planning and Sketching
-
Prepare the surfaces:
Begin by priming both canvases with a fresh coat of gesso if they aren’t pre-primed, ensuring a smooth texture for the detailed portrait work. -
Establish the composition:
Decide on the scale of the heads. The profiles should be roughly the same size and aligned so that if the canvases are hung together, the King and Queen appear to be looking at one another. -
Transfer or sketch the outlines:
Lightly sketch the profiles onto the canvas. If you aren’t confident in freehand drawing, print reference photos to size and use graphite transfer paper to trace the main contours—nose, chin, eye placement, and crown shape—onto the canvas.
Step 2: The King (Left Canvas)
-
Background application:
Mix a very pale gray using Titanium White and a tiny dot of Black. Apply this evenly across the entire background of the King’s canvas, cutting in carefully around the profile sketch. -
Base tonal blocking:
Using a grayscale palette (Black and White only), block in the darkest shadow areas first: the pupil, the nostalgic, the beard shadow, and the back of the hair. -
Midtone development:
Mix a medium gray and fill in the planes of the face, blending wet-on-wet into the darker shadows to create the curvature of the cheek and jawline. -
Adding skin texture:
With a smaller brush, stipple thin washes of gray to suggest skin pores and facial hair stubble, focusing heavily on the jaw and chin area for the beard texture. -
Painting the King’s crown:
Basecoat the crown shape with a mustard yellow or Yellow Ochre. Once dry, apply your Rich Gold metallic paint. -
Crown detailing:
Use a mix of Burnt Umber and Black to paint the intricate filigree shadows within the crown, giving it a 3D relief effect. Highlight the highest points with pure bright gold or liquid gold leaf. -
Clothing foundation:
Paint the visible collar or shoulder area with a deep charcoal gray, stippling to create the texture of heavy velvet or wool. -
Pearls and embellishments:
With a small round brush, dot a line of gray pearls along the collar, adding a tiny white highlight on the top of each sphere to make them look round.
Gilded Glory
For the King’s crown, I apply the dark shadows *after* the gold base coat is dry. This makes the metallic paint look like raised metalwork rather than flat color.
Step 3: The Queen (Right Canvas)
-
Dark background:
Paint the background of the Queen’s canvas a solid, matte black. This high contrast will make her pale features pop. -
Skin tone base:
Mix a pale flesh tone using White, a touch of Yellow Ochre, and a tiny amount of Cadmium Red. Apply this base evenly to the face area. -
Soft contouring:
While the base is still slightly tacky, mix a slightly darker, cooler beige to shade the eye socket, the side of the nose, and under the jawline. Blending here should be much smoother than on the King. -
Key facial features:
Paint the eye with precision, adding a soft pink to the lips and a touch of blush to the cheek. Keep the colors desaturated to maintain an elegant mood. -
Hair flow:
Create the blonde hair by laying down a dark ochre base, then layering sweeping strokes of lighter beige and white on top to simulate individual strands pulling back into an updo. -
The Queen’s crown:
Outline the tiara shape with gray. Fill in the metallic structure with Bright Silver paint. -
Jewel details:
For the diamonds, place distinct dots of Titanium White on the silver base. Add small dots of gold in the center of specific jewels for contrast. -
Earrring dazzle:
Replicate the silver and white dotting technique for her drop earring, ensuring it hangs vertically from the lobe. -
Fur collar:
Use a rough, dry brush with white paint to dab the fur texture along her neckline, letting it fade softly into the black background.
Flat Profiles?
If faces look flat, deepen the shading right under the jawline and behind the nose. High contrast between the lightest highlight and darkest shadow creates the 3D volume.
Hang these royal counterfeits side-by-side to instantly add a commanding presence to your room


Have a question or want to share your own experience? I'd love to hear from you in the comments below!