
Whenever I need an easy, satisfying sketch subject, I reach for hat drawing—it’s like practicing tiny wearable sculptures. Here are my favorite hat ideas to draw, starting with the classics you’ll use all the time and ending with the fun, weird stuff that sparks character stories.
Cozy Beanie with Ribbing
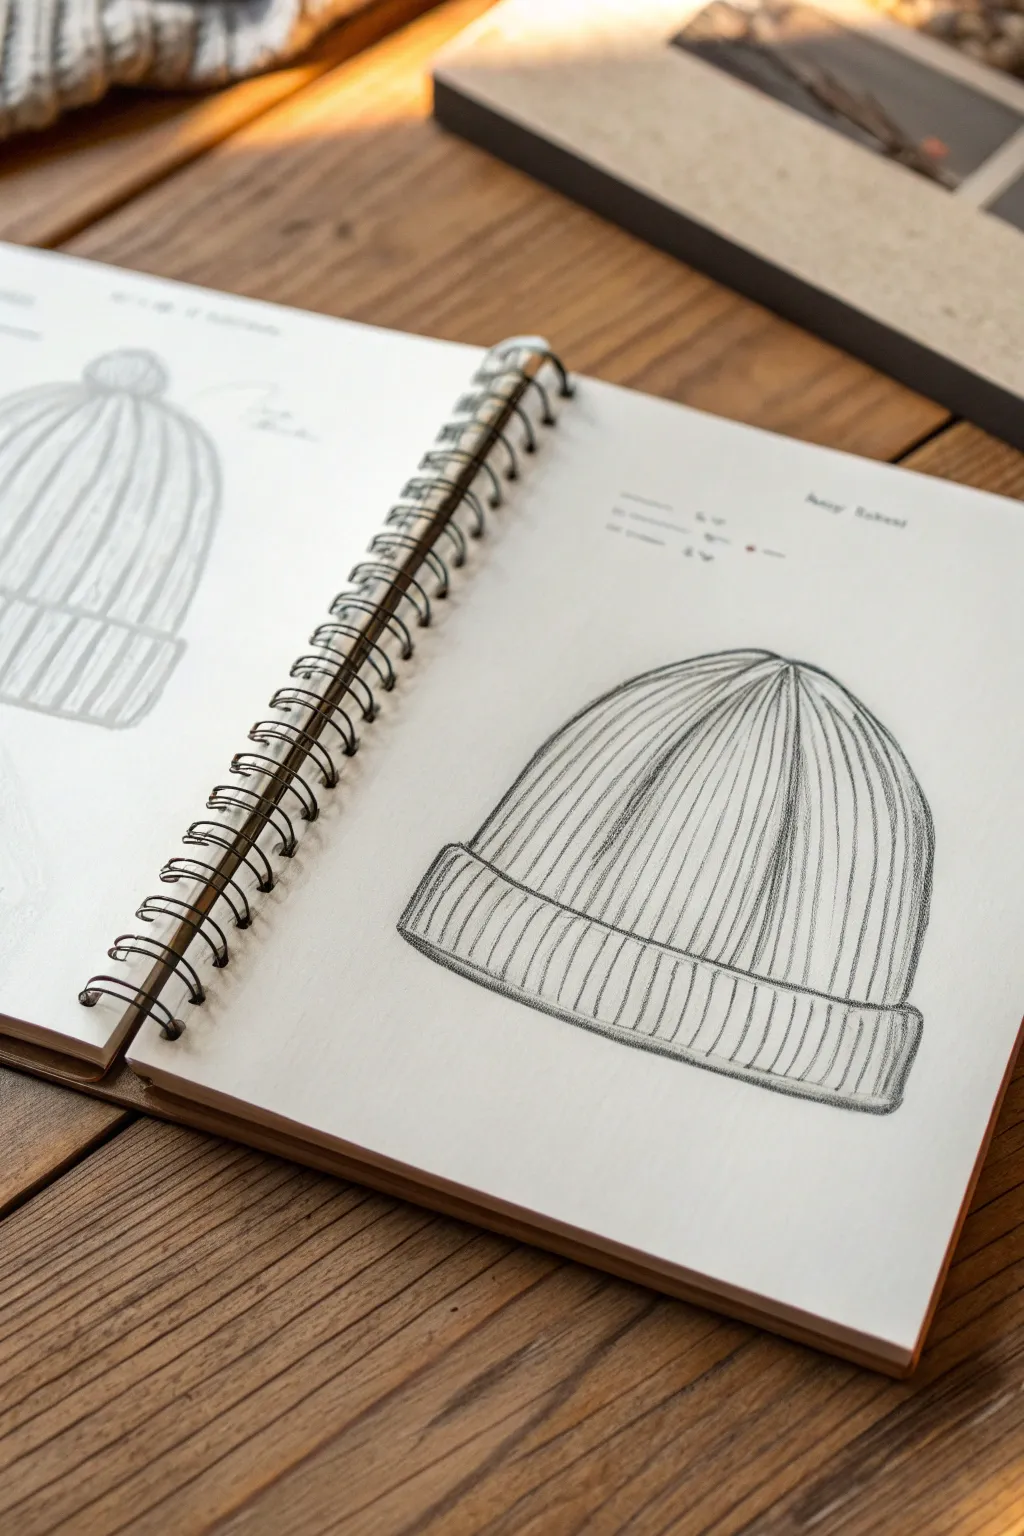
Capture the soft texture and warmth of a winter classic with this pencil study of a ribbed beanie. This tutorial focuses on understanding the structure of knitwear and translating it into clean, expressive lines that suggest volume and pliability.
Step-by-Step Tutorial
Materials
- Spiral-bound sketchbook (medium weight paper)
- H pencil (for initial layout)
- HB or 2B pencil (for contouring and shading)
- Kneaded eraser
- Pencil sharpener
Step 1: Laying the Groundwork
-
Define the overall shape:
Start with a light H pencil to draw a simple dome shape. This will be the crown of the beanie. Keep your hand loose and make a few passes until the curve feels symmetrical and natural. -
Mark the brim:
Draw a slightly curved horizontal line across the bottom of the dome to establish where the folded brim sits. Add another curved line below it to create the bottom edge of the hat, wrapping it around the corners to show thickness. -
Establish the central axis:
Lightly sketch a vertical line down the direct center of the hat. This guideline is crucial because the ribbing lines will radiate outward from this center point, helping the hat look round rather than flat. -
Map out the ribbing curves:
Sketch light, sweeping curves radiating from the top center point down to the brim. On the left side, curve them to the left; on the right, curve them to the right. These initial guides dictate the flow of the fabric.
Step 2: Defining the Knit Structure
-
Draw the main rib panels:
Using your HB pencil, begin defining the actual ‘ribs.’ Draw pairs of lines following your curved guides. The space between the lines represents the raised part of the knit. -
Connect to the crown:
As these lines approach the very top of the hat, let them taper and converge. In real knitting, stitches decrease here, so drawing them slightly closer together at the apex adds realism. -
Detail the brim structure:
The ribs on the brim should align with the ribs on the main body but will look slightly wider and straighter since the fabric is stretched horizontally. Draw vertical lines on the brim band that correspond to the ribs above. -
Curve the brim base:
At the very bottom edge of the brim, curve the ends of your vertical lines slightly inward. This small detail communicates that the fabric is soft and turning underneath, rather than a hard, sharp edge.
Flat Hat Fix
If the beanie looks 2D, your rib lines might be too straight. Ensure they curve progressively more as they move toward the edges of the hat to mimic the cylinder shape of a head.
Step 3: Shading and texture
-
Apply core shadows:
Switch to your 2B pencil for softer marks. Identify a light source (usually top-left or top-right). Add light shading to the side of the hat opposite the light source to give it form. -
Deepen the rib crevices:
Go back into the ‘valleys’ between your rib lines. Darken these lines with a sharp pencil, varying the pressure. I find that pressing harder at the bottom near the brim creates a nice sense of depth. -
Enhance the brim fold:
Add a slightly darker shadow right underneath the overhang where the main body of the hat meets the folded brim. This separation is key to making the brim look like a separate layer of fabric. -
Add texture strokes:
Within the raised rib sections, add faint, short diagonal hatch marks. These don’t need to be perfect; they just hint at the yarn’s fuzzy texture and prevent the drawing from looking like plastic. -
Refine the outline:
Go over the outer contour of the hat. Instead of a solid rigid line, make it slightly broken or bumpy to mimic the silhouette of knit stitches. -
Clean up highlights:
Take your kneaded eraser and gently lift off some graphite from the center of the raised ribs where the light hits. This high contrast makes the ribs pop forward.
Add a Pom-Pom
Customize your sketch by drawing a fluffy circle on top. Use quick, outward-flicking strokes from the center to create a messy, fibrous texture for a playful pom-pom finish.
Now you have a charming, textured sketch ready to anchor a winter-themed illustration page

Baseball Cap in 3/4 View
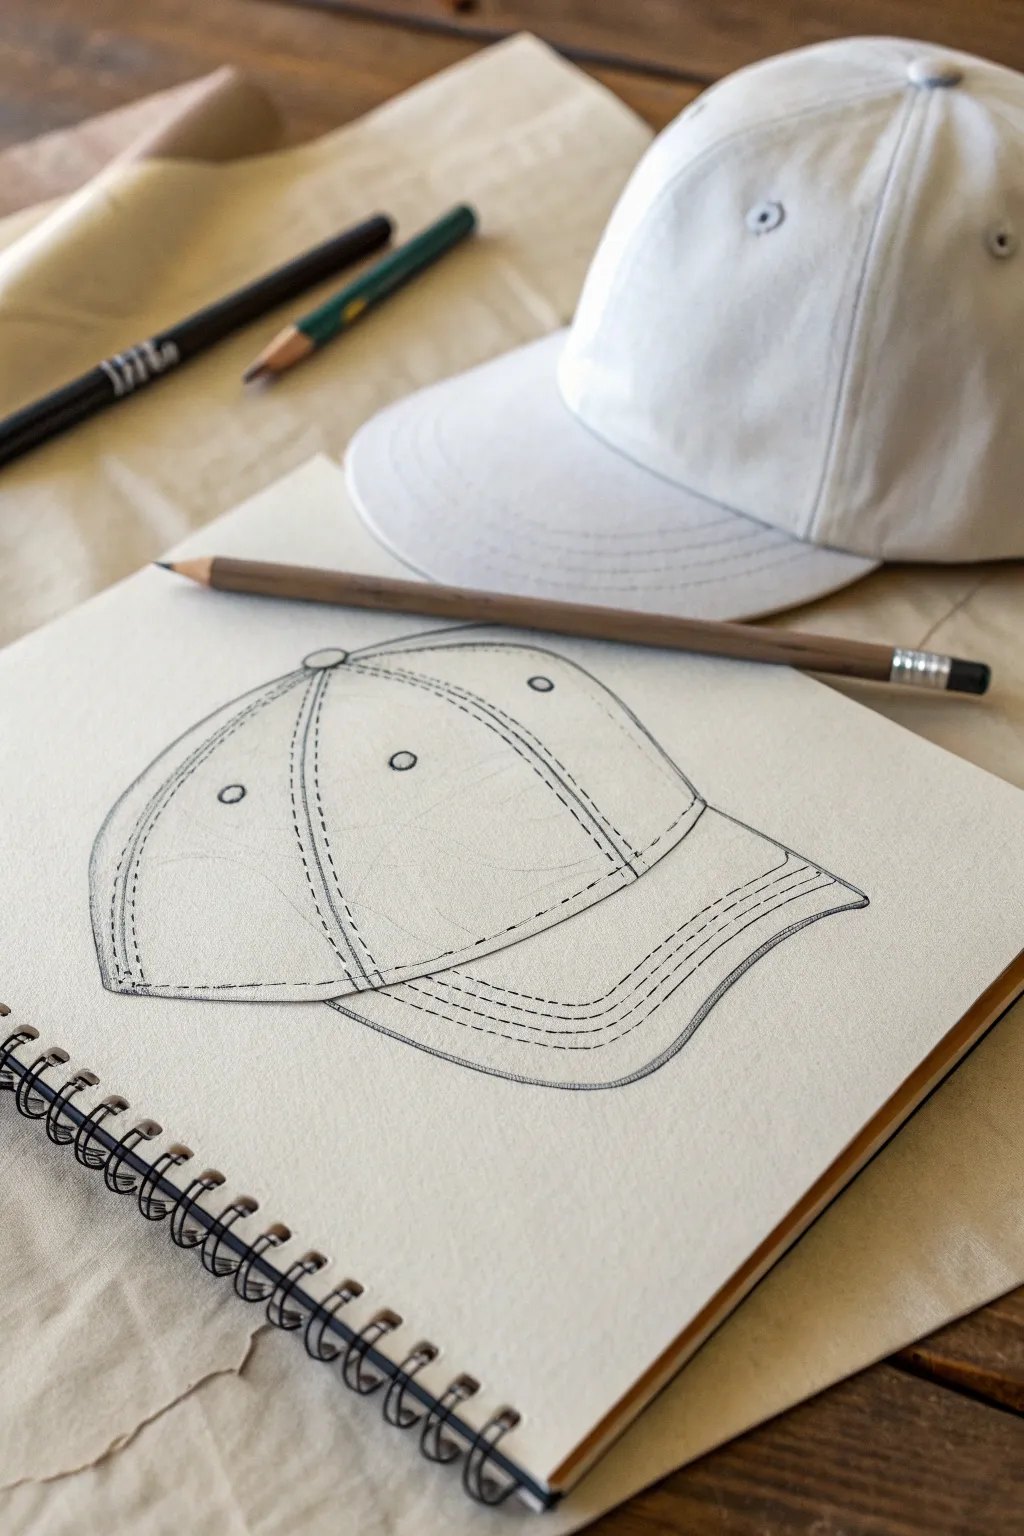
Learn to sketch a timeless baseball cap with realistic stitching details and form-defining curves. This project focuses on capturing the iconic six-panel structure in a dynamic three-quarter perspective using simple pencil techniques.
Step-by-Step Guide
Materials
- Spiral-bound sketchbook or sketch paper
- HB graphite pencil (for initial layout)
- 2B or 4B graphite pencil (for darker lines)
- Fine-point black fineliner (optional)
- Eraser
- Reference cap (optional)
Step 1: Constructing the Base Form
-
Establish the crown:
Begin by drawing a large, rounded dome shape lightly with your HB pencil. This will be the main body (crown) of the cap. Imagine it slightly tilted away from you. -
Find the center button:
Locate the apex of the dome. Since this is a 3/4 view, place a small oval (the button) slightly off-center to the left, rather than dead center. -
Draw the center seam:
From that top button, draw a curved line coming down the front-left of the dome. This line defines the front two panels and establishes the direction the hat is facing. -
Add side panel lines:
Draw two more curved lines radiating from the button downwards. One goes to the far left edge, and one curves down the right side, creating the visual separation for the side panels. -
Sketch the brim shape:
At the bottom of the front panels, sketch a U-shaped curve extending outward. Connect this back to the sides of the cap to form the bill or brim. Keep the curves smooth to show rigidity.
Step 2: Adding Key Details
-
Refine the perimeter:
Go over the bottom edge of the cap where it sits on the head. Make sure this line curves around the form, disappearing behind the brim on the far side. -
Add ventilation eyelets:
Place small circles on the visible panels. These aren’t random; center them within each panel section, slightly lower than the top button. They add immediate realism. -
Thicken the brim:
Draw a line parallel to the outer edge of the brim to give it thickness. I find this small step instantly transforms a flat shape into a 3D object. -
Define the panel seams:
Use your sharp pencil to double-line the major vertical seams you drew earlier. Real caps have a visible fold or joining strip here.
Keep it fluid
When drawing stitching, rotate your paper so your hand moves in a natural arc. This prevents the dashed lines from looking stiff or jagged.
Step 3: Applying Stitching & Texture
-
Start the brim stitching:
This is the signature detail. Draw rows of dashed lines following the curve of the brim. Start near the forehead and work outward toward the edge. -
Keep stitching parallel:
Ensure your dashed rows stay evenly spaced. You can draw light guidelines first if you’re worried about them wobbling. -
Stitch the seams:
Add small, dashed tick marks running alongside the vertical panel lines on the crown. This mimics the reinforced sewing on real caps. -
Detail the eyelets:
Darken the rims of the ventilation circles you drew earlier to make them look like metal or embroidered grommets. -
Darken the shadows:
Switch to your softer 2B or 4B pencil. Add shading underneath the button and slightly along the seams to create depth. -
Shade the brim:
Add a little shading where the brim meets the crown, suggesting a slight cast shadow. -
Final outline pass:
Go over the main outer contours with firm, confident strokes or a pen. Leave the stitching lines slightly lighter so they don’t overpower the drawing.
Make it yours
Once the base drawing is done, sketch a custom logo or team initial on the front panel. It fills the negative space perfectly.
Now you have a solid structural drawing ready for logos or shading practice


Wide-Brim Sun Hat Flow
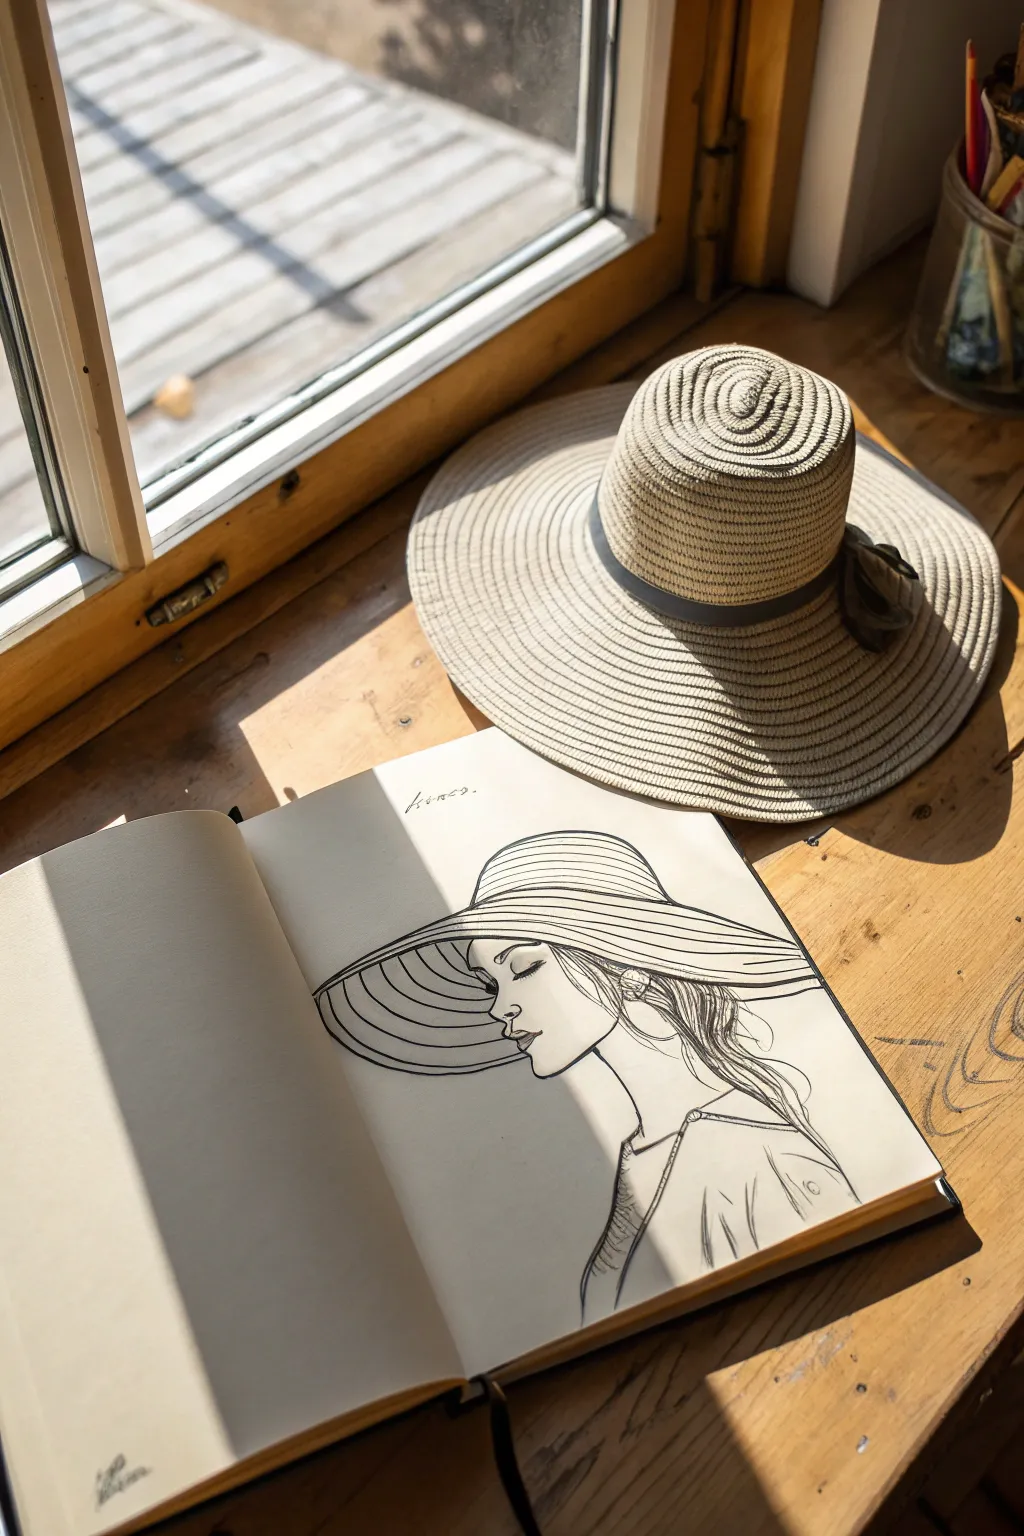
Capture the graceful curve of a wide-brimmed sun hat with this refined profile sketch. Using clean lines and minimal shading, you’ll create a sophisticated illustration that emphasizes the hat’s flowing shape against a delicate portrait.
Step-by-Step Tutorial
Materials
- Sketchbook (cream or off-white paper preferred)
- HB Graphite pencil for underdrawing
- Fine liner pens (0.1mm, 0.3mm, and 0.5mm)
- Kneaded eraser
- Ruler (optional for reference lines)
Step 1: Structuring the Portrait
-
Initial Construction:
Begin with a very light HB pencil circle for the cranium. Draw a vertical line dropping down for the face and jawline profile, angling it slightly inward at the bottom. -
Mapping Facial Features:
Mark horizontal guidelines for the eyes, nose, and mouth. The eye line should sit roughly halfway down the head shape. Keep these marks faint, as they are just place holders. -
Profiling the Face:
Lightly sketch the silhouette of the face. Focus on a gentle slope for the forehead, a small indentation at the eye socket, the protrusion of the nose, and the soft curve of the lips and chin. -
Positioning the Neck:
Draw the neck lines, extending elegantly downward. The back of the neck should connect smoothly to the base of the skull, while the front extends from under the chin.
Step 2: Drafting the Wide-Brim Hat
-
Defining the Crown:
Sketch a rounded dome shape sitting atop the head. Ensure it sits slightly lower than the top of the skull line to show weight and realistic positioning. -
Establishing the Brim Angle:
Draw a long, sweeping diagonal line starting from the forehead area and extending far back behind the head. This defines the dramatic angle of the brim. -
Curving the Brim edges:
Turn that diagonal line into an ellipse. The front of the brim should curve downward slightly over the eyes, while the back sweeps broadly. I find keeping your wrist loose here helps create a smoother curve. -
Adding Dimension:
Draw a second curve parallel to the brim’s edge to indicate thickness and the underside of the hat, particularly visible near the face.
Keep the Flow
When drawing the large brim, lock your wrist and move your entire arm from the shoulder. This produces smoother, less shaky curves than trying to draw with just your fingers.
Step 3: Refining with Ink
-
Outlining the Profile:
Using a 0.3mm pen, carefully ink the facial profile. Use a delicate touch on the lips and nose to keep the look feminine and soft. -
Defined Eyelashes:
With a 0.1mm pen, draw the closed eyelid with a thick upper line, tapering into long, sweeping lashes that curve upward. -
Inking the Hat Structure:
Switch to a 0.5mm pen for the main outline of the hat. Use a confident, continuous stroke for the long brim to avoid shakiness. -
Creating Texture:
Use the 0.1mm pen to draw concentric lines following the curve of the brim. These lines mimic the woven straw texture without needing to draw every individual fiber. -
Hair details:
Sketch flowing hair strands tucking behind the ear and cascading down the back. Use quick, flicking strokes with the 0.3mm pen to suggest movement.
Wobbly Lines?
If your long ink lines aren’t perfect, don’t restart. Simply add a few more textural lines parallel to the error to mimic the ribbed straw texture, camouflaging the mistake.
Step 4: Shading and Finishing
-
Shadowing the Underside:
Identify the area under the brim closest to the forehead. Use close hatching lines to create a shadow here, grounding the hat on the head. -
Earring Detail:
Draw a simple round earring or stud. Add a tiny highlight circle inside it before filling the rest with black ink. -
Clothing Suggestion:
Lightly ink the collar and shoulder line. Keep this very minimal—just enough to suggest a blouse or dress without distracting from the hat. -
Final Erasure:
Wait for the ink to be completely dry to the touch to avoid smearing. Gently erase all pencil guidelines with the kneaded eraser. -
Contrast Check:
Step back and look at your drawing. If the hat needs more weight, thicken the outer bottom line of the brim slightly.
Enjoy the effortless style of your finished fashion illustration


Tall Top Hat Cylinder Study
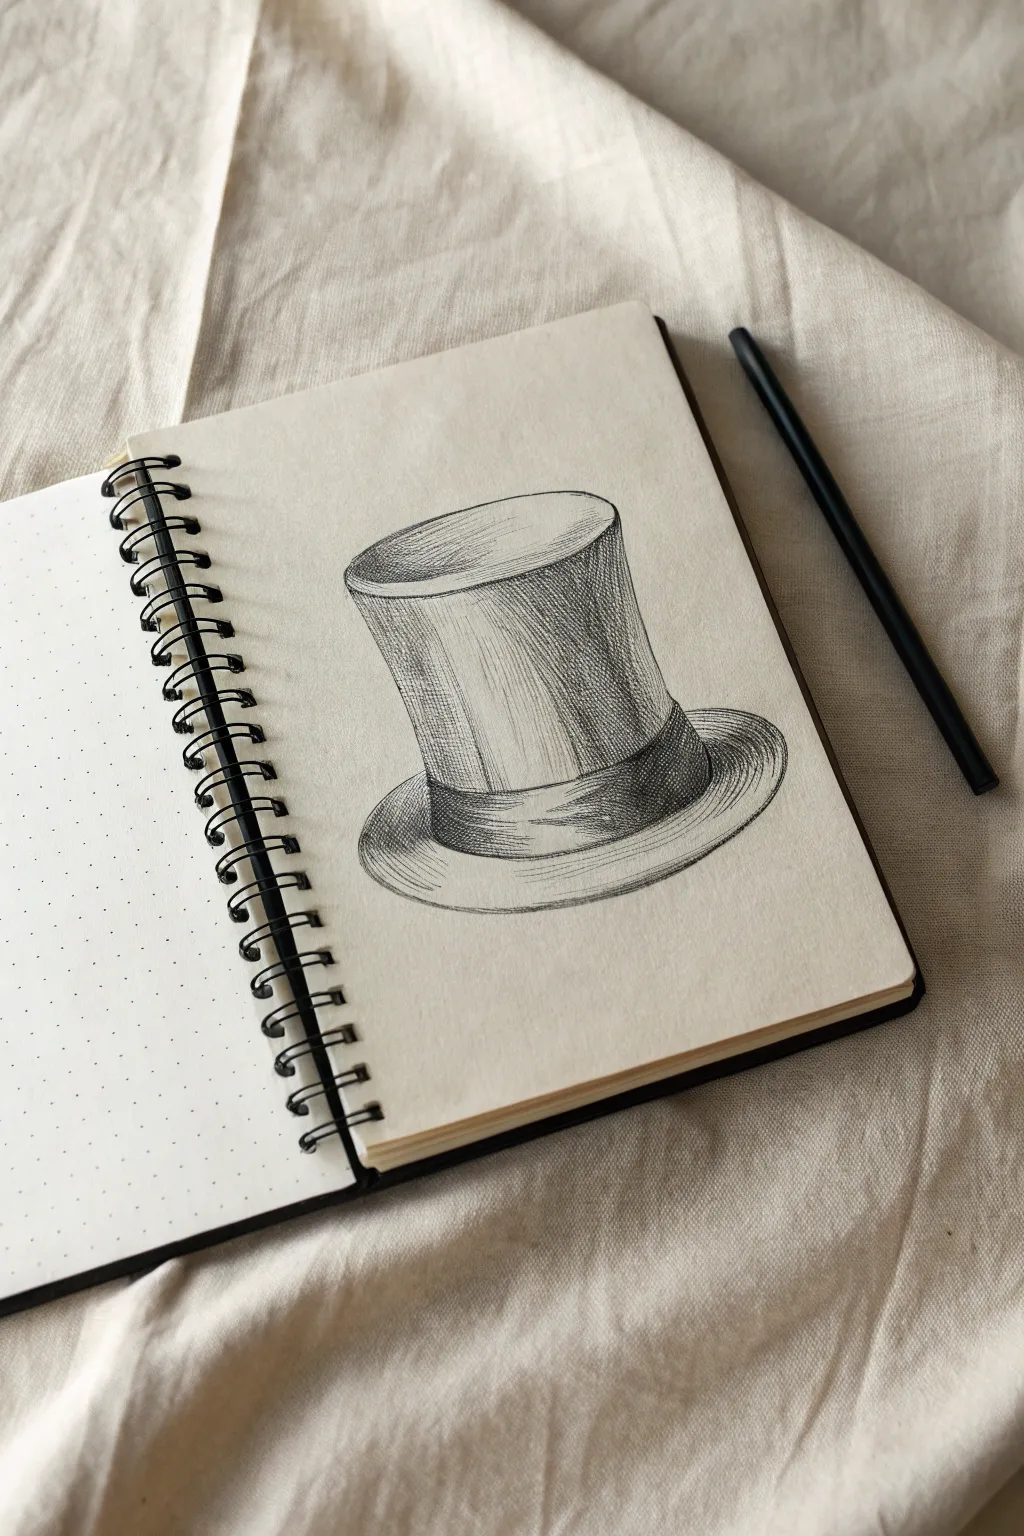
Master the art of shading curved forms with this elegant top hat sketch. Using simple cross-hatching and contour lines on warm-toned paper, you’ll create a sophisticated, volumetric drawing that pops off the page.
Detailed Instructions
Materials
- Spiral-bound sketchbook (cream/off-white dot grid or plain paper)
- Black fineliner (0.3mm or 0.5mm)
- Graphite pencil (HB or 2B for initial sketch)
- Soft eraser
Step 1: Constructing the Form
-
Establish the central axis:
Begin by lightly sketching a vertical centerline with your pencil. This invisible line will help keep your cylinder symmetrical and upright. -
Draw the rim ellipses:
Sketch a narrow, horizontal ellipse at the top of your axis to define the crown of the hat. Further down, draw a slightly wider, larger ellipse to mark where the brim will begin. -
Connect the sides:
Draw two slightly curved vertical lines connecting the outer edges of your top ellipse to the lower ellipse. These shouldn’t be perfectly straight; give them a very subtle inward curve to show the fabric’s character. -
Define the brim:
Sketch a much larger, wider ellipse around the base of the cylinder to form the brim. The back part of this ellipse should disappear behind the main cylinder body. -
Add the ribbon band:
Draw two parallel curved lines near the base of the cylinder, slightly above the brim, to indicate the silk ribbon band wrapping around the hat.
Step 2: Inking the Outlines
-
Trace the crown:
Switch to your fineliner pen. Carefully ink the top ellipse, but break the line slightly or keep it thinner at the back to suggest distance. -
Refine the cylinder walls:
Ink the vertical sides of the hat. I prefer to use a slightly disjointed line here rather than a ruler-straight one, as it mimics the texture of felt or silk. -
Ink the brim curves:
Outline the wide swooping curve of the brim. Pay special attention to where the brim curls up slightly at the sides, giving it that classic top hat silhouette. -
Erase pencil guides:
Once the ink is completely dry draft, gently erase your initial graphite structure lines to leave a clean ink drawing ready for shading.
Curve Your Strokes
When hatching the cylinder, curve your vertical lines slightly to match the rounded form. Straight lines flatten the image, curved lines build volume.
Step 3: Shading and Texture
-
Start vertical hatching:
Begin shading the main cylinder body using long, vertical hatching lines. Keep your strokes consistent but not robotic. -
Create the highlight:
Leave a vertical strip on the left-center of the hat largely unshaded. This negative space acts as the primary highlight where light hits the curved surface. -
Deepen the shadows:
Add a second layer of diagonal hatching (cross-hatching) on the right side of the cylinder to create a core shadow, making the form look round. -
Shade the ribbon:
Fill in the ribbon band densely. Use tighter, darker cross-hatching here to distinguish the ribbon’s texture and color from the hat’s body. -
Texture the brim:
Add curved hatching lines to the brim that follow the sweep of the ellipse. Focus the darkest shading under the curl of the brim on the right side. -
Shade the inner rim:
Add very light, sparse hatching to the back interior of the top rim to show a little depth, implying the hat isn’t perfectly flat on top. -
Final contrast check:
Review your drawing and darken the deepest crevices—specifically where the ribbon meets the brim—to anchor the drawing.
Add a Prop
Draw a simple cane handle leaning against the brim or a pair of white gloves nearby to create a complete Victorian-style vignette.
Now you have a structured, distinguished top hat sketch that helps perfect your cylinder shading skills

PENCIL GUIDE
Understanding Pencil Grades from H to B
From first sketch to finished drawing — learn pencil grades, line control, and shading techniques.
Explore the Full Guide
Slouchy Beret Shape
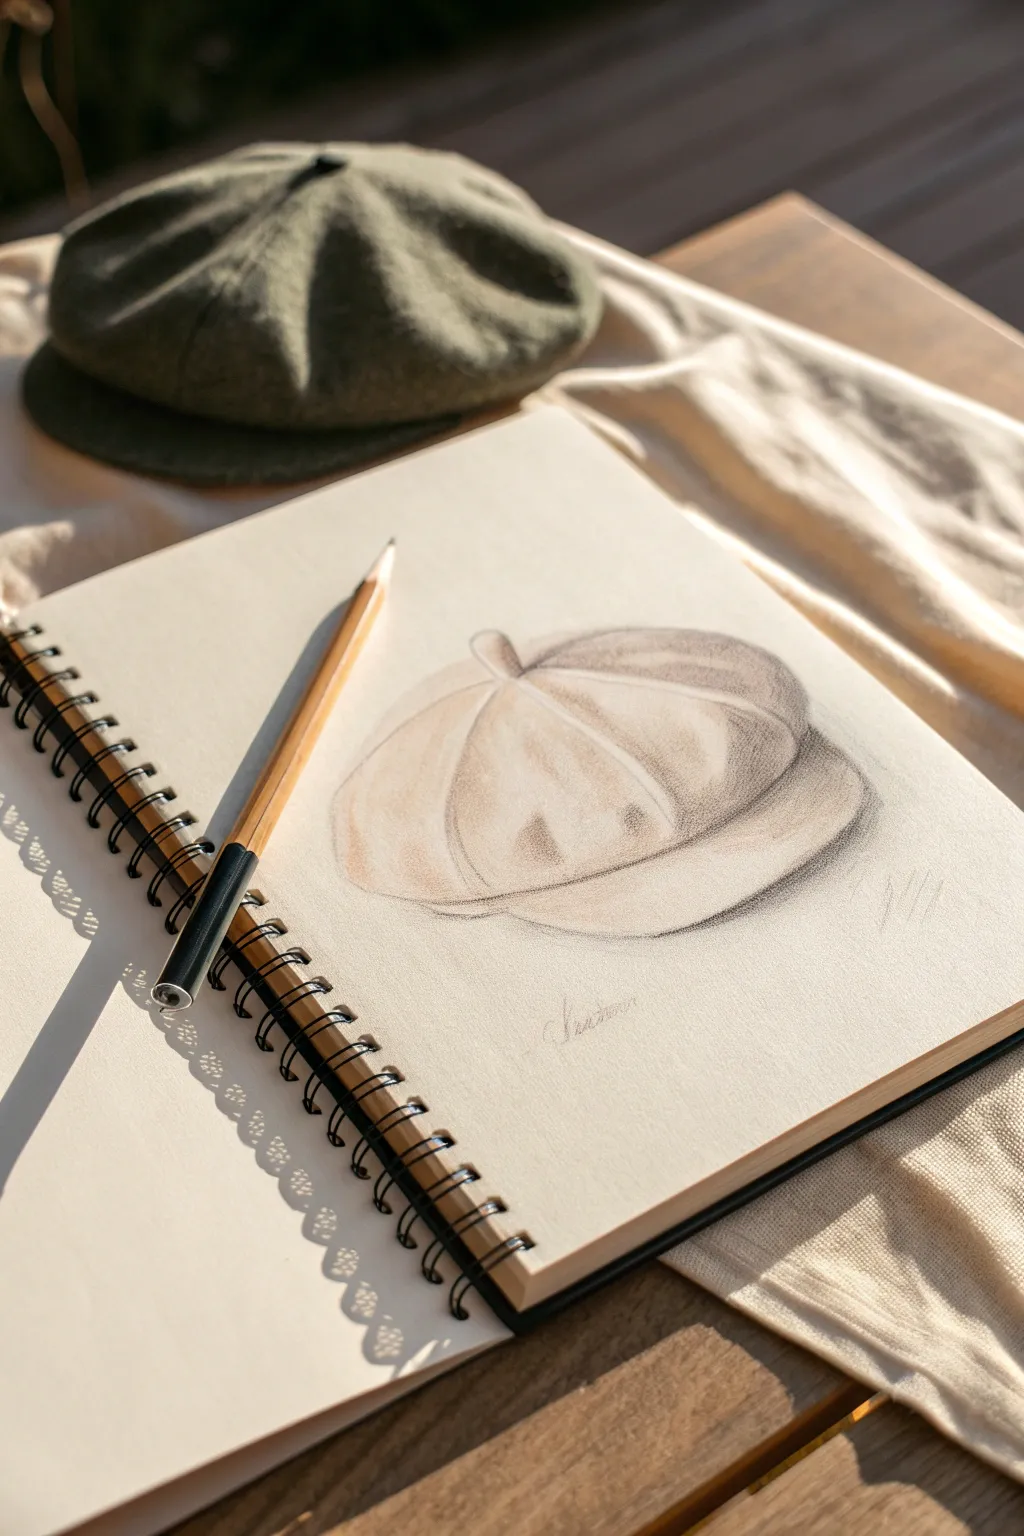
This project captures the classic structure of a slouchy newsboy cap or flat cap using soft pencil shading. The focus is on rendering the gentle folds of the fabric and the curved brim to create a realistic, dimensional form on paper.
Step-by-Step Guide
Materials
- Sketchbook with slightly textured paper
- HB graphite pencil for initial lines
- 2B or 4B pencil for shading
- Charcoal pencil (optional, for deepest blacks)
- Kneaded eraser
- Blending stump or tissue
Step 1: Shaping the Foundation
-
Establish the main oval:
Visualize the cap as a flattened sphere. Lightly sketch a large, slightly tilted oval shape in the center of your page to represent the main body of the hat. -
Add the brim outline:
Below the main oval, draw a curved, crescent-like shape that hugs the bottom front. This will become the stiff brim of the cap. Ensure it connects naturally to the sides of the oval. -
Mark the center button:
Place a small, flattened circle at the very top center of the dome. This button acts as the anchor point where all the fabric segments will meet. -
Define the segments (panels):
From the center button, draw faint, curved lines radiating outward towards the brim and sides. These lines divide the cap into its characteristic triangular panels, like slices of a pie.
Use Contrast Wisely
Keep your darkest darks for the crevices between panels and under the brim. High contrast here makes the form pop.
Step 2: Refining Features
-
Softening the silhouette:
Go over your initial oval outline, giving it a more slouchy, fabric-like quality. Allow the lines to dip slightly between the panel seams to show the fabric’s weight. -
Detailing the brim:
Sharpen the curve of the brim. Draw a second, parallel line just inside the bottom edge to suggest the thickness of the material. -
Adding the folds:
Where the fabric meets the brim, sketch small, irregular creases. Fabric rarely sits perfectly flat, so these small imperfections add realism. -
Enhancing the button:
Refine the top button shape, giving it a tiny shadow underneath to lift it off the fabric surface.
Step 3: Shading and Texture
-
Base shading layer:
Using the side of a 2B pencil, apply a light, even layer of graphite across the entire cap, leaving the very tops of the panels lighter to represent highlights. -
Deepening the shadows:
Concentrate darker shading in the valleys where the panels meet. Press a bit harder to define these seams, but keep the transition to the highlighted areas smooth. -
Brim shadow:
I like to add a decisive shadow right under the overhang of the main cap body, where it casts darkness onto the brim. This separates the two forms clearly. -
Creating volume:
Shade the sides of the cap more heavily than the center. This gradient effect makes the cap look round and three-dimensional rather than flat. -
Blending for softness:
Use a blending stump or a piece of tissue to gently smudge the graphite marks. Follow the curve of the cap while blending to maintain the directional flow of the fabric.
Try Sepia Tones
For a vintage look, sketch this on toned tan paper using sepia or sanguine pencils instead of standard graphite.
Step 4: Final Touches
-
Lifting highlights:
Take your kneaded eraser and dab it on the highest points of each fabric panel. This removes some graphite and creates a soft, diffused highlight that mimics wool or felt. -
Reinforcing edges:
Use a sharpened pencil (or charcoal if you have it) to re-state the darkest outer outlines, particularly the bottom edge of the brim and the deep crevices. -
Adding texture lines:
Sketch very faint, short directional strokes across the shaded areas to hint at the weave of the fabric. -
Cast shadow:
Lightly shade the area immediately underneath the cap on the paper surface to ground the object so it doesn’t look like it’s floating. -
Signature:
Add a delicate signature near the bottom right to claim your finished study.
Now you have a stylish sketch that perfectly captures the texture and form of a classic cap
Newsboy Cap Panel Seams
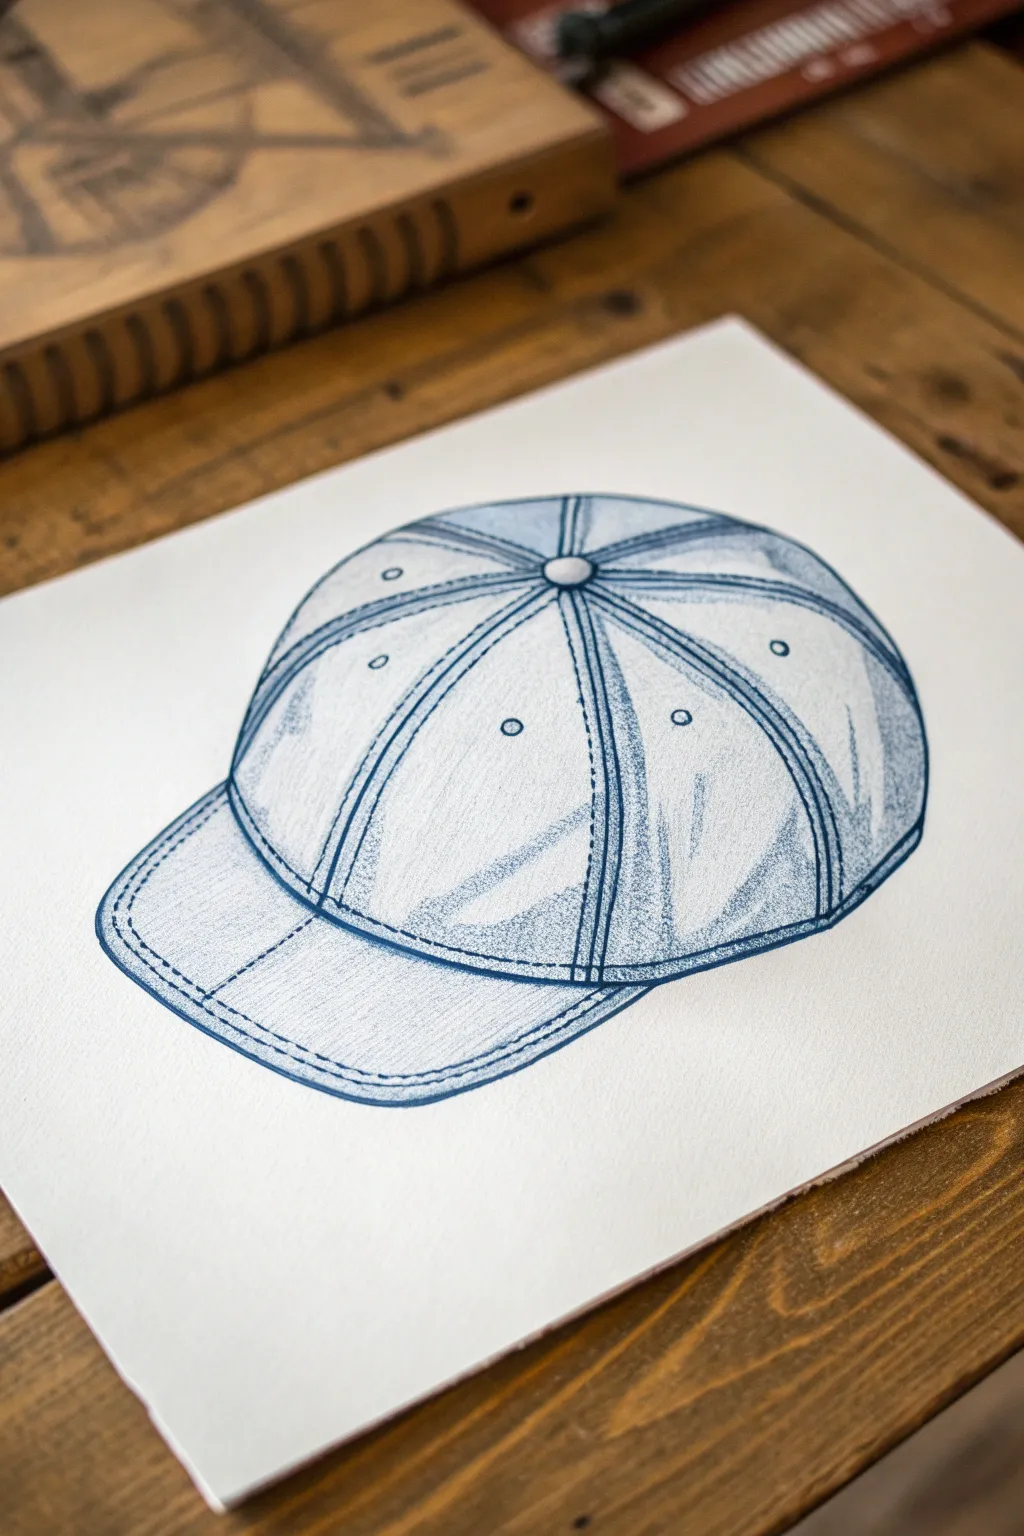
This tutorial guides you through drawing a classic six-panel cap with a focus on clean lines and visible stitching details. The monochromatic blue style mimics a technical fashion illustration or an architectural blueprint, giving the artwork a crisp, professional finish.
Detailed Instructions
Materials
- Smooth bristol board or heavyweight drawing paper
- HB graphite pencil (for initial sketch)
- Blue fine-liner pen (0.3mm or 0.5mm)
- Blue colored pencil (for shading)
- Kneaded eraser
- Ruler (optional)
Step 1: Basic Structure
-
Lay the Foundation:
Start lightly with your HB pencil. Draw a large, slightly flattened semi-circle to represent the main dome of the cap. Imagine it as a bowl resting upside down. -
Add the Brim:
Attached to the front left of the dome, sketch a curved shape extending outward for the brim (visor). The perspective shows the brim slightly from above, so keep the curve gentle and wide. -
Define the Button:
Place a small oval at the very peak of the dome. This ‘squatchee’ or top button acts as the anchor point where all the panel seams will converge. -
Map the Panels:
Draw curved lines radiating from the center button down to the base of the crown. These lines define the six triangular panels. Ensure the lines curve with the form of the head to create volume.
Uneven stitching?
If your dashed ink lines get wobbly, don’t panic. Go over them with a slightly thicker line style or stippling (dots) to disguise the irregularity as fabric texture.
Step 2: Inking the Outline
-
Initial Inking:
Take your blue fine-liner. Carefully trace over your pencil outlines for the main silhouette of the cap and the brim. Keep your hand steady for a smooth, continuous line. -
Double the Seams:
For the panel divisions, draw a second line parallel to each radiating spoke. This illustrates the thick fabric seams where the panels are sewn together. -
Add Ventilation Eyelets:
Draw small circles inside each panel section, roughly halfway down the crown. These represent the embroidered eyelets for airflow. -
Detail the Brim Structure:
Ink the edge of the brim. Add a subtle seam line running parallel to the outer edge of the visor to suggest the stitched hem. -
Erase Guidelines:
Once the ink is completely dry, gently run your kneaded eraser over the drawing to lift away all the underlying graphite sketch marks.
Step 3: Stitching and Texture
-
Stipple the Seams:
Using the fine-liner again, add tiny, evenly spaced dashes along the parallel seam lines you drew earlier. This mimics the double-stitching common on denim or canvas caps. -
Stitch the Brim:
Continue these small dash marks along the edge of the brim. I find rotating the paper helps me keep the stitch spacing consistent as I work around the curve. -
Base Shading:
Switch to your blue colored pencil. Apply a very light layer of blue to the side panels of the cap, leaving the top and front areas lighter to simulate a light source from above. -
Deepen the Shadows:
Press slightly harder with the colored pencil to darken the areas near the seams. This creates a recess effect, making the panels look puffy and three-dimensional. -
Cross-Hatching Technique:
Use fine hatching lines with the colored pencil on the side of the cap and under the brim. The strokes should follow the curve of the fabric. -
Fabric Creases:
Add a few confident, slightly darker strokes in the shaded areas to suggest vague wrinkles or folds in the soft fabric structure. -
Final Contrast:
Go back in with the fine-liner and re-darken the deepest crevices: right where the brim meets the crown and the very center point under the top button.
Volume Hack
Keep the center of each panel almost white. This high-contrast highlight makes the fabric look curved and full rather than flat.
Now you have a structured, fashion-forward cap illustration ready to be colored or kept as a stylish monochrome sketch
BRUSH GUIDE
The Right Brush for Every Stroke
From clean lines to bold texture — master brush choice, stroke control, and essential techniques.
Explore the Full Guide
Cowboy Hat Curved Brim
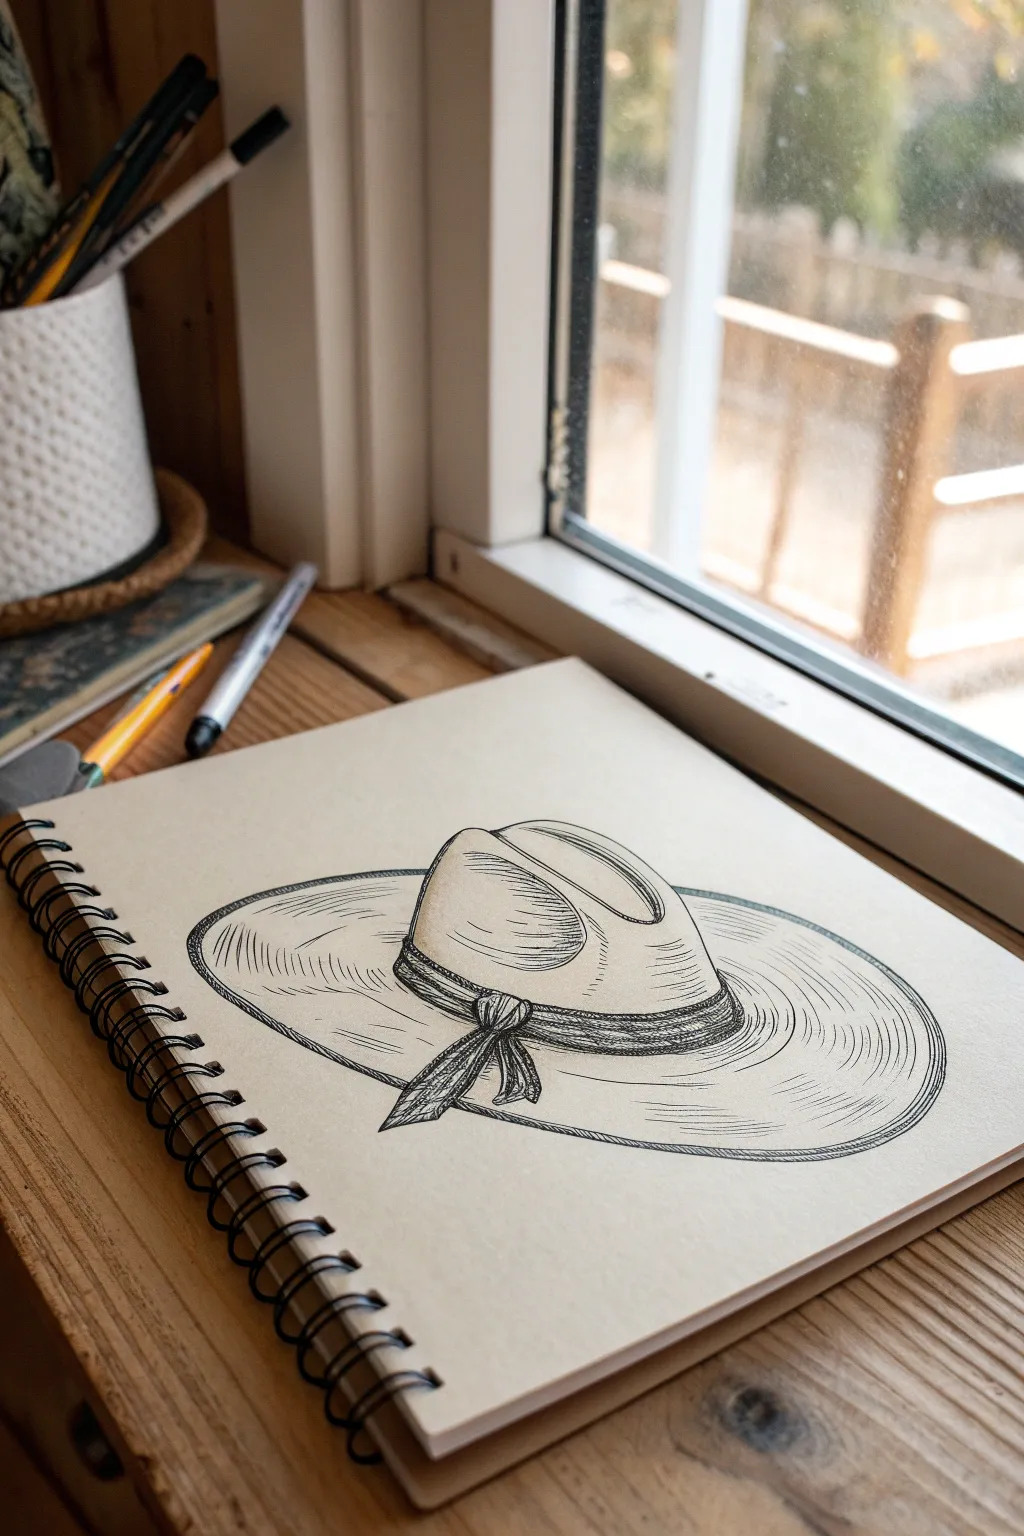
Capture the relaxed elegance of a summer hat with this pen and ink drawing tutorial. Using hatching techniques on toned paper adds warmth and dimension to the sweeping curves of the brim.
How-To Guide
Materials
- Toned tan or kraft sketchbook paper
- HB graphite pencil
- Kneaded eraser
- Black fineliner pens (sizes 0.1, 0.3, and 0.5)
- Ruler (optional)
Step 1: Pencil Understructure
-
Establish the crown:
Begin lightly in pencil by drawing a rounded trapezoid shape for the crown of the hat. Keep the top slightly curved rather than flat to give it a soft, fabric-like appearance. -
Define the brim’s oval:
Sketch a large, wide oval surrounding the crown. This doesn’t need to be perfect; tilt it slightly so the front left corner feels closer to the viewer. -
Add the brim curve:
Refine the brim line. The key feature is the dip near the crown and the slight upward curl at the edges. Make the front rim dip downwards slightly to create depth. -
Draw the hatband:
Wrap a curved band around the base of the crown. Follow the curvature of the hat’s bottom edge so it looks like it’s hugging the form. -
Detail the pinch:
Add the ‘dent’ or pinch at the top of the crown. I usually draw a sort of kidney-bean shape indentation on the top surface to show where the fabric folds inward. -
Sketch the knot:
Place a loose knot on the left side of the band where it meets the brim, letting the ribbon ends drape down naturally.
Step 2: Inking the Outlines
-
Outline the main shapes:
Switch to your 0.5 pen. Go over your pencil lines for the outer silhouette of the brim and the main crown shape, using confident, sweeping strokes. -
Define the band edges:
Use a slightly thinner 0.3 pen to outline the hatband. Keep these lines slightly jagged or textured to suggest a woven material. -
Ink the ribbon knot:
Outline the knot folds and the hanging tails. Add small creases radiating from the center of the knot to show tension in the fabric. -
Erase pencil guides:
Once the ink is completely dry (give it a full minute), gently gently use the kneaded eraser to lift away the graphite sketch.
Wobbly Lines?
If your long brim curves look shaky, try locking your wrist and moving your entire arm from the shoulder. Faster strokes are often smoother.
Step 3: Shading and Texture
-
Hatch the crown shadow:
Using the 0.1 pen, draw parallel hatching lines on the right side of the crown’s ‘pinch’ indentation. Follow the curve of the dent. -
Texture the band:
Fill the hatband with tight, horizontal lines suitable for a grosgrain texture. Leave a few gaps for highlights. -
Contour the brim:
This is a crucial step. Draw long, curved hatching lines following the oval shape of the brim. Start from the band and flick outward toward the edge. -
Deepen the contrast:
Add a second layer of cross-hatching to the darkest areas, specifically right underneath the brim where it meets the crown. -
Detail the ribbon tails:
Use directional lines on the ribbon tails that follow the length of the fabric. Darken the undersides of the ribbon for weight. -
Final brim accents:
Add a double line to the very outer edge of the brim to suggest a stitched hem or thickness. -
Cast shadow:
Add a little shading on the far right side of the brim to suggest the hat is blocking light, grounding the object.
Add Highlights
Use a white gel pen or white charcoal pencil to add highlights to the top of the crown and the rim of the brim for extra pop on the toned paper.
Now you have a stylish accessory captured right on the page, ready for your next sketchbook spread
Warm Ear-Flap Hat Details

Capture the warmth of winter with this detailed pencil sketch of a knit ear-flap hat. Using stippling and careful shading, you will render the soft texture of wool and the recognizable silhouette of this cozy accessory.
Step-by-Step Tutorial
Materials
- Sketchbook with smooth, heavy-weight paper
- Graphite pencils (HB for outlines, 2B and 4B for shading)
- Fine-point black fineliner pen (01 or 03 size)
- Kneadable eraser
- Blending stump or tortillon
Step 1: Drafting the Structure
-
Establish the crown:
Begin lightly with your HB pencil. draw a semi-circle or dome shape for the main part of the hat. Keep the lines very faint so you can adjust the curvature as needed. -
Add the brim guideline:
Draw a slightly curved horizontal line across the bottom of the semi-circle to define where the hat sits on the forehead. This helps anchor the perspective. -
Shape the ear flaps:
From the sides of the brim line, extend two large, curved U-shapes downwards. These flaps should angle slightly outward to mimic how they would hang naturally. -
Sketch the drawstrings:
Starting from the bottom center of each ear flap, draw a wavy, rope-like line extending further down. Let them curve organically rather than hanging perfectly straight. -
Position the pom-poms:
At the end of each drawstring and at the very top center of the hat, sketch rough circles to indicate where the fluffy pom-poms will go.
Stippling Patience
Don’t rush the dots! Keep your pen vertical and tap gently. Rushing creates tails or dashes, ruining the fluffy illusion of the pom-poms.
Step 2: Adding Patterns and Texture
-
Define the ribbed brim:
Draw a second curved line parallel to the brim guideline, about an inch up. Within this band, add faint vertical tick marks to suggest a knit ribbing texture. -
Create the geometric pattern:
Above the brim, create a decorative band. Draw two horizontal parallel lines and fill the space between them with a zig-zag pattern or triangles. -
Add the top stripe:
Sketch another thinner band near the top of the crown, mirroring the curve of the hat’s shape to emphasize its roundness. -
Texturize the outline:
Go over your initial smooth outline with short, slightly jagged strokes. This “fuzzy” line quality mimics the texture of wool yarn.
Flat Looking Hat?
If the hat looks flat, curve your decorative bands more intensely. Horizontal straight lines flatten forms; curved lines imply roundness.
Step 3: Inking and Shading
-
Initial inking:
Using your fine-point pen, carefully trace over the final outlines. Keep your hand loose to maintain that sketchy, organic feel rather than a rigid technical drawing. -
Stipple the pom-poms:
For the pom-poms, do not draw a solid outline. Instead, use hundreds of tiny dots (stippling) and short flicks radiating outward from the center to create a fluffy, spherical look. -
Shade the interior:
Identify the inside of the hat visible near the ear flaps. Darken this area significantly with cross-hatching to show depth and separation from the outer flaps. -
Create fabric volume:
Use stippling or very short dash marks along the sides of the hat and under the pattern bands. I find concentrating dots near the edges makes the center look highlighted and rounded. -
Detail the rope strings:
Add short, diagonal hash marks along the drawstrings to simulate the twisted texture of the cord. -
Refine the geometric band:
Fill in the triangles or zig-zags with tight stippling or shading to make the pattern pop against the lighter wool background. -
Final contrast check:
Deepen the darkest shadows—especially under the ear flaps and at the base of the pom-poms—to ensure the drawing has strong three-dimensional form.
Sign your sketch with a flourish and enjoy the cozy winter vibes you’ve created on paper.


Construction Lines: Ovals and Spheres
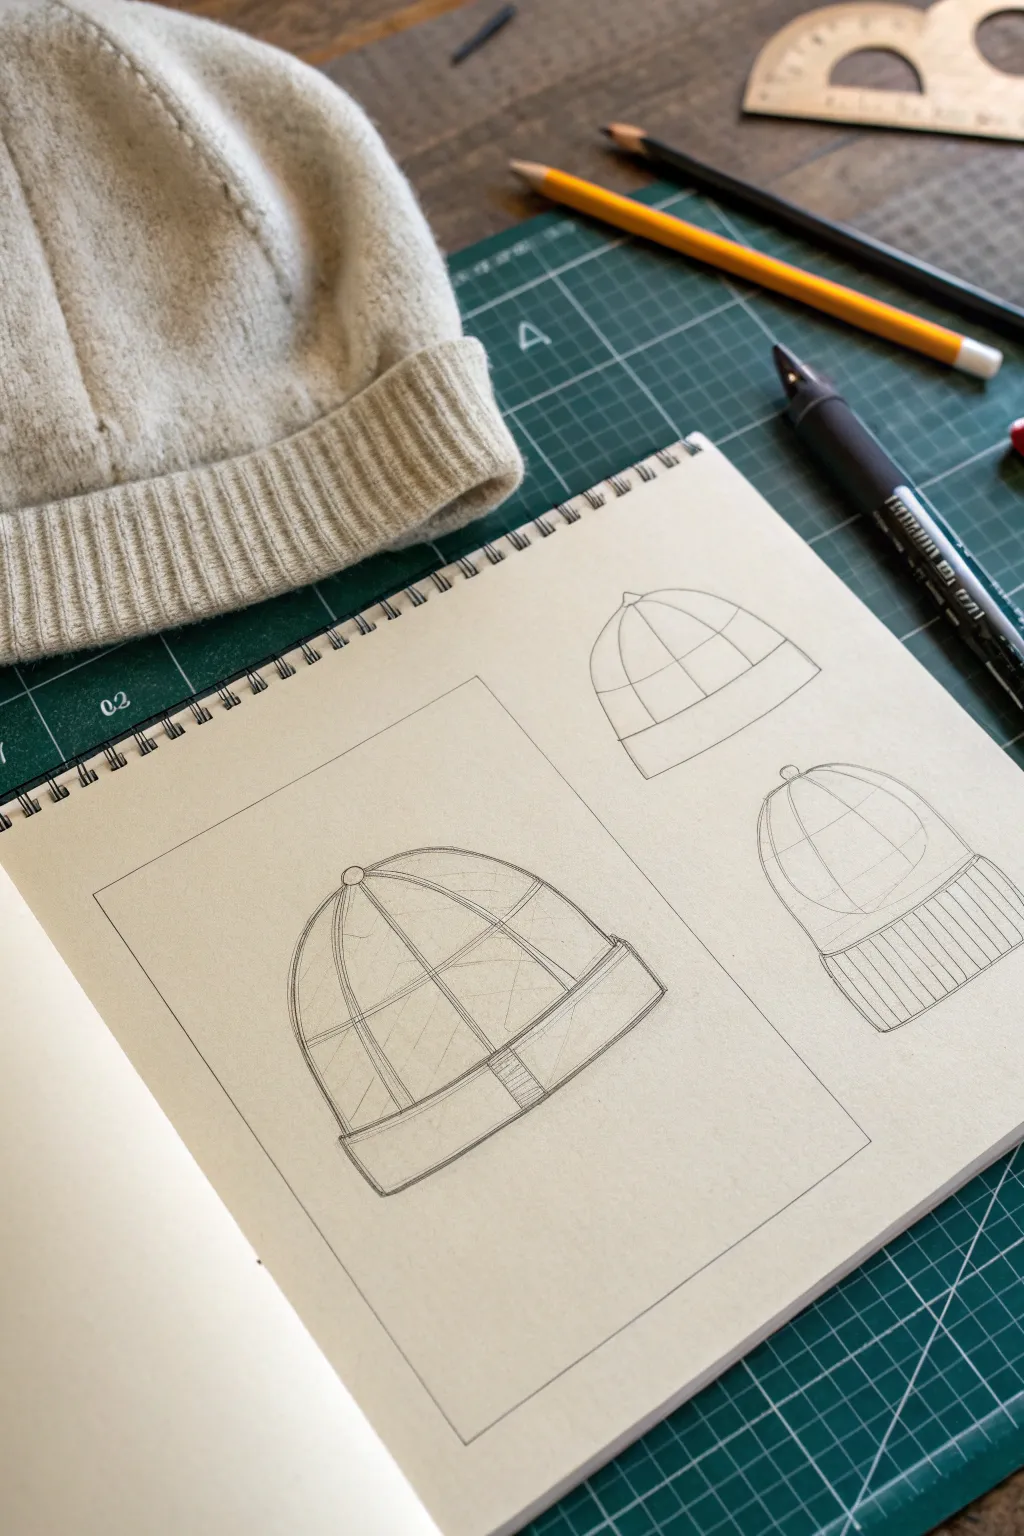
Learn to deconstruct complex knitwear shapes using simple geometry with this technical drawing exercise. You will practice visualizing a beanie hat’s volume through spheres and ellipses before refining the ribbed textures.
Step-by-Step Tutorial
Materials
- Spiral-bound sketchbook or drawing paper
- H or HB pencil for light construction lines
- 2B or 4B pencil for darker outlines
- Fine liner pen (black, roughly 0.3mm)
- Ruler or straight edge
- Eraser
- A real beanie for reference (optional)
Step 1: Establishing the Framework
-
Draw the Main Frame:
Start by drawing a large, clean rectangle on the left side of your page. This will house your primary, detailed sketch and helps frame the composition. -
Sketch the Base Sphere:
Lightly sketch a large semi-circle or dome shape within the rectangle. This represents the crown of the head and the main body of the hat. Keep your pencil pressure very light, as these lines are just guides. -
Add the Cuff Oval:
At the bottom of your dome, draw a fairly flat ellipse. This establishes the opening of the hat and gives the object three-dimensional volume rather than looking flat. -
Define the Cuff Height:
Draw a second curve slightly above the bottom ellipse, following the same arc. This creates the folded-up cuff of the beanie. -
Center Line and Axis:
Sketch a vertical curved line down the center of the dome. This central axis helps you understand the curvature of the form and where the center seam would lie.
Volume Trick
When drawing the ribbing lines on the cuff, space them closer together near the edges. This foreshortening visually turns the form away from the viewer.
Step 2: Developing volume & Perspective
-
Create Cross-Countour Lines:
Draw 2-3 curved horizontal lines across the dome of the hat. Imagine these lines wrapping around the sphere form; this is crucial for making the hat look round. -
Add Vertical Meridians:
Sketch curved vertical lines radiating from the top center point down to the cuff. These act like the distinctive seams often found on knit caps. -
Draw the Pom-Pom Anchor:
At the very top intersection of your lines, add a small, flattened circle or button shape. Even if your hat doesn’t have a pom-pom, this marks the gathering point of the fabric. -
Draft the Side Views:
To the right of your main box, sketch two smaller versions of the hat. For the top one, try a slightly lower angle where you see more of the dome. For the bottom one, try a side profile. -
Structure the Smaller Sketches:
Repeat the sphere and ellipse process for these smaller drawings. Focus on keeping the proportions consistent with your large main drawing.
Texture Study
Try stippling or small ‘v’ shapes along the meridian lines to simulate a heavy wool knit texture instead of smooth fabric.
Step 3: Refining Details
-
Outline the Silhouette:
Switch to a slightly darker pencil or press harder. Trace over the outer edges of your construction lines to firm up the final shape of the beanie. -
Detail the Cuff:
On the main drawing, add vertical lines to the cuff section to indicate ribbing. Pay attention to the curve—the lines should curve slightly outward as they move away from the center. -
Refine the Seams:
Darken the vertical meridian lines on the dome. Ensure they connect cleanly to the top button and tuck largely behind the folded cuff. -
Variation: The Back View:
I like to use the bottom-right sketch to show the ‘back’ or side. Add heavier ribbing details here to practice how texture wraps around a cylindrical form. -
Clean Up:
Gently erase any stray construction lines that distract from the form, but leave the faint grid visible—it adds to the technical ‘blueprint’ aesthetic. -
Final Outline:
Optionally, go over your definitive lines with a fine liner pen for a crisp, architectural look, leaving the pencil undersketch visible for character.
Practice rotating your mental model to sketch the hat from even more angles to master the geometry
Hat Fit: Hair Tucking and Flyaways
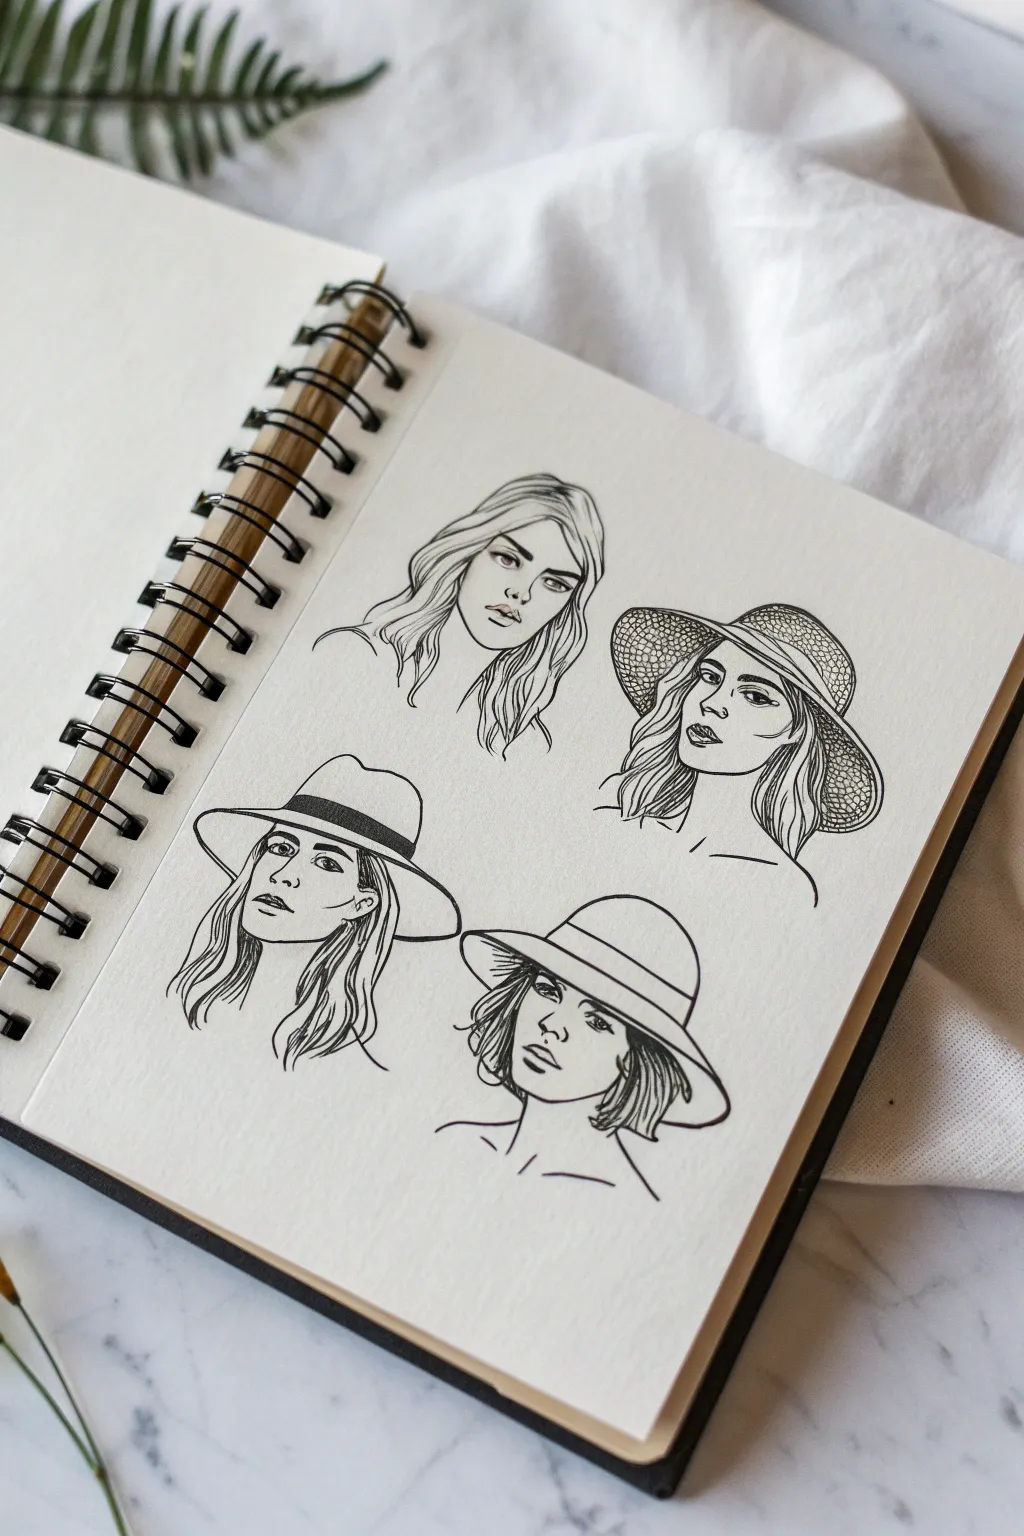
This sketchbook study explores the playful interaction between various hat styles and hairstyles using clean, confident line art. The layout features four distinct portraits that demonstrate how hair tucks, flows, and frames the face under different brims.
Detailed Instructions
Materials
- Spiral-bound sketchbook (heavyweight paper)
- HB or 2H graphite pencil
- Kneaded eraser
- Fine liner pens (sizes 005, 01, and 03)
- Black brush pen or thicker marker (optional for shadows)
Step 1: Planning the Layout
-
Establish the composition:
Begin by lightly visualizing four quadrants on your sketchbook page. You want the four heads to sit comfortably without crowding each other, leaving enough negative space around the brims. Their placement doesn’t need to be perfectly grid-like, but balanced. -
Sketch the head shapes:
Using your HB pencil with a very light hand, draw four basic ovals for the heads. Add a vertical centerline and horizontal eye-line to guide facial features. Keep these construction lines faint so they erase easily later. -
Outline the hat forms:
Rough in the basic geometric shapes of the hats. For the top right, sketch a wide, floppy oval. For the bottom left, draw a structured fedora crown and brim. For the bottom right, outline a rounded cloche or bucket shape. Leave the top left figure ‘hatless’ to serve as a baseline for hair volume.
Step 2: Refining the Pencil Sketch
-
Define the features:
Sketch in the eyes, noses, and lips. The style is semi-realistic but stylized, so focus on the contour of the lips and the shape of the eyes without over-shading. Keep the expressions neutral or slightly pensive. -
Draft the hair flow:
This is the crucial step for this tutorial section. For the top-left figure, draw loose, wavy strands framing the face. For the hat-wearing figures, pay attention to where the hair emerges from under the brim. Show how the hat compresses the volume at the crown but allows flyaways to escape near the ears. -
Detail the hat textures:
Add specific details to the hats. Draw the band on the fedora (bottom left). Indicate the woven texture on the wide-brim hat (top right) by sketching small, repetitive loops or cross-hatching patterns near the brim edge.
Ink Confidence
Don’t correct wobbly lines by going over them again; it makes them look heavy. Embrace the little imperfections as part of the hand-drawn charm.
Step 3: Inking the Outlines
-
Inking facial features:
Switch to your 01 fineliner. Carefully ink the eyes, focusing on the upper lash line to give weight. Use a broken or thinner line for the nose bridge to keep the face looking soft. Ink the lips with a clean, continuous line. -
Contouring the face:
Use the same 01 pen to trace the jawlines and necks. Keep these lines confident and smooth. I find that lifting the pen swiftly at the end of a stroke helps create a tapered, natural look for the neck lines. -
Inking the hats:
Trace your hat outlines. For the fedora and cloche, use steady, solid lines. For the straw hat (top right), allow the line to be slightly bumpy or textured to mimic the woven material. -
Drawing the hair:
Switch to a 005 or 01 pen for the hair. Instead of drawing every individual hair, draw groupings or ‘ribbons’ of hair. Use long, fluid strokes that follow the wave pattern you sketched earlier.
Add a Wash
Once the ink is dry, use a waterbrush and diluted grey ink (or watercolor) to add soft, transparent drop shadows for extra dimension.
Step 4: Adding Texture and Depth
-
Building hat texture:
For the wide-brimmed straw hat, use your 005 pen to create a tight stippling or small circular pattern across the brim and crown. This creates the illusion of intricate weaving without darkening the area too much. -
Darkening the hat band:
On the fedora (bottom left), use a 03 pen or a brush pen to fill in the hat band. Leave a tiny sliver of white space near the top edge to simulate a highlight on the fabric ribbon. -
Shading the hair:
Return to the hair with your 005 pen. Add hatching where the hair tucks behind the ears or sits deeply under the hat brim. This shadow gives the hair volume and separates it from the neck. -
Defining flyaways:
Add very fine, singular lines escaping the main hair shapes. Place these near the temples or the ends of the hair to show movement and make the style look less rigid. -
Subtle facial shading:
Add tiny bits of hatching under the lower lip, under the nose, and perhaps a small shadow under the hat brims where they cast a shade over the eyes. Keep this minimal to maintain the clean aesthetic.
Step 5: Final Touches
-
Erase pencil marks:
Wait until the ink is completely dry—give it a few extra minutes to be safe. Gently run your kneaded eraser over the entire page to lift all graphite guidelines, revealing the crisp black ink. -
Review and refine:
Assess the visual weight of the four drawings. If one looks too light, go back in with your 03 pen and thicken the main outline of the hat or the shadow side of the hair to balance the page.
You have now created a stylish reference sheet that captures the elegance of hat fashion and hair dynamics
Floating Hat Rotation Sheet
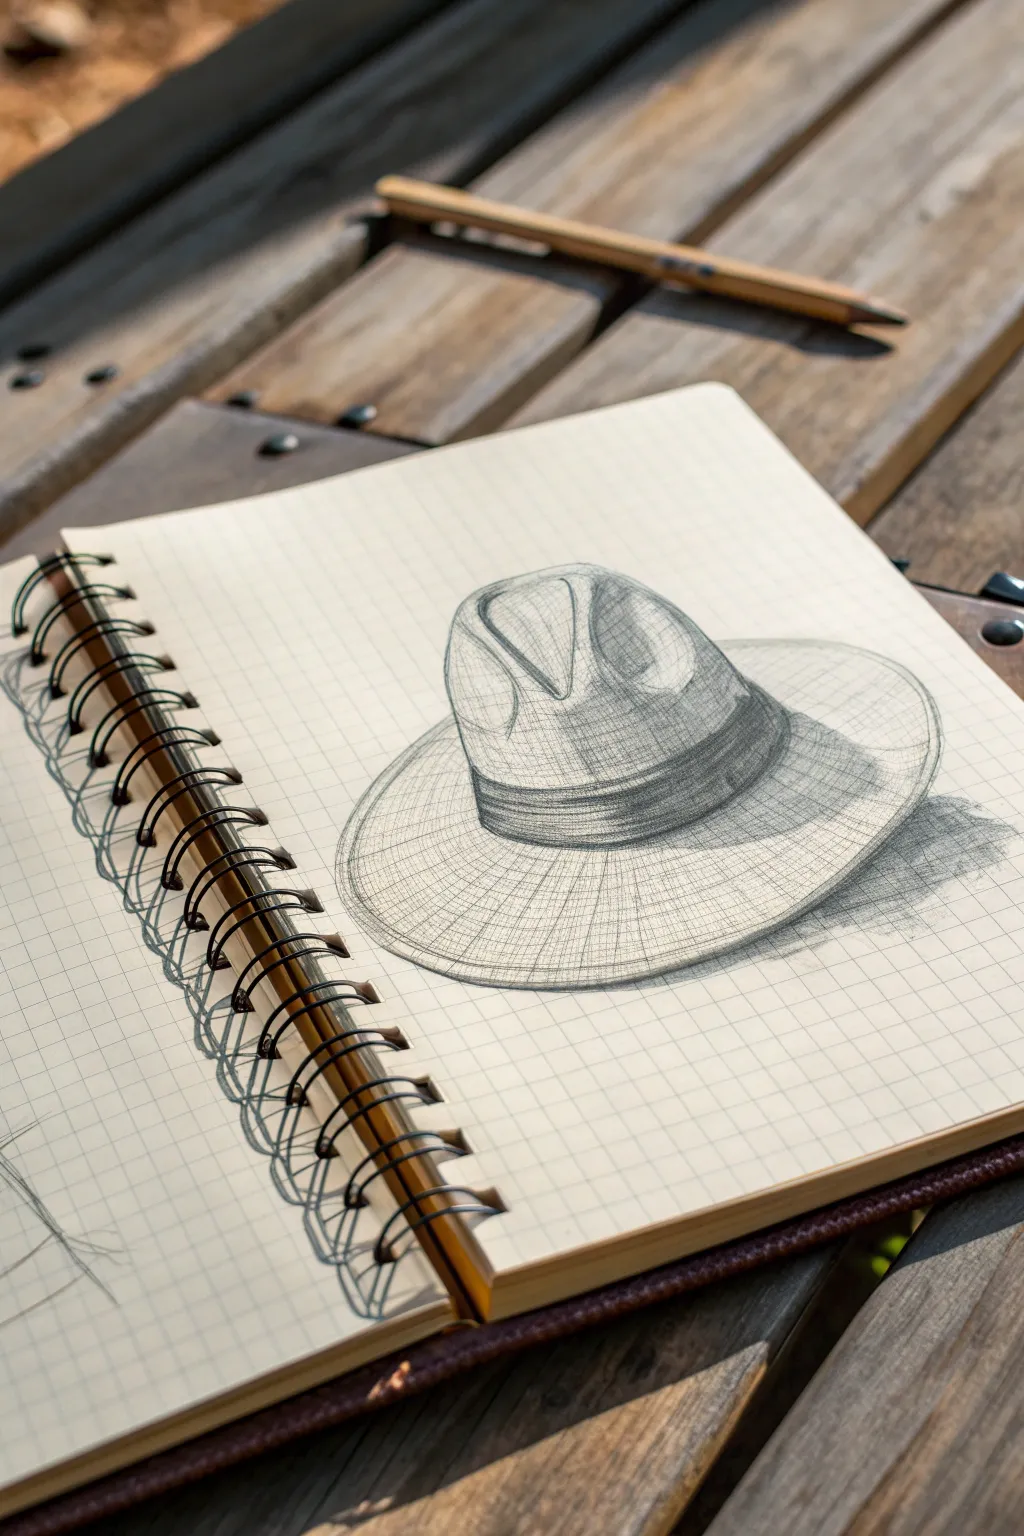
Capture the timeless elegance of a wide-brimmed fedora with this pencil study on grid paper. This project focuses on drawing specific volumes and realistic shading techniques to make the hat appear as if it is resting naturally on the page.
Step-by-Step Guide
Materials
- Spiral-bound grid paper notebook (A5 or A4 size)
- H pencil (for initial outlines)
- HB or 2B pencil (for shading)
- Kneaded eraser
- Pencil sharpener
- Ruler (optional, if you want precise brim lines)
Step 1: Establishing the Structure
-
Map the crown base:
Begin by lightly sketching an oval in the center of your page using your H pencil to define the opening where the head would go. -
Define the brim:
Draw a much larger, concentric oval around the first one to create the wide brim of the fedora, tilting it slightly to give a 3/4 perspective view. -
Build the crown height:
Extend vertical lines up from the inner oval, tapering them slightly inward as they go up, to form the sides of the hat’s crown. -
Sculpt the dent:
At the top of the crown, draw a curved ‘C’ shape or a deep valley to represent the classic fedora crease (the ‘pinch’).
Grid Guide
Use the grid lines on your paper to ensure the left and right sides of the brim are symmetrical before you start shading.
Step 2: Refining the Details
-
Draw the ribbon:
Add a band around the base of the crown, giving it a slight thickness so it looks like a separate piece of fabric rather than a flat line. -
Curve the brim:
Modify the outer oval of the brim by curling the sides upward slightly; this breaks the perfect geometric shape and makes it look like flexible felt. -
Clean up guidelines:
Gently use your kneaded eraser to lift away the internal construction lines from your initial oval sketches, leaving only the definitive outline.
Step 3: Shading and Texture
-
Identify the light source:
Decide that your light is coming from the top left, which means shadows will fall heavily on the right side and under the brim. -
Hatch the crown:
Using the 2B pencil, apply vertical hatching lines along the crown, curving them with the form to emphasize its roundness. -
Darken the ribbon:
Fill in the ribbon band with darker, denser horizontal strokes to distinguish its texture from the felt of the hat. -
Deepen the crease:
Press harder inside the top dent of the hat to create deep shadows, which gives the crown significant depth and volume. -
Texture the brim:
Sketch long, sweeping curved lines along the brim that follow the oval shape, mimicking the grain of the fabric.
Style Swap
Transform this fedora into a sun hat or cowboy hat simply by widening the brim or curling the edges up more dramatically.
Step 4: Final Touches
-
Cast the shadow:
Draw a cast shadow on the grid paper to the right of the hat, fading it out as it gets further away to ground the object. -
Refine contrast:
Go back over your darkest areas—specifically the ribbon and the deep crease—to increase the contrast against the lighter highlights. -
Soften edges:
I keep the edges of the cast shadow slightly fuzzy rather than sharp, which helps the drawing look more realistic and less like a cutout.
Now you have a stylish accessory sketched out, ready to be the start of a whole wardrobe study
Pattern Play on Hat Designs
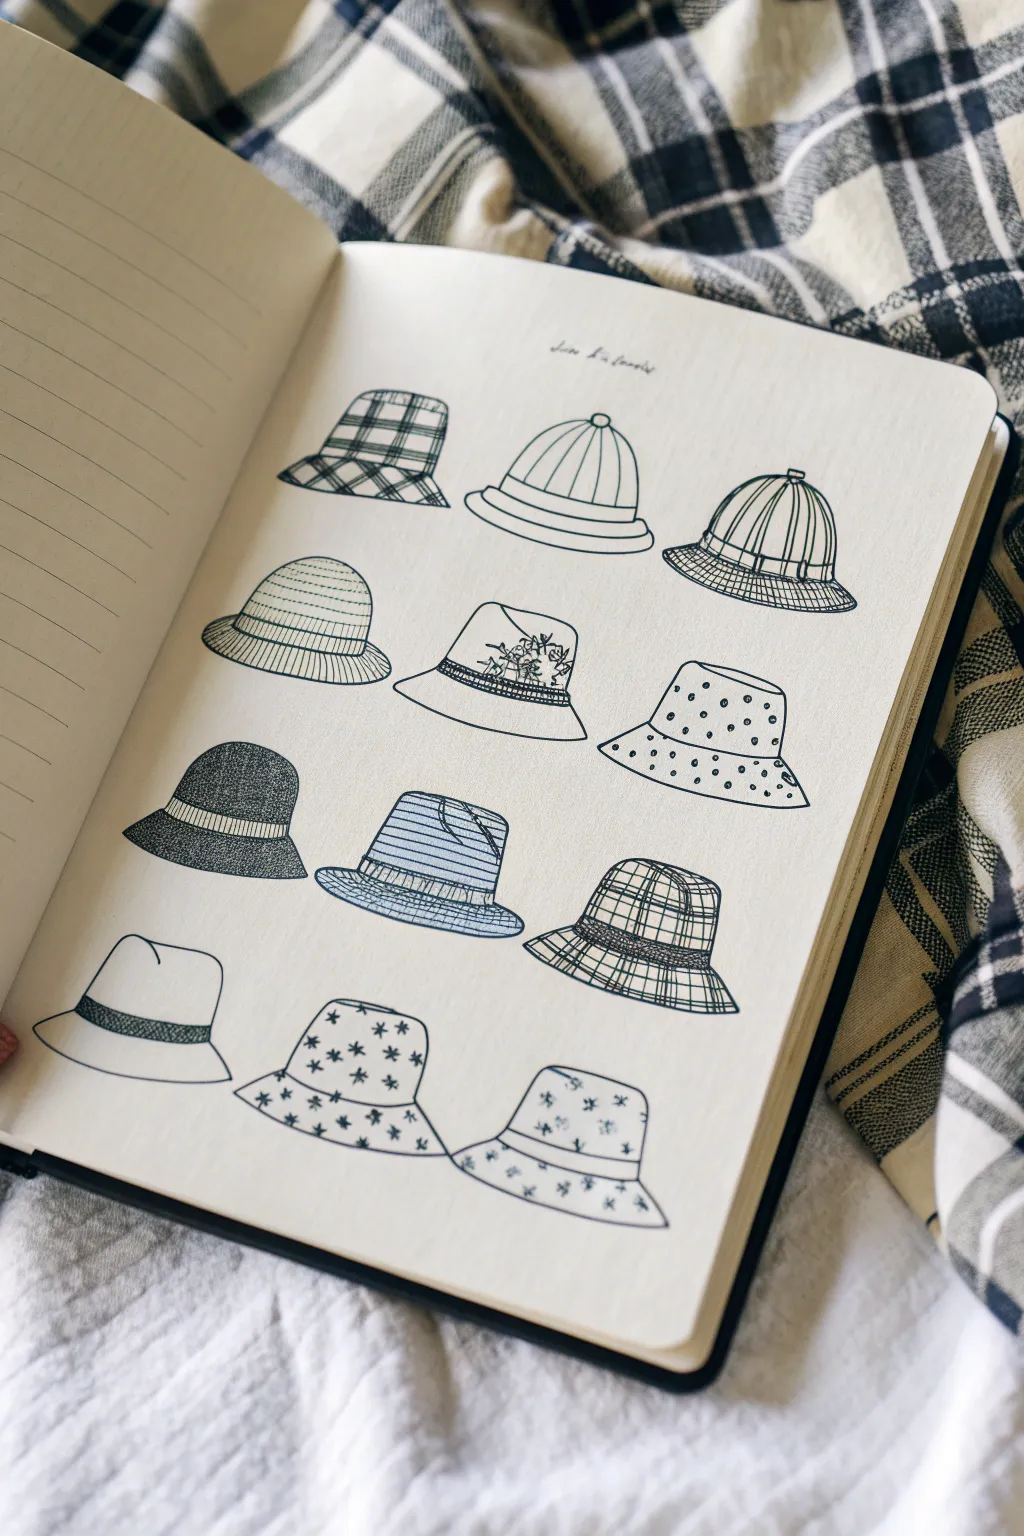
Here is a charming sketchbook spread featuring twelve unique variations on the classic bucket hat, each showcasing a different texture or pattern. This simple line-art project is perfect for practicing pen control and exploring how simple fills can create the illusion of fabric.
Step-by-Step Tutorial
Materials
- A5 Sketchbook or smooth drawing paper
- Fine liner pens (sizes 005, 01, and 03)
- Pencil (HB or 2H)
- Eraser
- Ruler (optional for plaid lines)
Step 1: Drafting the Shapes
-
Layout grid:
Visualize a grid of 3 columns and 4 rows on your page. Lightly mark the center points for each of the twelve hats with your pencil to ensure even spacing. -
Basic crown structure:
Start by sketching the crowns (the top part) of the hats. Vary the shapes slightly: make some round and dome-like, others flatter on top like a traditional bucket hat, and a few slightly tapered. -
Adding brims:
Draw the brims extending from the bottom of each crown. Angle them differently to show perspective; some brims should flare out wider, while others can droop down more steeply. -
Refining the silhouettes:
Connect the crowns and brims smoothly. Add slight dips or curves to the lines to make the fabric look soft and pliable rather than rigid. -
Bands and details:
Sketch in ribbons or bands at the base of the crowns where they meet the brims. Not every hat needs one, but alternating them adds variety.
Ink Weight Trick
Use a thicker pen (03) for the outer silhouette of the hat and a very thin nib (005) for heavier internal patterns like plaid. This prevents the drawing from looking too dark or cluttered.
Step 2: Inking outlines
-
Main outlines:
Using an 03 fine liner, carefully trace over your pencil outlines. Use confident, smooth strokes. If a line is meant to be a fabric fold, let it taper off gently at the end. -
Erase guidelines:
Once the main ink has dried completely (wait a few minutes to avoid smudges), gently erase all your pencil sketches so you have a clean slate for patterning.
Step 3: Pattern Play: Row 1 & 2
-
Classic Plaid:
For the first hat (top left), use an 005 pen to draw crossing horizontal and vertical lines. Vary the spacing to create a tartan look, and double up some lines for thickness. -
Vertical Stripes:
On the top middle hat, draw curved vertical lines following the contour of the dome to show volume. Add a double rim at the bottom. -
Structured Stripes:
For the top right hat, draw bold vertical stripes with a banded rim. I find adding tiny stitch marks along the band’s edge adds a nice realistic touch. -
Horizontal Texture:
Move to the second row. Use thin horizontal lines across the entire left hat. Make the lines slightly wobbly to mimic a knit or woven texture. -
Floral Motif:
In the center hat, draw delicate leaves and flowers just within the band area. Keep the rest of the hat plain to let the detail stand out. -
Polka Dots:
For the right hat on the second row, fill the shape with small, evenly spaced circles. Leave them white in the center.
Add a Watered Wash
After the ink is fully waterproof-dry, use a water brush with a tiny drop of diluted grey ink to add shadows under the brims for instant 3D depth.
Step 4: Pattern Play: Row 3 & 4
-
Stippling Texture:
For the third row, left hat: fill the entire shape with tiny dots (stippling). Cluster them denser near the edges to create a shadowed, felt-like effect. -
Horizontal Stripes:
On the center hat, draw closely spaced horizontal stripes. Include a ‘folded’ detail on the brim to show the underside of the fabric. -
Complex Check pattern:
For the right hat, draw a grid pattern. Instead of straight lines, use slightly curved lines that wrap around the form to emphasize 3D volume. -
Simple Banding:
On the bottom left hat, keep it minimal. Leave the hat white but fill the band with a dense texture or cross-hatching to create high contrast. -
Starred Pattern:
For the bottom center hat, draw small asterisks or simple star shapes scattered randomly across the surface. -
Tiny Florals:
Finish the last hat (bottom right) with very small, simple 3-petal flower doodles scattered loosely like a vintage print.
Now you have a full wardrobe of miniature hat designs to reference for future illustrations or fashion sketches


Have a question or want to share your own experience? I'd love to hear from you in the comments below!