Whenever you’re stuck on what to carve, the trick is choosing imagery that naturally turns into bold shapes and satisfying negative space. Here are my go-to linocut ideas—starting with the classics and drifting into the weirder, extra-fun directions once you’re warmed up.
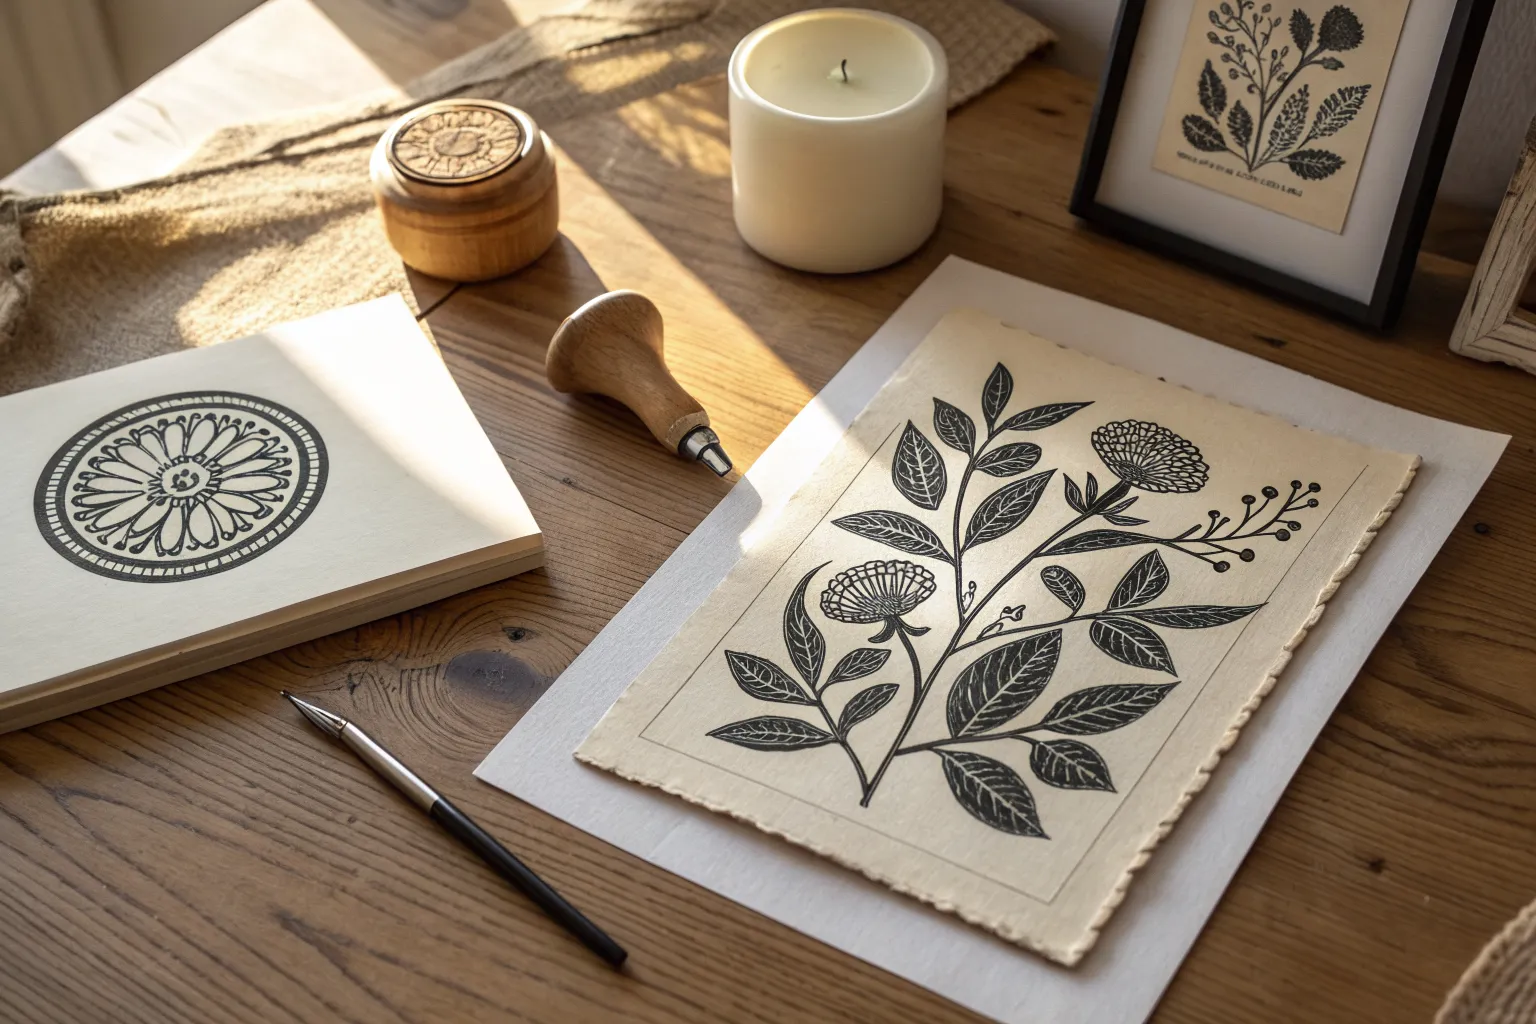
Simple Botanical Sprig
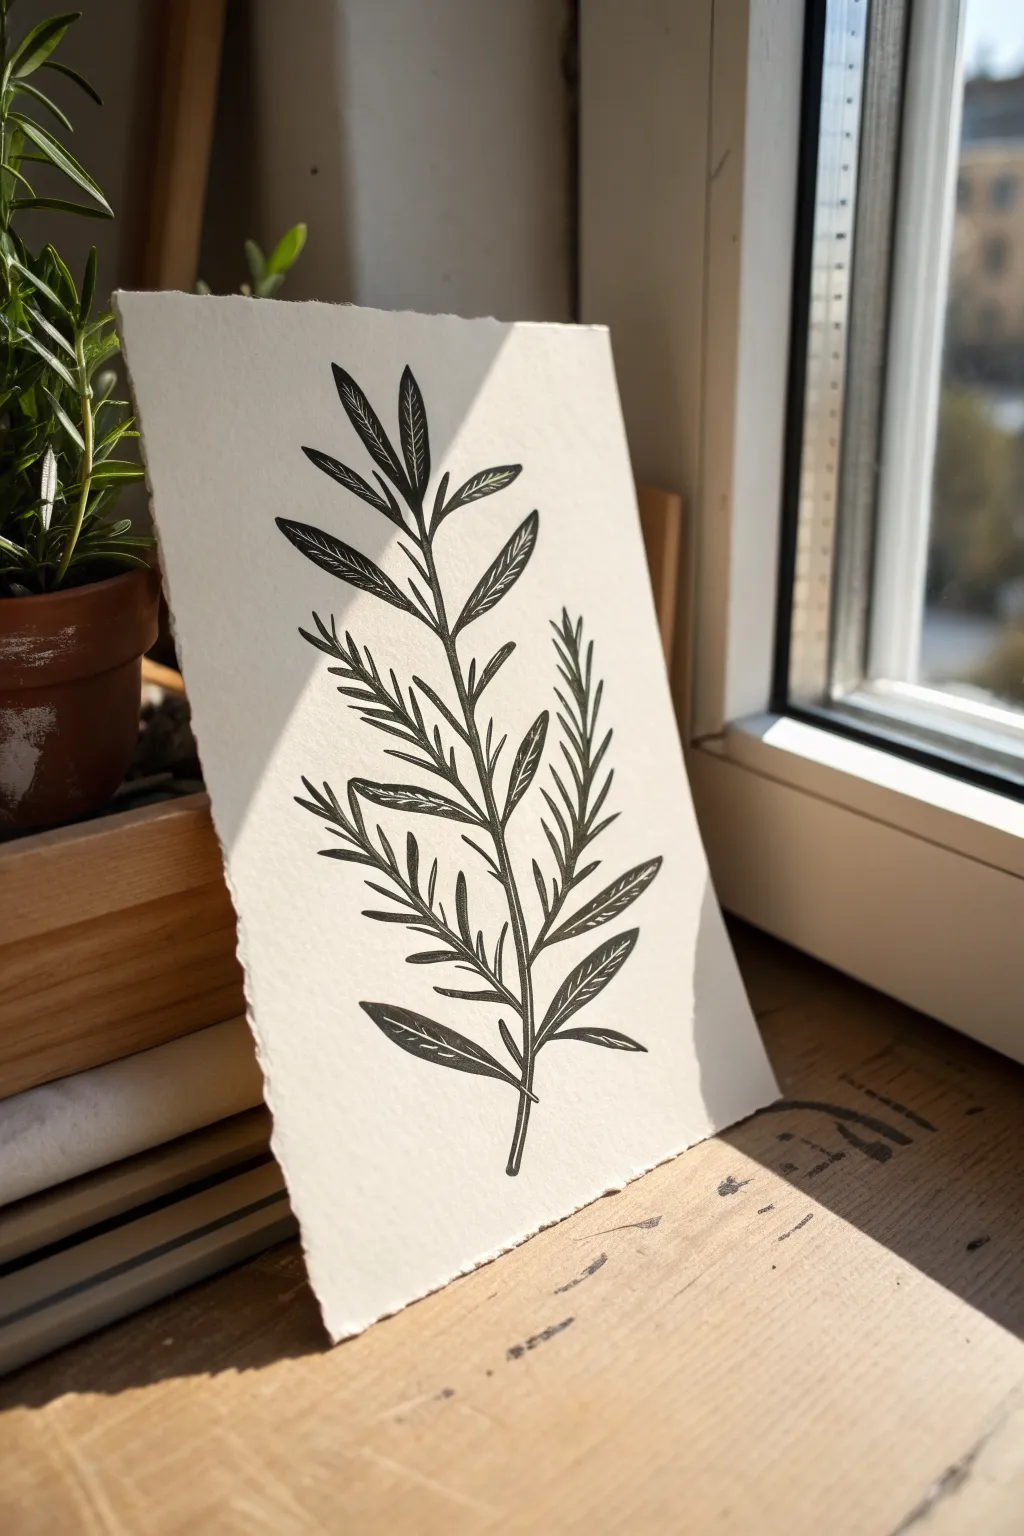
Capture the delicate beauty of fresh herbs with this minimalist botanical linocut. The resulting print features clean, sharp lines contrasting against the soft texture of printmaking paper, perfect for bringing a touch of nature indoors.
Step-by-Step Guide
Materials
- Soft-cut lino block (at least 4×6 inches)
- Linocut carving tools (V-gouge and U-gouge)
- Black block printing ink (oil-based or water-soluble)
- Brayer (roller)
- Glass or acrylic inking plate
- Heavyweight printmaking paper (deckle edge optional)
- Pencil and tracing paper
- Carbon transfer paper (optional)
- Baren or wooden spoon for burnishing
Step 1: Drafting and Transfer
-
Sketch the sprig:
Start by drawing a simple vertical stem line on your paper to establish the center of balance. -
Add the leaves:
Draw pair of leaves growing outward from the stem. Vary them between needle-like rosemary sprigs and slightly wider, lance-shaped leaves to mimic the organic variety seen in the reference. -
Refine the details:
Inside the wider leaves, sketch a central vein line. Keep your drawing clean and high-contrast, as this will determine your carving map. -
Prepare the block:
Lightly sand your lino block if it feels slick to help it accept the transfer clearer. -
Transfer the design:
Place carbon paper face down on the block, then your drawing on top. Trace over your lines firmly. Alternatively, draw directly on the block with a soft pencil if you feel confident.
Step 2: Carving the Block
-
Outline the shapes:
Using your fine V-gouge, carefully carve along the outer edges of the stem and every leaf. This outlines your positive space. -
Carve the leaf veins:
Switch to your finest tool to carve the thin center lines inside the broader leaves. Use a light touch here; you don’t need to go deep. -
Remove the negative space:
Use a U-gouge to clear away the area between the leaves. Keep your strokes moving away from the delicate plant parts to avoid accidental slips. -
Clear the background:
Continue clearing the rest of the background. You can leave some texture marks visible, but for this clean look, I prefer to smooth away most surrounding ridges. -
Review and refine:
Brush away any carved debris. Does the stem look too thick in places? Carefully trim it down now before inking.
Clean Lines Pro Tip
For ultra-sharp leaf tips, always carve from the center of the leaf outward toward the tip. Cutting inward can cause the delicate point of the lino to crumble or snap off.
Step 3: Inking and Printing
-
Prepare the ink:
Squeeze a small line of black ink onto your glass slab. Roll the brayer back and forth and lift it occasionally to create a velvety, hissing texture. -
Ink the block:
Roll the ink onto your carved block in thin layers. Apply one pass vertically and one horizontally to ensure even coverage on the raised leaf surfaces. -
Position the paper:
Center your heavyweight paper over the block. Gently lower it down, being careful not to shift it once it touches the sticky ink. -
Burnish the print:
Using a baren or the back of a wooden spoon, apply firm circular pressure over the entire back of the paper. Focus extra attention on the thin stem areas. -
The reveal:
Pick up one corner of the paper and slowly peel it back to reveal your print. Check for any missed spots before fully removing it. -
Dry the print:
Place the finished print in a safe, flat place to dry. If you used oil-based ink, this may take a few days.
Deckle Edge Level Up
To get the torn look from the photo, fold your paper and moisten the crease with a wet brush. Carefully tear along the wet line for a soft, professional deckle edge.
Now you have a timeless botanical print ready to frame or gift
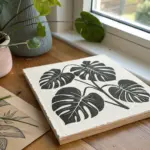


Big Houseplant Leaf
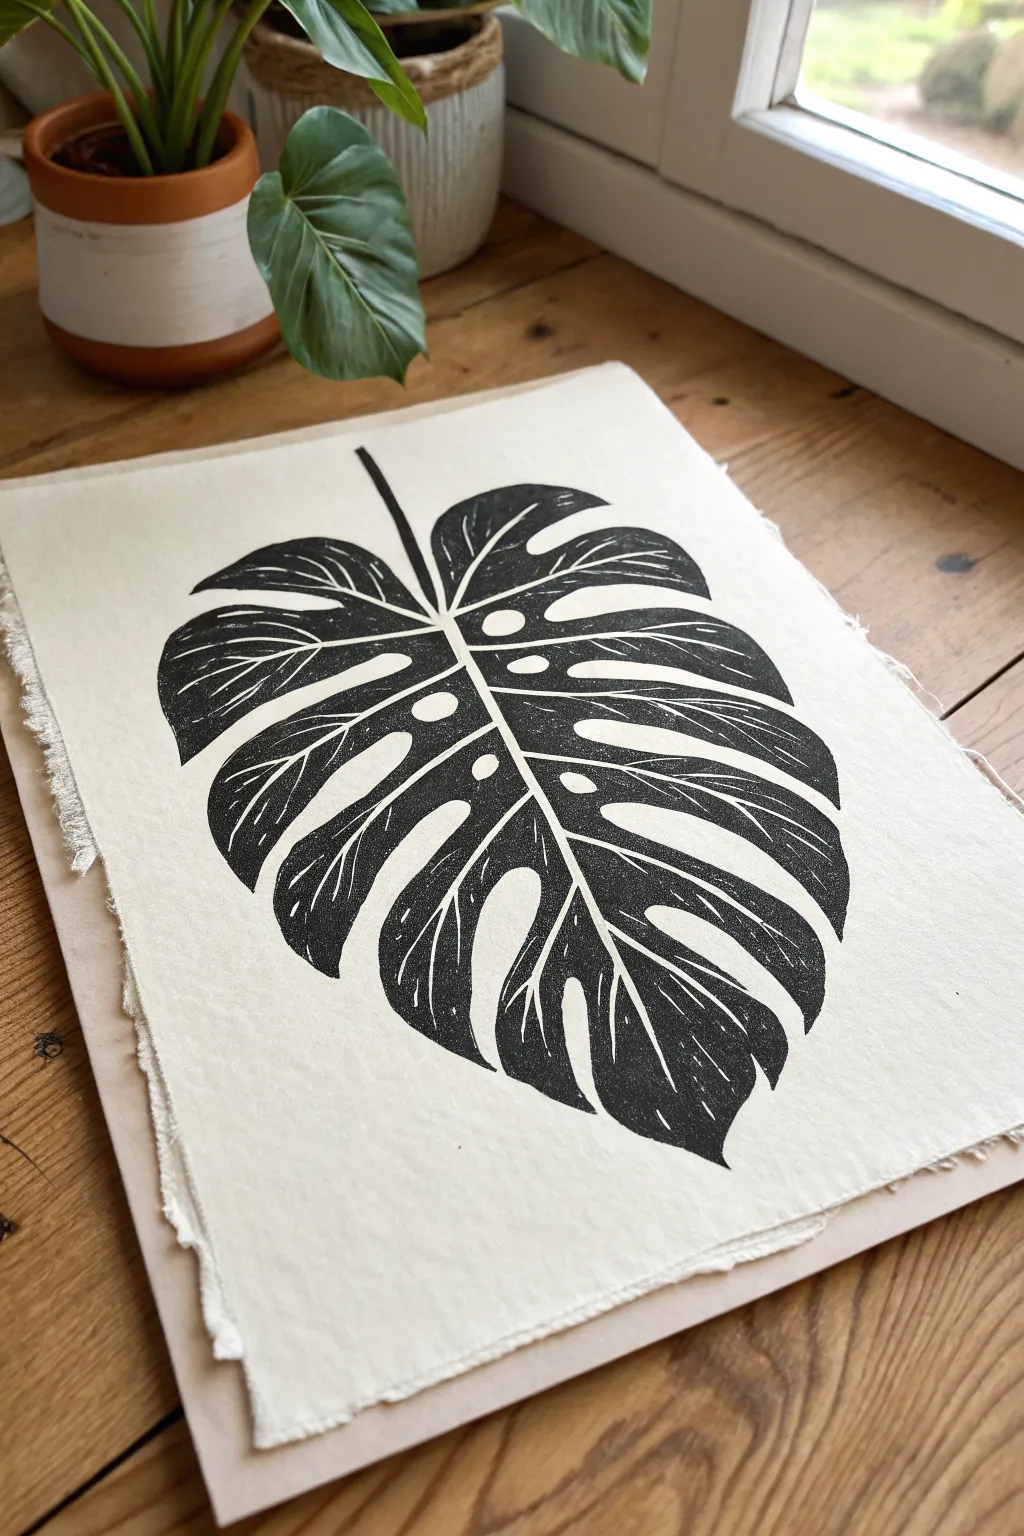
Capture the graphic elegance of a split-leaf philodendron with this bold linocut project. The high contrast of rich black ink against soft, textured paper makes this botanical print a striking piece of wall art.
Detailed Instructions
Materials
- Soft-cut lino block (approx. A4 size)
- Black water-based block printing ink
- Soft rubber brayer (roller)
- Lino cutting tools (V-gouge and U-gouge)
- Tracing paper
- Pencil and eraser
- Barren or wooden spoon for burnishing
- Heavyweight printmaking paper with deckled edge (e.g., Rives BFK or handmade cotton paper)
- Glass slab or acrylic sheet for inking
- Carbon paper (optional)
Step 1: Design & Transfer
-
Draft the Monstera shape:
Begin by sketching a large heart-shaped leaf outline on regular paper. Monstera leaves are rarely perfect, so don’t worry about symmetry; sketch a central vein that curves slightly for a natural look. -
Add the fenestrations:
Draw deep, elongated notches cutting into the sides of the leaf toward the center vein. Add a few oval holes (fenestrations) near the midrib to create that classic Swiss-cheese plant look. -
Refine the negative space:
Thicken your lines. Remember, in linocut, everything you cut away becomes white, and everything you leave becomes black. Visualize the leaf as a solid black shape and the veins/holes as the white paper. -
Transfer to the block:
Place carbon paper face down on your lino block, then layer your drawing on top. Trace over your lines firmly. Alternatively, use a soft pencil to heavily shade the back of your drawing, place it face-up on the block, and trace.
Clean Lines
Warm your lino block slightly with a hairdryer/heater before cutting. Soft lino cuts like butter when warm, giving you smoother curves.
Step 2: Carving the Block
-
Outline the main shapes:
Start with a fine V-gouge tool. Carefully carve along the outlines of the leaf, the central stem, and the edges of the inner holes. Always cut away from your body to keep those fingers safe. -
Carve the veins:
Switch to a slightly wider tool to carve the veins running through the heavy black sections. Keep these lines thin and expressive, allowing them to taper off as they reach the edge of the leaf segments. -
Clear large areas:
Use a wide U-gouge to clear away the negative space outside the leaf. I find it helpful to leave some textured chatter marks (shallow cuts) near the leaf edges to give the print distinct energy, but clear the outer perimeter thoroughly if you want a cleaner background. -
Refine the details:
Go back in with your smallest cutter to clean up any jagged edges inside the fenestrations or along the stem. Brush away all loose lino crumb debris.
Step 3: Inking & Printing
-
Prepare the ink:
Squeeze a small line of black block printing ink onto your glass slab. Roll the brayer back and forth and lift it occasionally to create a ‘hissing’ sound—this indicates an even, velvety texture. -
Ink the block:
Roll the brayer over your carved block. Apply the ink in thin, multiple layers, rolling in different directions to ensure the large black areas of the leaf are fully saturated without filling in the fine vein lines. -
Position the paper:
Carefully align your textured paper over the block. If your paper has a deckled edge, center the design so the rough edges frame the print beautifully. Let the paper drop gently; don’t drag it. -
Burnish the print:
Using a barren or the back of a wooden spoon, rub the back of the paper in small circular motions. Apply firm, even pressure, paying special attention to the solid black areas to ensure a deep, dark transfer. -
Partial peek check:
Hold down one corner of the paper firmly and gently lift the opposite corner to check the ink coverage. If it looks patchy, lay it back down and burnish that specific spot some more. -
The reveal:
Slowly peel the paper off the block from one end to the other. Lay the print flat on a clean surface or hang it to dry.
Salty Prints?
If your black ink looks speckled (salty), apply more ink layers to the block but with less pressure on the roller to avoid clogging details.
Once dry, frame your print floating in a shadow box to show off that beautiful deckled paper edge

Single Flower Close-Up
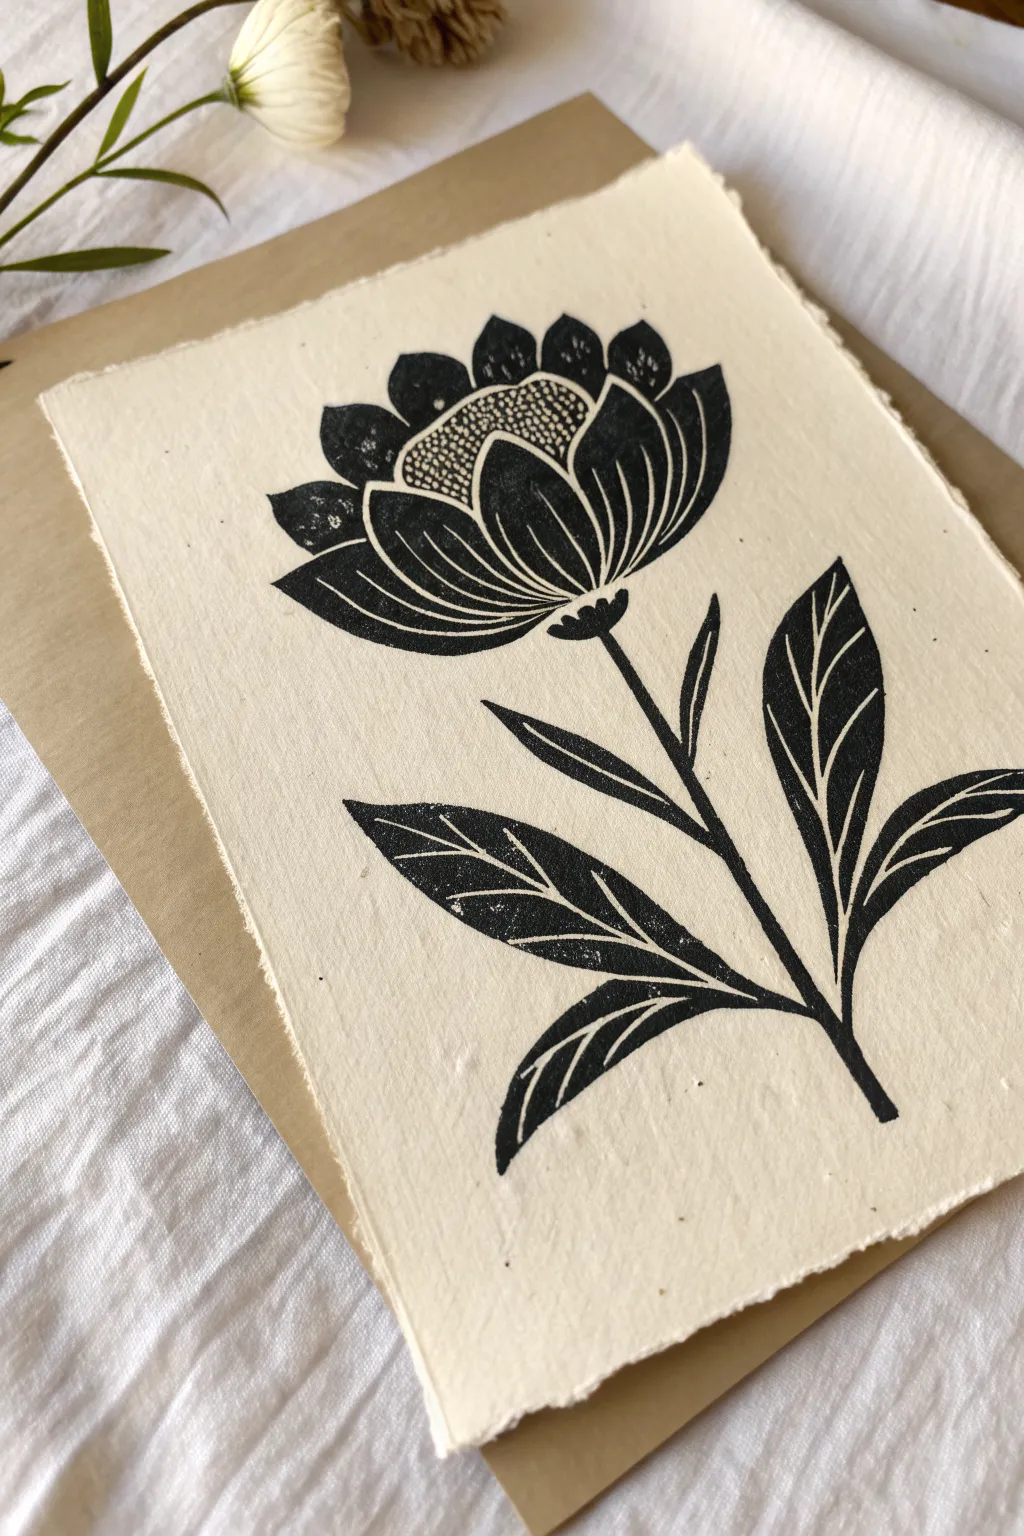
Embrace the bold contrast of relief printing with this striking single-flower design. Featuring deep black ink on textured, deckle-edge paper, this project celebrates the interplay between solid shapes and delicate carved lines.
Step-by-Step
Materials
- Soft-cut lino block (4×6 inch or similar)
- Linocut carving tools (V-gouge, U-gouge, and knife)
- Black water-soluble block printing ink
- Brayer (rubber roller)
- Baren or wooden spoon for burnishing
- Heavyweight printmaking paper (preferably khadi or handmade cotton rag)
- Pencil and tracing paper
- Inking plate or piece of glass
- Craft knife or ruler (optional for tearing paper)
Step 1: Design and Transfer
-
Sketch the flower:
Begin by drawing your floral design on paper. Focus on a strong central bloom with layered petals—a large outer ring and a tighter inner bud—sitting atop a simple stem with pairs of pointed leaves. -
Refine the lines:
Use a dark marker to finalize which areas will remain black (the positive space). Note the thin white veins in the leaves and the decorative lines within the petals; these will be carved away. -
Transfer to block:
Place tracing paper over your sketch and trace the outline with a soft pencil. Flip the tracing paper graphite-side down onto your lino block and rub the back firmly to transfer the image. -
Reinforce the guide:
Go over the faint pencil lines on the lino block with a permanent marker so they don’t smudge while you work. This ensures you can clearly see the boundaries between the petals and the background.
Step 2: Carving the Block
-
Carve the outline:
Using a fine V-gouge, carefully carve along the outer edges of the flower and stem. This ‘ditch’ creates a safety zone that prevents you from accidentally slicing into the image when clearing the background. -
Define the petal details:
Switch to your smallest V-gouge tool. Carve the thin, curved lines inside the large outer petals and the separation lines between the inner bud petals. Remember, you are carving the white lines. -
Create the center texture:
For the pollen area in the center of the flower, make tiny pecks or dots with the tip of the tool to create a stippled texture, leaving small islands of lino to pick up ink. -
Detail the leaves:
On the leaves, carve a central spine line and curved side veins. Keep these lines fluid and taper them gently as they move toward the leaf tips. -
Clear the background:
Use a wider U-gouge to clear away all the negative space around the flower. Work away from the design. You don’t need to go extremely deep, just enough so the background doesn’t touch the paper. -
Clean up edges:
Inspect your block for any high spots in the background area or little burrs of linoleum clinging to the design edges, and slice them away.
Chatter Marks
If accidental background ridges (chatter) appear in your print, carve those areas deeper. Alternatively, leave some for a rustic, handmade aesthetic.
Step 3: Printing the Edition
-
Prepare the paper:
Tear your printing paper to size. To get the soft, deckled edge look shown in the photo, fold the paper creatively and tear it along a ruler edge or use a water-tearing method. -
Charge the ink:
Squeeze a line of black ink onto your inking plate. Roll the brayer back and forth and lift it occasionally to spread the ink into a smooth, velvety layer that makes a hissing sound. -
Ink the block:
Roll the inked brayer over your carved block. Apply multiple thin layers rather than one thick glob, ensuring the solid black petals and leaves are completely covered but the fine carved lines remain clear. -
Position the paper:
Carefully lay your paper on top of the inked block. Once it touches the ink, do not shift it or the image will smear. -
Burnish the print:
Using a baren or the back of a wooden spoon, rub the back of the paper in small circles. Apply firm, even pressure, paying special attention to the solid black areas of the petals. -
The reveal:
Slowly peel back one corner of the paper to check the coverage. If it looks patchy, lay it back down carefully and burnish that spot more. If good, peel the paper completely off. -
Drying:
Place the wet print on a flat surface or drying rack. Oil-based inks may take a few days, while water-based inks will dry faster.
Eco Texture
Try printing on paper embedded with seeds or petals. The texture adds depth to the solid black ink and enhances the botanical theme.
Once dry, your bold botanical print is ready to be framed or gifted on a beautiful card backing


Dog Profile Portrait
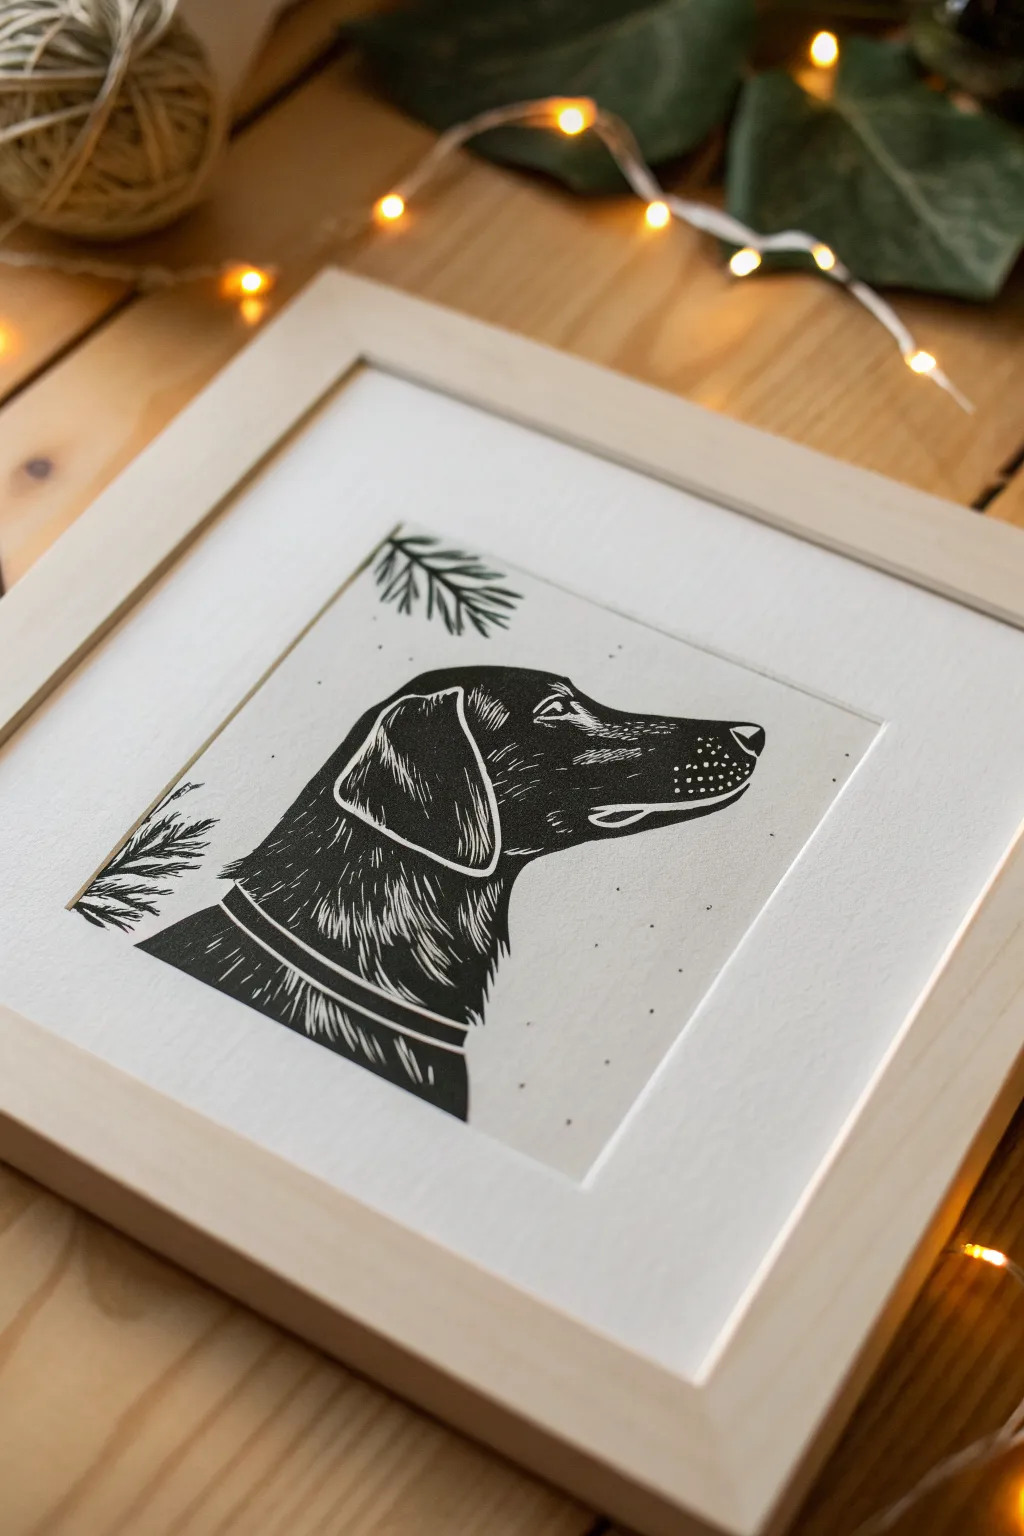
Capture the loyal spirit of a beloved pet with this classic black and white linocut portrait. The bold contrast of relief printing highlights the sleek fur and expressive profile, while delicate pine sprig details add a festive, natural touch.
Step-by-Step Tutorial
Materials
- Soft-cut block or traditional battleship grey lino block
- Lino cutting tools (V-gouge, U-gouge, and flat chisel)
- Tracing paper and pencil
- Carbon transfer paper
- Black water-based block printing ink
- Brayer (roller)
- Inking plate or glass slab
- Barren or wooden spoon for burnishing
- Heavyweight printmaking paper (off-white or light cream)
- Light wood box frame
- Mat board (mounting board)
Step 1: Preparation & Transfer
-
Select your reference:
Choose a clear side-profile photo of the dog. High-contrast photos work best for translating into a two-tone linocut design. -
Sketch the design:
Using tracing paper, create a line drawing of the dog’s silhouette. Simplify the details; you want blocks of shadow rather than individual hairs. Include the collar and the small pine sprigs in the top left corner. -
Prepare the block:
Lightly sand your lino block if using traditional battleship grey lino to ensure the ink adheres well later. Wipe it clean of any dust. -
Transfer the image:
Place carbon paper face down on the block, then your drawing on top. Trace over your lines firmly. Remember to reverse your image if text or directionality matters, though for a generic dog profile, this is less critical. -
Mark your negatives:
Using a permanent marker, color in the areas of the block that you intend to keep uncut (the black areas). This visual guide prevents accidental cutting of the wrong sections.
Patchy black print?
If your solid black areas look ‘salty’ or white-speckled, your paper might be too textured or you didn’t apply enough pressure. Try slightly dampening the paper before printing.
Step 2: Carving the Block
-
Outline the subject:
Start with a fine V-gouge tool. Carve along the outside of your sharpie lines, defining the dog’s profile, the ear shape, and the collar. -
Carve the fine details:
Switch to your finest tip. Carefully carve the white whiskers, the sheen on the nose, and the small dots on the muzzle. For the ear, use short, flicking strokes to mimic the texture of fur. -
Define the eye:
The eye is crucial. Leave a small white highlight (by carving it away) to give the dog life. Carve carefully around the eyelids. -
Create the fur texture:
On the neck and chest, use varied stroke lengths. I find that leaving some ‘chatter’ (small ridges) in the fur area adds movement and realism compared to perfectly flat black. -
Carve the background:
Use a wide U-gouge to clear away the large negative space around the dog. You can be rougher here, but be careful near the pine sprigs. -
Detail the foliage:
Carve the pine sprigs using simple, straight V-cuts. These should be delicate to contrast with the solid mass of the dog’s head. -
Clear final areas:
Use a wide chisel or flat tool to smooth down the background areas further away from the image to prevent stray ink marks.
Add a festive twist
Make this a holiday card by swapping the black ink for a deep forest green, or hand-paint a small red bow on the collar after the black ink is completely dry.
Step 3: Inking & Printing
-
Prepare the ink:
Squeeze a small line of black ink onto your inking plate. Roll the brayer back and forth and lift it occasionally to create a ‘velvety’ texture and an even charge of ink. -
Ink the block:
Roll the ink onto the carved block. Apply thin, even layers. You might need to roll in multiple directions to ensure the raised areas are fully coated without flooding the fine cut lines. -
Position the paper:
Carefully lay your printmaking paper on top of the inked block. Once it touches the ink, do not shift it or the image will blur. -
Burnish the print:
Using a barren or the back of a wooden spoon, rub the back of the paper in circular motions. Apply firm pressure, focusing on the solid black areas of the dog’s head and neck. -
The reveal:
Peel back one corner of the paper to check ink coverage. If it looks spotty, lay it back down and rub more. If good, pull the paper gently away from the block. -
Drying and framing:
Allow the print to dry fully (water-based ink takes about an hour; oil-based takes days). Once dry, mount it behind a mat board and place it in a light wood frame.
Now you have a timeless, hand-crafted tribute to your furry friend ready to hang on the wall
BRUSH GUIDE
The Right Brush for Every Stroke
From clean lines to bold texture — master brush choice, stroke control, and essential techniques.
Explore the Full Guide
Bird on a Branch
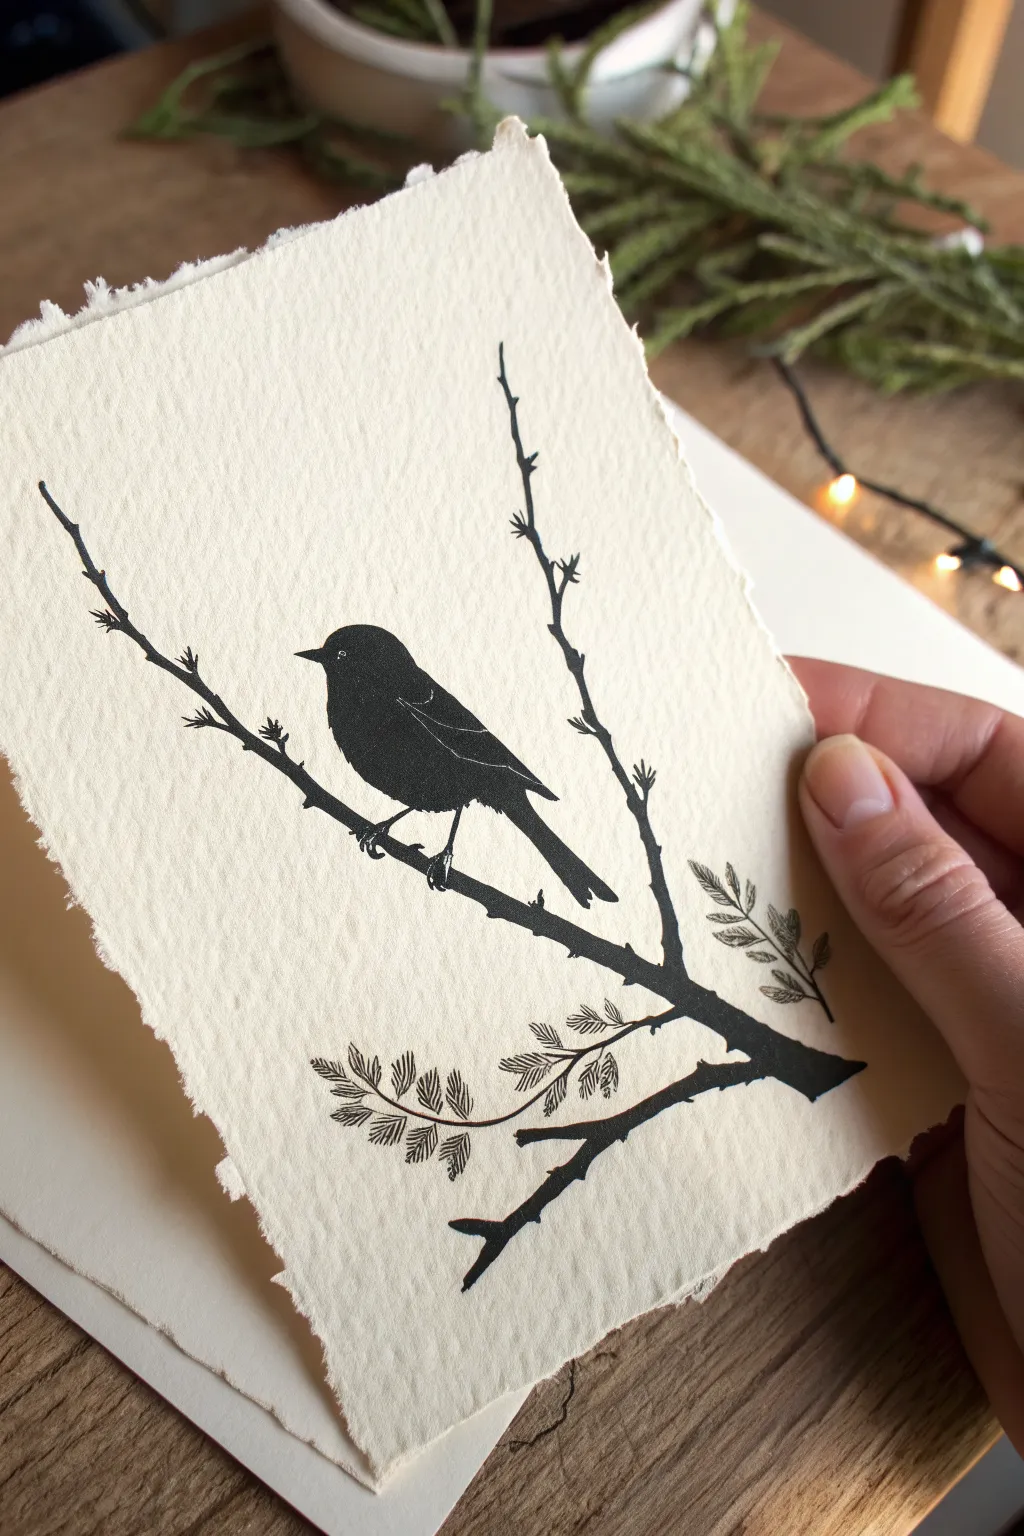
Capture the stark beauty of nature with this high-contrast linocut print featuring a lone bird perched on bare branches. The design relies on bold silhouette work balanced by delicate botanical details, all printed on textured handmade paper for an organic, artisanal finish.
How-To Guide
Materials
- Soft-cut lino block (approx. 4×6 inches)
- Linocut carving tools (V-gouge, U-gough, fine detail knife)
- Black water-soluble block printing ink
- Soft rubber brayer (roller)
- Heavyweight handmade paper with deckled edges (e.g., Khadi or cotton rag)
- Tracing paper and soft pencil (6B or similar)
- Baren or wooden spoon for burnishing
- Inking plate or piece of glass
- Fine-point permanent marker (optional)
Step 1: Design and Transfer
-
Draft the composition:
Begin by sketching your bird design on a piece of scrap paper. Focus on the triangular shape of the bird’s body and the long tail feathers pointing diagonally downward. Keep the main branch thick and diagonal, with thinner offshoots reaching upwards. -
Add botanical accents:
Draw small clusters of leaves or pine needles near the bottom right of the main branch. These should be stylized and somewhat separate from the main solid black branch to create visual interest. -
Trace the image:
Place tracing paper over your sketch and trace the lines with a soft lead pencil. Remember that your final print will be a mirror image of the block, so flip your tracing paper over before transferring if direction matters to you. -
Transfer to the block:
Place the tracing paper graphite-side down onto your lino block. Rub the back of the paper firmly with a spoon or your fingernail to transfer the pencil lines onto the surface. -
Reinforce the lines:
Go over your faint pencil lines on the lino block with a permanent marker. This prevents the design from smudging while you carve and clearly defines which areas will be kept (black) and which will be removed (white).
Fixing “Salty” Prints
If your solid black areas look speckled with white spots (salty), you likely need more ink or more pressure. Apply another thin layer of ink and burnish heavily in circular motions.
Step 2: Carving the Block
-
Outline the silhouette:
Using your finest V-gouge tool, carefully carve along the outer edges of the bird and the main branches. Carve away from the line into the negative space, creating a safety trench around your design. -
Detail the bird:
Use the fine tool to carve out the small eye and the subtle wing definition line within the bird’s body. These are the only white details inside the solid black shape, so keep them thin and sharp. -
Carve the leaves:
For the botanical details at the bottom right, switch to a very fine knife or V-tool. Use short, flicking motions to carve the veins and separation between the small leaves. -
Clear negative space:
Switch to a wider U-gouge to clear away the large open background areas. I find it helpful to carve in a consistent direction or follow the contours of the branches to create a subtle texture in the background if any chatter is picked up. -
Refine the edges:
Inspect your carving for any high spots or ridges right next to your design lines. Shave these down to ensure a clean, crisp print.
Deckled Paper Tip
Handmade paper has deep texture that can be hard to print on. Lightly mist the paper with water and blot it dry before printing; the damp fibers soften and accept ink much better.
Step 3: Inking and Printing
-
Prepare the ink:
Squeeze a small line of black block printing ink onto your inking plate. articulate the brayer back and forth and lift it frequently to create a thin, even layer of ink with a velvety ‘hissing’ texture. -
Ink the block:
Roll the brayer over your carved block. Apply ink in multiple thin layers rather than one thick one, rolling in different directions to ensure the solid black areas of the bird and branch are fully saturated. -
Position the paper:
Align your handmade deckled-edge paper over the inked block. Gently lower it down, being careful not to shift it once it touches the wet ink. -
Burnish the print:
Using a baren or the back of a wooden spoon, rub the back of the paper in small circles. Apply firm pressure, focusing especially on the solid black area of the bird’s body to get a deep, consistent black. -
Check and peel:
Carefully lift one corner of the paper to peek at the transfer. If the black looks patchy, lay it back down and burnish that spot again. When satisfied, slowly peel the paper off the block to reveal your print.
Allow the ink to dry completely for at least 24 hours before framing your elegant nature study
Moth or Butterfly Symmetry
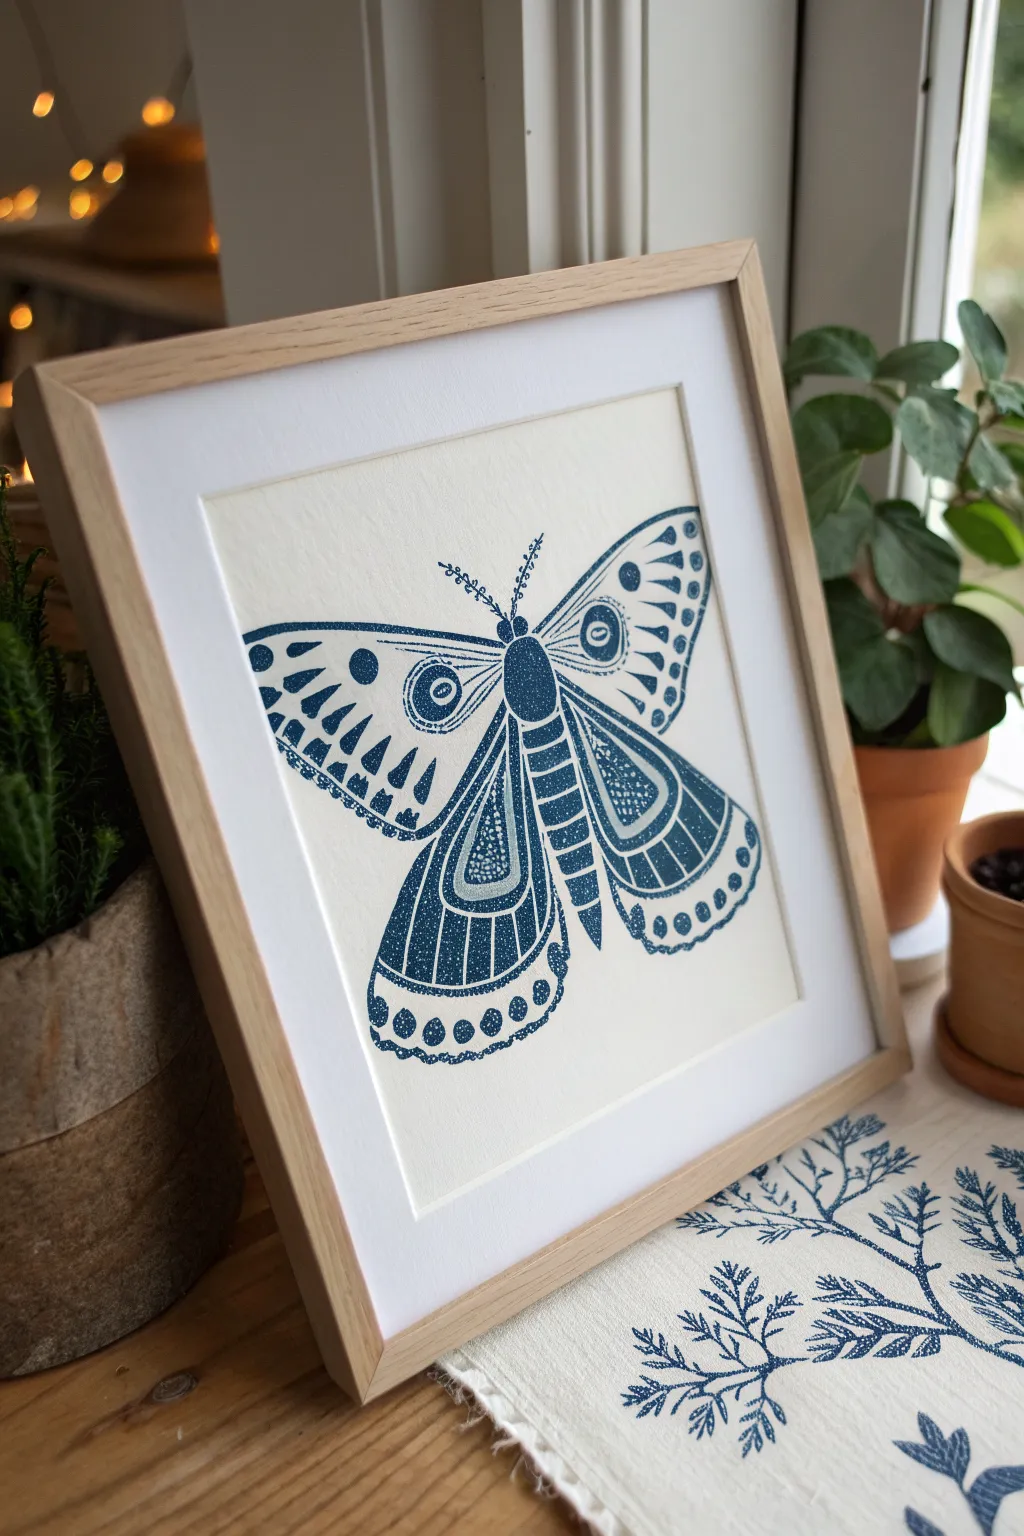
This project captures the delicate, mirrored beauty of a moth using the bold, graphic nature of linocut printing. The deep indigo ink against creamy paper creates a striking, vintage-inspired piece perfect for botanical or entomological collections.
Step-by-Step Tutorial
Materials
- Soft-cut lino block (at least 6×6 inches)
- Linoleum carving tools (V-gouge, U-gouge, fine knife)
- Tracing paper and pencil (2B or softer)
- Deep blue or indigo block printing ink (oil-based recommended for richness)
- Brayer (roller)
- Inking plate (glass or acrylic sheet)
- Printmaking paper (cream or off-white, e.g., Stonehenge or Rives BFK)
- Baren or wooden spoon for burnishing
- Light wood square frame with mat board
Step 1: Design and Transfer
-
Reference and Sketch:
Begin by sketching a moth shape on plain paper. Focus on distinct sections: a plump, segmented body, feathery antennae, and broad wings divided into panels. Don’t worry about perfect symmetry yet; just get the main shapes right. -
Refining the Pattern:
Fill the wing sections with repeating motifs. Use circles, teardrop shapes, and parallel lines to create texture. The image features concentric circles on the upper wings and striped panels on the lower wings. -
Fold for Symmetry:
To achieve perfect symmetry, trace just the left half of your design onto a piece of tracing paper. Fold the paper exactly down the center line of the moth’s body. -
Complete the Transfer:
Rub the back of the folded tracing paper to transfer the graphite to the other half, creating a perfectly mirrored image. Unfold and re-trace all lines heavily with a soft pencil. -
Transfer to Block:
Place the tracing paper face down onto your lino block. Burnish the back firmly with a spoon or barren to transfer the graphite image onto the surface. You should now see a faint grey outline on the block.
Step 2: Carving the Block
-
Outline the Subject:
Using a fine V-gouge tool, carve carefully along the main outlines of the moth. Keep the tool at a low angle to avoid chatter marks. This initial outline separates your subject from the background. -
Carving the Negative Space:
Switch to a wider U-gouge to clear away the large background area surrounding the moth. Leave a little texture if you like, but aim for a relatively clean background to let the subject pop. -
Detailed Wing Patterns:
Return to your finest tool to carve the intricate details inside the wings. Imagine you are drawing with light; every cut you make will be white paper. Carve out the centers of the circles and the stripes. -
Texturing the Body:
I like to use small, stippled pecks with the cutter to create the fuzzy texture on the moth’s thorax. For the abdomen, carve distinct horizontal bands. -
Antennae Precision:
The antennae require a very steady hand. Instead of carving the line itself, carve the space immediately around the thin lines to leave them raised.
Patchy Printing?
If your print looks salty (white speckles in the ink), your paper might have too much texture or you aren’t applying enough pressure. Try a thinner paper or use a slightly softer brayer.
Step 3: Inking and Printing
-
Prepare the Ink:
Squeeze a small line of indigo ink onto your inking plate. Roll the brayer back and forth and lift it occasionally to create a smooth, velvety texture—listen for a distinctive hiss sound. -
Ink the Block:
Roll the ink onto your carved block in thin, even layers. Apply ink in multiple directions to ensure all raised areas, especially the fine wing veins, are coated. Be careful not to flood the small carved details. -
Align the Paper:
Carefully lower your printmaking paper onto the inked block. Once the paper touches the ink, do not shift it, or your image will smudge. -
Burnish the Print:
Using a baron or the back of a wooden spoon, rub the back of the paper in small circular motions. Apply firm, consistent pressure, paying special attention to the edges and the center body of the moth. -
The Reveal:
Slowly peel one corner of the paper up to check coverage. If it looks patchy, lay it back down and burnish more. If satisfied, pull the paper entirely off the block to reveal your print. -
Drying and Framing:
Allow the print to dry completely (oil-based inks can take a few days). Once dry, mount it behind a white mat in a light square wooden frame to mimic the clean display in the reference image.
Metallic Accent
Once the blue ink is fully dry, hand-paint small details like the eye spots or wing tips with gold gouache or watercolor for a shimmering, precious effect.
Hang your symmetrical creation in a bright spot where the intricate details can be admired up close

PENCIL GUIDE
Understanding Pencil Grades from H to B
From first sketch to finished drawing — learn pencil grades, line control, and shading techniques.
Explore the Full Guide
Snail Mini Print
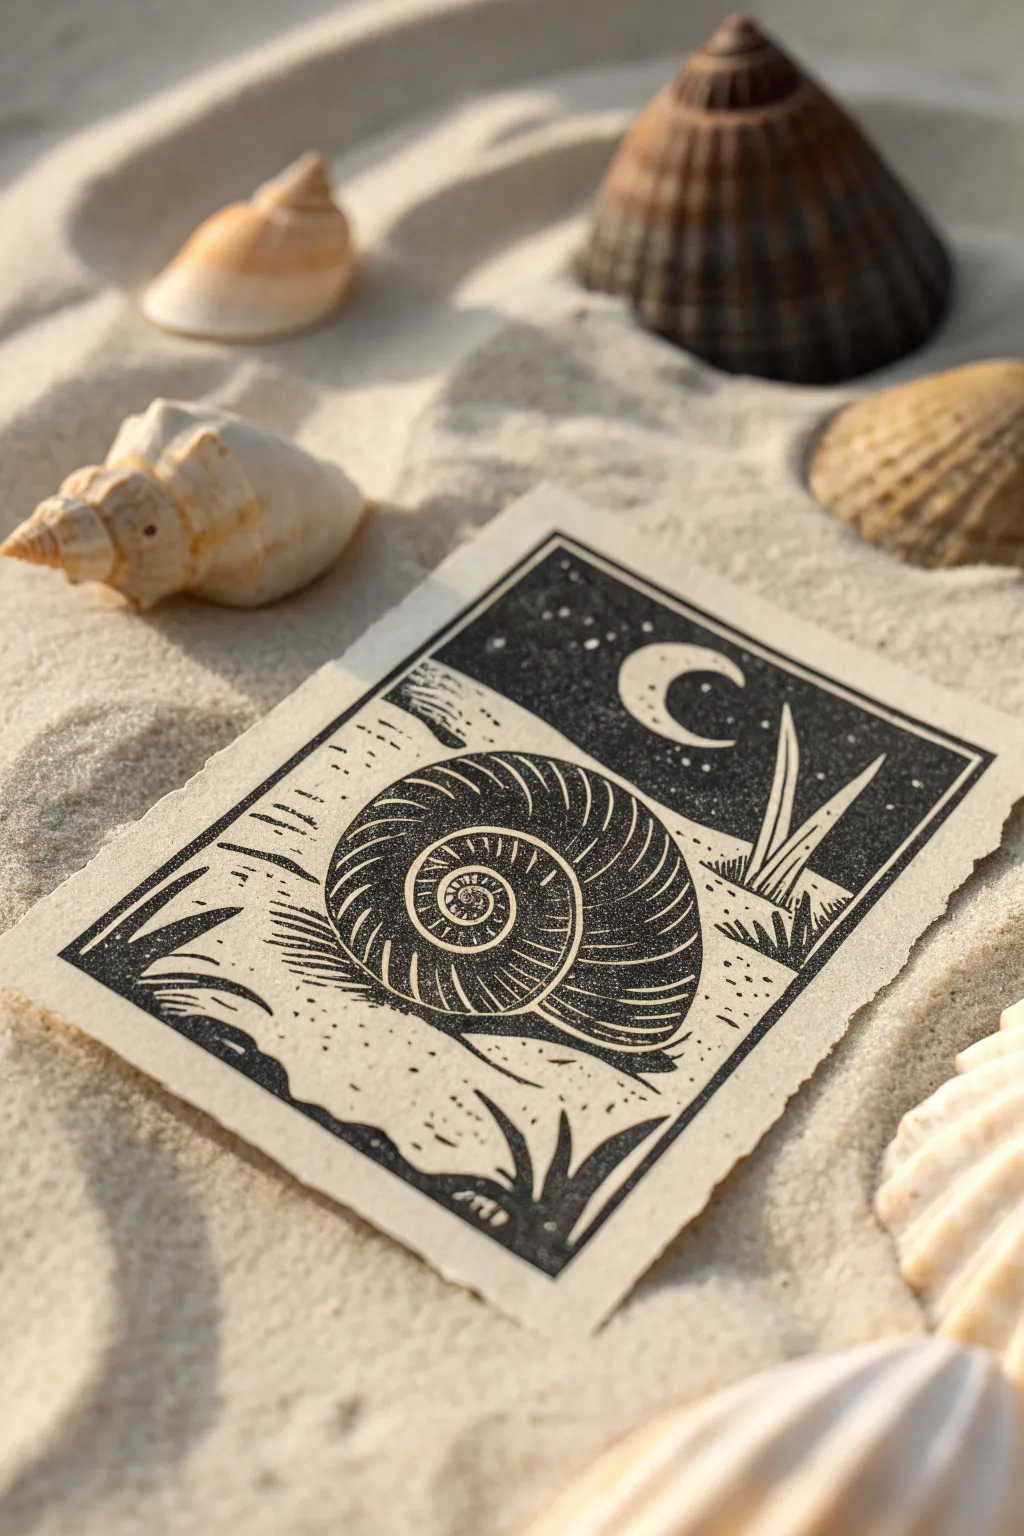
Capture the quiet beauty of a beach at night with this striking linocut mini print featuring a coiled snail shell under a crescent moon. Using strong contrast and textured carving strokes, you’ll create a timeless black-and-white design that feels both rustic and refined.
Step-by-Step Guide
Materials
- Soft-cut linoleum block or rubber carving block
- Linocut carving tools (V-gouge, U-gouge, knife)
- Black water-soluble block printing ink
- Brayer (roller)
- Baren or wooden spoon for burnishing
- Textured cream or heavy beige printmaking paper with deckled edges
- Tracing paper and soft pencil (2B or softer)
- Inking plate or piece of glass
Step 1: Design and Transfer
-
Draft your design:
Sketch a rectangular border on your tracing paper slightly smaller than your lino block. Draw a large, spiraling snail shell dominating the lower center, sitting on a sandy dune. Add a crescent moon in the upper right corner. -
Refine the details:
Visualize your negative space. In this print, the sky will be dark (left uncarved) and the sand will be light (carved away). Sketch thin lines for grass blades poking up and small dots for stars. -
Transfer to the block:
Flip your tracing paper graphite-side down onto the lino block. Rub the back firmly to transfer the image. Remember, your final print will be a mirror image of what’s on the block, so this flip is essential. -
Reinforce the lines:
Go over the transferred faint lines with a permanent marker directly on the block so they don’t smudge while you work.
Noise is Okay!
Don’t meticulously clear every bit of the ‘white’ areas. Leaving small ridges creates ‘noise’ that adds authentic texture, making it look like sand.
Step 2: Carving the Block
-
Outline the main shapes:
Using a fine V-gouge, carve carefully along the outer lines of the shell, the moon, and the horizon line separating the sand from the sky. Always carve away from your body for safety. -
Carve the shell texture:
Inside the shell spiral, use short, rhythmic strokes to create the ribbed texture. Leave thin ridges of lino between your gouges to catch the ink—these will become the black lines defining the spiral. -
Clear the sandy foreground:
Switch to a wider U-gouge to clear away the large negative space of the sand dunes at the bottom. Leave a few random, short gouge marks or ‘chatter’ to simulate the texture of sand. -
Detail the grass and sky:
Carve around the grass blades so they remain raised. In the sky area, use the tip of a small gouge to peck out tiny holes for the stars, leaving the rest of the sky smooth and uncarved. -
Define the border:
Carve a clear channel around the entire rectangular border. You can leave the very outer edges rough if you want a more organic look, but ensure the inner frame line is sharp. -
Clean the block:
Brush off all loose carving debris. I usually wipe the block gently with a slightly damp cloth to ensure no tiny crumbs remain in the grooves.
Deckle It Yourself
To get perfect fuzzy edges, paint a line of water where you want to cut the paper, let it soak for a minute, and then tear along a ruler.
Step 3: Inking and Printing
-
Prepare the paper:
Tear your paper to size rather than cutting it to achieve those soft, fuzzy deckled edges shown in the photo. Give yourself a generous margin around the print area. -
Charge the ink:
Squeeze a small line of black ink onto your inking plate. Roll the brayer back and forth and lift it vertically between rolls until you hear a consistent ‘velcrolike’ sticky sound. -
Ink the block:
Roll the ink onto your carved block in thin, even layers. Roll in multiple directions to ensure the raised surfaces are fully coated but the shallow carved lines don’t fill up with ink. -
Position the paper:
Carefully align your torn paper over the inked block. Once it touches the ink, do not shift it or the image will smear. Drop it gently into place. -
Burnish the print:
Using a baren or the back of a wooden spoon, rub the back of the paper in small circles. Apply firm, consistent pressure, focusing especially on the solid black areas like the sky and the dark spirals of the shell. -
The reveal:
Pick up one corner of the paper and slowly peel it back to reveal your print. Check the coverage as you peel; if you missed a spot, you can sometimes lay it back down and rub that specific area again. -
Dry the print:
Place your finished print on a flat drying rack or hang it by a corner. Water-based inks dry relatively quickly, but give it at least a few hours before handling.
Once dry, your handmade print is ready to be framed or gifted as a piece of coastal art
Pine Trees Under Moonlight
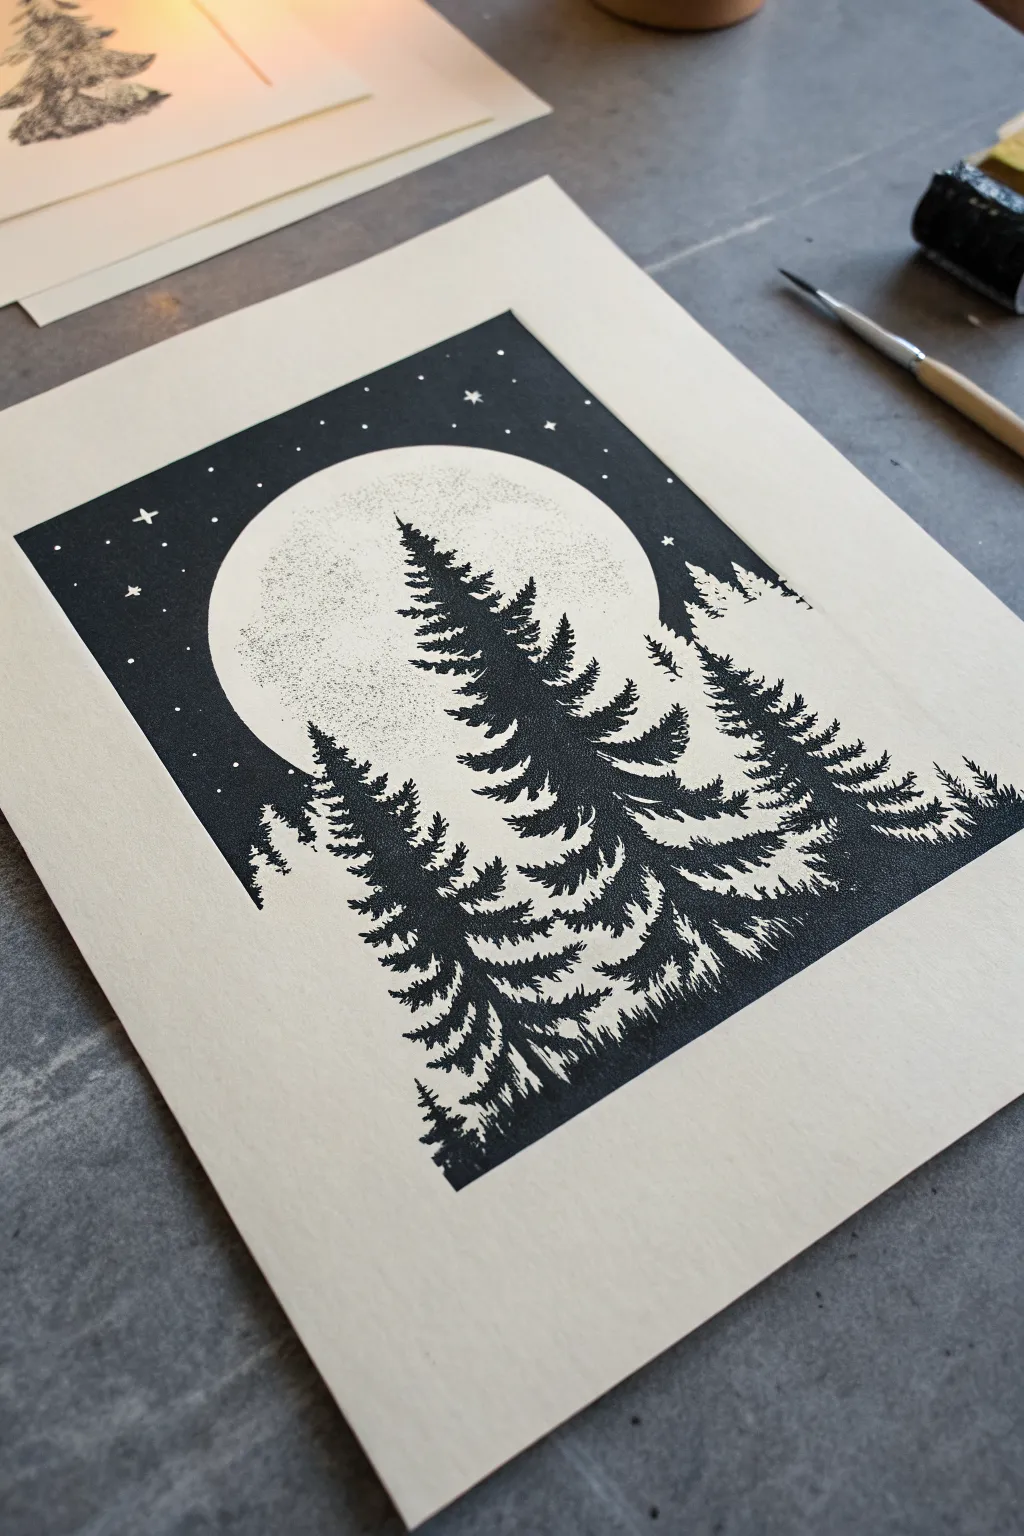
Capture the serene beauty of a winter night with this high-contrast linocut design. The composition features striking pine silhouettes set against a softly textured moon and a star-studded sky, creating a dramatic sense of depth.
Detailed Instructions
Materials
- Soft-cut lino block (at least 5×7 inches)
- Black water-based block printing ink
- High-quality printmaking paper (off-white or cream)
- V-gouge carving tool (fine)
- U-gouge carving tool (medium)
- Large flat gouge (for clearing)
- Brayer (roller)
- Inking plate or glass slab
- Pencil and tracing paper
- Barren or wooden spoon
Step 1: Planning and Transfer
-
Sketch the composition:
Begin by sketching your design on paper. Draw a large central circle for the moon and plan the placement of three pine trees: one tall central tree and two flanking it. Add small dots for stars in the upper corners. -
Define positive and negative space:
Shade in the areas that will remain black (the trees and the night sky around the moon). Leave the moon itself white, as well as the stars. This visual map is crucial for carving. -
Transfer to the block:
Use carbon paper or soft graphite to transfer your sketch onto the lino block. Remember that your final print will be a mirror image of what you carve, though for trees, symmetry makes this less critical. -
Trace with permanent marker:
Go over your pencil lines on the block with a fine-point permanent marker. This prevents the design from smudging while you work and clearly defines your cutting boundaries.
Moon Texture Trick
To get that subtle stippled texture on the moon without carving, try lightly sanding that specific area of the lino block with heavy-grit sandpaper before inking.
Step 2: Carving the Sky and Moon
-
Outline the stars:
Use your finest V-gouge to carefully carve out the small star shapes in the upper corners. These need to be deep enough that they don’t fill with ink later. -
Edge the moon:
Carve the perfect circle of the moon’s outline. I find it easier to rotate the block itself rather than my hand to get a smooth, continuous curve. -
Texture the moon’s surface:
Inside the moon circle, use a tool to create texture rather than clearing it completely. Use a stippling motion or very shallow, tiny picks to create a cratered, grainy look that suggests the moon’s surface. -
Clear the border:
Decide on the rectangular frame of your image. Clear away everything outside this rectangle using a large U-gouge to ensure clean margins on your paper.
Fixing ‘Chatter’
If you see unwanted ink lines in the negative space (chatter), wipe them off with a Q-tip before printing, or carve those areas deeper for the next print.
Step 3: Carving the Pine Trees
-
Define the tree silhouette:
The trees are the trickiest part because they are dark silhouettes against the light moon. You are actually carving the *light* spaces between the branches, not the branches themselves. -
Carve branch details:
Switch to your fine V-gouge. Make short, flicking cuts starting from the outside of the tree moving inward toward the trunk to create the jagged, needle-like edges of the boughs. -
Separate the trees:
Carefully carve the white space that separates the central tree from the background trees. These lines need to be thin but distinct to create depth. -
Ground the image:
At the bottom, leave a solid mass of black for the ground, but use small upward flicks to suggest grass or undergrowth silhouetted against the light. -
Clean up stray ridges:
Inspect the ‘white’ areas (the moon and the outside border). Use a wide gouge to trim down any high ridges that might accidentally catch ink.
Step 4: Inking and Printing
-
Prepare the ink:
Squeeze a small line of black ink onto your inking plate. Roll the brayer back and forth and lift it occasionally to create a purposeful ‘hissing’ sound, indicating an even, velvety layer of ink. -
Ink the block:
Roll the ink onto your carved block. Apply it in thin layers, rolling in different directions to ensure the solid black sky and trees get full coverage without flooding the fine star details. -
Position the paper:
Wash your hands or check them for ink spots. Carefully lower your printmaking paper onto the center of the block. -
Burnish the print:
Using a baren or the back of a wooden spoon, apply firm pressure in circular motions over the entire back of the paper. Focus extra pressure on the solid dark areas to get a rich black. -
Reveal the print:
Slowly peel back one corner of the paper to check the transfer. If it looks good, peel the rest away to reveal your stark winter scene.
Let the ink dry completely before framing your atmospheric nightscape


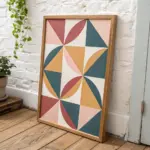
Mountain Badge Emblem
Capture the spirit of the great outdoors with this crisp mountain emblem, perfect for adventure journals or custom stationery. The design features bold geometric shading and classic nature motifs enclosed in a clean circular border, creating a professional-looking stamp effect.
Step-by-Step Tutorial
Materials
- Soft-cut lino block
- Linoleum cutter set (V-gouge and U-gouge)
- Black block printing ink (water or oil-based)
- Rubber brayer (roller)
- Pencil and tracing paper
- Compass or circular object
- Sheet of heavy, textured cotton rag paper (deckle edge preferred)
- Baren or wooden spoon
Step 1: Drafting the Design
-
Create the boundary:
Begin by drawing a perfect circle on your paper or directly on the block using a compass. This will be the outer boundary of your badge emblem. -
Sketch the mountains:
Draw three triangular mountain peaks in the lower half of the circle. Create jagged lines within them to indicate snowcaps and shadowed rocky faces. -
Add nature elements:
Sketch stylized pine trees in the foreground against the mountain bases. Use simple zigzag shapes for the branches. Below the mountains, draw two or three curved lines to represent rolling hills or a river. -
Design the sky:
Place a small circle in the upper left section for the sun. Draw radiating lines extending outward to fill the negative space of the sky, stopping short of the mountains and the outer border. -
Transfer to block:
Trace your final design onto tracing paper. Flip the paper over (graphite side down) onto your lino block and rub the back firmly to transfer the image in reverse. This ensures the print orientation is correct.
Fixing Chatter
If stray marks appear in the white areas (called chatter), let the print dry, then carefully trim the raised bits of lino down further before your next print run.
Step 2: Carving the Block
-
Outline the main shapes:
Using a fine V-gouge tool, carefully carve along all the pencil lines to isolate the shapes. Start with the circular border and the outlines of the mountains. -
Carve the sky:
Switch to a slightly wider tool to clear the space between the sun rays. Be careful not to undercut the thin lines of the sunbeams. -
Adding texture to mountains:
For the shaded parts of the mountains, don’t remove all the material. Instead, use a stippling technique or make tiny random picks with the smallest gouge to create that speckled, rocky texture seen in the reference. -
Define the snowcaps:
Clear away the white areas of the snowcaps completely. I like to keep my tool strokes moving in the same direction as the slope of the mountain for a cleaner look. -
Clear negative space:
Use a wide U-gouge to remove the large areas of linoleum outside the main circular border. Ensure these areas are carved deep enough so they don’t pick up stray ink.
Step 3: Inking and Printing
-
Prepare the ink:
Squeeze a small line of black block printing ink onto a glass slab or palette. Roll the brayer back and forth and lift it occasionally until the ink makes a consistent velcro-like hissing sound. -
Ink the block:
Roll the inked brayer over your carved block. Apply a thin, even layer. You might need to roll in multiple directions to ensure the textured mountain areas catch enough ink. -
Position the paper:
Carefully place your deckled-edge paper on top of the inked block. Once the paper touches the ink, do not shift or slide it. -
Burnish the print:
Using a baren or the back of a wooden spoon, rub the back of the paper in small circular motions. Apply firm pressure, focusing especially on the solid black areas of the mountains. -
The reveal:
Slowly peel one corner of the paper back to check ink coverage. If it looks spotty, lay it back down and burnish more. When fully transferred, pull the paper completely off the block. -
Dry and finish:
Place your wet print in a safe, flat area to dry. Water-based inks dry quickly, but oil-based inks may need a day or two.
Clean Lines
Warm your lino block slightly with a hairdryer or by sitting it in the sun for a few minutes before carving. It softens the material, allowing for much smoother, fluid cuts.
You now have a striking piece of handmade art ready to frame or gift
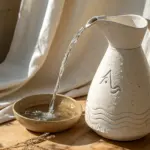
Ocean Wave White-Line Cut
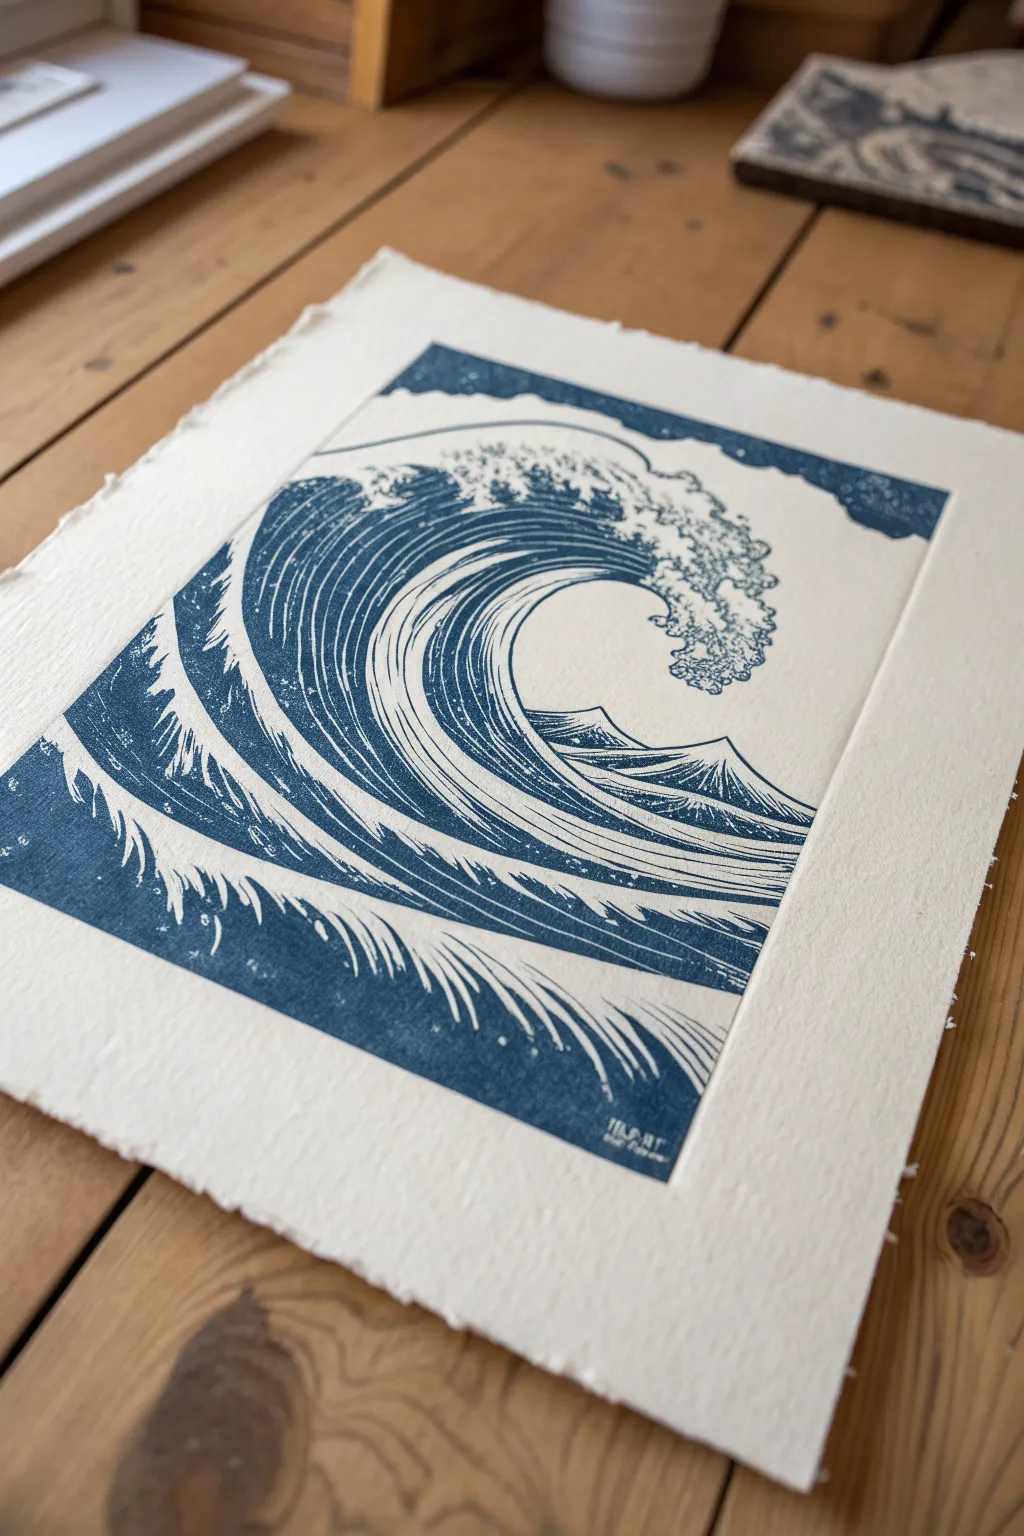
Capture the raw power of the ocean with this expressive white-line linocut project. By carving away the white foam and highlighted curves, you will leave behind a bold, rhythmic wave printed in a single, striking shade of Prussian blue.
Detailed Instructions
Materials
- Soft-cut lino block (approx 5×7 or 8×10 inches)
- Set of lino cutters (V-gouge, U-gouge, and knife)
- Block printing paper with deckled edge (e.g., Stonehenge or Rives BFK)
- Oil-based relief printing ink (Prussian Blue or Indigo)
- Brayer (rubber roller)
- Baren (or a wooden spoon) for burnishing
- Tracing paper and pencil (soft lead like 4B)
- Glass or acrylic sheet for inking
- Masking tape
Step 1: Design & Transfer
-
Sketch the wave:
Start by sketching your wave design on tracing paper. Focus on the main curl of the wave; draw long, sweeping lines that follow the water’s momentum. -
Add the foam texture:
Detail the crest of the wave with jagged, bubbly shapes. This will be the most intricate part of your carving, representing the sea spray. -
Define the flow lines:
Draw the secondary ripples and currents inside the wave’s body. These lines should curve upward, following the main arch of the water. -
Transfer to block:
Place your tracing paper face-down onto the lino block. Rub the back firmly with a bone folder or spoon to transfer the graphite image onto the surface. -
Reinforce the lines:
Go over the transferred faint lines with a permanent marker or darker pencil so they don’t disappear once you start carving.
Step 2: Carving the Block
-
Outline the main shape:
Using a fine V-gouge, carve along the very outer edge of your wave design. This establishes your primary border. -
Carve the white lines:
Switch to a medium U-gouge to carve the swooping lines inside the wave body. Remember, whatever you carve away will be the white paper showing through. -
Detail the foam:
I like to use the smallest cutter blade here. Make small, erratic gouges and stippling marks at the crest to mimic bubbling foam and splashing water. -
Clear the negative space:
Use a wide U-gouge to clear away the large area of sky to the right of the wave. Be careful near the intricate foam edges. -
Create the border:
Carve a rough, uneven border around the image if you want that framed look, or clear the edges completely for a floating image. -
Clean the block:
Brush away all linoleum crumbs with a soft brush. Any stray crumb left behind will create an unwanted white spot in your final print.
Patchy Prints?
If your print looks ‘salty’ (white speckles in the blue), you likely need a bit more ink on the brayer, or you simply need to apply more pressure while burnishing.
Step 3: Inking & Printing
-
Prepare the paper:
Tear your paper to size using a ruler to create a soft deckle edge. If using heavy paper, mist it lightly with water and blot it dry. -
Charge the ink:
Squeeze a small amount of blue ink onto your glass slab. Roll the brayer back and forth and up and down until the ink makes a velvety ‘hissing’ sound. -
Ink the block:
Roll the inked brayer over your carved block. Apply thin, even layers, rolling in multiple directions to ensure the raised surfaces are fully coated without flowing into the carved grooves. -
Register the paper:
Carefully align your paper over the inked block and lower it down gently. Once it touches the ink, do not shift it. -
Burnish the print:
Using a baren or the back of a wooden spoon, apply firm pressure in small circles over the back of the paper. Focus on the edges and solid blue areas. -
The reveal:
Slowly peel back one corner of the paper to check ink coverage. If it looks patchy, lay it back down and rub more. If it looks solid, peel the paper entirely off the block. -
Dry the print:
Place your finished print on a drying rack or hang it up. Oil-based inks can take a few days to fully cure, so be patient.
Gradient Effect
Try a ‘rainbow roll’ by putting dark blue ink on one side of your glass and teal on the other. Roll them together to create a gradient wave.
Once the ink is fully dry, you will have a stunning piece of nautical art ready for framing.
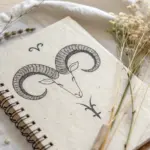
Sun and Moon Mystic Card
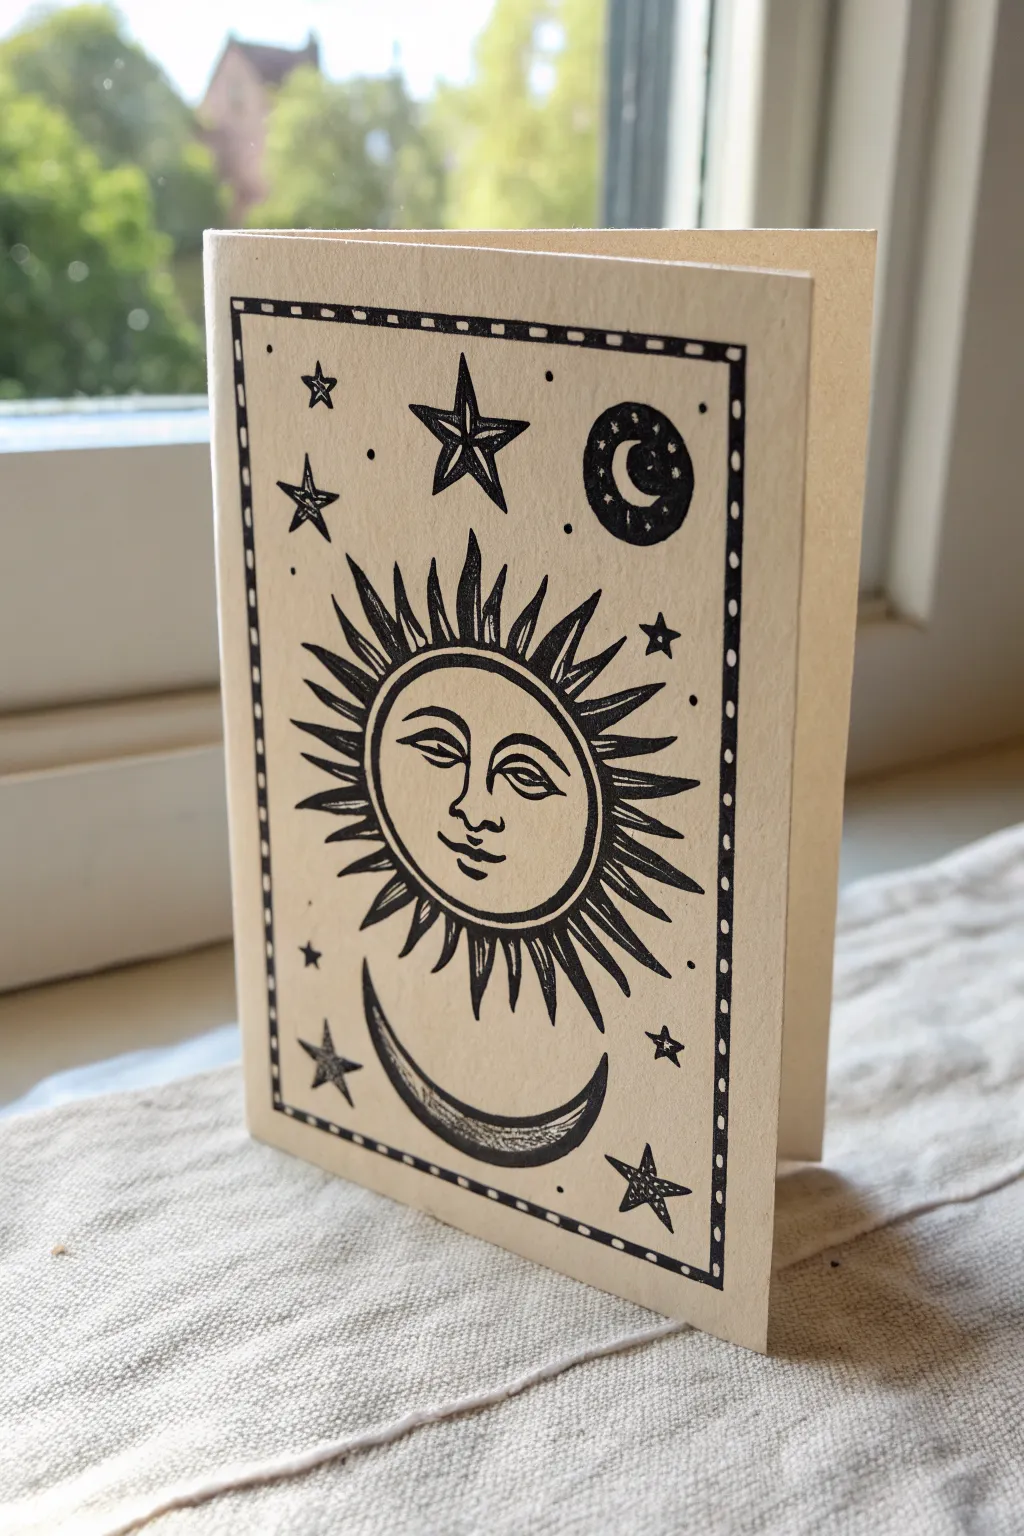
This project captures the charm of vintage tarot illustrations with a linocut design featuring a serene sun face, crescent moons, and scattered stars. Printed in stark black ink on warm cream cardstock, it makes for a striking greeting card or framed miniature print.
How-To Guide
Materials
- Soft-cut lino block (at least 4×6 inches)
- Linocut carving tools (V-gouge and U-gouge)
- Black water-based block printing ink
- Brayer (rubber roller)
- Cream or off-white cardstock (folded)
- Pencil and tracing paper
- Bench hook (optional but helpful)
- Baren or wooden spoon for burnishing
- Glass or acrylic sheet for ink rolling
Step 1: Design and Transfer
-
Sketch the focal point:
Start by drawing a circle in the center of your paper for the sun’s face. Sketch the facial features clearly—eyes looking forward, a defined nose, and a small smile. -
Add the rays:
Draw alternating triangular rays around the sun. Make some sharp and straight, and others slightly wavy to give the design dynamic energy. -
Incorporate celestial elements:
Below the sun, sketch a large upward-curving crescent moon. In the upper right corner, add a smaller crescent moon enclosed in a circle. -
Fill the void:
Scatter five-pointed stars of various sizes around the remaining negative space to balance the composition. -
Draw the border:
Create a double-line rectangular border around the entire design. Inside the border lines, draw small, evenly spaced squares or dots. -
Transfer to block:
Trace your final design onto tracing paper with a soft pencil. Flip the paper face-down onto your lino block and rub the back to transfer the graphite image.
Step 2: Carving the Block
-
Outline the main shapes:
Using a fine V-gouge, carefully carve along all the pencil lines. Outline the sun, the rays, the moons, and the border first to establish your boundaries. -
Define the face:
Switch to your finest tool to carve the details of the sun’s face. Remember, you are carving away the white areas; the black lines will remain raised. -
Clear the background:
Use a wider U-gouge to clear away the large negative spaces between the stars and the sun. I like to leave some texture marks here, as they add character to the print. -
Refine the border:
Carefully carve out the small squares within the border frame. This requires a steady hand, so rotate the block rather than contorting your wrist. -
Clean up edges:
Trim away any excess lino outside the rectangular border to ensure clean edges when printing.
Patchy Ink?
If your print looks ‘salty’ (white speckles in black areas), you need more ink. Add a tiny bit more to the slab and roll again until the coverage is solid.
Step 3: Inking and Printing
-
Prepare the ink:
Squeeze a small line of black block printing ink onto your glass slab. Roll it out with the brayer until you hear a consistent ‘velcro’ or sizzling sound. -
Ink the block:
Roll the brayer over your carved block. Apply a thin, even layer of ink, ensuring all raised surfaces are shiny and coated black. -
Position the paper:
Carefully place your folded cream cardstock on top of the inked block. Make sure it is centered properly before letting go. -
Burnish the print:
Using a baren or the back of a wooden spoon, rub the back of the paper firmly in circular motions. Pay extra attention to the corners and the center face. -
The reveal:
Slowly peel the paper back from one corner to reveal your print. If the ink looks spotty, layout the paper again and burnish harder. -
Let it dry:
Place the card in a safe, flat area to dry completely. Water-based inks usually take a few hours, while oil-based inks may need a day or two.
Make it Gold
For a truly mystical effect, swap the black ink for a metallic gold or bronze block printing ink. It looks stunning on dark navy or black cardstock.
Now you have a celestial masterpiece ready to send to a friend or frame on your wall.
Profile Portrait With Bold Shadows
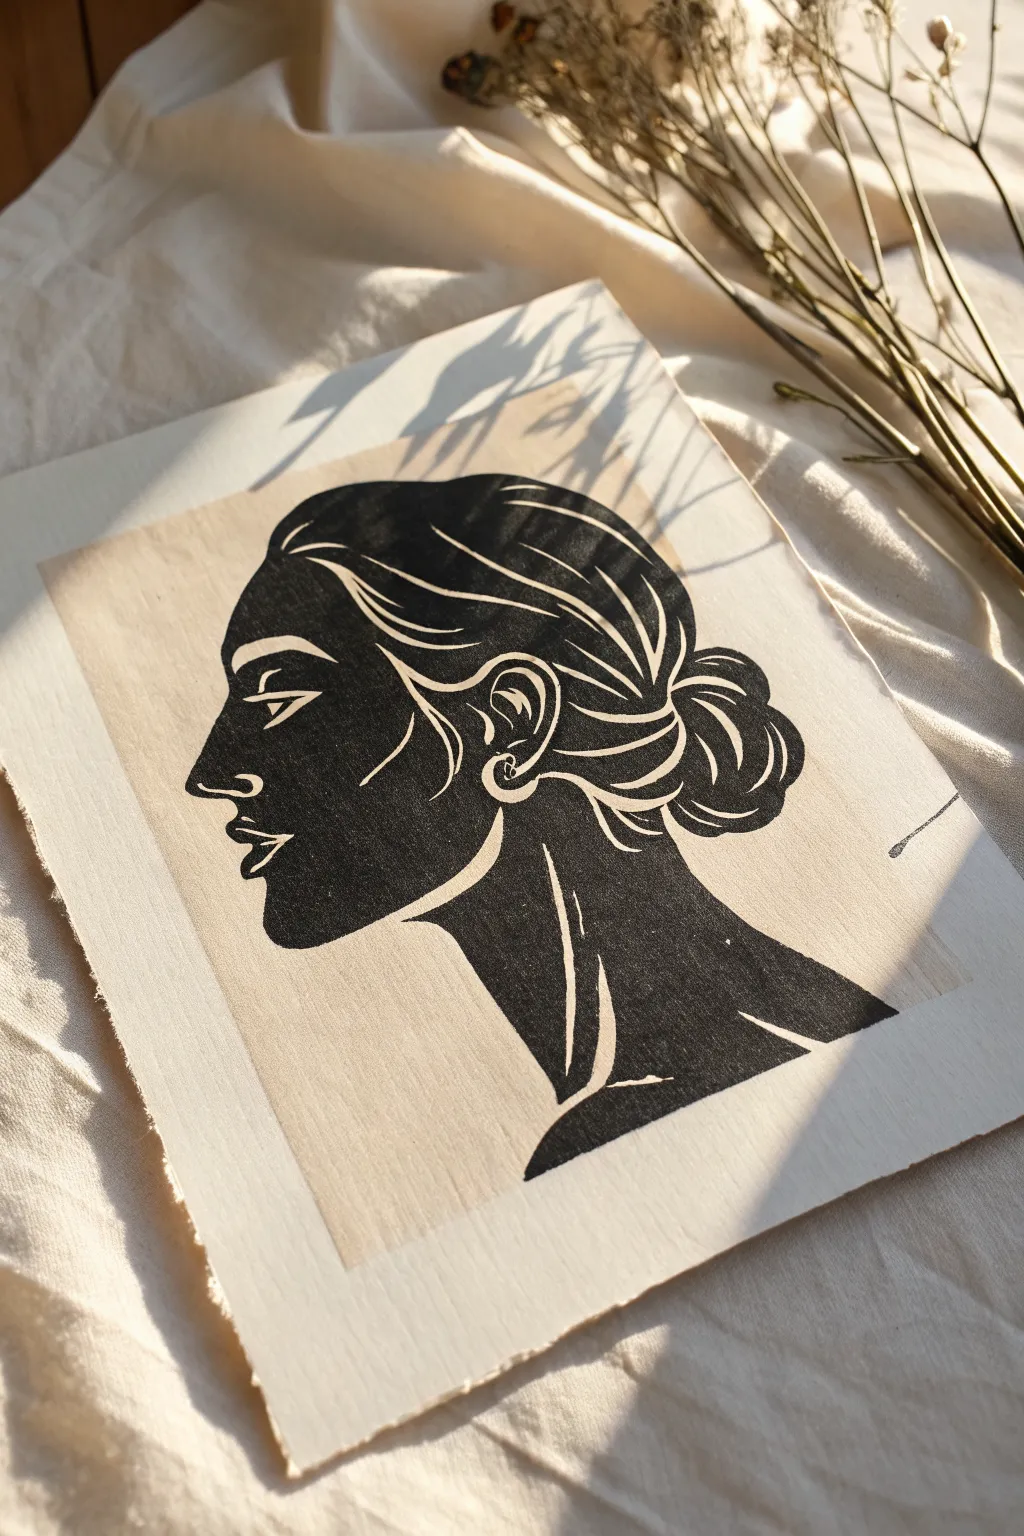
Capture the elegance of a classic silhouette with this striking linocut project. By balancing heavy black space with delicate carved lines, you will create a timeless portrait that emphasizes form and shadow.
Step-by-Step
Materials
- Soft linoleum block (at least 5×7 inches)
- Linocut carving tools (V-gouge, U-gouge, and knife)
- Black oil-based relief ink
- Brayer (roller)
- Cream or off-white printmaking paper (preferably with deckled edge)
- Tracing paper and soft pencil (6B or similar)
- Baren or wooden spoon for burnishing
- Glass or acrylic sheet for inking
- Newsprint or scrap paper
Step 1: Preparation and Transfer
-
Draft your design:
Begin by sketching the side profile of a woman on tracing paper. Focus on the graceful curve of the neck, the strong line of the nose, and the rounded shape of the bun. -
Define the negative space:
Shade in the entire silhouette with your pencil, leaving thin white areas for the hair strands, the jawline definition, the earring, and the eye details. This visualizes exactly what will be inked versus carved. -
Transfer to the block:
Flip your tracing paper pencil-side down onto the linoleum block. Rub the back firmly to transfer the graphite image. Remember, the final print will be a mirror image of your carving. -
Reinforce the lines:
Go over the faint transferred lines on the block with a permanent marker. This prevents the design from smudging while you work and gives you a clear guide.
Ink Bleeding Control
If fine lines in the hair are filling with ink, you are likely over-inking. Clean the block with a rag and re-ink with a “dryer” roller, applying less pressure.
Step 2: Carving the Block
-
Outline the silhouette:
Using your finest V-gouge, carefull carve around the entire perimeter of the profile. This establishes the boundary between the printed figure and the background. -
Carve the delicate hair details:
Switch to a very fine tool to carve the flowing lines inside the hair bun and along the scalp. These lines need to act as ‘white’ highlights, so keep your cuts shallow and fluid. -
Define facial features:
Carefully gouge out the white highlight of the eye, the eyebrow curve, and the small definition of the nostril. Be extremely cautious here; one slip can remove features you intended to keep black. -
Add neck and ear details:
Carve the sharp highlight along the neck muscle and the intricate shape of the ear. Don’t forget the tiny circular highlight for the earring. -
Clear the large background:
Once the detailed figure is safe, use a wide U-gouge to remove all the linoleum surrounding the head. I find it helpful to carve away from the figure to avoid accidental slips. -
Clean up the edges:
Check the large carved background area for high ridges. If you leave these too high, they might pick up ink and create ‘chatter’ on your final print, so trim them down.
Pro Tip: Warm Lino
Before carving, sit on your linoleum block or heat it briefly with a hairdryer. Warm lino cuts like butter, making those sweeping hair curves much smoother.
Step 3: Inking and Printing
-
Prepare the paper:
If your paper is large, tear it down to size using a ruler or tearing bar to create a soft, deckled edge that matches the aesthetic of the sample. -
Charge the ink:
Squeeze a small amount of black relief ink onto your glass slab. Roll it out with the brayer until you hear a consistent ‘hissing’ velcro-like sound and the texture looks velvety. -
Ink the block:
Roll the ink onto your carved block. Apply thin, even layers, rolling in multiple directions to ensure solid coverage on the black areas without flooding the fine carved lines. -
Position the paper:
Carefully lay your cream paper on top of the inked block. Once it touches the ink, do not shift or slide it. -
Burnish the print:
Using a baren or the back of a wooden spoon, rub the back of the paper in small circles. Apply firm pressure, focusing especially on the solid black areas to get a deep, rich tone. -
Reveal the artwork:
Lift one corner of the paper to peek at the transfer. If the black looks patchy, lay it back down and burnish more. When ready, peel the paper off slowly. -
Drying:
Place the print in a safe, flat area to dry. Oil-based inks can take several days to fully cure, but the rich finish is worth the wait.
Frame your print with plenty of white space to let the bold silhouette truly stand out
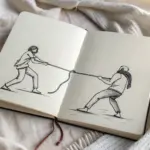
Folk-Style Story Scene
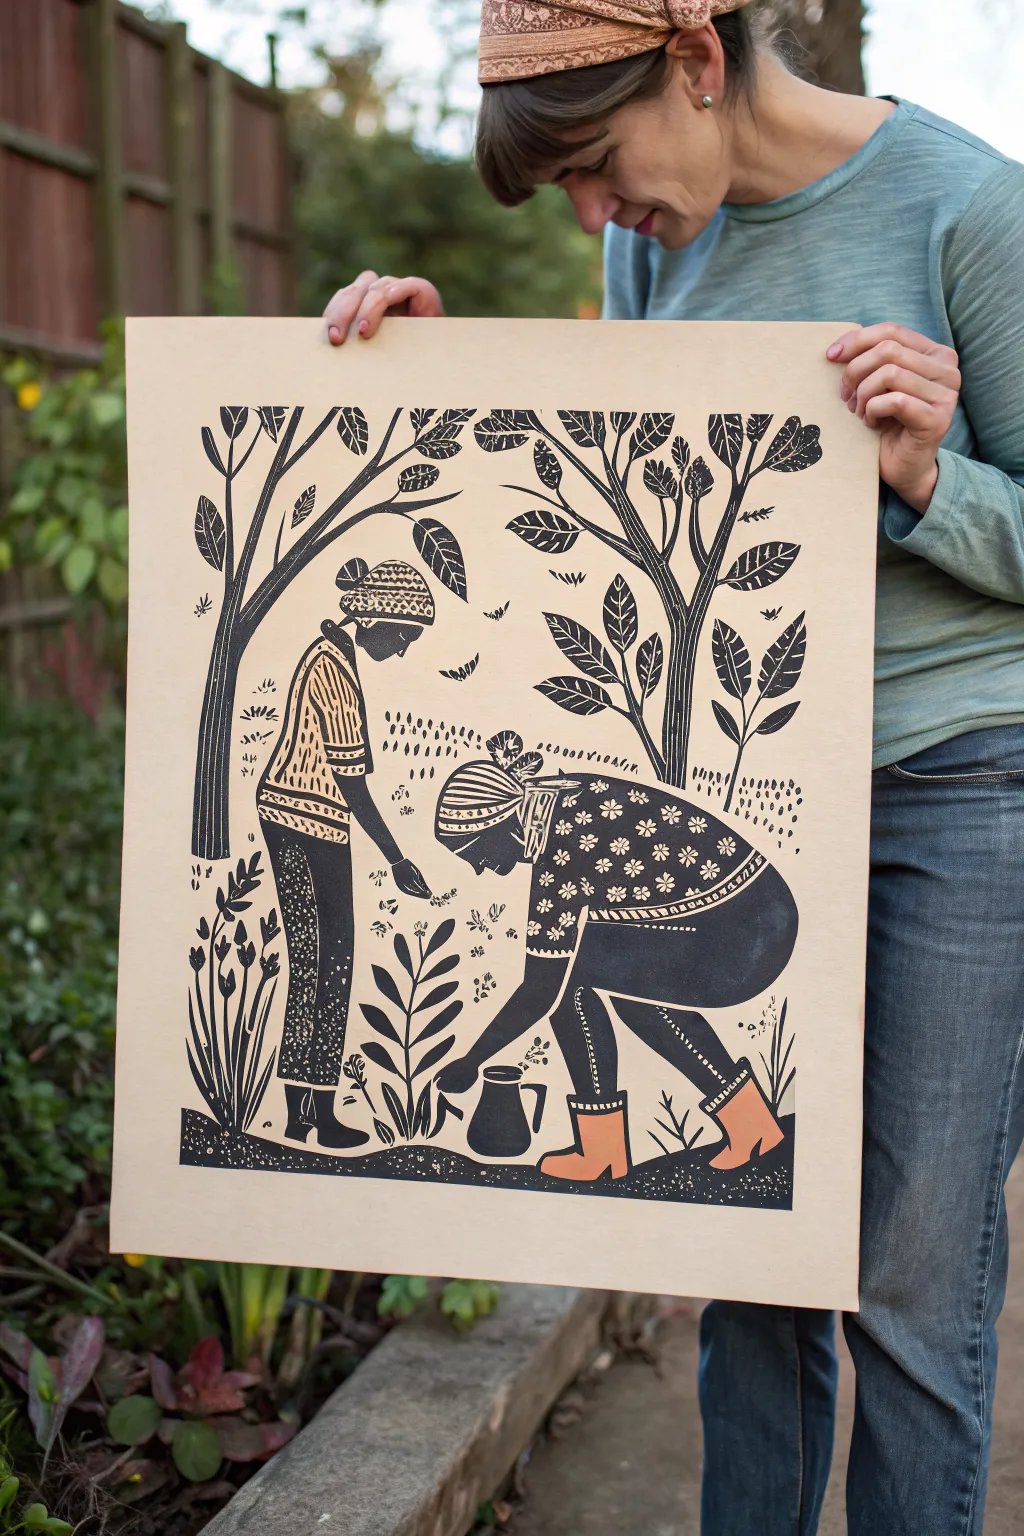
Create a narrative piece that captures the timeless rhythm of gardening with this bold, folk-art inspired linocut. By combining stylized figures with intricate botanical patterns, you will produce a striking black-on-tan print that feels both rustic and refined.
Step-by-Step Guide
Materials
- Large sheet of lino block (A3 size recommended)
- Set of lino carving tools (V-gouges and U-gouges)
- Black water-based block printing ink
- Soft rubber brayer (roller)
- Tan or kraft printmaking paper (heavyweight)
- Tracing paper and pencil
- Carbon transfer paper
- Wooden spoon or baren
- Permanent marker (optional)
Step 1: Planning and Transfer
-
Sketch the narrative:
Begin by sketching your scene on paper. Draw two figures: one standing on the left holding seeds, and one kneeling on the right with a watering can. Keep the forms simple and graphic, focusing on silhouette rather than realistic anatomy. -
Add nature elements:
Fill the surrounding space with stylized trees. Draw curving trunks framing the figures, arching towards the center to create a ‘canopy’ feel. -
Incorporate patterns:
Detail the clothing and plants with repeating marks. The standing figure’s shirt can have vertical stripes, while the kneeling figure’s shirt works well with small flower motifs. Sketch simple veins on the oversized leaves. -
Prepare for transfer:
Trace your final design onto tracing paper. Remember that printing reverses the image, so if specific directionality matters, flip your tracing paper over before the next step. -
Transfer to lino:
Place carbon paper on your lino block, then layer your tracing on top. Tracing over your lines firmly will transfer the design. If the lines are faint, go over them directly on the block with a permanent marker so you don’t lose your guide while carving.
Keep it Sharp
Strop your lino tools on a piece of leather or denim every 15-20 minutes of carving. A razor-sharp tool gives you crisp edges on those delicate leaf veins and lessens hand fatigue.
Step 2: Carving the Block
-
Outline the main shapes:
Using a fine V-gouge, carve along the outlines of the figures, the tree trunks, and the main plant stems. This establishes your ‘stop cuts’ and defines the primary positive space. -
Clear large negative spaces:
Switch to a wider U-gouge to remove the large open area in the background—specifically the sky between the trees and figures. Ensure you carve away enough depth so these areas don’t pick up stray ink later. -
Carve clothing details:
Return to your finer tools to carve the patterns inside the figures’ clothing. For the dark pants, leave them mostly uncarved, perhaps adding just a few texture specks. -
Texture the foliage:
Carve the veins into the leaves. I find it helpful to vary the pressure here to make the leaf veins feel organic rather than mechanical. -
Create the ground:
Instead of clearing the bottom area entirely, use short, chaotic gouges to create the texture of soil and grass beneath the figures’ feet. -
Refine the edges:
Check the perimeter of your design. The image has a rough, un-bordered edge, so simply carve away the excess lino around your scene, leaving a natural, slightly irregular outline.
Add a Pop of Color
After the black ink is fully dry, hand-paint small details like the watering can or the seeds using gouache or watercolor for a subtle mixed-media accent.
Step 3: Inking and Printing
-
Prepare the ink:
Squeeze a line of black block printing ink onto a glass slab or tray. Roll the brayer back and forth—and lift it occasionally—until the ink sounds like sizzling bacon and has a velvety texture. -
Ink the block:
Roll the ink onto your carved block. Apply several thin layers rather than one thick one, rolling in different directions to ensure the solid black areas (like the pants and tree trunks) get full coverage. -
Position the paper:
Carefully align your tan paper over the inked block. Once the paper touches the ink, do not shift it, or the image will smudge. -
Burnish the print:
Using a baren or the back of a wooden spoon, rub the back of the paper in small circles. Apply firm, consistent pressure, paying special attention to the solid black areas and edges. -
The reveal:
Slowly peel one corner of the paper up to peek at the transfer. If the black looks patchy, lay it back down and rub that specific spot more vigorously. -
Dry the print:
Peel the paper fully off the block and hang it or lay it flat to dry. Oil-based inks can take days, while water-based inks will be dry to the touch much sooner.
Frame your print against a neutral wall to let the bold contrast and storytelling really shine.
Pattern Sampler Tile Grid
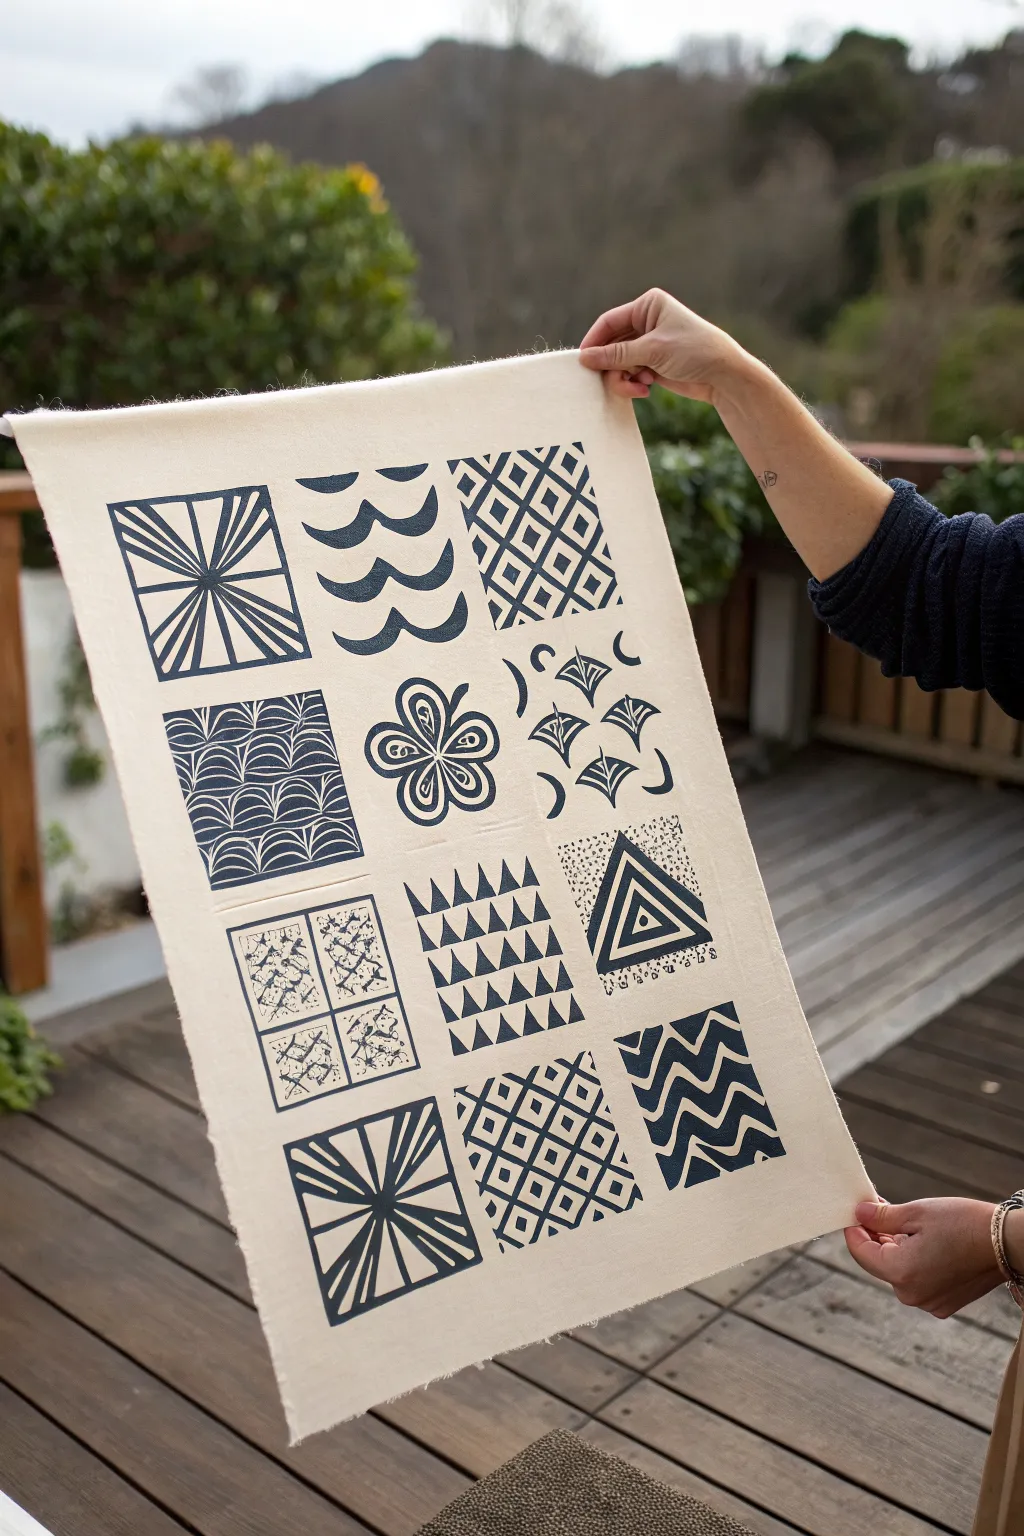
This project transforms simple linocut motifs into a stunning sampler grid on fabric. The striking contrast of deep indigo ink against natural canvas highlights the variety of geometric and organic patterns you can create with basic carving tools.
How-To Guide
Materials
- Soft-cut lino blocks (approx. 4×4 inches each)
- Lino carving tools (V-gouge and U-gouge)
- Block printing ink (fabric-safe, oil-based or screen printing ink)
- Rubber brayer
- Glass plate or inking tray
- Natural cotton or canvas fabric
- Ruler and pencil
- Baren or wooden spoon
- Iron (for heat setting)
- Paper for test prints
Step 1: Designing the Grid
-
Plan your layout:
Begin by sketching a grid of twelve squares on a piece of paper to plan your composition. This sampler features a 3×4 layout, so decide which patterns will sit next to each other to balance visual weight. -
Sketch the motifs:
Draft twelve distinct geometric designs. Include a mix of linear styles like the sunburst, organic shapes like the leaves, and repetitive patterns like the triangles or waves shown in the example.
Patchy Prints?
If your print looks ‘salty’ (white speckles), your fabric might be too textured. Try putting a slightly padded surface, like a towel or felt, underneath the fabric while printing to improve contact.
Step 2: Carving the Blocks
-
Transfer designs:
Transfer your sketches onto your soft-cut lino blocks. Remember that the design will print in reverse, which is crucial if you include any asymmetrical elements. -
Define the borders:
Use a ruler and a knife or a fine V-gouge to carve straight borders around your square designs if you want defined edges, or leave them open for a more organic feel. -
Carve the negative space:
Start carving away the areas you want to remain white (the color of the fabric). Use a U-gouge for larger clear areas and a V-gouge for fine details like the veins in the leaves or the thin lines of the sunburst. -
Refine the details:
Go back over your blocks to clean up any rough edges. I find it helpful to do a quick rubbing with a crayon on paper at this stage to check if I’ve missed any stray peaks of lino.
Step 3: Printing the Sampler
-
Prepare the fabric:
Iron your fabric piece flat. Using a pencil and ruler, lightly mark the center points or corners where each block will be placed to ensure your grid stays aligned. -
Ink the brayer:
Squeeze a line of ink onto your glass plate. Roll the brayer back and forth until the ink sounds ‘sticky’ and has a velvety texture, ensuring an even coat on the roller. -
Ink the first block:
Roll the ink onto your first block, applying light, even pressure. Roll in multiple directions to ensure full coverage of the raised design. -
Print the first tile:
Carefully place the inked block face down onto your marked fabric. Press down firmly with your hand to adhere it initially. -
Burnish the print:
Using a baren or the back of a wooden spoon, rub the back of the block in circular motions. Apply firm pressure, focusing especially on the corners and edges to get a crisp impression. -
Reveal the print:
Hold one corner of the fabric down and slowly peel the block away to reveal your first printed tile. Let this dry slightly if you’re worried about smudging while working on adjacent tiles. -
Complete the grid:
Repeat the inking and printing process for the remaining eleven blocks. Work methodically across your grid, wiping your hands frequently to avoid transferring ink smudges to the clean background.
Clean Edges
Before printing, wipe the recessed carved areas of your block with a Q-tip or rag. This removes stray ink spots that might accidentally transfer to the fabric background.
Step 4: Finishing Touches
-
Dry completely:
Allow the fabric to dry thoroughly. Oil-based inks can take several days to cure fully, while water-based inks might dry in a few hours. -
Heat set the ink:
Once dry, heat set the ink according to the manufacturer’s instructions. Usually, this involves ironing the back of the fabric for several minutes to make the design permanent and washable.
Hang your new textile art with clips or frame it to show off your collection of hand-carved patterns

Have a question or want to share your own experience? I'd love to hear from you in the comments below!