Your living room can be both your soft place to land and your most expressive canvas. Here are my favorite living room ideas—from classic, easy wins to more playful, art-forward twists you can make your own.
Build a Cozy Conversation Layout
Transform ordinary glass jars or inexpensive vases into high-end, textured decor pieces that radiate natural warmth. This simple twine-wrapping technique creates a beautiful, rustic-chic focal point perfect for holding dried pampas grass.
Step-by-Step
Materials
- Two glass vases or jars (one taller with a neck, one shorter and rounder)
- Jute twine (natural beige color)
- Matte cream or off-white chalk paint
- Paintbrush (medium flat brush)
- Hot glue gun and clear glue sticks
- Scissors
- Dried pampas grass stems
- Sandpaper (fine grit, optional)
- Clear matte sealant spray (optional)
Step 1: Preparing the Base
-
Clean surface:
Begin by thoroughly cleaning your glass vessels with warm soapy water or rubbing alcohol to remove any grease or labels. A clean surface ensures the glue and paint adhere properly for a long-lasting finish. -
Start the wrap:
Take your taller vase and apply a small dab of hot glue at the very bottom edge. Press the end of your jute twine into the glue to secure it. -
Wrap the base:
Slowly wind the twine around the base of the vase, adding small dots of hot glue every inch or so to keep the lines tight and preventing slipping. -
Continue upward:
Work your way up the body of the vase. Focus on keeping the rows of twine snug against each other so no glass shows through. I like to rotate the vase with one hand while guiding the twine with the other for a consistent tension. -
Navigate curves:
As you reach the tapered neck of the vase, you may need to use slightly more glue to prevent the twine from sliding down the slope. Press and hold for a few seconds if needed. -
Finish the rim:
Once you reach the top rim, cut the twine cleanly and secure the end with a final dab of hot glue, tucked neatly on the inside edge if possible.
Glue Control
Use a low-temp glue gun if possible. High-temp glue stays liquid longer, causing the twine to slip around on the glass before setting.
Step 2: Painting and Distressing
-
Apply chalk paint:
Dip your brush into the cream chalk paint. Apply a coat directly over the twine-wrapped vase. You don’t need perfect coverage; pushing the paint into the texture creates a lovely, unified look while letting the rough twine texture remain visible. -
Paint the second vase:
Take your second, rounder vase. For this project, we are painting the glass directly to resemble ceramic. Apply a thick coat of the same chalk paint to the entire surface. -
Add texture:
While the paint on the round pottery vase is still wet, you can dab it with a dry sponge or paper towel to create a slightly pitted, stone-like texture. -
Let dry:
Allow both vases to dry completely. Chalk paint dries relatively quickly, but give it at least an hour to be safe. -
Second coat:
Apply a second coat to the round vase if the glass is still showing through. The twine vase likely only needs one coat to maintain that rustic woven appearance. -
Optional sanding:
Once fully dry, you can lightly sand areas of the twine vase to reveal some of the natural jute color underneath, adding depth and an aged feel. -
Create the vignette:
Place the two vases together on a wooden tray. Variation in height is key for visual interest. -
Arrange the stems:
Take your dried pampas grass stems. Establish height with the tallest stems first, placing them in the twine vase. -
Fill and fluff:
Add 2-3 more stems at varying angles to create a fan shape. Gently shake the stems outside first to remove loose seeds, then arrange them so they lean naturally.
Faux Stone Finish
Mix baking soda into your acrylic paint (1 part soda to 2 parts paint) for the shorter vase. It creates a gritty, authentic ceramic texture instantly.
Now you have a serene, tonal centerpiece that brings soft texture to your living space

Choose a Soft Neutral Color Palette
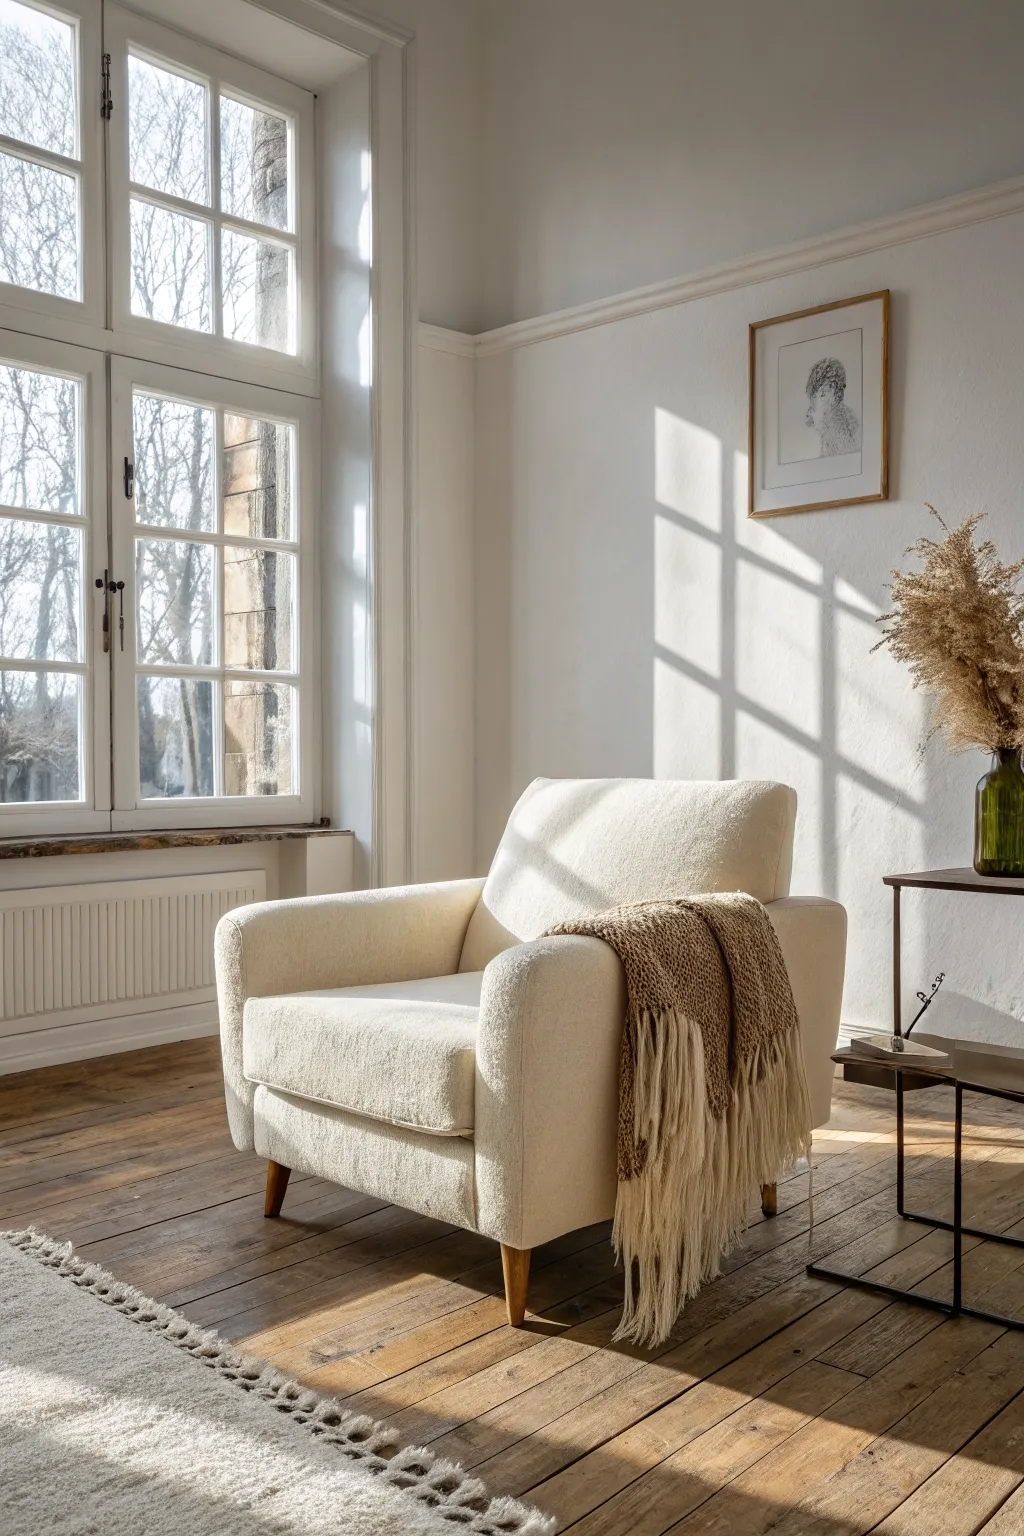
Capture the serene warmth of a quiet afternoon with this acrylic painting tutorial featuring a cozy armchair bathed in window light. You’ll learn to render soft textures and dramatic shadows to create a peaceful, inviting interior scene.
Step-by-Step Tutorial
Materials
- 12×16 inch Stretched canvas
- Gesso (if canvas isn’t pre-primed)
- Acrylic paints: Titanium White, Burnt Umber, Raw Sienna, Yellow Ochre, Paynes Grey, Unbleached Titanium
- Flat brushes (sizes 1 inch, 1/2 inch)
- Filbert brushes (sizes 6, 8)
- Small round brush (size 2)
- Palette knife for mixing
- Water cup and paper towels
- Pencil (HB) and eraser
Step 1: Sketch and Base Layers
-
Light pencil sketch:
Begin by lightly sketching the main geometric shapes: the large rectangle of the window on the left, the corner of the room, and the boxy shape of the armchair in the center. Use a ruler for the window panes to keep them straight. -
Refining the chair:
Refine the armchair’s shape, noting the sloping backrest and the curved armrests. Draw the outline of the throw blanket draped over the right arm and the spindly legs of the side table. -
Block in walls:
Mix a large amount of Titanium White with a tiny touch of Paynes Grey and Unbleached Titanium. Use the 1-inch flat brush to cover the walls, keeping the paint application fairly smooth but allowing some brush texture. -
Floor foundation:
For the floorboards, mix Raw Sienna with Burnt Umber. Paint in horizontal strokes to mimic the direction of the wood grain, but don’t worry about individual boards yet.
Soft Shadows
Mix glazing medium into your shadow color for the wall grid. This makes the straight lines feel like transparent light rather than painted stripes.
Step 2: Defining Light and Form
-
Window brightness:
Paint the window panes with almost pure Titanium White, blending a very faint blue-grey near the edges to suggest outdoor atmosphere. Paint the window frames in a darker grey-brown mix. -
Chair base color:
Mix Unbleached Titanium with a dot of Yellow Ochre for the creamy chair fabric. Block in the entire chair shape with a large filbert brush, avoiding the blanket area. -
Shadow shapes:
This is crucial: mix a cool grey using Paynes Grey and White. Paint the distinct grid-like cast shadows on the wall to the right of the window. Keep edges soft but defined. -
Window details:
Switch to a smaller flat brush. Add the view outside the window using soft greys and greens, keeping it blurry and indistinct to maintain focus on the interior.
Step 3: Textures and Details
-
Chair fabric texture:
To create the fuzzy bouclé texture, dab pure Titanium White highlights onto the sun-hit parts of the chair using a dry filbert brush. Use a stippling motion rather than long strokes. -
Deepening chair shadows:
Mix the chair base color with a little Burnt Umber. Paint the shadowed side of the chair seat and the area under the cushion to give it weight and volume. -
Painting the throw:
Mix Burnt Umber and Yellow Ochre for the throw blanket. Block in the main shape, draping it over the armrest. -
Blanket texture:
Using a size 2 round brush, paint small loop-like strokes in a lighter tan shade over the blanket to suggest knitting. Add vertical strokes at the bottom for the fringe. -
Floorboards detail:
Go back to the floor with a darker brown mix. Use a ruler or steady hand to paint fine lines separating the wood planks. Add knots and grain lines with a watered-down brown. -
Sunlight on the floor:
Glaze a transparent layer of Yellow Ochre and White over the floor area where the sun hits directly. This warms up the wood significantly compared to the shadowed areas. -
Rug texture:
In the bottom left corner, stipple a thick layer of White and Unbleached Titanium to create the fluffy rug texture. Pull out small strands at the edge for the fringe.
Adding Warmth
Glaze a very thin layer of Nickel Azo Gold over the sunlit parts of the chair and floor to intensify that ‘golden hour’ glow.
Step 4: Final Touches
-
Side table and accessories:
Paint the thin black legs of the side table using a script liner brush or the edge of a small flat brush. Add the green bottle vase with a touch of transparent olive green. -
Dried florals:
For the dried pampas grass in the vase, use a fan brush or an old splayed brush. Lightly tap in varied shades of beige and cream to create that feathery, airy look. -
The artwork on the wall:
Paint the simple wooden frame on the wall. Inside the frame, add a simplified suggestion of a sketch using light grey lines—don’t strive for perfect detail here. -
Final highlights:
Add pure white highlights to the bottle vase, the window latch, and the brightest tips of the throw fringe to bring the sparkle of light to life.
Step back and enjoy the tranquil, sun-drenched atmosphere you have created on canvas


Add One Bold Accent Color
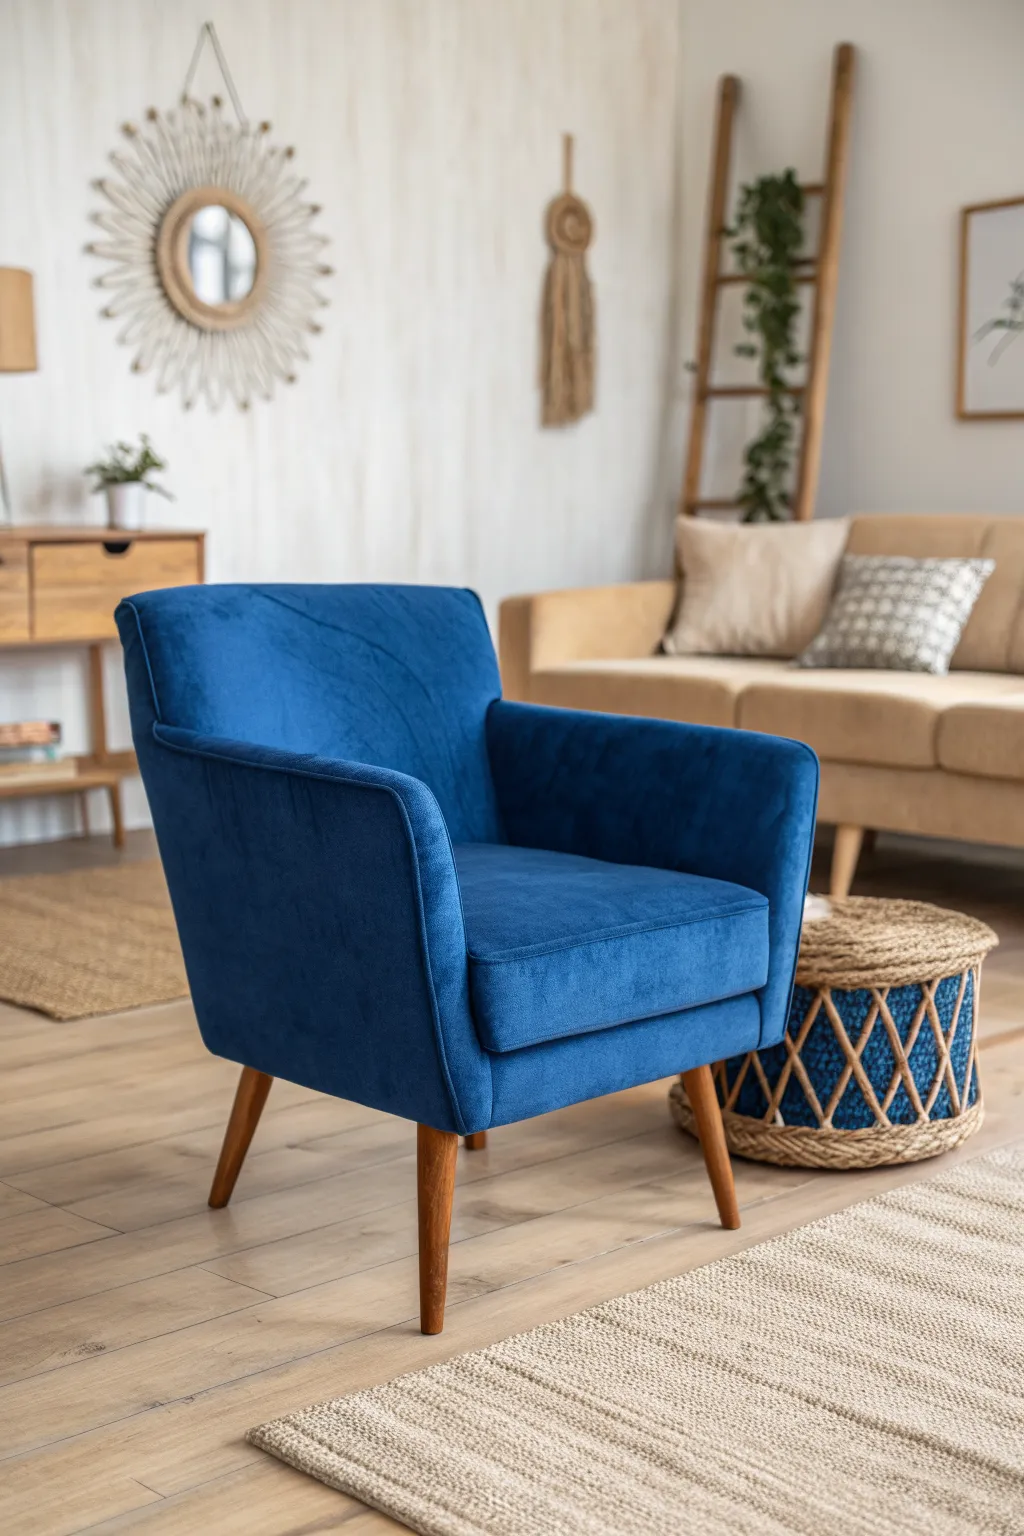
Transform a tired, secondhand find into a contemporary statement piece with rich royal blue velvet upholstery. This project revitalizes a classic mid-century modern silhouette, combining plush comfort with a bold pop of color that instantly elevates any living space.
How-To Guide
Materials
- Armchair with good structural bones
- Royal blue upholstery-grade velvet fabric (approx. 4-6 yards)
- Polyester batting (high loft)
- High-density foam (if replacing seat cushion)
- Upholstery staple gun and staples
- Needle-nose pliers and tack lifter
- Fabric scissors
- Sewing machine with heavy-duty needle
- Upholstery thread (matching blue)
- Cardboard tack strip
- Flexible metal tack strip
- Dust cover fabric (cambric)
- Wood stain and sealant (for legs)
- Fine-grit sandpaper
Step 1: Deconstruction & Prep
-
Assess and remove:
Begin by removing the legs of the chair to keep them safe and out of the way. If they are permanently attached, wrap them thoroughly in painter’s tape and plastic. -
Strip the old fabric:
Carefully remove the old fabric using a tack lifter and needle-nose pliers. Take your time here; try to keep the old fabric pieces intact as you’ll use them as patterns later. -
Document the process:
As you strip the chair, take photos of how the fabric was folded, stapled, and attached, especially around corners and curves. This visual reference is invaluable during reassembly. -
Inspect the innards:
Check the condition of the foam and batting. If the old foam is crumbling or smells musty, remove it down to the frame. Leave the springs or webbing if they are still taut and supportive. -
Refinish the legs:
While the chair is stripped, sand the wooden legs with fine-grit sandpaper to remove the old finish. Wipe them clean and apply a fresh coat of warm-toned wood stain, followed by a protective sealant.
Step 2: Padding & Patterning
-
Fresh foam base:
Cut new high-density foam for the seat and backrest if you removed the originals. Use an electric carving knife for smooth, clean cuts that match the frame’s contours. -
Layer with batting:
Cover the foam and frame with a layer of polyester batting. This softens the edges and prevents friction between the foam and the velvet, ensuring a smooth, professional finish. -
Create your pattern:
Lay out your removed fabric pieces on the new velvet. Pay close attention to the `nap` or direction of the velvet pile—it should run downwards on the backrest and frontwards on the seat. -
Cut the new fabric:
Cut around your old fabric templates, adding an extra 2-3 inches of margin around all edges to give yourself plenty of material to pull and staple.
Velvet Victory
Always check the velvet’s nap before cutting. Brush your hand across it; it should feel smooth going down the backrest and towards the front of the seat.
Step 3: Upholstery & Assembly
-
Sew the cushion boxing:
If your chair has a separate or defined seat cushion shape, sew the vertical side panels (boxing) to the top seat piece. Use a heavy-duty needle and upholstery thread for durability. -
Attach the seat deck:
Position the fabric over the seat. Pull it taut towards the back and sides, stapling it securely to the frame. Ensure the fabric is smooth but not overstretched, which can distort the weave. -
Secure the inside back:
Drape the fabric over the inside backrest. Start stapling from the center bottom, pulling the fabric up and out towards the top corners to eliminate wrinkles. Keep your staples neat and close together. -
Tackle the arms:
Apply fabric to the inside arms, pulling the material tough through the crevices where the arm meets the seat and back. Staple securely to the frame underneath. -
Outside back closure:
For the outside back, you’ll likely need flexible metal tack strips or cardboard tape to create a blind seam. Attach the strip to the top edge of the fabric (face down), flip it over, and hammer it into place for a seamless edge. -
Finish the underside:
Flip the chair over and trim any excess velvet. Staple a piece of black dust cover fabric (cambric) to the bottom to hide the internal structure and give it a finished look. -
Reattach legs:
Screw the freshly stained legs back into their mounting plates. Give the velvet a final brush with your hand to smooth the pile and admire your handiwork.
Finishing Touch
Add self-welting (piping made from the same velvet) along the arm fronts and cushion edges for a classic, tailored look that hides seams beautifully.
Now you have a stunning, custom piece of furniture ready to anchor your room with bold color and comfort

Layer Textures for a Finished Look
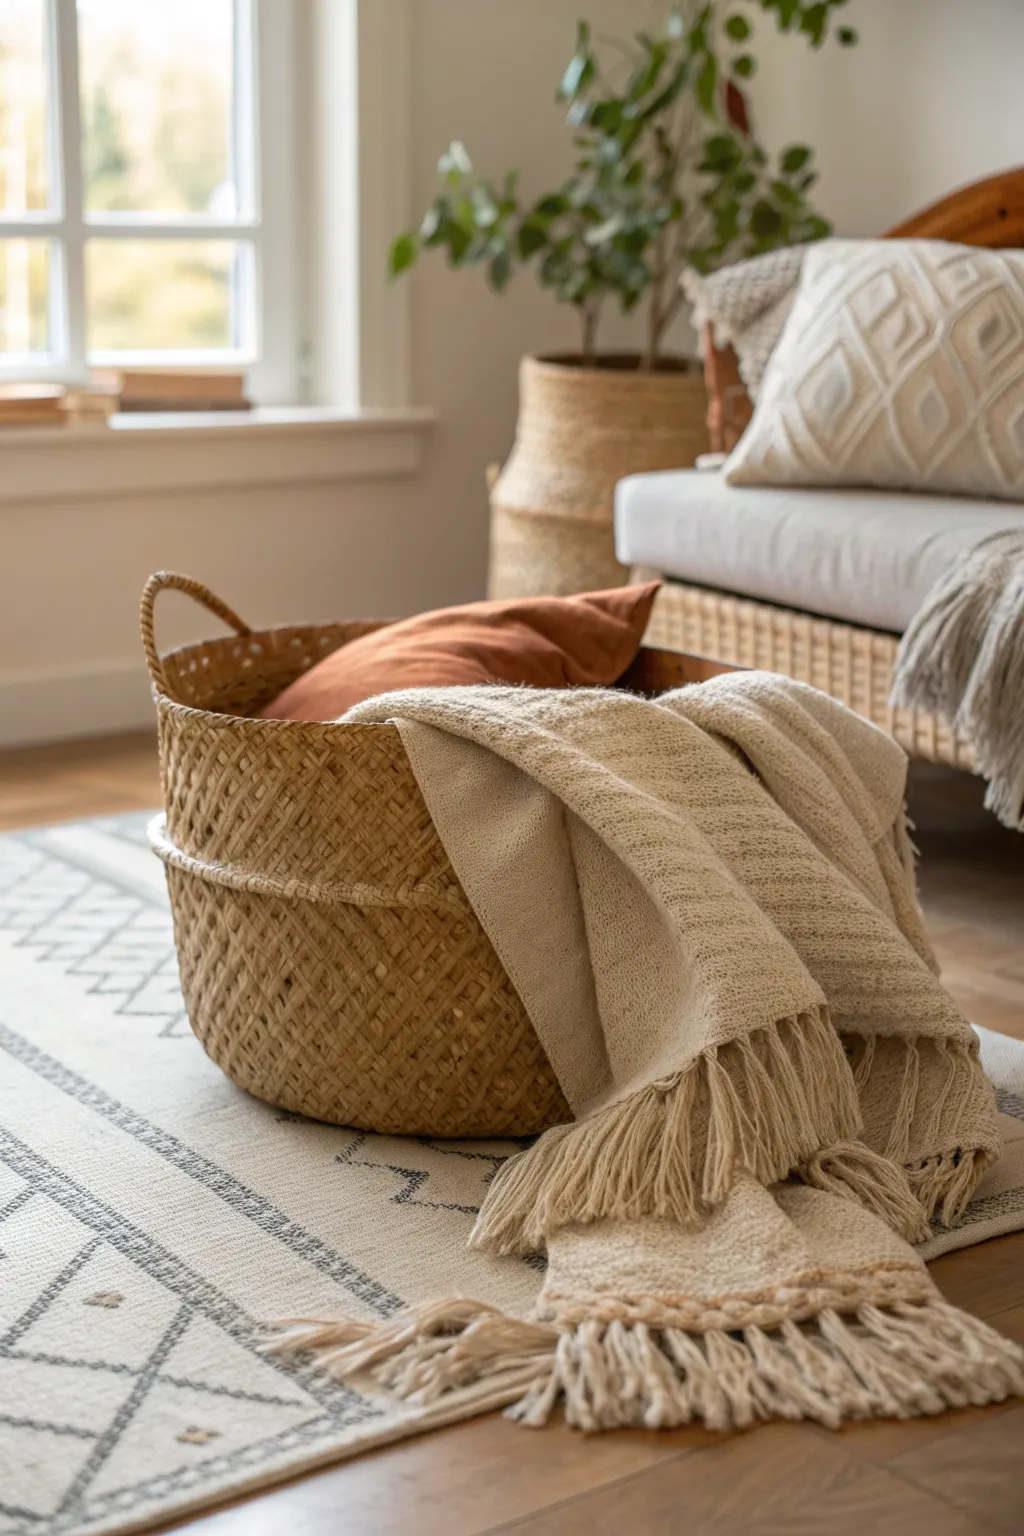
Bring natural warmth and functionality to your living space with this handmade woven basket project, perfect for stowing cozy throws and pillows. The rustic texture of the seagrass pairs beautifully with a simple coiling technique to create a sturdy, stylish vessel.
Step-by-Step
Materials
- Thick seagrass or jute rope (approx. 10mm thickness)
- Natural raffia or strong cotton twine (beige/tan)
- Large tapestry needle
- Scissors
- Measuring tape
- Low-temp hot glue gun (optional, for starting)
- Masking tape
Step 1: Establishing the Base
-
Create the center coil:
Start by taking the end of your thick seagrass rope. Apply a tiny dot of hot glue to the end to prevent fraying, then curl it tightly upon itself to form a small spiral center. -
Begin the stitching:
Thread your tapestry needle with a long strand of raffia. Insert the needle through the center of your starting coil and wrap it around the outer rope to secure the spiral shape. -
Build the floor:
Continue coiling the rope flat on a table. As you lay down each new section of rope, stitch it to the previous coil using a figure-eight or simple wrapping stitch every half-inch. -
Maintain tension:
Pull your raffia stitches tight. I find it helpful to keep the rope flat with my non-dominant hand while pulling the raffia taut to ensure the base doesn’t buckle. -
Check the diameter:
Keep coiling and stitching until your flat base reaches approximately 14-16 inches in diameter. This wide base ensures stability for holding bulky items like blankets.
Wobbly Walls?
If the sides are caving in or flaring out too much, gently dampen the finished basket with a spray bottle and reshape it with your hands, then let it dry completely.
Step 2: Forming the Walls
-
Transition to the sides:
Instead of placing the next coil directly beside the previous one, place it slightly on top of the outer edge of the base coil. Secure it with stitches. -
Build upward:
Continue stacking the rope coils directly on top of one another to build vertical walls. Keep your stitching consistent, aligning the new stitches with the ones below for a neat pattern. -
Shape the belly:
To get that slightly rounded look shown in the image, angle your rope slightly outward for a few rows, then back inward slightly as you near the top. -
Manage the rope length:
If you run out of rope, butt the end of the old rope against the new one. Wrap the join heavily with raffia to conceal the seam and secure the connection. -
Height check:
Continue building the walls until the basket is about 10-12 inches tall, or your desired height.
Dip-Dye Look
For a modern twist, dip the bottom third of the finished basket into a fabric dye bath or paint it with diluted acrylics for a two-tone effect.
Step 3: Handles and Finishing
-
Mark handle placement:
Use small pieces of masking tape to mark two opposite points on the rim where you want your handles to be. -
Form the first loop:
When you reach the first mark with your rope, stop stitching it to the row below. Arch the rope upward to create a handle loop about 4 inches high. -
Secure the handle:
Reattach the rope to the rim at the other side of your handle mark. Reinforce the stress points—where the handle leaves and rejoins the rim—with extra wrapping stitches. -
Repeat for second handle:
Continue stitching around the rim until you reach the opposite side, then create the second handle loop in the same manner. -
Reinforce the rim:
Do one final complete round of rope along the rim, following the contour of the handles. Wrap this final layer entirely with raffia for a smooth, finished look that is comfortable to grip. -
Taper the end:
To finish, cut the rope at a sharp angle to create a tapered end. Coil this tapered piece tightly against the rim and stitch it down firmly so it blends seamlessly. -
Trim excess:
Snip any loose raffia ends inside and outside the basket. Your textured vessel is now ready to hold your favorite comforts.
Fill your new basket with soft textiles to complete the cozy vignette in your living room
BRUSH GUIDE
The Right Brush for Every Stroke
From clean lines to bold texture — master brush choice, stroke control, and essential techniques.
Explore the Full Guide
Create Balance With Symmetry
Recreate the serene simplicity of this large-scale botanical artwork using basic sketching techniques and a focus on clean lines. This project captures the airy, organic feel of a single fern frond, perfect for bringing a natural touch to a neutral interior.
Detailed Instructions
Materials
- Large sheet of watercolor paper (warm white or cream, 18×24 inches or similar)
- Pencil (HB or H for light sketching)
- Fine liner pen (0.5mm, archival black ink)
- Pencil eraser (kneaded works best)
- Large wooden frame (honey or oak tone)
- Mat board (off-white, optional)
- Ruler or straight edge
Step 1: Planning and Sketching
-
Prepare the surface:
Lay your large watercolor paper on a flat, clean surface. Secure the corners with drafting tape if necessary to prevent it from sliding while you work. -
Establish the central axis:
Using your pencil and a ruler, very faintly mark a central vertical guideline. This doesn’t have to be perfectly straight, as a slight curve adds organic realism, but it helps center your composition. -
Sketch the main stem:
Draw the main stem line over your guide. Start from the bottom third and extend upwards, letting the line waver slightly to mimic a natural branch. -
Mark branch placement:
Lightly mark small ticks along the main stem where the side branches will emerge. Aim for symmetry but keep it natural—slightly offset pairs look more realistic than perfect mirror images. -
Draw the sub-branches:
Sketch the side branches extending outwards and upwards. They should be longer at the bottom and gradually get shorter as you move toward the tip of the main stem. -
Refine the curve:
Go back over your structural lines. Ensure the branches have a gentle, upward-curving energy rather than looking stiff or geometric.
Uneven Ink Flow?
If your pen skips, don’t panic. Embrace the texture! Broken lines add to the vintage, botanical aesthetic. Just avoid retracing the exact same spot too many times.
Step 2: Inking the Details
-
Test your pen:
On a scrap piece of the same paper, test your fine liner pen to ensure the ink flows smoothly and isn’t too heavy or blotting. -
Ink the main stem:
Begin tracing over your pencil sketch with the fine liner. Use a loose, confident hand; a slightly broken or jittery line often looks more artistic than a harsh, solid stroke. -
Add the leaf nodes:
Instead of drawing full leaves, create tiny, stippled dots or very short dashes along the side branches. This mimics the delicate texture of the dried fern seen in the inspiration photo. -
Vary the density:
Concentrate your stippling or dashes near the branch tips to give the illusion of buds or intricate foliage. -
Thicken the base:
I like to go back to the very bottom of the main stem and add a second, very thin line right next to the first one to give the base a bit more visual weight. -
Allow to dry:
Let the ink sit for at least 15-20 minutes. Archival ink dries relatively fast, but you want to be absolutely sure before erasing to avoid smudging.
Scale It Up
For massive impact, take a high-res photo of your drawing and have it professionally printed at a larger poster size on textured matte paper.
Step 3: Finishing and Framing
-
Erase guidelines:
Gently gently run your kneaded eraser over the entire drawing to lift the original pencil marks. Hold the paper taut so it doesn’t crinkle. -
Assess the composition:
Step back and look at the drawing. If any areas feel too sparse, verify balance and add a few more ink dots or tiny twig extensions where needed. -
Mount the artwork:
Center your artwork on the backing board of your frame. If you are using a mat, ensure the window is perfectly aligned with your central stem. -
Insert into frame:
Clean the glass on both sides before placing your artwork inside the wooden frame. The warm wood tone complements the organic simplicity of the sketch.
Hang your new botanical masterpiece centered above a mantle or console table to establish a calming focal point.
Try an Open-Concept Zone With a Rug Boundary
Recreate the warmth and texture of a traditional woven kilim rug using nothing more than a simple canvas drop cloth and paint. This DIY project allows you to mimic intricate geometric patterns in rich terracotta and indigo tones without needing a loom.
Step-by-Step
Materials
- Heavyweight canvas drop cloth or rug blank (approx. 2.5′ x 6′)
- Fabric medium
- Acrylic latex paint (Terracotta/Rust, Cream/Off-White, Navy Blue, Light Blue)
- Painter’s tape (various widths: 1-inch and 2-inch)
- Ruler or yardstick
- Chalk or pencil
- Stencil brushes and small angled brushes
- Spray sealant (matte finish)
- Black yarn or thick cotton cord (for fringe)
- Large sewing needle
Step 1: Preparation and Base Layer
-
Prep the canvas:
Start by washing and drying your canvas drop cloth to shrink the fibers and remove any sizing. Iron it completely flat to ensure your geometric lines stay crisp. -
Cut to size:
Measure and cut your canvas to your desired runner dimensions, leaving a 1-inch hem allowance on the long sides. Fold the long edges under and hem them with a sewing machine or strong fabric glue for a clean edge. -
Mix the base color:
Mix your rust-colored acrylic paint with fabric medium according to the bottle’s ratio (usually 1:1 or 2:1). The medium is essential—it keeps the rug flexible so the paint doesn’t crack underfoot. -
Tape the border:
Use 2-inch painter’s tape to mark off a thick border around the entire perimeter of the rug. This will remain unpainted (cream canvas) for now to frame the central design. -
Apply the background:
Paint the large central rectangular field with your rust/terracotta mixture. Use a stiff brush to work the paint deep into the canvas weave for a saturated, woven look. Let this dry completely, preferably overnight.
Bleeding Lines?
If paint bleeds under the tape, don’t panic. Once dry, touch up the edges with a small artist’s brush and the original background color to sharpen the lines.
Step 2: Drafting the Geometric Pattern
-
Mark the center line:
Once the red base is dry, use a yardstick and chalk to lightly mark a vertical center line running the length of the rug. This guide helps keep your diamonds symmetrical. -
Outline the diamonds:
Measure equal intervals along the center line (about 12-15 inches apart). Connect these points to the edges of the red field to create a chain of large diamond shapes using your chalk. -
Tape the diamonds:
Apply painter’s tape along the outside edges of your chalked diamond shapes. Press the edges of the tape down firmly with a credit card to prevent paint bleed. -
Paint the cream layer:
Mix your off-white paint with fabric medium. Paint the inside of these large diamond shapes. You may need two coats here to cover the rust background fully. Allow it to dry to the touch. -
Add inner details:
Once the large cream diamonds are dry, use thinner tape to create smaller, nested diamonds inside them. Paint the centers and the stepped ‘staircase’ geometric details using your navy and light blue paints.
Add Vintage Texture
Before sealing, lightly sand the painted surface with fine-grit sandpaper. This distresses the paint slightly, making the rug look like a vintage woven textile.
Step 3: Refining Borders and Details
-
Detail the perimeter:
Remove the initial border tape. Tape off a classic ‘sawtooth’ or zig-zag pattern along the long edges of the rug using small pieces of tape or a specialized stencil. -
Paint the border accents:
Fill in the border triangles with the navy blue and rust paint, alternating colors to create a rhythm that draws the eye down the hallway. -
Add floating motifs:
I like to hand-paint the small, floating ‘X’ or tree-like symbols in the red spaces between the main diamonds. Use a small angled brush and light blue paint for a handmade, organic feel. -
Seal the work:
Once all painting is done and fully cured (wait at least 24 hours), spray the entire rug with a clear matte sealant to protect it from foot traffic and dirt.
Step 4: Finishing Touches
-
Prep for fringe:
Along the two short ends of the runner, use a sharp object or awl to poke small holes every half-inch, just above the hem line. -
Cut the yarn:
Cut your black yarn into 8-inch strips. You will need a significant amount, so prepare a pile before starting the attachment process. -
Attach the fringe:
Fold a piece of yarn in half, feed the loop through a hole using your large needle, and pull the tails through the loop to secure it (a lark’s head knot). Repeat across both ends. -
Trim the ends:
Lay the rug flat and comb out the fringe with your fingers. Use sharp scissors to trim the yarn ends in a straight line for a polished, professional finish.
Place your new runner in a hallway or entry zone and enjoy the custom pop of color you built from scratch

PENCIL GUIDE
Understanding Pencil Grades from H to B
From first sketch to finished drawing — learn pencil grades, line control, and shading techniques.
Explore the Full Guide
Use a Sectional to Maximize Seating
Transform a plain pouf or footstool with this textured, bohemian-style cover made from natural jute rope. The finished piece adds warmth and tactile appeal to your living space, perfectly complementing neutral sofas and layered rugs.
Detailed Instructions
Materials
- Pre-made round ottoman or pouf insert (approx. 24-inch diameter)
- Heavy-duty jute rope (8mm – 10mm thickness, approx. 100 yards)
- Cotton macramé cord (natural color, 4mm)
- Hot glue gun and plenty of glue sticks
- Large eyed tapestry needle
- Heavy-duty canvas fabric (for base reinforcement, optional)
- Scissors
Step 1: Creating the Spiral Top
-
Start the center coil:
Begin by applying a generous dab of hot glue to the very end of your jute rope. Curl it tightly onto itself to create a small, flat spiral, holding it in place until the glue cools and sets completely. -
Continue coiling:
Apply a thin line of hot glue along the outer edge of your starting coil. Slowly wrap the rope around, pressing firmly for ten to fifteen seconds to ensure a strong bond. -
Adding stability:
As the disc grows larger than a dinner plate, flip it over occasionally. I like to add a few radial lines of glue on the backside or even glue a small circle of canvas to the center back to prevent the coil from popping out. -
Measure against your insert:
Keep coiling until the flat disc perfectly matches the top diameter of your ottoman insert. Place it on top of the pouf frequently to check for size accuracy. -
Create the top rim:
Once the top diameter is reached, glue a final round of rope slightly underneath the previous row rather than directly beside it. This begins the transition to the vertical sides.
Glue Mastery
Use high-temp hot glue for a permanent bond. If you live in a very hot climate, consider supplementing with E6000 for durability.
Step 2: Building the Sides
-
Form the upper section:
Continue coiling downwards, stacking the rope directly below the previous row to form a straight vertical wall. Continue this for about 6-8 inches to create the upper section of the pouf. -
Create the decorative ridge:
To make the distinctive central ridge seen in the photo, wrap the rope over itself or use a thicker gauge rope for two rounds. This creates a protruding bump that adds visual interest and structure. -
Complete the lower section:
Resume the standard vertical coiling below the ridge. Continue wrapping until you reach the bottom edge of your ottoman insert. -
Secure the end:
Cut the rope at an angle to taper the end. Glue it down firmly on the bottom edge or tuck it inside the coil for a seamless finish.
Two-Tone Texture
Dye the cotton cord with tea or coffee before attaching it for an aged, vintage look that blends better with dark wood floors.
Step 3: Adding the Textile Top Detail
-
Prepare the macramé topper:
Using the cotton macramé cord, crochet or braid a flat circular mat that is slightly smaller than the jute top—approximately 18 inches in diameter. -
Attach the topper:
Center your cotton mat on top of the jute coil. Using the tapestry needle and a length of thinner jute twine or heavy thread, stitch the cotton mat onto the jute base. -
Stitch the spiral detail:
Thread your needle with cotton cord. Taking large running stitches, sew a spiral pattern starting from the center of the cotton topper, working your way outward. -
Fray the edges:
If your cotton mat has a raw edge, use a comb to gently brush out the fibers, creating a soft fringe that blends into the jute below. -
Final shaping:
Place the finished cover over your insert. If it feels loose, add a few stitches through the cover into the insert fabric to hold it securely in place.
Now you have a custom, high-texture ottoman that brings an organic touch to your seating area
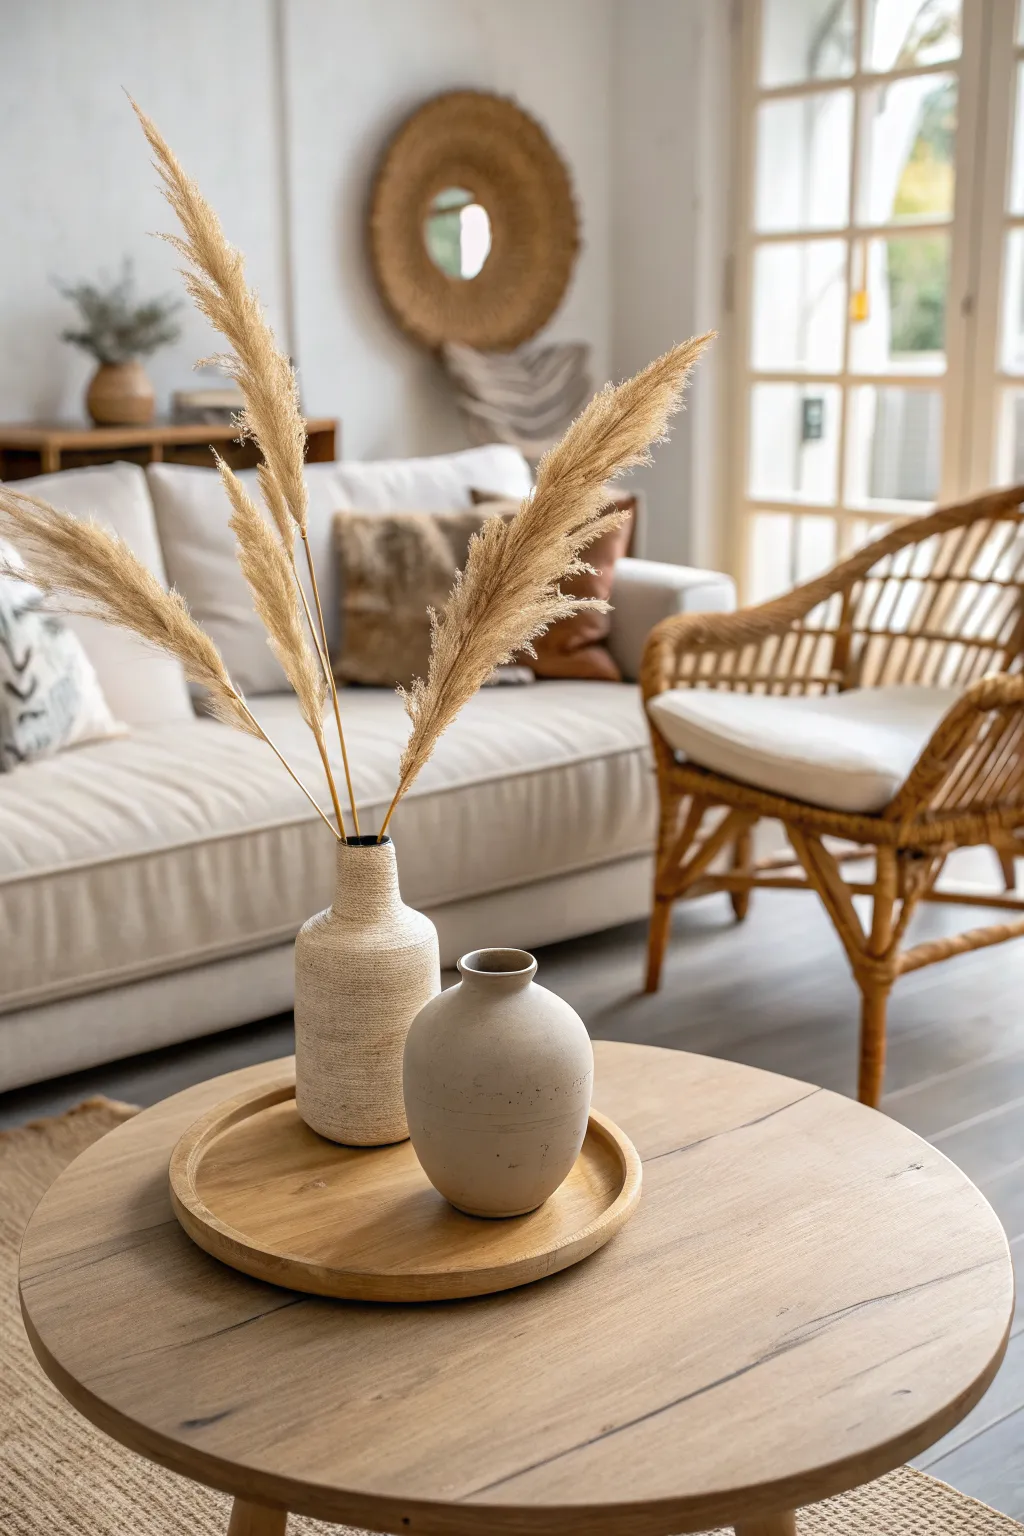
Style the Coffee Table Like a Still Life
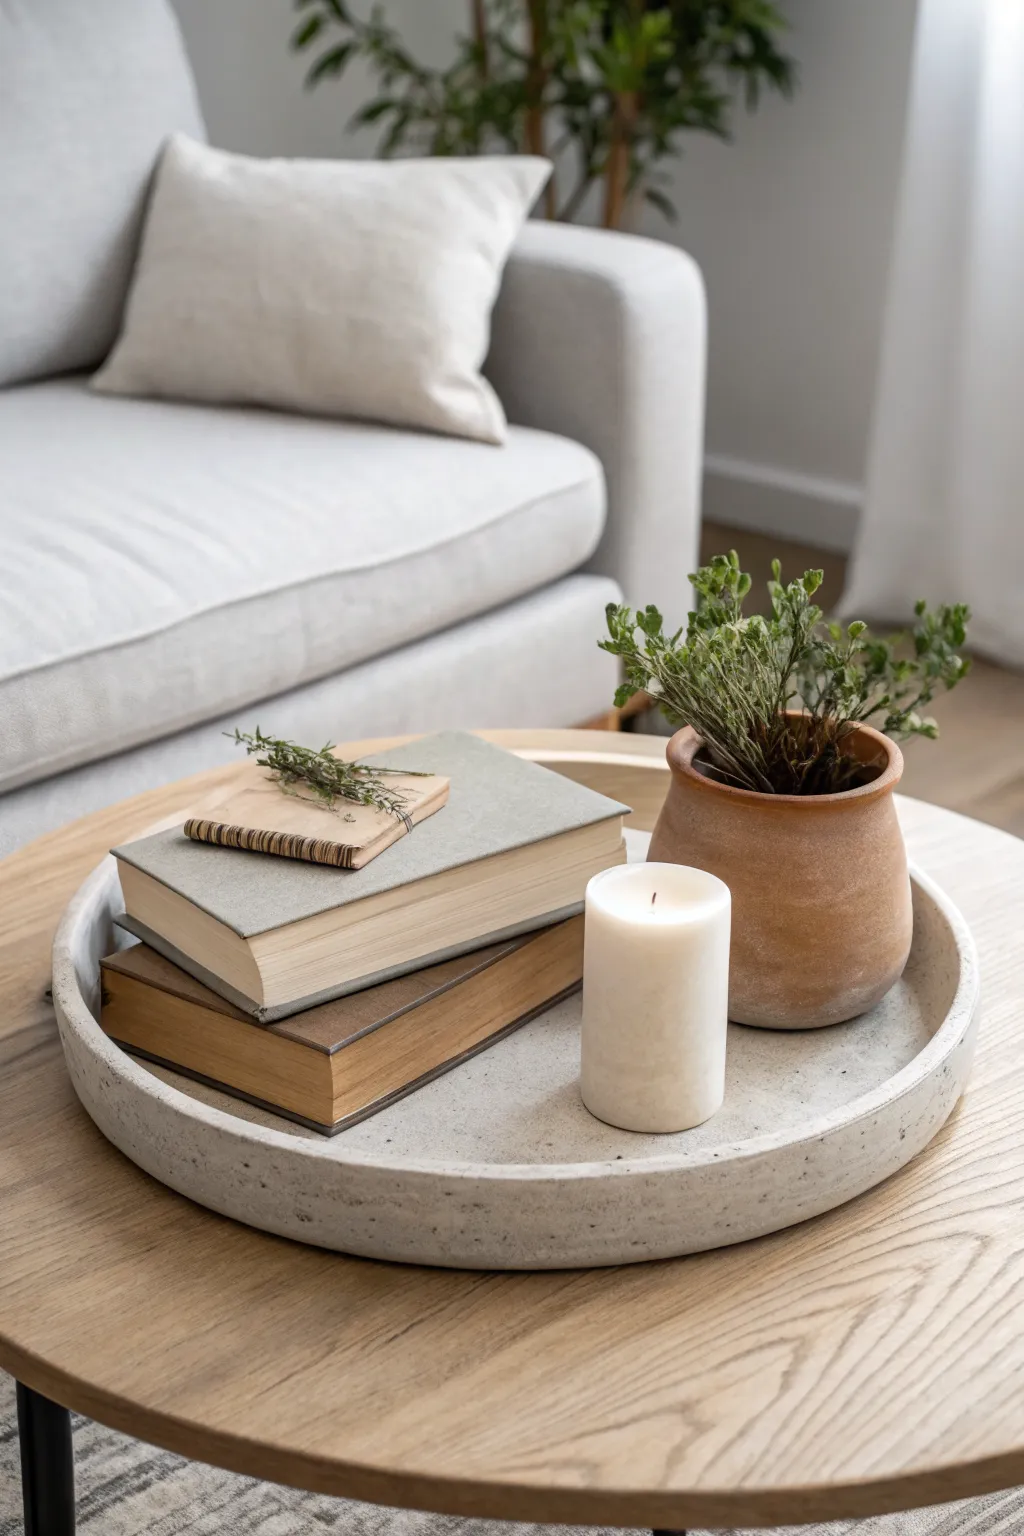
Transform your coffee table into a serene focal point with this textured concrete tray arrangement. By combining organic elements like terracotta and greenery with the industrial cool of polished cement, you’ll create a sophisticated vignette that feels effortless.
Step-by-Step Tutorial
Materials
- Quick-setting concrete mix
- Large round plastic mold (approx. 16-18 inches diameter)
- Small round plastic mold (approx. 14-16 inches diameter, for inner depression)
- Non-stick cooking spray or petroleum jelly
- Mixing bucket
- Trowel or wooden stir stick
- Heavy weights (bricks or sandbags)
- Sandpaper (medium and fine grit)
- Matte concrete sealer
- Paintbrush
- Terracotta pot with wide mouth
- Small thyme or oregano plant
- Large white pillar candle (3-4 inches diameter)
- Two hardcover vintage-style books
- Small kraft paper notebook
- Dried rosemary or olive branch sprig
Step 1: Casting the Tray
-
Prepare the molds:
Begin by thoroughly cleaning your two plastic molds. To ensure your tray releases easily later, coat the inside of the larger mold and the outside of the smaller mold with a generous layer of cooking spray or petroleum jelly. -
Mix the concrete:
Pour your quick-setting concrete mix into a bucket. Gradually add water according to the package instructions, stirring constantly until you achieve a consistency similar to thick peanut butter or pancake batter. -
Pour the base:
Pour the mixed concrete into the larger mold until it reaches a depth of about 1.5 to 2 inches. Shake the mold gently side-to-side to level the surface and help release any trapped air bubbles. -
Insert the inner mold:
Center the smaller mold on top of the wet concrete. Press it down firmly, but not all the way to the bottom—leave about a half-inch of concrete at the base for structural integrity. -
Weigh it down:
Place your heavy weights, such as bricks or rocks, inside the smaller mold to keep it from floating up as the concrete settles. Adjust slightly to ensure the rim thickness is even all the way around. -
Let it cure:
Allow the concrete to sit undisturbed for at least 24 to 48 hours. I usually prefer waiting the full 48 hours to minimize the risk of cracking during de-molding.
Air Bubble Trouble
If you see too many holes after pouring, tap the sides of the mold repeatedly with a rubber mallet. This forces bubbles to the surface before the mix sets.
Step 2: Finishing the Surface
-
Remove the molds:
Carefully remove the weights and wiggle the inner mold free. Then, turn the large mold upside down and tap gently to release your new concrete tray. -
Sand the edges:
Using medium-grit sandpaper, smooth out any rough upper edges or sharp burrs left by the mold. Switch to fine-grit paper to give the entire surface a soft, touchable finish. -
Apply sealer:
Brush on a coat of matte concrete sealer to protect the surface from water rings and stains. Let this dry completely according to the manufacturer’s timeframe.
Pro Tip: Custom Tone
Want a warmer tray? Mix a small amount of tan or beige concrete pigment powder into your wet mix to match natural stone colors found in your room.
Step 3: Styling the Vignette
-
Create the book stack:
Select two hardcover books with muted tones—grey and tan work beautifully. Stack them slightly off-center within the tray to build height and structure. -
Add the greenery:
Place a textured terracotta pot filled with a small, bushy plant like thyme or oregano to the right of the books. The warm clay tone contrasts perfectly with the cool grey concrete. -
Position the candle:
Set a chunky white pillar candle near the front of the tray. This adds a soft, vertical element that balances the visual weight of the plant pot. -
Layer the details:
Place a small kraft paper notebook atop the book stack. Angle it slightly differently than the books beneath to keep the look casual and unstudied. -
Final organic touch:
For the finishing detail, lay a fresh or dried sprig of rosemary across the notebook. This small addition connects the stationery element back to the living plant nearby.
Enjoy the balanced elegance your new handmade centerpiece brings to the room


Bring in Indoor Greenery for Life and Color
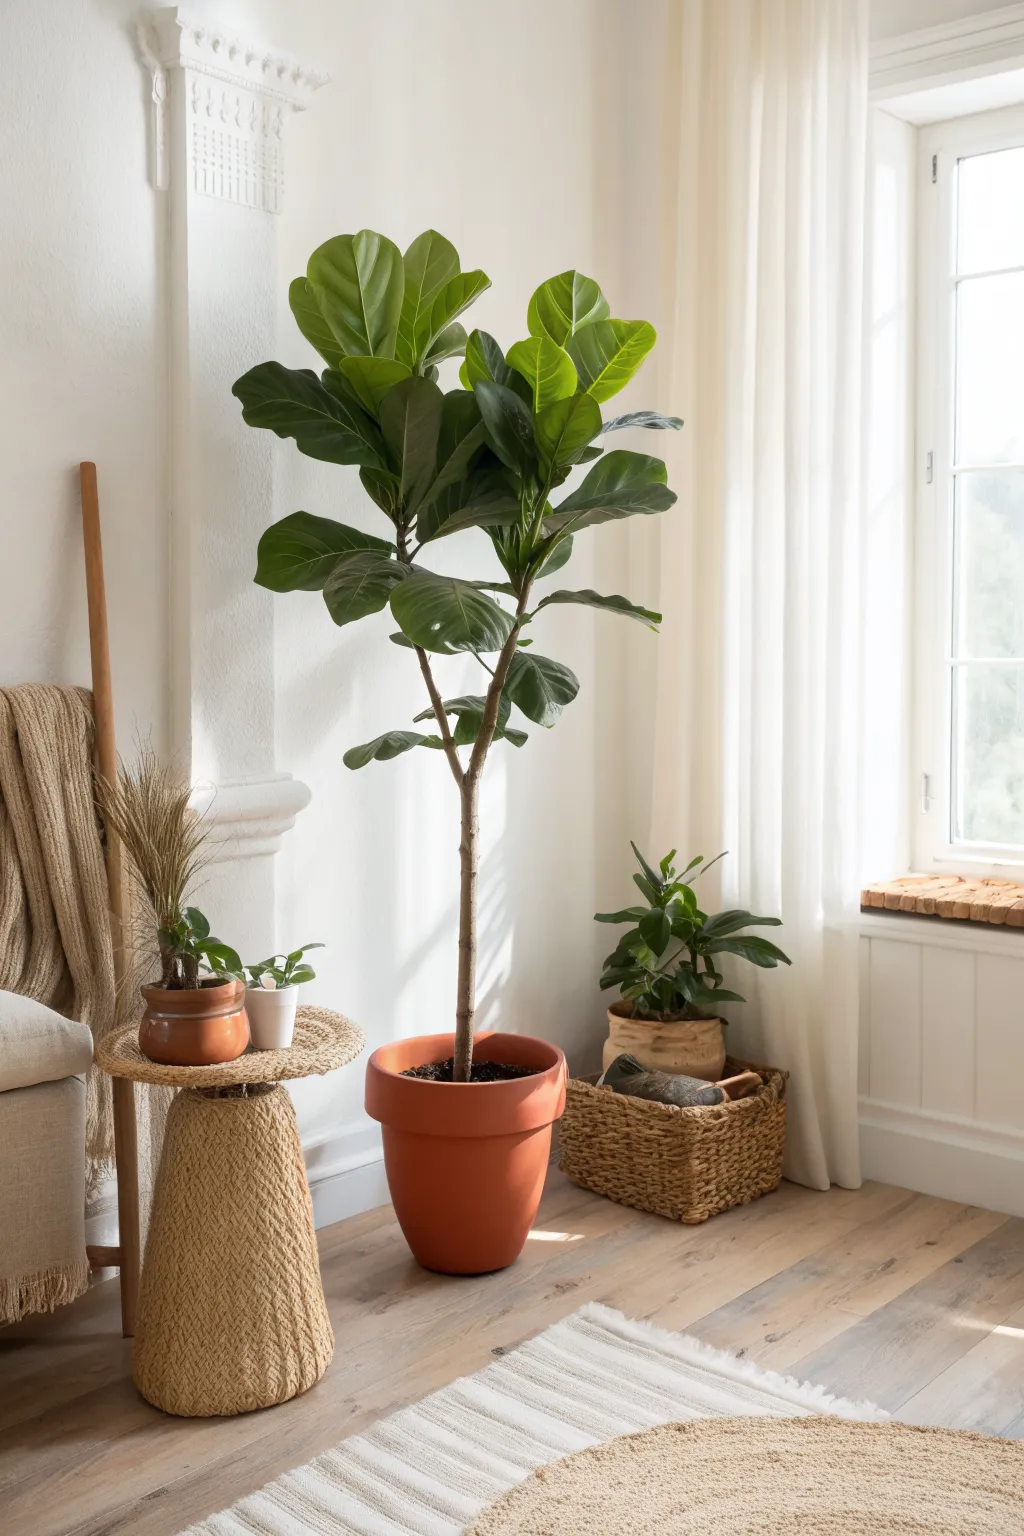
Transform an empty corner into a breathing sanctuary with this tiered plant arrangement that centers around the majestic Fiddle Leaf Fig. This styling project balances natural textures like terracotta and woven grasses with lush, vibrant greenery for an organic modern look.
Step-by-Step
Materials
- Large Fiddle Leaf Fig tree (Ficus lyrata)
- Oversized terracotta pot (16-20 inch diameter)
- Bag of high-quality potting mix
- Bag of perlite for drainage
- Small ZZ plant or Pothos
- Rubber plant (Ficus elastica) or similar medium plant
- Woven basket for floor plant
- Tall woven side table or plant stand
- Small terracotta pot
- Small white ceramic pot
- Pot feet or cork pads (optional)
- Watering can
Step 1: Setting the Stage
-
Assess the light:
Choose a corner near a bright window, preferably facing south or west. The Fiddle Leaf Fig is the star here and needs ample indirect sunlight to thrive, just like the setup shown near the large casement window. -
Place the rug:
Lay down a neutral, textured area rug or runner at an angle to define the space. This anchors the visual weight of the plants and protects your wood floors from potential water spills. -
Position the main furniture:
Set up your woven side table to the left of where the main tree will go. Ensure it’s stable enough to hold weight, as you’ll be layering smaller pots on top of it.
Leaf Shine Secret
Mix a tiny drop of mild dish soap and neem oil into water and wipe leaves. It cleans dust, adds a gentle shine, and deters pests naturally.
Step 2: Potting the Main Feature
-
Prepare the terracotta pot:
Take your large terracotta pot and ensure it has a drainage hole. If you’re worried about floor damage, place a saucer inside a slightly larger decorative basket, or use a plastic liner inside the terracotta. -
Mix the soil:
Combine two parts potting soil with one part perlite. Fiddle Leaf Figs hate wet feet, and this airy mixture ensures water flows through quickly. -
Position the tree:
Gently remove the Ficus lyrata from its nursery pot. Tease the roots slightly if they are bound tight. Place it in the center of the terracotta pot, checking that the top of the root ball sits about an inch below the rim. -
Fill and secure:
Fill the gaps with your soil mix, pressing down firmly around the base of the trunk to stabilize the tall stem. A slight lean is natural, but ensure it’s secure. -
Final placement:
Lift the heavy pot into position. Rotate the tree so the leaves face the light source for optimal growth, while the best side faces the room.
Height Boost
If your main tree looks too short for the corner, place an upside-down sturdy pot inside the planter before adding soil to elevate the root ball.
Step 3: Layering the Accents
-
Style the floor plant:
Place your medium-sized plant (like a Rubber plant) into a simple pot, then set that pot inside the square woven basket. This adds a texture contrast to the smooth terracotta nearby. -
Arrange the floor basket:
Tuck this basket to the right of the main tree, slightly behind it or to the side, creating a triangular composition with the tall tree as the apex. -
Prepare the side table plants:
Pot a small, spindly plant or grass into a small terracotta vessel. The color echo between this small pot and the large floor pot ties the look together nicely. -
Add a white accent:
Place a very small succulent or cutting in a white ceramic pot. The bright white pops against the earthy tones and matches the window trim. -
Compose the table top:
Arrange these two smaller pots on the woven side table. I usually place the taller grass slightly back and the smaller white pot in front for depth.
Step 4: Finishing Touches
-
Water deeply:
Give the Fiddle Leaf Fig a thorough watering until moisture drips from the bottom, then let it drain completely before leaving it. Do the same for the smaller companions. -
Dust the leaves:
Take a damp microfiber cloth and gently wipe the large, broad leaves of the Ficus. Dust blocks sunlight, and clean leaves are essential for that glossy, high-end magazine look. -
Curtain check:
Adjust the sheer white curtains so they frame the window without blocking the light hitting your new green corner. The soft fabric softens the architectural lines of the plants.
Enjoy the calm atmosphere your new botanical corner brings to the room
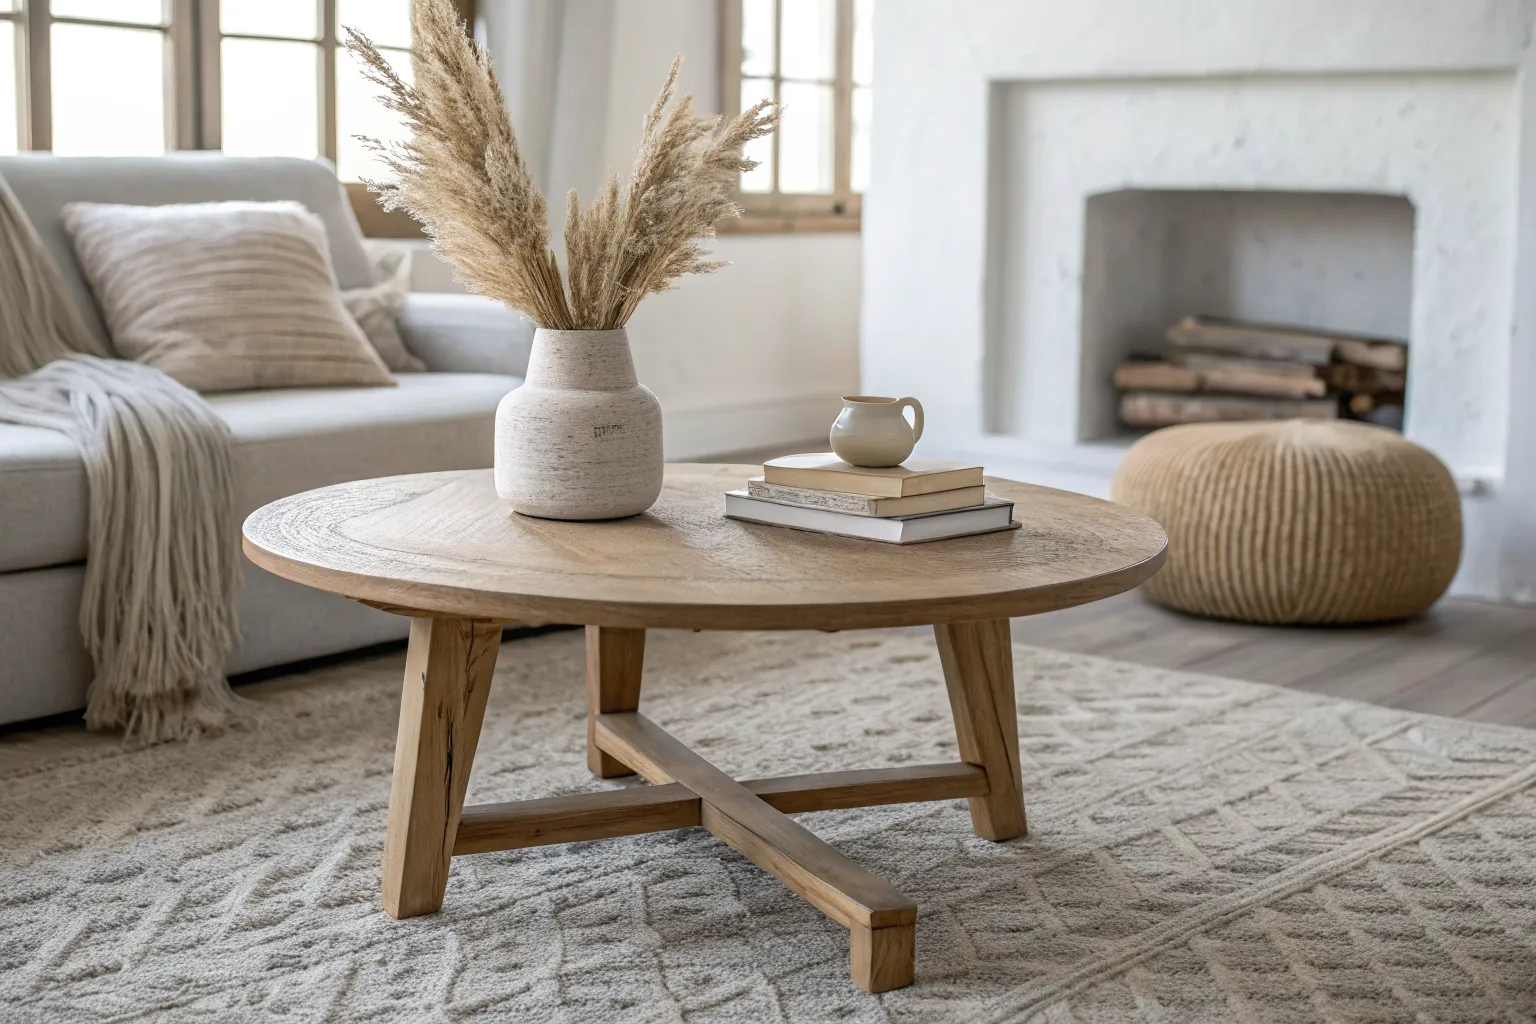
Mix Wood and Metal for Modern Warmth
This project centers on building a sturdy, modern coffee table designed to bring warmth and functionality to any living room. The piece features clean lines, rich oak grain, and practical drawer storage, perfectly blending mixed materials when paired with metal accents.
Step-by-Step Guide
Materials
- Solid Oak Boards (approx. 1-inch thick)
- Oak Plywood (for drawer bottoms/structural support)
- Wood Glue (high-strength)
- Pocket Hole Screws
- Drawer Slides (pair, soft-close recommended)
- Black Metal Knobs (2)
- Table Saw or Circular Saw
- Miter Saw
- Pocket Hole Jig
- Orbital Sander with varied grit sandpaper (80, 120, 220)
- Clamps (various sizes)
- Clear Matte Polyurethane or Wood Oil
Step 1: Building the Frame and Legs
-
Select and cut lumber:
Begin by selecting your best oak boards for the visible tops and sides. Cut four thick legs to your desired height (standard is around 16-18 inches) and cut the apron pieces—two long and two short—to define the table’s footprint. -
Prepare leg joints:
Using your pocket hole jig, drill pocket holes on the inside faces of the apron pieces. This ensures the joinery remains hidden for a clean, professional look on the exterior. -
Assemble the base:
Attach the apron pieces to the legs using wood glue and pocket hole screws. I like to use a flat surface here to ensure the legs stay perfectly square to the table frame. -
Add internal supports:
Install a central support rail running parallel to the shorter apron sides. This will divide the two drawer spaces and provide essential structural rigidity to the wide frame. -
Sand the base:
Before moving on, sand the entire base structure with 120-grit sandpaper to remove any rough edges or glue squeeze-out that might have occurred during assembly.
Step 2: Constructing the Drawers
-
Measure drawer openings:
Measure the exact width and height of the two openings in your frame. Subtract the width required for your specific drawer slides to determine the final drawer box dimensions. -
Build drawer boxes:
Cut pieces for the four sides of each drawer box from lighter lumber or plywood. Assemble them into a simple box shape using glue and screws or nails. -
Install drawer bottoms:
Cut a piece of plywood to fit the bottom of each drawer box. Secure it firmly with glue and brad nails to ensure it can hold the weight of standard living room items. -
Mount the slides:
Attach the drawer slides to the internal supports of the table frame and the corresponding sides of your drawer boxes. Test the fit carefully to ensure they glide smoothly without rubbing. -
Create drawer fronts:
Cut two showcase pieces of oak for the false fronts. These should be slightly larger than the drawer box to cover the gaps. Carefully align them to continue the grain pattern across both drawers.
Sticky Drawers?
If drawers don’t slide smoothly, check your table frame for squareness. Use shims behind the slide hardware to level things out.
Step 3: Top Assembly and Finishing
-
Panel glue-up:
Select long oak boards for the tabletop. Arrange them to create a pleasing grain pattern, apply glue to the edges, and clamp them tightly together until dry to form a solid panel. -
Trim and sand top:
Once the glue is cured, cut the panel to your final tabletop dimensions. Sand the surface progressively, starting with 80-grit and finishing with 220-grit for a buttery smooth feel. -
Attach the top:
Flip the table base upside down and place it on the underside of the tabletop. Secure the top to the base using metal Z-clips or pocket screws, allowing for slight wood movement. -
Detail sanding:
Give the entire piece a final hand-sanding with fine grit paper. Be sure to ease (slightly round over) all sharp corners and edges to make the table touch-friendly. -
Apply finish:
Apply a coat of clear matte polyurethane or wood oil. wipe off excess and let it dry according to the manufacturer’s instructions. A second coat is usually needed for durability. -
Install hardware:
Mark the exact center of each drawer front. Drill small pilot holes and screw in the black metal knobs to complete the modern, mixed-material aesthetic.
Grain Continuity Pro-Tip
Cut both drawer fronts from a single long board. This keeps the grain pattern flowing continuously across the front for a high-end look.
Enjoy the satisfaction of using a custom piece of furniture that anchors your living space perfectly
Go Big With a Gallery Wall
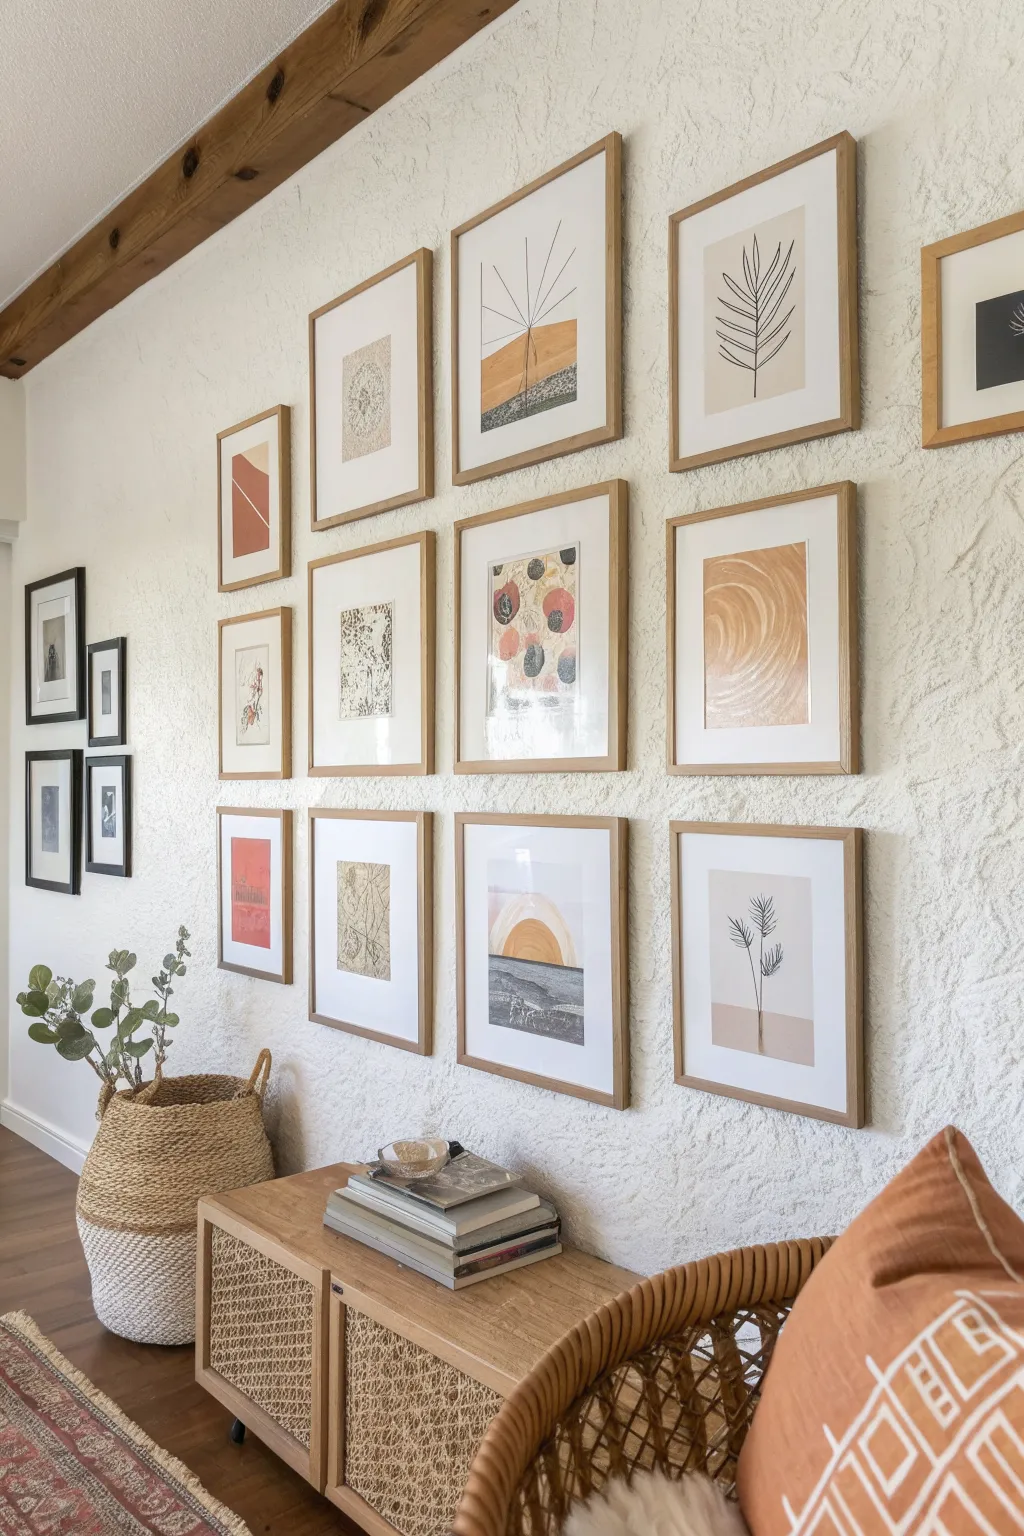
Transform a blank wall into a curated centerpiece with this large-scale gallery wall project featuring earthy tones and organic shapes. By arranging a grid of minimalist prints in light wood frames, you can achieve a cohesive, designer look that feels both modern and warm.
Step-by-Step Guide
Materials
- 12 matching light wood frames (approx. 11×14 or 16×20 inches with mats)
- Craft paper or newspaper (for templates)
- Painter’s tape
- Measuring tape
- Laser level or long spirit level
- Hammer
- Picture hanging nails or hooks
- Pencil
- 12 abstract art prints (earth tones, botanical line drawings, geometric shapes)
- Scissors
Step 1: Planning and Layout
-
Select your artwork:
Curate a collection of 12 images that share a similar color palette. Look for a mix of abstract shapes, botanical line drawings, and simple geometric forms in shades of terracotta, beige, sage, and black. -
Prep the frames:
Clean the glass on both sides of your 12 matching frames to ensure there are no smudges or dust trapped inside. Insert your chosen prints, securing the backs firmly. -
Create paper templates:
Trace the outline of one frame onto a roll of craft paper or newspaper and cut it out. Repeat this until you have 12 identical paper templates. -
Mark hanging points:
Flip a frame over to find where the hanging hardware is located. Measure the distance from the top of the frame to the hardware, then mark this exact spot on your paper templates so you know exactly where to hammer later. -
Determine the grid spacing:
Decide on the gap between frames. For a tight, cohesive look like the photo, a spacing of 1.5 to 2 inches between frames both vertically and horizontally works best.
Step 2: Mapping the Wall
-
Find the center:
Measure the total width of your wall space and mark the center point at eye level with a pencil. This will serve as the anchor for your entire grid. -
Place the first template:
Using painter’s tape, stick one of the middle templates onto the wall. Use your level to ensure it is perfectly straight before pressing the tape down. -
Expand the grid:
Tape up the remaining templates around your center point, using your pre-determined spacing. I find it helpful to use a spacer block (a small piece of wood cut to the exact size of your gap) to keep distances consistent without measuring every single time. -
Check for level:
Step back and look at the entire paper grid. Use a laser level or a long spirit level to check that the rows are horizontal and the columns are vertical. Adjust any paper templates that look skewed.
Uneven spacing?
Cut a scrap piece of wood or stiff cardboard to the exact width of your desired gap. Use this ‘spacer’ between frames as you tape templates for zero-math precision.
Step 3: Installation
-
Install hardware:
Hammer your nails or hooks directly through the hanging points you marked on the paper templates earlier. This method ensures perfect placement without marking the wall itself. -
Remove the templates:
Gently tear the paper templates away from the wall, leaving the nails in place. Be sure to pull any remaining painter’s tape off carefully to avoid damaging paint. -
Hang the frames:
Place your framed art onto the hooks. Start from the center and work your way out to the edges. -
Final adjustments:
Place your level on top of each frame one last time to ensure they haven’t shifted. Use small balls of adhesive putty on the bottom corners of the frames to keep them permanently straight if you live in a high-traffic area.
Make it matte
Remove the glass from the frames for a raw, glare-free texture. This works best with high-quality matte paper prints and adds a very tactile, organic feel.
Step back and admire how this structured arrangement brings immediate calm and style to your room
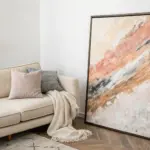
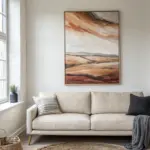
Hang One Oversized Artwork for Drama
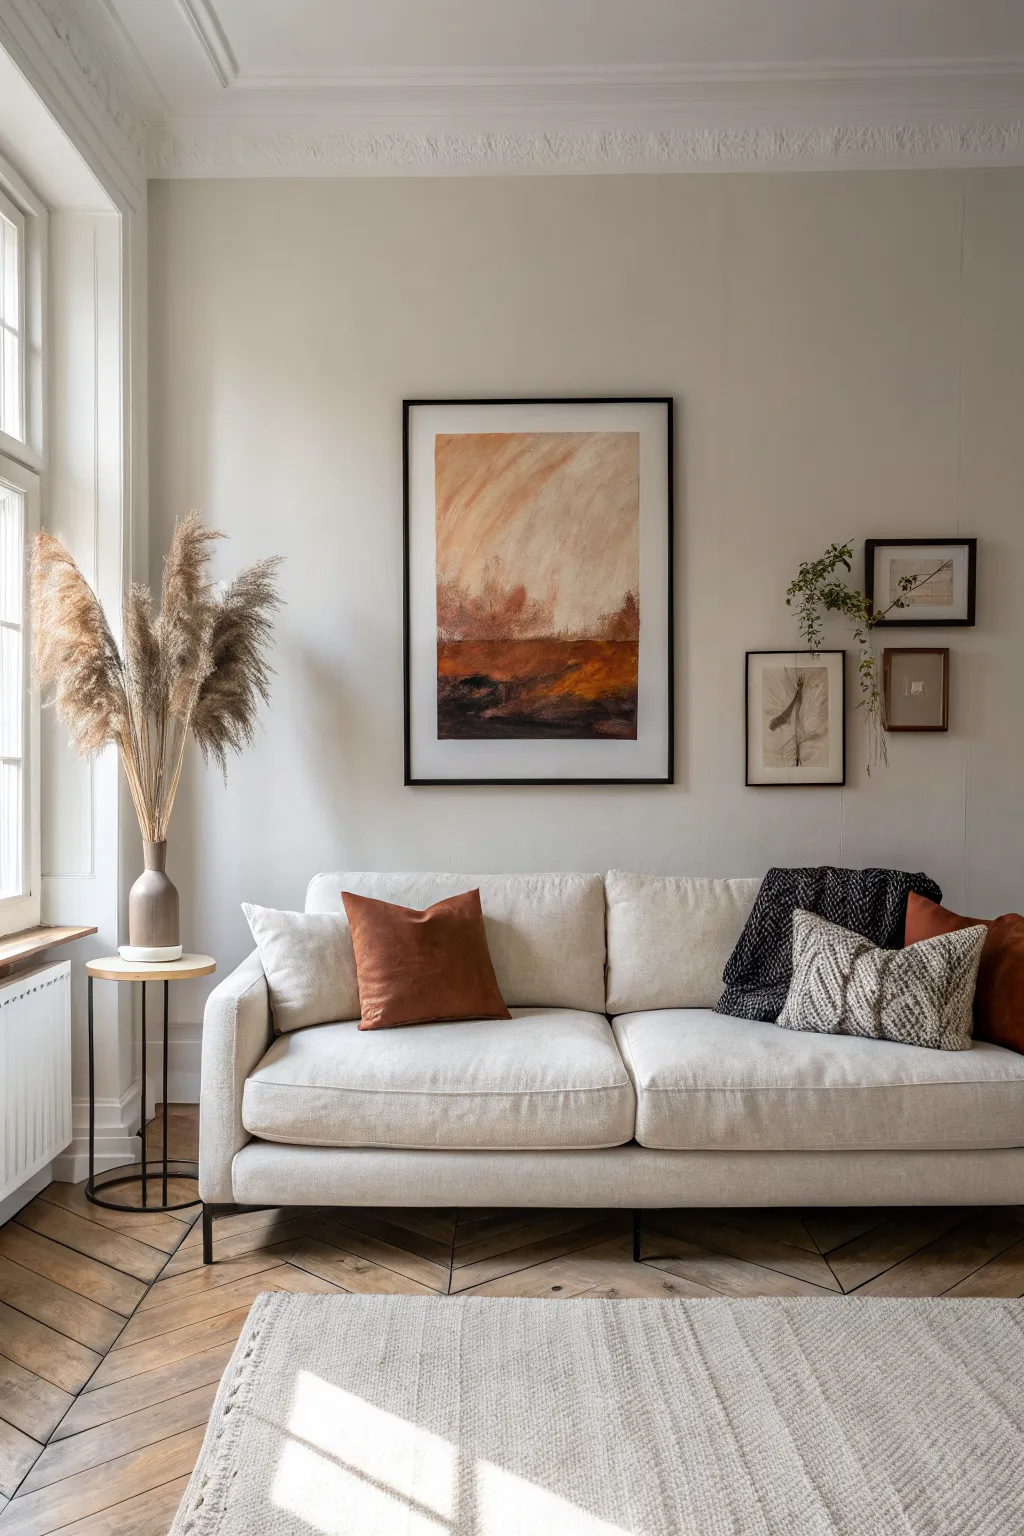
Create a stunning focal point for your living room with this large-scale abstract landscape painting that balances moody depth with airy lightness. Using warm terracotta tones and sweeping brushstrokes, you’ll capture the feeling of a vast horizon line that adds instant drama and sophistication to your space.
Step-by-Step
Materials
- Large watercolor paper sheet (approx. 24×36 inches or larger)
- Black wooden frame with mat
- Acrylic paints: Burnt Sienna, Raw Umber, Mars Black, Titanium White, Yellow Ochre
- Large flat brush (2-3 inch)
- Medium round brush
- Palette knife
- Water spray bottle
- Mixing palette or paper plates
- Paper towels or rag
- Masking tape
Step 1: Preparation and Background foundation
-
Secure the paper:
Tape your large watercolor paper down to a flat working surface using masking tape on all four corners creates a clean border and prevents the paper from buckling when wet. -
Mix the base sky color:
Combine a large amount of Titanium White with a tiny dot of Burnt Sienna and a hint of Yellow Ochre to create a warm, creamy beige. -
Apply the sky wash:
Using the large flat brush, cover the top two-thirds of the paper with this mixture. Add a little water to your brush to make the paint semi-translucent, allowing the texture of the paper to show through slightly. -
Create the upper gradient:
While the beige layer is still wet, mix a slightly stronger peach tone using more Burnt Sienna and White. Apply this loosely in the upper left corner, sweeping diagonally downward to create soft, atmospheric movement. -
Misty texture:
I like to spritz the upper section lightly with water and use a clean, dry brush to feather the edges of your strokes, making the sky look ethereal and soft.
Paper Buckling?
If the paper warps from water usage, place heavy books over the dried painting (protected by parchment paper) for a day to flatten it out.
Step 2: Building the Landscape
-
Establish the horizon:
Mix a deep, rich rust color using Burnt Sienna and a touch of Mars Black. Using the edge of your large brush, paint a horizontal band across the lower third of the paper to define where the ground meets the sky. -
Add depth to the ground:
Below the horizon line, fill the remaining bottom section with a mix of Raw Umber and Burnt Sienna. Don’t worry about being perfect; visible brushstrokes add to the organic feel. -
Introduce contrast:
Load your palette knife with Mars Black. Scrape it horizontally across the very bottom of the painting and sporadically into the brown section to create deep shadows and rugged texture. -
Blend the transition:
Where the sky meets the land, use a slightly damp medium brush to soften the hard line. You want the horizon to feel distinct but not like a ruler was used. -
Layering warmth:
Mix a vibrant orange using Burnt Sienna and Yellow Ochre. Apply this with quick, vertical dashes just above the black areas in the foreground to suggest dry grass or illuminated earth.
Step 3: Details and Framing
-
Intensify the sky:
Return to the sky area with a watered-down wash of pure Burnt Sienna. Create large, sweeping diagonal strokes that mimic wind or dramatic clouds, layering over the dry beige background. -
Add light sources:
Use Titanium White on your palette knife to add thick, textured highlights near the horizon line, suggesting light breaking through the distance. -
Final dark accents:
Look for areas that need more weight. Add small touches of pure black in the bottom corners to anchor the composition. -
Dry completely:
Allow the painting to dry flat for at least 24 hours. The thick acrylics and water washes need time to settle fully. -
Remove tape:
Peel the masking tape away slowly at a 45-degree angle to reveal your crisp, clean edges. -
Mount and frame:
Place the artwork behind the mat of your large black frame. Ensure it is centered before securing the back of the frame.
Texture Boost
Mix a little baking soda into your black and brown paints for a gritty, earthy texture that looks incredible under living room lighting.
Now hang your masterpiece and enjoy the moody, artistic atmosphere it brings to your home
Try Color Blocking With Painted Shapes
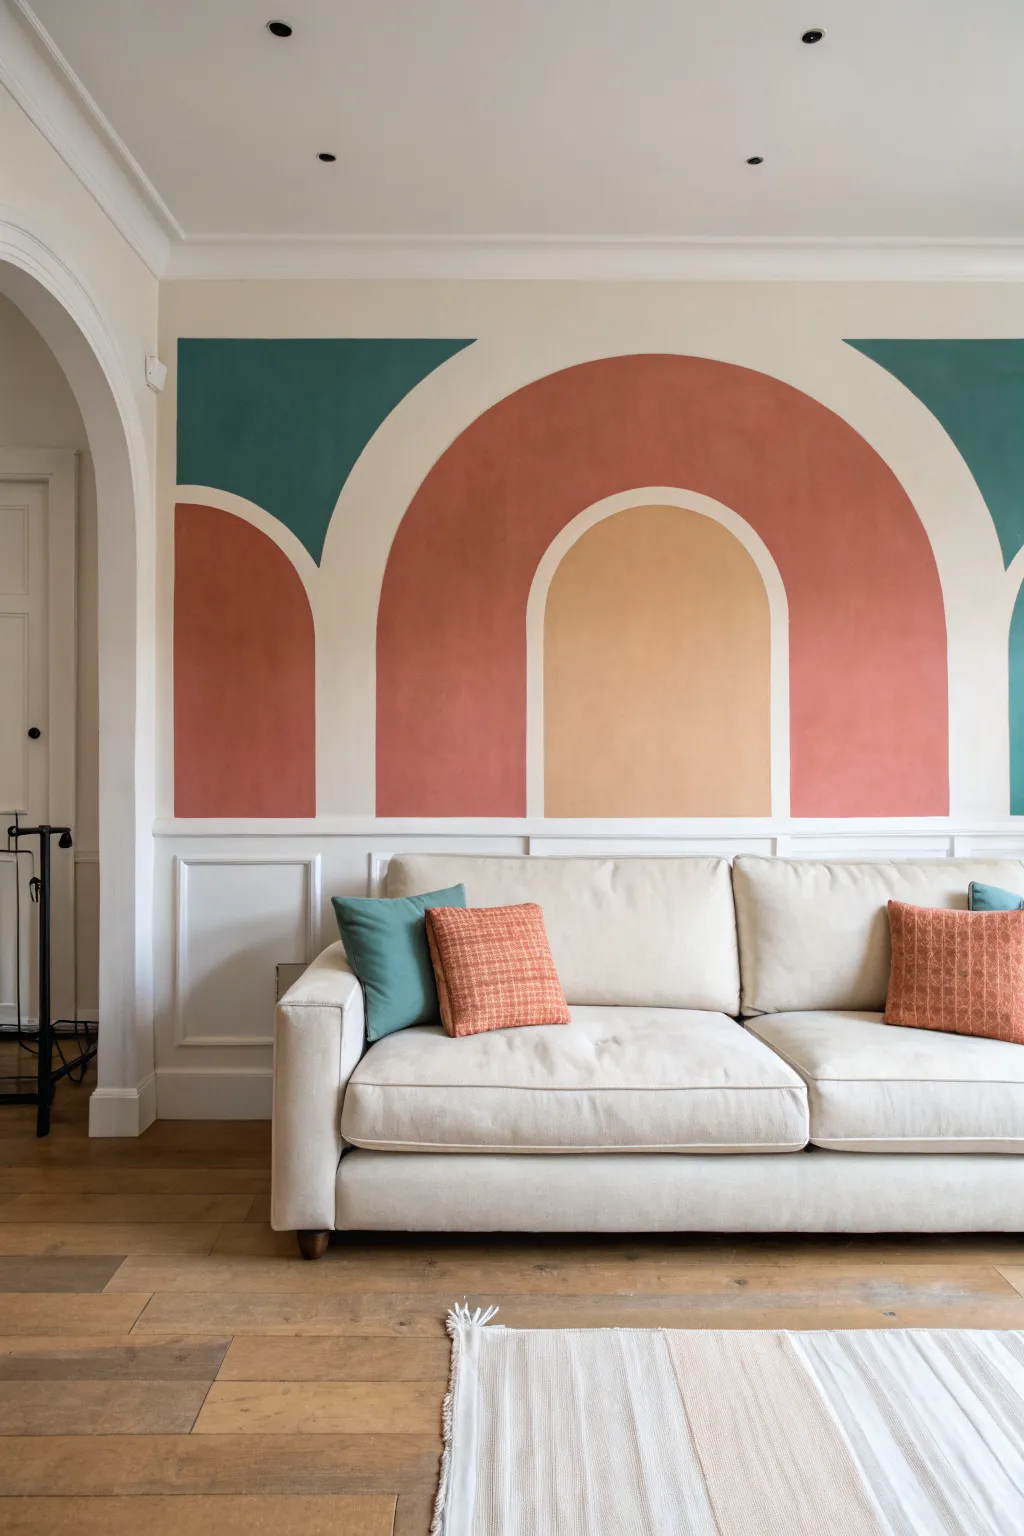
Transform a plain wall into a stunning focal point with this large-scale geometric mural featuring overlapping arches and bold color blocking. The warm terra cotta, deep teal, and soft ochre tones create a sophisticated yet playful backdrop that perfectly frames your living space.
How-To Guide
Materials
- Interior latex paint (Terra Cotta/Rust)
- Interior latex paint (Deep Teal)
- Interior latex paint (Soft Ochre/Mustard)
- Interior latex paint (Cream/Background color)
- Painter’s tape (multi-surface)
- Pencil
- String and thumb tack (or a laser level)
- Small angled sash brush (1.5 – 2 inch)
- Medium paint roller and tray
- Small foam roller (4 inch)
- Drop cloth
- Measuring tape
- Eraser
Step 1: Planning and Layout
-
Prepare the surface:
Begin by clearing the wall area and moving furniture away. Clean the wall thoroughly with a damp cloth to remove dust and grease, allowing it to dry completely. If your base wall color isn’t already the desired cream shade shown in the gaps, roll a fresh coat of cream base paint over the entire upper wall section above the wainscoting. -
Measure the center:
Find the horizontal center of your wall space. This is where the central ochre arch will sit. Mark this center point lightly with a pencil at the height where you want the top of that smallest arch to peak. -
Draw the central arch:
Create a makeshift compass using a piece of string tied to a pencil. Pin the string at the center point of the arch’s base line. Pull the string taut to the height mark you made and swing the pencil to draw a perfect semi-circle for the top of the ochre arch. Use a straight edge to draw the vertical sides down to the wainscoting. -
Outline the large Rust arch:
Using the same center point at the base line, extend your string length significantly to draw the outer curve of the large terra cotta arch. Ensure the gap between this line and the inner arch is consistent. Draw the vertical sides down, maintaing that consistent spacing from the inner arch. -
Sketch the side shapes:
Measure outward to the left and right for the teal sections. These forms are essentially ‘negative space’ inversions or partial arches. Sketch these curves starting from the ceiling line or corners, swooping down to meet the imaginary lines created by your central arches, leaving a consistent cream border between all shapes. -
Map the far left arch:
On the far left, sketch the partial terra cotta arch shape. This mirrors the curvature of the main central arch but appears ‘cut off’ by the wall edge or doorway, creating a sense of continuity beyond the frame.
Step 2: Painting the Shapes
-
Tape straight edges:
Apply painter’s tape along the straight vertical lines of your arches and along the top of the wainscoting or dado rail. Press the edges of the tape down firmly with a credit card to prevent bleed-through. -
Seal the tape:
I always like to brush a very thin layer of the *base* wall color over the tape edge first. This seals the tape, meaning any paint that bleeds under is the invisible base color, ensuring your final lines remain crisp. -
Cut in the curves:
For the curved upper sections where tape is difficult to use, use a high-quality angled sash brush. Load the brush with your terra cotta paint and carefully hand-paint the curved outline of the large central arch. Go slow and support your hand against the wall for stability. -
Fill the large arch:
Once the outline is established, use a small foam roller to fill in the body of the terra cotta arch. Use smooth, even strokes. You will likely need two coats for full opacity, allowing proper drying time between them. -
Paint the central arch:
Switch to the ochre/yellow paint. Cut in the curve of the smaller central arch with a clean angled brush, then roll the interior section. Be extremely careful not to smudge the cream gap between this and the rust arch. -
Adding the Teal sections:
Move to the teal paint for the upper corner shapes. Because these shapes often touch the ceiling line, use tape along the ceiling edge for a sharp finish. Cut in the curves freehand, then fill the areas with your roller. -
Paint the side accents:
Finally, paint the partial rust arch on the far left and the teal sliver on the far right using the same outlining and filling technique. Ensure the colors are balanced across the wall.
Wobbly Hand Issues?
If freehand painting curves is difficult, use flexible masking tape specifically designed for curves. It stretches to create smooth arcs without buckling like standard painter’s tape.
Step 3: Finishing Touches
-
Remove tape:
Peel off the painter’s tape while the final coat of paint is still slightly tacky—don’t wait for it to cure completely, or it might chip. Pull the tape away from the paint edge at a 45-degree angle. -
Touch up lines:
Inspect your ‘grout lines’ (the cream spaces between shapes). If any colored paint wobbled into these areas, use a small artist’s brush and your base cream color to tidy up the edges. -
Erase pencil marks:
Once the paint is fully dry (I’d give it at least 24 hours to be safe), use a clean white eraser to gently remove any visible pencil guidelines that weren’t covered by paint.
Make it Metallic
For a luxe upgrade, paint the thin separation lines (the gap between arches) with gold leaf paint or metallic sharpie instead of leaving them plain wall color.
Step back and admire how this bold, colorful geometry completely redefines the energy of your room.
Create a Mini Art Corner With an Easel or Desk
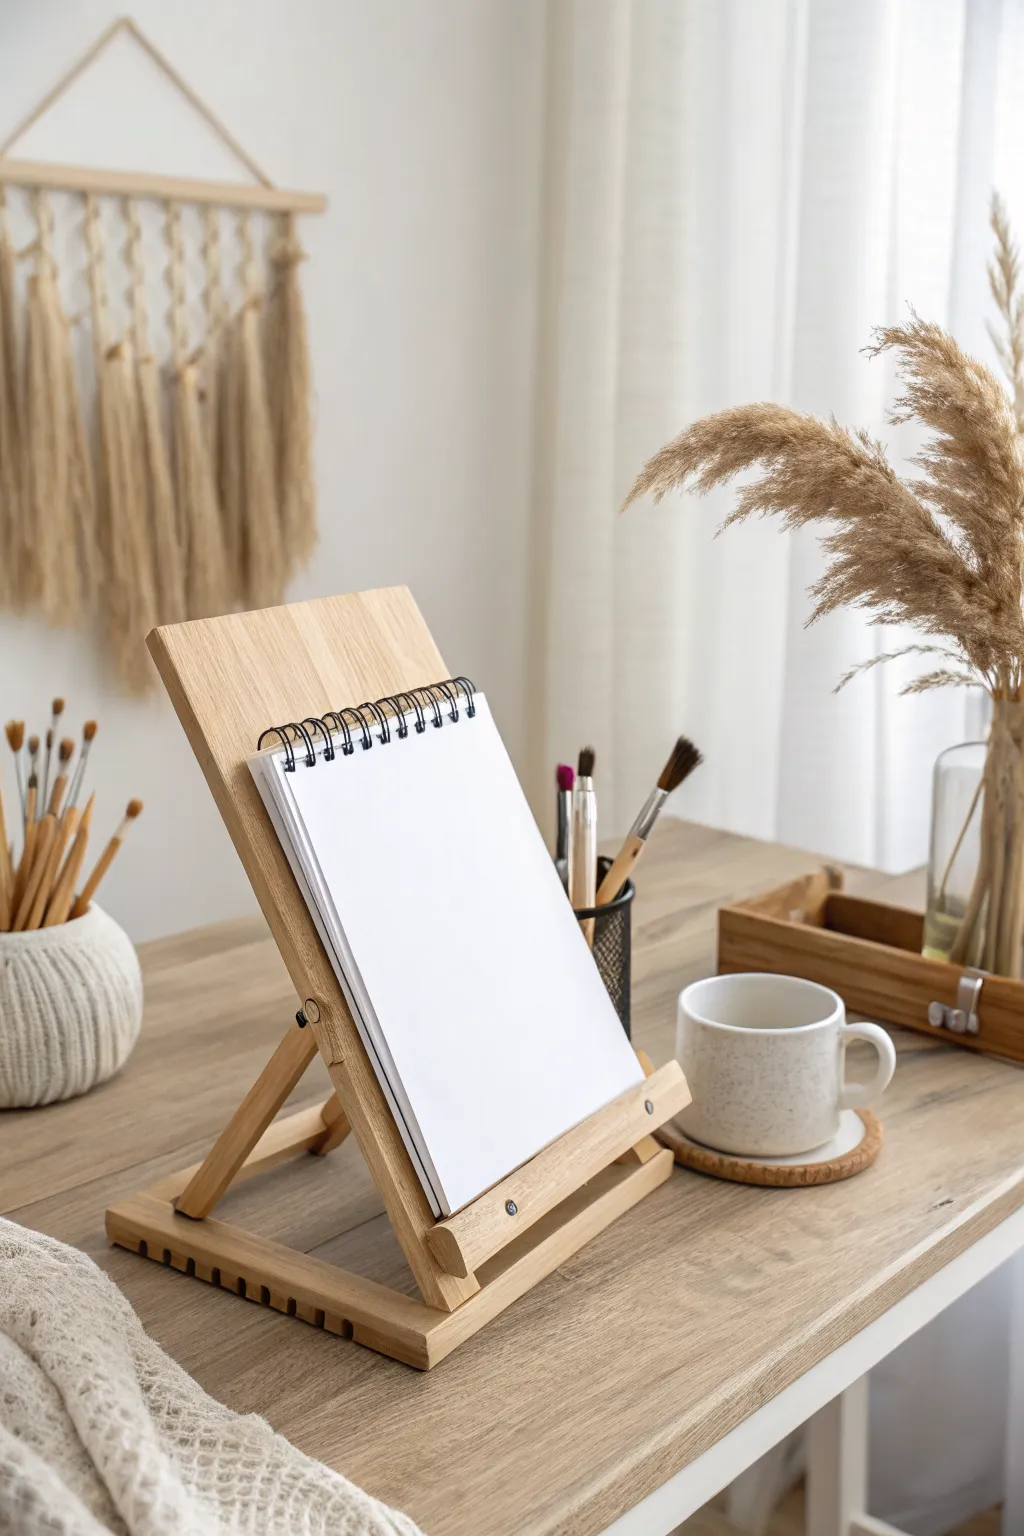
Sometimes the most inspiring art project isn’t a finished painting, but the inviting promise of a fresh start. This tutorial focuses on curating a minimalist, ready-to-go art station that beckons you to sit down and create whenever inspiration strikes.
Step-by-Step
Materials
- Tabletop wooden easel (adjustable angle)
- Spiral-bound sketchbook (A4 or slightly smaller)
- Set of artist paintbrushes (various sizes)
- Ceramic paintbrush holder or small pot
- Wooden tray or organizer
- Glass vase
- Dried pampas grass stems
- Macrame wall hanging (optional)
- Ceramic mug and coaster
Step 1: Setting the Foundation
-
Clear your workspace:
Begin with a completely clean, flat surface. A light wood desk or table works best to match the warm, neutral aesthetic we are aiming for. -
Position the easel:
Place your wooden tabletop easel centrally on the desk, angled slightly towards where you will sit. Ensure the adjustable back leg is locked securely into one of the grooves so it doesn’t collapse while you work. -
Mount the sketchbook:
Open your spiral-bound sketchbook to a fresh, blank page. Rest it on the easel’s ledge. I like to fold the cover all the way back so only the clean paper is visible, creating a distraction-free focal point. -
Check the angle:
Sit in your chair and test the angle of the paper. It should be steep enough to prevent neck strain but flat enough for ink or watercolor not to run instantly.
Light It Up
Position your easel near a window with natural light coming from the side opposite your dominant hand. This prevents your hand from casting shadows while you work.
Step 2: Arranging Tools
-
Organize your brushes:
Gather a selection of brushes—mix flat and round tips for visual variety. Place them handle-down into your ceramic holder or wire cup. Let them fan out naturally. -
Place the brush holder:
Position the brush holder to the right of the easel (or left if you are left-handed). It should be within easy reach but not blocking the light source. -
Add texture with a pot:
On the opposite side, place a textured ceramic pot with additional tools like pencils or palette knives to balance the composition.
Creative Spark
Clip a color swatch, a dried flower, or a small reference photo to the top of your sketchbook page to jumpstart your inspiration without cluttering the desk.
Step 3: Styling the Atmosphere
-
Arrange the botanical element:
Place dried pampas grass into a tall glass vase. Fluff the plumes gently to give them volume. Position this arrangement behind and to the side of the easel to add height and softness without casting harsh shadows on your paper. -
Set up the organizer:
Place a small wooden tray or box nearby. Use this to corral smaller items like erasers or tubes of paint, keeping the main work area clutter-free. -
Create a cozy vibe:
Place a ceramic mug on a coaster near the front of the desk. This suggests a relaxed, unhurried creative session is about to begin. -
Add a softness layer:
Drape a light-colored throw blanket or textured fabric over the corner of the table or the back of your chair to enhance the warm, inviting atmosphere. -
Final adjustment:
Step back and look at your setup. The blank page should be the brightest, most prominent element, inviting you to pick up a brush and make your first mark.
Now your serene art corner is ready and waiting for your next masterpiece to unfold
Use Mirrors to Bounce Natural Light
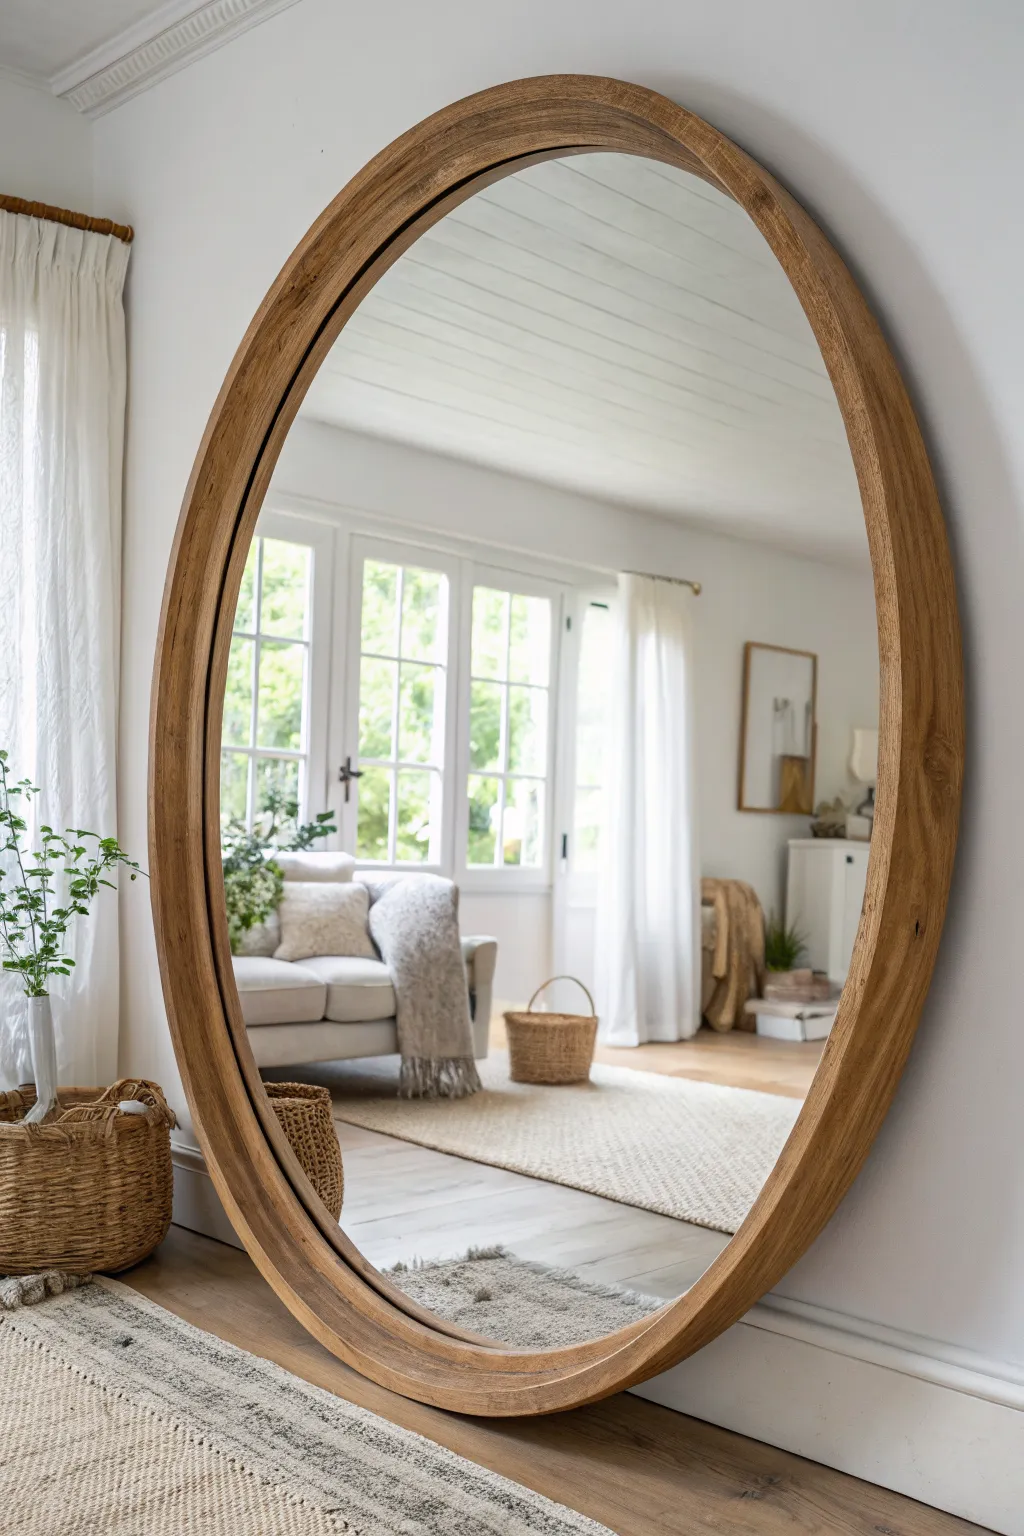
Transform your space with a statement piece that doubles the light and adds profound depth to any room. This oversized, deep-set wood mirror mimics high-end designer furniture but can be crafted for a fraction of the cost using basic plywood and thoughtful staining techniques.
How-To Guide
Materials
- One 4’x8′ sheet of 3/4″ high-quality birch plywood
- One 4’x8′ sheet of 1/4″ flexible plywood (bending ply)
- Large round or oval mirror glass (custom cut or repurposed)
- Wood glue
- Jigsaw with fine-tooth blade
- Router with flush-trim bit
- Orbital sander with 120 and 220 grit discs
- Brad nailer with 1″ nails
- Wood stain (Golden Oak or Early American)
- Matte polyurethane finish
- Heavy-duty mirror mastic or construction adhesive
- Ratchet straps or clamps
- String, pencil, and screw (for compass)
Step 1: Creating the Frame Structure
-
Draw your oval template:
Lay your 3/4″ birch plywood flat. Create a large compass by tying a string to a screw driven into the center of the board. Adjust the length to draw a large circle or oval that is 4 inches wider than your intended mirror glass size. -
Mark the inner cutout:
Shorten your string by exactly 3 inches and draw a concentric inner circle. This 3-inch band will become the face frame. -
Cut the primary ring:
Using a jigsaw with a scroll or fine-tooth blade, carefully cut along the outer line first. Take your time to keep the curve smooth, as this reduces sanding later. -
Remove the center:
Drill a starter hole inside the inner circle line, insert your jigsaw blade, and cut out the middle. You should now have a large wooden ring. -
Duplicate the ring (optional):
If you want a thicker visual profile or more structural support, trace this ring onto the remaining plywood and cut a second identical one. Glue and clamp them together for a double-thick face. -
Rip the depth strips:
Take your 1/4″ flexible plywood and rip 6-inch wide strips along the 8-foot length. These strips will form the deep, bent-wood sides of the mirror frame.
Step 2: Bending and Assembly
-
Attach the outer skin:
Apply wood glue to the outer edge of your plywood ring. Starting at the bottom center, wrap the flexible plywood strip around the outside perimeter. Use a brad nailer to tack it in place every few inches as you bend it. -
Secure the seam:
Where the flexible plywood strips meet, cut them cleanly for a tight butt joint. I like to reinforce this seam with a small scrap block on the inside (where the mirror will hide it) just to be safe. -
Repeat for the inside:
Now, glue and nail flexible plywood strips to the *inside* edge of the ring. This creates a sandwich effect where the structural ring is hidden between the inner and outer bending ply skins. -
Trim the edges:
Once the glue is dry, use a router with a flush-trim bit to ensure the flexible plywood edges are perfectly flush with the face frame. If you don’t have a router, aggressive sanding works too. -
Sand everything smooth:
Sand the entire frame, starting with 120 grit to remove any glue squeeze-out or uneven joints, and finish with 220 grit for a furniture-grade feel.
Pro Tip: Seamless Curves
Soak the flexible plywood strips with a hot wet rag 15 minutes before bending. The moisture relaxes fibers, making tight corners easier and preventing snapping.
Step 3: Finishing and Mounting
-
Apply the stain:
Wipe the wood clean of dust. Apply your chosen wood stain—Early American gives that warm, neutral tone seen in the photo. Apply with a rag, working in sections, and wipe off excess immediately to avoid blotchiness. -
Seal the wood:
Once the stain is fully dry, apply two coats of matte polyurethane. Sand lightly with a high-grit sponge between coats to knock down any raised grain. -
Create the mirror backing:
Cut a piece of thinner plywood (1/4″ or 1/2″) that fits inside the recessed back of your frame. This will hold the glass. -
Mount the glass:
Lay the backing board flat. Apply heavy-duty mirror mastic in large dollops. Carefully centre your mirror glass onto the backing and press strictly to ensure adhesion. Let this cure for 24 hours. -
Final assembly:
Place the frame face down. Lower the backing board (with the mirror attached) into the frame from the back. Screw it securely into the structural ring using short wood screws that won’t poke through the front.
Troubleshooting: Gaps
If you have small gaps between the bending ply and the ring, mix sawdust from your sanding step with wood glue to create a perfectly color-matched filler paste.
Lean your massive new mirror against the wall and watch how it instantly expands the visual boundaries of your room.
Set the Mood With Layered Lighting
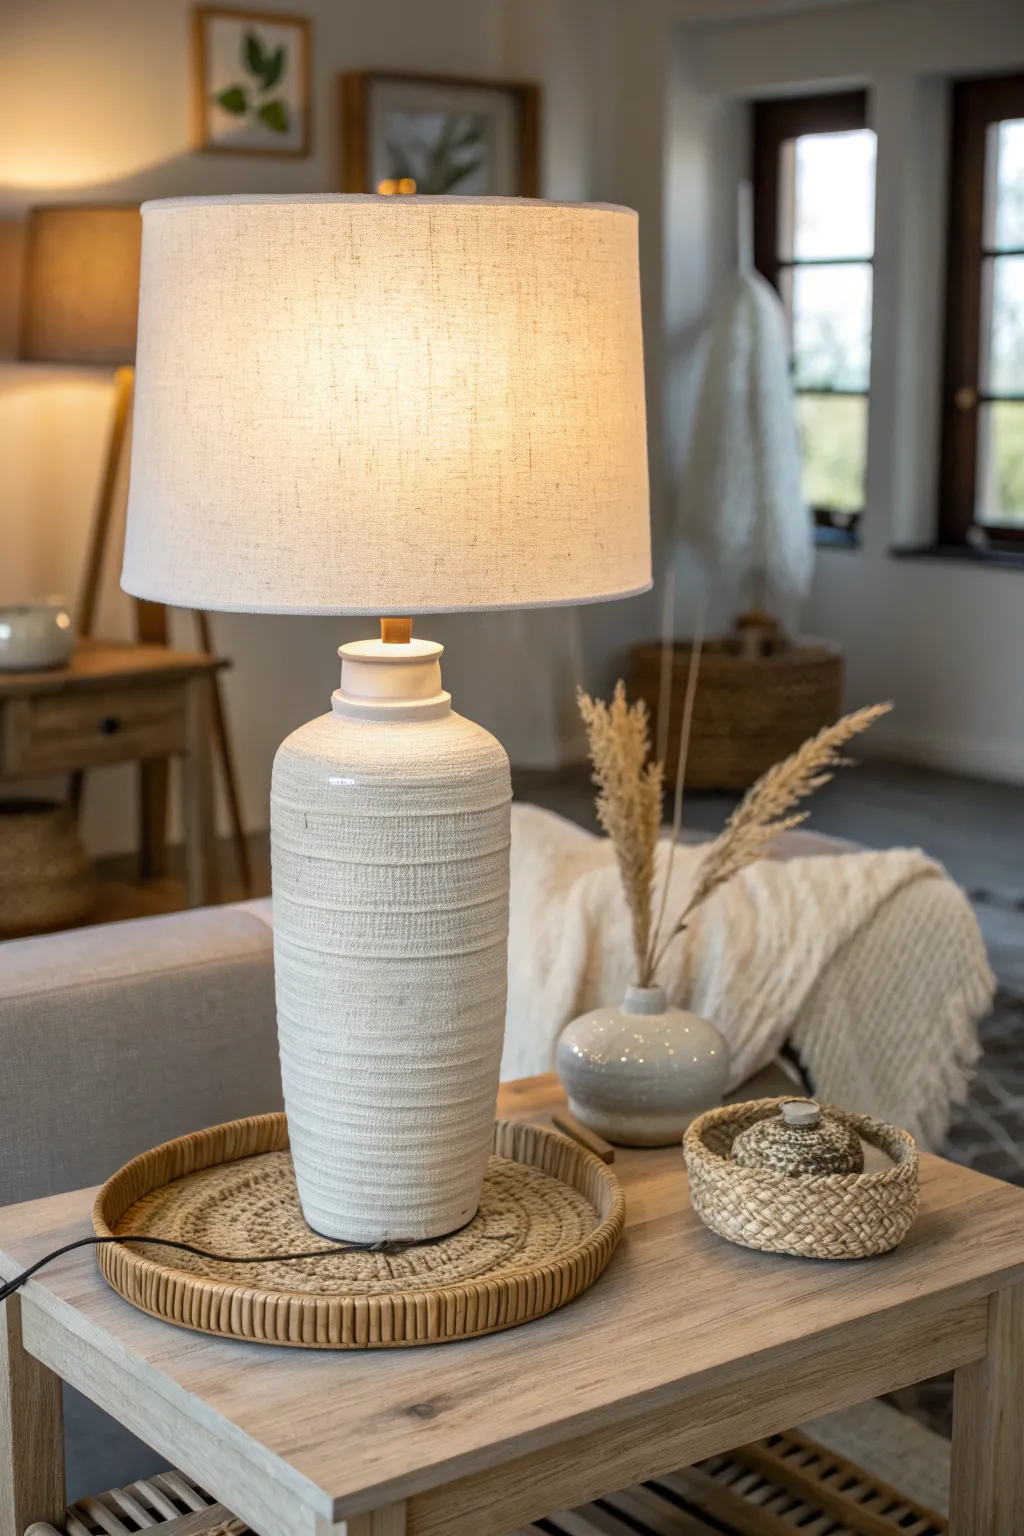
Transform an ordinary lamp base into a high-end, pottery-style statement piece using baking soda and paint. This project creates a beautifully organic, ridged texture that mimics the look of hand-thrown ceramic ware without the price tag.
Detailed Instructions
Materials
- Old lamp with a cylindrical or vase-shaped base
- Primer (spray or brush-on suitable for your lamp’s material)
- Water-based paint (matte warm white or cream)
- Baking soda
- Small mixing bowl
- Paintbrush (medium size)
- Small putty knife or plastic crafting spreaders
- Turning wheel or lazy Susan (optional but helpful)
- Clean rag
- Masking tape
Step 1: Preparation and Priming
-
Clean the surface:
Begin by thoroughly wiping down your lamp base with a damp rag to remove any dust or oils. This ensures your primer adheres properly. -
Protect the hardware:
Use masking tape to carefully cover the socket, cord, and any metal parts at the top or bottom that you want to keep paint-free. -
Apply the primer:
Coat the entire base with a layer of primer. If the original lamp is glossy or metal, a bonding primer is essential here. Let it dry completely according to the manufacturer’s instructions.
Step 2: Creating the Textured Mixture
-
Mix the paint foundation:
Pour about a cup of your warm white paint into a mixing bowl. -
Add the texture agent:
Slowly stir in baking soda. Start with a 1:1 ratio, but aim for a consistency that resembles fluffy mousse or thick frosting. It should hold its shape slightly when peaked. -
Test the consistency:
Dab a little mixture onto a scrap piece of cardboard. If it drips, add more powder; if it clumps too much, add a tiny splash of paint.
Clean Lines Tip
If you don’t have a lazy Susan, place the lamp on a folded towel. You can easily spin the towel on a smooth table surface to rotate the lamp steadily while sculpting.
Step 3: Sculpting the Ceramic Look
-
Apply the base layer:
Using your brush, apply a thick, uneven coat of the baking soda paint to the entire lamp base. You want significant coverage here, so don’t be shy. -
Begin the ridges:
While the paint is still wet, place the lamp on your lazy Susan if you have one. Hold a small putty knife or the edge of a stiff brush horizontally against the base. -
Create the grooves:
Slowly rotate the lamp (or move your hand steadily around it) to drag the tool through the thick paint, creating horizontal lines. I like to let these vary slightly in depth for an organic, handmade feel. -
Refine the pattern:
Continue these horizontal grooves from the bottom up to the neck of the lamp. Don’t worry about perfection; the charm lies in the irregularities. -
Inspect the texture:
Check for any bald spots where the original base shows through too clearly. Dab a bit more texture paste there and gently reform the groove.
Earthy Glaze Effect
Once dry, diluted brown paint or antique wax can be lightly brushed into the grooves and wiped off the high points to create depth and an aged pottery look.
Step 4: Finishing Touches
-
Allow to dry:
Let the lamp sit undisturbed for several hours, or preferably overnight. The thick mixture takes longer to cure than standard paint. -
Soften rough edges:
Once fully dry, lightly run your hand over the surface. If any ridges are too sharp or crumbly, gently knock them back with a soft cloth. -
Optional top coat:
For a bit more durability, you can brush on a very thin layer of plain matte paint over the texture to seal the baking soda, though leaving it raw offers a beautiful chalky finish. -
Remove tape:
Carefully peel away the masking tape from the hardware. -
Reassemble:
Screw in your bulb and add a linen shade to complement the earthy texture of your new base.
Now you have a custom lighting piece that adds warmth and tactile interest to your living space
Make a Sun-Filled Window Seat Moment
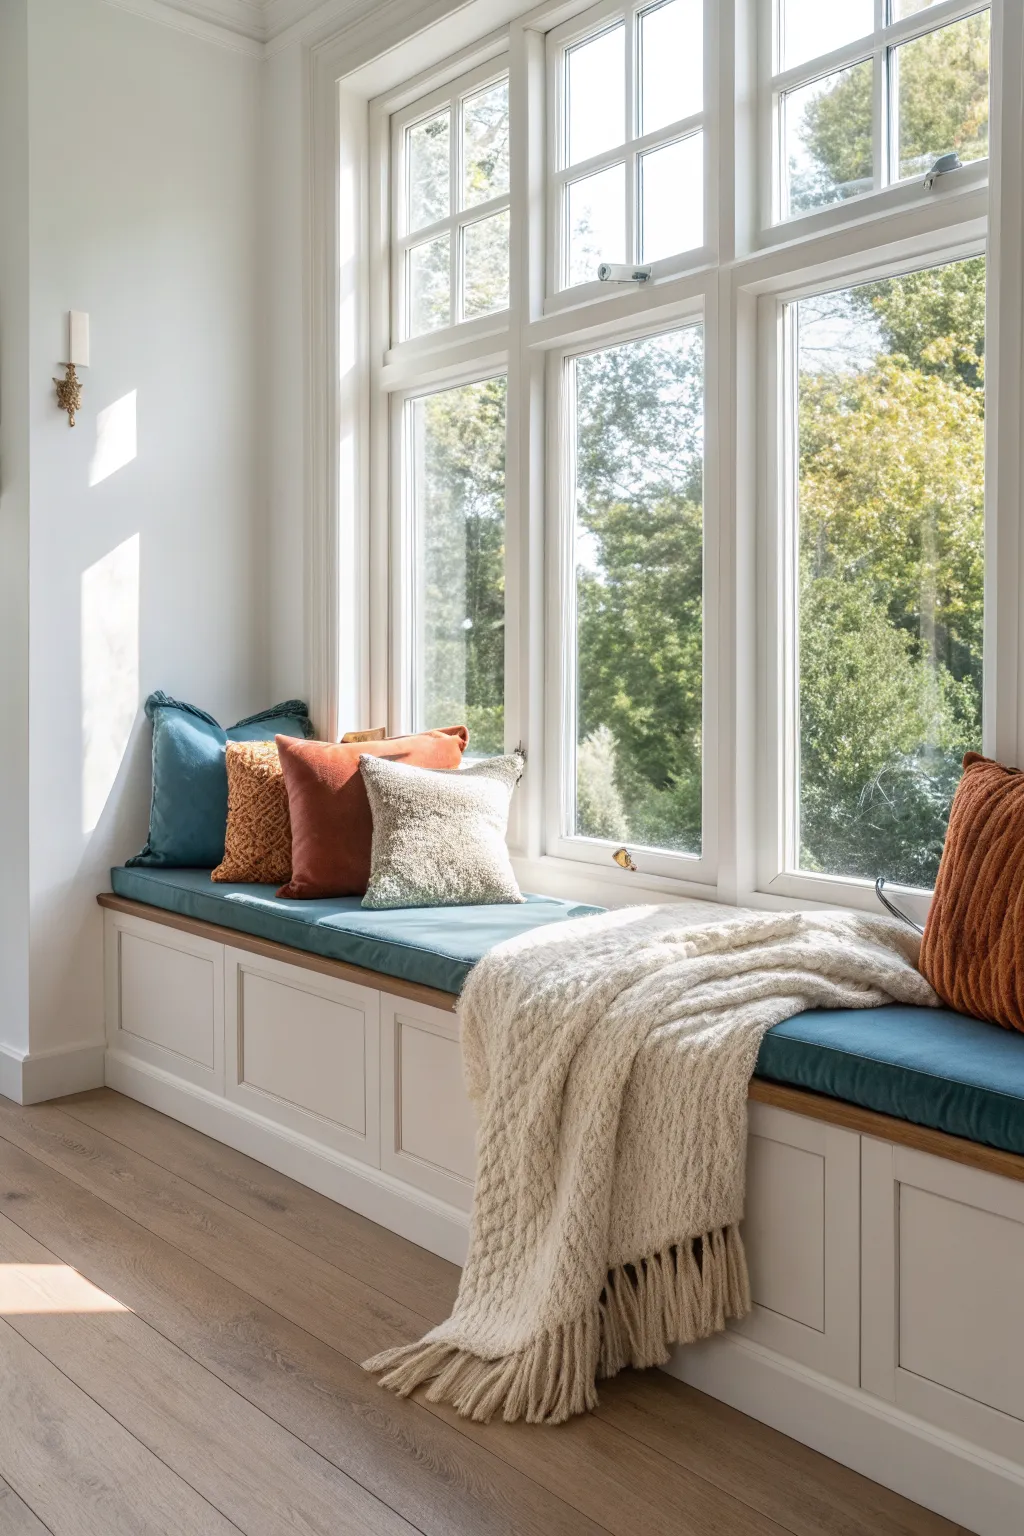
Transform an empty window alcove into a cozy, inviting reading spot with this custom built-in bench tutorial. Featuring clean shaker-style cabinetry and a plush cushion, this project combines practical storage with timeless comfort.
How-To Guide
Materials
- 3/4-inch Cabinet-grade plywood (birch or maple)
- 1×2 Poplar boards (for face frames)
- 1×4 Poplar boards (for baseboard and trim)
- 1×3 Poplar boards (for panel detailing)
- Cabinet door hinges (soft-close recommended)
- Wood glue
- Pocket hole screws (1-1/4 inch)
- Wood filler
- Primer and Cabinet paint (satin finish)
- High-density foam (3-4 inches thick)
- Upholstery fabric
- Circular saw or table saw
- Kreg jig (pocket hole jig)
- Drill and driver
- Brad nailer
- Measuring tape and level
- Sandpaper (120 and 220 grit)
Step 1: Building the Carcass
-
Measure the Alcove:
Measure the width of your window alcove at the floor, middle, and top to account for any wall variance. Use the smallest measurement as your total width to ensure a good fit. -
Construct the Base Frame:
Build a toe-kick base using 2×4 lumber cut to the length of your alcove minus the trim allowance. Set it back about 3 inches from where the front face of the cabinet will be. -
Cut Plywood Panels:
Cut your 3/4-inch plywood into three main pieces: a bottom panel, a top seat panel, and vertical dividers. The height of the dividers determines your seat height (standard is 16-18 inches). -
Assemble the Boxes:
Assemble the plywood carcass by attaching the bottom panel to the vertical dividers using pocket holes and wood glue. I find it easiest to drill the pocket holes on the outer faces where they will be hidden against the wall or by the face frame. -
Install the Carcass:
Place your assembled box on top of the toe-kick base. Check for level in all directions, shimming under the base if necessary, and screw the back of the cabinet into the wall studs.
Hiding the Seams
For a truly seamless built-in look, use painter’s caulk along the edges where the cabinet meets the wall and window frame before your final coat of paint.
Step 2: Adding the Trim and Detail
-
Attach the Face Frame:
Cut 1×2 poplar boards to frame the front edges of your plywood box. Attach these using wood glue and finish nails to create a clean, solid wood front. -
Create Shaker panels:
To mimic the paneled look in the photo, you have two options: build actual cabinet doors or create faux drawer fronts. For this look, measure and cut 1×3 boards to create rectangular frames on the front face, gluing and nailing them directly onto the plywood face or door panels. -
Add Baseboard Trim:
Install the 1×4 baseboard along the bottom edge, covering the toe-kick area to give it a built-in furniture appearance that matches your room’s existing trim. -
Install the Seat Top:
Secure the top plywood panel. If you want access to storage from the top, hinge this piece; otherwise, screw it down completely for a fixed bench. -
Fill and Sand:
Fill all nail holes and seams with wood filler. Once dry, sand everything smooth with 120-grit paper, followed by 220-grit for a professional finish.
Uneven Walls?
If your walls aren’t square, cut your top panel slightly oversized and scribe the back edge to match the wall’s contour for a gap-free fit.
Step 3: Finishing Touches
-
Prime the Woodwork:
Apply a high-quality wood primer to seal the plywood and poplar. Lightly sand again after the primer dries to knock down any raised grain. -
Paint the Cabinetry:
Paint the bench with two coats of durable cabinet paint. Use a foam roller or sprayer for the smoothest finish, allowing ample drying time between coats. -
Cut the Foam:
While the paint cures, cut your high-density foam to the exact dimensions of the seat top. An electric carving knife works wonders for getting a clean edge on thick foam. -
Sew the Box Cushion:
Sew a simple box cushion cover with a long zipper on the back edge using your chosen upholstery fabric. Ensure the fit is snug so the fabric doesn’t wrinkle. -
Style the Seat:
Place the cushion on the dried bench. Layer with textured throw pillows in varying sizes and drape a chunky knit blanket over the edge to complete the cozy aesthetic.
Enjoy your new favorite reading nook as the sunlight streams in.
Try a Playful Pattern Mix That Still Feels Calm
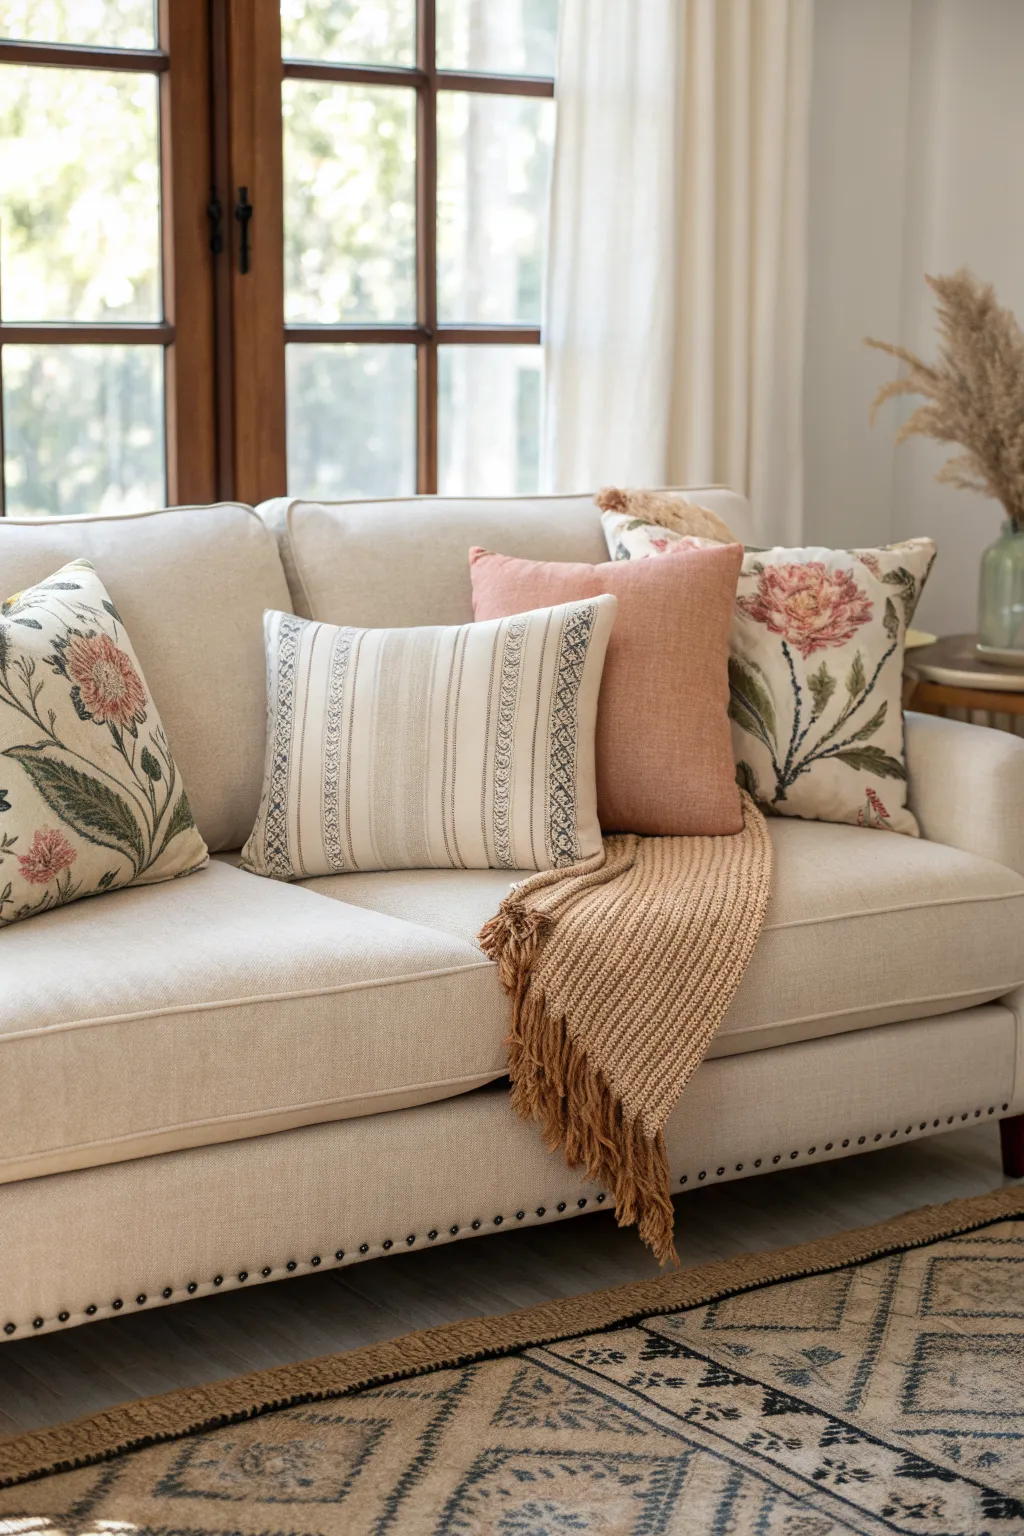
Bring warmth and character to a neutral sofa with this curated styling project that focuses on mixing patterns and textures. By layering custom-sewn pillow covers and a textured throw, you can achieve a sophisticated yet inviting look that feels effortlessly calm.
Step-by-Step
Materials
- Beige sofa (existing or new)
- Floral pattern fabric (linen or cotton blend)
- Striped woven fabric (ticking stripe or tribal motif)
- Solid terra cotta linen fabric
- Pillow inserts (2 square, 1 lumbar)
- Sewing machine and thread
- Pins, scissors, and measuring tape
- Chunky knit throw blanket (mustard or camel)
- Patterned area rug (geometric or tribal)
- Dried pampas grass and vase
Step 1: Planning the Palette
-
Assess your base:
Start by clearing your beige sofa to create a blank canvas. Observe the undertones of the fabric—whether they lean cool or warm—to better match your pillow textiles. -
Select your fabrics:
Choose three distinct fabrics. Aim for one large-scale organic print (like the botanical floral), one geometric or linear print (the stripes), and one solid color that pulls a tone from the floral pattern.
Step 2: Creating the Pillow Covers
-
Measure and cut floral fabric:
Measure your square pillow inserts. Cut two squares of the floral fabric, adding regular seam allowances, to create the front and back panels for the flanking pillows. -
Sew the floral pillows:
Pin the right sides together and sew around the perimeter, leaving a gap for the insert or installing a zipper. Turn right side out and press the seams flat for a crisp edge. -
Cut the solid accent fabric:
For the center-back accent pillow, cut your terra cotta linen to size. I find that washing linen beforehand gives it a lovely, lived-in texture that adds to the cozy vibe. -
Assemble the solid pillow:
Sew the solid pillow cover just like the floral ones. Use a simple straight stitch, reinforcing the corners to ensure they stay sharp when stuffed. -
Prepare the lumbar accent:
For the central striped lumbar pillow, cut a rectangular piece of your striped or woven fabric. Ensure the pattern is centered so the stripes run vertically or horizontally as desired. -
Sew the decorative lumbar:
Stitch the lumbar cover together. If your fabric has a heavy weave, use a slightly longer stitch length to accommodate the thickness without bunching. -
Stuff the pillows:
Insert your pillow forms into the covers. Use down or down-alternative inserts for that ‘choppable’ luxury look, then close up the openings with a blind stitch or zip them shut.
Wrinkled Linen?
Don’t iron linen perfectly flat. A light steam is enough; the natural wrinkles add to the organic, relaxed aesthetic of the room.
Step 3: Layering the Scene
-
Standard rug placement:
Lay down your geometric area rug first. Position it so the front legs of the sofa sit firmly on the rug, anchoring the furniture in the space. -
Position the base pillows:
Place your floral pillows in the corners of the sofa. Angle them slightly inward to create a welcoming embrace. -
Add the solid layer:
Nestle the solid terra cotta pillow in front of or slightly beside one of the floral pillows. This breaks up the pattern and adds a block of grounding color. -
Feature the lumbar:
Place the striped lumbar pillow front and center. This acts as the focal point that bridges the gap between the chaotic floral and the calm solid. -
Drape the throw:
Take your chunky knit throw and casually drape it over the sofa seat and down the front. Avoid folding it perfectly; a little messy cascade adds to the relaxed atmosphere. -
Style the side table:
Arrange a vase with tall dried pampas grass on a nearby side table. The height of the grass draws the eye up and complements the natural textures of the pillows.
Mix it Up
Add a flange edge or piping to the floral pillows in a contrasting color to make the pattern pop even more against the beige sofa.
Step back and enjoy the serene, textured corner you have curated


Have a question or want to share your own experience? I'd love to hear from you in the comments below!