If you’re craving baby Christmas painting ideas that feel sweet, simple, and actually frame-worthy, you’re in the right place. I’m all about turning tiny handprints and footprints into holiday symbols you’ll want to pull out every December.
Handprint Christmas Tree Keepsake
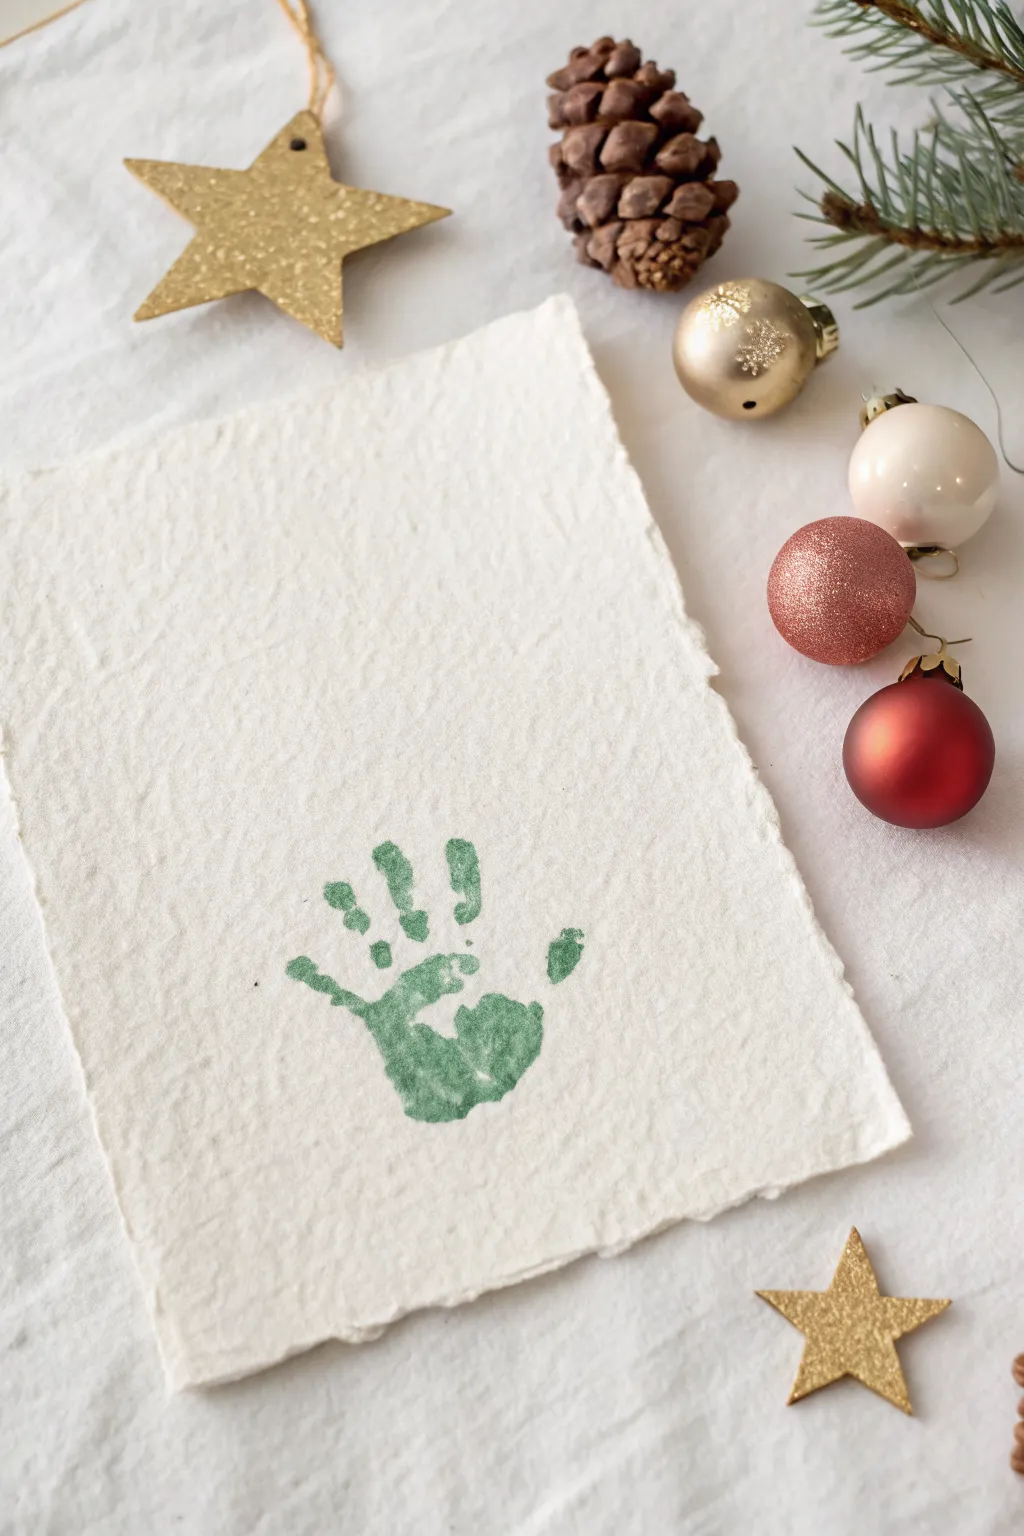
Capture the tiny size of your little one’s hand with this minimalist and elegant keepsake. The textured paper combined with the singular green print creates a modern, festive artwork that preserves a precious moment in time.
Step-by-Step Tutorial
Materials
- Thick, handmade cotton paper or cold-press watercolor paper (with deckle edge)
- Non-toxic, washable green tempera or acrylic paint (safe for skin)
- Small foam sponge brush or soft paintbrush
- Paper plate or palette
- Baby wipes or a damp cloth (essential for quick cleanup)
- Protective table covering
Step 1: Preparation
-
Prepare the workspace:
Clear a flat surface and lay down your protective covering. Since you are working with a baby, having everything within arm’s reach is crucial before you verify the little one is ready. -
Select the paper:
Choose a high-quality, textured paper. The example uses paper with a deckled (torn) edge, which adds a beautiful, rustic charm. Ensure the paper is flat and clean. -
Ready the paint:
Squeeze a small amount of green paint onto your paper plate. You want a shade that resembles evergreen trees—a hunter green or forest green works best. -
Prepare the applicator:
Dab your sponge brush or paintbrush into the paint. You want the brush fully loaded but not dripping.
Step 2: The Print
-
Engage the baby:
Bring your baby to the workspace. It’s often easier if they are sitting in a high chair or on a helper’s lap to keep them steady. -
Apply paint to the hand:
Gently hold the baby’s hand open. The palm tends to close instinctively, so I find it helpful to gently stroke the back of the hand to encourage it to open. -
Coat the palm:
Using the sponge brush, quickly and evenly coat the palm and fingers with green paint. Avoid applying it too thick, or the print will be a slippery blob. A medium, even coat is perfect. -
Wait a moment:
Check specifically that the paint covers the fingertips and the heel of the palm, as these defined areas make the print recognizable. -
Position the hand:
Ideally, you want the handprint centered in the bottom half of the paper to leave negative space above. Hover the hand over the paper to aim. -
Press down:
Press the hand firmly onto the paper. Apply gentle pressure to each finger and the center of the palm to ensure the texture of the skin transfers to the texture of the paper. -
Lift carefully:
Lift the hand straight up and away from the paper quickly to avoid smudging the wet paint.
Smudged Print?
If the hand slips, turn the smear into a creative element! Use a brush to feather the edges outward, transforming the smudge into an abstract pine branch instead.
Step 3: Finishing Touches
-
Clean up immediately:
Before worrying about the artwork, use the baby wipes or damp cloth to clean the paint off the baby’s hand immediately. -
Assess the print:
Look at the print. Don’t worry if it isn’t perfect; gaps in the paint or slight smudges add to the authentic, handmade feel. -
Dry completely:
Place the paper in a safe, flat spot to dry completely. Because the paper is thick, this might take an hour or two depending on the paint thickness. -
Flatten if needed:
If the watercolor paper curls slightly from the moisture of the paint, place it under a heavy book once it is 100% dry to flatten it back out.
Date It
Use a fine-tip gold archival pen to write the year or the baby’s age in small, delicate script on the bottom right corner once the paint is fully dry.
This simple, charming print is now ready to be framed or gifted as a heartfelt holiday memory


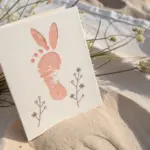
Footprint Reindeer With a Red Nose

This minimalist keepsake transforms a tiny footprint into a charming base for holiday art, capturing the delicate details of your baby’s skin texture in warm, earthy tones. The simple brown print stands beautifully on its own or serves as the perfect starting point for a reindeer face.
Detailed Instructions
Materials
- Heavyweight white cardstock or watercolor paper
- Non-toxic brown washable paint or acrylic paint
- Foam paintbrush or wide soft bristle brush
- Baby wipes (essential for quick cleanup)
- High chair or helper to hold the baby
- Small fine-point brown marker or pen (optional for signature)
Step 1: Preparation
-
Set the Stage:
Clear a workspace near where the baby is comfortable. If you are working alone, using a high chair to keep the baby secure is a lifesaver. -
Prepare the Paper:
Cut your cardstock to the desired size. A standard 5×7 inch size frames well, but having a few extra sheets ready is smart since babies are unpredictable artists. -
Ready the Materials:
Squeeze a generous amount of brown paint onto a palette or paper plate. Keep your baby wipes open and within immediate arm’s reach.
Step 2: Creating the Print
-
Apply the Paint:
Using the foam brush, apply a smooth, even layer of brown paint to the bottom of the baby’s foot. Aim for full coverage without it being gloopy, as too much paint will smear the fine skin lines. -
Check Consistency:
Look closely at the creative canvas (the foot!). If the paint looks too thick or drippy, blot it gently with a paper towel. You want a thin, tacky layer for the best texture transfer. -
Position the Foot:
Hold the baby’s ankle firmly but gently. Guide the foot toward the center of the paper, keeping the heel slightly lower than the toes. -
Press Down:
Press the foot onto the paper in a rolling motion, starting from the heel and moving to the toes. Apply gentle pressure to the ball of the foot and individual toes to ensure they make contact. -
Lift and Release:
Lift the foot straight up—quickly and vertically—to avoid smudging the print. Immediately hand the baby off to a helper for cleaning or grab a wipe yourself. -
Inspect the Print:
Check your transfer. A perfect print isn’t necessary; the little gaps and skin textures add character. If it’s too faint, simply try again on a fresh sheet.
Clean Print Pro-Tip
Do this when the baby is asleep or very calm (like after a feed). A wiggly baby equals a smeared print. Stamping while they nap in a carrier works wonders.
Step 3: Adding Details
-
Create the ‘Antlers’:
To mimic the style in the photo, you’ll need the toes to act as the top of the head. Dip your finger or a small round brush into the brown paint. -
Stamp the Dots:
Above the toe impressions, dab five distinct brown dots in an arc. These abstractly represent rounded antlers or simply decorative elements floating above the print. -
Vary the Sizes:
I prefer to make the outer dots slightly larger or smaller than the center ones to give the arrangement a natural, organic feel. -
Dry Time:
Let the cardstock sit undisturbed for at least 30 minutes. If the paint was applied thickly, give it an hour to prevent accidental smears. -
Finishing Touches:
Once dry, use a fine-point brown pen to create a tiny arrow or add the date and baby’s name near the heel for a subtle, personalized signature.
Level Up: Reindeer Face
Turn this abstract print into a character! Glue a small red pom-pom onto the heel for a nose and add googly eyes near the ball of the foot for a classic look.
Capture these tiny moments now and you will cherish the artwork forever


Mistletoes Footprint Mistletoe
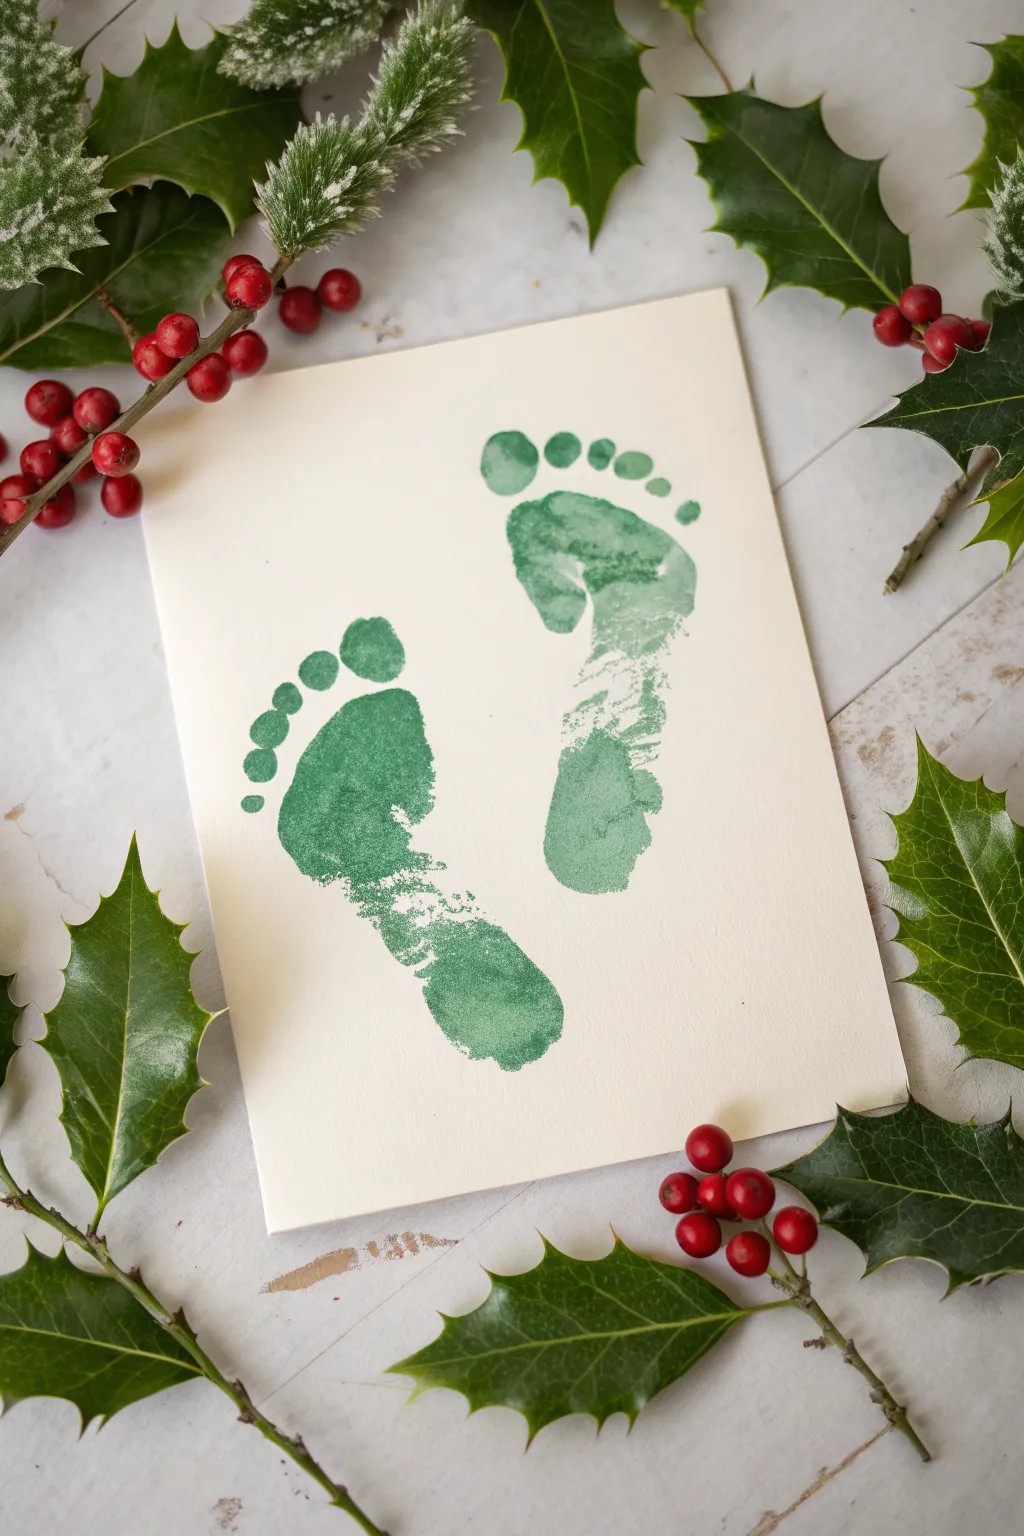
Capture the magic of tiny toes with this simple yet classic Christmas keepsake featuring adorable green footprints. The textured green paint creates a natural, mistletoe-inspired look that pops beautifully against crisp cream cardstock.
Step-by-Step Guide
Materials
- Cream or off-white heavy cardstock (A5 or 5×7 inches)
- Non-toxic, washable green tempera or acrylic paint
- Medium flat paintbrush or foam brush
- Paper plate or palette
- Baby wipes or damp cloth (for quick cleanups)
- Newspaper or messy mat
Step 1: Preparation
-
Set the Stage:
Clear a comfortable workspace on the floor or a low table. Lay down your newspaper or messy mat to protect the surface. -
Prepare the Paper:
Place your sheet of cream cardstock in the center of the workspace. If needed, tape the corners down slightly with painter’s tape to prevent it from sliding. -
Paint Setup:
Squeeze a generous dollop of green paint onto your paper plate. You want enough to cover a foot fully without needing to double dip mid-process. -
Texture Check:
I like to ensure the paint isn’t too watery; a slightly thicker consistency helps capture the unique ridges and lines of the footprint better.
Clean Print Pro-Tip
Do this when baby is sleepy or in a high chair. A wiggly baby leads to smudged prints, so a calm moment is key to getting defined toes.
Step 2: Printing the First Foot
-
Direct Application:
Using your flat brush or foam brush, paint the bottom of the baby’s left foot. Aim for an even coat—not dripping wet, but fully covered right up to the toes. -
Positioning:
Hold the painted foot by the ankle and hover it over the left side of the cardstock. Angle it slightly inward to mimic a natural standing stance. -
The Print:
Press the foot firmly onto the paper. Gently push down on each toe individually to ensure they make contact with the cardstock. -
The Lift:
Lift the foot straight up—avoid dragging it, which can smear the print. Use a baby wipe immediately to clean off the green paint.
Step 3: Printing the Second Foot
-
Apply Paint Again:
Reload your brush and coat the bottom of the right foot. Make sure you cover the heel and the ball of the foot thoroughly. -
Align the Print:
Hover the right foot over the paper, positioning it to the right of the first print. Leave a small gap between the heels, roughly angling the toes outward or parallel depending on the look you want. -
Press Down:
Guide the foot onto the paper, applying gentle pressure to the heel and arch area first, then moving toward the toes. -
Check the Toes:
Give the little toes a quick, gentle tap to ensure the smallest details transfer clearly. -
Clean Reveal:
Lift the foot straight up quickly and confidently. Clean the baby’s foot thoroughly while the artwork dries undisturbed.
Make it Mistletoe
Once dry, use a red marker or paint to add three small berries at the heels where the prints meet to turn the feet into a festive mistletoe shape.
Step 4: Finishing Touches
-
Drying Time:
Let the paint dry completely. This usually takes about 15 to 20 minutes depending on how thick the application was. -
Optional Trimming:
If there are any smudge marks on the edges, you can trim the cardstock down slightly for a cleaner border.
Display your charming green footprints surrounded by seasonal greenery for a perfect holiday memory

Handprint Holiday Wreath
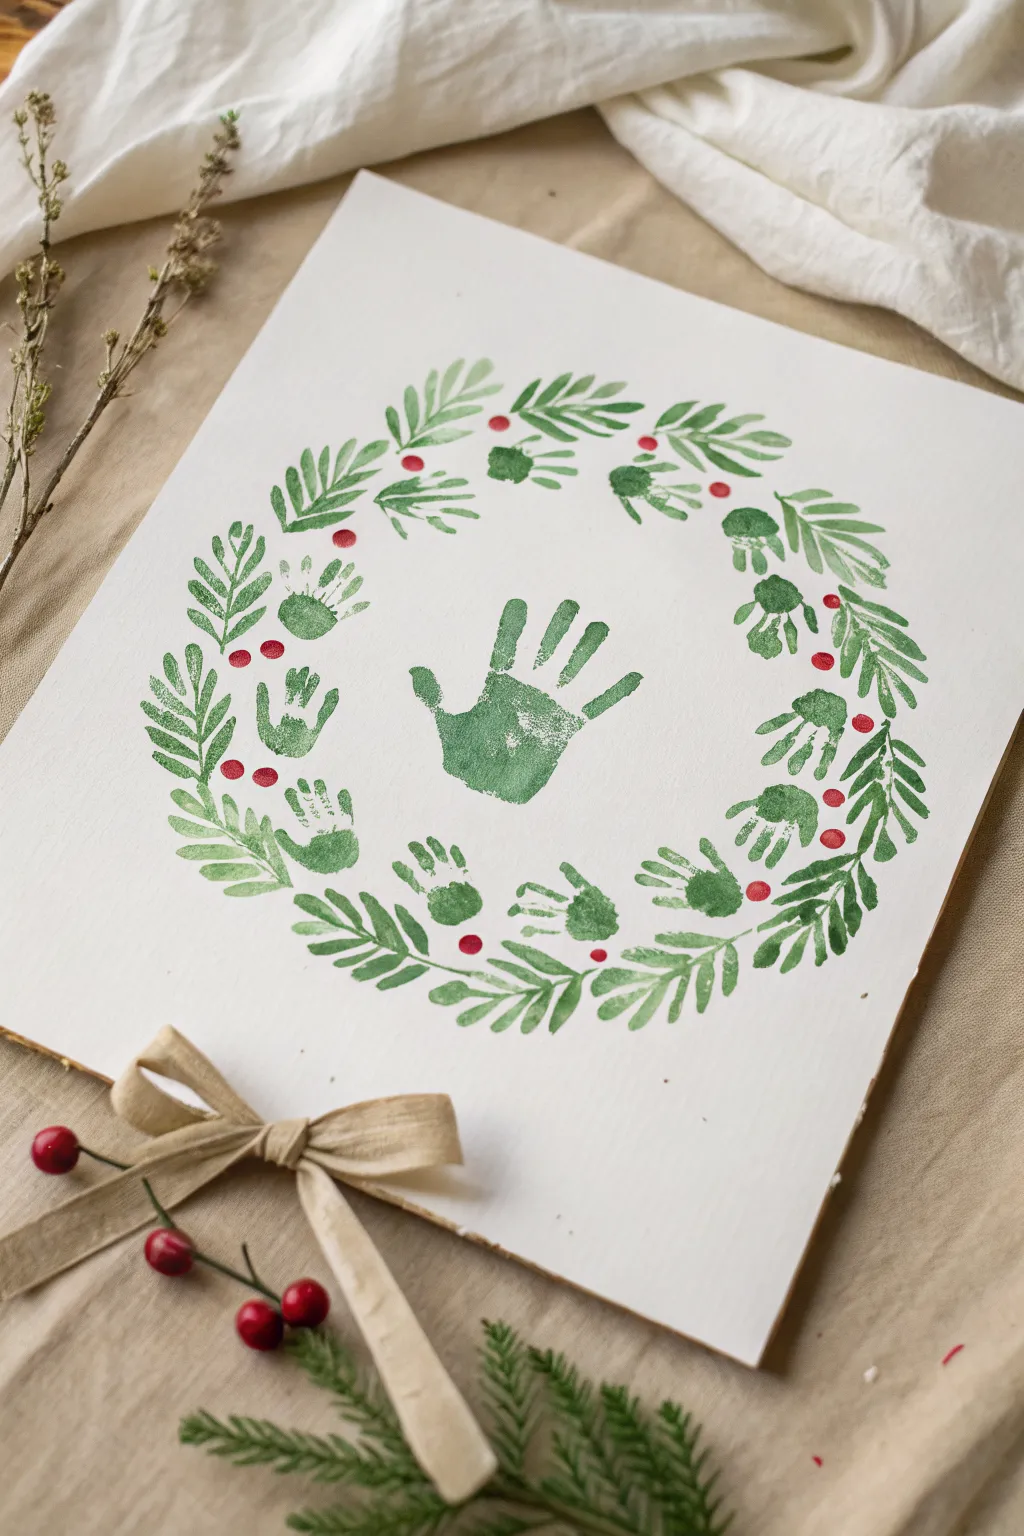
Capture the magic of tiny hands with this beautiful keepsake wreath made from simple green prints and festive details. The central handprint acts as a sweet focal point, surrounded by a circle of smaller prints and painted greenery that mimics natural pine branches.
How-To Guide
Materials
- White art canvas or heavy cardstock (rectangular)
- Non-toxic green acrylic paint
- Non-toxic red acrylic paint
- Small foam sponge brush
- Fine-tip paintbrush
- Medium round paintbrush
- Paper plate or palette
- Baby wipes or damp cloth (essential for cleanup)
- Beige ribbon and faux berries (optional for styling)
Step 1: Creating the Central Print
-
Prepare the workspace:
Lay down newspaper or a plastic tablecloth to protect your surface. Place the white canvas in the center and squeeze a dollop of green paint onto your palette. -
Paint the hand:
Use the foam sponge brush to apply an even, thin layer of green paint to the palm and fingers of your child’s hand. Avoid globs of paint, as these will smudge the details. -
Stamp the center:
Guide your child’s hand to the direct center of the canvas. Press down firmly on the palm and each finger to ensure a good impression. -
Lift carefully:
Lift the hand straight up and off the paper to avoid smearing the print. Wipe the hand clean immediately with a baby wipe.
Clean Prints Secret
Apply paint sparingly with a sponge rather than dipping the hand. Too much paint makes a slippery blob; a thin, even coat captures the unique fingerprints.
Step 2: Forming the Wreath Circle
-
Plan the circle:
Lightly visualize a circle around the central handprint. If you need a guide, you can very faintly trace a plate with a pencil, but keep it light so it can be erased later. -
Re-ink the hand:
Apply fresh green paint to the child’s hand using the sponge brush. For the wreath ring, you might want to use just the palm and fingers, or even just the fingers depending on the hand size. -
Stamp the first ring print:
Place the first handprint on your imaginary circle line. Orient the fingers so they point outward, following the curve of the circle. -
Complete the circle:
Continue re-inking and stamping handprints around the central print until you have a full circle. Leave some space between them for the painted leaves later. In this project, about 8-10 prints usually complete the loop.
Step 3: Painting the Greenery
-
Mix a lighter green:
Add a tiny touch of white or yellow to your green paint to create a slightly lighter shade for the painted leaves. This adds depth and separates the drawn elements from the stamped ones. -
Paint leaf stems:
Using a medium round brush, paint curved lines connecting the handprints or filling the gaps between them. These lines serve as the spine for your pine boughs. -
Add pine needles:
With the same brush, use quick, short strokes to paint leaves coming off the stems. Angle the strokes outward to mimic the feathery texture of evergreen branches. -
Layering details:
I like to go back in with a slightly darker green on a fine-tip brush to add veins to some leaves or define the edges of the pine needles for a crisper look. -
Balance the wreath:
Step back and look at the wreath shape. Add small sprigs of painted greenery anywhere the circle looks too thin or uneven.
Wiggly Baby Fix
If your baby clenches their fist, try doing this while they are in a high chair or asleep. You can also practice a few prints on scrap paper first.
Step 4: Adding Festive Accents
-
Prep the berries:
Clean your fine-tip brush thoroughly or switch to a new one. Squeeze a small amount of red paint onto your palette. -
Paint the berries:
Dip the tip of the brush into the red paint and gently dot small circles onto the wreath. Place them in clusters of two or three near the base of the leaves or in empty spaces. -
Let it dry completely:
Allow the painting to dry undisturbed for several hours. Acrylics dry relatively fast, but thick handprints might take a bit longer. -
Clean up the card:
If you made any faint pencil guides earlier, gently erase them now that the paint is fully dry. -
Optional embellishment:
To finish the look as shown, you can hot glue a small beige ribbon bow or a sprig of faux holly to the bottom corner of the canvas frame, though the painting stands beautifully on its own.
Hang this lovely artwork during the holidays to see how much those little hands grow each year
BRUSH GUIDE
The Right Brush for Every Stroke
From clean lines to bold texture — master brush choice, stroke control, and essential techniques.
Explore the Full Guide
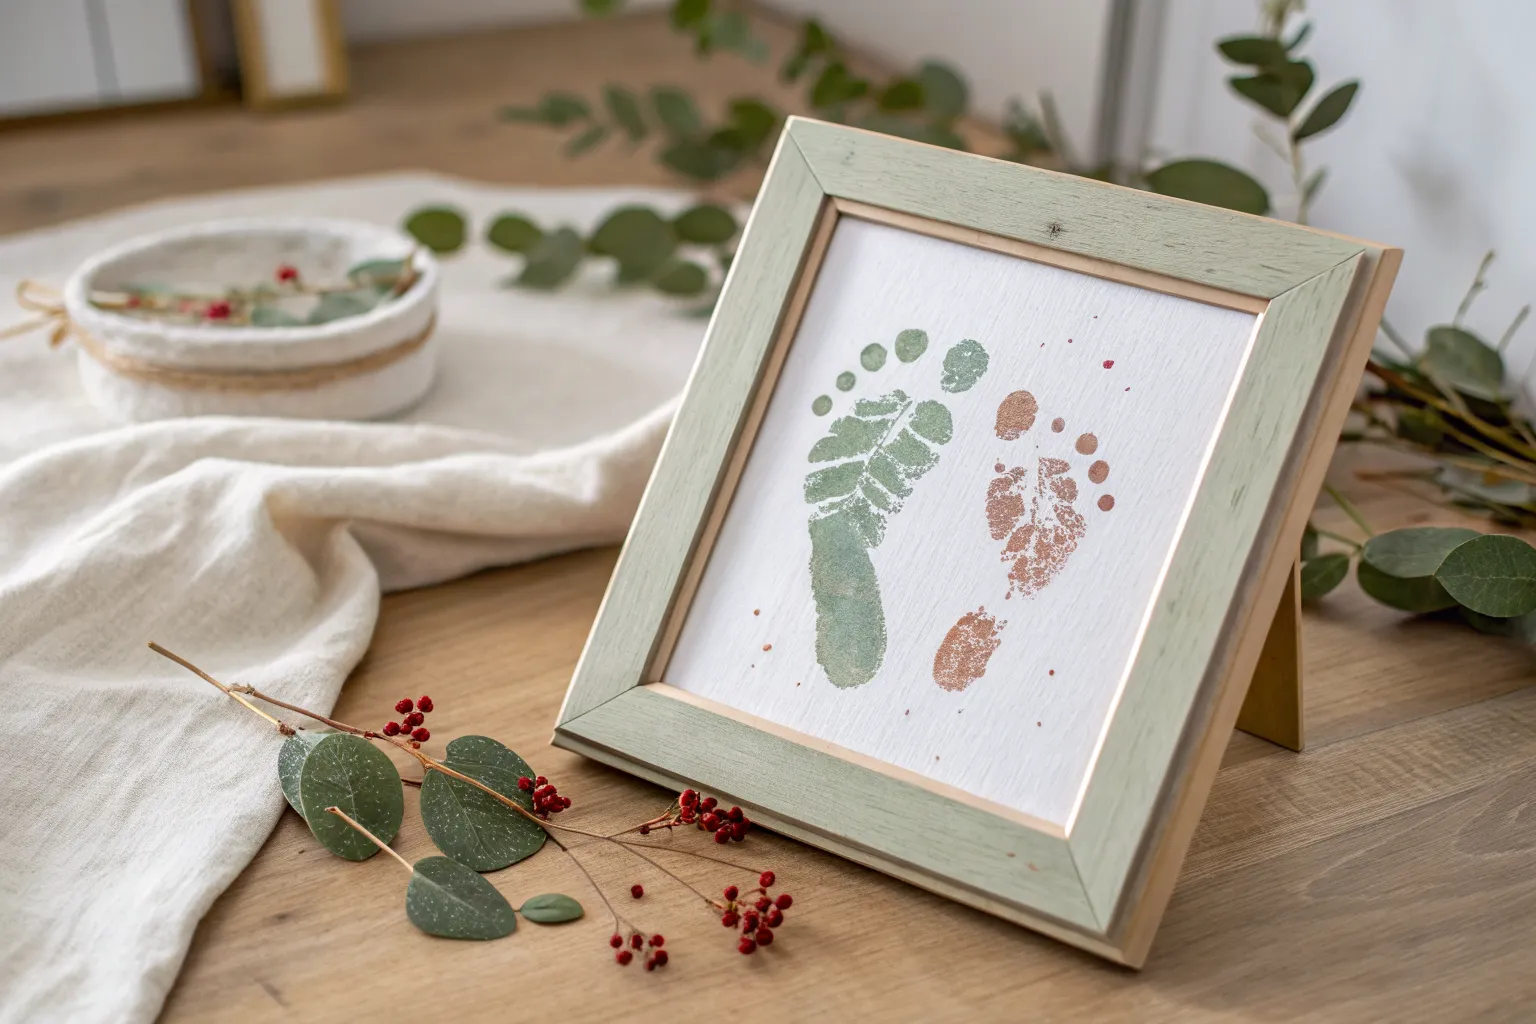
First Christmas Name and Date Frame
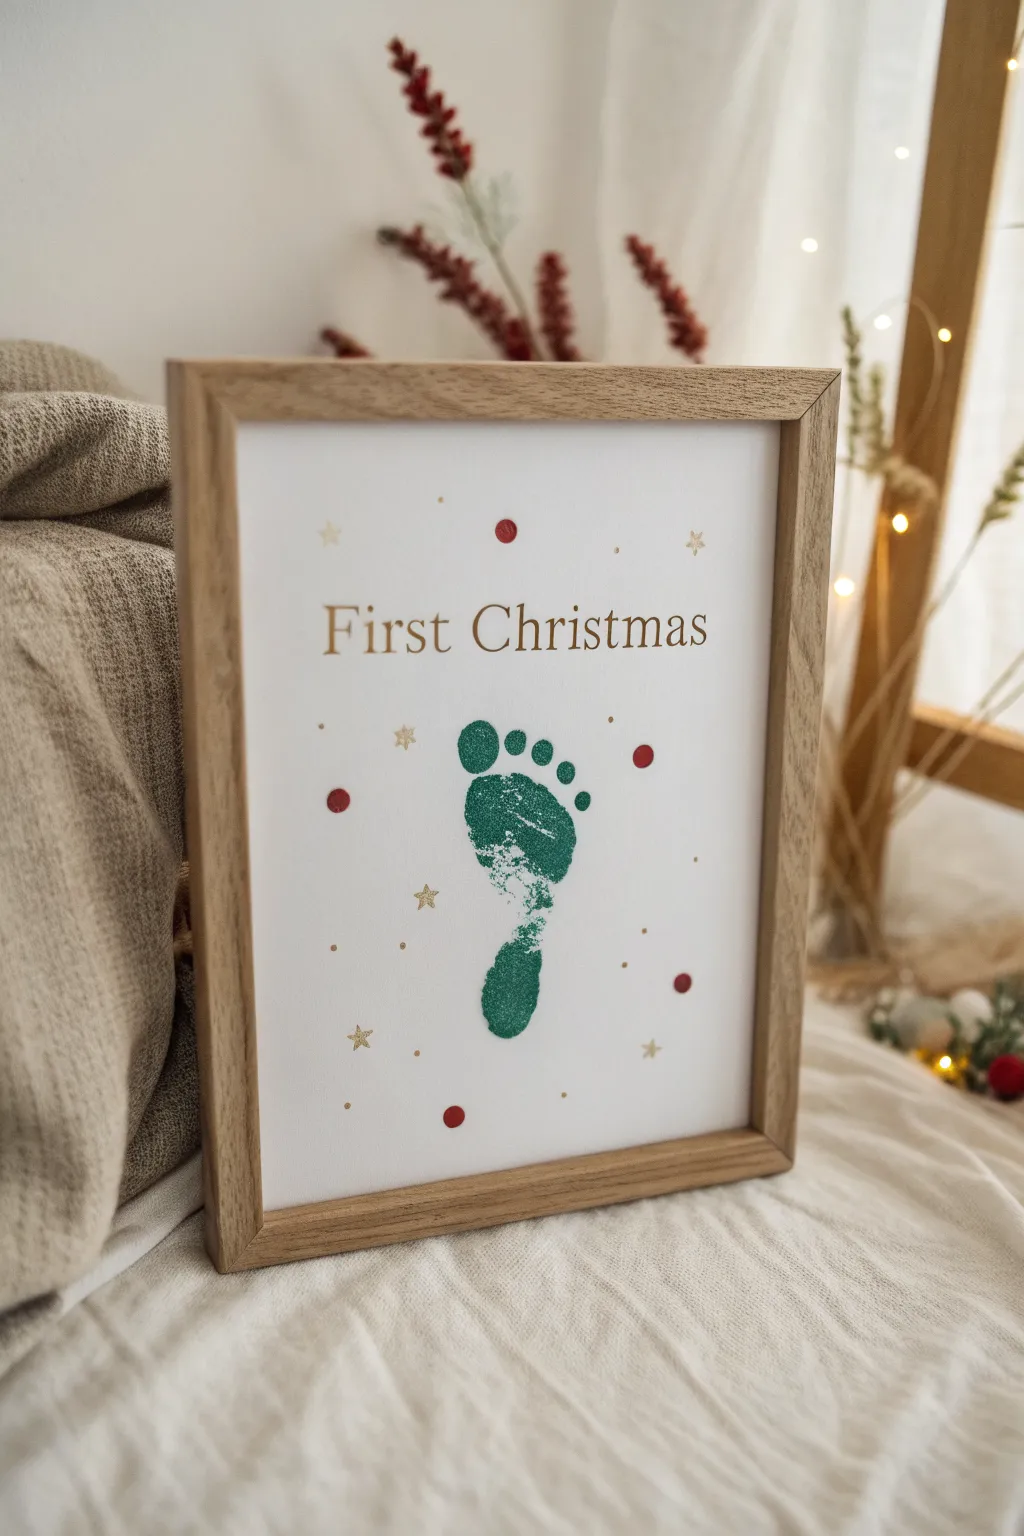
Immortalize those tiny toes with this elegant and minimal keepsake artwork. Combining a vibrant green footprint with classic gold typography and festive accents, this piece turns a simple milestone into refined holiday decor.
Detailed Instructions
Materials
- Heavyweight white cardstock or fine art paper (A4 size)
- Non-toxic green acrylic paint or fabric paint
- Small foam roller or wide sponge brush
- Gold foil transfer sheets (with adhesive pen) or metallic gold paint marker
- Red acrylic paint
- Small round paintbrush (size 2 or 3)
- Fine-tip stencil brush (optional for stars)
- Ruler
- Pencil
- Light wood frame (A4 size)
Step 1: Preparation and Footprint
-
Surface setup:
Lay your cardstock flat on a hard surface. Tape down the corners with low-tack painter’s tape to prevent it from shifting while you work with the baby. -
Paint application:
Squeeze a small amount of non-toxic green paint onto a palette or paper plate. Use your foam roller to create a thin, even layer of paint on the roller itself. -
Coating the foot:
Gently hold your baby’s foot and roll the paint onto the sole. Ensure coverage is even but not gloopy, as too much paint will cause the print to slide and smear. -
Making the impression:
Firmly but gently press the painted foot onto the center of the cardstock. Press down on the toes individually to ensure they make contact with the paper. -
Lifting away:
Lift the foot straight up without dragging it across the paper. Immediately wipe the baby’s foot clean with baby wipes before setting the paper aside to dry completely.
Smudged the print?
Don’t panic! Turn a smear into a creative element. If the smudge is near the toes, paint a tiny holly leaf or star over it. If it’s unsalvageable, cut out the best footprint and mount it on fresh paper.
Step 2: Typography and Details
-
Penciling guidelines:
Once the footprint is fully dry, use a ruler to lightly mark a horizontal line about 2 inches above the heel of the print. -
Drafting the text:
Lightly sketch the words ‘First Christmas’ in a serif font along your guideline. Center the text relative to the footprint below it. -
Applying the gold:
Carefully trace over your pencil letters using a metallic gold paint marker. If you want a more textured look, use a glue pen and apply gold foil sheets once the glue becomes tacky. -
Thickening the strokes:
Go back over the downstrokes of your letters to add a slight variation in thickness, giving it that classic typography feel. -
Erasing marks:
Wait at least 30 minutes for the gold ink to cure, then gently erase any visible pencil guidelines.
Clean lines tip
To get crisp text without freehanding, print ‘First Christmas’ in a light gray font on your cardstock using a home printer *before* doing the footprint, then trace over it with gold pen later.
Step 3: Decorative Accents
-
Planning the scatter:
Visualize a dispersed pattern around the footprint. You want a random but balanced mix of red dots and gold stars. -
Painting red dots:
Dip the handle end of a paintbrush into red acrylic paint. Dot the paint onto the paper in open spaces, varying the pressure slightly to create different sized circles. -
Adding gold stars:
Using your gold paint marker or a very fine brush with gold paint, draw small five-pointed stars or asterisks in the gaps between the red dots. -
Adding tiny specks:
For extra depth, add a few very tiny pin-sized dots of gold scattered throughout the design to fill empty negative space. -
Final drying:
Allow the entire piece to dry flat for at least an hour to ensure the raised paint dots don’t smear against the glass. -
Framing:
Clean the glass of your light wood frame on both sides to remove dust or fingerprints. Place your artwork inside and secure the backing.
Now you have a timeless holiday keepsake ready to be displayed on the mantle or gifted to grandparents
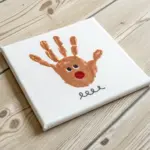
Santa Beard Handprint Painting
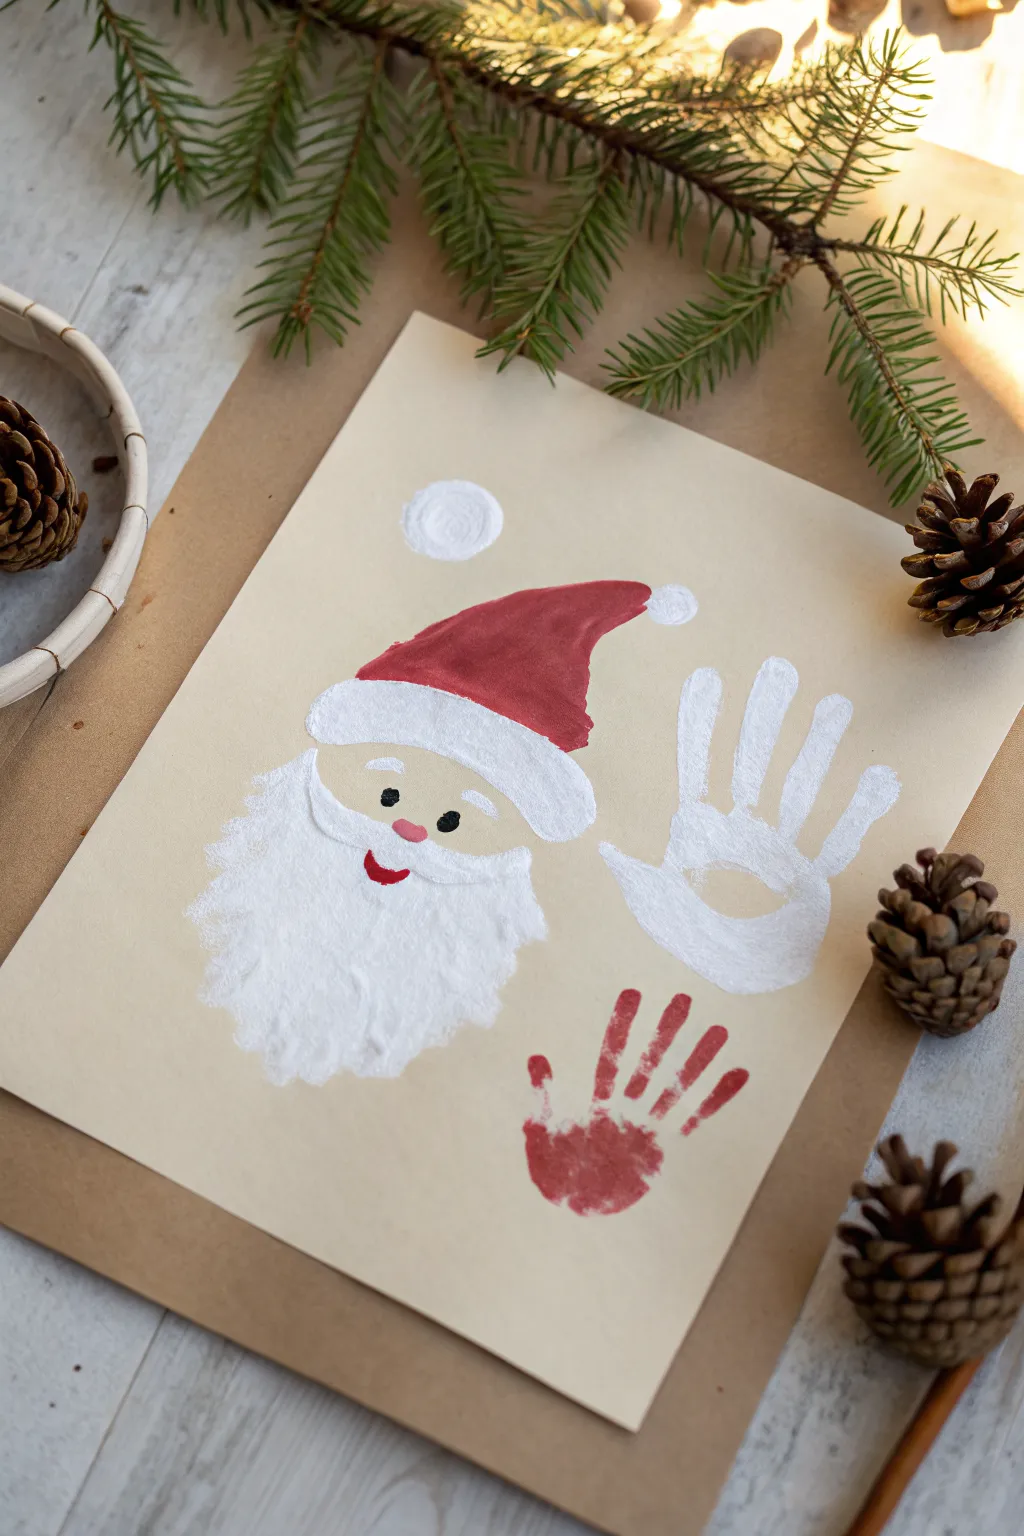
Capture a sweet moment in time with this adorable keepsake craft featuring a jolly Santa alongside two little handprints. Using simple white fingerprints to create Santa’s fluffy beard adds a wonderful texture that contrasts beautifully with smoothness of the painted red hat.
Step-by-Step Guide
Materials
- Beige or light tan cardstock paper
- Kraft paper (for mounting/framing)
- White acrylic paint
- Red acrylic paint
- Flesh-tone acrylic paint (peach or light brown)
- Black acrylic paint or marker
- Pink acrylic paint or marker
- Small round paintbrush
- Medium flat paintbrush
- Paper plate or palette
- Baby wipes (essential for cleanup!)
Step 1: Painting Santa’s Face
-
Paint the face shape:
Start by mixing a flesh tone suitable for your Santa. Using a medium flat brush, paint a soft, rounded rectangle or oval shape on the left side of your beige cardstock. This will be the area for his eyes and nose, so keep it relatively small compared to where the beard will go. -
Add the hat base:
Switch to red acrylic paint. Directly above the flesh-colored area, paint the main body of Santa’s hat. Create a shape that curves slightly to the right, tapering off like a soft triangle that has slumped over. -
Create the hat brim:
Once the red paint is tacky or dry, use white paint to create the fluffy brim of the hat. Paint a thick, curved white band that overlaps slightly with both the bottom of the red hat and the top of the flesh-colored face. -
Paint a sensory pom-pom:
Dip your index finger or a thumb into white paint. Press it gently at the very tip of the red hat point to create a round pom-pom. I also like to add a separate floating white circle higher up in the background as a little decorative snowball element.
Step 2: Creating the Fingerprint Beard
-
Prepare for fingerprints:
Squeeze a generous amount of white paint onto your palette. You want the paint to be thick enough to leave texture. -
Start the mustache:
Dip a finger into the white paint. Press it sideways just under the flesh-colored face area to form one half of a mustache. Repeat closely on the other side so they meet in the middle. -
Build the beard layers:
Continue dipping and pressing your finger repeatedly to build the beard. Work in u-shaped rows, starting just under the mustache and cheeks, moving downward. Create a full, inverted triangle shape that tapers at the bottom. -
Fill the gaps:
Go back and add extra fingerprints anywhere the beige paper is peeking through too much. The texture should look thick and fluffy like real hair.
Textured Beard Tip
Don’t smooth out the white paint when fingerprinting the beard. Leaving peaks and thick blobs of paint creates a realistic fluffy hair 3D texture when it dries.
Step 3: Adding the Handprints
-
Prepare the white handprint:
While Santa dries, prepare the child’s hand for the first print. Paint the palm and fingers of their left hand thoroughly with white paint. Ensure the coverage is even but not dripping. -
Press the white hand:
Guide the child’s hand to the empty space on the right side of the paper. Press it down firmly with fingers spreading slightly upward and outward. Lift straight up to avoid smearing. -
Clean and switch colors:
Use those baby wipes to clean the hand completely. Now, paint the palm and fingers of the same hand (or the other hand, if you prefer size variation) with red paint. -
Press the red hand:
Place the red handprint below the white one, near the bottom right corner. Press firmly and lift. This creates a cute visual balance with Santa’s red hat.
Glittery Snow Magic
While the white handprint and Santa’s hat brim are still wet, sprinkle a pinch of iridescent white glitter over them to make the artwork sparkle like fresh snow.
Step 4: Final Details
-
Add facial features:
Once the face paint is fully dry, dip the handle end of a paintbrush into black paint to dot two eyes. Using a small brush, paint a small pink oval for the nose right between the mustache parts. -
Paint the mouth:
With a fine detail brush and red paint, add a small, happy, u-shaped mouth peeking out from the white beard texture below the nose. -
Add rosy cheeks:
Mix a tiny bit of red into your white paint to make a very soft pink. Dab two small spots on Santa’s cheeks for a cold-weather glow. -
Mount the artwork:
Finish the project by gluing your beige cardstock onto a slightly larger sheet of kraft paper or cardboard. This creates a natural-looking frame that makes the white paint really pop.
Now you have a charming festive keepsake that perfectly captures how small those hands once were

PENCIL GUIDE
Understanding Pencil Grades from H to B
From first sketch to finished drawing — learn pencil grades, line control, and shading techniques.
Explore the Full Guide
Snowman Footprint Stack
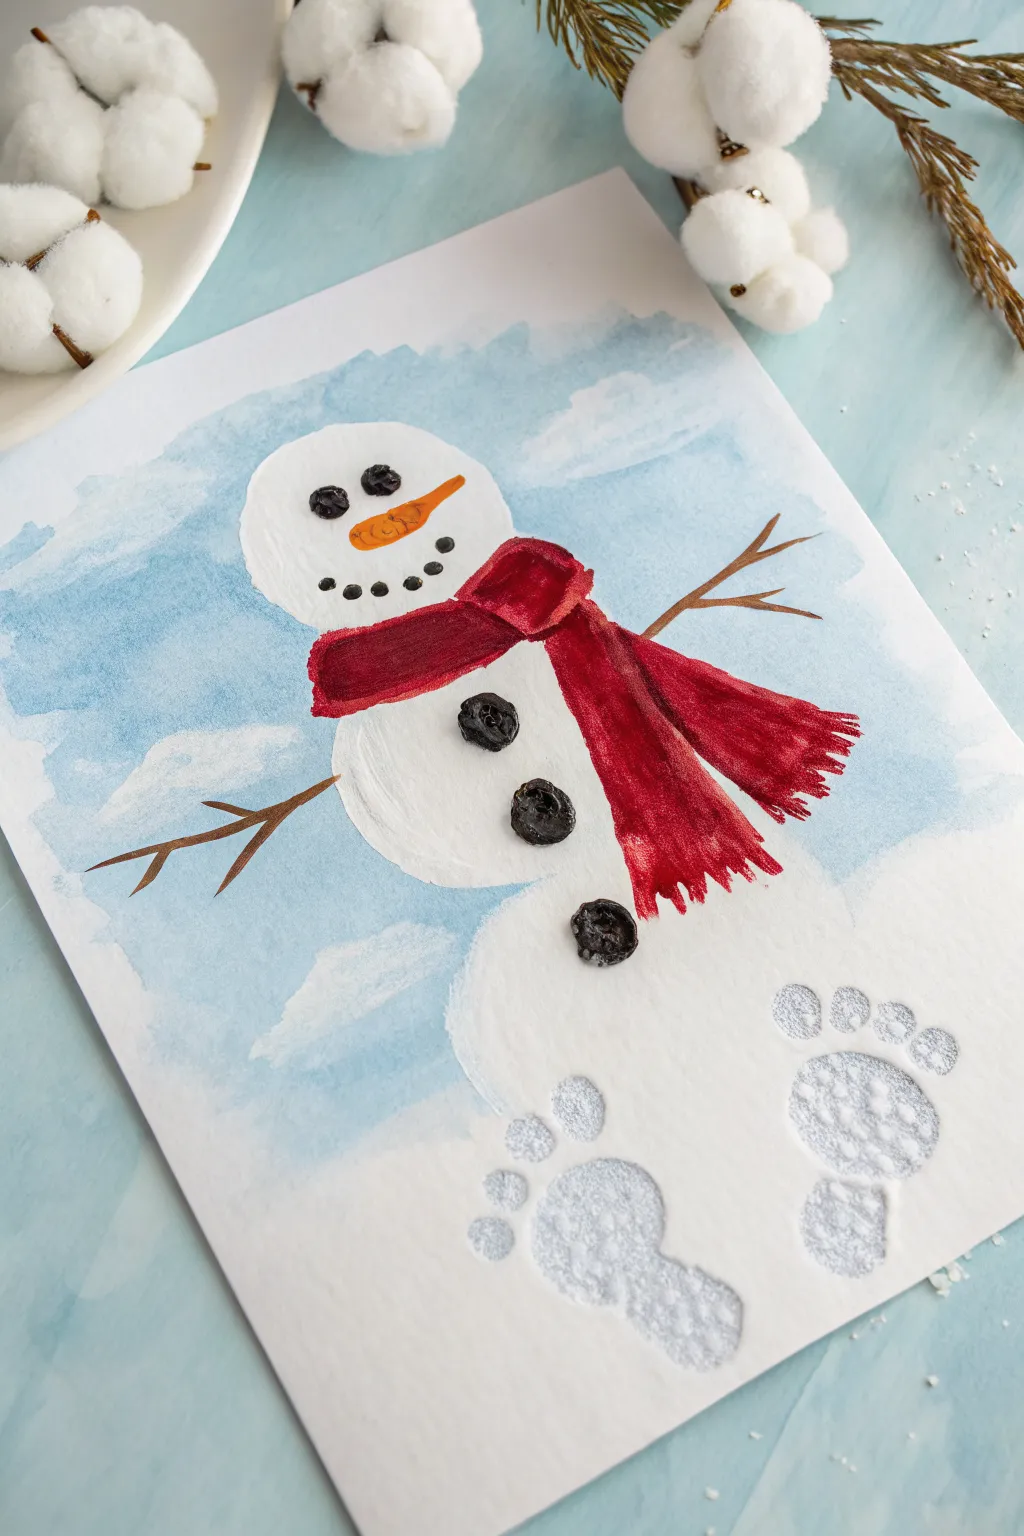
Transform tiny footprints into a chubby winter friend with this adorable keepsake art project. Featuring a soft watercolor sky and stamped details, it captures the fleeting smallness of baby feet in a whimsical seasonal scene.
Step-by-Step
Materials
- Heavyweight white cardstock or watercolor paper
- Blue watercolor paint
- Large flat paintbrush
- White washable tempera or acrylic paint
- Black acrylic paint
- Red acrylic paint
- Orange acrylic paint
- Brown acrylic paint
- Small round detail brushes
- Paper plate or palette
- Sponge brush
- Cup of water
Step 1: Setting the Scene
-
Prepare the workspace:
Lay down newspaper or a protective mat on your table. Since we are working with baby footprints later, I always like to have baby wipes or a warm soapy washcloth ready nearby for quick cleanup. -
Mix the sky color:
Dilute a small amount of blue watercolor paint with plenty of water. You want a very transparent, icy blue wash rather than a solid opaque color. -
Paint the background wash:
Using your large flat brush, sweep the watery blue paint across the paper. Leave uneven white spaces to represent fluffy clouds and snowdrifts on the ground, creating a natural, breezy atmosphere. -
Let the background dry:
Set the paper aside until the blue wash is completely dry to the touch. This prevents the white paint in the next steps from blending with the blue and turning muddy.
Step 2: Creating the Snowman Base
-
Prepare the white paint:
Pour a generous dollop of white washable tempera or acrylic paint onto a paper plate. Use a sponge brush to spread it into a smooth, even layer. -
Stamp the footprints:
Gently press the baby’s foot into the white paint, ensuring the toes and heel are covered. Press the foot firmly onto the bottom right area of the paper to make the ‘ground’ snow tracks. Repeat if you want a second footprint. -
Paint the bottom snowball:
Using the white paint and a brush, paint a large, slightly irregular circle near the bottom center of the page. This forms the snowman’s base. Make sure the paint is thick enough to look solid white against the blue. -
Add the middle section:
Paint a slightly smaller white circle directly on top of the base circle for the snowman’s torso. -
Create the head:
Paint the smallest circle on top for the head. Allow all the white paint sections (including the footprints) to dry completely before moving on to the details.
Smudged Footprint?
If the baby wiggles and smudges the print, don’t scrap it! Turn the smudge into a snowdrift or a fallen snowball, and try stamping again nearby.
Step 3: Adding Personality
-
Paint the scarf base:
Dip a medium round brush into red acrylic paint. Draw a curved band across where the head meets the torso. -
Detail the scarf tails:
Extended two wavy red lines hanging down from the neck band. Add little fringe lines at the ends of the scarf for a realistic textile look. -
Add shadowing to the scarf:
Mix a tiny drop of brown or black into your red paint to make a darker shade. Paint small strokes on the underside of the scarf folds to create depth and dimension. -
Paint the carrot nose:
Using orange paint and a small detail brush, create a long, tapered triangle shapes pointing to the right from the center of the face. Give it a slightly crooked line for character. -
Draw the stick arms:
Switch to brown paint and a thin liner brush. Paint twig-like lines extending outward from the middle snowball, adding small ‘V’ shapes for branching fingers.
Sparkly Snow
While the white paint is still wet on the footprints or the snowman’s body, sprinkle on some iridescent white glitter for a magical, frosty shimmer.
Step 4: Finishing Touches
-
add the coal eyes:
Dip the handle end of a small paintbrush into black paint. Dot two irregular circles onto the face for eyes. The handle trick makes perfect dots every time. -
Create the smile:
Using a very fine brush or the tip of a toothpick, paint five or six tiny black dots in a curved smile shape beneath the nose. -
Add the buttons:
Paint three larger, rough black circles down the center of the middle snowball to look like pieces of coal or rocks. -
Highlight the coal:
Once the black paint is dry, add a tiny speck of white or grey paint to the top of each coal piece (eyes, mouth, buttons) to make them look shiny and three-dimensional. -
Sprinkle some snow:
Optional: Flick a stiff toothbrush dipped in watered-down white paint over the entire image to create a light falling snow effect.
Hang this sweet wintry artwork up to enjoy those tiny toes all season long
Handprint Angel Wings
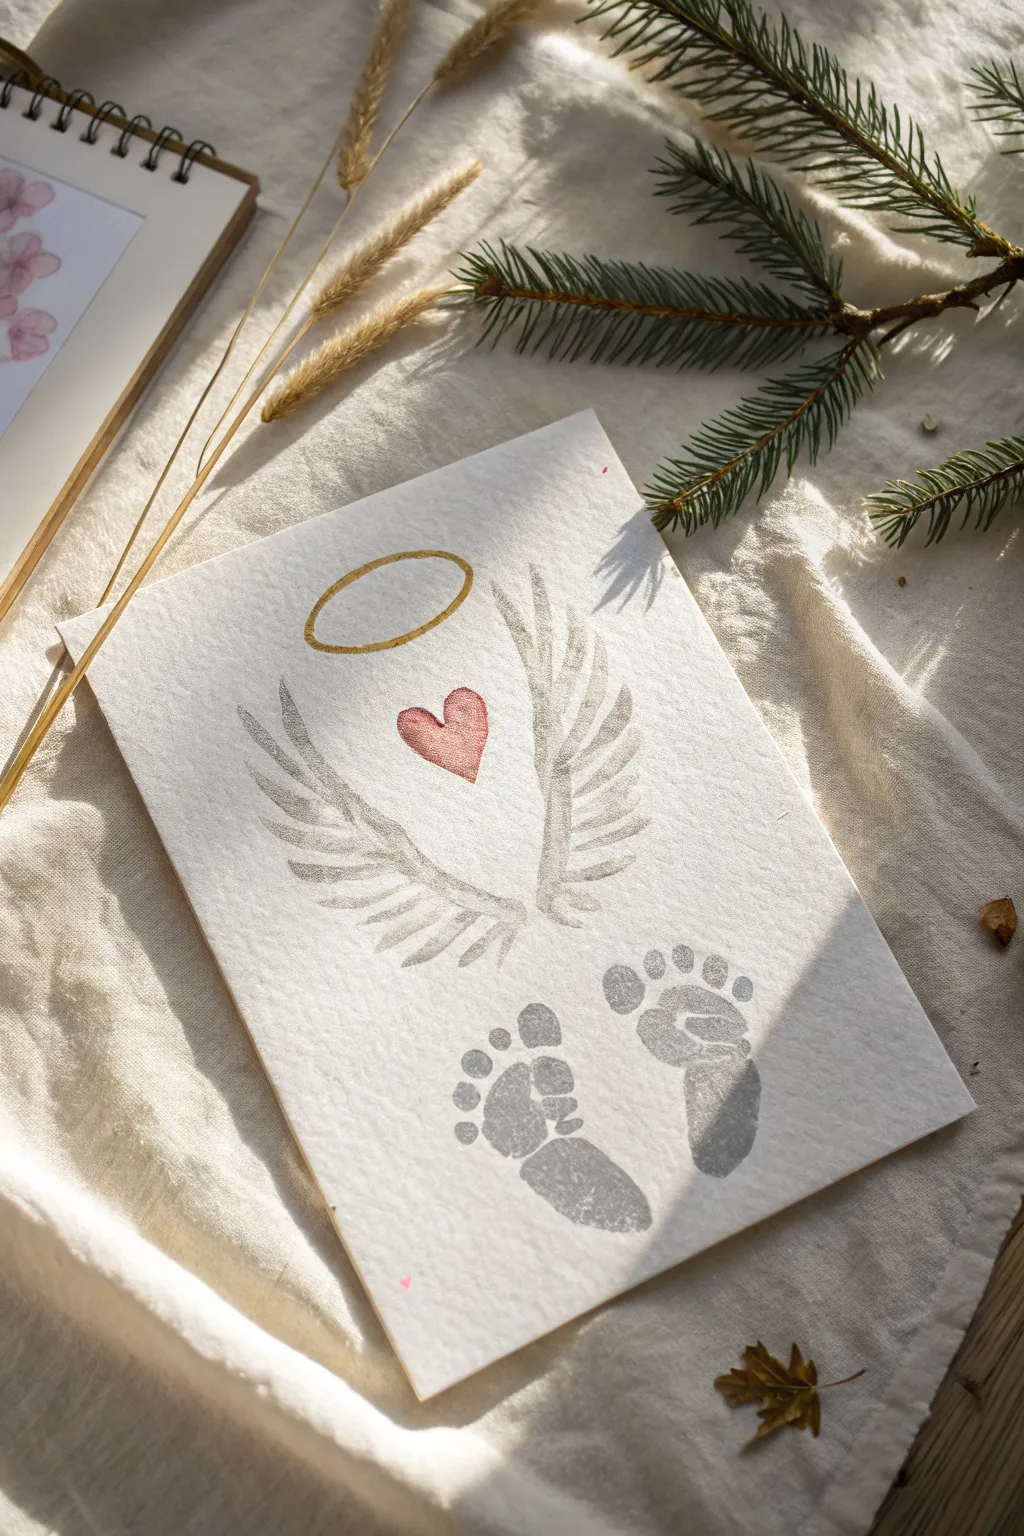
Immortalize those tiny toes with a heartwarming keepsake that transforms simple prints into a celestial masterpiece. This tender artwork features soft grey wings and footprints, crowned with a golden halo, making it a perfect holiday gift or nursery addition.
Step-by-Step Tutorial
Materials
- Heavyweight cold-press watercolor paper
- Grey acrylic paint or non-toxic stamp pad (soft charcoal shade)
- Metallic gold acrylic paint or paint pen
- Red watercolor or diluted acrylic paint
- Medium round paintbrush
- Small detail paintbrush
- Baby wipes (essential for quick cleanup)
- Palette for mixing
- Pencil (optional for light sketching)
Step 1: Creating the Celestial Wings
-
Prepare the workspace:
Lay down your watercolor paper on a flat surface. ensure your baby’s hands are clean and you have wipes immediately accessible. -
Apply paint to the hand:
Using a sponge brush or your finger, lightly coat your child’s right hand with the grey paint. Aim for a thin, even layer so the skin texture shows through. -
Print the left wing:
Guide the hand onto the paper, positioning it slightly to the left of the center. The fingers should point downward and outward to mimic feathers. Press gently but firmly. -
Print the right wing:
Clean the right hand, then coat the left hand with the same grey paint. Press this hand on the right side, mirroring the first print to create a symmetrical wing shape. -
Refine the feathers:
If the prints are faint or missing spots, use a small brush with a tiny amount of grey paint to lightly touch up the ‘feathers,’ extending the finger shapes slightly if needed for better proportion.
Clearer Prints Pro Tip
For crisper prints with more skin detail, apply the paint to a sponge first, then dab the sponge onto the foot/hand rather than brushing paint directly onto the skin.
Step 2: Capture the Footprints
-
Prepare the feet:
Clean off the hands and switch focus to the feet. Coat the bottom of the left foot with the grey paint. -
Position the first footprint:
Place the foot directly centered below the wings, leaving about an inch of space. Rock the foot gently from heel to toe to ensure the toes make contact. -
Print the second footprint:
Repeat the process with the right foot, placing it next to the left one. Angle them slightly outward for a natural, relaxed look. -
Let it dry completely:
Allow the grey prints to dry fully before moving on. This prevents smudging when you add the central details.
Step 3: Adding Heavenly Details
-
Paint the heart:
Using diluted red paint or watercolor, paint a simple, soft heart shape right in the center space between the two wings. -
Add texture to the heart:
While the red paint makes the shape, I like to blot it slightly with a paper towel for a vintage, textured look that isn’t too solid. -
Sketch the halo:
Load a fine detail brush with metallic gold paint. Hover over the space above the wings to find the center point. -
Paint the halo ring:
With a steady hand, draw a flattened oval (ellipse) floating above the wings. The line should be fluid but doesn’t need to be perfectly uniform in thickness. -
Enhance the shine:
Add a second, very thin layer of gold to the bottom curve of the halo to give it a bit of dimension and catch the light. -
Final dry:
Let the metallic and red paints cure completely. The paper might ripple slightly from the moisture, so you can press it under a heavy book once dry.
Level Up: Name & Date
Use a fine-tip calligraphy pen to write the baby’s name and the year in a small, cursive font right below the footprints for a true historical keepsake.
Now you have a timeless memory of how small they once were to cherish for years while they grow


Handprint Poinsettia Bloom
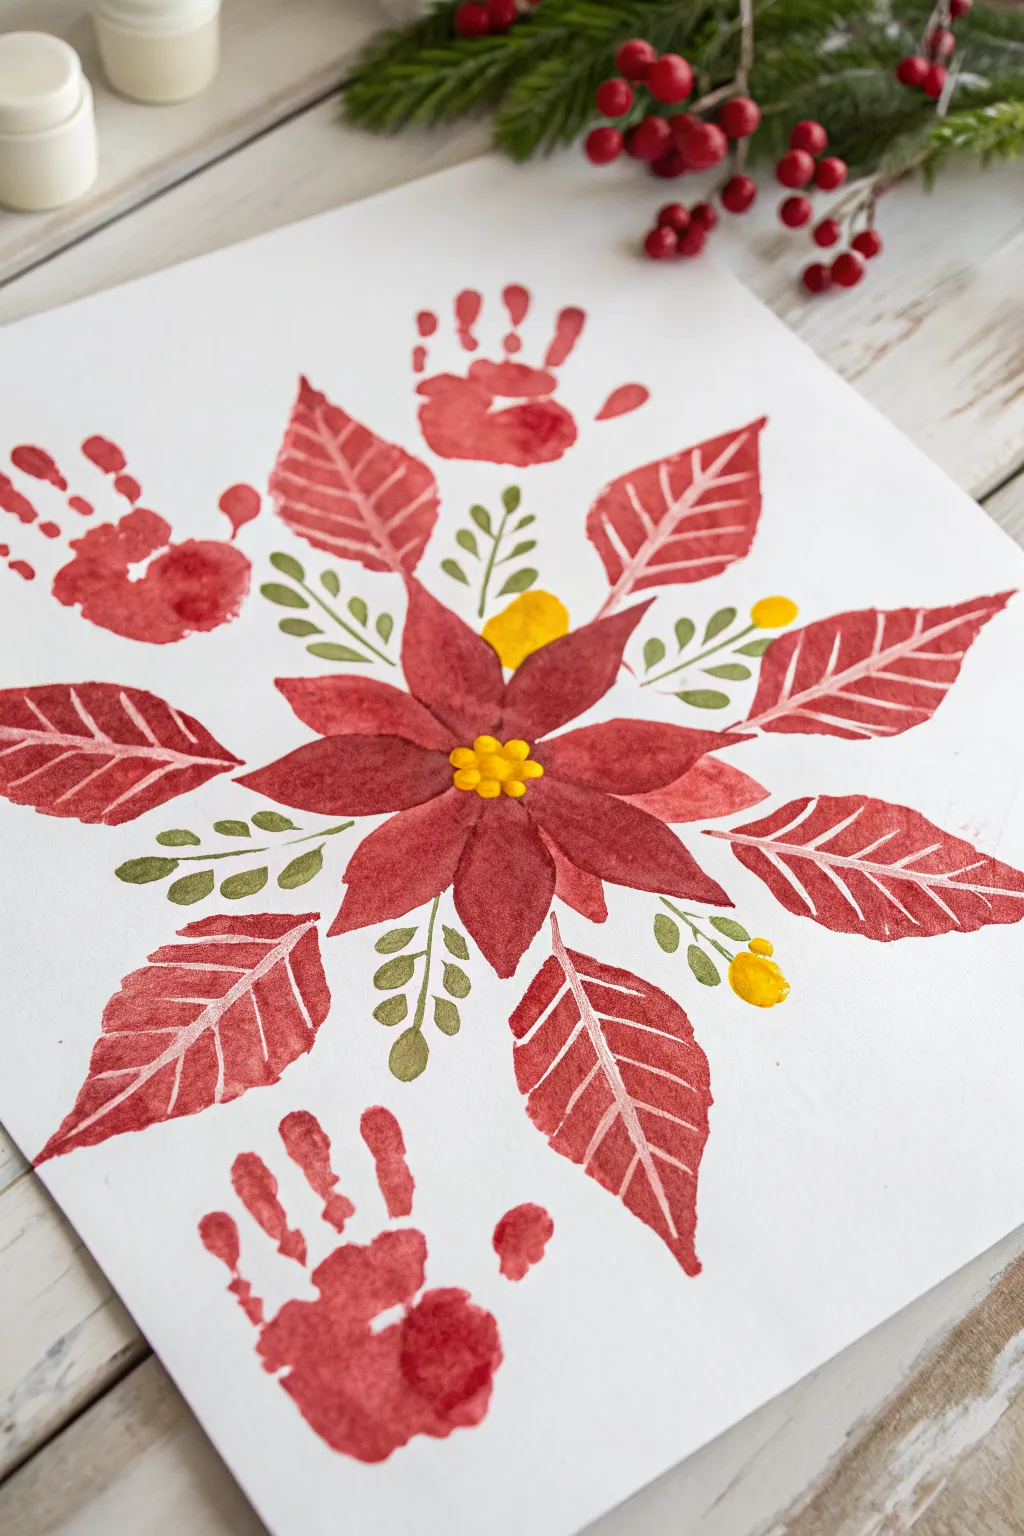
This festive artwork combines structured botanical painting with sweet personal touches, creating a keepsake poinsettia surrounded by little hands. The mix of bold red petals and delicate green sprigs makes for a sophisticated yet sentimental holiday display.
Step-by-Step Guide
Materials
- Heavyweight white paper or watercolor paper
- Red acrylic or tempera paint (washable for baby)
- Yellow acrylic paint
- Green acrylic paint
- Medium flat paintbrush
- Small round paintbrush
- Paper plate or palette
- Baby wipes or damp cloth
Step 1: Creating the Handprints
-
Prepare the workspace:
Lay down your paper on a flat, protected surface. Since we are working with baby hands, it is best to have wipes ready immediately. -
Paint the first hand:
Generously coat your child’s palm and fingers with washable red paint using a brush or sponge. Ensure the paint isn’t too drippy but fully covers the skin. -
Print the top hand:
Guide the hand to the top center of the paper, well above the middle point to leave room for the flower. Press down firmly on the palm and each finger, then lift straight up. -
Add side and bottom prints:
Repeat the process to place two more handprints: one on the bottom center and one on the left side, roughly forming a triangular arrangement around the center. Clean hands immediately.
Step 2: Painting the Poinsettia
-
Start the center petals:
Using a flat brush and red paint, paint a simple flower shape in the very center of the page. Make five or six tear-drop shaped petals that meet in the middle. -
Add outer petals:
Paint larger, pointed oval shapes extending out from behind the first set of petals to create a full, layered look. -
Create the large leaves:
For the largest elements between the handprints, paint four to five large leaf shapes radiating outward using red paint. These should be larger than the flower petals. -
Add vein details:
Once the large red leaves are semi-dry, use a very fine brush with white paint (or scratch through wet paint if thick enough) to draw a central line and angled veins on the large outer leaves. -
Paint yellow accents:
Using a small round brush, add clusters of bright yellow dots to the very center of your poinsettia flower. -
Add floating yellow buds:
Paint a few stray yellow circles or ovals near the outer edges of the flower cluster for extra color balance.
Smudge Rescue
If a handprint smudges, turn it into a creative abstract element by painting over the blur with extra green leaves or a red berry cluster.
Step 3: Adding Greenery
-
Mix your green shade:
Prepare a muted olive green on your palette. If your green is too bright, mix in a tiny touch of red or brown to make it look more botanical. -
Paint main stems:
Draw thin, curved lines extending from the center flower into the white spaces between the red petals and leaves. -
Add small leaves:
Along these stems, dap your small brush to create tiny, almond-shaped green leaves in pairs. -
Fill empty gaps:
Look for any large white spaces near the center and add smaller sprigs of greenery to make the arrangement look lush and full. -
Final drying time:
Allow the entire painting to dry completely flat for several hours to prevent the thicker areas of paint from crinkling or smearing.
Add Sparkle
While the yellow center dots are still wet, sprinkle a tiny pinch of gold glitter on them to make the poinsettia center shimmer.
Hang this beautiful collaborative piece on the wall to cherish those tiny hands for years to come
Penguin From a Baby Footprint
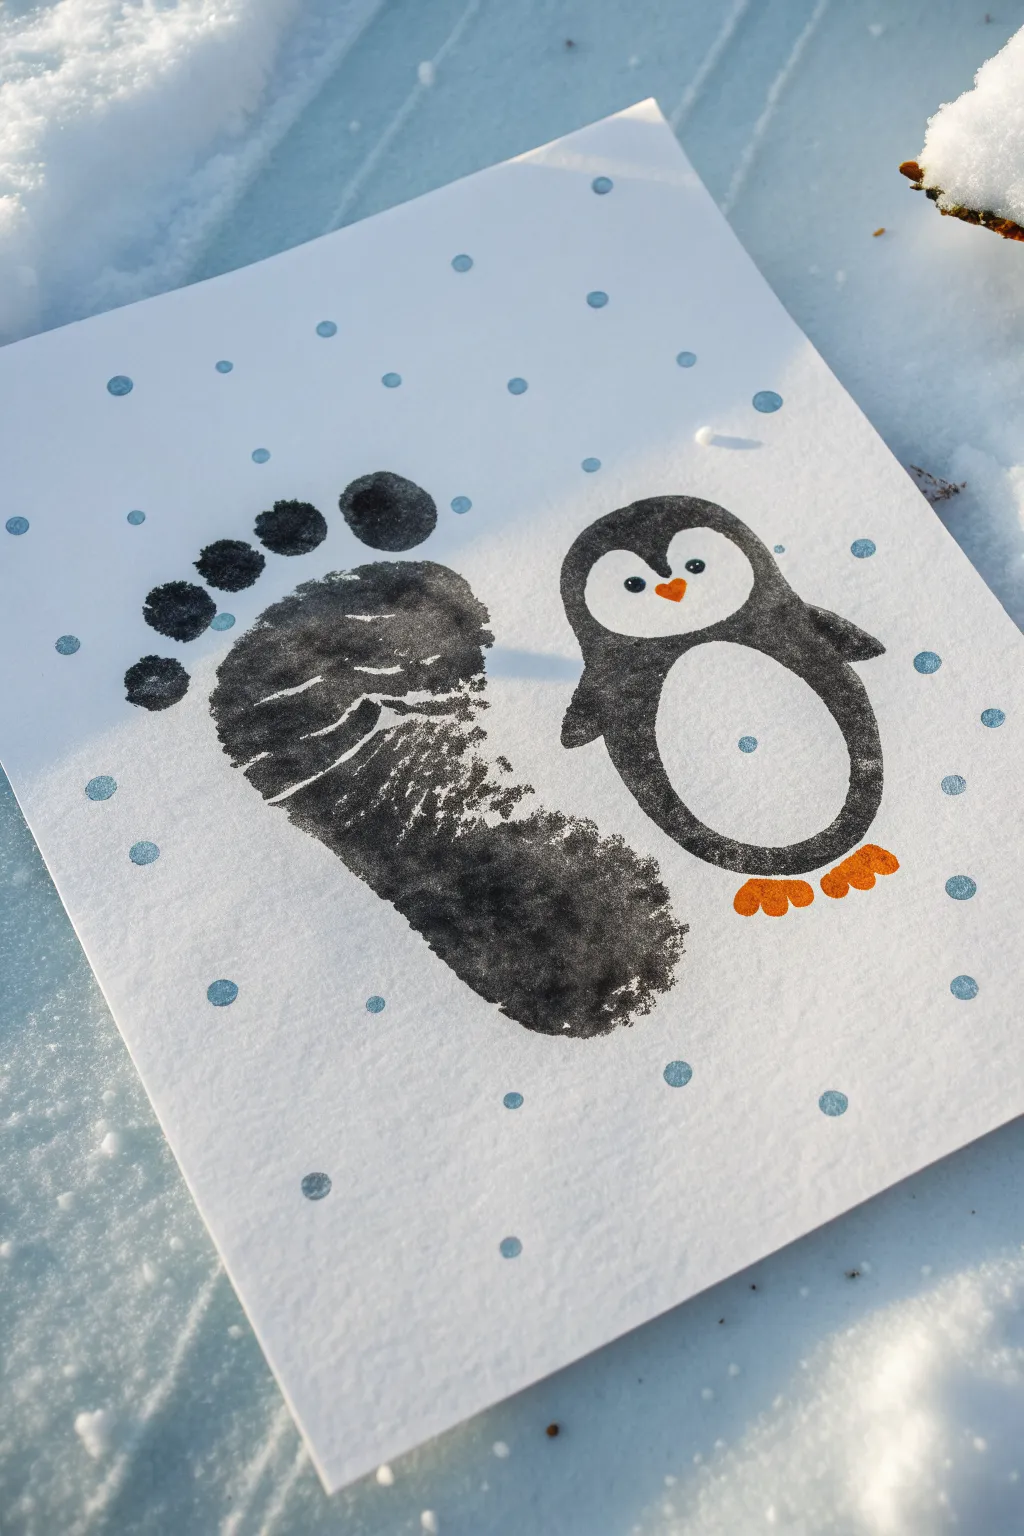
Capture a tiny moment in time with this adorable winter-themed art piece that transforms a baby footprint into a snowy scene. The stark contrast of black ink against crisp white cardstock makes the little penguin friend pop, creating a memory you will cherish forever.
Step-by-Step Guide
Materials
- White heavy cardstock or watercolor paper
- Black non-toxic washable ink pad or block printing ink
- Light blue pigment ink pad (or acrylic paint)
- Black fine-tip marker or pen
- Orange marker or paint pen
- Q-tip or small foam dauber
- Baby wipes (essential for cleanup)
- Penguin rubber stamp (optional, or draw it freehand)
Step 1: Preparation
-
Set the Stage:
Lay out your materials on a flat surface. Since working with baby feet can be unpredictable, I always recommend having your paper taped down or held by a helper so it doesn’t slide around. -
Clean Those Toes:
Ensure your baby’s foot is clean and dry. Any lint or lotion can prevent the ink from sticking evenly to the skin, resulting in a patchy print.
Step 2: Creating the Footprint
-
Ink the Foot:
Using the black washable ink pad, gently tap the ink all over the bottom of your baby’s foot. Ensure you cover the heel, the ball of the foot, and each tiny toe. -
Press and Print:
Firmly but gently press the inked foot onto the left side of the cardstock. Aim to place the heel slightly lower than the toes to mimic the shape of a standing penguin later, though here we are just capturing the print itself. -
Lift and Clean:
Lift the foot straight up to avoid smearing the toes. Immediately wipe the baby’s foot with a wet wipe before moving on to the artistic steps. -
Let it Dry:
Set the paper aside for 10-15 minutes. The ink needs to be completely dry so you don’t smudge the footprint while working on the rest of the scene.
Clearer Prints
For a sharper footprint, do a practice run on scrap paper first. If the print looks too blobby, blot the foot slightly on a paper towel before pressing onto the final cardstock.
Step 3: Adding the Penguin Friend
-
Position the Buddy:
To the right of the footprint, you will add the penguin character. In the example, a large stamp was used, but you can easily draw this shape. -
Outline the Body:
If drawing by hand, use your black marker to draw a large oval shape for the body, slightly shorter than the footprint. -
Draw the Wings:
Add two small, curved flippers extending from the sides of the oval body. -
Create the Tummy:
Draw a smaller, white oval inside the main body to create the classic penguin belly. -
Add the Face:
At the top of the body shape, draw a ‘widow’s peak’ hairline shape that curves down to form the black head markings, leaving white space for the eyes. -
Fill the Dark Areas:
Color in the outer body, head, and wings with your black marker or ink, leaving the tummy and face area white. Or, if you have a stamp like the image, ink it up and press it down firmly. -
Give it Character:
Using the orange marker, draw a small triangle for the beak and two little webbed feet at the bottom. Add two small dots for eyes with the black pen.
Smudged Toes?
If the baby wiggles and smears a toe, wait for it to dry, then use a white gel pen or white acrylic paint to ‘cut back’ into the black ink and redefine the toe separation.
Step 4: Winter Atmosphere
-
Prepare Blue Ink:
Get your light blue ink pad or mix a tiny amount of pale blue paint. -
Create Snowflakes:
Dip a Q-tip or the eraser end of a pencil into the blue ink. Dab it gently around the paper to create soft, perfect circles. -
Vary the Placement:
Scatter the blue dots randomly around both the footprint and the penguin to simulate falling snow. I like to let some ‘snow’ overlap the white space of the paper heavily while keeping the characters clear. -
Final Dry:
Allow the blue snowflakes and the penguin detailed work to dry completely before framing or gifting.
This simple black and white contrast creates a striking winter decoration that freezes a moment of childhood in time
Polar Bear Paw Print Christmas Scene
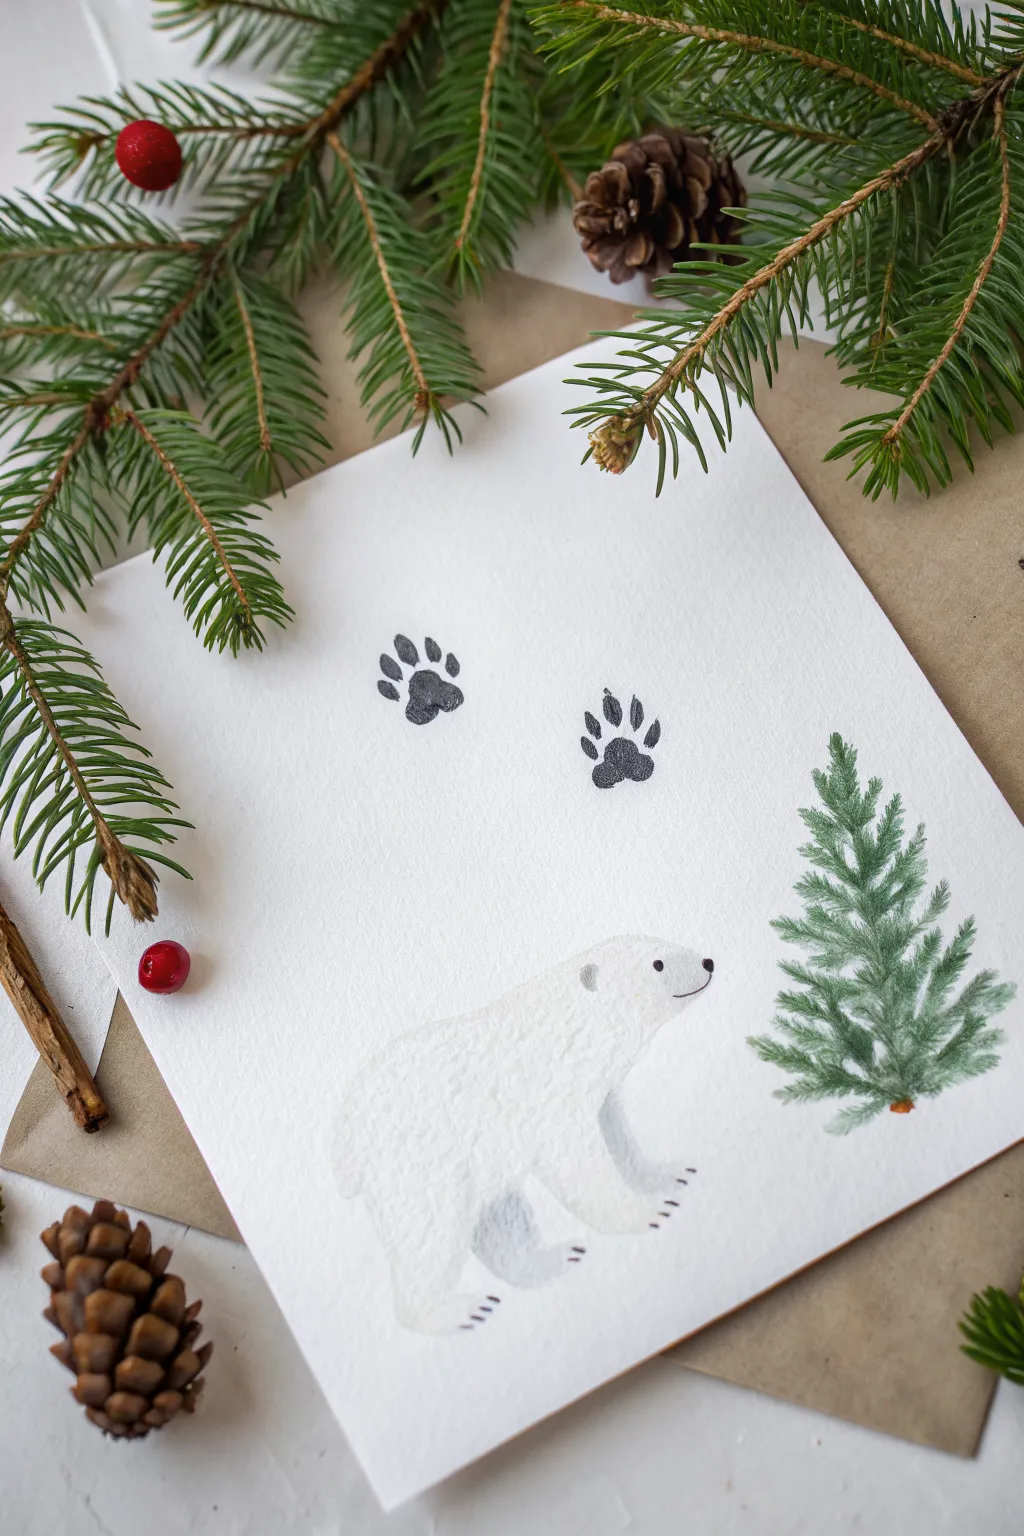
This adorable winter scene combines soft watercolor techniques with playful stamping to create a minimalist yet heartwarming holiday card. The gentle white polar bear contrasts beautifully with the crisp evergreen tree and whimsical paw prints in the sky.
How-To Guide
Materials
- Heavyweight watercolor paper or cardstock (cold press recommended for texture)
- White acrylic paint or gouache (needs to be opaque)
- Black ink pad or black acrylic paint
- Green watercolor paints (sap green and hooker’s green)
- Small round paintbrush (size 2 or 4)
- Fine liner brush (size 0 or 00)
- Black fineliner pen or marker
- Paper plate or palette
- Pencil and eraser
- Water cup and paper towels
Step 1: Planning and Stamping
-
Sketch the layout:
Begin by lightly sketching the outline of your polar bear in the bottom center of the paper with a pencil. Keep the lines extremely faint so they don’t show through the white paint later. You can also mark a light vertical line to guide where your tree will stand. -
Set up the ‘sky’:
For the paw prints floating above, you have a fun choice. You can use a pre-made paw print stamp, or create one using fingerprints. If painting with kids, I love using their actual thumb and pinky fingerprints to make these marks. -
Apply the prints:
Using black ink or paint, stamp two paw prints in the upper middle area of the paper. Place them slightly diagonal to each other to suggest movement. If using paint, apply it sparingly to a sponge first to get a textured, stamped look rather than a gloopy blob. -
Let the prints dry:
Allow the black paw prints to dry completely before moving on, as you don’t want to accidentally smudge black ink across your pristine white paper.
Smudge Savior
Did you smudge the black ink? Turn accidental marks into ‘falling snow’ by dotting more spots around or painting opaque white snowflakes over the error once dry.
Step 2: Painting the Polar Bear
-
Mix your white base:
Squeeze out some white acrylic or gouache. Since you are likely painting on white paper, you need this paint to be thick and opaque enough to create a texture that stands out against the paper’s grain. -
Fill in the bear body:
Using your small round brush, fill in the bear’s shape with the white paint. Don’t smooth it out perfectly; daub the brush slightly to mimic the texture of fur. Leave the area for the eye and nose tip unpainted if you customized your sketch, or just paint over it to add details later. -
Add gentle shadows:
While the white is still slightly damp (or after it dries, for a sharper look), mix a tiny drop of black or grey into your white to make a very pale grey. Paint subtle shadows under the belly, on the back leg, and under the neck to give the bear form. -
Paint the legs:
Ensure the legs are defined by using that pale grey tone to separate the front leg from the chest and the back leg from the hip. This simple shading stops the bear from looking like a flat white blob.
Make It Sparkle
Mix a tiny pinch of silver glitter or iridescent medium into the white paint for the bear to give the fur a magical, frosty shimmer.
Step 3: Creating the Evergreen Tree
-
Start the tree trunk:
Mix a small amount of brown watercolor or acrylic. Draw a very short, thin line near the bear’s nose for the trunk base. You won’t see much of the trunk, just a hint at the bottom. -
Paint the bottom branches:
Load your brush with a mix of sap green and a darker hooker’s green. Starting at the bottom, use short, flicking strokes that angle downward and outward to create the widest branches. -
Build the tree shape:
Move upward, making your flicking strokes slightly shorter as you ascend. Keep the branches loose and somewhat irregular to look like a natural pine tree. -
Layer the greens:
While the green is still wet, drop in a surprisingly dark green or even a touch of blue-green near the center (the ‘trunk’ area) to add depth and volume to the foliage. -
Refine the tree top:
Finish the tree with a few delicate, tiny vertical flicks at the very top to create a pointed crown.
Step 4: Final Details
-
Add the bear’s face:
Once the white bear body is completely dry, use a fine liner brush with black paint or a black fineliner pen. Draw a small dot for the eye and a curved line for the mouth. -
Paint the nose and ear:
Add a small black oval for the nose tip. For the ear, use a grey wash to paint a small semi-circle on top of the head so it looks soft and distant. -
Define the claws:
Using the very tip of your fineliner or smallest brush, draw three tiny lines on each foot to represent claws. This small detail adds a lot of character. -
Clean up edges:
Check the edges of your painting. If any pencil lines are still visible around the bear, gently erase them now that the paint is dry. -
Add a snowy base (Optional):
If the bear feels like it’s floating too much, you can add a very faint wash of watered-down blue-grey under its feet to ground it in the snow.
Once dry, this charming winter scene is ready to be framed or gifted as a heartfelt holiday card.
Nativity Star With Thumbprint Glow
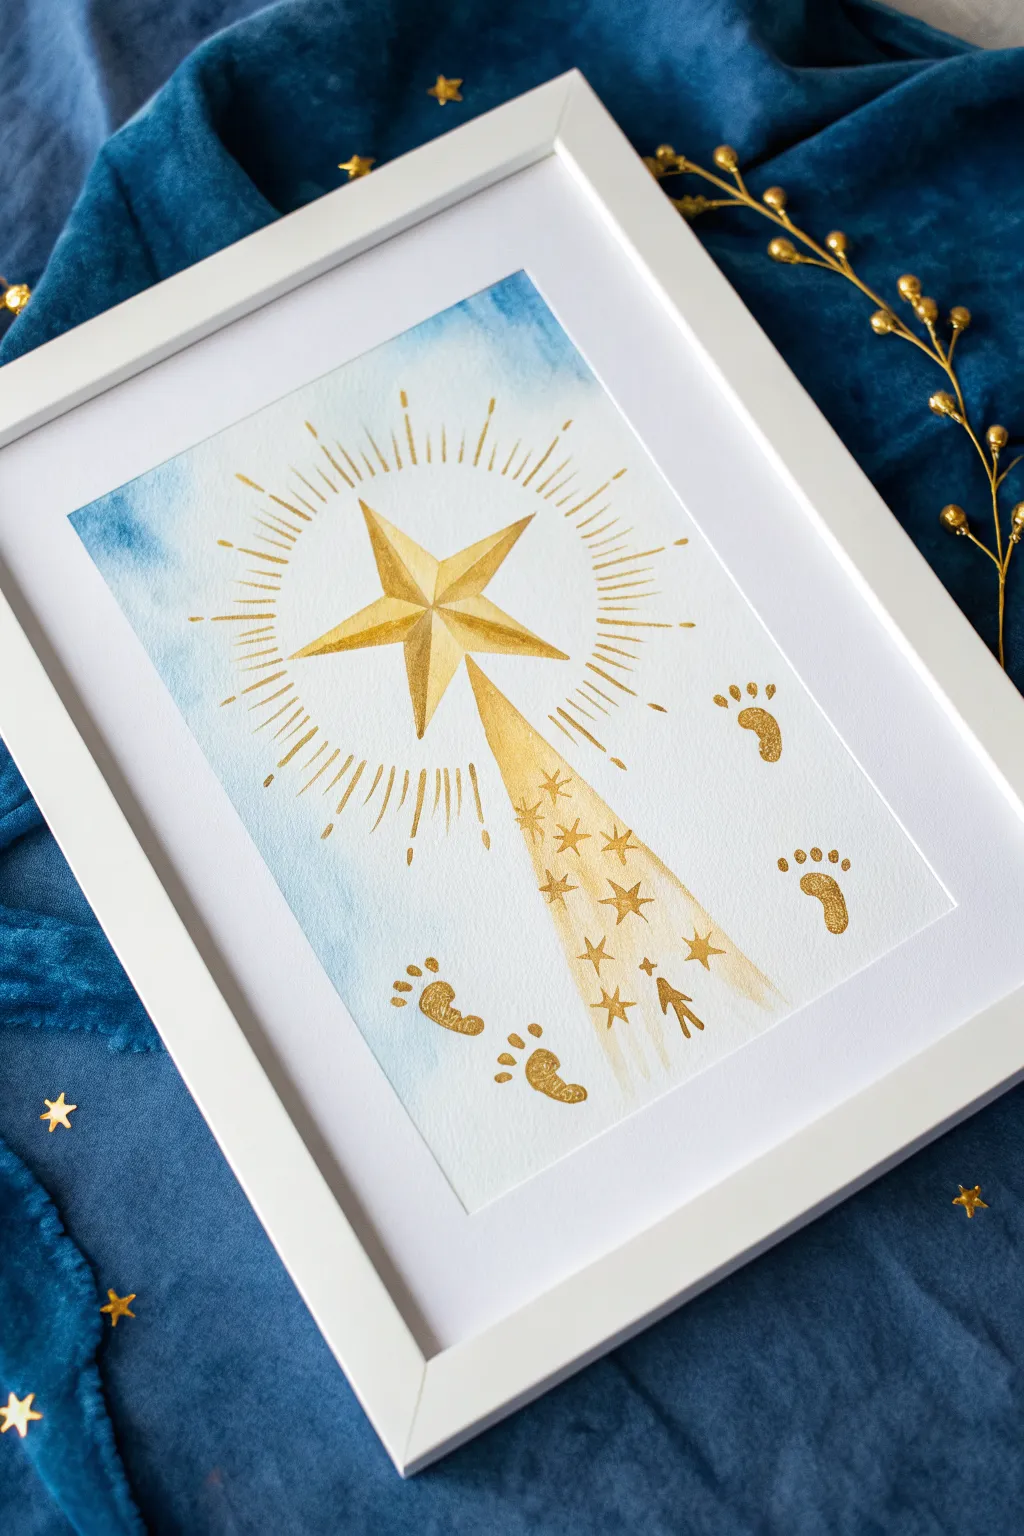
Immortalize your little one’s first Christmas with this stunning watercolor keepsake featuring the Star of Bethlehem. The soft blue wash background creates a beautiful contrast against the striking metallic gold star and tiny, precious baby footprints.
Step-by-Step
Materials
- Cold press watercolor paper (A4 or similar size)
- Watercolor paints (Indigo, Prussian Blue, or Phthalo Blue)
- Metallic gold watercolor paint or gold gouache
- Medium round brush (size 6 or 8)
- Small detail brush (size 0 or 1)
- Ruler
- Pencil
- Clean water jar
- Paper towels
- Your baby’s feet (for the prints)
Step 1: Setting the Celestial Scene
-
Prepare the wash:
Begin by wetting your watercolor paper slightly in the upper section where the sky will be. Don’t soak it; just a light sheen of water is perfect. -
Apply the blue sky:
Load your medium brush with a diluted blue watercolor mix. Apply it to the damp upper area using broad, sweeping strokes. Let the color fade naturally as you move down the page, leaving the bottom half mostly white to create an airy, ethereal effect. -
Soften edges:
If you have hard lines where the paint stops, clean your brush with water and gently run it along the edge of the paint to feather it out into the white paper. -
Let it dry completely:
This is crucial. The paper must be bone dry before you add the gold elements, otherwise the metallic paint will bleed into the blue background. A hairdryer on a low setting can speed this up.
Step 2: Drafting the Star
-
Mark the center:
Using a pencil very lightly, mark a small dot in the upper center of your blue wash. This will be the heart of your star. -
Draw the main points:
Sketch a classic five-pointed star shape around your center dot. Make the bottom point significantly longer than the others, dragging it downwards to form the start of the tail. -
Add dimension lines:
connect the tips of each star point back to the center dot with straight lines. Then, draw shorter lines from the inner corners of the star to the center. This creates the facets that give the star a 3D gem-like appearance.
Smudged the blue?
If blue paint bleeds where it shouldn’t, wet a clean brush and lift the color off with a paper towel. Do this immediately before it stains.
Step 3: Painting the Gold Elements
-
Mix your gold:
Prepare your metallic gold paint. You want a creamy consistency—not too watery, so it’s opaque and shiny. -
Paint the star facets:
Using your small detail brush, fill in the facets of the star. To enhance the 3D look, try slightly varying the intensity of the gold in adjacent sections, or leave a hair-thin line of white paper between the facets if your hand is steady. -
Extend the tail:
Paint the long downward tail, widening it slightly as it descends. Fade the gold out at the bottom of the tail so it looks like disappearing light. -
Add the radiance:
surround the star with fine, radiating lines. Use quick, confident flicks of your detail brush, moving outward from the star. Vary the lengths—some short, some long—to create a shimmering halo effect. -
Create the stardust:
Paint a cluster of tiny stars falling within and around the tail of the main star. Mix simple cross shapes with small five-pointed stars for variety.
Maximum Shimmer
For the brightest gold, apply a second layer of metallic paint to the star once the first layer is fully dry. It adds incredible depth.
Step 4: Adding the Footprints
-
Prepare for printing:
I recommend doing a test print on scrap paper first. Paint a generous layer of the gold paint onto the bottom of your baby’s foot. -
Stamp the right side:
Gently press the foot onto the paper to the right of the star’s tail. Ensure you press the toes down individually for a clear print. -
Stamp the left side:
Repeat the process with the other foot (or the same one) on the left side, slightly lower than the first set to create a walking pattern. -
Touch up prints:
If the prints are a bit patchy, use your detail brush and a little gold paint to carefully fill in the shape while keeping the natural texture of the footprint intact.
Frame this celestial masterpiece in a simple white frame to let the gold shine and keep those tiny memories safe forever
Galaxy Night Reindeer With Splatter Stars
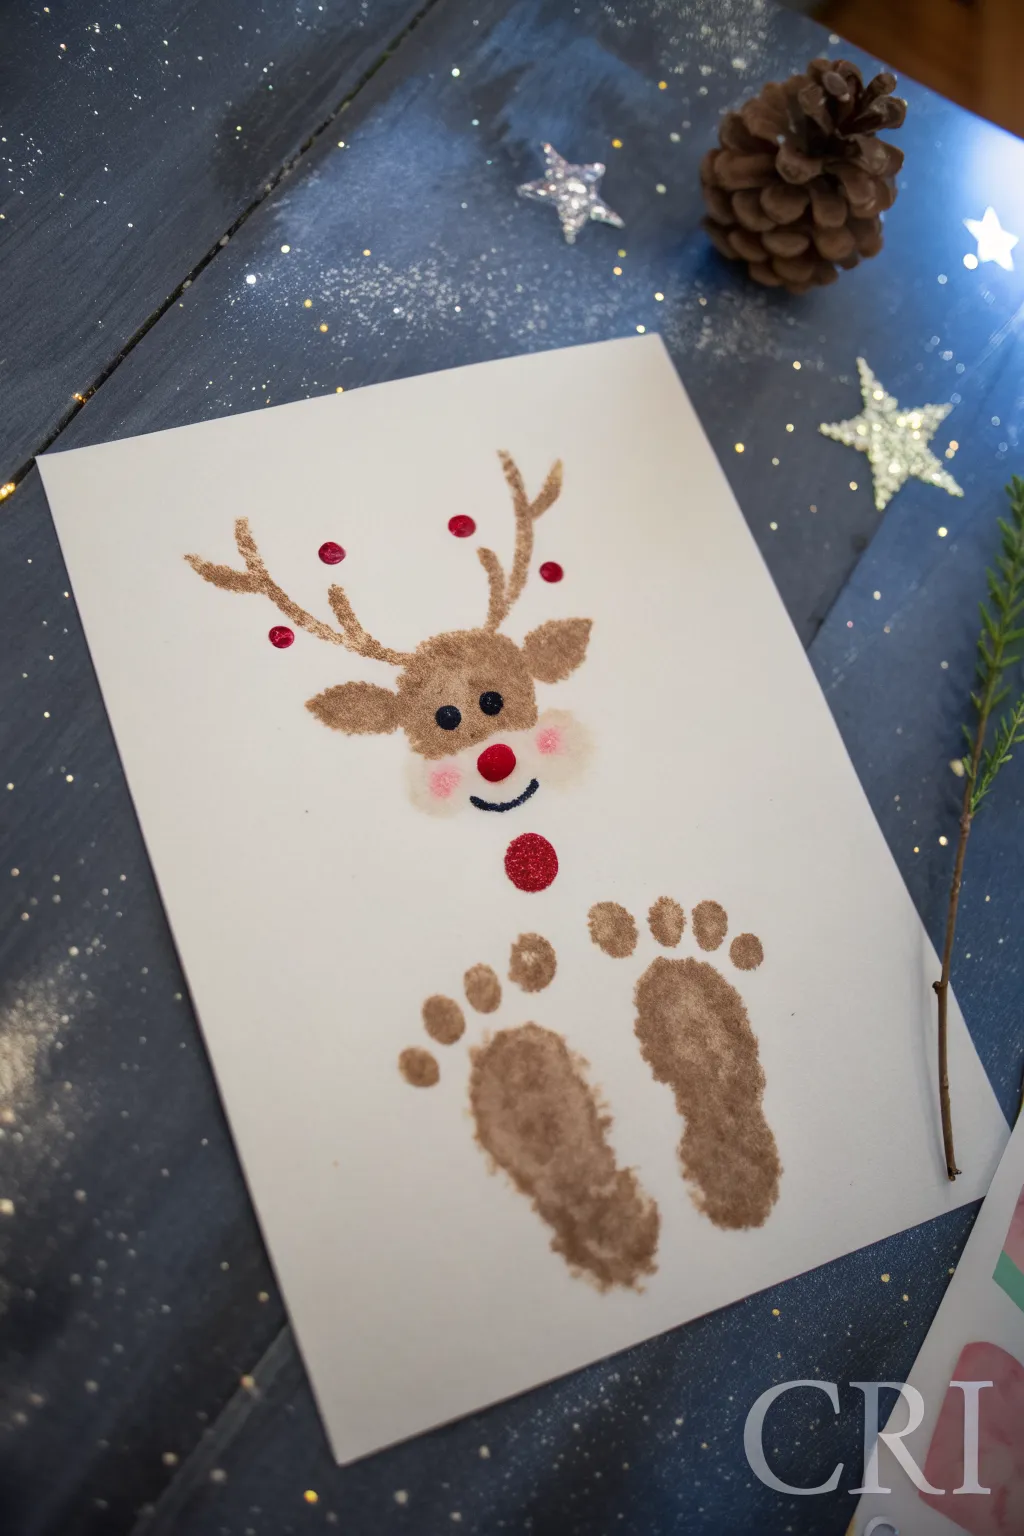
Transform tiny footprints into an adorable reindeer keepsake with this sweet and simple painting project. This craft creates a charming holiday card or wall art by combining stamped prints with hand-painted details.
Step-by-Step
Materials
- White cardstock or heavy watercolor paper
- Brown washable craft paint or acrylic paint
- Red paint (for the nose)
- Black paint or marker (for eyes/mouth)
- Sponge brush
- Small round paintbrush
- Glitter glue (red and gold)
- Black sharpie or fine liner
- Paper towels or baby wipes (essential for cleanup)
Step 1: Creating the Footprints
-
Prepare the workspace:
Lay down newspaper or a protective cloth on your surface. Prepare your white cardstock and squirt a generous amount of brown paint onto a palette or paper plate. -
Paint the first foot:
Using a sponge brush, coat the bottom of your baby’s right foot with brown paint. You want an even layer—not so thick that it slides, but enough to make a solid mark. -
Print the first foot:
Gently press the painted foot onto the bottom right side of the paper. Press down slightly on the toes and heel to ensure a good impression, then lift straight up. -
Clean and repeat:
Wipe that little foot clean immediately with a baby wipe. Repeat the process with the left foot, placing it just to the left of the first print to act as the reindeer’s ‘legs’ or lower body. -
Dry completely:
Set the paper aside to let the footprints dry fully. This is crucial before moving to the detailed face painting.
Step 2: Painting the Reindeer Face
-
Paint the head shape:
Above the space between the two footprints, paint a small brown oval for the reindeer’s head. Add two smaller leaf shapes sticking out from the sides for ears. -
Add the antlers:
Using a small brush and brown paint, draw two antlers branching out from the top of the head. I like to make them slightly curved with little notches. -
Layer the glitter:
While the antler paint is wet (or after it dries), trace over them with gold glitter glue for a festive sparkle. -
Add rosy cheeks:
Mix a tiny drop of red with white (or use very watered-down red) to create pink. Dab two soft pink circles on the cheeks for a blushing look.
Wiggle Control
If your baby is extra wiggly, try doing the footprint step while they are securely strapped into a high chair. It keeps them stationary and makes foot access much easier.
Step 3: Adding Details
-
Create the nose:
Paint a bold red circle in the center of the face for the nose. For extra holiday magic, cover this painted circle with red glitter glue. -
Draw the facial features:
Once the brown head paint is dry, use a black marker or fine paintbrush to add two small dots for eyes and a simple curved line for a smile. -
Paint the collar detail:
Between the head and the footprints, paint a small red circle (or use a rhinestone/button) to represent a festive collar or decoration. -
Embellish the scene:
Add small red dots around the antlers using the handle end of a paintbrush to look like berries floating in the air. -
Final touches:
Allow everything to dry completely, especially the thick glitter used on the nose, before displaying or mailing your masterpiece.
Smudged Prints?
Don’t scrap a smudged print right away. Once it dries, you can often fix edges with a brown marker or turn a blurry toe into a creative artistic choice.
Now you have a captured moment in time transformed into a festive holiday character to cherish


Have a question or want to share your own experience? I'd love to hear from you in the comments below!