
If you’ve ever tried to draw an elephant and ended up with something a little too serious, you’re not alone. Let’s lean into baby proportions, playful props, and simple shapes that instantly make your elephant look sweet and huggable.
Classic Baby Elephant With Big Eyes

Capture the sweetness of a baby elephant in this heartwarming sketchbook drawing. With its oversized eyes, gentle expression, and soft pink accents, this classic kawaii-style illustration is perfect for beginners wanting to practice character design.
Step-by-Step
Materials
- Textured sketch paper or spiral sketchbook
- HB or 2B pencil for initial sketching
- Fine-point black drawing pen (0.3mm or 0.5mm)
- Soft pink colored pencil or pastel
- High-quality eraser
Step 1: Shaping the Head
-
Start with the head shape:
Begin by drawing a large, rounded shape for the head. It shouldn’t be a perfect circle; aim for something slightly wider at the bottom to give the elephant chubby cheeks. -
Add the ear outlines:
On either side of the head, sketch two large, D-shaped curves for the ears. The tops of the ears should start near the upper curve of the head, flaring out significantly before curving back in near the cheek area. -
Define the inner ears:
Inside each ear shape, draw a smaller, parallel curve to create the inner ear flap. This separation effectively creates the space we will color pink later. -
Draft the trunk:
Right in the center of the face, starting from the lower third, draw the trunk. Extend it slightly downward and curve it to the right, ending with a small, flat tip.
Uneven Eyes?
If the eyes look lopsided, draw a faint horizontal guideline across the face before sketching. Place the top and bottom of each oval on this line to ensure they align perfectly.
Step 2: Drawing the Body and Limbs
-
Outline the body:
Beneath the head, draw a small, rounded body. Since the elephant is sitting, the body shape is compact and squarish with rounded corners, almost like a softly rounded cube. -
Position the front legs:
Draw two vertical lines coming down from the neck area to form the front legs. Close them off at the bottom with curved lines for the feet. Add three small U-shapes on each foot to indicate toenails. -
Add the back legs:
For the sitting posture, draw the back legs splayed out to the sides. Sketch circular or oval shapes near the hips, showing the bottom pads of the feet. -
Connect the back feet:
Draw the soles of the back feet on those ovals, adding a smaller inner oval for the characteristic foot pad. Don’t forget the little tail sticking out to the right with a tuft of hair at the end.
Step 3: Bringing the Face to Life
-
Sketch the prominent eyes:
Draw two large ovals for the eyes, spacing them widely apart above the trunk. Inside each oval, draw two smaller circles—one medium and one tiny—to represent reflected light. -
Add facial details:
Above the trunk, draw two small arched lines for wrinkled skin. Give the elephant expression by adding curved eyebrows high on the forehead and three distinct eyelashes flicking off the corners of each eye. -
Refine the trunk details:
Add horizontal curved lines across the trunk to show texture and flexibility. I like to keep these lines light so they don’t overpower the drawing. -
Add a tuft of hair:
At the very top of the head, sketch a few quick, jagged lines to create a cute little tuft of messy hair.
Add Watercolors
Instead of colored pencils, try using a very diluted watercolor wash for the grey body and pink ears. It creates a soft, cloudy texture perfect for nursery art.
Step 4: Inking and Coloring
-
Inking the outlines:
Go over your pencil lines with a fine-point black pen. Use confident strokes for the main outlines and lighter touches for details like the trunk wrinkles. -
Fill in the eyes:
Carefully color in the pupils with black ink, leaving the white reflection circles completely untouched. This contrast creates that sparkling, lively look. -
Erase pencil marks:
Once the ink is completely dry, gently erase all underlying pencil sketches to clean up the artwork. -
Add pink blush:
Using a soft pink colored pencil, gently shade two oval shapes on the cheeks just below the eyes for a rosy blush effect. -
Color the ears and feet:
Use the same pink pencil to fill in the inner ear shapes and the circular pads on the bottom of the back feet. Keep the shading light and even. -
Final decorative touches:
Finish the piece by drawing three small, floating hearts above the elephant’s head in pink pencil to complete the sweet atmosphere.
Your adorable baby elephant is now ready to bring a smile to anyone who flips through your sketchbook


Seated Teddy-Bear Elephant Pose
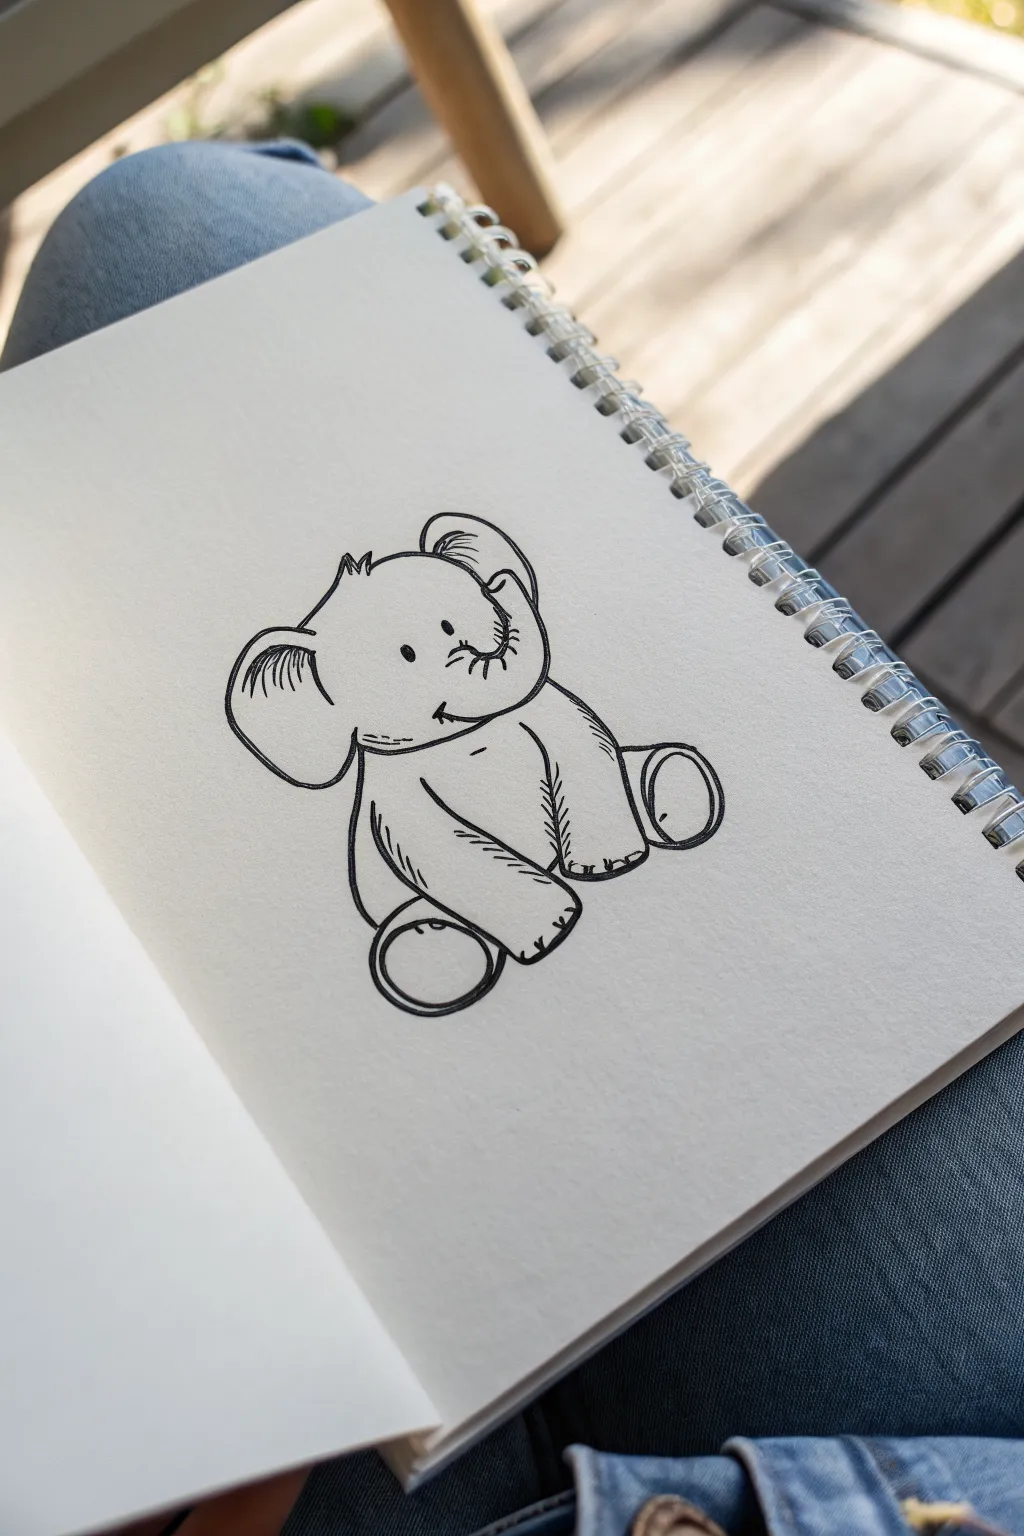
This adorable elephant doodle combines simplicity with character, sitting upright in a charming teddy-bear pose. The clean line work and playful expression make it a perfect subject for practicing your sketching skills in a relaxed setting.
Step-by-Step Guide
Materials
- Sketchbook or drawing paper (medium weight)
- HB or 2B Graphite pencil (for under-drawing)
- Eraser (kneaded preferred)
- Fine liner pen (black, 0.3mm or 0.5mm)
Step 1: Forming the Under-Sketch
-
Start with the head:
Begin by lightly sketching a loose, rounded shape for the head. Think of a slightly squashed circle or an oval that is wider than it is tall, leaving the bottom left side open for the ear. -
Add the body shape:
Connect a pear-shaped body directly below the head. Since this is a seated pose, the bottom of the pear should sit flat and wide, leaning slightly forward. -
Sketch the leg placements:
Roughly mark where the limbs will go. For this ‘teddy bear’ pose, the front legs (arms) should rest centrally on the belly, while the back legs splay outward to the sides with the soles of the feet facing front.
Wobbly Lines?
If your hand shakes while inking, don’t worry. Embrace it! Sketchy, imperfect lines often add more character and warmth to cartoon animals than perfectly straight vector-style lines.
Step 2: Drafting the Features
-
Outline the trunk:
Start from the center of the face and curve a trunk upwards. The trunk should curl back slightly towards the forehead, creating a lively ‘S’ shape. -
Draw the ears:
Add two large, floppy ears. The left ear should fan out widely from the side of the head, while the right ear can tuck slightly behind the head shape to show perspective. -
Detail the limbs:
Refine the front legs into simple, tube-like shapes that taper slightly towards the paws. Draw the rear feet as circles or ovals on either side of the body base. -
Face placement:
Mark two small dots for eyes just above the trunk’s base. Add a small, curved line for a smile tucked under the trunk.
Step 3: Inking the Lines
-
Trace head and trunk:
Switch to your fine liner pen. Carefully ink the top of the head, adding a few tufts of hair at the crown. Follow the curve of the trunk, adding small creases at the bend for texture. -
Define the ears:
Ink the large ear shapes. Inside the left ear, add quick, hatched lines to suggest the inner fold and depth. -
Inking the face:
Fill in the eye dots solidly black. Ink the mouth and tip of the trunk. Keep your hand steady but allow for slight natural wobbles to maintain that hand-drawn charm. -
Outline the front legs:
Draw the front legs now. Notice how the left arm overlaps the body. Add three small U-shapes at the end of each limb to indicate toes. -
Body and rear legs:
Connect the back curve of the elephant. Ink the round pads of the rear feet—draw a large circle for the pad and outline the foot around it.
Make it Yours
Try adding a small prop for the elephant to hold, like a balloon, a peanut, or a flower, to give the character a clearer story or emotion.
Step 4: Adding Texture and Polish
-
Add shading lines:
Use short, quick hatching marks to add shadow. Place these under the chin, on the belly where the legs meet, and along the creases of the limbs. -
Detail the trunk:
Add small curved lines along the top ridge of the trunk to show the wrinkled skin characteristic of elephants. -
Erase pencil marks:
Wait until the ink is completely dry to avoid smudging—I usually give it a full minute—then gently erase all your initial graphite guidelines. -
Thicken the outline:
Go back over the main outer contour lines (the silhouette) a second time to make them slightly bolder than the interior detail lines. -
Final touches:
Add a tiny line under the eye or near the cheek to give the face a bit more expression and dimension.
You now have a delightful little elephant sketch ready to brighten up any notebook page


Simple Elephant Head Doodle

This charming, simplified elephant doodle focuses purely on the head and trunk, making it a perfect quick sketch for notebook margins or bullet journals. The clean black lines and subtle stippling details give it a polished, ink-stamp aesthetic.
Step-by-Step Tutorial
Materials
- Sketchbook with cream or off-white paper (spiral bound preferred)
- Black fineliner pen (0.5mm or 0.8mm)
- Pencil (HB for initial sketch)
- Eraser
- Fountain pen or heavy black marker (optional for bolder lines)
Step 1: Basic Sketching
-
Map out the head shape:
Start by lightly sketching a rounded rectangle or soft oval shape in the center of your page to represent the main part of the elephant’s face. -
Add the trunk foundation:
From the bottom center of your oval, draw a sweeping ‘J’ curve that extends downward and curls up to the left. This will become the trunk. -
Outline the ears:
Sketch two large, kidney-bean shapes on either side of the head. Make sure the tops of the ears align roughly with the top of the head for a balanced look. -
Refine the forms:
Go over your pencil lines to connect the head smoothly into the trunk, ensuring the transitions aren’t too sharp.
Fixing Wobbly Lines
If a line goes astray, thicken the outline slightly in that specific area to hide the unevenness. A bold outline looks intentional!
Step 2: Inking the Outline
-
Start the final ink outline:
Using your black fineliner, carefully trace the top of the head first. Keep your hand relaxed to get a confident, smooth line. -
Draw the left ear:
Ink the large outer curve of the left ear. Inside this shape, draw a slightly smaller curve to define the inner ear rim, leaving a small gap at the bottom. -
Draw the right ear:
Repeat the process for the right ear, creating a mirror image. I like to make the lines slightly thicker on the outer edges to give the drawing some weight. -
Define the trunk shape:
Ink the long, sweeping lines of the trunk. At the very tip, flare the end slightly to create the distinctive elephant snout shape.
Step 3: Face and Details
-
Add the tusks:
Draw two small, pointed triangle shapes emerging from just under the head, right where the trunk begins. -
Create the eyes:
draw two solid black oval eyes. Place them fairly wide apart on the face. Leave a tiny white dot in each oval to serve as a highlight, which brings the character to life. -
Draw trunk wrinkles:
Down the length of the trunk, draw a series of short, curved horizontal lines. These represent the natural wrinkles of the skin. -
Add forehead details:
Place a few small, floating curves above the eyes to suggest eyebrows or forehead wrinkles. -
Stipple the ears:
Inside the inner rim of the ears, add clusters of small dots (stippling). Concentrate the dots near the edges and let them fade out toward the center for a shading effect. -
Stipple the face:
Add a few light dots on the forehead and cheeks to mimic texture without overwhelming the clean design. -
Clean up:
Once the ink is completely dry, gently erase all your underlying pencil sketches to reveal the crisp black artwork.
Add a Splash of Color
Use a light gray or pastel blue watercolor wash over the elephant, keeping the color loose and slightly outside the lines for an artistic feel.
Now you have a sweet elephant companion peeking out from your notebook pages


Elephant Holding a Heart
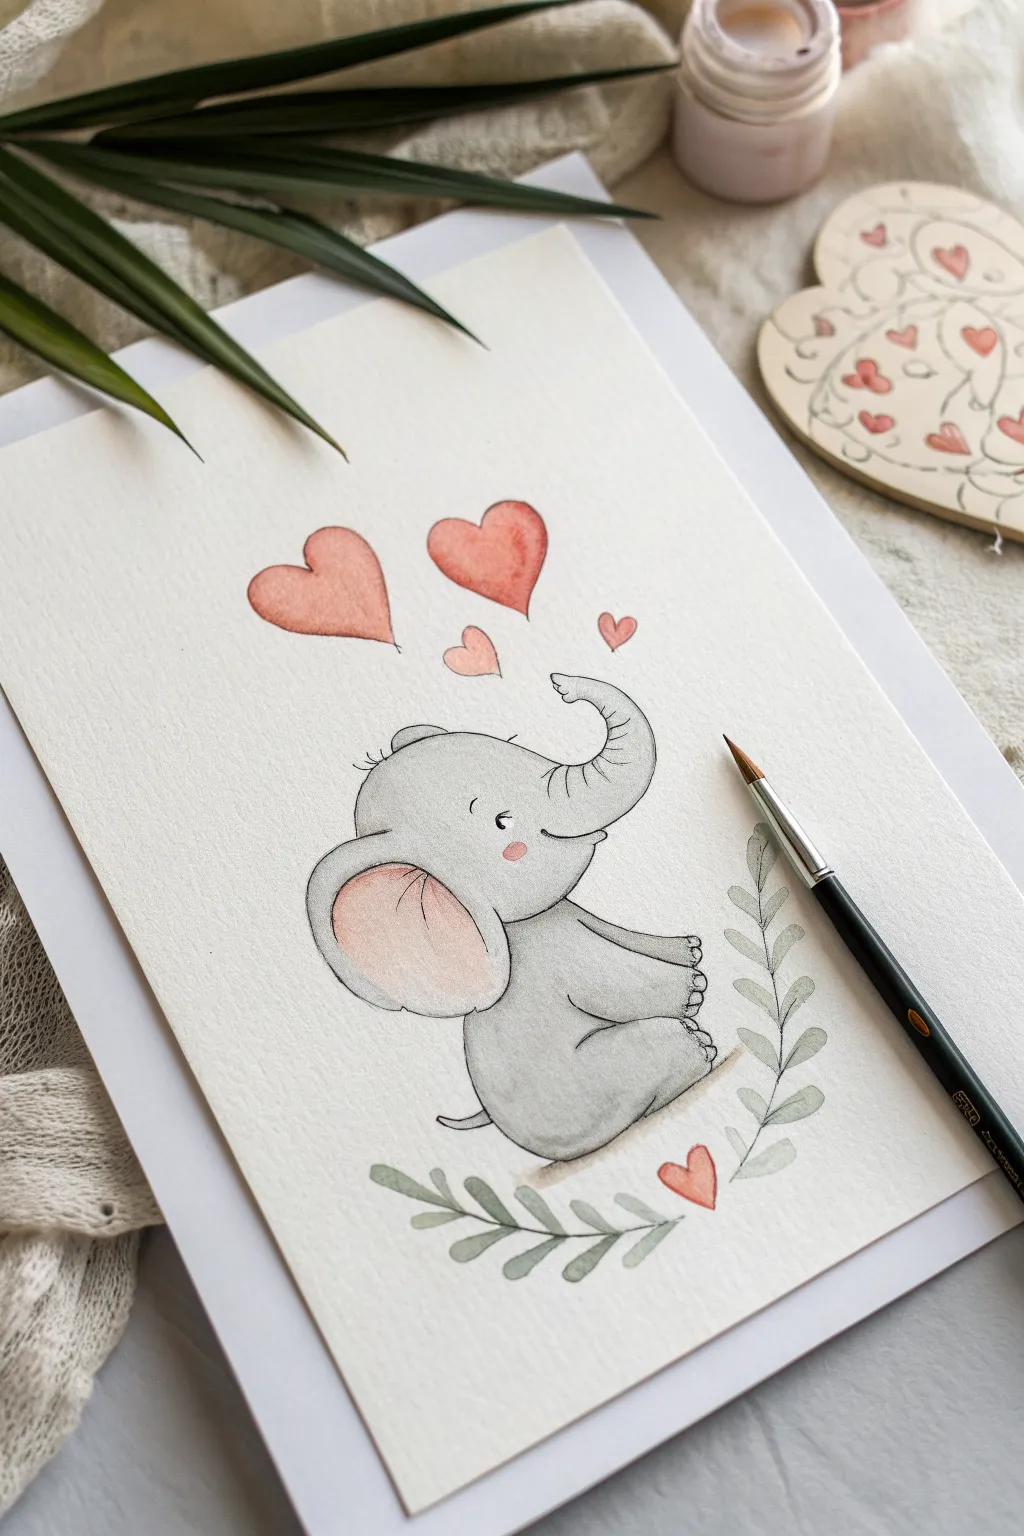
This tender illustration captures a sweet gray elephant gazing up at floating hearts, framed by gentle botanical leaves. Using soft watercolors and fine liner pens, you’ll create a heartwarming piece perfect for greeting cards or nursery art.
Detailed Instructions
Materials
- Cold press watercolor paper (300 gsm)
- HB pencil and kneaded eraser
- Waterproof fine liner pen (black, 0.1mm)
- Watercolor paints (Payne’s Grey, Alizarin Crimson, Sap Green)
- Round watercolor brushes (sizes 2 and 4)
- Clean water and paper towel
Step 1: Sketching the Outline
-
Head and trunk shape:
Begin lightly with your pencil, drawing a rounded oval for the elephant’s head near the center of the paper. Extend the top right side into a curved trunk that lifts upward in a gentle ‘S’ shape. -
Body and posture:
Sketch a pear-shaped body sitting below the head. Make the bottom flat where the elephant sits, and round out the back. -
Legs and details:
Add the front legs resting slightly forward and the back leg tucked in a seated position. Create the large, floppy ear on the left side of the head, and mark a small, curved tail at the rear. -
Floating elements:
Lightly sketch three or four hearts of varying sizes floating above the trunk. Below the elephant, draw two simple, curved stems with small leaves that frame the bottom of the drawing.
Uneven Watercolors?
Add more water to your brush if the paint drags; it should flow easily. If weird ‘blooms’ appear as it dries, you likely added wet paint into a semi-dry area—wait for layers to fully dry next time
Step 2: Inking the Drawing
-
Trace the main lines:
The charm of this piece lies in the delicate linework. Use your 0.1mm waterproof pen to trace over your pencil lines. Keep your hand relaxed to achieve smooth, slightly organic curves rather than rigid mechanical lines. -
Refining details:
Add small creases to the trunk and knees for texture. Draw the eye as a small, curved line with delicate lashes, and a tiny smile near the trunk base. -
Clean up:
Wait until the ink is completely dry—usually about 5 to 10 minutes—before gently erasing all pencil guidelines to prevent smudging.
Make it Sparkle
Once the painting is completely dry, use a white gel pen to add tiny highlights to the elephant’s eyes and the tops of the hearts. It makes the character instantly look more alive and glossy
Step 3: Watercolor Washes
-
Base grey layer:
Dilute Payne’s Grey with plenty of water to create a very pale, transparent wash. Apply this to the elephant’s body and head, working quickly to avoid hard edges. -
Adding dimension:
While the first layer is still slightly damp, drop a slightly more concentrated grey into the ‘shadow’ areas: under the ear, along the bottom of the belly, and where the legs meet the body. This creates a soft, rounded form. -
Ear and cheeks:
Mix a very watery Alizarin Crimson. Gently paint the inside of the large ear and add a small, circular blush to the cheek. Blend the edges with a clean, damp brush so the pink fades softly into the grey. -
Painting hearts:
Use the same red mixture, perhaps slightly stronger, to paint the floating hearts. I like to leave tiny slivers of white paper unpainted on the upper curves to act as highlights. -
Botanical accents:
Mix Sap Green with a touch of grey to desaturate it. Paint the leaves below the elephant using the tip of your size 2 brush for precision. -
Adding texture:
Once the grey body is fully dry, you can use a fairly dry brush with darker grey to stipple tiny dots or faint lines for texture on the skin, particularly around the trunk and toes. -
Grounding shadow:
Mix a diluted brown-grey and paint a thin, blurry shadow directly underneath the elephant so it doesn’t look like it’s floating in mid-air.
Now you have a sweet, heartwarming illustration ready to be framed or given to someone special
BRUSH GUIDE
The Right Brush for Every Stroke
From clean lines to bold texture — master brush choice, stroke control, and essential techniques.
Explore the Full Guide
Elephant With Heart-Shaped Balloon
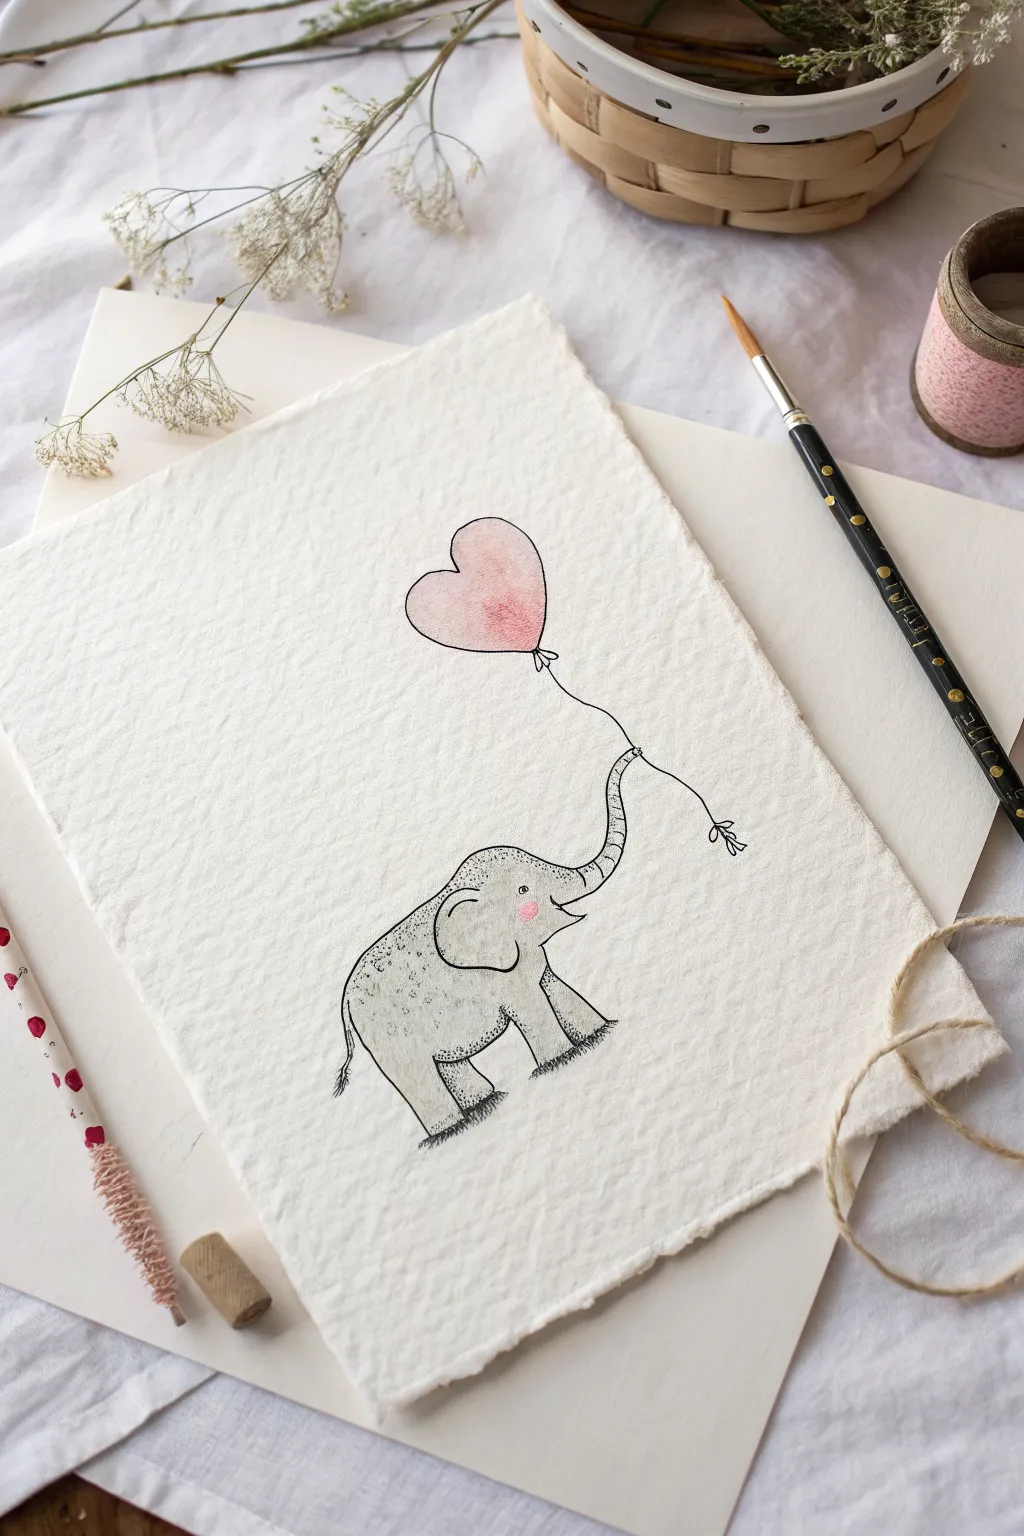
This whimsical illustration captures a sweet moment with a baby elephant holding a pink heart balloon, rendered delicately on textured handmade paper. It combines precise ink stippling with soft watercolor washes for a charming, rustic finish perfect for a greeting card or nursery art.
How-To Guide
Materials
- Heavyweight, handmade cotton rag paper with deckled edges
- Fine liner pen (black, 0.1mm and 0.05mm)
- Watercolor paints (pale grey, dusty rose/pink)
- Soft round watercolor brush (size 4 or 6)
- Pencil (HB or H)
- Kneaded eraser
- Paper towel
- Jar of clean water
Step 1: Sketching the Silhouette
-
Paper preparation:
Begin with a sheet of high-quality handmade paper. Because the texture is rough, tape the corners down lightly to your work surface to prevent shifting while you sketch. -
Basic shapes:
Using your pencil very lightly, draw a rounded oval for the elephant’s body and a smaller circle for the head, slightly overlapping. Position the figure in the lower third of the paper. -
Trunk and legs:
Extend a curved line upward from the face to form the trunk, giving it a playful ‘S’ curve. Sketch four sturdy, short legs at the bottom of the oval body. -
Features and balloon:
Add a large, floppy ear on the side of the head and a small tail at the back. Well above the trunk, float a heart shape for the balloon, connecting it to the trunk tip with a loose, wavy string line.
Ink Bleeding?
Handmade paper is absorbent. If your lines bleed, switch to a pigment-based art pen or do the watercolor wash first, let it dry fully, then add ink.
Step 2: Inking the Details
-
Initial outline:
Switch to your 0.1mm fine liner. Carefully trace over your pencil lines for the elephant’s outline. Use a slightly broken or jittery line rather than a perfect stroke to match the rustic paper texture. -
Refining features:
Ink the ear shape, ensuring it overlaps the shoulder area. Add the small eye as a simple dot and a tiny curved smile near the base of the trunk. -
Texturing with stippling:
This step brings the elephant to life. Using the 0.05mm pen, start adding tiny dots (stippling) along the bottom edge of the belly, under the ear, and on the legs. -
Building shadow:
Concentrate the dots more densely in shadow areas (under the chin, the rear leg, and the belly) and let them fade out toward the center of the body. -
String and balloon:
Ink the balloon string with a single delicate line. Outline the heart shape cleanly. Add a tiny bow or knot where the string meets the balloon. -
Grounding shadows:
Add short, scribbled hatch marks directly under the feet to ground the figure so the elephant doesn’t look like it’s floating. -
Clean up:
Wait at least 10 minutes for the ink to fully set, then gently dab—don’t rub—with a kneaded eraser to lift any visible pencil marks.
Keep it Light
Before painting, blot your brush on a paper towel. This ‘dry brush’ approach prevents the thick paper from buckling and gives more control over the wash.
Step 3: Adding Watercolor Washes
-
Mixing the grey:
Dilute a black or Payne’s Grey watercolor with plenty of water until you have a very varied, pale wash. You want it transparent, not opaque. -
Painting the body:
Apply the pale grey wash over the elephant’s body. I like to keep the center of the forehead and the top of the back slightly lighter to suggest highlights. -
Painting the balloon:
Mix a soft, dusty pink. Paint the heart balloon, starting with a concentrated color at the bottom point and adding water as you move up to create an ombré fade toward the top. -
Adding the blush:
While the grey paint on the face is still slightly damp but not soaking wet, dab a tiny spot of watered-down pink on the cheek for a soft blush effect. -
Final drying:
Let the paint dry completely. The textured paper will absorb the pigment unevenly, creating a beautiful, natural mottled effect.
Now you have a charming piece of art ready to frame or gift to someone special
Floating Elephant With Balloons
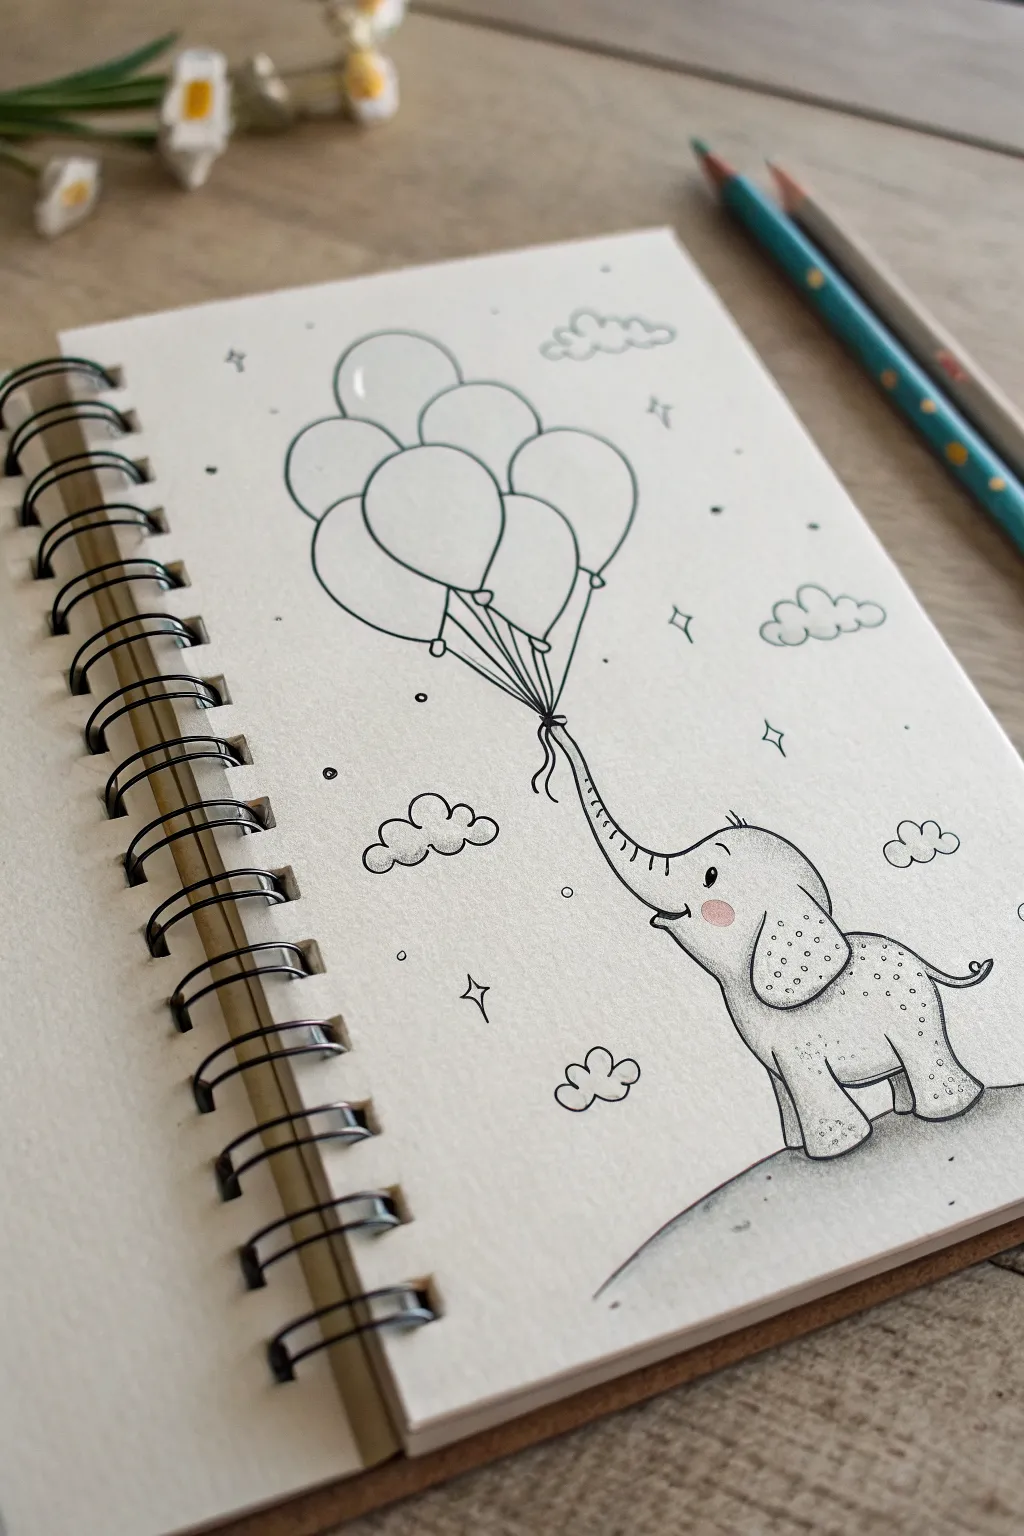
Capture a moment of pure joy with this charming sketch of a baby elephant being lifted by a bouquet of balloons. The design features clean ink lines, gentle stippling for texture, and a sweet splash of rosy color on the cheek.
Detailed Instructions
Materials
- Spiral-bound sketchbook (smooth paper recommended)
- HB or 2B pencil for sketching
- Fine liner pens (0.1mm and 0.3mm, black)
- Soft pink colored pencil or pastel
- Eraser (kneaded is best)
- Blending stump (optional)
Step 1: Sketching the Composition
-
Map out the shapes:
Start with a light pencil sketch to establish the main forms. Draw a large oval for the elephant’s body and a slightly smaller, rounded shape for the head. Position them in the bottom right corner of your page. -
Draft the balloons:
In the upper left area, sketch five or six overlapping balloon ovals. They should be arranged in a loose cluster, floating high above the elephant. -
Connect the trunk:
Draw a long, curving line extending from the elephant’s face up toward the balloons to represent the trunk. It should look like it is stretching upward. -
Add the hill:
Lightly sketch a curved line beneath the elephant’s feet to ground the figure on a gentle slope.
Step 2: Refining the Elephant
-
Shape the face:
Refine the head shape, adding a small tuft of hair on top. Draw a large, floppy ear that hangs down the side of the head. -
Detail the trunk:
Thicken the trunk lines you sketched earlier. Add small horizontal crease lines along the curve of the trunk for texture. -
Draw the facial features:
Place a small, solid black dot for the eye, leaving a tiny white speck for a highlight. Add a small smile line just under the trunk base. -
Define the body:
Outline the body, adding a small, curled tail at the back. Sketch stump-like legs, making sure the feet look flat against the ground line.
Wobbly Lines?
If your long lines (like balloon strings) are shaky, try drawing from your shoulder rather than your wrist, or use a ruler for guidance before inking.
Step 3: Inking the Outline
-
Ink the balloons:
Using a 0.3mm fine liner, trace over your balloon pencil lines. Make the lines clean and continuous. Where balloons overlap, stop the line of the rear balloon so it appears behind the front one. -
Draw the strings:
Switch to a 0.1mm pen for finer details. Draw straight(ish) lines from the bottom of each balloon converging at the tip of the elephant’s trunk. Add a little bow where they meet the trunk. -
Ink the elephant:
Go over the elephant’s outline with the 0.3mm pen. Use confident strokes for the back and head. -
Add environmental details:
Ink the curved ground line. Draw a few fluffy clouds floating around—scalloped edges work best here. Add tiny four-pointed stars or sparkles in the empty space.
Make it Pop
Use watercolor or colored pencils to fill the balloons with soft pastel hues like mint, lemon, and lavender for a splash of gentle color.
Step 4: Shading and Finishing Touches
-
Erase pencil marks:
Wait a moment for the ink to fully dry, then gently erase all the underlying pencil sketches to clean up the page. -
Stipple shading:
Create texture using stippling (tiny dots). Concentrate dots on the elephant’s ear, the bottom of the feet, and the underside of the belly to create shadow and volume. -
Shadow the ground:
Add a little stippling or very light hatching just under the elephant on the ground line to anchor him so he doesn’t look like he’s floating. -
Add the blush:
Take your soft pink pencil and gently color a small circle on the elephant’s cheek. I find layering this slowly keeps it looking soft and sweet. -
Highlight the balloons:
If you forgot to leave white space while inking, you can use a white gel pen to add small curved reflection lines on the top left of each balloon. -
Final check:
Review your drawing for any lines that need thickening or areas that need a few more dots for balance.
You now have a delightful illustration ready to brighten up any notebook page

PENCIL GUIDE
Understanding Pencil Grades from H to B
From first sketch to finished drawing — learn pencil grades, line control, and shading techniques.
Explore the Full Guide
Elephant on a Crescent Moon
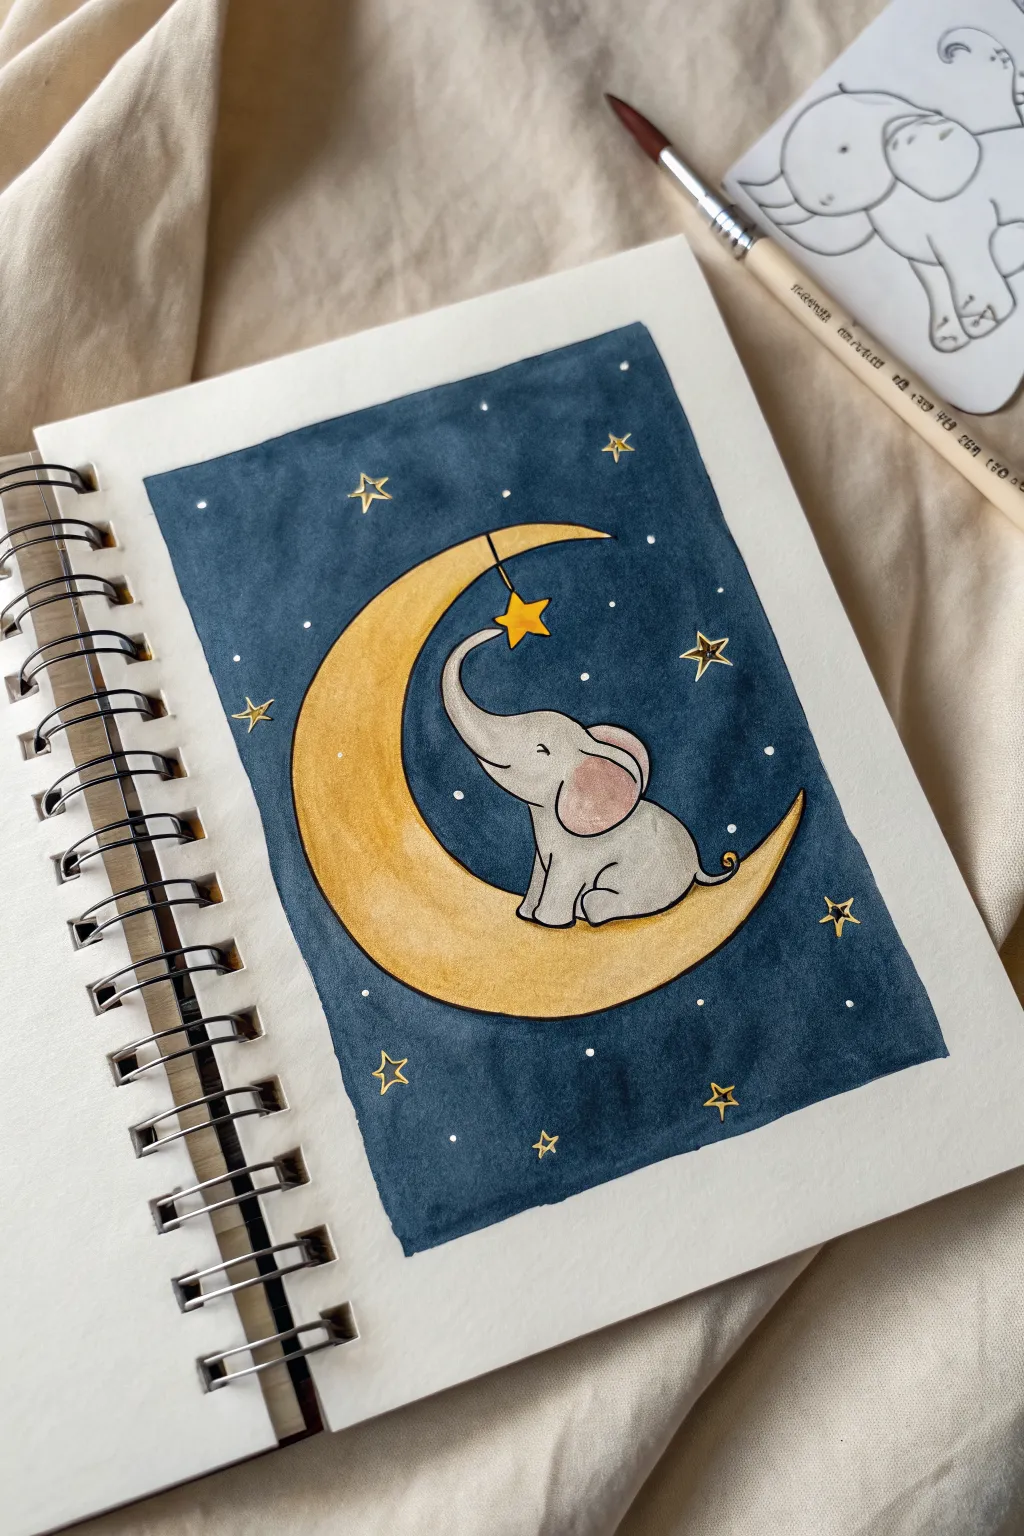
Capture the magic of bedtime stories with this enchanting illustration of a baby elephant balancing on a glowing crescent moon. Using deep indigo watercolors against bright yellows creates a striking contrast that makes the night sky pop right off the page.
Step-by-Step Guide
Materials
- Watercolor paper or mixed media sketchbook
- Pencil and eraser
- Waterproof fine liner pen (black, 0.3mm or 0.5mm)
- Watercolor paints (Indigo/Dark Blue, Yellow Ochre, Light Grey, Pink)
- Round watercolor brush (size 4 or 6)
- Gold gel pen or metallic paint marker
- White gel pen (for stars)
Step 1: Sketching the Composition
-
Define the frame:
Start by lightly drawing a rectangular border in the center of your page. This will contain your night sky scene and give the artwork a clean, finished edge. -
Draw the crescent moon:
Within the rectangle, sketch a large crescent moon shape. Keep the bottom curve wide enough to support the elephant, tapering to sharp points at the top corners. -
Outline the elephant’s body:
Place a rounded pear shape sitting directly on the lower curve of the moon. This will form the elephant’s body and head. -
Add trunk and ears:
Extend a trunk upwards from the head, curving it gently like an ‘S’ shape. Draw a large, floppy ear on the side of the head and a small tail curling off the back. -
Include the hanging star:
Draw a straight vertical line hanging from the tip of the moon’s upper horn. At the end of the line, sketch a five-pointed star right near the elephant’s reaching trunk.
Step 2: Inking and Definition
-
Outline the main shapes:
Using your waterproof fine liner, carefully trace over your pencil lines. Go over the moon, the elephant, the star, and the rectangular border. -
Add elephant details:
Draw the elephant’s closed eye with a small curved line and add eyelashes. Define the separation between the ear and head, and add small wrinkles on the trunk. -
Erase pencil marks:
Wait a moment for the ink to dry completely, then gently erase all visible pencil sketches to leave a clean black outline.
Clean Edges Pro-Tip
For the crispest rectangular borders, apply painter’s tape or washi tape around your frame before painting. Peel it away only when the paint is 100% dry.
Step 3: Painting the Scene
-
Base layer for the moon:
Here I prefer to start with the brightest element. Paint the moon carefully with a yellow ochre or warm yellow tone, keeping the color flat and even. -
Color the elephant:
Paint the elephant’s body with a very diluted warm grey. While it’s wet, add a touch of darker grey to the bottom of the feet for shadow. -
Add warmth to the elephant:
Use a soft, diluted pink wash for the inside of the elephant’s ear and a tiny dot for a cheek blush to make it look extra cute. -
Paint the star:
Fill in the hanging star with a bright, saturated yellow so it stands out as a focal point. -
Fill the night sky:
This is the big step. Load your brush with deep indigo or dark blue watercolor. Carefully paint the rectangular background space around the moon and elephant. -
Refine the edges:
Work slowly near the outlines of the moon and elephant. You want a crisp edge where the dark blue meets the yellow and grey. -
Let it dry completely:
Before adding the final magic, ensure the dark blue paint is bone dry to prevent any gel pens from smudging or blending.
Level Up: Texture
Add salt to the wet indigo paint while the sky is drying. The salt absorbs pigment relative to water, creating beautiful starry textures automatically.
Step 4: Magical Details
-
Gold accents:
Using a gold gel pen or metallic marker, trace the string holding the star. You can also add small gold star outlines scattered in the blue sky. -
White stars:
Take your white gel pen and dot tiny stars throughout the dark blue background. Vary the sizes for a natural look. -
Final highlights:
Add a tiny white highlight line on the elephant’s trunk and the curve of the moon to give them dimension.
Now you have a serene little scene perfect for a nursery decoration or a handmade card
Elephant With a Floral Crown
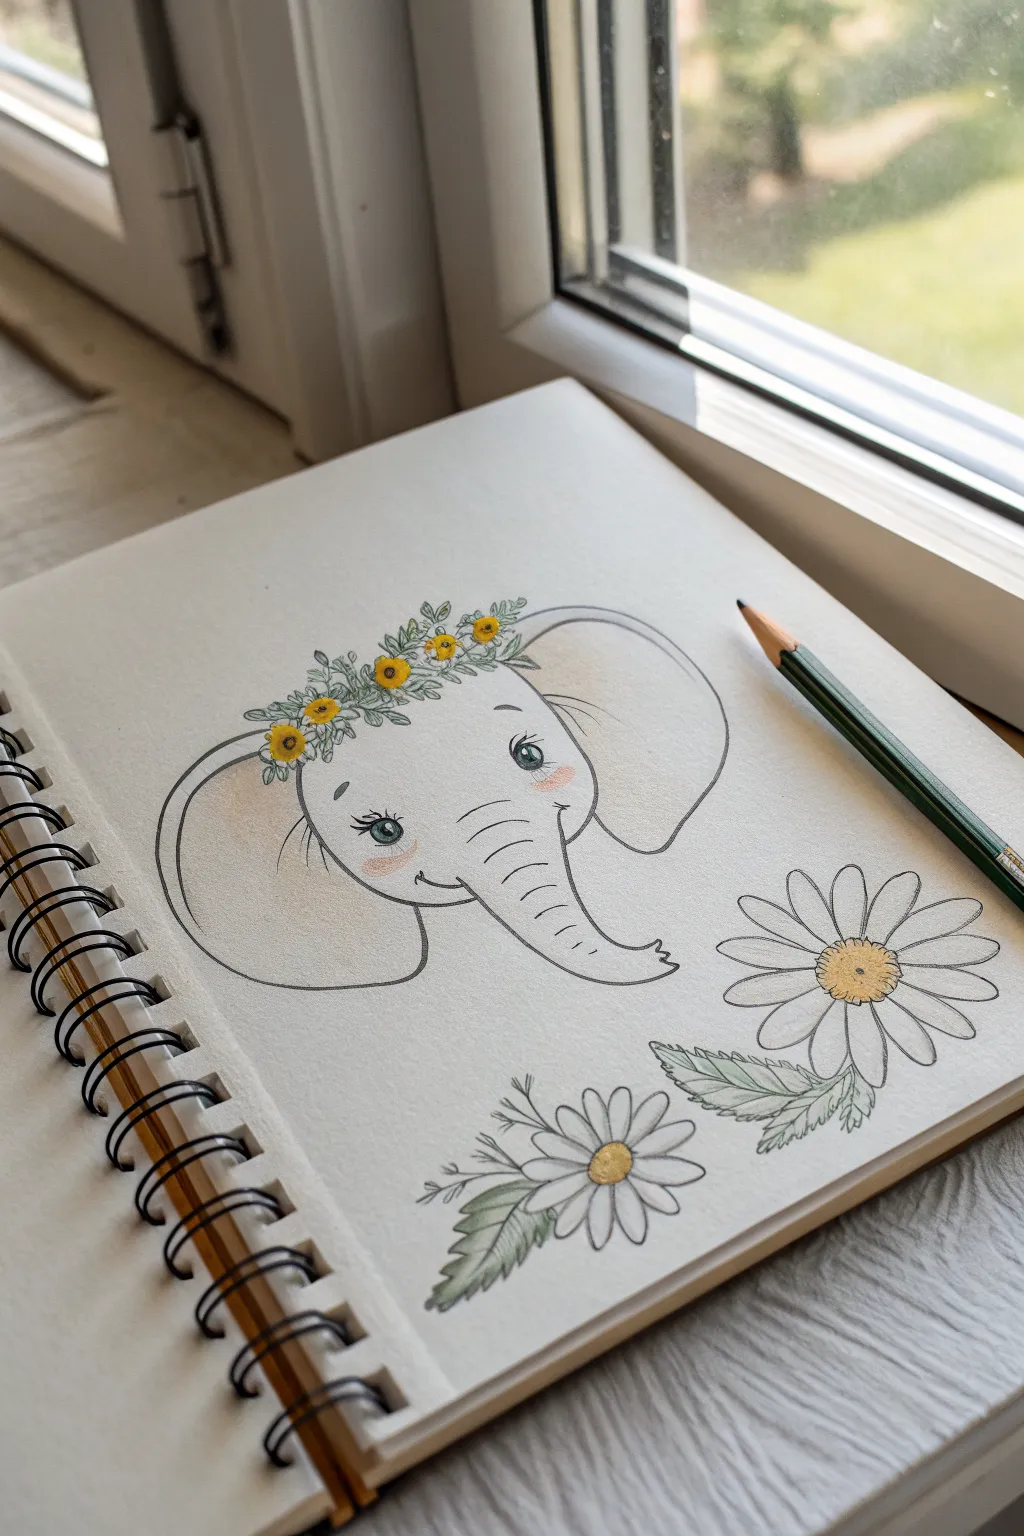
Capture the sweetness of a baby elephant adorned with delicate blooms in this gentle sketchbook study. It features soft pencil lines, subtle blushing cheeks, and a sunny yellow floral crown that adds a perfect pop of color.
Step-by-Step Tutorial
Materials
- Sketchbook or drawing paper (medium weight)
- H pencil for initial sketching
- HB or 2B pencil for final lines
- Fine-liner pen (optional, dark grey or black)
- Colored pencils (yellow, green, pink)
- Eraser
- Sharpener
Step 1: Shaping the Elephant
-
Head outline:
Begin by lightly sketching a large, rounded U-shape for the elephant’s head. Keep the lines faint so they are easy to adjust. -
Trunk placement:
Extend a curved trunk from the bottom center of your U-shape. Curve it gently to the right, slightly tapering the tip. -
Adding ears:
Draw two large, rounded triangle shapes on either side of the head for the ears. The left ear should hug the cheek, while the right ear can flare out a bit more for dimension. -
Defining the trunk:
Refine the trunk’s shape by adding horizontal curved lines along its length to suggest wrinkles and texture. -
Face details:
Position the eyes wide apart. Draw oval shapes with small circles inside for highlights, then shade the pupil dark, leaving the highlight white. -
Sweet expression:
Add eyelashes to the outer corners of the eyes and draw a small curved smile line right where the trunk meets the cheek.
Step 2: Drawing the Floral Elements
-
Crown base:
Lightly sketch a curved guideline across the elephant’s forehead where the crown will sit. -
Small flowers:
Draw five or six small, circular flower shapes along this guideline. Give them simple, rounded petals. -
Leafy accents:
Fill the gaps between the small flowers with tiny, oval-shaped leaves to make the crown look full and lush. -
Large daisies:
In the bottom right corner of the page, draw two large circles for flower centers. Radiate long, oval petals outward from these centers to create the daisies. -
Daisy leaves:
Add serrated, pointy leaves emerging from behind the large daisies to ground the floral composition.
Soft Shading Secret
To get that ultra-smooth cheek blush, scribble pink pencil on scrap paper, rub a Q-tip in it, then apply to the drawing.
Step 3: Refining and Coloring
-
Clean lines:
Go over your main outlines with an HB pencil or fine-liner to define the drawing. Erase any unnecessary stray sketch lines. -
Coloring the crown:
Use a bright yellow pencil to fill in the centers and petals of the small flowers on the crown. It’s okay if the color is soft and sketchy. -
Leaf details:
Color the leaves in the crown and the larger daisy leaves with a muted green pencil. Use light strokes to keep the texture airy. -
Golden centers:
Fill the large daisy centers with a golden-yellow hue. Drawing small dots or cross-hatching inside the center adds nice texture. -
Blushing cheeks:
I like to take a soft pink pencil and lightly shade oval patches on the elephant’s cheeks, right under the eyes, for a rosy glow. -
Final shading:
Add very light grey shading inside the ears and along the bottom of the trunk to give the drawing a little depth without making it heavy.
Petal Power
Try varying the petal lengths on the large daisies slightly; perfectly uniform petals can look stiff and unnatural.
Now you have a charming, gentle elephant friend living in your sketchbook to brighten your day


Elephant With a Tiny Flower in Its Trunk
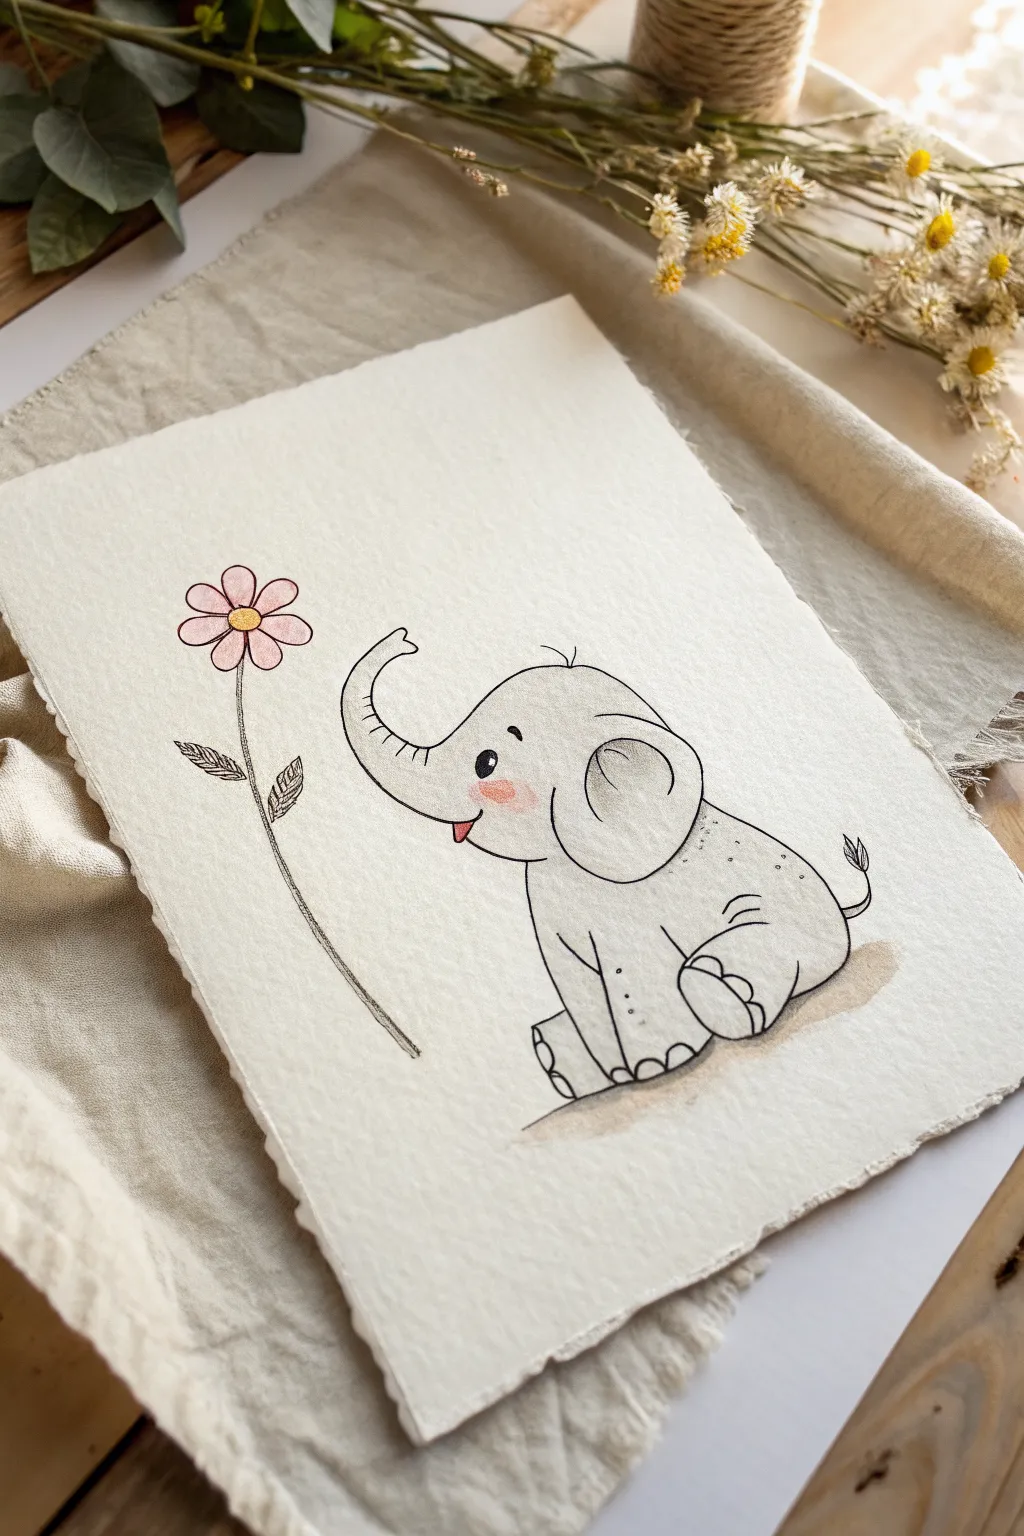
This sweet illustration captures a baby elephant gazing curiously at a delicate pink flower, perfect for a nursery or a thoughtful greeting card. The result combines soft pencil shading with crisp ink lines on lovely textured paper for a heartwarming, vintage feel.
How-To Guide
Materials
- Heavyweight watercolor paper (cold press with deckled edge preferred)
- HB or 2B pencil for sketching
- Kneaded eraser
- Fine liner pens (black, sizes 01 and 03)
- Watercolor paints (grey, pink, yellow, brown/sepia)
- Small round watercolor brush (size 2 or 4)
- Paper towel
- Water cup
Step 1: Sketching the Shape
-
Establish the Head:
Start by lightly sketching a large, rounded shape for the elephant’s head in the upper right quadrant of your paper. Keep the bottom slightly flatter where it meets the neck. -
Draft the Ear:
Draw a large, C-shaped curve attached to the right side of the head for the ear. Inside this shape, sketch a smaller, inner curve to suggest depth. -
Form the Trunk:
Extend a curved trunk out from the left side of the face, curling it upwards. The tip should be open and slightly flared, ready to greet the flower. -
Body Basics:
Below the head, sketch a pear-like shape for the body. The elephant is sitting, so keep the base wide and grounded. -
Limbs and Tail:
Add the front legs as simple columns resting on the ground. For the back leg, draw a rounded haunch tucked up against the body. Don’t forget a tiny, curved tail sticking out the back. -
Position the Flower:
To the left of the trunk, draw a long, slightly curved stem rising from the ground level. At the top, sketch a circle for the center and add five or six simple petals.
Smudge Prevention
If your ink smudges when erasing or painting, your pen might not be waterproof. Always test your pen on a scrap piece of paper with water before starting the final piece.
Step 2: Inking the Lines
-
Outline the Elephant:
Using an 03 fine liner, carefully trace your pencil lines. Use confident, smooth strokes for the back and head to give the elephant a clean look. -
Detail the Face:
Switch to an 01 pen for finer details. Draw a small, oval eye with a highlight dot, a cheerful curved mouth, and little crease lines on the trunk. -
Ink the Flower:
Outline the flower petals and stem. Add distinct veins to the leaves and small texture dots in the center of the bloom for realism. -
Erase Guidelines:
Once the ink is completely dry—I usually give it a full five minutes just to be safe—gently sweep the kneaded eraser over the entire drawing to remove the graphite sketches.
Make it Sparkle
Once the yellow center of the flower is completely dry, add a tiny dot of gold metallic paint or a gel pen to the center to make the illustration pop.
Step 3: Adding Soft Color
-
Rosy Cheeks:
Dilute a tiny bit of pink watercolor. Apply a soft, circular blush to the elephant’s cheek, just under the eye. Keep this very watery so it looks transparent. -
The Flower:
Paint the flower petals with a light wash of pink. While that dries, dab a bit of yellow ochre into the center of the flower. -
Grey Tones:
Mix a very watery grey wash. Instead of painting the whole elephant, add shadow only where necessary: under the chin, beneath the ear, and along the bottom of the belly and legs. -
Grounding Shadow:
Using a diluted brown or sepia, paint a gentle, horizontal shadow underneath the elephant’s bottom and legs to anchor the figure to the ground. -
Trunk Texture:
Using your finest pen again, add tiny hatching lines or stippling on the grey shadow areas of the trunk and ears to enhance the texture without adding more paint.
Now you have a heartwarming little scene ready to be framed or gifted
Elephant Wearing a Cozy Scarf
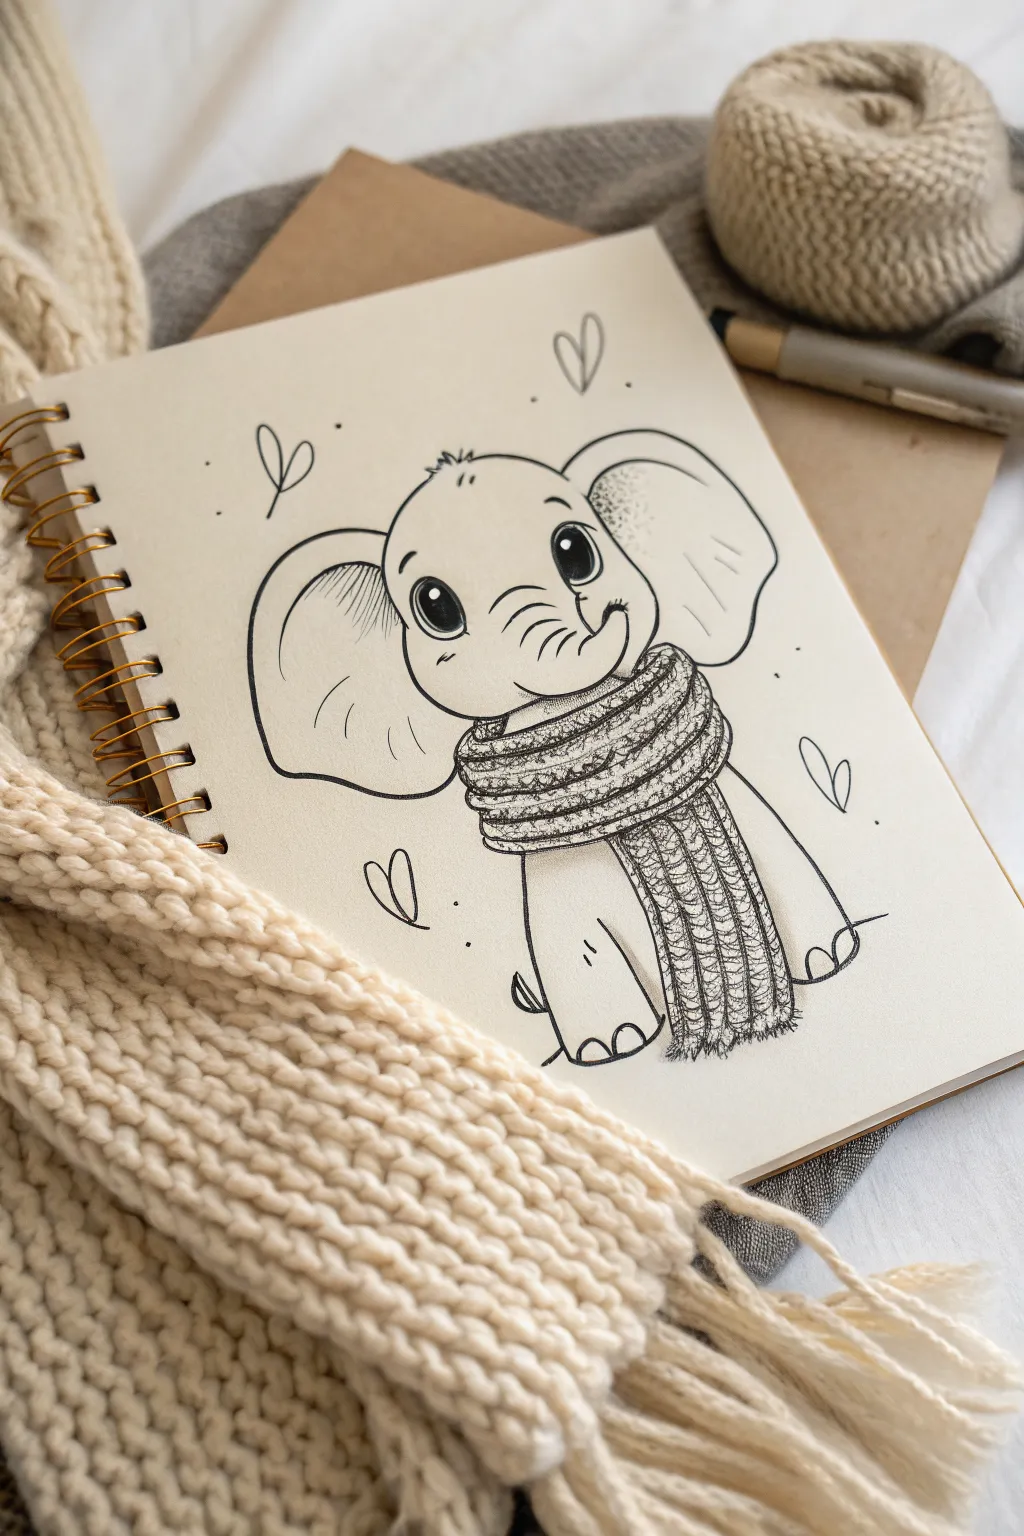
This heartwarming sketch captures a baby elephant bundled up for the cold, featuring expressive eyes and a beautifully detailed knitted scarf. The simple linework combined with intricate texture patterns makes this a relaxing and rewarding drawing project.
Step-by-Step Guide
Materials
- Spiral-bound sketchbook (smooth or mixed-media paper)
- H or HB pencil (for initial sketching)
- Fine liner pens (sizes 0.1, 0.3, and 0.5)
- Soft eraser
- Ruler (optional for scarf alignment)
Step 1: Drafting the Basic Shapes
-
Map out the head:
Start by lightly sketching a large, rounded shape for the head. It shouldn’t be perfectly round; give it a slightly wider base to account for the chubby cheeks. -
Position the ears:
On either side of the head, draw two large, butterfly-wing shapes for the ears. Keep the lines loose and flowing, ensuring the tops of the ears align roughly with the forehead. -
Add the trunk guide:
Draw a curved tube shape extending from the lower middle of the face, curving slightly upward to the right to suggest a happy gesture. -
Sketch the body and scarf:
Beneath the head, draw a smaller, rounded shape for the body. Wrap a thick, tube-like shape around the neck area to establish where the scarf will sit, letting one end drape down the front.
Uneven Ink Lines?
If your lines shake, don’t worry! Go over them again slightly thicker to smooth them out. A varied line weight often adds character and makes illustrations look more organic.
Step 2: Refining the Face
-
Define the eyes:
Draw two large, oval eyes. Inside each, sketch a smaller circle for the highlight and a larger pupil area. This gives that classic ‘cute’ expression. -
Detail the trunk:
Refine the trunk’s outline, adding little wrinkle lines (curved dashes) across the bridge of the nose and near the tip to show movement. -
Smile and cheeks:
Connect the bottom of the trunk to a small, upward-curved line for the mouth. Add little tick marks near the eyes to suggest cheekiness. -
Refine the ear shapes:
Go over your ear outlines, giving them a smoother finish. Add inner curved lines near the head join to show the ear’s fold and depth.
Add Winter Flair
Make it a holiday card by drawing faint snowflakes in the background or coloring the scarf with red and green markers for a festive touch.
Step 3: Inking and Outlining
-
Outline the main features:
Switch to your 0.5 fine liner. Carefully trace over your pencil lines for the head, ears, and body. Use a confident, consistent stroke. -
Fill the eyes:
With the pen, color in the pupils completely black, but leave the small highlight circles pure white. This high contrast brings the character to life. -
Ink the trunk details:
Use a thinner 0.3 pen for the wrinkles on the trunk and the small details around the mouth to keep them delicate.
Step 4: Texturing the Scarf
-
Outline the scarf folds:
Using the 0.5 pen, define the heavy coils of the scarf wrapped around the neck. Draw the draping end with slightly wavy lines to suggest soft fabric. -
Create the knit pattern:
I find it best to work in rows. Draw horizontal, slightly wavy lines across the width of the scarf sections. Then, add small, angled ‘v’ shapes or squiggles between these lines to mimic yarn loops. -
Add the ribbing:
For the hanging part of the scarf, draw vertical parallel lines. Between these lines, use a stippling (dotting) motion or tiny squiggles to create a fuzzy, ribbed texture. -
Draw the fringe:
At the very bottom of the scarf, sketch short, irregular clusters of lines to look like the tasseled ends of the yarn.
Step 5: Final Touches
-
Add decorative elements:
Draw simple, floating heart shapes around the elephant’s head to fill the negative space and enhance the mood. -
Erase guidelines:
Once the ink is completely dry (give it a minute or two), gently erase all underlying pencil sketch lines. -
Enhance the shading:
Use your 0.1 fine liner to add very subtle hatching lines inside the ears and under the scarf to create softly shadowed areas. -
Dot details:
Sprinkle a few tiny dots around the hearts and head for a whimsical, finished look.
Step back and enjoy the adorable winter companion you have just brought to life on paper
Elephant With a Party Hat and Confetti
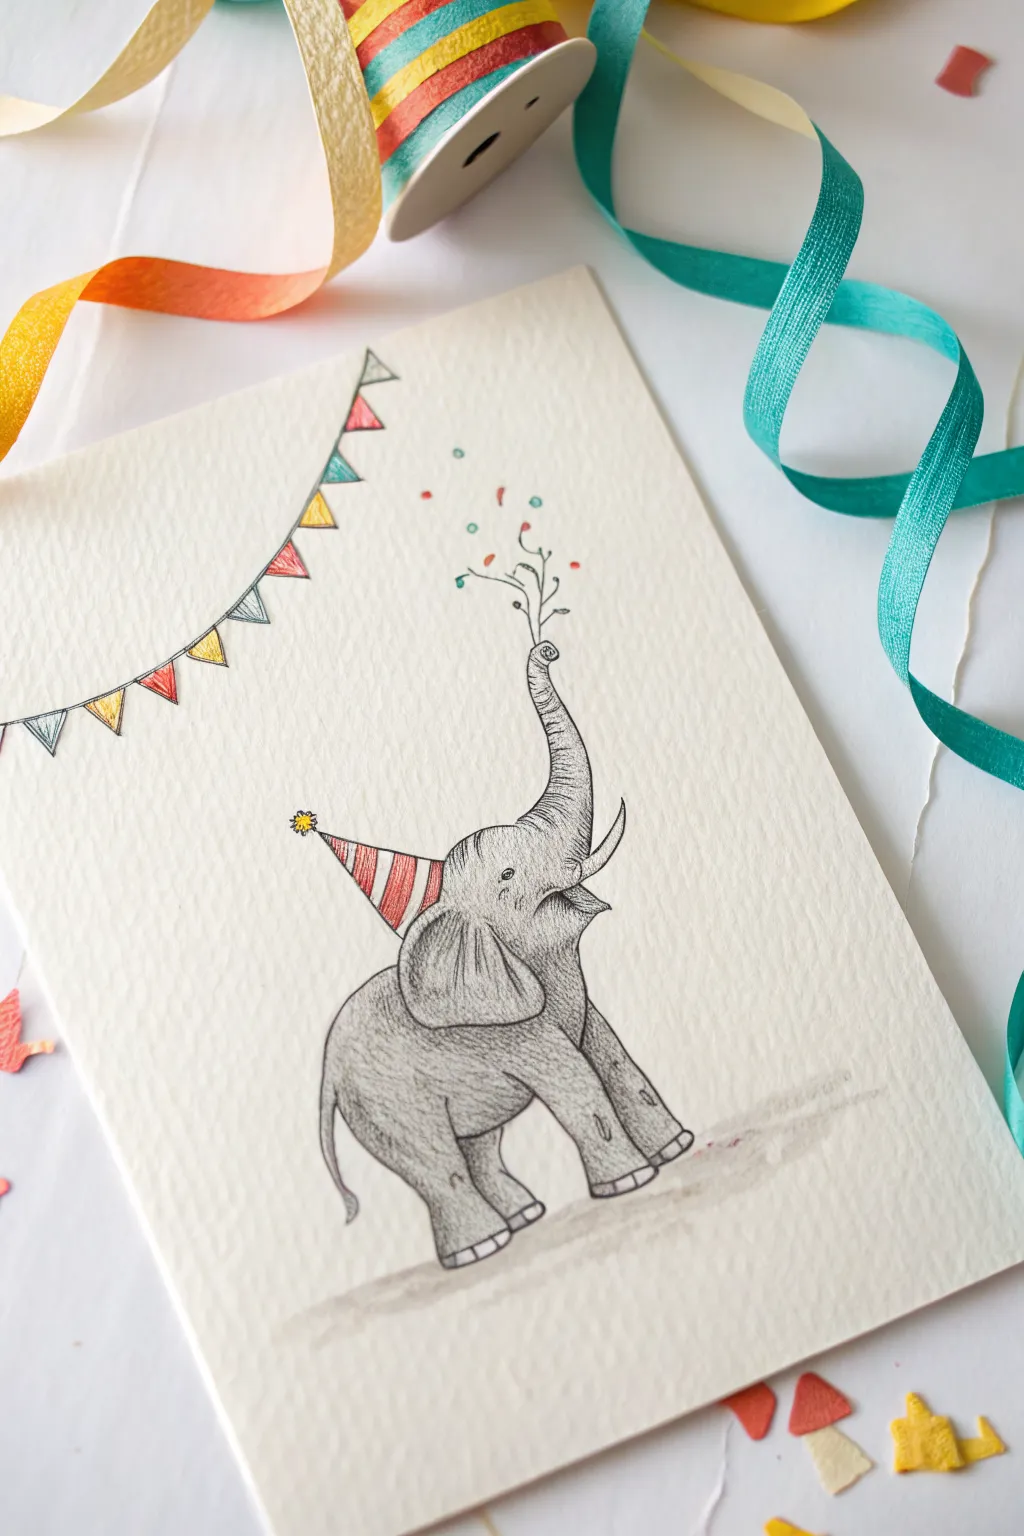
Capture the joy of a celebration with this whimsical illustration of a baby elephant sporting a festive hat and blowing confetti. Using fine liners and colored pencils on textured paper creates a charming, storybook quality that feels both classic and fun.
How-To Guide
Materials
- Textured heavy-weight drawing paper (like cold-press watercolor paper)
- H or HB pencil for sketching
- Kneaded eraser
- Fine liner pens (sizes 005, 01, and 03 in black)
- Colored pencils (red, yellow, teal, muted green)
- Pencil sharpener
Step 1: Sketching the Foundations
-
Map out the body shape:
Start by lightly drawing a large oval for the elephant’s body, leaning slightly backward to suggest the rearing posture. Add a smaller circle on top for the head, overlapping slightly with the body oval. -
Draft the trunk and legs:
Extend a curved line upwards from the head circle to form the trunk’s spine. Sketch two chunky rectangles for the rear legs to ground the figure, and two smaller shapes for the front legs lifted off the ground. -
Add facial features:
Define the elephant’s large ear with a generous, floppy curve on the side of the head. Mark a small dot for the eye and a curved line for the mouth to give him a happy expression. -
Sketch the accessories:
Place a triangular hat on the head, tilting it back slightly so it looks secure. Draw a curved line across the top left corner of the paper for the bunting string and hang small triangles from it. -
Refine the outline:
Go over your shapes to connect them into a single silhouette. Smooth out the connections between the trunk and head, and soften the leg shapes. Erase unnecessary internal structural lines gently.
Tip: Texture Is Key
Use cold-press watercolor paper even for dry drawings. The bumps break up pencil lines, instantly giving your art a vintage, storybook feel.
Step 2: Inking the Details
-
Outline the elephant:
Using a 01 fine liner, trace your refined pencil sketch. Use short, slightly broken strokes for the skin to suggest texture rather than a solid, heavy outline. -
Detail the trunk and wrinkles:
Switch to a 005 pen for the finer details. Draw horizontal curve lines all the way up the trunk to show its flexibility. Add little crinkle lines around the knees and ankles where the skin bunches up. -
Texture the skin:
Create shading by drawing fine, directional hatching lines. Focus these on the belly, the underside of the trunk, and beneath the ear. I find that following the curve of the body with these lines makes the elephant look much rounder. -
Ink the accessories:
Outline the party hat and the bunting flags with the 01 pen. Draw the string of the bunting with a slightly wobbly line to show it has slack. Don’t forget the little pom-pom on top of the hat. -
Draw the confetti spray:
From the tip of the trunk, extend a few squiggly lines outward like water or air being blown. Draw tiny circles and squares at the ends of these lines to represent confetti floating in the air. -
Ground the figure:
Sketch a faint, uneven horizon line near the elephant’s feet to simulate the ground, adding a few scribbles for shadows or dust.
Fix: Wobbly Lines?
If your ink lines feel too shaky, don’t worry! Go over them again loosely to create a messy, sketchy style that looks intentional.
Step 3: Adding Color
-
Color the hat:
Take a red colored pencil and fill in alternating stripes on the party hat. Press lightly to let the paper texture show through, keeping the drawing soft. -
Fill in the bunting:
Color the hanging flags in a repeating pattern using red, yellow, and teal pencils. Keeping the colors sheer preserves the delicate illustration style. -
Highlight the confetti:
Dot the tiny confetti shapes with your colored pencils. Use random colors for a festive look—red, teal, and yellow work beautifully against the black ink. -
Enhance the elephant:
Use a grey pencil or very lightly use a black pencil to deepen the darkest shadows on the elephant’s body, particularly under the chin and massive ear. -
Ground shadow:
Lightly shade the ground beneath the elephant’s feet with a warm grey or light brown pencil to plant him firmly in the scene.
Now you have a charming little elephant ready to celebrate any occasion
Elephant and Tiny Bird Best Friends
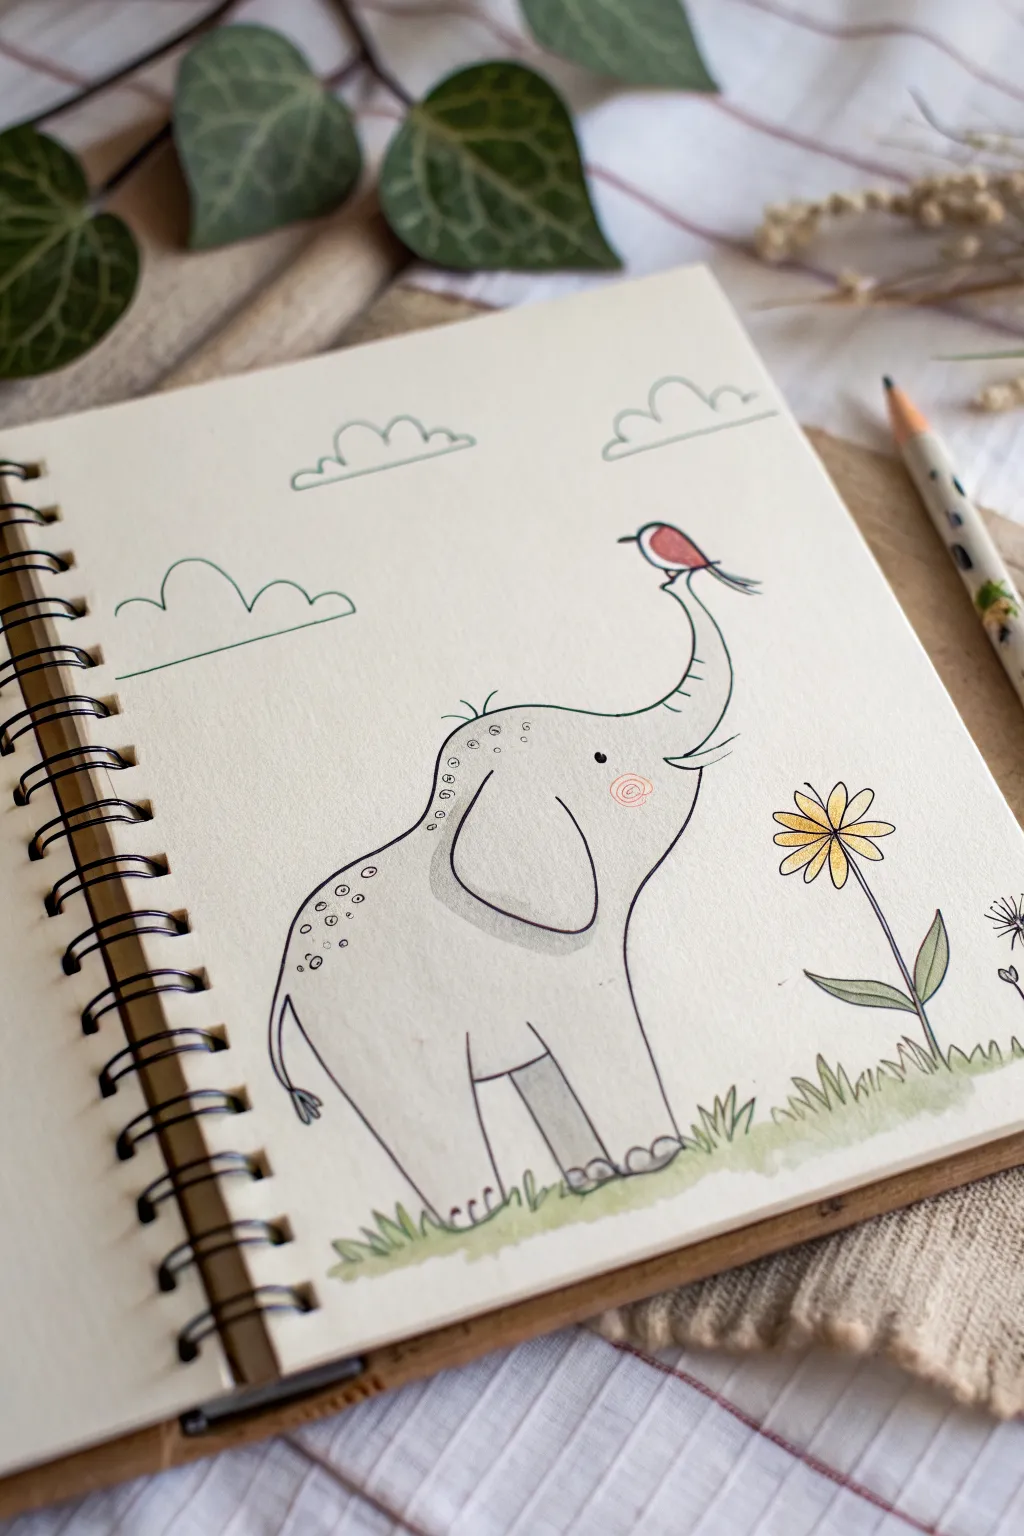
Capture a sweet moment between unlikely friends with this charming sketchbook illustration. This tutorial guides you through creating a simple line-art elephant gently balancing a robin on its trunk, finished with soft color accents.
Step-by-Step
Materials
- Spiral-bound sketchbook (mixed media paper recommended)
- Fine liner pen (black, 0.3mm or 0.5mm)
- Pencil (HB for sketching)
- Eraser
- Colored pencils or watercolor markers (Gray, Yellow, Green, Red/Pink)
- White gel pen (optional for highlights)
Step 1: Planning the Shapes
-
Rough placement:
Start lightly with your pencil. Draw a large, rounded bean shape in the center-left of your page for the elephant’s body. The top should be slightly humped for its back. -
Head and trunk guide:
Attach a circle to the right side of the body for the head. Extend a curving line upward from the head—this will guide the trunk reaching toward the sky. -
Legs and ground:
Sketch simple rectangular blocks for the legs at the bottom of the body. Lightly marking a horizontal line across the bottom ensures the feet and flower stem will be level.
Clean Lines
To keep the drawing whimsical and airy, don’t color the elephant fully gray. Use gray only for shadows (under ears/legs) to keep the look light and artistic.
Step 2: Drawing the Elephant
-
Inking the outline:
Switch to your black fine liner. Start defining the final contour, tracing over your pencil sketch with a confident, smooth line. Begin at the elephant’s curved back and work down to the hind leg. -
Trunk and mouth:
Draw the trunk following your upward curve, keeping it wider at the base and tapering near the tip. Add a small smile line just under where the trunk meets the face, and include a tiny tusk if desired. -
The big ear:
Draw a large, floppy ear shape on the side of the head. It should look a bit like a rounded triangle or a sagging ‘D’ shape. Don’t close the shape completely at the top; let it blend into the head line. -
Legs and tail:
Ink the legs, making them slightly rounded at the bottom for feet. I find that drawing three small bumps at the base of each foot suggests toes perfectly. Add a thin, curved tail with a tuft of hair at the end. -
Developing the texture:
Add small circles and dots along the elephant’s back and rump to give the skin some texture. Add a few small tufts of hair on top of the head. -
Facial features:
Place a solid black dot for the eye near the trunk base. Draw a small, swirled spiral on the cheek using a pink colored pencil or thin marker for a rosy blush effect.
Add Sparkle
Use a white gel pen to add a tiny highlight dot to the elephant’s black eye and the bird’s wing. It makes the characters instantly look more alive and cute.
Step 3: Adding the Friends and Environment
-
The tiny bird:
Perched right on the tip of the trunk, draw a very small bird. Start with a round body, add a tiny beak facing left, and a tail dipping down. Ink the legs gripping the trunk tip. -
Flower power:
To the right of the elephant, draw a tall, simple daisy. Draw a long, slightly curved stem, followed by two broad leaves near the bottom. Add an eight-petaled flower head at the top. -
Clouds and grass:
Draw a few jagged, grassy zig-zags along the bottom to ground the figures. In the sky, add two or three simple cloud shapes using scalloped lines.
Step 4: Coloring and Details
-
Clean up:
Wait for the ink to dry completely to avoid smudging, then erase all visible pencil guidelines gently. -
Soft gray tones:
Use a light gray marker or colored pencil to shade only parts of the elephant. Focus on the shadow areas: under the ear, the belly, the back leg, and under the chin. Keep the main body white. -
Coloring the bird:
Fill the bird’s belly with a warm red or dark pink color. Leave the top of the bird white or very light gray. -
Brightening the flower:
Color the flower petals a cheerful yellow and shade the center with an orange or darker yellow. Use a muted green for the stem and leaves. -
Grassy wash:
Apply a wash of pale green watercolor or marker along the bottom grass line. Keep it irregular and loose rather than a solid block of color. -
Sky accents:
Trace over your cloud lines with a pale green or teal fine liner to tie the color palette together, rather than using standard black.
Now you have a serene little scene perfect for a greeting card or a peaceful page in your sketchbook
Elephant in Rain Boots With a Puddle
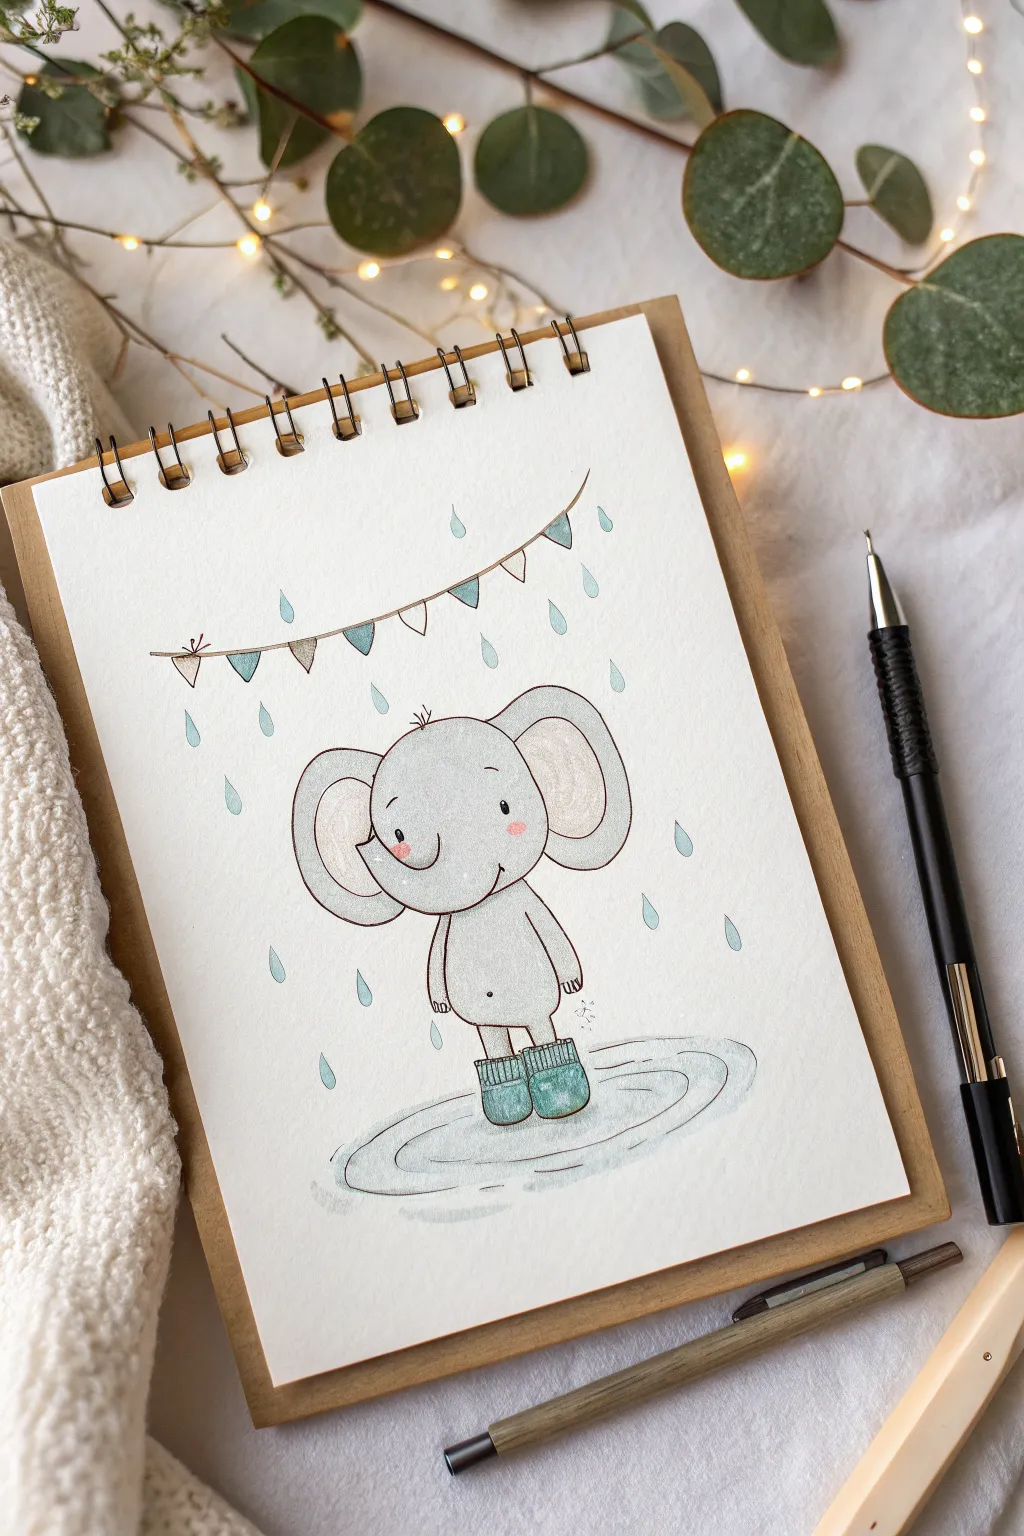
Capture the joy of a rainy day with this adorable illustration of a baby elephant splashing in a puddle. Using simple shapes and soft watercolor washes, you will create a charming character caught in a gentle spring shower.
Detailed Instructions
Materials
- Heavyweight drawing paper or watercolor paper (cold press creates nice texture)
- Pencil (HB or 2H for light sketching)
- Fine-liner pen (black, 0.3mm or 0.5mm, waterproof)
- Watercolor paints or watercolor pencils (grey, teal/turquoise, pink)
- Small round brush (size 4 or 6)
- White gel pen (optional for highlights)
- Eraser
Step 1: Sketching the Foundations
-
Start with the head:
Begin by lightly sketching a large, slightly flattened circle for the elephant’s head in the center of your page. -
Add the body:
Below the head, draw a smaller, pear-shaped oval for the body. The top of the pear should connect directly to the bottom of the head shape. -
Sketch the ears:
On either side of the head, draw large, rounded ears. Think of them as open butterfly wings or large beans that frame the face. -
Draw the trunk and face:
Erase a small section of the bottom headline and draw a curved trunk that curls upwards slightly. Add two small dots for eyes and a tiny curved line for a smile right next to the trunk. -
Add limbs and boots:
Sketch simple, tube-like arms resting at the sides. For the legs, draw two short lines going down into two rectangles that will become the rain boots. -
Refine the boots:
Detail the boots by rounding the toes and adding a ribbed cuff at the top of each rectangle to make them look like cosy wellies.
Water Control Tip
Keep your grey wash very watery. It’s better to build up color in layers than to start too dark, which can make the elephant look heavy.
Step 2: Setting the Scene
-
Draw the puddle:
Sketch a series of concentric, wavy ovals around the elephant’s feet to represent ripples in a puddle. -
Hang the bunting:
Above the elephant’s head, draw a gently curving line swooping from left to right. Hang small triangles along this line to create festive bunting. -
Add raindrops:
Draw teardrop shapes scattered randomly throughout the background, varying their sizes slightly for a natural look.
Make It Yours
Try changing the bunting flags to spell a name, or give the elephant a patterned umbrella instead of just letting the rain fall.
Step 3: Inking and Coloring
-
Outline with ink:
Using your waterproof fine-liner, carefully trace over your pencil lines. I prefer to keep the lines slightly loose rather than perfectly rigid to maintain a hand-drawn charm. -
Erase guidelines:
Once the ink is completely dry—give it a minute or two—gently erase all underlying pencil sketch marks. -
Paint the elephant grey:
Dilute a grey watercolor paint with plenty of water. Wash it over the elephant’s body, ears, and head, leaving the inner ears lighter or unpainted for now. -
Add rosy cheeks:
While the grey is still slightly damp or just after it dries, dab a tiny bit of diluted pink on the cheeks for a soft blush effect. -
Color the inner ears:
Paint the inside of the ear flaps with a very pale, warm beige or light pink wash to distinguish them from the grey skin. -
Paint the boots and details:
Use a teal or turquoise color to paint the rain boots. Use the same color, perhaps more diluted, to fill in alternating flags on the bunting. -
Color the rain and puddle:
Use a very watery blue or teal wash for the raindrops. For the puddle, simply trace the ripple lines with a wet brush carrying a hint of blue-grey pigment, rather than filling the whole shape. -
Final touches:
Once everything is dry, you can use a white gel pen to add tiny highlights on the boots or the elephant’s nose for extra cuteness.
Now you have a sweet little scene to brighten up even the gloomiest rainy afternoon
Elephant Made From Easy Shapes

Learn to draw this adorable elephant by starting with a simple foundation of intersecting circles. This construction method makes getting the proportions right incredibly easy, resulting in a charming, cartoon-style illustration.
Step-by-Step Tutorial
Materials
- Sketchbook or drawing paper
- Pencil (HB or 2B)
- Fine-point black fineliner pen (e.g., Micron 05)
- Light gray marker or colored pencil
- Pink marker or colored pencil
- Eraser
Step 1: Building the Foundation
-
Draw the head circle:
Start by lightly sketching a perfect circle near the top center of your page. This will become the top of the elephant’s head. -
Add the body circles:
Draw two slightly larger circles below the first one. They should overlap significantly with the head circle and with each other, creating a shape that looks a bit like a Venn diagram. -
Sketch the trunk guide:
Place a fourth circle in the center where the top three intersect. This central circle acts as the anchor point for the face and trunk. -
Outline the big ears:
On either side of the head circle, sketch two large, D-shaped curves. Make them grand and rounded, extending out further than the body.
Wobbly Circles?
Don’t stress about perfect circles! Trace a small cup or bottle cap for the initial guide shapes if you want cleaner lines.
Step 2: Developing the Details
-
Define the trunk:
Starting from the center of the face, draw the trunk curving downwards and slightly to the right. Use the central guide circle to help positioning, and curl the tip upward like a ‘J’ shape. -
Add trunk wrinkles:
Draw small horizontal curved lines all the way down the trunk to give it that classic wrinkled texture. -
Draw the legs:
Extend lines down from the bottom body circles to create sturdy, rectangular legs. The front legs should appear slightly ahead of the back legs. -
Add toes:
At the bottom of each leg, draw three small semi-circles to represent the toenails. -
Refine the body shape:
Connect your outer perimeter lines, smoothing out the transition between the head and body. Add a small ‘V’ shape between the front legs to show the chest. -
Face features:
For the eyes, draw two small, solid black ovals widely spaced above the trunk. Add a tiny tail with a tuft on the left side of the body.
Step 3: Inking and Coloring
-
Trace with fineliner:
Take your black fineliner and carefully trace over your final pencil lines. I prefer to use confident, smooth strokes rather than short, scratchy ones. -
Erase guidelines:
Once the ink is completely dry, gently erase all the underlying pencil circles and construction lines so only the clean drawing remains. -
Add gray tones:
Use a light gray marker to color the entire body. Apply the color evenly to avoid streakiness. -
Inner ear detail:
Leave the inner sections of the large ears uncolored (white) or use a very pale gray to distinguish them from the rest of the skin. -
Rosy cheeks:
Add two small pink dots or ovals on the cheeks, just below the eyes, to give the elephant a sweet, blushing expression.
Make it a Scene
Draw a tiny peanut near the trunk or add some grass tufts at the feet to place your elephant in a little environment.
You now have a charming little elephant that looks professionally drawn but started from simple shapes
Elephant With Patterned Patchwork Ears
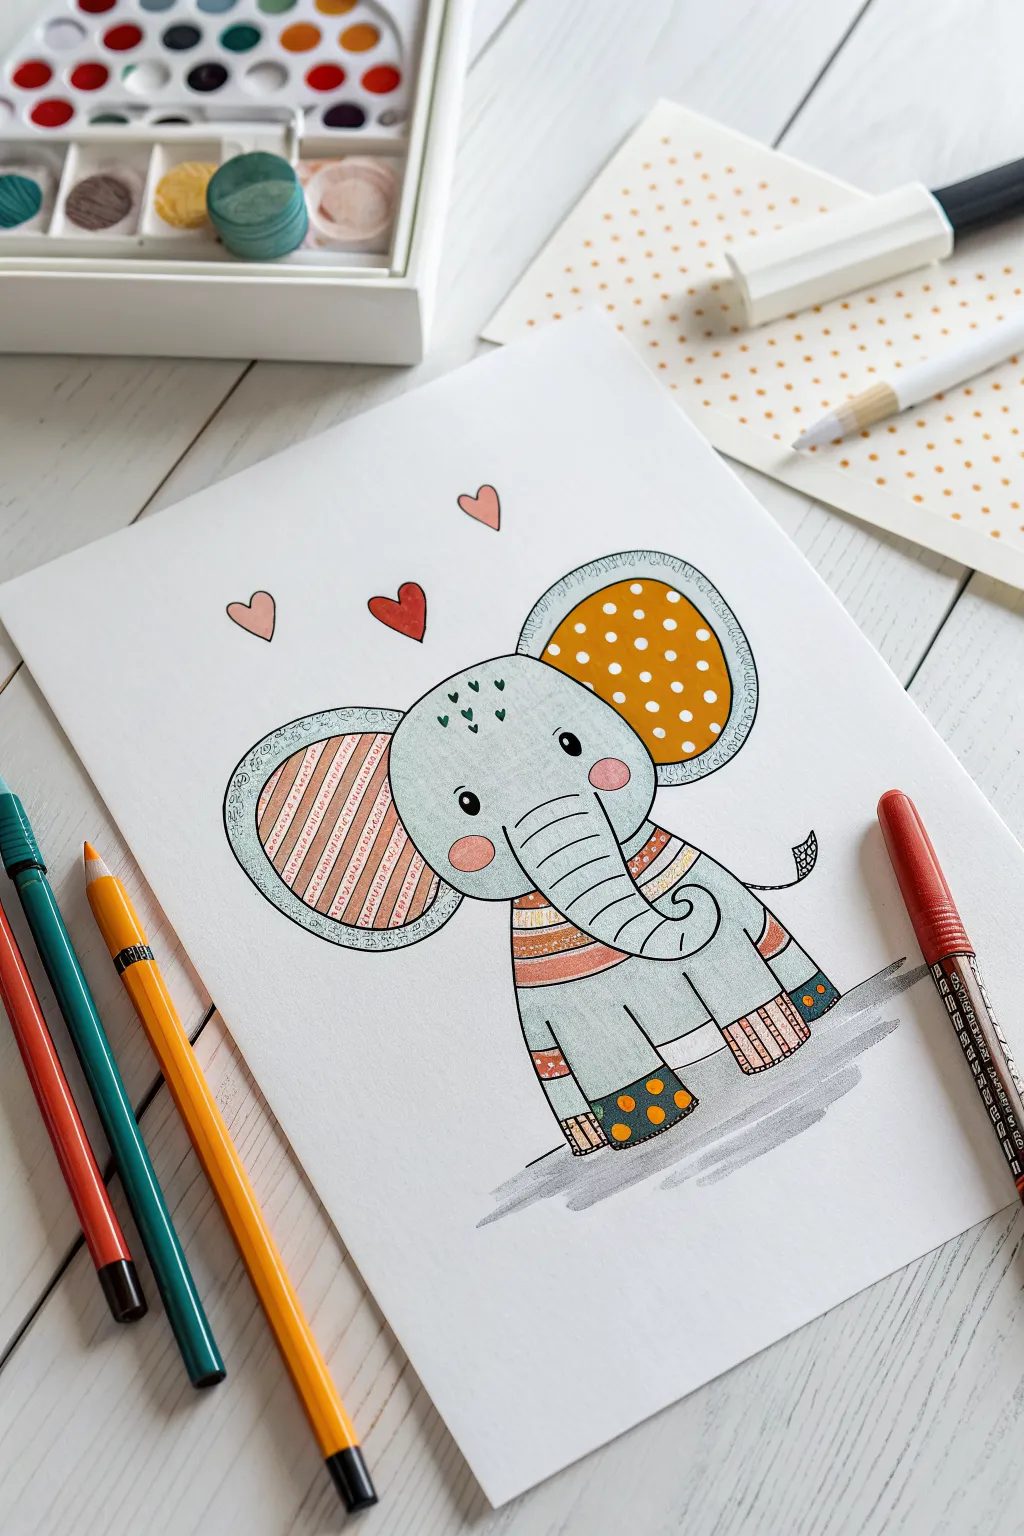
This charming project features a whimsical elephant drawn with a unique patchwork style, combining simple shapes with vibrant patterns. The soft watercolor-like shading contrasts beautifully with the crisp ink outlines and varied textures filling the ears and legs.
Detailed Instructions
Materials
- High-quality white drawing paper or mixed media paper
- Pencil and eraser
- Fine-liner black ink pens (0.3mm and 0.5mm)
- Colored pencils, markers, or watercolor paints (light blue, orange, yellow, red)
- White gel pen (optional for highlights)
Step 1: Sketching the Outline
-
Head start:
Begin by lightly sketching a large, rounded oval shape for the elephant’s head near the center of your page. -
Adding the ears:
On either side of the head, draw two large, kidney-bean shaped ears. Make the left ear slightly rounder and the right ear taller to give the character some personality. -
The trunk:
Extend a curved trunk downwards from the center of the face, curling it slightly upward at the tip. Add horizontal lines specifically on the trunk segment to create the ribbed texture. -
Body and legs:
Draw a rounded body below the head. Sketch two sturdy front legs and hind legs. For this patchwork style, segment the legs with horizontal lines where different patterns will go later. -
Facial features:
Place two small oval eyes wide apart on the face. Add rosy cheek circles below the eyes and a few small heart shapes floating above the head.
Bleeding Ink?
If your black ink smudges when coloring, switch to waterproof archival ink pens or let your outline dry for at least 30 minutes before adding any wet media.
Step 2: Defining Lines and Patterns
-
Inking the main outline:
Using a 0.5mm black fine-liner, carefully trace over your main pencil lines. Use a steady hand to create a smooth, continuous flow for the outer edges. -
Patterning the left ear:
Divide the inner part of the left ear into vertical stripes. Fill alternating stripes with small repeating geometric shapes or scribbles to mimic fabric texture. -
Polka dot right ear:
Draw a large inner shape inside the right ear, leaving a border. You will eventually color this solid but leave circular spots uncolored (or use white later). -
Patchwork legs:
Ink the horizontal dividers on the legs. Fill the bottom section of one leg with polka dots and another section with vertical stripes to match the ears. -
Finishing touches:
Add small details like the tuft of hair on the tail and the tiny stitch marks along the borders of the ears to emphasize the ‘sewn’ look. -
Clean up:
Wait for the ink to dry completely, then gently erase all remaining pencil marks to leave a clean black-and-white base.
Step 3: Adding Color
-
Base skin tone:
Color the elephant’s head, body, and trunk with a very light, soft blue. I like to keep the pressure light here to maintain a pastel look. -
Coloring the left ear:
Use warm orange and reddish-brown tones to color the patterned stripes in the left ear, alternating the intensity to create depth. -
Bold right ear:
Fill the right ear’s inner shape with a bright golden-yellow or orange marker, being careful to color around the white polka dots. -
Leg details:
Apply the same orange, red, and yellow palette to the patterned sections on the legs and the collar area, ensuring the colors are balanced across the drawing. -
Cheeks and hearts:
Color the circular cheeks and the floating hearts with a soft red or pink shade. -
Shadows:
Using a grey marker or pencil, add a simple cast shadow on the ground beneath the elephant’s feet to ground the figure. -
Final highlights:
If you have a white gel pen, add tiny highlights to the eyes and over the patterned areas to make them pop.
Pattern Harmony
To keep the drawing cohesive, reuse the same 3-4 distinct patterns (like dots, stripes, and cross-hatching) throughout different parts of the elephant rather than inventing new ones.
Step back and admire your adorable patterned elephant, perfectly ready to brighten up a sketchbook page or greeting card


Have a question or want to share your own experience? I'd love to hear from you in the comments below!