
When I’m painting something cute for my boyfriend, I always start with one goal: make it feel like *us*, not just a random pretty picture. These ideas are all about sentimental, personalized artwork that turns your favorite memories, inside jokes, and little love rituals into paint.
Sunset Couple Silhouette for Your Boyfriend
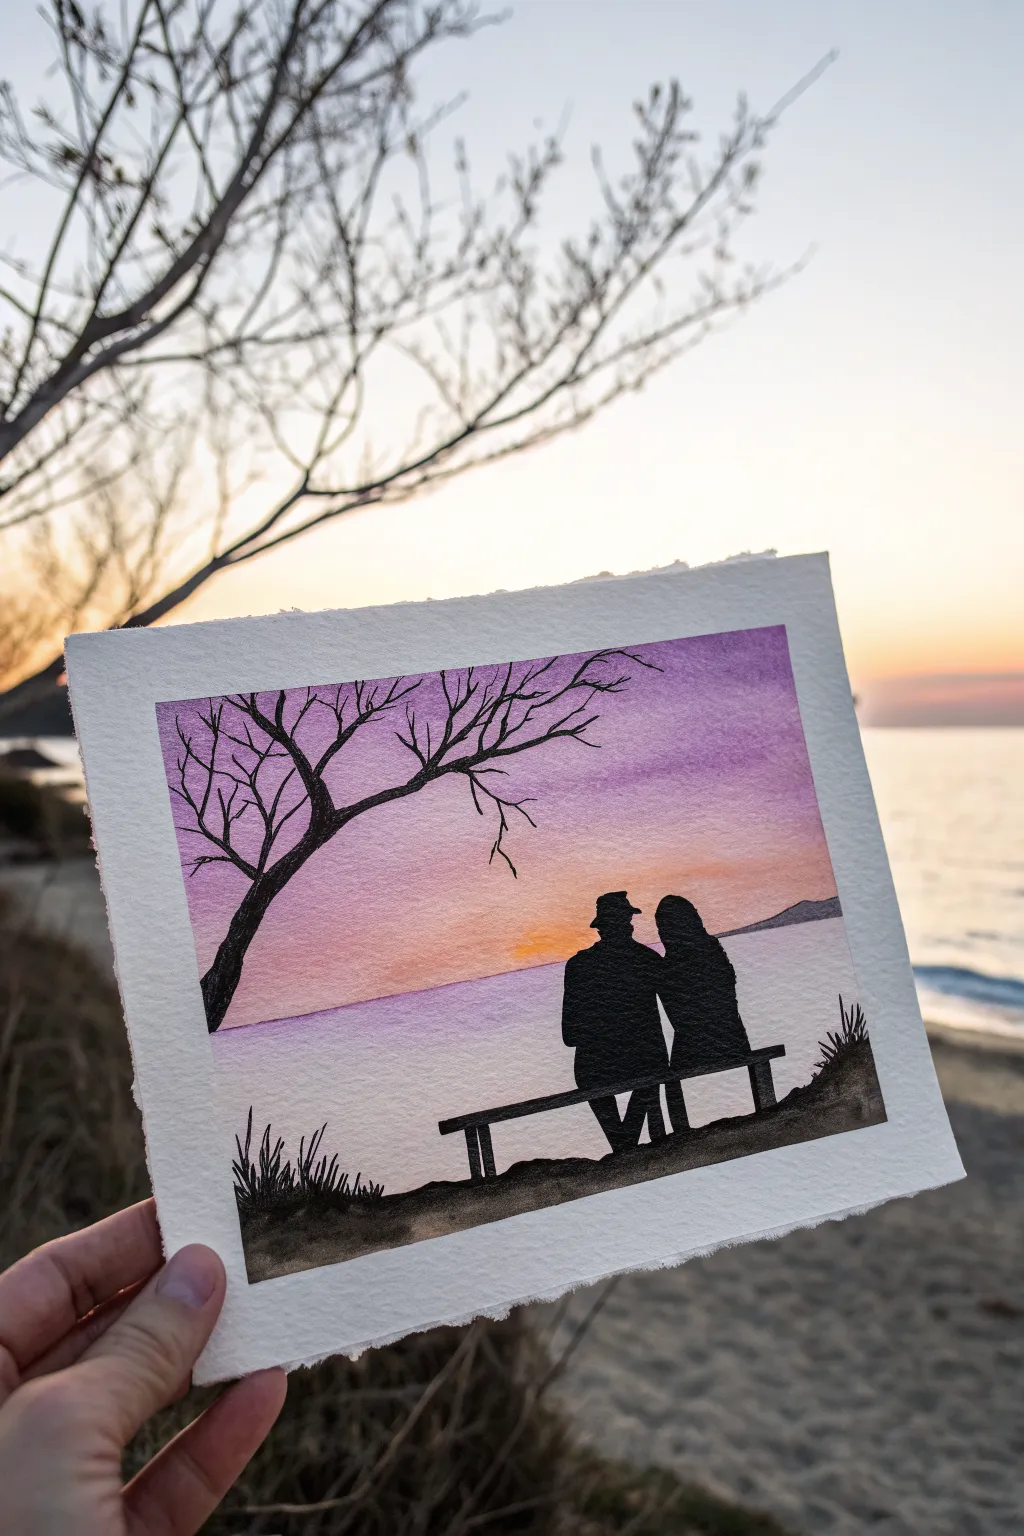
Capture a romantic moment in time with this beautiful watercolor silhouette painting. Using a stunning gradient of purple to orange, you’ll create a glowing sunset backdrop that perfectly frames a couple enjoying the view.
Detailed Instructions
Materials
- Cold press watercolor paper (approx. 5×7 inches)
- Masking tape or painter’s tape
- Watercolor paints (Purple/Violet, Alizarin Crimson, Orange, Yellow, Indigo/Black)
- Flat wash brush (3/4 inch)
- Round detail brushes (size 2 and 0)
- Pencil and eraser
- Jar of clean water
- Paper towels
- Board or clipboard to tape paper down
Step 1: Preparing the Sky
-
Secure the paper:
Tape your watercolor paper down onto a board on all four sides. This creates that crisp white border seen in the photo and prevents the paper from buckling when wet. -
Sketch the horizon:
Lightly draw a horizontal line about one-third of the way up from the bottom of the paper to separate the sky from the water. Keep this pencil line very faint. -
Wet the sky area:
Using your flat brush and clean water, apply a thin, even coat of water to the entire sky area above the horizon line. The paper should glisten but not have puddles. -
Apply the purple:
Load your brush with a rich purple or violet mix. Start at the very top of the paper and paint horizontal strokes, letting the color fade slightly as you move downward. -
Blend in the warmth:
Rinse your brush and pick up a vibrant orange. While the purple is still damp, paint below it, allowing the colors to maintain a soft transition without turning muddy. -
Create the sun glow:
Right above the horizon line in the center, drop in a small amount of yellow mixed with a touch of orange to represent the setting sun’s glow.
Clean Lines Secret
To get the sharpest silhouettes, use black gouache or india ink instead of watercolor for the final layer. It’s more opaque and won’t streak.
Step 2: Painting the Water
-
Establish the water base:
Once the sky allows for working below it without bleeding (or leave a tiny gap), paint the water area with a very diluted wash of the purple used in the sky. -
Reflect the sunset:
Add a few horizontal streaks of diluted orange into the wet purple wash near the horizon line to reflect the colors of the sky. -
Dry completely:
I prefer to let this stage dry completely before moving on to any silhouettes. The paper must be bone dry to keep the black paint crisp.
Make It Personal
Customize the silhouette to match your relationship! Add a pet sitting next to the bench, or change the hairstyles to match you and your boyfriend.
Step 3: Adding the Silhouettes
-
Draft the foreground:
Using a pencil, lightly sketch the outline of the tree on the left, the bench, and the couple. Don’t worry about details; just get the shapes right. -
Paint the tree trunk:
Switch to your size 2 round brush and black watercolor (or a thick mix of indigo and sepia). Paint the main trunk of the tree on the left, making it thicker at the base. -
Add the branches:
Switch to your smallest brush (size 0) for the fine branches. Use shaky, quick strokes to make them look organic, reaching out over the sky. -
Paint the bench:
Carefully paint the horizontal slats of the bench. Ensure the lines are straight and solid black. -
Fill the couple silhouette:
Paint the figures sitting on the bench. Focus on their posture—perhaps leaning slightly toward each other—and the outline of their heads/hats. -
Add the ground:
Paint the uneven ground beneath the bench and tree. Use rough, textured strokes to simulate dirt or sand. -
Detail the grass:
With the tip of your smallest brush, flick quick upward strokes from the ground area to create tufts of grass on the bottom left and right. -
Add distant land:
Paint a faint, low silhouette of a distant mountain or landmass on the far right horizon line using a watery grey-black mix. -
Reveal the border:
Once the black paint is 100% dry, carefully peel away the masking tape at a 45-degree angle to reveal the clean edges.
This serene landscape is ready to be framed or turned into a heartfelt card for your special someone


Your First Date Spot Mini Landscape for Your Boyfriend
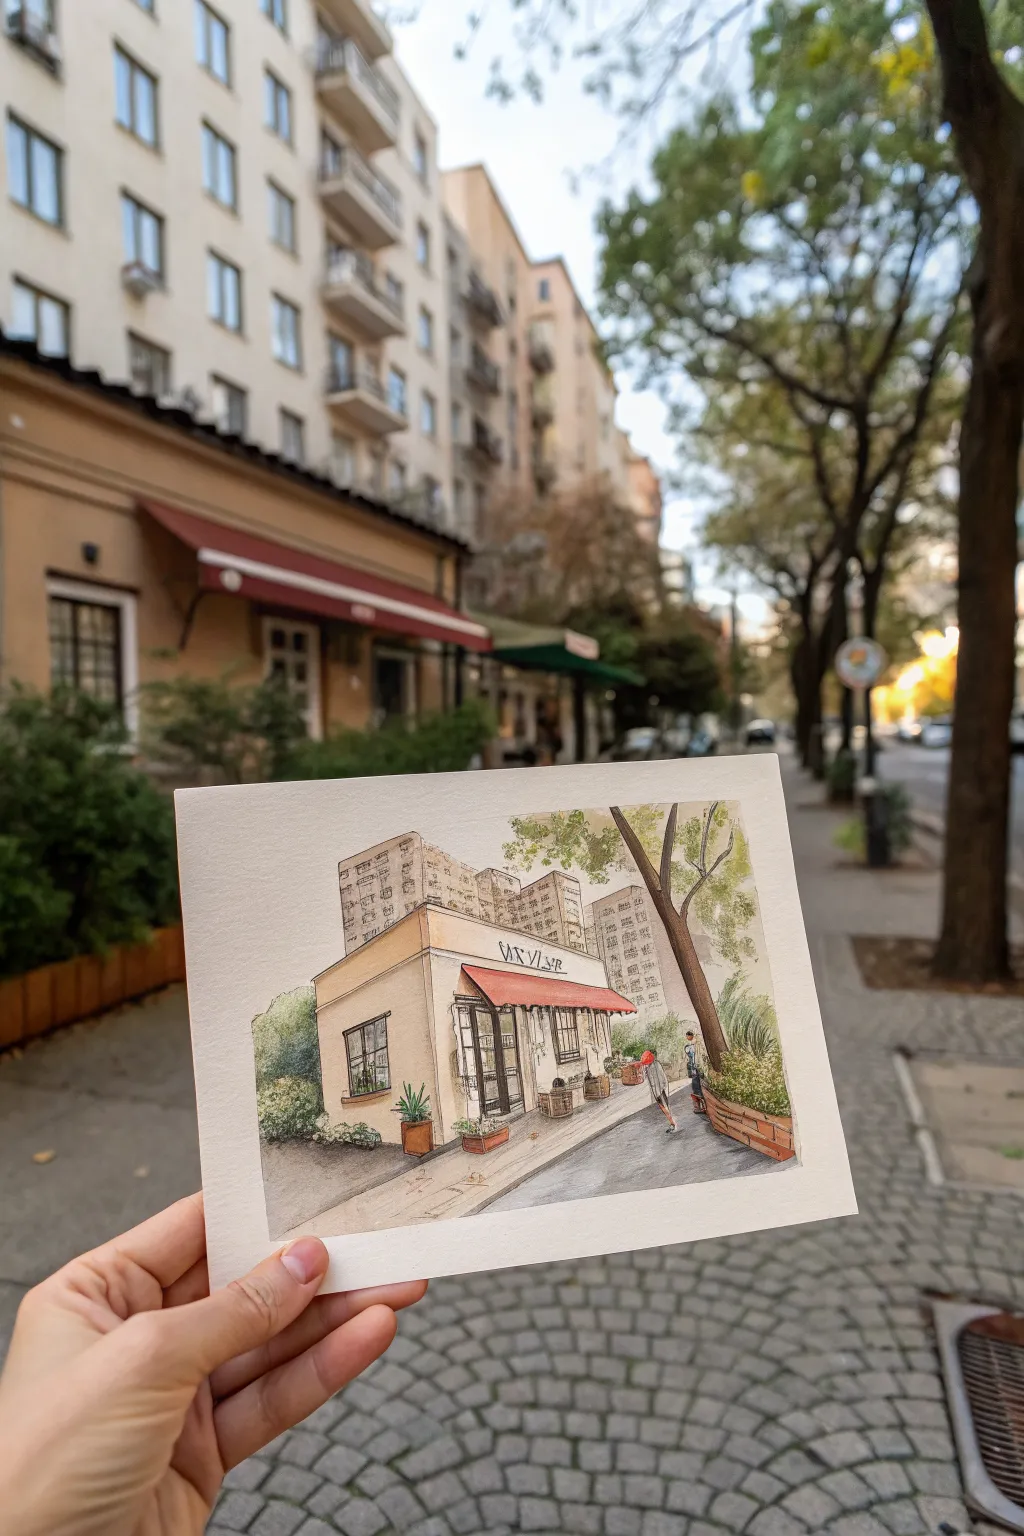
Capture the magic of where your story began with this charming mixed-media urban sketch. Using fine ink lines and soft watercolor washes, you’ll create a sentimental keepsake that perfectly frames a special memory.
Step-by-Step Tutorial
Materials
- Heavyweight watercolor paper (300gsm cold press recommended)
- Waterproof fineliner pens (sizes 0.1, 0.3, and 0.5)
- Watercolor paint set
- Round watercolor brushes (size 4 and 8)
- HB pencil and eraser
- Reference photo of your location
- Painter’s tape or masking tape
- jar of water and paper towels
Step 1: Drafting the Scene
-
Establish perspective lines:
Begin with a very light pencil sketch on your watercolor paper. Identify the horizon line and vanishing points of the building to get the 3D structure correct. Don’t worry about details yet; focus on the big geometric shapes. -
Block in major elements:
Sketch the main body of the building as a cube-like structure. Add the rough shapes of the awning, window placements, and the sidewalk line. Keep these lines faint so they can be easily erased later. -
Add environmental context:
Lightly draw the background elements like distant buildings, trees, and the lamppost or tree trunk in the foreground. This frames your main subject and adds depth to the scene.
Loose Lines
Don’t connect every single line perfectly. Leaving small gaps where lines meet (like corners of windows) keeps the sketch feeling lively and spontaneous rather than stiff.
Step 2: Inking the Details
-
Outline the main structure:
Switch to your 0.5 waterproof fineliner. Go over the main structural lines of the building. Use a confident, slightly loose hand—wobbly lines add character to urban sketching. -
Detail the architectural features:
Use a 0.3 pen for the windows, door frames, and the awning stripes. Add the shop name or signage above the door using careful lettering. -
Texture the surroundings:
With the finest 0.1 pen, add textures like bricks on the pavement, leaves on the bushes, and vertical lines for the background buildings. hatching techniques work well here to suggest shadows. -
Erase pencil guides:
Wait until the ink is completely dry to avoid smudging. Gently erase all your initial pencil marks to leave a clean, crisp line drawing.
Personalize It
Add the date of your first visit hidden in the graffiti, on a license plate, or on the shop sign to make it a secret code between the two of you.
Step 3: Adding Watercolor Washes
-
Wash the building walls:
Mix a very dilute wash of yellow ochre or cream. With a size 8 brush, paint the exterior walls of the shop, letting the color fade out loosely at the edges for an artistic vignette look. -
Paint the awning:
Use a vibrant red (or the actual color of the location) for the awning. Apply the paint slightly thicker here to make it pop against the pale walls. -
Add greenery:
Mix sap green with a touch of burnt sienna for a natural foliage color. Dab this onto the tree and bushes using the tip of your brush to mimic leaf textures. -
Tint the windows:
Use a very watery mix of Payne’s gray or light blue for the glass. Leave tiny patches of white paper unpainted to represent reflections on the windows. -
Shadows and pavement:
Mix a cool gray. Apply broad strokes for the sidewalk and cast shadows under the awning and planters to ground the building.
Step 4: Final Touches
-
Background wash:
Paint the background buildings with a pale, neutral beige or gray. Keep this wash very light so the main building remains the focal point. -
Depict tiny details:
If you included the tiny figure walking or planters, paint them now with small touches of color. I prefer using a size 4 brush for these delicate spots. -
Reinforce shadows:
Once the first layers are dry, go back with a slightly darker gray mix to deepen the darkest shadows, particularly under the eaves and around the door. -
Add white highlights:
If you lost any highlights, use a white gel pen to add sparkles to the windows or separate elements that blended together too much.
Frame this mini landscape in a deep wood frame to turn a shared memory into a permanent piece of art


Cute Love Quote Lettering for Your Boyfriend

This project proves that sometimes the simplest gestures speak the loudest, featuring clean, hand-lettered text and adorable celestial doodles. The monochrome design on crisp white cardstock creates a modern and heartfelt keepsake that feels intimate and personal.
Detailed Instructions
Materials
- Heavyweight white cardstock (A4 or letter size)
- Black brush pen or pigment liner (0.5mm tip)
- Black fine-point marker (0.1mm or 0.3mm tip)
- Pencil (HB or 2B)
- Soft eraser
- Ruler
- Bone folder (optional)
Step 1: Preparing the canvas
-
Cut the paper:
Start by selecting a high-quality, heavyweight cardstock. Cut it to your desired size; for a standard greeting card feel, an 8.5×11 inch sheet cut in half works perfectly. -
Score the center:
Find the exact center of your cut paper. Using a ruler and a bone folder (or the back of a dull butter knife), gently score a line across the middle to ensure a clean, crisp fold. -
Create the fold:
Fold the card along the scored line. Press down firmly along the crease to flatten it completely, ensuring the card stands up nicely on its own.
Ink Bleeding Info
If ink feathers on the paper, your cardstock is too absorbent. Switch to ‘Bristol’ paper or hot-press watercolor paper for sharper lines.
Step 2: Drafting the lettering
-
Mark layout guides:
Lightly sketch a few horizontal guidelines with your pencil and ruler to keep your text straight. You want the text block to sit slightly above the visual center of the card face. -
Sketch the letters:
Using your pencil, draft the words ‘I LOVE YOU’ in a playful, uppercase sans-serif style. Keep the letters loose and slightly imperfect for a hand-drawn charm. -
Stack the text:
Arrange the text on two lines: ‘I LOVE’ on the top line and ‘YOU’ centered directly beneath it. Leave a comfortable amount of white space around the edges. -
Add the central heart:
Sketch a simple, open heart shape centered below the word ‘YOU’. It should be roughly the same height as the letters to maintain visual balance. -
Place the stars:
Lightly mark the positions for four small five-pointed stars surrounding the heart—two on each side. -
Add floating dots:
Dot a few tiny circles or specks randomly around the heart and stars to create a magical, confetti-like effect.
Step 3: Inking the design
-
Trace the main text:
Take your 0.5mm pigment liner or brush pen. Carefully trace over your penciled letters. Press firmly to get a solid, bold black line. -
Adjust line weight:
If you want a bolder look, go over the downstrokes of each letter a second time to thicken them slightly, mimicking a subtle calligraphy style. -
Ink the heart:
Draw the heart outline with the same pen used for the text. Try to do this in two smooth strokes that meet at the bottom point. -
Draw the stars:
Switch to your finer 0.1mm or 0.3mm marker for the decorative elements. Outline the small stars carefully. You can color them in solid black or leave them as outlines. -
Fill the stars (optional):
For this specific look, fill the stars in solid black so they pop against the white paper like the text does. -
Add the stardust:
Using the fine-point marker, ink the small floating dots. Keep these very small—just a touch of the pen to the paper is enough. -
Let the ink set:
Allow the ink to dry completely. I usually wait at least 5 to 10 minutes to prevent any tragic smudging during the final step. -
Erase guidelines:
Gently run your soft eraser over the entire design to remove the pencil guidelines. Hold the paper taut with one hand so it doesn’t crinkle while you erase. -
Final inspection:
Brush away the eraser dust and check for any spots that need a tiny touch-up of ink to ensure every black line is crisp and solid.
Pro Tip: Steady Hand
Exhale slowly while drawing the long curves of the ‘O’ and the heart. This stabilizes your hand and prevents shaky lines.
Now you have a charming, handmade expression of love ready to be written in and gifted


Moon and Back Galaxy Painting for Him
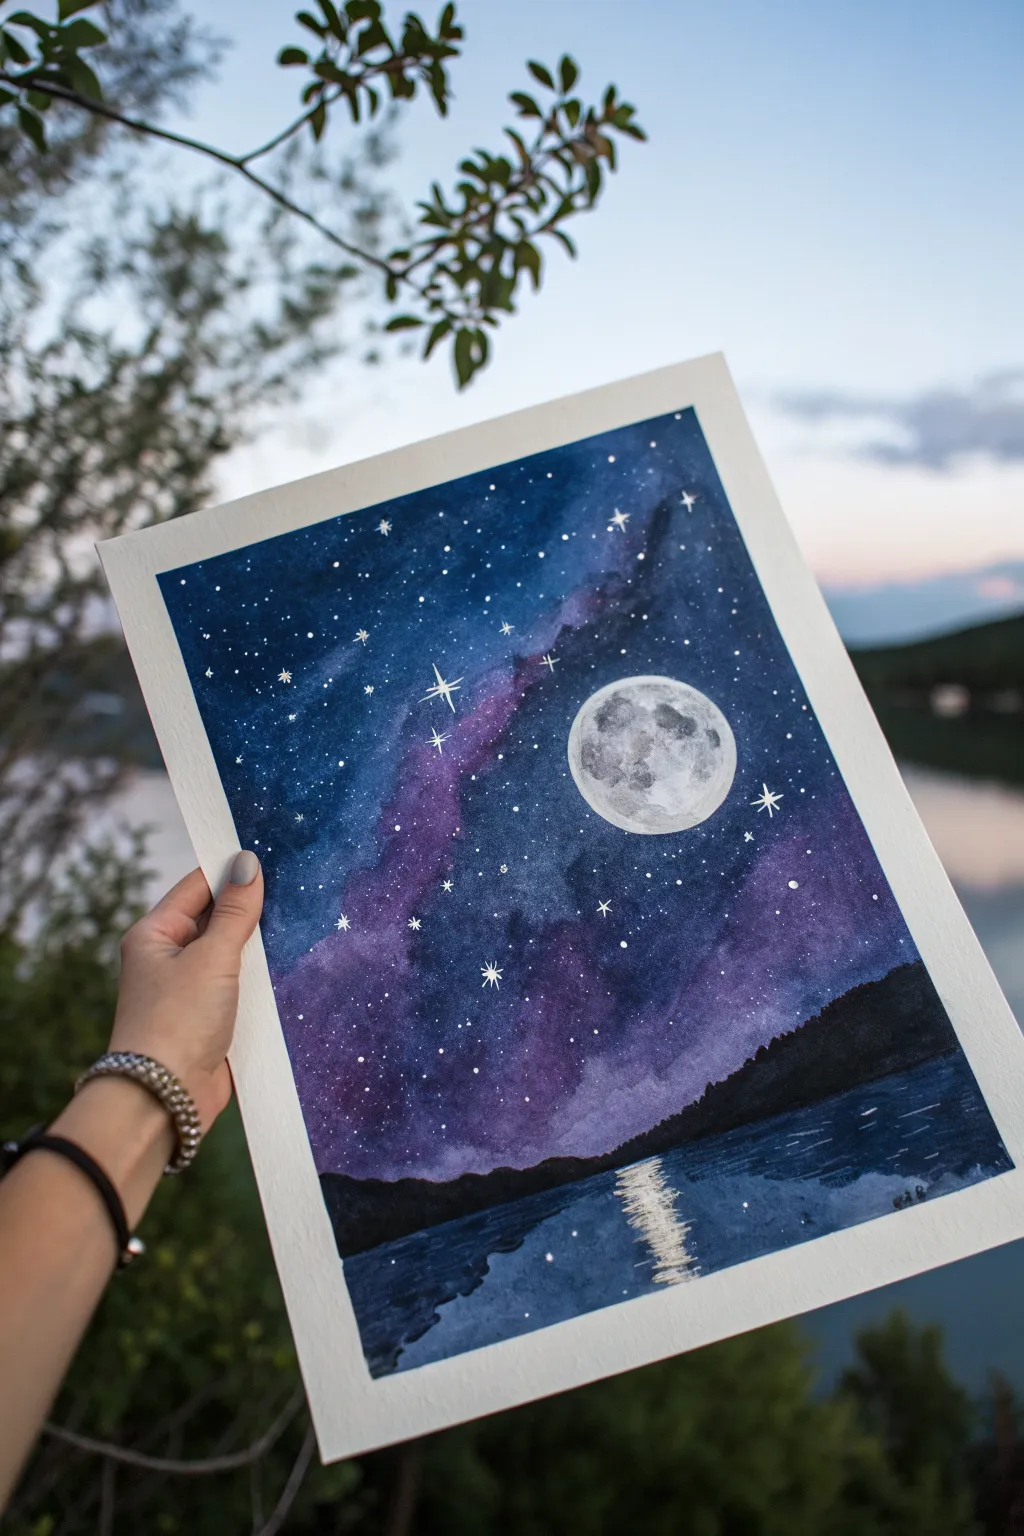
Capture the romance of a quiet night sky with this stunning watercolor galaxy piece. Featuring a luminous full moon, a sweeping purple nebula, and gentle reflections on calm water, this painting makes a heartfelt gift that says ‘I love you to the moon and back.’
Step-by-Step
Materials
- Cold press watercolor paper (300gsm/140lb)
- Painter’s tape or masking tape
- Watercolors: Indigo (or Paynes Grey), Ultramarine Blue, Prussian Blue, Turquoise, Violet/Purple, Black
- White gouache or white gel pen
- Large round brush (size 10 or 12)
- Medium round brush (size 6 or 8)
- Small liner or detail brush (size 0 or 1)
- Two jars of water
- Paper towels
- Circular object (like a masking tape roll) or compass
- Pencil
Step 1: Preparation and Sketching
-
Secure the edges:
Tape down all four edges of your watercolor paper to a board or table to create a clean white border and prevent warping when the paper gets wet. -
Outline the moon:
Using a roll of tape or a compass, lightly trace a perfect circle in the upper right quadrant of the paper for the moon. -
Mark the horizon:
Lightly sketch a horizontal line near the bottom third of the paper to separate the sky from the water, allowing for slightly uneven terrain on the sides.
Pro Tip: Masking Fluid
For a perfect moon edge, apply liquid masking fluid over the circle before painting the sky. Rub it off only after the background is totally dry.
Step 2: Painting the Galaxy Sky
-
Wet-on-wet base:
Brush clean water over the entire sky area, carefully painting around the moon so the circle stays dry and white. -
Lay the nebula color:
While the paper is still shiny and wet, drop vibrant Violet or Purple paint diagonally across the sky from bottom-left toward the top-right. -
Deepen the blue:
Fill in the rest of the sky with Ultramarine and Prussian Blue, letting it bleed naturally into the edges of the purple streak. -
Darken the corners:
Add Indigo or a touch of Black to the very top corners and edges to create depth, making the central galaxy look brighter by comparison. -
Add texture:
While damp, dab a clean, slightly thirsty brush into the purple areas to lift a tiny bit of pigment, creating soft, cloud-like textures. -
Dry completely:
Let this layer dry completely before moving on. The paper should be flat and room temperature to the touch.
Step 3: The Luminous Moon
-
First moon layer:
Paint the moon circle with a very watery, pale grey wash, leaving some small spots purely white for highlights. -
Add craters:
While the grey is damp, drop in slightly darker grey blotches to mimic lunar craters and maria.
Troubleshooting: Cauliflowers
If weird textures/blooms appear in the sky, you likely added water to a semi-dry area. Wait for it to dry, then glaze over with a thin wash to smooth it out.
Step 4: Landscape and Water
-
Paint the water base:
Wet the water area below the horizon line. Apply horizontal strokes of Prussian Blue and Indigo, leaving a vertical gap of white paper directly beneath the moon for the reflection. -
Define the water reflection:
With a damp brush, gently soften the edges of the blue paint nearest the reflection gap so it fades into the white rather than having a hard line. -
Create the silhouette hills:
Once the sky is dry, mix a thick, dark black-blue color. Paint the rolling hills along the horizon line, making the right side slope down toward the water.
Step 5: Sparkle and Details
-
Splatter stars:
Cover the landscape area with a paper scrap. Load a brush with white gouache and tap it against another brush handle to spray fine mist stars over the dark sky. -
Paint larger stars:
Use a white gel pen or a fine detail brush with gouache to add specific bright stars. Draw small crosses or four-pointed shapes for a twinkling effect. -
Add the shimmer:
Using the white gouache or gel pen, draw horizontal zig-zag lines across the white reflection gap in the water to create shimmering moonlight ripples. -
Final touches:
Add a few tiny white dots or sparkles into the dark water area to mirror the stars above. -
Reveal the border:
Wait until the painting is bone dry, then slowly peel away the masking tape at a 45-degree angle to reveal the crisp white edge.
Now frame this celestial scene and gift it to remind him that he is your whole universe
BRUSH GUIDE
The Right Brush for Every Stroke
From clean lines to bold texture — master brush choice, stroke control, and essential techniques.
Explore the Full Guide
Lovebirds on a Wire Painting for Your Boyfriend
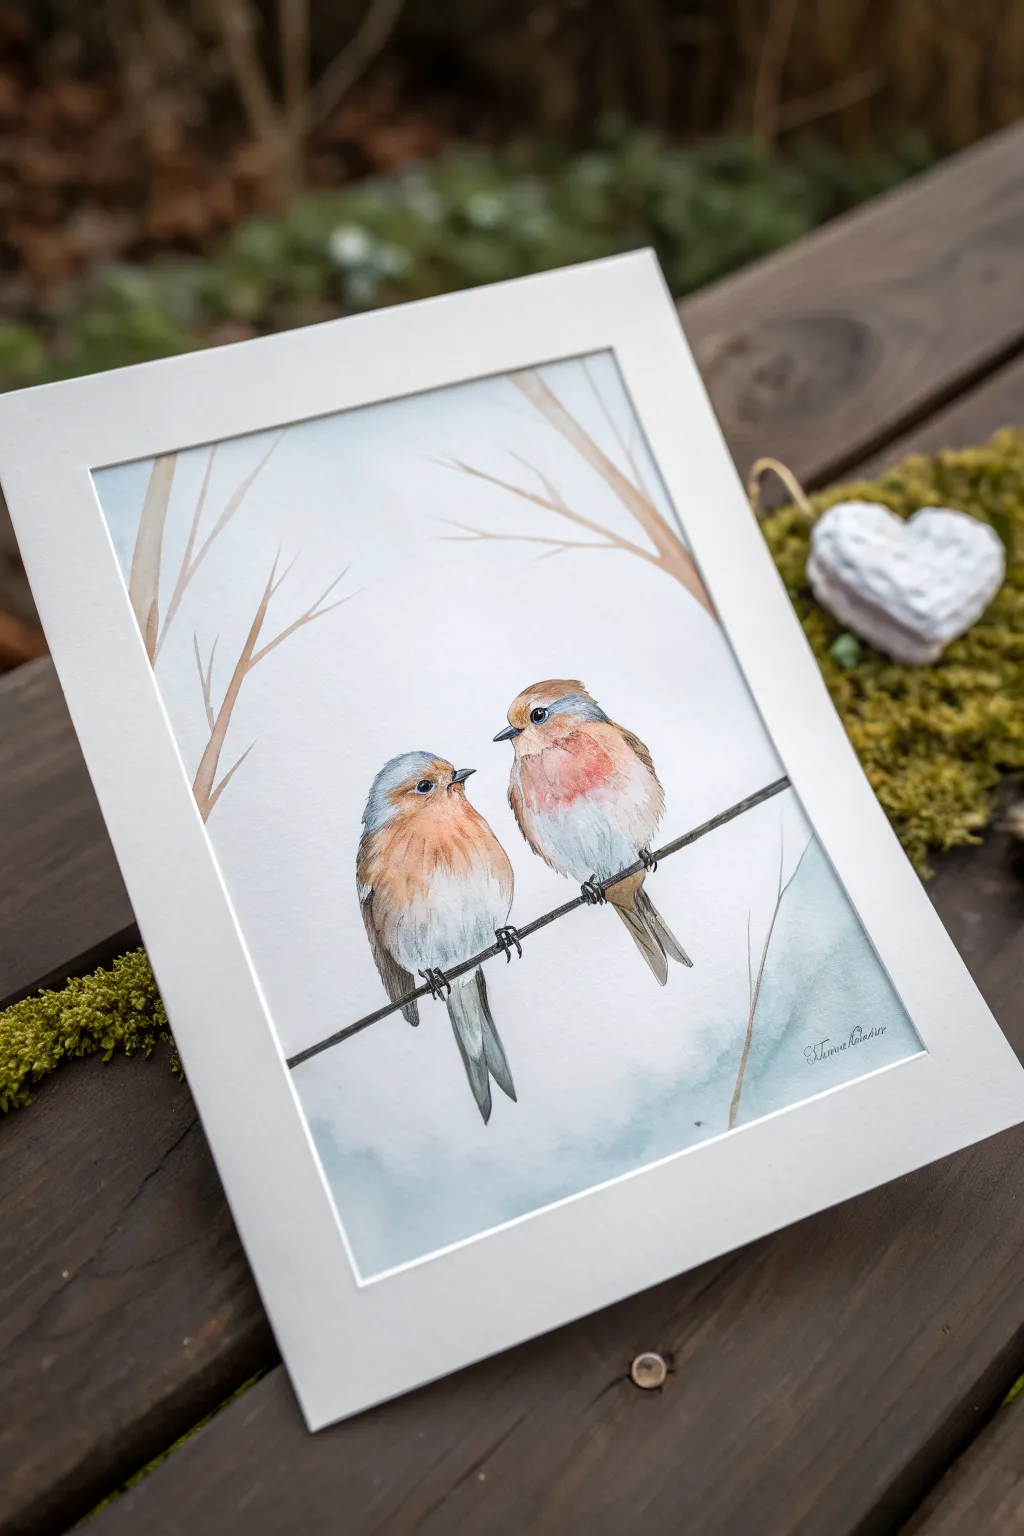
Capture the sweetness of affection with this gentle watercolor painting of two robins perching side-by-side. The soft washes and delicate branches create a serene atmosphere perfect for a romantic gift.
Detailed Instructions
Materials
- Cold-pressed watercolor paper (300 gsm)
- Watercolor paints (Payne’s Grey, Burnt Sienna, Yellow Ochre, Ultramarine Blue, Alizarin Crimson)
- Round brushes (sizes 2, 4, and 0 for details)
- HB pencil and kneadable eraser
- Masking tape
- White or light gray photo mount/mat
- Mixing palette
- Two jars of water
Step 1: Sketching and Preparation
-
Paper Setup:
Begin by taping your watercolor paper to a board on all four sides. This prevents the paper from buckling when wet and creates a clean, professional border once removed. -
Outline the Birds:
Using your HB pencil, lightly sketch two oval shapes for the bodies of the birds, positioning them slightly off-center. Add smaller circles for their heads, making sure they are angled slightly towards each other as if interacting. -
Details and Composition:
Refine the sketch by adding the beaks, eyes, and tail feathers. Then, draw a straight diagonal line for the wire they are perched on. Finally, sketch faint, branching lines in the background to suggest bare tree limbs, ensuring these are much lighter than the main subjects.
Fixing Hard Edges
If a shadow dries with a harsh line, wet a clean brush and gently scrub the edge to soften it. Dab with a tissue to lift excess pigment.
Step 2: Painting the Background
-
Wet-on-Wet Sky:
Prepare a very dilute mixture of Ultramarine Blue with a touch of Payne’s Grey. Wet the background area with clean water, avoiding the birds, and drop in this pale blue mix loosely along the bottom and sides to create a soft, wintry atmosphere. -
Ghostly Branches:
While the paper is still slightly damp but no longer shiny, mix a watery pale brown using Burnt Sienna and a lot of water. Paint the background branches with a size 4 brush. The damp paper will soften the edges, pushing these trees into the distance.
Step 3: Bringing the Birds to Life
-
Base Warmth:
Starting with the bird on the left, mix Yellow Ochre with a tiny bit of Alizarin Crimson for that signature robin breast. Apply this wet-on-dry to the chest area, keeping the wash light initially. -
Cooler Tones:
While the chest is drying, mix Payne’s Grey with a hint of Ultramarine Blue. Apply this cool grey to the head caps, wings, and tail feathers, leaving a small white gap around the eye for highlights. -
Color Bleeding:
Before the grey fully dries, touch the edge where the grey meets the orange chest with a clean, damp brush. This allows the colors to bleed slightly into one another, creating a soft, feathery transition rather than a hard line. -
Second Bird:
Repeat the previous three steps for the second bird on the right. Vary the color slightly—perhaps making the chest a bit pinker or the grey a bit darker—to give them individual character. -
Deepening Shadows:
Once the base layers are completely dry, mix a stronger concentration of Payne’s Grey and Burnt Sienna. Use a size 2 brush to deepen the shadows under the wings and along the tail feathers to add dimension.
Make it Personal
Add subtle initials carved into the background tree bark or hide a tiny heart shape in the negative space between the birds.
Step 4: Final Details
-
The Wire:
Using a size 2 brush and a dark mix of Payne’s Grey and Burnt Sienna (almost black), carefully paint the wire. Keep your hand steady but allow for slight unevenness to make it look realistic. Don’t simply draw a line through the birds; paint up to their feet and restart on the other side. -
Feet and Claws:
With your smallest brush (size 0), paint the tiny claws gripping the wire. Use the dark grey mix and ensure the claws wrap realistically around the line. -
Eye Sparkle:
Paint the eyes using concentrated black or dark grey, being extremely careful to leave a tiny speck of white unpainted for the catchlight. This single step is crucial for making the birds look alive. -
Beak Definition:
Fill in the beaks with a dark grey, keeping the top beak slightly darker than the bottom if possible to suggest volume. -
Mounting:
Allow the painting to dry completely—I usually wait at least an hour to be safe. Carefully peel off the masking tape at a 45-degree angle. Place your artwork behind the white bevel-cut mat to finish the professional look.
This charming duo will now serve as a lasting reminder of togetherness and affection
Cute Pet Portrait for Your Boyfriend’s Favorite Buddy
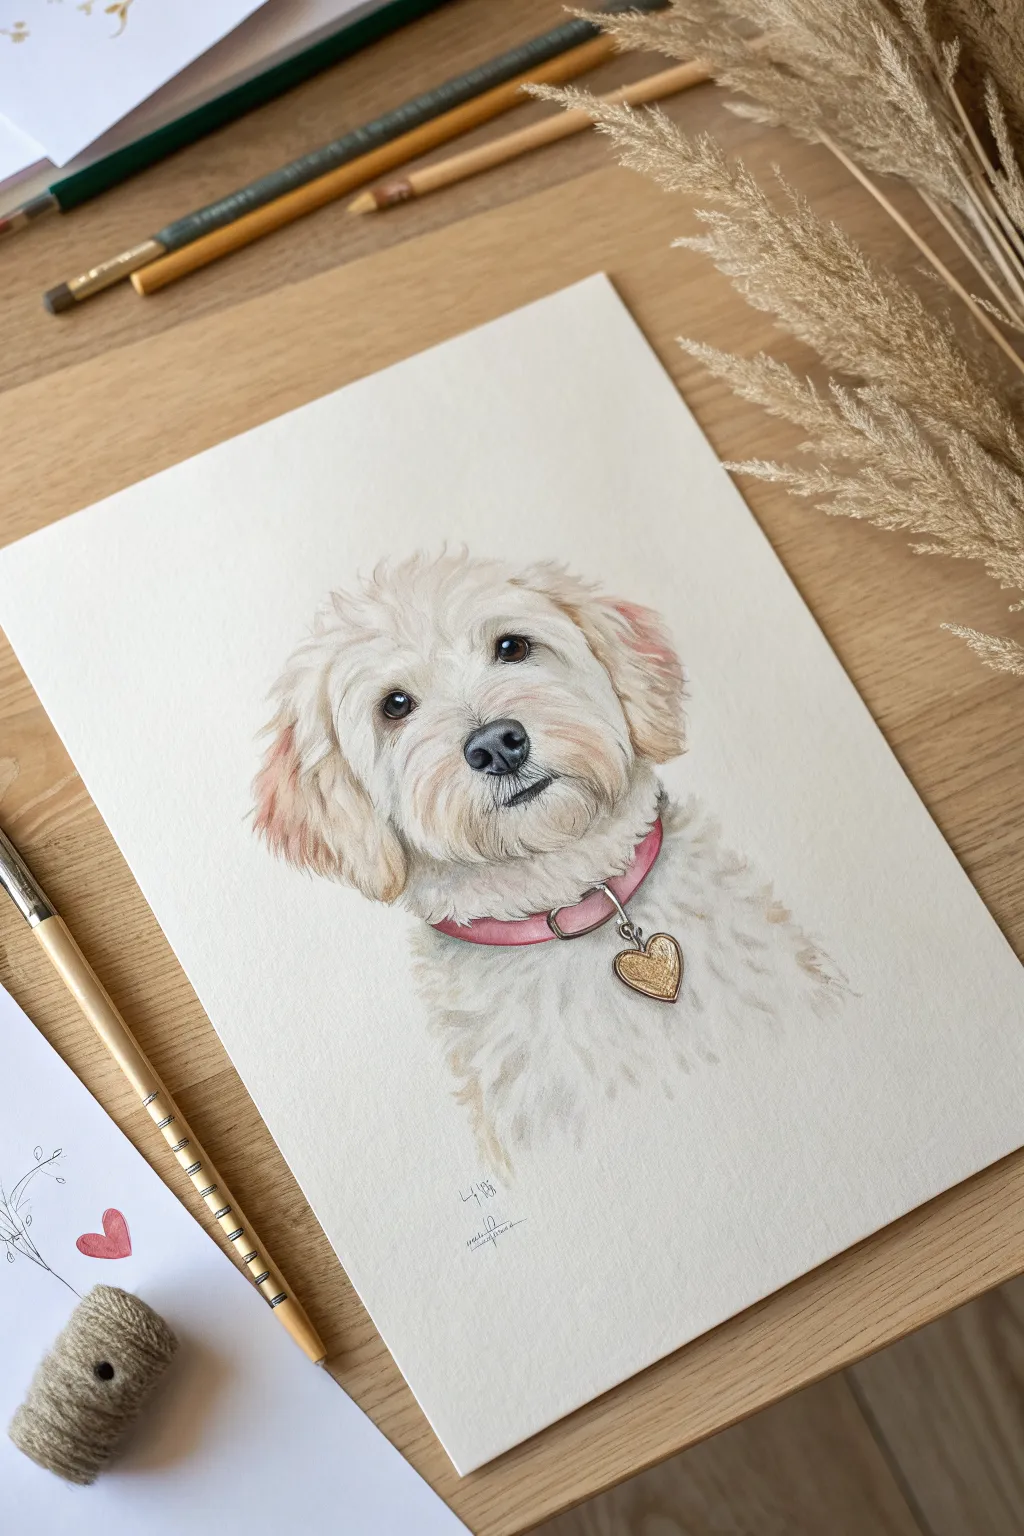
Capture the spirit of a beloved furry friend with this tender, mixed-media portrait that combines soft watercolor washes with precise pencil details. The result is a lifelike sketch that feels warm and personal, perfect for celebrating a boyfriend’s favorite buddy.
Step-by-Step
Materials
- Heavyweight watercolor paper (300gsm cold press recommended)
- HB graphite pencil for sketching
- Kneadable eraser
- Watercolor paints (Yellow Ochre, Burnt Sienna, Burnt Umber, Alizarin Crimson, Lamp Black)
- Small round watercolor brushes (sizes 2 and 4)
- Colored pencils (Cream, Warm Grey, Sepia, Pink, Gold/Metallic)
- White gel pen or gouache for highlights
- Pencil sharpener
- Reference photo of the dog
Step 1: Sketching the Foundation
-
Establish placement:
Begin by lightly marking the top, bottom, and center of the dog’s head on your paper to ensure the composition is centered. Keep these marks barely visible. -
Map the features:
Draw faint guidelines for the eyes, nose, and mouth. For a dog like this, the eyes are typically aligned halfway down the head shape, with the nose just below. Pay close attention to the distance between the eyes. -
Outline the fur:
Sketch the outer contour of the dog’s head using light, broken lines to simulate fluffiness rather than a hard, continuous line. Don’t forget to sketch the floppy ears and the general shape of the neck. -
Refine the expression:
Darken the pupils, nostrils, and the line of the mouth slightly. Add the collar shape around the neck, including the ring and heart-shaped tag. Use your kneadable eraser to lift any heavy graphite lines until they are just faint guides.
Stubborn Graphite?
If your pencil sketch lines are showing through the watercolor too clearly, gently roll a kneadable eraser over the drawing before painting to lift excess graphite without losing your guide.
Step 2: Layering Watercolor Washes
-
First wash: Base tone:
Mix a very watery wash of Yellow Ochre and a tiny touch of Burnt Umber. Apply this loosely over the darker areas of the fur—around the ears, under the chin, and near the eyes—leaving the lightest parts of the face the white of the paper. -
Defining shadows:
While the first layer is still slightly damp, drop in a slightly more concentrated mix of Burnt Umber and Warm Grey into the deeper shadows under the ears and beneath the mouth to create depth. -
Painting the eyes and nose:
Use a small size 2 brush and a mix of Burnt Umber and Lamp Black to paint the eyes and nose. Leave tiny white specks of paper for the catchlights in the eyes; these are crucial for life. -
Adding the collar:
Paint the collar with a soft Alizarin Crimson or pink tone. For the heart tag, use a metallic gold paint or a mix of Yellow Ochre and Burnt Sienna. Let the entire painting dry completely before moving to pencils.
Step 3: Detailing with Colored Pencils
-
Fur texture: Initial strokes:
Using a sharp Cream and Warm Grey colored pencil, start drawing individual hairs. Follow the direction of growth—outward from the nose, sweeping down the ears, and radiating around the eyes. -
Deepening contrast:
Switch to a Sepia or Dark Brown pencil. Add definition to the inner corners of the eyes, the nostrils, and the ‘smile’ line of the mouth. This brings the expression into focus. -
Softening the ears:
Layer strokes of Cream, Sepia, and a very light touch of Pink on the ears. The pink helps suggest skin showing through the fur, which is common in light-colored doodles. -
Collar hardware:
Outline the collar and the metal ring with a sharp dark grey pencil. Add shading to the heart tag to make it look three-dimensional, simulating a metallic sheen. -
Refining the muzzle:
Use a sharp Warm Grey to add tiny dots on the muzzle where whiskers would originate, and sketch a few fine whiskers extending outwards. -
Blending edges:
Soften the bottom edge of the neck fur. I like to let the pencil strokes fade out gradually into the white paper here, creating a vignette effect rather than a harsh cutoff.
Level Up: Texture
For extra realism on the gold tag, stipple (dot) the paint while wet to create a hammered metal texture, then glaze over with a metallic pen once dry.
Step 4: Final Highlights
-
Brightening the eyes:
If you lost the white sparkle in the eyes during painting, use a white gel pen or a dot of white gouache to re-establish the catchlights. This instantly wakes up the portrait. -
Highlighting the nose:
Add a subtle textured highlight to the top of the nose using the white pen or pencil to show wetness. -
Signing off:
Add your signature or the date neatly at the bottom near the faded neckline using a fine-point pen or sharp pencil.
Now you have a charming, soulful portrait ready to be framed and gifted to your favorite dog dad

PENCIL GUIDE
Understanding Pencil Grades from H to B
From first sketch to finished drawing — learn pencil grades, line control, and shading techniques.
Explore the Full Guide
Two-Canvas Diptych You Finish Together for Him
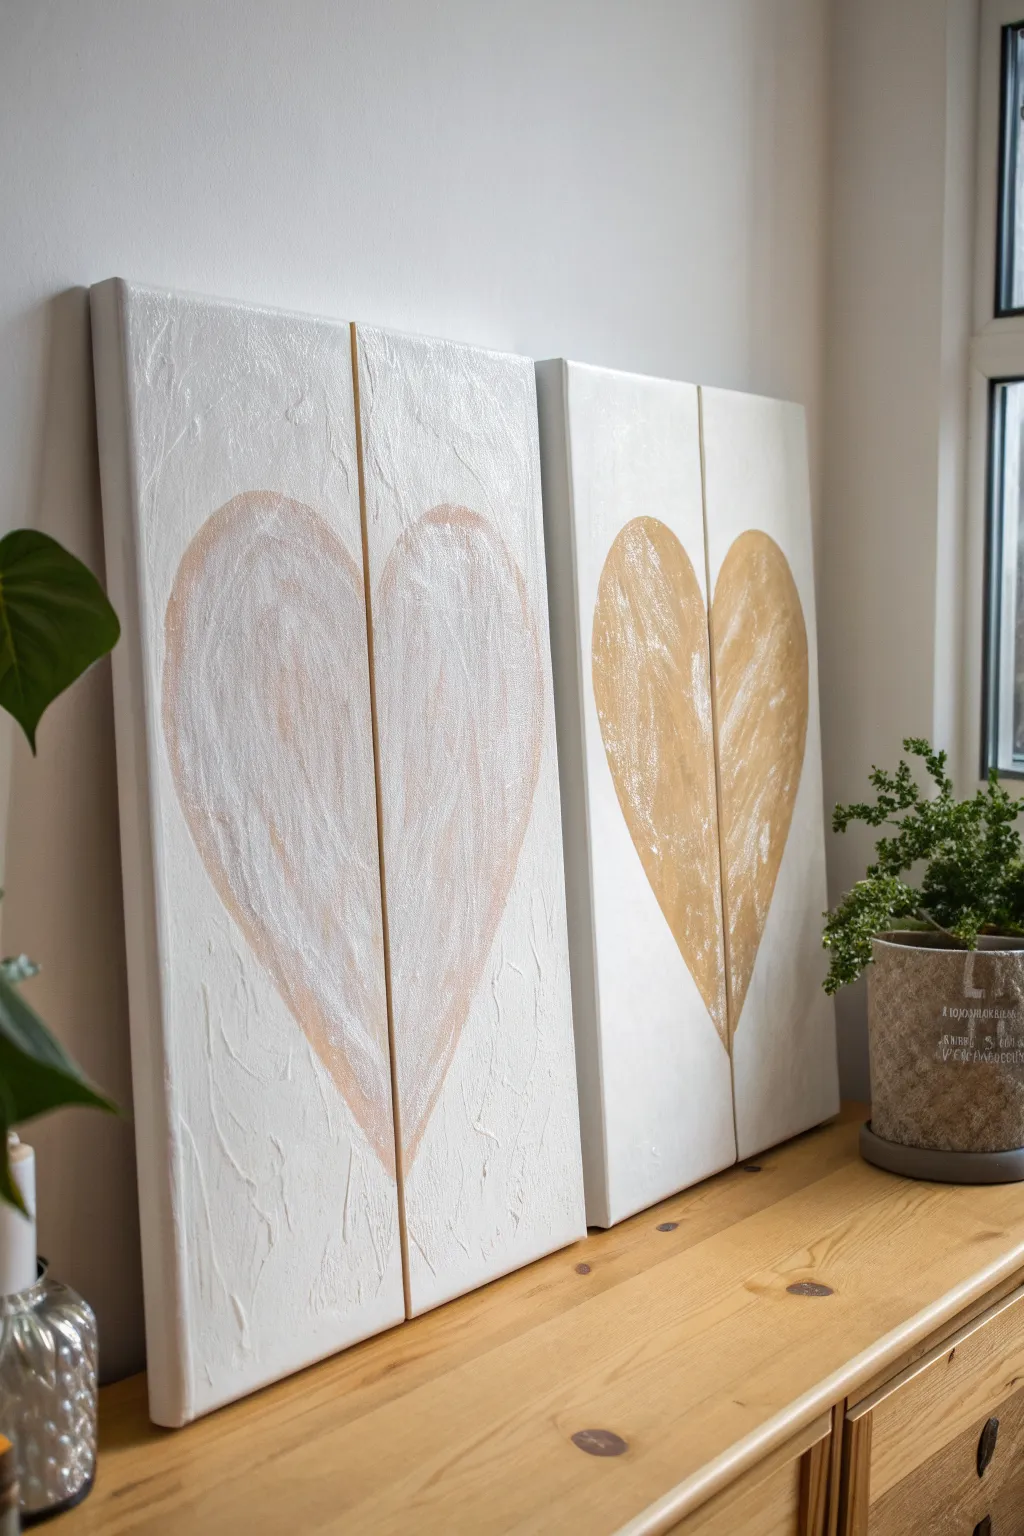
Create a meaningful and modern statement piece by splitting a single heart across two canvases, symbolizing how two halves make a whole. This project uses texture paste and metallic acrylics to create a tactile, raised finish that catches the light beautifully.
Step-by-Step Tutorial
Materials
- 4 Stretched canvases (size 12×24 inches or similar rectangular shape)
- White texture paste or modeling paste
- Palette knife (medium size, trowel shape)
- Wide flat paintbrush (2-3 inch)
- Acrylic paint: White, Metallic Gold, Pearlescent Pink/Rose Gold
- Pencil
- Large sheet of paper or cardstock (for template)
- Scissors
- Painter’s tape or masking tape
- Drop cloth or newspaper
Step 1: Preparation and Texture Base
-
Prepare the workspace:
Lay down your drop cloth to protect the surface. Set up your four canvases. You will be treating them as two separate pairs, so group two canvases together side-by-side for the first heart, and the other two for the second heart. -
Create the texture mix:
Scoop a generous amount of texture paste onto a palette or disposable plate. If you want the background to be pure white immediately, you can mix a little white acrylic paint into the paste, though most pastes dry white anyway. -
Apply base texture:
Using the palette knife, spread a layer of texture paste over the entire surface of all four canvases. Don’t try to make it smooth; use haphazard, multi-directional strokes to create peaks and ridges. -
Refine the background:
While the paste is wet, you can lightly drag a wide, dry brush over some areas to soften the peaks if they look too sharp. Aim for an organic, stucco-like finish. -
First drying phase:
Let this base layer dry completely. This is crucial—if the base is wet, the next steps will turn into a muddy mess. This usually takes 12-24 hours depending on the thickness.
Cracking Paste?
If your texture paste cracks while drying, it was likely applied too thick in one go. Fill cracks with a little extra paste mixed with white paint and let dry.
Step 2: Drafting the Design
-
Make the heart template:
Fold your large paper or cardstock in half. Draw half a heart shape along the fold and cut it out. Unfold it to reveal a perfectly symmetrical heart. Ensure it is large enough to span across two canvases with a nice margin on the sides. -
Align the canvases:
Push the first pair of canvases together so they are touching. Place your paper heart in the center, bridging the gap between the two. -
Trace the shape:
Lightly trace the outline of the heart onto the textured surface using a pencil. Since the surface is bumpy, the line will be rough, but that’s fine. Repeat this process for the second pair of canvases.
Pro Tip: Clean Lines
For a sharper heart outline, cut the heart shape out of masking tape sheets or contact paper and stick the ‘negative’ space stencil to the canvas before texturing.
Step 3: Painting the Hearts
-
Apply texture to the heart (optional):
For extra dimension, apply a second, thicker layer of texture paste *inside* the heart outlines only. Use the palette knife to create directional strokes that mimic the curve of the heart shape. -
Dry the heart texture:
If you added the second layer, allow this to dry completely before painting. -
Mix the colors:
Prepare your metallic gold paint for one set, and the pearlescent pink for the other. I like to mix a tiny bit of white into the metallic paints to make them slightly more opaque and creamy. -
Paint the gold heart:
Using a smaller brush or the edge of a clean palette knife, apply the gold paint inside the heart shape on the first pair. Use a ‘dry brush’ technique—wiping most paint off the brush—to drag color lightly over the raised texture, letting the white background show through in the valleys. -
Paint the pink heart:
Repeat the previous step with the pearlescent pink paint on the second pair of canvases. The goal is a distressed, vintage look, so don’t aim for solid, flat coverage. -
Refine the edges:
If your edges look too messy, you can use a small brush with white paint to touch up the background around the heart, sharpening the silhouette. -
Paint the inner edges:
Don’t forget the inner canvas edges where the two distinct pieces meet. Continue the heart color onto these side edges so the design looks continuous even if the canvases hang slightly apart. -
Final drying and sealing:
Allow the paint to cure for at least 24 hours. Because texture paste can be brittle, you may want to apply a spray varnish (matte or satin) to seal the surface and protect the metallic sheen.
Hang these canvases side-by-side to symbolize your connection and enjoy the beautifully tactile art you’ve created together
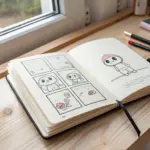
Inside Joke Mini Comic Painting for Your Boyfriend
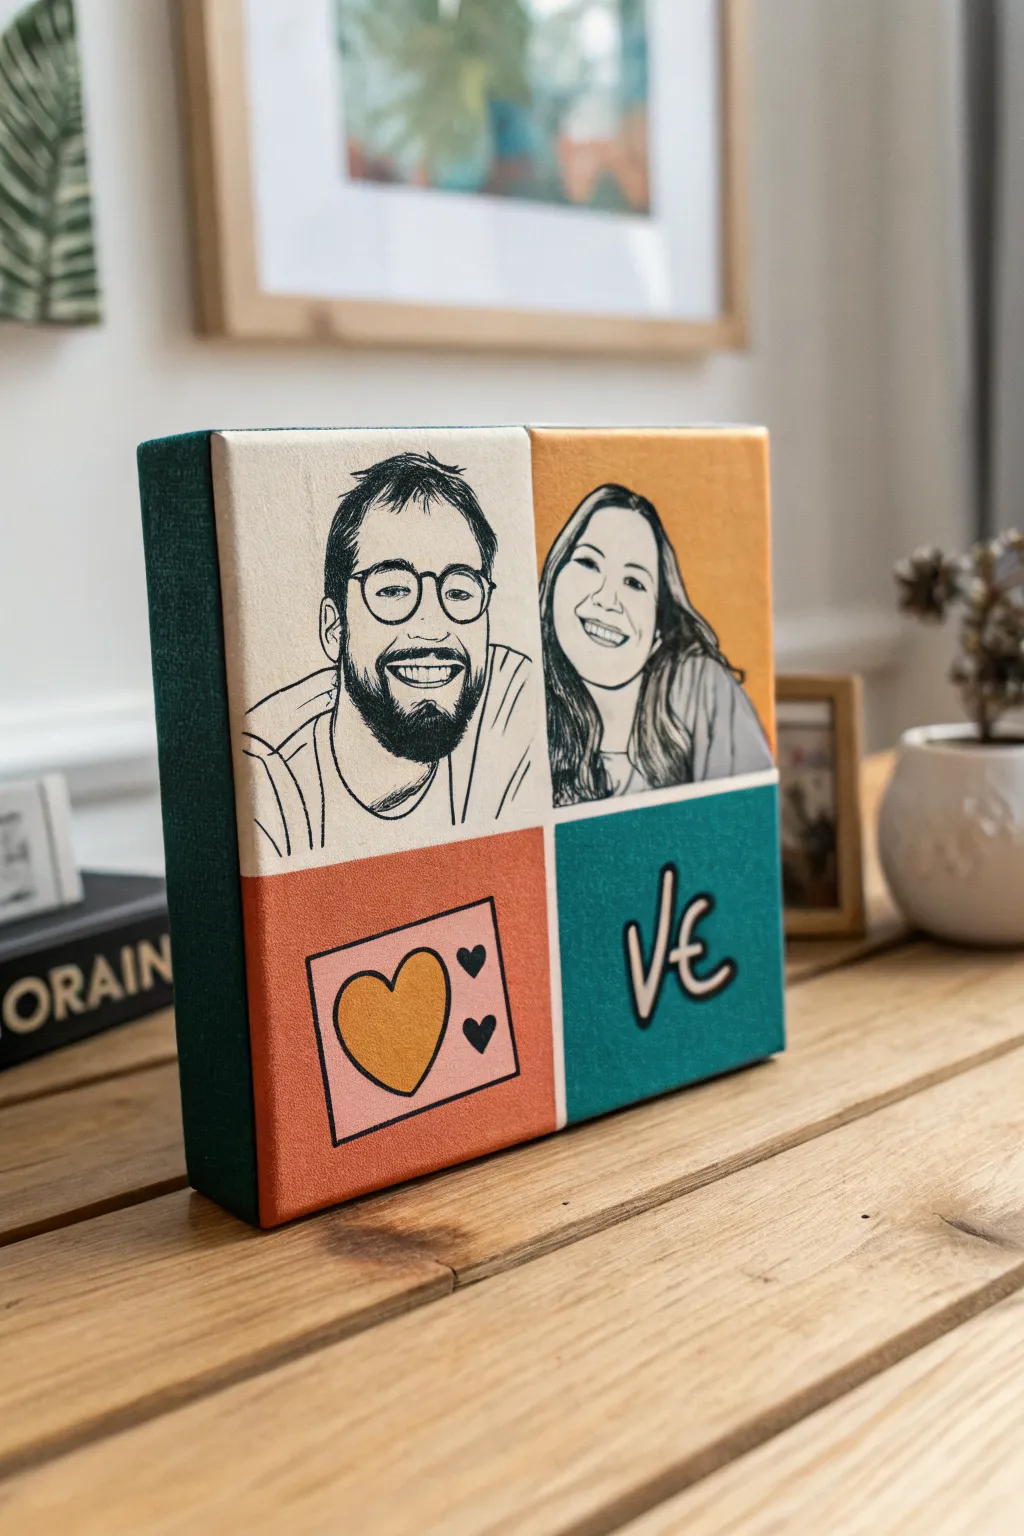
Celebrate your relationship with this vibrant, comic-style four-panel portrait that mimics the look of a printed canvas. This project combines bold line art with flat blocks of color to create a modern keepsake that feels personalised and professional.
Detailed Instructions
Materials
- Deep-edge square canvas (8×8 or 10×10 inches)
- Acrylic paints (Cream, Teal, Burnt Orange, Mustard Yellow, Black, Pink)
- Fine liner posca pens or permanent markers (Black, varying thicknesses)
- Pencil and eraser
- Ruler
- Carbon transfer paper
- Painter’s tape or masking tape
- Digital photo editing software or app (optional for tracing prep)
- Fine detail paintbrush
- Flat shader paintbrush
Step 1: Preparation and Base Colors
-
Divide the canvas:
Using your ruler and a light pencil touch, find the exact center of your square canvas. Draw a vertical line and a horizontal line to split the surface into four equal quadrants. -
Tape the edges:
To get crisp lines between the colored blocks, apply painter’s tape along the pencil lines. I usually tape off two diagonal quadrants first (e.g., top-left and bottom-right) to paint them without bleeding into the neighbors. -
Paint the cream quadrant:
Paint the top-left quadrant with a creamy off-white acrylic. Use a flat shader brush for smooth coverage. Apply two thin coats rather than one thick one to avoid brush strokes, letting the first coat dry completely. -
Paint the graphic quadrant:
Paint the bottom-right quadrant with a burnt orange. Ensure you paint all the way to the tape edge for a sharp finish later. -
Paint the remaining backgrounds:
Once the first two sections are bone dry, carefully remove the tape. Re-tape over the painted sections to protect them, then paint the top-right quadrant mustard yellow and the bottom-left teal. Let everything cure fully. -
Paint the sides:
Since this is a deep-edge canvas, paint the sides to match the adjacent front colors, wrapping the design around the corner, or choose a solid contrasting color like dark green or black for the edges to frame the piece.
Step 2: Drafting the Designs
-
Prepare your reference photos:
Choose a clear photo of you and your boyfriend. Crop them so just the heads and shoulders are visible. It helps to turn up the contrast digitally or use a ‘posterize’ filter to clearly see the main line details. -
Design the lower icons:
Sketch out simple symbols for the bottom quadrants on scrap paper first. For this project, you’ll need a cute ‘love letter’ icon for the orange square and stylized initials or a short word like ‘Us’ or ‘Ve’ (for Love) for the teal square. -
Transfer the portraits:
Place carbon paper over the top two painted quadrants. Tape your printed photo reference on top. Trace the main facial features—eyes, glasses, beard line, and hair shape—using a ballpoint pen. Don’t worry about shading; just get the outlines. -
Transfer the icons:
Repeat the transfer process for the bottom two quadrants, centering your heart letter and stylized text.
Tape Bleed Fix
If paint bled under your tape, don’t panic. Wait for it to dry completely, then use a small angled brush and your background color to carefully ‘cut in’ and cover the mistake.
Step 3: Inking and Details
-
Outline the portraits:
Using a medium-thickness black paint pen or permanent marker, carefully go over your transferred pencil lines giving the portraits a comic-book feel. -
Add line weight:
Thicken the outer contours of the hair and shoulders to make the figures pop. Leave the facial features like smile lines thinner. -
Fill the hair details:
For darker hair, don’t color it solid black. Instead, use quick, directional strokes to suggest hair texture while leaving some background color showing through for highlights. -
Paint the icon colors:
For the bottom-left ‘love letter’ quadrant, paint a pink rectangle and a yellow heart inside your traced lines. Let this dry before outlining. -
Outline the bottom graphics:
Once the icon paint is dry, use your thickest black marker to outline the postcard and the floating hearts. Do the same for the text on the teal background, giving it a bold, drop-shadow effect. -
Grid separation lines:
Using a ruling pen or a steady hand with a white paint pen, draw thin white lines directly over the seam where the four colors meet to mimic a photo strip or comic pane layout. -
Final clean up:
Erase any visible carbon or pencil marks gently. If your black lines look a bit faded in spots, go over them one last time for a deep, rich black finish.
Level Up: Texture
For a true pop-art feel, add Benday dots (comic book shading dots) to the background of one quadrant using the eraser end of a pencil dipped in a lighter shade of paint.
Hang this colorful story on your wall or gift it to see a genuine smile


Minimal Ghost Hug Painting for Him
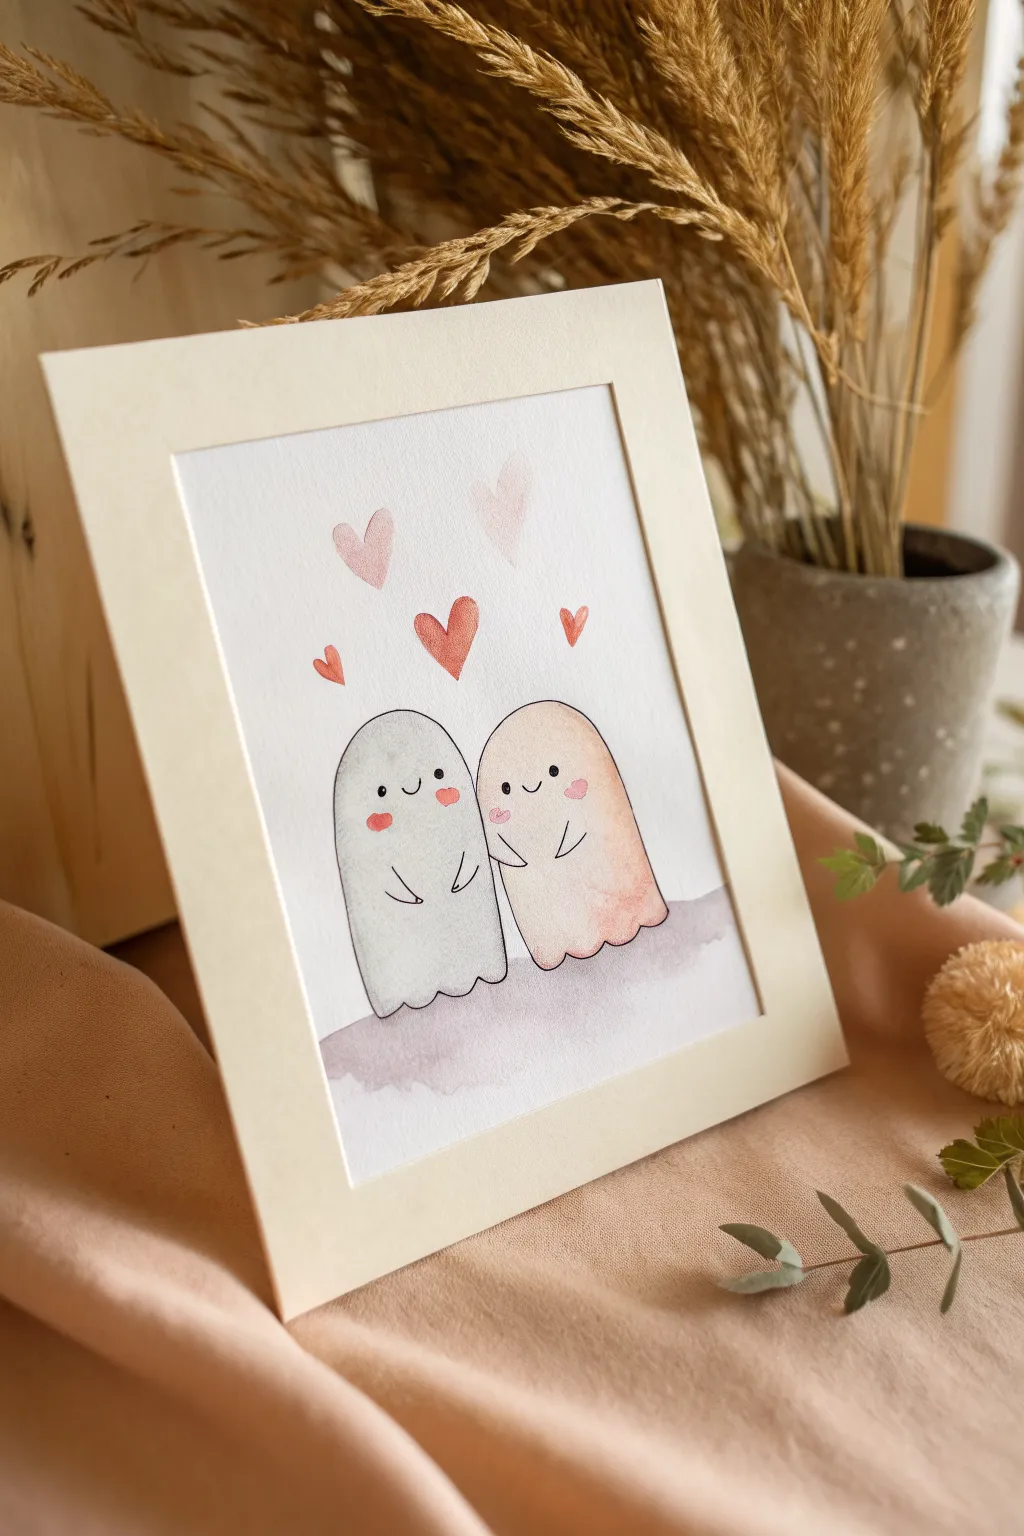
Capture a hauntingly sweet moment with this adorable watercolor painting of two ghosts sharing a cozy hug. The soft pastel tones and simple lines make it a perfect beginner-friendly project that feels both modern and sentimental.
Step-by-Step Guide
Materials
- Cold press watercolor paper (approx. 5×7 inches)
- Watercolor paints (Payne’s Gray, Light Oxide Red or Blush, Alizarin Crimson)
- Round watercolor brush (size 4 or 6)
- Fine liner pen (black, waterproof, size 03 or 05)
- Pencil (HB or H)
- Kneaded eraser
- Jar of clean water
- Paper towels
- Painter’s tape or masking tape
Step 1: Sketching the Outline
-
Prepare your paper:
Tape your watercolor paper down to a hard surface or board. This keeps the paper flat while you paint and creates a nice clean border if you decide to frame it later without a mat. -
Sketch the ghost shapes:
Using your pencil very lightly, draw two overlapping ‘U’ shapes. Imagine two large gumdrops sitting side-by-side. The left ghost should be slightly taller or positioned a bit higher, while the right ghost tilts slightly inward toward the left one. -
Add the bottom ruffles:
Connect the bottom points of your U-shapes with a wavy or scalloped line to create the classic ghost ‘sheet’ look. Keep the waves soft and organic rather than perfectly uniform. -
Draw the arms:
Sketch simple curved lines for arms. The left ghost’s right arm and the right ghost’s left arm should meet in the middle to suggest they are holding hands or hugging. -
Place the hearts:
Lightly sketch three to four hearts floating above their heads in varying sizes. Make the central heart the largest and most prominent.
Pro Tip: Wet-on-Wet
For a softer look, pre-wet the ghost shape with clean water before adding color. Touch the brush to the paper and watch the pigment bloom naturally.
Step 2: Painting the Base Layers
-
Mix the gray wash:
Dilute a tiny amount of Payne’s Gray with plenty of water. You want a very pale, transparent gray, not a dark stormy color. Test it on a scrap piece of paper first. -
Paint the left ghost:
Apply the pale gray wash to the left ghost. Start at the top and pull the color down. While the paint is still wet, you can drop a tiny bit more pigment near the bottom edge for a gentle gradient effect. -
Mix the peach wash:
Clean your brush thoroughly. Mix a watery wash of Light Oxide Red or a soft blush pink. It should be equally transparent as the gray. -
Paint the right ghost:
Fill in the right ghost shape with the peach wash. Be careful where the two ghosts touch; if the gray paint is still very wet, leave a hair-thin gap to prevent the colors from bleeding into each other. -
Add the ground shadow:
Mix a slightly darker, purplish-gray (you can mix your gray and pink together). Paint a loose, horizontal wash beneath the ghosts to ground them, letting it fade out irregularly at the edges. -
Let it dry completely:
Wait until the paper is bone dry. If the paper feels cool to the touch, it’s still damp. I like to let this dry briefly while I clean my water jar.
Step 3: Adding Details and Definition
-
Paint the floating hearts:
Using a slightly more saturated red or pink mix, carefully paint in the hearts floating above lightly sketched pencil lines. Vary the opacity slightly for visual interest. -
Add the cheeks:
Mix a rosy pink color. Paint two small oval blushes on the cheeks of each ghost. Keep these soft and watery so they look like a natural flush. -
Outline with ink:
Once you are 100% certain the paint is dry, take your waterproof fine liner pen. Trace the main outline of the ghosts. Keep your hand loose; a shaky line actually adds to the cute, hand-drawn charm. -
Draw the faces:
With the pen, draw two small, wide-set dots for eyes on each ghost. Add a tiny ‘u’ shape for a smile between the eyes. Position the faces slightly lower on the body for maximum cuteness. -
Define the arms:
Trace the arm lines carefully. Ensure the connection point between the two ghosts looks deliberate, emphasizing the hug. -
Erase pencil lines:
Gently rub your kneaded eraser over the entire drawing to pick up any visible graphite lines that weren’t covered by ink. -
Final touches:
If you want the hearts to have more definition, you can outline them partially or fully with the pen, or leave them soft and paint-only for contrast.
Troubleshooting: Bleeding
If the gray and pink ghosts bled into each other, don’t panic! Let it dry, then use the black ink outline to redefine the separation between them clearly.
Pop your finished masterpiece into a cream or white mat to really make those pastel colors sing.
Coordinates and Date Painting for Your Boyfriend
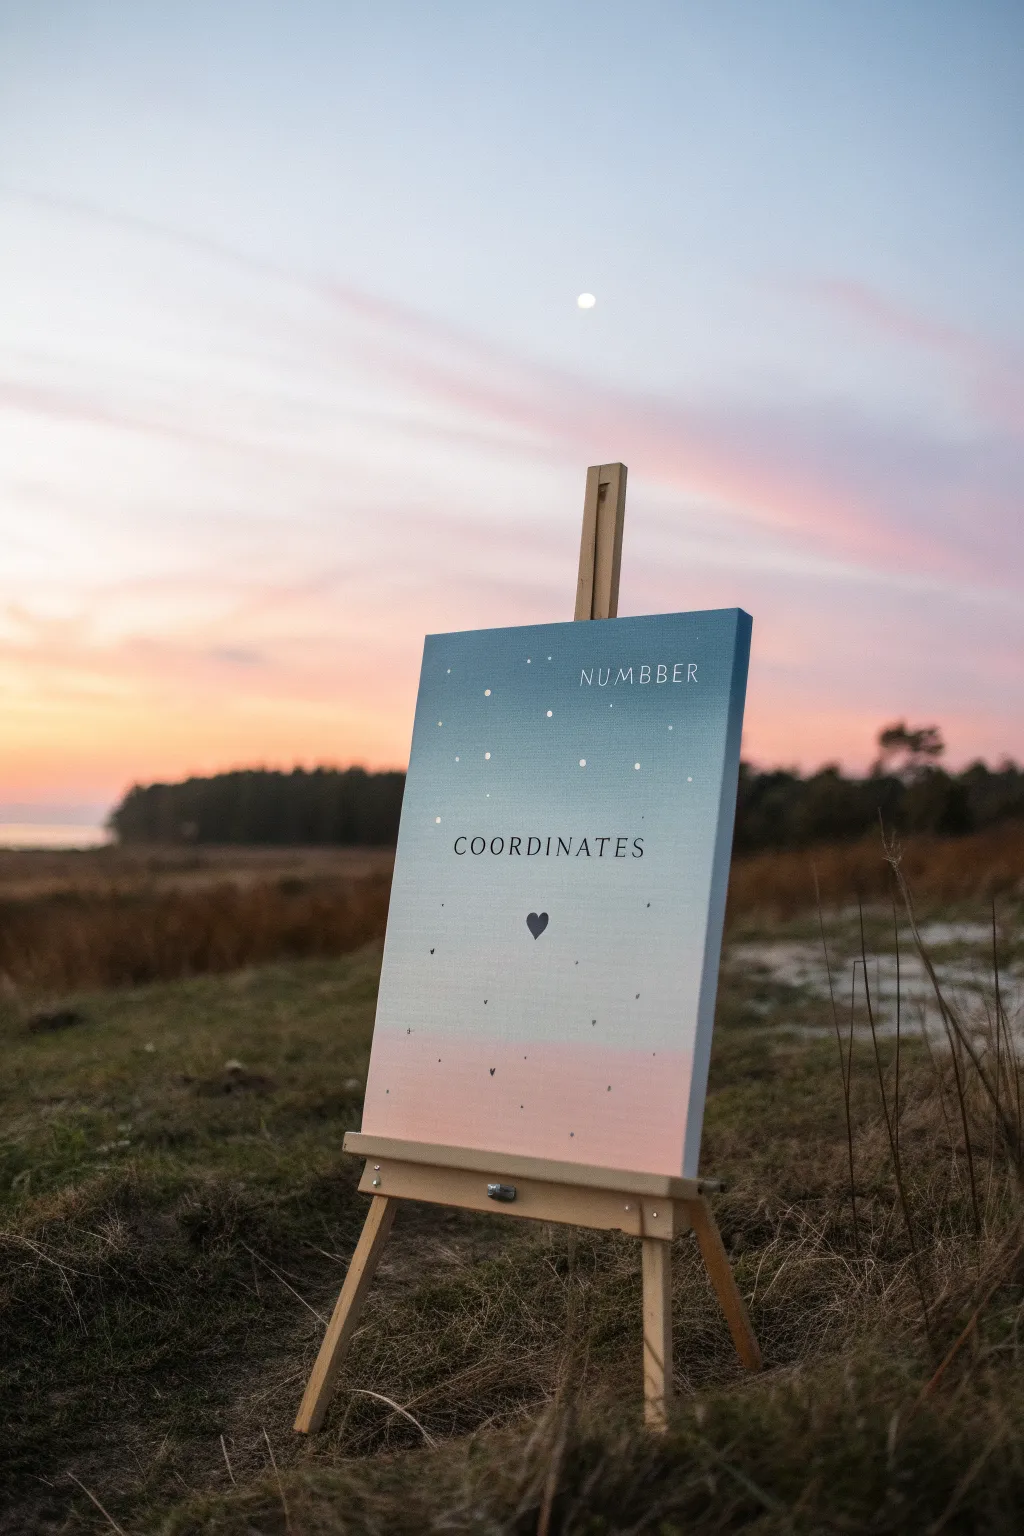
Capture the magic of a special location with this serene gradient canvas painting. Featuring a dreamy twilight sky that fades from deep blue to soft peach, this personalized piece highlights specific coordinates and a significant date or number, making it a heartfelt gift for your boyfriend.
How-To Guide
Materials
- Rectangular stretched canvas (16×20 or similar size)
- Acrylic paints: Navy blue, teal/cyan, white, peach/light pink
- Large flat paintbrush or sponge brush
- Medium flat paintbrush
- Small fine-point paintbrush
- Stencil letters (optional)
- Ruler
- Pencil
- Mixing palette
- Cup of water and paper towels
Step 1: Creating the Gradient Background
-
Prepare your palette:
Squeeze out generous amounts of navy blue, teal, white, and peach paint onto your palette. You’ll need enough to cover the entire canvas without stopping to mix more. -
Paint the bottom section:
Start at the very bottom of the canvas with your peach or light pink paint. Use the large flat brush to apply horizontal strokes, covering roughly the bottom quarter of the canvas. -
Apply the mid-tone:
Clean your brush, then pick up the white paint mixed with a tiny drop of teal to create a very pale blue. Paint the section immediately above the peach, blending the wet edges gently where they meet to create a soft transition. -
Add the upper sky:
Move up the canvas with pure teal or a medium blue tone. Paint horizontal strokes, again blending downwards into the pale blue section while the paint is still wet to avoid harsh lines. -
Deepen the zenith:
Finish the top quarter of the canvas with the navy blue paint. Blend this into the teal section below it. I find that using a slightly damp sponge brush here helps smooth out the final gradient seamlessly. -
Let it dry completely:
Allow the background to dry fully before moving on. This usually takes about 30-60 minutes depending on the thickness of your paint layers.
Smooth Blends
Work quickly when painting the background gradient. Acrylics dry fast, and wet-on-wet blending is the secret to that soft, dreamlike transition between colors.
Step 2: Adding the Night Sky Details
-
Create the stars:
Dip the handle end of a small paintbrush or a toothpick into white paint. Gently dot the upper blue sections of the canvas to create stars. Vary the pressure to make some stars slightly larger than others. -
Add tiny distant stars:
For a fuller starry effect, you can spatter tiny white specks. Load an old toothbrush with slightly watered-down white paint and flick the bristles with your thumb over the top half of the canvas. -
Paint the heart:
Identify the center point of your canvas. Using a small brush and navy or black paint, carefully paint a small, simple heart right in the middle where the sky transitions colors.
Golden Hour Glow
Mix a tiny bit of metallic gold paint into your stars or the bottom peach layer to make the painting shimmer beautifully when it catches the light.
Step 3: Lettering the Coordinates
-
Plan your text placement:
Decide on the layout for your text. Typically, a significant number or date goes at the top right, and the geographic coordinates go across the center above the heart. -
Mark guidelines:
Use a ruler and a pencil to very lightly mark straight horizontal lines where your text will sit. This ensures your lettering doesn’t slant. -
Sketch the letters:
Lightly sketch the word ‘COORDINATES’ (or actual numbers) and your top text (like ‘NUMBER’ or a date) with a pencil. Using stencils here can guarantee uniform sizing. -
Paint the text:
Using your finest detail brush and black or dark charcoal paint, carefully go over your pencil lines. Keep your hand steady and reload your brush often for crisp edges. -
Add floating hearts:
Using the very tip of your fine brush, add tiny, almost microscopic hearts floating upwards from the bottom pink section, mimicking dust motes or fireflies. -
Erase guidelines:
Once the black lettering paint is 100% dry (give it at least an hour), gently erase any visible pencil guidelines.
Hang this personalized celestial map in a shared space to always remember that specific place in time
Song Lyric Color Blocks for Your Boyfriend
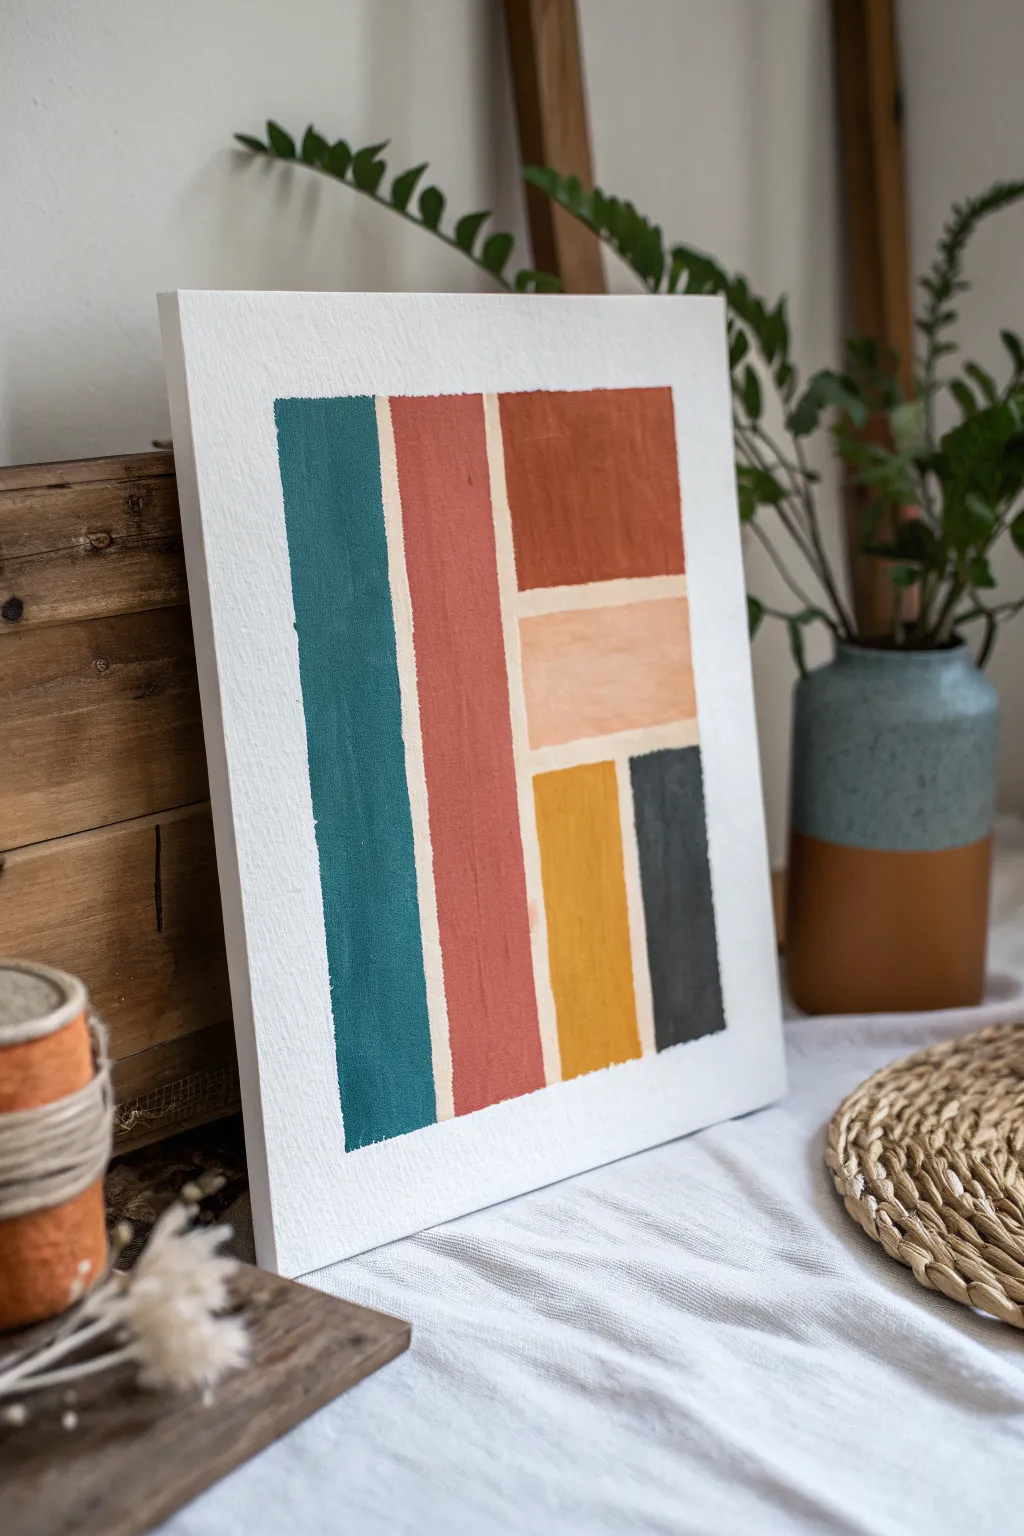
This modern, geometric art piece uses a balance of cool teal, warm terracotta, and mustard yellow to create a striking visual statement. The clean lines and bold color blocking make it a perfect, personalized gift that looks professionally designed but is deceptively simple to execute.
Step-by-Step Tutorial
Materials
- Canvas panel or heavy mixed-media paper (11×14 inch)
- Painter’s tape or masking tape (various widths)
- Acrylic paints (Teal, Terracotta/Rust, Burnt Orange, Mustard Yellow, Peach, Charcoal Gray)
- Flat shader brushes (medium and large sizes)
- Ruler
- Pencil
- Palette for mixing
Step 1: Planning and Taping
-
Prepare your surface:
Start with a clean canvas panel. If you are using paper, tape the edges down to a board to prevent warping. Wipe away any dust to ensure the tape sticks perfectly later. -
Measured margins:
Using a ruler and pencil, lightly mark a consistent border around the entire rectangle of your composition. Aim for about 1.5 to 2 inches of white space from the edge of the canvas to frame the artwork. -
Sketch the layout:
Lightly sketch the internal vertical and horizontal lines. In this design, you’ll need two main vertical columns on the left, and a segmented column on the right. -
Apply the border tape:
Apply strips of painter’s tape along the outside border lines you marked first. Press down firmly on the edges of the tape to prevent paint from bleeding under. -
Block out internal sections:
Tape off the vertical white spaces between the color blocks. Place a long strip separating the teal block from the rust block, and another separating the rust block from the right-hand column. -
Horizontal masking:
For the right-hand column, which is split into four blocks, add horizontal tape strips to separate the top rust square, the peach rectangle, and the bottom yellow/grey split.
Crisp Line Secret
To get razor-sharp lines, paint a thin layer of white (or your background color) over the tape edges first to seal them before applying the color.
Step 2: Painting the Blocks
-
Paint the teal column:
Load your flat brush with teal paint. Fill in the far-left vertical rectangle. Use long, vertical strokes to minimize brush marks and create a smooth finish. -
The rust column:
Mix a terracotta shade or use a tube color like burnt sienna. Paint the second vertical column completely. If the paint feels transparent, let it dry and apply a second coat for opacity. -
Top right block:
For the top right rectangle, use a darker burnt orange or reddish-brown. This section mirrors the warmth of the central column but in a deeper tone. -
Create the peach tone:
For the middle horizontal rectangle on the right, mix a little white into your rust color to create a soft peach or beige tone. Apply this carefully. -
Mustard yellow section:
Paint the small bottom-left section of the right column with a rich mustard yellow. This pop of brightness balances the darker tones. -
Charcoal accent:
Finish the bottom-right corner with a dark charcoal gray or soft black. Be careful near the tape edges here, as dark colors show bleeds more easily.
Make it Personal
Use color theory to pick shades that match his bedroom decor or use the specific color palette from his favorite album cover for a subtle tribute.
Step 3: Finishing Touches
-
Let it set:
Allow the acrylics to dry until they are dry to the touch, but not fully cured hard. This usually takes about 15-20 minutes. -
The reveal:
Slowly peel back the tape at a 45-degree angle away from the painted area. This technique helps cut through the paint film cleanly without lifting chunks of dry paint. -
Touch up edges:
Inspect the white lines. If any paint bled under the tape, use a small detail brush and white paint (or gesso) to tidy up the lines for a crisp look. -
Add the lyrics (optional):
If you are customizing this for a boyfriend as suggested by the section title, now is the time to write lyrics in the white spaces or over the lighter color blocks using a fine-tip paint marker. -
Final seal:
Once fully dry, you can apply a matte varnish spray to protect the colors and give the sheen a uniform finish.
Now you have a sophisticated, gallery-worthy piece that holds a secret sentimental meaning


Have a question or want to share your own experience? I'd love to hear from you in the comments below!