Whenever I’m stuck on what to draw, Easter egg designs are my favorite little canvas because you can go from super simple to wildly detailed in minutes. Here are my go-to Easter egg drawing ideas—starting with the classics and gradually getting into those “how did you do that?” looks.
Smooth Egg Outline With Curved Guides
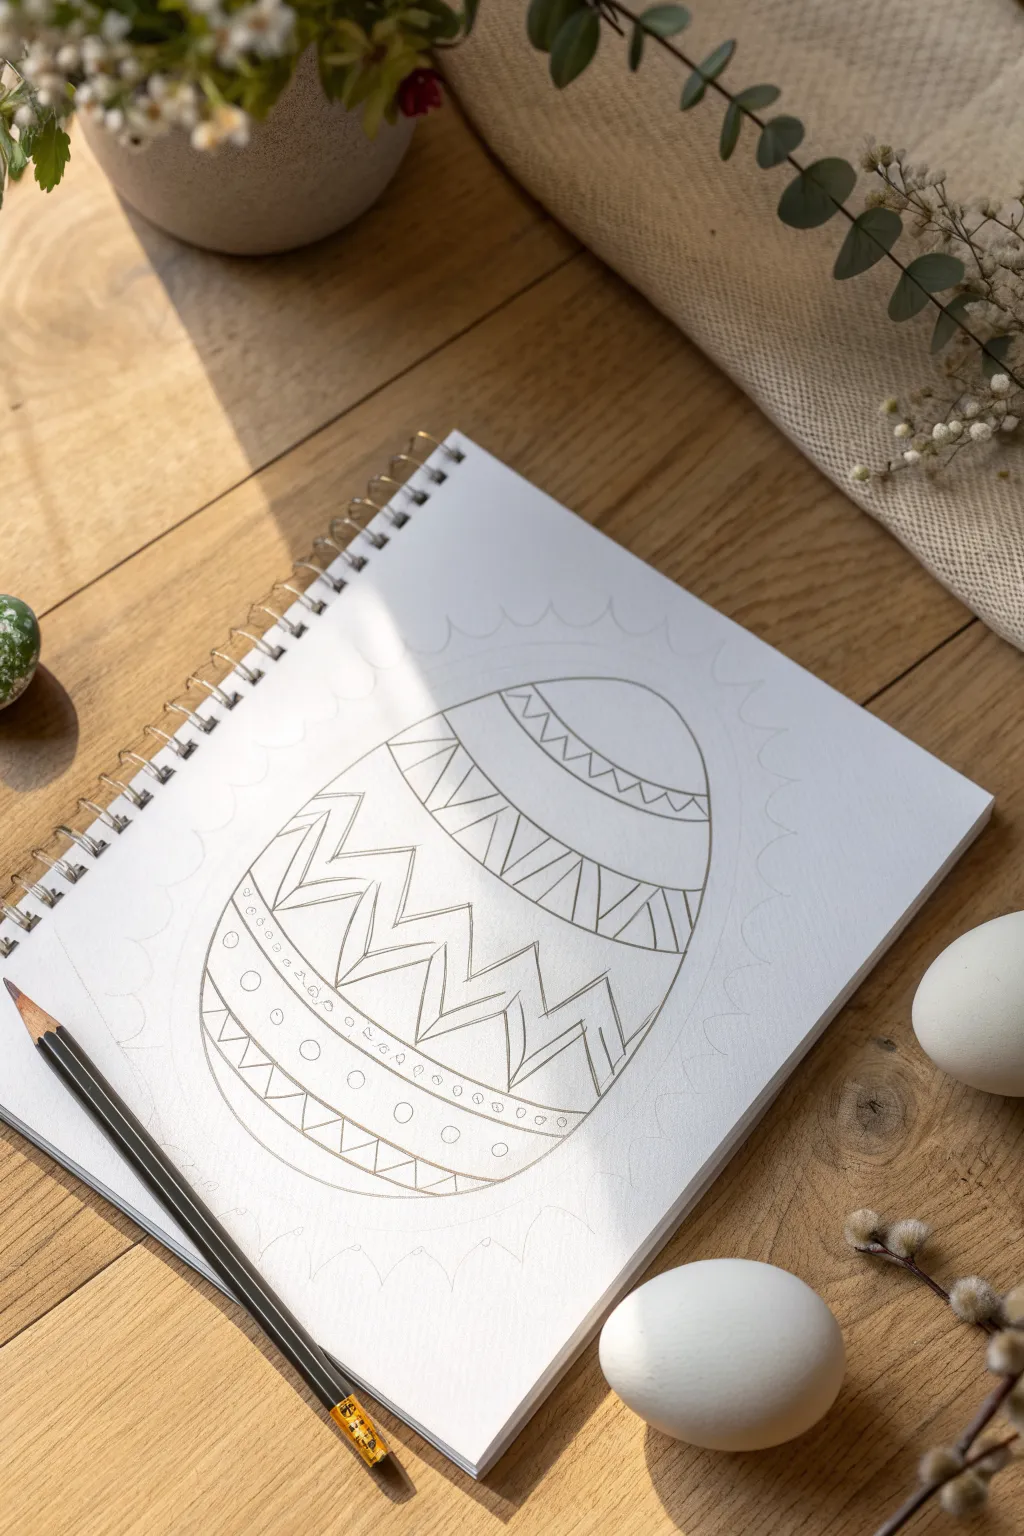
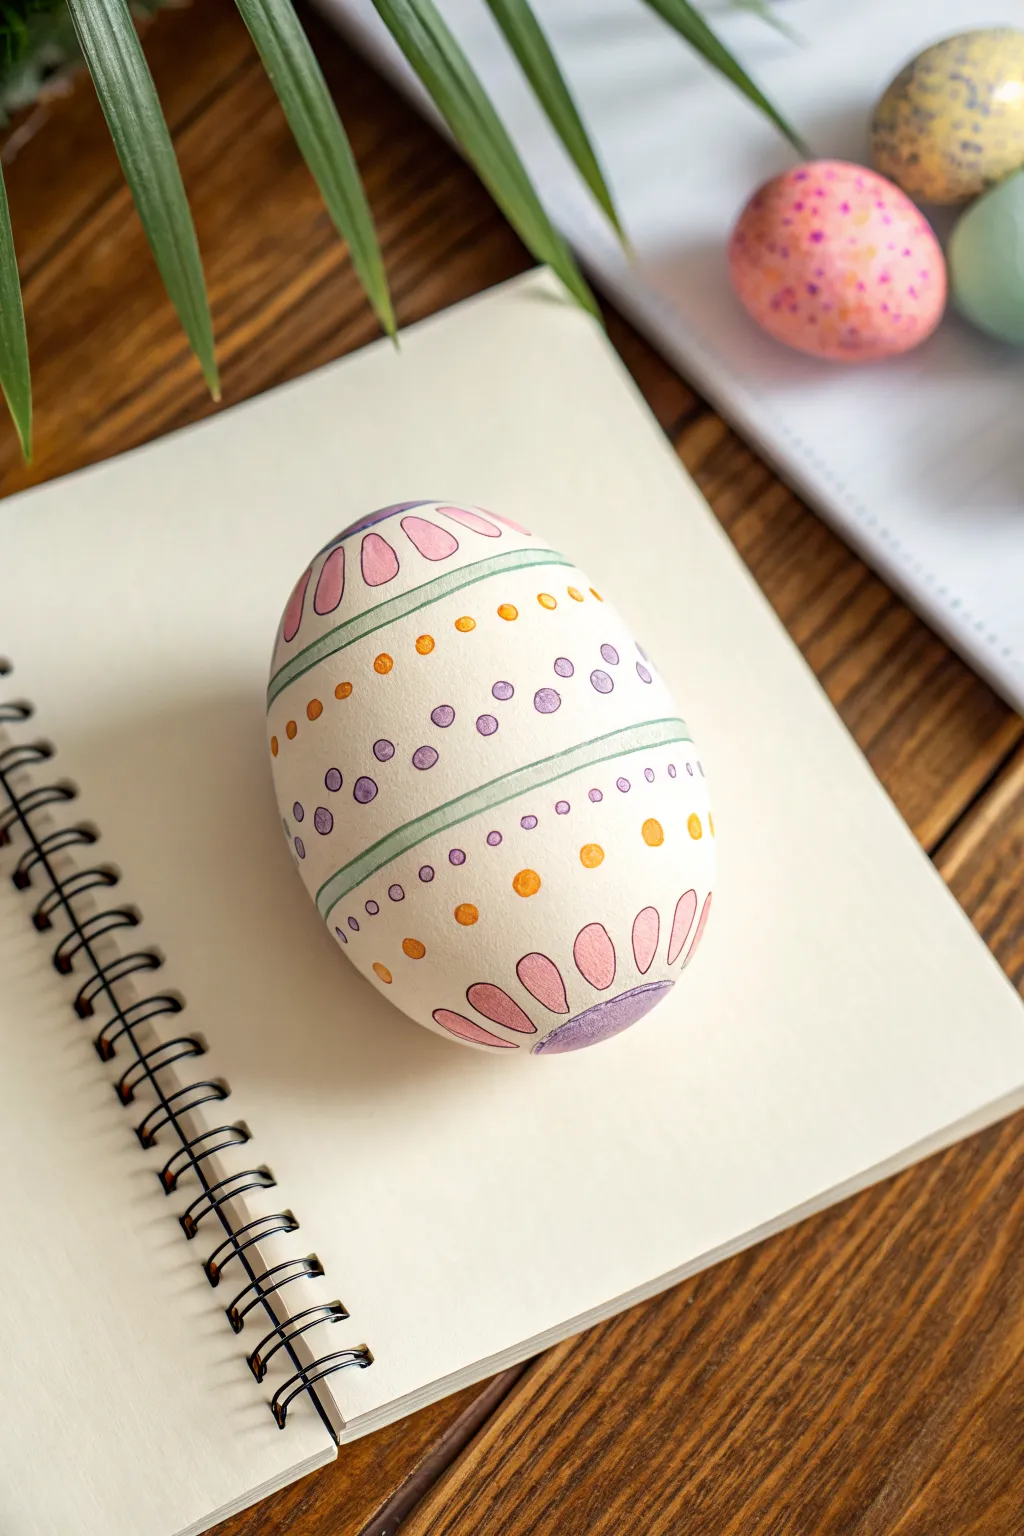
This project features a clean, harmonious Easter egg design focused on symmetry and geometric patterns. Using simple pencil lines, you’ll build up layers of zig-zags and decorative bands to create a structured yet whimsical illustration perfect for coloring later.
Detailed Instructions
Materials
- Spiral-bound sketchbookor heavyweight drawing paper
- HB or 2B graphite pencil
- Clean eraser
- Ruler (optional, but helpful for guidelines)
- Compass or oval template (optional)
Step 1: Planning and Foundation
-
Establish the central axis:
Begin by lightly drawing a vertical line down the center of your page. This axis is crucial for keeping your egg shape symmetrical and balanced on both the left and right sides. -
Mark width and height:
Determine the top and bottom points of your egg on the vertical line. Then, mark the widest part of the egg, which should be slightly below the vertical center point, to create that classic tapered egg shape. -
Sketch the egg perimeter:
Connect your marks using long, sweeping curved strokes. Keep your wrist loose and sketch lightly so you can easily correct any wobbles. The top should be narrower than the bottom base. -
Define the curved guides:
Draw four or five horizontal curved lines across the width of the egg. These shouldn’t be straight; curve them slightly downwards to mimic the 3D surface of a round object, giving your drawing volume.
Step 2: Adding Patterns
-
Create the central zig-zag:
Locate the wide center band of your egg. I like to start here because it anchors the design. Draw a large, bold zig-zag pattern between two of your curved guide lines. -
Double the zig-zag lines:
Inside each ‘V’ of your central zig-zag, draw a second, smaller ‘V’. This creates a striped ribbon effect and adds complexity without much effort. -
Draw the top geometric band:
Move to the section above the center. Draw a series of triangles pointing upwards. Inside these triangles, add vertical hatch marks or smaller triangles to fill the space. -
Add the upper scalloped edge:
Near the top tip of the egg, draw a simple wavy line or a smaller zig-zag. This acts as a ‘cap’ to the design. -
Detail the lower section:
Below your main central zig-zag, add a band of small circles. Keep them evenly spaced. If you have trouble with spacing, mark the center point first and work outward. -
Add the bottom triangles:
At the base of the egg, draw a row of downward-pointing triangles. Like the top section, you can add an inner line to each triangle to echo the shape.
Uneven Egg Shape?
Turn your sketchbook upside down. Viewing the shape from a new angle often reveals lopsided curves immediately, making them easier to fix.
Step 3: Refining and Formatting
-
Check symmetry:
Take a step back and look at your drawing. Does the left side mirror the right? Make minor adjustments to the pattern widths now before darkening the lines. -
Darken the main lines:
Using slightly more pressure or a softer pencil (like a 2B), go over your final design lines. Make them crisp and confident, defining the final shapes clearly. -
Add texture details:
Add tiny dots or small dashes inside the empty bands to create texture. In the image, small accent circles are used between the major pattern bands. -
Erase construction lines:
Gently remove your initial vertical axis line and any stray sketch marks that interfere with the pattern. Be careful not to smudge your darkened lines. -
Sketch the outer aura:
To finish the composition, lightly sketch a scalloped or wavy aura around the entire egg. This frame helps the egg pop off the page.
Curve Consistency
When drawing the horizontal bands, follow the curve of the egg’s bottom. If you draw straight lines across, the egg will look flat rather than round.
Now you have a beautifully patterned egg ready for paints, markers, or colored pencils


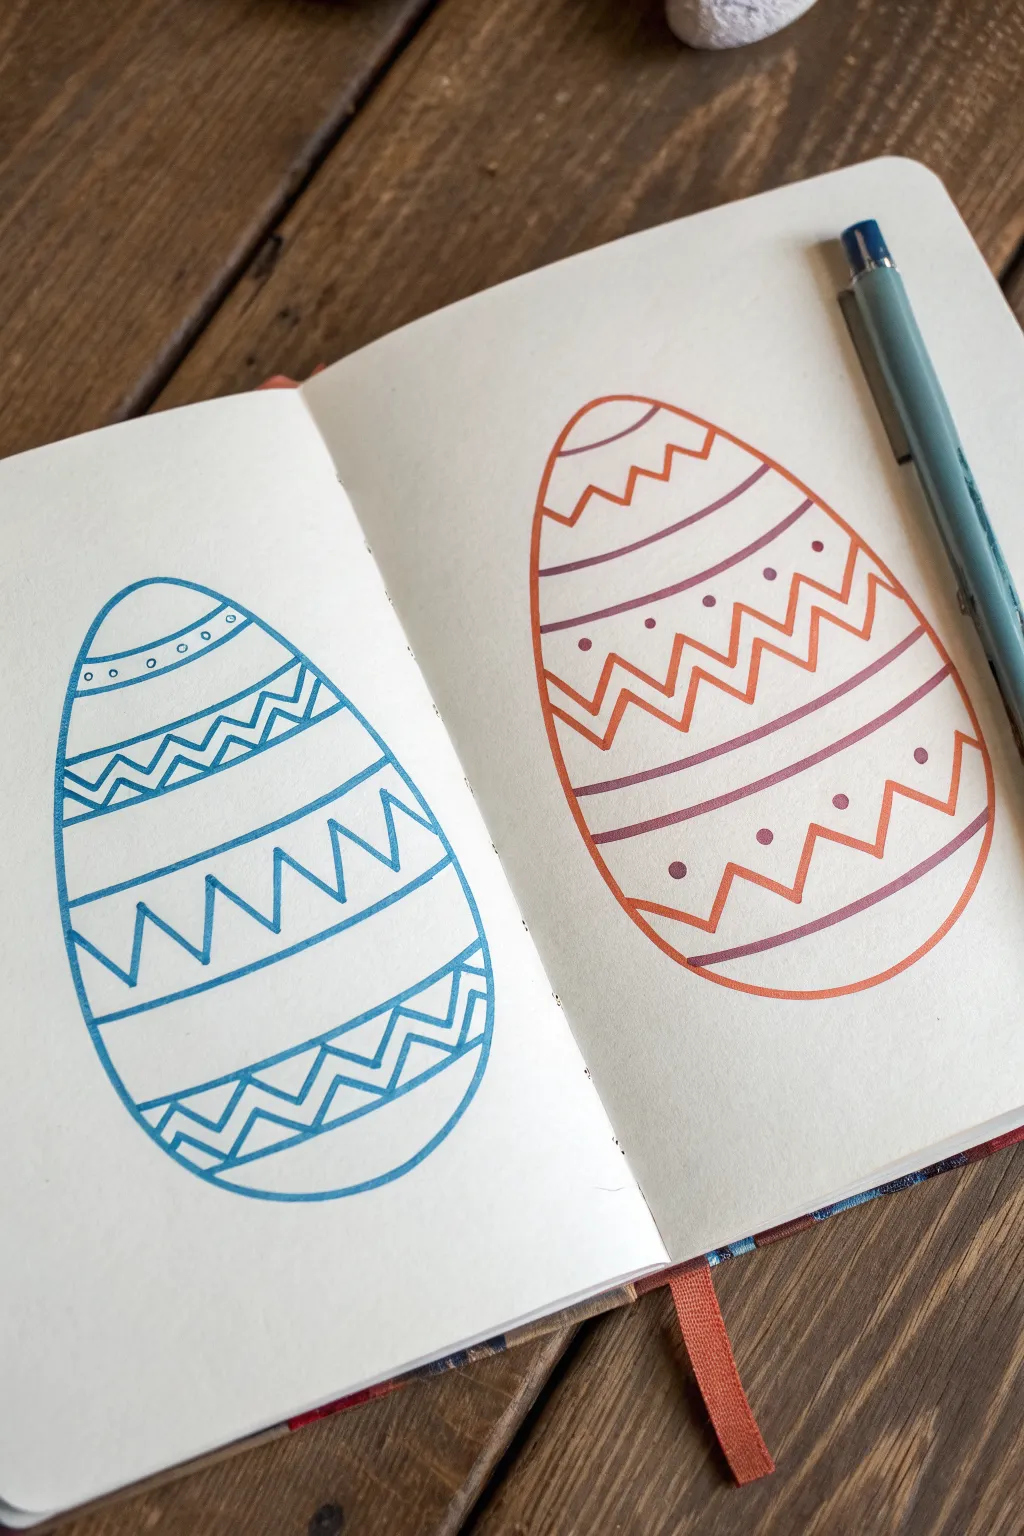
Classic Stripes and Bands
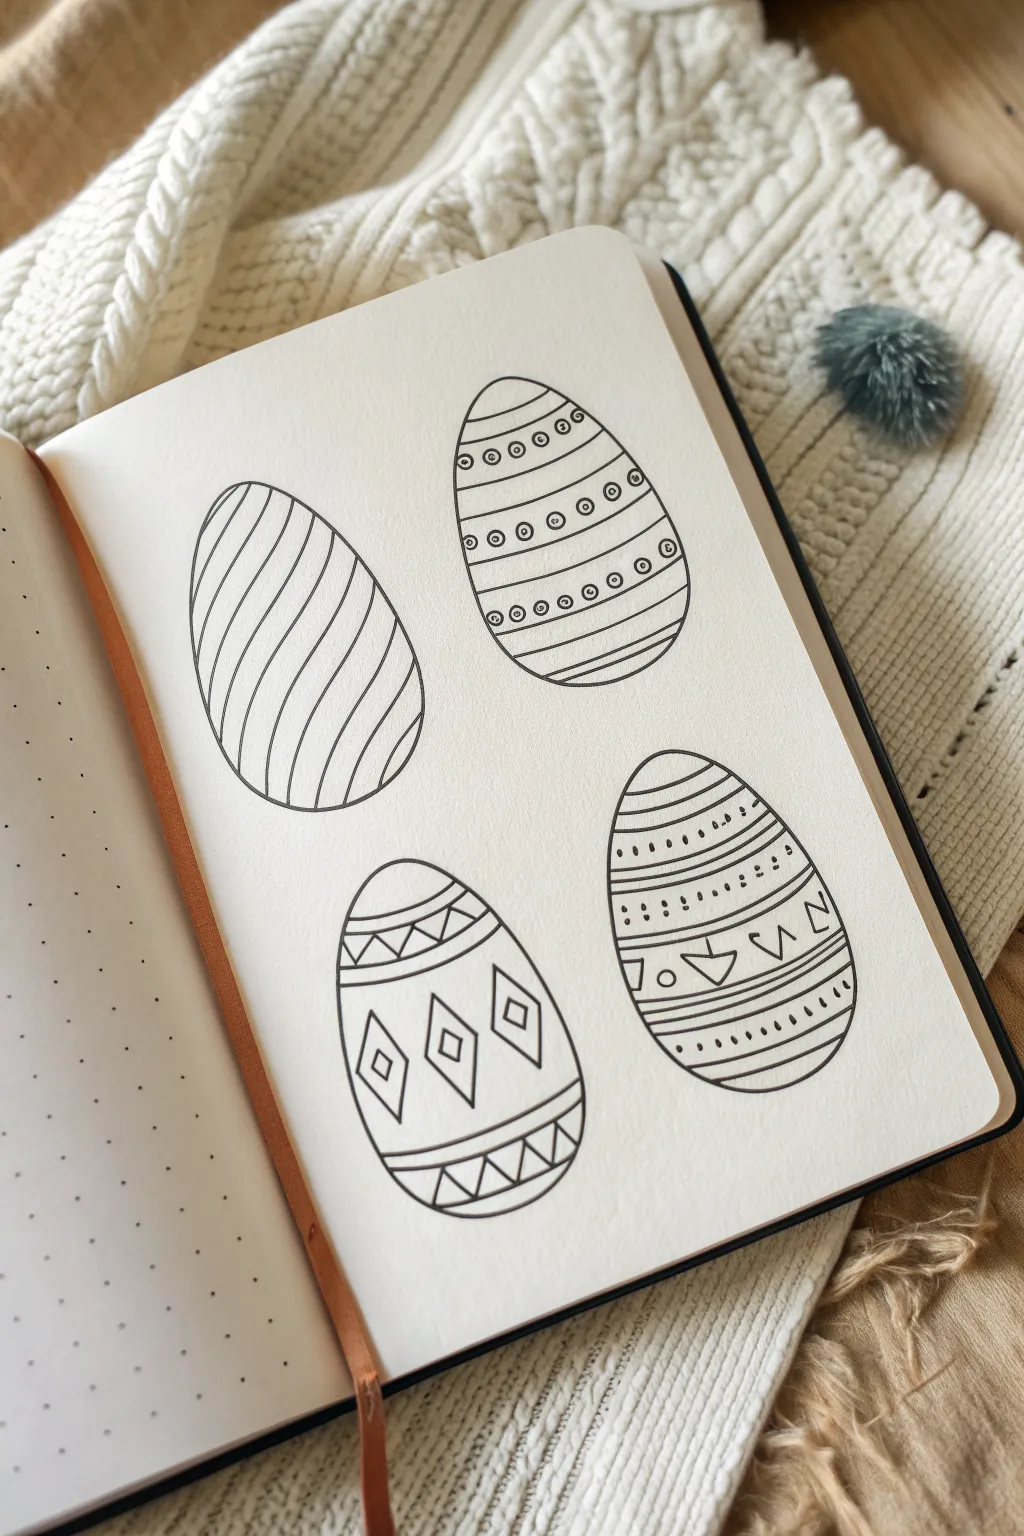
These four elegant Easter egg designs focus on the beauty of simplicity, using crisp black lines to create striking patterns. Perfect for a bullet journal spread or handmade cards, this project explores how varying line weights and geometric repetition can bring a simple oval shape to life.
Step-by-Step Guide
Materials
- Dotted or blank journal notebook
- HB Pencil
- Eraser
- Fine liner pen (0.3mm or 0.5mm)
- Ruler (optional)
Step 1: Laying the Foundations
-
Sketch the egg shapes:
Begin by lightly sketching four oval egg shapes in pencil. Arrange them in a loose grid—two on top, two on the bottom. Aim for that classic egg silhouette: slightly wider at the bottom and tapering gently toward the top. -
Refine the symmetry:
Review your pencil ovals. They don’t need to be mathematically perfect, but try to balance the left and right curves. Lightly erase and redraw any sides that look too flat or too pointy. -
Ink the outlines:
Take your fine liner pen and carefully trace over your pencil outlines. Use a confident, steady hand to create a smooth, continuous loop for each egg. Let the ink dry completely before erasing the pencil marks underneath.
Step 2: Design 1: The Diagonal Ripple
-
Start the curves:
On the top-left egg, start at the bottom left curve and draw a diagonal, wavy line stretching upwards to the right. Keep the curve gentle. -
Fill the space:
Continue drawing parallel wavy lines across the entire egg, maintaining equal spacing between them. The lines should follow the contour of the egg slightly, rather than being perfectly straight rulers.
Steady Hands
For smoother curves, lock your wrist and move your entire arm. Drawing lines quickly often results in straighter strokes than moving slowly.
Step 3: Design 2: Circles and Stripes
-
Divide the egg:
Move to the top-right egg. Draw horizontal bands across the egg. Create variation by alternating between thick bands (made of two parallel lines close together) and wider open spaces. -
Add circular details:
Inside the wider bands, draw a row of small circles. In the center of each small circle, place a tiny dot. -
Texture the stripes:
For the thinner bands, draw simple, straight horizontal lines to fill the space, giving them a stripped texture that contrasts with the bubbly circle rows.
Add a Pop
After the black ink dries, use pastel watercolor markers or colored pencils to fill in select bands or shapes for a vibrant spring look.
Step 4: Design 3: The Geometric Diamond
-
Create the framework:
On the bottom-left egg, draw two horizontal curved bands near the top and two near the bottom. This leaves a large open belly in the center. -
Draw the center diamonds:
In the large central space, draw three diamond shapes. I find it easiest to draw the center diamond first, then add the left and right ones to ensure they are centered. -
Detail the diamonds:
Draw a smaller diamond inside each of the three large ones to create a double-outlined look. -
Add zigzag borders:
Fill the top and bottom bands you created earlier with a simple zigzag line pattern to frame the central diamonds.
Step 5: Design 4: Folk Art Bands
-
establish horizontal zones:
For the final bottom-right egg, draw several slightly curved horizontal lines to divide the egg into about five or six distinct sections. -
Add dots and dashes:
In the top sections, fill the rows with simple patterns like vertical dashes or small, deliberate dots. -
Incorporate shapes:
In a middle band, draw small geometric shapes like triangles pointing down or open ‘V’ shapes for a folk-art feel. Add a small circle inside or between these shapes if there is room. -
Finalize bottom texture:
Fill the bottom-most band with simple angled hatch marks or teardrop shapes to weight the design visually at the base. -
Clean up:
Once all ink works are completely dry, take your eraser and gently remove any remaining pencil sketch lines to leave the page crisp and clean.
Enjoy the rhythmic process of filling these shapes with patterns and making the page your own
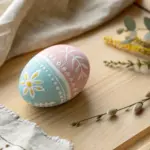


Polka Dots in Pastels
This delicate design combines soft pinks, lavenders, and greens in repeating horizontal bands for a structured yet playful look. The mix of polka dots, scallops, and thin lines creates a lovely rhythm that feels fresh and perfectly spring-like.
How-To Guide
Materials
- White egg (hard-boiled or blown out)
- Light pencil (HB or H)
- Eraser
- Fine-tip markers or paint pens (light green, lavender, pastel pink, golden yellow)
- Paper towel or soft cloth
- Egg stand or tape ring (for stability)
Step 1: Preparation & Guidelines
-
Prepare your surface:
Begin with a clean, dry white egg. If you are using a blown-out egg, gently plug the holes with a tiny bit of wax or tape if desired, though it’s not strictly necessary. -
Mark the center guidelines:
Using a very light touch with your pencil, sketch two horizontal rings around the middle section of the egg. Space them about an inch apart to create the central band where the polka dots will live. -
Define the top and bottom zones:
Sketch another horizontal ring slightly below the top of the egg and a matching one slightly above the bottom. These will serve as the baselines for your petal designs.
Steady Hand Trick
Rest your wrist on the table and rotate the egg itself rather than moving your hand. This helps keep horizontal bands straight and even.
Step 2: Designing the Bands
-
Draw the green borders:
Take your light green fine-tip marker and trace over your central horizontal pencil lines. Draw two parallel lines for each band—one main line and a thinner accent line right next to it—to create a striped border effect. -
Add the central wavy chain:
In the wide space between your two green bands, use a lavender marker to create a line of medium-sized dots that dips up and down in a gentle sine wave pattern. -
Fill the center with smaller dots:
Switch to a golden yellow marker. Place small, solid dots in the empty spaces created by the curves of your lavender dot wave, alternating positions to fill the gaps evenly. -
Create the upper transition:
Just above the top green band, add a row of golden yellow dots. Space them widely, leaving room between each one for the next step. -
Complete the upper pattern:
Using the lavender marker again, draw smaller dots in the spaces between the yellow ones you just created, forming an alternating row of yellow and purple. -
Mirror the pattern below:
Repeat this same alternating dot pattern (yellow and lavender) immediately below the bottom green band to maintain symmetry.
Step 3: Petal Details & Finishing
-
Outline the top petals:
At the very top of the egg, above your dot rows, draw a series of elongated loops or petal shapes using a pastel pink marker. They should radiate from the center top like a flower. -
Outline the bottom petals:
Spin the egg around and replicate these pink petal loops at the very bottom, radiating outward from the base. -
Fill the petal centers:
Gently color inside the petals with the pink marker, leaving a distinct white outline or using a lighter shade of pink if you have one to create some depth. -
Add purple accents:
Between the pink petals at both the top and bottom, draw curved triangular shapes or smaller petals using the lavender marker to fill the negative space. -
Color the purple accents:
Fill in these lavender shapes solidly. I like to let the ink dry for a few seconds before touching the egg to prevent smudging. -
Refine the lines:
Go back over any lines that look faint, particularly the green bands, to ensure they look crisp against the white shell. -
Clean up sketch lines:
Once you are absolutely certain the ink is completely dry, very gently erase any visible pencil guidelines that haven’t been covered by marker.
Ink Smudging?
If your markers are smearing on the smooth shell surface, lightly sand the egg with extra-fine sandpaper first to give the ink more ‘tooth’ to grab onto.
Place your finished masterpiece in a basket or a simple egg cup to show off those intricate patterns


Zigzags and Wavy Lines
These clean, graphic egg designs combine the simplicity of bold geometric patterns with a classic hand-drawn aesthetic. By using structured sections of zigzags and gentle curves, you can create a playful yet orderly look that feels perfectly festive for Easter.
Step-by-Step Guide
Materials
- A5 Sketchbook or heavy drawing paper
- Light blue felt-tip pen or fine liner
- Orange felt-tip pen or fine liner
- Purple felt-tip pen or fine liner
- Pencil (HB)
- Eraser
- Ruler (optional, for guidelines)
Step 1: Drawing the Base Shape
-
Lightly sketch the first egg outline:
Start on the left page by using your pencil to draw a large, vertical oval shape. Keep the bottom slightly wider than the top to achieve that classic egg silhouette. Aim for it to take up about two-thirds of the page height. -
Sketch the second egg outline:
On the facing right page, draw a similar egg shape. Try to match the size and vertical placement of the first one so they look like a balanced pair across your spread. -
Ink the left egg outline:
Switch to your light blue marker. Carefully trace over your pencil line for the left egg. Use a steady hand and try to complete the curve in two or three long, specialized strokes rather than inching along. -
Ink the right egg outline:
Use an orange marker to trace the outline of the right-hand egg. Rotate your sketchbook if needed to find the most comfortable angle for your hand. -
Erase pencil guides:
Once the ink is completely dry—give it a minute to be sure—gently erase the underlying pencil marks from both outline shapes.
Wobbly Lines?
If your curved dividing lines aren’t matching perfectly, try drawing the middle line first as an anchor, then spacing the top and bottom lines relative to that center point.
Step 2: Designing the Blue Egg
-
Divide the egg horizontally:
With the blue marker, draw four curved horizontal lines across the egg. These lines should curve slightly downward to mimic the roundness of the egg. Space them out to create five sections of varying widths. -
Add dots to the top section:
In the open space created by the top curved line, draw a row of small, evenly spaced circles or hollow dots. -
Create the first zigzag band:
In the second band down, draw a sharp zigzag line that spans the entire width. Then, draw a second zigzag line right below it that mirrors the first one perfectly. -
Connect the zigzags:
Connect the points of your two zigzag lines with short vertical strokes, creating a ribbon-like geometric pattern. -
Draw large zigzags:
In the large middle section, draw a big, bold zigzag line. Make the peaks and valleys deep and dramatic, letting this pattern dominate the center of the design. -
Fill the bottom section:
Repeat the double-zigzag ribbon pattern you used earlier in the bottommost section. Draw two parallel zigzag lines and connect their points with straight lines to ground the design.
Make It Pop
Use a white gel pen to add tiny highlights on the coloured lines or inside the filled sections. This small detail mimics the gloss of a real painted egg.
Step 3: Designing the Orange & Purple Egg
-
Draw the main dividing lines:
Switch to the purple marker for the dividing lines on the right egg. Draw four downward-curving lines across the egg to segment it, similar to the blue egg but perhaps varying the spacing slightly. -
Add the top chevron detail:
Using the orange marker, draw a simple zigzag or chevron line inside the very top section of the egg. -
Create the heavy central zigzag:
In the large middle band, use your orange marker to draw a ‘double’ zigzag pattern. Instead of connecting them like a ribbon, just draw one zigzag line nested closely inside another. -
Add floating dots:
Between the purple dividing lines and the orange zigzags in the upper-middle section, add a few small purple dots to fill the negative space. -
Detail the lower band:
In the lower section, draw a wide, loose orange zigzag line. Underneath the peaks of this zigzag, place a single purple dot for decoration. -
Final touches:
Review both eggs. If any lines look too thin or shaky, carefully go over them again to thicken the line weight and add confidence to the drawing.
Now you have a charming spread of patterned eggs ready to inspire your next holiday coloring session
BRUSH GUIDE
The Right Brush for Every Stroke
From clean lines to bold texture — master brush choice, stroke control, and essential techniques.
Explore the Full Guide
Simple Chevron Panels
Embrace earthy warmth with this striking chevron design that alternates bold black outlines with burnt orange fills. The matte finish and geometric precision give this egg a modern, southwestern pottery vibe that stands out in any Easter basket.
Detailed Instructions
Materials
- White craft egg (ceramic, wood, or blown real egg)
- Black fine-point permanent marker or acrylic paint pen
- Burnt orange or terracotta acrylic paint
- Fine detail paintbrush (size 0 or 00)
- Pencil
- Eraser
- Measuring tape (flexible)
- Matte spray varnish (optional)
Step 1: Planning and Sketching
-
Prep the surface:
Ensure your egg is clean and dry. If you are using a wooden or paper mache egg, give it a base coat of matte white acrylic paint and let it dry completely to create a smooth, neutral canvas. -
Mark horizontal guides:
Using a flexible measuring tape and a pencil, lightly mark horizontal rings around the egg to divide it into sections. You’ll need four main bands where the chevrons will sit. -
Sketch vertical guides:
Lightly draw vertical lines from the top to the bottom of the egg, spacing them evenly. These intersections with your horizontal rings will act as the peaks and valleys for your zigzag pattern. -
Connect the dots:
Connect your intersection points diagonally to create the base chevron zigzag line. Do this for all four bands of the pattern, keeping your pencil pressure very light so it’s easy to erase later. -
Double the lines:
To create the thick borders seen in the photo, sketch a second parallel line slightly above or below your initial zigzags. This defines the thickness of the black bands.
Wobbly Lines?
If your hand shakes, rest your pinky finger on the egg surface to stabilize your grip, or place the egg in a shot glass while drawing the upper details.
Step 2: Inking the Outline
-
Start the black linework:
Take your black fine-point marker or paint pen. Carefully trace over your pencil sketches. Start with the uppermost chevron pattern near the tip of the egg. -
Work top to bottom:
Move downwards to the next chevron band. I find it helpful to turn the egg slowly as I draw to keep my hand stabilized against the table. -
Create the parallel bands:
Draw the second black line parallel to the first one within each chevron group. The gap between these two black lines is where your orange paint will eventually go. -
Add the bottom stripe:
Near the base of the egg, draw two straight horizontal rings to create the simple band that grounds the design. -
Detail the negative space:
In the white spaces between your main colored bands, draw a single, thin black zigzag line that mirrors the heavier bands. This creates that intricate, optical illusion effect. -
Clean up:
Once the ink is 100% dry, gently erase any visible pencil guidelines. Be careful not to smudge the marker.
Pro Tip: Matte Finish
To keep that authentic pottery look, avoid glossy sealers. Use a matte spray varnish or even a light coat of matte Mod Podge to protect the design.
Step 3: Adding Color and Detail
-
Mix your color:
Prepare your burnt orange acrylic paint. If the paint is too thick, thin it slightly with a drop of water to help it flow smoothly into the narrow spaces. -
Fill the top chevron:
Using your fine detail brush, carefully paint between the double black lines of the top chevron. Rotate the egg to maintain a consistent angle for your brush strokes. -
Paint the middle band:
Skip the single thin black zigzag and move to the next double-lined section. Fill this band with the same burnt orange color. -
Stipple the top:
Use the very tip of your black marker to add tiny, delicate dots to the very top cap of the egg, fading them out as they move down. -
Stipple the base:
Repeat the stippling process at the very bottom of the egg, below the solid band. This adds a nice textured finish that mimics ceramic clay. -
Final touches:
Check for any uneven edges in your painting. You can use the black marker to tidy up the outlines if paint went slightly over the lines.
Place your warm, geometric egg in a bowl of sand or neutral linens to show off its intricate pattern
Two-Tone Color Block Eggs
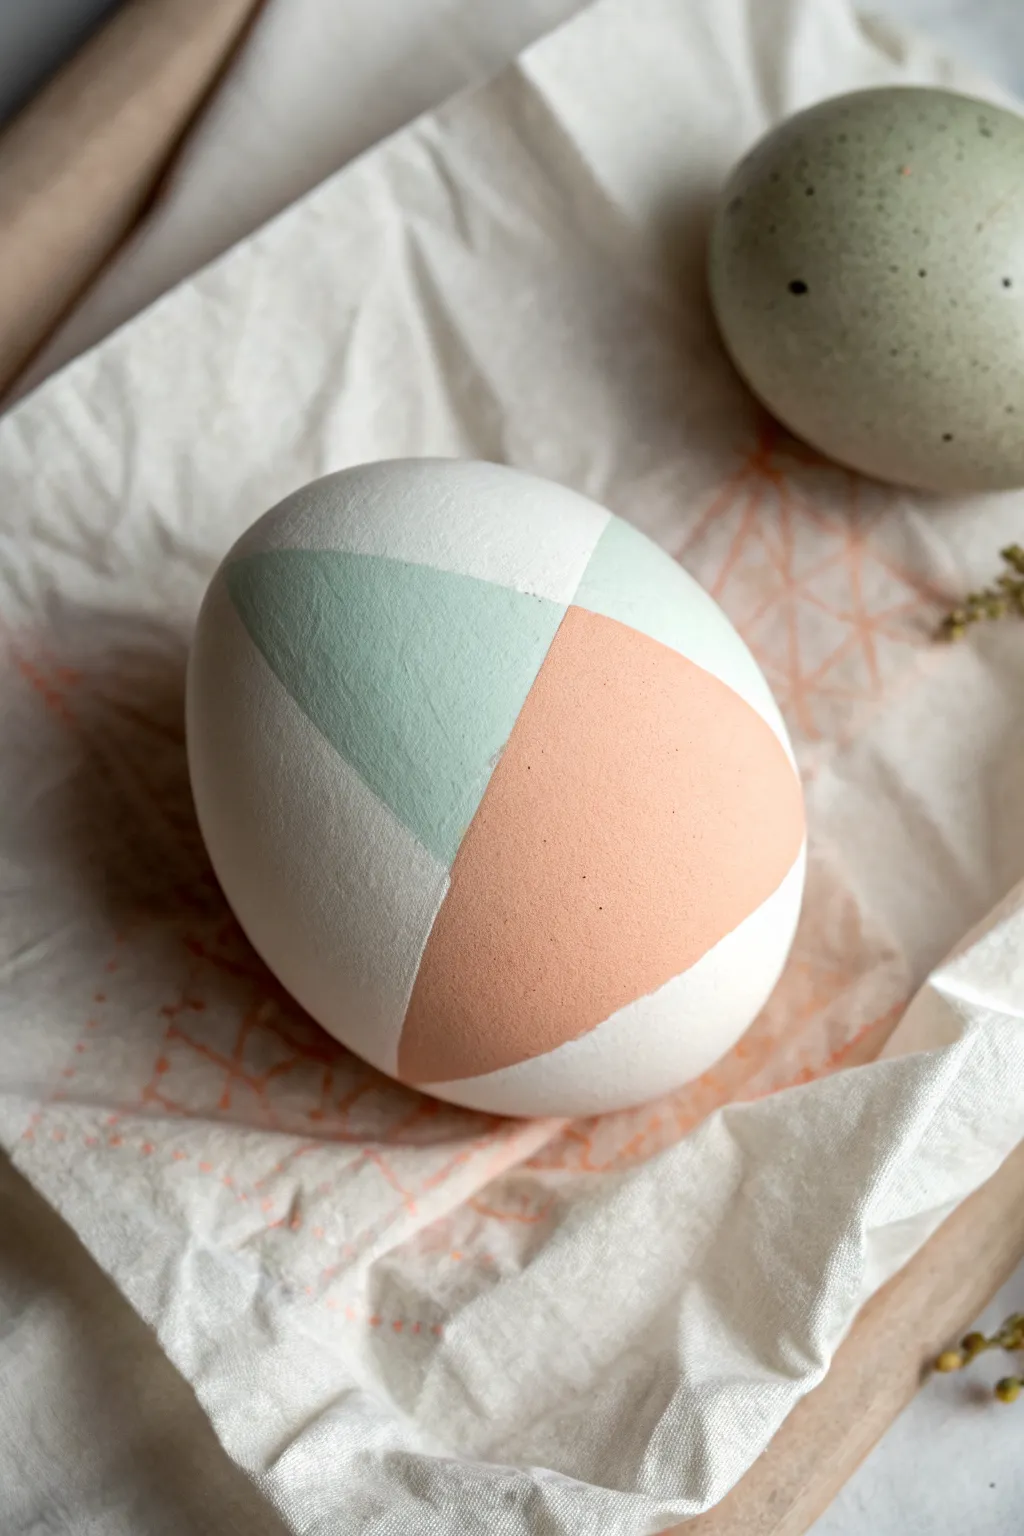
Achieve a modern, minimalist holiday look with this geometric color-block design. Using soft tints of teal and terracotta against a matte white background creates a sophisticated, Scandinavian-inspired Easter decoration.
Step-by-Step Guide
Materials
- White or blown-out egg (clean and dry)
- Acrylic craft paints (matte white, mint green, peach/terracotta)
- Fine painter’s tape or washi tape
- Small flat synthetic paintbrush (size 4 or 6)
- Very fine detail brush (size 0 or 00)
- Pencil (H or 2H for light lines)
- Palette or small dish for mixing
- Egg holder or drying stand (bottle caps work well)
Step 1: Preparation and Base Coat
-
Surface prep:
Begin by gently wiping down your egg with a mixture of water and vinegar to remove any natural oils, ensuring the paint adheres perfectly. Let it dry completely. -
Applying the base:
Even if your egg is naturally white, apply a thin, even coat of matte white acrylic paint. This creates a uniform texture and brightness that helps the pastel colors pop. -
Drying time:
Allow the base coat to dry fully. Since acrylics dry quickly on porous shells, 10-15 minutes should be sufficient, but verify no tackiness remains.
Tape Trick
To prevent tape from peeling up the base coat, stick the tape to your pants or skin a few times first to reduce its tackiness before applying it to the egg.
Step 2: Drafting the Design
-
Planning the layout:
Visualize the intersection of your shapes. The design relies on two large geometric zones touching each other, leaving significant negative white space. -
Sketching the triangle:
Using a hard pencil (like a 2H) very lightly sketch a wide triangle shape on the side of the egg. Keep the lines faint so they don’t show through light paint. -
Sketching the adjacent shape:
Draw the second shape next to the first. In the reference, this is a softer, almost semi-circular or rounded triangular peach shape that directly abuts the mint triangle. -
Taping (Optional):
If you prefer extremely crisp straight lines, apply small strips of painter’s tape along the outer edges of your triangle sketch. Rub the edges of the tape down firmly with your fingernail.
Step 3: Painting the Color Blocks
-
Mixing the mint:
Mix a dab of green with a generous amount of white and a tiny touch of blue to get that soft, dusty mint shade. I find mixing slightly more than you need helps avoid color matching mid-project. -
Painting the triangle:
Load your flat brush and carefully fill in the triangle area. If you taped it, paint away from the tape edge to prevent bleeding. -
Refining the edge:
Whether using tape or freehanding, use the flat edge of the brush to create the sharp, straight line where the triangle meets the white space. -
Mixing the peach:
Clean your brush thoroughly. Mix orange with white and a tiny dot of brown or burnt sienna to achieve an earthy terracotta-peach tone. -
Filling the second block:
Paint the adjacent rounded shape. Be extremely careful at the ‘seam’ where the peach meets the mint; use the very tip of your brush to make them touch without overlapping layers. -
Opacity check:
Pastels can sometimes be translucent. Once the first layer is dry to the touch, assess if a second coat is needed for solid, opaque coverage. -
Applying a second coat:
Apply a second thin layer if necessary, focusing on smoothing out any visible brushstrokes for that matte, ceramic look.
Add Texture
Mix a tiny pinch of baking soda into your acrylic paint before applying the colored shapes to create a tactile, faux-terracotta texture on the egg.
Step 4: Finishing Touches
-
Removing tape:
If you used tape, wait until the paint is mostly dry but strictly not fully cured before peeling it away at a sharp angle. -
Cleanup:
Dip your fine detail brush into the white base paint. Use this as an ‘eraser’ to tidy up any wobbly edges or stray specks of color on the white background. -
Final cure:
Place the egg on its holder and allow it to dry undisturbed for at least an hour to ensure the paint hardens and won’t scratch easily.
Display your modern art eggs in a simple ceramic bowl or on a linen napkin for an elegant centerpiece

PENCIL GUIDE
Understanding Pencil Grades from H to B
From first sketch to finished drawing — learn pencil grades, line control, and shading techniques.
Explore the Full Guide
Flower Garland Wrap
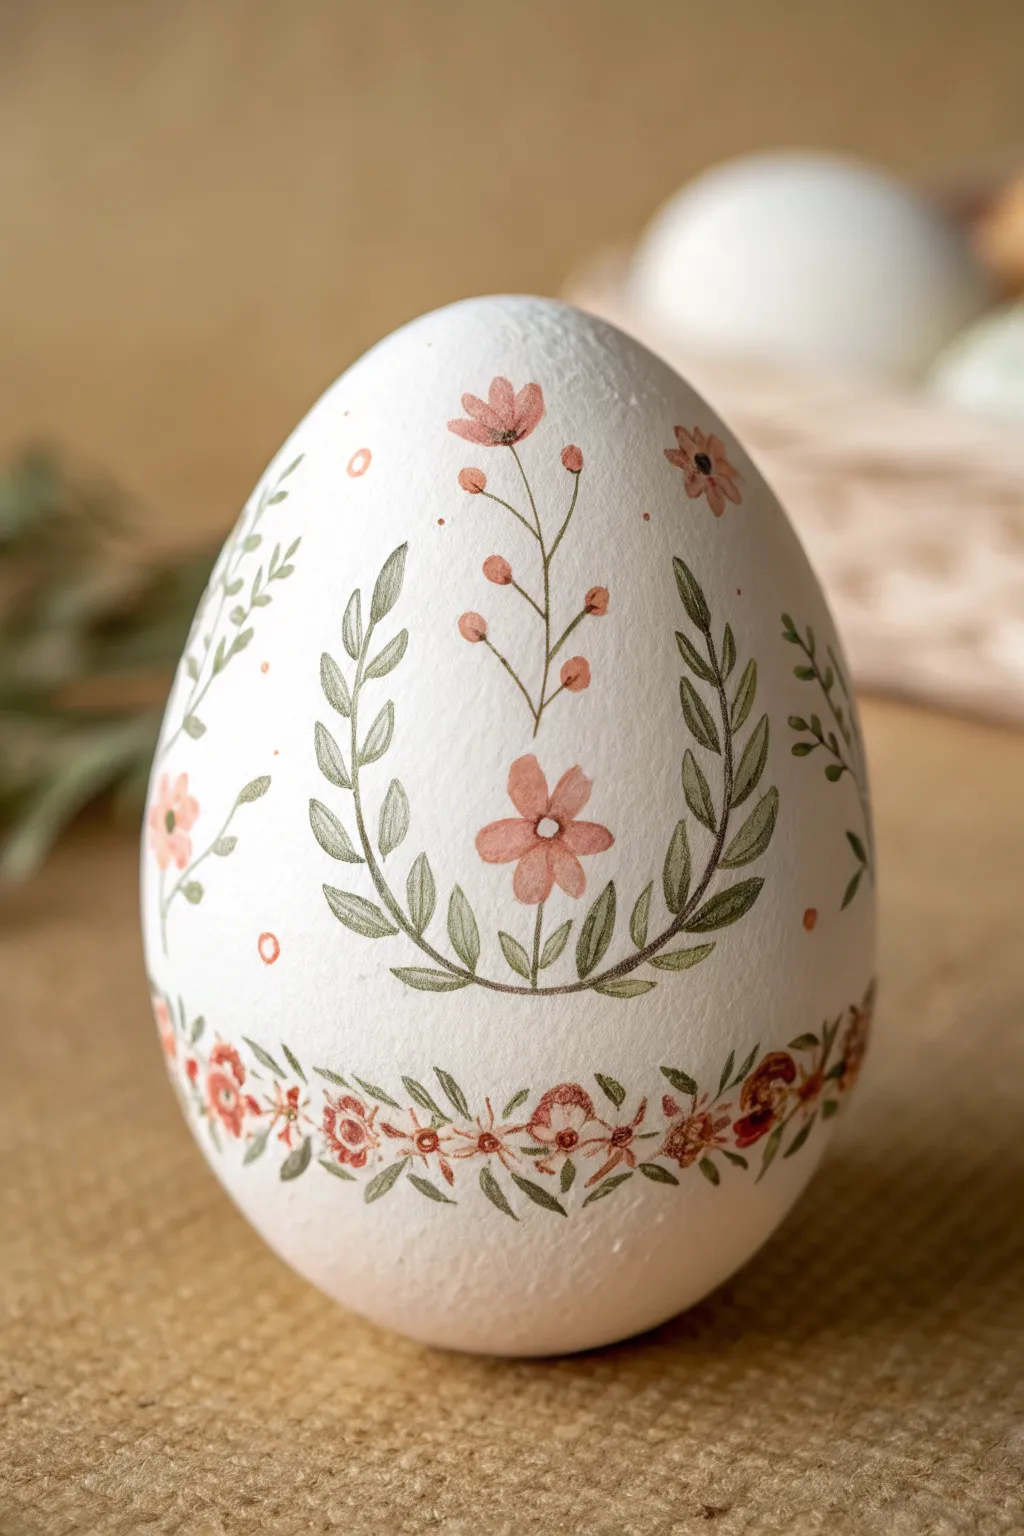
This elegant Easter egg features a soft, botanical design that mimics the look of vintage watercolor illustrations. With its central wreath motif and a dainty garland encircling the base, it brings a touch of sophisticated nature to your holiday decor.
Step-by-Step Tutorial
Materials
- Large white egg (blown-out, wooden, or ceramic)
- Fine-grit sandpaper (optional)
- Pencil (H or HB)
- Kneaded eraser
- Watercolors (pan or tube) in sage green, dusty rose, and terracotta
- Fine detail brushes (sizes 0, 00, and 2)
- Mixing palette
- Paper towels
- Matte spray varnish
Step 1: Preparation & Sketching
-
Prepare the surface:
Ensure your egg is clean and dry. If using a wooden or faux egg, lightly sand it to remove any glossy coating that might repel watercolor. Wipe away dust with a damp cloth. -
Mark the center:
Hold the egg upright. Visually locate the center of the front face where the main wreath will go. Lightly mark a tiny dot with your pencil as a guide. -
Sketch the main wreath:
Draw two curved lines extending upwards from a central point, forming a loose ‘U’ shape. These will become the main leafy stems. -
Add floral placement:
Sketch a small five-petaled flower right at the junction where the two stems meet. Above that, sketch a thin vertical stem rising from the flower’s center. -
Outline the bottom garland:
About one inch from the bottom of the egg, lightly trace a horizontal guideline wrapping all the way around. Sketch a repeating pattern of tiny leaves and buds along this line.
Paint Beading Up?
If paint beads on a plastic egg, the surface is too smooth. Buff gently with sandpaper or apply a layer of watercolor rhythmic ground (or matte gesso) first.
Step 2: Painting the Greenery
-
Mix sage green:
On your palette, mix green with a touch of brown or grey to achieve a muted sage color. Keep the consistency watery but pigmented. -
Paint the main stems:
Using your size 0 brush, carefully trace over the pencil lines for the main wreath stems. Use a very light hand to keep the lines thin. -
Add base leaves:
Starting near the bottom flower, paint pairs of small, pointed leaves growing outward from the stems. Press the belly of the brush down and lift up to create the leaf shape. -
Build leaf density:
Continue painting leaves up the stems, making them slightly smaller as you reach the top tips. Vary the angles slightly for a natural look. -
Paint the vertical stem:
Paint the thin vertical line rising from the center flower. Add tiny, thin branches extending off it, preparing them for the buds later. -
Paint garland foliage:
Moving to the bottom band, paint small clusters of leaves along your guideline. Leave gaps between the clusters for the red flowers.
Make it Sparkle
Mix a tiny amount of iridescent medium into your rose paint, or add minuscule dots of metallic gold ink to the flower centers for a subtle, elegant shimmer.
Step 3: Adding Floral Details
-
Paint the central flower:
Switch to a dusty rose color. Clean your brush thoroughly. Paint the five petals of the central flower at the base of the wreath, letting the color fade slightly toward the center. -
Add vertical buds:
Using a slightly more orange-terracotta shade, dab small circles or ovals onto the tips of the thin vertical branches you painted earlier. -
Paint the top flower:
Identify the top of the vertical stem and paint a small, fan-shaped flower using the dusty rose mix. -
Fill the bottom garland:
Dip your smallest brush (00) into the terracotta paint. Fill the gaps in the bottom garland with tiny three-petaled flowers and single dots for berries. -
Add extra stray petals:
For a whimsical touch, paint a few tiny circles or petals floating detached near the main design, as if falling in the wind.
Step 4: Refining & Finishing
-
Deepen the shadows:
Once the first layer is dry, I like to mix a slightly darker green. Go back and add thin veins to the larger leaves or darken where stems overlap to create depth. -
Define flower centers:
Use a tiny dot of dark brown or deep red in the very center of the main pink flower and the buds to give them definition. -
Clean up sketch lines:
Wait until the paint is bone dry. Gently dab—do not rub—with a kneaded eraser to lift any visible pencil lines without smudging the paint. -
Seal the artwork:
To protect the water-soluble paint, spray the egg lightly with a matte varnish. Hold the can 12 inches away and do two light coats rather than one heavy one.
Display your beautiful botanical creation in a nest or egg cup to show off the delicate details
Tiny Spring Floral Scatter
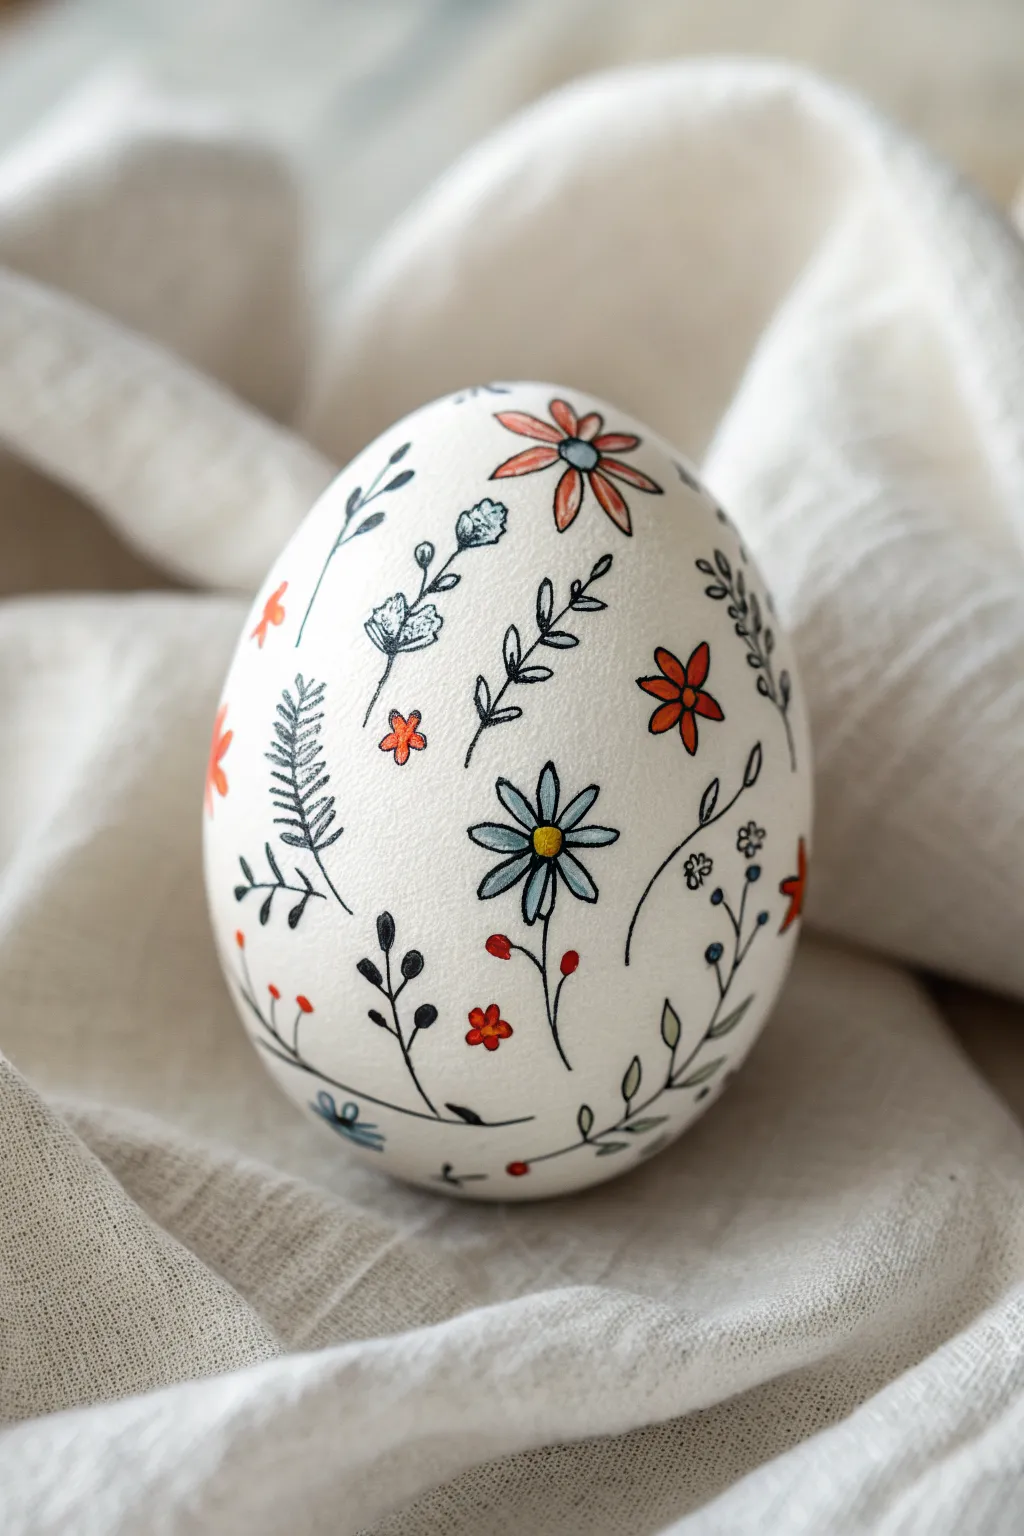
Bring the charm of a spring meadow to your Easter basket with this delicate floral scatter design. Using fine-line markers and touches of color, you’ll create an elegant, hand-drawn look that feels both vintage and fresh.
Step-by-Step
Materials
- Clean white egg (hard-boiled or blown-out)
- Fine-point black permanent marker (0.1mm or 0.3mm)
- Set of fine tip colored markers or pens (terracotta orange, slate blue, sage green)
- Pencil (H or 2H hardness)
- White eraser
- Soft cloth or tissue
Step 1: Preparation and Planning
-
Prepare your canvas:
Ensure your egg is clean, dry, and room temperature before starting. If using a blown-out egg, gently wipe it with a vinegar-dampened cloth to remove any oils that might resist the ink. -
Map the spacing:
Hold the egg and visualize where your largest flowers will sit. I like to lightly mark 4-5 small dots with a pencil to serve as anchors for the biggest blooms, ensuring they don’t all cluster on one side.
Ink Smudge Prevention
Work from the top down or rotate the egg so your hand rests on un-drawn areas. A piece of tissue under your drawing hand acts as a safety barrier.
Step 2: Drawing the Primary Blooms
-
Sketch the main daisy:
Choose a central spot and lightly pencil in a simple seven-petal daisy shape. Keep the petals slightly elongated and separated. -
Add secondary flowers:
Rotate the egg slightly and pencil in a different flower shape, perhaps a five-petal bloom with slightly more rounded edges, to create variety. -
Ink the outlines:
Using your fine-point black marker, carefully trace over your pencil lines. Don’t worry if the lines aren’t perfectly smooth; a slightly jittery line adds to the hand-drawn, botanical illustration aesthetic. -
Detail the centers:
Draw small circles or stippled dots in the center of your open flowers to give them texture and depth.
Vintage Look
Dip a toothbrush in diluted brown acrylic paint and flick it over the finished egg for a speckled, robin’s egg effect.
Step 3: Adding Foliage and Filler
-
Draw fern-like fronds:
Locate empty white spaces between your main flowers. using the black pen, draw a curved central stem, then add tiny, parallel dashes along both sides to create a fern leaf. -
Create leafy stems:
Add new stems that curve gently around the curve of the egg. Along these stems, draw small, hollow teardrop shapes to represent simple leaves. -
Insert sprigs of buds:
Draw thin, branching lines that end in tiny solid black dots or small open circles. These represent berry sprays or unopened buds. -
Add shading details:
Go back to your larger leaves and add a single central vein line. For some petals, add very short, light flick marks near the center to suggest dimension. -
Fill the gaps:
Look for any awkwardly large empty spaces. Fill these with tiny, floating elements like single tear-drop petals, tiny ‘x’ stars, or small clusters of three dots.
Step 4: Adding the Color
-
Erase guidelines:
Gently erase any visible pencil marks. Be very careful to support the egg fully in your hand so the pressure doesn’t crack the shell. -
Color the petals:
Select a slate blue marker. Choose one or two of your daisy-style flowers and color the petals in completely. Use a light touch to avoid analyzing the ink. -
Add warm accents:
Switch to a terracotta or burnt orange marker. Color the five-petal flowers and use this same shade for the tiny berry clusters scattered around the design. -
Highlight the centers:
Use a yellow or ochre marker to fill in the centers of your blue daisies. -
Tint the leaves:
You can leave most foliage black and white for contrast, but if desired, use a pale sage green to fill in just a few of the larger leaf shapes. -
Final ink check:
Sometimes adding color can dull the black outlines. If necessary, re-trace just the outer edges of the colored petals with your black fine-liner to make them pop. -
Let it set:
Allow the egg to sit untouched for at least 10 minutes to ensure all ink is completely dry before placing it in a display bowl.
Display your botanical masterpiece on a simple wooden stand or nestled in a linen napkin to highlight the delicate details


Bunny Face Easter Eggs
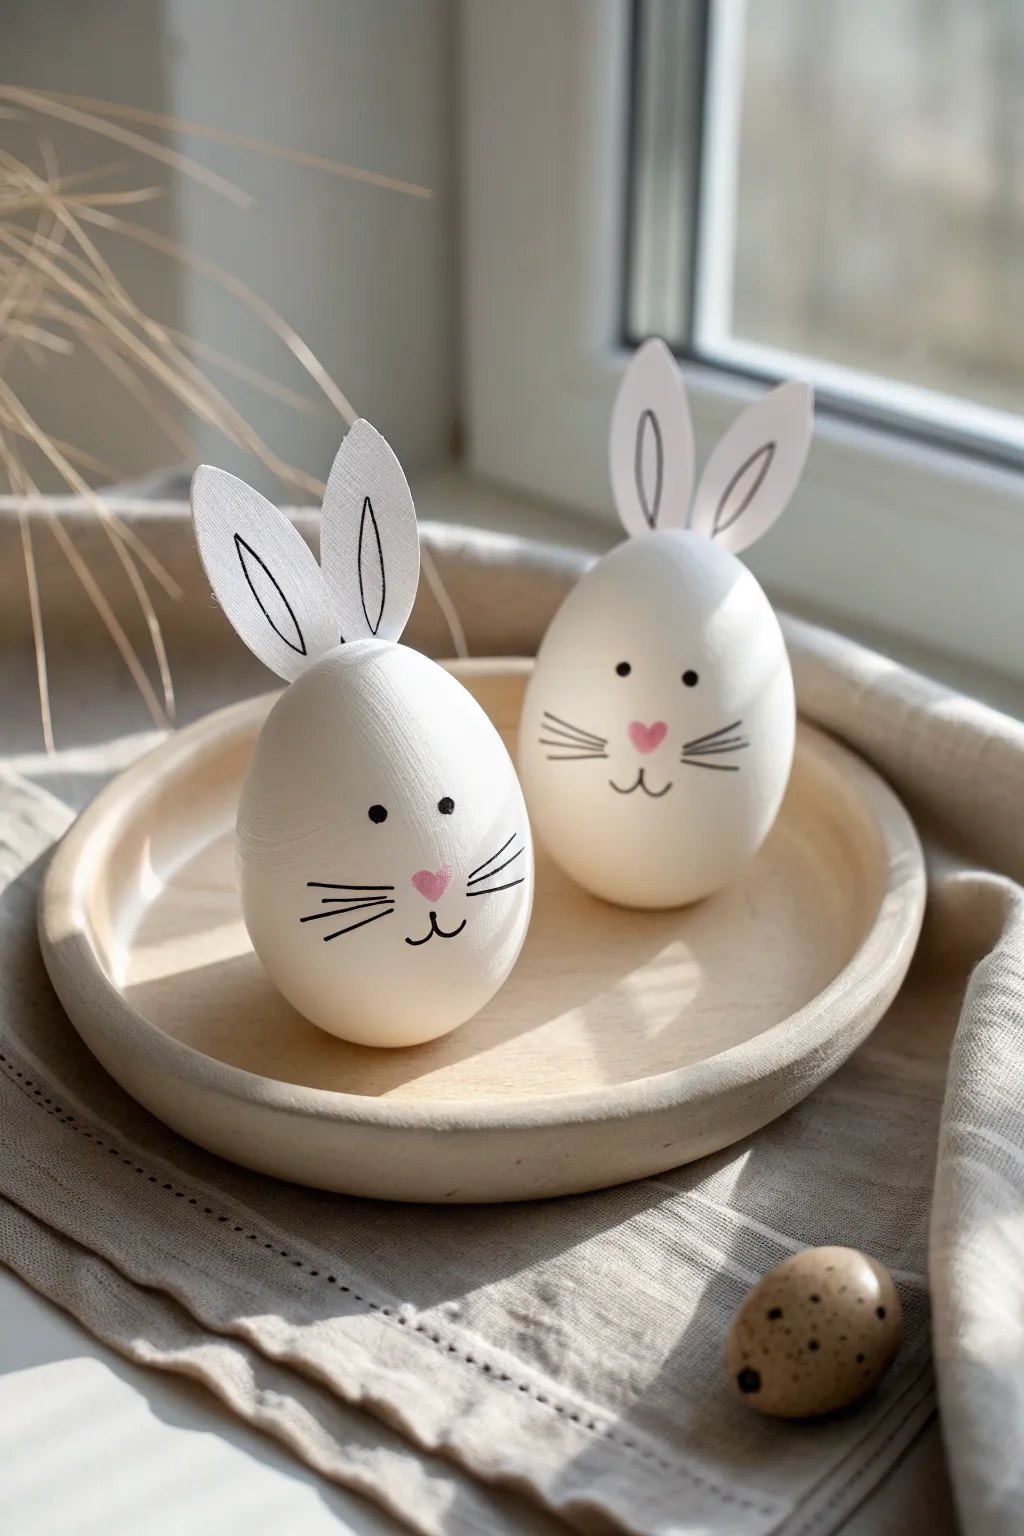
Transform plain white eggs into charming, minimalist bunnies using simple drawing techniques and paper accents. This clean, modern aesthetic relies on crisp lines and a touch of sweetness to create a festive decoration that looks lovely on any spring table.
How-To Guide
Materials
- White eggs (blown out, hard-boiled, or white wooden eggs)
- Black fine-point permanent marker or acrylic paint pen
- Pink paint marker or fine paintbrush with pink acrylic paint
- White stiff felt, cardstock, or heavy paper
- Scissors
- Strong craft glue or a low-temp hot glue gun
- Pencil
Step 1: Preparing the Base
-
Select and clean your eggs:
Choose clean, smooth white eggs for the best canvas. If you are using real eggs, ensure they are thoroughly washed and dried to remove any oils that might resist the marker ink. -
Blow out real eggs:
If you want these to last for years, carefully blow out the contents of raw eggs by poking a hole in the top and bottom. Rinse the insides and let them dry out completely for at least 24 hours. -
Or prep wooden eggs:
If using wooden eggs, I recommend giving them a quick coat of matte white acrylic paint if the natural wood grain shows through too much.
Smudge Control
Ink not drying fast enough? Place the egg in an egg cup while you work so you don’t have to hold the painted areas. Hairdryers can speed up drying time.
Step 2: Crafting the Ears
-
Sketch the ear shape:
On your white cardstock or stiff felt, draw a simple, elongated oval shape that tapers at the top and bottom. It should look like a long teardrop. -
Cut out the ears:
Cut out your first ear shape and use it as a template to trace and cut three more, ensuring you have two pairs of matching ears. -
Add inner ear details:
Using your black fine-point marker, draw a smaller, narrower loop inside each ear cut-out to represent the inner ear. Keep the line steady but slightly organic. -
Shape the base:
Slightly curve the bottom edge of each paper ear. This little curve will help the flat paper sit flush against the rounded surface of the egg. -
Attach the ears:
Apply a tiny dot of glue to the bottom curve of the ears. Press them onto the top of the egg, spacing them slightly apart. Hold them in place for a few seconds until the glue sets firm.
Texture Tip
For a softer look similar to the photo, use textured watercolor paper for the ears. The slight grain adds a lovely, crafted dimension compared to standard printer paper.
Step 3: Drawing the Bunny Face
-
Mark the face placement:
Visualize the face placement first. The eyes should sit roughly at the midline of the egg or slightly above it for a cuter look. -
Pencil sketch (optional):
If you’re nervous about inking directly, very lightly sketch the face features with a pencil first. -
Draw the eyes:
Using the black marker, draw two small, solid dots for the eyes. Space them wide enough to leave room for the nose. -
Create the nose:
With your pink paint marker or brush, add a small, inverted heart shape or rounded triangle centered below the eyes. -
Add the mouth:
Once the nose is dry, use the black marker to draw a small vertical line coming down from the bottom of the nose, causing it to split into a ‘w’ shape for the mouth smile. -
Draw the whiskers:
Draw three straight, horizontal lines on each cheek area. Start the stroke near the face and flick outward quickly for a tapered, natural look. -
Let it set:
Allow the ink and paint to dry completely without touching the face area to prevent accidental smearing.
Arranging these sweet little characters on a wooden plate or in a basket creates an instant spring centerpiece.
Chick Peekaboo Egg Designs
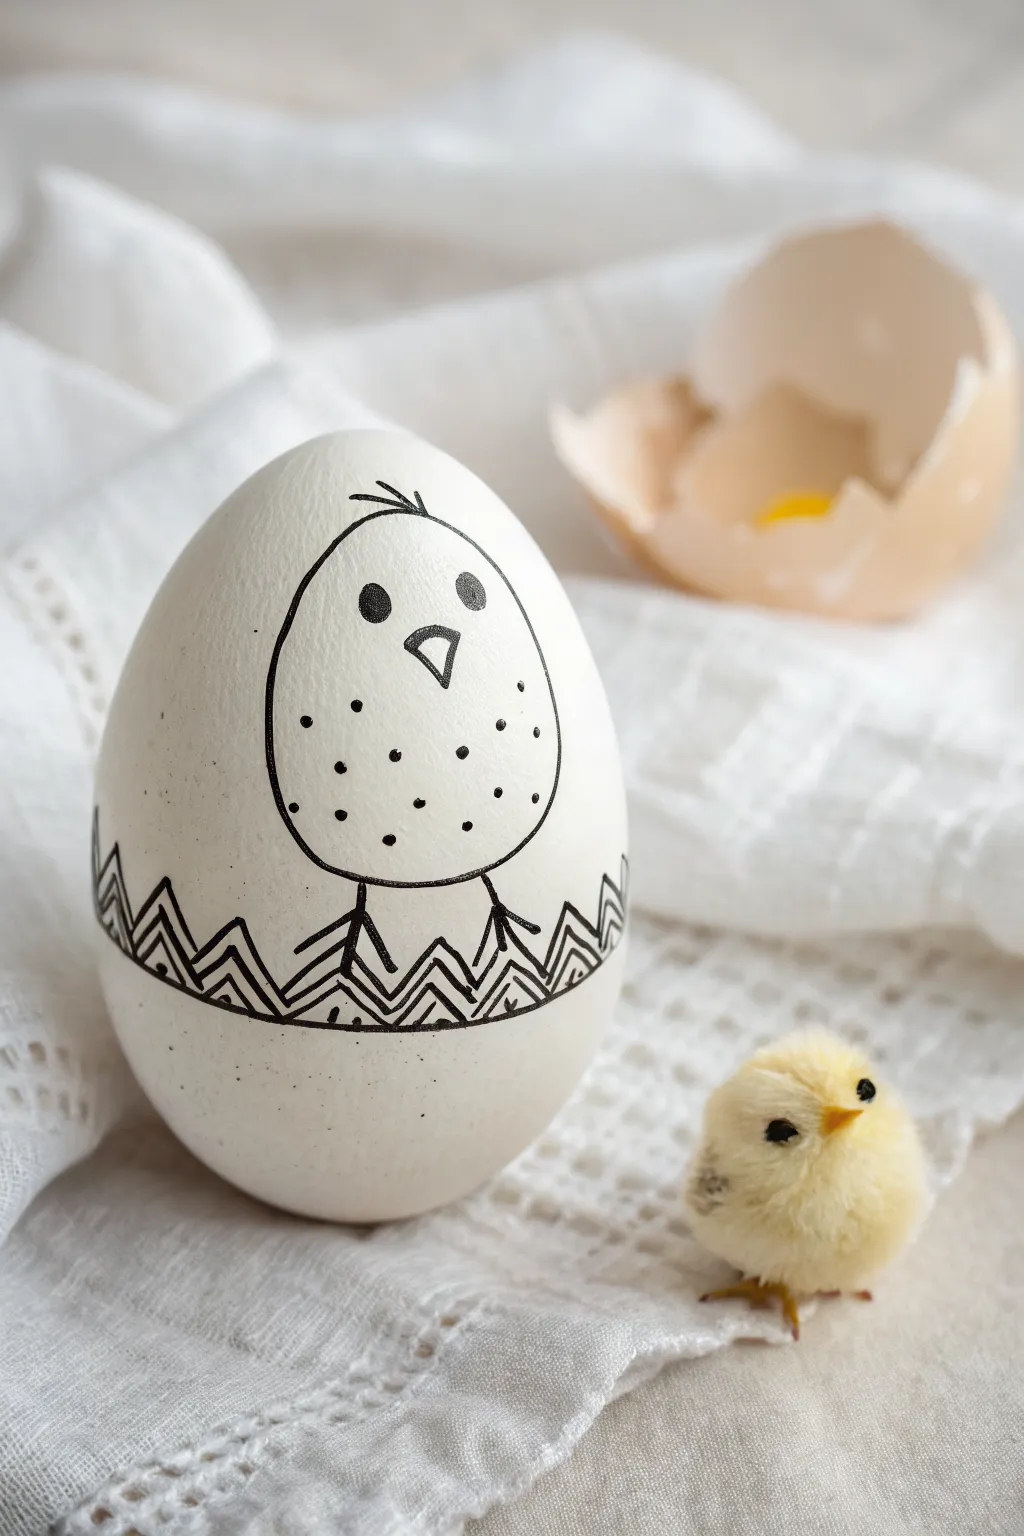
This charmingly minimal design transforms a plain white egg into a playful scene of a hatching chick using nothing but simple black ink. The stark contrast of the black lines against the white shell creates a modern, doodle-style aesthetic that is both adorable and surprisingly easy to achieve.
Detailed Instructions
Materials
- White hard-boiled egg or white ceramic egg
- Fine-point black permanent marker or drawing pen
- Pencil (optional, but recommended)
- Eraser (soft vinyl)
- Paper towel or soft cloth
Step 1: Preparation & Planning
-
Clean the surface:
Before starting, ensure your egg is completely clean and dry. Wipe it down with a soft cloth to remove any oils from your fingers, which can cause the ink to skip or smudge. -
Visualize the layout:
Hold the egg upright. Imagine dividing it into vertical thirds. The zig-zag ‘crack’ pattern will sit just below the halfway mark, acting as a base for your drawing.
Smudge Control
If you make a mistake with permanent marker on a smooth shell, try dipping a Q-tip in rubbing alcohol to gently lift the fresh ink before it sets completely.
Step 2: Drawing the Base Design
-
Sketch the oval body:
Using a pencil very lightly, draw a tall, slightly rounded oval shape for the chick’s body. It should rest on the imaginary line where your crack pattern will go. -
Add the head tuft:
At the very top of your oval, sketch two or three small, curved lines sticking up to create a cute feather tuft. -
Draw the zig-zag border:
Lightly sketch a horizontal line intersecting the bottom section of the chick’s body. Create a zig-zag pattern along this line, ensuring the peaks and valleys are relatively sharp. -
Double the zig-zags:
Draw a second, parallel zig-zag line just below the first one. Connect the points to create a geometric, triangular band effect. -
Refine the pencil lines:
Take a moment to check your proportions. If the chick looks too wide or the crack looks uneven, gently erase and adjust now before committing to ink.
Step 3: Inking the Details
-
Outline the body:
Switch to your black permanent marker. Carefully trace over the main oval of the chick, stopping where the body meets the zig-zag line. -
Ink the shell pattern:
Trace the double zig-zag pattern around the circumference of the egg. I find it easier to rotate the egg slowly in my hand while keeping my pen hand steady. -
Add internal zig-zags:
Inside the zig-zag band you just created, add smaller triangles or lines to mimic the hatching texture shown in the photo. -
Draw the stick legs:
Draw two simple stick legs extending down from the chick’s body. Place them so they appear to be stepping over the cracked shell line. -
Add the beak:
In the upper third of the oval, draw a small, inverted triangle for the beak. Add a tiny line inside it to give it depth. -
Create the eyes:
Draw two solid black circles for the eyes. Place them fairly wide apart to enhance the cute, cartoonish look. -
Stipple the texture:
Add small dots randomly around the lower half of the chick’s body. This stippling technique adds texture and shading without needing gray tones.
Add Pop of Color
For a fun twist, color in the chick’s beak with a neon orange highlighter or paint pen, leaving the rest monochrome to maintain the modern style.
Step 4: Finishing Touches
-
Let the ink set:
Allow the egg to sit untouched for at least 5-10 minutes. Permanent marker can smudge easily on non-porous eggshells if not fully dry. -
Erase guidelines:
Once the ink is completely dry, very gently rub a soft eraser over the design to remove any visible pencil marks. -
Final inspection:
Check for any light spots in your black lines and go over them one last time to ensure a crisp, bold contrast.
Place your finished egg in a simple holder or nest to display your hand-drawn masterpiece
Carrot Pattern Easter Eggs

Bring the vegetable garden to your holiday table with this charming illustration-style egg design. Featuring a repeating pattern of bright orange carrots and leafy green tops, this project uses simple shapes to create a playful and organic look.
Step-by-Step Guide
Materials
- White ceramic, wooden, or hard-boiled egg
- Fine-point black permanent marker (0.5mm or 0.3mm)
- Orange paint pen or acrylic paint
- Green paint pen or acrylic paint
- Small round paintbrush (if using bottled paint)
- Pencil (optional)
- Eraser (optional)
- Matte sealant spray
Step 1: Planning and Outlining
-
Clean surface:
Begin by ensuring your egg is completely clean and dry. Any oils from your fingers can prevent the marker ink from setting properly, so give it a quick wipe. -
Sketch the layout (optional):
If you are nervous about freehand drawing in ink, lightly sketch the triangular carrot shapes randomly around the egg using a soft pencil. Keep the lines faint so they are easy to erase later. -
Draw the carrot bodies:
Using your fine-point black marker, draw elongated, inverted triangles. Vary the angles slightly so some tilt left and some tilt right, creating movement. -
Add tops:
At the top (wider end) of each triangle, draw three to five small loops or lines to represent the leafy greens. Keep these simple and loose. -
Fill the gaps:
Rotate the egg and continue drawing carrots in the empty spaces. This pattern works best when the carrots are evenly spaced but facing different directions to avoid a rigid grid look.
Smudge Alert
If your black marker smears when applying the clear coat, switch to a water-based sealant spray or apply a thin layer of Mod Podge with a very soft brush instead.
Step 2: Adding Color
-
Color the vegetables:
Using an orange paint pen or a fine brush with acrylic paint, carefully fill inside the triangular outlines. Don’t worry if you go slightly over the black line, as we can touch that up later. -
Color the greens:
Switch to your green paint pen or paint. Fill in the leafy loops at the top of each carrot. Use a vibrant, grassy green to contrast nicely against the orange. -
Let it dry completely:
Allow the paint to fully cure. If you try to add details over wet paint, the marker tip will clog or the colors will muddy. -
Re-outline if needed:
If your painting covered up the original black outlines significantly, gently trace over the main shapes again with your black marker to make them pop.
Step 3: Detailing
-
Add texture lines:
Return to the orange carrot bodies with your black marker. Draw small horizontal lines inside the orange shape to mimic the ridges found on real carrots. -
Vary the texture:
Don’t make these lines perfectly straight; curve them slightly to follow the roundness of the carrot. I prefer to add some small dots or stippling near the tips for extra visual interest. -
Leaf details:
Draw a single central line through each green leaf loop to define the stems, connecting them visually to the top of the orange vegetable. -
Check for empty spots:
Look at the egg from all angles. If there are large white gaps, draw tiny partial carrots or loose green leaves peeking in from the “edges” of your view. -
Seal the design:
Once all ink and paint is bone dry, spray the egg with a light coat of matte sealant to prevent the marker from smudging during handling.
Go 3D
For a tactile twist, replace the painted green tops with tiny snippets of actual green yarn or felt glued to the top of each painted carrot.
Display your garden-fresh creation in a small basket or egg cup to celebrate the season
Hand-Lettered “Happy Easter”

This rustic yet modern design combines natural earth tones with crisp hand-lettering for a standout addition to your Easter basket. By creating a negative space effect with a painted white band, you get a clean canvas for your holiday message while keeping the charm of a terracotta or brown egg base.
Step-by-Step
Materials
- Brown or terracotta colored craft egg (or a blown-out brown chicken egg)
- White acrylic paint (matte finish)
- Flat shader paintbrush (medium size)
- Black fine-tip permanent marker or paint pen
- Gold metallic paint pen or gel pen
- Small round paintbrush or toothbrush (for speckling)
- Small cup of water
- Paper plate or palette
- Pencil (optional)
Step 1: Creating the Canvas
-
Prepare the egg:
Ensure your egg surface is clean and dry. If you are using a real brown egg, wipe it down gently with vinegar and water to remove any oils that might resist paint. Paint adhesion is key here. -
Outline the band:
Visualize a wide band wrapping around the center or slightly lower third of the egg. You can trust your eye and freehand this for a more organic look, or lightly sketch two parallel horizontal lines with a pencil to guide your painting. -
Paint the band base layer:
Load your flat shader brush with white acrylic paint. Carefully paint between your imaginary or penciled lines. Don’t worry about perfect opacity on the first go; thin, even coats are better than one thick, gloppy one. -
Refine the edges:
As you paint around the curve, turn the egg slowly in your hand rather than moving the brush long distances. This helps maintain a straighter line on a spherical object. -
Add a second coat:
Once the first layer is dry to the touch, apply a second coat of white paint. This ensures the background is solid and bright enough so that the brown shell doesn’t show through your lettering later. -
Dry completely:
Set the egg aside to dry fully. The paint must be completely cured before you try to write on top of it, or the pen nib will dig into the soft acrylic and ruin the finish.
Clean Lines Hack
Wrap two rubber bands around the egg to act as stencils for the top and bottom of your white paint section. Paint between them, let dry, and snip them off for a crisp edge.
Step 2: Lettering and Details
-
Draft the text:
If you’re nervous about spacing, lightly sketch ‘HAPPY’ on the top line and ‘EASTER’ on the bottom line within the white band using a pencil. Center the words relative to each other. -
Lettering structure:
Using your black fine-tip marker or paint pen, trace over your letters. Use a tall, narrow sans-serif style. Aim for slightly uneven, ‘hand-drawn’ lines to match the rustic aesthetic shown in the photo. -
Thicken the strokes:
Go back over the vertical lines of each letter a second time to add just a tiny bit of weight, making the text pop against the white background. -
Add black stars:
Draw small, solid black five-pointed stars on the left and right sides of the text. Place one larger star to the right of ‘HAPPY’ and a smaller one to the left of ‘EASTER’ to create balance. -
Add gold accents:
Switch to your gold metallic pen. Draw small asterisks or snowflake shapes in the empty spaces—one near the ‘H’ in Happy and another near the ‘R’ in Easter. This adds a subtle shimmer to the design. -
Draw tiny stars:
Fill in any remaining awkward gaps in the white band with tiny gold or black dots and miniature starbursts, keeping the pattern relatively sparse so the text remains the focal point. -
Erase guidelines:
Once the ink is totally dry, gently erase any visible pencil marks from your initial sketch.
Make It Glossy
Once the design is fully cured, coat the entire egg with a layer of satin or gloss Mod Podge. This seals the paint and gives the egg a finished, ceramic store-bought look.
Step 3: The Speckled Finish
-
Prepare splatter paint:
Put a tiny drop of black acrylic paint on your palette and mix in a drop of water. You want an inky consistency—runny enough to fly off a brush, but pigmented enough to see. -
Protect the band:
This is crucial: Cut a strip of paper or use masking tape to loosely cover your white ‘HAPPY EASTER’ band. You want the speckles only on the brown parts of the egg. -
Flick the paint:
Dip a toothbrush or stiff brush into the watery black paint. Run your thumb across the bristles to flick tiny droplets onto the top and bottom brown sections of the egg. -
Hand-paint larger spots:
I prefer to go back in with the very tip of a fine marker or a toothpick dipped in paint to add a few deliberate, larger black dots on the brown sections for variety. -
Remove protection:
Carefully peel away your masking tape or paper strip to reveal the pristine white band contrasted against the speckled brown shell.
Now you have a charming, hand-lettered decoration ready to be displayed in a nest or bowl
Black-and-White Doodle Eggs
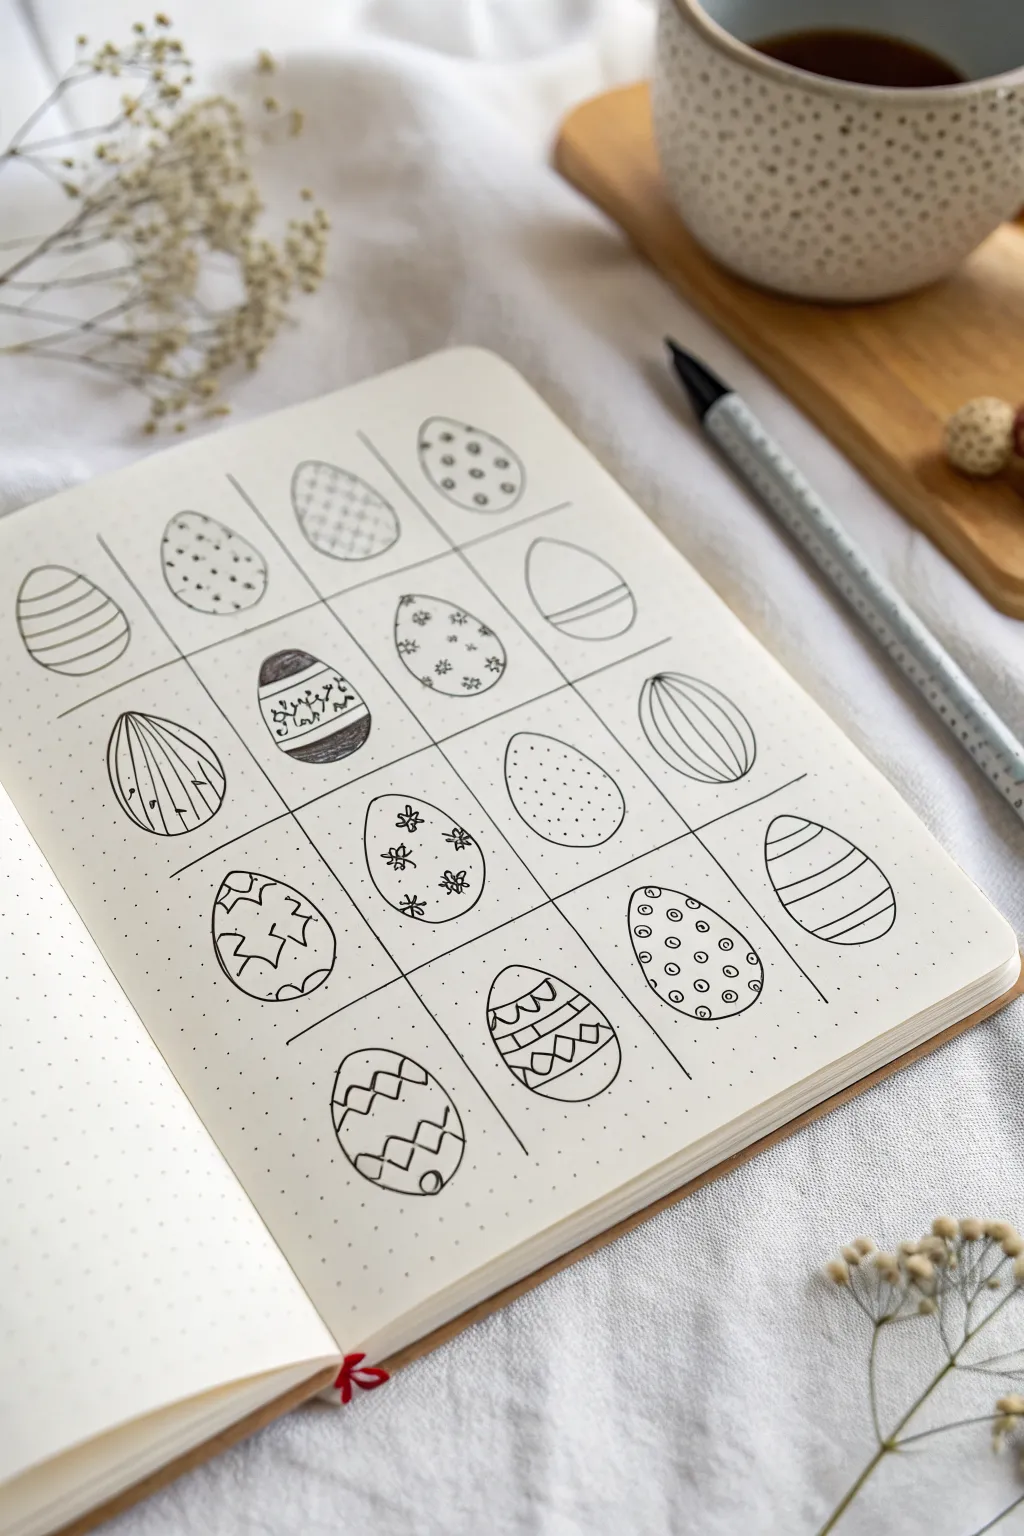
Capture the charm of Easter with this elegant black-and-white grid of patterned eggs, perfect for bullet journals, sketchbooks, or handmade cards. The designs rely on simple lines and repetition to create a cohesive, clean aesthetic that feels both modern and handmade.
How-To Guide
Materials
- A5 dot grid journal or notebook
- Fine black liner pen (0.3mm or 0.5mm)
- Pencil (HB)
- Ruler
- Eraser
Step 1: Setting up the Grid
-
Measure the layout:
Begin by determining the size of your grid squares based on your paper’s dot spacing. A 4×4 grid structure works perfectly here. Aim for each square to be roughly 3.5 to 4 cm (approx. 1.5 inches) wide and tall. -
Draft the grid lines:
Using your pencil and ruler, lightly mark out the horizontal and vertical lines to create sixteen equal boxes. Keep these lines faint, as you might want to erase them later, or trace over them for a structured look. -
Ink the structure:
Take your fine black liner and carefully trace over your pencil grid lines. I like to stop just short of the intersections to keep the look airy, though you can connect them fully for a rigid table effect.
Step 2: Drawing the Base Shapes
-
Sketch egg outlines:
Switch back to your pencil. In the center of each grid square, lightly sketch a simple egg shape. Aim for a slightly wider bottom and a narrower top. -
Check consistency:
Step back and look at your sixteen eggs. They don’t need to be identical clones, but they should generally be the same height and width to maintain the pattern’s rhythm. -
Refine the outlines:
Once satisfied with the placement, go over your pencil egg shapes with the black fine liner. Use a confident, continuous motion for the smoothest curve. -
Erase guidelines:
Wait a moment for the ink to dry completely to avoid smudging, then gently erase the pencil egg sketches, leaving clean black outlines inside your grid boxes.
Wobbly Lines?
Don’t stress over perfect curves. If a line goes astray, thicken the outline slightly to correct the shape. Imperfections add hand-drawn character.
Step 3: Adding Patterns: Row by Row
-
Row 1: Simple Texture:
Start the top left egg with simple horizontal stripes. For the second egg, use tiny dots or stippling. The third can have faint cross-hatching, and the fourth simply a horizontal band near the bottom. -
Row 2: Vertical and Floral:
On the second row, draw vertical curved lines contouring the egg’s shape for the first one. For the second, draw a thick band with text or small doodles inside. The third gets a scatter of tiny flowers, and the fourth stays minimal with a single horizontal line. -
Row 3: Geometric mix:
Create vertical stripes on the first egg here. For the second, add small flower clusters. The third egg is perfect for stippling (lots of dots), and the fourth gets bold, thick horizontal stripes. -
Row 4: Detail work:
For the bottom row, draw a ‘cracked egg’ zig-zag pattern on the first one. The second allows for zig-zags inside horizontal bands. The third features rows of small circles or ‘polka dots’, and the final egg can mirror the simple stripes from the beginning.
Level Up: Gold accents
Once the black ink is fully dry, use a metallic gold gel pen to fill in select stripes or dots. It adds an elegant, festive pop to the monochrome look.
Step 4: Refinement
-
Fill and heavy lines:
Look back at your patterns. Select a few areas—like the bands in the second row or specific shapes—and color them in solid black to add contrast and visual weight. -
Clean up:
Give the entire page one final check for stray pencil marks and erase them. Strengthen any grid lines that look too faint compared to your bold egg patterns.
Now you have a charming collection of patterned eggs ready to decorate your seasonal spread
Geometric Diamond Grid
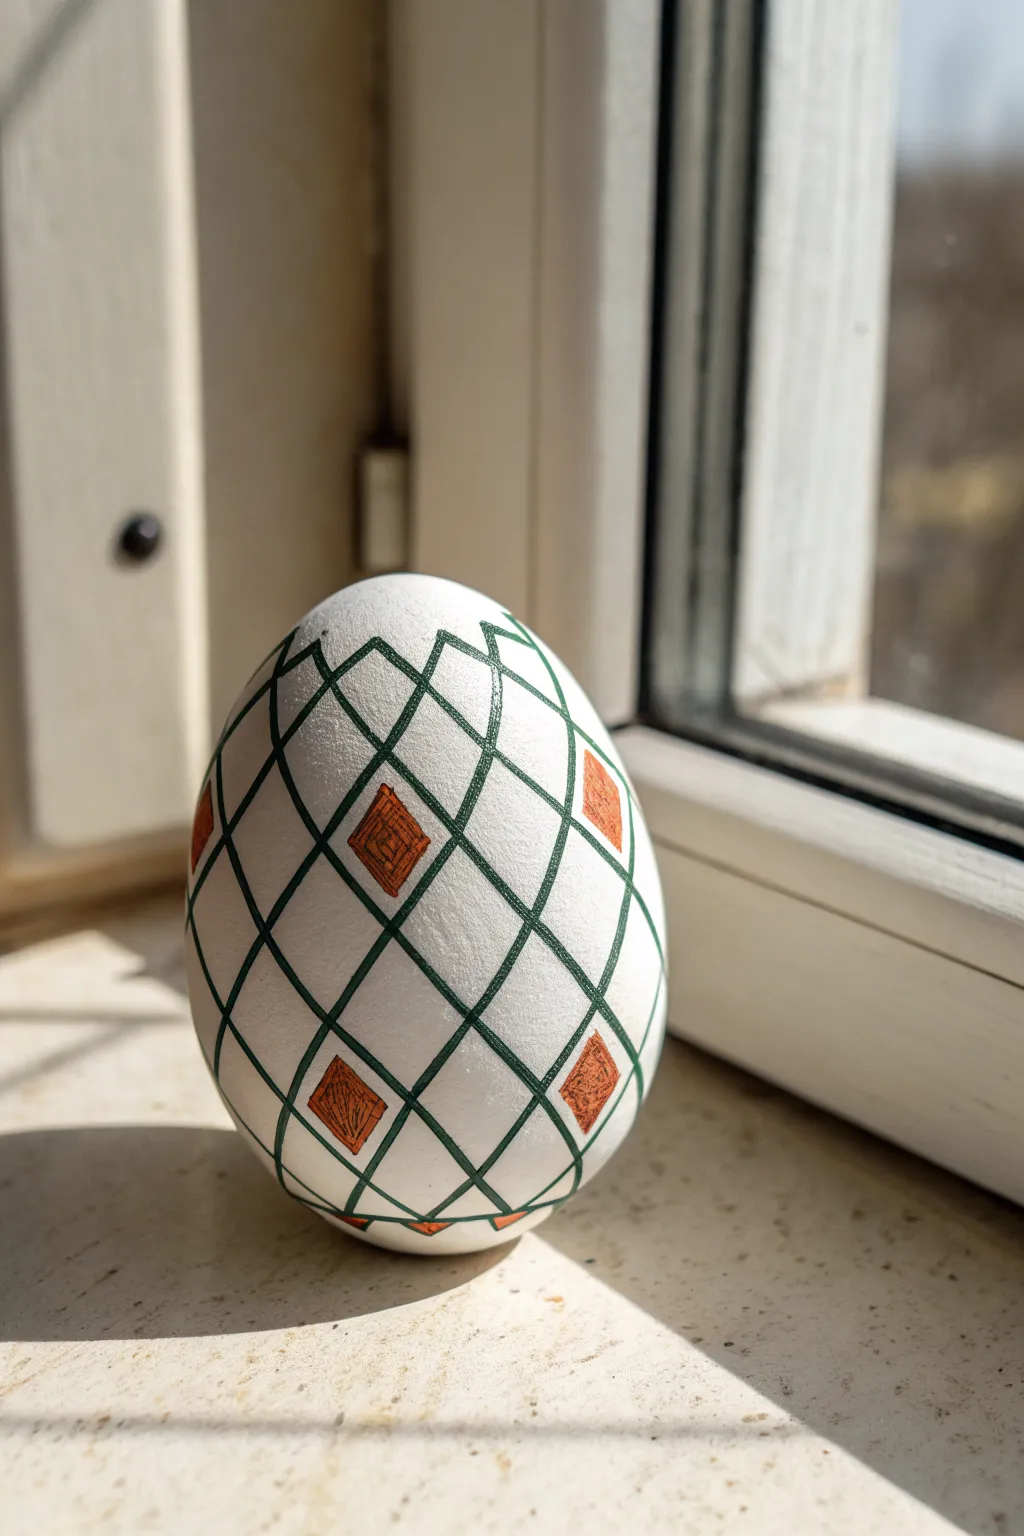
This elegant design transforms a simple white egg into a piece of geometric art using nothing more than a steady hand and a classic diamond grid. The contrast between the crisp, dark green lattice and the warm, textured orange accents creates a sophisticated, modern look perfect for grown-up Easter baskets.
Detailed Instructions
Materials
- White egg (hard-boiled or blown)
- Pencil (HB or lighter)
- Eraser
- Fine-point permanent marker or paint pen (Dark Green)
- Fine-point permanent marker or paint pen (Burnt Orange/Terra Cotta)
- Flexible ruler or tape measure
- Paper towel or egg stand
Step 1: Drafting the Grid
-
Establish the meridian:
Begin by holding your egg vertically. Using your pencil, draw a faint vertical line that circles the entire egg from top to bottom, dividing it in half. -
Create quadrants:
Turn the egg 90 degrees and draw a second vertical line circling the egg, crossing your first line at the top and bottom poles. You now have a basic guide dividing the egg into four equal sections. -
Mark the equator:
Around the fattest part of the egg (the middle), draw a horizontal line that circles the entire circumference, intersecting your vertical lines. -
Subdivide the sections:
To create the lattice density seen in the photo, you’ll need more guidelines. Lightly draw vertical lines exactly halfway between your existing main vertical lines. -
Sketch diagonal guides:
Starting at an intersection on the ‘equator’ line, draw a diagonal pencil line connecting up to the next vertical line. Repeat this zigzag pattern all the way around to form the basis of your diamonds.
Straight Line Secret
Wrap a rubber band around the egg to act as a flexible ruler. It clings to the curves and gives you a perfect edge to trace against for your initial pencil grid lines.
Step 2: Inking the Lattice
-
Trace the first direction:
Switch to your dark green fine-point marker. Carefully trace over your diagonal pencil sketches that slant upward to the right. Keep your wrist loose to handle the curve of the shell. -
Complete the cross-hatch:
Now trace the diagonal lines slanting upward to the left. As these lines cross the first set, you will see the distinctive diamond grid pattern emerge. -
Refine the intersections:
Go back over any lines that look thin or uneven. The beauty of this design relies on the green grid being bold and visible. -
Let the ink set:
Pause for a moment to let the green ink dry completely. I usually give it about five minutes to ensure I don’t smudge the grid while adding color later. -
Erase guidelines:
Once the green ink is totally dry, gently use an eraser to remove any visible pencil marks from your initial drafting phase.
Step 3: Adding the Accents
-
Select your diamonds:
Study the pattern. You aren’t filling every diamond. Choose a pattern, such as filling every third or fourth diamond within a vertical column, or staggering them randomly like the photo. -
Fill the centers:
Using the orange marker, color inside your chosen diamonds. Instead of a solid block of color, use a scribbling or hatching motion to create a bit of texture. -
Add inner details:
For a more intricate look, draw a smaller, concentric diamond shape inside the orange filled areas using the orange marker, pressing slightly harder for definition. -
Create double borders:
Inside the orange diamonds, you can sketch a very faint second diamond outline just inside the green grid lines to create a tiny gap between the fill color and the grid. -
Final inspection:
Rotate the egg and check for any spots where the green lines might skip over the shell’s texture. Touch up gaps with the very tip of your marker.
Metallic Upgrade
Swap the orange marker for gold leaf or a metallic gold paint pen. The shimmer against the matte white shell adds an instant touch of luxury to the grid.
Place your geometric masterpiece near a window to let the natural light highlight the clean lines and colorful accents
Mandala Medallion Eggs
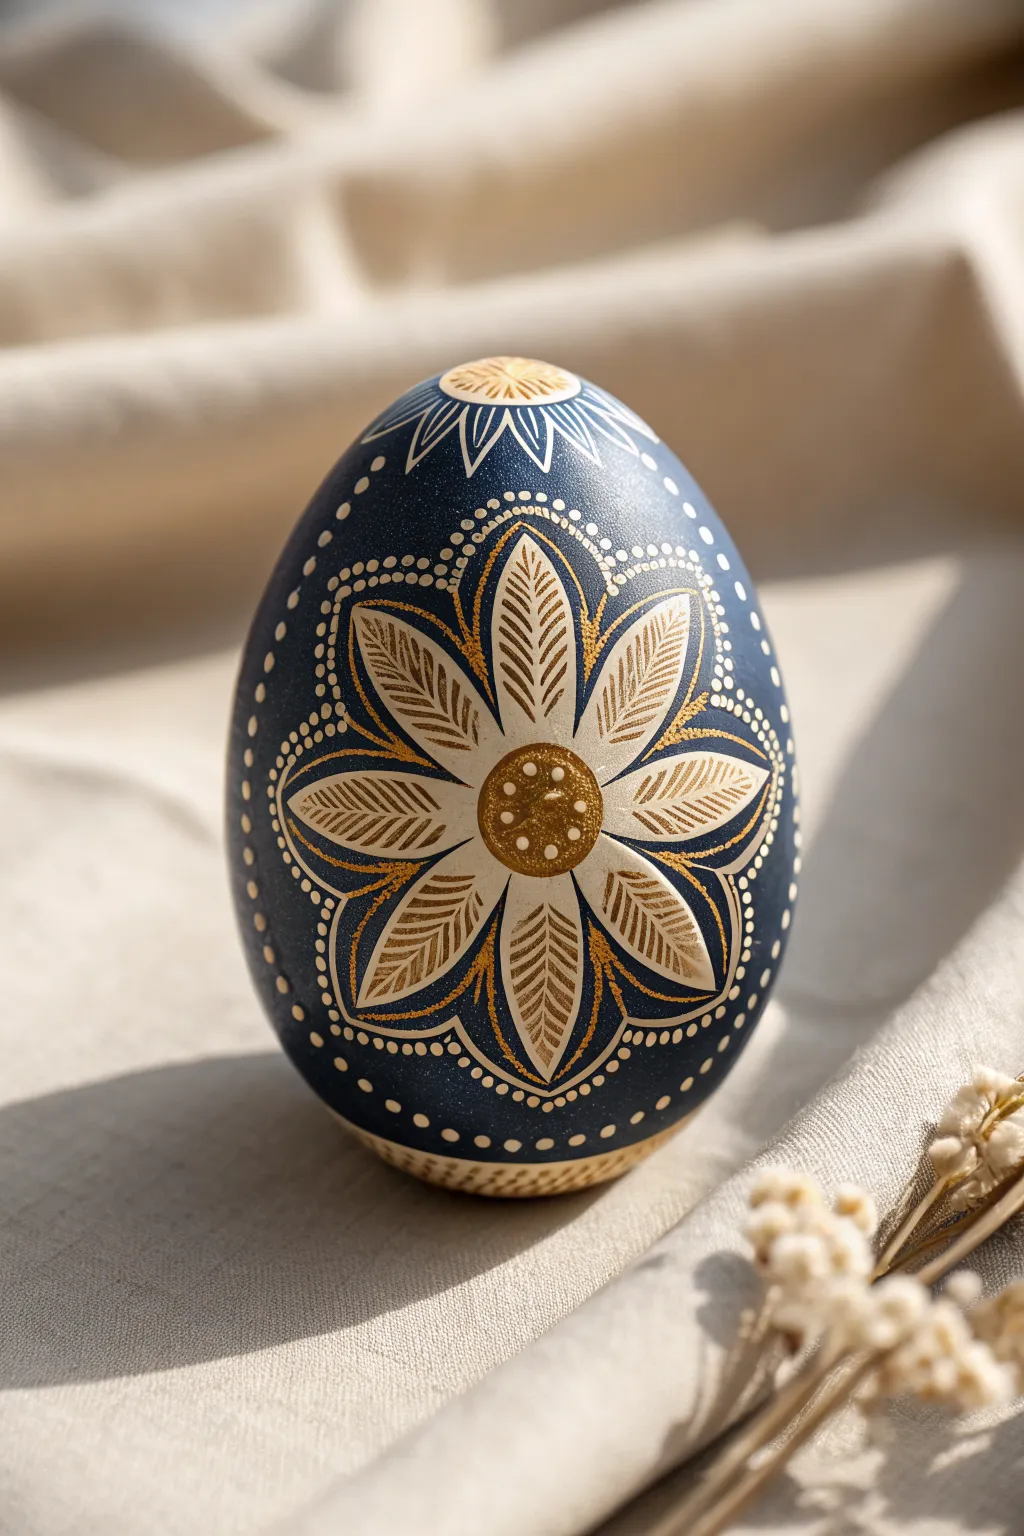
This stunning Easter egg features a deep midnight-blue backdrop that makes the creamy etched floral design pop with elegance. Using a scratch-art technique (or careful painting), you’ll build a central medallion surrounded by delicate stippled dots and gold accents.
Step-by-Step Tutorial
Materials
- Wooden or ceramic egg (smooth surface)
- Deep indigo or navy blue matte acrylic paint
- Wide flat brush for base coating
- sharp pencil (HB or harder)
- Scratch-art tools or a very fine craft knife (e.g., X-Acto)
- White gel pen (0.5mm) or fine liner brush with white acrylic
- Gold metallic paint or gold leaf pen
- Fine dotting tool or toothpick
- Matte spray varnish
Step 1: Base Preparation
-
Prime the surface:
Before laying down color, ensure your egg is perfectly smooth. Sand away any rough spots on your wooden or ceramic egg with fine-grit sandpaper, then wipe it clean with a dry cloth. -
Apply the midnight coat:
Using a wide flat brush, paint the entire egg with deep indigo or navy blue matte acrylic paint. You want solid, opaque coverage, so apply two to three thin layers rather than one thick one. -
Ensure complete drying:
Let the egg dry completely between coats and especially before starting the design work. This is crucial—if the paint is tacky, your tools will drag rather than etch or draw cleanly.
Oops! Uneven Scratches?
If you scratch off too much blue paint by mistake, don’t panic. Use a tiny brush with your base blue color to ‘erase’ the error, let it dry, and scratch again.
Step 2: Drafting the Mandala
-
Mark the center:
visualize the ‘equator’ of the egg. Make a tiny, faint impression with your pencil exactly where the center of your flower will sit to anchor the symmetrical design. -
Sketch the core circle:
Lightly sketch a small circle around your center point—this will be the flower’s center disk. Don’t press hard; we want barely visible guidelines. -
Draft the petals:
Draw eight long, leaf-shaped petals radiating from the center circle. Start with the top, bottom, left, and right petals to establish a cross shape, then fill in the diagonals to keep spacing even. -
Outline the outer border:
Drawing loosely, create a scalloped border that hugs the tips of the petals. This creates the ‘medallion’ shape where we will later add our decorative dots.
Step 3: Creating the Floral Detail
-
Define the petal shapes:
Using your scratch tool (or fine white paint), firmly outline each of the eight petals. If scratching, aim to remove the blue paint to reveal the lighter wood or ceramic underneath. -
Add the leaf veins:
Inside every petal, draw a central spine line from base to tip. Then, create the hallmark ‘feathered’ texture by scratching or painting diagonal lines angling upward from the spine to the petal edge. -
Detail the center disk:
Fill the central circle with a solid coat of gold metallic paint. I like to let this dry briefly before moving to the next texturing step. -
Add texture highlights:
Once the gold center is dry, use your white tool to add tiny dots inside the gold circle. This provides contrast and makes the center look like a textured seed pod. -
Accentuate with gold:
Using a very fine brush or gold pen, add thin gold lines between the white veins on the petals. This subtle shimmer gives the design depth without overpowering the white contrast.
Level Up: Real Gold Leaf
Instead of metallic paint for the center, use size adhesive and apply a small piece of real gold leaf. The texture will catch the light beautifully.
Step 4: The Dotted Medallion
-
Begin the dot border:
Take your dotting tool or toothpick dipped in white paint. Place a series of small, uniform dots following the scalloped pencil guideline you drew earlier, encircling the flower. -
Create the secondary rows:
Add a second row of dots just inside the first one, nestled in the gaps of the outer row. This double-row technique creates a lace-like effect. -
Detail the negative space:
In the dark blue triangular spaces between the petal tips, add a single larger gold dot or a small cluster of three white dots to fill the void.
Step 5: Finishing Touches
-
Top and bottom ornamentation:
At the very top and bottom of the egg (where the surface curves away), etch or paint a simple sunburst pattern—a small semi-circle with rays extending downward—to cap the design. -
Connect the elements:
Run a line of tiny dots connecting the main floral medallion to the top and bottom ornaments, creating vertical continuity. -
Seal the artwork:
Once all paint and ink is thoroughly dry, spray the egg with a matte varnish. This protects the scratch work and keeps the acrylic from chipping over time.
Now you have a sophisticated, folk-art inspired egg that looks beautiful in a bowl or on a display stand
Watercolor Wash and Splatter Eggs
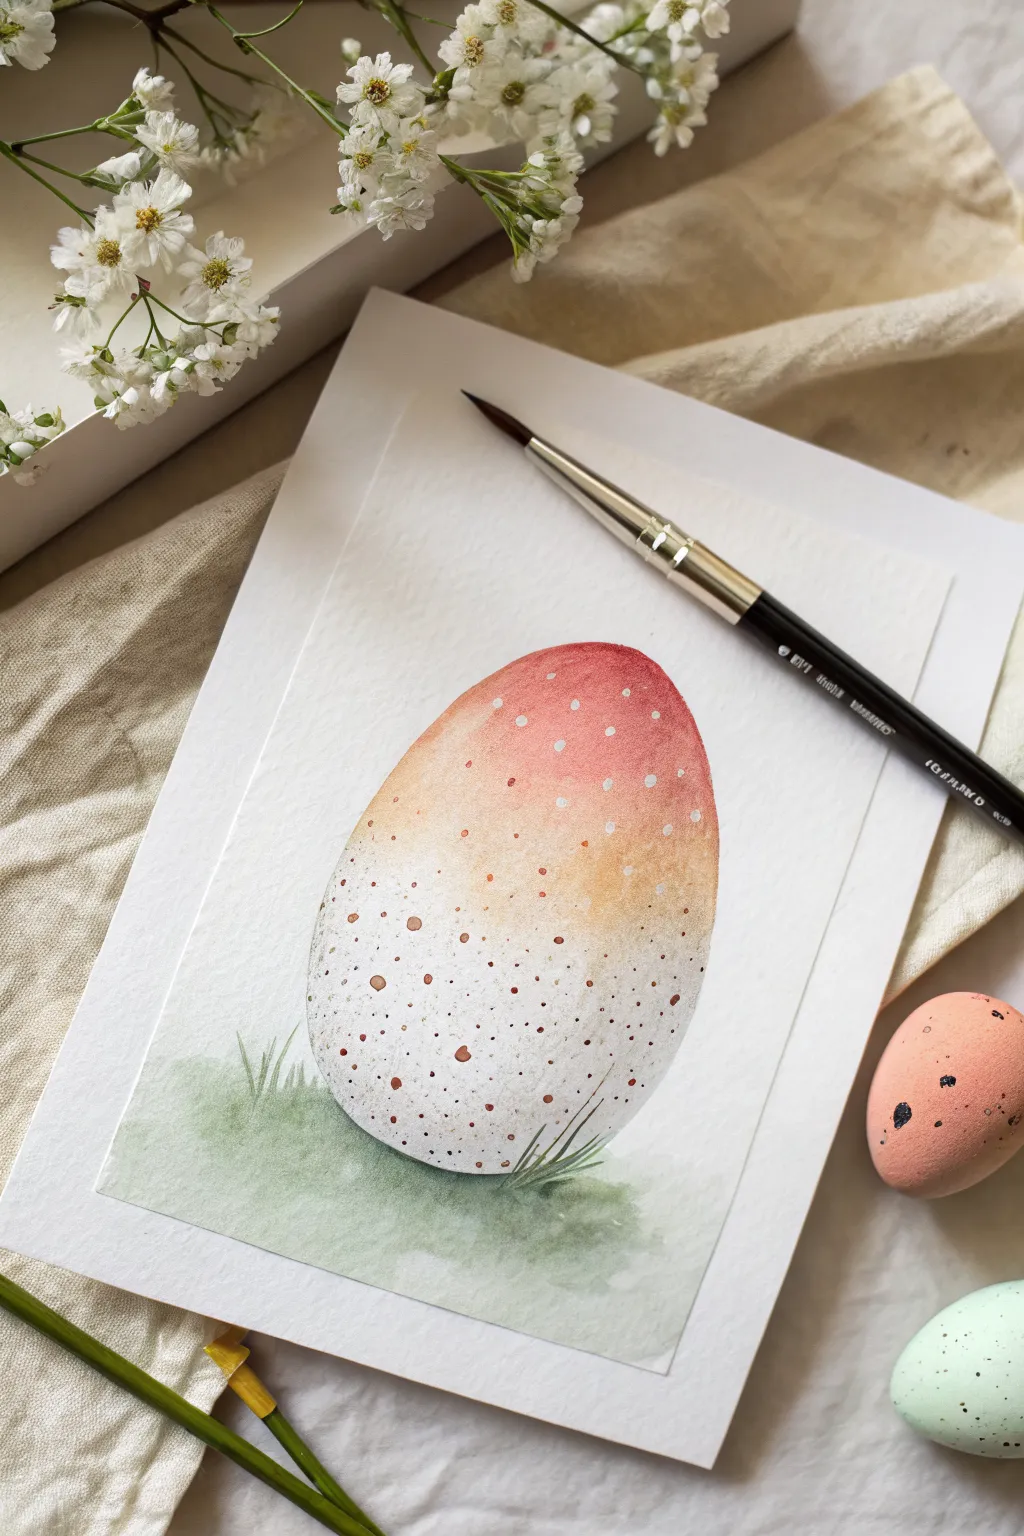
Capture the delicate beauty of spring with this soft, gradient watercolor egg painting. This project combines a smooth wet-on-wet wash with precise splatter techniques to create a realistic, textured speckled egg resting on a bed of fresh grass.
Detailed Instructions
Materials
- Cold press watercolor paper (300 gsm)
- Pencil (HB or H)
- Kneaded eraser
- Watercolor paints (Alizarin Crimson, Burnt Sienna, Yellow Ochre, Sap Green, Sepia)
- Round watercolor brushes (size 6 for washes, size 2 or 0 for details)
- Masking fluid (optional)
- Cup of water
- Paper towels
- Small toothbrush (optional for splatter)
Step 1: Sketching and Preparation
-
Outline the Shape:
Begin by lightly sketching an oval egg shape in the center of your paper. Keep your pencil lines very faint so they don’t show through the transparent watercolor layers later. -
Define the Grass:
Lightly sketch a few upward strokes at the base of the egg to indicate where the blades of grass will eventually be painted. -
Clean Up:
Use a kneaded eraser to gently lift any excess graphite, leaving only a ghost of the outline to guide you.
Uneven Wash?
If your gradient dries with hard edges (blooms), your paper wasn’t evenly wet. Soften hard lines by gently scrubbing with a damp brush, then dab with a tissue.
Step 2: The Gradient Wash
-
Wet the Paper:
Using your larger round brush and clean water, apply a glaze over the entire inside of the egg shape. The paper should be glistening but not forming a puddle. -
Apply the Top Color:
While the paper is wet, load your brush with a mix of Alizarin Crimson and a touch of Burnt Sienna. Touch the top of the egg and let the color bleed downward naturally. -
Introduce Warmth:
Clean your brush slightly and pick up some Yellow Ochre. Blend this into the bottom edge of the red section, creating a soft orange transition in the upper middle area. -
Fade to White:
With a clean, damp brush, gently pull the color from the middle section downward, allowing it to fade completely into the white of the paper near the bottom. This preserves the highlight and gives the egg volume. -
Shadowing:
Mix a very watery grey using a tiny bit of Sepia and blue. Carefully glaze the bottom right curve of the egg to create a subtle shadow form, keeping the very center bottom bright. -
Dry Completely:
Let this base layer dry fully before moving on. The paper must be bone dry, or your speckles will bleed into fuzzy blobs.
Level Up: Masking
Before painting, use masking fluid to draw tiny circles on the egg. Peel it off after the wash dries to reveal crisp white speckles, then paint around them.
Step 3: Speckles and Texture
-
Mix Speckle Color:
Create a concentrated mix of Sepia or Burnt Umber. You want a creamy consistency, not too watery, to ensure distinct dots. -
Controlled Splatter:
For fine mist speckles, load a toothbrush or stiff brush with paint and flick the bristles with your thumb. Focus the density near the bottom of the egg. -
Protect the Background:
I usually hold a scrap piece of paper over the white background area while splattering to keep the spray contained inside the egg shape. -
Hand-Painted Dots:
Switch to your smallest detail brush (size 0). Paint larger, distinct brown spots randomly throughout the lower two-thirds of the egg. -
Adding Contrast:
Add a few tiny white gouache or gel pen dots near the top red section to suggest light reflecting off the texture, creating a magical sparkle effect.
Step 4: Grounding the Scene
-
Base Greenery:
Mix a light wash of Sap Green. Paint a loose, horizontal patch under the egg to ground it, letting the edges fade out softly. -
Grass Blades:
While the green base is still slightly damp, load a size 2 brush with darker, more concentrated green paint. -
Flick Strokes:
Using quick, upward flicking motions, paint blades of grass overlapping the bottom of the egg. Vary the height and angle for a natural look. -
Final Shadows:
Add a touch of dark green or brown right directly underneath the egg where it touches the grass to plant it firmly in the scene.
Now you have a serene, handcrafted piece of art perfect for a greeting card or seasonal display
Dip-Dye Ombre Band Drawings
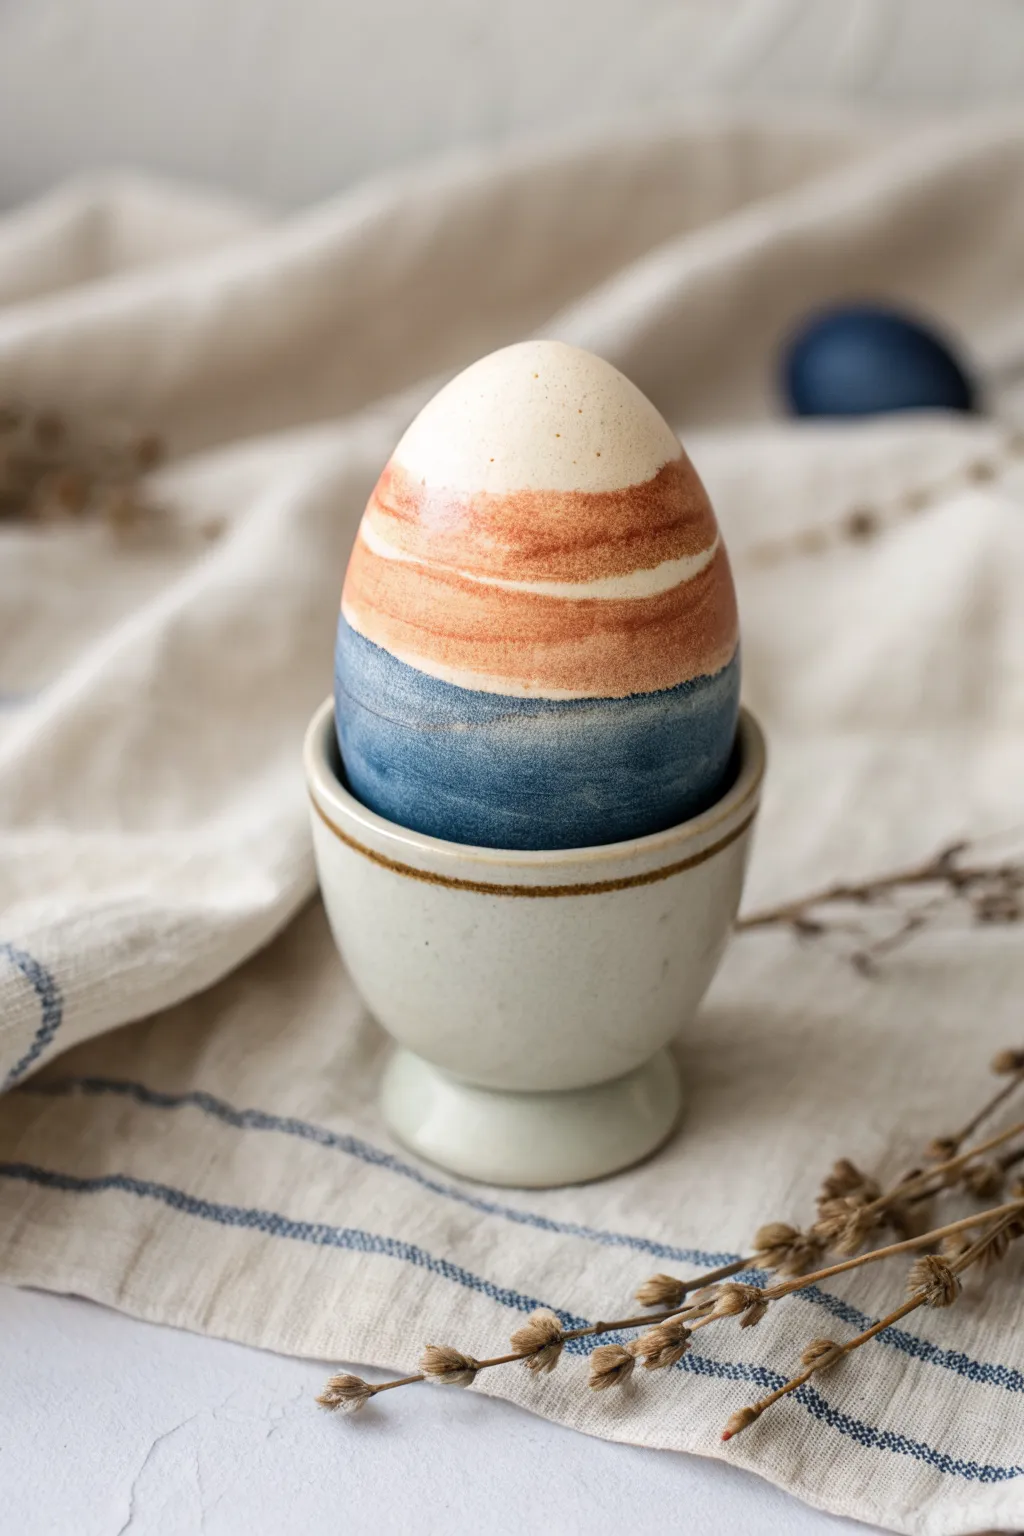
Capture the serene beauty of a desert landscape with this unique Easter egg design featuring layered bands of terracotta and deep indigo. The organic, striated texture created by the dye mimics sedimentary rock layers for a sophisticated, earthy finish.
Step-by-Step
Materials
- Hard-boiled white eggs (cooled and dry)
- Deep blue liquid food coloring or fabric dye
- Terracotta or rust-orange liquid food coloring
- White vinegar
- Boiling water
- Two heat-safe glass jars or mugs (wide enough for an egg)
- Paper towels
- Spoon or egg dipper
- Optional: Clean, dry paintbrush for texture touches
- Egg drying rack or carton
Step 1: Preparation and Blue Base
-
Prepare the workspace:
Cover your work surface with paper towels or newspaper to prevent staining. Set out your heat-safe jars for the dye baths. -
Clean the egg:
Ensure your hard-boiled egg is completely cool and dry. Wipe the shell gently with a little vinegar on a paper towel to remove any natural oils, which helps the dye adhere evenly. -
Mix the blue dye bath:
In the first jar, mix 1/2 cup of boiling water with 1 teaspoon of vinegar. Add 15-20 drops of deep blue coloring. Stir well to combine. -
Initial dip:
Hold the egg securely in your fingers or place it on a spoon. Carefully lower just the bottom third of the egg into the blue dye bath. -
Hold steady:
Hold the egg in this position without moving it up or down for about 3-5 minutes. The longer you hold it, the deeper the denim blue color will become. -
Lift and dry:
Gently lift the egg straight up. Use a paper towel to carefully blot the very bottom drop of excess dye to prevent running. Let the blue layer dry completely for 10-15 minutes by resting it upside down or on a rack.
Step 2: Creating the Rusty Horizon
-
Mix the terracotta dye:
In the second jar, prepare the rusty orange color. Mix 1/2 cup boiling water, 1 teaspoon vinegar, and your terracotta coloring. If you don’t have a pre-made rust color, I find mixing red with a few drops of yellow and a tiny dot of brown works well. -
Angle the dip:
Hold the dried blue-bottomed egg. You will need to dip the middle section. Lower the egg into the orange dye so that the liquid covers the band above the blue line, but leaves the very top white. -
Create the overlap:
Allow the orange dye to slightly overlap the top edge of the blue section. This creates a dark, transition line that adds depth. -
Add movement:
Instead of holding perfectly still like before, gently bob the egg up and down very slightly—just a millimeter or two—while submerged in the orange dye. This creates the striated, ‘brushed’ look seen in the reference image. -
Check color intensity:
After about 2 minutes, lift the egg to check the color. It should be a warm, earthy tone. If it’s too pale, re-submerge for another minute. -
Blot and rest:
Remove the egg and carefully blot excess liquid. Let this layer dry completely before handling further.
Bleeding Lines?
If dye runs between layers, wrap a rubber band tightly around the egg at the desired line before dipping to act as a barrier.
Step 3: Refining the Textures
-
Assess the bands:
Once dry, look at the transition lines. If the orange band looks too solid, we can add some organic texture. -
Texture technique:
Dip a barely damp paper towel or a dry paintbrush into a tiny amount of undiluted orange dye. -
Feather the edges:
Lightly drag the brush or towel horizontally across the orange band to create streaks that mimic sedimentary rock or clouds. -
Final drying:
Place the finished egg in a drying rack and allow it to sit undisturbed for at least 30 minutes to set the colors permanently.
Speckled Finish
Flick a toothbrush dipped in diluted brown paint over the dry egg to add subtle speckles for a realistic bird egg effect.
Place your earthy masterpiece in a neutral ceramic cup to highlight the rich color contrast
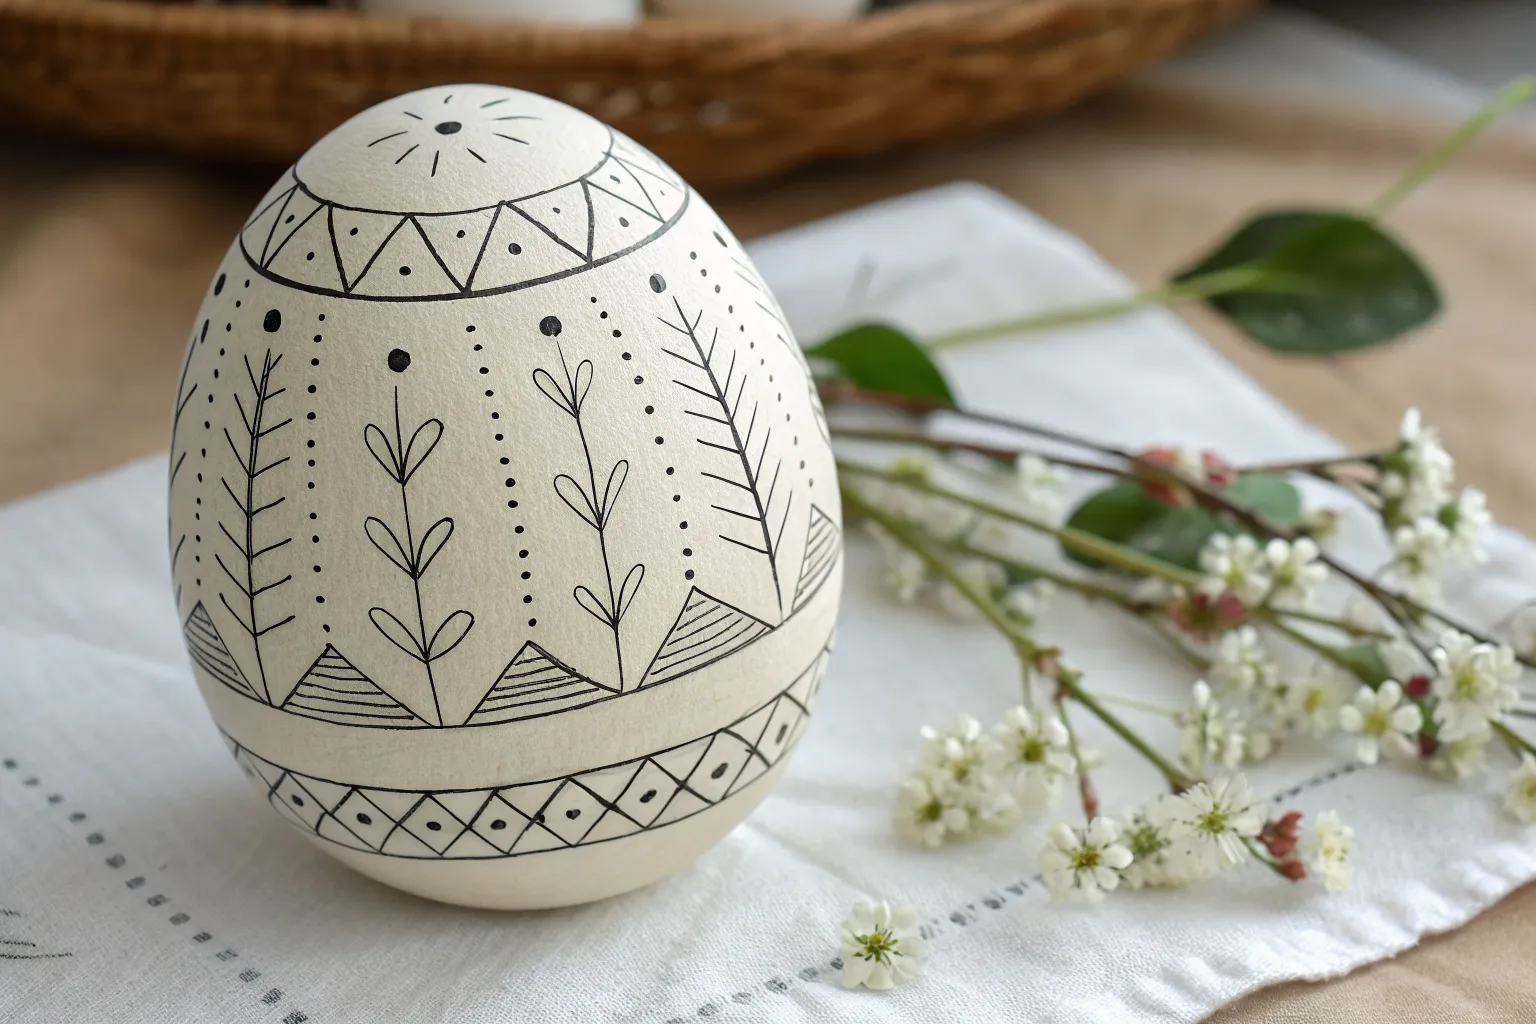
Negative Space Masked Shapes
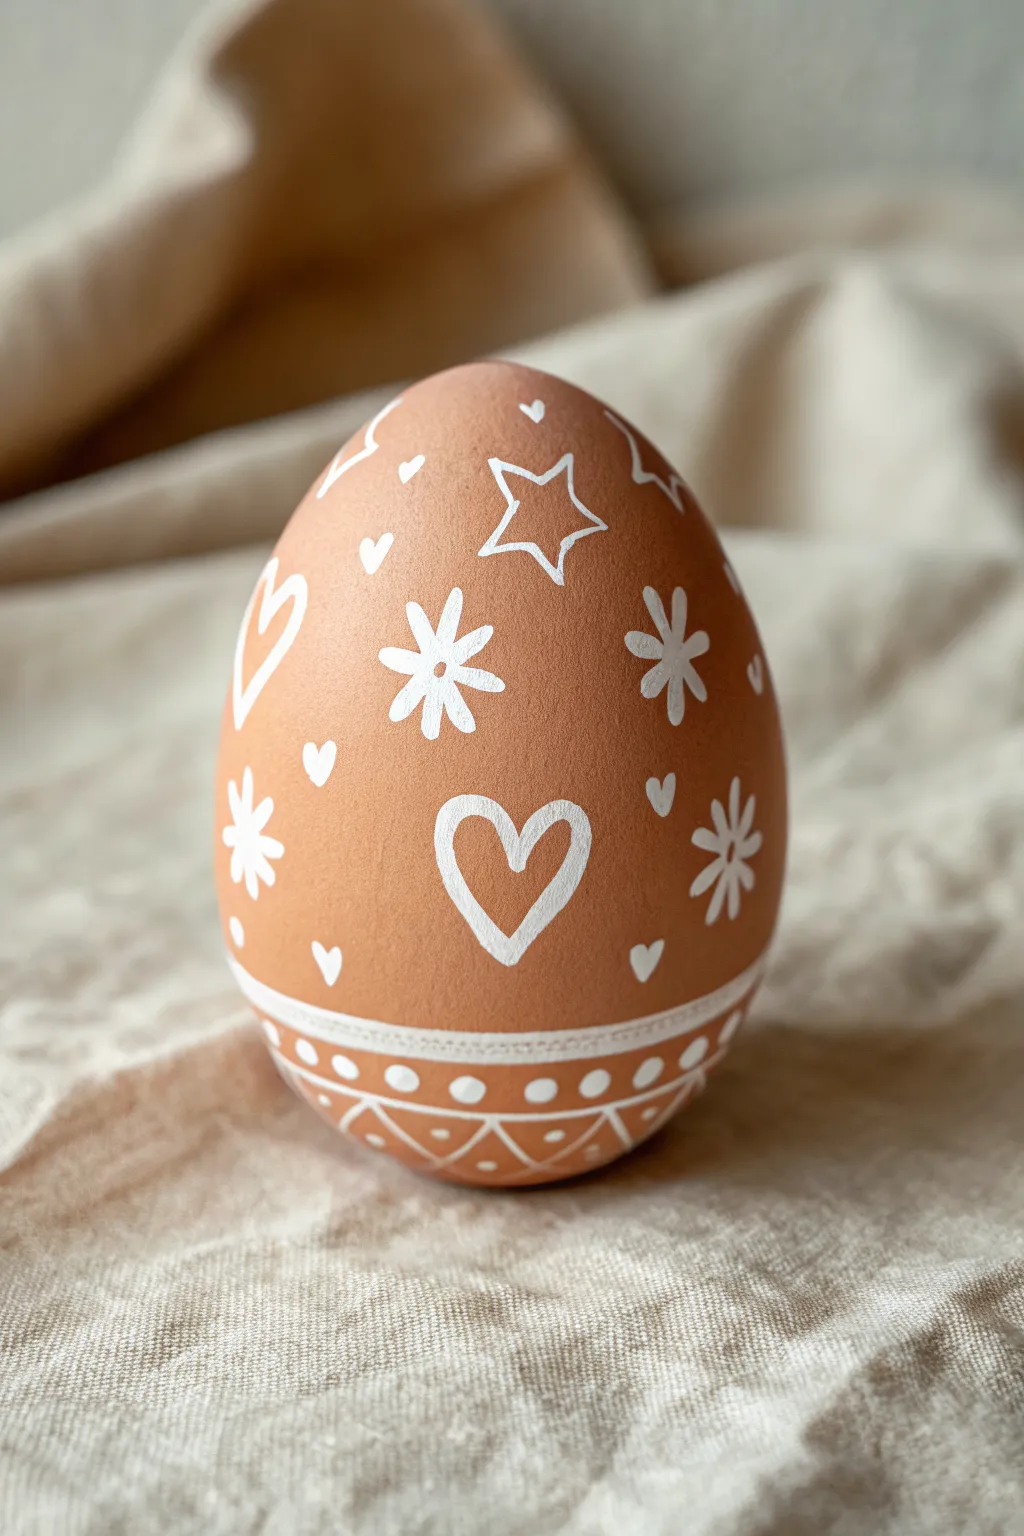
This elegant Easter egg relies on the striking contrast between a natural brown shell and opaque white ink for a pseudo-negative space effect. The folk-inspired motifs—hearts, stars, and snowflakes—create a delicate, lace-like appearance without the need for messy dyes.
Step-by-Step Guide
Materials
- Hard-boiled or hollowed brown egg
- White extra-fine paint marker (oil-based or acrylic)
- Pencil (optional, hard lead like 2H)
- Soft eraser
- Egg cup or stand (for drying)
- Paper towel
Step 1: Preparation & Planning
-
Select the egg:
Choose a brown egg with a smooth, consistent shell color. If you are boiling it, you might want to rub it with a tiny bit of vinegar water afterward to ensure it is perfectly clean and free of natural oils, which helps the marker adhere better. -
Map the zones:
Visually divide your egg into a main upper canvas and a lower border area. The bottom third will be reserved for a geometric band, while the top two-thirds will host the scattered icons. -
Sketch lightly (optional):
If you are nervous about freehanding, use a hard pencil (like a 2H) to extremely lightly mark the placement of your largest shapes. Keep the lines faint so they don’t show through the white ink.
Ink Not Flowing?
If the marker feels scratchy or dry, press the nib onto a scrap paper repeatedly to re-saturate it. Don’t press hard directly on the fragile shell.
Step 2: Drawing the Main Motifs
-
Start with the heart:
Locate the center-front of the egg. Draw the outline of a simple, open heart. Keep your hand steady and let the curve of the egg guide the marker tip. -
Add the stars:
Above and slightly to the right of the heart, draw a five-pointed open star. I like to rotate the egg slightly in my hand as I draw the points to keep the angles even. -
Draw the snowflakes:
Create simple asterisk-style flowers or snowflakes. Draw one central vertical line, crossing it with two diagonal lines to make six arms. Add small rounded tips to the ends of the lines for a softer look. -
Draw secondary hearts:
Place a smaller open heart roughly opposite or diagonally from your first large heart to balance the composition. -
Fill the gaps:
Look for large empty spaces between your main drawings. Fill these with small, solid white hearts (just simple ‘V’ shapes with rounded tops) scattered randomly. -
Add detail dots:
Around the main shapes, dab tiny dots of white ink. These filler elements make the design look denser and more intricate, mimicking lace.
Step 3: Creating the Geometric Border
-
Define the upper boundary:
About one-third of the way up from the bottom, draw a solid white horizontal line that circumscribes the entire egg. This acts as the ceiling for your border pattern. -
Draw the lower boundary:
Draw a second parallel line about half an inch below the first one. This creates the ‘band’ for your geometric design. -
Create the zig-zag:
Inside the band you just created, draw a continuous zig-zag line that touches the top and bottom parallel lines, creating a series of triangles. -
Fill the triangles:
Inside each resulting triangle, place a single centered dot. This is a classic folk-art technique that adds immense detail with minimal effort. -
Add the scalloped bottom:
Below the bottom-most parallel line, draw a series of connecting arches (scallops) that loop downward around the base of the egg. -
Detail the scallops:
Just as you did with the triangles, place a small dot in the center of each scallop loop and intricate cross-hatching or dots at the intersection points.
Pro Tip: Anchor Your Hand
Rest your pinky finger on the egg surface as a stabilizing pivot point while drawing. This prevents shaky lines on the curved surface.
Step 4: Finishing Touches
-
Let it cure:
Place the egg in a holder and let the paint dry completely. Paint markers on eggshells can take a surprisingly long time to set fully—give it at least 20 minutes. -
Erase guidelines:
Once you are absolutely certain the white ink is dry, gently run a soft eraser over any visible pencil marks. -
Double-check opacity:
If your white lines look translucent against the dark brown shell, retrace the main shapes (like the big heart and stars) one more time to brighten them up.
Display your collection of patterned brown eggs in a simple ceramic bowl or on a linen cloth to highlight their rustic, handmade charm


Have a question or want to share your own experience? I'd love to hear from you in the comments below!