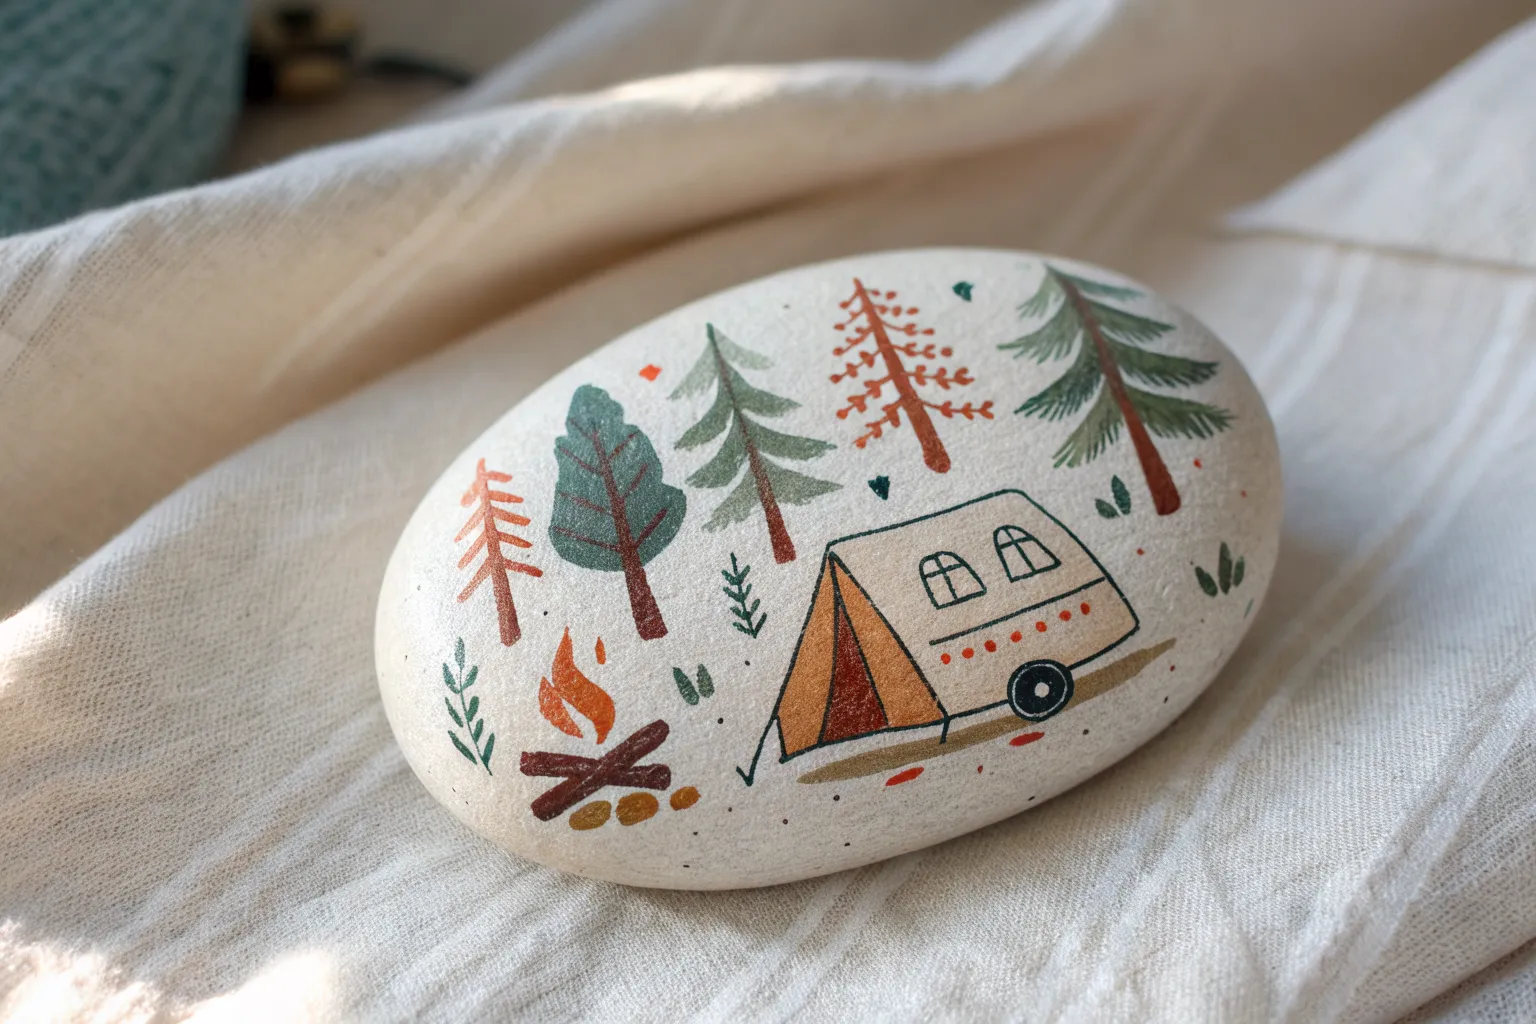
If you love tiny art projects that instantly feel like a mini vacation, camping painted rocks are such a satisfying win. I’m sharing my favorite camping theme designs—starting with the classics everyone expects, then drifting into some more playful, surprising ideas.
Simple Tent Silhouette

This rustic design captures the magic of camping under the stars with three high-contrast tipis nestled against a line of evergreens. The clever use of unpainted stone near the bottom provides a natural texture that grounds the entire scene.
Step-by-Step Tutorial
Materials
- Smooth, rounded river stone (medium to dark grey)
- Black acrylic paint
- White or cream acrylic paint
- Orange acrylic paint (tiny amount)
- Fine liner brush (size 00 or 000)
- Small flat brush (size 2-4)
- Dotting tool or toothpick
- Clear matte sealer (spray or varnish)
Step 1: Setting the Scene
-
Clean your canvas:
Begin by scrubbing your rock with warm water and a little soap to remove any dirt or oils, then let it dry completely. A clean surface ensures your paint won’t peel later. -
Plan the horizon:
Visualize a wavy line running horizontally across the lower third of the rock. This will be your snow or ground line. -
Paint the sky:
Using your flat brush and black acrylic paint, fill in the entire area above your imaginary horizon line. Be careful to create a distinct, slightly undulating edge where the black meets the unpainted stone. -
First drying phase:
Allow the black background to dry fully. It needs to be completely matte and touch-dry before you start adding the white details to prevent any greying or smudging.
Creamy Coverage
Painting light colors over black is tricky. Instead of one thick gloopy layer, paint three thin layers of cream, letting each dry fully in between, for a smooth finish.
Step 2: Constructing the Tipis
-
Outline the triangles:
Mix a tiny bit of brown or tan into your white paint to create a warm cream color. With a fine liner brush, paint three large triangles on the black background. The bases should touch the horizon line, and the tips should stop short of the rock’s top edge. -
Fill the forms:
Fill in these triangles with your cream mixture. You might need two coats to get solid coverage over the harsh black background. -
Define the structure:
Once dry, switch back to black paint and your liner brush. Paint a thick line down the right side of each triangle to create the open flap or shadow effect. -
Add the poles:
Extend the two side lines of each triangle slightly upward past the peak to form the crossing poles. I like to make these lines slightly thinner at the very tips for realism. -
Create the geometric patterns:
Near the top of each tent, paint two horizontal lines. Inside this band, add small vertical stripes to create a decorative geometric pattern. -
Add the cozy glow:
On the middle tipi only, paint a tiny rectangle using bright orange paint on the right-hand shadow side to mimic a glowing window or entrance.
Moonlight Magic
Add a large, pale yellow circle in the upper corner for a full moon, or paint thin silver highlights on one side of the tipi poles to suggest moonlight reflection.
Step 3: Details & Atmosphere
-
Draw the forest:
Along the bottom area where you left the stone unpainted, use black paint and the liner brush to create a row of small pine trees. -
Tree technique:
For each tree, draw a vertical line for the trunk, then add downward-slanting branches getting progressively wider at the bottom. Keep these distinct and spaced out in a single line. -
Starry sky:
Dip a dotting tool or the tip of a toothpick into white paint. Gently dot the black sky area, varying the spacing. -
Varying star sizes:
Make some stars slightly larger than others by engaging the tool with a bit more pressure, but keep the overall density light so it doesn’t look cluttered. -
Final cure:
Let the entire rock dry for at least 24 hours to ensure all layers, especially the thick background, are set. -
Protect the art:
Finish by applying a clear matte sealer. This protects the stone from weather if you plan to hide it outside and keeps the unpainted stone looking natural rather than glossy.
Now you have a peaceful camping scene captured forever on stone, ready to gift to an outdoorsy friend


Cozy Campfire Glow
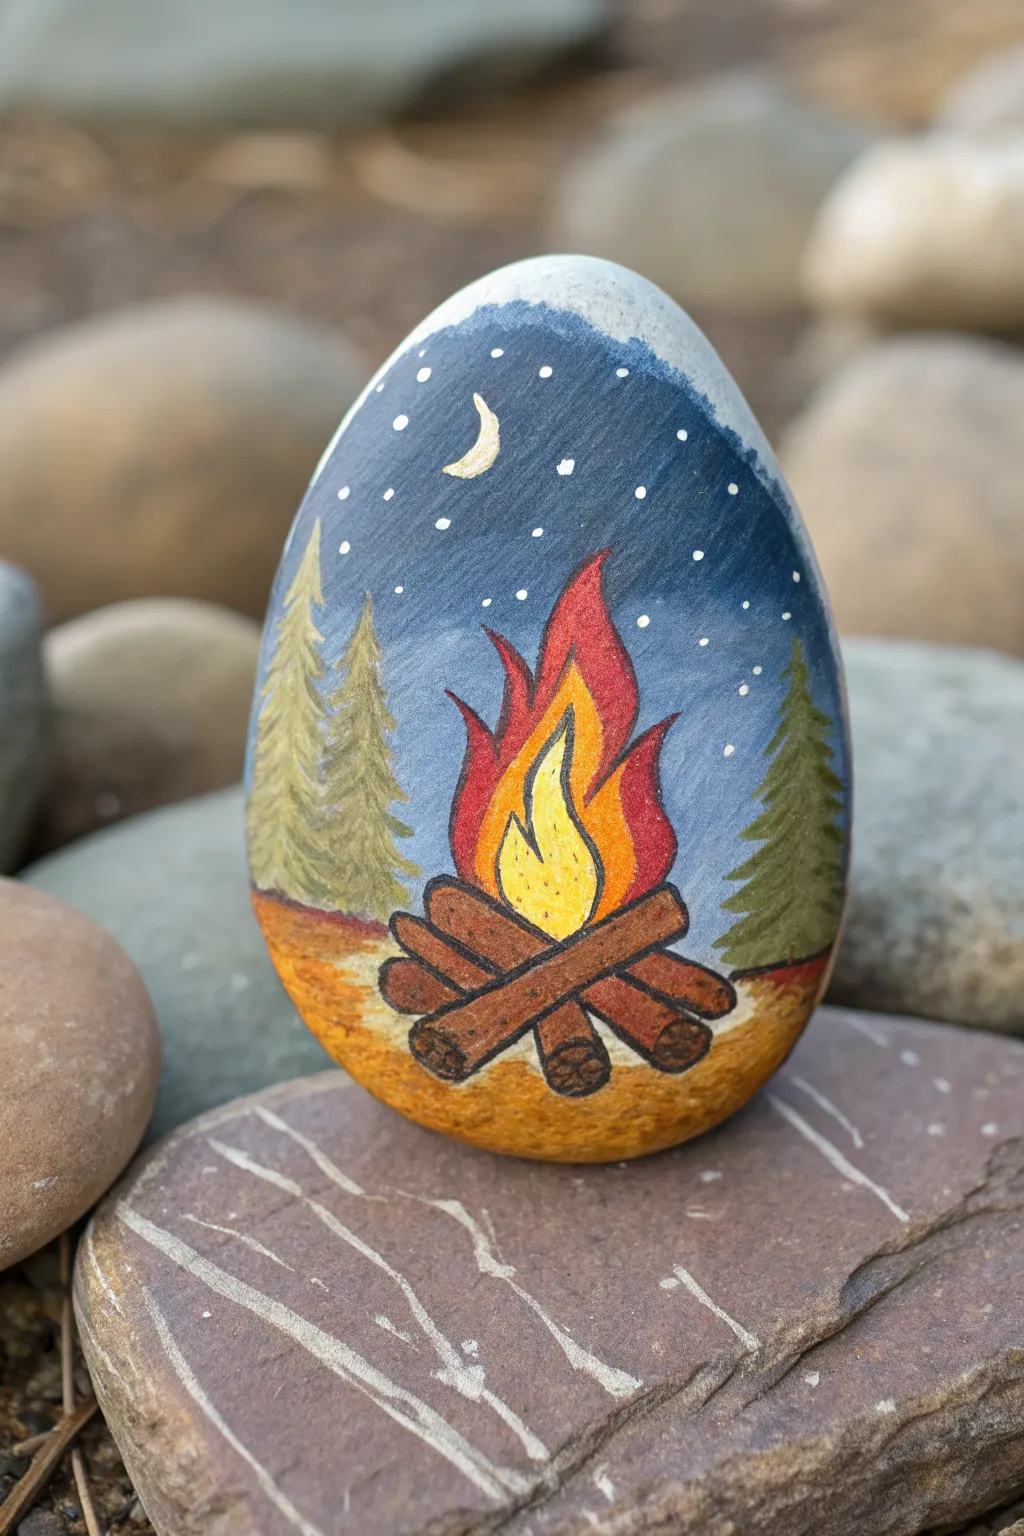
Capture the warmth of a crisp evening outdoors with this delightful painted rock. Featuring a roaring campfire nestled beneath a starry sky, this charming design uses simple shapes and vibrant colors to create a cozy, nostalgic scene.
Step-by-Step Guide
Materials
- Smooth, egg-shaped river rock (cleaned and dried)
- Acrylic paints (dark blue, black, medium blue, yellow, orange, red, brown, white, tan/dark green)
- Fine liner brushes (sizes 0 and 00)
- Small flat brush
- Pencil for sketching
- Gloss varnish or sealant
Step 1: Setting the Scene
-
Prime the Surface:
Before painting details, I like to create a solid base. Since the sky dominates the top half, mix a deep midnight blue with a tiny touch of black. Paint the upper two-thirds of the rock with this mixture, using a flat brush for smooth coverage. -
Lay the Groundwork:
For the bottom third, mix a golden-brown or tan shade. Paint this area to represent the dirt ground, blending slightly where it meets the blue sky to create a soft horizon line rather than a harsh cut. -
Sketch the Elements:
Allow the base coat to dry completely. Once dry to the touch, use a pencil to very lightly sketch the basic shapes: the triangular outline for the fire, the crossed logs at the bottom, and vertical lines for the trees on either side.
Pro Tip: Glowing Fire
To make the fire look hotter, blend the yellow and orange paint slightly while they are still wet on the rock for a smooth, seamless transition.
Step 2: Building the Fire
-
Paint the Logs:
Start with the firewood. Using a medium brown paint and a detail brush, fill in the thick, rectangular shapes of the logs. Arrange them so two large logs are crossed in an ‘X’ shape, with smaller logs tucked underneath. -
Add Log Details:
Once the brown is dry, outline the logs with a fine black line. Add small circles or spirals on the ends to look like wood grain. -
Base of the Flame:
Start the fire with the hottest part. Paint a tear-drop shape in the center of the logs using bright yellow paint. You may need two coats here to ensure it pops against the darker background. -
Add the Orange Layer:
Paint jagged, flame-like shapes surrounding the yellow center using bright orange. Let the orange lick upwards, creating distinct points top. -
Finish the Flames:
Complete the fire by outlining the orange sections with a deep red. Extend these red tips higher, curling them slightly to mimic movement. Finally, use a very fine black liner to outline the entire fire shape for a graphic, illustrative look.
Level Up: Sparkle Sky
Mix a tiny pinch of fine silver glitter into your sealant or the blue sky paint layer to make the stars actually twinkle in the sunlight.
Step 3: Forest & Sky Details
-
Paint Tree Silhouettes:
On the left and right sides of the fire, paint simple pine trees. For the left tree, use a lighter sage green or tan to suggest distance or firelight reflection. For the right tree, use a darker forest green. -
Texture the Trees:
Instead of painting solid triangles, use short, downward brush strokes to mimic pine needles and branches. Let the bottom branches touch the ground area. -
Create the Crescent Moon:
In the upper left portion of the sky, carefully paint a small, thin crescent moon using a mix of white and pale yellow. -
Add Starlight:
Dip the tip of a toothpick or a very fine dotting tool into white paint. Gently dot ‘stars’ across the blue sky area. Vary the spacing to make it look natural, avoiding uniform rows. -
Warm Ground Glow:
To show the fire’s light, dry brush a little bit of orange or yellow paint lightly onto the ground immediately surrounding the fire pit.
Step 4: Finishing Touches
-
Final Outlines:
Check your black outlines around the fire and logs. If any paint overlapped, touch up the lines now with your 00 liner brush to ensure everything looks crisp. -
Seal the Rock:
Allow the entire rock to cure for at least 24 hours. Finish by applying a coat of gloss varnish or spray sealant to protect the paint from chipping and to give the night sky a beautiful sheen.
Place this glowing rock in your garden or on a porch step to keep the camping spirit alive all year round


Starry Night Sky and Moon
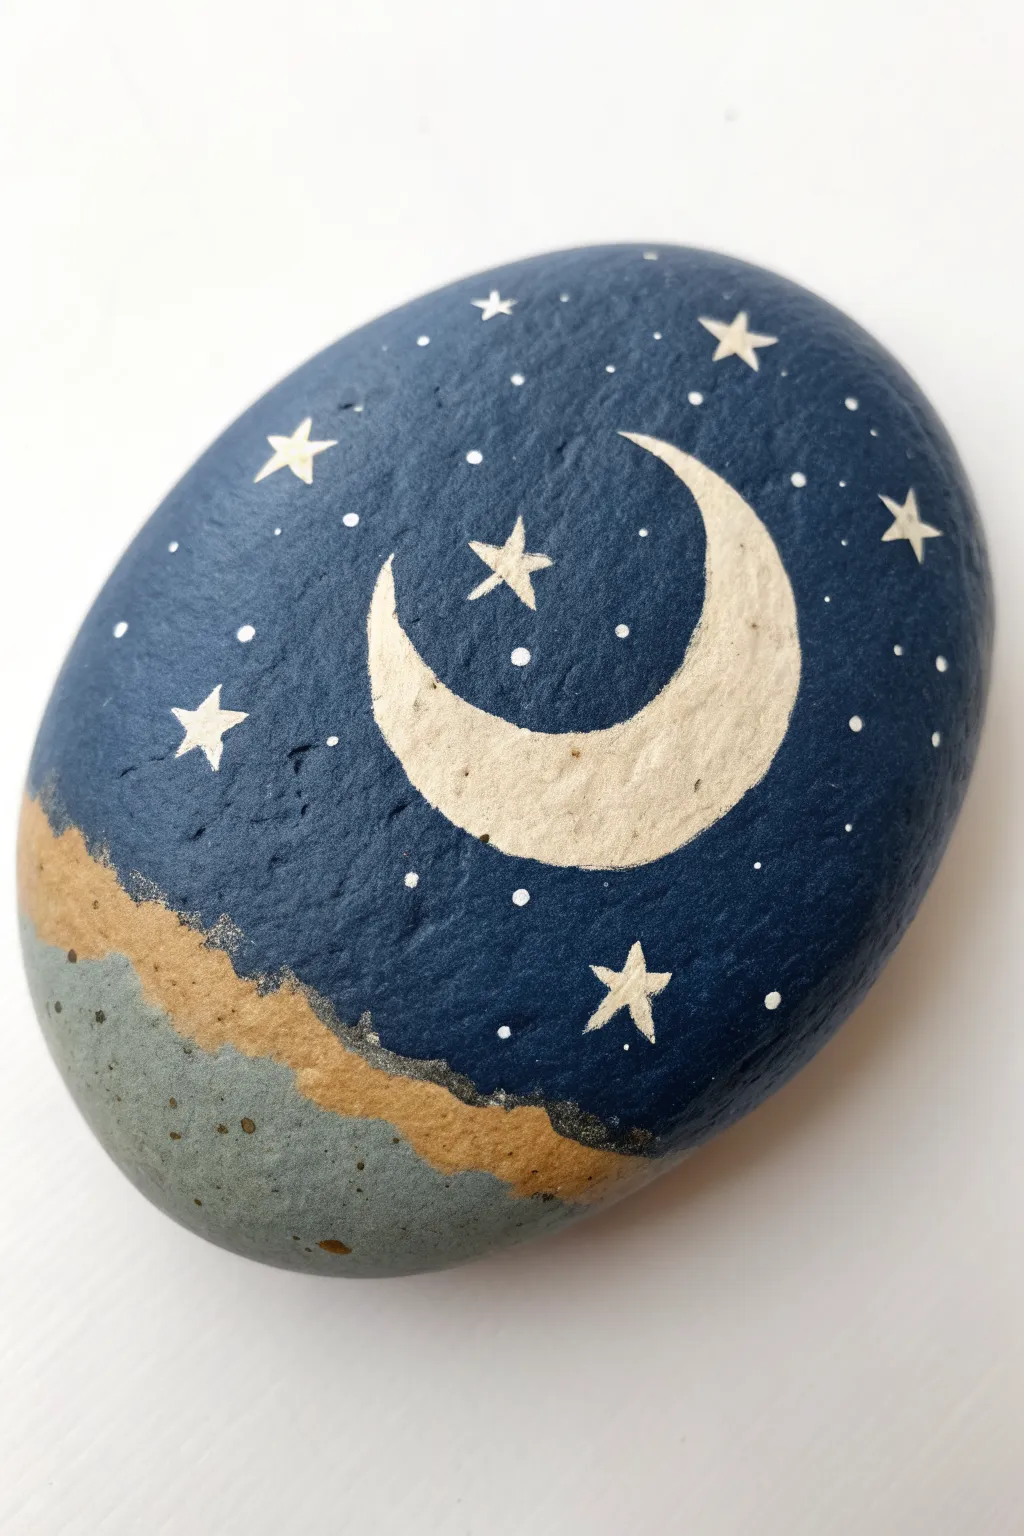
Capture the magic of a clear night sky on a smooth river rock with this serene painted design. The deep blue background contrasts beautifully with the crisp white crescent moon and stars, all grounded by a shimmering golden landscape.
How-To Guide
Materials
- Smooth, oval river rock
- Acrylic paints: Navy blue, metallic gold or bronze, light grey, white
- Flat paintbrush (medium size)
- Fine detail paintbrush (liner brush)
- Dotting tool or toothpick
- Pencil for sketching
- Clear acrylic sealer (spray or brush-on)
Step 1: Setting the Scene
-
Clean surface:
Begin by washing your rock with soap and warm water to remove any dirt or oils, then let it dry drastically to ensure the paint adheres properly. -
Sketch the horizon:
Lightly trace a wavy horizon line across the bottom third of the rock with a pencil to separate the sky from the land. -
Sketch the moon:
Draw the crescent moon shape in the center of the upper section, making sure the curve faces the left side as shown in the artwork. -
Base coat the sky:
Load your flat brush with navy blue acrylic paint and fill in the entire sky area, carefully painting around your pencil moon sketch. -
Define the moon:
While the blue is still wet, you can carefully refine the edge of the moon shape, but try to keep the paint lines distinct. -
Second coat:
Allow the first layer of blue to dry completely, then apply a second coat if needed to get that rich, opaque midnight color.
Star Sharpness Tip
If your brush isn’t fine enough for star points, try using a toothpick dipped in paint. Drag the paint outward from a center dot to pull sharp points.
Step 2: Painting the Landscape
-
Paint the ground:
Using the light grey paint, fill in the bottommost section of the rock below your horizon line. -
Add the metallic strip:
Take your metallic gold or bronze paint and create a jagged, uneven band right along the horizon line where the sky creates a border with the ground. -
Blend the transition:
While painting the gold strip, I like to let it slightly overlap the grey area beneath it to create a layered, organic landscape effect. -
Dry time:
Let these landscape layers dry thoroughly before moving on to the delicate sky details.
Glow in the Dark
Mix glow-in-the-dark medium into your white paint for the moon and stars. The rock will look normal by day but magically light up at the campsite.
Step 3: Stars and Details
-
Fill the moon:
Using a smaller brush, fill in the crescent moon shape with pure white paint. You might need two layers to cover the dark rock surface completely. -
Texture the moon:
Once the white base is dry, you can stipple a tiny amount of off-white or very light grey specifically on the inner curve to give the moon a subtle cratered texture. -
Paint main stars:
With your finest liner brush and white paint, create several five-pointed stars scattered around the moon. Use a light hand to keep the points sharp. -
Add medium stars:
Paint smaller four-pointed sparkle shapes in the empty spaces between the larger stars. -
Dot the background:
Dip a dotting tool or the tip of a toothpick into white paint and gently tap it across the sky to create distant stars. -
Vary the dots:
Make sure to vary the pressure as you dot to create different sizes, mimicking the depth of a real galaxy. -
Final touches:
Review your gold landscape band; adding a few tiny specks of grey or gold splatter can add nice texture to the ‘ground’ area. -
Seal the artwork:
Once strictly dry (wait at least 24 hours), apply a clear acrylic sealer to protect your painting from the elements if you plan to hide it outdoors.
Place this peaceful stone near your tent entrance to enjoy a personal piece of starlight


Pine Tree Trio
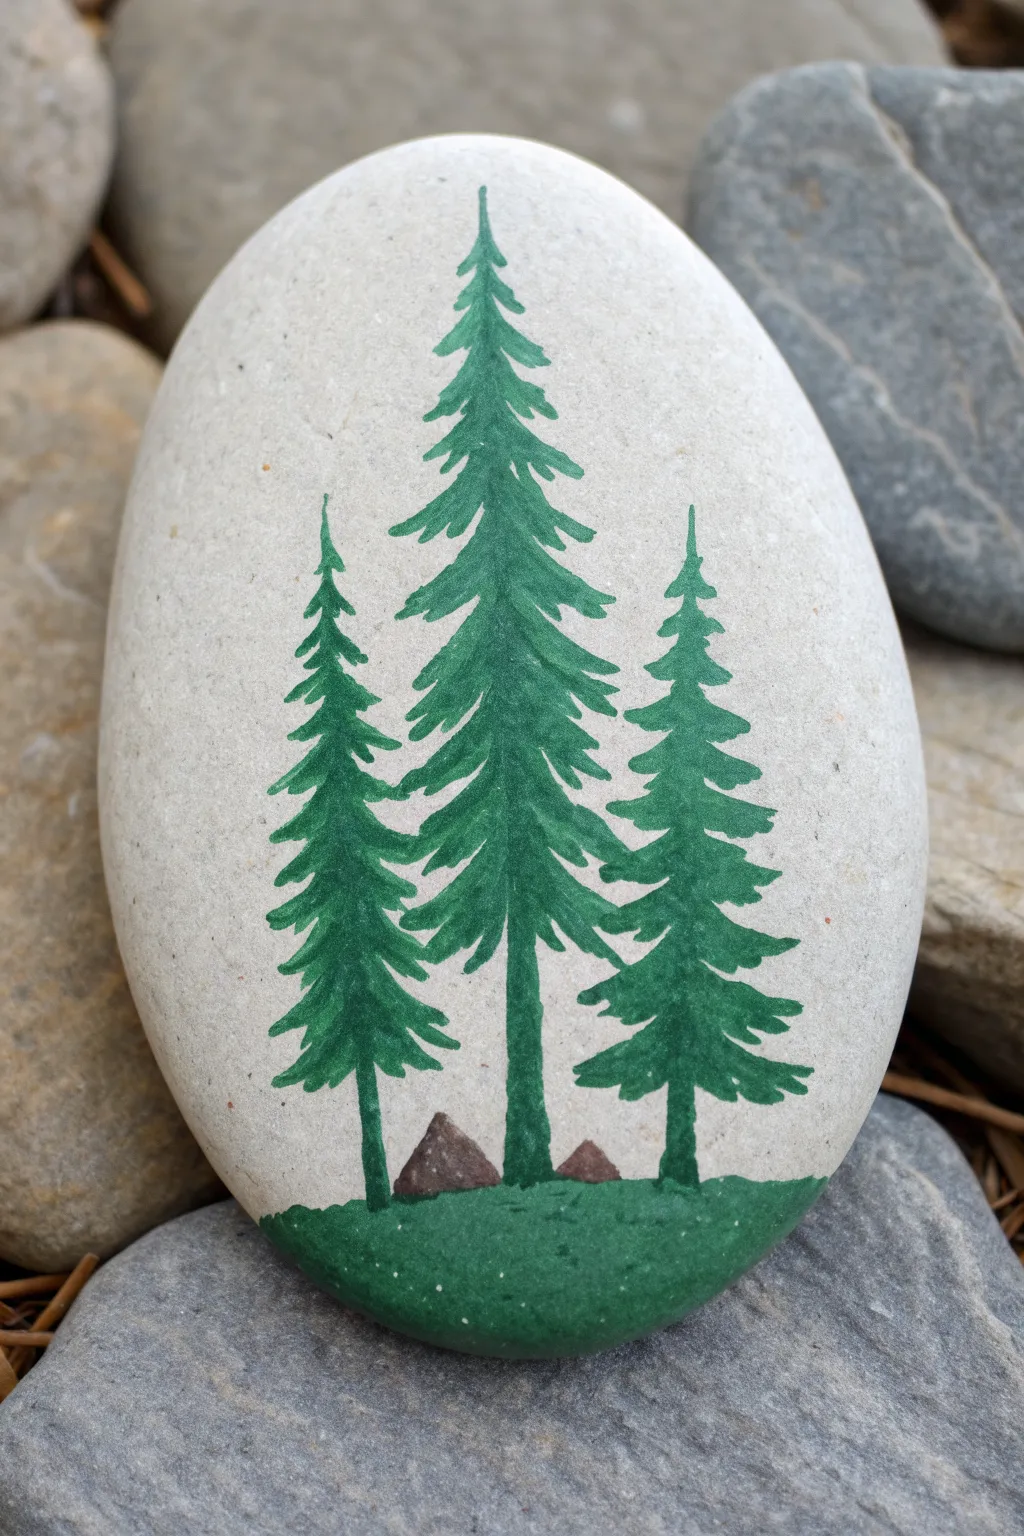
Capture the serenity of the forest with this minimalist painted stone featuring three towering pines. By utilizing the natural texture of a smooth river rock as your background, you can create a piece that feels both rustic and refined.
Step-by-Step
Materials
- Smooth, light-colored river rock (oval shape preferred)
- Acrylic paints (Forest Green, Dark Green, Chocolate Brown, White)
- Flat brush (small/medium)
- Fine liner brush or detail brush (size 0 or 00)
- Pencil and eraser
- Clear acrylic sealer (matte or satin spray)
Step 1: Preparation and Layout
-
Prepare the Surface:
Begin by washing your stone with warm soapy water to remove any dirt or oils. Let it dry completely in the sun or with a hair dryer to ensure the paint adheres properly. -
Sketch the Guidelines:
Lightly sketch three vertical lines on the rock face to mark the trunks. Place the longest line in the center and two shorter lines on either side, slightly staggered in height. -
Plan the Tree Bottoms:
Mark a gently curved line near the bottom of the rock where the ground will be. Ensure you leave enough space at the bottom edge for the painted grass area.
Clean Edges?
If your pine needles look too blobby, your paint might be too thick. Thin it slightly with a drop of water to get sharper, crisper lines.
Step 2: Painting the Foreground
-
Paint the Base:
Using your flat brush, fill in the bottom curved area with a mix of Forest Green and a tiny dot of Dark Green. Create a solid foundation for your trees to stand on. -
Add Texture:
While the green base is still slightly wet, stipple it gently with the tip of the brush to give it a grassy texture rather than a perfectly smooth finish. -
Paint Small Rocks:
Mix Chocolate Brown with a speck of White to create a lighter brown. Paint two small, triangular rock shapes nestling just behind where the trunks will start—one between the left and center tree, and one between the center and right tree. -
Shade the Rocks:
Add a tiny touch of darker brown to one side of each small triangular rock to give them dimensionality and shadow.
Step 3: Creating the Pines
-
Paint the Trunks:
Switch to your fine liner brush. Using Dark Green mixed with a hint of brown, paint thin vertical lines over your initial pencil sketches to create the tree trunks. -
Start the Foliage:
Begin at the very top of the center tree. Using just the tip of your liner brush and pure Forest Green, dab small, short strokes downward to form a pointed tip. -
Widen the Branches:
As you move down the trunk, make your strokes progressively wider. Use a flicking motion, pulling the paint from the trunk outward and slightly downward to mimic pine boughs. -
Create Layering:
Leave tiny gaps between the layers of branches so the lighter rock color shows through occasionally; this transparency prevents the tree from looking like a solid triangle. -
Paint the Side Trees:
Repeat the process for the left and right trees. Remember to make these slightly shorter and narrower than the central giant to create visual balance. -
Add Depth:
Mix a small amount of Dark Green with black. Go back in and add darker strokes near the center of the trees closest to the trunk to create deep shadows. -
Highlight the Tips:
Mix Forest Green with a little White or yellow-green. Carefully add tiny highlights to the outer tips of the branches where the sun would hit.
Make it Snowy
Add tiny dots of white paint to the tops of the branches and the ground to transform this into a winter scene.
Step 4: Finishing Touches
-
Ground the Trunks:
Ensure the bottom of each trunk connects visually with the green base you painted earlier. Add a few tiny vertical grass strokes at the base of the trunks to blend them in. -
Clean Up:
If you got any stray paint on the bare rock background, use a wet Q-tip or a damp brush to gently wipe it away before it fully cures. -
Seal the Rock:
Once the paint is completely dry (give it at least an hour), spray the stone with a matte or satin clear acrylic sealer to protect your miniature forest from the elements.
Place this little piece of wilderness on your desk or in a planter to enjoy a breath of fresh air every day
BRUSH GUIDE
The Right Brush for Every Stroke
From clean lines to bold texture — master brush choice, stroke control, and essential techniques.
Explore the Full Guide
Mountains Over a Lake
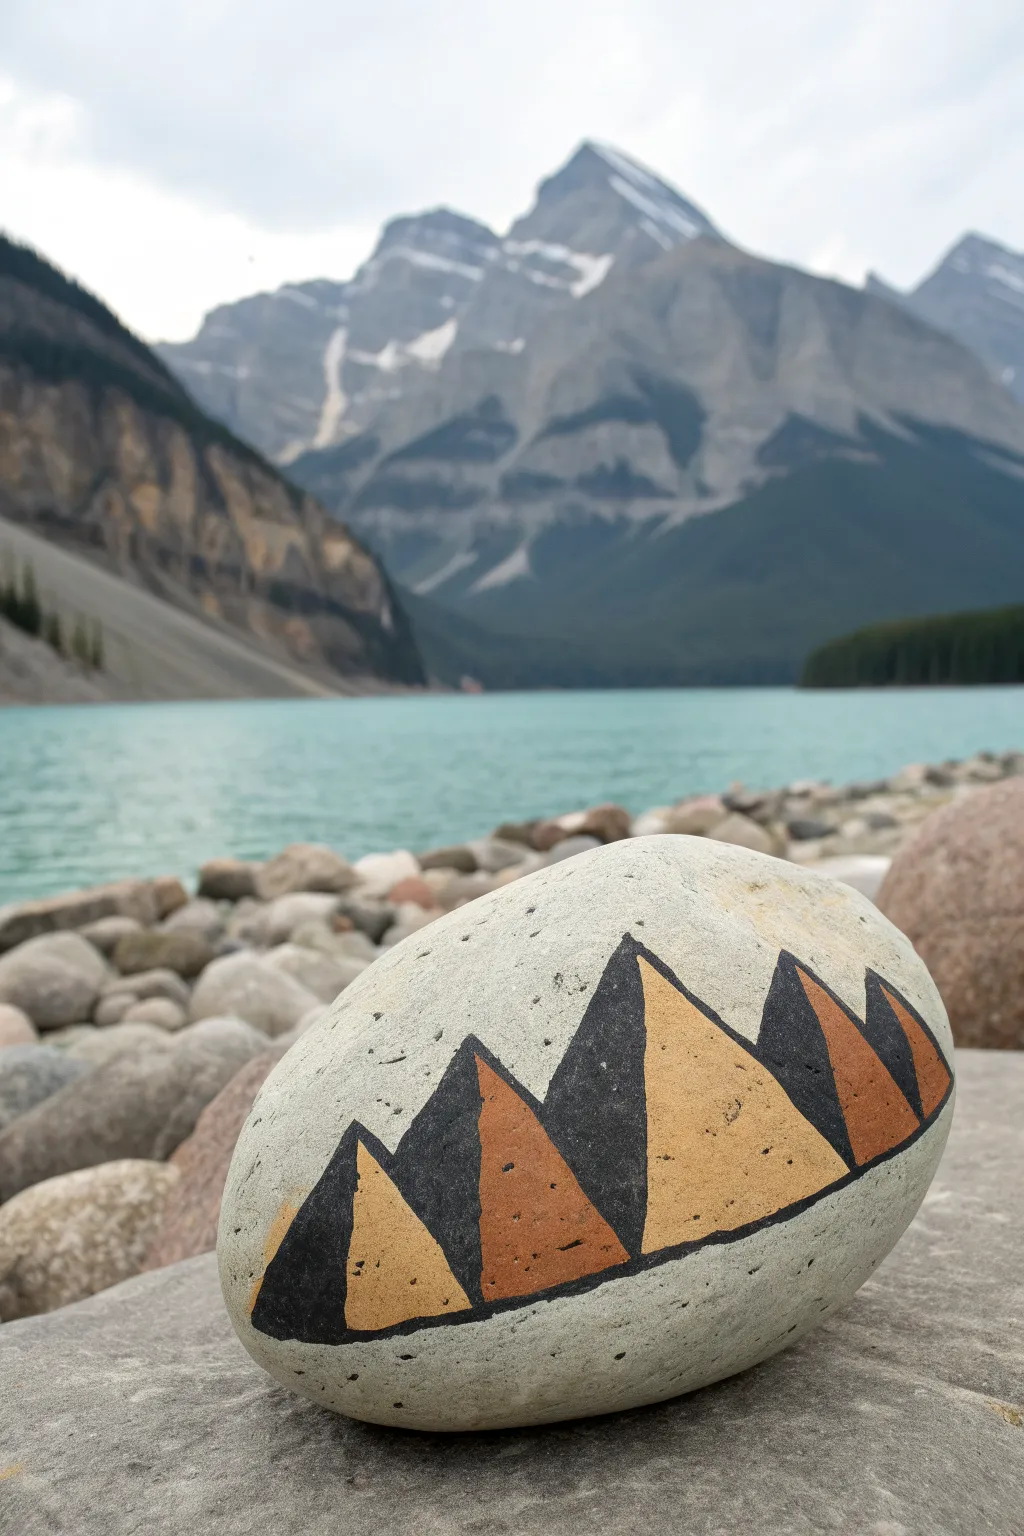
Reflect the stunning grandeur of the wilderness right in the palm of your hand with this stylized mountain landscape. Using sharp lines and a muted, earthy color palette, you’ll transform a simple river stone into a modern piece of camping art that looks great on any desk or shelf.
Detailed Instructions
Materials
- Smooth, oval-shaped river rock (approximately palm-sized)
- Acrylic paints: black, light tan/ochre, terracotta/rust orange, light grey
- Flat shader brush (small)
- Fine liner brush (size 0 or 00)
- Pencil and eraser
- Ruler or straight edge (optional, for planning)
- Matte finish spray sealant
Step 1: Preparation & Sketching
-
Clean the canvas:
Start by washing your rock thoroughly with soap and water to remove any river silt or oils. Let it dry completely in the sun or with a towel before you begin. -
Base coat application:
Mix a very light grey paint (mostly white with a tiny dot of black) to match the natural stone color, or simply use the bare stone if it’s already a clean, light grey. If painting, apply an even coat over the entire top surface and let it dry. -
Mark the horizon:
Using a pencil, lightly sketch a straight horizontal line across the lower third of the rock. This will serve as the base for your mountain range. -
Outline the peaks:
Draw four distinct triangles resting on your horizon line. Vary their heights—make the central two the tallest and the outer two slightly shorter to create a balanced composition. -
Divide light and shadow:
Draw a vertical line down the center of each triangle, from the peak straight down to the base. This splits each mountain into a sunlit side and a shadowed side.
Step 2: Painting the Design
-
Paint the shadows:
Load your small flat brush with black acrylic paint. Carefully fill in the left half of every triangle. Keep your edges as sharp and straight as possible. -
First sunlit peak:
For the largest mountain’s right side, use a warm light tan or ochre color. I usually apply two thin coats here to ensure the dark stone doesn’t show through. -
Second sunlit peak:
Move to the second-largest mountain and paint its right side with a terracotta or rust orange color. This contrast adds depth and visual interest. -
Outer peaks:
Repeat the process for the smaller outer mountains. Paint the far right mountain’s light side with the rust orange, and the far left mountain’s light side with the tan ochre. -
Clean up edges:
Once the filled shapes are dry, switch to your fine liner brush. Touch up any wobbly lines where the black meets the colors to ensure a crisp geometric look. -
The base line:
Using the liner brush and black paint, carefully trace the bottom horizon line, creating a solid base that connects all the triangles.
Tape it off
For perfectly straight lines without a steady hand, use thin strips of washi tape or painter’s tape to mask off the triangles before painting.
Step 3: Finishing Touches
-
Add texture (optional):
If you want a weathered look, lightly dab a dry sponge with a tiny bit of grey over the painted areas to simulate stone texture, though the solid block color looks great too. -
Final drying:
Allow the rock to sit undisturbed for at least an hour. The thick layers of acrylic need to be fully cured before sealing. -
Sealing the work:
Take the rock outside and spray it with a matte clear coat. This protects the paint from chipping without adding an unnatural glossy shine to the stone.
Paint looking chalky?
If your black paint looks grey or patchy after drying, apply a second coat. Low-viscosity craft paints often need two layers for full opacity.
Place your finished mountain rock on your desk as a peaceful reminder of your outdoor adventures
S’mores Stack Icon
This delightful rock painting features a stylized stack of delicious s’mores, capturing the essence of campfire treats with clean lines and warm tones. The bright white background makes the chocolatey layers pop, creating a modern and appetizing icon perfect for your camping collection.
Step-by-Step
Materials
- Smooth, rounded river rock (approx. 3-4 inches wide)
- White acrylic paint or gesso
- Paintbrushes: medium flat brush, fine detail liner brush (size 0 or 00)
- Acrylic paints: tan/light brown, dark chocolate brown, white, black
- Pencil (optional for sketching)
- Posca paint pens (optional alternative for fine lines)
- Clear sealant spray (matte or glossy)
Step 1: Preparing the Base
-
Clean the surface:
Begin by washing your stone thoroughly with soap and water to remove any dirt or oils that might prevent the paint from sticking. Let it dry completely. -
Apply the base coat:
Using a medium flat brush, paint the entire top surface of the rock with white acrylic paint. You want a solid, opaque background. -
Add a second coat:
Once the first layer is dry to the touch, apply a second coat of white to ensure no grey stone shows through. Let this cure fully.
Step 2: Creating the Graham Crackers
-
Mix the cracker color:
Mix a light tan acrylic paint. If you only have brown, mix a small drop of brown into a larger amount of white until you get a warm, biscuit color. -
Paint the top square:
Paint a rounded diamond shape near the center-top of the rock. This perspective gives the 3D effect of the top cracker. -
Create the bottom cracker base:
Visualize where the bottom of the stack will be. Paint a jagged, uneven line or strip of tan near the bottom to represent the crumbled graham cracker base. -
Outline the top cracker:
Using your fine liner brush and dark brown paint (or a dark brown paint pen), carefully outline the top tan diamond shape. -
Add cracker dimension:
Paint a thin dark brown line dropping down from the three visible corners of your top diamond, then connect them to create the thickness of the cracker.
Fixing Wobbly Lines
If your outlines look shaky, wait for them to dry completely. Then, use the background color (white) or the fill color to ‘cut back’ into the line and thin it out.
Step 3: Layering the Filling
-
Paint the marshmallow:
Below the top cracker, paint a thick white stripe that follows the angles of the cracker above it. This is your fluffy marshmallow layer. -
Outline the marshmallow:
Use the dark brown liner brush to outline the white marshmallow shape, separating it visually from the cracker above. -
Add the chocolate layer:
Paint a thick dark brown stripe directly underneath the white marshmallow layer. Extend it slightly wider than the marshmallow for that melting effect. -
Add the second marshmallow:
Paint another white stripe underneath the chocolate layer. I usually angle this one slightly differently to make the stack look playful and loose. -
Create the bottom cracker:
Paint a dark brown slab underneath the second marshmallow, connecting it to the crumbled tan base you painted earlier.
Make It Gooey
To make the s’more look extra melted, curve the white marshmallow layers slightly downward at the corners, like they are squishing under the weight.
Step 4: Adding Details & Highlights
-
Fill the bottom crumbs:
Return to the tan base area at the bottom. Fill in the shape with tan paint if needed, and outline the top edge with dark brown. -
Add cracker dots:
On the very top tan square, use the tip of a small brush or a toothpick to dab small brown dots in a grid pattern to mimic graham cracker holes. -
Texture the crumbs:
Add small black or dark brown dots scattered across the bottom tan base to effectively simulate crumbs and texture. -
Enhance the chocolate:
Create thin white lines or small dashes on the dark chocolate layer to suggest a glossy, melted shine. -
Final outlines:
Go over any main outlines with your fine brush one last time to sharpen the contrast between layers. Clean up any white areas if the brown smudged. -
Seal the artwork:
Allow the paint to dry for at least 24 hours, then spray with a clear sealant to protect your s’mores stack from the elements.
Now you have a permanent sweet treat that captures the cozy vibes of a campfire night.

PENCIL GUIDE
Understanding Pencil Grades from H to B
From first sketch to finished drawing — learn pencil grades, line control, and shading techniques.
Explore the Full Guide
Trail Signpost Directions
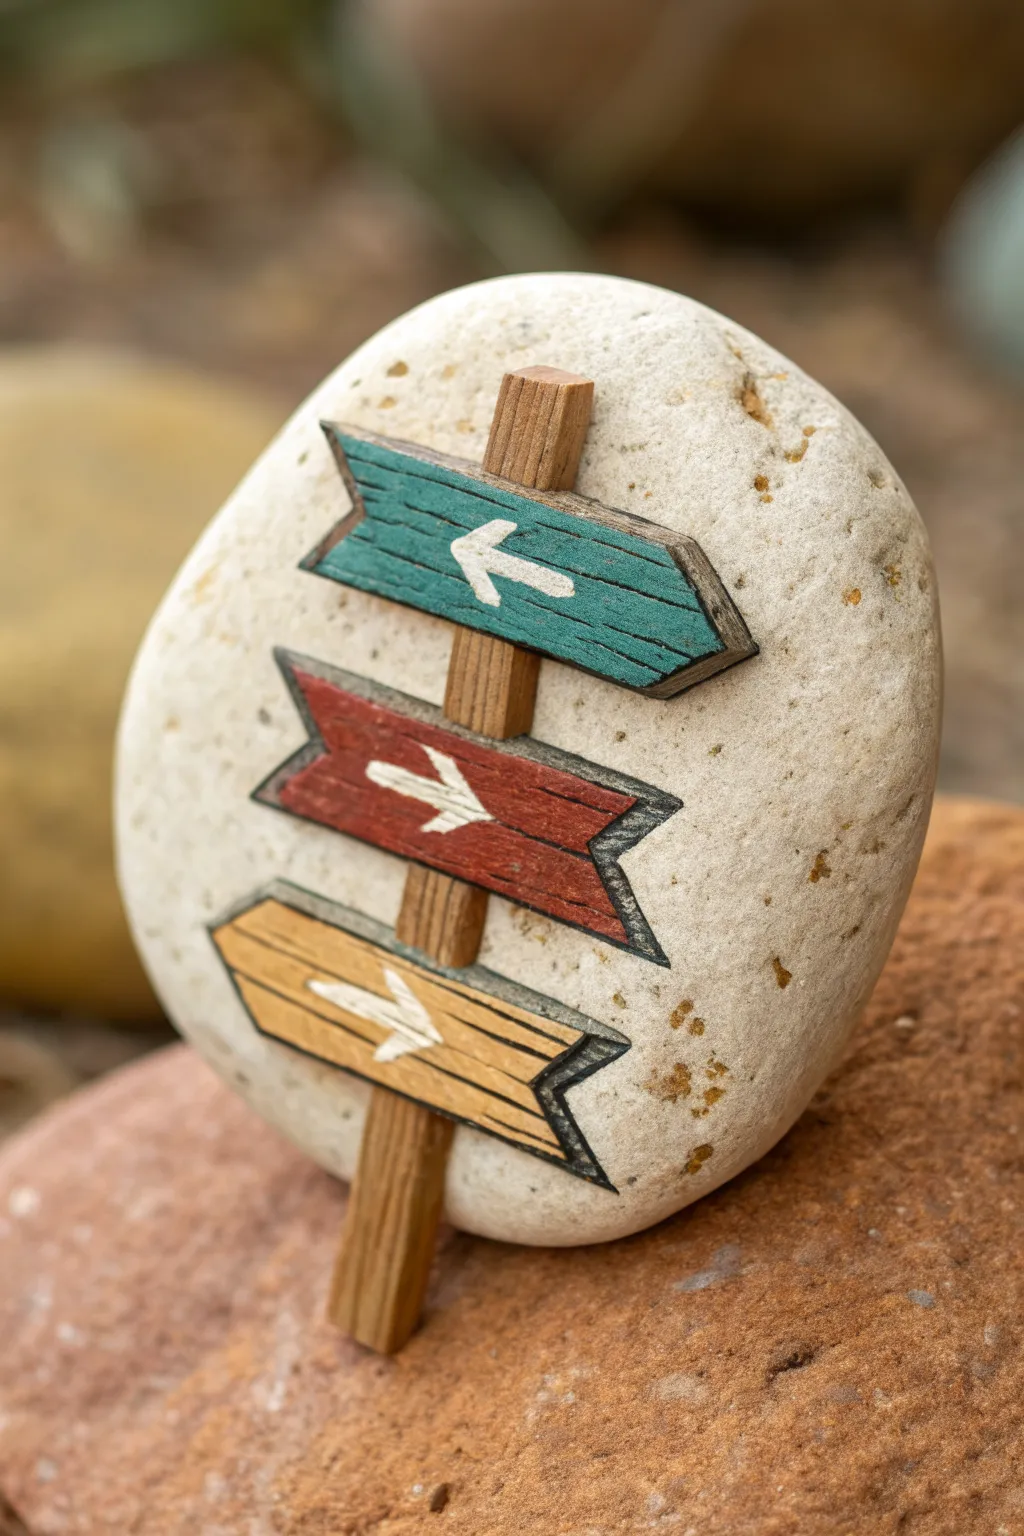
Bring the adventure of hiking trails home with this charming signpost rock painting. The design features a realistic-looking wooden post with three colorful directional arrows, using clever shading to create a 3D effect on a smooth stone canvas.
Step-by-Step Tutorial
Materials
- Smooth, rounded river rock (white or light grey preferred)
- Acrylic paints: Burnt Umber, Raw Sienna, Teal/Turquoise, Deep Red, Yellow Ochre, White, Black
- Fine liner brush (size 0 or 00)
- Small flat shader brush (size 2)
- Pencil for sketching
- Matte spray sealer or varnish
- Palette or paper plate
- Water cup and paper towels
Step 1: Preparation and Sketching
-
Clean the Stone:
Begin by washing your rock thoroughly with soap and water to remove any dirt or oils. Let it dry completely in the sun or with a hairdryer before starting. -
Sketch the Central Post:
Use a pencil to lightly sketch a vertical rectangle in the center of the rock. It doesn’t need to be perfectly straight; a slight tilt adds character. -
Add Sign Shapes:
Draw three arrow shapes crossing the central post. Make the top one point left, the middle right, and the bottom left again. Give them slightly jagged ends to mimic broken wood planks. -
Detail the Perspective:
To give the illusion of depth, draw small angled lines at the corners of your signs and the post, indicating the thickness of the wood.
Wobbly Lines?
If your fine lines are shaky, try thinning your paint with a drop of water until it has an ink-like consistency. This helps the paint flow smoothly.
Step 2: Base Colors
-
Paint the Post:
Mix a wooden tone using Raw Sienna and a touch of Burnt Umber. Fill in the central vertical post, avoiding the areas where the signs overlap. -
Base Coat: Top Sign:
Paint the top arrow with a teal or turquoise acrylic. Apply a second coat if your paint is too transparent. -
Base Coat: Middle Sign:
Fill in the middle arrow using a deep red or barn red shade. Ensure the edges are crisp against the stone background. -
Base Coat: Bottom Sign:
Paint the bottom arrow with Yellow Ochre. This lighter color might need an extra layer for full opacity.
Step 3: Texturing and Details
-
Wood Grain Texture:
Using your fine liner brush and thinned Burnt Umber paint, carefully draw horizontal wood grain lines across all three colored arrows. Keep lines wavy and broken for realism. -
Post Texture:
Add vertical grain lines to the central post using the same dark brown mix to differentiate the direction of the wood. -
Adding Depth (Thickness):
Paint the ‘thickness’ edges you sketched earlier—the sides and bottom edges of the signs—with a darker version of their respective base colors (mix in a tiny dot of black or dark brown). -
Outlining:
Outline the entire signpost structure with a very thin line of black or dark charcoal. I usually brace my hand against the table for stability here. -
Directional Arrows:
With a fine brush and white paint, carefully draw small arrows inside each colored sign following their direction. If the white isn’t bright enough, let it dry and apply a second layer.
Wood Grain Trick
Don’t just draw straight lines for grain. Create small knots or ‘eyes’ in the wood pattern by drawing elongated oval shapes to add rustic character.
Step 4: Shading and Finishing
-
Cast Shadows:
Mix a translucent grey wash (water down black paint significantly). Paint a subtle shadow onto the rock surface just below and to the right of the signs to make them look like they are floating off the stone. -
Highlighting:
Add tiny slivers of white or light cream to the top edges of the signs and the post to simulate sunlight hitting the wood. -
Clean Up:
If you made any smudges on the bare rock, now is the time to carefully scrape them off or touch them up with a white paint that matches your stone. -
Seal the Artwork:
Once fully dry, spray the rock with a matte sealer. This protects the paint from chipping and weather if you plan to leave it outdoors.
Place this little signpost in your garden or on a desk to remind you that a new path is always waiting
Compass Rose Badge
This striking painted rock transforms a simple stone into a timeless navigational tool, featuring a classic compass rose design. With its crisp black lines, stippled detailing, and earthy red accents, this piece feels like a vintage map brought to life in three dimensions.
How-To Guide
Materials
- Smooth, oval-shaped river rock (preferably white or very light grey)
- Pencil (HB or lighter)
- Ruler or straight edge
- Protractor (optional but helpful for spacing)
- Fine-tip permanent marker (black, 0.5mm and 0.1mm)
- Acrylic paint pens (black, dark red/burgundy, slate grey)
- White gel pen (for cleanups)
- Matte spray sealant
Step 1: Preparation & Base Layout
-
Select and clean your canvas:
Choose a rock that is naturally smooth and pale, as this design relies on the negative space of the stone itself. Wash it thoroughly with soap and water to remove any grit or oils, then let it dry completely. -
Find the center point:
Using your pencil, lightly mark the approximate center of the rock. This will be the anchor for your entire design. -
Draft the cardinal directions:
Use a flexible ruler or straight edge to lightly draw a vertical line for North/South and a horizontal line for East/West intersecting at your center dot. The vertical line should be longer to fit the elongated star shape. -
Mark the diagonal points:
Lightly sketch shorter diagonal lines intersecting the center to mark Northeast, Southeast, Southwest, and Northwest. These should be roughly half the length of your main cardinal lines.
Wobbly Circles?
If freehanding circles is tough, trace a coin or bottle cap for the inner rings. For the outer ring, use a jar lid slightly smaller than the rock.
Step 2: Drawing the Star Structure
-
Connect the cardinal points:
Draw lines from the tip of the North mark down to the center of the Northeast/Northwest lines. Repeat this all around to form a skinny four-pointed star shape for the main directions (N, E, S, W). -
Form the secondary star:
Create a smaller, four-pointed star behind the main one by connecting the tips of your diagonal lines to the base of the main star’s arms. It should look like an eight-pointed star total. -
Add the inner circle:
Sketch a small circle in the very center of the star. Inside this, sketch a tiny propeller or flower motif based on the reference imagery. -
Draw the outer ring:
Sketch a perfect circle that encompasses the middle section of the star points. The long points of the star should extend well beyond this circle. -
Create the ring borders:
Add a second circle slightly inside the first one to create a band. This band will eventually be filled with decorative dots.
Crisp Lines Secret
For the straightest lines on the star points, use a flexible piece of cardstock or thin plastic as a ruler that can bend with the rock’s curve.
Step 3: Inking & Coloring
-
Outline the main structure:
Using your 0.5mm black marker, carefully trace over your pencil lines for the star shape and the circular ring. Keep your hand steady and rotate the rock rather than twisting your wrist. -
Divide the star points:
Draw a straight line down the center of every star point, dividing each triangle in half length-wise. This creates the faceted, 3D look. -
Apply the grey shading:
Use a slate grey paint pen or very light black shading to fill in the right side of the North point, and alternate this pattern around the compass (filling every other half-triangle) to create depth. -
Apply the red accents:
With a dark red or burgundy paint pen, color the alternating facets of the star points that weren’t colored grey. Leave some facets the natural stone color if you prefer a lighter look. -
Fill the ring decoration:
Color the band between your two circles solid black. Once dried, use a white gel pen or a fine tool to add evenly spaced white dots around the entire ring. -
Add the center detail:
Ink the tiny central motif inside your inner circle with fine black lines and small touches of red.
Step 4: Final Details
-
Lettering:
In the open spaces near the tips of the star, sketch the letters N, E, S, and W in a serif font. The ‘N’ and ‘S’ should be upright, while ‘E’ and ‘W’ follow the curve of the rock. -
Ink the letters:
Go over your letter sketches with the fine black marker. Add small serifs (feet) to the letters for that classic cartography style. -
Stipple the background:
Using your finest 0.1mm pen, add a dotted trail (stippling) extending from the outer ring toward the letters. Also, add tiny cross-star shapes floating in the negative space between the star points. -
Erase guidelines:
Wait at least 30 minutes for all ink and paint to cure fully. Gently erase any visible pencil marks. I usually do a ‘touch test’ first to ensure no ink smudges. -
Seal the artwork:
Finish with a light coat of matte spray sealant to protect the fine lines from moisture during your camping trips.
Now you have a beautiful, handmade direction marker to guide your next adventure.


Topographic Trail Lines
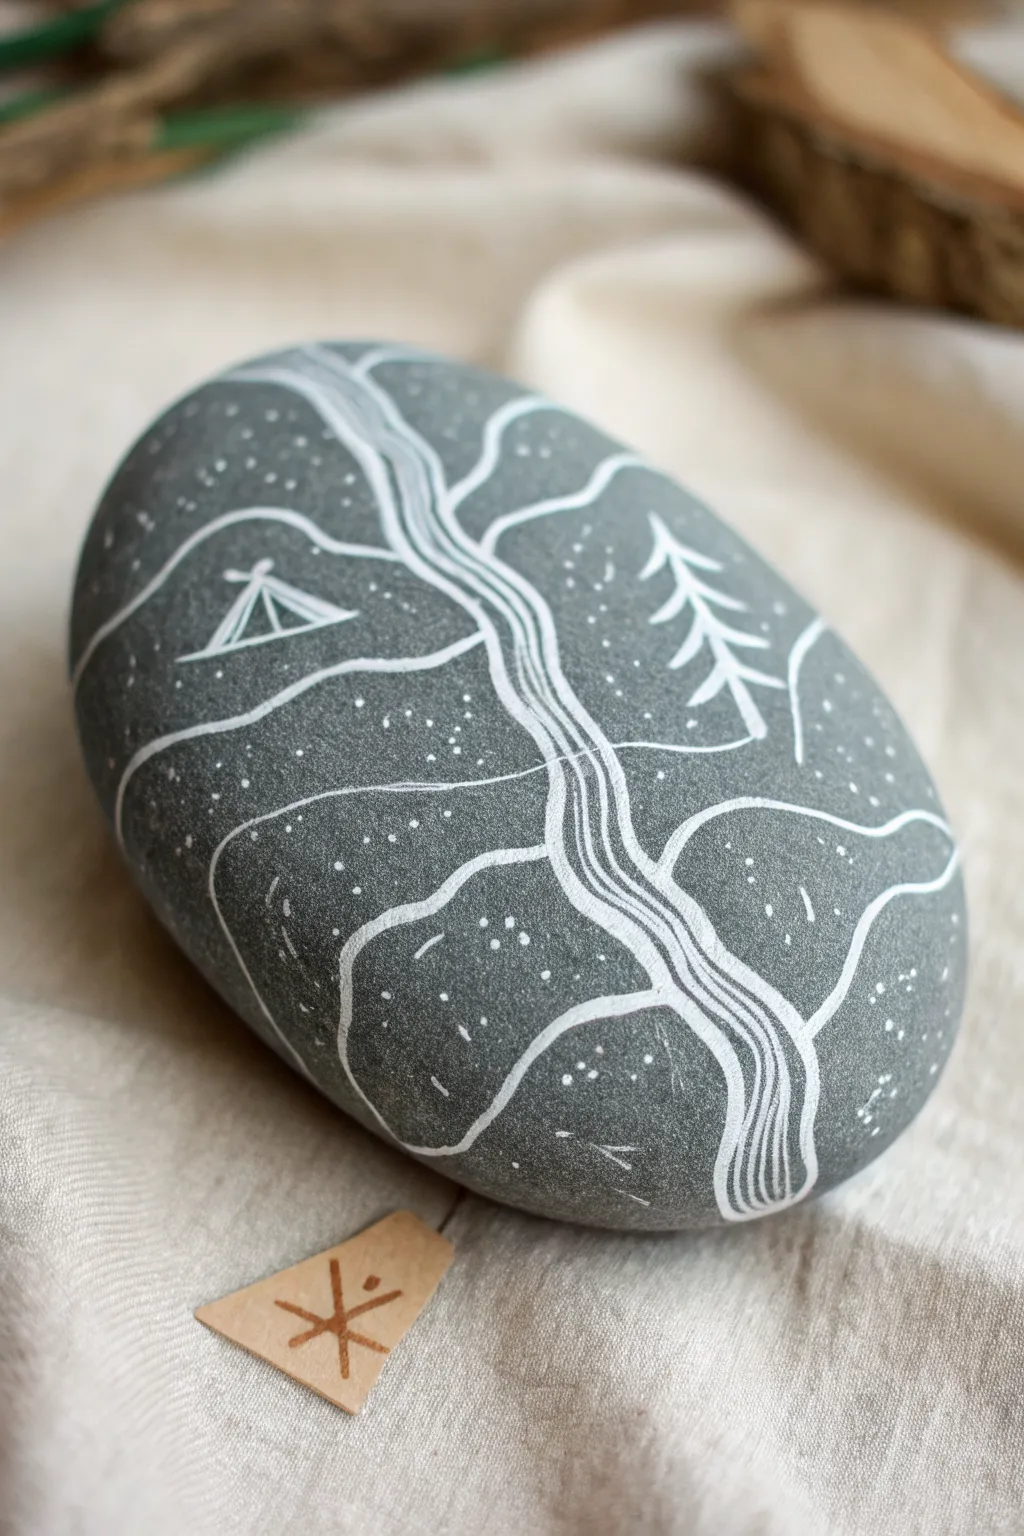
Transform an ordinary river rock into a minimalist tribute to the great outdoors with this topographic trail design. Using simple white lines on a dark grey background creates a striking contrast that feels both modern and rustic.
Step-by-Step
Materials
- Smooth, oval river rock (dark grey or black works best)
- Fine point white paint pen (0.7mm or extra fine)
- Pencil (HB or lighter)
- Eraser
- Matte spray varnish or sealant
- Soap and water for cleaning
- Small piece of scrap paper
Step 1: Preparation and Planning
-
Select your canvas:
Find a smooth river rock that fits comfortably in your palm. A darker grey color is ideal because it allows the white ink to pop without needing a base coat of paint. -
Clean the surface:
Wash the rock thoroughly with warm soapy water to remove any dirt or oils. Let it dry completely in the sun or with a cloth before you start sketching. -
Warm up your lines:
Before touching the rock, practice drawing wavy, parallel lines on a piece of scrap paper. Getting a feel for the flow of topographical lines will make the actual painting much smoother.
Step 2: Sketching the Topography
-
Draft the central path:
Lightly sketch a winding path or river running from the top edge to the bottom edge of the rock using your pencil. Keep the curves gentle and organic. -
Outline the sections:
Draw loose, wavy horizontal lines stemming from the central path outward to the edges of the rock. These shapes should look like amoebas or puzzle pieces, representing different elevation levels. -
Place your icons:
Choose a spot on the left side for a small triangle tent shape. Then, pick a spot on the right side for a simple pine tree sketch. Keep these outline marks very faint.
Steady Hand Pro-Tip
Anchor your pinky finger against the rock surface while drawing. This acts as a stabilizer, allowing you to pull smooth curves without your hand shaking.
Step 3: Inking the Design
-
Prime the pen:
Shake your white paint pen vigorously and press the nib down on your scrap paper until the ink flows consistently. You want solid, opaque lines, not watery ones. -
Draw the central trail:
Start by inking the central winding path. Instead of one single line, draw three or four parallel lines close together that follow the same curve, mimicking the flow of a river or a wide topographical trail. -
Define the tent:
Carefully trace your tent sketch. Draw a simple triangle with a vertical line down the middle for the opening, and add two small diagonal lines at the bottom corners for stakes. -
Ink the pine tree:
On the opposite side, draw a vertical line for the tree trunk. Add downward-slanting branches in a zig-zag pattern, starting small at the top and getting wider toward the bottom. -
Create the terrain lines:
Go over your pencil lines that separate the land sections. Ensure these lines connect smoothly to the central trail but don’t cross over it. -
Add contour details:
Inside each large land section, add a few more curved lines parallel to the outlines. These don’t need to be continuous; broken or partial lines add to the map-like aesthetic.
Ink Troubleshooting
If the paint pen splatters or creates a puddle, don’t wipe it! Let it dry completely, then scratch the excess paint off gently with a toothpick or craft knife.
Step 4: Adding Texture and Finishing
-
Stipple the terrain:
Using the very tip of your paint pen, gently tap varying sizes of dots into the dark spaces between your lines. I like to cluster them slightly denser near the lines and sparser in the open areas. -
Check for consistency:
Look over the rock for any faint lines. Go over any segments where the white ink looks translucent to ensure a solid, crisp brightness. -
Dry completely:
Let the paint pen ink dry for at least 30 minutes. Be careful not to smudge the wet ink with your hand while handling the rounded surface. -
Erase guidelines:
Once the ink is bone dry, gently use an eraser to remove any visible pencil marks that weren’t covered by the paint. -
Seal the artwork:
Take the rock outside and spray it with a light coat of matte varnish. This protects the design from scratches and weather if you plan to leave it outdoors.
Place your finished topographic rock on your desk as a reminder of future adventures
Canoe on Calm Water
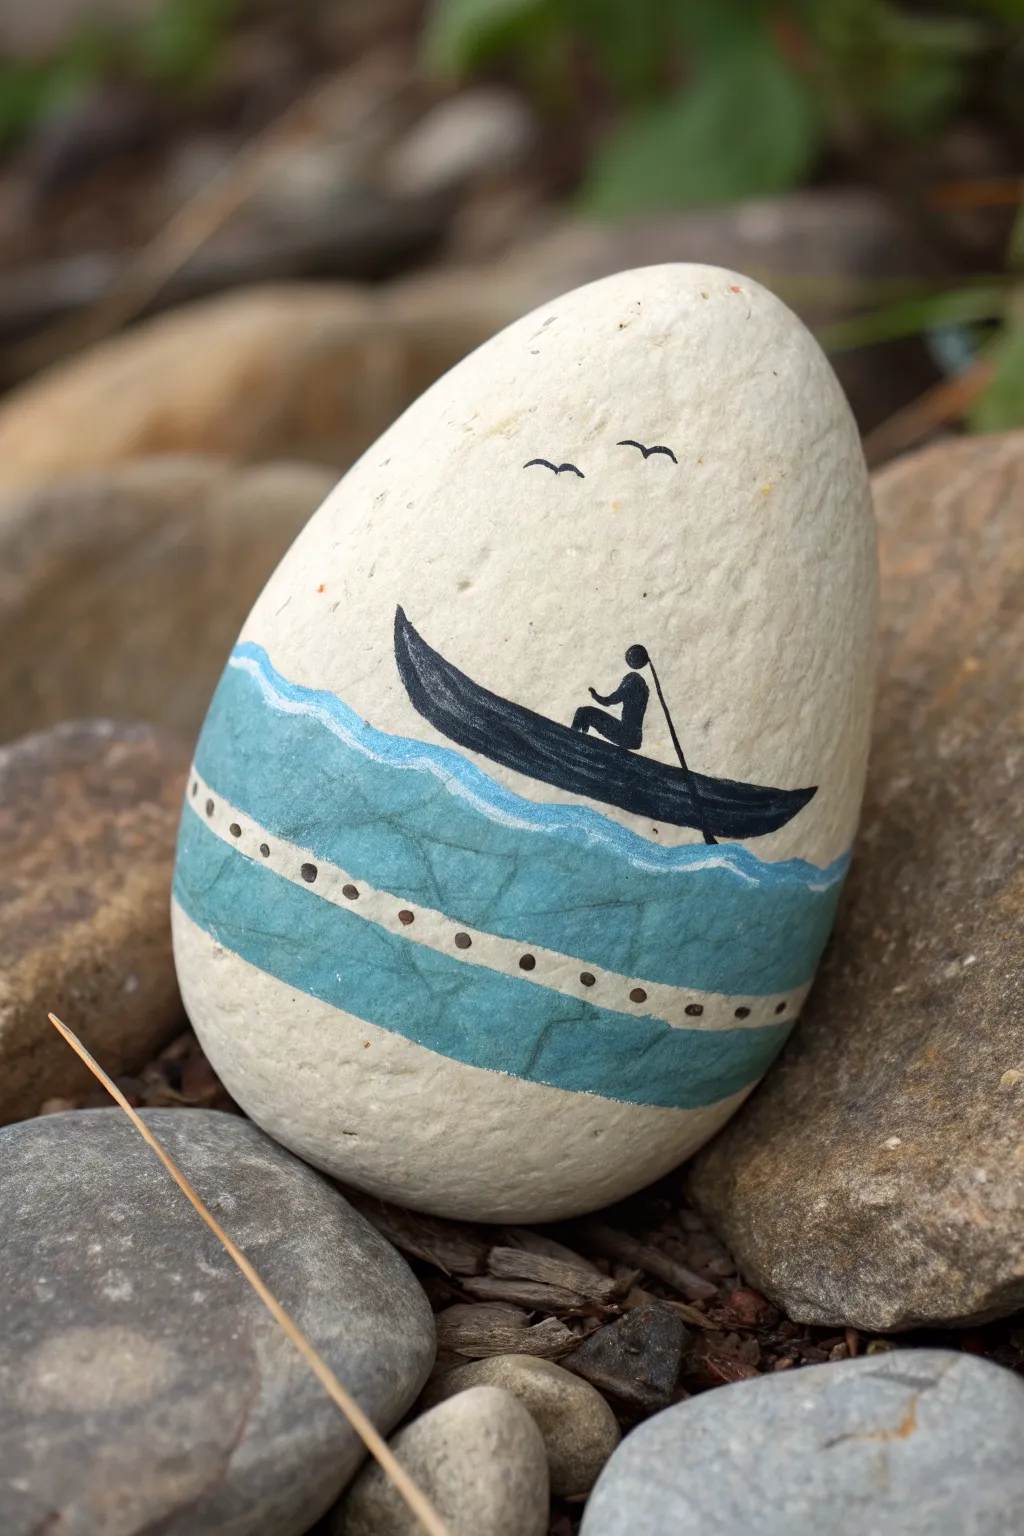
Capture the tranquility of a solo canoe trip on a smooth, egg-shaped stone. This minimalist design combines bold silhouette work with soothing blue waves for a perfect camping keepsake.
How-To Guide
Materials
- Smooth, egg-shaped rock (white or light beige)
- Acrylic paint (teal blue, white, black)
- Fine detail paintbrush (size 0 or 00)
- Small flat paintbrush
- Pencil (optional)
- Paint markers (black and white, fine tip)
- Spray sealant or varnish
Step 1: Preparation and Base
-
Select your stone:
Find a rock that mimics the shape of an egg and has a naturally smooth texture. A light-colored stone works best so you don’t have to paint a base coat. -
Clean the surface:
Wash the rock thoroughly with soapy water and scrub away any dirt or grit. Should the surface be oily, a quick wipe with rubbing alcohol helps the paint stick. -
Dry completely:
Let the rock dry fully before you begin painting. Trapped moisture can ruin your acrylics later. -
Sketch the layout:
Lightly sketch the horizon line where the water meets the sky using a pencil. Mark the position of the canoe just above this line.
Use a Paint Marker
For the tiny paddler and birds, use a fine-tip acrylic paint marker instead of a brush. It gives you much more control over the tiny silhouette details.
Step 2: Painting the Water
-
Mix your water color:
Create a calming teal by mixing blue with a touch of green and white. You want a color that contrasts well with the black canoe. -
Paint the main wave band:
Using your flat brush, paint a wide band of teal across the lower third of the rock. The top edge should have a gentle, wavy motion. -
Fill the lower section:
Extend this blue band downward, but leave the very bottom of the rock natural if you like the look in the photo. Apply a second coat if the first looks streaky. -
Add the wave crest:
Mix a lighter blue or use thinned white paint. With a fine brush, carefully paint a distinct, wavy line right along the top edge of your teal band to simulate foam. -
Create the decorative stripe:
Paint a thin, horizontal band of unpainted rock or light beige paint through the middle of the blue water section. -
Add the dots:
Using a very fine brush or the tip of a toothpick, place small, evenly spaced dark dots along that decorative beige stripe.
Sunset Variation
Swap the white stone background for a blended gradient of orange and pink to make it look like a sunset paddle instead of a daytime scene.
Step 3: Adding the Silhouette
-
Outline the canoe:
Switch to black paint or a black paint marker. Draw the crescent shape of the canoe hull directly on top of the wave crest line. -
Fill the canoe:
Fill in the canoe shape with solid black. Ensure the ends curve upward characteristically. -
Paint the paddler’s body:
Draw a small L-shape for the seated figure. Add a small circle for the head, slightly separated from the body to imply a neck. -
Add the arm and paddle:
Paint a thin line for the arm extending forward. From the hands, draw a straight line diagonally down into the ‘water’ for the paddle shaft. -
Detail the paddle blade:
Thicken the end of the paddle line where it dips below the boat to represent the blade pushing unseen water.
Step 4: Final Details
-
Add the birds:
Using your finest brush or pen, draw two small, graceful ‘m’ shapes high in the sky area to represent birds in flight. -
Review and refine:
Check for any uneven edges or spots where the paint is transparent. Touch up the white wave lines if the black canoe smudged onto them. -
Let it cure:
I prefer to let the rock sit overnight to ensure the thickest parts of the paint are fully hardened. -
Seal the artwork:
Spray the rock with a clear matte or satin varnish to protect your painting from scratches and weather if you plan to leave it outside.
Place your finished voyager rock on a shelf or hide it at a campsite for a fellow traveler to find
Bear Paw Prints Trail
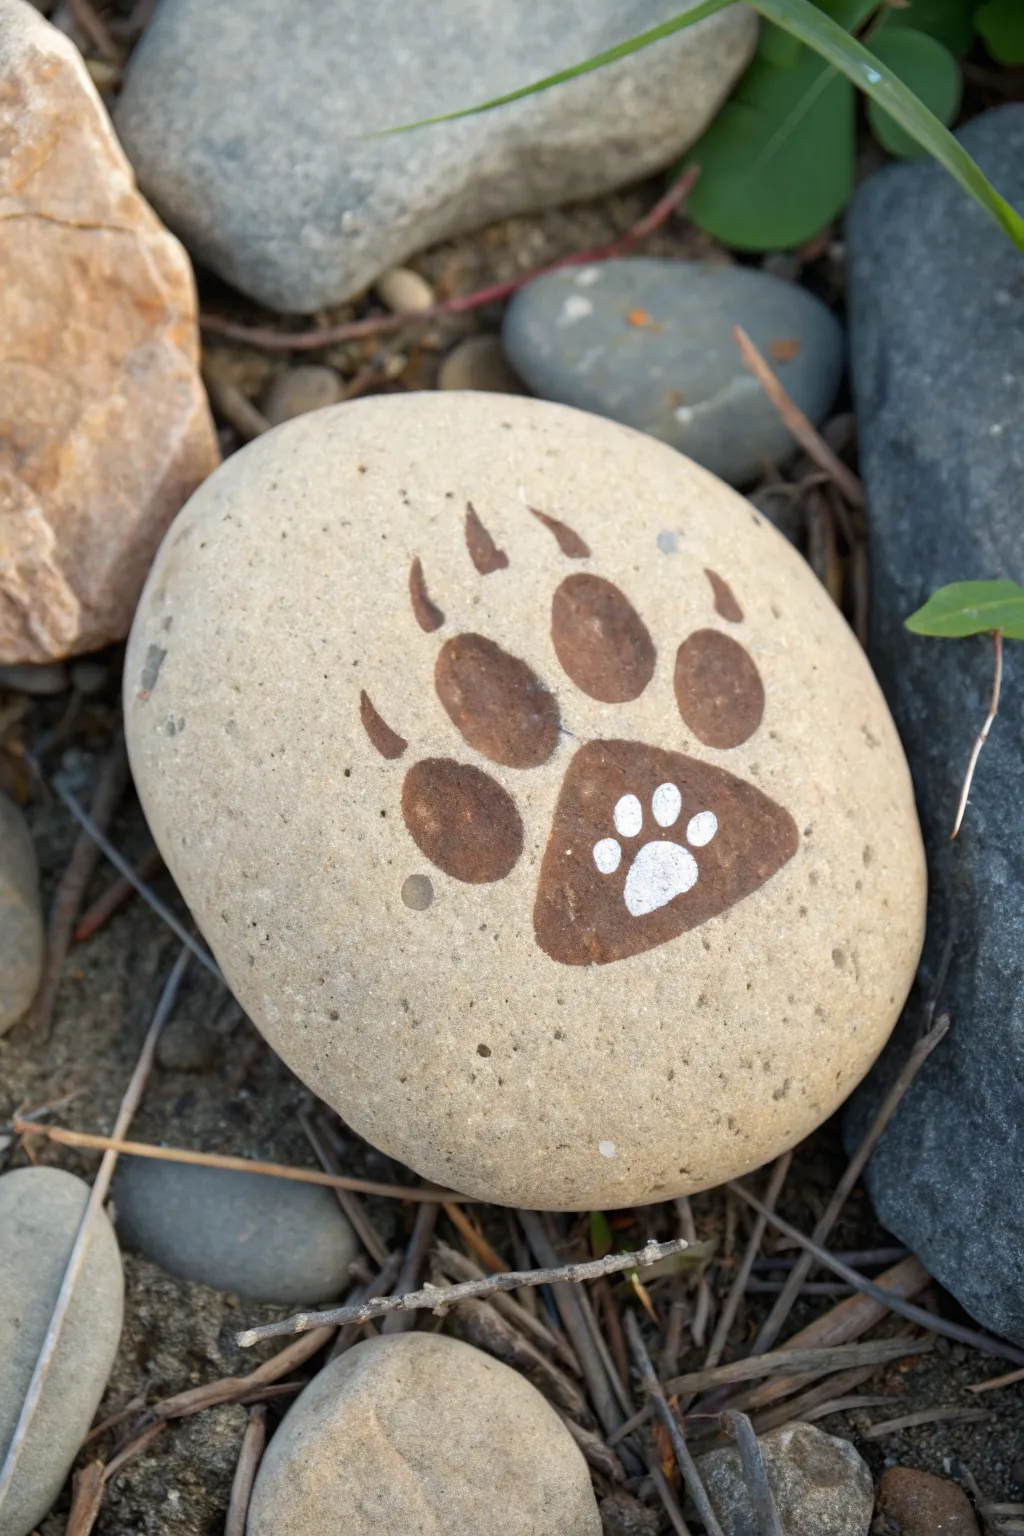
This whimsical rock art project features a prominent bear paw print with a delightful hidden surprise—a tiny secondary print nested right in the center. The smooth, earthy tones of the stone combined with rich brown acrylics create a natural look perfect for leaving along a campsite trail.
Step-by-Step Guide
Materials
- Smooth, oval-shaped river rock (light beige or tan)
- Acrylic paint (dark chocolate brown)
- Acrylic paint (white)
- Small round paintbrush (size 2 or 4)
- Fine detail paintbrush (size 0 or 00)
- Pencil for sketching
- Clear outdoor sealant (matte or satin finish)
- Palette or small mixing dish
- Water and paper towels
Step 1: Preparation and Sketching
-
Clean the canvas:
Begin by thoroughly washing your rock with soapy water and a scrub brush to remove any dirt or river sediment. Let it dry completely in the sun. -
Plan the placement:
Ideally, you want the paw print to sit centrally but slightly angled, as if an animal just stepped there. Place your rock on a flat surface to see which side faces up naturally. -
Sketch the main pad:
Using a pencil, lightly draw a rounded triangle shape near the bottom center of the rock. Since rocks can be porous, keep your pressure light to avoid etching the surface. -
Sketch the toes:
Draw four oval shapes arching above the main pad. Make the two middle toes slightly larger and higher than the outer two toes. -
Add the claws:
Mark the position of the claws with small, curved lines extending upward from each toe pad. Bears have non-retractable claws, so you’ll want them distinct and pointed.
Natural Texture Tip
Don’t paint the brown completely solid. Leaving tiny specks of the stone visible through the paint makes the print look stamped and weathered.
Step 2: Painting the Paw
-
Load the brush:
Squeeze a generous dot of dark chocolate brown acrylic paint onto your palette. Load your small round brush, ensuring the bristles are coated but not dripping. -
Fill the main pad:
Carefully paint the large bottom pad shape. Use the tip of the brush to outline the edges first, then fill in the center with smooth strokes. -
Paint the toes:
Move to the four toe pads. I find it easiest to start in the center of each oval and swirl the paint outward to hit your pencil lines. -
Create the claws:
Switch to your fine detail brush for the claws. Start at the top of the toe pad and pull the brush upward and slightly curved to a sharp point, lifting the brush off the rock at the end to taper the line. -
Check opacity:
Let the first coat dry for about 10-15 minutes. If the rock’s color is showing through the brown, apply a second coat for a solid, opaque look. -
Dry completely:
Allow the brown paint to dry fully before moving on. This is crucial so the white paint step doesn’t smear into the brown.
Glow in the Dark Upgrade
Mix glow-in-the-dark medium into your white paint for the tiny inner paw print so hidden rocks can be discovered by flashlight at night.
Step 3: The Tiny Print Detail
-
Position the mini-print:
Locate the spot on the large brown pad where you want the tiny print to go. It should be slightly off-center to look organic. -
Paint the mini-pad:
Dip the very tip of your detail brush into white paint. Gently dab a small, upside-down heart or rounded triangle shape inside the brown pad. -
Add mini-toes:
Using the very finest point of your brush or even a toothpick, place four tiny white dots above the white pad to represent the toes. -
Clean up edges:
If any brown edges look ragged against the stone, stick a clean damp brush along the perimeter to tidy them up.
Step 4: Sealing
-
Final drying time:
Wait at least an hour for the thick layers of paint to cure completely. -
Apply sealant:
Brush or spray a layer of clear outdoor sealant over the entire top surface of the rock. This protects your artwork from rain and dirt if you plan to hide it on a trail.
Once sealed, your bear print rock is ready to start a fun tracking game for the kids around the campsite
Camping Lantern Shine
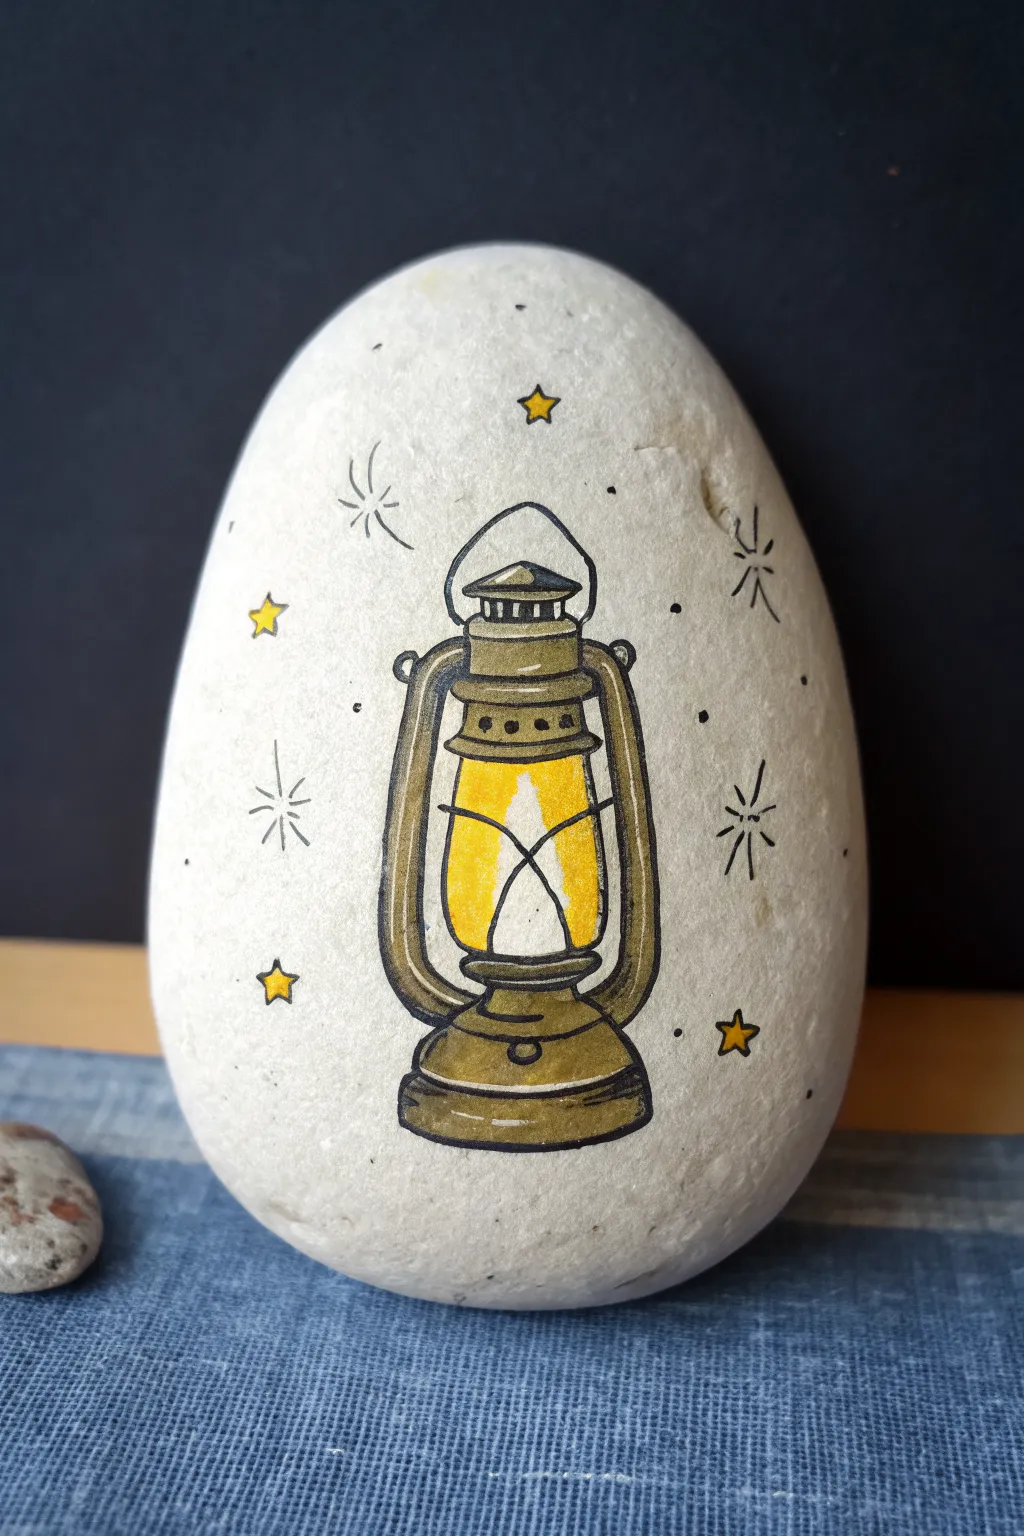
Capture the cozy warmth of a campsite evening with this vintage-style lantern painted on a smooth river rock. This project combines crisp linework with subtle coloring to create a glowing effect that stands out beautifully against the white stone background.
Step-by-Step
Materials
- Smooth, oval-shaped white river rock (sanitized and dried)
- Pencil and eraser
- Fine-point black permanent marker or Posca paint pen (0.7mm)
- Ultra-fine black permanent marker (0.3mm or 0.1mm)
- Acrylic paint markers or fine brushes (Yellow, Bronze/Olive-Green, White)
- Spray varnish or clear sealer (matte or satin finish)
Step 1: Sketching the Structure
-
Prepare the surface:
Begin with a clean, dry rock. Because this design relies on the natural white of the stone for the background, ensure there is no dirt or grease on the surface. If your rock isn’t naturally white, you can paint a base coat of white acrylic paint first and let it dry completely. -
Center the design:
Using a pencil, lightly mark a vertical centerline down the middle of the rock. This will help you keep the symmetrical lantern shape balanced. -
Sketch the lantern base:
Near the bottom of the rock, sketch an oval for the foot of the lantern. Add the rounded fuel tank section just above it, keeping the lines curved to show volume. -
Draw the glass globe:
Above the base, lightly sketch the pear-shaped glass chimney. It should be narrower at the top and wider near the bottom. Inside this shape, sketch a simple flame shape—just a teardrop will do. -
Add the upper housing:
Sketch the metal cap on top of the glass. Draw a small tiered roof shape with a semi-circle handle (the bail) arching over the very top. -
Sketch the side tubes:
Draw the tubular supports that run from the tank base up to the top cap on either side of the glass. These curve slightly outward and frame the central light source.
Steadier Lines
Rest your pinky finger on the rock or the table surface while drawing the fine black lines. This acts as an anchor and stops your hand from shaking on the curved surface.
Step 2: Inking the Details
-
Outline the main shape:
Switch to your fine-point black marker or paint pen. Carefully trace over your pencil lines for the main structural parts: the base, the side tubes, and the top cap. Do not outline the flame or the glass interior yet. -
Define the glass:
Draw the outline of the glass chimney. Inside, draw the wire guard—these are the thin lines that cross in front of the glass in an ‘X’ shape or horizontal curve. -
Thicken the shadows:
Review your black lines. To make the object look heavy and metallic, thicken the lines on the underside of curves, like the bottom of the base and under the rim of the top cap. This adds instant visual weight. -
Erase pencil marks:
Once the ink is 100% dry (give it a few minutes to avoid smudging), gently erase all your initial pencil guidelines.
Step 3: Adding Color
-
Paint the glow:
Use a bright yellow paint pen or fine brush to fill in the glass area. Leave the center flame shape unpainted (showing the white stone) to represent the brightest white-hot part of the light. -
Color the metal body:
Fill in the base, side tubes, and top cap with a bronze, olive-green, or brownish-gold color. This gives it that classic vintage camping gear look. Be careful not to paint over your black outlines—or plan to re-trace them later. -
Add highlights:
Once the metal color is dry, use a white paint pen or a tiny brush with white paint to add small reflection lines on the oil tank, the side tubes, and the top rim. I find this step crucial for making the lantern look like shiny metal.
Glow Up
Paint a faint ring of translucent yellow wash around the outside of the glass lantern section to create a hazy ‘halo’ effect, making the light look even brighter.
Step 4: Finishing Touches
-
Draw the stars:
Around the lantern, draw several small five-pointed stars using the fine black pen. Fill them in with the same yellow you used for the light to tie the color palette together. -
Add sparkle details:
Using the ultra-fine black pen, draw simple starbursts (lines crossing at a center point) and tiny dots scattered around the background to simulate a twinkling night sky. -
Retouch outlines:
If your painting covered any of the structural black lines, go back over them now to crisp up the drawing. Add a few horizontal hatch marks on the darker parts of the metal for texture. -
Seal the rock:
Allow the rock to dry completely, ideally overnight. Finish with a spray varnish to protect your artwork from chipping, especially if you plan to hide the rock outdoors.
Now you have a charming piece of pocket-sized art ready to brighten up a garden path or campsite table.
Steaming Camp Mug
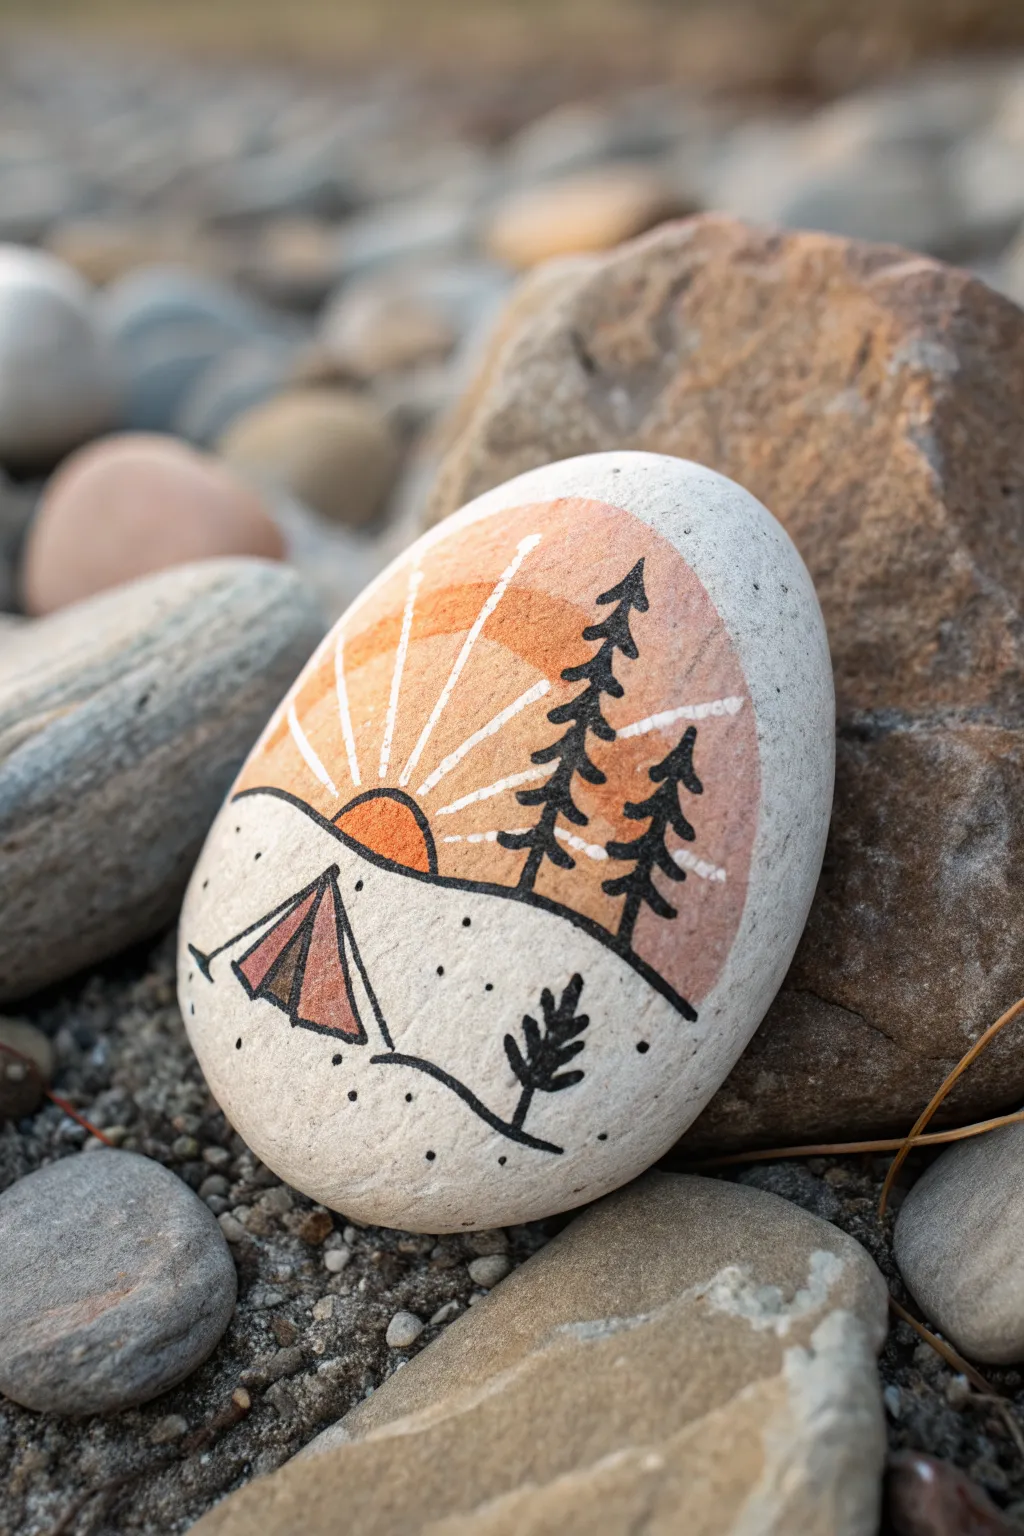
Capture the serenity of waking up in the wilderness with this beautifully simple painted rock design. Using a natural palette and clean line art, you’ll create a charming vignette featuring a tent, towering pines, and a glowing sunrise.
How-To Guide
Materials
- Smooth, oval-shaped river rock (light colored)
- Pencil and eraser
- Acrylic paints: warm white/cream, terracotta orange, muted peach/tan
- Fine liner brushes (size 0 and 00)
- Black acrylic paint pen (extra fine tip) or black paint
- White acrylic paint or gel pen
- Matte spray varnish
Step 1: Planning and Base Colors
-
Clean your canvas:
Begin by scrubbing your rock with warm soapy water to remove any dirt or oils. Let it dry completely in the sun or use a hairdryer to speed things up. -
Sketch the horizon:
Using a pencil, lightly sketch a curved horizon line about one-third up from the bottom of the rock. This separates your foreground campsite from the sky. -
Outline the sun:
Draw semi-circle rising from the center of your horizon line. You don’t need a compass; a freehand curve adds organic charm. -
Map the sky arch:
Sketch a larger arch above the sun to define the area where the sky colors will live. It doesn’t need to cover the whole top of the rock—leaving raw stone visible at the top edges creates a nice vignette effect. -
Paint the sun:
Fill in the semi-circle sun with your terracotta orange paint. You might need two thin coats for full opacity. -
Block in the sky bands:
For the sky arch, use your muted peach or tan paint. I like to apply this in concentric bands radiating from the sun, fading slightly as they go out, though a solid block of color works beautifully too. Let this dry thoroughly.
Fixing Smudges
If your black line work smudges, don’t panic. Wait for it to dry completely, then gently scrape the excess paint off with a toothpick or paint over it with a mix that matches your rock’s base color.
Step 2: Line Work and Details
-
Draw the horizon line:
Using your black paint pen or a very fine brush with black paint, trace over your initial horizon pencil line. Make the line slightly thicker in the dip where the tent will sit. -
Create the sun rays:
Switch to a white paint pen or fine brush. Draw straight lines radiating outward from the sun through the peach sky section. These negative-space style lines break up the color block effectively. -
Outline the sun:
Go back with your black pen and outline the terracotta sun semi-circle to define it clearly against the sky. -
Add the pine trees:
On the right side of the hill, draw two vertical lines for tree trunks. Add jagged, downward-sloping branches creating a classic pine silhouette. Make the one closer to the center slightly taller. -
Sketch the tent:
On the left side, draw a simple triangle for the front of the tent. Extend a line backward to create the side wall, giving it dimension. -
Color the tent:
Fill the side panel of the tent with the terracotta paint used for the sun. Leave the front triangle the natural rock color or paint it off-white for contrast. -
Detail the tent:
Once the paint is dry, outline the entire tent in black. Add a vertical line down the center of the front triangle to suggest the entrance flaps. -
Add foreground vegetation:
In the bottom right foreground, draw a small, simplified plant or fern using black lines. Keep it minimal to balance the composition. -
Texture with stippling:
Use the tip of your black pen to add small dots (stippling) around the base of the tent and the foreground. This simulates sand or gravel texture. -
Final touches:
Add a few disconnected line segments around the tent stakes to ground the structure. -
Seal your work:
Once completely dry, spray with a matte varnish to protect your art without making it unnaturally glossy.
Make It Golden
Swap the white sun rays for metallic gold paint. It catches the light beautifully when the rock is turned and mimics the actual glow of a sunrise.
Place this little piece of art on your desk to remind you of your next adventure
Backpack and Gear Icons
Capture the spirit of the trail with this charming backpack illustration on a smooth river stone. The clean lines and muted earth tones give it a modern, travel-sticker aesthetic that looks great in a camper van or on a bookshelf.
Step-by-Step
Materials
- Smooth, oval river rock (medium size)
- White or cream acrylic paint (for base)
- Acrylic paint markers (dark green, terracotta orange, cream/beige)
- Fine tip liner brush (optional)
- Matte spray varnish
- Pencil and eraser
Step 1: Preparing the Canvas
-
Clean the stone:
Scrub your rock with warm soapy water to remove any dirt or oils, then let it dry extensively to ensure the paint adheres properly. -
Prime the surface:
Apply a base coat of white or cream acrylic paint over the entire top surface of the stone. You want a smooth, opaque background, so applying two thin coats is better than one thick, gloppy one. -
Sketch the outline:
Once the base is bone-dry, lightly sketch the backpack shape with a pencil. Start with a tall rectangle with rounded corners for the main bag, add a curved flap on top, and a cylindrical shape at the bottom for the sleeping bag.
Keep it Steady
To get those clean negative space lines between the pockets, steady your painting hand by resting your pinky finger on a dry part of the rock while you draw.
Step 2: Blocking in Color
-
Paint the main bag:
Using a dark green paint pen, fill in the main body of the backpack. Leave thin negative spaces (gaps showing the white background) between the flap, the pockets, and the main compartment to define the sections without needing black outlines. -
Add the side pickets:
Draw small, rectangular pockets on the left and right sides of the bag using the same green, ensuring you maintain that tiny gap of white space between them and the main bag body. -
Create the top flap:
Color in the top flap section. The shape should slightly overhang the main body. I find it helpful to round the corners softly to make the fabric look worn and soft. -
Fill the front pocket:
Add a large, rounded square shape in the center of the bag for the main zipper pocket. Again, remember to leave that crucial sliver of negative space around it. -
Paint the sleeping bag:
Switch to your terracotta orange marker. Fill in the cylindrical shape at the bottom, positioned slightly angled as if strapped beneath the pack.
Make it Yours
Personalize the backpack by painting it in your favorite hiking gear colors, or add a tiny patch logo on the pocket representing a park you visited.
Step 3: Adding Details
-
Detail the bedroll:
Using a cream or white fine-tip paint pen, draw two curved lines on the orange cylinder to represent straps. Add a spiral on the circular end to show the rolled layers of the sleeping bag. -
Add zipper accents:
Draw a small horizontal ‘L’ shape on the front green pocket using the cream pen to create a stylized zipper pull. -
Draw the buckles:
Add a small buckle clasp on the center of the main flap and a small loop handle at the very top of the pack using the cream color. -
Add texture lines:
Use the cream pen to add tiny, dashed lines on the top flap and sides of the bag. These small tick marks simulate stitching or folds in the fabric. -
Ground the image:
Using the dark green pen, draw a few simple grass tufts near the bottom corners of the bag. -
Add stippling:
Dot a few tiny green specks around the grass and under the sleeping bag to add texture and ground the object so it doesn’t look like it’s floating.
Step 4: Finishing Touches
-
Clean up edges:
If any green or orange paint bled into your negative space lines, use a white paint pen or a tiny brush with base paint to touch them up and make them crisp again. -
Seal the rock:
Allow the paint to cure for at least 24 hours. Finish with a matte spray sealer to protect your artwork from chipping while preserving that natural stone look.
Now you have a miniature tribute to your outdoor adventures ready to display
Build-a-Campsite Story Stones
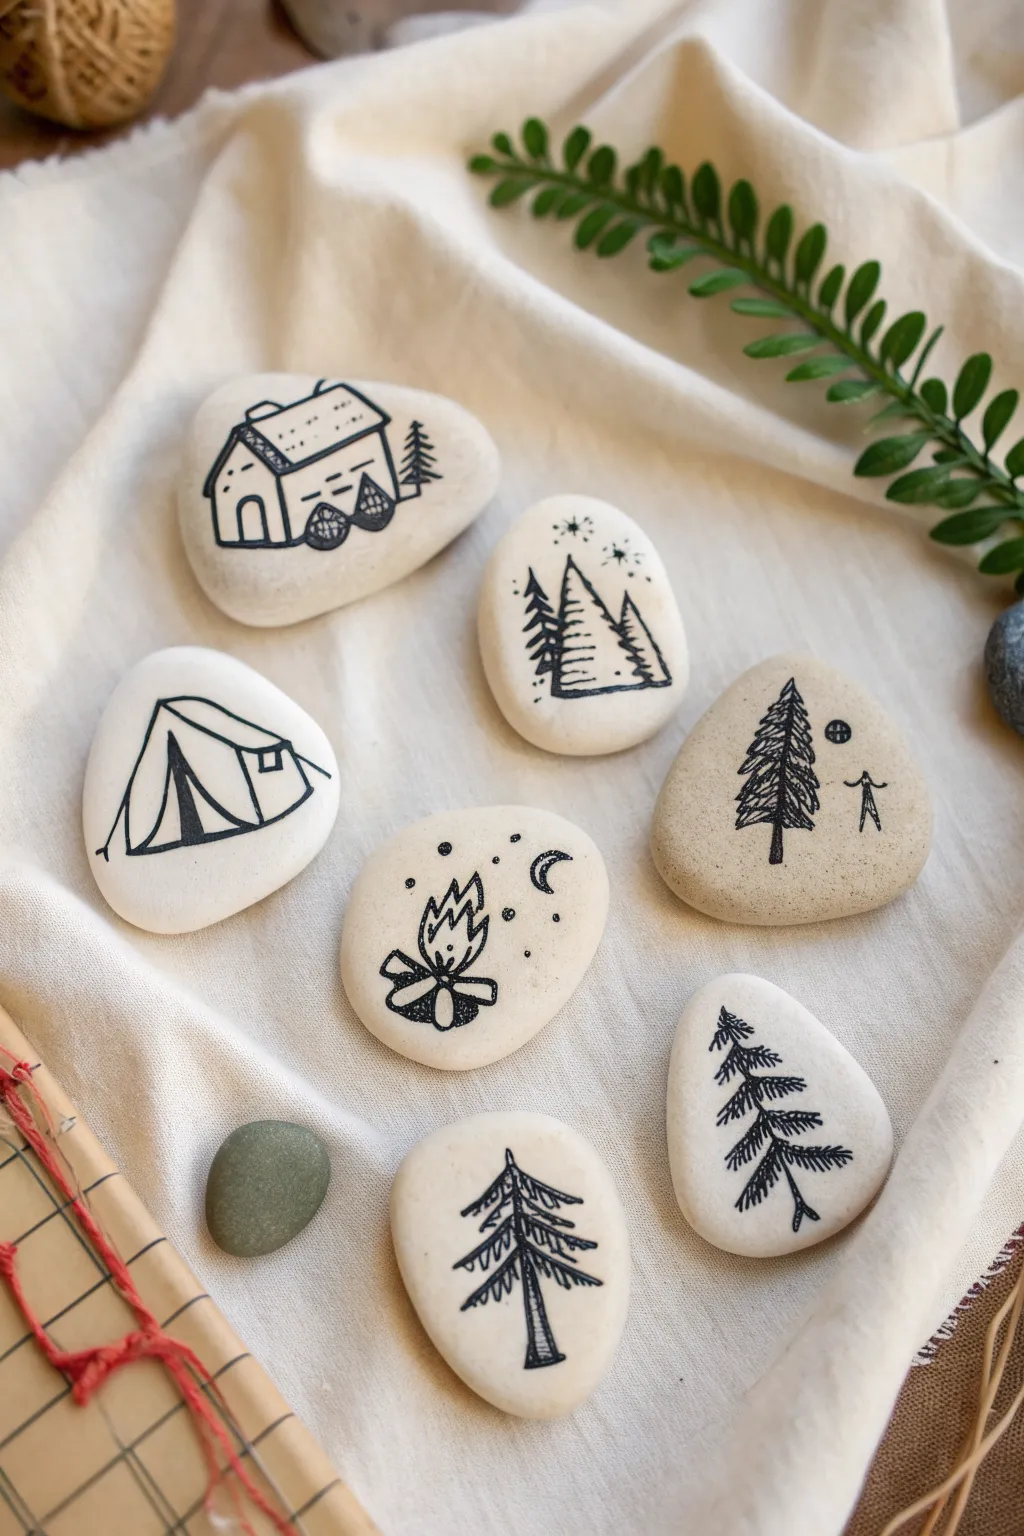
Create a pocket-sized adventure with these charming monochromatic story stones featuring cozy camping motifs. Using simple black ink on smooth white river rocks, this project captures the rustic essence of the outdoors in a clean, minimalist style that is perfect for imaginative play.
Detailed Instructions
Materials
- Smooth white river rocks or beach pebbles (approx. 2-3 inches)
- Fine-point black paint pen (e.g., Posca or uni-ball)
- Extra-fine point black archival ink pen (e.g., Micron 01 or 03)
- Pencil (HB or 2H)
- White eraser
- Matte spray sealant or clear varnish
- Scrap paper for sketching
Step 1: Preparation & Planning
-
Clean the canvas:
Begin by washing your stones with mild soap and warm water to remove any dirt or oily residue. Let them dry completely, as any moisture will prevent the ink from setting properly. -
Brainstorm motifs:
On a piece of scrap paper, sketch out simple camping-themed doodles. Aim for iconic shapes like a classic A-frame tent, a log cabin, different types of evergreen trees, a campfire, and a starry night sky. -
Lightly sketch outlines:
Using a pencil, very lightly draw your chosen designs onto the center of each stone. Keep the pressure minimal so you don’t groove the stone or leave heavy graphite marks that are hard to erase later.
Ink Bleeding?
If your black ink ‘feathers’ into the rock’s porous surface, apply a base coat of clear matte varnish or white paint first to seal the stone before drawing your design.
Step 2: Drawing the Structures
-
Trace the cabin:
Start with the cabin stone. Use your fine-point paint pen to draw the main outline of the house, adding a slanted roof and simple square walls. Draw small arched doorways and windows. -
Detail the cabin logs:
Switch to your extra-fine pen to add texture. Draw horizontal dashes across the roof to simulate shingles and vertical lines on the walls for wood planks. Add two small wheels at the base if you want it to look like a tiny camper. -
Outline the tent:
On another stone, draw a large triangle for the front of the tent and a prism shape extending backward. Leave the front flaps open by drawing two curved lines parting in the middle. -
Fill the tent interior:
Color in the triangular opening of the tent fully black to create depth, making it look like a dark, cozy space inside.
Glow in the Dark
Use glow-in-the-dark paint for the moon, stars, and campfire flames. It adds a magical surprise when the lights go out for bedtime storytelling.
Step 3: Creating Nature Elements
-
Draw the campfire:
For the fire stone, start by drawing two or three crossed logs at the bottom. Above them, draw jagged, flame-like shapes rising up. I like to keep the flames slightly separated to keep the design airy. -
Add campfire atmosphere:
Use the extra-fine pen to add tiny dots and small stars or a crescent moon around the fire to suggest sparks flying into the night sky. -
Sketch the lone pine:
On a new stone, draw a single vertical line for a tree trunk. Starting from the top, draw downward-sloping branches that get wider as you move down, creating a classic Christmas tree shape. -
Create a forest scene:
For a multi-tree stone, draw three varying heights of trees overlapping slightly. Use loose, zig-zag motions for the branches to give them a textured, needled look compared to the solid lines of the structures. -
Add the figure:
On a plain stone or next to a tree, draw a very simple stick figure with arms raised. This adds a human element to your story set. Include a small circle for a moon or sun above them.
Step 4: Finishing Touches
-
Let ink cure:
Allow the stones to sit untouched for at least an hour. Paint pens can feel dry to the touch quickly but may still smear if handled too roughly before fully curing. -
Clean up sketches:
Once you are certain the ink is 100% dry, gently erase any visible pencil sketch lines. Be careful not to rub the ink too vigorously. -
Protect the art:
Take the stones outside or to a well-ventilated area. Hold the spray sealant about 8-10 inches away and apply a light, even mist coat. Don’t spray too heavily at once, or the ink might run. -
Final cure:
Allow the first coat of sealant to dry, then apply a second light coat for extra durability, especially if these will be used as play items.
Pack these little stones in a canvas pouch for your next camping trip or backyard adventure
Memory Rock With Place and Year
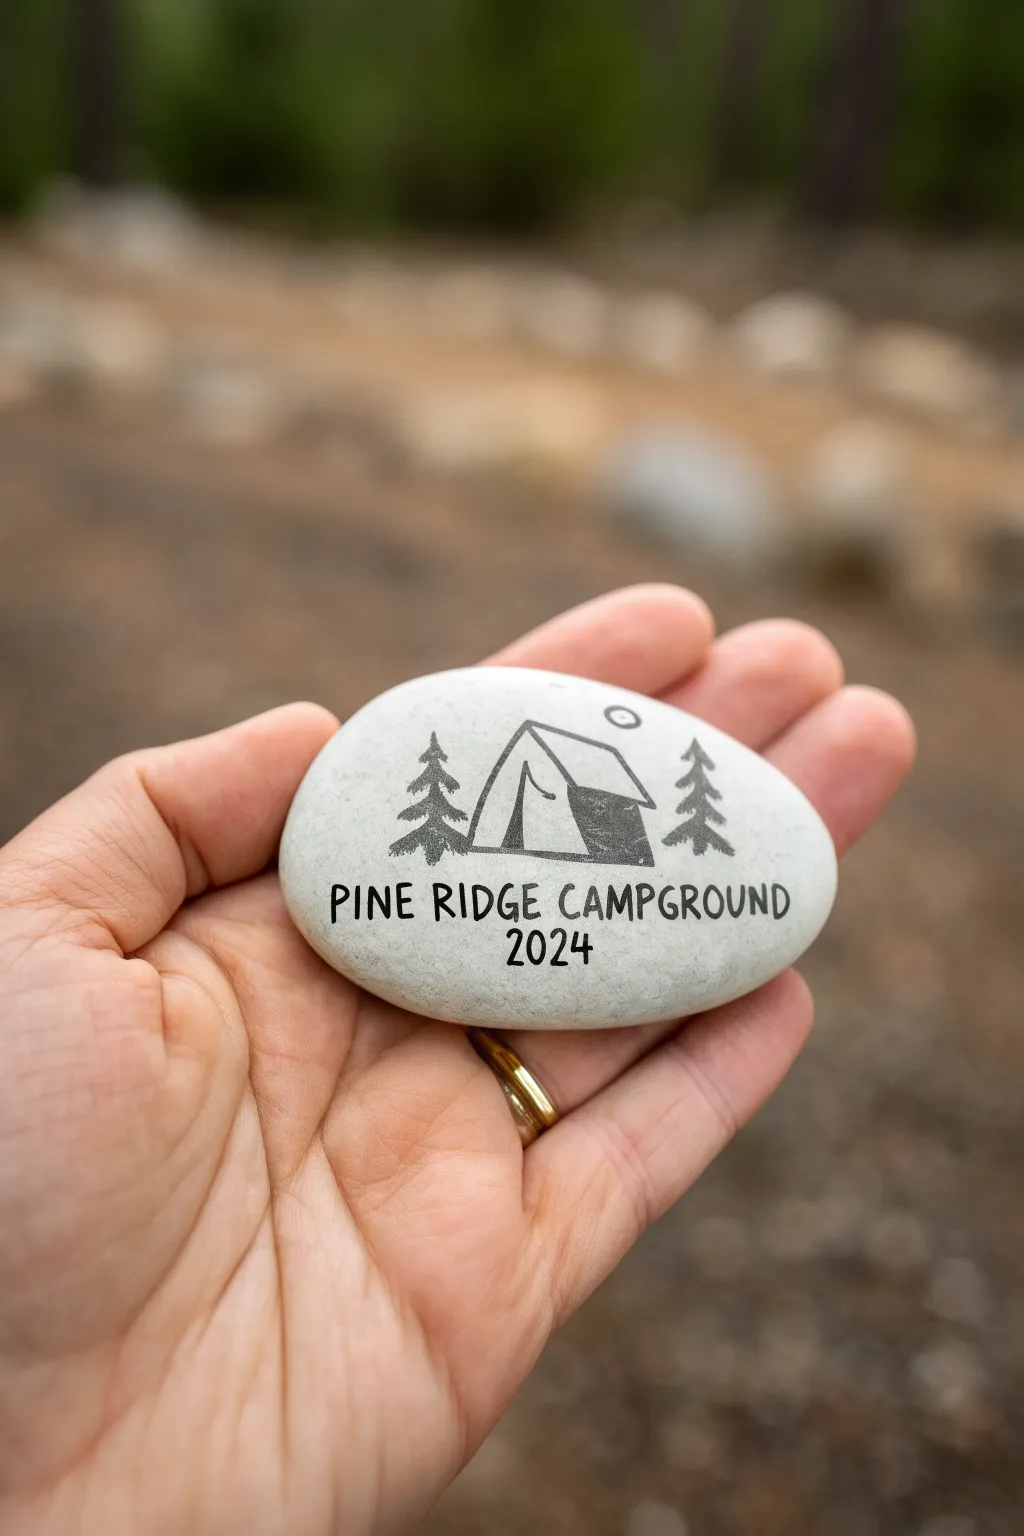
Create a lasting souvenir from your outdoor adventures with this clean, minimalist painted rock. Using simple line art and clear lettering on a smooth, white river stone captures the memory of your favorite campground and the year you visited.
How-To Guide
Materials
- Smooth white or light grey river rock (flat surface is best)
- Black fine-point paint pen (like Posca or Sharpie)
- Black extra-fine point paint pen (for details)
- Pencil (HB or lighter)
- White eraser
- Sealant (spray or brush-on clear varnish)
- Ruler (optional)
- Isopropyl alcohol and cotton pad
Step 1: Preparation and Planning
-
Clean the surface:
Begin by washing your stone with soap and water to remove any dirt. Once dry, wipe the surface with isopropyl alcohol on a cotton pad to remove skin oils, ensuring the paint adheres perfectly. -
Evaluate the shape:
Hold the stone in your hand to find the flattest, smoothest face. This will be your canvas. Orient the rock horizontally to accommodate the landscape scene and text. -
Sketch the baseline:
Using a pencil very lightly, draw a straight horizontal line across the lower third of the stone. This will act as a guide for your text to ensure it stays level. -
Outline the central tent:
Lightly sketch a simple A-frame tent in the center, resting just above where your text will go. Draw the front triangular opening and extending side wall to give it dimension. -
Add nature elements:
Sketch a pine tree on either side of the tent. Keep them simple—just a vertical line with downward-slanting branches. Add a small circle near the top right for the sun or moon.
Step 2: Applying the Design
-
Trace the tent:
Take your fine-point black paint pen and carefully trace over your pencil lines for the tent structure. Keep your hand steady and use smooth, confident strokes. -
Fill the tent shadow:
On the side panel of the tent, use the pen to fill in the shape completely solid black. This contrast gives the simple line drawing immediate depth and visual interest. -
Ink the trees:
Switch to your extra-fine point pen if the trees are small. Draw the vertical trunk line first, then add the branches using short, quick hatched lines to simulate pine needles. -
Add the celestial body:
Carefully trace the small circle in the sky. If you want it to look like a ring, leave the center empty; for a full sun, you could fill it in, but the open circle matches the minimalist aesthetic. -
Let the ink set:
Pause for a few minutes here. Paint pens dry quickly, but smudging is easy to do if you rush into the lettering phase immediately.
Smudge Stopper
If using a brush-on sealer over paint markers, the ink often bleeds. To prevent this, apply a very light coat of spray fixative or hairspray first and let it dry before brushing on varnish.
Step 3: Lettering and Finishing
-
Draft the lettering:
Before committing to ink, check your pencil spelling of the campground name and year. Ensure the spacing is centered under the illustration. -
Ink the main text:
Using the fine-point pen, write the campground name in all caps. Use a simple, sans-serif print style. I find that lifting the pen completely between each stroke helps keep the letters crisp. -
Add the year:
Directly below the text, center the year. Make these numbers slightly smaller than the campground name to create a visual hierarchy. -
Erase guidelines:
Allow the paint to cure fully—wait at least 15 to 20 minutes to be safe. Gently erase any visible pencil marks with a white eraser, being careful not to rub too hard over the ink. -
Seal the memory:
To protect your rock from the elements or handling, apply a thin coat of clear sealant. A spray sealant is often safer for ink drawings to prevent smearing.
Make it a Stamp
If you are making these for a group, carve a simple rubber eraser stamp for the tent and tree design. This guarantees uniformity and speeds up the process significantly.
Now you have a simple, elegant memento that perfectly captures the place and time of your trip
Glow-Style Constellation Rocks
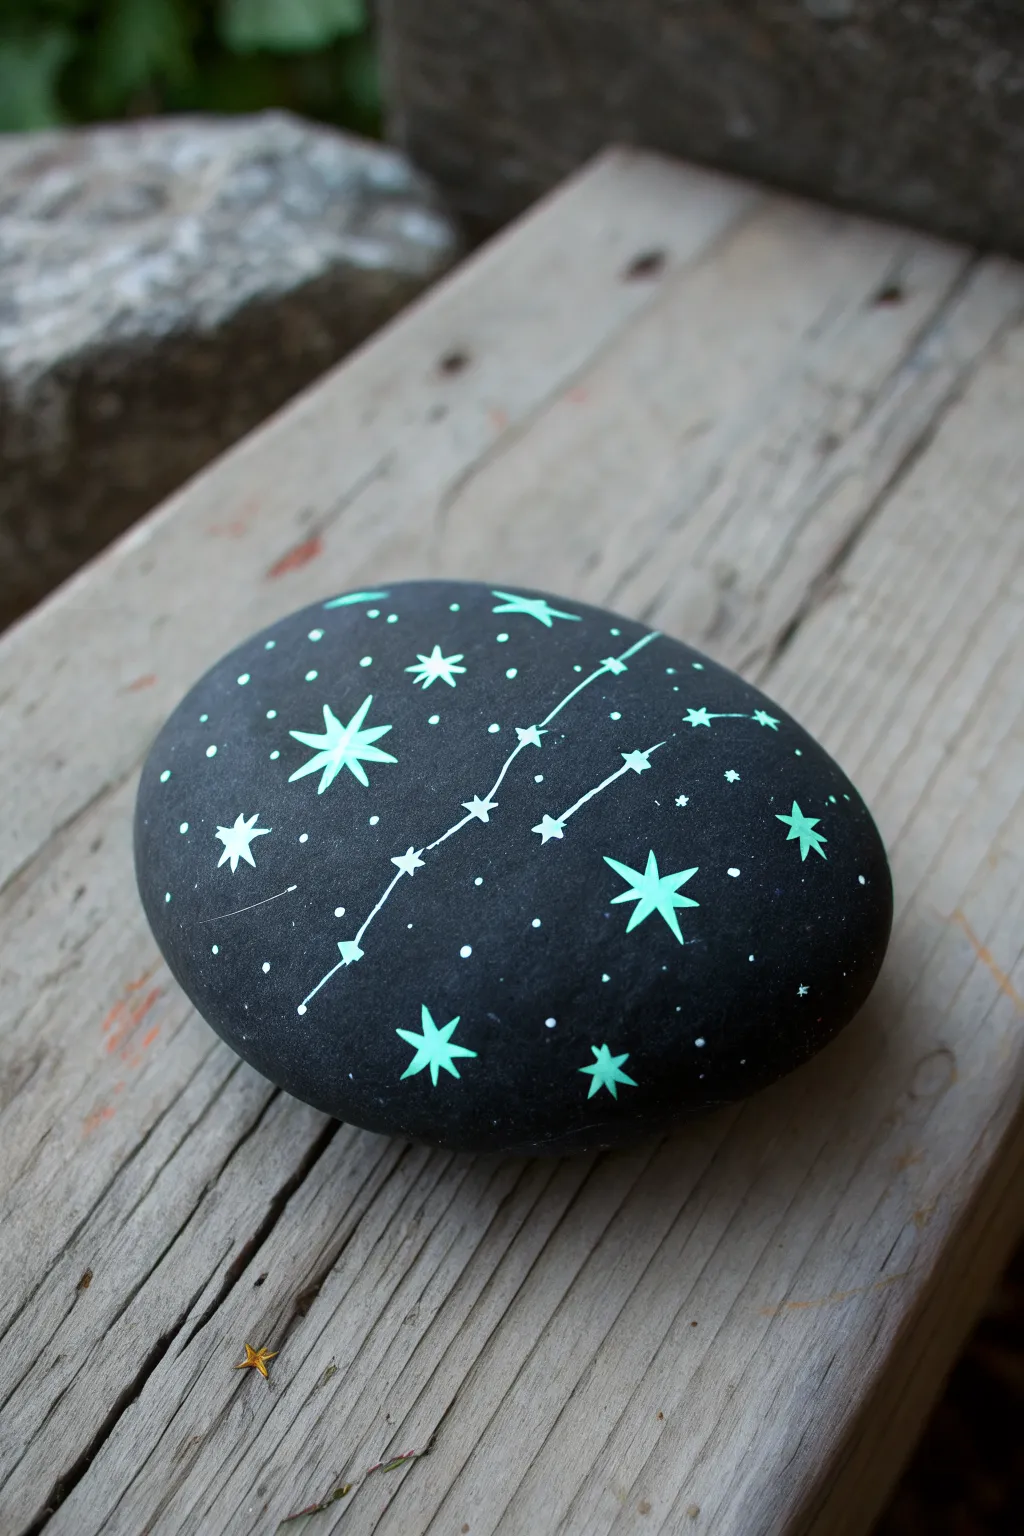
Transform a smooth river rock into a piece of the night sky that you can hold in your hand. This design features delicate constellations and scattered stardust against a deep black background, perfect for lighting up a campsite table.
Step-by-Step
Materials
- Smooth, rounded river rock (flat is best)
- Black acrylic paint (matte finish recommended)
- Glow-in-the-dark acrylic paint or paint pen (pale green or aqua)
- White acrylic paint (for base layering)
- Wide flat paintbrush
- Fine detail paintbrush (size 0 or 00)
- Small dotting tool or toothpick
- Clear outdoor sealer (spray or brush-on)
Step 1: Preparing the Night Sky
-
Clean the canvas:
Start by scrubbing your chosen rock with warm, soapy water to remove any dirt or oils. Let it dry completely in the sun or use a hair dryer to speed up the process. -
Apply the base coat:
Using your wide flat brush, paint the entire top surface of the rock with black acrylic paint. You want solid, opaque coverage, so apply a second coat if the stone’s natural color shows through. -
Let it cure:
Allow the black base to dry thoroughly. This is crucial because if the black is wet, it will muddy the lighter colors we are about to add.
Starry Hack
Can’t draw a perfect star? Paint a simple cross first, then add a smaller ‘X’ over the center to create an easy 8-point star burst.
Step 2: Mapping the Constellation
-
Plan your stars:
Visualize where you want your main constellation points to be. The image shows a sweeping line of stars, similar to Cygnus or Cassiopeia, stretching across the rock’s surface. -
Paint the major stars:
Dip your fine detail brush into white paint first. Paint small 5-point stars at your key constellation points. This white underlayer will make the glow paint pop much brighter later. -
Connect the dots:
Using a very light hand and the fine brush, draw thin white lines connecting specific stars to form the constellation shape. Don’t worry if the lines aren’t perfectly straight; organic imperfect lines look natural. -
Add secondary stars:
Paint a few medium-sized 4-point or 5-point stars scattered randomly around the main constellation to add depth to the galaxy. -
Create the stardust:
Switch to your dotting tool or a toothpick. Dip it in white paint and gently tap small dots around the empty black spaces to simulate distant stars.
Level Up: Nebula Effect
Before painting stars, sponge on very faint patches of dark blue and purple over the black base to create a deep space nebula background.
Step 3: Adding the Glow
-
Layer the glow paint:
Once the white guide layer is dry, carefully trace over every star, line, and dot using your glow-in-the-dark paint or paint pen. The white base underneath acts as a reflector. -
Sharpen the star points:
Use the very tip of your detail brush to pull the paint outward from the center of the larger stars, creating sharp, tapering points. -
Build intensity:
Glow paint is often translucent. I find that applying a second or even third coat over the larger stars creates a much stronger luminescence once the lights go out. -
Check for gaps:
Look closely at the connecting lines. If the glow paint looks streaky, dap a little more onto the lines to ensure a consistent flow of light. -
Final drying time:
Let the thick layers of glow paint dry completely. This might take longer than standard acrylics, so be patient. -
Protect your work:
Finish the rock by applying a clear outdoor sealer. This protects the paint from chipping and weather if you leave the rock at a campsite or in the garden.
Charge your finished rock under a bright light or sunlight to see your personal galaxy come to life in the dark


Have a question or want to share your own experience? I'd love to hear from you in the comments below!