Rocks and stones are my favorite tiny canvases because they’re already full of character before you ever touch a brush. With a little paint (and a little patience), you can turn ordinary pebbles into decorative rock art you’ll actually want to display, gift, or tuck into your garden.
Classic Ladybug And Beetle Rocks
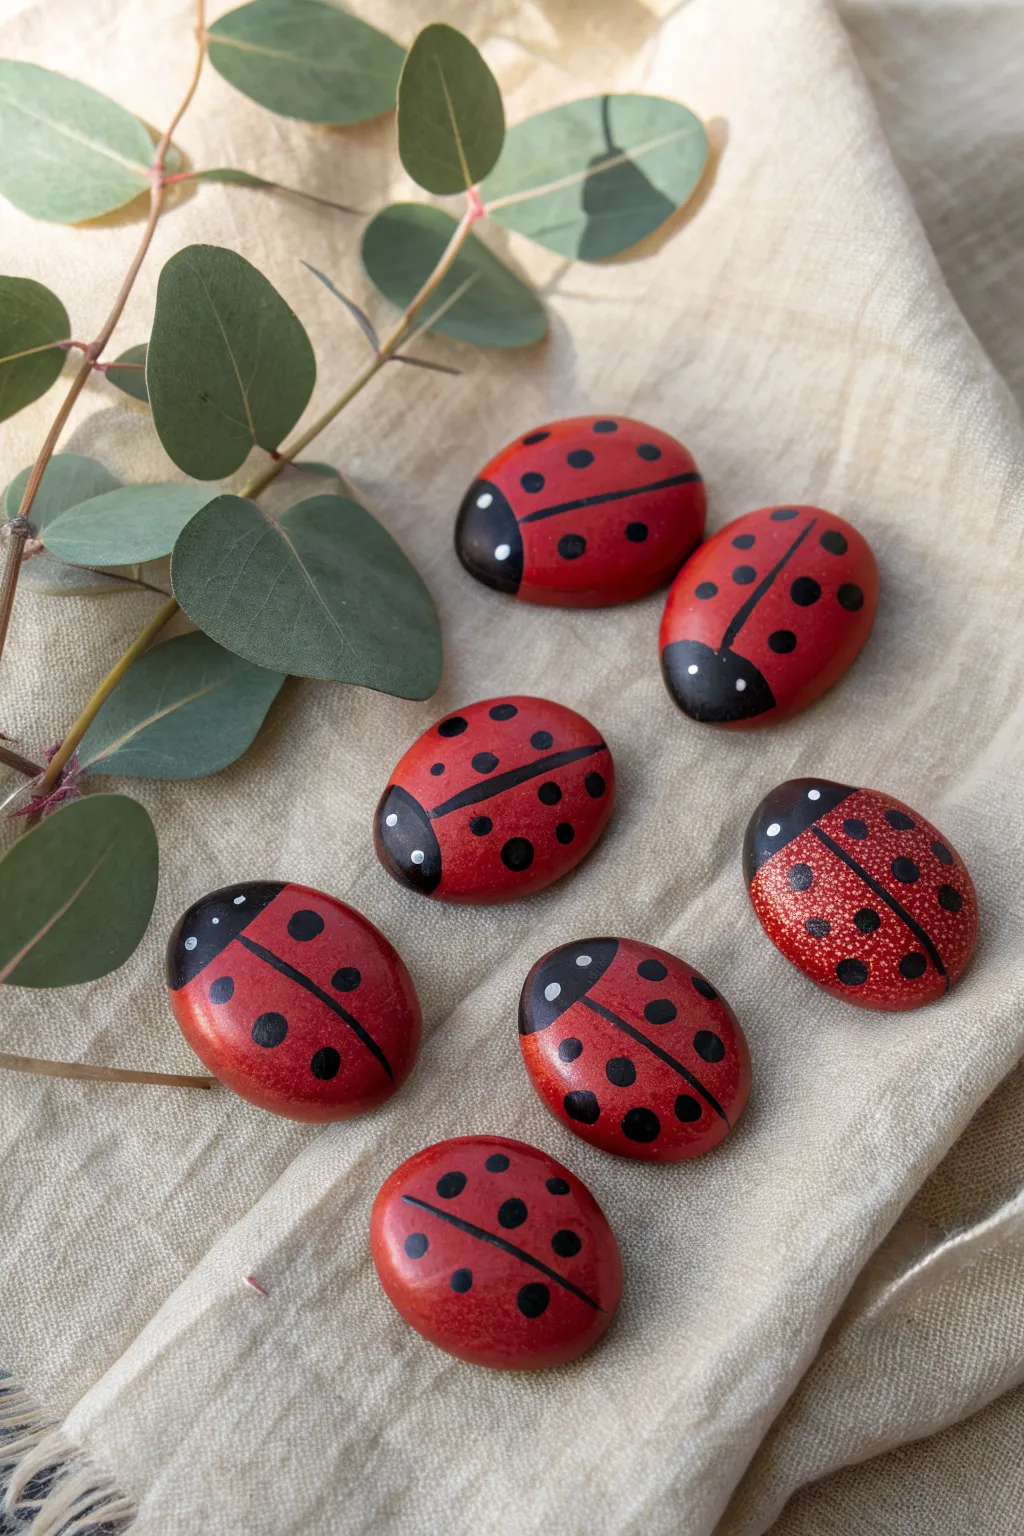
Transform smooth river stones into a charming family of ladybugs with just a few simple brushstrokes. These bright red beetles add a pop of whimsical color to planters or windowsills and are practically mistake-proof to create.
Detailed Instructions
Materials
- Smooth oval river rocks (approx. 2-3 inches)
- Red acrylic paint (bright cherry or scarlet)
- Black acrylic paint
- White acrylic paint
- Soft flat paintbrush
- Fine detail paintbrush or liner brush
- Dotting tool or the back end of a paintbrush
- Clear gloss varnish or sealant (spray or brush-on)
- Red glitter paint (optional, for texture)
Step 1: Base Coat Preparation
-
Clean the stones:
Before starting, scrub your stones with warm soapy water and let them dry completely. Dust or dirt will prevent the paint from sticking properly. -
Apply the red base:
Using your flat brush, paint the entire top surface of the stone with bright red acrylic paint. Don’t worry about the underside for now. -
Building opacity:
Let the first coat dry fully. Apply a second or even third coat of red until the gray color of the rock no longer shows through. I like to let each layer dry for at least 15 minutes to prevent lifting.
Step 2: Defining the Shape
-
Paint the head:
Switch to a smaller brush and black paint. At one end of the oval, paint a semi-circle or crescent shape to create the ladybug’s head. -
Create the wings:
Using a fine detail brush or liner brush, draw a straight black line down the center of the red body, starting from the base of the black head to the tail end of the stone. -
Thicken the line:
Go over the center line gently to make it solid and distinct, ensuring it doesn’t look like a scratchy sketch.
Paint Slipping?
If the paint streaks or won’t stick to a very smooth river rock, apply a layer of white gesso or matte medium first to give the surface some ‘tooth’ for the color to grab onto.
Step 3: Adding the Spots
-
Load your dotting tool:
Dip a dotting tool or the non-brush end of a paintbrush into your black paint puddle. -
Place primary spots:
Press the tool gently onto the red wings to create perfectly round spots. vary the placement so they don’t look too grid-like. -
Varying spot sizes:
For a natural look, you can use different sized tools to make some spots slightly smaller than others. -
The glitter variant:
For the textured ladybug seen in the group, apply a coat of red glitter paint over the red base before adding the black spots. This gives it a shimmering, speckled shell appearance.
Perfect Round Dots
Don’t have a dotting tool? Use the flat head of a nail, a toothpick for tiny dots, or even a Q-tip with the cotton removed for larger spots.
Step 4: Finishing Details
-
Adding eyes:
Clean your dotting tool or use a very fine brush tip. Dip it into white paint and place two small dots on the black head area for the eyes. -
Dry time is key:
Allow the painted stones to sit undisturbed for several hours. If the black paint is still wet when you varnish, it will smear across the red. -
Sealing the work:
Apply a coat of high-gloss varnish. This step is crucial as it makes the colors pop and gives the ladybug that realistic ‘wet shell’ shine. -
Second seal:
Once the first layer of varnish is tacky or dry, apply a second coat to ensure the rock is fully weatherproof if you plan to keep these outside.
Place your finished beetle family among plenty of green leaves for a delightful garden surprise

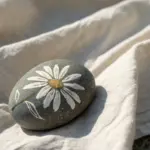
Easy Floral Doodles On Pebbles
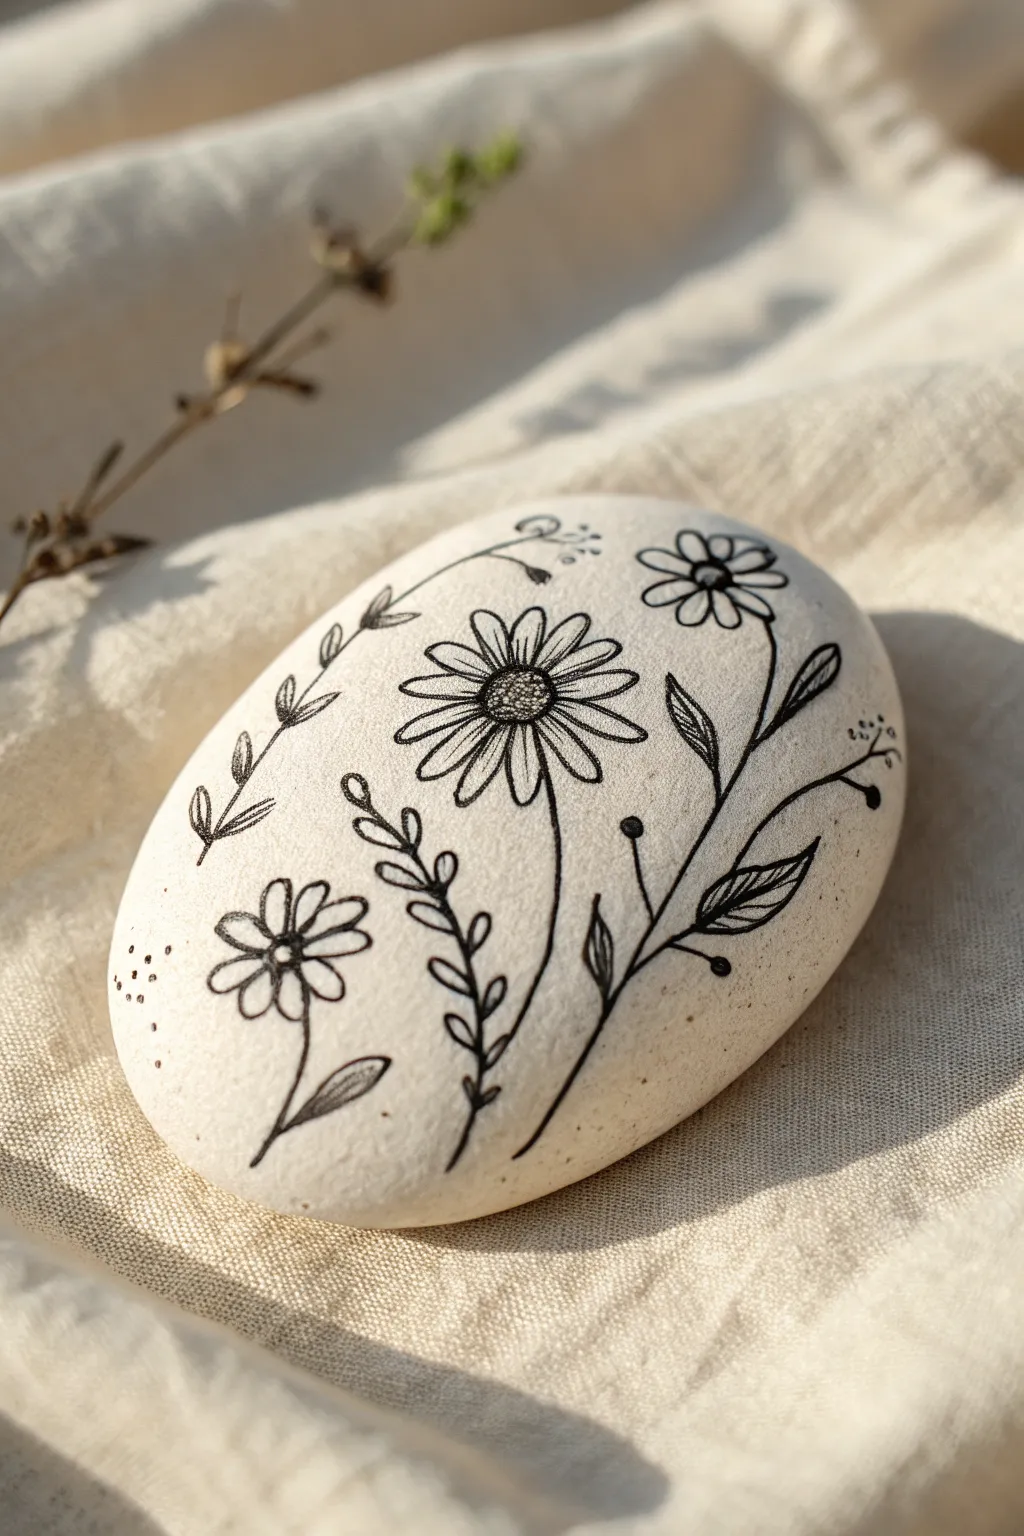
Transform a simple found stone into a botanical keepsake with fine-line floral doodles. This minimalist design uses crisp black ink against smooth, pale stone to capture the elegance of wildflowers.
Detailed Instructions
Materials
- Smooth, light-colored river rock or pebble (cream or white is ideal)
- Fine-grit sandpaper (optional)
- Pencil (HB or H)
- Eraser
- Black fine-liner pens (0.1mm and 0.3mm nibs)
- Matte spray varnish or sealant
- Soap and water
- Paper towel
Step 1: Preparation and Planning
-
Clean the canvas:
Wash your stone thoroughly with warm soapy water to remove any dirt or natural oils. Scrub gently with an old toothbrush if needed to get into tiny crevices, then dry completely with a paper towel. -
Smooth the surface:
Run your fingers over the face of the stone. If there are rough patches that might snag your pen, lightly sand them down with fine-grit sandpaper until the surface feels satin-smooth. -
Draft the stems:
Using a pencil, lightly sketch three main curved lines stemming from the bottom edge of the rock. These will be the spines for your main flowers. Keep the curves natural and flowing rather than stiffly straight. -
Position the blooms:
Sketch a small circle at the top of the center stem for the main daisy head. Add smaller circles on the left and right stems to mark where secondary flowers will sit.
Ink Control Secret
Work from the top of the stone downward (or left to right if you’re right-handed) to prevent your hand from smudging wet ink on the smooth surface.
Step 2: Inking the Blooms
-
Start the center daisy:
Switch to your 0.3mm pen. Draw the center disk of the main daisy using small, tight stippling dots to create texture. This mimics the pollen-dense middle of a real flower. -
Add main petals:
Draw long, slender petals radiating from the dotted center. Keep them close together but distinct. I like to make the tips slightly rounded or jagged for a natural look. -
Draw the secondary flowers:
Move to the side stems. Draw simpler, smaller daisy shapes here. For the flower on the left, aim for five or six broader petals. For the one on the right, create a smaller, classic daisy shape. -
Refine the petals:
Add a single, very thin line down the center of each of the larger petals using the 0.1mm pen to suggest veins and depth.
Ink Bleeding?
If the stone is too porous and ink feathers, apply a layer of clear matte acrylic medium or clear nail polish first to seal the pores before drawing.
Step 3: Adding Foliage and details
-
Ink the stems:
Go over your pencil stem lines with specific strokes. Don’t draw one continuous heavy line; instead, pull the pen gently along the curve to keep it graceful. -
Create leaf branches:
Along the main stems, draw small offshoots for leaves. On the left side, draw a stem with paired, oval leaves climbing upward. -
Draw detailed leaves:
On the right side of the main daisy, draw larger, pointed leaves. Fill these leaves with diagonal hatching lines to create shading and contrast against the pale stone. -
Add filler florals:
Sketch thin, wispy stems extending into the empty spaces near the top. Add tiny dots or small buds at the ends of these lines to resemble baby’s breath or wildflowers. -
Balance the composition:
Look for empty gaps near the bottom left. Draw a few tiny, scattered dots to gently fade the design out, adding an artistic, speckled touch.
Step 4: Finishing Touches
-
Review and erase:
Wait at least 15 minutes to ensure the ink is totally dry. Gently erase any visible pencil sketch marks, being careful not to smudge your fresh ink. -
Enhance contrast:
If any lines look too faint against the stone’s texture, carefully go over them again with the 0.3mm pen to darken them. -
Seal the artwork:
Take the stone to a well-ventilated area. Apply a light coat of matte spray varnish. Avoid gloss finishes, as the shine can distract from the delicate line work.
Place your finished floral stone on a desk or windowsill to enjoy a touch of nature indoors


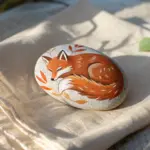
Cute Animal Face Rocks
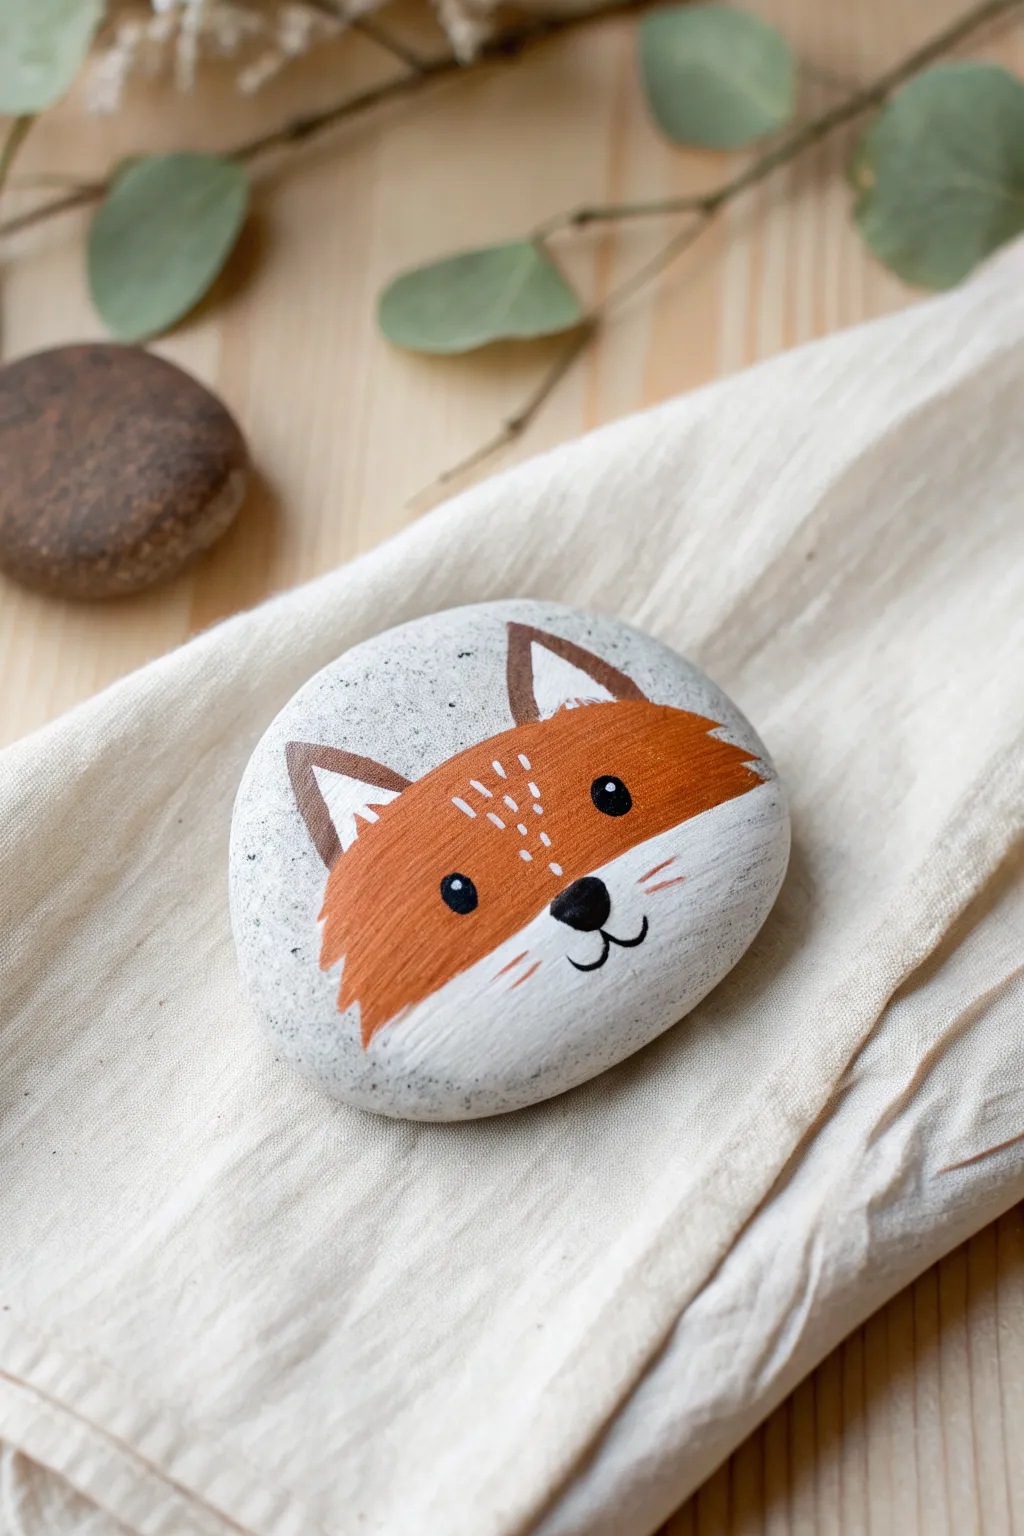
Bring a touch of woodland whimsy to your garden or desk with this adorable fox painted rock. This project uses the natural shape of a smooth stone to create a sweet, stylized animal portrait that pops with vibrant orange and crisp white details.
Step-by-Step Guide
Materials
- Smooth, round river stone (light grey or white preferred)
- Acrylic paints (Titanium White, Burnt Orange/Fox Red, Dark Brown, Black)
- Flat synthetic paintbrush (size 6 or 8)
- Fine detail liner brush (size 0 or 00)
- Pencil for sketching
- Matte or satin varnish (spray or brush-on)
- Water cup and paper towels
Step 1: Preparing the Base
-
Clean the canvas:
Start by scrubbing your stone with warm soapy water to remove any dirt or oils that might repel paint. Let it dry completely in the sun or with a hairdryer. -
Base coat choice:
If your stone is naturally dark, paint a solid layer of white or very light grey over the entire surface to make the colors pop. If you have a lovely pale stone like the one pictured, you can leave the background natural, just ensure it’s clean.
Fixing Shaky Lines
If your fine lines look wobbly, thin your black paint with a drop of water until it’s ink-like. It will flow much smoother from the liner brush.
Step 2: Sketching the Fox
-
Outline the head shape:
Using a pencil, lightly sketch a rounded heart shape or a wide oval in the center of the rock. This will be the main area for the fox’s face. -
Mark the fur line:
Draw a curved line dividing the face horizontally. This swooping ‘M’ shape separates the orange forehead from the white muzzle area below. -
Add the ears:
Sketch two triangles at the top of the head. Inside each triangle, draw a smaller triangle to indicate the inner ear.
Step 3: Blocking in Color
-
Painting the orange fur:
Load your flat brush with Burnt Orange paint. Fill in the top section of the face, carefully following the ‘M’ curve you sketched earlier. -
Creating texture:
As you paint the bottom edge of the orange section, use flicking brush strokes downward to mimic the look of fur overlapping the white area. Don’t make this line too straight. -
Refining opacity:
Let the first coat of orange dry. If the stone color shows through, apply a second coat for a rich, bold color. -
Painting the muzzle:
Using white paint, fill in the bottom section of the face. Blend it slightly upward where it meets the orange to soften the transition if you prefer a softer look, or keep it crisp like the photo. -
Inner ears:
Paint the larger triangles of the ears white. Leave the outer rim of the ears unpainted or defined by the background stone color.
Pro Tip: Dotting Tool
Don’t have a tiny brush for the eye sparkle? Use the tip of a toothpick or unwound paperclip dipped in white paint for a perfect, tiny dot.
Step 4: Adding Features & Details
-
The ear outline:
Switch to your fine detail brush and dark brown paint. Outline the outer edges of the ears to define them clearly against the stone. -
Painting the eyes:
Dip the handle end of a paintbrush into black paint to create two perfect circles for the eyes. Place them spaced widely apart in the orange section, just above the muzzle line. -
The nose:
Paint an inverted rounded triangle for the nose using black paint right in the center of the white muzzle section. -
Mouth details:
With your finest liner brush and black paint, draw a small vertical line down from the nose, branching into a curved ‘w’ shape for the smiling mouth. -
Whiskers:
Mix a tiny bit of orange with white to make a light peach color, or just use thinned orange. Paint two or three short, floating whisker lines on each cheek specifically in the white zone.
Step 5: Finishing Touches
-
Eye sparkle:
Once the black eye paint is 100% dry, add a tiny white dot to the upper right of each eye using the tip of a toothpick or a clean detail brush. This brings the character to life. -
Forehead texture:
Add small, vertical dashed lines in white on the forehead between the eyes to simulate fur texture and highlights. -
Cleanup:
If you made any smudges on the raw stone part, you can sometimes gently scratch them off with a toothpick or paint over them with a color matching the stone. -
Sealing:
Allow the rock to cure for at least 24 hours. Apply a spray varnish in light, even coats to protect your artwork from weather and handling without smearing the ink.
Place your finished fox in a potted plant or give it to a friend as a charming pocket companion
Bold Fruit And Veggie Illusion Stones
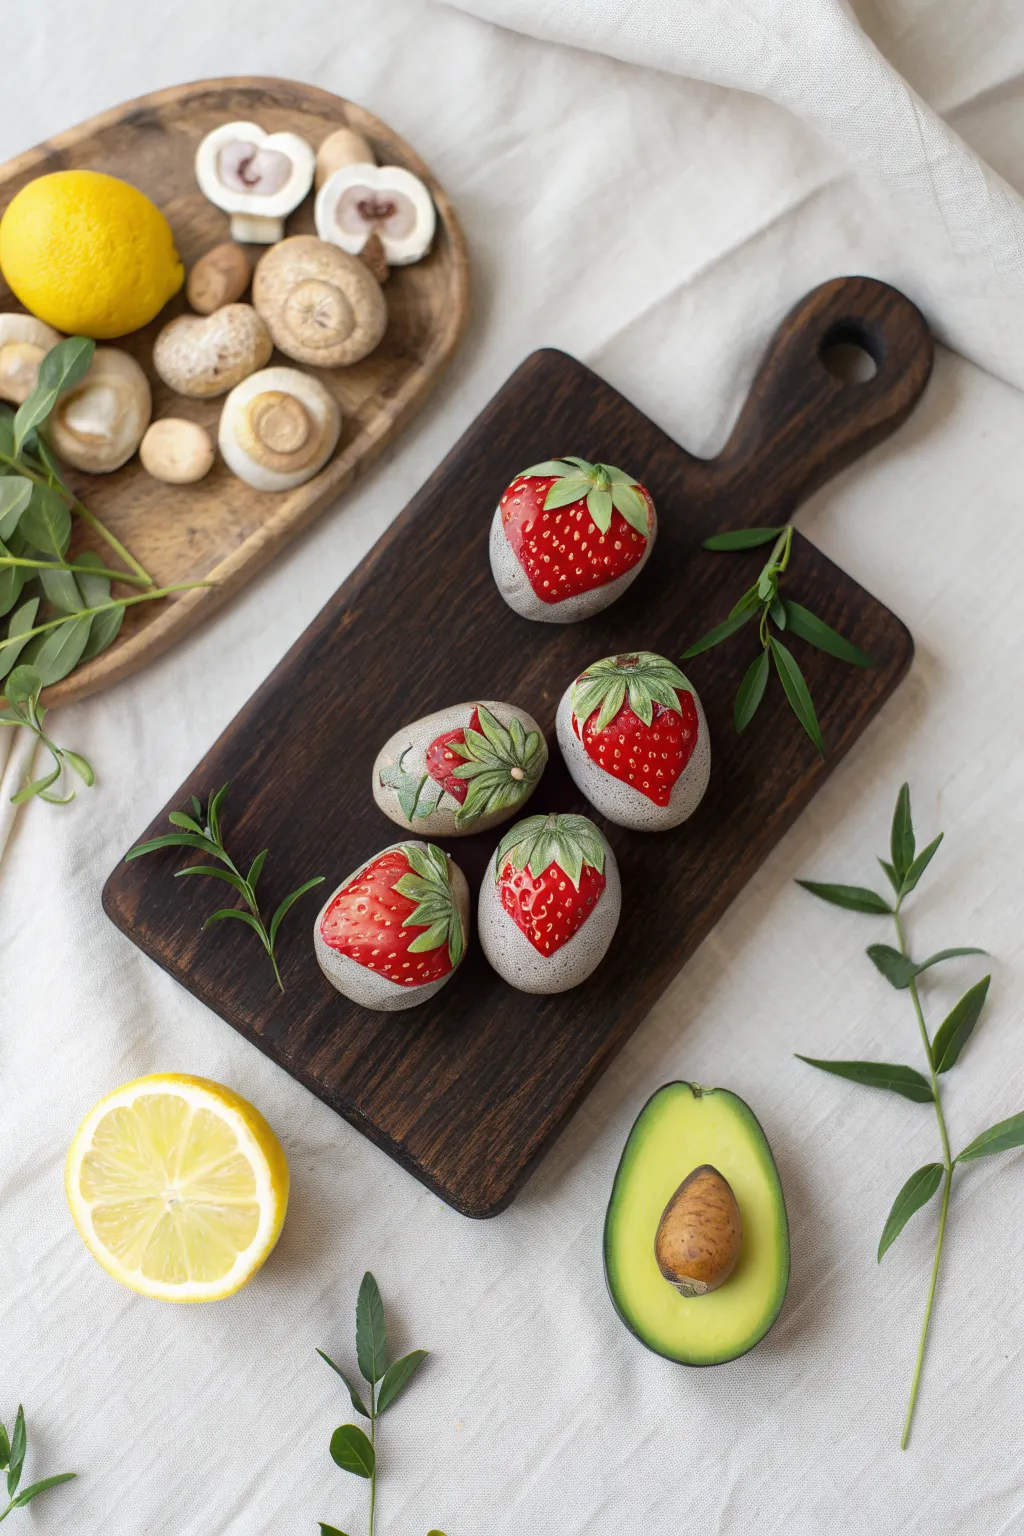
Transform ordinary smooth stones into a basket of summer sweetness with this realistic rock painting project. By carefully layering shades of red and adding detailed seeds, you’ll create a trompe l’oeil effect so convincing, you might just try to take a bite.
How-To Guide
Materials
- Smooth, oval river rocks (approx. 2-3 inches)
- Acrylic paints (Titanium White, Cadmium Red, Deep Red/Crimson, Sap Green, Lime Green, Yellow Ochre)
- Grey acrylic paint (optional, for base)
- Pencil for sketching
- Fine detail brushes (size 00 or 000)
- Flat shader brush (size 4 or 6)
- Medium round brush
- Matte or satin varnish
- Palette for mixing
- Water cup and paper towels
Step 1: Preparation and Base
-
Clean and prep:
Begin by thoroughly washing your stones with soap and water to remove any dirt or oils. Let them dry completely before starting. -
Study the shape:
Examine your stones and decide which end looks more like the tip of a strawberry and which looks like the stem end. Visualize how the fruit sits on the stone. -
Sketch the outline:
Lightly sketch the general shape of the strawberry ‘flesh’ onto the stone using a pencil. You don’t need to cover the whole rock; leaving some raw stone visible creates a nice artistic effect, as seen in the photo. -
Base coat the red:
Using your flat shader brush, fill in the strawberry shape with a mix of Titanium White and a touch of Cadmium Red to create a pink undercoat. This helps the final red pop against the grey stone. -
Main color application:
Once the pink is dry, paint over it with your bright Cadmium Red. You may need two coats to get a solid, opaque coverage.
Uneven Texture?
If your rock is too bumpy for fine seeds, apply a layer of heavy gel medium or gesso first. Sand it smooth once dry to create a perfect canvas for detailed painting.
Step 2: Adding the Leaves
-
Sketch the calyx:
At the top of your red shape, lightly pencil in the star-shaped leafy cap (the calyx). Make the leaves flow naturally over the curve of the stone. -
Base green layer:
Use your round brush to fill in these leaves with Sap Green. It’s okay if it looks a bit flat right now; we will add depth next. -
Highlighting the leaves:
Mix a little Lime Green or Yellow with your Sap Green. Paint thin streaks down the center and edges of each leaf to simulate veins and light hitting the foliage. -
Shadowing the leaves:
Mix a tiny bit of black or purple into your Sap Green to create a shadow tone. Paint this carefully right where the leaves meet the red fruit to lift them off the surface.
Step 3: Details and Seeds
-
Create seed indentations:
Using a deep red or crimson color, paint small, teardrop-shaped dimples across the red surface of the berry. Arrange them in a somewhat diagonal pattern for realism. -
Painting the seeds:
Switch to your finest detail brush (00 or 000). Mix Yellow Ochre with a dot of White. Carefully place a tiny seed inside each dark red dimple you just painted. -
Seed placement tip:
I find it helpful to place the seed slightly off-center within the dark dimple, closer to the top, to suggest perspective and shadow intensity. -
Adding highlights:
With pure Titanium White and your finest brush, add a microscopic dot of shine to the upper left of the red fruit surface, near the leaves, to make it look wet and glossy. -
Add leaf tips:
Go back to the green leaves and add very sharp, tiny points to the ends using a lighter green shade to define the crisp edges. -
Clean up edges:
If any paint went outside your initial sketch lines onto the raw stone, you can gently scrape it off with a toothpick while semi-dry, or paint over it with a grey that matches your rock.
Realistic Depth
When painting the red body, leave the center bright but slightly darken the edges with crimson. This gradient mimics the roundness of real fruit.
Step 4: Finishing Touches
-
Dry completely:
Allow the stones to sit undisturbed for at least 24 hours to ensure all layers of acrylic are fully cured. -
Seal the artwork:
Apply a coat of satin or matte varnish over the painted area. A satin finish works beautifully here to mimic the natural sheen of a ripe strawberry without being overly glossy.
Arrange your finished stone strawberries in a bowl or on a cutting board for a delightful piece of permanent summer decor
BRUSH GUIDE
The Right Brush for Every Stroke
From clean lines to bold texture — master brush choice, stroke control, and essential techniques.
Explore the Full Guide
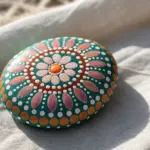
Mandala Dot Art Rocks
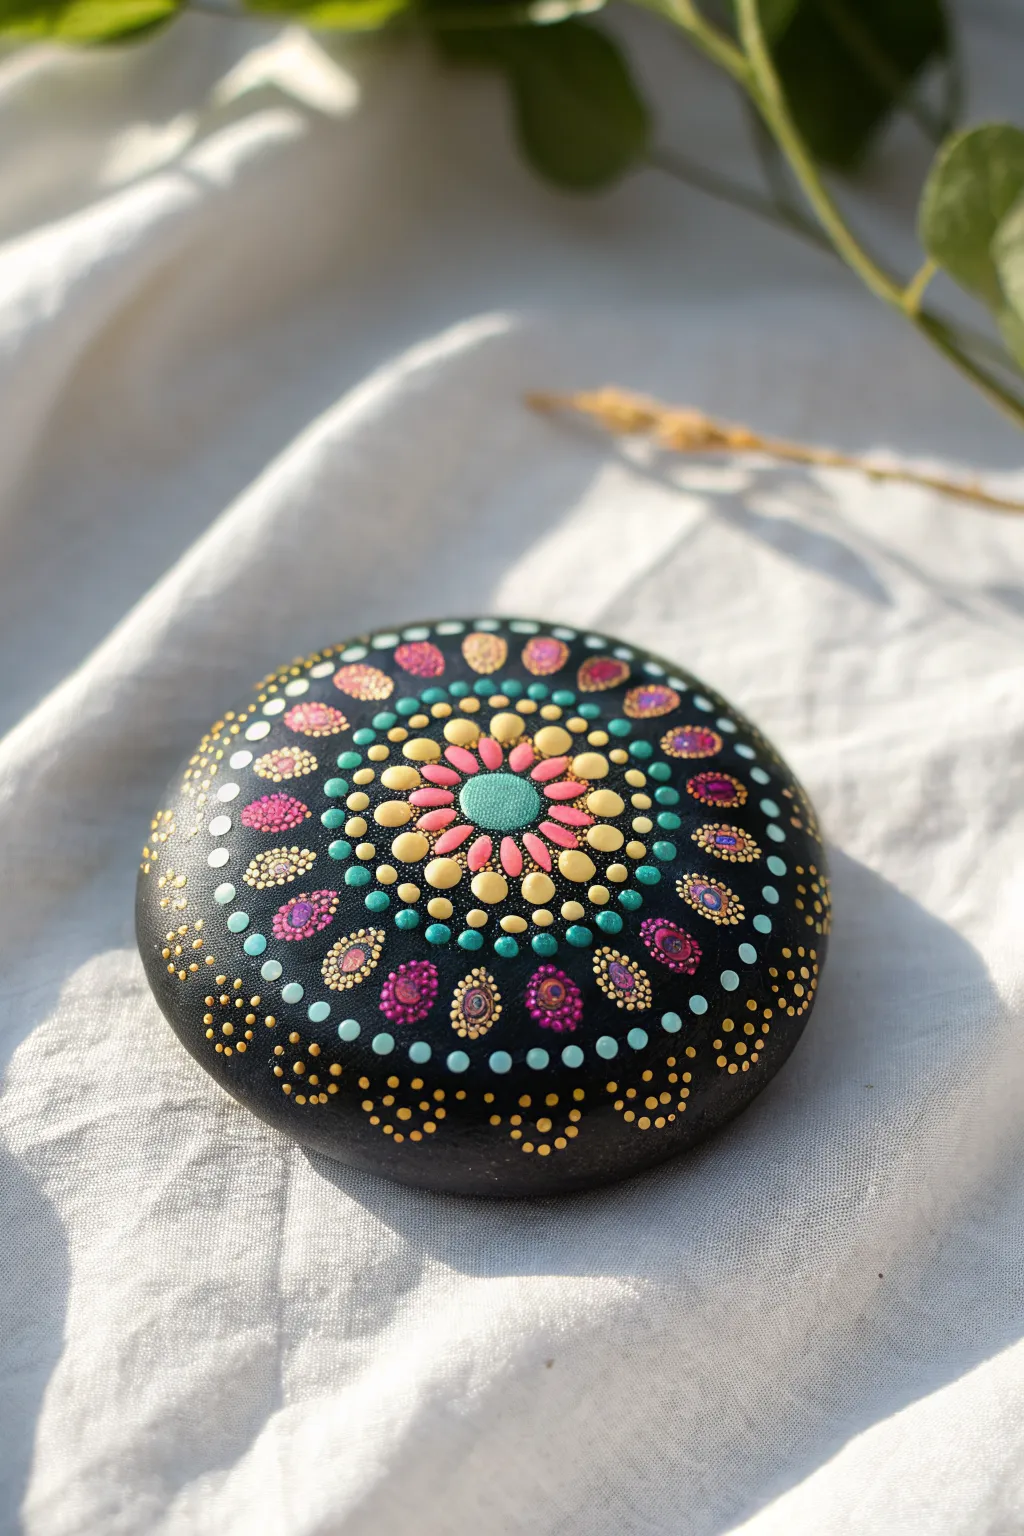
This striking mandala stone uses a deep black base to make the concentric rings of teal, pink, gold, and magenta pop with energy. It creates a hypnotic, radiating pattern that looks beautiful displayed on a shelf or used as a meditation focus piece.
Step-by-Step Guide
Materials
- Smooth, round river rock (approx. 4-5 inches diameter)
- Black gesso or multi-surface acrylic paint
- Acrylic paints: Teal, Light Pink, Magenta, Golden Yellow, Pastel Yellow, Lavender
- Dotting tools (set with graduated sizes, from fine stylus to large rods)
- White charcoal pencil or chalk pencil
- Ruler
- Compass or circular stencils
- High-gloss varnish (spray or brush-on)
- Palette or small tray
- Damp cloth for clean-up
Step 1: Preparation and Base
-
Clean surface:
Scrub the stone thoroughly with soap and water to remove any dirt or oils, then let it dry completely. This ensures the paint adheres properly. -
Base coat:
Apply two coats of black gesso or black acrylic paint over the entire top surface. Allow the first coat to dry before applying the second for solid, opaque coverage. -
Grid lines:
Find the center of your stone. Using a white charcoal pencil and a ruler, draw a vertical and horizontal line crossing at the center. Use a compass to lightly sketch 4-5 concentric circles outward from the center to act as guides for your pattern rings.
Fixing a Bloop
If two wet dots accidentally touch and merge, don’t wipe them! Let them dry completely, paint over the mistake with black base paint, dry again, and re-dot the area.
Step 2: Painting the Core Mandala
-
Center dot:
Using your largest dotting tool, place a generous dot of teal paint directly in the center of the stone. Gently swirl the tool in a circle to expand the dot into a perfect, large circle. -
First ring:
Switch to a medium-small tool. Place pink dots closely together around the central teal circle. Aim for consistent spacing and size. -
Second ring:
With a slightly larger tool, apply golden yellow dots in the gaps between the pink dots of the previous ring. This creates an interlocking effect. -
Third ring:
Using pastel yellow, make a ring of larger dots around the golden ones. These should align with the pink dots from the first ring to maintain symmetry.
Add Some Sparkle
For a magical finish, use a glitter topcoat or iridescent medium mixed into your final varnish layer to make the mandala shimmer in the sunlight.
Step 3: Expanding the Pattern
-
Inner teal accents:
Take a smaller tool and place a teal dot between each pastel yellow dot. This introduces the cool tone back into the warm yellow layers. -
Golden border:
Surround each of these new teal dots with tiny golden yellow dots, stippling them carefully to create a framed look without covering the teal. -
Magenta teardrops:
Moving outward, paint larger oval or teardrop shapes using magenta. Place these radially, pointing outward from the center. -
Teardrop details:
Once the magenta shapes are dry, add a smaller pink dot inside each one, followed by an even smaller golden dot inside that to create depth. -
Teal ring:
Paint a ring of medium-sized teal dots spaced slightly apart. -
Walking the dots:
Using a very fine tool and white or light lavender paint, ‘walk the dots’ around the larger teal ones. Dip once, then tap repeatedly in a curve around the main dot until the paint runs out, creating a diminishing tail.
Step 4: Outer Border and Finish
-
Outer flourish:
Create large, decorative shapes near the edge of the stone using gold paint. These should look like petal outlines or large ovals. -
Filling the flourished:
Should you wish to add texture, fill these gold shapes with tiny stippled dots of lavender or pink. -
Final border dots:
Add a final ring of tiny gold dots around the very edge of the design to frame the mandala and transition into the black background. -
Cleaning guides:
Allow the stone to dry for at least 24 hours. Gently wipe away any visible charcoal grid lines with a damp Q-tip or cloth. -
Sealing:
Apply a coat of high-gloss varnish to protect the paint and give the stone a polished, ceramic-like finish. I usually prefer a spray varnish here to avoid smearing the dots.
Place your finished mandala stone in a sunny spot and enjoy the calming rhythm of the pattern you created
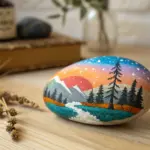
Mini Landscape Stones With Skies
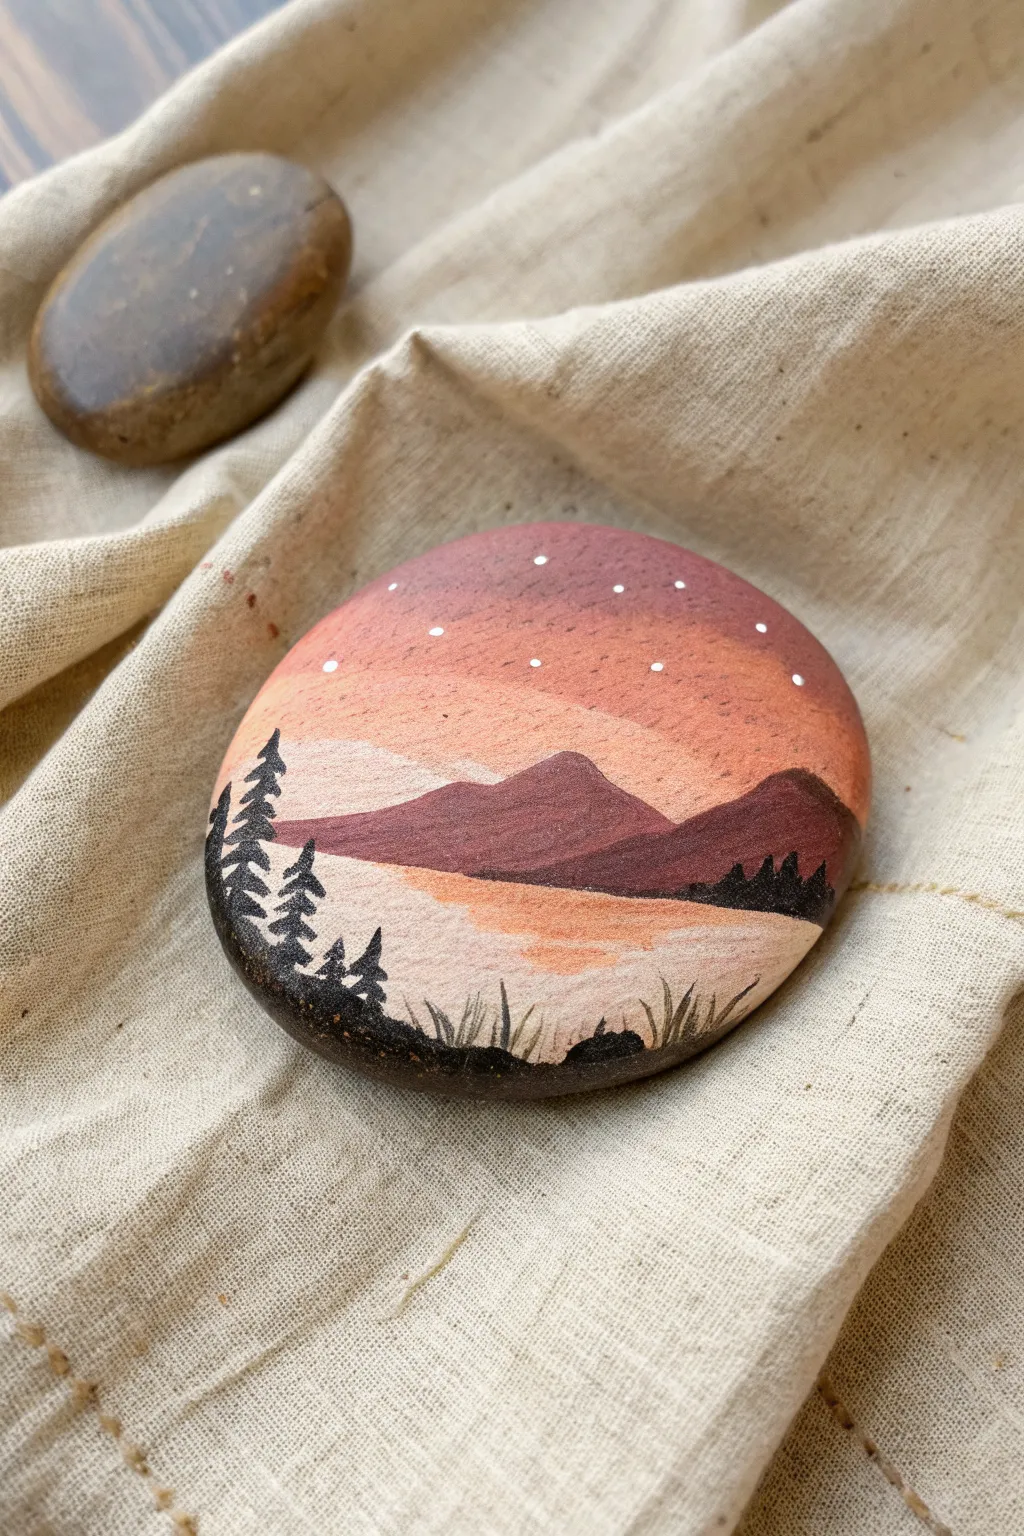
Capture the serene beauty of dusk with this miniature landscape painted on a smooth stone. Featuring a gradient sky, rolling mountains, and silhouette pines, this project transforms a simple rock into a tiny window to nature.
How-To Guide
Materials
- Smooth, round river stone (palm-sized)
- Acrylic paints (Burgundy/Deep Mauve, Peach, White, Black, Burnt Sienna)
- Flat paintbrushes (small and medium)
- Fine detail liner brush (size 0 or 00)
- Palette for mixing
- Water cup and paper towels
- Matte finish spray sealant (optional)
Step 1: Creating the Sky Gradient
-
Clean your canvas:
Begin by washing your stone with soap and water to remove any dirt or oils. Let it dry completely before starting. -
Mix your sky colors:
Prepare a gradient palette on your mixing tray. You’ll need a deep mauve or burgundy for the top, a warm peach for the middle, and a very pale peach-white for the horizon. -
Paint the upper sky:
Using a medium flat brush, apply the deep mauve color to the top third of the stone. Curve your strokes slightly to follow the rounded shape of the rock. -
Blend the middle section:
While the top paint is still slightly wet, pick up your peach color. Paint the middle band of the sky, blending gently upward where it meets the mauve to create a soft transition. -
Brighten the horizon:
Mix white with a tiny dot of peach. Paint the area just above where your mountains will go, blending it upward into the peach section. This creates that glowing sunset effect.
Uneven Gradients?
If your sky colors aren’t blending smoothly, use a mesmerizingly tiny amount of water on your brush to extend the drying time, allowing you to rework the transition between colors.
Step 2: Painting Mountains and Water
-
Establish the mountain range:
Mix a dark brownish-purple by combining your burgundy with a little burnt sienna or black. Paint the silhouette of distant mountains across the middle of the rock, overlapping the horizon line. -
Add mountain depth:
While the mountains dry, you can add a slightly darker shade to the right side of the peaks to suggest shadow, giving them a bit of dimension rather than being perfectly flat. -
Create the water base:
For the lake area below the mountains, mix a soft peach color similar to your middle sky tone but slightly muted. -
Paint the reflection:
Apply horizontal strokes of this peach color below the mountains. Leave some negative space or mix in a little white to mimic the shimmer of light on water. -
Refine the water line:
Use a detail brush to tighten up the shoreline where the water meets the base of the mountains. A straight, clean line here helps ground the scene.
Step 3: Adding Details and Silhouettes
-
Paint the foreground land:
Using pure black paint, create a small, uneven strip of land at the very bottom edge of the stone. -
Start the pine trees:
I like to switch to my finest liner brush here. Draw a thin vertical line for the trunk of the first tree on the left side. -
Flesh out the branches:
Using tiny dabbing or flicking motions with just the tip of the brush, add branches starting narrow at the top and getting wider toward the bottom. Repeat for a few more trees of varying heights. -
Add distant trees:
On the right side of the horizon, paint tiny, bumpy shapes along the water’s edge to represent a distant forest line. -
Paint grassy details:
From the black foreground at the bottom, flick your detail brush upward quickly to create thin blades of grass overlapping the water. -
Add the stars:
Dip the very tip of a clean brush handle or a toothpick into white paint. Gently perfect small dots into the upper mauve section of the sky for stars. -
Final touches:
Review your painting for any gaps. If the black looks patchy, give the silhouette layer a second coat once dry for solid opacity.
Add Moonlight
Add a tiny crescent moon in the upper sky and paint a thin, vertical white line zig-zagging on the water below it to create a magical reflection.
Let your stone dry completely before sealing it to preserve your miniature world for years to come

PENCIL GUIDE
Understanding Pencil Grades from H to B
From first sketch to finished drawing — learn pencil grades, line control, and shading techniques.
Explore the Full Guide
Seasonal Tree Series On Matching Stones
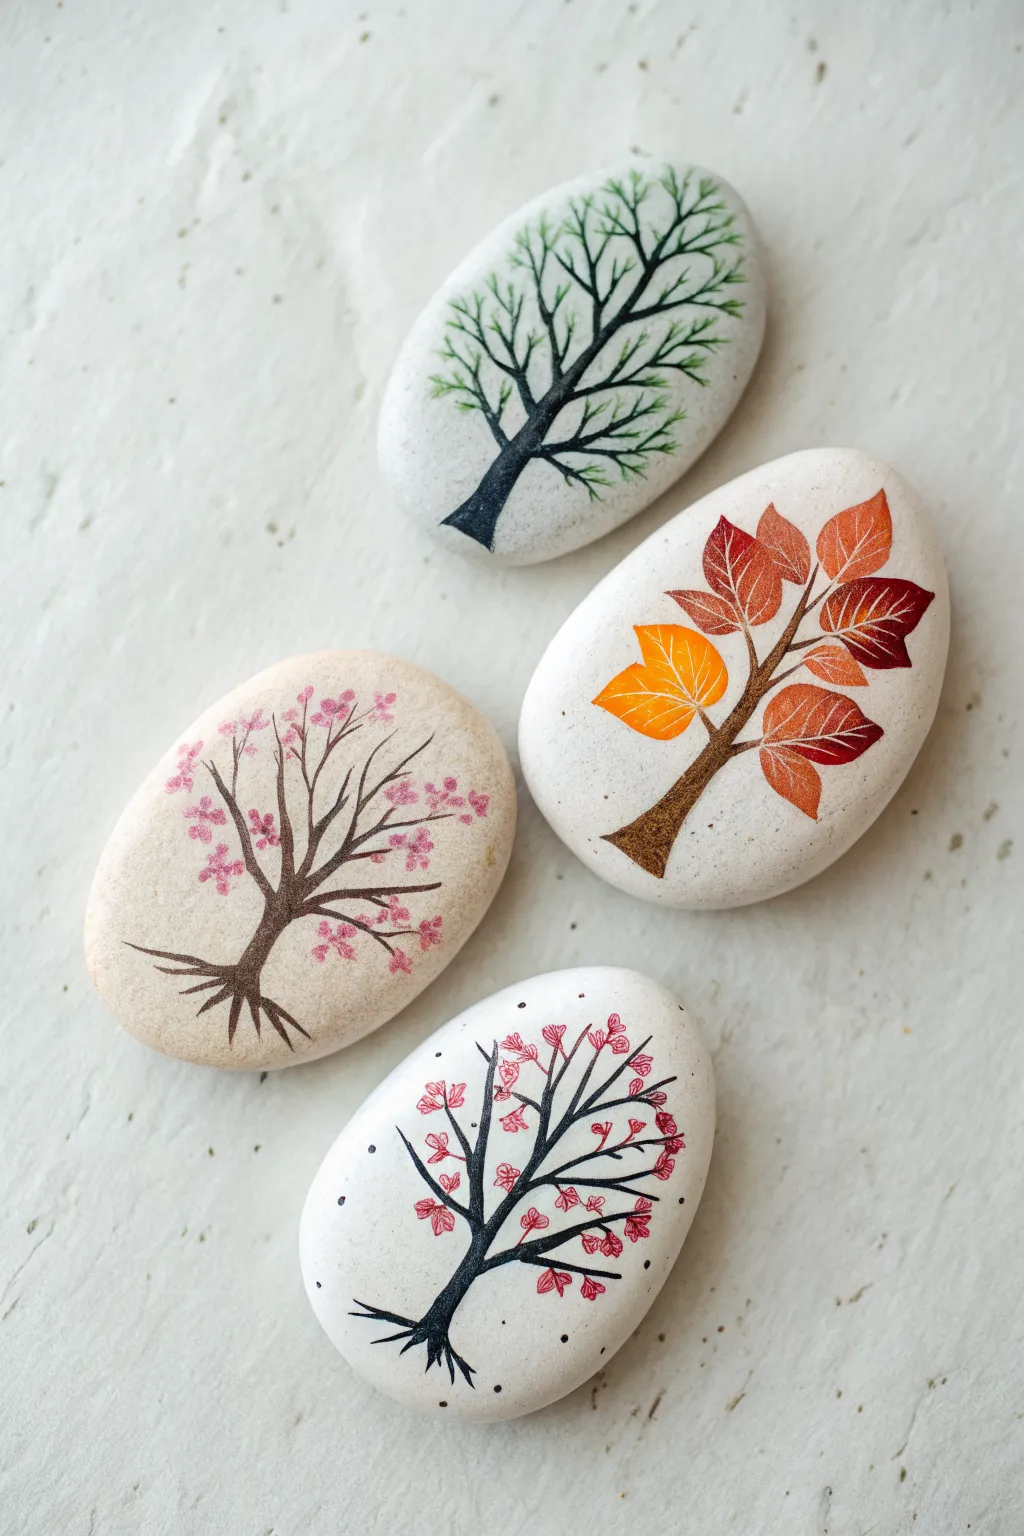
Capture the changing beauty of nature with this elegant set of hand-painted river rocks. Each stone features a unique tree silhouette representing a different seasonal mood, creating a cohesive and artistic display perfect for a desk or shelf.
Step-by-Step
Materials
- 4 smooth, flat river rocks (white or light grey)
- Black and dark brown fine-tip paint pens (0.5mm or 0.7mm)
- Acrylic paints (various greens, bright orange, deep red, burgundy, pink)
- Fine detail paintbrushes (size 00 or 0)
- Pencil and eraser
- Matte spray varnish or sealant
Step 1: Preparation & Planning
-
Clean the canvas:
Begin by washing your stones thoroughly with warm soapy water to remove any dirt or oils. Let them dry completely, ideally in the sun, to ensure a clean surface for the paint to adhere to. -
Sketch the skeletons:
Using a light pencil, gently sketch the main trunk and primary branches for each tree on your four stones. Vary the shapes to give each one personality—curving one trunk slightly to the left and another to the right keeps the set visually dynamic.
Pen vs. Paint Tip
Paint pens offer superior control for the thin tree branches. Use liquid acrylics and a brush only for the larger leaves or filling in thicker trunk bases.
Step 2: The Summer & Spring Trees
-
Draw the black trunks:
For the top (green) and bottom (pink/red) stones, use a black fine-tip paint pen to draw the trunks. Start thicker at the base and taper off as you move upward into the branches. -
Branch out:
Extend fine black lines from the main trunk to create a network of delicate branches. For the top tree, aim for an upward-reaching, canopy style. For the bottom tree, make the branches slightly more angular and spread out. -
Add roots:
Ground your trees by adding small, straggly root lines at the very bottom of the black trunks so they don’t look like they are floating. -
Paint green foliage:
For the top tree, switch to a fine brush and green paint (or a green paint pen). Draw tiny, feathery strokes along the black branches to simulate pine needles or fine summer leaves. -
Create pink blossoms:
For the bottom tree, use a small dotting tool or the tip of a brush to dab small clusters of pink and red dots near the ends of the branches. I like to group them in threes or fours to mimic flower clusters. -
Add floating petals:
Add a few stray dots around the branches of the bottom tree to represent falling petals, giving the piece a sense of movement.
Gradient Inspiration
For the autumn leaves, try blending wet orange into wet red directly on the stone to create a beautiful, seamless ombre effect within a single leaf.
Step 3: The Autumn & Cherry Blossom Trees
-
Paint the brown trunks:
For the middle-left (pink blossoms) and middle-right (autumn leaves) stones, use a dark brown paint pen or brush. Similar to before, start with a solid base and taper upwards. -
Sketch autumn leaves:
On the middle-right stone, pencil in larger, teardrop-shaped leaf outlines attached to the branches. Make them significantly larger than the leaves on other trees for a stylized look. -
Color the fall foliage:
Fill in the sketched leaves with autumn shades: bright orange, burnt sienna, and deep burgundy. Alternate colors so no two identical leaves are right next to each other. -
Detail the veins:
Once the autumn leaves are dry, use a white or very light cream gel pen to draw delicate veins inside each leaf for added realism and contrast. -
Soft pink canopy:
For the middle-left stone (cherry blossom), use a pale pink paint. Instead of individual dots, dab the paint gently to create soft, cloud-like clusters of blossoms along the brown branches. -
Define the blooms:
After the pale pink dries, go back in with a slightly darker magenta pen or brush to add tiny centers to some of the flowers, giving them depth.
Step 4: Finishing Touches
-
Review and refine:
Line up all four stones. Check for any patchy areas in the black or brown trunks and fill them in for a solid, opaque silhouette. -
Clean up:
If any pencil marks are still visible around the edges of your paint, wait until everything is 100% dry and gently erase them. -
Seal the deal:
Spray the stones with a matte varnish. This protects the delicate paint work from chipping and keeps the natural texture of the stone visible without making it too glossy.
Now you have a timeless collection celebrating nature’s cycles to display or give as a thoughtful gift
Galaxy And Night-Sky Stone Art
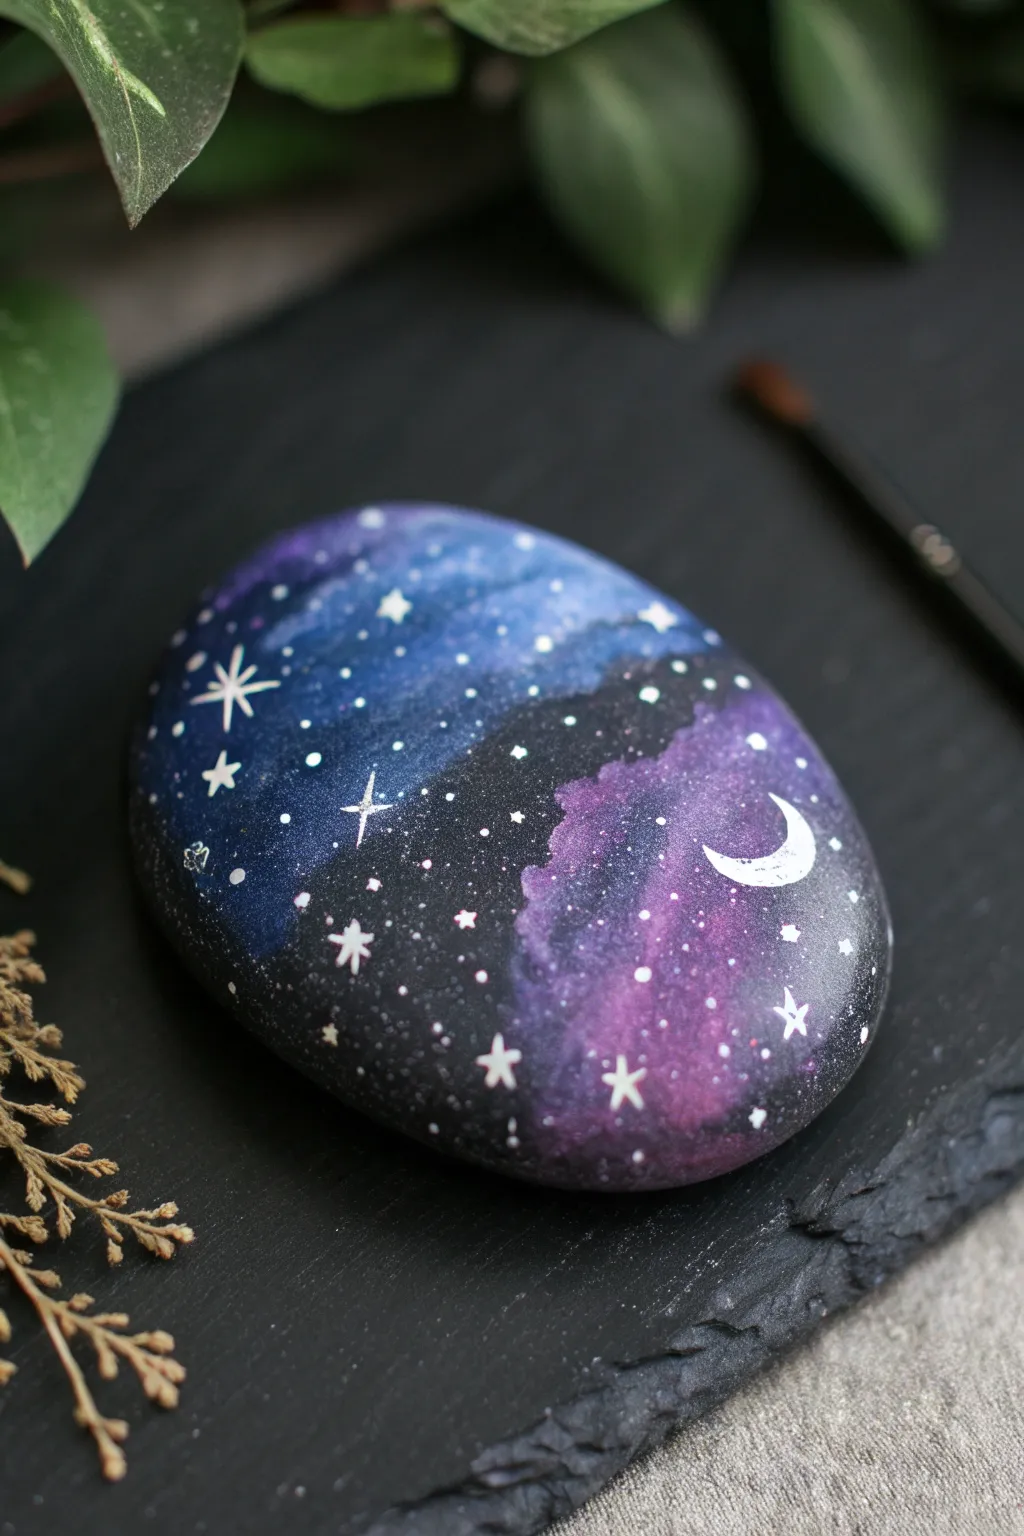
Transform a simple smooth stone into a window to the cosmos with this mesmerizing galaxy painting project. By blending deep blues, purples, and blacks, you’ll create a stunning nebular background that makes the stark white stars and crescent moon truly pop.
Detailed Instructions
Materials
- Smooth, oval river rock or stone
- Black acrylic paint (or gesso)
- Acrylic paints: phthalo blue, violet/purple, magenta, titanuim white
- Sponge applicator or small cosmetic wedge
- Flat brush (small to medium)
- Fine liner brush (size 00 or 000)
- Water cup and palette
- Toothbrush (optional, for splattering)
- Gloss varnish or clear sealant spray
Step 1: Base and Background
-
Prep the surface:
Begin by washing your stone with warm soapy water to remove any dust or oils. Let it dry completely before starting. -
Apply the base coat:
Paint the entire top surface of the stone with solid black acrylic paint. You might need two coats to ensure it is completely opaque and no stone texture shows through. Allow this to dry fully. -
Sponge on the first nebula layer:
Dampen a small piece of sponge or a cosmetic wedge slightly. Dip it into dark blue paint and dab off the excess on your palette until the texture is soft and airy. -
Create the blue cloud:
Gently sponge the blue paint diagonally across the upper left portion of the stone. Don’t cover the whole black background; leave plenty of negative space for depth. -
Add purple tones:
Using a clean section of the sponge, pick up some violet paint. Dab this onto the lower right section of the stone, creating a second diagonal cloud that roughly parallels the blue one but leaves a dark channel in between. -
Blend the transitions:
While the paint is still slightly tacky, use a clean, slightly damp sponge to soften the edges where the color meets the black background. You want a smoky, faded look rather than hard lines. -
Highlight with magenta:
Mix a tiny bit of white into your magenta or purple to create a lighter shade. Sponge this sparingly into the center of the purple cloud to create a glowing ‘core’ effect. -
Highlight the blue:
Similarly, mix a touch of white with your blue paint and sponge it into the brightest parts of the blue sections. This creates the illusion of dimension within the nebula.
Step 2: Stars and Details
-
Prepare the ‘star’ paint:
Slightly water down your titanium white acrylic paint until it has an inky consistency. This helps it flow smoothly from a liner brush. -
Paint the crescent moon:
Using your fine liner brush, carefully paint a crescent moon shape on the right side of the stone, nestled within the purple nebula. Start with a thin ‘C’ shape and thicken the center. -
Create distant stars:
Dip a toothbrush or stiff brush into the watered-down white paint. Run your thumb across the bristles to flick tiny speckles onto the stone. Keep the spray light to mimic distant star clusters. -
Add prominent stars:
Use the liner brush or a dotting tool to place specific, larger white dots around the composition. Place them randomly, focusing on the darker transition areas. -
Paint a large starburst:
Select a spot on the left side (in the blue area). Paint a simple cross, then paint a smaller ‘X’ over it to create an eight-pointed star flare. Keep the lines very thin at the tips. -
Add medium stars:
Paint a few simple four-pointed stars (just a cross shape) scattered elsewhere on the rock. Varying the size of your stars makes the galaxy feel vast. -
Refine the moon:
If the black background shows through your moon, apply a second coat of white to make it crisp and bright. -
Seal the artwork:
Once the paint is absolutely dry (give it at least an hour), apply a coat of gloss varnish. This will deepen the black tones, make the colors vibrant, and protect your galaxy for years.
Muddy colors?
If your blue and purple are blending into a gray mess, let the first color dry completely before sponging on the second. Layering dry paint keeps hues distinct.
Add some sparkle
Mix a tiny amount of holographic glitter medium into your varnish or topcoat. It creates a subtle shimmer that mimics twinkling stars when the light hits.
Display your finished celestial stone on a desk or shelf to keep a piece of the night sky close by


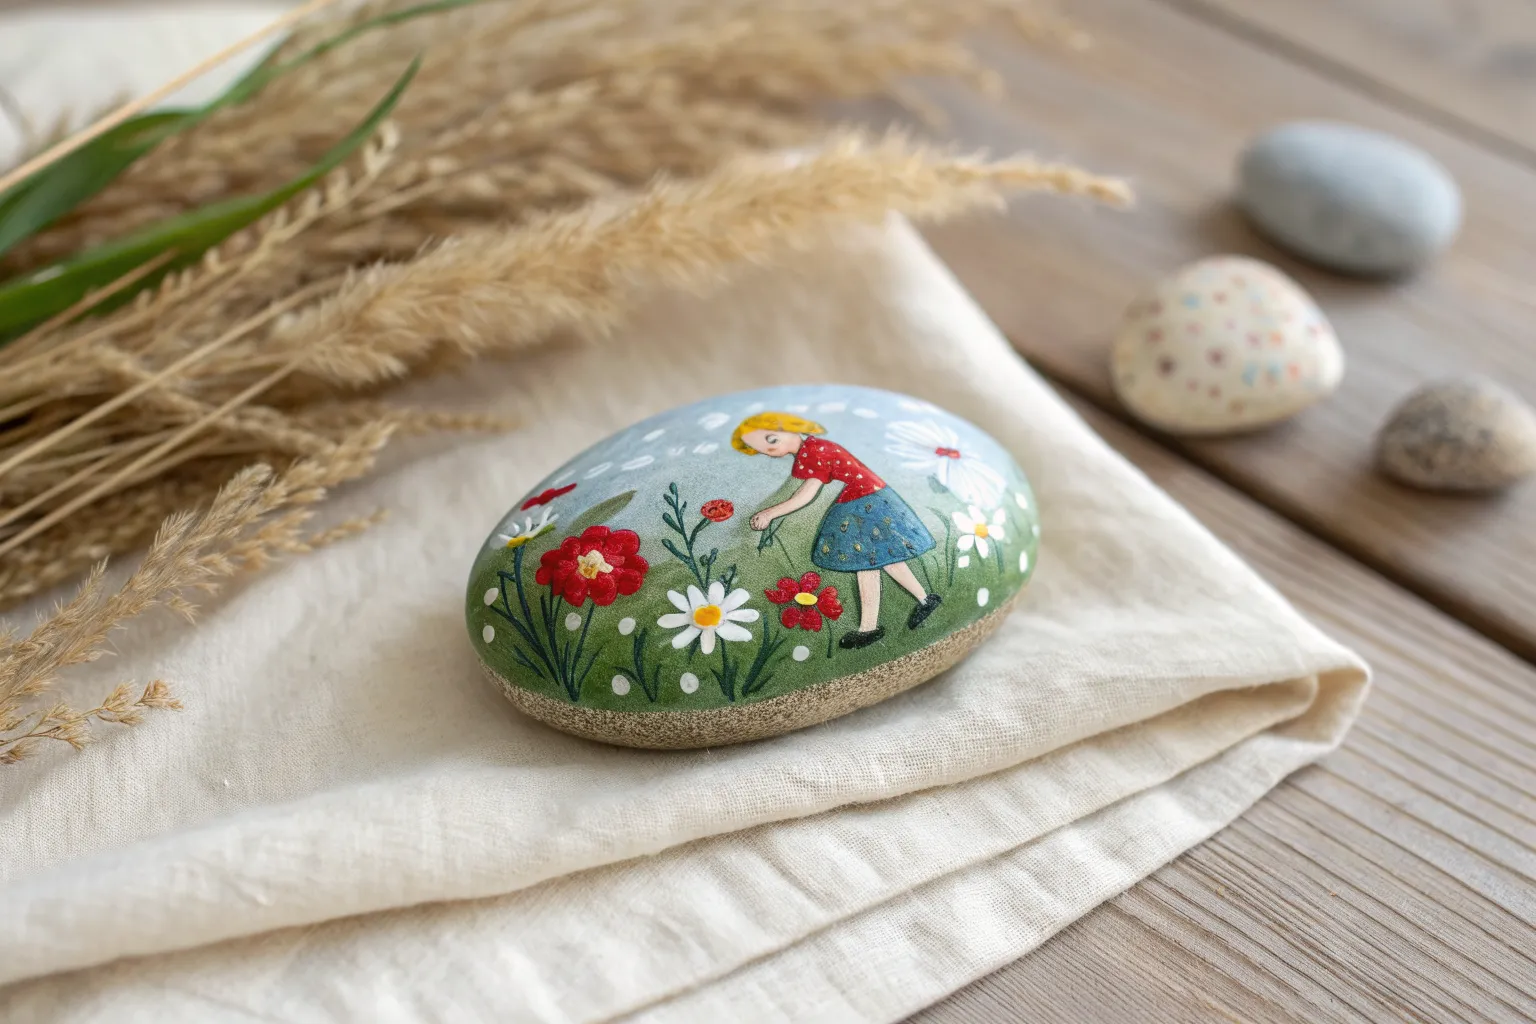
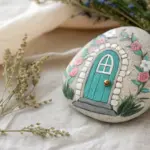
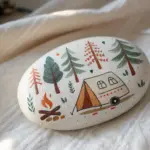
Story Stone Sets For Imaginative Play
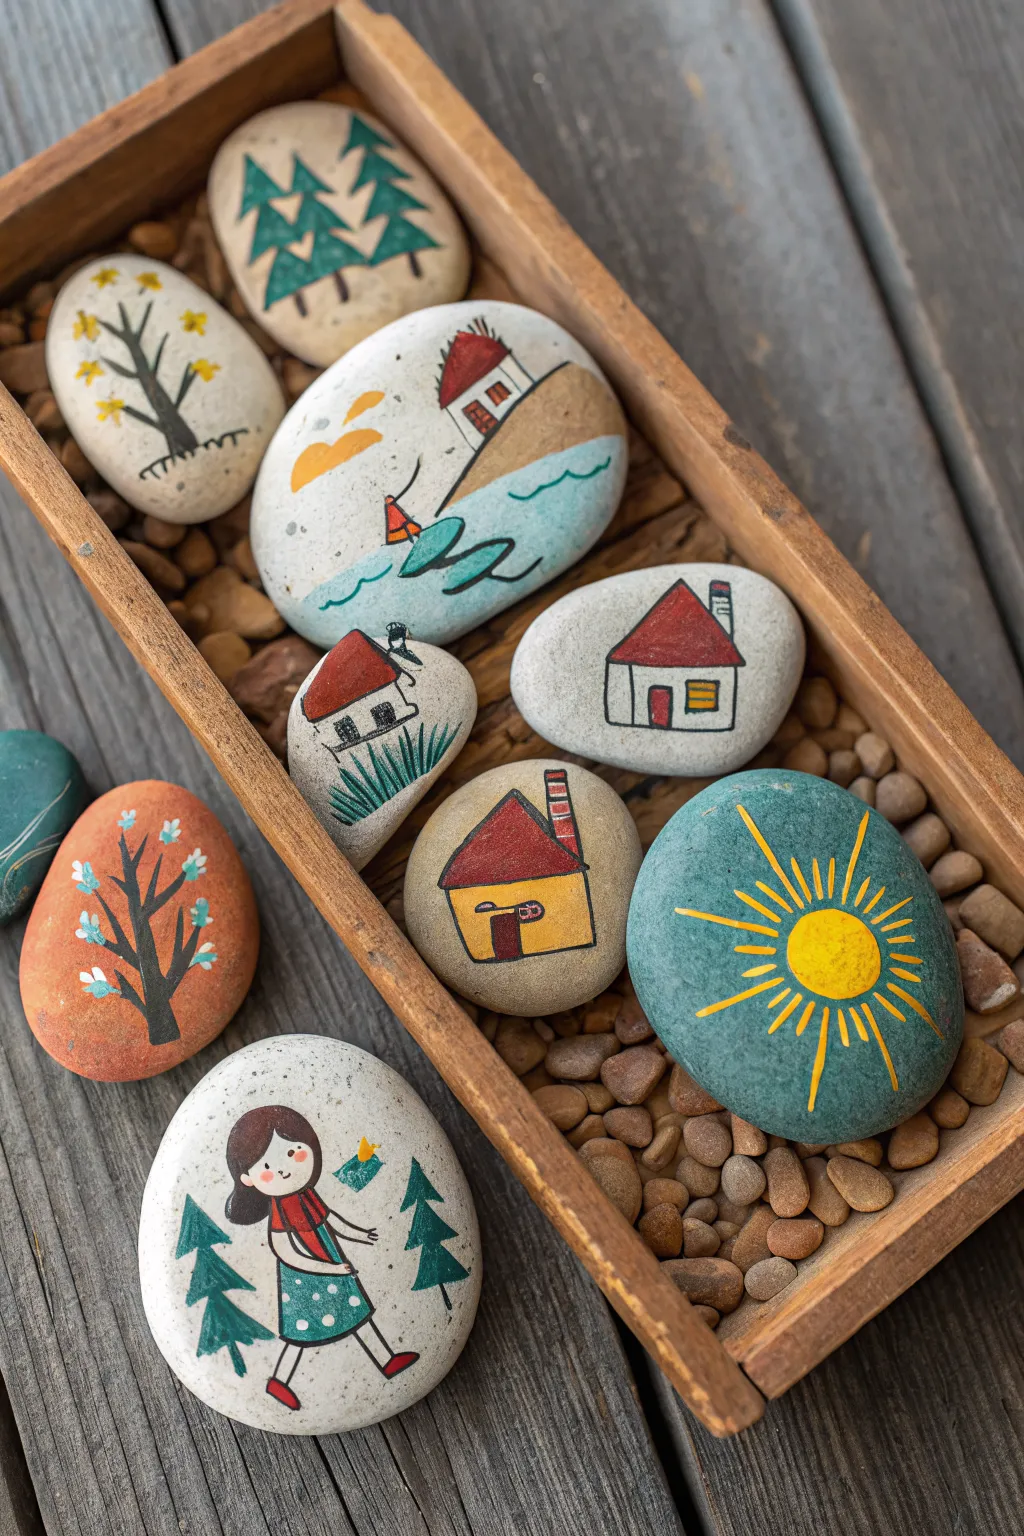
Transform smooth river rocks into a miniature world of characters and scenery perfect for open-ended storytelling. This charming set features simple houses, nature elements, and figures painted in a cohesive, folk-art style.
Detailed Instructions
Materials
- Smooth, flat river rocks (varied sizes)
- Acrylic paints (red, yellow, white, black, dark green, light blue)
- Fine liner brushes (sizes 0 and 00)
- Small flat brush (size 4 or 6)
- Black fine-tip paint pen or permanent marker
- Pencil and eraser
- Matte or satin spray sealant
- Water cup and paper towels
Step 1: Preparation and Base Shapes
-
Select your canvas:
Choose lighter-colored stones for the base so the colors pop without a base coat. Look for rounded, oblong stones for houses and flatter, wider ones for scenes. -
Clean the surface:
Wash your rocks with warm soapy water and scrub them well to remove any dirt or oils. Let them dry completely, ideally in the sun. -
Sketch the designs:
Lightly sketch your designs with a pencil. Plan for a mix of subjects: a large girl figure, a bright sun, a few different houses, pine trees, and a seascape. -
Block in color for houses:
Using a small flat brush, paint the roofs of your houses. Use red for a triangular roof on a round stone, and perhaps a yellow base for a square house. Let the natural stone color serve as the ‘white’ walls. -
Paint the sun stone:
For the dark sun stone, paint a loose circle of solid yellow in the center. Don’t worry about the rays yet; just get the core shape opaque. -
Create the seascape base:
On a larger oval stone, paint a tan diagonal swoosh for a cliff or beach, and leave the sky area unpainted if the stone is light enough.
Ink Bleeding?
If your black outline pen bleeds when you apply varnish, your paint wasn’t fully dry. Wait longer, or switch to a water-based sealant applied gently with a soft brush.
Step 2: Adding Details and Line Work
-
Outline the structures:
Once the paint is dry, use your black fine-tip paint pen or a very steady hand with black paint to outline the roofs and draw the boxy shapes of the houses. -
Add architectural features:
Draw small squares for windows and rectangles for doors. You can fill the windows with yellow paint or simple horizontal lines to suggest panes. -
Detail the trees:
For the pine tree stones, paint stacked triangles in dark green. I find it helps to start small at the top and widen as you go down. Once dry, add a simple straight brown or black line for the trunk. -
Paint the girl figure:
On a large round stone, paint the girl’s dress (dark green with polka dots) and scarf (red). Paint her hair dark brown. Keep the face simple with two dots for eyes and a small smile. -
Finish the sun rays:
If the background stone is dark (like the teal one shown), use a yellow paint pen or fine brush to draw long, thin spikes radiating from your yellow center circle. -
Detail the seascape:
Add a small house on top of your painted cliff. Use light blue paint to draw wavy lines for the water, and add a small figure surfing or standing near the water’s edge. -
Create the leaf tree:
On a tall oval stone, draw a black barren tree structure with twisting branches. Then, dab small yellow dots along the branches to represent leaves or flowers.
Smoother Lines
For the crispest details on rougher stones, skip the brush and use acrylic paint markers (0.7mm tip) for everything except the largest color blocks.
Step 3: Finishing Touches
-
Clean up stray marks:
Check your pencil lines. If any are still visible under the paint or pen work, gently erase them. -
Add highlights:
Using a tiny dot of white paint, add a sparkle to the girl’s eyes or a highlight on the roof tiles to give them dimension. -
Seal the stones:
Take the stones outside and spray them with a matte or satin sealant. This protects the paint from chipping during play. -
Final cure:
Let the sealant cure fully according to the bottle instructions—usually 24 hours—before handing them over for storytelling.
Now you have a durable, pocket-sized village ready to inspire countless adventures
Painted Rock Tic-Tac-Toe Game
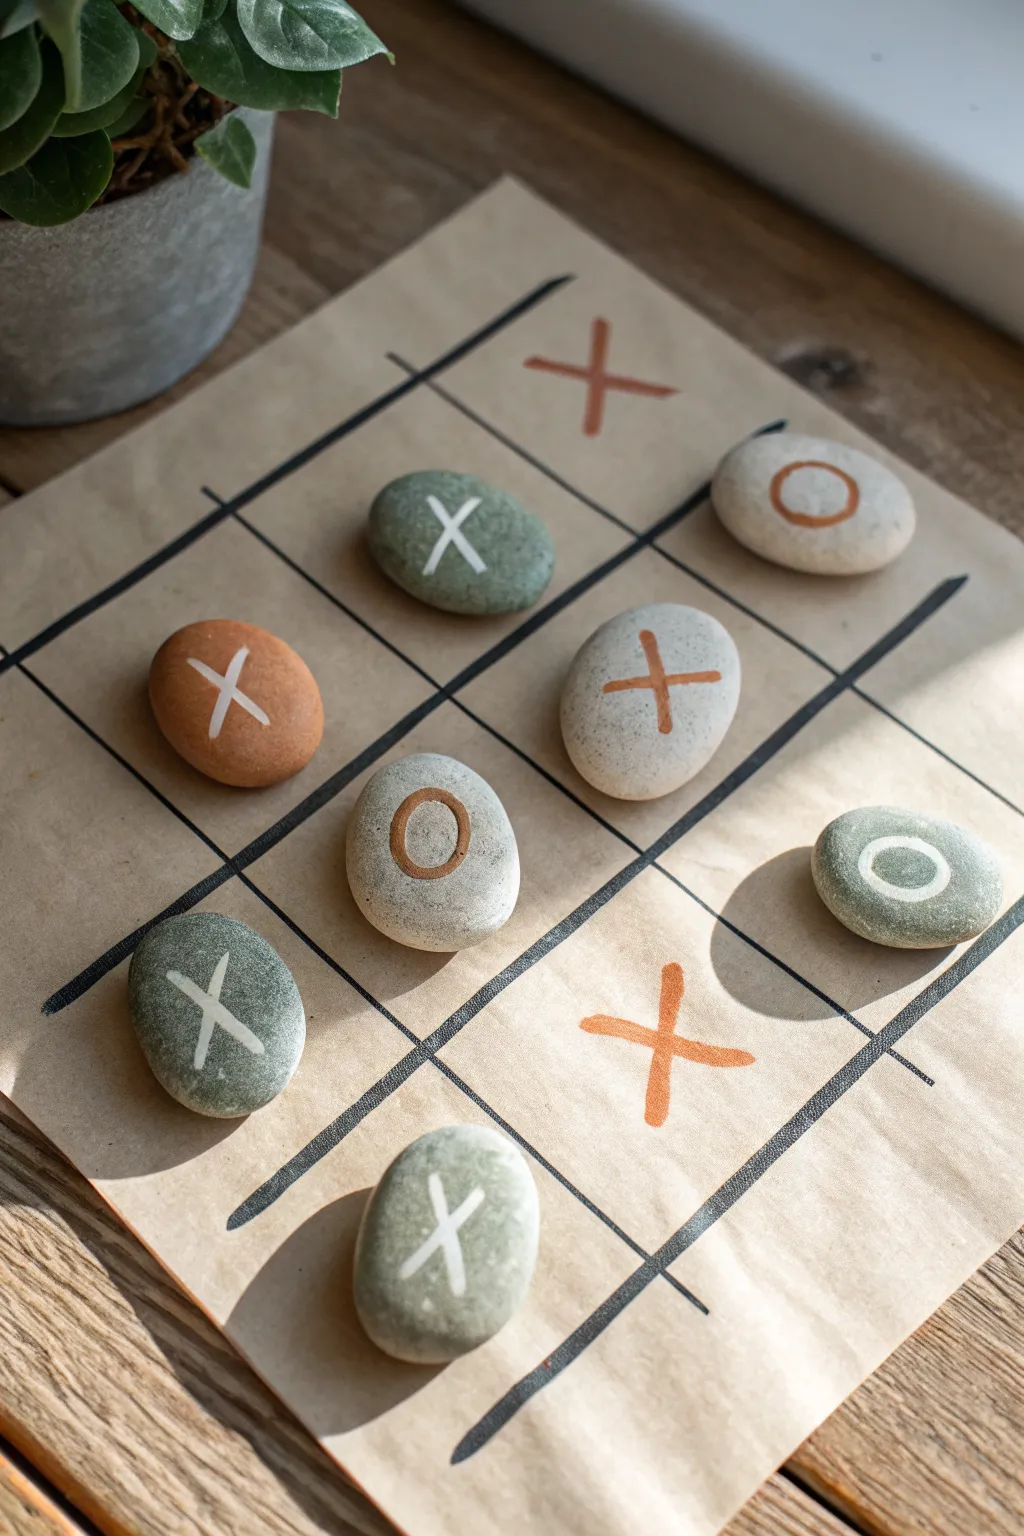
Transform simple garden finds into a travel-ready game set with this rustic painted rock tic-tac-toe project. Featuring smooth river stones and a hand-drawn grid on natural paper, it captures an earthy, minimalist aesthetic perfect for cozy afternoons.
Step-by-Step Tutorial
Materials
- 10 smooth, flat river rocks (approx. 1.5-2 inches diameter)
- White acrylic paint or a white fine-tip paint pen
- Copper or rust-colored acrylic paint
- Small paintbrush (size 0 or 1 round)
- Thick kraft paper or cardstock (tan/brown)
- Black permanent marker or black acrylic paint
- Ruler
- Clear matte sealant spray (optional)
Step 1: Preparing the Game Pieces
-
Wash and dry stones:
Begin by thoroughly scrubbing your river rocks with warm soapy water to remove any dirt or grit. Let them dry completely, preferably in the sun, to ensure the paint adheres properly. -
Sort your stones:
Divide your ten stones into two groups of five. Try to mix the natural stone colors evenly, or separate them by shade (darker vs. lighter stones) if you have distinct variations. -
Paint the X pieces:
Take your first set of five stones. Using a white paint pen or a small brush with white acrylic paint, draw a simple, centered ‘X’ on each stone. I like to make the lines slightly organic rather than perfectly straight to match the rustic vibe. -
Paint the O pieces:
For the opposing set, use either white paint on darker stones or a contrasting color like copper/rust on lighter stones. Draw a clear ‘O’ in the center of each. The image shows a mix, so feel free to alternate colors for visual interest. -
Add variation:
To exactly replicate the photo’s look, paint some ‘X’s in white and others in the rust color. Similarly, paint some ‘O’s in white and others in rust. This creates a charming, mismatched pottery feel. -
Let paint cure:
Allow the painted symbols to dry undisturbed for at least 30 minutes. If the paint looks translucent, apply a second coat over the lines for opacity.
Paint Won’t Stick?
If acrylic paint beads up on smooth stones, lightly buff the surface with fine-grit sandpaper first. Alternatively, a base layer of clear matte medium helps adhesion.
Step 2: Creating the Game Board
-
Cut the paper base:
Cut a square piece of thick kraft paper or cardstock, roughly 8×8 inches or 10×10 inches, depending on the size of your stones. The edges don’t need to be perfect; a rough cut adds character. -
Measure the grid:
Using a ruler, lightly mark out a tic-tac-toe grid. You want nine roughly equal squares. Don’t worry about mathematical precision; visual estimation works fine here. -
Draw the grid lines:
Take your black permanent marker or a brush with black paint. Draw two vertical lines and two horizontal lines to form the grid. Make these lines bold and thick. -
Extend the lines:
Let the lines run all the way to the edges of the paper, or stop them just short for a contained look. In the reference, the lines extend fully, giving it an open feel. -
Add decorative X’s:
Randomly paint a few ‘X’ symbols directly onto the paper grid squares using your rust-colored paint. The image shows a couple of these painted directly on the board to fill empty spaces creatively.
Step 3: Finishing Touches
-
Seal the stones:
Once all paint is fully dry, take your stones outside and give them a light coat of clear matte sealant spray. This protects the painted symbols from chipping during play. -
Seal the board (optional):
If you want the paper board to last longer, you can laminate it or simply spray it lightly with the same matte fixative to prevent smudging. -
Arrangement test:
Place your finished stones onto the grid squares to ensure they fit comfortably without crowding each other. -
Final detail check:
Check for any uneven lines on your symbols. You can touch up edges with a toothpick dipped in paint if needed.
Make It a Gift
Sew a simple drawstring bag out of burlap or linen to hold the stones. You can even draw the grid directly onto the fabric bag so the pouch doubles as the board!
Now you have a charming, handmade game set ready for your coffee table or your next camping trip
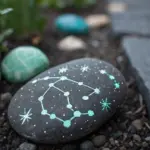
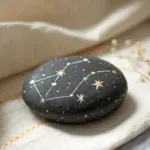
Glow-In-The-Dark Constellation Rocks
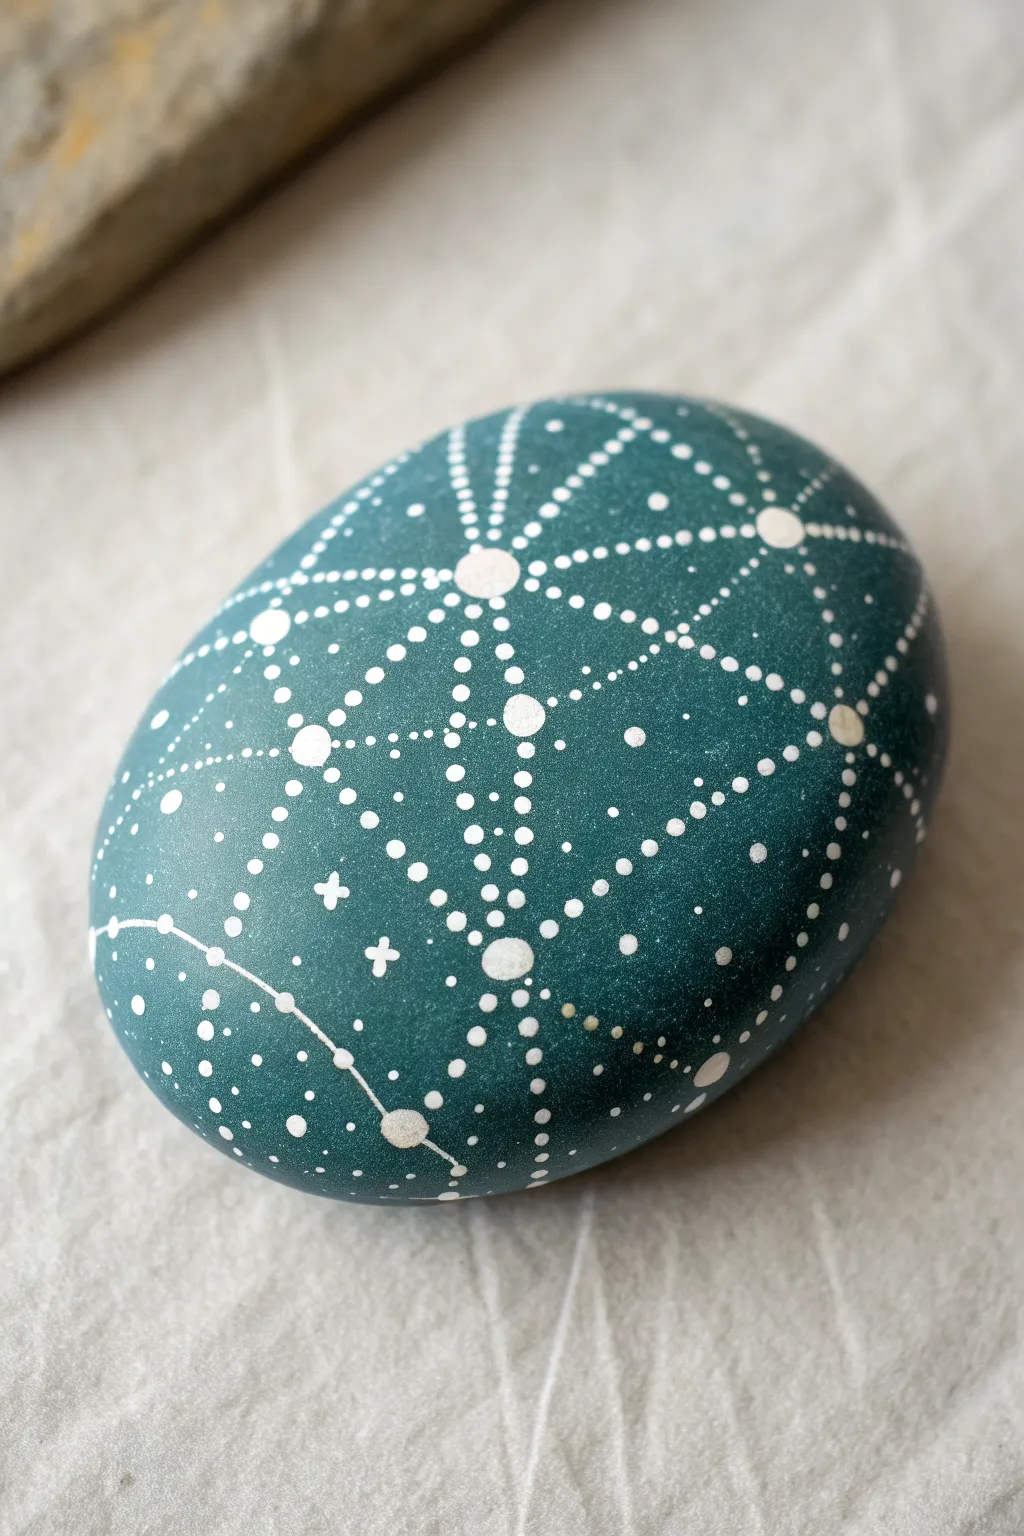
Transform a simple smooth stone into a mesmerizing cosmic artifact with this intricate dot-work project. The design features a deep teal base overlaid with a geometric star-chart pattern, creating a connection between earthly materials and the night sky.
Step-by-Step Tutorial
Materials
- Smooth, oval river rock (palm-sized)
- Deep teal or emerald green acrylic paint
- Glow-in-the-dark acrylic paint (white or pale yellow base)
- Wide flat paintbrush
- Set of dotting tools (various sizes)
- White gel pen or very fine liner brush
- Pencil (optional for sketching)
- Ruler or flexible measuring tape
- Matte or satin varnish spray
Step 1: Preparation & Base Coat
-
Clean surface:
Begin by washing your stone thoroughly with soap and water to remove any dirt or oils. Let it dry completely before starting. -
Primary coat:
Using your flat brush, apply a smooth, even layer of the deep teal acrylic paint over the entire top surface of the stone. -
Opacity check:
Once the first layer is dry, assess the coverage. If the stone’s natural color shows through, apply a second coat for a rich, solid background. Let this dry fully for at least 30 minutes.
Uneven Dots?
If your dots are peaking (like Hershey’s Kisses), your paint is too thick. Add a literal drop of water to thin it, or tap the rock gently on the table while wet to flatten them.
Step 2: Mapping the Main Stars
-
Visualize the grid:
This design relies on a geometric grid. Imagine a central hexagon or diamond shape in the middle of the rock. You can lightly mark these main points with a pencil if you’re unsure about freehanding. -
Primary nodes:
Select your largest dotting tool. Dip it into the glow-in-the-dark paint and place a large, bold dot in the visual center of your stone. -
Creating the constellation points:
Still using the large tool, place 4-6 large dots around the center dot, spaced about an inch apart, forming a rough hexagon or circle shape. -
Outer nodes:
Place a few more large dots towards the edges of the stone, ensuring they align roughly with the inner circle points to create linear pathways later.
Step 3: Connecting the Constellations
-
Switch tools:
Switch to your smallest dotting tool or a fine liner brush for the connecting lines. -
Dotted lines:
Instead of solid lines, connect your large ‘star’ nodes with rows of tiny, uniform dots. Start from the center node and work outward to the surrounding nodes. -
Maintain spacing:
Keep the tiny dots close together but not touching. This creates that delicate ‘star trail’ effect seen in the reference. -
Triangulation:
Now connect the outer nodes to each other with similar lines of tiny dots, forming triangles and geometric shapes across the surface. -
Secondary stars:
Where your dotted lines cross or meet in open spaces, use a medium-sized dotting tool to add ‘medium’ stars. This adds hierarchy to your galaxy map.
Color Shift
Instead of just white glow paint, mix a tiny amount of metallic silver or blue into your dots. It won’t glow as bright, but it adds shimmer during the day.
Step 4: Details & Finishing
-
Tiny crosses:
To break up the pattern, use your finest brush or a white gel pen to draw tiny cross-shapes or four-pointed stars in the large open teal spaces between lines. -
Filler dots:
Scatter the smallest possible dots randomly in the empty negative spaces to represent distant stars, giving the piece a dense, crowded sky look. -
Clean up:
If any dots merged or smeared, wait for them to dry completely, then touch them up with a tiny dab of the teal base paint. -
Charging layers:
For a brighter glow, carefully apply a second layer of glow paint directly on top of the largest ‘star’ dots once the first layer is dry. -
Seal the cosmos:
Allow the stone to cure for 24 hours. Finish by spraying with a matte or satin varnish to protect the paint without creating distracting glare.
Place your finished stone under a lamp for a few minutes, then turn off the lights to see your handheld galaxy come to life
Tiny Mosaic Stones With Broken-Tile Look
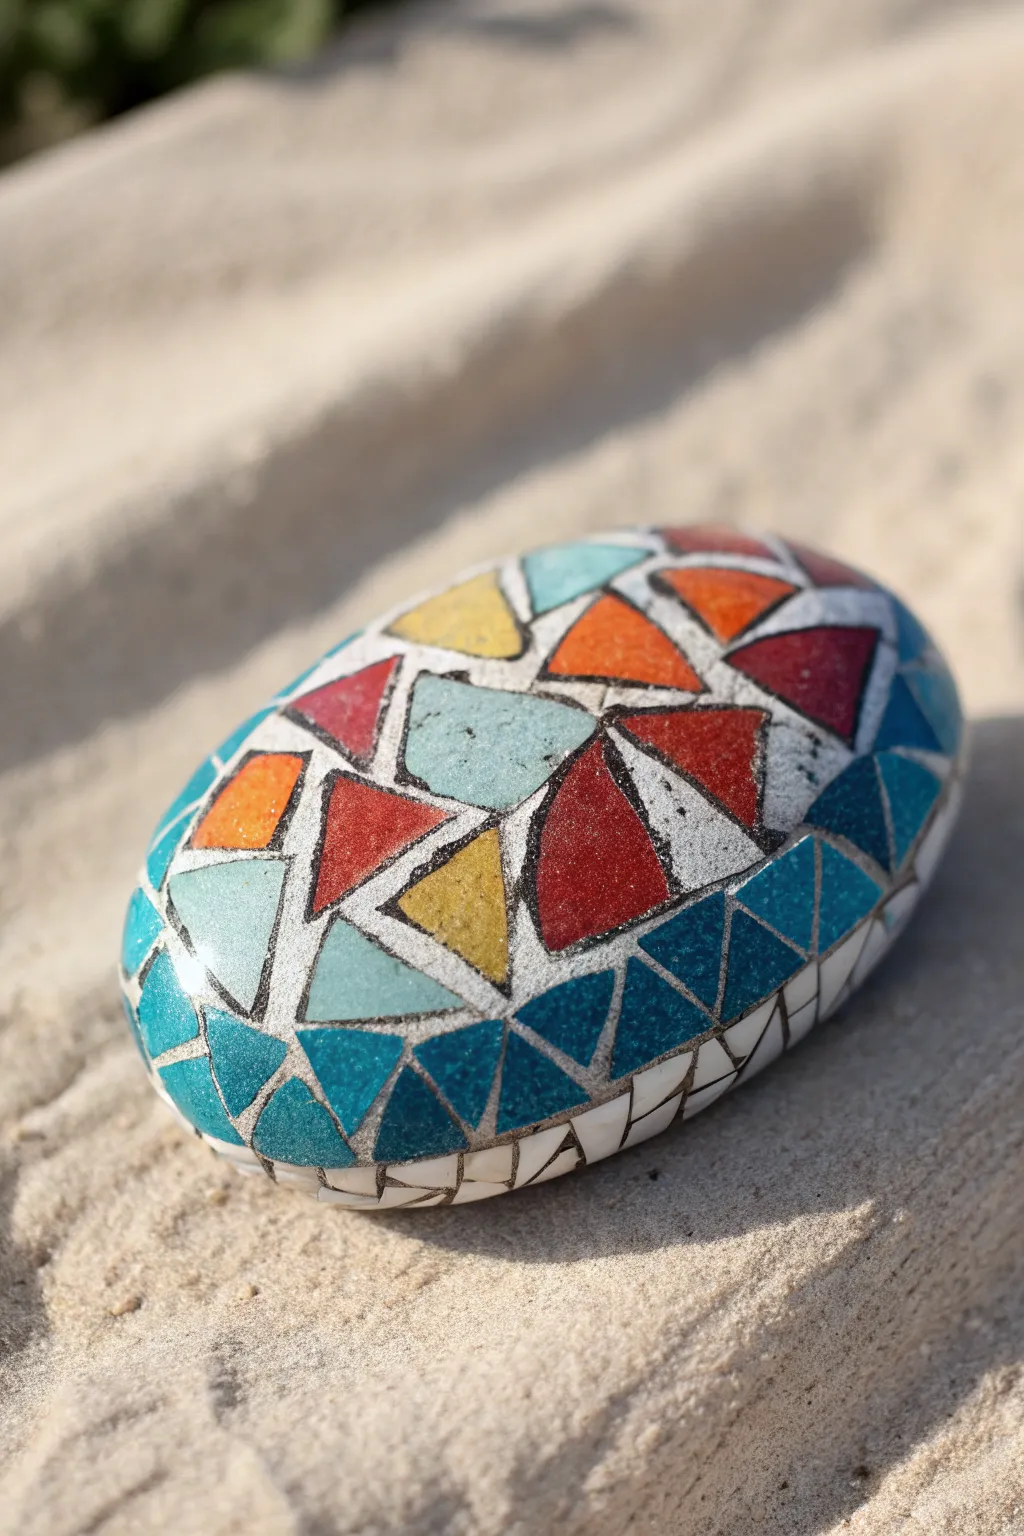
Transform a simple river rock into a stunning piece of geometric art that mimics the look of stained glass or broken ceramic tiles. This project uses clever outlining and vibrant acrylics to create a texture-rich finish without cutting a single piece of glass.
Step-by-Step
Materials
- Smooth, oval river stone (cleaned and dried)
- White acrylic gesso or primer
- Pencil
- Black acrylic paint or black paint marker (fine tip)
- Acrylic paints (teal, turquoise, red, orange, yellow, white)
- Fine detail paintbrushes (sizes 0 and 00)
- Gloss varnish or clear resin (for the glass-like finish)
- Water cup and paper towels
Step 1: Preparation and Base Layout
-
Prime the Surface:
Begin by coating your clean stone with a layer of white gesso or primer. This provides a tooth for the paint to grab onto and ensures the subsequent colors pop vividly. Let it dry completely. -
Draft the Grid:
Using a pencil, lightly sketch a ‘grout’ network across the top surface of the stone. Draw intersecting lines to create triangles and irregular polygons. -
Refine the Shapes:
Focus on varying the size of your shapes. Keep the shapes smaller near the edges to enhance the 3D effect of the stone’s curve. -
Establish the Grout Lines:
Go over your pencil sketch with black acrylic paint and a fine liner brush, or a black paint marker. Make these lines relatively thick—about 2-3mm—to mimic the spacing between real mosaic tiles.
Step 2: Adding Color
-
Plan the Palette:
Select a limited color palette to maintain harmony. For the look in the image, you’ll need cool tones (teals, blues) and warm accents (red, orange, yellow), plus some white sections. -
Paint the Cool Tones:
Start by filling in about half of the shapes with your teal and turquoise shades. I like to concentrate the darker blues around the lower edge to suggest weight and shadow. -
Add Warm Accents:
Fill in scattered shapes with red, orange, and yellow. Place these warm colors centrally or near the top to catch the eye. -
Incorporate Negative Space:
Leave several shapes white or paint them a fresh, bright white. This mimics the look of white ceramic tiles often used in traditional mosaics. -
Create Texture:
Instead of painting perfectly smooth layers, dab the paint on slightly thicker in the center of each shape to create a subtle raised effect. -
Let it Cure:
Allow the colored layers to dry fully. Acrylics can dry quickly on the surface but remain wet underneath, so give it at least 20 minutes.
Uneven Lines?
If your black lines look shaky, thicken them slightly to hide the wobble. A paint marker offers more stability than a brush for beginners.
Step 3: Defining and Finishing
-
Re-line the Grout:
Painting inside the lines is tough, and you likely painted over some black edges. Tracey back over the black grout lines carefully to crisp up the boundaries. -
Simulate Chips (Optional):
For a truly weathered look, you can add tiny grey specks or subtle texture to the white tiles to make them look like textured stone. -
Seal the Deal:
Apply a thick coat of high-gloss varnish. This is the secret step; the gloss makes the paint look like hard, fired ceramic glaze. -
Apply a Second Coat:
Once the first coat is tacky but dry, apply a second layer of gloss. This builds up physical depth, enhancing the illusion of separate tiles.
Use Heavy Body Paint
Use heavy body acrylics if available. They hold brush strokes better, creating a raised texture that feels more like real tile under the varnish.
Place your faux-mosaic stone in a garden pot or on a sunny windowsill where the light can catch its glossy surface


Have a question or want to share your own experience? I'd love to hear from you in the comments below!