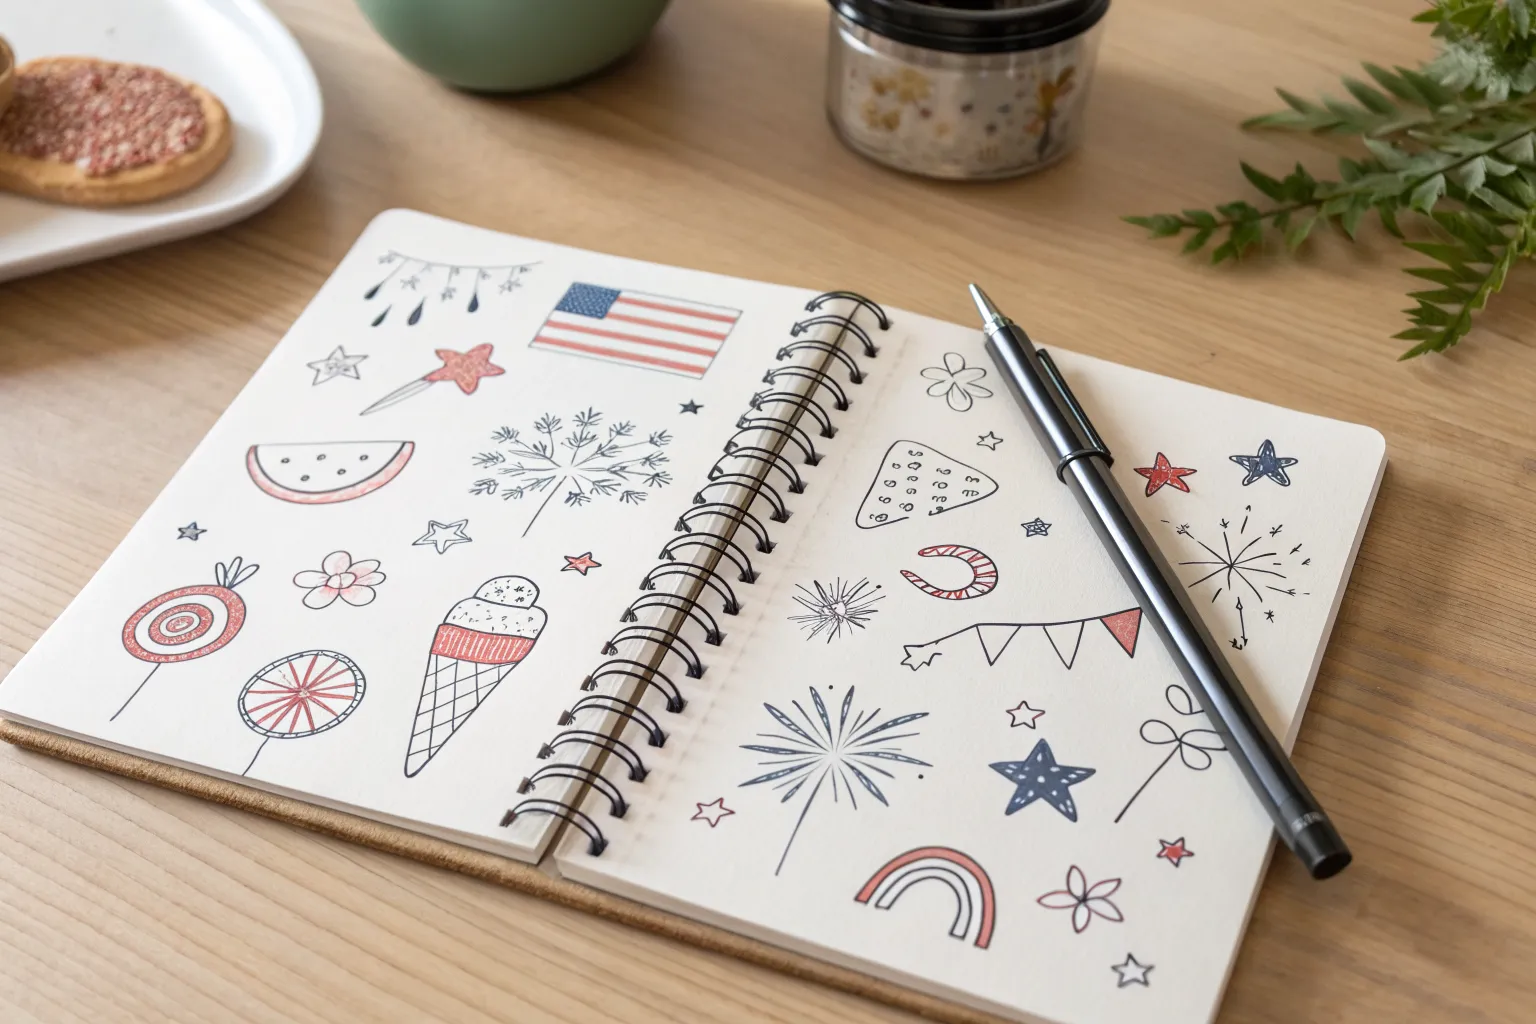
When I want a page to feel instantly celebratory, I lean on quick Fourth of July doodles that look great even if you’re just sketching with a pen. Here are my favorite 4th of July doodle ideas—from classic icons to more unexpected little details that make a layout feel alive.
Waving American Flag
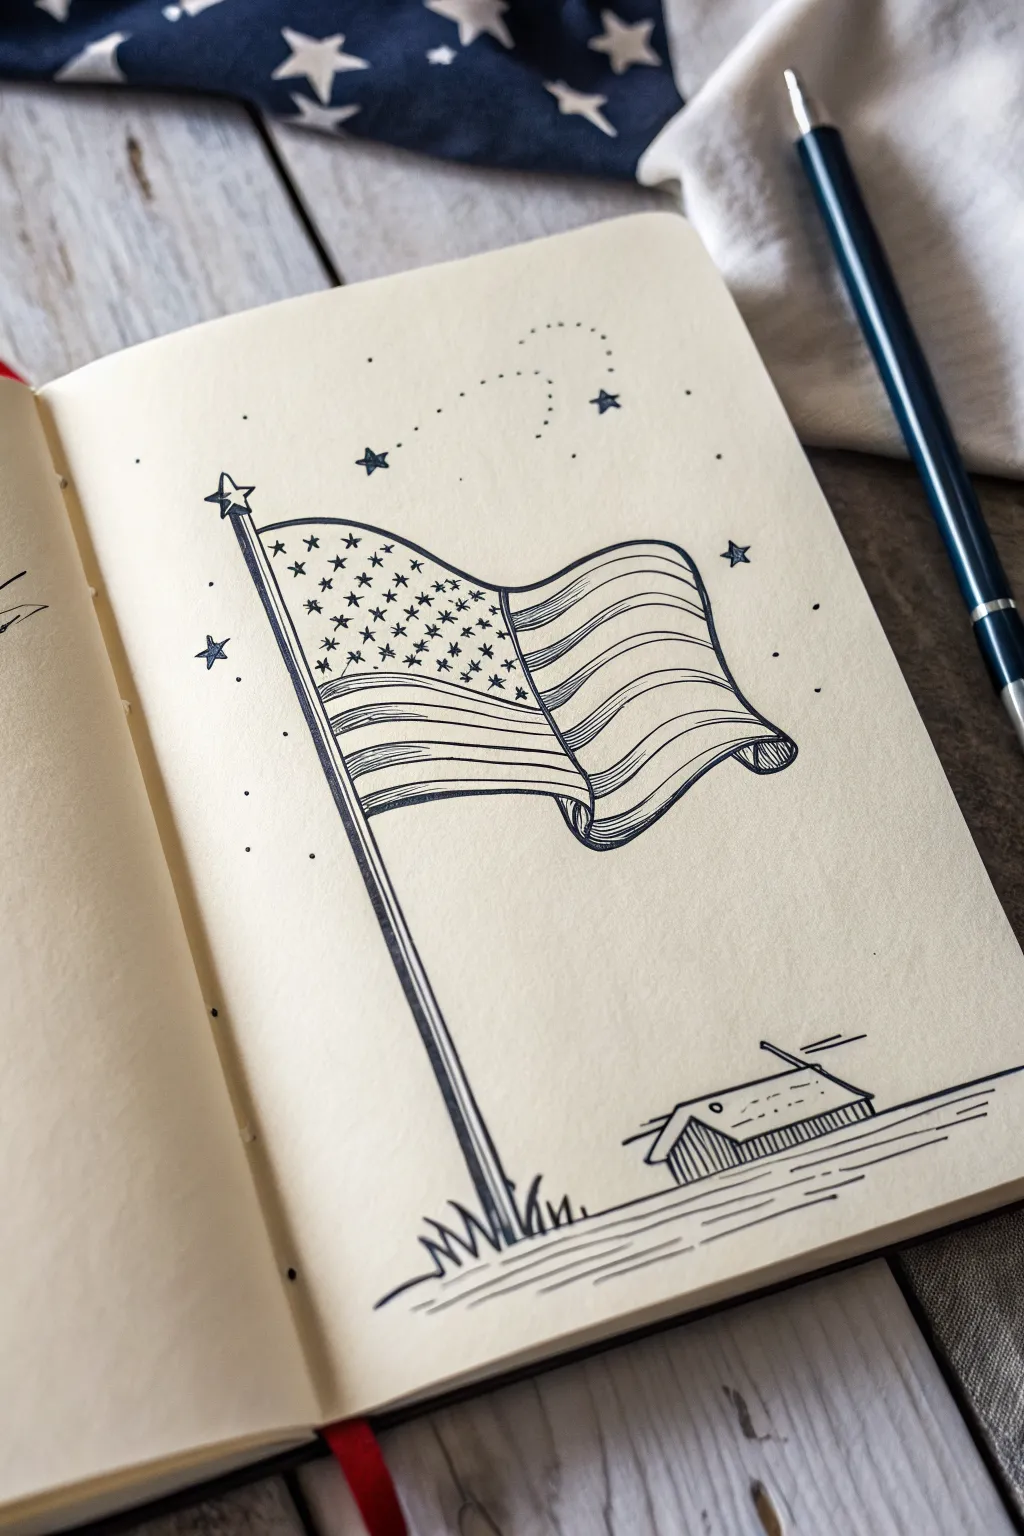
Capture the spirit of Independence Day with this elegant, monochromatic pen sketch featuring a classic waving American flag. The clean lines and gentle curves create a sense of movement, while the simple landscape base adds a grounding touch to this patriotic journal page.
Detailed Instructions
Materials
- Blank journal or sketchbook
- Pencil (HB or 2B)
- Eraser
- Fine-liner pen (0.1mm or 0.3mm, black)
- Ruler (optional)
Step 1: Planning and Basic Shapes
-
Sketch the flagpole:
Start by lightly sketching a long, diagonal line for the flagpole using your pencil. Draw a parallel line right next to it to give the pole some thickness. Add a small ball or star shape at the very top as a finial. -
Map the flag’s wave:
From the top of the pole, sketch the top edge of the flag. Instead of a straight rectangle, draw a flowing ‘S’ curve that dips down and rises back up to suggest wind. -
Define the flag body:
Mirror that top curve for the bottom edge of the flag, keeping the width consistent. Connect the ends with vertical lines, adding small folds where the fabric would naturally turn back on itself to create depth. -
Sketch the landscape:
At the base of the pole, draw a simple horizontal ground line. Sketch a tiny, primitive cabin or house shape to the right to create a sense of scale, giving the drawing a pastoral feel.
Natural Curves
When drawing stripes on a waving flag, never use a straight ruler. Always mimic the curve of the top and bottom edges to keep the fabric looking soft.
Step 2: Inking the Outlines
-
Outline the pole:
Switch to your fine-liner pen. Carefully trace over your pencil lines for the flagpole, making the lines crisp. I like to double up the line on the shadowed side for extra weight. -
Ink the flag edges:
Trace the waving perimeter of the flag. Pay special attention to the corners where the fabric folds over; these lines should overlap slightly to show which part of the cloth is in front. -
Define the canton:
Draw the rectangular box (the canton) in the top left corner of the flag area. Remember to curve its bottom and right edges to match the wave of the flag, rather than drawing straight ruler lines. -
Draw the stripes:
Lightly pencil in the 13 stripes first to ensure they fit. Then, ink them slowly. Follow the same wavy curve as the top and bottom edges of the flag so the pattern moves with the fabric.
Ink Smearing?
If your fine-liner smears when you erase, switch to a pigment-based fineliner which dries waterproof, or wait at least 5 minutes before touching the eraser.
Step 3: Adding Details and Texture
-
Add the stars:
Fill the canton with small, simple five-pointed stars. Don’t worry about perfect geometric accuracy; a loose, hand-drawn look fits the style better. -
Hatching the stripes:
To differentiate the red stripes from the white ones, use horizontal hatching. Draw thin, closely spaced lines inside every other stripe. This creates a grey value without needing color. -
Shade the folds:
Identify the ‘valleys’ of the flag waves. Add curved hatching lines in these dips to represent shadow, strengthening the illusion of three-dimensional fabric. -
Ink the house:
Go over the tiny house sketch. Use vertical lines to texture the walls and diagonal hatching for the roof to distinguish the surfaces.
Step 4: Atmosphere and Finishing Touches
-
Ground the scene:
Draw grass tufts around the base of the pole using quick, upward flicks of the pen. Add long, horizontal motion lines across the ground to suggest a breeze. -
Create a starry sky:
Draw a few larger, loose stars scattered around the top of the page. Connect some of them with tiny dots or stippling to suggest a whimsical wind or magical trail. -
Thicken key lines:
Review your drawing and go over the outermost edges of the flag and the pole one more time to thicken the line weight slightly, helping it pop off the page. -
Erase guidelines:
Wait for the ink to become completely dry—give it a full minute or two. Gently erase all remaining pencil marks to reveal the clean contrast.
You now have a timeless patriotic illustration ready to decorate your journal for the holiday


Firework Burst Clusters
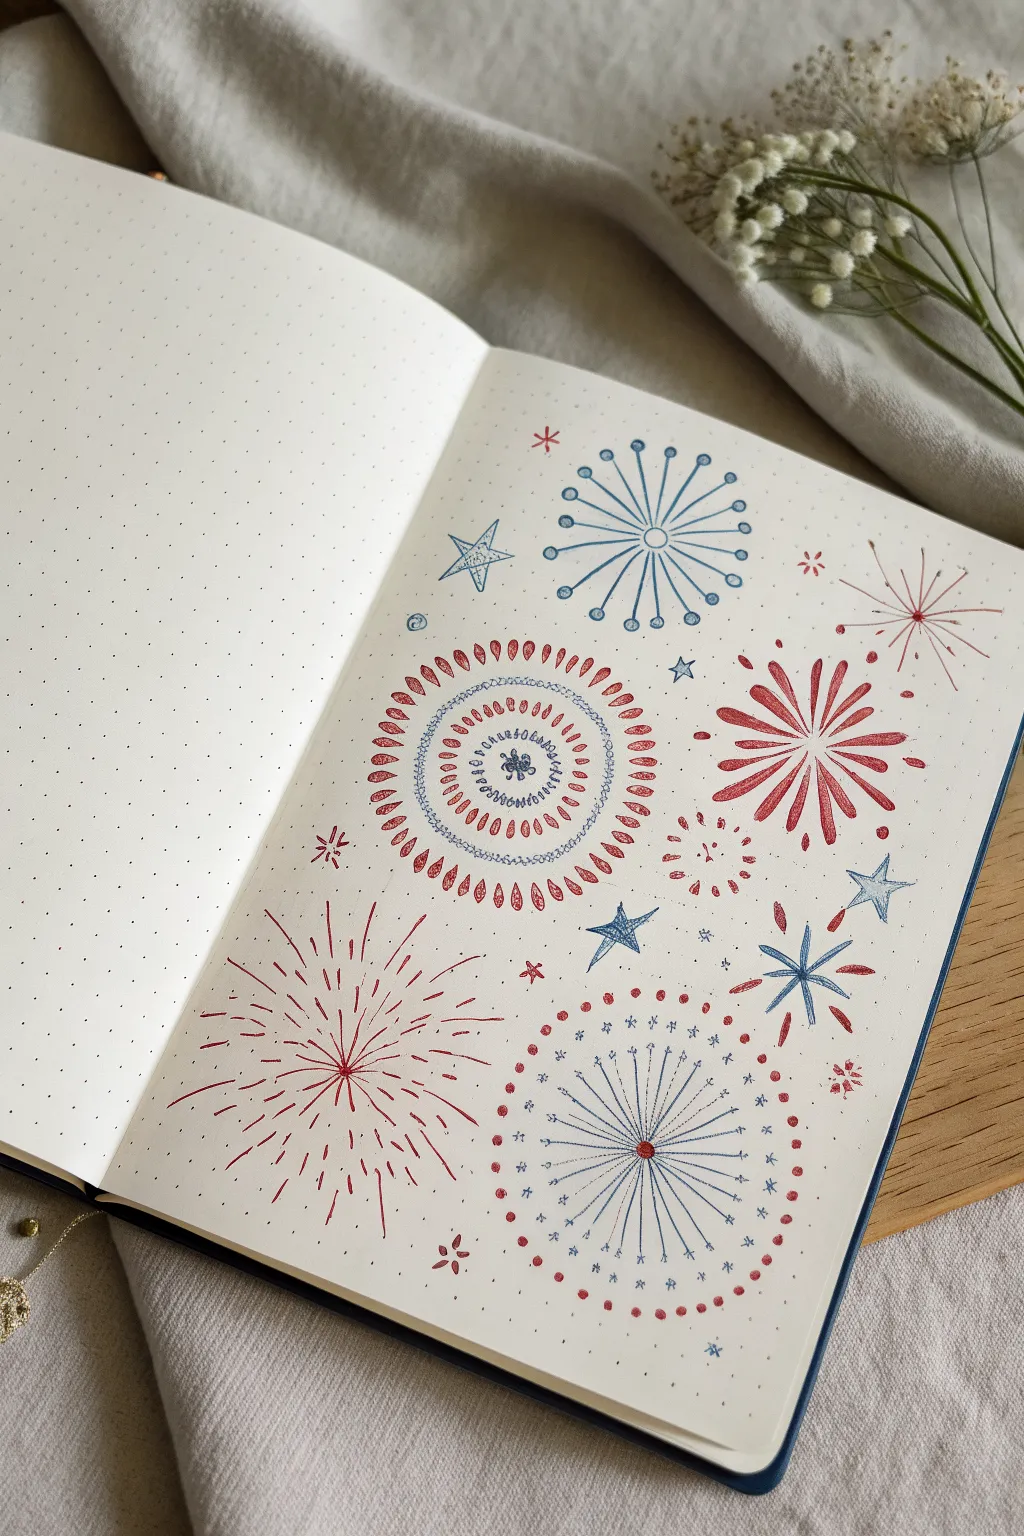
Capture the explosive magic of Independence Day with this spread of hand-drawn firework clusters, perfect for adding festive flair to your bullet journal. Using a simple palette of patriotic red and blue fine-liners on dot grid paper creates a clean, cohesive look that celebrates summer nights.
Step-by-Step Guide
Materials
- Dot grid notebook or journal
- Red fine-liner pen (0.3mm or 0.5mm)
- Blue fine-liner pen (0.3mm or 0.5mm)
- Light blue fine-liner pen (optional, for variation)
- Pencil (HB or H)
- Eraser
Step 1: Planning the Layout
-
Sketch placement circles:
Start lightly with a pencil. Draw about 5-7 loose circles of varying sizes scattered across the right-hand page. These circles will serve as boundaries for your main fireworks, ensuring they don’t overlap too awkwardly. -
Mark varied centers:
Place a small dot in the center of each circle. Don’t worry about perfect symmetry; having some slightly off-center makes the burst look more natural and dynamic.
Step 2: Drawing the Main Bursts
-
Create the ‘Dandelion’ burst:
Pick a spot near the top right. Using your blue pen, draw long, straight lines radiating from a center point. Add small, open circles to the end of each line to mimic a dandelion puff or a classic sparkler effect. -
Draw the ‘Flower’ burst:
For the large central firework, switch to red. Draw a small, dense circle of dashes in the middle. Around that, draw two concentric rings of simple dashes. -
Add teardrop petals:
Finish this ‘Flower’ burst by drawing a ring of teardrop shapes pointing outward. Keep the pointed ends facing the center to simulate the outward explosion. -
Draft the ‘Palm Tree’ burst:
In the lower left corner, create a large red firework. Start from the center and flick your pen outward to create long, curved lines. Vary the lengths significantly so some lines are short and others extend far out. -
Add detail lines:
In the gaps between your long red curves, add tiny floating dashes to suggest sparks fading away. -
Create the ‘Wheel’ burst:
For the bottom right firework, use blue to draw a central dot. Draw straight spokes radiating out. Connect these spokes with two concentric circles of dashed lines for a structured, wheel-like appearance. -
Dot the perimeter:
Switch to red and add a ring of solid dots around the outermost edge of your blue ‘Wheel’ burst. -
Draw the ‘Chrysanthemum’ burst:
Find a space on the right side for a classic red burst. Draw thick, tear-drop shapes that originate from a center point but don’t quite touch in the middle, creating a star-like negative space.
Ink Smearing?
If your eraser smears the ink, switch to a kneaded eraser. Press and lift the graphite rather than rubbing back and forth, which protects the fresh ink lines.
Step 3: Fillers and Stars
-
Add simple stars:
Using the blue pen, draw classic five-pointed stars in the larger gaps between fireworks. I like to shade one half of each point with vertical lines to give them a dimensional, metallic feel. -
Scatter mini-sparks:
Draw tiny asterisks or six-pointed stars using just crossed lines. Use red for some and blue for others to balance the color distribution. -
Draw spiral squiggles:
Add small, loose spirals in blue to represent whimsical smoke trails or fizzling sparks. -
Include confetti dots:
Look for any remaining awkward white spaces. Fill them with tiny groups of three dots or small open circles to make the page feel full and festive.
Variation Tip
Vary your line weight! Use a thicker 0.8mm pen for the main burst lines and a super fine 0.1mm pen for the tiny outer sparks to create depth.
Step 4: Finishing Touches
-
Erase pencil guides:
Wait at least 5-10 minutes to ensure the ink is completely dry. Gently erase all your initial pencil circles and center dots. -
Refine lines:
Check your doodles for any faint lines. Go over them once more with your pen if you want the color to pop more against the page.
Now you have a vibrant, patriotic spread ready to celebrate the holiday


Hand-Lettered “4th of July”
Celebrate Independence Day with this charming hand-lettered spread that perfectly captures the festive spirit. Using a classic serif font and playful doodles, this design is both simple to execute and striking on the page.
Step-by-Step Tutorial
Materials
- Spiral-bound unlined notebook or sketchbook
- Pencil (HB or lighter)
- Eraser
- Dark blue fineliner or gel pen (0.5mm or 0.8mm)
- Red fineliner or gel pen
- Navy blue marker or colored pencil (optional, for filling)
- Ruler (optional)
Step 1: Drafting the Layout
-
Center constraints:
Begin by lightly marking the vertical center of your page with a pencil. This will help keep your text alignment balanced. -
Rough spacing:
Lightly sketch three horizontal guidelines where your text will sit. Leave generous vertical space between the lines for the tall letters. -
Drafting the 4:
Sketch a large number ‘4’ on the top left. Draw it as a block letter outlines rather than a single stick figure, giving the strokes some thickness. -
Drafting ‘th’:
Beside the 4, sketch the letters ‘t’ and ‘H’. Make the ‘H’ slightly taller and wider than the ‘t’. Add small serifs (the little feet) to the tops and bottoms of the strokes. -
Drafting ‘OF’:
On the second line, center the word ‘OF’. These letters should be significantly smaller than the first and third lines to create visual hierarchy. -
Drafting ‘JULY’:
On the bottom line, sketch ‘JULY’ in tall, narrow serif letters. Pay attention to the ‘J’ and ‘Y’ tails; curve them gently upwards.
Step 2: Inking and Details
-
Inking the outlines:
Using your dark blue pen, trace over the pencil outlines of your text. For the ‘4’, create a double outline to separate the border from the filling. -
Adding weight:
Go back over the downstrokes of the blue letters (‘t’, ‘H’, ‘OF’, ‘JULY’) to thicken them slightly, mimicking a calligraphy look. -
Striping the 4:
Switch to your red pen. Carefully draw horizontal stripes inside the block shape of the number ‘4’. I find drawing the middle stripe first helps keep spacing even. -
Coloring the blue text:
Use the blue pen or a marker to fill in the thickened letters of ‘OF’ and ‘JULY’ completely, making them solid and bold. -
Erasing guides:
Once the ink is completely dry—give it a full minute—gently erase all your pencil sketches and guidelines.
Smudge Alert
Work from the top left to the bottom right (if right-handed) to avoid smearing fresh ink with your hand. Use a piece of scrap paper under your palm for safety.
Step 3: Decoration and Doodles
-
Large blue stars:
Draw three large, five-pointed stars using the blue pen. Place one near the ‘4’, one near ‘OF’, and one below ‘JULY’. Fill them in solid blue. -
Medium blue stars:
Add a few medium-sized blue stars scattered around the periphery to balance the composition. Fill these in as well. -
Tiny red stars:
Using the red pen, draw tiny 5-pointed star outlines in the empty spaces. Unlike the blue ones, leave these just as simple outlines for variety. -
Firework bursts:
Create simple fireworks by drawing a central point with your red pen. Draw 8-10 straight lines radiating outward from the center. -
Firework details:
Add shorter lines between the long radiating lines of the fireworks to make them look more explosive. -
Final touches:
Review the spread for any large empty gaps. Fill them with a tiny dot or a very small star to balance the visual weight.
Make it Shine
Overtrace the red firework lines with a glitter gel pen or a metallic silver marker to give them a real sparkle that catches the light.
Now you have a festive, hand-lettered page ready to kick off your summer journaling


Star Scatter Border
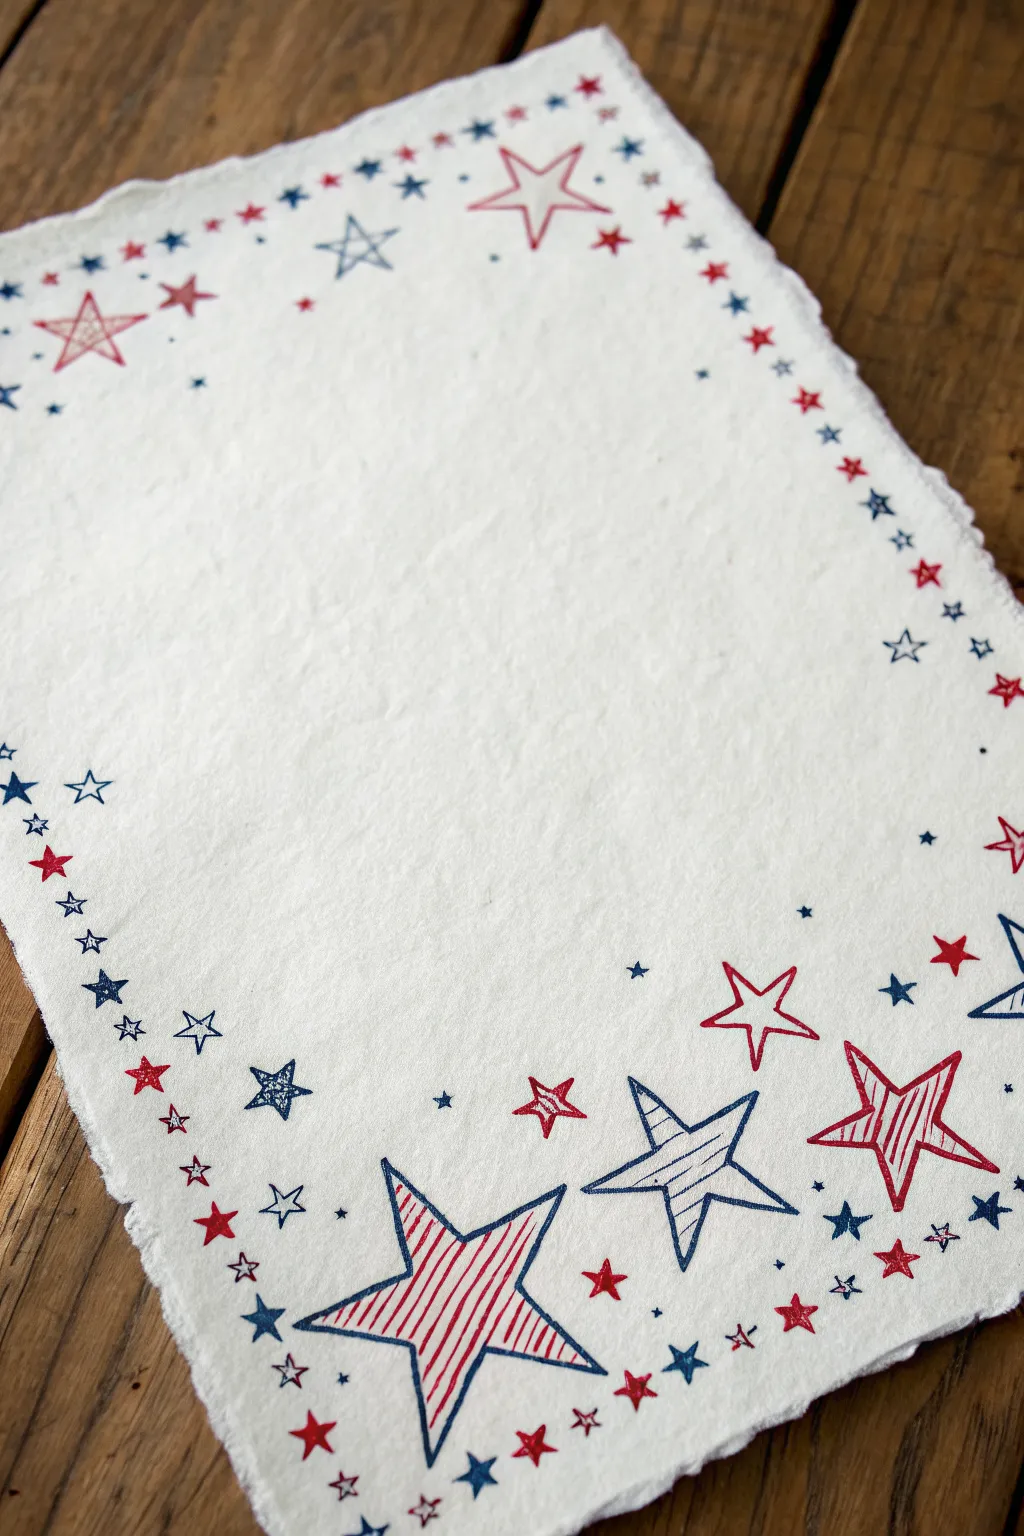
Create a stunningly simple yet festive piece of stationery with this red, white, and blue star scatter design. The imperfect, hand-drawn quality of the stars combined with the texture of deckle-edge paper gives it a charming, rustic Americana feel.
Step-by-Step Guide
Materials
- Heavyweight textured paper (ideally handmade or deckle-edge)
- Fine liner pens (Red, 0.3mm or 0.5mm)
- Fine liner pens (Blue or Navy, 0.3mm or 0.5mm)
- Pencil (H or HB for light sketching)
- Kneadable eraser
- Ruler (optional)
Step 1: Planning the Layout
-
Paper selection:
Choose a paper with some tooth and texture. The project relies on the contrast between the crisp ink lines and the rough, organic edge of the paper. -
Visualize the border:
Imagine a frame around your paper where the bottom edge is much heavier and denser with stars, while the top and sides are lighter and airier. The bottom stars will anchor the design. -
Sketch the anchors:
Using a pencil very lightly, sketch the positions of the 3-4 largest stars along the bottom edge. These will be your main focal points, roughly 1 to 1.5 inches in size.
Step 2: Drawing the Base Stars
-
Inking the large stars:
Use your blue fine liner to trace over a couple of your large pencil stars. Don’t worry about perfect symmetry; a slightly wonky hand-drawn look adds character. -
Adding large red stars:
Switch to your red pen and ink the remaining large anchor stars at the bottom. Try to alternate colors so you don’t have two large blue stars right next to each other. -
Adding texture details:
Inside one or two of the large blue stars, draw horizontal hatching lines. I like to keep these lines slightly loose rather than ruler-perfect. -
Diagonal hatching:
For the large red stars, draw diagonal hatching lines to fill them. This variation in texture makes the doodle look more dynamic.
Ink Smearing?
Textured paper can pool ink. If you smudge a star, turn it into a ‘shooting star’ by adding trailing lines, or cover it with a solid filled star.
Step 3: Building the Scatter
-
Medium-sized outlines:
Draw medium-sized open star outlines (about 0.5 inches) scattered around the large anchor stars. Use both red and blue ink, letting them float upward slightly from the bottom edge. -
Climbing the sides:
Begin working up the vertical sides of the paper. Draw small, open star outlines in an alternating pattern of red and blue. Keep them relatively evenly spaced but not rigid. -
Top border simple line:
Continue the pattern across the top edge. Keep the stars here quite small—mostly just simple 5-point outlines—to ensure the top feels lighter than the bottom. -
Corner accents:
Add a slightly larger star (maybe with some simple internal doodle lines) to the top corners to define the frame shape clearly.
Vintage Vibe
Tea-stain your paper before drawing and let it dry completely. The antique brown combined with faded red and blue ink looks incredible.
Step 4: Adding Depth and Filler
-
Tiny solid stars:
Go back to the bottom heavy section. Draw tiny, solid-filled stars in both colors to fill the gaps between the larger outlined stars. -
Micro-dots:
Add very small dots or specks of ink around the densest part of the cluster at the bottom. This ‘dust’ effect integrates the shapes together. -
Internal scribbles:
If a medium star looks too plain, add a quick, messy scribble inside it (like a smaller star shape) to give it visual weight without fully coloring it in. -
Reviewing the balance:
Step back and look at the overall distribution. If the sides look too thin, add a few tiny micro-stars between the main border stars. -
Cleanup:
Once the ink is completely dry (give it at least 10 minutes to be safe), gently erase any visible pencil marks with your kneadable eraser.
This festive border gives your handwritten notes a personalized, commemorative touch for the holiday season

PENCIL GUIDE
Understanding Pencil Grades from H to B
From first sketch to finished drawing — learn pencil grades, line control, and shading techniques.
Explore the Full Guide
Liberty Torch Doodle
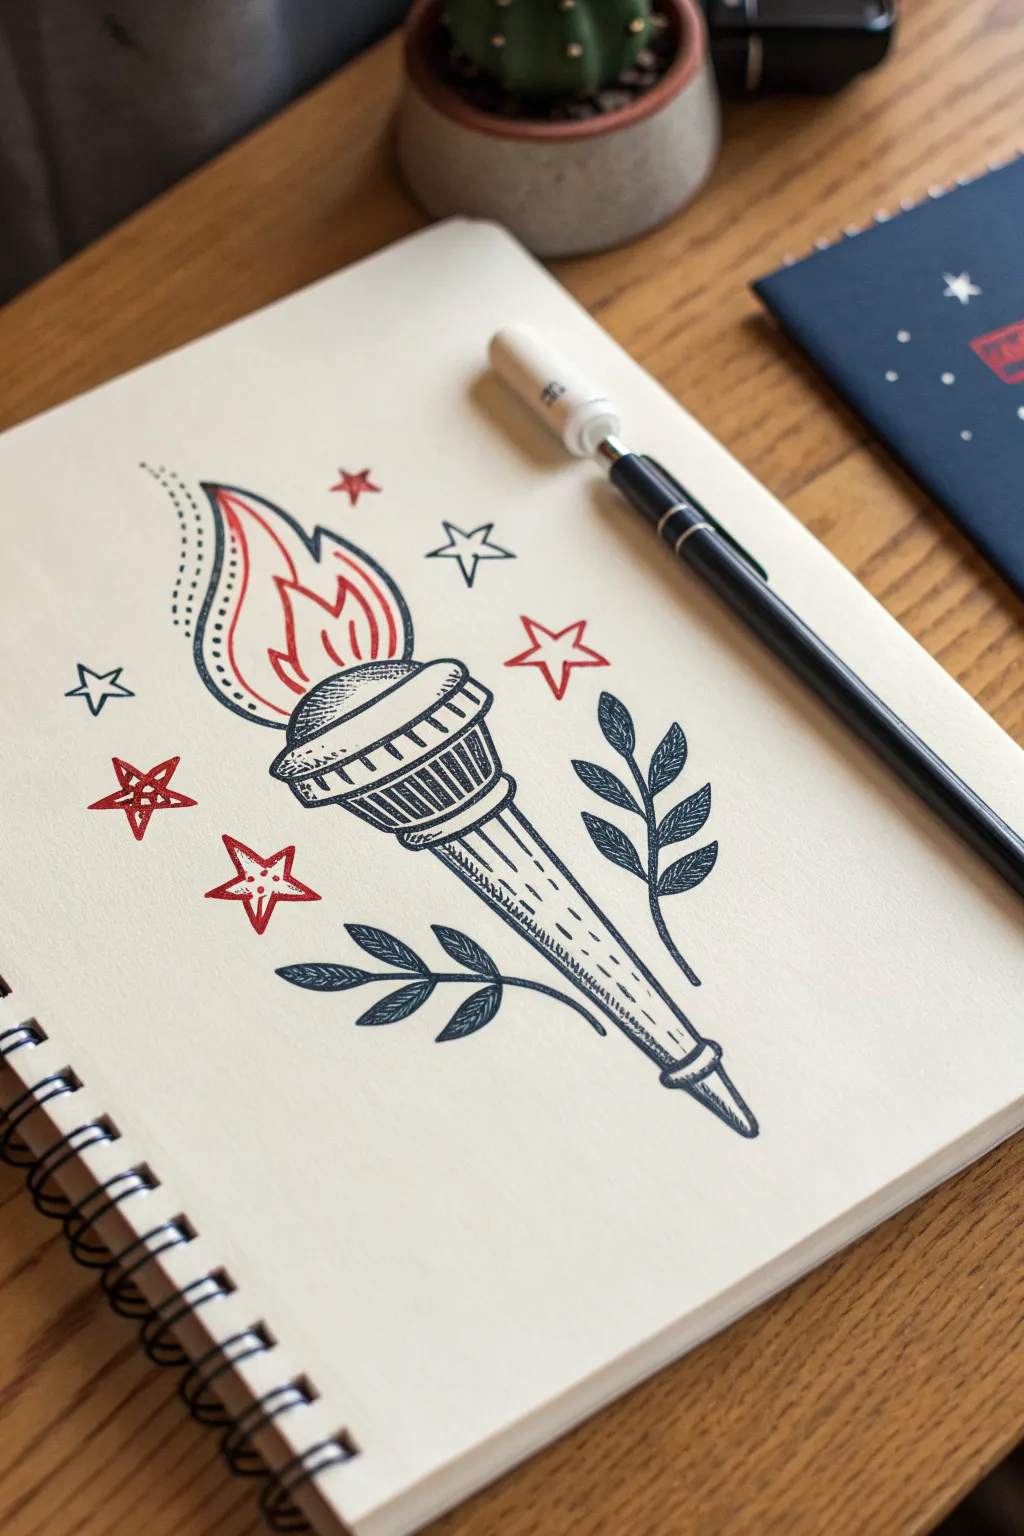
This classic torch doodle captures a patriotic spirit with a clean, vintage tattoo aesthetic. Using bold linework and simple stippling, it embodies the Fourth of July with a timeless red and navy color palette.
Detailed Instructions
Materials
- Sketchbook or heavy drawing paper
- Pencil (HB or H for light sketching)
- Eraser
- Navy blue felt-tip pen or fineliner (0.5mm)
- Red felt-tip pen or fineliner (0.5mm)
- Ruler (optional, for handle symmetry)
Step 1: Basic Sketch Structure
-
Map the handle:
Start by lightly sketching a long, tapering cylinder for the torch handle, angled slightly to the right. Add a small rounded cap at the bottom. -
Outline the torch cup:
At the top of the handle, draw a wider, bowl-shaped form for the base of the flame. Above that, add a slightly narrower, cylindrical band with a curved rim. -
Sketch the flame:
Draw the general shape of the flame emerging from the cup. It should be organically curved, tapering to a point at the top left, resembling a large teardrop with wavy edges.
Stippling Secret
When stippling the torch cup, cluster dots densely where the shadow is darkest and space them out as you move toward the light source.
Step 2: Drawing the Torch Details
-
Ink the handle shape:
Switch to your navy pen. Trace the main outline of the tapered handle. At the bottom, draw a distinct ring before the pointed end cap. -
Detail the cup structure:
Ink the bowl shape at the top of the handle. Draw the upper rim with a double line to give it thickness. Below this rim, add vertical lines to create a ribbed texture. -
Add handle texture:
Draw short, dashed lines down the center of the handle to suggest a rounded wooden or metal surface. Add slight shading lines on the right side of the handle for dimension. -
Stipple shading:
Using tiny dots (stippling), shade the rounded bottom of the cup and the area just under the rim to create a sense of depth and form.
Step 3: Adding the Flame and Branches
-
Outline the main flame:
With the navy pen, draw the outermost contour of the flame. Keep the lines smooth but wavy to mimic movement. Add a second, inner line parallel to the left side for a decorative border effect. -
Draw the inner fire:
Switch to your red pen. Inside the navy outline, draw freely flowing, smaller flame shapes. These should be pointy and curve upward. -
Dot the details:
Add a dotted line of navy ink following the curve outside the left of the flame for extra motion. I find this simple touch really helps balance the composition. -
Sketch the olive branches:
Using the navy pen, draw two curved stems emerging from behind the handle near the bottom—one curving left, one right. -
Leaf detailing:
Draw small, pointed oval leaves along these stems. Shade one half of each leaf with diagonal hatching lines to create a stylized, graphic look.
Go For Gold
Add a third color with a metallic gold gel pen for the torch handle highlights or the stars to make the doodle truly festive.
Step 4: Finishing Stars
-
Place the red stars:
Draw a few five-pointed stars using the red pen. Place a large one to the right of the flame and two smaller ones on the left side near the handle. -
Detail the red stars:
Add a secondary internal outline to the red stars or a small dot in the center to give them a vintage feel. -
Add navy stars:
Fill in the remaining empty spaces with outline stars using the navy pen. Vary their sizes slightly for visual interest. -
Clean up:
Once the ink is completely dry, gently erase any visible pencil sketch lines to reveal the crisp doodle.
Your patriotic torch is now ready to light up your page with holiday spirit
Liberty Crown Mini Icon
Transform a plain muslin drawstring bag into a festive favor pouch with this charming crown motif. Using fine-point fabric markers, you’ll sketch a whimsical tiara design featuring patriotic colors and scattered stars.
Step-by-Step Guide
Materials
- Small muslin or canvas drawstring bag (approx. 4×6 inches)
- Fabric markers (fine tipped) in navy blue, red, and gold/mustard yellow
- Pencil (optional for initial sketch)
- Piece of cardboard or stiff cardstock (to insert inside the bag)
- Iron (to set the ink)
Step 1: Preparation
-
Insert the Barrier:
Before uncapping any markers, slip a small piece of cardboard or stiff cardstock inside the drawstring bag. This prevents the ink from bleeding through to the back side of the fabric. -
Smooth the Canvas:
Use your hands to flatten the bag thoroughly against the cardboard insert, ensuring there are no wrinkles or bumps where you plan to draw.
Bleeding Ink?
If the marker ink spreads into the fabric grain (feathering), you’re pressing too hard. Use a lighter touch or try markers specifically labeled ‘fine point permanent.’
Step 2: Drawing the Outline
-
Sketch the Base:
Starting near the bottom center, draw a slightly curved, wide ‘U’ shape using your navy blue marker. This will be the bottom edge of the crown’s headband. -
Create the Band Width:
Draw a parallel curved line about a quarter-inch above your first line to create the thickness of the crown’s band. -
Draw the Outer Spikes:
From the top left corner of the headband, draw a tall, narrow triangle shape pointing diagonally outward. Repeat this on the right side to mirror it, using the navy blue marker. -
Add Inner Spikes:
Draw two slightly shorter, narrower triangles just inside the outer ones, angled slightly more inward. Leave a gap in the very center for the main spike. -
Draw the Central Spike:
Switch to your red fabric marker. In the center gap, draw the tallest, widest triangle spike so it stands out as the focal point. -
Cap the Spikes:
At the very tip of each spike, draw a tiny colored dot. Use blue dots for the blue spikes and a red dot for the central red spike.
Step 3: Adding Details
-
Embellish the Band:
Return to the navy blue marker. Along the center of the headband, draw a row of five or six small circles, evenly spaced. -
Draw the Stars:
Using the red marker again, draw a small five-pointed star in the middle of the central red spike. Add two smaller red asterisks or simple stars on the adjacent blue spikes. -
Add Gold Accents:
Pick up your gold or mustard yellow marker. Draw small five-pointed stars floating around the crown—place one near the top left, one near the top right, and one near the bottom left. -
Fill the Gaps:
Add a few tiny gold dots or specks in the empty white spaces between the spikes to give the design a magical, twinkling effect. -
Final Texture:
If you want a bit more depth, add very faint, tiny dots inside the blue spikes using the blue marker to create a subtle texture without filling them in completely.
Custom Touch
Make these personalized party favors by writing a guest’s name in a script font just below the crown using the navy marker.
Step 4: Finishing Up
-
Let it Dry:
Allow the ink to air dry completely for at least 15 to 20 minutes before handling the bag too much. -
Heat Set:
Once dry, remove the cardboard insert. Set your iron to the cotton setting (no steam) and press the design for about 30 seconds to permanentize the ink.
Fill your newly decorated bag with treats and enjoy your custom Fourth of July accessory
BRUSH GUIDE
The Right Brush for Every Stroke
From clean lines to bold texture — master brush choice, stroke control, and essential techniques.
Explore the Full Guide
Patriotic Top Hat
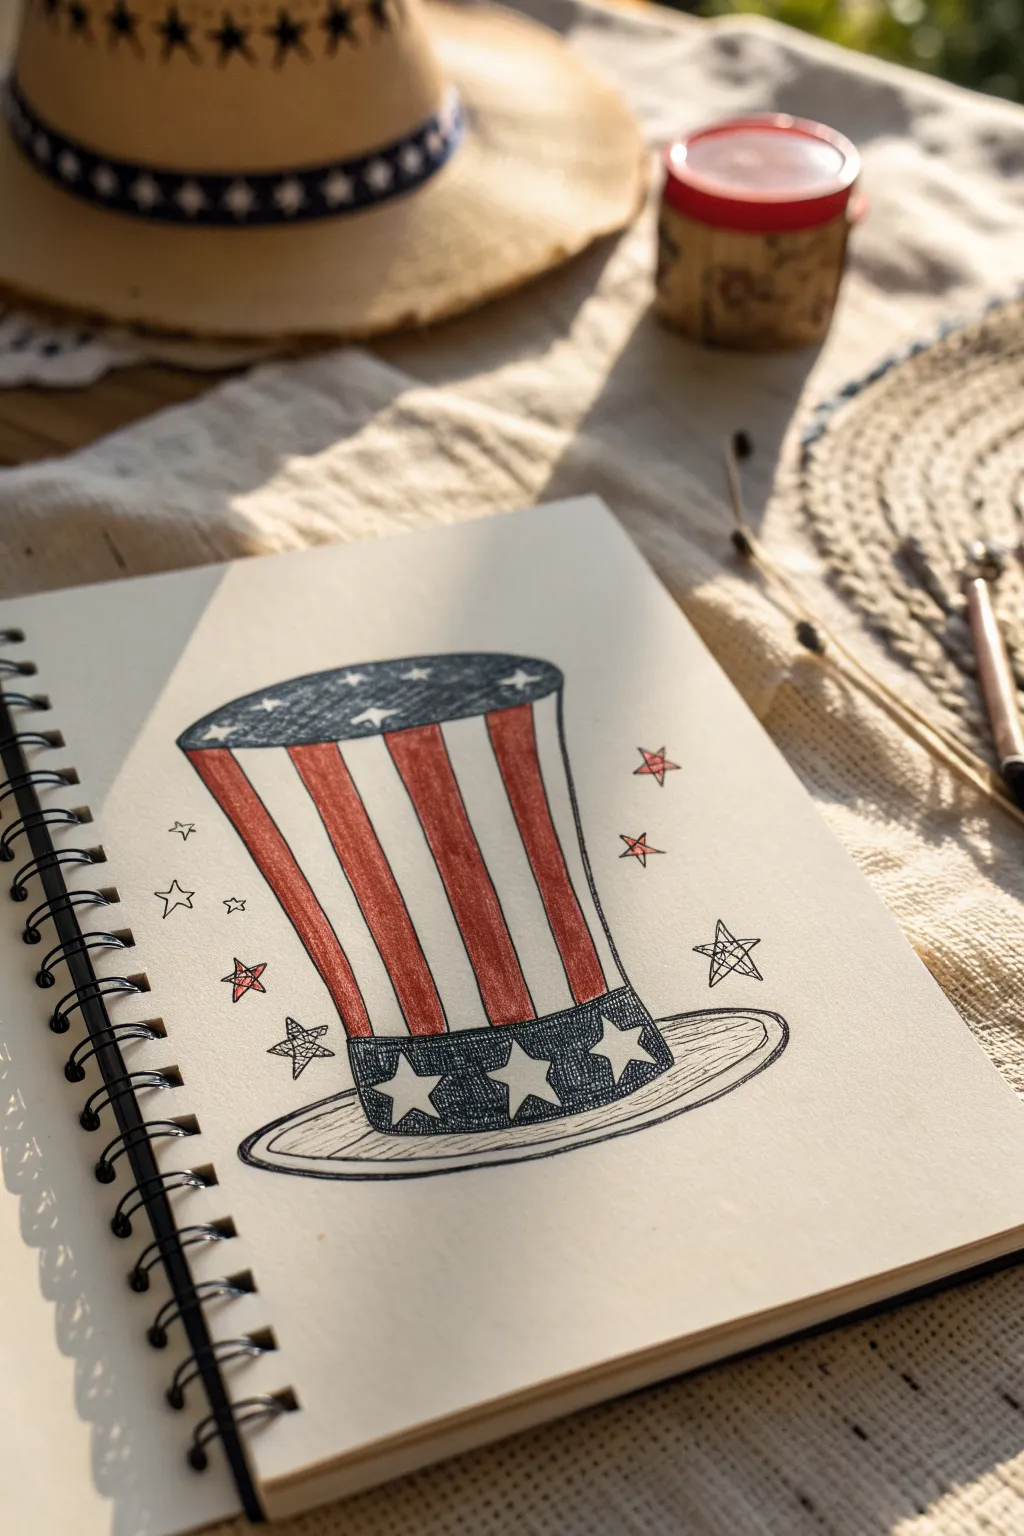
Capture the spirit of Independence Day with this charmingly sketched top hat, featuring iconic stripes and stars. The rugged, hand-drawn style gives it a classic Americana feel, perfect for journaling or party invites.
How-To Guide
Materials
- Spiral-bound sketchbook or heavy drawing paper
- Fine-liner pen (black, 0.5mm or similar)
- Red colored pencil or marker
- Blue colored pencil or marker (navy shade)
- Pencil and eraser for initial sketch
Step 1: Structural Outline
-
Draw the rim:
Begin by lightly sketching a wide, flattened oval near the bottom of your page. This will serve as the brim of the hat. Keep the lines loose. -
Add the crown base:
Draw two vertical lines extending upward from the inner part of the oval. Angle them slightly outward as they go up, so the top of the hat is a bit wider than the base. -
Close the top:
Connect the two vertical lines at the top with a curved line that mirrors the curve of the brim’s front edge. This creates the cylinder shape. -
Define the band:
Near the bottom of the cylinder, just above the brim, draw a curved horizontal line to partition off the hatband area where the stars will go.
Uneven Stripes?
Don’t stress if your stripes aren’t perfectly equal. I find that varying widths actually enhance the hand-drawn, vintage aesthetic of this doodle.
Step 2: Inking and Details
-
Section the stripes:
On the main body of the hat, draw vertical lines following the curve of the cylinder. Create roughly five or six sections for the alternating red and white stripes. -
Refine the brim:
Using your fine-liner, go over the brim sketch. Draw a second oval line inside the first to give the brim some thickness and dimension. -
Add the stars:
Inside the hatband area, draw three large, five-pointed stars. Let the outer points of the stars touch the edges of the band for a bold look. -
Top detail:
Draw the top surface of the hat as a narrow oval. Inside this top oval, add a few small, partial stars as if they are part of a patterned fabric on top. -
Ink the main lines:
Confidently trace over your pencil lines with the black fine-liner. Don’t worry about being perfectly straight; a little waiver adds character. -
Background stars:
Scatter a few loose, hand-drawn stars around the hat in the negative space. Vary their sizes and make them look roughly sketched, almost like doodles.
Add Sparkle
Use a white gel pen to add tiny dots or ‘sparkles’ inside the blue band or on the red stripes after coloring to make the hat look festive and shiny.
Step 3: Color and Shading
-
Color the red stripes:
Take your red pencil and fill in every other vertical stripe. Use vertical strokes to mimic the texture of fabric. -
Fill the blue band:
Color the hatband with the navy blue pencil, being careful to work around the white stars you drew earlier. Press harder near the edges for depth. -
Top surface color:
Lightly color the top oval surface with blue, again working around the tiny white stars. Keep this shading lighter than the band. -
Hatch shading:
Use your black pen to add very fine hatching lines on the shadowed side of the hat (the left side here). This simple texture suggests volume. -
Shadow the brim:
Add some horizontal hatching lines on the brim, specifically under where the hat cylinder sits, to ground the object. -
Accent the doodles:
Use the red pencil to add a quick scribbled fill to just one or two of the background stars for a pop of color balance.
Now you have a festive piece of art ready to celebrate the holiday season
BBQ Grill With Smoke Swirls
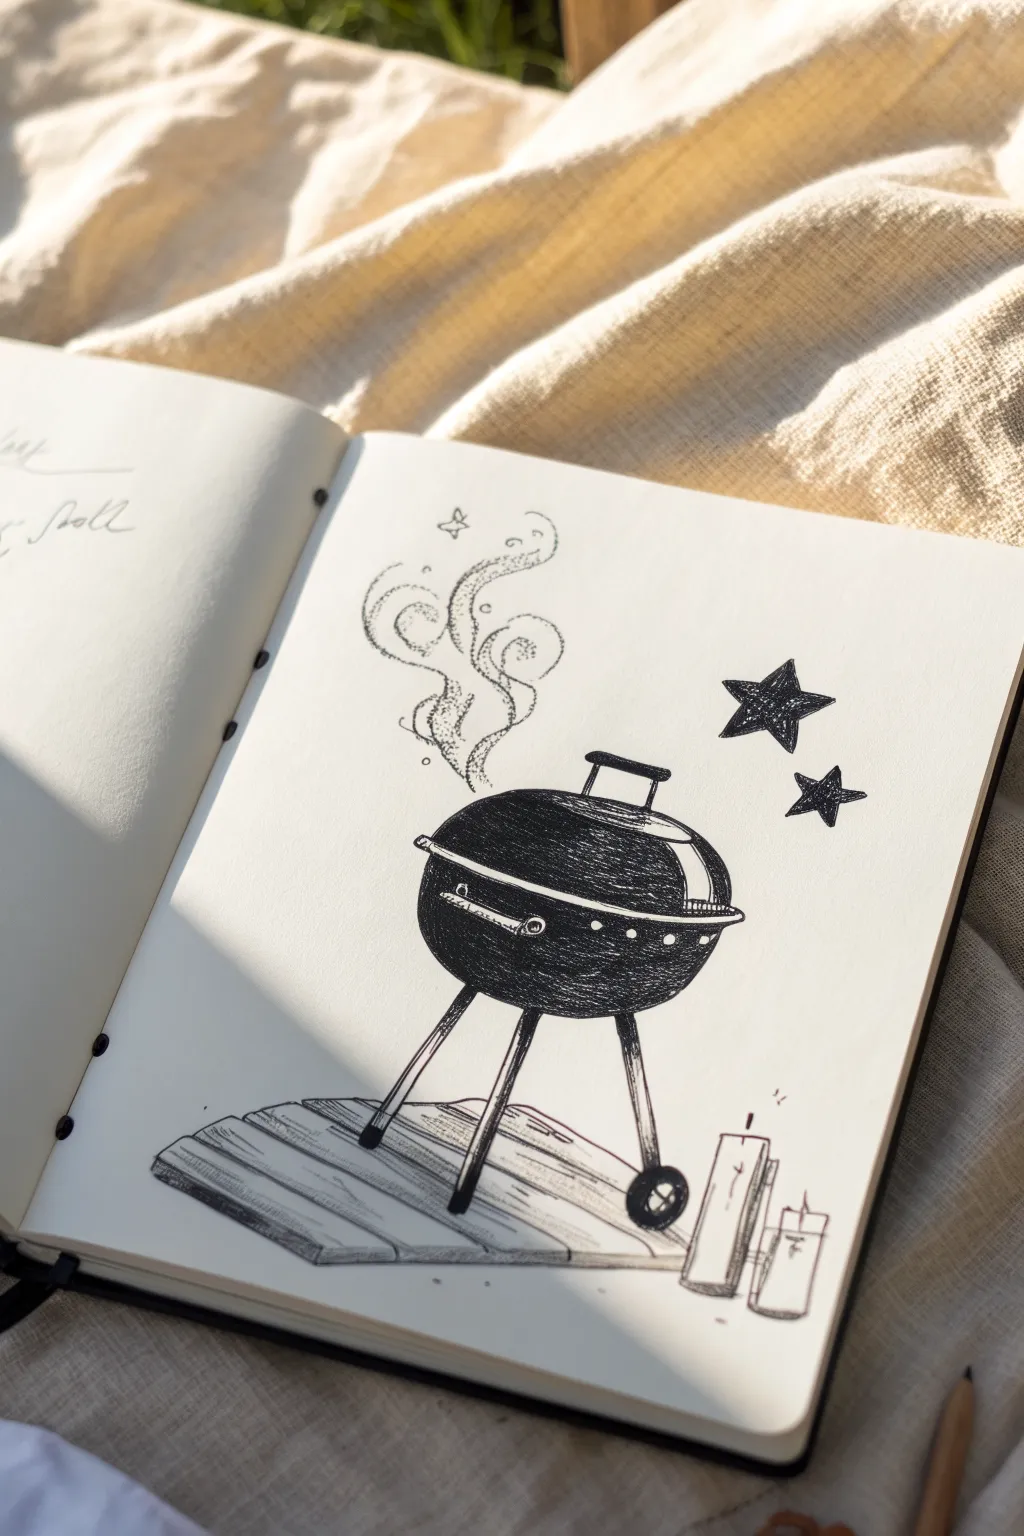
Capture the essence of a summer cookout with this charming black ink illustration. Using stippling and simple line work, you’ll create a classic kettle grill featuring whimsical smoke swirls and festive stars.
Detailed Instructions
Materials
- Fine liner pen (01 or 03 size)
- Thicker drawing pen or marker (05 or 08 size)
- Sketchbook or drawing paper
- Pencil (HB or 2B)
- Eraser
Step 1: Sketching the Foundation
-
Draft the grill body:
Start by lightly sketching a wide oval shape for the lid of the grill. Directly beneath it, draw a matching bowl shape for the bottom half, making sure they connect seamlessly. -
Add the legs:
Pencil in three legs extending downward. Two should flare slightly outward to the left and right, while the third leg sits centrally in the back. -
Detail the features:
Sketch a small rectangle handle on top of the lid. Add a horizontal handle on the front of the grill bowl and sketch the small wheels at the base of the legs. -
Outline the base:
Draw diagonal lines beneath the grill to represent the wooden plank base it stands on. Keep these loose and sketchy. -
Position the extras:
Lightly mark placements for the two hanging stars to the right and the swirling smoke rising from the left side. Don’t forget the candle shapes in the bottom right corner.
Smudged Ink?
If you smear ink while erasing, cover the mistake with a small white gel pen or correction fluid. Once dry, you can draw over it again.
Step 2: Inking the Grill
-
Outline the main shape:
Using your thicker pen, trace the main outline of the grill’s lid and bowl. Leave a small gap or thin line where the lid meets the base to define the separation. -
Ink the hardware:
Carefully outline the top handle, the front handle, and the legs. Use a steady hand to circle the wheels. -
Fill the darks:
This is the most satisfying part. Use the pen to fill in the grill body with solid black, but leave the rim of the lid and the handles white for highlight. -
Add texture:
Instead of full solid black, I like to use dense horizontal hatching or cross-hatching to fill the body. This gives it that textured, charcoal-dusted look. -
Create highlights:
Ensure you leave a crisp white highlight stripe across the glossy lid and the bowl to show the curvature. -
Detail the vents:
Draw small white circles or dashes along the bottom rim of the lid to represent the air vents.
Highlight Hack
If you accidentally filled in your highlights, use a white Posca marker or white gel pen to add the shine back onto the grill lid after the black ink dries.
Step 3: Atmospheric Details
-
Draw the smoke:
Switch to your finer pen (01 or 03). Draw the smoke using a technique called stippling—lots of tiny dots clustered together creates the form without hard lines. -
Swirl the patterns:
Arrange your stipple dots in curling, S-shaped ribbons rising from the vent, making the dots denser at the edges and sparse in the center. -
Ink the stars:
Outline the two stars with the thicker pen. Fill them in using a scribble texture rather than solid black to keep the doodle playful. -
Define the wood base:
Ink the wooden planks beneath the grill. Use long, broken lines for the grain and add shading on the sides to give the planks dimension. -
Adding candles:
Outline the cylindrical candle shapes in the corner. Keep the lines simple and add a tiny wick to each. -
Final clean up:
Wait at least five minutes for the ink to fully cure, then gently erase all your initial pencil guidelines to reveal the crisp black and white contrast.
Now you have a bold, graphic illustration ready to decorate your summer journal spread


Hot Dog With Toppings
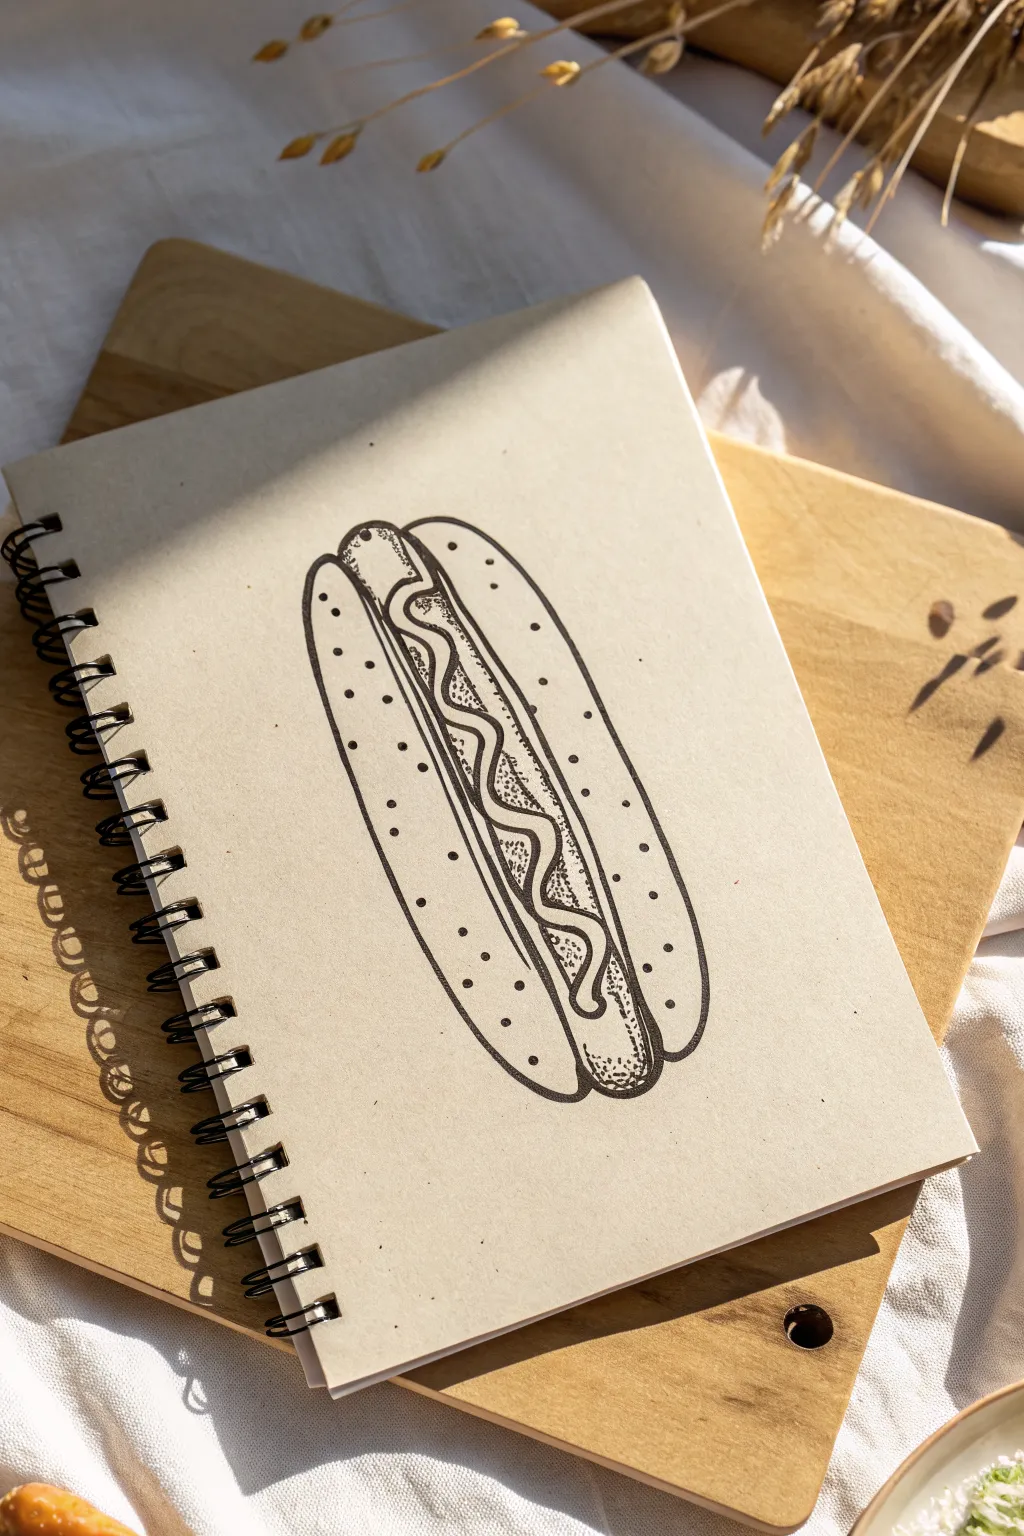
This classic hot dog doodle combines bold, crisp line work with a touch of pointillism for texture, creating a graphic yet detailed illustration. It is a fantastic practice in balancing negative space with deliberate shading.
How-To Guide
Materials
- Spiral-bound sketchbook with off-white or cream paper
- Fine liner pen (black, 0.5mm or 0.8mm for outlines)
- Ultra-fine liner pen (black, 0.1mm or 0.05mm for details)
- Pencil (HB or 2H)
- Eraser
Step 1: Sketching the Base
-
Outline the Bun:
Begin by lightly sketching a long, narrow oval shape with your pencil. This will serve as the foundation for the entire drawing. -
Define the Bread Halves:
Refine that oval into two separate, elongated shapes that curve slightly inward at the ends. Leave a gap in the center where the hot dog itself will nestle. -
Sketch the Hot Dog:
Draw the sausage shape sitting between the two bun halves. It should protrude slightly at the top and bottom ends to give it volume and realism. -
Add the Mustard:
Lightly sketch a wavy, serpentine line running down the entire length of the sausage. Create a parallel wavy line right next to it to give the mustard width.
Pro Tip: Pen Pressure
Keep your pen vertical when stippling. Slanted dots look like dashes. A straight-down tapping motion creates perfect, round dots for cleaner shading.
Step 2: Inking the Lines
-
Trace the Bun Outline:
Switch to your thicker fine liner (0.5mm or 0.8mm). Carefully go over the outer edges of the bun halves, keeping your hand steady for a smooth, continuous line. -
Ink the Sausage:
Outline the visible parts of the hot dog sausage. When you reach the mustard area, stop your line so the mustard appears to sit on top of the meat. -
Outline the Condiment:
Trace your wavy mustard sketch with the same pen. Ensure the ends of the wave connect smoothly to create a contained shape. -
Erase Pencil Marks:
Once the ink is completely dry—I usually give it at least five minutes to be safe—gently erase all the underlying pencil sketches.
Troubleshooting: Smuding Ink
If you notice ink smearing when you erase the pencil lines, stop immediately. Wait another 15 minutes. Some papers absorb ink slowly.
Step 3: Shading and Texturing
-
Begin Stippling:
Switch to your ultra-fine liner (0.1mm). Start adding small dots to the shadow areas of the bun, primarily along the inner edges where the bread meets the sausage. -
Texture the Sausage:
Add a denser concentration of dots on the curved sides of the sausage itself. This pointillism technique creates a rounded, 3D effect without harsh lines. -
Mustard Shadows:
Place tiny dots right along the edges of the wavy mustard line. This subtle shading makes the condiment look like it has thickness and is resting on the hot dog. -
Add Bun Details:
Draw widely spaced, small dots across the top surface of the bun halves. These represent the texture of the bread or perhaps sesame seeds. -
Darken the Crevices:
Go back to the areas where the different elements touch (bun to meat, meat to bun). Add more dots here to deepen the shadows and separate the forms. -
Final Polish:
Review your drawing for balance. If one side looks too flat, add a few more stippled dots to round it out.
Now you have a crisp, graphic illustration that perfectly captures a summer barbecue vibe.
Burger Picnic Stack
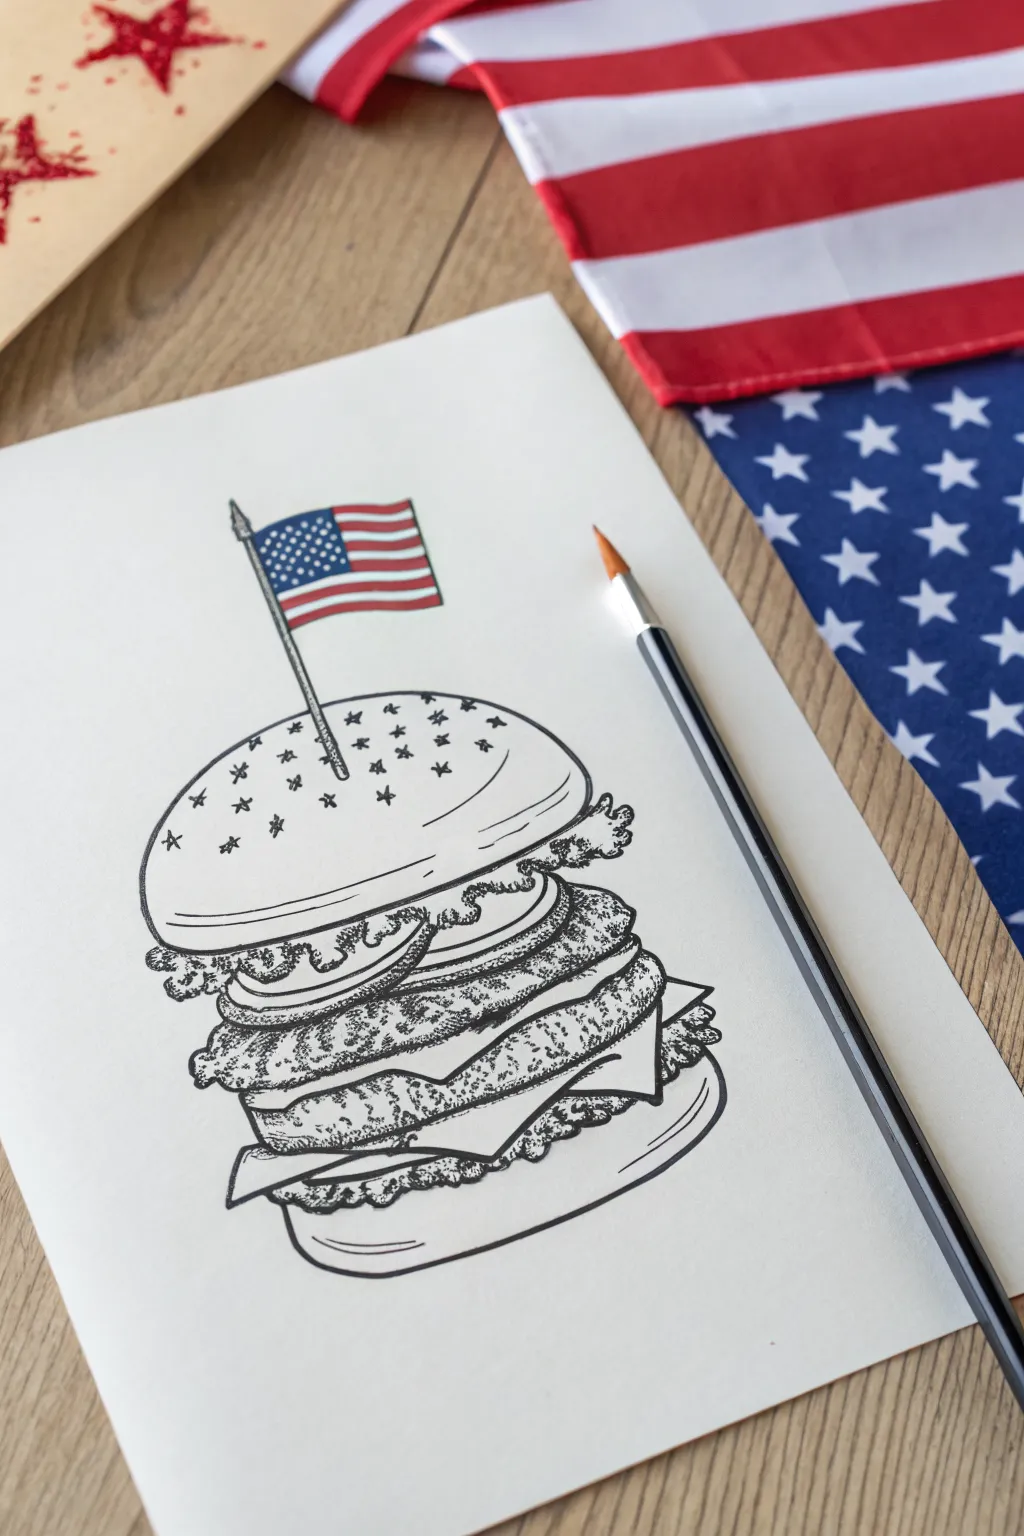
Capture the spirit of a July 4th cookout with this fun ink illustration of a classic double-decker burger. Featuring stellar sesame seeds and a patriotic flag topper, this sketch combines bold outlines with delicate stippling textures.
Detailed Instructions
Materials
- Smooth white drawing paper or cardstock
- Pencil (HB or 2H)
- Eraser
- Fine liner pen (0.3mm or 0.5mm, black)
- Ultra-fine liner pen (0.05mm or 0.1mm, black)
- Red fine liner or colored pencil
- Blue fine liner or colored pencil
Step 1: Pencil Sketching
-
Draft the Top Bun:
Start near the upper middle of your page by lightly sketching a large, rounded dome shape for the top bun. Flatten the bottom curve slightly to give it weight. -
Add the Flagpole:
Draw a thin, diagonal line sticking out of the center of the bun. Add a small triangle or spear shape at the very top. -
Sketch the Flag:
Attached to the pole, draw a waving rectangle for the flag. Divide a small corner for the stars area and sketch horizontal stripes for the rest. -
Outline the Fixings:
Below the top bun, sketch wavy lines for lettuce. Under that, draw thin ovals for tomato slices and onion rings. -
Stack the Patties:
Draw the first burger patty as a thick, rough-edged oval. Below it, sketch sharp, angular shapes for melting cheese, followed by a second patty and more cheese. -
Finish with the Bottom Bun:
Ground your burger with a bottom bun. Draw a U-shape that connects to the lowest ingredients, adding a rim line parallel to the bottom curve for perspective.
Oops! Smudged Ink?
If you smudge wet ink while erasing, don’t panic. Turn the smudge into a shadow by adding more stippling dots over the area to hide the mistake.
Step 2: Inking Outlines
-
Ink the Flag:
Using your standard fine liner, carefully trace over the flag. Use red for the stripes and blue for the star field, but keep the pole black. -
Define the Bun Stars:
Instead of sesame seeds, draw small five-pointed stars scattered across the top bun with your black pen. -
Outline the Top Bun:
Trace the outer curve of the bun with a smooth, continuous line. Add a second, thinner line just inside the bottom edge to show thickness. -
Texture the Lettuce:
Use a jagged, wavy line to ink the lettuce leaves underneath the bun, giving them a ruffled appearance. -
Define Smooth Layers:
Ink the onion rings and tomato slices with clean, smooth curves. Overlap them slightly to create depth. -
Draw the Cheese:
Outline the cheese slices with sharp corners that drape over the patties, making them look melted and heavy.
Go Bigger
Try making a ‘menu board’ version by drawing this on kraft paper and using white gel pens for the highlights and stars to make them pop.
Step 3: Texturing and Shading
-
Stipple the Patties:
Switch to your ultra-fine pen. Fill the burger patties with tiny dots (stippling). Cluster dots densely near the bottom of each patty for shadow and spread them out near the top for highlights. -
Detail the Buns:
Add a few broken lines on the side of the top bun to suggest volume. For the bottom bun, add a long, curved contour line. -
Add Shadows:
Use the fine pen to add small hatched lines or extra stippling right underneath the cheese and lettuce layers to show where they cast shadows on the ingredients below. -
Erase Guidelines:
Wait until the ink is completely dry to avoid smudging. Then, gently erase all visible pencil marks to leave a clean, crisp illustration.
Now you have a delicious-looking piece of art ready for your holiday display
Balloon Bouquet With Stars
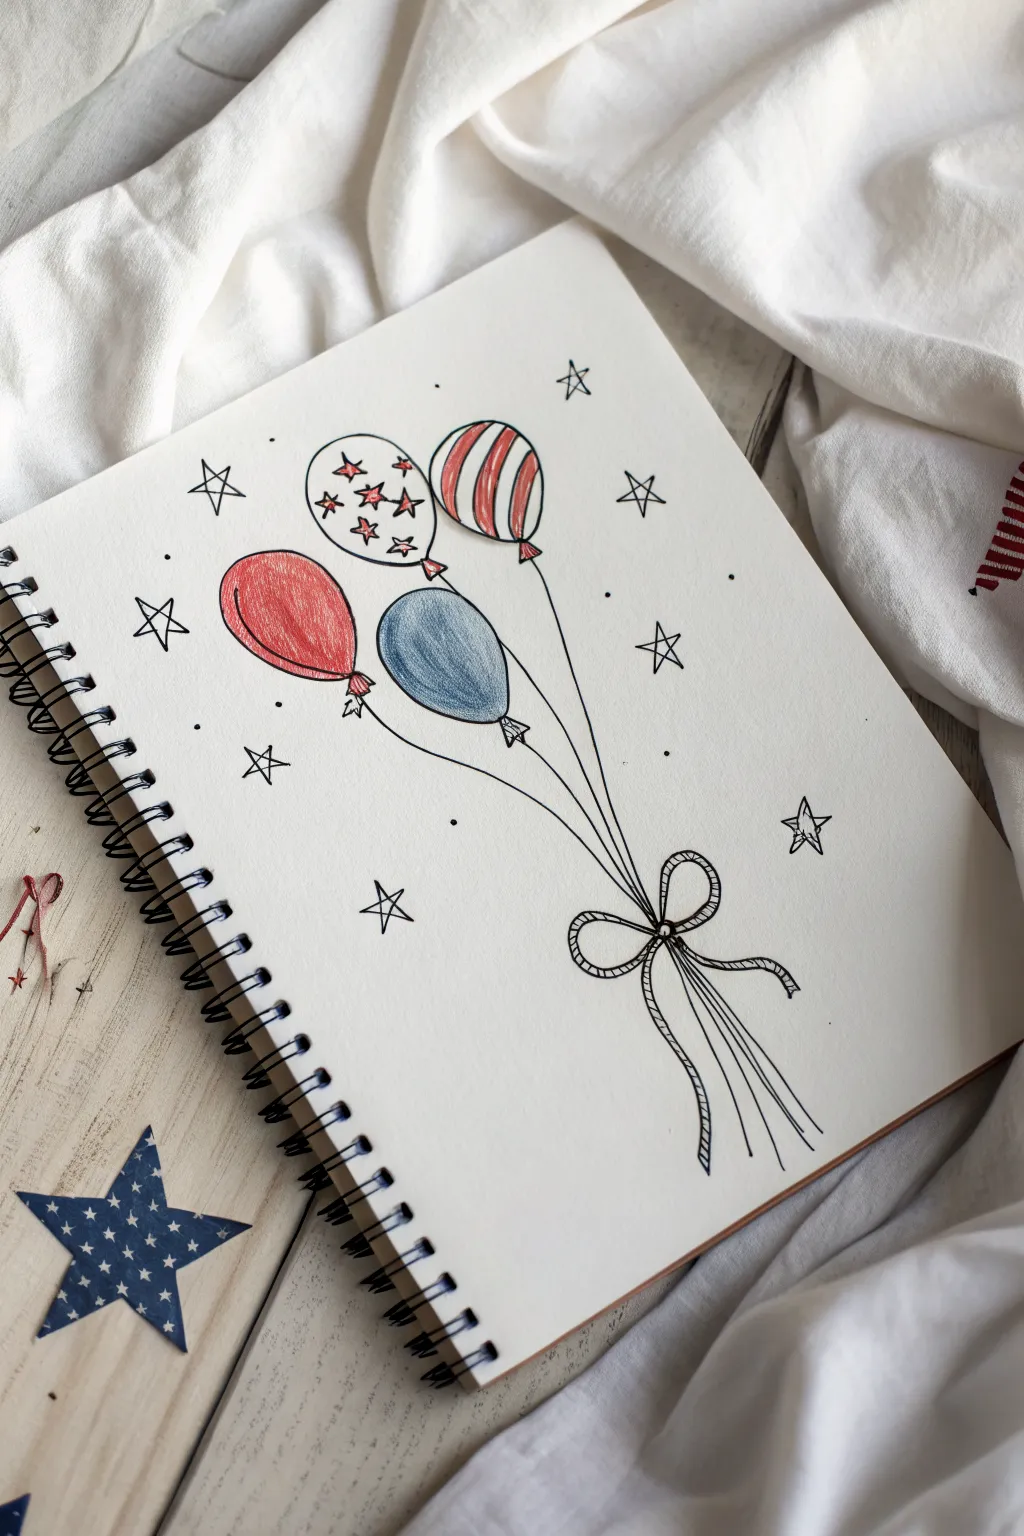
Capture the festive spirit of Independence Day with this charming and simple sketchbook doodle featuring a bouquet of balloons in classic red, white, and blue. The combination of solid colors and patterned designs creates a playful visual texture that pops against the white page.
Detailed Instructions
Materials
- Sketchbook or drawing paper (heavyweight preferred)
- Fine liner pen (black, 0.3mm or 0.5mm)
- Colored pencils (Red and Blue)
- Pencil (HB for sketching)
- Eraser
Step 1: Basic Shapes & Outlines
-
Pencil Sketching:
Begin by lightly sketching the placement of your four balloons using an HB pencil. Arrange them in a loose cluster near the top center of the page, varying their heights slightly for a natural look. Draw them as simple ovals that are slightly wider at the top. -
Refining the Shapes:
Once happy with the placement, refine the balloon shapes. Make sure the bottom of each oval tapers in slightly where the knot will go. Add a small triangle at the base of each balloon to represent the tied knot. -
Adding the Strings:
Sketch long, flowing lines coming down from each balloon knot. Guide all four lines to meet at a single point lower down on the page, where the bow will eventually be placed. -
Inking the Balloons:
Using your fine liner pen, carefully trace over the balloon outlines and the small knots at the bottom. Keep your hand steady for smooth curves, but don’t worry if they aren’t perfectly symmetrical—slight wobbles add charm. -
Inking the Strings:
Trace the string lines with the pen. I like to make these lines slightly organic rather than perfectly straight ruler lines to give the feeling of movement.
Volume Hack
When coloring the solid balloons, leave a small white oval shape near the top left uncolored. This creates an instant ‘shiny’ reflection highlighting the balloon’s roundness.
Step 2: Adding Patterns & Color
-
Star Balloon Design:
Choose the top-left balloon for the star pattern. Draw small, five-pointed stars scattered inside the oval using your red colored pencil. Vary the sizes slightly and let some touch the edges. -
Stripe Balloon Design:
For the top-right balloon, draw curved vertical lines to create stripes. These should follow the contour of the balloon to show volume. Color alternating stripes with red pencil, leaving white spaces in between. -
Solid Colors:
Color the bottom-left balloon entirely in red and the bottom-right balloon in blue. Apply the colored pencil in light, circular motions to build up an even layer of pigment without harsh streaks. -
Adding Highlights:
To give the solid balloons a 3D effect, press a little harder on the sides to deepen the shadow, and leave the center area slightly lighter or fade it out completely for a highlight. -
Pattern Highlights:
Go back to your striped balloon and add a few thin, sketchy black ink lines over the red stripes to define the curvature even more.
Smudge Alert
If your black fineliner smears when you color over it, change the order: do all your colored pencil work first, and lay down the black ink outlines last.
Step 3: The Bow & Final Details
-
sketching the Bow:
Draw a bow where the strings converge. Start with a small circle for the center knot, then add two large loops on either side. -
Ribbon Tails:
Draw two wavy ribbon tails flowing down from the center of the bow. Add a few extra straight lines extending downward to represent the ends of the balloon strings peeking through. -
Texturing the Bow:
Ink the bow outline. To make it look like fabric or twine, fill the inside of the ribbon loops with close, diagonal hatching lines using your fine liner. -
Scattered Stars:
Fill the negative space around the balloon bouquet with scattered stars. Draw simple five-pointed stars in black ink—some larger, some smaller. -
Stippling Effects:
Add tiny ink dots (stippling) randomly between the stars and balloons. This subtle confetti effect fills the empty space without making the drawing look cluttered. -
Final Erasure:
Wait a moment for the ink to fully dry, then gently erase all your original pencil guidelines to leave a clean, crisp finish.
Now you have a festive page ready to celebrate the holiday
Have a question or want to share your own experience? I'd love to hear from you in the comments below!