Patriotic painted rocks are my favorite kind of quick, satisfying project—small canvas, big impact. With a simple red, white, and blue palette, you can make designs that feel instantly festive for summer holidays and beyond.
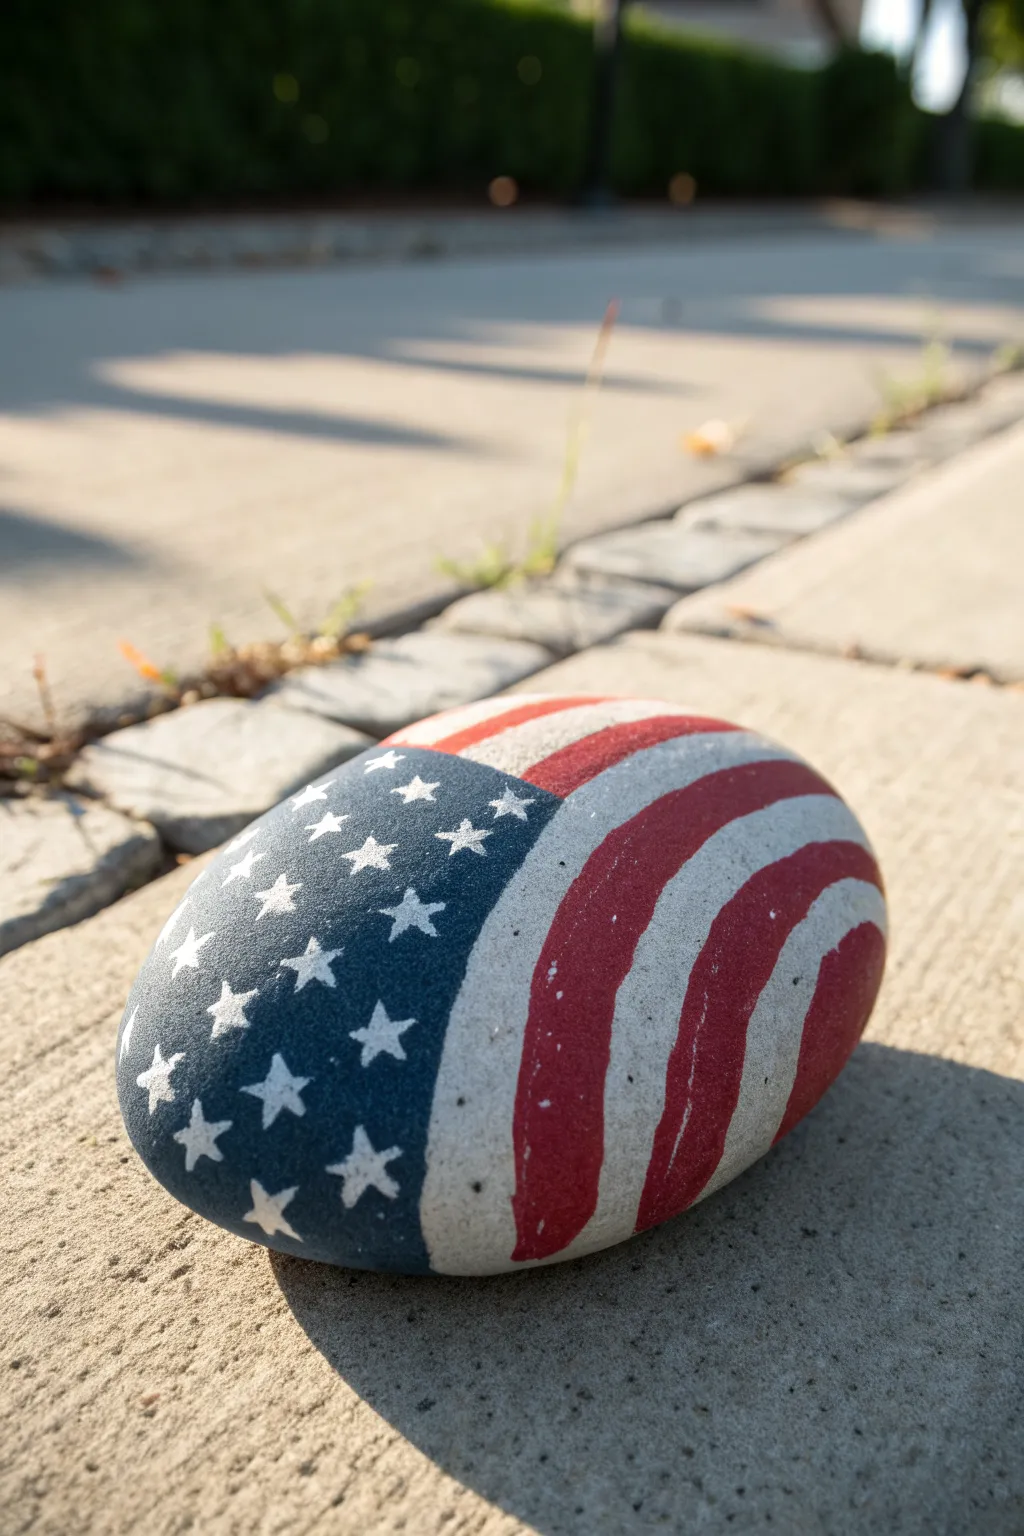
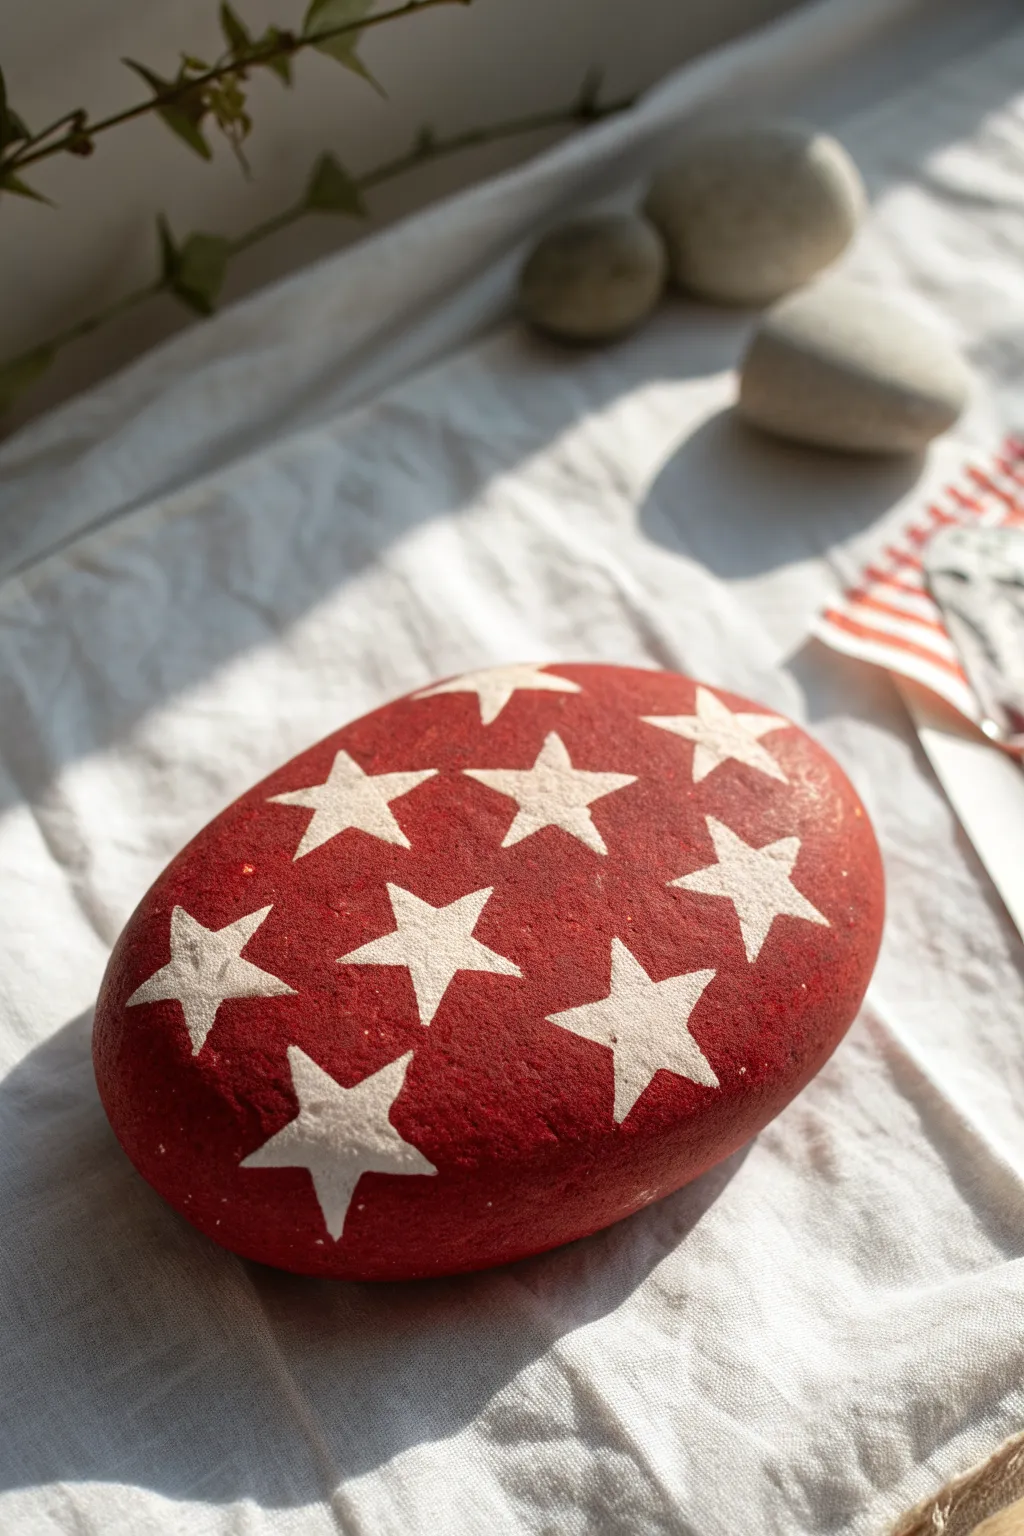
Classic Stars and Stripes
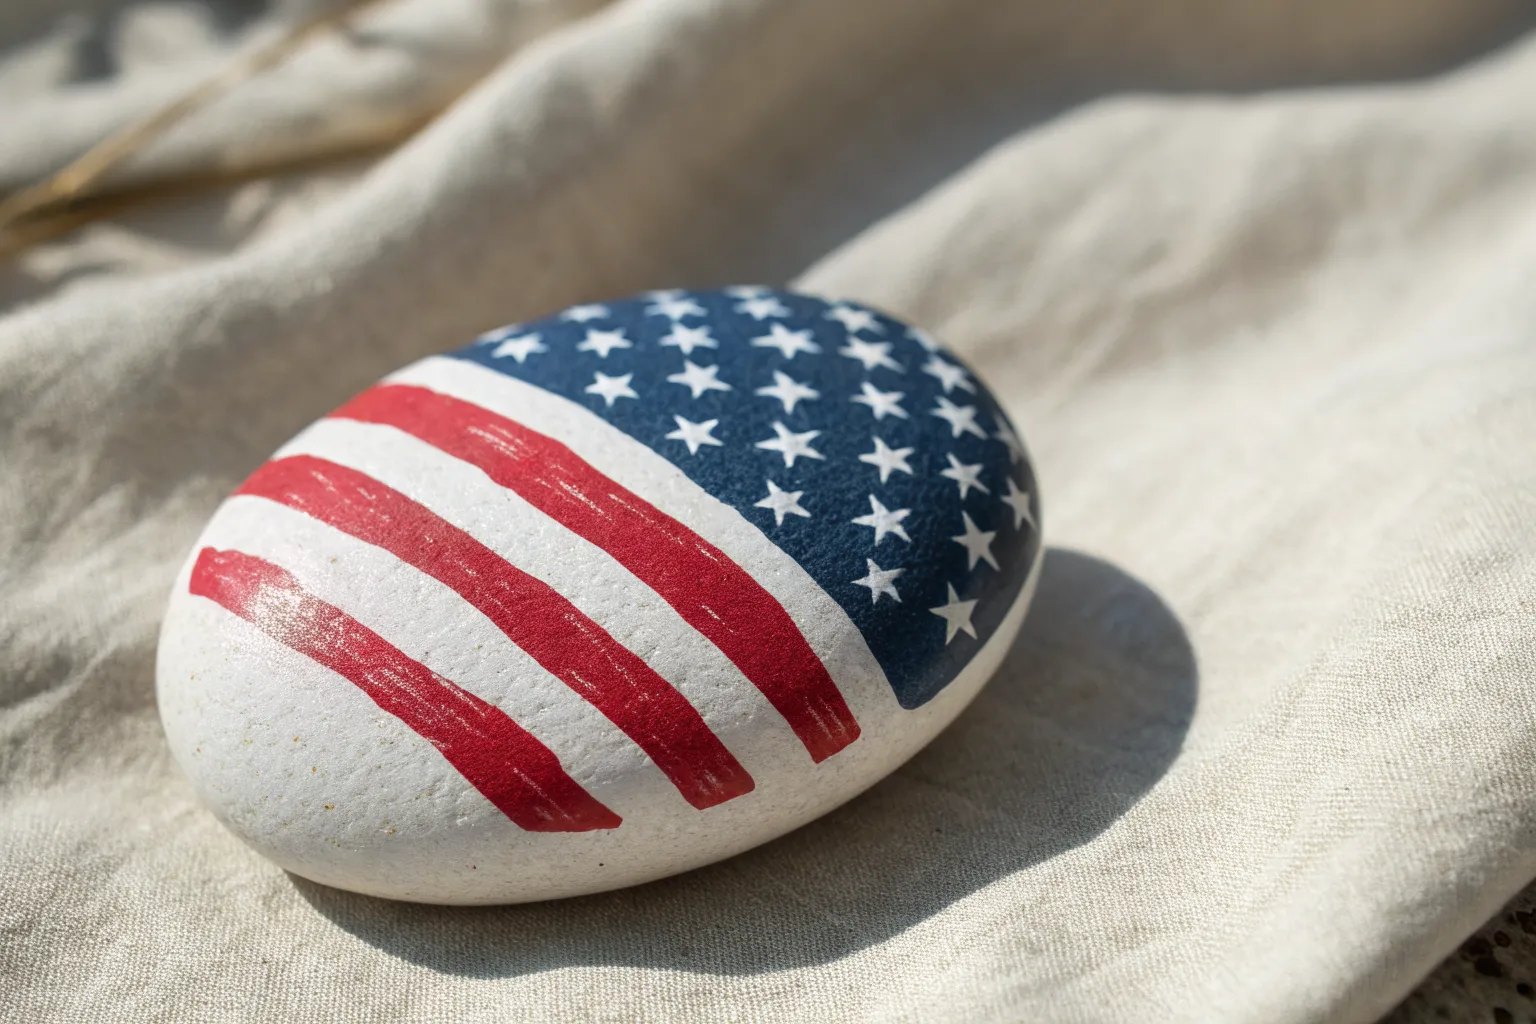
Transform a smooth, rounded stone into a symbol of national pride with this simple flag design. By following the natural curves of the rock, the stars and stripes wrap around the surface for a soft, organic look.
How-To Guide
Materials
- Smooth oval river rock (palm-sized)
- Acrylic paint (Navy Blue, Bright Red, Titanium White)
- Flat paintbrush (medium width)
- Small round detail brush (size 0 or 1)
- Pencil for sketching (optional)
- Acrylic sealer or varnish (spray or brush-on)
- Water cup and paper towels
Step 1: Base Coat & Layout
-
Clean your canvas:
Begin by washing your rock with warm, soapy water to remove any dirt or grit. Let it dry completely before painting. -
Prime the surface:
Apply a coat of Titanium White acrylic paint over the entire top surface of the rock. This creates a bright base that will make your colors pop, especially the red stripes. -
Second coat:
Once the first layer is dry to the touch, apply a second coat of white if the rock’s natural color is still showing through. Allow this to dry thoroughly. -
Visually divide the rock:
Imagine a diagonal line curving gently across the rock, separating the upper left third from the rest. You can lightly sketch this curve with a pencil if it helps.
Starry Strategy
Struggling with tiny brushes? Use a white paint pen or a toothpick dipped in paint to create the stars. The sharp point gives you much more control.
Step 2: Painting the Colors
-
Paint the blue field:
Using your medium flat brush, fill in that upper left section with Navy Blue paint. Follow the curve you visualized earlier to give the flag a draped effect. -
Refine the edge:
Carefully smooth out the curved edge where the blue paint meets the white base. I find it helps to rotate the rock in my hand to get the best angle for this curve. -
Plan the stripes:
Visualize or lightly sketch curved bands radiating from the blue section across the white area. Aim for slightly diagonal lines rather than perfectly horizontal ones. -
Paint the red stripes:
Load your brush with Bright Red paint. Carefully paint the alternating red stripes, leaving the white base coat visible for the white stripes. -
Clean up edges:
Check the edges where red meets blue. If the red overlaps, you can touch up the blue later, but try to keep a clean line. -
Let colors set:
Allow the red and blue sections to dry completely. This step is crucial so the white stars don’t turn pink or light blue.
Distressed Denim Look
For a vintage vibe, lightly sand the painted surface with fine-grit sandpaper after it dries but before sealing to weather the flag design.
Step 3: Details & Finish
-
Start the stars:
Switch to your small round detail brush and dip it into Titanium White paint. You want just a small amount on the tip. -
Place the center stars:
Begin painting small, five-pointed stars in the middle of the blue field. Spacing them out first ensures you don’t crowd the design. -
Fill in the star field:
Paint the remaining stars around the edges. Don’t worry if they aren’t perfect; slightly organic shapes look charming on a rock. -
Add stripe texture (optional):
If you want a rustic look, you can dry-brush a tiny bit of white lightly over the red stripes to simulate fabric texture, though solid colors work great too. -
Inspect the artwork:
Look over the rock for any accidental smudges. Use a tiny bit of the background color to cover any mistakes. -
Seal the deal:
Once the paint is fully cured (usually after an hour or so), apply a layer of acrylic sealer to protect your artwork from the elements.
Place your finished patriotic rock on a windowsill or porch to welcome guests with a touch of Americana


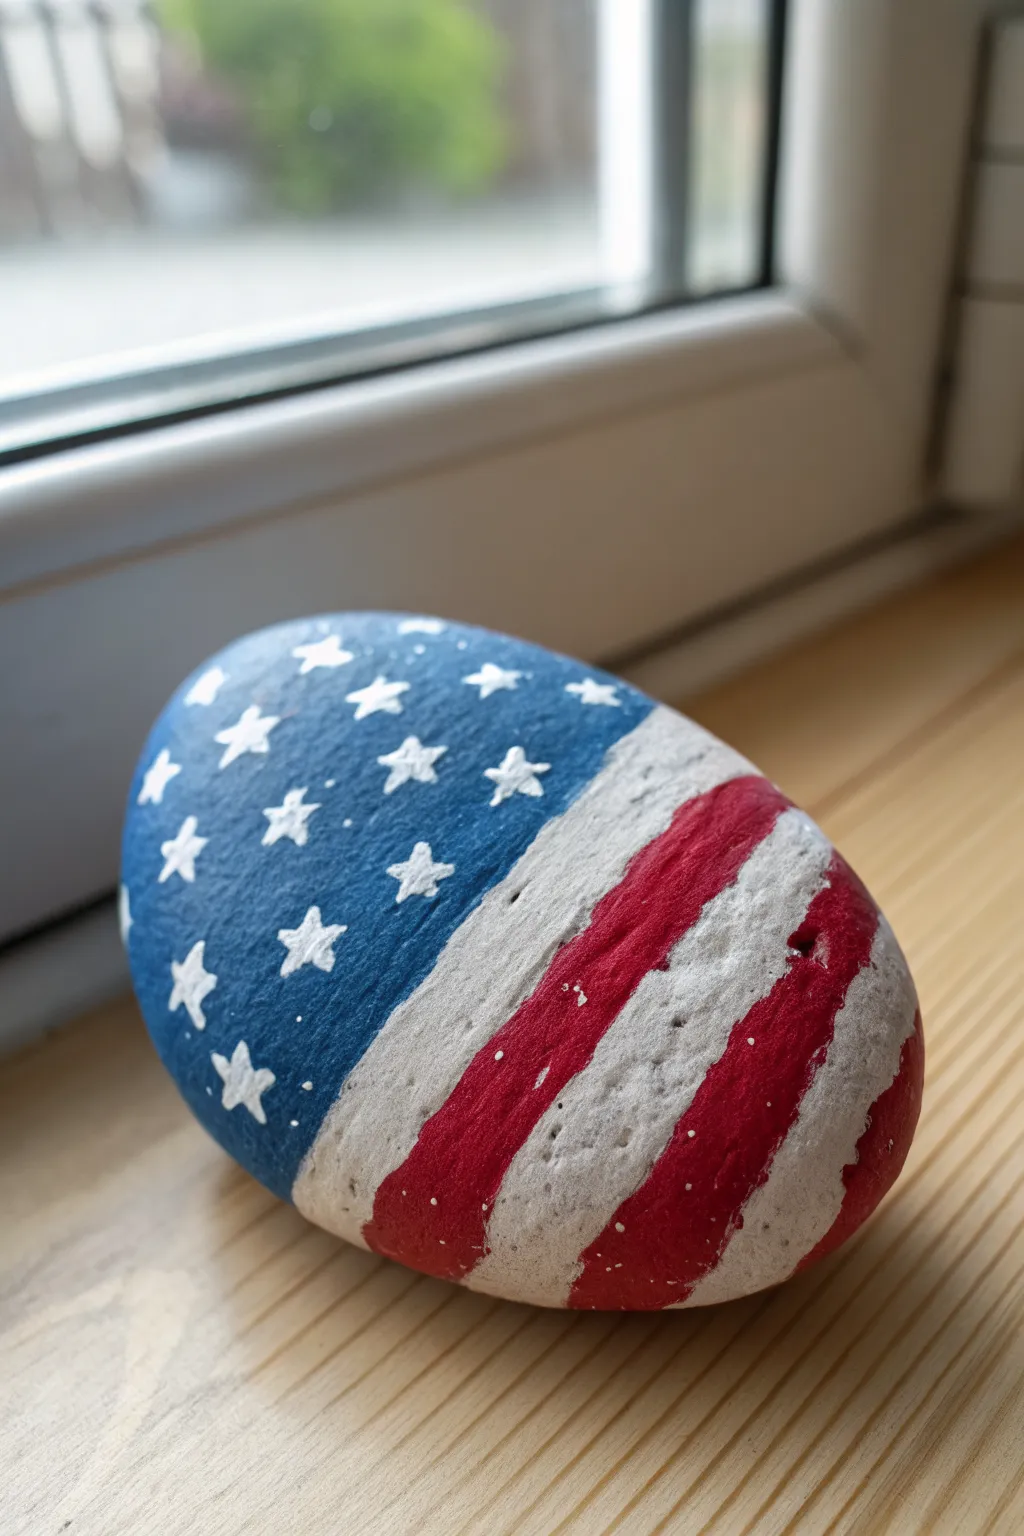
Wavy Flag on a Rock
This clever design takes advantage of a rock’s natural curvature to create the illusion of a waving flag blowing in the breeze. The bold red stripes and classic white stars against a deep blue field make for a striking patriotic decoration.
Step-by-Step
Materials
- Smooth, oval river rock
- White acrylic paint (priming base)
- Red acrylic paint
- Navy blue acrylic paint
- Flat paintbrush (medium width)
- Small round detail brush (size 0 or 1)
- Pencil for sketching
- Clear spray sealer (gloss or matte)
Step 1: Preparation and Base Coat
-
Clean the canvas:
Before laying down any color, give your rock a thorough wash with soap and water to remove any dirt or oils. Let it dry completely in the sun. -
Prime the surface:
Paint the entire top surface of the rock with white acrylic paint. This creates a bright base so the red and blue colors will pop later. -
Apply a second coat:
Once the first layer is dry to the touch, apply a second coat of white to ensure full, opaque coverage where the rock color doesn’t show through.
Curve Control
When painting stripes, turn the rock in your hand as you pull the brush. Following the rock’s physical curve naturally creates that 3D wavy effect.
Step 2: Sketching the Layout
-
Draw the union:
Using a pencil very lightly, sketch a curved line on the left side of the rock to demarcate the blue field (the union). Curve it outward slightly to mimic movement. -
Sketch the stripes:
From the curved line, draw parallel wavy lines flowing toward the right edge of the rock. These will be your guides for the red stripes. -
Vary the wave:
Try to make the wavy lines follow the contour of the rock; I find this helps the flag look like it’s actually draped over a surface.
Sparkle Finish
Mix a tiny pinch of silver glitter into your clear sealer or final coat of white paint on the stars for a subtle, patriotic shimmer in the sunlight.
Step 3: The Blue Field
-
Fill in the blue:
Using your medium flat brush, carefully paint the left section navy blue up to your pencil line. -
Refine the edge:
Switch to a smaller brush if needed to get a crisp, clean edge where the blue meets the white reserved area. -
Let it cure:
Allow the blue paint to dry completely. Since we will be painting white stars on top, the blue must be 100% dry to avoid mixing into a light blue mess.
Step 4: The Red Stripes
-
Start the red:
Using the flat brush, paint every other stripe red, following your pencil guides carefully. -
Smooth strokes:
Use long, fluid strokes to fill the stripes. This keeps the edges relatively smooth and mimics the flow of fabric. -
Clean up edges:
If your red paint bleeds slightly into the white stripes, wait for it to dry and then touch up the white areas with a detail brush.
Step 5: Stars and Details
-
Prepare the stars:
Dip your smallest round detail brush into white paint. You want the paint to be fluid but not watery. -
Paint the center points:
Start by placing small dots where you want the center of each star to be, creating a staggered or grid pattern. -
Draw the star points:
From each center dot, gently pull five tiny lines outward to form the star shape. Rotating the rock as you adhere the points can make this easier. -
Fix imperfections:
If a star looks wonky, don’t panic; just wait for the white to dry and touch up the negative space with a dab of navy blue.
Step 6: Finishing
-
Allow a full dry:
Give the rock several hours to dry completely to ensure no moisture is trapped under the sealer. -
Seal the rock:
Spray the rock with a clear acrylic sealer. This protects the paint from chipping and gives it a finished, professional sheen.
Place your waving flag rock on a porch step or garden path to share a bit of spirit with passersby


Blue Field With White Stars
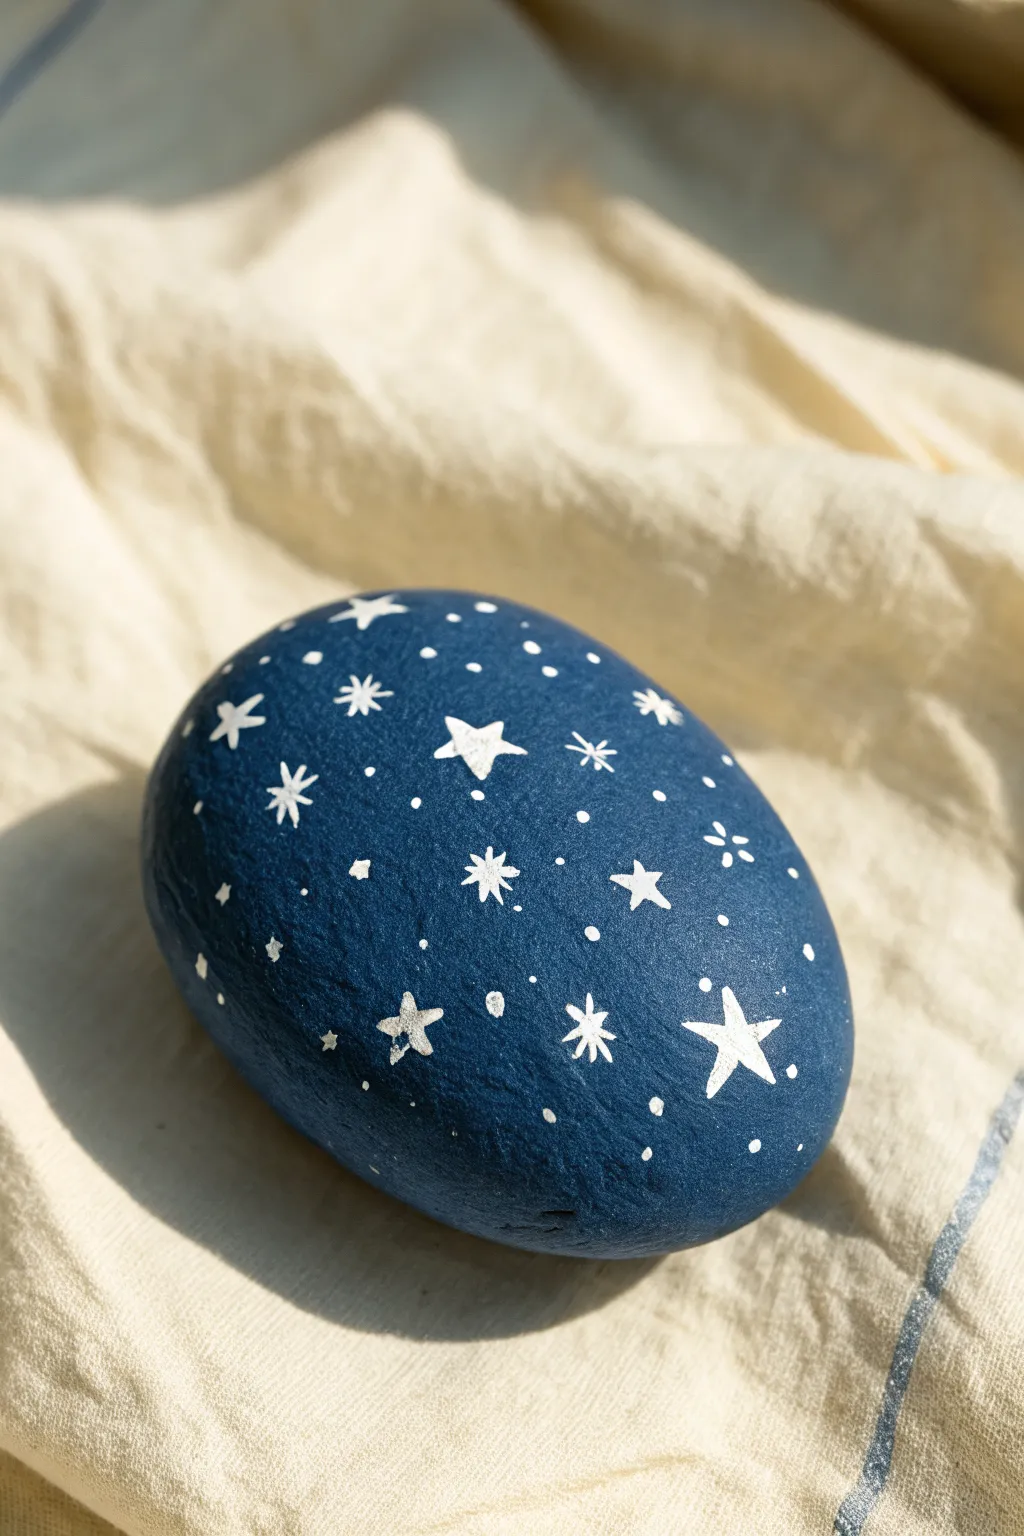
Capture the magic of a twilight sky or the patriotic pride of the American flag with this elegantly simple design. This project transforms a smooth, ordinary stone into a celestial keepsake featuring a deep matte blue background scattered with whimsical white stars.
How-To Guide
Materials
- Smooth, oval-shaped river rock
- Deep navy blue acrylic paint
- Flat paintbrush (medium size)
- White acrylic paint or a white fine-tip paint pen
- Fine-point detail brush (if using paint)
- Dotting tool or toothpick
- Matte or satin sealant spray
Step 1: Preparing the Canvas
-
Clean the surface:
Begin by washing your rock thoroughly with warm soapy water to remove any dirt or oils. -
Let it dry completely:
Allow the stone to dry fully before applying any paint, as moisture can prevent adhesion. -
Apply the base coat:
Using a flat medium brush, cover the entire top surface of the rock with deep navy blue acrylic paint. -
Smooth coverage:
Brush across the surface in long, even strokes to minimize texture and ensure a solid, opaque color. -
Second coat:
Once the first layer is dry to the touch, apply a second coat of blue to achieve that rich, deep midnight tone. -
Dry thoroughly:
Let the blue base dry completely; this is crucial so the white stars remain crisp and don’t blend into a light blue smear.
Star Sharpness Trick
If using a brush, slightly thin your white paint with a drop of water. It flows smoother for sharp points.
Step 2: Painting the Stars
-
Plan your constellation:
Visualize where you want your largest stars to go first, aiming for a random but balanced distribution across the curve of the rock. -
Draw the five-point stars:
Using a fine-tip white paint pen or a detail brush, carefully draw small five-point stars. -
Start with the outline:
I find it easiest to draw the outline of the star shape first, rather than trying to paint it in one go. -
Fill them in:
Gentle fill the distinct star shapes with white paint, ensuring the white is solid against the dark background. -
Add variance:
Paint a few smaller, simpler stars nearby; these can just be crossed lines or ‘asterisk’ shapes to simulate distant twinkling. -
Create starbursts:
Make some stars with eight points by drawing a cross and then an ‘X’ over it for a glowing effect. -
Check density:
Step back and look at the rock to ensure you haven’t clustered too many large stars in one area.
Glow Effect
Mix a tiny amount of glow-in-the-dark medium into your white paint for stars that shine at night.
Step 3: Finishing Touches
-
Add the galaxy dust:
Dip a dotting tool or the tip of a toothpick into white paint. -
Dot the empty spaces:
Gently press small white dots into the negative spaces between your stars to represent distant planets and stardust. -
Vary dot sizes:
Apply different amounts of pressure to create tiny pinpricks and slightly larger dots for a natural look. -
Final drying time:
Allow the white paint to cure completely, which may take longer if you applied the dots thickly. -
Seal the artwork:
Spray the rock with a clear matte sealant to protect the design from chipping and weather.
Now you have a piece of the night sky you can hold in the palm of your hand


Single Bold Star Centerpiece
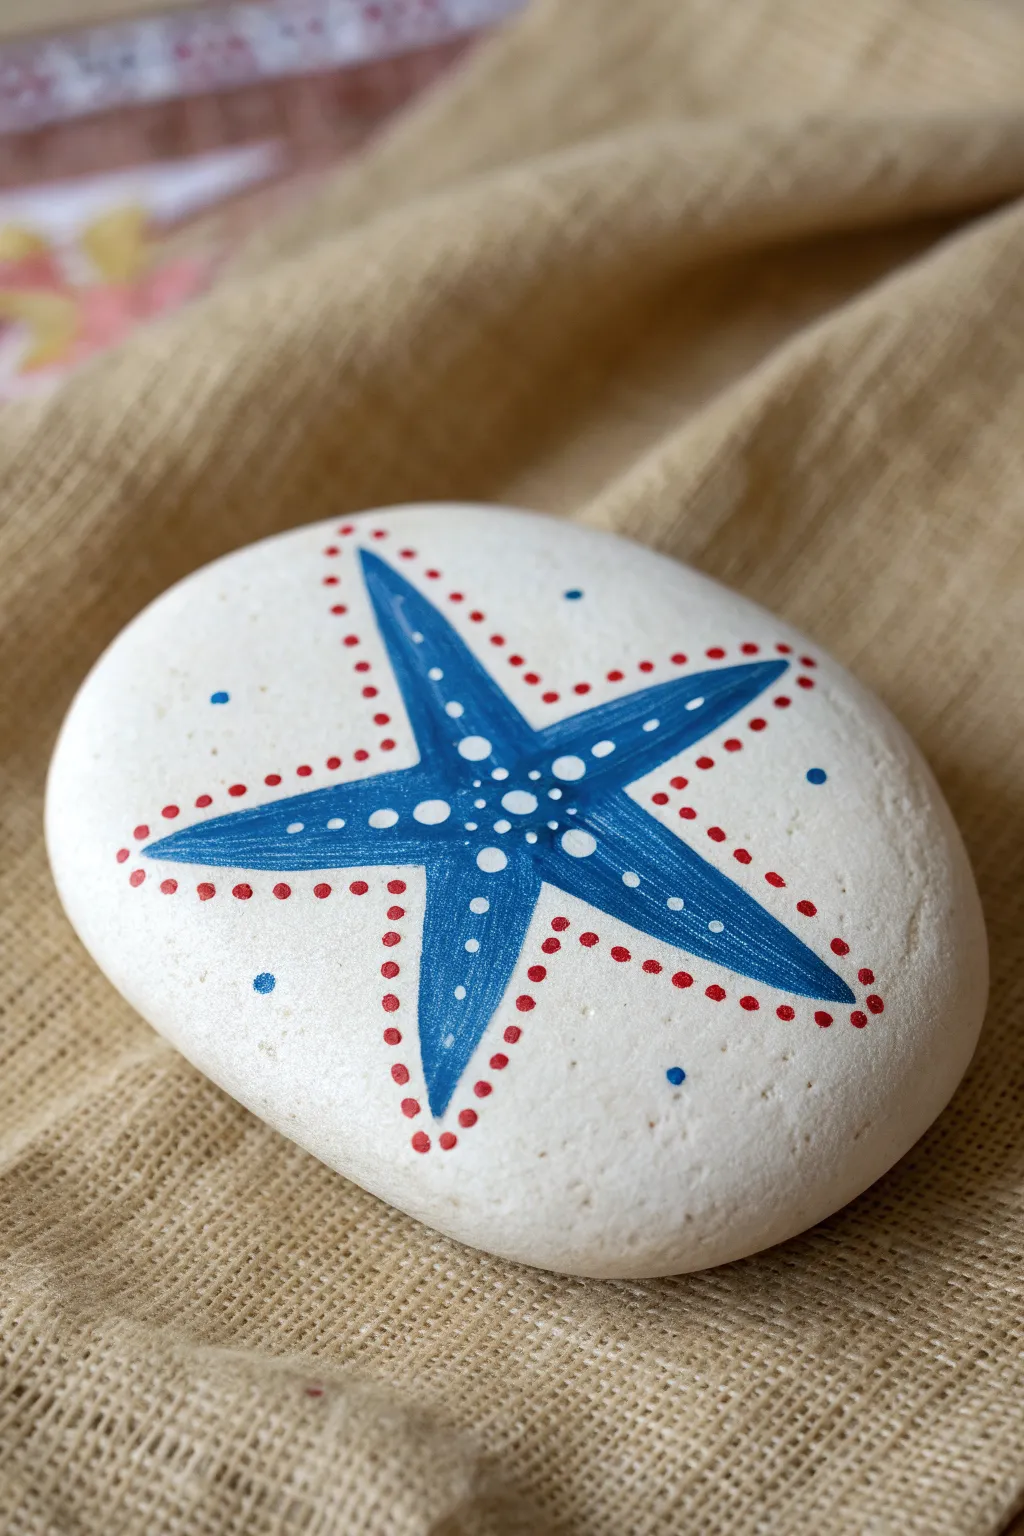
Celebrate national pride with this striking yet simple design that turns a humble stone into a nautical tribute. The bold blue starfish stands out beautifully against the white background, while the dotted red border adds a festive, patriotic flair.
Detailed Instructions
Materials
- Smooth, oval-shaped river rock (medium size)
- White acrylic craft paint or gesso
- Royal blue acrylic paint
- Red acrylic paint
- Paintbrushes (flat shader brush, fine liner brush)
- Dotting tools (or toothpicks/ends of paint brushes)
- Pencil (optional)
- Clear spray sealant
Step 1: Preparation & Base Coat
-
Clean the Stone:
Begin by washing your stone with warm soapy water to remove any dirt or oils. Let it dry completely before starting. -
Prime the Surface:
Apply a coat of white acrylic paint or gesso to the smoother side of the rock. This creates a clean canvas and makes the colors pop. -
Add a Second Coat:
Once the first layer is dry, add a second or even third coat of white until the stone’s natural color is completely hidden and the surface looks opaque. -
Smooth the Finish:
Check for any large brush strokes. If necessary, lightly sand the dry paint for an ultra-smooth finish, then wipe away the dust.
Precision Pointer
If you don’t have dotting tools, different sized nail heads or the flat end of a wooden skewer work perfectly for varying dot sizes.
Step 2: Painting the Starfish
-
Sketch the Star:
Lightly sketch a five-pointed star in the center of the rock using a pencil. Aim for long, slender arms to mimic a starfish shape rather than a blocky cartoon star. -
Paint the Blue Base:
Using a small brush and royal blue paint, fill in the star shape. Use smooth strokes starting from the center and pulling outward to the tips. -
Refine the Edges:
While the paint is wet, use a fine liner brush to neaten the edges of the star points to ensure they are sharp and clean. Let this blue layer dry thoroughly. -
Center Highlights:
Dip a medium-sized dotting tool or the back of a paintbrush into white paint. Place a circle of white dots around the very center of the blue star. -
Arm Decorations:
Using a smaller dotting tool, add a line of progressively smaller white dots running down the spine of each starfish arm. -
Tiny Accents:
Fill in the remaining blue space on the star with tiny white micro-dots using a toothpick or a fine-tip white paint pen for texture.
Step 3: Adding the Patriotic Border
-
Start the Red Outline:
Load a small dotting tool with red paint. Begin placing dots just outside the blue star, maintaining a consistent gap of about 2-3 millimeters. -
Follow the Curves:
carefully follow the contours of the star. Be patient around the inner corners where the arms meet to keep the dots evenly spaced. -
Complete the Circuit:
Continue dotting all the way around the perimeter until the red outline is complete. I find it easier to rotate the rock as I work to keep my hand steady. -
Add Floating Blue Dots:
To balance the design, place 3 or 4 single blue dots in the white negative space around the outer edges of the rock. -
Final White Dots:
If you missed any spots on the starfish body, add a final tiny white dot in the direct center of the star to pull the eye inward. -
Seal the Artwork:
Once all paint is completely dry (give it at least an hour), spray the stone with a clear acrylic sealer to protect it from weather and scratches.
Make It Sparkle
Mix a tiny amount of glitter into your clear sealant or use a metallic silver paint for the white dots to give the starfish a shimmering, wet look.
Now you have a stunning centerpiece ready to brighten up your garden or holiday table
BRUSH GUIDE
The Right Brush for Every Stroke
From clean lines to bold texture — master brush choice, stroke control, and essential techniques.
Explore the Full Guide
USA Block Letters
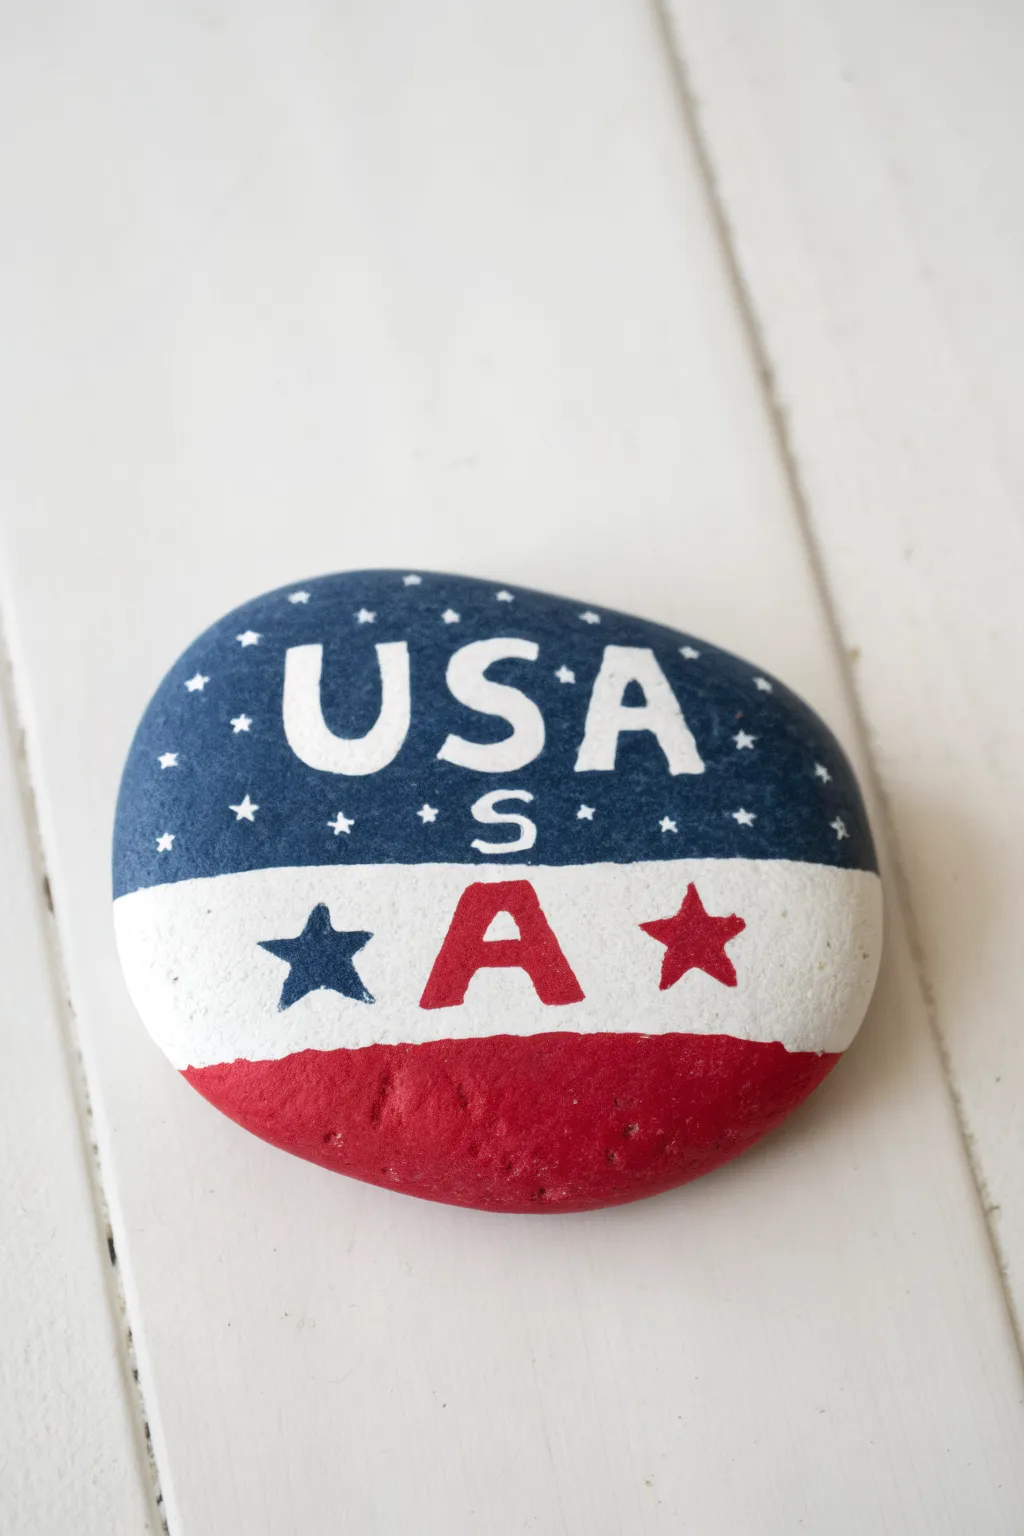
Show off your American pride with this bold USA rock painting project featuring classic block lettering and crisp patriotic colors. The design breaks the rock into clear sections of red, white, and blue for a clean, iconic look perfect for Fourth of July decor.
Step-by-Step Tutorial
Materials
- Smooth, flat river rock (oval shape works best)
- Acrylic paints: Navy Blue, Bright Red, White
- Flat paintbrush (medium width)
- Small round detail brush
- Pencil for sketching
- Posca paint pens (Extra Fine tip): White, Red, Blue (optional but helpful for lettering)
- Clear acrylic sealer (spray or brush-on)
- Cup of water and paper towels
Step 1: Base Blocking
-
Clean your canvas:
Start by washing your rock with soap and water to remove any dirt or grease. Make sure it is completely dry before you begin painting. -
Map out the sections:
Using a pencil, lightly draw two horizontal lines across the rock to divide it into three distinct sections. The top section should be the largest (for the blue field), while the middle and bottom sections can be roughly equal in height. -
Paint the bottom red:
Load your flat brush with bright red acrylic paint. Fill in the bottom section completely, following the curve of the rock’s edge. Let the paint dry; apply a second coat if the color isn’t fully opaque. -
Paint the middle white:
Rinse your brush thoroughly. Paint the middle band with white acrylic paint. This layer is crucial because the stars and letters will sit on top, so ensure it is solid and bright. It might need two or even three coats for perfect coverage. -
Paint the top blue:
Clean your brush again and dip into the navy blue paint. Carefully fill in the large top section, creating a clean line where it meets the white band. -
Wait for the base to cure:
Set the rock aside and let all three color blocks dry completely. If the base paint is wet, your lettering will smear and ruin the crisp lines.
Uneven Lines?
If your horizontal stripes look shaky, place a piece of painter’s tape or masking tape over the dry area to create a stencil for a perfectly straight edge when painting the next color.
Step 2: Lettering & Details
-
Sketch the main text:
Once the blue paint is dry to the touch, lightly pencil in the letters ‘USA’ in the center of the blue field. Make them large and blocky, slightly arching them to follow the rock’s shape. -
Add the smaller text:
Directly under the ‘USA’, sketch a tiny letter ‘s’. Then, in the white middle band, sketch a large block letter ‘A’ right in the center. -
Paint the white letters:
Using your smallest round brush or a white fine-tip paint pen, carefully fill in the ‘USA’ and the small ‘s’. Take your time to keep the edges sharp against the dark blue background. -
Fill the red ‘A’:
Switch to red paint or a red paint pen to fill in the ‘A’ located in the center of the white band. -
Paint the bottom stars:
On the white band, to the left of the red ‘A’, paint a five-pointed star using navy blue paint. To the right of the ‘A’, paint a matching star using red paint.
Step 3: Starry Sky & Finishing
-
Create the constellation:
Return to the top blue section. Dip the tip of your smallest brush or a toothpick into white paint. -
Dot the stars:
Gently dab distinct white stars randomly around the ‘USA’ lettering. I like to vary their positions slightly to make it look like a real night sky pattern. -
Sharpen the points:
If you are handy with a detail brush, pull tiny points out from the white dots to make them look like traditional five-pointed stars, or simply leave them as simple dots for a whimsical look. -
Check your edges:
Look over the rock for any accidental smudges. You can easily touch up the horizontal lines between the red, white, and blue sections now that the main painting is done. -
Seal for protection:
Once you are absolutely certain all paint is bone dry (give it at least an hour), take your rock outside or to a well-ventilated area. -
Apply the finish:
Spray or brush on a clear acrylic sealer. This will make the colors pop and protect your rock from weather if you choose to display it outdoors.
Paint Pen Precision
For the lettering, acrylic paint pens are far easier to control than brushes. Use them for the ‘USA’ and star details to get sharp, professional-looking corners without frustration.
Place your finished patriotic rock in the garden or on your porch to welcome guests with a splash of handmade spirit
Freedom Script Word Rock
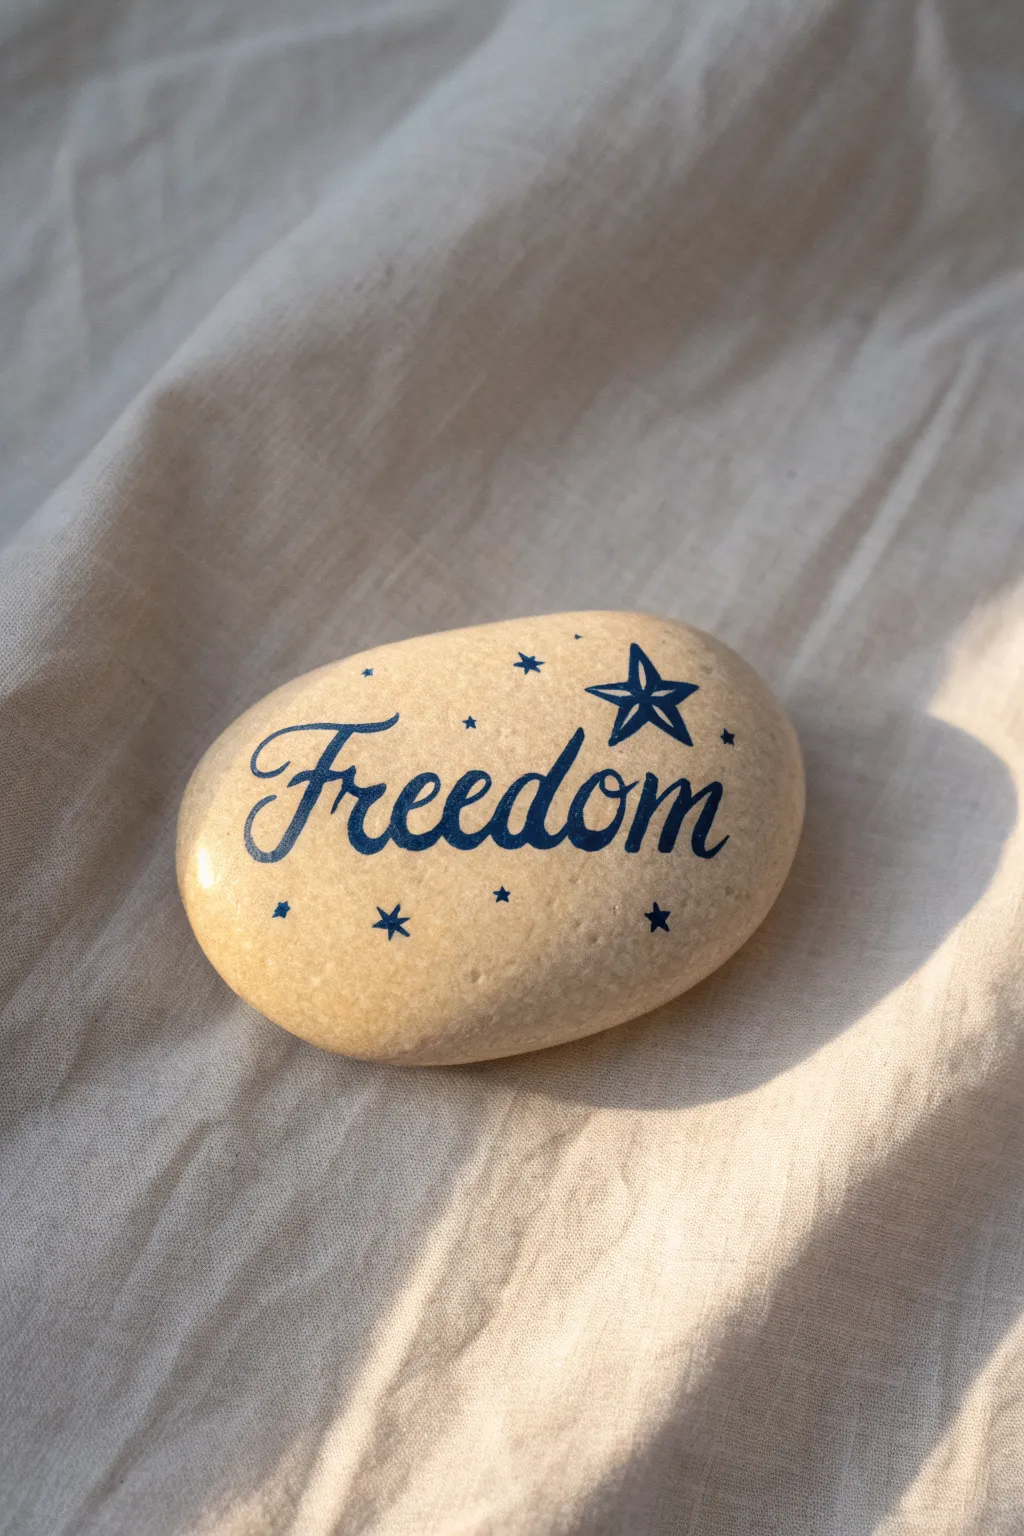
Capture the spirit of liberty with this elegant calligraphy rock featuring the word “Freedom” in deep blue script. The naturally smooth stone serves as the perfect canvas for a striking starry design that blends patriotic pride with rustic simplicity.
How-To Guide
Materials
- Smooth river rock (light tan or beige color)
- Deep blue acrylic paint or paint pen (navy or royal blue)
- Fine liner brush (size 00 or 000) or extra-fine tip paint marker
- Pencil
- Eraser
- Sealant (matte or gloss spray varnish)
- Water cup and paper towels (if using brush)
Step 1: Preparation and Sketching
-
Select your canvas:
Begin by finding a river rock that is relatively flat and smooth. A light-colored stone works best to ensure the dark blue lettering stands out clearly. -
Clean and dry:
Wash the rock thoroughly with warm soapy water to remove any dirt or oils, then let it dry completely before starting. -
Draft the word:
Lightly sketch the word “Freedom” across the center of the rock using a pencil. Aim for a flowing, cursive style. -
Refine the spacing:
Check the spacing between your letters. The “F” should be large and sweeping, serving as the anchor for the rest of the word. -
Add star placements:
Pencil in small dots or tiny star shapes where you want your decorative elements to go. Plan for one larger star above the “dm” and smaller scattered stars throughout.
Step 2: Lettering
-
Outline the text:
Using your fine liner brush or paint pen, carefully trace over your pencil lines for the word “Freedom”. Start with thin strokes to get the shape right. -
Thicken slightly:
Go back over the downstrokes of your cursive letters to add weight. This faux-calligraphy technique gives the text a professional hand-lettered look. -
Refine the curves:
Smooth out any shaky lines, particularly on the loops of the “e”s and the “o”. Keep your paint consistency fluid but not watery. -
Connect the letters:
Ensure the connection points between letters flow naturally. I like to extend the tail of the “m” slightly for a graceful finish. -
Let the text dry:
Allow the lettering to dry completely for about 10-15 minutes. Avoid touching it to prevent smudging.
Steady Hand Trick
Rest your painting hand’s pinky finger on the dry part of the rock while you work. This acts as a stabilizer for smoother cursive loops.
Step 3: Adding Details
-
Draw the main star:
Paint the outline of the large five-pointed star above the end of the word. Draw the five points first, then connect them to the center. -
Detail the main star:
Add inner lines to the large star to give it a slightly dimensional or sketched appearance, keeping the center open. -
Paint solid stars:
Using the very tip of your brush or pen, fill in the smaller solid stars scattered around the text. Vary their sizes for visual interest. -
Check for balance:
Step back and look at the composition. If a spot looks too empty, add a tiny dot or micro-star to balance it out. -
Clean up:
Once the paint is fully dry, gently erase any visible pencil marks that weren’t covered by paint. -
Seal the rock:
Finally, spray a thin coat of clear sealant over the entire rock to protect your design from weather and wear.
Wobbly Lines?
If your lines are shaky, wait for the paint to dry completely. Then, use a toothpick to gently scrape away excess paint and refine edges.
Place this rock in your garden or on a desk as a simple, powerful reminder of liberty

PENCIL GUIDE
Understanding Pencil Grades from H to B
From first sketch to finished drawing — learn pencil grades, line control, and shading techniques.
Explore the Full Guide
Liberty and Stars Border

This classic design features a crisp white background with a patriotic torch icon, elegant lettering, and a festive ring of stars. It’s a clean, sophisticated way to show off red, white, and blue pride on a perfectly smooth stone.
Step-by-Step Guide
Materials
- Smooth, oval river rock
- White acrylic paint or gesso
- Navy blue fine-point paint pen (or acrylic paint)
- Red fine-point paint pen (or acrylic paint)
- Small flat paintbrush
- Pencil with a good eraser
- Clear spray sealant (matte or gloss)
Step 1: Preparation & Base Coat
-
Clean the surface:
Begin by washing your rock with soap and warm water to remove any dirt or oils. Let it dry completely before starting. -
Apply the first base layer:
using a flat paintbrush, apply a coat of white acrylic paint to the top surface of the rock. Don’t worry if it looks streaky at first. -
Build opacity:
Once the first coat is dry to the touch, apply a second layer of white. You want a solid, opaque background so the stone’s natural color doesn’t peek through. -
Smooth the finish:
I like to inspect the final white coat for brush strokes; if needed, add a third thin layer to get that porcelain-like finish. -
Let it cure:
Allow the white base to dry fully for at least an hour. This prevents your pencil sketches from digging into soft paint.
Smudged Ink?
If your paint pen smudges on the white base, wait for it to dry fully, then gently paint over the mistake with a small dot of white acrylic to act as “white-out.”
Step 2: Measuring & Sketching
-
Find the center:
Lightly mark the vertical center line of the rock with a pencil to help align the torch and text. -
Sketch the torch handle:
Draw the torch handle first. It looks like a small inverted cone or trapezoid with a few horizontal lines near the top. -
Add the flame:
Sketch a stylized flame shape rising from the handle. It should curve slightly to the right for a dynamic look. -
Draft the lettering:
Below the torch, lightly pencil in the word ‘Liberty’. Use a serif font style (with little feet on the letters) to match the elegant look. -
Plot the star border:
Mark small dots around the perimeter of the rock where you want your stars to go, ensuring even spacing before you commit to drawing the shapes.
Step 3: Painting the Details
-
Outline the text:
Using your navy blue fine-point paint pen, carefully trace over your penciled letters. A steady hand is key here. -
Fill the text:
Thicken the downstrokes of the letters slightly to mimic a traditional serif typeface and give the word weight. -
Color the torch handle:
Use the blue pen to color in the handle of the torch, leaving small horizontal gaps white if you want to copy the segmented look, or draw white lines over it later. -
Ignite the flame:
Switch to your red paint pen. Fill in the center of the flame shape, leaving a sliver of white space between the red flame and the blue handle. -
Draw the flame accent:
Add a small red accent stroke to the right side of the main flame to give it dimension and movement. -
Paint the blue stars:
Start your border by drawing the blue stars first. I usually do the top, bottom, left, and right stars first to anchor the spacing, then fill in between. -
Add the red stars:
Fill in the remaining gaps in the border with red stars. Alternating colors creates a balanced, festive rhythm around the edge. -
Clean up:
Once the paint markers are totally dry, gently erase any visible pencil sketch lines.
Make It Shine
Add a tiny dot of metallic gold paint to the center of the stars or add a sheer layer of glitter glaze over the flame for extra patriotic sparkle.
Step 4: Finishing Touches
-
Seal the rock:
Take the rock outside and apply a clear spray sealant. This protects the white background from getting dirty and keeps the colors vibrant.
Now you have a timeless piece of patriotic decor that looks great on a table or in the garden
Patriotic Heart Flag
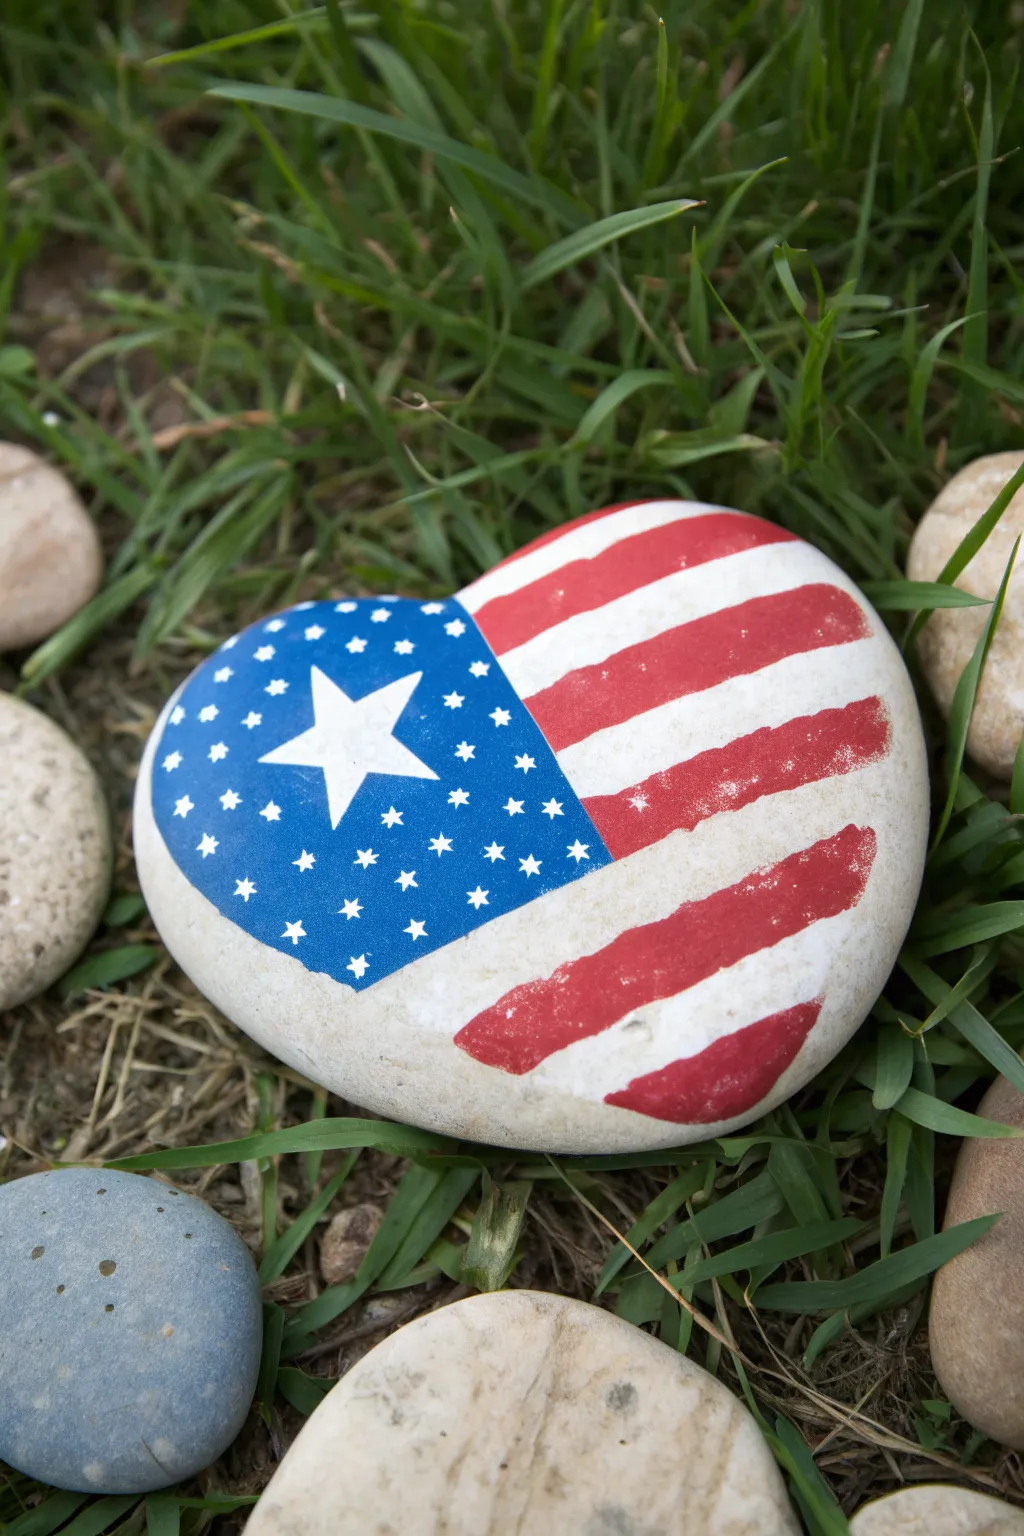
Transform a simple heart-shaped river rock into a symbol of patriotism with this waving flag design. The finished piece features a bold blue union with a standout star and classic red stripes, perfect for garden decor or a festive paperweight.
Step-by-Step
Materials
- Heart-shaped river rock (smooth surface)
- White acrylic paint or gesso
- Bright red acrylic paint
- Navy blue acrylic paint
- Flat paintbrush (medium size)
- Small round detail brush
- Pencil
- Sealant (spray or brush-on)
- Water cup and paper towels
Step 1: Preparation and Base Coat
-
Clean the Stone:
Begin by thoroughly washing your heart-shaped rock with warm soapy water to remove any dirt or oils. Let it dry completely before starting. -
Prime with White:
Paint the entire top surface of the rock with white acrylic paint. This acts as both your primer and the white stripes of the flag. -
Apply Second Coat:
Once the first layer is dry to the touch, apply a second coat of white to ensure a solid, opaque background. No gray rock should show through. -
Dry Completely:
Allow the white base to cure fully. If you rush this step, the pencil lines in the next phase might scratch the paint.
Fixing Wobbly Lines
If your red stripes bleed onto the white, wait for the red to dry completely. Then, use a flat brush with white paint to clean up the edge.
Step 2: Drafting the Design
-
Sketch the Union:
Lightly draw a curved line with a pencil starting from the top center dip of the heart, sweeping down towards the bottom left. This defines the blue field. -
Mark the Stripes:
On the right side of the heart, lightly sketch curved lines for your red stripes. Following the contour of the rock makes the flag look like it’s waving. -
Outline the Main Star:
In the center of your blue section, carefully draw a large, five-pointed star. This will be your focal point.
Sparkle Finish
Mix a tiny amount of silver glitter into your final sealant coat over the blue section to make the stars shimmer in the sunlight.
Step 3: Painting the Colors
-
Paint the Blue Field:
Using a smaller flat brush, fill in the area to the left of your curved line with navy blue paint. -
Navigate the Star:
I find it helpful to carefully paint around the pencil outline of the large star, leaving the white base coat visible, rather than painting blue over it and trying to add white later. -
Paint the Red Stripes:
Switch to your red paint. Using a steady hand, fill in every other stripe section on the right side of the heart. -
Refine Edges:
Go back and touch up the edges where the red and blue meet or where the stripes end, ensuring clean, sharp lines. -
Let Colors Set:
Allow the dark blue and red paints to dry completely before moving on to the final details.
Step 4: Stars and Details
-
Brighten the Big Star:
Use your smallest brush to add a fresh coat of white inside the large star outline to make it pop against the dark blue. -
Add Small Stars:
Dip the tip of a toothpick or a very fine detail brush into white paint. Gently dot small stars around the large main star. -
Vary Star Sizes:
Create visual interest by making some of the surrounding stars slightly smaller than others, scattering them like a constellation. -
Add Texture (Optional):
For a rustic look like the example, you can dry-brush a tiny bit of white over the red stripes to simulate a worn fabric texture. -
Final Cure:
Let the entire rock dry for at least 24 hours to ensure all layers are hardened. -
Seal the Rock:
Apply a clear, weather-resistant sealant to protect your artwork from fading or chipping, especially if it will live outdoors.
Place your heart-shaped flag in the garden or on a porch to share a little patriotic spirit with everyone who passes by


Confetti Stars and Dots
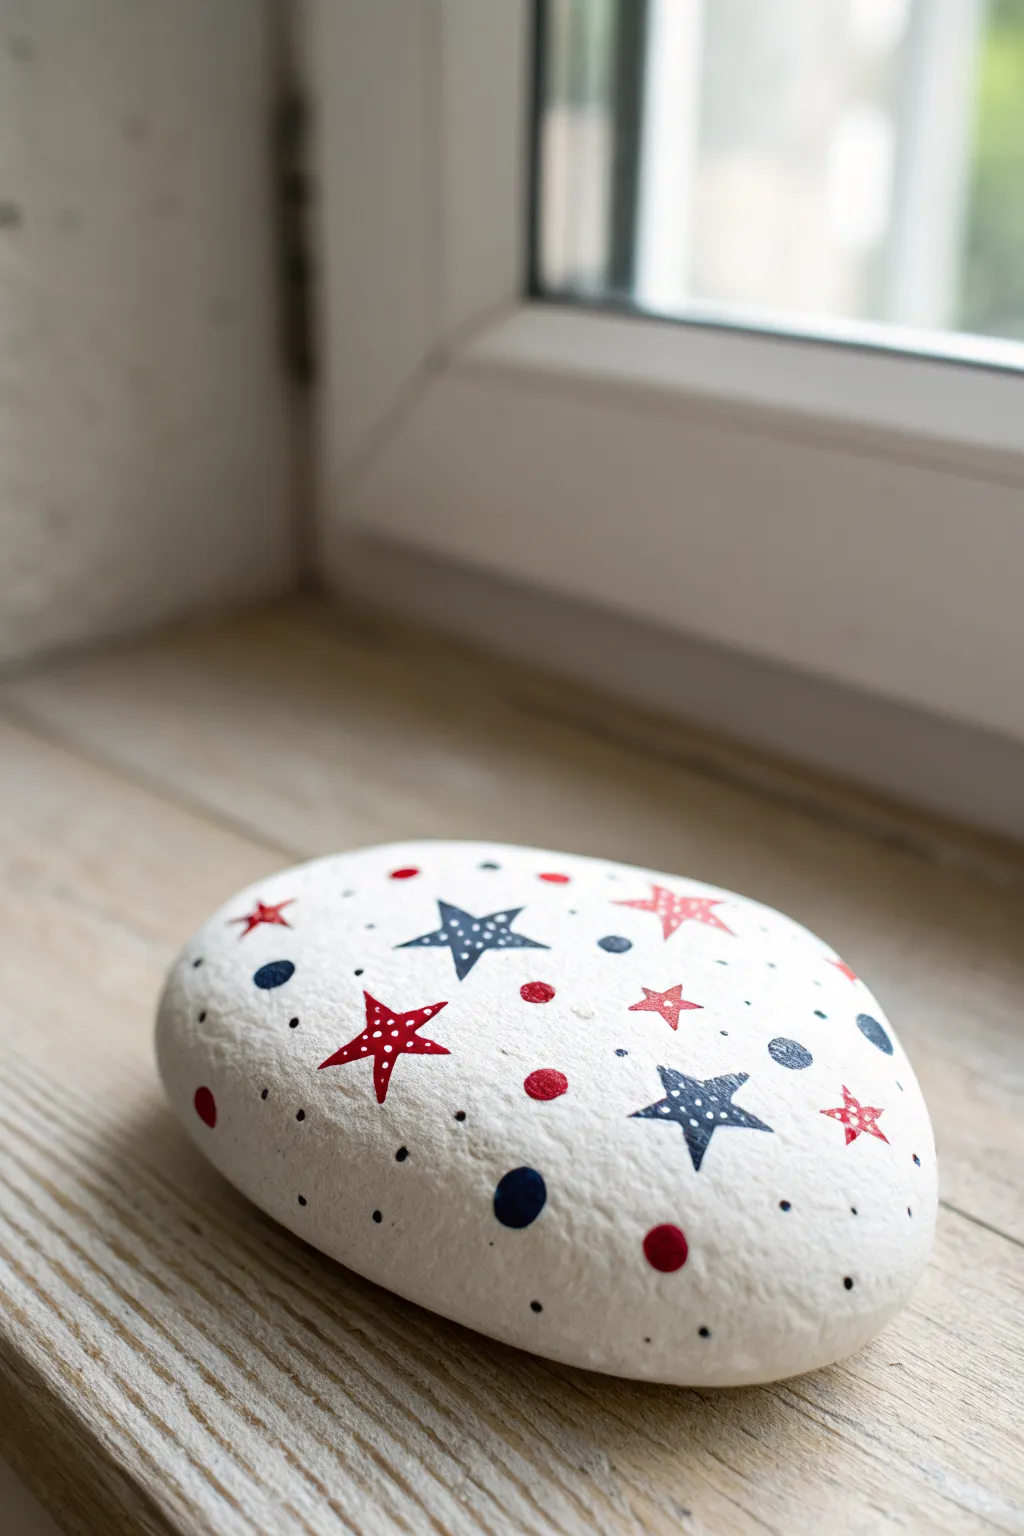
This festive design combines the timeless appeal of red, white, and blue with a whimsical, confetti-like scattering of stars and dots. It’s a forgiving pattern that looks polished but doesn’t require perfect symmetry, making it ideal for a relaxed afternoon crafting session.
Detailed Instructions
Materials
- Smooth, rounded river rock (medium size)
- White acrylic paint (matte finish)
- Red acrylic paint
- Navy blue acrylic paint
- Flat paintbrush (medium width)
- Thin liner paintbrush (size 0 or 1)
- Dotting tools (or toothpicks/paintbrush ends)
- Clear acrylic sealer (matte or satin spray)
Step 1: Base Preparation
-
Clean the surface:
Begin by thoroughly washing your rock with warm soapy water to remove any dirt or oils that could prevent the paint from sticking. -
Apply the white base:
Using your medium flat brush, coat the top surface of the rock with matte white acrylic paint. You don’t need to paint the very bottom, just the visible curve. -
Add a second coat:
Once the first layer is dry to the touch, apply a second coat of white. This ensures the rock’s natural color is completely hidden and provides a bright canvas. -
Smooth the finish:
Inspect the white base for brush strokes. If needed, do a third thin layer using a slightly damp brush to get a very smooth, eggshell-like finish.
Star Shape Hack
Make painting stars easier by painting a capital ‘A’, then crossing the legs. Fill in the center to create a perfect five-point star every time.
Step 2: Painting the Stars
-
Outline the large blue stars:
Switch to your thin liner brush. Dip it into navy blue paint and outline 3-4 larger five-pointed stars scattered randomly across the surface. -
Fill the blue stars:
Carefully fill in the outlines of your blue stars. If the paint looks streaky, let it dry and add a second layer for solid opacity. -
Outline red stars:
Rinse your brush thoroughly. Now, paint the outlines for 3-4 slightly smaller red five-pointed stars, placing them in the empty spaces between the blue ones. -
Fill the red stars:
Fill in the red stars just as you did the blue ones. Keep a steady hand, and remember that slight imperfections add to the handmade charm. -
Add tiny solid stars:
Using just the very tip of your liner brush, add a few tiny, solid red stars in gaps. These act like filler elements to balance the composition.
Step 3: Adding the Confetti Dots
-
Create large blue dots:
Dip a medium-sized dotting tool (or the back of a paintbrush) into the navy paint. Press gently to create perfectly round dots scattered around the larger stars. -
Add medium red dots:
Clean your tool and switch to red paint. Place medium-sized red dots in open areas, trying not to cluster them too close to the red stars. -
Sprinkle micro-dots:
Use a toothpick or a very fine dotting tool to add tiny ‘dust’ specks of navy blue. Scatter these liberally, especially near the edges of the rock. -
Balance with black specks:
If you look closely at the reference, there are tiny micro-dots of black or very dark blue as well. Add a few of these for depth and contrast.
Add Some Shimmer
Swap the plain white dots on top of the stars for metallic silver or gold paint to give your patriotic rock a sparkling, firework effect.
Step 4: Detailing and Sealing
-
Stipple the blue stars:
Once the large blue stars are fully dry, dip a toothpick into white paint. Gently tap tiny white dots onto the blue stars to create a patterned look. -
Stipple the red stars:
Repeat the stippling process on the large red stars. I find it helps to concentrate the white dots slightly randomly rather than in perfect rows. -
Dry completely:
Let the rock sit undisturbed for at least an hour—or overnight if possible—to ensure the thickest dots of paint are cured all the way through. -
Seal the artwork:
Finish by spraying the rock with a clear matte or satin acrylic sealer. This protects the design from chipping and yellowing over time.
Place this cheerful rock on a windowsill or porch step to enjoy a pop of patriotic color all summer long
Red, White, and Blue Polka Stripes
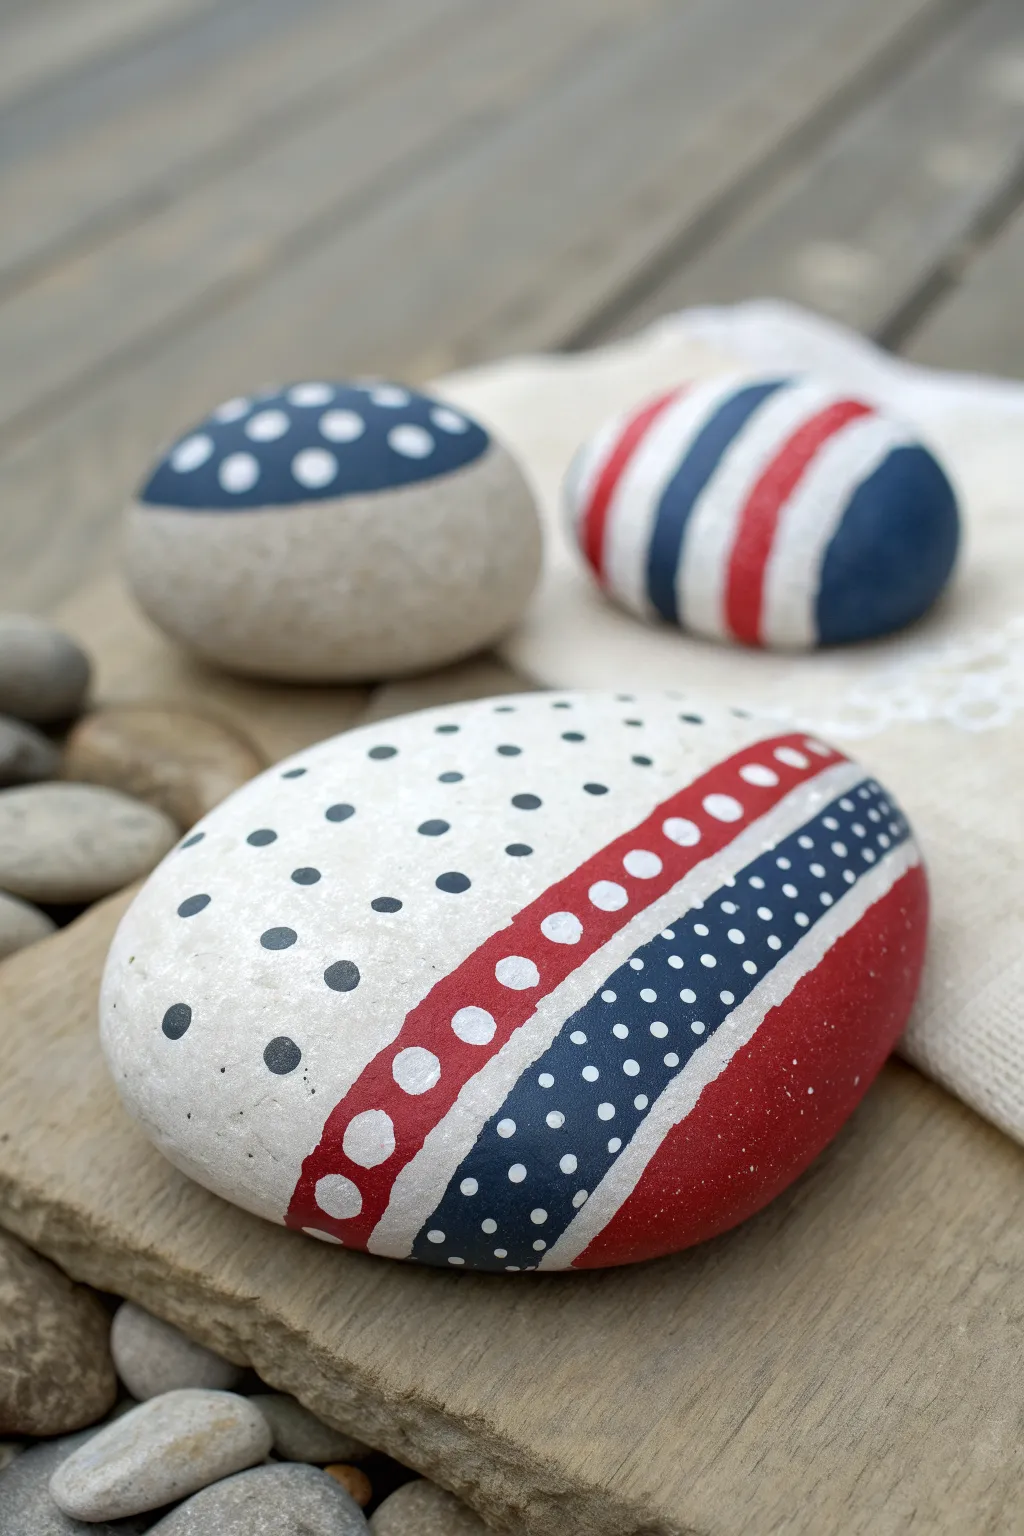
This eye-catching design combines classic patriotic colors with playful patterns for a modern twist on traditional flag decor. The largest stone features bold bands of color separating fields of polka dots, creating a layered, textural look that pops beautifully against the smooth river rock surface.
Step-by-Step Tutorial
Materials
- Smooth, flat river rocks (medium to large size)
- White acrylic paint or gesso (for base coat)
- Red acrylic paint (bright, primary red)
- Navy blue acrylic paint
- Black acrylic paint
- Flat paintbrushes (various sizes)
- Fine liner brush
- Dotting tools (various sizes) or toothpicks/pencil erasers
- Clear acrylic sealer (spray or brush-on)
- Palette or paper plate
- Cup of water and paper towels
Step 1: Base Preparation
-
Clean surface:
Begin by washing your stone thoroughly with warm soapy water to remove any dirt or oils. Let it dry completely before starting. -
Prime the canvas:
Paint the entire top surface of the rock with white acrylic paint. This ensures your subsequent colors will be bright and true. -
Second coat:
If the grey of the stone is still peeking through after the first layer dries, apply a second coat of white for a solid, opaque background.
Smear Patrol
If you make a mistake or a dot smears while wet, quickly dab it away with a damp Q-tip. If it’s already dry, just paint over the error with the background color and re-dot.
Step 2: Color Blocking
-
Mark the sections:
Lightly sketch curved lines across the rock with a pencil to plan your color zones. You’ll need a large white section, a thick red band, a narrower blue band, and a final red section at the edge. -
Paint the first red band:
Using a flat brush, carefully fill in the first curved stripe with red paint. Keep your edges as crisp as possible. -
Add the blue band:
Next to the red line, paint a stripe of navy blue. Leave a thin gap of white space between the red and blue stripes to act as a separator. -
Fill the final edge:
Paint the remaining outer edge of the rock with red paint to balance the design. Let all color blocks dry completely. -
Refine the separators:
If your white gaps got messy, use a fine liner brush and fresh white paint to clean up the lines between the colored bands.
Step 3: Patterning Details
-
Start the black dots:
In the large white section on the left, use a medium-sized dotting tool or the end of a paintbrush handle dipped in black paint. -
Create spacing:
Apply the black dots in a somewhat random, spaced-out pattern. Avoid clustering them too tightly; let the white background breathe. -
Large white dots:
Switch to a larger dotting tool (or a pencil eraser). Dip it in white paint and press firmly along the center of the first red band to create a row of bold polka dots. -
Check opacity:
The white on red might be translucent. I usually wait for the first dot layer to dry and then gently dab a second bit of white on top for brightness. -
Small white dots:
For the navy blue band, use a fairly small dotting tool. Add two or three rows of small, tidy white dots following the curve of the stripe. -
Tiny accents:
If you have an ultra-fine tool or toothpick, add shrinking dots near the edges of the blue band for a tapering effect.
Go Glittery
For extra festive flair, mix a tiny amount of silver glitter into your white paint before dotting the blue stripe, or brush a glitter topcoat over the red sections once dry.
Step 4: Finishing Touches
-
Clean edges:
Inspect the sides of the rock. If the paint lines look ragged where they curve under the stone, tidy them up with the appropriate base color. -
Dry thoroughly:
Allow the painted rock to sit undisturbed for at least a few hours, or overnight if possible, to ensure the thick dots are hard all the way through. -
Seal:
Apply a coat of clear acrylic sealer. A spray sealer is best for dotted designs to prevent smearing thick paint bumps.
Place your finished rock in the garden or on a porch railing to add a pop of patriotic pride to your home
Diagonal Stripe Wrap
This rock painting project takes the classic stars-and-stripes motif and gives it a dynamic twist by wrapping the stripes diagonally across a smooth stone. The result is a bold, patriotic design that looks great from every angle, perfect for Fourth of July décor or a summer garden accent.
Detailed Instructions
Materials
- Smooth, medium-sized river rock (oval shape works best)
- White acrylic paint (matte or satin)
- Red acrylic paint (bright scarlet or crimson)
- Dark blue acrylic paint (navy or royal blue)
- Flat paintbrush (medium size)
- Detail paintbrush (fine point)
- 1/4 inch painter’s tape or washi tape (optional)
- Pencil
- Clear spray sealer (gloss or matte)
Step 1: Base Coat and Planning
-
Clean the stone:
Begin by thoroughly washing your rock with warm, soapy water to remove any dirt or oils. Let it dry completely in the sun or use a hairdryer to speed things up. -
Paint the background:
Apply a solid coat of white acrylic paint over the entire top surface of the rock. Depending on the opacity of your paint, you may need a second coat once the first is dry to ensure the gray stone doesn’t show through. -
Dry strictly:
Allow the white base coat to dry fully before moving on; rushing this step can lead to muddy colors later. -
Sketch the layout:
Using a pencil very lightly, sketch a curved line separating the ‘blue field’ area on the left tip of the rock from the rest of the body. -
Mark stripe guides:
Continue sketching diagonal lines across the rest of the rock to serve as guides for your red and white stripes. They should wrap slightly around the curve.
Clean Lines Hack
If free-handing stripes is tough, use thin washi tape or painter’s tape to mask off the white areas before painting red. Peel while paint is still slightly wet.
Step 2: Adding Colors
-
Paint the blue field:
Dip your medium flat brush into the dark blue paint. Carefully fill in the marked section on the left tip of the rock, maintaining a clean, curved edge where it meets the white area. -
Refine the blue edge:
Go back over the edge of the blue section with a loaded brush to smooth out any wobbly lines. -
Start the red stripes:
Using the red paint and your flat brush, fill in every other diagonal stripe section you sketched earlier. I find it helpful to start in the middle and work outward. -
Wrap the stripes:
Extend the red paint down the sides of the rock so the stripes appear to wrap around the stone, rather than just sitting on top. -
Second coats:
Once the first layer of red and blue is touch-dry, apply a second coat to make the colors vibrant and opaque. -
Clean up edges:
If any red paint strayed into the white stripes, use a clean brush with a tiny bit of white paint to touch up the edges for a crisp look.
Step 3: Patriotic Details
-
Practice your stars:
The stars are tiny, so practice painting small five-pointed shapes on a scrap piece of paper using your finest detail brush before touching the rock. -
Paint the white stars:
Dip the fine point brush into white paint. Dot small stars onto the dry blue field. Stagger them in rough rows to mimic the flag pattern. -
Add stripe details:
This design features tiny white stars *inside* the red stripes. Using the very tip of your detail brush, paint miniature white stars dispersed along the red bands. -
Add red stars:
For extra flair, paint slightly larger red stars in the white stripe areas. This creates a playful, confetti-like effect. -
Final drying:
Let the rock sit undisturbed for several hours (or overnight) to ensure the thickest parts of the paint are fully cured. -
Seal the rock:
Take the rock outside and spray it with a clear acrylic sealer. This protects your artwork from weather and chipping if you plan to keep it outdoors.
Star Short-Cut
Struggling to paint tiny stars? Use a white or red paint pen or an extra-fine tip permanent marker for much easier control than a brush.
Place your finished patriotic rock on a porch rail or windowsill to show off your festive handiwork
Simple Rocket Pops Pattern
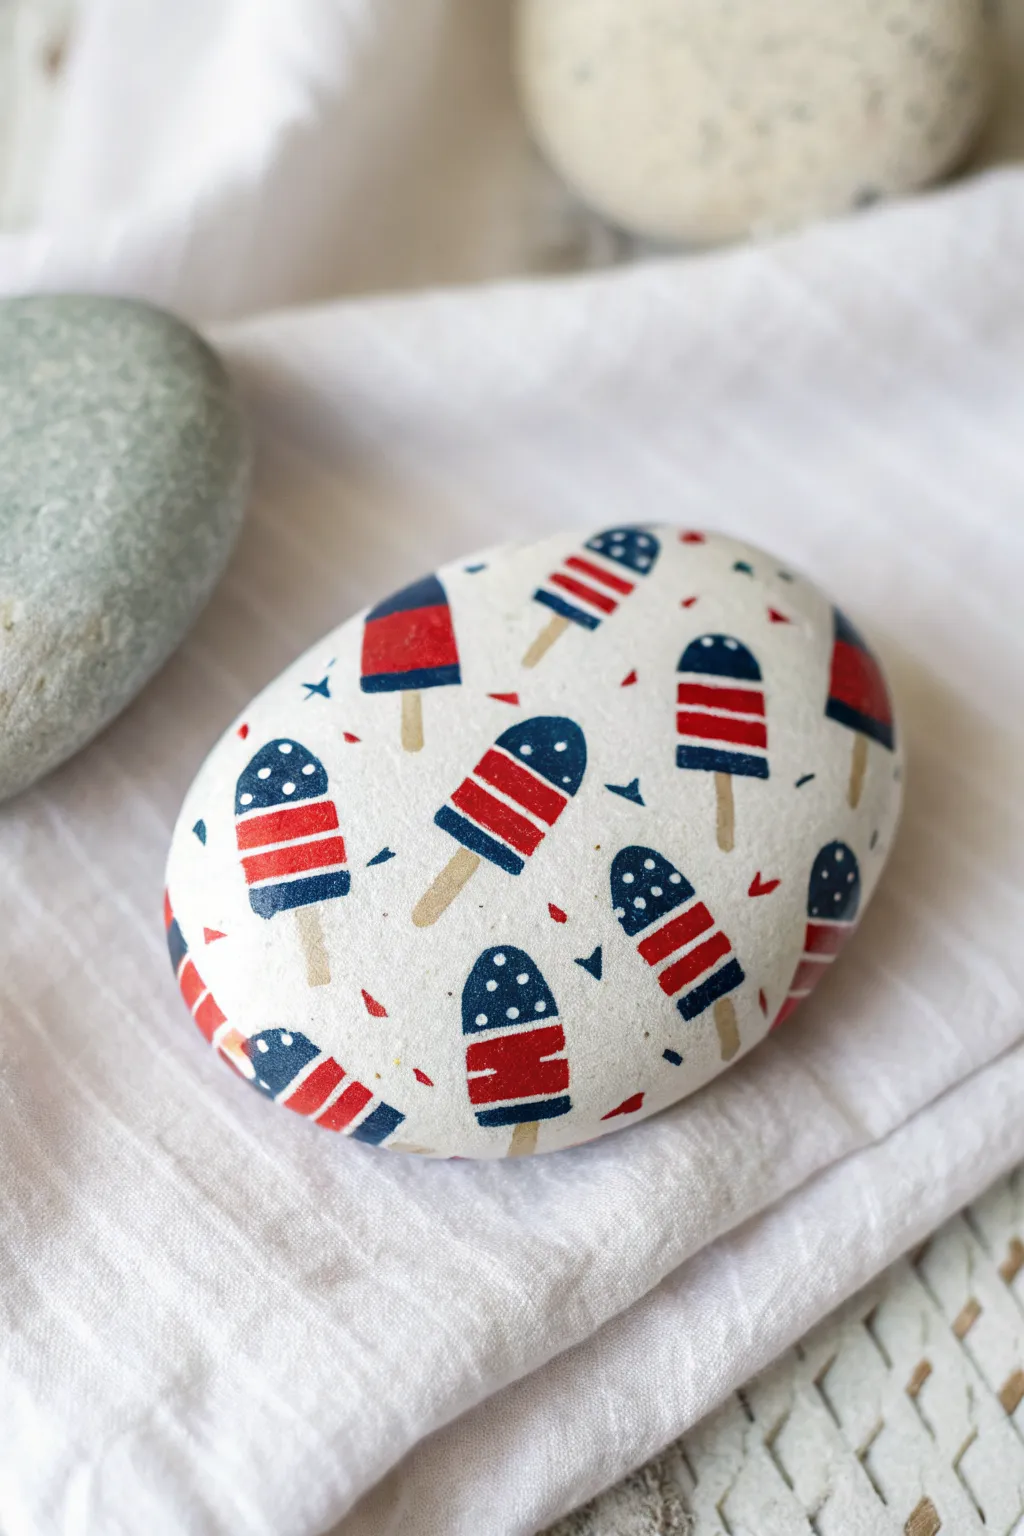
Celebrate summer nostalgia with this delightful painted rock featuring a classic red, white, and blue rocket popsicle pattern. The clean white background makes the patriotic colors pop, creating a crisp and whimsical decoration perfect for Independence Day.
How-To Guide
Materials
- Smooth, oval river rock (cleaned and dried)
- White acrylic paint or gesso
- Red acrylic paint (bright cherry or true red)
- Blue acrylic paint (navy or dark royal blue)
- Beige or tan acrylic paint (for the popsicle sticks)
- Small flat brush (size 2 or 4)
- Very fine detail brush (size 0 or 00) or a toothpick
- Pencil (optional)
- Clear sealant spray or varnish (matte or satin finish)
Step 1: Preparation & Base Coat
-
Clean your canvas:
Begin by scrubbing your rock with warm soapy water to remove any dirt or oils. Let it dry completely in the sun or use a hairdryer to speed up the process. -
Apply the foundation:
Paint the entire top surface of the rock with white acrylic paint. You want a solid, opaque background, so applying two or three thin layers is better than one thick gob of paint. -
Wait for drying:
Allow the white base coat to dry fully between layers. If the paint is still tacky, it will mix with your pattern colors and look muddy.
Paint Pen Trick
Struggling with brush control? Use fine-tip acrylic paint markers for the stripes and stars. They offer way more precision than brushes for tiny details.
Step 2: Painting the Popsicle Shapes
-
Sketch the layout (optional):
If you are nervous about freehanding, lightly sketch small, rounded-top cylinder shapes scattered randomly across the rock using a pencil. -
Paint the red sections:
Using a small flat brush, paint the middle stripe of your popsicles with bright red paint. Make this a simple, horizontal rectangle shape. -
Add the blue tips:
Paint the top third of each popsicle shape in dark blue. Make the top edge rounded like a dome, mirroring the classic shape of a rocket pop. -
Create the white stripe:
Since your background is already white, you can simply leave a negative space gap below the red stripe. However, I find it looks sharper if you paint a small white stripe just below the red one to define the bottom edge clearly. -
Add the sticks:
Switch to your beige or tan paint. Using a fine detail brush, paint a small, thin rectangle extending from the bottom center of each popsicle to represent the wooden stick. -
Vary the angles:
Ensure the popsicles are facing different directions—some upright, some diagonal, some upside down—to create a dynamic, toss-pattern look. -
Fill the gaps:
If you have large empty white spaces between the popsicles, add partial popsicle shapes hanging off the edge of the rock to make the pattern look continuous.
Step 3: Adding Details & Confetti
-
Paint the stars:
Dip the very tip of your smallest brush or a toothpick into white paint. Carefully dab tiny dots onto the blue dome section of each popsicle to mimic stars. -
Add separation lines:
For a cleaner look, you can use the fine brush to touch up the edges where the red and blue meet, ensuring a crisp line. -
Sprinkle the confetti:
Using your red and blue paints, add tiny triangles or small jagged shapes in the empty white background spaces. This creates a festive confetti effect. -
Check for consistency:
Look over the rock and make sure the red triangles are balanced with blue triangles, filling in any awkward voids. -
Let the pattern dry:
Give the rock plenty of time to dry completely. The thickest parts of the paint, usually the dots, will take the longest.
Messy Lines?
If your red or blue bleeds into the white, wait for it to dry completely, then use a tiny brush with white paint to ‘erase’ the mistake and sharpen the edge.
Step 4: Finishing Touches
-
Seal the artwork:
Once the paint is bone dry, take the rock outside and spray it with a clear acrylic sealer. This protects the paint from chipping and makes the colors vibrant. -
Apply a second coat:
For extra durability, especially if the rock will live outdoors, apply a second coat of sealer after the first one dries.
Place this nostalgic summer creation on your porch or hide it in the neighborhood for a fun patriotic surprise
Bald Eagle Silhouette
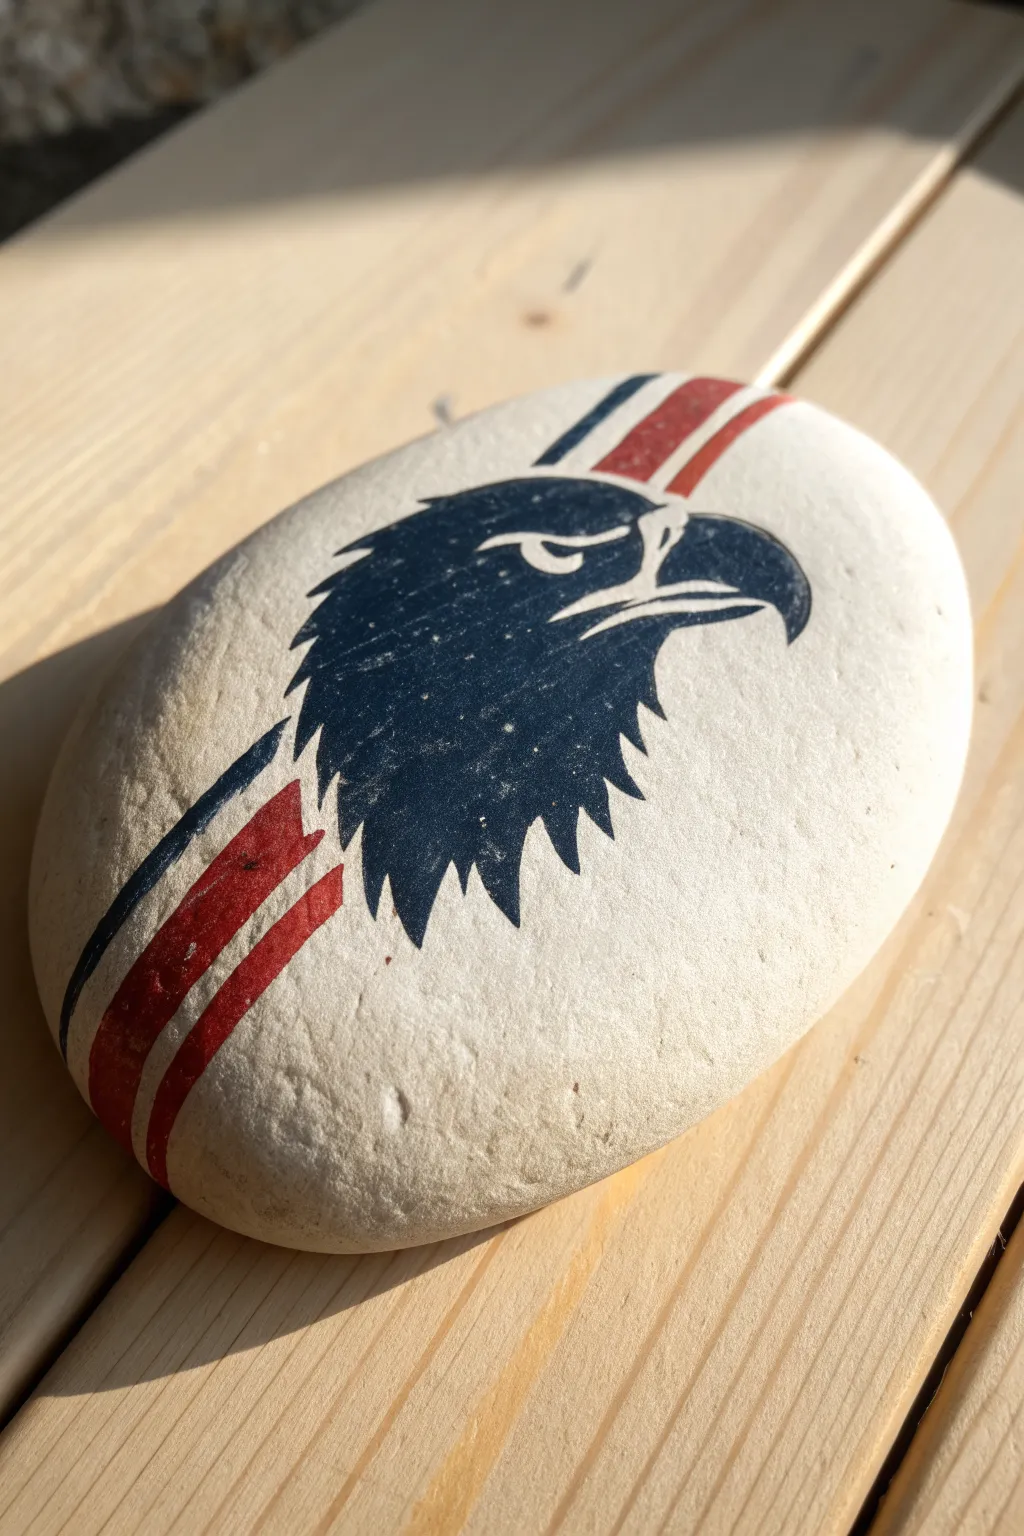
Capture the majestic spirit of the American icon on a smooth river stone with this striking silhouette design. The sharp contrast of the navy blue eagle against patriotic stripes creates a bold, classic look that’s surprisingly simple to achieve.
Step-by-Step Guide
Materials
- Smooth, flat oval rock (approx. 4-5 inches)
- White acrylic paint (or gesso)
- Navy blue acrylic paint
- Red acrylic paint
- Painter’s tape or masking tape
- Pencil
- Fine liner brush (size 0 or 00)
- Small flat brush (size 4 or 6)
- Clear spray sealer (matte or gloss)
Step 1: Base and Background
-
Select your stone:
Choose a rock that is relatively flat and smooth. A lighter-colored stone works best so the red and blue pop, but any smooth stone will do if we embrace the base coat. -
Clean surface:
Scrub the rock with warm soapy water and let it dry completely. Any dust or dirt will prevent the paint from sticking properly. -
Apply base coat:
Paint the entire top surface of the rock with a layer of white acrylic paint. This creates a uniform canvas. -
Dry and repeat:
Let the first layer dry completely. If the original rock color is still showing through, apply a second coat of white for full opacity.
Step 2: Patriotic Stripes
-
Visual planning:
Visualize a diagonal line running from the bottom left to the top right of the rock. This is where your stripes will sit. -
Create the stripe path:
Using a small flat brush, paint a diagonal band across the rock. This doesn’t need to be perfect yet, as the eagle will cover the middle section. -
Paint the red stripes:
Dip your flat brush into red paint. Carefully paint two parallel red stripes along that diagonal path, leaving a gap of white between them. -
Add the blue stripe:
Above the red stripes, paint a single, thinner navy blue stripe parallel to the others. Creating this diagonal flow gives the rock a sense of movement. -
Refine edges:
If your hand isn’t steady, you can gently scrape away wet mistakes with a toothpick or touch them up with white paint once dry.
Use Tape for Stripes
For perfectly straight stripes, lay down strips of painter’s tape or washi tape before painting red and blue. Peel it off while wet for crisp lines.
Step 3: The Eagle
-
Sketch the outline:
Once the stripes are fully dry, lightly sketch the profile of the eagle’s head in pencil directly over the stripes. Focus on the strong beak curve and the jagged neck feathers. -
Outline in blue:
Switch to your fine liner brush and navy blue paint. Carefully trace over your pencil sketch, defining the hooked beak and the spiky feathers at the neck. -
Define the eye:
Paint the eye shape in navy blue, leaving a small negative space or painting a white dot later for the highlight. The expression should look focused and sharp. -
Fill the silhouette:
Using a slightly larger brush, fill in the main body of the eagle’s head with navy blue paint. Be careful not to paint over the white details of the face. -
Detail the face:
Use your liner brush to carefully carve out the white space around the eye and beak. If needed, use white paint to sharpen the lines where the blue meets the white face. -
Clean the beak:
Ensure the beak has a distinct hook at the end. I find it helpful to look at a reference photo to get that classic raptor shape correct. -
Feather texture:
Go back to the neck area and ensure the blue paint ends in sharp, jagged points to mimic layered feathers, rather than a smooth line. -
Final check:
Step back and look at the proportions. If the neck looks too thin, extend the jagged feather lines outward slightly.
Uneven Paint Coverage?
If the navy blue looks streaky or transparent over the white base, don’t overwork it. Let it dry fully, then apply a second thin coat or stipple it on.
Step 4: Finishing Up
-
Erase guidelines:
Once the paint is absolutely bone dry, gently erase any visible pencil marks from your initial sketch. -
Seal the artwork:
Take the rock outside or to a well-ventilated area. Spray a light coat of clear sealer over the entire rock to protect the paint from chipping or fading.
Place your finished eagle rock in a garden or on a porch to share a little patriotic pride with your neighborhood
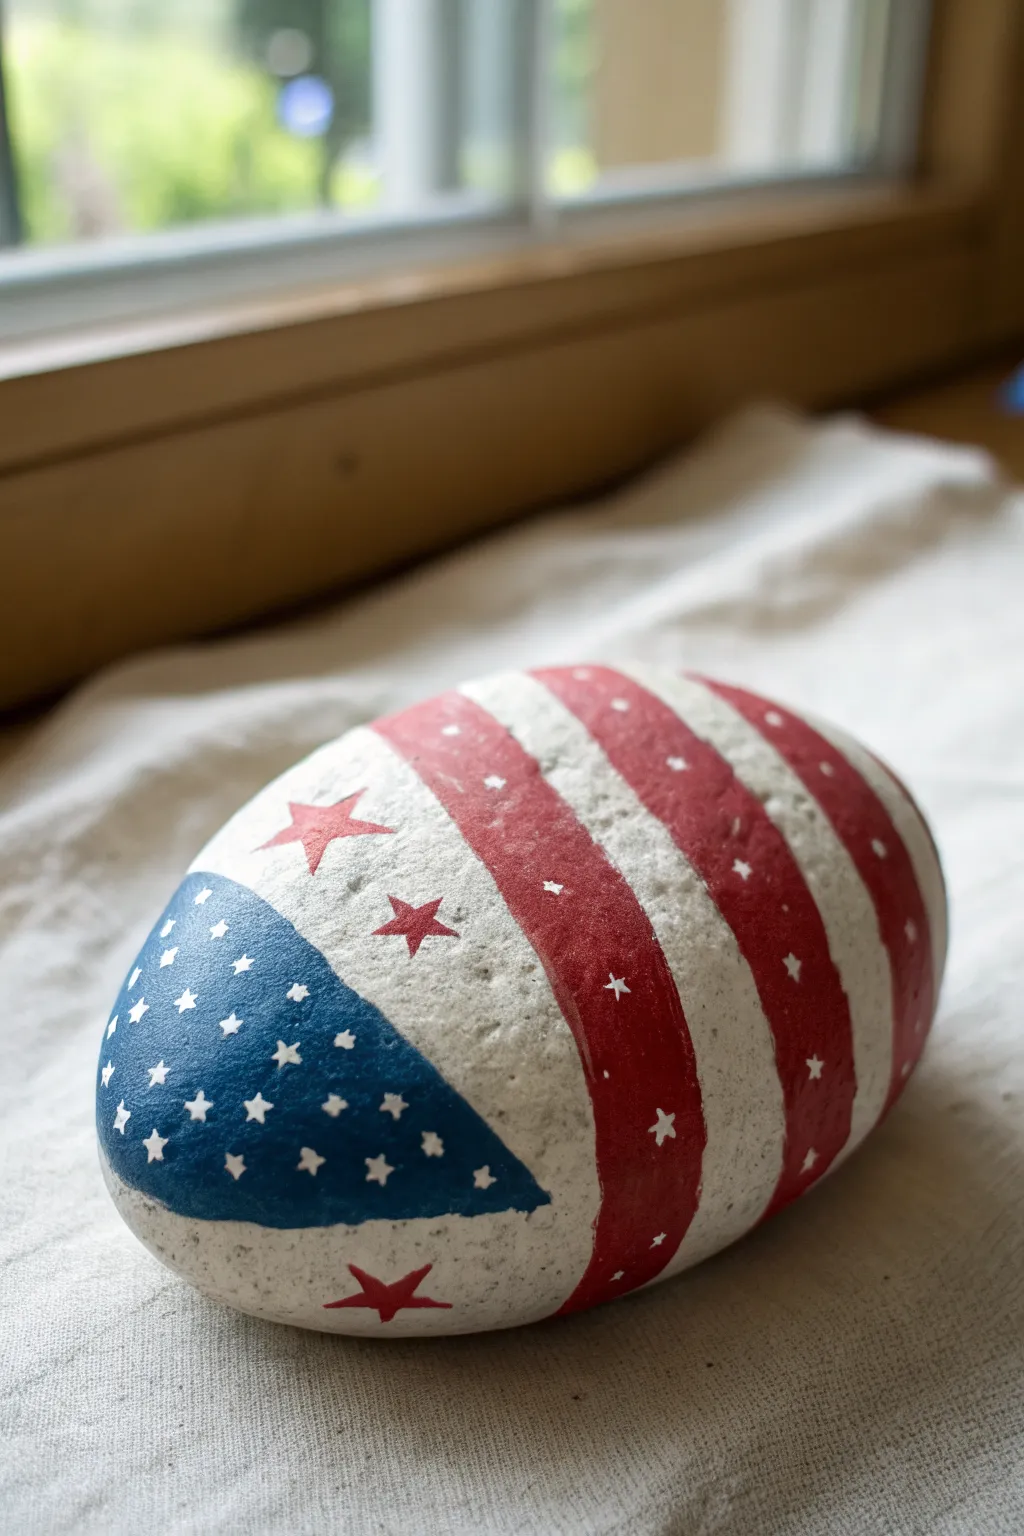
Mini Flag Rock Set
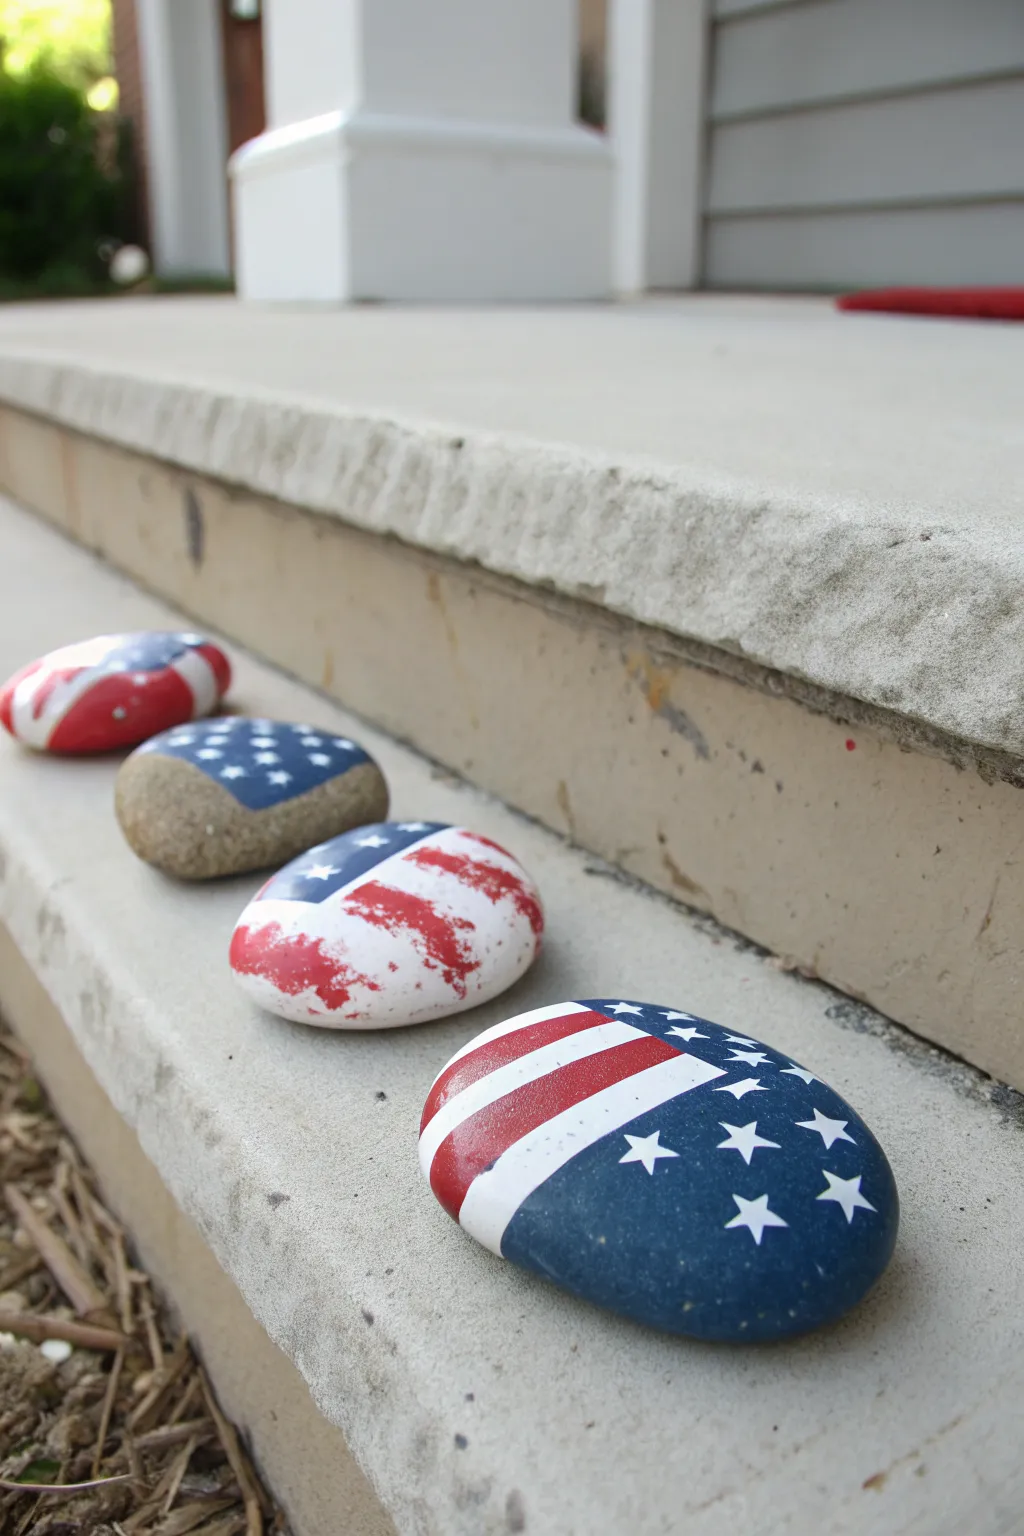
Show off your patriotism with this charming set of hand-held flag stones, perfect for lining a porch step or garden path. The quartet breaks down the iconic elements of the stars and stripes into distinct, mix-and-match designs.
Step-by-Step
Materials
- Smooth, flat river rocks (approx. 2-3 inches wide)
- Acrylic paint (Red, White, Navy Blue)
- Flat paintbrushes (medium and small)
- Fine detail brush or dotting tool
- Painter’s tape or masking tape
- Pencil
- Clear outdoor sealant spray (matte or glossy)
Step 1: Preparation & Base Coats
-
Clean the surface:
Begin by scrubbing your rocks with soap and warm water to remove any dirt or grit. Let them dry completely, as any moisture trapped inside will cause the paint to bubble later. -
Sort your designs:
Visualize the four designs shown: one fully striped rock, one blue field with stars, one combining a blue corner with stripes, and one featuring a distressed flag look. Assign a specific rock to each design based on its shape. -
Apply white base:
For the striped rocks and the distressed flag rock, paint a solid coat of white acrylic over the entire top surface. This brightens the subsequent red layers. -
Apply blue base:
For the rock that will be the ‘star field’ (the second one from the top in the photo), paint a blue patch covering about two-thirds of the stone, leaving the natural stone color showing on the bottom if desired, or cover the whole top. -
Let it cure:
Allow these base coats to dry fully. If the white looks streaky, add a second thin coat for better coverage.
Sticky Situation
Press the edges of your painter’s tape down with your fingernail or a credit card edge. This prevents paint from bleeding under the tape.
Step 2: Striping & Color Blocking
-
Tape off stripes:
For the sharp, clean lines seen on the bottom rock, cut small strips of painter’s tape and press them firmly across the white surface. These covered areas will remain white. -
Paint red stripes:
Paint vivid red over the exposed areas between your tape strips. Don’t worry about being messy here; the tape protects the lines. -
Freehand distressed stripes:
For the third rock (the distressed look), skip the tape. Instead, use a dry brush with red paint and dragging strokes to create rough, textured stripes that look weathered. -
Add blue fields:
On the bottom rock and the third rock, paint a navy blue section. For the bottom rock, this is a curved section on the right; for the distressed rock, it’s the upper left corner. -
Remove tape:
Once the red paint is tacky but not fully dry, carefully peel back the painter’s tape to reveal your crisp white stripes.
Star Spangled Stencil
Can’t freehand stars? Use a small star-shaped paper punch on a piece of masking tape to create an instant , perfect stencil for your rocks.
Step 3: The Starry Details
-
Plan star placement:
Using a pencil, lightly mark where your stars will go on the blue sections. This ensures you don’t run out of room. -
Paint the stars:
Using your finest detail brush and white paint, carefully fill in the star shapes. If painting a 5-point star is difficult, first paint an upside-down ‘V’, then cross it with a horizontal line. -
Simplify with dots:
If painting tiny stars feels too tricky on smaller rocks, I often use a dotting tool to create small white clusters that suggest stars from a distance. -
Clean overlaps:
Check where the blue fields meet the red and white stripes. If the edge is messy, re-outline carefully with the appropriate color to crisp up the border.
Step 4: Finishing Touches
-
Let decorations dry:
Give the rocks plenty of time to dry completely. The thick layers of acrylic can take longer than you expect. -
Seal the deal:
Take the rocks to a well-ventilated area and spray them with a clear outdoor sealant. This protects the colors from fading in the sun and rain.
Arranging these together creates a unified patriotic theme that looks great all summer long
Ombre Blue With Star Scatter
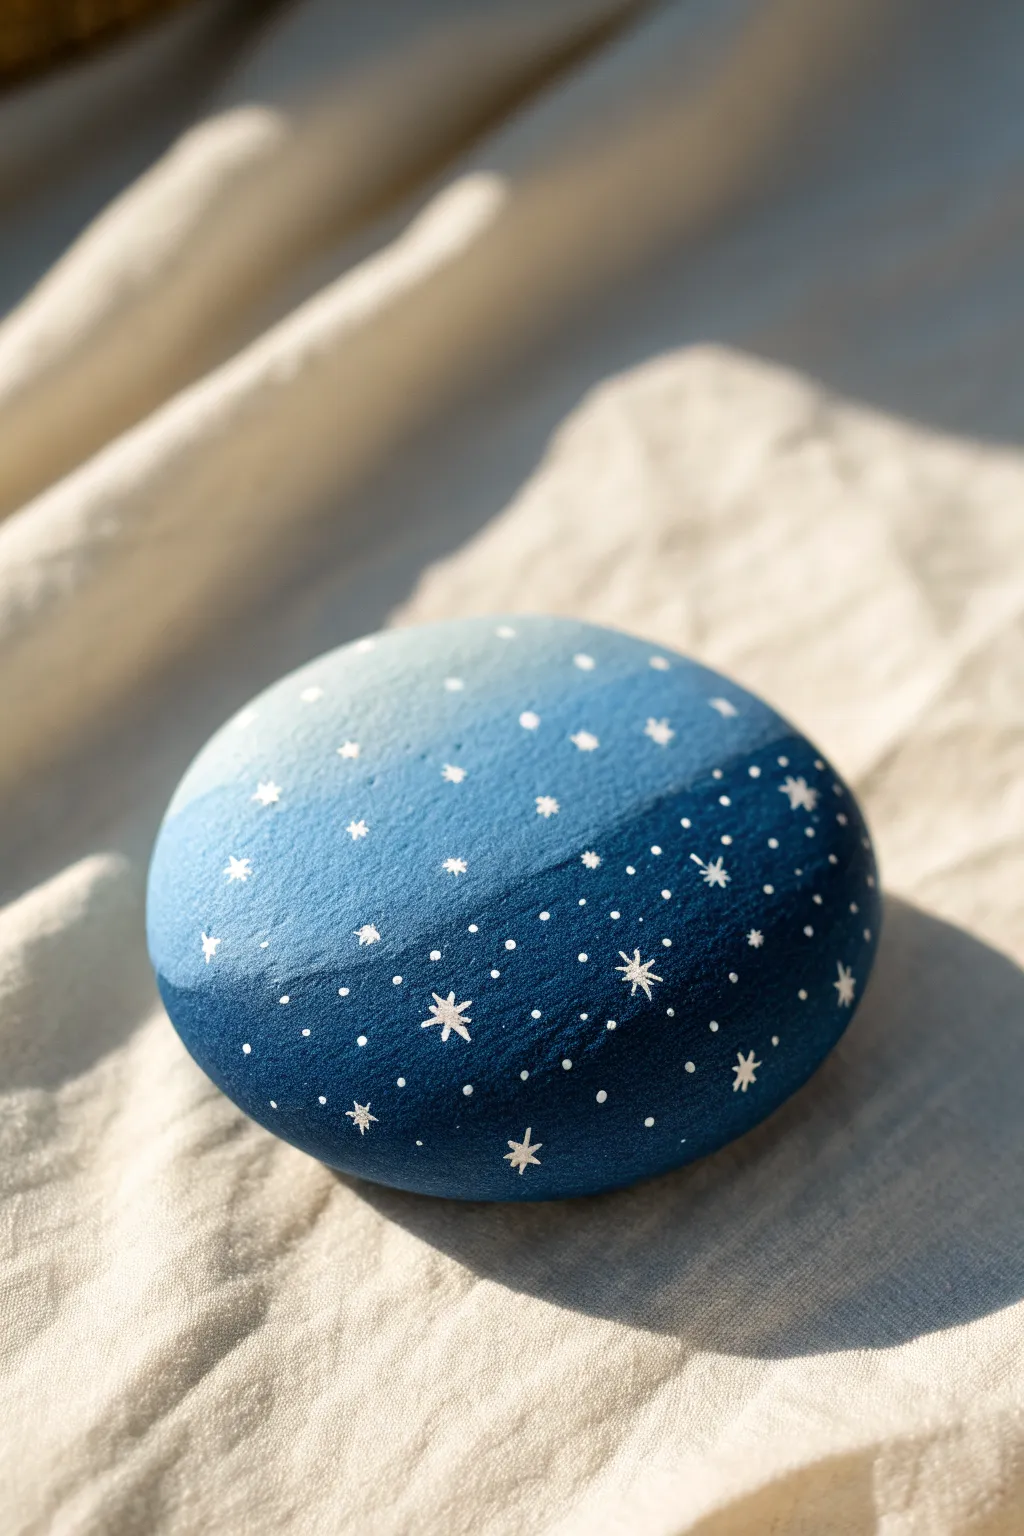
Capture the magic of a twilight sky with this soothing gradient rock painting project. The seamless transition from pale morning mist to deep midnight blue creates a stunning backdrop for delicate white stars.
How-To Guide
Materials
- Smooth, round river rock (cleaned and dried)
- Acrylic paints: White, Light Blue, Medium Blue, Navy/Dark Blue
- Flat shader brush (medium size)
- Small round detail brush (size 0 or 00)
- Dotting tool or toothpick
- Palette or paper plate for mixing
- Water cup and paper towels
- Gloss varnish or sealant (optional)
Step 1: Creating the Ombre Base
-
Prepare the surface:
Begin with a clean, dry rock. If your stone is dark or porous, you might want to apply a base coat of white paint first to make the blue colors pop, though this is optional. -
Lay down the lightest tone:
Squeeze out your white and light blue acrylics. Mix a very pale, almost white-blue shade. Paint the top one-third of the rock with this color using your flat brush. -
Apply the mid-tone:
While the top layer is still slightly wet, paint the middle section of the rock with your medium blue shade. Don’t worry about a perfect line yet; just get the color on the stone. -
Add the deepest blue:
Paint the bottom third of the rock with your darkest navy blue. You should now have three distinct bands of color stacked on top of each other. -
Blend the upper transition:
Wipe your brush clean but leave it slightly damp. Gently stroke back and forth horizontally where the pale top meets the medium middle blue to blur the line. -
Blend the lower transition:
Clean your brush again. Repeat the horizontal blending motion where the medium blue meets the dark navy bottom. If the paint dries too fast, dip just the corner of your brush in the lighter color to help re-wet the edge. -
Smooth the gradient:
Continue working the brush lightly over the transition zones until the colors flow seamlessly into one another. I find that using long, continuous strokes across the whole width helps unify the gradient. -
Let it cure:
Set the rock aside to dry completely. The ombre background needs to be perfectly dry before you start the delicate star details, or the white will turn muddy.
Blending Trouble?
If acrylics dry too strictly before blending, lightly mist the rock with water or use a ‘slow drying medium’ mixed into your paints to buy yourself more working time.
Step 2: Adding the Starry Scatter
-
Thin the white paint:
Place a dollop of white paint on your palette. Add a tiny drop of water to improve the flow; it should be the consistency of heavy cream so it glides easily off a liner brush. -
Paint the large stars:
Using your smallest detail brush, paint a few scattered eight-pointed stars in the dark blue section. Start with a simple cross, then add smaller diagonal lines in between. -
Add medium stars:
Paint five-pointed or six-pointed stars randomly throughout the middle and lower sections. Vary the sizes slightly to create a sense of depth. -
Create the tiny sparkles:
Switch to a smaller four-point ‘sparkle’ shape for the upper, lighter sections of the rock. Keep the lines very thin and delicate. -
Add large dots:
Using a dotting tool or the blunt end of a paintbrush, dip into the white paint and place a few prominent round stars among the drawn ones. -
Fill with micro-dots:
Use a toothpick or a very fine dotting tool to fill the empty dark spaces with tiny specks of white. This ‘star dust’ effect brings the galaxy to life. -
Review contrast:
Check the lighter top section. If your white stars are getting lost against the pale background, you can gently dot the very centers with a tiny excess of white paint to make them stand out. -
Seal the artwork:
Once the stars are bone dry, apply a coat of gloss varnish. This not only protects the paint but deepens the dark blue, making it look like a glossy night sky.
Starry Precision
For the finest star points, don’t press down on the brush. Instead, touch the rock lightly and flick the brush outward quickly to taper the line to a sharp point.
Place this peaceful stone on your desk or in a garden pot to enjoy a moment of celestial calm
Negative Space Star Cutouts
This striking rock painting project uses a clever negative space technique to create crisp, perfect stars against a bold field of patriotic red. By using stickers as stencils, you achieve sharp edges without the frustration of freehand painting, resulting in a finish that looks professionally printed.
Detailed Instructions
Materials
- Smooth, oval river rock (medium size, preferably light-colored)
- Star-shaped stickers or masking tape and scissors
- Deep red acrylic paint (matte finish looks best)
- White acrylic paint (optional, for base coat)
- Medium flat paintbrush
- Tweezers or a craft pick
- Clear spray sealant (matte or satin)
- Paper palette or plate
- Water cup and paper towels
Step 1: Preparation and Masking
-
Clean Your Canvas:
Begin by scrubbing your rock with warm, soapy water to remove any dirt or oils. Rinse it thoroughly and let it dry completely in the sun or with a hairdryer. -
Check the Base Color:
Examine your stone. If it is naturally dark, apply a smooth base coat of white acrylic paint over the entire top surface. If the rock is already a light, sandy color like the one in the photo, you can skip this step, but painting it white will make the stars pop brighter. -
Select Your Stars:
Choose star-shaped stickers that fit the scale of your rock. If you don’t have stickers, you can carefully cut star shapes out of painter’s tape or adhesive vinyl. -
Place the Central Star:
Place one star sticker near the center of the rock to anchor your design. Press down firmly on all five points to ensure a tight seal against the surface. -
Arrange the Pattern:
Apply the remaining star stickers around the center star. Aim for an even but slightly varied distribution, letting some stars extend off the curved edges of the stone. -
Seal the Edges:
Run your fingernail or a burnishing tool over the edges of every sticker one last time. This step is crucial to prevent the red paint from bleeding underneath.
Bleeding Lines?
If paint seeps under stickers, your paint might be too watered down. Next time, apply a thin layer of white paint over the sticker edges first to seal them before adding the red.
Step 2: Applying the Color
-
Load the Brush:
Squeeze a generous amount of deep red acrylic paint onto your palette. Load your flat brush, ensuring the bristles are coated but not dripping. -
Paint the Surface:
Apply the red paint over the entire top surface of the rock, painting directly over the stickers. Use long, smooth strokes to cover the stone evenly. -
Watch the Direction:
I find it helpful to brush away from the center of the stickers rather than pushing paint underneath their edges. This small adjustment helps keep lines sharp. -
Let it Dry:
Allow the first coat of red to dry until it is dry to the touch, usually about 15 to 20 minutes. -
Apply Second Coat:
Add a second layer of red paint to ensure full opacity. The texture should look rich and velvety, covering any streaks from the first pass. -
Dry Completely:
Let this final coat dry completely. It is important that the paint is not tacky when you move to the next step.
Add Sparkle
Before removing the stickers, brush a clear glitter glaze over the wet red paint. When you peel the stickers, you’ll have matte stars against a glittering red background.
Step 3: The Reveal and Finish
-
Lift the Stickers:
Using tweezers or a craft pick, carefully lift the edge of one star sticker. Pull it slowly away from the rock to reveal the unpainted surface beneath. -
Remove All Masking:
Repeat the process for all the stars. Peel them off gently to avoid chipping the surrounding red paint. -
Clean Up Edges:
If a little red paint bled under a sticker, don’t worry. Use a small detail brush with a tiny bit of white paint (or the rock’s base color) to touch up the star points. -
Seal the Rock:
Take the rock to a well-ventilated area and apply a light coat of clear spray sealant. This protects the paint from chipping and weather if you place it outside.
Now you have a bold, star-spangled decoration perfect for your garden or table setting
Glitter Accent Firework Finale
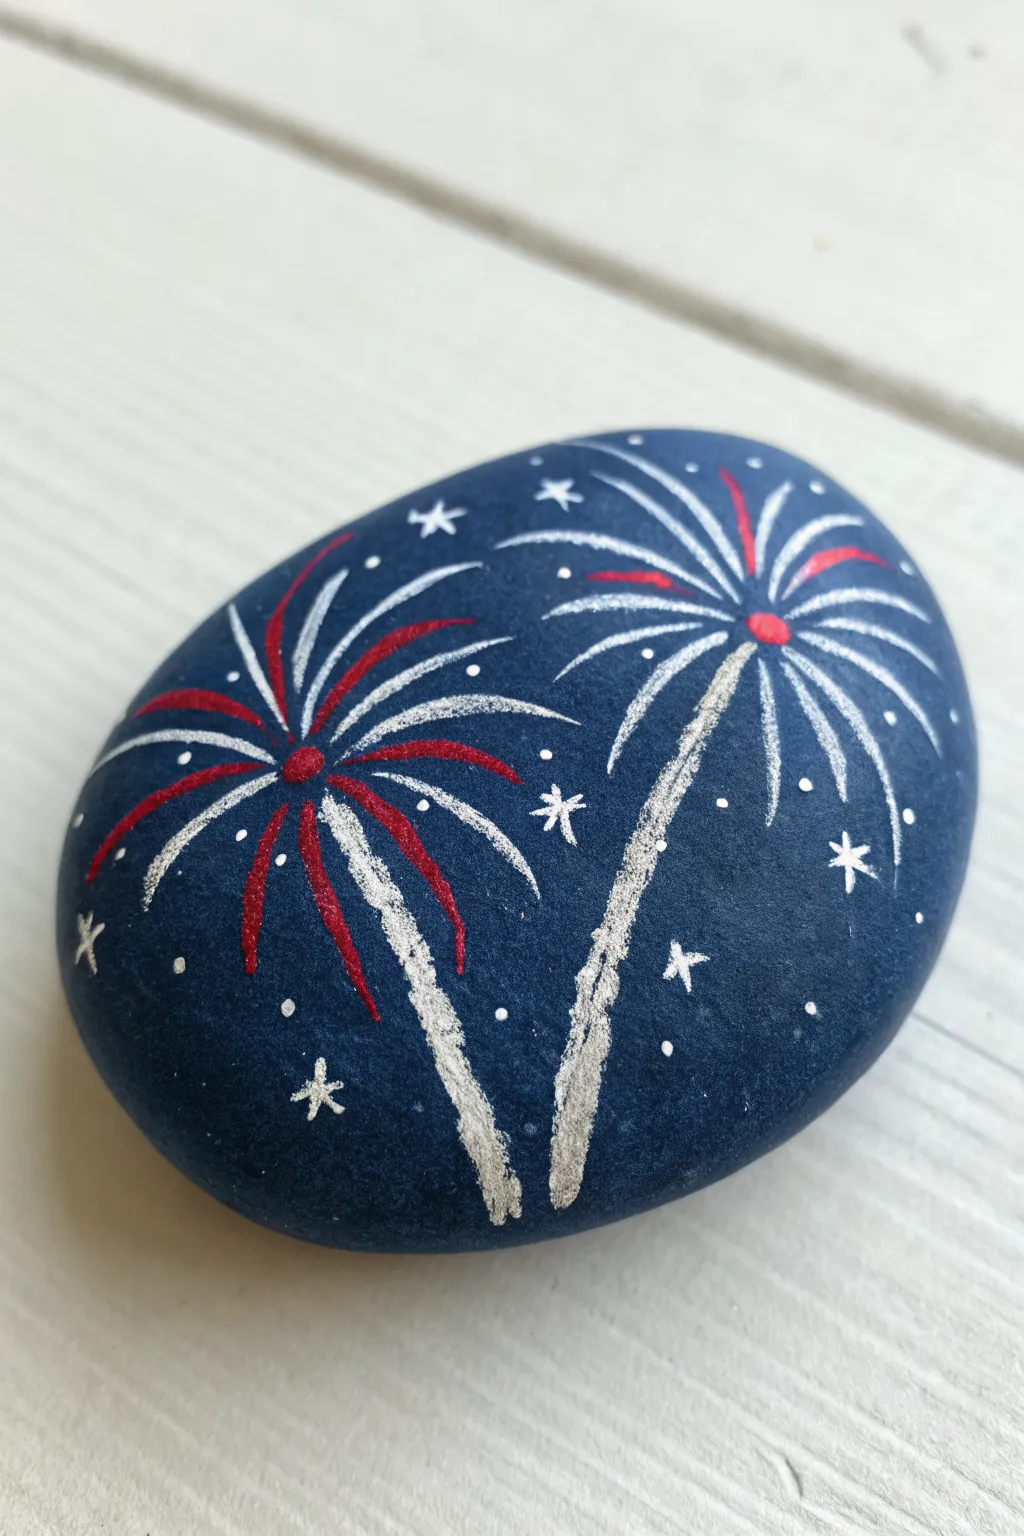
Capture the magic of a Fourth of July finale on a simple garden stone. This project uses metallic silver and bold red against a deep midnight blue background to create bursting fireworks that shimmer in the light.
Step-by-Step
Materials
- Smooth, oval-shaped river rock
- Acrylic paint: Dark Navy Blue or Midnight Blue
- Paint pens (fine tip): Red, Metallic Silver/White
- Paintbrush (wide flat brush for base coat)
- Glitter paint or fine silver glitter (optional)
- Clear sealant spray or Mod Podge
Step 1: Setting the Scene
-
Clean the canvas:
Begin by thoroughly washing your rock with soap and water to remove any dirt or oils. Let it dry completely in the sun or use a hair dryer to speed up the process. -
Apply the base coat:
Using your wide flat brush, paint the entire top surface of the rock with the dark navy blue acrylic paint. Make sure to get into any small crevices. -
Let it dry:
Allow the first coat to dry fully. If the rock’s natural color is showing through, apply a second coat of blue for a solid, opaque midnight sky background.
Step 2: Creating the Fireworks
-
Plan the placement:
Visualize where your two main fireworks will go. In our example, one is slightly lower on the left, and one is higher on the right. -
Start the tails:
Using the metallic silver paint pen or a thin brush, draw two slightly curved lines rising from the bottom of the rock. These are the smoke trails leading up to the explosion point. -
Thicken the trails:
Go over the rising trails again to make them look a bit thicker and more textured, almost like scribbled sketch lines rather than perfect straight rulers. -
Draw the center points:
At the top of each trail, place a small dot. Use red for the left firework and red for the right firework. This acts as the anchor for your burst. -
Add silver spokes:
Starting from the center dot, draw fine silver lines bursting outward in a circular pattern. Vary the lengths; some should be long and sweeping, others short. -
Layer the red spokes:
Once the silver is dry to the touch, use your red paint pen to add red lines in between the silver ones. I find that alternating colors gives the firework real depth. -
Create the heavy burst:
On the left firework, make the red lines slightly thicker and more dominant. On the right firework, keep the silver lines dominant with just a few red accents.
Smear Prevention
Paint pens can reactivate when sealed. Spray your sealant in very light, misty coats rather than one heavy wet coat to prevent the lines from blurring and running.
Step 3: Stars and Details
-
Add large stars:
scattered around the empty blue space, draw simple five-point stars or asterisks using the silver pen. Place a few near the bottom and some in the top corners. -
Dot the night sky:
Gently press the tip of your silver pen onto the rock to create tiny dots. These distant stars fill up the negative space and make the sky look vast. -
Highlight the centers:
Go back to the center of each firework. If the red dot has been covered up by lines, add a fresh, bright red dot right in the middle to make it pop. -
Optional glitter accent:
For that extra ‘finale’ look, you can brush a very thin layer of glitter paint over the silver lines, or tap a tiny bit of loose glitter onto the wet center dots.
Pro Tip: Textured Trails
When drawing the upward smoke trails, tap the pen repeatedly instead of drawing a smooth line. This stippling effect mimics the look of falling sparks.
Step 4: Finishing Touches
-
Final dry time:
Let all your paint pen work dry completely. Paint pens can smear easily if sealed too soon, so give it at least 30 minutes. -
Seal the artwork:
Spray the rock with a clear sealant or brush on a layer of Mod Podge. This protects your patriotic design from weather if you plan to leave it outdoors.
Place your shimmering rock in a garden bed or on a porch railing to celebrate the holiday season


Have a question or want to share your own experience? I'd love to hear from you in the comments below!